Embed Size (px)
Citation preview
ENVIRONMENTAL HANDBOOK FOR CONSTRUCTION AND MAINTENANCE
F O R U M
T r a n s m i s s i o n E n v i r o n m e n t
Transpower and its Service Providers
0.1
ENVIRONMENTAL HANDBOOK FOR CONSTRUCTION AND MAINTENANCE
F O R U M
T r a n s m i s s i o n E n v i r o n m e n t
Transpower and its Service Providers
July 2015Version 2
0.2
ACKNOWLEDGEMENTS
Energy Network Association of Australia for the original document template.Ministry for Primary Industry for Bio-Security Materials.Southern Skies for photo use.Rural Fire.Marshall Day for photo use.Ministry for Environment for waste information.Auckland Council for silt fence figures.Transpower and Service Provider staff for review and photo’s.
DISCLAIMER
This handbook has been developed using information available from the field and other sources and is designed to help manage environmental events encountered on the New Zealand National Grid. Particular conditions, projects or localities will require special or different practices. It is the responsibility of the service provider and the individual involved to ensure that work practices are adequately applied in accordance with environmental legislation and service specifications applicable to the work.
All businesses must rely on their own systems and procedures to identify all sources of existing or potential environmental harm, assess the risk and apply adequate control methods to minimise that risk. This Handbook can help in the identification and management of those situations. It provides guidance on the basis of good practices rather than determined practices identified in a controlled document or legislation.
Transpower disclaims any and all liability to any person persons for any procedure, process or any other thing done or not done, as a result of this Handbook.
The Handbook does not attempt to cover safety requirements, please refer to your organisation’s health and safety procedures.
0.3
1 INTRODUCTION
2 ACTIVITY REFERENCE TABLE
3 ENVIRONMENTAL DOCUMENTS
4 RESPONSIBILITIES
5 DEPOT OPERATIONS
6 RESOURCES AND ENERGY MANAGEMENT
7 WATER USE
8 WASTE MANAGEMENT
9 HOURS OF OPERATION AND NOISE
10 RURAL FIRE PRECAUTIONS
11 AIR POLLUTION
12 SULPHUR HEXAFLUORIDE GAS
13 WATER QUALITY
14 CONTAMINATED LAND
15 HANDLING, STORAGE AND TRANSPORT OF OIL, FUEL AND LIQUID CHEMICALS
16 HAZARDOUS SUBSTANCES IN THE WORKPLACE
17 ENVIRONMENTAL INCIDENTS AND EMERGENCY MANAGEMENT
18 SPILL CONTAINMENT AND CLEAN UP
19 POLYCHLORINATED BIPHENYLS (PCB)
20 VEGETATION AND HABITAT MANAGEMENT
21 WEED AND PEST CONTROL
22 PESTICIDES
23 HERITAGE AND ARCHAEOLOGY
24 STAKEHOLDER NOTIFICATION AND ACCESS
25 TOWER PAINTING
26 SITE INFORMATION
27 ACRONYMS
28 OTHER USEFUL DOCUMENTS
29 CONTACTS INCLUDING EMERGENCIES
ContentsClick to link
0.4
Transpower’s Environmental Commitment
Transpower is the owner and operator of the National Grid – the high voltage transmission network made up of lines and substations connecting areas of electricity generation with towns and cities across New Zealand.
Transpower is committed to developing and managing its assets in a way that has regard for the environment and the interests of communities.
To meet this commitment, Transpower will comply with relevant environmental legislation and take all reasonable and practical steps to:
� Comply with applicable laws, legislation, regulations, standards and codes of practice through consenting and environmental risk assessments.
� Minimise any adverse environmental effects resulting from its activities.
� Improve environmental performance.
Transpower will achieve these outcomes by:
� Setting objectives and developing procedures and programmes for managing identified environmental effects.
� Consulting with local communities and stakeholders about proposed activities.
� Ensuring environmental considerations are embedded into practices and processes.
� Auditing and reporting on environmental performance.
� Requiring all employees, contractors and service providers to abide by all environmental policies, procedures and other directives.
� Provide training and development for our people on environmental issues.
For further information, please contact:[email protected]
Alison AndrewChief Executive Officer
1.1
1. INTRODUCTION
The purpose of this Handbook is to encourage the application of effective environmental protection practices when undertaking work on National Grid assets; that legislative requirements are met as well as Transpower’s own environmental commitment.
Many of the practices can be applied as part of our day-to-day maintenance, construction, and operational activities. These practices do not need to be mandated to be applied. Their general application will contribute to good stakeholder relations and reduce the risk of adverse effects and regulatory attention. However, particular conditions, projects, localities, or legislative requirements may require different practices. Project Managers, Maintenance Managers, service provider staff, and the individuals involved in activities on the National Grid are all responsible for managing work practices in accordance with the applicable environmental legislative requirements1.
Who should use this Handbook?
This Handbook is primarily for communicating good practices to personnel who undertake physical activities on the National Grid.
All personnel who undertake activities on the National Grid are required to have environmental knowledge appropriate to the type of activities they are engaged in. The Handbook communicates good practices to align with Transpower’s commitment to improve performance, and recommends that:
1. Personnel who CONDUCT WORK on the National Grid will require awareness of most sections of this Handbook.
2. SUPERVISORY, PLANNING AND MANAGEMENT personnel will require a thorough knowledge of all sections of this Handbook to enable communication of its guidance to personnel conducting work. This Handbook does not cover areas of knowledge that supervisory, planning and management personnel would be expected to additionally know. For example, the legislative framework is not covered in great detail and a range of environmental management tools are not covered. This includes guidance on corporate environmental management systems, development of construction environmental management plans, undertaking environmental audits, and incident categorisation.
1 Transpower’s maintains a web based system (CS-VueTM) for storing environmental authorisations, communicating compliance responsibilities and confirming compliance is achieved. Each service provider company has access to CS-VueTM. See Section 3 for more information.
1.2
How should this Handbook be used?
The Handbook is divided into sections. Each section refers to the environmental issues which need to be managed when undertaking activities on the National Grid.
Sections 5 to 25 provide techniques to minimise effects on either:
� particular environmental resources such as air or water quality, historic places, etc; or
� specific areas of risk such as use of pesticides, managing spills etc.
To assist in identifying which sections of the Handbook are relevant to the work at hand, and encourage use, an Activity Reference Check Sheet is provided in the next section (Section 2).
Managers and supervisors can refer to the Handbook ahead of undertaking activities to assist in project planning and job set-up. Supervisors can also use relevant sections during site inductions and toolbox talks with site staff upon start of work, or to reinforce good practices following any incident. The Handbook has been designed for sections to be lifted out to facilitate on-site training. It may also be useful to management for developing more formal group training sessions.
2PHOTOCOPY SHEET
2.1
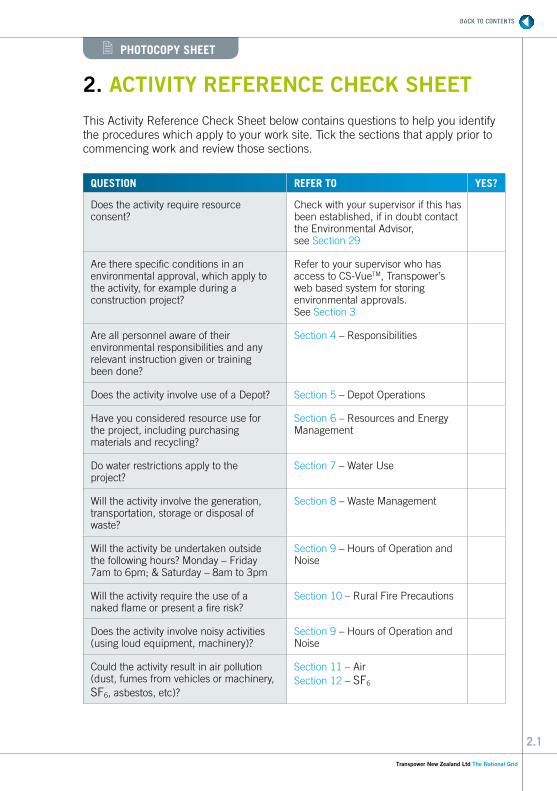
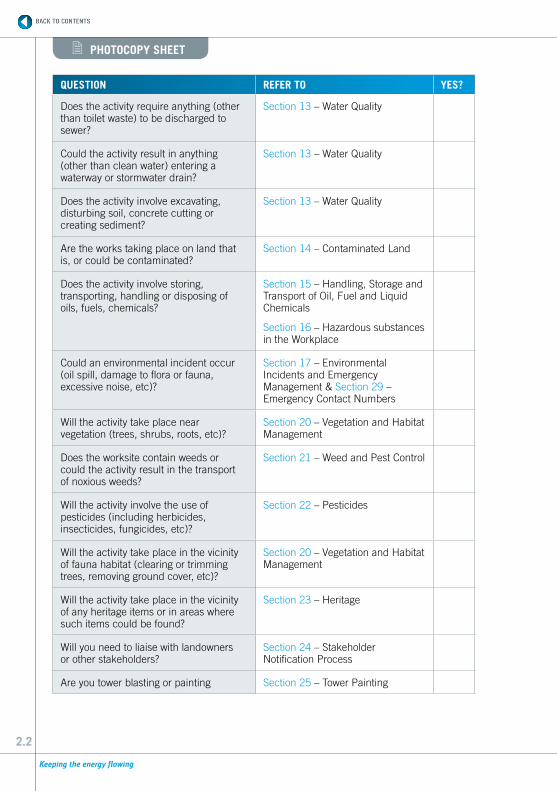
2. ACTIVITY REFERENCE CHECK SHEET
This Activity Reference Check Sheet below contains questions to help you identify the procedures which apply to your work site. Tick the sections that apply prior to commencing work and review those sections.
QUESTION REFER TO YES?
Does the activity require resource consent?
Check with your supervisor if this has been established, if in doubt contact the Environmental Advisor, see Section 29
Are there specific conditions in an environmental approval, which apply to the activity, for example during a construction project?
Refer to your supervisor who has access to CS-VueTM, Transpower’s web based system for storing environmental approvals. See Section 3
Are all personnel aware of their environmental responsibilities and any relevant instruction given or training been done?
Section 4 – Responsibilities
Does the activity involve use of a Depot? Section 5 – Depot Operations
Have you considered resource use for the project, including purchasing materials and recycling?
Section 6 – Resources and Energy Management
Do water restrictions apply to the project?
Section 7 – Water Use
Will the activity involve the generation, transportation, storage or disposal of waste?
Section 8 – Waste Management
Will the activity be undertaken outside the following hours? Monday – Friday 7am to 6pm; & Saturday – 8am to 3pm
Section 9 – Hours of Operation and Noise
Will the activity require the use of a naked flame or present a fire risk?
Section 10 – Rural Fire Precautions
Does the activity involve noisy activities (using loud equipment, machinery)?
Section 9 – Hours of Operation and Noise
Could the activity result in air pollution (dust, fumes from vehicles or machinery, SF6, asbestos, etc)?
Section 11 – Air Section 12 – SF6
2PHOTOCOPY SHEET
2.2
QUESTION REFER TO YES?
Does the activity require anything (other than toilet waste) to be discharged to sewer?
Section 13 – Water Quality
Could the activity result in anything (other than clean water) entering a waterway or stormwater drain?
Section 13 – Water Quality
Does the activity involve excavating, disturbing soil, concrete cutting or creating sediment?
Section 13 – Water Quality
Are the works taking place on land that is, or could be contaminated?
Section 14 – Contaminated Land
Does the activity involve storing, transporting, handling or disposing of oils, fuels, chemicals?
Section 15 – Handling, Storage and Transport of Oil, Fuel and Liquid Chemicals
Section 16 – Hazardous substances in the Workplace
Could an environmental incident occur (oil spill, damage to flora or fauna, excessive noise, etc)?
Section 17 – Environmental Incidents and Emergency Management & Section 29 – Emergency Contact Numbers
Will the activity take place near vegetation (trees, shrubs, roots, etc)?
Section 20 – Vegetation and Habitat Management
Does the worksite contain weeds or could the activity result in the transport of noxious weeds?
Section 21 – Weed and Pest Control
Will the activity involve the use of pesticides (including herbicides, insecticides, fungicides, etc)?
Section 22 – Pesticides
Will the activity take place in the vicinity of fauna habitat (clearing or trimming trees, removing ground cover, etc)?
Section 20 – Vegetation and Habitat Management
Will the activity take place in the vicinity of any heritage items or in areas where such items could be found?
Section 23 – Heritage
Will you need to liaise with landowners or other stakeholders?
Section 24 – Stakeholder Notification Process
Are you tower blasting or painting Section 25 – Tower Painting
2
3.1
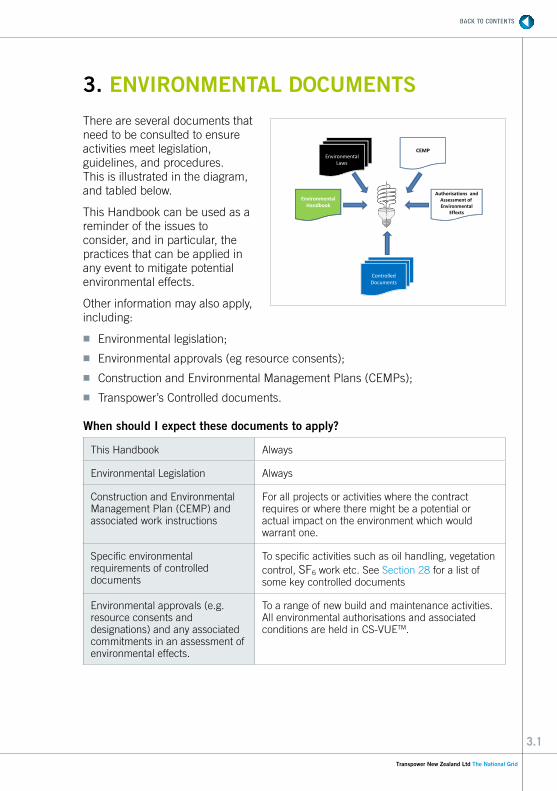
3. ENVIRONMENTAL DOCUMENTS
There are several documents that need to be consulted to ensure activities meet legislation, guidelines, and procedures. This is illustrated in the diagram, and tabled below.
This Handbook can be used as a reminder of the issues to consider, and in particular, the practices that can be applied in any event to mitigate potential environmental effects.
Other information may also apply, including:
� Environmental legislation;
� Environmental approvals (eg resource consents);
� Construction and Environmental Management Plans (CEMPs);
� Transpower’s Controlled documents.
When should I expect these documents to apply?
This Handbook Always
Environmental Legislation Always
Construction and Environmental Management Plan (CEMP) and associated work instructions
For all projects or activities where the contract requires or where there might be a potential or actual impact on the environment which would warrant one.
Specific environmental requirements of controlled documents
To specific activities such as oil handling, vegetation control, SF6 work etc. See Section 28 for a list of some key controlled documents
Environmental approvals (e.g. resource consents and designations) and any associated commitments in an assessment of environmental effects.
To a range of new build and maintenance activities. All environmental authorisations and associated conditions are held in CS-VUETM.
EnvironmentalLaws
CEMP
ControlledDocuments
EnvironmentalHandbook
Authorisations andAssessment of Environmental
Effects
3.2
Transpower’s contractors on site are often responsible for compliance with conditions of environmental approvals. Environmental approval conditions are communicated to contractors and Transpower managers using CS-VUETM, a web based software application which enables proactive tracking of compliance with conditions.
CS-VUETM provides the tools to view and manage conditions easily and effectively. Good compliance management results in improved compliance, reduced costs and an improved reputation with environmental regulators. Once CS-VUETM has been used to obtain all resource consent information, it is good practice to check with the Transpower Environmental Advisor that the information is complete and up-to-date. Contact details for Environmental Advisors are in Section 29 of this Handbook. More information on CS-VUETM can be found in the consultants/contractors area of Transpowers internet under Environmental Resources\CS-VUETM.
Upon receiving this Handbook, please ensure site specific and or current contact information is entered in Sections 26 and 29.
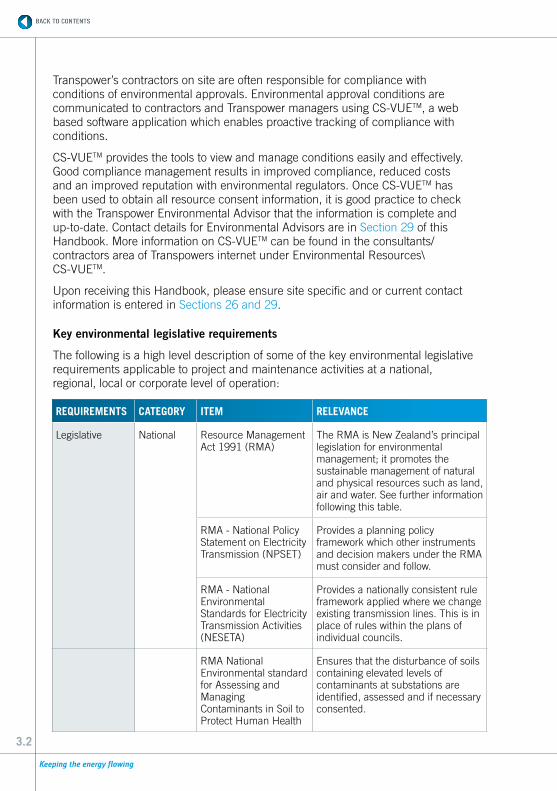
Key environmental legislative requirements
The following is a high level description of some of the key environmental legislative requirements applicable to project and maintenance activities at a national, regional, local or corporate level of operation:
REQUIREMENTS CATEGORY ITEM RELEVANCE
Legislative National Resource Management Act 1991 (RMA)
The RMA is New Zealand’s principal legislation for environmental management; it promotes the sustainable management of natural and physical resources such as land, air and water. See further information following this table.
RMA - National Policy Statement on Electricity Transmission (NPSET)
Provides a planning policy framework which other instruments and decision makers under the RMA must consider and follow.
RMA - National Environmental Standards for Electricity Transmission Activities (NESETA)
Provides a nationally consistent rule framework applied where we change existing transmission lines. This is in place of rules within the plans of individual councils.
RMA National Environmental standard for Assessing and Managing Contaminants in Soil to Protect Human Health
Ensures that the disturbance of soils containing elevated levels of contaminants at substations are identified, assessed and if necessary consented.
3.3
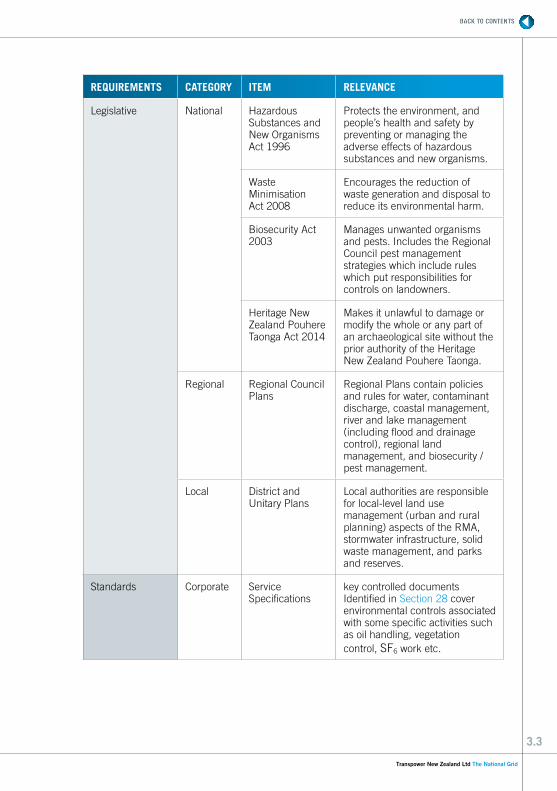
REQUIREMENTS CATEGORY ITEM RELEVANCE
Legislative National Hazardous Substances and New Organisms Act 1996
Protects the environment, and people’s health and safety by preventing or managing the adverse effects of hazardous substances and new organisms.
Waste Minimisation Act 2008
Encourages the reduction of waste generation and disposal to reduce its environmental harm.
Biosecurity Act 2003
Manages unwanted organisms and pests. Includes the Regional Council pest management strategies which include rules which put responsibilities for controls on landowners.
Heritage New Zealand Pouhere Taonga Act 2014
Makes it unlawful to damage or modify the whole or any part of an archaeological site without the prior authority of the Heritage New Zealand Pouhere Taonga.
Regional Regional Council Plans
Regional Plans contain policies and rules for water, contaminant discharge, coastal management, river and lake management (including flood and drainage control), regional land management, and biosecurity / pest management.
Local District and Unitary Plans
Local authorities are responsible for local-level land use management (urban and rural planning) aspects of the RMA, stormwater infrastructure, solid waste management, and parks and reserves.
Standards Corporate Service Specifications
key controlled documents Identified in Section 28 cover environmental controls associated with some specific activities such as oil handling, vegetation control, SF6 work etc.

3.4
A broad comparison of the RMA with the Health and Safety in Employment Act 1992 (HSE) is tabled below:
HSE (1992) RMA (1991)
Eliminate, isolate and minimise workplace hazards
Avoid, remedy and mitigate discharges
S19- employee shall take all practical steps to ensure safety
S17 every person has a duty to avoid, remedy or mitigate environmental effects arising from an activity
Demonstrate all practicable steps taken Resource consents with conditions that must be met
Often a commonly accepted best practice – transferable between sites, e.g. climbing protection, PPE
Rules will differ between districts, however concepts are often the same, e.g. divert stormwater around site, capture and treat any on-site.
All legally responsible, principal through to site staff
All legally responsible, principal through to site staff
A guide to works which do and don’t require input from Transpower’s environment and property groups is available on the contractors/consultants accessible area of the Transpower internet site under ‘guidelines and resources’.
When the environment is being adversely impacted, the RMA can rely on:
� Infringement notices, (instant fines like a parking ticket),
� Abatement notices and enforcement orders which can require that actions be taken, effects be managed or that damaging activities stop, both can stop or slow the job,
� Maximum fines of $300,000 for an individual and $600,000 for a company,
� and $10,000 a day for a continuing offence,
� Up to two year jail sentences.
Specialist advice on the application of environmental legislation to our assets and work activities can be obtained from Transpower’s Environmental Policy and Planning Group, see Section 29 Table 29.3.
4.1
4. RESPONSIBILITIES
It is the responsibility of all personnel to:
� Be familiar and comply with the requirements in all environmental documents relevant to their activities. See Section 3, Environmental Documents.
� Exercise the due care, skill and foresight expected of a reasonable person to manage and minimise the potential for environmental harm.
� Speak up when it is believed an environmental document is missing or cannot be followed.
� Speak up when something appears to be wrong, difficult to understand, or something could be improved.
� Report all environmental incidents to your supervisor and your Environmental Advisor, (see Section 17).
It is the responsibility of the site supervisors/team leaders to:
� Make sure people doing the work are aware of any environmental approval requirements and conditions associated with the task at hand.
� Make certain that all employees reporting to you have been inducted in their environmental responsibilities and are adequately resourced to meet them.
� Be able to interpret the required environmental controls from a work plan.
� Ensure that sufficient environmental records are maintained to be able to demonstrate due diligence as needed.
� Understand environmental risks and legal requirements relevant to your area of the organisation.
� Use appropriate communication methods to educate and provide information on environmental issues.
� Ensure that there are appropriate contingency plans for dealing with environmental problems and emergencies.
� Implement appropriate remedial actions following problem identification and incidents.
� Investigate all relevant environmental concerns; report on potential risks and suggested measures to mitigate environmental aspects.
4
4.2
Everyone has a legal duty of care and all personnel must contact their supervisor and environmental advisor, (see Table 29.3) if they become aware of an environmental incident whilst working on site. Failure to do so can result in individual fines and prosecution.
Management would be expected to have, or have available, staff with an understanding of the legislative framework and a range of environmental management tools for example corporate environmental management systems, development of construction environmental management plans, experience with environmental audits, incident categorisation etc.

5.1
5. DEPOT OPERATIONS
Good environmental management at depots is necessary to comply with the law, but is also essential for good relations with neighbours. Housekeeping is of foremost importance and the site should be left tidy at the end of each day. This section outlines some key considerations for depots:
REQUIREMENT HANDBOOK REFERENCE
Ensure staff and contractors are aware of the site layout and environmental requirements.
Section 26 – Site information
Turn off non-essential lights and equipment in buildings and outside areas when not in use.
Section 6 – Resources and Energy Management
Ensure spills and leaks of any type are quickly and properly reported and managed.
Section 17 – Environmental Incidents and Emergency Management
Ensure noise is kept to a minimum and work within allowable hours.
Section 9 – Hours of Operation and Noise
Minimise water use and comply with water restrictions and relevant trade waste permits.
Section 7 – Water Use
Ensure drains are regularly inspected and free of sediment and debris.
Section 13 – Water Quality
Remove unused materials and waste materials from site.
Section 8 – Waste Management
Ensure wastes are appropriately classified, handled and stored.
Section 8 – Waste Management
Minimise fumes and dust generation. Section 11 – Air Pollution
Ensure unsealed areas are stabilized and erosion and sediment controls are in place.
Section 13 – Water Quality
Ensure oil, chemicals and fuels are stored in a manner that prevents risk to staff and the environment.
Section 15 – Handling, Storage and Transport of Oil, Fuel and Liquid Chemicals
Ensure any suspected land contamination is immediately reported.
Section 14 – Contaminated Land
Tidy organised depots with good environmental controls are an important part of a safe and well-managed business.
6.1
6. RESOURCES AND ENERGY MANAGEMENT
The benefits of good resource management and energy efficient processes include reduced cost of resources including materials, water and power, reduced greenhouse gas emissions, increased resource conservation, healthier ecosystems, reduced waste disposal costs, and an enhanced public image for the organisation.
It is everyone’s responsibility to protect our ecosystems, and minimise raw materials, water, energy and fuel usage.
How can you do your part?
� Turn off your computer monitor at the end of each day.
� Switch off lights and electric equipment when not required.
� Plug device chargers onto a power bar which can be switched off when not in use.
� Use energy saving light bulbs when possible.
� Only print documents when absolutely necessary.
� Install trigger devices on water hoses.
� Only purchase the amount of materials required, preferably with minimal or recyclable packaging.
� Only order the amount of supplies needed for the job.
� Minimise the number of trips/meetings taken, use car-pooling or video-conferencing when possible.
� Follow efficient driving techniques to reduce fuel use.
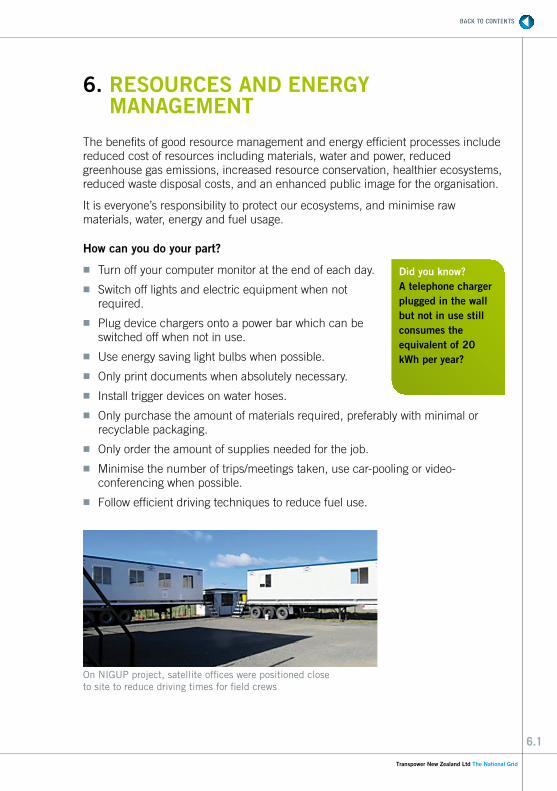
On NIGUP project, satellite offices were positioned close to site to reduce driving times for field crews
Did you know? A telephone charger plugged in the wall but not in use still consumes the equivalent of 20 kWh per year?

6.2
All areas of Transpower should follow the hierarchy of good resource management practices as summarised here:
Segregation of general waste, scrap metal, Paper and Cardboard at a depot. This depot also recycles aluminium and insulators (which are crushed, the metal being recycled and the porcelain/glass used in sealing roads)
REDUCE � Look at opportunities to reduce future waste when purchasing equipment, consider the whole of the equipment’s life including resource use and waste generation.
� Purchase goods and materials with low energy and water usage.
� Purchase only what you need and where possible, reduce material use and waste generation.
REUSE � Consider reuse of equipment/materials and coordinate use of materials between jobs.
� Return over-supplied quantities of materials and, when possible, packaging to the supplier.
� Keep unused materials segregated from waste so that they can be reused or recycled later.
RECYCLE/ COMPOST
� Recycle as many materials as possible to reduce waste disposal costs. See Section 8 – Waste Management.
� Compost green waste and recycle as ground cover or send it to a facility that processes it.
� Engage a recycling contractor to remove recoverable materials from the site.
DISPOSE/ LANDFILL
� Classify wastes and dispose of them using a reputable contractor to an authorised disposal facility. See Section 8 – Waste Management.
Reduce.
Reuse.
Recycle/Compost.
Recover/ Energy-from-Waste.
Dispose/ Landfill.
Most desirable
Least desirable
7.1
7. WATER USE
Water is a finite resource and must be managed accordingly. Water can become scarce during periods of drought if local authorities establish water restrictions. Where water is used for cleaning, dust suppression etc, it can create polluted water which needs to be managed. Minimising water use can therefore also reduce wastewater treatment requirements and costs.
Water usage at job sites
� Do not take water from a stream for site works unless that use is consented or confirmed as a permitted activity.
� Despite what resource consents allow, water should always be used sparingly.
� Consented activities must be undertaken in accordance with the conditions of resource consent, (such as volumes or time of use).
� Resource consents must be held at the worksite.
� For any question regarding requirements for resource consent, contact your supervisor or Environmental Advisor, (see Table 29.3).
General water saving tips
� When selecting equipment for construction and maintenance activities, select water efficient options.
� Consider the use of alternate water supplies such as rainwater tanks, bore water and water re-use systems where available.
� Report leaking water taps and water pipes immediately.
� Clean footpaths and driveways with a broom.
� Use trigger hoses to limit the indiscriminate use of water.
� Limit the amount of disturbance during excavation or clearing activities to reduce the need for dust suppression.
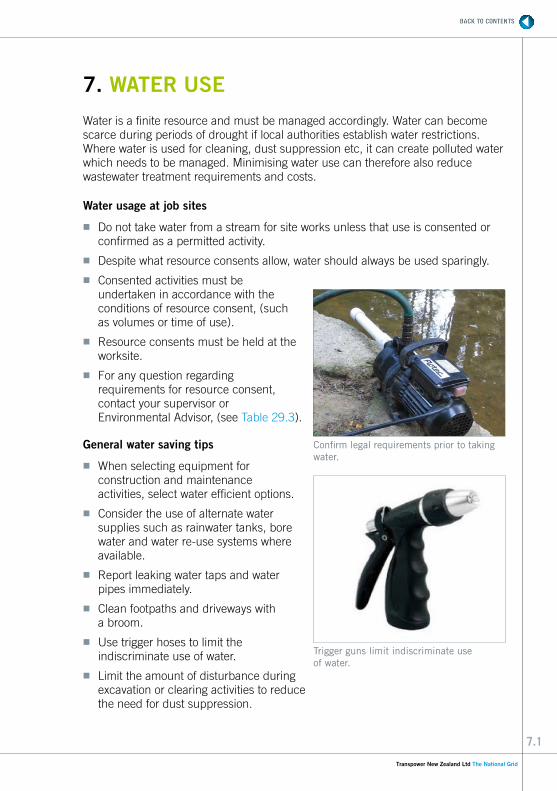
Confirm legal requirements prior to taking water.
Trigger guns limit indiscriminate use of water.
8.1
8. WASTE MANAGEMENT
Good resource management reduces waste quantities and disposal costs, conserves resources and minimises environmental damage. Segregation and appropriate disposal can reduce waste management costs significantly. Waste is any substance or material that is discarded, rejected, unwanted, surplus or abandoned. It is still waste even if it can be processed, recycled, re-used or recovered.
Planning
To manage waste effectively, consider the following points during the planning stage of any project:
� Follow the hierarchy of good resource management; see Section 6 Resources and Energy Management for tips.
� Before works start, determine the types and quantities of waste which will be generated.
� Classify wastes appropriately to determine storage, transport and disposal requirements.
� If applicable, comply with any Waste Management Plan.
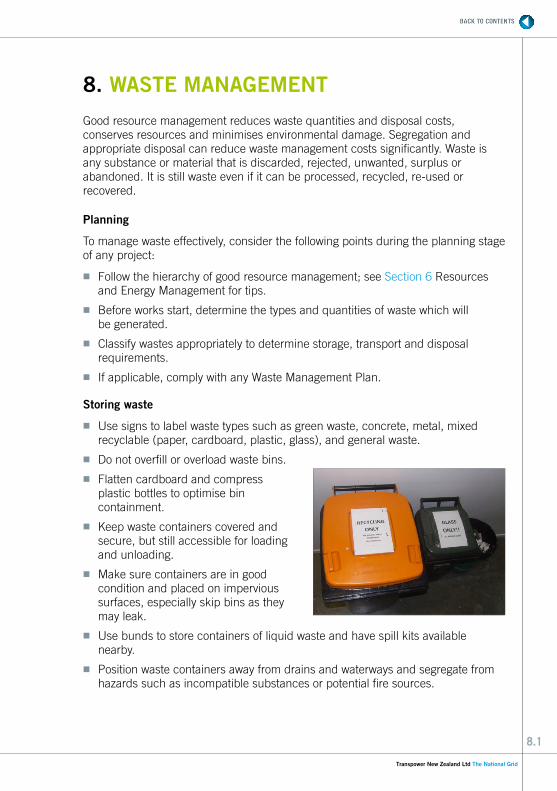
Storing waste
� Use signs to label waste types such as green waste, concrete, metal, mixed recyclable (paper, cardboard, plastic, glass), and general waste.
� Do not overfill or overload waste bins.
� Flatten cardboard and compress plastic bottles to optimise bin containment.
� Keep waste containers covered and secure, but still accessible for loading and unloading.
� Make sure containers are in good condition and placed on impervious surfaces, especially skip bins as they may leak.
� Use bunds to store containers of liquid waste and have spill kits available nearby.
� Position waste containers away from drains and waterways and segregate from hazards such as incompatible substances or potential fire sources.

8.2
Disposal and transportation of waste
� Make sure wastes have been classified correctly.
� Dangerous goods must be transported in accordance with the Transport Rule: Dangerous Goods 2005 and Land Transport Rule: Dangerous Goods Amendment 2010. If you’re unsure call the New Zealand Transport Agency (NZTA) contact centre on 0800 699 000.
� Maintain vehicles which are used to transport waste in a clean condition.
� Safely secure all containers on the vehicle.
� Cover loads to prevent spillage, loss of waste and the emission of odours.
� Comply with licensing and documentation requirements.
� Liquid and Hazardous waste (or potentially hazardous) must be removed and disposed of by a suitably licenced hazardous waste disposal operator, (see Section 29, Table 29.1 for code compliant contractors).
� Code compliant contractors will track liquid hazardous waste giving assurance the waste gets to the treatment or disposal facility.
Special considerations
Some wastes may have special requirements in addition to those described above and should never be combined with general waste. Examples include PCBs, e-waste, hazardous waste, dangerous goods, soil from some transmission trenches, radioactive waste and special waste (tyres, asbestos, and clinical.) See Section 19 for PCB management. Refer to your safety manager for instructions on disposal of other types of waste.
List of recyclable items
This is a partial list of recyclable items that can be found on your site. Feel free to amend the list as required.
� scrap steel � all types of batteries � timber � copper wire � glass � clean fill � cable drums � brick � vegetation
� paper and cardboard � concrete � oil (not contaminated with PCB)
� hard hats � plastics
Did you know? � In 2011, an estimated
2,461,000 tonnes of waste were disposed of to municipal landfills in New Zealand. There are just over 50 operating municipal landfills throughout New Zealand.
� In 2007/08, approximately three quarters of waste disposed of to landfills was potentially reusable wastes, such as organic waste, rubble, timber, paper, plastic, metal and glass.
9.1
9. HOURS OF OPERATION AND NOISE
Background
Construction work is often accompanied by noise, bright lighting, vibration and changed traffic conditions. This can be disruptive to landowners and the disruptive effects can be mitigated by notifying residents prior to the works, avoiding unsociable operating hours, and following good work practices.
Noise is the most disruptive of the impacts of construction work as it can be annoying, interrupt communication and disrupt sleep or work. Exposure to loud noise can result in anxiety, frustration and adverse health effects. The impacts of noise depend both on the noise level, the environment, and how it is perceived by those affected. The New Zealand construction noise standard NZS 6803:1999 provides methods for the measurement, assessment and prediction of noise and guides those involved in managing noise in the construction industry. It includes guidance on the control of construction noise.
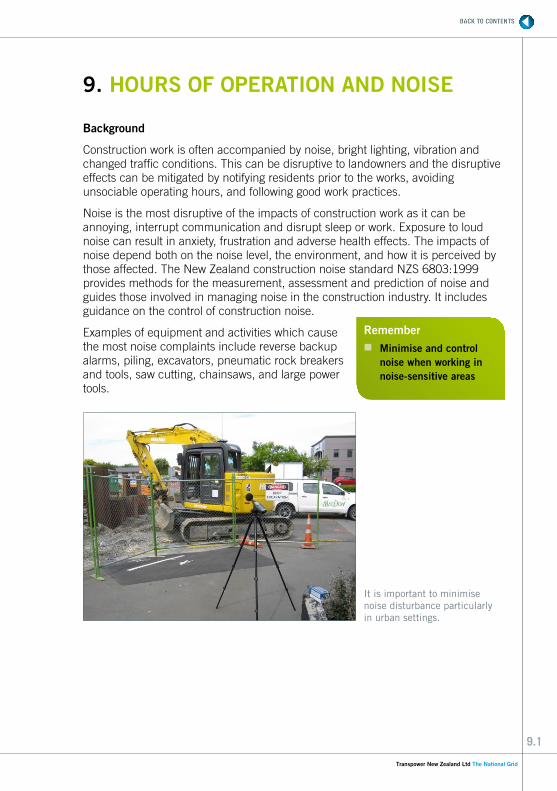
Examples of equipment and activities which cause the most noise complaints include reverse backup alarms, piling, excavators, pneumatic rock breakers and tools, saw cutting, chainsaws, and large power tools.
It is important to minimise noise disturbance particularly in urban settings.
Remember � Minimise and control
noise when working in noise-sensitive areas
9.2
Useful information and “how to”
Standard operating hours
In sensitive areas such as residential areas and near hospitals, works should be undertaken during the following hours where possible:
� Monday to Friday – 7am to 6pm
� Saturday – 8am to 3pm
� No work on Sundays or Public Holidays.
Exemptions to standard operating hours
Works may be undertaken outside of Standard Operating Hours if the following criteria are satisfied:
� The work complies with out-of-hours conditions of any environmental approval.
� The works cannot be undertaken during Standard Operating Hours (eg, in an emergency, roads authority requirements).
� Any potentially affected residents are given prior notice of work times and reasons.
Factors which can influence the impact of noise include:
� Existing background noise levels.
� Distance between site and area affected by the noise.
� Duration and time of the activity.
� Nature of noise – volume, pitch, frequency.
Planning and site layout
� Notify affected residents.
� Check any approval conditions.
� Schedule works to consider the local conditions and community needs (noise, traffic conditions).
� Select low noise machinery where practicable, (eg electric instead of internal combustion, vibratory piling instead of impact).
� Arrange the work site to minimise the projection of noise and lighting to sensitive receivers by taking advantage of natural barriers (eg hills, trees) and structures or temporary screening (eg fences, work trucks, stockpiles).
� Where appropriate, install portable screening around high impact equipment/activities so that noise/light is mitigated.
� Avoid rowdy behaviour on work sites (eg shouting, radios on high volume, and inappropriate vehicle use).

9.3
During works
� When possible, site and orientate the noisiest equipment furthest away from noise-sensitive areas.
� Operate and maintain plant and equipment according to site procedures.
� Shut down machines that are used intermittently or throttle down to a minimum.
� Avoid dropping materials from a height, e.g. either into or out of trucks, trays or bins.
� Restrict vehicle speeds on, or near, the work site.
� Consider scheduling works to provide respite periods throughout the duration of the project.
� Place and angle lighting to minimise light spill outside the construction area.
For all works outside of standard operating hours, consider scheduling the noisiest works to be completed before 3pm.
Special considerations for implosive jointing
� Implosive jointing can give rise to noise levels which might cause to annoyance, (120dBC Lpeak) at some distance from the worksite.
� For the smallest charges anticipated, such levels might occur out to 600m from the site of the implosive jointing and for the largest as far as 1450m.
� Where buildings are within 1450m resource consent may be required.
� Closer to the worksite noise and vibration levels can be high enough to cause building and hearing damage and where this is possible precautions should be taken or alternative jointing methods used.
� People should not be exposed to noise levels in excess of 140dBC Lpeak without hearing protection.
� Livestock may also be startled.
� Notification of the public and emergency services etc, needs to be carefully considered and planned.
� Seek advice from Transpower Environmental Planning and Policy Group on these matters, see Table 29.3.
Remember � When emergencies occur and
notification to residents is not possible, notify the local council(s) providing work times and reasons.
10.1
10. RURAL FIRE PRECAUTIONS
Background
During a restricted or prohibited fire season, no fire may be lit in the open unless in accordance with an approved fire permit. Where exemptions apply, ensure compliance with relevant conditions.
Useful information and “how to”
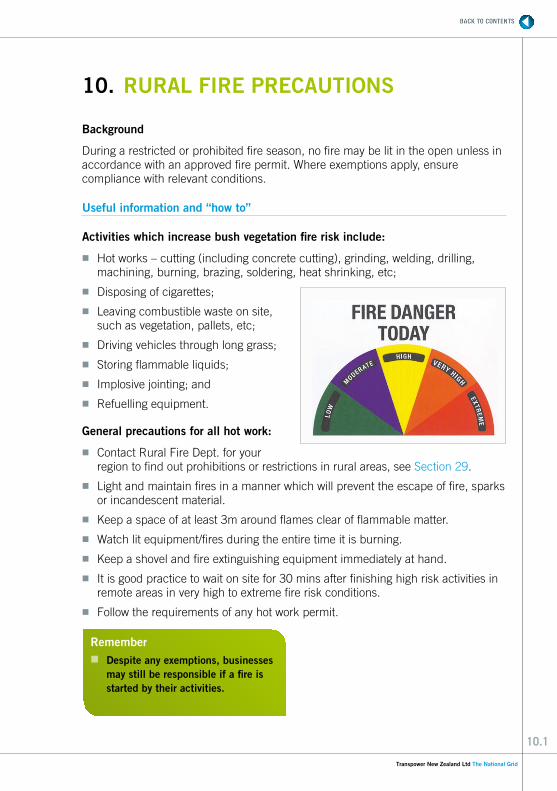
Activities which increase bush vegetation fire risk include:
� Hot works – cutting (including concrete cutting), grinding, welding, drilling, machining, burning, brazing, soldering, heat shrinking, etc;
� Disposing of cigarettes;
� Leaving combustible waste on site, such as vegetation, pallets, etc;
� Driving vehicles through long grass;
� Storing flammable liquids;
� Implosive jointing; and
� Refuelling equipment.
General precautions for all hot work:
� Contact Rural Fire Dept. for your region to find out prohibitions or restrictions in rural areas, see Section 29.
� Light and maintain fires in a manner which will prevent the escape of fire, sparks or incandescent material.
� Keep a space of at least 3m around flames clear of flammable matter.
� Watch lit equipment/fires during the entire time it is burning.
� Keep a shovel and fire extinguishing equipment immediately at hand.
� It is good practice to wait on site for 30 mins after finishing high risk activities in remote areas in very high to extreme fire risk conditions.
� Follow the requirements of any hot work permit.
Remember � Despite any exemptions, businesses
may still be responsible if a fire is started by their activities.
11.1
11. AIR POLLUTION
Background
Air pollution including dust generation on a work site can have health and nuisance implications for workers and residents and cause adverse effects on the surrounding crops, natural vegetation, and waterways.
Minimising fuel consumption reduces cost and improves profits, while reducing emissions of air pollutants to the environment including greenhouse gases.
Measures should be employed to reduce smoke, hydrocarbon emissions, chemical vapour emissions and dust generation during works.
Useful information and “how to”
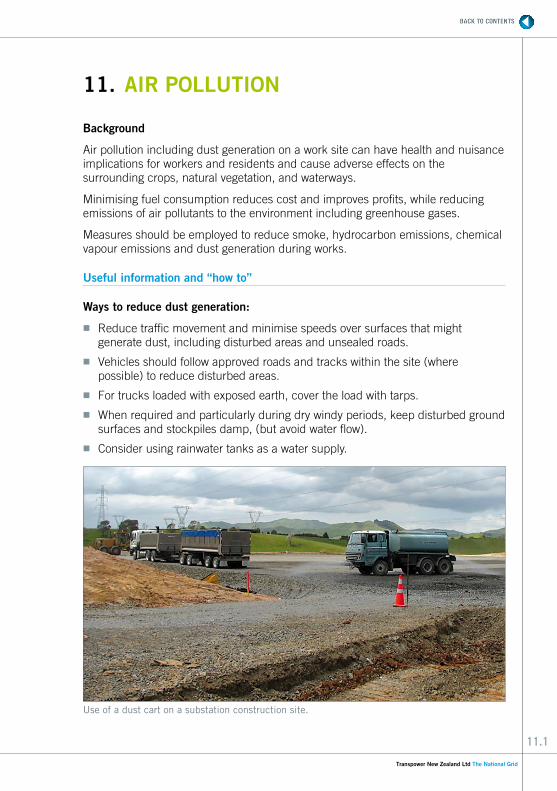
Ways to reduce dust generation:
� Reduce traffic movement and minimise speeds over surfaces that might generate dust, including disturbed areas and unsealed roads.
� Vehicles should follow approved roads and tracks within the site (where possible) to reduce disturbed areas.
� For trucks loaded with exposed earth, cover the load with tarps.
� When required and particularly during dry windy periods, keep disturbed ground surfaces and stockpiles damp, (but avoid water flow).
� Consider using rainwater tanks as a water supply.
Use of a dust cart on a substation construction site.
11.2
The following measures can also usefully reduce sediment erosion by rainwater.
� Phase works to minimise the duration of soil disturbance and avoid soil excavation on windy days.
� Install wind breaks (silt fence or shade cloth) to reduce wind erosion of soil.
� Cover or stabilise exposed areas. Options include mulch, hydro-seed, plastic or geotextile sheets.
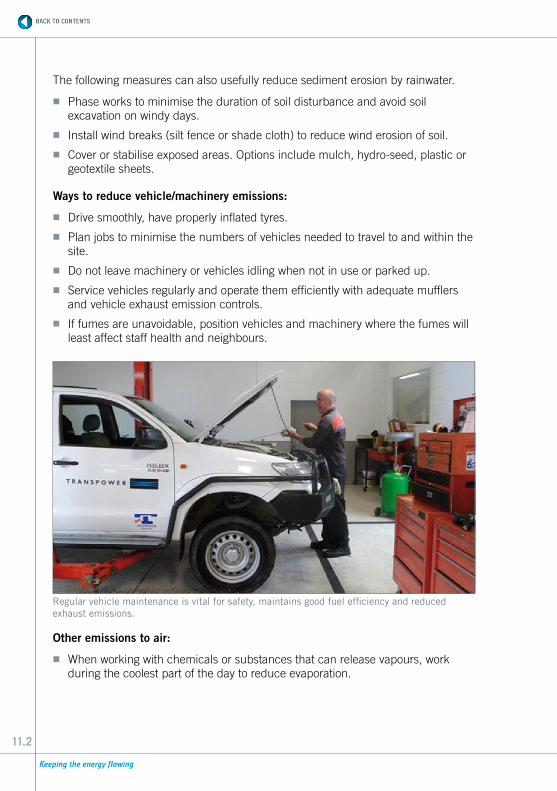
Ways to reduce vehicle/machinery emissions:
� Drive smoothly, have properly inflated tyres.
� Plan jobs to minimise the numbers of vehicles needed to travel to and within the site.
� Do not leave machinery or vehicles idling when not in use or parked up.
� Service vehicles regularly and operate them efficiently with adequate mufflers and vehicle exhaust emission controls.
� If fumes are unavoidable, position vehicles and machinery where the fumes will least affect staff health and neighbours.
Other emissions to air:
� When working with chemicals or substances that can release vapours, work during the coolest part of the day to reduce evaporation.
Regular vehicle maintenance is vital for safety, maintains good fuel efficiency and reduced exhaust emissions.
12.1
12. SULPHUR HEXAFLUORIDE GAS
Sulphur hexafluoride gas (SF6) is used in circuit breakers and gas insulated switchgear to prevent arcing. This inert gas is a very powerful greenhouse gas - one kilogram of sulphur hexafluoride has the same global warming effect as 22,800 kilograms of carbon dioxide once released into the atmosphere. SF6 is odourless, colourless and non-combustible but during usage can decompose and generate a white carcinogenic residue along with a gas that has a strong rotten eggs odour.
Useful information and “how to”
Maintenance of equipment containing SF6 should only be undertaken by staff competent in this activity. Service specification, TP.SS 02.29, Sulphur Hexafluoride (SF6) Gas and Handling Equipment Maintenance and Management must be followed.
� Prevent all SF6 release to the environment.
� Check for leaks following maintenance and installation of assets.
� Check soundness of filling equipment, hoses and couplings and service regularly to minimise leaks during top ups and other gas transactions.
� Record the trends of all pressure gauges when visiting a substation to enable early detection of leaks rather than relying solely on low level alarms.
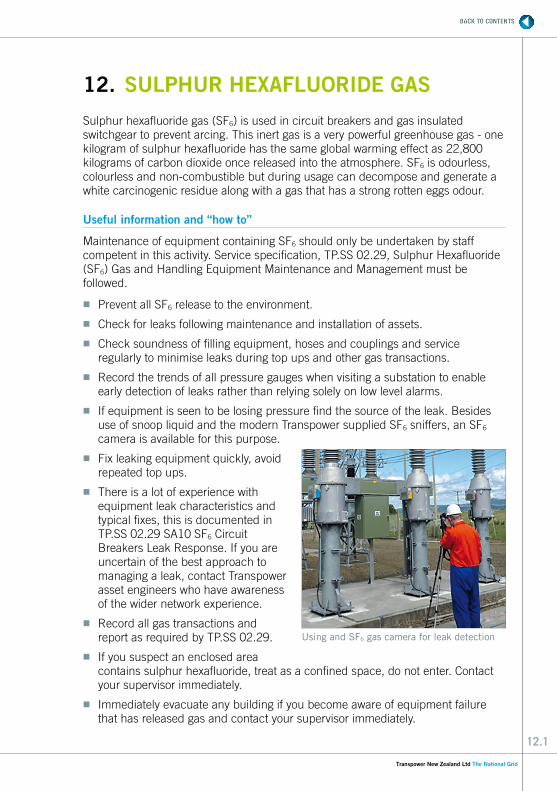
� If equipment is seen to be losing pressure find the source of the leak. Besides use of snoop liquid and the modern Transpower supplied SF6 sniffers, an SF6 camera is available for this purpose.
� Fix leaking equipment quickly, avoid repeated top ups.
� There is a lot of experience with equipment leak characteristics and typical fixes, this is documented in TP.SS 02.29 SA10 SF6 Circuit Breakers Leak Response. If you are uncertain of the best approach to managing a leak, contact Transpower asset engineers who have awareness of the wider network experience.
� Record all gas transactions and report as required by TP.SS 02.29.
� If you suspect an enclosed area contains sulphur hexafluoride, treat as a confined space, do not enter. Contact your supervisor immediately.
� Immediately evacuate any building if you become aware of equipment failure that has released gas and contact your supervisor immediately.
Using and SF6 gas camera for leak detection
13.1
13. WATER QUALITY
Background
Water can become polluted through a number of mechanisms associated with National Grid activities, including:
� Rainwater running over and eroding exposed ground (for example due to earthworks) and picking up sediment;
� Water contacting chemical or oil contaminated surfaces;
� Paint wash water; and
� Concrete works.
Only clean rainwater is allowed to enter a waterway or stormwater drain. All reasonable and practicable measures must be taken to achieve this. Any other liquid or solid entering or with the potential to enter a waterway or stormwater system is considered pollution and can have adverse effects on plants animals and our waterways. Polluting our waterways can result in fines and/or prosecution for companies and individuals.
Useful information and “how to”
When working with or near water:
� Do not store or use any potential pollutant (eg transformer oil or a chemical) where it might enter a waterway or storm water drain.
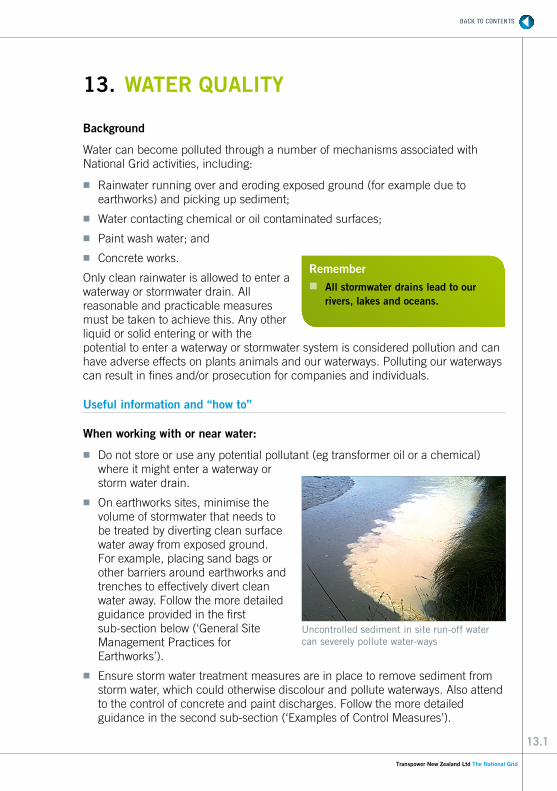
� On earthworks sites, minimise the volume of stormwater that needs to be treated by diverting clean surface water away from exposed ground. For example, placing sand bags or other barriers around earthworks and trenches to effectively divert clean water away. Follow the more detailed guidance provided in the first sub-section below (‘General Site Management Practices for Earthworks’).
� Ensure storm water treatment measures are in place to remove sediment from storm water, which could otherwise discolour and pollute waterways. Also attend to the control of concrete and paint discharges. Follow the more detailed guidance in the second sub-section (‘Examples of Control Measures’).
Remember � All stormwater drains lead to our
rivers, lakes and oceans.
Uncontrolled sediment in site run-off water can severely pollute water-ways
13.2
� Any discharges to stormwater must be in accordance with the process at the third sub-section (‘Managing Water Discharges’).
� Any discharges to sewer must be in accordance with a trade waste certificate from the relevant local authority.
The remainder of this chapter is divided into the following sub-sections:
1. General Site Management Practices for Earthworks
2. Examples of Control Measures
3. Managing Water Discharges
General Site Management Practices for Earthworks
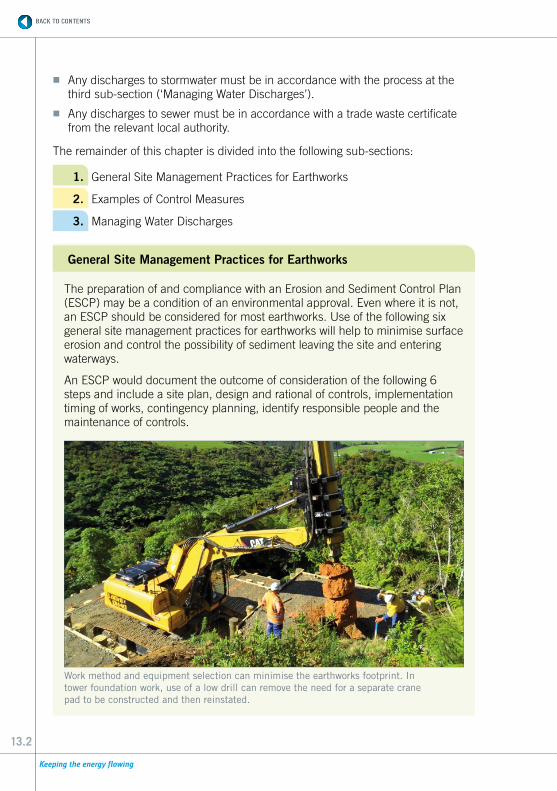
The preparation of and compliance with an Erosion and Sediment Control Plan (ESCP) may be a condition of an environmental approval. Even where it is not, an ESCP should be considered for most earthworks. Use of the following six general site management practices for earthworks will help to minimise surface erosion and control the possibility of sediment leaving the site and entering waterways.
An ESCP would document the outcome of consideration of the following 6 steps and include a site plan, design and rational of controls, implementation timing of works, contingency planning, identify responsible people and the maintenance of controls.
Work method and equipment selection can minimise the earthworks footprint. In tower foundation work, use of a low drill can remove the need for a separate crane pad to be constructed and then reinstated.
13.3
1. Assess the site and proposed works for risks of erosion and sedimentation before work commences.
� Identify slopes/contours (the steeper the slope the greater the erosion risk).
� Locate drainage lines and waterways.
� Locate areas of soil disturbance and exposed surfaces.
2. Plan your works and implement measures to prevent erosion. � Minimise the removal of natural stabilisers such as grass, vegetation and
mulch. This is particularly relevant to work near water ways where retention of vegetation would provide a useful filter to sediment in run-off when used with other approaches.
� Minimise the amount of site disturbance and the time that areas are left exposed.
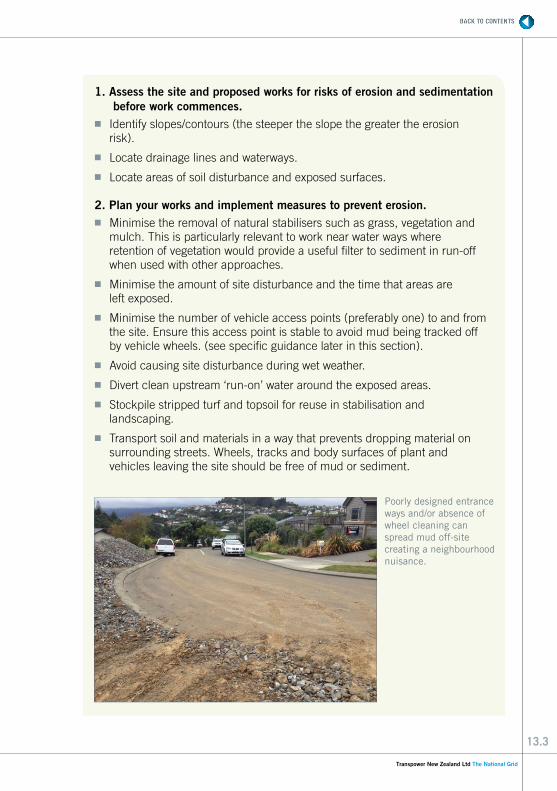
� Minimise the number of vehicle access points (preferably one) to and from the site. Ensure this access point is stable to avoid mud being tracked off by vehicle wheels. (see specific guidance later in this section).
� Avoid causing site disturbance during wet weather.
� Divert clean upstream ‘run-on’ water around the exposed areas.
� Stockpile stripped turf and topsoil for reuse in stabilisation and landscaping.
� Transport soil and materials in a way that prevents dropping material on surrounding streets. Wheels, tracks and body surfaces of plant and vehicles leaving the site should be free of mud or sediment.
Poorly designed entrance ways and/or absence of wheel cleaning can spread mud off-site creating a neighbourhood nuisance.
13.4
3. Install erosion and sediment controls. � Protect all existing drains, such as substation drainage kerb drains etc,
(see protecting kerb drains later in this section).
� Place controls such as clean water diversion bunds uphill of works to divert runoff around work areas and stockpiles, thereby reducing the quantity of sediment laden water to treat.
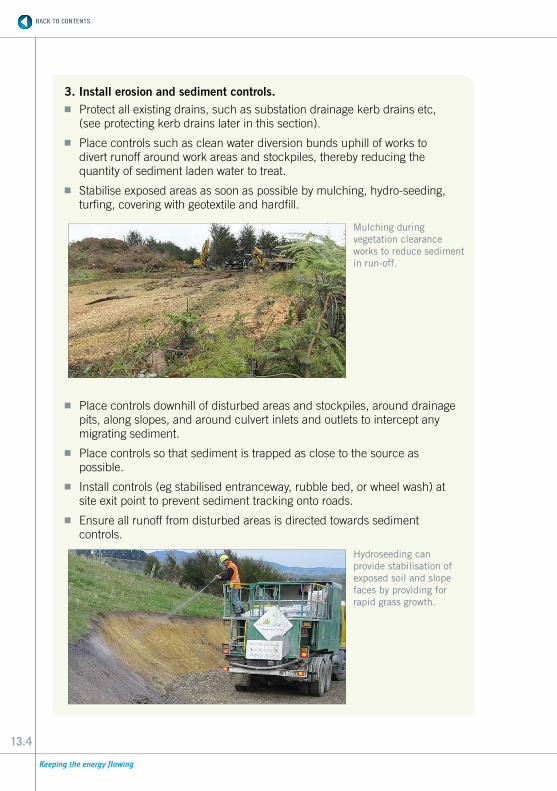
� Stabilise exposed areas as soon as possible by mulching, hydro-seeding, turfing, covering with geotextile and hardfill.
� Place controls downhill of disturbed areas and stockpiles, around drainage pits, along slopes, and around culvert inlets and outlets to intercept any migrating sediment.
� Place controls so that sediment is trapped as close to the source as possible.
� Install controls (eg stabilised entranceway, rubble bed, or wheel wash) at site exit point to prevent sediment tracking onto roads.
� Ensure all runoff from disturbed areas is directed towards sediment controls.
Mulching during vegetation clearance works to reduce sediment in run-off.
Hydroseeding can provide stabilisation of exposed soil and slope faces by providing for rapid grass growth.
13.5
4. Employ good site management practices during the course of works. � Avoid making a mess and clean as you go.
� Ensure surrounding areas and hard surfaces are clean and free of sediment.
� Avoid placing soil in areas outside of the disturbed area, (eg pushing soil over banks and slopes where it can run into waterways).
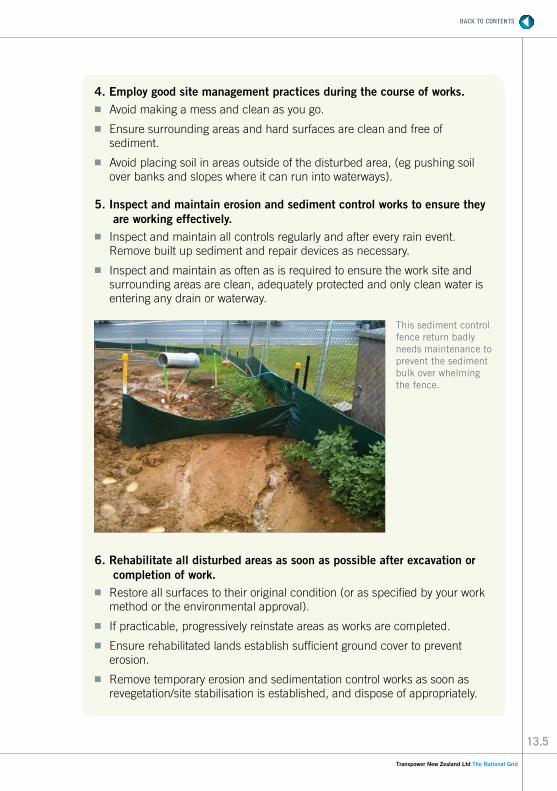
5. Inspect and maintain erosion and sediment control works to ensure they are working effectively.
� Inspect and maintain all controls regularly and after every rain event. Remove built up sediment and repair devices as necessary.
� Inspect and maintain as often as is required to ensure the work site and surrounding areas are clean, adequately protected and only clean water is entering any drain or waterway.
6. Rehabilitate all disturbed areas as soon as possible after excavation or completion of work.
� Restore all surfaces to their original condition (or as specified by your work method or the environmental approval).
� If practicable, progressively reinstate areas as works are completed.
� Ensure rehabilitated lands establish sufficient ground cover to prevent erosion.
� Remove temporary erosion and sedimentation control works as soon as revegetation/site stabilisation is established, and dispose of appropriately.
This sediment control fence return badly needs maintenance to prevent the sediment bulk over whelming the fence.
13.6
Examples of Control Measures
A number of specific activity considerations and key stormwater and erosion control measures are identified below. These represent only some of the more commonly used controls. Information on a wider range of available measures (e.g. sediment retention ponds) can be found in a number of sources including guidelines provided by regional councils e.g. Auckland’s Erosion and Sediment Control Guidelines, TP90.
Please check your Regional Council guidelines for local information. See Section 29 for Regional Council contact details; guidelines are usually available on their websites. The NZTA also have a detailed ‘Draft erosion and sediment control field guide for contractors’, available at http://www.nzta.govt.nz/resources/erosion-sediment-control/docs/draft-field-guide.pdf.
When stockpiling cannot be avoided: � Order only the material quantities required.
� Choose an appropriate sheltered location away from possible hazards such as areas of concentrated water flow, channels, gutters, drains, steep slopes (eg flat grassed areas).
� Limit height of stockpiles according to your erosion and sediment control plan.
� Place stockpiles on a tarpaulin where possible.
� Adequately protect stockpiles so that no material can escape, especially if the site is left unattended or rain is expected. PVA or Latex binding sprays can be used to protect longer term stockpile, or well-fixed tarpaulins or mulch for shorter term stockpiles.
� Provide sediment control (eg sediment fences, sandbags) to protect and divert runoff water around stockpiles where required.
� Set up sediment control devices downhill of disturbed areas to intercept mobile sediment.
� Remove stockpile and clean up as soon as possible.
� Check with your District and/or Regional Council to ensure that the stockpile is a permitted activity and if not, then ensure appropriate resource consents are applied for before the stockpile is formed.
13.7
When trenching: � Avoid trenching during periods of high rain, or when the water table is high
(such as in winter), where possible. Divert surface water runoff away from trenches.
� Limit the length of time trenches are open to less than three days, where possible.
� When discharging water offsite, refer to the end of this section.
When underboring: � Use a closed recirculatory drilling mud system.
� Prepare contingency plans to deal with “frac outs” (when drilling mud propagates toward the surface and can escape).
Installing a sediment control fence 1. Identify the natural drainage flow and construct sediment control fences as
close as possible to parallel to the contours of the site, i.e. across a slope and not down it.
2. Employ small returns to limit the catchment area of any one section.
3. Cut a 200mm deep trench along the upslope line of the fence location and place the bottom of the fabric into the trench. Backfill the trench and compact to secure the fabric.
4. Drive 1.5m long star pickets or warratahs into the ground at 2m intervals (maximum) at the downslope edge of the trench.
5. Fix self-supporting geotextile to the upslope side of the posts ensuring it goes to the base of the trench. Fix the geotextile with wire as recommended by the manufacture. Only use geotextile specifically produced for sediment fencing.
6. If required, join sections of fabric at a support post with a 150mm overlap.
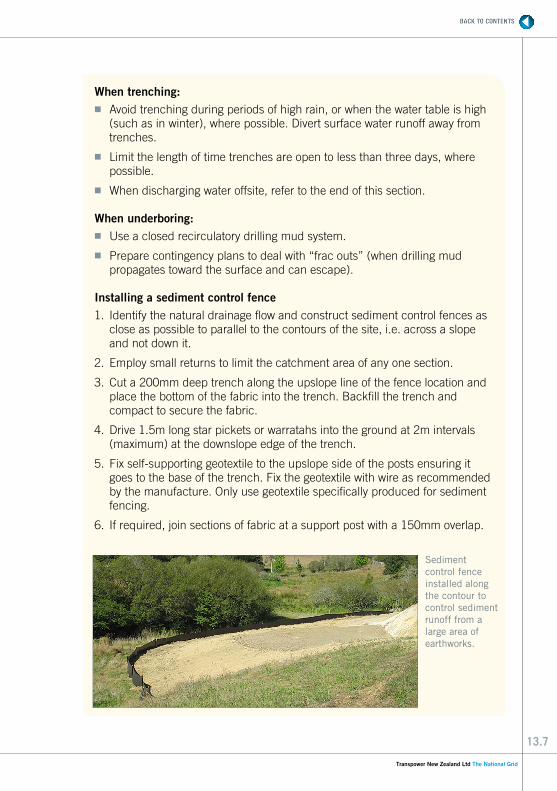
Sediment control fence installed along the contour to control sediment runoff from a large area of earthworks.
13.8
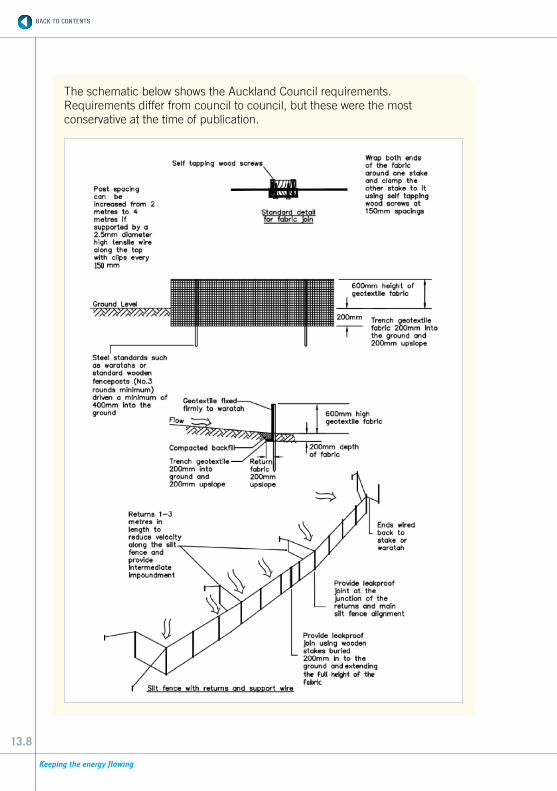
The schematic below shows the Auckland Council requirements. Requirements differ from council to council, but these were the most conservative at the time of publication.
13.9
Protecting kerb drains1. Form a seal with the kerb to prevent sediment bypassing the filter.
2. Geotextile devices should only be filled to 2/3 capacity with 25mm to 50mm aggregate so a good seal with the kerb can be achieved. If the bag ruptures, it must be cleaned and replaced.
3. Cover the drain or use a bag inside the drain sump to further catch sediment.
NOTE: Sandbags do not allow matter to filter through and hay bales offer inadequate filtration. Geotextile devices should be used in cases where filtering is required. These measures will also not be effective with paint and concrete washings.
When using a geotextile sausage � Make a sleeve from geotextile longer than the length of the inlet pit and fill
with 25mm to 50mm aggregate.
� Leave at least a 100mm space between the filter and the kerb inlet using spacer blocks.
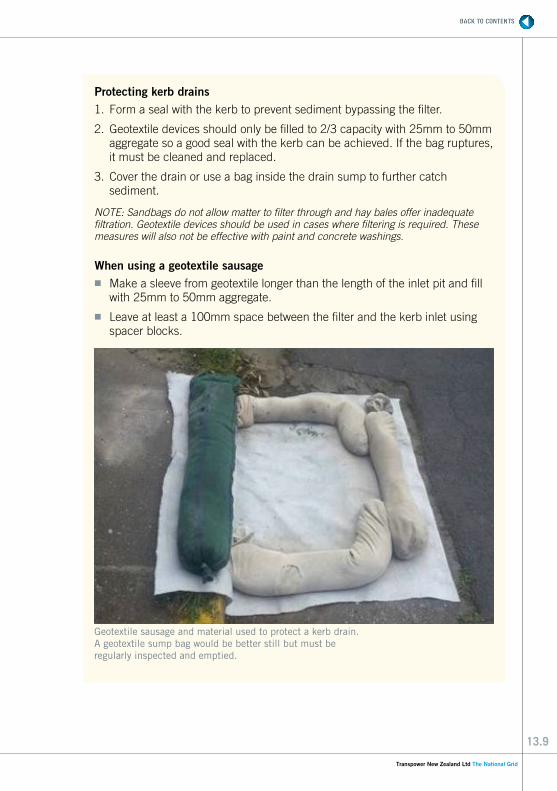
Geotextile sausage and material used to protect a kerb drain. A geotextile sump bag would be better still but must be regularly inspected and emptied.
13.10
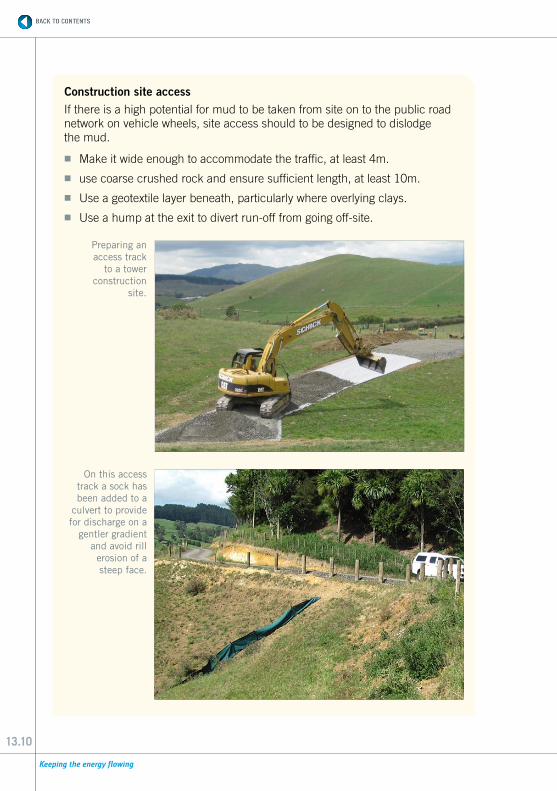
Construction site accessIf there is a high potential for mud to be taken from site on to the public road network on vehicle wheels, site access should to be designed to dislodge the mud.
� Make it wide enough to accommodate the traffic, at least 4m.
� use coarse crushed rock and ensure sufficient length, at least 10m.
� Use a geotextile layer beneath, particularly where overlying clays.
� Use a hump at the exit to divert run-off from going off-site.
Preparing an access track
to a tower construction
site.
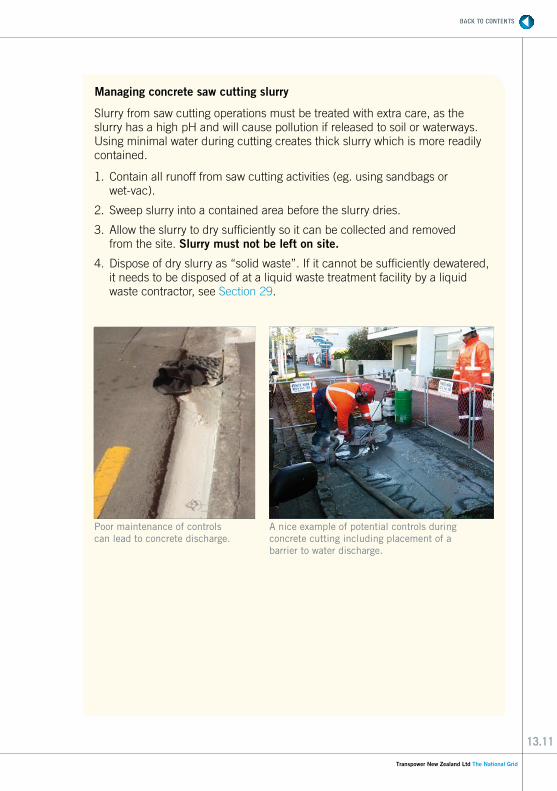
On this access track a sock has been added to a
culvert to provide for discharge on a
gentler gradient and avoid rill
erosion of a steep face.
13.11
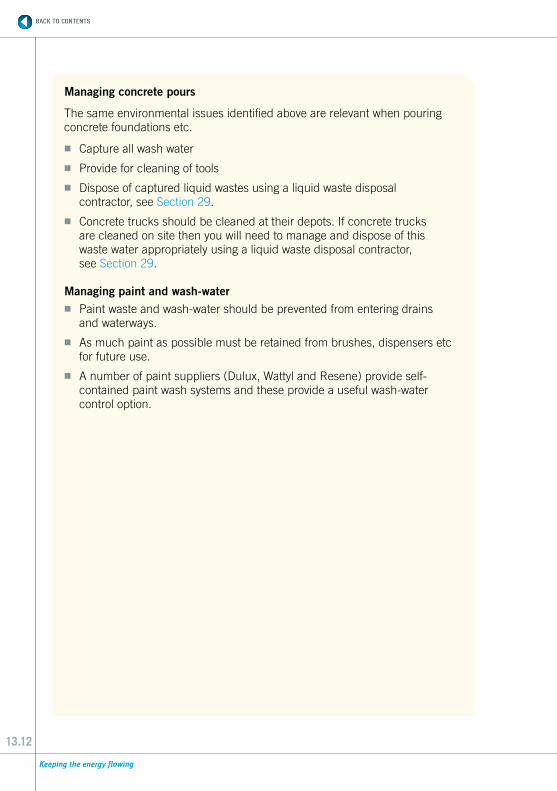
Managing concrete saw cutting slurry
Slurry from saw cutting operations must be treated with extra care, as the slurry has a high pH and will cause pollution if released to soil or waterways. Using minimal water during cutting creates thick slurry which is more readily contained.
1. Contain all runoff from saw cutting activities (eg. using sandbags or wet-vac).
2. Sweep slurry into a contained area before the slurry dries.
3. Allow the slurry to dry sufficiently so it can be collected and removed from the site. Slurry must not be left on site.
4. Dispose of dry slurry as “solid waste”. If it cannot be sufficiently dewatered, it needs to be disposed of at a liquid waste treatment facility by a liquid waste contractor, see Section 29.
Poor maintenance of controls can lead to concrete discharge.
A nice example of potential controls during concrete cutting including placement of a barrier to water discharge.
13.12
Managing concrete pours
The same environmental issues identified above are relevant when pouring concrete foundations etc.
� Capture all wash water
� Provide for cleaning of tools
� Dispose of captured liquid wastes using a liquid waste disposal contractor, see Section 29.
� Concrete trucks should be cleaned at their depots. If concrete trucks are cleaned on site then you will need to manage and dispose of this waste water appropriately using a liquid waste disposal contractor, see Section 29.
Managing paint and wash-water � Paint waste and wash-water should be prevented from entering drains
and waterways.
� As much paint as possible must be retained from brushes, dispensers etc for future use.
� A number of paint suppliers (Dulux, Wattyl and Resene) provide self-contained paint wash systems and these provide a useful wash-water control option.
13.13
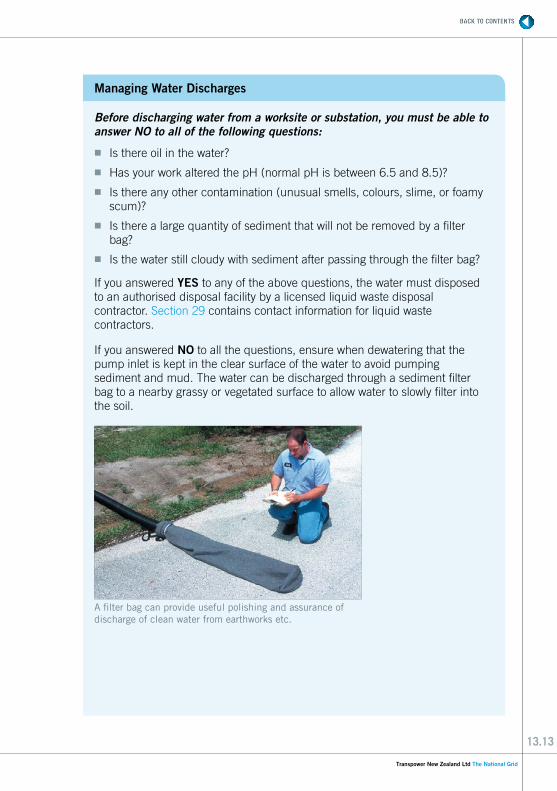
A filter bag can provide useful polishing and assurance of discharge of clean water from earthworks etc.
Managing Water Discharges
Before discharging water from a worksite or substation, you must be able to answer NO to all of the following questions:
� Is there oil in the water?
� Has your work altered the pH (normal pH is between 6.5 and 8.5)?
� Is there any other contamination (unusual smells, colours, slime, or foamy scum)?
� Is there a large quantity of sediment that will not be removed by a filter bag?
� Is the water still cloudy with sediment after passing through the filter bag?
If you answered YES to any of the above questions, the water must disposed to an authorised disposal facility by a licensed liquid waste disposal contractor. Section 29 contains contact information for liquid waste contractors.
If you answered NO to all the questions, ensure when dewatering that the pump inlet is kept in the clear surface of the water to avoid pumping sediment and mud. The water can be discharged through a sediment filter bag to a nearby grassy or vegetated surface to allow water to slowly filter into the soil.
14.1
14. CONTAMINATED LAND
Background
Soil and groundwater may be contaminated from previous activities on site. Exposure to contamination presents a potential risk for workers, the public and the environment. In addition, contamination can damage our infrastructure, may require special treatment/disposal and could cause future liabilities.
Useful information and “how to”
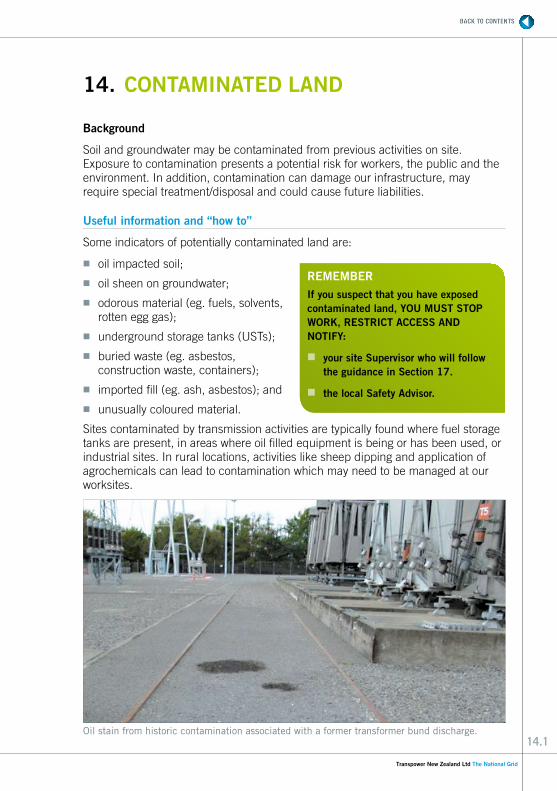
Some indicators of potentially contaminated land are:
� oil impacted soil;
� oil sheen on groundwater;
� odorous material (eg. fuels, solvents, rotten egg gas);
� underground storage tanks (USTs);
� buried waste (eg. asbestos, construction waste, containers);
� imported fill (eg. ash, asbestos); and
� unusually coloured material.
Sites contaminated by transmission activities are typically found where fuel storage tanks are present, in areas where oil filled equipment is being or has been used, or industrial sites. In rural locations, activities like sheep dipping and application of agrochemicals can lead to contamination which may need to be managed at our worksites.
REMEMBERIf you suspect that you have exposed contaminated land, YOU MUST STOP WORK, RESTRICT ACCESS AND NOTIFY:
� your site Supervisor who will follow the guidance in Section 17.
� the local Safety Advisor.
Oil stain from historic contamination associated with a former transformer bund discharge.
14.2
Substations are identified in NZ legislation as potentially contaminated sites as they are on the Hazardous Activities and Industries List of sites. On sites like substations with known or potential contamination; where soil is to be disturbed the sites should be investigated by specialists. Regional Councils keep registers of known or potentially contaminated sites. Resource consents are likely to be required for earthworks on such sites. Contact Transpower’s Environmental Policy and Planning Group, (see Section 29 Table 29.3) to arrange appropriate assistance.
More detailed guidance is available in the document ‘Site Management Plan for Ground Contamination’ which can be found under the ‘environmental resources’ section of the contractor accessible area of Transpower’s internet site.
It provides further guidance on the management of any ground contamination encountered on Transpowers substation sites, transmission line support structures or corridors. Guidance includes how to deal with unexpected contamination and how/where to dispose of contaminated material.
With the input of Transpowers Environmental Advisors, the document can also support resource consent applications.
Work on contaminated sites must be planned and managed, which may involve the use of specific PPE and require specialist testing and waste classification.
REMEMBERIf you suspect that you have exposed contaminated land, YOU MUST STOP WORK, RESTRICT ACCESS AND NOTIFY:
� your site Supervisor who will follow the guidance in Section 17.
� the local Safety Advisor.
15.1
15. HANDLING, STORAGE AND TRANSPORT OF OIL, FUEL AND LIQUID CHEMICALS
Background
Oil, fuel and liquid chemicals must be handled, stored, transported and disposed of in a way that minimises the risk of spill or leak. Spills and leaks can impact on human health and the environment. Hazardous substances are discussed in Section 16.
Useful information and “how to”
Best practice in the workplace
� Store oil and other chemicals in a contained area secure from vandalism and theft.
� For flammable and combustible liquids, the net capacity of the bund should be maintained at a minimum of 110% of the volume of the largest tank.
� Ensure all plant and equipment used in the handling and transport of oil, fuels or chemicals are regularly checked for serviceability, all hoses checked for deterioration, and hose ends and fittings checked for distortion. This includes hydraulic hoses on earth moving plant etc.
� Use absorbents and drip trays as an appropriate precaution when undertaking tasks involving oils and other liquids.
� Do not leave oil hoses and pumps unattended whilst in use.
� Oil and chemicals should be positioned as far away as possible from drains, water bodies and boundaries.
� Stormwater drains should be protected during high risk operations, see Section 18 Spill Containment and Clean-up.
� Drums on bunded pallets must be covered if stored outside to prevent bunds from filling with water.
� Emergency spill kits should be maintained and readily available whenever oils, fuels or chemicals are handled, transported, stored, processed or tested.
15.2
� Bund valves including those around oil containing equipment should normally be in the closed position when works on assets is undertaken.
� Check and empty bunds of clean rainwater regularly and after storms.
� If rainwater is contaminated with oil, it must be treated as liquid waste and the water must be taken by a licenced liquid waste disposal contractor and disposed to an authorised disposal facility. See Section 29 to gain contact information for liquid waste contractors.
� Oil interceptors should be inspected and drained of oil and excess water in line with TP.SS.02.84, Station Oil Services Maintenance.
� Substation discharges should be monitored for hydrocarbon content in line with TP.SS.02.84, Station Oil Services Maintenance.
� Where possible and within the provisions of TP.SS.02.35 ‘Insulating oil –acceptance criteria, monitoring and treatment’, oil should be recycled and used oil should be regenerated.
� Maintain spray distances. Leaks should not be able to spray outside the bund wall.
� All personnel involved in the storage of oil, fuel and chemicals should be familiar with the procedures for cleaning up spills and using spill kits (see Section 18).
� Spills should be reported, (see Section 17).
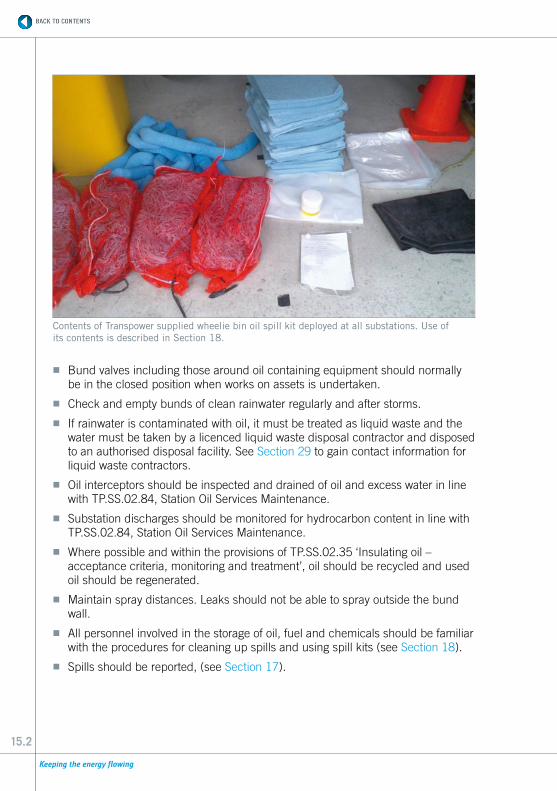
Contents of Transpower supplied wheelie bin oil spill kit deployed at all substations. Use of its contents is described in Section 18.
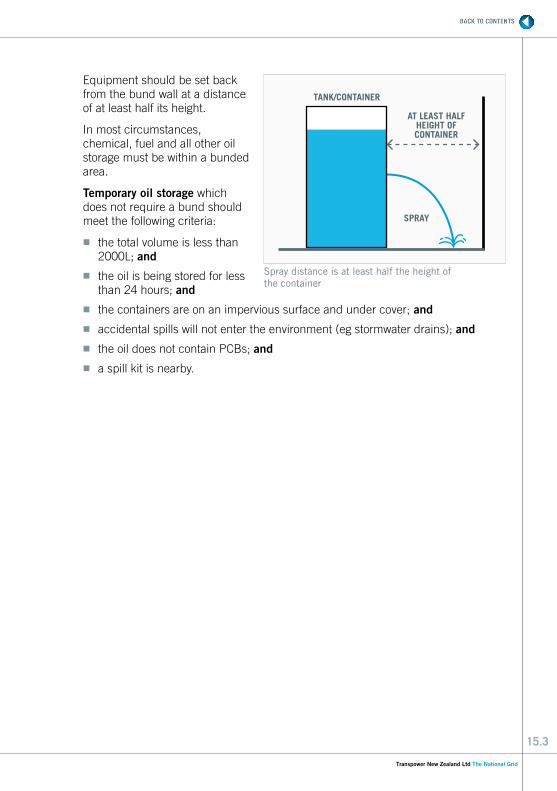
15.3
Spray distance is at least half the height of the container
Equipment should be set back from the bund wall at a distance of at least half its height.
In most circumstances, chemical, fuel and all other oil storage must be within a bunded area.
Temporary oil storage which does not require a bund should meet the following criteria:
� the total volume is less than 2000L; and
� the oil is being stored for less than 24 hours; and
� the containers are on an impervious surface and under cover; and
� accidental spills will not enter the environment (eg stormwater drains); and
� the oil does not contain PCBs; and
� a spill kit is nearby.
TANK/CONTAINER
AT LEAST HALF HEIGHT OF CONTAINER
SPRAY
16.1
16. HAZARDOUS SUBSTANCES IN THE WORKPLACE
Background
Hazardous substances can readily explode, burn, oxidise or corrode and/or be toxic to people and the environment. They must be stored, handled and transported in a controlled manner. Each service provider has approved handlers who can advise on management of hazardous substances.
Useful information and “how to”
Typical hazardous substances
� Transformer oil � Battery acid (including that in sealed and vented batteries)
� PCBs � Chemical cleaners
� Diesel fuel � Paints and /or thinners
� Mercury � Solvents
� Hydrogen � Asbestos
� Pesticides � Contaminated Soils
� SF6 gas breakdown products
The Governments’ ‘Hazardous Substances Toolbox’ available online at http://www.hazardoussubstances.govt.nz/ or in print, provides a useful resource, call 0800 376 234 or search online.
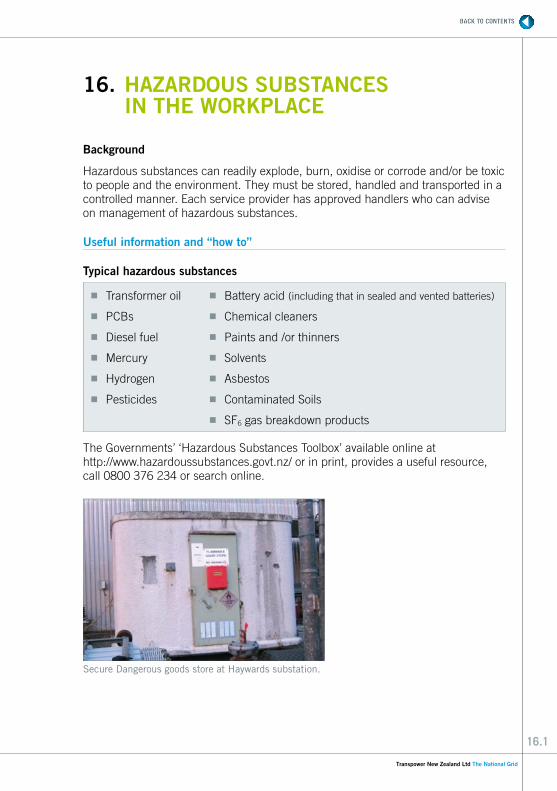
Secure Dangerous goods store at Haywards substation.
16.2
Best workplace practices
� Consider if there are non-hazardous material options that can be used as alternatives.
� Follow Hazardous Substances (Classes 1 to 5 Controls) Regulations 2001, (http://www.legislation.govt.nz/regulation/public/2001/0116/latest/DLM35395.html) requirements include that:
There is a register of hazardous substances;
Hazardous substances signage is utilised;
Material Safety data sheets (MSDS) are available onsite for each hazardous substance that is handled, stored and transported at/to the site;
Emergency response flipcharts are on site
Hazard identification boards are used
Only compatible chemicals are stored together.
� Check if quantities being transported require their management as a ‘dangerous good’ or handlers to be approved.
� Follow advice of MSDS’s including use of personal protective equipment.
� Ensure the appropriate storage standard is followed for corrosives, oxidizers and other chemicals.
� Be aware of the location and contents of the site Hazardous Substances Register and the Emergency Response Flipchart (at substations and comms sites) which contain useful information as to their control and what to do in the event of an emergency including useful contact details.
� Ensure correct labelling of all containers. Contact your HSE section if you discover an unlabelled container as it can pose a hazard to you and your co-workers.
� Store all chemicals as determined by your site procedures.
� Know the location of MSDS for all site substances and ensure you are familiar with properties of each chemical prior to its use.
� Report all leaks as per Environmental Incidents and Emergency Management, see Section 17.
17.1
17. ENVIRONMENTAL INCIDENTS AND EMERGENCY MANAGEMENT
Background
An environmental incident is defined as “an unplanned event that has the potential to cause harm or impact the surrounding environment”. Environmental incidents include: oil spills and leaks, land contamination, damage to heritage items, unauthorised land clearing, pollution of waterways, air releases, or anything that could harm people or the environment.
Useful information and “how to”
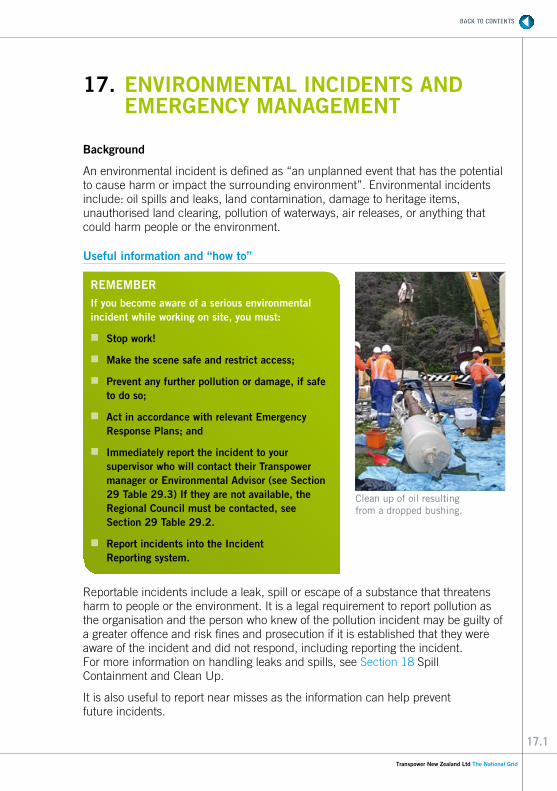
Clean up of oil resulting from a dropped bushing.
Reportable incidents include a leak, spill or escape of a substance that threatens harm to people or the environment. It is a legal requirement to report pollution as the organisation and the person who knew of the pollution incident may be guilty of a greater offence and risk fines and prosecution if it is established that they were aware of the incident and did not respond, including reporting the incident. For more information on handling leaks and spills, see Section 18 Spill Containment and Clean Up.
It is also useful to report near misses as the information can help prevent future incidents.
REMEMBERIf you become aware of a serious environmental incident while working on site, you must:
� Stop work!
� Make the scene safe and restrict access;
� Prevent any further pollution or damage, if safe to do so;
� Act in accordance with relevant Emergency Response Plans; and
� Immediately report the incident to your supervisor who will contact their Transpower manager or Environmental Advisor (see Section 29 Table 29.3) If they are not available, the Regional Council must be contacted, see Section 29 Table 29.2.
� Report incidents into the Incident Reporting system.
18.1
18. SPILL CONTAINMENT AND CLEAN UP
Background
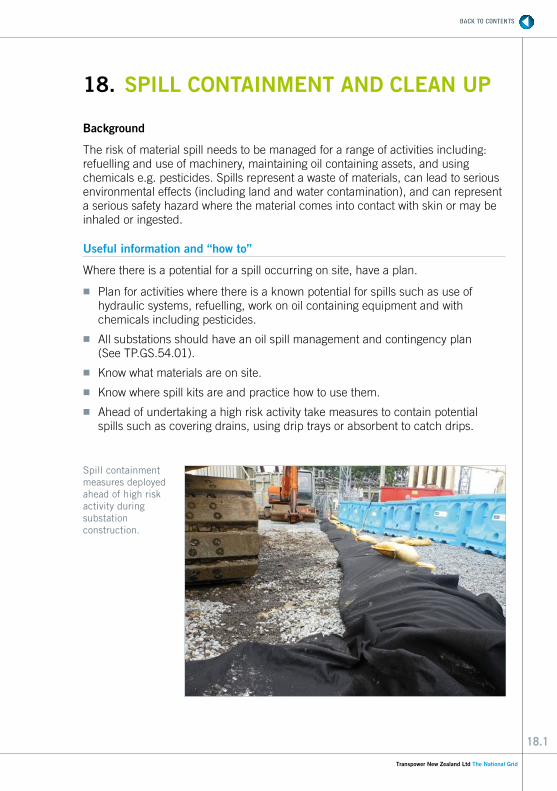
The risk of material spill needs to be managed for a range of activities including: refuelling and use of machinery, maintaining oil containing assets, and using chemicals e.g. pesticides. Spills represent a waste of materials, can lead to serious environmental effects (including land and water contamination), and can represent a serious safety hazard where the material comes into contact with skin or may be inhaled or ingested.
Useful information and “how to”
Where there is a potential for a spill occurring on site, have a plan.
� Plan for activities where there is a known potential for spills such as use of hydraulic systems, refuelling, work on oil containing equipment and with chemicals including pesticides.
� All substations should have an oil spill management and contingency plan (See TP.GS.54.01).
� Know what materials are on site.
� Know where spill kits are and practice how to use them.
� Ahead of undertaking a high risk activity take measures to contain potential spills such as covering drains, using drip trays or absorbent to catch drips.
Spill containment measures deployed ahead of high risk activity during substation construction.
Clean up of oil resulting from a dropped bushing
18.2
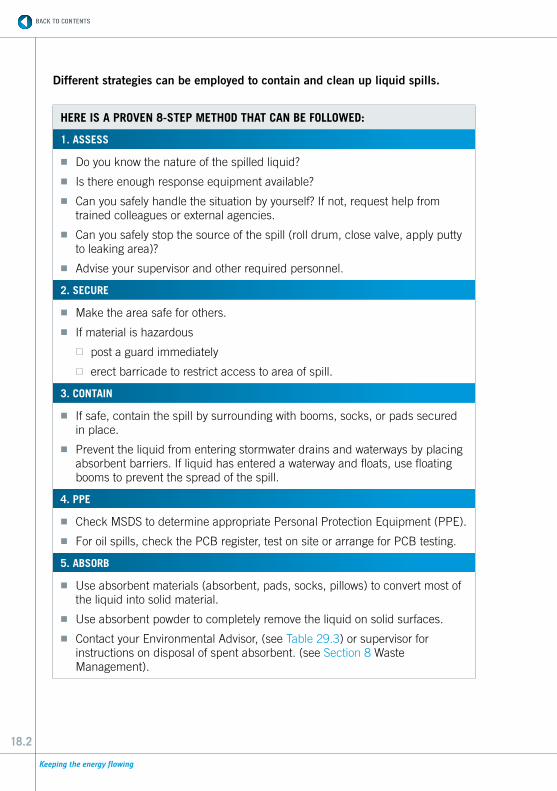
Different strategies can be employed to contain and clean up liquid spills.
HERE IS A PROVEN 8-STEP METHOD THAT CAN BE FOLLOWED:
1. ASSESS
� Do you know the nature of the spilled liquid?
� Is there enough response equipment available?
� Can you safely handle the situation by yourself? If not, request help from trained colleagues or external agencies.
� Can you safely stop the source of the spill (roll drum, close valve, apply putty to leaking area)?
� Advise your supervisor and other required personnel.
2. SECURE
� Make the area safe for others.
� If material is hazardous
post a guard immediately
erect barricade to restrict access to area of spill.
3. CONTAIN
� If safe, contain the spill by surrounding with booms, socks, or pads secured in place.
� Prevent the liquid from entering stormwater drains and waterways by placing absorbent barriers. If liquid has entered a waterway and floats, use floating booms to prevent the spread of the spill.
4. PPE
� Check MSDS to determine appropriate Personal Protection Equipment (PPE).
� For oil spills, check the PCB register, test on site or arrange for PCB testing.
5. ABSORB
� Use absorbent materials (absorbent, pads, socks, pillows) to convert most of the liquid into solid material.
� Use absorbent powder to completely remove the liquid on solid surfaces.
� Contact your Environmental Advisor, (see Table 29.3) or supervisor for instructions on disposal of spent absorbent. (see Section 8 Waste Management).
18.3
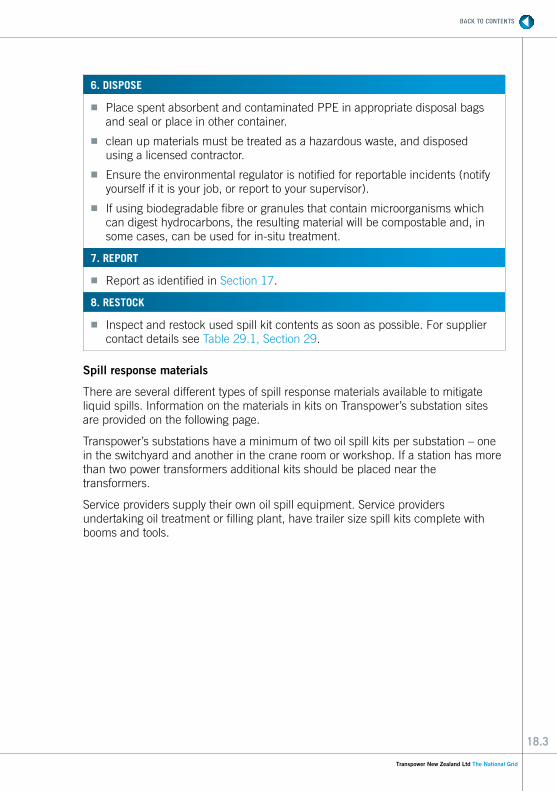
6. DISPOSE
� Place spent absorbent and contaminated PPE in appropriate disposal bags and seal or place in other container.
� clean up materials must be treated as a hazardous waste, and disposed using a licensed contractor.
� Ensure the environmental regulator is notified for reportable incidents (notify yourself if it is your job, or report to your supervisor).
� If using biodegradable fibre or granules that contain microorganisms which can digest hydrocarbons, the resulting material will be compostable and, in some cases, can be used for in-situ treatment.
7. REPORT
� Report as identified in Section 17.
8. RESTOCK
� Inspect and restock used spill kit contents as soon as possible. For supplier contact details see Table 29.1, Section 29.
Spill response materials
There are several different types of spill response materials available to mitigate liquid spills. Information on the materials in kits on Transpower’s substation sites are provided on the following page.
Transpower’s substations have a minimum of two oil spill kits per substation – one in the switchyard and another in the crane room or workshop. If a station has more than two power transformers additional kits should be placed near the transformers.
Service providers supply their own oil spill equipment. Service providers undertaking oil treatment or filling plant, have trailer size spill kits complete with booms and tools.
18.4
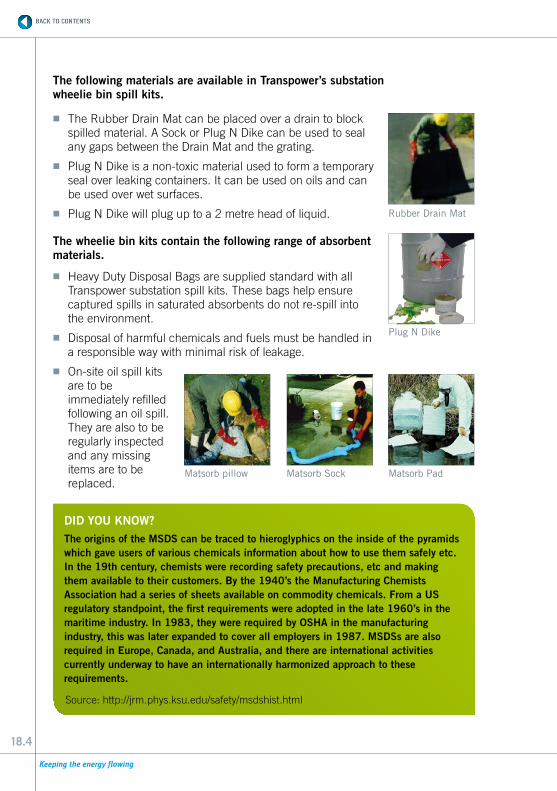
� The Rubber Drain Mat can be placed over a drain to block spilled material. A Sock or Plug N Dike can be used to seal any gaps between the Drain Mat and the grating.
� Plug N Dike is a non-toxic material used to form a temporary seal over leaking containers. It can be used on oils and can be used over wet surfaces.
� Plug N Dike will plug up to a 2 metre head of liquid.
The wheelie bin kits contain the following range of absorbent materials.
� Heavy Duty Disposal Bags are supplied standard with all Transpower substation spill kits. These bags help ensure captured spills in saturated absorbents do not re-spill into the environment.
� Disposal of harmful chemicals and fuels must be handled in a responsible way with minimal risk of leakage.
� On-site oil spill kits are to be immediately refilled following an oil spill. They are also to be regularly inspected and any missing items are to be replaced.
Matsorb pillow Matsorb Sock Matsorb Pad
DID YOU KNOW?The origins of the MSDS can be traced to hieroglyphics on the inside of the pyramids which gave users of various chemicals information about how to use them safely etc. In the 19th century, chemists were recording safety precautions, etc and making them available to their customers. By the 1940’s the Manufacturing Chemists Association had a series of sheets available on commodity chemicals. From a US regulatory standpoint, the first requirements were adopted in the late 1960’s in the maritime industry. In 1983, they were required by OSHA in the manufacturing industry, this was later expanded to cover all employers in 1987. MSDSs are also required in Europe, Canada, and Australia, and there are international activities currently underway to have an internationally harmonized approach to these requirements.
Source: http://jrm.phys.ksu.edu/safety/msdshist.html
Rubber Drain Mat
Plug N Dike
The following materials are available in Transpower’s substation wheelie bin spill kits.
19.1
19. POLYCHLORINATED BIPHENYLS (PCB)
Background
Polychlorinated Biphenyls (PCBs) are a group of synthetic compounds which were used as a dielectric fluid in electrical transformers for their insulating properties and chemical stability. That stability makes them dangerous as they bio-accumulate throughout the food chain if released into the environment. They are now known to pose risks to human health and the environment and have been banned from use. Although the majority of the equipment using PCBs has been removed from service, some old equipment in particular some capacitors may still be contaminated.
Useful information and “how to”
Handling of PCBs
� Wear required PPE gear:
Chemical goggles
Impervious gloves – nitrile or neoprene, DO NOT USE PVC or latex gloves
Protective footwear – gumboots or Tyvek overboots, and
Tyvek disposable overalls laminated with non-absorbent PVC.
� If inhalation risk exists, wear organic vapour respirator. In confined spaces or where ventilation is inadequate, a full-face respirator with supplied air is to be used.
� Equipment containing PCB-contaminated oil should be bagged, transported in accordance with TP.SS.03.00. HV Power System Protection Maintenance.
� Transport as a hazardous waste, See Section 8 ‘Waste Management’ and Section 16 ‘Hazardous Substances in the Workplace’.
REMEMBERIf the PCB level of the oil is unknown, treat as PCB contaminated and take all required precautions. Follow the requirements identified in TP.SS.03.00 HV Power System Protection maintenance.
20.1
20. VEGETATION AND HABITAT MANAGEMENT
Background
While Transpower controls vegetation around its transmission lines to maintain safe clearances, this section addresses vegetation protection while undertaking construction activities, such as laying communication cable and other maintenance activities. Healthy vegetation keeps soils healthy, filters the air, improves water quality, produces oxygen and supports natural habitat. Protecting the soil around trees using correct trenching and generally minimising impacts can help to maintain healthy vegetation. The removal of native, significant and threatened species can lead to significant penalties.
Useful information and “how to”
Minimise impacts on vegetation and habitats
� Ensure any work involving the removal of vegetation is legally compliant. See Section 3 on whether resource consent should be sought.
� Minimise clearance and disturbance of all vegetation, particularly along watercourses.
� Where possible, work outside the Tree Protection Zone (TPZ). The TPZ is generally a minimum distance 10 times the trunk diameter at 1.5m above ground (eg. For a 30 cm trunk, the TPS is 300 cm or 3m).
� Clearly mark sensitive vegetation to avoid unintended damage.
� Where possible, avoid the removal of ground cover and understorey vegetation, particularly native vegetation.
� Minimise the movement of vehicles and use existing access roads where possible.
� Where necessary, clear along the edge of vegetated areas rather than through the middle to maintain wildlife corridors, and discourage spread of weeds.
� Where practicable, use locally endemic species for landscaping.
� Provide an escape route for fauna if trenches/pits will be open for extended periods (eg, log or stick to use to climb out).
� If clearing works will impact known wildlife habitat, contact the Department of Conservation (DoC) at least two weeks prior to the commencement of works.
� Look for opportunities to conserve native fauna found on assets, e.g. nesting birds. Consider contacting the local DoC office ahead of removal.
� Manage and control the spread of weeds. See Section 21: ‘Weed and Pest Control’.
20.2
� Avoid using pesticides near fauna habitat or waterways. See Section 22: ‘Pesticides’.
� If a native animal is injured, contact DoC or the local authority.
� Evaluate fauna deterrents and determine if they need to be repaired or replaced.
� Consider mulching wood waste and use on site for earthworks stabilisation, weed suppression etc.
Protect the soil within the drip line of trees
Works within the TPZ, such as trenching, stockpiling soils or parking vehicles and plant can directly impact the health of a tree.
Where works could impact trees:
� Keep fill material, storage areas, stockpiles, vehicle parking, and access tracks clear of the TPZ.
� Where changes in soil level are unavoidable, keep as large an area of the drip zone at the original level and backfill with coarse material such as gravel.
� If surface sealing around trees is required, use a material which allows aeration, eg, gravel, unit pavers, or coarse sand (no mortar).
� Never wash down contaminated material on the ground.
� Consider watering of affected trees during construction to reduce stress upon the trees.
� Avoid discharging water on an on-going basis in the same area as it may waterlog the soil and affect the trees health.
Trenching
Roots provide for uptake of water and nutrients, and store food reserves. They also provide anchorage and support.
When trenching near trees:
� Trench outside the TPZ where possible to avoid damage to the tree’s root system and make the tree unstable.
� If it is not practicable to trench outside the TPZ, underbore/directional drill at least 600mm beneath the ground surface (if possible, directly under the centreline of the tree) or hand dig or use an air knife within these areas.
� If roots must be severed, cut the roots with a clean sharp implement at the trench edge and do not apply any type of liquid or material to the severed root end.
� Avoid using backhoes or excavators around trees to minimise damaging roots.
� Where the structural integrity of a tree could be affected, contact a specialist to carry out an assessment of the on-going stability of the tree.
20.3
Pruning trees
� Ensure all minor (branch diameters <50mm) trimming or pruning of branches protects the branch collar. If the branch collar is injured or removed during pruning, the trunk tissues can be rapidly infected and decay may develop.
� When pruning a branch use the step cut method.
� Care must also be taken to retain the branch bark ridge.
All trimming or pruning of trees should be under the supervision of personnel trained in an approved tree trimming techniques course, unless in an emergency situation.
Follow the guidance in Section 10 (‘Rural fire precautions’) if burn off of vegetation is practiced.
21.1
21. WEED AND PEST CONTROL
Background
Weeds and pests are one of the most serious threats to New Zealand’s native vegetation and wildlife. They take over native species habitats, contribute to land degradation and can have serious impacts on agriculture, economy, human health and the environment. Examples include the devastating impact of PSA on kiwifruit production, and the appearance of Chilean needle grass in parts of the South Island.
Most pests in New Zealand only occupy a tiny fraction of the land they could invade at this time. Machinery movements are a high-risk pathway for the spread of pests and weeds. At least 80 known pest species can typically be moved by machinery.
Seeds and plant parts can attach to footwear, tools and vehicles. Cleaning these is the key way to manage their spread, particularly following activities in infested areas.
Useful information and ‘how to’
When to clean machinery
Machinery hygiene should be practiced each time a machine is moved, particularly where:
� Pest infestation is known. Speak to the landowners about whether there are any known pest issues.
� For long distance machinery transfer. Inter-regional or inter-island machinery movements should always be subject to very strict hygiene standards.
� For ground engaging machinery, (soil can contain seed and viable fragments of numerous weed and disease species).
� For waterway engaging machinery, (aquatic environments are particularly pest prone, many pests can only move between catchments with our help).
� For wet machinery, (disease, spores, fungus and aquatic pests are more easily able to survive transfer in damp environments).
� A place is a “restricted place” under the Biosecurity Act 1993 due to a serious pest issue, (there will be signage to this effect, and the occupier will know).
However, basic hygiene standards should not be allowed to slip where no particular problem is known. There needs to be strong evidence that an area or a property is “pest free” before reduced hygiene measures can be considered. This provides an opportunity for a three way conversation between the landowner, the machinery operator, and council biosecurity professionals.
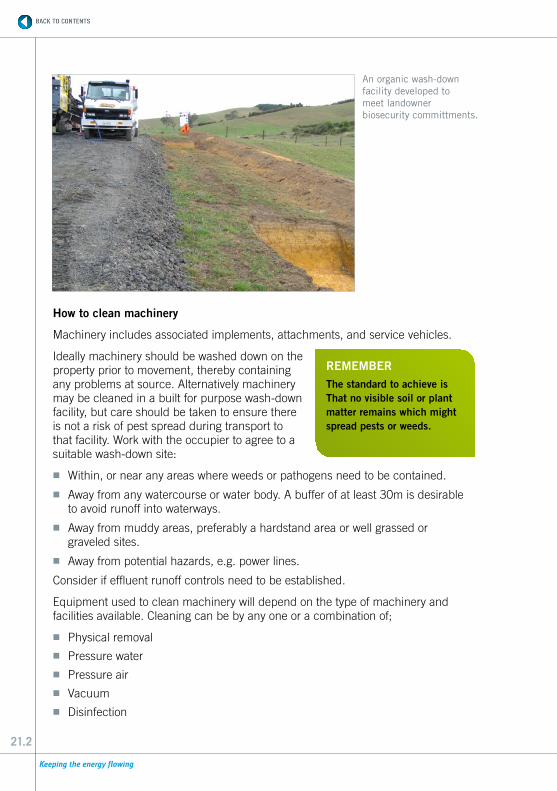
21.2
How to clean machinery
Machinery includes associated implements, attachments, and service vehicles.
Ideally machinery should be washed down on the property prior to movement, thereby containing any problems at source. Alternatively machinery may be cleaned in a built for purpose wash-down facility, but care should be taken to ensure there is not a risk of pest spread during transport to that facility. Work with the occupier to agree to a suitable wash-down site:
� Within, or near any areas where weeds or pathogens need to be contained.
� Away from any watercourse or water body. A buffer of at least 30m is desirable to avoid runoff into waterways.
� Away from muddy areas, preferably a hardstand area or well grassed or graveled sites.
� Away from potential hazards, e.g. power lines.
Consider if effluent runoff controls need to be established.
Equipment used to clean machinery will depend on the type of machinery and facilities available. Cleaning can be by any one or a combination of;
� Physical removal � Pressure water � Pressure air � Vacuum � Disinfection
An organic wash-down facility developed to meet landowner biosecurity committments.
REMEMBERThe standard to achieve is That no visible soil or plant matter remains which might spread pests or weeds.
21.3
Be careful not to damage sensitive equipment, particularly with pressure water. Consult and comply with manufacturer recommended cleaning methods if in doubt. Follow selective and responsible use of herbicides. See Section 22: ‘Pesticides’.
The following guidelines apply to general cleaning procedures:
� Remove only those cover plates etc that can be quickly and easily removed and replaced.
� No clods of dirt or loose soil should be present after wash-down. Smeared soil stains and soil firmly lodged in difficult to access areas are acceptable, except for known high risk scenarios.
� Radiator, grills, and the interior of vehicles should be free of accumulations of seed and other plant material.
� Check the machinery inside and out, where dirt or plant material including seeds are lodged. Pay attention to awkward places such as the underside, radiators, between dual wheels, spare tyres, hollow sections, foot wells and bumper bars.
Suggested vehicle cleaning checklist:
R Interior of vehicle: footwells, check carpets for burrs and seeds.
R Inside the boot: carpet, spare wheel area, and other recesses.
R Engine bay: radiator, grill, recess under windscreen wipers, air filters.
R Underside: wheel arches and trims, step treads, bumpers, mud flaps, wheel rims, spare wheel on 4WDs.
R Clean toolboxes, ladders and storage compartments.
R Back tray of trucks and 4WD: remove soil, seed and plants.
R Trailers: wheels, guards, trays, channels of drawbar and under body.
21.4
Other useful strategies
TimeAllowing sufficient drying time after cleaning will kill many aquatic pest species, e.g. didymo.
Local knowledgeRegional Council biosecurity officers can provide guidance on high-risk pests for the environment you are working in. Learn how to recognise these pests. Furthermore, take the time to notify the regional council of any potentially new pests, species you have not seen before, and which seem out of place. Your efforts will be appreciated. Links to the relevant parts of regional council websites can be found here: http://www.biosecurityperformance.maf.govt.nz/.
It is a legal offence to knowingly spread most pest species.
When an area is known to be infested with a high-risk pest, consider options with the occupier and biosecurity officers. Options include:
� Work infested areas last to reduce clean down requirements at earlier sites and to prevent weed dispersal.
� Encourage occupiers to work infested areas with “on farm” machinery.
� Use dedicated machinery for working the infested sites (e.g. an older machine which is rarely used otherwise).
� When working on a known contaminated site undertake operations outside of critical times, e.g. peak seeding times.
� Avoid moving potentially contaminated machinery over ground which is suitable for weed establishment.
� Keep to defined vehicle tracks as much as possible and drive around infestations of weeds rather than driving through them.
� Create ground cover with leaves, twigs and low growing plants to prevent weed growth.
� Mulch vegetation which has been cleared from the site and use for weed suppression and erosion control.
� Replant and re-vegetate with native plants.
� Dig out and remove known noxious weeds by hand, or with suitable machinery.
� Dispose of weeds and clippings to an appropriately licensed facility.
21.5
Further information
There are a number of well-established sources of information on the current problematic weeds and their control. The National Plant Accord identifies species already in New Zealand which cannot be sold, propagated or distributed. The accord manual contains photos and information on plants included in the accord and is available here:
http://www.biosecurity.govt.nz/nppa
Weedbusters is an inter-agency weeds awareness and education programme. Their website contains useful information on weed identification and controls, including a weed control Handbook.
http://weedbusters.co.nz/index.asp
If you suspect you have found an unwanted pest or disease please call the Ministry of Primary Industries pest and disease hotline on 0800 80 99 66.
REMEMBERFor information on biosecurity issues commonly found in your area, contact your regional council officer (see Table 29.3) or visit their website.

22.1
22. PESTICIDES
Background
Pesticides can help control or remove problems associated with unwanted pests. If these chemicals are mishandled they can often have harmful effects on the surrounding environment. Pesticides include herbicides, insecticides and fungicides.
Useful information and “how to”
Training
� Ensure people have the necessary training for the pesticide being applied as some substances can pose a serious health hazard if used improperly.
� All pesticide users should be familiar with NZS 8409:2004 Management of Agrichemicals.
� See www.growsafe.co.nz for training in safe, responsible and effective use of agrichemicals.
Planning and use
� Only use approved pesticides. Contact your Environmental Advisor (Table 29.3) if you are uncertain of a pesticides status.
� Most pesticides are classified as hazardous chemicals so the information in Section 16: ‘Hazardous Substances in the Workplace’ will be relevant.
� Always wear the right personal protective equipment (see MSDS).
� Handle, store, mix, use and dispose of pesticides in accordance with the label and New Zealand standard.
� Do not spray on rainy, windy or very hot conditions. Check the weather warnings on the pesticide label. Monitor and stop if weather conditions deteriorate.
� Keep pesticides away from waterways, plants, animals and sensitive receivers.
� Avoid using herbicides in the vicinity of trees.
� Prepare mixtures carefully and do not prepare any more mixture than is required for the job.
� Use only well maintained equipment that is in good working order.
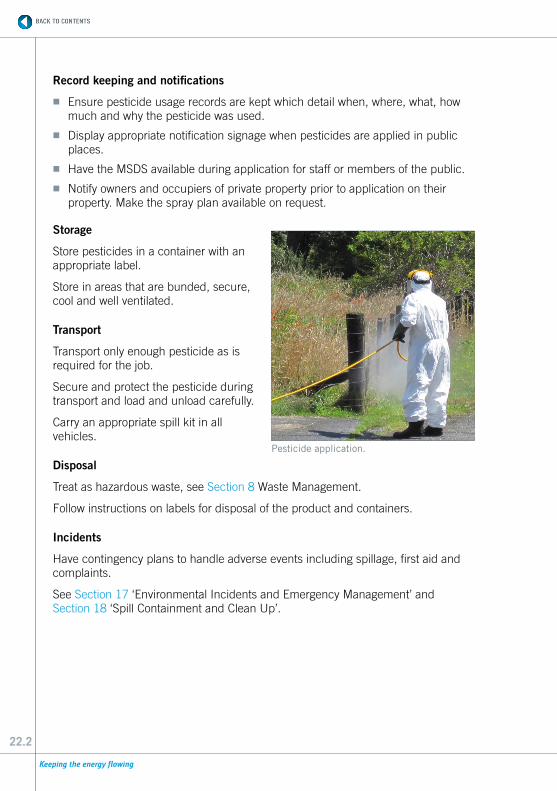
22.2
Record keeping and notifications
� Ensure pesticide usage records are kept which detail when, where, what, how much and why the pesticide was used.
� Display appropriate notification signage when pesticides are applied in public places.
� Have the MSDS available during application for staff or members of the public.
� Notify owners and occupiers of private property prior to application on their property. Make the spray plan available on request.
Storage
Store pesticides in a container with an appropriate label.
Store in areas that are bunded, secure, cool and well ventilated.
Transport
Transport only enough pesticide as is required for the job.
Secure and protect the pesticide during transport and load and unload carefully.
Carry an appropriate spill kit in all vehicles.
Disposal
Treat as hazardous waste, see Section 8 Waste Management.
Follow instructions on labels for disposal of the product and containers.
Incidents
Have contingency plans to handle adverse events including spillage, first aid and complaints.
See Section 17 ‘Environmental Incidents and Emergency Management’ and Section 18 ‘Spill Containment and Clean Up’.
Pesticide application.
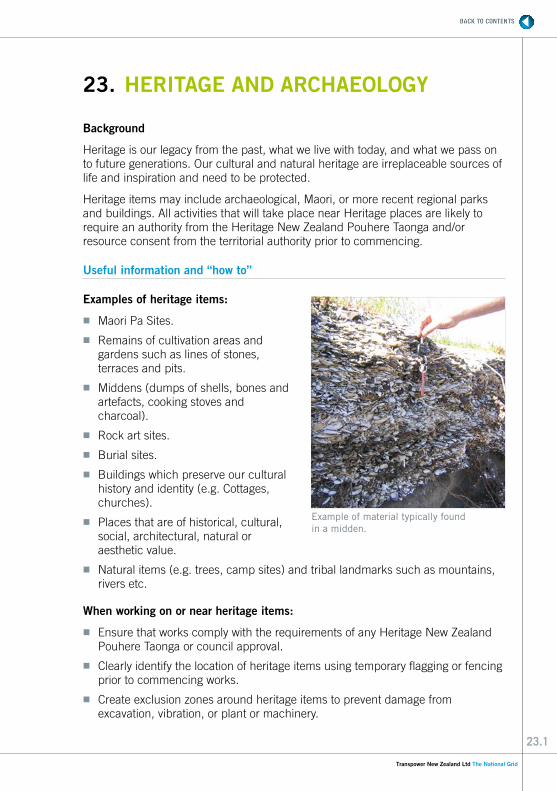
23.1
23. HERITAGE AND ARCHAEOLOGY
Background
Heritage is our legacy from the past, what we live with today, and what we pass on to future generations. Our cultural and natural heritage are irreplaceable sources of life and inspiration and need to be protected.
Heritage items may include archaeological, Maori, or more recent regional parks and buildings. All activities that will take place near Heritage places are likely to require an authority from the Heritage New Zealand Pouhere Taonga and/or resource consent from the territorial authority prior to commencing.
Useful information and “how to”
Examples of heritage items:
� Maori Pa Sites.
� Remains of cultivation areas and gardens such as lines of stones, terraces and pits.
� Middens (dumps of shells, bones and artefacts, cooking stoves and charcoal).
� Rock art sites.
� Burial sites.
� Buildings which preserve our cultural history and identity (e.g. Cottages, churches).
� Places that are of historical, cultural, social, architectural, natural or aesthetic value.
� Natural items (e.g. trees, camp sites) and tribal landmarks such as mountains, rivers etc.
When working on or near heritage items:
� Ensure that works comply with the requirements of any Heritage New Zealand Pouhere Taonga or council approval.
� Clearly identify the location of heritage items using temporary flagging or fencing prior to commencing works.
� Create exclusion zones around heritage items to prevent damage from excavation, vibration, or plant or machinery.
Example of material typically found in a midden.
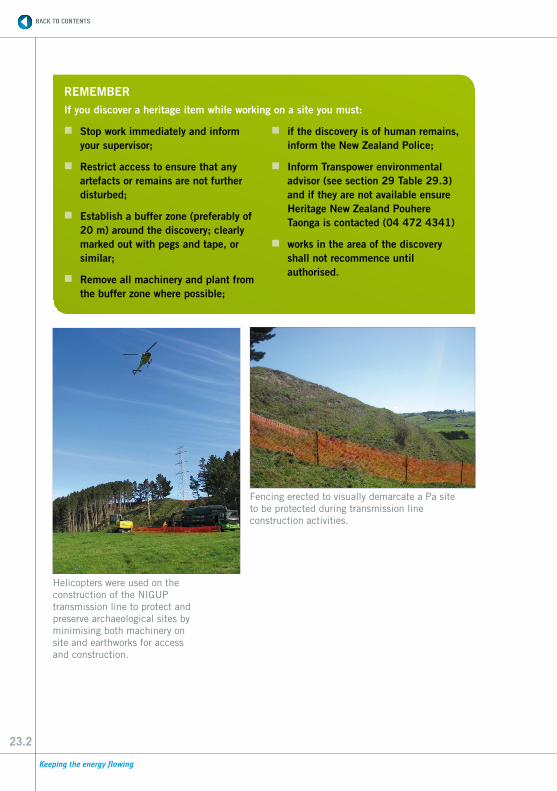
23.2
Fencing erected to visually demarcate a Pa site to be protected during transmission line construction activities.
Helicopters were used on the construction of the NIGUP transmission line to protect and preserve archaeological sites by minimising both machinery on site and earthworks for access and construction.
REMEMBERIf you discover a heritage item while working on a site you must:
� Stop work immediately and inform your supervisor;
� Restrict access to ensure that any artefacts or remains are not further disturbed;
� Establish a buffer zone (preferably of 20 m) around the discovery; clearly marked out with pegs and tape, or similar;
� Remove all machinery and plant from the buffer zone where possible;
� if the discovery is of human remains, inform the New Zealand Police;
� Inform Transpower environmental advisor (see section 29 Table 29.3) and if they are not available ensure Heritage New Zealand Pouhere Taonga is contacted (04 472 4341)
� works in the area of the discovery shall not recommence until authorised.
24.1
24. STAKEHOLDER NOTIFICATION AND ACCESS
Background
It is important to work through your Landowner Liaison Officer (LOLO) who is familiar with the notification requirements detailed in Transpower’s Service Specification 05.20 ‘Stakeholder Liaison’. Following the LOLOs guidance will ensure compliance with the Electricity Act and with any easements, and minimise potential impacts on landowners or occupiers.
Useful information and “how to
� Work with the LOLO to ensure the stakeholder receives a notice of entry at least ten working days prior to the entry date. The Notice must clearly specify:
a) Location of proposed entry and work;
b) the reasons for entry and work and nature of work to be undertaken; and
c) that Transpower staff and or agents may visit the site for example to review work.
� The LOLO has access to Transpower’s ‘Connect’ landowner database. This should be checked for any special access information or requirements such as exclusion periods due to lambing or cropping etc.
Conduct of staff
� Manage all works safely for on-site staff and the landowner.
� Leave all gates as found.
� Remove all material, debris and rubbish after all work is completed.
� Comply with stakeholders reasonable requirements.
� Avoid and mitigate localised contamination.
� Provide a feedback form when significant work is completed.
� Provide landowner/occupier with TPNZ information which is listed on the TPNZ website.
� Discuss any bio-security requirements; see Section 21 ‘Weed and Pest Control’.
25.1
25. TOWER PAINTING
Background
Tower blasting and painting is an essential part of Transpower’s maintenance activities and is undertaken by specialist contractors. It is also one of Transpower’s more environmentally contentious activities, due to the discharges associated with tower preparation.
Useful information and “how to
Mitigation tool box for water and wet abrasive blasting
Standard blasting mitigation to be applied at all work sites � Communicate the intention to undertake the work with landowners and how
impacts will be controlled.
� Comply with any relevant environmental approvals. Transpower has region-wide resource consents for wet abrasive blasting across the whole of New Zealand.
� Use only abrasive material that has less than 5% free silica.
� Do not use paint strippers, fungicides, acids, alkalis, sodium hypo chlorite or other oxidising agents for surface preparation.
� Do not apply paint using pressurised spray.
� Do not undertake blasting works where the wind speed exceeds 50 km/h, blasting in low winds avoids spray drift and minimises risk to workers.
� Remove debris from the abrasive blasting site following work to the extent practicable.
Site specific blasting mitigation options for dwellingsThe following measure should be considered for owners / occupiers of dwellings within 100m of the blasting works:
� Place geotextile cloth over the ground.
� Cover gardens, vehicles and buildings.
� Complete building wash down post works.
� Directing blasting away from dwellings.
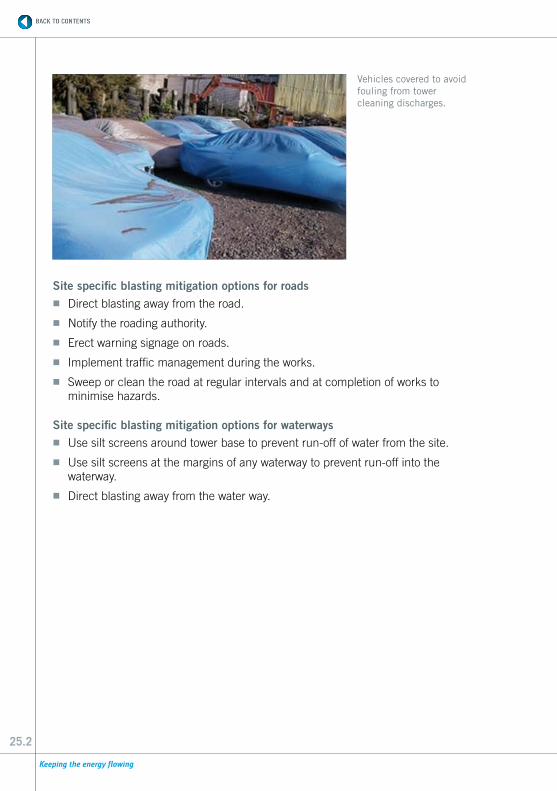
25.2
Site specific blasting mitigation options for roads � Direct blasting away from the road.
� Notify the roading authority.
� Erect warning signage on roads.
� Implement traffic management during the works.
� Sweep or clean the road at regular intervals and at completion of works to minimise hazards.
Site specific blasting mitigation options for waterways � Use silt screens around tower base to prevent run-off of water from the site.
� Use silt screens at the margins of any waterway to prevent run-off into the waterway.
� Direct blasting away from the water way.
Vehicles covered to avoid fouling from tower cleaning discharges.

2PHOTOCOPY SHEET
26.1
26. SITE INFORMATION
Site diagram

2PHOTOCOPY SHEET
26.2
SITE INFORMATION
Stormwater diagram
2PHOTOCOPY SHEET
26.3
SITE INFORMATION
Emergency response equipment locations
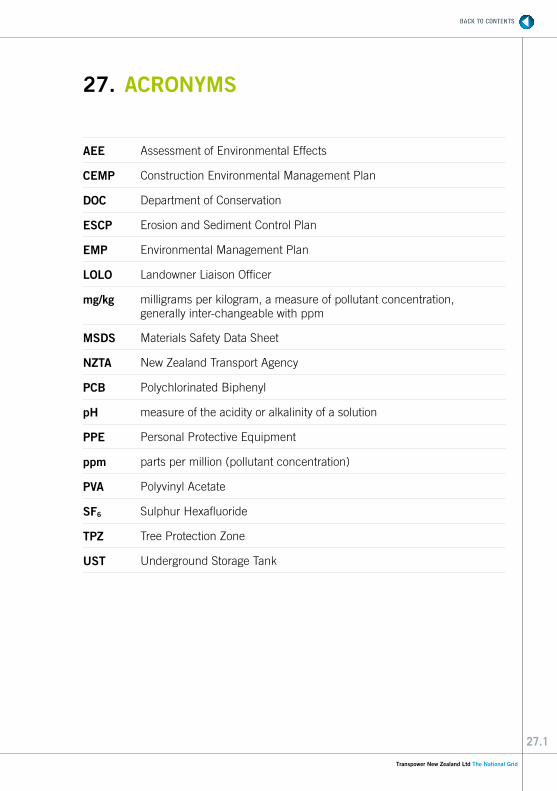
27.1
27. ACRONYMS
AEE Assessment of Environmental Effects
CEMP Construction Environmental Management Plan
DOC Department of Conservation
ESCP Erosion and Sediment Control Plan
EMP Environmental Management Plan
LOLO Landowner Liaison Officer
mg/kg milligrams per kilogram, a measure of pollutant concentration, generally inter-changeable with ppm
MSDS Materials Safety Data Sheet
NZTA New Zealand Transport Agency
PCB Polychlorinated Biphenyl
pH measure of the acidity or alkalinity of a solution
PPE Personal Protective Equipment
ppm parts per million (pollutant concentration)
PVA Polyvinyl Acetate
SF6 Sulphur Hexafluoride
TPZ Tree Protection Zone
UST Underground Storage Tank
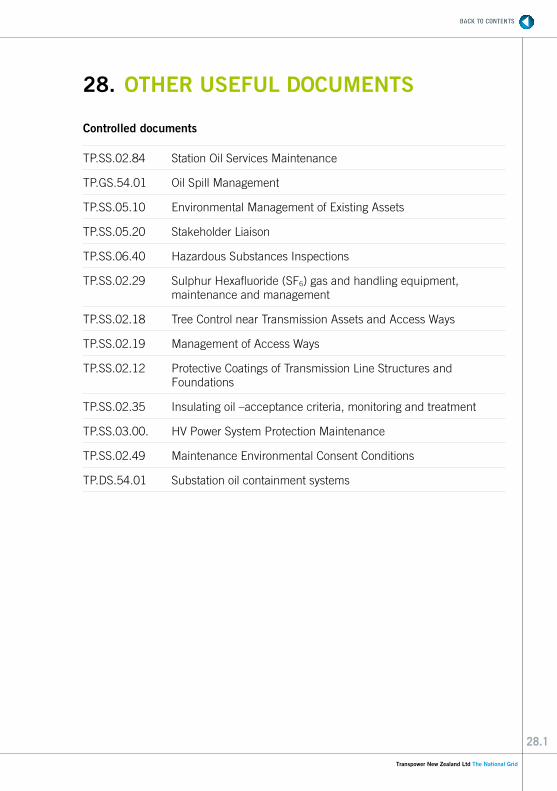
28.1
28. OTHER USEFUL DOCUMENTS
Controlled documents
TP.SS.02.84 Station Oil Services Maintenance
TP.GS.54.01 Oil Spill Management
TP.SS.05.10 Environmental Management of Existing Assets
TP.SS.05.20 Stakeholder Liaison
TP.SS.06.40 Hazardous Substances Inspections
TP.SS.02.29 Sulphur Hexafluoride (SF6) gas and handling equipment, maintenance and management
TP.SS.02.18 Tree Control near Transmission Assets and Access Ways
TP.SS.02.19 Management of Access Ways
TP.SS.02.12 Protective Coatings of Transmission Line Structures and Foundations
TP.SS.02.35 Insulating oil –acceptance criteria, monitoring and treatment
TP.SS.03.00. HV Power System Protection Maintenance
TP.SS.02.49 Maintenance Environmental Consent Conditions
TP.DS.54.01 Substation oil containment systems
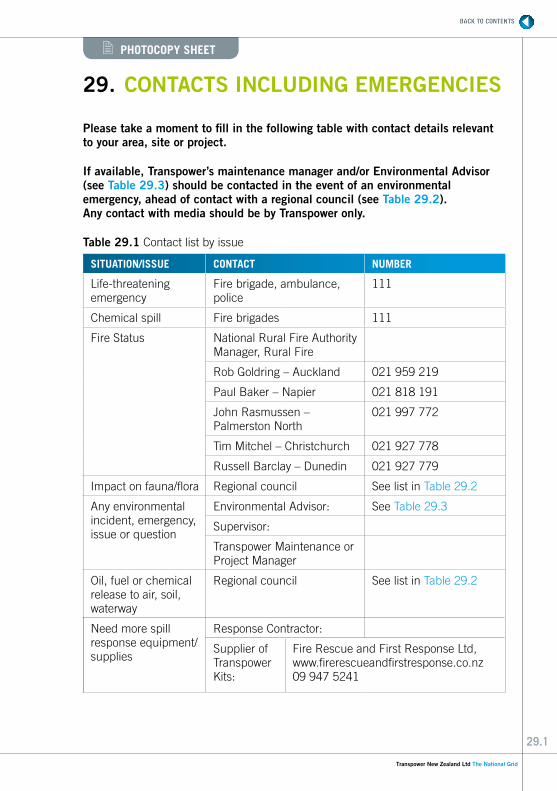
2PHOTOCOPY SHEET
29.1
29. CONTACTS INCLUDING EMERGENCIES
Please take a moment to fill in the following table with contact details relevant to your area, site or project.
If available, Transpower’s maintenance manager and/or Environmental Advisor (see Table 29.3) should be contacted in the event of an environmental emergency, ahead of contact with a regional council (see Table 29.2). Any contact with media should be by Transpower only.
Table 29.1 Contact list by issue
SITUATION/ISSUE CONTACT NUMBER
Life-threatening emergency
Fire brigade, ambulance, police
111
Chemical spill Fire brigades 111
Fire Status National Rural Fire Authority Manager, Rural Fire
Rob Goldring – Auckland 021 959 219
Paul Baker – Napier 021 818 191
John Rasmussen – Palmerston North
021 997 772
Tim Mitchel – Christchurch 021 927 778
Russell Barclay – Dunedin 021 927 779
Impact on fauna/flora Regional council See list in Table 29.2
Any environmental incident, emergency, issue or question
Environmental Advisor: See Table 29.3
Supervisor:
Transpower Maintenance or Project Manager
Oil, fuel or chemical release to air, soil, waterway
Regional council See list in Table 29.2
Need more spill response equipment/supplies
Response Contractor:
Supplier of Transpower Kits:
Fire Rescue and First Response Ltd, www.firerescueandfirstresponse.co.nz 09 947 5241
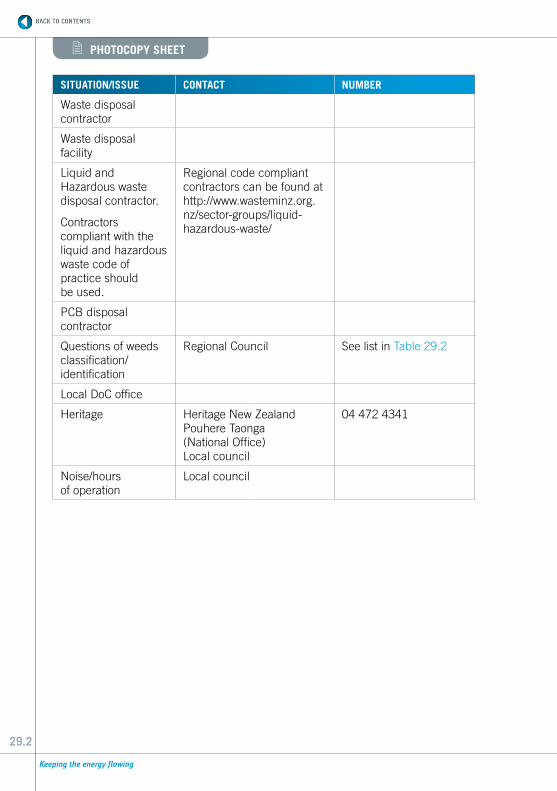
2PHOTOCOPY SHEET
29.2
SITUATION/ISSUE CONTACT NUMBER
Waste disposal contractor
Waste disposal facility
Liquid and Hazardous waste disposal contractor.
Contractors compliant with the liquid and hazardous waste code of practice should be used.
Regional code compliant contractors can be found at http://www.wasteminz.org.nz/sector-groups/liquid-hazardous-waste/
PCB disposal contractor
Questions of weeds classification/ identification
Regional Council See list in Table 29.2
Local DoC office
Heritage Heritage New Zealand Pouhere Taonga (National Office) Local council
04 472 4341
Noise/hours of operation
Local council
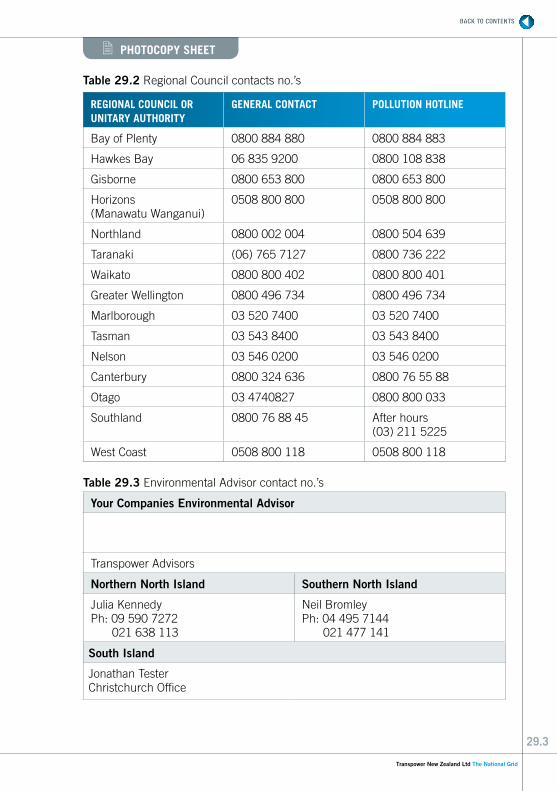
2PHOTOCOPY SHEET
29.3
Table 29.2 Regional Council contacts no.’s
REGIONAL COUNCIL OR UNITARY AUTHORITY
GENERAL CONTACT POLLUTION HOTLINE
Bay of Plenty 0800 884 880 0800 884 883
Hawkes Bay 06 835 9200 0800 108 838
Gisborne 0800 653 800 0800 653 800
Horizons (Manawatu Wanganui)
0508 800 800 0508 800 800
Northland 0800 002 004 0800 504 639
Taranaki (06) 765 7127 0800 736 222
Waikato 0800 800 402 0800 800 401
Greater Wellington 0800 496 734 0800 496 734
Marlborough 03 520 7400 03 520 7400
Tasman 03 543 8400 03 543 8400
Nelson 03 546 0200 03 546 0200
Canterbury 0800 324 636 0800 76 55 88
Otago 03 4740827 0800 800 033
Southland 0800 76 88 45 After hours (03) 211 5225
West Coast 0508 800 118 0508 800 118
Table 29.3 Environmental Advisor contact no.’s
Your Companies Environmental Advisor
Transpower Advisors
Northern North Island Southern North Island
Julia KennedyPh: 09 590 7272
021 638 113
Neil BromleyPh: 04 495 7144
021 477 141
South Island
Jonathan TesterChristchurch Office


![Handbook [Final] Maintenance Driver](https://img.pdfslide.us/doc/110x75/577d2aad1a28ab4e1ea9cb64/handbook-final-maintenance-driver.jpg)