Embed Size (px)
Citation preview

Enterprise Surveillance Manager Version 6.0 Installation Manual
This document provides installation installation, setup, and system configuration instructions
for IPConfigure Enterprise Surveillance Manager (ESM) version 6.0.
Rev. 7.15
4211 Monarch Way | Suite 500 | Norfolk, VA 23508 | p: 877.207.1112 | f: 832.201.0342 | www.ipconfigure.com

IPConfigure ESM v6.0 Installation Manual
TABLE OF CONTENTS
SYSTEM REQUIREMENTS 2 Server Hardware/Software Minimum Requirements 2 Client Hardware/Software Minimum Requirements
OS INSTALLATION & CONFIGURATION
3 Windows Server 2012 R2 Setup 3 Windows Firewall Configuration 4 Server Roles and Features Dependency Installation
ESM & SQL INSTALLATION
5 ESM Prerequisite Installation 6 SQL Installation 7 ESM Installation
1

IPConfigure ESM v6.0 Installation Manual
System Requirements
➽ Server Hardware/Software Minimum Requirements Enterprise Surveillance Manager 6.0 recording and management functions utilize a x64 hardware platform with the following MINIMUM requirements.
OS: Windows Server 2012 R2 Browser Internet Explorer 11 w/ FLASH installed CPU: Intel Core i3 RAM: 8 GB Network: 1 Gbps Hard drives: SATA 6 Gb/s 7200 RPM Surveillance or Enterprise Class Graphics card: 1 GB onboard video memory UPS: Initiates formal shutdown during power interruptions
➽ Client Hardware/Software Minimum Requirements Client user and administrative access to Enterprise Surveillance Manager 6.0 software is provided through a web browser equipped workstation with the following MINIMUM requirements.
OS: Windows 7 Pro 64-bit Browser Internet Explorer 11 w/ FLASH installed CPU: Intel Core i7 RAM: 8 GB Network: 1 Gbps Graphics card: 1 GB onboard video memory
2

IPConfigure ESM v6.0 Installation Manual
OS Installation & Configuration
➽ Windows Server 2012 R2 Setup Microsoft provides up to date content for IT professionals to plan, deploy, manage, troubleshoot, and support servers running the Windows Server 2012 R2 and Windows Server 2012 operating systems. For more information, see the following link: Microsoft Tech Net Windows Server 2012 R2, https://technet.microsoft.com/library/hh801901.aspx.
OS Installation Steps:
1. Install operating system.
2. Setup drive partition(s).
3. Assign password to built-in administrator account.
4. Connect to Internet (optional).
5. Check for Windows Updates (optional).
➽Server Roles and Features Dependency Installation IIS servers the Enterprise Surveillance Manager 6.0 web browser interface and needs to be installed as a server role in Windows Server. To install and configure IIS, open the Server Manager and click the Manage button in the top toolbar, then click Add Roles and Features.
Click Next on the Before you Begin page. Role-based or feature-based installation should be selected on the Installation Type page. Click Next to continue. On the Server Selection page, ensure the server you’re setting up is selected (this should only be required if a Server Pool has been setup). Click the Next button.
3

IPConfigure ESM v6.0 Installation Manual
On the Server Roles page, select Web Server (IIS). A new window will appear asking if you want to add any additional features for IIS. Leave everything at the default and click the Add Features button to close the window. Click Next to continue to the Features page.
Select .NET Framework 3.5 Features. Click the drop-down button for .NET Framework 4.5 Features and expand the WCF Services section. Check HTTP Activation, TCP Activation, and TCP Port Sharing (if it is not already checked).
4

IPConfigure ESM v6.0 Installation Manual
Scroll down and select Media Foundation. Scroll down and expand the User Interfaces and Infrastructure section. Select Desktop Experience. Click Next to continue to the Confirmation page. Click the Install button to the selected features. Once the wizard completes, restart the server to finish the installation.
ESM & SQL Server Installation
➽ ESM Prerequisite Installation The ESM installation package is able to install .NET Framework 4.5.2 and Microsoft SQL Server 2008 (or higher) if they are not installed already. However, you will need an internet connection for the installation. .NET Framework 4.5.2 should only need to be installed if you are using Windows Server 2008.
The Prerequisites page will automatically select .NET Framework 4.5.2 and SQL Server if they need to be installed. Click Next. The installer will begin downloading and installing .NET Framework and SQL Server as needed. Their respective installation wizards will open in new windows once they are installed.
5

IPConfigure ESM v6.0 Installation Manual
➽ SQL Server Installation Accept the installation license license terms and click Next until you reach the Feature Selection page. The installer will automatically scan your system and determine what needs to be installed.
The default features can be left checked. We recommend setting the Shared feature directory and Shared feature directory (x86) to be installed on your largest storage volume.
When ready, click the Next button to proceed with the installation.
The Named instance and the Instance ID both need to be set to MSSQLSERVER Update the Instance root directory to match the same drive you set for the Shared feature directory in the previous step. Click the Next button until you reach the Database Engine Configuration page.
6

IPConfigure ESM v6.0 Installation Manual
Set the Authentication Mode to Mixed Mode and set the password to: P@ssword Leave everything else as the default setting and click the Next button twice to complete the installation.
The ESM installation wizard will automatically open once SQL has finished installing.
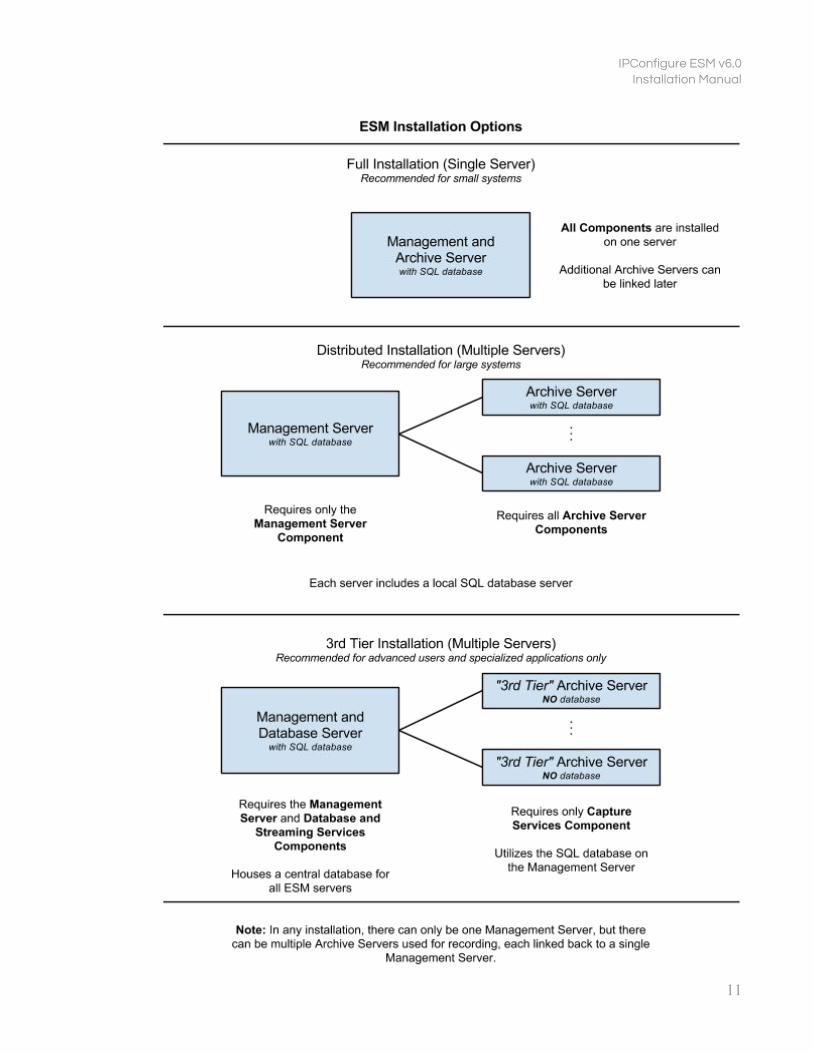
➽ ESM Installation Select the ESM components you want to install. Full Install: Installs both the management server software and the archive server software, allowing one server to serve both purposes. Management Server: Only installs the software for the management side of ESM. Archive Server: Installs both a database and the capture services used for archiving video. Click the Next button once you have selected the components you want installed.
Tip: Consult the diagram ESM Installation Options on page 11 for schematics of several common ESM installation architectures, with explanations of which components should be installed on which servers.
7

IPConfigure ESM v6.0 Installation Manual
Input the IP address or hostname of the server your SQL database is running on. This would only apply if you are doing a 3rd Tier Installation. In most cases, the database will be running on the same server as ESM and the default setting of (local) will work. The SQL Username and Password fields can be left blank. Click Next once you have set the database settings.
Select the authentication method you want ESM to use. Internal Authentication will set ESM to use its own authentication system, managed within the ESM admin interface. Active Directory will set ESM to use an already setup Active Directory server. For Active Directory, the domain name and system admin group will need to be set in the Active Directory Settings section. Click Next to proceed.
8

IPConfigure ESM v6.0 Installation Manual
The System Title Text sets the page titles for ESM that will appear in the browser and can be set to your preference, or left at the default. The Management Server and Archive Server fields must be either the IP addresses or hostnames of the respective servers. Click the Next button to continue to the SMTP settings.
Enter the server and username information for the E-mail account ESM will use to send E-mail alerts. This is can be left blank if you do not intend to have ESM send automated reports and alerts through E-mail. Click the Next button when ready.
9

IPConfigure ESM v6.0 Installation Manual
Set the folder where ESM will store the user interface files and archive video. This should be the largest volume available on the server. Click Next once you have set the install folder, then the Install button on the next page to complete the installation.
When the installation finishes, click the Finish button to close the installer.
Restart the server when prompted by the installation wizard is complete to finish installing ESM.
10
IPConfigure ESM v6.0 Installation Manual
11

IPConfigure ESM v6.0 Installation Manual
Rev.07/15
©2015 IPConfigure Inc. The material in this document is copyrighted and not to be used or reproduced
without the express written consent of IPConfigure. Information in the document is subject to change
without notice.
12