Embed Size (px)
Citation preview

enteliWEB v4.13Developer Guide Edition 2.8
Page 2 of 108 enteliWEB Version 4.13 Developer Guide Document Edition 2.8
Copyright Copyright © Delta Controls Inc. All rights reserved.
No part of this document may be reproduced, transmitted, transcribed, stored in a retrieval system or translated into any language (natural or computer), in any form or by any means, without the prior written permission of Delta Controls Inc.
Limited permission is granted to reproduce documents released in Adobe Portable Document Format (PDF) electronic format in paper format. Documents released in PDF electronic format may be printed by end users for their own use using a printer such as an inkjet or laser device. Authorized distributors of Delta Controls Inc. products (Delta Partners) may print PDF documents for their own internal use or for use by their customers. Authorized Delta Partners may produce copies of released PDF documents with the prior written permission of Delta Controls Inc.
Information in this document is subject to change without notice and does not represent a commitment to past versions of this document on the part of Delta Controls Inc. Delta Controls Inc. may make improvements and/or changes to this document /the associated software/or associated hardware at any time.
The Delta logo and enteliWEB and are registered trademarks of Delta Controls Inc.
All other trademarks are the property of their respective owners.
Document Edition: 2.8

enteliWEB Version 4.13 Developer Guide Page 3 of 108 Document Edition 2.8
Contents About this document...................................................................................................................6
Audience ................................................................................................................................. 6
Required Knowledge ............................................................................................................... 6
Chapter 1 - Creating a custom energy report .............................................................................7
Main steps to create a custom report ...................................................................................... 7
Step 1. Background information .............................................................................................. 8
Step 2. Configure enteliWEB ................................................................................................. 13
Step 3. Create a web service ................................................................................................. 14
Step 4. Create a report .......................................................................................................... 19
Step 5. Add parameters to the report .................................................................................... 25
Step 6. Specify a web service URL as the data source ........................................................... 32
Advanced reporting ............................................................................................................... 35
Chapter 2 - Creating a custom BAS report ............................................................................... 38
Before you begin ................................................................................................................... 38
Step 1. Create the report design file ..................................................................................... 38
Step 2. Modify the object filter ............................................................................................... 39
Step 3. Add a parameter ........................................................................................................ 41
Step 4. Modify the report title ................................................................................................ 44
Step 5. Modify the columns ................................................................................................... 44
Chapter 3 - Creating a custom widget type .............................................................................. 46
Suggested tools ..................................................................................................................... 46
The example widget .............................................................................................................. 47
Widget basics ........................................................................................................................ 48
Widget config.xml ................................................................................................................. 49
Widget custom controller file (PHP) ...................................................................................... 56
Widget script file (PHTML) .................................................................................................... 60
Create a custom widget from the beginning .......................................................................... 74
About this document
Page 4 of 108 enteliWEB Version 4.13 Developer Guide Document Edition 2.8
Remove a custom widget ....................................................................................................... 79
Mobile aware widget ............................................................................................................. 79
Upgrade widgets from enteliWEB 1.1 to 2.2 and later ........................................................... 80
Chapter 4 - Integrating an application module with enteliWEB ............................................... 84
Chapter 5 - Obtaining trend log samples from CopperCube .................................................... 85
Before you begin ................................................................................................................... 85
Read Archiver Data using the getdata Web Service ............................................................... 85
Static Public Member Functions in Settings_ArchiverSite .................................................... 88
Public Member Functions in Settings_Archiver .................................................................... 88
Chapter 6 – Supporting Multi-language Help in enteliWEB ..................................................... 90
Before you begin ................................................................................................................... 90
Multi-language help in enteliWEB ......................................................................................... 90
Location of the help folder .................................................................................................... 91
Add the translated help to the enteliWEB server .................................................................. 91
How to open the translated help ........................................................................................... 91
Appendix A - Delta_BAC library reference .............................................................................. 94
Appendix B - Delta_DS library reference ................................................................................. 94
Appendix C - Report data web service reference ..................................................................... 95
Aggregates action ................................................................................................................. 95
Cost ranking action ............................................................................................................... 97
Cumulative consumption action ............................................................................................ 99
Cumulatives action .............................................................................................................. 101
Cumulative targets action ................................................................................................... 103
Daily average profile action ................................................................................................. 105
Load duration multiple action ............................................................................................. 107
Appendix D - Delta JavaScript libraries ................................................................................. 109
Delta.js ................................................................................................................................ 109
Delta.DateTime.js ................................................................................................................ 109
Delta.UI.js ........................................................................................................................... 110

enteliWEB Version 4.13 Developer Guide Page 5 of 108 Document Edition 2.8
Document revision history ..................................................................................................... 111

About this document
Page 6 of 108 enteliWEB Version 4.13 Developer Guide Document Edition 2.8
About this document The enteliWEB Version 4.13 Developer Guide provides tutorial and API reference information to allow developers to create custom reports and custom widget types for enteliWEB.
In version 2.2 and later, enteliWEB provides both PHP and REST APIs with which developers can leverage enteliWEB's Zend framework, MVC software architecture and web application development languages to develop and integrate an application with enteliWEB.
The enteliWEB Version 4.13 Developer Guide does not contain information about the PHP and REST APIs. This information is located in the enteliWEB help. Search for “developer guide”.
Audience The audience for this document includes web developers and technical personnel who want to create custom reports and custom widget types to suit an application.
Required Knowledge A developer can create custom reports and custom widget types based on a good understanding of the following technologies:
• PHP programming • Model-View-Controller (MVC) architecture and design patterns • SQL • XML, HTML and CSS • JavaScript • BIRT (Business Intelligence and Reporting Tools) Report Designer

enteliWEB Version 4.13 Developer Guide Page 7 of 108 Document Edition 2.8
Chapter 1 - Creating a custom energy report This chapter uses a tutorial approach to outline the steps required to create a custom energy report and to allow you to become familiar with the components of an enteliWEB report.
By the end of this tutorial, you will have created a working report which retrieves raw data from Historian, displays it in a tabular format, and filters it based on a BACnet object reference and time range.
This tutorial is not intended to be a training tool for BIRT Report Designer or for PHP. To develop custom reports you need competence with both. Here are some training resources:
• Eclipse offers a number of tutorials and examples to become familiar with the various aspects of BIRT Report Designer - http://www.eclipse.org/birt/phoenix/examples/.
• The PHP website provides a comprehensive manual detailing every aspect of the programming language – http://php.net.
• Countless tutorials and examples of PHP scripts can be found online. • Online and classroom training is available from a number of companies for both PHP
and BIRT Designer.
Main steps to create a custom report 1. Background Information: Required knowledge about enteliWEB and BIRT to review
before starting to create custom reports. 2. Configure enteliWEB: Basic setup before starting the tutorial. 3. Create a Custom Web Service: Setting up a PHP script as a web service. 4. Create a Custom Report: Generates a basic report with a static data source. 5. Add Parameters to the Report: Report parameters allow the user to modify the
information passed to the web service 6. Specify the Web Service URL as the Data Source: Removing the static data source and
using the custom web service to provide dynamic data.

Chapter 1 - Creating a custom energy report
Page 8 of 108 enteliWEB Version 4.13 Developer Guide Document Edition 2.8
Step 1. Background information The following section provides an overview of the components, services and information flows in an enteliWEB report.
enteliWEB reporting overview Each report design (report type) in enteliWEB requires two components on the server:
• A web service (PHP) • A report design (BIRT)
A web service is an Application Protocol Interface (API) which can be accessed through a browser or called by web pages (commonly through JavaScript AJAX requests). Each enteliWEB report uses one or more PHP web services which calculate and format report data in a specific way. These web services have been created for general use by multiple reports and can be used by custom reports as well.
The report designs are created for the Java BIRT (Business Intelligence and Reporting Tools) engine, which formats and displays the report data provided by the web service (http://eclipse.org/birt).
enteliWEB Version 4.13 Developer Guide Page 9 of 108 Document Edition 2.8
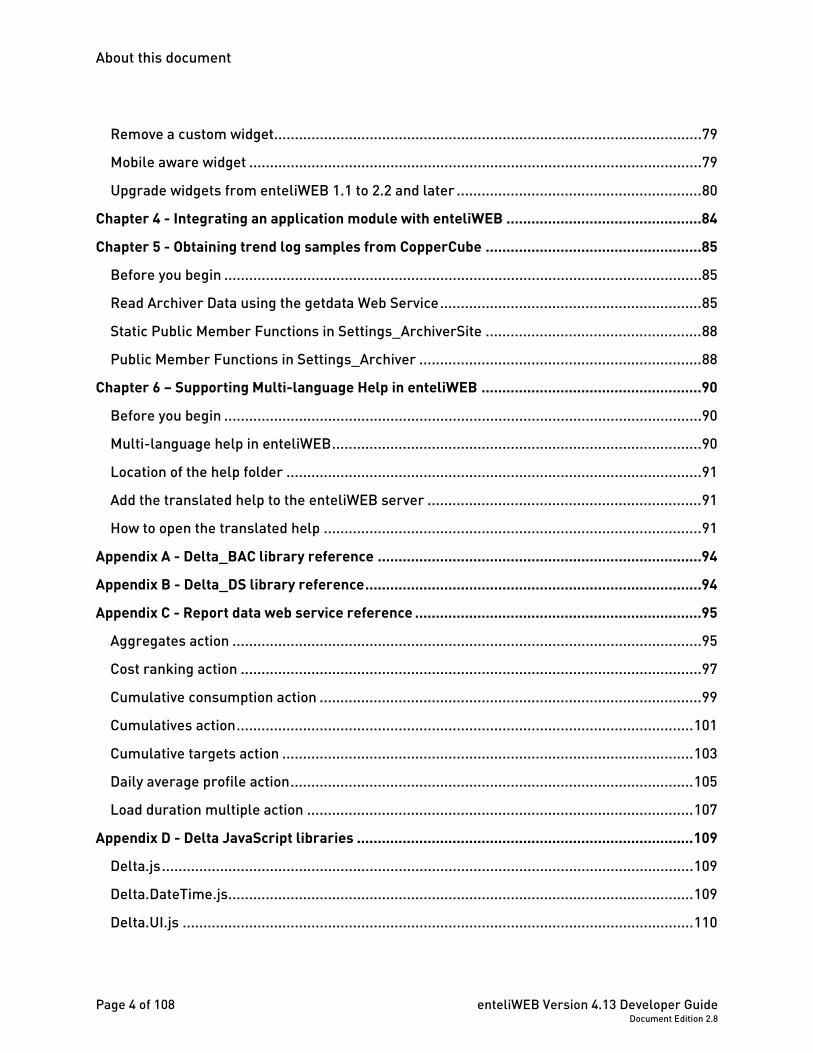
Generating a report information flowchart
Delta Historian
CopperCubeODBC Data Source
Report User Interface Report Instance
PHP Classes enteliWEB Database
Web Services
BIRT Runner
Custom Report Design
Custom Web Service
1
2
3
46
5
7
8
A
B
C
D
Legend A External Components B enteliWEB User Interface C enteliWEB Core D User-Generated Components
Chapter 1 - Creating a custom energy report
Page 10 of 108 enteliWEB Version 4.13 Developer Guide Document Edition 2.8
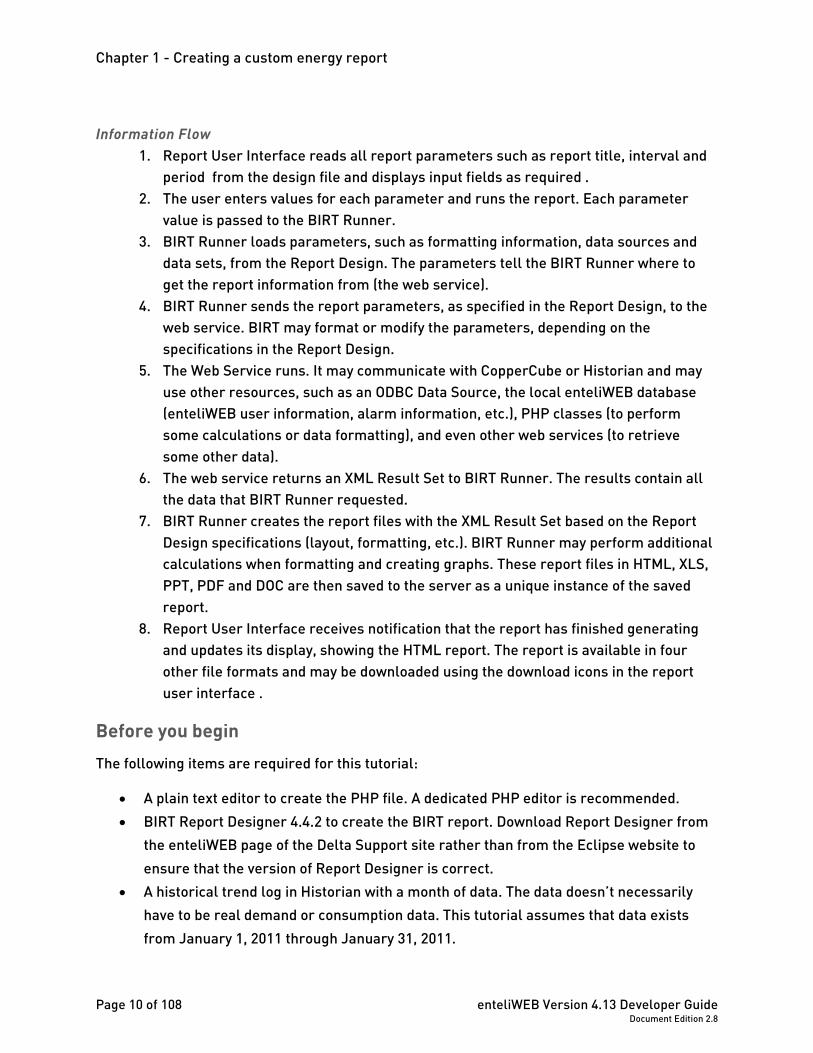
Information Flow 1. Report User Interface reads all report parameters such as report title, interval and
period from the design file and displays input fields as required . 2. The user enters values for each parameter and runs the report. Each parameter
value is passed to the BIRT Runner. 3. BIRT Runner loads parameters, such as formatting information, data sources and
data sets, from the Report Design. The parameters tell the BIRT Runner where to get the report information from (the web service).
4. BIRT Runner sends the report parameters, as specified in the Report Design, to the web service. BIRT may format or modify the parameters, depending on the specifications in the Report Design.
5. The Web Service runs. It may communicate with CopperCube or Historian and may use other resources, such as an ODBC Data Source, the local enteliWEB database (enteliWEB user information, alarm information, etc.), PHP classes (to perform some calculations or data formatting), and even other web services (to retrieve some other data).
6. The web service returns an XML Result Set to BIRT Runner. The results contain all the data that BIRT Runner requested.
7. BIRT Runner creates the report files with the XML Result Set based on the Report Design specifications (layout, formatting, etc.). BIRT Runner may perform additional calculations when formatting and creating graphs. These report files in HTML, XLS, PPT, PDF and DOC are then saved to the server as a unique instance of the saved report.
8. Report User Interface receives notification that the report has finished generating and updates its display, showing the HTML report. The report is available in four other file formats and may be downloaded using the download icons in the report user interface .
Before you begin The following items are required for this tutorial:
• A plain text editor to create the PHP file. A dedicated PHP editor is recommended. • BIRT Report Designer 4.4.2 to create the BIRT report. Download Report Designer from
the enteliWEB page of the Delta Support site rather than from the Eclipse website to ensure that the version of Report Designer is correct.
• A historical trend log in Historian with a month of data. The data doesn’t necessarily have to be real demand or consumption data. This tutorial assumes that data exists from January 1, 2011 through January 31, 2011.

enteliWEB Version 4.13 Developer Guide Page 11 of 108 Document Edition 2.8
• enteliWEB with the Energy Management add-on with access to the Historian database. • A basic understanding of XML markup. • A basic understanding of object oriented programming. • A basic understanding of the Historian database architecture.
enteliWEB’s MVC architecture enteliWEB is a Model-View-Controller (MVC) application, built on the Zend PHP framework. For more information with MVC designs, review http://wikipedia.org/wiki/Model-view-controller/.
This section provides a brief overview of enteliWEB’s implementation of MVC, as it pertains to custom reports.
Each URL in enteliWEB is of the form:
http://locahost/enteliweb/[controller]/[action]/[arguments]
where:
Controller: Specifies the name of the controller being accessed and the name of the class being used. Each controller uses a single PHP script located in /enteliweb/website/application/controllers/[controller]Controller.php. Controllers beginning with ‘ws’ provide web services such as wsreportdata.
Action: Specifies the function being called within the specific controller. If no action is specified the controller’s indexAction function is called. Actions are always defined as [action]Action(). In the case of reporting, actions may be custom web services created for a custom report. Actions can make use of public functions from PHP Libraries (Delta or Zend), from Models, or from their parent controller.
Arguments: Defines optional parameters as required by the specified action of the controller. This provides a means of passing all other information to the controller. For reporting, common arguments are the meter list, the start and end date, and formatting details such as report title, time interval, and so on.
Chapter 1 - Creating a custom energy report
Page 12 of 108 enteliWEB Version 4.13 Developer Guide Document Edition 2.8
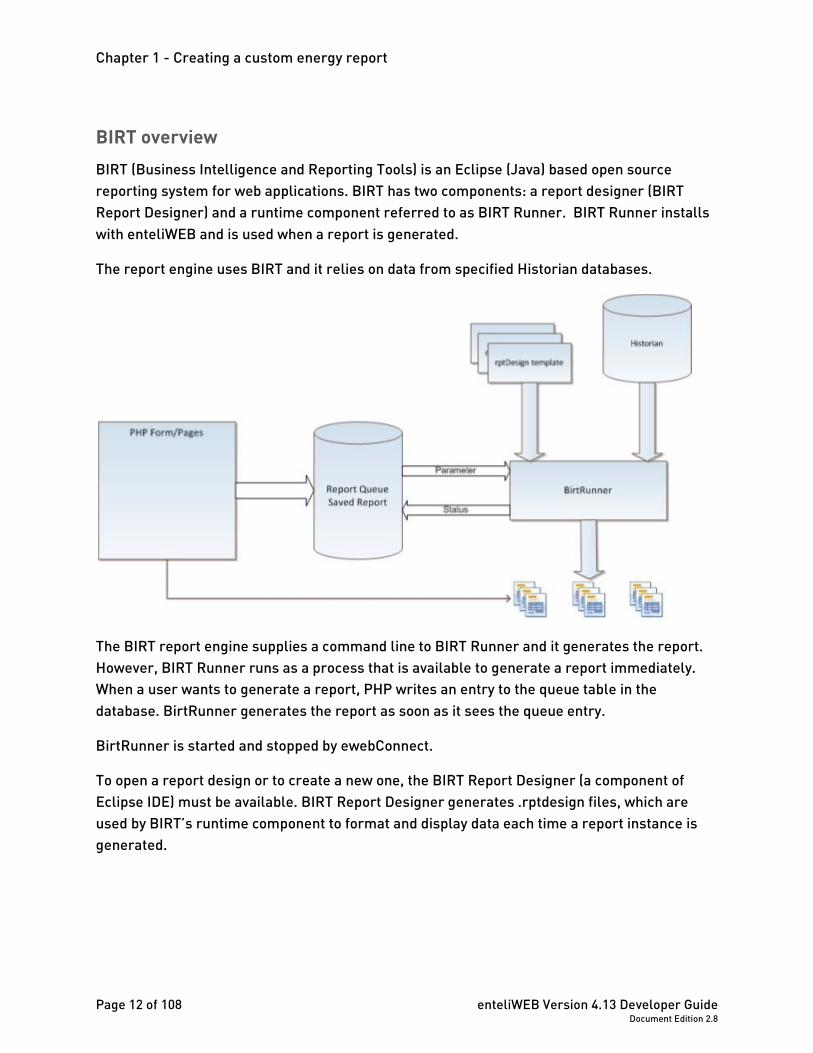
BIRT overview BIRT (Business Intelligence and Reporting Tools) is an Eclipse (Java) based open source reporting system for web applications. BIRT has two components: a report designer (BIRT Report Designer) and a runtime component referred to as BIRT Runner. BIRT Runner installs with enteliWEB and is used when a report is generated.
The report engine uses BIRT and it relies on data from specified Historian databases.
The BIRT report engine supplies a command line to BIRT Runner and it generates the report. However, BIRT Runner runs as a process that is available to generate a report immediately. When a user wants to generate a report, PHP writes an entry to the queue table in the database. BirtRunner generates the report as soon as it sees the queue entry.
BirtRunner is started and stopped by ewebConnect.
To open a report design or to create a new one, the BIRT Report Designer (a component of Eclipse IDE) must be available. BIRT Report Designer generates .rptdesign files, which are used by BIRT’s runtime component to format and display data each time a report instance is generated.
enteliWEB Version 4.13 Developer Guide Page 13 of 108 Document Edition 2.8
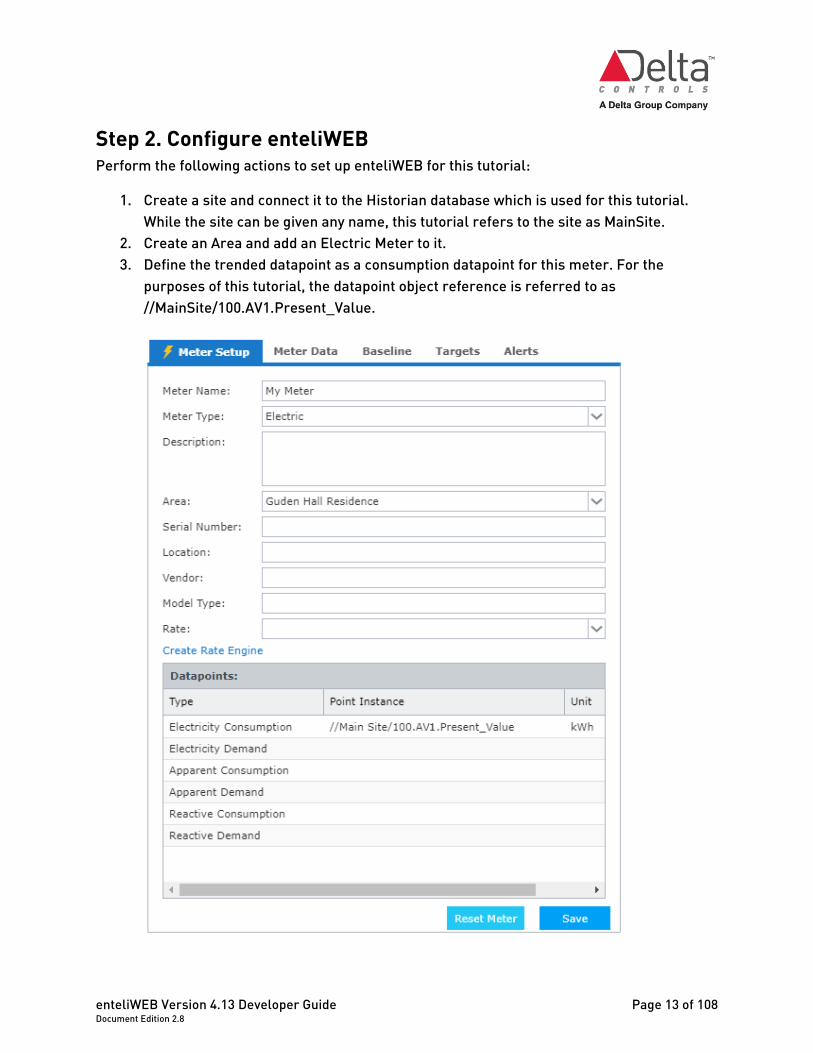
Step 2. Configure enteliWEB Perform the following actions to set up enteliWEB for this tutorial:
1. Create a site and connect it to the Historian database which is used for this tutorial. While the site can be given any name, this tutorial refers to the site as MainSite.
2. Create an Area and add an Electric Meter to it. 3. Define the trended datapoint as a consumption datapoint for this meter. For the
purposes of this tutorial, the datapoint object reference is referred to as //MainSite/100.AV1.Present_Value.
Chapter 1 - Creating a custom energy report
Page 14 of 108 enteliWEB Version 4.13 Developer Guide Document Edition 2.8
Step 3. Create a web service
Use the following naming convention for all PHP file names and class names: first letter in upper case, remainder of name in lower case and append the word Controller. For example: PHP file: MycustomdataController.php, class MycustomdataController
Use the following naming convention for all action names: all letters in lower case and append the word Action. For example: public function gethistoriandataAction()
Create the file All report files are located in the folder \enteliweb\website\report\ , located in C:\Program Files\Delta Controls\ by default.
In this folder, create a blank PHP file named MycustomdataController.php.
Create the web service Custom web services required for custom reports can be accessed through the wsreportdata controller. Each custom web service can have multiple actions of its own, and is accessed through a URL such as:
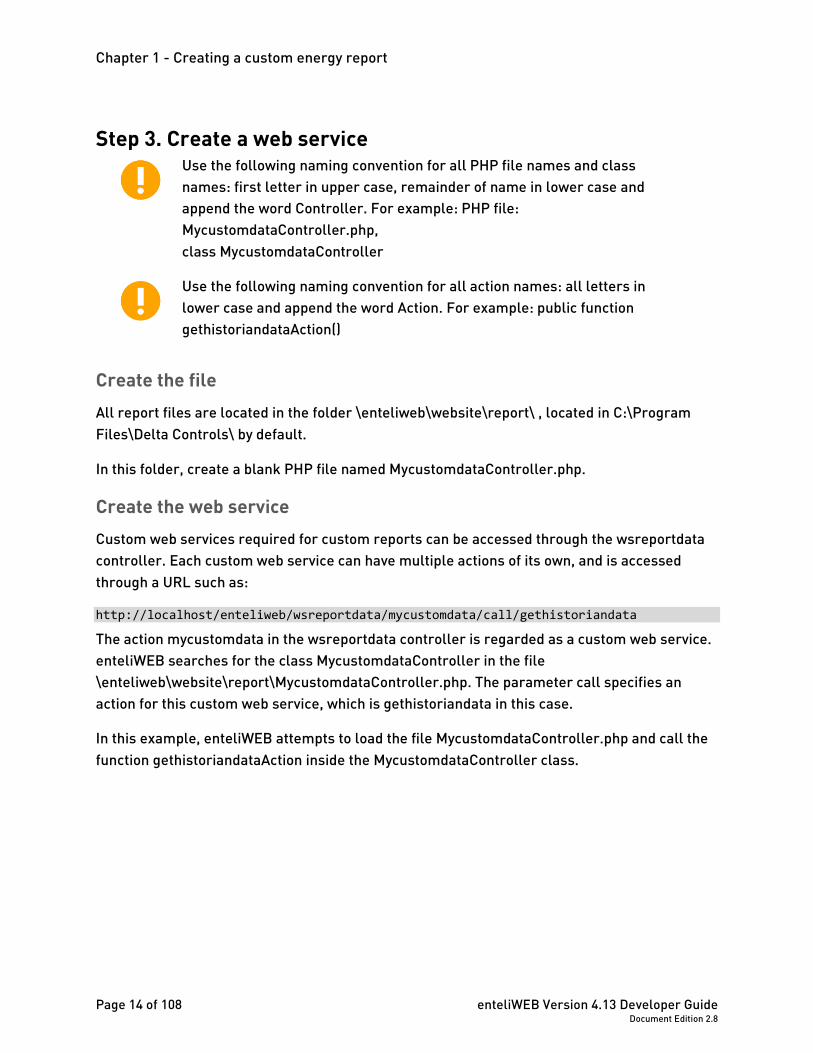
http://localhost/enteliweb/wsreportdata/mycustomdata/call/gethistoriandata
The action mycustomdata in the wsreportdata controller is regarded as a custom web service. enteliWEB searches for the class MycustomdataController in the file \enteliweb\website\report\MycustomdataController.php. The parameter call specifies an action for this custom web service, which is gethistoriandata in this case.
In this example, enteliWEB attempts to load the file MycustomdataController.php and call the function gethistoriandataAction inside the MycustomdataController class.
enteliWEB Version 4.13 Developer Guide Page 15 of 108 Document Edition 2.8
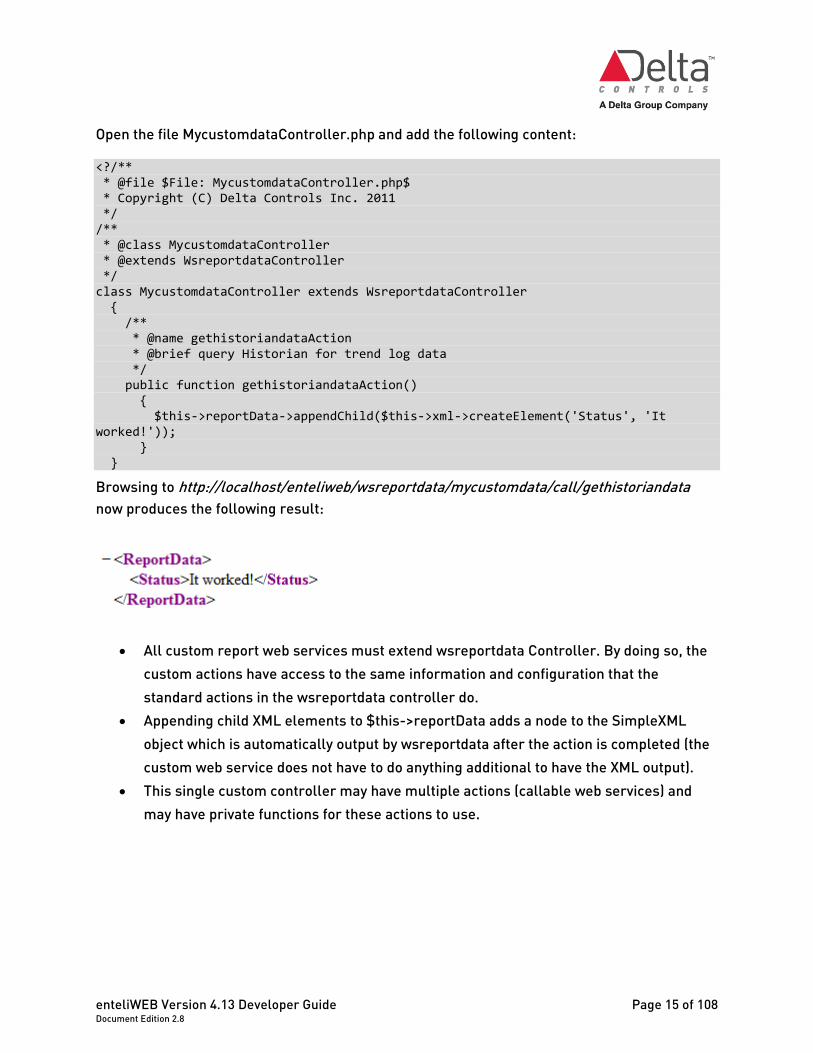
Open the file MycustomdataController.php and add the following content:
<?/** * @file $File: MycustomdataController.php$ * Copyright (C) Delta Controls Inc. 2011 */ /** * @class MycustomdataController * @extends WsreportdataController */ class MycustomdataController extends WsreportdataController { /** * @name gethistoriandataAction * @brief query Historian for trend log data */ public function gethistoriandataAction() { $this->reportData->appendChild($this->xml->createElement('Status', 'It worked!')); } }
Browsing to http://localhost/enteliweb/wsreportdata/mycustomdata/call/gethistoriandata now produces the following result:
• All custom report web services must extend wsreportdata Controller. By doing so, the custom actions have access to the same information and configuration that the standard actions in the wsreportdata controller do.
• Appending child XML elements to $this->reportData adds a node to the SimpleXML object which is automatically output by wsreportdata after the action is completed (the custom web service does not have to do anything additional to have the XML output).
• This single custom controller may have multiple actions (callable web services) and may have private functions for these actions to use.
Chapter 1 - Creating a custom energy report
Page 16 of 108 enteliWEB Version 4.13 Developer Guide Document Edition 2.8
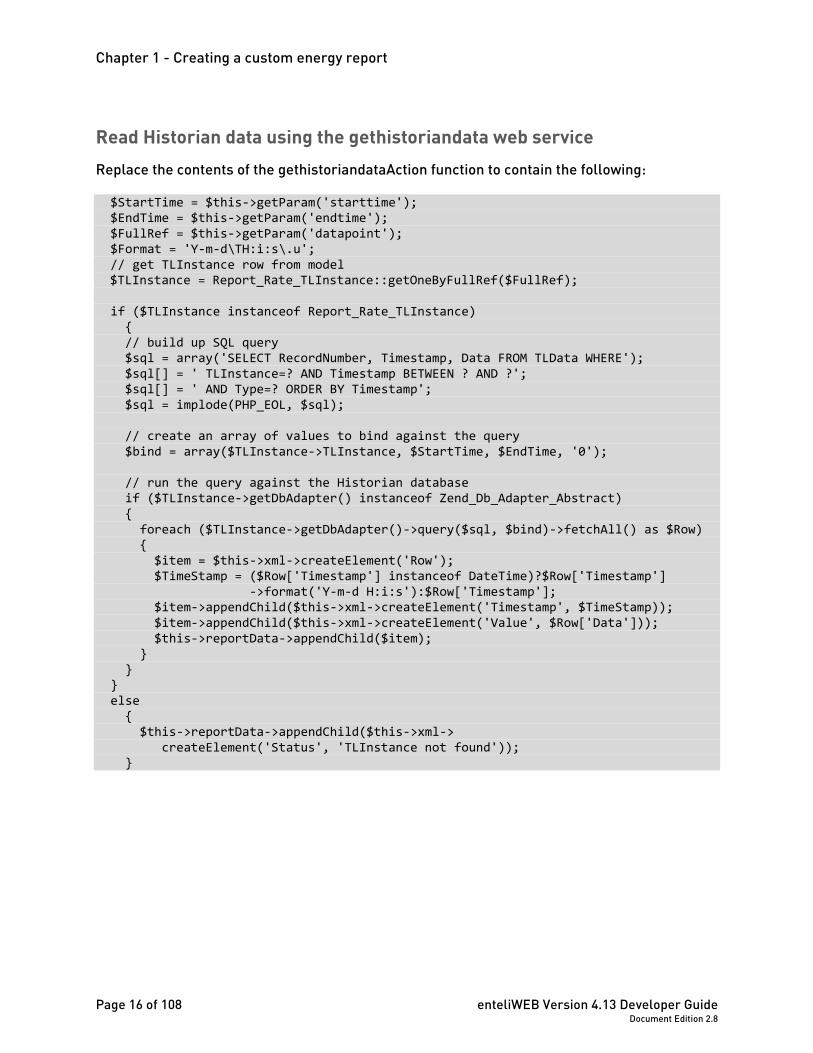
Read Historian data using the gethistoriandata web service Replace the contents of the gethistoriandataAction function to contain the following:
$StartTime = $this->getParam('starttime'); $EndTime = $this->getParam('endtime'); $FullRef = $this->getParam('datapoint'); $Format = 'Y-m-d\TH:i:s\.u'; // get TLInstance row from model $TLInstance = Report_Rate_TLInstance::getOneByFullRef($FullRef); if ($TLInstance instanceof Report_Rate_TLInstance) { // build up SQL query $sql = array('SELECT RecordNumber, Timestamp, Data FROM TLData WHERE'); $sql[] = ' TLInstance=? AND Timestamp BETWEEN ? AND ?'; $sql[] = ' AND Type=? ORDER BY Timestamp'; $sql = implode(PHP_EOL, $sql); // create an array of values to bind against the query $bind = array($TLInstance->TLInstance, $StartTime, $EndTime, '0'); // run the query against the Historian database if ($TLInstance->getDbAdapter() instanceof Zend_Db_Adapter_Abstract) { foreach ($TLInstance->getDbAdapter()->query($sql, $bind)->fetchAll() as $Row) { $item = $this->xml->createElement('Row'); $TimeStamp = ($Row['Timestamp'] instanceof DateTime)?$Row['Timestamp'] ->format('Y-m-d H:i:s'):$Row['Timestamp']; $item->appendChild($this->xml->createElement('Timestamp', $TimeStamp)); $item->appendChild($this->xml->createElement('Value', $Row['Data'])); $this->reportData->appendChild($item); } } } else { $this->reportData->appendChild($this->xml-> createElement('Status', 'TLInstance not found')); }

enteliWEB Version 4.13 Developer Guide Page 17 of 108 Document Edition 2.8
In a browser, call:
http://localhost/enteliweb/wsreportdata/mycustomdata/call/gethistoriandata?starttime=2011-01-01&endtime=2011-01-31&datapoint=//MainSite/100.AV1.Present_Value
It displays the Historian data as XML:
Note the following:
• Parameters passed through the URL (such as starttime, endtime and datapoint) can be accessed using $this->getParam().
• getParam() is not case sensitive. • The Report_Rate_TLInstance row corresponding to the datapoint provided in the URL is
loaded using Report_Rate_TLInstance::getOneByFullRef($FullRef). • The code verifies that $TLInstance is an instance of Report_Rate_TLInstance before
reading any properties from it. • If this check is not done, and no Report_Rate_TLInstance row is found, reading
properties from the $TLInstance variable causes a fatal PHP error. • The SQL query to read Historian data is built up as an array, and then imploded into a
string. This step is not necessary, but helps improve readability when SQL queries become complex and take multiple lines.
• The SQL query is a prepared statement and uses the ‘?’ character as parameter markers.
• When repeatedly running the same query with different parameters, MySQL caches the query itself and only has to change these parameters. By marking parameters with ‘?’ the SQL query time is reduced.
• The binding array is passed to MySQL – each element replaces a ‘?’ in the prepared statement.
• The number of array elements (number of bindings) must match the number of parameter markers in the query.
Chapter 1 - Creating a custom energy report
Page 18 of 108 enteliWEB Version 4.13 Developer Guide Document Edition 2.8
• The SQL statement searches for records where type is 0. In Historian, all true trend log data entries have a type of 0, and all other internal data markers (trend log enables/disables, time changes, missed samples, etc…) have a type which is not 0.
• Each Report_Rate_TLInstance record has an associated database adapter, which connects to its Historian database.
o This adapter may be a MySQL adapter (Zend_Db_Adapter_Mysqli) or a MS SQL adapter (Zend_Db_Adapter_Sqlsrv), both which extend Zend_Db_Adapter_Abstract. Verifying the adapter is an instance of Zend_Db_Adapter_Abstract ensures a valid object is returned by the getDbAdapter call.
Save the web service XML output Use the web browser to save the web service response as an XML document in the \enteliweb\website\report\Sample data\ directory. When creating the custom report design, this XML document serves as a web service data sample.
enteliWEB Version 4.13 Developer Guide Page 19 of 108 Document Edition 2.8
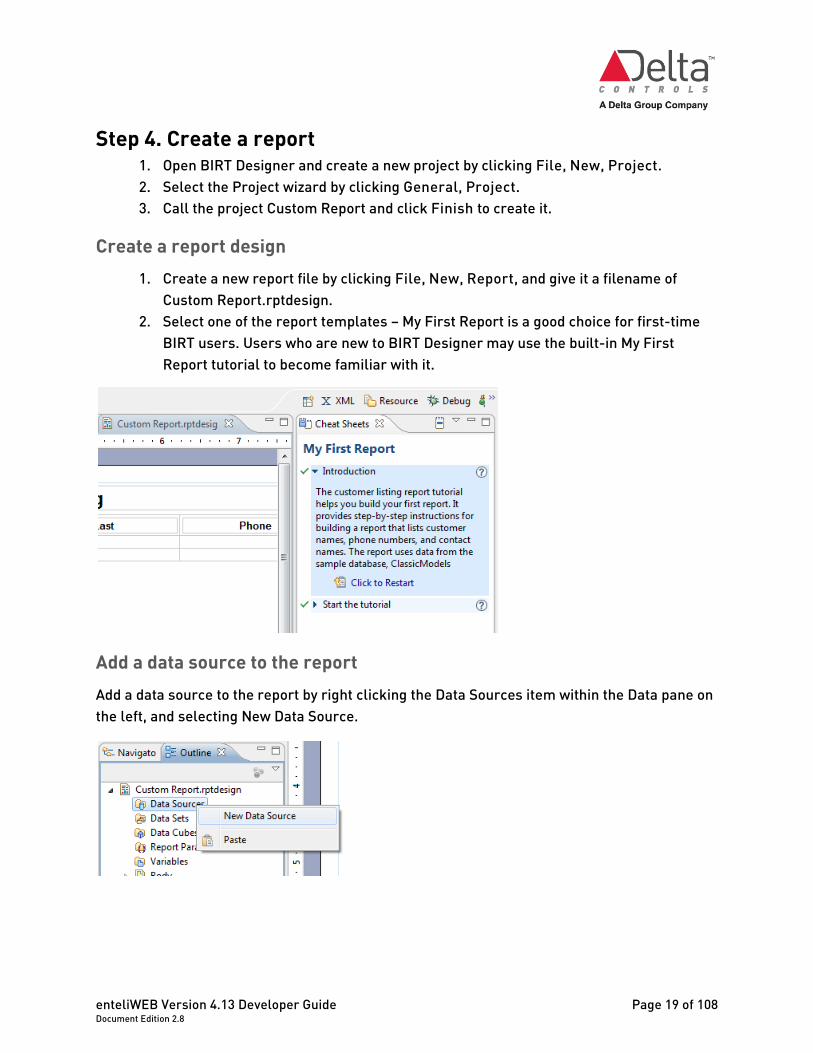
Step 4. Create a report 1. Open BIRT Designer and create a new project by clicking File, New, Project. 2. Select the Project wizard by clicking General, Project. 3. Call the project Custom Report and click Finish to create it.
Create a report design 1. Create a new report file by clicking File, New, Report, and give it a filename of
Custom Report.rptdesign. 2. Select one of the report templates – My First Report is a good choice for first-time
BIRT users. Users who are new to BIRT Designer may use the built-in My First Report tutorial to become familiar with it.
Add a data source to the report Add a data source to the report by right clicking the Data Sources item within the Data pane on the left, and selecting New Data Source.

Chapter 1 - Creating a custom energy report
Page 20 of 108 enteliWEB Version 4.13 Developer Guide Document Edition 2.8
Specify the data source as being an XML Data Source, give it the name HistorianData, and click Next.
Select the XML document previously saved from the mycustomdata web service as the XML source and click Finish.
.
enteliWEB Version 4.13 Developer Guide Page 21 of 108 Document Edition 2.8
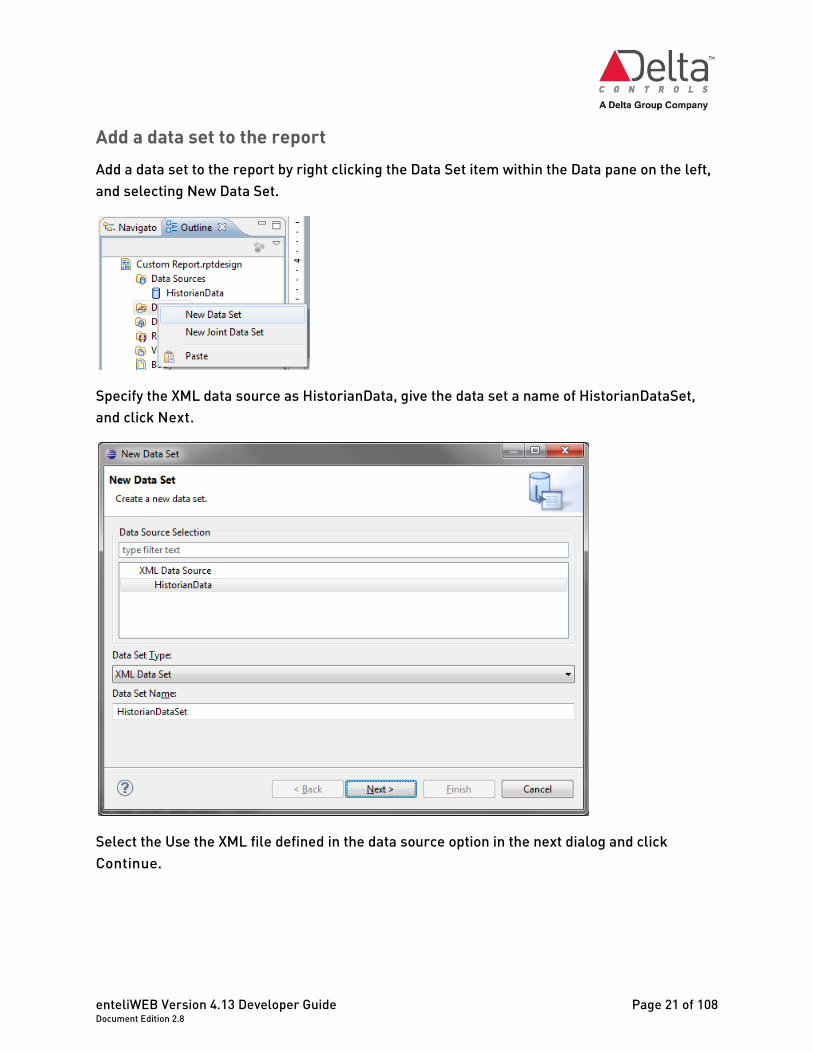
Add a data set to the report Add a data set to the report by right clicking the Data Set item within the Data pane on the left, and selecting New Data Set.
Specify the XML data source as HistorianData, give the data set a name of HistorianDataSet, and click Next.
Select the Use the XML file defined in the data source option in the next dialog and click Continue.
Chapter 1 - Creating a custom energy report
Page 22 of 108 enteliWEB Version 4.13 Developer Guide Document Edition 2.8
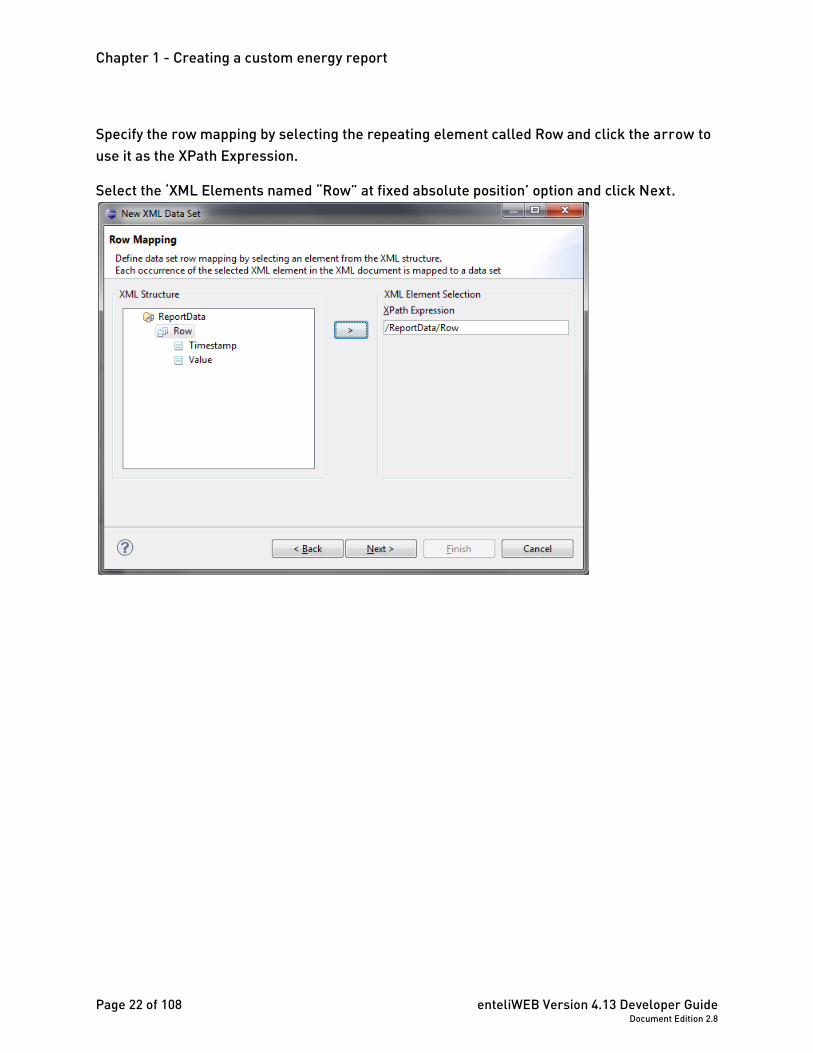
Specify the row mapping by selecting the repeating element called Row and click the arrow to use it as the XPath Expression.
Select the ‘XML Elements named “Row” at fixed absolute position’ option and click Next.
enteliWEB Version 4.13 Developer Guide Page 23 of 108 Document Edition 2.8
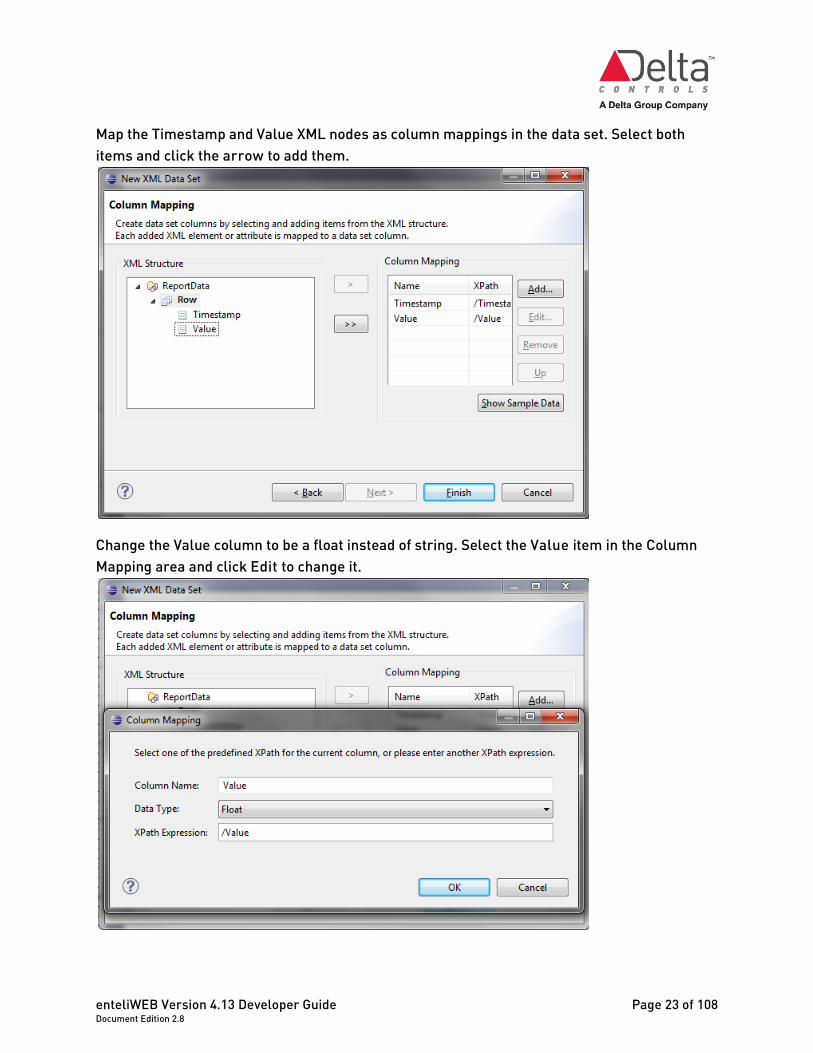
Map the Timestamp and Value XML nodes as column mappings in the data set. Select both items and click the arrow to add them.
Change the Value column to be a float instead of string. Select the Value item in the Column Mapping area and click Edit to change it.
Chapter 1 - Creating a custom energy report
Page 24 of 108 enteliWEB Version 4.13 Developer Guide Document Edition 2.8
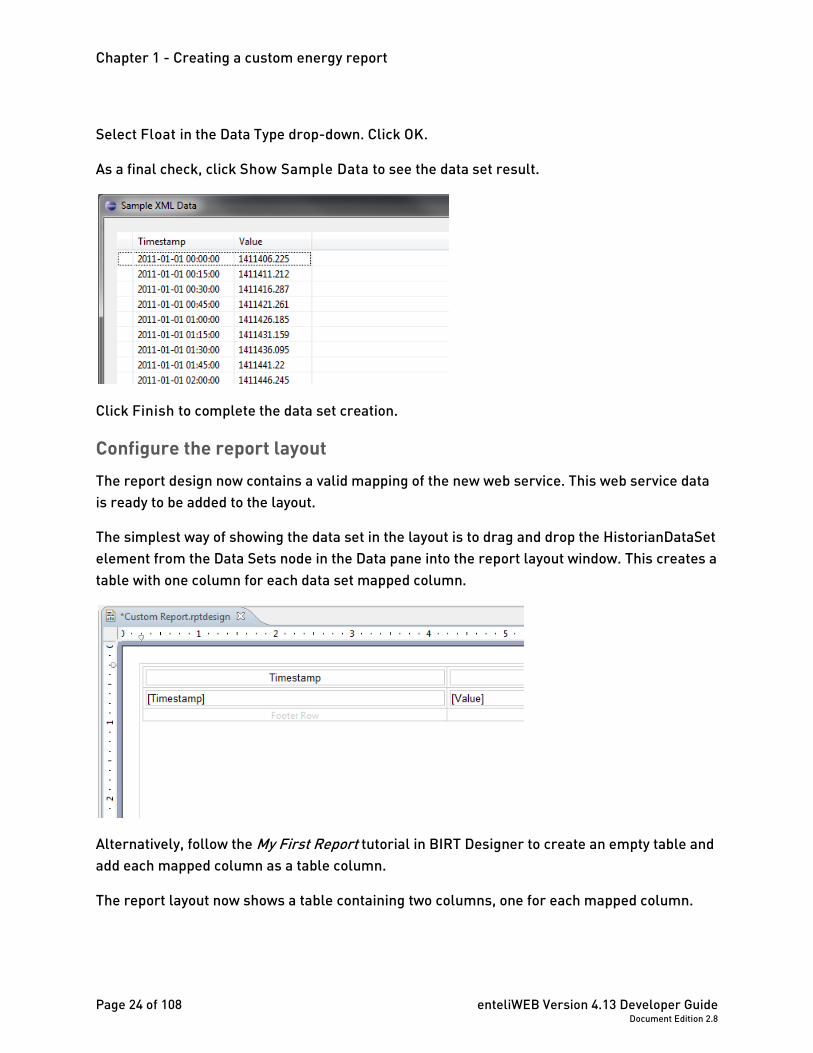
Select Float in the Data Type drop-down. Click OK.
As a final check, click Show Sample Data to see the data set result.
Click Finish to complete the data set creation.
Configure the report layout The report design now contains a valid mapping of the new web service. This web service data is ready to be added to the layout.
The simplest way of showing the data set in the layout is to drag and drop the HistorianDataSet element from the Data Sets node in the Data pane into the report layout window. This creates a table with one column for each data set mapped column.
Alternatively, follow the My First Report tutorial in BIRT Designer to create an empty table and add each mapped column as a table column.
The report layout now shows a table containing two columns, one for each mapped column.
enteliWEB Version 4.13 Developer Guide Page 25 of 108 Document Edition 2.8
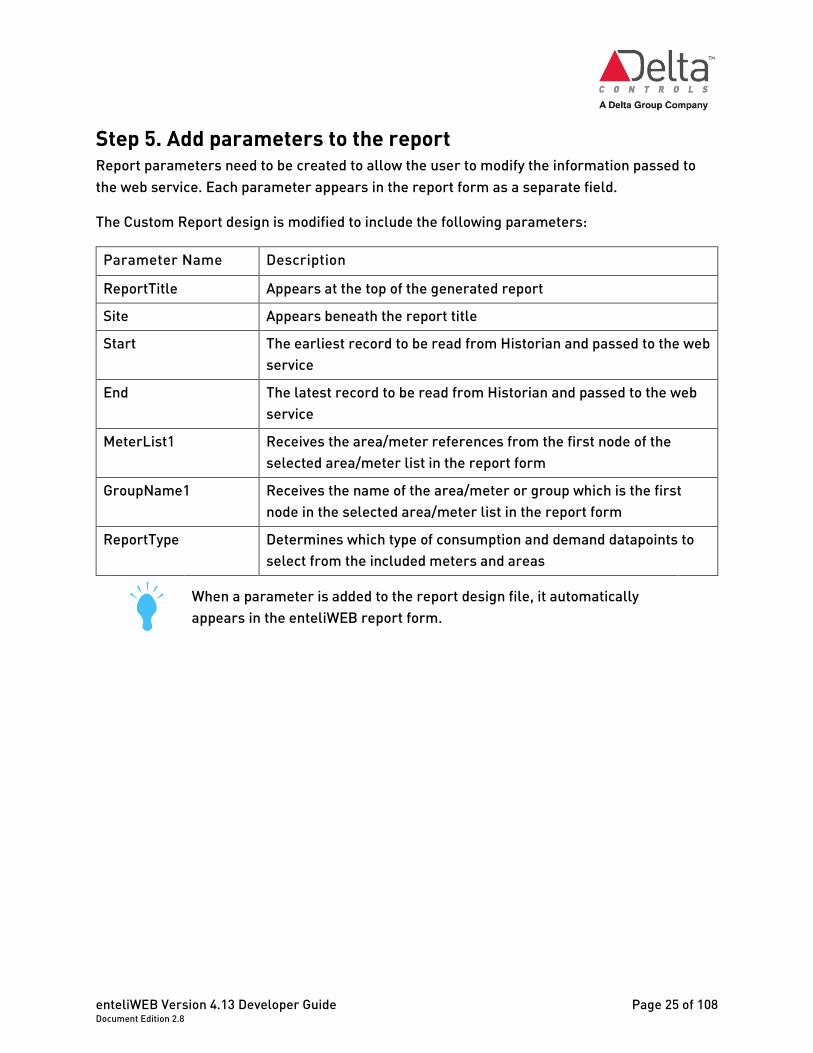
Step 5. Add parameters to the report Report parameters need to be created to allow the user to modify the information passed to the web service. Each parameter appears in the report form as a separate field.
The Custom Report design is modified to include the following parameters:
Parameter Name Description
ReportTitle Appears at the top of the generated report
Site Appears beneath the report title
Start The earliest record to be read from Historian and passed to the web service
End The latest record to be read from Historian and passed to the web service
MeterList1 Receives the area/meter references from the first node of the selected area/meter list in the report form
GroupName1 Receives the name of the area/meter or group which is the first node in the selected area/meter list in the report form
ReportType Determines which type of consumption and demand datapoints to select from the included meters and areas
When a parameter is added to the report design file, it automatically appears in the enteliWEB report form.
Chapter 1 - Creating a custom energy report
Page 26 of 108 enteliWEB Version 4.13 Developer Guide Document Edition 2.8
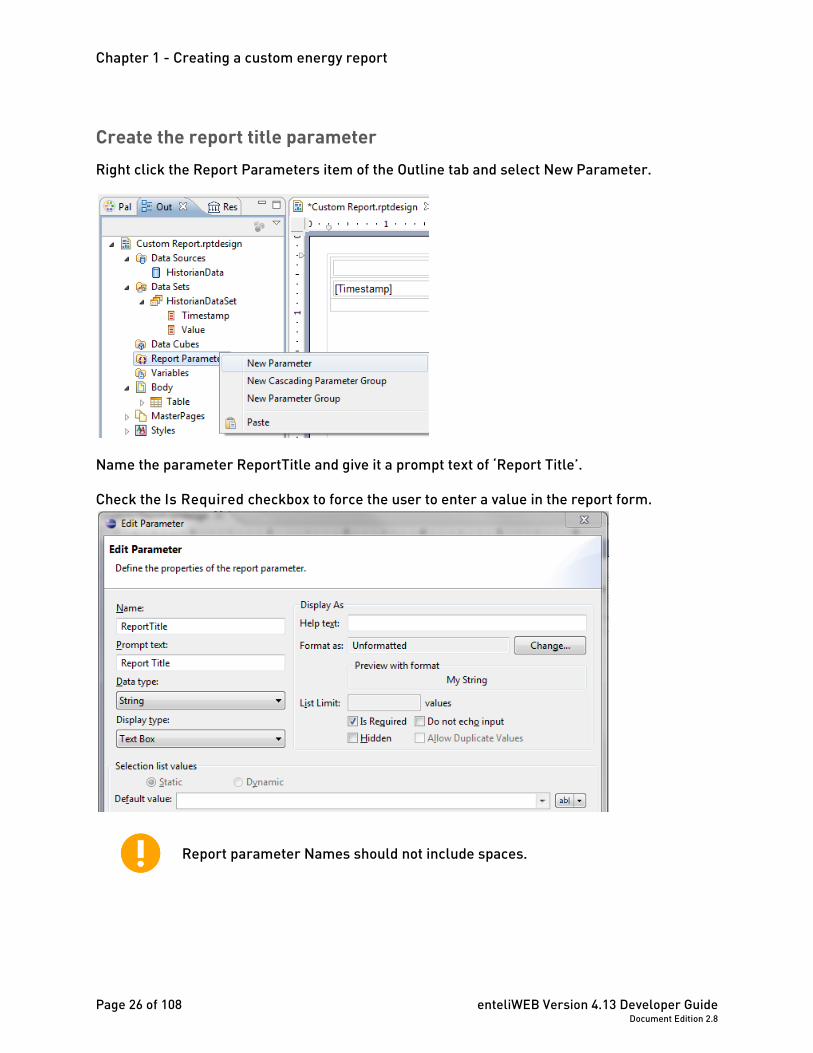
Create the report title parameter Right click the Report Parameters item of the Outline tab and select New Parameter.
Name the parameter ReportTitle and give it a prompt text of ‘Report Title’.
Check the Is Required checkbox to force the user to enter a value in the report form.
Report parameter Names should not include spaces.
enteliWEB Version 4.13 Developer Guide Page 27 of 108 Document Edition 2.8
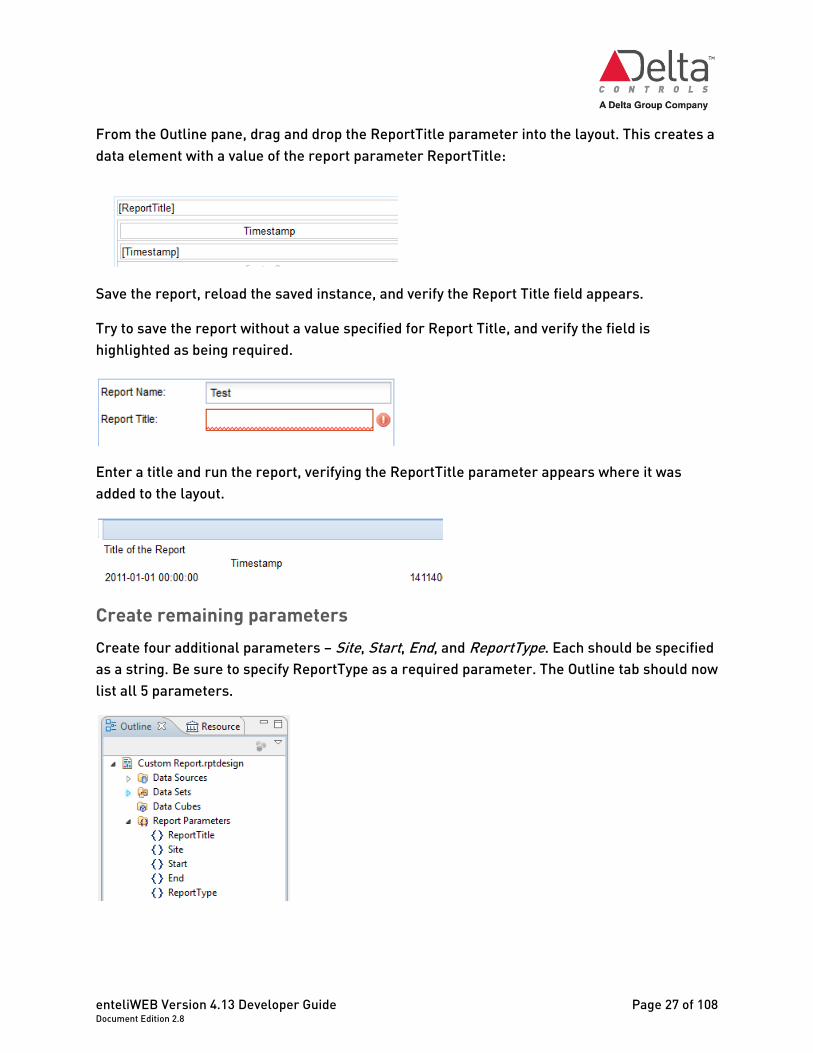
From the Outline pane, drag and drop the ReportTitle parameter into the layout. This creates a data element with a value of the report parameter ReportTitle:
Save the report, reload the saved instance, and verify the Report Title field appears.
Try to save the report without a value specified for Report Title, and verify the field is highlighted as being required.
Enter a title and run the report, verifying the ReportTitle parameter appears where it was added to the layout.
Create remaining parameters Create four additional parameters – Site, Start, End, and ReportType. Each should be specified as a string. Be sure to specify ReportType as a required parameter. The Outline tab should now list all 5 parameters.
Chapter 1 - Creating a custom energy report
Page 28 of 108 enteliWEB Version 4.13 Developer Guide Document Edition 2.8
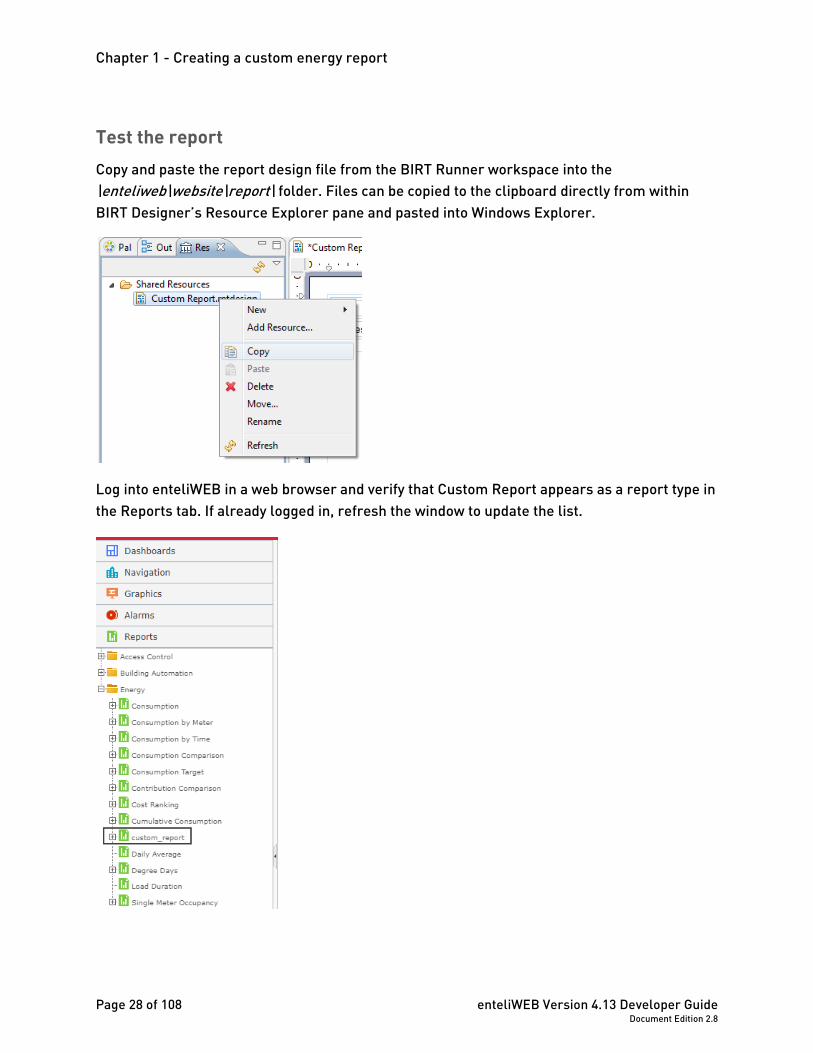
Test the report Copy and paste the report design file from the BIRT Runner workspace into the \enteliweb\website\report\ folder. Files can be copied to the clipboard directly from within BIRT Designer’s Resource Explorer pane and pasted into Windows Explorer.
Log into enteliWEB in a web browser and verify that Custom Report appears as a report type in the Reports tab. If already logged in, refresh the window to update the list.
enteliWEB Version 4.13 Developer Guide Page 29 of 108 Document Edition 2.8
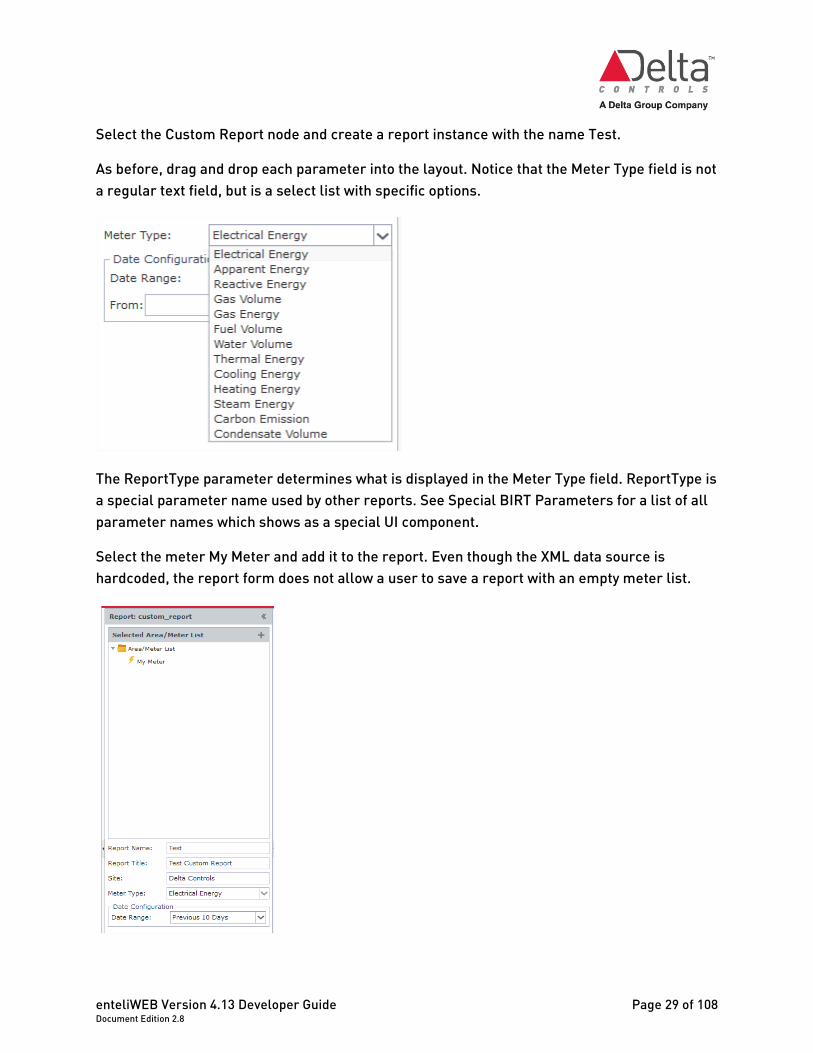
Select the Custom Report node and create a report instance with the name Test.
As before, drag and drop each parameter into the layout. Notice that the Meter Type field is not a regular text field, but is a select list with specific options.
The ReportType parameter determines what is displayed in the Meter Type field. ReportType is a special parameter name used by other reports. See Special BIRT Parameters for a list of all parameter names which shows as a special UI component.
Select the meter My Meter and add it to the report. Even though the XML data source is hardcoded, the report form does not allow a user to save a report with an empty meter list.
Chapter 1 - Creating a custom energy report
Page 30 of 108 enteliWEB Version 4.13 Developer Guide Document Edition 2.8
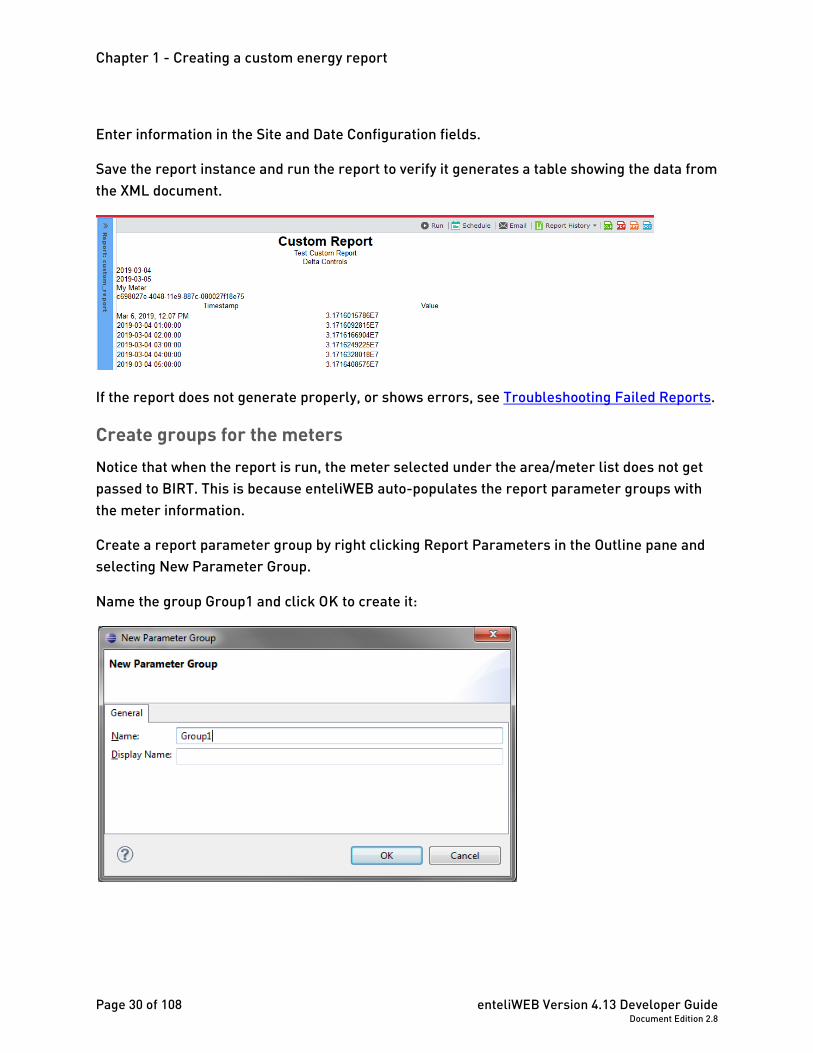
Enter information in the Site and Date Configuration fields.
Save the report instance and run the report to verify it generates a table showing the data from the XML document.
If the report does not generate properly, or shows errors, see Troubleshooting Failed Reports.
Create groups for the meters Notice that when the report is run, the meter selected under the area/meter list does not get passed to BIRT. This is because enteliWEB auto-populates the report parameter groups with the meter information.
Create a report parameter group by right clicking Report Parameters in the Outline pane and selecting New Parameter Group.
Name the group Group1 and click OK to create it:
enteliWEB Version 4.13 Developer Guide Page 31 of 108 Document Edition 2.8
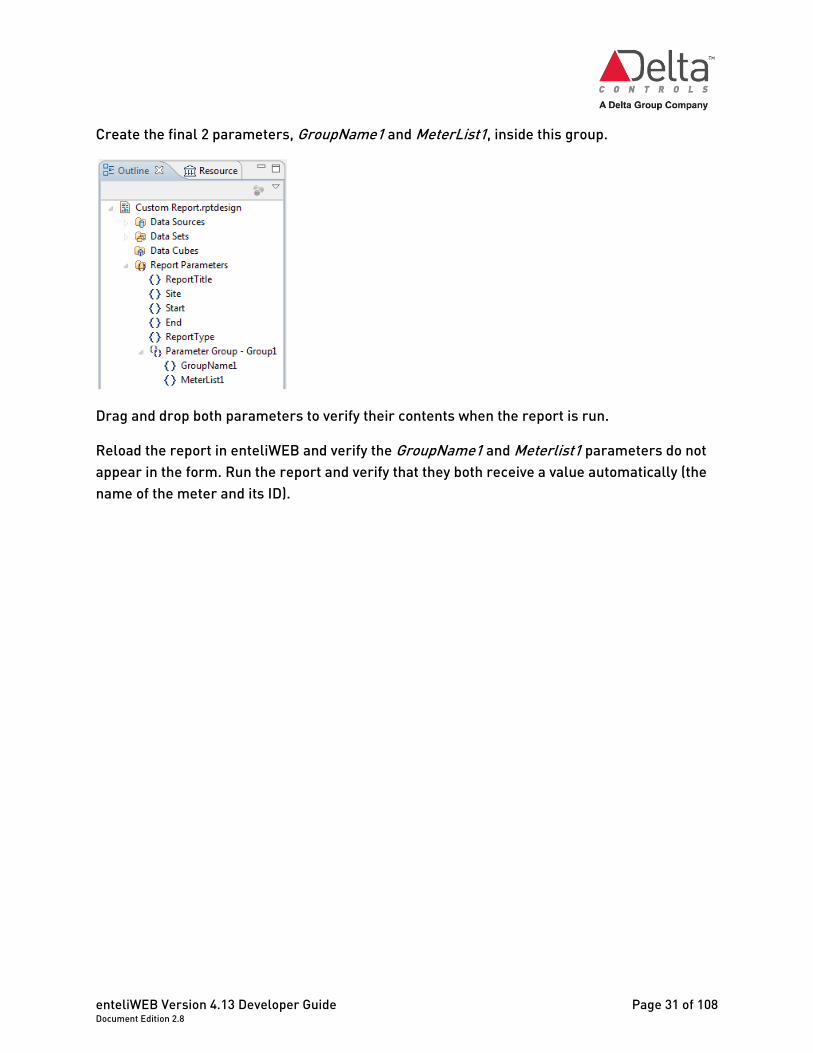
Create the final 2 parameters, GroupName1 and MeterList1, inside this group.
Drag and drop both parameters to verify their contents when the report is run.
Reload the report in enteliWEB and verify the GroupName1 and Meterlist1 parameters do not appear in the form. Run the report and verify that they both receive a value automatically (the name of the meter and its ID).
Chapter 1 - Creating a custom energy report
Page 32 of 108 enteliWEB Version 4.13 Developer Guide Document Edition 2.8
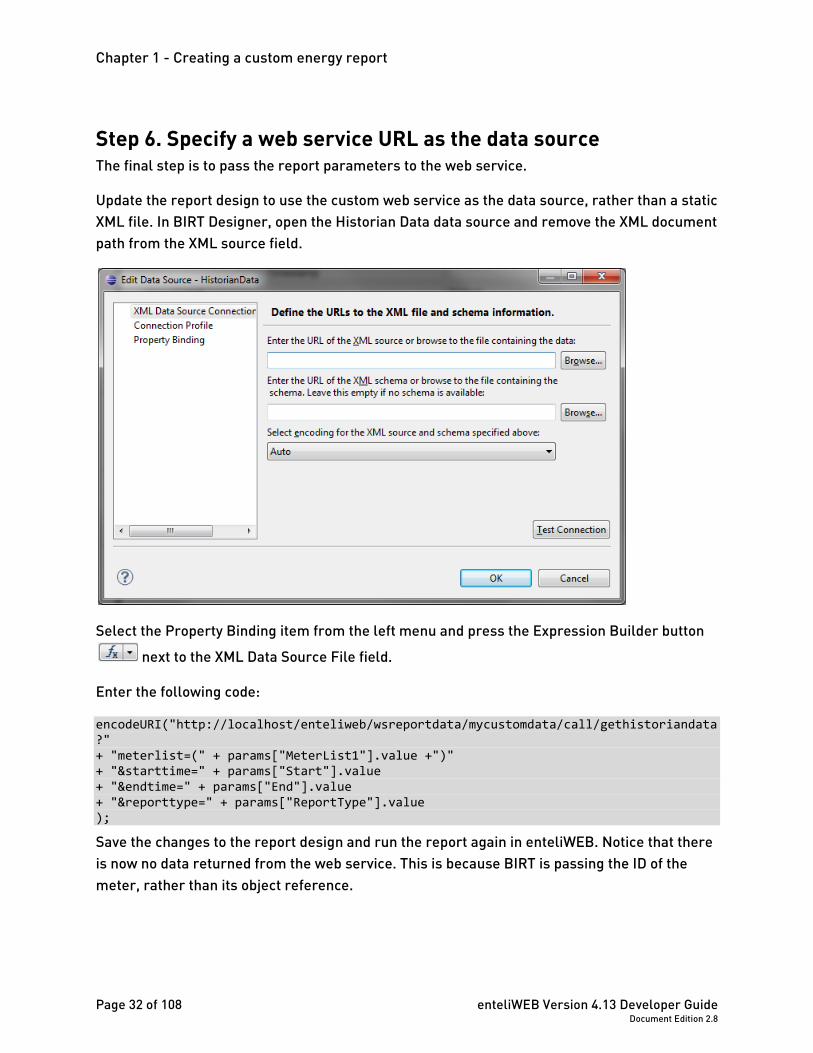
Step 6. Specify a web service URL as the data source The final step is to pass the report parameters to the web service.
Update the report design to use the custom web service as the data source, rather than a static XML file. In BIRT Designer, open the Historian Data data source and remove the XML document path from the XML source field.
Select the Property Binding item from the left menu and press the Expression Builder button
next to the XML Data Source File field.
Enter the following code:
encodeURI("http://localhost/enteliweb/wsreportdata/mycustomdata/call/gethistoriandata?" + "meterlist=(" + params["MeterList1"].value +")" + "&starttime=" + params["Start"].value + "&endtime=" + params["End"].value + "&reporttype=" + params["ReportType"].value );
Save the changes to the report design and run the report again in enteliWEB. Notice that there is now no data returned from the web service. This is because BIRT is passing the ID of the meter, rather than its object reference.
enteliWEB Version 4.13 Developer Guide Page 33 of 108 Document Edition 2.8
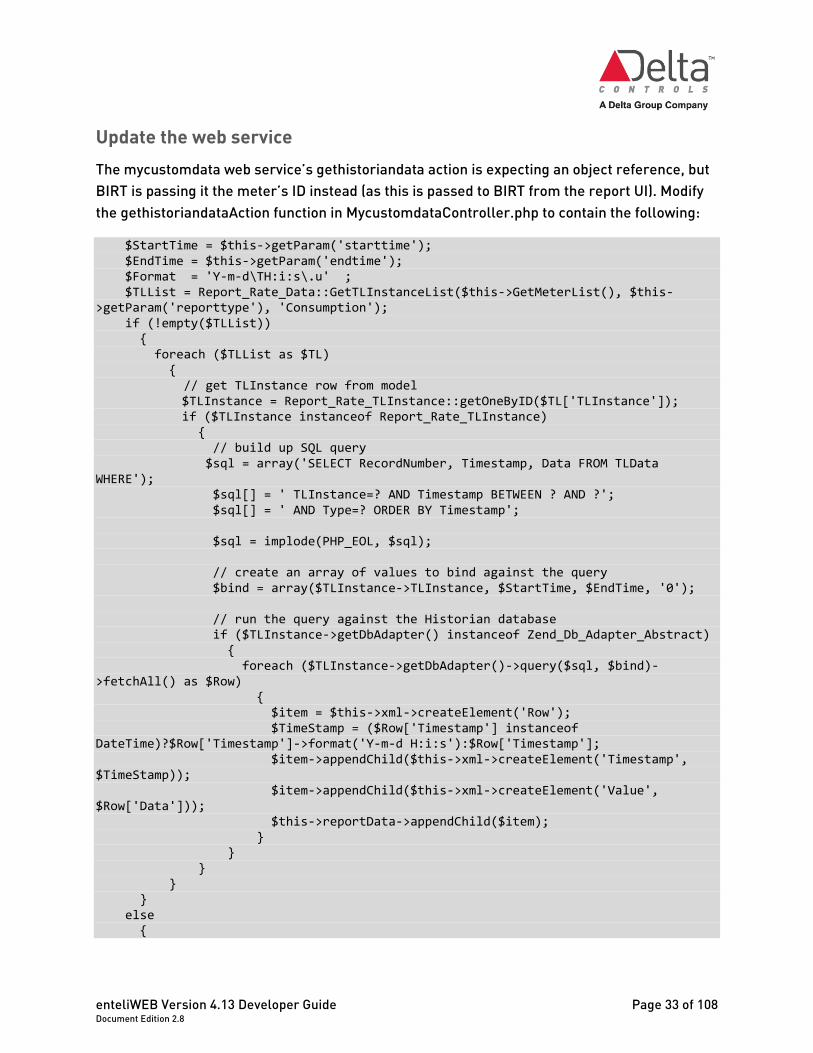
Update the web service The mycustomdata web service’s gethistoriandata action is expecting an object reference, but BIRT is passing it the meter’s ID instead (as this is passed to BIRT from the report UI). Modify the gethistoriandataAction function in MycustomdataController.php to contain the following:
$StartTime = $this->getParam('starttime'); $EndTime = $this->getParam('endtime'); $Format = 'Y-m-d\TH:i:s\.u' ; $TLList = Report_Rate_Data::GetTLInstanceList($this->GetMeterList(), $this->getParam('reporttype'), 'Consumption'); if (!empty($TLList)) { foreach ($TLList as $TL) { // get TLInstance row from model $TLInstance = Report_Rate_TLInstance::getOneByID($TL['TLInstance']); if ($TLInstance instanceof Report_Rate_TLInstance) { // build up SQL query $sql = array('SELECT RecordNumber, Timestamp, Data FROM TLData WHERE'); $sql[] = ' TLInstance=? AND Timestamp BETWEEN ? AND ?'; $sql[] = ' AND Type=? ORDER BY Timestamp'; $sql = implode(PHP_EOL, $sql); // create an array of values to bind against the query $bind = array($TLInstance->TLInstance, $StartTime, $EndTime, '0'); // run the query against the Historian database if ($TLInstance->getDbAdapter() instanceof Zend_Db_Adapter_Abstract) { foreach ($TLInstance->getDbAdapter()->query($sql, $bind)->fetchAll() as $Row) { $item = $this->xml->createElement('Row'); $TimeStamp = ($Row['Timestamp'] instanceof DateTime)?$Row['Timestamp']->format('Y-m-d H:i:s'):$Row['Timestamp']; $item->appendChild($this->xml->createElement('Timestamp', $TimeStamp)); $item->appendChild($this->xml->createElement('Value', $Row['Data'])); $this->reportData->appendChild($item); } } } } } else {
Chapter 1 - Creating a custom energy report
Page 34 of 108 enteliWEB Version 4.13 Developer Guide Document Edition 2.8
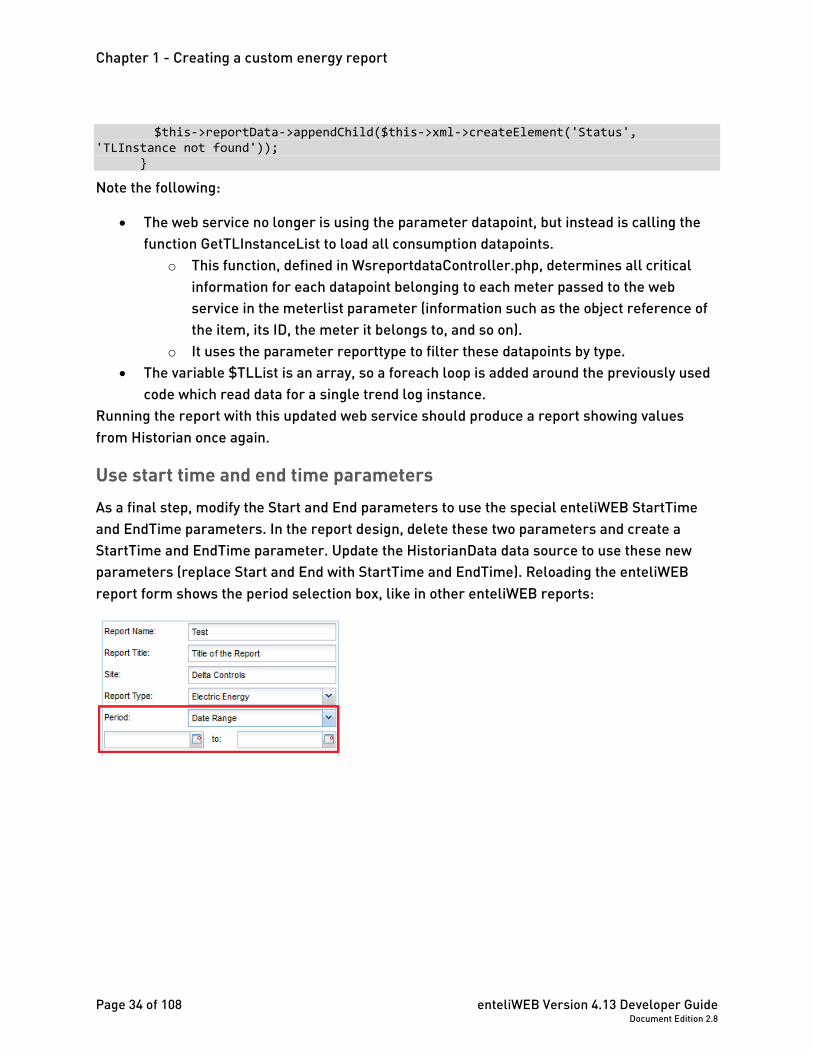
$this->reportData->appendChild($this->xml->createElement('Status', 'TLInstance not found')); }
Note the following:
• The web service no longer is using the parameter datapoint, but instead is calling the function GetTLInstanceList to load all consumption datapoints.
o This function, defined in WsreportdataController.php, determines all critical information for each datapoint belonging to each meter passed to the web service in the meterlist parameter (information such as the object reference of the item, its ID, the meter it belongs to, and so on).
o It uses the parameter reporttype to filter these datapoints by type. • The variable $TLList is an array, so a foreach loop is added around the previously used
code which read data for a single trend log instance. Running the report with this updated web service should produce a report showing values from Historian once again.
Use start time and end time parameters As a final step, modify the Start and End parameters to use the special enteliWEB StartTime and EndTime parameters. In the report design, delete these two parameters and create a StartTime and EndTime parameter. Update the HistorianData data source to use these new parameters (replace Start and End with StartTime and EndTime). Reloading the enteliWEB report form shows the period selection box, like in other enteliWEB reports:
enteliWEB Version 4.13 Developer Guide Page 35 of 108 Document Edition 2.8
Advanced reporting One of the best ways to become familiar with how enteliWEB and BIRT interact is to open the report design files which come with enteliWEB and look at how they are built. When trying to add more complex features, find an existing report which behaves in a similar fashion and check how it was designed.
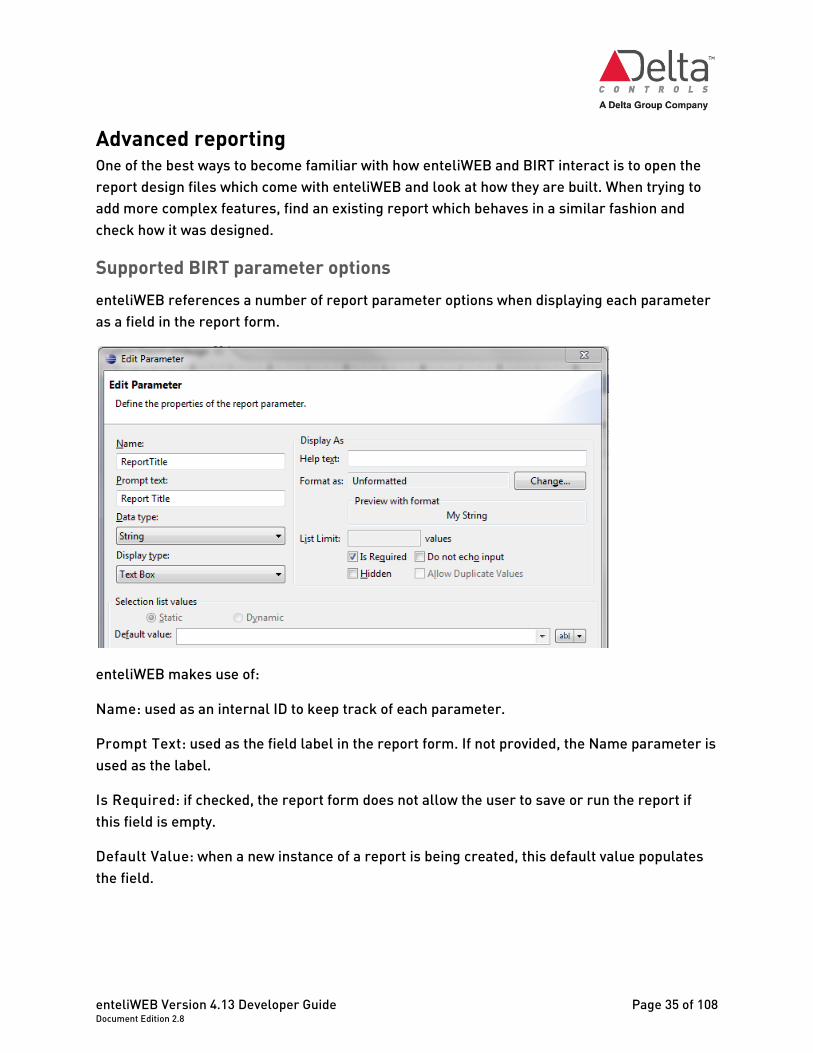
Supported BIRT parameter options enteliWEB references a number of report parameter options when displaying each parameter as a field in the report form.
enteliWEB makes use of:
Name: used as an internal ID to keep track of each parameter.
Prompt Text: used as the field label in the report form. If not provided, the Name parameter is used as the label.
Is Required: if checked, the report form does not allow the user to save or run the report if this field is empty.
Default Value: when a new instance of a report is being created, this default value populates the field.
Chapter 1 - Creating a custom energy report
Page 36 of 108 enteliWEB Version 4.13 Developer Guide Document Edition 2.8
Special BIRT parameters A number of parameters used by the default energy reports are shown in the enteliWEB report form in a special way. These parameters may be reused by custom reports:
ReportType: generates a dropdown list of all types of meter data. Required if using built-in functionality of WsreportdataController to determine the trend log instance list from the meter list (using GetTLInstanceList() for example).
Interval: generates a dropdown list of report interval options. In existing reports, some web services group data by this interval.
StartTime and EndTime: generates a period dropdown, with a number of relative options (Yesterday, Current Month, Last Year, etc.) and a custom period option, allowing the user to enter a starting and ending date. Both are sent to BIRT in the format ‘Y-m-d’ when the report is generated (for example, ‘2011-06-19’).
OnHoursStart and OnHoursEnd: generates a dropdown list of time options for the report on hours transition and off hours transition. Both are sent to BIRT in the format ‘H:I’ when the report is generated (for example, ’19:10’).
Weekdays: generates a checkbox for each day of the week. When the report is generated, BIRT receives a comma delimited list of numbers, indicating which days are selected. The numbers start at 0 for Sunday, incrementing to 6 for Saturday (for example, only selecting Monday and Tuesday would create a Weekdays value of ‘1,2’).
BaselineStart and BaselineEnd: generates a baseline field set which allows the user to specify a relative offset from the selected report period, or specify a custom start date. Both fields are submitted to BIRT in the format ‘Y-m-d’ just as with the StartTime and EndTime parameters. Note that the report must have both StartTime and EndTime fields defined, as the baseline is based off their values.

enteliWEB Version 4.13 Developer Guide Page 37 of 108 Document Edition 2.8
Troubleshoot failed reports Reports may fail to generate when they are being developed and major changes are being made to them. Problems may be caused by PHP errors in a report web service, or by an issue in the BIRT design itself.
To check for PHP errors, watch the PHP log in the enteliWEB logfiles directory, while the report generates. Any fatal or critical errors are logged immediately. If enteliWEB is in development mode, additional debug information is output while the report calls on the PHP web services.
To check for a report design error, use the Preview tab in BIRT Designer. This runs the report directly inside the designer and may provide useful error messages when problems occur. Alternatively, check the BIRT log in the enteliWEB logfiles directory for any errors or exceptions.
In the report design file, when a grid is added, and in the bottom row a few cells are set up to be aggregated values with aggregate functions like SUM(). When all the values in a column are NULL, SUM() returns NULL in Birt 3.7, but in Birt 4.4, it returns 0. Therefore, you cannot hide/show a column in grid based on if the aggregate functions return NULL or not.
Chapter 2 - Creating a custom BAS report
Page 38 of 108 enteliWEB Version 4.13 Developer Guide Document Edition 2.8
Chapter 2 - Creating a custom BAS report This chapter describes how to create a custom building automation system report.
Before you begin You require BIRT Report Designer for this procedure. Download Report Designer from the enteliWEB page of the Delta Support site rather than from the Eclipse website to ensure that the version of Report Designer is correct.
BIRT Report Designer generates .rptdesign files, which are used by the BIRT runtime component to format and display data each time a report instance is generated.
Configure BIRT Report Designer for report design by clicking Windows > Open Perspective > Report Design.
Learn by example This chapter describes, as an example, how to create a report that lists GCL+ programs that are not running.
Step 1. Create the report design file Perform the following actions to create the BIRT report design file for the custom report.
1. Log on to the enteliWEB server as an administrative user. 2. Navigate to C:\Program Files (x86)\Delta Controls\enteliWEB\website\report\bas. 3. Copy the file named Object Query.rptdesign. Name the copy with the name you want for
your custom report, for example, Programs not Running.rptdesign. 4. Open Programs not Running.rptdesign in BIRT.
enteliWEB Version 4.13 Developer Guide Page 39 of 108 Document Edition 2.8
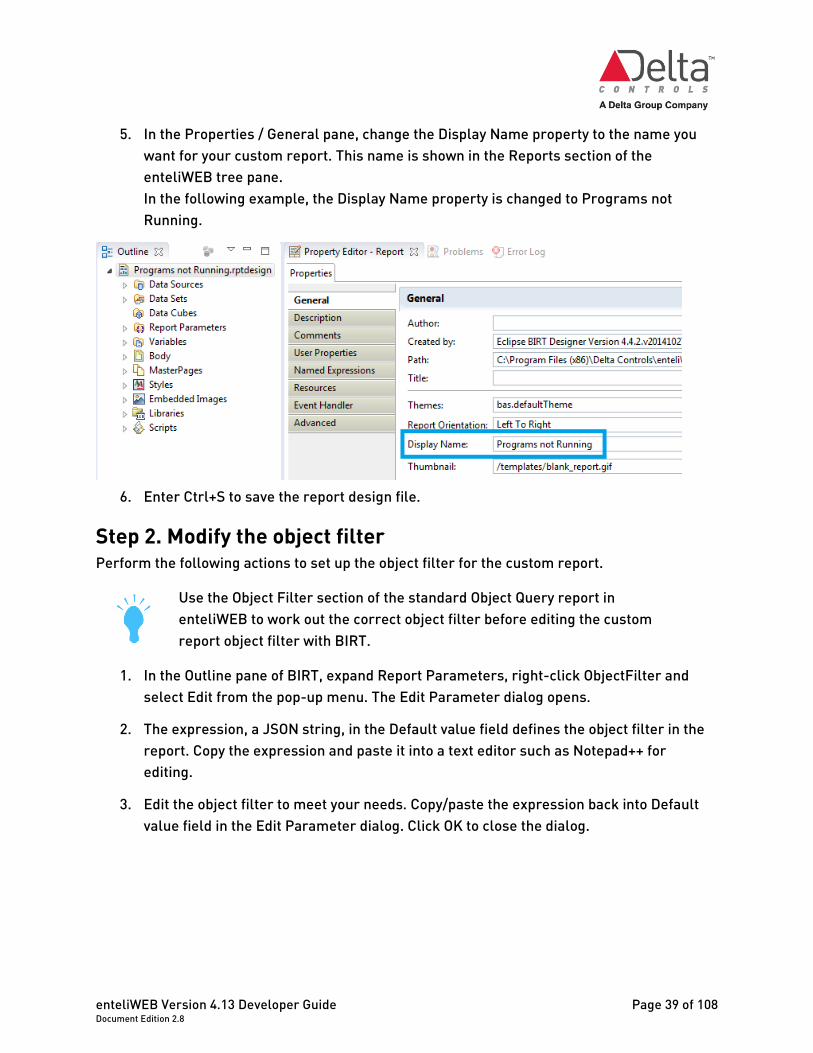
5. In the Properties / General pane, change the Display Name property to the name you want for your custom report. This name is shown in the Reports section of the enteliWEB tree pane. In the following example, the Display Name property is changed to Programs not Running.
6. Enter Ctrl+S to save the report design file.
Step 2. Modify the object filter Perform the following actions to set up the object filter for the custom report.
Use the Object Filter section of the standard Object Query report in enteliWEB to work out the correct object filter before editing the custom report object filter with BIRT.
1. In the Outline pane of BIRT, expand Report Parameters, right-click ObjectFilter and select Edit from the pop-up menu. The Edit Parameter dialog opens.
2. The expression, a JSON string, in the Default value field defines the object filter in the report. Copy the expression and paste it into a text editor such as Notepad++ for editing.
3. Edit the object filter to meet your needs. Copy/paste the expression back into Default value field in the Edit Parameter dialog. Click OK to close the dialog.
Chapter 2 - Creating a custom BAS report
Page 40 of 108 enteliWEB Version 4.13 Developer Guide Document Edition 2.8
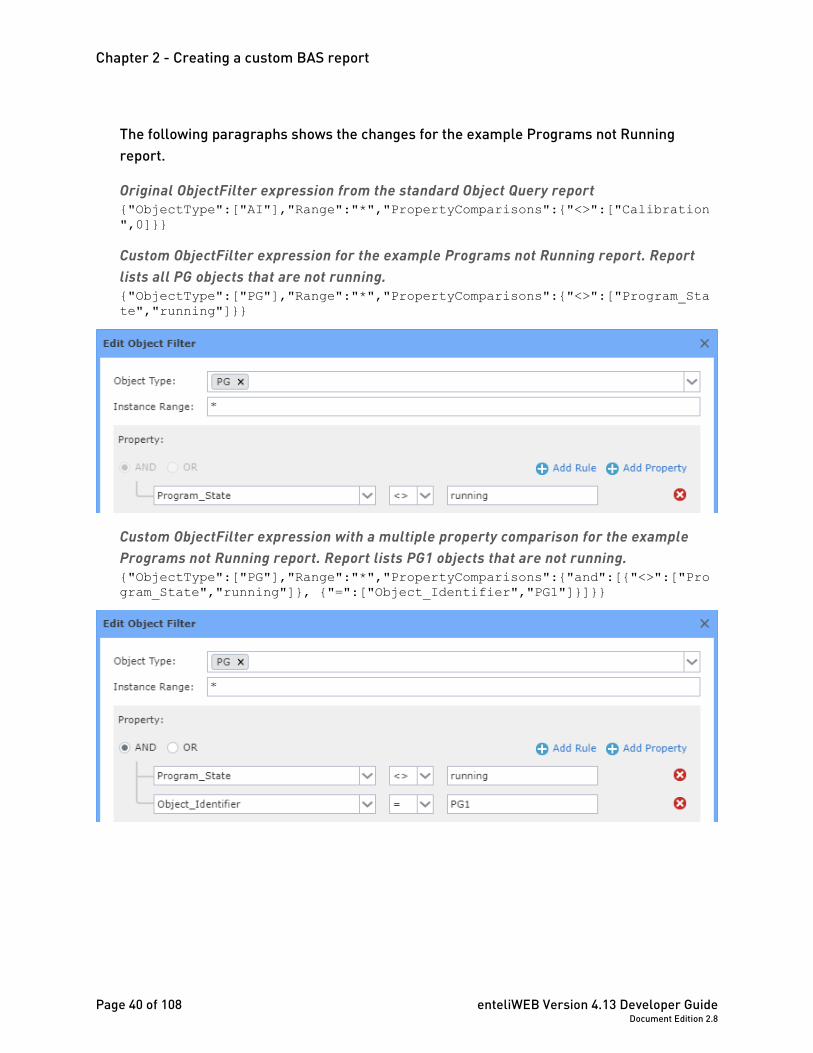
The following paragraphs shows the changes for the example Programs not Running report.
Original ObjectFilter expression from the standard Object Query report {"ObjectType":["AI"],"Range":"*","PropertyComparisons":{"<>":["Calibration",0]}}
Custom ObjectFilter expression for the example Programs not Running report. Report lists all PG objects that are not running. {"ObjectType":["PG"],"Range":"*","PropertyComparisons":{"<>":["Program_State","running"]}}
Custom ObjectFilter expression with a multiple property comparison for the example Programs not Running report. Report lists PG1 objects that are not running. {"ObjectType":["PG"],"Range":"*","PropertyComparisons":{"and":[{"<>":["Program_State","running"]}, {"=":["Object_Identifier","PG1"]}]}}
enteliWEB Version 4.13 Developer Guide Page 41 of 108 Document Edition 2.8
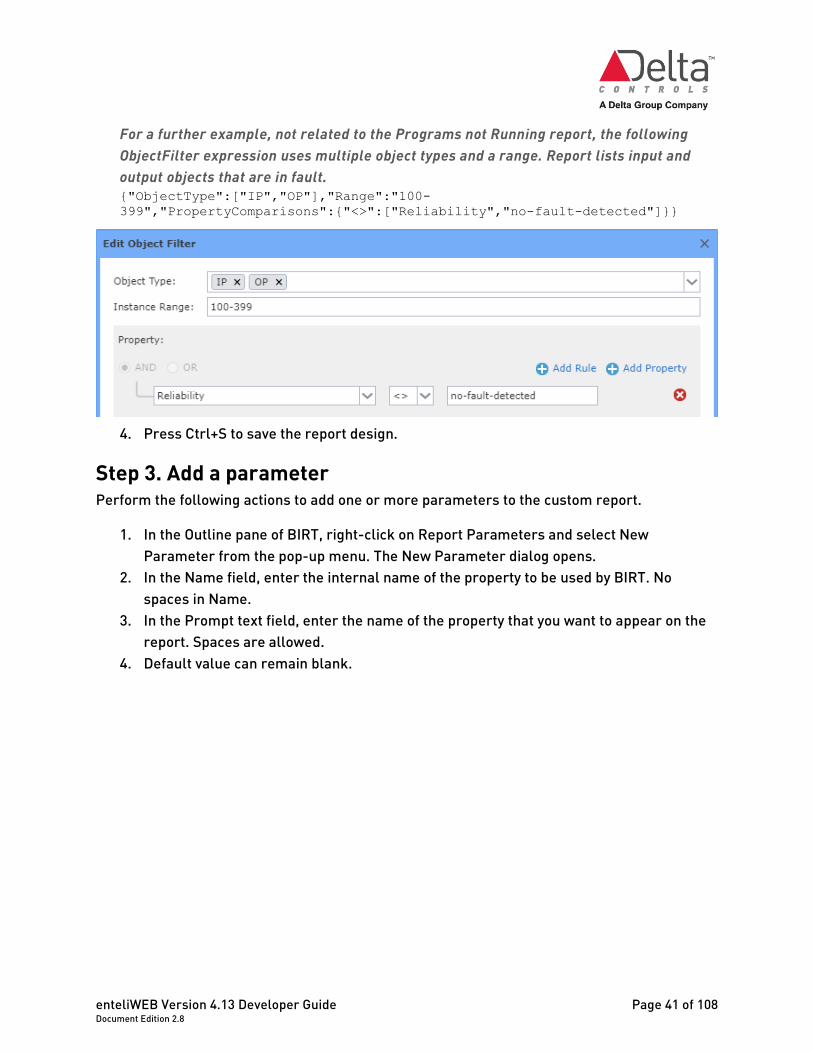
For a further example, not related to the Programs not Running report, the following ObjectFilter expression uses multiple object types and a range. Report lists input and output objects that are in fault. {"ObjectType":["IP","OP"],"Range":"100-399","PropertyComparisons":{"<>":["Reliability","no-fault-detected"]}}
4. Press Ctrl+S to save the report design.
Step 3. Add a parameter Perform the following actions to add one or more parameters to the custom report.
1. In the Outline pane of BIRT, right-click on Report Parameters and select New Parameter from the pop-up menu. The New Parameter dialog opens.
2. In the Name field, enter the internal name of the property to be used by BIRT. No spaces in Name.
3. In the Prompt text field, enter the name of the property that you want to appear on the report. Spaces are allowed.
4. Default value can remain blank.
Chapter 2 - Creating a custom BAS report
Page 42 of 108 enteliWEB Version 4.13 Developer Guide Document Edition 2.8
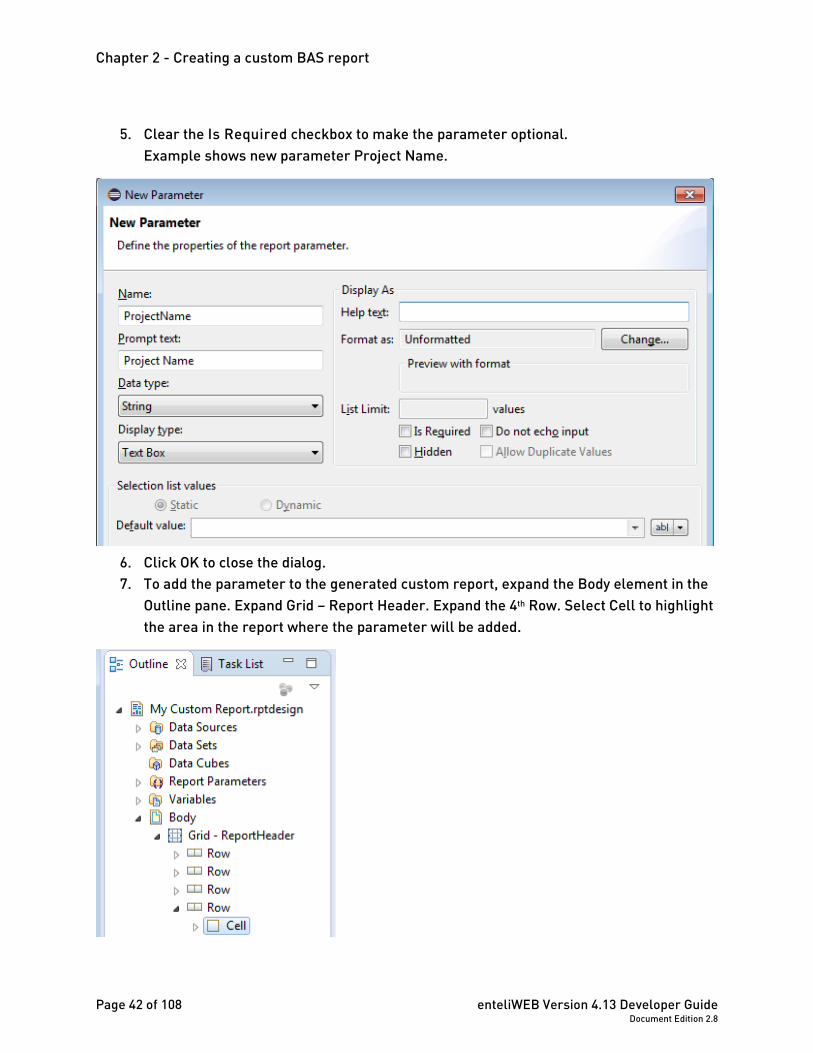
5. Clear the Is Required checkbox to make the parameter optional. Example shows new parameter Project Name.
6. Click OK to close the dialog. 7. To add the parameter to the generated custom report, expand the Body element in the
Outline pane. Expand Grid – Report Header. Expand the 4th Row. Select Cell to highlight the area in the report where the parameter will be added.
enteliWEB Version 4.13 Developer Guide Page 43 of 108 Document Edition 2.8
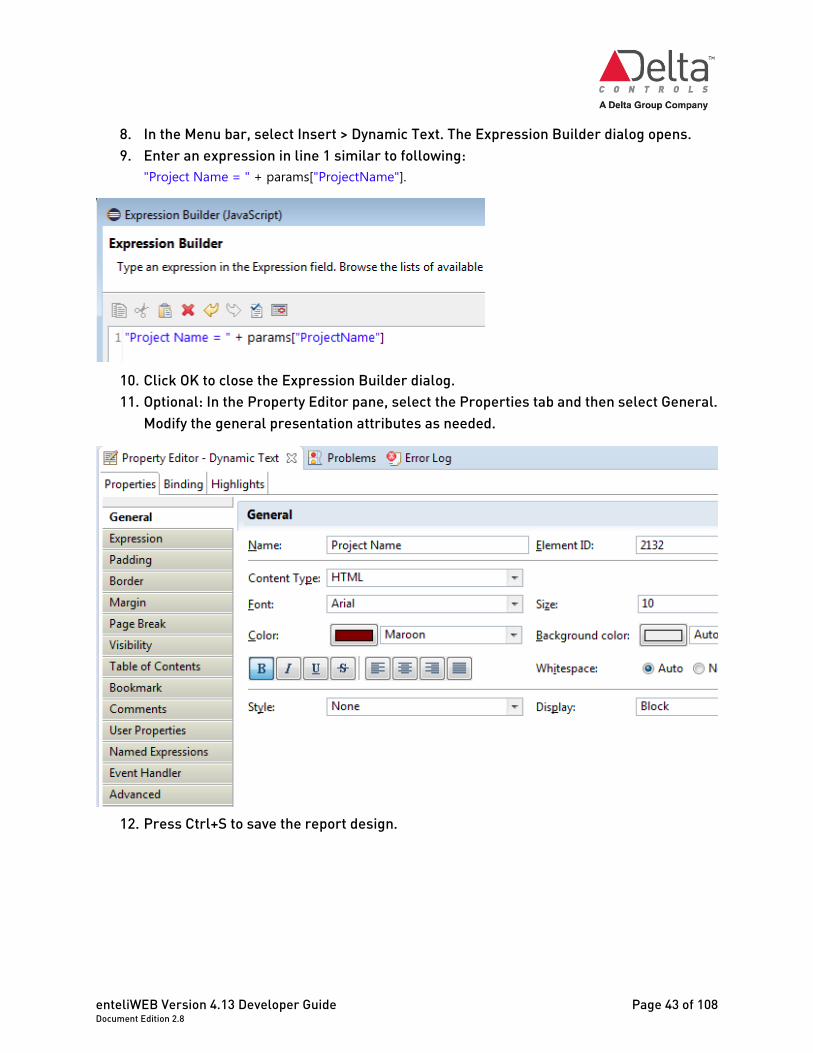
8. In the Menu bar, select Insert > Dynamic Text. The Expression Builder dialog opens. 9. Enter an expression in line 1 similar to following:
"Project Name = " + params["ProjectName"].
10. Click OK to close the Expression Builder dialog. 11. Optional: In the Property Editor pane, select the Properties tab and then select General.
Modify the general presentation attributes as needed.
12. Press Ctrl+S to save the report design.
Chapter 2 - Creating a custom BAS report
Page 44 of 108 enteliWEB Version 4.13 Developer Guide Document Edition 2.8
Step 4. Modify the report title Perform the following actions to customize the report title for the custom report.
1. In the Outline pane of BIRT, expand Report Parameters and double-click ReportTitle from the list of properties. The Edit Parameter dialog opens.
2. In the Default value field, enter the name you want for the report. For our example, enter Programs not Running. Click OK to close the dialog.
3. Press Ctrl+S to save the report design.
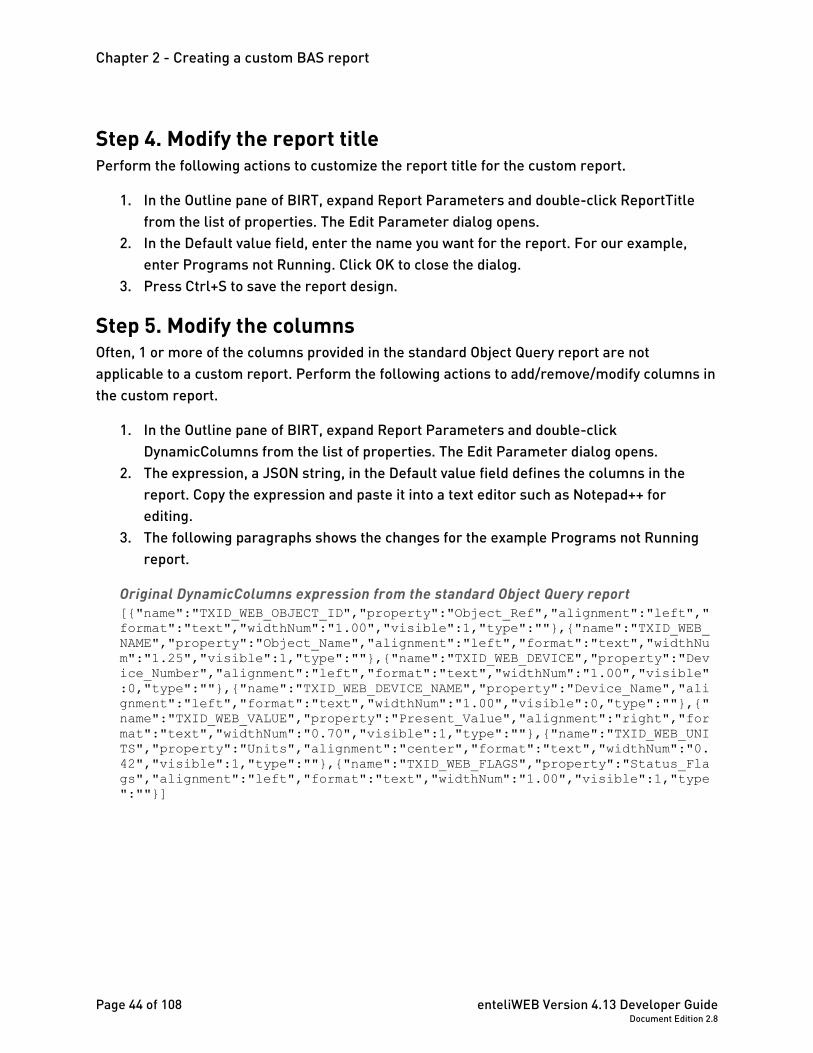
Step 5. Modify the columns Often, 1 or more of the columns provided in the standard Object Query report are not applicable to a custom report. Perform the following actions to add/remove/modify columns in the custom report.
1. In the Outline pane of BIRT, expand Report Parameters and double-click DynamicColumns from the list of properties. The Edit Parameter dialog opens.
2. The expression, a JSON string, in the Default value field defines the columns in the report. Copy the expression and paste it into a text editor such as Notepad++ for editing.
3. The following paragraphs shows the changes for the example Programs not Running report.
Original DynamicColumns expression from the standard Object Query report [{"name":"TXID_WEB_OBJECT_ID","property":"Object_Ref","alignment":"left","format":"text","widthNum":"1.00","visible":1,"type":""},{"name":"TXID_WEB_NAME","property":"Object_Name","alignment":"left","format":"text","widthNum":"1.25","visible":1,"type":""},{"name":"TXID_WEB_DEVICE","property":"Device_Number","alignment":"left","format":"text","widthNum":"1.00","visible":0,"type":""},{"name":"TXID_WEB_DEVICE_NAME","property":"Device_Name","alignment":"left","format":"text","widthNum":"1.00","visible":0,"type":""},{"name":"TXID_WEB_VALUE","property":"Present_Value","alignment":"right","format":"text","widthNum":"0.70","visible":1,"type":""},{"name":"TXID_WEB_UNITS","property":"Units","alignment":"center","format":"text","widthNum":"0.42","visible":1,"type":""},{"name":"TXID_WEB_FLAGS","property":"Status_Flags","alignment":"left","format":"text","widthNum":"1.00","visible":1,"type":""}]
enteliWEB Version 4.13 Developer Guide Page 45 of 108 Document Edition 2.8
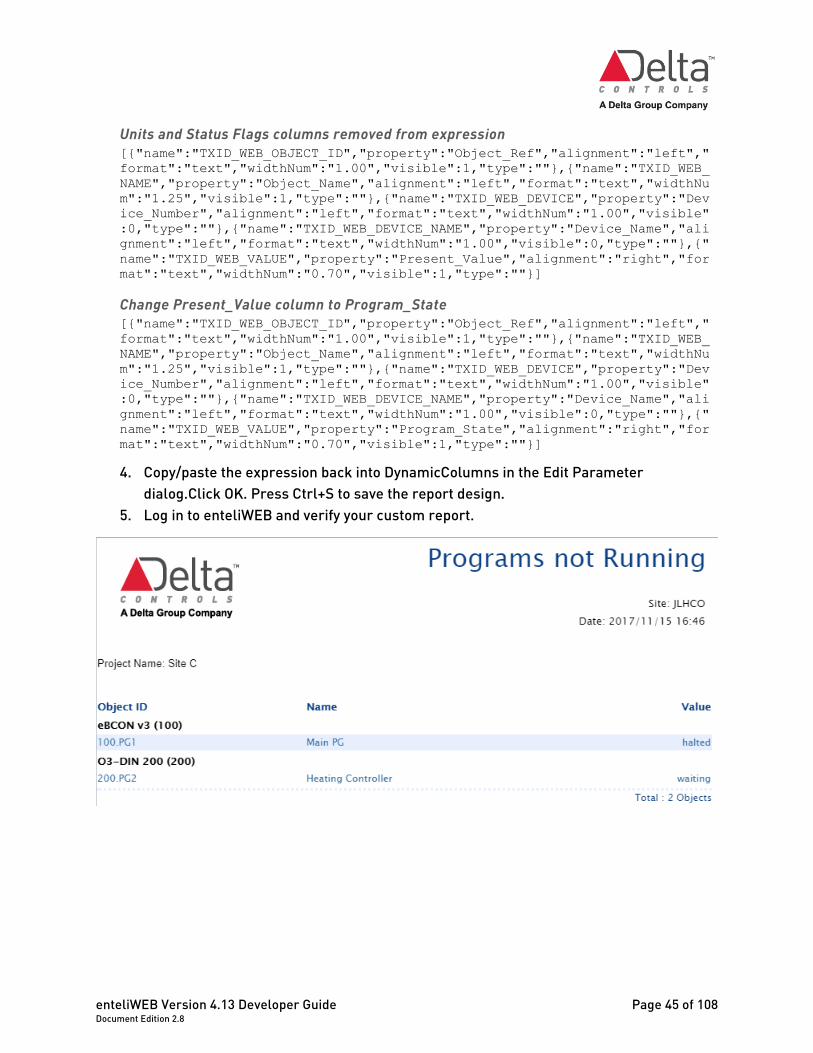
Units and Status Flags columns removed from expression [{"name":"TXID_WEB_OBJECT_ID","property":"Object_Ref","alignment":"left","format":"text","widthNum":"1.00","visible":1,"type":""},{"name":"TXID_WEB_NAME","property":"Object_Name","alignment":"left","format":"text","widthNum":"1.25","visible":1,"type":""},{"name":"TXID_WEB_DEVICE","property":"Device_Number","alignment":"left","format":"text","widthNum":"1.00","visible":0,"type":""},{"name":"TXID_WEB_DEVICE_NAME","property":"Device_Name","alignment":"left","format":"text","widthNum":"1.00","visible":0,"type":""},{"name":"TXID_WEB_VALUE","property":"Present_Value","alignment":"right","format":"text","widthNum":"0.70","visible":1,"type":""}]
Change Present_Value column to Program_State [{"name":"TXID_WEB_OBJECT_ID","property":"Object_Ref","alignment":"left","format":"text","widthNum":"1.00","visible":1,"type":""},{"name":"TXID_WEB_NAME","property":"Object_Name","alignment":"left","format":"text","widthNum":"1.25","visible":1,"type":""},{"name":"TXID_WEB_DEVICE","property":"Device_Number","alignment":"left","format":"text","widthNum":"1.00","visible":0,"type":""},{"name":"TXID_WEB_DEVICE_NAME","property":"Device_Name","alignment":"left","format":"text","widthNum":"1.00","visible":0,"type":""},{"name":"TXID_WEB_VALUE","property":"Program_State","alignment":"right","format":"text","widthNum":"0.70","visible":1,"type":""}]
4. Copy/paste the expression back into DynamicColumns in the Edit Parameter dialog.Click OK. Press Ctrl+S to save the report design.
5. Log in to enteliWEB and verify your custom report.
Chapter 3 - Creating a custom widget type
Page 46 of 108 enteliWEB Version 4.13 Developer Guide Document Edition 2.8
Chapter 3 - Creating a custom widget type enteliWEB comes with ready to use widget types. The enteliWEB widget framework enables developers to develop their own custom widget types and use them alongside the enteliWEB widget types. This chapter covers the basics of developing and deploying a new custom widget type. For the purpose of this document, we refer to this as developing a new widget, without the type.
If you have created a custom widget in enteliWEB version 1.1 or earlier then it must be upgraded to work properly in 1.2 and later versions. See the Upgrading Widgets from 1.1 to 2.2 section. Widgets from 1.2 work in later versions without any need to upgrade.
You must have a good understanding of the JavaScript scripting language and XML syntax usage. Please familiarize yourself with these technologies.
The following tutorials are recommended if you are new to these concepts or would like a refresher: https://developer.mozilla.org/en-US/docs/JavaScript/A_re-introduction_to_JavaScript
http://www.w3schools.com/xml/
Suggested tools An enteliWEB widget is essentially a web page – it is an HTML file with a little PHP that injects widget information from the server and database. JavaScript is the scripting language used to create the client side functionality for the widget. Because of this, development and debugging environments are flexible – there is no required application to develop in.
Development environments There are many tools available, which allow the development of a web page, but the most beneficial have JavaScript support. Many commercial applications are capable, and even some open source options. A widget can be developed in Notepad, however this might prove challenging.
The following wiki provides a comprehensive list of common HTML editors that may help: http://en.wikipedia.org/wiki/List_of_HTML_editors#Basic_text_editors
enteliWEB Version 4.13 Developer Guide Page 47 of 108 Document Edition 2.8
Debugging environments Most modern browsers such as IE, Chrome and FireFox have built in developer tools which allow developers to trigger debug statements in their code. Becoming familiar with one or more of these browsers, and learning how to use their developer toolkits, is highly recommended.
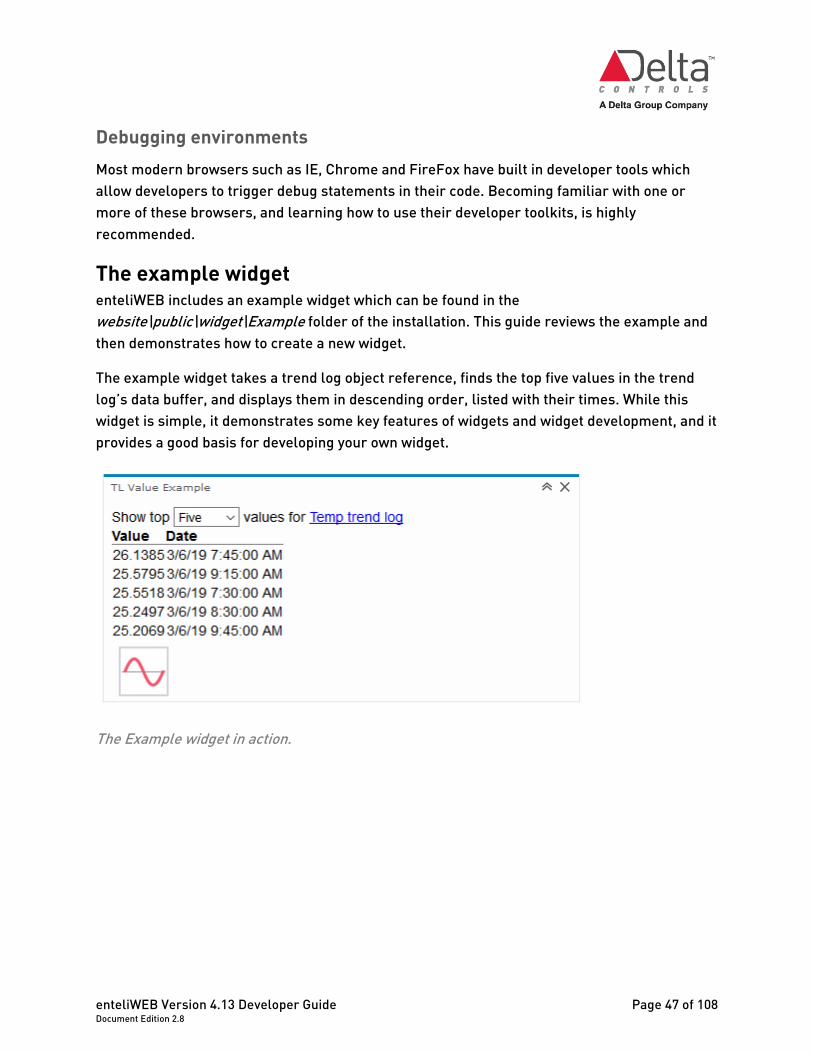
The example widget enteliWEB includes an example widget which can be found in the website\public\widget\Example folder of the installation. This guide reviews the example and then demonstrates how to create a new widget.
The example widget takes a trend log object reference, finds the top five values in the trend log’s data buffer, and displays them in descending order, listed with their times. While this widget is simple, it demonstrates some key features of widgets and widget development, and it provides a good basis for developing your own widget.
The Example widget in action.
Chapter 3 - Creating a custom widget type
Page 48 of 108 enteliWEB Version 4.13 Developer Guide Document Edition 2.8
Widget basics A widget is made up of the following main components:
• An XML config file which indicates widget attributes as well as what settings and preferences should be made available to those who use the widget.
• A PHTML script file which contains the widget implementation. • A custom PHP controller file which may contain the custom web services required by
the widget to function correctly. A custom PHP controller file is optional.
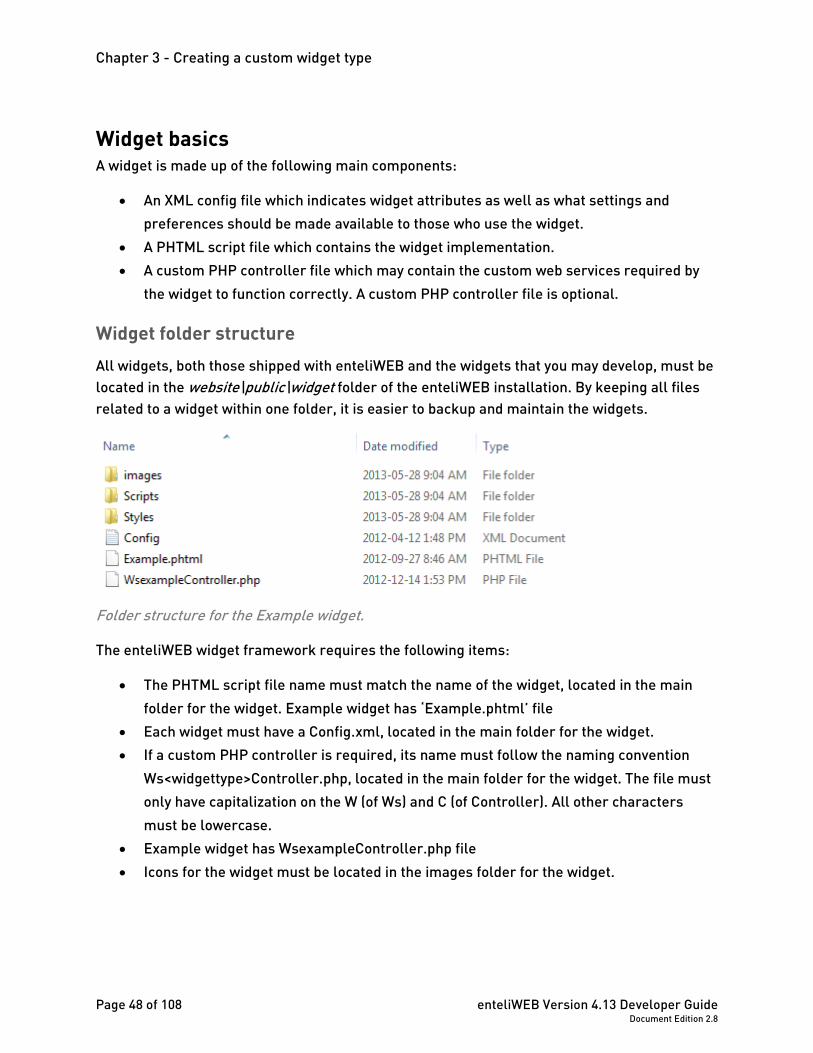
Widget folder structure All widgets, both those shipped with enteliWEB and the widgets that you may develop, must be located in the website\public\widget folder of the enteliWEB installation. By keeping all files related to a widget within one folder, it is easier to backup and maintain the widgets.
Folder structure for the Example widget.
The enteliWEB widget framework requires the following items:
• The PHTML script file name must match the name of the widget, located in the main folder for the widget. Example widget has ‘Example.phtml’ file
• Each widget must have a Config.xml, located in the main folder for the widget. • If a custom PHP controller is required, its name must follow the naming convention
Ws<widgettype>Controller.php, located in the main folder for the widget. The file must only have capitalization on the W (of Ws) and C (of Controller). All other characters must be lowercase.
• Example widget has WsexampleController.php file • Icons for the widget must be located in the images folder for the widget.

enteliWEB Version 4.13 Developer Guide Page 49 of 108 Document Edition 2.8
Widgets and Cross Site Request Forgery enteliWEB (version 4.0 and later) is protected against penetration by a CSRF (Cross Site Request Forgery) attack. To ensure your widget works properly with enteliWEB, apply the following recommendations and follow the code examples in this document.
Recommendations for CSRF compatibility:
• use $this->headScript() as shown in the DOCTYPE and $this->headScript() example to include the Delta token insertion code.
• use jQuery to do AJAX requests
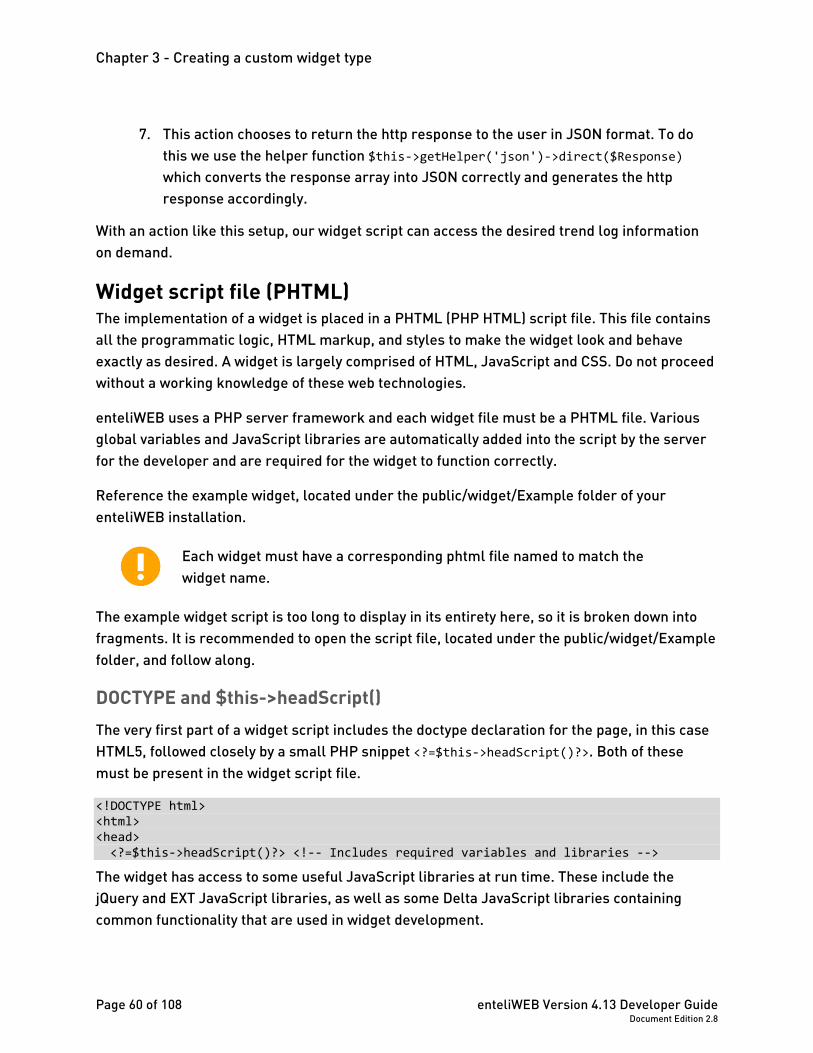
Widget config.xml The config file is essentially the definition of the widget. It indicates the widget type properties, as well as any required settings and preferences for the widget. The file is written in XML format and follows a specific schema recognized by enteliWEB.
Open the Config.xml file located in the Example folder (website\public\widget\Example). It contains the following:
<?xml version="1.0" encoding="utf-8"?> <WidgetType xmlns="http://www.deltacontrols.com/enteliweb/widget/widgets.xsd" xmlns:xsi="http://www.w3.org/2001/XMLSchema-instance" xsi:schemaLocation="http://www.deltacontrols.com/enteliweb/widget/widgets.xsd ../widgets.xsd" type="Example" title="TL Value Example" icon="tl" description="Testing new example"> <Setting name="TrendLogRef" displayName="Trend Log Reference" type="objRef" description="Trend log to run results on." array="false"> <Value>//Demo/2007.TL1</Value> </Setting> <Preference name="NumResults" displayName="Number of Results" type="enum" description="" array="false"> <EnumValues> <EnumValue displayValue="Five">5</EnumValue> <EnumValue displayValue="Ten">10</EnumValue> <EnumValue displayValue="Fifteen">15</EnumValue> </EnumValues> <Value>5</Value> </Preference> </WidgetType>
Chapter 3 - Creating a custom widget type
Page 50 of 108 enteliWEB Version 4.13 Developer Guide Document Edition 2.8
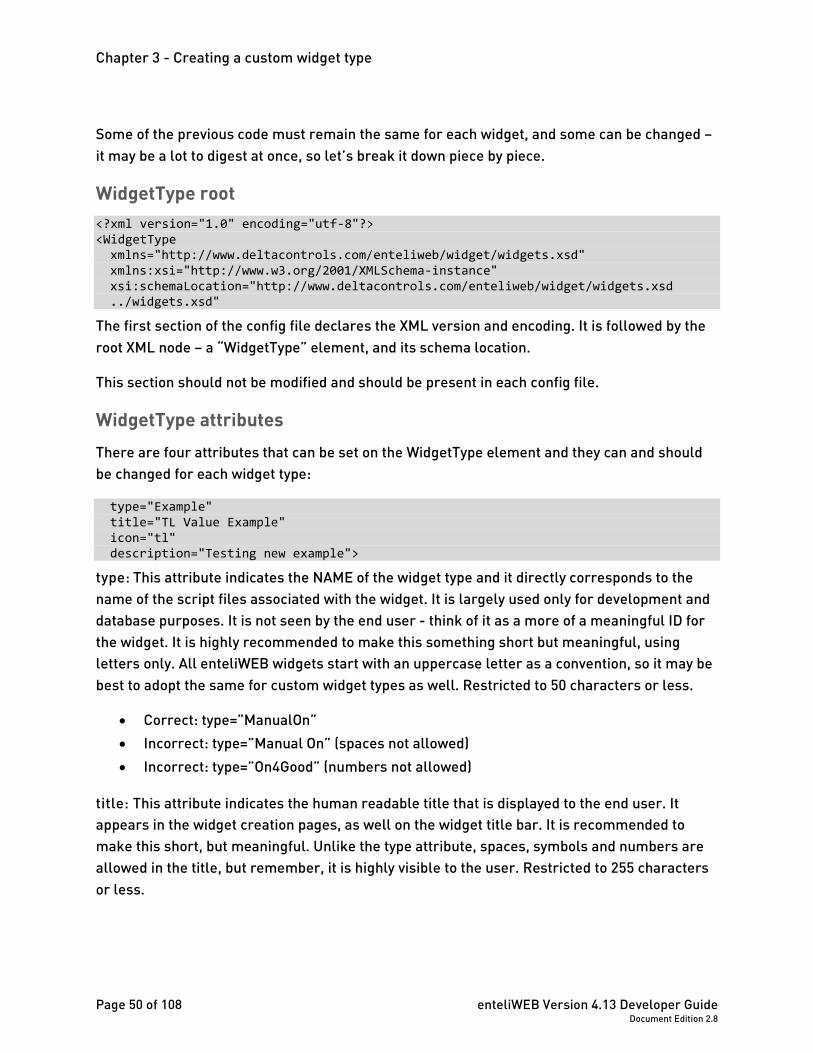
Some of the previous code must remain the same for each widget, and some can be changed – it may be a lot to digest at once, so let’s break it down piece by piece.
WidgetType root <?xml version="1.0" encoding="utf-8"?> <WidgetType xmlns="http://www.deltacontrols.com/enteliweb/widget/widgets.xsd" xmlns:xsi="http://www.w3.org/2001/XMLSchema-instance" xsi:schemaLocation="http://www.deltacontrols.com/enteliweb/widget/widgets.xsd ../widgets.xsd"
The first section of the config file declares the XML version and encoding. It is followed by the root XML node – a “WidgetType” element, and its schema location.
This section should not be modified and should be present in each config file.
WidgetType attributes There are four attributes that can be set on the WidgetType element and they can and should be changed for each widget type:
type="Example" title="TL Value Example" icon="tl" description="Testing new example">
type: This attribute indicates the NAME of the widget type and it directly corresponds to the name of the script files associated with the widget. It is largely used only for development and database purposes. It is not seen by the end user - think of it as a more of a meaningful ID for the widget. It is highly recommended to make this something short but meaningful, using letters only. All enteliWEB widgets start with an uppercase letter as a convention, so it may be best to adopt the same for custom widget types as well. Restricted to 50 characters or less.
• Correct: type=”ManualOn” • Incorrect: type=”Manual On” (spaces not allowed) • Incorrect: type=”On4Good” (numbers not allowed)
title: This attribute indicates the human readable title that is displayed to the end user. It appears in the widget creation pages, as well on the widget title bar. It is recommended to make this short, but meaningful. Unlike the type attribute, spaces, symbols and numbers are allowed in the title, but remember, it is highly visible to the user. Restricted to 255 characters or less.
enteliWEB Version 4.13 Developer Guide Page 51 of 108 Document Edition 2.8
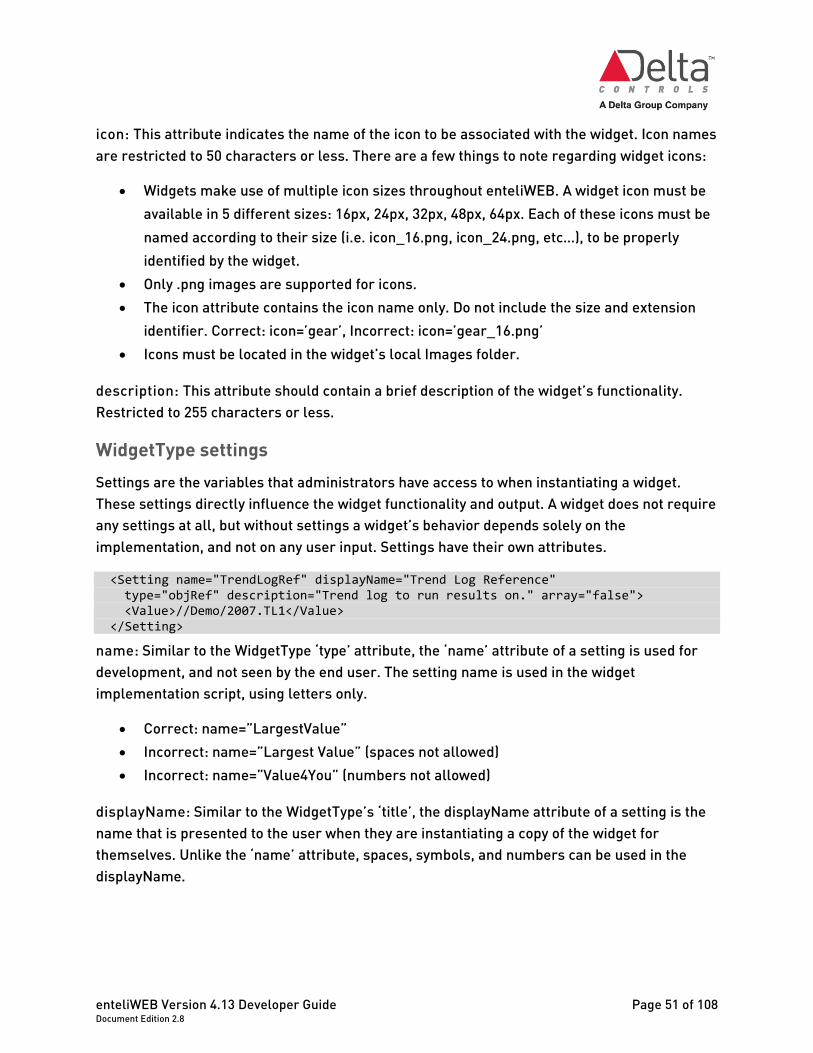
icon: This attribute indicates the name of the icon to be associated with the widget. Icon names are restricted to 50 characters or less. There are a few things to note regarding widget icons:
• Widgets make use of multiple icon sizes throughout enteliWEB. A widget icon must be available in 5 different sizes: 16px, 24px, 32px, 48px, 64px. Each of these icons must be named according to their size (i.e. icon_16.png, icon_24.png, etc…), to be properly identified by the widget.
• Only .png images are supported for icons. • The icon attribute contains the icon name only. Do not include the size and extension
identifier. Correct: icon=’gear’, Incorrect: icon=’gear_16.png’ • Icons must be located in the widget’s local Images folder.
description: This attribute should contain a brief description of the widget’s functionality. Restricted to 255 characters or less.
WidgetType settings Settings are the variables that administrators have access to when instantiating a widget. These settings directly influence the widget functionality and output. A widget does not require any settings at all, but without settings a widget’s behavior depends solely on the implementation, and not on any user input. Settings have their own attributes.
<Setting name="TrendLogRef" displayName="Trend Log Reference" type="objRef" description="Trend log to run results on." array="false"> <Value>//Demo/2007.TL1</Value> </Setting>
name: Similar to the WidgetType ‘type’ attribute, the ‘name’ attribute of a setting is used for development, and not seen by the end user. The setting name is used in the widget implementation script, using letters only.
• Correct: name=”LargestValue” • Incorrect: name=”Largest Value” (spaces not allowed) • Incorrect: name=”Value4You” (numbers not allowed)
displayName: Similar to the WidgetType’s ‘title’, the displayName attribute of a setting is the name that is presented to the user when they are instantiating a copy of the widget for themselves. Unlike the ‘name’ attribute, spaces, symbols, and numbers can be used in the displayName.
Chapter 3 - Creating a custom widget type
Page 52 of 108 enteliWEB Version 4.13 Developer Guide Document Edition 2.8
type: This attribute indicates the setting type. It functions to help select the correct input element to display to the end user who selects the widget settings when instantiating a widget. For example, the objRef setting type has an associated object selector that is automatically shown to the user in the widget setting page.
The following setting types are supported by enteliWEB:
• string, number, bool, date, color, objRef, report, graphic, enum, site, meter • string, bool (uses 0 and 1 for values), enum, site, objRef and meter have customized
input objects to help the user more easily enter in a value • number, date, color, report and graphic do not have specialized inputs and simply use a
text box for value entry. In the future these types will be expanded on to have more customized inputs
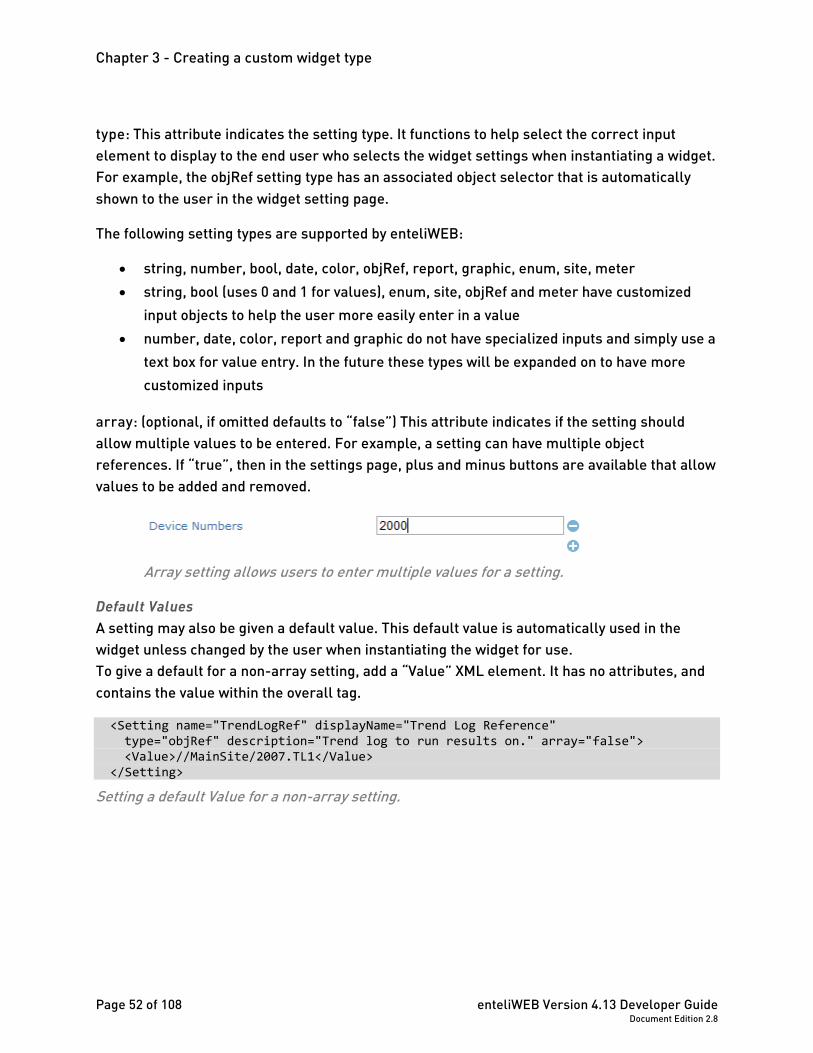
array: (optional, if omitted defaults to “false”) This attribute indicates if the setting should allow multiple values to be entered. For example, a setting can have multiple object references. If “true”, then in the settings page, plus and minus buttons are available that allow values to be added and removed.
Array setting allows users to enter multiple values for a setting.
Default Values A setting may also be given a default value. This default value is automatically used in the widget unless changed by the user when instantiating the widget for use. To give a default for a non-array setting, add a “Value” XML element. It has no attributes, and contains the value within the overall tag.
<Setting name="TrendLogRef" displayName="Trend Log Reference" type="objRef" description="Trend log to run results on." array="false"> <Value>//MainSite/2007.TL1</Value> </Setting>
Setting a default Value for a non-array setting.

enteliWEB Version 4.13 Developer Guide Page 53 of 108 Document Edition 2.8
To give a default for an array setting, enclose all “Value” elements within a parent “Values” element. <Setting name="TrendLogRefs" displayName="Trend Log References" type="objRef" description="Trend logs to run results on." array="true"> <Values> <Value>//MainSite/2007.TL1</Value> <Value>//MainSite/2007.TL2</Value> </Values> </Setting>
Setting a default value for an array setting.
WidgetType preferences Preferences are very similar to settings, in terms of how they are setup in the Config.xml file. However, they should be regarded differently than settings. Preferences are values that are intended to be changed by the dashboard user at run time when the widget is being used. Preferences are often variables that affect the UI more than the function of the widget. For example, the number of values to show, or the highlight color of a column. It is up to the widget implementation to decide how to present these preferences to the user at run time, which is discussed later when we look at the widget implementation script code.
<Preference name="NumResults" displayName="Number of Results" type="enum" description="" array="false"> <EnumValues> <EnumValue displayValue="Five">5</EnumValue> <EnumValue displayValue="Ten">10</EnumValue> <EnumValue displayValue="Fifteen">15</EnumValue> </EnumValues> <Value>5</Value> </Preference>
A preference is setup in a “Preference” XML element, and contains the same attributes as the Settings element, with the same restrictions: name, displayName, type, description, and array. These attributes and restrictions are listed in full in the previous “WidgetType Settings” section.
However, the previous preference example does show something new – how to setup a Preference (or Setting) to use an enumerated listed of values for selection.
Enumerations A setting or preference can restrict the user input to a list (enumeration) of values. This is accomplished by setting the type to ‘enum’. Enumeration values (and display values, if desired)

Chapter 3 - Creating a custom widget type
Page 54 of 108 enteliWEB Version 4.13 Developer Guide Document Edition 2.8
are also setup in their own XML element, and must be included for the enum setting/preference to function correctly.
<EnumValues> <EnumValue displayValue="Five">5</EnumValue> <EnumValue displayValue="Ten">10</EnumValue> <EnumValue displayValue="Fifteen">15</EnumValue> </EnumValues> <Value>5</Value>
In the example, each EnumValue element may have a displayValue attribute set. This is the value that is displayed to the user in the enum drop down selection box. The value for the Preference stored in the DB and used by the widget script is given as the EnumValue element content – in the previous example: 5, 10 and 15.
For those familiar with HTML option tag, the displayValue attribute corresponds to the display value of the option, and the EnumValue content corresponds to the key value of the option.
A default value may also be set for the enum, and indicates which option is to be selected by default when an admin instantiates a widget.
The enum Preference as seen by an admin when instantiating a widget.
enteliWEB Version 4.13 Developer Guide Page 55 of 108 Document Edition 2.8
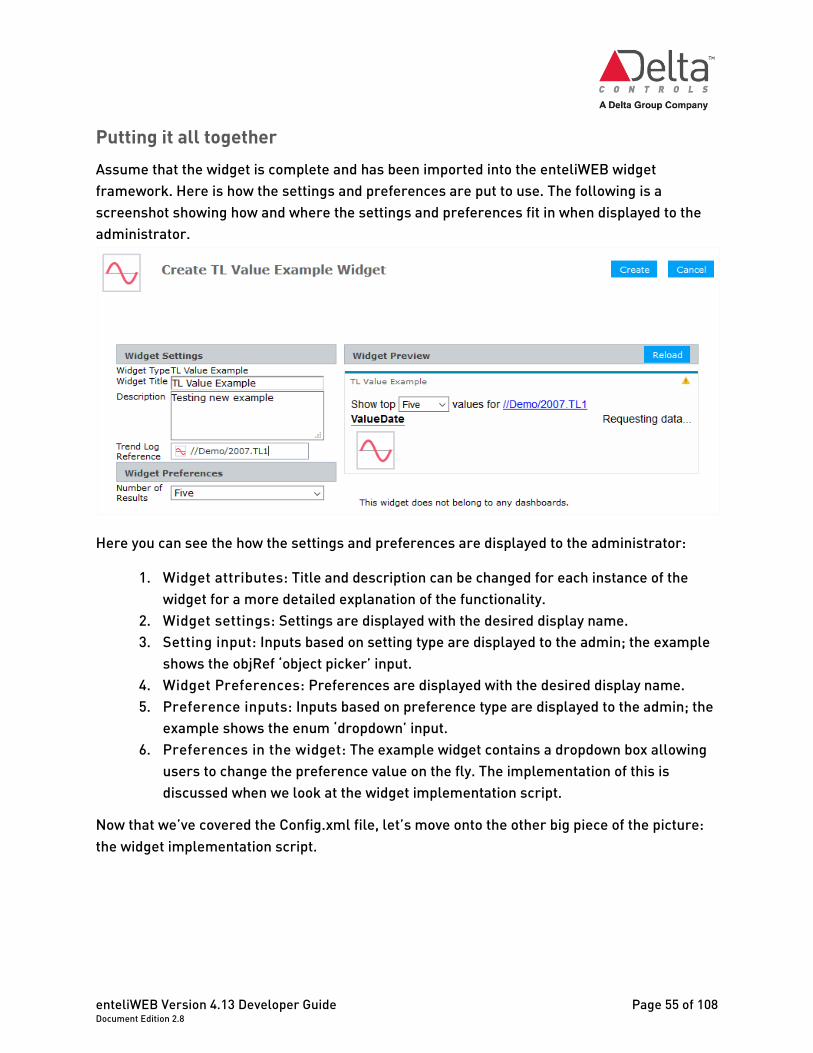
Putting it all together Assume that the widget is complete and has been imported into the enteliWEB widget framework. Here is how the settings and preferences are put to use. The following is a screenshot showing how and where the settings and preferences fit in when displayed to the administrator.
Here you can see the how the settings and preferences are displayed to the administrator:
1. Widget attributes: Title and description can be changed for each instance of the widget for a more detailed explanation of the functionality.
2. Widget settings: Settings are displayed with the desired display name. 3. Setting input: Inputs based on setting type are displayed to the admin; the example
shows the objRef ‘object picker’ input. 4. Widget Preferences: Preferences are displayed with the desired display name. 5. Preference inputs: Inputs based on preference type are displayed to the admin; the
example shows the enum ‘dropdown’ input. 6. Preferences in the widget: The example widget contains a dropdown box allowing
users to change the preference value on the fly. The implementation of this is discussed when we look at the widget implementation script.
Now that we’ve covered the Config.xml file, let’s move onto the other big piece of the picture: the widget implementation script.

Chapter 3 - Creating a custom widget type
Page 56 of 108 enteliWEB Version 4.13 Developer Guide Document Edition 2.8
Widget custom controller file (PHP) In addition to the implementation of the widget, code is required to generate the data that the widget consumes and displays. It is easier to understand how the widget implementation works when the exact data to be worked with is known.
PHP web service controllers are part of enteliWEB’s MVC (Model, View, Controller) framework. Their job is to accept http requests from a client, the widget in our example, process data from database object models, and ,in our example, return an http response to the client containing the desired data.
enteliWEB contains a number of web service controllers that provide data to be used by widgets. For example, there are web services that return information about object properties or alarming information that a custom widget can make use of.
Custom widgets may require more specialized results though, and to support this, each widget may have its own custom PHP controller. This controller is loaded into the enteliWEB framework when the widget is run. It functions like an existing enteliWEB web service controller and has access to database and device information.
File name convention For a custom PHP controller to be picked up and used in a custom widget, the file name must follow a specific naming convention: Ws<widgettype>Controller.php
• Example: Our Example widget WsexampleController.php • Example: A custom widget type named ‘PointsInManual’
WspointsinmanualController.php
The controller must be placed in the root folder for the widget.
enteliWEB Version 4.13 Developer Guide Page 57 of 108 Document Edition 2.8
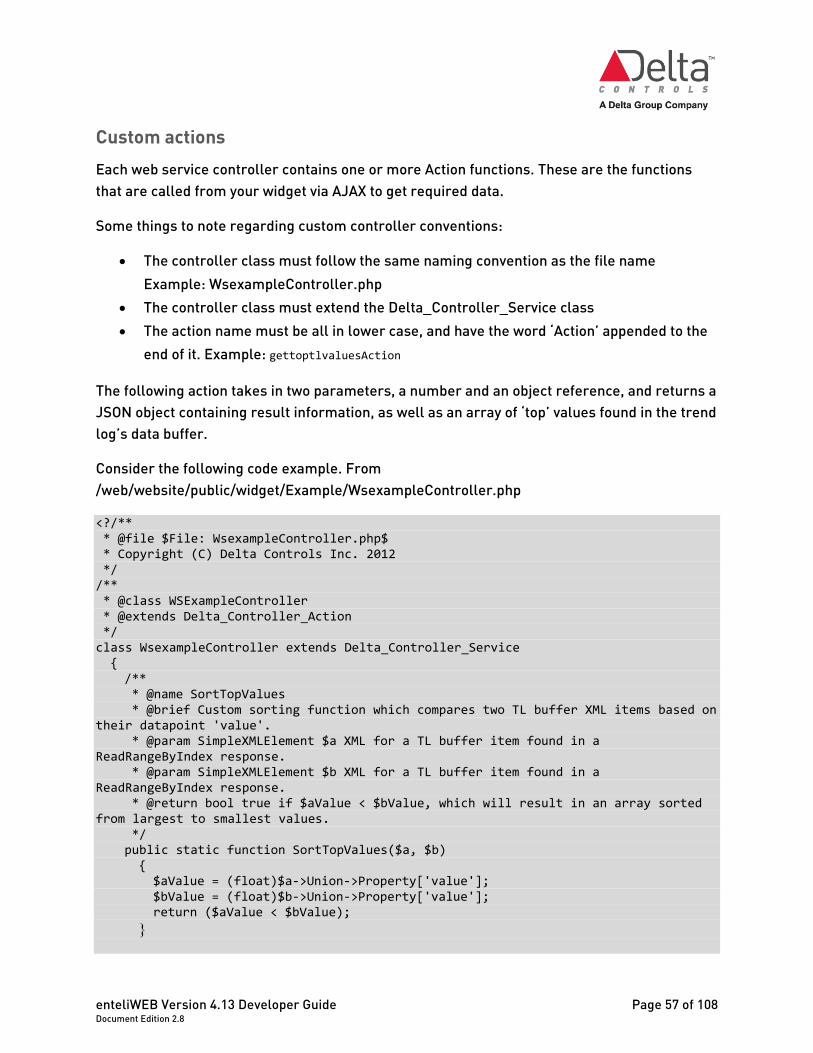
Custom actions Each web service controller contains one or more Action functions. These are the functions that are called from your widget via AJAX to get required data.
Some things to note regarding custom controller conventions:
• The controller class must follow the same naming convention as the file name Example: WsexampleController.php
• The controller class must extend the Delta_Controller_Service class • The action name must be all in lower case, and have the word ‘Action’ appended to the
end of it. Example: gettoptlvaluesAction
The following action takes in two parameters, a number and an object reference, and returns a JSON object containing result information, as well as an array of ‘top’ values found in the trend log’s data buffer.
Consider the following code example. From /web/website/public/widget/Example/WsexampleController.php
<?/** * @file $File: WsexampleController.php$ * Copyright (C) Delta Controls Inc. 2012 */ /** * @class WSExampleController * @extends Delta_Controller_Action */ class WsexampleController extends Delta_Controller_Service { /** * @name SortTopValues * @brief Custom sorting function which compares two TL buffer XML items based on their datapoint 'value'. * @param SimpleXMLElement $a XML for a TL buffer item found in a ReadRangeByIndex response. * @param SimpleXMLElement $b XML for a TL buffer item found in a ReadRangeByIndex response. * @return bool true if $aValue < $bValue, which will result in an array sorted from largest to smallest values. */ public static function SortTopValues($a, $b) { $aValue = (float)$a->Union->Property['value']; $bValue = (float)$b->Union->Property['value']; return ($aValue < $bValue); }
Chapter 3 - Creating a custom widget type
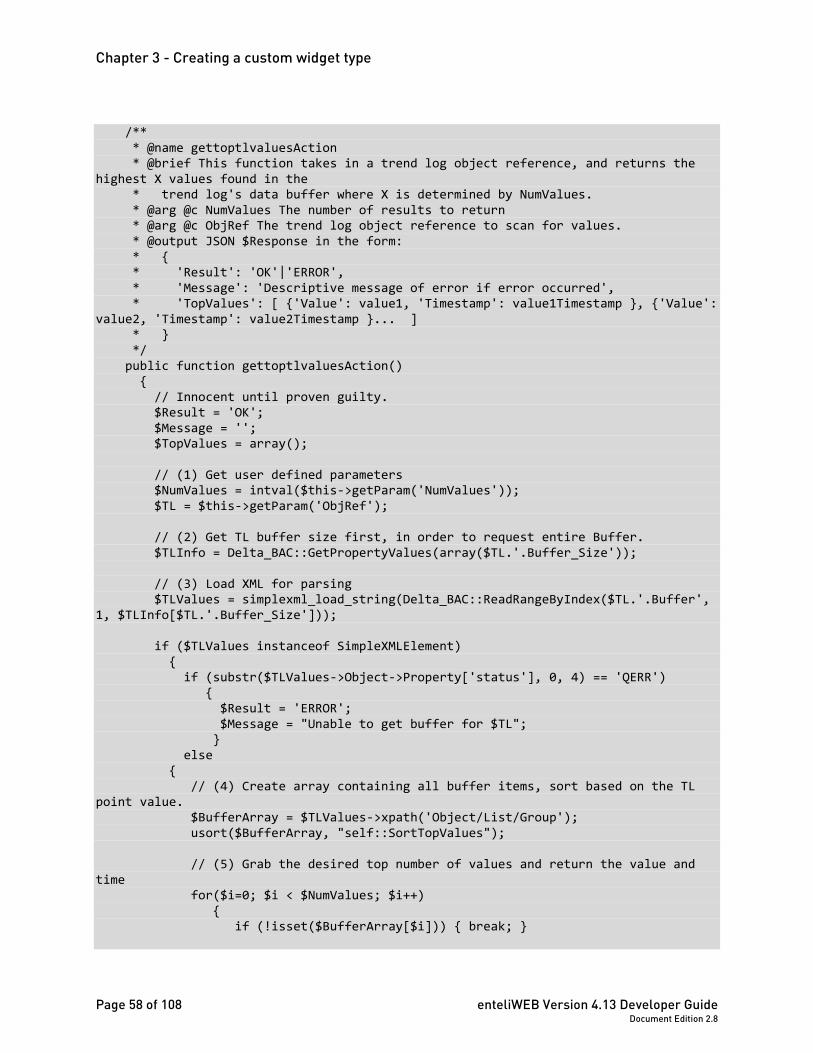
Page 58 of 108 enteliWEB Version 4.13 Developer Guide Document Edition 2.8
/** * @name gettoptlvaluesAction * @brief This function takes in a trend log object reference, and returns the highest X values found in the * trend log's data buffer where X is determined by NumValues. * @arg @c NumValues The number of results to return * @arg @c ObjRef The trend log object reference to scan for values. * @output JSON $Response in the form: * { * 'Result': 'OK'|'ERROR', * 'Message': 'Descriptive message of error if error occurred', * 'TopValues': [ {'Value': value1, 'Timestamp': value1Timestamp }, {'Value': value2, 'Timestamp': value2Timestamp }... ] * } */ public function gettoptlvaluesAction() { // Innocent until proven guilty. $Result = 'OK'; $Message = ''; $TopValues = array(); // (1) Get user defined parameters $NumValues = intval($this->getParam('NumValues')); $TL = $this->getParam('ObjRef'); // (2) Get TL buffer size first, in order to request entire Buffer. $TLInfo = Delta_BAC::GetPropertyValues(array($TL.'.Buffer_Size')); // (3) Load XML for parsing $TLValues = simplexml_load_string(Delta_BAC::ReadRangeByIndex($TL.'.Buffer', 1, $TLInfo[$TL.'.Buffer_Size'])); if ($TLValues instanceof SimpleXMLElement) { if (substr($TLValues->Object->Property['status'], 0, 4) == 'QERR') { $Result = 'ERROR'; $Message = "Unable to get buffer for $TL"; } else { // (4) Create array containing all buffer items, sort based on the TL point value. $BufferArray = $TLValues->xpath('Object/List/Group'); usort($BufferArray, "self::SortTopValues"); // (5) Grab the desired top number of values and return the value and time for($i=0; $i < $NumValues; $i++) { if (!isset($BufferArray[$i])) { break; }
enteliWEB Version 4.13 Developer Guide Page 59 of 108 Document Edition 2.8
$TopValues[] = array( 'Timestamp' => (string)$BufferArray[$i]->Property['value'], 'Value' => (float)$BufferArray[$i]->Union->Property['value']); } } } else { $Result = 'ERROR'; $Message = "Unable to get buffer for $TL"; } // (6) Craft and send response $Response = array('Result' => $Result, 'Message' => $Message, 'TopValues' => $TopValues); // (7) Respond in JSON format; use the json helper method to handle our response. $this->getHelper('json')->direct($Response); } }
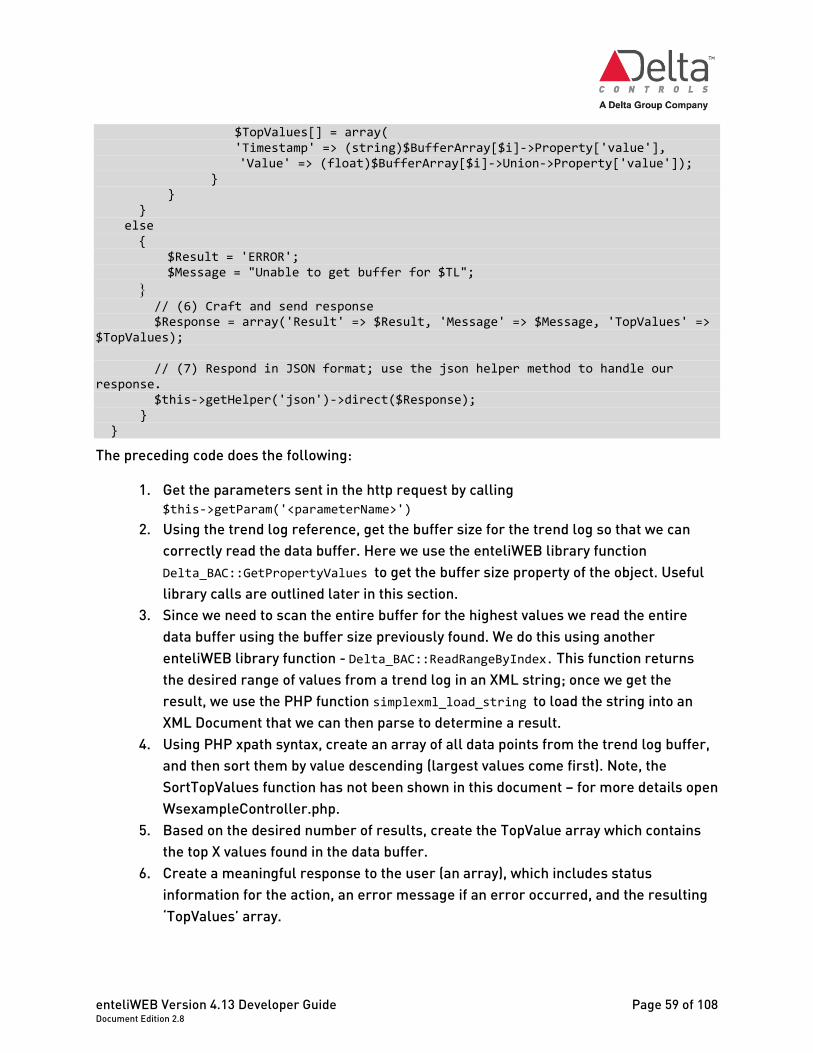
The preceding code does the following:
1. Get the parameters sent in the http request by calling $this->getParam('<parameterName>')
2. Using the trend log reference, get the buffer size for the trend log so that we can correctly read the data buffer. Here we use the enteliWEB library function Delta_BAC::GetPropertyValues to get the buffer size property of the object. Useful library calls are outlined later in this section.
3. Since we need to scan the entire buffer for the highest values we read the entire data buffer using the buffer size previously found. We do this using another enteliWEB library function - Delta_BAC::ReadRangeByIndex. This function returns the desired range of values from a trend log in an XML string; once we get the result, we use the PHP function simplexml_load_string to load the string into an XML Document that we can then parse to determine a result.
4. Using PHP xpath syntax, create an array of all data points from the trend log buffer, and then sort them by value descending (largest values come first). Note, the SortTopValues function has not been shown in this document – for more details open WsexampleController.php.
5. Based on the desired number of results, create the TopValue array which contains the top X values found in the data buffer.
6. Create a meaningful response to the user (an array), which includes status information for the action, an error message if an error occurred, and the resulting ‘TopValues’ array.
Chapter 3 - Creating a custom widget type
Page 60 of 108 enteliWEB Version 4.13 Developer Guide Document Edition 2.8
7. This action chooses to return the http response to the user in JSON format. To do this we use the helper function $this->getHelper('json')->direct($Response) which converts the response array into JSON correctly and generates the http response accordingly.
With an action like this setup, our widget script can access the desired trend log information on demand.
Widget script file (PHTML) The implementation of a widget is placed in a PHTML (PHP HTML) script file. This file contains all the programmatic logic, HTML markup, and styles to make the widget look and behave exactly as desired. A widget is largely comprised of HTML, JavaScript and CSS. Do not proceed without a working knowledge of these web technologies.
enteliWEB uses a PHP server framework and each widget file must be a PHTML file. Various global variables and JavaScript libraries are automatically added into the script by the server for the developer and are required for the widget to function correctly.
Reference the example widget, located under the public/widget/Example folder of your enteliWEB installation.
Each widget must have a corresponding phtml file named to match the widget name.
The example widget script is too long to display in its entirety here, so it is broken down into fragments. It is recommended to open the script file, located under the public/widget/Example folder, and follow along.
DOCTYPE and $this->headScript() The very first part of a widget script includes the doctype declaration for the page, in this case HTML5, followed closely by a small PHP snippet <?=$this->headScript()?>. Both of these must be present in the widget script file.
<!DOCTYPE html> <html> <head> <?=$this->headScript()?> <!-- Includes required variables and libraries -->
The widget has access to some useful JavaScript libraries at run time. These include the jQuery and EXT JavaScript libraries, as well as some Delta JavaScript libraries containing common functionality that are used in widget development.
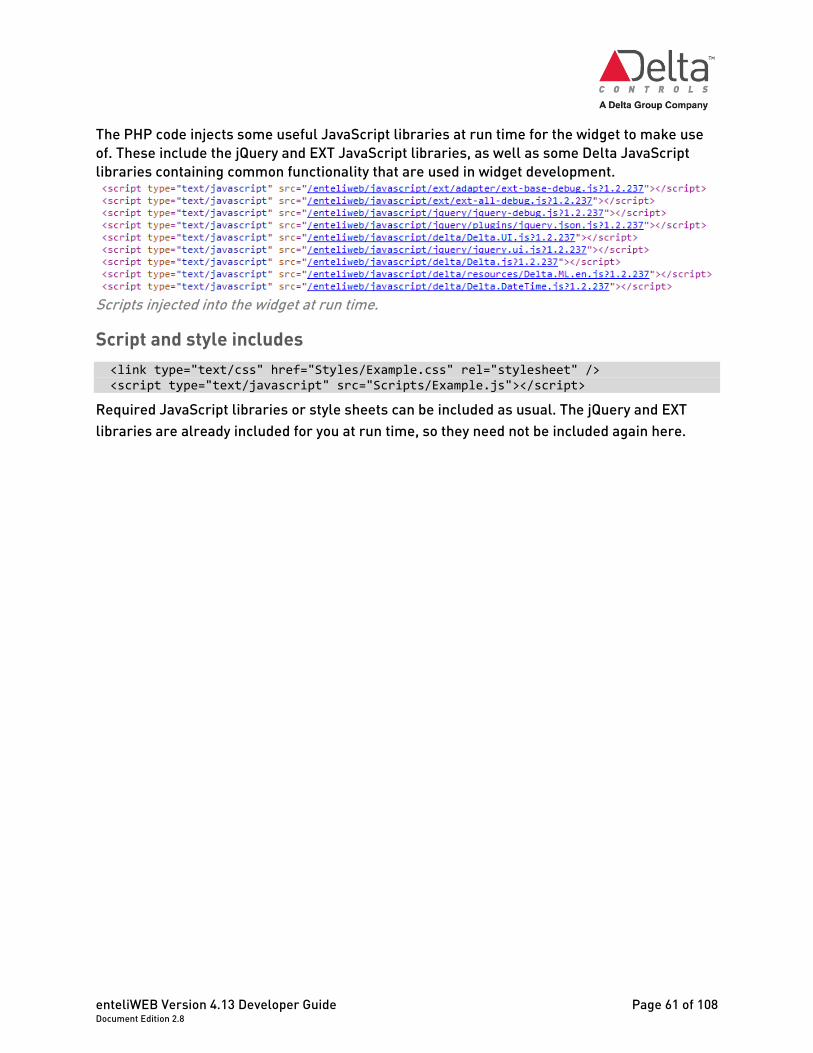
enteliWEB Version 4.13 Developer Guide Page 61 of 108 Document Edition 2.8
The PHP code injects some useful JavaScript libraries at run time for the widget to make use of. These include the jQuery and EXT JavaScript libraries, as well as some Delta JavaScript libraries containing common functionality that are used in widget development.
Scripts injected into the widget at run time.
Script and style includes <link type="text/css" href="Styles/Example.css" rel="stylesheet" /> <script type="text/javascript" src="Scripts/Example.js"></script>
Required JavaScript libraries or style sheets can be included as usual. The jQuery and EXT libraries are already included for you at run time, so they need not be included again here.
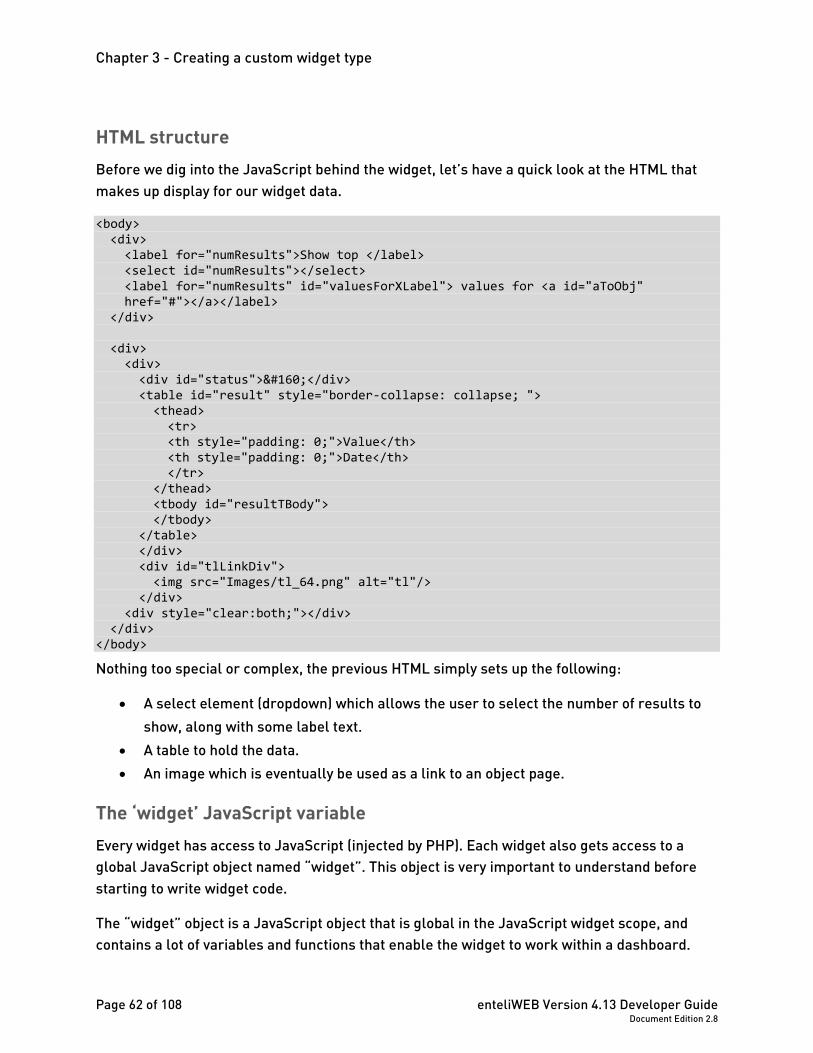
Chapter 3 - Creating a custom widget type
Page 62 of 108 enteliWEB Version 4.13 Developer Guide Document Edition 2.8
HTML structure Before we dig into the JavaScript behind the widget, let’s have a quick look at the HTML that makes up display for our widget data.
<body> <div> <label for="numResults">Show top </label> <select id="numResults"></select> <label for="numResults" id="valuesForXLabel"> values for <a id="aToObj" href="#"></a></label> </div> <div> <div> <div id="status"> </div> <table id="result" style="border-collapse: collapse; "> <thead> <tr> <th style="padding: 0;">Value</th> <th style="padding: 0;">Date</th> </tr> </thead> <tbody id="resultTBody"> </tbody> </table> </div> <div id="tlLinkDiv"> <img src="Images/tl_64.png" alt="tl"/> </div> <div style="clear:both;"></div> </div> </body>
Nothing too special or complex, the previous HTML simply sets up the following:
• A select element (dropdown) which allows the user to select the number of results to show, along with some label text.
• A table to hold the data. • An image which is eventually be used as a link to an object page.
The ‘widget’ JavaScript variable Every widget has access to JavaScript (injected by PHP). Each widget also gets access to a global JavaScript object named “widget”. This object is very important to understand before starting to write widget code.
The “widget” object is a JavaScript object that is global in the JavaScript widget scope, and contains a lot of variables and functions that enable the widget to work within a dashboard.
enteliWEB Version 4.13 Developer Guide Page 63 of 108 Document Edition 2.8
Most importantly, it contains the variables that indicate user settings and preferences, which ultimately determine how the widget functions. We discuss the most important properties of this object here, but note that this list does not cover all properties. For detailed information about the widget object, see .../website/public/javascript/delta/Delta.Widget.js .
The following are the most useful widget variables:
widget.refreshRate (int): Indicates the time (in seconds) to wait before attempting to update (refresh) the widget. Once this time has expired, the widget.update() function is called. If set to 0, the widget does not refresh (the update function is called only once). Keep in mind, the faster the refresh rate, the more taxing it is on the system. It is not recommended to drop the refresh rate below a few seconds. Default is 0 (no refresh).
widget.preferences (object): This and the settings object are the most used in your widget script. This object contains a variable corresponding with each preference setup in the Config.xml file.
In our example we had the following preference:
<Preference name="NumResults" displayName="Number of Results" type="enum" description="" array="false"> <EnumValues> <EnumValue displayValue="Five">5</EnumValue> <EnumValue displayValue="Ten">10</EnumValue> <EnumValue displayValue="Fifteen">15</EnumValue> </EnumValues> <Value>5</Value> </Preference>
Which provides the following JavaScript object in the widget:
widget.preferences.NumResults = “5”; // Stores VALUE widget.preferences.NumResultsEnumValues = // Bonus! Stores EnumValues [{“value”: “5”, “displayValue”: “5”}, {“value”: “10”, “displayValue”: “10”}, {“value”: “15”, “displayValue”: “15”}];
widget.settings (object): This and the preferences object are the most used in widget script. This object contains a variable corresponding with each setting setup in the Config.xml file.
In our example we had the following setting:
<Setting name="TrendLogRef" displayName="Trend Log Reference" type="objRef" description="Trend log to run results on." array="false"> <Value>//Demo/2007.TL1</Value> </Setting>
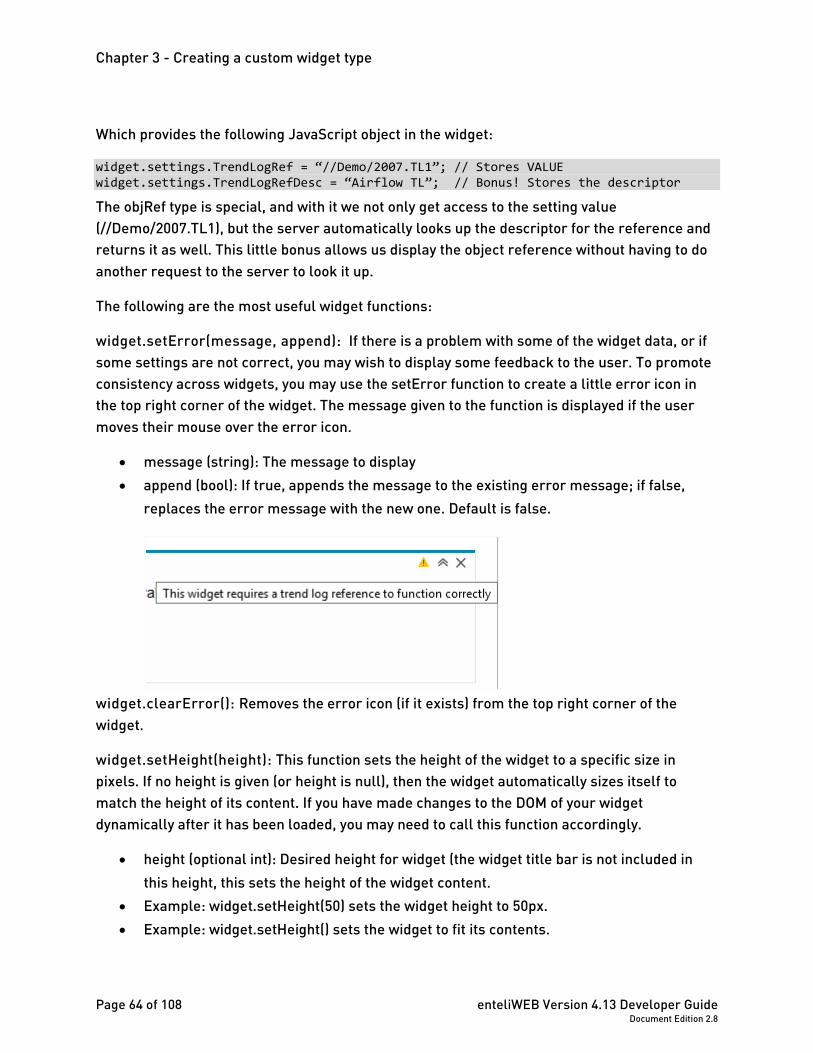
Chapter 3 - Creating a custom widget type
Page 64 of 108 enteliWEB Version 4.13 Developer Guide Document Edition 2.8
Which provides the following JavaScript object in the widget:
widget.settings.TrendLogRef = “//Demo/2007.TL1”; // Stores VALUE widget.settings.TrendLogRefDesc = “Airflow TL”; // Bonus! Stores the descriptor
The objRef type is special, and with it we not only get access to the setting value (//Demo/2007.TL1), but the server automatically looks up the descriptor for the reference and returns it as well. This little bonus allows us display the object reference without having to do another request to the server to look it up.
The following are the most useful widget functions:
widget.setError(message, append): If there is a problem with some of the widget data, or if some settings are not correct, you may wish to display some feedback to the user. To promote consistency across widgets, you may use the setError function to create a little error icon in the top right corner of the widget. The message given to the function is displayed if the user moves their mouse over the error icon.
• message (string): The message to display • append (bool): If true, appends the message to the existing error message; if false,
replaces the error message with the new one. Default is false.
widget.clearError(): Removes the error icon (if it exists) from the top right corner of the widget.
widget.setHeight(height): This function sets the height of the widget to a specific size in pixels. If no height is given (or height is null), then the widget automatically sizes itself to match the height of its content. If you have made changes to the DOM of your widget dynamically after it has been loaded, you may need to call this function accordingly.
• height (optional int): Desired height for widget (the widget title bar is not included in this height, this sets the height of the widget content.
• Example: widget.setHeight(50) sets the widget height to 50px. • Example: widget.setHeight() sets the widget to fit its contents.
enteliWEB Version 4.13 Developer Guide Page 65 of 108 Document Edition 2.8
widget.setPreference(PreferenceName, ValueArr): If the widget contains preferences, those preferences need to be saved when changed by the user. By calling this function, the preferences are saved so that next time the user loads this widget, the preference is automatically used.
• PreferenceName (string): The name of the preference as found in the Config.xml file. • ValueArr (array): An array containing one or more preference values. Note, a non-array
preference type still needs to set its preference as an array with a single item. • Example: widget.setPreference(“NumResults”, [“15”]);
widget.update(): The update function is perhaps the most important widget function. All functionality that updates the widget UI with data, must be placed, or called, from within this function. Some widgets only have this function called once on load (if widget.refreshRate is 0), where other widgets may need to have content updated more frequently, therefore, this function would be called at regular intervals (based on widget.refreshRate). This function is overridden in each widget as shown in the following section.
Embedded JavaScript Now that we have looked at the HTML structure, and global JavaScript ‘widget’ object, we can look into the JavaScript code that makes the widget work! Since the files are rather lengthy, they are referenced in snippets. Open the script file, located under the public/widget/Example folder, in the Example.phtml file, and see the following:
widget.refreshRate = 60; // Widget refreshes every minute (60 seconds); widget.topValues = []; if (isPhone) // mobile version { // do not use auto refresh for mobile widgets widget.refreshRate = 0; $(window).bind("resize", function() { // update the widget size when orientation changes widget.setHeight(); }); } widget.URLToObjPage = "../../object/display/ObjRef/" + Delta.Util.encodeURI(widget.settings.TrendLogRef);
As you can see, we use the widget object. Here we set widget.refreshRate to 60, indicating that the widget should be updated every minute. We use the JavaScript variable isPhone to detect if widget is being used on a mobile phone. For a mobile phone we set the refresh rate to zero to disable refreshing and we handle resizing for orientation changes.

Chapter 3 - Creating a custom widget type
Page 66 of 108 enteliWEB Version 4.13 Developer Guide Document Edition 2.8
Set up some custom widget variables which have specific purposes in our example widget. Here, the topValues array holds the data, and the URLtoObjPage is a handy alias which stores the URL path to the trend log object reference. enteliWEB has many useful web services and action calls available for use by any widget, available through the PHP MVC server framework. The frameworks is discussed in Widget custom controller file (PHP), but for now keep in mind that the URL is accessing enteliWEB functionality that allows an object page to be loaded.
Embedded JavaScript may also be easily stored in an external JavaScript file and then included, however, for this example both methods are shown. Simple widgets may want to embed, while more complex widgets may choose to break out all functionality into external files.
Widget initialization A widget is really just a web page, so a developer may choose to initialize the widget however he or she pleases. enteliWEB widgets use the jQuery JavaScript library to simplify development. The example widget uses the same principles.
If you are unfamiliar with jQuery and its syntax, it is strongly recommended to do a quick overview of how it works:
http://docs.jquery.com/How_jQuery_Works
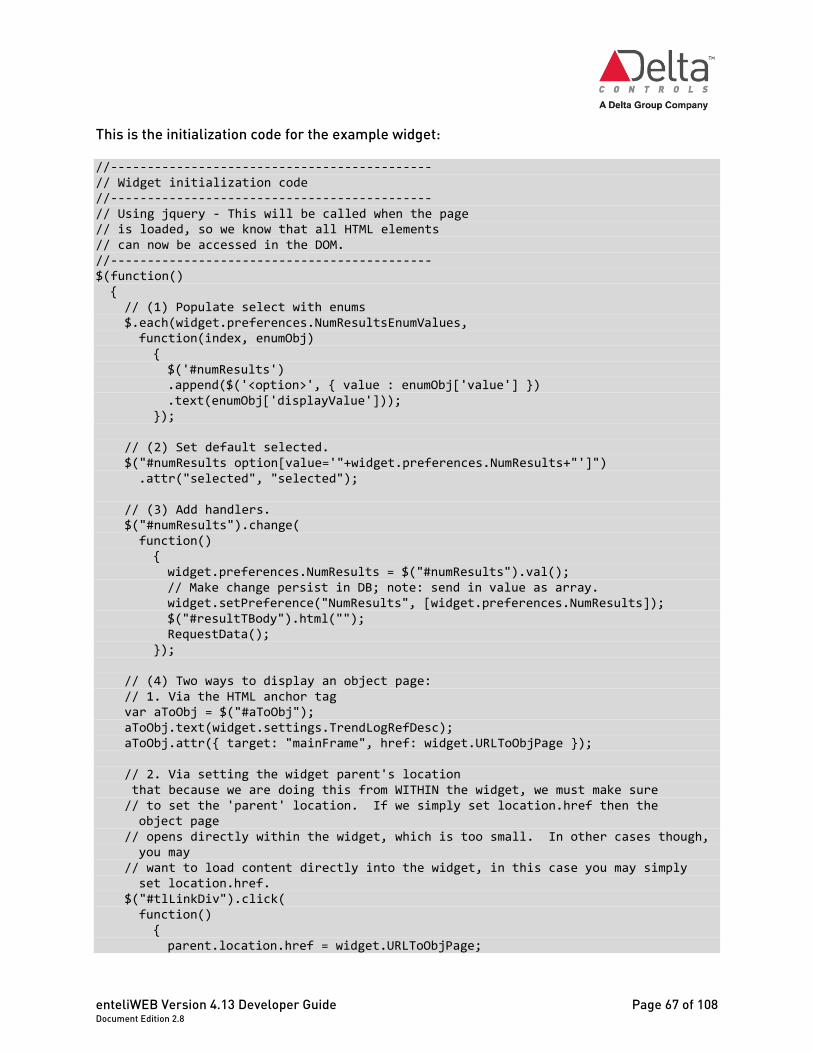
enteliWEB Version 4.13 Developer Guide Page 67 of 108 Document Edition 2.8
This is the initialization code for the example widget:
//-------------------------------------------- // Widget initialization code //-------------------------------------------- // Using jquery - This will be called when the page // is loaded, so we know that all HTML elements // can now be accessed in the DOM. //-------------------------------------------- $(function() { // (1) Populate select with enums $.each(widget.preferences.NumResultsEnumValues, function(index, enumObj) { $('#numResults') .append($('<option>', { value : enumObj['value'] }) .text(enumObj['displayValue'])); }); // (2) Set default selected. $("#numResults option[value='"+widget.preferences.NumResults+"']") .attr("selected", "selected"); // (3) Add handlers. $("#numResults").change( function() { widget.preferences.NumResults = $("#numResults").val(); // Make change persist in DB; note: send in value as array. widget.setPreference("NumResults", [widget.preferences.NumResults]); $("#resultTBody").html(""); RequestData(); }); // (4) Two ways to display an object page: // 1. Via the HTML anchor tag var aToObj = $("#aToObj"); aToObj.text(widget.settings.TrendLogRefDesc); aToObj.attr({ target: "mainFrame", href: widget.URLToObjPage }); // 2. Via setting the widget parent's location that because we are doing this from WITHIN the widget, we must make sure // to set the 'parent' location. If we simply set location.href then the object page // opens directly within the widget, which is too small. In other cases though, you may // want to load content directly into the widget, in this case you may simply set location.href. $("#tlLinkDiv").click( function() { parent.location.href = widget.URLToObjPage;
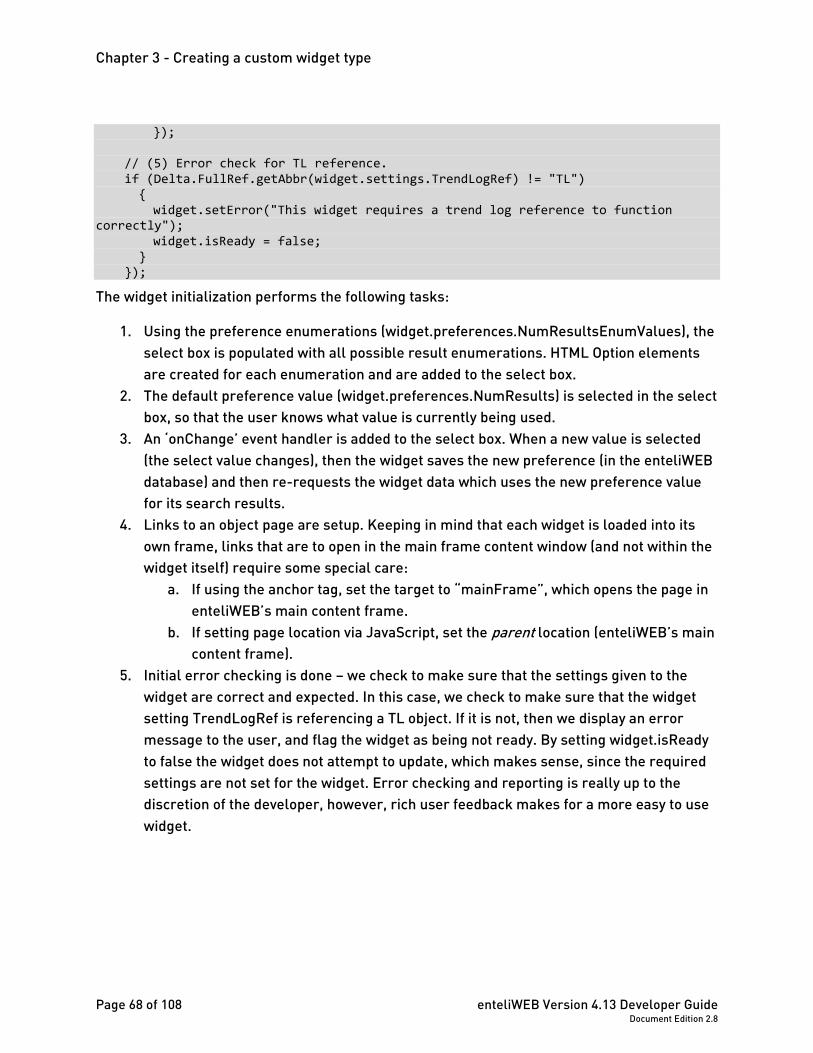
Chapter 3 - Creating a custom widget type
Page 68 of 108 enteliWEB Version 4.13 Developer Guide Document Edition 2.8
}); // (5) Error check for TL reference. if (Delta.FullRef.getAbbr(widget.settings.TrendLogRef) != "TL") { widget.setError("This widget requires a trend log reference to function correctly"); widget.isReady = false; } });
The widget initialization performs the following tasks:
1. Using the preference enumerations (widget.preferences.NumResultsEnumValues), the select box is populated with all possible result enumerations. HTML Option elements are created for each enumeration and are added to the select box.
2. The default preference value (widget.preferences.NumResults) is selected in the select box, so that the user knows what value is currently being used.
3. An ‘onChange’ event handler is added to the select box. When a new value is selected (the select value changes), then the widget saves the new preference (in the enteliWEB database) and then re-requests the widget data which uses the new preference value for its search results.
4. Links to an object page are setup. Keeping in mind that each widget is loaded into its own frame, links that are to open in the main frame content window (and not within the widget itself) require some special care:
a. If using the anchor tag, set the target to “mainFrame”, which opens the page in enteliWEB’s main content frame.
b. If setting page location via JavaScript, set the parent location (enteliWEB’s main content frame).
5. Initial error checking is done – we check to make sure that the settings given to the widget are correct and expected. In this case, we check to make sure that the widget setting TrendLogRef is referencing a TL object. If it is not, then we display an error message to the user, and flag the widget as being not ready. By setting widget.isReady to false the widget does not attempt to update, which makes sense, since the required settings are not set for the widget. Error checking and reporting is really up to the discretion of the developer, however, rich user feedback makes for a more easy to use widget.
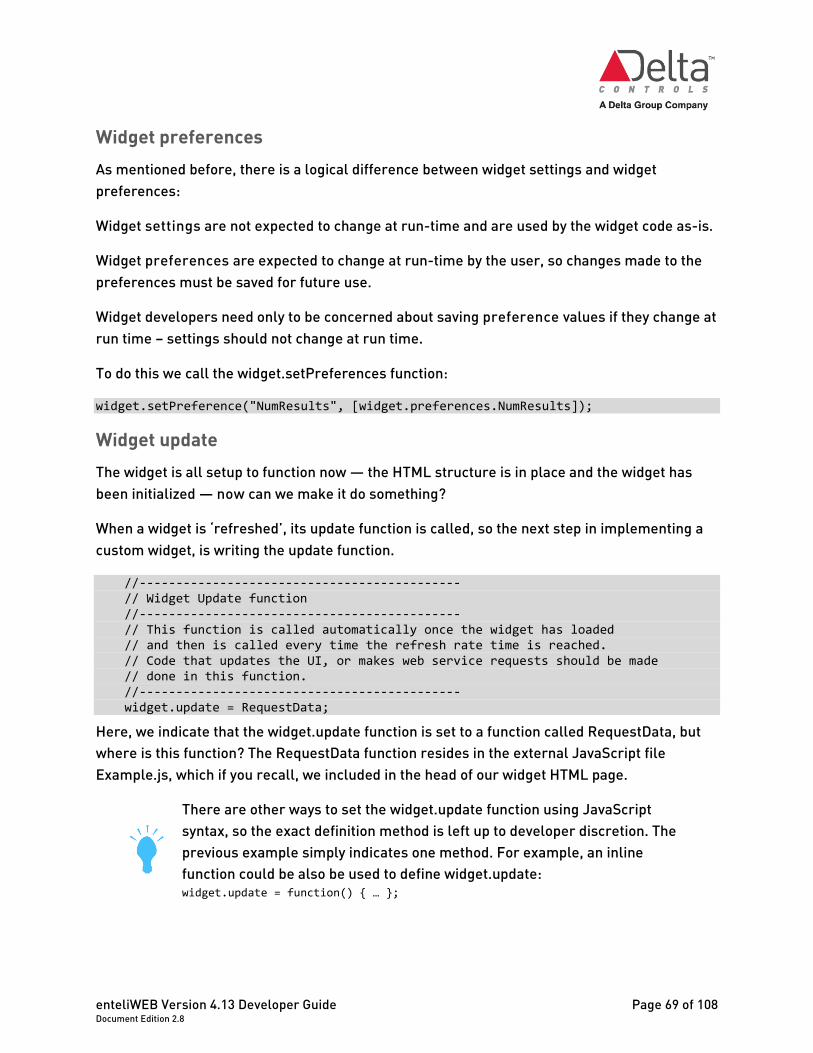
enteliWEB Version 4.13 Developer Guide Page 69 of 108 Document Edition 2.8
Widget preferences As mentioned before, there is a logical difference between widget settings and widget preferences:
Widget settings are not expected to change at run-time and are used by the widget code as-is.
Widget preferences are expected to change at run-time by the user, so changes made to the preferences must be saved for future use.
Widget developers need only to be concerned about saving preference values if they change at run time – settings should not change at run time.
To do this we call the widget.setPreferences function:
widget.setPreference("NumResults", [widget.preferences.NumResults]);
Widget update The widget is all setup to function now — the HTML structure is in place and the widget has been initialized — now can we make it do something?
When a widget is ‘refreshed’, its update function is called, so the next step in implementing a custom widget, is writing the update function.
//-------------------------------------------- // Widget Update function //-------------------------------------------- // This function is called automatically once the widget has loaded // and then is called every time the refresh rate time is reached. // Code that updates the UI, or makes web service requests should be made // done in this function. //-------------------------------------------- widget.update = RequestData;
Here, we indicate that the widget.update function is set to a function called RequestData, but where is this function? The RequestData function resides in the external JavaScript file Example.js, which if you recall, we included in the head of our widget HTML page.
There are other ways to set the widget.update function using JavaScript syntax, so the exact definition method is left up to developer discretion. The previous example simply indicates one method. For example, an inline function could be also be used to define widget.update: widget.update = function() { … };
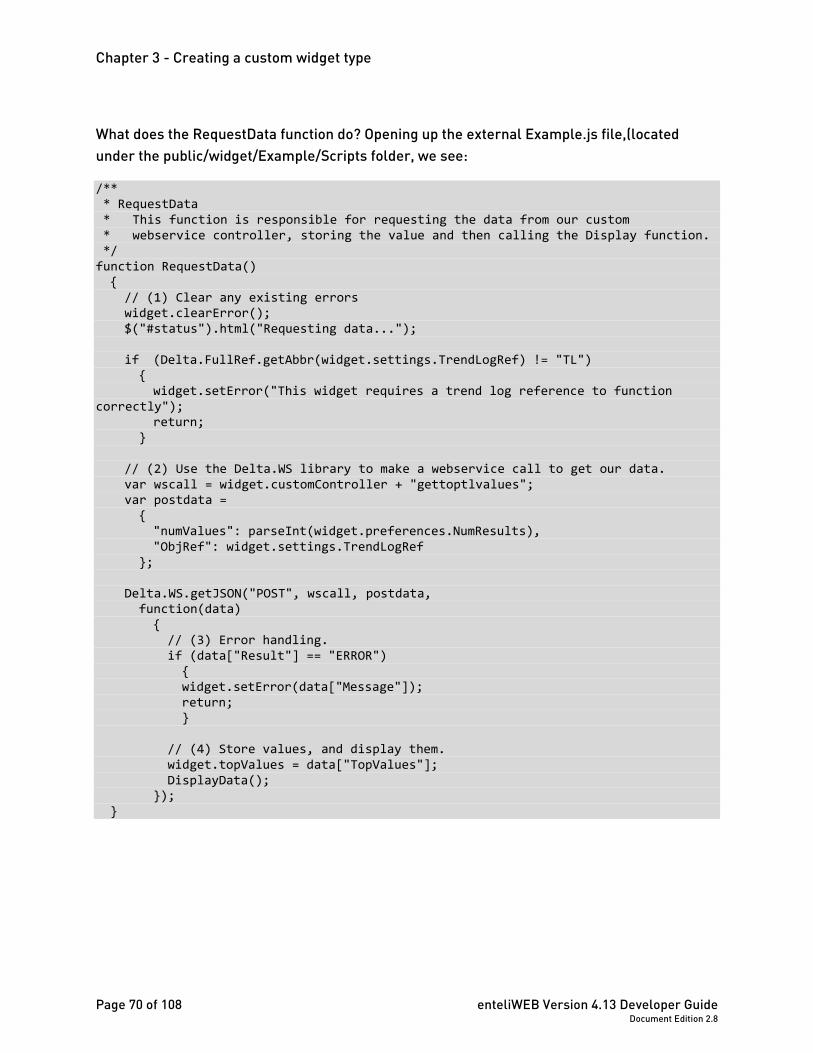
Chapter 3 - Creating a custom widget type
Page 70 of 108 enteliWEB Version 4.13 Developer Guide Document Edition 2.8
What does the RequestData function do? Opening up the external Example.js file,(located under the public/widget/Example/Scripts folder, we see:
/** * RequestData * This function is responsible for requesting the data from our custom * webservice controller, storing the value and then calling the Display function. */ function RequestData() { // (1) Clear any existing errors widget.clearError(); $("#status").html("Requesting data..."); if (Delta.FullRef.getAbbr(widget.settings.TrendLogRef) != "TL") { widget.setError("This widget requires a trend log reference to function correctly"); return; } // (2) Use the Delta.WS library to make a webservice call to get our data. var wscall = widget.customController + "gettoptlvalues"; var postdata = { "numValues": parseInt(widget.preferences.NumResults), "ObjRef": widget.settings.TrendLogRef }; Delta.WS.getJSON("POST", wscall, postdata, function(data) { // (3) Error handling. if (data["Result"] == "ERROR") { widget.setError(data["Message"]); return; } // (4) Store values, and display them. widget.topValues = data["TopValues"]; DisplayData(); }); }
enteliWEB Version 4.13 Developer Guide Page 71 of 108 Document Edition 2.8
RequestData does the following:
1. Clears error messages with the widget.clearError() function. 2. Makes an AJAX call to get data from our custom PHP controller. If you recall from the
beginning of this section, the web service call ,which has been custom built for this widget, returns the top X values from the desired trend log’s data buffer, where X is set by user preference. Custom web service implementation are discussed in Widget custom controller file (PHP), but - for now, focus on the JavaScript code used to make and receive the web request. The Delta.WS.getJSON function is used to make our AJAX request. This function makes a request, is given some data, and then returns a JSON object containing the results from the AJAX request. This function is discussed in Widget custom controller file (PHP), but – for now, note the parameters the function requires:
o “POST”: We are making an AJAX POST request. o wscall: Contains the URL that points to the custom controller action we wish to
query. o postdata: The JavaScript object containing the post data for the web service. In
this case, we pass along two variables: numValues (the number of values to return) and ObjRef (the trend reference).
3. function(data) {}: An inline function - called when the AJAX request has returned with the data. Once result data is available, check for errors that may have occurred in our web service and display them accordingly.
4. If the data is valid, save it to a widget variable and then call a function to display the data.
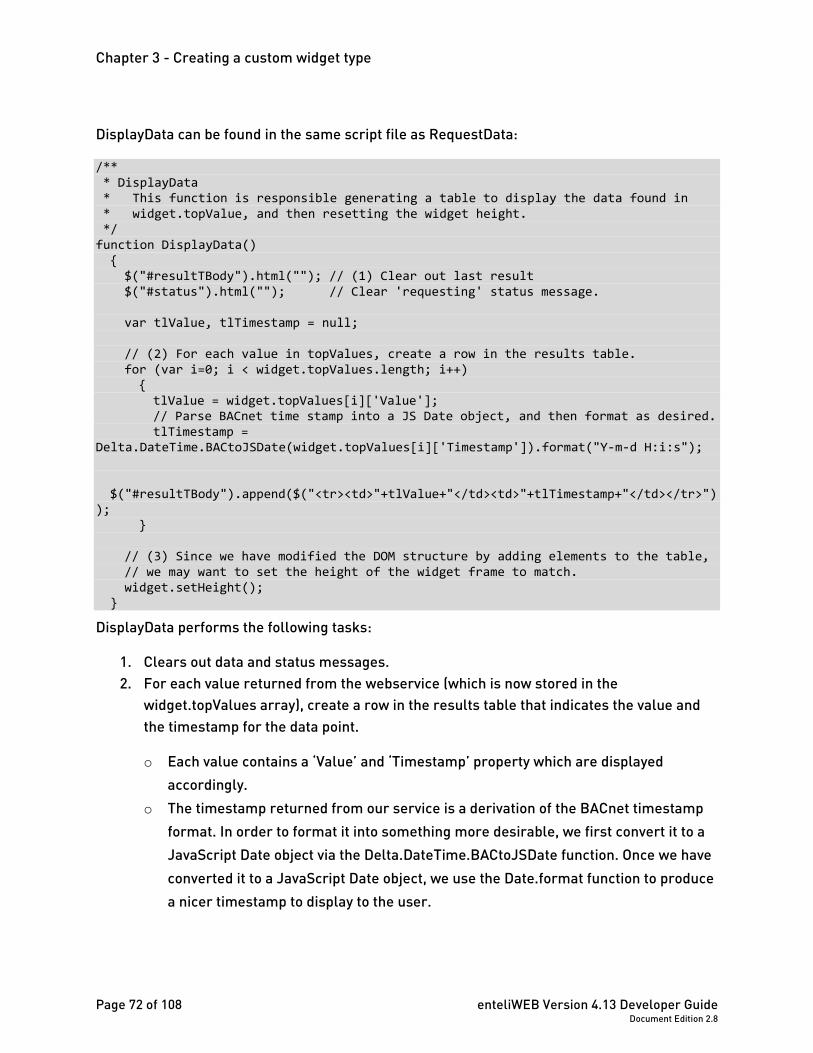
Chapter 3 - Creating a custom widget type
Page 72 of 108 enteliWEB Version 4.13 Developer Guide Document Edition 2.8
DisplayData can be found in the same script file as RequestData:
/** * DisplayData * This function is responsible generating a table to display the data found in * widget.topValue, and then resetting the widget height. */ function DisplayData() { $("#resultTBody").html(""); // (1) Clear out last result $("#status").html(""); // Clear 'requesting' status message. var tlValue, tlTimestamp = null; // (2) For each value in topValues, create a row in the results table. for (var i=0; i < widget.topValues.length; i++) { tlValue = widget.topValues[i]['Value']; // Parse BACnet time stamp into a JS Date object, and then format as desired. tlTimestamp = Delta.DateTime.BACtoJSDate(widget.topValues[i]['Timestamp']).format("Y-m-d H:i:s"); $("#resultTBody").append($("<tr><td>"+tlValue+"</td><td>"+tlTimestamp+"</td></tr>")); } // (3) Since we have modified the DOM structure by adding elements to the table, // we may want to set the height of the widget frame to match. widget.setHeight(); }
DisplayData performs the following tasks:
1. Clears out data and status messages. 2. For each value returned from the webservice (which is now stored in the
widget.topValues array), create a row in the results table that indicates the value and the timestamp for the data point.
o Each value contains a ‘Value’ and ‘Timestamp’ property which are displayed accordingly.
o The timestamp returned from our service is a derivation of the BACnet timestamp format. In order to format it into something more desirable, we first convert it to a JavaScript Date object via the Delta.DateTime.BACtoJSDate function. Once we have converted it to a JavaScript Date object, we use the Date.format function to produce a nicer timestamp to display to the user.
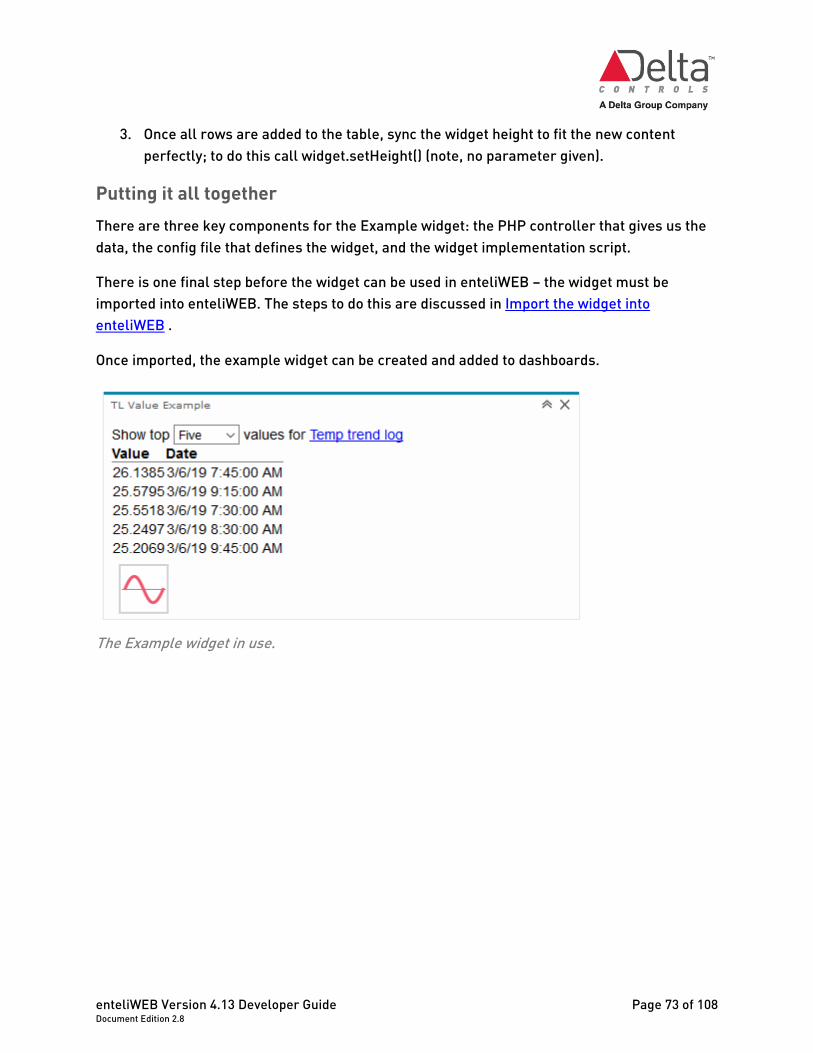
enteliWEB Version 4.13 Developer Guide Page 73 of 108 Document Edition 2.8
3. Once all rows are added to the table, sync the widget height to fit the new content perfectly; to do this call widget.setHeight() (note, no parameter given).
Putting it all together There are three key components for the Example widget: the PHP controller that gives us the data, the config file that defines the widget, and the widget implementation script.
There is one final step before the widget can be used in enteliWEB – the widget must be imported into enteliWEB. The steps to do this are discussed in Import the widget into enteliWEB .
Once imported, the example widget can be created and added to dashboards.
The Example widget in use.
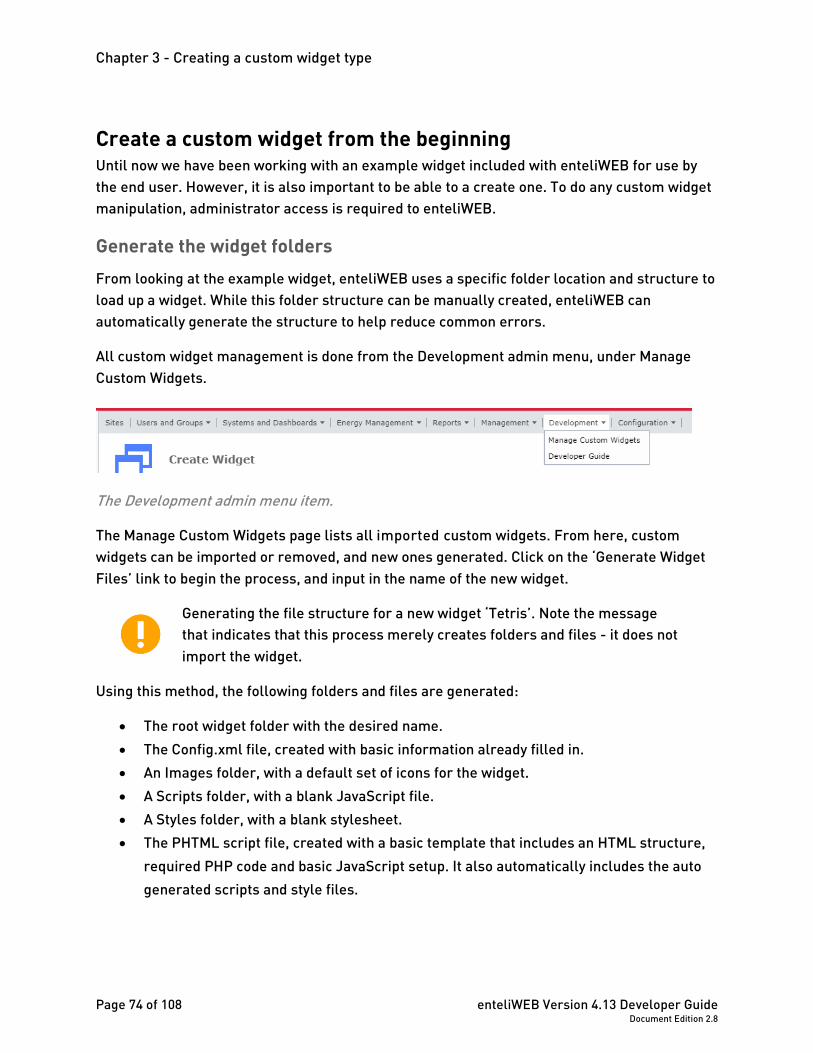
Chapter 3 - Creating a custom widget type
Page 74 of 108 enteliWEB Version 4.13 Developer Guide Document Edition 2.8
Create a custom widget from the beginning Until now we have been working with an example widget included with enteliWEB for use by the end user. However, it is also important to be able to a create one. To do any custom widget manipulation, administrator access is required to enteliWEB.
Generate the widget folders From looking at the example widget, enteliWEB uses a specific folder location and structure to load up a widget. While this folder structure can be manually created, enteliWEB can automatically generate the structure to help reduce common errors.
All custom widget management is done from the Development admin menu, under Manage Custom Widgets.
The Development admin menu item.
The Manage Custom Widgets page lists all imported custom widgets. From here, custom widgets can be imported or removed, and new ones generated. Click on the ‘Generate Widget Files’ link to begin the process, and input in the name of the new widget.
Generating the file structure for a new widget ‘Tetris’. Note the message that indicates that this process merely creates folders and files - it does not import the widget.
Using this method, the following folders and files are generated:
• The root widget folder with the desired name. • The Config.xml file, created with basic information already filled in. • An Images folder, with a default set of icons for the widget. • A Scripts folder, with a blank JavaScript file. • A Styles folder, with a blank stylesheet. • The PHTML script file, created with a basic template that includes an HTML structure,
required PHP code and basic JavaScript setup. It also automatically includes the auto generated scripts and style files.
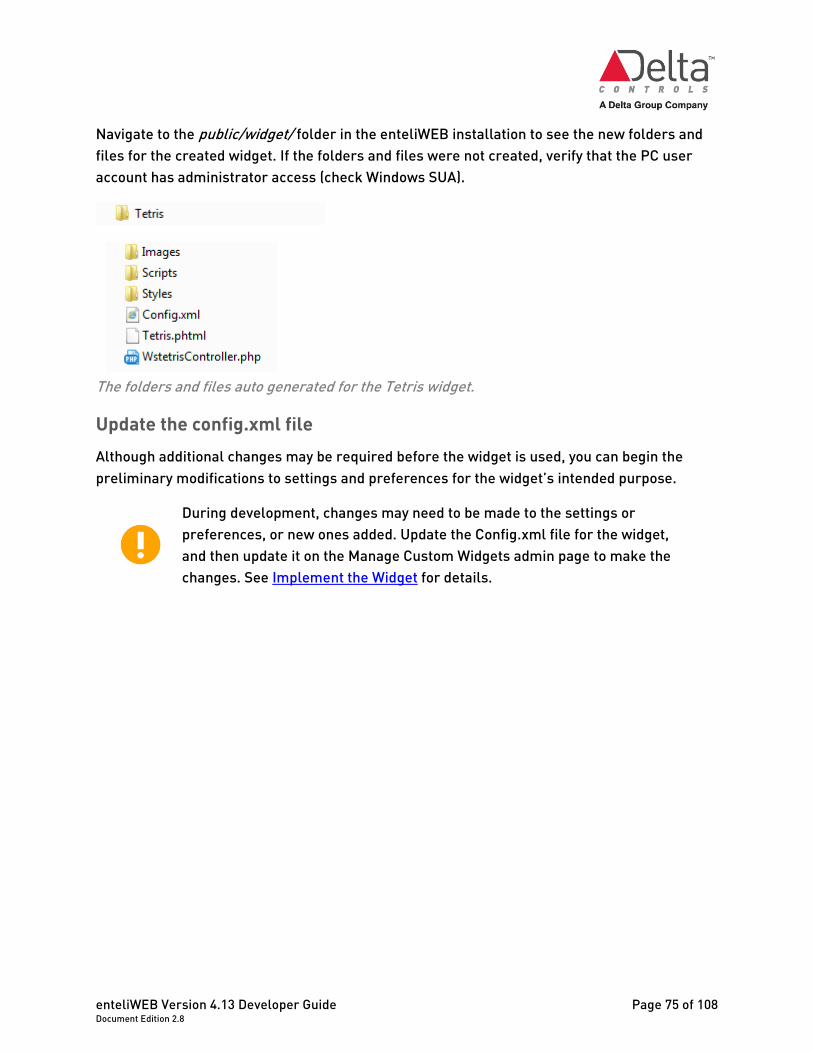
enteliWEB Version 4.13 Developer Guide Page 75 of 108 Document Edition 2.8
Navigate to the public/widget/ folder in the enteliWEB installation to see the new folders and files for the created widget. If the folders and files were not created, verify that the PC user account has administrator access (check Windows SUA).
The folders and files auto generated for the Tetris widget.
Update the config.xml file Although additional changes may be required before the widget is used, you can begin the preliminary modifications to settings and preferences for the widget’s intended purpose.
During development, changes may need to be made to the settings or preferences, or new ones added. Update the Config.xml file for the widget, and then update it on the Manage Custom Widgets admin page to make the changes. See Implement the Widget for details.
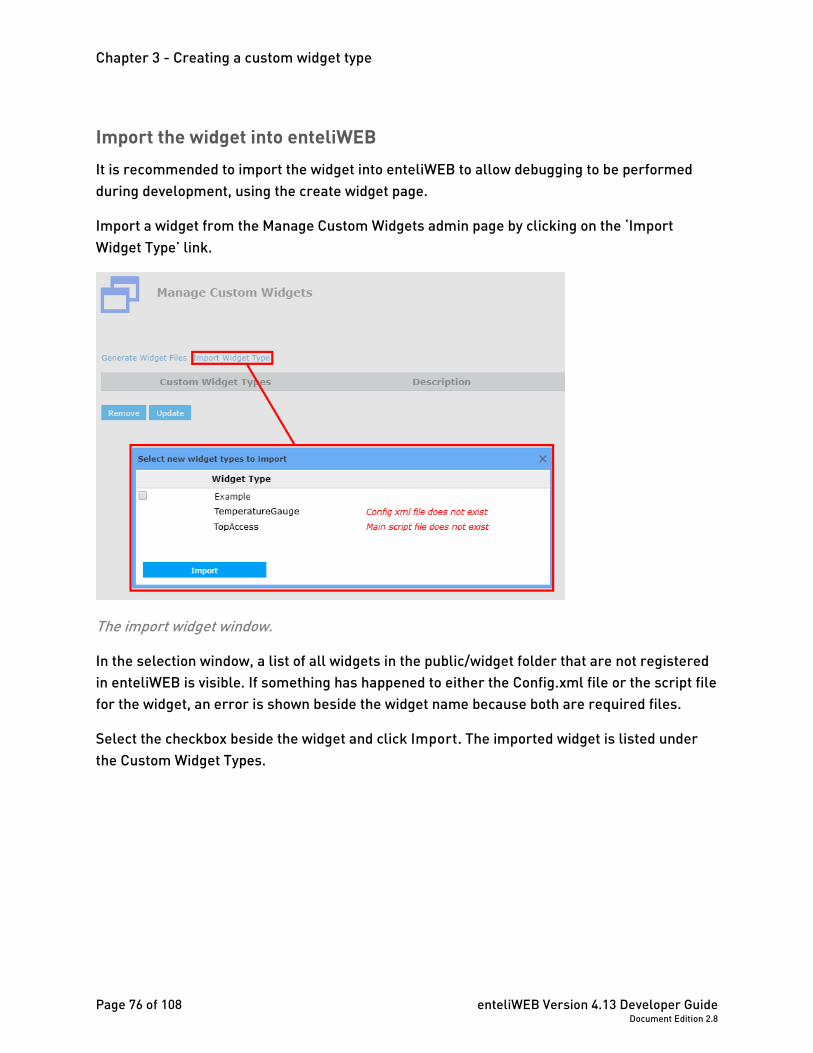
Chapter 3 - Creating a custom widget type
Page 76 of 108 enteliWEB Version 4.13 Developer Guide Document Edition 2.8
Import the widget into enteliWEB It is recommended to import the widget into enteliWEB to allow debugging to be performed during development, using the create widget page.
Import a widget from the Manage Custom Widgets admin page by clicking on the ‘Import Widget Type’ link.
The import widget window.
In the selection window, a list of all widgets in the public/widget folder that are not registered in enteliWEB is visible. If something has happened to either the Config.xml file or the script file for the widget, an error is shown beside the widget name because both are required files.
Select the checkbox beside the widget and click Import. The imported widget is listed under the Custom Widget Types.
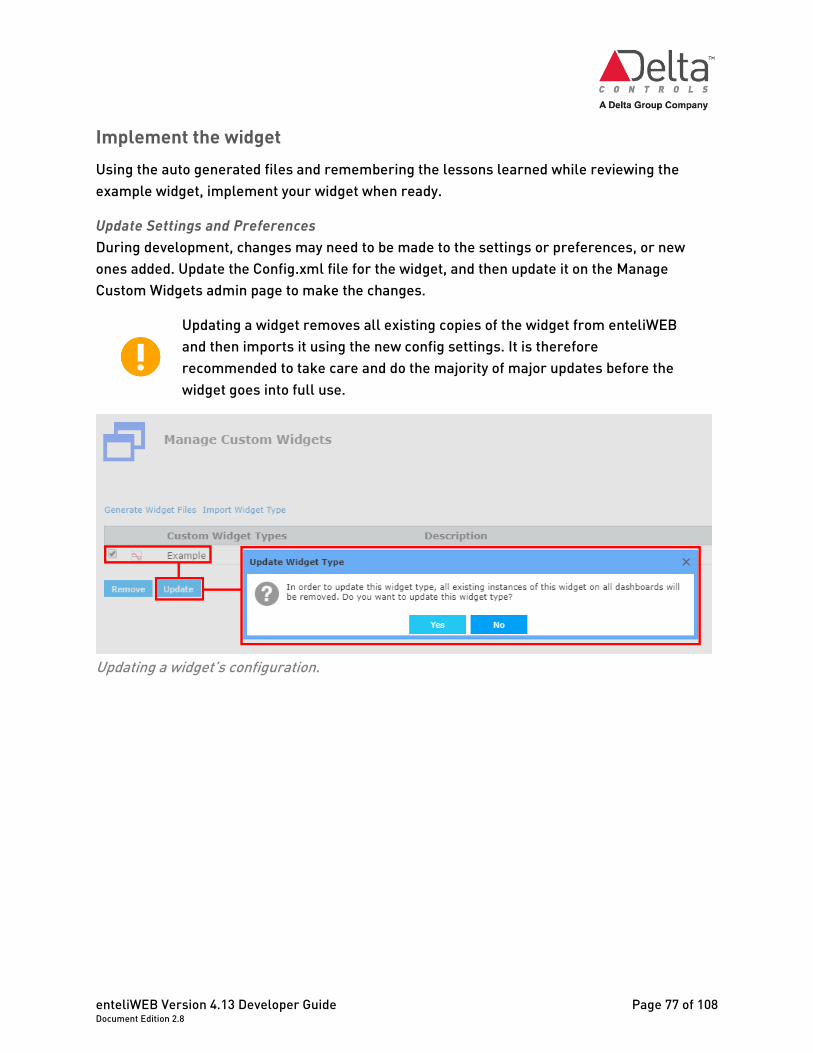
enteliWEB Version 4.13 Developer Guide Page 77 of 108 Document Edition 2.8
Implement the widget Using the auto generated files and remembering the lessons learned while reviewing the example widget, implement your widget when ready.
Update Settings and Preferences During development, changes may need to be made to the settings or preferences, or new ones added. Update the Config.xml file for the widget, and then update it on the Manage Custom Widgets admin page to make the changes.
Updating a widget removes all existing copies of the widget from enteliWEB and then imports it using the new config settings. It is therefore recommended to take care and do the majority of major updates before the widget goes into full use.
Updating a widget’s configuration.
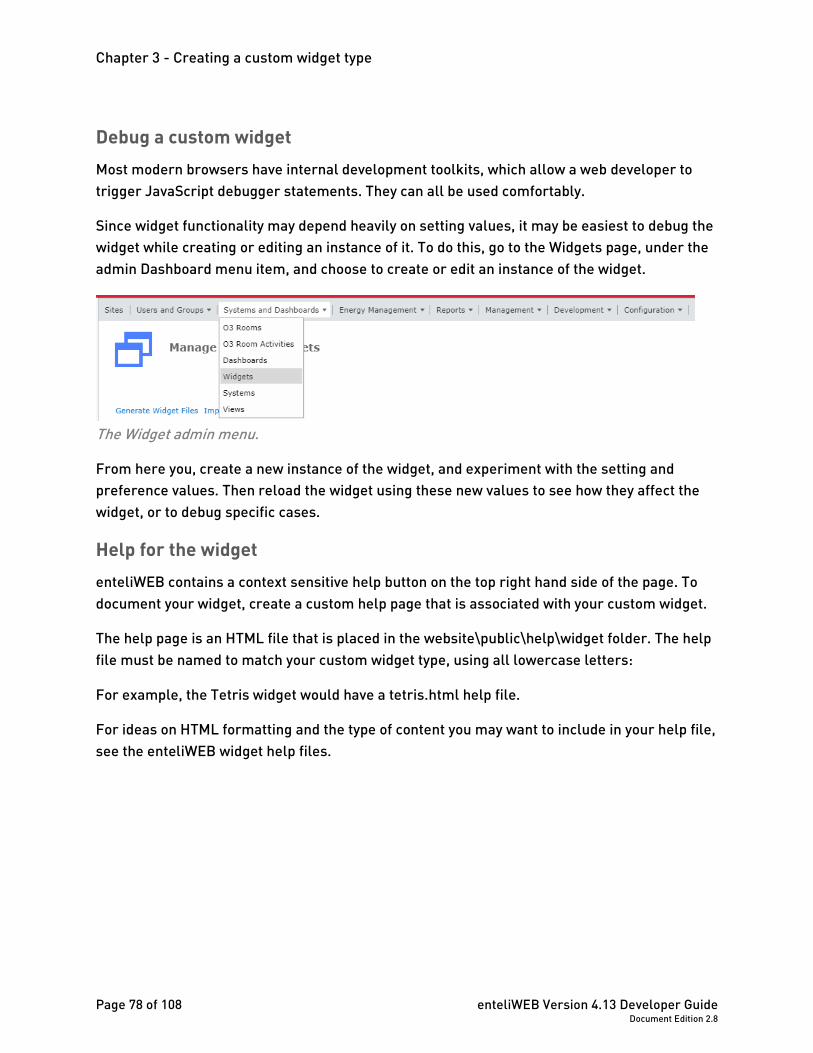
Chapter 3 - Creating a custom widget type
Page 78 of 108 enteliWEB Version 4.13 Developer Guide Document Edition 2.8
Debug a custom widget Most modern browsers have internal development toolkits, which allow a web developer to trigger JavaScript debugger statements. They can all be used comfortably.
Since widget functionality may depend heavily on setting values, it may be easiest to debug the widget while creating or editing an instance of it. To do this, go to the Widgets page, under the admin Dashboard menu item, and choose to create or edit an instance of the widget.
The Widget admin menu.
From here you, create a new instance of the widget, and experiment with the setting and preference values. Then reload the widget using these new values to see how they affect the widget, or to debug specific cases.
Help for the widget enteliWEB contains a context sensitive help button on the top right hand side of the page. To document your widget, create a custom help page that is associated with your custom widget.
The help page is an HTML file that is placed in the website\public\help\widget folder. The help file must be named to match your custom widget type, using all lowercase letters:
For example, the Tetris widget would have a tetris.html help file.
For ideas on HTML formatting and the type of content you may want to include in your help file, see the enteliWEB widget help files.
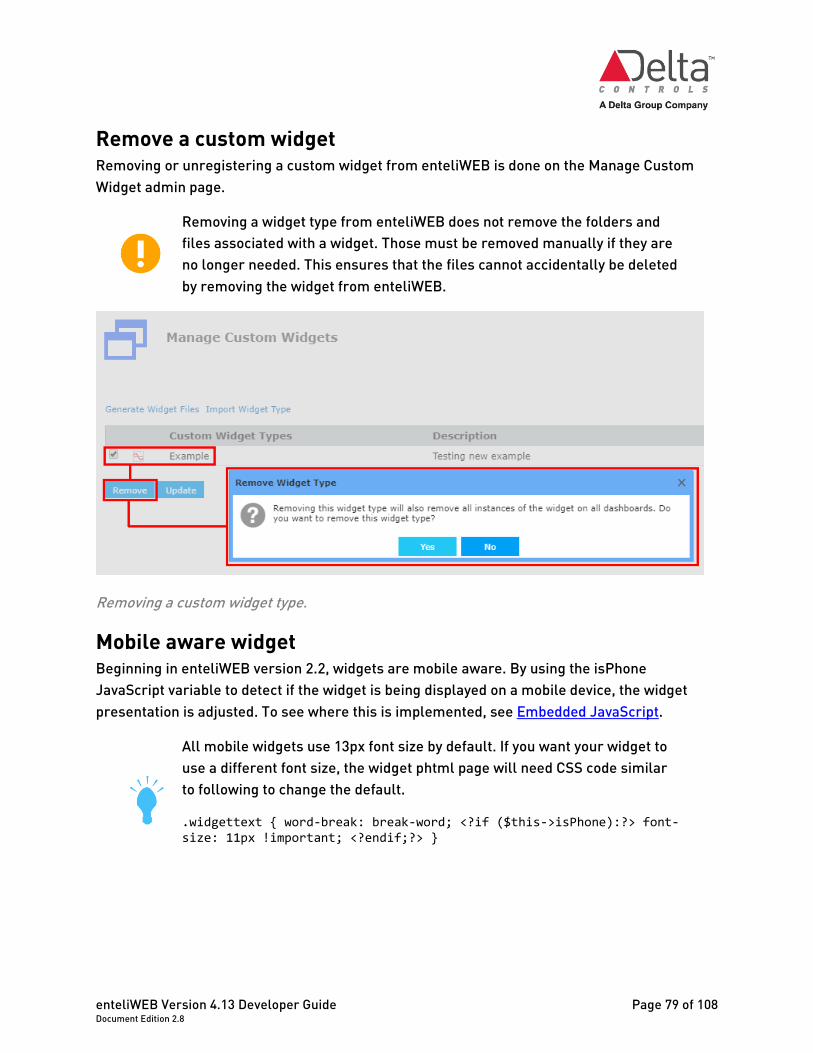
enteliWEB Version 4.13 Developer Guide Page 79 of 108 Document Edition 2.8
Remove a custom widget Removing or unregistering a custom widget from enteliWEB is done on the Manage Custom Widget admin page.
Removing a widget type from enteliWEB does not remove the folders and files associated with a widget. Those must be removed manually if they are no longer needed. This ensures that the files cannot accidentally be deleted by removing the widget from enteliWEB.
Removing a custom widget type.
Mobile aware widget Beginning in enteliWEB version 2.2, widgets are mobile aware. By using the isPhone JavaScript variable to detect if the widget is being displayed on a mobile device, the widget presentation is adjusted. To see where this is implemented, see Embedded JavaScript.
All mobile widgets use 13px font size by default. If you want your widget to use a different font size, the widget phtml page will need CSS code similar to following to change the default.
.widgettext { word-break: break-word; <?if ($this->isPhone):?> font-size: 11px !important; <?endif;?> }
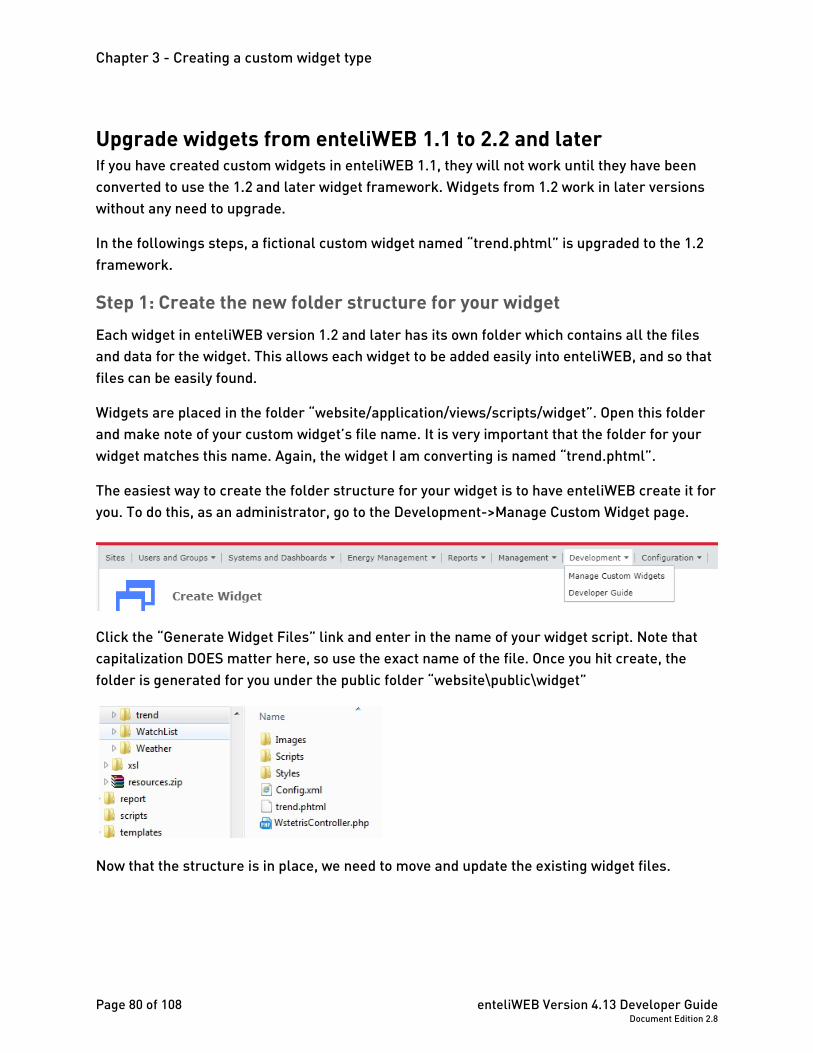
Chapter 3 - Creating a custom widget type
Page 80 of 108 enteliWEB Version 4.13 Developer Guide Document Edition 2.8
Upgrade widgets from enteliWEB 1.1 to 2.2 and later If you have created custom widgets in enteliWEB 1.1, they will not work until they have been converted to use the 1.2 and later widget framework. Widgets from 1.2 work in later versions without any need to upgrade.
In the followings steps, a fictional custom widget named “trend.phtml” is upgraded to the 1.2 framework.
Step 1: Create the new folder structure for your widget Each widget in enteliWEB version 1.2 and later has its own folder which contains all the files and data for the widget. This allows each widget to be added easily into enteliWEB, and so that files can be easily found.
Widgets are placed in the folder “website/application/views/scripts/widget”. Open this folder and make note of your custom widget’s file name. It is very important that the folder for your widget matches this name. Again, the widget I am converting is named “trend.phtml”.
The easiest way to create the folder structure for your widget is to have enteliWEB create it for you. To do this, as an administrator, go to the Development->Manage Custom Widget page.
Click the “Generate Widget Files” link and enter in the name of your widget script. Note that capitalization DOES matter here, so use the exact name of the file. Once you hit create, the folder is generated for you under the public folder “website\public\widget”
Now that the structure is in place, we need to move and update the existing widget files.
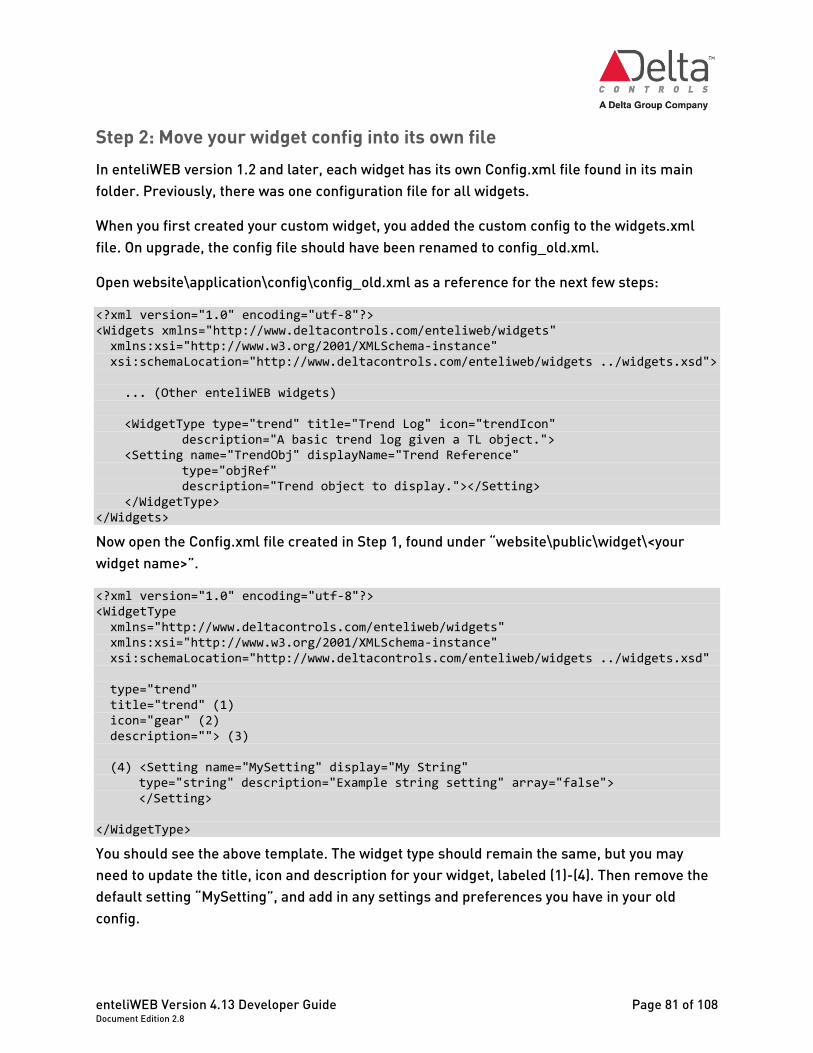
enteliWEB Version 4.13 Developer Guide Page 81 of 108 Document Edition 2.8
Step 2: Move your widget config into its own file In enteliWEB version 1.2 and later, each widget has its own Config.xml file found in its main folder. Previously, there was one configuration file for all widgets.
When you first created your custom widget, you added the custom config to the widgets.xml file. On upgrade, the config file should have been renamed to config_old.xml.
Open website\application\config\config_old.xml as a reference for the next few steps:
<?xml version="1.0" encoding="utf-8"?> <Widgets xmlns="http://www.deltacontrols.com/enteliweb/widgets" xmlns:xsi="http://www.w3.org/2001/XMLSchema-instance" xsi:schemaLocation="http://www.deltacontrols.com/enteliweb/widgets ../widgets.xsd"> ... (Other enteliWEB widgets) <WidgetType type="trend" title="Trend Log" icon="trendIcon" description="A basic trend log given a TL object."> <Setting name="TrendObj" displayName="Trend Reference" type="objRef" description="Trend object to display."></Setting> </WidgetType> </Widgets>
Now open the Config.xml file created in Step 1, found under “website\public\widget\<your widget name>”.
<?xml version="1.0" encoding="utf-8"?> <WidgetType xmlns="http://www.deltacontrols.com/enteliweb/widgets" xmlns:xsi="http://www.w3.org/2001/XMLSchema-instance" xsi:schemaLocation="http://www.deltacontrols.com/enteliweb/widgets ../widgets.xsd" type="trend" title="trend" (1) icon="gear" (2) description=""> (3) (4) <Setting name="MySetting" display="My String" type="string" description="Example string setting" array="false"> </Setting> </WidgetType>
You should see the above template. The widget type should remain the same, but you may need to update the title, icon and description for your widget, labeled (1)-(4). Then remove the default setting “MySetting”, and add in any settings and preferences you have in your old config.
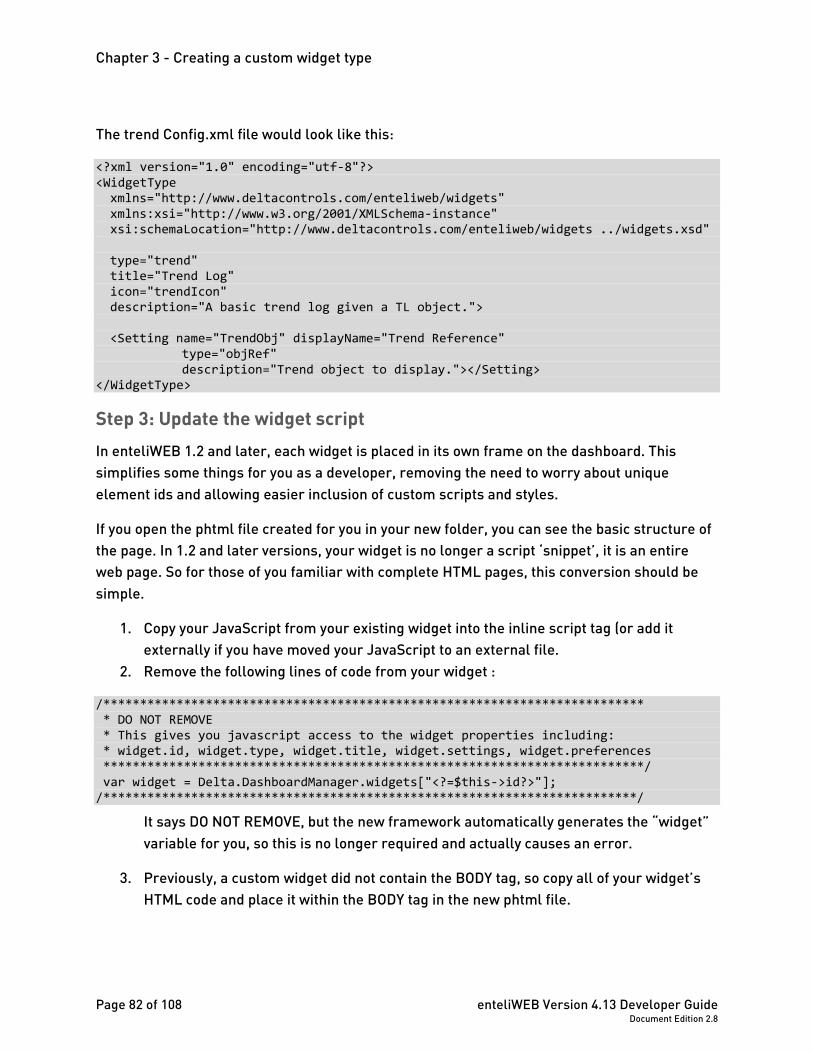
Chapter 3 - Creating a custom widget type
Page 82 of 108 enteliWEB Version 4.13 Developer Guide Document Edition 2.8
The trend Config.xml file would look like this:
<?xml version="1.0" encoding="utf-8"?> <WidgetType xmlns="http://www.deltacontrols.com/enteliweb/widgets" xmlns:xsi="http://www.w3.org/2001/XMLSchema-instance" xsi:schemaLocation="http://www.deltacontrols.com/enteliweb/widgets ../widgets.xsd" type="trend" title="Trend Log" icon="trendIcon" description="A basic trend log given a TL object."> <Setting name="TrendObj" displayName="Trend Reference" type="objRef" description="Trend object to display."></Setting> </WidgetType>
Step 3: Update the widget script In enteliWEB 1.2 and later, each widget is placed in its own frame on the dashboard. This simplifies some things for you as a developer, removing the need to worry about unique element ids and allowing easier inclusion of custom scripts and styles.
If you open the phtml file created for you in your new folder, you can see the basic structure of the page. In 1.2 and later versions, your widget is no longer a script ‘snippet’, it is an entire web page. So for those of you familiar with complete HTML pages, this conversion should be simple.
1. Copy your JavaScript from your existing widget into the inline script tag (or add it externally if you have moved your JavaScript to an external file.
2. Remove the following lines of code from your widget :
/************************************************************************** * DO NOT REMOVE * This gives you javascript access to the widget properties including: * widget.id, widget.type, widget.title, widget.settings, widget.preferences **************************************************************************/ var widget = Delta.DashboardManager.widgets["<?=$this->id?>"]; /*************************************************************************/
It says DO NOT REMOVE, but the new framework automatically generates the “widget” variable for you, so this is no longer required and actually causes an error.
3. Previously, a custom widget did not contain the BODY tag, so copy all of your widget’s HTML code and place it within the BODY tag in the new phtml file.
enteliWEB Version 4.13 Developer Guide Page 83 of 108 Document Edition 2.8
4. Using the php <?=$this->id%> to make unique IDs is no longer required in the new framework, so all these ID references may be removed. No harm is done by leaving these references in, but your code may look a little messier.
Step 4: Add widget.setHeight() If your widget’s “height” changes at all after it has first loaded, that is, you are adding or removing elements from the DOM in the update function, and may need to call the widget.setHeight() function with no parameters. Calling this function synchronizes the widget frame height to match the new widget content height. This may often be done at the very end of the widget.update function.
Step 5: Use your converted custom widgets If you have followed the previous steps, then all instances of your custom widget should now display correctly on their dashboards. If the widgets still display an error, return to the steps above and ensure that you have not missed anything. Also, comparing with the enteliWEB widgets may give some hints regarding steps you may have missed.
Chapter 4 - Integrating an application module with enteliWEB
Page 84 of 108 enteliWEB Version 4.13 Developer Guide Document Edition 2.8
Chapter 4 - Integrating an application module with enteliWEB enteliWEB allows you to leverage its Zend framework, MVC software architecture and web application development languages to develop and integrate an application module with enteliWEB.
Your application module can integrate seamlessly into the enteliWEB user interface through its own navigation section or accordion in the left pane navigation tree.
Your application module can also add a page in the Administration section of the enteliWEB user interface that can be accessed from the administration menu bar.
For detailed documentation to guide you to develop and integrate an application module, see the Application Module documentation included in the enteliWEB help.
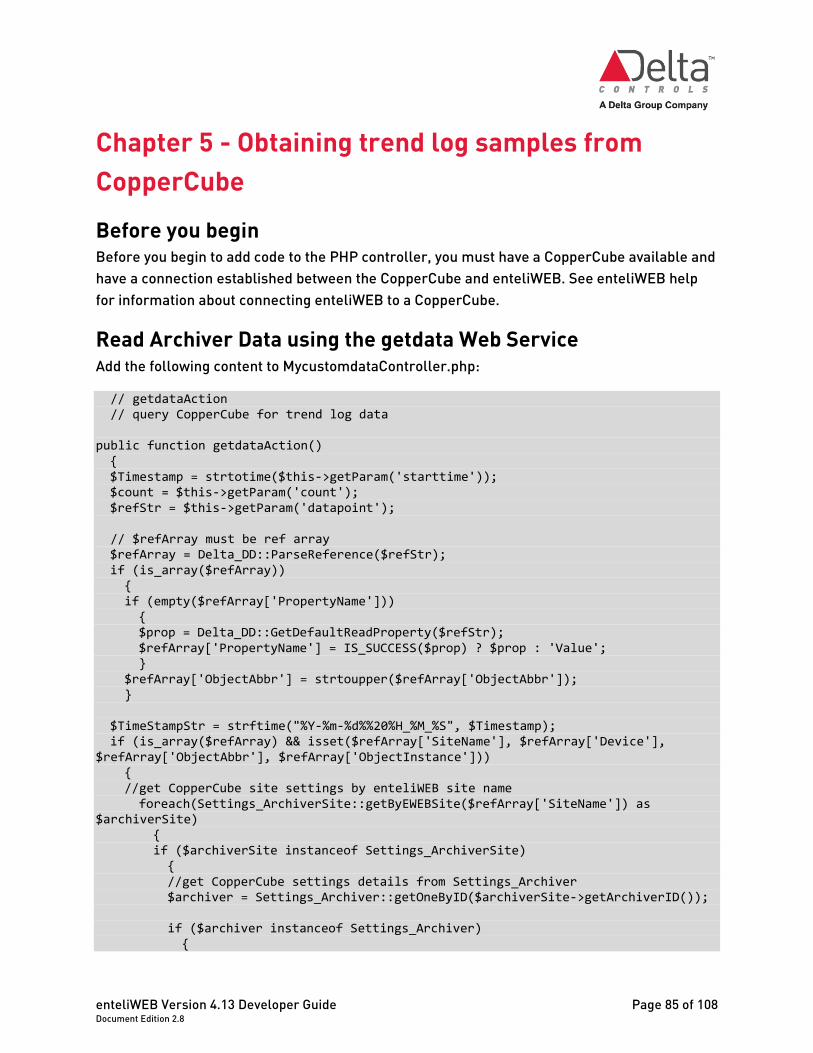
enteliWEB Version 4.13 Developer Guide Page 85 of 108 Document Edition 2.8
Chapter 5 - Obtaining trend log samples from CopperCube Before you begin Before you begin to add code to the PHP controller, you must have a CopperCube available and have a connection established between the CopperCube and enteliWEB. See enteliWEB help for information about connecting enteliWEB to a CopperCube.
Read Archiver Data using the getdata Web Service Add the following content to MycustomdataController.php: // getdataAction // query CopperCube for trend log data public function getdataAction() { $Timestamp = strtotime($this->getParam('starttime')); $count = $this->getParam('count'); $refStr = $this->getParam('datapoint'); // $refArray must be ref array $refArray = Delta_DD::ParseReference($refStr); if (is_array($refArray)) { if (empty($refArray['PropertyName'])) { $prop = Delta_DD::GetDefaultReadProperty($refStr); $refArray['PropertyName'] = IS_SUCCESS($prop) ? $prop : 'Value'; } $refArray['ObjectAbbr'] = strtoupper($refArray['ObjectAbbr']); } $TimeStampStr = strftime("%Y-%m-%d%%20%H_%M_%S", $Timestamp); if (is_array($refArray) && isset($refArray['SiteName'], $refArray['Device'], $refArray['ObjectAbbr'], $refArray['ObjectInstance'])) { //get CopperCube site settings by enteliWEB site name foreach(Settings_ArchiverSite::getByEWEBSite($refArray['SiteName']) as $archiverSite) { if ($archiverSite instanceof Settings_ArchiverSite) { //get CopperCube settings details from Settings_Archiver $archiver = Settings_Archiver::getOneByID($archiverSite->getArchiverID()); if ($archiver instanceof Settings_Archiver) {
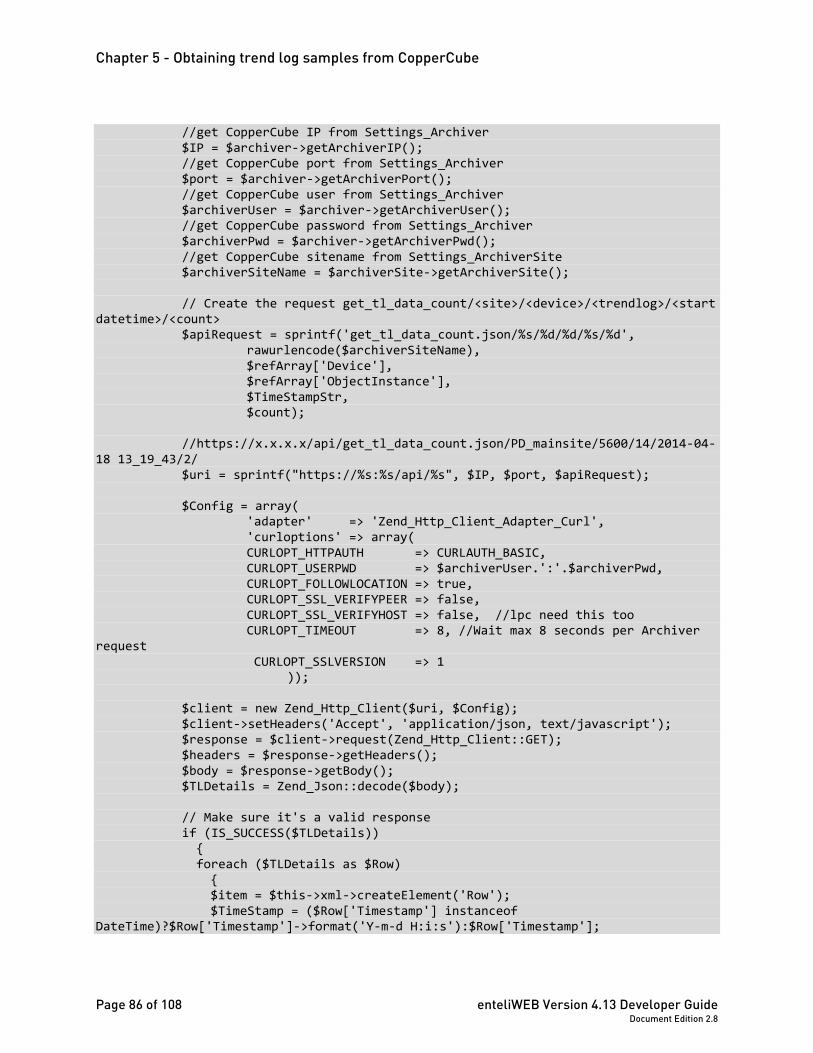
Chapter 5 - Obtaining trend log samples from CopperCube
Page 86 of 108 enteliWEB Version 4.13 Developer Guide Document Edition 2.8
//get CopperCube IP from Settings_Archiver $IP = $archiver->getArchiverIP(); //get CopperCube port from Settings_Archiver $port = $archiver->getArchiverPort(); //get CopperCube user from Settings_Archiver $archiverUser = $archiver->getArchiverUser(); //get CopperCube password from Settings_Archiver $archiverPwd = $archiver->getArchiverPwd(); //get CopperCube sitename from Settings_ArchiverSite $archiverSiteName = $archiverSite->getArchiverSite(); // Create the request get_tl_data_count/<site>/<device>/<trendlog>/<start datetime>/<count> $apiRequest = sprintf('get_tl_data_count.json/%s/%d/%d/%s/%d', rawurlencode($archiverSiteName), $refArray['Device'], $refArray['ObjectInstance'], $TimeStampStr, $count); //https://x.x.x.x/api/get_tl_data_count.json/PD_mainsite/5600/14/2014-04-18 13_19_43/2/ $uri = sprintf("https://%s:%s/api/%s", $IP, $port, $apiRequest); $Config = array( 'adapter' => 'Zend_Http_Client_Adapter_Curl', 'curloptions' => array( CURLOPT_HTTPAUTH => CURLAUTH_BASIC, CURLOPT_USERPWD => $archiverUser.':'.$archiverPwd, CURLOPT_FOLLOWLOCATION => true, CURLOPT_SSL_VERIFYPEER => false, CURLOPT_SSL_VERIFYHOST => false, //lpc need this too CURLOPT_TIMEOUT => 8, //Wait max 8 seconds per Archiver request CURLOPT_SSLVERSION => 1 )); $client = new Zend_Http_Client($uri, $Config); $client->setHeaders('Accept', 'application/json, text/javascript'); $response = $client->request(Zend_Http_Client::GET); $headers = $response->getHeaders(); $body = $response->getBody(); $TLDetails = Zend_Json::decode($body); // Make sure it's a valid response if (IS_SUCCESS($TLDetails)) { foreach ($TLDetails as $Row) { $item = $this->xml->createElement('Row'); $TimeStamp = ($Row['Timestamp'] instanceof DateTime)?$Row['Timestamp']->format('Y-m-d H:i:s'):$Row['Timestamp'];
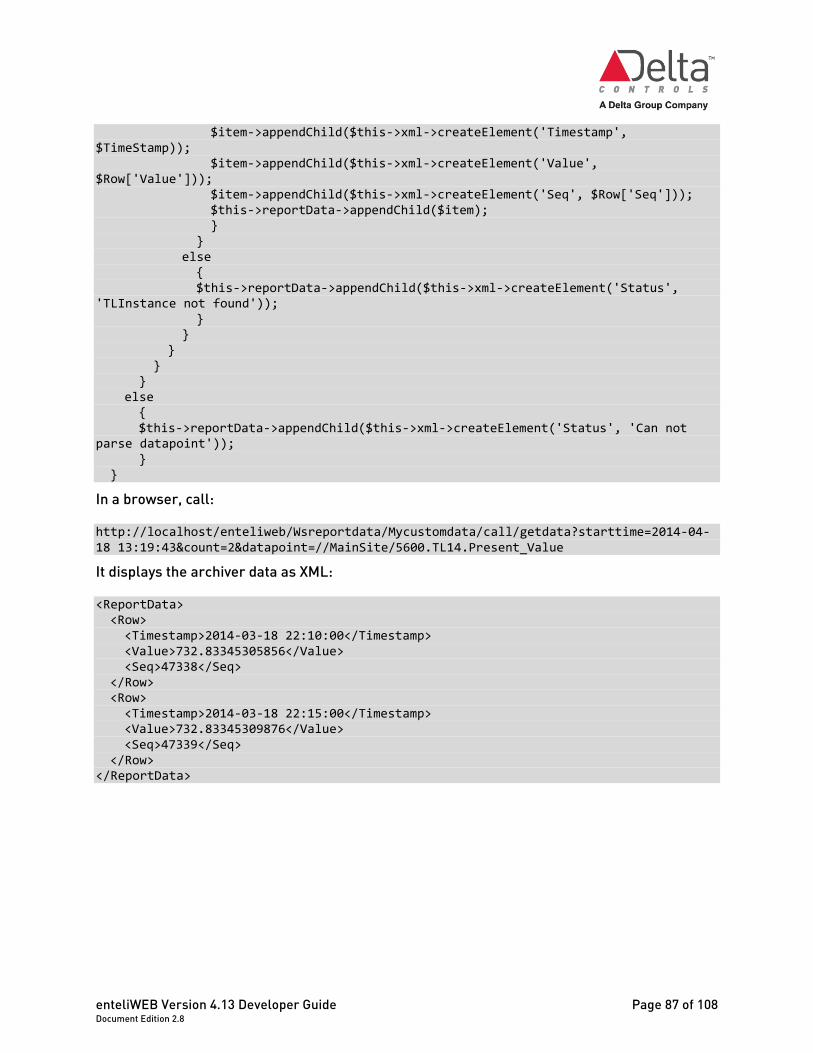
enteliWEB Version 4.13 Developer Guide Page 87 of 108 Document Edition 2.8
$item->appendChild($this->xml->createElement('Timestamp', $TimeStamp)); $item->appendChild($this->xml->createElement('Value', $Row['Value'])); $item->appendChild($this->xml->createElement('Seq', $Row['Seq'])); $this->reportData->appendChild($item); } } else { $this->reportData->appendChild($this->xml->createElement('Status', 'TLInstance not found')); } } } } } else { $this->reportData->appendChild($this->xml->createElement('Status', 'Can not parse datapoint')); } }
In a browser, call:
http://localhost/enteliweb/Wsreportdata/Mycustomdata/call/getdata?starttime=2014-04-18 13:19:43&count=2&datapoint=//MainSite/5600.TL14.Present_Value
It displays the archiver data as XML:
<ReportData> <Row> <Timestamp>2014-03-18 22:10:00</Timestamp> <Value>732.83345305856</Value> <Seq>47338</Seq> </Row> <Row> <Timestamp>2014-03-18 22:15:00</Timestamp> <Value>732.83345309876</Value> <Seq>47339</Seq> </Row> </ReportData>
Chapter 5 - Obtaining trend log samples from CopperCube
Page 88 of 108 enteliWEB Version 4.13 Developer Guide Document Edition 2.8
Notes: • Parameters passed through the URL, such as starttime, count and datapoint, can be
accessed using $this->getParam(). • getParam() is not case sensitive. • The code gets CopperCube site settings by enteliWEB site name, ArchiverSite will give
information about archiver ID to be used • The data from the CopperCube archive is retrieved by calling get_tl_data_count.json,
given a TL reference, start datetime, and a count, the service returns up to count data samples relative to the start datetime.
The datetime format is "YYYY-MM-DD HH_MM_SS" ,in 24 hour time. Note: '_' is because of URL encoding restrictions.
Static Public Member Functions in Settings_ArchiverSite
static getByEWEBSite($EWEBSite) Searches for Archiver_Site Setting entry based on the enteliWEB site name.
Parameters $EWEBSite- enteliWEB site name to search for in the CopperCube archives (Type: string)
Returns If successful, Settings_Archiver object. Otherwise, NULL. (Type: NULL / object)
Example Settings_ArchiverSite::getByEWEBSite(‘MainSite’)
Public Member Functions in Settings_Archiver
public getArchiverIP() Returns related CopperCube IP address.
Returns Returns CopperCube IP address. (Type: string)
Example Note: $archiver is the instance of Settings_Archiver
$archiver->getArchiverIP();
enteliWEB Version 4.13 Developer Guide Page 89 of 108 Document Edition 2.8
public getArchiverPort() Returns related CopperCube IP port.
Returns Returns CopperCube IP port. (Type: string)
Example Note: $archiver is the instance of Settings_Archiver
$archiver-> getArchiverPort();
public getArchiverUser() Returns related CopperCube user name.
Returns Returns CopperCube user name. (Type: string)
Example Note: $archiver is the instance of Settings_Archiver
$archiver-> getArchiverUser();
public getArchiverPwd() Returns related CopperCube password.
Returns Returns CopperCube password. (Type: string)
Example Note: $archiver is the instance of Settings_Archiver
$archiver-> getArchiverPwd();
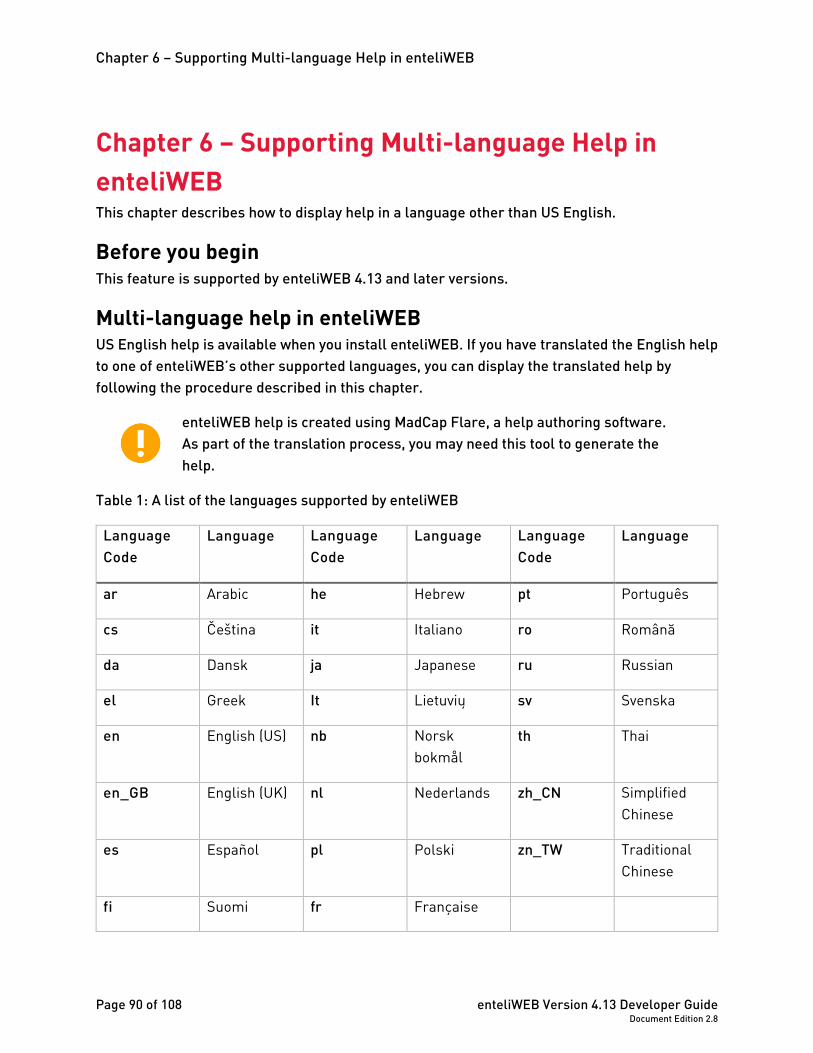
Chapter 6 – Supporting Multi-language Help in enteliWEB
Page 90 of 108 enteliWEB Version 4.13 Developer Guide Document Edition 2.8
Chapter 6 – Supporting Multi-language Help in enteliWEB This chapter describes how to display help in a language other than US English.
Before you begin This feature is supported by enteliWEB 4.13 and later versions.
Multi-language help in enteliWEB US English help is available when you install enteliWEB. If you have translated the English help to one of enteliWEB’s other supported languages, you can display the translated help by following the procedure described in this chapter.
enteliWEB help is created using MadCap Flare, a help authoring software. As part of the translation process, you may need this tool to generate the help.
Table 1: A list of the languages supported by enteliWEB
Language Code
Language Language Code
Language Language Code
Language
ar Arabic he Hebrew pt Português
cs Čeština it Italiano ro Română
da Dansk ja Japanese ru Russian
el Greek It Lietuvių sv Svenska
en English (US) nb Norsk bokmål
th Thai
en_GB English (UK) nl Nederlands zh_CN Simplified Chinese
es Español pl Polski zn_TW Traditional Chinese
fi Suomi fr Française
enteliWEB Version 4.13 Developer Guide Page 91 of 108 Document Edition 2.8
Location of the help folder The help folder for the US English help is located on the enteliWEB server at ..\website\help\en . This folder contains all the help files, scripts and stylesheets.
Add the translated help to the enteliWEB server 1. Go to the location of the help folder on the enteliWEB server.2. In the website\help folder, create a new empty folder and name it using the translated
language code from Table 1. Note: The code is case-sensitive.3. Add the translated help files into the folder you have just created. The file and folder
architecture of the translated help must match the English-US help. This architectureof the help files may also change between different versions of enteliWEB.
Important: DO NOT delete any files or folders in the website\help\en folder.
In addition to the help files, these files and folders are required for the online help to work correctly.
• All files in website\help\yourlanguagecode\Data\
• All files in website\help\yourlanguagecode\resources\
• All files in website\ help\yourlanguagecode\images\
• All files in website\help\yourlanguagecode\Skins\
• website\help\yourlanguagecode\csh.js
• website\help\yourlanguagecode\Default.js
• All files in website\help\yourlanguagecode\generatedimages\pdfs
• All files inwebsite\help\yourlanguagecode\device\configuration\files
How to display the translated help The translated help is displayed to match the language of the enteliWEB user interface.
1. Add the translated help to the enteliWEB server.2. Log into enteliWEB.

Chapter 6 – Supporting Multi-language Help in enteliWEB
Page 92 of 108 enteliWEB Version 4.13 Developer Guide Document Edition 2.8
3. In the upper right corner of the screen, click your user name. In the example below, the user name is Admin.
4. In the Language field, select the language of the translated help, for example, Deutsch.
5. Click Save.
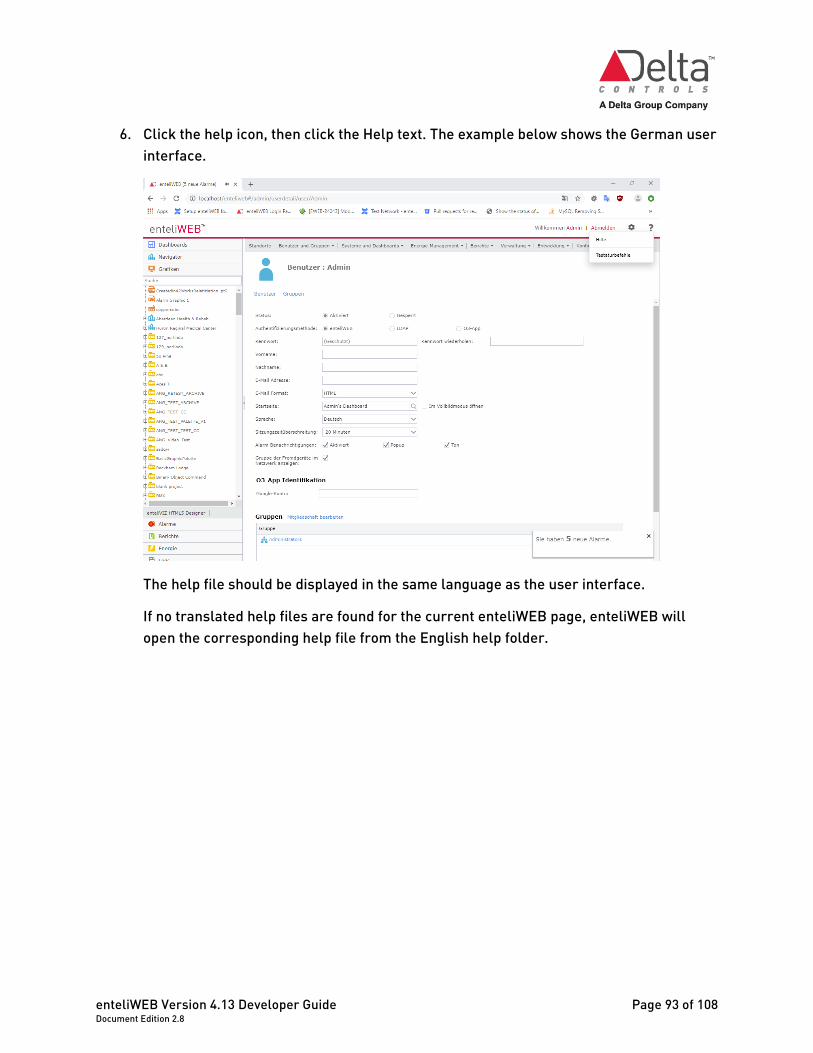
enteliWEB Version 4.13 Developer Guide Page 93 of 108 Document Edition 2.8
6. Click the help icon, then click the Help text. The example below shows the German user interface.
The help file should be displayed in the same language as the user interface.
If no translated help files are found for the current enteliWEB page, enteliWEB will open the corresponding help file from the English help folder.

Appendix A - Delta_BAC library reference
Page 94 of 108 enteliWEB Version 4.13 Developer Guide Document Edition 2.8
Appendix A - Delta_BAC library reference The Delta_BAC PHP Library Class Reference is removed from the Developer Guide for enteliWEB 2.2 and later versions.
See idotbacnet class API for similar functions. Documentation for enteliWEB APIs is located in the help that is installed with enteliWEB.
Appendix B - Delta_DS library reference The Delta_DS PHP Library Class Reference is removed from the Developer Guide for enteliWEB 2.2 and later versions.
See idotbacnet class API for similar functions. Documentation for enteliWEB APIs is located in the help that is installed with enteliWEB.

enteliWEB Version 4.13 Developer Guide Page 95 of 108 Document Edition 2.8
Appendix C - Report data web service reference This report data web service reference section outlines the web services available for retrieving meter data. It provides the basic functionality for requesting consumption and demand data. All report data web service calls are made to /enteliweb/wsreportdata/.
Aggregates action Calculates the average, total, maximum, minimum, and number of samples (normalized to 5 minute intervals) for the specified meters during occupied and unoccupied times. The aggregates can optionally be grouped by a time interval (day, week, month, or year).
Parameters meterlist[] – The ID of the areas/meters to read data for. Each meterlist[] parameter is treated as a group.
datatype – Type of data to return (Consumption or Demand).
starttime – The first day to read data from.
endtime – The last day to read data from.
weekdays – The days of the week to include in the returned data. Specified as a comma delimited list of numbers 0 through 6, where 0 represents Sunday and 6 represents Saturday.
occupiedweekdays – The days of the week to consider as occupied days. Days included in the weekdays parameter but not in the occupiedweekdays parameter show all their values as unoccupied hours. Same format as weekdays.
ohstart – Starting time of occupied hours. Specified in hours and minutes in 24 hour time.
ohend – Ending time of occupied hours (start time of unoccupied hours). Specified in hours and minutes in 24 hour time.
interval – How to group data – options are ‘day’, ‘week’, ‘month’, and ‘year’. If not specified, data is not grouped by time.
reporttype – The type of data to use from the specified meters and areas. Possible values are Electric_Energy, Electric_Apparent, Gas_Volume, Gas_Energy, Fuel_Volume, Water_Volume, Thermal_Energy, Steam_Weight, and Carbon_Emission.
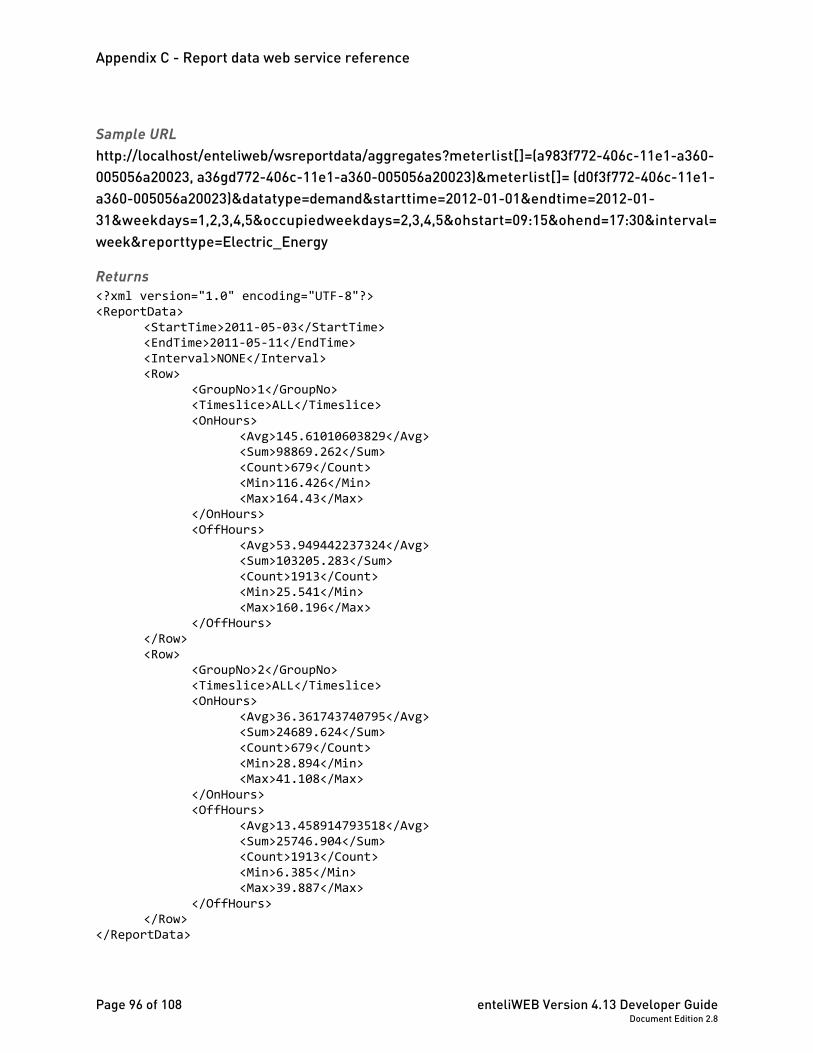
Appendix C - Report data web service reference
Page 96 of 108 enteliWEB Version 4.13 Developer Guide Document Edition 2.8
Sample URL http://localhost/enteliweb/wsreportdata/aggregates?meterlist[]=(a983f772-406c-11e1-a360-005056a20023, a36gd772-406c-11e1-a360-005056a20023)&meterlist[]= (d0f3f772-406c-11e1-a360-005056a20023)&datatype=demand&starttime=2012-01-01&endtime=2012-01-31&weekdays=1,2,3,4,5&occupiedweekdays=2,3,4,5&ohstart=09:15&ohend=17:30&interval=week&reporttype=Electric_Energy
Returns <?xml version="1.0" encoding="UTF-8"?> <ReportData>
<StartTime>2011-05-03</StartTime> <EndTime>2011-05-11</EndTime> <Interval>NONE</Interval> <Row>
<GroupNo>1</GroupNo> <Timeslice>ALL</Timeslice> <OnHours>
<Avg>145.61010603829</Avg> <Sum>98869.262</Sum> <Count>679</Count> <Min>116.426</Min> <Max>164.43</Max>
</OnHours> <OffHours>
<Avg>53.949442237324</Avg> <Sum>103205.283</Sum> <Count>1913</Count> <Min>25.541</Min> <Max>160.196</Max>
</OffHours> </Row> <Row>
<GroupNo>2</GroupNo> <Timeslice>ALL</Timeslice> <OnHours>
<Avg>36.361743740795</Avg> <Sum>24689.624</Sum> <Count>679</Count> <Min>28.894</Min> <Max>41.108</Max>
</OnHours> <OffHours>
<Avg>13.458914793518</Avg> <Sum>25746.904</Sum> <Count>1913</Count> <Min>6.385</Min> <Max>39.887</Max>
</OffHours> </Row>
</ReportData>
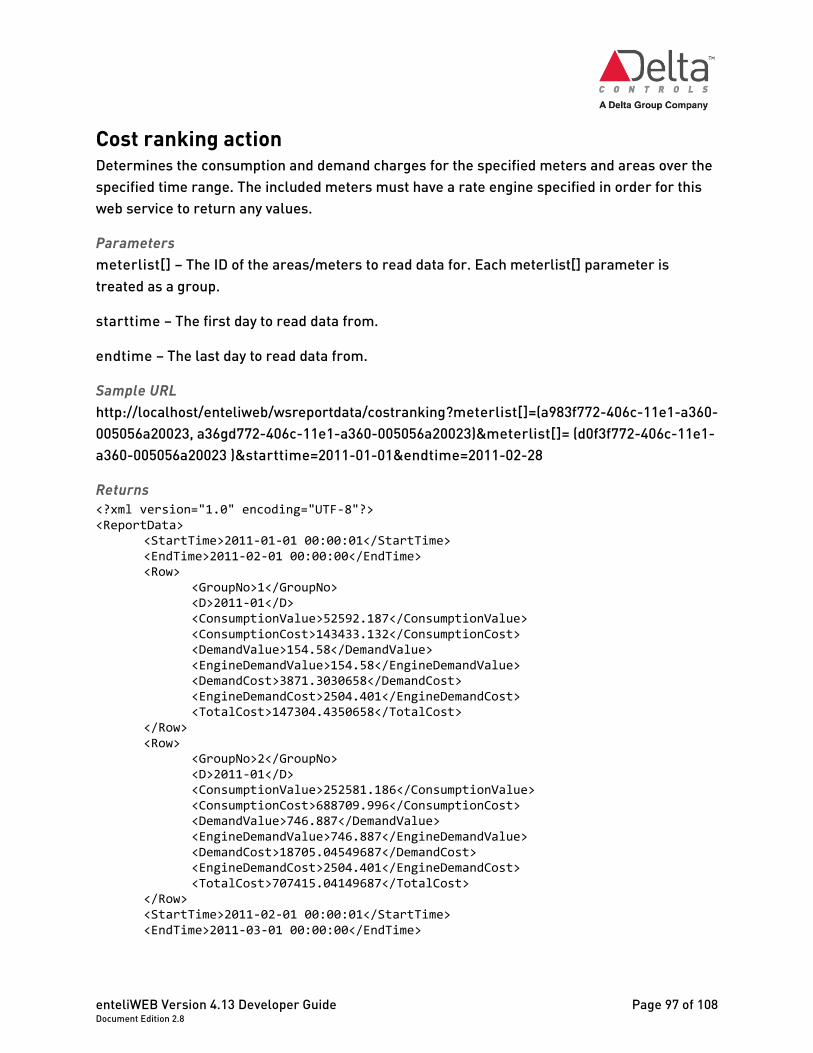
enteliWEB Version 4.13 Developer Guide Page 97 of 108 Document Edition 2.8
Cost ranking action Determines the consumption and demand charges for the specified meters and areas over the specified time range. The included meters must have a rate engine specified in order for this web service to return any values.
Parameters meterlist[] – The ID of the areas/meters to read data for. Each meterlist[] parameter is treated as a group.
starttime – The first day to read data from.
endtime – The last day to read data from.
Sample URL http://localhost/enteliweb/wsreportdata/costranking?meterlist[]=(a983f772-406c-11e1-a360-005056a20023, a36gd772-406c-11e1-a360-005056a20023)&meterlist[]= (d0f3f772-406c-11e1-a360-005056a20023 )&starttime=2011-01-01&endtime=2011-02-28
Returns <?xml version="1.0" encoding="UTF-8"?> <ReportData>
<StartTime>2011-01-01 00:00:01</StartTime> <EndTime>2011-02-01 00:00:00</EndTime> <Row>
<GroupNo>1</GroupNo> <D>2011-01</D> <ConsumptionValue>52592.187</ConsumptionValue> <ConsumptionCost>143433.132</ConsumptionCost> <DemandValue>154.58</DemandValue> <EngineDemandValue>154.58</EngineDemandValue> <DemandCost>3871.3030658</DemandCost> <EngineDemandCost>2504.401</EngineDemandCost> <TotalCost>147304.4350658</TotalCost>
</Row> <Row>
<GroupNo>2</GroupNo> <D>2011-01</D> <ConsumptionValue>252581.186</ConsumptionValue> <ConsumptionCost>688709.996</ConsumptionCost> <DemandValue>746.887</DemandValue> <EngineDemandValue>746.887</EngineDemandValue> <DemandCost>18705.04549687</DemandCost> <EngineDemandCost>2504.401</EngineDemandCost> <TotalCost>707415.04149687</TotalCost>
</Row> <StartTime>2011-02-01 00:00:01</StartTime> <EndTime>2011-03-01 00:00:00</EndTime>
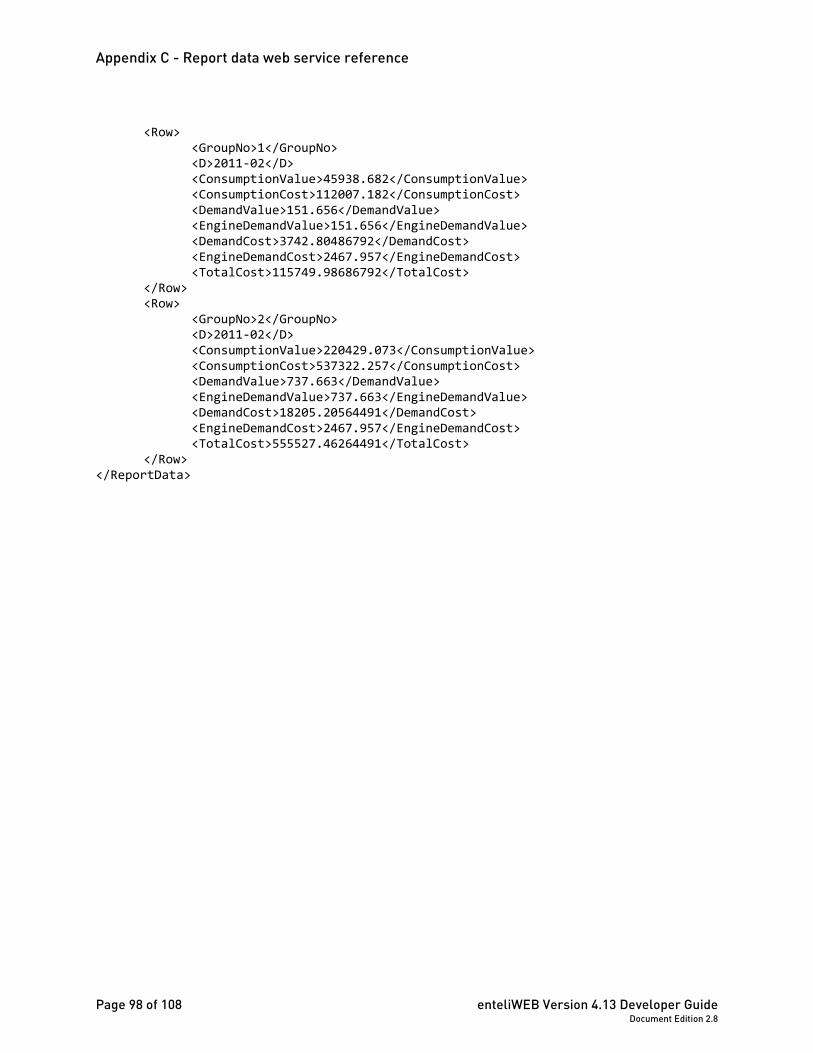
Appendix C - Report data web service reference
Page 98 of 108 enteliWEB Version 4.13 Developer Guide Document Edition 2.8
<Row> <GroupNo>1</GroupNo> <D>2011-02</D> <ConsumptionValue>45938.682</ConsumptionValue> <ConsumptionCost>112007.182</ConsumptionCost> <DemandValue>151.656</DemandValue> <EngineDemandValue>151.656</EngineDemandValue> <DemandCost>3742.80486792</DemandCost> <EngineDemandCost>2467.957</EngineDemandCost> <TotalCost>115749.98686792</TotalCost>
</Row> <Row>
<GroupNo>2</GroupNo> <D>2011-02</D> <ConsumptionValue>220429.073</ConsumptionValue> <ConsumptionCost>537322.257</ConsumptionCost> <DemandValue>737.663</DemandValue> <EngineDemandValue>737.663</EngineDemandValue> <DemandCost>18205.20564491</DemandCost> <EngineDemandCost>2467.957</EngineDemandCost> <TotalCost>555527.46264491</TotalCost>
</Row> </ReportData>
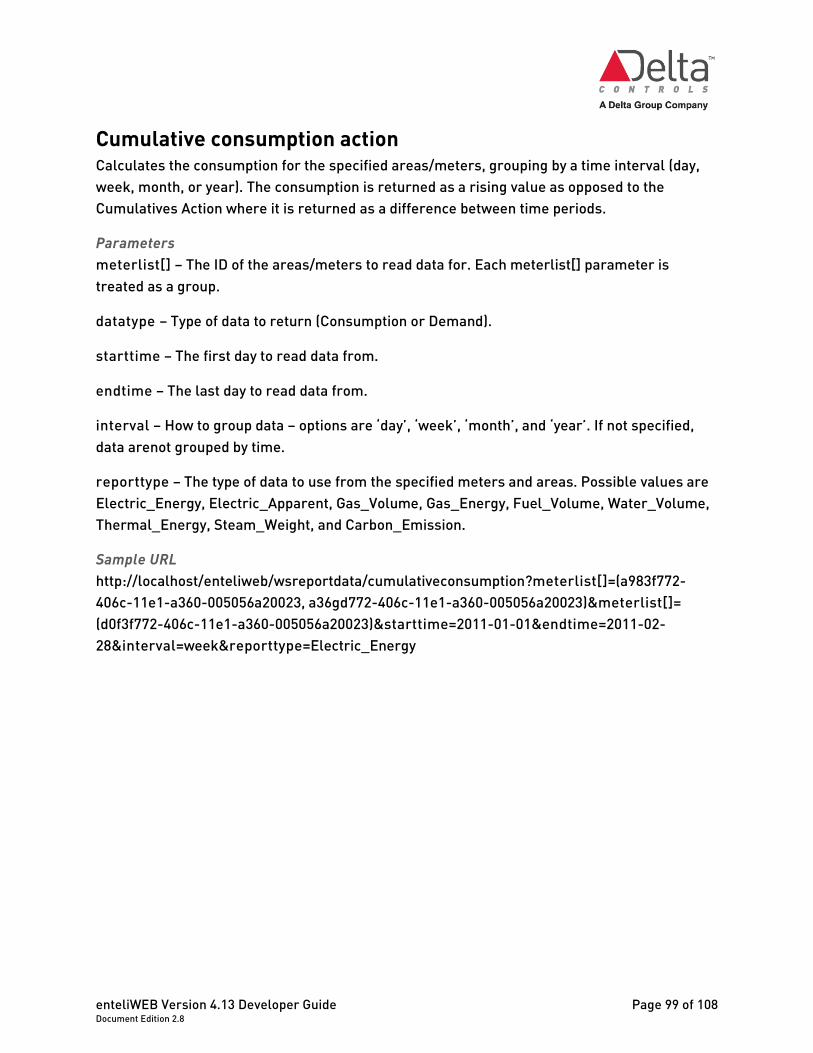
enteliWEB Version 4.13 Developer Guide Page 99 of 108 Document Edition 2.8
Cumulative consumption action Calculates the consumption for the specified areas/meters, grouping by a time interval (day, week, month, or year). The consumption is returned as a rising value as opposed to the Cumulatives Action where it is returned as a difference between time periods.
Parameters meterlist[] – The ID of the areas/meters to read data for. Each meterlist[] parameter is treated as a group.
datatype – Type of data to return (Consumption or Demand).
starttime – The first day to read data from.
endtime – The last day to read data from.
interval – How to group data – options are ‘day’, ‘week’, ‘month’, and ‘year’. If not specified, data arenot grouped by time.
reporttype – The type of data to use from the specified meters and areas. Possible values are Electric_Energy, Electric_Apparent, Gas_Volume, Gas_Energy, Fuel_Volume, Water_Volume, Thermal_Energy, Steam_Weight, and Carbon_Emission.
Sample URL http://localhost/enteliweb/wsreportdata/cumulativeconsumption?meterlist[]=(a983f772-406c-11e1-a360-005056a20023, a36gd772-406c-11e1-a360-005056a20023)&meterlist[]= (d0f3f772-406c-11e1-a360-005056a20023)&starttime=2011-01-01&endtime=2011-02-28&interval=week&reporttype=Electric_Energy
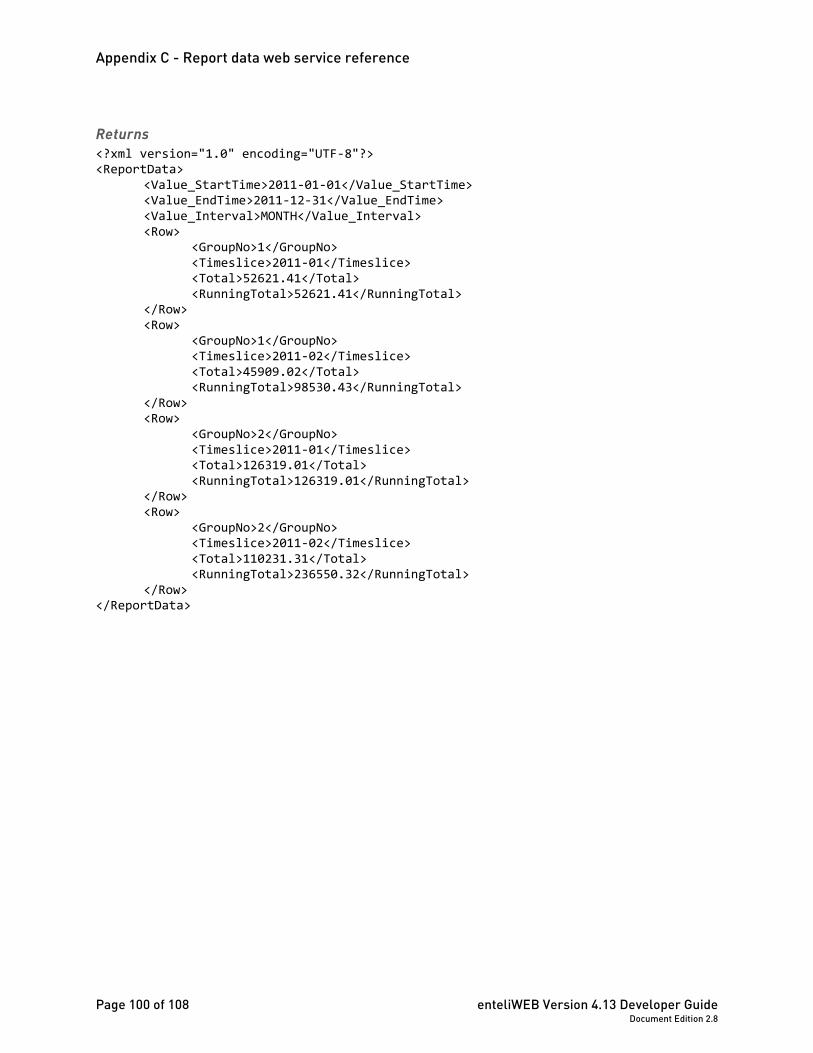
Appendix C - Report data web service reference
Page 100 of 108 enteliWEB Version 4.13 Developer Guide Document Edition 2.8
Returns <?xml version="1.0" encoding="UTF-8"?> <ReportData>
<Value_StartTime>2011-01-01</Value_StartTime> <Value_EndTime>2011-12-31</Value_EndTime> <Value_Interval>MONTH</Value_Interval> <Row>
<GroupNo>1</GroupNo> <Timeslice>2011-01</Timeslice> <Total>52621.41</Total> <RunningTotal>52621.41</RunningTotal>
</Row> <Row>
<GroupNo>1</GroupNo> <Timeslice>2011-02</Timeslice> <Total>45909.02</Total> <RunningTotal>98530.43</RunningTotal>
</Row> <Row>
<GroupNo>2</GroupNo> <Timeslice>2011-01</Timeslice> <Total>126319.01</Total> <RunningTotal>126319.01</RunningTotal>
</Row> <Row>
<GroupNo>2</GroupNo> <Timeslice>2011-02</Timeslice> <Total>110231.31</Total> <RunningTotal>236550.32</RunningTotal>
</Row> </ReportData>
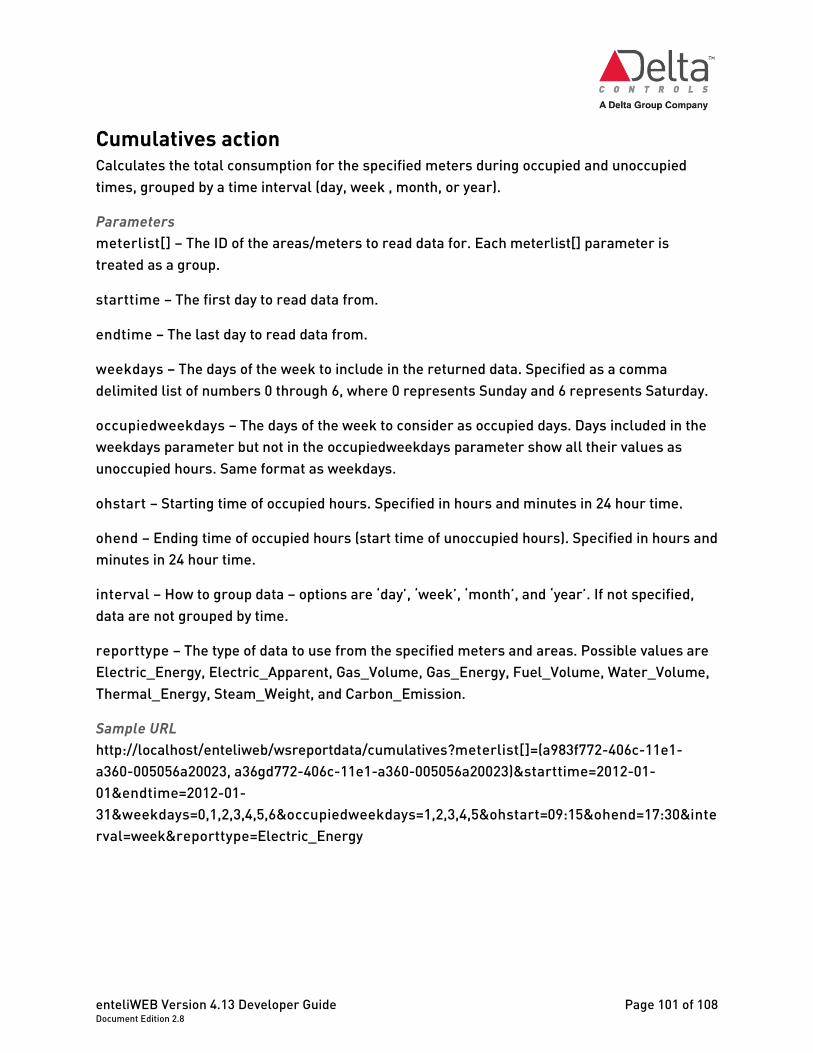
enteliWEB Version 4.13 Developer Guide Page 101 of 108 Document Edition 2.8
Cumulatives action Calculates the total consumption for the specified meters during occupied and unoccupied times, grouped by a time interval (day, week , month, or year).
Parameters meterlist[] – The ID of the areas/meters to read data for. Each meterlist[] parameter is treated as a group.
starttime – The first day to read data from.
endtime – The last day to read data from.
weekdays – The days of the week to include in the returned data. Specified as a comma delimited list of numbers 0 through 6, where 0 represents Sunday and 6 represents Saturday.
occupiedweekdays – The days of the week to consider as occupied days. Days included in the weekdays parameter but not in the occupiedweekdays parameter show all their values as unoccupied hours. Same format as weekdays.
ohstart – Starting time of occupied hours. Specified in hours and minutes in 24 hour time.
ohend – Ending time of occupied hours (start time of unoccupied hours). Specified in hours and minutes in 24 hour time.
interval – How to group data – options are ‘day’, ‘week’, ‘month’, and ‘year’. If not specified, data are not grouped by time.
reporttype – The type of data to use from the specified meters and areas. Possible values are Electric_Energy, Electric_Apparent, Gas_Volume, Gas_Energy, Fuel_Volume, Water_Volume, Thermal_Energy, Steam_Weight, and Carbon_Emission.
Sample URL http://localhost/enteliweb/wsreportdata/cumulatives?meterlist[]=(a983f772-406c-11e1-a360-005056a20023, a36gd772-406c-11e1-a360-005056a20023)&starttime=2012-01-01&endtime=2012-01-31&weekdays=0,1,2,3,4,5,6&occupiedweekdays=1,2,3,4,5&ohstart=09:15&ohend=17:30&interval=week&reporttype=Electric_Energy
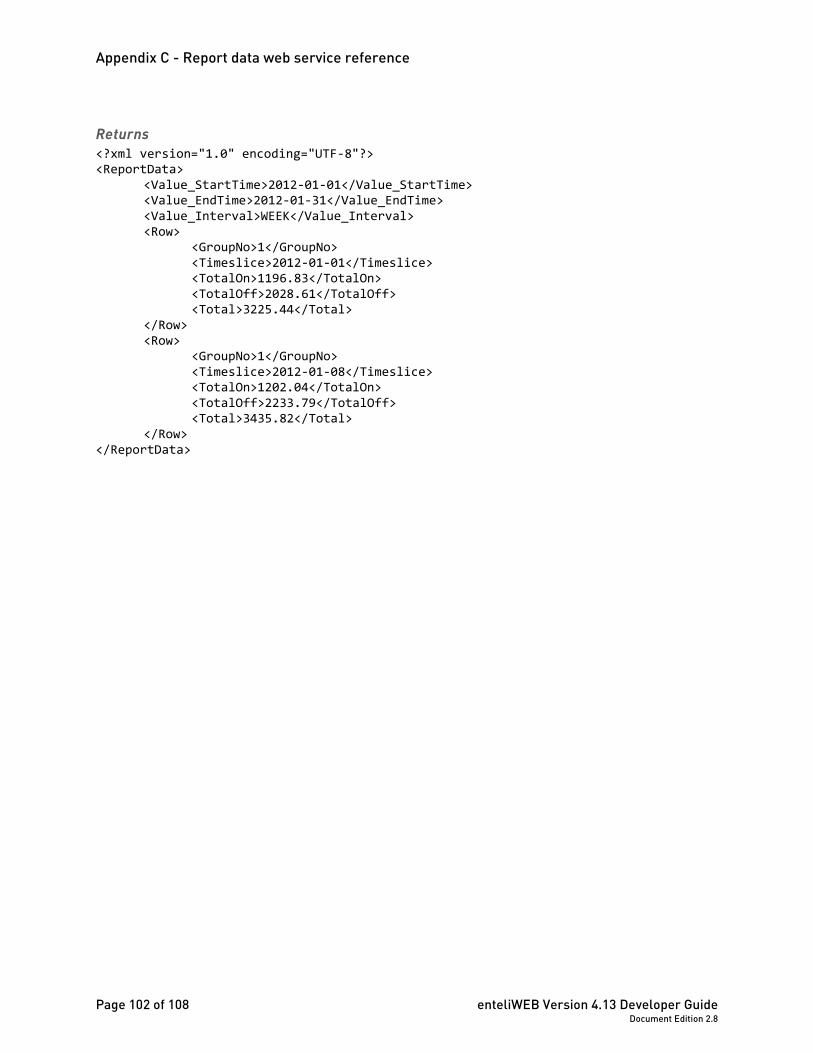
Appendix C - Report data web service reference
Page 102 of 108 enteliWEB Version 4.13 Developer Guide Document Edition 2.8
Returns <?xml version="1.0" encoding="UTF-8"?> <ReportData>
<Value_StartTime>2012-01-01</Value_StartTime> <Value_EndTime>2012-01-31</Value_EndTime> <Value_Interval>WEEK</Value_Interval> <Row>
<GroupNo>1</GroupNo> <Timeslice>2012-01-01</Timeslice> <TotalOn>1196.83</TotalOn> <TotalOff>2028.61</TotalOff> <Total>3225.44</Total>
</Row> <Row>
<GroupNo>1</GroupNo> <Timeslice>2012-01-08</Timeslice> <TotalOn>1202.04</TotalOn> <TotalOff>2233.79</TotalOff> <Total>3435.82</Total>
</Row> </ReportData>
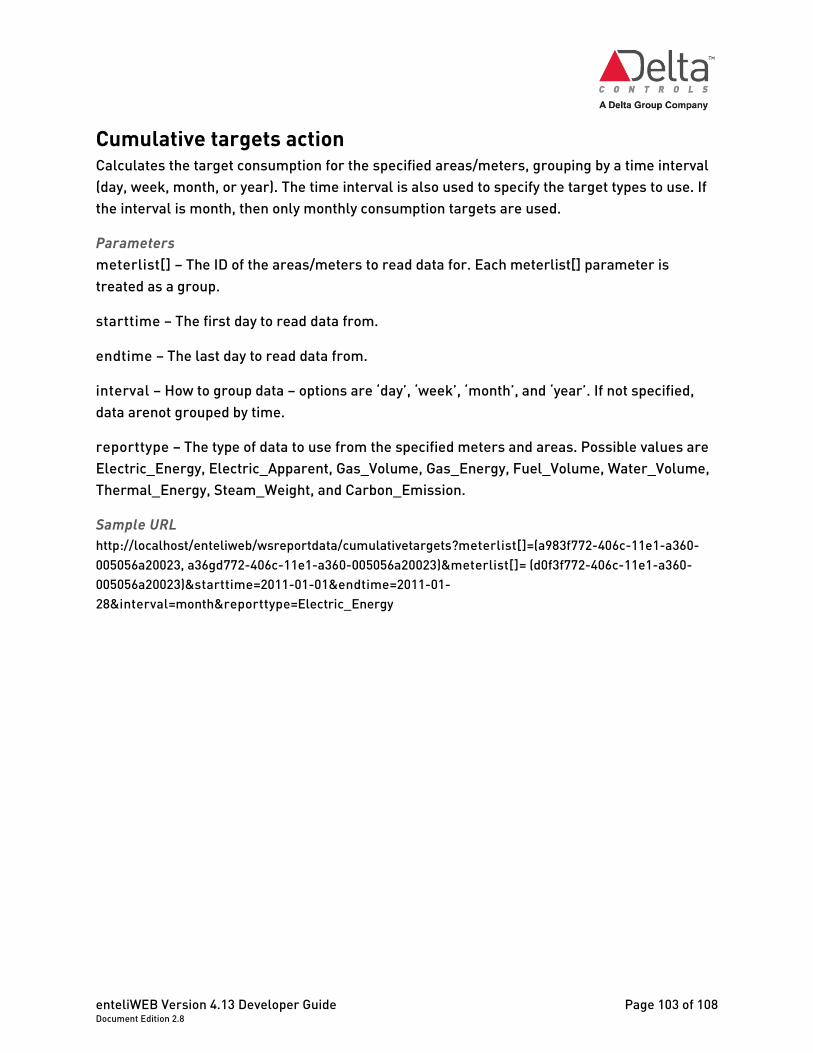
enteliWEB Version 4.13 Developer Guide Page 103 of 108 Document Edition 2.8
Cumulative targets action Calculates the target consumption for the specified areas/meters, grouping by a time interval (day, week, month, or year). The time interval is also used to specify the target types to use. If the interval is month, then only monthly consumption targets are used.
Parameters meterlist[] – The ID of the areas/meters to read data for. Each meterlist[] parameter is treated as a group.
starttime – The first day to read data from.
endtime – The last day to read data from.
interval – How to group data – options are ‘day’, ‘week’, ‘month’, and ‘year’. If not specified, data arenot grouped by time.
reporttype – The type of data to use from the specified meters and areas. Possible values are Electric_Energy, Electric_Apparent, Gas_Volume, Gas_Energy, Fuel_Volume, Water_Volume, Thermal_Energy, Steam_Weight, and Carbon_Emission.
Sample URL http://localhost/enteliweb/wsreportdata/cumulativetargets?meterlist[]=(a983f772-406c-11e1-a360-005056a20023, a36gd772-406c-11e1-a360-005056a20023)&meterlist[]= (d0f3f772-406c-11e1-a360-005056a20023)&starttime=2011-01-01&endtime=2011-01-28&interval=month&reporttype=Electric_Energy
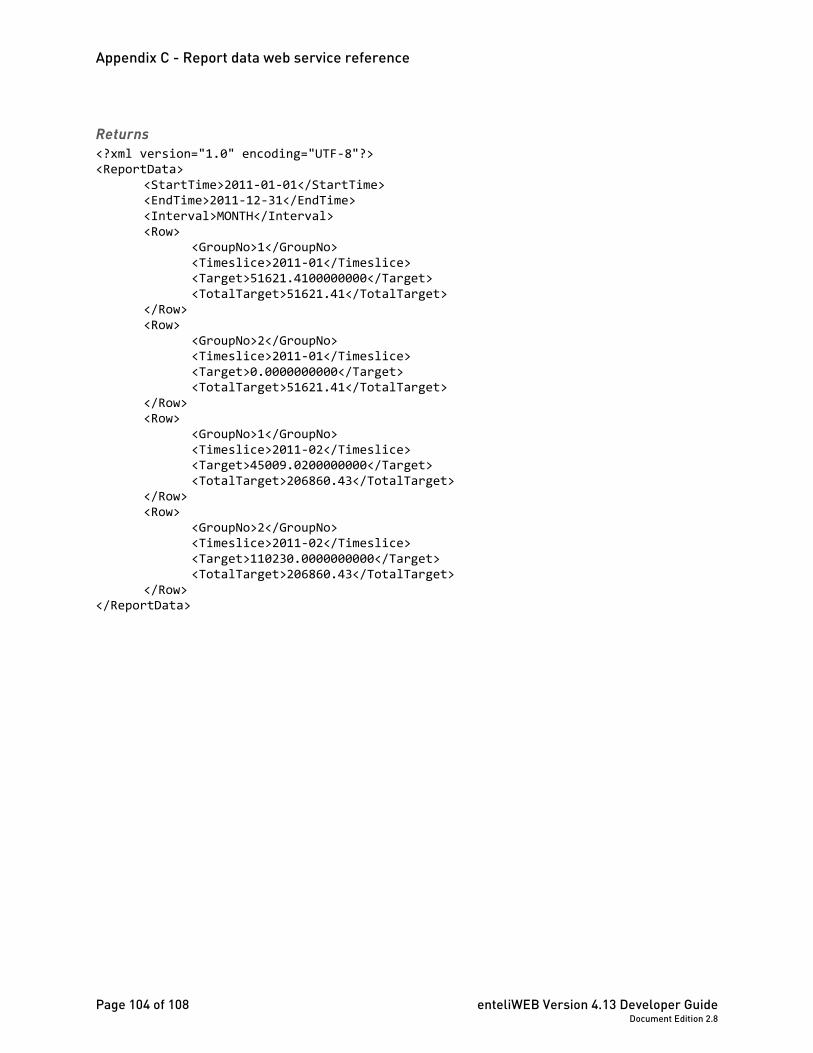
Appendix C - Report data web service reference
Page 104 of 108 enteliWEB Version 4.13 Developer Guide Document Edition 2.8
Returns <?xml version="1.0" encoding="UTF-8"?> <ReportData>
<StartTime>2011-01-01</StartTime> <EndTime>2011-12-31</EndTime> <Interval>MONTH</Interval> <Row>
<GroupNo>1</GroupNo> <Timeslice>2011-01</Timeslice> <Target>51621.4100000000</Target> <TotalTarget>51621.41</TotalTarget>
</Row> <Row>
<GroupNo>2</GroupNo> <Timeslice>2011-01</Timeslice> <Target>0.0000000000</Target> <TotalTarget>51621.41</TotalTarget>
</Row> <Row>
<GroupNo>1</GroupNo> <Timeslice>2011-02</Timeslice> <Target>45009.0200000000</Target> <TotalTarget>206860.43</TotalTarget>
</Row> <Row>
<GroupNo>2</GroupNo> <Timeslice>2011-02</Timeslice> <Target>110230.0000000000</Target> <TotalTarget>206860.43</TotalTarget>
</Row> </ReportData>
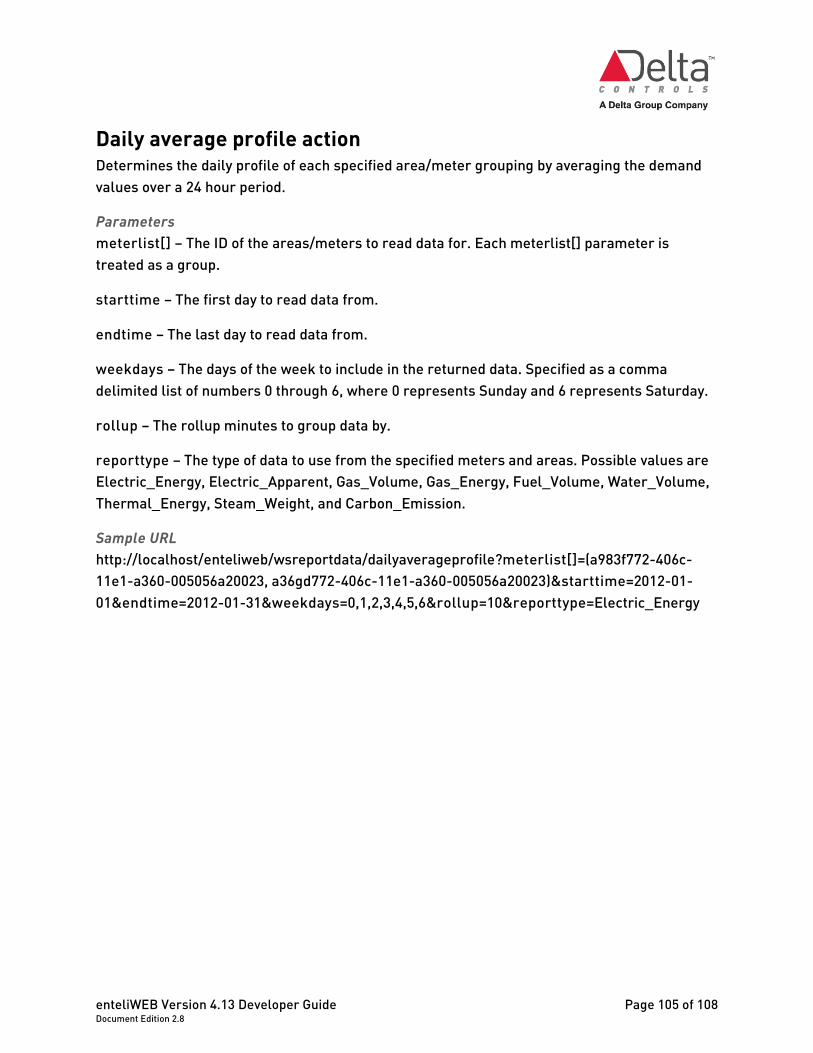
enteliWEB Version 4.13 Developer Guide Page 105 of 108 Document Edition 2.8
Daily average profile action Determines the daily profile of each specified area/meter grouping by averaging the demand values over a 24 hour period.
Parameters meterlist[] – The ID of the areas/meters to read data for. Each meterlist[] parameter is treated as a group.
starttime – The first day to read data from.
endtime – The last day to read data from.
weekdays – The days of the week to include in the returned data. Specified as a comma delimited list of numbers 0 through 6, where 0 represents Sunday and 6 represents Saturday.
rollup – The rollup minutes to group data by.
reporttype – The type of data to use from the specified meters and areas. Possible values are Electric_Energy, Electric_Apparent, Gas_Volume, Gas_Energy, Fuel_Volume, Water_Volume, Thermal_Energy, Steam_Weight, and Carbon_Emission.
Sample URL http://localhost/enteliweb/wsreportdata/dailyaverageprofile?meterlist[]=(a983f772-406c-11e1-a360-005056a20023, a36gd772-406c-11e1-a360-005056a20023)&starttime=2012-01-01&endtime=2012-01-31&weekdays=0,1,2,3,4,5,6&rollup=10&reporttype=Electric_Energy
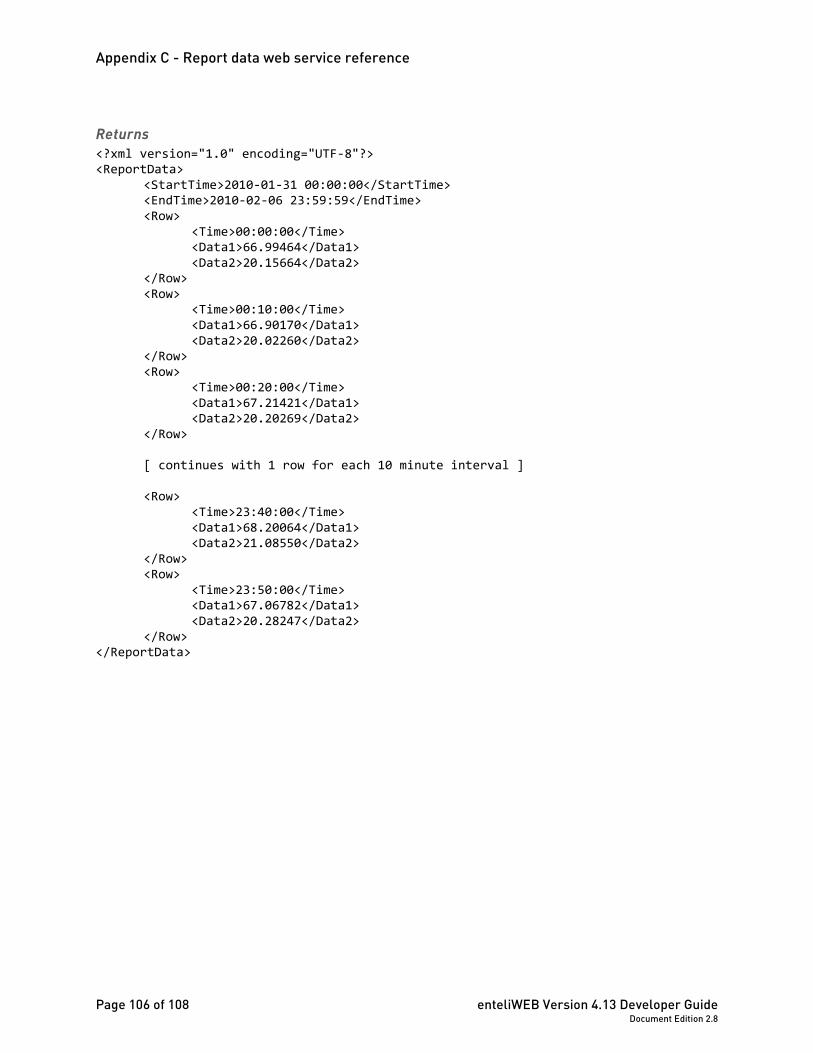
Appendix C - Report data web service reference
Page 106 of 108 enteliWEB Version 4.13 Developer Guide Document Edition 2.8
Returns <?xml version="1.0" encoding="UTF-8"?> <ReportData>
<StartTime>2010-01-31 00:00:00</StartTime> <EndTime>2010-02-06 23:59:59</EndTime> <Row>
<Time>00:00:00</Time> <Data1>66.99464</Data1> <Data2>20.15664</Data2>
</Row> <Row>
<Time>00:10:00</Time> <Data1>66.90170</Data1> <Data2>20.02260</Data2>
</Row> <Row>
<Time>00:20:00</Time> <Data1>67.21421</Data1> <Data2>20.20269</Data2>
</Row> [ continues with 1 row for each 10 minute interval ]
<Row> <Time>23:40:00</Time> <Data1>68.20064</Data1> <Data2>21.08550</Data2>
</Row> <Row>
<Time>23:50:00</Time> <Data1>67.06782</Data1> <Data2>20.28247</Data2>
</Row> </ReportData>
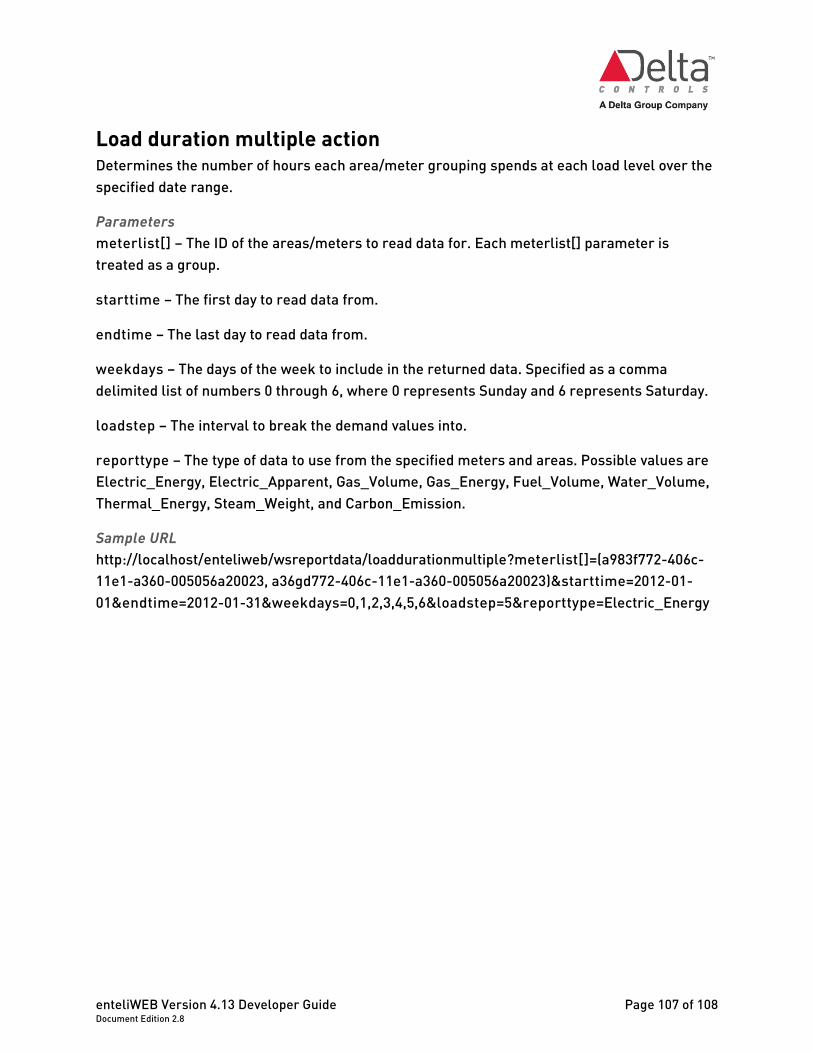
enteliWEB Version 4.13 Developer Guide Page 107 of 108 Document Edition 2.8
Load duration multiple action Determines the number of hours each area/meter grouping spends at each load level over the specified date range.
Parameters meterlist[] – The ID of the areas/meters to read data for. Each meterlist[] parameter is treated as a group.
starttime – The first day to read data from.
endtime – The last day to read data from.
weekdays – The days of the week to include in the returned data. Specified as a comma delimited list of numbers 0 through 6, where 0 represents Sunday and 6 represents Saturday.
loadstep – The interval to break the demand values into.
reporttype – The type of data to use from the specified meters and areas. Possible values are Electric_Energy, Electric_Apparent, Gas_Volume, Gas_Energy, Fuel_Volume, Water_Volume, Thermal_Energy, Steam_Weight, and Carbon_Emission.
Sample URL http://localhost/enteliweb/wsreportdata/loaddurationmultiple?meterlist[]=(a983f772-406c-11e1-a360-005056a20023, a36gd772-406c-11e1-a360-005056a20023)&starttime=2012-01-01&endtime=2012-01-31&weekdays=0,1,2,3,4,5,6&loadstep=5&reporttype=Electric_Energy
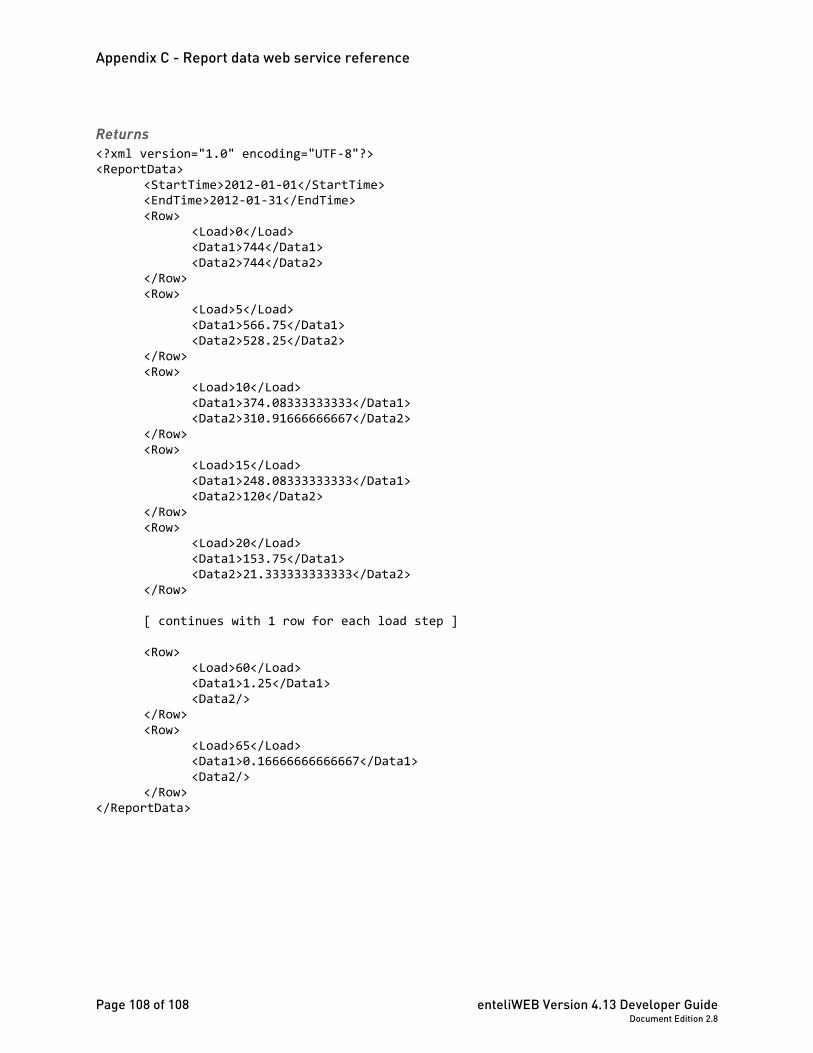
Appendix C - Report data web service reference
Page 108 of 108 enteliWEB Version 4.13 Developer Guide Document Edition 2.8
Returns <?xml version="1.0" encoding="UTF-8"?> <ReportData>
<StartTime>2012-01-01</StartTime> <EndTime>2012-01-31</EndTime> <Row>
<Load>0</Load> <Data1>744</Data1> <Data2>744</Data2>
</Row> <Row>
<Load>5</Load> <Data1>566.75</Data1> <Data2>528.25</Data2>
</Row> <Row>
<Load>10</Load> <Data1>374.08333333333</Data1> <Data2>310.91666666667</Data2>
</Row> <Row>
<Load>15</Load> <Data1>248.08333333333</Data1> <Data2>120</Data2>
</Row> <Row>
<Load>20</Load> <Data1>153.75</Data1> <Data2>21.333333333333</Data2>
</Row> [ continues with 1 row for each load step ] <Row>
<Load>60</Load> <Data1>1.25</Data1> <Data2/>
</Row> <Row>
<Load>65</Load> <Data1>0.16666666666667</Data1> <Data2/>
</Row> </ReportData>

enteliWEB Version 4.13 Developer Guide Page 109 of 108 Document Edition 2.8
Appendix D - Delta JavaScript libraries To aid developers in widget development, some commonly used functionality has been wrapped up under the “Delta” JavaScript namespace for use. These API files are located under the \website\public\javascript\delta folder.
This appendix outlines the most useful functions in these libraries.You can open up the library files for viewing – they are not minified so they are easily readable.
Delta.js Delta.js is the main API file for use. It contains the following collection of useful namespaces:
Delta.FullRef Contains reference parsing functionality for dealing with BAC object references.
Delta.Util Contains common JavaScript utilities for trimming spaces and encoding text.
Delta.WS Contains wrappers for AJAX web service calls, as well as some common enteliWEB web service calls.
Delta.DateTime.js The Delta.DateTime.js library contains custom date/time parsing and formatting functions that help to handle the differences between BACnet and JavaScript date formatting.
BACtoJSDate
JStoBACDateTime
formatDate
getPrettyDateTime
Appendix D - Delta JavaScript libraries
Page 110 of 108 enteliWEB Version 4.13 Developer Guide Document Edition 2.8
Delta.UI.js The Delta.UI.js library contains functions which help aid in getting object UI information such as icons and links.
getObjectLink
getIcon
playSound
enteliWEB Version 4.13 Developer Guide Page 111 of 108 Document Edition 2.8
Document revision history Document Edition Number
Date Published
Author Description of Change
1.5 July 2014 J.Halliday enteliWEB 2.2 Removed appendices Delta_BAC Library Reference and Delta_DS Library Reference Added section Integrate an application with enteliWEB Updated section Create a custom widget to show how widget is mobile-aware, in Example.phtml. Added section Obtain trend log samples from CopperCube
1.61 January 2015 J.Halliday enteliWEB 4.0 Updated to the new BACnet property naming convention introduced in enteliWEB 4.0. Several places changed the property Value to Present_Value, and changed TL property BufferSize to Buffer_Size. Updated Javascript code examples to match the source.
1.62 June 2015 J.Halliday Added information about CSRF (Cross Site Request Forgery)
1.71 December 2015 J.Halliday enteliWEB 4.1 Pages 15 and 32, in the example code, the statement immediately below: // get TLInstance row from model
is changed. Page 16, third bullet, code example is changed.
1.72 August 2016 J.Halliday Page 78, in the example, changed CURLOPT_SSLVERSION => 3 to CURLOPT_SSLVERSION => 1 CopperCube removed SSLv2 and SSLv3 support as a security measure against the poodle attack
Document revision history
Page 112 of 108 enteliWEB Version 4.13 Developer Guide Document Edition 2.8
Document Edition Number
Date Published
Author Description of Change
1.73 September 2016 J.Halliday Page 8, updated the flowchart to include CopperCube.
1.81 October 2016 J.Halliday enteliWEB 4.2 page 9, recommended version of BIRT Report Designer is changed to 4.4.2 Page 36, added paragraph to Troubleshooting section
1.90 December 2016 J.Halliday enteliWEB 4.3 No changes from edition 1.81
2.0 February 2017 J.Halliday enteliWEB 4.4 No changes from edition 1.90
2.1 May 2017 J.Halliday enteliWEB 4.5 No changes from edition 2.0
2.2 August 2017 J.Halliday enteliWEB 4.6 No changes from edition 2.1
2.3 November 2017 J.Halliday enteliWEB 4.7 Inserted Chapter 2 - Creating a Custom BAS Report
2.4 February 2018 J.Halliday enteliWEB 4.8 No changes from edition 2.3
2.5 June 2018 J.Halliday enteliWEB 4.9 No changes from edition 2.4
2.6 November 2018 N.Ghazali enteliWEB 4.11 Some enteliWEB screenshots were updated.
2.7 April 2019 N. Ghazali enteliWEB 4.12 Some enteliWEB screenshots were updated.
2.8 August 2019 N. Ghazali enteliWEB 4.13 Added a new section about supporting multi-language help.

enteliWEB Version 4.13 Developer Guide Page 113 of 108 Document Edition 2.8

www.deltacontrols.com