Embed Size (px)
Citation preview

EN
GLIS
HFR
AN
ÇA
ISD
EU
TS
CH
FR
AN
ÇA
ISIT
ALIA
NO
NED
ER
LAN
DS
Hide-away TV tuner
Syntoniseur de télévision déporté
Operation Manual
GEX-P6400TVMode d’emploi

1
Contents
Dear Customer ............................................ 2
Before Using This Product ...................... 3About This Product .......................................... 3
- Video system of a connected component- This product’s power source
Important .......................................................... 3About This Manual ............................................ 4Precaution .......................................................... 4
- After-sales Service for Pioneer ProductsResetting the Microprocessor ............................ 5OSD Switch Setting .......................................... 5
Key Finder .................................................... 6- Optional Remote Control CD-R99
(sold separately)- The Head Unit (e.g. DEH-P8400MP)
Operating with Head Unit ........................ 8- Head Unit Group 1- Head Unit Group 2- Head Unit Group 3- Head Unit Group 4
Function Compatibility Charts .......................... 9- Preset Memory- Direct Recall- Entering the Function Menu- Preset Scan- Switching the Tuning Mode- Using the PGM Button- Preset ch. List
Basic Operation ...................................... 12Switching the Source ...................................... 12Basic Operation of TV Tuner .......................... 13
- Manual and Seek Tuning- BAND- Preset Tuning
BSSM (Best Station Sequential Memory) ...... 14Confirming Current Channel and
Other Settings .......................................... 15
Specifications .......................................... 16

2
EN
GLIS
HES
PA
ÑO
LD
EU
TS
CH
FR
AN
ÇA
ISIT
ALIA
NO
NED
ER
LAN
DS
Selecting fine audio equipment such as the unit you’ve just purchased is only the start of yourmusical enjoyment. Now it’s time to consider how you can maximize the fun and excitement yourequipment offers. This manufacturer and the Electronic Industries Association’s ConsumerElectronics Group want you to get the most out of your equipment by playing it at a safe level.One that lets the sound come through loud and clear without annoying blaring or distortion—and,most importantly, without affecting your sensitive hearing.
Sound can be deceiving. Over time your hearing “comfort level” adapts to higher volumes ofsound. So what sounds “normal” can actually be loud and harmful to your hearing. Guard againstthis by setting your equipment at a safe level BEFORE your hearing adapts.
To establish a safe level:
• Start your volume control at a low setting.• Slowly increase the sound until you can hear it comfortably and clearly, and without distor-
tion.
Once you have established a comfortable sound level:• Set the dial and leave it there.
Taking a minute to do this now will help to prevent hearing damage or loss in the future. After all,we want you listening for a lifetime.
We Want You Listening For A LifetimeUsed wisely, your new sound equipment will provide a lifetime of fun and enjoyment. Since
hearing damage from loud noise is often undetectable until it is too late, this manufacturer and theElectronic Industries Association’s Consumer Electronics Group recommend you avoid pro-longed exposure to excessive noise. This list of sound levels is included for your protection.DecibelLevel Example
30 Quiet library, soft whispers40 Living room, refrigerator, bedroom away from traffic50 Light traffic, normal conversation, quiet office60 Air conditioner at 20 feet, sewing machine70 Vacuum cleaner, hair dryer, noisy restaurant80 Average city traffic, garbage disposals, alarm clock at two feet.
THE FOLLOWING NOISES CAN BE DANGEROUS UNDER CONSTANT EXPOSURE90 Subway, motorcycle, truck traffic, lawn mower
100 Garbage truck, chain saw, pneumatic drill120 Rock band concert in front of speakers, thunderclap140 Gunshot blast, jet plane180 Rocket launching pad
Information courtesy of the Deafness Research Foundation.

3
Before Using This Product
About This ProductThis product is a TV tuner for reception of TV broadcasts. Combining it with a separatelysold display with AV-BUS lets you enjoy TV entertainment (refer to this product’sInstallation Manual for details concerning the AV-BUS). The tuner frequencies on thisproduct are allocated for use in North America. Use in other areas may result in improperreception.
This product features a Rear Display output (REAR OUT), letting you watch TV on a RearDisplay (sold separately).
Video system of a connected componentThis product is NTSC system compatible. When connecting an external component to thisproduct’s Rear Display output (REAR OUT), be sure the component is compatible with thesame video systems. If it is not, images will not be correctly reproduced.
WARNING• Be sure to stop driving and park your car in a safe place before watching
the TV.• Watching the TV while driving is dangerous and could result in an acci-
dent.• This product’s Rear Display output is for connection of a display to enable
passengers in the rear seats to watch the TV. Do not install the rear displayin a location that enables the driver to watch the TV while driving.
This product’s power sourceSwitching power to the unit controlling this product OFF, or selecting a source other thanTV does not switch power to this product OFF.Although this product is designed to assure no problems occur during use, if for some rea-son you want to switch power OFF, switch ACC OFF on the car side.
ImportantThe serial number of this device is located on the bottom of this product. For your ownsecurity and convenience, be sure to record this number on the enclosed warranty card.
[For Canadian model]This Class B digital apparatus complies with Canadian ICES-003.
Information to UserAlternation or modifications carried out without appropriate authorization mayinvalidate the user’s right to operate the equipment.

About This ManualThis product features a number of sophisticated functions ensuring superior reception andoperation. All are designed for the easiest possible use, but many are not self-explanatory.This operation manual is intended to help you benefit fully from their potential and tomaximize your listening enjoyment.We recommend that you familiarize yourself with the functions and their operation byreading through the manual before you begin using this product. It is especially importantthat you read and observe the “Precaution” on this page and in other sections.
Precaution• Keep this manual handy as a reference for operating procedures and precautions.• Always keep the volume low enough for outside sounds to be audible. • Protect this product from moisture.• If the battery is disconnected, the preset memory will be erased and must be
reprogrammed.
After-sales Service for Pioneer ProductsPlease contact the dealer or distributor from where you purchased the product for its after-sales service (including warranty conditions) or any other information. In case the necessaryinformation is not available, please contact the companies listed below:
Please do not ship your product to the companies at the addresses listed below for repairwithout advance contact.
For warranty information please see the Limited Warranty sheet included with your product.
When using with a Pioneer AV Receiver (e.g. AVH-P6400CD, AVH-P6400), pleaseread the AV Receiver’s Operation Manual.
4
EN
GLIS
HES
PA
ÑO
LD
EU
TS
CH
FR
AN
ÇA
ISIT
ALIA
NO
NED
ER
LAN
DS
7 U.S.A.Pioneer Electronics (U.S.A.), Inc.CUSTOMER SUPPORT DIVISIONP.O. Box 1760Long Beach, CA 90801-1760800-421-1404
7 CANADAPioneer Electronics of Canada, Inc.CUSTOMER SATISFACTION DEPARTMENT300 Allstate Parkway, Markham, Ontario L3R OP2(905) 479-44111-877-283-5901

5
Before Using This Product
Resetting the MicroprocessorThe microprocessor must be reset under the following conditions:When using this product for the first time after installation.When the machine fails to operate properly.When strange (incorrect) messages appear on the display.When setting the position of the OSD switch on the right side of this product.If you reset the microprocessor, memorized broadcast stations and other information iserased, and this product returns to its initial settings.
• To reset the microprocessor, press the RESET button on the unit with a pentip or other pointed instrument.
OSD Switch Setting
Set the OSD (On Screen Display) switch on the right side of this product to the appropriateposition with a pen tip or other pointed instrument, for the component you are combining itwith.
(1) OSD OFFWhen combining with a PIONEER AV Receiver (e.g. AVH-P6400CD, AVH-P6400).• Select this setting when not using this product’s OSD indications in the display.
(2) OSD ONWhen combining with a PIONEER Display featuring an AV-BUS input (e.g. AVX-P7300DVD, AVX-7300).• Select this setting when using this product’s OSD indications in the display.
Note:• As output from the Rear Display output has no relation to the OSD switch’s ON/OFF setting, OSD
indications are always displayed.
2TV 1
OSD
Key Finder
Optional Remote Control CD-R99 (sold separately)The optional remote control CD-R99 is mainly for use by rear seat passengers. Whenusing, point at the front seat display remote control sensor.
7 Other remote controlsYou can also perform operations with the remote controls shown below.Operate using the buttons that correspond to those on the optional remote control CD-R99,as shown in the chart.
The optional remote control CD-R99 A Pioneer car DVD player’s remote control*1 CH CALL button STEP (E) button
2 5/∞/2/3 buttons Joystick
Mode switch:When operating a TV, be sure to set the “Remote control operation mode switch” to the “TV” position.
*…SDV-P7, AVX-P7300DVD, XDV-P9II
MENU TOP
MENU
AUDIO RTN
S.TITLE DISP
ANGLE
RGB
WIDE
POWER
BANDBSSM/ch call
MENU
REAR
V.SEL
OPEN/CLOSE ANGLE
CLEAR
21
DVDTV
3 C
4 5 6 10
7 8 9 0
RGB
BSSM/ch call
OPEN/CLOSE
2 Joystick/5/∞/2/3 buttons
1 CH CALL buttonMode switch
6
EN
GLIS
HES
PA
ÑO
LD
EU
TS
CH
FR
AN
ÇA
ISIT
ALIA
NO
NED
ER
LAN
DS
7
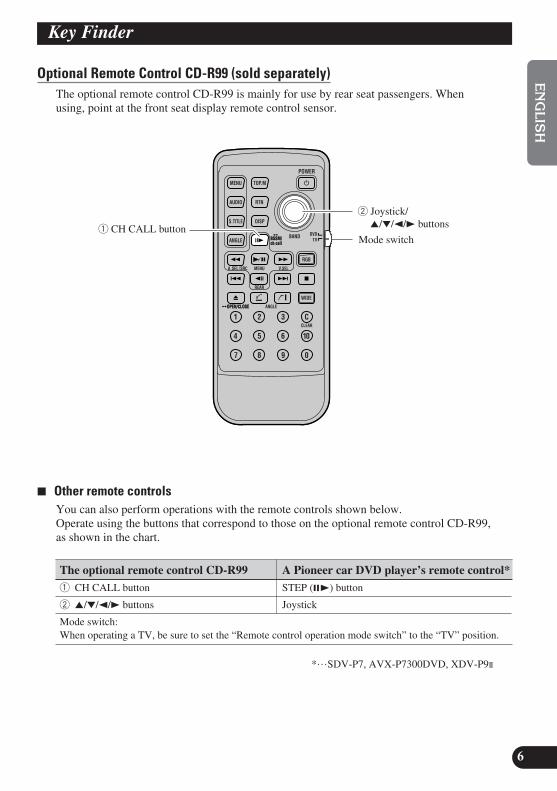
Key Finder
The Head Unit (e.g. DEH-P8400MP)You can control this unit with a Head Unit (sold separately).
Front panel (open)
Note:• Button layout differs depending on the model, so please read the Operation Manual of the Head
Unit you are using.
FUNCTION button
SOURCE button
VOLUME 1–6 (PRESET TUNING)buttons
5/∞/2/3 buttons
BAND button

These instructions explain how to operate this product with a connected Head Unit (soldseparately). Some Head Units control this product as a TV source, while others control itas an External Unit. Among Head Units that control this product as an External Unit, somedo it using a FUNCTION button and some do not.
Note:• External Unit refers to a component that cannot be fully controlled by a Head Unit as a source.• When connected to a Head Unit that cannot control a TV as a source, this product (TV) is
controlled as an External Unit.• Two types of Pioneer Head Unit are available: one type to which only one external unit can be con-
nected and another type to which two external units can be connected.
7 Head Unit Group 1Head Units that control this product as a TV source.
7 Head Unit Group 2Head Units that control this product as an External Unit using a FUNCTION button tooperate functions.
7 Head Unit Group 3Head Units that control this product as an External Unit, not using a FUNCTION button tooperate functions.
7 Head Unit Group 4Head Units that control this product as a TV source, not using a FUNCTION button tooperate functions.
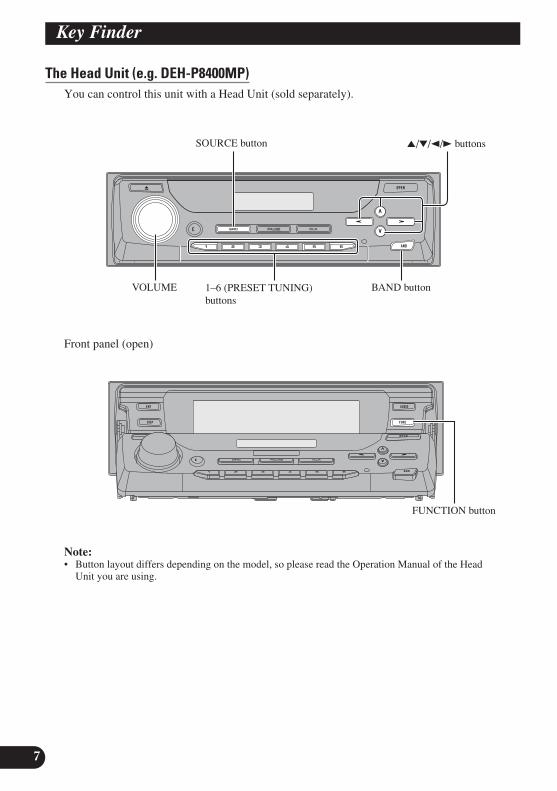
Head Unit Group 1When using the unit with one of these Head Units, operate while referring to Head UnitGroup 1 in the Function Compatibility Charts. DEX-P9
DEH-P90HDD DEH-P940MP DEH-P9400MPDEH-P9300 DEH-P930 DEH-P8400MPDEH-P840MP DEH-P8200R DEH-P7400MPDEH-P740MP DEH-P7300 DEH-P730DEH-P7200 DEH-P720 DEH-P6400DEH-P640 DEH-P6300 DEH-P630DEH-P6200 DEH-P5200 DEH-P520DEH-P4400 DEH-P440 DEH-P44DEH-P4300 DEH-P430 DEH-P43DEH-P3300 DEH-P330 DEH-P33DEH-P3370XM DEH-P77DH
KEH-P6010 KEH-P601 KEH-P690
FH-P4100 FH-P4000
AVM-P9000R AVM-P8000R
AVH-P6400CD AVH-P6400
DVH-P7000
Operating with Head Unit
8
EN
GLIS
HES
PA
ÑO
LD
EU
TS
CH
FR
AN
ÇA
ISIT
ALIA
NO
NED
ER
LAN
DS
9
Operating with Head Unit
Head Unit Group 2When using the unit with one of these Head Units, operate while referring to Head UnitGroup 2 in the Function Compatibility Charts.
DEH-P4100 DEH-P410 DEH-P41FH-P8800
Head Unit Group 3When using the unit with one of these Head Units, operate while referring to Head UnitGroup 3 in the Function Compatibility Charts.
KEH-P4900 KEH-P490 KEH-P4010KEH-P1010
Head Unit Group 4When using the unit with one of these Head Units, operate while referring to Head UnitGroup 4 in the Function Compatibility Charts.
KEH-P4020
Function Compatibility ChartsOperate using buttons with the same function on the Head Unit itself or the remote control.
Note:• You may not be able to use functions* with some Head Units.
Head Unit Group 1
Function Button Operation PageSwitching the Source SOURCE, SOURCE/OFF :Select 12
Manual Tuning (Step by Step) 2/3 (0.5 seconds or less) :Select 13
Seek Tuning 2/3 (0.5 seconds or more) :Select 13
Preset Tuning 5/∞ :Select 13
Changing the Band BAND, 23 :Select 13
Preset Memory 1–6 (Hold for 2 seconds) :Memory 10
Direct Recall 1–6 :Select 11
BSSM FUNCTION (A.MENU) :ON/OFF 145/∞
Preset ch. List* FUNCTION (A.MENU) 115/∞/2/3
Setting the PGM Button* FUNCTION (Hold for 2 seconds) :Select —5/∞/2/3
Using the PGM Button* PGM (Hold for 2 seconds) :BSSM 11ON/OFF
Note:• For TV, you cannot memorize functions other than BSSM in the PGM button. (You may not be
able to use this function with some Head Units.)• When using with an AV Receiver (e.g. AVH-P6400CD, AVH-P6400), please read the AV
Receiver’s Operation Manual.
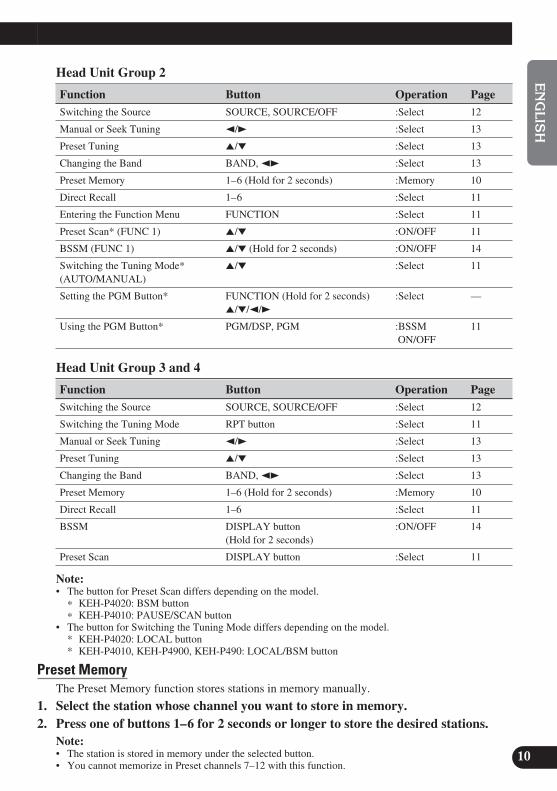
Head Unit Group 2
Function Button Operation PageSwitching the Source SOURCE, SOURCE/OFF :Select 12
Manual or Seek Tuning 2/3 :Select 13
Preset Tuning 5/∞ :Select 13
Changing the Band BAND, 23 :Select 13
Preset Memory 1–6 (Hold for 2 seconds) :Memory 10
Direct Recall 1–6 :Select 11
Entering the Function Menu FUNCTION :Select 11
Preset Scan* (FUNC 1) 5/∞ :ON/OFF 11
BSSM (FUNC 1) 5/∞ (Hold for 2 seconds) :ON/OFF 14
Switching the Tuning Mode* 5/∞ :Select 11(AUTO/MANUAL)
Setting the PGM Button* FUNCTION (Hold for 2 seconds) :Select —5/∞/2/3
Using the PGM Button* PGM/DSP, PGM :BSSM 11ON/OFF
Head Unit Group 3 and 4
Function Button Operation PageSwitching the Source SOURCE, SOURCE/OFF :Select 12
Switching the Tuning Mode RPT button :Select 11
Manual or Seek Tuning 2/3 :Select 13
Preset Tuning 5/∞ :Select 13
Changing the Band BAND, 23 :Select 13
Preset Memory 1–6 (Hold for 2 seconds) :Memory 10
Direct Recall 1–6 :Select 11
BSSM DISPLAY button :ON/OFF 14(Hold for 2 seconds)
Preset Scan DISPLAY button :Select 11
Note:• The button for Preset Scan differs depending on the model.
* KEH-P4020: BSM button* KEH-P4010: PAUSE/SCAN button
• The button for Switching the Tuning Mode differs depending on the model.* KEH-P4020: LOCAL button* KEH-P4010, KEH-P4900, KEH-P490: LOCAL/BSM button
Preset MemoryThe Preset Memory function stores stations in memory manually.
1. Select the station whose channel you want to store in memory.2. Press one of buttons 1–6 for 2 seconds or longer to store the desired stations.
Note:• The station is stored in memory under the selected button.• You cannot memorize in Preset channels 7–12 with this function.
10
EN
GLIS
HES
PA
ÑO
LD
EU
TS
CH
FR
AN
ÇA
ISIT
ALIA
NO
NED
ER
LAN
DS

11
Operating with Head Unit
Direct Recall
• Press one of buttons 1–6 to recall a station preset under that button.
Note:• To recall Preset channels 7–12, perform Preset Tuning with 5/∞ buttons.
Entering the Function Menu
• Press the FUNCTION button to select the desired mode in the FunctionMenu.Each press of the FUNCTION button selects the mode in the following order:
FUNC 1 (Preset Scan/BSSM) = FUNC 2 = FUNC 3 = FUNC 4 = AUTO/MANUAL (Switching the Tuning Mode)
Note:• In FUNC 1, Preset Scan or BSSM is selected by changing the length of time you press the 5/∞
button.• There are no functions in FUNC 2, FUNC 3 or FUNC 4.
Preset ScanThis lets you view up to 12 stations stored in the Preset Channels one after the other.
Switching the Tuning ModeYou can select between Manual Tuning (MANUAL) and Seek Tuning (AUTO). Press the5/∞ button, or other button as appropriate, and tuning is performed in the selected tuningmode.
Using the PGM ButtonThe PGM (PGM/DSP) button operates in a different way depending on the function programmed (memorized). (For details concerning programming the PGM (PGM/DSP)button, refer to the Head Unit’s operation manual.)
• Press the PGM (PGM/DSP) button.
Function Press Hold for 2 secondsPreset Scan/BSSM (FUNC1) Preset Scan ON/OFF BSSM ON/OFF
Switching the Tuning Mode Select _____(AUTO/MANUAL)
Preset ch. ListRead the Operation Manual of a Head Unit that can use this function.
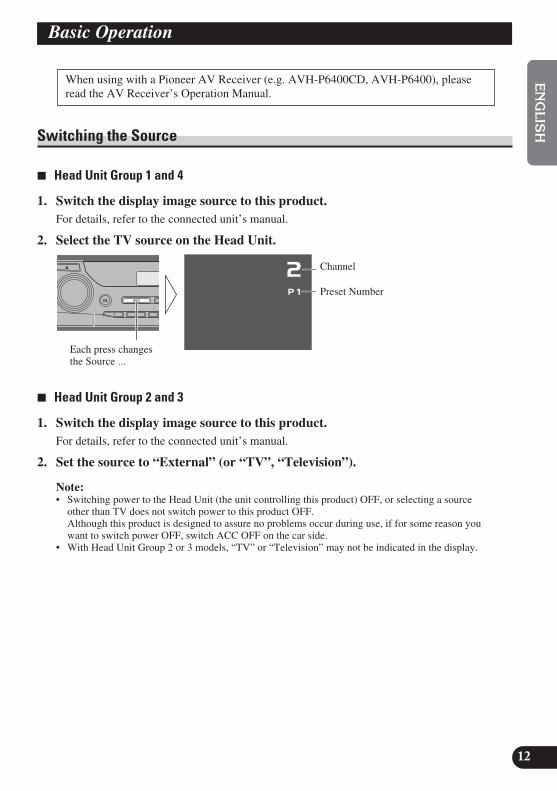
Basic Operation
Switching the Source
7 Head Unit Group 1 and 4
1. Switch the display image source to this product.For details, refer to the connected unit’s manual.
2. Select the TV source on the Head Unit.
7 Head Unit Group 2 and 3
1. Switch the display image source to this product.For details, refer to the connected unit’s manual.
2. Set the source to “External” (or “TV”, “Television”).
Note:• Switching power to the Head Unit (the unit controlling this product) OFF, or selecting a source
other than TV does not switch power to this product OFF.Although this product is designed to assure no problems occur during use, if for some reason youwant to switch power OFF, switch ACC OFF on the car side.
• With Head Unit Group 2 or 3 models, “TV” or “Television” may not be indicated in the display.
Each press changesthe Source ...
Channel
Preset Number
2P1
When using with a Pioneer AV Receiver (e.g. AVH-P6400CD, AVH-P6400), pleaseread the AV Receiver’s Operation Manual.
12
EN
GLIS
HES
PA
ÑO
LD
EU
TS
CH
FR
AN
ÇA
ISIT
ALIA
NO
NED
ER
LAN
DS

13
Basic Operation
Basic Operation of TV Tuner
2P1
Manual and Seek Tuning
• You can select the tuning method by changing the length of time youpress the 2/3 button.
Manual Tuning (step by step) 0.5 seconds or less
Seek Tuning 0.5 seconds or more
Note:• If you continue pressing the button for longer than 0.5 seconds, you can skip broadcasting
stations. Seek Tuning starts as soon as you stop pressing the button.
Preset Tuning
• You can recall memorized stations. You can memorize and recall stations using buttons 1–6 in the sameway as with Head Unit tuner Preset Tuning. (Refer to page 11.)
BANDTV1 = TV2Operation is possible only with the HeadUnit’s BAND (23) button.
Audio sourcePreset Number
Audio sourceChannel
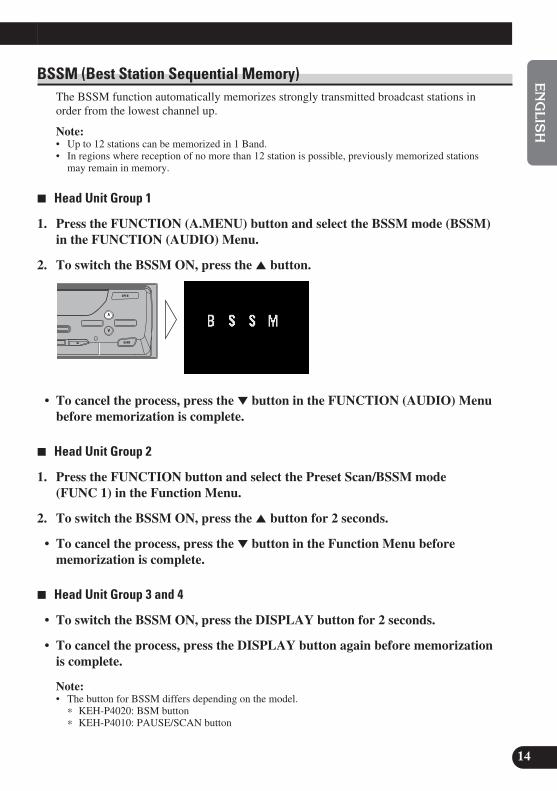
BSSM (Best Station Sequential Memory)The BSSM function automatically memorizes strongly transmitted broadcast stations inorder from the lowest channel up.
Note:• Up to 12 stations can be memorized in 1 Band.• In regions where reception of no more than 12 station is possible, previously memorized stations
may remain in memory.
7 Head Unit Group 1
1. Press the FUNCTION (A.MENU) button and select the BSSM mode (BSSM)in the FUNCTION (AUDIO) Menu.
2. To switch the BSSM ON, press the 5 button.
• To cancel the process, press the ∞ button in the FUNCTION (AUDIO) Menubefore memorization is complete.
7 Head Unit Group 2
1. Press the FUNCTION button and select the Preset Scan/BSSM mode (FUNC 1) in the Function Menu.
2. To switch the BSSM ON, press the 5 button for 2 seconds.
• To cancel the process, press the ∞ button in the Function Menu before memorization is complete.
7 Head Unit Group 3 and 4
• To switch the BSSM ON, press the DISPLAY button for 2 seconds.
• To cancel the process, press the DISPLAY button again before memorizationis complete.
Note:• The button for BSSM differs depending on the model.
* KEH-P4020: BSM button* KEH-P4010: PAUSE/SCAN button
14
EN
GLIS
HES
PA
ÑO
LD
EU
TS
CH
FR
AN
ÇA
ISIT
ALIA
NO
NED
ER
LAN
DS

15
Basic Operation
7 The optional remote control CD-R99You can also perform BSSM with the optional remote control CD-R99.
• To switch the BSSM ON, press the CH CALL button for 2 seconds.
• To cancel the process, press the CH CALL button for 2 seconds again beforememorization is complete.
Confirming Current Channel and Other SettingsIf the current audio source is TV, reception information such as the channel and band isdisplayed. You can also display to the preset channel list.
• Select the desired mode in the following order:(Channel Recall)
Channel Recall = Preset channel list = Indication OFF
(Preset channel list)
Note:• Recalled indications are displayed for 8 seconds.
Channels memorized (preset) in that Band
TV 1
2
2 4 6 7 10 1314 25 36 46 57 69
Each Press changes the Mode ...
Channel
BandTV 1
2AUDIO RTN
S.TITLE DISP
ANGLE
RGB
BANDBSSM/ch call
MENU V.SEL
DVDTV
RGB
BSSM/ch call

Specifications
GeneralPower source .............................................................................................. 14.4 V DC (10.8 — 15.1 V allowable)Grounding system .............................................................................................................................. Negative typeMax. current consumption .............................................................................................................................. 0.5 ADimensions .......................................................................................................... 172 (W) × 30 (H) × 148 (D) mm
[6-3/4 (W) × 1-1/8(H) × 5-7/8 (D) in.]Weight .............................................................................................................................................. 0.7 kg (1.5 lbs)
TV tunerReception channel/TV system ............................................................ US/M : VHF 2 — 13 ch, UHF 14 — 69 chColor system .................................................................................................................................. NTSC compatibleUsable sensitivity ............................................................................................................................................ 12 dBµVideo S/N ................................................................................ Over 37 dB (59 dBµ RF input, White Peak 100%)Video S/N 30 dB usable sensitivity ............................................................................................................ 44 dBµAntenna input ........................................................................................ 4 ch Diversity (φ 3.5 mm Mini plug type)Antenna cable .................................................................................................................................. 6 m (19 ft 8 in)
Rear display outputVideo .................................................................................................... 1 Vp-p/75 Ω (TV: White 100% Modulated)Sound ...................................................................................... 500 mVrms/Less than 1 kΩ (TV: 100% Modulated)
Note:• Specifications and the design are subject to possible modification without notice due to improvements.
16
EN
GLIS
HES
PA
ÑO
LD
EU
TS
CH
FR
AN
ÇA
ISIT
ALIA
NO
NED
ER
LAN
DS
1
Table des matières
Cher Client .................................................. 2
Avant d’utiliser cet appareil .................... 3Quelques mots concernant cet appareil ............ 3
- Système vidéo de l’appareil relié- Alimentation de cet appareil
Quelques mots concernant ce mode d’emploi .................................................... 4
Précaution .......................................................... 4- Service après-vente des produits PIONEER
Réinitialisation du microprocesseur .................. 5Réglage du commutateur OSD .......................... 5
Tableau des commandes .......................... 6- Boîtier de télécommande en option CD-R99
(vendu séparément)- Appareil central
(par exemple DEH-P8400MP)
Fonctionnement avec l’élément central ................................ 8- Groupe 1 d’éléments centraux- Groupe 2 d’éléments centraux- Groupe 3 d’éléments centraux- Groupe 4 d’éléments centraux
Tableaux des compatibilité des fonctions ........ 9- Mémoire des présélections- Rappel direct- Affichage du menu des fonctions- Examen des présélections- Sélection du mode d’accord- Utilisation de la touche PGM- Liste des canaux préréglés
Opérations de base .................................. 12Sélection de la source ...................................... 12Opérations de base sur le syntoniseur
de télévision ............................................ 13- Accord manuel et accord automatique- Gamme- Mise en mémoire des fréquences
BSSM (Mémoire séquentiel des meilleures stations) .................................................... 14
Confirmation du canal et des autres réglages .................................................... 15
Caractéristiques techniques ................ 16

2
EN
GLIS
HFR
AN
ÇA
ISD
EU
TS
CH
FR
AN
ÇA
ISIT
ALIA
NO
NED
ER
LAN
DS
Cher Client:La sélection d’un équipement audio de qualité comme l’unité que vous venez d’acheter n’est
que le début de votre plaisir musical. Maintenant, il est temps de penser à la manière de profiter aumaximum des plaisirs que vous offre votre équipement. Ce fabricant et le Groupe “ConsumerElectronics Group” de l’Association des Industries Electroniques veut que vous profitiez au maxi-mum de votre équipement en l’utilisation à un niveau sûr. Un niveau qui permet au son d’être fortet clair, sans beuglement ennuyant ou distorsion — et, ce qui est plus important, sans affecter votreouïe sensible.
Le son peut être décevant. Avec le temps, le “niveau de confort” de votre ouïe s’adapte aux volumessonores plus élevés. Ainsi, les sons “normaux” peuvent en fait être forts et affecter votre ouïe. Protégez-vous contre cela en réglant votre équipement à un niveau sûr AVANT l’adaptation de votre ouïe.
Pour établir un niveau sûr:• Démarrer votre commande de volume à un réglage bas. • Augmentez lentement le son jusqu’à ce que vous l’entendiez confortablement et clairement,
sans distorsion.Lorsque vous avez établi un niveau sonore confortable: • Réglez le cadran et laissez-le tel quel.
En prenant une minute pour faire cela, vous pourrez éviter des dommages oudes pertes de sensibilités d’écoute dans le futur. Après tout, nous voulons quevous écoutiez pendant toute votre vie.
Nous voulons que vous écoutiez pendant toute votre vieUtilisé avec sagesse, votre nouvel équipement sonore sera une source de plaisir pendant toute
votre vie. Comme les dommages de l’ouïe provenant d’un bruit fort ne sont souvent détectablesque lorsqu’il est trop tard, ce fabricant et le Groupe “Consumer Electronics Group” del’Association des Industries Electroniques vous recommandent d’éviter toute exposition prolongéeà un bruit excessif. Cette liste de niveaux sonores est incluse pour votre protection. Niveau deDécibels Exemple
30 Bibliothèque tranquille, chuchotement40 Salon, réfrigérateur, chambre à distance de la circulation50 Circulation légère, conversation normale, bureau tranquille60 Climatiseur à 20 pieds, machine à coudre70 Aspirateur, sèche-cheveux, restaurant bruyant80 Circulation moyenne en ville, évacuateurs de déchets, réveils à deux pieds.
LES BRUITS SUIVANTS PEUVENT ETRE DANGEREUX DANS LE CASD’UNE EXPOSITION CONSTANTE90 Métro, motocyclette, circulation de camion, tondeuse à gazon
100 Collecteurs de poubelle, scie à chaîne, perceuse pneumatique 120 Concert de groupe rock devant les haut-parleurs, coup de tonnerre140 Coup de pistolet, avion à réaction 180 Aire de lancement d’une fusée
Ces informations ont été gracieusement fournies par la Fondation de laRecherche pour les Sourds.
3
Avant d’utiliser cet appareil
Quelques mots concernant cet appareil
Cet appareil est un syntoniseur de télévision destiné à la réception des émissions de télévision. Associé à un écran avec AV-BUS vendu séparément, il vous donne lapossibilité de regarder des programmes de télévision (pour de plus amples détailsconcernant l’AV-BUS, reportez-vous au manuel d’installation de cet appareil). Lesfréquences sur lesquelles ce syntoniseur peut s’accorder sont dans les gammes employéesen Amérique du Nord. L’utilisation de cet appareil dans d’autres régions n’est paspossible.
Cet appareil, possède une sortie pour un écran arrière (REAR OUT), ce qui permet deregarder la télévision sur un écran arrière (vendu séparément).
Système vidéo de l’appareil reliéCet appareil est compatible NTSC. Avant de relier un appareil extérieur à sa sortie pourécran arrière (REAR OUT), assurez-vous que cet appareil extérieur est bien compatibleavec ces systèmes vidéo. Dans le cas contraire, les images ne seront pas convenablementreproduites.
ATTENTION• Avant de regarder la télévision, garez le véhicule sur une aire de station-
nement sûre.• Regarder la télévision tout en conduisant est dangereux et peut entraîner
un accident.• Cet appareil possède une sortie vers écran arrière qui est destiné à
permettre aux passagers assis à l’arrière de regarder la télévision.N’installez pas cet écran arrière dans un endroit tel que le conducteurpuisse, lui aussi, regarder la télévision tout en conduisant.
Alimentation de cet appareilLa mise hors tension de l’unité qui commande cet appareil, ou encore le choix d’unesource autre que la télévision, ne mettent pas cet appareil hors tension.Bien que cet appareil soit conçu pour être à l’abri des anomalies pendant son fonction-nement, si vous désirez, pour une raison quelconque, le mettre hors tension, placez le con-tacteur de démarrage du véhicule sur la position ACC OFF.
[Pour le modèle Canadien]Cet appareil numérique de la Classe B est conforme à la norme NMB-003 duCanada.

Quelques mots concernant ce mode d’emploi
Cet appareil est doté de nombreuses fonctions qui permettent la réception dans lesmeilleures conditions. Ces fonctions sont conçues pour que leur emploi soit aussi aisé quepossible mais certaines exigent certaines quelques explications. Ce mode d’emploi a pourobjet de vous aider à tirer le meilleur parti des possibilités de l’appareil de façon que votreplaisir d’écouter de la musique soit aussi grand que possible.Nous vous conseillons de lire attentivement ce mode d’emploi afin de vous familiariseravec les fonctions et les modes opératoires. Il est particulièrement important que vouslisiez et respectiez les consignes du paragraphe “Précaution” de cette page et d’autrespages.
Précaution• Conservez ce mode d’emploi à portée de main de façon à pouvoir vous y reporter en cas
de besoin.• Maintenez le niveau d’écoute à une valeur telle que les bruits extérieurs ne soient pas
masqués.• Veillez à ce que l’appareil soit à l’abri de l’humidité.• Si la batterie est débranchée, le contenu de la mémoire des fréquences d’accord est
effacé et la remise en mémoire des fréquences est nécessaire.
Service après-vente des produits PIONEERVeuillez contacter votre revendeur ou distributeur en ce qui concerne le service après-vente(et les conditions de garantie) ou tout autre information. En cas de nécessité ou lorsque l’in-formation recherchée n’est pas disponible, veuillez contacter Pioneer aux adresses suivantes;
N’envoyez pas le produit à réparer sans avoir, au préalable, contacté nos bureaux.
Pour de plus amples informations relatives à la garantie, référez-vous au feuillet GarantieLimitée livrée avec l’appareil.
Si vous utilisez un récepteur audiovisuel Pioneer (par exemple, AVH-P6400CD, AVH-P6400), lisez tout d’abord le mode d’emploi du récepteur audiovisuel.
4
EN
GLIS
HFR
AN
ÇA
ISD
EU
TS
CH
FR
AN
ÇA
ISIT
ALIA
NO
NED
ER
LAN
DS
7 U.S.A.Pioneer Electronics (U.S.A.), Inc.CUSTOMER SUPPORT DIVISIONP.O. Box 1760Long Beach, CA 90801-1760800-421-1404
7 CANADAPioneer électroniques du Canada, Inc.Département de service aux consommateurs300 Allstate Parkway,Markham, Ontario L3R OP2(905) 479-44111-877-283-5901

5
Avant d’utiliser cet appareil
Réinitialisation du microprocesseurLe microprocesseur doit être réinitialisé dans les conditions suivantes:Lors de l’utilisation de cet appareil pour la première fois après son installation. Lorsque l’appareil ne fonctionne pas correctement. Lorsque des messages étranges (incorrects) apparaissent sur l’affichage.Lorsque vous modifiez la position du commutateur OSD qui se trouve sur le panneaulatéral droit de l’appareil.Lors de la réinitialisation du microprocesseur les fréquences des stations mises en mémoireet certaines autres informations sont effacées, tandis que les réglages initiaux sont rétablis.
• Pour réinitialiser le microprocesseur, appuyez sur le bouton RESET de l’appareil avec la pointe d’un stylo ou un autre instrument pointu.
Réglage du commutateur OSD
Réglez le commutateur OSD (Affichage sur l’écran), placé sur le côté droit de cet appareil,sur la position convenable compte tenu de l’appareil auquel il est associé; utilisez pour celala pointe d’un stylo à bille ou un instrument similaire.
(1) OSD OFFEn association avec un récepteur audiovisuel PIONEER (par exemple, AVH-P6400CD,AVH-P6400).• Sélectionnez ce réglage si vous ne désirez pas faire figurer sur l’écran les indications
d’affichage sur l’écran de cet appareil.
(2) OSD ONEn association avec un écran PIONEER possédant une entrée AV-BUS (par exemple,AVX-P7300DVD, AVX-7300).• Sélectionnez ce réglage si vous désirez faire figurer sur l’écran les indications
d’affichage sur l’écran de cet appareil.
Remarque:• Comme la sortie de la prise d’affichage arrière n’a aucune relation avec le réglage ON/OFF du
commutateur OSD, les indications sur l’écran sont toujours affichées.
2TV 1
OSD

Tableau des commandes
Boîtier de télécommande en option CD-R99 (vendu séparément)Le boîtier de télécommande en option CD-R99 est essentiellement destiné aux passagersdes sièges arrière. Dirigez ce boîtier vers le capteur de télécommande de l’afficheur dessièges avant.
7 Autres commandes à distanceVous pouvez également effectuer des opérations à l’aide des commandes à distance ci-dessous.Agissez sur les touches qui correspondent à celles du boîtier de télécommande en optionCD-R99, comme le montre le tableau ci-dessous.
Le boîtier de télécommande en option CD-R99 Boîtier de télécommande de lecteur de DVD Pioneer*1 Touche CH CALL Touche STEP (E)
2 Touches 5/∞/2/3 Bouton polyvalent
Commutateur de mode:Pour la commande d’un téléviseur, n’oubliez pas de placer le “Commutateur de mode de fonctionnement du boîtier de télécommande” sur la position “TV”.
*…SDV-P7, AVX-P7300DVD, XDV-P9II
MENU TOP
MENU
AUDIO RTN
S.TITLE DISP
ANGLE
RGB
WIDE
POWER
BANDBSSM/ch call
MENU
REAR
V.SEL
OPEN/CLOSE ANGLE
CLEAR
21
DVDTV
3 C
4 5 6 10
7 8 9 0
RGB
BSSM/ch call
OPEN/CLOSE
2 Bouton polyvalent/Touches 5/∞/2/3
Commutateur de mode1 Touche CH CALL
6
EN
GLIS
HFR
AN
ÇA
ISD
EU
TS
CH
FR
AN
ÇA
ISIT
ALIA
NO
NED
ER
LAN
DS

7
Tableau des commandes
Appareil central (par exemple DEH-P8400MP)Vous pouvez régler cet appareil grâce à un appareil central (vendu séparément).
Face avant (ouverte)
Remarque:• La disposition des touches dépend du modèle; veuillez donc consulter le mode d’emploi de
l’appareil central que vous utilisez.
Touche FUNCTION
Touche SOURCE
VOLUME Touche 1–6 (PRESET TUNING)
Touches 5/∞/2/3
Touche BAND
Fonctionnement avec l’élément central
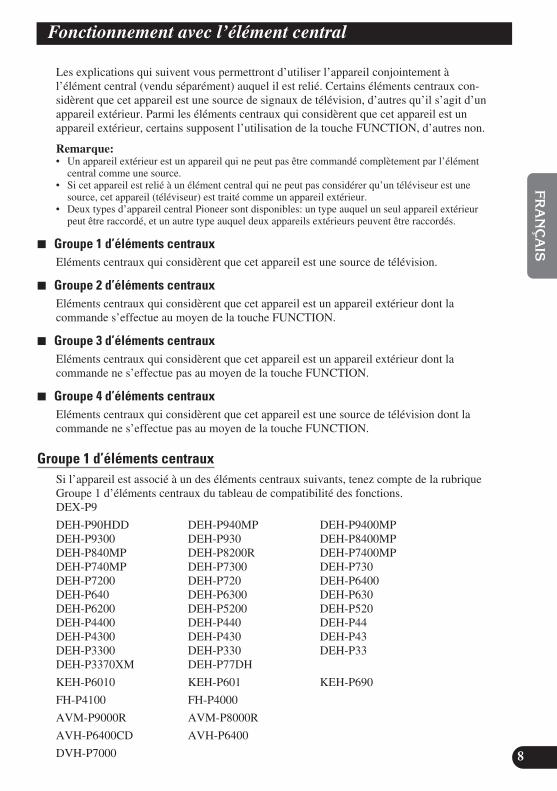
Les explications qui suivent vous permettront d’utiliser l’appareil conjointement à l’élément central (vendu séparément) auquel il est relié. Certains éléments centraux con-sidèrent que cet appareil est une source de signaux de télévision, d’autres qu’il s’agit d’unappareil extérieur. Parmi les éléments centraux qui considèrent que cet appareil est unappareil extérieur, certains supposent l’utilisation de la touche FUNCTION, d’autres non.
Remarque:• Un appareil extérieur est un appareil qui ne peut pas être commandé complètement par l’élément
central comme une source.• Si cet appareil est relié à un élément central qui ne peut pas considérer qu’un téléviseur est une
source, cet appareil (téléviseur) est traité comme un appareil extérieur.• Deux types d’appareil central Pioneer sont disponibles: un type auquel un seul appareil extérieur
peut être raccordé, et un autre type auquel deux appareils extérieurs peuvent être raccordés.
7 Groupe 1 d’éléments centrauxEléments centraux qui considèrent que cet appareil est une source de télévision.
7 Groupe 2 d’éléments centrauxEléments centraux qui considèrent que cet appareil est un appareil extérieur dont la commande s’effectue au moyen de la touche FUNCTION.
7 Groupe 3 d’éléments centrauxEléments centraux qui considèrent que cet appareil est un appareil extérieur dont la commande ne s’effectue pas au moyen de la touche FUNCTION.
7 Groupe 4 d’éléments centrauxEléments centraux qui considèrent que cet appareil est une source de télévision dont la commande ne s’effectue pas au moyen de la touche FUNCTION.
Groupe 1 d’éléments centrauxSi l’appareil est associé à un des éléments centraux suivants, tenez compte de la rubriqueGroupe 1 d’éléments centraux du tableau de compatibilité des fonctions.DEX-P9
DEH-P90HDD DEH-P940MP DEH-P9400MPDEH-P9300 DEH-P930 DEH-P8400MPDEH-P840MP DEH-P8200R DEH-P7400MPDEH-P740MP DEH-P7300 DEH-P730DEH-P7200 DEH-P720 DEH-P6400DEH-P640 DEH-P6300 DEH-P630DEH-P6200 DEH-P5200 DEH-P520DEH-P4400 DEH-P440 DEH-P44DEH-P4300 DEH-P430 DEH-P43DEH-P3300 DEH-P330 DEH-P33DEH-P3370XM DEH-P77DH
KEH-P6010 KEH-P601 KEH-P690
FH-P4100 FH-P4000
AVM-P9000R AVM-P8000R
AVH-P6400CD AVH-P6400
DVH-P7000 8
EN
GLIS
HFR
AN
ÇA
ISD
EU
TS
CH
FR
AN
ÇA
ISIT
ALIA
NO
NED
ER
LAN
DS

9
Fonctionnement avec l’élément central
Groupe 2 d’éléments centrauxSi l’appareil est associé à un des éléments centraux suivants, tenez compte de la rubriqueGroupe 2 d’éléments centraux du tableau de compatibilité des fonctions.
DEH-P4100 DEH-P410 DEH-P41FH-P8800
Groupe 3 d’éléments centrauxSi l’appareil est associé à l’un des éléments centraux suivants, tenez compte de la rubriqueGroupe 3 d’éléments centraux du tableau de compatibilité des fonctions.
KEH-P4900 KEH-P490 KEH-P4010KEH-P1010
Groupe 4 d’éléments centrauxSi l’appareil est associé à l’un des éléments centraux suivants, tenez compte de la rubriqueGroupe 4 d’éléments centraux du tableau de compatibilité des fonctions.
KEH-P4020
Tableaux des compatibilité des fonctionsCommandez les fonctions au moyen des touches de l’élément central ou du boîtier de télécommande qui portent le même nom.Remarque:• Il se peut que vous ne puissiez pas utiliser les fonctions* avec certains appareils centraux.
Groupe 1 d’éléments centraux
Fonction Touche Opération PageSélection de la source SOURCE, SOURCE/OFF :Choisissez 12
Accord manuel (pas à pas) 2/3 (0,5 seconde ou moins) :Choisissez 13
Accord automatique 2/3 (0,5 seconde ou moins) :Choisissez 13
Mise en mémoire des fréquences 5/∞ :Choisissez 13
Sélection de la gamme BAND, 23 :Choisissez 13
Mémoire des présélections 1–6 (Appuyez pendant 2 secondes) :Mémoire 10
Rappel direct 1–6 :Choisissez 11
BSSM FUNCTION (A.MENU) :EN/HORS 145/∞
Liste des canaux préréglés* FUNCTION (A.MENU) 115/∞/2/3
Rôle de la touche PGM* FUNCTION (Appuyez pendant 2 :Choisissez —secondes) 5/∞/2/3
Utilisation de la touche PGM* PGM (Appuyez pendant 2 secondes) :BSSM 11EN/HORS
Remarque:• Dans le cas de la télévision, seule la fonction BSSM peut être attribuée à la touche PGM. (Il se peut
que vous ne puissiez pas utiliser cette fonction avec certains appareils centraux.)• Si vous utilisez un récepteur audiovisuel (par exemple, AVH-P6400CD, AVH-P6400), lisez tout
d’abord le mode d’emploi du récepteur audiovisuel.

Groupe 2 d’éléments centraux
Fonction Touche Opération PageSélection de la source SOURCE, SOURCE/OFF :Choisissez 12
Accord manuel ou automatique 2/3 :Choisissez 13
Mise en mémoire des fréquences 5/∞ :Choisissez 13
Sélection de la gamme BAND, 23 :Choisissez 13
Mémoire des présélections 1–6 (Appuyez pendant 2 secondes) :Mémoire 10
Rappel direct 1–6 :Choisissez 11
Affichage du menu des fonctions FUNCTION :Choisissez 11
Examen des présélections* (FUNC1) 5/∞ :EN/HORS 11
BSSM (FUNC1) 5/∞ (Appuyez pendant 2 secondes) :EN/HORS 14
Sélection du mode d’accord* 5/∞ :Choisissez 11(AUTO/MANUAL)
Rôle de la touche PGM* FUNCTION (Appuyez pendant 2 :Choisissez —secondes) 5/∞/2/3
Utilisation de la touche PGM* PGM/DSP, PGM :BSSM 11EN/HORS
Groupes 3 et 4 d’éléments centraux
Fonction Touche Opération PageSélection de la source SOURCE, SOURCE/OFF :Choisissez 12
Sélection du mode d’accord Touche RPT :Choisissez 11
Accord manuel ou automatique 2/3 :Choisissez 13
Mise en mémoire des fréquences 5/∞ :Choisissez 13
Sélection de la gamme BAND, 23 :Choisissez 13
Mémoire des présélections 1–6 (Appuyez pendant 2 seconds) :Mémoire 10
Rappel direct 1–6 :Choisissez 11
BSSM Touche DISPLAY (Appuyez pendant 2 seconds) :EN/HORS 14
Examen des présélections Touche DISPLAY :Choisissez 11
Remarque:• La touche d’examen des présélections diffère selon le modèle.
* KEH-P4020: Touche BSM* KEH-P4010: Touche PAUSE/SCAN
• La touche de sélection du mode d’accord diffère selon le modèle.* KEH-P4020: Touche LOCAL* KEH-P4010, KEH-P4900, KEH-P490: Touche LOCAL/BSM
Mémoire des présélectionsLa mémoire des présélections permet de conserver les fréquences introduites manuellement.
1. Choisissez la station dont la fréquence doit être mise en mémoire.2. Appuyez, pendant au moins 2 secondes, sur une des touches 1–6 pour mettre
en mémoire la fréquence de la station.Remarque:• De la station est conservée par la mémoire correspondante à la touche utilisée.• Cette fonction ne permet pas d’utiliser les mémoires 7–12.
10
EN
GLIS
HFR
AN
ÇA
ISD
EU
TS
CH
FR
AN
ÇA
ISIT
ALIA
NO
NED
ER
LAN
DS

11
Fonctionnement avec l’élément central
Rappel direct
• Appuyez sur la touche 1–6 ayant servi à la mise en mémoire de la station.
Remarque:• Pour les présélections 7–12, effectuez un accord sur présélection à l’aide des touches 5/∞.
Affichage du menu des fonctions
• Appuyez sur la touche FUNCTION pour sélectionner le mode convenablesur le menu des fonctions.Chaque pression sur la touche FUNCTION, provoque le choix d’un autre mode, dans l’ordre qui suit:
FUNC 1 (Examen des présélections/BSSM) = FUNC 2 = FUNC 3 = FUNC 4 = AUTO MANUAL (Sélection du mode d’accord)
Remarque:• Avec FUNC1, le choix entre l’examen des présélections ou BSSM s’obtient par la durée de la
pression exercée sur la touche 5/∞.• FUNC 2, FUNC 3 et FUNC 4 n’ont aucune fonction.
Examen des présélectionsVous pouvez, grâce à cette fonction, regarder l’une après l’autre les 12 stations dont lesfréquences sont en mémoire.
Sélection du mode d’accordVous avez le choix entre l’accord manuel (MANUAL) et l’accord automatique (AUTO).Appuyez sur la touche 5/∞ ou sur une autre touche appropriée pour effectuer l’accordselon le mode choisi.
Utilisation de la touche PGMLa touche PGM (PGM/DSP) joue un rôle différent selon la fonction qui lui a été attribuée(mise en mémoire). (Pour de plus amples détails concernant l’attribution d’une fonction àla touche PGM (PGM/DSP), reportez-vous au mode d’emploi de l’élément central.)
• Appuyez sur la touche PGM (PGM/DSP).
Fonction Action Appuyez pendant 2 secondesExamen des présélections/BSSM Examen des présélections BSSM EN/HORS(FUNC1) EN/HORS
Sélection du mode d’accord Choisissez _____(AUTO/MANUAL)
Liste des canaux préréglésLisez le mode d’emploi d’un appareil central qui peut utiliser cette fonction.

Opérations de base
Sélection de la source
7 Groupes 1 et 4 d’éléments centraux
1. Choisissez la source d’image affichée de cet appareil.Pour de plus amples détails, reportez-vous au mode d’emploi de l’appareil relié.
2. Sur l’élément central, choisissez la source de télévision.
7 Groupes 2 et 3 d’éléments centraux
1. Choisissez la source d’image affichée de cet appareil.Pour de plus amples détails, reportez-vous au mode d’emploi de l’appareil relié.
2. Réglez la source sur “External” (ou “TV”, “Television”).
Remarque:• La mise hors tension de l’appareil central (l’appareil qui commande cet appareil-ci), ou la sélection
d’une source autre que le téléviseur, ne provoquent pas la mise hors tension de cet appareil.Bien que cet appareil soit conçu pour être à l’abri des anomalies pendant son fonctionnement, sivous désirez, pour une raison quelconque, le mettre hors tension, placez le contacteur de démarragedu véhicule sur la position ACC OFF.
• Avec les appareils centraux des groupes 2 et 3, les mentions “TV” ou “Television” ne sont pas tou-jours indiquées sur l’écran.
Chaque pressionchange la source...
Canal
Numéro de présélection
2P1
Si vous utilisez un récepteur audiovisuel Pioneer (par exemple, AVH-P6400CD, AVH-P6400), lisez tout d’abord le mode d’emploi du récepteur audiovisuel.
12
EN
GLIS
HFR
AN
ÇA
ISD
EU
TS
CH
FR
AN
ÇA
ISIT
ALIA
NO
NED
ER
LAN
DS
13
Opérations de base
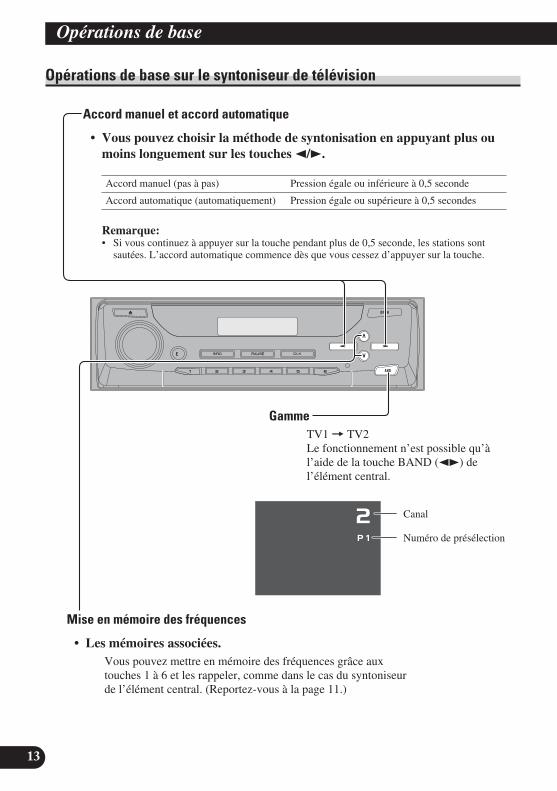
Opérations de base sur le syntoniseur de télévision
2P1
Accord manuel et accord automatique
• Vous pouvez choisir la méthode de syntonisation en appuyant plus oumoins longuement sur les touches 2/3.
Accord manuel (pas à pas) Pression égale ou inférieure à 0,5 seconde
Accord automatique (automatiquement) Pression égale ou supérieure à 0,5 secondes
Remarque:• Si vous continuez à appuyer sur la touche pendant plus de 0,5 seconde, les stations sont
sautées. L’accord automatique commence dès que vous cessez d’appuyer sur la touche.
Mise en mémoire des fréquences
• Les mémoires associées.Vous pouvez mettre en mémoire des fréquences grâce auxtouches 1 à 6 et les rappeler, comme dans le cas du syntoniseurde l’élément central. (Reportez-vous à la page 11.)
GammeTV1 = TV2Le fonctionnement n’est possible qu’àl’aide de la touche BAND (23) del’élément central.
Canal
Numéro de présélection
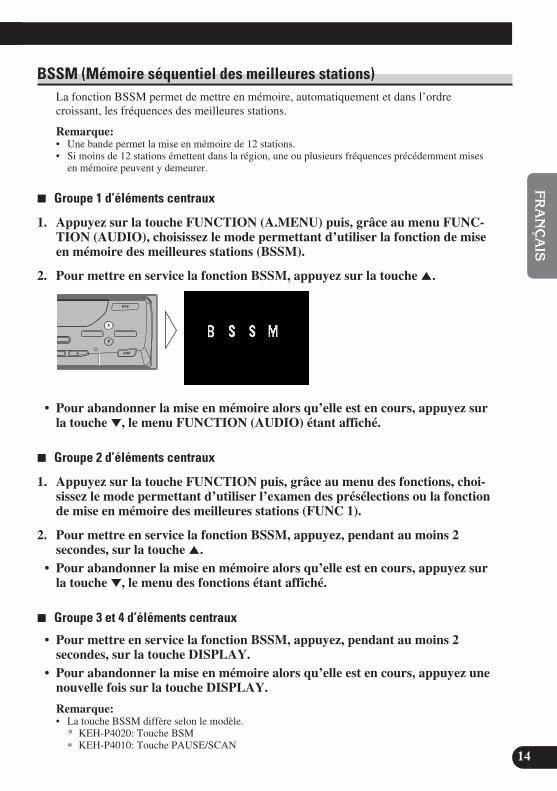
BSSM (Mémoire séquentiel des meilleures stations)La fonction BSSM permet de mettre en mémoire, automatiquement et dans l’ordre croissant, les fréquences des meilleures stations.
Remarque:• Une bande permet la mise en mémoire de 12 stations.• Si moins de 12 stations émettent dans la région, une ou plusieurs fréquences précédemment mises
en mémoire peuvent y demeurer.
7 Groupe 1 d’éléments centraux
1. Appuyez sur la touche FUNCTION (A.MENU) puis, grâce au menu FUNC-TION (AUDIO), choisissez le mode permettant d’utiliser la fonction de miseen mémoire des meilleures stations (BSSM).
2. Pour mettre en service la fonction BSSM, appuyez sur la touche 5.
• Pour abandonner la mise en mémoire alors qu’elle est en cours, appuyez surla touche ∞, le menu FUNCTION (AUDIO) étant affiché.
7 Groupe 2 d’éléments centraux
1. Appuyez sur la touche FUNCTION puis, grâce au menu des fonctions, choi-sissez le mode permettant d’utiliser l’examen des présélections ou la fonctionde mise en mémoire des meilleures stations (FUNC 1).
2. Pour mettre en service la fonction BSSM, appuyez, pendant au moins 2 secondes, sur la touche 5.
• Pour abandonner la mise en mémoire alors qu’elle est en cours, appuyez surla touche ∞, le menu des fonctions étant affiché.
7 Groupe 3 et 4 d’éléments centraux
• Pour mettre en service la fonction BSSM, appuyez, pendant au moins 2 secondes, sur la touche DISPLAY.
• Pour abandonner la mise en mémoire alors qu’elle est en cours, appuyez unenouvelle fois sur la touche DISPLAY.
Remarque:• La touche BSSM diffère selon le modèle.
* KEH-P4020: Touche BSM* KEH-P4010: Touche PAUSE/SCAN
14
EN
GLIS
HFR
AN
ÇA
ISD
EU
TS
CH
FR
AN
ÇA
ISIT
ALIA
NO
NED
ER
LAN
DS

15
Opérations de base
7 Le boîtier de télécommande en option CD-R99Vous pouvez également utiliser la mémoire séquentielle des meilleures stations (BSSM) envous servant du boîtier de télécommande en option CD-R99.
• Pour mettre en service la fonction BSSM, appuyez, pendant au moins 2 secondes, sur la touche CH CALL.
• Pour abandonner la mise en mémoire alors qu’elle est en cours, appuyez,pendant au moins 2 secondes, une nouvelle fois sur la touche CH CALL.
Confirmation du canal et des autres réglagesSi la source des sons est le téléviseur, certaines informations sur la réception telles que lecanal et la gamme sont affichées. Vous pouvez également afficher la liste des canauxprésélectionnés.
• Choisissez, dans l’ordre suivant, le mode de fonctionnement désiré:(Rappel de canal)
Rappel de canal = Liste des canaux présélectionnés = HORS indication
(Liste des canaux présélectionnés)
Remarque:• Les indications rappelées sont affichées pendant 8 secondes.
Canaux de cette gamme mis en mémoire (présélections)
TV 1
2
2 4 6 7 10 1314 25 36 46 57 69
Chaque pression change lemode ...
Canal
GammeTV 1
2AUDIO RTN
S.TITLE DISP
ANGLE
RGB
BANDBSSM/ch call
MENU V.SEL
DVDTV
RGB
BSSM/ch call
Caractéristiques techniques
GénéralitésAlimentation .............................................................................................................................................. 14,4 V CC
(tensions autorisées: 10,8 — 15,1 V)Masse ................................................................................................................................ Pôle négatif de la batterieConsommation maximale en courant ................................................................................................................ 0,5 ADimensions .............................................................................................................. 172 (L) × 30 (H) × 148 (P) mmPoids .................................................................................................................................................................. 0,7 kg
Syntoniseur de télévisionCanal de réception/Système de télévision .......................... US/M : canaux VHF 2 — 13, canaux UHF 14 — 69Système couleur ........................................................................................................................ Compatible NTSCSensibilité utile ............................................................................................................................................ 12 dBµRapport signal/bruit vidéo
................................ Supérieur à 35 dB (pour une entrée radiofréquence de 59 dBµ, crête du blanc à 100%)Rapport signal/bruit vidéo pour 30 dB de sensibilité utile .......................................................................... 44 dBµEntrée antenne .......................................................................................... 4 voies possibles (minifiche de 3,5 mm)Câble antenne .................................................................................................................................................... 6 m
Sortie vers l’écran arrièreImage .............................................................................. 1 Vcc/75 Ω (Télévision: 100% de modulation du blanc)Son ...................................................................... 500 mV eff./Moins de 1 kΩ (Télévision: 100% de modulation)
Remarque:• Les caractéristiques et la présentation peuvent être modifiées sans avis préalable à fin d’amélioration.
16
EN
GLIS
HFR
AN
ÇA
ISD
EU
TS
CH
FR
AN
ÇA
ISIT
ALIA
NO
NED
ER
LAN
DS

34
A Title (English)

A Title (English)
35
EN
GLIS
HFR
AN
ÇA
ISD
EU
TS
CH
FR
AN
ÇA
ISIT
ALIA
NO
NED
ER
LAN
DS
PIONEER CORPORATION4-1, MEGURO 1-CHOME, MEGURO-KU, TOKYO 153-8654, JAPAN
PIONEER ELECTRONICS (USA) INC.P.O. Box 1540, Long Beach, California 90801-1540, U.S.A.TEL: (800) 421-1404
PIONEER EUROPE NVHaven 1087, Keetberglaan 1, B-9120 Melsele, BelgiumTEL: (0) 3/570.05.11
PIONEER ELECTRONICS ASIACENTRE PTE. LTD.253 Alexandra Road, #04-01, Singapore 159936TEL: 65-472-1111
PIONEER ELECTRONICS AUSTRALIA PTY. LTD.178-184 Boundary Road, Braeside, Victoria 3195, AustraliaTEL: (03) 9586-6300
PIONEER ELECTRONICS OF CANADA, INC.300 Allstate Parkway, Markham, Ontario L3R OP2, CanadaTEL: (905) 479-4411
PIONEER ELECTRONICS DE MEXICO, S.A. de C.V.San Lorenzo 1009 3er. Piso Desp. 302Col. Del Valle Mexico, D.F. C.P. 03100TEL: 55-5688-52-90
Published by Pioneer Corporation. Copyright © 2002 by Pioneer Corporation. All rights reserved.
Publication de Pioneer Corporation. Copyright © 2002 Pioneer Corporation. Tous droits de reproduction et de traductionréservés.
Printed in JapanImprimé au Japon
<CRD3615-A> UC<KKYFF/02C00000>


![63 - c813999.r99.cf2.rackcdn.comc813999.r99.cf2.rackcdn.com/uploads/2014youthnenov_2014_full.pdf · Note:All TIMES are ESTIMATES ONLY YNEW 2014 Novice Intermidiate ... [MA2]Nate ChandlerNewton](https://img.pdfslide.us/doc/110x75/5aa1c2fa7f8b9ac67a8c3807/63-c813999r99cf2-all-times-are-estimates-only-ynew-2014-novice-intermidiate.jpg)