Embed Size (px)
Citation preview

ENGL Deployment Monitor™ 1.0.5
Documentation

Table of Contents
Table of ContentsTable of Contents 3
1 Getting Started 5
1.1 Overview 6
1.1.1 Deployment Monitor Server 6
1.1.2 Deployment Monitor Web Console 6
1.1.3 Imaging Toolkit Status Updates 6
1.2 System Requirements 7
1.2.1 Windows Versions 7
1.2.2 .NET Framework 7
1.2.3 Internet Information Services (IIS) 7
1.2.4 SQL Server 9
1.2.5 Imaging Toolkit Versions 9
1.2.6 Administration Browser Versions 9
1.3 Installation 11
1.3.1 Downloading 11
1.3.2 Installing 11
1.3.3 Upgrading 12
1.3.4 Configuration Wizard 12
1.3.5 Uninstalling 13
2 Configuration 14
2.1 Deployment Monitor Web Console 15
2.1.1 Starting 15
2.1.2 Tour of the Workspace 15
2.1.3 Options 17
2.1.4 About 18
2.1.5 Live View 18
2.1.6 History View 19
3 Implementation 20
3.1 Zim Script Changes to Support Deployment Monitor 21
3.1.1 Imaging Toolkit 10.0, 9.0.2, 9.0.1, 9.0 and 8.0.2 21
3.1.2 Imaging Toolkit 8.0.1 21
4 Support 23
5 ENGL Software Licence 24
- 3 -


1 Getting Started
1 Getting StartedThis section introduces you to Deployment Monitor, system requirements and installation walkthroughs.
n Overview
n System Requirements
n Installation
- 5 -
1 Getting Started
1.1 OverviewENGL Deployment Monitor provides a centralised view of devices that are deployed using ENGL Imaging Toolkit.
1.1.1 Deployment Monitor ServerDeployment Monitor can be installed on a Windows server or workstation running Microsoft IIS and SQLExpress (see System Requirements for version compatibility). Once installed the Configuration Wizard can be run to configure Deployment Monitor.
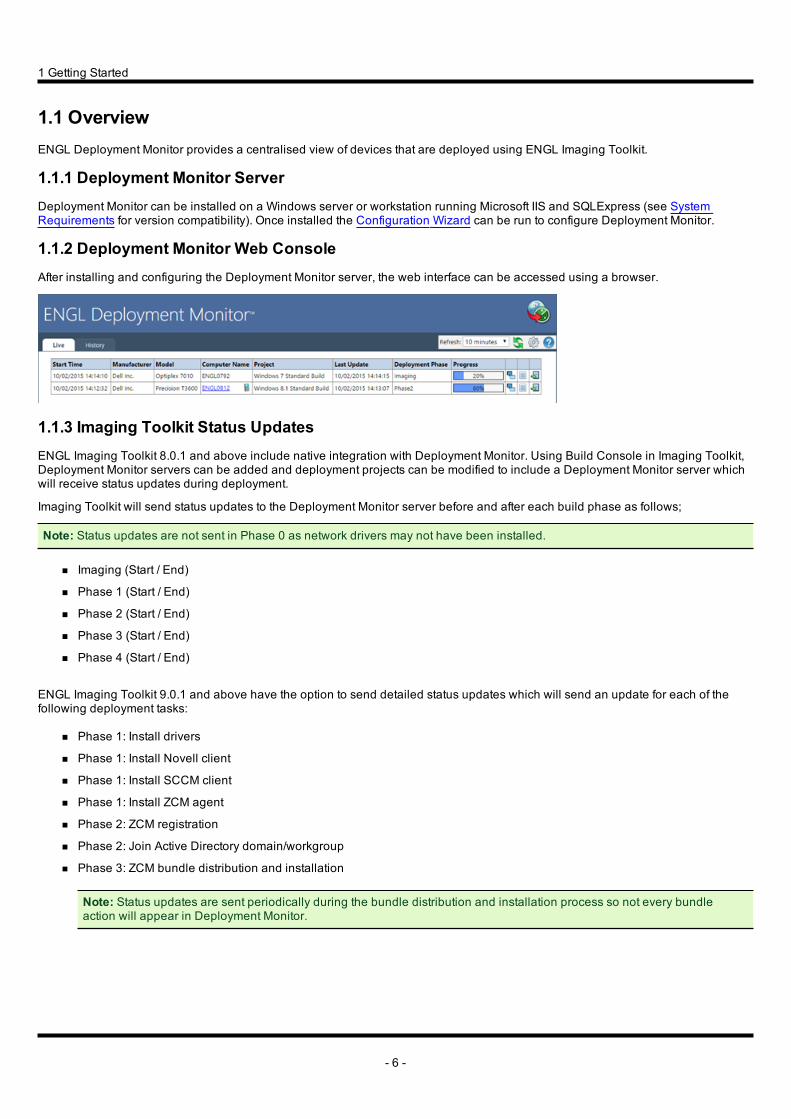
1.1.2 Deployment Monitor Web ConsoleAfter installing and configuring the Deployment Monitor server, the web interface can be accessed using a browser.
1.1.3 Imaging Toolkit Status UpdatesENGL Imaging Toolkit 8.0.1 and above include native integration with Deployment Monitor. Using Build Console in Imaging Toolkit, Deployment Monitor servers can be added and deployment projects can be modified to include a Deployment Monitor server which will receive status updates during deployment.
Imaging Toolkit will send status updates to the Deployment Monitor server before and after each build phase as follows;
Note: Status updates are not sent in Phase 0 as network drivers may not have been installed.
n Imaging (Start / End)
n Phase 1 (Start / End)
n Phase 2 (Start / End)
n Phase 3 (Start / End)
n Phase 4 (Start / End)
ENGL Imaging Toolkit 9.0.1 and above have the option to send detailed status updates which will send an update for each of the following deployment tasks:
n Phase 1: Install drivers
n Phase 1: Install Novell client
n Phase 1: Install SCCM client
n Phase 1: Install ZCM agent
n Phase 2: ZCM registration
n Phase 2: Join Active Directory domain/workgroup
n Phase 3: ZCM bundle distribution and installation
Note: Status updates are sent periodically during the bundle distribution and installation process so not every bundle action will appear in Deployment Monitor.
- 6 -
1 Getting Started
1.2 System RequirementsThe following system requirements must be met in order to use Deployment Monitor.
n Windows versions
n .NET Framework
n Internet Information Services (IIS)
n SQL Server
n Imaging Toolkit versions
n Administration browser versions
1.2.1 Windows VersionsThe following operating systems may be used for the Deployment Monitor Server machine. Where a service pack is specified it is the minimum supported version.
n Windows 10 (x64)
n Windows 8.1 (x64)
n Windows 8 (x64)
n Windows 7 SP1 (x64)
n Windows Server 2012 R2
n Windows Server 2012
n Windows Server 2008 R2
The following are the minimum supported display settings required to run Configuration Wizard.
n Resolution 1024 x 768 pixels or higher
n Colour depth 16-bit or higher
1.2.2 .NET FrameworkBefore installing Deployment Monitor the .NET Framework 4.0 or later feature must be installed.
1.2.3 Internet Information Services (IIS)
Note: Before installing Deployment Monitor, Internet Information Services (IIS) 7.0 or above must be installed.
Windows 10:
Open Control Panel > Programs > Turn Windows features on or off and enable the following features:
n Internet Information Services
n Internet Information Services > Web Management Tools > IIS Management Console
n Internet Information Services > World Wide Web Services
n Internet Information Services > World Wide Web Services > Application Development Features
n Internet Information Services > World Wide Web Services > Application Development Features > .NET Extensibility 4.6
n Internet Information Services > World Wide Web Services > Application Development Features > ASP .NET 4.6
n Internet Information Services > World Wide Web Services > Common HTTP Features > Static Content
Windows 8.x:
Open Control Panel > Programs > Turn Windows features on or off and enable the following features:
- 7 -
1 Getting Started
n Internet Information Services
n Internet Information Services > Web Management Tools > IIS Management Console
n Internet Information Services > World Wide Web Services
n Internet Information Services > World Wide Web Services > Application Development Features
n Internet Information Services > World Wide Web Services > Application Development Features > .NET Extensibility 4.5
n Internet Information Services > World Wide Web Services > Application Development Features > ASP .NET 4.5
n Internet Information Services > World Wide Web Services > Common HTTP Features > Static Content
Windows 7 SP1:
Open Control Panel > Programs > Turn Windows features on or off and enable the following features:
n Internet Information Services
n Internet Information Services > Web Management Tools > IIS Management Console
n Internet Information Services > World Wide Web Services
n Internet Information Services > World Wide Web Services > Application Development Features
n Internet Information Services > World Wide Web Services > Application Development Features > .NET Extensibility
n Internet Information Services > World Wide Web Services > Application Development Features > ASP .NET
n Internet Information Services > World Wide Web Services > Common HTTP Features > Static Content
Windows Server 2012 R2:
Open the Server Manager > Dashboard and add/enable the following roles/features:
n Web Server (IIS) > Web Management Tools > IIS Management Console
n Web Server (IIS) > Web Server
n Web Server (IIS) > Web Server > Application Development Features
n Web Server (IIS) > Web Server > Application Development Features > .NET Extensibility 4.5
n Web Server (IIS) > Web Server > Application Development Features > ASP .NET 4.5
n Web Server (IIS) > Web Server > Common HTTP Features > Static Content
Windows Server 2012:
Open the Server Manager > Dashboard and add/enable the following roles/features:
n Web Server (IIS) > Web Management Tools > IIS Management Console
n Web Server (IIS) > Web Server
n Web Server (IIS) > Web Server > Application Development Features
n Web Server (IIS) > Web Server > Application Development Features > .NET Extensibility 4.5
n Web Server (IIS) > Web Server > Application Development Features > ASP .NET 4.5
n Web Server (IIS) > Web Server > Common HTTP Features > Static Content
Windows Server 2008 R2:
Open the Server Manager > Dashboard and add/enable the following roles/features:
n Web Server (IIS) > Web Management Tools > IIS Management Console
n Web Server (IIS) > Web Server
n Web Server (IIS) > Web Server > Application Development Features
n Web Server (IIS) > Web Server > Application Development Features > .NET Extensibility
n Web Server (IIS) > Web Server > Application Development Features > ASP .NET
n Web Server (IIS) > Web Server > Common HTTP Features > Static Content
- 8 -
1 Getting Started
1.2.4 SQL ServerBefore installing Deployment Monitor, one of the following supported versions of SQL Server Express must be installed:
n SQL Server 2014 Express
n SQL Server 2012 Express
During the SQL Server Express installation, the following steps must be completed:
1. Run the SQL Server Express installation (see above for supported versions).
2. On the Feature Selection page, ensure Database Engine Services is selected.
3. On the Instance Configuration page, select a Default instance or Named instance.
Note: Deployment Monitor supports SQL Server Express configured using either a Default instance or Named instance. ENGL recommends using a Named instance of SQLExpress. Make a note of these settings as they will be needed when running the Deployment Monitor Configuration Wizard.
4. On the Server Configuration page, accept the default settings.
5. On the Database Engine Configuration page, select Mixed Mode authentication mode and enter a password for the SQL Server system administrator (sa) account.
Note: The password will be required when running the Deployment Monitor Configuration Wizard.
6. Accept the defaults for the remaining options and complete the installation.
1.2.5 Imaging Toolkit VersionsThe following table details ENGL Imaging Toolkit compatibility with features in Deployment Monitor 1.0.5.
Imaging Toolkit Status Updates Detailed Status Updates Log File Updates
10.0 Yes Yes Yes
9.0.2 Yes Yes Yes
9.0.1 Yes Yes -
9.0 Yes - -
8.0.2 Yes - -
8.0.1 Yes - -
1.2.6 Administration Browser VersionsThe following browser versions are recommended when accessing the Deployment Monitor Web Console.
n Chrome 28.0 or above
n Firefox 18.0 or above
n Internet Explorer 10 or above
Note: The Deployment Monitor Web Console URL should be added to the Internet Explorer Internet Options > Security > Trusted Sites. The Require server verification (https) will need to be disabled before the site can be added to Trusted Sites.
To use ZENworks remote control from Deployment Monitor Web Console the ZENworks Remote Management Viewer must be installed. The Remote Management viewer can be installed by going to http://<ZCM Server>/zenworks-setup/?pageId=tools, selecting the Remote Management tab and clicking on the novell-zenworks-rm-viewer-<zcm version>.msi.
- 9 -

1 Getting Started
Note: Review the Novell documentation for supported browser versions for the ZENworks Remote Management viewer.
- 10 -
1 Getting Started
1.3 InstallationThis section describes the steps required to install Deployment Monitor. Before performing these steps you should familiarise yourself with System Requirements.
The following tasks are used to install or upgrade Deployment Monitor.
n Downloading
n Installing
n Upgrading
n Configuration Wizard
n Uninstalling
1.3.1 DownloadingThe following tasks must be completed to download the latest version of Deployment Monitor.
1. Visit the ENGL web site at www.engl.co.uk
2. New users should click Login then Register Me and following on-screen instructions to activate their ENGL user account.
3. Login to the ENGL web site.
4. Select My ENGL > Product Downloads.
5. Select the Deployment Monitor 1.0.5 link then click Download.
Note: Deployment Monitor must be installed on a 64-bit version of Windows.
6. Carefully read the license agreement. Click Yes to accept the terms of the license agreement or No to cancel the download.
7. Click an available link to begin the download.
1.3.2 InstallingThe following steps are required to install Deployment Monitor.
1. Ensure the System Requirements have been completed.
2. Login to the machine with administrative permissions.
3. Run the Deployment Monitor 1.0.5 setup EXE and follow these steps. a. At the Welcome page, click Next.
b. At the License Agreement page, carefully read the license agreement and do one of the following: n Select I Accept the Terms of the License Agreement then click Next.
OR
n Select I Do Not Accept the Terms of the License Agreement then click Next.
Note: If the license agreement is not accepted the setup will exit.
c. At the Ready to Install the Program page, click Install.
Setup Status will be displayed during installation.
d. At the Installation Wizard Complete page, click Finish.
e. Run the Deployment Monitor Configuration Wizard.
- 11 -
1 Getting Started
1.3.3 Upgrading
Upgrading from Deployment Monitor 1.0.xThe following tasks must be completed to upgrade from Deployment Monitor 1.0.x.
1. Login to the machine with administrative permissions.
2. Run the Deployment Monitor 1.0.5 setup EXE and follow these steps. a. At the Welcome page, click Next.
b. At the confirmation message telling you that IIS will be restarted and Deployment Monitor status updates will not be received, click Yes to continue the upgrade.
Setup Status will be displayed during upgrade.
c. At the Update Complete page, click Finish.
Note: A reboot will be required following an upgrade from Deployment Monitor 1.0.2 or below.
1.3.4 Configuration WizardThe following tasks must be completed after a first time installation.
1. Login to the machine with administrative permissions.
2. Start Deployment Monitor Configuration Wizard as follows. n Windows 10
Click Start > All apps > ENGL Deployment Monitor > Configuration Wizard
n Windows 8.1, 8, Server 2012 R2 and Server 2012
Click Start screen > All apps > ENGL Deployment Monitor > Configuration Wizard
n Windows 7 and Server 2008 R2
Click Start > All Programs > ENGL Deployment Monitor > Configuration Wizard
3. At the Deployment Monitor Configuration Wizard page, do the following: a. Enter an Instance name.
Note: The instance name will default to <computername>\SQLExpress, e.g. "MYSERVER\SQLExpress". If SQL Server Express was installed with a Default instance then enter only the <computername>, e.g. "MYSERVER". If SQL Server Express was installed with a Named instance then enter <com-putername>\<instancename>, e.g. "MYSERVER\SQLExpress".
b. Enter a Port (optional).
c. Enter a SQL administrator username.
d. Enter a SQL administrator password.
e. Click Test Connection which will verify the connection settings and populate the Database path.
f. Select an IIS Web Site.
g. Click Install to configure create a Deployment Monitor SQL database and account, and add the Deployment Monitor Web Service and Web Application to IIS.
h. Once installation has completed click the Open Deployment Monitor link.
4. Select the icon to open the About page: a. Paste the Deployment Monitor license into the Register Deployment Monitor section.
b. Click Register to activate the license.
- 12 -

1 Getting Started
1.3.5 UninstallingThe following steps are required to uninstall Deployment Monitor.
1. Login to the machine with administrative permissions.
2. Start Deployment Monitor Configuration Wizard as follows. n Windows 10
Click Start > All apps > ENGL Deployment Monitor > Configuration Wizard
n Windows 8.1, 8, Server 2012 R2 and Server 2012
Click Start screen > All apps > ENGL Deployment Monitor > Configuration Wizard
n Windows 7 and Server 2008 R2
Click Start > All Programs > ENGL Deployment Monitor > Configuration Wizard
3. At the Deployment Monitor Configuration Wizard page, do the following: a. Enter a Instance name.
b. Enter a Port (optional).
c. Enter a SQL administrator username.
d. Enter a SQL administrator password.
e. Select the IIS Web Site where Deployment Monitor has been installed.
f. Click Uninstall to remove the IIS configuration, Deployment Monitor database and services.
g. Once the uninstall process has completed, click Close to exit the Configuration Wizard.
4. Open the Windows Control Panel and select Programs and Features then click Uninstall on the ENGL Deployment Monitor entry.
- 13 -
2 Configuration
2 ConfigurationThis section contains information on using Deployment Monitor to view and manage Imaging Toolkit deployment progress status.
n Deployment Monitor web console
- 14 -
2 Configuration
2.1 Deployment Monitor Web ConsoleThis section contains information about using Deployment Monitor Web Console to view and manage device deployment progress.
n Starting Steps to launch Deployment Monitor Web Console.
n Tour of the Workspace Introduction to the user interface.
n Options Changing Deployment Monitor settings.
n About License registration and version information.
n Live View Viewing live device deployment progress.
n History View Viewing historic device deployment progress.
2.1.1 StartingThe Deployment Monitor Web Console can be started using one of the following.
n Windows 10
Click Start > All apps > ENGL Deployment Monitor > Web Console
n Windows 8.1, 8, Server 2012 R2 and Server 2012
Click Start screen > All apps > ENGL Deployment Monitor > Web Console
n Windows 7 and Server 2008 R2
Click Start > All Programs > ENGL Deployment Monitor > Web Console
n Enter the following URL into a supported browser.
http://<server>/ITDM/Monitor.aspx
Note: The Deployment Monitor Web Console URL should be added to the Internet Explorer Internet Options > Security > Trusted Sites. The Require server verification (https) will need to be disabled before the site can be added to Trusted Sites.
2.1.2 Tour of the WorkspaceThe Deployment Monitor Web Console user interface consists of the following sections:
n Toolbar
n Live View
n History View
n Log View
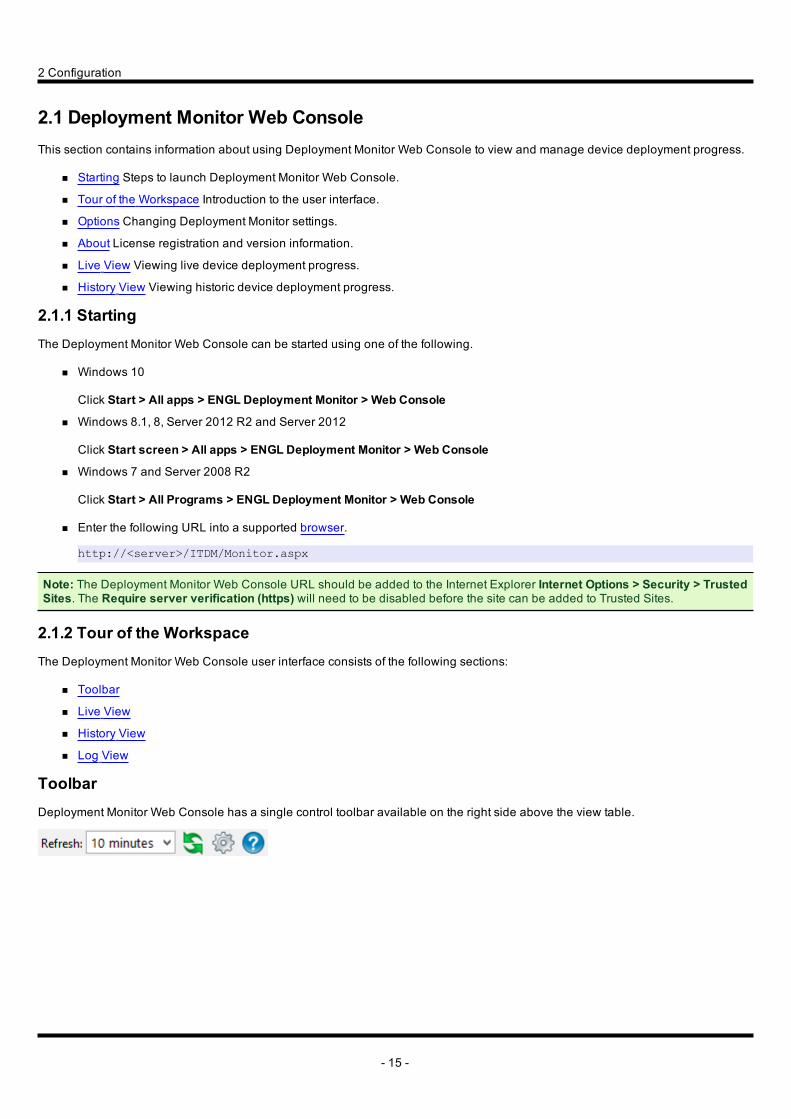
ToolbarDeployment Monitor Web Console has a single control toolbar available on the right side above the view table.
- 15 -
2 Configuration
Button / Section Description
Specifies the automatic refresh interval for the Live and History views.
Forces a refresh of the current view.
Displays the options.
Displays Deployment Monitor version and license. A license can be entered here.
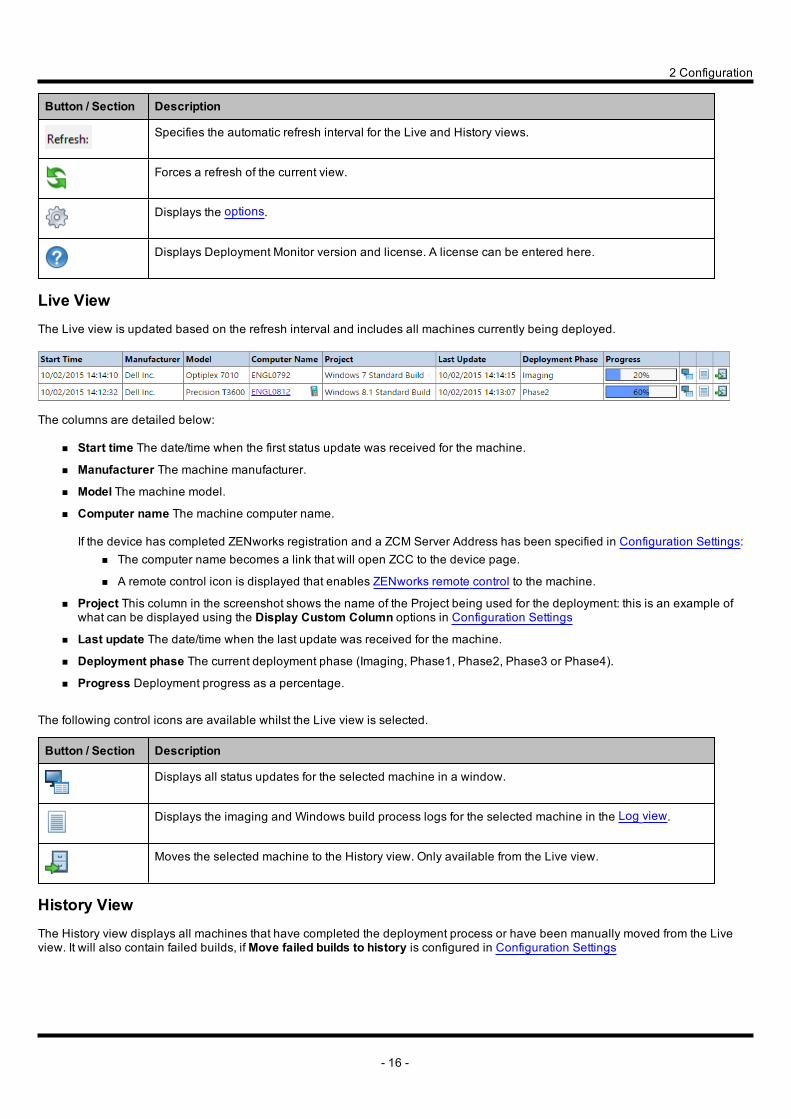
Live ViewThe Live view is updated based on the refresh interval and includes all machines currently being deployed.
The columns are detailed below:
n Start time The date/time when the first status update was received for the machine.
n Manufacturer The machine manufacturer.
n Model The machine model.
n Computer name The machine computer name.
If the device has completed ZENworks registration and a ZCM Server Address has been specified in Configuration Settings: n The computer name becomes a link that will open ZCC to the device page.
n A remote control icon is displayed that enables ZENworks remote control to the machine.
n Project This column in the screenshot shows the name of the Project being used for the deployment: this is an example of what can be displayed using the Display Custom Column options in Configuration Settings
n Last update The date/time when the last update was received for the machine.
n Deployment phase The current deployment phase (Imaging, Phase1, Phase2, Phase3 or Phase4).
n Progress Deployment progress as a percentage.
The following control icons are available whilst the Live view is selected.
Button / Section Description
Displays all status updates for the selected machine in a window.
Displays the imaging and Windows build process logs for the selected machine in the Log view.
Moves the selected machine to the History view. Only available from the Live view.
History ViewThe History view displays all machines that have completed the deployment process or have been manually moved from the Live view. It will also contain failed builds, if Move failed builds to history is configured in Configuration Settings
- 16 -
2 Configuration
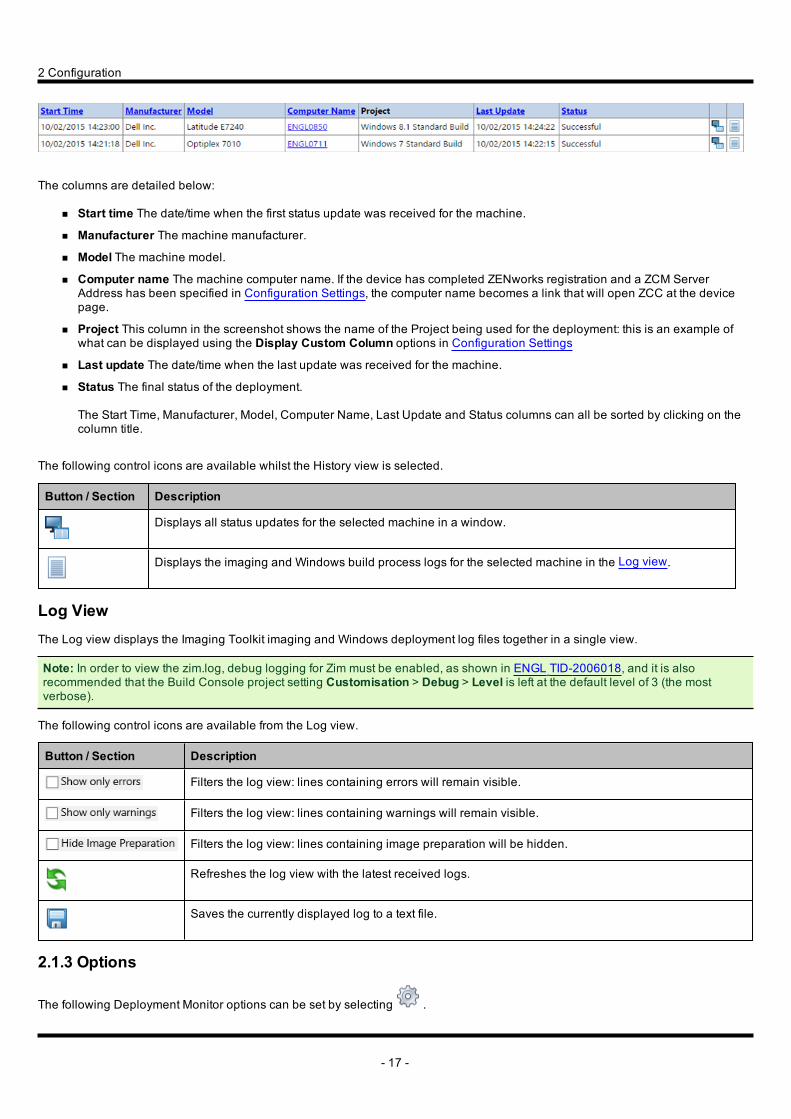
The columns are detailed below:
n Start time The date/time when the first status update was received for the machine.
n Manufacturer The machine manufacturer.
n Model The machine model.
n Computer name The machine computer name. If the device has completed ZENworks registration and a ZCM Server Address has been specified in Configuration Settings, the computer name becomes a link that will open ZCC at the device page.
n Project This column in the screenshot shows the name of the Project being used for the deployment: this is an example of what can be displayed using the Display Custom Column options in Configuration Settings
n Last update The date/time when the last update was received for the machine.
n Status The final status of the deployment.
The Start Time, Manufacturer, Model, Computer Name, Last Update and Status columns can all be sorted by clicking on the column title.
The following control icons are available whilst the History view is selected.
Button / Section Description
Displays all status updates for the selected machine in a window.
Displays the imaging and Windows build process logs for the selected machine in the Log view.
Log ViewThe Log view displays the Imaging Toolkit imaging and Windows deployment log files together in a single view.
Note: In order to view the zim.log, debug logging for Zim must be enabled, as shown in ENGL TID-2006018, and it is also recommended that the Build Console project setting Customisation > Debug > Level is left at the default level of 3 (the most verbose).
The following control icons are available from the Log view.
Button / Section Description
Filters the log view: lines containing errors will remain visible.
Filters the log view: lines containing warnings will remain visible.
Filters the log view: lines containing image preparation will be hidden.
Refreshes the log view with the latest received logs.
Saves the currently displayed log to a text file.
2.1.3 Options
The following Deployment Monitor options can be set by selecting .
- 17 -
2 Configuration
n Password required to change settings Specifies whether a configuration password is required. When set, a password must be entered to access the configuration settings page.
n Password Specifies the configuration password.
n Confirm Password Confirmation of the configuration password, must match the Password.
n Days to keep history Specifies the number of days to keep completed or failed builds in the History view. Deployment Mon-itor will calculate which build records to remove based on the number of days history to be kept. Build records and cor-responding log files will be deleted at 01:00 each day.
n Move failed builds to history Specifies whether a monitored build is moved to the History view when a failure occurs.
n Move after Specifies (when Move failed builds to history is enabled) the number of minutes before the failed build is moved from the Live to the History view.
n ZCM server address Specifies the URL of the ZENworks Configuration Management (ZCM) server for the zone.
Note: This is used to open ZENworks Control Center (ZCC) at the device page for the selected machine and is required to enable ZENworks remote control of the machine
n Display custom column Specifies whether an additional column is displayed in the Live and History views.
n Column title Specifies (when Display custom column is enabled) a custom column title displayed in the Live and History view.
n Build data attribute Specified (when Display custom column is enabled) an attribute written to EBD/ZISD by the Imaging Toolkit build process (the default attributes set in zim.cfg are Machine Type, OS, and Project name).
2.1.4 AboutThe following information is available on the About page:
n Deployment Monitor version / build
n License details
n Registration
RegistrationTo register Deployment Monitor follow these steps;
1. Request a license code from ENGL.
2. Enter the license code.
3. Click Register.
To Request an Evaluation License click on link, a separate page will open and you will be prompted for your ENGL website login credentials, the evaluation license will then be displayed and can be copied into the Register Deployment Monitor dialog.
2.1.5 Live ViewThis Deployment Monitor Web Console Live view contains a list of machines which are in the process of being deployed by Imaging Toolkit.
Note: The page will automatically refresh based on the refresh interval or can be refreshed manually by clicking the refresh button in the toolbar.
For details on the Live view table and controls for each machine displayed, please view the Tour of the Workspace.
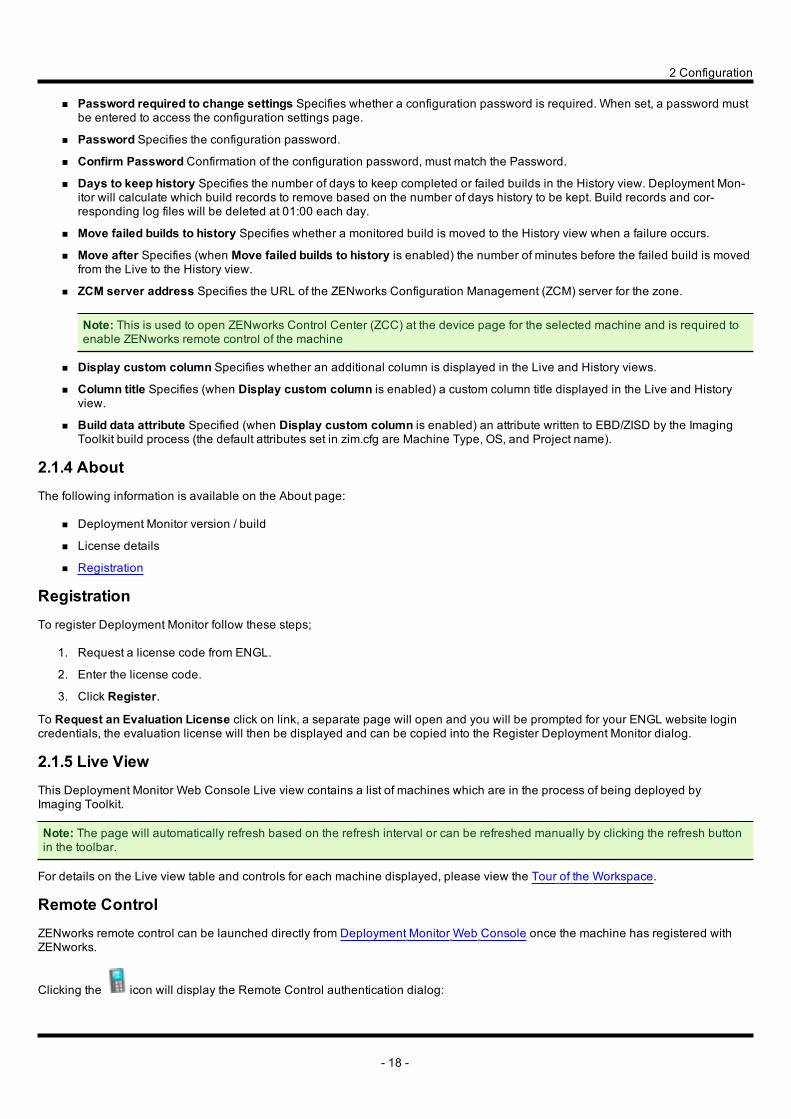
Remote ControlZENworks remote control can be launched directly from Deployment Monitor Web Console once the machine has registered with ZENworks.
Clicking the icon will display the Remote Control authentication dialog:
- 18 -
2 Configuration
Enter a Username and Password for a ZENworks administrator user that has the Remote Control Management right assigned in ZENworks.
Note: You must configure a ZENworks Remote Control policy with Allow managed device to be controlled remotely enabled and Ask permission from user on managed device before starting Remote Control disabled in order to control the machine without user intervention.
Note: Only Rights-based Remote control is available via this interface
2.1.6 History ViewThis Deployment Monitor Web Console History view contains a list of all machines that have completed their Imaging Toolkit deployment or have been manually moved from the Live view. It will also contain failed builds, if Move failed builds to history is configured in Configuration Settings
Note: The page will automatically refresh based on the refresh interval or can be refreshed manually by clicking the refresh button in the toolbar.
For details on the History view table and controls for each machine displayed, please view the Tour of the Workspace.
- 19 -
3 Implementation
3 ImplementationFollow the steps below to configure Imaging Toolkit for use with Deployment Monitor.
Note: Build Console, Deployment Wizard and Integration Wizard are components of Imaging Toolkit. The following procedures should be used in conjunction with the Imaging Toolkit documentation. Ensure the Imaging Toolkit version meets the Deployment Monitor system requirements.
1. Install Deployment Monitor a. Follow the installation steps to install, configure and register a Deployment Monitor server.
2. Add Deployment Monitor servers to Build Console a. Select Options > Monitoring in Build Console.
b. Click Add, enter a Description, Hostname and Port for the Deployment Monitor server, then click OK.
c. Click Test Servers to ensure the Deployment Monitor server is available and licensed.
3. Modify an existing Imaging Toolkit project a. Open an existing project in Build Console.
b. Select Customisation > Monitoring.
c. In the Deployment Monitor Server properties, set Enabled to True.
d. Set Include detailed status updates to True if you want to be able to see the detailed updated in the Web Console.
Note: The Include detailed status updates option is available in Imaging Toolkit 9.0.1 and above. See the Imaging Toolkit system requirements for Deployment Monitor feature compatibility.
e. Select the Monitor Server from the list.
f. Save and validate the project.
g. Run Deployment Wizard to generate a new Ztoolkit image and copy the image to your imaging server.
4. Update the imaging environment a. Backup your existing TFTP zimfiles folder.
b. Edit the zim.cfg (Zim Script) as detailed in the section Zim Script Changes to Support Deployment Monitor below.
c. Enable Zim debug logging as shown in ENGL TID-2006018.
- 20 -
3 Implementation
3.1 Zim Script Changes to Support Deployment Monitor
Warning: Do not modify live imaging environments unless you have completed testing in a non-production environment.
3.1.1 Imaging Toolkit 10.0, 9.0.2, 9.0.1, 9.0 and 8.0.2Zim Script (zim.cfg) files created by Build Console 8.0.2 onwards will already contain the lines shown below, but remember to replace the _MonitorServer and _MonitorPort variable values to match your Deployment Monitor server.
If, however, the Zim Script (zim.cfg) file was created by a version of Build Console prior to 8.0.2, at the top of the Zim Script insert the following lines, but remember to replace the _MonitorServer and _MonitorPort variable values to match your Deployment Monitor server.
; Deployment monitoring server settings
Set:_MonitorServer,"myserver"
Set:_MonitorPort,"80"
Set:_MonitorData_BuildData,""
Set:_MonitorData_ComputerName,""
Set:_MonitorData_LastError,""
Set:_MonitorData_Project,""
Before imaging (all img restore or wim apply commands) insert the following lines:
Set:MonitorStatus,"Started"
Gosub:SendUpdateToMonitorServer
After imaging (all img restore or wim apply commands) insert the following lines:
Set:MonitorStatus,"Finished"
Gosub:SendUpdateToMonitorServer
Towards the end of the script, before error codes are defined ("; Error codes") insert the following lines:
Note: If Imaging Toolkit is used with System Center Configuration Manager (SCCM), replace the _MonitorData_BuildData value "%VendorDataENGLSTRING%" with "%EBDSTRING%".
; ------------------------------------------------------
; Send Update to Monitor Server
; ------------------------------------------------------
Label:SendUpdateToMonitorServer
If:Var,_MonitorServer,NE,""
Set:_MonitorData_Project,"%Lookup_Project%"
Set:_MonitorData_ComputerName,"%COMPUTERNAME%"
Set:_MonitorData_BuildData,"%VendorDataENGLSTRING%"
Monitor:SendUpdate,"%MonitorStatus%"
End:
Return:
3.1.2 Imaging Toolkit 8.0.1At the top of the Zim Script insert the following lines, but remember to replace the _MonitorServer and _MonitorPort variable values to match your Deployment Monitor server.
; Deployment monitoring server settings
Set:_MonitorServer,"myserver"
Set:_MonitorPort,"80"
- 21 -
3 Implementation
Set:_MonitorData_BuildData,""
Set:_MonitorData_ComputerName,""
Set:_MonitorData_LastError,""
Set:_MonitorData_Manufacturer,""
Set:_MonitorData_Model,""
Set:_MonitorData_Project,""
Before imaging (all img restore or wim apply commands) insert the following lines:
Set:MonitorStatus,"Started"
Gosub:SendUpdateToMonitorServer
After imaging (all img restore or wim apply commands) insert the following lines:
Set:MonitorStatus,"Finished"
Gosub:SendUpdateToMonitorServer
Towards the end of the script, before error codes are defined ("; Error codes") insert the following lines:
Note: If Imaging Toolkit is used with System Center Configuration Manager (SCCM), replace the _MonitorData_BuildData value "%VendorDataENGLSTRING%" with "%EBDSTRING%".
; ------------------------------------------------------
; Send Update to Monitor Server
; ------------------------------------------------------
Label:SendUpdateToMonitorServer
If:Var,_MonitorServer,NE,""
Set:_MonitorData_Manufacturer,"%Lookup_Section%"
Set:_MonitorData_Model,"%Lookup_Value%"
Set:_MonitorData_Project,"%Lookup_Project%"
Set:_MonitorData_ComputerName,"%COMPUTERNAME%"
Set:_MonitorData_BuildData,"%VendorDataENGLSTRING%"
Monitor:SendUpdate,"%MonitorStatus%"
End:
Return:
- 22 -
4 Support
4 SupportKnowledgebaseThe ENGL Knowledgebase includes useful information and examples which have been compiled by ENGL consultants whilst working on customer engagements. Search the Technical Information Documents in the ENGL Knowledgebase for more details.
Support IncidentsLicensed customers with an active maintenance agreement can log a support incident which will be answered by one of our engineers.
Support ForumsOur support forums are monitored on a daily basis and can be used to post your technical questions for all ENGL products. For connection information please visit ENGL Support.
Contact ENGLIf you are unable to access the news servers or log an incident or you have other difficulties please send an email to the ENGL Support Team at [email protected]. Please provide as much information as possible when you email, including the product name, version, and details of your server and workstation environment.
Alternatively visit our web site for full contact details at www.engl.co.uk.
- 23 -
5 ENGL Software Licence
5 ENGL Software Licence BEFORE YOU USE AND/OR DOWNLOAD ENGL SOFTWARE INCLUDING ENGL DEPLOYMENT MONITOR
(“THE SOFTWARE”), CAREFULLY READ THE TERMS AND CONDITIONS OF THIS LICENCE. BY
USING AND BY DOWNLOADING THE SOFTWARE YOU ARE CONSENTING TO BE BOUND BY AND
ARE BECOMING THE LICENSEE TO THIS LICENCE. IF YOU DO NOT AGREE TO ALL OF THE
TERMS OF THIS LICENCE, DO NOT USE THE SOFTWARE.
A. PROPERTY OF LICENSOR:
You may obtain a copy of the Software product by downloading it remotely from
our server. The copyright, database rights and any other intellectual property
rights in the programs and data which constitute this Software product (‘the
materials’) are and remain the property of the Licensor (‘the Licensor’). You
are licensed to use them only if you accept all the terms and conditions set
out below.
B. LICENCE ACCEPTANCE PROCEDURE:
By installing and using this software, you indicate acceptance of this
licence agreement and the limited liability set out in this licence agreement.
Such acceptance is either on your own behalf or on behalf of any corporate
entity which employs you or which you represent (‘corporate licensee’). In this
licence agreement, ‘you’ includes both the reader and any corporate licensee.
C. LICENCE REJECTION PROCEDURE:
If you do not accept these terms and conditions, you should uninstall this
software and not attempt to use it.
TERMS AND CONDITIONS OF LICENCE AGREEMENT
1. OWNERSHIP OF MATERIALS AND COPIES
The Materials and related documentation are copyrighted works of authorship.
The Licensor retains ownership of the Materials and all subsequent copies of
the Materials, regardless of the form in which the copies may exist. This
licence is not a sale of the original Materials or any copies, particularly,
(but not by way of limitation) not a sale of the Software or its source code.
2. LICENCE
Provided that you have paid the applicable licence fee and adhere to the terms
and conditions of this licence, the Licensor grants to you a limited,
non-exclusive licence to:
2.1 Use the Materials for use on only as many single computer systems
(whether owned, leased and/or controlled by you or any member of your
corporate group, which expression includes Corporate Licensee,
- 24 -
5 ENGL Software Licence
Corporate Licensee’s majority-owned subsidiaries, any parent company
having a majority-owned interest in Corporate Licensee, and such
parent’s majority-owned subsidiaries) as you have purchased licenses
for;
2.2 Make copies of the Materials after a licence has been purchased, for
back up, archival or other security purposes, as follows:
One (1) copy of Materials for each licence purchased;
One (1) copy of Materials for back up;
One (1) copy of Materials for disaster recovery purposes;
Provided always that they contain the same copyright materials as
original Materials purchased. For the avoidance of doubt, where the
materials are licensed at no fee for evaluation, you shall not have a
right to make copies of the materials for any purpose.
3. LICENCE RESTRICTIONS
You may not use, copy, modify or transfer the materials (including any
related documentation) or any copy, in whole or in part, except as
expressly provided for in this licence. If you transfer possession of
any copy of the materials to another party except as provided above,
your licence is automatically terminated. You may not translate,
reverse engineer, decompile, disassemble, modify or create derivative
works based on the materials, except as expressly permitted by the law
of this agreement. You may not vary, delete or obscure any notices of
proprietary rights or any product identification or restrictions on or
in the materials.
4. NO TRANSFER
The materials are licensed only to you for use on only so many single
computer systems as you are licensed for. You may not rent, lease,
sublicence, sell, assign, pledge, transfer or otherwise dispose of the
materials, on a temporary or permanent basis, without the prior written
consent of the Licensor.
5. UNDERTAKINGS
You undertake to:
5.1 ensure that, prior to use of the Materials by your employees or agents,
all such parties are notified of this licence and the terms of this
Agreement;
5.2 reproduce and include our copyright notice (or such other party’s
copyright notice as specified on the Materials) on all and any copies
of the Materials, including any partial copies of the Materials;
- 25 -
5 ENGL Software Licence
5.3 hold all drawings, specifications, data (including object and source
codes), Software listings and all other information relating to the
Materials confidential and not at any time, during this licence or
after it’s expiry, disclose the same, whether directly or indirectly,
to any third party without the Licensor’s consent;
5.4 supervise and control, at all times, use of the Materials to ensure
that the Materials are used in accordance with the terms and
conditions of the Licence including specifically:
(i) ensure that your employees, agents and other parties who will
use the Software are notified of, and adhere to, the terms of
this Licence prior to such employee, agent or party using the
same;
(ii) maintain accurate and up-to-date records of the number and
location of all copies of the Software;
(iii) not display the Software on the bulletin board, FTP site,
worldwide website, chat room or by any other means;
(iv) not to use the Software for immoral, illegal or any other purpose
which may be determined threatening, abusive or harmful including
but not limited to the creation or transmission of any virus,
worms, trojan horse, cancel bots or other destructive or
contaminating programs.
6. LICENCE FEE
The Licence fee per computer system may be varied from time to time and is
published on the website at www.engl.co.uk. The Licence fee is payable to the
Licensor by direct bank transfer to the Licensor’s account, by phone or fax by
cheque or credit card.
7. NO WARRANTIES
The Software is provided "as is" without any warranty of any kind either
express or implied including but not limited to the implied warranties of
merchantability, fitness for a particular purpose, title and non-infringement.
The Licensor does not warrant that the Software will be error-free or that such
errors will be corrected and you are solely responsible for all costs and
expenses associated with rectification, repair or damage caused by such errors.
The Licensor does not warrant that the materials will meet your requirements
that its operation will be uninterrupted or error free. Exclusion of warranties
may not be valid in certain jurisdictions however, the only applicable laws
under which this licence shall be construed are the laws of England and Wales.
- 26 -
5 ENGL Software Licence
8. EXCLUSION OF LIABILITY
8.1 Except in respect of personal injury or death caused directly by the
negligence of the Licensor, in no event will the Licensor be liable to
you for any damages, including any lost profits, lost savings, loss of
data or any indirect, special, incidental or consequential damages
arising out of the use of or inability to use such materials, even if
the Licensor has been advised of the possibility of such damages.
Nothing in this agreement limits liability for fraudulent
misrepresentation.
8.2 In the event the Licensor incurs any liability whatsoever, such
liability is limited to the licence fee paid by you for the Software
(except for death or personal injury arising from the Licensor’s
negligence).
9. YOUR STATUTORY RIGHTS
This licence gives you specific legal rights and you may also have other rights
that vary from country to country. Some jurisdictions do not allow the
exclusion of implied warranties, or certain kinds of limitations or exclusions
of liability, so the above limitations and exclusions may not apply to you.
Other jurisdictions allow limitations and exclusions subject to certain
conditions. In such a case the above limitations and exclusions shall apply to
the fullest extent permitted by the laws of such applicable jurisdictions. If
any part of the above limitations or exclusions is held to be void or
unenforceable, such part shall be deemed to be deleted from this Agreement and
the remainder of the limitation or exclusion shall continue in full force and
effect. Any rights that you may have as a consumer (i.e. a purchaser for
private as opposed to business, academic or government use) are not affected.
10. TERM
The licence is effective until terminated. You may terminate it at any time by
destroying the Materials together with all copies in any form. It will also
terminate upon receipt of written notice from the Licensor
(i) if you fail to comply with any term or condition of this
Agreement; or
(ii) if you voluntarily return the Materials to us.
The Licence will automatically terminate without further notice after a period
of 30 days from your acceptance of the Licence in the event that this Licence
is for evaluation purposes and at no fee.
You agree, upon termination on any grounds, to destroy the Materials together
with all copies in any form.
- 27 -
5 ENGL Software Licence
11. MAINTENANCE
In the event that You have purchased Upgrade Protection and Maintenance for the
Licensed Materials from the Licensor you also accept the Licensor’s
Maintenance Terms and Conditions, a copy of which is available on request.
12. GENERAL
12.1 You agree that the Licensor shall have the right, after supplying
undertakings as to confidentiality, to audit any computer system on
which the Materials are installed in order to verify compliance with
this Software licence.
12.2 Each party hereby irrevocably agrees that the courts of England and
Wales shall have exclusive jurisdiction to resolve any controversy or
claim of whatever nature arising out of or in relation to this
Agreement and the place of performance of this Agreement shall be
England that the laws of England shall govern such controversy or
claim.
12.3 This Agreement constitutes the complete and exclusive statement of the
Agreement between the Licensor and you with respect to the subject
matter of this agreement and supersedes all proposals, representations,
understandings and prior agreements, whether oral or written, and all
other communications between us relating to that subject matter.
12.4 Any clause in this Agreement that is found to be invalid or
unenforceable shall be deemed deleted and the remainder of this
Agreement shall not be affected by that deletion.
12.5 Failure or neglect by either party to exercise any of its rights or
remedies under this Agreement will not be construed as a waiver of that
party’s rights nor in any way affect the validity of the whole of part
of this Agreement nor prejudice that party’s right to take subsequent
action.
12.6 This Agreement is personal to you and you may not assign, transfer,
sub-contract or otherwise part with this Agreement or any right or
obligation under it without the Licensor’s prior written consent. The
Materials may only be transferred to another party if the original and
all copies (including back-ups) of the Materials and this Licence are
transferred permanently at no charge to the proposed new licensee and
such party agrees to be bound by all the terms of this Licence and
PROVIDING ALWAYS that the Licensor has agreed to the transfer in
writing in advance of the transfer. You remain liable for any breach of
- 28 -

5 ENGL Software Licence
this Licence by any new licensee if any transfer is attempted without
the consent of the Licensor. Upon such transfer the Licensor may
retain NO copies of the Software or documentation.
- 29 -


![Application Note - 134117 - Open Text eDOCS DM 5[1].1.0.5 and 5.2 Dynamic Views User Functionality Comparison](https://img.pdfslide.us/doc/110x75/577d20881a28ab4e1e93257b/application-note-134117-open-text-edocs-dm-51105-and-52-dynamic-views.jpg)