Embed Size (px)
Citation preview

1
EnduraPress Heat Press
Please check with Library staff to confirm minimum age certification requirements to use this machine with supervision, and without supervision as provided on the Equipment Usage Chart

2
Table of Contents
Page
Certification 4
Reservation 4
Reference Sheet 5
Approved Materials 5
Machine Accessories 5
Important Information (About This Machine) 6
Workflow 6
Heat Press Components and Warnings 7
Control Panel Operation of the heat press 8
Heat Press Time, Temperature and Pressure Settings 10
Preparing the Image 12
Resolution of the Image 15
Printing the Image 15
Preparing to Press 16
Tips 17
Warnings 17
Guidelines For Pigment Inkjet Process 17
Guidelines For Sublimation Inkjet Process 17
Refilling the Ink Cartridges 18

3
Design Placement Tips 19
Fig 1 19
Fig 2 20
FAQs 21
Understanding Color Profiles 22

4
Certification
To become certified on this piece of equipment you will need to attend a training class that lasts approximately 30 minutes. By the end of the class you will be able to: Print a design on the transfer paper Know which transfer paper/printer to use according to the material being pressed Adjust settings and timer on heat press for specific materials Press transfer designs on various materials To sign up for a training session please see the training binder (available at the front desk). Reservation To reserve this piece of equipment you will need to first be certified on this equipment. After you have attended a training for the equipment you may sign up for a time slot. To see available time slots and sign up for one please see the Reservation Binder (available at the front desk). Your reservation reserves the equipment for you to use during that time, if you are more than 5 minutes late to your reservation time you will lose your reservation and the machine may be used on a first come-first served basis.

5
Reference Sheet Approved Materials
Fabric: Cotton or Polyester or a blend of both
Items that are provided by the Innovation Studios grant for heat pressing.
• Aprons (light colored) • T-shirts (light colored) • Mousepads • Canvas bags (light colored)
Max Design Area 9” x 11” Machine Accessories
• Scissors • Paper cutter (not included but would be helpful if available) • X-acto knife • Cutting matt • Pigment ink or Sublimation ink transfer paper • Heat resistant tape (for sublimation transfers) • Teflon sheet • Teflon pillow (not in all studios) • Gloves or hot pad • Ruler (not included in Library Innovation Studios kits but would
be helpful if available) • T-square (not included in Library Innovation Studios kits but
would be helpful if available) • Epson Workforce Printers (2) • Refillable Ink Cartridges with bottles of Pigment and
Sublimation Ink and syringes for refilling, one for each type • Software: CorelDraw, Corel Photo Paint and Gimp

6
Important Information: The heat press achieves temperatures of 400 °+, burn hazards exist with this process. There is also some risk as scissors are used for cutting transfer paper.
Workflow:
1. Acquire/design images 2. Edit/adjust/size images 3. Determine the content of the material being pressed (cotton or
polyester) 4. Select the correct printer (ink type) and corresponding transfer
paper i. Pigment Ink =Softstretch SS ii. Sublimation Ink =TexPrint
5. Print images on transfer paper – mirrored or backwards 6. Cut out images 7. Set temperature, pressure and time on heat press 8. Set timer 9. Carefully arrange material on heat press base 10. Quickly press T-shirt 2-3 seconds to get rid of moisture and wrinkles 11. Place printed, cutout image on material upside down 12. If using sublimation transfer paper tape down with heat resistant
tape 13. Cover all with the protective Teflon sheet 14. Press material 15. Remove from press 16. Remove/peel off transfer paper from material while hot 17. If using Pigment transfer paper, stretch the material while it is still
warm in all directions.
7
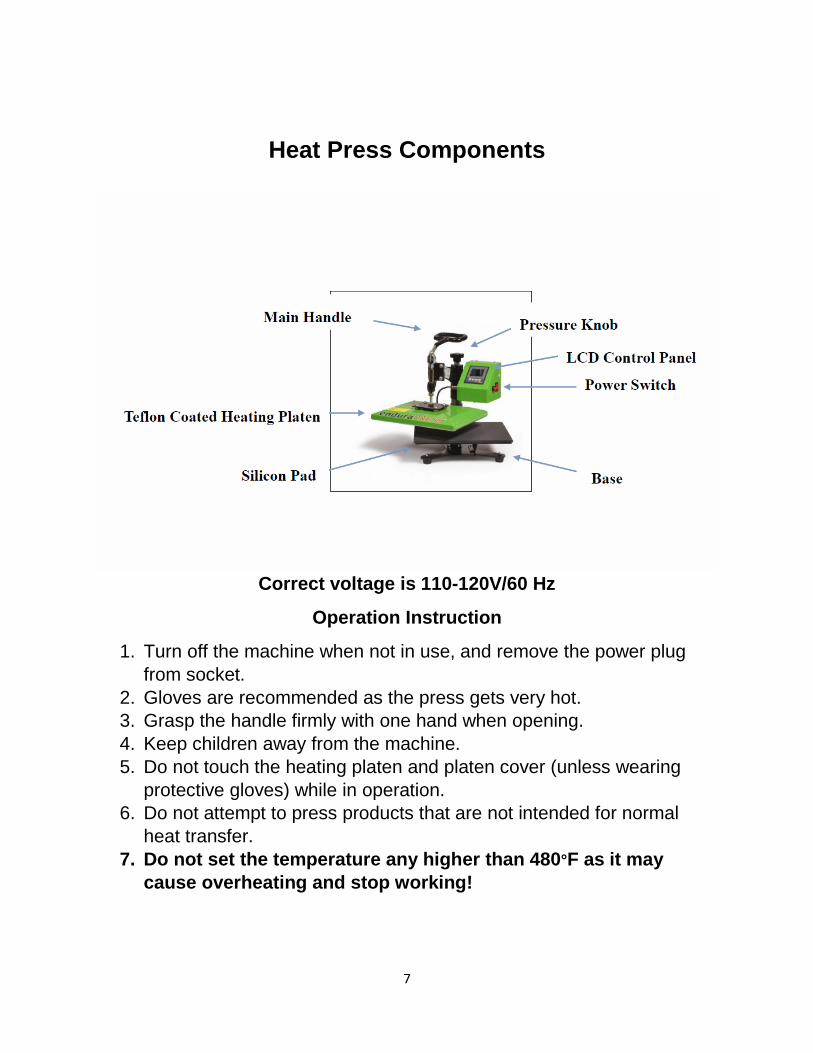
Heat Press Components
Correct voltage is 110-120V/60 Hz
Operation Instruction
1. Turn off the machine when not in use, and remove the power plug from socket.
2. Gloves are recommended as the press gets very hot. 3. Grasp the handle firmly with one hand when opening. 4. Keep children away from the machine. 5. Do not touch the heating platen and platen cover (unless wearing
protective gloves) while in operation. 6. Do not attempt to press products that are not intended for normal
heat transfer. 7. Do not set the temperature any higher than 480°F as it may
cause overheating and stop working!

8
Control Panel Operation P-1: Temp. Setting Mode. Touch Set & key to set desired temp.

9
Press the Set Key and Screen P-1 is displayed. Use arrows to increase or decrease temperature. Press the Set Key again to move to Screen P-2 Time Setting Mode. Use arrows to increase or decrease the length of time the item is to be pressed. The P-3 Screen is to set Centrigrade or Fahrenheit temp measurement. This should already be set, but it will show either a C for Celsius or an F for Fahrenheit. Just touch the up or down arrow to change it. The P-4 is temp calibration mode. (This requires testing the platen for actual temperature, not necessary for most users) The P-5 is the Pre-Alarm. This is a feature that you won’t always need, but it’s good to have. If, for example, you’re doing laser transfers with two-step paper that must be peeled warm, you might set a five second pre-alarm to give you time to put on a pair of cotton gloves before the end of the press cycle. To do this, just use the up arrow in the P – 5 pre-alarm screen to add an alarm five seconds before the end of cycle alarm begins.

10
Heat Press Time, Temperature and Pressure Settings General guidelines provided by manufacturer of the EnduraPress Heat Press and the transfer paper manufacturers. Surface/Material Transfer
Paper Press time Temp Pressu
re Tips/Comments
Cotton/Blend Pigment 15-25 sec. 365 °
30 Psi Pre-press shirt for 3-5 seconds to eliminate moisture.
Polyester Sublimation 35 – 40 sec.
400 °
30-40 Psi (light - med)
Pre-press shirt for 3-5 seconds to eliminate moisture. Tape down design with heat tape. Use Teflon pillow underneath garment to avoid ghosting.
Polyester cont. Sublimation 55 sec. 390 ° “ Try this setting to avoid the press marks.
Mousepads 45 sec. 400 °
40 Psi (med)
Setting the Heat Press Pressure Adjust the pressure by turning the knob clockwise to increase and counter-clockwise to decrease. It’s a good idea to do this first before starting to heat the press because you will want to “test” your pressure and it is much easier if the press isn’t hot. Your heat press works like a fulcrum. Putting thicker materials in the heat press multiplies the closing force. If you place thick items like mouse pads or hoodies in the press, you must reduce the pressure setting. If you place thick items in the press without reducing the pressure setting, the applied clamping force will be too high. You may damage the heat press.

11
Most new users of heat presses focus on adjusting time and temperature and forget about the critical third element. The amount of pressure applied can make the difference between success or failure. For most heat transfer applications, there should be a definite amount of resistance when you close the press. If you can close the press completely with no effort at all, your T-shirt transfers are probably not going to stick. Set the press for minimum pressure, then place your thick item on the base and do a test press to see how much force is actually being applied to the item. Likewise, when going from a thick item to thin one, you’ll need to increase the pressure setting to account for the change in material thickness.

12
Preparing the Artwork • Open or import the image into CorelDraw.
• Open a Vector file or Import a Raster file
• The image may not be 8 ½” x 11” the size
of most transfer sheets.To correct this, after
the artwork opens in CorelDraw, select it
and copy it.
• Create a new file to paste the artwork into. The new document is set
on Letter size or 8.5” x 11”, Primary color mode is set to RGB and the
resolution is 300 dpi. See the “Create a New Document” dialog box
below.
A Note About File Types
Vector
• Vector files are mathematically described drawings
• Vector files can be made as big as you want them without degradation of quality
• Vector files can be “Opened” in CorelDraw File-Open
• Vector files extension: .eps, .ai,.pdf, .svg.cdr
Raster
• Raster files are made of pixels
• Not a good idea to make a bitmap bigger because the picture becomes pixelated.
• Raster files must be imported rather than opened into CorelDraw. File-Import
• Common raster file extensions: .jpeg, .gif, .png, .tif, .bmp

13
Click on “OK”
• Paste into the new document New file
Size: Letter
Width: 8.5”
Height: 11”
Primary color mode: RGB
Rendering resolution: 300 dpi

14
• Adjust size by grabbing a corner handle and pulling towards the
center to reduce the size or pulling outward to increase the size.
Always use the corner handle to avoid distorting the image.
• Reverse the image by selecting the artwork and clicking on the Mirror
horizontally button shown above.
• Remember that you would only increase the size of the artwork if it is
vector art. If it is a photo you can make it smaller but not bigger
without it becoming pixelating.
Mirror horizontally button
Original art file
New file that artwork has been pasted into.
Selected artwork dimensions.
An image is selected when you see the 8 handles around the object.
Corner Handles

15
Resolution of the Image • The resolution of your image will have a lot to do with the success of
your heat pressing projects. The term resolution describes the
number of dots or pixels that an image contains or that can be
displayed on a computer monitor or other display device. The
resolution should be 300 dpi (dots per inch)
Printing the image
• Determine the type of fabric you want to print on,
i.e. polyester or cotton and select the
corresponding printer, ensuring the correct
transfer paper is loaded in the paper drawer, right
side down.
100% polyester or a high % of polyester =
Sublimation
Cotton, polyester or blends = Pigment
• If the graphic is small, place several graphics on
the sheet at one time that can be cut out and heat
pressed later so as not to waste the expensive
transfer paper.
• Print to either the pigment ink or sublimation ink printer which are
both labeled Epson 3620 but one is distinguished from the other as
Epson 3620 (copy). Each printer is labeled either Pigment or
Sublimation.
Check the label on the T-shirt. All T-shirts provided as consumables will have the fabric contents and price on the label.
Mousepads provided are polyester covered. Dimensions are 9.25” x 7.75”. If you want the image on the mousepad to completely cover it dimensions for artwork should be .1/4” -.1/2” larger than the mouse pad.
Aprons are polyester.

16
Preparing to Press • Cut out the images being used. Trimming as close to the edges of the
image as possible. If possible use a cutting machine or x-acto knife
with a straight edge on a cutting matt to make the edges as straight
and uniform as possible if the image is type or has straight edges.
• Set the press according to the instructions for the type of material and
transfer paper being used. This will require three settings:
temperature, pressure and time for each T-shirt or other item you are
pressing on.
• Use the lint roller to ensure a perfectly clean surface prior to pressing.
• Pre-press the material first before applying the transfer. This gets rid
of moisture that could prevent a good transfer of ink and gets rid of
any wrinkles. Timing for this process is just a second or two.
• Place the T-shirt or other material on the bottom plate, making sure
the collar is off the edge of the plate which would raise up the platen
slightly and reduce the pressure on the rest of the shirt.
• Lay the transfer onto the spot you want the design to appear on the
T-shirt or other material ink-side down. See Figure 1 and 2 for
placement guidance.
• Place a Teflon sheet on top of the T-shirt to keep the top platen free
of ink that could spoil subsequent pressings. The Teflon will also
keep the machine from accumulating ink and dust, and Teflon is easy
to wipe clean. Lock the press and follow the manufacturer timing
instructions for each type of material being used.

17
Tips
• Use a potholder or gloves to hold down the hot T-shirt material while
lifting off the transfer paper
Warning:
Never leave a heat press on unattended.
• The printer that corresponds to the material you will be pressing the
design onto, i.e. pigment ink printer to cotton, polyester or blends and
sublimation ink printer to polyester only (can be a blend but a blend
that has a high percentage of polyester will be most successful and
long lasting)
Guidelines For Pigment Inkjet Process
• Cut out the design as close as possible since a plastic film will
surround the design/artwork.
• After pressing remove transfer paper while hot, then stretch the fabric
in all directions while still warm for best results.
• Wash in cool water with T-shirt turned inside out. Hang to dry.
Guidelines For Sublimation Inkjet Process • Use heat resistant tape to hold down transfer paper as it doesn’t stick
and could move when lifting the press after the heating process. This
could result in ink dropping on areas where you don’t want it.

18
Refilling Printer Ink Cartridges.
For more detailed instructions see page 9 of the Epson WK 3260 SOP.

19
Figure 1

20
Figure 2

21
FAQs
Q: How often should I use my printer?
A: These printers use water based inks which as you know, water evaporates. If you don’t use it, the print head will dry up and potentially clog and damage the head. We recommend doing a head cleaning a week and ensuring you have a perfect nozzle check to make sure your printer stays healthy and in perfect working condition.
Q: I didn’t use my printer for a certain amount of time, what should I do to get it going again?
A: The very first thing you need to do is re-prime the cartridges. Ensure you can pull the ink into the syringe and all the inks are flowing as they should. Once re-primed, run up to 5 head cleanings with a nozzle check after each cleanings and see if you can get a perfect nozzle check or if it’s even improving. If it stays the same all 5 cleanings, there’s a good chance you’ve got a clog and in that case you need to call one of our technicians for further instructions.
Q: What is the difference between your three types of ink?
A: Dye is for general office printing, photographs, and screen printing. Pigment is for general office printing, photographs, and doing cotton blended shirt transfers. (50% and higher) Sublimation ink is for doing poly coated substrates, license plates, phone cases, mouse pads, coffee cups, and poly clothing. (65% and higher)

22
Color Profiles
Color Profiles have been installed on each of the Epson WK3260
printers, one for each type of ink – Pigment or Sublimation. These
profiles have been obtained by the ink manufacturer. These color
profiles tell the graphics program/printer how best to print for that
fabric
Understanding Color Profile and How To Use Them How to read the Color Profile code.
Setting up a color profile on the printer
Make sure that CorelDraw is closed.
Go to the Windows button in the lower left hand corner. Right click, go to
Control Panel, Printers and Devices, Select the Epson WF 3260, right click
and go to Printing preferences.
Printer name Intended Use
Paper Type Setting
Quality setting
Ink type
Name of the color profile. This is what you will look for when selecting the correct profile for your print job. This is for the WF7110 printer, printing on a polyester material. Plain Paper, High Quality, using Adobe CS/4.2.

23
By setting the Paper type to Plain Paper you have more options available under the Quality selection (as shown in the illustration below)
With Plain Paper selected, go to the Quality tab and select “More Settings”.

24
Move the bar to the highest quality setting available.
Under “Color Correction” select the “Custom” radio button and click on the “Advanced” button.

25
Under “Advanced” select the “No Color Adjustment” radio button. Then select “OK”. This forces the printer to use the Color Management you select rather than the default.
Here you can select to always print the “Mirror Image” and it is done automatically. This has NOT been set up to automatically Mirror because in previous instructions you are instructed to do this in CorelDraw, which would cancel out this setting and not reverse the image.
Select “OK”.

26
Now select the Maintenance tab.
Select “Nozzle Check”. This prints out a test page and you are asked if you want to do a head cleaning. Make sure you don’t have the transfer paper loaded yet. It’s better to do this on cheaper paper. If the printout looks good, you would say no the Head Cleaning. If it is streaky or coverage isn’t what it should be, proceed with the Head Cleaning.
Do Not mess with the Print Head Alignment! Cobra Ink warns that 99% of the time this causes more problems if not done correctly.
Select “OK”.

27
Here you can see the presets that have been loaded already. Since we don’t use Aluminum Plates this shouldn’t be selected. The Poly is one that we will use.
Now open a graphic file in CorelDraw.

28
Click on the “Printer” icon.
The printer dialog box opens and you select the correct printer, which is the Epson 3260 (copy).
At this point you can check the preferences that had been set up previously.
Select Epson WF-3620 or the Epson WF-3620 (copy) depending on which is set up as sublimation or pigment (there should be a label on the printer designating which is which).

29
Click on the “Color” tab.
Select “CorelDraw” for the “Color conversion performed by”
This example shows quite a number of color profiles to select from but we need only those for sublimation on the sublimation printer and the only printer will be the Epson 3260 (copy). Select the Polyester Cloth Texprint
Uncheck “Preserve pure black”.
Then click on “Print”