Embed Size (px)
Citation preview
Technical Services, Inc Page 1
Parts List Processor End-User Manual
End-User Software Manual Parts List Processor
Technical Services, Inc Page 2
Parts List Processor End-User Manual
Table Of Contents Page Topic
Configuration Mapping
Converting a Comma Delimited File to a RazorGage File
Manually Creating a Parts File
Combining RazorGage Parts Files
3
4
6
7
8
Technical Services, Inc Page 3
Parts List Processor End-User Manual
Configuration
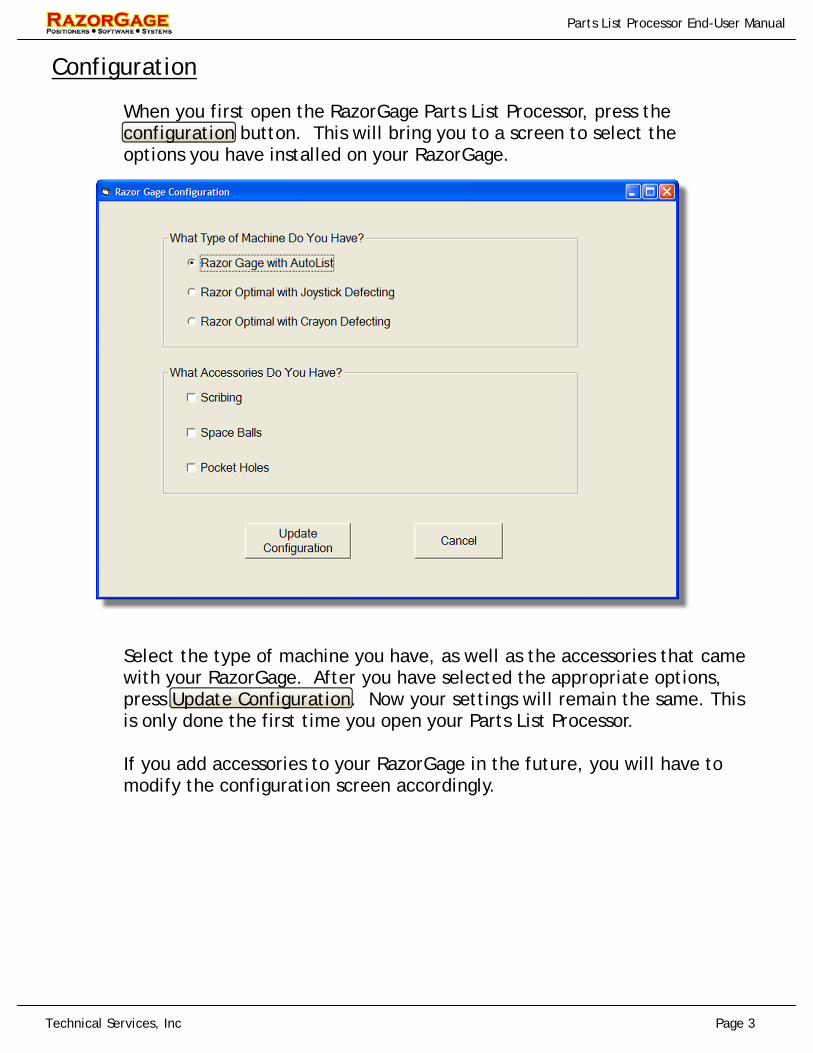
When you first open the RazorGage Parts List Processor, press the configuration button. This will bring you to a screen to select the options you have installed on your RazorGage.
Select the type of machine you have, as well as the accessories that came with your RazorGage. After you have selected the appropriate options, press Update Configuration. Now your settings will remain the same. This is only done the first time you open your Parts List Processor. If you add accessories to your RazorGage in the future, you will have to modify the configuration screen accordingly.
Technical Services, Inc Page 4
Parts List Processor End-User Manual
Mapping
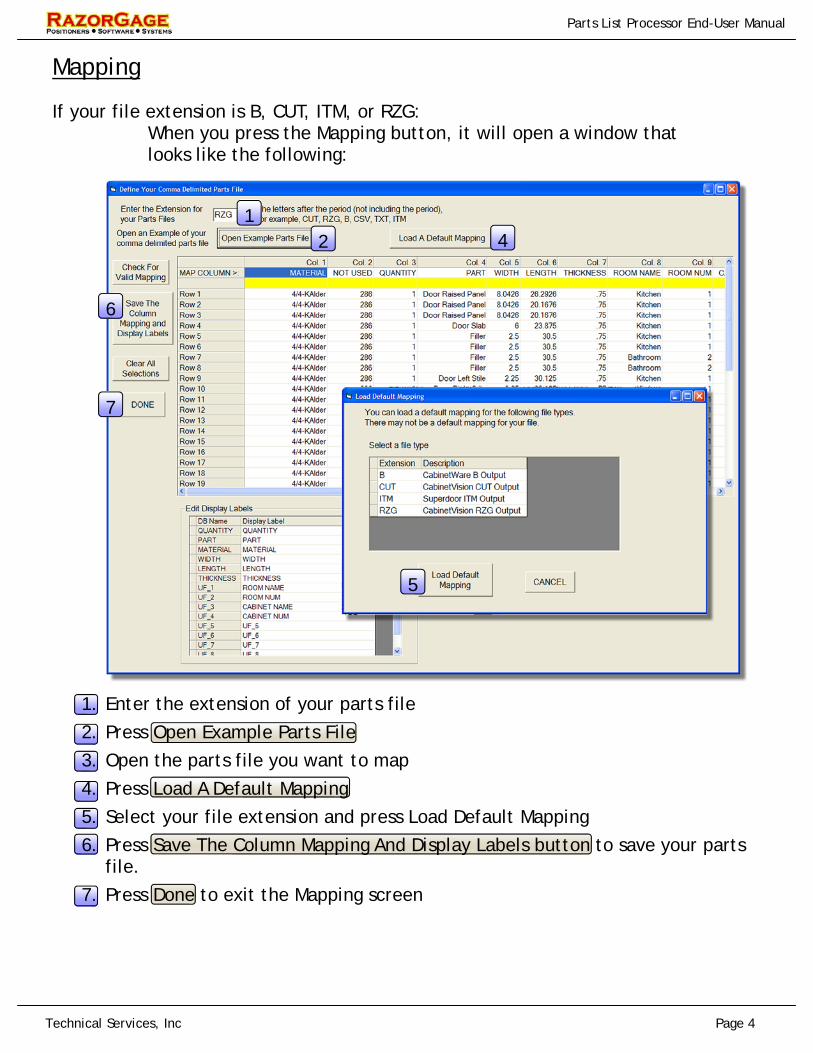
If your file extension is B, CUT, ITM, or RZG: When you press the Mapping button, it will open a window that looks like the following:
1. Enter the extension of your parts file
2. Press Open Example Parts File
3. Open the parts file you want to map
4. Press Load A Default Mapping
5. Select your file extension and press Load Default Mapping
6. Press Save The Column Mapping And Display Labels button to save your parts file.
7. Press Done to exit the Mapping screen
1 2 4
5
6
7
Technical Services, Inc Page 5
Parts List Processor End-User Manual
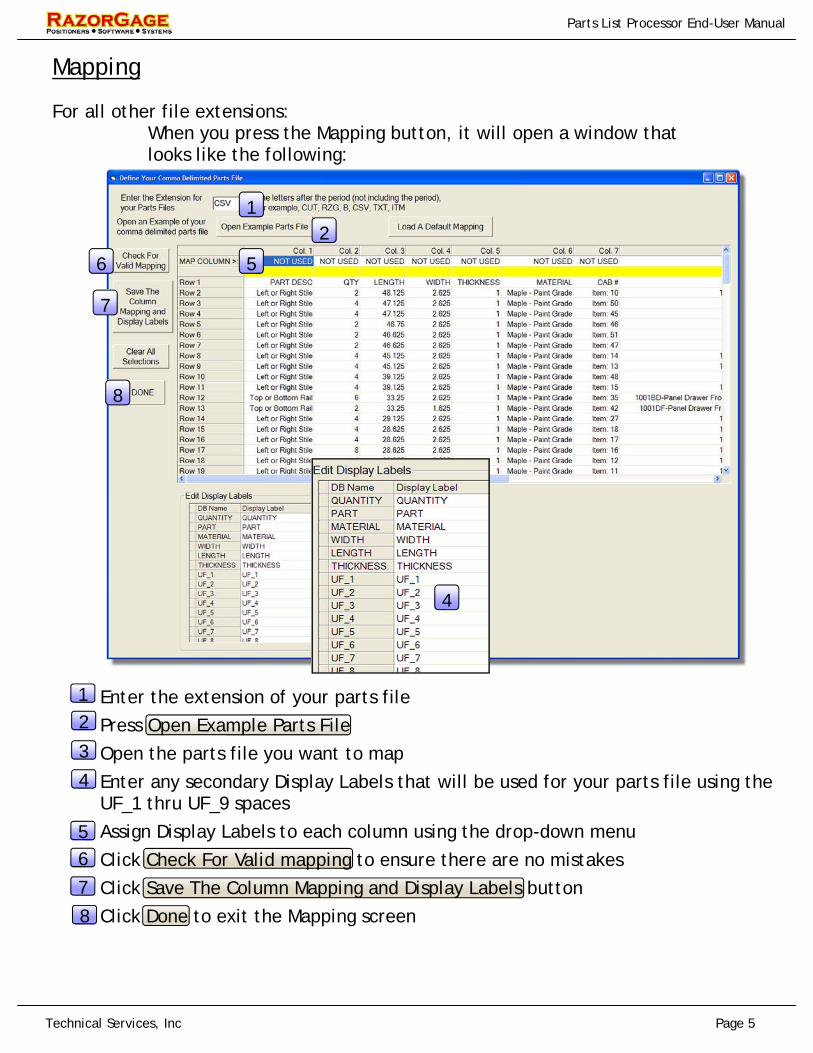
Enter the extension of your parts file
Press Open Example Parts File
Open the parts file you want to map
Enter any secondary Display Labels that will be used for your parts file using the UF_1 thru UF_9 spaces
Assign Display Labels to each column using the drop-down menu
Click Check For Valid mapping to ensure there are no mistakes
Click Save The Column Mapping and Display Labels button
Click Done to exit the Mapping screen
Mapping
For all other file extensions: When you press the Mapping button, it will open a window that looks like the following:
1 2
1 2
3
4
5
4
5
6
7
8
6
7
8
Technical Services, Inc Page 6
Parts List Processor End-User Manual
Converting a Comma Delimited Parts File to a RazorGage Parts File
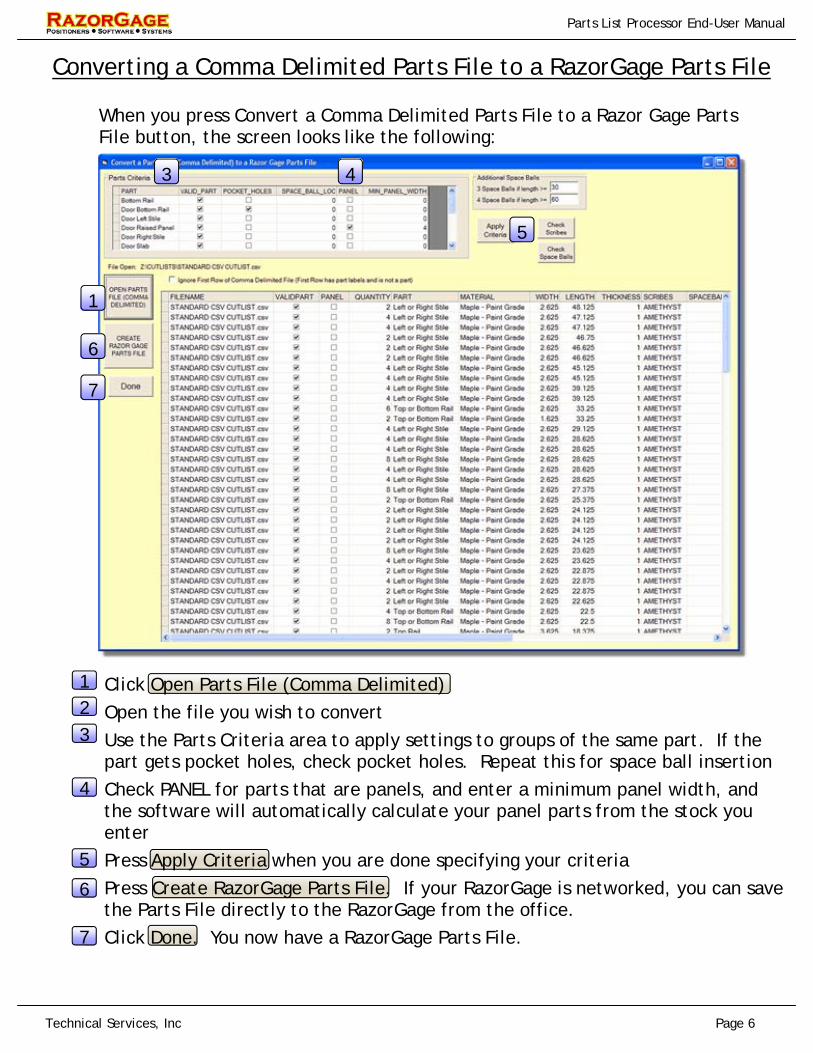
When you press Convert a Comma Delimited Parts File to a Razor Gage Parts File button, the screen looks like the following:
Click Open Parts File (Comma Delimited)
Open the file you wish to convert
Use the Parts Criteria area to apply settings to groups of the same part. If the part gets pocket holes, check pocket holes. Repeat this for space ball insertion
Check PANEL for parts that are panels, and enter a minimum panel width, and the software will automatically calculate your panel parts from the stock you enter
Press Apply Criteria when you are done specifying your criteria
Press Create RazorGage Parts File. If your RazorGage is networked, you can save the Parts File directly to the RazorGage from the office.
Click Done. You now have a RazorGage Parts File.
1 2 3
4
5
6
7
1
3 4
5
6
7
Technical Services, Inc Page 7
Parts List Processor End-User Manual
Manually Creating a RazorGage Parts File
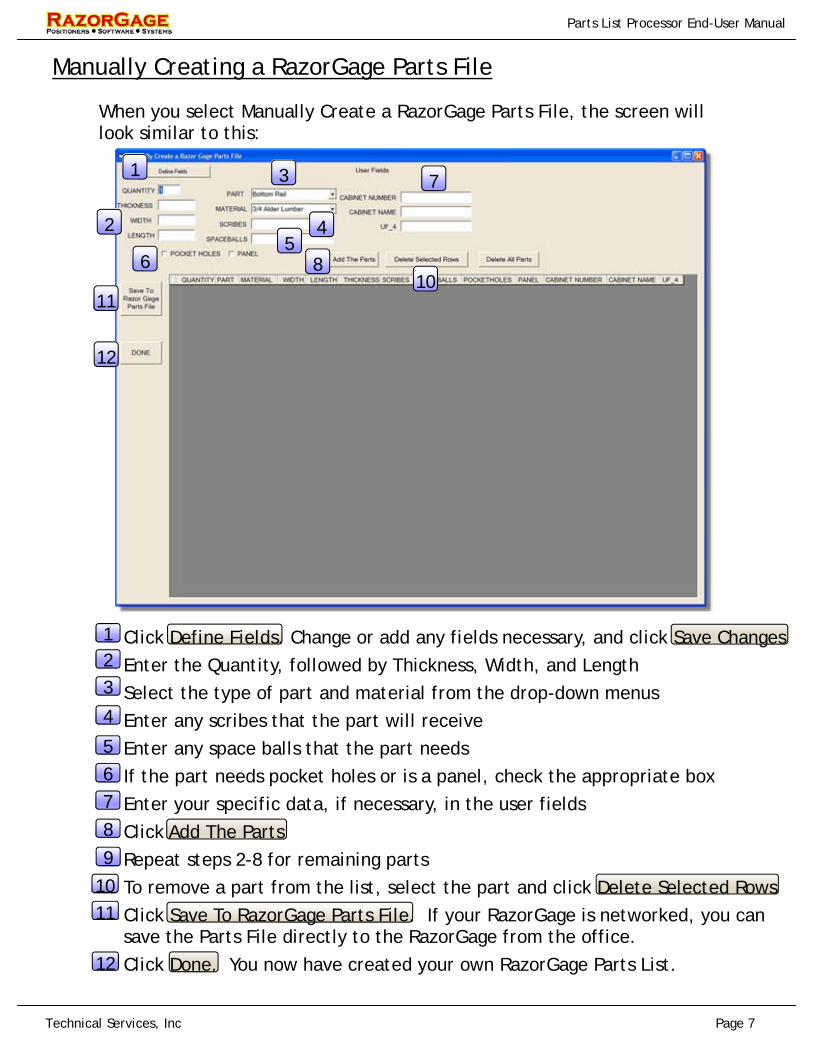
When you select Manually Create a RazorGage Parts File, the screen will look similar to this:
Click Define Fields. Change or add any fields necessary, and click Save Changes
Enter the Quantity, followed by Thickness, Width, and Length
Select the type of part and material from the drop-down menus
Enter any scribes that the part will receive
Enter any space balls that the part needs
If the part needs pocket holes or is a panel, check the appropriate box
Enter your specific data, if necessary, in the user fields
Click Add The Parts
Repeat steps 2-8 for remaining parts
To remove a part from the list, select the part and click Delete Selected Rows
Click Save To RazorGage Parts File. If your RazorGage is networked, you can save the Parts File directly to the RazorGage from the office.
Click Done. You now have created your own RazorGage Parts List.
1 2 3
4
5 6 7
8
9
10 11
12
1
2
3
6
4 5
7
8 10
11
12
Technical Services, Inc Page 8
Parts List Processor End-User Manual
Combining RazorGage Parts Files
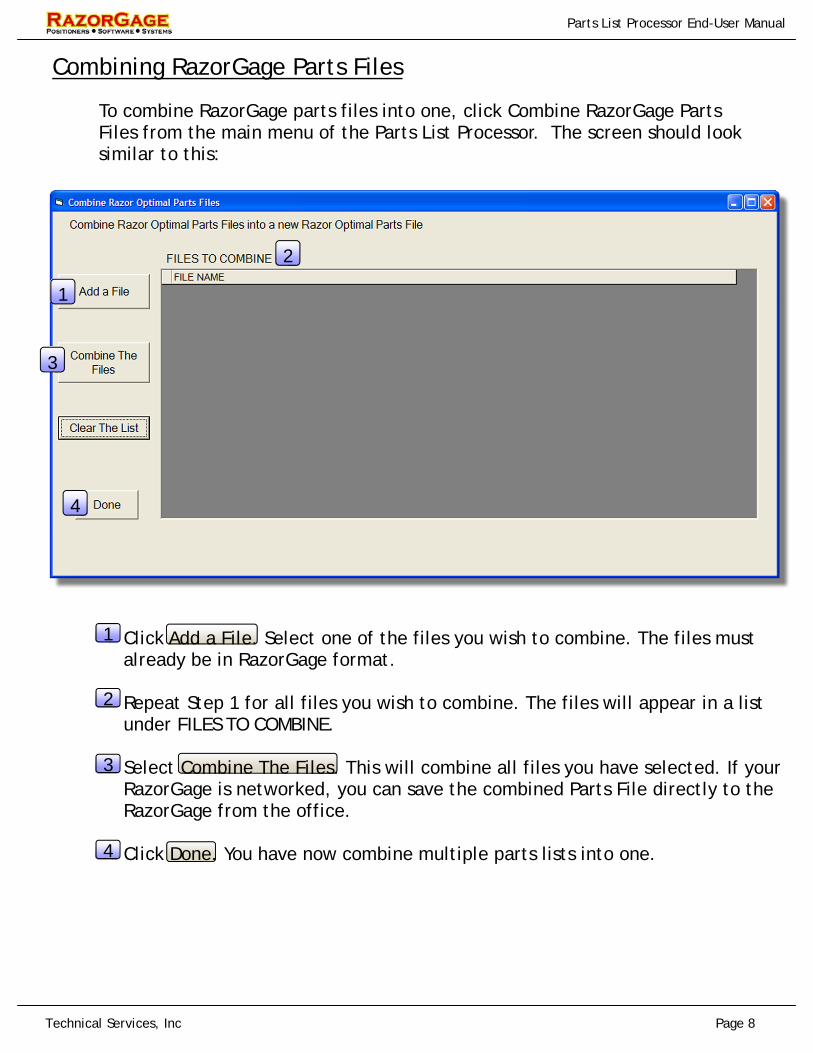
To combine RazorGage parts files into one, click Combine RazorGage Parts Files from the main menu of the Parts List Processor. The screen should look similar to this:
Click Add a File. Select one of the files you wish to combine. The files must already be in RazorGage format. Repeat Step 1 for all files you wish to combine. The files will appear in a list under FILES TO COMBINE. Select Combine The Files. This will combine all files you have selected. If your RazorGage is networked, you can save the combined Parts File directly to the RazorGage from the office. Click Done. You have now combine multiple parts lists into one.
1
2
3
4
1
2
3
4