Embed Size (px)
Citation preview
EncryptStick 6.0 User Manual – Edition 1.0
For Windows Users

2 | P a g e
Contents Introduction to EncryptStick™ .......................................................................................................... 3
Installation Steps .............................................................................................................................. 4
How to Login ................................................................................................................................... 14
EncryptStick™ Home Screen ........................................................................................................... 17
Vault Maintenance and new Vaults ............................................................................................... 19
How to “Save File(s) to” Other Locations ....................................................................................... 21
Add an Existing Vault ...................................................................................................................... 23
Disconnecting a Vault ..................................................................................................................... 23
Locking Vaults or Exiting EncryptStick ............................................................................................ 24
How to Cut, Copy and Paste Files ................................................................................................... 25
How to Move Files in Folders ......................................................................................................... 26
View Menu ...................................................................................................................................... 27
How to Create a New Folder in a Vault .......................................................................................... 28
How to Add Files to the New Folder ............................................................................................... 29
How to Drag and Drop Files to a Folder ......................................................................................... 31
How to Rename a Vault .................................................................................................................. 32
How to Delete a Vault ..................................................................................................................... 33
How to “Change Password”? .......................................................................................................... 34
How to Share a Private Vault .......................................................................................................... 36
How to Synchronize Vaults and Peer Folders ................................................................................ 37
How to Backup Vault Data .............................................................................................................. 39
How to Restore a Vault Backup ...................................................................................................... 42
Mount a vault as a Drive letter in Windows or as a Favorite within Windows Explorer .............. 44
How to Repair a Damaged Vault .................................................................................................... 45
Encryption Levels ............................................................................................................................ 46
How to Upgrade from EncryptStick™ version 5.4.x to EncryptStick™ 6.0.x .................................. 48
How To Upgrade from the Trial Version to the Fully Functional Version of EncryptStick (for Trials started before January 9, 2015) ...................................................................................................... 51
Switching From a Time-‐Limited Trial to the Licensed Version of EncryptStick ............................. 51
TROUBLESHOOTING AND MAINTENANCE ..................................................................................... 52
What To Do if You Lose Your EncryptStick-‐enabled USB flash drive ............................................. 52
How to get online support? ............................................................................................................ 55

3 | P a g e
Introduction to EncryptStick™
Congratulations on your decision to purchase EncryptStick™, the world’s foremost and best data
protection software. Like most people, you keep a treasure trove of private information, on your
computer or other storage devices: important documents, photos, videos, financial records and
other sensitive data that make up your digital life, and that deserve the protection you would want
for any property you own.
Each and every day, cybercriminals are at work, hacking into computer systems and making off with
private files and sensitive information. Now, with EncryptStick, you have an easy to use program,
with all the tools needed to protect your important files and data from unauthorized access and
malicious or criminal misuse. The possible consequences of information falling into the wrong
hands: identity theft, embarrassment, job loss, or worse... will no longer be your concern, when you
take the few seconds needed for EncryptStick to permanently secure all your important documents
and sensitive data.
Whether you are securing your vital information on your desktop, laptop, flash drive, or some other
storage device, With EncryptStick you can now have peace of mind and full control of your digital
life.

4 | P a g e
Installation Steps
The 1st step is to visit our website www.EncryptStick.com and click on the “Get it now” or “Try it
now” button as shown below:
After you click the “Get it now” or “Try it now” button, you will be directed to the one-‐page
Checkout form. Once you fill in the details correctly and pay the amount shown on the screen, you
will receive an email invoice as shown below, with the product license details and a 25-‐digit serial
number to use for activating your license:
The 25-‐digit serial number will be required during the installation procedure.
5 | P a g e
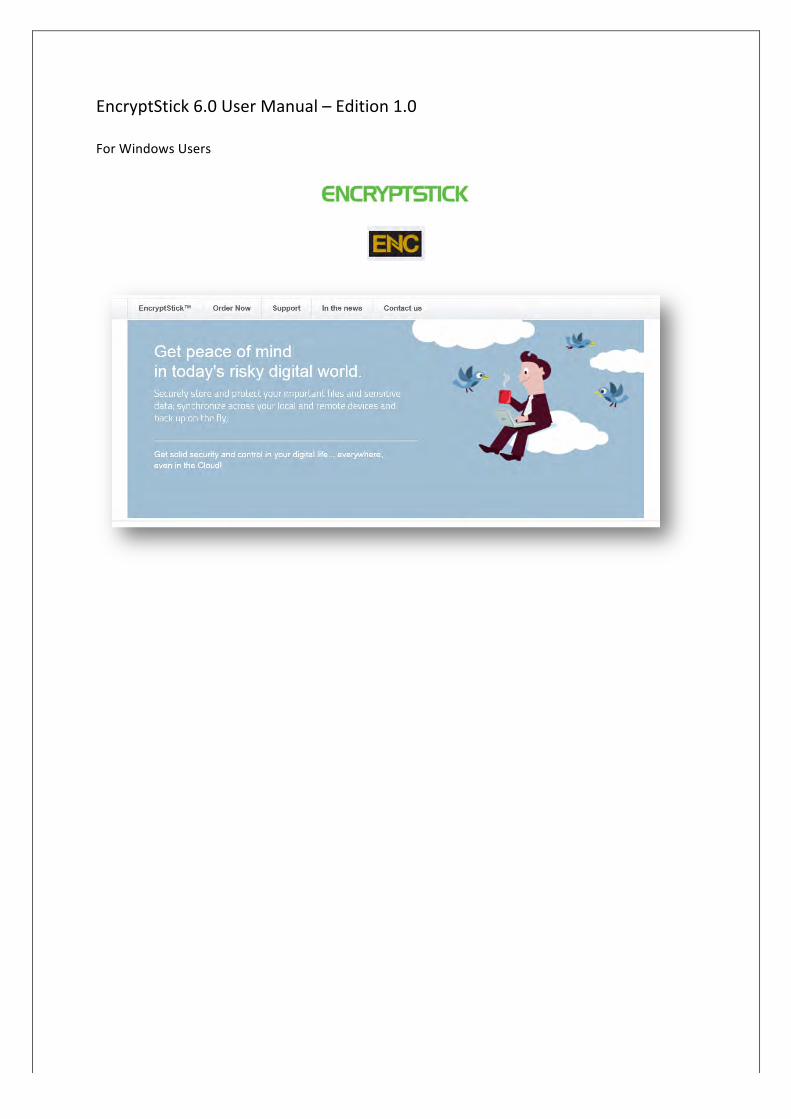
The next step is to download the software from the website at www.encryptstick.com/download
and run the executable file to proceed with the installation. Once you have downloaded the
software for your PC, Mac, or Laptop computer, you will see a welcome screen as shown below:
The steps are self-‐explanatory and the Setup Wizard will guide you through the installation. Click
“Next” and you will get a screen showing the End User License Agreement (EULA), as shown below.
You should read the entire EULA before clicking “I Agree”.
6 | P a g e
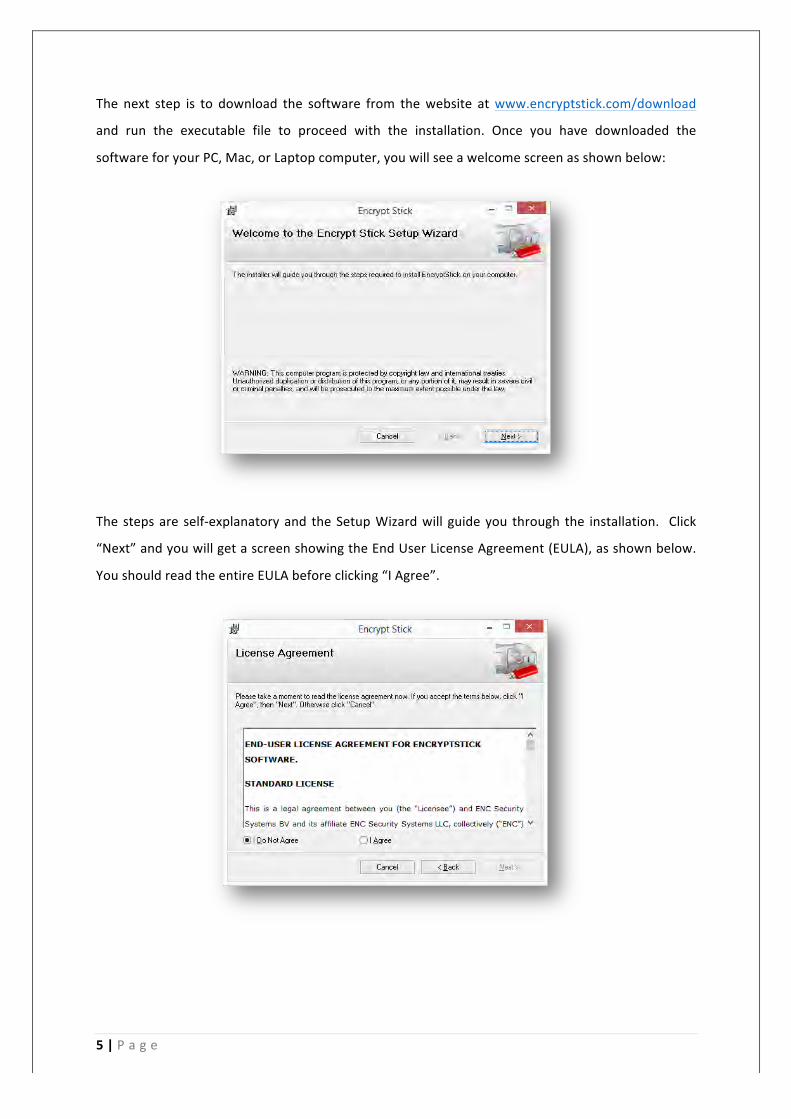
The “I Do Not Agree” radio button is pre-‐selected by default. Once you click on “I Agree” you will be
able to press the “Next” Button as shown below, and proceed:
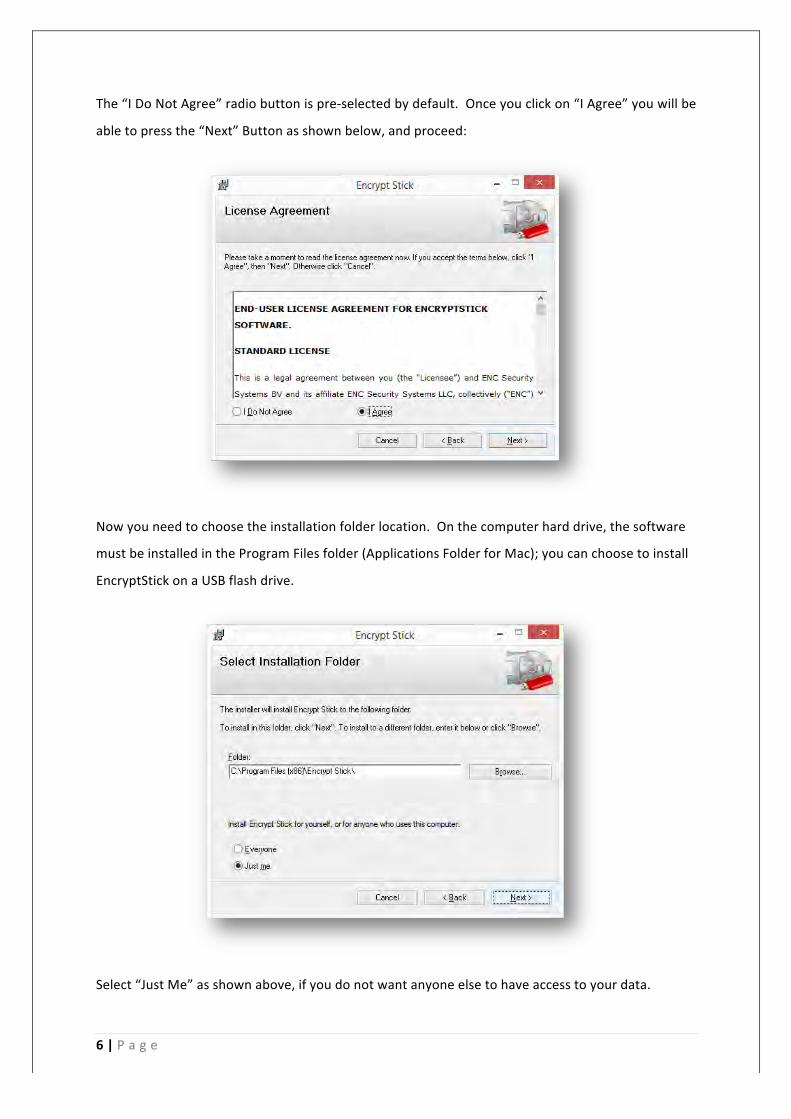
Now you need to choose the installation folder location. On the computer hard drive, the software
must be installed in the Program Files folder (Applications Folder for Mac); you can choose to install
EncryptStick on a USB flash drive.
Select “Just Me” as shown above, if you do not want anyone else to have access to your data.
7 | P a g e
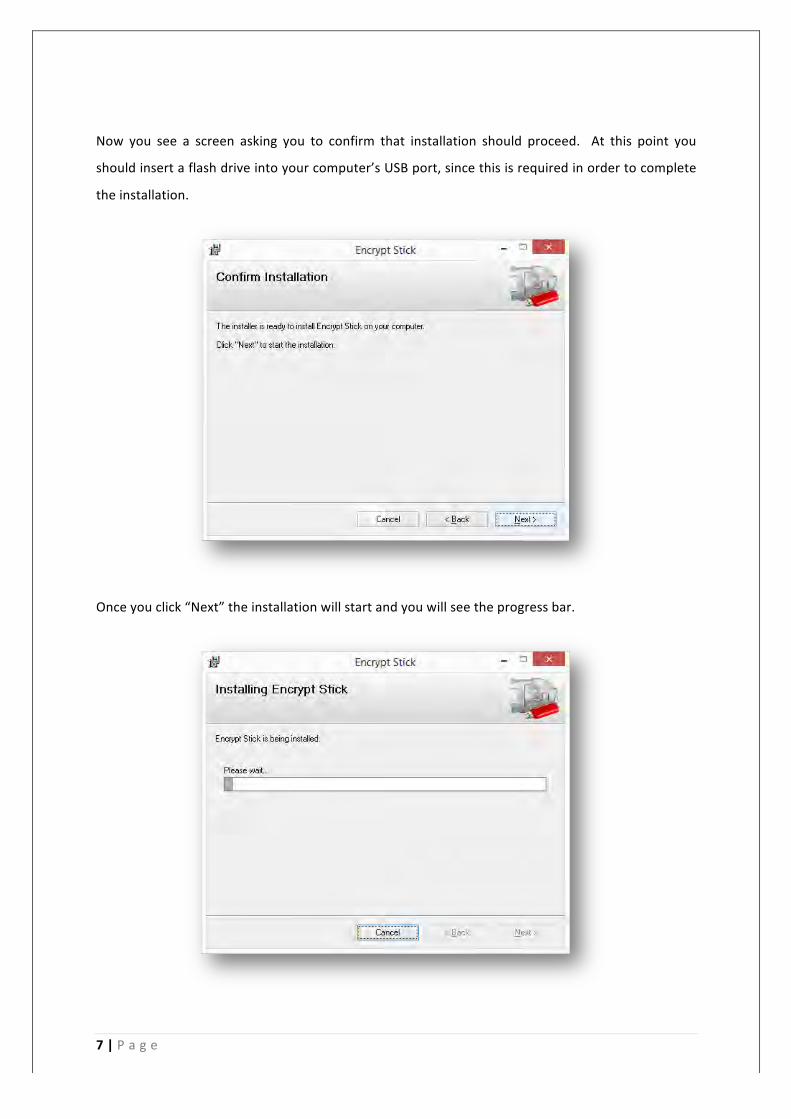
Now you see a screen asking you to confirm that installation should proceed. At this point you
should insert a flash drive into your computer’s USB port, since this is required in order to complete
the installation.
Once you click “Next” the installation will start and you will see the progress bar.

8 | P a g e
The EncryptStick Setup Wizard will automatically install the software in a matter of seconds.
Once the installation process is complete click “Close”. The software will then look for the USB flash
device and give you the prompt below if it is not plugged onto your PC or laptop:
Insert the flash drive into the USB port and click “Yes” to proceed with registration.

9 | P a g e
The Welcome screen will appear, giving you the option to either try or buy the software:
If you have the license key, you can activate it right away, or you can click on “Here” to buy a license.
When you click on either “Try It” or “Activate your License Now”, you will be redirected to the
Registration screen:
On the Registration screen you will see a list of all the USB flash drives connected to your PC or
laptop. Now you have 3 choices: you can install the software onto your computer, or to a flash
drive, or to both your PC/Laptop and a flash drive. Installing to a flash drive is particularly useful
when you travel and carry the flash drive only, since you can access and edit your documents from
any computer. You can use your single license to activate up to three devices.
10 | P a g e
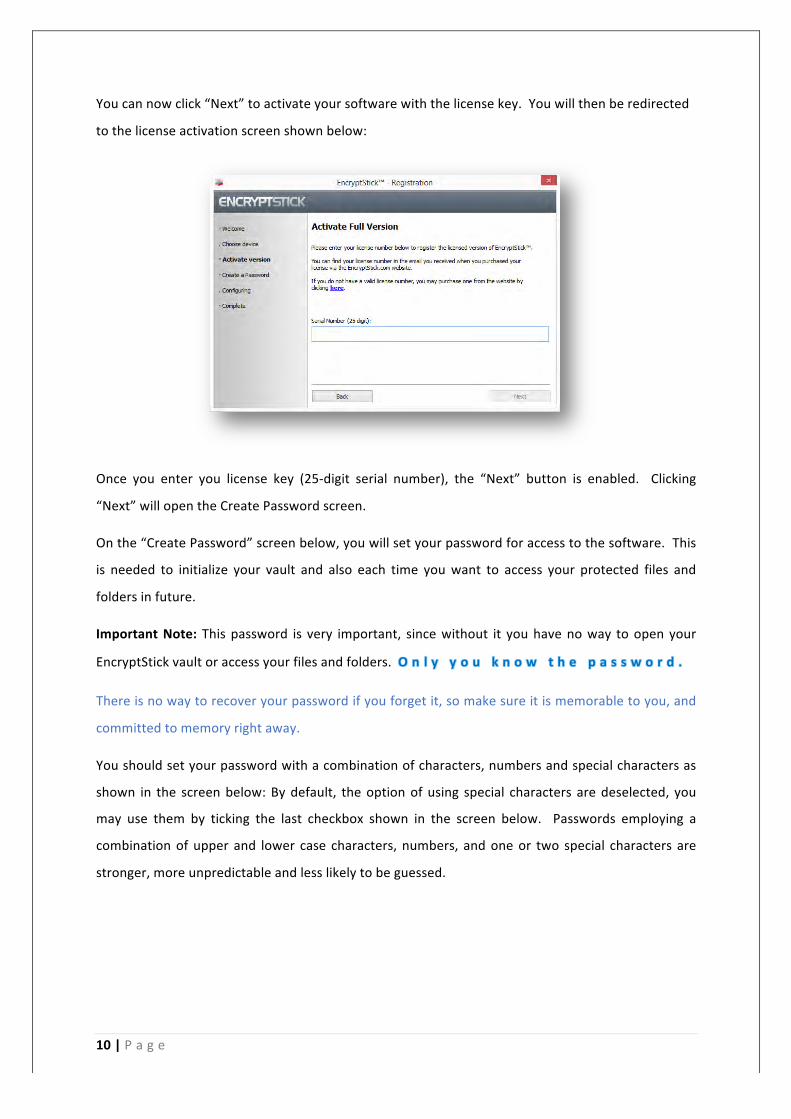
You can now click “Next” to activate your software with the license key. You will then be redirected
to the license activation screen shown below:
Once you enter you license key (25-‐digit serial number), the “Next” button is enabled. Clicking
“Next” will open the Create Password screen.
On the “Create Password” screen below, you will set your password for access to the software. This
is needed to initialize your vault and also each time you want to access your protected files and
folders in future.
Important Note: This password is very important, since without it you have no way to open your
EncryptStick vault or access your files and folders. O n l y y o u k n o w t h e p a s s w o r d .
There is no way to recover your password if you forget it, so make sure it is memorable to you, and
committed to memory right away.
You should set your password with a combination of characters, numbers and special characters as
shown in the screen below: By default, the option of using special characters are deselected, you
may use them by ticking the last checkbox shown in the screen below. Passwords employing a
combination of upper and lower case characters, numbers, and one or two special characters are
stronger, more unpredictable and less likely to be guessed.
11 | P a g e
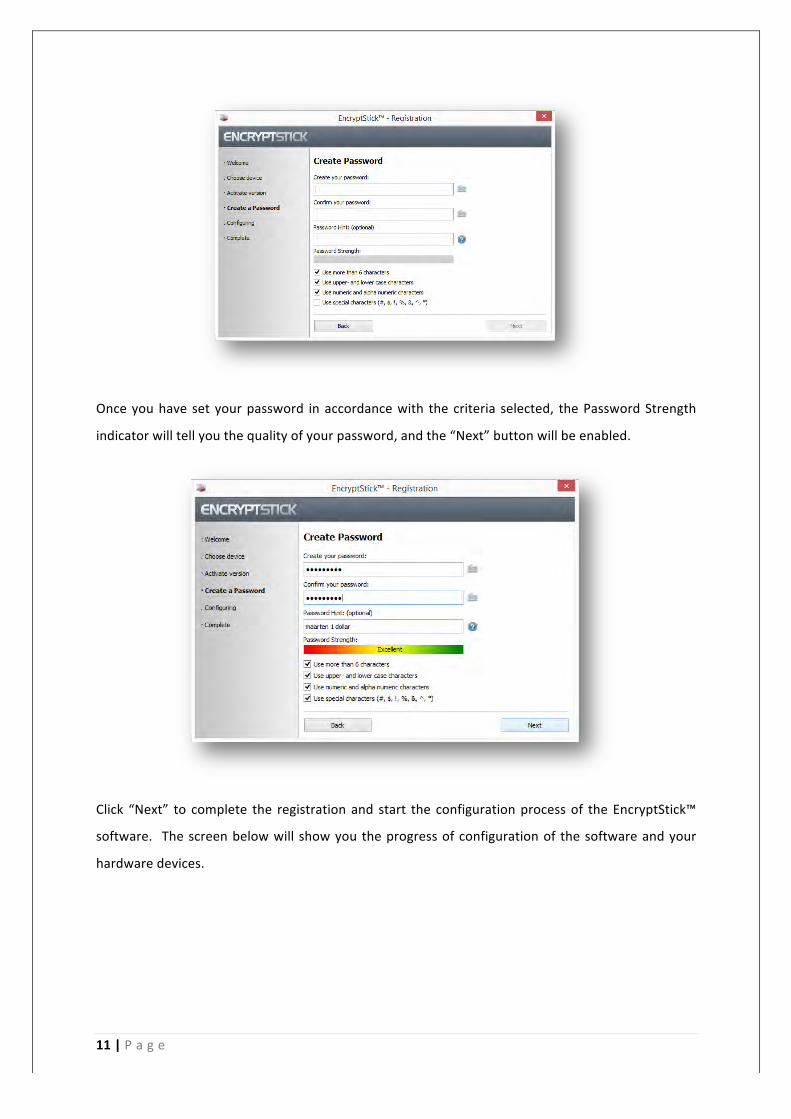
Once you have set your password in accordance with the criteria selected, the Password Strength
indicator will tell you the quality of your password, and the “Next” button will be enabled.
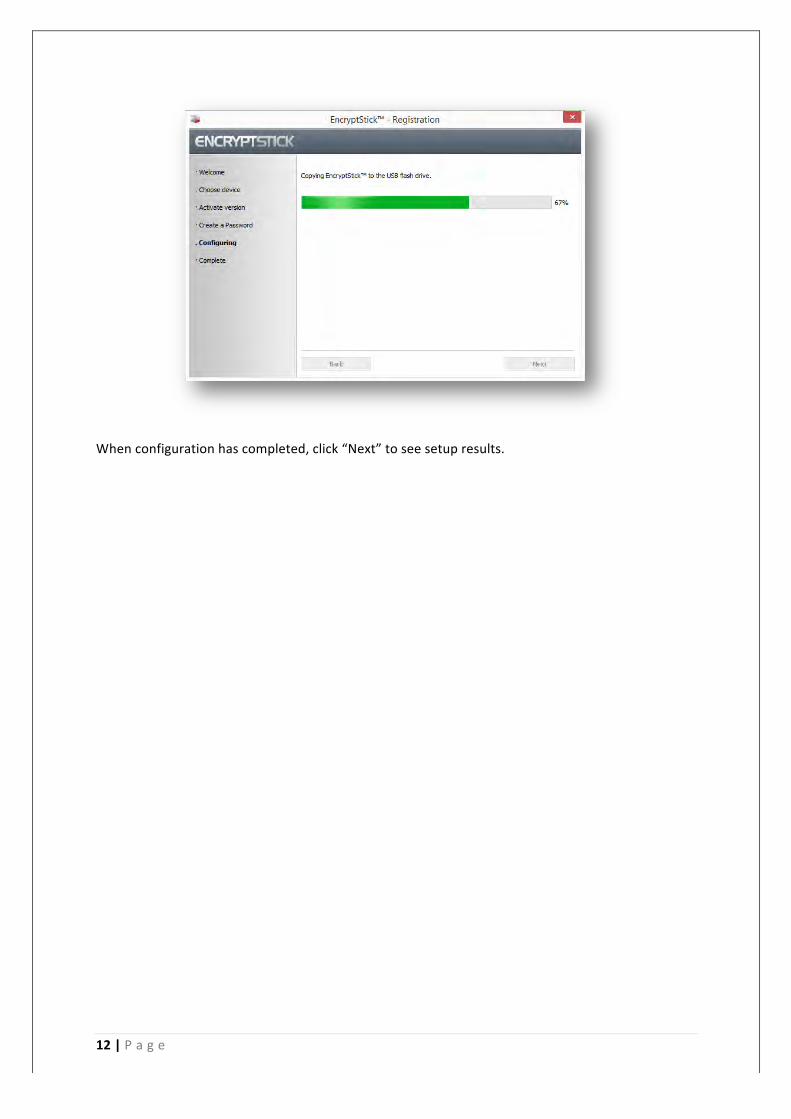
Click “Next” to complete the registration and start the configuration process of the EncryptStick™
software. The screen below will show you the progress of configuration of the software and your
hardware devices.
12 | P a g e
When configuration has completed, click “Next” to see setup results.
13 | P a g e
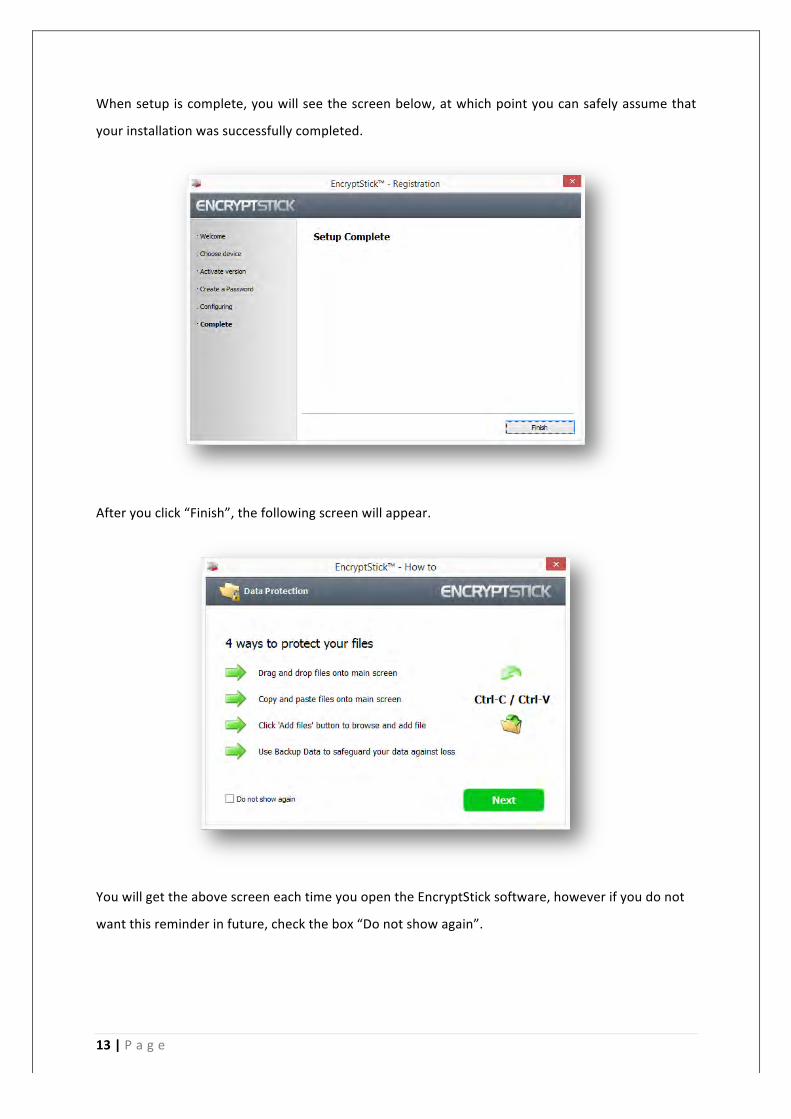
When setup is complete, you will see the screen below, at which point you can safely assume that
your installation was successfully completed.
After you click “Finish”, the following screen will appear.
You will get the above screen each time you open the EncryptStick software, however if you do not
want this reminder in future, check the box “Do not show again”.
14 | P a g e
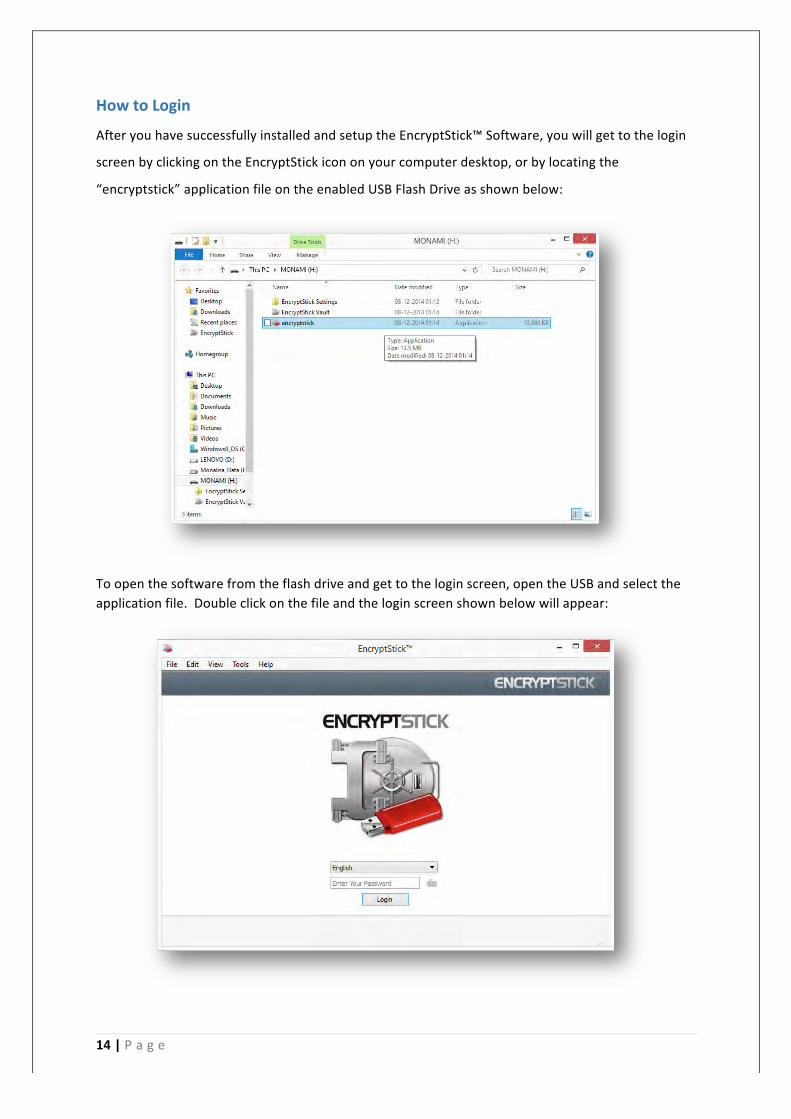
How to Login
After you have successfully installed and setup the EncryptStick™ Software, you will get to the login
screen by clicking on the EncryptStick icon on your computer desktop, or by locating the
“encryptstick” application file on the enabled USB Flash Drive as shown below:
To open the software from the flash drive and get to the login screen, open the USB and select the application file. Double click on the file and the login screen shown below will appear:

15 | P a g e
Note: If you are using EncryptStick on a publicly available computer, or a guest computer that you
suspect may be compromised by malware, then it is recommended that you use the virtual keyboard
to enter your password. The virtual keyboard dramatically reduces the risks of your keystrokes being
intercepted by malware that may have installed itself on the computer. This feature uses advanced
memory management and encryption technology to defeat malware. It keeps your password safer
by preventing malware from intercepting your keystrokes, or mouse positions, orscreen capture
images. Launch the virtual keyboard by clicking on the icon to the right of the password entry field.
While you click a number or a character on the virtual keyboard, you will notice that the keys
automatically reposition randomly after each click – another anti-‐malware feature.
Virtual Keyboard
16 | P a g e
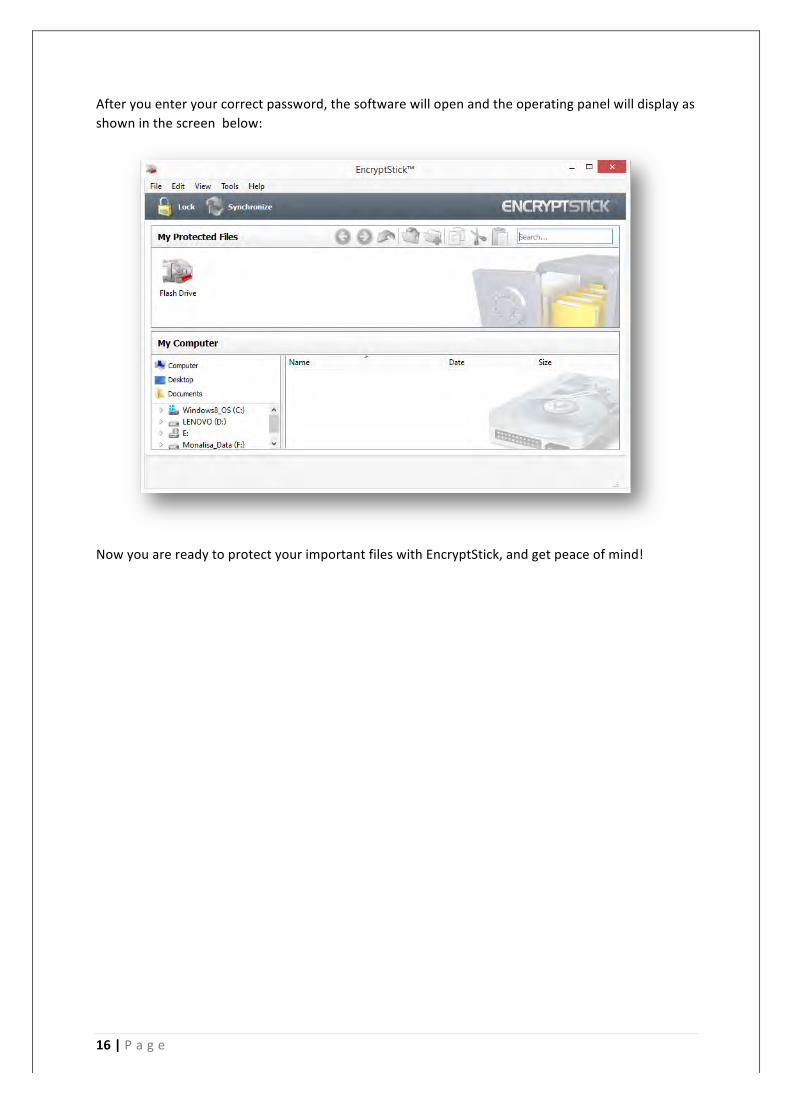
After you enter your correct password, the software will open and the operating panel will display as shown in the screen below:
Now you are ready to protect your important files with EncryptStick, and get peace of mind!
17 | P a g e
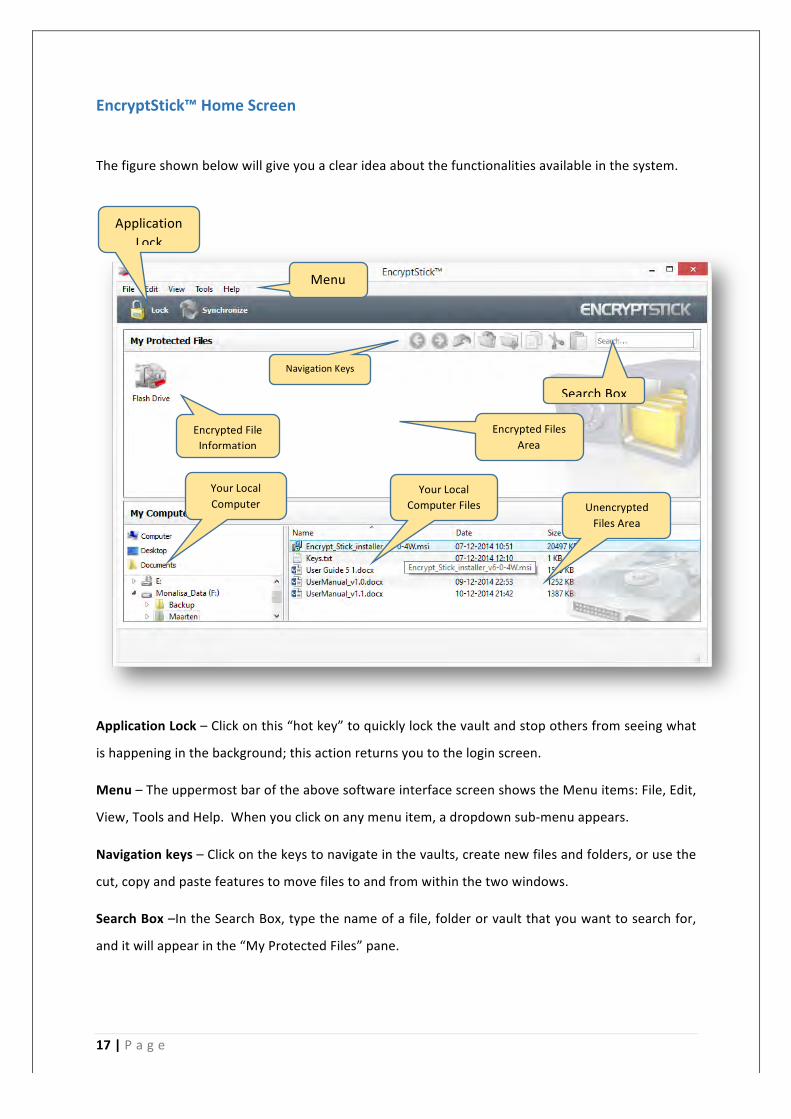
EncryptStick™ Home Screen
The figure shown below will give you a clear idea about the functionalities available in the system.
Application Lock – Click on this “hot key” to quickly lock the vault and stop others from seeing what
is happening in the background; this action returns you to the login screen.
Menu – The uppermost bar of the above software interface screen shows the Menu items: File, Edit,
View, Tools and Help. When you click on any menu item, a dropdown sub-‐menu appears.
Navigation keys – Click on the keys to navigate in the vaults, create new files and folders, or use the
cut, copy and paste features to move files to and from within the two windows.
Search Box –In the Search Box, type the name of a file, folder or vault that you want to search for,
and it will appear in the “My Protected Files” pane.
Menu
Navigation Keys
Application Lock
Search Box
Encrypted File Information
Your Local Computer
Your Local Computer Files Unencrypted
Files Area
Encrypted Files Area
18 | P a g e
Encrypted File information – Click to open and see information about vaults, folders and files that
have been encrypted using Encrypt Stick. Information available includes: names, dates, size, path
(location) of your encrypted items. You can customize this view by right clicking your mouse while
your pointer is over the header bars above the line information displayed.
Encrypted Files area – Right click in the open space area to reveal the functions that are available for
action without using the drop down menus
Local computer – Displays the resources that are available on the host computer that is running the
software application.
Local Computer Files – Displays the files stored in your local computer. If you select a file and right
click on it, you will be allowed to rename, copy, move or delete the file.

19 | P a g e
Vault Maintenance and new Vaults
The Home screen is divided horizontally into two sections, an upper pane that contains “My
Protected Files” and a lower panel that is “My Computer”. You create your new vaults in the upper
section and within those vault(s) you can keep your encrypted files. You can create new vaults in
two ways:
1. You can go to the File Menu and select “New Vault”;
2. You can right click on the “My Protected Files” area and select “Vault” from the dropdown
menu;
The following screenshots show the ways you can create a new vault.
Option 1: Click “File” on the Menu bar and click on “New Vault”
Option2: Right click on the Protected files pane and click on “Vault”

20 | P a g e
Either option will take you to the next screen
Name the New Vault (eg. “TestVault1” and click the “Save” button. The new vault will appear on the
encryption pane with the name you gave it, as shown below:
The vault is now created and you can select the files and folders you want to add to the encrypted vault.

21 | P a g e
Right click on the vault to see the editing options available. The following screen shows the options for handling and editing your vaults.
How to “Save File(s) to” Other Locations
You can save your files from a vault to other locations, using the software. In order to save files from
the vault to your hard drive, a USB drive or any other external storage device, you can only do so by
accessing the vaults and files using the EncryptStick software as shown below:
Double on your Vault
22 | P a g e
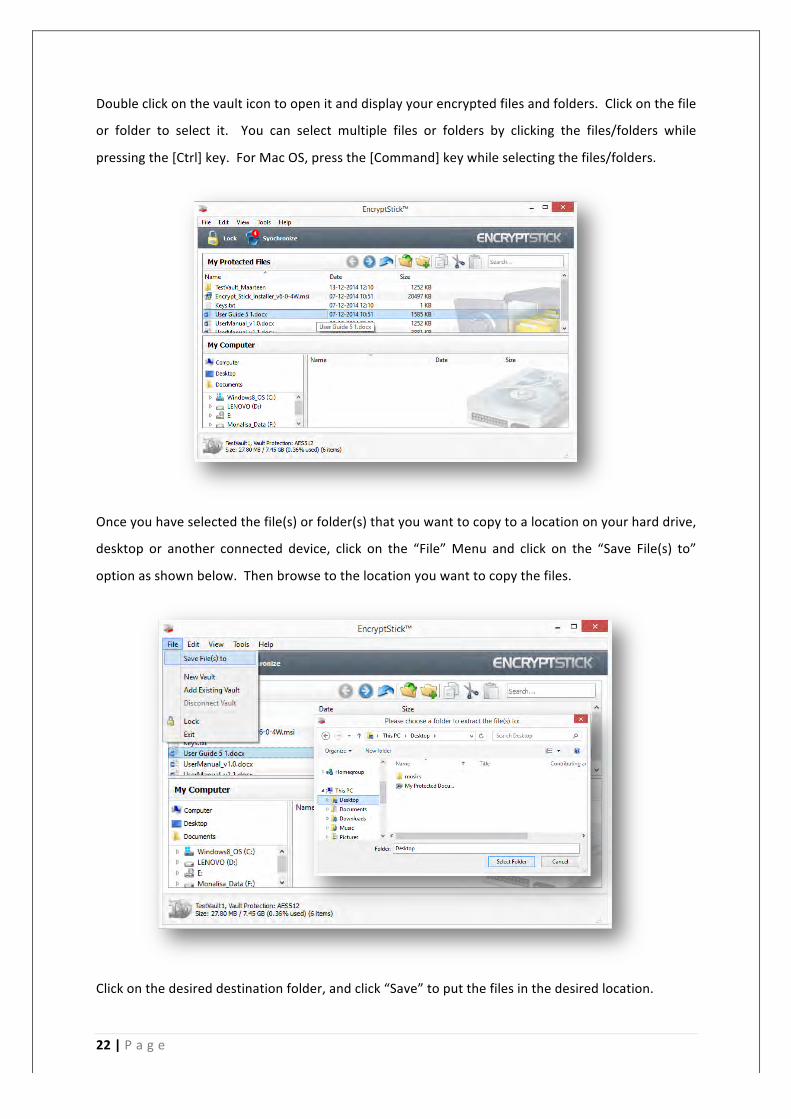
Double click on the vault icon to open it and display your encrypted files and folders. Click on the file
or folder to select it. You can select multiple files or folders by clicking the files/folders while
pressing the [Ctrl] key. For Mac OS, press the [Command] key while selecting the files/folders.
Once you have selected the file(s) or folder(s) that you want to copy to a location on your hard drive,
desktop or another connected device, click on the “File” Menu and click on the “Save File(s) to”
option as shown below. Then browse to the location you want to copy the files.
Click on the desired destination folder, and click “Save” to put the files in the desired location.
23 | P a g e
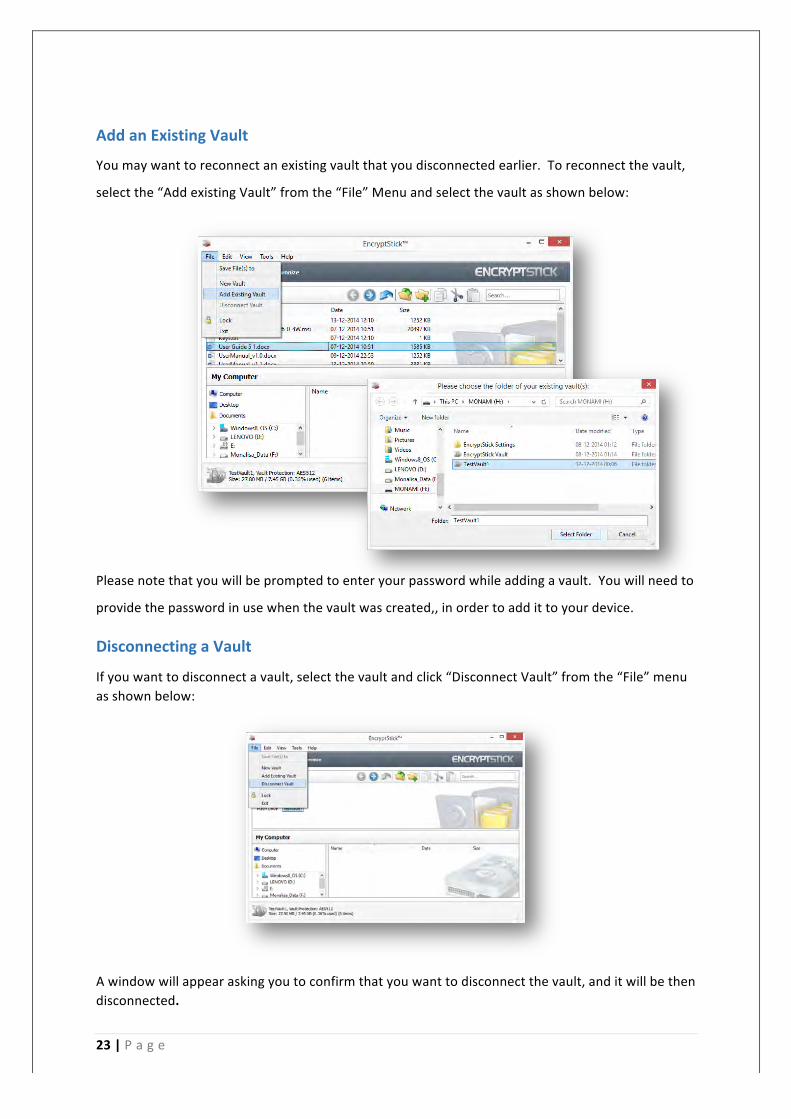
Add an Existing Vault
You may want to reconnect an existing vault that you disconnected earlier. To reconnect the vault,
select the “Add existing Vault” from the “File” Menu and select the vault as shown below:
Please note that you will be prompted to enter your password while adding a vault. You will need to
provide the password in use when the vault was created,, in order to add it to your device.
Disconnecting a Vault
If you want to disconnect a vault, select the vault and click “Disconnect Vault” from the “File” menu as shown below:
A window will appear asking you to confirm that you want to disconnect the vault, and it will be then disconnected.
24 | P a g e
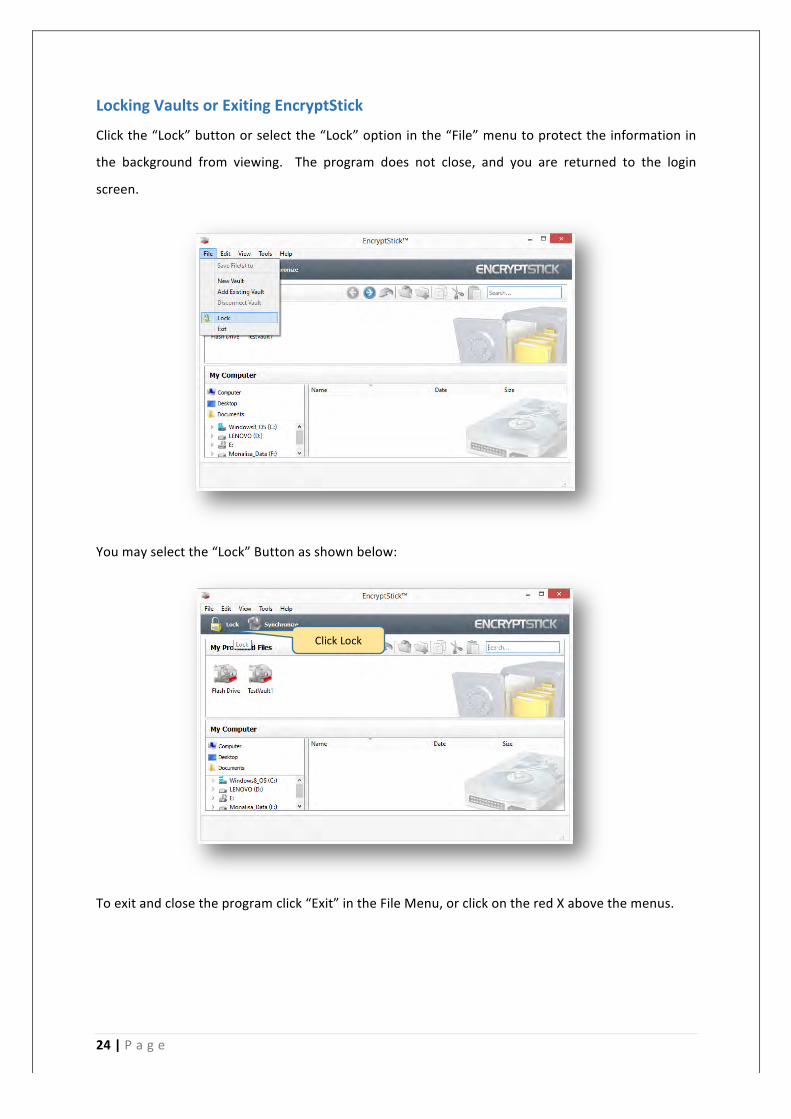
Locking Vaults or Exiting EncryptStick
Click the “Lock” button or select the “Lock” option in the “File” menu to protect the information in
the background from viewing. The program does not close, and you are returned to the login
screen.
You may select the “Lock” Button as shown below:
To exit and close the program click “Exit” in the File Menu, or click on the red X above the menus.
Click Lock

25 | P a g e
How to Cut, Copy and Paste Files
You may cut or copy a file from one vault and paste it in another vault as shown below:
. The “Select All” Option under the “Edit” menu will allow you to select all the files of the folder to either cut, copy, paste or delete.
Select a file which you want to cut or copy
After selecting the file, select a Copy or Cut
option
26 | P a g e
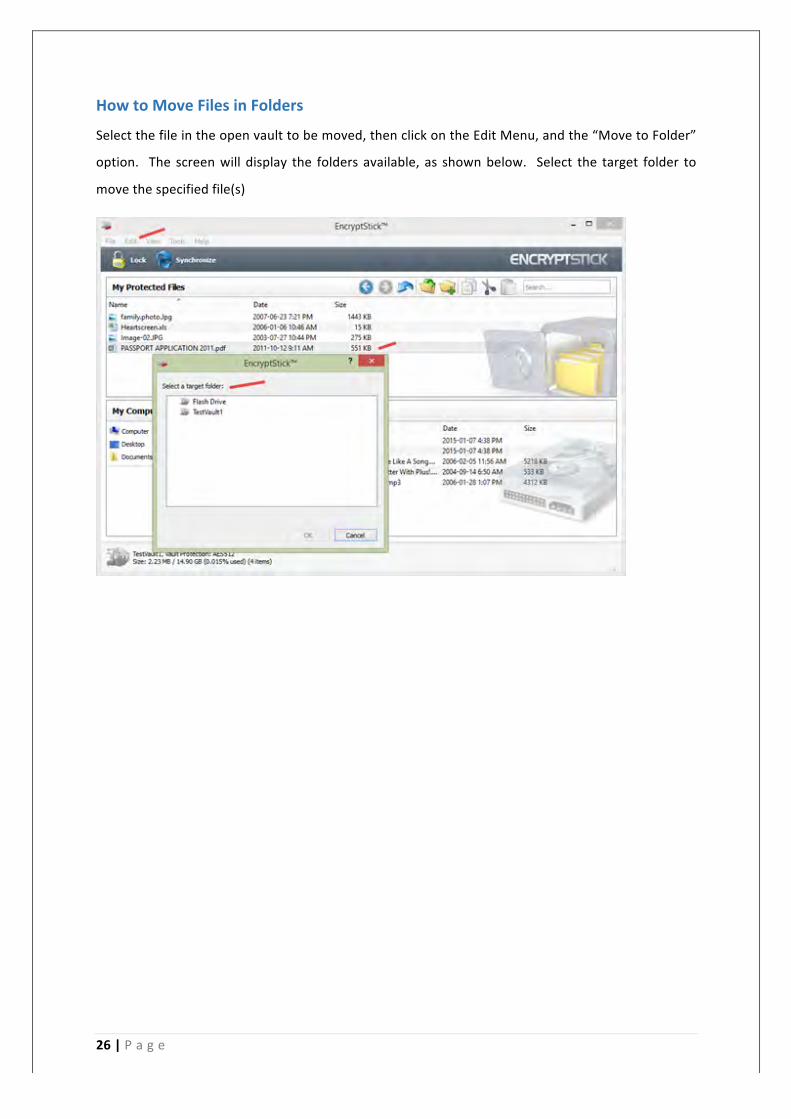
How to Move Files in Folders
Select the file in the open vault to be moved, then click on the Edit Menu, and the “Move to Folder”
option. The screen will display the folders available, as shown below. Select the target folder to
move the specified file(s)
27 | P a g e
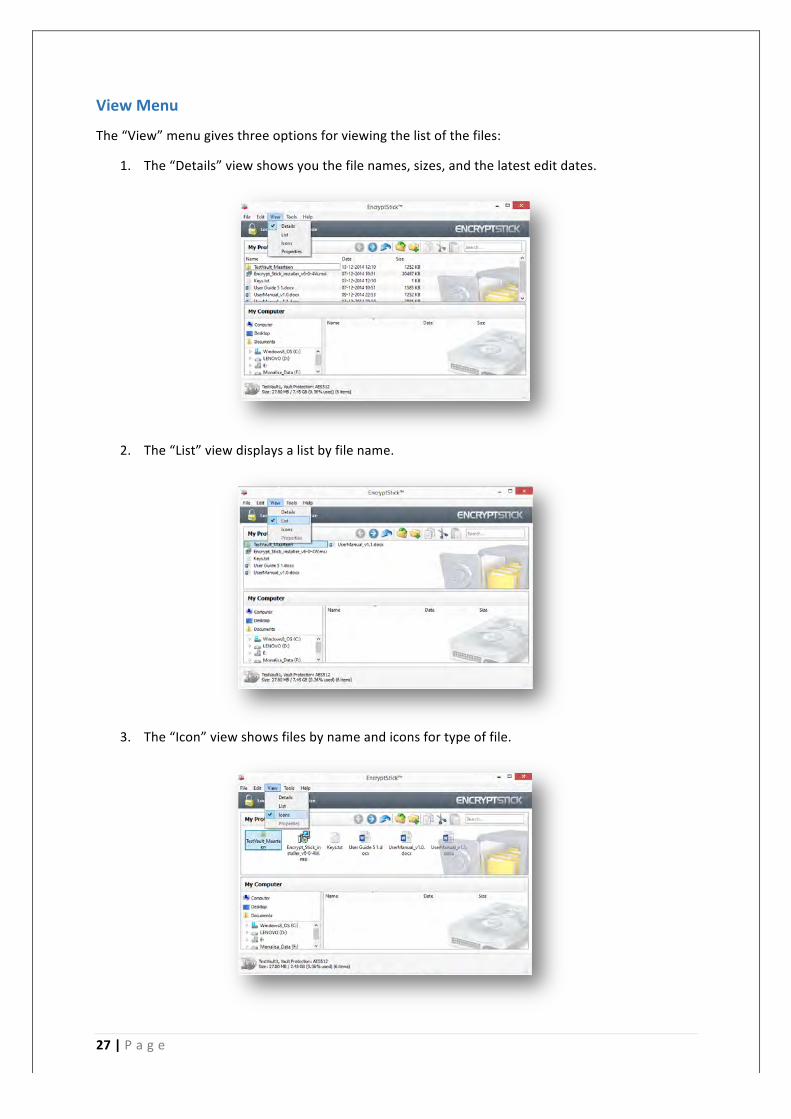
View Menu
The “View” menu gives three options for viewing the list of the files:
1. The “Details” view shows you the file names, sizes, and the latest edit dates.
2. The “List” view displays a list by file name.
3. The “Icon” view shows files by name and icons for type of file.

28 | P a g e
How to Create a New Folder in a Vault
A Vault is like a container or a cupboard in which you can create folders where you can securely
store your files, documents etc.
To create a new folder inside your vault, right click on the relevant vault; a popup menu with the
option “New Folder” appears:
Click on “New Folder” and the following screen appears; name the new folder you want to create
and click OK.

29 | P a g e
The new folder will be displayed in the upper pane, as shown above.
Alternatively you can use the “New folder” Navigation Key to create a new folder as shown below:
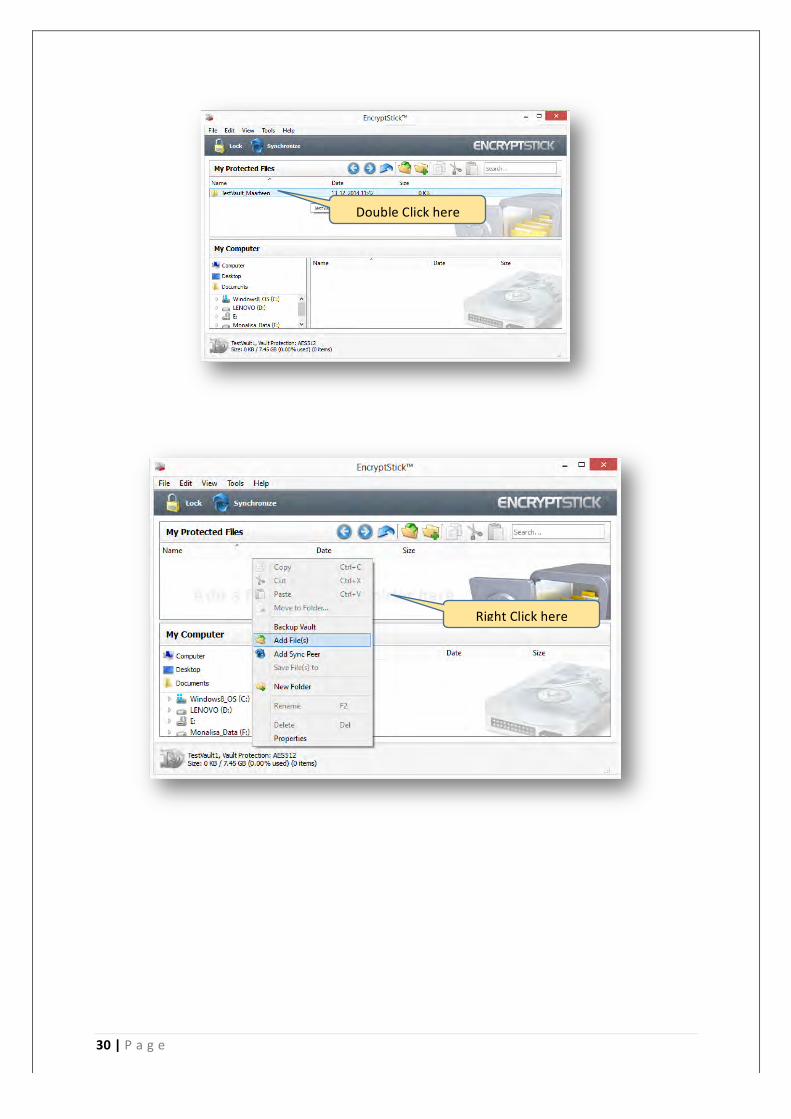
How to Add Files to the New Folder
You can now add files to the newly created folder. Double click on the new folder to open it, and
add the files you want to encrypt and protect. The screens below show the procedures for adding
files to a newly created folder, or any folder:
New Folder
30 | P a g e
Double Click here
Right Click here

31 | P a g e
The file dialogue box appears, allowing you to select the files you want.
Select the desired file(s) and click the “Encrypt” button. The file(s) will be added to the open folder
in the vault. A message will popup asking if you would like to permanently remove the original file(s)
from the computer after the transfer to the vault is completed. At that point you need to decide
whether you wish to keep the original file at its source location, or permanently remove it, after a
copy is stored securely in the vault.
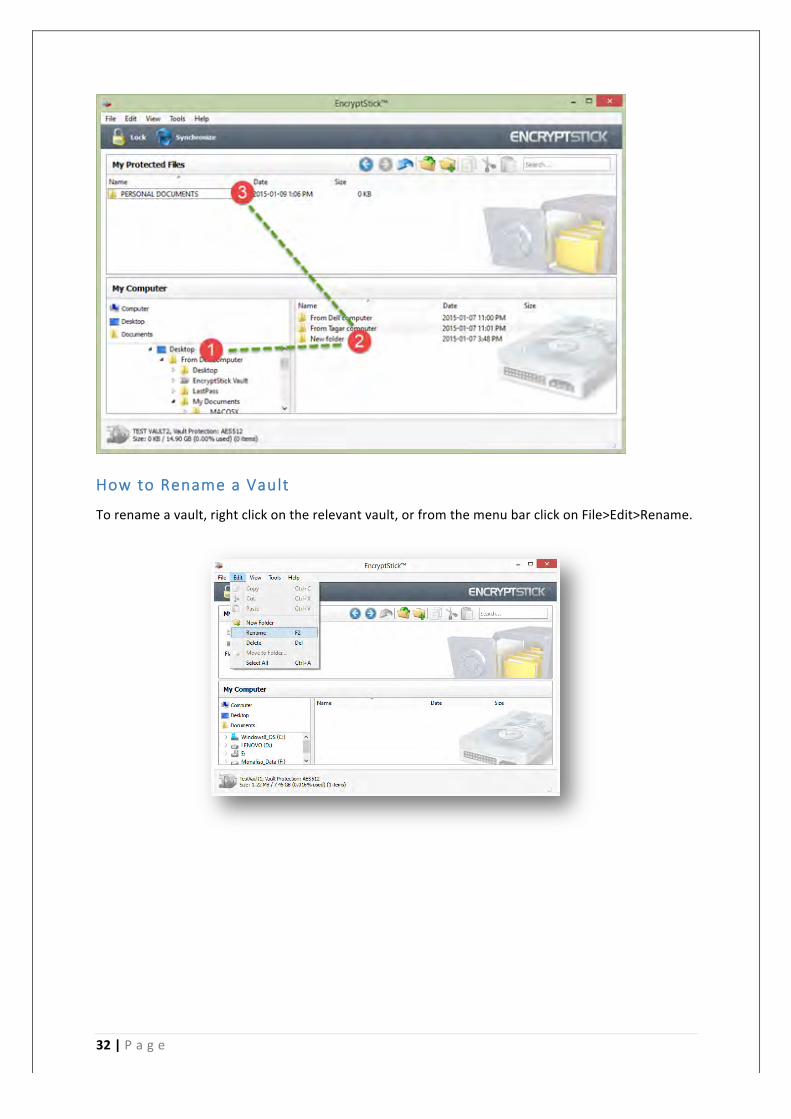
How to Drag and Drop Fi les to a Folder
Another way to copy or move files or folders from your computer to a vault folder is to drag and
drop them.
In this example you want to copy an entire folder from your desktop to a vault folder named
“Personal Documents”. You can open this destination folder, or leave it closed, as in this example.
(1) Click on Desktop in My Computer to view the folder in the lower pane. (2) Click and hold the
mouse button to drag the folder from the lower pane to the folder in the Protected Files pane. (3)
Highlight the target folder “Personal Documents” with the mouse pointer and release the mouse to
drop the folder. You now have an encrypted copy of the source folder in the Vault.
32 | P a g e
How to Rename a Vault
To rename a vault, right click on the relevant vault, or from the menu bar click on File>Edit>Rename.

33 | P a g e
A text box will appear; enter the new name and click OK to complete the name change; the vault will appear on the Protected Files Pane with the new name.
How to Delete a Vault
If you wish to delete any Vault, to select the Vault which you wish to delete, you can either use the
File Menu “Edit” menu or just right click on the Vault.
34 | P a g e
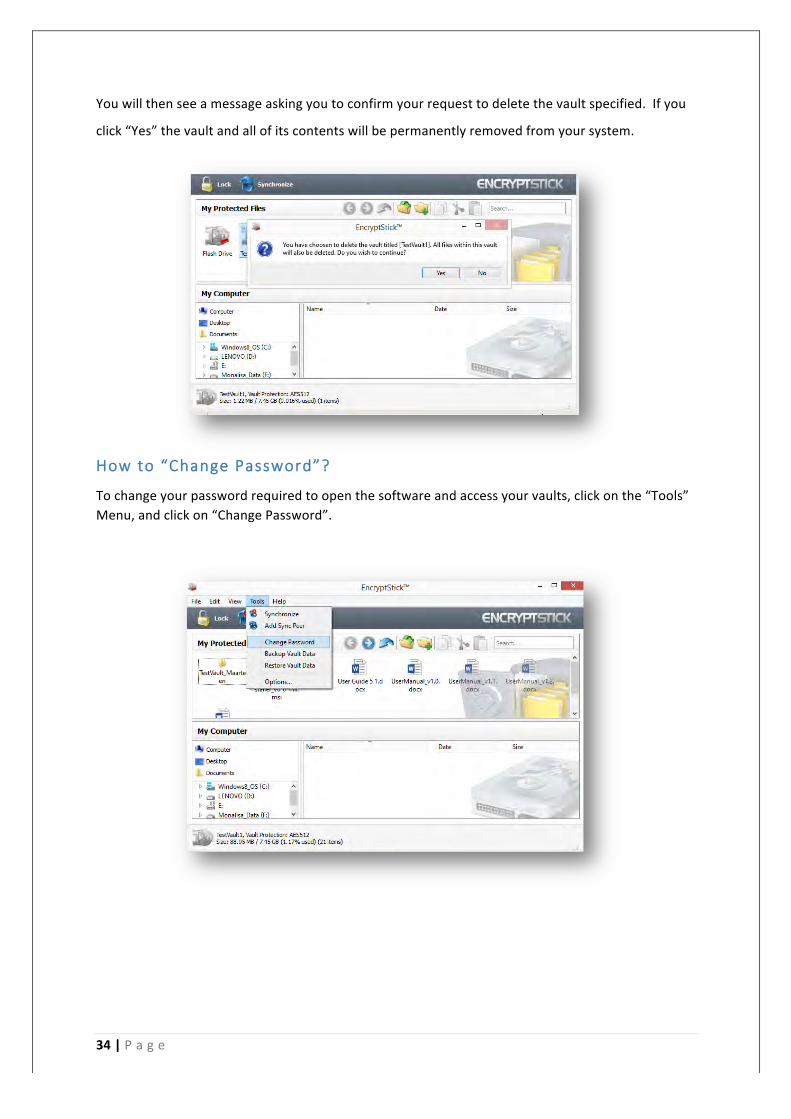
You will then see a message asking you to confirm your request to delete the vault specified. If you
click “Yes” the vault and all of its contents will be permanently removed from your system.
How to “Change Password”?
To change your password required to open the software and access your vaults, click on the “Tools” Menu, and click on “Change Password”.

35 | P a g e
When you click “Change Password”, the screen below will appear. You have to provide your current
password and the new password twice. Once you have given the new password and press “OK”,
your new password will be effective. Next time you try to log in, you will have to provide the new
password.
IMPORTANT NOTE: After you change your password, you should immediately perform a backup of
your vault data. If you ever need to restore your vault data from a backup, the password in use at
the time that backup was made will be required in order to restore your vault.
We encourage you to make backing up your vault data a part of your normal daily maintenance
routine.
See “How to Backup Vault Data” on page 38 of this Manual for details on procedure.
36 | P a g e
How to Share a Private Vault
With EncryptStick, you can share one of your vaults and its file contents in private with another
person who uses EncryptStick software. A private vault can be shared with anyone who has
EncryptStick installed on their computer, by e-‐mail, by secure link via Dropbox or Google drive for
example, or on portable media (flash drive, CD, DVD).
To enable this feature, you assign a password directly to the specific vault, with the following steps:
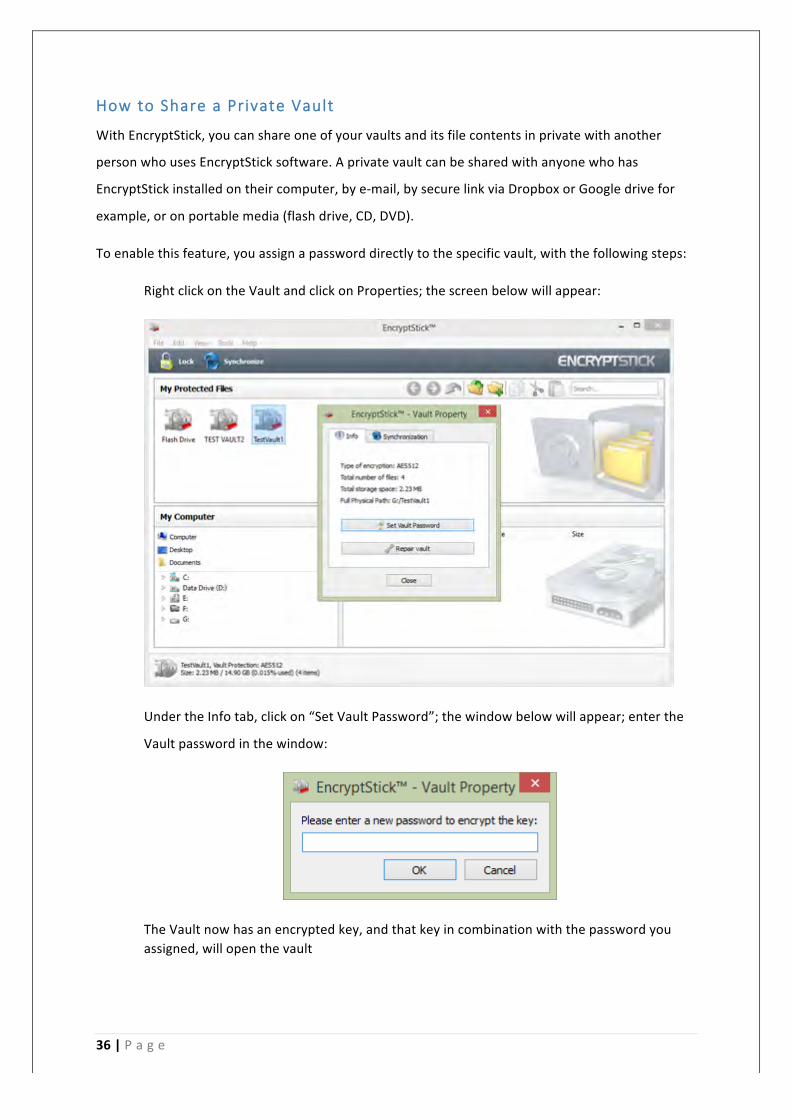
Right click on the Vault and click on Properties; the screen below will appear:
Under the Info tab, click on “Set Vault Password”; the window below will appear; enter the
Vault password in the window:
The Vault now has an encrypted key, and that key in combination with the password you assigned, will open the vault
37 | P a g e
How to Synchronize Vaults and Peer Folders
Individual vaults can be linked with any folder(s) on your PC (by using Windows Explorer or File
Explorer] or on your Mac [using Finder]. Once linked to any peer folder(s), the vault and folder(s) are
synchronized on command.
Any selected folders or files on your Mac, Windows or Linux PC can be synced with vaults in any
location. To sync your vault with a folder on your PC or Laptop, follow the steps below:
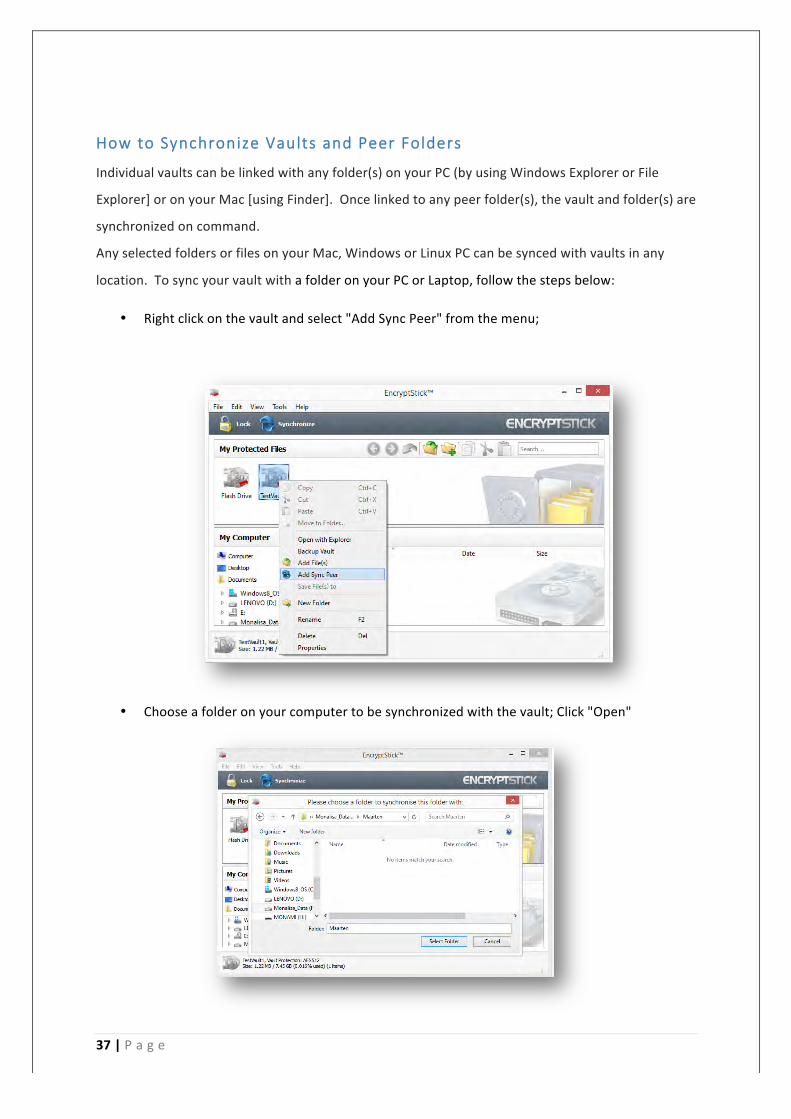
• Right click on the vault and select "Add Sync Peer" from the menu;
• Choose a folder on your computer to be synchronized with the vault; Click "Open"

38 | P a g e
• The files in the vault and in the folder on the computer will now synchronize;
• A synchronization window will open showing the synchronization progress;
• You will be notified when synching is finished, click "Close".
The pairing of a vault and folder(s) for synching can also be completed using the menu bar: on the
Menu bar select "Tools", and perform the above steps;
If any files have been changed, added or deleted a red dot is superimposed on the "Synchronize" icon that shows the number of files that have been updated on either the vault or the peer folder, and as a reminder to synch the peers.
The number of files updated shown in red
color

39 | P a g e
How to Backup Vault Data
Just as it is important to back up your computer files regularly, we strongly recommend that you
perform a backup of your protected files (vault data) as a part of your regular routine. A vault is
simply an encrypted folder and like any other folder on a flash drive, is vulnerable to loss or damage,
or data corruption.
To complete a backup of your vaults from any location, follow these simple steps:
Select Backup location
• Click on "Tools" in the menu bar and select "Options"
• On the Options screen, select the "Locations" tab.
• You can back either of 2 locations: the Application Data, or My Documents;
• Select "Ok"
Make the Backup
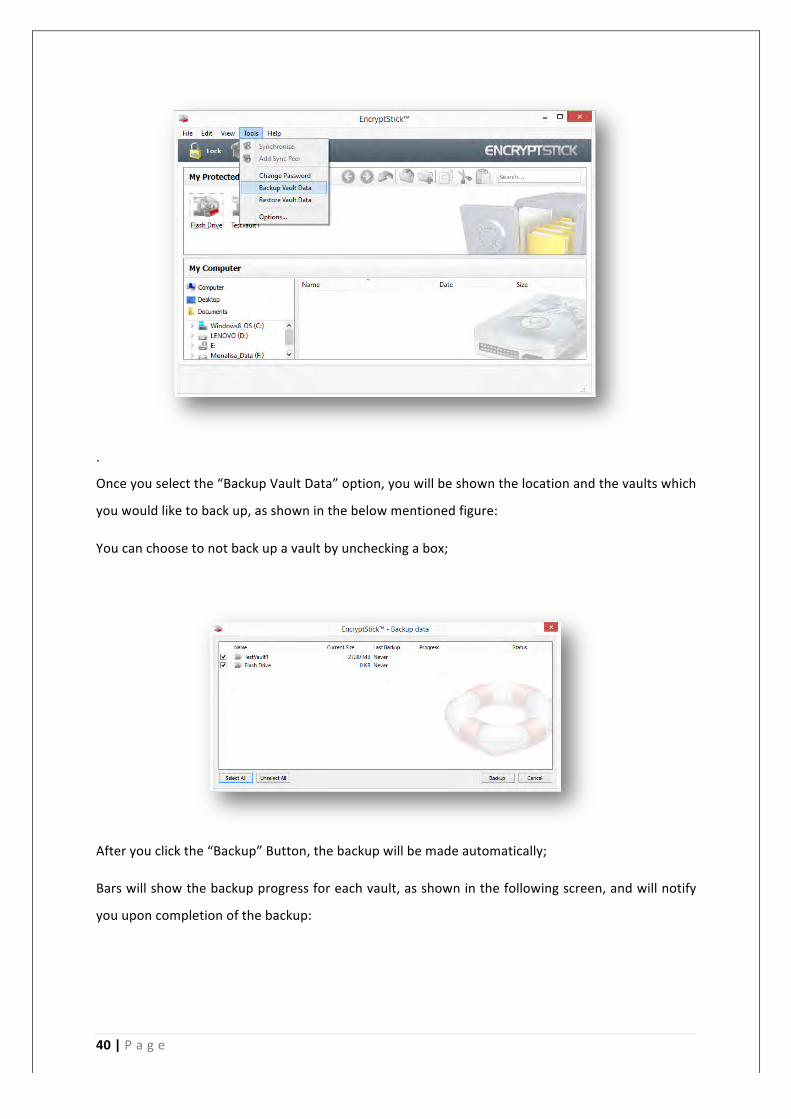
Click on "Tools" in the menu bar and select "Backup Vault Data".
By default all vaults are selected for backup.
40 | P a g e
.
Once you select the “Backup Vault Data” option, you will be shown the location and the vaults which
you would like to back up, as shown in the below mentioned figure:
You can choose to not back up a vault by unchecking a box;
After you click the “Backup” Button, the backup will be made automatically;
Bars will show the backup progress for each vault, as shown in the following screen, and will notify
you upon completion of the backup:

41 | P a g e
When the backup is completed successfully, click OK.
Keep Several Backups
You can specify how many backups are kept, as follows:
• Click on "Tools" in the menu bar and select "options";
• Select the "Locations" tab;
• Check the box "Enable automatic backup retention";
• Select the number of Backups you want to keep, (current and prior versions);
• Select "Ok"

42 | P a g e
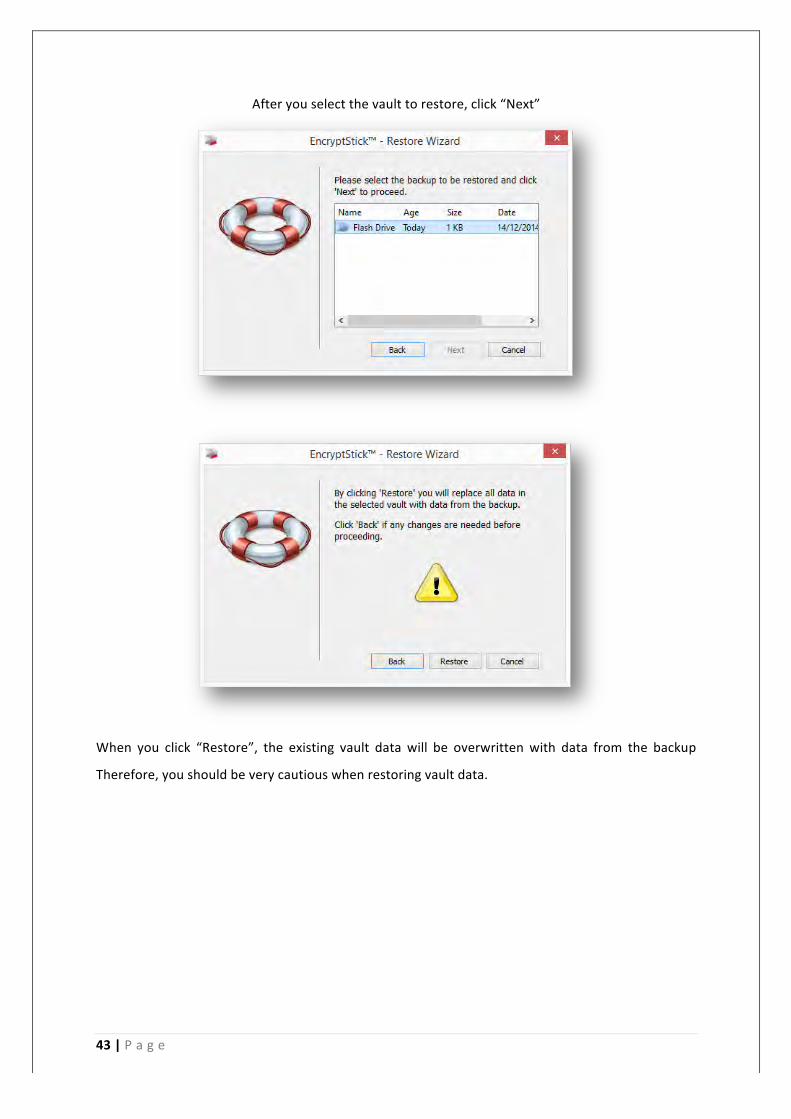
How to Restore a Vault Backup
With EncryptStick, you can easily restore a vault from an earlier backup. Click on "Tools" in the
menu bar and select "Restore Vault Data".
After you click “Restore Vault Data”, you will see the following screen:
Select the vault that you want to restore; the following screen will appear:
43 | P a g e
After you select the vault to restore, click “Next”
When you click “Restore”, the existing vault data will be overwritten with data from the backup
Therefore, you should be very cautious when restoring vault data.
44 | P a g e
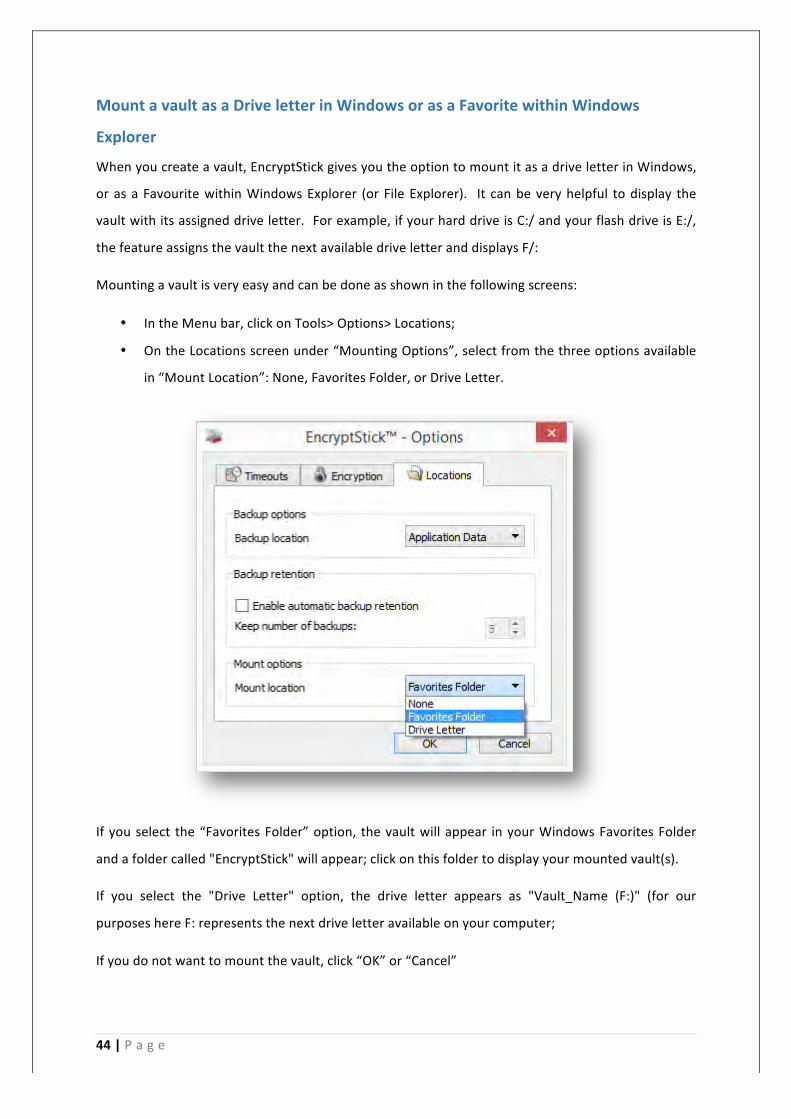
Mount a vault as a Drive letter in Windows or as a Favorite within Windows
Explorer
When you create a vault, EncryptStick gives you the option to mount it as a drive letter in Windows,
or as a Favourite within Windows Explorer (or File Explorer). It can be very helpful to display the
vault with its assigned drive letter. For example, if your hard drive is C:/ and your flash drive is E:/,
the feature assigns the vault the next available drive letter and displays F/:
Mounting a vault is very easy and can be done as shown in the following screens:
• In the Menu bar, click on Tools> Options> Locations;
• On the Locations screen under “Mounting Options”, select from the three options available
in “Mount Location”: None, Favorites Folder, or Drive Letter.
If you select the “Favorites Folder” option, the vault will appear in your Windows Favorites Folder
and a folder called "EncryptStick" will appear; click on this folder to display your mounted vault(s).
If you select the "Drive Letter" option, the drive letter appears as "Vault_Name (F:)" (for our
purposes here F: represents the next drive letter available on your computer;
If you do not want to mount the vault, click “OK” or “Cancel”

45 | P a g e
For security reasons, your vault location settings only appear when the EncryptStick™ application is
running; if the program is locked, a Drive letter or Favorites folder will not appear;
How to Repair a Damaged Vault
Situations may arise that can potentially damage your hardware and also your vault(s). Mishandling
a flash drive, or premature ejection in unsafe conditions, a sudden power surge or drop, or an abrupt
shutdown of a computer can all cause damage to your vault(s). EncryptStick has a vault repair
feature to help with repair data corruption in your vault(s) in case of such events.
To use the Vault Repair tool, click on a Vault, and on the Menu bar click “View” and select
“Properties” as shown below:
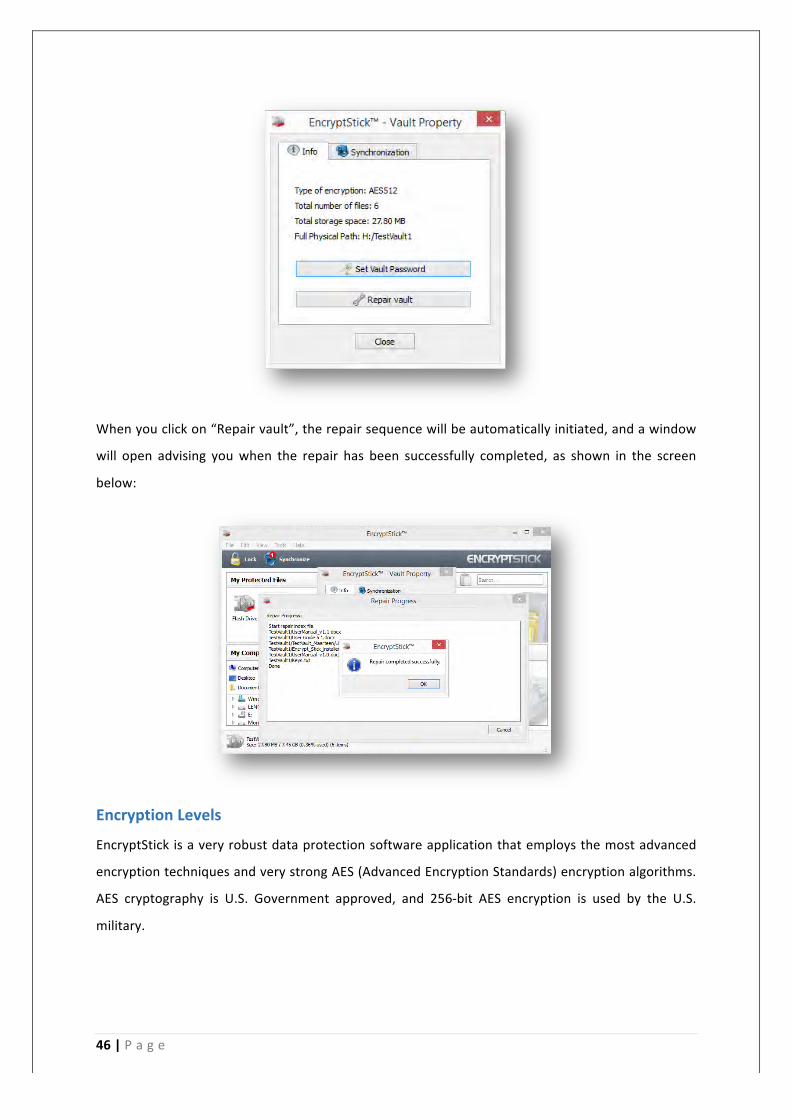
When you select “Properties”, the following screen is shown:
46 | P a g e
When you click on “Repair vault”, the repair sequence will be automatically initiated, and a window
will open advising you when the repair has been successfully completed, as shown in the screen
below:
Encryption Levels
EncryptStick is a very robust data protection software application that employs the most advanced
encryption techniques and very strong AES (Advanced Encryption Standards) encryption algorithms.
AES cryptography is U.S. Government approved, and 256-‐bit AES encryption is used by the U.S.
military.

47 | P a g e
With EncryptStick you have the option to select a preferred encryption level when you create new
vaults. For a new vault you can choose to protect its data with 128-bit, 256-bit or 512-bit AES. Soon
we will offer 1024-bit encryption, our highest level of encryption strength.
Note: The level of encryption you choose for a new vault will be applied to each new vault created
thereafter.
The system is set to select 512-bit AES by default. To select a different leval for a new vault, click on
“Tools” on the Menu bar. When you click on “Options” the screen below will open; click on
“Encryption”:
After you select the “Encryption” tab, the screen below opens and you can choose your preferred
encryption level; click “OK”.
48 | P a g e
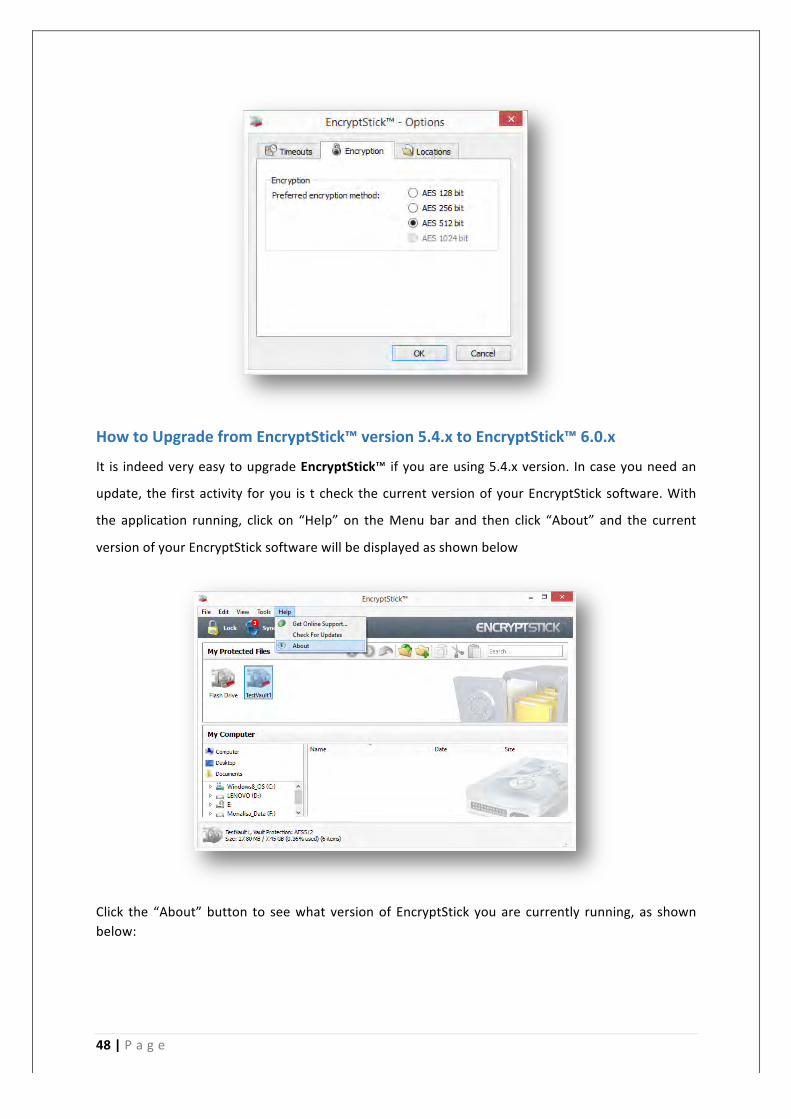
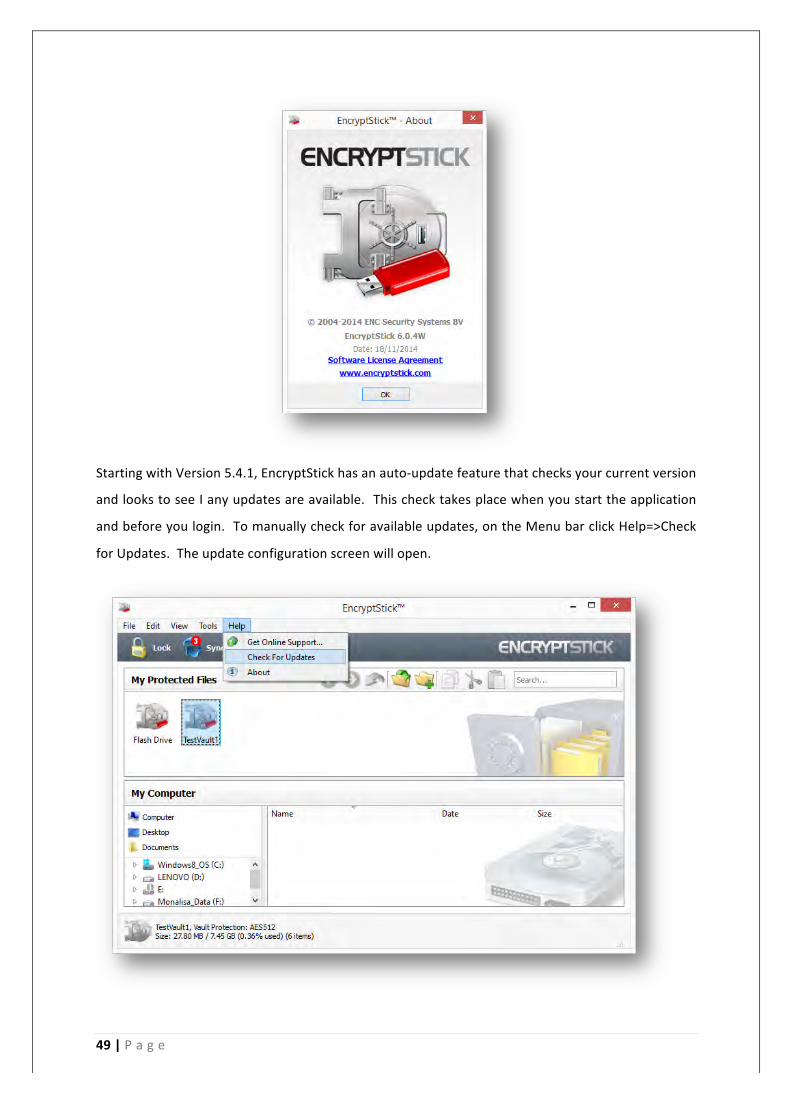
How to Upgrade from EncryptStick™ version 5.4.x to EncryptStick™ 6.0.x
It is indeed very easy to upgrade EncryptStick™ if you are using 5.4.x version. In case you need an
update, the first activity for you is t check the current version of your EncryptStick software. With
the application running, click on “Help” on the Menu bar and then click “About” and the current
version of your EncryptStick software will be displayed as shown below
Click the “About” button to see what version of EncryptStick you are currently running, as shown below:
49 | P a g e
Starting with Version 5.4.1, EncryptStick has an auto-‐update feature that checks your current version
and looks to see I any updates are available. This check takes place when you start the application
and before you login. To manually check for available updates, on the Menu bar click Help=>Check
for Updates. The update configuration screen will open.

50 | P a g e
On the screen below, you can set the frequency that the auto-‐updater will check for available
updates. You can also press the “Check for Updates Now” button, to see if any updates are currently
available.

51 | P a g e
If there is no update available, you will get the following screen:
How To Upgrade from the Trial Version to the Fully Functional Version of EncryptStick (for Trials started before January 9, 2015)
For those trials that started before January 9, 2015 using EncryptStick 6.0.4 and prior versions,
certain features in the trial were limited. Users of these trial versions can easily upgrade to the
latest full version, by following the steps below:
1. Go to the website page https://www.encryptstick.com/download; click on “BUY IT”
2. The Checkout page will open;
3. Complete the order and registration form and make your payment;
4. An invoice, with order details and a 25-‐digit code will be emailed to you;
5. Go back to this page: https://www.encryptstick.com/download and Click on the Windows,
Mac, or Linux button to download the correct installer file;
6. Run the installer file; during the installation, the Install Wizard will require you to enter the 25-‐
digit serial code; copy and paste the activation code to the box provided from the email you
received;
7. When the installation of the software is completed, the application will be launched;
8. Login, using the same password you created on setup of the Trial Version;
Switching From a Time-‐Limited Trial to the Licensed Version of EncryptStick
For orders placed after January 9, 2015, the full version of EncryptStick software (version 6.0.5 for
Windows, Mac or Linux) is free to try for 14 days. Before the end of the 14-‐day trial period, you
need to buy a license in order to enjoy continued and uninterrupted use of EncryptStick.

52 | P a g e
If you do not purchase a license to use the software, the following will result:
• All features, including file encryption, synchronizing of vaults with peer folders, and secure
backups of vault data will no longer function;
• You will not be able to add, remove or edit files in vaults, or create new vaults;
• You will be able to read files in vaults, and copy them from within vaults to other locations;
At any time during your 14-‐day trial, or after it has expired, you can buy an EncryptStick license by
following the download and installation steps shown in the 8 steps above.
TROUBLESHOOTING AND MAINTENANCE
What To Do if You Lose Your EncryptStick-‐enabled USB flash drive
If your flash drive with your private files is damaged or lost, the data in your EncryptStick vaults is
secure and inaccessible to anyone. If you have made regular backups of your vault(s), you can
recover your data from a backup following the steps below:
• Insert a replacement flash drive in your computer’s USB port;
• Go to: http://www.encryptstick.com/download
• Download and install EncryptStick (Windows, Mac or Linux version);
• During installation, activate the flash drive as a replacement drive using your existing license
activation code (if you have used all the device activations available on your existing license,
you will need to buy a new license);
• Go to your Flash Drive using Windows Explorer (in Windows) of Finder (on a Mac)
• Login to EncryptStick using your existing password;
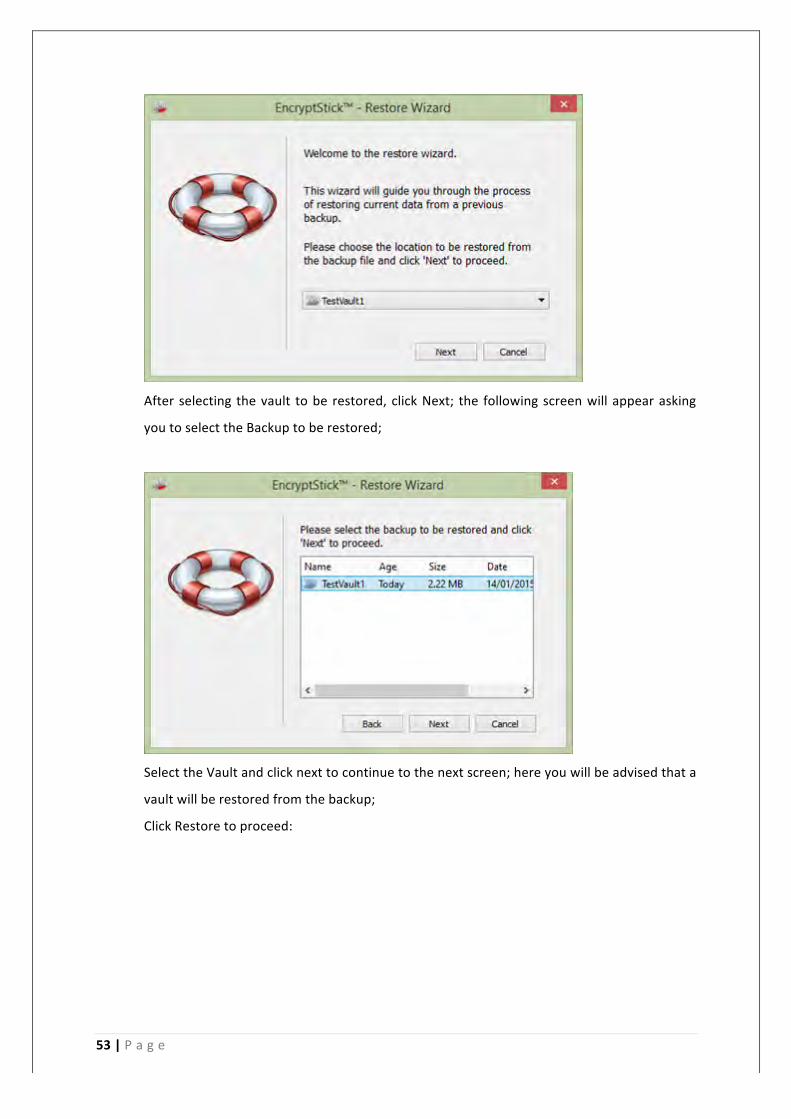
• On the Menu bar click “Tools” => “Restore Vault Data”; The following screen will open:
53 | P a g e
After selecting the vault to be restored, click Next; the following screen will appear asking
you to select the Backup to be restored;
Select the Vault and click next to continue to the next screen; here you will be advised that a
vault will be restored from the backup;
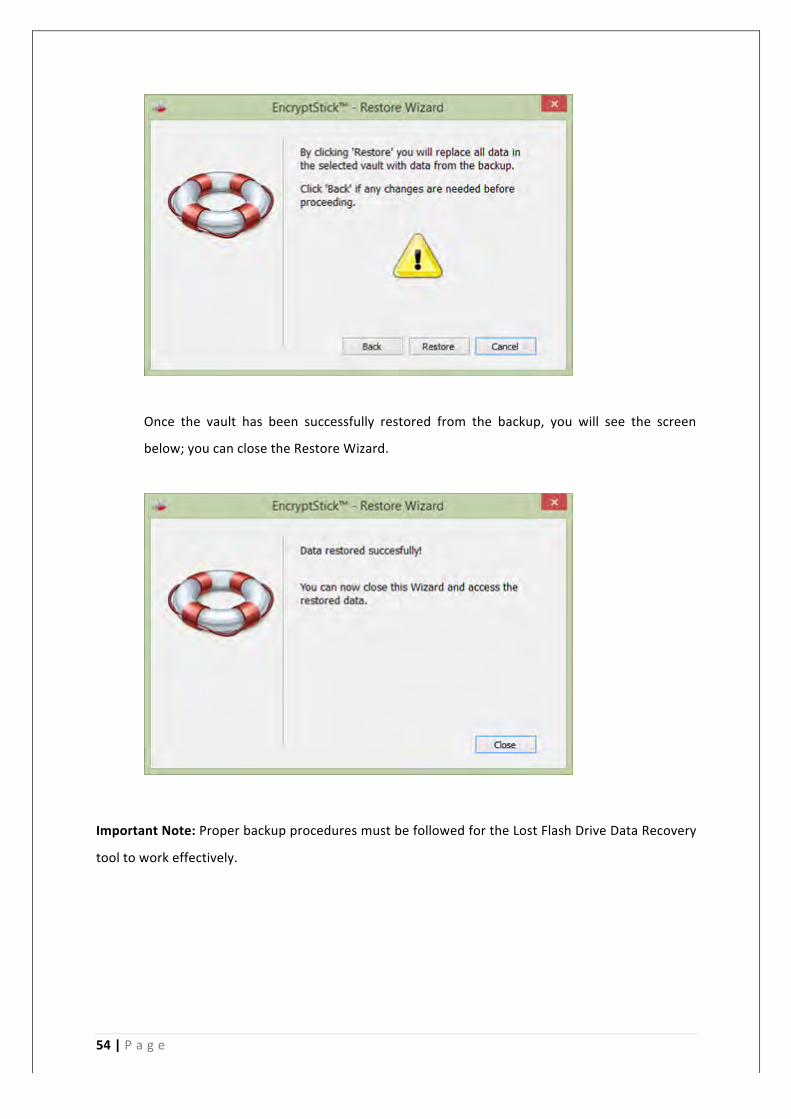
Click Restore to proceed:
54 | P a g e
Once the vault has been successfully restored from the backup, you will see the screen
below; you can close the Restore Wizard.
Important Note: Proper backup procedures must be followed for the Lost Flash Drive Data Recovery
tool to work effectively.

55 | P a g e
How to get online support?
To open online support from the program, click “Get Online Support” option in the “Help” menu as
shown below:
Once you click the “Get Online Support” option, you will be redirected to our online support web
page. In case you have lost your activation serial number, you can have it resent to you by entering
the email address you used for the original order.
The FAQs are also available on this support page.