Embed Size (px)
Citation preview
Enabling Microsoft Translator in Adobe Experience Manager
Your site in any of more than 40 languages: Adobe Experience Manager enables you to internationalize your site with fully integrated and customized automatic translation in 40+ languages.
To use the automatic translation functionality within Adobe Experience Manager, you connect a subscription to the Microsoft Translator service with your instance of Adobe Experience Manager. If you already have a subscription to Microsoft Translator, you can of course use it for translations in Adobe Experience Manager.
If you already have a subscription, you may go straight to the end of this guide learn how to plug in your credentials.
Here are the steps to enable automatic translation in Adobe Experience Manager.
Create a Microsoft Account
Make sure that you have a free Microsoft Account. A Microsoft Account provides your login credentials.
You’ll need this to sign-in to Windows Azure Marketplace, subscribe to the Microsoft Translator service,
and generate a set of credentials for Adobe Experience Manager to use in your name. You can sign up
for a Microsoft Account at http://login.live.com. If you already have a live.com, hotmail.com, or
outlook.com account, you already have a Microsoft Account, and can use it here.
Get an account on Windows Azure Marketplace.
You create and manage your subscription to Microsoft Translator in the Windows Azure Marketplace.
1. Register for an account on Windows Azure Marketplace. If you already have an account, you can use it, but it’s recommended that you follow through these steps to ensure that you configure the service correctly.
2. Sign up for the Microsoft Translator API using your registered account. 3. Register your application on Windows Azure Marketplace. 4. Get the Client ID and Client Secret for your registered application.
The following instructions show you how to do this.
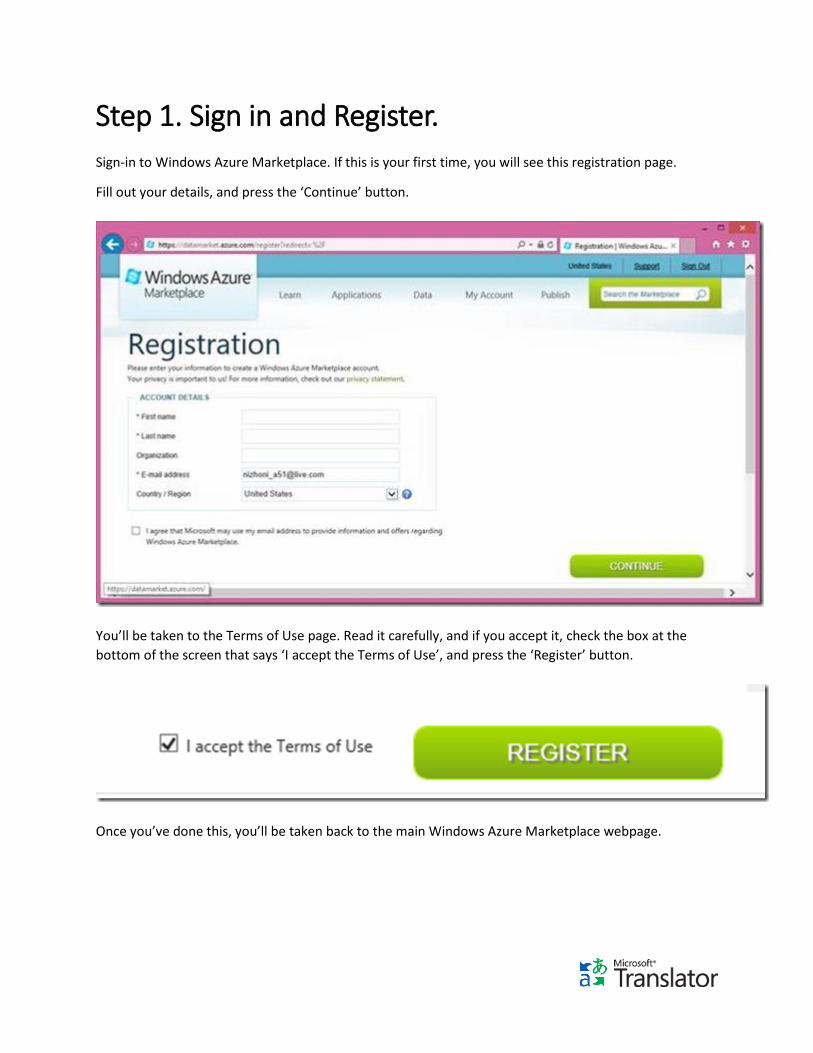
Step 1. Sign in and Register.
Sign-in to Windows Azure Marketplace. If this is your first time, you will see this registration page.
Fill out your details, and press the ‘Continue’ button.
You’ll be taken to the Terms of Use page. Read it carefully, and if you accept it, check the box at the
bottom of the screen that says ‘I accept the Terms of Use’, and press the ‘Register’ button.
Once you’ve done this, you’ll be taken back to the main Windows Azure Marketplace webpage.
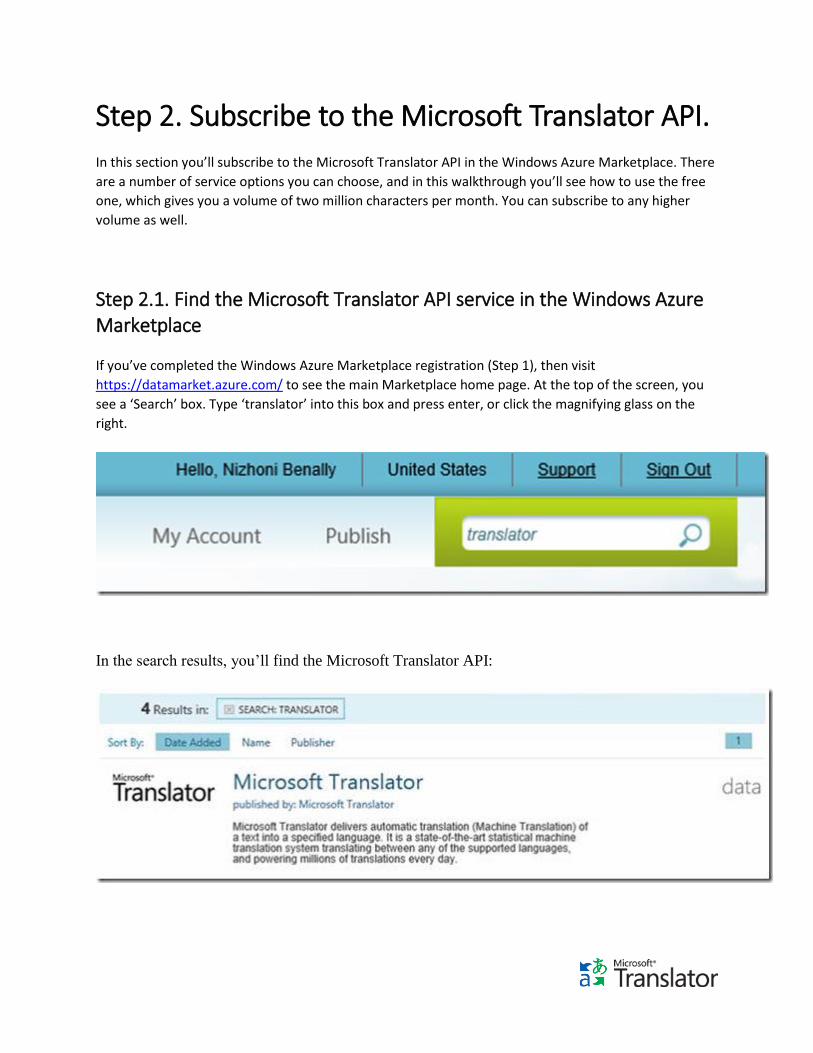
Step 2. Subscribe to the Microsoft Translator API.
In this section you’ll subscribe to the Microsoft Translator API in the Windows Azure Marketplace. There
are a number of service options you can choose, and in this walkthrough you’ll see how to use the free
one, which gives you a volume of two million characters per month. You can subscribe to any higher
volume as well.
Step 2.1. Find the Microsoft Translator API service in the Windows Azure Marketplace
If you’ve completed the Windows Azure Marketplace registration (Step 1), then visit
https://datamarket.azure.com/ to see the main Marketplace home page. At the top of the screen, you
see a ‘Search’ box. Type ‘translator’ into this box and press enter, or click the magnifying glass on the
right.
In the search results, you’ll find the Microsoft Translator API:
Step 2.2. Subscribe to the Translator API service.
Click on ’Microsoft Translator’ and you’ll be taken to the Microsoft Translator offer page on Windows
Azure Marketplace.
(Note: For a shortcut, you can also go directly to the Microsoft Translator offer by visiting this URL:
https://datamarket.azure.com/dataset/bing/microsofttranslator)
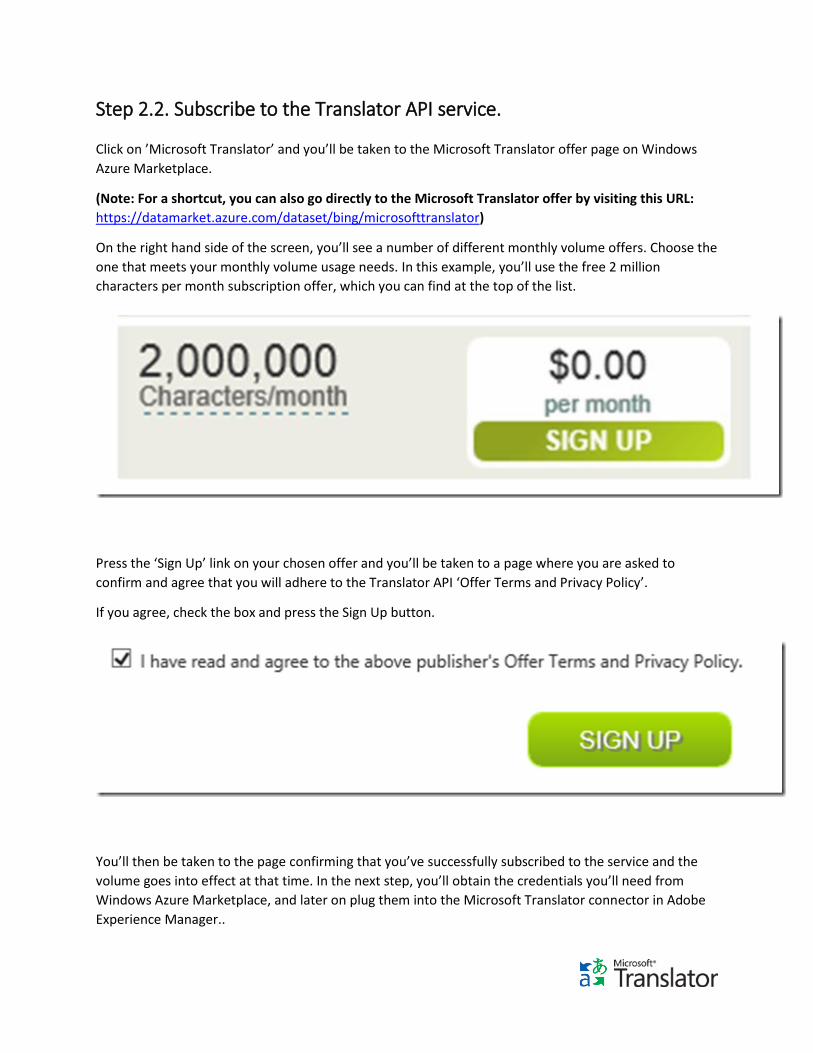
On the right hand side of the screen, you’ll see a number of different monthly volume offers. Choose the
one that meets your monthly volume usage needs. In this example, you’ll use the free 2 million
characters per month subscription offer, which you can find at the top of the list.
Press the ‘Sign Up’ link on your chosen offer and you’ll be taken to a page where you are asked to
confirm and agree that you will adhere to the Translator API ‘Offer Terms and Privacy Policy’.
If you agree, check the box and press the Sign Up button.
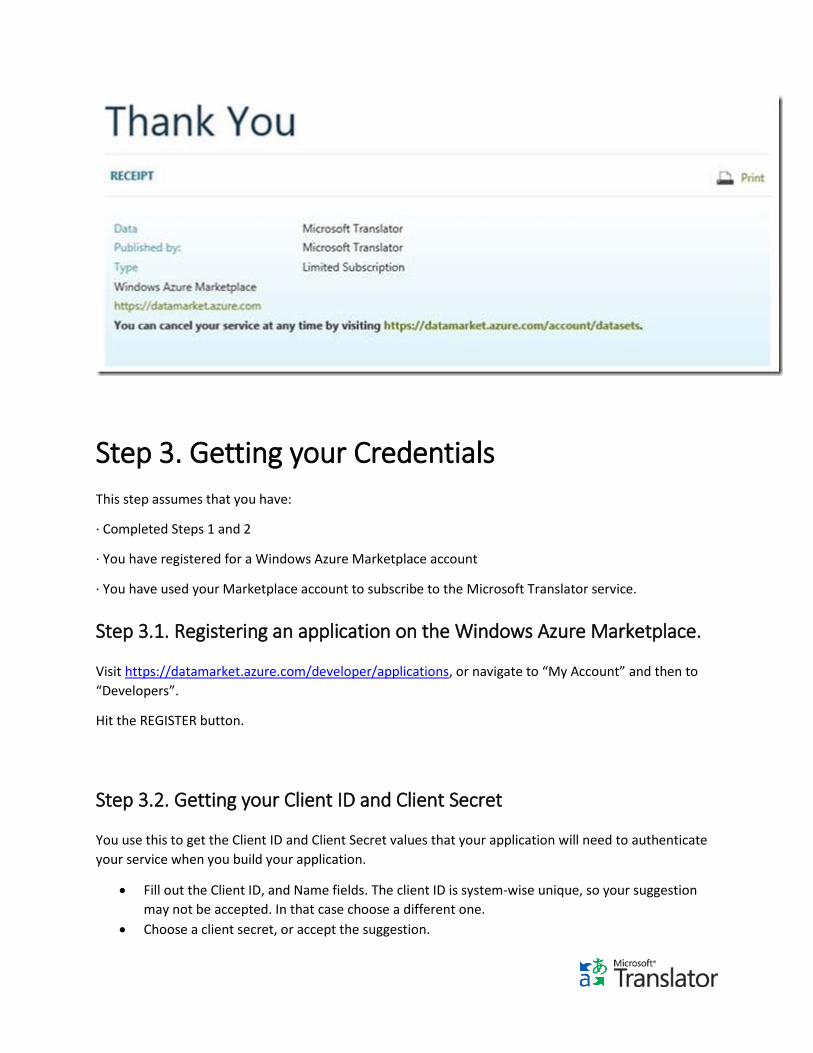
You’ll then be taken to the page confirming that you’ve successfully subscribed to the service and the
volume goes into effect at that time. In the next step, you’ll obtain the credentials you’ll need from
Windows Azure Marketplace, and later on plug them into the Microsoft Translator connector in Adobe
Experience Manager..
Step 3. Getting your Credentials
This step assumes that you have:
· Completed Steps 1 and 2
· You have registered for a Windows Azure Marketplace account
· You have used your Marketplace account to subscribe to the Microsoft Translator service.
Step 3.1. Registering an application on the Windows Azure Marketplace.
Visit https://datamarket.azure.com/developer/applications, or navigate to “My Account” and then to
“Developers”.
Hit the REGISTER button.
Step 3.2. Getting your Client ID and Client Secret
You use this to get the Client ID and Client Secret values that your application will need to authenticate
your service when you build your application.
Fill out the Client ID, and Name fields. The client ID is system-wise unique, so your suggestion
may not be accepted. In that case choose a different one.
Choose a client secret, or accept the suggestion.
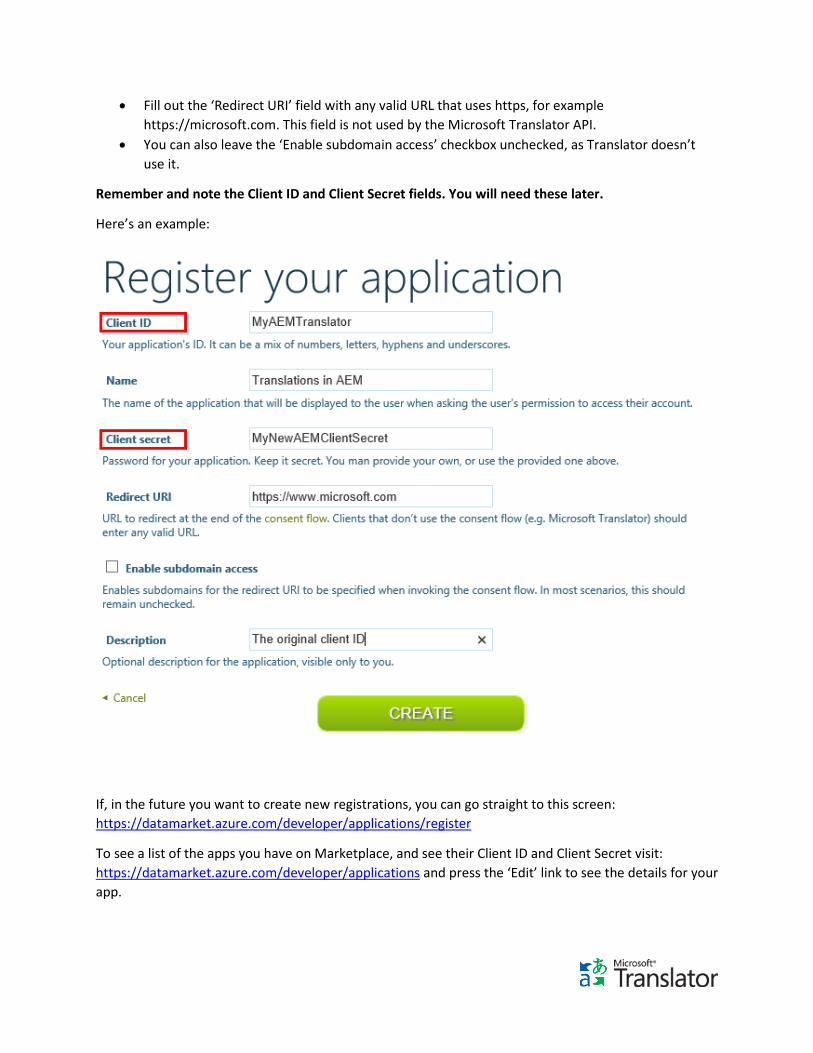
Fill out the ‘Redirect URI’ field with any valid URL that uses https, for example
https://microsoft.com. This field is not used by the Microsoft Translator API.
You can also leave the ‘Enable subdomain access’ checkbox unchecked, as Translator doesn’t
use it.
Remember and note the Client ID and Client Secret fields. You will need these later.
Here’s an example:
If, in the future you want to create new registrations, you can go straight to this screen:
https://datamarket.azure.com/developer/applications/register
To see a list of the apps you have on Marketplace, and see their Client ID and Client Secret visit:
https://datamarket.azure.com/developer/applications and press the ‘Edit’ link to see the details for your
app.
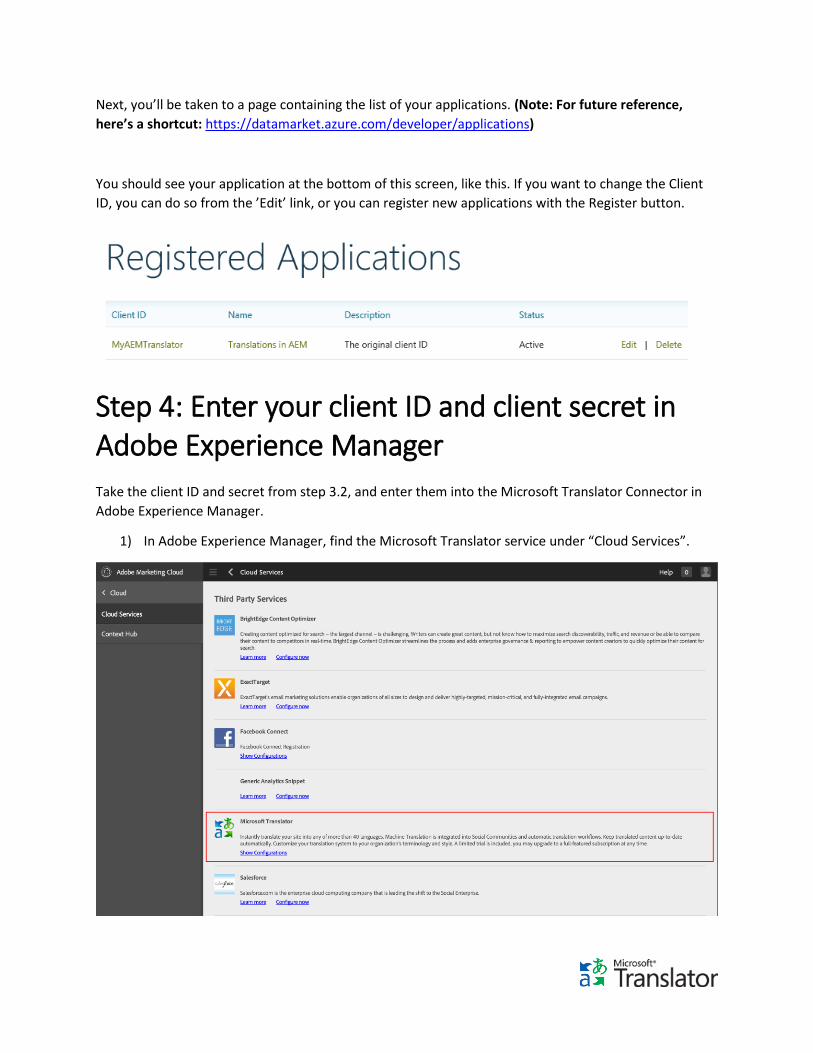
Next, you’ll be taken to a page containing the list of your applications. (Note: For future reference,
here’s a shortcut: https://datamarket.azure.com/developer/applications)
You should see your application at the bottom of this screen, like this. If you want to change the Client
ID, you can do so from the ’Edit’ link, or you can register new applications with the Register button.
Step 4: Enter your client ID and client secret in Adobe Experience Manager
Take the client ID and secret from step 3.2, and enter them into the Microsoft Translator Connector in
Adobe Experience Manager.
1) In Adobe Experience Manager, find the Microsoft Translator service under “Cloud Services”.
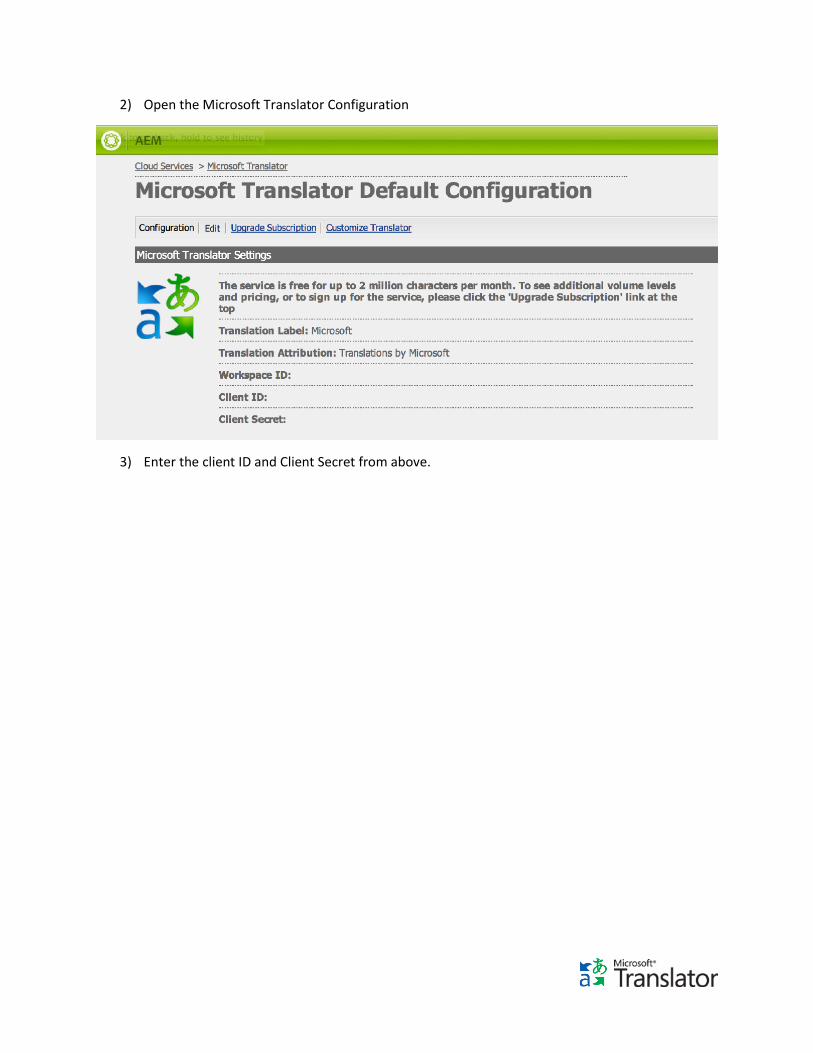
2) Open the Microsoft Translator Configuration
3) Enter the client ID and Client Secret from above.
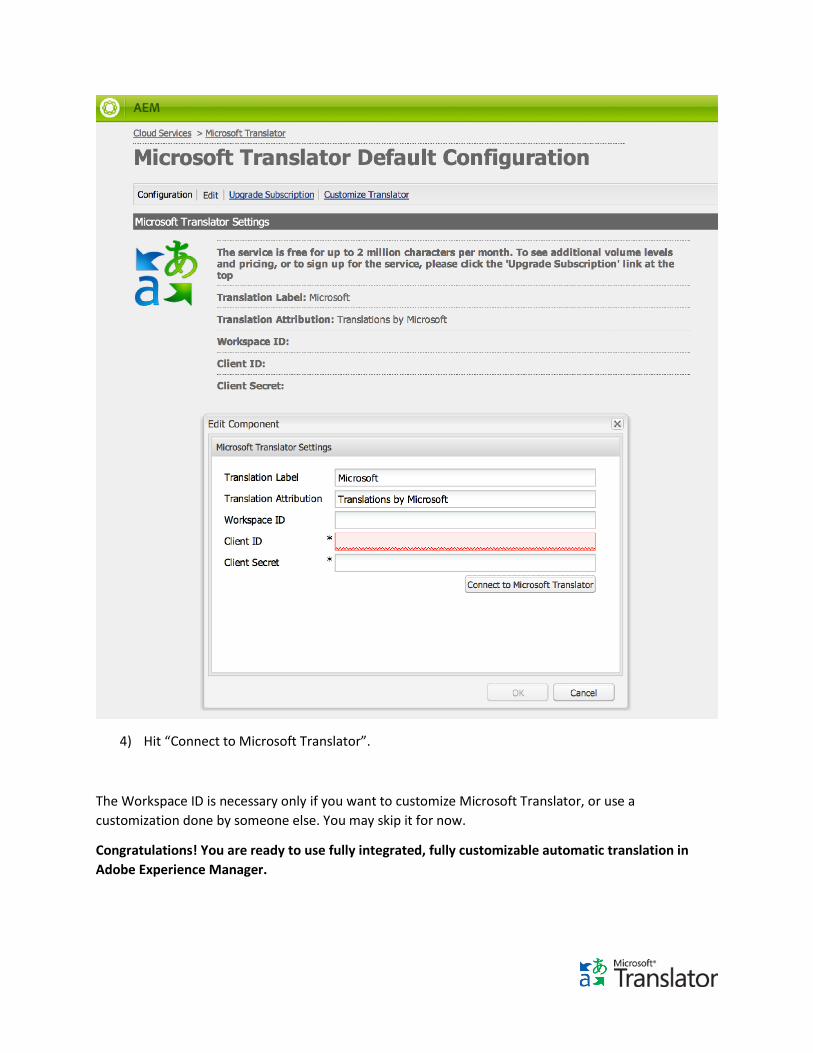
4) Hit “Connect to Microsoft Translator”.
The Workspace ID is necessary only if you want to customize Microsoft Translator, or use a
customization done by someone else. You may skip it for now.
Congratulations! You are ready to use fully integrated, fully customizable automatic translation in
Adobe Experience Manager.
Using a customized machine translation system in Adobe Experience Manager
Microsoft Translator is fully customizable to your preferred terminology and style. In order to build a
customized machine translation system, please visit the Microsoft Translator Hub at
http://hub.microsofttranslator.com. Follow the instructions provided there to build your custom MT
system.
In order to connect Adobe Experience Manager to your custom system, you will need to copy the
Workspace ID that identifies the workspace you used to build your custom system into the Microsoft
Translator Connector in Adobe Experience Manager.
How to Find the Workspace ID for a Translation System from Microsoft
Translator Hub
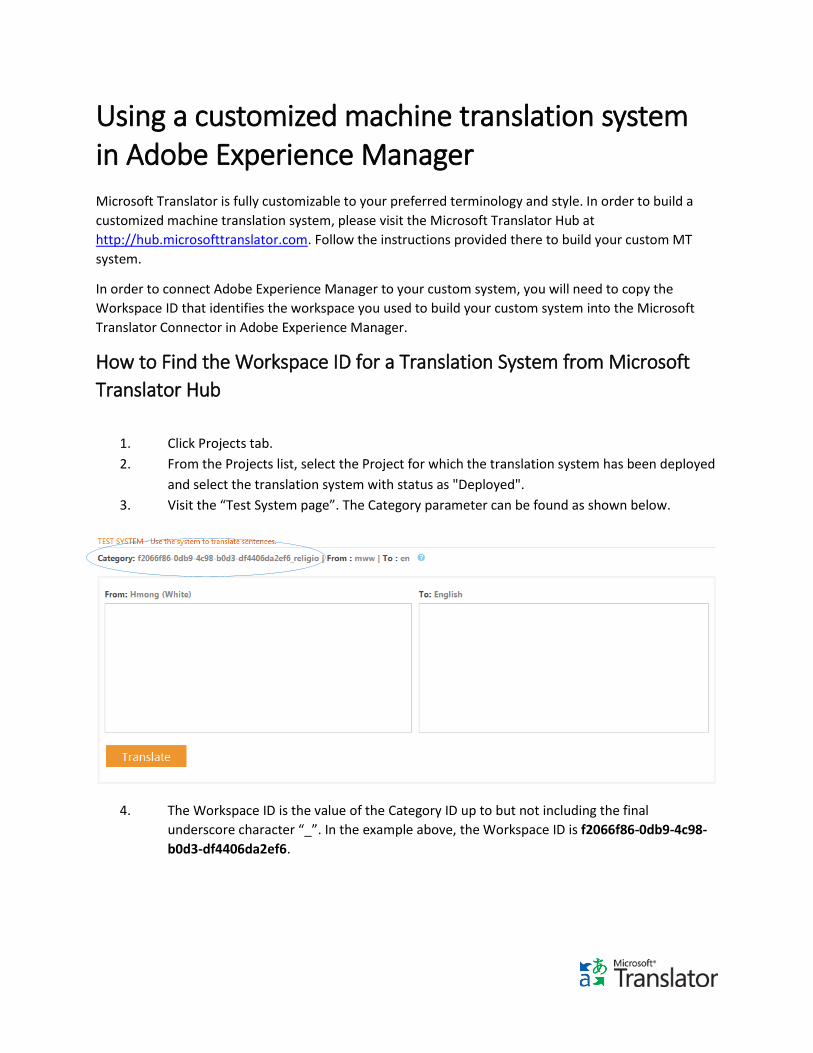
1. Click Projects tab.
2. From the Projects list, select the Project for which the translation system has been deployed
and select the translation system with status as "Deployed".
3. Visit the “Test System page”. The Category parameter can be found as shown below.
4. The Workspace ID is the value of the Category ID up to but not including the final
underscore character “_”. In the example above, the Workspace ID is f2066f86-0db9-4c98-
b0d3-df4406da2ef6.
Copy the Workspace ID to Microsoft Translator Connector
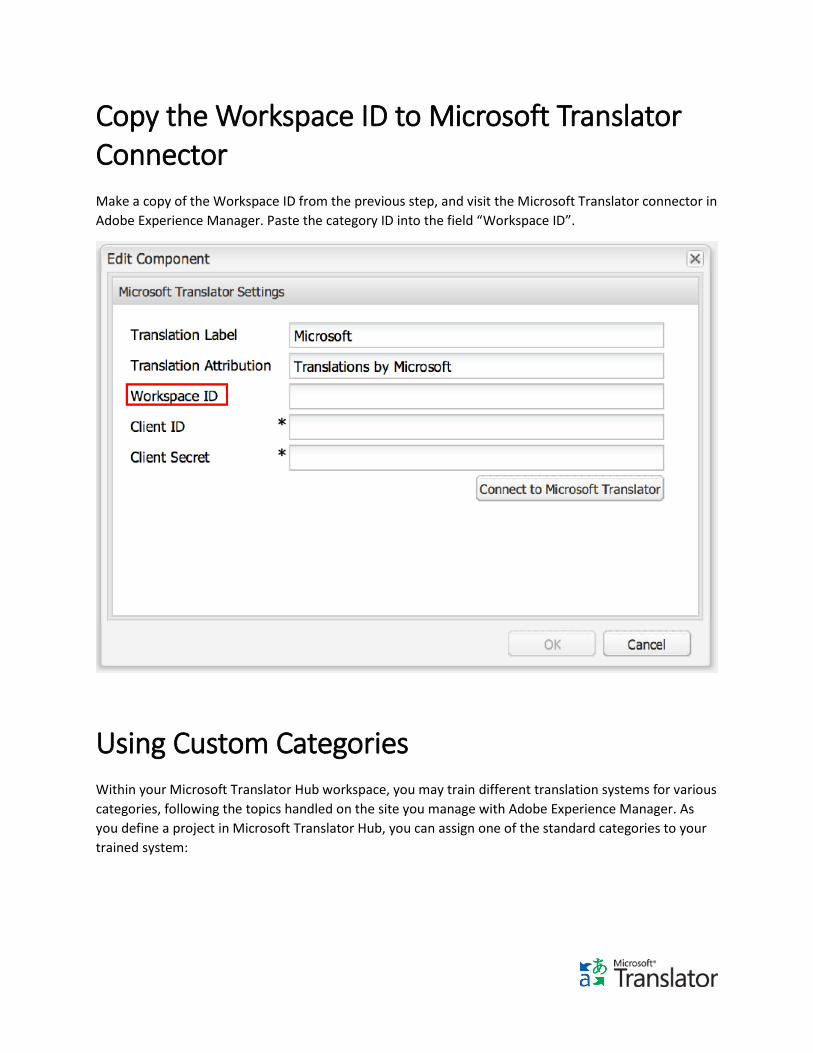
Make a copy of the Workspace ID from the previous step, and visit the Microsoft Translator connector in
Adobe Experience Manager. Paste the category ID into the field “Workspace ID”.
Using Custom Categories
Within your Microsoft Translator Hub workspace, you may train different translation systems for various
categories, following the topics handled on the site you manage with Adobe Experience Manager. As
you define a project in Microsoft Translator Hub, you can assign one of the standard categories to your
trained system:

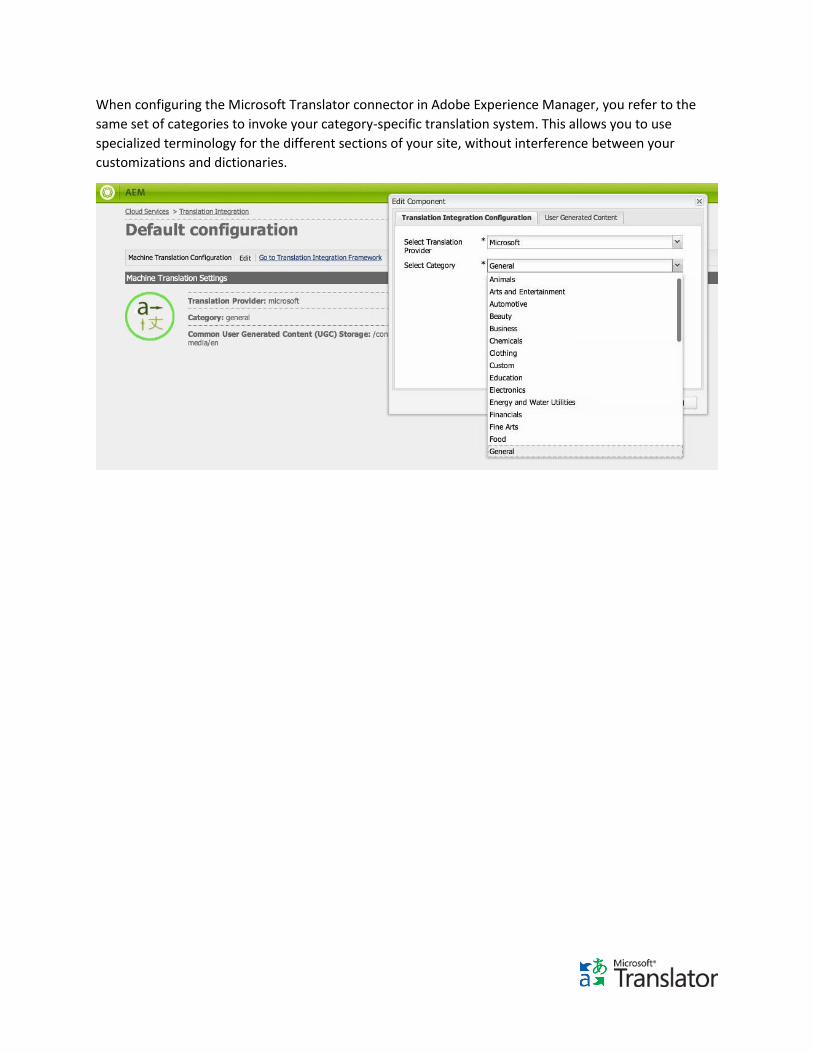
When configuring the Microsoft Translator connector in Adobe Experience Manager, you refer to the
same set of categories to invoke your category-specific translation system. This allows you to use
specialized terminology for the different sections of your site, without interference between your
customizations and dictionaries.