Embed Size (px)
Citation preview

EN User manual
Washing Machine
ZWG 6141 P

Contents
Safety information _ _ _ _ _ _ _ _ _ _ _ _ _ _ _ _ _ _ 2Frost precaution _ _ _ _ _ _ _ _ _ _ _ _ _ _ _ _ _ _ _ 4Environment concerns _ _ _ _ _ _ _ _ _ _ _ _ _ _ _ _ 4Product description _ _ _ _ _ _ _ _ _ _ _ _ _ _ _ _ _ 5Technical data _ _ _ _ _ _ _ _ _ _ _ _ _ _ _ _ _ _ _ 5Installation _ _ _ _ _ _ _ _ _ _ _ _ _ _ _ _ _ _ _ _ _ 6
First use _ _ _ _ _ _ _ _ _ _ _ _ _ _ _ _ _ _ _ _ _ _ 10Daily use _ _ _ _ _ _ _ _ _ _ _ _ _ _ _ _ _ _ _ _ _ 10Washing programmes _ _ _ _ _ _ _ _ _ _ _ _ _ _ _ 17Consumption values _ _ _ _ _ _ _ _ _ _ _ _ _ _ _ _ 19Care and cleaning _ _ _ _ _ _ _ _ _ _ _ _ _ _ _ _ _ 20What to do if… _ _ _ _ _ _ _ _ _ _ _ _ _ _ _ _ _ _ 22
Subject to change without notice
Safety information
Important! Read carefully and keep for future reference.
• The safety of your appliance complies with the industrystandards and with legal requirements on the safety ofappliances. However, as manufacturers, we feel it isour duty to provide the following safety notes.
• It is most important that this instruction book shouldbe retained with the appliance for future reference.Should the appliance be sold or transferred to anotherowner, or should you move house and leave the appli-ance, always ensure that the book is supplied with theappliance in order that the new owner can get to knowthe functioning of the appliance and the relevant warn-ings.
• You MUST read them carefully before installing or us-ing the appliance.
• Before first starting up, check the appliance for anydamage incurred during transport. Never connect up adamaged appliance . If parts are damaged, contact yoursupplier.
• If the appliance is delivered in the winter months whenthere are minus temperatures. Store it at room temper-ature for 24 hours before using for the first time.
• This appliance is made for use in a normal domesticsituation. The manufacturer is not responsible forfreezing damages. Read "Frost precaution".
General safety• It is dangerous to alter the specifications or attempt to
modify this product in any way.• During high temperature wash programmes the door
glass may get hot. Do not touch it!• Make sure that small children and pets do not climb
into the drum. To avoid this, please check inside thedrum before using.
• Any objects such as coins, safety pins, nails, screws,stones or any other hard, sharp material can cause ex-tensive damage and must not be placed into the appli-ance.
• Only use the advised quantities of fabric softener anddetergent. Damage to the fabric can ensue if you over-fill. Refer to the manufacturer’s recommendations ofquantities.
• Wash small items such as socks, laces, washable beltsetc in a washing bag or pillow case as it is possible forsuch items to slip down between the tub and the innerdrum.
• Do not use your appliance to wash articles with whale-bones, material without hems or torn material.
• Always unplug the appliance and turn off the watersupply after use, cleaning and maintenance.
• Under no circumstances should you attempt to repairthe appliance yourself. Repairs carried out by inexper-ienced people may cause injury or serious malfunc-tioning. Contact your local Service Centre. Always in-sist on genuine spare parts.
Installation• This appliance is heavy. Care should be taken when
moving it.• All packing and transit bolts must be removed before
use. Serious damage can occur to the product and toproperty if this is not adhered to. See relevant sectionin the user manual.
• This appliance is free standing only. DO NOT build it inunder a counter and DO NOT remove the worktop forany reason.
• After having installed the appliance, check that it is notstanding on the inlet and drain hose and the worktop is
2
not pressing the electrical supply cable against thewall.
• Install the appliance on a flat hard floor.• Never place cardboard, wood or similar materials un-
der the appliance to compensate for any unevenness inthe floor.
• If the appliance is situated on a carpeted floor, pleaseadjust the feet in order to allow air to circulate freelyunder the appliance.
• Check that the appliance does not touch the wall orother kitchen units.
• This appliance must be connected to a cold water sup-ply.
• Do not use the hose from your previous appliance toconnect to water supply. Always use the hose suppliedwith the appliance.
• The inlet hose must not be lengthened. If it is too shortand you do not wish to move the tap, you will have topurchase a new, longer hose specially designed forthis type of use.
• Always be sure, that there is no water leakage from ho-ses and their connections after the installation.
• If the appliance is installed in a location subject tofrost, please read the “Frost precaution” chapter. Man-ufacturer decline any responsibility for freezing dam-ages.
• Any plumbing work required to install this applianceshould be carried out by a qualified plumber or compe-tent person.
• Any electrical work required to install this applianceshould be carried out by a qualified electrician or com-petent person.
Use• This appliance is designed for domestic use. It must
not be used for purposes other than those for which itwas designed.
• Only wash fabrics which are designed to be machinewashed. Follow the instructions on each garment label.
• Do not overload the appliance. See the "Washing Pro-gramme Chart".
• Before washing, ensure that all pockets are empty andbuttons and zips are fastened. Avoid washing frayed ortorn articles and treat stains such as paint, ink, rust,and grass before washing. Underwired bras must NOTbe machine washed.
• The detergent dispenser drawer is provided with an in-sert for liquid detergent. Do not use the insert down-wards for gelatinous detergents, with programmes in-cluding prewash, with the delay start option. In allthese cases you can use metering balls or sachets pro-vided with the detergent, Take out the metering aid atthe end of the washing cycle.
• Garments which have been in contact with volatile pe-troleum products should not be machine washed. Ifvolatile cleaning fluids are used, care should be takento ensure that the fluid is removed from the garmentbefore placing in the appliance.
• Never pull the power supply cable to remove the plugfrom the socket; always take hold of the plug itself.
• Never use the appliance if the power supply cable, thecontrol panel, the working surface or the base are dam-aged so that the inside of the appliance is accessible.
Child safety• This appliance is not intended for use by persons (in-
cluding children) with reduced physical sensory ormental capabilities or lack of experience and knowl-edge unless they have been given supervision or in-struction concerning use of the appliance by a personresponsible for their safety.
• Children should be supervised to ensure that they donot play with the appliance.
• The packaging components (e.g. plastic film, polystyr-ene) can be dangerous to children - danger of suffoca-tion! Keep them out of children’s reach.
• Keep all detergents in a safe place out of children’sreach.
• Make sure that children or pets do not climb inside thedrum. To prevent children and pets becoming trappedinside the drum this appliance incorporates a specialfeature.
3

To activate this device, ro-tate the button (withoutpressing it) inside thedoor clockwise until thegroove is horizontal. Ifnecessary use a coin.
To disable this device andrestore the possibility ofclosing the door, rotate thebutton anti-clockwise untilthe groove is vertical.
Frost precaution
If the appliance is installed in a place where the tempera-ture could drop below 0°C, proceed as follows to removeany water remaining inside the appliance:1. unplug the appliance;2. turn off the water tap;3. unscrew the water inlet hose from the tap;4. unscrew the drain hose from the rear support and
unhook it from sink or spigot;
5. place a bowl on the floor;
6. let the drain hose run along the floor, place the ex-ternal extremities of the drain and inlet hoses in thebowl placed on the floor and let water drain out com-pletely;
7. screw the water inlet hose to the tap and the drainhose to the rear of the appliance again;
When you intend to start the appliance up again, makesure that the room temperature is above 0°C.
Environment concerns
The symbol on the product or on its packagingindicates that this product may not be treated ashousehold waste. Instead it should be taken to theappropriate collection point for the recycling of electricaland electronic equipment. By ensuring this product isdisposed of correctly, you will help prevent potentialnegative consequences for the environment and humanhealth, which could otherwise be caused by inappropriate
waste handling of this product. For more detailedinformation about recycling of this product, please contactyour local council, your household waste disposal serviceor the shop where you purchased the product.
Packaging materialsThe materials marked with the symbol are recyclable.>PE<=polyethylene>PS<=polystyrene
4

>PP<=polypropyleneThis means that they can be recycled by disposing ofthem properly in appropriate collection containers.
Ecological hintsTo save water, energy and to help protect the environment,we recommend that you follow these tips:• Normally soiled laundry may be washed without pre-
washing in order to save detergent, water and time (theenvironment is protected too!).
• The machine works more economically if it is fully loa-ded.
• With adequate pre-treatment, stains and limited soilingcan be removed; the laundry can then be washed at alower temperature.
• Measure out detergent according to the water hard-ness, the degree of soiling and the quantity of laundrybeing washed.
Product description
1 2 3
4
5
6
11
9
10
9
9
8
7
12
1 Detergent dispenser drawer2 Worktop3 Control panel4 Door opening handle5 Rating plate (on the inner edge)6 Front adjustable feet
7 Water drain hose8 Drain hose support9 Hose holders10 Water inlet hose11 Mains cable12 Back feet
Technical data
Dimensions WidthHeightDepth
60 cm85 cm54 cm
5

Electrical connectionVoltage - Overall power - Fuse
Information on the electrical connection is given on the rating plate, on theinner edge of the appliance door.
Water supply pressure MinimumMaximum
0,05 MPa0,8 MPa
Maximum Load Cotton 6 kg
Spin Speed Maximum 1400 rpm
Installation
Unpacking
Warning!• Read carefully the "Safety information" chapter
before installing the appliance.
x 3
x 3
x 2
x 1
BA
C
Warning! Remove and keep all transit devices sothat they can be refitted if the appliance ever has
to be transported again.
Necessary tools
10 mm
30 mm
• Remove the externalfilm. Use a cutter, ifnecessary.
• Remove the cardboard top.• Remove the polystyrene packaging materials.
2
1• Spread the front piece
on the floor behind theappliance and then laythe appliance carefullyrear side down on it.Make sure that no ho-ses are crushed in theprocess.
• Remove the polystyrene base from the bottom.
• Return appliance to it'supright position.
6

• Open the door and re-move the plastic hoseguide, the bag contain-ing the instructionbooklet and the plasticplug caps from thedrum.
• Remove the power supply cable and the draining andinlet hose from the hose holders (C) on the rear ofthe appliance.
• Unscrew the three bolts (A) and remove the hoseholders (C).
• Slide out the relevant plastic spacers (B).
Warning! Do not re-move the drain hose
from the rear support. Re-move this hose only if it isnecessary to drain the wa-ter. Refer to "Frost precau-tion" and "What to do if".
• Plug the smaller upper hole and the two large oneswith the corresponding plastic plug caps.
7

Positioning and levelling
x 4
Level the appliance by raising or lowering the feet.The appliance MUST be level and stable on a flat hardfloor. If necessary, check the setting with a spirit level.Any necessary adjustment can be made with a spanner.
Accurate levelling prevents vibration, noise and dis-placement of the appliance during operation.Repeat the levelling action, if the appliance is not leveland stable.
Water inlet
Connect the hose to a tapwith a 3/4” thread.
35° 45°
Loosen the ring nut to angle the hose to the left or rightdepending on the position of your water tap. Do notplace the inlet hose downwards. After positioning theinlet hose, be sure to tighten the ring nut again to pre-vent leaks.
Water drainage
Firstly form a hook in the end of the drain hose usingthe plastic hose guide supplied with the appliance .
The end of the drain hose can be positioned in fourways:
• Hooked over the edge of a sink using the plastichose guide.
Tie the plastic hose guide to the tap with a string to pre-vent that the drain hose unhooks when the appliance isemptying.
• Onto a sink outlet spigot.
8

Push the drain hose onto the spigot and secure with aclip, ensure a loop is formed in the drain hose to pre-vent waste from the sink entering the appliance.
If the outlet spigot has not been used before, removeany blanking plug that may be in place.
• Directly into a drain pipe at a height of not less than60 cm and not more than 100 cm.
MAX
100c
m
The end of the drain hosemust always be ventilated,i.e. the inside diameter ofthe drain pipe must belarger than the outside di-ameter of the drain hose.The drain hose must notbe kinked.
If your drain hose lookslike this (see beside) youdo not require the “U”piece”. Just push the hosefirmly in to the standpipe.
• Directly to a built-in drain pipe in the room wall.
The drain hose may be extended to a maximum of 4metres. An additional drain hose and joining piece
is available from your Local Centre.
Connections overview
115 cm 140 cm
mc150mc100
max 1
00 cm
min.
60 cm
max 1
00 cm
min.
60 cm
mc9 0 mc115
9

In the interest of the environmentThe appliance should be connected to the FOUL drainagesystem, the water will then be taken to a sewage works fortreatment before being discharged safely into a river.It is essential that these appliances are not connected tothe surface water drainage system as this water is dis-charged directly into a river or stream and may cause pol-lution.If you require any further advice please contact your localwater authority.
SHOWER
WASHINGMACHINE DISHWASHER
BATHSINK TOILET
BIDET
RAINWATER‘RUN-OFF’
SURFACE WATERDRAINS & SEWERS
UNTREATEDDISCHARGE
RIVER RIVERTREATED DISCHARGE
FOUL DRAINFOUL SEWERS
SEWAGE TREATMENTWORKS
Electrical connection• The appliance must be earthed.• Make sure that the electrical information on the rating
plate agree with your domestic power supply.• Always use a correctly installed shockproof socket.• Do not use multi-way plugs, connectors and extension
cables. There is a risk of fire.• Do not replace or modify the mains cable yourself.
Contact the After Sales Service.• Make sure that the mains plug and cable is not
squashed or damaged by the back of the appliance.• The mains plug must be accessible without moving
machine to enable electrical isolation of appliance priorto cleaning or service.
• Do not pull the mains cable to disconnect the appli-ance. Always pull the mains plug.
• This appliance complies with the E.E.C. Directives.
Warning! The appliance is supplied with a 13 ampplug attached. Use a 13 amp ASTA approved (BS
1362) fuse if it is necessary to change the fuse in the plugsupplied. A cut off plug inserted into a 13 amp socket is aserious safety danger. Make sure that it is disposed ofsafely.
First use
• Ensure that the electrical and water connectionscomply with the installation instructions.
• Ensure that the drum is empty.
• Before the first wash, run a cotton cycle at thehighest temperature without any laundry in the
machine, to remove any manufacturing residuefrom the drum and tub. Pour 1/2 a measure ofdetergent into the main wash compartment andstart the machine.
Daily use
Sort out the laundryFollow the wash code symbols on each garment label andthe manufacturer’s washing instructions. Sort the laundryas follows: whites, coloureds, synthetics, delicates, wool-lens.
10
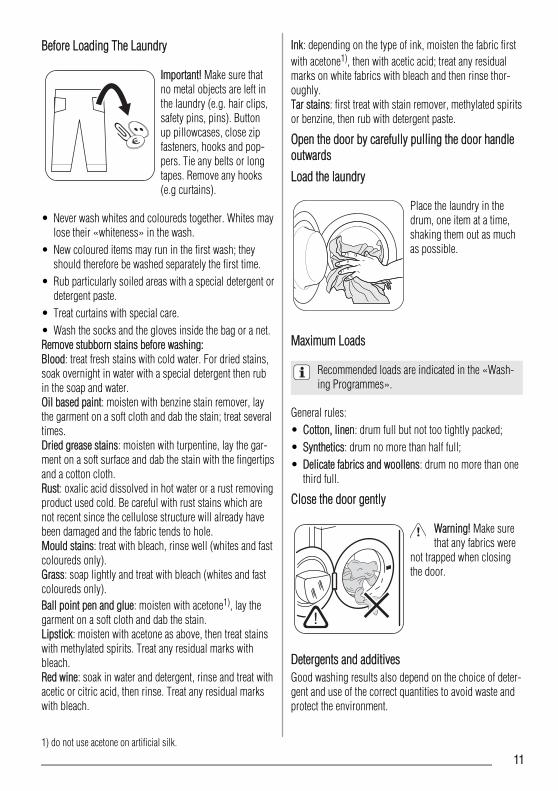
Before Loading The Laundry
Important! Make sure thatno metal objects are left inthe laundry (e.g. hair clips,safety pins, pins). Buttonup pillowcases, close zipfasteners, hooks and pop-pers. Tie any belts or longtapes. Remove any hooks(e.g curtains).
• Never wash whites and coloureds together. Whites maylose their «whiteness» in the wash.
• New coloured items may run in the first wash; theyshould therefore be washed separately the first time.
• Rub particularly soiled areas with a special detergent ordetergent paste.
• Treat curtains with special care.• Wash the socks and the gloves inside the bag or a net.Remove stubborn stains before washing:Blood: treat fresh stains with cold water. For dried stains,soak overnight in water with a special detergent then rubin the soap and water.Oil based paint: moisten with benzine stain remover, laythe garment on a soft cloth and dab the stain; treat severaltimes.Dried grease stains: moisten with turpentine, lay the gar-ment on a soft surface and dab the stain with the fingertipsand a cotton cloth.Rust: oxalic acid dissolved in hot water or a rust removingproduct used cold. Be careful with rust stains which arenot recent since the cellulose structure will already havebeen damaged and the fabric tends to hole.Mould stains: treat with bleach, rinse well (whites and fastcoloureds only).Grass: soap lightly and treat with bleach (whites and fastcoloureds only).Ball point pen and glue: moisten with acetone1), lay thegarment on a soft cloth and dab the stain.Lipstick: moisten with acetone as above, then treat stainswith methylated spirits. Treat any residual marks withbleach.Red wine: soak in water and detergent, rinse and treat withacetic or citric acid, then rinse. Treat any residual markswith bleach.
Ink: depending on the type of ink, moisten the fabric firstwith acetone1), then with acetic acid; treat any residualmarks on white fabrics with bleach and then rinse thor-oughly.Tar stains: first treat with stain remover, methylated spiritsor benzine, then rub with detergent paste.
Open the door by carefully pulling the door handleoutwards
Load the laundry
Place the laundry in thedrum, one item at a time,shaking them out as muchas possible.
Maximum Loads
Recommended loads are indicated in the «Wash-ing Programmes».
General rules:• Cotton, linen: drum full but not too tightly packed;• Synthetics: drum no more than half full;• Delicate fabrics and woollens: drum no more than one
third full.
Close the door gently
Warning! Make surethat any fabrics were
not trapped when closingthe door.
Detergents and additivesGood washing results also depend on the choice of deter-gent and use of the correct quantities to avoid waste andprotect the environment.
1) do not use acetone on artificial silk.
11

Although biodegradable, detergents contain substanceswhich, in large quantities, can upset the delicate balanceof nature.The choice of detergent will depend on the type of fabric(delicates, woollens, cottons, etc.), the colour, washingtemperature and degree of soiling.All commonly available washing machine detergents maybe used in this appliance:• powder detergents for all types of fabric,• powder detergents for delicate fabrics (40°C max) and
woollens,• liquid detergents, preferably for low temperature wash
programmes (60°C max) for all types of fabric, or spe-cial for woollens only.
Quantity of detergent to be usedThe type and quantity of detergent will depend on the typeof fabric, load size, degree of soiling and hardness of thewater used.For the quantity of detergent, refer always to what is writ-ten on the product packing.Use less detergent if:• you are washing a small load,• the laundry is lightly soiled,• large amounts of foam form during washing.
Degrees of water hardnessWater hardness is classified in so-called “degrees” ofhardness. Information on hardness of the water in yourarea can be obtained from the relevant water supply com-pany, or from your local authority.If the water hardness degree is medium or high we sug-gest you to add a water softener following always themanufacturer’s instructions.When the degree of hardness is soft, readjust the quantityof the detergent.
Open the detergent dispenser drawer
Compartment forpowder or liquid detergentused for main wash. Compartment for liquidadditives (fabric softener,starch).
Warning! If you wish to carry out the prewash, pourthe detergent among washing items into the drum.
Warning! Depending on the type detergent you use(powder of liquid), ensure that the flap, placed in the
main wash compartment, is in the desired position.
Flap for powder or liquid detergent
UP- Flap position if usingPOWDER detergent
DOWN - Flap position ifusing LIQUID detergentduring main wash
PUSH
REM
OVE
TO C
LEAN PU
SH
REM
OVE
TO C
LEAN
If the flap is not in the desired position:
• Remove the drawer. Push the drawer edge outwardswhere indicated by the arrow (PUSH) to facilitatedrawer removal.
The flap is down and you wish to use powder detergent:
• Rotate the flap up-wards. Ensure to fit theflap completely in.
• Carefully put the drawerback.
12

• Measure out the deter-gent.
• Pour the powder deter-gent into the main washcompartment .
The flap is up and you wish to use liquid detergent:
• Rotate the flap down-wards.
• Carefully put the drawerback.
• Measure out the detergent.
For the quantity of detergent, refer always to whatis written on the product packing and ensure that
the detergent can be poured in the drawer.
• Pour the liquid detergent in the compartment without exceeding the limit indicated in the flap. Thedetergent must be placed in the appropriate com-partments of the dispenser drawer before starting thewash programme.
Warning! Do not use the flap in "DOWN" positionwith:
• Gelatinous detergent or thick detergent.• Powder detergent.• With programmes with prewash.• Do not use liquid detergent if the washing programme
doesn't start immediately.
In all above listed cases, use the flap in "UP" posi-tion .
Measure out the fabric softener
Pour fabric softener or anyadditives into the compart-ment marked (do notexceed the «MAX» markin the drawer). Any addi-tives must be placed in theappropriate compartmentsof the dispenser drawerjust before starting thewash programme.
Close the detergent dispenser drawer
Set your washing programme
The control panel permits to select a washing programmes and different options.When an option button is selected, the corresponding pilot light is on. Otherwise it is off.
For compatibility among washing programmes and options, see the "Washing Programme Chart". If an incorrectoption is selected, the integrated red pilot light of the button 6 flashes 3 times.
13
764321
5
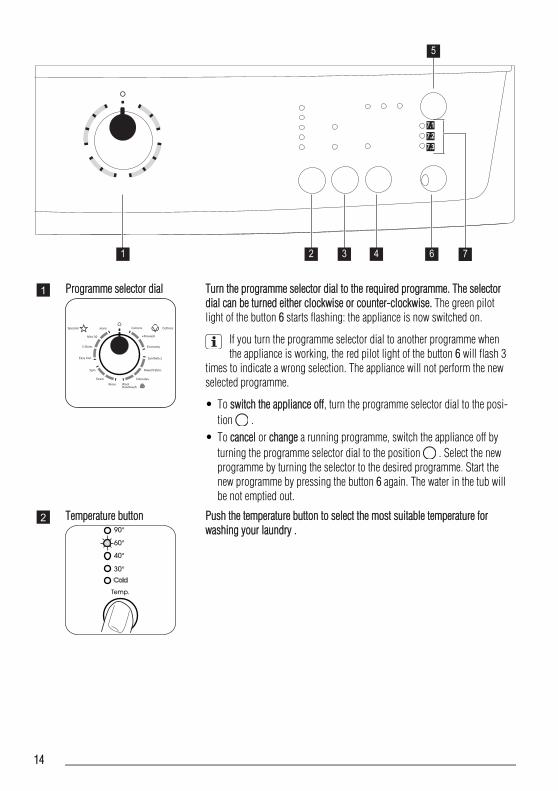
1 Programme selector dial
Specials CottonsCottons
+Prewash
Economy
Synthetics
Mixed Fabric
Delicates
WoolHandwash
Rinse
Drain
Spin
Easy Iron
5 Shirts
Mini 30
Jeans
Turn the programme selector dial to the required programme. The selectordial can be turned either clockwise or counter-clockwise. The green pilotlight of the button 6 starts flashing: the appliance is now switched on.
If you turn the programme selector dial to another programme whenthe appliance is working, the red pilot light of the button 6 will flash 3
times to indicate a wrong selection. The appliance will not perform the newselected programme.
• To switch the appliance off, turn the programme selector dial to the posi-tion .
• To cancel or change a running programme, switch the appliance off byturning the programme selector dial to the position . Select the newprogramme by turning the selector to the desired programme. Start thenew programme by pressing the button 6 again. The water in the tub willbe not emptied out.
2 Temperature button Push the temperature button to select the most suitable temperature forwashing your laundry .
14

3 Automatic Spin reduction andRinse Hold
Spin
By selecting a programme, the appliance proposes automatically the maxi-mum spin speed provided for that programme.By selecting Automatic Spin reduction ( ) the spin speed is reduced to ahalf, but not less than 400 rpm. The relevant light illuminates.
Rinse HoldBy selecting this function the water of the last rinse is not emptied out toprevent the fabrics from creasing. Before opening the door it will be neces-sary to empty out the water.To empty out the water, please read the paragraph «At the end of the pro-gramme».
4 Super Quick
SuperQuick
By pressing this button the corresponding pilot light illuminates.Short cycle for lightly soiled items or for laundry which needs only freshen-ing up.With this option, a reduced load of laundry is recommended:• Cottons 3 kg• Synthetics and delicates 1,5 kg
3+4
Extra Rinse
SpinSuperQuick
This appliance is designed for saving water. However, for people with verydelicate skin (allergic to detergents) it may be necessary to rinse the laundryusing an extra quantity of water.Press simultaneously the buttons 3 and 4 for some seconds: the pilot light7.2 comes on. This function stays permanently on. To remove it press thesame buttons again until the pilot light 7.2 goes off.
5 Delay Start
3h 6h 9h
Delay Start
The start of the programme can be delayed by 9, 6 or 3 hours by means ofthis button. The relevant light illuminates.You must select this option after you have set the programme and beforeyou start the programme.Select a delayed start:• select the programme and the required options;• select the delay start by pressing the button 5;• press the button 6:
– the appliance starts its hourly countdown.– The programme will start after the selected delay has expired.
Cancelling the delayed start after having started the programme:• set the appliance to PAUSE by pressing the button 6;• press the button 5 once, the light relevant to the selected delay goes off;• press the button 6 again to start the programme.The DELAY START cannot be selected with the drain programme.
15

Important! The selected delay can be changed only after selecting the wash-ing programme again. The door will be locked throughout the delay time. Ifyou need to open the door, you must set the appliance to PAUSE (by press-ing the button 6) and then wait a few minutes. After you have closed thedoor, press the button 6 again.
6 Start/Pause
Start /Pause
Start the programme by pressing the button 6• To start the selected programme, press the button 6, the corresponding
green pilot light stops flashing. The pilot light 7.1 illuminates to indicatethat the appliance starts operating and the door is locked. If you havechosen a delayed start, the appliance will begin the countdown.
• To interrupt a programme which is running, press the button 6: the cor-responding green pilot light starts flashing. It is possible to change someoptions of a running programme before the programme carries them out.
• To restart the programme from the point at which it was interrupted,press the button 6.
• After the programme has started the door is locked. If, for any reason,you need to open the door, set firstly the appliance to PAUSE by pressingthe button 6. After a few minutes it will be possible to open the door.If the door remains locked, this means that the appliance is already heat-ing or that the water level is too high. In any case, do not try to force thedoor!If you cannot open the door but you need to open it you have to switchthe appliance off by turning the selector dial to . After a few minutesthe door can be opened (pay attention to the water level and tempera-ture!). After closing the door, it is necessary to select the programme andoptions again and to press the button 6.
,.7.1
7.2
7.3
Indicator pilot lights • When you start the programme by pressing the button 6, the washingphase pilot light (7.1) illuminates. This means that the appliance is oper-ating.
• The additional rinses pilot light (7.2) illuminates when the appliance per-forms an extra rinse.
• When the programme has finished the end cycle pilot light (7.3) comeson.
At the end of the programmeThe appliance stops automatically. The pilot light of thebutton 6 and the pilot light corresponding to the just fin-ished washing phase go off. The light 7.3 illuminates.If a programme or an option that ends with water left in thetub has been selected and the door remains locked to in-dicate that the water must be emptied out before openingthe door.Follow the below instructions to empty out the water:• Turn the programme selector dial to .
• Select the draining or spinning programme.• Reduce the spin speed if needed, by pressing the rele-
vant button.• Press the button 6.At the end of the programme, the door can be nowopened. Turn the programme selector dial to to switchthe appliance off.Remove the laundry from the drum and carefully checkthat the drum is empty. If you do not intend to carry out
16

another wash, close the water tap. Leave the door open toprevent the formation of mildew and unpleasant smells.
Warning! If there are children or pets in the house,activate the child safety device in the inner side of
the door frame (for more details read " Child safety" in thechapter "Safety Information").
Stand by: during programme setting up and oncethe programme has finished, if the programme se-
lector dial and any button are not touched, after a few mi-nutes the energy saving system is enabled. The pilotlights go off. The green pilot light of the button 6 flasheswith a low frequency. By pressing any button the appli-ance will come out of the energy saving status.
Door seal
At the end of every cycle,check from the door sealand remove objects thatcould be trapped in thefold.
Washing programmes
Programme - Maximum and Minimum Temperature - Cycle De-scription - Maximum Spin Speed - Maximum Fabrics Load - Typeof Laundry
Options Detergent Com-partment
COTTONS90°-ColdMain wash - Rinses - Maximum spin speed at 1400 rpmMax. load 6 kg - Reduced load 3 kgWhite, coloured cotton and linen. Normally soiled items.
AUTOMATIC SPIN RE-DUCTION
RINSE HOLDSUPER QUICK1)
EXTRA RINSEDELAY START
COTTONS + PREWASH 2)
90°- ColdPrewash - Main wash - Rinses - Maximum spin speed at 1400 rpmMax. load 6 kg - Reduced load 3 kgWhite, coloured cotton and linen. Heavy soiled items.
AUTOMATIC SPIN RE-DUCTION
RINSE HOLDSUPER QUICK 1)
EXTRA RINSEDELAY START
COTTONS ECONOMY60° - 40°Main wash - Rinses - Maximum spin speed at 1400 rpmMax. load 6 kgWhite and coloured cotton. This programme can be selected forslightly or normally soiled cotton items. The temperature will de-crease and the washing time will be extended. This allows to obtaina good washing efficiency by saving energy.
AUTOMATIC SPIN RE-DUCTION
RINSE HOLDEXTRA RINSEDELAY START
SYNTHETICS60° - ColdMain wash - Rinses - Maximum spin speed at 1200 rpmMax. load 3 kg - Reduced load 1,5 kgSynthetic or mixed fabrics: underwear, coloured garments, non-shrink shirts, blouses . Normally soiled items.
AUTOMATIC SPIN RE-DUCTION
RINSE HOLDSUPER QUICK 1)
EXTRA RINSEDELAY START
17

Programme - Maximum and Minimum Temperature - Cycle De-scription - Maximum Spin Speed - Maximum Fabrics Load - Typeof Laundry
Options Detergent Com-partment
MIXED FABRICSColdMain wash - Rinses - Maximum spin speed at 1200 rpmMax. load 3 kgHighly energy efficient cold wash programme for lightly soiledlaundry. This programme requires a detergent which is active incold water.
AUTOMATIC SPIN RE-DUCTION
RINSE HOLDEXTRA RINSEDELAY START
DELICATES40°- ColdMain wash - Rinses - Maximum spin speed at 700 rpmMax. load kg 3 - Reduced load 1,5 kgDelicate fabrics: acrylics, viscose, polyester . Normally soileditems.
AUTOMATIC SPIN RE-DUCTION
RINSE HOLDSUPER QUICK 1)
EXTRA RINSEDELAY START
WOOL / HANDWASH40°- ColdMain wash - Rinses - Maximum spin speed at 1200 rpmMax. load 1 kgMachine washable wool, hand washable woollens and delicate fab-rics with «hand washing» care symbol. Note: A single or bulky itemmay cause imbalance. If the appliance doesn’t perform the final spinphase, add more items, redistribute the load manually and then se-lect the spinning programme.
AUTOMATIC SPIN RE-DUCTION
RINSE HOLDDELAY START
RINSERinse - Short spin speed at 700 rpm.Max. load 6 kgTo rinse and spin cotton garments which have been washed byhand. Select the EXTRA RINSE option to intensify the rinsing ac-tion. The appliance adds additional rinses.
AUTOMATIC SPIN RE-DUCTION
RINSE HOLDEXTRA RINSEDELAY START,
DRAINDraining of waterFor emptying out the water left in the drum in the programmes withRinse Hold option.
SPINDrain and long spin at maximum spin speed at 1400 rpmMax. load 6 kgSeparate spin for hand washed garments and after programmeswith the Rinse Hold option selected. If the Automatic Spin reductionis selected, by pressing the relevant button, the appliance performsa short spin.
AUTOMATIC SPIN RE-DUCTION
DELAY START
18
Programme - Maximum and Minimum Temperature - Cycle De-scription - Maximum Spin Speed - Maximum Fabrics Load - Typeof Laundry
Options Detergent Com-partment
EASY IRON60°- ColdMain wash - Rinses - Maximum spin speed at 900 rpmIn order to obtain the best anti-creasing result, reduce the load ofsynthetics items. (Recommended load 1 Kg)Synthetic or mixed fabrics. Gentle wash and spin to avoid anycreasing. The appliance performs additional rinses.
AUTOMATIC SPIN RE-DUCTION
RINSE HOLDEXTRA RINSEDELAY START
5 SHIRTS30°Main wash - Rinses - Maximum spin speed at 900 rpmSynthetics and mixed fabrics. Suitable for 5 - 6 shirts lightly soiled.
AUTOMATIC SPIN RE-DUCTION
DELAY START
MINI 3030°Main wash - Rinses - Maximum spin speed at 700 rpmMax. load 2 kgSynthetics and delicates. Lightly soiled items or which only needsfreshening up.
AUTOMATIC SPIN RE-DUCTION
DELAY START
JEANS60°- ColdMain wash - Rinses - Maximum spin speed at 1200 rpmMax. load 3 kgTrousers, shirts or jackets in denim and jersey realized with hi-techmaterials. The Extra Rinse option is activated automatically.
AUTOMATIC SPIN RE-DUCTION
RINSE HOLDDELAY START
1) If you select the SUPER QUICK option by pressing button 5, we recommend that you reduce the maximum load as indicated. Fullloading is possible however with somewhat reduced cleaning results.
2) In case of prewash phase, put the detergent directly into the drum.
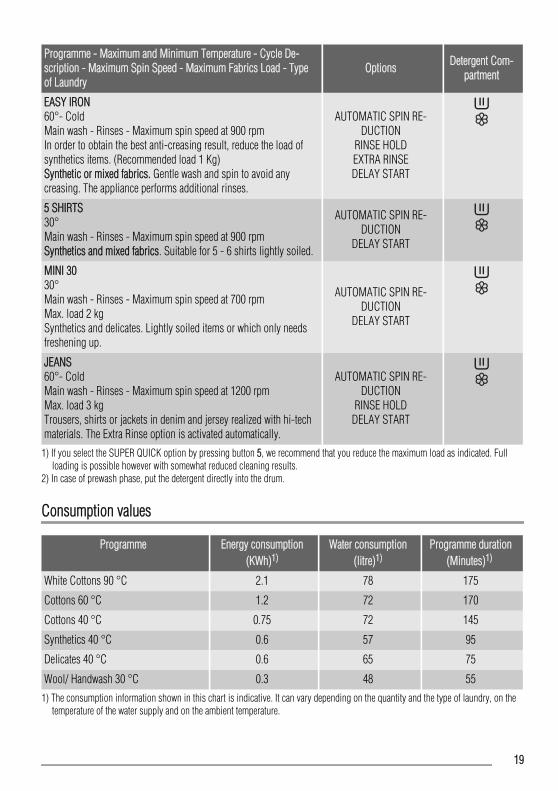
Consumption values
Programme Energy consumption(KWh)1)
Water consumption(litre)1)
Programme duration(Minutes)1)
White Cottons 90 °C 2.1 78 175
Cottons 60 °C 1.2 72 170
Cottons 40 °C 0.75 72 145
Synthetics 40 °C 0.6 57 95
Delicates 40 °C 0.6 65 75
Wool/ Handwash 30 °C 0.3 48 551) The consumption information shown in this chart is indicative. It can vary depending on the quantity and the type of laundry, on the
temperature of the water supply and on the ambient temperature.
19
Standard programmes for the Energy Label consumptionvaluesThe cotton 60 °C economy and cotton 40 °C economy arethe standard cotton programmes for normally soiled cot-ton laundry. They are suitable to clean normally soiledcotton laundry and they are the most efficient programmes
in terms of combined energy and water consumption forwashing that type of cotton laundry.They agree with EN60456.
The actual water temperature may differ from the de-clared cycle temperature.
Care and cleaning
Warning! Switch the appliance off and remove themains plug from the socket before any cleaning
action.
Maintenance WashWith the use of low temperature washes it is possible toget a build up of residues inside the drum.We recommend that a maintenance wash be performed ona regular basis.To run a maintenance wash:• The drum should be empty of laundry.• Select the hottest cotton wash programme.• Use a normal measure of detergent, must be a powder
with biological properties.
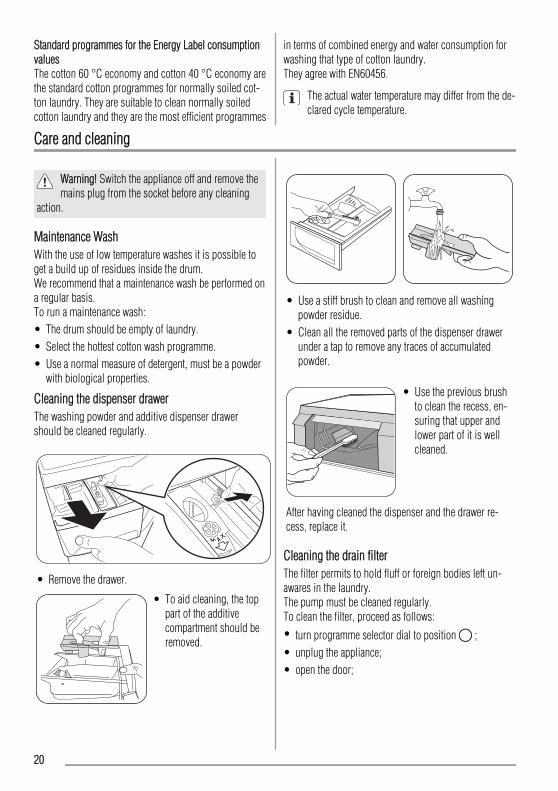
Cleaning the dispenser drawerThe washing powder and additive dispenser drawershould be cleaned regularly.
• Remove the drawer.
• To aid cleaning, the toppart of the additivecompartment should beremoved.
• Use a stiff brush to clean and remove all washingpowder residue.
• Clean all the removed parts of the dispenser drawerunder a tap to remove any traces of accumulatedpowder.
• Use the previous brushto clean the recess, en-suring that upper andlower part of it is wellcleaned.
After having cleaned the dispenser and the drawer re-cess, replace it.
Cleaning the drain filterThe filter permits to hold fluff or foreign bodies left un-awares in the laundry.The pump must be cleaned regularly.To clean the filter, proceed as follows:• turn programme selector dial to position ;• unplug the appliance;• open the door;
20

• turn the drum and alignthe filter cover (FILTER)with the arrow on thedoor seal;
• open the filter cover bypressing the specialhook and by rotatingthe cover upwards;
Warning! Keep thefilter cover open un-
til the filter removal.
• before removing the fil-ter, remove any fluff orsmall objects fromaround the filter;
• remove the filter and clean it under the tap;
• if necessary, place thefilter cover in the rightposition again.
• open the filter coverand insert the filteragain;
The filter is inserted correctly when the indicator on itstop is visible and blocked.
• close the filter cover;• insert the mains plug
again.
Cleaning the water inlet filters
Important! If the appliance doesn't fill, it takes a long timeto fill with water, the starting button flashes red or thedisplay (if available) shows the relevant alarm (see chapter"What to do if..." for more details), check if the water inletfilters are blocked .
To clean the water inlet filters:
• Turn off the water tap.• Unscrew the hose from
the tap.• Clean the filter in the
hose with a stiff brush.
21
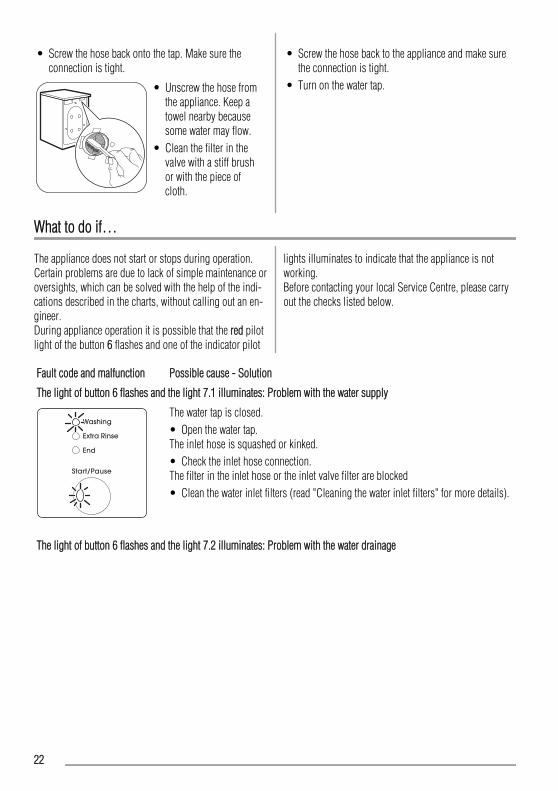
• Screw the hose back onto the tap. Make sure theconnection is tight.
• Unscrew the hose fromthe appliance. Keep atowel nearby becausesome water may flow.
• Clean the filter in thevalve with a stiff brushor with the piece ofcloth.
• Screw the hose back to the appliance and make surethe connection is tight.
• Turn on the water tap.
What to do if…
The appliance does not start or stops during operation.Certain problems are due to lack of simple maintenance oroversights, which can be solved with the help of the indi-cations described in the charts, without calling out an en-gineer.During appliance operation it is possible that the red pilotlight of the button 6 flashes and one of the indicator pilot
lights illuminates to indicate that the appliance is notworking.Before contacting your local Service Centre, please carryout the checks listed below.
Fault code and malfunction Possible cause - Solution
The light of button 6 flashes and the light 7.1 illuminates: Problem with the water supply
The water tap is closed.• Open the water tap.The inlet hose is squashed or kinked.• Check the inlet hose connection.The filter in the inlet hose or the inlet valve filter are blocked• Clean the water inlet filters (read "Cleaning the water inlet filters" for more details).
The light of button 6 flashes and the light 7.2 illuminates: Problem with the water drainage
22

The drain hose is squashed or kinked.• Check the drain hose connection.The drain filter is clogged• If the appliance stops working without discharging the water , first carry out an
emergency drain:– Turn the programme selector dial to ;– Unplug the appliance;– Close the water tap;– If necessary, wait until the water has cooled down;– Unscrew the drain hose from the rear support (see "Frost precaution") and un-
hook it from the sink or spigot;– Let it run along the floor;– Place a bowl on the floor and place the end of the draining hose into the bowl.
The water should drain by gravity into the bowl. When the bowl is full, empty it.Repeat the procedure until water stops flowing out ;
– Screw the draining hose to the rear support and reposition it;– Open the door and remove the laundry;– Carry out the drain filter cleaning as described in "Cleaning the drain filter";– At the end of cleaning action, close the door and insert the mains plug again;– Run a drain programme to check if the appliance works now.
The light of button 6 flashes and the light 7.3 illuminates: Door open
The door has not been closed or is not closed properly.• Close firmly the door.
The appliance does not start or stops during operationwithout any visible alarm.
Before contacting your local Service Centre, please carryout the checks listed below.
23
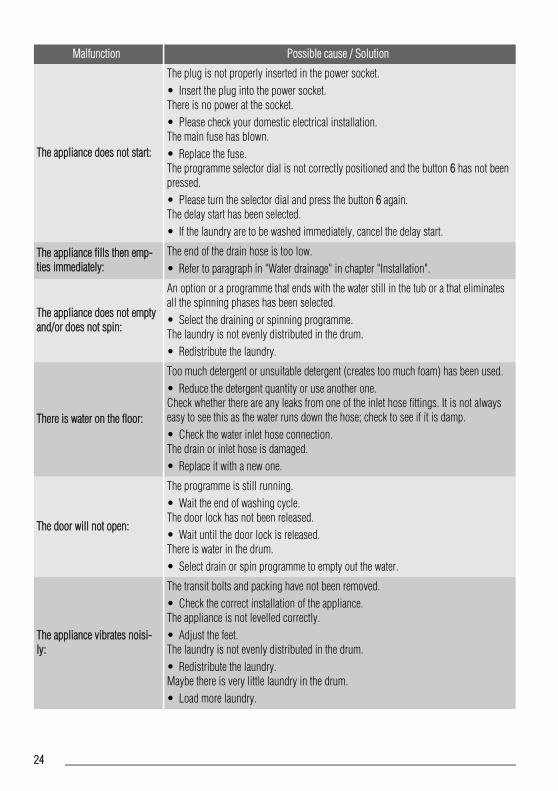
Malfunction Possible cause / Solution
The appliance does not start:
The plug is not properly inserted in the power socket.• Insert the plug into the power socket.There is no power at the socket.• Please check your domestic electrical installation.The main fuse has blown.• Replace the fuse.The programme selector dial is not correctly positioned and the button 6 has not beenpressed.• Please turn the selector dial and press the button 6 again.The delay start has been selected.• If the laundry are to be washed immediately, cancel the delay start.
The appliance fills then emp-ties immediately:
The end of the drain hose is too low.• Refer to paragraph in "Water drainage" in chapter "Installation".
The appliance does not emptyand/or does not spin:
An option or a programme that ends with the water still in the tub or a that eliminatesall the spinning phases has been selected.• Select the draining or spinning programme.The laundry is not evenly distributed in the drum.• Redistribute the laundry.
There is water on the floor:
Too much detergent or unsuitable detergent (creates too much foam) has been used.• Reduce the detergent quantity or use another one.Check whether there are any leaks from one of the inlet hose fittings. It is not alwayseasy to see this as the water runs down the hose; check to see if it is damp.• Check the water inlet hose connection.The drain or inlet hose is damaged.• Replace it with a new one.
The door will not open:
The programme is still running.• Wait the end of washing cycle.The door lock has not been released.• Wait until the door lock is released.There is water in the drum.• Select drain or spin programme to empty out the water.
The appliance vibrates noisi-ly:
The transit bolts and packing have not been removed.• Check the correct installation of the appliance.The appliance is not levelled correctly.• Adjust the feet.The laundry is not evenly distributed in the drum.• Redistribute the laundry.Maybe there is very little laundry in the drum.• Load more laundry.
24

Malfunction Possible cause / Solution
Spinning starts late or the ap-pliance does not spin:
The electronic unbalance detection device has cut in because the laundry is not even-ly distributed in the drum. The laundry is redistributed by reverse rotation of thedrum. This may happen several times before the unbalance disappears and normalspinning can resume. If, after 10 minutes, the laundry is still not evenly distributed inthe drum, the appliance will not spin. In this case, redistribute the load manually andselect the spin programme.• Load more laundry.The load is too small.• Add more items, redistribute the load manually and then select the spinning pro-
gramme.
No water is visible in thedrum:
Appliances based on modern technology operate very economically using very littlewater without affecting performance.
Unsatisfactory washing re-sults
Too little detergent or unsuitable detergent has been used.• Increase the detergent quantity or use another one.Stubborn stains have not been treated prior to washing.• Use commercial products to treat the stubborn stains.The correct temperature was not selected.• Check if you have selected the correct temperature.Excessive laundry load.• Reduce the laundry load.
The appliance makes an un-usual noise
The appliance is fitted with a type of motor which makes an unusual noise comparedwith other traditional motors. This new motor ensures a softer start and more evendistribution of the laundry in the drum when spinning, as well as increased stability ofthe appliance.
After completing these checks, switch on the applianceand press the button 6 to restart the programme.
If the malfunction shows again, contact your Service Cen-tre. The necessary data for the service centre is on the rat-ing plate. We recommend that you write the data here:
Mod. ... ... ...Prod. No. ... ... ... Ser. No. ... ... ...
Mod
. ...
... ..
.
Prod
. No.
... .
.. ..
Ser
. No.
... .
.. ...
Model description (MOD.) ........................................Product number (PNC) .............................................Serial number (S.N.) .................................................
25

26

27

www.zanussi.com/shop
1929
8754
0-A-
1020
11