Embed Size (px)
Citation preview

User Guide
EMR Provider DocumentationApril 2014 Volume 1


Table of Contents
OVERVIEW ....................................................................................................................................................................................1
CREatIng a nOtE .....................................................................................................................................................................1
REMOVIng a nOtE SECtIOn OR SUBSECtIOn ...................................................................................................................3
aDDIng FREE tEXt ....................................................................................................................................................................5
InSERtIng a FREE tEXt FIElD ................................................................................................................................................5
MODIFyIng FREE tEXt .............................................................................................................................................................6
USIng glOBal aUtO tEXt ......................................................................................................................................................6
FORMattIng FREE tEXt ..........................................................................................................................................................7
SaVIng a nOtE ..........................................................................................................................................................................8
OPEnIng an EXIStIng nOtE .................................................................................................................................................12
MODIFyIng an EXIStIng nOtE .............................................................................................................................................13
OVERRIDIng a lOCkED nOtE ................................................................................................................................................15
ERROR a DOCUMEnt ...............................................................................................................................................................16
aPPEnDIX I: lEgEnD FOR DynaMIC DOCUMEntatIOn .................................................................................................18
aPPEnDIX II: aVaIlaBlE glOBal tEXt ................................................................................................................................20
aPPEnDIX III: tEMPlatES ........................................................................................................................................................21
aPPEnDIX IV: CREatIng a PERSOnal nOtE tyPE lISt .....................................................................................................22
aPPEnDIX V: CO-SIgnatURE MatRIX .....................................................................................................................................22
EMR Provider Documentation
1
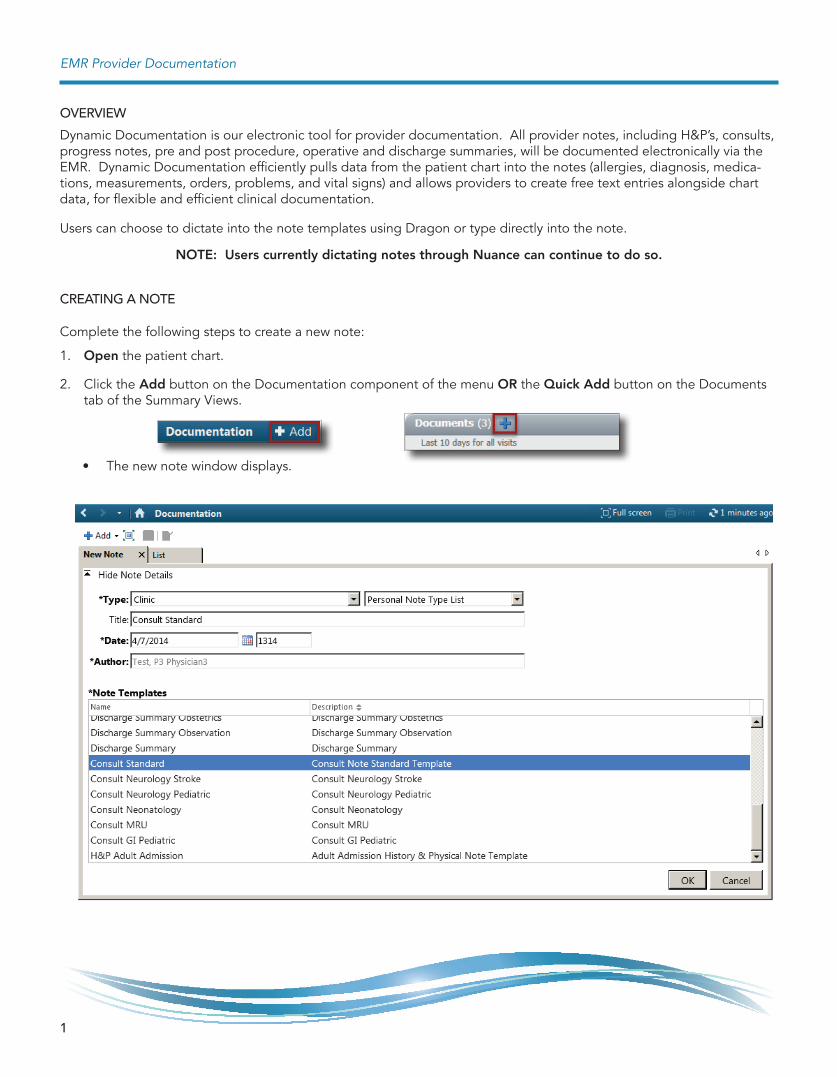
OVERVIEW
Dynamic Documentation is our electronic tool for provider documentation. All provider notes, including H&P’s, consults, progress notes, pre and post procedure, operative and discharge summaries, will be documented electronically via the EMR. Dynamic Documentation efficiently pulls data from the patient chart into the notes (allergies, diagnosis, medica-tions, measurements, orders, problems, and vital signs) and allows providers to create free text entries alongside chart data, for flexible and efficient clinical documentation.
Users can choose to dictate into the note templates using Dragon or type directly into the note.
NOTE: Users currently dictating notes through Nuance can continue to do so.
CREatIng a nOtE
Complete the following steps to create a new note:
1. Open the patient chart.
2. Click the Add button on the Documentation component of the menu OR the Quick Add button on the Documents tab of the Summary Views.
• The new note window displays.

Dynamic Documentation
2
CREatIng a nOtE (Continued)
NOTE: Providers who currently work in areas using PowerNote for documentation in the ED and Ambulatory Clinics will continue to use PowerNote in those settings, but will be required to use Dynamic Documentation for the inpatient setting.
3. Click the drop-down arrow to the right of the Add button.
4. Select Dynamic Documentation for inpatient documentation.
5. Click the drop-down arrow to select the appropriate Note Type.
• It is extremely important to choose the correct note type when creating a note as this will determine where it is filed in the clinical folders.
• Note: To create a Personal Note Type List, please see the Appendix.
6. Enter the Title of the note.
7. Enter the Date and Time.
8. Double-click on the appropriate Note Template at the bottom of the page to select it.

EMR Provider Documentation
3
CREatIng a nOtE (Continued)
• The selected note will open.
• Items documented in the patient chart already (allergies, diagnosis, medications, measurements, orders, prob-lems and vital signs) will automatically pull into the note.
• The user will dictate using Dragon, or free text into the remaining fields.
REMOVIng a nOtE SECtIOn OR SUBSECtIOn
Each section and subsection contain a bent arrow and an X icon located to the right of the section or subsection title. They are only visible when you hover the pointer over the section or subsection and neither are visible in the final note.

Dynamic Documentation
4
REMOVIng a nOtE SECtIOn OR SUBSECtIOn (Continued)
To remove a note section or subsection that you do not want to include in the note:
• Position the cursor over the section or subsection you want to remove.
• NOTE: When the cursor is hovered over a section, the border and gray background display behind all contents in that section to help you understand what will be removed.
• Deleting a section removes all data, the X image, the bent arrow, the heading, and the entire section, including any subsections.
1. Click the X icon on the section or subsection.
2. Click the Undo icon to add a deleted item.

EMR Provider Documentation
5
aDDIng FREE tEXt
• Working in free text mode enables you to enter free text in the note.
• If a free text field already exists in a section, position the cursor in that field and type or dictate in your entry.
InSERtIng a FREE tEXt FIElD
1. Position the cursor over the heading of a chosen section or subsection.
2. Click the bent arrow to the right of the section or subsection.
• A free text field is inserted at the bottom of the section or subsection, if one did not already exist.
• If a section or subsection existed, the cursor is placed in that free text field.
3. Free text or dictate into the field.
4. Click the X on the lower right side of the note to remove a free text area.
Dynamic Documentation
6
MODIFyIng FREE tEXt
The following steps will allow you to modify free text PRIOR to signing a Dynamic Documentation note.
1. Click anywhere in the free text and begin typing.
2. Select the text and press the Backspace or Delete key to remove text.
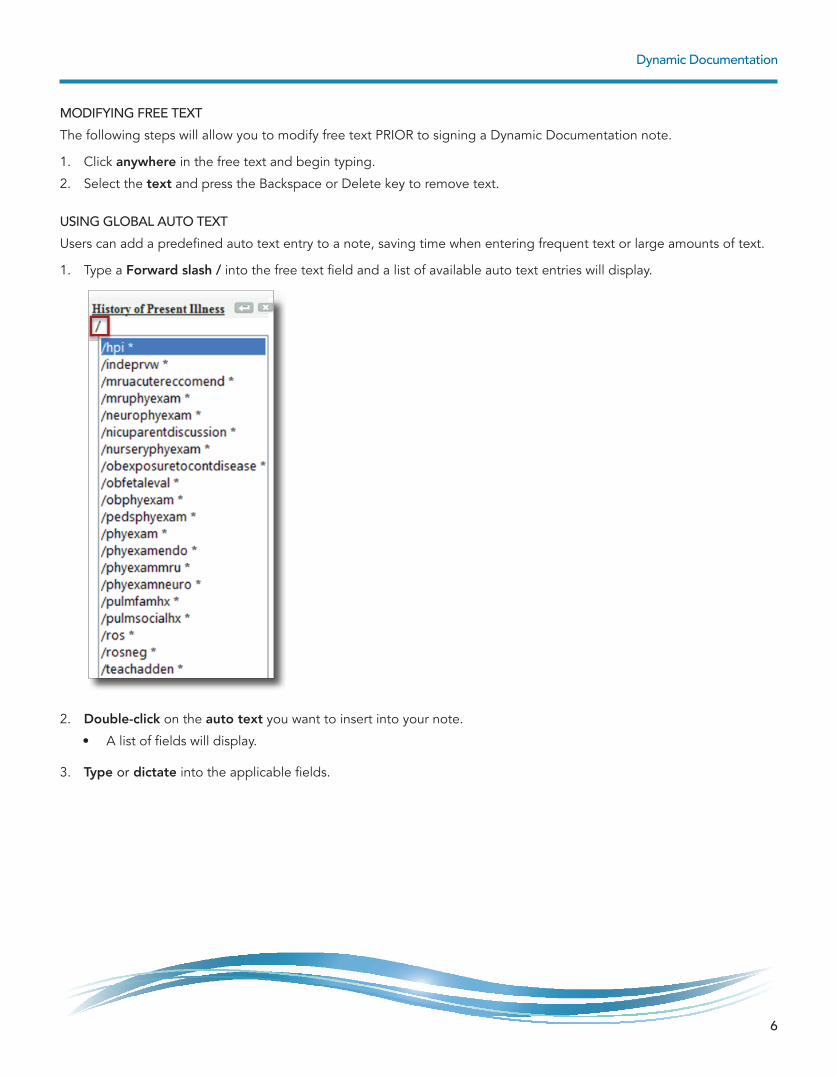
USIng glOBal aUtO tEXt
Users can add a predefined auto text entry to a note, saving time when entering frequent text or large amounts of text.
1. Type a Forward slash / into the free text field and a list of available auto text entries will display.
2. Double-click on the auto text you want to insert into your note.
• A list of fields will display.
3. Type or dictate into the applicable fields.

EMR Provider Documentation
7
FORMattIng FREE tEXt
The following steps will allow you to format free text PRIOR to signing a Dynamic Documentation note.
1. Click to select the text to be formatted.
2. Click the Font Name drop-down button on the toolbar.
• The available fonts display in the short cut menu.
3. Click to select the desired font.
• The selected font is applied to the selected text.
4. Click the Font Size drop-down button.
5. Select the desired font size from the shortcut menu.
• The selected font size is applied to the selected text.
6. Click the Text Color button.
7. Select the desired color.
• The selected text color will be applied to the selected text.
8. Click the Bold button to apply this style to the selected text.
9. Click the Italics button to apply this style to the selected text.
10. Click the Underline button to apply this style to the selected text.
11. Click the Strike-through button to apply this style to the selected text.
12. Click the appropriate Align button to justify the selected text to the left, right or center.
• Text to which a strike-through has been applied (changes in text) in unauthenticated (unsigned) areas of the notes will display text in the color the user chooses.
• Text to which the strike-through has been applied (changes in text) in authenticated (signed) areas of the note will display as red text by default.
• All text formatting options can be applied to all or part of the unauthenticated (unsigned) note.
• If the user selects text and changes the formatting options, the new format applies to the selected text only.
Misspelled words will display with a red underline.
13. Right-click over the misspelled word to display the menu of alternative words to select from.

Dynamic Documentation
8
SaVIng a nOtE
• Saving, rather than signing, enables you to make revisions to the note at a later time.
• Periodically saving a note is recommended to preserve your work.
1. Click the Save button at the bottom of the note or the Save icon on the toolbar.
• If the note has been previously saved, your changes are saved with an In Progress status without further action.
• If the document has not been saved previously, the Save Note dialog box opens.
• To close a note and save your work, click the Save & Close button on the bottom of the note.
The Title defaults to the name of the selected template unless changed manually.
2. Select a different note type, change the title, or change the service date and time in the Save Note dialog.

EMR Provider Documentation
9
SaVIng a nOtE (Continued)
3. Click OK.
• The note is saved with an In Progress status.
• Users may retrieve saved notes from the Documentation component of the menu,
• OR, from within the Message Center.

Dynamic Documentation
10
SIgnIng a nOtE
When you are finished documenting, signing the note completes the documentation process and publishes the note in the patient’s chart.
To sign a note, complete the following steps:
1. With the note open, click the Sign / Submit button at the bottom of the note.
• The Sign/Submit Note dialog opens.
• The Document title defaults to the name of the template selected unless changed manually.
2. Enter the Document title into the Document title box.
3. Enter the clinically significant date and time for the note.

EMR Provider Documentation
11
SIgnIng a nOtE (Continued)
4. Click the Sign button.
• The note now appears in the List tab of the Document Viewing window and in Clinical folders.
NP’s, Midwives, and PA’s will need to forward H&P’s and Operative notes to the Attending for final review and co-
signature.
Residents will need to forward all notes to their attending for final review and co-signature.
5. Click the Forward button on the toolbar of the Document viewing list.
6. Click the Additional Forward Action drop-down and select Sign.
7. Click the OK button.
• The note will route to the Attending’s Message Center for co-signature.

Dynamic Documentation
12
OPEnIng an EXIStIng nOtE
Complete the following steps to open an existing note:
1. Click the Documentation component on the menu or the Documents hyperlink on the Inpatient Summary.
• The List tab is displayed.
• The Display filter is defaulted to the last display filter used from the previous session.
• A list of documents consistent with the filter is displayed.
2. Select Only in the Display filter.
• If Only is selected, a shortcut menu displays additional options.
3. Select the appropriate option.
• Depending on the option chosen, additional filter menus may display.
4. Select the appropriate options for each.
• You can also click the Ellipsis icon to select advanced filters.
• The filtered list of documents display.
5. Double-click the note you want to open.
• The selected note is opened in the editor.
• If the note you chose is already signed, you have the option to modify it.
• If the note you chose is unsigned, you have the option to continue editing.

EMR Provider Documentation
13
MODIFyIng an EXIStIng nOtE
To modify an authenticated noted (already signed), complete the following steps:
1. Click to highlight an authenticated (signed) Dynamic Documentation note in the document list.
2. Click the Modify button on the toolbar, or,
3. Right-click the preview pane and select Modify.
• The note will open.
• Position your cursor in the “Insert Addendum Here:” and enter your addendum.

Dynamic Documentation
14
MODIFyIng an EXIStIng nOtE (Continued)
• Free text must be entered for the Sign / Submit button to be activated.
4. Click the X at the right-side of the selection to strike through an entire selection of existing text.
• For individual results, the X is found immediately following the result.
5. Highlight the text and choose the Strike-through button on the toolbar to strike through portions of existing text.
6. Click the Undo button on the toolbar to undo the last strike-through.
7. Click the Sign / Submit button.
aDDIng SUPERVISIng tEaChIng aDDEnDUM
To modify an unauthenticated note (note forwarded from resident), complete the following steps:
1. Open the note from the forwarded documents to sign in Message Center or from the Document List in Document Viewing.
2. Click the Modify button on the toolbar, or right-click the preview pane and select Modify.
3. Edit the body of the note if necessary.
4. Use Supervising teaching advisory auto text to insert teaching addendum.
5. Click Sign to sign the note.

EMR Provider Documentation
15
OVERRIDIng a lOCkED nOtE
Notes are locked when in use by another user or workstation. Locked notes can be accessed as read-only or by directly overriding the other session.
Complete the following steps to open a locked note from the List tab of the Document Viewing window:
1. Double-click the note you want to open.
• The Note in Use dialog window displays.
• If the note is open for editing by another user, the user will see an option to open the note as read-only and the last saved version of the note will display.
2. Click the Read-Only button to open the note as read only.
• Read only will display the note, but not enable editing.
3. Click Cancel to close the dialog box and discontinue the override.
If a user leaves a note open at one location, then tries to open that note to finish the documentation from another loca-tion, that user will see a notification that the note is in use by you and is locked.
4. Click Edit to break the lock.
• You will lose any unsaved changes.
5. Click OK to proceed with the edit.
6. Click Cancel to discontinue the override and exit from the dialog.
Dynamic Documentation
16
ERROR a DOCUMEnt
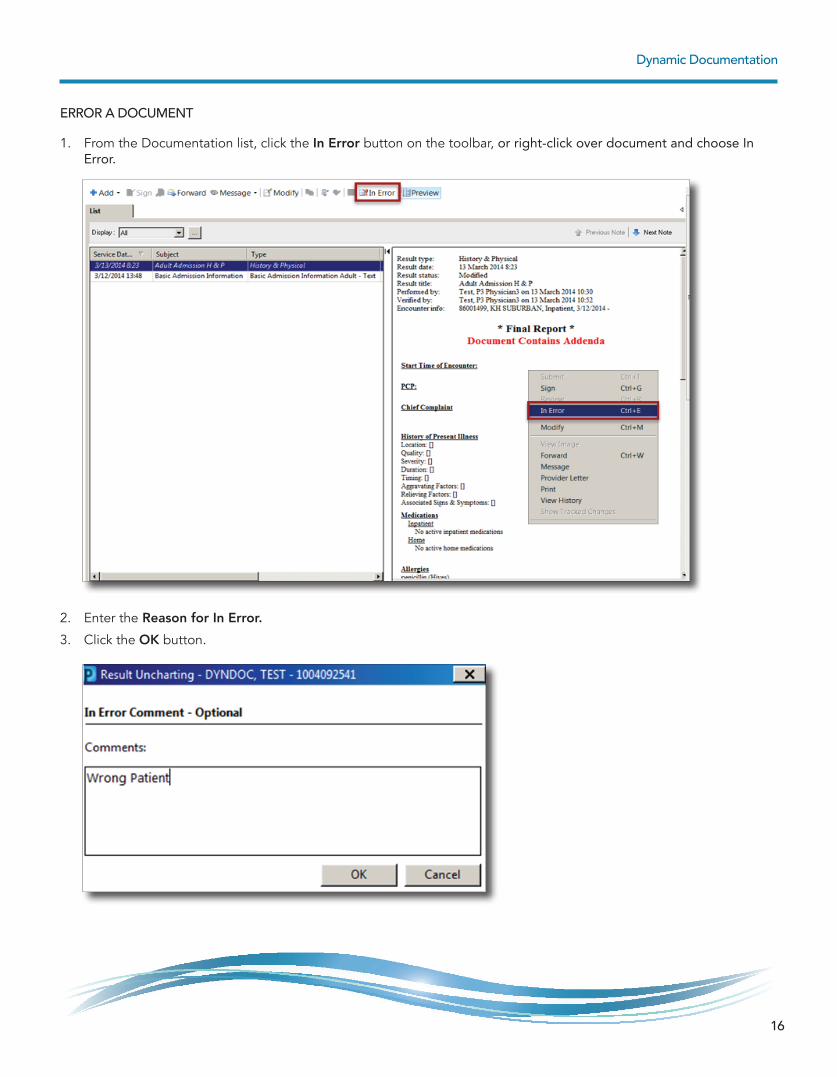
1. From the Documentation list, click the In Error button on the toolbar, or right-click over document and choose In Error.
2. Enter the Reason for In Error.
3. Click the OK button.

EMR Provider Documentation
17
ERROR a DOCUMEnt (Continued)
• The note now displays in Error.

Dynamic Documentation
18
aPPEnDIX I: lEgEnD FOR DynaMIC DOCUMEntatIOn
Insert Free Text
Remove From Note
Save Note
Sign/Submit Note
Refresh this section Undo
Redo
Strikethrough

EMR Provider Documentation
19
aPPEnDIX II: aVaIlaBlE glOBal tEXt
Acute Medical Rehab Recommendation
Endocrine Physical Exam
HPI
Independent Review
MRU Reason For Admission
Neonatology Consultation Parent Discussion
Nursery Physical Exam
OB Exposure to Contagious Disease
OB Fetal Eval Data
Physical Exam
Physical Exam MRU
Physical Exam Neuro
Physical Exam OB
Pulmonary Family History
Pulmonary Social History
Review of Systems
Review of Systems Negative
Teaching Supervisory Addendum

Dynamic Documentation
20
aPPEnDIX III: - tEMPlatE naMES WIth RECOMMEnDED nOtE tyPES.
TEMPLATE NAME NOTE TYPE (Clinical Folder)
Consult GI Pediatric GI Consultation
Consult MRU Physicial Med and +Rehab Consultation
Consult Neonatology Neonatology Consultation
Consult Neurology Pediatric Neurology Consultation
Consult Neurology Stroke Neurology Consultation
Consult Standard File as Consultation note type (depending on Specialty)
Discharge Summary Newborn Discharge Summary Reports
Discharge Summary Observation Observation Discharge Summary
Discharge Summary Obstetrics Discharge Summary Reports
H&P Adult Admission History and Physical Reports
H&P Adult MRU History and Physical Reports
H&P Newborn History and Physical Reports
H&P Observation Adult Observation History & Physical
H&P Observation Pediatric Observation History & Physical
H&P Obstetric Outpatient Evaluation History and Physical Reports
H&P Obstetrics History and Physical Reports
H&P Pediatric Admission History and Physical Reports
Minor Pre Procedure Note Minor Pre-procedure Progress Note
Minor Post Procedure Note Minor Post-procedure Progress Note
Operative Note Operative Note
Pre Procedure Note Pre-Operative Progress Note
Progress Code Blue Code Blue Documentation
Progress Critical Care Critical Care Progress Note
Progress MRU Team Conference Report Progress Note
Progress Pronouncement Note Progress Note
Progress Provider Note Progress Note
Progress Pulmonary Progress Note
Progress Rapid Response Team Progress Note
Progress Standard SOAP Note Progress Note

EMR Provider Documentation
21
aPPEnDIX IV: CREatIng a PERSOnal nOtE tyPE lISt
1. Select Documentation in the Table of Contents and then click the Add button.
• Note that the Type box is empty.
2. Select View, then Customize.
• The Customize Window will open.
3. Select the note types from the Available Note Types (left column) and move them to the Personal Note Type List (right column) for the note types that you would like to filter.

EMR Provider Documentation
22
4. When you are done selecting your Personal Note Type list, click Apply, then click OK.
5. Personal Note Type list now displays desired note types.
EMR Provider Documentation
23
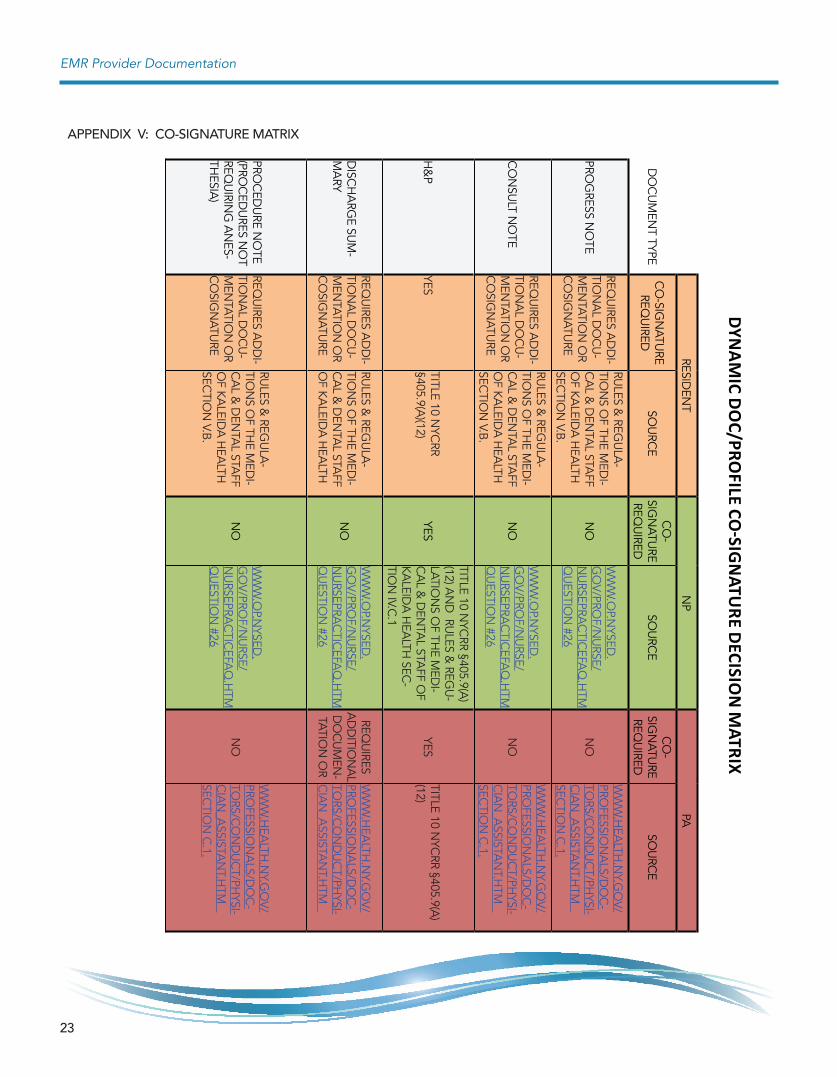
aPPEnDIX V: CO-SIgnatURE MatRIX
Dynam
ic Do
c/Profile co
-Sign
ature D
eciSion
matrix
RESIDEN
TN
PPA
DO
CU
MEN
T TYPEC
O-SIG
NATU
RE REq
UIRED
SOU
RCE
CO
- SIG
NATU
RE REq
UIRED
SOU
RCE
CO
- SIG
NATU
RE REq
UIRED
SOU
RCE
PROG
RESS NO
TE
REqU
IRES AD
DI-
TION
AL D
OC
U-
MEN
TATION
OR
CO
SIGN
ATURE
RULES &
REGU
LA-
TION
S OF TH
E MED
I-C
AL &
DEN
TAL STA
FF O
F KA
LEIDA
HEA
LTH
SECTIO
N V.B
.
NO
WW
W.O
P.NYSED
.G
OV/PRO
F/NU
RSE/N
URSEPRA
CTIC
EFAq
.HTM
q
UESTIO
N #26
NO
WW
W.H
EALTH
.NY.G
OV/
PROFESSIO
NA
LS/DO
C-
TORS/C
ON
DU
CT/PH
YSI-C
IAN
_ASSISTA
NT.H
TM
SECTIO
N C
.1.
CO
NSU
LT NO
TE
REqU
IRES AD
DI-
TION
AL D
OC
U-
MEN
TATION
OR
CO
SIGN
ATURE
RULES &
REGU
LA-
TION
S OF TH
E MED
I-C
AL &
DEN
TAL STA
FF O
F KA
LEIDA
HEA
LTH
SECTIO
N V.B
.
NO
WW
W.O
P.NYSED
.G
OV/PRO
F/NU
RSE/N
URSEPRA
CTIC
EFAq
.HTM
q
UESTIO
N #26
NO
WW
W.H
EALTH
.NY.G
OV/
PROFESSIO
NA
LS/DO
C-
TORS/C
ON
DU
CT/PH
YSI-C
IAN
_ASSISTA
NT.H
TM
SECTIO
N C
.1.
H&
PYES
TITLE 10 NYC
RR §405.9(A
)(12)YES
TITLE 10 NYC
RR §405.9(A)
(12) AN
D RU
LES & REG
U-
LATION
S OF TH
E MED
I-C
AL &
DEN
TAL STA
FF OF
KA
LEIDA
HEA
LTH SEC
-TIO
N IV.C
.1
YESTITLE 10 N
YCRR §405.9(A
)(12)
DISC
HA
RGE SU
M-
MA
RY
REqU
IRES AD
DI-
TION
AL D
OC
U-
MEN
TATION
OR
CO
SIGN
ATURE
RULES &
REGU
LA-
TION
S OF TH
E MED
I-C
AL &
DEN
TAL STA
FF O
F KA
LEIDA
HEA
LTH
NO
WW
W.O
P.NYSED
.G
OV/PRO
F/NU
RSE/N
URSEPRA
CTIC
EFAq
.HTM
q
UESTIO
N #26
REqU
IRES A
DD
ITION
AL
DO
CU
MEN
-TATIO
N O
R WW
W.H
EALTH
.NY.G
OV/
PROFESSIO
NA
LS/DO
C-
TORS/C
ON
DU
CT/PH
YSI-C
IAN
_ASSISTA
NT.H
TM
PROC
EDU
RE NO
TE (PRO
CED
URES N
OT
REqU
IRING
AN
ES-TH
ESIA)
REqU
IRES AD
DI-
TION
AL D
OC
U-
MEN
TATION
OR
CO
SIGN
ATURE
RULES &
REGU
LA-
TION
S OF TH
E MED
I-C
AL &
DEN
TAL STA
FF O
F KA
LEIDA
HEA
LTH
SECTIO
N V.B
.
NO
WW
W.O
P.NYSED
.G
OV/PRO
F/NU
RSE/N
URSEPRA
CTIC
EFAq
.HTM
q
UESTIO
N #26
NO
WW
W.H
EALTH
.NY.G
OV/
PROFESSIO
NA
LS/DO
C-
TORS/C
ON
DU
CT/PH
YSI-C
IAN
_ASSISTA
NT.H
TM
SECTIO
N C
.1.

For assistance, please contact the Technology Assistance Center
(TAC) at 859-7777.
“Kaleida Health approved this training manual as the source of truth as of April 2014. Printing this training document is permitted, however upon printing, this document will be valid for April 2014 only, the source of truth will always be the document found on KaleidaScope”.
EMR Provider Documentation


![PA PROMISe · I PA PROMISe™. Provider Electronic Solutions Software User Manual . PROVIDER ELECTRONIC SOLUTIONS SOFTWARE DOCUMENTATION LIBRARY REFERENCE NUMBER [00000147]](https://img.pdfslide.us/doc/110x75/5b654d0f7f8b9a6e1f8b8b92/pa-promise-i-pa-promise-provider-electronic-solutions-software-user-manual.jpg)


![Introduction · Web view[MS-NSPI]: Name Service Provider Interface (NSPI) Protocol Intellectual Property Rights Notice for Open Specifications Documentation Technical Documentation](https://img.pdfslide.us/doc/110x75/5aa2a1db7f8b9ab4208d5145/introduction-viewms-nspi-name-service-provider-interface-nspi-protocol-intellectual.jpg)