Embed Size (px)
Citation preview

Employee Time Clock Training eLearning Course Notes
Created: 7/19/2013 Page 1
Slide 1: Welcome
Welcome to eLearning.
eLearning is a method that replaces instructor led classroom /
lab training sessions.
Each person will see and hear the same information.
Each person can learn at their own pace, taking the course
several times if necessary.
Each person can print the optional written notes for each
course.
Slide 2: Navigation Overview Notes
Welcome to the navigation overview for Milford eLearning.
You should now hear audio.
All audio is also written as text in the Notes tab.
Just click Notes to see the text anytime throughout the course.
Slide 3: Navigation Overview Outline
Click on the outline tab to see a list of topics.
Selecting a topic will take you to that part of the course.
Slide 4: Navigation Overview Player Controls
The bottom navigation is an important part of the course.
Most slides will automatically advance from one slide to another.
A user can also advance to the next slide by clicking the Next button.
When the audio is playing, the Play button also pauses the course.
At anytime, you can click the Back button to repeat the previous screens.
Employee Time Clock Training eLearning Course Notes
Created: 7/19/2013 Page 2
Slide 5: Navigation Overview Exit
When you start a course, the audio should start playing.
You can also control the volume of the audio by clicking on the Speaker button.
Slide 6: Skills Review
A short Skills Review exercise after a topic allows you to review your skills about the material presented.
The results are displayed for your benefit only.
Once the exercise begins, you must complete it entirely.
Questions can be True/False, Multiple Choice or Multiple Response.
Make your selection(s) and click the Submit button. You'll be notified if your selection was Correct or Incorrect.
At the end of the course you can Review, Retry or Finish the exercise.
Reminder: At any point in the course you can re-take an exercise by clicking on the Outline tab and selecting the
exercise.
Slide 7: Skills Review
Skills Review are displayed for you only to view.
It is recommended to retake the course if you do not receive the suggested 80% Passing Score.
There is also an option to Review Quiz to identify which answers were incorrect.
Select Finish to exit the exercise.
Slide 8: TimeCentre Course
The Employee Time Clock training course has been created specifically for Milford Public Schools.
The TimeCentre device is an innovative versatile time clock that reads an employee's ID badge.

Employee Time Clock Training eLearning Course Notes
Created: 7/19/2013 Page 3
Slide 9: Course Topics
This course will present the new Employee Time Clock training in the sequence steps you see on your screen.
Topic 1 reviews Guidelines & Procedures.
How to use the TimeCentre Device will be covered in Topic 2.
Topic 3 will focus on how to access and read the TimeCentre website.
The final topic is a Wrap Up of what you just learned.
Slide 10: Topic 1: Guidelines & Procedures
Formal written guidelines and procedures will be available in the
Employer Forms section on the Employee portal.
For the purpose of this course, we will review a few guidelines you
should be aware of.
Slide 11: Guidelines & Procedures
It is your responsibility to check the TimeCentre website.
Recommended to do this daily.
Unmatched punches could lead to incomplete pay records.
It is your responsibility to check if you have exceptions (unmatched punches) and check reports to verify detailed time
sheets.
If you discover any unmatched punches, they should be corrected immediately with a blue sheet.
You will not be notified if you have unmatched punches.
Therefore, if you do not make the required corrections by the end of the pay period your paycheck will be affected.
Excessive use of the blue Exception sheet will be monitored and could lead to disciplinary action.

Employee Time Clock Training
Created: 7/19/2013
Slide 12: Blue Exception Sheet
Displayed is a sample of the Employee Exception Sheet.
It is printed on blue paper and is referred to throughout this
course as the blue Exception Sheet.
Notice the revised date. This identifies that you are using the
corrected version.
Slide 13: Skills Review
We have completed the Employee Time Clock Training
Guidelines & Procedures topic. Next is a short Skills Review.
Slide 14: Topic 1: Policies Skills Review
Slide 15: Topic 2: TimeCentre Device
Topic 2 TimeCentre Device will provide information on the new time clock and how to use it.
Slide 16: Device
The TimeCentre device has 3 main sections.
Display
Keypad
Card Reader
The device also has a green light that can eithe
steady or blinking and is of no concern either way.
Slide 17: 3 Step Process
There are 3 steps to recording your time.
View, Set, Scan
Let’s review each one.
Employee Time Clock Training eLearning Course Notes
Page 4
Slide 12: Blue Exception Sheet
Displayed is a sample of the Employee Exception Sheet.
It is printed on blue paper and is referred to throughout this
date. This identifies that you are using the
We have completed the Employee Time Clock Training
Guidelines & Procedures topic. Next is a short Skills Review.
Slide 14: Topic 1: Policies Skills Review
Topic 2: TimeCentre Device
Topic 2 TimeCentre Device will provide information on the new time clock and how to use it.
The TimeCentre device has 3 main sections.
The device also has a green light that can either be
steady or blinking and is of no concern either way.
eLearning Course Notes

Employee Time Clock Training
Created: 7/19/2013
Slide 18: Step 1: View
Step 1: View
Take a second to identify which of the 4 Action Bars
the screen is high-lighted in red.
By taking the time to VIEW which bar is red before you scan will save you from having to submit a correction.
There are 4 bars in the display section, 2 on the left and 2 on the right.
But only 1 can be high-lighted in red.
Start Action Bar (Top left)
Records the time when starting your day
End Action Bar (Bottom left)
Records the time when ending your day
Lunch Out Action Bar (Top right)
Records the time when you are leaving for your lunch or meal period bre
Lunch In Action Bar (Bottom right)
Records the time when you are returning from your lunch or meal period break
Slide 19: Step 2: Set
In the keypad section, there are only TWO keys you will ever use.
The F1 and F3 keys that are high-lighted with a gree
Slide 20: F1 Key
Press the F1 key to select the Start Action Bar.
Pressing the F1 key again will select the End Action Bar.
Pressing the F1 key a 3rd time will select the Start Action Bar again.
Basically it toggles between the 2 Action Bars
Employee Time Clock Training eLearning Course Notes
Page 5
Take a second to identify which of the 4 Action Bars displayed on
By taking the time to VIEW which bar is red before you scan will save you from having to submit a correction.
There are 4 bars in the display section, 2 on the left and 2 on the right.
Records the time when you are leaving for your lunch or meal period break
Records the time when you are returning from your lunch or meal period break
In the keypad section, there are only TWO keys you will ever use.
lighted with a green border.
Press the F1 key to select the Start Action Bar.
Pressing the F1 key again will select the End Action Bar.
Pressing the F1 key a 3rd time will select the Start Action Bar again.
Basically it toggles between the 2 Action Bars on the left side of the display.
eLearning Course Notes
By taking the time to VIEW which bar is red before you scan will save you from having to submit a correction.

Employee Time Clock Training
Created: 7/19/2013
Slide 21: F3 Key
Press the F3 key to select the Lunch Out Action Bar.
Pressing the F3 key again will select the Lunch In Action Bar.
Basically the F3 key toggles between the 2 Action Bars on the right side of the display.
Slide 22: Step 3: Scan In the Card Reader section, place your card on or near the green light.
Slide 23: Step 3: Scan Successful
When the card has been read successfully, a GREEN checkmark will be
displayed as well as an audio message of 'Thank You'.
For a few seconds your ID Number and Name will be displayed as well as
the message that your card has been Verified.
If you hear Thank You and see the green check mark, your time has been
recorded.
Slide 24: Step 3: Scan Not Successful
If the card has NOT been read successfully, a RED X graphic will be displayed as well as an audio message of ‘Oh Oh’.
For a few seconds your ID Number will be displayed as well as the message
that your card is Not Enrolled.
Notify the payroll department that your card is not working properly and
record your time on the blue Exception sheet.
Employee Time Clock Training eLearning Course Notes
Page 6
Press the F3 key to select the Lunch Out Action Bar.
Pressing the F3 key again will select the Lunch In Action Bar.
Basically the F3 key toggles between the 2 Action Bars on the right side of the display.
In the Card Reader section, place your card on or near the green light.
Slide 23: Step 3: Scan Successful
When the card has been read successfully, a GREEN checkmark will be
displayed as well as an audio message of 'Thank You'.
For a few seconds your ID Number and Name will be displayed as well as
the message that your card has been Verified.
If you hear Thank You and see the green check mark, your time has been
Slide 24: Step 3: Scan Not Successful
as NOT been read successfully, a RED X graphic will be displayed as well as an audio message of ‘Oh Oh’.
For a few seconds your ID Number will be displayed as well as the message
card is not working properly and
record your time on the blue Exception sheet.
eLearning Course Notes
as NOT been read successfully, a RED X graphic will be displayed as well as an audio message of ‘Oh Oh’.

Employee Time Clock Training
Created: 7/19/2013
Slide 25: Instructions
Displayed near each time clock is a label with instructions on the 4 Action
Bars.
Slide 26: Frequently Asked Questions
Time to review frequently asked questions.
If I hear the network is down at our school can I use the time clock?
Yes
TimeCentre is connected to a server at the Parsons complex, so your
school network does not impact the time clock.
If for some reason the time clock cannot access the
be established.
Slide 27: Frequently Asked Questions
If the power was to go out at my school, can I use the time clock?
Yes
TimeCentre has a battery backup and will continue running for a
If the display is visible, continue scanning.
Slide 28: Frequently Asked Questions
How will I know if my card is working?
The user is notified when a card is read and their time recorded with a green checkmark graphic and an audio ‘Th
You’.
They are also notified when a card cannot be read with a RED X graphic and an audio ‘Oh Oh’ message.
Employee Time Clock Training eLearning Course Notes
Page 7
Displayed near each time clock is a label with instructions on the 4 Action
Slide 26: Frequently Asked Questions
questions.
If I hear the network is down at our school can I use the time clock?
TimeCentre is connected to a server at the Parsons complex, so your
school network does not impact the time clock.
If for some reason the time clock cannot access the Parsons complex, all recorded times are stored until connection can
Slide 27: Frequently Asked Questions
If the power was to go out at my school, can I use the time clock?
TimeCentre has a battery backup and will continue running for a short period of time.
Slide 28: Frequently Asked Questions
The user is notified when a card is read and their time recorded with a green checkmark graphic and an audio ‘Th
They are also notified when a card cannot be read with a RED X graphic and an audio ‘Oh Oh’ message.
eLearning Course Notes
Parsons complex, all recorded times are stored until connection can
The user is notified when a card is read and their time recorded with a green checkmark graphic and an audio ‘Thank
They are also notified when a card cannot be read with a RED X graphic and an audio ‘Oh Oh’ message.
Employee Time Clock Training eLearning Course Notes
Created: 7/19/2013 Page 8
Slide 29: Frequently Asked Questions
After my card is scanned and then I notice the wrong Action Bar was high-lighted in red, what should I do?
Select the correct Action Bar, scan again and complete a blue Exception sheet.
Slide 30: Frequently Asked Questions
If I lost or left my card at home, what should I do?
For lost cards, notify the Human Resources department immediately.
For a card left at home, use the blue Exception sheet to record your time for the day.
Reminder:
Excessive use of the blue Exception sheet will be monitored and could lead to disciplinary action.
Slide 31: Skills Review
We have completed the Employee Time Clock Training TimeCentre Device topic. Next is a short Skills Review.
Slide 32: Topic 2: TimeCentre Device Skills Review
Slide 33: Topic 3: TimeCentre Website
Slide 34: A. Log In Information
Topic 3 will be covered in 5 sections.
A. Log In Information
B. Unmatched Punches
C. Detailed Time Sheet Report
D. Parameters
E. Report Toolbar
We’ll begin with Topic A. Log In Information

Employee Time Clock Training
Created: 7/19/2013
Slide 35: A. Log In Information
District employees can access the new TimeCentre website 1 of 2
ways.
From any computer in or out of the district from the
click on Staff Workroom at the top of the page.
To the left is a list of links, select the TimeCentre link.
There are 2 links available.
To view current information, select the TimeCentre
To view historical information, prior to July 25, 2013 select the
From any computer, in or out of the district, an employee can use the URL displayed on your screen.
https://mpstime.milforded.org/TimeCentre72/login.asp
Slide 36: User
In the User field, enter your first initial and last name.
This entry should be all lower case.
For the purpose of this course, we will log in as jtest.
Slide 37: Password
In the Password field, type in the temporary (one time) default password of Milford1.
Note that the M is capitalized.
Click the login button.
Employee Time Clock Training eLearning Course Notes
Page 9
Slide 35: A. Log In Information
District employees can access the new TimeCentre website 1 of 2
From any computer in or out of the district from the Milford website,
click on Staff Workroom at the top of the page.
To the left is a list of links, select the TimeCentre link.
TimeCentre link.
information, prior to July 25, 2013 select the TimeCentre Historical link.
From any computer, in or out of the district, an employee can use the URL displayed on your screen.
https://mpstime.milforded.org/TimeCentre72/login.asp
User field, enter your first initial and last name.
For the purpose of this course, we will log in as jtest.
In the Password field, type in the temporary (one time) default password of Milford1.
eLearning Course Notes
From any computer, in or out of the district, an employee can use the URL displayed on your screen.

Employee Time Clock Training
Created: 7/19/2013
Slide 38: Invalid Username or Password
If a username or password is Invalid, the system notifies you with the message displayed.
‘We are sorry, there has been an error: Invalid Username or Password.’
Click on the try again link to start over.
Slide 39: Forgotten Password
If I have forgotten my password, what can I do?
Call the payroll department to reset your password to the temporary (one time) default password of Milford1.
Slide 40: EmpSelf
To change the temporary (one time) default password of Milford1 click on the EmpSelf link at the top of the page.
Slide 41: Change Password
To your left is a list of options.
Select the Change Password option.
Slide 42: Change Password
Enter your old password. This is the temporary (one time) default password of Milford1.
Enter your new password.
Required that your password contains:
at least one capital letter,
one numeral and
must be 6-8 characters.
Enter your new password again to confirm it.
Select the Change My Password button.
Employee Time Clock Training eLearning Course Notes
Page 10
Slide 38: Invalid Username or Password
If a username or password is Invalid, the system notifies you with the message displayed.
‘We are sorry, there has been an error: Invalid Username or Password.’
If I have forgotten my password, what can I do?
Call the payroll department to reset your password to the temporary (one time) default password of Milford1.
e the temporary (one time) default password of Milford1 click on the EmpSelf link at the top of the page.
This is the temporary (one time) default password of Milford1.
Enter your new password again to confirm it.
eLearning Course Notes
Call the payroll department to reset your password to the temporary (one time) default password of Milford1.
e the temporary (one time) default password of Milford1 click on the EmpSelf link at the top of the page.

Employee Time Clock Training
Created: 7/19/2013
Slide 43: Logoff
After changing your password, the system will log you off and ask you to click here to log on again.
At the end of a session, it is recommended to Logoff, not X out to exit.
Select the Logoff link at the top of the page.
Slide 44: B. Unmatched Punches
Slide 45: Missed Punches
Click on the Missed Punches link.
Slide 46: Punch Exceptions
Displayed are Punch Exceptions that the system has been unable to match with a corresponding punch.
FYI
Recommended to check this report daily for the previous days punches.
Punches for the day you are checking will not be displayed until the final punch has been completed.
Exceptions may include duplicate punches, pressing the wrong button as well as miss
For each ‘unmatched punch’ listed, you will need to submit a blue Exception sheet with the correction.
Slide 47: Punch Type
In the Punch Type column, an O punch type listed means you are missing the corresponding 'In'
punch.
You need to record an In punch on the blue Exception sheet.
It also could mean it is a duplicate Out punch.
An I punch type listed means you are missing the corresponding 'Out' punch.
You need to record an Out punch on the blue Exception sheet.
It also could mean it is a duplicate In punch.
Employee Time Clock Training eLearning Course Notes
Page 11
After changing your password, the system will log you off and ask you to click here to log on again.
At the end of a session, it is recommended to Logoff, not X out to exit.
of the page.
Slide 44: B. Unmatched Punches
Displayed are Punch Exceptions that the system has been unable to match with a corresponding punch.
Recommended to check this report daily for the previous days punches.
Punches for the day you are checking will not be displayed until the final punch has been completed.
Exceptions may include duplicate punches, pressing the wrong button as well as missing In or Out punches.
For each ‘unmatched punch’ listed, you will need to submit a blue Exception sheet with the correction.
punch type listed means you are missing the corresponding 'In'
need to record an In punch on the blue Exception sheet.
It also could mean it is a duplicate Out punch.
punch type listed means you are missing the corresponding 'Out' punch.
You need to record an Out punch on the blue Exception sheet.
It also could mean it is a duplicate In punch.
eLearning Course Notes
After changing your password, the system will log you off and ask you to click here to log on again.
Displayed are Punch Exceptions that the system has been unable to match with a corresponding punch.
Punches for the day you are checking will not be displayed until the final punch has been completed.
ing In or Out punches.
For each ‘unmatched punch’ listed, you will need to submit a blue Exception sheet with the correction.
punch type listed means you are missing the corresponding 'In'

Employee Time Clock Training
Created: 7/19/2013
Slide 48: Punch Type
In the Punch Type column, there are additional codes not on the report displayed.
For a LI punch type listed means you are missing the corresponding ‘Lunch Out’ punch.
It also could mean there is a duplicate Lunch In punch.
You need to record the missing or duplicate punch on the blue Exception sheet.
For a LO punch type listed means you are missing the corresponding ‘Lunch In’ punch.
It also could mean there is a duplicate Lunch Out punch.
You need to record the missing or duplicate punch on the blue Exception sheet.
Slide 49: C. Detailed Time Sheet
Slide 50: Detailed Time Sheet Report
Click on the Detailed Time Sheet Report link
Employee Time Clock Training eLearning Course Notes
Page 12
In the Punch Type column, there are additional codes not on the report displayed.
punch type listed means you are missing the corresponding ‘Lunch Out’ punch.
It also could mean there is a duplicate Lunch In punch.
You need to record the missing or duplicate punch on the blue Exception sheet.
punch type listed means you are missing the corresponding ‘Lunch In’ punch.
uplicate Lunch Out punch.
You need to record the missing or duplicate punch on the blue Exception sheet.
Slide 49: C. Detailed Time Sheet
Slide 50: Detailed Time Sheet Report
Click on the Detailed Time Sheet Report link
eLearning Course Notes

Employee Time Clock Training eLearning Course Notes
Created: 7/19/2013 Page 13
Slide 51: Detailed Time Sheet
Displayed is a Detailed Time Sheet report for the current pay period.
We recommend that you check this report daily to view your previous days punches.
At the end of each pay period, it is vital that you verify that all dates worked are listed and that the Total Paid Time is
correct.
Slide 52: A Perfect Day
For July 8, we have a perfect day. It is perfect because all 4 punches have been recorded and Jane Test will be paid 7
hours, which is correct.

Employee Time Clock Training
Created: 7/19/2013
Slide 53: A Not So Perfect Day
For July 9, we do not have a perfect day.
Lunch In and Out was recorded correctly.
An End was recorded correctly, which means the employee punched out at the end of the day.
We are missing a Start punch for the start of our day.
To correct this unmatched punch, we need to make an entry on the blue Exception sheet.
Slide 54: Exception Sheet Sample
Displayed is a sample of how to complete the blue Exception Sheet for the Tuesday July 9th missed Start punch.
Notice the 5 Reason Codes available. For July 9th, use Code 1 Missed Punch In (start of day).
Employee Time Clock Training eLearning Course Notes
Page 14
An End was recorded correctly, which means the employee punched out at the end of the day.
We are missing a Start punch for the start of our day.
unmatched punch, we need to make an entry on the blue Exception sheet.
Slide 54: Exception Sheet Sample
Displayed is a sample of how to complete the blue Exception Sheet for the Tuesday July 9th missed Start punch.
For July 9th, use Code 1 Missed Punch In (start of day).
eLearning Course Notes
An End was recorded correctly, which means the employee punched out at the end of the day.
Displayed is a sample of how to complete the blue Exception Sheet for the Tuesday July 9th missed Start punch.

Employee Time Clock Training eLearning Course Notes
Created: 7/19/2013 Page 15
Slide 55: Another Not So Perfect Day
For July 10, we have another not so perfect day.
Jane arrived to work at 08:00 and she took a 15 minute lunch break.
What is missing is the End punch, which means the employee did not punch out at the end of the day.
The correct end time is 1:00 pm which she must record on the blue exception sheet.
If she took sick time for the remainder of the day she will need to complete a blue exception sheet requesting 2.25 hours
sick leave.
Slide 56: Exception Sheet Sample
Displayed is a sample of how to complete the blue Exception Sheet for the July 10 missed End punch.
Our example also shows the request for 2.25 hours of sick leave.
For July 10th, use Code 4 Missed Punch Out (end of day).
Slide 57: Sick Day
For July 11, notice that there is no time recorded.
Jane Test was sick and an entry will need to be made on the blue Exception sheet.
It will be entered in TimeCentre manually by the designated time keeper and once recorded will be displayed as “Sick”
on the Detailed Time Sheet in the Pay Type column.
Additional options such as Holiday, etc. will display similar to the Sick Pay Type displayed.
Slide 58: Exception Sheet Sample
Displayed is a sample of how to complete the blue Exception Sheet for the July 11 Sick Day.
Slide 59: Missed Lunch Punch
For July 12, we are missing a punch.
Although Jane punched out for the day, the Out punch is not displayed on the detailed time sheet because she is missing
her Lunch In punch.
Employee Time Clock Training
Created: 7/19/2013
The Lunch In punch must be recorded on the blue Exception sheet.
Slide 60: Exception Sheet Sample
Displayed is a sample of how to complete the blue Exception Sheet for July 12.
For July 12th, use Code 3 Missed Lunch Punch Return
Slide 61: Detailed Time Sheet
After all corrections from the blue Exception sheets have been made, displayed is the updated Detailed Time Sheet
report.
Checking this report by the end of the pay period can eliminate errors on your paycheck.
Slide 62: D. Parameters
Slide 63: Parameters
Click on the Parameters link at the top of the page.
Slide 64: Next Period
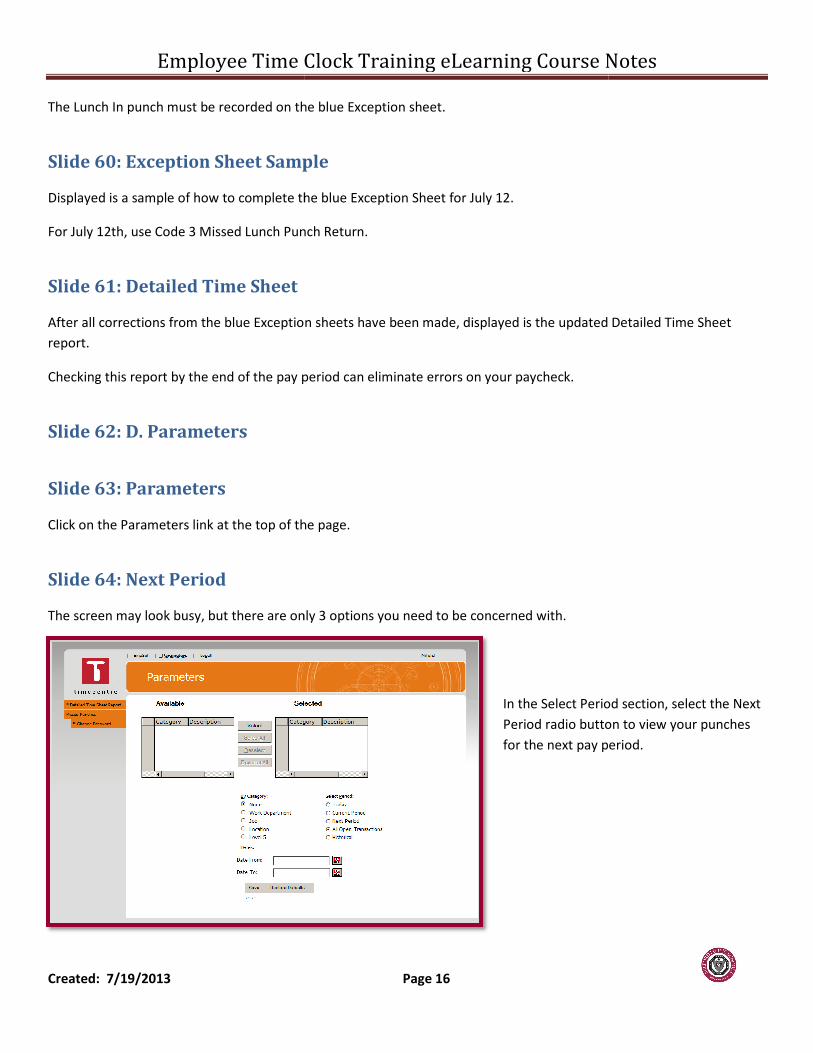
The screen may look busy, but there are only 3 options you need to be concerned with.
Employee Time Clock Training eLearning Course Notes
Page 16
The Lunch In punch must be recorded on the blue Exception sheet.
Slide 60: Exception Sheet Sample
Displayed is a sample of how to complete the blue Exception Sheet for July 12.
For July 12th, use Code 3 Missed Lunch Punch Return.
After all corrections from the blue Exception sheets have been made, displayed is the updated Detailed Time Sheet
Checking this report by the end of the pay period can eliminate errors on your paycheck.
Click on the Parameters link at the top of the page.
The screen may look busy, but there are only 3 options you need to be concerned with.
In the Select Period section, select the Next
Period radio button to view your punches
for the next pay period.
eLearning Course Notes
After all corrections from the blue Exception sheets have been made, displayed is the updated Detailed Time Sheet
In the Select Period section, select the Next
radio button to view your punches
for the next pay period.
Employee Time Clock Training eLearning Course Notes
Created: 7/19/2013 Page 17
Slide 65: All Open Transactions
You can also select All Open Transactions to view all transactions that have not been finalized.
Slide 66: Historical
All historical payroll information that occurred after July 26, 2013 will be displayed in the new TimeCentre website.
All payroll information prior to July 25, 2013 cannot be viewed in the new TimeCentre website.
It is available in the TimeCentre Historical (Prior to July 25 2013) link.
Slide 67: E. Report Toolbar
Slide 68: Toolbar
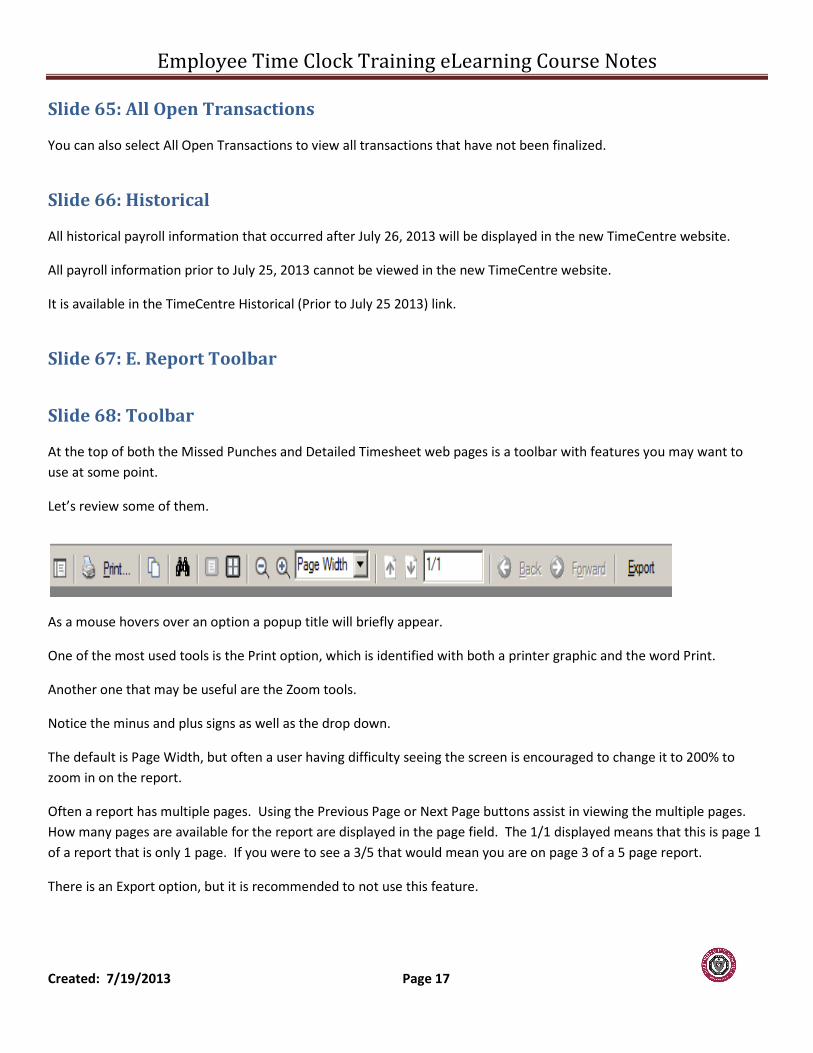
At the top of both the Missed Punches and Detailed Timesheet web pages is a toolbar with features you may want to
use at some point.
Let’s review some of them.
As a mouse hovers over an option a popup title will briefly appear.
One of the most used tools is the Print option, which is identified with both a printer graphic and the word Print.
Another one that may be useful are the Zoom tools.
Notice the minus and plus signs as well as the drop down.
The default is Page Width, but often a user having difficulty seeing the screen is encouraged to change it to 200% to
zoom in on the report.
Often a report has multiple pages. Using the Previous Page or Next Page buttons assist in viewing the multiple pages.
How many pages are available for the report are displayed in the page field. The 1/1 displayed means that this is page 1
of a report that is only 1 page. If you were to see a 3/5 that would mean you are on page 3 of a 5 page report.
There is an Export option, but it is recommended to not use this feature.
Employee Time Clock Training
Created: 7/19/2013
Slide 69: Skills Review
We have completed the Employee Time Clock Training TimeCentre Website topic. Next is a short Skills Review.
Slide 70: Topic 3: TimeCentre Website Skills Review
Slide 71: Topic 4: Wrap Up
Slide 72: Helpful Hints
A lot of information has been provided. It may feel overwhelming, but allow me to remind you that this course is
available to retake as often as necessary.
The optional printed documentation serves as a User’s Guide as well.
Recommended to take the course until you reach the passing score of 80% on all Skills Review.
Slide 73: Exit You have now completed the Milford eLearning Employee Time Clock Training
Great job!
Select the Red X to close this course. (Top Right corner
Employee Time Clock Training eLearning Course Notes
Page 18
We have completed the Employee Time Clock Training TimeCentre Website topic. Next is a short Skills Review.
Slide 70: Topic 3: TimeCentre Website Skills Review
A lot of information has been provided. It may feel overwhelming, but allow me to remind you that this course is
The optional printed documentation serves as a User’s Guide as well.
ended to take the course until you reach the passing score of 80% on all Skills Review.
Milford eLearning Employee Time Clock Training course.
(Top Right corner)
eLearning Course Notes
We have completed the Employee Time Clock Training TimeCentre Website topic. Next is a short Skills Review.
A lot of information has been provided. It may feel overwhelming, but allow me to remind you that this course is
ended to take the course until you reach the passing score of 80% on all Skills Review.