Embed Size (px)
Citation preview
6-12 Computer Science – Week 1.9
Windows 10 Start Menu
The Microsoft Ribbon (Office 2007)
Ribbon Video & PowerPoint
Documents - The RibbonTabs, Groups, and CommandsLive PreviewQuick Access ToolbarMini ToolbarThe Microsoft Office Button
New, Open, Save, Print, OptionsALT key, Key TipsVersion Compatibility
Word, Excel, and PowerPoint can Save as 97-2003 versionsIf older versions of Access are upgraded to 2007 you cannot go back
Online - Read the Ribbon DocumentPowerPoint – The Ribbon
Homework Online - Microsoft Ribbon Quiz
3 - The New Start Menu
Back by popular demand, the Start menu in Windows 10 replaces the Start screen as seen in Windows 8, at least for desktop users. In this lesson we will introduce the new Start menu and show you how to use it.
3.1 – Opening the Start menu
To open the Start menu at any time, simply click on the Start button in the bottom left hand corner of the screen. You can also press either of the Windows logo keys on your keyboard or press the Windows button on your device, if it has one. Figure 3.1 shows the Start menu open on a typical Windows 10 PC.
Figure 3.1 – The Windows 10 Start menu
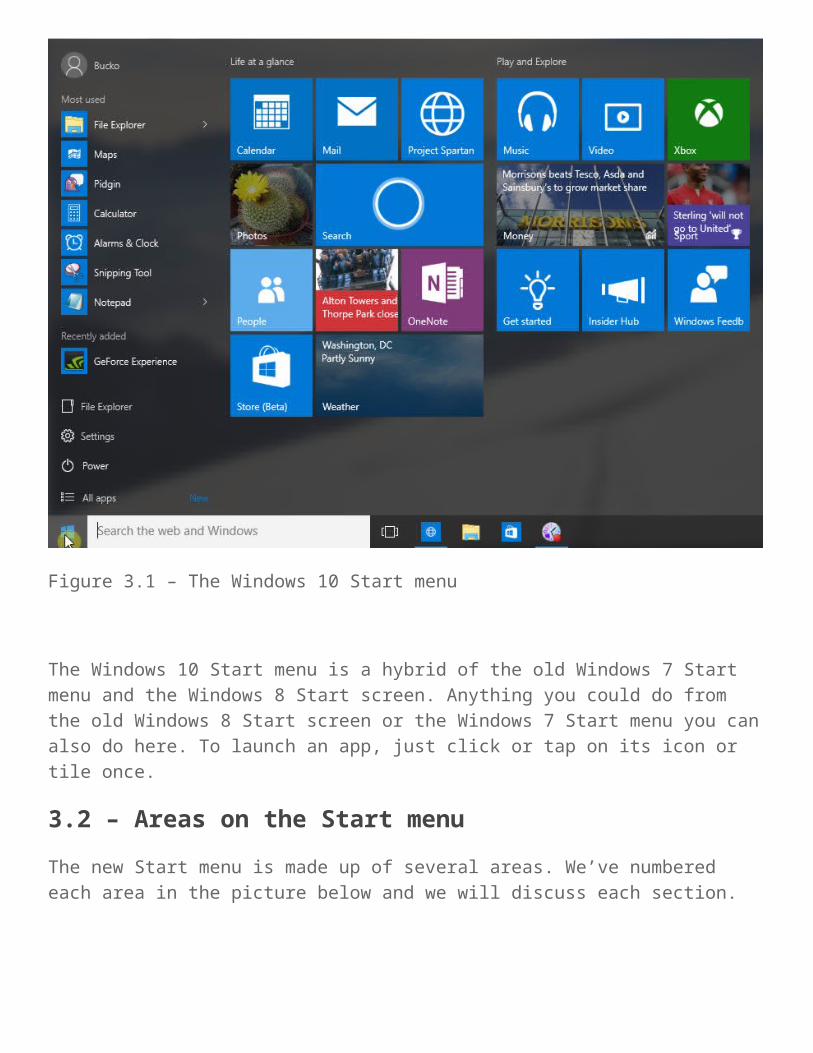
The Windows 10 Start menu is a hybrid of the old Windows 7 Start menu and the Windows 8 Start screen. Anything you could do from the old Windows 8 Start screen or the Windows 7 Start menu you can also do here. To launch an app, just click or tap on its icon or tile once.
3.2 – Areas on the Start menu
The new Start menu is made up of several areas. We’ve numbered each area in the picture below and we will discuss each section.
Figure 3.2 – Start menu areas
Area 1 – Most used programs – This is where your most frequently run programs will be placed. Some of these programs may have an arrow next to them. By clicking on this arrow you open the programs “jump list”. This usually opens a list of files that this app has
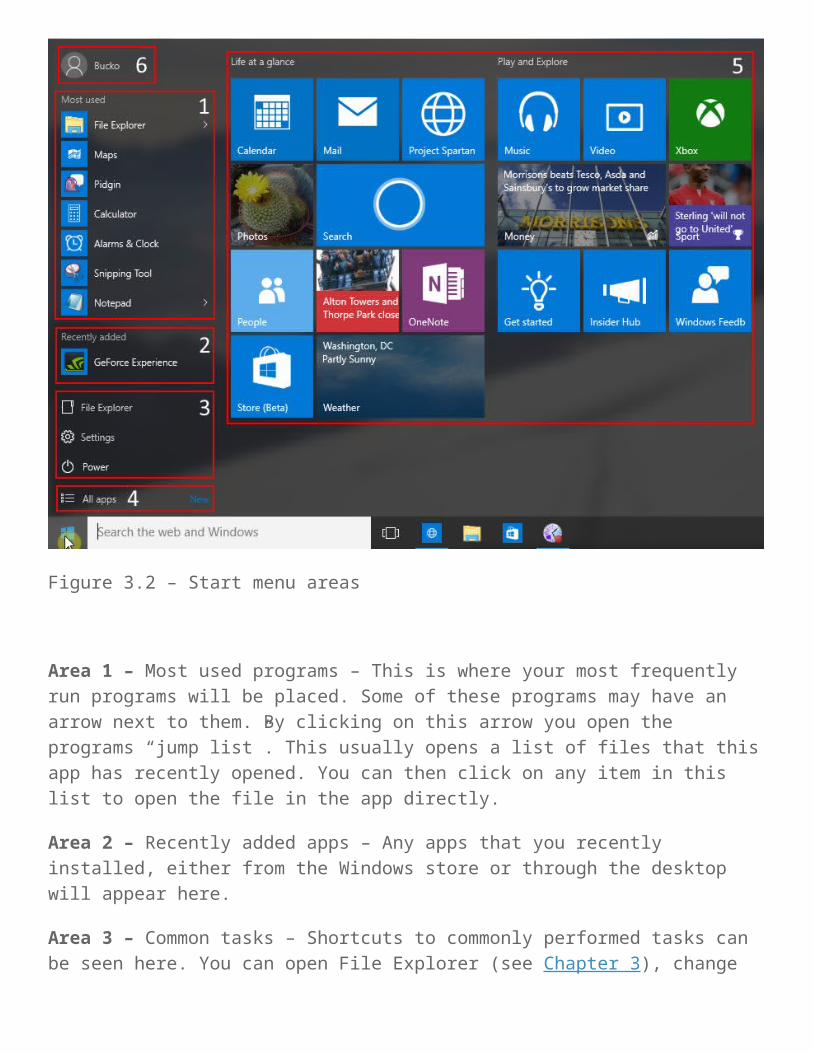
recently opened. You can then click on any item in this list to open the file in the app directly.
Area 2 – Recently added apps – Any apps that you recently installed, either from the Windows store or through the desktop will appear here.
Area 3 – Common tasks – Shortcuts to commonly performed tasks can be seen here. You can open File Explorer (see Chapter 3), change computer settings or power down or restart your PC. We’ll cover power options later in the lesson.
Area 4 – All Apps – The all apps section allows you to browse all the applications on your PC in alphabetical order. We will look at this in more detail later in the lesson.
Area 5 – Tiles – The live tiles shown on the right of the Start menu should be familiar to Windows 8 users. Each tile on the Start menu represents a program. In figures 3.1 and 3.2 we can see a tile in the second column from the left with a picture on it and the words “Alton Towers and Thorpe Park close”. This is the News tile and the picture and headline relates to the roller coaster accident that was sadly in the news at the time the picture was taken. The pictures and information on the tiles are constantly changing, unlike traditional icons that usually remain static.
You can pin other applications and add more tiles to this section too. We show you how in lesson 45.2. If you have more tiles than will fit on the Start menu, a scroll bar will appear on the right allowing you to scroll down to see more tiles.
Many tiles on the Start menu can show information. As you work with Windows 10 the Start menu will “come alive”. For instance, pictures from your Pictures library will appear on the Pictures tile, music recommendations may appear on the Music tile.
Area 6 – User account functions – Go to this section to log out or switch user. We will look at that in more detail later in the lesson.
3.3 – All apps
If a program isn’t listed anywhere on the basic Start menu, as seen in figures 3.1 and 3.2, you can find it under “All apps” (section 4 in figure 3.2). To open the All apps section you need to click on it just once. This is like opening the “All programs” section on the Windows 7 Start menu, or the All apps page on the Windows 8 Start screen. Figure 3.3 shows the Start menu with the All apps section open.
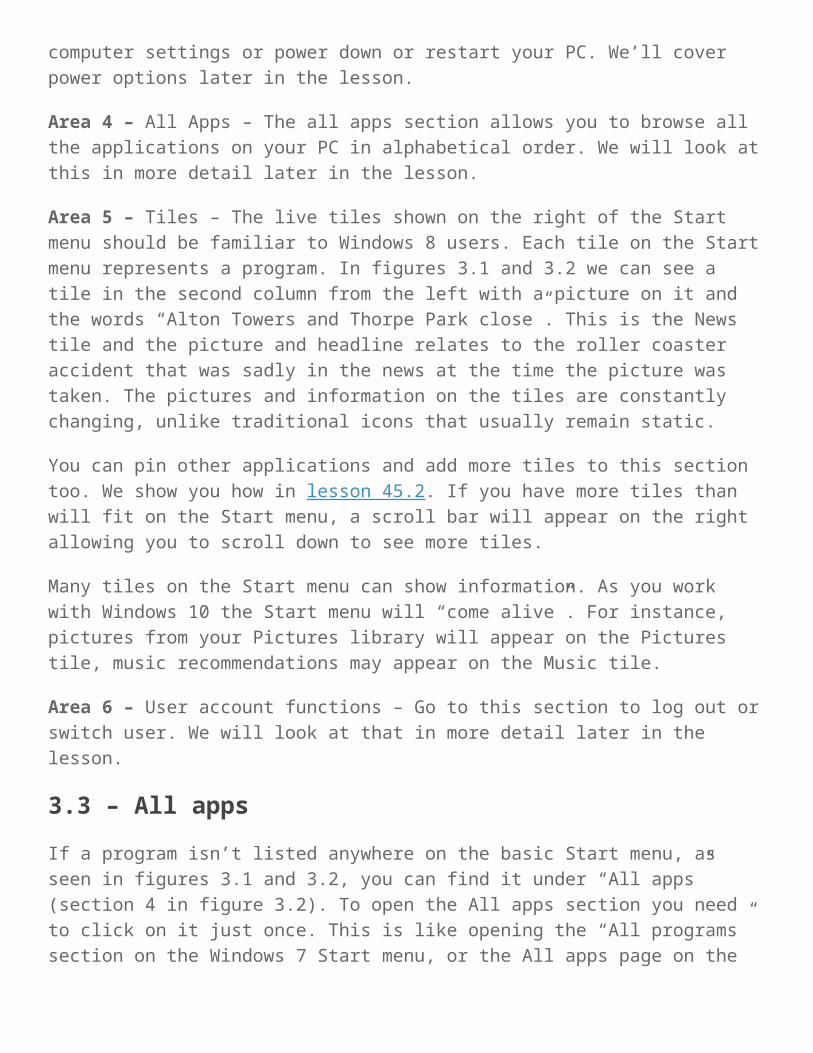
Figure 3.3 – All apps on the Windows 10 Start menu
Rather than a custom sorting order, as with Windows 7 and earlier versions of Windows, All apps view lets you browse your applications alphabetically. Use the scroll bar at the side (the one under the mouse pointer in figure 3.3) to scroll down the list. When you’re done working with All apps view, click on “Back”.
As an alternative to trawling through the All apps view, you can use the “Search the web and Windows” bar that’s next to the Start button and we will cover that in some detail in lesson 4.
3.4 – Locking, signing out and powering down
You can lock, sign out and shut down your PC from the Start menu too.

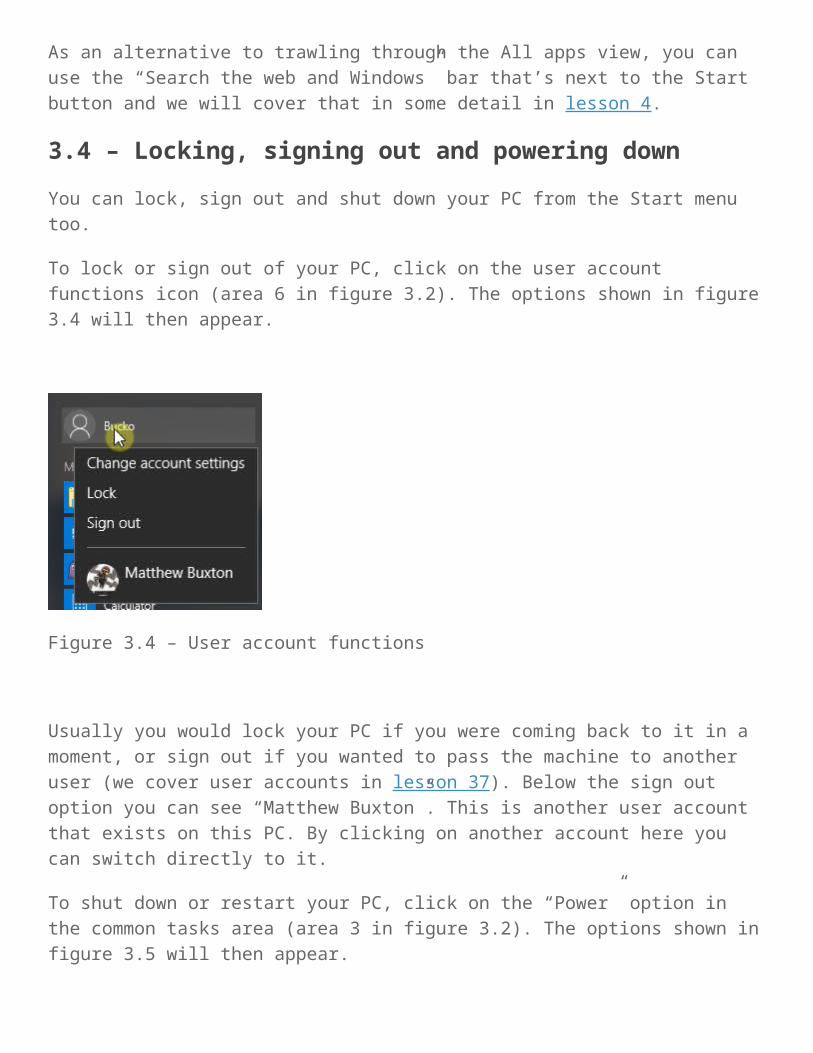
To lock or sign out of your PC, click on the user account functions icon (area 6 in figure 3.2). The options shown in figure 3.4 will then appear.
Figure 3.4 – User account functions
Usually you would lock your PC if you were coming back to it in a moment, or sign out if you wanted to pass the machine to another user (we cover user accounts in lesson 37). Below the sign out option you can see “Matthew Buxton”. This is another user account that exists on this PC. By clicking on another account here you can switch directly to it.
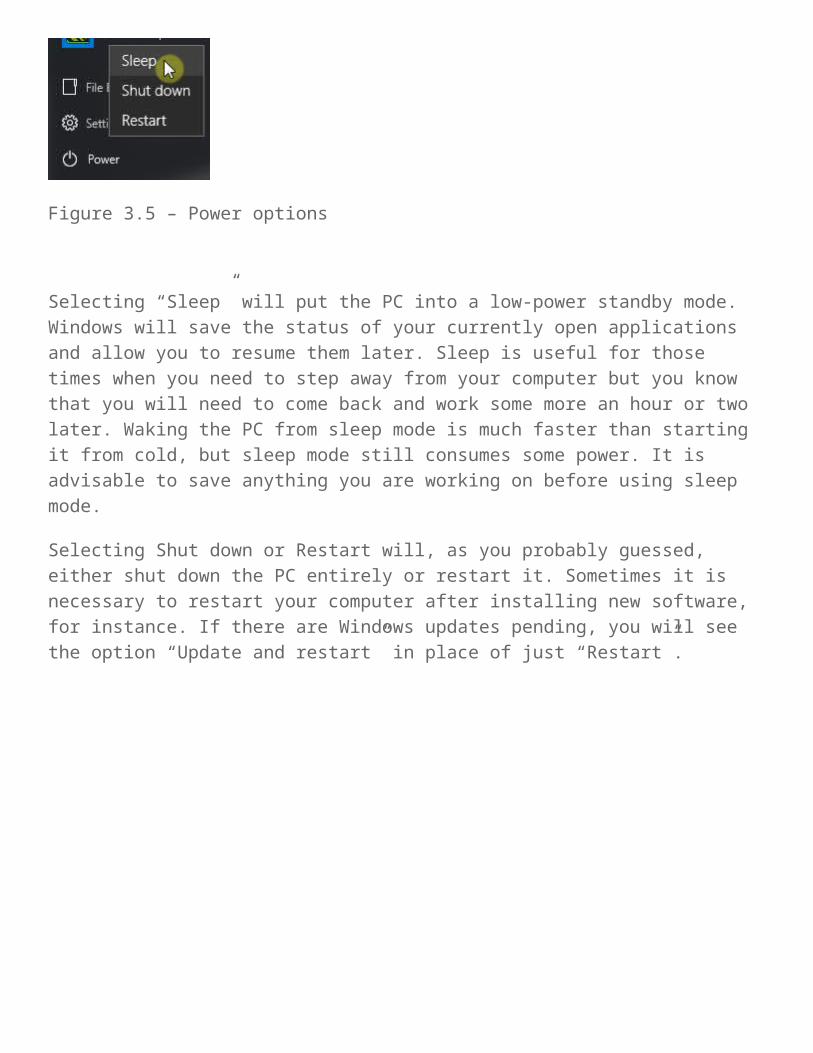
To shut down or restart your PC, click on the “Power” option in the common tasks area (area 3 in figure 3.2). The options shown in figure 3.5 will then appear.
Figure 3.5 – Power options
Selecting “Sleep” will put the PC into a low-power standby mode. Windows will save the status of your currently open applications and allow you to resume them later. Sleep is
useful for those times when you need to step away from your computer but you know that you will need to come back and work some more an hour or two later. Waking the PC from sleep mode is much faster than starting it from cold, but sleep mode still consumes some power. It is advisable to save anything you are working on before using sleep mode.
Selecting Shut down or Restart will, as you probably guessed, either shut down the PC entirely or restart it. Sometimes it is necessary to restart your computer after installing new software, for instance. If there are Windows updates pending, you will see the option “Update and restart” in place of just “Restart”.
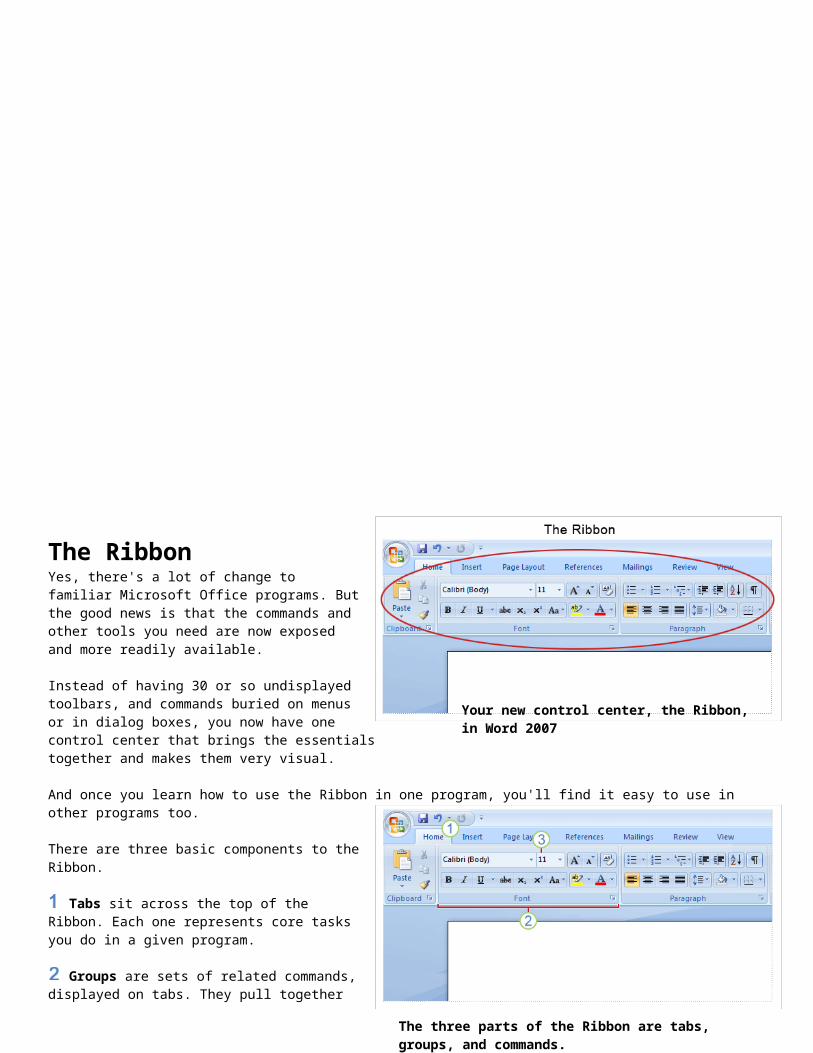
The Ribbon
Yes, there's a lot of change to familiar Microsoft Office programs. But the good news is that the commands and other tools you need are now exposed and more readily available.
Instead of having 30 or so undisplayed toolbars, and commands buried on menus or in dialog boxes, you now have one control center that brings the essentials together and makes them very visual.
And once you learn how to use the Ribbon in one program, you'll find it easy to use in other programs too.
There are three basic components to the Ribbon.
Tabs sit across the top of the Ribbon. Each one represents core tasks you do in a given program.
Groups are sets of related commands, displayed on tabs. They pull together all the commands you're likely to need for a type of task, and they remain on display and readily available, giving you rich visual aids.
Commands are arranged in groups. A command can be a button, a menu, or a box where you enter information.How do you get started? Begin with the first tab.
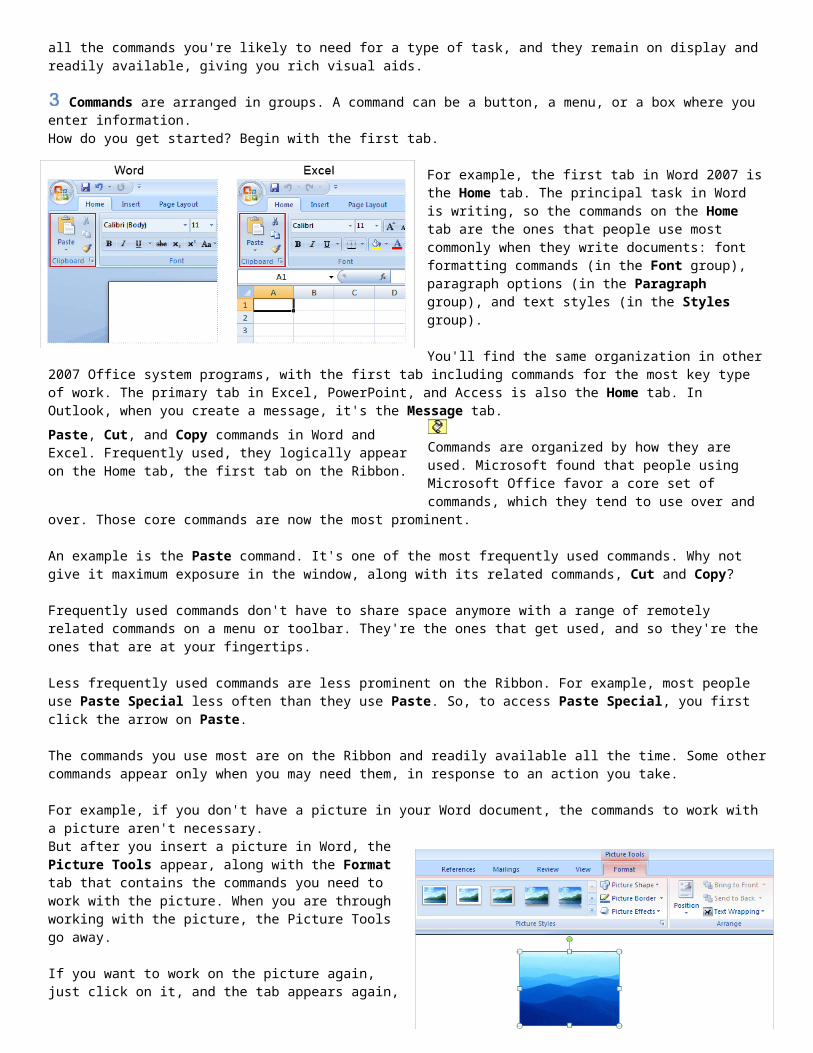
For example, the first tab in Word 2007 is the Home tab. The principal task in Word is writing, so the commands on the Home tab are the ones that people use most commonly when they write documents: font formatting commands (in the Font group), paragraph options (in the Paragraph group), and text styles (in the Styles group).
You'll find the same organization in other 2007 Office system programs, with the first tab including commands for the most key type of work. The primary tab in Excel, PowerPoint, and Access is also the Home tab. In Outlook, when you create a message, it's the Message tab.
Commands are organized by how they are used. Microsoft found that people using Microsoft Office favor a core set of commands, which they tend to use over and over. Those core commands are now the most prominent.
An example is the Paste command. It's one of the most frequently used commands. Why not give it maximum exposure in the window, along with its related commands, Cut and Copy?
Frequently used commands don't have to share space anymore with a range of remotely related commands on a menu or toolbar. They're the ones that get used, and so they're the ones that are at your fingertips.
Less frequently used commands are less prominent on the Ribbon. For example, most people use Paste Special less often than they use Paste. So, to access Paste Special, you first click the arrow on Paste.
The commands you use most are on the Ribbon and readily available all the time. Some other commands appear only when you may need them, in response to an action you take.
For example, if you don't have a picture in your Word document, the commands to work with a picture aren't necessary.But after you insert a picture in Word, the Picture Tools appear, along with the Format tab that contains the commands you need to work with the picture. When you are through working with the picture, the Picture Tools go away.
If you want to work on the picture again, just click on it, and the tab appears again, with all the commands you need. Word knows what you are doing and provides you with the tools you need. The Ribbon responds to your action.
Your new control center, the Ribbon, in Word 2007
The three parts of the Ribbon are tabs, groups, and commands.
Paste, Cut, and Copy commands in Word and Excel. Frequently used, they logically appear on the Home tab, the first tab on the Ribbon.
So don't worry if you don't see all the commands you need at all times. Take the first steps. Then the commands you need will be at hand.
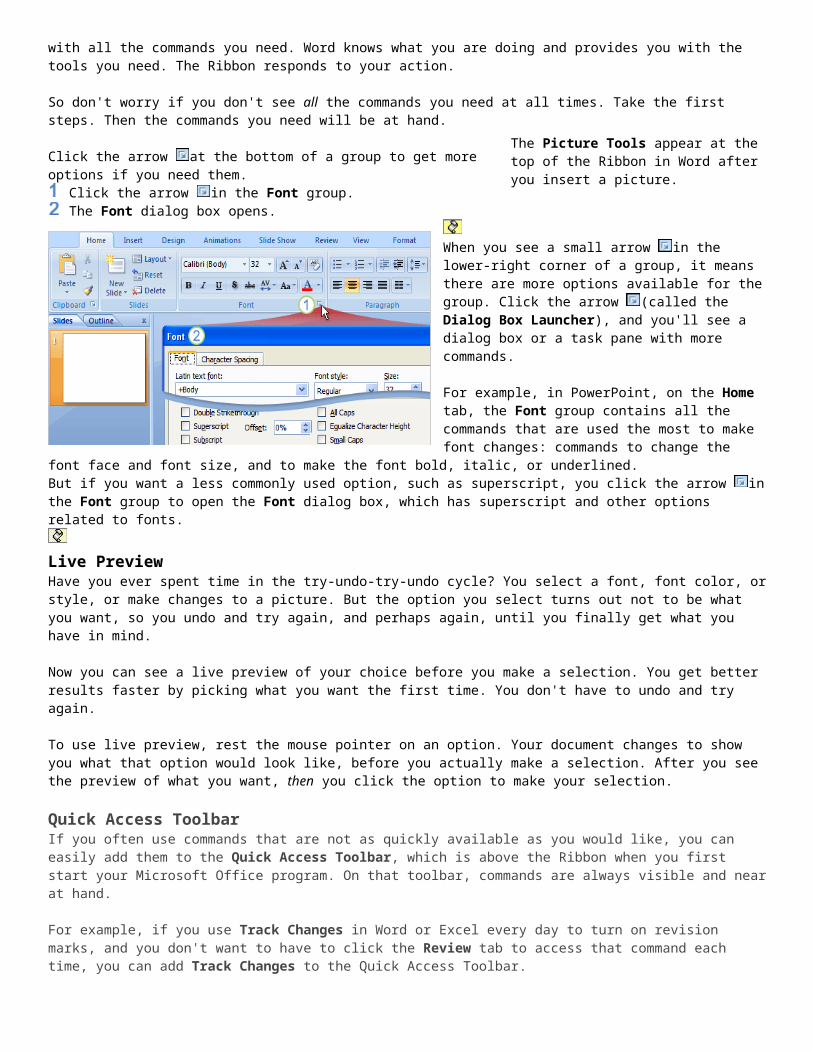
Click the arrow at the bottom of a group to get more options if you need them. Click the arrow in the Font group. The Font dialog box opens.
When you see a small arrow in the lower-right corner of a group, it means there are more options available for the group. Click the arrow (called the Dialog Box Launcher), and you'll see a dialog box or a task pane with more commands.
For example, in PowerPoint, on the Home tab, the Font group contains all the commands that are used the most to make font changes: commands to change the font face and font size, and to make the font bold, italic, or underlined.But if you want a less commonly used option, such as superscript, you click the arrow in the Font group to open the Font dialog box, which has superscript and other options related to fonts.
Live PreviewHave you ever spent time in the try-undo-try-undo cycle? You select a font, font color, or style, or make changes to a picture. But the option you select turns out not to be what you want, so you undo and try again, and perhaps again, until you finally get what you have in mind.
Now you can see a live preview of your choice before you make a selection. You get better results faster by picking what you want the first time. You don't have to undo and try again.
To use live preview, rest the mouse pointer on an option. Your document changes to show you what that option would look like, before you actually make a selection. After you see the preview of what you want, then you click the option to make your selection.
Quick Access ToolbarIf you often use commands that are not as quickly available as you would like, you can easily add them to the Quick Access Toolbar, which is above the Ribbon when you first start your Microsoft Office program. On that toolbar, commands are always visible and near at hand.
For example, if you use Track Changes in Word or Excel every day to turn on revision marks, and you don't want to have to click the Review tab to access that command each time, you can add Track Changes to the Quick Access Toolbar.
To do that, right-click Track Changes on the Review tab, and then click Add to Quick Access Toolbar. To delete a button, right-click it, and then click Remove from Quick Access Toolbar.
Mini ToolbarThe new "Mini Toolbar" is a type of context menu that is automatically shown (by default) when text is selected. The purpose of this feature is to provide easy access to the most-used formatting commands without requiring a right-mouse-button click, as was necessary in older versions of the software. Because the Mini Toolbar is automatically displayed, it remains semi-transparent until the mouse pointer is situated on the control in order to allow an almost-unobstructed view of what is beneath it. It also appears above the right-click menu when a user right-clicks on a selection of words. The Mini Toolbar is currently not customizable, but can be turned off.Everything we've told you so far applies if your screen is set to a high resolution and the program window is maximized. If that's not the case, things look different. How? Like this:
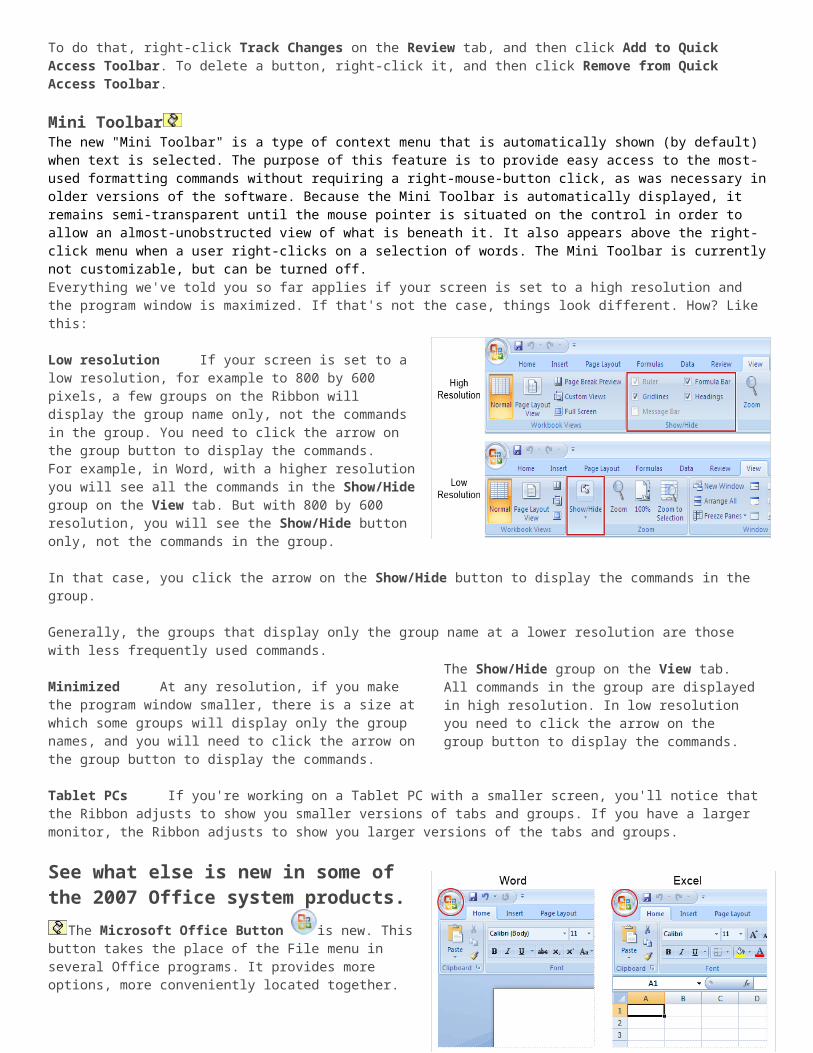
Low resolution If your screen is set to a low resolution, for example to 800 by 600 pixels, a few groups on the Ribbon will display the group name only, not the commands in the group. You need to click the arrow on the group button to display the commands.
The Picture Tools appear at the top of the Ribbon in Word after you insert a picture.
For example, in Word, with a higher resolution you will see all the commands in the Show/Hide group on the View tab. But with 800 by 600 resolution, you will see the Show/Hide button only, not the commands in the group.
In that case, you click the arrow on the Show/Hide button to display the commands in the group.
Generally, the groups that display only the group name at a lower resolution are those with less frequently used commands.
Minimized At any resolution, if you make the program window smaller, there is a size at which some groups will display only the group names, and you will need to click the arrow on the group button to display the commands.
Tablet PCs If you're working on a Tablet PC with a smaller screen, you'll notice that the Ribbon adjusts to show you smaller versions of tabs and groups. If you have a larger monitor, the Ribbon adjusts to show you larger versions of the tabs and groups.
See what else is new in some of the 2007 Office system products. The Microsoft Office Button is new. This button takes the
place of the File menu in several Office programs. It provides more options, more conveniently located together. What else is new? New keyboard shortcuts, and new file formats for Word, Excel, PowerPoint, and Access 2007.
Find out how to work with some of the new options, see what to do if you can't find a command you need, see how to work with the new file formats, and find out how people who haven't upgraded to Word, Excel, or PowerPoint 2007 can open your files and work in them as usual.
The Microsoft Office Button appears in the upper-left corner of the window in several Microsoft Office programs. You get the same basic commands as appeared before on the File menu to open, save, and print your documents.
But the button offers more commands than the File menu did. For example, you've got support here for checking that files in Word, Excel, and PowerPoint don't contain private information or comments.
The Microsoft Office Button also leads you to the program settings that control things like your preferences for correcting spelling.Click Excel Options, Word Options, and so on, at the bottom of the menu, and then click any of the categories in the list on the left. For example, in Excel, click Formulas to turn the R1C1 reference style on or off. In Word, click Proofing to turn on or off the feature to check spelling as you type.
In previous versions of Office you could set options in the Options dialog box, which you opened through the Tools menu. Many of those options can now be found when you click the Microsoft Office Button — where they are more visible, and conveniently close at hand when you start work on old files or new ones.
When you create a new document, workbook, presentation, or database, you'll get a full, colorful window to help you begin. Start with a blank or existing file, as you're accustomed to doing. Or on the left, under Microsoft Office Online, click Featured and choose from the catalog of links to online templates and training courses to jump-start your authoring work.
To begin, click the Microsoft Office Button in the upper-left corner of the window. Then click New to open the New Document window in Word, the New Workbook window in Excel, the New Presentation window in PowerPoint, or the Getting Started with Microsoft Office Access window in Access.
The Show/Hide group on the View tab. All commands in the group are displayed in high resolution. In low resolution you need to click the arrow on the group button to display the commands.
The Microsoft Office Button in Word and Excel.
The New Presentation window in PowerPoint 2007.
You can use Key Tips to remove a heading style in Word, for example.
Press ALT to make the Key Tips appear. Then press H to select the Home tab. Press E to select the Clear Formatting button in the Font group to remove the heading style.
If you rely on the keyboard more than the mouse, you'll want to know about keyboard shortcuts in the 2007 Office system.
The Ribbon design comes with new shortcuts. Why? Because this change brings two big advantages over previous versions: ← Shortcuts for every single button on the Ribbon.← Shortcuts that often require fewer keys.←
Using the new shortcutsThe new shortcuts also have a new name: Key Tips. You press ALT to make the Key Tips appear. You'll see Key Tips for all Ribbon tabs, all commands on the tabs, the Quick Access Toolbar, and the Microsoft Office Button.
Press the key for the tab you want to display. This makes all the Key Tip badges for that tab's buttons appear. Then, press the key for the button you want.
What about the old keyboard shortcuts? Keyboard shortcuts of old that begin with CTRL are all still intact, and you can use them like you always have. For example, the shortcut CTRL+C still copies something to the clipboard, and the shortcut CTRL+V still pastes something from the clipboard.
Benefits of the new file formats.In Word 2007, Excel 2007, and PowerPoint 2007, there are new file formats. Why? There are a lot of reasons! For example,
increased security for your files; reduced chance of file corruption; reduced file size; and new features.
If the technical details interest you, the new file formats are based on XML (Extensible Markup Language) and embrace the Office Open XML Formats.
A bit more about the new format in Word, Excel, and PowerPoint← For documents, workbooks, and presentations, the default file format now has an "x" on the end, representing the XML format.
For example, in Word, a document is now saved by default with the extension .docx, rather than .doc.←
← If you save a file as a template, the same applies: You get the template extension of old, with an "x" on the end; for example, .dotx in Word.
←← If your file contains code or macros, you have to save it using the new macro-enabled file format. For a Word document, that
translates into .docm; for a Word template, it's .dotm.←
Sharing documents between the 2007 Office system and an earlier version of Office.Maybe you're the first person in your workgroup to get the 2007 Office system. Or perhaps you work with some departments who
need to use Office documents saved in an earlier format. You can still share documents with each other. Here's how.
You can open a file created in previous versions of Office, from 95 through 2003. Just open the file as usual. After working with it in the 2007 version, you may want to save the file. By default, the Save As dialog box saves a file created in a previous version as that same version. As you save, a Compatibility Checker will let you know of any new features added to the file that may be disabled, or matched as closely as possible.
Note If you open a presentation created in PowerPoint 95, PowerPoint will default to the 2007 format when you save it. But you can choose to save the file in the 97-2003 format.
If you want to save the file in the 2007 format, select Word Document, Excel Workbook, or PowerPoint Presentation in the Save as type box.
Colleagues who have Word, Excel, or PowerPoint versions 2000 through 2003 (and the latest patches and service packs) can open 2007 files. When they click on your document, they will be asked if they want to download a converter that will let them open your document.
Access 2007
After you upgrade an earlier version database to Access 2007, you cannot use the database again in an earlier version.
The new file format in Access 2007, .accdb, supports new product features such as the attachment data type, which lets you store documents and files as compressed attachments in your database, and multivalued fields. It allows improved encryption for stronger privacy and security.
Version compatibilityWhen you create a new database in Access 2007, the database automatically uses the new .accdb format. Earlier versions of Access use the .mdb file format. You can open and work with .mdb files in Access 2007, if those files were saved in Access 2003, Access 2002, or Access 2000. However, the new features in Access 2007 will not work for .mdb files. If you want to use the new features, use Save As to convert the database to the .accdb format.
When you use Access 2007 to open a database saved in Access 95 or Access 97, Access 2007 offers to upgrade it to the .accdb format. If you don't plan to use the database with earlier versions of Access (and if you do not use replication or user level security), you should upgrade the database.
Important You cannot open a database in .accdb file format with any version of Access except Access 2007.