Embed Size (px)
Citation preview
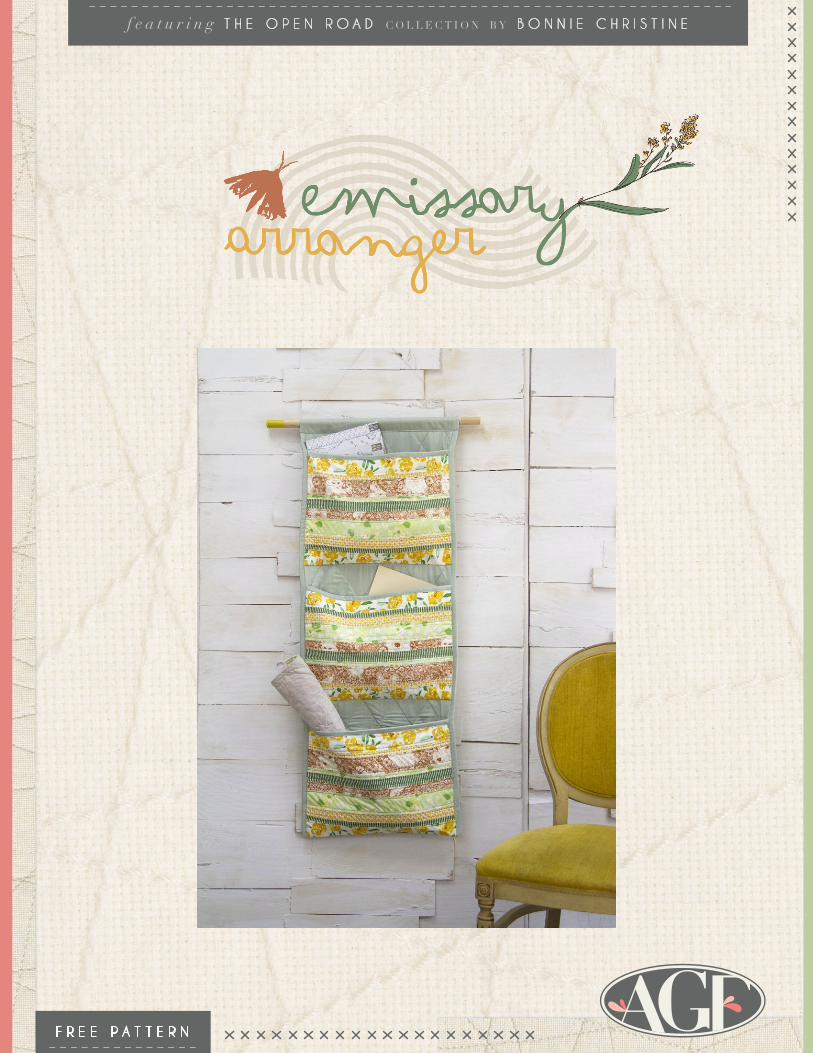
F R E E P A T T E R N
f e a t u r i n g T H E O P E N R O A D C O L L E C T I O N B Y B O N N I E C H R I S T I N E

TOR-13860FIELDS OF ALSIKE
TOR-23860 FIELDS OF GOLDENROD
TOR-13865 BACKROADS UMBER
TOR-23865ACKROADS MOSS
TOR-13861 TERRAIN OVERLOOK
TOR-23861 TERRAIN UNMARKED
TOR-13866WINDING COURSE
TOR-23867WHISPER WEALD
TOR-13862 ROADSIDE WILDFLOWERS
TOR-23863QUIET DRIFT
TOR-13868NATURE WALK YELLOWSTONE
TOR-13864 DISCOVERED WARMTH
TOR-23864DISCOVERED SUNSHINE
TOR-23869WANDERING WITH BEAR
TOR-13869WANDERING WITH DOE
TOR-23868NATURE WALK LIMESTONE
© 2019 Courtesy of Art Gallery Quilts LLC. All Rights Reserved.
F A B R I C S D E S I G N E D B Y B O N N I E C H R I S T I N E
D E S I G N E D B Y A G F S T U D I O
UN
DE
R T
HE
T
RE
ES
UN
DE
R T
HE
S
UN
ar tga l le ry fabr ics.com
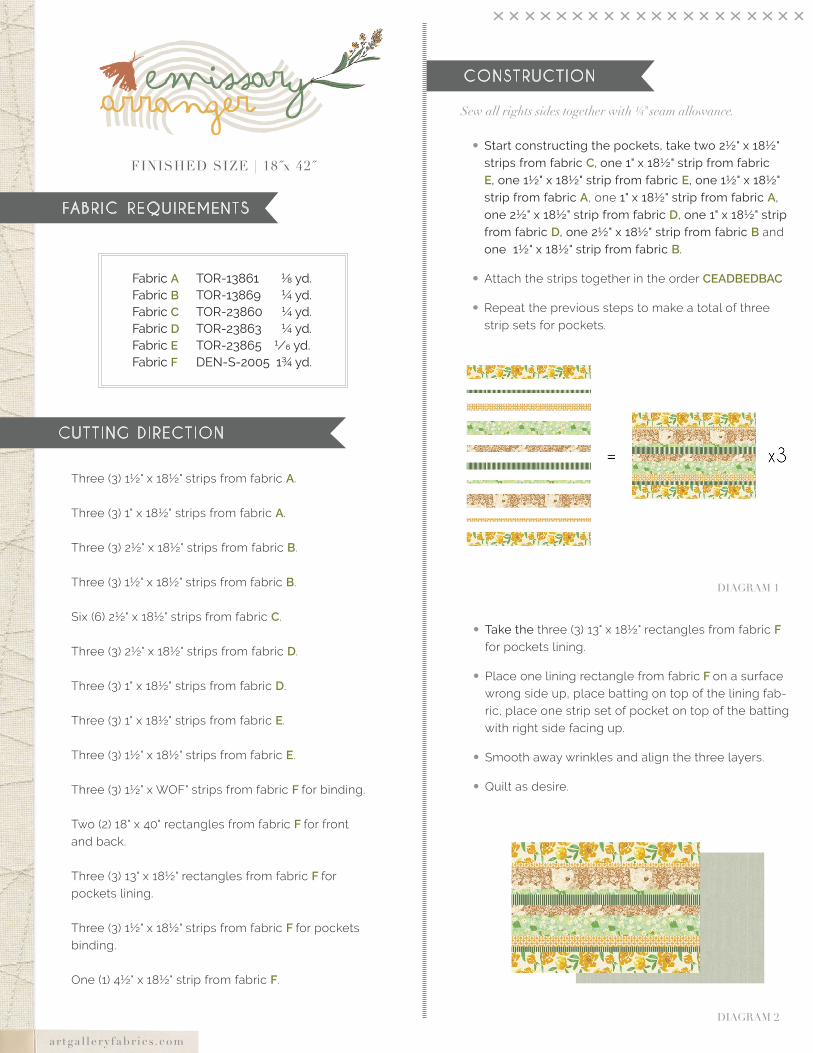
FINISHED SIZE | 18˝x 42˝
FABR IC REQUIREMENTS
CUTT ING D IRECT ION
Fabric A TOR-13861 ⅛ yd. Fabric B TOR-13869 ¼ yd.Fabric C TOR-23860 ¼ yd.Fabric D TOR-23863 ¼ yd.Fabric E TOR-23865 �∕� yd.Fabric F DEN-S-2005 1¾ yd.
CONSTRUCT ION
Sew all rights sides together with ¼"seam allowance.
DIAGRAM 1
DIAGRAM 2
• Start constructing the pockets, take two 2½" x 18½" strips from fabric C, one 1" x 18½" strip from fabric E, one 1½" x 18½" strip from fabric E, one 1½" x 18½" strip from fabric A, one 1" x 18½" strip from fabric A, one 2½" x 18½" strip from fabric D, one 1" x 18½" strip from fabric D, one 2½" x 18½" strip from fabric B and one 1½" x 18½" strip from fabric B.
• Attach the strips together in the order CEADBEDBAC
• Repeat the previous steps to make a total of three strip sets for pockets.
• Take the three (3) 13" x 18½" rectangles from fabric F
for pockets lining.
• Place one lining rectangle from fabric F on a surface wrong side up, place batting on top of the lining fab-ric, place one strip set of pocket on top of the batting with right side facing up.
• Smooth away wrinkles and align the three layers.
• Quilt as desire.
Three (3) 1½" x 18½" strips from fabric A.
Three (3) 1" x 18½" strips from fabric A.
Three (3) 2½" x 18½" strips from fabric B.
Three (3) 1½" x 18½" strips from fabric B.
Six (6) 2½" x 18½" strips from fabric C.
Three (3) 2½" x 18½" strips from fabric D.
Three (3) 1" x 18½" strips from fabric D.
Three (3) 1" x 18½" strips from fabric E.
Three (3) 1½" x 18½" strips from fabric E.
Three (3) 1½" x WOF" strips from fabric F for binding.
Two (2) 18" x 40" rectangles from fabric F for front and back.
Three (3) 13" x 18½" rectangles from fabric F for pockets lining.
Three (3) 1½" x 18½" strips from fabric F for pockets binding.
One (1) 4½" x 18½" strip from fabric F.
ar tga l le ry fabr ics.com
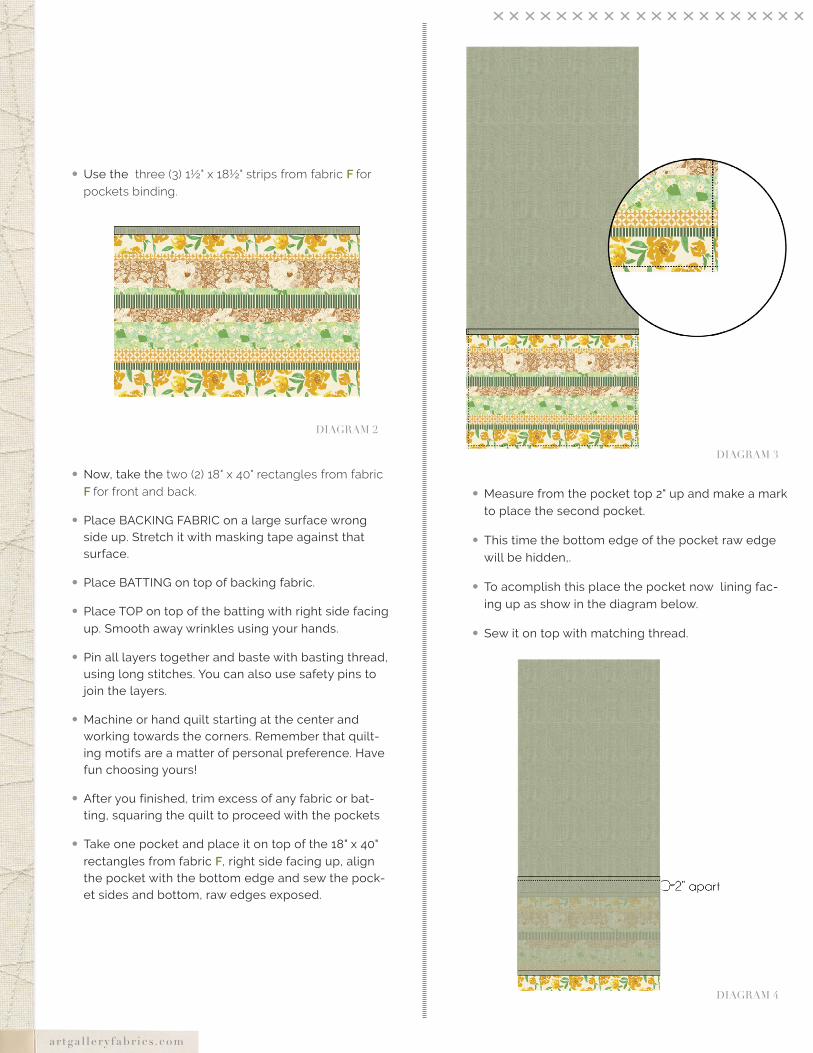
• Use the three (3) 1½" x 18½" strips from fabric F for pockets binding.
• Now, take the two (2) 18" x 40" rectangles from fabric F for front and back.
• Place BACKING FABRIC on a large surface wrong side up. Stretch it with masking tape against that surface.
• Place BATTING on top of backing fabric.
• Place TOP on top of the batting with right side facing up. Smooth away wrinkles using your hands.
• Pin all layers together and baste with basting thread, using long stitches. You can also use safety pins to join the layers.
• Machine or hand quilt starting at the center and working towards the corners. Remember that quilt-ing motifs are a matter of personal preference. Have fun choosing yours!
• After you finished, trim excess of any fabric or bat-ting, squaring the quilt to proceed with the pockets
• Take one pocket and place it on top of the 18" x 40" rectangles from fabric F, right side facing up, align the pocket with the bottom edge and sew the pock-et sides and bottom, raw edges exposed.
• Measure from the pocket top 2" up and make a mark to place the second pocket.
• This time the bottom edge of the pocket raw edge will be hidden,.
• To acomplish this place the pocket now lining fac-ing up as show in the diagram below.
• Sew it on top with matching thread.
DIAGRAM 2
DIAGRAM 3
DIAGRAM 4
ar tga l le ry fabr ics.com
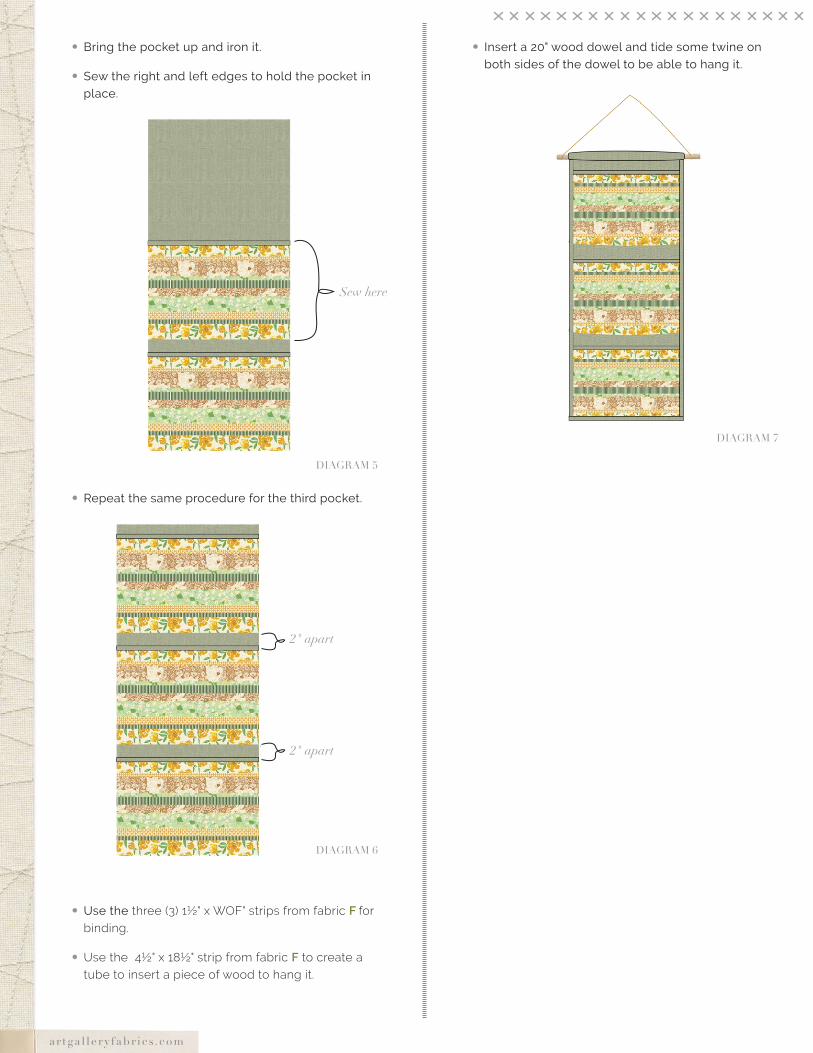
• Bring the pocket up and iron it.
• Sew the right and left edges to hold the pocket in place.
• Repeat the same procedure for the third pocket.
• Insert a 20" wood dowel and tide some twine on both sides of the dowel to be able to hang it.
• Use the three (3) 1½" x WOF" strips from fabric F for binding.
• Use the 4½" x 18½" strip from fabric F to create a tube to insert a piece of wood to hang it.
DIAGRAM 5
DIAGRAM 6
DIAGRAM 7
Sew here
2" apart
2" apart

ar tga l le ry fabr ics.com
NOTE: While all possible care has been taken to ensure the accuracy of this pattern, We are not responsible for print-ing errors or the way in which individual work varies.Please read instructions carefully before starting the construction of this quilt. If desired, wash and iron your fabrics before starting to cut.
a r tga l le ry fabr ics.com
© 2019 Courtesy of Art Gallery Quilts LLC. All Rights Reserved.