Embed Size (px)
Citation preview

EMC® Data Domain®
Boost for Databases and ApplicationsRelease 1.0
Administration GuideP/N 302-000-230REV 05
EMC Data Domain Boost for Databases and Applications Release 1.0 Administration Guide2
Copyright © 2015 EMC Corporation. All rights reserved. Published in the USA.
Published May 2015
EMC believes the information in this publication is accurate as of its publication date. The information is subject to change without notice.
The information in this publication is provided as is. EMC Corporation makes no representations or warranties of any kind with respect to the information in this publication, and specifically disclaims implied warranties of merchantability or fitness for a particular purpose. Use, copying, and distribution of any EMC software described in this publication requires an applicable software license.
EMC2, EMC, and the EMC logo are registered trademarks or trademarks of EMC Corporation in the United States and other countries. All other trademarks used herein are the property of their respective owners.
For the most up-to-date regulatory document for your product line, go to EMC Online Support (https://support.emc.com).

CONTENTS
Preface
Revision History
Chapter 1 Product Overview
Introduction to the product ......................................................................... 14DD Boost distributed segment processing............................................. 14
Terminology used in this guide.................................................................... 15 Supported configurations ........................................................................... 16
High-availability configurations............................................................. 16Virtualization support............................................................................ 17Data Domain replication........................................................................ 17
Road map for product operations ................................................................ 18
Chapter 2 Data Domain System Configuration
Licensing the Data Domain system.............................................................. 20 Enabling DD Boost on a Data Domain system .............................................. 20 Changing DD Boost access rights ................................................................ 21 Enabling the DD Boost operations through a firewall ................................... 22 Setting up the storage units ........................................................................ 22 Enabling the distributed segment processing .............................................. 23 Enabling the advanced load balancing and link failover .............................. 24 Enabling the DD Boost-over-FC service ........................................................ 25
DD Boost-over-FC path management ..................................................... 26 Validating the database and Data Domain system connection..................... 26
Chapter 3 Product Installation
Preparing to install the software.................................................................. 30 AIX installation............................................................................................ 31
Installing the software on AIX ................................................................ 31Uninstalling the software on AIX............................................................ 32
HP-UX installation ....................................................................................... 33Installing the software on HP-UX ........................................................... 33Uninstalling the software on HP-UX ....................................................... 34
Linux installation ........................................................................................ 34Installing the software on Linux............................................................. 34Uninstalling the software on Linux......................................................... 35
Solaris installation ...................................................................................... 36Installing the software on Solaris .......................................................... 36Uninstalling the software on Solaris ...................................................... 37
Microsoft Windows installation ................................................................... 37Installing the software on Windows....................................................... 37Uninstalling the software on Windows................................................... 38
Product software components..................................................................... 39 Verifying the installed software ................................................................... 39
EMC Data Domain Boost for Databases and Applications Release 1.0 Administration Guide 3

Contents
Chapter 4 Product Configuration
Road map for configuration ......................................................................... 42 Setting up the configuration file .................................................................. 42
Syntax rules for the configuration file .................................................... 43Common parameters............................................................................. 43
Configuring operations over Fibre Channel and Ethernet networks............... 45 Configuring restores of replicated backups.................................................. 46 Configuring the lockbox for backups and restores........................................ 48
Lockbox requirements for backups and restores ................................... 48Configuring the lockbox with the ddbmadmin command ....................... 49
Troubleshooting tips ................................................................................... 52Debug log settings ................................................................................ 52Debug log files ...................................................................................... 53Backup or restore fails due to an inaccessible lockbox.......................... 54Command ddbmadmin -P encounters a conflict with an installed application............................................................................................ 54Command ddbmadmin -P fails when IPv6 is enabled............................. 55Command ddbmadmin -U fails with an internal decryption error............ 55
Chapter 5 Operations on DB2 Systems
Product overview in a DB2 environment ...................................................... 58DB2 backup processes.......................................................................... 58DB2 restore processes .......................................................................... 58DB2 backups of transaction logs ........................................................... 59
Product configuration in a DB2 environment ............................................... 59Integrating the product into the DB2 environment ................................. 59Configuring the DB2 parameters............................................................ 59Configuring DB2 transaction log archiving ............................................. 60Configuring DB2 backup deletion .......................................................... 61Preventing deletion of DB2 backup images ........................................... 62
Performing backups and recovery with the DB2 CLP .................................... 62Performing DB2 backups with the DB2 CLP............................................ 62Performing DB2 restores with the DB2 CLP ............................................ 63Performing DB2 recovery with the DB2 CLP............................................ 65
Performing backups and restores with the DB2 GUI ..................................... 66 Preparing for DB2 disaster recovery............................................................. 66 DB2 DPF requirements ................................................................................ 67 DB2 HADR requirements ............................................................................. 68 DB2 troubleshooting tips ............................................................................ 69
DB2 operation might generate empty debug logs on Windows .............. 69DB2 recover operation fails due to the logarchoptn value ...................... 69Pruning of a multisession backup leaves entries in the DB2 history....... 69Pruning of DB2 log history after a rollforward might produce errors........ 70Pruning of log backups fails due to the logarchoptn value ..................... 70Database backup might fail when run concurrently with backups of a high number of archived logs........................................................................ 71
Chapter 6 Operations on SAP HANA Systems
Product overview in a SAP HANA environment ............................................. 74SAP HANA backup processes ................................................................ 74SAP HANA restore processes ................................................................. 75SAP HANA backups of redo logs ............................................................ 75
Product configuration in a SAP HANA environment ...................................... 75
4 EMC Data Domain Boost for Databases and Applications Release 1.0 Administration Guide

Contents
Integrating the product into the SAP HANA environment........................ 75Configuring the SAP HANA parameters .................................................. 76Enabling the configuration file in SAP HANA Studio ............................... 76Configuring automatic backups of SAP HANA redo logs ......................... 77
Performing backups, recovery, and deletion with SAP HANA Studio ............. 78Performing backups with SAP HANA Studio ........................................... 78Performing restore and recovery with SAP HANA Studio......................... 80Deleting backups with SAP HANA Studio ............................................... 82
Performing backups and recovery with the SAP HANA CLI ............................ 82Performing backups with the SAP HANA CLI........................................... 83Canceling backups with the SAP HANA CLI ............................................ 83Checking backups with the SAP HANA CLI ............................................. 83Performing recovery with the SAP HANA CLI ........................................... 84
Preparing for SAP HANA disaster recovery.................................................... 85 SAP HANA scale-out requirements............................................................... 85
Chapter 7 Operations on SAP with Oracle Systems
Product overview in a SAP with Oracle environment..................................... 88SAP with Oracle backup processes........................................................ 88SAP with Oracle restore processes ........................................................ 89
Product configuration in a SAP with Oracle environment.............................. 89Integrating the product into the BR*Tools environment.......................... 89Confirming the environment and file permissions.................................. 91Enabling administrator privileges for SAP with Oracle restores on Windows 91Configuring the SAP with Oracle parameters.......................................... 91
Performing backup and recovery with SAP BR*Tools .................................... 93Performing backups with BR*Tools........................................................ 93Performing restore and recovery with BR*Tools ..................................... 94
Preparing for SAP with Oracle disaster recovery ........................................... 95Restoring the required Oracle and SAP BR*Tools files............................ 95
Cluster requirements................................................................................... 96
Glossary
Index
EMC Data Domain Boost for Databases and Applications Release 1.0 Administration Guide 5

Contents
6 EMC Data Domain Boost for Databases and Applications Release 1.0 Administration Guide

Title Page
TABLES
1 Software installation directories on AIX ....................................................................... 322 Software installation directories on HP-UX................................................................... 333 Software installation directories on Linux.................................................................... 354 Software installation directories on Solaris ................................................................. 365 Product software components..................................................................................... 396 Common parameters................................................................................................... 437 Parameters for operations over FC networks ................................................................ 468 Parameters for restores from a secondary Data Domain system................................... 479 Options of the ddbmadmin command for lockbox operations...................................... 4910 Parameters for debugging ........................................................................................... 5211 DB2 parameters .......................................................................................................... 6012 SAP HANA parallelism parameter ................................................................................ 7613 SAP with Oracle parameters ........................................................................................ 92
EMC Data Domain Boost for Databases and Applications Release 1.0 Administration Guide 7

Tableses
8 EMC Data Domain Boost for Databases and Applications Release 1.0 Administration Guide
PREFACE
As part of an effort to improve its product lines, EMC periodically releases revisions of its software and hardware. Therefore, some functions described in this document might not be supported by all versions of the software or hardware currently in use. The product release notes provide the most up-to-date information on product features.
Contact your EMC technical support professional if a product does not function properly or does not function as described in this document.
Note: This document was accurate at publication time. Go to EMC Online Support (https://support.emc.com) to ensure that you are using the latest version of this document.
PurposeThis document describes how to install, configure, and use the EMC Data Domain Boost for Databases and Applications (DDBDA) release 1.0.
AudienceThis document is intended for system administrators or database administrators (DBAs) who are responsible for installing software and maintaining backup and recovery systems for databases or applications.
Users of this guide must be familiar with the following topics:
◆ Backup, recovery, database, applications, and network terminology◆ Backup and recovery procedures◆ Disaster recovery procedures
Related documentationYou can find additional EMC publications for this product release and related products at EMC Online Support (https://support.emc.com).
The EMC DD Boost for Enterprise Applications Software Compatibility Guide, available from EMC Online Support, provides details on supported environments and platforms.
Conventions used in this documentEMC uses the following conventions for special notices:
NOTICE is used to address practices not related to personal injury.
Note: A note presents information that is important, but not hazard-related.
Preface 9

Preface
Typographical conventions
EMC uses the following type style conventions in this document:
Where to get helpEMC support, product, and licensing information can be obtained as follows:
Product information — For documentation, release notes, software updates, or information about EMC products, go to EMC Online Support at:
https://support.emc.com
Technical support — Go to EMC Online Support and click Service Center. You will see several options for contacting EMC Technical Support. Note that to open a service request, you must have a valid support agreement. Contact your EMC sales representative for details about obtaining a valid support agreement or with questions about your account.
Online communities — Visit EMC Community Network at https://community.EMC.com for peer contacts, conversations, and content on product support and solutions. Interactively engage online with customers, partners, and certified professionals for all EMC products.
Your commentsYour suggestions will help to improve the accuracy, organization, and overall quality of the user publications. Send your opinions of this document to:
Bold Used for names of interface elements, such as names of windows, dialog boxes, buttons, fields, tab names, key names, and menu paths (what the user specifically selects or clicks).
Italic Used for full titles of publications referenced in text.
Monospace Used for:• System output, such as an error message or script• System code• Pathnames, file names, prompts, and syntax• Commands and options
Monospace italic Used for variables.
Monospace bold Used for user input.
[ ] Square brackets enclose optional values.
| Vertical bar indicates alternate selections—the bar means “or”.
{ } Braces enclose content that the user must specify, such as x or y or z.
... Ellipses indicate nonessential information omitted from the example.
10 EMC Data Domain Boost for Databases and Applications Release 1.0 Administration Guide

REVISION HISTORY
The following table presents the revision history of this document.
Revision Date Description
05 May 6, 2015 Updated the following information:• “Product overview in a SAP HANA environment” on page 74 - Deleted the Note about
a limitation in redirected recovery to an alternate host.• “Pruning of DB2 log history after a rollforward might produce errors” on page 70 -
Added this topic under “DB2 troubleshooting tips.”
04 November 26, 2014 Updated the following information:• “High-availability configurations” on page 16 - Added details about DB2 HADR
support.• “DB2INSTANCE” on page 60 - Updated the parameter details.• “SOURCE_DBNAME” on page 60 - Updated the parameter details.• “DB2 HADR requirements” on page 68 - Added the topic about the DB2 HADR support
03 August 7, 2014 Updated the following information:• “Validating the database and Data Domain system connection” on page 26 - Updated
the information about running the rpcinfo command.• “CLIENT” on page 43 - Added the Note about the parameter setting for a restore.
EMC Data Domain Boost for Databases and Applications Release 1.0 Administration Guide 11

Revision History
02 July 9, 2014 Updated the following information:• “Introduction to the product” on page 14 - Added the final Note about network
support for DDBDA operations.• Table 6 on page 43 - Updated the DEVICE_HOST and DEVICE_PATH parameter
descriptions.• “Configuring operations over Fibre Channel and Ethernet networks” on page 45 -
Updated details about network operations and the two document ID numbers.• “Command ddbmadmin -P encounters a conflict with an installed application” on
page 54 - Added this troubleshooting topic.• “Command ddbmadmin -P fails when IPv6 is enabled” on page 55 - Added this
troubleshooting topic.• “DB2 backups of transaction logs” on page 59 - Updated details about archived
logging and rollforward recovery.• “DB2INSTANCE” on page 60 - Updated the DB2 parameter description.• “Configuring DB2 transaction log archiving” on page 60 - Updated details in step 3.• “Configuring DB2 backup deletion” on page 61 - Updated details in the first
paragraph.• “Preventing deletion of DB2 backup images” on page 62 - Added this new topic.• “DB2 recover operation fails due to the logarchoptn value” on page 69 - Updated
details in the first paragraph.• “Pruning of log backups fails due to the logarchoptn value” on page 70 - Updated
details in the first paragraph.• “Database backup might fail when run concurrently with backups of a high number of
archived logs” on page 71 - Updated this DB2 troubleshooting topic.• “Integrating the product into the SAP HANA environment” on page 75 - Added the
Note about creating the opt subdirectory if it does not exist.• “PARALLELISM” on page 76 - Updated the SAP HANA parameter description.• “Performing backups, recovery, and deletion with SAP HANA Studio” on page 78 -
Updated the topic title and reordered the subtopics.• “Performing backups and recovery with the SAP HANA CLI” on page 82 - Updated the
topic heading and added subtopics on canceling, checking, and recovering backups.• “Enabling administrator privileges for SAP with Oracle restores on Windows” on
page 91 - Added this new topic.• Table 13 on page 92 - Updated the GROUP_BY_FS and SAVESETS parameter
descriptions.• “save set” on page 99 - Added the glossary definition of save set.
01 March 6, 2014 Initial release of DDBDA 1.0.
Revision Date Description
12 EMC Data Domain Boost for Databases and Applications Release 1.0 Administration Guide
CHAPTER 1Product Overview
This chapter includes the following topics:
◆ Introduction to the product ..................................................................................... 14◆ Terminology used in this guide................................................................................ 15◆ Supported configurations ....................................................................................... 16◆ Road map for product operations ............................................................................ 18
Product Overview 13

Product Overview
Introduction to the productEMC® Data Domain® Boost for Databases and Applications (DDBDA) is an EMC product that enables you to perform backups and restores of DB2, SAP HANA, or SAP with Oracle database data with a Data Domain system. You can use the database-specific backup and recovery tools to complete the product operations.
DDBDA performs backups to and restores from a Data Domain system by using the Data Domain Boost (DD Boost) interface.
A backup to a Data Domain system takes advantage of the DD Boost feature by using the following two components:
◆ The DD Boost library API enables the backup software to communicate with the Data Domain system.
The EMC DD Boost for Enterprise Applications Software Compatibility Guide, available from EMC Online Support (https://support.emc.com), provides details about the supported versions of the DD Boost library and DD OS.
◆ The distributed segment processing (DSP) component reviews the data that is already stored on the Data Domain system and sends only unique data for storage. The DSP component enables the backup data to be deduplicated on the database or application host to reduce the amount of data transferred over the network. “DD Boost distributed segment processing” on page 14 provides more details.
During the restore of a backup to the client, the Data Domain system converts the stored data to its original nondeduplicated state before sending the data over the network.
You can perform DD Boost backups and restores over either an Ethernet (IP) or Fibre Channel (FC) network connection.
Note: DDBDA does not distinguish TCP/IP network types (LAN, WAN, or MAN) and can successfully operate where packet loss is strictly 0% and latency is less than 20 ms.
DD Boost distributed segment processing
There are two modes of operation for sending backup data to a Data Domain system through DD Boost, one with distributed segment processing (DSP) enabled and the other with DSP disabled. The operation mode is set on the Data Domain system.
When DSP is enabled, the deduplication process is distributed between the DD Boost library and the Data Domain system. Parts of the deduplication process are run on the database or application host so that the DD Boost library sends only unique data to the Data Domain system over the network.
14 EMC Data Domain Boost for Databases and Applications Release 1.0 Administration Guide

Product Overview
Distributed segment processing provides the following benefits:
◆ Throughput is potentially greater because the DD Boost library sends only unique data instead of all the data to the Data Domain system. The throughput improvements depend on the level of redundancy in the data being backed up, the overall workload on the database server, and the database server capability. In general, greater throughput is attained with higher redundancy, greater database server workload, and greater database server capability.
◆ The network bandwidth requirements are significantly reduced because only the unique data is sent to the Data Domain system over the network.
◆ Recovery from failed backups can be potentially much faster. If a large backup fails in the middle or towards the end and a user restarts the backup, the data already sent to the Data Domain system does not need to be resent. The backup completes more quickly on retry.
When distributed segment processing is enabled, the DD Boost library, which is part of the product, performs the following tasks:
1. Segments the data.
2. Computes IDs for the data segments.
3. Checks with the Data Domain system for duplicate segments.
4. Compresses unique segments that are not found on the Data Domain system.
5. Sends the compressed data to the Data Domain system, which writes the unique data to disk.
The local compression algorithm used by the DD Boost library must be configured on the Data Domain system. The EMC Data Domain Operating System Administration Guide provides more information about local compression and its configuration.
When distributed segment processing is disabled, the DD Boost library sends the data directly to the Data Domain system over the network. The Data Domain system then segments, deduplicates, and compresses the data before writing the data to the disk.
Note: Distributed segment processing cannot be disabled on an Extended Retention Data Domain system.
Terminology used in this guideThe terms “product” and “software” in this guide refer to DDBDA, unless specified otherwise.
The generic sections of this guide use the term “transaction logs” for the logs required to recover data backed up by DDBDA. The different applications that the product supports use application-specific terms for the logs, such as archived logs and so on.
The UNIX references in this guide apply to both UNIX and Linux operating systems, unless specified otherwise. The Windows references apply to all the supported Microsoft Windows operating systems, unless specified otherwise.
Terminology used in this guide 15

Product Overview
The DDBDA processes distinguish between the restore and recovery of a database:
◆ Restore means to retrieve data from backup and store the data on disk.◆ Recover means to apply the transaction logs to make the database consistent.
“Glossary” on page 97 provides details about terms used in this guide.
Supported configurationsYou can deploy DDBDA in a database stand-alone or high-availability configuration in a supported environment.
The following figure shows a stand-alone configuration that uses the product to back up or restore the data on the database server host to or from the Data Domain system.
Figure 1 DDBDA in a stand-alone configuration
The DDBDA version must be compatible with the Data Domain system and DDBDA configurations. Data Domain does not support combinations other than those detailed in the EMC Data Domain Boost Compatibility Guide, which is available from EMC Online Support (https://support.emc.com). Access the guide from the Support by Product page by typing Data Domain Software in the Find a Product field and then clicking the Documentation link on the product page.
High-availability configurations
DDBDA supports backups and restores in the following high-availability environments:
◆ DB2 Database Partitioning Feature (DPF) environment◆ DB2 High Availability Disaster Recovery (HADR) environment◆ SAP HANA scale-out multinode environment◆ SAP with Oracle active-passive cluster
A DB2 DPF system offers an environment where a single database is divided into multiple partitions, either on the same host or on multiple hosts.
A DB2 HADR system consists of a primary host and multiple standby hosts. HADR replicates all the data changes from the primary host to the standby hosts, and provides fast failover to a standby host if the primary host fails. You can perform a backup on the primary host only.
SAP HANA software supports high availability on a SAP HANA scale-out appliance that contains multiple nodes.
Data Domain
WAN
Offsitedisasterrecoverystorage
Onsiteretentionstorage
Databasehost
DD Boost for Databases and
Applications
16 EMC Data Domain Boost for Databases and Applications Release 1.0 Administration Guide

Product Overview
A SAP with Oracle active-passive cluster includes multiple hosts (nodes) connected by a shared SCSI bus with common storage attached. A user can define cluster services, such as disk services, and assign the services their own IP addresses and names (virtual cluster hosts). The services and their associated storage can migrate for failover between the hosts in the cluster.
The EMC DD Boost for Enterprise Applications Software Compatibility Guide, available from EMC Online Support (https://support.emc.com), provides details about the supported versions and cluster environments.
Note: You must install DDBDA on each node in a high-availability environment.
Virtualization support
DDBDA supports several types of virtualization software, such as VMware, Solaris zones, Microsoft Hyper-V, and so on.
The EMC DD Boost for Enterprise Applications Software Compatibility Guide, available from EMC Online Support (https://support.emc.com), provides details about the supported environments and platforms. “Solaris installation” on page 36 provides details about Solaris zones.
Note: You must install DDBDA in the guest operating system.
Data Domain replication
The EMC Data Domain Replicator provides automated, encrypted replication for disaster recovery and multisite backup and archive consolidation. The Data Domain Replicator software asynchronously replicates only compressed, deduplicated data over a wide area network (WAN).
DDBDA does not insatiate or monitor a replication. However, the product can restore from the replicated copy on a secondary Data Domain system. You must have used the product to originally create the backup on a primary Data Domain system. A Data Domain administrator performs the backup replication from the primary system to the secondary system.
Note: The replication process must not change the names of the directories and files created by DDBDA.
To enable the backup replication and subsequent restore from a secondary Data Domain system, the user ID or primary group ID of the DD Boost users on the primary and secondary systems must be identical.
You must meet specific configuration requirements to automatically enable the restore of replicated backups from a secondary Data Domain system when the primary Data Domain system is unavailable. “Configuring restores of replicated backups” on page 46 provides details.
The EMC Knowledgebase Article number 182294, titled Configuration of DDBoost Users on Source and Destination DDRs for MTree Replication, provides more details. The article is available from EMC Online Support.
Supported configurations 17

Product Overview
Road map for product operationsUse the following road map to install and configure the DDBDA software, and perform backups and restores with the product on the supported database and application hosts.
Before you click a cross-reference, check the page number of your current topic in the guide in case you need to return to the same location from the cross-referenced topic.
1. Review the EMC Data Domain Boost for Databases and Applications Release Notes for the most up-to-date information about the product.
2. Ensure that the required Data Domain systems are set up, configured, and enabled according to Chapter 2, “Data Domain System Configuration.”
3. Install the DDBDA software according to Chapter 3, “Product Installation.”
4. Configure the product according to Chapter 4, “Product Configuration.”
5. Follow the appropriate procedures to protect the database system:
• Perform DB2 operations according to Chapter 5, “Operations on DB2 Systems.”
• Perform SAP HANA operations according to Chapter 6, “Operations on SAP HANA Systems.”
• Perform SAP with Oracle operations according to Chapter 7, “Operations on SAP with Oracle Systems.”
6. Use the following information to troubleshoot issues with the product operations:
• “Troubleshooting tips” on page 52• “DB2 troubleshooting tips” on page 69• EMC Data Domain Boost for Databases and Applications Release Notes
18 EMC Data Domain Boost for Databases and Applications Release 1.0 Administration Guide
CHAPTER 2Data Domain System Configuration
This chapter includes the following topics:
◆ Licensing the Data Domain system.......................................................................... 20◆ Enabling DD Boost on a Data Domain system .......................................................... 20◆ Changing DD Boost access rights ............................................................................ 21◆ Enabling the DD Boost operations through a firewall ............................................... 22◆ Setting up the storage units .................................................................................... 22◆ Enabling the distributed segment processing .......................................................... 23◆ Enabling the advanced load balancing and link failover .......................................... 24◆ Enabling the DD Boost-over-FC service .................................................................... 25◆ Validating the database and Data Domain system connection................................. 26
Note: The Data Domain administrator must configure the Data Domain system for DD Boost operations. This chapter provides examples of the basic configurations. The Data Domain documentation provides details on the Data Domain system configurations.
Data Domain System Configuration 19
Data Domain System Configuration
Licensing the Data Domain systemYou require the EMC Data Domain Boost license to use the Data Domain Boost for Databases and Applications (DDBDA) software.
You also require a replication license for both the source and destination Data Domain systems to use the replication feature.
Contact your EMC Data Domain representative for more information and to purchase licensed features.
The EMC Data Domain Operating System Administration Guide provides details about all the licensed features and how to display and enable Data Domain licenses.
Enabling DD Boost on a Data Domain systemYou can enable DD Boost on a Data Domain system through the ddboost enable command or from the EMC Data Domain System Manager on the Data Management > DD Boost page as described in the EMC Data Domain Operating System Administration Guide.
Use the Data Domain command line interface to complete the required administration tasks. The EMC Data Domain Operating System Command Reference Guide provides details about the commands.
1. On the Data Domain system, log in as an administrative user.
2. Run the following command to verify that the file system is enabled and running:
# filesys status
The file system is enabled and running.
If the file system is disabled, run the following command to enable the file system:
# filesys enable
3. Run the following command to verify that the DD Boost license is enabled:
# license show
Feature licenses:## License Key Feature-- -------------------- --------1 ABCD-EFGH-IJKL-MNOP DDBOOST-- -------------------- --------
If the DD Boost license is disabled, run the following command to add the DD Boost license by using the license key that Data Domain provided:
# license add license_key
License “ABCE-BCDA-CDAB-DABC” added.
20 EMC Data Domain Boost for Databases and Applications Release 1.0 Administration Guide

Data Domain System Configuration
4. Establish the DD Boost username and password for the Data Domain system.
Note: The username, password, and role must be set up on the Data Domain system as described in the EMC Data Domain Operating System Administration Guide. The username and password are case-sensitive and must match the username and password provided in the procedure “Configuring the lockbox for backups and restores” on page 48.
Run the following commands to establish the username and password:
# user add username password password# ddboost set user-name username
“Changing DD Boost access rights” on page 21 provides information about how changing a username and access rights affects the operations on a Data Domain system.
5. Run the following command to enable DD Boost:
# ddboost enable
DD Boost enabled
6. Run the following command to verify that DD Boost is enabled:
# ddboost status
Changing DD Boost access rightsBy default, when the DD Boost service is first enabled on a Data Domain system, the service is accessible to all database servers. You can use the ddboost access command to override this default and restrict the access to specific database servers.
For example, the Data Domain administrator can run the following commands to remove the default access permission for all servers and add new access permissions for two specific database servers, dbserver1.datadomain.com and dbserver2.datadomain.com. The EMC Data Domain Operating System Command Reference Guide provides details about the commands.
# ddboost disable# ddboost access del clients *# ddboost access add clients dbserver1.datadomain.com
dbserver2.datadomain.com# ddboost enable
These commands establish a set of access controls that enable DD Boost access only to the two database servers, dbserver1.datadomain.com and dbserver2.datadomain.com.
Changing DD Boost access rights 21

Data Domain System Configuration
Consider the following guidelines when you change the DD Boost access rights:
◆ Ensure that no backup operations are running to the Data Domain system when you change any access rights. You can run the ddboost disable command to prevent operations while access is being changed.
◆ Specify only a fully qualified domain name, IP address, or resolvable DNS name for the client when modifying the client access control list.
◆ After the access rights are changed, you can run the ddboost enable command to enable DD Boost and the access rights will take effect.
You can run the ddboost access show command to verify which database hosts have the DD Boost access rights. If the command output is simply *, then all database servers have the access rights. For example:
# ddboost access showDD Boost access allowed from the following clients*
# ddboost access showDD Boost access allowed from the following clients:dbserver1.datadomain.comdbserver2.datadomain.com
Enabling the DD Boost operations through a firewallThe Data Domain system as initially configured does not operate through a firewall, neither for a database server connection to a Data Domain system nor for one Data Domain system connection to another. If you need the Data Domain system to operate through a firewall, contact your network support provider.
The following ports must be open in a firewall to enable DD Boost backups and optimized duplication:
◆ TCP 2049 (NFS)◆ TCP 2051 (Replication)◆ TCP 111 (NFS portmapper)◆ TCP xxx (select a port for NFS mountd, where the default MOUNTD port is 2052)
Setting up the storage unitsOne or more storage units must be created on each Data Domain system that will be used with DDBDA. Each storage unit name on a single Data Domain system must be unique. However, you can use the same storage unit name on more than one Data Domain system.
Note: Storage unit names are case-sensitive.
You must provide the storage unit name when you configure the operations with DDBDA. Chapter 4, “Product Configuration,” provides more information.
You can create a storage unit through the ddboost storage-unit command or from the EMC Data Domain System Manager on the Data Management > DD Boost page as described in the EMC Data Domain Operating System Administration Guide.
22 EMC Data Domain Boost for Databases and Applications Release 1.0 Administration Guide

Data Domain System Configuration
For example, you can run the following command on the Data Domain system for each storage unit that you want to create:
# ddboost storage-unit create storage_unit_name
You can run the following command to list the status of the storage units:
# ddboost storage-unit show
Name Pre-Comp (GiB) Status---------- -------------- ------SU_ABCDE03 5.8 RWSU_ABCDE5 9.8 RW/Q---------- -------------- ------ D : Deleted Q : Quota Defined RO : Read Only RW : Read Write
You must create at least one storage unit on each Data Domain system that you will use with DDBDA. You can share a storage unit on a Data Domain system among multiple database hosts.
The storage on a Data Domain system can be provisioned through optional quota limits for a storage unit. Quota limits can be specified either when a storage unit is created or later through separate commands. The EMC Data Domain Operating System Command Reference Guide provides details about the quota and ddboost commands.
Enabling the distributed segment processingDistributed segment processing is a DD Boost software feature that uses the DD Boost library on the database server and the Data Domain software on the DDR. DDBDA loads the DD Boost library during backup and restores operations.
You must configure the distributed segment processing option on the Data Domain system. The option setting applies to all the database servers and all the software that uses DD Boost on this Data Domain system.
You can manage the distributed segment processing through the ddboost option command or from the EMC Data Domain System Manager on the Data Management > DD Boost page as described in the EMC Data Domain Operating System Administration Guide.
You can run the following command to configure the distributed segment processing option:
# ddboost option set distributed-segment-processing {enabled | disabled}
Enabling or disabling the distributed segment processing option does not require a restart of the Data Domain file system.
Distributed segment processing is enabled by default on a system initially installed with the Data Domain operating system (DD OS) release 5.2 or later. If a system is upgraded from DD OS release 5.0.x or 5.1.x to DD OS release 5.2 or later, distributed segment processing is left in its previous state.
Enabling the distributed segment processing 23

Data Domain System Configuration
Enabling the advanced load balancing and link failover
Note: This topic applies only if you use an Ethernet connection, not Fibre Channel, for backup and restore operations with DDBDA.
The advanced load balancing and link failover feature enables the combination of multiple Ethernet links into a group and the registration of only one interface on the Data Domain system with DDBDA.
The Data Domain documentation provides details about the features and benefits of advanced load balancing and link failover.
If an interface group is configured when the Data Domain system receives data from the DD Boost client, the data transfer is load balanced and distributed as separate jobs on the private network, providing greater throughput, especially for customers who use multiple 1 GbE connections.
You can manage advanced load balancing and link failover through the ddboost ifgroup command or from the EMC Data Domain System Manager on the Data Management > DD Boost page as described in the EMC Data Domain Operating System Administration Guide.
You can perform the following steps to create an interface group on the Data Domain system by adding existing interfaces to the group and registering the Data Domain system with DDBDA. After the interface group is set up, you can add or delete interfaces from the group.
1. Run the ddboost ifgroup command to add the interfaces into the group. The interfaces must have been created with the net command. For example:
# ddboost ifgroup default add interface 192.168.1.1# ddboost ifgroup default add interface 192.168.1.2# ddboost ifgroup default add interface 192.168.1.3# ddboost ifgroup default add interface 192.168.1.4
This example assumes that no additional named interface groups have been created and uses the default interface group.
2. Select one interface on the Data Domain system to register with DDBDA. Create a failover aggregated interface and register that interface with DDBDA. The EMC Data Domain Operating System Administration Guide describes how to create a virtual interface for link aggregation.
It is not mandatory to use an interface in the ifgroup to register with DDBDA. An interface that is not part of the ifgroup can also be used to register with DDBDA. The interface should be registered with a resolvable name using DNS or any other name resolution mechanism.
3. Run the following command to enable the feature on the Data Domain system:
# ddboost ifgroup enable
24 EMC Data Domain Boost for Databases and Applications Release 1.0 Administration Guide

Data Domain System Configuration
4. Run the following command to verify the configuration:
# ddboost ifgroup show config interfaces
Group Name Status Interface---------- ------- -----------default enabled 192.168.1.1default enabled 192.168.1.2default enabled 192.168.1.3default enabled 192.168.1.4
Enabling the DD Boost-over-FC serviceDD OS release 5.3 and later provides support for the Data Domain Fibre Channel (DFC or FC) mechanism of communication between the DD Boost library and the Data Domain system.
Note: Support of the DD Boost-over-FC service with the DDBDA software requires that a presales FC qualifier has been submitted and approved. Contact your EMC Data Domain representative for more details.
The Data Domain documentation provides details about the features and benefits of the DD Boost-over-FC service.
The Data Domain system must have an HBA that the DD Boost-over-FC service supports. The EMC Data Domain Operating System Command Reference Guide and EMC Data Domain Operating System Administration Guide provide information about using the scsitarget command for managing the SCSI target subsystem.
The Data Domain administrator can complete the following steps to configure the DD Boost-over-FC service.
1. Run the following command to enable the DD Boost-over-FC service:
# ddboost option set fc enabled
2. Optionally run the following command to set the dfc-server-name:
# ddboost fc dfc-server-name set server_name
Alternatively, accept the default name, which is the base hostname of the Data Domain system. A valid dfc-server-name consists of one or more of the following characters:
• lowercase letters (a–z)• uppercase letters (A–Z)• digits (0–9)• underscore (_)• dash (–)
Note: The dot or period character (.) is not valid within a dfc-server-name. You cannot use the fully qualified domain name of a Data Domain system as the dfc-server-name.
Enabling the DD Boost-over-FC service 25

Data Domain System Configuration
3. Run the following command to create a DD Boost FC group:
# ddboost fc group create group_name
For example:
# ddboost fc group create lab_group
4. Run the following command to configure the device set of the DD Boost FC group:
# ddboost fc group modify group_name device-set count count endpoint{all | none | endpoint_list}
For example:
# ddboost fc group modify lab_group device-set count 8 endpoint all
5. Run the following command to add initiators to the DD Boost FC group:
# ddboost fc group add group_name initiator initiator_spec
For example:
# ddboost fc group add lab_group initiator"initiator-15,initiator-16"
6. Verify that the DFC devices are visible on the database server.
7. Ensure that the user who performs the backups and restores has the required permission to access the DFC devices.
“Configuring operations over Fibre Channel and Ethernet networks” on page 45 provides details about configuring DDBDA to use the FC network connection.
DD Boost-over-FC path management
The ifgroup-based advanced load balancing and link failover mechanism described in a previous topic is based on Ethernet interfaces and is not applicable to the Fibre Channel transport. Instead, a different path mechanism is provided for the DD Boost-over-FC solution. The Data Domain documentation provides more details.
Validating the database and Data Domain system connectionDepending on the type of network connection being used, you can run the appropriate command to validate the communication between the database server host and the Data Domain system:
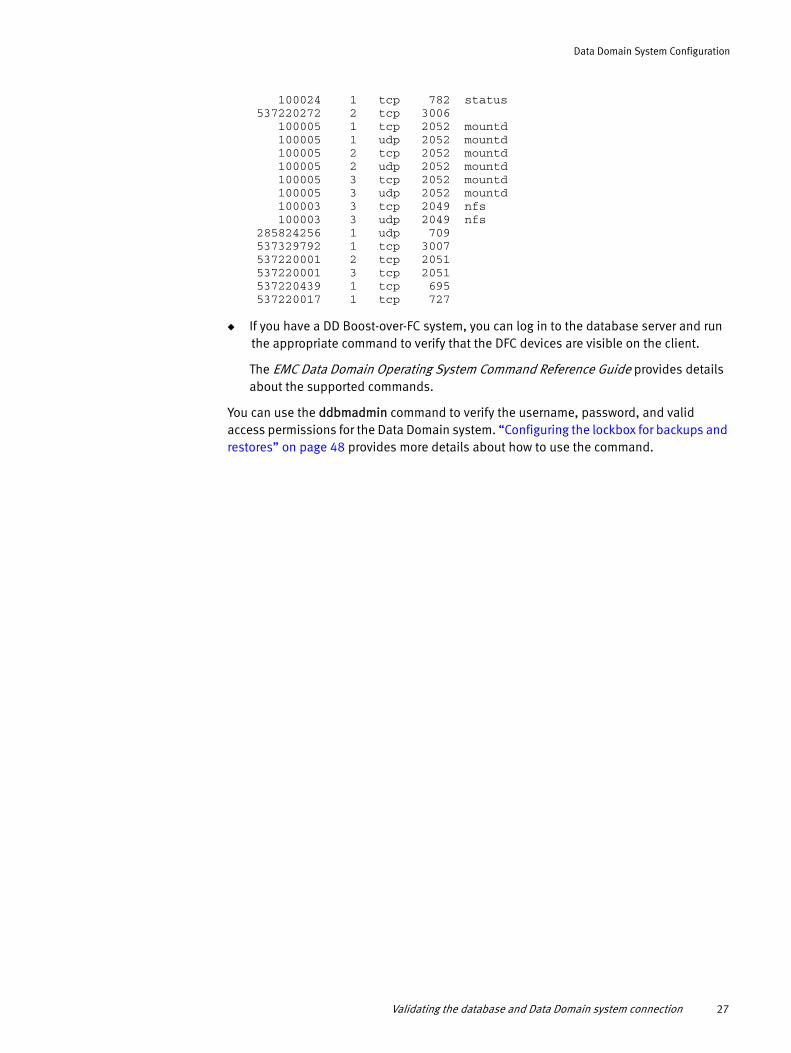
◆ If you have a DD Boost-over-IP system, you can log in to the database server and run the rpcinfo command if the command is available on the system. For example:
# rpcinfo -p Data_Domain_system_hostname
The command output must include the ports listed in “Enabling the DD Boost operations through a firewall” on page 22. For example:
# rpcinfo -p Data_Domain_system_hostname
program vers proto port service 100000 2 tcp 111 portmapper 100000 2 udp 111 portmapper 100024 1 udp 779 status
26 EMC Data Domain Boost for Databases and Applications Release 1.0 Administration Guide
Data Domain System Configuration
100024 1 tcp 782 status 537220272 2 tcp 3006 100005 1 tcp 2052 mountd 100005 1 udp 2052 mountd 100005 2 tcp 2052 mountd 100005 2 udp 2052 mountd 100005 3 tcp 2052 mountd 100005 3 udp 2052 mountd 100003 3 tcp 2049 nfs 100003 3 udp 2049 nfs 285824256 1 udp 709 537329792 1 tcp 3007 537220001 2 tcp 2051 537220001 3 tcp 2051 537220439 1 tcp 695 537220017 1 tcp 727
◆ If you have a DD Boost-over-FC system, you can log in to the database server and run the appropriate command to verify that the DFC devices are visible on the client.
The EMC Data Domain Operating System Command Reference Guide provides details about the supported commands.
You can use the ddbmadmin command to verify the username, password, and valid access permissions for the Data Domain system. “Configuring the lockbox for backups and restores” on page 48 provides more details about how to use the command.
Validating the database and Data Domain system connection 27

Data Domain System Configuration
28 EMC Data Domain Boost for Databases and Applications Release 1.0 Administration Guide

CHAPTER 3Product Installation
This chapter includes the following topics:
◆ Preparing to install the software.............................................................................. 30◆ AIX installation........................................................................................................ 31◆ HP-UX installation ................................................................................................... 33◆ Linux installation .................................................................................................... 34◆ Solaris installation .................................................................................................. 36◆ Microsoft Windows installation ............................................................................... 37◆ Product software components................................................................................. 39◆ Verifying the installed software ............................................................................... 39
Product Installation 29

Product Installation
Preparing to install the softwareEnsure that you meet the following prerequisites before you install the Data Domain Boost for Databases and Applications (DDBDA) software on the database or application server host:
◆ The database or application server host contains the supported database or application server software, installed and functioning properly in a supported environment.
The EMC DD Boost for Enterprise Applications Software Compatibility Guide, available from EMC Online Support (https://support.emc.com), describes the supported software and operating system versions.
◆ You have reviewed the information in the latest version of the EMC Data Domain Boost for Databases and Applications Release Notes.
◆ The Data Domain system has been prepared according to the information in Chapter 2, “Data Domain System Configuration.”
◆ You have operating system root or administrator privileges on the database or application server host.
◆ You have obtained one of the following software licenses:
• Data Protection Suite for Enterprise Applications Capacity license• Data Protection Suite Capacity license
Contact your EMC sales representative for more details about the appropriate license for the environment.
Note: You receive a password with the software license. You must use the password when you uncompress the downloaded software package.
◆ You have downloaded the DDBDA software package from EMC Online Support at https://support.emc.com, and extracted the installation package from the file.
You must uncompress the downloaded file twice. First, uncompress the file by using WinZip on Windows (recommended) or an unzip utility on UNIX/Linux that supports encryption. Then uncompress the resulting file on the DDBDA host by using WinZip again on Windows or the gunzip utility on UNIX/Linux.
Example: Preparing for a DDBDA installation on Windows
1. Download the DDBDA software package to the Windows DDBDA host.
2. Use WinZip to uncompress the file. When you are prompted for a password, type the password that you received with the software license.
3. Use WinZip again to uncompress the resulting zip file.
Example: Preparing for a DDBDA installation on AIX
1. Download the ddbda_aixpower.zip file to a Windows system.
2. Use WinZip to uncompress the file. When you are prompted for a password, type the password that you received with the software license.
30 EMC Data Domain Boost for Databases and Applications Release 1.0 Administration Guide

Product Installation
3. Transfer the ddbda_aixpower.tar.gz file to the AIX DDBDA host.
4. Uncompress and extract the DDBDA package:
gunzip ddbda_aixpower.tar.gztar -xvpBf ddbda_aixpower.tar
AIX installationYou must complete the required procedures to install and uninstall the DDBDA software on AIX. The following topics provide detailed instructions.
Installing the software on AIX
You can install the DDBDA software on AIX by running the installp command line interface (CLI) program or the AIX System Management Interface Tool (SMIT), which is a graphical user interface (GUI) program. In a supported cluster, you must install the software on each node that will perform backups and recovery.
1. Complete the preparation tasks in “Preparing to install the software” on page 30. Ensure that you log in as the root user and you are in the correct directory, which contains the downloaded software installation files.
Note: If you do not start the installation from the correct directory, the installation might fail.
2. Run either the installp CLI program or the SMIT GUI program:
• To run the CLI program, type the following command:
installp -a -d /dir_pathname EMCddbda.rte
where /dir_pathname is the complete pathname of the directory that contains the software installation files.
To verify that the installation succeeded, type the following command:
lslpp -L all | grep -i emcddbda
If the lslpp command output includes EMCddbda.rte 1.0.0.0, then the installation succeeded.
• To run the SMIT GUI program, perform the following steps:
a. Type the following command:
smitty install_latest
b. In the Entry Field, type the complete pathname of the directory that contains the software installation software files.
c. Select the option SOFTWARE to install .
d. Type yes in response to the following prompts:
Accept new license agreements?Preview new license agreements?
e. Select F4=List to display the list of the software packages.
AIX installation 31

Product Installation
f. Select EMCddbda.rte to install the software.
g. Select Install and Update Software.
h. Press Enter to begin the installation.
The installation on AIX stores the different types of software files in the directories shown in the following table.
3. Configure the DDBDA software by following the instructions in Chapter 4, “Product Configuration.”
Uninstalling the software on AIX
You can uninstall the DDBDA software on AIX by running the installp command or the SMIT GUI program. In a supported cluster, you must perform the uninstall procedure on each node that contains the software.
1. Ensure that no database or application backups are running.
2. As the root user, use one of the following methods to uninstall the software:
Note: You do not need to shut down a database to uninstall the software.
• Use the command line interface by typing the following command:
installp -u EMCddbda.rte
• Use the SMIT GUI program:
a. Type the following smitty command:
smitty remove
b. Select F4=List to display a list of the installed software packages.
c. Select the package to uninstall:
EMCddbda.rte
d. Set the PREVIEW Only option to No.
e. Press Enter to uninstall the software.
f. Exit the SMIT GUI program.
The uninstall procedure does not remove certain files and directories that contain logs and lockbox files. You must manually remove these items after saving a copy, if required.
Table 1 Software installation directories on AIX
Types of installed files or directories Installation directory
Executable files /opt/ddbda/bin
Configuration file templates /opt/ddbda/config
Debug log files directory /opt/ddbda/logs, linked to /var/opt/ddbda/logs
Library files /usr/lib/ddbda/lib64
32 EMC Data Domain Boost for Databases and Applications Release 1.0 Administration Guide

Product Installation
HP-UX installationYou must complete the required procedures to install and uninstall the DDBDA software on HP-UX. The following topics provide detailed instructions.
Installing the software on HP-UX
You can install the DDBDA software on HP-UX by using the swinstall utility to run the command line interface (CLI) or the graphical user interface (GUI) program. In a supported cluster, you must install the software on each node that will perform backups and recovery.
1. Complete the preparation tasks in “Preparing to install the software” on page 30. Ensure that you log in as the root user and you are in the correct directory, which contains the downloaded software installation files.
Note: If you do not start the installation from the correct directory, the installation might fail.
2. Type the swinstall command to run either the CLI or GUI program:
• To run the swinstall CLI program, type the following command:
swinstall -x mount_all_filesystems=false-s /dir_pathname/EMCddbda.pkg DDBDA
where /dir_pathname is the complete pathname of the directory that contains the software installation files.
• To run the swinstall GUI program, type the following command:
swinstall -x mount_all_filesystems=false -i-s /dir_pathname/EMCddbda.pkg DDBDA
where /dir_pathname is the complete pathname of the directory that contains the software installation files. Perform the following steps in the GUI program:
a. From the Actions menu, select Install (analysis).
When the analysis is complete, a “Ready with Warnings” message appears. The message is normal.
b. Click OK to continue the installation.
The installation on HP-UX stores the different types of software files in the directories shown in the following table.
Table 2 Software installation directories on HP-UX
Types of installed files or directories Installation directory
Executable files /opt/ddbda/bin
Configuration file templates /opt/ddbda/config
Debug log files directory /opt/ddbda/logs, linked to /var/opt/ddbda/logs
Library files /opt/ddbda/lib/hpux64
HP-UX installation 33

Product Installation
The installation on HP-UX stores informational messages including installation errors in the /var/adm/sw/swagent.log file. If an error occurs during the installation, check this file to obtain details about the error.
3. Configure the DDBDA software by following the instructions in Chapter 4, “Product Configuration.”
Uninstalling the software on HP-UX
You can uninstall the DDBDA software on HP-UX by running the swremove command or GUI program. In a supported cluster, you must perform the uninstall procedure on each node that contains the software.
1. Ensure that no database or application backups are running.
2. As the root user, use one of the following methods to uninstall the software:
Note: You do not need to shut down a database to uninstall the software.
• Use the CLI by typing the following command:
swremove DDBDA
• Use the swremove GUI program:
a. Type the following swremove command:
swremove -i DDBDA
b. Select Actions > Remove (analysis).
c. When the system analysis is complete, click OK to complete the uninstall.
d. To confirm the uninstall, click Yes.
The uninstall procedure does not remove certain files and directories that contain logs and lockbox files. You must manually remove these items after saving a copy, if required.
Linux installationYou must complete the required procedures to install and uninstall the DDBDA software on Linux. The following topics provide detailed instructions.
Installing the software on Linux
You can install the DDBDA software on Linux by running the rpm command. In a supported cluster, you must install the software on each node that will perform backups and recovery.
1. Complete the preparation tasks in “Preparing to install the software” on page 30. Ensure that you log in as the root user and you are in the correct directory, which contains the downloaded software installation files.
Note: If you do not start the installation from the correct directory, the installation might fail.
34 EMC Data Domain Boost for Databases and Applications Release 1.0 Administration Guide

Product Installation
2. On a RHEL 6 Linux platform, ensure that you have downloaded and installed the compat-libstdc++-33 package.
3. Type the rpm command to install the software on Linux x64:
rpm -i emcddbda-1.0.0.0-1.x86_64.rpm
4. To verify that the installation was successful, type the rpm -aq command:
rpm -aq | grep -i emc
The command output must include the following line:
emcddbda-1.0.0.0-1
The installation on Linux stores the different types of software files in the directories shown in the following table.
5. Configure the DDBDA software by following the instructions in Chapter 4, “Product Configuration.”
Uninstalling the software on Linux
You can uninstall the DDBDA software on Linux by running the rpm command. In a supported cluster, you must perform the uninstall procedure on each node that contains the software.
1. Ensure that no database or application backups are running.
2. As the root user, type the following command to uninstall the software:
Note: You do not need to shut down a database to uninstall the software.
rpm -e emcddbda-1.0.0.0-1
The uninstall procedure does not remove certain files and directories that contain logs and lockbox files. You must manually remove these items after saving a copy, if required.
Table 3 Software installation directories on Linux
Types of installed files or directories Installation directory
Executable files /opt/ddbda/bin
Configuration file templates /opt/ddbda/config
Debug log files directory /opt/ddbda/logs, linked to /var/opt/ddbda/logs
Library files /usr/lib/ddbda/lib64
Linux installation 35

Product Installation
Solaris installationYou must complete the required procedures to install and uninstall the DDBDA software on Solaris. The following topics provide detailed instructions.
Installing the software on Solaris
You can install the DDBDA software on Solaris by running the pkgadd command. In a supported cluster, you must install the software on each node that will perform backups and recovery.
1. Complete the preparation tasks in “Preparing to install the software” on page 30. Ensure that you log in as the root user and you are in the correct directory, which contains the downloaded software installation files.
Note: If you do not start the installation from the correct directory, the installation might fail.
If the Solaris system has Solaris zones (containers) and the software is to run on a sparse root zone, install the software on the global zone and on each required sparse root zone.
2. Verify that the basedir variable setting is basedir=default in the /var/sadm/install/admin/default file.
3. Type the following pkgadd command to install the software:
pkgadd -d /dir_pathname EMCddbda
where /dir_pathname is the complete pathname of the directory that contains the software package.
4. Type y when prompted whether to continue the installation.
The installation on Solaris stores the different types of software files in the directories shown in the following table.
5. Configure the DDBDA software by following the instructions in Chapter 4, “Product Configuration.”
Table 4 Software installation directories on Solaris
Types of installed files or directories Installation directory
Executable files /opt/ddbda/bin
Configuration file templates /opt/ddbda/config
Debug log files directory /opt/ddbda/logs, linked to /var/opt/ddbda/logs
Library files /usr/lib/ddbda/sparcv9 (Solaris SPARC)/usr/lib/ddbda/amd64 (Solaris x64)
36 EMC Data Domain Boost for Databases and Applications Release 1.0 Administration Guide

Product Installation
Uninstalling the software on Solaris
You can uninstall the DDBDA software on Solaris by running the pkgrm command. In a supported cluster, you must perform the uninstall procedure on each node that contains the software.
1. Ensure that no database or application backups are running.
2. As the root user, uninstall the software by typing the following command:
Note: You do not need to shut down a database to uninstall the software.
To uninstall the software on Solaris zones, first uninstall the software on the global zone and then uninstall the software on each required sparse root zone.
pkgrm EMCddbda
3. Type y when prompted.
The uninstall procedure does not remove certain files and directories that contain logs and lockbox files. You must manually remove these items after saving a copy, if required.
Microsoft Windows installationYou must complete the required procedures to install and uninstall the DDBDA software on Windows. You can also modify, repair, and remove an existing installation on Windows. The following topics provide detailed instructions.
Installing the software on Windows
You can install the DDBDA software on Windows by running the software installer, EMCDDBDA.msi. In a supported cluster, you must install the software on each node that will perform backups and restores.
1. Complete the preparation tasks in “Preparing to install the software” on page 30. Ensure that you log in as an administrator and you are in the correct directory, which contains the downloaded software installation files.
Note: If you do not start the installation from the correct directory, the installation might fail.
2. Run the Windows installer, EMCDDBDA.msi, and follow the instructions provided by the installation wizard.
3. Click Finish to exit the installer.
The installation on Windows stores all the executable files, configuration file templates, and library files in the directory C:\Program Files\EMC DD Boost\DA\bin\. The installation also creates the debug log files directory, C:\Program Files\EMC DD Boost\DA\logs\.
Microsoft Windows installation 37
Product Installation
4. Verify that the system %PATH% environment variable includes the software installation directory. For example:
a. Right-click My Computer and select Manage.
b. Click Properties.
c. On the Advanced tab under Environment Variables, click Settings.
d. In System Variables, verify the Path variable. The Path variable must include the software installation directory, C:\Program Files\EMC DD Boost\DA\bin.
Note: The directory pathname can include spaces, but there cannot be spaces before or after the pathname.
5. Configure the DDBDA software by following the instructions in Chapter 4, “Product Configuration.”
Uninstalling the software on Windows
You can uninstall the DDBDA software on Windows by using the Windows installer or Windows Control Panel. In a supported cluster, you must perform the uninstall procedure on each node that contains the software.
1. Log in as the Windows system administrator on the software host.
2. Ensure that no database or application backups are running.
3. Uninstall the software by using one of the following methods:
Note: You do not need to shut down a database to uninstall the software. Before you complete the uninstall, save a copy of any configuration files, if required.
• Windows installer method:
a. Run the Windows installer, EMCDDBDA.msi.
b. On the Change, repair, or remove installation page, select Remove and click Next.
c. In the Remove the Program dialog box, click Remove to uninstall the software.
• Windows Control Panel method:
a. In the Windows Control Panel window, select Add or Remove Programs or Programs and Features, depending on the Microsoft Windows version.
b. In the Add or Remove Programs window, select Data Domain Boost for Databases and Applications and click Remove.
The uninstall procedure does not remove certain files and directories that contain logs and lockbox files. You must manually remove these items after saving a copy, if required.
38 EMC Data Domain Boost for Databases and Applications Release 1.0 Administration Guide
Product Installation
Product software componentsThe following table lists the major software components installed on the database or application host during an installation of the DDBDA software.
Verifying the installed softwareYou can verify the installed version of DDBDA by checking the version of the ddbmadmin program file, where file_name is the complete pathname of the ddbmadmin binary:
◆ On UNIX systems, run the following command:
what file_name
◆ On Linux systems, run the following command:
strings file_name | grep "@(#)"
◆ On Windows systems, check the system Properties for file_name.
Table 5 Product software components
Component name Description
Components used with all applications:
ddbmadmin Program used for lockbox operations with DDBDA.
liblocktbl.solibccme*.xxlibcryptocme*.xxlibCSP*.so
On UNIX and Linux, library files used for lockbox operations with DDBDA.
locktbl.ddccme*.dllcryptocme*.xxxCSP*.dll
On Windows, library files used for lockbox operations with DDBDA.
libDDBoost.xx DD Boost library file used by DDBDA.
Components used with DB2 only:
db2_ddbda.cfg Configuration file template for DB2 operations.
libddboostdb2.xx DDBDA library used for DB2 operations.
Components used with SAP HANA only:
hdbbackint DDBDA executable for SAP HANA operations.
sap_hana_ddbda.utl Configuration file template for SAP HANA operations.
Components used with SAP with Oracle only:
backint DDBDA executable for SAP with Oracle (BR*Tools) operations.
sap_oracle_ddbda.utl Configuration file template for SAP with Oracle operations.
Product software components 39
Product Installation
You can run the appropriate command on the operating system to display the software version number:
◆ On AIX:
lslpp -L all | grep -i emcddbda
◆ On HP-UX:
swlist -l product DDBDA
◆ On Linux:
rpm -aq | grep -i emc
◆ On Solaris:
pkginfo -l EMCddbda
40 EMC Data Domain Boost for Databases and Applications Release 1.0 Administration Guide

CHAPTER 4Product Configuration
This chapter includes the following topics:
◆ Road map for configuration ..................................................................................... 42◆ Setting up the configuration file .............................................................................. 42◆ Configuring operations over Fibre Channel and Ethernet networks........................... 45◆ Configuring restores of replicated backups.............................................................. 46◆ Configuring the lockbox for backups and restores.................................................... 48◆ Troubleshooting tips ............................................................................................... 52
Note: The configuration procedures described in this chapter apply to all the supported database servers. Review the configuration information in the subsequent chapters for additional procedures that apply to specific database servers.
Product Configuration 41
Product Configuration
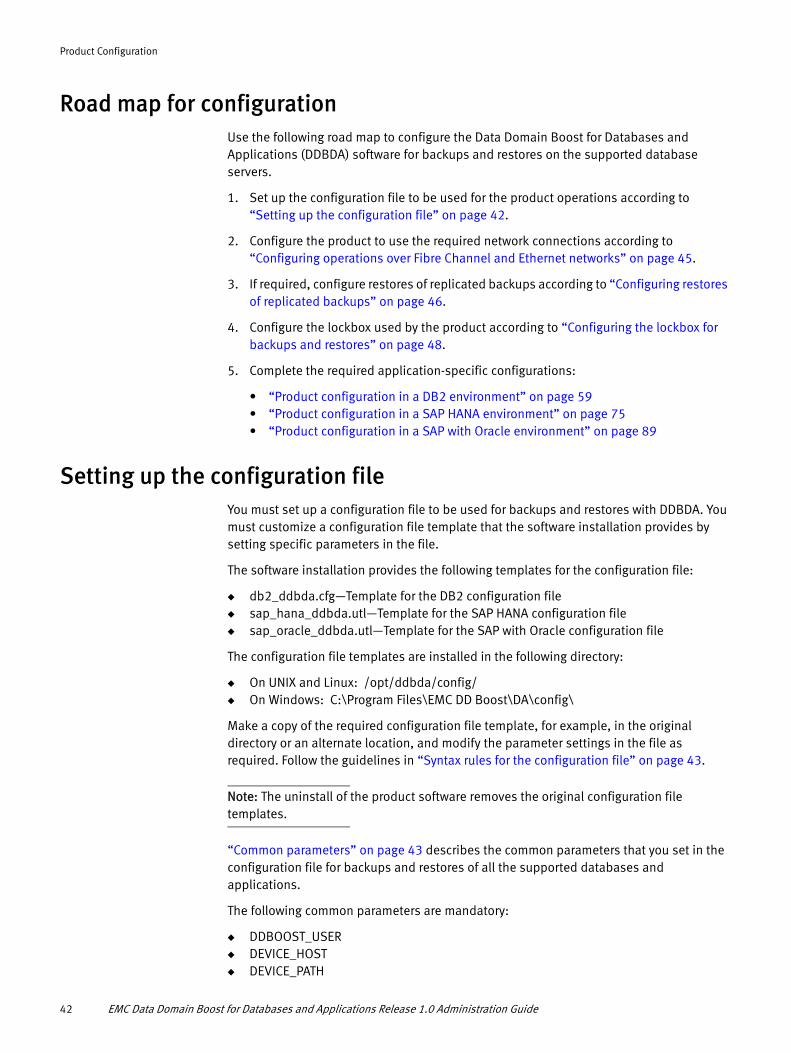
Road map for configurationUse the following road map to configure the Data Domain Boost for Databases and Applications (DDBDA) software for backups and restores on the supported database servers.
1. Set up the configuration file to be used for the product operations according to “Setting up the configuration file” on page 42.
2. Configure the product to use the required network connections according to “Configuring operations over Fibre Channel and Ethernet networks” on page 45.
3. If required, configure restores of replicated backups according to “Configuring restores of replicated backups” on page 46.
4. Configure the lockbox used by the product according to “Configuring the lockbox for backups and restores” on page 48.
5. Complete the required application-specific configurations:
• “Product configuration in a DB2 environment” on page 59• “Product configuration in a SAP HANA environment” on page 75• “Product configuration in a SAP with Oracle environment” on page 89
Setting up the configuration fileYou must set up a configuration file to be used for backups and restores with DDBDA. You must customize a configuration file template that the software installation provides by setting specific parameters in the file.
The software installation provides the following templates for the configuration file:
◆ db2_ddbda.cfg—Template for the DB2 configuration file◆ sap_hana_ddbda.utl—Template for the SAP HANA configuration file◆ sap_oracle_ddbda.utl—Template for the SAP with Oracle configuration file
The configuration file templates are installed in the following directory:
◆ On UNIX and Linux: /opt/ddbda/config/◆ On Windows: C:\Program Files\EMC DD Boost\DA\config\
Make a copy of the required configuration file template, for example, in the original directory or an alternate location, and modify the parameter settings in the file as required. Follow the guidelines in “Syntax rules for the configuration file” on page 43.
Note: The uninstall of the product software removes the original configuration file templates.
“Common parameters” on page 43 describes the common parameters that you set in the configuration file for backups and restores of all the supported databases and applications.
The following common parameters are mandatory:
◆ DDBOOST_USER◆ DEVICE_HOST◆ DEVICE_PATH
42 EMC Data Domain Boost for Databases and Applications Release 1.0 Administration Guide

Product Configuration
Subsequent topics describe additional parameters that you can set in the configuration file for specific operations. Subsequent chapters describe additional database-specific parameters.
Syntax rules for the configuration file
The configuration file must conform to the following syntax rules:
◆ Each parameter setting must be one of the following formats:
NAME=valueNAME=value1;value2;value3
where:
• NAME is the parameter name.• value, value1, value2, value3 are the assigned parameter values.
◆ Parameter names and values are case-sensitive, unless specified otherwise.
◆ If a parameter value contains a quotation mark, then enclose the value with outer quotes that are different from the inner quote:
• Use double quotes to enclose a parameter value that contains a single quote. For example: DEVICE_PATH= "/new's"
• Use single quotes to enclose a parameter value that contains a double quote.
◆ A mandatory parameter must always be set for the specified operation. If an optional parameter is not set, the operation uses the default value of the parameter, if such a value exists.
◆ Use white spaces as preferred. DDBDA ignores all the white spaces.
◆ When a line starts with the # symbol, any text on the line is a comment. DDBDA ignores all the comments.
Common parameters
The following table describes the common parameters that DDBDA uses for backups and restores of all the supported databases and applications.
Table 6 Common parameters (page 1 of 3)
Parameter Description Default and valid values
CLIENT Specifies the hostname of the client that stores the backups on the Data Domain system.Mandatory in a high-availability environment or for a restore to an alternative host. The application-specific chapters provide details on this parameter setting in a high-availability environment.Recommended in all other environments.
Note: The CLIENT parameter setting for a restore must match the CLIENT parameter setting used during the backup.
• Hostname of the local physical host on which the backup or restore runs (default).
• Client hostname.
Setting up the configuration file 43

Product Configuration
DDBOOST_USER Specifies the username of the DD Boost user configured on the primary Data Domain system.Mandatory.
Notice: You must set the initial value of the parameter in the configuration file before the ddbmadmin command is used for any lockbox procedures. After this initial setting, you can modify the parameter value and rerun the ddbmadmin command as described in “Configuring the lockbox for backups and restores” on page 48.
• Undefined (default).• Valid username of the DD Boost user on the
primary Data Domain system. For example:DDBOOST_USER=user1
DEVICE_HOST Specifies the hostname of the primary Data Domain system where the backup is stored.Mandatory.
Notice: You must set the initial value of the parameter in the configuration file before the ddbmadmin command is used for any lockbox procedures. After this initial setting, you can modify the parameter value and rerun the ddbmadmin command as described in “Configuring the lockbox for backups and restores” on page 48.
Set the DEVICE_HOST parameter to the same value in all the DDBDA configuration files on a particular client host. All the DDBDA backups for a given client should be stored under the same DEVICE_HOST if you upgrade from DDBDA to EMC NetWorker® software in the future.
• Undefined (default).• Valid hostname as the fully qualified domain
name of the primary Data Domain system. For example:DEVICE_HOST=dd.host.com
Table 6 Common parameters (page 2 of 3)
Parameter Description Default and valid values
44 EMC Data Domain Boost for Databases and Applications Release 1.0 Administration Guide
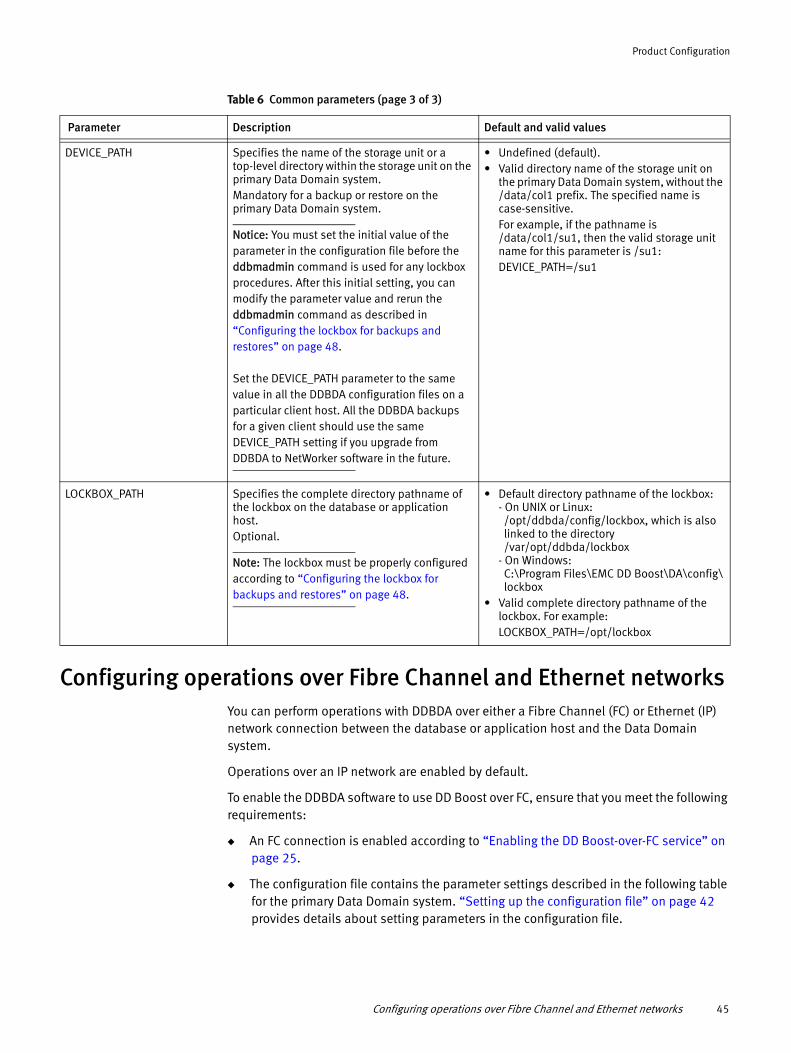
Product Configuration
Configuring operations over Fibre Channel and Ethernet networksYou can perform operations with DDBDA over either a Fibre Channel (FC) or Ethernet (IP) network connection between the database or application host and the Data Domain system.
Operations over an IP network are enabled by default.
To enable the DDBDA software to use DD Boost over FC, ensure that you meet the following requirements:
◆ An FC connection is enabled according to “Enabling the DD Boost-over-FC service” on page 25.
◆ The configuration file contains the parameter settings described in the following table for the primary Data Domain system. “Setting up the configuration file” on page 42 provides details about setting parameters in the configuration file.
DEVICE_PATH Specifies the name of the storage unit or a top-level directory within the storage unit on the primary Data Domain system.Mandatory for a backup or restore on the primary Data Domain system.
Notice: You must set the initial value of the parameter in the configuration file before the ddbmadmin command is used for any lockbox procedures. After this initial setting, you can modify the parameter value and rerun the ddbmadmin command as described in “Configuring the lockbox for backups and restores” on page 48.
Set the DEVICE_PATH parameter to the same value in all the DDBDA configuration files on a particular client host. All the DDBDA backups for a given client should use the same DEVICE_PATH setting if you upgrade from DDBDA to NetWorker software in the future.
• Undefined (default).• Valid directory name of the storage unit on
the primary Data Domain system, without the /data/col1 prefix. The specified name is case-sensitive.For example, if the pathname is /data/col1/su1, then the valid storage unit name for this parameter is /su1:DEVICE_PATH=/su1
LOCKBOX_PATH Specifies the complete directory pathname of the lockbox on the database or application host.Optional.
Note: The lockbox must be properly configured according to “Configuring the lockbox for backups and restores” on page 48.
• Default directory pathname of the lockbox:- On UNIX or Linux:/opt/ddbda/config/lockbox, which is alsolinked to the directory/var/opt/ddbda/lockbox
- On Windows:C:\Program Files\EMC DD Boost\DA\config\lockbox
• Valid complete directory pathname of the lockbox. For example:LOCKBOX_PATH=/opt/lockbox
Table 6 Common parameters (page 3 of 3)
Parameter Description Default and valid values
Configuring operations over Fibre Channel and Ethernet networks 45

Product Configuration
“Configuring restores of replicated backups” on page 46 describes additional parameter settings for restores from a secondary Data Domain system over an FC network.
◆ The operating system user who performs the backup or restore has the correct device permissions as described in the following EMC articles:
• Fibre Channel Devices with Products using DD Boost in Linux Environment (Document ID dd95007)
• Fibre Channel Devices with Products using DD Boost in Windows Environment (Document ID dd95005)
Use the document ID to search for these articles on EMC Online Support.
◆ When a Data Domain host is rebooted, you might need to perform a rescan of the operating system devices on the application host to ensure that the DFC devices are recognized.
Configuring restores of replicated backupsDDBDA supports the restore of replicated backups from a secondary Data Domain system when the primary Data Domain system is unavailable.
To enable DDBDA to automatically restore replicated backups from a secondary Data Domain system when the primary Data Domain system is unavailable, ensure that the configuration file contains the appropriate parameter settings from the following table. “Setting up the configuration file” on page 42 provides details about setting parameters in the configuration file.
For restores from a secondary system over an FC network, ensure that the operating system user who performs the restores has the correct device permissions as described “Configuring operations over Fibre Channel and Ethernet networks” on page 45.
Table 7 Parameters for operations over FC networks
Parameter Description Default and valid values
DDBOOST_FC Specifies whether a backup or restore on the primary Data Domain system uses a Fibre Channel (FC) or IP network connection.
Note: The primary Data Domain system must be configured to support an FC connection if this parameter is set to TRUE.
• FALSE (default) = Backup or restore uses an IP network connection.
• TRUE = Backup or restore uses an FC network connection.
DEVICE_FC_SERVICE Specifies the name of the Fibre Channel service configured on the primary Data Domain system to be used for a backup or restore.Mandatory when the DDBOOST_FC parameter is set to TRUE.
Note: The DEVICE_HOST parameter must be set during Fibre Channel operations as described in “DEVICE_HOST” on page 44.
• Undefined (default).• Name of the DD Boost server on the primary
Data Domain system, without a DFC- prefix.
46 EMC Data Domain Boost for Databases and Applications Release 1.0 Administration Guide
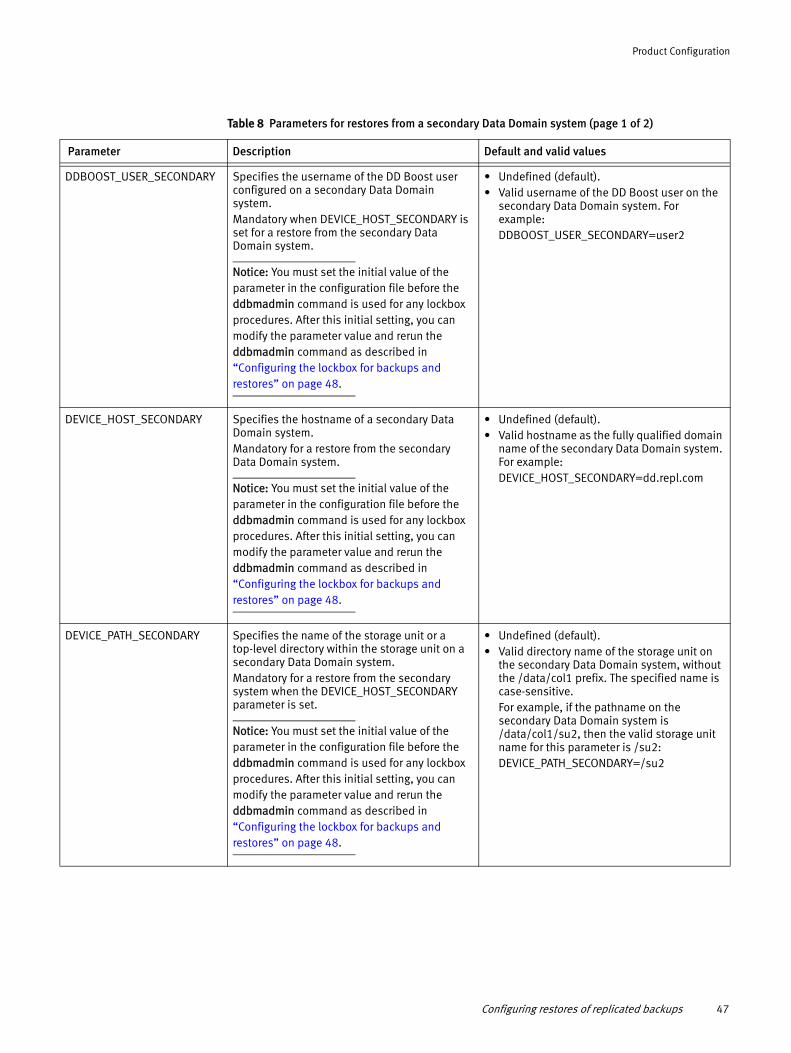
Product Configuration
Table 8 Parameters for restores from a secondary Data Domain system (page 1 of 2)
Parameter Description Default and valid values
DDBOOST_USER_SECONDARY Specifies the username of the DD Boost user configured on a secondary Data Domain system.Mandatory when DEVICE_HOST_SECONDARY is set for a restore from the secondary Data Domain system.
Notice: You must set the initial value of the parameter in the configuration file before the ddbmadmin command is used for any lockbox procedures. After this initial setting, you can modify the parameter value and rerun the ddbmadmin command as described in “Configuring the lockbox for backups and restores” on page 48.
• Undefined (default).• Valid username of the DD Boost user on the
secondary Data Domain system. For example:DDBOOST_USER_SECONDARY=user2
DEVICE_HOST_SECONDARY Specifies the hostname of a secondary Data Domain system.Mandatory for a restore from the secondary Data Domain system.
Notice: You must set the initial value of the parameter in the configuration file before the ddbmadmin command is used for any lockbox procedures. After this initial setting, you can modify the parameter value and rerun the ddbmadmin command as described in “Configuring the lockbox for backups and restores” on page 48.
• Undefined (default).• Valid hostname as the fully qualified domain
name of the secondary Data Domain system. For example:DEVICE_HOST_SECONDARY=dd.repl.com
DEVICE_PATH_SECONDARY Specifies the name of the storage unit or a top-level directory within the storage unit on a secondary Data Domain system.Mandatory for a restore from the secondary system when the DEVICE_HOST_SECONDARY parameter is set.
Notice: You must set the initial value of the parameter in the configuration file before the ddbmadmin command is used for any lockbox procedures. After this initial setting, you can modify the parameter value and rerun the ddbmadmin command as described in “Configuring the lockbox for backups and restores” on page 48.
• Undefined (default).• Valid directory name of the storage unit on
the secondary Data Domain system, without the /data/col1 prefix. The specified name is case-sensitive.For example, if the pathname on the secondary Data Domain system is /data/col1/su2, then the valid storage unit name for this parameter is /su2:DEVICE_PATH_SECONDARY=/su2
Configuring restores of replicated backups 47

Product Configuration
Configuring the lockbox for backups and restoresA lockbox is an encrypted file that DDBDA uses to store and protect confidential information from unauthorized access. The lockbox stores the Data Domain system information, including credentials for the DD Boost user.
Lockbox requirements for backups and restores
The lockbox file used by DDBDA is named ddbmadmin.lb. The default directory location of the lockbox file is as follows:
◆ On UNIX or Linux: /opt/ddbda/config/lockbox, which is linked to the directory /var/opt/ddbda/lockbox
◆ On Windows: C:\Program Files\EMC DD Boost\DA\config\lockbox
The root or administrative user can specify a nondefault directory for the lockbox file during the lockbox creation. For example, the lockbox can be stored in a shared directory in a cluster environment.
In the same directory as the lockbox file, the product also maintains additional files needed for correct lockbox operations.
The root or administrative user must have read and write permissions to the lockbox, and all the database users must have at least the read permission to the lockbox.
The default file permissions on a lockbox file can be changed to restrict the lockbox access to a specified group of users. The lockbox files in the directory must all have the same permissions.
DDBOOST_FC_SECONDARY Specifies whether a restore uses an FC or IP network connection from a secondary Data Domain system, where backups were replicated from the primary Data Domain system.
Note: The secondary Data Domain system must be configured to support an FC connection if this parameter is set to TRUE.
• FALSE (default) = Restore uses an IP network connection.
• TRUE = Restore uses an FC network connection.
DEVICE_FC_SERVICE_SECONDARY
Specifies the name of the Fibre Channel service configured on a secondary Data Domain system, where backups are replicated from the primary Data Domain system.Mandatory when the DDBOOST_FC_SECONDARY parameter is set to TRUE.
Note: The DEVICE_HOST_SECONDARY parameter must be set during Fibre Channel operations.
• Undefined (default).• Name of the DD Boost server on the
secondary Data Domain system, without a DFC- prefix.
Table 8 Parameters for restores from a secondary Data Domain system (page 2 of 2)
Parameter Description Default and valid values
48 EMC Data Domain Boost for Databases and Applications Release 1.0 Administration Guide

Product Configuration
Configuring the lockbox with the ddbmadmin command
The root or administrative user must run the ddbmadmin command to configure the lockbox.
Note: Only the root or administrative user can run the ddbmadmin command to create and update the lockbox on the database or application host to be used for backups or restores. Only one host at a time can access a shared lockbox by running the ddbmadmin command.
The root or administrative user must run one of the following ddbmadmin commands to perform lockbox operations:
ddbmadmin {-P | -X} -z configuration_file [-D 9]
ddbmadmin {-G | -R | -U} [-D 9]
where configuration_file is the complete pathname of the configuration file.
You must use a complete pathname in each case when the ddbmadmin command requires a file name.
The following table describes the ddbmadmin command options for lockbox operations.
Adding Data Domain systems to the lockboxTo enable backups to and restores from a Data Domain system, you must run the ddbmadmin -P -z configuration_file command to register the Data Domain system to the host. This command creates the required lockbox (if it does not exist) or updates an existing lockbox.
Table 9 Options of the ddbmadmin command for lockbox operations
Option Description
-P -z configuration_file This option registers a primary and optional secondary Data Domain system with the lockbox.“Adding Data Domain systems to the lockbox” on page 49 provides details.
-X -z configuration_file This option unregisters a primary and optional secondary Data Domain system.“Removing Data Domain systems from the lockbox” on page 50 provides details.
-G This option grants lockbox access to a specific host.“Configuring the lockbox in a high-availability environment” on page 51 provides details.
-R This option revokes lockbox access from a specific host.“Configuring the lockbox in a high-availability environment” on page 51 provides details.
-U This option regenerates the internal encryption key of the lockbox.“Regenerating the lockbox encryption key” on page 51 provides details.
-D 9 This option generates debugging information during a lockbox operation. The option is used to troubleshoot lockbox issues.
Configuring the lockbox for backups and restores 49

Product Configuration
Before you run the ddbmadmin -P -z configuration_file command, the configuration file must exist and contain the mandatory parameter settings. For example:
DDBOOST_USER=user1DEVICE_HOST=dd.host.comDEVICE_PATH=/su1
You can optionally register a secondary Data Domain system to be used for restores when the primary system is unavailable. In this case, the configuration file must also contain the parameter settings for the secondary system. For example:
DDBOOST_USER_SECONDARY=user2DEVICE_HOST_SECONDARY=dd.repl.comDEVICE_PATH_SECONDARY=/su2
To register the secondary system, the primary system parameters must be in the configuration file.
Optionally, you can set LOCKBOX_PATH in the configuration file to a nondefault lockbox location. “Setting up the configuration file” on page 42 provides details about setting parameters in the configuration file.
If you edit the configuration file and modify any of these parameter settings after you registered them with the lockbox, you must rerun the ddbmadmin -P -z configuration_file command to update the corresponding lockbox entries. Otherwise, backups and restores can fail.
The ddbmadmin -P -z configuration_file command prompts for the DD Boost password of the primary system and optional secondary system. For example:
# ddbmadmin -P -z /opt/ddbda/config/db2_ddbda.cfg
DD Boost password for device host ‘primary_system_hostname_from_configuration_file’:
Confirm password:Logging in to the device host
'primary_system_hostname_from_configuration_file'...Logging in to the device host
'primary_system_hostname_from_configuration_file' was successful.Continue with the registration of the secondary device host
‘secondary_system_hostname_from_configuration_file’? [y/n]:yDD Boost password for device host
‘secondary_system_hostname_from_configuration_file’:Confirm password:
The ddbmadmin -P -z configuration_file command verifies the provided passwords by logging in to the primary and secondary systems, then encrypts the passwords and stores the encrypted passwords in the lockbox.
Removing Data Domain systems from the lockboxYou can run the ddbmadmin -X -z configuration_file command to unregister a Data Domain system. The command uses the parameter settings in the configuration file to determine the required information about the Data Domain system.
The ddbmadmin -X -z command deletes the information in the lockbox about the registered systems and deletes the corresponding parameters in the configuration file.
50 EMC Data Domain Boost for Databases and Applications Release 1.0 Administration Guide

Product Configuration
Regenerating the lockbox encryption keyYou can run the ddbmadmin -U command to regenerate the internal encryption key of the lockbox. This operation ensures that the lockbox is continuously accessible to the host.
To ensure that the lockbox is continuously accessible, ensure that the ddbmadmin -U command is run every time a system is restarted.
Configuring the lockbox in a high-availability environmentIn a high-availability environment, you can create a lockbox on the local disk of each node. In this case, each lockbox must contain the same information. Alternately, you can configure a lockbox in a shared location and grant the lockbox access to all the nodes in the environment.
Note: When the lockbox is located in an NFS-shared location, the NFS share must grant access to the root or administrative user. For example, the NFS share is exported with the no root squash option.
You must complete the following steps to configure a lockbox in a shared location.
1. Select one host (node) and run the ddbmadmin -P -z configuration_file command to register the Data Domain system.
2. On the same host, run the ddbmadmin -G command to grant lockbox access to another host, host2.
Note: You must run the ddbmadmin -G command separately for each host (node) when the environment contains multiple hosts.
The ddbmadmin -G command prompts for the hostname of the host to be granted the lockbox access. You must provide the output of the uname -n command on host2 if host2 is a UNIX or Linux system, and the fully qualified domain name if host2 is a Windows system. For example:
# ddbmadmin -G
If you wish to specify a non-default location for lockbox, type the full path below. Otherwise press Enter to accept the default location. Lockbox directory (installation_directory/config/lockbox): /opt/lockboxHost to be added to lockbox: host2.xyz.com
3. On host2, run the ddbmadmin -U command immediately, before any other host runs the ddbmadmin -U command.
If another host runs the ddbmadmin -U command before you complete this step, host2 will be unable to run the command or perform backups and restores with the Data Domain system until the issue is resolved as described in “Command ddbmadmin -U fails with an internal decryption error” on page 55.
4. Repeat step 2 and step 3 for each additional host that needs to be added to the lockbox. You must run the ddbmadmin -G command separately for each host to which you grant lockbox access.
Configuring the lockbox for backups and restores 51

Product Configuration
Keep a record of the hosts that are granted access to the lockbox. You cannot use the ddbmadmin command to obtain a list of all the hosts that have lockbox access.
In an environment where the lockbox is shared among multiple hosts, the user from each host that performs any operations with DDBDA must have operating system read access to the lockbox files. The root or administrative user on each host must have read and write access to the files.
You can run the ddbmadmin -R command to revoke the lockbox access from a host. You must run the command on a host other than the host from which you revoke the lockbox access. For example, you cannot run the command on host1 to revoke the lockbox access from host1.
When a new node is added to a high-availability environment or replaces an existing node, you must grant the lockbox access to the new node according to step 2 and step 3.
Troubleshooting tipsReview the following information about troubleshooting general issues that you might encounter in operations with DDBDA.
Debug log settings
The following table describes parameters that you can set in the configuration file to specify the debug log settings for DDBDA. You typically use these parameters when you work with Technical Support to troubleshoot issues with the product. Do not use these parameters for regular product operations.
“Setting up the configuration file” on page 42 describes how to set parameters in the configuration file.
“Debug log files” on page 53 describes the naming conventions for the debug log files.
Table 10 Parameters for debugging (page 1 of 2)
Parameter Description Default and valid values
DEBUG_LEVEL Specifies whether the software writes debug messages to the debug log file, located in the directory specified by the DIAGNOSTIC_DEST parameter.
Note: Use this parameter for debugging purposes with assistance from EMC Technical Support only.
• 0 (default) = The software does not generate debug messages.
• 9 = The software writes debug messages to the debug log file with a .log file name extension.
52 EMC Data Domain Boost for Databases and Applications Release 1.0 Administration Guide
Product Configuration
Debug log files
The DDBDA programs generate debugging information in debug log files with specific names.
Debug logs created by the ddbmadmin program for lockbox operations
◆ Debug log created with -D 9 option: ddbmadmin_yyyy_mm_dd.<timestamp>.<pid>.log
For example: ddbmadmin_2014_02_24.10_39_11.18678.log
◆ Regular log: ddbmadmin.messages.log
Debug logs created for DB2 operations
◆ Operational and error message log: ddboost_db2.messages.log
◆ Initial default log: libddboostdb2_default.log
◆ Session debug log: libddboostdb2_DB2_<timestamp>.<process/thread_id>.log
◆ XBSA error message log: xbsa.messages
DIAGNOSTIC_DEST Specifies the directory location of the debug logs generated when the DEBUG_LEVEL parameter is set to 9.
Note: The operational logs generated during normal product operations are not affected by this parameter setting.
• Default directory of the debug log files:- /opt/ddbda/logs (UNIX or Linux)- C:\Program Files\EMC DD Boost\DA\logs(Windows)
• Valid pathname of the directory of the debug log files.
Note: The default directory is used for SAP HANA or SAP Oracle if the specified nondefault directory does not exist or does not have write permissions for the OS user that runs the hdbbackint or backint program.
DPRINTF Specifies whether the software writes additional debug messages to the debug log file.
Note: On Windows, this parameter is ignored for a DB2 multisession restore with the DEBUG_LEVEL parameter set to 9.
• FALSE (default) = The software does not generate additional debug messages.
• TRUE = The software writes additional debug messages to the debug log file.
Table 10 Parameters for debugging (page 2 of 2)
Parameter Description Default and valid values
Troubleshooting tips 53

Product Configuration
Debug logs created for SAP HANA operations
◆ Operational log: hdbbackintSID.log
For example: hdbbackintEMC.log
◆ Database, archived log, and catalog file backup logs:
• hdbbackintSID.debug.pid.log
For example: hdbbackintEMC.debug.11403.log
• LGTOSAPs.debug.SID.pid.log
For example: LGTOSAPs.debug.EMC.11419.log
◆ Database recovery log: LGTOSAPr.debug.SID.pid.log
For example: LGTOSAPr.debug.EMC.14158.log
Debug logs created for SAP with Oracle operations
◆ Database and catalog file backup logs:
• backintSAP.debug.pid
For example: backintSAP.debug.984
• LGTOSAPs.debug.SAP.pid
For example: LGTOSAPs.debug.SAP.1002
◆ Archived log backup logs:
• arch_backintSAP.debug.pid
For example: arch_backintSAP.debug.4018
• LGTOSAPs.debug.SAP.pid
For example: LGTOSAPs.debug.SAP.4434
Backup or restore fails due to an inaccessible lockbox
A DDBDA operation might fail with the following error message:
Unable to retrieve the primary device user password from the lockbox
If this happens and the lockbox is not shared with any other host, then you must run the ddbmadmin -P -z configuration_file command to register the Data Domain systems in the lockbox.
Command ddbmadmin -P encounters a conflict with an installed application
If another installed application uses the same libraries as DDBDA in the /usr/lib/ddbda/lib64 directory, then the ddbmadmin -P -z configuration_file command might encounter a conflict with the application.
Ensure that the software path and library path are set correctly before you run any ddbmadmin command.
54 EMC Data Domain Boost for Databases and Applications Release 1.0 Administration Guide

Product Configuration
For example, run the following commands before you run any ddbmadmin command on Linux:
# export PATH=/usr/lib/ddbda/lib64:$PATH# export LD_LIBRARY_PATH=/usr/lib/ddbda/lib64:$LD_LIBRARY_PATH
Note: The LD_LIBRARY_PATH environment variable applies to Linux and Solaris. Set LIBPATH for AIX, and SHLIB_PATH for HP-UX. On Windows, ensure that the DDBDA library path appears at the front in the PATH environment variable setting, similar to the environment variable settings on UNIX and Linux.
Command ddbmadmin -P fails when IPv6 is enabled
DDBDA 1.0 does not support IPv6. If IPv6 and IPv4 are both enabled on the database host and you want to configure DDBDA with IPv4, then you might receive an error when you run the ddbmadmin command. For example:
# /opt/ddbda/bin/ddbmadmin -P –z /bigspace/db/u01/app/oracle/product/11.2.0/db_1/dbs/ddbda.conf
ddbmadmin: Failed to resolve the IPv6 localhost address ::1. Please verify an entry for the IPv6 localhost address exists in your /etc/hosts file.
In an environment with both IPv6 and IPv4 enabled, you must complete the following steps:
1. Ensure that /etc/hosts has an entry for ::1. For example:
::1 localhost6.localdomain6 localhost6
2. Ensure that /etc/netsvc.conf includes hosts=local. For example:
hosts = local, local4, bind4aliases=filesDEFAULT
Command ddbmadmin -U fails with an internal decryption error
In a multinode environment, the ddbmadmin -U command might fail with the following error message:
The primary internal decryption routine failed
This failure occurs in the case where a node is granted access to the lockbox but before the node runs the ddbmadmin -U command, another node uses the ddbmadmin -U command to reset the encryption key for the lockbox. Then when the first node runs the ddbmadmin -U command, the command fails with the error.
For example, Node A is granted access to the lockbox but Node B runs the ddbmadmin -U command to reset the encryption key before Node A runs the ddbmadmin -U command. Then when Node A runs the ddbmadmin -U command, the command fails with the error.
To resolve the issue, any node other than Node A can run the ddbmadmin -U command to reset the encryption key again for the lockbox. Node A is then able to run the ddbmadmin -U command.
Troubleshooting tips 55

Product Configuration
To prevent the error, a node must run the ddbmadmin -U command immediately after being granted access to the lockbox as described in step 3.
56 EMC Data Domain Boost for Databases and Applications Release 1.0 Administration Guide

CHAPTER 5Operations on DB2 Systems
This chapter includes the following topics:
◆ Product overview in a DB2 environment .................................................................. 58◆ Product configuration in a DB2 environment ........................................................... 59◆ Performing backups and recovery with the DB2 CLP ................................................ 62◆ Performing backups and restores with the DB2 GUI ................................................. 66◆ Preparing for DB2 disaster recovery......................................................................... 66◆ DB2 DPF requirements ............................................................................................ 67◆ DB2 HADR requirements ......................................................................................... 68◆ DB2 troubleshooting tips ........................................................................................ 69
Operations on DB2 Systems 57

Operations on DB2 Systems
Product overview in a DB2 environmentData Domain Boost for Databases and Applications (DDBDA) is integrated with the DB2 interfaces for third-party media management vendors to enable DB2 data backups, restores, transaction log archiving, and backup deletion (pruning).
You can perform a backup or recovery with the product on a DB2 database server by running one of the supported DB2 backup or recovery tools:
◆ DB2 Command Line Processor (CLP) with the commands db2 backup, db2 restore, db2 rollforward, and db2 recover
◆ IBM Data Studio GUI (DB2 10.1 and later)
◆ DB2 Control Center GUI (DB2 9.x)
You can use these tools in cooperation with DDBDA to perform the following DB2 operations:
◆ Online and offline backups◆ Full, incremental, and delta backups◆ Archived log backups◆ Recovery of a database to the current time or a specific point-in-time◆ Recovery to the original location or an alternate location◆ Backup and recovery of databases, tablespaces, and archived logs◆ Backup deletion (pruning)
The product maintains online backup indexes on the Data Domain system. During backups, the product creates backup entries in the online indexes, which provide the information required to restore the backed-up data.
DB2 backup processes
A DB2 database backup includes the following process interactions:
1. The database administrator initiates the backup by running the db2 backup command, IBM Data Studio GUI, or DB2 Control Center GUI.
2. The DB2 software loads the DDBDA shared library.
Note: IBM documentation refers to this library as a vendor library.
3. DDBDA reads the configuration file and initializes the data transport media.
4. The DB2 software sends the database or log data to DDBDA, which uses the DD Boost interface to send the data to the Data Domain system for storage.
DB2 restore processes
A DB2 database restore includes the following process interactions:
1. The database administrator initiates the restore by running the DB2 CLP, the IBM Data Studio GUI, or the DB2 Control Center GUI.
2. The DB2 software loads the DDBDA shared library.
3. DDBDA reads the configuration file and initializes the data transport media.
58 EMC Data Domain Boost for Databases and Applications Release 1.0 Administration Guide

Operations on DB2 Systems
4. The DB2 software requests the backup from DDBDA.
5. DDBDA performs the following tasks:
a. Queries the index on the Data Domain system to locate the backup data.
b. Retrieves the backup data from the Data Domain system.
c. Sends the backup data to the DB2 server.
DB2 backups of transaction logs
DB2 software provides two types of transaction logging:
◆ Circular logging is the default behavior when you create a DB2 database. With this type of logging, each full backup deletes the transaction logs. You can restore only full backups. Circular logging supports only full offline backups of databases.
◆ Archived logging supports online backups and rollforward recovery. With this type of logging, the transaction logs are retained as archived logs that can be managed by DDBDA. You can recover a database or tablespace to a specific point-in-time by using the rollforward feature. You can recover the archived logs and apply the transactions in the logs in sequence until the specified point, to the end of the backup or the end of the logs.
Ensure that the DB2 archived transaction logs are backed up, for example, by configuring the automatic backup of DB2 transaction logs as described in “Configuring DB2 transaction log archiving” on page 60.
Product configuration in a DB2 environmentYou must complete the required configurations to enable the product operations in a DB2 environment. The following topics provide the product configuration details.
Integrating the product into the DB2 environment
After the product installation on Windows, verify that the system %PATH% environment variable includes the software installation directory:
C:\Program Files\EMC DD Boost\DA\bin
Note: The directory pathname can include spaces, but there cannot be spaces before or after the pathname.
Restart the DB2 database manager after the product installation.
Configuring the DB2 parameters
You must set the required parameters for DB2 operations in the DDBDA configuration file.
“Setting up the configuration file” on page 42 describes the common parameters and how to set parameters in the configuration file.
Ensure that the configuration file contains the appropriate DB2 parameters from the following table.
Product configuration in a DB2 environment 59
Operations on DB2 Systems
After the configuration file is set up, ensure that the required lockbox procedures have been performed as described in “Configuring the lockbox for backups and restores” on page 48.
Configuring DB2 transaction log archiving
When you configure the archiving of DB2 transaction logs, DDBDA performs the log backups based on DB2 database policy settings. The product has no control over when the logs are backed up or how often. The DB2 server starts the backup when a transaction log becomes full.
Complete the required steps to configure the DB2 transaction log archiving with DDBDA.
1. Create a configuration file for the archived log backup, which can be the same as or different than the configuration file used for a database backup and restore.
2. Configure the database with the command and options appropriate for the client operating system:
• On UNIX:
$ db2 update db cfg for sample using logarchmeth1 vendor:library_path/libddboostdb2.so logarchopt1 @pathname/db2_ddbda_tlogs.cfg
• On Windows:
C:> db2 update db cfg for sample using logarchmeth1 ‘vendor:C:\Program Files\EMC DD Boost\DA\bin\libddboostdb2.dll’ logarchopt1 @pathname\db2_ddbda_tlogs.cfg
where:
– library_path is the directory pathname of the DDBDA library for DB2 operations.
Table 11 DB2 parameters
Parameter Description Default and valid values
DB2INSTANCE Specifies the name (not the alias) of the source DB2 instance that was used for the backup and contains the archived logs to be retrieved.Mandatory for a DB2 restore, recovery, and rollforward operation.Mandatory for a log retrieval operation as when a backup to be retrieved includes the logs.
Note: Ensure that you set the parameter to the correct value. The DB2 documentation provides details.Ensure that you set the parameter in the logarchoptn configuration file as the parameter is mandatory for a log retrieval operation.
• Undefined (default).• Valid name of the source DB2 instance that
contains the logs to be retrieved.
SOURCE_DBNAME Specifies the name of the source DB2 database that was originally used for the backup of the database or archived logs.Mandatory for a database restore to a different database and for a recovery and rollforward operation to a different database.
• Undefined (default).• Valid name of the source DB2 database that
was originally used for the backup of the database or archived logs.
60 EMC Data Domain Boost for Databases and Applications Release 1.0 Administration Guide

Operations on DB2 Systems
– sample is the name of the database to be backed up.
– pathname/db2_ddbda_tlogs.cfg or pathname\db2_ddbda_tlogs.cfg is the complete pathname of the DB2 configuration file. Do not specify a relative pathname.
The logarchoptn setting is used to fill in the COMMENT field in the DB2 history archived log records, which is restricted to a maximum length of 30 characters. This value is then used during the pruning of the archived logs and during the rollforward stage in a db2 recover operation. For the operation to succeed, the logarchoptn setting must not exceed 30 characters in length.
3. When you complete the configuration, perform an offline backup as required by IBM DB2. “Performing backups and recovery with the DB2 CLP” on page 62 includes an example of how to run a DB2 backup.
Configuring DB2 backup deletion
The automatic deletion or pruning of backups by the DB2 database manager is based on the setting of the configuration parameters num_db_backups and rec_his_retentn. When you set the DB2 database configuration parameter auto_del_rec_obj to on, the DB2 database manager automatically performs the following maintenance operations when both of the num_db_backups and rec_his_retentn values are exceeded:
◆ Prunes the database history.◆ Deletes the corresponding backup images, load copy images, and log files. These
objects are generally referred to as DB2 recovery objects.
These maintenance operations can be performed as part of a backup.
You can perform the following steps to enable the automatic deletion of DB2 backups.
1. Set the DB2 database configuration vendoropt parameter to the pathname of the DDBDA configuration file for the DB2 database or tablespace whose backups are to be deleted. For example:
db2 update db cfg for sample using vendoropt @pathname/db2_ddbda.cfg
where:
• sample is the name of the database or tablespace whose backups are to be deleted.
• pathname/db2_ddbda.cfg is the complete pathname of the DDBDA configuration file.
2. Enable automatic pruning of the recovery history:
db2 update db cfg for sample using num_db_backups ndb2 update db cfg for sample using rec_his_rentn number_of_days
Product configuration in a DB2 environment 61

Operations on DB2 Systems
3. Enable the automatic deletion of physical backup images and log files:
db2 update db cfg for sample using auto_del_rec_obj on
where sample is the name of the database whose backups are to be deleted.
Note: Without this step, the recovery history pruning removes entries only in the DB2 history file and does not remove the associated backups.
You can also prune the history file and delete the backups manually by using the db2 prune command.
The DB2 documentation provides details about the automatic deletion of DB2 recovery objects and the db2 prune command.
Preventing deletion of DB2 backup images
The automatic deletion and manual pruning might accidentally remove backup images that are still needed, especially when the backup images retention management relies only on the automatic deletion configuration and manual pruning of recovery objects.
If you want to exclude certain backups from automatic deletion and retain those backups for a longer time, update the status of the associated entries in the recovery history file to do_not_delete (acronym X). For example, run the following command:
db2 update history EID 10 with status X
DB20000I The UPDATE HISTORY command completed successfully.
When you perform manual pruning, do not use the with force option for the status setting to be effective. If you use this option, the backup entries are still pruned.
When you no longer need to keep the backup images, update the status of the entries back to normal, for example, active (A) or expired (E). This updated status enables the pruning and removal of those backup images according to the automatic deletion configuration in place for other backup images. The DB2 documentation provides more details about protecting recovery objects from being deleted.
Performing backups and recovery with the DB2 CLPYou can run the DB2 CLP to perform backups, restores, and recovery with DDBDA. The DB2 documentation provides details about the DB2 CLP commands and options.
Performing DB2 backups with the DB2 CLP
You can perform a DB2 backup after you have completed the backup configurations in “Product configuration in a DB2 environment” on page 59.
You can run the appropriate db2 backup command to perform a DB2 backup.
Note: DDBDA includes support of the dedup_device option for backups with the db2 backup command. The dedup_device option optimizes the format of data that is backed up to a deduplication device.
62 EMC Data Domain Boost for Databases and Applications Release 1.0 Administration Guide

Operations on DB2 Systems
For example on UNIX, run the following command:
$ db2 backup db sample load library_path/libddboostdb2.so open n sessions options @pathname/db2_ddbda.cfg dedup_device
where:
◆ sample is the name of the database to back up.
◆ library_path is the directory pathname of the DDBDA library for DB2 operations.
◆ n is the number of concurrent backup sessions.
◆ pathname/db2_ddbda.cfg is the pathname of the DB2 configuration file as described in “Configuring the DB2 parameters” on page 59.
The DB2 documentation provides more details about how to use the db2 backup command for manual backups.
Performing DB2 restores with the DB2 CLP
You can run the appropriate db2 restore command to perform a DB2 data restore to either the same DB2 application host or a different host.
A DB2 restore can restore the data to the original database or to a different database under the same or different DB2 instance.
Performing DB2 restores to the same instanceYou can perform the steps to restore the DB2 data to the original DB2 instance.
If you are recovering the data to a point-in-time, note the timestamp of the backup to restore.
You can run the db2 restore command with the appropriate options. For example:
◆ On UNIX, run the following command:
$ db2 restore db sample load library_path/libddboostdb2.so open n sessions options @pathname/db2_ddbda.cfg taken at yyyymmddtttt into sample2
where:
• sample is the name of the database to be restored.
• library_path is the directory pathname of the DDBDA library for DB2 operations.
• n is the number of restore sessions if DDBDA used multiple sessions for the backup.
• pathname/db2_ddbda.cfg is the pathname of the DB2 configuration file.
• yyyymmddtttt is the timestamp of the backup to restore.
Skip the taken at parameter if you are restoring only the most recent backup of a database or tablespace.
• sample2 is the new name of the database if you are restoring to a different database name.
Skip the into parameter if you are restoring the database to the original database name.
Performing backups and recovery with the DB2 CLP 63

Operations on DB2 Systems
◆ On Windows, run the following command:
C:> db2 restore db sample load ‘C:\Program Files\EMC DD Boost\DA\bin\libddboostdb2.dll’ open n sessions options @pathname\db2_ddbda.cfg taken at yyyymmddtttt into sample2
If the timestamp of the backup is unknown, find the timestamp by querying all the backups with the following command:
$ db2 list history backup all for sample
where sample is the name of the database to be restored.
Performing DB2 restores to a different instanceYou can perform the steps to restore the DB2 data to a different DB2 instance. For example:
1. From the new instance, generate a redirection script by running the db2 restore command with the redirect generate script option:
• On UNIX, run the following command:
$ db2 restore db sample load library_path/libddboostdb2.so options @pathname/db2_ddbda.cfg taken at yyyymmddtttt redirect generate script pathname/my_redirect.ddl
where:
– pathname/my_redirect.ddl is the complete pathname of the generated redirection script.
– The other command line options are the same as described in “Performing DB2 restores to the same instance” on page 63.
• On Windows, run the following command:
C:> db2 restore db sample load ‘C:\Program Files\EMC DD Boost\DA\bin\libddboostdb2.dll’ options @pathname\db2_ddbda.cfg taken at yyyymmddtttt redirect generate script pathname\my_redirect.ddl
Note: Ensure that the new instance has read and write permission to the script.
2. Edit the generated script, and define the following parameters:
• OPTIONS (mandatory)—Complete pathname of the DB2 configuration file.
• ON (mandatory)—Complete pathname of the new database instance.
• INTO—New database name, if you are redirecting the recovery to a new name.
• TAKEN AT—Timestamp of the backup to recover, yyyymmddtttt, if you are restoring the data to a point-in-time.
• OPEN SESSIONS—Number of restore sessions, if DDBDA used multiple sessions for the backup.
64 EMC Data Domain Boost for Databases and Applications Release 1.0 Administration Guide

Operations on DB2 Systems
For example:
OPTIONS ‘@/bigspace/home/db2inst2/db2_ddbda.cfg’ON ‘/bigspace/home/db2inst2’INTO sample2
Note: If you created DMS tablespaces with the backup, you might need to set the SET TABLESPACE CONTAINERS parameter to the appropriate value.
The DB2 documentation provides details.
3. On the DB2 application host, run the following command to invoke the redirection script under the redirected different instance where the data is to be restored:
$ db2 -tvf my_redirect.ddl
where my_redirect.ddl is the name of the generated redirection script.
Performing DB2 recovery with the DB2 CLP
You can run the db2 rollforward command to apply the transaction logs that are stored on the Data Domain system to recover a DB2 database to either the current time or a specific point-in-time.
If you want to restore and roll forward a DB2 database in a single operation, you can run the db2 recover command.
Note: To use rollforward recovery, DDBDA must have backed up the transaction logs. “DB2 backups of transaction logs” on page 59 provides details.
Performing DB2 recovery with the db2 rollforward commandTo apply all the transactions to the end of the logs, run the following command:
$ db2 “rollforward db sample to end of logs and complete”
where sample is the database name.
To apply the transactions to a specific point-in-time, run the following command:
$ db2 “rollforward db sample to yyyy-mm-dd.hh.mm.ss using local time”
Performing DB2 restore and recovery with the db2 recover commandThe db2 recover command combines the functions of the db2 restore command and db2 rollforward command.
1. Set the DB2 database configuration vendoropt parameter to the pathname of the DDBDA configuration file for the database to be recovered. For example:
$ db2 update db cfg for sample using vendoropt @pathname/db2_ddbda.cfg
where:
• sample is the name of the database or tablespace to be recovered.
• pathname/db2_ddbda.cfg is the complete pathname of the DDBDA configuration file.
Performing backups and recovery with the DB2 CLP 65

Operations on DB2 Systems
2. Run the db2 recover command with appropriate options.
To apply all the transactions to the end of the logs, run the following command:
$ db2 recover db sample to end of logs
To apply the transactions to a specific point-in-time, run the following command:
$ db2 recover db sample to yyyy-mm-dd.hh.mm.ss using local time
The command line options in these examples are the same as described in “Performing DB2 restores to the same instance” on page 63.
Note: The db2 recover command does not support the load syntax or options syntax that is available with db2 backup and db2 restore commands. Instead, the db2 recover command uses information in the DB2 history file to determine what file to load during the recovery and uses the VENDOROPT variable to pass the options file.
For a dropped database, use the db2 restore and db2 rollforward commands to perform disaster recovery. You cannot use the db2 recover command for dropped databases.
Performing backups and restores with the DB2 GUIYou can run the DB2 GUI to perform backups, restores, and recovery with DDBDA. The DB2 documentation provides details about all the GUI procedures.
You can perform a DB2 backup or restore after you have completed the configurations in “Product configuration in a DB2 environment” on page 59.
Specify the DDBDA configuration file in the GUI by setting VENDOROPT to the value @configuration_file_pathname. For example:
@d:\db2_ddbda.cfg
The product configuration file must contain the parameter settings for the backup or restore as described in “Setting up the configuration file” on page 42.
Set the Vendor DLL to the DDBDA library name in the GUI.
Note: After you select the DLL path with the DB2 Control Center for a Windows client, enclose the path with quotes or use a short file name (8.3 format). Otherwise, the backup returns an error similar to the following example:SQL0104N An unexpected token "Files\EMC" was found following
"<identifier>". Expected tokens may include: "INCLUDE".
Preparing for DB2 disaster recoveryFor a comprehensive disaster recovery plan, you must ensure that you can reconstruct the computing environment and all the DB2 server files associated with maintaining data on the application host.
66 EMC Data Domain Boost for Databases and Applications Release 1.0 Administration Guide

Operations on DB2 Systems
Use the following guidelines to prepare for a disaster recovery of the DB2 server host:
◆ Maintain accurate and complete records of the network and system configurations. Keep all the original software media and the following items in a safe location:
• Original operating system media and patches• Device drivers and device names• File system configuration• IP addresses and hostnames
◆ Ensure that you have a current full backup of the database and all the archived logs required for a rollforward operation.
◆ Save a copy of the DDBDA configuration file used for the DB2 backups of the database and archived logs.
◆ Confirm that the parameter setting of the corresponding options file, such as logarchopt1, from the source database image is valid on the destination host.
Plan to perform the following tasks during a disaster recovery:
1. Set up the DDBDA configuration file to be used during the recovery, including the following parameter settings:
• CLIENT=source_client_hostname• DB2INSTANCE=source_database_instance• SOURCE_DBNAME=source_database_name
“Configuring the DB2 parameters” on page 59 provides details.
2. Re-create the lockbox on the database host. “Configuring the lockbox for backups and restores” on page 48 provides details about the lockbox.
3. Ensure that all the required database and log backup images are available.
4. Run a db2 restore command to restore the database. For example:
$ db2 restore database db_name load library_path/libddboostdb2.so options @pathname/db2_ddbda.cfg taken at yyyymmddtttt
5. Perform a rollforward operation on the restored database, to the end of the logs or a point-in-time:
$ db2 rollforward database database_name
DB2 DPF requirementsYou can perform DB2 backups in a DB2 Database Partitioning Feature (DPF) environment.
You must meet the following configuration requirements in a DB2 DPF environment:
◆ You have set up the database in the DPF environment according to the appropriate DB2 DPF documentation.
◆ You have installed the DDBDA software on each node that will participate in backups or recovery.
◆ You have completed all the post-installation procedures on each node, including the lockbox configuration procedure for all the participating hosts. The hosts can use either a shared lockbox or individually configured lockboxes.
DB2 DPF requirements 67

Operations on DB2 Systems
◆ If an NFS-shared lockbox is configured, you have followed all the required steps in “Configuring the lockbox in a high-availability environment” on page 51.
◆ You have set the CLIENT parameter in the DB2 configuration file to the hostname of the catalog node. “CLIENT” on page 43 provides details.
◆ You have ensured that all the partitions have the same DDBDA parameter settings.
DB2 HADR requirementsYou can perform DB2 backups in a DB2 High Availability Disaster Recovery (HADR) environment. You can start a backup on the primary node only. DB2 does not support backups on standby nodes.
You must meet the following configuration requirements in a DB2 HADR environment:
◆ You have set up the database in the HADR environment according to the appropriate DB2 documentation.
◆ You have installed the DDBDA software on each node that will participate in backups or recovery, including the standby nodes.
◆ You have completed all the post-installation procedures on each node, including the lockbox configuration procedure for all the participating hosts. The hosts can use either a shared lockbox or individually configured lockboxes.
◆ You have set the CLIENT parameter in the DB2 configuration file to the valid hostname of one of the nodes for all the backups and recovery. “CLIENT” on page 43 provides details.
Note: The same CLIENT setting must be used in all the backup and recovery operations for the HADR nodes.
◆ You have ensured that all the nodes have the same DDBDA parameter settings.
A DB2 HADR recovery requires the following steps:
Note: As a DB2 requirement before you start a HADR recovery, you must stop HADR and deactivate the database. The DB2 documentation provides details about the required procedures.
1. Recover the database to all the HADR nodes as if they were stand-alone databases.
2. Configure the HADR environment settings.
3. Start HADR on all the standby nodes.
4. Start HADR on the primary node.
5. Manually back up the database.
68 EMC Data Domain Boost for Databases and Applications Release 1.0 Administration Guide

Operations on DB2 Systems
DB2 troubleshooting tips“Troubleshooting tips” on page 52 provides common troubleshooting information that applies to DDBDA operations with all the supported databases and applications.
The following topics provide troubleshooting information for DB2 operations with DDBDA.
DB2 operation might generate empty debug logs on Windows
On Windows, certain DB2 operations with DDBDA might generate debug log files with a size of zero bytes.
You can ignore any zero-byte debug logs.
DB2 recover operation fails due to the logarchoptn value
Due to a DB2 limitation, when the recorded value of logarchoptn in the DB2 recovery history exceeds 30 characters in length, the db2 recover db operation might fail with the following type of error:
SQL1268N Roll-forward recovery stopped due to error "SQL1042" while retrieving log file "S0000001.LOG" for database "TEST" on node "0"
To work around this issue, ensure that the current logarchopt1 parameter does not exceed 30 characters in length:
1. Reconfigure the logarchopt1 parameter by running the following command:
db2 update db cfg for database_name using logarchopt1 @pathname/db2_ddbda.cfg
where:
• database_name is the name of the database.
• pathname/db2_ddbda.cfg is the complete pathname that contains fewer than 30 characters.
2. Rerun the database recovery. For example, run the following command:
db2 recover db database_name
3. Back up the database after the recovery completes successfully. For example, run the following command:
db2 backup db pathname load library_path/libddboostdb2.so options @pathname2/bk_db2.cfg
This step ensures that future recovery operations, to a point-in-time after this backup time, use the new setting for the logarchopt1 parameter.
Pruning of a multisession backup leaves entries in the DB2 history
The prune operation of a backup performed in multiple sessions removes all the backup pieces from the Data Domain system but might not remove all the entries in the DB2 database history.
To work around this issue and remove the entries in the DB2 database history, run a db2 prune history with force option command without the delete option.
DB2 troubleshooting tips 69

Operations on DB2 Systems
Pruning of DB2 log history after a rollforward might produce errors
If you perform a DB2 restore without the replace history file option and then perform a rollforward operation, the log history file might contain duplicated entries for the logs archived after the backup and used in the rollforward. A DB2 history pruning operation with auto_del_rec_obj set to on might then produce misleading errors. The errors occur when the DB2 software requests the removal of the same archived log backup multiple times due to the duplicated entries in the history.
Note: This issue does not occur when you perform the DB2 restore with the replace history file option.
For example, the db2 prune history operation produces the following message in the db2diag.log file:
2015-05-04-13.39.24.676564-240 E684889E515 LEVEL: InfoPID : 1027 TID : 47814394505536PROC : db2sysc 0INSTANCE: db2inst1 NODE : 000 DB : TESTAPPHDL : 0-5718 APPID: *LOCAL.db2inst1.150504173845AUTHID : DB2INST1EDUID : 2878 EDUNAME: db2agent (TEST) 0FUNCTION: DB2 UDB, database utilities, sqluhDeletionReport, probe:381MESSAGE : ADM8506I Successfully deleted the following database logs "3
- 5" in log chain "1".
2015-05-04-13.39.24.676841-240 E685405E502 LEVEL: ErrorPID : 1027 TID : 47814394505536PROC : db2sysc 0INSTANCE: db2inst1 NODE : 000 DB : TESTAPPHDL : 0-5718 APPID: *LOCAL.db2inst1.150504173845AUTHID : DB2INST1EDUID : 2878 EDUNAME: db2agent (TEST) 0FUNCTION: DB2 UDB, database utilities, sqluhDeletionReport, probe:387MESSAGE : ADM8509N Unable to delete the database logs "3 - 4" in log
chain "1".
To work around this issue, perform the following steps:
1. Check the db2diag.log file and the backup index to verify that the log entries are removed.
2. Clean up the DB2 history file by running a db2 prune history...with force option command without the and delete option.
Pruning of log backups fails due to the logarchoptn value
Due to a DB2 limitation, when the logarchoptn value exceeds 30 characters, the value is not recorded correctly in the DB2 recover history. In such cases, the pruning operation might encounter an issue. The output of the db2 prune history and delete command might indicate success but the deletion of log backups might have an issue. Errors might appear in the db2diag.log file, and the log entries might still remain in both the DB2 database history and backup storage.
70 EMC Data Domain Boost for Databases and Applications Release 1.0 Administration Guide

Operations on DB2 Systems
In this case, you can perform the following workaround:
1. Run the following command to adjust the length of the parameter setting:
db2 update history file EID entry-eid with comment 'new_location_of_logarchopt1'
For example, run the following command:
db2 update history EID 10 with comment '@C:\tmp\other.cfg'
2. Rerun the db2 prune history and delete command.
In some cases, there might be multiple entries of the same archived log in the DB2 history as shown by the db2 list history archive log command. However, there might be only one corresponding entry in the backup storage. During the pruning of the log backup, DB2 might send more than one deletion request. In such cases, the entries are removed from the backup storage but might still appear in the DB2 archived log history after the prune operation. You can remove the entries from the DB2 history by performing a manual prune operation without the delete option.
Database backup might fail when run concurrently with backups of a high number of archived logs
If a database backup, especially one with multiple sessions, starts when a high number of archived logs (more than 300 logs) are ready to be backed up, the database backup might fail.
In this case, you can restart the database backup later when there are fewer logs to be backed up. You can estimate the approximate number of logs ready for backup by comparing the latest log sequence number that was backed up and the next log sequence to be archived.
To estimate the next log sequence number to be archived, query the next active log sequence number from the database configuration. For example:
C:\Program Files> db2 get db cfg for testdb1 | grep -i log
First active log file = S0000559.LOG
To estimate the next archived log to be backed up, browse the db2diag.log file. For example, the file contains the following information:
FUNCTION: DB2 UDB, data protection services, sqlpgArchiveLogFile, probe:3180
DATA #1 : <preformatted> Completed archive for log file S0000347.LOG to VENDOR chain 1 from
C:\DB2_01\NODE0000\SQL00001\LOGSTREAM0000\.
From these examples, you can calculate the number of archived logs ready to be backed up as: 559 – 347 = 212 logs.
DB2 troubleshooting tips 71

Operations on DB2 Systems
72 EMC Data Domain Boost for Databases and Applications Release 1.0 Administration Guide

CHAPTER 6Operations on SAP HANA Systems
This chapter includes the following topics:
◆ Product overview in a SAP HANA environment ......................................................... 74◆ Product configuration in a SAP HANA environment .................................................. 75◆ Performing backups, recovery, and deletion with SAP HANA Studio ......................... 78◆ Performing backups and recovery with the SAP HANA CLI ........................................ 82◆ Preparing for SAP HANA disaster recovery................................................................ 85◆ SAP HANA scale-out requirements........................................................................... 85
Operations on SAP HANA Systems 73

Operations on SAP HANA Systems
Product overview in a SAP HANA environmentA SAP HANA database holds most of the data in memory but also uses persistent storage on disk. During normal database operations, the data is automatically saved from memory to the disk at regular intervals. All the data changes are also captured in the redo log on disk, which is updated after each committed database transaction. The data on disk must be backed up to ensure protection against a disk failure.
Data Domain Boost for Databases and Applications (DDBDA) is integrated with the SAP HANA BACKINT interface to enable SAP HANA database data and redo log backups and restores.
You can perform a backup, recover, inquire, or delete operation with the product on a SAP HANA database server by running one of the supported SAP HANA tools:
◆ SAP HANA command line interface (CLI) with the hdbsql command◆ SAP HANA Studio GUI◆ SAP DBA Cockpit in The Computing Center Management System (CCMS) GUI
You can use these tools in cooperation with DDBDA to perform the following SAP HANA operations:
◆ Online backups
◆ Full database backups
◆ Redo log backups
◆ Recovery of a database to the most recent state, a specific point-in-time, a specific data backup, or a log position
◆ Recovery to the original host or an alternate host
The SAP HANA documentation provides details about any specific limitations related to these SAP HANA operations.
The product maintains online backup indexes on the Data Domain system. During backups, the product creates backup entries in the online indexes, which provide the information required to restore the backed-up data.
SAP HANA backup processes
A SAP HANA database backup includes the following process interactions:
1. The database administrator initiates the backup by running the hdbsql command, SAP HANA Studio GUI, or SAP DBA Cockpit in CCMS.
2. The SAP HANA database server runs the hdbbackint program, installed as part of DDBDA, and passes a list of pipes to back up.
3. The hdbbackint program processes the SAP HANA parameters from the configuration file and starts the child hdbbackint processes that back up the required data.
4. The child hdbbackint processes send the database data and tracking information to the Data Domain system for storage.
74 EMC Data Domain Boost for Databases and Applications Release 1.0 Administration Guide
Operations on SAP HANA Systems
SAP HANA restore processes
A SAP HANA database restore includes the following process interactions:
1. The database administrator initiates the restore by running the SAP HANA Studio GUI.
2. The SAP HANA database server runs the hdbbackint program and passes a list of pipes to receive the restored data.
3. The hdbbackint program processes the SAP HANA parameters from the configuration file and starts the child hdbbackint processes that restore the required data.
4. The child hdbbackint processes perform the following tasks:
a. Query the index on the Data Domain system to locate the backup data.
b. Retrieve the backup data from the Data Domain system.
c. Write the backup data to files on the SAP HANA database server.
SAP HANA backups of redo logs
The SAP HANA database server automatically performs periodic backups of the redo logs for a database. You do not run the log backups with any backup commands as is the case for database backups.
You can use the SAP HANA Studio to configure the frequency of automatic log backups and whether the BACKINT interface is used for the log backups as described in “Configuring automatic backups of SAP HANA redo logs” on page 77.
Product configuration in a SAP HANA environmentYou must complete the required configurations to enable the product operations in a SAP HANA environment. The following topics provide the product configuration details.
Integrating the product into the SAP HANA environment
The DDBDA installation places the hdbbackint program in the /opt/ddbda/bin directory. However, SAP HANA requires the program to be accessible from the /usr/sap/SID/SYS/global/hdb/opt directory.
Note: You must manually create the opt subdirectory if it does not exist in the /usr/sap/SID/SYS/global/hdb directory.
You can either copy the hdbbackint file to that directory or create a symbolic link that points from /usr/sap/SID/SYS/global/hdb/opt/hdbbackint to the actual executable file.
Ensure that the hdbbackint file has the required executable permissions for the operating system user SIDadm to run the program, where SID is the system ID of the SAP HANA system.
Product configuration in a SAP HANA environment 75

Operations on SAP HANA Systems
Configuring the SAP HANA parameters
You must set the required parameters for SAP HANA operations in the DDBDA configuration file.
“Setting up the configuration file” on page 42 describes the common parameters and how to set parameters in the configuration file.
You can optionally set the PARALLELISM parameter to specify a multistream restore as described in the following table.
After the configuration file is set up, ensure that the required lockbox procedures have been performed as described in “Configuring the lockbox for backups and restores” on page 48.
Enabling the configuration file in SAP HANA Studio
You must specify the location of the DDBDA configuration file in SAP HANA Studio. On the Configuration tab of the Backup editor, type the complete pathname of the configuration file in the Backint Parameter File text box.
Note: The same configuration file is used for all the SAP HANA CLI and SAP HANA Studio operations.
You can specify separate configuration files for the database backup and log backup.
You can also select Use the same parameter file for data backup and log backup to use the same configuration file for both types of backups.
Table 12 SAP HANA parallelism parameter
Parameter Description Default and valid values
PARALLELISM Specifies the number of concurrent data streams to send from the Data Domain system during a restore, for each hdbbackint program that SAP HANA runs for the restore.
Note: A SAP HANA backup always has a parallelism of 1 per hdbbackint process. However, the SAP HANA server starts multiple hdbbackint processes concurrently, with one process per HANA service.
Optional for a restore.
• 8 (default).• Positive integer number.
76 EMC Data Domain Boost for Databases and Applications Release 1.0 Administration Guide

Operations on SAP HANA Systems
The following figure shows a configuration example in SAP HANA Studio 1.0 SPS 5.
Configuring automatic backups of SAP HANA redo logs
You must complete the required steps in SAP HANA Studio to configure the automatic backups of SAP HANA redo logs.
On the Configuration tab of the Backup editor, complete the settings in the Log Backup Settings group box:
◆ Select Enable Automatic Log Backup.
◆ For Destination Type, select Backint.
◆ For Backup Interval, specify the log backup interval. Type the numeric value in the text box, and select the unit of time, such as Minutes, from the menu.
Note: The recommended log backup interval is 30 minutes.
Product configuration in a SAP HANA environment 77

Operations on SAP HANA Systems
The following figure shows a configuration example in SAP HANA Studio 1.0 SPS 5.
Performing backups, recovery, and deletion with SAP HANA StudioYou can run the SAP HANA Studio GUI to perform backups, backup deletions, restores, and recovery with DDBDA. The SAP HANA documentation provides details about the SAP HANA Studio procedures.
You can perform operations with SAP HANA Studio after you have completed the configurations in “Product configuration in a SAP HANA environment” on page 75.
Performing backups with SAP HANA Studio
In SAP HANA Studio, you must specify the database for backup and enable the backup to use the BACKINT interface.
78 EMC Data Domain Boost for Databases and Applications Release 1.0 Administration Guide

Operations on SAP HANA Systems
For example, the Specify Backup Settings dialog box appears as follows.
In the Specify Backup Settings dialog box, you must select Backint for the Destination Type and optionally type a prefix for the backup name in the Backup Prefix text box. If you specify a prefix, then the backup name will include the prefix, prefix_databackup_#_#.
Performing backups, recovery, and deletion with SAP HANA Studio 79

Operations on SAP HANA Systems
Performing restore and recovery with SAP HANA Studio
In SAP HANA Studio, you must select the recovery option for the required SID.
For example, the Specify Recovery Type dialog box appears as follows.
You must select the type of recovery:
◆ Select Recover the database to its most recent state to recover the database as close as possible to the current time.
◆ Select Recover the database to the following point in time to recover the database to a specific point-in-time.
◆ Select Recover the database to a specific data backup to restore only the specified data backup.
◆ Click Advanced and select Recover the database to the following log position in an exceptional case only when a previous recovery has failed.
80 EMC Data Domain Boost for Databases and Applications Release 1.0 Administration Guide

Operations on SAP HANA Systems
For example, the Select Data Backup dialog box appears as follows.
You must select the database backup for the restore or recovery.
You can optionally select to perform an inquire operation that checks the backup availability by selecting the backup in the list and clicking Check Availability. The Available column displays a green or red icon, based on the physical availability of the backup.
The recovery progress is displayed for each service, including the name server, index server, and statistics server. A confirmation message appears when the recovery is complete.
Performing backups, recovery, and deletion with SAP HANA Studio 81

Operations on SAP HANA Systems
Deleting backups with SAP HANA Studio
In SAP HANA Studio, you must select the backup catalog option for the required SID and select a database backup for deletion from the backup catalog list.
For example, the Specify Backup Deletion Settings dialog box appears as follows.
You can select the appropriate type of deletion:
◆ Select Catalog to delete the backup from the backup catalog only.
◆ Select Catalog and backup location to delete the backup from both the backup catalog and the Data Domain system.
Performing backups and recovery with the SAP HANA CLIYou can run the SAP HANA CLI to perform backups of SAP HANA data.
Starting with SAP HANA SPS 07, you can run the SAP HANA CLI to perform recovery of the SAP HANA backups, and run specific maintenance commands to check the availability and integrity of data and log backups.
You can perform the SAP HANA operations after you have completed the backup configurations in “Product configuration in a SAP HANA environment” on page 75.
82 EMC Data Domain Boost for Databases and Applications Release 1.0 Administration Guide
Operations on SAP HANA Systems
Performing backups with the SAP HANA CLI
You can run the appropriate hdbsql command to perform a database backup. For example:
hdbsql -U user_key "backup data using backint ('/usr/sap/SID/SYS/global/hdb/backint/prefix')"
where:
◆ user_key is the user store key created with the SAP HANA hdbuserstore tool. SAP HANA documentation provides details about the tool.
◆ SID is the system ID of the SAP HANA system. /usr/sap/SID/SYS/global/hdb/backint/ is optional in the hdbsql command.
◆ prefix is an optional prefix for the backup name. If you specify prefix in the hdbsql command, then the backup name will include the prefix, prefix_databackup_#_#.
The SAP HANA documentation provides details about how to use the hdbsql command for backups.
Canceling backups with the SAP HANA CLI
You can cancel a SAP HANA backup by using the appropriate SQL command with the backup ID of the running data backup.
1. Determine the backup ID of the running data backup by using the monitoring view M_BACKUP_CATALOG, which provides an overview of information about backup and recovery activities.
Run the following SQL command to determine the backup ID:
select BACKUP_ID from "M_BACKUP_CATALOG" where entry_type_name = 'complete data backup' and state_name = 'running' order by sys_start_time desc;
2. Run the following SQL command to cancel the running data backup:
backup cancel backup_ID
Checking backups with the SAP HANA CLI
Starting with SAP HANA SPS 07, you can run the hdbbackupcheck and hdbbackupdiag commands to check the integrity and availability of SAP HANA backups.
Using the hdbbackupcheck command to check backup integrityYou can run the hdbbackupcheck command to check the integrity of a data or log backup. The command reads part of the backup, checks the metadata for correctness and consistency, and checks the content for any changes.
The following example command checks the integrity of a SAP HANA backup:
./hdbbackupcheck -v --backintParamFile /usr/sap/space/space_hana/init.ddp.utl /usr/sap/AAA/SYS/global/hdb/backint/foooo_databackup_0_1 -e 1396019304
Performing backups and recovery with the SAP HANA CLI 83

Operations on SAP HANA Systems
In this command, the backup file name is the pipe name provided by SAP HANA during the backup. The pathname is the location where the pipes were created. The -e option provides the external backup ID of the backup file. You can find all these values in the M_BACKUP_CATALOG_FILES view.
The SAP Note 1869119 provides details about the hdbbackupcheck command.
Using the hdbbackupdiag command to check backup availabilityYou can run the hdbbackupdiag command to check the backup availability.
The following example command checks the availability of a SAP HANA backup:
./hdbbackupdiag --check -i 1393886826664 --useBackintForCatalog --backintDataParamFile /nsr/res/initAAA.utl --backintLogParamFile /nsr/res/initAAA-logs.utl
Ensure that you use the --useBackintForCatalog option.
The SAP Note 1873247 provides more details about the hdbbackupdiag command.
Performing recovery with the SAP HANA CLI
Starting with SAP HANA SPS 07, you can use an SQL command to perform a recovery of a SAP HANA backup.
Note: The SAP HANA Studio GUI is the recommended method to perform a restore and rcovery.
You must be logged in to the SAP HANA system as the OS user sidadm to run the recovery SQL command. In a scale-out multinode environment, you must run the command from the master node.
The recovery command must first include the HDBSettings.sh and recoverSys.py scripts in that order. The HDBSettings.sh script sets the environment for recovery. The recoverSys.py script processes the recovery SQL command and performs the database recovery.
The following example command performs a recovery of a SAP HANA backup:
./HDBSettings.sh recoverSys.py --command="recover database until timestamp '2014-02-28 00:00:00' using data path ('/usr/sap/AAA/SYS/global/hdb/backint/') using log path ('/usr/sap/AAA/SYS/global/hdb/backint/') using BACKUP_ID 1593520382350" --wait
You must include the --wait option for proper completion of the recoverSys.py script.
The SPS 07 version of the SAP HANA Administration Guide provides details about the SQL command syntax of the recovery command.
84 EMC Data Domain Boost for Databases and Applications Release 1.0 Administration Guide
Operations on SAP HANA Systems
Preparing for SAP HANA disaster recoveryFor a comprehensive disaster recovery plan, you must ensure that you can reconstruct the computing environment and all the SAP HANA server files associated with maintaining data on the application host.
Use the following guidelines to prepare for a disaster recovery of the SAP HANA server host:
◆ Maintain accurate and complete records of the network and system configurations. Keep all the original software media and the following items in a safe location:
• Original operating system media and patches• Device drivers and device names• File system configuration• IP addresses and hostnames
◆ To ensure the recovery of customer-specific settings of the database, back up the SAP HANA configuration files by following the SAP HANA Administration Guide. These files are not backed up during database backups.
◆ Ensure that you have a current full backup of the database and all the redo logs as required for a recovery of the database to the current time.
Plan to perform the following tasks during a disaster recovery:
1. Set up the SAP HANA database system to the same configuration as when the data was backed up.
2. Set up the SAP HANA configuration file to be used during the recovery, including the CLIENT parameter setting. The CLIENT parameter must be set to the hostname of the host where the data was backed up. “Configuring the SAP HANA parameters” on page 76 provides details.
3. Re-create the lockbox on the database host. “Configuring the lockbox for backups and restores” on page 48 provides details about the lockbox.
4. Ensure that all the required database and log backup images are available.
5. Run SAP HANA Studio to recover the database and redo logs.
SAP HANA scale-out requirementsYou can perform SAP HANA backups in a SAP HANA scale-out multinode environment.
You must meet the following configuration requirements in a SAP HANA scale-out environment:
◆ You have set up the database in the scale-out environment according to the appropriate SAP HANA documentation.
◆ You have installed the DDBDA software on each node.
◆ You have set the CLIENT parameter in the SAP HANA configuration file to the hostname of one of the nodes. “CLIENT” on page 43 provides details.
◆ You have completed the lockbox configuration for all the participating hosts. The hosts can use either a shared lockbox or individually configured lockboxes.
Preparing for SAP HANA disaster recovery 85

Operations on SAP HANA Systems
86 EMC Data Domain Boost for Databases and Applications Release 1.0 Administration Guide

CHAPTER 7Operations on SAP with Oracle Systems
This chapter includes the following topics:
◆ Product overview in a SAP with Oracle environment................................................. 88◆ Product configuration in a SAP with Oracle environment.......................................... 89◆ Performing backup and recovery with SAP BR*Tools ................................................ 93◆ Preparing for SAP with Oracle disaster recovery ....................................................... 95◆ Cluster requirements............................................................................................... 96
Operations on SAP with Oracle Systems 87

Operations on SAP with Oracle Systems
Product overview in a SAP with Oracle environmentData Domain Boost for Databases and Applications (DDBDA) is integrated with the SAP BR*Tools backint interface to enable SAP with Oracle data backups, restores, and transaction log archiving.
Note: The product does not support the Oracle Recovery Manager (RMAN) interface.
You can perform a backup, restore, or recovery operation with the product on a SAP with Oracle database server by running one of the supported SAP tools:
◆ BR*Tools command line interface (CLI) with the commands brbackup, brarchive, brrestore, brrecover, and brtools
◆ BRGUI
◆ BR*Tools Studio GUI
◆ SAP DBA Cockpit in The Computing Center Management System (CCMS) GUI
You can use these tools in cooperation with DDBDA to perform the following operations:
◆ Online and offline backups◆ Full backups of database, tablespace, or data files◆ Archived redo log backups◆ Recovery of a database to the current time or a specific point-in-time◆ Recovery to the original location or an alternate location◆ Backup and recovery of directories◆ Control parallelism for backups and restores
The product maintains online backup indexes on the Data Domain system. During backups, the product creates backup entries in the online indexes, which provide the information required to restore the backed-up data.
SAP with Oracle backup processes
A SAP with Oracle backup includes the following process interactions:
1. The database administrator initiates the backup by running the BR*Tools CLI, BRGUI, BR*Tools Studio GUI, or SAP DBA Cockpit in CCMS.
2. The brbackup or brarchive program on the SAP with Oracle database server runs the backint program, installed as part of DDBDA, and passes a list of files or directories to back up.
3. The backint program processes the parameters from the DDBDA configuration file and starts the child backint processes that back up the required files.
4. The child backint processes send the backup data and tracking information to the Data Domain system for storage by using the DD Boost interface.
88 EMC Data Domain Boost for Databases and Applications Release 1.0 Administration Guide

Operations on SAP with Oracle Systems
SAP with Oracle restore processes
A SAP with Oracle restore includes the following process interactions:
1. The database administrator initiates the restore by running the BR*Tools CLI, BRGUI, or BR*Tools Studio GUI.
2. The brrestore or brrecover program on the SAP with Oracle database server runs the backint program and passes a list of files to restore.
3. The backint program processes the parameters from the DDBDA configuration file and starts the child backint processes that restore the required files.
4. The child backint processes perform the following tasks:
a. Query the index on the Data Domain system to locate the backup pieces.
b. Retrieve the backup data from the Data Domain system.
c. Write the backup data to files on the SAP with Oracle database server.
After the backup data is restored, the database administrator must recover the database by using the brrecover command or the Oracle SQL Plus tool. The SAP with Oracle documentation provides details.
Product configuration in a SAP with Oracle environmentYou must complete the required configurations to enable the product operations in a SAP with Oracle environment. The following topics provide the product configuration details.
Integrating the product into the BR*Tools environment
You must complete the required settings in the BR*Tools configuration file initDBSID.sap to enable the BR*Tools operations to use the backint program:
◆ Define the directory from which BR*Tools calls the backint program.
By default, BR*Tools calls backint from the sapexe directory. You can set the util_path parameter to the directory pathname where backint is located. For example:
• On UNIX:
util_path = /opt/ddbda/bin
• On Windows:
util_path = C:\PROGRA~1\EMC~1\DA\bin
Product configuration in a SAP with Oracle environment 89

Operations on SAP with Oracle Systems
Note: On Windows, you must specify the short version of the directory pathname C:\Program Files\EMC DD Boost\DA\bin because you must not include spaces in the util_path setting. If you include spaces in the setting, the backup will fail. To obtain the short version of a directory, run the dir /x command in the parent directory. For example:C:\>dir /x
:
:
11/21/2013 07:38 AM <DIR> PROGRA~1 Program Files
Here, the short version of “Program Files” is PROGRA~1.
◆ Set the backup medium to use the backint program.
Set the backup_dev_type parameter to one of the following values:
backup_dev_type = util_fileorbackup_dev_type = util_file_online
Set backup_dev_type = util_file_online for online backups to decrease the amount of time each tablespace remains in hot backup mode, resulting in a smaller number of generated transaction logs.
You can override this backup_dev_type setting with the -d option when you perform a BR*Tools operation from the command line. For example:
brbackup -d util_file_online
◆ Set the util_par_file parameter to the location of the DDBDA configuration file as configured in “Configuring the SAP with Oracle parameters” on page 91. For example:
util_par_file = ?/dbs/initDBSID.utl
where ? is $ORACLE_HOME.
If you do not specify the complete pathname of this configuration file, the software searches for the file under the following default directory:
• On UNIX: $ORACLE_HOME/dbs• On Windows: %ORACLE_HOME%\database
You can override this util_par_file setting by specifying the configuration file pathname with the -r option when you perform a BR*Tools operation from the command line. For example:
brbackup -r pathname/initDBSID.utl
The SAP BR*Tools documentation provides more details about parameters in the BR*Tools configuration file.
90 EMC Data Domain Boost for Databases and Applications Release 1.0 Administration Guide

Operations on SAP with Oracle Systems
Confirming the environment and file permissions
You must confirm the settings of the database server environment and file permissions before you perform any SAP with Oracle operations.
The DBA operating system group must have read access to datafiles that will be restored. This read access enables the restore of the data by a different database user to a different host.
You can restore only datafiles for which you have read permission, based on the files’ operating system permissions at the time that the files were backed up.
On UNIX, the read permission is associated with the user ID (UID) and group ID (GID), not the username or group name. The UID and GID of the user performing the restore must match the IDs associated with the files at backup time.
Enabling administrator privileges for SAP with Oracle restores on Windows
On specific types of Microsoft Windows systems, User Account Control (UAC) is designed to provide additional operating system security by preventing software from being installed or run unless an administrator authorizes the elevated privileges.
On Windows systems with UAC enabled, prior to the start of a restore from the CLI, ensure that administrator privileges are enabled for the user that will perform the restore. Otherwise, the operation might fail.
You can enable administrator privileges from the CLI:
1. Right-click the Command Prompt icon.
2. Select Run as administrator from the list.
Configuring the SAP with Oracle parameters
You must set the required parameters for SAP with Oracle operations in the DDBDA configuration file.
“Setting up the configuration file” on page 42 describes the common parameters and how to set parameters in the configuration file.
Ensure that the configuration file contains any other required parameters from the following table. You must specify the location of the configuration file in the BR*Tools configuration file as described in “Integrating the product into the BR*Tools environment” on page 89.
After the configuration file is set up, ensure that the required lockbox procedures have been performed as described in “Configuring the lockbox for backups and restores” on page 48.
Product configuration in a SAP with Oracle environment 91

Operations on SAP with Oracle Systems
Table 13 SAP with Oracle parameters (page 1 of 2)
Parameter Description Default and valid values
ARCH_LOGS_SEQUENTIAL Specifies whether the brarchive program backs up archive logs in alphabetical order to optimize the log removal (cleanup) during an archive log backup.Setting this parameter to TRUE causes the brarchive program to back up archive logs in alphabetical order, which speeds up the log cleanup process during the archive log backup.The parameter is ignored during a brbackup or brrestore operation.Optional for backups of archive logs with brarchive.
• FALSE (default).• TRUE.
Note: When you use the nondefault value TRUE, the load balancing parameter GROUP_BY_FS is ignored during the brarchive backup.
GROUP_BY_FS If you set this parameter to TRUE, then the operation ignores the SAVESETS parameter and groups the files by file system instead of file size. This efficient grouping of files can improve the performance of backups, index searches, and restore times.
Note: Setting this parameter to TRUE means that all the files being processed must be visible within the local file system. Windows UNC pathnames must be mapped to a local drive letter.
Optional for a backup.
• FALSE (default).• TRUE.
PARALLELISM Specifies the number of concurrent data streams to send to or from the Data Domain system during a backup or restore, for each backint program that SAP Oracle runs for the operation.
Note: The parallelism value for a backup is reduced if the value is greater than the SAVESETS parameter value.
Optional for a backup or restore.
• 8 (default).• Positive integer number.
RAW_DEVICE_SKIP_BYTES Specifies to omit unwanted data from recovery on a raw device. Specifies the initial amount of data to skip.
Notice: When you adjust the amount of data to skip, you require expert knowledge of the operating system and the volume manager specifications.
• Undefined (default).• Valid device name, followed by an equal
sign and the amount of data to skip in bytes, kilobytes, megabytes, or gigabytes:RAW_DEVICE_SKIP_BYTES=/raw/dev1=skip[B|K|M|G]
Specify multiple devices by separating the devices with a colon. For example, the following setting skips 8 KB for the raw device /dev/rdsk/c2t4d0s5:RAW_DEVICE_SKIP_BYTES=/dev/rdsk/c2t4d0s5=8K
92 EMC Data Domain Boost for Databases and Applications Release 1.0 Administration Guide
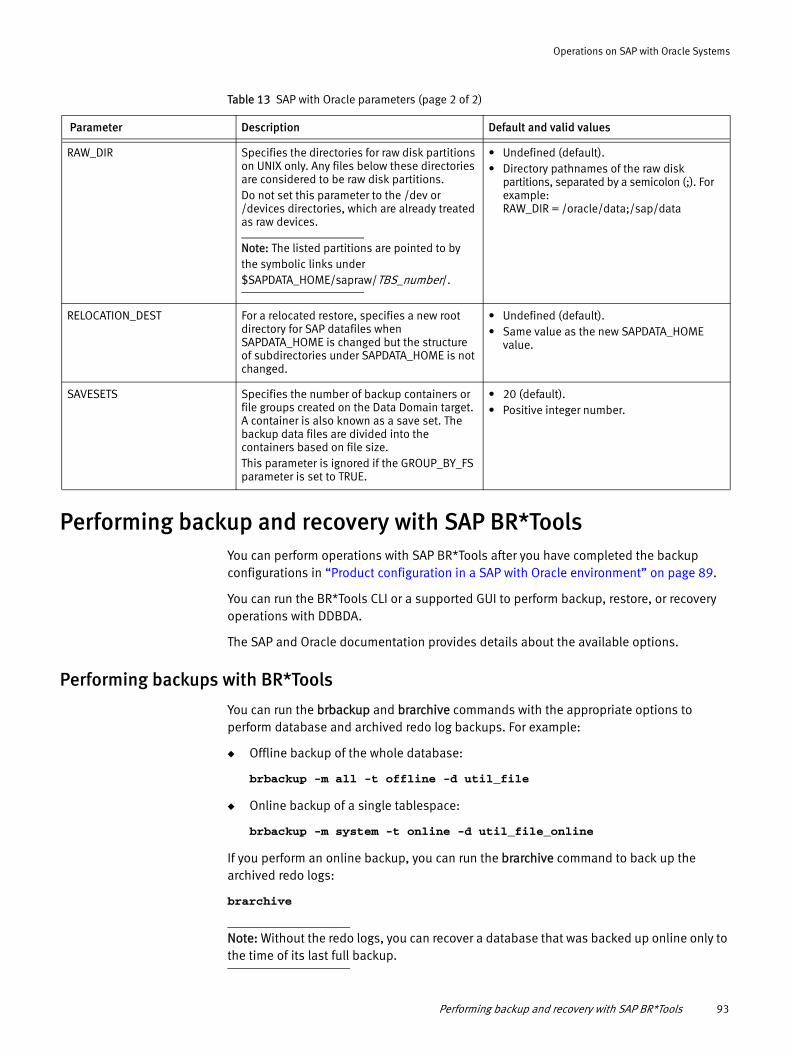
Operations on SAP with Oracle Systems
Performing backup and recovery with SAP BR*ToolsYou can perform operations with SAP BR*Tools after you have completed the backup configurations in “Product configuration in a SAP with Oracle environment” on page 89.
You can run the BR*Tools CLI or a supported GUI to perform backup, restore, or recovery operations with DDBDA.
The SAP and Oracle documentation provides details about the available options.
Performing backups with BR*Tools
You can run the brbackup and brarchive commands with the appropriate options to perform database and archived redo log backups. For example:
◆ Offline backup of the whole database:
brbackup -m all -t offline -d util_file
◆ Online backup of a single tablespace:
brbackup -m system -t online -d util_file_online
If you perform an online backup, you can run the brarchive command to back up the archived redo logs:
brarchive
Note: Without the redo logs, you can recover a database that was backed up online only to the time of its last full backup.
RAW_DIR Specifies the directories for raw disk partitions on UNIX only. Any files below these directories are considered to be raw disk partitions.Do not set this parameter to the /dev or /devices directories, which are already treated as raw devices.
Note: The listed partitions are pointed to by the symbolic links under $SAPDATA_HOME/sapraw/TBS_number/.
• Undefined (default).• Directory pathnames of the raw disk
partitions, separated by a semicolon (;). For example:RAW_DIR = /oracle/data;/sap/data
RELOCATION_DEST For a relocated restore, specifies a new root directory for SAP datafiles when SAPDATA_HOME is changed but the structure of subdirectories under SAPDATA_HOME is not changed.
• Undefined (default).• Same value as the new SAPDATA_HOME
value.
SAVESETS Specifies the number of backup containers or file groups created on the Data Domain target. A container is also known as a save set. The backup data files are divided into the containers based on file size.This parameter is ignored if the GROUP_BY_FS parameter is set to TRUE.
• 20 (default).• Positive integer number.
Table 13 SAP with Oracle parameters (page 2 of 2)
Parameter Description Default and valid values
Performing backup and recovery with SAP BR*Tools 93

Operations on SAP with Oracle Systems
You can run the following command to back up nondatabase files or directories:
brbackup -m {sap_dir | ora_dir | all_dir | full_directory_path | nondatabase_file_path}
Performing restore and recovery with BR*Tools
You can use the brrestore command or brrecover interface to perform a restore or recovery. The brrestore command restores the backed-up database files, and you must run Oracle SQL Plus to recover the database by applying the transaction logs to roll forward the database to a specific point-in-time. The brrecover interface automates the restore and recovery process by calling brrestore and SQL Plus to perform specific steps as needed.
For example, you can run the following command to restore the entire database:
brrestore -u / -m all -d util_file -c force
You can run the following command to restore a single tablespace:
brrestore -u / -m PSAPSR3DB -d util_file -c force
The brrestore program used for a restore operation, whether run directly from the command line or indirectly from the brrecover command, first deletes all the original files to be restored before the program runs backint to restore the backed-up files. You will lose the original files if brrestore or backint fails.
Perform one of the following actions to prevent these issues:- Restore the files to a different location that does not include any files by using the -moption and specifying the restore destination, for example:brrestore -m tablespace_name=restore_directory
- Use the brrestore -NFD option to prevent deletion of the original files by brrestore.
To restore data from a directory (nondatabase) backup, use the brrestore -m non_db command. When you restore the SAP directory data, prevent deletion of the BR*Tools and backint binaries during the restore by performing a relocated restore. For example, run the following command:
brrestore -m non_db=restore_directory
Performing a restore to an alternate hostTo optionally restore the data to a different SAP Oracle host (destination host) than the one that was backed up:
◆ Set the CLIENT parameter to the hostname of the host where the data was backed up.
◆ Follow the disaster recovery steps to re-create the environment and restore the configuration files and BR*Tools logs. “Preparing for SAP with Oracle disaster recovery” on page 95 provides details.
94 EMC Data Domain Boost for Databases and Applications Release 1.0 Administration Guide

Operations on SAP with Oracle Systems
Preparing for SAP with Oracle disaster recoveryFor a comprehensive disaster recovery plan, you must ensure that you can reconstruct the computing environment and all the SAP Oracle server files associated with maintaining data on the application host.
Use the following guidelines to prepare for a disaster recovery of the SAP with Oracle server host:
◆ Maintain accurate and complete records of the network and system configurations. Keep all the original software media and the following items in a safe location:
• Original operating system media and patches• Device drivers and device names• File system configuration• IP addresses and hostnames
◆ To ensure the recovery of customer-specific settings of the database, back up the system configuration files by following the SAP with Oracle documentation. These files are not backed up during database backups.
◆ Ensure that you have a current full backup of the database and all the archived redo logs as required for a recovery of the database to the current time.
To recover from a disaster, you must first restore any lost Oracle and SAP configuration files and lost BR*Tools backup log files according to the following instructions. After you restore these files, you can perform a database point-in-time recovery or a whole database reset according to the instructions in “Performing restore and recovery with BR*Tools” on page 94.
Restoring the required Oracle and SAP BR*Tools files
The following procedure is a concise version of the disaster recovery steps described in the SAP documentation, modified for the specific requirements of DDBDA. You can perform this procedure on the original host or a new host, both referred to as the destination host.
To restore to a different host than the one backed up, follow the guidelines in “Performing a restore to an alternate host” on page 94.
1. If the entire SAP Oracle system is lost:
a. Reinstall all the required SAP and Oracle software components according to the SAP and Oracle documentation.
b. Reconfigure the SAP data layout, such as the SAPDATA_HOME directory and its subdirectories, to the same state as before the disaster.
2. Configure the BR*Tools configuration file, initDBSID-dr.sap, and the DDBDA configuration file, initDBSID-dr.utl, for recovery on the destination host.
3. Re-create the lockbox on the destination host. “Configuring the lockbox for backups and restores” on page 48 provides details about the lockbox.
4. Ensure that the parameters are correctly set for a redirected restore according to “Configuring the SAP with Oracle parameters” on page 91.
Preparing for SAP with Oracle disaster recovery 95

Operations on SAP with Oracle Systems
5. On the destination host, start BR*Tools and follow the onscreen instructions to perform a disaster recovery of profiles and logs.
For example, the following steps show how to use BR*Tools for disaster recovery to restore profiles and log files from a BRBACKUP backup:
a. In the brtools menu, select Restore and Recovery and then Disaster recovery.
b. On the page BRRECOVER options for disaster recovery, set the location of the BR*Tools configuration file and the SAP with Oracle configuration file to the file names configured in step 2.
Note: If you are restoring the original BR*Tools configuration file or SAP with Oracle configuration file, ensure that the files used for the disaster recovery have different names or are stored in a different location than the original files to be restored.
c. On the page Device type for restoring profiles and log files from BRBACKUP backup, select Backup utility.
d. On the page Parameters for restoring profiles and log files from BRBACKUP backup utility backup, specify the files to restore.
e. On the page Restore of profiles and log files from BRBACKUP backup, select the components that you want to restore.
The SAP documentation provides more details about disaster recovery.
Recovering a SAP Oracle database after disasterAfter you restore the correct SAP BR*Tools configuration file and logs on the application host, follow the normal BR*Tools recovery procedure to perform database point-in-time recovery or database reset.
“Performing restore and recovery with BR*Tools” on page 94 provides the procedure to recover a SAP with Oracle database.
The SAP documentation provides more details about database recovery.
Cluster requirementsYou can perform backups and restores in an active-passive cluster environment.
You must meet the following configuration requirements in the cluster environment:
◆ You have set up the database in the cluster according to the appropriate database server documentation.
◆ You have installed the DDBDA software on each node of the cluster that will participate in backups or recovery.
◆ You have set the CLIENT parameter in the SAP with Oracle configuration file to the hostname of the virtual node. “CLIENT” on page 43 provides details.
96 EMC Data Domain Boost for Databases and Applications Release 1.0 Administration Guide

GLOSSARY
This glossary contains the definitions of terms found in this manual. Most of the terms are specific to Data Domain Boost for Databases and Applications (DDBDA).
A
active-passive cluster Type of cluster configuration where the data server runs on the active node, and other nodes are passive nodes that maintain data updates and wait to take over if the active node fails.
B
backup 1. Duplicate of database data or application data or an entire computer system stored separately from the original, which you can use to recover the original if it is destroyed or damaged.
2. Operation that saves data to a volume for use during a recovery.
backup level See “level.”
C
client Database or application server whose data can be backed up and restored with the DDBDA software.
cluster nodes A group of linked virtual or physical hosts with shared storage in a cluster, which work together and represent themselves as a single host called a virtual cluster host.
cold backup See “offline backup.”
D
DD Boost An optimized library and communication framework with a special Data Domain API that enables the backup software to define and interact with storage devices on the Data Domain system.
deduplication backup Type of backup in which redundant data blocks are identified and only unique blocks of data are stored. When the deduplicated data is restored, the restore returns the data to its original native format.
deprecated feature Feature that is supported in the current release of the software but will be unsupported and removed in a future release.
destination client Computer to which a directed recovery restores the database data.
directed recovery Method that recovers data that originated on one client host and re-creates it on a different client host, known as the destination client.
EMC Data Domain Boost for Databases and Applications Release 1.0 Administration Guide 97

Glossary
disaster recovery Restore and recovery of business operations and data if a hardware failure or software corruption occurs.
distributed segmentprocessing (DSP)
Part of the DD Boost interface, which enables data deduplication on a host before the data is sent to the Data Domain system for storage.
F
firewall A system designed to prevent unauthorized access to or from a private network.
full backup See “level.”
H
high-availability system System of multiple computers configured as interconnected nodes on a network that ensures the application services continue despite a hardware failure or a software failure.
host Computer on a network.
hot backup See “online backup.”
I
incremental backup See “level.”
L
level Backup configuration option that specifies how much data is saved during a backup:
◆ A full backup backs up all data objects, regardless of when they last changed.◆ An incremental backup backs up only data objects that have changed since the
previous backup.
O
offline backup Backup of database objects performed while the corresponding database or instance is shutdown and unavailable to users.
online backup Backup of database objects performed while the corresponding database or instance is running and available to users.
Oracle Recovery Manager(RMAN)
Oracle utility that acts as an intelligent interface to Oracle databases for the backup and restore of Oracle database objects.
P
parallelism Method that backs up or recovers data through multiple concurrent streams.
pathname Set of instructions to the operating system for accessing a file:
◆ An absolute pathname indicates how to find a file starting from the root directory and working down the directory tree.
◆ A relative pathname indicates how to find a file starting from the current location.
98 EMC Data Domain Boost for Databases and Applications Release 1.0 Administration Guide

Glossary
primary Data Domainsystem
Data Domain system that stores the DDBDA backups performed from a database or application host. DDBDA can back up data to a primary Data Domain system only.
R
recover To restore data files from backup media to a client disk and apply transaction logs or redo logs to make the data consistent with a given point-in-time.
restore To retrieve individual data files from backup media and then copy the files to disk, without applying transaction logs. See also “recover.”
roll forward To apply transaction logs to a recovered database to restore the database to a state that is consistent with a given point-in-time.
rollforward recovery Type of DB2 database recovery that applies transaction logs to restore the database to a given point-in-time.
S
save set Backup container used to group the SAP with Oracle backup files according to file size.
secondary Data Domainsystem
Data Domain system from which you can restore replicated backups to a database or application host by using DDBDA. The Data Domain administrator replicates the backups from a primary Data Domain system to the secondary Data Domain system.
shared disk Storage disk connected to multiple nodes in the cluster.
T
tablespace Oracle database structure that consists of one or more data files.
transaction log Record of named database transactions or a list of changed files in a database, stored in a log file to enable quick restore and rollback transactions.
EMC Data Domain Boost for Databases and Applications Release 1.0 Administration Guide 99

Glossary
100 EMC Data Domain Boost for Databases and Applications Release 1.0 Administration Guide

INDEX
AARCH_LOGS_SEQUENTIAL parameter 92archive logging 59archived redo logs 93
Bbackup
archived redo logs 93transaction logs 60
backup typesData Domain deduplication 14
Ccircular logging 59CLIENT parameter 43
DData Domain deduplication
backup 14restore 14
DB2restore to same or different instance 63
DB2INSTANCE parameter 60DDBOOST_FC parameter 46DDBOOST_FC_SECONDARY parameter 48DDBOOST_USER parameter 44DDBOOST_USER_SECONDARY parameter 47DEBUG_LEVEL parameter 52destination host 94DEVICE_FC_SERVICE parameter 46DEVICE_FC_SERVICE_SECONDARY parameter 48DEVICE_HOST parameter 44DEVICE_HOST_SECONDARY parameter 47DEVICE_PATH parameter 45DEVICE_PATH_SECONDARY parameter 47DIAGNOSTIC_DEST parameter 53disaster recovery 66, 85, 95distributed segment processing (DSP) 14DPRINTF parameter 53
EEMC Online Support 9
GGROUP_BY_FS parameter 92
LLOCKBOX_PATH parameter 45logs
archived redo 93
Oonline backup indexes 58, 74, 88Oracle
recover 16restore 16
PPARALLELISM parameter 76, 92parameters
ARCH_LOGS_SEQUENTIAL 92CLIENT 43DB2INSTANCE 60DDBOOST_FC 46DDBOOST_FC_SECONDARY 48DDBOOST_USER 44DDBOOST_USER_SECONDARY 47DEBUG_LEVEL 52DEVICE_FC_SERVICE 46DEVICE_FC_SERVICE_SECONDARY 48DEVICE_HOST 44DEVICE_HOST_SECONDARY 47DEVICE_PATH 45DEVICE_PATH_SECONDARY 47DIAGNOSTIC_DEST 53DPRINTF 53GROUP_BY_FS 92LOCKBOX_PATH 45PARALLELISM 76, 92RAW_DEVICE_SKIP_BYTES 92RAW_DIR 93RELOCATION_DEST 93SAVESETS 93SOURCE_DBNAME 60
RRAW_DEVICE_SKIP_BYTES parameter 92RAW_DIR parameter 93recover 16RELOCATION_DEST parameter 93restore
Data Domain deduplication 14Oracle data 16to a different host 94
Ssave
archived redo logs 93SAVESETS parameter 93SOURCE_DBNAME parameter 60
Ttransaction logs
EMC Data Domain Boost for Databases and Applications Release 1.0 Administration Guide 101

Index
backup 60rollforward recovery 60
VVENDOROPT 65
102 EMC Data Domain Boost for Databases and Applications Release 1.0 Administration Guide