Embed Size (px)
Citation preview
Embarcadero® Change Manager™ 5.1 User Guide
Last updated 7/16/09

Contents
Welcome to Change Manager . . . . . . . . . . . . . . . . . . . . . . . . . . . . . . . . . . . . . . . . . . . . . . . . . . . . . . . . . . . . . . . . . . . . 7
Technical Requirements . . . . . . . . . . . . . . . . . . . . . . . . . . . . . . . . . . . . . . . . . . . . . . . . . . . . . . . . . . . . . . . . . . . . . . 7
Additional Product Information . . . . . . . . . . . . . . . . . . . . . . . . . . . . . . . . . . . . . . . . . . . . . . . . . . . . . . . . . . . . . . . . . 8
Using Change Manager . . . . . . . . . . . . . . . . . . . . . . . . . . . . . . . . . . . . . . . . . . . . . . . . . . . . . . . . . . . . . . . . . . . . . . . . . 9
Registering Data Sources . . . . . . . . . . . . . . . . . . . . . . . . . . . . . . . . . . . . . . . . . . . . . . . . . . . . . . . . . . . . . . . . . . . . . 9
Navigating the Workbench . . . . . . . . . . . . . . . . . . . . . . . . . . . . . . . . . . . . . . . . . . . . . . . . . . . . . . . . . . . . . . . . . . . 11
Welcome Page . . . . . . . . . . . . . . . . . . . . . . . . . . . . . . . . . . . . . . . . . . . . . . . . . . . . . . . . . . . . . . . . . . . . . . . . . 12
Workbench Space. . . . . . . . . . . . . . . . . . . . . . . . . . . . . . . . . . . . . . . . . . . . . . . . . . . . . . . . . . . . . . . . . . . . . . . 13
Views. . . . . . . . . . . . . . . . . . . . . . . . . . . . . . . . . . . . . . . . . . . . . . . . . . . . . . . . . . . . . . . . . . . . . . . . . . . . . . . . . 14
Job Explorer . . . . . . . . . . . . . . . . . . . . . . . . . . . . . . . . . . . . . . . . . . . . . . . . . . . . . . . . . . . . . . . . . . . . . . . . . . . 15
Data Source Explorer . . . . . . . . . . . . . . . . . . . . . . . . . . . . . . . . . . . . . . . . . . . . . . . . . . . . . . . . . . . . . . . . . . . . 16
Project Explorer. . . . . . . . . . . . . . . . . . . . . . . . . . . . . . . . . . . . . . . . . . . . . . . . . . . . . . . . . . . . . . . . . . . . . . . . . 18
Navigator. . . . . . . . . . . . . . . . . . . . . . . . . . . . . . . . . . . . . . . . . . . . . . . . . . . . . . . . . . . . . . . . . . . . . . . . . . . . . . 20
Compliance . . . . . . . . . . . . . . . . . . . . . . . . . . . . . . . . . . . . . . . . . . . . . . . . . . . . . . . . . . . . . . . . . . . . . . . . . . . . 21
SQL Errors View . . . . . . . . . . . . . . . . . . . . . . . . . . . . . . . . . . . . . . . . . . . . . . . . . . . . . . . . . . . . . . . . . . . . . . . . 22
Data Diff View . . . . . . . . . . . . . . . . . . . . . . . . . . . . . . . . . . . . . . . . . . . . . . . . . . . . . . . . . . . . . . . . . . . . . . . . . . 22
SQL Log . . . . . . . . . . . . . . . . . . . . . . . . . . . . . . . . . . . . . . . . . . . . . . . . . . . . . . . . . . . . . . . . . . . . . . . . . . . . . . 23
SQL Errors Log . . . . . . . . . . . . . . . . . . . . . . . . . . . . . . . . . . . . . . . . . . . . . . . . . . . . . . . . . . . . . . . . . . . . . . . . . 23
Table Constraints View . . . . . . . . . . . . . . . . . . . . . . . . . . . . . . . . . . . . . . . . . . . . . . . . . . . . . . . . . . . . . . . . . . . 23
Search View . . . . . . . . . . . . . . . . . . . . . . . . . . . . . . . . . . . . . . . . . . . . . . . . . . . . . . . . . . . . . . . . . . . . . . . . . . . 24
Editors . . . . . . . . . . . . . . . . . . . . . . . . . . . . . . . . . . . . . . . . . . . . . . . . . . . . . . . . . . . . . . . . . . . . . . . . . . . . . . . . 25
Data Comparison Job Editor . . . . . . . . . . . . . . . . . . . . . . . . . . . . . . . . . . . . . . . . . . . . . . . . . . . . . . . . . . . . . . . 25
Configuration Comparison Job Editor . . . . . . . . . . . . . . . . . . . . . . . . . . . . . . . . . . . . . . . . . . . . . . . . . . . . . . . . 25
Configuration Standard Editor. . . . . . . . . . . . . . . . . . . . . . . . . . . . . . . . . . . . . . . . . . . . . . . . . . . . . . . . . . . . . . 26
Configuration Archive Editor . . . . . . . . . . . . . . . . . . . . . . . . . . . . . . . . . . . . . . . . . . . . . . . . . . . . . . . . . . . . . . . 27
Schema Comparison Job Editor . . . . . . . . . . . . . . . . . . . . . . . . . . . . . . . . . . . . . . . . . . . . . . . . . . . . . . . . . . . . 28
Schema Archive Editor . . . . . . . . . . . . . . . . . . . . . . . . . . . . . . . . . . . . . . . . . . . . . . . . . . . . . . . . . . . . . . . . . . . 31
SQL Editor. . . . . . . . . . . . . . . . . . . . . . . . . . . . . . . . . . . . . . . . . . . . . . . . . . . . . . . . . . . . . . . . . . . . . . . . . . . . . 32
Using Basic Commands . . . . . . . . . . . . . . . . . . . . . . . . . . . . . . . . . . . . . . . . . . . . . . . . . . . . . . . . . . . . . . . . . . . . . 33
Creating New Data Source Groups. . . . . . . . . . . . . . . . . . . . . . . . . . . . . . . . . . . . . . . . . . . . . . . . . . . . . . . . . . 34
Searching for Database Objects and Synchronization Scripts . . . . . . . . . . . . . . . . . . . . . . . . . . . . . . . . . . . . . 35
Viewing Change History . . . . . . . . . . . . . . . . . . . . . . . . . . . . . . . . . . . . . . . . . . . . . . . . . . . . . . . . . . . . . . . . . . 37
Building Command Line Syntax and Creating Bulk Job Files . . . . . . . . . . . . . . . . . . . . . . . . . . . . . . . . . . . . . . 38
Filtering Data Source Objects . . . . . . . . . . . . . . . . . . . . . . . . . . . . . . . . . . . . . . . . . . . . . . . . . . . . . . . . . . . . . . 40
Comparing Data . . . . . . . . . . . . . . . . . . . . . . . . . . . . . . . . . . . . . . . . . . . . . . . . . . . . . . . . . . . . . . . . . . . . . . . . . . . 42
Create a New Data Comparison Job . . . . . . . . . . . . . . . . . . . . . . . . . . . . . . . . . . . . . . . . . . . . . . . . . . . . . . . . 43
EMBARCADERO TECHNOLOGIES > EMBARCADERO® CHANGE MANAGER™ 5.1 USER GUIDE 3
CONTENTS >
Specify a Job Name . . . . . . . . . . . . . . . . . . . . . . . . . . . . . . . . . . . . . . . . . . . . . . . . . . . . . . . . . . . . . . . . . . . . . 44
Specify the Source and Target Data Sources. . . . . . . . . . . . . . . . . . . . . . . . . . . . . . . . . . . . . . . . . . . . . . . . . . 45
Specify Execution, Mapping, Comparison, and Resolution Options . . . . . . . . . . . . . . . . . . . . . . . . . . . . . . . . . 46
Understand the Data Source Mapping Process . . . . . . . . . . . . . . . . . . . . . . . . . . . . . . . . . . . . . . . . . . . . . . . . 50
Customize the Data Source Mapping Process . . . . . . . . . . . . . . . . . . . . . . . . . . . . . . . . . . . . . . . . . . . . . . . . . 51
Customize Database Mapping . . . . . . . . . . . . . . . . . . . . . . . . . . . . . . . . . . . . . . . . . . . . . . . . . . . . . . . . . . . . . 52
Customize Table Mapping . . . . . . . . . . . . . . . . . . . . . . . . . . . . . . . . . . . . . . . . . . . . . . . . . . . . . . . . . . . . . . . . 52
Specify Notification Options . . . . . . . . . . . . . . . . . . . . . . . . . . . . . . . . . . . . . . . . . . . . . . . . . . . . . . . . . . . . . . . 54
Execute the Data Comparison Job . . . . . . . . . . . . . . . . . . . . . . . . . . . . . . . . . . . . . . . . . . . . . . . . . . . . . . . . . . 58
Resolve Data Repositories . . . . . . . . . . . . . . . . . . . . . . . . . . . . . . . . . . . . . . . . . . . . . . . . . . . . . . . . . . . . . . . . 60
Execute an SQL Synchronization Script . . . . . . . . . . . . . . . . . . . . . . . . . . . . . . . . . . . . . . . . . . . . . . . . . . . . . . 62
Generate a Job Report . . . . . . . . . . . . . . . . . . . . . . . . . . . . . . . . . . . . . . . . . . . . . . . . . . . . . . . . . . . . . . . . . . . 64
Masking Data . . . . . . . . . . . . . . . . . . . . . . . . . . . . . . . . . . . . . . . . . . . . . . . . . . . . . . . . . . . . . . . . . . . . . . . . . . . . . 65
Create a New Masking Job . . . . . . . . . . . . . . . . . . . . . . . . . . . . . . . . . . . . . . . . . . . . . . . . . . . . . . . . . . . . . . . . 66
Specify a Masking Job Name . . . . . . . . . . . . . . . . . . . . . . . . . . . . . . . . . . . . . . . . . . . . . . . . . . . . . . . . . . . . . . 66
Specify Source and Target Data Sources. . . . . . . . . . . . . . . . . . . . . . . . . . . . . . . . . . . . . . . . . . . . . . . . . . . . . 67
Set to Automatically Synchronize . . . . . . . . . . . . . . . . . . . . . . . . . . . . . . . . . . . . . . . . . . . . . . . . . . . . . . . . . . . 68
Specify Mapping Options . . . . . . . . . . . . . . . . . . . . . . . . . . . . . . . . . . . . . . . . . . . . . . . . . . . . . . . . . . . . . . . . . 69
Specify Masking Rules for Individual Columns . . . . . . . . . . . . . . . . . . . . . . . . . . . . . . . . . . . . . . . . . . . . . . . . . 70
Run the Database Masking Job . . . . . . . . . . . . . . . . . . . . . . . . . . . . . . . . . . . . . . . . . . . . . . . . . . . . . . . . . . . . 71
See the Masked Data . . . . . . . . . . . . . . . . . . . . . . . . . . . . . . . . . . . . . . . . . . . . . . . . . . . . . . . . . . . . . . . . . . . . 72
Comparing Configurations . . . . . . . . . . . . . . . . . . . . . . . . . . . . . . . . . . . . . . . . . . . . . . . . . . . . . . . . . . . . . . . . . . . 73
Create a New Configuration Comparison Job. . . . . . . . . . . . . . . . . . . . . . . . . . . . . . . . . . . . . . . . . . . . . . . . . . 73
Specify a Comparison Job Name . . . . . . . . . . . . . . . . . . . . . . . . . . . . . . . . . . . . . . . . . . . . . . . . . . . . . . . . . . . 74
Specify Source and Target Data Sources. . . . . . . . . . . . . . . . . . . . . . . . . . . . . . . . . . . . . . . . . . . . . . . . . . . . . 75
Refine Property Comparisons . . . . . . . . . . . . . . . . . . . . . . . . . . . . . . . . . . . . . . . . . . . . . . . . . . . . . . . . . . . . . . 77
Specify Job Options . . . . . . . . . . . . . . . . . . . . . . . . . . . . . . . . . . . . . . . . . . . . . . . . . . . . . . . . . . . . . . . . . . . . . 77
Execute Comparison Job . . . . . . . . . . . . . . . . . . . . . . . . . . . . . . . . . . . . . . . . . . . . . . . . . . . . . . . . . . . . . . . . . 79
View Results . . . . . . . . . . . . . . . . . . . . . . . . . . . . . . . . . . . . . . . . . . . . . . . . . . . . . . . . . . . . . . . . . . . . . . . . . . . 79
Execute an SQL Synchronization Script . . . . . . . . . . . . . . . . . . . . . . . . . . . . . . . . . . . . . . . . . . . . . . . . . . . . . . 81
Generate a Job Report . . . . . . . . . . . . . . . . . . . . . . . . . . . . . . . . . . . . . . . . . . . . . . . . . . . . . . . . . . . . . . . . . . . 82
Creating a Configuration Standard . . . . . . . . . . . . . . . . . . . . . . . . . . . . . . . . . . . . . . . . . . . . . . . . . . . . . . . . . . 84
Creating a Configuration Archive . . . . . . . . . . . . . . . . . . . . . . . . . . . . . . . . . . . . . . . . . . . . . . . . . . . . . . . . . . . 88
Specify Notification Options . . . . . . . . . . . . . . . . . . . . . . . . . . . . . . . . . . . . . . . . . . . . . . . . . . . . . . . . . . . . . . . 93
Use Archive in Configuration Comparison Jobs . . . . . . . . . . . . . . . . . . . . . . . . . . . . . . . . . . . . . . . . . . . . . . . . 99
Comparing Schemas . . . . . . . . . . . . . . . . . . . . . . . . . . . . . . . . . . . . . . . . . . . . . . . . . . . . . . . . . . . . . . . . . . . . . . . 99
Create a New Schema Comparison Job. . . . . . . . . . . . . . . . . . . . . . . . . . . . . . . . . . . . . . . . . . . . . . . . . . . . . 100
Specify a Job Name . . . . . . . . . . . . . . . . . . . . . . . . . . . . . . . . . . . . . . . . . . . . . . . . . . . . . . . . . . . . . . . . . . . . 101
Specify Source and Target Data Sources. . . . . . . . . . . . . . . . . . . . . . . . . . . . . . . . . . . . . . . . . . . . . . . . . . . . 102
Refine Schema Comparisons . . . . . . . . . . . . . . . . . . . . . . . . . . . . . . . . . . . . . . . . . . . . . . . . . . . . . . . . . . . . . 104
EMBARCADERO TECHNOLOGIES > EMBARCADERO® CHANGE MANAGER™ 5.1 USER GUIDE 4
CONTENTS >
Customize Schema Mapping . . . . . . . . . . . . . . . . . . . . . . . . . . . . . . . . . . . . . . . . . . . . . . . . . . . . . . . . . . . . . 105
Specify Job Options . . . . . . . . . . . . . . . . . . . . . . . . . . . . . . . . . . . . . . . . . . . . . . . . . . . . . . . . . . . . . . . . . . . . 106
Specify Notification Options . . . . . . . . . . . . . . . . . . . . . . . . . . . . . . . . . . . . . . . . . . . . . . . . . . . . . . . . . . . . . . 112
Execute the Schema Comparison Job . . . . . . . . . . . . . . . . . . . . . . . . . . . . . . . . . . . . . . . . . . . . . . . . . . . . . . 116
Resolve Schema via a Generated SQL Script . . . . . . . . . . . . . . . . . . . . . . . . . . . . . . . . . . . . . . . . . . . . . . . . 122
Execute a SQL Synchronization Script . . . . . . . . . . . . . . . . . . . . . . . . . . . . . . . . . . . . . . . . . . . . . . . . . . . . . . 123
Generate a Job Report . . . . . . . . . . . . . . . . . . . . . . . . . . . . . . . . . . . . . . . . . . . . . . . . . . . . . . . . . . . . . . . . . . 126
Creating a Schema Archive . . . . . . . . . . . . . . . . . . . . . . . . . . . . . . . . . . . . . . . . . . . . . . . . . . . . . . . . . . . . . . 127
Specify Notification Options . . . . . . . . . . . . . . . . . . . . . . . . . . . . . . . . . . . . . . . . . . . . . . . . . . . . . . . . . . . . . . 134
Configuring Change Manager . . . . . . . . . . . . . . . . . . . . . . . . . . . . . . . . . . . . . . . . . . . . . . . . . . . . . . . . . . . . . . . . . . 139
Register Data Sources . . . . . . . . . . . . . . . . . . . . . . . . . . . . . . . . . . . . . . . . . . . . . . . . . . . . . . . . . . . . . . . . . . . . . 140
Importing and Exporting Data Sources . . . . . . . . . . . . . . . . . . . . . . . . . . . . . . . . . . . . . . . . . . . . . . . . . . . . . . 143
Extending Change Manager Functionality with Eclipse Plug-Ins . . . . . . . . . . . . . . . . . . . . . . . . . . . . . . . . . . . . . 144
Creating and Implementing a Notification Plug-In. . . . . . . . . . . . . . . . . . . . . . . . . . . . . . . . . . . . . . . . . . . . . . 144
Creating and Implementing a Custom Configuration Plug-In . . . . . . . . . . . . . . . . . . . . . . . . . . . . . . . . . . . . . 155
Customizing Change Manager (Preferences). . . . . . . . . . . . . . . . . . . . . . . . . . . . . . . . . . . . . . . . . . . . . . . . . . . . 161
Compliance . . . . . . . . . . . . . . . . . . . . . . . . . . . . . . . . . . . . . . . . . . . . . . . . . . . . . . . . . . . . . . . . . . . . . . . . . . . 162
Comparison Options . . . . . . . . . . . . . . . . . . . . . . . . . . . . . . . . . . . . . . . . . . . . . . . . . . . . . . . . . . . . . . . . . . . . 162
Data Result Options . . . . . . . . . . . . . . . . . . . . . . . . . . . . . . . . . . . . . . . . . . . . . . . . . . . . . . . . . . . . . . . . . . . . 162
Script Execution Options. . . . . . . . . . . . . . . . . . . . . . . . . . . . . . . . . . . . . . . . . . . . . . . . . . . . . . . . . . . . . . . . . 163
Script Generation Options. . . . . . . . . . . . . . . . . . . . . . . . . . . . . . . . . . . . . . . . . . . . . . . . . . . . . . . . . . . . . . . . 163
Jobs. . . . . . . . . . . . . . . . . . . . . . . . . . . . . . . . . . . . . . . . . . . . . . . . . . . . . . . . . . . . . . . . . . . . . . . . . . . . . . . . . 163
Command Line . . . . . . . . . . . . . . . . . . . . . . . . . . . . . . . . . . . . . . . . . . . . . . . . . . . . . . . . . . . . . . . . . . . . . . . . 164
Mapping . . . . . . . . . . . . . . . . . . . . . . . . . . . . . . . . . . . . . . . . . . . . . . . . . . . . . . . . . . . . . . . . . . . . . . . . . . . . . 164
Notification . . . . . . . . . . . . . . . . . . . . . . . . . . . . . . . . . . . . . . . . . . . . . . . . . . . . . . . . . . . . . . . . . . . . . . . . . . . 164
Reports . . . . . . . . . . . . . . . . . . . . . . . . . . . . . . . . . . . . . . . . . . . . . . . . . . . . . . . . . . . . . . . . . . . . . . . . . . . . . . 164
Data Sources . . . . . . . . . . . . . . . . . . . . . . . . . . . . . . . . . . . . . . . . . . . . . . . . . . . . . . . . . . . . . . . . . . . . . . . . . 165
SQL Editor. . . . . . . . . . . . . . . . . . . . . . . . . . . . . . . . . . . . . . . . . . . . . . . . . . . . . . . . . . . . . . . . . . . . . . . . . . . . 165
Code Assist . . . . . . . . . . . . . . . . . . . . . . . . . . . . . . . . . . . . . . . . . . . . . . . . . . . . . . . . . . . . . . . . . . . . . . . . . . . 165
Code Formatter . . . . . . . . . . . . . . . . . . . . . . . . . . . . . . . . . . . . . . . . . . . . . . . . . . . . . . . . . . . . . . . . . . . . . . . . 165
Results Viewer . . . . . . . . . . . . . . . . . . . . . . . . . . . . . . . . . . . . . . . . . . . . . . . . . . . . . . . . . . . . . . . . . . . . . . . . 166
Syntax Coloring. . . . . . . . . . . . . . . . . . . . . . . . . . . . . . . . . . . . . . . . . . . . . . . . . . . . . . . . . . . . . . . . . . . . . . . . 166
SQL Filters . . . . . . . . . . . . . . . . . . . . . . . . . . . . . . . . . . . . . . . . . . . . . . . . . . . . . . . . . . . . . . . . . . . . . . . . . . . 166
Using Source Control Systems. . . . . . . . . . . . . . . . . . . . . . . . . . . . . . . . . . . . . . . . . . . . . . . . . . . . . . . . . . . . . . . 166
Setting Up Concurrent Versions System. . . . . . . . . . . . . . . . . . . . . . . . . . . . . . . . . . . . . . . . . . . . . . . . . . . . . 167
Using Concurrent Versions System . . . . . . . . . . . . . . . . . . . . . . . . . . . . . . . . . . . . . . . . . . . . . . . . . . . . . . . . 167
Setting Up Microsoft Visual Source Safe . . . . . . . . . . . . . . . . . . . . . . . . . . . . . . . . . . . . . . . . . . . . . . . . . . . . 168
Using Microsoft Visual Source Safe . . . . . . . . . . . . . . . . . . . . . . . . . . . . . . . . . . . . . . . . . . . . . . . . . . . . . . . . 168
EMBARCADERO TECHNOLOGIES > EMBARCADERO® CHANGE MANAGER™ 5.1 USER GUIDE 5
CONTENTS >
Reference . . . . . . . . . . . . . . . . . . . . . . . . . . . . . . . . . . . . . . . . . . . . . . . . . . . . . . . . . . . . . . . . . . . . . . . . . . . . . . . . . . 169
Change Manager Operations/DBMS Permissions Table . . . . . . . . . . . . . . . . . . . . . . . . . . . . . . . . . . . . . . . . . . . 169
Understanding Version Information. . . . . . . . . . . . . . . . . . . . . . . . . . . . . . . . . . . . . . . . . . . . . . . . . . . . . . . . . . . . 170
Appendix A: Change Manager Cheat Sheets. . . . . . . . . . . . . . . . . . . . . . . . . . . . . . . . . . . . . . . . . . . . . . . . . . . . . . . 173
Cheat Sheet 1A: Creating a New Configuration Comparison Job . . . . . . . . . . . . . . . . . . . . . . . . . . . . . . . . . . . . 174
Cheat Sheet 1B: Creating a New Configuration Archive . . . . . . . . . . . . . . . . . . . . . . . . . . . . . . . . . . . . . . . . . . . 177
Cheat Sheet 1C: Creating a New Configuration Standard . . . . . . . . . . . . . . . . . . . . . . . . . . . . . . . . . . . . . . . . . . 180
Cheat Sheet 2A: Creating a New Data Comparison Job . . . . . . . . . . . . . . . . . . . . . . . . . . . . . . . . . . . . . . . . . . . 182
Cheat Sheet 3A: Creating a New Schema Comparison Job . . . . . . . . . . . . . . . . . . . . . . . . . . . . . . . . . . . . . . . . 188
Cheat Sheet 3B: Creating a New Schema Archive. . . . . . . . . . . . . . . . . . . . . . . . . . . . . . . . . . . . . . . . . . . . . . . . 191
Glossary . . . . . . . . . . . . . . . . . . . . . . . . . . . . . . . . . . . . . . . . . . . . . . . . . . . . . . . . . . . . . . . . . . . . . . . . . . . . . . . . . . . 194
A . . . . . . . . . . . . . . . . . . . . . . . . . . . . . . . . . . . . . . . . . . . . . . . . . . . . . . . . . . . . . . . . . . . . . . . . . . . . . . . . . . . . . . 194
B . . . . . . . . . . . . . . . . . . . . . . . . . . . . . . . . . . . . . . . . . . . . . . . . . . . . . . . . . . . . . . . . . . . . . . . . . . . . . . . . . . . . . . 194
C . . . . . . . . . . . . . . . . . . . . . . . . . . . . . . . . . . . . . . . . . . . . . . . . . . . . . . . . . . . . . . . . . . . . . . . . . . . . . . . . . . . . . . 194
D . . . . . . . . . . . . . . . . . . . . . . . . . . . . . . . . . . . . . . . . . . . . . . . . . . . . . . . . . . . . . . . . . . . . . . . . . . . . . . . . . . . . . . 195
E . . . . . . . . . . . . . . . . . . . . . . . . . . . . . . . . . . . . . . . . . . . . . . . . . . . . . . . . . . . . . . . . . . . . . . . . . . . . . . . . . . . . . . 196
F . . . . . . . . . . . . . . . . . . . . . . . . . . . . . . . . . . . . . . . . . . . . . . . . . . . . . . . . . . . . . . . . . . . . . . . . . . . . . . . . . . . . . . 196
G . . . . . . . . . . . . . . . . . . . . . . . . . . . . . . . . . . . . . . . . . . . . . . . . . . . . . . . . . . . . . . . . . . . . . . . . . . . . . . . . . . . . . . 196
H . . . . . . . . . . . . . . . . . . . . . . . . . . . . . . . . . . . . . . . . . . . . . . . . . . . . . . . . . . . . . . . . . . . . . . . . . . . . . . . . . . . . . . 196
I . . . . . . . . . . . . . . . . . . . . . . . . . . . . . . . . . . . . . . . . . . . . . . . . . . . . . . . . . . . . . . . . . . . . . . . . . . . . . . . . . . . . . . . 196
J . . . . . . . . . . . . . . . . . . . . . . . . . . . . . . . . . . . . . . . . . . . . . . . . . . . . . . . . . . . . . . . . . . . . . . . . . . . . . . . . . . . . . . 197
K . . . . . . . . . . . . . . . . . . . . . . . . . . . . . . . . . . . . . . . . . . . . . . . . . . . . . . . . . . . . . . . . . . . . . . . . . . . . . . . . . . . . . . 197
L . . . . . . . . . . . . . . . . . . . . . . . . . . . . . . . . . . . . . . . . . . . . . . . . . . . . . . . . . . . . . . . . . . . . . . . . . . . . . . . . . . . . . . 197
M. . . . . . . . . . . . . . . . . . . . . . . . . . . . . . . . . . . . . . . . . . . . . . . . . . . . . . . . . . . . . . . . . . . . . . . . . . . . . . . . . . . . . . 197
N . . . . . . . . . . . . . . . . . . . . . . . . . . . . . . . . . . . . . . . . . . . . . . . . . . . . . . . . . . . . . . . . . . . . . . . . . . . . . . . . . . . . . . 198
O . . . . . . . . . . . . . . . . . . . . . . . . . . . . . . . . . . . . . . . . . . . . . . . . . . . . . . . . . . . . . . . . . . . . . . . . . . . . . . . . . . . . . . 198
P . . . . . . . . . . . . . . . . . . . . . . . . . . . . . . . . . . . . . . . . . . . . . . . . . . . . . . . . . . . . . . . . . . . . . . . . . . . . . . . . . . . . . . 198
Q . . . . . . . . . . . . . . . . . . . . . . . . . . . . . . . . . . . . . . . . . . . . . . . . . . . . . . . . . . . . . . . . . . . . . . . . . . . . . . . . . . . . . . 198
R . . . . . . . . . . . . . . . . . . . . . . . . . . . . . . . . . . . . . . . . . . . . . . . . . . . . . . . . . . . . . . . . . . . . . . . . . . . . . . . . . . . . . . 198
S . . . . . . . . . . . . . . . . . . . . . . . . . . . . . . . . . . . . . . . . . . . . . . . . . . . . . . . . . . . . . . . . . . . . . . . . . . . . . . . . . . . . . . 198
T . . . . . . . . . . . . . . . . . . . . . . . . . . . . . . . . . . . . . . . . . . . . . . . . . . . . . . . . . . . . . . . . . . . . . . . . . . . . . . . . . . . . . . 199
U . . . . . . . . . . . . . . . . . . . . . . . . . . . . . . . . . . . . . . . . . . . . . . . . . . . . . . . . . . . . . . . . . . . . . . . . . . . . . . . . . . . . . . 199
V . . . . . . . . . . . . . . . . . . . . . . . . . . . . . . . . . . . . . . . . . . . . . . . . . . . . . . . . . . . . . . . . . . . . . . . . . . . . . . . . . . . . . . 199
W. . . . . . . . . . . . . . . . . . . . . . . . . . . . . . . . . . . . . . . . . . . . . . . . . . . . . . . . . . . . . . . . . . . . . . . . . . . . . . . . . . . . . . 199
X . . . . . . . . . . . . . . . . . . . . . . . . . . . . . . . . . . . . . . . . . . . . . . . . . . . . . . . . . . . . . . . . . . . . . . . . . . . . . . . . . . . . . . 200
Y . . . . . . . . . . . . . . . . . . . . . . . . . . . . . . . . . . . . . . . . . . . . . . . . . . . . . . . . . . . . . . . . . . . . . . . . . . . . . . . . . . . . . . 200
Z . . . . . . . . . . . . . . . . . . . . . . . . . . . . . . . . . . . . . . . . . . . . . . . . . . . . . . . . . . . . . . . . . . . . . . . . . . . . . . . . . . . . . . 200
EMBARCADERO TECHNOLOGIES > EMBARCADERO® CHANGE MANAGER™ 5.1 USER GUIDE 6
Welcome to Change ManagerEmbarcadero® Change Manager™ offers database administrators and developers a powerful tool to simplify and automate the database change management lifecycle. The schema compare and alter, data compare and synchronization, and configuration auditing capabilities let you report on database changes, roll out new releases, and troubleshoot database performance problems that result from both planned and unplanned changes. Change Manager supports IBM® DB2® for LUW, Microsoft® SQL Server, Oracle®, and Sybase®. Change Manager is available as a stand-alone application or as an Eclipse plug-in.
Welcome to Change Manager
Using Change Manager
Configuring Change Manager
Reference
Technical RequirementsBefore installing Change Manager, verify that your environment meets the following requirements.
Hardware RequirementsThe following minimum hardware requirements are required to run Change Manager:
• 1.2 GHz processor
• 1 GB of RAM
• 500 MB of hard disk space (more space is recommended for large data source comparisons)
• High resolution monitor (1024 x 768), 16-bit display (or greater)
• Internet Explorer 6 Service Pack 1 or later (Windows) or Mozilla (Linux)
Operating System RequirementsChange Manager supports the following operating systems:
• Microsoft Windows XP (x86-32, Win32)
• Microsoft Windows Server 2003
• Microsoft Windows Vista
DBMS SupportChange Manager supports the following platforms:
• IBM DB2 LUW 8.0 - 9.5
• Oracle 8i - 11g
• Microsoft SQL Server 2000, 2005, and 2008
• Sybase ASE 12.5 and 15, 15.0.1, and 15.0.2
EMBARCADERO TECHNOLOGIES > EMBARCADERO® CHANGE MANAGER™ 5.1 USER GUIDE 7
WELCOME TO CHANGE MANAGER > ADDITIONAL PRODUCT INFORMATION
Installation NotesChange Manager can be installed as a standalone application (RCP installation) or as an Eclipse plug-in (Plug-in Installation). Eclipse is an open source development framework that supports application plug-ins to provide additional functionality.
The Eclipse plug-in version of Change Manager requires Eclipse version 3.3 or higher, and Sun Java Standard Edition 5.0 Update 11 or later, in addition to regular system requirements.
Before installing the plug-in version of Change Manager, ensure that Eclipse and Java are installed on your machine. You can download Eclipse from the following Web site: http://www.eclipse.org/downloads.
Additional Product InformationThe Embarcadero Web site is an excellent source for additional product information, including white papers, articles, FAQs, discussion groups, and the Embarcadero Knowledge Base.
Go to www.embarcadero.com/support, or click any of the links below, to find:
• Documentation
• Online Demos
• Technical Papers
• Discussion Forums
• Knowledge Base
EMBARCADERO TECHNOLOGIES > EMBARCADERO® CHANGE MANAGER™ 5.1 USER GUIDE 8
USING CHANGE MANAGER > REGISTERING DATA SOURCES
Using Change ManagerThis section contains information on how to implement Change Manager on a new machine and additional, basic functionality and procedures that will enable you to begin using the product almost immediately upon installation.
This section contains the following topics:
Registering Data Sources
Navigating the Workbench
Using Basic Commands
Comparing Data
Masking Data
Comparing Configurations
Creating a Configuration Standard
Creating a Configuration Archive
Comparing Schemas
Creating a Schema Archive
Registering Data SourcesWhen you execute comparison jobs, Data Source Explorer provides a tree view of data sources to use in the jobs. Data sources must be registered with the application prior to using them in jobs.
If a data source is not present in the registry, but you need to add it to Data Source Explorer, you can manually add it by right-clicking on the Managed Data Sources node in Data Source Explorer and selecting New > Data Source.
EMBARCADERO TECHNOLOGIES > EMBARCADERO® CHANGE MANAGER™ 5.1 USER GUIDE 9
USING CHANGE MANAGER > REGISTERING DATA SOURCES
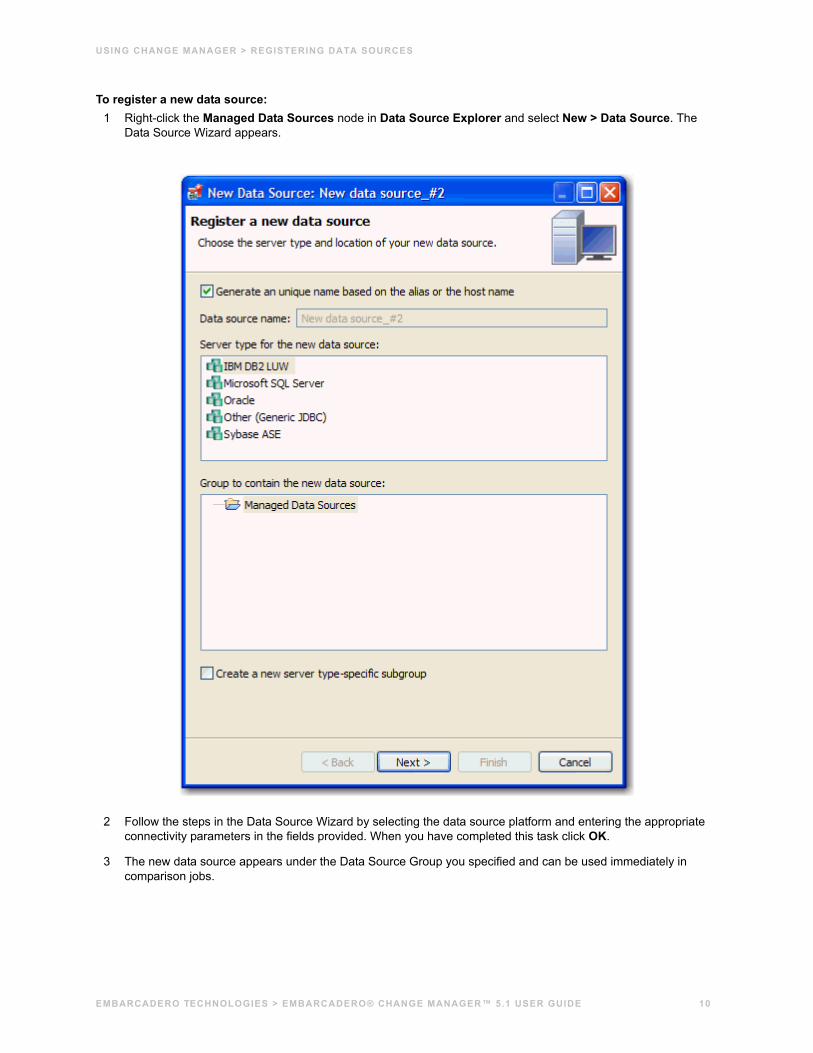
To register a new data source:1 Right-click the Managed Data Sources node in Data Source Explorer and select New > Data Source. The
Data Source Wizard appears.
2 Follow the steps in the Data Source Wizard by selecting the data source platform and entering the appropriate connectivity parameters in the fields provided. When you have completed this task click OK.
3 The new data source appears under the Data Source Group you specified and can be used immediately in comparison jobs.
EMBARCADERO TECHNOLOGIES > EMBARCADERO® CHANGE MANAGER™ 5.1 USER GUIDE 10
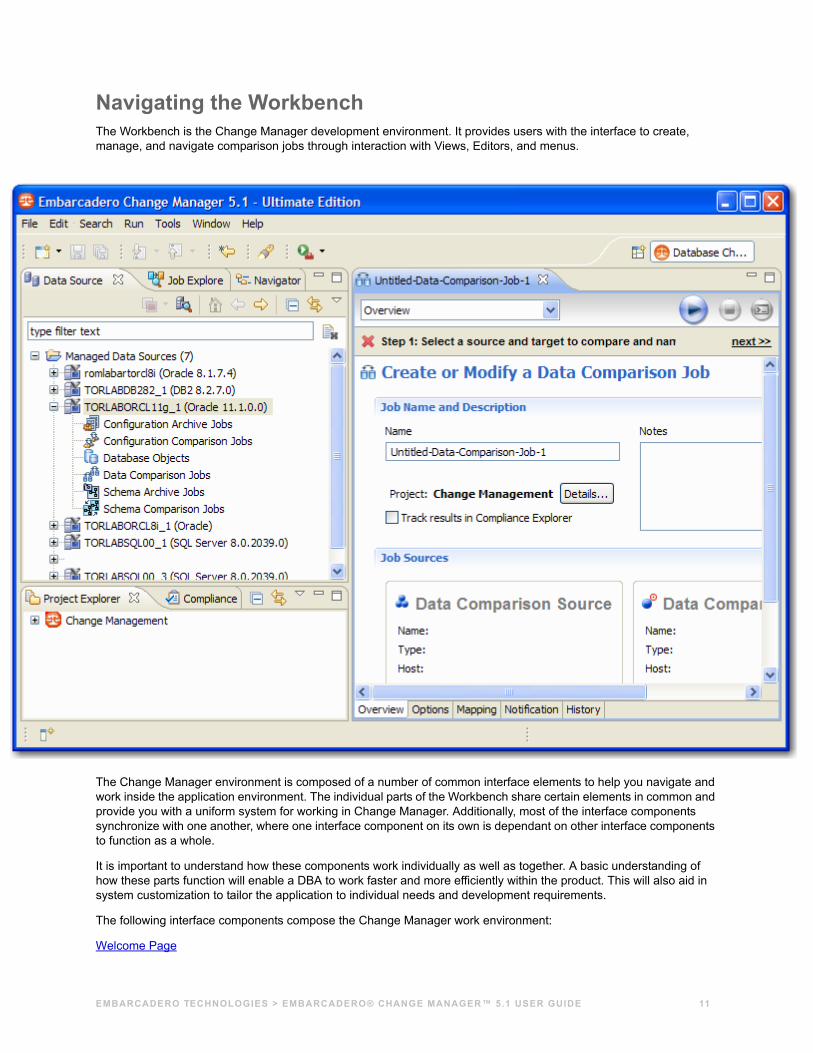
Navigating the WorkbenchThe Workbench is the Change Manager development environment. It provides users with the interface to create, manage, and navigate comparison jobs through interaction with Views, Editors, and menus.
The Change Manager environment is composed of a number of common interface elements to help you navigate and work inside the application environment. The individual parts of the Workbench share certain elements in common and provide you with a uniform system for working in Change Manager. Additionally, most of the interface components synchronize with one another, where one interface component on its own is dependant on other interface components to function as a whole.
It is important to understand how these components work individually as well as together. A basic understanding of how these parts function will enable a DBA to work faster and more efficiently within the product. This will also aid in system customization to tailor the application to individual needs and development requirements.
The following interface components compose the Change Manager work environment:
Welcome Page
EMBARCADERO TECHNOLOGIES > EMBARCADERO® CHANGE MANAGER™ 5.1 USER GUIDE 11
USING CHANGE MANAGER > NAVIGATING THE WORKBENCH
Workbench Space
Views
Job Explorer
Data Source Explorer
Project Explorer
Navigator
Compliance
SQL Errors View
Data Diff View
SQL Log
SQL Errors Log
Table Constraints View
Search View
Welcome PageThe Welcome page is the first screen a user encounters when Change Manager is launched. It is composed of icons that are clicked to access tutorials and other information to help you get started. The Welcome page is intended to provide easy access to information that may be of value to new users.
Each module can be accessed directly via the Welcome page by clicking on its name. Additionally, a Workbench link is offered, which takes you to the Workbench space rather than opening one of the specified jobs. You can choose to open the Welcome page each time you start Change Manager by selecting the Show on Startup check box.
EMBARCADERO TECHNOLOGIES > EMBARCADERO® CHANGE MANAGER™ 5.1 USER GUIDE 12
USING CHANGE MANAGER > NAVIGATING THE WORKBENCH
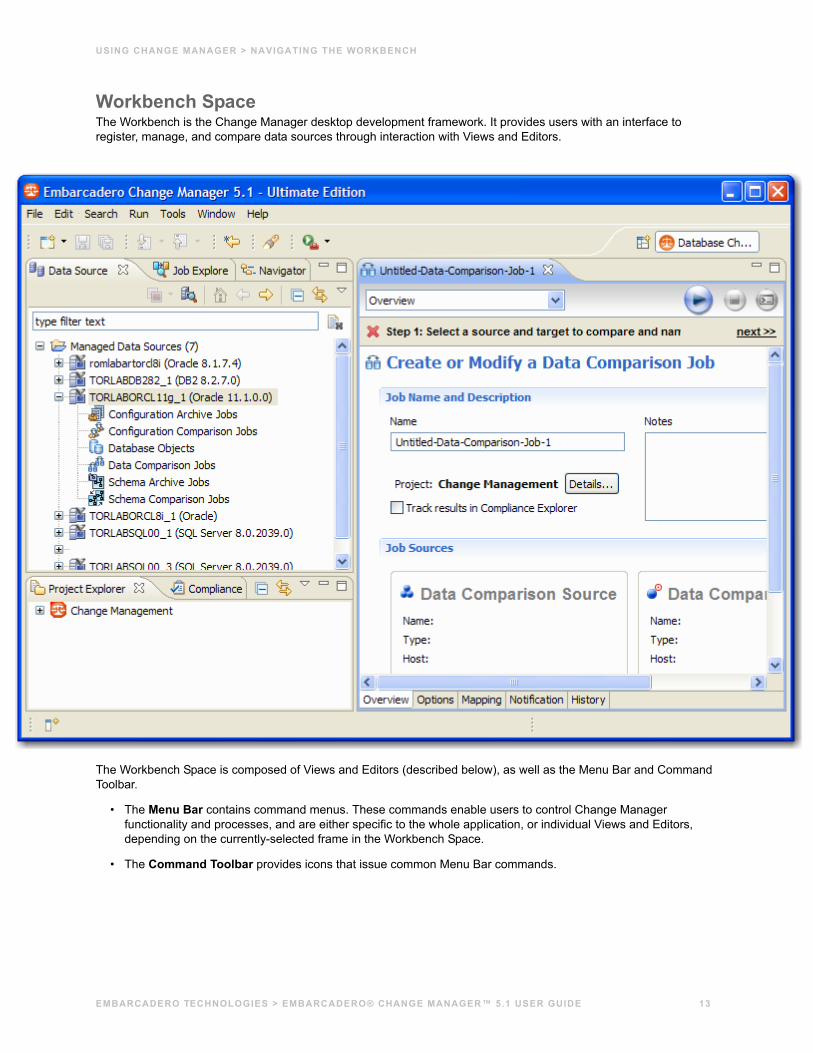
Workbench SpaceThe Workbench is the Change Manager desktop development framework. It provides users with an interface to register, manage, and compare data sources through interaction with Views and Editors.
The Workbench Space is composed of Views and Editors (described below), as well as the Menu Bar and Command Toolbar.
• The Menu Bar contains command menus. These commands enable users to control Change Manager functionality and processes, and are either specific to the whole application, or individual Views and Editors, depending on the currently-selected frame in the Workbench Space.
• The Command Toolbar provides icons that issue common Menu Bar commands.
EMBARCADERO TECHNOLOGIES > EMBARCADERO® CHANGE MANAGER™ 5.1 USER GUIDE 13
USING CHANGE MANAGER > NAVIGATING THE WORKBENCH
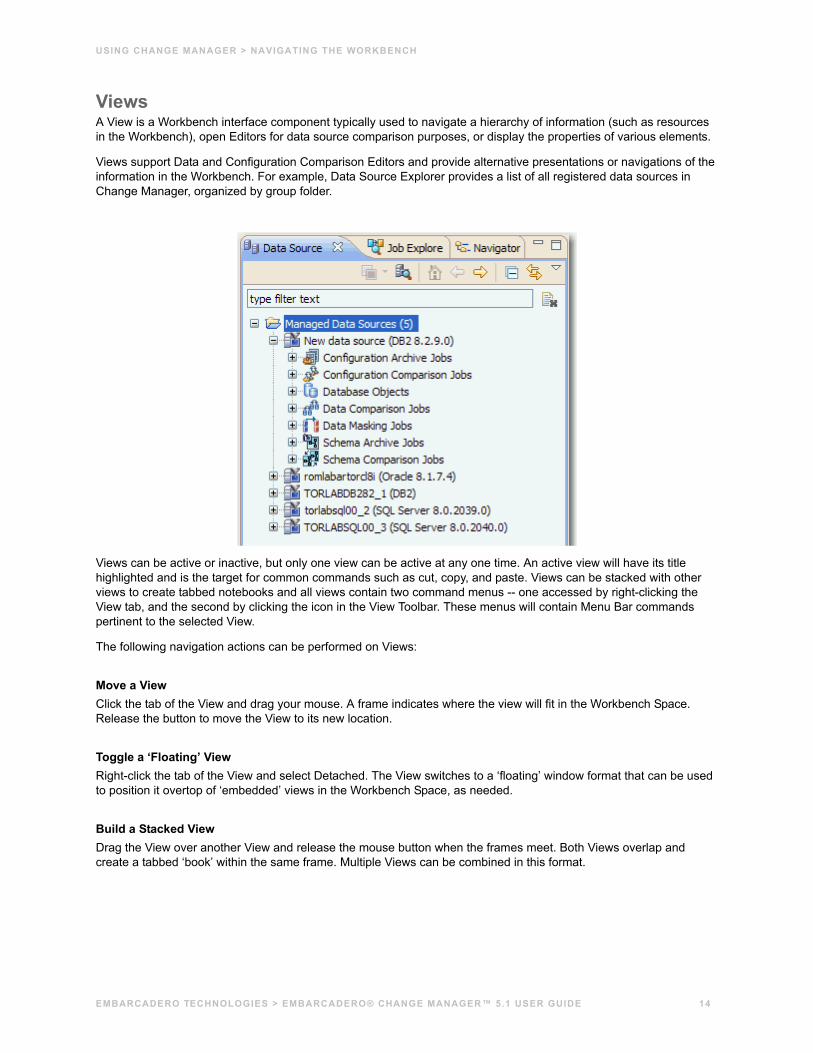
ViewsA View is a Workbench interface component typically used to navigate a hierarchy of information (such as resources in the Workbench), open Editors for data source comparison purposes, or display the properties of various elements.
Views support Data and Configuration Comparison Editors and provide alternative presentations or navigations of the information in the Workbench. For example, Data Source Explorer provides a list of all registered data sources in Change Manager, organized by group folder.
Views can be active or inactive, but only one view can be active at any one time. An active view will have its title highlighted and is the target for common commands such as cut, copy, and paste. Views can be stacked with other views to create tabbed notebooks and all views contain two command menus -- one accessed by right-clicking the View tab, and the second by clicking the icon in the View Toolbar. These menus will contain Menu Bar commands pertinent to the selected View.
The following navigation actions can be performed on Views:
Move a ViewClick the tab of the View and drag your mouse. A frame indicates where the view will fit in the Workbench Space. Release the button to move the View to its new location.
Toggle a ‘Floating’ ViewRight-click the tab of the View and select Detached. The View switches to a ‘floating’ window format that can be used to position it overtop of ‘embedded’ views in the Workbench Space, as needed.
Build a Stacked ViewDrag the View over another View and release the mouse button when the frames meet. Both Views overlap and create a tabbed ‘book’ within the same frame. Multiple Views can be combined in this format.
EMBARCADERO TECHNOLOGIES > EMBARCADERO® CHANGE MANAGER™ 5.1 USER GUIDE 14
USING CHANGE MANAGER > NAVIGATING THE WORKBENCH
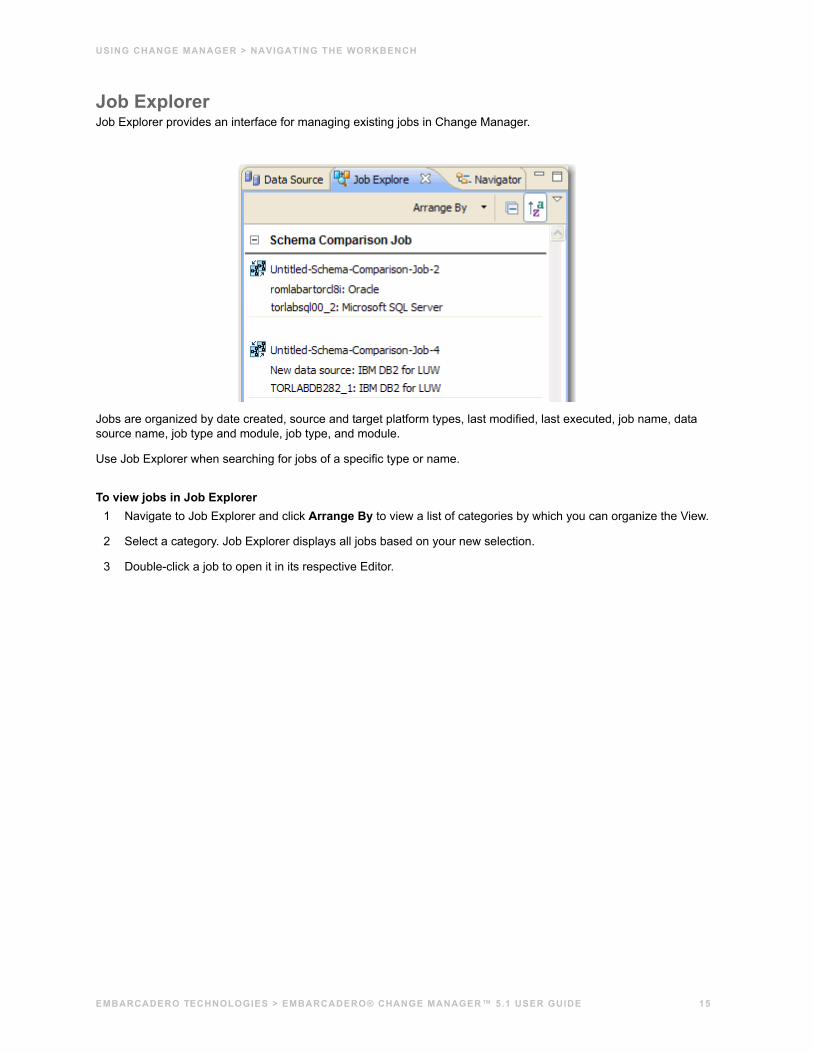
Job ExplorerJob Explorer provides an interface for managing existing jobs in Change Manager.
Jobs are organized by date created, source and target platform types, last modified, last executed, job name, data source name, job type and module, job type, and module.
Use Job Explorer when searching for jobs of a specific type or name.
To view jobs in Job Explorer1 Navigate to Job Explorer and click Arrange By to view a list of categories by which you can organize the View.
2 Select a category. Job Explorer displays all jobs based on your new selection.
3 Double-click a job to open it in its respective Editor.
EMBARCADERO TECHNOLOGIES > EMBARCADERO® CHANGE MANAGER™ 5.1 USER GUIDE 15
USING CHANGE MANAGER > NAVIGATING THE WORKBENCH
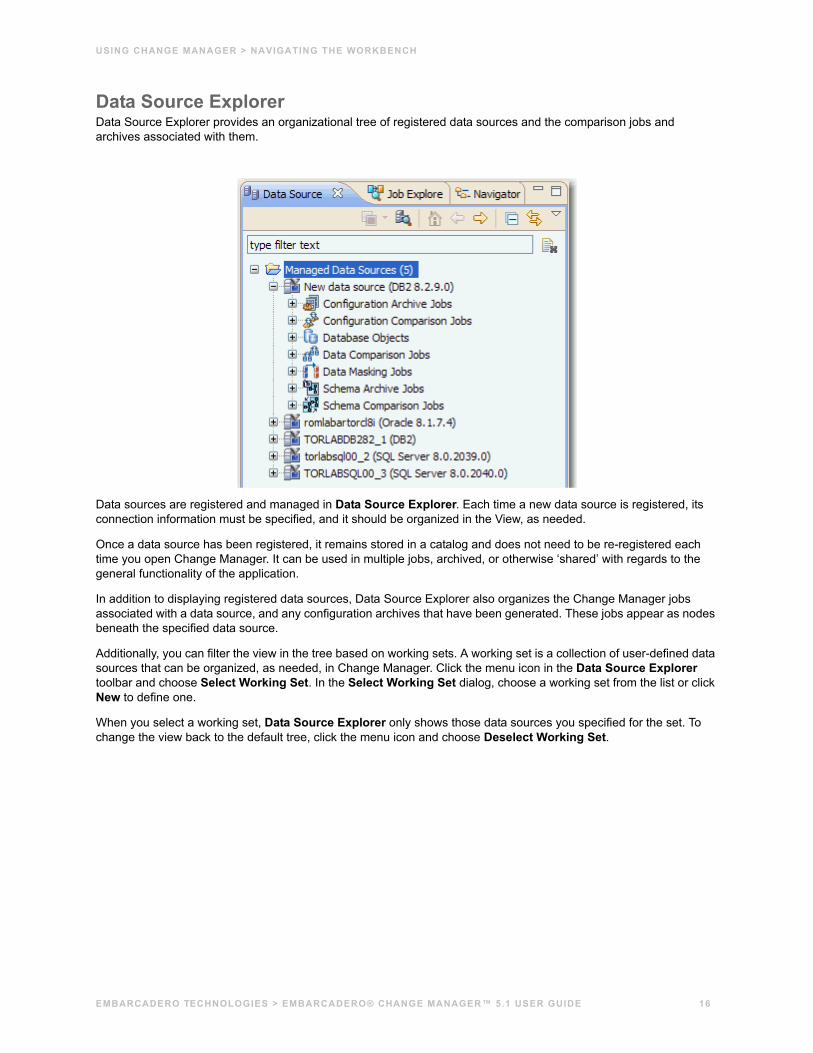
Data Source ExplorerData Source Explorer provides an organizational tree of registered data sources and the comparison jobs and archives associated with them.
Data sources are registered and managed in Data Source Explorer. Each time a new data source is registered, its connection information must be specified, and it should be organized in the View, as needed.
Once a data source has been registered, it remains stored in a catalog and does not need to be re-registered each time you open Change Manager. It can be used in multiple jobs, archived, or otherwise ‘shared’ with regards to the general functionality of the application.
In addition to displaying registered data sources, Data Source Explorer also organizes the Change Manager jobs associated with a data source, and any configuration archives that have been generated. These jobs appear as nodes beneath the specified data source.
Additionally, you can filter the view in the tree based on working sets. A working set is a collection of user-defined data sources that can be organized, as needed, in Change Manager. Click the menu icon in the Data Source Explorer toolbar and choose Select Working Set. In the Select Working Set dialog, choose a working set from the list or click New to define one.
When you select a working set, Data Source Explorer only shows those data sources you specified for the set. To change the view back to the default tree, click the menu icon and choose Deselect Working Set.
EMBARCADERO TECHNOLOGIES > EMBARCADERO® CHANGE MANAGER™ 5.1 USER GUIDE 16

USING CHANGE MANAGER > NAVIGATING THE WORKBENCH
To add a data source1 Right-click on the Managed Data Sources node in Data Source Explorer and select New > Data Source. The
Add Data Source dialog appears.
2 Follow the steps in the Data Source Wizard by selecting the data source platform and entering the appropriate connectivity parameters in the fields provided. Click OK when you are finished. The new data source appears in Data Source Explorer.
EMBARCADERO TECHNOLOGIES > EMBARCADERO® CHANGE MANAGER™ 5.1 USER GUIDE 17
USING CHANGE MANAGER > NAVIGATING THE WORKBENCH
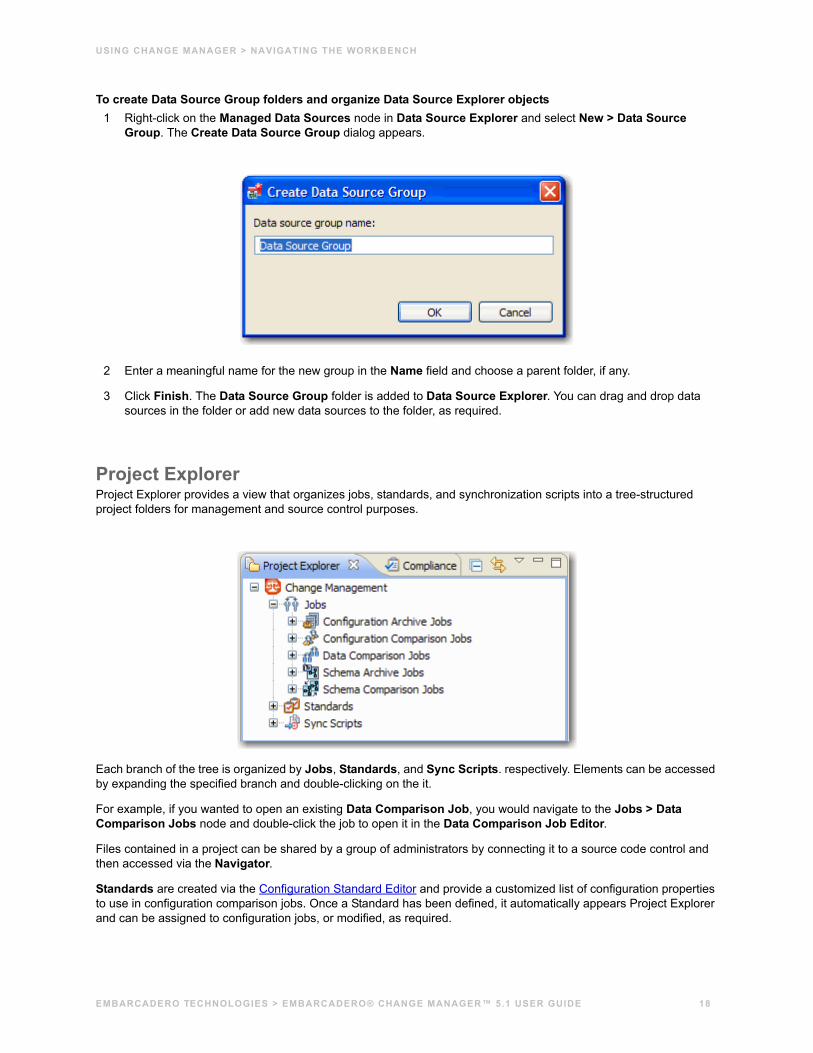
To create Data Source Group folders and organize Data Source Explorer objects1 Right-click on the Managed Data Sources node in Data Source Explorer and select New > Data Source
Group. The Create Data Source Group dialog appears.
2 Enter a meaningful name for the new group in the Name field and choose a parent folder, if any.
3 Click Finish. The Data Source Group folder is added to Data Source Explorer. You can drag and drop data sources in the folder or add new data sources to the folder, as required.
Project ExplorerProject Explorer provides a view that organizes jobs, standards, and synchronization scripts into a tree-structured project folders for management and source control purposes.
Each branch of the tree is organized by Jobs, Standards, and Sync Scripts. respectively. Elements can be accessed by expanding the specified branch and double-clicking on the it.
For example, if you wanted to open an existing Data Comparison Job, you would navigate to the Jobs > Data Comparison Jobs node and double-click the job to open it in the Data Comparison Job Editor.
Files contained in a project can be shared by a group of administrators by connecting it to a source code control and then accessed via the Navigator.
Standards are created via the Configuration Standard Editor and provide a customized list of configuration properties to use in configuration comparison jobs. Once a Standard has been defined, it automatically appears Project Explorer and can be assigned to configuration jobs, or modified, as required.
EMBARCADERO TECHNOLOGIES > EMBARCADERO® CHANGE MANAGER™ 5.1 USER GUIDE 18
USING CHANGE MANAGER > NAVIGATING THE WORKBENCH
Sync Scripts are generated by the system whenever a synchronization job is run. Synchronization scripts are created in the Data Comparison Job Editor and Schema Comparison Job Editor, respectively.
You can also create project folders to further organize and manage your jobs via the File > New > Project command in the Main Menu. When you create a new project, a folder is added to Project Explorer with the name that you specified. Files can then be added and deleted under this folder by dragging and dropping them from the Change Management branch.
To create a new project:1 Select File > New > Project. The New Project wizard appears.
2 Expand the General Node and select Project. Click Next.
3 Type a project name into the field provided. The Location field indicates where the project files are stored on your machine. By default, all project data is stored in the location where you installed Change Manger. If you want to change this location, de-select the Use Default Location check box and define a new directory location in the field provided.
4 Click Finish. The new project folder appears in Project Explorer. You can drag and drop files from the Change Management branch to the new folder or otherwise organize your files, as needed.
EMBARCADERO TECHNOLOGIES > EMBARCADERO® CHANGE MANAGER™ 5.1 USER GUIDE 19
USING CHANGE MANAGER > NAVIGATING THE WORKBENCH
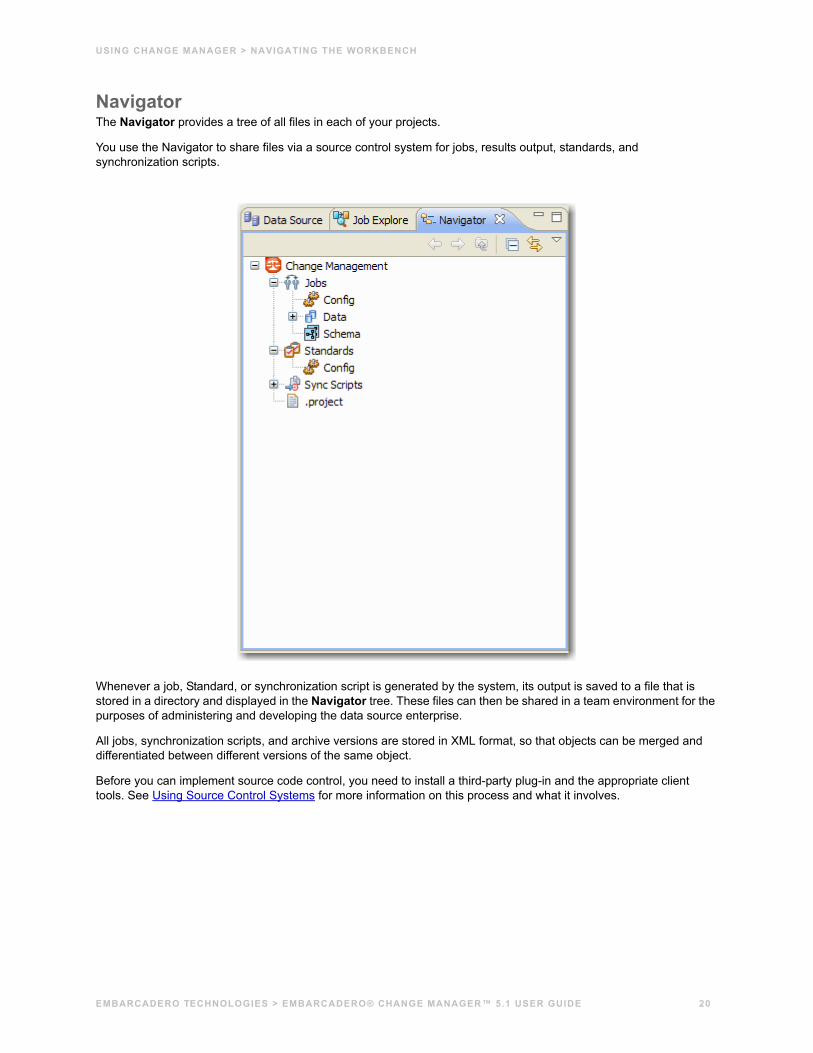
NavigatorThe Navigator provides a tree of all files in each of your projects.
You use the Navigator to share files via a source control system for jobs, results output, standards, and synchronization scripts.
Whenever a job, Standard, or synchronization script is generated by the system, its output is saved to a file that is stored in a directory and displayed in the Navigator tree. These files can then be shared in a team environment for the purposes of administering and developing the data source enterprise.
All jobs, synchronization scripts, and archive versions are stored in XML format, so that objects can be merged and differentiated between different versions of the same object.
Before you can implement source code control, you need to install a third-party plug-in and the appropriate client tools. See Using Source Control Systems for more information on this process and what it involves.
EMBARCADERO TECHNOLOGIES > EMBARCADERO® CHANGE MANAGER™ 5.1 USER GUIDE 20
USING CHANGE MANAGER > NAVIGATING THE WORKBENCH
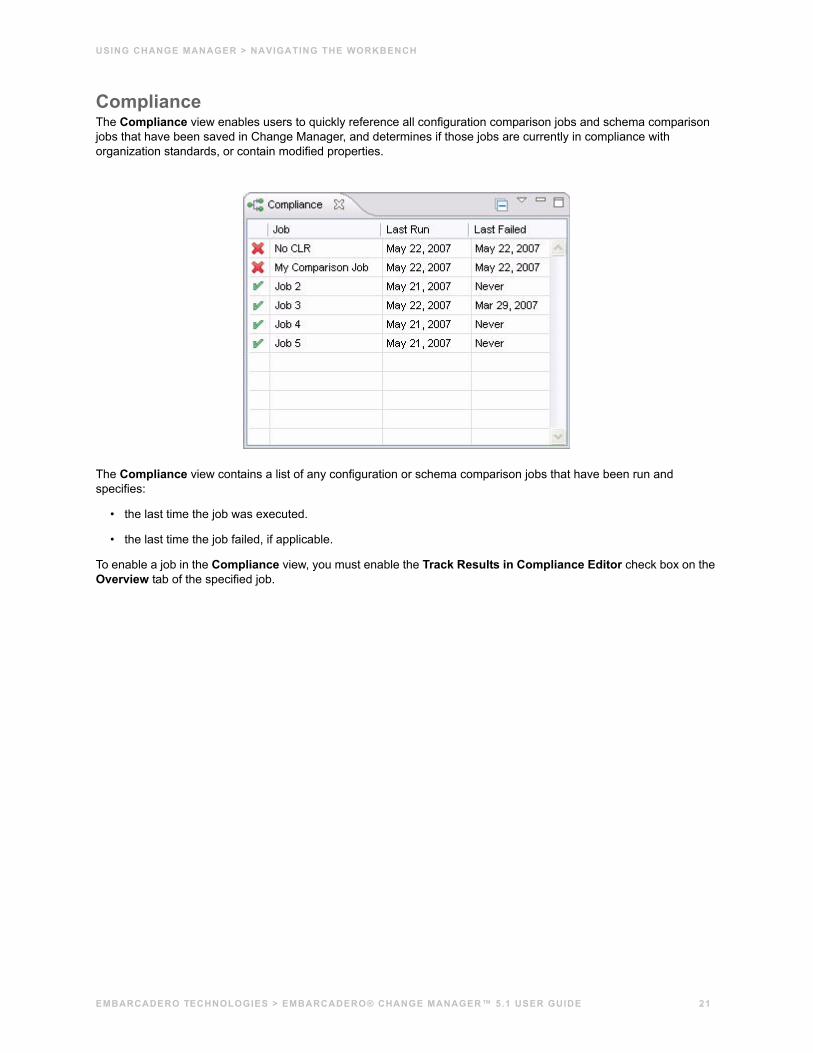
ComplianceThe Compliance view enables users to quickly reference all configuration comparison jobs and schema comparison jobs that have been saved in Change Manager, and determines if those jobs are currently in compliance with organization standards, or contain modified properties.
The Compliance view contains a list of any configuration or schema comparison jobs that have been run and specifies:
• the last time the job was executed.
• the last time the job failed, if applicable.
To enable a job in the Compliance view, you must enable the Track Results in Compliance Editor check box on the Overview tab of the specified job.
EMBARCADERO TECHNOLOGIES > EMBARCADERO® CHANGE MANAGER™ 5.1 USER GUIDE 21
USING CHANGE MANAGER > NAVIGATING THE WORKBENCH
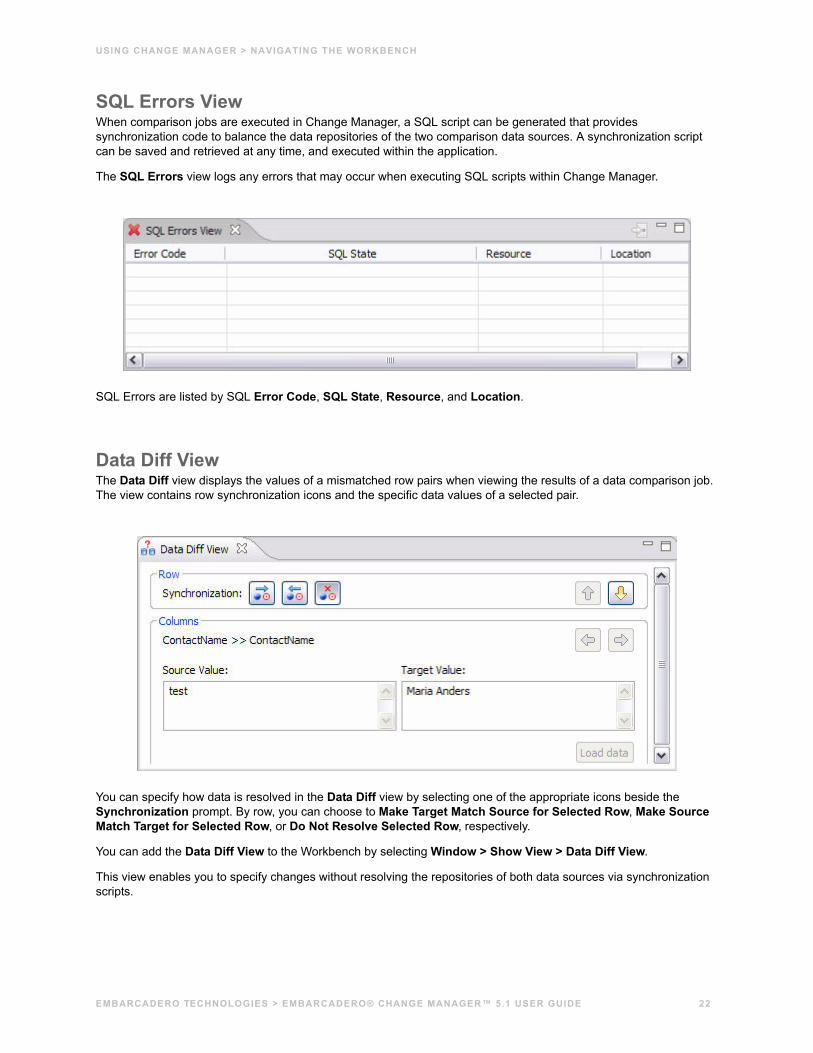
SQL Errors ViewWhen comparison jobs are executed in Change Manager, a SQL script can be generated that provides synchronization code to balance the data repositories of the two comparison data sources. A synchronization script can be saved and retrieved at any time, and executed within the application.
The SQL Errors view logs any errors that may occur when executing SQL scripts within Change Manager.
SQL Errors are listed by SQL Error Code, SQL State, Resource, and Location.
Data Diff ViewThe Data Diff view displays the values of a mismatched row pairs when viewing the results of a data comparison job. The view contains row synchronization icons and the specific data values of a selected pair.
You can specify how data is resolved in the Data Diff view by selecting one of the appropriate icons beside the Synchronization prompt. By row, you can choose to Make Target Match Source for Selected Row, Make Source Match Target for Selected Row, or Do Not Resolve Selected Row, respectively.
You can add the Data Diff View to the Workbench by selecting Window > Show View > Data Diff View.
This view enables you to specify changes without resolving the repositories of both data sources via synchronization scripts.
EMBARCADERO TECHNOLOGIES > EMBARCADERO® CHANGE MANAGER™ 5.1 USER GUIDE 22
USING CHANGE MANAGER > NAVIGATING THE WORKBENCH
SQL LogThe SQL Log captures all SQL commands executed by SQL Editor and the system. SQL Log entries are listed by SQL Statement name, Date issued, Host/Server, Service, User, Source, and the Time (in milliseconds) it took to execute the command.
SQL Errors LogThe SQL Errors log automatically logs all SQL errors encountered when SQL commands are executed through Change Manager. Errors are listed by Error Code, SQL State, error Details, Resource, and the Location of the error in the SQL file.
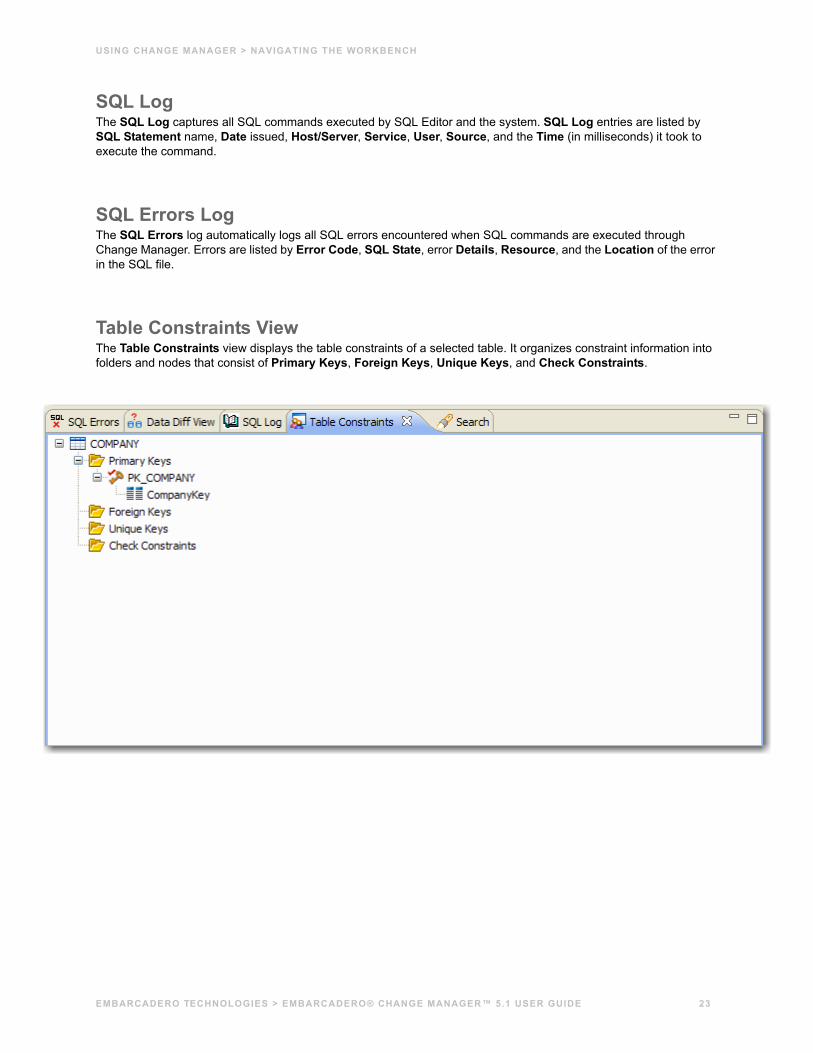
Table Constraints ViewThe Table Constraints view displays the table constraints of a selected table. It organizes constraint information into folders and nodes that consist of Primary Keys, Foreign Keys, Unique Keys, and Check Constraints.
EMBARCADERO TECHNOLOGIES > EMBARCADERO® CHANGE MANAGER™ 5.1 USER GUIDE 23
USING CHANGE MANAGER > NAVIGATING THE WORKBENCH
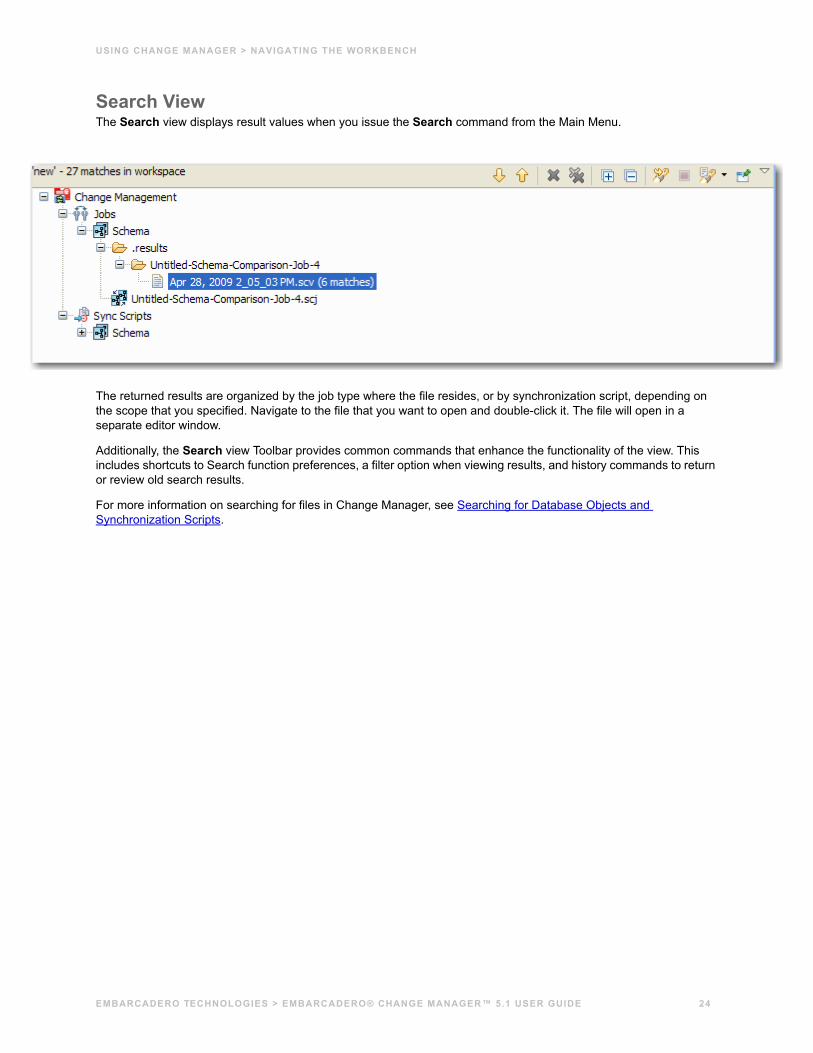
Search ViewThe Search view displays result values when you issue the Search command from the Main Menu.
The returned results are organized by the job type where the file resides, or by synchronization script, depending on the scope that you specified. Navigate to the file that you want to open and double-click it. The file will open in a separate editor window.
Additionally, the Search view Toolbar provides common commands that enhance the functionality of the view. This includes shortcuts to Search function preferences, a filter option when viewing results, and history commands to return or review old search results.
For more information on searching for files in Change Manager, see Searching for Database Objects and Synchronization Scripts.
EMBARCADERO TECHNOLOGIES > EMBARCADERO® CHANGE MANAGER™ 5.1 USER GUIDE 24
USING CHANGE MANAGER > NAVIGATING THE WORKBENCH
EditorsEditors are workbench interface components that enable Change Manager processes. That is, data, configuration, and schema comparison jobs. Editors are treated differently than views because as stand-alone components, they function at an individual level rather than a supportive one.
Data Comparison Job Editor
Configuration Comparison Job Editor
Configuration Standard Editor
Configuration Archive Editor
Schema Comparison Job Editor
Schema Archive Editor
SQL Editor
The following navigational-type actions can be performed on all Editors in general:
Move an EditorClick the tab of the Editor and drag your mouse. A frame indicates where the Editor will fit in the Workbench Space. Release the button to move the Editor to its new location.
Build a Tabbed NotebookDrag the Editor over another Editor and release the mouse button when the frames meet. Both Editors overlap and create a tabbed ‘book’ within the same frame. Multiple Editors can be combined in this format.
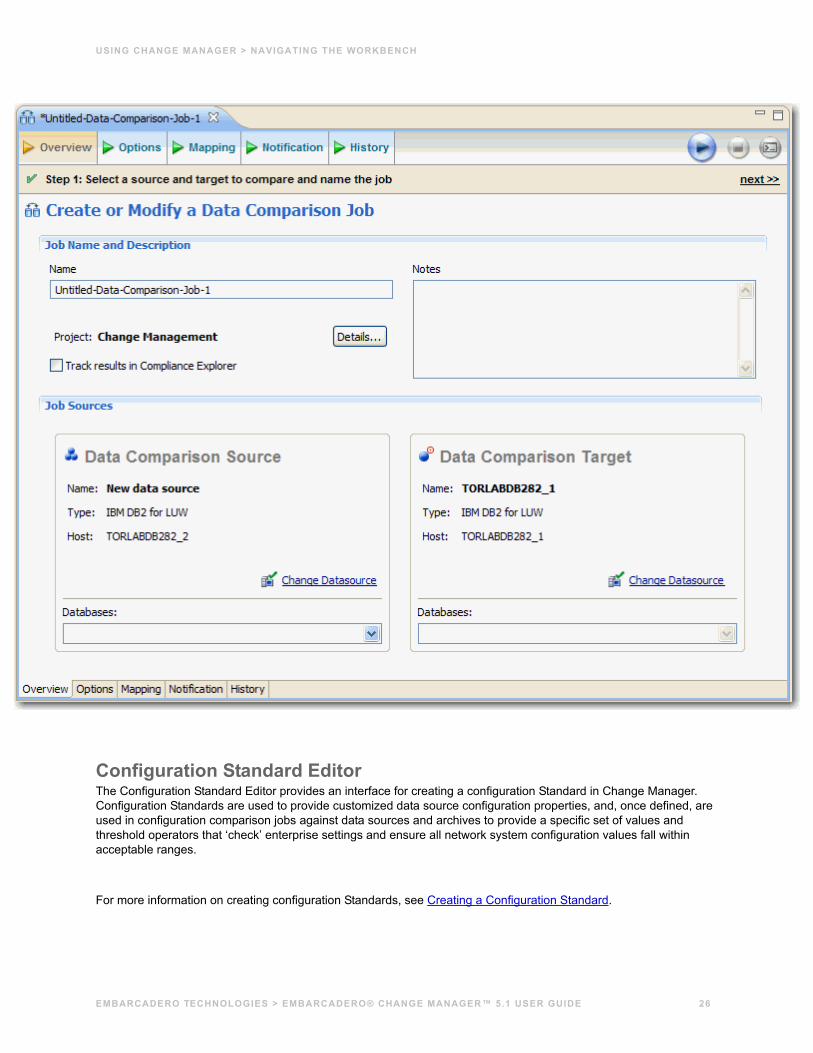
Data Comparison Job EditorThe Data Comparison Job Editor compares the data repositories of two specified data sources at the table and row levels. Additionally, the editor provides the ability to specify table mappings and further manipulate data via matching functions that synchronize it at the global, table, and row level, as specified by the user, and provides high-level mapping/refinement options for a job, based on data source (database, schema, or owner selection).
For more information on comparing the data repositories of two specified data sources, see Comparing Data.
Configuration Comparison Job EditorThe Configuration Comparison Job Editor compares the configuration settings of two specified data sources. Additional, the Editor provides the ability to define standard settings templates and archive individual data source properties to be used in comparison jobs.
For more information on comparing the configuration settings of two specified data sources, see Comparing Configurations.
EMBARCADERO TECHNOLOGIES > EMBARCADERO® CHANGE MANAGER™ 5.1 USER GUIDE 25
USING CHANGE MANAGER > NAVIGATING THE WORKBENCH
Configuration Standard EditorThe Configuration Standard Editor provides an interface for creating a configuration Standard in Change Manager. Configuration Standards are used to provide customized data source configuration properties, and, once defined, are used in configuration comparison jobs against data sources and archives to provide a specific set of values and threshold operators that ‘check’ enterprise settings and ensure all network system configuration values fall within acceptable ranges.
For more information on creating configuration Standards, see Creating a Configuration Standard.
EMBARCADERO TECHNOLOGIES > EMBARCADERO® CHANGE MANAGER™ 5.1 USER GUIDE 26
USING CHANGE MANAGER > NAVIGATING THE WORKBENCH
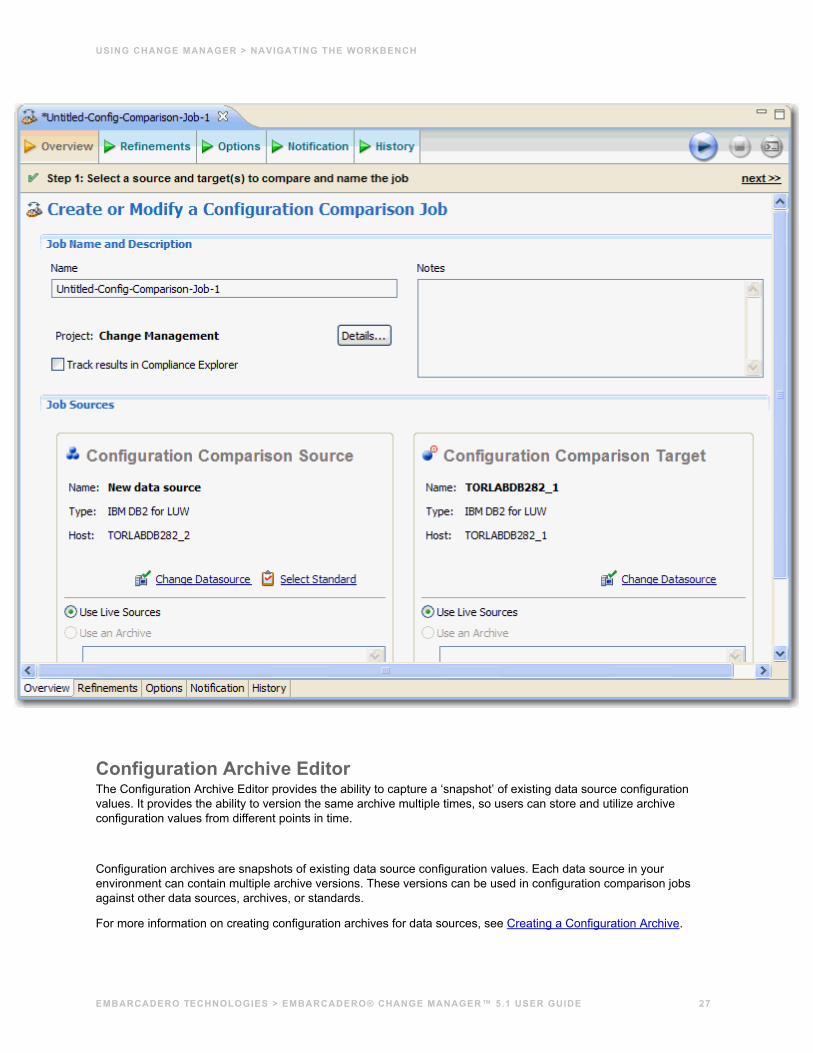
Configuration Archive EditorThe Configuration Archive Editor provides the ability to capture a ‘snapshot’ of existing data source configuration values. It provides the ability to version the same archive multiple times, so users can store and utilize archive configuration values from different points in time.
Configuration archives are snapshots of existing data source configuration values. Each data source in your environment can contain multiple archive versions. These versions can be used in configuration comparison jobs against other data sources, archives, or standards.
For more information on creating configuration archives for data sources, see Creating a Configuration Archive.
EMBARCADERO TECHNOLOGIES > EMBARCADERO® CHANGE MANAGER™ 5.1 USER GUIDE 27
USING CHANGE MANAGER > NAVIGATING THE WORKBENCH
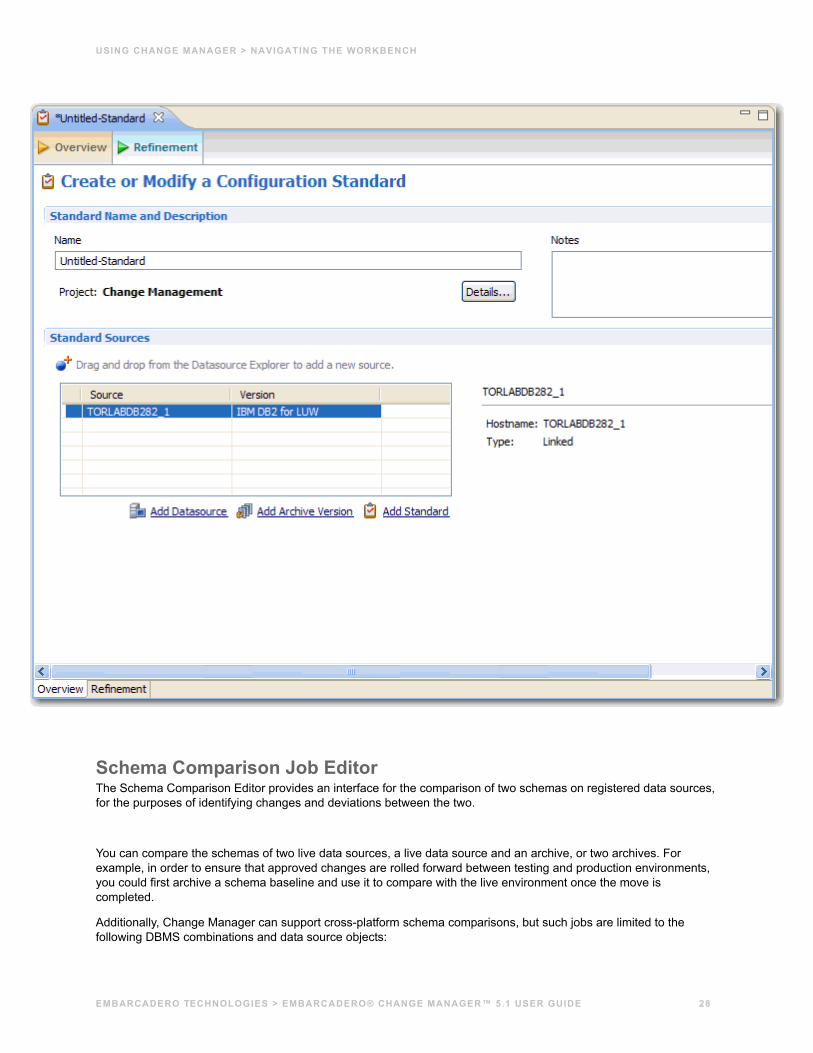
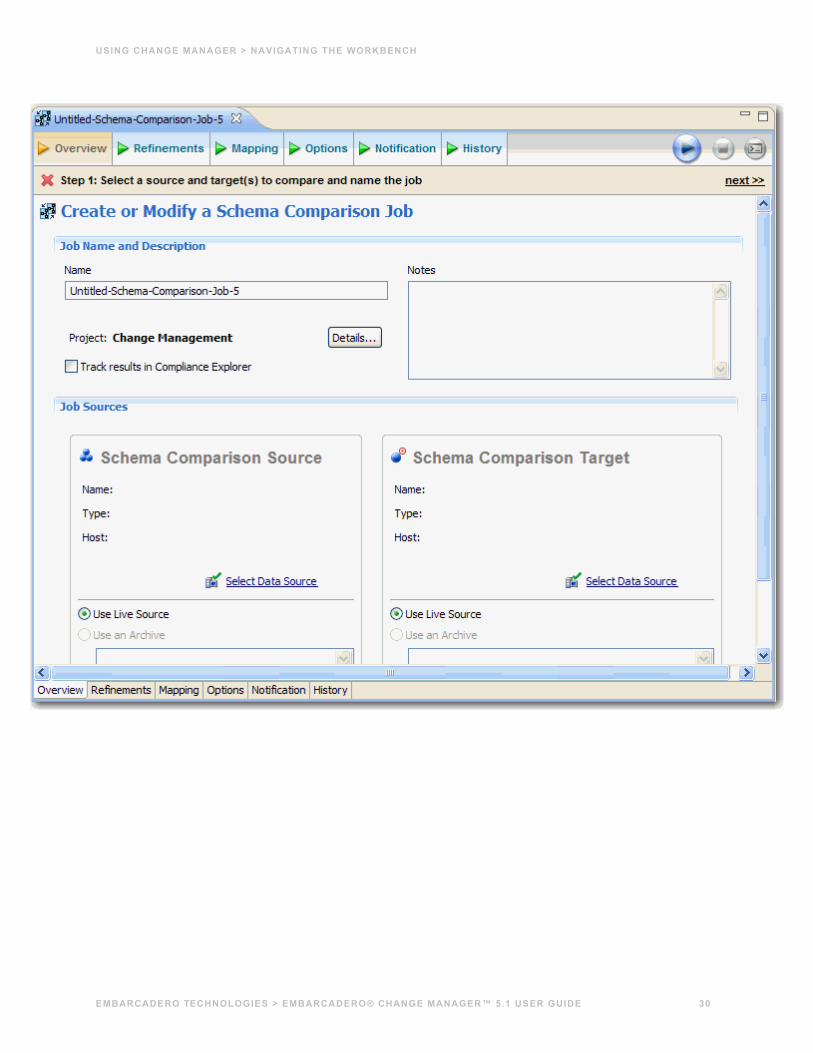
Schema Comparison Job EditorThe Schema Comparison Editor provides an interface for the comparison of two schemas on registered data sources, for the purposes of identifying changes and deviations between the two.
You can compare the schemas of two live data sources, a live data source and an archive, or two archives. For example, in order to ensure that approved changes are rolled forward between testing and production environments, you could first archive a schema baseline and use it to compare with the live environment once the move is completed.
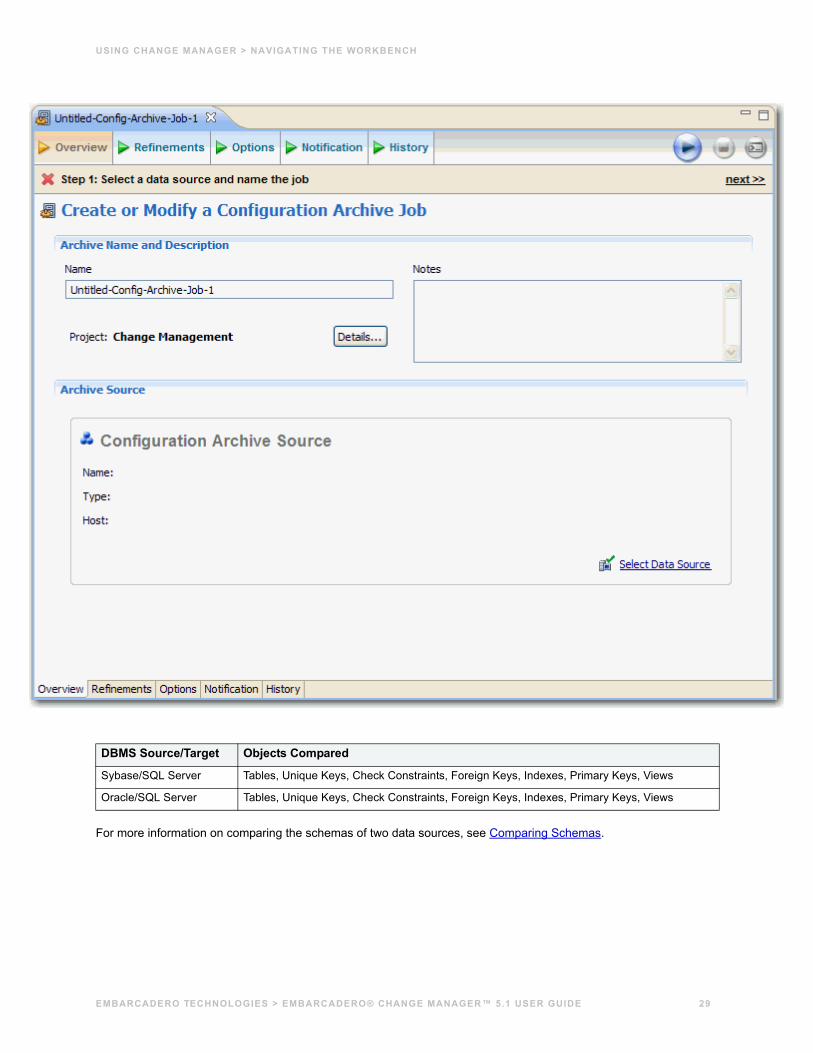
Additionally, Change Manager can support cross-platform schema comparisons, but such jobs are limited to the following DBMS combinations and data source objects:
EMBARCADERO TECHNOLOGIES > EMBARCADERO® CHANGE MANAGER™ 5.1 USER GUIDE 28
USING CHANGE MANAGER > NAVIGATING THE WORKBENCH
For more information on comparing the schemas of two data sources, see Comparing Schemas.
DBMS Source/Target Objects Compared
Sybase/SQL Server Tables, Unique Keys, Check Constraints, Foreign Keys, Indexes, Primary Keys, Views
Oracle/SQL Server Tables, Unique Keys, Check Constraints, Foreign Keys, Indexes, Primary Keys, Views
EMBARCADERO TECHNOLOGIES > EMBARCADERO® CHANGE MANAGER™ 5.1 USER GUIDE 29
USING CHANGE MANAGER > NAVIGATING THE WORKBENCH
EMBARCADERO TECHNOLOGIES > EMBARCADERO® CHANGE MANAGER™ 5.1 USER GUIDE 30
USING CHANGE MANAGER > NAVIGATING THE WORKBENCH
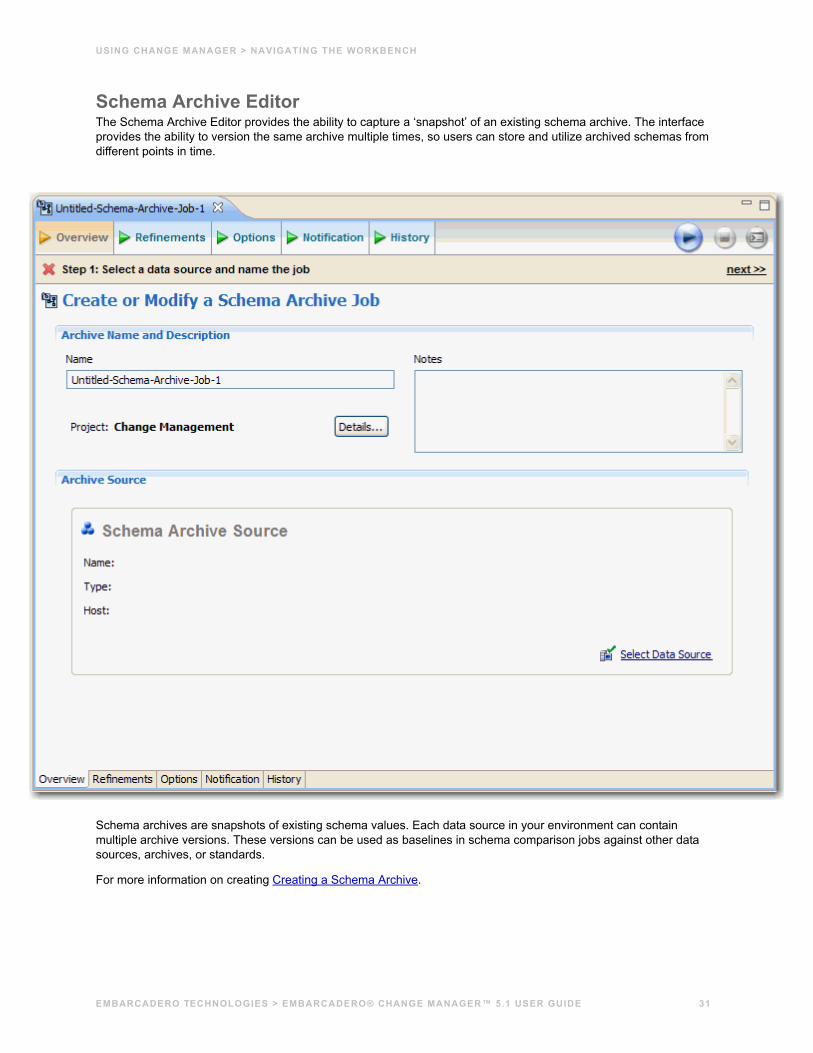
Schema Archive EditorThe Schema Archive Editor provides the ability to capture a ‘snapshot’ of an existing schema archive. The interface provides the ability to version the same archive multiple times, so users can store and utilize archived schemas from different points in time.
Schema archives are snapshots of existing schema values. Each data source in your environment can contain multiple archive versions. These versions can be used as baselines in schema comparison jobs against other data sources, archives, or standards.
For more information on creating Creating a Schema Archive.
EMBARCADERO TECHNOLOGIES > EMBARCADERO® CHANGE MANAGER™ 5.1 USER GUIDE 31
USING CHANGE MANAGER > NAVIGATING THE WORKBENCH
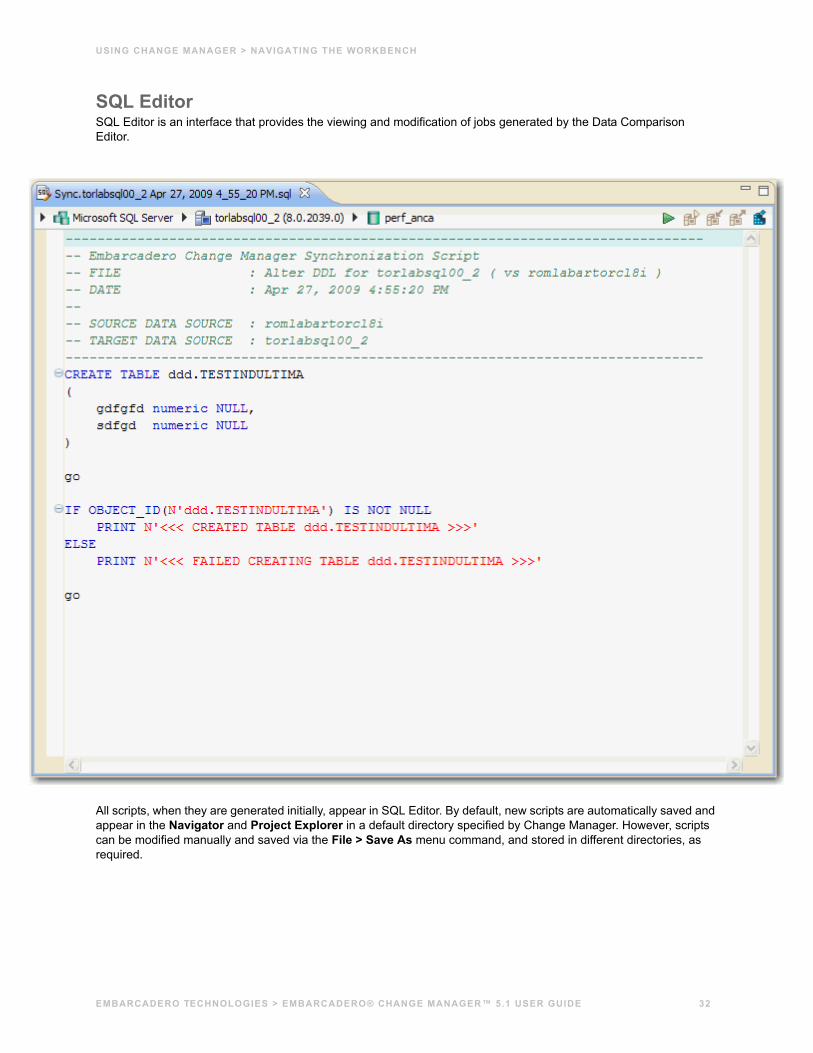
SQL EditorSQL Editor is an interface that provides the viewing and modification of jobs generated by the Data Comparison Editor.
All scripts, when they are generated initially, appear in SQL Editor. By default, new scripts are automatically saved and appear in the Navigator and Project Explorer in a default directory specified by Change Manager. However, scripts can be modified manually and saved via the File > Save As menu command, and stored in different directories, as required.
EMBARCADERO TECHNOLOGIES > EMBARCADERO® CHANGE MANAGER™ 5.1 USER GUIDE 32
USING CHANGE MANAGER > USING BASIC COMMANDS
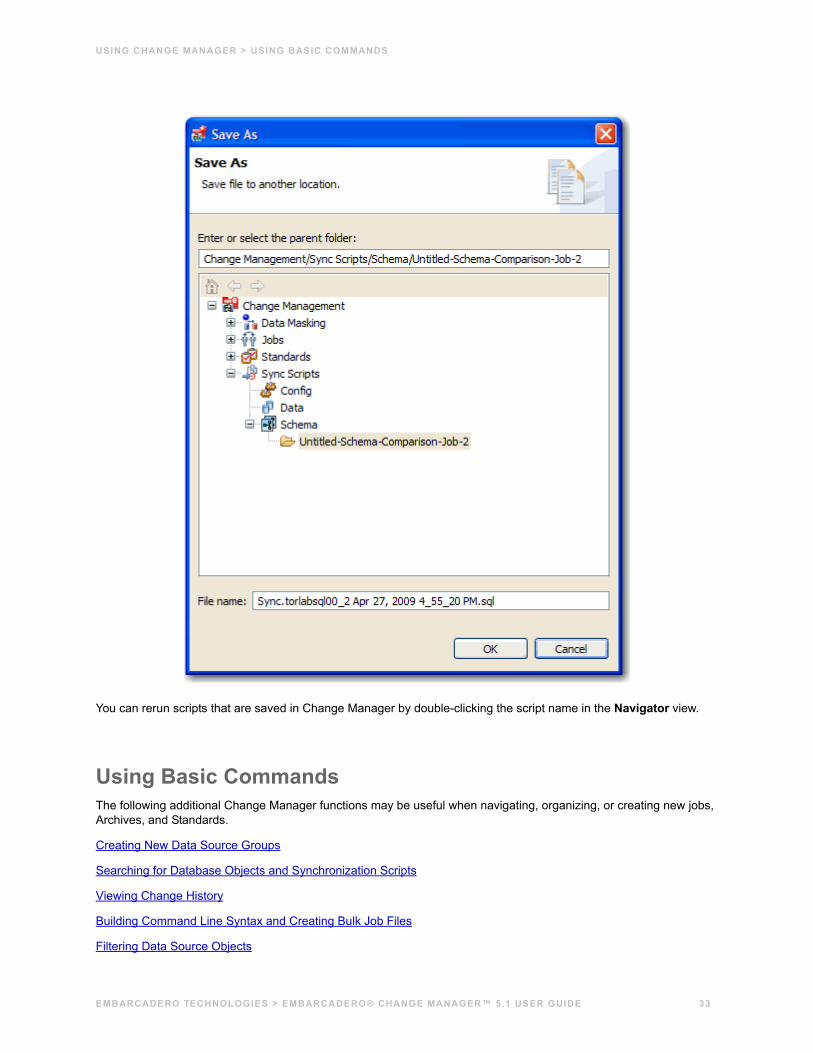
You can rerun scripts that are saved in Change Manager by double-clicking the script name in the Navigator view.
Using Basic CommandsThe following additional Change Manager functions may be useful when navigating, organizing, or creating new jobs, Archives, and Standards.
Creating New Data Source Groups
Searching for Database Objects and Synchronization Scripts
Viewing Change History
Building Command Line Syntax and Creating Bulk Job Files
Filtering Data Source Objects
EMBARCADERO TECHNOLOGIES > EMBARCADERO® CHANGE MANAGER™ 5.1 USER GUIDE 33
USING CHANGE MANAGER > USING BASIC COMMANDS
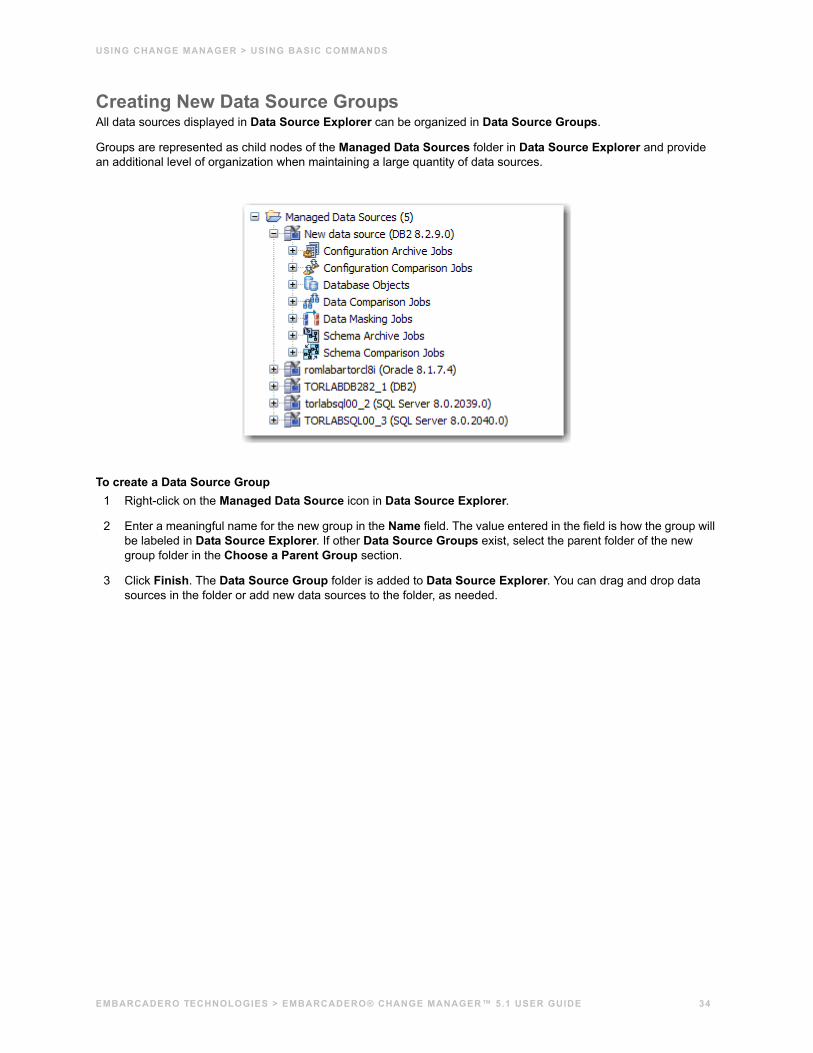
Creating New Data Source GroupsAll data sources displayed in Data Source Explorer can be organized in Data Source Groups.
Groups are represented as child nodes of the Managed Data Sources folder in Data Source Explorer and provide an additional level of organization when maintaining a large quantity of data sources.
To create a Data Source Group1 Right-click on the Managed Data Source icon in Data Source Explorer.
2 Enter a meaningful name for the new group in the Name field. The value entered in the field is how the group will be labeled in Data Source Explorer. If other Data Source Groups exist, select the parent folder of the new group folder in the Choose a Parent Group section.
3 Click Finish. The Data Source Group folder is added to Data Source Explorer. You can drag and drop data sources in the folder or add new data sources to the folder, as needed.
EMBARCADERO TECHNOLOGIES > EMBARCADERO® CHANGE MANAGER™ 5.1 USER GUIDE 34
USING CHANGE MANAGER > USING BASIC COMMANDS
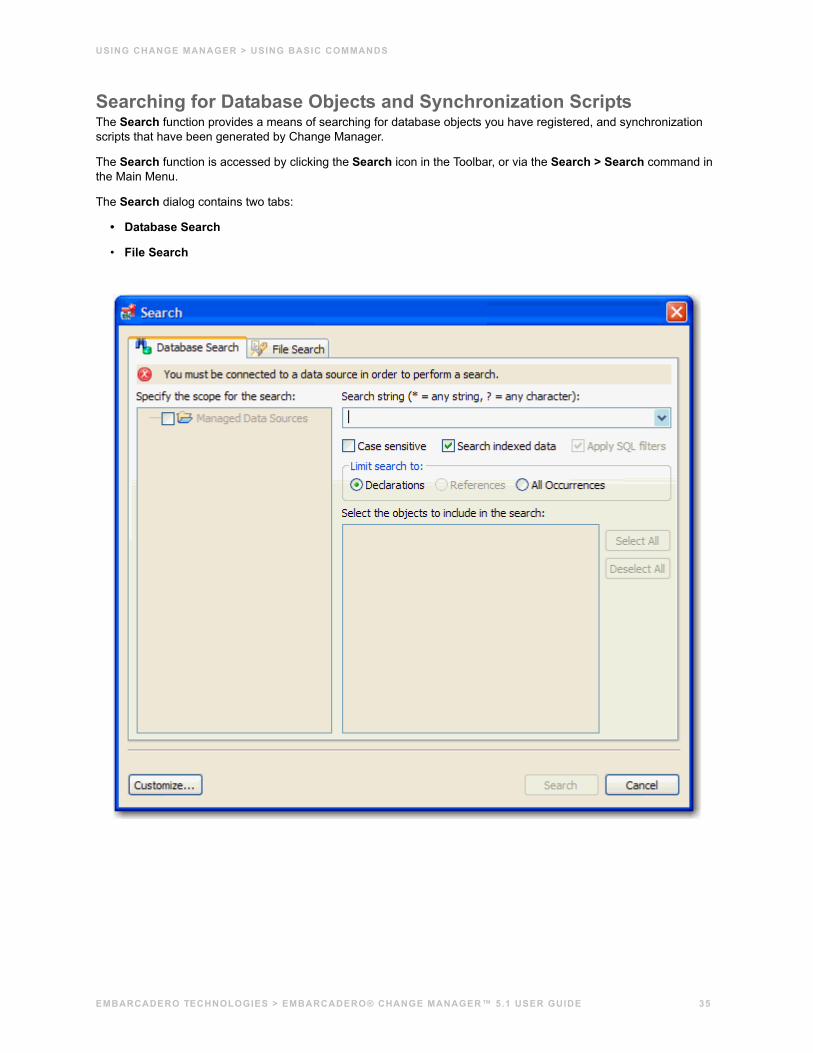
Searching for Database Objects and Synchronization ScriptsThe Search function provides a means of searching for database objects you have registered, and synchronization scripts that have been generated by Change Manager.
The Search function is accessed by clicking the Search icon in the Toolbar, or via the Search > Search command in the Main Menu.
The Search dialog contains two tabs:
• Database Search
• File Search
EMBARCADERO TECHNOLOGIES > EMBARCADERO® CHANGE MANAGER™ 5.1 USER GUIDE 35
USING CHANGE MANAGER > USING BASIC COMMANDS
To search for databases:1 Navigate to the Database Search tab.
2 Use the parameter fields provided to search and locate a database:
• In the box on the left-hand side of the window, use the check boxes to select the Data Source Groups you want to search in.
• In the Search String field, type a value to search. Use the * character to indicate wildcard string values, and the ? character to indicate wildcard character values. The \ character indicates an escape character for literals. (* ? and /).
• Select Case Sensitive to take case into account when searching for string matches.
• Select Search Indexed Data to include any information that has been retained by Change Manager’s indexing function.
• Select Apply SQL Filters to apply any filters you may have associated with the registered data sources in the system.
• Specify if the search is limited to Declarations, References, or All Occurrences in the Limit Search to section.
• In the box in the lower right-hand corner of the screen, select and de-select the object types you want to include in the search. Only selected objects that match your search criteria will be returned.
3 Click Search. Change Manager returns a list of all possible script selections based on the variables you entered.
To search for synchronization scripts:1 Navigate to the File Search tab.
2 Use the parameter fields provided to search and locate a synchronization script:
• Type a value to search in the Containing Text field. Use the * character to indicate wildcard string values, the ? character to indicate wildcard character values, and the \ character to indicate an escape character for literals. (* ? and /).
• Select Case Sensitive to take case into account when searching for string matches.
• Select Regular Expression to identify the string as a regular function in terms of search criteria.
• In the File Name Pattern field, specify the extension name of the files to search for explicitly. If the value in this field is a * character, the search function will search all files regardless of extension. Manually type the extensions to indicate the file type (separate multiple file types with commas), or click Choose and use the Select Types dialog to select the file extensions the process will use to search for the string. For example, selecting*.caj will search for configuration archive job files, exclusively.
• Select Consider Derived Resources to include derived resources in the search.
3 Click Search. Change Manager returns a list of all possible script selections based on the variables you entered.
EMBARCADERO TECHNOLOGIES > EMBARCADERO® CHANGE MANAGER™ 5.1 USER GUIDE 36
USING CHANGE MANAGER > USING BASIC COMMANDS
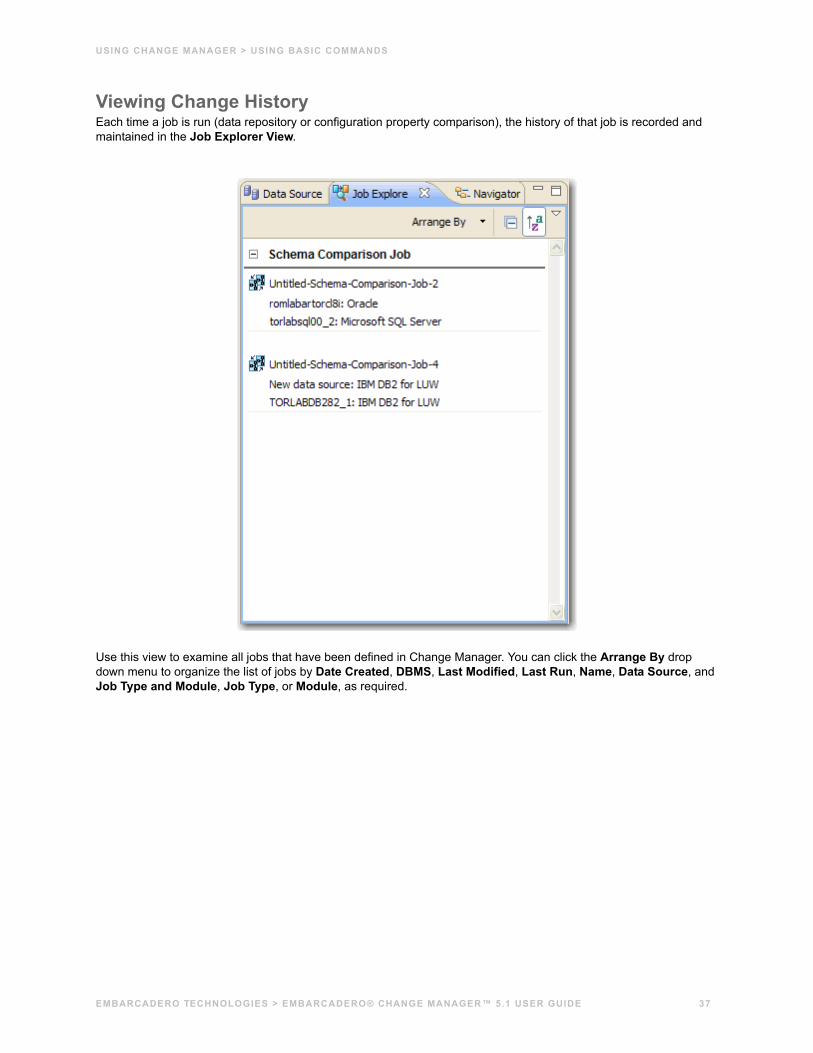
Viewing Change HistoryEach time a job is run (data repository or configuration property comparison), the history of that job is recorded and maintained in the Job Explorer View.
Use this view to examine all jobs that have been defined in Change Manager. You can click the Arrange By drop down menu to organize the list of jobs by Date Created, DBMS, Last Modified, Last Run, Name, Data Source, and Job Type and Module, Job Type, or Module, as required.
EMBARCADERO TECHNOLOGIES > EMBARCADERO® CHANGE MANAGER™ 5.1 USER GUIDE 37
USING CHANGE MANAGER > USING BASIC COMMANDS
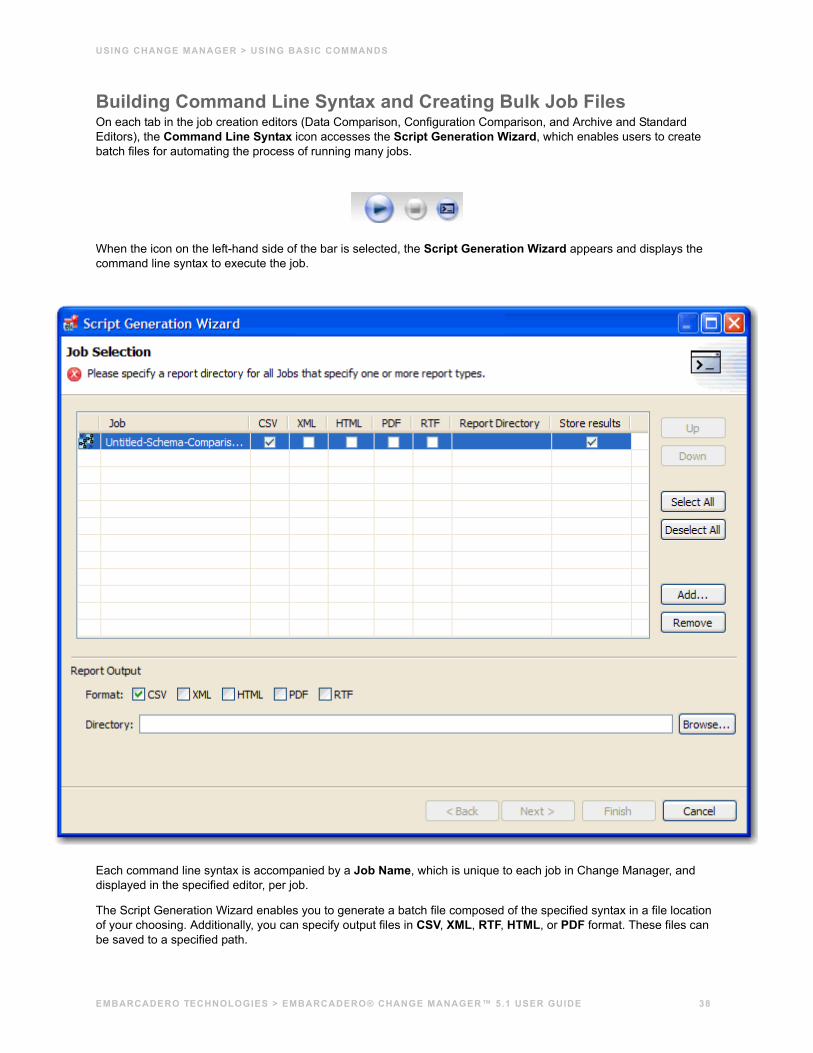
Building Command Line Syntax and Creating Bulk Job FilesOn each tab in the job creation editors (Data Comparison, Configuration Comparison, and Archive and Standard Editors), the Command Line Syntax icon accesses the Script Generation Wizard, which enables users to create batch files for automating the process of running many jobs.
When the icon on the left-hand side of the bar is selected, the Script Generation Wizard appears and displays the command line syntax to execute the job.
Each command line syntax is accompanied by a Job Name, which is unique to each job in Change Manager, and displayed in the specified editor, per job.
The Script Generation Wizard enables you to generate a batch file composed of the specified syntax in a file location of your choosing. Additionally, you can specify output files in CSV, XML, RTF, HTML, or PDF format. These files can be saved to a specified path.
EMBARCADERO TECHNOLOGIES > EMBARCADERO® CHANGE MANAGER™ 5.1 USER GUIDE 38
USING CHANGE MANAGER > USING BASIC COMMANDS
The Report Directory column indicates the location where reports will be created. The Store Results column indicates if the job results will be saved once the job has executed.
NOTE: This feature is only enabled for jobs that have been saved.
Additionally, jobs can be manually launched from the changec command line program, which is located in the Change Manager installation directory.
Job options must be specified by inserting the -job and -output commands when issuing a command from this location.
• The -job command specifies the jobs to run by job file name. This line must also include a directory location where the projects and jobs are stored.
• The -output command specifies reporting options for the job.
For example, the code below runs the MyConfigCompare database comparison job and generates a report in PDF format:
-job “C:\Users\test1\change_workbench_5_0\workspace\DatabaseChange]MyConfigCompare.ccj”-output PDF “c:/report”
In order to execute multiple jobs from the same command line, use the following syntax:
changec -bulk bulkfilename
Where bulkfilename is a file where each row has a -job attribute.
The -job command also accepts regular expressions:
• ** indicates all sub folders in a directory location.
• * indicates any string.
For example, the following command runs all configuration archive jobs in all projects and folders in the workspace:
changec -job workspace:\**\*.caj
To create a batch file1 In the editor of the job you want to create an execution script for, select the Command Line Syntax icon located
in the upper-right hand corner of the interface window. The Script Generation Wizard appears, and the job appears in a table.
2 Add output report options, as needed, and specify the Directory where the files will be generated. Click Next.
3 Specify the Location where the batch file will be generated, and provide a file format for the script.
4 Click Finish. The batch file is generated in the directory you specified in Step 3.
NOTE: If you want to create a batch file to run multiple jobs,click Add, and then add the other jobs. The Remove, Up, and Down commands help you control the jobs in the file, as job order is sometimes important. For example, an archive needs to be captured before the version is used in a comparison.
To run a job from the command line1 From the command line, enter an execution string with the following format:
changec -job job_directory job_name -option report_format report_directory
EMBARCADERO TECHNOLOGIES > EMBARCADERO® CHANGE MANAGER™ 5.1 USER GUIDE 39
USING CHANGE MANAGER > USING BASIC COMMANDS
2 The job you specified as the job_name runs. If you specified a report format and location, the report is generated as well.
NOTE: The Script Generation Wizard builds command line options automatically and stores them in the file you specified. When the batch file is run, it executes the parameters as specified in the wizard.
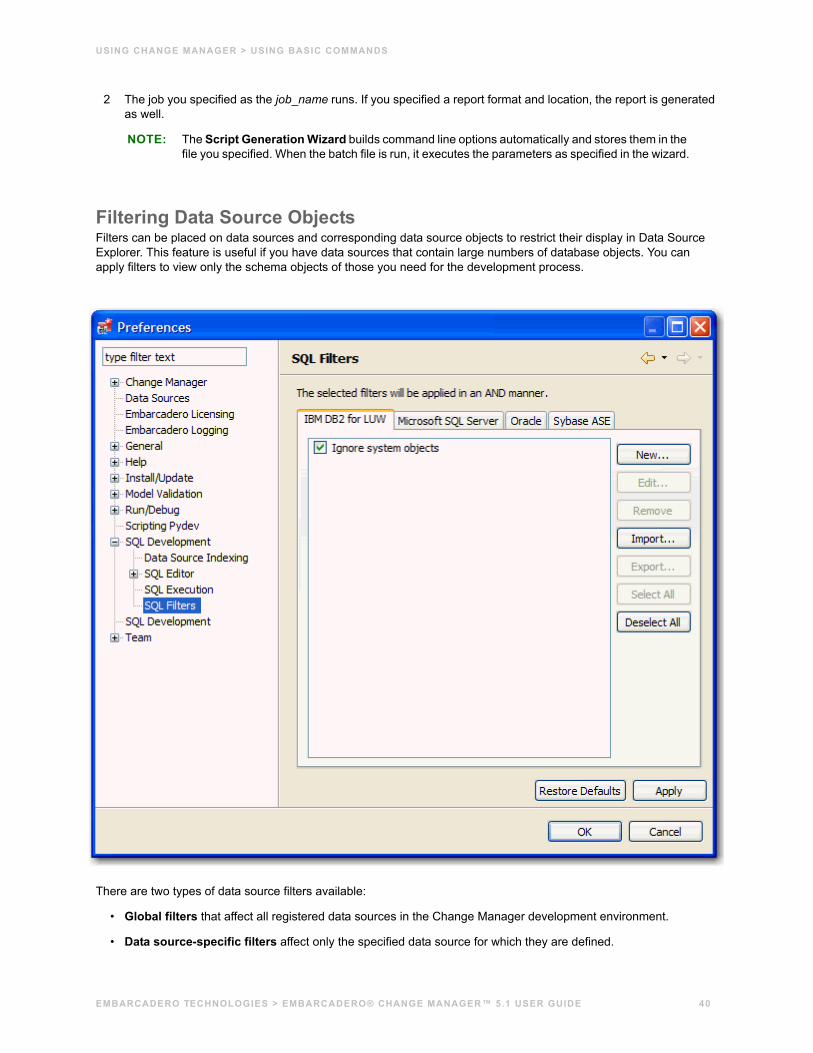
Filtering Data Source ObjectsFilters can be placed on data sources and corresponding data source objects to restrict their display in Data Source Explorer. This feature is useful if you have data sources that contain large numbers of database objects. You can apply filters to view only the schema objects of those you need for the development process.
There are two types of data source filters available:
• Global filters that affect all registered data sources in the Change Manager development environment.
• Data source-specific filters affect only the specified data source for which they are defined.
EMBARCADERO TECHNOLOGIES > EMBARCADERO® CHANGE MANAGER™ 5.1 USER GUIDE 40
USING CHANGE MANAGER > USING BASIC COMMANDS
In both cases, data source object filters are defined via the Object Filter Manager, through the development of filter templates. Once defined, filter templates can be activated and deactivated as you need them.
Several filter templates can be combined at a global level or applied to a specific data source.
Global filters affect all registered data sources in the Change Manager development environment. When you create and apply a global filter to a platform vendor in Change Manager, all databases associated with that vendor are affected by the filter, as defined.
Individual global filter templates are separated, by supported data source platform, on tabs in the SQL Filter window. Select the appropriate tab to view existing filter templates or add new ones, as needed.
To define a global filter:1 Select Window > Preferences from the Main Menu. The Preferences dialog appears.
2 Expand the SQL Development node and select the SQL Filter subnode. The SQL Filter pane appears.
3 Click New. The Filter Template dialog appears.
4 Specify the parameters of the filter template:
• In the Name field, enter the name of the filter as you want it to appear in the selection window on the SQL Filter node.
• The Database Type pane provides a list of data source objects. Deselect the data source objects that this template filters so that they do not appear in Database Explorer when displaying data source objects for the data source.
• Click New to add filter parameters for data source objects properties. The New SQL Filter Predicate dialog appears.
• Use the Property and Operator fields to supply the filter criteria. Property specifies if the value is a Name or Schema, and Operator specifies the matching type of the filter syntax. (Equals, Not Equals, Like, Not Like, In, Not In)
• In the Value field, enter the full or partial syntax of the property or properties you want the template to filter in data source Explorer.
5 Click OK. The filter property specification is added to the Filter Template.
6 When you have finished defining the filter template, click OK. The template name is added to the Properties dialog. It can be enabled and disabled by selecting or de-selecting the check box beside its name, respectively.
Data source object filters are added and removed from the development environment by selecting and de-selecting the checkboxes associated with each filter template on both the global and data source-specific dialogs.
To define a specific filter:Data source-specific object filters affect only the specified data source. Use the tabs on the SQL Filters page to specify the DBMS type.
To define data source specific filters:1 In Data Source Explorer, right-click the data source and select Properties.
The Properties dialog appears.
2 Select the SQL Filter node and deselect Enable Data Source Specific Settings. The other controls on the dialog become enabled.
3 Click New. The Filter Template dialog appears.
EMBARCADERO TECHNOLOGIES > EMBARCADERO® CHANGE MANAGER™ 5.1 USER GUIDE 41
USING CHANGE MANAGER > COMPARING DATA
4 Specify the parameters of the filter.
• In the Name field, enter the name of the filter as you want it to appear in the selection window on the SQL Filter node.
• The Database Type pane provides a list of data source objects. Deselect the data source objects that this template will not apply filter criteria to when displaying data source objects for the specified data source.
• Click New to add filter parameters for data source object properties. The New SQL Filter Predicate dialog appears.
• Use the Property and Operator fields to supply the filter criteria. Property specifies if the value is a Name or Schema, and Operator specifies the matching type of the filter syntax. (Equals, Not Equals, Like, Not Like, In, Not In)
• In the Value field, enter the full or partial syntax of the property or properties you want to filter in Data Source Explorer.
Click OK. The filter property specification is added to the Filter Template.
5 When you have finished defining the filter template, click OK. The template name is added to the Properties dialog. It can be enabled and disabled by selecting or deselecting the check box beside its name, respectively.
Comparing DataData comparison jobs enable you to compare the data repositories of two registered data sources, specify configuration adjustments and mapping refinement parameters, and synchronize any discrepancies discovered by the job, post-execution.
Comparison job results are viewed at row level per resident database, owner or schema, and mismatches can be updated automatically or missing rows added at the table level. The synchronization scripts used to update data sources are stored or executed immediately upon job completion.
The following tasks provide a high-level overview of the data comparison job process:
1 Create a New Data Comparison Job
2 Specify a Job Name
3 Specify the Source and Target Data Sources
4 Specify Execution, Mapping, Comparison, and Resolution Options
5 Understand the Data Source Mapping Process
6 Customize the Data Source Mapping Process
7 Customize Database Mapping
8 Customize Table Mapping
9 Specify Notification Options
10 Execute the Data Comparison Job
11 Resolve Data Repositories
12 Execute an SQL Synchronization Script
13 Generate a Job Report
EMBARCADERO TECHNOLOGIES > EMBARCADERO® CHANGE MANAGER™ 5.1 USER GUIDE 42

USING CHANGE MANAGER > COMPARING DATA
Create a New Data Comparison JobData comparison jobs are performed in the Data Comparison Job Editor.
To begin a new comparison job• Select File > New > Data Comparison Job. The Data Comparison Job Editor opens.
EMBARCADERO TECHNOLOGIES > EMBARCADERO® CHANGE MANAGER™ 5.1 USER GUIDE 43
USING CHANGE MANAGER > COMPARING DATA
You can now proceed to set up the parameters of the new job.
NOTE: If any jobs already exist, they can be opened by selecting File > Open Comparison and choosing the name from the list of available jobs.
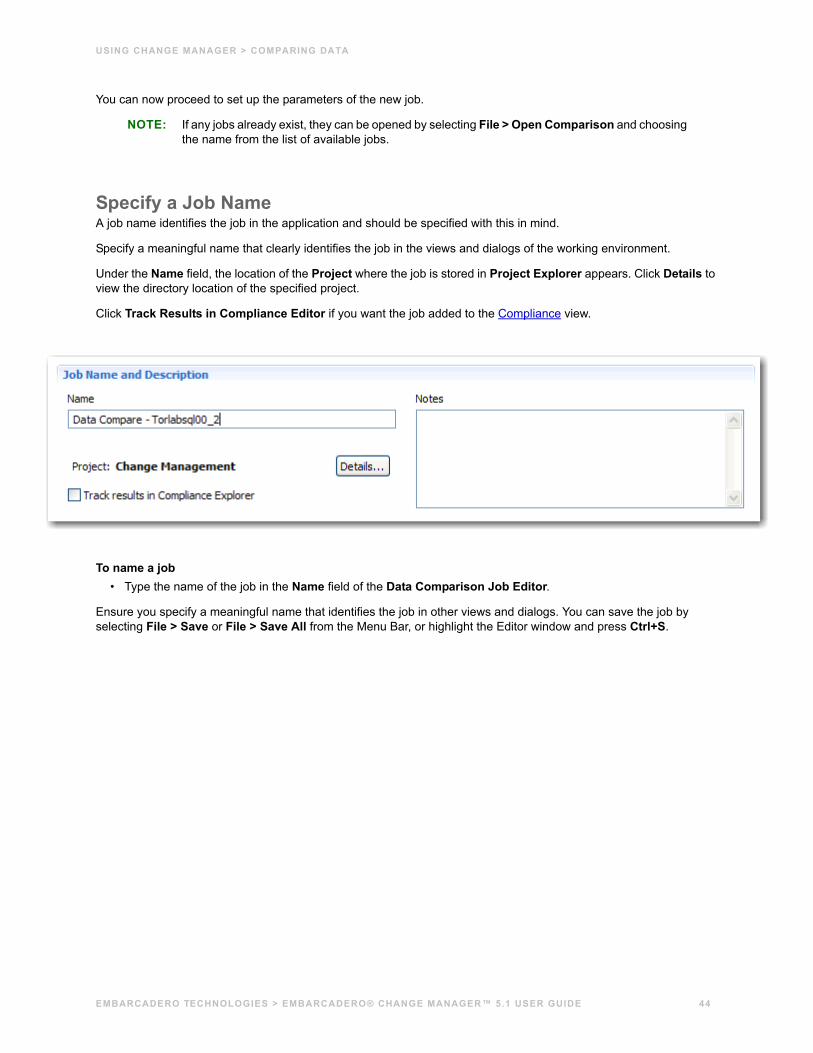
Specify a Job NameA job name identifies the job in the application and should be specified with this in mind.
Specify a meaningful name that clearly identifies the job in the views and dialogs of the working environment.
Under the Name field, the location of the Project where the job is stored in Project Explorer appears. Click Details to view the directory location of the specified project.
Click Track Results in Compliance Editor if you want the job added to the Compliance view.
To name a job• Type the name of the job in the Name field of the Data Comparison Job Editor.
Ensure you specify a meaningful name that identifies the job in other views and dialogs. You can save the job by selecting File > Save or File > Save All from the Menu Bar, or highlight the Editor window and press Ctrl+S.
EMBARCADERO TECHNOLOGIES > EMBARCADERO® CHANGE MANAGER™ 5.1 USER GUIDE 44
USING CHANGE MANAGER > COMPARING DATA
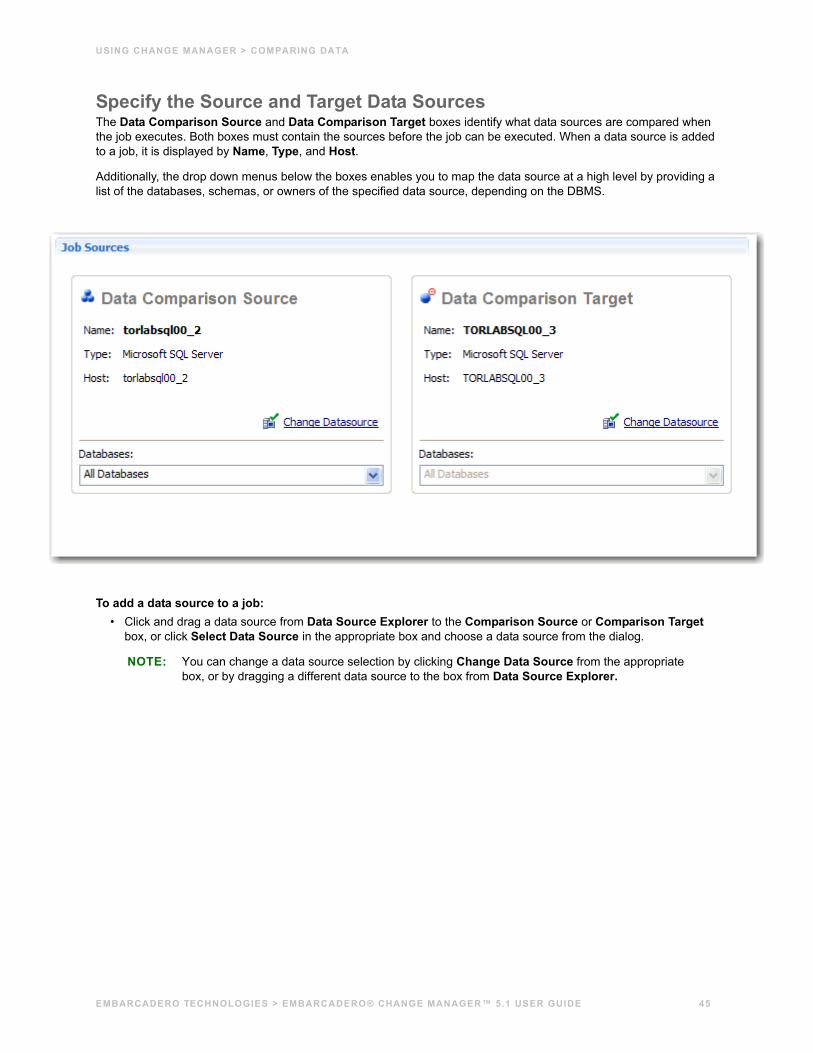
Specify the Source and Target Data SourcesThe Data Comparison Source and Data Comparison Target boxes identify what data sources are compared when the job executes. Both boxes must contain the sources before the job can be executed. When a data source is added to a job, it is displayed by Name, Type, and Host.
Additionally, the drop down menus below the boxes enables you to map the data source at a high level by providing a list of the databases, schemas, or owners of the specified data source, depending on the DBMS.
To add a data source to a job:• Click and drag a data source from Data Source Explorer to the Comparison Source or Comparison Target
box, or click Select Data Source in the appropriate box and choose a data source from the dialog.
NOTE: You can change a data source selection by clicking Change Data Source from the appropriate box, or by dragging a different data source to the box from Data Source Explorer.
EMBARCADERO TECHNOLOGIES > EMBARCADERO® CHANGE MANAGER™ 5.1 USER GUIDE 45
USING CHANGE MANAGER > COMPARING DATA
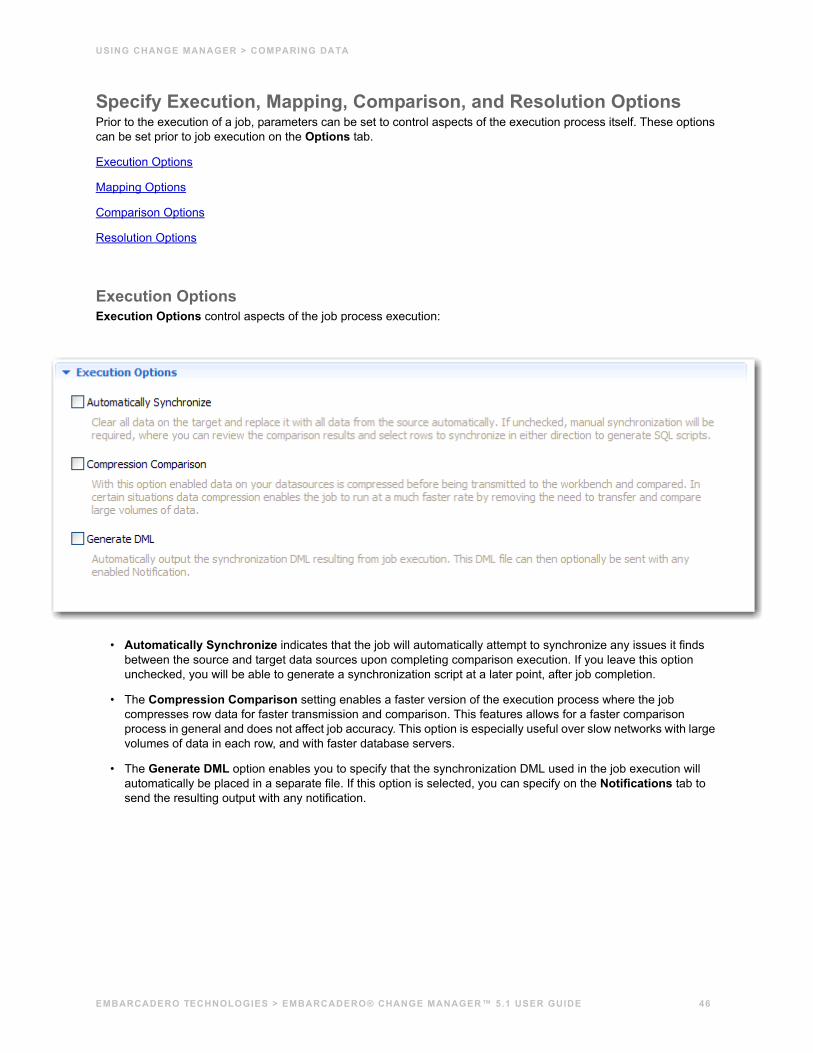
Specify Execution, Mapping, Comparison, and Resolution OptionsPrior to the execution of a job, parameters can be set to control aspects of the execution process itself. These options can be set prior to job execution on the Options tab.
Execution Options
Mapping Options
Comparison Options
Resolution Options
Execution OptionsExecution Options control aspects of the job process execution:
• Automatically Synchronize indicates that the job will automatically attempt to synchronize any issues it finds between the source and target data sources upon completing comparison execution. If you leave this option unchecked, you will be able to generate a synchronization script at a later point, after job completion.
• The Compression Comparison setting enables a faster version of the execution process where the job compresses row data for faster transmission and comparison. This features allows for a faster comparison process in general and does not affect job accuracy. This option is especially useful over slow networks with large volumes of data in each row, and with faster database servers.
• The Generate DML option enables you to specify that the synchronization DML used in the job execution will automatically be placed in a separate file. If this option is selected, you can specify on the Notifications tab to send the resulting output with any notification.
EMBARCADERO TECHNOLOGIES > EMBARCADERO® CHANGE MANAGER™ 5.1 USER GUIDE 46
USING CHANGE MANAGER > COMPARING DATA
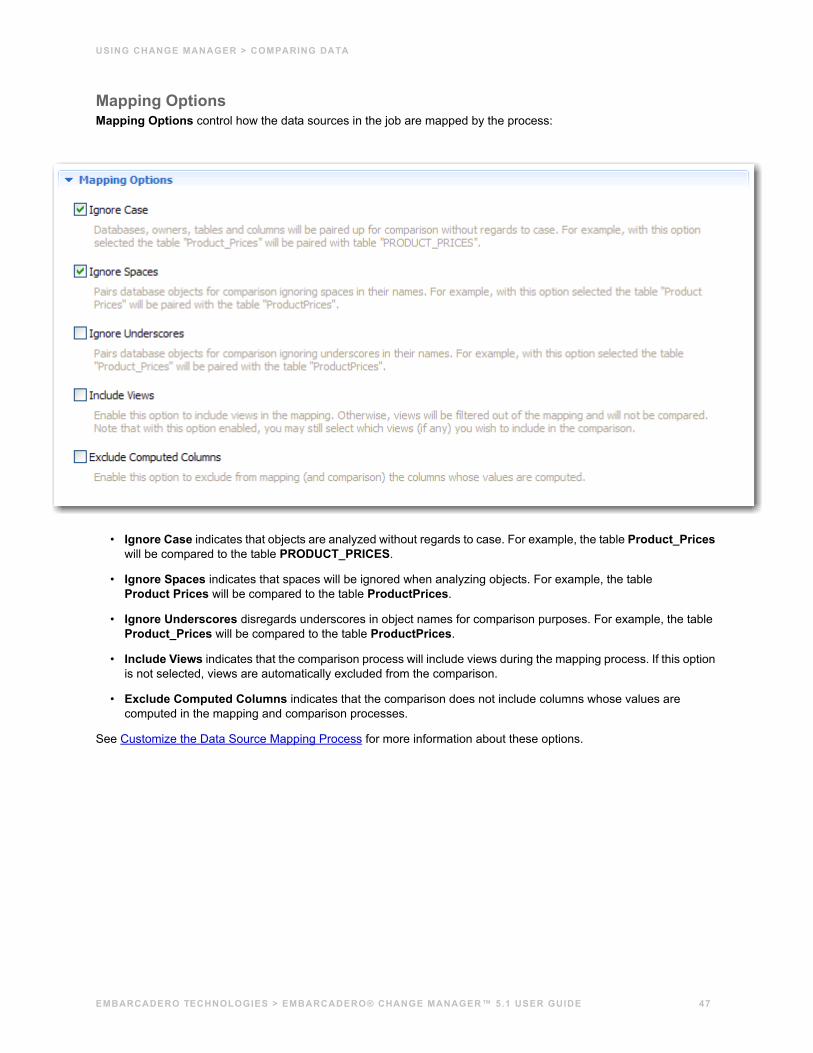
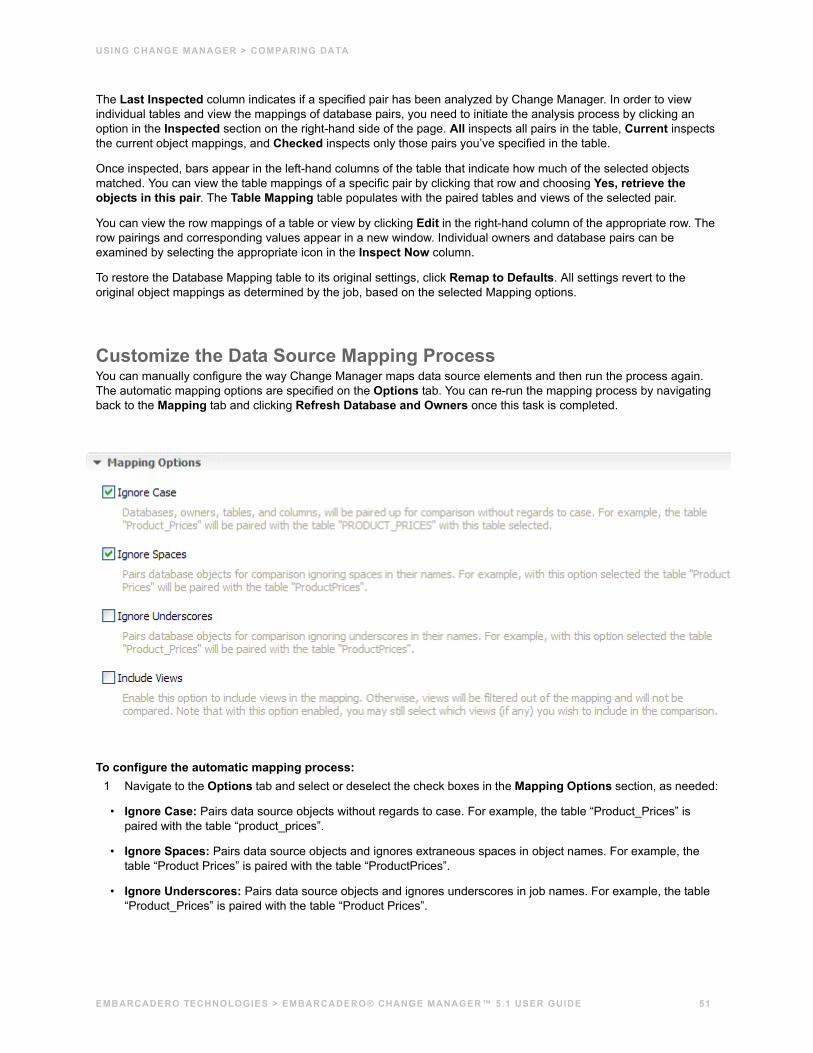
Mapping OptionsMapping Options control how the data sources in the job are mapped by the process:
• Ignore Case indicates that objects are analyzed without regards to case. For example, the table Product_Prices will be compared to the table PRODUCT_PRICES.
• Ignore Spaces indicates that spaces will be ignored when analyzing objects. For example, the tableProduct Prices will be compared to the table ProductPrices.
• Ignore Underscores disregards underscores in object names for comparison purposes. For example, the table Product_Prices will be compared to the table ProductPrices.
• Include Views indicates that the comparison process will include views during the mapping process. If this option is not selected, views are automatically excluded from the comparison.
• Exclude Computed Columns indicates that the comparison does not include columns whose values are computed in the mapping and comparison processes.
See Customize the Data Source Mapping Process for more information about these options.
EMBARCADERO TECHNOLOGIES > EMBARCADERO® CHANGE MANAGER™ 5.1 USER GUIDE 47
USING CHANGE MANAGER > COMPARING DATA
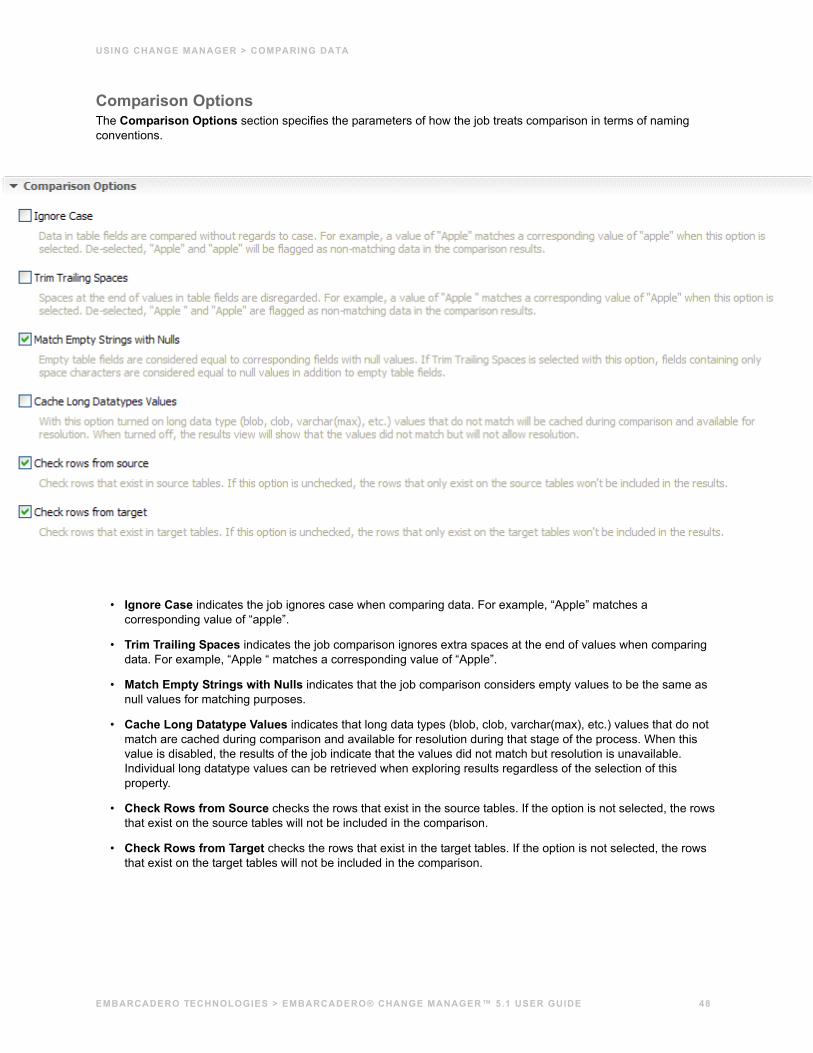
Comparison OptionsThe Comparison Options section specifies the parameters of how the job treats comparison in terms of naming conventions.
• Ignore Case indicates the job ignores case when comparing data. For example, “Apple” matches a corresponding value of “apple”.
• Trim Trailing Spaces indicates the job comparison ignores extra spaces at the end of values when comparing data. For example, “Apple “ matches a corresponding value of “Apple”.
• Match Empty Strings with Nulls indicates that the job comparison considers empty values to be the same as null values for matching purposes.
• Cache Long Datatype Values indicates that long data types (blob, clob, varchar(max), etc.) values that do not match are cached during comparison and available for resolution during that stage of the process. When this value is disabled, the results of the job indicate that the values did not match but resolution is unavailable. Individual long datatype values can be retrieved when exploring results regardless of the selection of this property.
• Check Rows from Source checks the rows that exist in the source tables. If the option is not selected, the rows that exist on the source tables will not be included in the comparison.
• Check Rows from Target checks the rows that exist in the target tables. If the option is not selected, the rows that exist on the target tables will not be included in the comparison.
EMBARCADERO TECHNOLOGIES > EMBARCADERO® CHANGE MANAGER™ 5.1 USER GUIDE 48
USING CHANGE MANAGER > COMPARING DATA
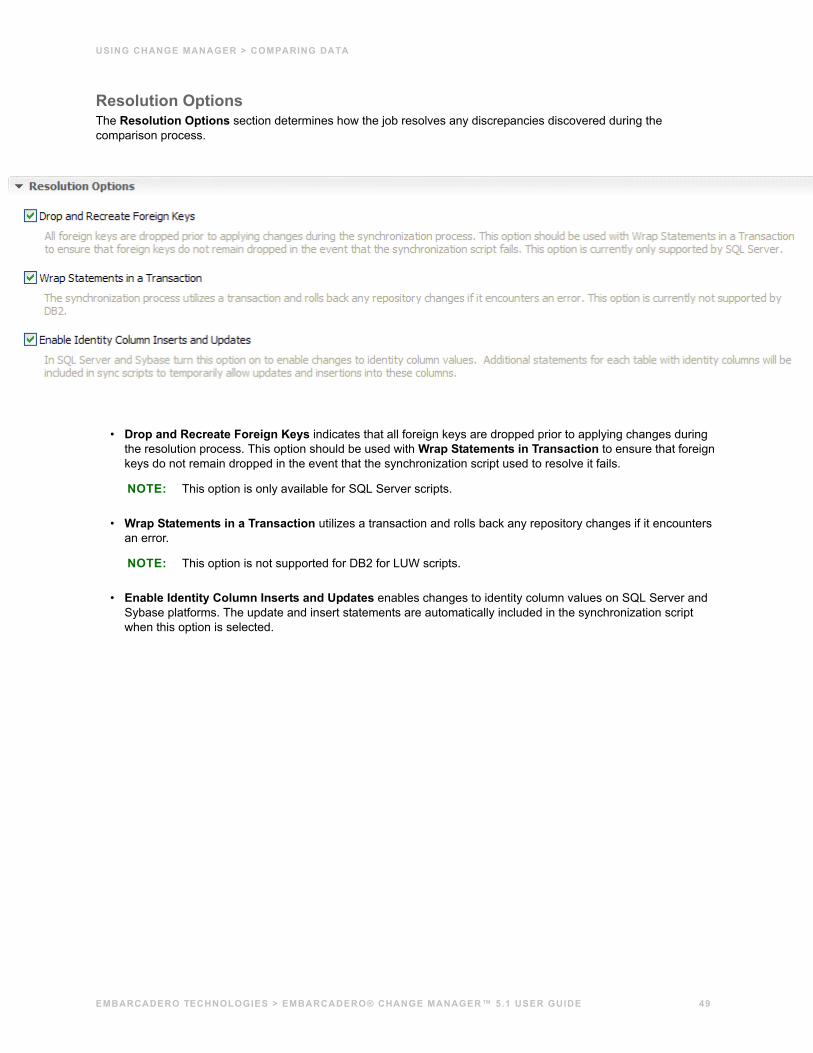
Resolution OptionsThe Resolution Options section determines how the job resolves any discrepancies discovered during the comparison process.
• Drop and Recreate Foreign Keys indicates that all foreign keys are dropped prior to applying changes during the resolution process. This option should be used with Wrap Statements in Transaction to ensure that foreign keys do not remain dropped in the event that the synchronization script used to resolve it fails.
NOTE: This option is only available for SQL Server scripts.
• Wrap Statements in a Transaction utilizes a transaction and rolls back any repository changes if it encounters an error.
NOTE: This option is not supported for DB2 for LUW scripts.
• Enable Identity Column Inserts and Updates enables changes to identity column values on SQL Server and Sybase platforms. The update and insert statements are automatically included in the synchronization script when this option is selected.
EMBARCADERO TECHNOLOGIES > EMBARCADERO® CHANGE MANAGER™ 5.1 USER GUIDE 49
USING CHANGE MANAGER > COMPARING DATA
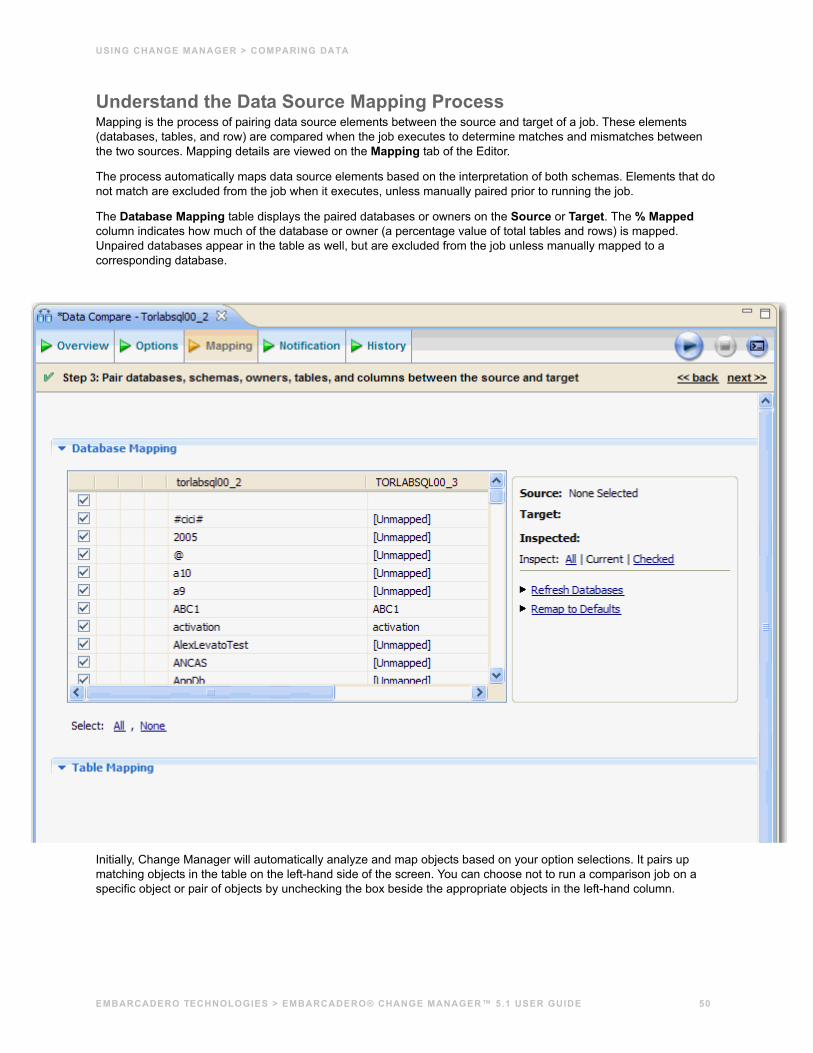
Understand the Data Source Mapping ProcessMapping is the process of pairing data source elements between the source and target of a job. These elements (databases, tables, and row) are compared when the job executes to determine matches and mismatches between the two sources. Mapping details are viewed on the Mapping tab of the Editor.
The process automatically maps data source elements based on the interpretation of both schemas. Elements that do not match are excluded from the job when it executes, unless manually paired prior to running the job.
The Database Mapping table displays the paired databases or owners on the Source or Target. The % Mapped column indicates how much of the database or owner (a percentage value of total tables and rows) is mapped. Unpaired databases appear in the table as well, but are excluded from the job unless manually mapped to a corresponding database.
Initially, Change Manager will automatically analyze and map objects based on your option selections. It pairs up matching objects in the table on the left-hand side of the screen. You can choose not to run a comparison job on a specific object or pair of objects by unchecking the box beside the appropriate objects in the left-hand column.
EMBARCADERO TECHNOLOGIES > EMBARCADERO® CHANGE MANAGER™ 5.1 USER GUIDE 50
USING CHANGE MANAGER > COMPARING DATA
The Last Inspected column indicates if a specified pair has been analyzed by Change Manager. In order to view individual tables and view the mappings of database pairs, you need to initiate the analysis process by clicking an option in the Inspected section on the right-hand side of the page. All inspects all pairs in the table, Current inspects the current object mappings, and Checked inspects only those pairs you’ve specified in the table.
Once inspected, bars appear in the left-hand columns of the table that indicate how much of the selected objects matched. You can view the table mappings of a specific pair by clicking that row and choosing Yes, retrieve the objects in this pair. The Table Mapping table populates with the paired tables and views of the selected pair.
You can view the row mappings of a table or view by clicking Edit in the right-hand column of the appropriate row. The row pairings and corresponding values appear in a new window. Individual owners and database pairs can be examined by selecting the appropriate icon in the Inspect Now column.
To restore the Database Mapping table to its original settings, click Remap to Defaults. All settings revert to the original object mappings as determined by the job, based on the selected Mapping options.
Customize the Data Source Mapping ProcessYou can manually configure the way Change Manager maps data source elements and then run the process again. The automatic mapping options are specified on the Options tab. You can re-run the mapping process by navigating back to the Mapping tab and clicking Refresh Database and Owners once this task is completed.
To configure the automatic mapping process:1 Navigate to the Options tab and select or deselect the check boxes in the Mapping Options section, as needed:
• Ignore Case: Pairs data source objects without regards to case. For example, the table “Product_Prices” is paired with the table “product_prices”.
• Ignore Spaces: Pairs data source objects and ignores extraneous spaces in object names. For example, the table “Product Prices” is paired with the table “ProductPrices”.
• Ignore Underscores: Pairs data source objects and ignores underscores in job names. For example, the table “Product_Prices” is paired with the table “Product Prices”.
EMBARCADERO TECHNOLOGIES > EMBARCADERO® CHANGE MANAGER™ 5.1 USER GUIDE 51
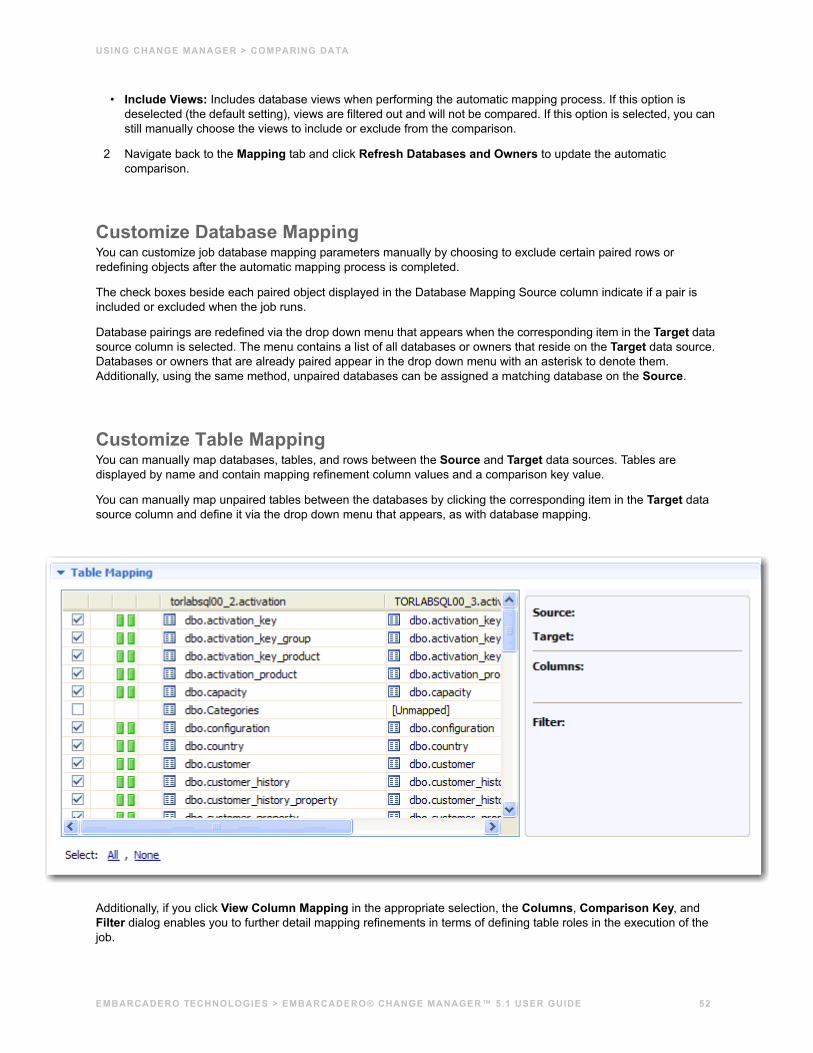
USING CHANGE MANAGER > COMPARING DATA
• Include Views: Includes database views when performing the automatic mapping process. If this option is deselected (the default setting), views are filtered out and will not be compared. If this option is selected, you can still manually choose the views to include or exclude from the comparison.
2 Navigate back to the Mapping tab and click Refresh Databases and Owners to update the automatic comparison.
Customize Database MappingYou can customize job database mapping parameters manually by choosing to exclude certain paired rows or redefining objects after the automatic mapping process is completed.
The check boxes beside each paired object displayed in the Database Mapping Source column indicate if a pair is included or excluded when the job runs.
Database pairings are redefined via the drop down menu that appears when the corresponding item in the Target data source column is selected. The menu contains a list of all databases or owners that reside on the Target data source. Databases or owners that are already paired appear in the drop down menu with an asterisk to denote them. Additionally, using the same method, unpaired databases can be assigned a matching database on the Source.
Customize Table MappingYou can manually map databases, tables, and rows between the Source and Target data sources. Tables are displayed by name and contain mapping refinement column values and a comparison key value.
You can manually map unpaired tables between the databases by clicking the corresponding item in the Target data source column and define it via the drop down menu that appears, as with database mapping.
Additionally, if you click View Column Mapping in the appropriate selection, the Columns, Comparison Key, and Filter dialog enables you to further detail mapping refinements in terms of defining table roles in the execution of the job.
EMBARCADERO TECHNOLOGIES > EMBARCADERO® CHANGE MANAGER™ 5.1 USER GUIDE 52
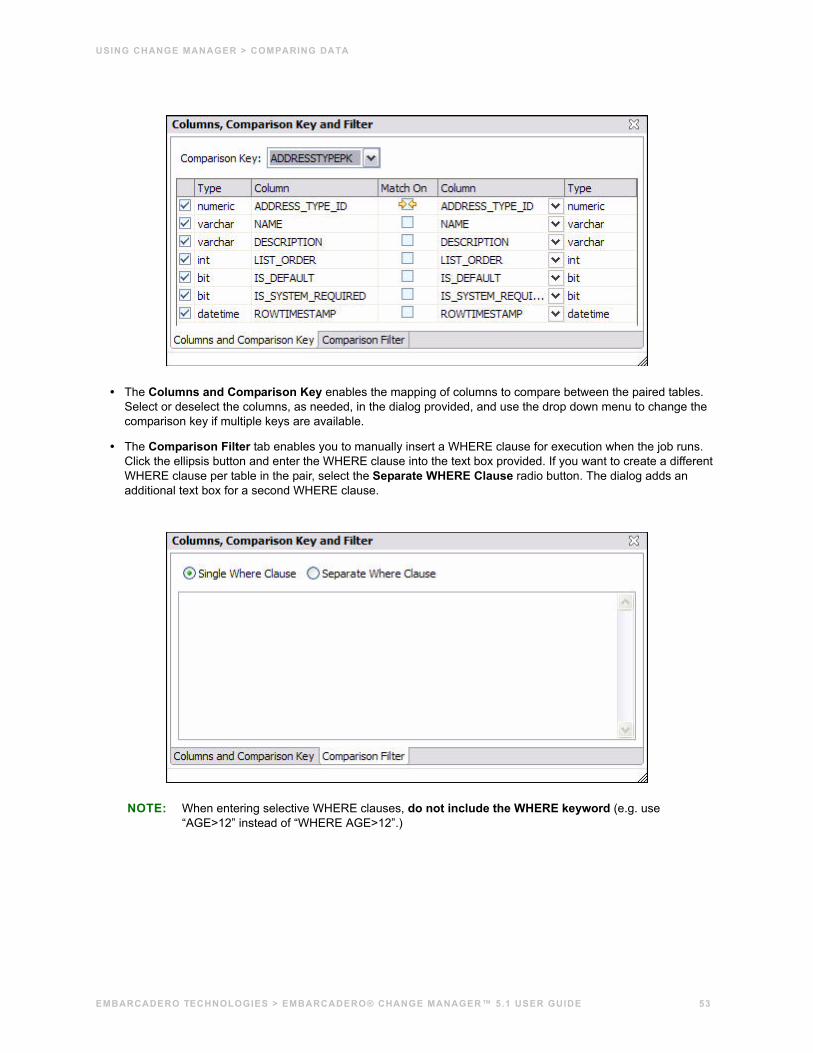
USING CHANGE MANAGER > COMPARING DATA
• The Columns and Comparison Key enables the mapping of columns to compare between the paired tables. Select or deselect the columns, as needed, in the dialog provided, and use the drop down menu to change the comparison key if multiple keys are available.
• The Comparison Filter tab enables you to manually insert a WHERE clause for execution when the job runs. Click the ellipsis button and enter the WHERE clause into the text box provided. If you want to create a different WHERE clause per table in the pair, select the Separate WHERE Clause radio button. The dialog adds an additional text box for a second WHERE clause.
NOTE: When entering selective WHERE clauses, do not include the WHERE keyword (e.g. use “AGE>12” instead of “WHERE AGE>12”.)
EMBARCADERO TECHNOLOGIES > EMBARCADERO® CHANGE MANAGER™ 5.1 USER GUIDE 53
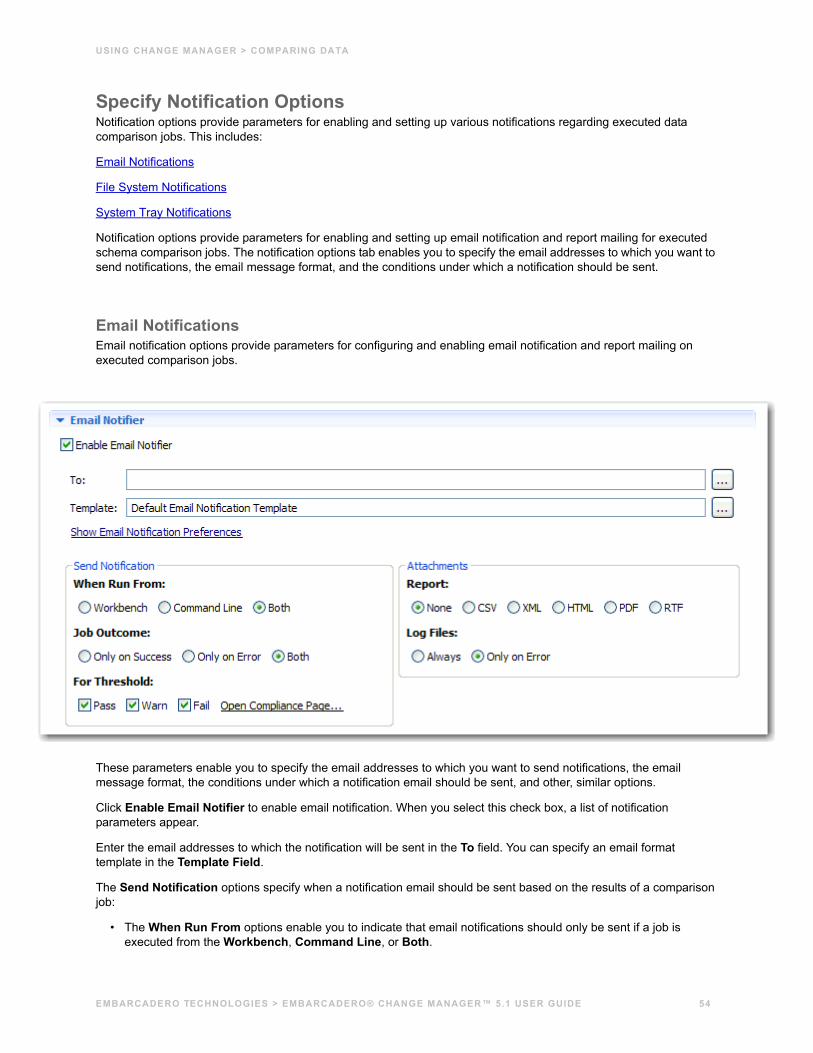
USING CHANGE MANAGER > COMPARING DATA
Specify Notification OptionsNotification options provide parameters for enabling and setting up various notifications regarding executed data comparison jobs. This includes:
Email Notifications
File System Notifications
System Tray Notifications
Notification options provide parameters for enabling and setting up email notification and report mailing for executed schema comparison jobs. The notification options tab enables you to specify the email addresses to which you want to send notifications, the email message format, and the conditions under which a notification should be sent.
Email NotificationsEmail notification options provide parameters for configuring and enabling email notification and report mailing on executed comparison jobs.
These parameters enable you to specify the email addresses to which you want to send notifications, the email message format, the conditions under which a notification email should be sent, and other, similar options.
Click Enable Email Notifier to enable email notification. When you select this check box, a list of notification parameters appear.
Enter the email addresses to which the notification will be sent in the To field. You can specify an email format template in the Template Field.
The Send Notification options specify when a notification email should be sent based on the results of a comparison job:
• The When Run From options enable you to indicate that email notifications should only be sent if a job is executed from the Workbench, Command Line, or Both.
EMBARCADERO TECHNOLOGIES > EMBARCADERO® CHANGE MANAGER™ 5.1 USER GUIDE 54

USING CHANGE MANAGER > COMPARING DATA
• The Job Outcome options enable you to indicate that email notifications should be sent Only on Success, Only on Error, or Both.
• The For Threshold options enable you to specify the threshold level for which email notifications are sent, based on job results. Choose Pass, Warn, or Fail. You can also click Open Compliance Page to specify the percentage value of each of the threshold warning levels. These values are based on the percent match results of a given comparison job.
The Attachments section enables you to specify the file format of an attached report that will display job results with the notification email. Choose None (does not attach a report), CSV, XML, HTML, PDF, or RTF to specify the file format of the report. The Log Files indicates when to log the notification file results to the Change Manager log file. You can choose Always or Only on Error.
File System NotificationsFile system notification options provide parameters for configuring and enabling logging options for executed comparison jobs.
Click Enable File System Notifier to enable comparison job logging. When you select this check box, a list of notification parameters appear.
Specify the directory location of each of the output files that are produced by the notification function in the Report Directory, Log Directory, and Script Directory, respectively. Additionally, you can click the Show File System Notification Preferences link if you want to change the directory locations at the application level rather than just the job level.
The Send Notification options specify when job results are output to the specified file directories:
• The When Run From options enable you to indicate that results should only be sent to file if a job is executed from the Workbench, Command Line, or Both.
EMBARCADERO TECHNOLOGIES > EMBARCADERO® CHANGE MANAGER™ 5.1 USER GUIDE 55

USING CHANGE MANAGER > COMPARING DATA
• The Job Outcome options enable you to indicate that results should be sent to file Only on Success, Only on Error, or Both.
• The For Threshold options enable you to specify the threshold level for which results are sent to file, based on job results. Choose Pass, Warn, or Fail. You can also click Open Compliance Page to specify the percentage value of each of the threshold warning levels. These values are based on the percent match results of a given comparison job.
The Attachments section enables you to specify the file format of the output results. Choose None (does not produce a file), CSV, XML, HTML, PDF, or RTF to specify the file format. The Log FIles indicates when to log the notification file results to the Change Manager log file. You can choose Always or Only on Error.
System Tray NotificationsSystem Tray notification parameters enable pop-up window notifications on your Desktop when Change Manager is minimized, but running jobs.
Click Enable System Tray Notifier to enable system tray notifications. When you select this check box, a list of notification parameters appear.
Click Show System Tray Notifications to specify global parameters with regards to the appearance and behavior of the specific pop-up windows.
The Send Notification options specify when a pop-up notification will appear.
• The When Run From options enable you to indicate that a pop-up notification should only appear if a job is executed from the Workbench, Command Line, or Both.
• The Job Outcome options enable you to indicate that a pop-up notification should appear Only on Success, Only on Error, or Both.
EMBARCADERO TECHNOLOGIES > EMBARCADERO® CHANGE MANAGER™ 5.1 USER GUIDE 56
USING CHANGE MANAGER > COMPARING DATA
• The For Threshold options enable you to specify the threshold level for which a pop-up notification will appear, based on job results. Choose Pass, Warn, or Fail. You can also click Open Compliance Page to specify the percentage value of each of the threshold warning levels. These values are based on the percent match results of a given comparison job.
NOTE: The Attachments section enables you to specify the file format of a report that can be accessed via the pop-up notification. Choose None (does not produce a file), CSV, XML, HTML, PDF, or RTF to specify the file format of the report. The Log FIles indicates when to log the notification to the Change Manager log file. You can choose Always or Only on Error.
EMBARCADERO TECHNOLOGIES > EMBARCADERO® CHANGE MANAGER™ 5.1 USER GUIDE 57
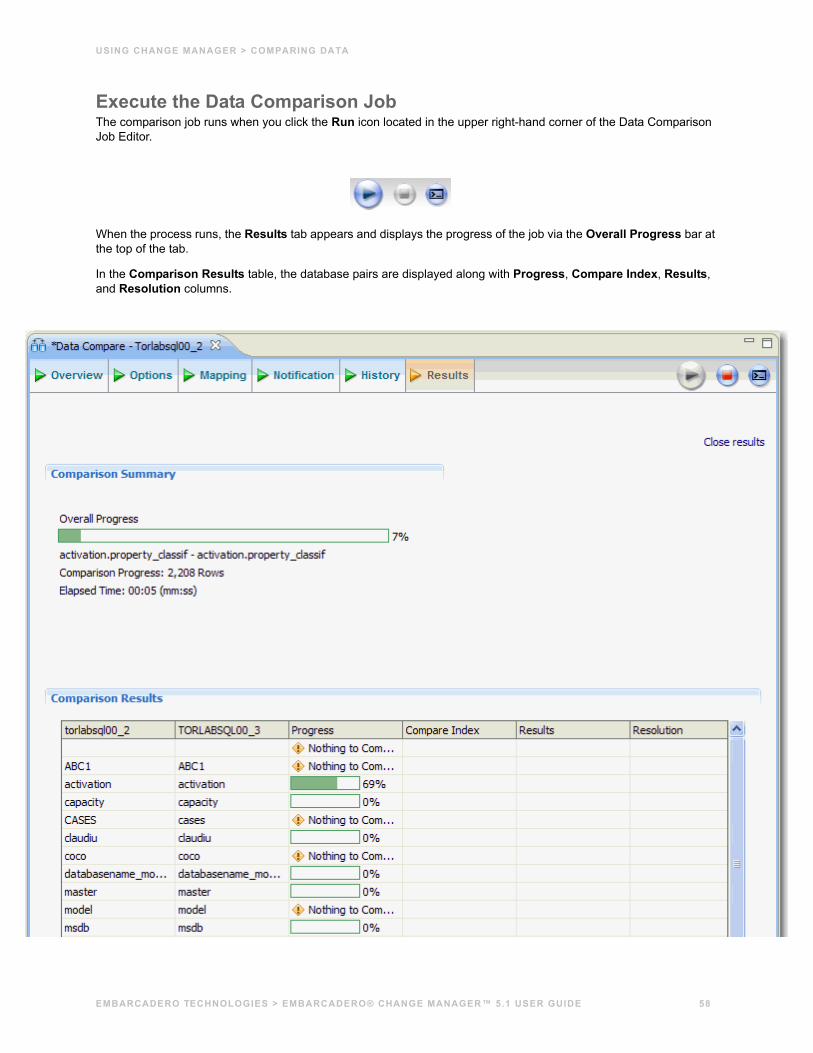
USING CHANGE MANAGER > COMPARING DATA
Execute the Data Comparison JobThe comparison job runs when you click the Run icon located in the upper right-hand corner of the Data Comparison Job Editor.
When the process runs, the Results tab appears and displays the progress of the job via the Overall Progress bar at the top of the tab.
In the Comparison Results table, the database pairs are displayed along with Progress, Compare Index, Results, and Resolution columns.
EMBARCADERO TECHNOLOGIES > EMBARCADERO® CHANGE MANAGER™ 5.1 USER GUIDE 58
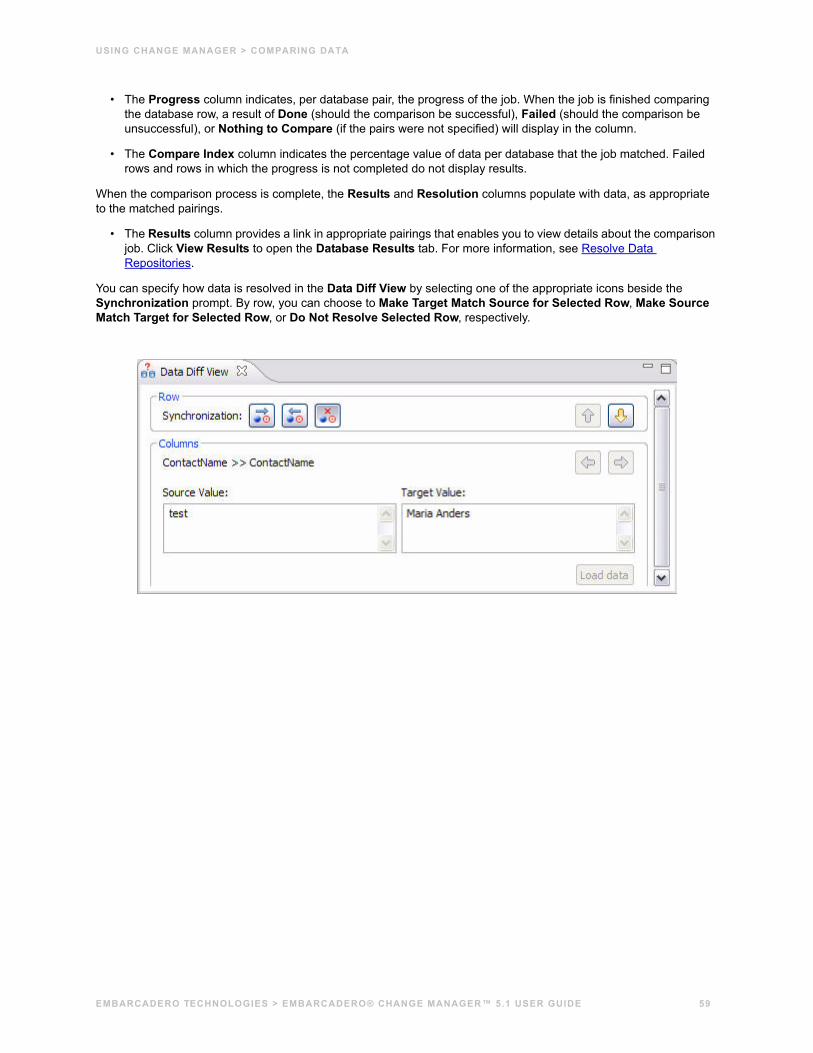
USING CHANGE MANAGER > COMPARING DATA
• The Progress column indicates, per database pair, the progress of the job. When the job is finished comparing the database row, a result of Done (should the comparison be successful), Failed (should the comparison be unsuccessful), or Nothing to Compare (if the pairs were not specified) will display in the column.
• The Compare Index column indicates the percentage value of data per database that the job matched. Failed rows and rows in which the progress is not completed do not display results.
When the comparison process is complete, the Results and Resolution columns populate with data, as appropriate to the matched pairings.
• The Results column provides a link in appropriate pairings that enables you to view details about the comparison job. Click View Results to open the Database Results tab. For more information, see Resolve Data Repositories.
You can specify how data is resolved in the Data Diff View by selecting one of the appropriate icons beside the Synchronization prompt. By row, you can choose to Make Target Match Source for Selected Row, Make Source Match Target for Selected Row, or Do Not Resolve Selected Row, respectively.
EMBARCADERO TECHNOLOGIES > EMBARCADERO® CHANGE MANAGER™ 5.1 USER GUIDE 59
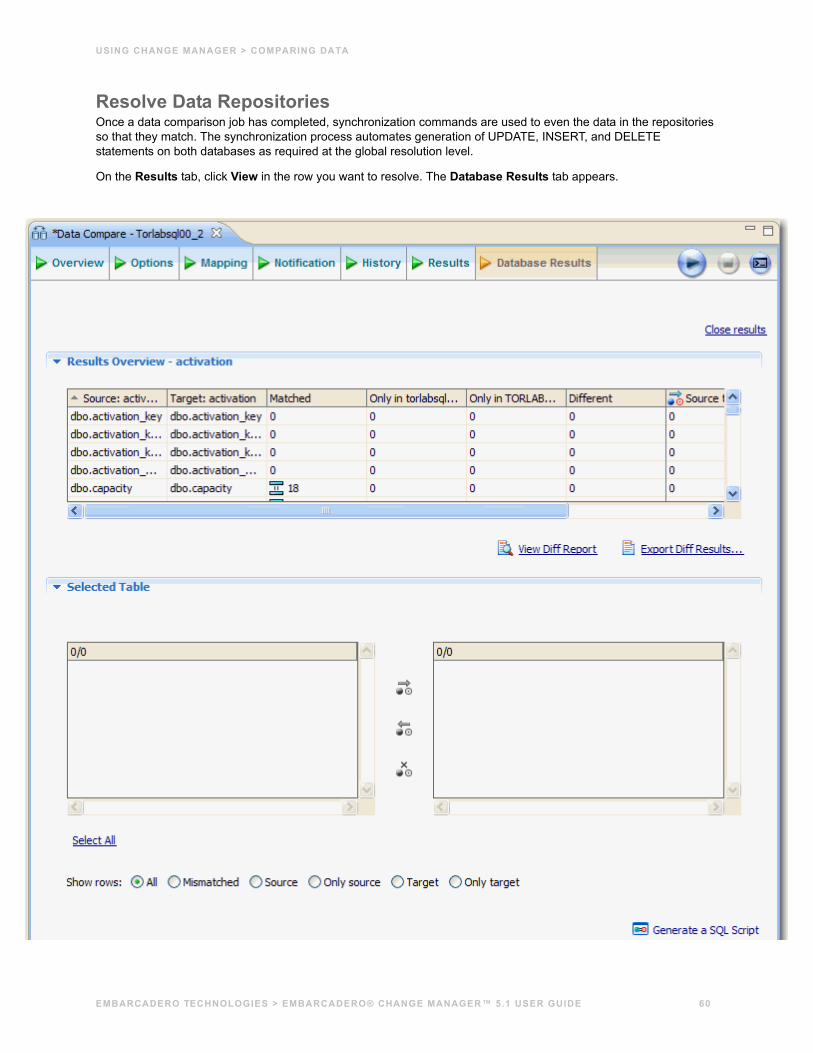
USING CHANGE MANAGER > COMPARING DATA
Resolve Data RepositoriesOnce a data comparison job has completed, synchronization commands are used to even the data in the repositories so that they match. The synchronization process automates generation of UPDATE, INSERT, and DELETE statements on both databases as required at the global resolution level.
On the Results tab, click View in the row you want to resolve. The Database Results tab appears.
EMBARCADERO TECHNOLOGIES > EMBARCADERO® CHANGE MANAGER™ 5.1 USER GUIDE 60
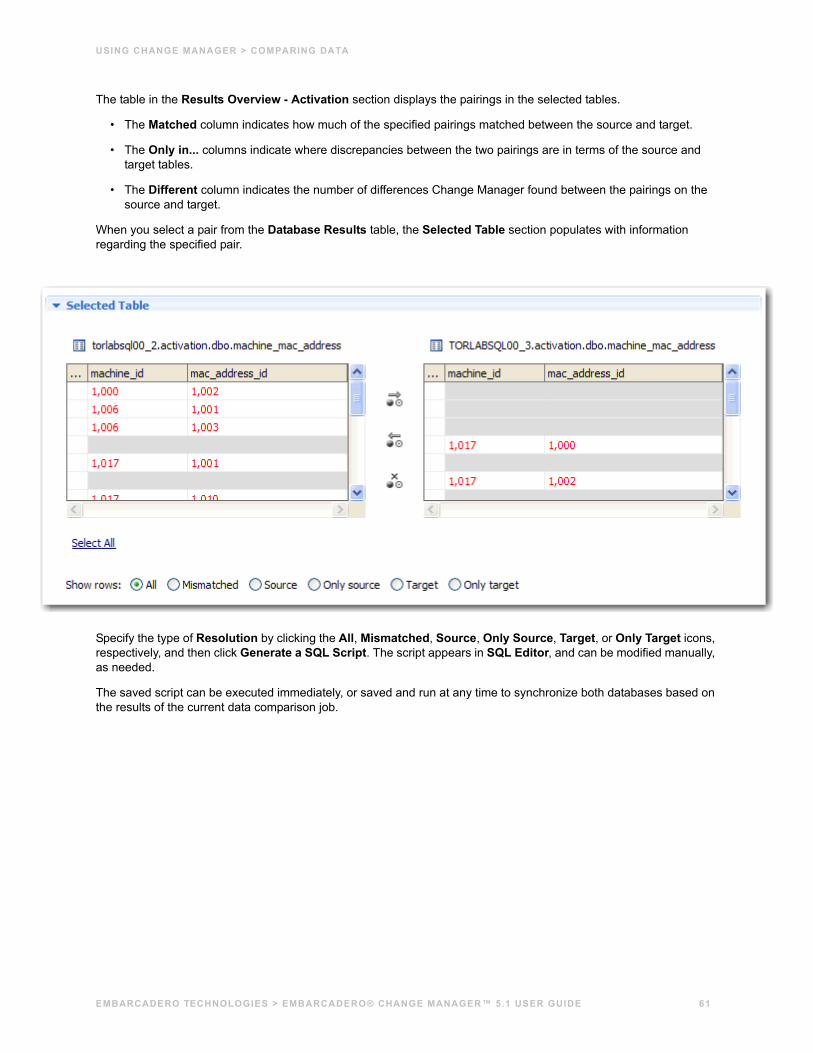
USING CHANGE MANAGER > COMPARING DATA
The table in the Results Overview - Activation section displays the pairings in the selected tables.
• The Matched column indicates how much of the specified pairings matched between the source and target.
• The Only in... columns indicate where discrepancies between the two pairings are in terms of the source and target tables.
• The Different column indicates the number of differences Change Manager found between the pairings on the source and target.
When you select a pair from the Database Results table, the Selected Table section populates with information regarding the specified pair.
Specify the type of Resolution by clicking the All, Mismatched, Source, Only Source, Target, or Only Target icons, respectively, and then click Generate a SQL Script. The script appears in SQL Editor, and can be modified manually, as needed.
The saved script can be executed immediately, or saved and run at any time to synchronize both databases based on the results of the current data comparison job.
EMBARCADERO TECHNOLOGIES > EMBARCADERO® CHANGE MANAGER™ 5.1 USER GUIDE 61
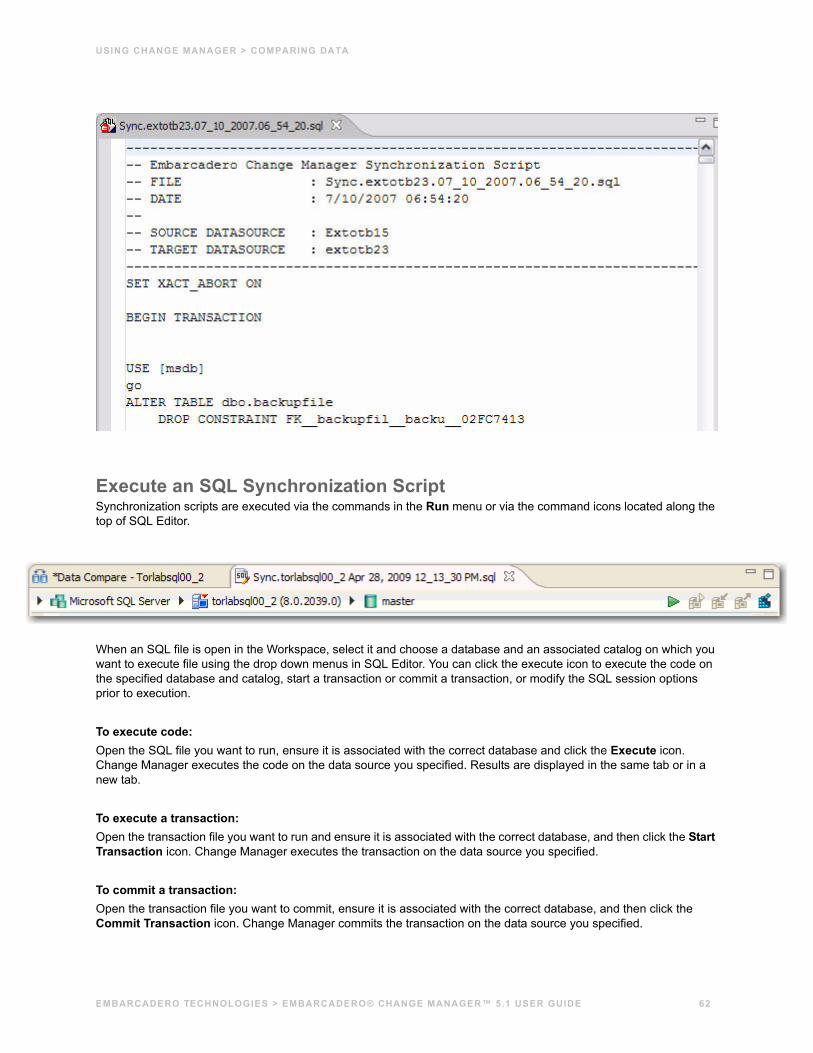
USING CHANGE MANAGER > COMPARING DATA
Execute an SQL Synchronization ScriptSynchronization scripts are executed via the commands in the Run menu or via the command icons located along the top of SQL Editor.
When an SQL file is open in the Workspace, select it and choose a database and an associated catalog on which you want to execute file using the drop down menus in SQL Editor. You can click the execute icon to execute the code on the specified database and catalog, start a transaction or commit a transaction, or modify the SQL session options prior to execution.
To execute code:Open the SQL file you want to run, ensure it is associated with the correct database and click the Execute icon. Change Manager executes the code on the data source you specified. Results are displayed in the same tab or in a new tab.
To execute a transaction:Open the transaction file you want to run and ensure it is associated with the correct database, and then click the Start Transaction icon. Change Manager executes the transaction on the data source you specified.
To commit a transaction:Open the transaction file you want to commit, ensure it is associated with the correct database, and then click the Commit Transaction icon. Change Manager commits the transaction on the data source you specified.
EMBARCADERO TECHNOLOGIES > EMBARCADERO® CHANGE MANAGER™ 5.1 USER GUIDE 62
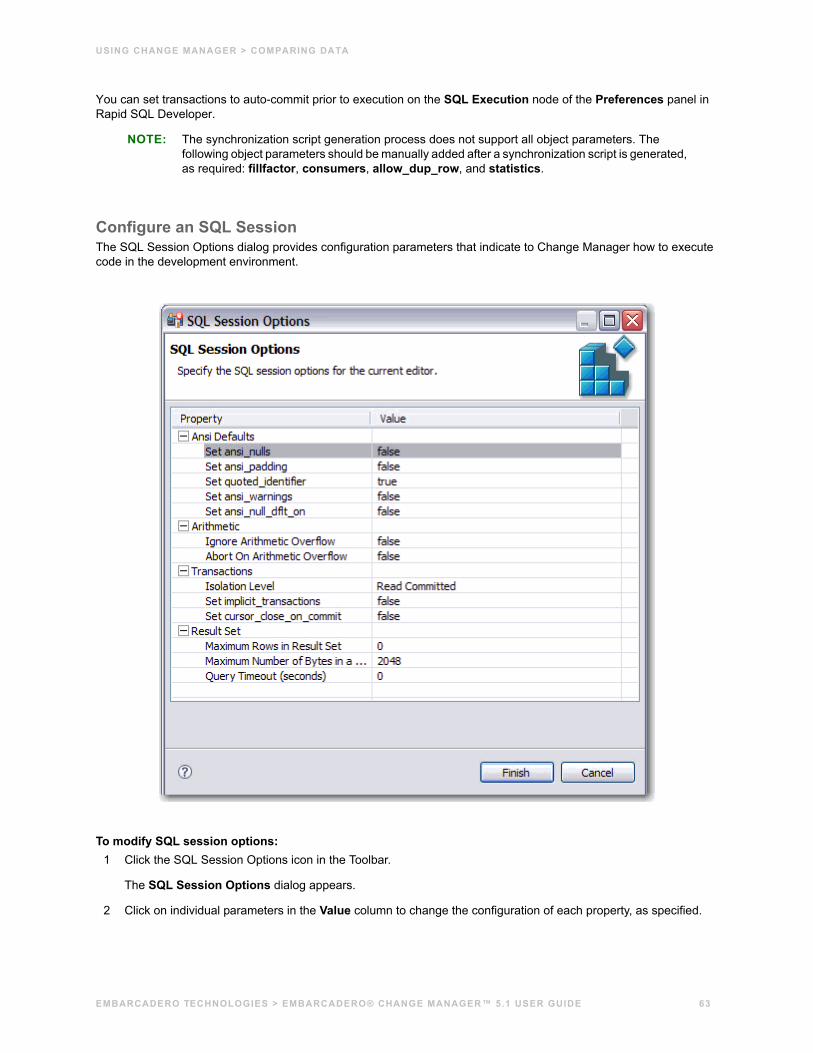
USING CHANGE MANAGER > COMPARING DATA
You can set transactions to auto-commit prior to execution on the SQL Execution node of the Preferences panel in Rapid SQL Developer.
NOTE: The synchronization script generation process does not support all object parameters. The following object parameters should be manually added after a synchronization script is generated, as required: fillfactor, consumers, allow_dup_row, and statistics.
Configure an SQL SessionThe SQL Session Options dialog provides configuration parameters that indicate to Change Manager how to execute code in the development environment.
To modify SQL session options:1 Click the SQL Session Options icon in the Toolbar.
The SQL Session Options dialog appears.
2 Click on individual parameters in the Value column to change the configuration of each property, as specified.
EMBARCADERO TECHNOLOGIES > EMBARCADERO® CHANGE MANAGER™ 5.1 USER GUIDE 63
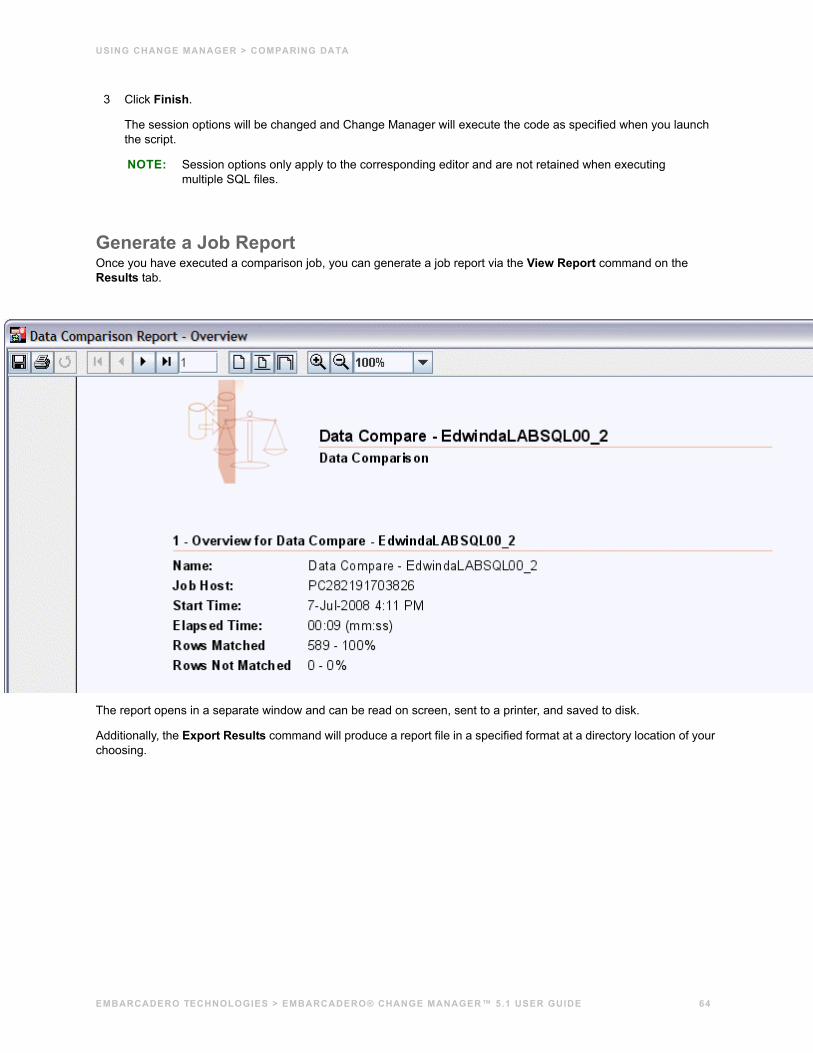
USING CHANGE MANAGER > COMPARING DATA
3 Click Finish.
The session options will be changed and Change Manager will execute the code as specified when you launch the script.
NOTE: Session options only apply to the corresponding editor and are not retained when executing multiple SQL files.
Generate a Job ReportOnce you have executed a comparison job, you can generate a job report via the View Report command on the Results tab.
The report opens in a separate window and can be read on screen, sent to a printer, and saved to disk.
Additionally, the Export Results command will produce a report file in a specified format at a directory location of your choosing.
EMBARCADERO TECHNOLOGIES > EMBARCADERO® CHANGE MANAGER™ 5.1 USER GUIDE 64
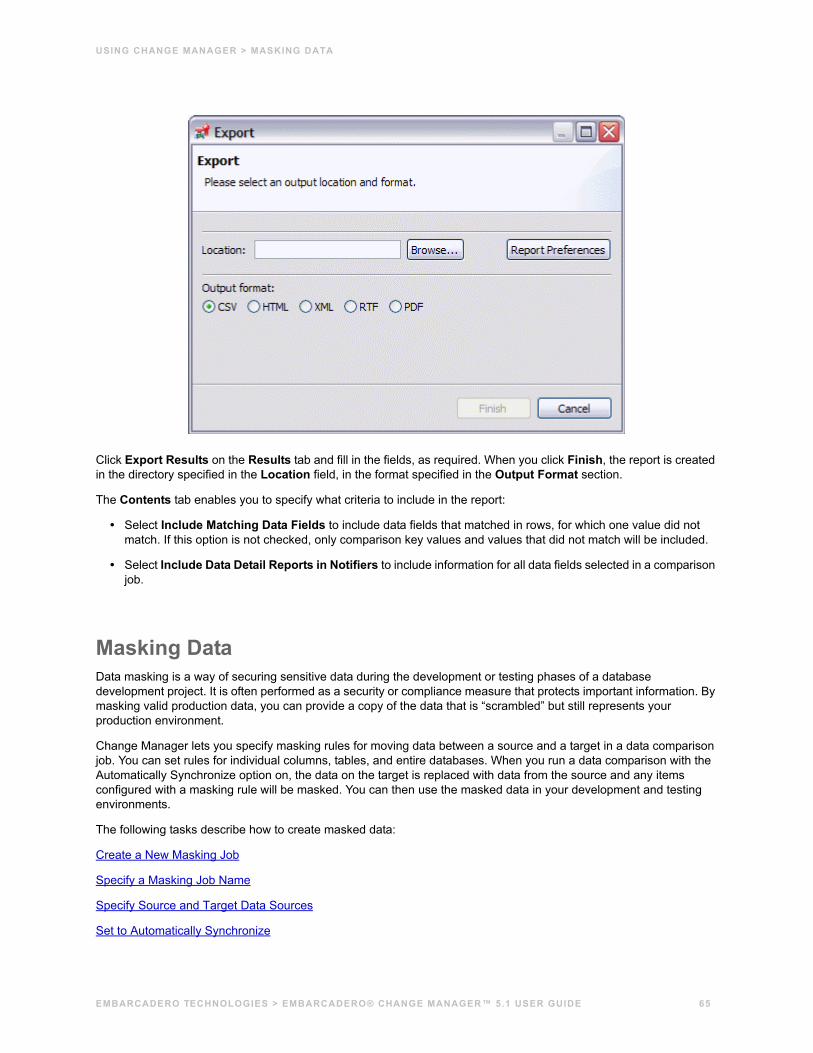
USING CHANGE MANAGER > MASKING DATA
Click Export Results on the Results tab and fill in the fields, as required. When you click Finish, the report is created in the directory specified in the Location field, in the format specified in the Output Format section.
The Contents tab enables you to specify what criteria to include in the report:
• Select Include Matching Data Fields to include data fields that matched in rows, for which one value did not match. If this option is not checked, only comparison key values and values that did not match will be included.
• Select Include Data Detail Reports in Notifiers to include information for all data fields selected in a comparison job.
Masking DataData masking is a way of securing sensitive data during the development or testing phases of a database development project. It is often performed as a security or compliance measure that protects important information. By masking valid production data, you can provide a copy of the data that is “scrambled” but still represents your production environment.
Change Manager lets you specify masking rules for moving data between a source and a target in a data comparison job. You can set rules for individual columns, tables, and entire databases. When you run a data comparison with the Automatically Synchronize option on, the data on the target is replaced with data from the source and any items configured with a masking rule will be masked. You can then use the masked data in your development and testing environments.
The following tasks describe how to create masked data:
Create a New Masking Job
Specify a Masking Job Name
Specify Source and Target Data Sources
Set to Automatically Synchronize
EMBARCADERO TECHNOLOGIES > EMBARCADERO® CHANGE MANAGER™ 5.1 USER GUIDE 65
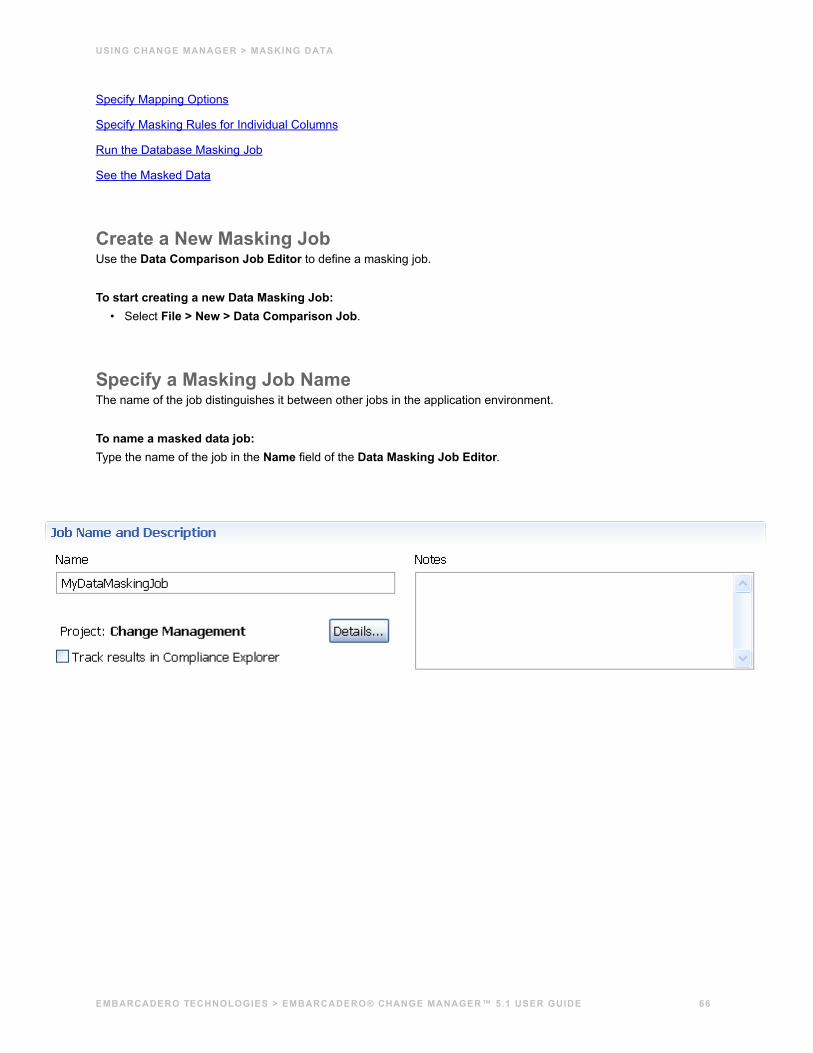
USING CHANGE MANAGER > MASKING DATA
Specify Mapping Options
Specify Masking Rules for Individual Columns
Run the Database Masking Job
See the Masked Data
Create a New Masking JobUse the Data Comparison Job Editor to define a masking job.
To start creating a new Data Masking Job:• Select File > New > Data Comparison Job.
Specify a Masking Job NameThe name of the job distinguishes it between other jobs in the application environment.
To name a masked data job:Type the name of the job in the Name field of the Data Masking Job Editor.
EMBARCADERO TECHNOLOGIES > EMBARCADERO® CHANGE MANAGER™ 5.1 USER GUIDE 66
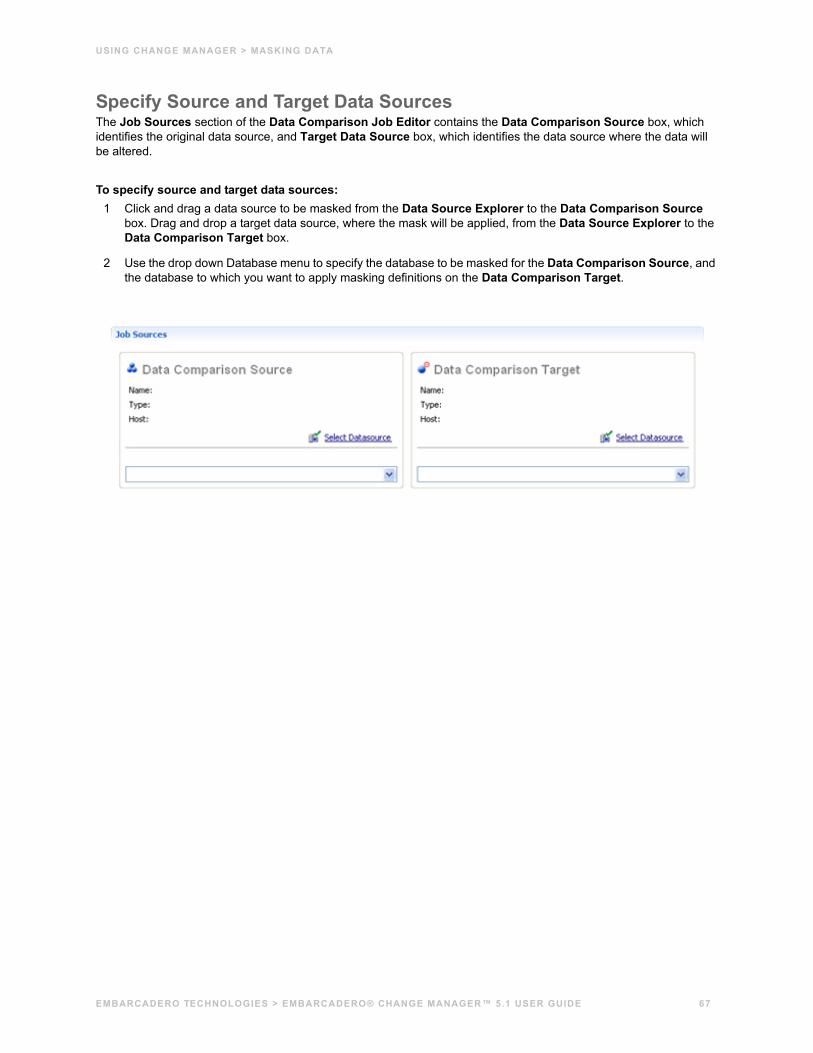
USING CHANGE MANAGER > MASKING DATA
Specify Source and Target Data SourcesThe Job Sources section of the Data Comparison Job Editor contains the Data Comparison Source box, which identifies the original data source, and Target Data Source box, which identifies the data source where the data will be altered.
To specify source and target data sources:1 Click and drag a data source to be masked from the Data Source Explorer to the Data Comparison Source
box. Drag and drop a target data source, where the mask will be applied, from the Data Source Explorer to the Data Comparison Target box.
2 Use the drop down Database menu to specify the database to be masked for the Data Comparison Source, and the database to which you want to apply masking definitions on the Data Comparison Target.
EMBARCADERO TECHNOLOGIES > EMBARCADERO® CHANGE MANAGER™ 5.1 USER GUIDE 67
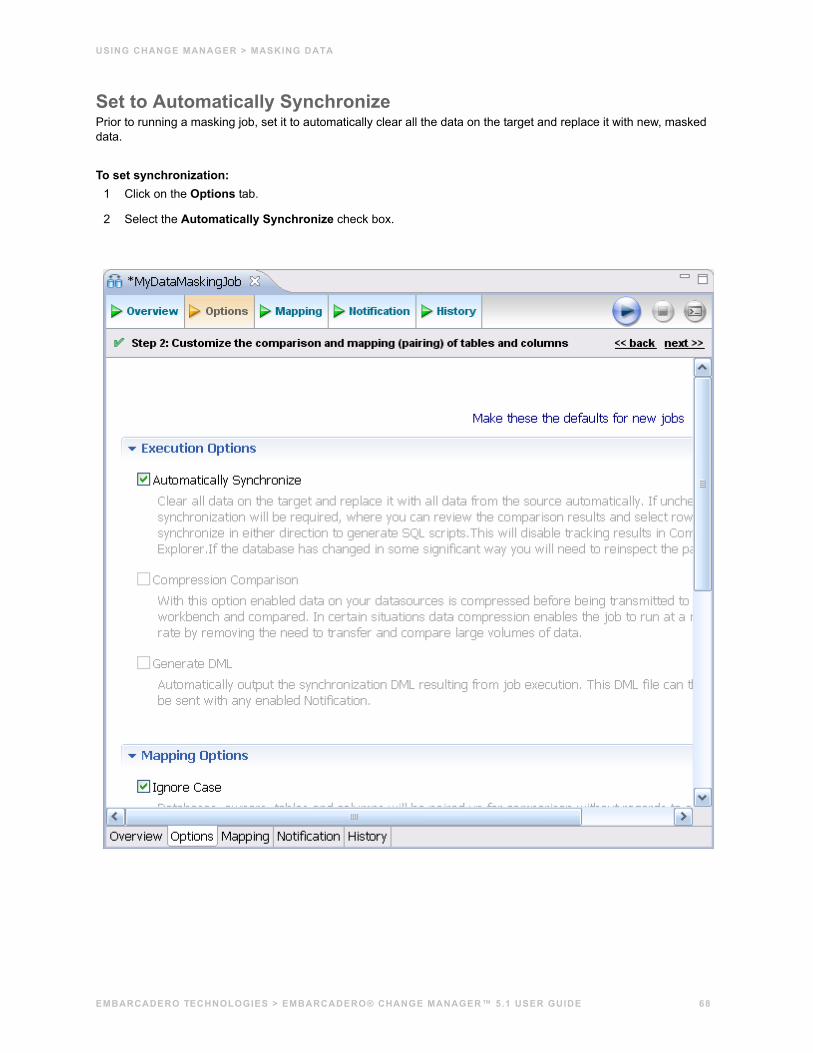
USING CHANGE MANAGER > MASKING DATA
Set to Automatically SynchronizePrior to running a masking job, set it to automatically clear all the data on the target and replace it with new, masked data.
To set synchronization:1 Click on the Options tab.
2 Select the Automatically Synchronize check box.
EMBARCADERO TECHNOLOGIES > EMBARCADERO® CHANGE MANAGER™ 5.1 USER GUIDE 68
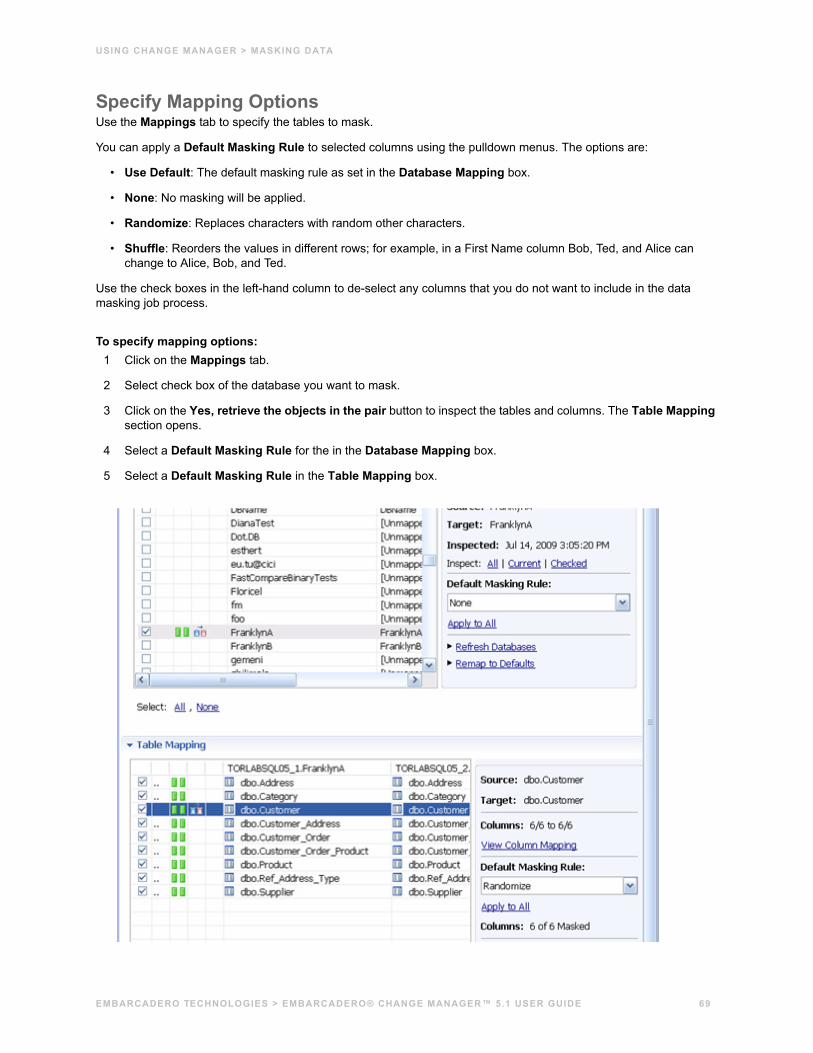
USING CHANGE MANAGER > MASKING DATA
Specify Mapping OptionsUse the Mappings tab to specify the tables to mask.
You can apply a Default Masking Rule to selected columns using the pulldown menus. The options are:
• Use Default: The default masking rule as set in the Database Mapping box.
• None: No masking will be applied.
• Randomize: Replaces characters with random other characters.
• Shuffle: Reorders the values in different rows; for example, in a First Name column Bob, Ted, and Alice can change to Alice, Bob, and Ted.
Use the check boxes in the left-hand column to de-select any columns that you do not want to include in the data masking job process.
To specify mapping options:1 Click on the Mappings tab.
2 Select check box of the database you want to mask.
3 Click on the Yes, retrieve the objects in the pair button to inspect the tables and columns. The Table Mapping section opens.
4 Select a Default Masking Rule for the in the Database Mapping box.
5 Select a Default Masking Rule in the Table Mapping box.
EMBARCADERO TECHNOLOGIES > EMBARCADERO® CHANGE MANAGER™ 5.1 USER GUIDE 69
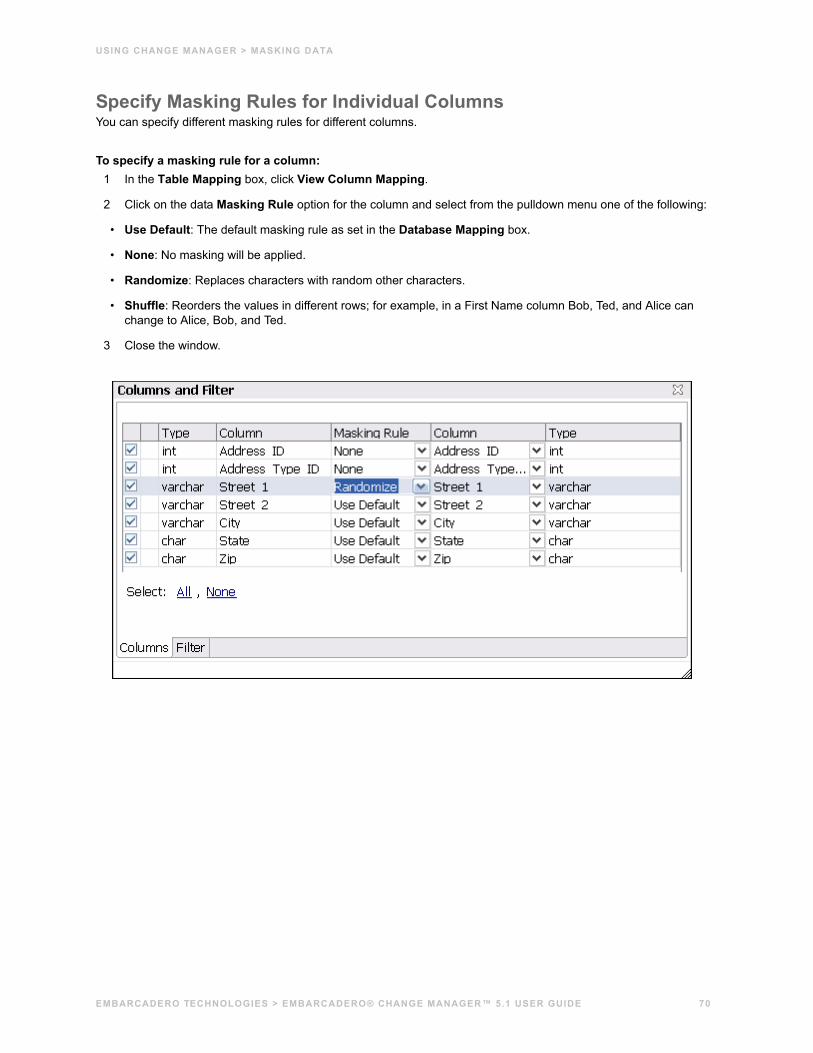
USING CHANGE MANAGER > MASKING DATA
Specify Masking Rules for Individual ColumnsYou can specify different masking rules for different columns.
To specify a masking rule for a column:1 In the Table Mapping box, click View Column Mapping.
2 Click on the data Masking Rule option for the column and select from the pulldown menu one of the following:
• Use Default: The default masking rule as set in the Database Mapping box.
• None: No masking will be applied.
• Randomize: Replaces characters with random other characters.
• Shuffle: Reorders the values in different rows; for example, in a First Name column Bob, Ted, and Alice can change to Alice, Bob, and Ted.
3 Close the window.
EMBARCADERO TECHNOLOGIES > EMBARCADERO® CHANGE MANAGER™ 5.1 USER GUIDE 70
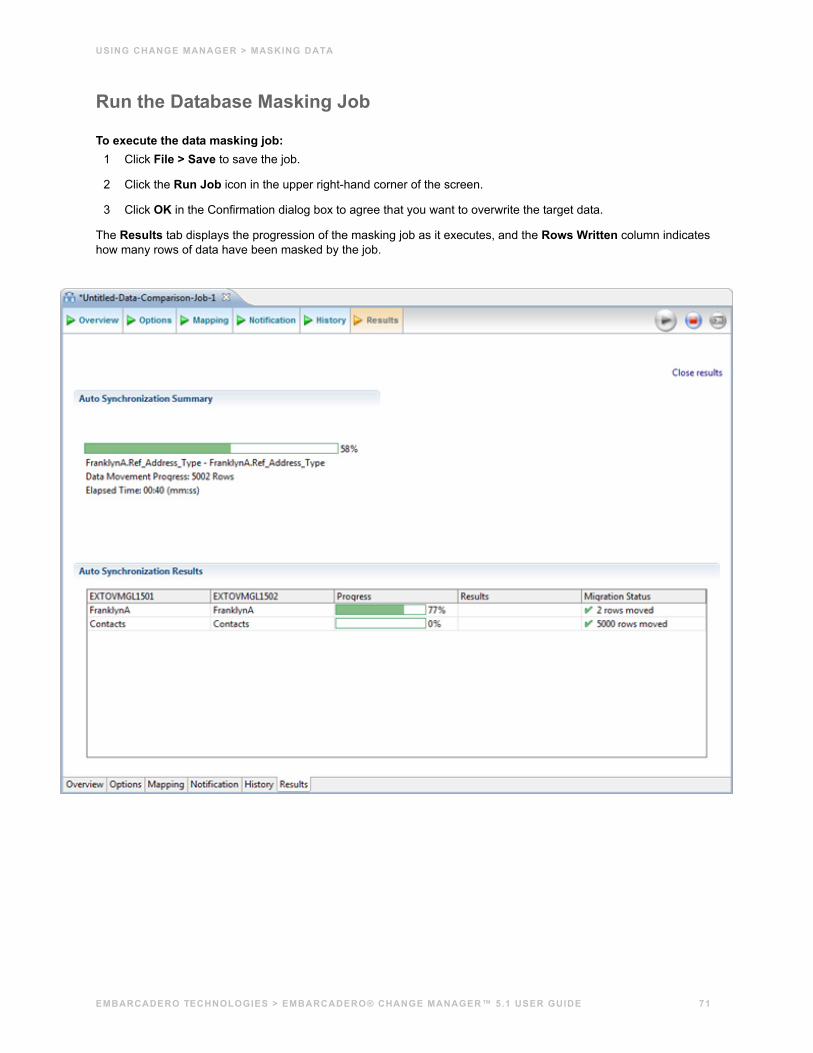
USING CHANGE MANAGER > MASKING DATA
Run the Database Masking Job
To execute the data masking job:1 Click File > Save to save the job.
2 Click the Run Job icon in the upper right-hand corner of the screen.
3 Click OK in the Confirmation dialog box to agree that you want to overwrite the target data.
The Results tab displays the progression of the masking job as it executes, and the Rows Written column indicates how many rows of data have been masked by the job.
EMBARCADERO TECHNOLOGIES > EMBARCADERO® CHANGE MANAGER™ 5.1 USER GUIDE 71
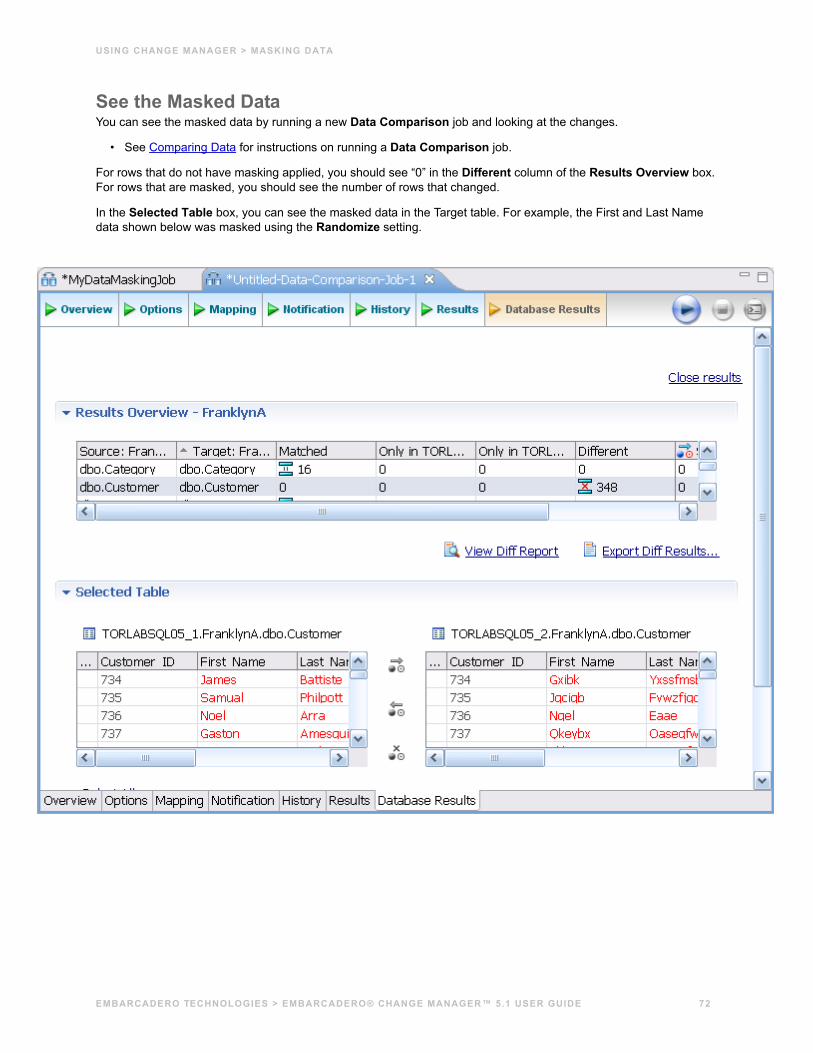
USING CHANGE MANAGER > MASKING DATA
See the Masked DataYou can see the masked data by running a new Data Comparison job and looking at the changes.
• See Comparing Data for instructions on running a Data Comparison job.
For rows that do not have masking applied, you should see “0” in the Different column of the Results Overview box. For rows that are masked, you should see the number of rows that changed.
In the Selected Table box, you can see the masked data in the Target table. For example, the First and Last Name data shown below was masked using the Randomize setting.
EMBARCADERO TECHNOLOGIES > EMBARCADERO® CHANGE MANAGER™ 5.1 USER GUIDE 72
USING CHANGE MANAGER > COMPARING CONFIGURATIONS
Comparing ConfigurationsConfiguration comparison jobs enable you to compare the configuration settings between two registered data sources. They are used to ensure consistency between the settings of two data sources in order to meet guidelines regarding the storage and retention of data.
Comparison job results are viewed as an overall “percentage matched” between two data sources. Comparison jobs also provides a list of individual configuration properties and other, more granular details regarding both data source’s configuration settings. Additionally, the job determines the total properties matched, total properties that do not match, the properties available on only one data source, and the overall total properties compared in the job.
The following tasks provide a high-level overview of the configuration comparison job process:
Create a New Configuration Comparison Job
Specify a Comparison Job Name
Specify Source and Target Data Sources
Specify Job Options
Refine Property Comparisons
Execute Comparison Job
View Results
Execute an SQL Synchronization Script
Generate a Job Report
In addition to comparing two registered data sources, you can create a Standard -- a configuration comparison object that contains a customized list of configuration parameters, values, and comparison operators, or an Archive -- the older, stored configuration properties of an existing registered data source. Archives and Standards can then be used in comparison jobs in the same manner as registered data sources.
Creating a Configuration Standard
Creating a Configuration Archive
Finally, all comparison jobs, archives, and standards provide version information with regards to each data source platform. Each version parameter and description is available via the link below.
Understanding Version Information
Create a New Configuration Comparison JobConfiguration comparison jobs are defined in the Configuration Comparison Job Editor.
To start a new comparison job:• Select File > New > Configuration Comparison Job in the Menu Bar.
The Configuration Comparison Job Editor opens.
You can now proceed to define the parameters of the new job.
EMBARCADERO TECHNOLOGIES > EMBARCADERO® CHANGE MANAGER™ 5.1 USER GUIDE 73
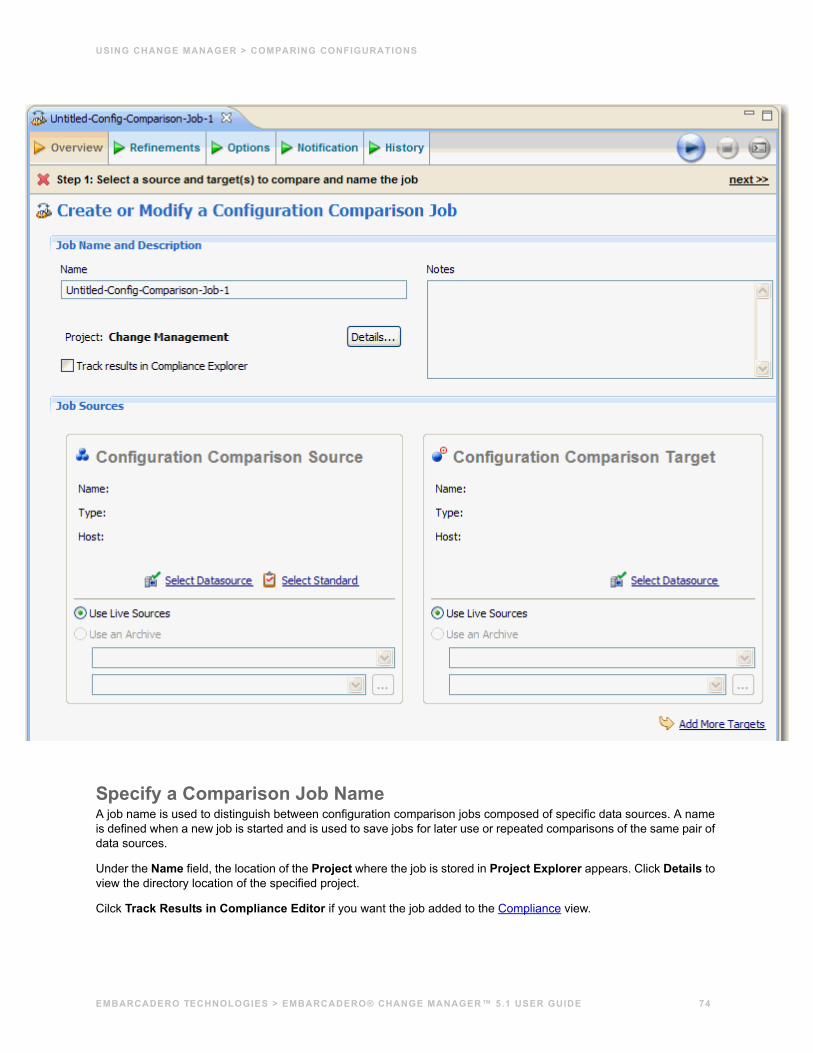
USING CHANGE MANAGER > COMPARING CONFIGURATIONS
Specify a Comparison Job NameA job name is used to distinguish between configuration comparison jobs composed of specific data sources. A name is defined when a new job is started and is used to save jobs for later use or repeated comparisons of the same pair of data sources.
Under the Name field, the location of the Project where the job is stored in Project Explorer appears. Click Details to view the directory location of the specified project.
Cilck Track Results in Compliance Editor if you want the job added to the Compliance view.
EMBARCADERO TECHNOLOGIES > EMBARCADERO® CHANGE MANAGER™ 5.1 USER GUIDE 74
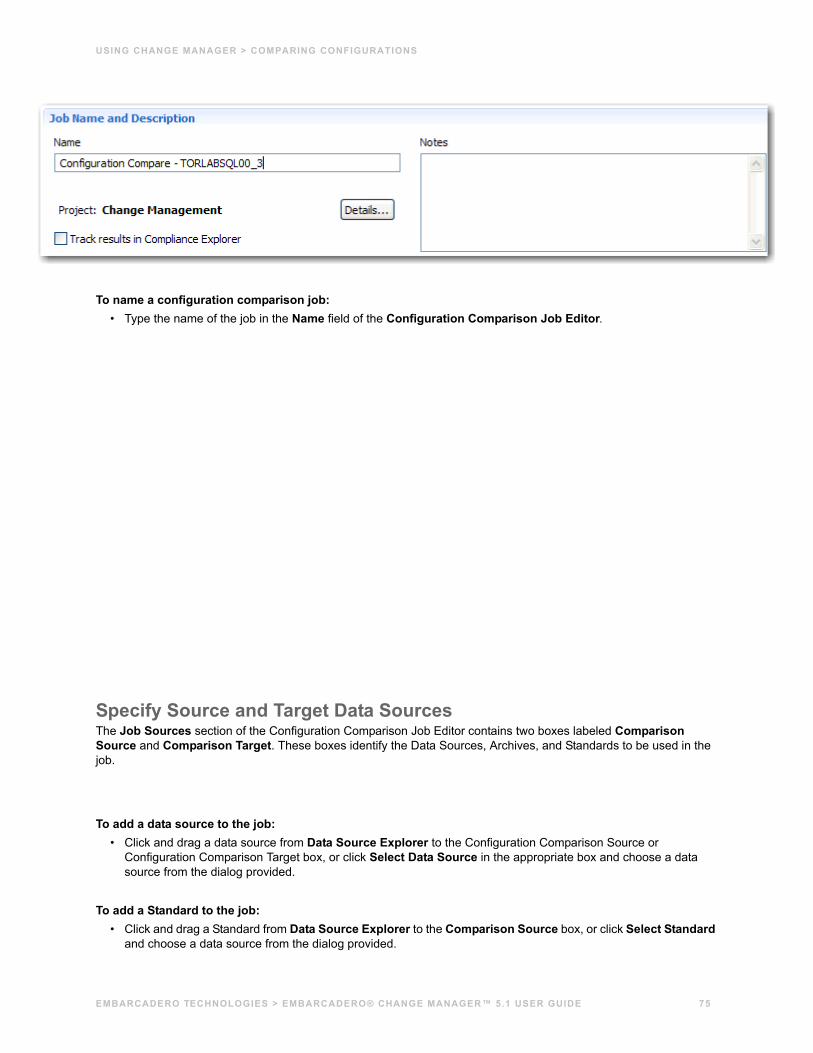
USING CHANGE MANAGER > COMPARING CONFIGURATIONS
To name a configuration comparison job:• Type the name of the job in the Name field of the Configuration Comparison Job Editor.
Specify Source and Target Data SourcesThe Job Sources section of the Configuration Comparison Job Editor contains two boxes labeled Comparison Source and Comparison Target. These boxes identify the Data Sources, Archives, and Standards to be used in the job.
To add a data source to the job:• Click and drag a data source from Data Source Explorer to the Configuration Comparison Source or
Configuration Comparison Target box, or click Select Data Source in the appropriate box and choose a data source from the dialog provided.
To add a Standard to the job:• Click and drag a Standard from Data Source Explorer to the Comparison Source box, or click Select Standard
and choose a data source from the dialog provided.
EMBARCADERO TECHNOLOGIES > EMBARCADERO® CHANGE MANAGER™ 5.1 USER GUIDE 75
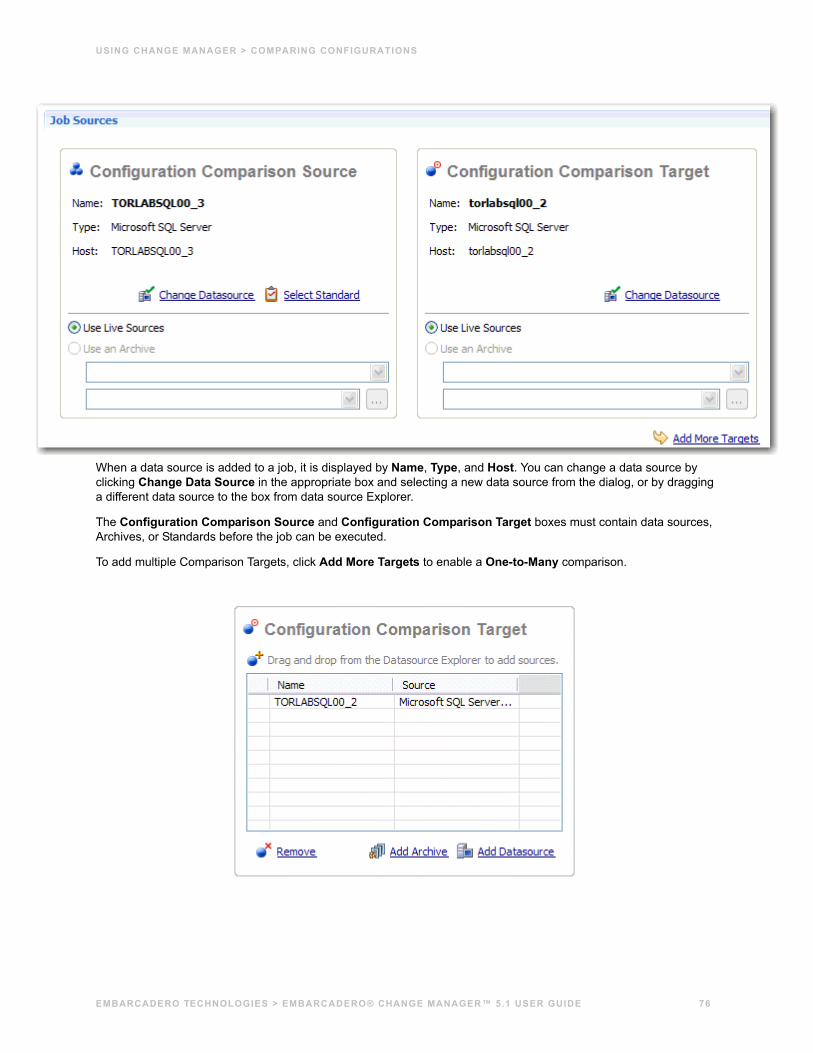
USING CHANGE MANAGER > COMPARING CONFIGURATIONS
When a data source is added to a job, it is displayed by Name, Type, and Host. You can change a data source by clicking Change Data Source in the appropriate box and selecting a new data source from the dialog, or by dragging a different data source to the box from data source Explorer.
The Configuration Comparison Source and Configuration Comparison Target boxes must contain data sources, Archives, or Standards before the job can be executed.
To add multiple Comparison Targets, click Add More Targets to enable a One-to-Many comparison.
EMBARCADERO TECHNOLOGIES > EMBARCADERO® CHANGE MANAGER™ 5.1 USER GUIDE 76
USING CHANGE MANAGER > COMPARING CONFIGURATIONS
To add multiple targets to the comparison job• Drag and drop additional data sources or Archives from Data Source Explorer to the Configuration
Comparison Target box, or click the Add Archive or Add Data Source commands beneath the table and select the appropriate target from the dialog provided.
Additionally, you can specify whether you want to compare the current properties of the live data source, or an archived set of properties previously stored in Change Manager using the radio buttons beneath each box.
• Select Use Live Sources to compare the current properties of the data source when the job is executed.
• Select Use an Archive and select the Archive and version to use in the job.
NOTE: You can drag and drop data sources, Archive Jobs, Archive Versions, and Standards into the Comparison Source and Comparison Target cells. A Standard can only be the Source of a Configuration Comparison Job.
Refine Property ComparisonsConfiguration property refinement involves choosing specific configuration properties to compare and specific configuration properties to omit prior to executing a comparison job.
By default, when you specify a data source as a comparison job Source or Target, you can refine the properties to be compared prior to executing the job on the Refinements tab of the Configuration Comparison Job Editor.
Configuration properties are organized by tree and listed by Property name, Description, Data Source Location, and Source.
To specify the properties used in the comparison job:Navigate to the Refinements tab and select or deselect the configuration properties in the table, as required. Selected properties are included in the comparison job, and de-selected properties are ignored during job execution.
Specify Job OptionsPrior to the execution of a job, parameters can be set to control aspects of the execution process itself. These options can be set prior to job execution on the Options tab.
EMBARCADERO TECHNOLOGIES > EMBARCADERO® CHANGE MANAGER™ 5.1 USER GUIDE 77
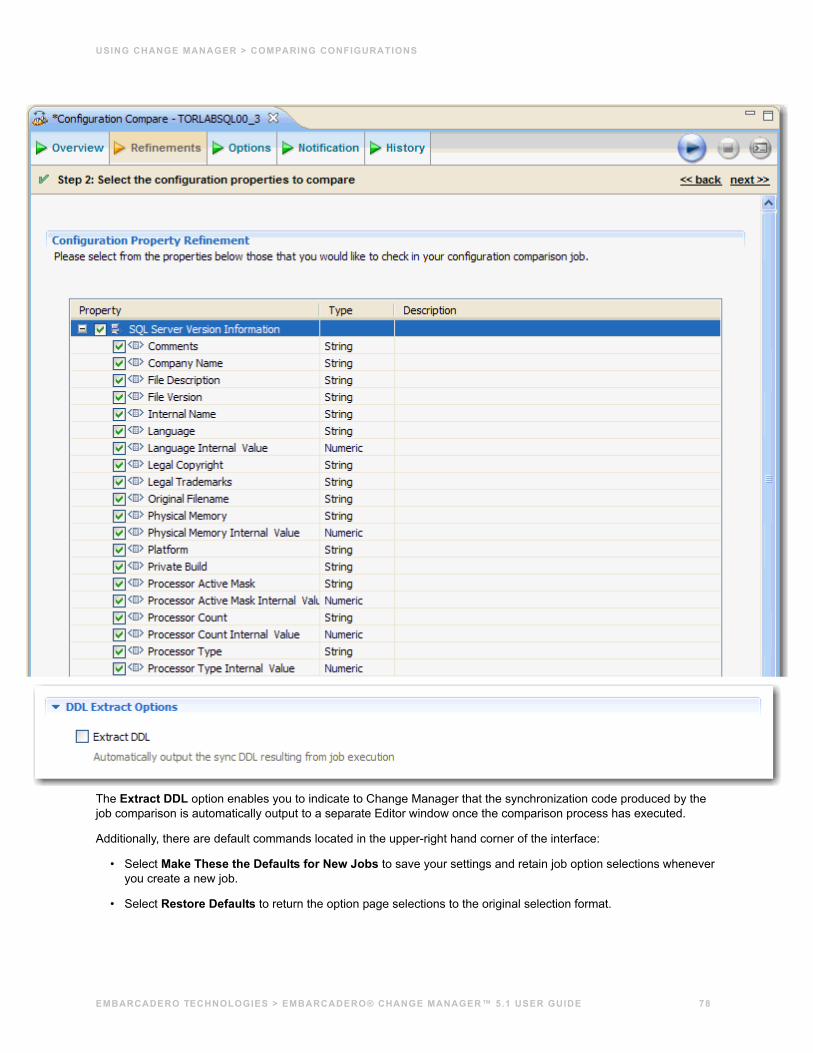
USING CHANGE MANAGER > COMPARING CONFIGURATIONS
The Extract DDL option enables you to indicate to Change Manager that the synchronization code produced by the job comparison is automatically output to a separate Editor window once the comparison process has executed.
Additionally, there are default commands located in the upper-right hand corner of the interface:
• Select Make These the Defaults for New Jobs to save your settings and retain job option selections whenever you create a new job.
• Select Restore Defaults to return the option page selections to the original selection format.
EMBARCADERO TECHNOLOGIES > EMBARCADERO® CHANGE MANAGER™ 5.1 USER GUIDE 78
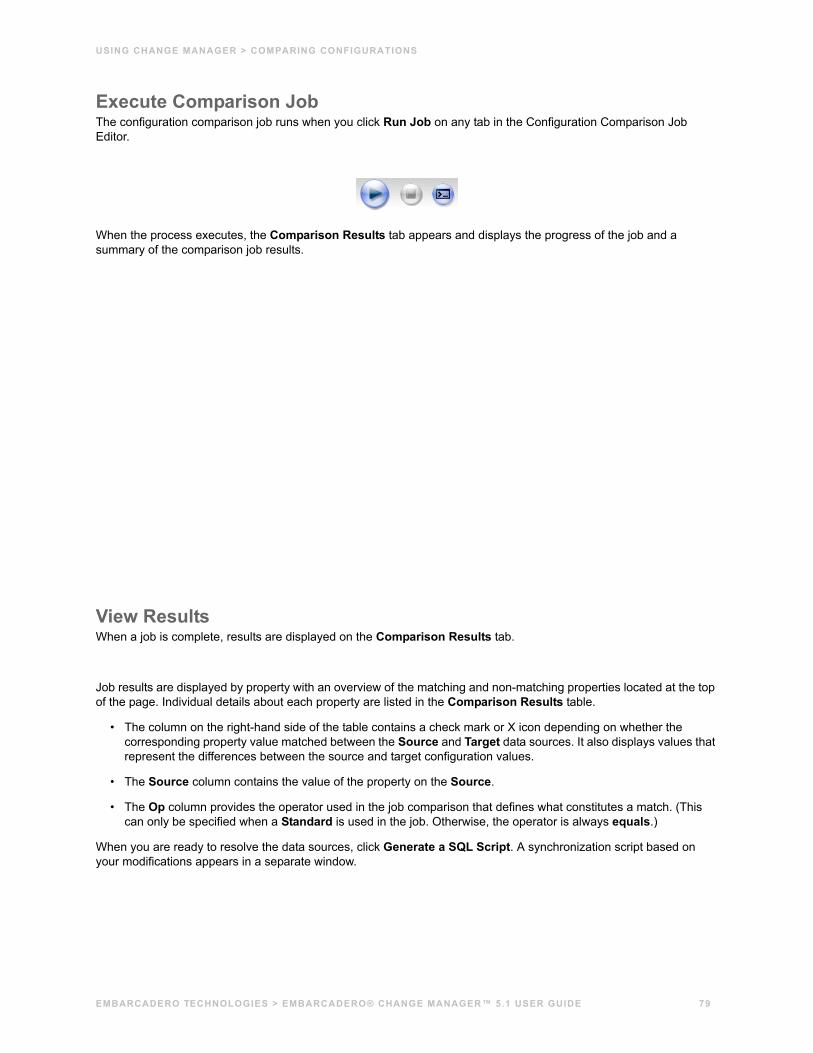
USING CHANGE MANAGER > COMPARING CONFIGURATIONS
Execute Comparison JobThe configuration comparison job runs when you click Run Job on any tab in the Configuration Comparison Job Editor.
When the process executes, the Comparison Results tab appears and displays the progress of the job and a summary of the comparison job results.
View ResultsWhen a job is complete, results are displayed on the Comparison Results tab.
Job results are displayed by property with an overview of the matching and non-matching properties located at the top of the page. Individual details about each property are listed in the Comparison Results table.
• The column on the right-hand side of the table contains a check mark or X icon depending on whether the corresponding property value matched between the Source and Target data sources. It also displays values that represent the differences between the source and target configuration values.
• The Source column contains the value of the property on the Source.
• The Op column provides the operator used in the job comparison that defines what constitutes a match. (This can only be specified when a Standard is used in the job. Otherwise, the operator is always equals.)
When you are ready to resolve the data sources, click Generate a SQL Script. A synchronization script based on your modifications appears in a separate window.
EMBARCADERO TECHNOLOGIES > EMBARCADERO® CHANGE MANAGER™ 5.1 USER GUIDE 79
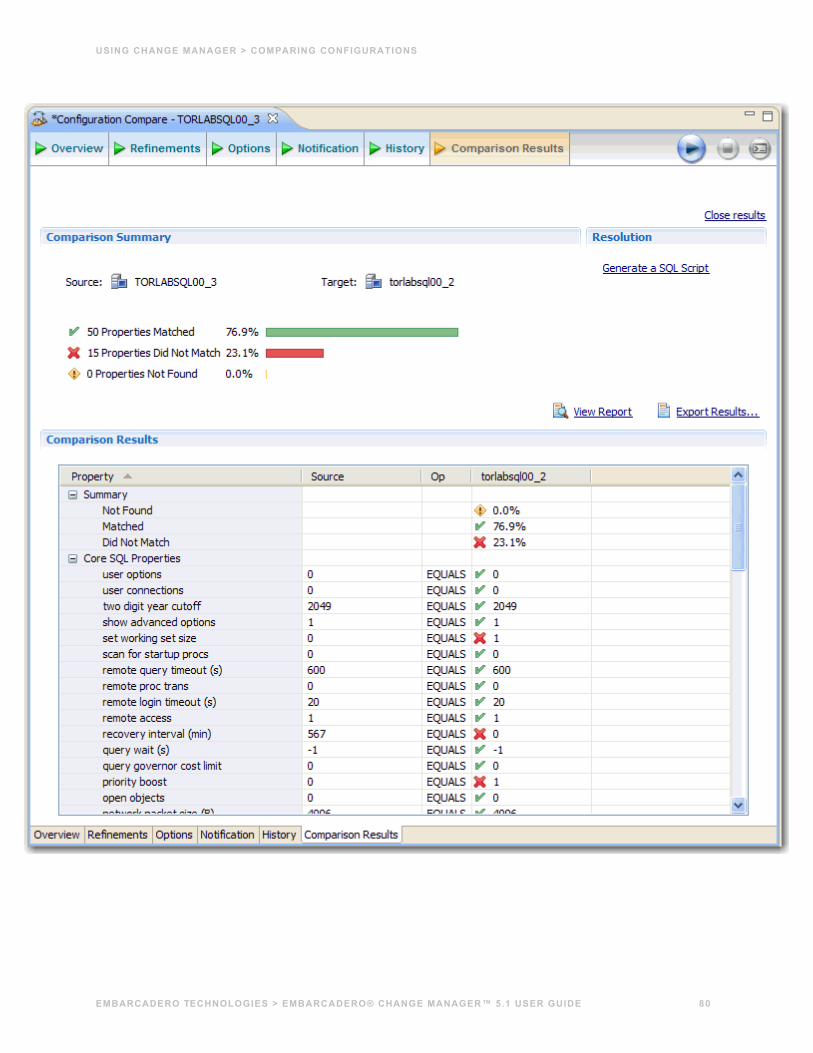
USING CHANGE MANAGER > COMPARING CONFIGURATIONS
EMBARCADERO TECHNOLOGIES > EMBARCADERO® CHANGE MANAGER™ 5.1 USER GUIDE 80
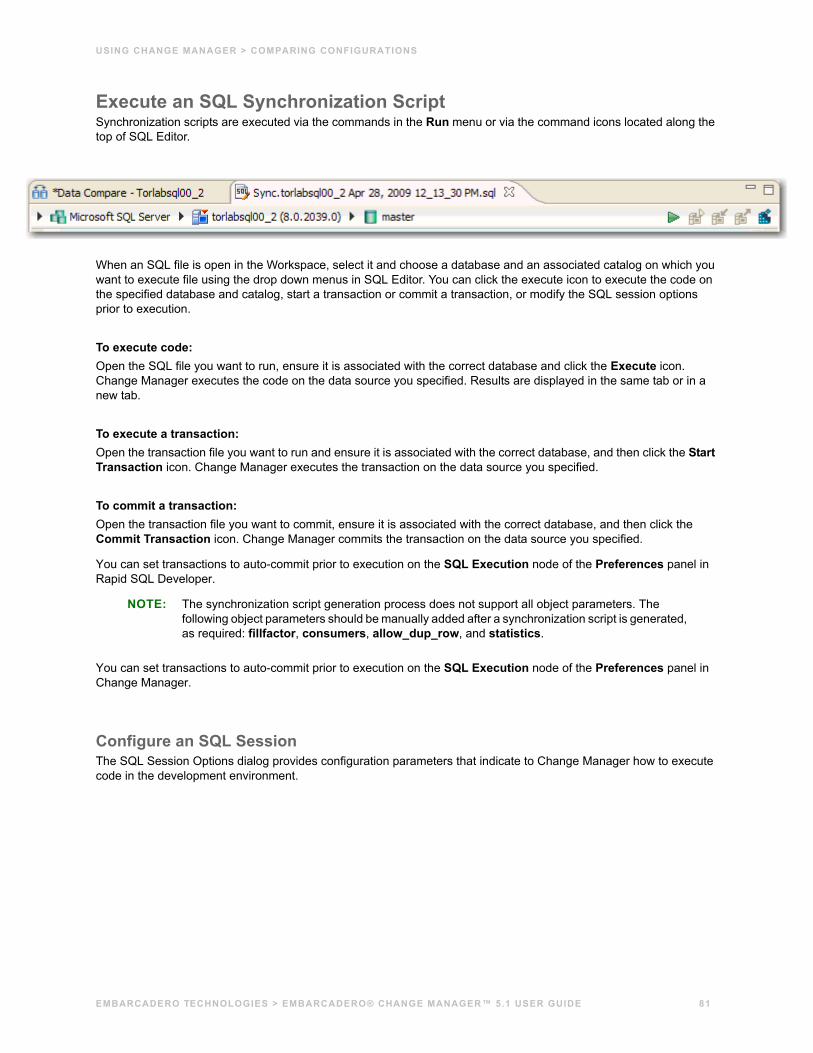
USING CHANGE MANAGER > COMPARING CONFIGURATIONS
Execute an SQL Synchronization ScriptSynchronization scripts are executed via the commands in the Run menu or via the command icons located along the top of SQL Editor.
When an SQL file is open in the Workspace, select it and choose a database and an associated catalog on which you want to execute file using the drop down menus in SQL Editor. You can click the execute icon to execute the code on the specified database and catalog, start a transaction or commit a transaction, or modify the SQL session options prior to execution.
To execute code:Open the SQL file you want to run, ensure it is associated with the correct database and click the Execute icon. Change Manager executes the code on the data source you specified. Results are displayed in the same tab or in a new tab.
To execute a transaction:Open the transaction file you want to run and ensure it is associated with the correct database, and then click the Start Transaction icon. Change Manager executes the transaction on the data source you specified.
To commit a transaction:Open the transaction file you want to commit, ensure it is associated with the correct database, and then click the Commit Transaction icon. Change Manager commits the transaction on the data source you specified.
You can set transactions to auto-commit prior to execution on the SQL Execution node of the Preferences panel in Rapid SQL Developer.
NOTE: The synchronization script generation process does not support all object parameters. The following object parameters should be manually added after a synchronization script is generated, as required: fillfactor, consumers, allow_dup_row, and statistics.
You can set transactions to auto-commit prior to execution on the SQL Execution node of the Preferences panel in Change Manager.
Configure an SQL SessionThe SQL Session Options dialog provides configuration parameters that indicate to Change Manager how to execute code in the development environment.
EMBARCADERO TECHNOLOGIES > EMBARCADERO® CHANGE MANAGER™ 5.1 USER GUIDE 81
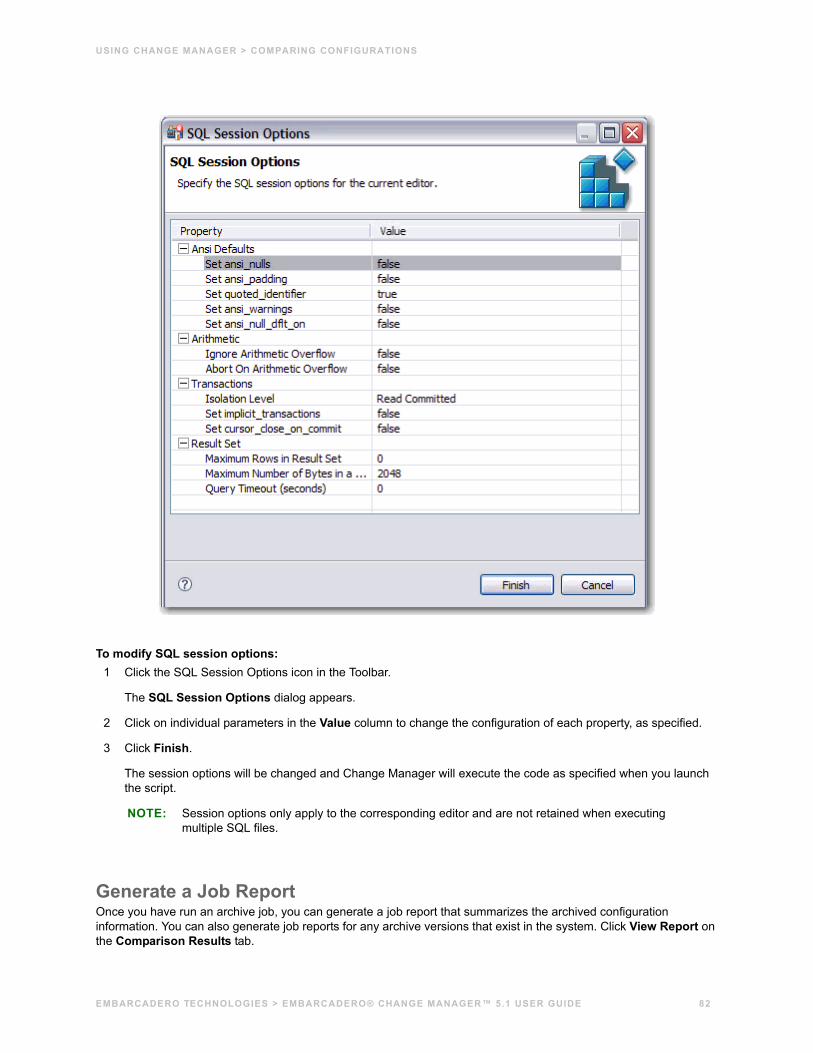
USING CHANGE MANAGER > COMPARING CONFIGURATIONS
To modify SQL session options:1 Click the SQL Session Options icon in the Toolbar.
The SQL Session Options dialog appears.
2 Click on individual parameters in the Value column to change the configuration of each property, as specified.
3 Click Finish.
The session options will be changed and Change Manager will execute the code as specified when you launch the script.
NOTE: Session options only apply to the corresponding editor and are not retained when executing multiple SQL files.
Generate a Job ReportOnce you have run an archive job, you can generate a job report that summarizes the archived configuration information. You can also generate job reports for any archive versions that exist in the system. Click View Report on the Comparison Results tab.
EMBARCADERO TECHNOLOGIES > EMBARCADERO® CHANGE MANAGER™ 5.1 USER GUIDE 82
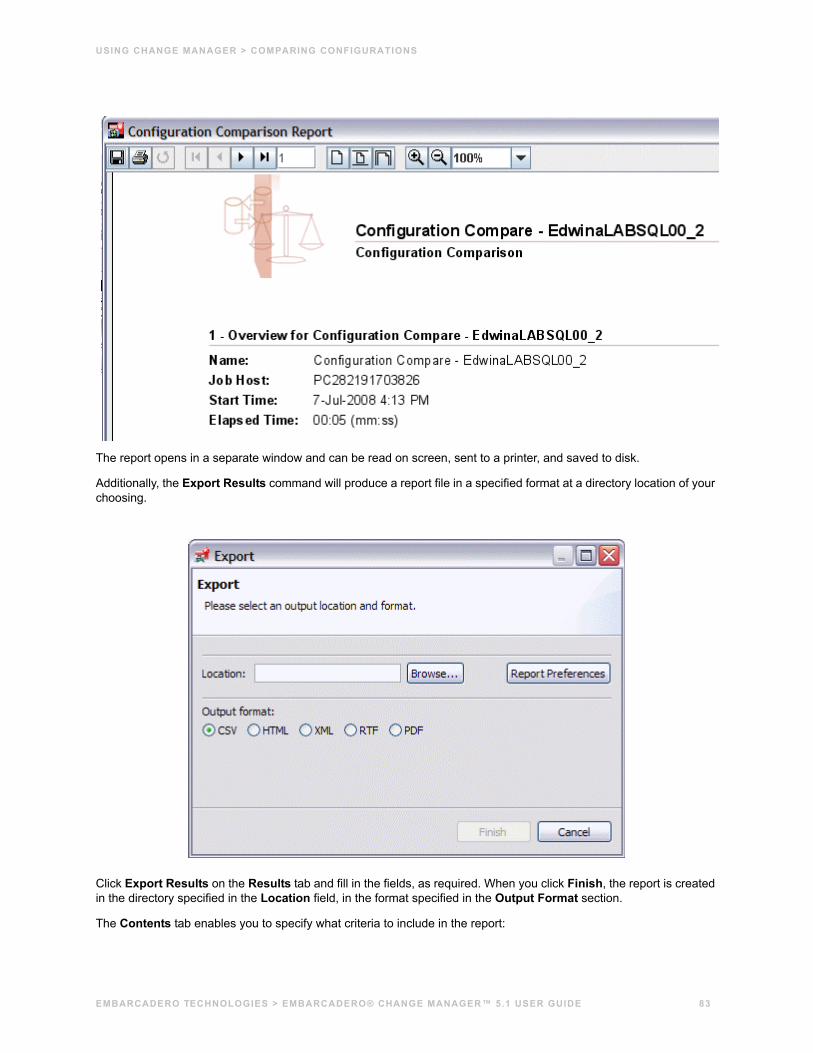
USING CHANGE MANAGER > COMPARING CONFIGURATIONS
The report opens in a separate window and can be read on screen, sent to a printer, and saved to disk.
Additionally, the Export Results command will produce a report file in a specified format at a directory location of your choosing.
Click Export Results on the Results tab and fill in the fields, as required. When you click Finish, the report is created in the directory specified in the Location field, in the format specified in the Output Format section.
The Contents tab enables you to specify what criteria to include in the report:
EMBARCADERO TECHNOLOGIES > EMBARCADERO® CHANGE MANAGER™ 5.1 USER GUIDE 83
USING CHANGE MANAGER > COMPARING CONFIGURATIONS
• Select Include Matching Configuration Parameters to include configuration parameters and values that matched when the job was run.
Creating a Configuration StandardA Standard is an object specific to configuration comparison jobs that contains a custom set of stored data source configuration properties. Standards are used in configuration comparison jobs against registered data sources and Archives and provide a means of defining and retaining a specific set of configuration parameter values and thresholds to ‘check’ against your enterprise and ensure all network systems meet data complacency measures.
All Standards are composed of a name, description, and a list of properties that are assigned set values. Properties are derived from live data sources, Archives, or other Standards, Additionally, each property value is assigned an operator that asserts if the same value on an opposing data source/Archive in a comparison job falls within a specific range, is the member of a set, is greater than a value, etc.
The following tasks provide a high-level overview of the Standard definition process:
Create a New Standard
Specify a Standard Name
Add Property Sources
Refine Properties
Save Standard
Use Standard in Configuration Comparison Jobs
Create a New StandardStandards are defined in Standards Editor.
EMBARCADERO TECHNOLOGIES > EMBARCADERO® CHANGE MANAGER™ 5.1 USER GUIDE 84
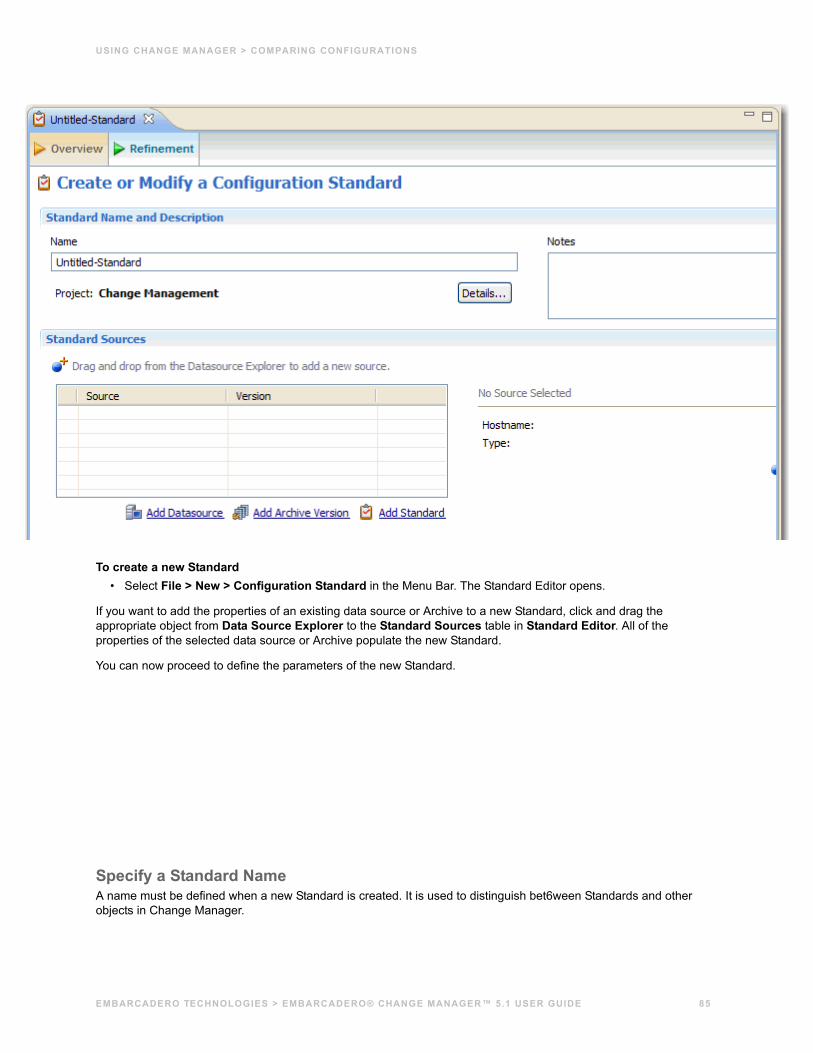
USING CHANGE MANAGER > COMPARING CONFIGURATIONS
To create a new Standard• Select File > New > Configuration Standard in the Menu Bar. The Standard Editor opens.
If you want to add the properties of an existing data source or Archive to a new Standard, click and drag the appropriate object from Data Source Explorer to the Standard Sources table in Standard Editor. All of the properties of the selected data source or Archive populate the new Standard.
You can now proceed to define the parameters of the new Standard.
Specify a Standard NameA name must be defined when a new Standard is created. It is used to distinguish bet6ween Standards and other objects in Change Manager.
EMBARCADERO TECHNOLOGIES > EMBARCADERO® CHANGE MANAGER™ 5.1 USER GUIDE 85
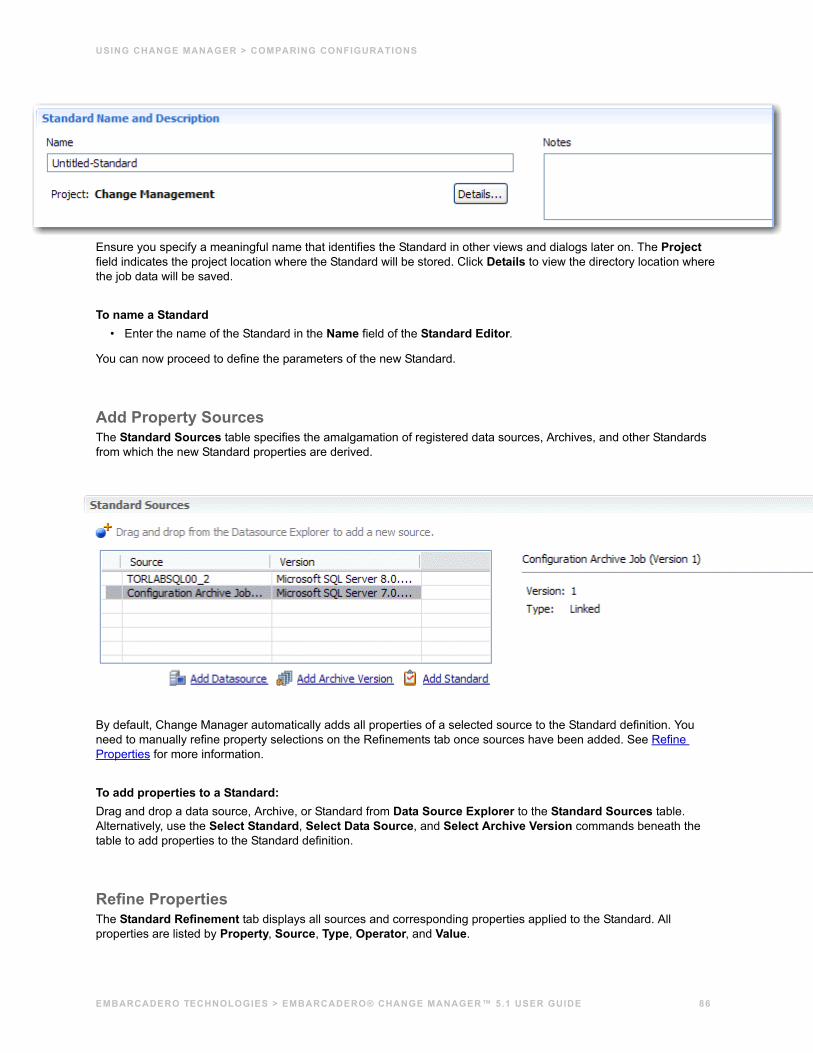
USING CHANGE MANAGER > COMPARING CONFIGURATIONS
Ensure you specify a meaningful name that identifies the Standard in other views and dialogs later on. The Project field indicates the project location where the Standard will be stored. Click Details to view the directory location where the job data will be saved.
To name a Standard• Enter the name of the Standard in the Name field of the Standard Editor.
You can now proceed to define the parameters of the new Standard.
Add Property SourcesThe Standard Sources table specifies the amalgamation of registered data sources, Archives, and other Standards from which the new Standard properties are derived.
By default, Change Manager automatically adds all properties of a selected source to the Standard definition. You need to manually refine property selections on the Refinements tab once sources have been added. See Refine Properties for more information.
To add properties to a Standard:Drag and drop a data source, Archive, or Standard from Data Source Explorer to the Standard Sources table. Alternatively, use the Select Standard, Select Data Source, and Select Archive Version commands beneath the table to add properties to the Standard definition.
Refine PropertiesThe Standard Refinement tab displays all sources and corresponding properties applied to the Standard. All properties are listed by Property, Source, Type, Operator, and Value.
EMBARCADERO TECHNOLOGIES > EMBARCADERO® CHANGE MANAGER™ 5.1 USER GUIDE 86
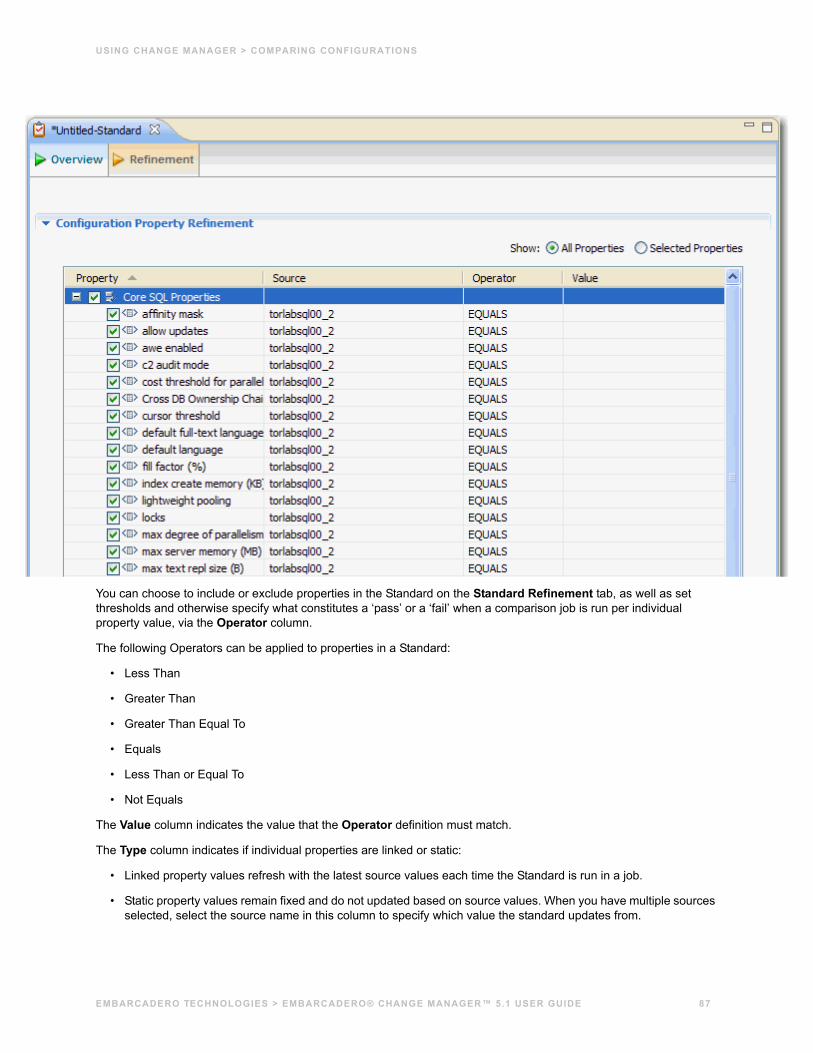
USING CHANGE MANAGER > COMPARING CONFIGURATIONS
You can choose to include or exclude properties in the Standard on the Standard Refinement tab, as well as set thresholds and otherwise specify what constitutes a ‘pass’ or a ‘fail’ when a comparison job is run per individual property value, via the Operator column.
The following Operators can be applied to properties in a Standard:
• Less Than
• Greater Than
• Greater Than Equal To
• Equals
• Less Than or Equal To
• Not Equals
The Value column indicates the value that the Operator definition must match.
The Type column indicates if individual properties are linked or static:
• Linked property values refresh with the latest source values each time the Standard is run in a job.
• Static property values remain fixed and do not updated based on source values. When you have multiple sources selected, select the source name in this column to specify which value the standard updates from.
EMBARCADERO TECHNOLOGIES > EMBARCADERO® CHANGE MANAGER™ 5.1 USER GUIDE 87
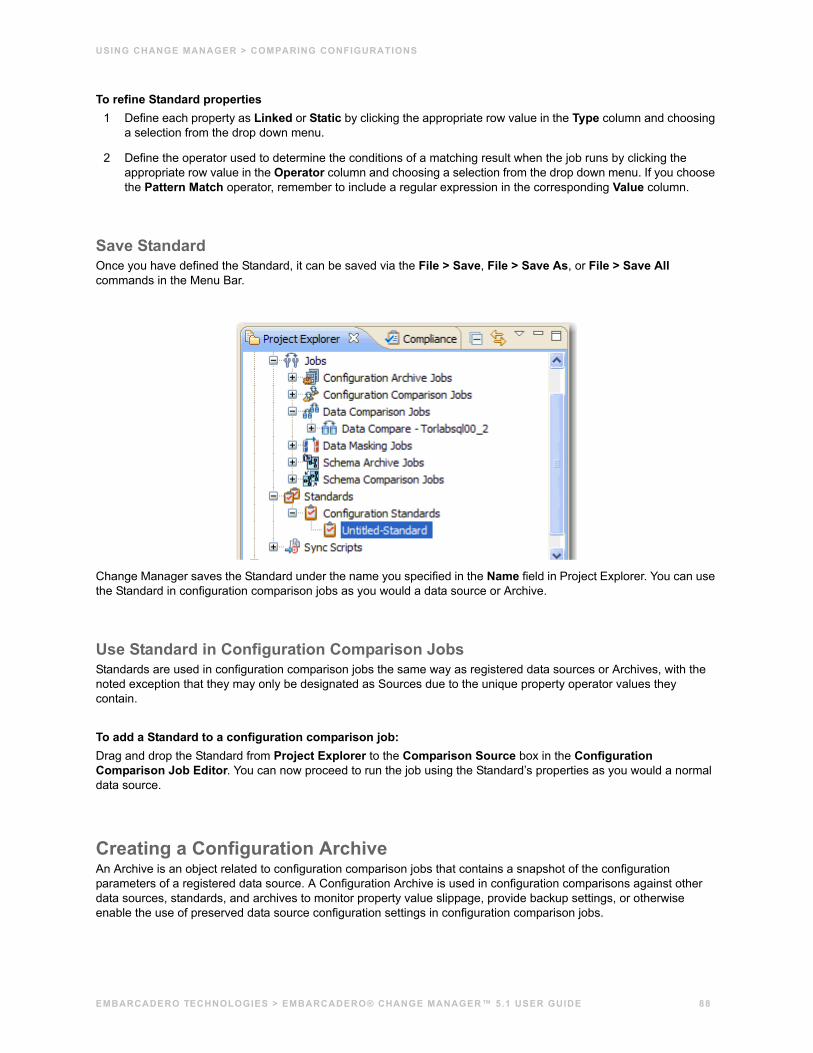
USING CHANGE MANAGER > COMPARING CONFIGURATIONS
To refine Standard properties1 Define each property as Linked or Static by clicking the appropriate row value in the Type column and choosing
a selection from the drop down menu.
2 Define the operator used to determine the conditions of a matching result when the job runs by clicking the appropriate row value in the Operator column and choosing a selection from the drop down menu. If you choose the Pattern Match operator, remember to include a regular expression in the corresponding Value column.
Save StandardOnce you have defined the Standard, it can be saved via the File > Save, File > Save As, or File > Save All commands in the Menu Bar.
Change Manager saves the Standard under the name you specified in the Name field in Project Explorer. You can use the Standard in configuration comparison jobs as you would a data source or Archive.
Use Standard in Configuration Comparison JobsStandards are used in configuration comparison jobs the same way as registered data sources or Archives, with the noted exception that they may only be designated as Sources due to the unique property operator values they contain.
To add a Standard to a configuration comparison job:Drag and drop the Standard from Project Explorer to the Comparison Source box in the Configuration Comparison Job Editor. You can now proceed to run the job using the Standard’s properties as you would a normal data source.
Creating a Configuration ArchiveAn Archive is an object related to configuration comparison jobs that contains a snapshot of the configuration parameters of a registered data source. A Configuration Archive is used in configuration comparisons against other data sources, standards, and archives to monitor property value slippage, provide backup settings, or otherwise enable the use of preserved data source configuration settings in configuration comparison jobs.
EMBARCADERO TECHNOLOGIES > EMBARCADERO® CHANGE MANAGER™ 5.1 USER GUIDE 88
USING CHANGE MANAGER > COMPARING CONFIGURATIONS
All Archives are composed of a name, description, and a list of configuration properties derived from a single live data source at a specific point in time. Additionally, Archives have Versioning functionality and can be periodically updated with the current values of an associated data source. Older Versions are retained within an Archive and can be recalled as needed.
Archives are located in data source Explorer on the Configuration Archive Jobs node of the corresponding data source.
The following tasks provide a high-level overview of the Archive definition process:
Create a New Configuration Archive
Specify an Archive Name
Specify an Archive Source
Refine Properties
Specify Notification Options
Save the Archive/Manage Versioning
Generating a Job Report
Use Archive in Configuration Comparison Jobs
Create a New Configuration ArchiveArchives are defined in the Configuration Archive Job Editor.
EMBARCADERO TECHNOLOGIES > EMBARCADERO® CHANGE MANAGER™ 5.1 USER GUIDE 89
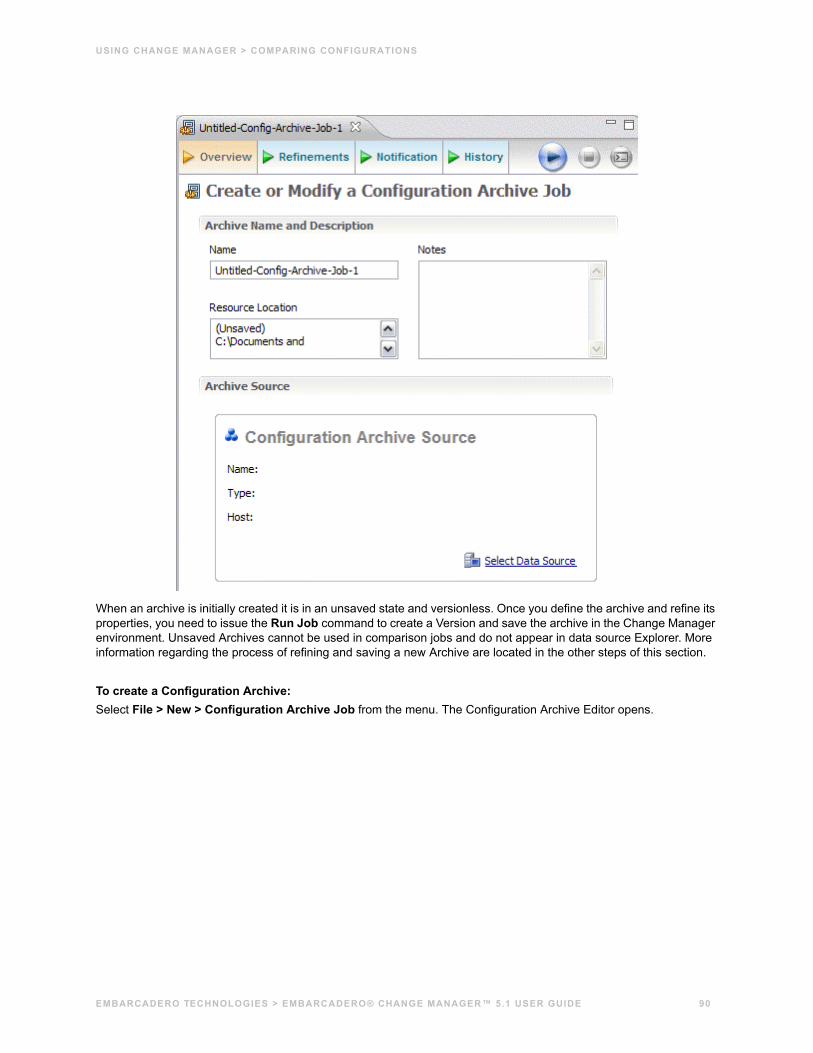
USING CHANGE MANAGER > COMPARING CONFIGURATIONS
When an archive is initially created it is in an unsaved state and versionless. Once you define the archive and refine its properties, you need to issue the Run Job command to create a Version and save the archive in the Change Manager environment. Unsaved Archives cannot be used in comparison jobs and do not appear in data source Explorer. More information regarding the process of refining and saving a new Archive are located in the other steps of this section.
To create a Configuration Archive:Select File > New > Configuration Archive Job from the menu. The Configuration Archive Editor opens.
EMBARCADERO TECHNOLOGIES > EMBARCADERO® CHANGE MANAGER™ 5.1 USER GUIDE 90
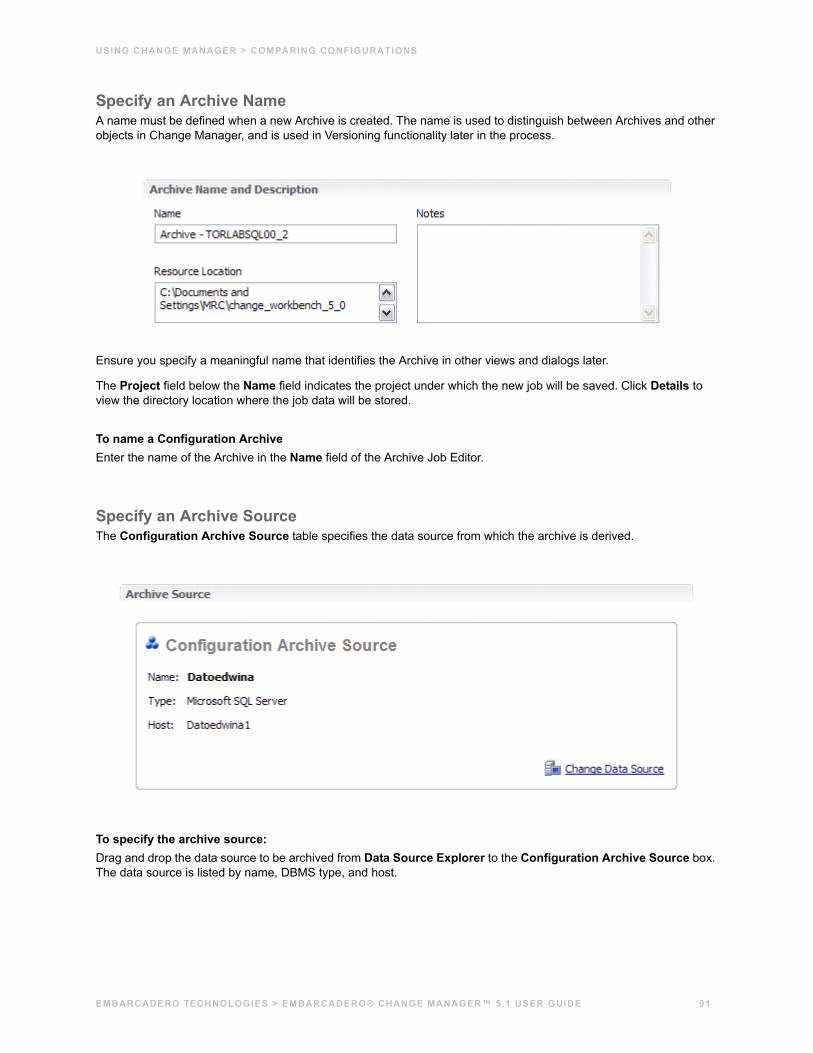
USING CHANGE MANAGER > COMPARING CONFIGURATIONS
Specify an Archive NameA name must be defined when a new Archive is created. The name is used to distinguish between Archives and other objects in Change Manager, and is used in Versioning functionality later in the process.
Ensure you specify a meaningful name that identifies the Archive in other views and dialogs later.
The Project field below the Name field indicates the project under which the new job will be saved. Click Details to view the directory location where the job data will be stored.
To name a Configuration ArchiveEnter the name of the Archive in the Name field of the Archive Job Editor.
Specify an Archive SourceThe Configuration Archive Source table specifies the data source from which the archive is derived.
To specify the archive source:Drag and drop the data source to be archived from Data Source Explorer to the Configuration Archive Source box. The data source is listed by name, DBMS type, and host.
EMBARCADERO TECHNOLOGIES > EMBARCADERO® CHANGE MANAGER™ 5.1 USER GUIDE 91
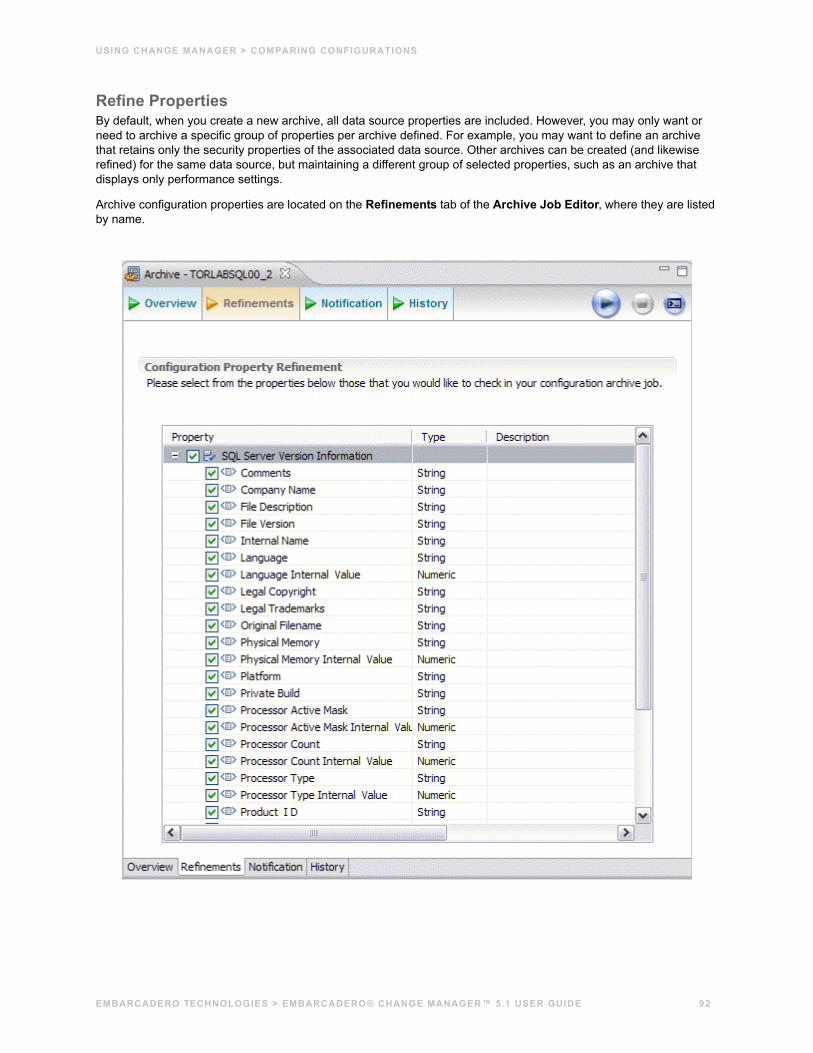
USING CHANGE MANAGER > COMPARING CONFIGURATIONS
Refine PropertiesBy default, when you create a new archive, all data source properties are included. However, you may only want or need to archive a specific group of properties per archive defined. For example, you may want to define an archive that retains only the security properties of the associated data source. Other archives can be created (and likewise refined) for the same data source, but maintaining a different group of selected properties, such as an archive that displays only performance settings.
Archive configuration properties are located on the Refinements tab of the Archive Job Editor, where they are listed by name.
EMBARCADERO TECHNOLOGIES > EMBARCADERO® CHANGE MANAGER™ 5.1 USER GUIDE 92
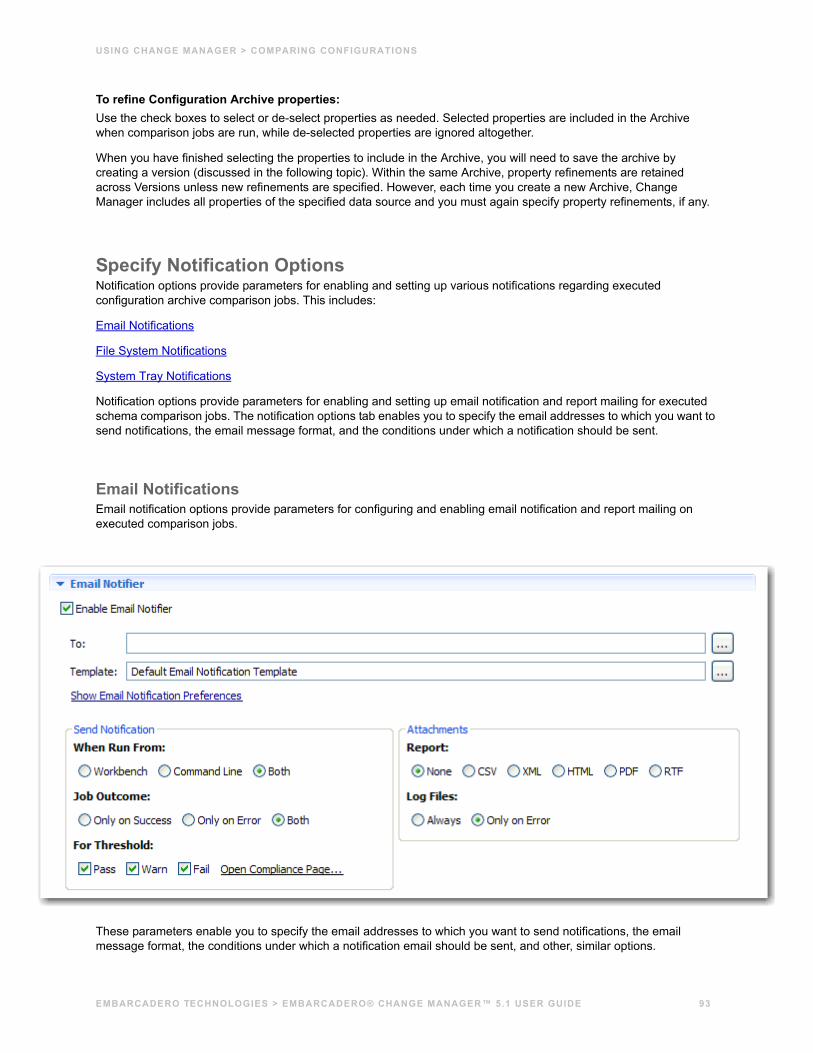
USING CHANGE MANAGER > COMPARING CONFIGURATIONS
To refine Configuration Archive properties:Use the check boxes to select or de-select properties as needed. Selected properties are included in the Archive when comparison jobs are run, while de-selected properties are ignored altogether.
When you have finished selecting the properties to include in the Archive, you will need to save the archive by creating a version (discussed in the following topic). Within the same Archive, property refinements are retained across Versions unless new refinements are specified. However, each time you create a new Archive, Change Manager includes all properties of the specified data source and you must again specify property refinements, if any.
Specify Notification OptionsNotification options provide parameters for enabling and setting up various notifications regarding executed configuration archive comparison jobs. This includes:
Email Notifications
File System Notifications
System Tray Notifications
Notification options provide parameters for enabling and setting up email notification and report mailing for executed schema comparison jobs. The notification options tab enables you to specify the email addresses to which you want to send notifications, the email message format, and the conditions under which a notification should be sent.
Email NotificationsEmail notification options provide parameters for configuring and enabling email notification and report mailing on executed comparison jobs.
These parameters enable you to specify the email addresses to which you want to send notifications, the email message format, the conditions under which a notification email should be sent, and other, similar options.
EMBARCADERO TECHNOLOGIES > EMBARCADERO® CHANGE MANAGER™ 5.1 USER GUIDE 93
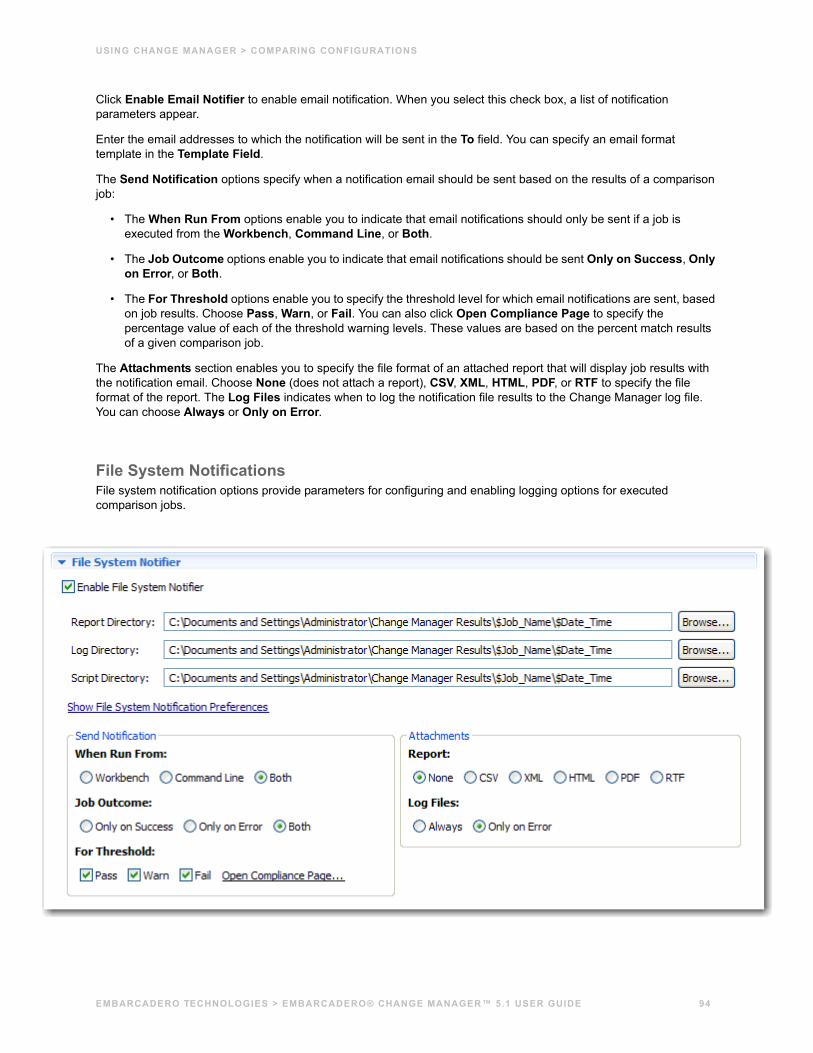
USING CHANGE MANAGER > COMPARING CONFIGURATIONS
Click Enable Email Notifier to enable email notification. When you select this check box, a list of notification parameters appear.
Enter the email addresses to which the notification will be sent in the To field. You can specify an email format template in the Template Field.
The Send Notification options specify when a notification email should be sent based on the results of a comparison job:
• The When Run From options enable you to indicate that email notifications should only be sent if a job is executed from the Workbench, Command Line, or Both.
• The Job Outcome options enable you to indicate that email notifications should be sent Only on Success, Only on Error, or Both.
• The For Threshold options enable you to specify the threshold level for which email notifications are sent, based on job results. Choose Pass, Warn, or Fail. You can also click Open Compliance Page to specify the percentage value of each of the threshold warning levels. These values are based on the percent match results of a given comparison job.
The Attachments section enables you to specify the file format of an attached report that will display job results with the notification email. Choose None (does not attach a report), CSV, XML, HTML, PDF, or RTF to specify the file format of the report. The Log Files indicates when to log the notification file results to the Change Manager log file. You can choose Always or Only on Error.
File System NotificationsFile system notification options provide parameters for configuring and enabling logging options for executed comparison jobs.
EMBARCADERO TECHNOLOGIES > EMBARCADERO® CHANGE MANAGER™ 5.1 USER GUIDE 94
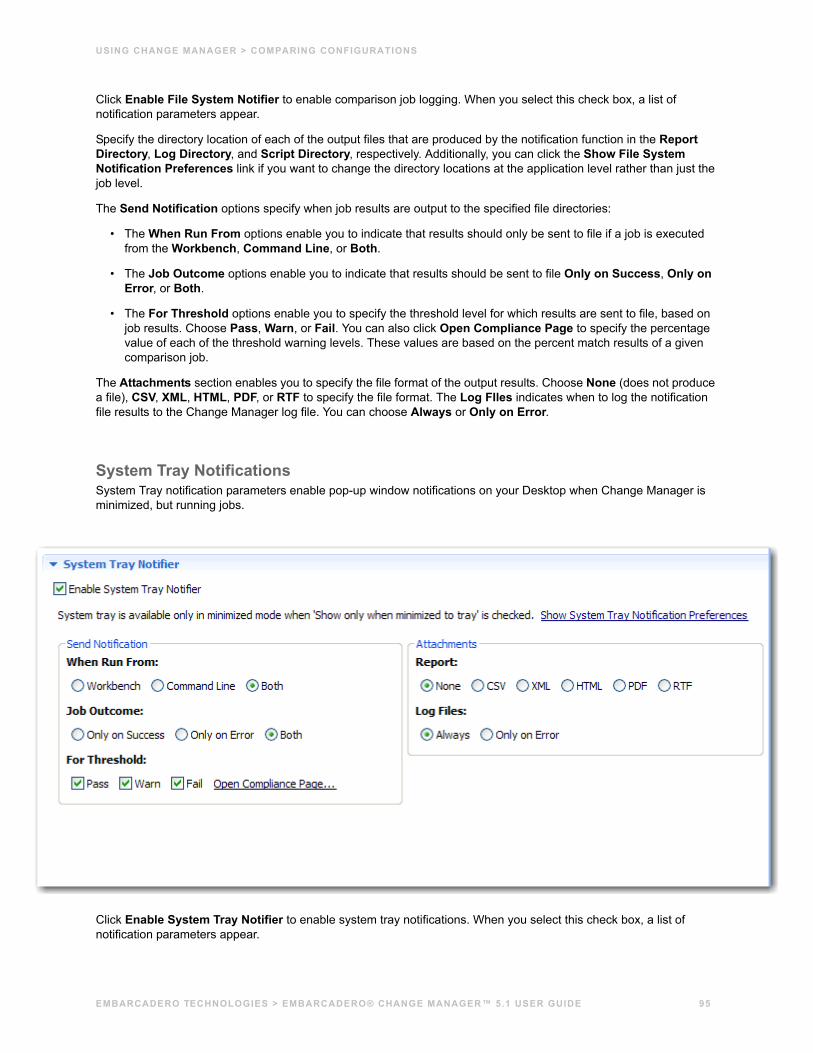
USING CHANGE MANAGER > COMPARING CONFIGURATIONS
Click Enable File System Notifier to enable comparison job logging. When you select this check box, a list of notification parameters appear.
Specify the directory location of each of the output files that are produced by the notification function in the Report Directory, Log Directory, and Script Directory, respectively. Additionally, you can click the Show File System Notification Preferences link if you want to change the directory locations at the application level rather than just the job level.
The Send Notification options specify when job results are output to the specified file directories:
• The When Run From options enable you to indicate that results should only be sent to file if a job is executed from the Workbench, Command Line, or Both.
• The Job Outcome options enable you to indicate that results should be sent to file Only on Success, Only on Error, or Both.
• The For Threshold options enable you to specify the threshold level for which results are sent to file, based on job results. Choose Pass, Warn, or Fail. You can also click Open Compliance Page to specify the percentage value of each of the threshold warning levels. These values are based on the percent match results of a given comparison job.
The Attachments section enables you to specify the file format of the output results. Choose None (does not produce a file), CSV, XML, HTML, PDF, or RTF to specify the file format. The Log FIles indicates when to log the notification file results to the Change Manager log file. You can choose Always or Only on Error.
System Tray NotificationsSystem Tray notification parameters enable pop-up window notifications on your Desktop when Change Manager is minimized, but running jobs.
Click Enable System Tray Notifier to enable system tray notifications. When you select this check box, a list of notification parameters appear.
EMBARCADERO TECHNOLOGIES > EMBARCADERO® CHANGE MANAGER™ 5.1 USER GUIDE 95
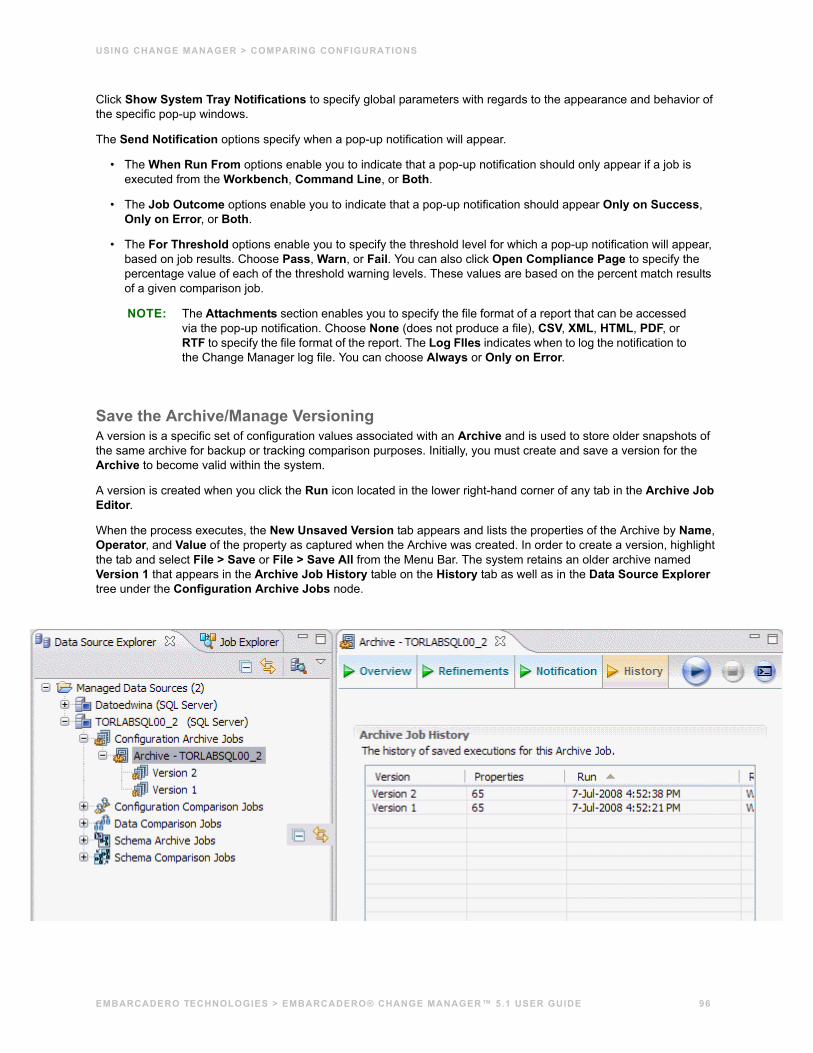
USING CHANGE MANAGER > COMPARING CONFIGURATIONS
Click Show System Tray Notifications to specify global parameters with regards to the appearance and behavior of the specific pop-up windows.
The Send Notification options specify when a pop-up notification will appear.
• The When Run From options enable you to indicate that a pop-up notification should only appear if a job is executed from the Workbench, Command Line, or Both.
• The Job Outcome options enable you to indicate that a pop-up notification should appear Only on Success, Only on Error, or Both.
• The For Threshold options enable you to specify the threshold level for which a pop-up notification will appear, based on job results. Choose Pass, Warn, or Fail. You can also click Open Compliance Page to specify the percentage value of each of the threshold warning levels. These values are based on the percent match results of a given comparison job.
NOTE: The Attachments section enables you to specify the file format of a report that can be accessed via the pop-up notification. Choose None (does not produce a file), CSV, XML, HTML, PDF, or RTF to specify the file format of the report. The Log FIles indicates when to log the notification to the Change Manager log file. You can choose Always or Only on Error.
Save the Archive/Manage VersioningA version is a specific set of configuration values associated with an Archive and is used to store older snapshots of the same archive for backup or tracking comparison purposes. Initially, you must create and save a version for the Archive to become valid within the system.
A version is created when you click the Run icon located in the lower right-hand corner of any tab in the Archive Job Editor.
When the process executes, the New Unsaved Version tab appears and lists the properties of the Archive by Name, Operator, and Value of the property as captured when the Archive was created. In order to create a version, highlight the tab and select File > Save or File > Save All from the Menu Bar. The system retains an older archive named Version 1 that appears in the Archive Job History table on the History tab as well as in the Data Source Explorer tree under the Configuration Archive Jobs node.
EMBARCADERO TECHNOLOGIES > EMBARCADERO® CHANGE MANAGER™ 5.1 USER GUIDE 96
USING CHANGE MANAGER > COMPARING CONFIGURATIONS
To create a version and save the archive job• Click Run Job. A version appears in the Archive Job History table on the History tab containing the name of
the Archive, the number of properties retained by the version, a time stamp, and where the archive job was run from. (Workbench for manual job execution, or command line, if automated.)
You create additional versions within the same archive job each time you click Run Job. The new version contains the latest values for the archive job properties as specified on the Refinements tab. Versions are listed on the Overview tab in a table that displays them in ascending order. A version can be accessed for viewing by double-clicking the appropriate Version in the table. The selected version opens in a new tab of the Archive Job Editor.
Additionally, Versions are listed as child nodes of the archive job to which they belong in Data Source Explorer. To view a Version, double-click the appropriate node.
EMBARCADERO TECHNOLOGIES > EMBARCADERO® CHANGE MANAGER™ 5.1 USER GUIDE 97
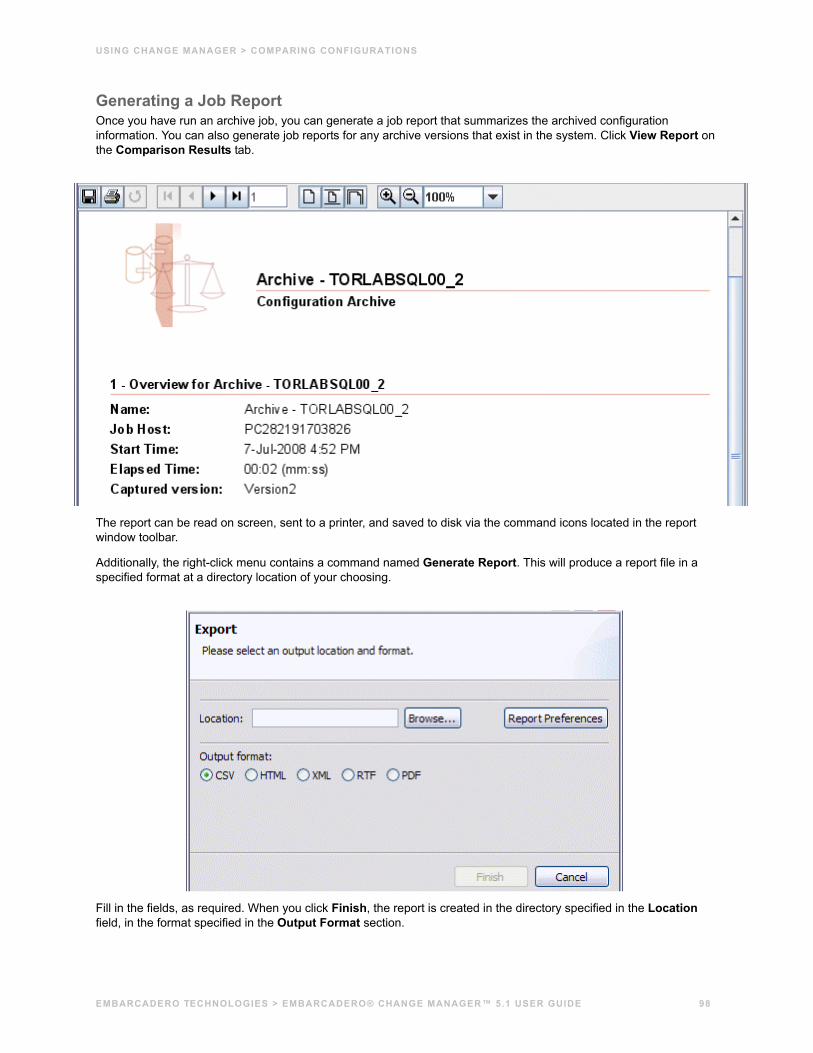
USING CHANGE MANAGER > COMPARING CONFIGURATIONS
Generating a Job ReportOnce you have run an archive job, you can generate a job report that summarizes the archived configuration information. You can also generate job reports for any archive versions that exist in the system. Click View Report on the Comparison Results tab.
The report can be read on screen, sent to a printer, and saved to disk via the command icons located in the report window toolbar.
Additionally, the right-click menu contains a command named Generate Report. This will produce a report file in a specified format at a directory location of your choosing.
Fill in the fields, as required. When you click Finish, the report is created in the directory specified in the Location field, in the format specified in the Output Format section.
EMBARCADERO TECHNOLOGIES > EMBARCADERO® CHANGE MANAGER™ 5.1 USER GUIDE 98
USING CHANGE MANAGER > COMPARING SCHEMAS
Use Archive in Configuration Comparison JobsArchives are used in configuration comparison jobs the same way as registered data sources or Standards.
To add an Archive to a configuration comparison job:Drag and drop an Archive version from Data Source Explorer to the Comparison Source or Comparison Target boxes in the Configuration Comparison Job Editor. Alternatively, if a data source is selected as the Source or Target, select Use an Archive in the respective box and use the drop down menu to choose an associated archive from the list provided.
Comparing SchemasChange Manager provides the ability to capture, compare, and synchronize schemas in databases and provide reports on schema comparison jobs that enable you to distribute information throughout your environment.
The following tasks provide a high-level overview of the schema comparison process:
Create a New Schema Comparison Job
Specify a Job Name
Specify Source and Target Data Sources
Refine Schema Comparisons
Customize Schema Mapping
Specify Job Options
Specify Notification Options
Execute the Schema Comparison Job
Generating a Job Report
Resolve Schema via a Generated SQL Script
EMBARCADERO TECHNOLOGIES > EMBARCADERO® CHANGE MANAGER™ 5.1 USER GUIDE 99
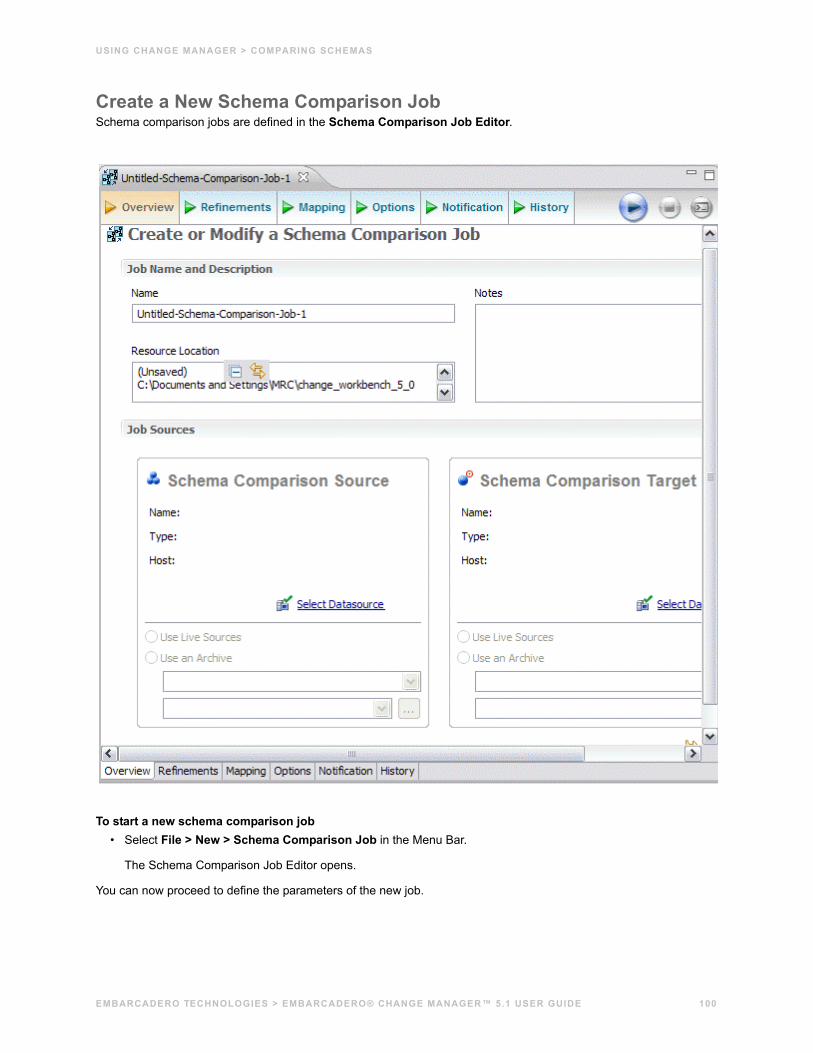
USING CHANGE MANAGER > COMPARING SCHEMAS
Create a New Schema Comparison JobSchema comparison jobs are defined in the Schema Comparison Job Editor.
To start a new schema comparison job• Select File > New > Schema Comparison Job in the Menu Bar.
The Schema Comparison Job Editor opens.
You can now proceed to define the parameters of the new job.
EMBARCADERO TECHNOLOGIES > EMBARCADERO® CHANGE MANAGER™ 5.1 USER GUIDE 100
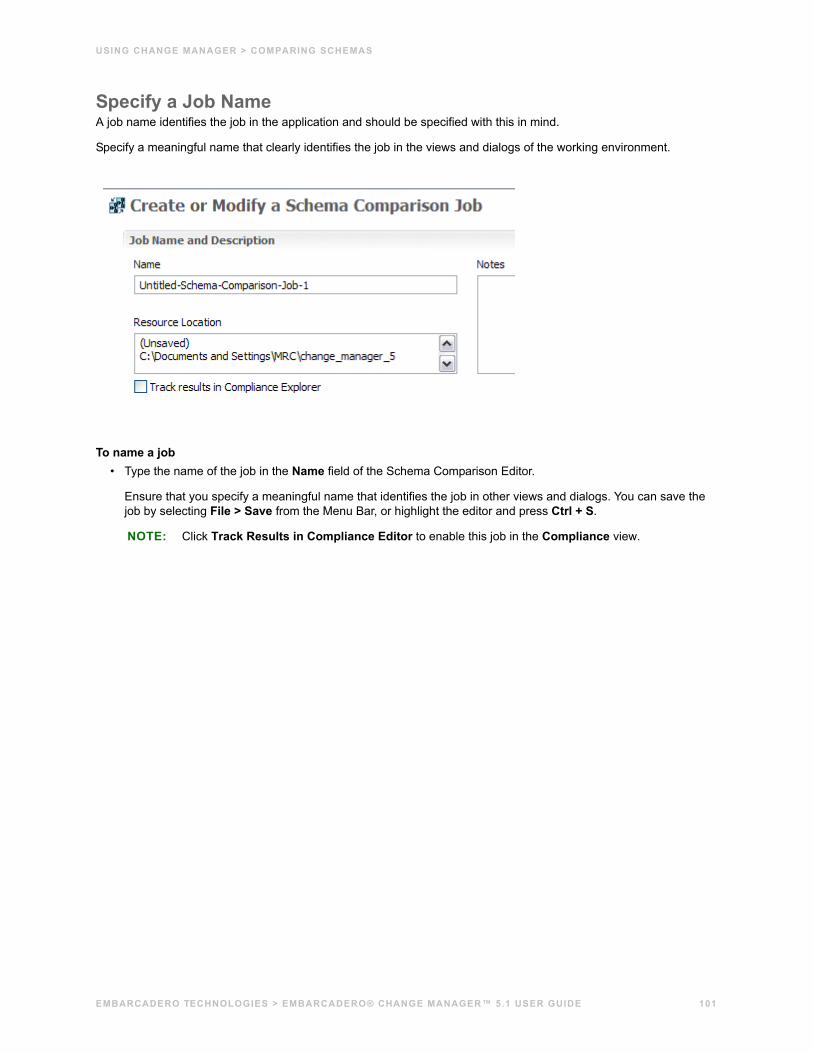
USING CHANGE MANAGER > COMPARING SCHEMAS
Specify a Job NameA job name identifies the job in the application and should be specified with this in mind.
Specify a meaningful name that clearly identifies the job in the views and dialogs of the working environment.
To name a job• Type the name of the job in the Name field of the Schema Comparison Editor.
Ensure that you specify a meaningful name that identifies the job in other views and dialogs. You can save the job by selecting File > Save from the Menu Bar, or highlight the editor and press Ctrl + S.
NOTE: Click Track Results in Compliance Editor to enable this job in the Compliance view.
EMBARCADERO TECHNOLOGIES > EMBARCADERO® CHANGE MANAGER™ 5.1 USER GUIDE 101
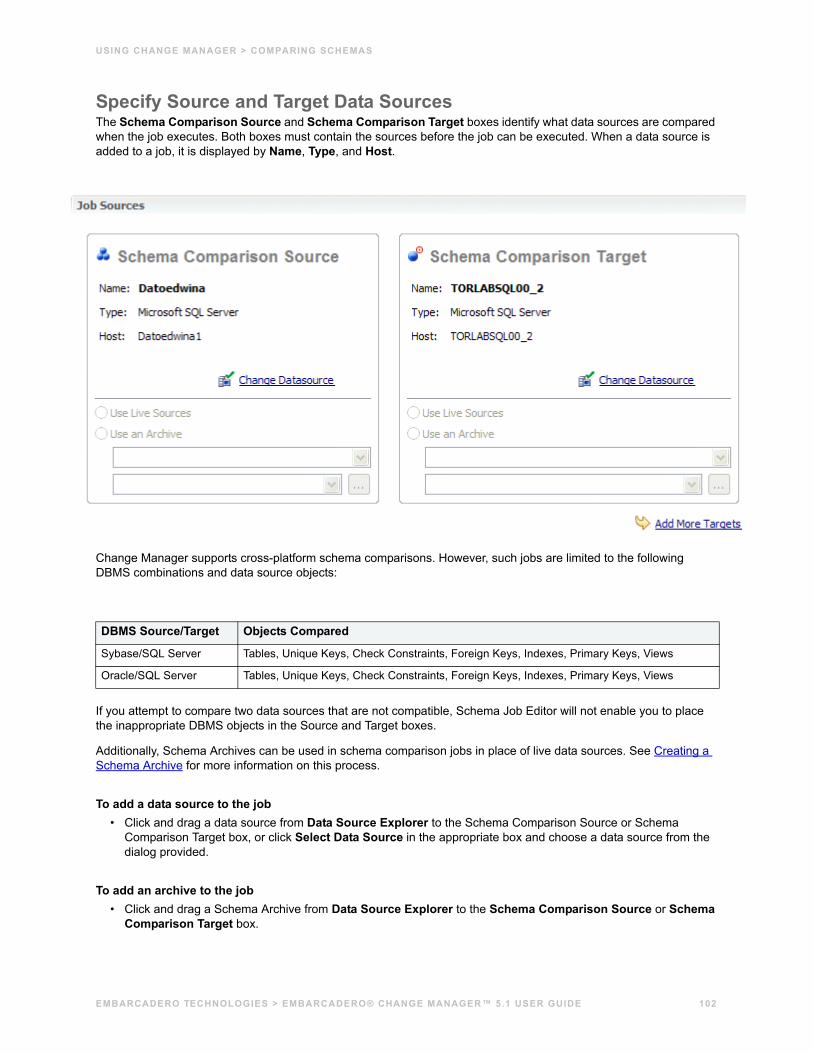
USING CHANGE MANAGER > COMPARING SCHEMAS
Specify Source and Target Data SourcesThe Schema Comparison Source and Schema Comparison Target boxes identify what data sources are compared when the job executes. Both boxes must contain the sources before the job can be executed. When a data source is added to a job, it is displayed by Name, Type, and Host.
Change Manager supports cross-platform schema comparisons. However, such jobs are limited to the following DBMS combinations and data source objects:
If you attempt to compare two data sources that are not compatible, Schema Job Editor will not enable you to place the inappropriate DBMS objects in the Source and Target boxes.
Additionally, Schema Archives can be used in schema comparison jobs in place of live data sources. See Creating a Schema Archive for more information on this process.
To add a data source to the job• Click and drag a data source from Data Source Explorer to the Schema Comparison Source or Schema
Comparison Target box, or click Select Data Source in the appropriate box and choose a data source from the dialog provided.
To add an archive to the job• Click and drag a Schema Archive from Data Source Explorer to the Schema Comparison Source or Schema
Comparison Target box.
DBMS Source/Target Objects Compared
Sybase/SQL Server Tables, Unique Keys, Check Constraints, Foreign Keys, Indexes, Primary Keys, Views
Oracle/SQL Server Tables, Unique Keys, Check Constraints, Foreign Keys, Indexes, Primary Keys, Views
EMBARCADERO TECHNOLOGIES > EMBARCADERO® CHANGE MANAGER™ 5.1 USER GUIDE 102
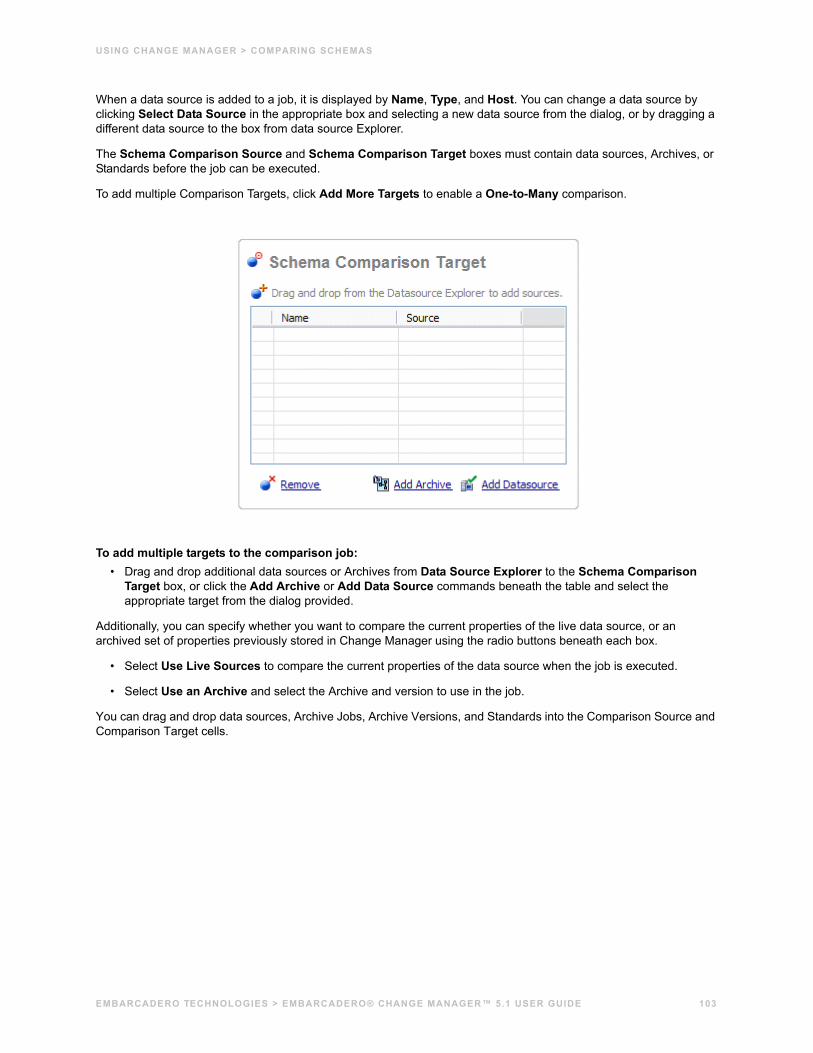
USING CHANGE MANAGER > COMPARING SCHEMAS
When a data source is added to a job, it is displayed by Name, Type, and Host. You can change a data source by clicking Select Data Source in the appropriate box and selecting a new data source from the dialog, or by dragging a different data source to the box from data source Explorer.
The Schema Comparison Source and Schema Comparison Target boxes must contain data sources, Archives, or Standards before the job can be executed.
To add multiple Comparison Targets, click Add More Targets to enable a One-to-Many comparison.
To add multiple targets to the comparison job:• Drag and drop additional data sources or Archives from Data Source Explorer to the Schema Comparison
Target box, or click the Add Archive or Add Data Source commands beneath the table and select the appropriate target from the dialog provided.
Additionally, you can specify whether you want to compare the current properties of the live data source, or an archived set of properties previously stored in Change Manager using the radio buttons beneath each box.
• Select Use Live Sources to compare the current properties of the data source when the job is executed.
• Select Use an Archive and select the Archive and version to use in the job.
You can drag and drop data sources, Archive Jobs, Archive Versions, and Standards into the Comparison Source and Comparison Target cells.
EMBARCADERO TECHNOLOGIES > EMBARCADERO® CHANGE MANAGER™ 5.1 USER GUIDE 103
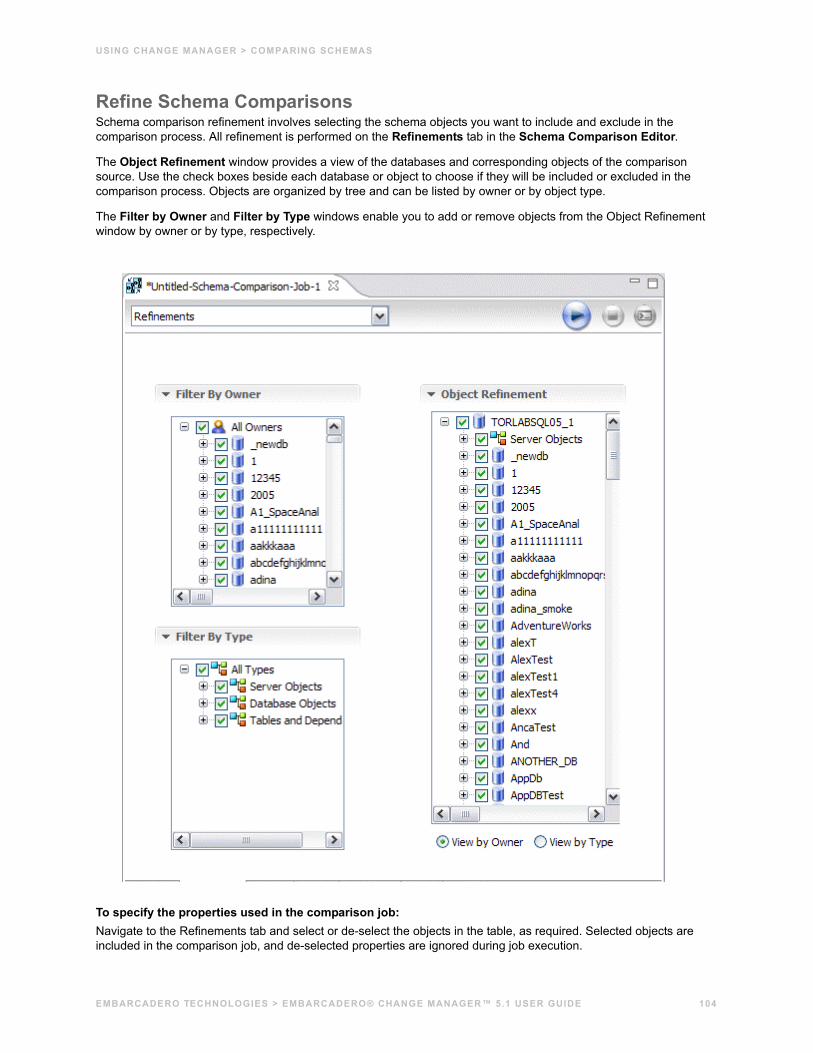
USING CHANGE MANAGER > COMPARING SCHEMAS
Refine Schema ComparisonsSchema comparison refinement involves selecting the schema objects you want to include and exclude in the comparison process. All refinement is performed on the Refinements tab in the Schema Comparison Editor.
The Object Refinement window provides a view of the databases and corresponding objects of the comparison source. Use the check boxes beside each database or object to choose if they will be included or excluded in the comparison process. Objects are organized by tree and can be listed by owner or by object type.
The Filter by Owner and Filter by Type windows enable you to add or remove objects from the Object Refinement window by owner or by type, respectively.
To specify the properties used in the comparison job:Navigate to the Refinements tab and select or de-select the objects in the table, as required. Selected objects are included in the comparison job, and de-selected properties are ignored during job execution.
EMBARCADERO TECHNOLOGIES > EMBARCADERO® CHANGE MANAGER™ 5.1 USER GUIDE 104
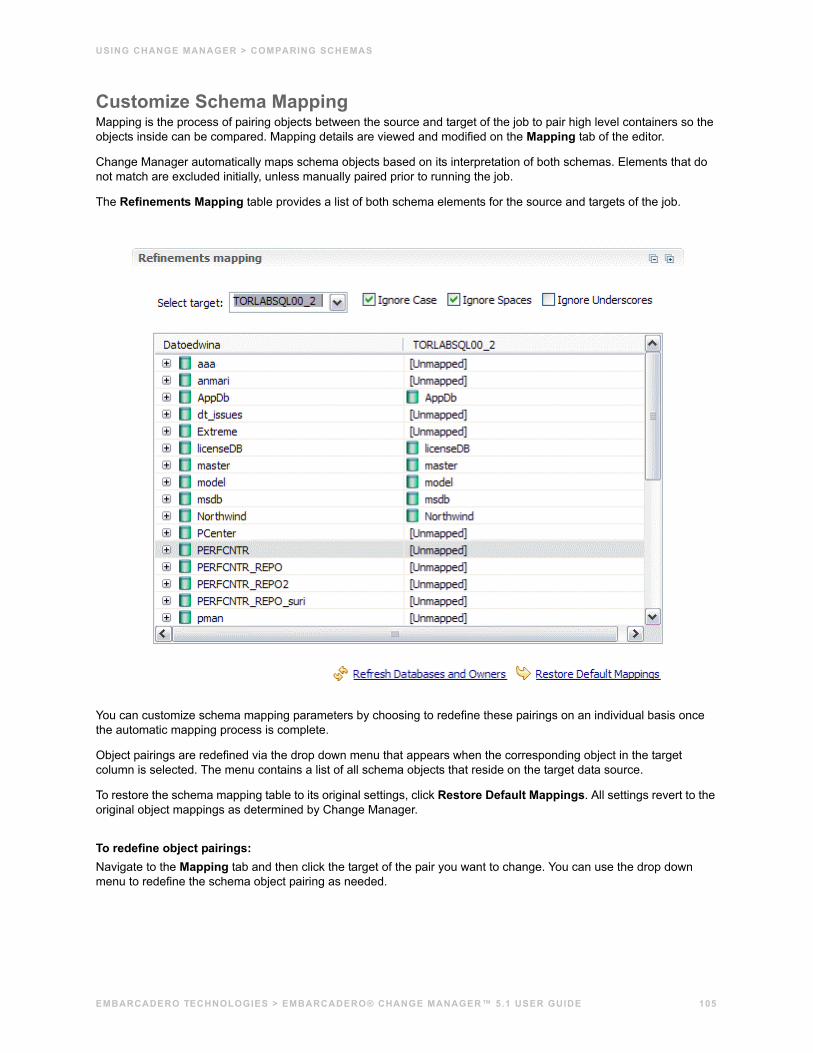
USING CHANGE MANAGER > COMPARING SCHEMAS
Customize Schema MappingMapping is the process of pairing objects between the source and target of the job to pair high level containers so the objects inside can be compared. Mapping details are viewed and modified on the Mapping tab of the editor.
Change Manager automatically maps schema objects based on its interpretation of both schemas. Elements that do not match are excluded initially, unless manually paired prior to running the job.
The Refinements Mapping table provides a list of both schema elements for the source and targets of the job.
You can customize schema mapping parameters by choosing to redefine these pairings on an individual basis once the automatic mapping process is complete.
Object pairings are redefined via the drop down menu that appears when the corresponding object in the target column is selected. The menu contains a list of all schema objects that reside on the target data source.
To restore the schema mapping table to its original settings, click Restore Default Mappings. All settings revert to the original object mappings as determined by Change Manager.
To redefine object pairings:Navigate to the Mapping tab and then click the target of the pair you want to change. You can use the drop down menu to redefine the schema object pairing as needed.
EMBARCADERO TECHNOLOGIES > EMBARCADERO® CHANGE MANAGER™ 5.1 USER GUIDE 105
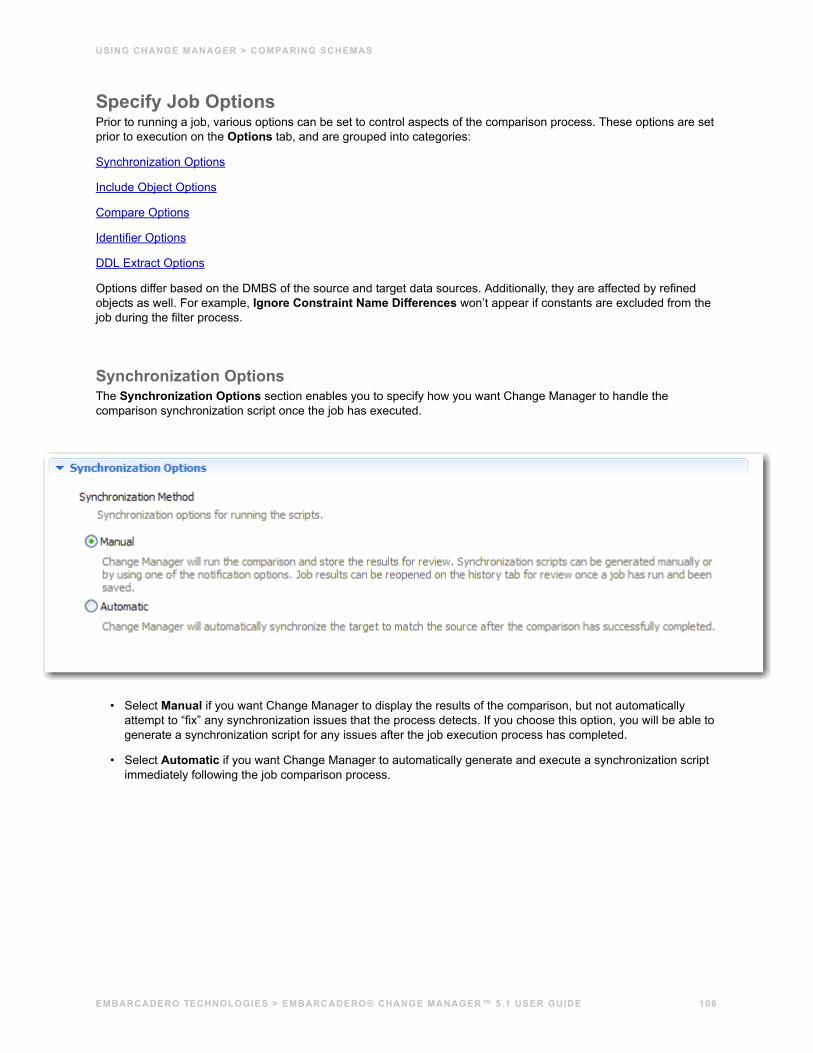
USING CHANGE MANAGER > COMPARING SCHEMAS
Specify Job OptionsPrior to running a job, various options can be set to control aspects of the comparison process. These options are set prior to execution on the Options tab, and are grouped into categories:
Synchronization Options
Include Object Options
Compare Options
Identifier Options
DDL Extract Options
Options differ based on the DMBS of the source and target data sources. Additionally, they are affected by refined objects as well. For example, Ignore Constraint Name Differences won’t appear if constants are excluded from the job during the filter process.
Synchronization OptionsThe Synchronization Options section enables you to specify how you want Change Manager to handle the comparison synchronization script once the job has executed.
• Select Manual if you want Change Manager to display the results of the comparison, but not automatically attempt to “fix” any synchronization issues that the process detects. If you choose this option, you will be able to generate a synchronization script for any issues after the job execution process has completed.
• Select Automatic if you want Change Manager to automatically generate and execute a synchronization script immediately following the job comparison process.
EMBARCADERO TECHNOLOGIES > EMBARCADERO® CHANGE MANAGER™ 5.1 USER GUIDE 106
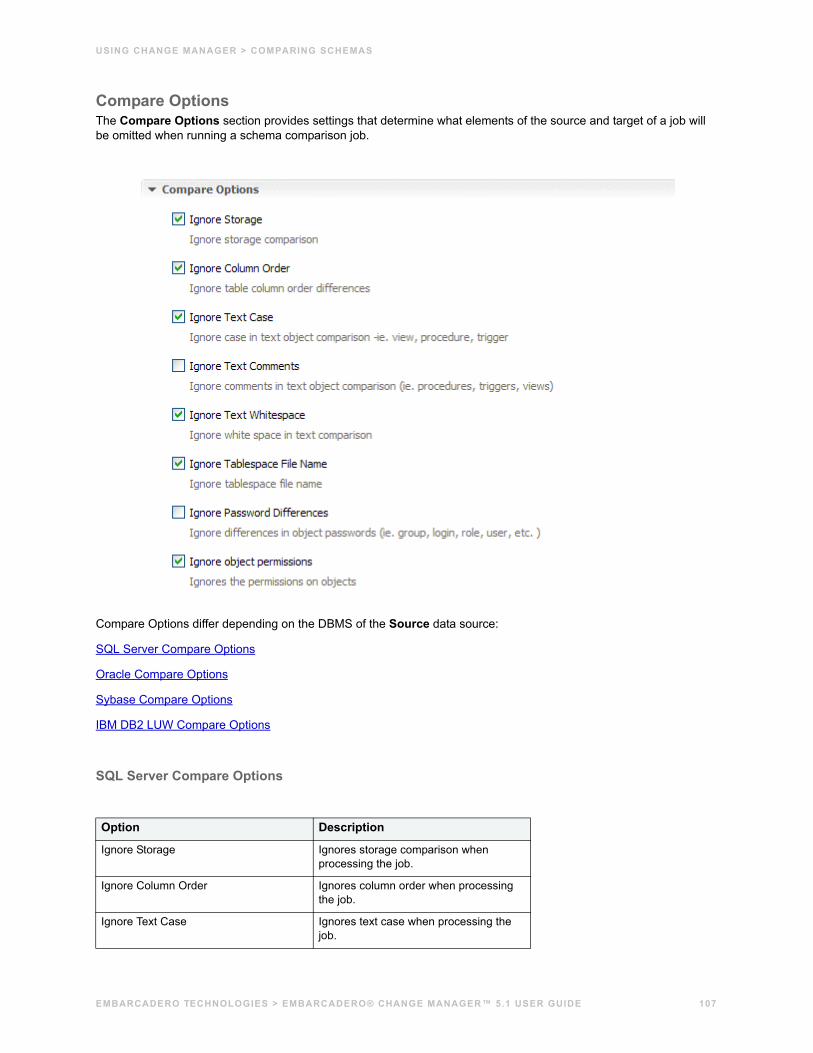
USING CHANGE MANAGER > COMPARING SCHEMAS
Compare OptionsThe Compare Options section provides settings that determine what elements of the source and target of a job will be omitted when running a schema comparison job.
Compare Options differ depending on the DBMS of the Source data source:
SQL Server Compare Options
Oracle Compare Options
Sybase Compare Options
IBM DB2 LUW Compare Options
SQL Server Compare Options
Option Description
Ignore Storage Ignores storage comparison when processing the job.
Ignore Column Order Ignores column order when processing the job.
Ignore Text Case Ignores text case when processing the job.
EMBARCADERO TECHNOLOGIES > EMBARCADERO® CHANGE MANAGER™ 5.1 USER GUIDE 107
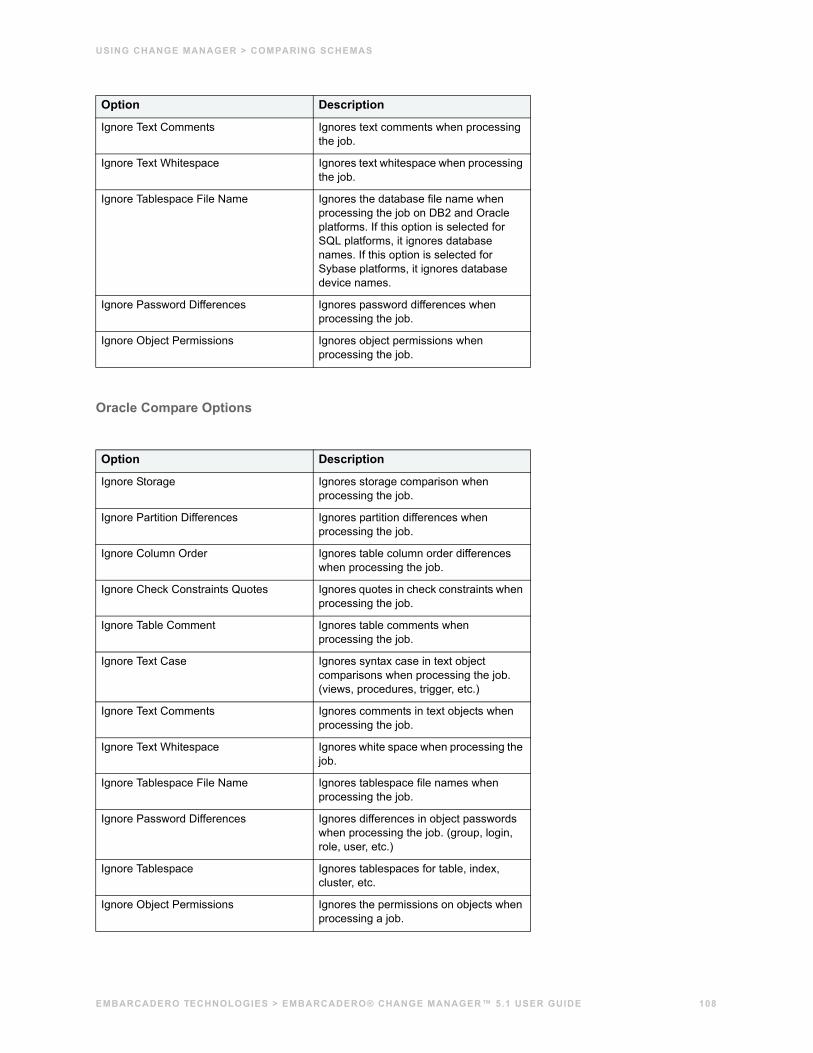
USING CHANGE MANAGER > COMPARING SCHEMAS
Oracle Compare Options
Ignore Text Comments Ignores text comments when processing the job.
Ignore Text Whitespace Ignores text whitespace when processing the job.
Ignore Tablespace File Name Ignores the database file name when processing the job on DB2 and Oracle platforms. If this option is selected for SQL platforms, it ignores database names. If this option is selected for Sybase platforms, it ignores database device names.
Ignore Password Differences Ignores password differences when processing the job.
Ignore Object Permissions Ignores object permissions when processing the job.
Option Description
Ignore Storage Ignores storage comparison when processing the job.
Ignore Partition Differences Ignores partition differences when processing the job.
Ignore Column Order Ignores table column order differences when processing the job.
Ignore Check Constraints Quotes Ignores quotes in check constraints when processing the job.
Ignore Table Comment Ignores table comments when processing the job.
Ignore Text Case Ignores syntax case in text object comparisons when processing the job. (views, procedures, trigger, etc.)
Ignore Text Comments Ignores comments in text objects when processing the job.
Ignore Text Whitespace Ignores white space when processing the job.
Ignore Tablespace File Name Ignores tablespace file names when processing the job.
Ignore Password Differences Ignores differences in object passwords when processing the job. (group, login, role, user, etc.)
Ignore Tablespace Ignores tablespaces for table, index, cluster, etc.
Ignore Object Permissions Ignores the permissions on objects when processing a job.
Option Description
EMBARCADERO TECHNOLOGIES > EMBARCADERO® CHANGE MANAGER™ 5.1 USER GUIDE 108
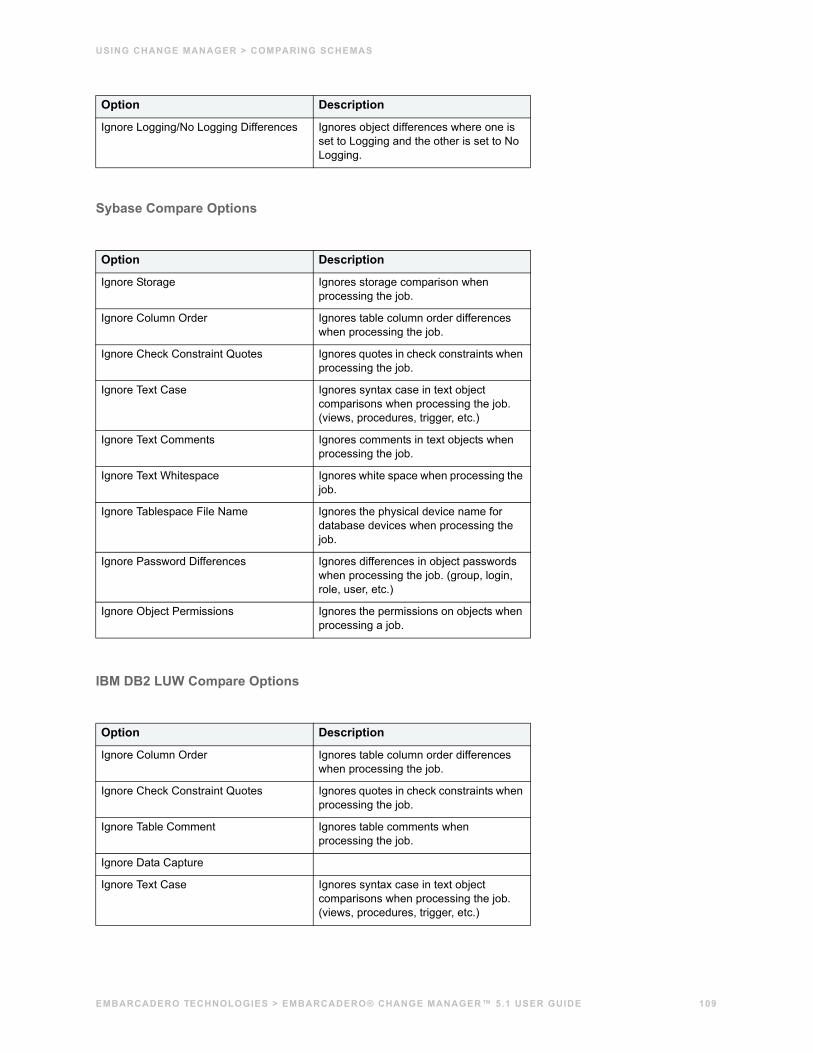
USING CHANGE MANAGER > COMPARING SCHEMAS
Sybase Compare Options
IBM DB2 LUW Compare Options
Ignore Logging/No Logging Differences Ignores object differences where one is set to Logging and the other is set to No Logging.
Option Description
Ignore Storage Ignores storage comparison when processing the job.
Ignore Column Order Ignores table column order differences when processing the job.
Ignore Check Constraint Quotes Ignores quotes in check constraints when processing the job.
Ignore Text Case Ignores syntax case in text object comparisons when processing the job. (views, procedures, trigger, etc.)
Ignore Text Comments Ignores comments in text objects when processing the job.
Ignore Text Whitespace Ignores white space when processing the job.
Ignore Tablespace File Name Ignores the physical device name for database devices when processing the job.
Ignore Password Differences Ignores differences in object passwords when processing the job. (group, login, role, user, etc.)
Ignore Object Permissions Ignores the permissions on objects when processing a job.
Option Description
Ignore Column Order Ignores table column order differences when processing the job.
Ignore Check Constraint Quotes Ignores quotes in check constraints when processing the job.
Ignore Table Comment Ignores table comments when processing the job.
Ignore Data Capture
Ignore Text Case Ignores syntax case in text object comparisons when processing the job. (views, procedures, trigger, etc.)
Option Description
EMBARCADERO TECHNOLOGIES > EMBARCADERO® CHANGE MANAGER™ 5.1 USER GUIDE 109
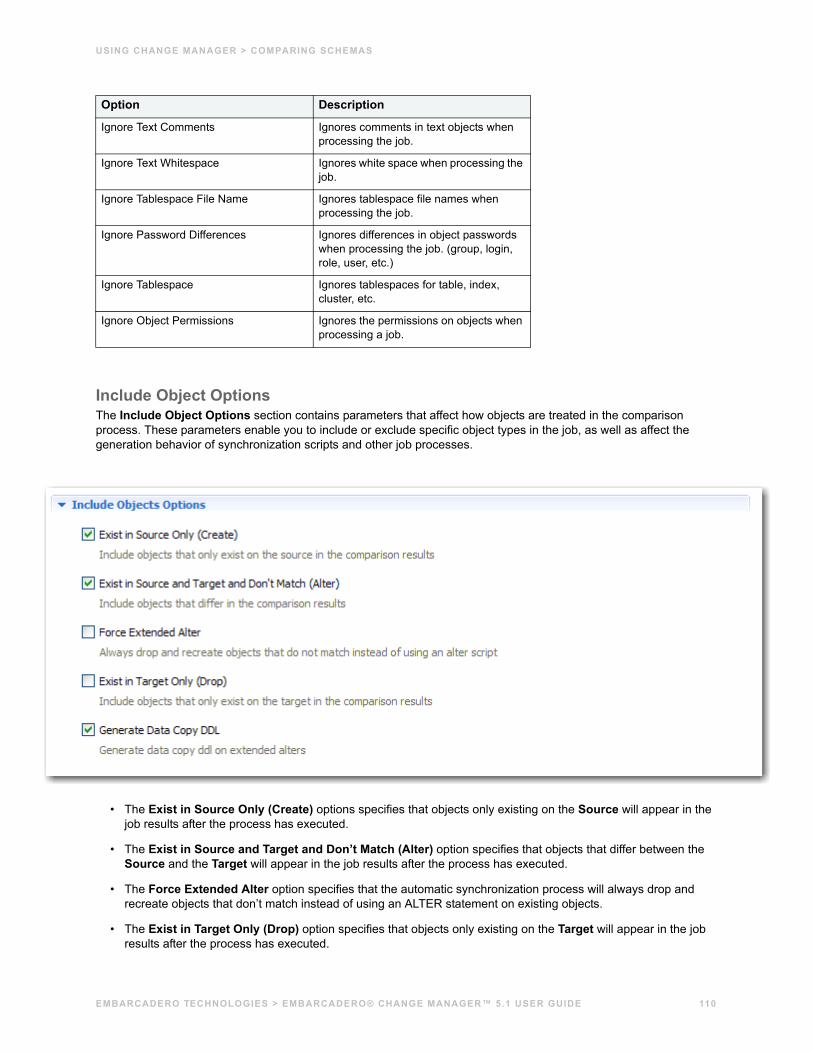
USING CHANGE MANAGER > COMPARING SCHEMAS
Include Object OptionsThe Include Object Options section contains parameters that affect how objects are treated in the comparison process. These parameters enable you to include or exclude specific object types in the job, as well as affect the generation behavior of synchronization scripts and other job processes.
• The Exist in Source Only (Create) options specifies that objects only existing on the Source will appear in the job results after the process has executed.
• The Exist in Source and Target and Don’t Match (Alter) option specifies that objects that differ between the Source and the Target will appear in the job results after the process has executed.
• The Force Extended Alter option specifies that the automatic synchronization process will always drop and recreate objects that don’t match instead of using an ALTER statement on existing objects.
• The Exist in Target Only (Drop) option specifies that objects only existing on the Target will appear in the job results after the process has executed.
Ignore Text Comments Ignores comments in text objects when processing the job.
Ignore Text Whitespace Ignores white space when processing the job.
Ignore Tablespace File Name Ignores tablespace file names when processing the job.
Ignore Password Differences Ignores differences in object passwords when processing the job. (group, login, role, user, etc.)
Ignore Tablespace Ignores tablespaces for table, index, cluster, etc.
Ignore Object Permissions Ignores the permissions on objects when processing a job.
Option Description
EMBARCADERO TECHNOLOGIES > EMBARCADERO® CHANGE MANAGER™ 5.1 USER GUIDE 110
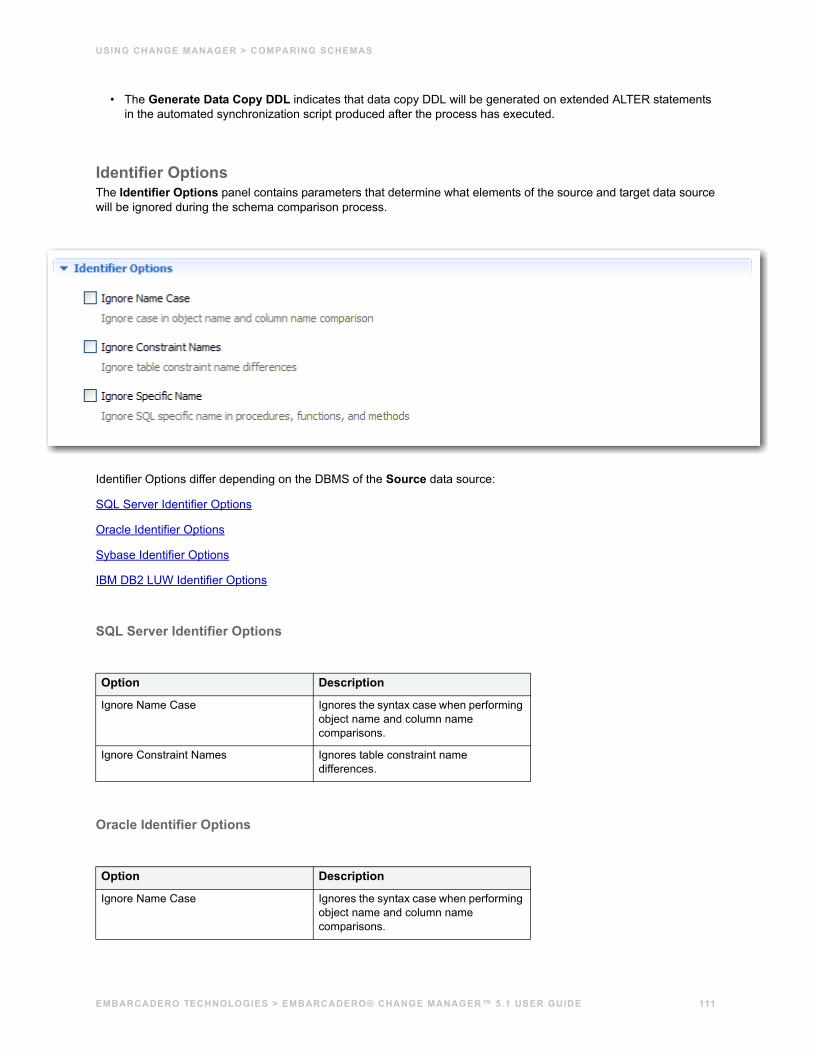
USING CHANGE MANAGER > COMPARING SCHEMAS
• The Generate Data Copy DDL indicates that data copy DDL will be generated on extended ALTER statements in the automated synchronization script produced after the process has executed.
Identifier OptionsThe Identifier Options panel contains parameters that determine what elements of the source and target data source will be ignored during the schema comparison process.
Identifier Options differ depending on the DBMS of the Source data source:
SQL Server Identifier Options
Oracle Identifier Options
Sybase Identifier Options
IBM DB2 LUW Identifier Options
SQL Server Identifier Options
Oracle Identifier Options
Option Description
Ignore Name Case Ignores the syntax case when performing object name and column name comparisons.
Ignore Constraint Names Ignores table constraint name differences.
Option Description
Ignore Name Case Ignores the syntax case when performing object name and column name comparisons.
EMBARCADERO TECHNOLOGIES > EMBARCADERO® CHANGE MANAGER™ 5.1 USER GUIDE 111
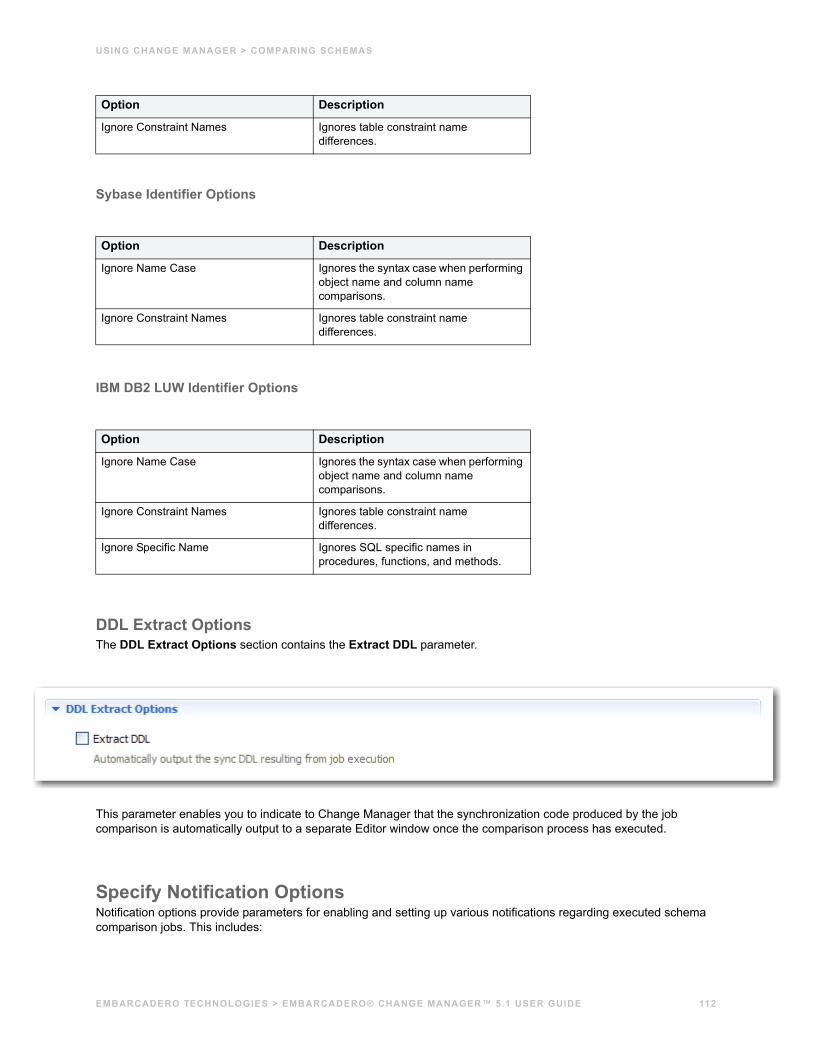
USING CHANGE MANAGER > COMPARING SCHEMAS
Sybase Identifier Options
IBM DB2 LUW Identifier Options
DDL Extract OptionsThe DDL Extract Options section contains the Extract DDL parameter.
This parameter enables you to indicate to Change Manager that the synchronization code produced by the job comparison is automatically output to a separate Editor window once the comparison process has executed.
Specify Notification OptionsNotification options provide parameters for enabling and setting up various notifications regarding executed schema comparison jobs. This includes:
Ignore Constraint Names Ignores table constraint name differences.
Option Description
Ignore Name Case Ignores the syntax case when performing object name and column name comparisons.
Ignore Constraint Names Ignores table constraint name differences.
Option Description
Ignore Name Case Ignores the syntax case when performing object name and column name comparisons.
Ignore Constraint Names Ignores table constraint name differences.
Ignore Specific Name Ignores SQL specific names in procedures, functions, and methods.
Option Description
EMBARCADERO TECHNOLOGIES > EMBARCADERO® CHANGE MANAGER™ 5.1 USER GUIDE 112
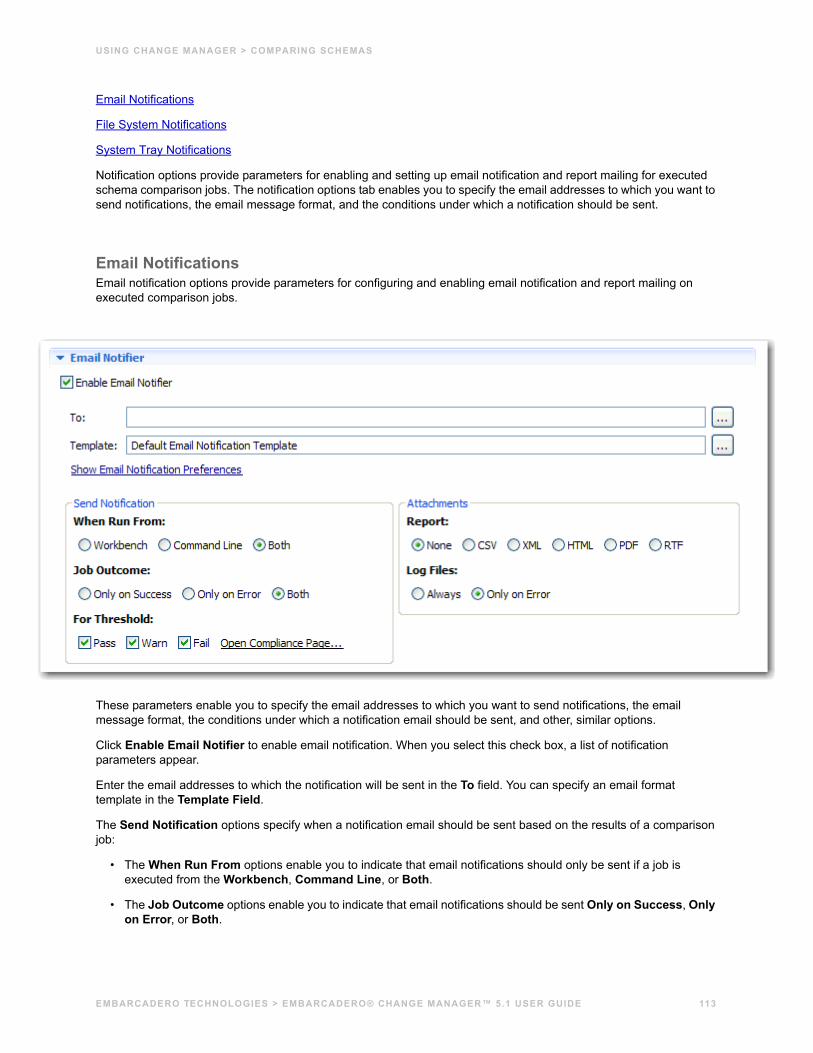
USING CHANGE MANAGER > COMPARING SCHEMAS
Email Notifications
File System Notifications
System Tray Notifications
Notification options provide parameters for enabling and setting up email notification and report mailing for executed schema comparison jobs. The notification options tab enables you to specify the email addresses to which you want to send notifications, the email message format, and the conditions under which a notification should be sent.
Email NotificationsEmail notification options provide parameters for configuring and enabling email notification and report mailing on executed comparison jobs.
These parameters enable you to specify the email addresses to which you want to send notifications, the email message format, the conditions under which a notification email should be sent, and other, similar options.
Click Enable Email Notifier to enable email notification. When you select this check box, a list of notification parameters appear.
Enter the email addresses to which the notification will be sent in the To field. You can specify an email format template in the Template Field.
The Send Notification options specify when a notification email should be sent based on the results of a comparison job:
• The When Run From options enable you to indicate that email notifications should only be sent if a job is executed from the Workbench, Command Line, or Both.
• The Job Outcome options enable you to indicate that email notifications should be sent Only on Success, Only on Error, or Both.
EMBARCADERO TECHNOLOGIES > EMBARCADERO® CHANGE MANAGER™ 5.1 USER GUIDE 113
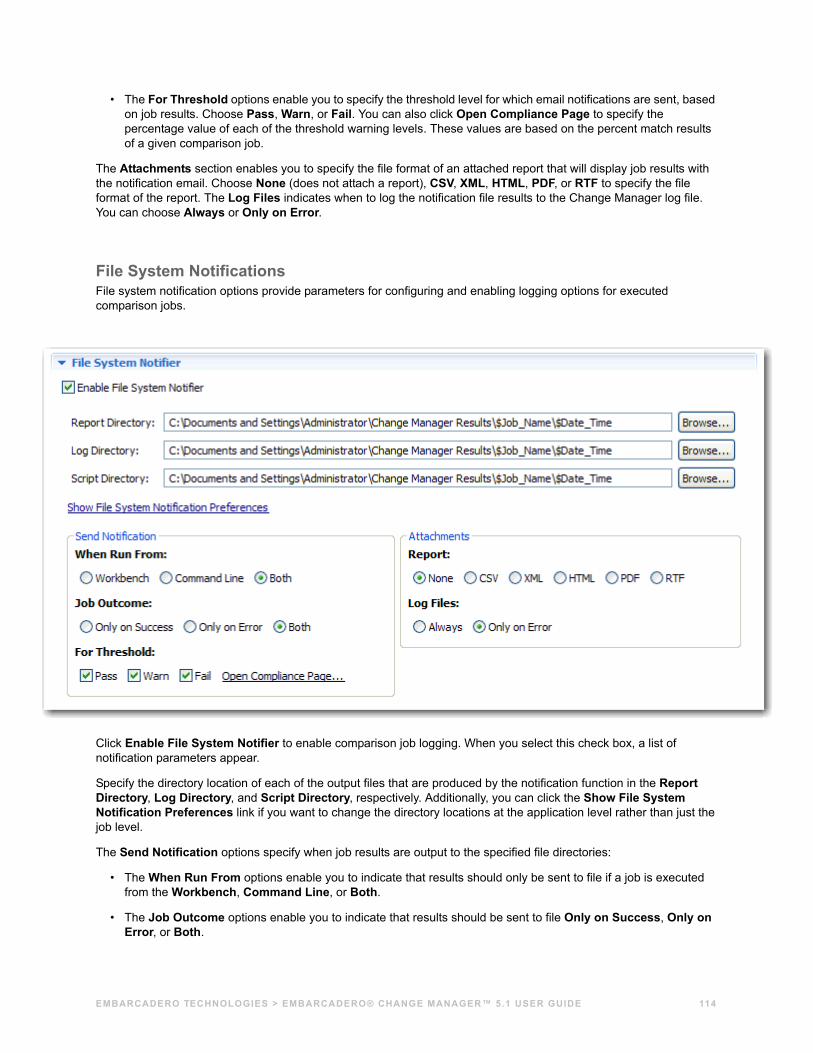
• The For Threshold options enable you to specify the threshold level for which email notifications are sent, based on job results. Choose Pass, Warn, or Fail. You can also click Open Compliance Page to specify the percentage value of each of the threshold warning levels. These values are based on the percent match results of a given comparison job.
The Attachments section enables you to specify the file format of an attached report that will display job results with the notification email. Choose None (does not attach a report), CSV, XML, HTML, PDF, or RTF to specify the file format of the report. The Log Files indicates when to log the notification file results to the Change Manager log file. You can choose Always or Only on Error.
File System NotificationsFile system notification options provide parameters for configuring and enabling logging options for executed comparison jobs.
Click Enable File System Notifier to enable comparison job logging. When you select this check box, a list of notification parameters appear.
Specify the directory location of each of the output files that are produced by the notification function in the Report Directory, Log Directory, and Script Directory, respectively. Additionally, you can click the Show File System Notification Preferences link if you want to change the directory locations at the application level rather than just the job level.
The Send Notification options specify when job results are output to the specified file directories:
• The When Run From options enable you to indicate that results should only be sent to file if a job is executed from the Workbench, Command Line, or Both.
• The Job Outcome options enable you to indicate that results should be sent to file Only on Success, Only on Error, or Both.
EMBARCADERO TECHNOLOGIES > EMBARCADERO® CHANGE MANAGER™ 5.1 USER GUIDE 114
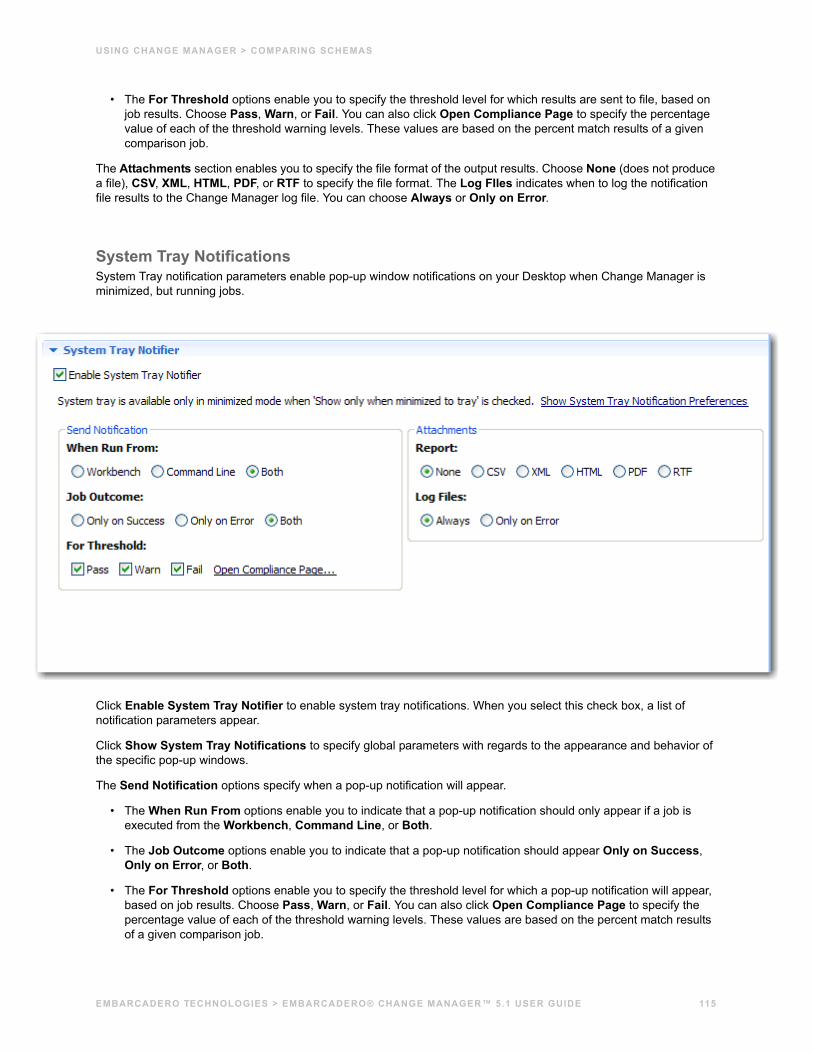
USING CHANGE MANAGER > COMPARING SCHEMAS
• The For Threshold options enable you to specify the threshold level for which results are sent to file, based on job results. Choose Pass, Warn, or Fail. You can also click Open Compliance Page to specify the percentage value of each of the threshold warning levels. These values are based on the percent match results of a given comparison job.
The Attachments section enables you to specify the file format of the output results. Choose None (does not produce a file), CSV, XML, HTML, PDF, or RTF to specify the file format. The Log FIles indicates when to log the notification file results to the Change Manager log file. You can choose Always or Only on Error.
System Tray NotificationsSystem Tray notification parameters enable pop-up window notifications on your Desktop when Change Manager is minimized, but running jobs.
Click Enable System Tray Notifier to enable system tray notifications. When you select this check box, a list of notification parameters appear.
Click Show System Tray Notifications to specify global parameters with regards to the appearance and behavior of the specific pop-up windows.
The Send Notification options specify when a pop-up notification will appear.
• The When Run From options enable you to indicate that a pop-up notification should only appear if a job is executed from the Workbench, Command Line, or Both.
• The Job Outcome options enable you to indicate that a pop-up notification should appear Only on Success, Only on Error, or Both.
• The For Threshold options enable you to specify the threshold level for which a pop-up notification will appear, based on job results. Choose Pass, Warn, or Fail. You can also click Open Compliance Page to specify the percentage value of each of the threshold warning levels. These values are based on the percent match results of a given comparison job.
EMBARCADERO TECHNOLOGIES > EMBARCADERO® CHANGE MANAGER™ 5.1 USER GUIDE 115
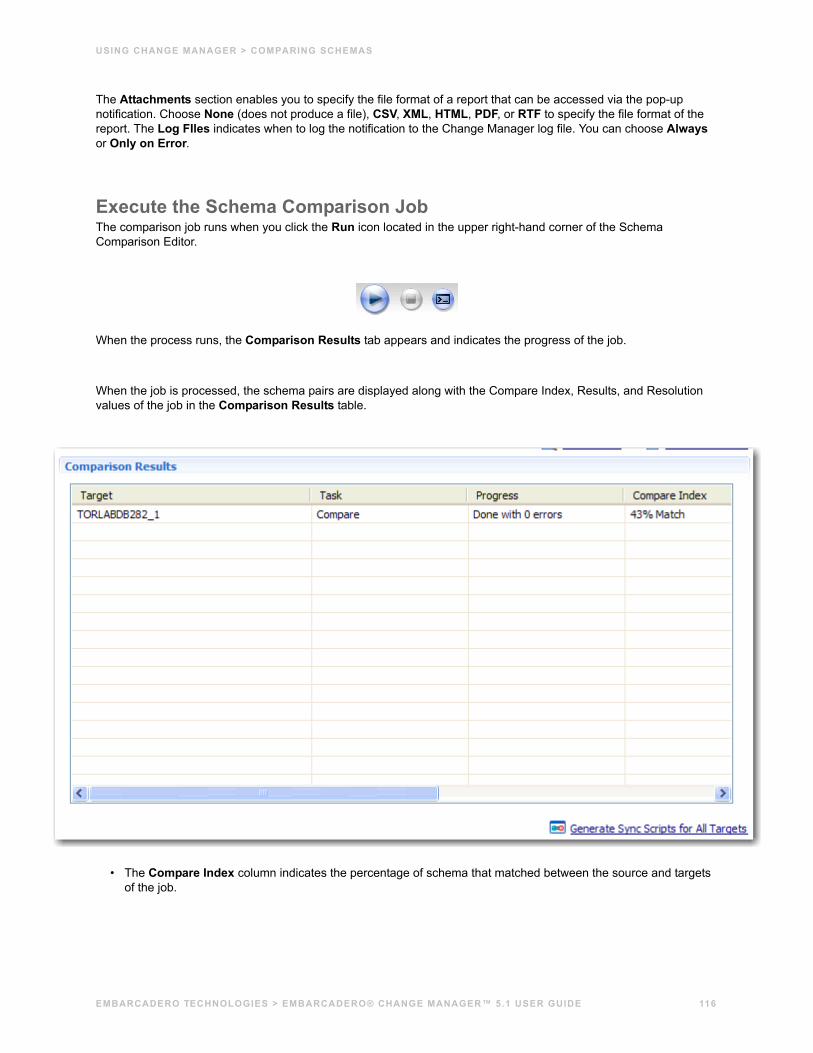
USING CHANGE MANAGER > COMPARING SCHEMAS
The Attachments section enables you to specify the file format of a report that can be accessed via the pop-up notification. Choose None (does not produce a file), CSV, XML, HTML, PDF, or RTF to specify the file format of the report. The Log FIles indicates when to log the notification to the Change Manager log file. You can choose Always or Only on Error.
Execute the Schema Comparison JobThe comparison job runs when you click the Run icon located in the upper right-hand corner of the Schema Comparison Editor.
When the process runs, the Comparison Results tab appears and indicates the progress of the job.
When the job is processed, the schema pairs are displayed along with the Compare Index, Results, and Resolution values of the job in the Comparison Results table.
• The Compare Index column indicates the percentage of schema that matched between the source and targets of the job.
EMBARCADERO TECHNOLOGIES > EMBARCADERO® CHANGE MANAGER™ 5.1 USER GUIDE 116
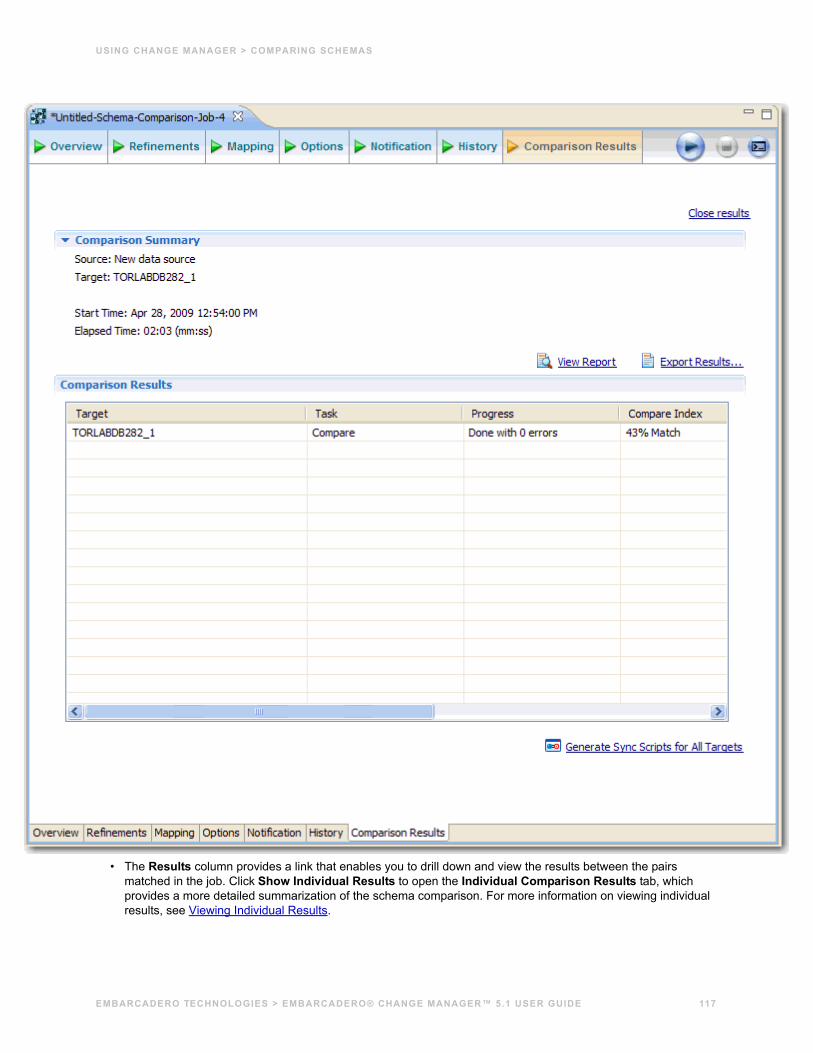
USING CHANGE MANAGER > COMPARING SCHEMAS
• The Results column provides a link that enables you to drill down and view the results between the pairs matched in the job. Click Show Individual Results to open the Individual Comparison Results tab, which provides a more detailed summarization of the schema comparison. For more information on viewing individual results, see Viewing Individual Results.
EMBARCADERO TECHNOLOGIES > EMBARCADERO® CHANGE MANAGER™ 5.1 USER GUIDE 117

USING CHANGE MANAGER > COMPARING SCHEMAS
• The Resolution column provides a command that produces a synchronization script that, when executed, will automatically synchronizes the compared schema. For more information on generating a synchronization script, see Resolve Schema via a Generated SQL Script.
• The Errors column indicates how many errors were encountered during the comparison process, and provides a link to view them in a separate dialog window.
EMBARCADERO TECHNOLOGIES > EMBARCADERO® CHANGE MANAGER™ 5.1 USER GUIDE 118
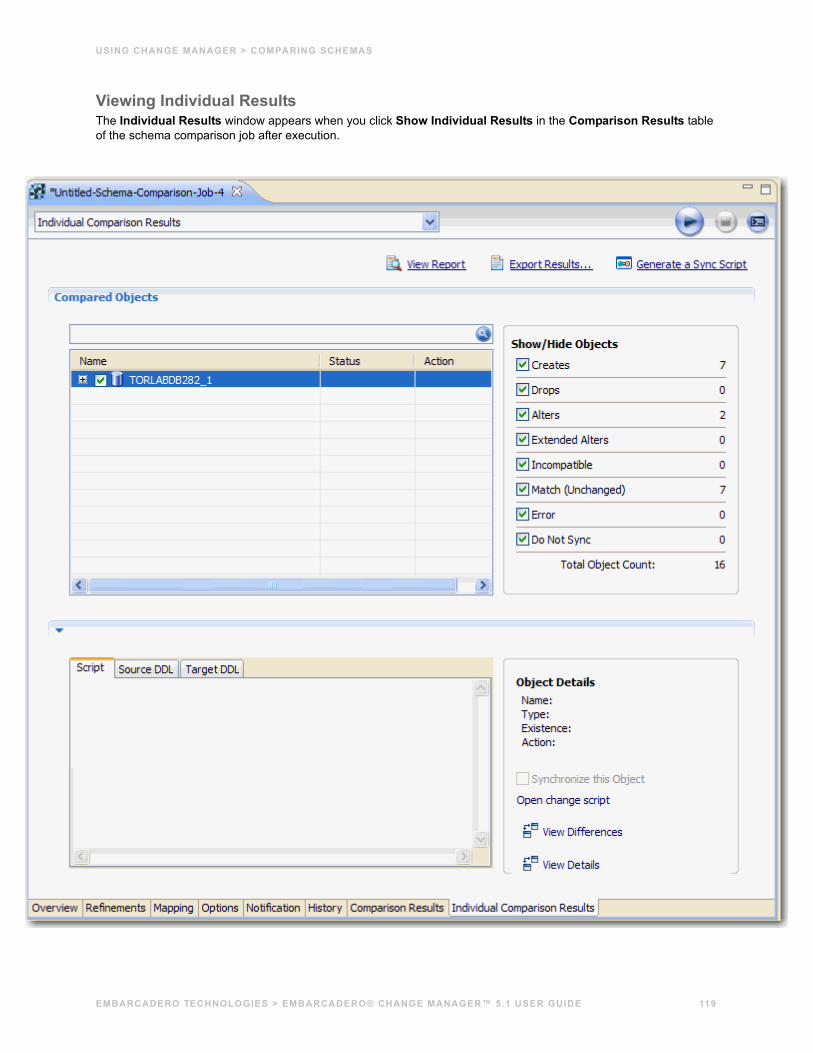
USING CHANGE MANAGER > COMPARING SCHEMAS
Viewing Individual ResultsThe Individual Results window appears when you click Show Individual Results in the Comparison Results table of the schema comparison job after execution.
EMBARCADERO TECHNOLOGIES > EMBARCADERO® CHANGE MANAGER™ 5.1 USER GUIDE 119
USING CHANGE MANAGER > COMPARING SCHEMAS
• Click View Differences to view
• Click View Details to view the DDL between two results.
• You can save the individual results data to a .txt file by clicking Export to File.
Generating a Job ReportOnce you have run an archive job, you can generate a job report that summarizes the archived configuration information. You can also generate job reports for any archive versions that exist in the system. Click View Report on the Comparison Results tab.
EMBARCADERO TECHNOLOGIES > EMBARCADERO® CHANGE MANAGER™ 5.1 USER GUIDE 120
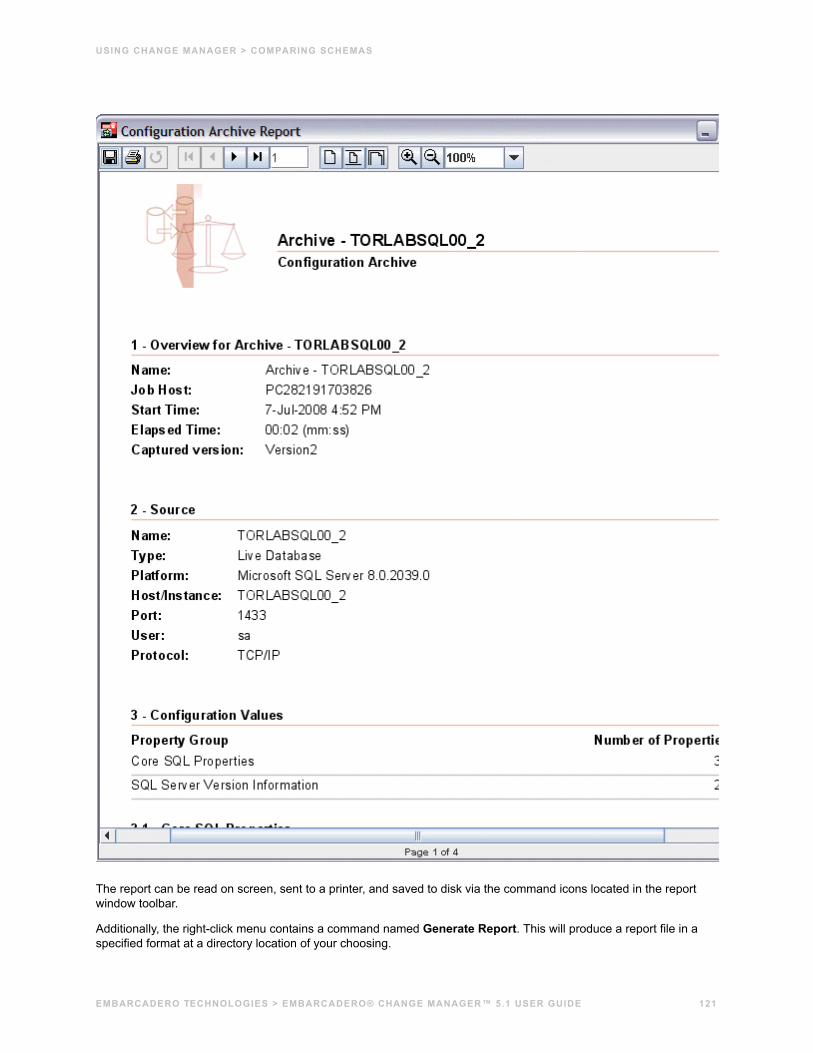
USING CHANGE MANAGER > COMPARING SCHEMAS
The report can be read on screen, sent to a printer, and saved to disk via the command icons located in the report window toolbar.
Additionally, the right-click menu contains a command named Generate Report. This will produce a report file in a specified format at a directory location of your choosing.
EMBARCADERO TECHNOLOGIES > EMBARCADERO® CHANGE MANAGER™ 5.1 USER GUIDE 121
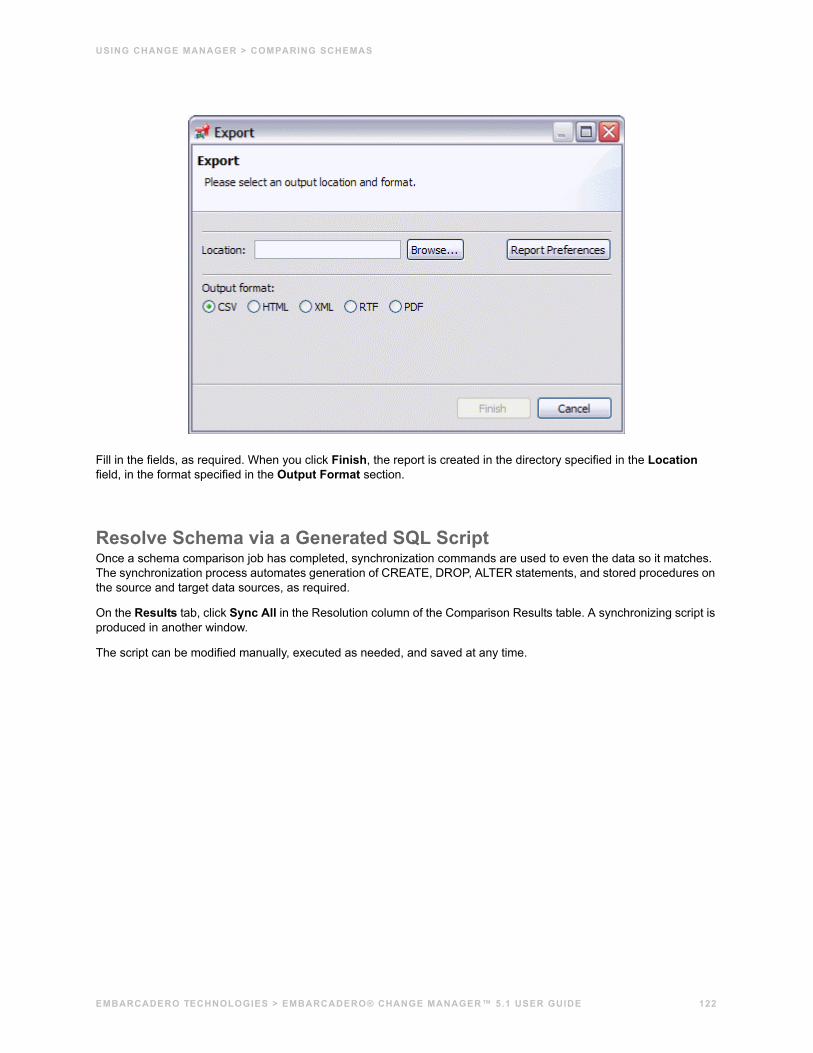
USING CHANGE MANAGER > COMPARING SCHEMAS
Fill in the fields, as required. When you click Finish, the report is created in the directory specified in the Location field, in the format specified in the Output Format section.
Resolve Schema via a Generated SQL ScriptOnce a schema comparison job has completed, synchronization commands are used to even the data so it matches. The synchronization process automates generation of CREATE, DROP, ALTER statements, and stored procedures on the source and target data sources, as required.
On the Results tab, click Sync All in the Resolution column of the Comparison Results table. A synchronizing script is produced in another window.
The script can be modified manually, executed as needed, and saved at any time.
EMBARCADERO TECHNOLOGIES > EMBARCADERO® CHANGE MANAGER™ 5.1 USER GUIDE 122
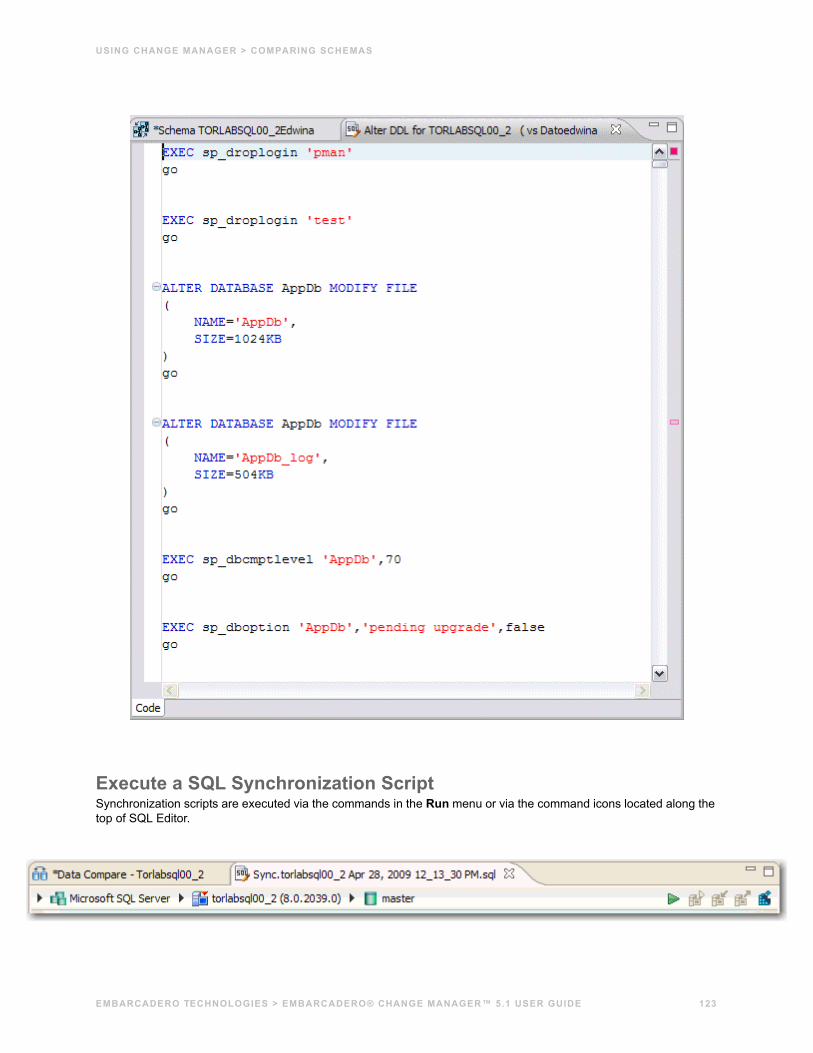
USING CHANGE MANAGER > COMPARING SCHEMAS
Execute a SQL Synchronization ScriptSynchronization scripts are executed via the commands in the Run menu or via the command icons located along the top of SQL Editor.
EMBARCADERO TECHNOLOGIES > EMBARCADERO® CHANGE MANAGER™ 5.1 USER GUIDE 123
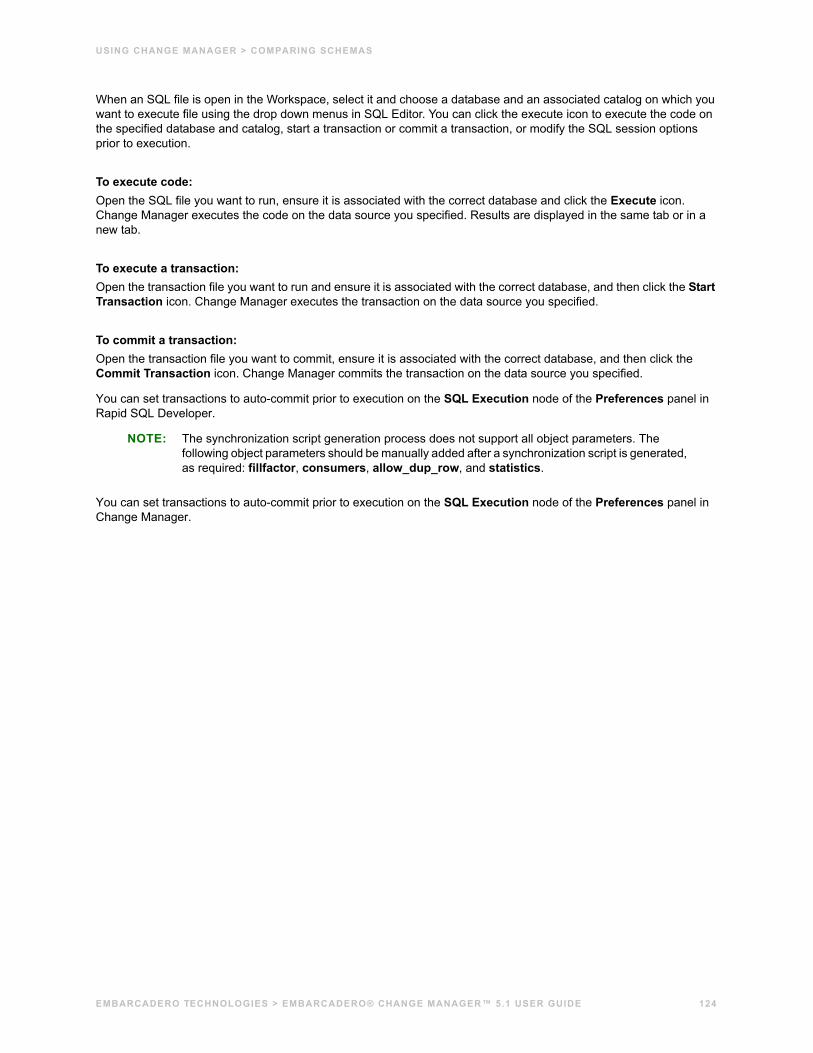
USING CHANGE MANAGER > COMPARING SCHEMAS
When an SQL file is open in the Workspace, select it and choose a database and an associated catalog on which you want to execute file using the drop down menus in SQL Editor. You can click the execute icon to execute the code on the specified database and catalog, start a transaction or commit a transaction, or modify the SQL session options prior to execution.
To execute code:Open the SQL file you want to run, ensure it is associated with the correct database and click the Execute icon. Change Manager executes the code on the data source you specified. Results are displayed in the same tab or in a new tab.
To execute a transaction:Open the transaction file you want to run and ensure it is associated with the correct database, and then click the Start Transaction icon. Change Manager executes the transaction on the data source you specified.
To commit a transaction:Open the transaction file you want to commit, ensure it is associated with the correct database, and then click the Commit Transaction icon. Change Manager commits the transaction on the data source you specified.
You can set transactions to auto-commit prior to execution on the SQL Execution node of the Preferences panel in Rapid SQL Developer.
NOTE: The synchronization script generation process does not support all object parameters. The following object parameters should be manually added after a synchronization script is generated, as required: fillfactor, consumers, allow_dup_row, and statistics.
You can set transactions to auto-commit prior to execution on the SQL Execution node of the Preferences panel in Change Manager.
EMBARCADERO TECHNOLOGIES > EMBARCADERO® CHANGE MANAGER™ 5.1 USER GUIDE 124
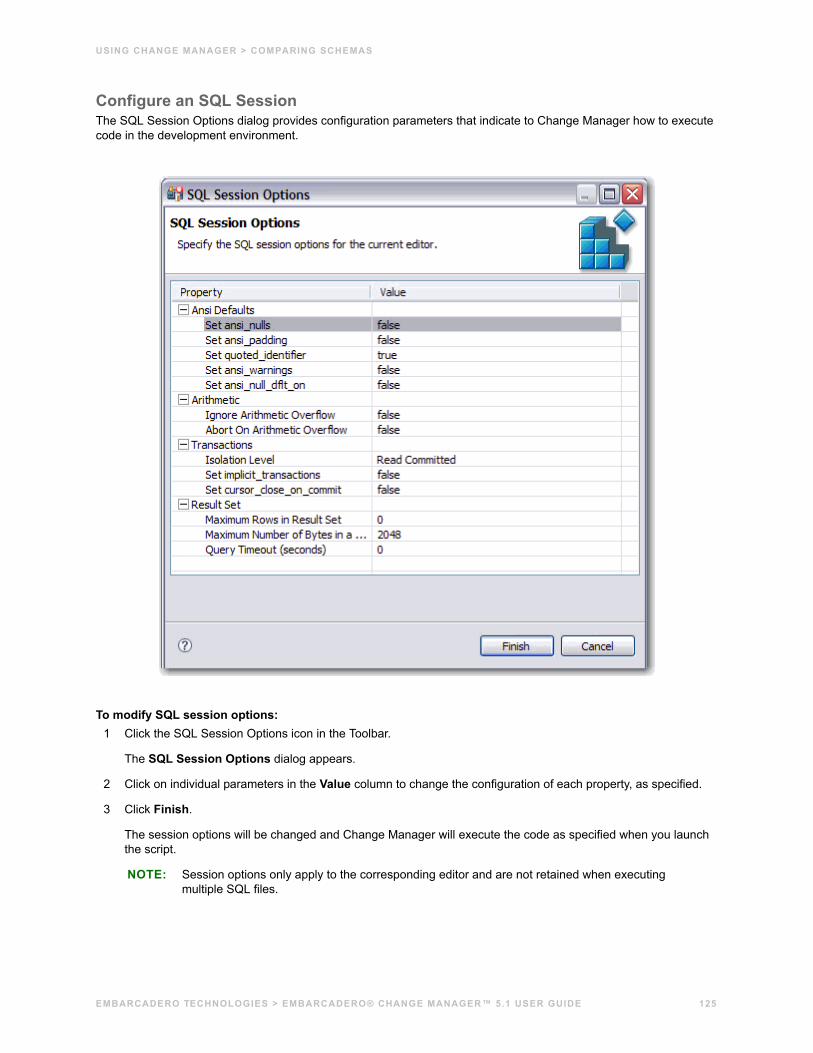
USING CHANGE MANAGER > COMPARING SCHEMAS
Configure an SQL SessionThe SQL Session Options dialog provides configuration parameters that indicate to Change Manager how to execute code in the development environment.
To modify SQL session options:1 Click the SQL Session Options icon in the Toolbar.
The SQL Session Options dialog appears.
2 Click on individual parameters in the Value column to change the configuration of each property, as specified.
3 Click Finish.
The session options will be changed and Change Manager will execute the code as specified when you launch the script.
NOTE: Session options only apply to the corresponding editor and are not retained when executing multiple SQL files.
EMBARCADERO TECHNOLOGIES > EMBARCADERO® CHANGE MANAGER™ 5.1 USER GUIDE 125
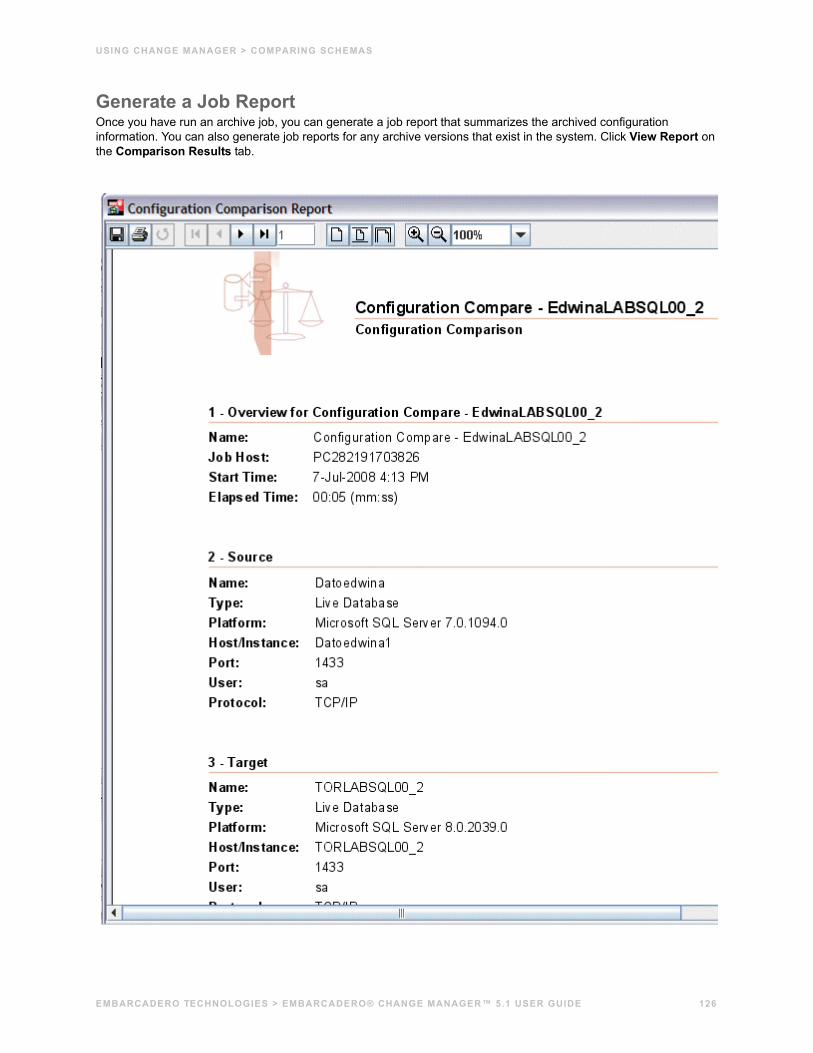
USING CHANGE MANAGER > COMPARING SCHEMAS
Generate a Job ReportOnce you have run an archive job, you can generate a job report that summarizes the archived configuration information. You can also generate job reports for any archive versions that exist in the system. Click View Report on the Comparison Results tab.
EMBARCADERO TECHNOLOGIES > EMBARCADERO® CHANGE MANAGER™ 5.1 USER GUIDE 126
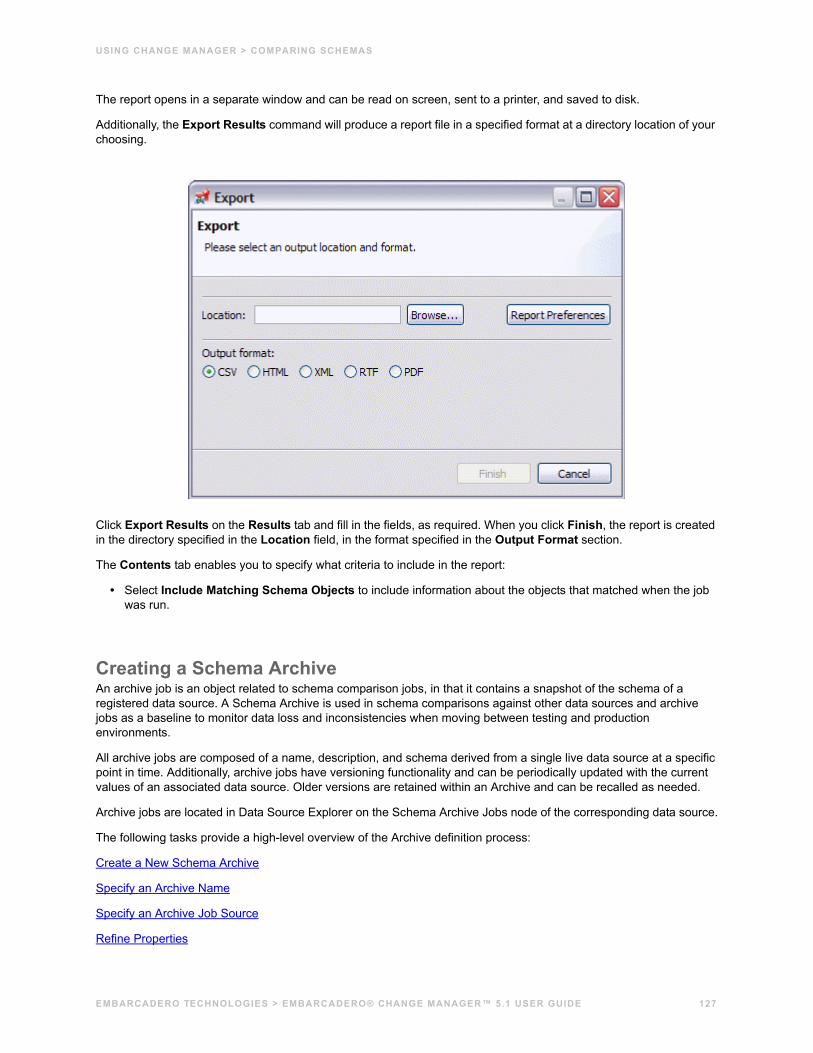
USING CHANGE MANAGER > COMPARING SCHEMAS
The report opens in a separate window and can be read on screen, sent to a printer, and saved to disk.
Additionally, the Export Results command will produce a report file in a specified format at a directory location of your choosing.
Click Export Results on the Results tab and fill in the fields, as required. When you click Finish, the report is created in the directory specified in the Location field, in the format specified in the Output Format section.
The Contents tab enables you to specify what criteria to include in the report:
• Select Include Matching Schema Objects to include information about the objects that matched when the job was run.
Creating a Schema ArchiveAn archive job is an object related to schema comparison jobs, in that it contains a snapshot of the schema of a registered data source. A Schema Archive is used in schema comparisons against other data sources and archive jobs as a baseline to monitor data loss and inconsistencies when moving between testing and production environments.
All archive jobs are composed of a name, description, and schema derived from a single live data source at a specific point in time. Additionally, archive jobs have versioning functionality and can be periodically updated with the current values of an associated data source. Older versions are retained within an Archive and can be recalled as needed.
Archive jobs are located in Data Source Explorer on the Schema Archive Jobs node of the corresponding data source.
The following tasks provide a high-level overview of the Archive definition process:
Create a New Schema Archive
Specify an Archive Name
Specify an Archive Job Source
Refine Properties
EMBARCADERO TECHNOLOGIES > EMBARCADERO® CHANGE MANAGER™ 5.1 USER GUIDE 127
USING CHANGE MANAGER > COMPARING SCHEMAS
Specify Extraction Options
Specify Notification Options
Save the Archive Job/Manage Versioning
Compare Archive Contents and Extract DDL
Generating a Job Report
Use Archive in Schema Comparison Jobs
EMBARCADERO TECHNOLOGIES > EMBARCADERO® CHANGE MANAGER™ 5.1 USER GUIDE 128
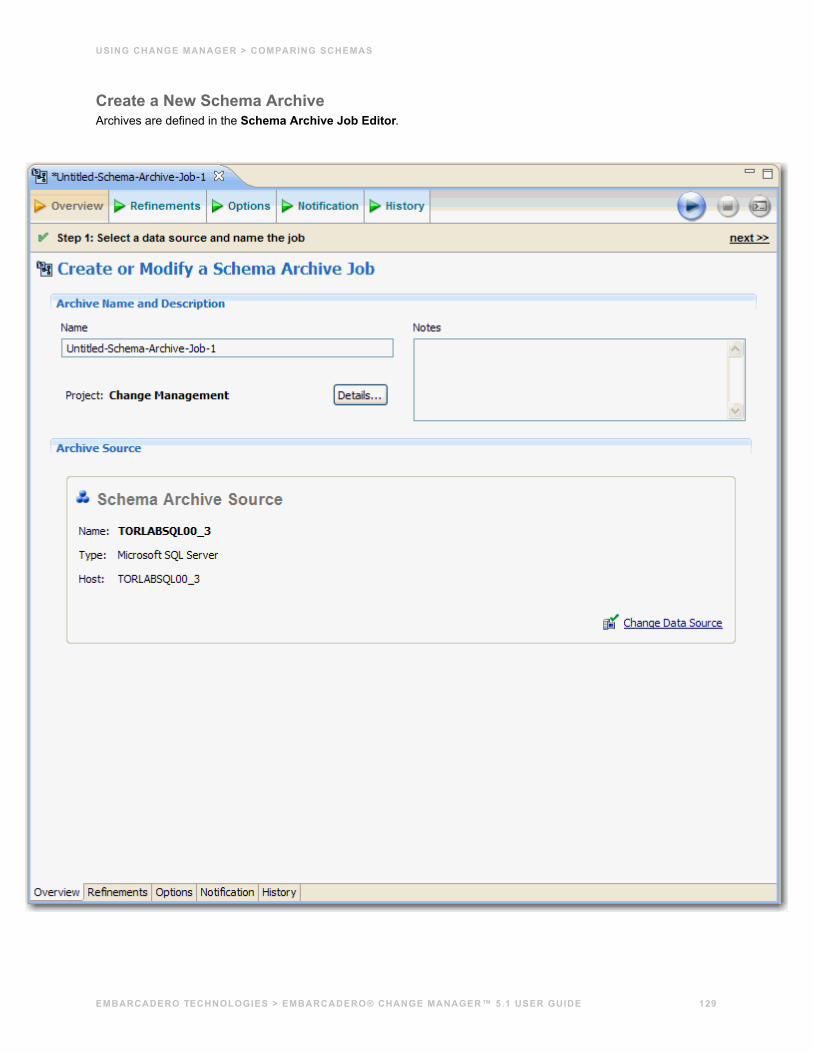
USING CHANGE MANAGER > COMPARING SCHEMAS
Create a New Schema ArchiveArchives are defined in the Schema Archive Job Editor.
EMBARCADERO TECHNOLOGIES > EMBARCADERO® CHANGE MANAGER™ 5.1 USER GUIDE 129
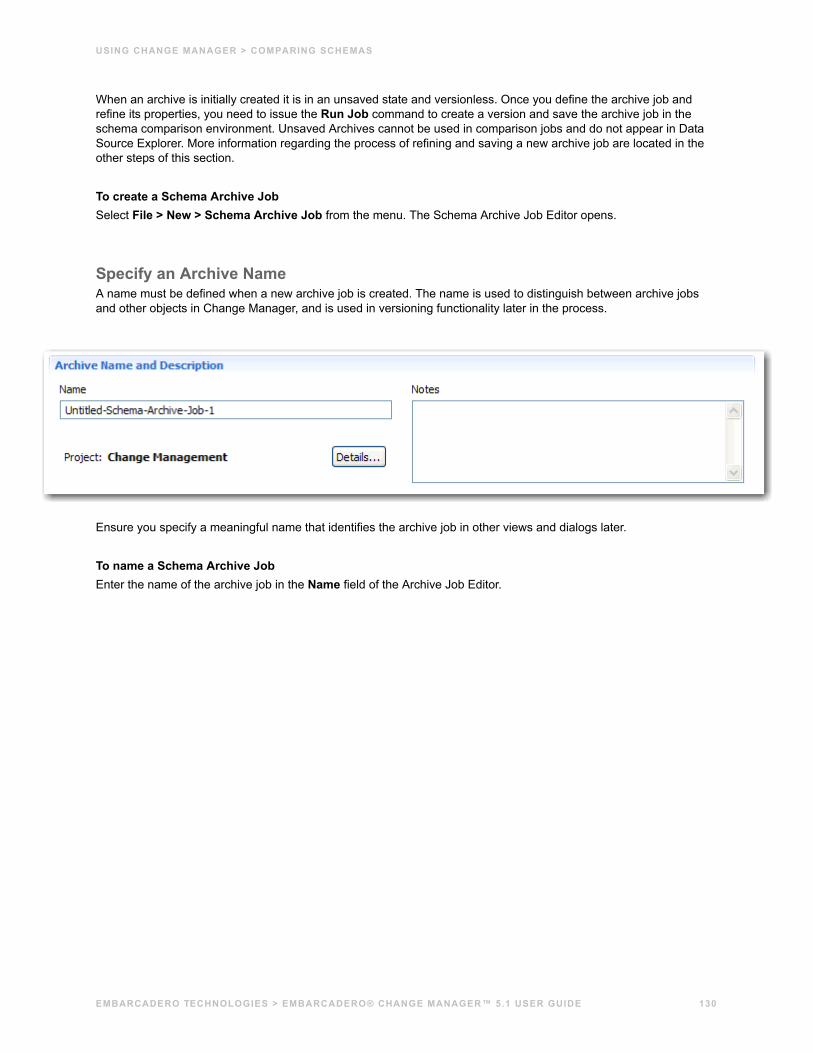
USING CHANGE MANAGER > COMPARING SCHEMAS
When an archive is initially created it is in an unsaved state and versionless. Once you define the archive job and refine its properties, you need to issue the Run Job command to create a version and save the archive job in the schema comparison environment. Unsaved Archives cannot be used in comparison jobs and do not appear in Data Source Explorer. More information regarding the process of refining and saving a new archive job are located in the other steps of this section.
To create a Schema Archive JobSelect File > New > Schema Archive Job from the menu. The Schema Archive Job Editor opens.
Specify an Archive NameA name must be defined when a new archive job is created. The name is used to distinguish between archive jobs and other objects in Change Manager, and is used in versioning functionality later in the process.
Ensure you specify a meaningful name that identifies the archive job in other views and dialogs later.
To name a Schema Archive JobEnter the name of the archive job in the Name field of the Archive Job Editor.
EMBARCADERO TECHNOLOGIES > EMBARCADERO® CHANGE MANAGER™ 5.1 USER GUIDE 130
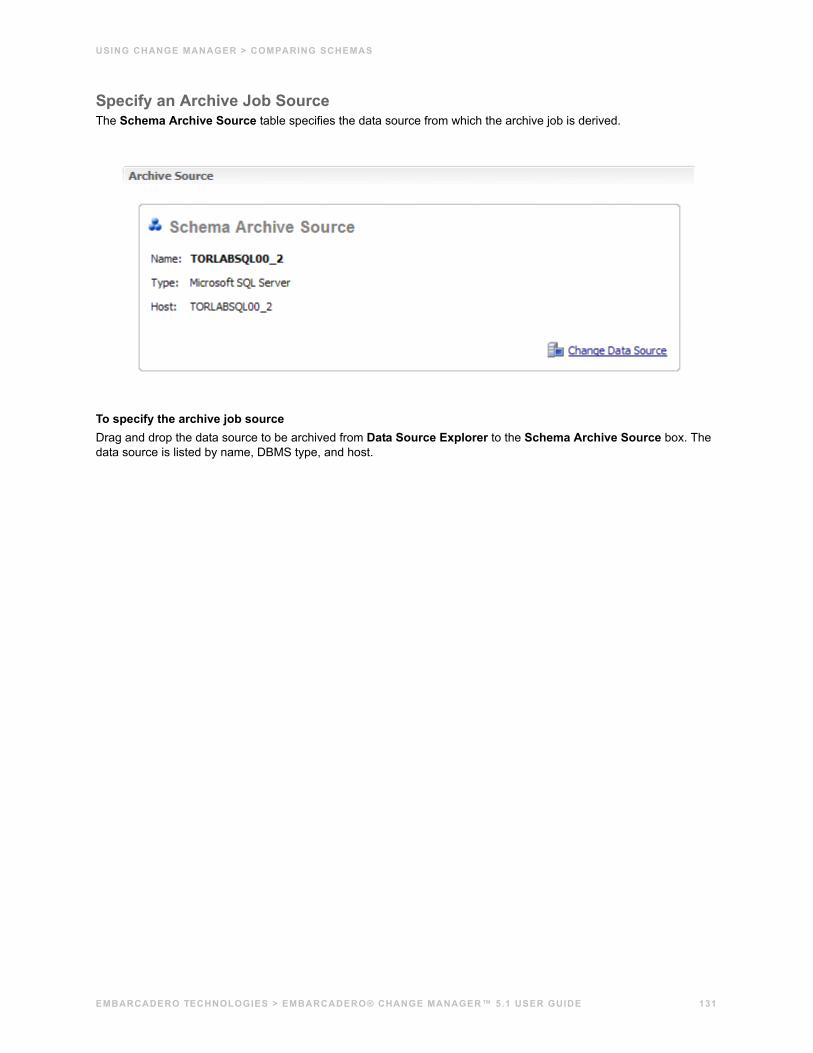
USING CHANGE MANAGER > COMPARING SCHEMAS
Specify an Archive Job SourceThe Schema Archive Source table specifies the data source from which the archive job is derived.
To specify the archive job sourceDrag and drop the data source to be archived from Data Source Explorer to the Schema Archive Source box. The data source is listed by name, DBMS type, and host.
EMBARCADERO TECHNOLOGIES > EMBARCADERO® CHANGE MANAGER™ 5.1 USER GUIDE 131
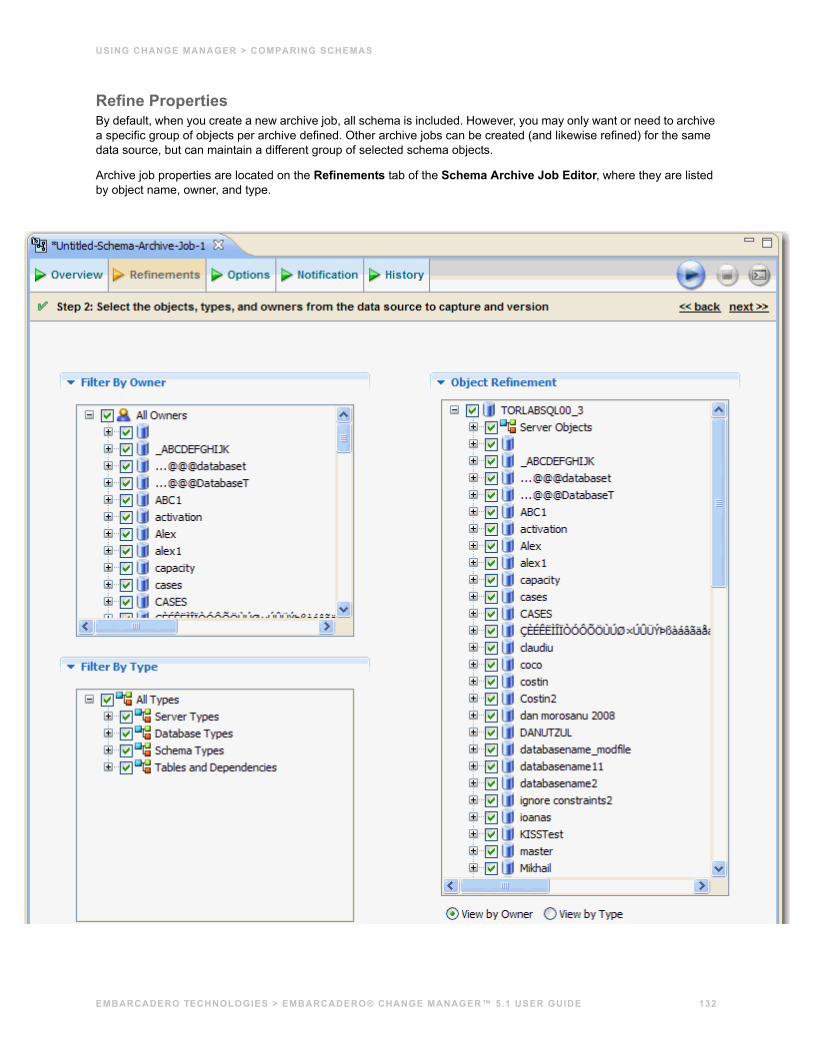
USING CHANGE MANAGER > COMPARING SCHEMAS
Refine PropertiesBy default, when you create a new archive job, all schema is included. However, you may only want or need to archive a specific group of objects per archive defined. Other archive jobs can be created (and likewise refined) for the same data source, but can maintain a different group of selected schema objects.
Archive job properties are located on the Refinements tab of the Schema Archive Job Editor, where they are listed by object name, owner, and type.
EMBARCADERO TECHNOLOGIES > EMBARCADERO® CHANGE MANAGER™ 5.1 USER GUIDE 132
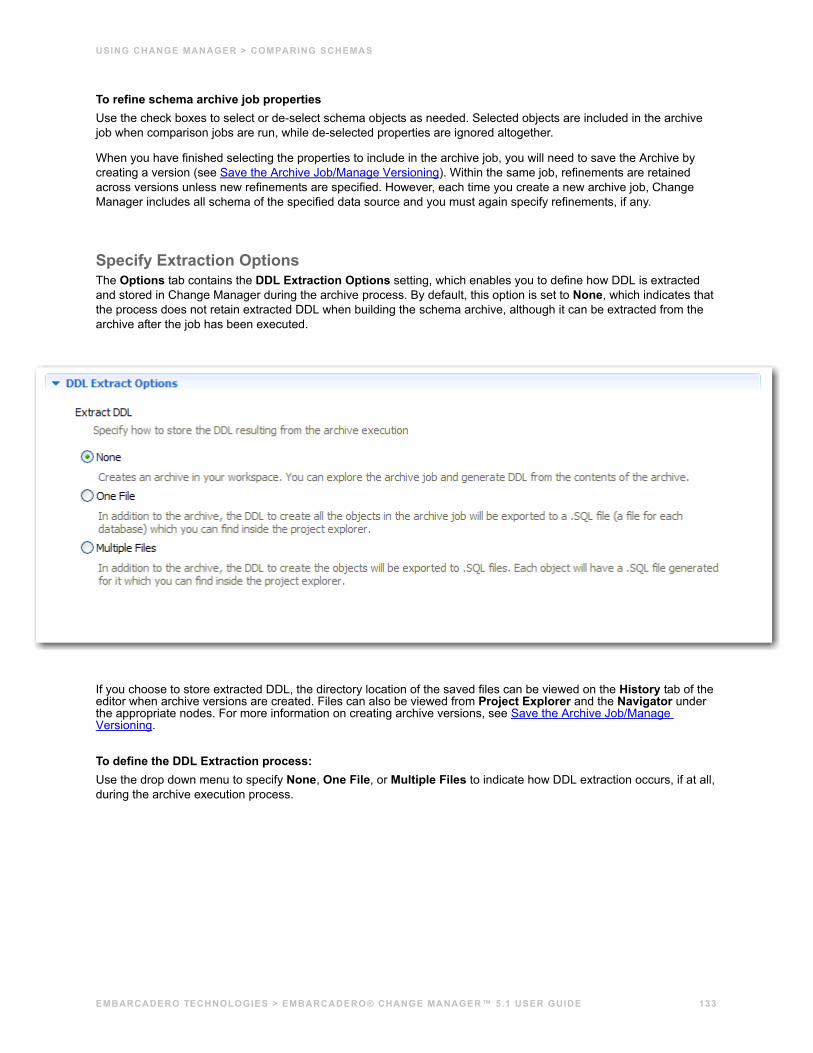
USING CHANGE MANAGER > COMPARING SCHEMAS
To refine schema archive job propertiesUse the check boxes to select or de-select schema objects as needed. Selected objects are included in the archive job when comparison jobs are run, while de-selected properties are ignored altogether.
When you have finished selecting the properties to include in the archive job, you will need to save the Archive by creating a version (see Save the Archive Job/Manage Versioning). Within the same job, refinements are retained across versions unless new refinements are specified. However, each time you create a new archive job, Change Manager includes all schema of the specified data source and you must again specify refinements, if any.
Specify Extraction OptionsThe Options tab contains the DDL Extraction Options setting, which enables you to define how DDL is extracted and stored in Change Manager during the archive process. By default, this option is set to None, which indicates that the process does not retain extracted DDL when building the schema archive, although it can be extracted from the archive after the job has been executed.
If you choose to store extracted DDL, the directory location of the saved files can be viewed on the History tab of the editor when archive versions are created. Files can also be viewed from Project Explorer and the Navigator under the appropriate nodes. For more information on creating archive versions, see Save the Archive Job/Manage Versioning.
To define the DDL Extraction process:Use the drop down menu to specify None, One File, or Multiple Files to indicate how DDL extraction occurs, if at all, during the archive execution process.
EMBARCADERO TECHNOLOGIES > EMBARCADERO® CHANGE MANAGER™ 5.1 USER GUIDE 133
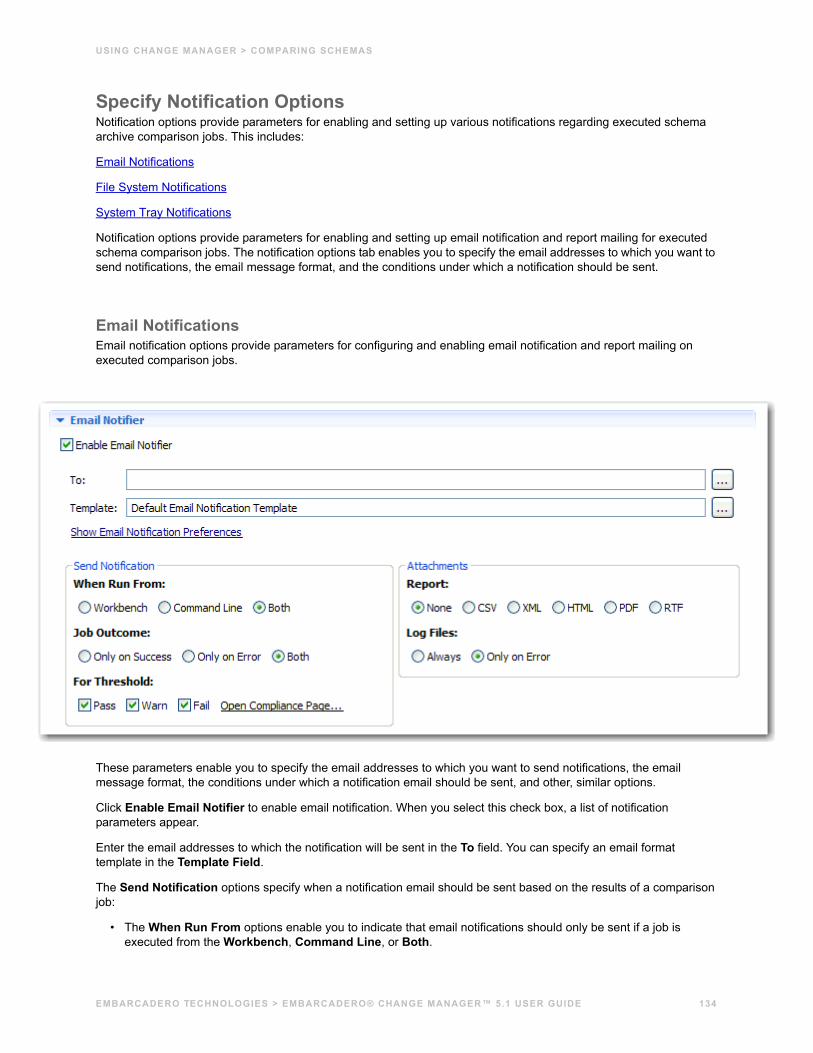
USING CHANGE MANAGER > COMPARING SCHEMAS
Specify Notification OptionsNotification options provide parameters for enabling and setting up various notifications regarding executed schema archive comparison jobs. This includes:
Email Notifications
File System Notifications
System Tray Notifications
Notification options provide parameters for enabling and setting up email notification and report mailing for executed schema comparison jobs. The notification options tab enables you to specify the email addresses to which you want to send notifications, the email message format, and the conditions under which a notification should be sent.
Email NotificationsEmail notification options provide parameters for configuring and enabling email notification and report mailing on executed comparison jobs.
These parameters enable you to specify the email addresses to which you want to send notifications, the email message format, the conditions under which a notification email should be sent, and other, similar options.
Click Enable Email Notifier to enable email notification. When you select this check box, a list of notification parameters appear.
Enter the email addresses to which the notification will be sent in the To field. You can specify an email format template in the Template Field.
The Send Notification options specify when a notification email should be sent based on the results of a comparison job:
• The When Run From options enable you to indicate that email notifications should only be sent if a job is executed from the Workbench, Command Line, or Both.
EMBARCADERO TECHNOLOGIES > EMBARCADERO® CHANGE MANAGER™ 5.1 USER GUIDE 134
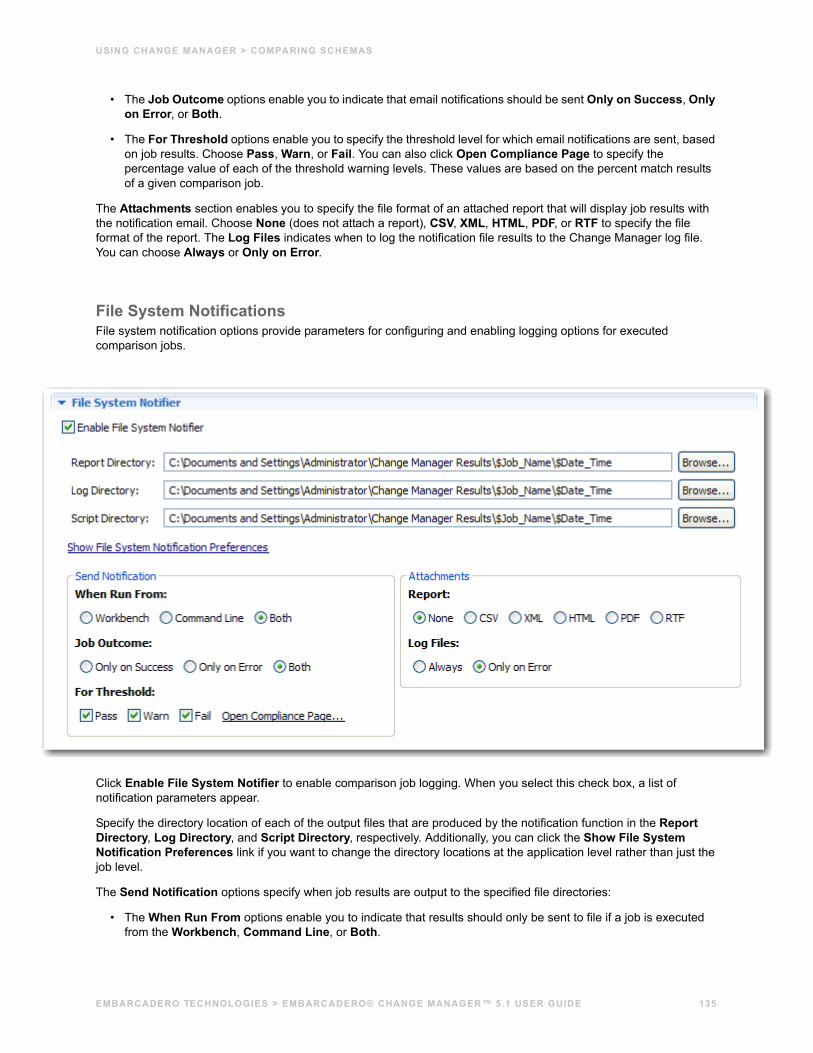
USING CHANGE MANAGER > COMPARING SCHEMAS
• The Job Outcome options enable you to indicate that email notifications should be sent Only on Success, Only on Error, or Both.
• The For Threshold options enable you to specify the threshold level for which email notifications are sent, based on job results. Choose Pass, Warn, or Fail. You can also click Open Compliance Page to specify the percentage value of each of the threshold warning levels. These values are based on the percent match results of a given comparison job.
The Attachments section enables you to specify the file format of an attached report that will display job results with the notification email. Choose None (does not attach a report), CSV, XML, HTML, PDF, or RTF to specify the file format of the report. The Log Files indicates when to log the notification file results to the Change Manager log file. You can choose Always or Only on Error.
File System NotificationsFile system notification options provide parameters for configuring and enabling logging options for executed comparison jobs.
Click Enable File System Notifier to enable comparison job logging. When you select this check box, a list of notification parameters appear.
Specify the directory location of each of the output files that are produced by the notification function in the Report Directory, Log Directory, and Script Directory, respectively. Additionally, you can click the Show File System Notification Preferences link if you want to change the directory locations at the application level rather than just the job level.
The Send Notification options specify when job results are output to the specified file directories:
• The When Run From options enable you to indicate that results should only be sent to file if a job is executed from the Workbench, Command Line, or Both.
EMBARCADERO TECHNOLOGIES > EMBARCADERO® CHANGE MANAGER™ 5.1 USER GUIDE 135
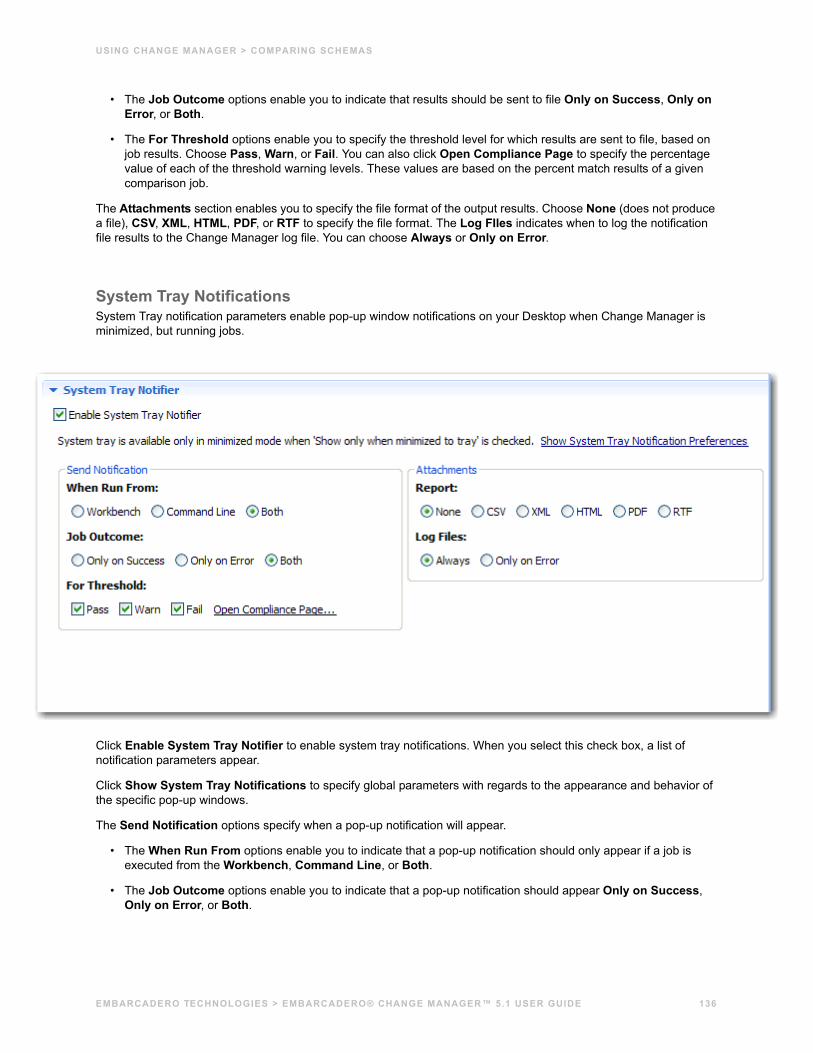
USING CHANGE MANAGER > COMPARING SCHEMAS
• The Job Outcome options enable you to indicate that results should be sent to file Only on Success, Only on Error, or Both.
• The For Threshold options enable you to specify the threshold level for which results are sent to file, based on job results. Choose Pass, Warn, or Fail. You can also click Open Compliance Page to specify the percentage value of each of the threshold warning levels. These values are based on the percent match results of a given comparison job.
The Attachments section enables you to specify the file format of the output results. Choose None (does not produce a file), CSV, XML, HTML, PDF, or RTF to specify the file format. The Log FIles indicates when to log the notification file results to the Change Manager log file. You can choose Always or Only on Error.
System Tray NotificationsSystem Tray notification parameters enable pop-up window notifications on your Desktop when Change Manager is minimized, but running jobs.
Click Enable System Tray Notifier to enable system tray notifications. When you select this check box, a list of notification parameters appear.
Click Show System Tray Notifications to specify global parameters with regards to the appearance and behavior of the specific pop-up windows.
The Send Notification options specify when a pop-up notification will appear.
• The When Run From options enable you to indicate that a pop-up notification should only appear if a job is executed from the Workbench, Command Line, or Both.
• The Job Outcome options enable you to indicate that a pop-up notification should appear Only on Success, Only on Error, or Both.
EMBARCADERO TECHNOLOGIES > EMBARCADERO® CHANGE MANAGER™ 5.1 USER GUIDE 136
USING CHANGE MANAGER > COMPARING SCHEMAS
• The For Threshold options enable you to specify the threshold level for which a pop-up notification will appear, based on job results. Choose Pass, Warn, or Fail. You can also click Open Compliance Page to specify the percentage value of each of the threshold warning levels. These values are based on the percent match results of a given comparison job.
NOTE: The Attachments section enables you to specify the file format of a report that can be accessed via the pop-up notification. Choose None (does not produce a file), CSV, XML, HTML, PDF, or RTF to specify the file format of the report. The Log FIles indicates when to log the notification to the Change Manager log file. You can choose Always or Only on Error.
Save the Archive Job/Manage VersioningA version is a set of schema objects captured by an archive job, and is used to store older snapshots of the same job for backup or tracking comparison purposes. Initially, you must create and save a version for the job to become valid within the system.
A version is created when you click the Run icon located in the upper right-hand corner of any tab in the Schema Archive Job Editor.
When the process executes, the New Unsaved Version tab appears and lists information related to the archive job, including the full archive contents and any extracted DDL.
In order to create a version, highlight the tab and select File > Save or File > Save All from the Menu Bar. The system retains an older archive job named Version 1 that appears in the Archive Job History table on the History tab as well as in the Data Source Explorer tree under the Schema Archive Jobs node.
To create a version and save the archive job• Click the Run Job icon. When you have saved the executed job, a version appears in the Archive Job History
table on the History tab containing the name of the archive job, the number of properties retained by the version, a time stamp, where the archive job was run from, and the number of errors. (Workbench for manual job execution, or command line, if automated.)
You create additional versions within the same archive job each time you click Run Job. The new version contains the latest values for the captured schema archive job, as specified on the Refinements tab. Versions are listed on the Overview tab in a table that displays them in ascending order. A version can be accessed for viewing by double-clicking the appropriate version in the table. The selected version opens in a new tab of the Archive Job Editor.
Additionally, versions are listed as child nodes of the archive job to which they belong in Data Source Explorer. To view a version, double-click the appropriate node.
Compare Archive Contents and Extract DDLOn an open version tab, the Schema Archive Editor enables you to compare that archive version with the live source by right-clicking on the Archive Contents table and selecting Compare.
Schema Comparison Job Editor opens immediately, and designates the archive version and the original source as its source and target data sources, respectively.
Additionally, you can select Extract from the Archive Contents menu to extract the DDL of the archived contents. The code opens in the DDL Extract window, and can be viewed, saved, or otherwise modified via the Open Editor command.
NOTE: Options to compare archive contents and extract DDL are also available via Data Source Explorer, under the appropriate archive node.
EMBARCADERO TECHNOLOGIES > EMBARCADERO® CHANGE MANAGER™ 5.1 USER GUIDE 137
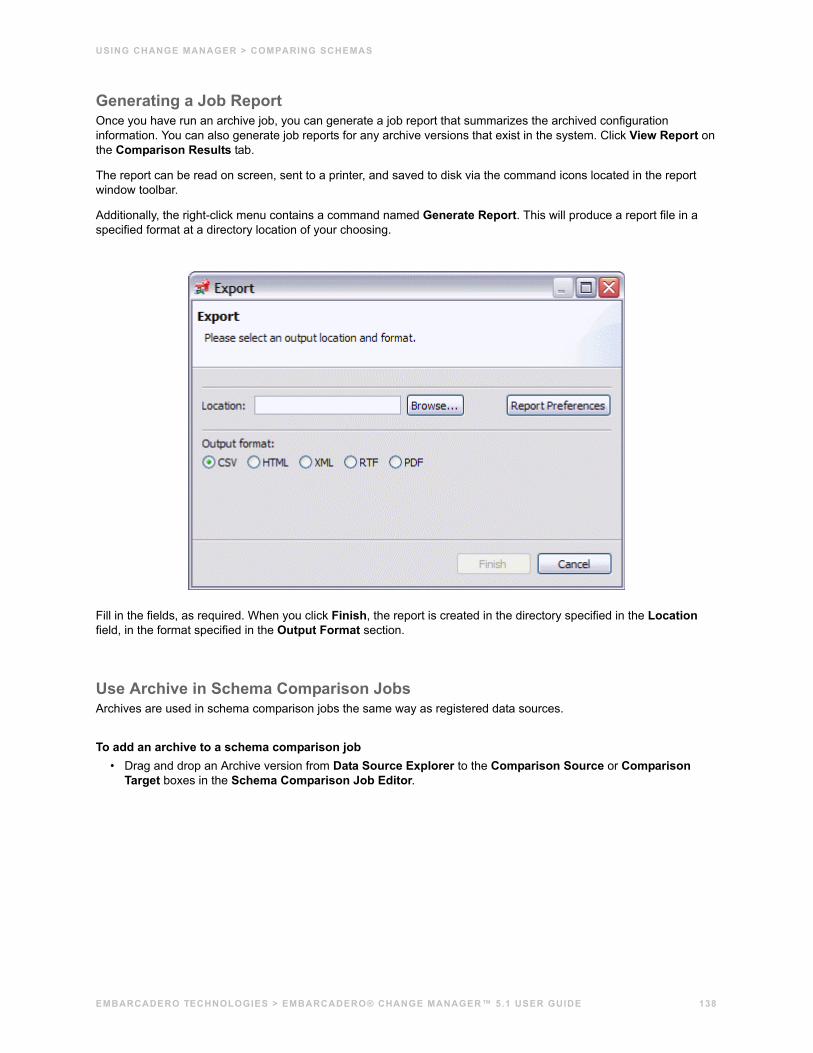
USING CHANGE MANAGER > COMPARING SCHEMAS
Generating a Job ReportOnce you have run an archive job, you can generate a job report that summarizes the archived configuration information. You can also generate job reports for any archive versions that exist in the system. Click View Report on the Comparison Results tab.
The report can be read on screen, sent to a printer, and saved to disk via the command icons located in the report window toolbar.
Additionally, the right-click menu contains a command named Generate Report. This will produce a report file in a specified format at a directory location of your choosing.
Fill in the fields, as required. When you click Finish, the report is created in the directory specified in the Location field, in the format specified in the Output Format section.
Use Archive in Schema Comparison JobsArchives are used in schema comparison jobs the same way as registered data sources.
To add an archive to a schema comparison job• Drag and drop an Archive version from Data Source Explorer to the Comparison Source or Comparison
Target boxes in the Schema Comparison Job Editor.
EMBARCADERO TECHNOLOGIES > EMBARCADERO® CHANGE MANAGER™ 5.1 USER GUIDE 138
CONFIGURING CHANGE MANAGER > COMPARING SCHEMAS
Configuring Change ManagerThis section contains information regarding the general configuration and management of the Change Manager environment.
The following topics can be found in this section:
Register Data Sources
Extending Change Manager Functionality with Eclipse Plug-Ins
Customizing Change Manager (Preferences)
Using Source Control Systems
EMBARCADERO TECHNOLOGIES > EMBARCADERO® CHANGE MANAGER™ 5.1 USER GUIDE 139
CONFIGURING CHANGE MANAGER > REGISTER DATA SOURCES
Register Data SourcesWhen Change Manager is started, it prompts you to discover data source catalogs that have been created by any previously installed Embarcadero products (DBArtisan, Rapid SQL, DB Optimizer), or other instances of Change Manager.
Additionally, the system scans your machine for the client software of all supported third-party DBMS platforms (TOAD, Eclipse Data Tools Platform, etc.). These data sources are automatically added to the data source catalog.
EMBARCADERO TECHNOLOGIES > EMBARCADERO® CHANGE MANAGER™ 5.1 USER GUIDE 140
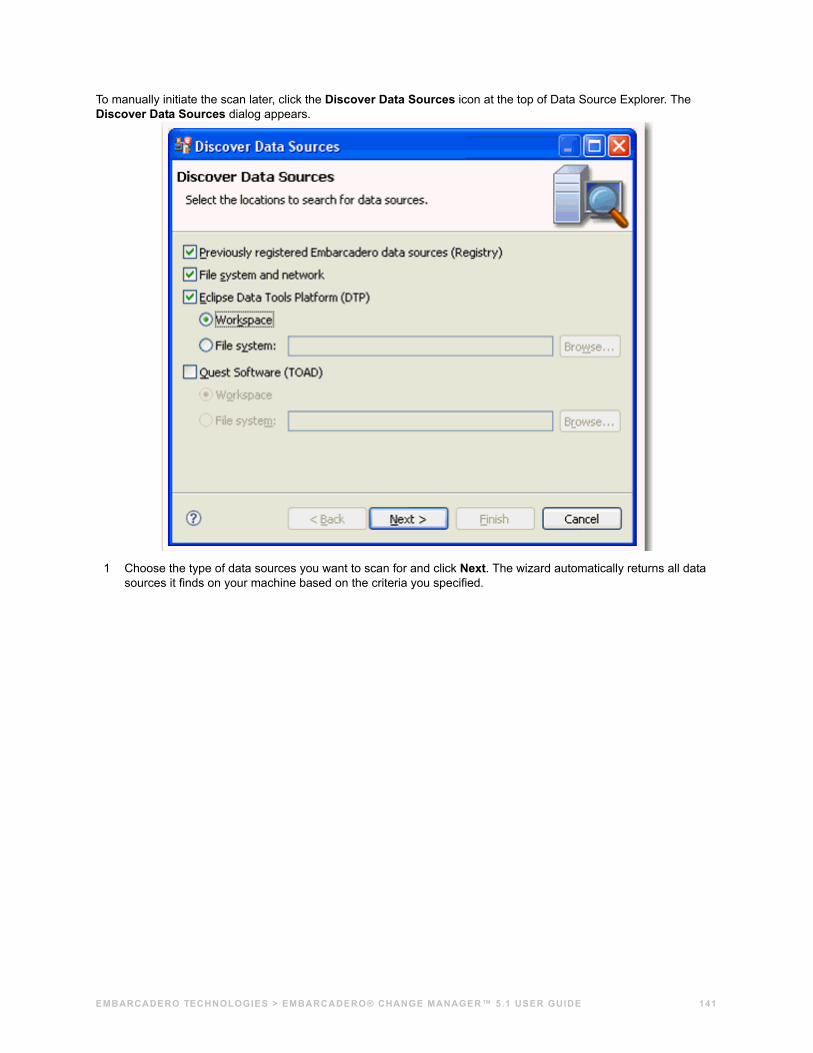
To manually initiate the scan later, click the Discover Data Sources icon at the top of Data Source Explorer. The Discover Data Sources dialog appears.
1 Choose the type of data sources you want to scan for and click Next. The wizard automatically returns all data sources it finds on your machine based on the criteria you specified.
EMBARCADERO TECHNOLOGIES > EMBARCADERO® CHANGE MANAGER™ 5.1 USER GUIDE 141
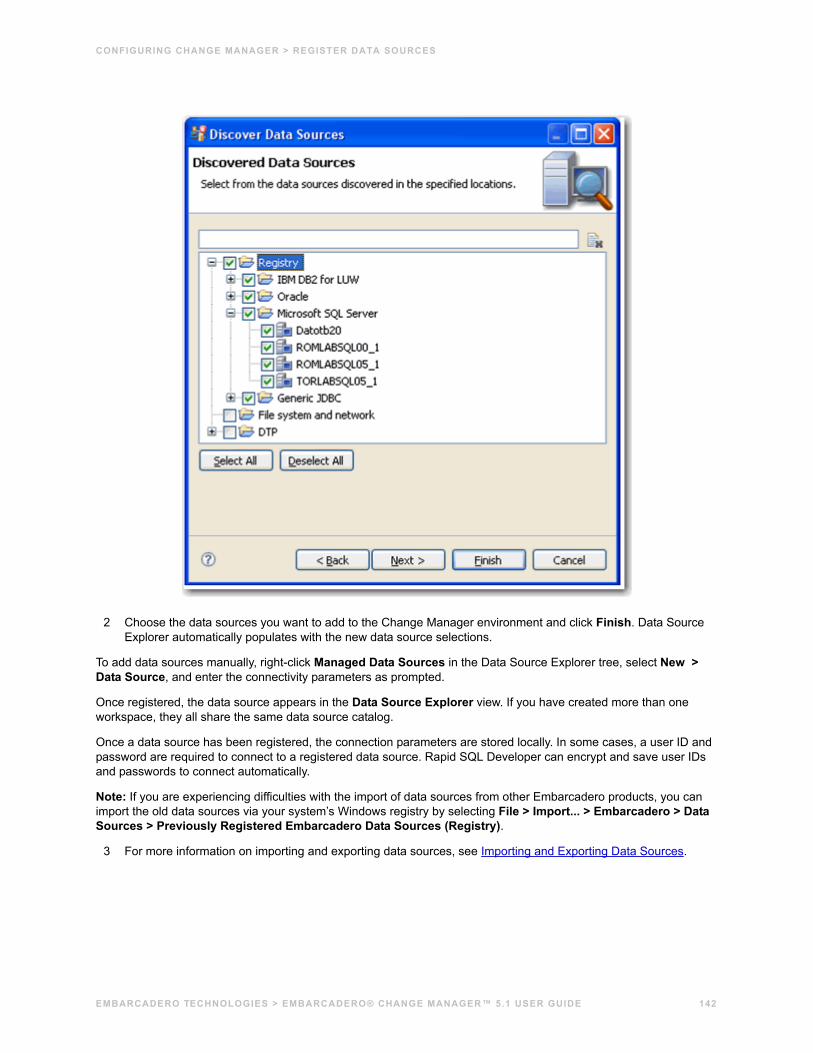
CONFIGURING CHANGE MANAGER > REGISTER DATA SOURCES
2 Choose the data sources you want to add to the Change Manager environment and click Finish. Data Source Explorer automatically populates with the new data source selections.
To add data sources manually, right-click Managed Data Sources in the Data Source Explorer tree, select New > Data Source, and enter the connectivity parameters as prompted.
Once registered, the data source appears in the Data Source Explorer view. If you have created more than one workspace, they all share the same data source catalog.
Once a data source has been registered, the connection parameters are stored locally. In some cases, a user ID and password are required to connect to a registered data source. Rapid SQL Developer can encrypt and save user IDs and passwords to connect automatically.
Note: If you are experiencing difficulties with the import of data sources from other Embarcadero products, you can import the old data sources via your system’s Windows registry by selecting File > Import... > Embarcadero > Data Sources > Previously Registered Embarcadero Data Sources (Registry).
3 For more information on importing and exporting data sources, see Importing and Exporting Data Sources.
EMBARCADERO TECHNOLOGIES > EMBARCADERO® CHANGE MANAGER™ 5.1 USER GUIDE 142
CONFIGURING CHANGE MANAGER > REGISTER DATA SOURCES
Importing and Exporting Data SourcesSome Embarcadero products contain data source catalogs that are shared with Change Manager. In other words, instead of manually adding data sources to the environment, you can import an existing data source catalog from other Embarcadero products or third-party DBMS sources.
You import Data Sources via the File > Import command in the Main Menu, expanding the Embarcadero folder in the Data Source Selection tree, and choosing Data Sources.
The following types of sources can be imported to Data Source Explorer:
• Eclipse Data Tools Platform (DTP)
• Previously Registered Embarcadero Data Sources (File)
• Previously Registered Embarcadero Data Sources (Registry)
• Quest Software (TOAD)
Once a data source is registered, it automatically appears in Data Source Explorer. Connection parameters are stored locally, and Change Manager can be set to connect automatically each time you select the data source from the tree.
Conversely, you can also Export your current data source catalog to a file, which can then be imported into other instances of Change Manager via the Previously Registered Embarcadero Data Sources (File) option. This is performed using the File > Export command in the Main Menu, and then selecting Embarcadero > Data Sources from the tree view in the Export Data Sources dialog.
To import data sources:
1 Select File > Import . The Import Data Sources dialog appears.
2 Choose Embarcadero > Data Sources from the tree and click Next.
3 Choose a source from which you want to import the data sources. You can choose to import data sources from the DTP, TOAD, or an existing Embarcadero data source catalog stored in the Windows registry or as a file (created via the Export command). Click Next.
4 Specify the location of the import source and click Finish. Data Source Explorer is automatically populated with the new data sources.
To export data sources:
1 Select File > Export. The Export Data Sources dialog appears.
2 Choose Embarcadero > Data Sources from the export tree and click Next.
3 Use the check boxes beside each listed data source to indicate which data sources you want to export. Click Next.
4 Click Finish.
5 The data sources are automatically exported in the form of an XML file. You can import this file to other instances of Change Manager via the Import command.
EMBARCADERO TECHNOLOGIES > EMBARCADERO® CHANGE MANAGER™ 5.1 USER GUIDE 143
CONFIGURING CHANGE MANAGER > EXTENDING CHANGE MANAGER FUNCTIONALITY WITH ECLIPSE PLUG-INS
Extending Change Manager Functionality with Eclipse Plug-InsChange Manager publishes two extensions that can be implemented via plug-ins to customize the application.
The two feature extensions are:
• Notifications: enable you to code a plug-in for Change Manager that implements any type of job execution notification required for your organization. Change Manager includes email notification by default, but other plug-ins can be coded in Java and added to Change Manager, as needed.
• Configuration Parameters: enable you to code a plug-in for Change Manager that adds additional configuration parameters and values for configuration standards, archive jobs, and comparisons. Change Manager includes plug-ins for standard configuration properties and version information, but other plug-ins can query data sources via Java JDBC for additional or environment-specific information.
In order to utilize the functionality of these features, you will need to build a plug-in and specify the parameters of the notification and custom configuration extensions. The following sections provide examples that demonstrate the possibilities regarding this feature.
Creating and Implementing a Notification Plug-In
Creating and Implementing a Custom Configuration Plug-In
Creating and Implementing a Notification Plug-InThe job notification plug-in is built on the Eclipse platform and some knowledge regarding java coding and Eclipse plug-in development is required.
Notifications can be set to alert you if a job is successful, unsuccessful, or either result. Additionally, a notification can also indicate if a job was launched from the workbench or from a command line, and can produce a report in a number of different file formats.
The following options and option parameters may be selected via the job notification plug-in:
Notification parameters are set independently on each job configured in Change Manager. Additionally, each set of notification options apply individually per job selected.
The notification plug-in must be defined in Eclipse and then activated in Change Manager.
The following tasks provide a high-level overview of defining and implementing the notification plug-in:
Creating a Plug-In Project
Configuring the Target Platform
Defining Plug-In Dependencies
Implementing a Notifier Class
Implementing a Viewer Contribution
Notification Option Option Parameters
Notify When Run From Workbench, Command Line, Both
Attached Report None, CSV, XML, HTML, PDF, RTF
Send Notification Always, Only on Success, Only on Failure
EMBARCADERO TECHNOLOGIES > EMBARCADERO® CHANGE MANAGER™ 5.1 USER GUIDE 144
CONFIGURING CHANGE MANAGER > EXTENDING CHANGE MANAGER FUNCTIONALITY WITH ECLIPSE PLUG-INS
Specifying Setup Constants
Implementing the DirectoryNotifier Class
Implementing the DirectoryNotifierViewerContribution Class
Registering the Extensions
Deploying the Notifier Plug-In
Creating a Plug-In ProjectIn order to start building a plug-in, you need to create a new plug-in platform in Eclipse.
To create a plug-in project1 Select File > New > Other.
The Select a Wizard dialog appears.
2 Select Plug-In Project and click Next.
3 Type a name for the plug-in in the appropriate field, and leave the remainder of the parameters as they appear. Click Next.
4 Retain the default parameters on the next dialog and click Finish.
The new plug-in project is created in Eclipse and is ready for plug-in development.
Configuring the Target PlatformThe target platform for the plug-in development process needs to be identified in Change Manager. This will indicate to the new plug-in for what product it extends, and will grant the plug-in access to the system.
1 Select Window > Preferences.
The Preferences dialog appears.
2 Choose the Plug-In Development > Target Platform node and click Browse.
3 Navigate to the install directory for Change Manager.
4 Click Apply and OK.
The Preferences dialog closes and the target platform of the plug-in is now indicated.
Defining Plug-In DependenciesThe new plug-in requires a pair of dependency definitions on the Change Manager Notification Plug-In:
• com.embarcadero.change.notifications
• org.eclipse.ui.forms
1 Navigate to the META-INF folder in your project and double-click MANIFEST.MF.
The MANIFEST.MF file opens in Eclipse.
2 Select the Dependencies tab and click Add...
EMBARCADERO TECHNOLOGIES > EMBARCADERO® CHANGE MANAGER™ 5.1 USER GUIDE 145
CONFIGURING CHANGE MANAGER > EXTENDING CHANGE MANAGER FUNCTIONALITY WITH ECLIPSE PLUG-INS
3 Choose com.embarcadero.change.notifications and click OK.
The dependency is added.
4 Choose org.eclipse.ui.forms and click OK.
The dependency is added.
5 Press Ctrl+S to save the changes, or choose File>Save from the menu to retain the new dependencies and close the editor.
Implementing a Notifier ClassEach notification plug-in requires a Notifier class that must implement the interface com.embarcadero.change.notifications.api.INotifier.
EMBARCADERO TECHNOLOGIES > EMBARCADERO® CHANGE MANAGER™ 5.1 USER GUIDE 146
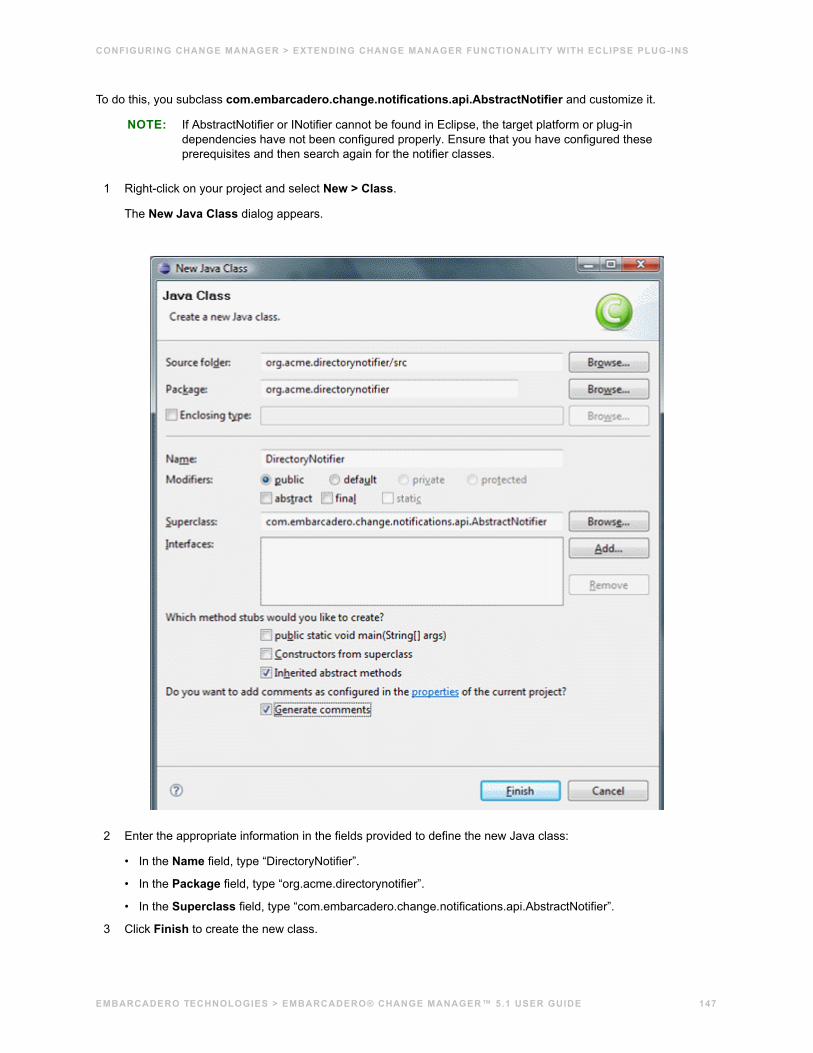
CONFIGURING CHANGE MANAGER > EXTENDING CHANGE MANAGER FUNCTIONALITY WITH ECLIPSE PLUG-INS
To do this, you subclass com.embarcadero.change.notifications.api.AbstractNotifier and customize it.
NOTE: If AbstractNotifier or INotifier cannot be found in Eclipse, the target platform or plug-in dependencies have not been configured properly. Ensure that you have configured these prerequisites and then search again for the notifier classes.
1 Right-click on your project and select New > Class.
The New Java Class dialog appears.
2 Enter the appropriate information in the fields provided to define the new Java class:
• In the Name field, type “DirectoryNotifier”.
• In the Package field, type “org.acme.directorynotifier”.
• In the Superclass field, type “com.embarcadero.change.notifications.api.AbstractNotifier”.
3 Click Finish to create the new class.
EMBARCADERO TECHNOLOGIES > EMBARCADERO® CHANGE MANAGER™ 5.1 USER GUIDE 147
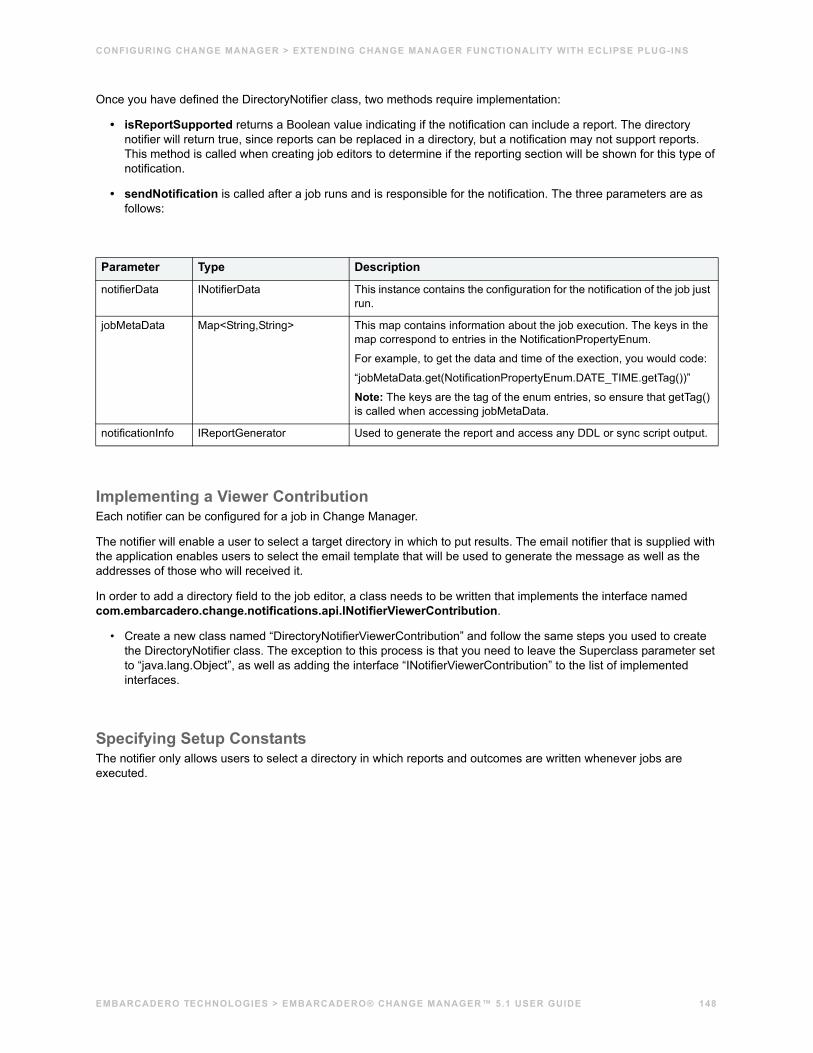
CONFIGURING CHANGE MANAGER > EXTENDING CHANGE MANAGER FUNCTIONALITY WITH ECLIPSE PLUG-INS
Once you have defined the DirectoryNotifier class, two methods require implementation:
• isReportSupported returns a Boolean value indicating if the notification can include a report. The directory notifier will return true, since reports can be replaced in a directory, but a notification may not support reports. This method is called when creating job editors to determine if the reporting section will be shown for this type of notification.
• sendNotification is called after a job runs and is responsible for the notification. The three parameters are as follows:
Implementing a Viewer ContributionEach notifier can be configured for a job in Change Manager.
The notifier will enable a user to select a target directory in which to put results. The email notifier that is supplied with the application enables users to select the email template that will be used to generate the message as well as the addresses of those who will received it.
In order to add a directory field to the job editor, a class needs to be written that implements the interface named com.embarcadero.change.notifications.api.INotifierViewerContribution.
• Create a new class named “DirectoryNotifierViewerContribution” and follow the same steps you used to create the DirectoryNotifier class. The exception to this process is that you need to leave the Superclass parameter set to “java.lang.Object”, as well as adding the interface “INotifierViewerContribution” to the list of implemented interfaces.
Specifying Setup ConstantsThe notifier only allows users to select a directory in which reports and outcomes are written whenever jobs are executed.
Parameter Type Description
notifierData INotifierData This instance contains the configuration for the notification of the job just run.
jobMetaData Map<String,String> This map contains information about the job execution. The keys in the map correspond to entries in the NotificationPropertyEnum.
For example, to get the data and time of the exection, you would code:
“jobMetaData.get(NotificationPropertyEnum.DATE_TIME.getTag())”
Note: The keys are the tag of the enum entries, so ensure that getTag() is called when accessing jobMetaData.
notificationInfo IReportGenerator Used to generate the report and access any DDL or sync script output.
EMBARCADERO TECHNOLOGIES > EMBARCADERO® CHANGE MANAGER™ 5.1 USER GUIDE 148
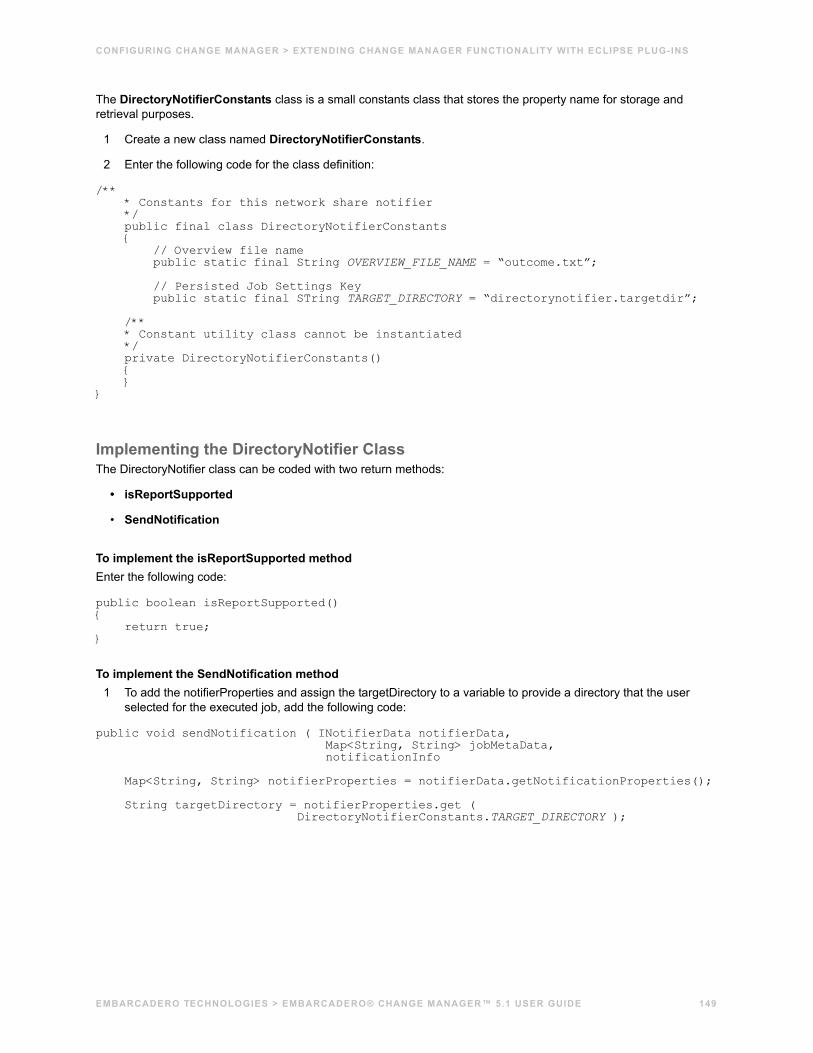
CONFIGURING CHANGE MANAGER > EXTENDING CHANGE MANAGER FUNCTIONALITY WITH ECLIPSE PLUG-INS
The DirectoryNotifierConstants class is a small constants class that stores the property name for storage and retrieval purposes.
1 Create a new class named DirectoryNotifierConstants.
2 Enter the following code for the class definition:
/*** Constants for this network share notifier*/public final class DirectoryNotifierConstants{
// Overview file namepublic static final String OVERVIEW_FILE_NAME = “outcome.txt”;
// Persisted Job Settings Keypublic static final STring TARGET_DIRECTORY = “directorynotifier.targetdir”;
/*** Constant utility class cannot be instantiated*/private DirectoryNotifierConstants(){}
}
Implementing the DirectoryNotifier ClassThe DirectoryNotifier class can be coded with two return methods:
• isReportSupported
• SendNotification
To implement the isReportSupported methodEnter the following code:
public boolean isReportSupported(){
return true;}
To implement the SendNotification method1 To add the notifierProperties and assign the targetDirectory to a variable to provide a directory that the user
selected for the executed job, add the following code:
public void sendNotification ( INotifierData notifierData,Map<String, String> jobMetaData,notificationInfo
Map<String, String> notifierProperties = notifierData.getNotificationProperties();
String targetDirectory = notifierProperties.get (DirectoryNotifierConstants.TARGET_DIRECTORY );
EMBARCADERO TECHNOLOGIES > EMBARCADERO® CHANGE MANAGER™ 5.1 USER GUIDE 149
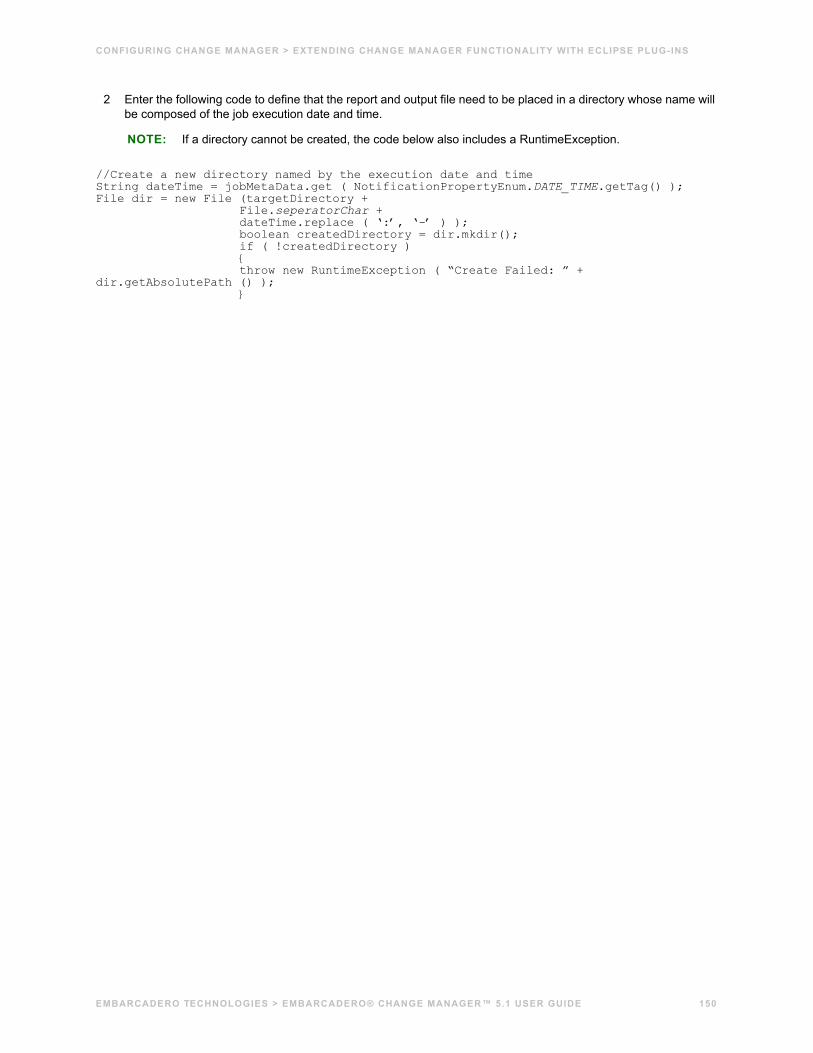
CONFIGURING CHANGE MANAGER > EXTENDING CHANGE MANAGER FUNCTIONALITY WITH ECLIPSE PLUG-INS
2 Enter the following code to define that the report and output file need to be placed in a directory whose name will be composed of the job execution date and time.
NOTE: If a directory cannot be created, the code below also includes a RuntimeException.
//Create a new directory named by the execution date and timeString dateTime = jobMetaData.get ( NotificationPropertyEnum.DATE_TIME.getTag() );File dir = new File (targetDirectory +
File.seperatorChar +dateTime.replace ( ‘:’, ‘-’ ) );boolean createdDirectory = dir.mkdir();if ( !createdDirectory ){throw new RuntimeException ( “Create Failed: ” +
dir.getAbsolutePath () );}
EMBARCADERO TECHNOLOGIES > EMBARCADERO® CHANGE MANAGER™ 5.1 USER GUIDE 150
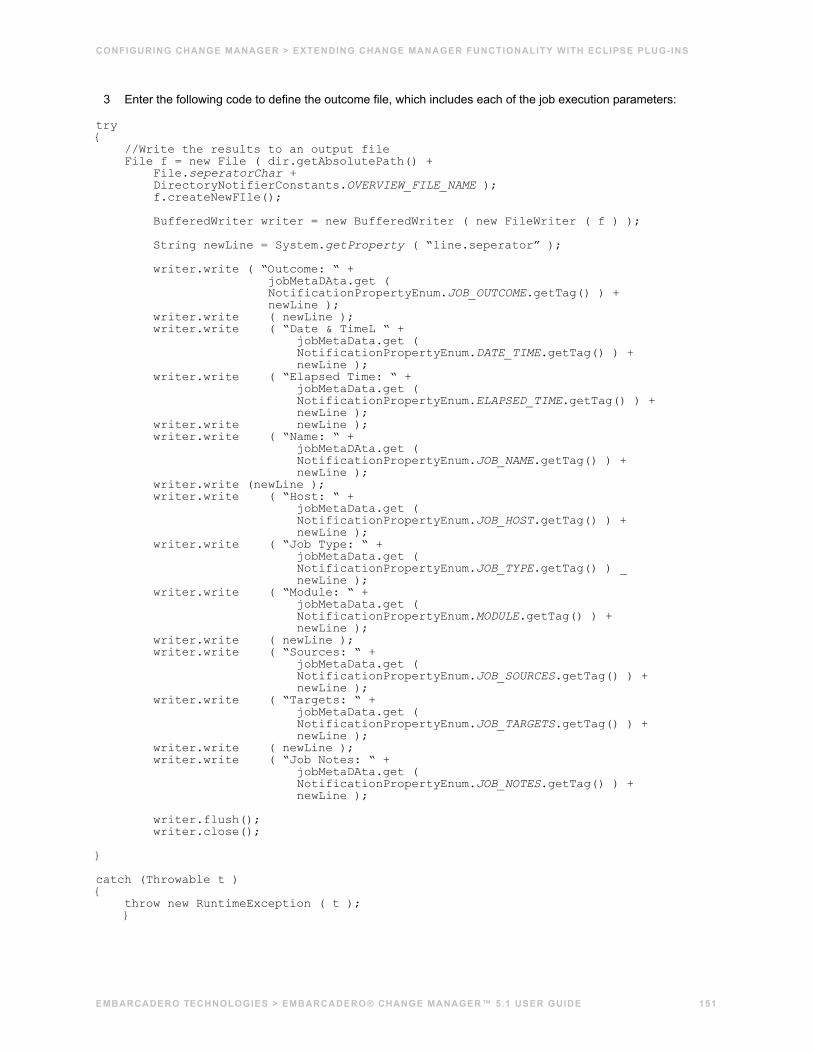
CONFIGURING CHANGE MANAGER > EXTENDING CHANGE MANAGER FUNCTIONALITY WITH ECLIPSE PLUG-INS
3 Enter the following code to define the outcome file, which includes each of the job execution parameters:
try{
//Write the results to an output fileFile f = new File ( dir.getAbsolutePath() +
File.seperatorChar +DirectoryNotifierConstants.OVERVIEW_FILE_NAME );f.createNewFIle();
BufferedWriter writer = new BufferedWriter ( new FileWriter ( f ) );
String newLine = System.getProperty ( “line.seperator” );
writer.write ( “Outcome: “ +jobMetaDAta.get (NotificationPropertyEnum.JOB_OUTCOME.getTag() ) +newLine );
writer.write ( newLine );writer.write ( “Date & TimeL “ +
jobMetaData.get (NotificationPropertyEnum.DATE_TIME.getTag() ) +newLine );
writer.write ( “Elapsed Time: “ +jobMetaData.get (NotificationPropertyEnum.ELAPSED_TIME.getTag() ) +newLine );
writer.write newLine );writer.write ( “Name: “ +
jobMetaDAta.get (NotificationPropertyEnum.JOB_NAME.getTag() ) +newLine );
writer.write (newLine );writer.write ( “Host: “ +
jobMetaData.get (NotificationPropertyEnum.JOB_HOST.getTag() ) +newLine );
writer.write ( “Job Type: “ +jobMetaData.get (NotificationPropertyEnum.JOB_TYPE.getTag() ) _newLine );
writer.write ( “Module: “ +jobMetaData.get (NotificationPropertyEnum.MODULE.getTag() ) +newLine );
writer.write ( newLine );writer.write ( “Sources: “ +
jobMetaData.get (NotificationPropertyEnum.JOB_SOURCES.getTag() ) +newLine );
writer.write ( “Targets: “ +jobMetaData.get (NotificationPropertyEnum.JOB_TARGETS.getTag() ) +newLine );
writer.write ( newLine );writer.write ( “Job Notes: “ +
jobMetaDAta.get (NotificationPropertyEnum.JOB_NOTES.getTag() ) +newLine );
writer.flush();writer.close();
}
catch (Throwable t ){
throw new RuntimeException ( t );}
EMBARCADERO TECHNOLOGIES > EMBARCADERO® CHANGE MANAGER™ 5.1 USER GUIDE 151
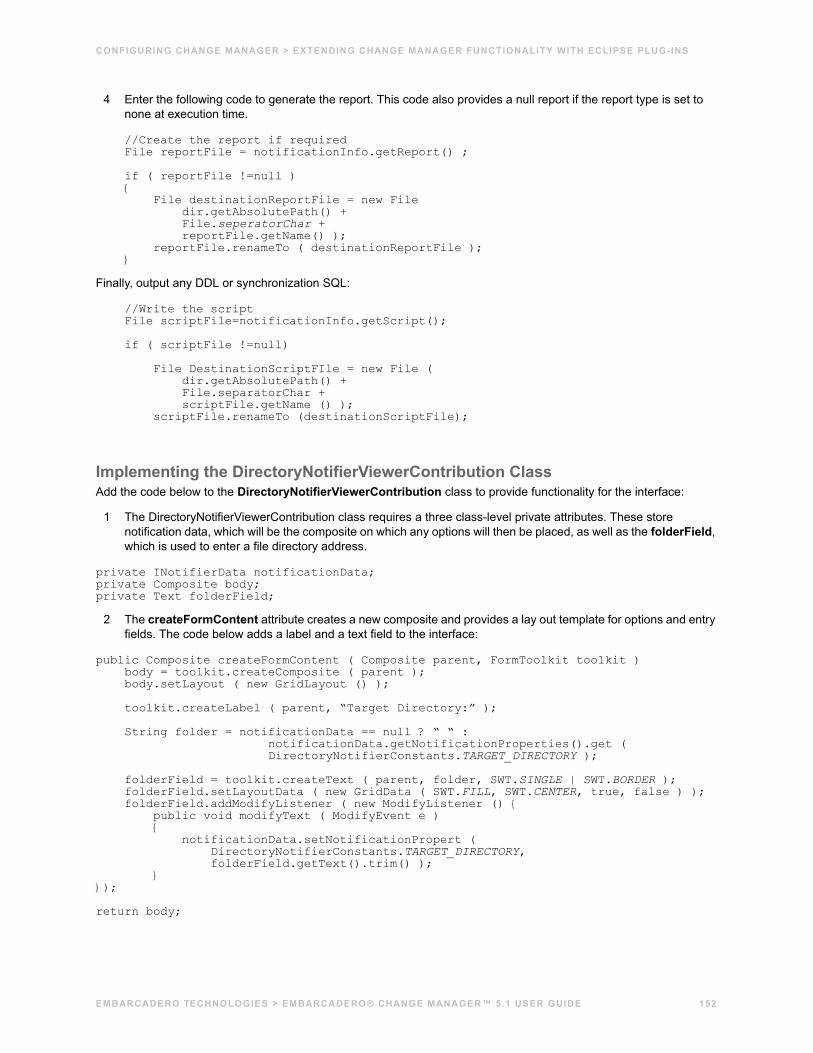
CONFIGURING CHANGE MANAGER > EXTENDING CHANGE MANAGER FUNCTIONALITY WITH ECLIPSE PLUG-INS
4 Enter the following code to generate the report. This code also provides a null report if the report type is set to none at execution time.
//Create the report if requiredFile reportFile = notificationInfo.getReport() ;
if ( reportFile !=null ){
File destinationReportFile = new Filedir.getAbsolutePath() +File.seperatorChar +reportFile.getName() );
reportFile.renameTo ( destinationReportFile );}
Finally, output any DDL or synchronization SQL:
//Write the scriptFile scriptFile=notificationInfo.getScript();
if ( scriptFile !=null)
File DestinationScriptFIle = new File (dir.getAbsolutePath() +File.separatorChar +scriptFile.getName () );
scriptFile.renameTo (destinationScriptFile);
Implementing the DirectoryNotifierViewerContribution ClassAdd the code below to the DirectoryNotifierViewerContribution class to provide functionality for the interface:
1 The DirectoryNotifierViewerContribution class requires a three class-level private attributes. These store notification data, which will be the composite on which any options will then be placed, as well as the folderField, which is used to enter a file directory address.
private INotifierData notificationData;private Composite body;private Text folderField;
2 The createFormContent attribute creates a new composite and provides a lay out template for options and entry fields. The code below adds a label and a text field to the interface:
public Composite createFormContent ( Composite parent, FormToolkit toolkit )body = toolkit.createComposite ( parent );body.setLayout ( new GridLayout () );
toolkit.createLabel ( parent, “Target Directory:” );
String folder = notificationData == null ? “ “ :notificationData.getNotificationProperties().get (DirectoryNotifierConstants.TARGET_DIRECTORY );
folderField = toolkit.createText ( parent, folder, SWT.SINGLE | SWT.BORDER );folderField.setLayoutData ( new GridData ( SWT.FILL, SWT.CENTER, true, false ) );folderField.addModifyListener ( new ModifyListener () {
public void modifyText ( ModifyEvent e ){
notificationData.setNotificationPropert (DirectoryNotifierConstants.TARGET_DIRECTORY,folderField.getText().trim() );
}});
return body;
EMBARCADERO TECHNOLOGIES > EMBARCADERO® CHANGE MANAGER™ 5.1 USER GUIDE 152
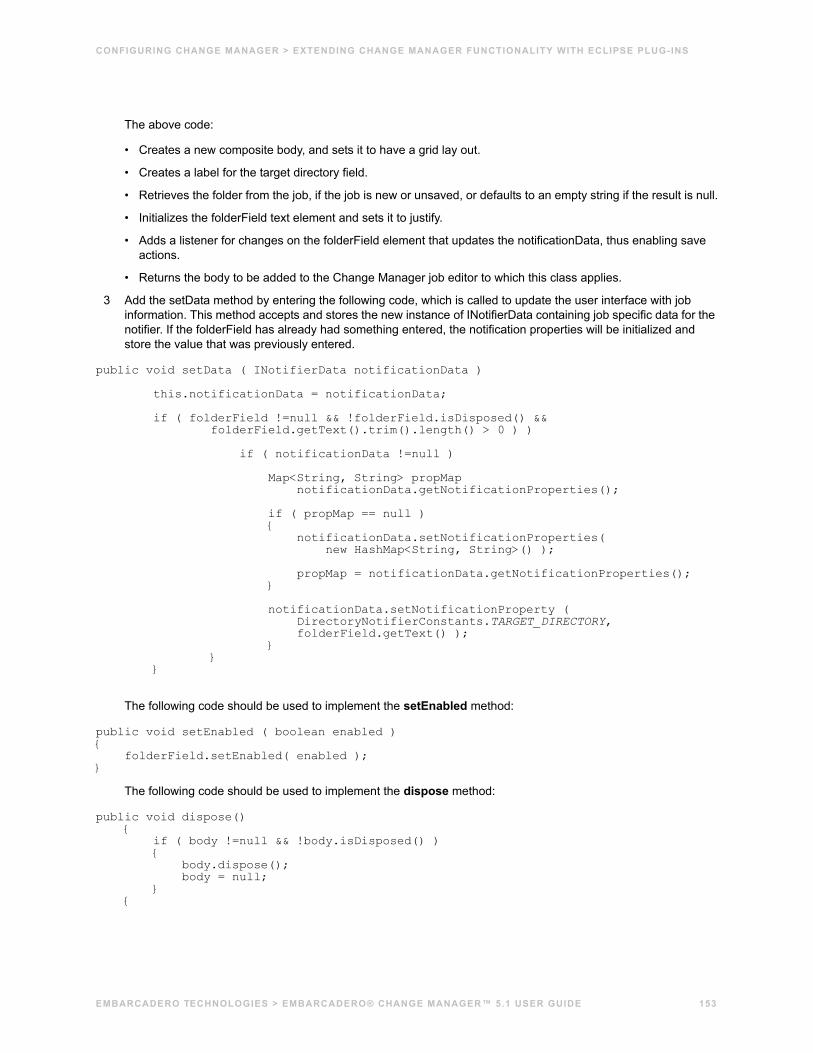
CONFIGURING CHANGE MANAGER > EXTENDING CHANGE MANAGER FUNCTIONALITY WITH ECLIPSE PLUG-INS
The above code:
• Creates a new composite body, and sets it to have a grid lay out.
• Creates a label for the target directory field.
• Retrieves the folder from the job, if the job is new or unsaved, or defaults to an empty string if the result is null.
• Initializes the folderField text element and sets it to justify.
• Adds a listener for changes on the folderField element that updates the notificationData, thus enabling save actions.
• Returns the body to be added to the Change Manager job editor to which this class applies.
3 Add the setData method by entering the following code, which is called to update the user interface with job information. This method accepts and stores the new instance of INotifierData containing job specific data for the notifier. If the folderField has already had something entered, the notification properties will be initialized and store the value that was previously entered.
public void setData ( INotifierData notificationData )
this.notificationData = notificationData;
if ( folderField !=null && !folderField.isDisposed() &&folderField.getText().trim().length() > 0 ) )
if ( notificationData !=null )
Map<String, String> propMapnotificationData.getNotificationProperties();
if ( propMap == null ){
notificationData.setNotificationProperties(new HashMap<String, String>() );
propMap = notificationData.getNotificationProperties();}
notificationData.setNotificationProperty (DirectoryNotifierConstants.TARGET_DIRECTORY,folderField.getText() );
}}
}
The following code should be used to implement the setEnabled method:
public void setEnabled ( boolean enabled ){
folderField.setEnabled( enabled );}
The following code should be used to implement the dispose method:
public void dispose(){
if ( body !=null && !body.isDisposed() ){
body.dispose();body = null;
}{
EMBARCADERO TECHNOLOGIES > EMBARCADERO® CHANGE MANAGER™ 5.1 USER GUIDE 153
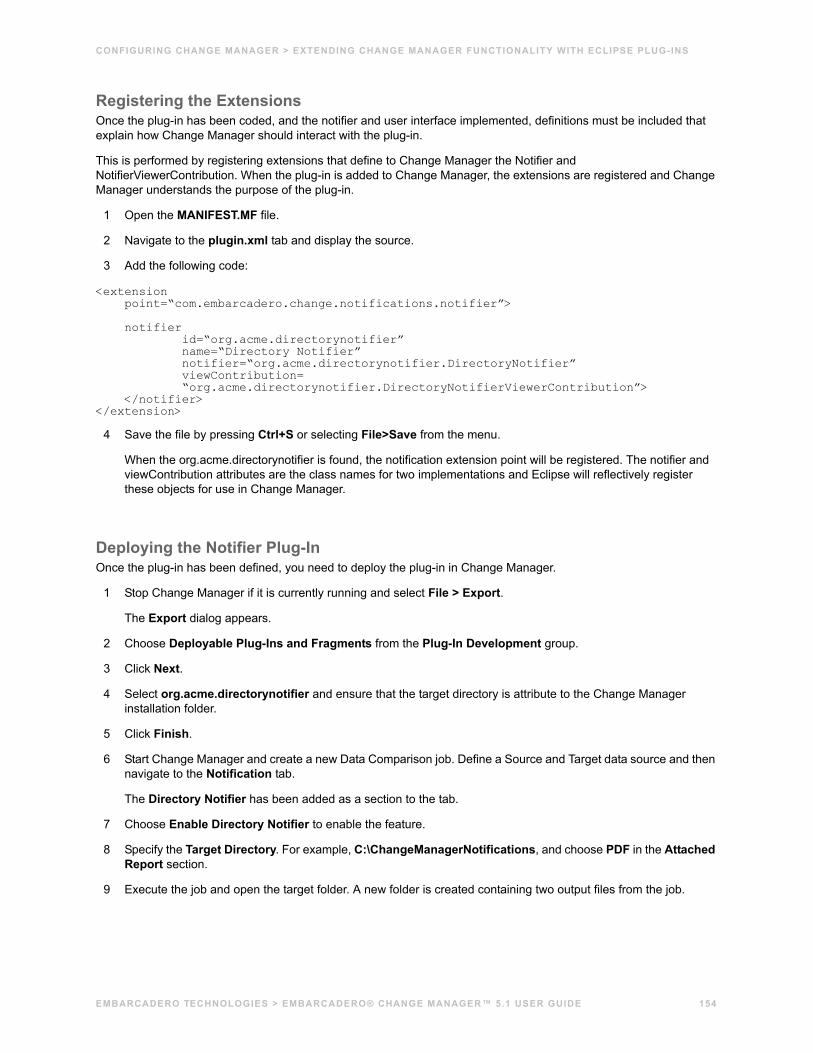
CONFIGURING CHANGE MANAGER > EXTENDING CHANGE MANAGER FUNCTIONALITY WITH ECLIPSE PLUG-INS
Registering the ExtensionsOnce the plug-in has been coded, and the notifier and user interface implemented, definitions must be included that explain how Change Manager should interact with the plug-in.
This is performed by registering extensions that define to Change Manager the Notifier and NotifierViewerContribution. When the plug-in is added to Change Manager, the extensions are registered and Change Manager understands the purpose of the plug-in.
1 Open the MANIFEST.MF file.
2 Navigate to the plugin.xml tab and display the source.
3 Add the following code:
<extension point=“com.embarcadero.change.notifications.notifier”>
notifier id=“org.acme.directorynotifier”name=“Directory Notifier”notifier=“org.acme.directorynotifier.DirectoryNotifier”viewContribution=“org.acme.directorynotifier.DirectoryNotifierViewerContribution”>
</notifier></extension>
4 Save the file by pressing Ctrl+S or selecting File>Save from the menu.
When the org.acme.directorynotifier is found, the notification extension point will be registered. The notifier and viewContribution attributes are the class names for two implementations and Eclipse will reflectively register these objects for use in Change Manager.
Deploying the Notifier Plug-InOnce the plug-in has been defined, you need to deploy the plug-in in Change Manager.
1 Stop Change Manager if it is currently running and select File > Export.
The Export dialog appears.
2 Choose Deployable Plug-Ins and Fragments from the Plug-In Development group.
3 Click Next.
4 Select org.acme.directorynotifier and ensure that the target directory is attribute to the Change Manager installation folder.
5 Click Finish.
6 Start Change Manager and create a new Data Comparison job. Define a Source and Target data source and then navigate to the Notification tab.
The Directory Notifier has been added as a section to the tab.
7 Choose Enable Directory Notifier to enable the feature.
8 Specify the Target Directory. For example, C:\ChangeManagerNotifications, and choose PDF in the Attached Report section.
9 Execute the job and open the target folder. A new folder is created containing two output files from the job.
EMBARCADERO TECHNOLOGIES > EMBARCADERO® CHANGE MANAGER™ 5.1 USER GUIDE 154
CONFIGURING CHANGE MANAGER > EXTENDING CHANGE MANAGER FUNCTIONALITY WITH ECLIPSE PLUG-INS
Creating and Implementing a Custom Configuration Plug-In
Creating a Project Plug-In
Configuring the Target Platform
Defining Plug-In Dependencies
Implementing a Property Source
Determining Support
Defining Properties
Gathering Results
Synchronizing the Job
Registering Extensions
Deploying the Custom Configuration Plug-In
Creating a Project Plug-InIn order to start building a plug-in, you need to create a new plug-in platform in Eclipse.
To create a plug-in project1 Select File > New > Other.
The Select a Wizard dialog appears.
2 Select Plug-In Project and click Next.
3 Type a name for the plug-in in the appropriate field, and leave the remainder of the parameters as they appear. Click Next.
4 Leave the parameters on the next screen as they appear and click Finish.
The new plug-in project is created in Eclipse and is ready for plug-in development.
Configuring the Target PlatformThe target platform for the plug-in development process needs to be identified in Change Manager. This will indicate to the new plug-in for what product it extends, and will grant the plug-in access to the system.
1 Select Window > Preferences.
The Preferences dialog appears.
2 Choose the Plug-In Development > Target Platform node and click Browse.
3 Navigate to the install directory for Change Manager.
4 Click Apply and OK.
The Preferences dialog closes and the target platform of the plug-in is now indicated.
EMBARCADERO TECHNOLOGIES > EMBARCADERO® CHANGE MANAGER™ 5.1 USER GUIDE 155
CONFIGURING CHANGE MANAGER > EXTENDING CHANGE MANAGER FUNCTIONALITY WITH ECLIPSE PLUG-INS
Defining Plug-In DependenciesThe plug-in requires a dependency for configuration comparison jobs in Change Manager. This dependency can be set by opening the MANIFEST.MF file located in the META-INF directory of your project.
1 Select the Dependencies tab and click Add...
2 Choose com.embarcadero.change.config.propertysource and click OK.
The dependency is added to the plug-in and appears in the Dependencies list.
3 Press CTRL-S, or Select File>Save from the menu to save your changes.
Once the dependency definition has been saved, you can close the editor and the system will retain your selection.
Implementing a Property SourceEach configuration property source plug-in must contain a class that extends com.embarcadero.change.config.propertysource.api.ConfigurationPropertySource.
NOTE: If ConfigurationPropertySource cannot be found in Eclipse, it means you have misconfigured the target platform or target dependencies.
1 Right-click on the project and select New>Class.
The New Java Class dialog appears.
2 Name the class JDBCVersionInformation, set the package to org.acme.versioninformation, and set the superclass to com.embarcadero.change.config.propertysource.api.ConfigurationPropertySource.
3 Click Finish.
The new class is generated.
Determining SupportEach class that subclasses ConfigurationPropertySource contributes properties to configuration comparison job functionality.
The implementation is indicated via the isSupported method, which determines if there are attributes available for a specific data source.
For example, if a user added the Sybase @@Version tag as a configuration property, it would be pointless to run the code for Oracle, SQL Server, or DB2 for LUW data sources.
The method has the following signature:
boolean isSupported ( IDatasourceIdentifier dataSourceIdentifier )
This method is called by Change Manager, for any registered content plug-in when a data source is used in a Configuration Archive job, a Standard, or a comparison job. When it encounters a data source identifier, it returns true or false and indicates if the property source provides parameters for the data source, or not.
Implement the following code to define this method:
public boolean isSupported ( IDatasourceIdentifier dataSourceIdentifier ){
return dataSourceIdentifier.getDatabaseVersion().getDBMSType() !=DBMSType.DB2;}
EMBARCADERO TECHNOLOGIES > EMBARCADERO® CHANGE MANAGER™ 5.1 USER GUIDE 156
CONFIGURING CHANGE MANAGER > EXTENDING CHANGE MANAGER FUNCTIONALITY WITH ECLIPSE PLUG-INS
Defining PropertiesThe getAvailableProperties function returns a set of instances of IConfigurationProperty instances.
There are several utility methods to help instantiate these instances, named of the form, createConfigurationProperty.
Implement the following code to define the getAvailableProperties method:
public Set(IConfigurationProperty> getAvailableProperties (IDatasourceIdentifier identifier )
{Set<IConfigurationProperty> results = new HashSet<IConfigurationProperty>();
for (EVersionProperties prop : EVersionProperties.values() ){
results.add ( createCOnfigurationProperty ( prop.getDisplayName(),prop.name(),“”,prop.getType(),“” ) );
}
return results;}
EMBARCADERO TECHNOLOGIES > EMBARCADERO® CHANGE MANAGER™ 5.1 USER GUIDE 157
CONFIGURING CHANGE MANAGER > EXTENDING CHANGE MANAGER FUNCTIONALITY WITH ECLIPSE PLUG-INS
Because the EVersionProperties code cannot be resolved, you can add a Java enum to define the properties provided by the plug-in. Create a new file named EVersionProperties.java and implement the following code:
package org.acme.versioninformation;
import java.sql.Connection;import java.sql.SQLException;
import com.embarcadero.change.config.propertysource.api.ConfigurationPropertyType;
/*** An enumeration of version properties*/public enum EVersionProperties{
PRODUCT_NAME ( ConfigurationPropertyType.STRING, “Product Name” ){
/*** @returns the JDBC metadata’s information for product name* @throws SQLException if ther eis a JDBC error*/public String getValue ( Connection connection ) throws SQLException{
return connection.getMetaData().getDatabaseProductName();}
},PRODUCT_VERSION ( ConfigurationPropertyType.STRING, “Product Version” ){
/*** @returns the JDBC metadata’s information for product version* @throws SQLException if there is a JDBC error*/public String getVAlue ( Connection connection ) throws SQLException{
return connection.getMetaData().getDAtabaseProductVersion();}
},MAJOR_VERSION ( ConfigurationPropertyType.NUMERIC, “Major Version” ){
/*** @returns the JDBC metadata’s information for major version* @throws SQLException if there is a JDBC error*/public String getValue ( Connection connection ) throws SQLException{
return “ ” + connection.getMetaData().getDataMajorVersion();}
};
//Attributesprivate ConfigurationPropertyType type;private String name;
/*** Constructor to set entry attributes* @param type the type* @param name*/private EVersionProperties ( ConfigurationPropertyType type,
String name)}
this.type = type;this.name = name;
{
/*** Given a JDBC connection return the parameter’s value* @param connection the database connection* @throws SQLException if there is a JDBC error*/abstract String getValue ( Connection connection ) throws SQLException;
EMBARCADERO TECHNOLOGIES > EMBARCADERO® CHANGE MANAGER™ 5.1 USER GUIDE 158
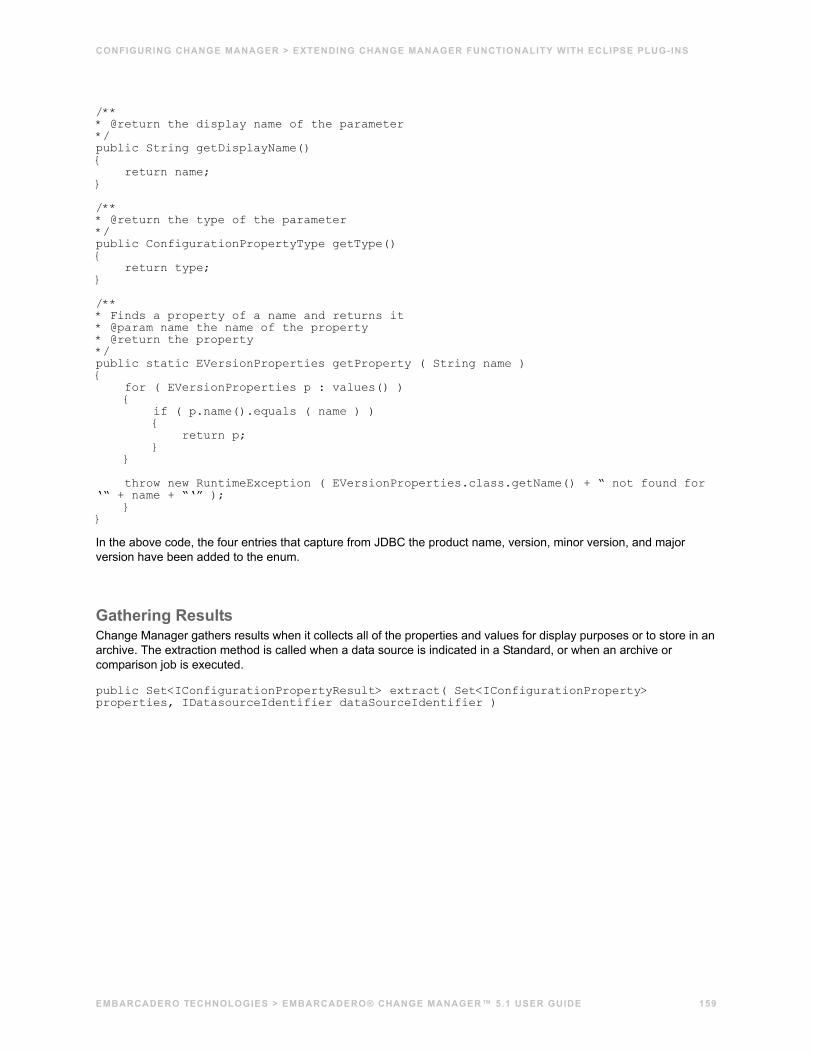
CONFIGURING CHANGE MANAGER > EXTENDING CHANGE MANAGER FUNCTIONALITY WITH ECLIPSE PLUG-INS
/*** @return the display name of the parameter*/public String getDisplayName(){
return name;}
/*** @return the type of the parameter*/public ConfigurationPropertyType getType(){
return type;}
/*** Finds a property of a name and returns it* @param name the name of the property* @return the property*/public static EVersionProperties getProperty ( String name ){
for ( EVersionProperties p : values() ){
if ( p.name().equals ( name ) ){
return p;}
}
throw new RuntimeException ( EVersionProperties.class.getName() + “ not found for ‘“ + name + “‘” );
}}
In the above code, the four entries that capture from JDBC the product name, version, minor version, and major version have been added to the enum.
Gathering ResultsChange Manager gathers results when it collects all of the properties and values for display purposes or to store in an archive. The extraction method is called when a data source is indicated in a Standard, or when an archive or comparison job is executed.
public Set<IConfigurationPropertyResult> extract( Set<IConfigurationProperty> properties, IDatasourceIdentifier dataSourceIdentifier )
EMBARCADERO TECHNOLOGIES > EMBARCADERO® CHANGE MANAGER™ 5.1 USER GUIDE 159
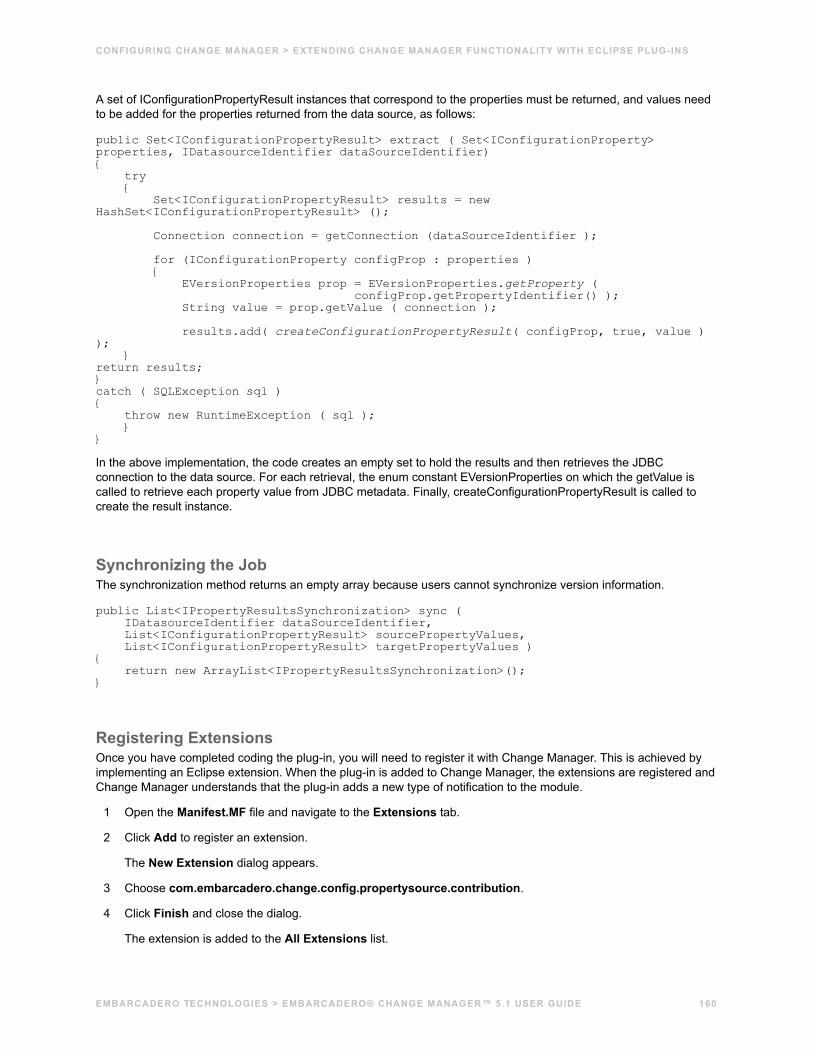
CONFIGURING CHANGE MANAGER > EXTENDING CHANGE MANAGER FUNCTIONALITY WITH ECLIPSE PLUG-INS
A set of IConfigurationPropertyResult instances that correspond to the properties must be returned, and values need to be added for the properties returned from the data source, as follows:
public Set<IConfigurationPropertyResult> extract ( Set<IConfigurationProperty> properties, IDatasourceIdentifier dataSourceIdentifier){
try{
Set<IConfigurationPropertyResult> results = new HashSet<IConfigurationPropertyResult> ();
Connection connection = getConnection (dataSourceIdentifier );
for (IConfigurationProperty configProp : properties ){
EVersionProperties prop = EVersionProperties.getProperty (configProp.getPropertyIdentifier() );
String value = prop.getValue ( connection );
results.add( createConfigurationPropertyResult( configProp, true, value ) );
}return results;}catch ( SQLException sql ){
throw new RuntimeException ( sql );}
}
In the above implementation, the code creates an empty set to hold the results and then retrieves the JDBC connection to the data source. For each retrieval, the enum constant EVersionProperties on which the getValue is called to retrieve each property value from JDBC metadata. Finally, createConfigurationPropertyResult is called to create the result instance.
Synchronizing the JobThe synchronization method returns an empty array because users cannot synchronize version information.
public List<IPropertyResultsSynchronization> sync (IDatasourceIdentifier dataSourceIdentifier,List<IConfigurationPropertyResult> sourcePropertyValues,List<IConfigurationPropertyResult> targetPropertyValues )
{return new ArrayList<IPropertyResultsSynchronization>();
}
Registering ExtensionsOnce you have completed coding the plug-in, you will need to register it with Change Manager. This is achieved by implementing an Eclipse extension. When the plug-in is added to Change Manager, the extensions are registered and Change Manager understands that the plug-in adds a new type of notification to the module.
1 Open the Manifest.MF file and navigate to the Extensions tab.
2 Click Add to register an extension.
The New Extension dialog appears.
3 Choose com.embarcadero.change.config.propertysource.contribution.
4 Click Finish and close the dialog.
The extension is added to the All Extensions list.
EMBARCADERO TECHNOLOGIES > EMBARCADERO® CHANGE MANAGER™ 5.1 USER GUIDE 160
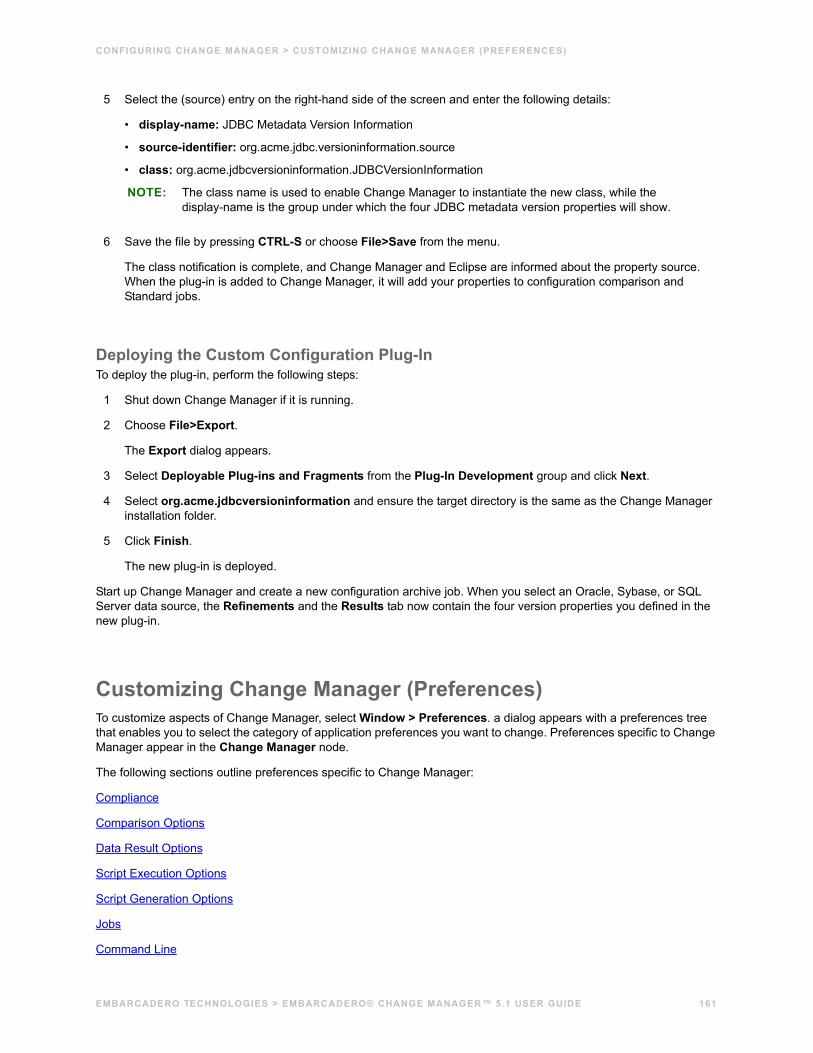
CONFIGURING CHANGE MANAGER > CUSTOMIZING CHANGE MANAGER (PREFERENCES)
5 Select the (source) entry on the right-hand side of the screen and enter the following details:
• display-name: JDBC Metadata Version Information
• source-identifier: org.acme.jdbc.versioninformation.source
• class: org.acme.jdbcversioninformation.JDBCVersionInformation
NOTE: The class name is used to enable Change Manager to instantiate the new class, while the display-name is the group under which the four JDBC metadata version properties will show.
6 Save the file by pressing CTRL-S or choose File>Save from the menu.
The class notification is complete, and Change Manager and Eclipse are informed about the property source. When the plug-in is added to Change Manager, it will add your properties to configuration comparison and Standard jobs.
Deploying the Custom Configuration Plug-InTo deploy the plug-in, perform the following steps:
1 Shut down Change Manager if it is running.
2 Choose File>Export.
The Export dialog appears.
3 Select Deployable Plug-ins and Fragments from the Plug-In Development group and click Next.
4 Select org.acme.jdbcversioninformation and ensure the target directory is the same as the Change Manager installation folder.
5 Click Finish.
The new plug-in is deployed.
Start up Change Manager and create a new configuration archive job. When you select an Oracle, Sybase, or SQL Server data source, the Refinements and the Results tab now contain the four version properties you defined in the new plug-in.
Customizing Change Manager (Preferences)To customize aspects of Change Manager, select Window > Preferences. a dialog appears with a preferences tree that enables you to select the category of application preferences you want to change. Preferences specific to Change Manager appear in the Change Manager node.
The following sections outline preferences specific to Change Manager:
Compliance
Comparison Options
Data Result Options
Script Execution Options
Script Generation Options
Jobs
Command Line
EMBARCADERO TECHNOLOGIES > EMBARCADERO® CHANGE MANAGER™ 5.1 USER GUIDE 161
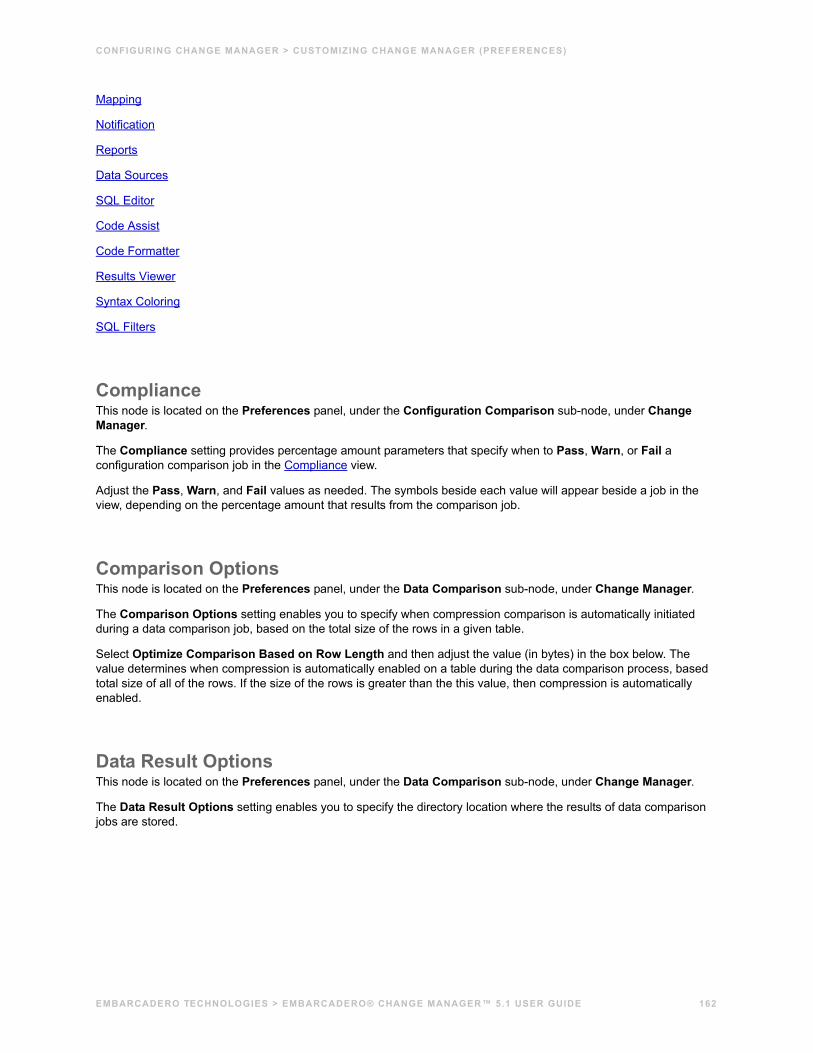
CONFIGURING CHANGE MANAGER > CUSTOMIZING CHANGE MANAGER (PREFERENCES)
Mapping
Notification
Reports
Data Sources
SQL Editor
Code Assist
Code Formatter
Results Viewer
Syntax Coloring
SQL Filters
ComplianceThis node is located on the Preferences panel, under the Configuration Comparison sub-node, under Change Manager.
The Compliance setting provides percentage amount parameters that specify when to Pass, Warn, or Fail a configuration comparison job in the Compliance view.
Adjust the Pass, Warn, and Fail values as needed. The symbols beside each value will appear beside a job in the view, depending on the percentage amount that results from the comparison job.
Comparison OptionsThis node is located on the Preferences panel, under the Data Comparison sub-node, under Change Manager.
The Comparison Options setting enables you to specify when compression comparison is automatically initiated during a data comparison job, based on the total size of the rows in a given table.
Select Optimize Comparison Based on Row Length and then adjust the value (in bytes) in the box below. The value determines when compression is automatically enabled on a table during the data comparison process, based total size of all of the rows. If the size of the rows is greater than the this value, then compression is automatically enabled.
Data Result OptionsThis node is located on the Preferences panel, under the Data Comparison sub-node, under Change Manager.
The Data Result Options setting enables you to specify the directory location where the results of data comparison jobs are stored.
EMBARCADERO TECHNOLOGIES > EMBARCADERO® CHANGE MANAGER™ 5.1 USER GUIDE 162
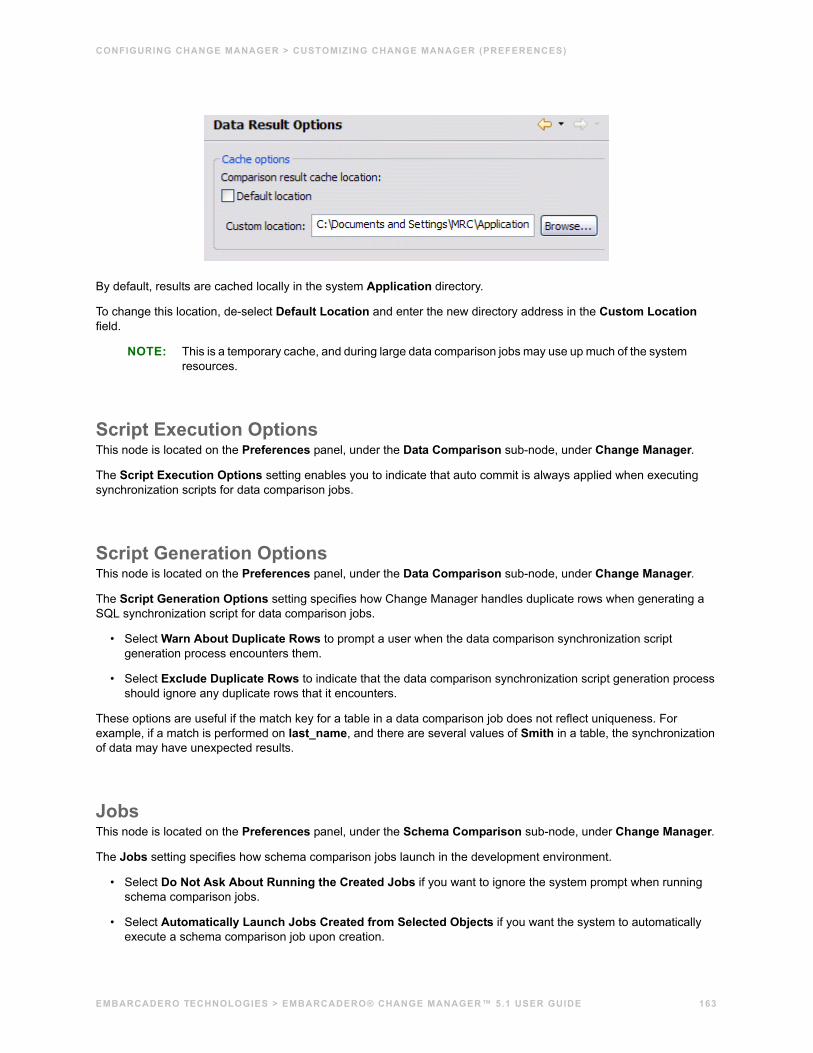
CONFIGURING CHANGE MANAGER > CUSTOMIZING CHANGE MANAGER (PREFERENCES)
By default, results are cached locally in the system Application directory.
To change this location, de-select Default Location and enter the new directory address in the Custom Location field.
NOTE: This is a temporary cache, and during large data comparison jobs may use up much of the system resources.
Script Execution OptionsThis node is located on the Preferences panel, under the Data Comparison sub-node, under Change Manager.
The Script Execution Options setting enables you to indicate that auto commit is always applied when executing synchronization scripts for data comparison jobs.
Script Generation OptionsThis node is located on the Preferences panel, under the Data Comparison sub-node, under Change Manager.
The Script Generation Options setting specifies how Change Manager handles duplicate rows when generating a SQL synchronization script for data comparison jobs.
• Select Warn About Duplicate Rows to prompt a user when the data comparison synchronization script generation process encounters them.
• Select Exclude Duplicate Rows to indicate that the data comparison synchronization script generation process should ignore any duplicate rows that it encounters.
These options are useful if the match key for a table in a data comparison job does not reflect uniqueness. For example, if a match is performed on last_name, and there are several values of Smith in a table, the synchronization of data may have unexpected results.
JobsThis node is located on the Preferences panel, under the Schema Comparison sub-node, under Change Manager.
The Jobs setting specifies how schema comparison jobs launch in the development environment.
• Select Do Not Ask About Running the Created Jobs if you want to ignore the system prompt when running schema comparison jobs.
• Select Automatically Launch Jobs Created from Selected Objects if you want the system to automatically execute a schema comparison job upon creation.
EMBARCADERO TECHNOLOGIES > EMBARCADERO® CHANGE MANAGER™ 5.1 USER GUIDE 163
CONFIGURING CHANGE MANAGER > CUSTOMIZING CHANGE MANAGER (PREFERENCES)
Command LineThis node is located on the Preferences panel, under the Change Manager node.
The Command Line node provides the Default Script Output setting, which enables you to define the operating system/file type by which command line scripts are stored as during the batch file creation process. (See Building Command Line Syntax and Creating Bulk Job Files for details of this process.)
• Select Windows (*.bat) (for scripts to be run on Windows), Linux (*.sh) (for scripts to be run on Linux), or Ant (*.xml) as appropriate.
MappingThis node is located on the Preferences panel, under the Change Manager node.
The Mapping node is used to specify how the system handles syntax nuances between objects during comparison job mapping processes.
• Select Ignore Case, Ignore Spaces, and/or Ignore Underscores, as needed.
NotificationThis node is located on the Preferences panel, under the Change Manager node.
The Notification node is composed of the Email Notification subnode and its associated branches. These settings are used to modify and set up how Change Manager handles job notifications for its various modules.
• The Email Notification node contains the Host Settings and User Information fields that the system will use to send email notifications.
• The Advanced Settings node contains JavaMail key-value pair definitions that the system uses to send email notifications. Refer to https://java.sun.com/products/javamail/downloads/index.html for more information. An FAQ is also available here: https://java.sun.com/products/javamail/FAQ.html, and SMTP properties are listed here: http://java.sun.com/products/javamail/javadocs/com/sun/mail/smtp/package-summary.html.
• The Contacts node enables you to create a list of address contacts to whom email notifications will be sent.
• The Templates node enables you to define and save email notification templates, which control the format in which notification emails are sent.
NOTE: Pressing Ctrl-Space on the Notification screen opens a list of tags that Change Manager replaces with job-specific content.
ReportsThis node is located on the Preferences panel, under the Change Manager node.
The Reports node provides settings and parameters that enable you to customize the look, feel, and format of reports issued when you generate a job report for comparison jobs.
• The Report Style tab enables you to change the logo and accent color of a report.
• The Paper Setup tab enables you to modify printer settings for paper reports.
EMBARCADERO TECHNOLOGIES > EMBARCADERO® CHANGE MANAGER™ 5.1 USER GUIDE 164
CONFIGURING CHANGE MANAGER > CUSTOMIZING CHANGE MANAGER (PREFERENCES)
Data SourcesThis node is located on the Preferences panel, under the Change Manager node.
The Data Sources node contains a directory location field that specifies where registered data source definitions are stored.
SQL EditorThis node is located on the Preferences panel, under the SQL Development node.
1 Select Window > Preferences > SQL Development > SQL Editor.
2 Change the settings as appropriate in each section and then click Apply.
• Enable SQL Parser indicates that the parser that provides code development features in SQL Editor is enabled. If this option is disabled, functions such as code formatting, auto completion, semantic validation, hyperlinks, etc. will not be available. The options below the check box enable you to limit (by file size) when the parser is enabled when dealing with code on a file-by-file basis.
• Parsing Delay specifies the amount of time that the parser delays prior to activating features after a keystroke.
• Severity Level for Semantic Validation Problems determines how semantic code errors are flagged in the editor and the Problems view.
Clearing Enable SQL Parser will disable many of the “smart” SQL editor features, including code formatting, auto completion, semantic validation, and hyperlinks. For better performance, you may disable the parser for files above a specified size.
Code AssistThe Code Assist panel is used to specify configuration parameters that determine how code completion features in SQL Editor behave.
Select Window > Preferences > SQL Development > Code Assist.
• Enable Auto Activation enables or disables code assist functionality.
• Insert Single Proposals Automatically specifies if only a single code completion suggestion is returned, it is inserted automatically.
• Fully Qualified Completions Automatically specifies if code completion results are returned specific (fully qualified), rather than the minimum required to identify the object.
Code Assist Color Options specifies the color formatting of code completion proposals. Select background or foreground options from the menu and modify them as appropriate.
Code FormatterThe Code Formatter pane provides configuration options for code formatting functionality in SQL Editor.
Select Window > Preferences > SQL Development > Code Formatter.
The panel provides a drop down list of formatting profiles and a preview window that displays how each profile formats code.
EMBARCADERO TECHNOLOGIES > EMBARCADERO® CHANGE MANAGER™ 5.1 USER GUIDE 165
CONFIGURING CHANGE MANAGER > USING SOURCE CONTROL SYSTEMS
Results ViewerThe Results Viewer pane provides configuration options that specify how the Results view displays results.
Select Window > Preferences > SQL Development > Results Viewer.
• Grid Refresh Interval indicates the speed in millisecords that the Results view refreshes.
• Stripe the Rows of the Results Table adds intermittent highlighted bars in the Results view.
Display Results in Separate Tab in SQL Editor opens the Results view in a separate window on the Workbench.
Syntax ColoringThe Syntax Coloring panel provides configuration options that change the look and feel of code syntax in SQL Editor.
Select Window > Preferences > SQL Development > Syntax Coloring.
Use the tree view provided in the Element window to select the comment type or code element you want to modify. Select the options to the right-hand side of the window to modify it. The Preview window shows a piece of sample code that updates according to the changes you made.
SQL FiltersSee Filtering Data Source Objects for instructions.
Using Source Control SystemsChange Manager can be integrated with source control systems such as Concurrent Versions System (CVS) and Visual Source Safe (VSS).
Source control systems provide a repository for project files and are aimed specifically at team programming environments where developers can work on the same code simultaneously and merge it as needed. Most source control systems provide versioning as well, which provides backup instances of code when development regression is required.
Typically, a source control system repository and its associated files are updated by individual members of a development team as they add and modify files in the project. Work is shared in this manner as the project evolves, and the latest work is always available in a given project as individuals can update files from the specified Change Manager directory to the branch repository and vice-versa.
The Navigator provides an interface for accessing these files in the Change Manager development environment. Job files and archive versions are stored as XML files and synchronization scripts are stored as text, in a specified directory for the purpose of sharing them in some manner of third-party source control system.
For more information regarding the implementation of source control systems, as well as the client and tool application software and how it integrates with Change Manager (built on the Eclipse platform framework for source sharing and version control systems), consult the third-party documentation provided with these plug-ins and/or applications.
All source code control actions much be manually performed.
NOTE: Change Manager is built on the Eclipse 3.3 framework. Consequently, any source code control plug-in designed to work with Eclipse 3.3 can also be implemented in Change Manager.
EMBARCADERO TECHNOLOGIES > EMBARCADERO® CHANGE MANAGER™ 5.1 USER GUIDE 166
CONFIGURING CHANGE MANAGER > USING SOURCE CONTROL SYSTEMS
Setting Up Concurrent Versions SystemConcurrent Versions System (CVS) can be downloaded from the following Web site: http://ximbiot.com/cvs/cvshome. By default, Change Manager framework supports a plug-in for CVS.
Once you have installed CVS on your machine and have created a repository system (consult the CVS documentation for details regarding these tasks), you need to enable it in Change Manager.
To set up CVS in Change Manager:1 Choose Help > Software Updates > Find and Install and choose Search for New Features to Install. Click
Next.
2 Select Eclipse 3.3 Update Site or add it by selecting New Remote Site... and entering the following URL: http://update.eclipse.org/updates/3.3*
3 Choose Automatically Select Mirrors and click Finish. A tree appears.
4 Choose the CVS plug-ins from the tree and install them. You may need to include dependencies as well.
5 Click Finish and restart Change Manager.
6 Right-click in the CVS Repositories view and choose New > Repository Location...
7 Enter the server and directory in the fields provided. The connection type should be pserver.
8 Enter your Windows credentials and specify the default port.
9 Click Apply and then save the connection. It appears in the Repository view.
Using Concurrent Versions System
To connect a project to the repository1 Highlight the Navigator view and right-click on the project you want to associate with CVS.
2 Select Team > Share Project... The Share Project dialog appears.
3 Select CVS and click Next.
4 Choose the existing repository and click Next.
5 Specify the default for Enter Module Name and click Next.
6 Complete the wizard as needed to check the files into the CVS repository. The project is added to CVS.
NOTE: If prompted, change any current job files and synchronization scripts from Binary to ASCII format.
To check in files• Jobs and scripts that are not up to date in the CVS repository appear in the Navigator with a > prefix beside the
file name. You can update files in the source control by right clicking on the file name and choosing Team > Commit. The > prefix will disappear. When you make new changes to the specified file, the prefix will appear again, indicating that it differs from the file stored in CVS.
To view version history• To view the version history of a file, right-click on it in the Navigator and choose Team > Show History.
EMBARCADERO TECHNOLOGIES > EMBARCADERO® CHANGE MANAGER™ 5.1 USER GUIDE 167
CONFIGURING CHANGE MANAGER > USING SOURCE CONTROL SYSTEMS
Setting Up Microsoft Visual Source SafeIn order to use VSS with Change Manager, you will need to download and install a plug-in that makes the two products compatible. You can download a VSS plug-in via the following link: http://sourceforge.net/projects/vssplugin.
Additionally, you will need to install Java Development Tools (JDT), which can be accessed via the Find and Install command in the Change Manager Main Menu.
To install JDT1 Choose Help > Software Updates > Find and Install.... The Find and Install dialog appears.
2 Select Search for New Features to Install and click Next.
3 Choose Eclipse 3.3 Update Site or add it by clicking New Remote Site and entering the following URL: http://update.eclipse.org/updates/3.3*
4 Choose Automatically Select Mirrors and click Finish. Change Manager searches for the JDT and adds it to the system.
5 Choose JDT (Java Development Tools) and install it, then restart Change Manager.
To install the VSS plug-in• Once you have downloaded the plug-in, close Change Manager and extract the plug-in zip file to Change
Manager’s plugins directory. When you restart Change Manager it will automatically be added to the application.
Using Microsoft Visual Source Safe
To connect a project to the repository1 In the Navigator, right-click on the project you want to connect and choose Team > Share Project...
2 Select VSS Configuration Wizard and click Next.
1 Enter the VSS connection information as applicable and click Finish. The project is associated with VSS.
To check in files1 In the Navigator, right-click on the file you want to add to VSS and select Team > Commit Changes. The
Commit Changes dialog appears.
2 Click OK. The file is added to VSS.
To check out files• In the Navigator, right-click on the file you want to check out of VSS and select Team > Check Out. The job is
checked out of VSS and can be modified. Conversely, you can check in files via the Team > Check In command.
Viewing file differences against the repository version• In the Navigator, right-click on the file you want to compare and choose Compare With > Latest from VSS
Repository... The differences will be displayed, based on the description you specified the last time you checked out the file.
EMBARCADERO TECHNOLOGIES > EMBARCADERO® CHANGE MANAGER™ 5.1 USER GUIDE 168
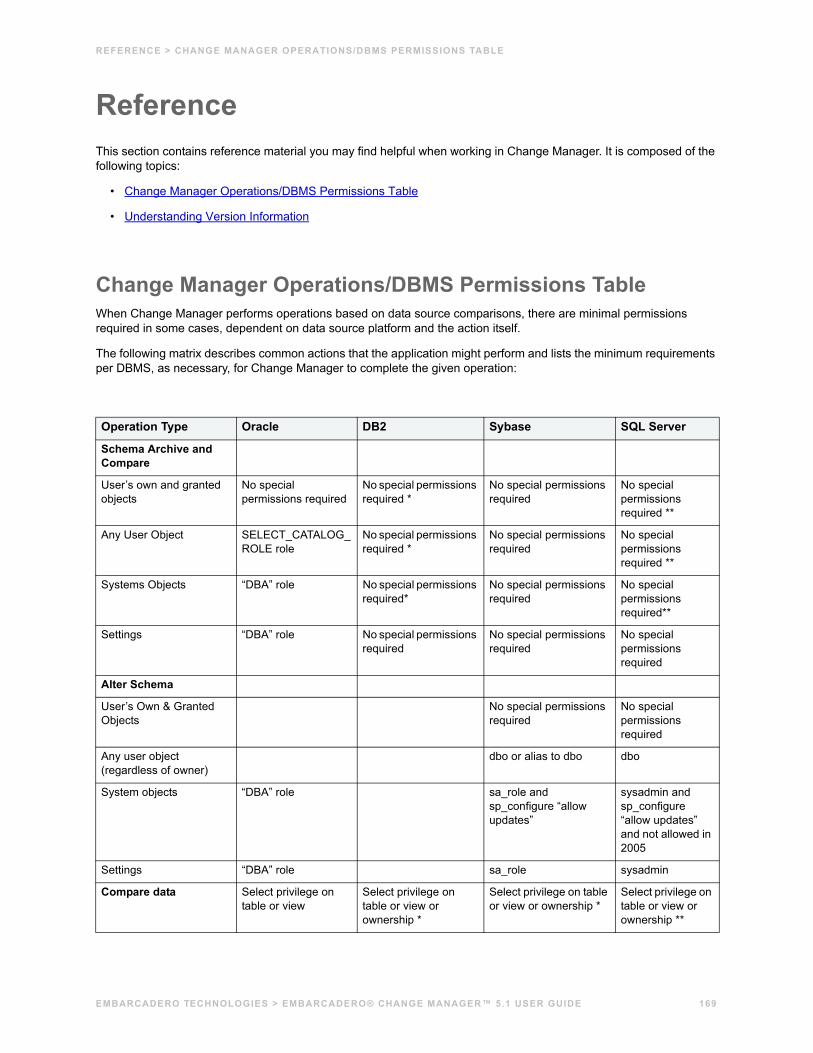
REFERENCE > CHANGE MANAGER OPERATIONS/DBMS PERMISSIONS TABLE
ReferenceThis section contains reference material you may find helpful when working in Change Manager. It is composed of the following topics:
• Change Manager Operations/DBMS Permissions Table
• Understanding Version Information
Change Manager Operations/DBMS Permissions TableWhen Change Manager performs operations based on data source comparisons, there are minimal permissions required in some cases, dependent on data source platform and the action itself.
The following matrix describes common actions that the application might perform and lists the minimum requirements per DBMS, as necessary, for Change Manager to complete the given operation:
Operation Type Oracle DB2 Sybase SQL Server
Schema Archive and Compare
User’s own and granted objects
No special permissions required
No special permissions required *
No special permissions required
No special permissions required **
Any User Object SELECT_CATALOG_ROLE role
No special permissions required *
No special permissions required
No special permissions required **
Systems Objects “DBA” role No special permissions required*
No special permissions required
No special permissions required**
Settings “DBA” role No special permissions required
No special permissions required
No special permissions required
Alter Schema
User’s Own & Granted Objects
No special permissions required
No special permissions required
Any user object (regardless of owner)
dbo or alias to dbo dbo
System objects “DBA” role sa_role and sp_configure “allow updates”
sysadmin and sp_configure “allow updates” and not allowed in 2005
Settings “DBA” role sa_role sysadmin
Compare data Select privilege on table or view
Select privilege on table or view or ownership *
Select privilege on table or view or ownership *
Select privilege on table or view or ownership **
EMBARCADERO TECHNOLOGIES > EMBARCADERO® CHANGE MANAGER™ 5.1 USER GUIDE 169
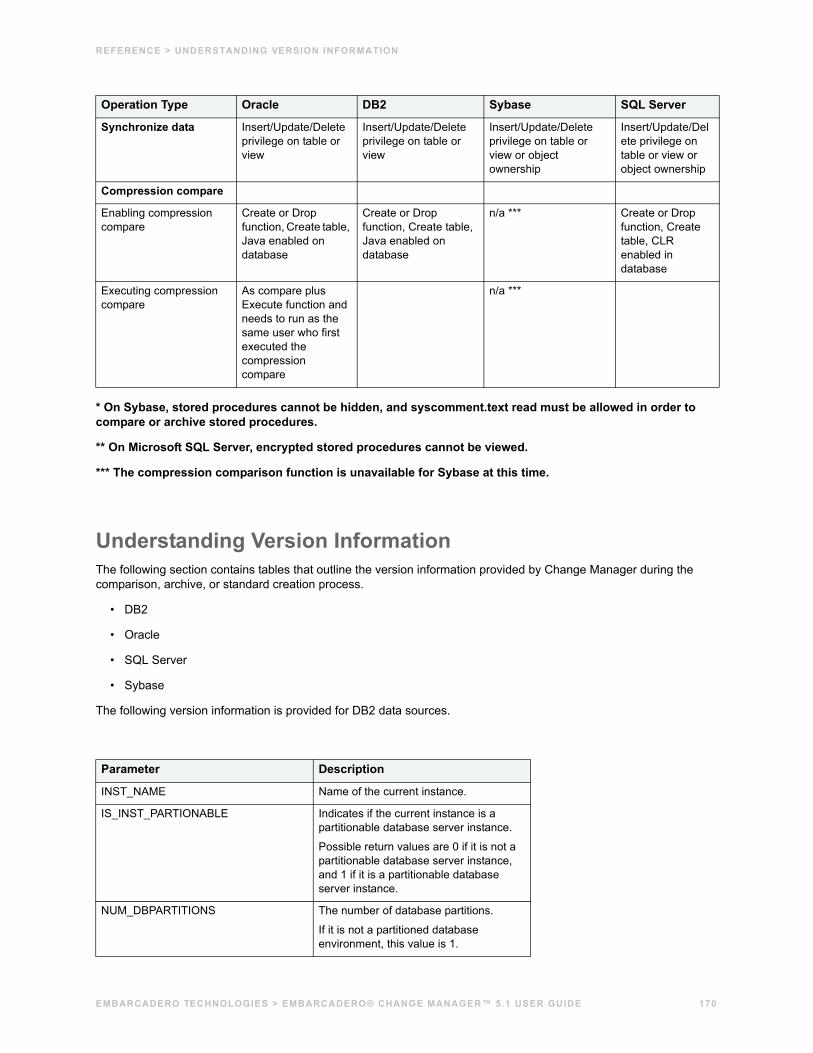
REFERENCE > UNDERSTANDING VERSION INFORMATION
* On Sybase, stored procedures cannot be hidden, and syscomment.text read must be allowed in order to compare or archive stored procedures.
** On Microsoft SQL Server, encrypted stored procedures cannot be viewed.
*** The compression comparison function is unavailable for Sybase at this time.
Understanding Version InformationThe following section contains tables that outline the version information provided by Change Manager during the comparison, archive, or standard creation process.
• DB2
• Oracle
• SQL Server
• Sybase
The following version information is provided for DB2 data sources.
Synchronize data Insert/Update/Delete privilege on table or view
Insert/Update/Delete privilege on table or view
Insert/Update/Delete privilege on table or view or object ownership
Insert/Update/Delete privilege on table or view or object ownership
Compression compare
Enabling compression compare
Create or Drop function, Create table, Java enabled on database
Create or Drop function, Create table, Java enabled on database
n/a *** Create or Drop function, Create table, CLR enabled in database
Executing compression compare
As compare plus Execute function and needs to run as the same user who first executed the compression compare
n/a ***
Parameter Description
INST_NAME Name of the current instance.
IS_INST_PARTIONABLE Indicates if the current instance is a partitionable database server instance.
Possible return values are 0 if it is not a partitionable database server instance, and 1 if it is a partitionable database server instance.
NUM_DBPARTITIONS The number of database partitions.
If it is not a partitioned database environment, this value is 1.
Operation Type Oracle DB2 Sybase SQL Server
EMBARCADERO TECHNOLOGIES > EMBARCADERO® CHANGE MANAGER™ 5.1 USER GUIDE 170
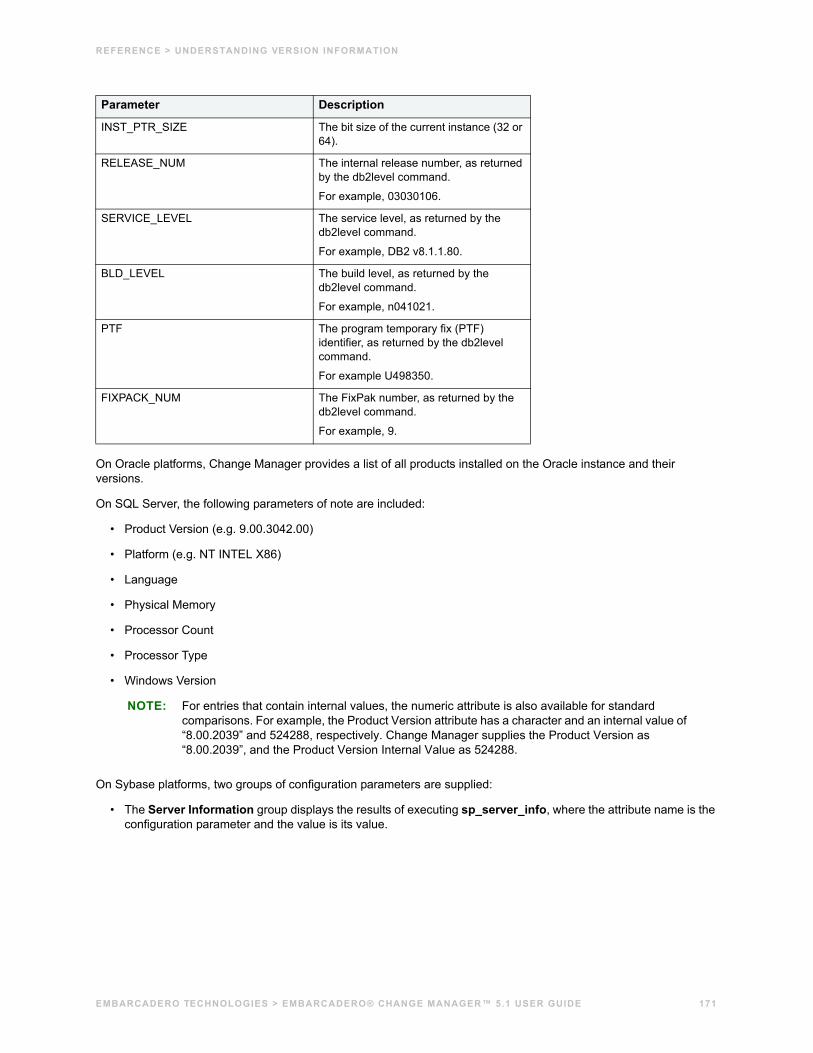
REFERENCE > UNDERSTANDING VERSION INFORMATION
On Oracle platforms, Change Manager provides a list of all products installed on the Oracle instance and their versions.
On SQL Server, the following parameters of note are included:
• Product Version (e.g. 9.00.3042.00)
• Platform (e.g. NT INTEL X86)
• Language
• Physical Memory
• Processor Count
• Processor Type
• Windows Version
NOTE: For entries that contain internal values, the numeric attribute is also available for standard comparisons. For example, the Product Version attribute has a character and an internal value of “8.00.2039” and 524288, respectively. Change Manager supplies the Product Version as “8.00.2039”, and the Product Version Internal Value as 524288.
On Sybase platforms, two groups of configuration parameters are supplied:
• The Server Information group displays the results of executing sp_server_info, where the attribute name is the configuration parameter and the value is its value.
INST_PTR_SIZE The bit size of the current instance (32 or 64).
RELEASE_NUM The internal release number, as returned by the db2level command.
For example, 03030106.
SERVICE_LEVEL The service level, as returned by the db2level command.
For example, DB2 v8.1.1.80.
BLD_LEVEL The build level, as returned by the db2level command.
For example, n041021.
PTF The program temporary fix (PTF) identifier, as returned by the db2level command.
For example U498350.
FIXPACK_NUM The FixPak number, as returned by the db2level command.
For example, 9.
Parameter Description
EMBARCADERO TECHNOLOGIES > EMBARCADERO® CHANGE MANAGER™ 5.1 USER GUIDE 171
REFERENCE > UNDERSTANDING VERSION INFORMATION
• The Version Information group, which contains the following parameters:
• Build Number
• Build Type
• Compilation Date & Time
• Compilation Kernel
• Compilation OS Bit Size
• Compilation OS Platform
• EBF Version
• Post Build Type
• Product
• Product Code
• Version
EMBARCADERO TECHNOLOGIES > EMBARCADERO® CHANGE MANAGER™ 5.1 USER GUIDE 172
Appendix A: Change Manager Cheat SheetsThis section provides a complete list of the Change Manager cheat sheets. Cheat sheets are available from the Workbench, and provide a series of step-by-step, task-based instructions on how to perform key tasks within the application.
In Change Manager, you can access cheat sheets by selecting Help > Cheat Sheets, and then selecting the cheat sheet you want to view.
This section of the help guide reproduces the cheat sheets provided in the application to enable hard copy printing and provide a higher level of user comprehension while working with Change Manager features and functionality.
The following cheat sheets are reproduced in this section:
Configuration Comparison Cheat SheetsCheat Sheet 1A: Creating a New Configuration Comparison Job
Cheat Sheet 1B: Creating a New Configuration Archive
Cheat Sheet 1C: Creating a New Configuration Standard
Data Comparison Cheat SheetsCheat Sheet 2A: Creating a New Data Comparison Job
Schema Comparison Cheat SheetsCheat Sheet 3A: Creating a New Schema Comparison Job
Cheat Sheet 3B: Creating a New Schema Archive
EMBARCADERO TECHNOLOGIES > EMBARCADERO® CHANGE MANAGER™ 5.1 USER GUIDE 173
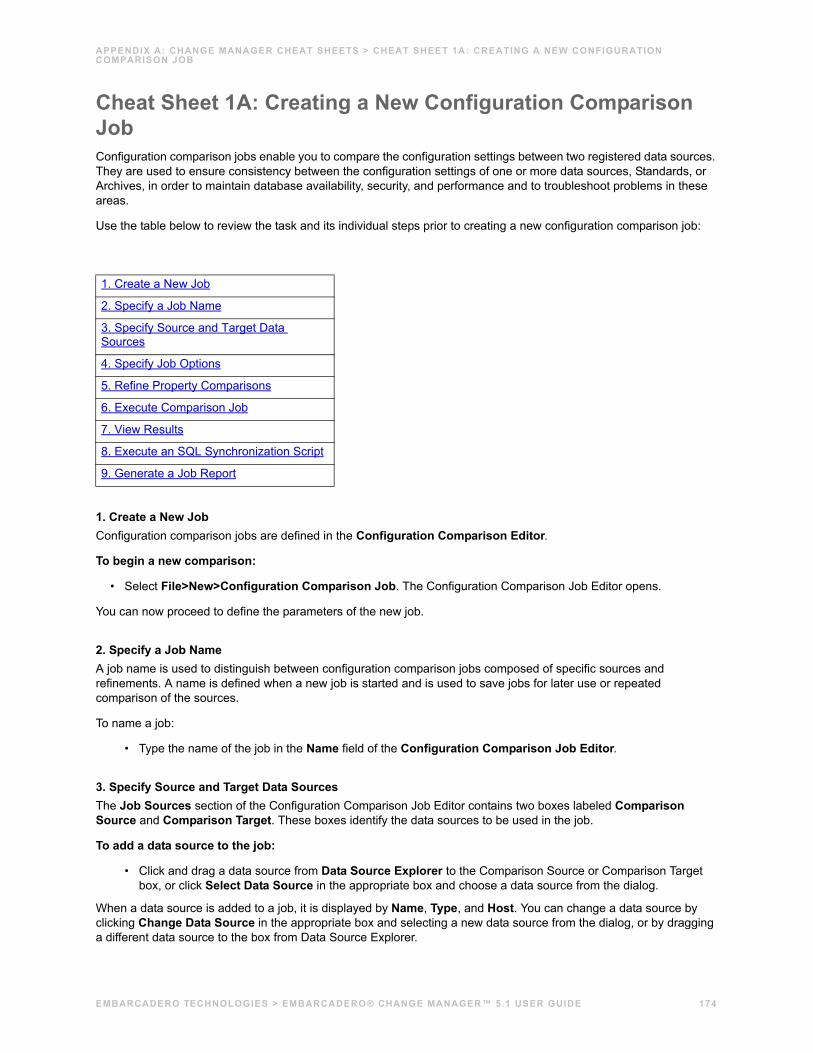
APPENDIX A: CHANGE MANAGER CHEAT SHEETS > CHEAT SHEET 1A: CREATING A NEW CONFIGURATION COMPARISON JOB
Cheat Sheet 1A: Creating a New Configuration Comparison JobConfiguration comparison jobs enable you to compare the configuration settings between two registered data sources. They are used to ensure consistency between the configuration settings of one or more data sources, Standards, or Archives, in order to maintain database availability, security, and performance and to troubleshoot problems in these areas.
Use the table below to review the task and its individual steps prior to creating a new configuration comparison job:
1. Create a New JobConfiguration comparison jobs are defined in the Configuration Comparison Editor.
To begin a new comparison:
• Select File>New>Configuration Comparison Job. The Configuration Comparison Job Editor opens.
You can now proceed to define the parameters of the new job.
2. Specify a Job NameA job name is used to distinguish between configuration comparison jobs composed of specific sources and refinements. A name is defined when a new job is started and is used to save jobs for later use or repeated comparison of the sources.
To name a job:
• Type the name of the job in the Name field of the Configuration Comparison Job Editor.
3. Specify Source and Target Data SourcesThe Job Sources section of the Configuration Comparison Job Editor contains two boxes labeled Comparison Source and Comparison Target. These boxes identify the data sources to be used in the job.
To add a data source to the job:
• Click and drag a data source from Data Source Explorer to the Comparison Source or Comparison Target box, or click Select Data Source in the appropriate box and choose a data source from the dialog.
When a data source is added to a job, it is displayed by Name, Type, and Host. You can change a data source by clicking Change Data Source in the appropriate box and selecting a new data source from the dialog, or by dragging a different data source to the box from Data Source Explorer.
1. Create a New Job
2. Specify a Job Name
3. Specify Source and Target Data Sources
4. Specify Job Options
5. Refine Property Comparisons
6. Execute Comparison Job
7. View Results
8. Execute an SQL Synchronization Script
9. Generate a Job Report
EMBARCADERO TECHNOLOGIES > EMBARCADERO® CHANGE MANAGER™ 5.1 USER GUIDE 174
APPENDIX A: CHANGE MANAGER CHEAT SHEETS > CHEAT SHEET 1A: CREATING A NEW CONFIGURATION COMPARISON JOB
The Comparison Source and Comparison Target boxes must contain data sources, archives, and standards before the job can be executed.
To add multiple comparison targets, click Add More Targets to enable a One-to-Many comparison.
Additionally, you can specify whether you want to compare the current properties of the live data source, or an archived set of properties previously stored by Change Manager using the radio buttons beneath each box:
• Select Use Live Sources to compare the current properties of the data source when the job is executed.
• Select Use an Archive and select the archive and version to use in the job.
Note: You can drag and drop data sources, archive jobs, archive versions, and standards into the Comparison Source and Comparison Target boxes. A Standard can only be the Source in a Configuration Comparison Job.
4. Specify Job OptionsPrior to the execution of a job, parameters can be set to control aspects of the execution process itself. These options are set on the Options tab.
Presently, the Options tab contains only the Extract DDL option. When selected, this function automatically outputs the synchronization code produced by the job comparison into a separate editor window once the process has executed.
To specify job options:
• Navigate to the Options tab and select or de-select the Extract DDL check box to turn this function on or off, respectively.
5. Refine Property ComparisonsConfiguration property refinement involves choosing specific configuration properties to compare, and specific configuration properties to omit, prior to executing a comparison job.
By default, when you specify a data source as a comparison job Source or Target, you can refine the properties to be compared prior to executing the job on the Refinements tab of the Configuration Comparison Job Editor.
Configuration properties are organized by tree and listed by Property Name, Description, Location, and Source.
To specify the properties used in the comparison job:
• Navigate to the Refinements tab and select or de-select the configuration properties in the table, as required. Selected properties are included in the comparison job, and de-selected properties are ignored during job execution.
6. Execute Comparison JobThe configuration comparison job runs when you click the Run Job icon on any tab in the Configuration Comparison Job Editor. It’s located in the upper right-hand corner of your screen.
When the process executes, the Comparison Results tab appears and displays the progress of the job and a summary of the comparison job results.
7. View ResultsWhen a job is complete, results are displayed on the Comparison Results tab.
Job results are displayed by property with an overview of the matching and non-matching properties located at the top of the page display. Individual details regarding the data source properties are listed in the Comparison Results table:
• The Result column for each Target contains a check mark or X icon, depending on if the corresponding property value matches between the Source and Target data sources.
EMBARCADERO TECHNOLOGIES > EMBARCADERO® CHANGE MANAGER™ 5.1 USER GUIDE 175
APPENDIX A: CHANGE MANAGER CHEAT SHEETS > CHEAT SHEET 1A: CREATING A NEW CONFIGURATION COMPARISON JOB
• The Source Value column contains the value of the property on the Source.
• The Op column provides the operator used in the job comparison that defines what constitutes a match.
8. Execute an SQL Synchronization ScriptChange Manager will build a SQL synchronization script to correct any discrepancies it discovers between the source and the target during the job execution process.
You execute a synchronization script via the Run menu or via the commands located along the top of the editor window where the script opened.
To execute the code:
Click the Execute icon. Change Manager executes the code on the specified data source. Results of the execution are displayed in the same tab or in a new tab.
9. Generate a Job ReportOnce you have executed a job, you can generate a job report via the View Report command, located on the Results tab.
The report opens in a separate window where additional report options are available, such as sending the report to the printer, saving it to disk, or exporting the report in a specified file format to a directory or network location.
To generate a job report:
• Click the View Report command on the Results tab. The report opens in a new window and enables you to customize and perform other operations on it.
EMBARCADERO TECHNOLOGIES > EMBARCADERO® CHANGE MANAGER™ 5.1 USER GUIDE 176
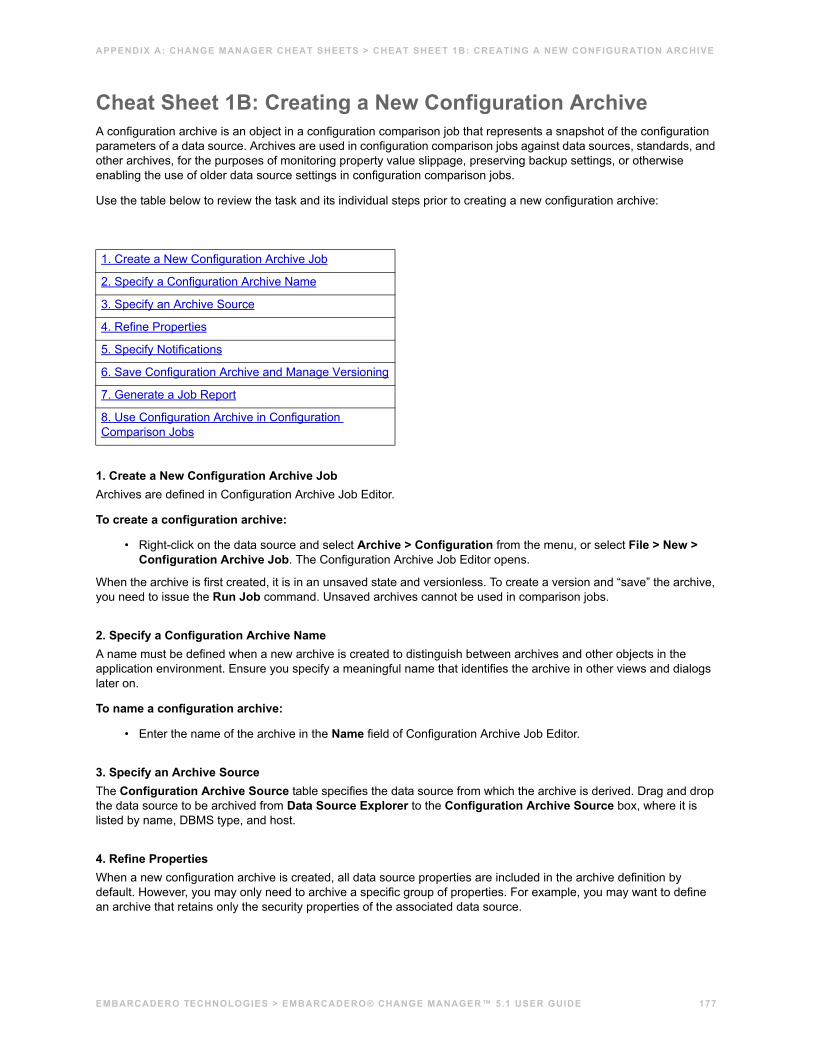
APPENDIX A: CHANGE MANAGER CHEAT SHEETS > CHEAT SHEET 1B: CREATING A NEW CONFIGURATION ARCHIVE
Cheat Sheet 1B: Creating a New Configuration ArchiveA configuration archive is an object in a configuration comparison job that represents a snapshot of the configuration parameters of a data source. Archives are used in configuration comparison jobs against data sources, standards, and other archives, for the purposes of monitoring property value slippage, preserving backup settings, or otherwise enabling the use of older data source settings in configuration comparison jobs.
Use the table below to review the task and its individual steps prior to creating a new configuration archive:
1. Create a New Configuration Archive JobArchives are defined in Configuration Archive Job Editor.
To create a configuration archive:
• Right-click on the data source and select Archive > Configuration from the menu, or select File > New > Configuration Archive Job. The Configuration Archive Job Editor opens.
When the archive is first created, it is in an unsaved state and versionless. To create a version and “save” the archive, you need to issue the Run Job command. Unsaved archives cannot be used in comparison jobs.
2. Specify a Configuration Archive NameA name must be defined when a new archive is created to distinguish between archives and other objects in the application environment. Ensure you specify a meaningful name that identifies the archive in other views and dialogs later on.
To name a configuration archive:
• Enter the name of the archive in the Name field of Configuration Archive Job Editor.
3. Specify an Archive SourceThe Configuration Archive Source table specifies the data source from which the archive is derived. Drag and drop the data source to be archived from Data Source Explorer to the Configuration Archive Source box, where it is listed by name, DBMS type, and host.
4. Refine PropertiesWhen a new configuration archive is created, all data source properties are included in the archive definition by default. However, you may only need to archive a specific group of properties. For example, you may want to define an archive that retains only the security properties of the associated data source.
1. Create a New Configuration Archive Job
2. Specify a Configuration Archive Name
3. Specify an Archive Source
4. Refine Properties
5. Specify Notifications
6. Save Configuration Archive and Manage Versioning
7. Generate a Job Report
8. Use Configuration Archive in Configuration Comparison Jobs
EMBARCADERO TECHNOLOGIES > EMBARCADERO® CHANGE MANAGER™ 5.1 USER GUIDE 177
APPENDIX A: CHANGE MANAGER CHEAT SHEETS > CHEAT SHEET 1B: CREATING A NEW CONFIGURATION ARCHIVE
To refine archive properties:
Use the check boxes to select or de-select properties as needed. Selected properties are included in the archive when configuration comparison jobs run, while de-selected properties are ignored.
5. Specify NotificationsNotification options provide parameters for enabling and setting up various notifications regarding executed configuration archive comparison jobs.
You can specify email, file system, or system tray notifications on the Notification tab of the Configuration Archive Editor:
• Email notification options provide parameters for configuring and enabling email notification and report mailing on executed comparison jobs.
• File system notification options provide parameters for configuring and enabling logging options for executed comparison jobs.
• System tray notification parameters enable pop-up window notifications on your Desktop when Change Manager is minimized, but running jobs.
To set notifications:
• Navigate to the Notifications tab and modify the settings, as appropriate. Email, file system, and system tray notification options are labeled and contained in separate sections on the interface.
6. Save Configuration Archive and Manage VersioningOnce you have completed property refinement, you need to save the archive by creating a version. A version is a specific set of configuration property values associated with an archive and used to store older snapshots of the same archive for backup or tracking comparison purposes.
Versions are created by clicking the Run Job icon located in the lower right-hand corner of each tab on the Editor. When you define a new archive, no versions exist. This indicates the archive is not yet saved to the system, and cannot be used in comparison jobs.
To create a version and save the archive:
• Click Run Job. A new tab appears named Unsaved Version that displays the current values of the specified database.
Additionally versions are created in the same archive each time you click Run Job. The new version will contain the latest values for the properties, as specified on the Refinements tab.
Versions are listed on the Overview tab, (displayed in ascending order), and can be accessed by double-clicking the appropriate version in the table. The selected version opens in a new tab of the Editor. Additionally, versions are listed in the Data Source Explorer as the child nodes of the archive to which they represent.
7. Generate a Job ReportOnce you have executed a job, you can generate a job report via the View Report command, located on the Results tab.
The report opens in a separate window where additional report options are available, such as sending the report to the printer, saving it to disk, or exporting the report in a specified file format to a directory or network location.
To generate a job report:
• Click the View Report command on the Results tab. The report opens in a new window and enables you to customize and perform other operations on it.
EMBARCADERO TECHNOLOGIES > EMBARCADERO® CHANGE MANAGER™ 5.1 USER GUIDE 178
APPENDIX A: CHANGE MANAGER CHEAT SHEETS > CHEAT SHEET 1B: CREATING A NEW CONFIGURATION ARCHIVE
8. Use Configuration Archive in Configuration Comparison JobsArchives are used in configuration comparison jobs in the same manner as registered Data Sources or Standards.
To use an archive in a configuration comparison job:
• Click and drag the appropriate version from Data Source Explorer to the Source or Target box in Configuration Comparison Editor.
EMBARCADERO TECHNOLOGIES > EMBARCADERO® CHANGE MANAGER™ 5.1 USER GUIDE 179
APPENDIX A: CHANGE MANAGER CHEAT SHEETS > CHEAT SHEET 1C: CREATING A NEW CONFIGURATION STANDARD
Cheat Sheet 1C: Creating a New Configuration StandardA Configuration Standard is an object associated with configuration comparison feature. It provides customized data source configuration properties that are used in configuration comparison jobs, against data sources and archives to provide a specific set of values and threshold operators that “check” enterprise settings and ensure all network configuration values fall within acceptable ranges.
Use the table below to review the task and its individual steps prior to creating a new configuration standard:
1. Create a New Configuration StandardStandards are defined in the Configuration Standards Editor.
To create a new configuration standard:
• Select File > New > Configuration Standard. The Standard Editor opens.
If you want to add the configuration properties of an existing data source or archive to the new standard, click and drag the appropriate object from Data Source Explorer or Standards Explorer to the Standard Sources table in the editor. The properties of the selected data source/archive populate the new standard.
2. Specify a Configuration Standard NameA name must be defined when a new standard is created to distinguish between standards and other objects in the Change Manager environment. Ensure you specify a meaningful name that identifies the standard in other views and dialogs later on.
To name a configuration standard:
• Enter the name of the standard in the Name field of the Configuration Standards Editor.
3. Add Property SourcesThe Standard Sources table specifies the amalgamation of data sources, archives, and other standards from which new standard properties are derived.
By default, Change manager automatically adds all properties of a selected source to the standard definition. You need to manually refine property selections on the Refinements tab once sources have been added. See the Refine Properties step below for more information.
To add properties to a standard:
• Drag and drop a data source, archive, or standard, from Data Source Explorer or Standards Explorer, respectively, to the Standard Sources table. Alternatively, use the Select Standard, Select Data Source, and Select Archive Version commands to add properties to the Standards definition.
1. Create a New Configuration Standard
2. Specify a Configuration Standard Name
3. Add Property Sources
4. Refine Properties
5. Save Configuration Standard
6. Use Configuration Standard in Configuration Comparison Jobs
EMBARCADERO TECHNOLOGIES > EMBARCADERO® CHANGE MANAGER™ 5.1 USER GUIDE 180
APPENDIX A: CHANGE MANAGER CHEAT SHEETS > CHEAT SHEET 1C: CREATING A NEW CONFIGURATION STANDARD
4. Refine PropertiesThe Standard Refinement tab displays all sources and corresponding properties applied to the Standard. Properties are listed by Property Name, Source, Type of Property, Operator, and Type, and are organized in a tree as the children of the original source.
The Standard Refinement tab is used to customize property selections. You can choose to include or exclude properties via the check boxes located beside each property. Additionally, Operator values can be customized to set threshold or otherwise specify what constitutes a “pass” or a “fail” when a comparison job runs using the standard.
The following operators can be applied to properties:
• Less Than
• Greater Than
• Greater Than or Equal To
• Equals
• Less Than or Equal To
• Not Equal
The Value column indicates the value or the Operator definition must match.
The Type column indicates if individual properties are Linked or Static:
Linked property values refresh with the latest source values whenever the standard is used in a job. Static property values remain affixed at the value the property contained at the time it was added to the standard definition.
To refine standard properties:
1 Define each property as Linked or Static by clicking the appropriate row value in the Type column and choosing a selection from the drop down menu.
2 Define the operator used to determine the conditions of the matching result when the job runs. Click the appropriate row value in the Operator column and choose a selection from the drop down menu. Ensure you include a condition value in the corresponding Value column.
5. Save Configuration StandardWhen a standard is saved, it appears in Standards Explorer as the name you defined in the Name field of the Editor.
To save a standard:
• Select File > Save or File > Save All. The standard appears in Project Explorer.
6. Use Configuration Standard in Configuration Comparison JobsStandards are used in configuration comparison jobs in the same manner as data sources and archives, with the noted exception that they may only be designated as Sources due to the unique property operator values they contain.
EMBARCADERO TECHNOLOGIES > EMBARCADERO® CHANGE MANAGER™ 5.1 USER GUIDE 181
APPENDIX A: CHANGE MANAGER CHEAT SHEETS > CHEAT SHEET 2A: CREATING A NEW DATA COMPARISON JOB
Cheat Sheet 2A: Creating a New Data Comparison JobData comparison jobs are used to compare the repositories of two data sources. Job features enable you to specify execution options and mapping refinement parameters and synchronize any discrepancies discovered by the job, once it has been executed.
Use the table below to review the task and its individual steps prior to creating a new data comparison job:
1. Create a New JobData comparison jobs are performed in the Data Comparison Job Editor. You create a new comparison job by opening the editor and defining job parameters, as needed.
To create a new comparison job:
• Select File > New > Data Comparison Job. The Data Comparison Job Editor opens.
Note: If any jobs already exist, they can be opened by selecting File > Open Comparison, and choosing the name from the list of available jobs.
2. Specify a Job NameA job name identifies the job in the application and should be specified with this in mind.
Specify a meaningful name that clearly identifies the job in the views and dialogs of the working environment.
To name a job:
• Enter the name of the job in the Name field of the Data Comparison Job Editor.
3. Specify Source and Target Data SourcesThe Source and Target boxes identify what data sources will be compared when the job executes. Both boxes must contain data sources before the job can be executed. When a data source is added to a job, it is displayed by Name, Type, and Host.
1. Create a New Job
2. Specify a Job Name
3. Specify Source and Target Data Sources
4. Specify Job Options
5. View Data Source Mapping Details
6. Customize Database Mapping
7. Customize Table Mapping
8. Specify Notification Options
9. Execute Job
10. View Results
11. Customize Data Resolution
12. Resolve Data Repositories via an SQL Script
13. Generate a Job Report
EMBARCADERO TECHNOLOGIES > EMBARCADERO® CHANGE MANAGER™ 5.1 USER GUIDE 182
APPENDIX A: CHANGE MANAGER CHEAT SHEETS > CHEAT SHEET 2A: CREATING A NEW DATA COMPARISON JOB
To add a data source:
• Cilck and drag a data source from Data Source Explorer to the Source or Target box. If no data sources have been registered in Change Manager, click Select Data Source in the appropriate box and then click New Data Source to add the data source. Data sources added in this way are automatically registered and added to Data Source Explorer.
Note: You can change a data source selection by clicking Change Data Source in the appropriate box, or by dragging a different data source to the box from Data Source Explorer.
4. Specify Job OptionsPrior to the execution of a job, parameters can be set to control aspects of the execution process itself. These options are set on the Options tab.
The following option groups are available:
• Execution options control aspects of the job process execution.
• Mapping options control how the data sources in the job are mapped by the process.
• Comparison options specify the parameters of how the job treats the comparison in terms of naming conventions.
• Resolution options determine how the job resolves any discrepancies discovered during the comparison process.
Additionally, the Execution Options section contains the Compression Comparison setting.
The comparison of large repositories with many databases, tables, and rows can be a time consuming and tedious process, especially when you are required to check at the row level to ensure complete accuracy between a data source and its backup, or during migration procedures from testing to production that require optimum levels of accuracy.
The Compression Comparison option enables an algorithm during the execution process of a job. The algorithm provides Change Manager with the ability to compare at the table level instead of the row level, initially.
Each table in a pair is assigned a value and if the values match, the comparison process moves to the next pair of tables. If the values do not match, the process performs a more detailed comparison at the row level. This feature allows for a faster comparison process in general, without losing any accuracy during the process.
The Compression Comparison option is enabled on the Options tab of the Data Comparison Job Editor. It is available on SQL Server 2005, DB2, and Oracle platforms, and requires that CLR is enabled to function correctly.
To set job options:
• Navigate to the Options tab and modify the options, as needed. Options are grouped into execution, mapping, comparison, and resolution sections.
To enable Fast Compare:
• Before executing a job in the Data Comparison Job Editor, navigate to the Options tab and select Compression Comparison in the Execution Options section. Fast Compare is enabled and when the job is executed, the system performs the comparison, as appropriate.
EMBARCADERO TECHNOLOGIES > EMBARCADERO® CHANGE MANAGER™ 5.1 USER GUIDE 183
APPENDIX A: CHANGE MANAGER CHEAT SHEETS > CHEAT SHEET 2A: CREATING A NEW DATA COMPARISON JOB
5. View Data Source Mapping DetailsMapping is the process of pairing data source elements between the source and target of a job. These elements (databases, tables, and rows) are compared when the job executes to determine matches and mismatches between the two sources. Mapping details are viewed on the Mapping tab of the editor.
Change Manager automatically maps data source elements based on its interpretation of both schemas. Elements that do not match are excluded from the job when it executes, unless manually paired prior to running the job.
The Database Mapping table displays the paired databases or owners on the Source and Target. The % Mapped column indicates how much of the database or owner (a percentage value of total tables and rows) is mapped. Unpaired databases appear in this table as well, but are excluded from the execution process unless manually mapped to a corresponding database.
In order to view the table and view mappings of database pairs, you need to initiate the inspection process by clicking Inspect Checked Pairs. Once Change Manager has analyzed the selected pairs, to view the table mappings of a specified pair, click a row. The Table Mapping table populates with the paired tables and views of the selected pair. You can view the row mappings of a table or view pair by clicking Edit in the rightmost column of the appropriate row. The row pairings and corresponding values appear in the new window.
Individual owner and database pairs can be examined by selecting the appropriate icon in the Inspect Now column.
6. Customize Database MappingYou can customize job database mapping parameters manually by choosing to exclude certain paired rows, or redefining objects after the automatic mapping process is completed.
The check boxes beside each paired object displayed in the Database Mapping Source column indicate if a pair is included or excluded when the job runs.
To include or exclude a database pair from the job:
• Select or de-select the check box beside each database pair, as needed. Use the All and None commands at the bottom of the table to select all or none of the rows in the table, respectively.
Database pairings can also be redefined via the drop down menu that appears when the corresponding item in the Target data source column is selected. The menu contains a list of all databases or owners that reside on the Target data source.
Databases or owners that are already paired appear in the drop down menu with an asterisk to denote them. Additionally, using the same method, unpaired databases can be assigned a matching database on the Source.
On Microsoft SQL Server and Sybase, you can pair up owners independently of databases by right-clicking on a row and selecting Show Database Parts, Show Source Database Parts, or Show Target Database Parts to decompose the database into its owner components. These components can be individually mapped and explored.
To recompose the database, right-click on and select Hide Database Parts. To restore the Database Mapping table to its original settings, click Restore Default Mappings. All settings revert to the original object mappings as determined by Change Manager based on the selected Mapping Options.
EMBARCADERO TECHNOLOGIES > EMBARCADERO® CHANGE MANAGER™ 5.1 USER GUIDE 184
APPENDIX A: CHANGE MANAGER CHEAT SHEETS > CHEAT SHEET 2A: CREATING A NEW DATA COMPARISON JOB
7. Customize Table MappingYou can manually map databases, tables, and rows between the Source and Target data sources. Tables are displayed by name and contain mapping refinement column values (Columns, Comparison Key, and Filter).
You can manually map unpaired tables between the database by clicking the corresponding item in the Target data source column and define it via the drop down menu that appears, as with database mapping.
Additionally, if you click Edit in the appropriate pairing, the Columns, Comparison Key, and Filter dialog enables you to further detail mapping refinements in terms of defining table roles in the execution of the job.
• The Columns and Comparison Key tab enables the mapping of columns to compare between the paired tables. Select or de-select the columns, as needed, in the dialog provided and use the drop down menu to change the comparison key if multiple keys are available.
• The Comparison Filter enables you to manually insert a WHERE clause for execution when the job runs. Click the ellipsis button and enter the WHERE clause into the text box provided. If you want to create a different WHERE clause per table in the pair, select the Separate WHERE Clause radio button. The dialog adds an additional text box for a second WHERE clause.
Note: When entering selective WHERE clauses, do not include the WHERE keyword. (E.g. use “AGE>12” not “WHERE AGE>12”).
8. Specify Notification OptionsNotification options provide parameters for enabling and setting up various notifications regarding executed jobs.
You can specify email, file system, or system tray notifications on the Notification tab of the Configuration Archive Editor:
• Email notification options provide parameters for configuring and enabling email notification and report mailing on executed comparison jobs.
• File system notification options provide parameters for configuring and enabling logging options for executed comparison jobs.
• System tray notification parameters enable pop-up window notifications on your Desktop when Change Manager is minimized, but running jobs.
To set notifications:
Navigate to the Notifications tab and modify the settings, as appropriate. Email, file system, and system tray notification options are labeled and contained in separate sections on the interface.
9. Execute JobThe job runs when you click the Run icon located in the lower right-hand corner of the Options or Mapping tab in the Data Comparison Editor.
When the process executes, the Results tab appears and displays the progress of the job via the Overall Progress bar at the top of the tab.
In the Comparison Results table, the database pairs are displayed along with Progress, Compare Index, Results, and Resolution columns.
• The Progress column indicates, per database pair, the progress of the job. When the job is finished comparing the database row, a result of Done (should the comparison be successful), Failed (should the comparison be unsuccessful), or Nothing to Compare (if pairs were not specified) will display in the column.
• The Compare Index column indicates the percentage value of data per database pair that Change Manager matched. Failed rows and rows in which the progress is not completed do not display results.
EMBARCADERO TECHNOLOGIES > EMBARCADERO® CHANGE MANAGER™ 5.1 USER GUIDE 185
APPENDIX A: CHANGE MANAGER CHEAT SHEETS > CHEAT SHEET 2A: CREATING A NEW DATA COMPARISON JOB
10. View ResultsWhen a job is complete, you can view its details by clicking the View command in the Results column if the pair succeeded, or the Show Errors command if the pair failed. The Show Errors command opens a SQL error dialog that displays the error encountered by Change Manager during the job and the time that it occurred.
If a data comparison job is successful, the View command displays database or owner pair results in the Database Results tab:
• The first two columns of the Database Results are labeled with the names of the data sources that were compared. Rows are populated with the names of the tables residing on each database.
• The Matched column indicates how many row values between the specified pair of tables matched in the comparison job.
• The Only in [Source Name] column indicates the number of extra rows that were found in the specified source table.
• The Only in [Target Name] column indicates the number of extra rows that were found in the specified target table.
• The Different column indicates the number of rows different between the two tables.
When a table row is selected, the Selected Table panel populates with the rows and columns of both tables. All values that are out-of-sync between the two tables are highlighted in red. Rows that matched are not displayed.
Double-click on a mismatched row pair to open the Data Diff View. The view contains row synchronization commands and the specific data values of the selected pair.
11. Customize Data ResolutionYou can specify how data is resolved in the Data Diff View by selecting one of the appropriate icons beside the Synchronization prompt. By row, you can choose to Make Target Match Source for Selected Row, Make Source Match Target for Selected Row, or Do Not Resolve Selected Row, respectively.
12. Resolve Data Repositories via an SQL ScriptOnce a data comparison job has completed, synchronization commands are used to even data in the repositories so they match.
To resolve data respositories:
1 On the Results tab, click View in the row you want to resolve. The Database Results tab appears.
2 The table in the Results Overview - Activation section displays the pairings in the selected tables, and includes the Matched, Only In, and Different columns that indicate any discrepancies between the two pairings. Select a pair from the table, the Selected Table populates with information regarding the specified pair.
3 Specify the type of Resolution by clicking All, Mismatched, Source, Only Source, Target, or Only Target radio buttons, respectively.
4 Click Generate an SQL Script. The script appears in SQL Editor, and can be modified manually, as needed, prior to its execution.
EMBARCADERO TECHNOLOGIES > EMBARCADERO® CHANGE MANAGER™ 5.1 USER GUIDE 186
APPENDIX A: CHANGE MANAGER CHEAT SHEETS > CHEAT SHEET 2A: CREATING A NEW DATA COMPARISON JOB
13. Generate a Job ReportOnce you have executed a job, you can generate a job report via the View Report command, located on the Results tab.
The report opens in a separate window where additional report options are available, such as sending the report to the printer, saving it to disk, or exporting the report in a specified file format to a directory or network location.
To generate a job report:
Click the View Report command on the Results tab. The report opens in a new window and enables you to customize and perform other operations on it.
EMBARCADERO TECHNOLOGIES > EMBARCADERO® CHANGE MANAGER™ 5.1 USER GUIDE 187
APPENDIX A: CHANGE MANAGER CHEAT SHEETS > CHEAT SHEET 3A: CREATING A NEW SCHEMA COMPARISON JOB
Cheat Sheet 3A: Creating a New Schema Comparison JobSchema comparison jobs are used to capture, compare, and synchronize schema in databases and provide reports on comparison jobs that enable you to distribute information throughout your environment.
Use the table below to review the task and its individual steps prior to creating a new schema comparison job:
1. Create a New JobSchema comparison jobs are defined in the Schema Comparison Job Editor.
To create a new schema comparison job:
• Select File > New > Schema Comparison Job in the Menu Bar.
The Schema Comparison Job Editor opens and you can now proceed to define the parameters of the new job.
2. Specify a Job NameA job name identifies the job in the application and should be specified with this in mind. Specify a meaningful name that clearly identifies the job in the views and dialogs of the working environment.
To name a job:
• Enter the name of the job in the Name filed of the Data Comparison Job Editor.
3. Specify Source and Target Data SourcesThe Schema Comparison Source and Schema Comparison Target boxes identify what data sources are compared when the job executes. Both boxes must contain the sources before the job can be executed. When a source is added to a job, it is displayed by Name, Type, and Host.
To add a data source:
• Click and drag a data source from Data Source Explorer to the Schema Comparison Source or Schema Comparison Target box. If no data sources have been registered in Change Manager, click Select Data Source in the appropriate box and then click New Data Source to add it. Data Sources added in this way are automatically registered and added to Data Source Explorer.
1. Create a New Job
2. Specify a Job Name
3. Specify Source and Target Data Sources
4. Refine Schema Comparisons
5. Customize Schema Mapping
6. Specify Job Options
7. Specify Notification Options
8. Execute the Job
9. Generate Job Report
10. Resolve Schema
EMBARCADERO TECHNOLOGIES > EMBARCADERO® CHANGE MANAGER™ 5.1 USER GUIDE 188
APPENDIX A: CHANGE MANAGER CHEAT SHEETS > CHEAT SHEET 3A: CREATING A NEW SCHEMA COMPARISON JOB
4. Refine Schema ComparisonsSchema comparison refinement involves selecting the schema objects that you want to include and exclude in the comparison process. All refinement is performed on the Refinements tab in the Schema Comparison Editor.
To specify the properties used in the comparison job:
• Navigate to the Refinements tab and select or de-select the objects in the table, as required. Selected objects are included in the comparison job, and de-selected properties are ignored during job execution.
5. Customize Schema MappingMapping is the process of pairing objects between the source and target of the job for parallel comparison purposes. Mapping details are viewed and modified on the Mapping tab of the editor.
Change Manager automatically maps schema objects based on its interpretation of both schema. Elements that do not match are excluded initially, unless manually paired prior to running the job.
Object pairings are redefined via the drop down menu that appears when the corresponding object in the target column is selected. The menu contains a list of all schema objects that reside on the target data source.
To redefine object pairings:
• Navigate to the Mapping tab and then click the target of the pair you want to change. You can use the drop down menu to redefine the schema object pairing, as needed.
6. Specify Job OptionsPrior to the execution of a job, parameters can be set to control aspects of the execution process itself. These options are set on the Options tab.
The following option groups are available:
• Synchronization options enables you to specify how Change manager handles the comparison synchronization script once a job has executed.
• Compare options provide settings that determine what elements of the source and target of a job are omitted when running the job.
• Include Objects options determine how objects are treated during the job execution process. For example, including or excluding specific object types.
• Identifier options determine what elements of the source and target data source will be ignored during the comparison process.
To set job options:
Navigate to the Options tab and modify the options, as needed. Options are grouped into execution, mapping, comparison, and resolution sections.
7. Specify Notification OptionsNotification options provide parameters for enabling and setting up various notifications regarding executed jobs.
You can specify email, file system, or system tray notifications on the Notification tab of the Configuration Archive Editor:
• Email notification options provide parameters for configuring and enabling email notification and report mailing on executed comparison jobs.
• File system notification options provide parameters for configuring and enabling logging options for executed comparison jobs.
EMBARCADERO TECHNOLOGIES > EMBARCADERO® CHANGE MANAGER™ 5.1 USER GUIDE 189
APPENDIX A: CHANGE MANAGER CHEAT SHEETS > CHEAT SHEET 3A: CREATING A NEW SCHEMA COMPARISON JOB
• System tray notification parameters enable pop-up window notifications on your Desktop when Change Manager is minimized, but running jobs.
To set notification options:
• Navigate to the Notifications tab and modify the settings, as appropriate. Email, file system, and system tray notification options are labeled and contained in separate sections on the interface.
8. Execute the JobThe job runs when you click the Run icon located in the upper right-hand corner of Schema Comparison Editor.
When the process executes, the Comparison Results tab appears and displays the progress of the job.
In the Comparison Results table, the schema pairs are displayed along with the Compare Index, Results, and Resolution values of the job.
• The Compare Index column indicates the percentage of schema that matched between the source and target of the job.
• The Results column provides a link that enables you to drill down and view the results between the pairs matched in the job. Click Show Individual Results to open the Individual Comparison Results tab.
• The Resolution column provides a command that produces a synchronization script to automatically synchronize any discrepancies between the compared schema.
9. Generate Job ReportOnce you have executed a job, you can generate a job report via the View Report command, located on the Results tab.
The report opens in a separate window where additional report options are available, such as sending the report to the printer, saving it to disk, or exporting the report in a specified file format to a directory or network location.
To generate a job report:
• Click the View Report command on the Results tab. The report opens in a new window and enables you to customize and perform other operations on it.
10. Resolve SchemaWhen a schema comparison job is complete, synchronization commands are used to even the data so it matches. The synchronization process automates the generation of UPDATE, INSERT, and DELETE statements on the source and target data sources, as required.
The script can be manually modified, saved, or executed immediately via the commands in the Run menu, located on the Workbench toolbar. Save scripts are stored in Project Explorer and can be accessed at any time.
To resolve schema via a synchronization script:
1 On the Results tab, click Sync All in the Resolution column of the Comparison Results table. A synchronization script is produced in another window.
2 Modify the script as needed in the window, save the script via the File > Save command, or use the commands in the Run menu on the Workbench toolbar to execute the script, as needed.
EMBARCADERO TECHNOLOGIES > EMBARCADERO® CHANGE MANAGER™ 5.1 USER GUIDE 190
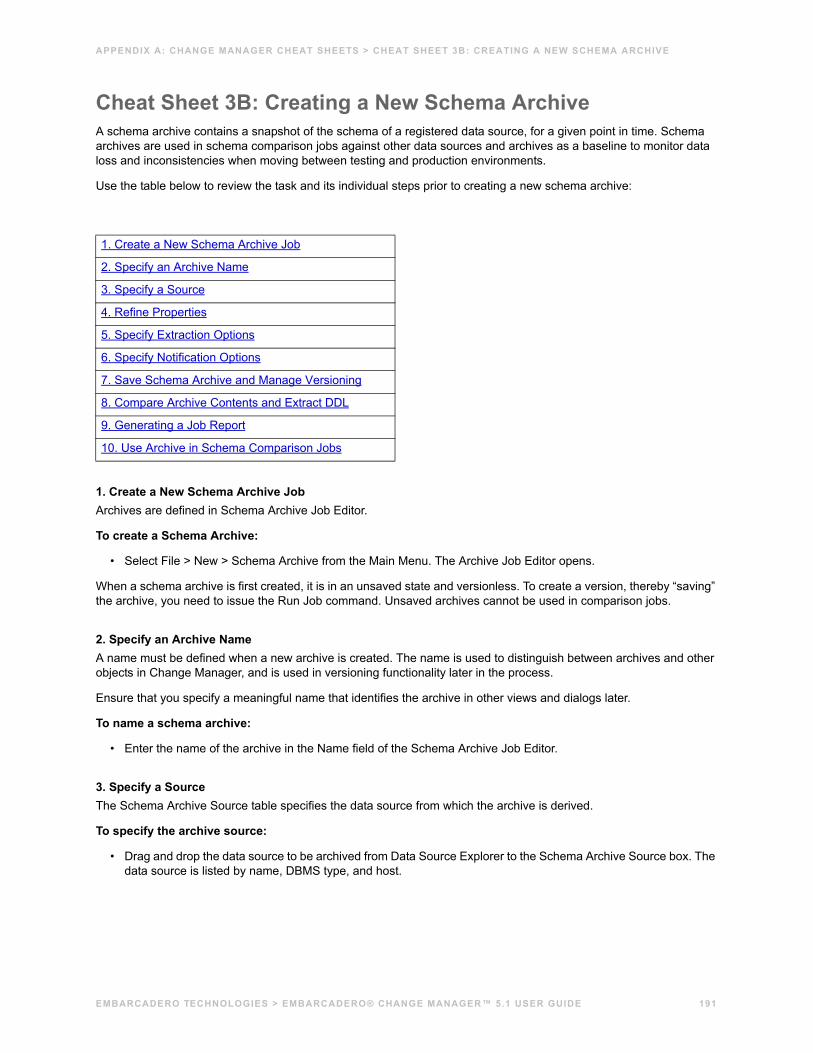
APPENDIX A: CHANGE MANAGER CHEAT SHEETS > CHEAT SHEET 3B: CREATING A NEW SCHEMA ARCHIVE
Cheat Sheet 3B: Creating a New Schema ArchiveA schema archive contains a snapshot of the schema of a registered data source, for a given point in time. Schema archives are used in schema comparison jobs against other data sources and archives as a baseline to monitor data loss and inconsistencies when moving between testing and production environments.
Use the table below to review the task and its individual steps prior to creating a new schema archive:
1. Create a New Schema Archive JobArchives are defined in Schema Archive Job Editor.
To create a Schema Archive:
• Select File > New > Schema Archive from the Main Menu. The Archive Job Editor opens.
When a schema archive is first created, it is in an unsaved state and versionless. To create a version, thereby “saving” the archive, you need to issue the Run Job command. Unsaved archives cannot be used in comparison jobs.
2. Specify an Archive NameA name must be defined when a new archive is created. The name is used to distinguish between archives and other objects in Change Manager, and is used in versioning functionality later in the process.
Ensure that you specify a meaningful name that identifies the archive in other views and dialogs later.
To name a schema archive:
• Enter the name of the archive in the Name field of the Schema Archive Job Editor.
3. Specify a SourceThe Schema Archive Source table specifies the data source from which the archive is derived.
To specify the archive source:
• Drag and drop the data source to be archived from Data Source Explorer to the Schema Archive Source box. The data source is listed by name, DBMS type, and host.
1. Create a New Schema Archive Job
2. Specify an Archive Name
3. Specify a Source
4. Refine Properties
5. Specify Extraction Options
6. Specify Notification Options
7. Save Schema Archive and Manage Versioning
8. Compare Archive Contents and Extract DDL
9. Generating a Job Report
10. Use Archive in Schema Comparison Jobs
EMBARCADERO TECHNOLOGIES > EMBARCADERO® CHANGE MANAGER™ 5.1 USER GUIDE 191
APPENDIX A: CHANGE MANAGER CHEAT SHEETS > CHEAT SHEET 3B: CREATING A NEW SCHEMA ARCHIVE
4. Refine PropertiesBy default, when you create a new archive, all schema is included. However, you may only want or need to archive a specific group of objects per archive defined. Other archives can be created, and likewise refined, for the same data source, but can maintain a different group of selected schema objects.
Archive properties are located on the Refinements tab of the Schema Archive Job Editor, where they are listed by object name, owner, and type.
To refine schema archive properties:
• Use the check boxes to select or de-select schema objects as needed. Selected objects are included in the archive when comparison jobs are run, while de-selected properties are ignored altogether.
5. Specify Extraction OptionsThe Options tab contains the DDL Extraction Options setting, which enables you to define how DDL is extracted and stored in Change Manager during the schema archive process. By default, the option is set to None, which indicates that the process does not retain extracted DDL when building the schema archive (although it can be extracted from the archive afterwards.)
If you choose to store extracted DDL, the directory location of the saved files can be viewed on the History tab of the editor when archive versions are created.
To define DDL extraction processes:
• Use the drop down menu to specify None, One File, or Multiple Files to indicate how DDL extraction occurs, if at all, during the archive execution process.
6. Specify Notification OptionsNotification options provide parameters for enabling and setting up various notifications regarding executed jobs.
You can specify email, file system, or system tray notifications on the Notification tab of the Configuration Archive Editor:
• Email notification options provide parameters for configuring and enabling email notification and report mailing on executed comparison jobs.
• File system notification options provide parameters for configuring and enabling logging options for executed comparison jobs.
• System tray notification parameters enable pop-up window notifications on your Desktop when Change Manager is minimized, but running jobs.
To set notifications:
• Navigate to the Notifications tab and modify the settings, as appropriate. Email, file system, and system tray notification options are labeled and contained in separate sections on the interface.
7. Save Schema Archive and Manage VersioningA version is a specific set of values associated with an archive, and is used to store older snapshots of the same archive for backup and tracking comparison purposes. Initially, you must create and save a version for the archive to become valid within Change Manager.
A version is created when you click the Run icon located in the upper right-hand corner of any tab in the Schema Job Editor.
When the process executes, the New Unsaved Version tab appears and lists information related to the archive, including its contents and any extracted DDL.
To create a version and save the archive:
EMBARCADERO TECHNOLOGIES > EMBARCADERO® CHANGE MANAGER™ 5.1 USER GUIDE 192
APPENDIX A: CHANGE MANAGER CHEAT SHEETS > CHEAT SHEET 3B: CREATING A NEW SCHEMA ARCHIVE
• Click the Run Job icon. After saving a version, it appears in the Job History table on the History tab containing various information, such as version number, timestamp, DDL location, where the archive was run (Workbench or command line), host name, and number of errors.
Additional versions are created in the same archive each time you click Run Job. The new version contains the latest values for the archive properties specified on the Refinements tab.
8. Compare Archive Contents and Extract DDLOn an open version tab, the Schema Archive Editor enables you to compare the archive version with its live source by right-clicking the Archive Contents table and selecting Compare. When you complete this action, Schema Comparison Job Editor opens immediately and designates the archive version and the original source as its source and target data sources, respectively.
Additionally, you can select Extract from the menu to extract the DDL of the archived contents. The code opens in the DDL Extract window, and can be viewed, saved, or otherwise modified via the Open Editor command beneath the window.
9. Generating a Job ReportOnce you have executed an archive job (by saving it and creating a version), you can generate a job report that summarizes the archived schema information.
Click the History tab and then right-click on the version you want to create a report for. From the menu, select View Report. A summary report of the schema archive specific to the selected version appears in a separate window.
The report can be read on screen, sent to a printer, and saved to disk via the command icons located in the port window toolbar.
Additionally, the right-click menu contains a command named Generate Report. This will produce a report file in a specified format at a directory location of your choosing.
10. Use Archive in Schema Comparison JobsArchives are used in Schema Comparison jobs the same way as registered data sources.
To use an archive in a schema comparison job:
• Click and drag the appropriate version from Data Source Explorer to the Source or Target box in Schema Comparison Editor prior to executing the job.
EMBARCADERO TECHNOLOGIES > EMBARCADERO® CHANGE MANAGER™ 5.1 USER GUIDE 193

Glossary
A
ArchiveA set of files, in an Embarcadero Change Manager-specific format, which represent a snapshot image of a database schema at a given point in time.
B
BCP UtilityBulk Copy Utility. A command-prompt utility that copies data to or from an operating system file into a user-specified format.
C
CaptureThe act of generating an archive file. A Capture job can be run on demand or scheduled to run at a later time.
Change ManagerAn Eclipse-based application that provides comparison and synchronization functionality for schema, configuration settings, and data repository information between two or more data sources. The application also features archiving and standardization functionality.
Clone A copy of a data source including all of the properties (thresholds, notifications, etc.) from the original data source.
Command Line Syntax WizardA feature that provides a command line interface for manual input of job commands to run Change Manager job functionality. The Command Line Syntax Wizard also provides a means to configure and run batch files for the purpose of running bulk comparison and archive jobs on an automated schedule.
CompareThe facility that identifies similarities and differences between servers, databases, database objects, and archives.
EMBARCADERO TECHNOLOGIES > EMBARCADERO® CHANGE MANAGER™ 5.1 USER GUIDE 194
GLOSSARY > D
Compare WindowThe window that opens after completing a Compare or Monitor job using the user interface (as opposed to a scheduled Compare or Monitor job). Also known as the Compare Result Grid Window. Database objects are displayed in grid format showing target and source data sources with the synchronization action required to synchronize the target to the source. From the Compare Window, you can filter the list of displayed objects, launch the Diff Analysis Window, open a Schema Compare Summary Report, generate synchronization scripts, re-compare selected objects, or review the comparison criteria.
Compliance ViewA view that displays a history of all configuration comparison jobs. Jobs are listed by the last job that was executed and the last time the job failed.
Configuration Archive EditorThe interface through which configuration archives are captured in Change Manager. Once defined, archives are then used in configuration comparison jobs against live data sources and standards.
Configuration Comparison Job EditorThe interface through which configuration comparison job functionality is executed. The job editor enables the specification of multiple data source targets within a single configuration comparison job against one data source, archive, or standard.
Configuration Standard EditorThe interface through which configuration standards are defined in Change Manager. Once defined, standards are used in configuration comparison jobs against live data sources and archives.
D
Data Comparison Job EditorThe interface through which data comparison functionality is executed. The job editor enables the specification of data source targets in a data comparison job.
Data Diff ViewDisplays the values of mismatched row pairs as a result of a data comparison job. The view features row synchronization icons and the specific data values of the selected pair.
Data SourceA reusable connection to a specific database on a specific database server. A data source provides connection information, user name, and password to the desired database environment.
Data Source ExplorerData Source Explorer provides an organizational tree of registered data sources and the comparison jobs and archives associated with them.
EMBARCADERO TECHNOLOGIES > EMBARCADERO® CHANGE MANAGER™ 5.1 USER GUIDE 195
GLOSSARY > E
Diff Analysis WindowThe Diff Analysis Window (also known as the Visual Differences Window or the Diff Window) is launched from the Compare Window after a Compare or Monitor job completes in the UI. The Diff Analysis window shows color-coded differences between each object on the source and target data sources along with the appropriate synchronization script.
E
EditorA workbench interface component that enables Change Manager processes. That is, data, configuration, and schema comparison jobs.
Extended ALTERA change which cannot be handled by a simple ANSI SQL ALTER statement, usually requiring that the database object be copied, dropped, and then re-created.
F
Filter System Objects ListA list that includes Embarcadero Change Manager’s default system objects and any system objects you have added to that list. You have the option of ignoring the items on this list (filtering them out) when you run Capture, Compare or Monitor jobs.
G
GroupA folder used to organize registered data sources in Data Source Explorer. Groups provide an additional level of organization when maintaining a large quantity of data sources.
HThere are no entries for this letter.
I
Imported ArchivesArchives created on a different machine (and possibly by a different user) that you have copied into your Embarcadero Change Manger environment.
EMBARCADERO TECHNOLOGIES > EMBARCADERO® CHANGE MANAGER™ 5.1 USER GUIDE 196
GLOSSARY > J
J
JobAn application process that involves the creation of an object or element, or the comparison of an object or element. In some cases, such as data comparison jobs, a comparison is made (the data repositories of two or more data sources), and an object is created (the job definition is retained in Change Manager for reuse.)
Job ExplorerProvides a tree that lists all jobs defined and saved in Change Manager. Jobs are organized by date created, source and target platform type, last modified, last executed, job name, data source name, and job type.
Jobs WindowThe Jobs Window presents an overview of all Compare, Capture, Monitor, and Migrate jobs in an expandable grid format.
KThere are no entries for this letter.
L
LoginA login is an form of identification that lets you connect to a data source. Permissions within specific databases are controlled by user accounts. The database administrator maps your login account to a user account in any database you are authorized to access.
Logins are one of the fundamental security mechanisms of Embarcadero Change Manager. Users who connect to a server must identify themselves using a specific login identifier (ID). Users can then only see the tables and views they are authorized to see.
M
MigrateThe facility that allows you to move schema archives and database object definitions to one or more databases.
MonitorThe facility that combines the capture and compare operations into a single job. Monitor jobs create an archive for a data source, and then compares the last archive against the next-to-last archive (latest version -1).
EMBARCADERO TECHNOLOGIES > EMBARCADERO® CHANGE MANAGER™ 5.1 USER GUIDE 197
GLOSSARY > N
N
Navigator ViewA view that provides a tree of all data comparison job synchronization scripts that are generated in the Data Comparison Job Editor. Scripts are launched directly from the view for execution and modification purposes.
NotificationNotifications are Job monitoring messages sent through email to the addresses you identify in the Options Editor.
OThere are no entries for this letter.
PThere are no entries for this letter.
QThere are no entries for this letter.
RThere are no entries for this letter.
S
SchemaThe definition or structure of data or database objects.
Shell Data SourceAn empty data source with only the name and DBMS type defined. A shell data source is created during the import archive function when the data source specified in the imported archive does not exist. The connection information, user name, and password is intentionally missing from the shell data source for security and data integrity purposes.
SQL EditorAn interface that provides a means to view and modify the SQL synchronization scripts generated by the Data Comparison Editor after a data comparison job has been executed.
EMBARCADERO TECHNOLOGIES > EMBARCADERO® CHANGE MANAGER™ 5.1 USER GUIDE 198
GLOSSARY > T
SQL Errors ViewDisplays any errors encountered while executing synchronization scripts in Change Manager.
StandardUsed to provided customized data source configuration properties and are used in configuration comparison jobs against data sources and archives to provide a specific set of values and threshold operators that check enterprise settings and ensure all system configuration values fall within acceptable ranges.
Synchronization ScriptSynchronization scripts are automatically generated by the data comparison job editor when a data comparison job is executed and, when run, synchronize the data repositories of two or more data sources where disparities are discovered by the job process.
Synchronization Script NavigatorA view that provides a tree of all synchronization scripts generated during the execution process of comparison jobs. Scripts can be modified and executed from the Synchronization Script Navigator as required.
TThere are no entries for this letter.
UThere are no entries for this letter.
V
ViewA workbench interface component that is used to navigate a hierarchy of information, open editors, or display properties.
W
Welcome PageProvides a series of links and icons that are clicked to access tutorials, cheat sheets, and other information. The Welcome page is intended to provide access to information regarding Change Manager tasks and processes, and its design is aimed particularly towards orientating new users.
WizardA series of User Interface panels that lead you through a task.
EMBARCADERO TECHNOLOGIES > EMBARCADERO® CHANGE MANAGER™ 5.1 USER GUIDE 199
GLOSSARY > X
WorkbenchThe Change Manager development environment. It provides the interface to create, manage, and navigate comparison jobs via an array of views, editors, and menus.
XThere are no entries for this letter.
YThere are no entries for this letter.
ZThere are no entries for this letter.
EMBARCADERO TECHNOLOGIES > EMBARCADERO® CHANGE MANAGER™ 5.1 USER GUIDE 200
EMBARCADERO TECHNOLOGIES > EMBARCADERO® CHANGE MANAGER™ 5.1 USER GUIDE 201
IndexAAdditional resources 8Archive 88
Name 91, 130New 89, 129Property Refinement 92, 132Save 96, 137Use 99
CChange history 37Configuration Comparison Job
Create 73Configuration Standard 84
Create 84
DData Comparison Job 43Datasource group 34Datasources
Register 9, 140Discussion Groups 8Documentation 8
EEditors 25
Moving 25Stacked 25
FFAQs 8Forums 8
JJob Execution Options 46Job Name 44, 74
KKnowledge Base 8
MMapping
Concepts 50Customization 51Database 52Table 52
OOS 7Other commands 33
RRefine Properties 77Requirements 7
Hardware 7Operating System 7
Run Job 58, 79
SScripts 35Source 45, 75Standard 85
Property Refinement 86Property Sources 86Save 88Using 88
TTarget 45, 75
VVersioning 96, 137View Results 79Views 14
Move 14Stacked 14Toggle 14
WWelcome Page 12Workbench 11Workbench Space 13


![NSP Manager Installation 5.1[1]](https://img.pdfslide.us/doc/110x75/553d56c5550346792d8b4615/nsp-manager-installation-511.jpg)


