Embed Size (px)
Citation preview

Email with Postfix, Dovecot, and MySQL
Author: Sharon Campbell <mailto:[email protected]>Description: Setting up a mail server with Postfix, Dovecot, and MySQL
Location: http://library.linode.com/email/postfix/postfix2.9.6-dovecot2.0.19-mysqlKeywords: email,mail,postfix,dovecot,mysql,ubuntu 12.04,dovecot 2, dovecot 2.0.19, postfix 2.9.6
License: CC BY-ND 3.0Published: Monday, May 13th, 2013Modified: Friday, March 14th, 2014 by Sharon Campbell
This guide shows you how to set up a secure mail server on your Linode with Postfix, Dovecot, and MySQL. By the time you reach the end, you'll know how to create mailboxes for your users and send and receive email for your domains. You'll learn how to add new domains and users with MySQL, and how to prevent your server from being used as an "open relay" spam hub. Your users will be able to securely connect to their mailboxes with standard email clients like Microsoft Outlook and Apple Mail.
Contents
Getting Started o What's Not Covered
o Prerequisites
o How It Works
o Configuring DNS
o Installing an SSL Certificate
o Finding the Hostname
Installing Packages
MySQL
o Creating the Database
o Adding Data
o Testing
Postfix
Dovecot
Adding New Domains, Email Addresses, and Aliases
o Domains
o Email Addresses
o Aliases
Getting StartedSetting up a mail server is a big project. Before installing and configuring the necessary packages on your mail server, you should learn what everything does and understand how the components work together to send and receive email. For the purposes of this guide, we'll assume that you'll be using the following packages and operating system:
Page 1 of 27
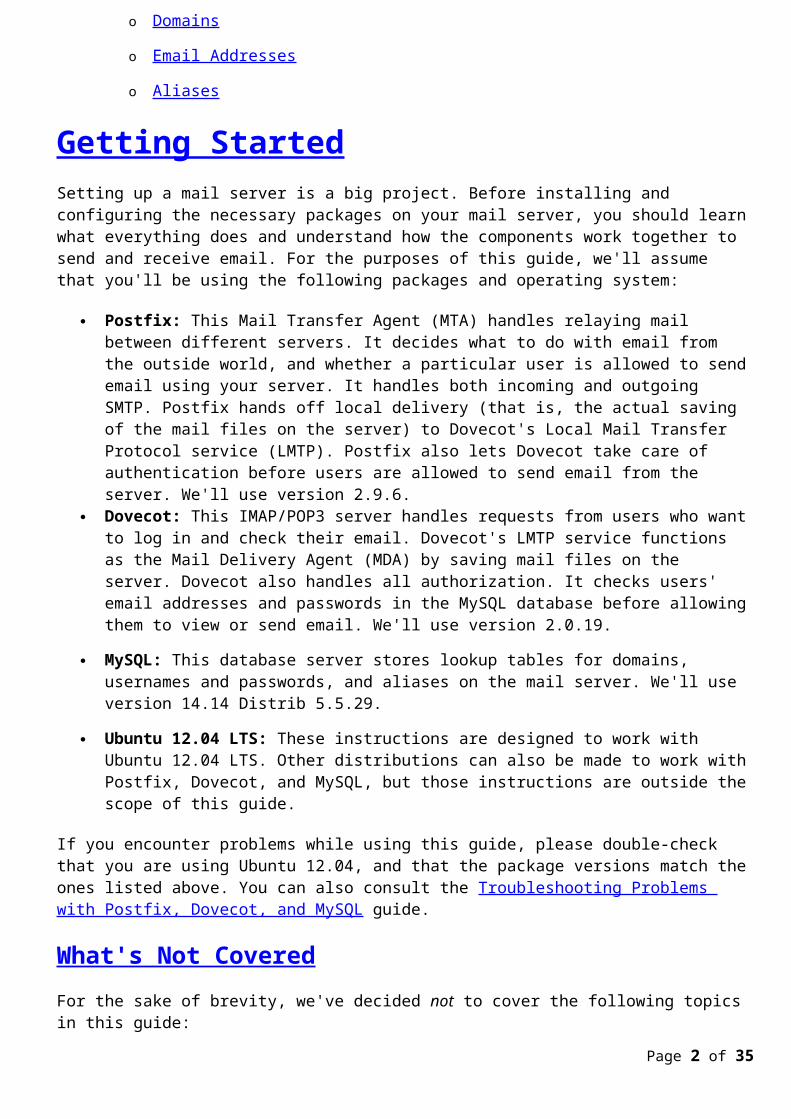
Postfix: This Mail Transfer Agent (MTA) handles relaying mail between different servers. It decides what to do with email from the outside world, and whether a particular user is allowed to send email using your server. It handles both incoming and outgoing SMTP. Postfix hands off local delivery (that is, the actual saving of the mail files on the server) to Dovecot's Local Mail Transfer Protocol service (LMTP). Postfix also lets Dovecot take care of authentication before users are allowed to send email from the server. We'll use version 2.9.6.
Dovecot: This IMAP/POP3 server handles requests from users who want to log in and check their email. Dovecot's LMTP service functions as the Mail Delivery Agent (MDA) by saving mail files on the server. Dovecot also handles all authorization. It checks users' email addresses and passwords in the MySQL database before allowing them to view or send email. We'll use version 2.0.19.
MySQL: This database server stores lookup tables for domains, usernames and passwords, and aliases on the mail server. We'll use version 14.14 Distrib 5.5.29.
Ubuntu 12.04 LTS: These instructions are designed to work with Ubuntu 12.04 LTS. Other distributions can also be made to work with Postfix, Dovecot, and MySQL, but those instructions are outside the scope of this guide.
If you encounter problems while using this guide, please double-check that you are using Ubuntu 12.04, and that the package versions match the ones listed above. You can also consult the Troubleshooting Problems with Postfix, Dovecot, and MySQL guide.
What's Not CoveredFor the sake of brevity, we've decided not to cover the following topics in this guide:
Spam and virus scanning for incoming messages to your users. You could use SpamAssassin to add that functionality later.
Webmail to allow users to access their email from a web browser.
GUIs for administration. You could use phpMyAdmin for MySQL or Postfix Admin for Postfix to add that functionality later.
PrerequisitesBefore setting up your mail server, you'll need to set up your Linode as specified in the Getting Started and Securing Your Server guides. You'll also need to verify that you've completed the following steps:
Booted into Ubuntu 12.04 LTS . Set a root password.
Set the hostname and updated the /etc/hosts file.
Updated and upgraded the operating system and all installed packages.
Created a Linux user with sudo access .
Optional: Created SSH keys for secure SSH sessions.
Made sure that your firewall is not blocking any of the standard mail ports (25, 465, 587, 110, 995, 143, and 993).
Once you've verified these prerequisites, you're ready to continue.
How It Works
Page 2 of 27
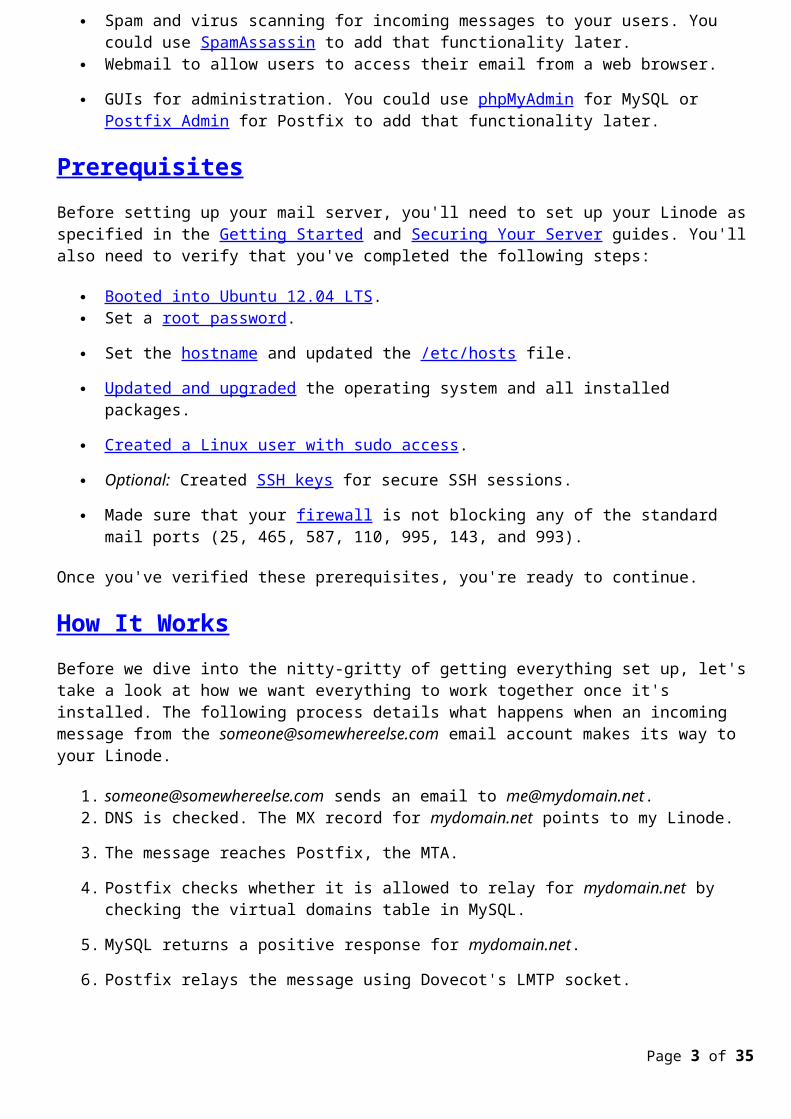
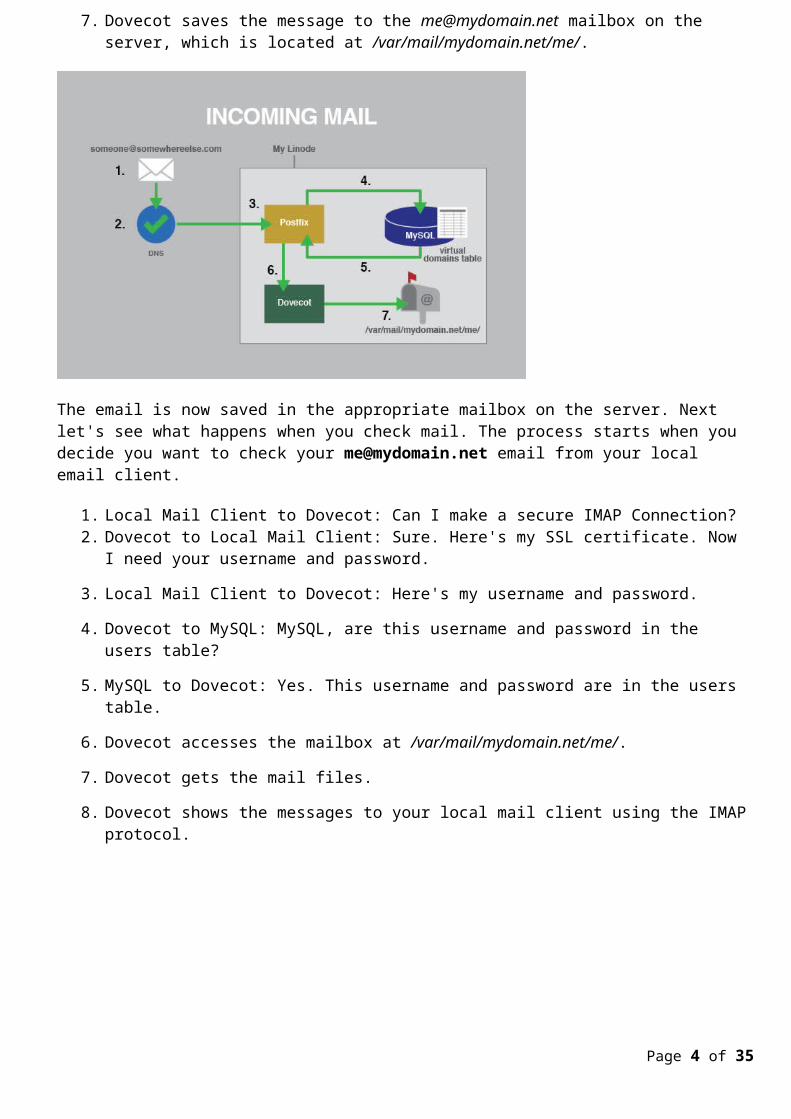
Before we dive into the nitty-gritty of getting everything set up, let's take a look at how we want everything to work together once it's installed. The following process details what happens when an incoming message from the [email protected] email account makes its way to your Linode.
1. [email protected] sends an email to [email protected]. DNS is checked. The MX record for mydomain.net points to my Linode.
3. The message reaches Postfix, the MTA.
4. Postfix checks whether it is allowed to relay for mydomain.net by checking the virtual domains table in MySQL.
5. MySQL returns a positive response for mydomain.net.
6. Postfix relays the message using Dovecot's LMTP socket.
7. Dovecot saves the message to the [email protected] mailbox on the server, which is located at /var/mail/mydomain.net/me/.
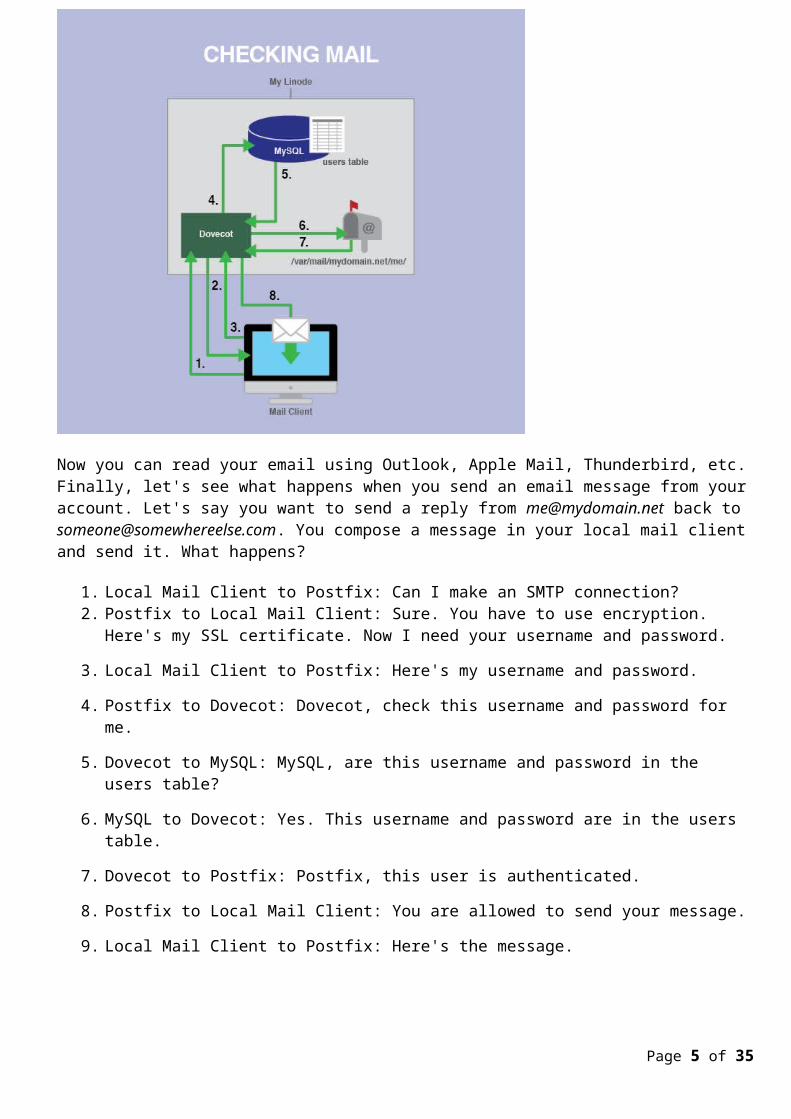
The email is now saved in the appropriate mailbox on the server. Next let's see what happens when you check mail. The process starts when you decide you want to check your [email protected] email from your local email client.
1. Local Mail Client to Dovecot: Can I make a secure IMAP Connection?2. Dovecot to Local Mail Client: Sure. Here's my SSL certificate. Now I need your username and
password.
3. Local Mail Client to Dovecot: Here's my username and password.
4. Dovecot to MySQL: MySQL, are this username and password in the users table?
5. MySQL to Dovecot: Yes. This username and password are in the users table.
6. Dovecot accesses the mailbox at /var/mail/mydomain.net/me/.
7. Dovecot gets the mail files.
8. Dovecot shows the messages to your local mail client using the IMAP protocol.
Page 3 of 27
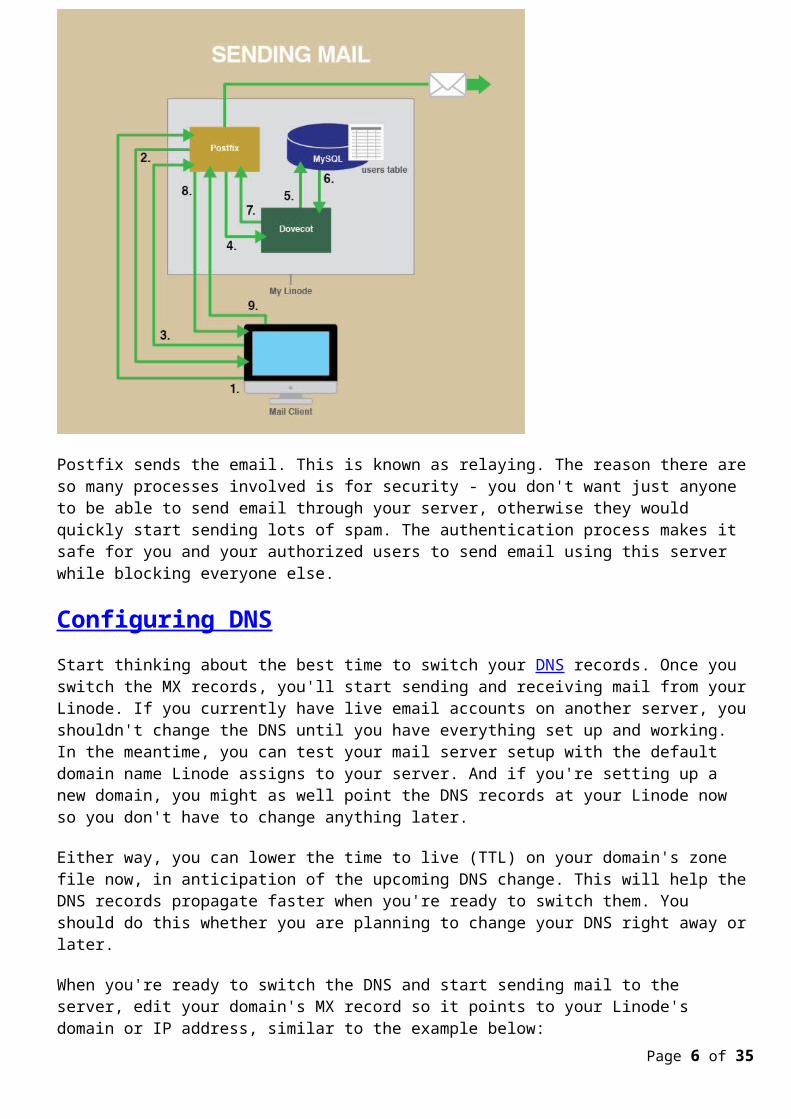
Now you can read your email using Outlook, Apple Mail, Thunderbird, etc. Finally, let's see what happens when you send an email message from your account. Let's say you want to send a reply from [email protected] back to [email protected]. You compose a message in your local mail client and send it. What happens?
1. Local Mail Client to Postfix: Can I make an SMTP connection?2. Postfix to Local Mail Client: Sure. You have to use encryption. Here's my SSL certificate. Now I
need your username and password.
3. Local Mail Client to Postfix: Here's my username and password.
4. Postfix to Dovecot: Dovecot, check this username and password for me.
5. Dovecot to MySQL: MySQL, are this username and password in the users table?
6. MySQL to Dovecot: Yes. This username and password are in the users table.
7. Dovecot to Postfix: Postfix, this user is authenticated.
8. Postfix to Local Mail Client: You are allowed to send your message.
9. Local Mail Client to Postfix: Here's the message.
Page 4 of 27
Postfix sends the email. This is known as relaying. The reason there are so many processes involved is for security - you don't want just anyone to be able to send email through your server, otherwise they would quickly start sending lots of spam. The authentication process makes it safe for you and your authorized users to send email using this server while blocking everyone else.
Configuring DNSStart thinking about the best time to switch your DNS records. Once you switch the MX records, you'll start sending and receiving mail from your Linode. If you currently have live email accounts on another server, you shouldn't change the DNS until you have everything set up and working. In the meantime, you can test your mail server setup with the default domain name Linode assigns to your server. And if you're setting up a new domain, you might as well point the DNS records at your Linode now so you don't have to change anything later.
Either way, you can lower the time to live (TTL) on your domain's zone file now, in anticipation of the upcoming DNS change. This will help the DNS records propagate faster when you're ready to switch them. You should do this whether you are planning to change your DNS right away or later.
When you're ready to switch the DNS and start sending mail to the server, edit your domain's MX record so it points to your Linode's domain or IP address, similar to the example below:
example.com MX 10 example.comexample.com MX 10 12.34.56.78mail.example.com MX 10 12.34.56.78
Make sure you do this for all domains and subdomains that might receive email for your domain. If you use Linode's DNS Manager, you will need to create an MX record that points to the desired domain or subdomain, and then create an A record for that domain or subdomain as well, that points to the correct IP address.
Installing an SSL CertificatePage 5 of 27
You should think about whether you need to purchase a valid SSL certificate or not. In this guide, you'll use the default self-signed certificate that comes with Dovecot for free. This certificate encrypts your mail connections just like a purchased certificate, but your email users will receive warnings about the certificate when they attempt to set up their email accounts.
This can be confusing for users, and it may encourage bad security habits by forcing them to accept a self-signed certificate. If you're going to set up all of your users' mail clients yourself, or if you have a small number of tech-savvy users, this might not be a problem. You'll need to use your best judgement to decide whether you need to purchase a signed SSL certificate or not. For information about SSL certificates, see these guides in the Linode Library.
Finding the HostnameYou'll need your Linode's hostname to configure Dovecot and Postfix. Before following these instructions, make sure you've set a hostname. Here's how to find your Linode's hostname:
1. Open a terminal window and log in to your Linode via SSH.2. Find your server's hostname by entering the following command, and then make a note of it:
3. hostname4. Find your server's fully-qualified domain name (FQDN) by entering the following command, and
then make a note of it:
5. hostname -f
Save these hostnames - you'll need them later!
Installing PackagesNow that you understand how everything works and have finished preparing your Linode to act as a mail server, let's configure your server for mail. We'll start by installing all of the necessary packages. Here's how:
1. Log in as the root user by entering the following command:2. su3. Enter the password for the root user when prompted.
4. Install the required packages by entering the following command. Here's what you'll install:
5. apt-get install postfix postfix-mysql dovecot-core dovecot-imapd dovecot-pop3d dovecot-lmtpd dovecot-mysql mysql-server
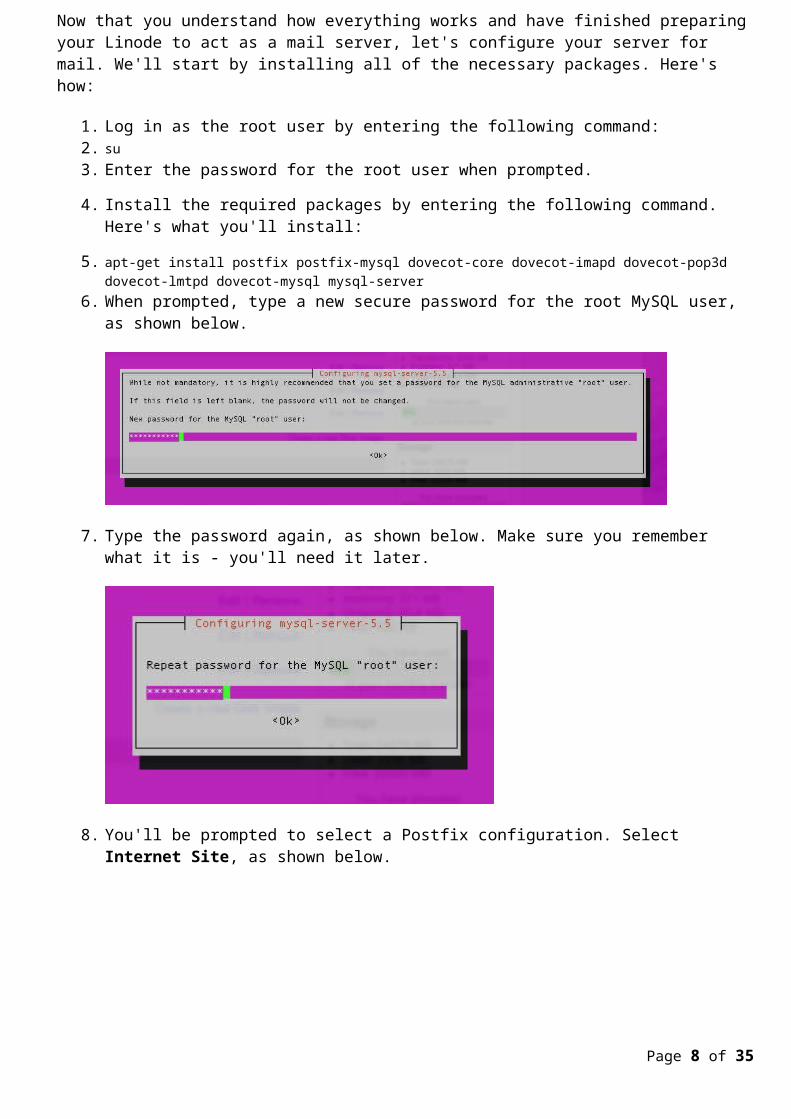
6. When prompted, type a new secure password for the root MySQL user, as shown below.
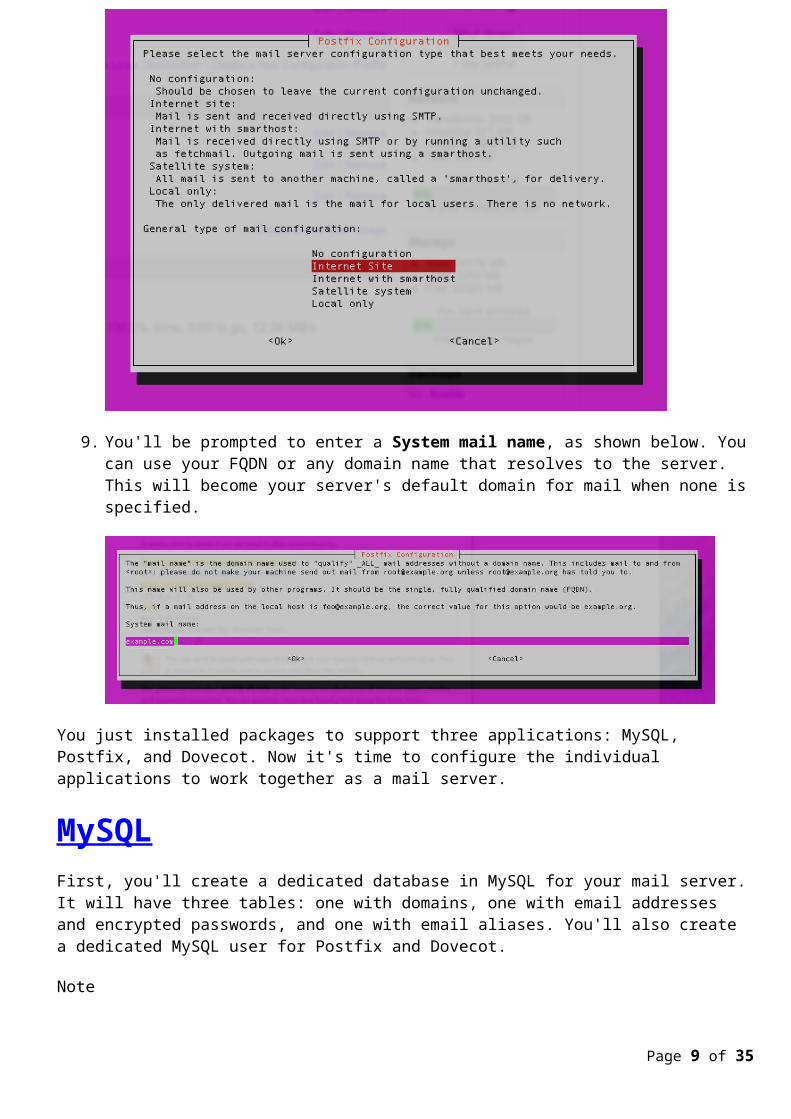
7. Type the password again, as shown below. Make sure you remember what it is - you'll need it later.
Page 6 of 27
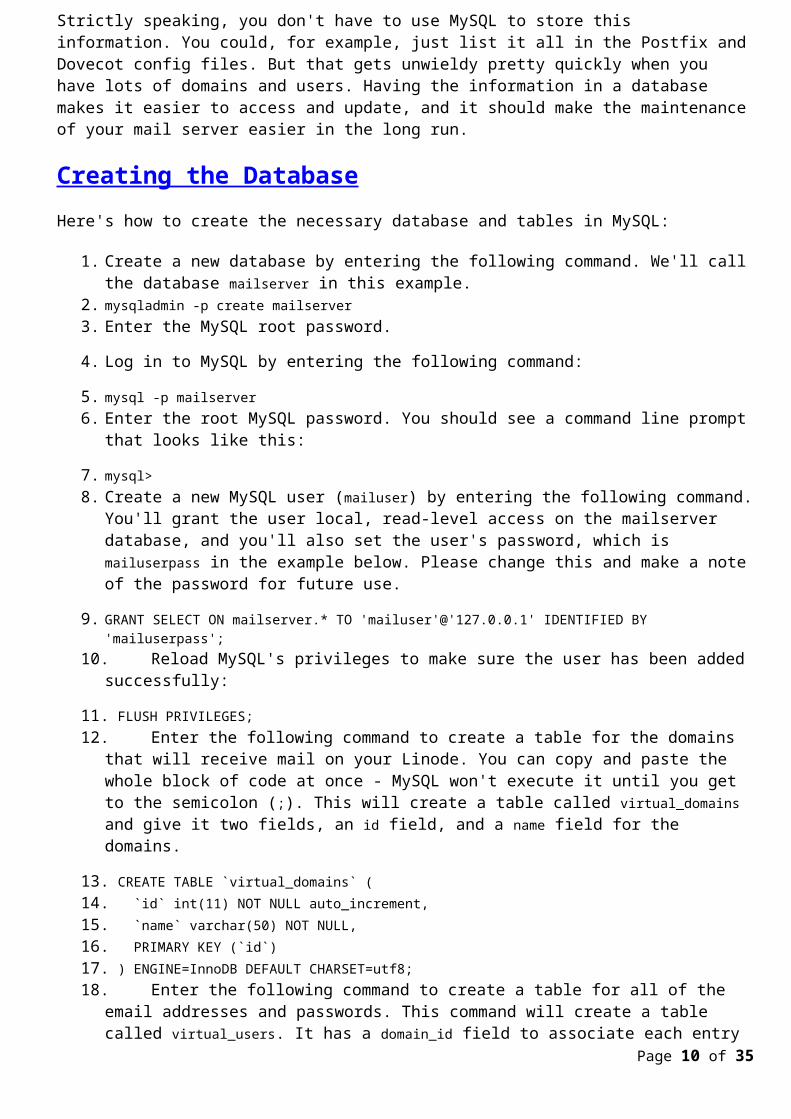
8. You'll be prompted to select a Postfix configuration. Select Internet Site, as shown below.
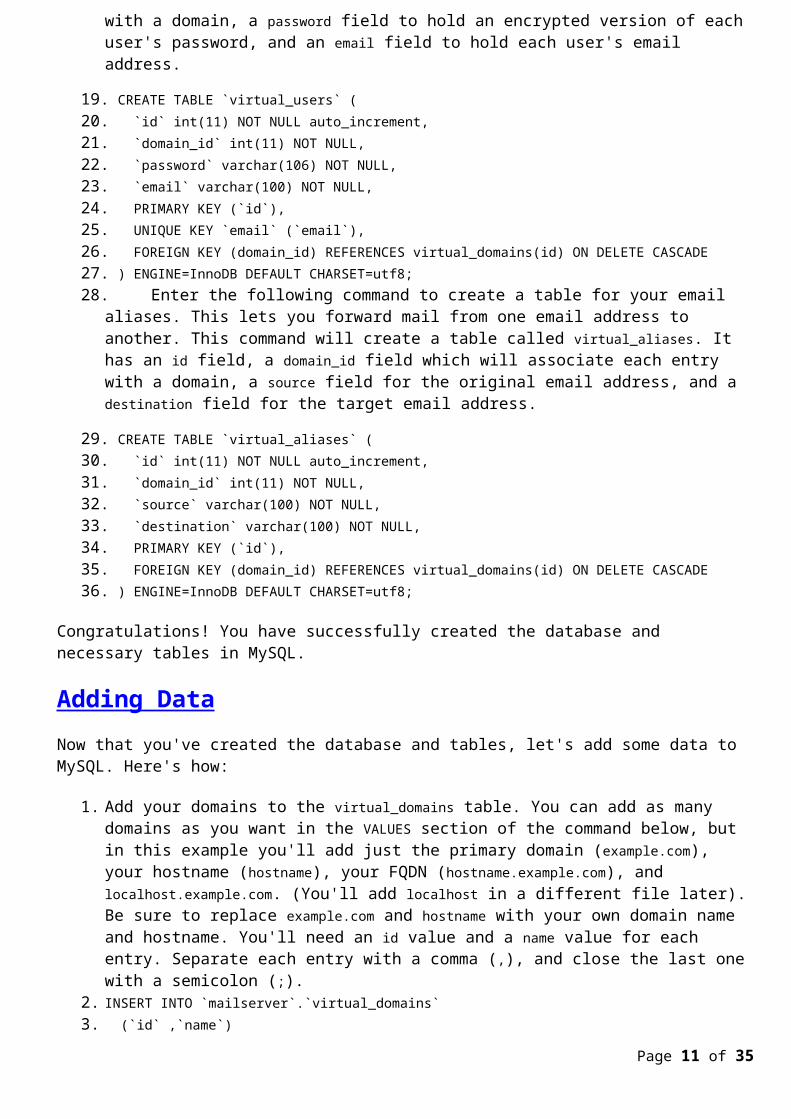
9. You'll be prompted to enter a System mail name, as shown below. You can use your FQDN or any domain name that resolves to the server. This will become your server's default domain for mail when none is specified.
You just installed packages to support three applications: MySQL, Postfix, and Dovecot. Now it's time to configure the individual applications to work together as a mail server.
Page 7 of 27
MySQLFirst, you'll create a dedicated database in MySQL for your mail server. It will have three tables: one with domains, one with email addresses and encrypted passwords, and one with email aliases. You'll also create a dedicated MySQL user for Postfix and Dovecot.
Note
Strictly speaking, you don't have to use MySQL to store this information. You could, for example, just list it all in the Postfix and Dovecot config files. But that gets unwieldy pretty quickly when you have lots of domains and users. Having the information in a database makes it easier to access and update, and it should make the maintenance of your mail server easier in the long run.
Creating the DatabaseHere's how to create the necessary database and tables in MySQL:
1. Create a new database by entering the following command. We'll call the database mailserver in this example.
2. mysqladmin -p create mailserver3. Enter the MySQL root password.
4. Log in to MySQL by entering the following command:
5. mysql -p mailserver6. Enter the root MySQL password. You should see a command line prompt that looks like this:
7. mysql>8. Create a new MySQL user (mailuser) by entering the following command. You'll grant the user
local, read-level access on the mailserver database, and you'll also set the user's password, which is mailuserpass in the example below. Please change this and make a note of the password for future use.
9. GRANT SELECT ON mailserver.* TO 'mailuser'@'127.0.0.1' IDENTIFIED BY 'mailuserpass';
10. Reload MySQL's privileges to make sure the user has been added successfully:
11. FLUSH PRIVILEGES;12. Enter the following command to create a table for the domains that will receive mail on your Linode.
You can copy and paste the whole block of code at once - MySQL won't execute it until you get to the semicolon (;). This will create a table called virtual_domains and give it two fields, an id field, and a name field for the domains.
13. CREATE TABLE `virtual_domains` (14. `id` int(11) NOT NULL auto_increment,15. `name` varchar(50) NOT NULL,16. PRIMARY KEY (`id`)17. ) ENGINE=InnoDB DEFAULT CHARSET=utf8;18. Enter the following command to create a table for all of the email addresses and passwords. This
command will create a table called virtual_users. It has a domain_id field to associate each entry with a domain, a password field to hold an encrypted version of each user's password, and an email field to hold each user's email address.
19. CREATE TABLE `virtual_users` (20. `id` int(11) NOT NULL auto_increment,21. `domain_id` int(11) NOT NULL,22. `password` varchar(106) NOT NULL,23. `email` varchar(100) NOT NULL,24. PRIMARY KEY (`id`),
Page 8 of 27
25. UNIQUE KEY `email` (`email`),26. FOREIGN KEY (domain_id) REFERENCES virtual_domains(id) ON DELETE CASCADE27. ) ENGINE=InnoDB DEFAULT CHARSET=utf8;28. Enter the following command to create a table for your email aliases. This lets you forward mail
from one email address to another. This command will create a table called virtual_aliases. It has an id field, a domain_id field which will associate each entry with a domain, a source field for the original email address, and a destination field for the target email address.
29. CREATE TABLE `virtual_aliases` (30. `id` int(11) NOT NULL auto_increment,31. `domain_id` int(11) NOT NULL,32. `source` varchar(100) NOT NULL,33. `destination` varchar(100) NOT NULL,34. PRIMARY KEY (`id`),35. FOREIGN KEY (domain_id) REFERENCES virtual_domains(id) ON DELETE CASCADE36. ) ENGINE=InnoDB DEFAULT CHARSET=utf8;
Congratulations! You have successfully created the database and necessary tables in MySQL.
Adding DataNow that you've created the database and tables, let's add some data to MySQL. Here's how:
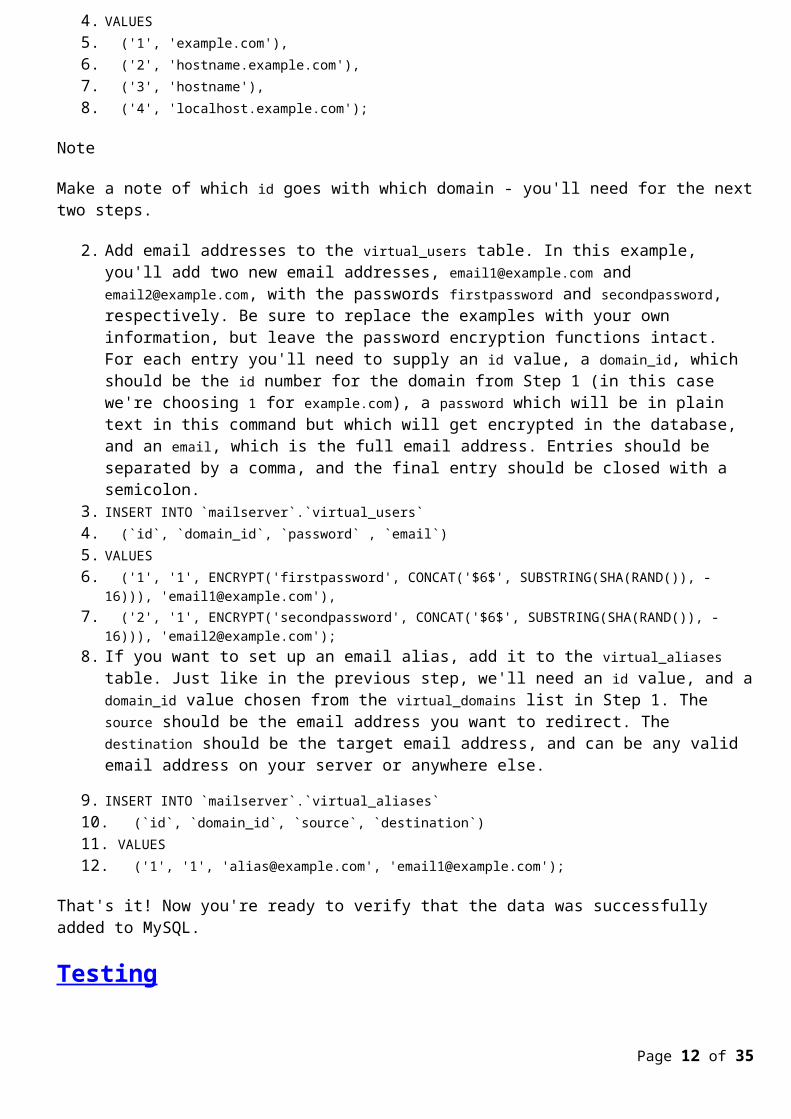
1. Add your domains to the virtual_domains table. You can add as many domains as you want in the VALUES section of the command below, but in this example you'll add just the primary domain (example.com), your hostname (hostname), your FQDN (hostname.example.com), and localhost.example.com. (You'll add localhost in a different file later). Be sure to replace example.com and hostname with your own domain name and hostname. You'll need an id value and a name value for each entry. Separate each entry with a comma (,), and close the last one with a semicolon (;).
2. INSERT INTO `mailserver`.`virtual_domains`3. (`id` ,`name`)4. VALUES5. ('1', 'example.com'),6. ('2', 'hostname.example.com'),7. ('3', 'hostname'),8. ('4', 'localhost.example.com');
Note
Make a note of which id goes with which domain - you'll need for the next two steps.
2. Add email addresses to the virtual_users table. In this example, you'll add two new email addresses, [email protected] and [email protected], with the passwords firstpassword and secondpassword, respectively. Be sure to replace the examples with your own information, but leave the password encryption functions intact. For each entry you'll need to supply an id value, a domain_id, which should be the id number for the domain from Step 1 (in this case we're choosing 1 for example.com), a password which will be in plain text in this command but which will get encrypted in the database, and an email, which is the full email address. Entries should be separated by a comma, and the final entry should be closed with a semicolon.
3. INSERT INTO `mailserver`.`virtual_users`4. (`id`, `domain_id`, `password` , `email`)5. VALUES6. ('1', '1', ENCRYPT('firstpassword', CONCAT('$6$', SUBSTRING(SHA(RAND()), -
16))), '[email protected]'),7. ('2', '1', ENCRYPT('secondpassword', CONCAT('$6$', SUBSTRING(SHA(RAND()), -
16))), '[email protected]');8. If you want to set up an email alias, add it to the virtual_aliases table. Just like in the previous
step, we'll need an id value, and a domain_id value chosen from the virtual_domains list in Step
Page 9 of 27
1. The source should be the email address you want to redirect. The destination should be the target email address, and can be any valid email address on your server or anywhere else.
9. INSERT INTO `mailserver`.`virtual_aliases`10. (`id`, `domain_id`, `source`, `destination`)11. VALUES12. ('1', '1', '[email protected]', '[email protected]');
That's it! Now you're ready to verify that the data was successfully added to MySQL.
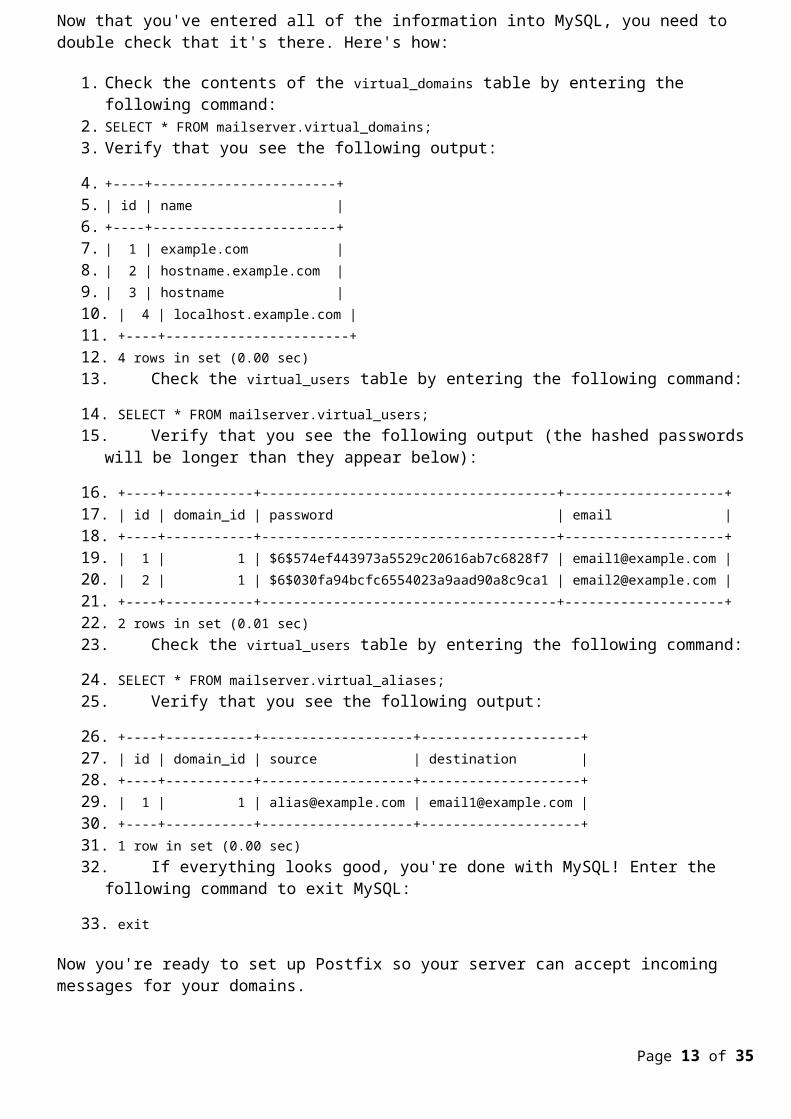
TestingNow that you've entered all of the information into MySQL, you need to double check that it's there. Here's how:
1. Check the contents of the virtual_domains table by entering the following command:2. SELECT * FROM mailserver.virtual_domains;3. Verify that you see the following output:
4. +----+-----------------------+5. | id | name |6. +----+-----------------------+7. | 1 | example.com |8. | 2 | hostname.example.com |9. | 3 | hostname |10. | 4 | localhost.example.com |11. +----+-----------------------+12. 4 rows in set (0.00 sec)13. Check the virtual_users table by entering the following command:
14. SELECT * FROM mailserver.virtual_users;15. Verify that you see the following output (the hashed passwords will be longer than they appear
below):
16. +----+-----------+-------------------------------------+--------------------+17. | id | domain_id | password | email |18. +----+-----------+-------------------------------------+--------------------+19. | 1 | 1 | $6$574ef443973a5529c20616ab7c6828f7 | [email protected] |20. | 2 | 1 | $6$030fa94bcfc6554023a9aad90a8c9ca1 | [email protected] |21. +----+-----------+-------------------------------------+--------------------+22. 2 rows in set (0.01 sec)23. Check the virtual_users table by entering the following command:
24. SELECT * FROM mailserver.virtual_aliases;25. Verify that you see the following output:
26. +----+-----------+-------------------+--------------------+27. | id | domain_id | source | destination |28. +----+-----------+-------------------+--------------------+29. | 1 | 1 | [email protected] | [email protected] |30. +----+-----------+-------------------+--------------------+31. 1 row in set (0.00 sec)32. If everything looks good, you're done with MySQL! Enter the following command to exit MySQL:
33. exit
Now you're ready to set up Postfix so your server can accept incoming messages for your domains.
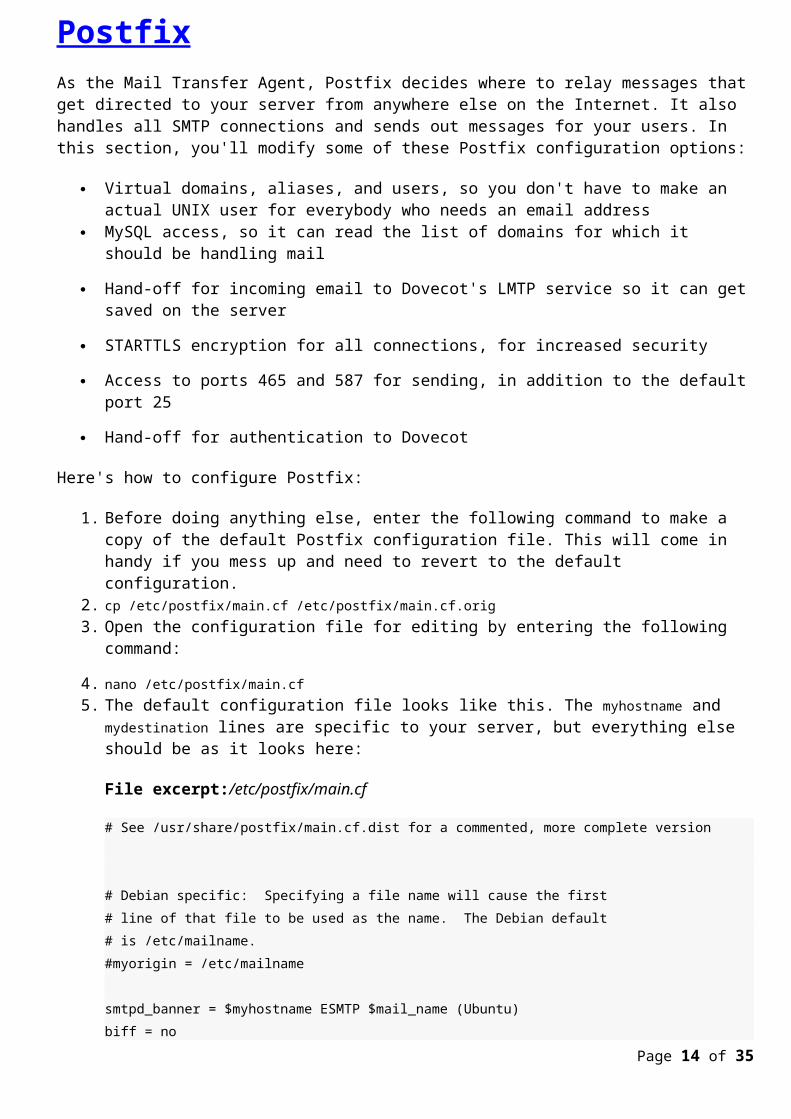
Postfix
Page 10 of 27
As the Mail Transfer Agent, Postfix decides where to relay messages that get directed to your server from anywhere else on the Internet. It also handles all SMTP connections and sends out messages for your users. In this section, you'll modify some of these Postfix configuration options:
Virtual domains, aliases, and users, so you don't have to make an actual UNIX user for everybody who needs an email address
MySQL access, so it can read the list of domains for which it should be handling mail
Hand-off for incoming email to Dovecot's LMTP service so it can get saved on the server
STARTTLS encryption for all connections, for increased security
Access to ports 465 and 587 for sending, in addition to the default port 25
Hand-off for authentication to Dovecot
Here's how to configure Postfix:
1. Before doing anything else, enter the following command to make a copy of the default Postfix configuration file. This will come in handy if you mess up and need to revert to the default configuration.
2. cp /etc/postfix/main.cf /etc/postfix/main.cf.orig3. Open the configuration file for editing by entering the following command:
4. nano /etc/postfix/main.cf5. The default configuration file looks like this. The myhostname and mydestination lines are specific
to your server, but everything else should be as it looks here:
File excerpt:/etc/postfix/main.cf
# See /usr/share/postfix/main.cf.dist for a commented, more complete version
# Debian specific: Specifying a file name will cause the first# line of that file to be used as the name. The Debian default# is /etc/mailname.#myorigin = /etc/mailname
smtpd_banner = $myhostname ESMTP $mail_name (Ubuntu)biff = no
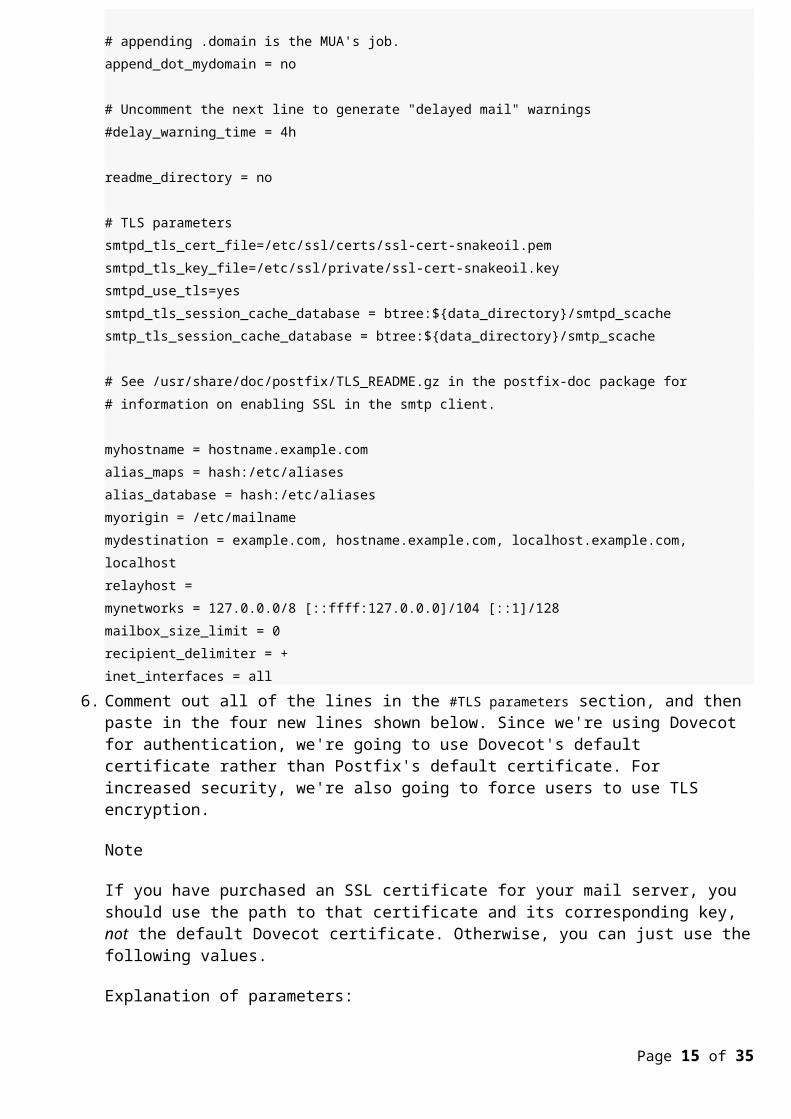
# appending .domain is the MUA's job.append_dot_mydomain = no
# Uncomment the next line to generate "delayed mail" warnings#delay_warning_time = 4h
readme_directory = no
# TLS parameterssmtpd_tls_cert_file=/etc/ssl/certs/ssl-cert-snakeoil.pemsmtpd_tls_key_file=/etc/ssl/private/ssl-cert-snakeoil.keysmtpd_use_tls=yessmtpd_tls_session_cache_database = btree:${data_directory}/smtpd_scachesmtp_tls_session_cache_database = btree:${data_directory}/smtp_scache
# See /usr/share/doc/postfix/TLS_README.gz in the postfix-doc package for
Page 11 of 27
# information on enabling SSL in the smtp client.
myhostname = hostname.example.comalias_maps = hash:/etc/aliasesalias_database = hash:/etc/aliasesmyorigin = /etc/mailnamemydestination = example.com, hostname.example.com, localhost.example.com, localhostrelayhost =mynetworks = 127.0.0.0/8 [::ffff:127.0.0.0]/104 [::1]/128mailbox_size_limit = 0recipient_delimiter = +inet_interfaces = all
6. Comment out all of the lines in the #TLS parameters section, and then paste in the four new lines shown below. Since we're using Dovecot for authentication, we're going to use Dovecot's default certificate rather than Postfix's default certificate. For increased security, we're also going to force users to use TLS encryption.
Note
If you have purchased an SSL certificate for your mail server, you should use the path to that certificate and its corresponding key, not the default Dovecot certificate. Otherwise, you can just use the following values.
Explanation of parameters:
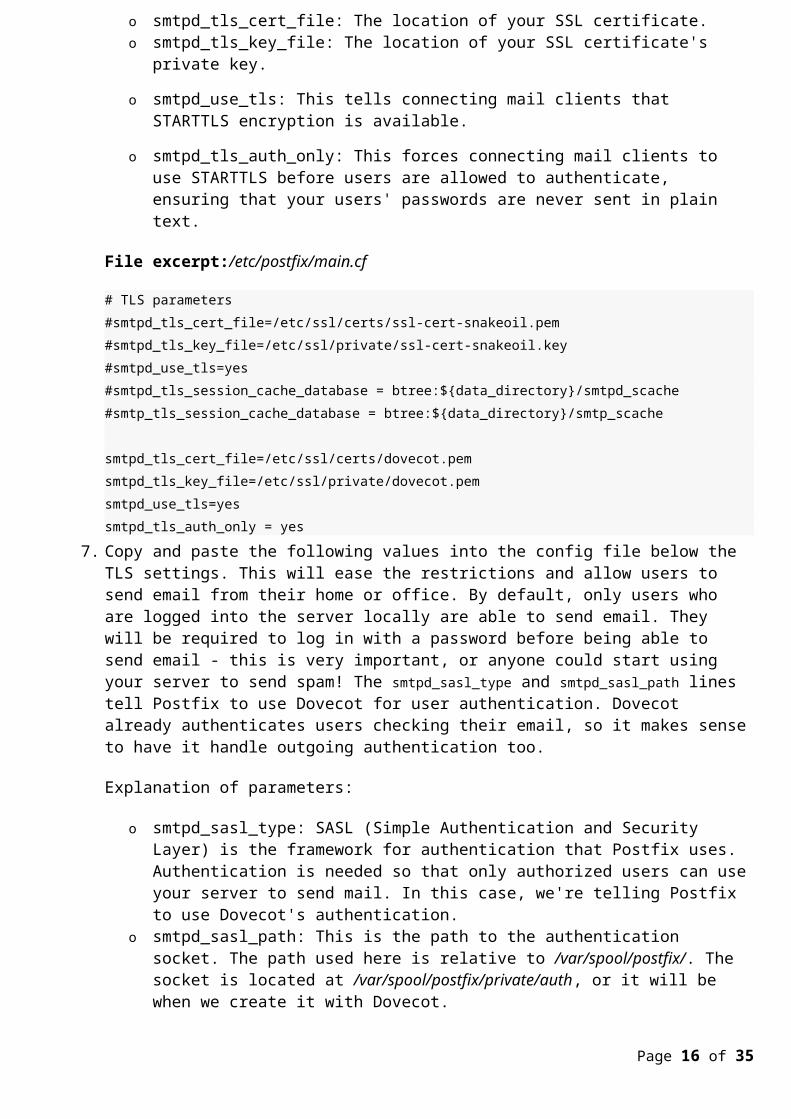
o smtpd_tls_cert_file: The location of your SSL certificate.o smtpd_tls_key_file: The location of your SSL certificate's private key.
o smtpd_use_tls: This tells connecting mail clients that STARTTLS encryption is available.
o smtpd_tls_auth_only: This forces connecting mail clients to use STARTTLS before users are allowed to authenticate, ensuring that your users' passwords are never sent in plain text.
File excerpt:/etc/postfix/main.cf
# TLS parameters#smtpd_tls_cert_file=/etc/ssl/certs/ssl-cert-snakeoil.pem#smtpd_tls_key_file=/etc/ssl/private/ssl-cert-snakeoil.key#smtpd_use_tls=yes#smtpd_tls_session_cache_database = btree:${data_directory}/smtpd_scache#smtp_tls_session_cache_database = btree:${data_directory}/smtp_scache
smtpd_tls_cert_file=/etc/ssl/certs/dovecot.pemsmtpd_tls_key_file=/etc/ssl/private/dovecot.pemsmtpd_use_tls=yessmtpd_tls_auth_only = yes
7. Copy and paste the following values into the config file below the TLS settings. This will ease the restrictions and allow users to send email from their home or office. By default, only users who are logged into the server locally are able to send email. They will be required to log in with a password before being able to send email - this is very important, or anyone could start using your server to send spam! The smtpd_sasl_type and smtpd_sasl_path lines tell Postfix to use Dovecot for user authentication. Dovecot already authenticates users checking their email, so it makes sense to have it handle outgoing authentication too.
Explanation of parameters:Page 12 of 27
o smtpd_sasl_type: SASL (Simple Authentication and Security Layer) is the framework for authentication that Postfix uses. Authentication is needed so that only authorized users can use your server to send mail. In this case, we're telling Postfix to use Dovecot's authentication.
o smtpd_sasl_path: This is the path to the authentication socket. The path used here is relative to /var/spool/postfix/. The socket is located at /var/spool/postfix/private/auth, or it will be when we create it with Dovecot.
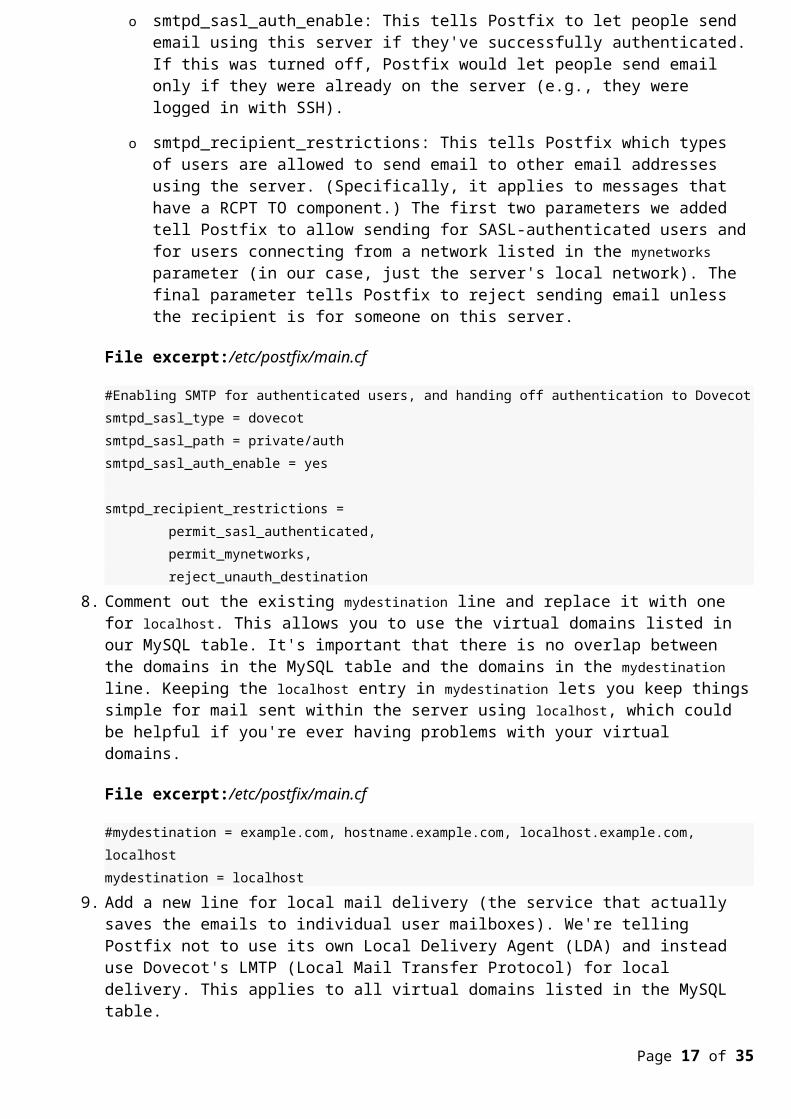
o smtpd_sasl_auth_enable: This tells Postfix to let people send email using this server if they've successfully authenticated. If this was turned off, Postfix would let people send email only if they were already on the server (e.g., they were logged in with SSH).
o smtpd_recipient_restrictions: This tells Postfix which types of users are allowed to send email to other email addresses using the server. (Specifically, it applies to messages that have a RCPT TO component.) The first two parameters we added tell Postfix to allow sending for SASL-authenticated users and for users connecting from a network listed in the mynetworks parameter (in our case, just the server's local network). The final parameter tells Postfix to reject sending email unless the recipient is for someone on this server.
File excerpt:/etc/postfix/main.cf
#Enabling SMTP for authenticated users, and handing off authentication to Dovecotsmtpd_sasl_type = dovecotsmtpd_sasl_path = private/authsmtpd_sasl_auth_enable = yes
smtpd_recipient_restrictions = permit_sasl_authenticated, permit_mynetworks, reject_unauth_destination
8. Comment out the existing mydestination line and replace it with one for localhost. This allows you to use the virtual domains listed in our MySQL table. It's important that there is no overlap between the domains in the MySQL table and the domains in the mydestination line. Keeping the localhost entry in mydestination lets you keep things simple for mail sent within the server using localhost, which could be helpful if you're ever having problems with your virtual domains.
File excerpt:/etc/postfix/main.cf
#mydestination = example.com, hostname.example.com, localhost.example.com, localhostmydestination = localhost
9. Add a new line for local mail delivery (the service that actually saves the emails to individual user mailboxes). We're telling Postfix not to use its own Local Delivery Agent (LDA) and instead use Dovecot's LMTP (Local Mail Transfer Protocol) for local delivery. This applies to all virtual domains listed in the MySQL table.
File excerpt:/etc/postfix/main.cf
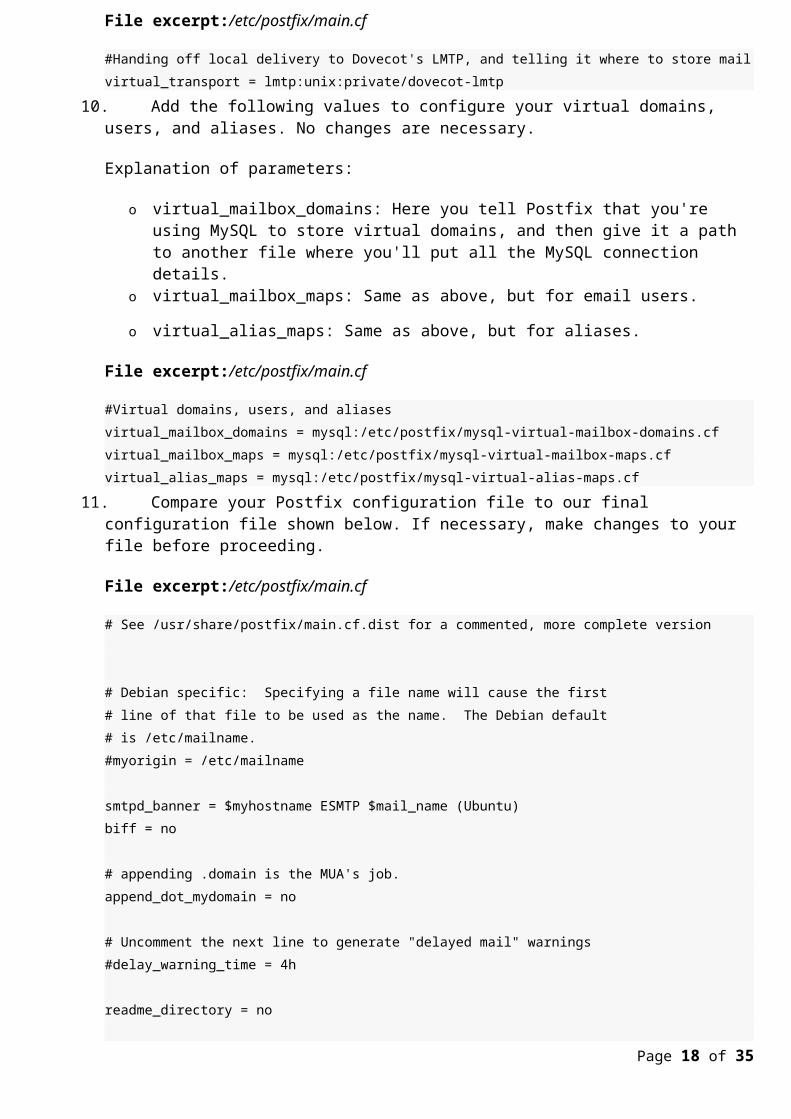
#Handing off local delivery to Dovecot's LMTP, and telling it where to store mailvirtual_transport = lmtp:unix:private/dovecot-lmtp
10. Add the following values to configure your virtual domains, users, and aliases. No changes are necessary.
Explanation of parameters:
Page 13 of 27
o virtual_mailbox_domains: Here you tell Postfix that you're using MySQL to store virtual domains, and then give it a path to another file where you'll put all the MySQL connection details.
o virtual_mailbox_maps: Same as above, but for email users.
o virtual_alias_maps: Same as above, but for aliases.
File excerpt:/etc/postfix/main.cf
#Virtual domains, users, and aliasesvirtual_mailbox_domains = mysql:/etc/postfix/mysql-virtual-mailbox-domains.cfvirtual_mailbox_maps = mysql:/etc/postfix/mysql-virtual-mailbox-maps.cfvirtual_alias_maps = mysql:/etc/postfix/mysql-virtual-alias-maps.cf
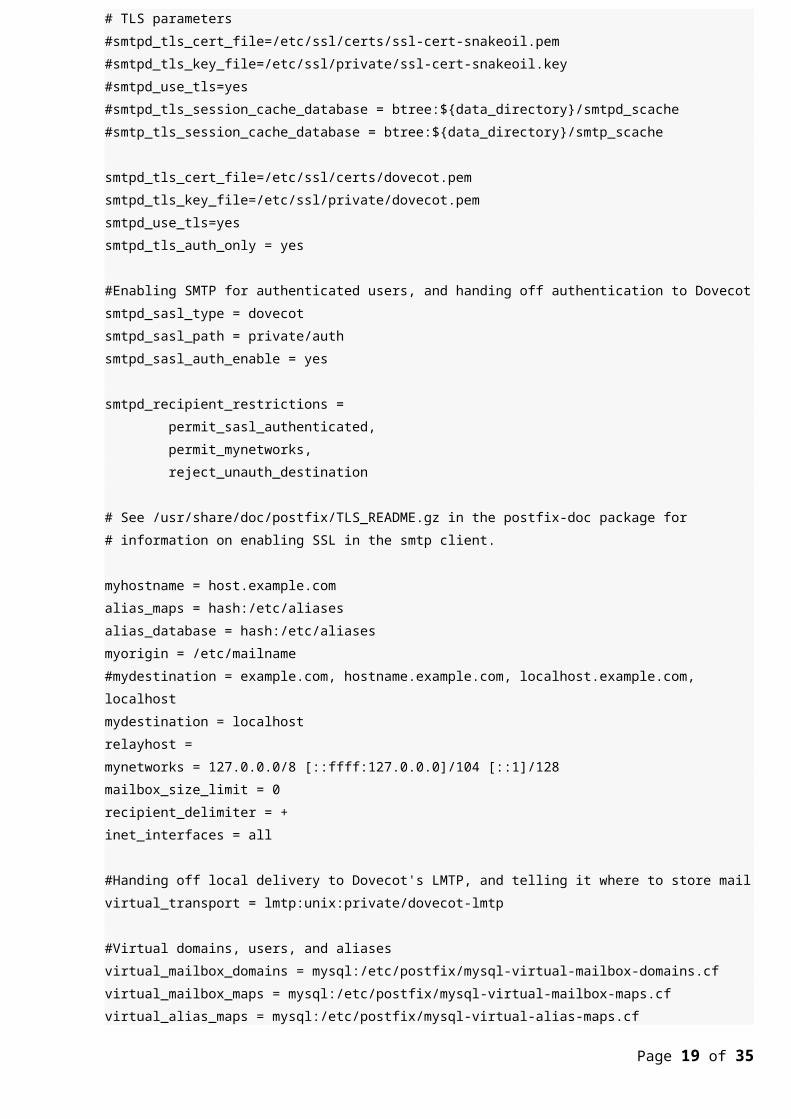
11. Compare your Postfix configuration file to our final configuration file shown below. If necessary, make changes to your file before proceeding.
File excerpt:/etc/postfix/main.cf
# See /usr/share/postfix/main.cf.dist for a commented, more complete version
# Debian specific: Specifying a file name will cause the first# line of that file to be used as the name. The Debian default# is /etc/mailname.#myorigin = /etc/mailname
smtpd_banner = $myhostname ESMTP $mail_name (Ubuntu)biff = no
# appending .domain is the MUA's job.append_dot_mydomain = no
# Uncomment the next line to generate "delayed mail" warnings#delay_warning_time = 4h
readme_directory = no
# TLS parameters#smtpd_tls_cert_file=/etc/ssl/certs/ssl-cert-snakeoil.pem#smtpd_tls_key_file=/etc/ssl/private/ssl-cert-snakeoil.key#smtpd_use_tls=yes#smtpd_tls_session_cache_database = btree:${data_directory}/smtpd_scache#smtp_tls_session_cache_database = btree:${data_directory}/smtp_scache
smtpd_tls_cert_file=/etc/ssl/certs/dovecot.pemsmtpd_tls_key_file=/etc/ssl/private/dovecot.pemsmtpd_use_tls=yessmtpd_tls_auth_only = yes
#Enabling SMTP for authenticated users, and handing off authentication to Dovecotsmtpd_sasl_type = dovecotsmtpd_sasl_path = private/authsmtpd_sasl_auth_enable = yes
smtpd_recipient_restrictions =
Page 14 of 27
permit_sasl_authenticated, permit_mynetworks, reject_unauth_destination
# See /usr/share/doc/postfix/TLS_README.gz in the postfix-doc package for# information on enabling SSL in the smtp client.
myhostname = host.example.comalias_maps = hash:/etc/aliasesalias_database = hash:/etc/aliasesmyorigin = /etc/mailname#mydestination = example.com, hostname.example.com, localhost.example.com, localhostmydestination = localhostrelayhost =mynetworks = 127.0.0.0/8 [::ffff:127.0.0.0]/104 [::1]/128mailbox_size_limit = 0recipient_delimiter = +inet_interfaces = all
#Handing off local delivery to Dovecot's LMTP, and telling it where to store mailvirtual_transport = lmtp:unix:private/dovecot-lmtp
#Virtual domains, users, and aliasesvirtual_mailbox_domains = mysql:/etc/postfix/mysql-virtual-mailbox-domains.cfvirtual_mailbox_maps = mysql:/etc/postfix/mysql-virtual-mailbox-maps.cfvirtual_alias_maps = mysql:/etc/postfix/mysql-virtual-alias-maps.cf
12. Save the changes you've made to the /etc/postfix/main.cf file.13. Create the three files you specified earlier. These files will tell Postfix how to connect to MySQL to
read the lists of domains, email addresses, and aliases. Create the file for virtual domains by entering the following command:
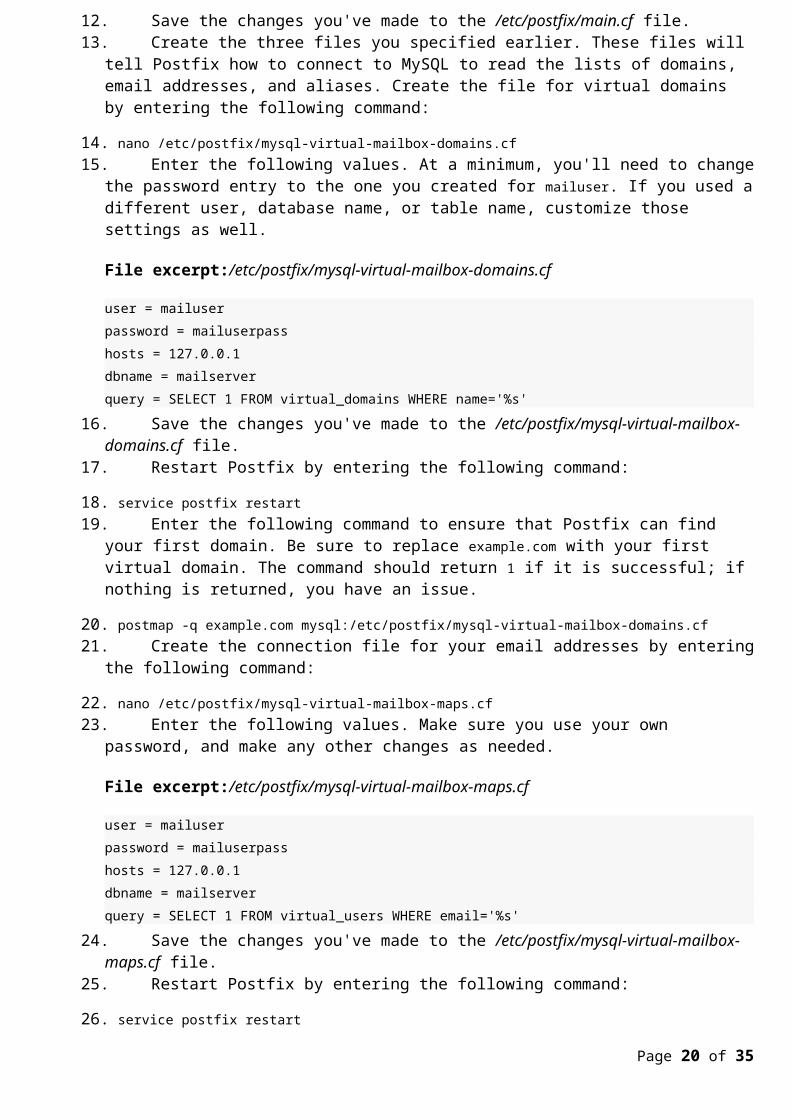
14. nano /etc/postfix/mysql-virtual-mailbox-domains.cf15. Enter the following values. At a minimum, you'll need to change the password entry to the one you
created for mailuser. If you used a different user, database name, or table name, customize those settings as well.
File excerpt:/etc/postfix/mysql-virtual-mailbox-domains.cf
user = mailuserpassword = mailuserpasshosts = 127.0.0.1dbname = mailserverquery = SELECT 1 FROM virtual_domains WHERE name='%s'
16. Save the changes you've made to the /etc/postfix/mysql-virtual-mailbox-domains.cf file.17. Restart Postfix by entering the following command:
18. service postfix restart19. Enter the following command to ensure that Postfix can find your first domain. Be sure to replace
example.com with your first virtual domain. The command should return 1 if it is successful; if nothing is returned, you have an issue.
20. postmap -q example.com mysql:/etc/postfix/mysql-virtual-mailbox-domains.cf21. Create the connection file for your email addresses by entering the following command:
22. nano /etc/postfix/mysql-virtual-mailbox-maps.cf
Page 15 of 27
23. Enter the following values. Make sure you use your own password, and make any other changes as needed.
File excerpt:/etc/postfix/mysql-virtual-mailbox-maps.cf
user = mailuserpassword = mailuserpasshosts = 127.0.0.1dbname = mailserverquery = SELECT 1 FROM virtual_users WHERE email='%s'
24. Save the changes you've made to the /etc/postfix/mysql-virtual-mailbox-maps.cf file.25. Restart Postfix by entering the following command:
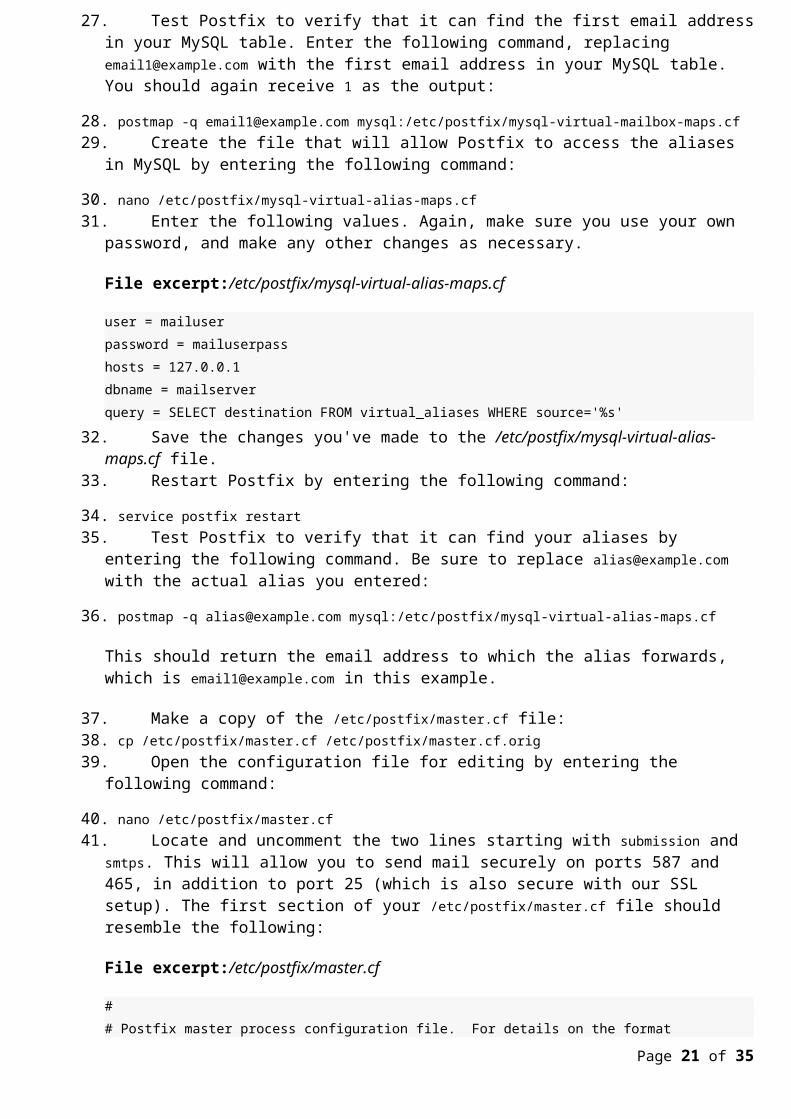
26. service postfix restart27. Test Postfix to verify that it can find the first email address in your MySQL table. Enter the following
command, replacing [email protected] with the first email address in your MySQL table. You should again receive 1 as the output:
28. postmap -q [email protected] mysql:/etc/postfix/mysql-virtual-mailbox-maps.cf29. Create the file that will allow Postfix to access the aliases in MySQL by entering the following
command:
30. nano /etc/postfix/mysql-virtual-alias-maps.cf31. Enter the following values. Again, make sure you use your own password, and make any other
changes as necessary.
File excerpt:/etc/postfix/mysql-virtual-alias-maps.cf
user = mailuserpassword = mailuserpasshosts = 127.0.0.1dbname = mailserverquery = SELECT destination FROM virtual_aliases WHERE source='%s'
32. Save the changes you've made to the /etc/postfix/mysql-virtual-alias-maps.cf file.33. Restart Postfix by entering the following command:
34. service postfix restart35. Test Postfix to verify that it can find your aliases by entering the following command. Be sure to
replace [email protected] with the actual alias you entered:
36. postmap -q [email protected] mysql:/etc/postfix/mysql-virtual-alias-maps.cf
This should return the email address to which the alias forwards, which is [email protected] in this example.
37. Make a copy of the /etc/postfix/master.cf file:38. cp /etc/postfix/master.cf /etc/postfix/master.cf.orig39. Open the configuration file for editing by entering the following command:
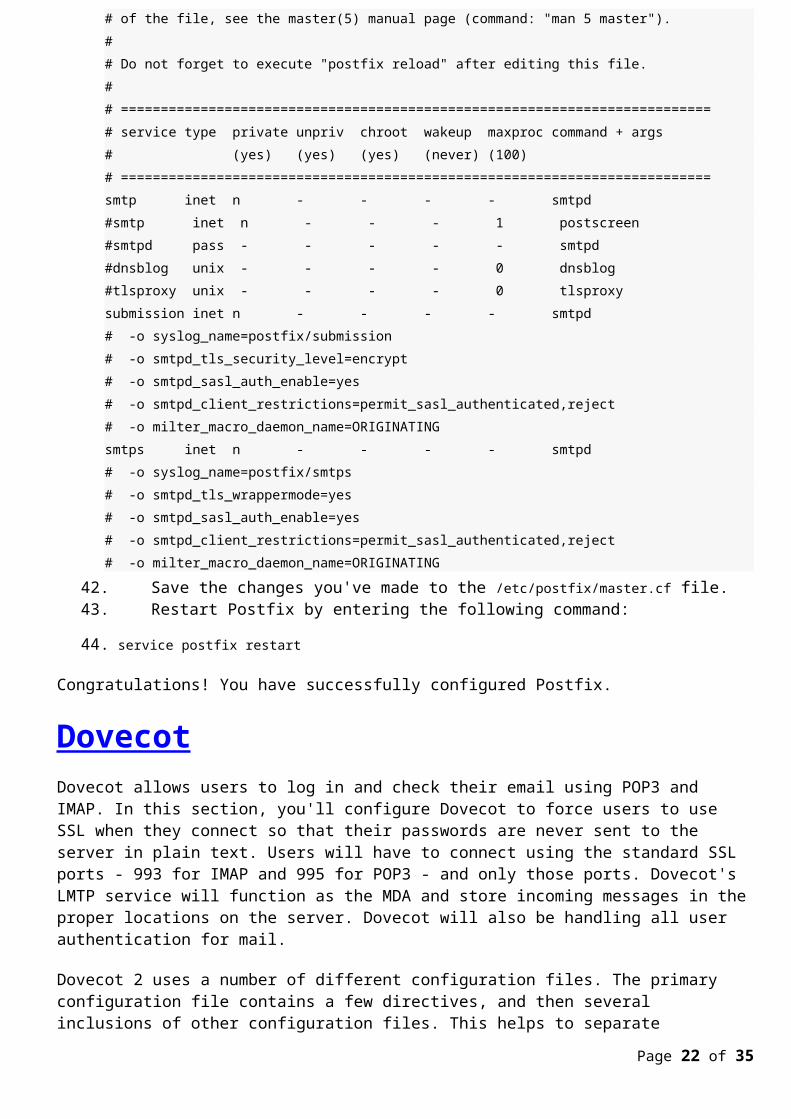
40. nano /etc/postfix/master.cf41. Locate and uncomment the two lines starting with submission and smtps. This will allow you to
send mail securely on ports 587 and 465, in addition to port 25 (which is also secure with our SSL setup). The first section of your /etc/postfix/master.cf file should resemble the following:
File excerpt:/etc/postfix/master.cf
## Postfix master process configuration file. For details on the format# of the file, see the master(5) manual page (command: "man 5 master").
Page 16 of 27
## Do not forget to execute "postfix reload" after editing this file.## ==========================================================================# service type private unpriv chroot wakeup maxproc command + args# (yes) (yes) (yes) (never) (100)# ==========================================================================smtp inet n - - - - smtpd#smtp inet n - - - 1 postscreen#smtpd pass - - - - - smtpd#dnsblog unix - - - - 0 dnsblog#tlsproxy unix - - - - 0 tlsproxysubmission inet n - - - - smtpd# -o syslog_name=postfix/submission# -o smtpd_tls_security_level=encrypt# -o smtpd_sasl_auth_enable=yes# -o smtpd_client_restrictions=permit_sasl_authenticated,reject# -o milter_macro_daemon_name=ORIGINATINGsmtps inet n - - - - smtpd# -o syslog_name=postfix/smtps# -o smtpd_tls_wrappermode=yes# -o smtpd_sasl_auth_enable=yes# -o smtpd_client_restrictions=permit_sasl_authenticated,reject# -o milter_macro_daemon_name=ORIGINATING
42. Save the changes you've made to the /etc/postfix/master.cf file.43. Restart Postfix by entering the following command:
44. service postfix restart
Congratulations! You have successfully configured Postfix.
DovecotDovecot allows users to log in and check their email using POP3 and IMAP. In this section, you'll configure Dovecot to force users to use SSL when they connect so that their passwords are never sent to the server in plain text. Users will have to connect using the standard SSL ports - 993 for IMAP and 995 for POP3 - and only those ports. Dovecot's LMTP service will function as the MDA and store incoming messages in the proper locations on the server. Dovecot will also be handling all user authentication for mail.
Dovecot 2 uses a number of different configuration files. The primary configuration file contains a few directives, and then several inclusions of other configuration files. This helps to separate different configuration parameters logically so they're not all grouped together in one file. This is a major change from Dovecot 1, where virtually everything was configured in the same file.
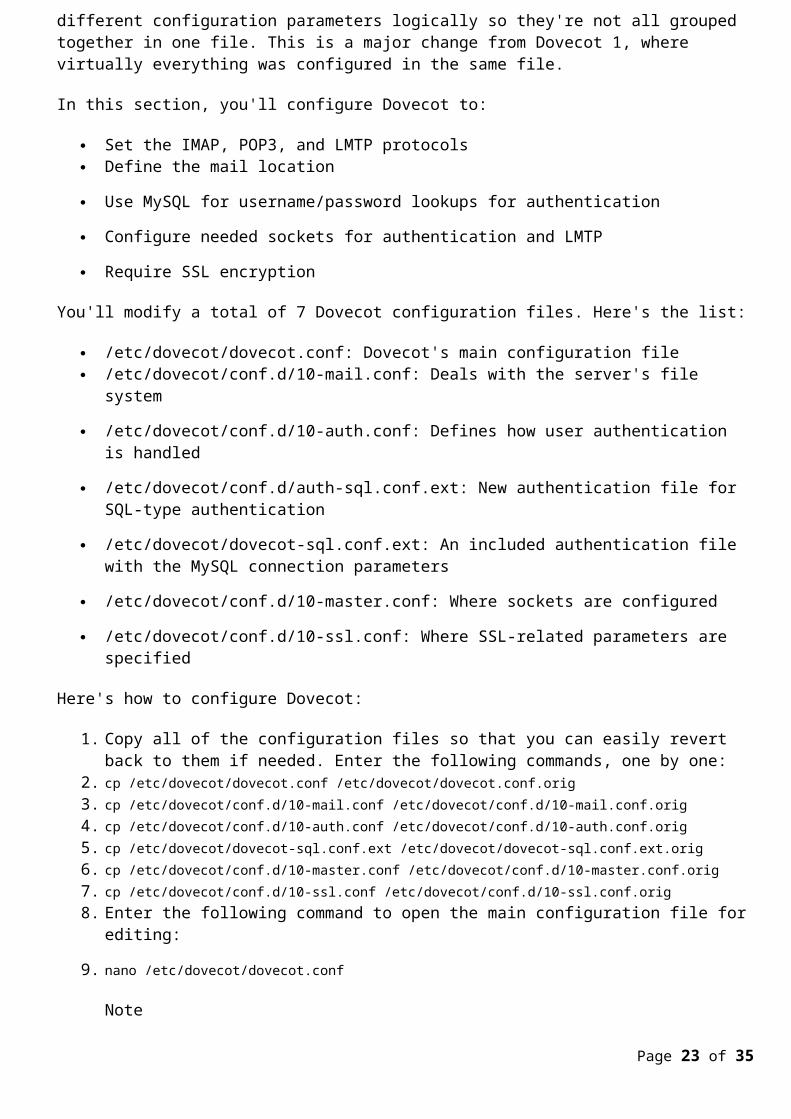
In this section, you'll configure Dovecot to:
Set the IMAP, POP3, and LMTP protocols Define the mail location
Use MySQL for username/password lookups for authentication
Configure needed sockets for authentication and LMTP
Require SSL encryption
You'll modify a total of 7 Dovecot configuration files. Here's the list:Page 17 of 27
/etc/dovecot/dovecot.conf: Dovecot's main configuration file /etc/dovecot/conf.d/10-mail.conf: Deals with the server's file system
/etc/dovecot/conf.d/10-auth.conf: Defines how user authentication is handled
/etc/dovecot/conf.d/auth-sql.conf.ext: New authentication file for SQL-type authentication
/etc/dovecot/dovecot-sql.conf.ext: An included authentication file with the MySQL connection parameters
/etc/dovecot/conf.d/10-master.conf: Where sockets are configured
/etc/dovecot/conf.d/10-ssl.conf: Where SSL-related parameters are specified
Here's how to configure Dovecot:
1. Copy all of the configuration files so that you can easily revert back to them if needed. Enter the following commands, one by one:
2. cp /etc/dovecot/dovecot.conf /etc/dovecot/dovecot.conf.orig3. cp /etc/dovecot/conf.d/10-mail.conf /etc/dovecot/conf.d/10-mail.conf.orig4. cp /etc/dovecot/conf.d/10-auth.conf /etc/dovecot/conf.d/10-auth.conf.orig5. cp /etc/dovecot/dovecot-sql.conf.ext /etc/dovecot/dovecot-sql.conf.ext.orig6. cp /etc/dovecot/conf.d/10-master.conf /etc/dovecot/conf.d/10-master.conf.orig7. cp /etc/dovecot/conf.d/10-ssl.conf /etc/dovecot/conf.d/10-ssl.conf.orig8. Enter the following command to open the main configuration file for editing:
9. nano /etc/dovecot/dovecot.conf
Note
Click this link to see the final, complete version of our dovecot.conf example file.
10. Verify that dovecot.conf is including all of the other configuration files. This option should be enabled by default:
File excerpt:/etc/dovecot/dovecot.conf
!include conf.d/*.conf
11. Add the following line to /etc/dovecot/dovecot.conf so Dovecot knows to support IMAP, POP3, and LMTP. In this example, we have inserted it below the existing !include_try /usr/share/dovecot/protocols.d/*.protocol line:
File excerpt:/etc/dovecot/dovecot.conf
# Enable installed protocols!include_try /usr/share/dovecot/protocols.d/*.protocolprotocols = imap pop3 lmtp
12. Save your changes to the /etc/dovecot/dovecot.conf file.13. Open the /etc/dovecot/conf.d/10-mail.conf file for editing by entering the following command. This
file allows us to control how Dovecot interacts with the server's file system to store and retrieve messages.
14. nano /etc/dovecot/conf.d/10-mail.conf
Note
Click this link to see the final, complete version of our 10-mail.conf example file. This is a long file, so you may need to use your editor's search feature to find the values you need to edit.
Page 18 of 27
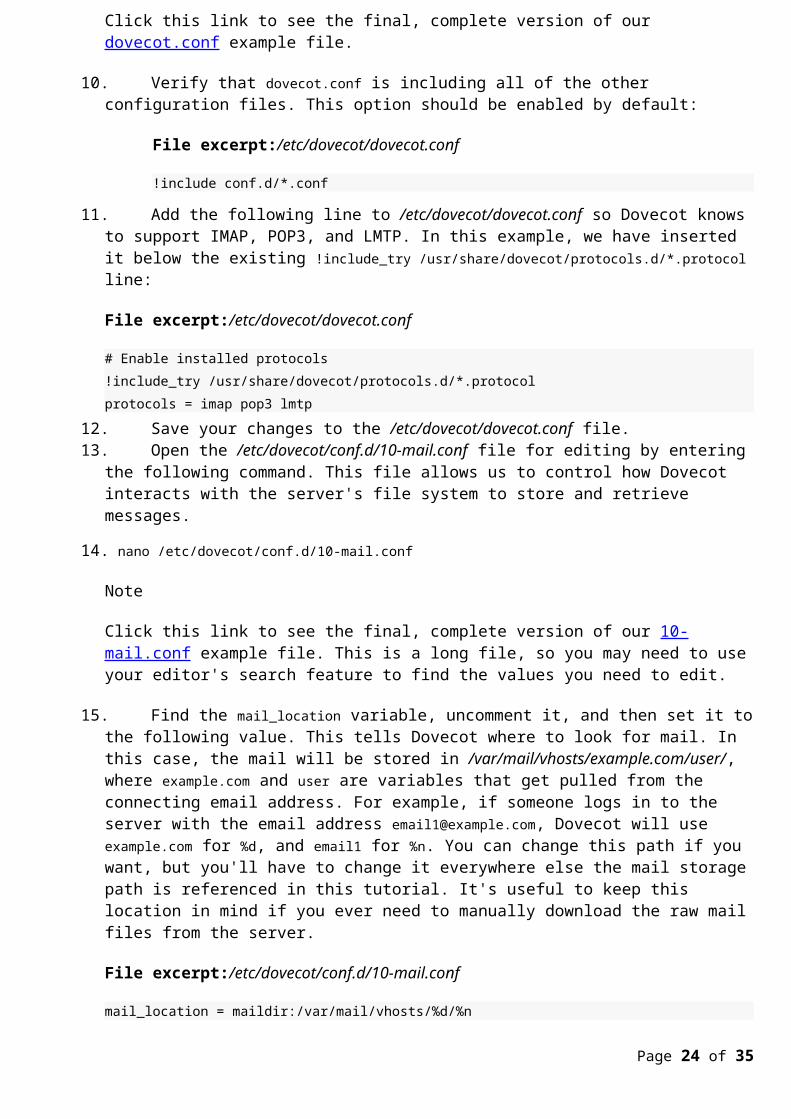
15. Find the mail_location variable, uncomment it, and then set it to the following value. This tells Dovecot where to look for mail. In this case, the mail will be stored in /var/mail/vhosts/example.com/user/, where example.com and user are variables that get pulled from the connecting email address. For example, if someone logs in to the server with the email address [email protected], Dovecot will use example.com for %d, and email1 for %n. You can change this path if you want, but you'll have to change it everywhere else the mail storage path is referenced in this tutorial. It's useful to keep this location in mind if you ever need to manually download the raw mail files from the server.
File excerpt:/etc/dovecot/conf.d/10-mail.conf
mail_location = maildir:/var/mail/vhosts/%d/%n
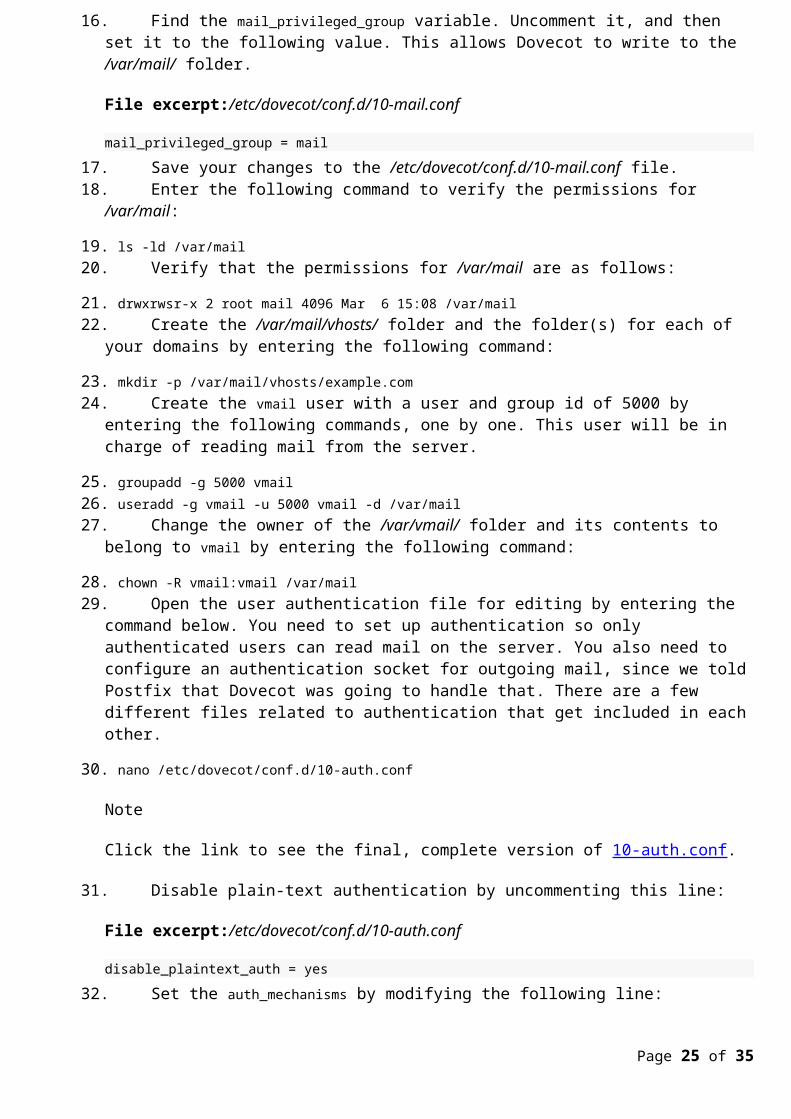
16. Find the mail_privileged_group variable. Uncomment it, and then set it to the following value. This allows Dovecot to write to the /var/mail/ folder.
File excerpt:/etc/dovecot/conf.d/10-mail.conf
mail_privileged_group = mail
17. Save your changes to the /etc/dovecot/conf.d/10-mail.conf file.18. Enter the following command to verify the permissions for /var/mail:
19. ls -ld /var/mail20. Verify that the permissions for /var/mail are as follows:
21. drwxrwsr-x 2 root mail 4096 Mar 6 15:08 /var/mail22. Create the /var/mail/vhosts/ folder and the folder(s) for each of your domains by entering the
following command:
23. mkdir -p /var/mail/vhosts/example.com24. Create the vmail user with a user and group id of 5000 by entering the following commands, one by
one. This user will be in charge of reading mail from the server.
25. groupadd -g 5000 vmail26. useradd -g vmail -u 5000 vmail -d /var/mail27. Change the owner of the /var/vmail/ folder and its contents to belong to vmail by entering the
following command:
28. chown -R vmail:vmail /var/mail29. Open the user authentication file for editing by entering the command below. You need to set up
authentication so only authenticated users can read mail on the server. You also need to configure an authentication socket for outgoing mail, since we told Postfix that Dovecot was going to handle that. There are a few different files related to authentication that get included in each other.
30. nano /etc/dovecot/conf.d/10-auth.conf
Note
Click the link to see the final, complete version of 10-auth.conf.
31. Disable plain-text authentication by uncommenting this line:
File excerpt:/etc/dovecot/conf.d/10-auth.conf
disable_plaintext_auth = yes
32. Set the auth_mechanisms by modifying the following line:
File excerpt:/etc/dovecot/conf.d/10-auth.conf
auth_mechanisms = plain login
Page 19 of 27
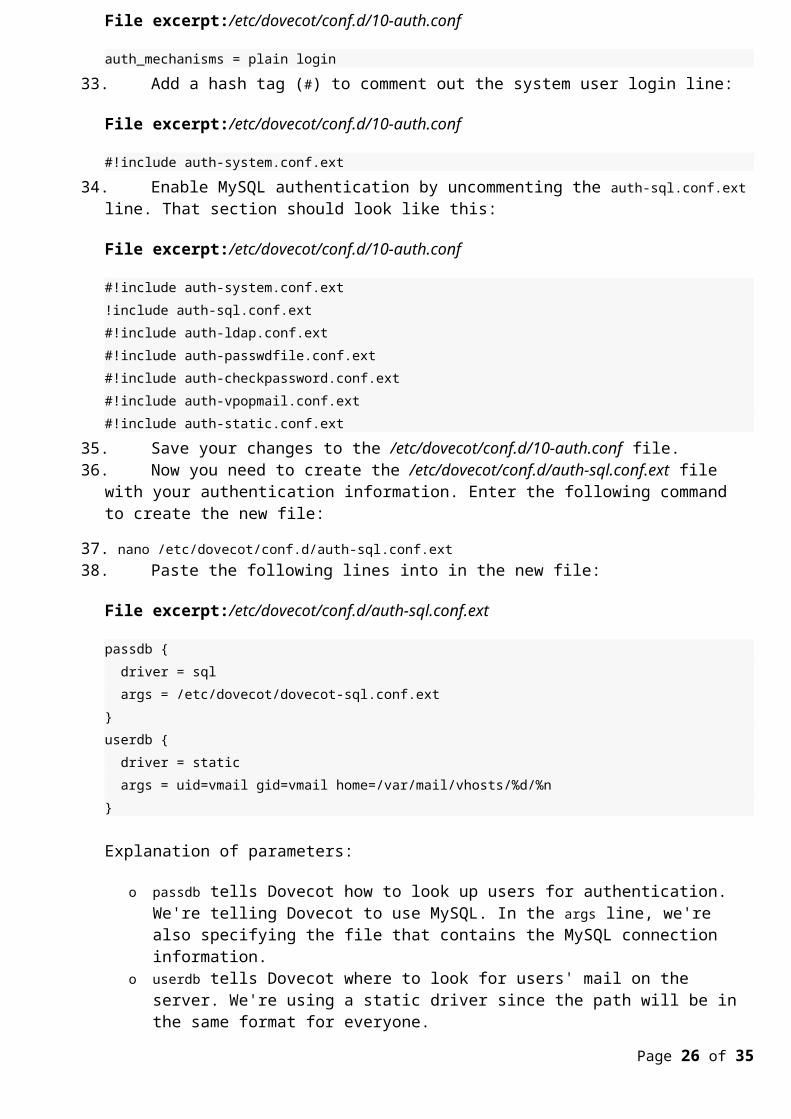
33. Add a hash tag (#) to comment out the system user login line:
File excerpt:/etc/dovecot/conf.d/10-auth.conf
#!include auth-system.conf.ext
34. Enable MySQL authentication by uncommenting the auth-sql.conf.ext line. That section should look like this:
File excerpt:/etc/dovecot/conf.d/10-auth.conf
#!include auth-system.conf.ext!include auth-sql.conf.ext#!include auth-ldap.conf.ext#!include auth-passwdfile.conf.ext#!include auth-checkpassword.conf.ext#!include auth-vpopmail.conf.ext#!include auth-static.conf.ext
35. Save your changes to the /etc/dovecot/conf.d/10-auth.conf file.36. Now you need to create the /etc/dovecot/conf.d/auth-sql.conf.ext file with your authentication
information. Enter the following command to create the new file:
37. nano /etc/dovecot/conf.d/auth-sql.conf.ext38. Paste the following lines into in the new file:
File excerpt:/etc/dovecot/conf.d/auth-sql.conf.ext
passdb { driver = sql args = /etc/dovecot/dovecot-sql.conf.ext}userdb { driver = static args = uid=vmail gid=vmail home=/var/mail/vhosts/%d/%n}
Explanation of parameters:
o passdb tells Dovecot how to look up users for authentication. We're telling Dovecot to use MySQL. In the args line, we're also specifying the file that contains the MySQL connection information.
o userdb tells Dovecot where to look for users' mail on the server. We're using a static driver since the path will be in the same format for everyone.
39. Save your changes to the /etc/dovecot/conf.d/auth-sql.conf.ext file.
40. Update the /etc/dovecot/dovecot-sql.conf.ext file with our custom MySQL connection information. Open the file for editing by entering the following command:
41. nano /etc/dovecot/dovecot-sql.conf.ext
Note
Click the link to see the final, complete version of dovecot-sql.conf.ext.
42. Uncomment and set the driver line as shown below:
File excerpt:/etc/dovecot/dovecot-sql.conf.extPage 20 of 27
driver = mysql
43. Uncomment the connect line and set your MySQL connection information. Make sure you use your own password and any other custom settings:
File excerpt:/etc/dovecot/dovecot-sql.conf.ext
connect = host=127.0.0.1 dbname=mailserver user=mailuser password=mailuserpass
44. Uncomment the default_pass_scheme line and set it to SHA512-CRYPT. This tells Dovecot to expect the passwords in an ecrypted format (which is how they are stored in the database).
File excerpt:/etc/dovecot/dovecot-sql.conf.ext
default_pass_scheme = SHA512-CRYPT
45. Uncomment the password_query line and set it to the following. This is a MySQL query that Dovecot uses to retrieve the password from the database.
File excerpt:/etc/dovecot/dovecot-sql.conf.ext
password_query = SELECT email as user, password FROM virtual_users WHERE email='%u';
Note
This password query lets you use an email address listed in the virtual_users table as your username credential for an email account. The primary email address should still be used as the username, even if you have set up your email client for an alias. If you want to be able to use the alias as your username instead (listed in the virtual_aliases table), you should first add every primary email address to the virtual_aliases table (directing to themselves) and then use the following line in /etc/dovecot/dovecot-sql.conf.ext instead:
password_query = SELECT email as user, password FROM virtual_users WHERE email=(SELECT destination FROM virtual_aliases WHERE source = '%u');
46. Save your changes to the /etc/dovecot/dovecot-sql.conf.ext file.47. Change the owner and group of the /etc/dovecot/ directory to vmail and dovecot by entering the
following command:
48. chown -R vmail:dovecot /etc/dovecot49. Change the permissions on the /etc/dovecot/ directory by entering the following command:
50. chmod -R o-rwx /etc/dovecot51. Open the sockets configuration file by entering the following command. You'll change the settings in
this file to set up the LMTP socket for local mail delivery, and the auth socket for authentication. Postfix uses these sockets to connect to Dovecot's services.
52. nano /etc/dovecot/conf.d/10-master.conf
Note
Click the link to see the final, complete version of 10-master.conf. There are many nested blocks of code in this file, so please pay very close attention to your brackets. It's probably better if you edit line by line, rather than copying large chunks of code. If there's a syntax error, Dovecot will crash silently, but you can check /var/log/upstart/dovecot.log to help you find the error.
53. Disable unencrypted IMAP and POP3 by setting the protocols' ports to 0, as shown below. This will force your users to use secure IMAP or secure POP on 993 or 995 when they configure their mail clients:
Page 21 of 27
File excerpt:/etc/dovecot/conf.d/10-master.conf
service imap-login { inet_listener imap { port = 0 }...}
service pop3-login { inet_listener pop3 { port = 0 }...}
Note
Make sure you leave the secure versions alone - imaps and pop3s - so their ports still work. The default settings for imaps and pop3s are fine. You can leave the port lines commented out, as the default ports are the standard 993 and 995.
54. Find the service lmtp section and use the configuration shown below. You'll need to add a few lines in the unix_listener block. This section makes the socket for LMTP in the place we told Postfix to look for it.
File excerpt:/etc/dovecot/conf.d/10-master.conf
service lmtp { unix_listener /var/spool/postfix/private/dovecot-lmtp { mode = 0600 user = postfix group = postfix } # Create inet listener only if you can't use the above UNIX socket #inet_listener lmtp { # Avoid making LMTP visible for the entire internet #address = #port = #}}
55. Locate the service auth section and use the configuration shown below. You'll need to create a new unix_listener block, modify the existing one, and then uncomment and set the user. This section makes the authorization socket where we told Postfix to look for it:
File excerpt:/etc/dovecot/conf.d/10-master.conf
service auth { # auth_socket_path points to this userdb socket by default. It's typically # used by dovecot-lda, doveadm, possibly imap process, etc. Its default # permissions make it readable only by root, but you may need to relax these # permissions. Users that have access to this socket are able to get a list # of all usernames and get results of everyone's userdb lookups. unix_listener /var/spool/postfix/private/auth { mode = 0666
Page 22 of 27
user = postfix group = postfix }
unix_listener auth-userdb { mode = 0600 user = vmail #group = }
# Postfix smtp-auth #unix_listener /var/spool/postfix/private/auth { # mode = 0666 #}
# Auth process is run as this user. user = dovecot}
56. In the service auth-worker section, uncomment the user line and set it to vmail, as shown below.
File excerpt:/etc/dovecot/conf.d/10-master.conf
service auth-worker { # Auth worker process is run as root by default, so that it can access # /etc/shadow. If this isn't necessary, the user should be changed to # $default_internal_user. user = vmail}
57. Save your changes to the /etc/dovecot/conf.d/10-master.conf file.58. Verify that the default Dovecot SSL certificate and key exist by entering the following commands,
one by one:
59. ls /etc/ssl/certs/dovecot.pem60. ls /etc/ssl/private/dovecot.pem
Note
If you are using a different SSL certificate, you should upload the certificate to the server and make a note of its location and the key's location.
61. Open the SSL configuration file for editing by entering the following command. This is where we tell Dovecot where to find our SSL certificate and key, and any other SSL-related parameters.
62. nano /etc/dovecot/conf.d/10-ssl.conf
Note
Click the link to see the final, complete version of 10-ssl.conf.
63. Verify that the ssl_cert setting has the path to your certificate, and that the ssl_key setting has the path to your key. The default setting here uses Dovecot's built-in certificate, so you can leave this as-is if you are using the Dovecot certificate. You should update the paths if you are using a different certificate and key.
File excerpt:/etc/dovecot/conf.d/10-ssl.conf
ssl_cert = </etc/ssl/certs/dovecot.pem
Page 23 of 27
ssl_key = </etc/ssl/private/dovecot.pem
64. Force your clients to use SSL encryption for all connections. Set ssl to required:
File excerpt:/etc/dovecot/conf.d/10-ssl.conf
ssl = required
65. Save your changes to the /etc/dovecot/conf.d/10-ssl.conf file. Dovecot has been configured!66. Restart Dovecot by entering the following command:
67. service dovecot restart68. Set up a test account in an email client to make sure everything is working. You'll need to use the
following parameters:
o Your full email address, including the @example.com part, is your username.
o Your password should be the one you added to the MySQL table for this email address.
o The incoming and outgoing server names must be a domain that resolves to your Linode.
o Both the incoming and outgoing servers require authentication and SSL encryption.
o You should use Port 993 for secure IMAP, Port 995 for secure POP3, and Port 25 with SSL for SMTP.
69. Try sending an email to this account from an outside email account and then reply to it. If it works, you're in business! You can check your mail log file in /var/log/mail.log, where you should see something like this (the first block is for an incoming message, and the second block for an outgoing message):
File excerpt:/var/log/mail.log
Mar 22 18:18:15 host postfix/smtpd[22574]: connect from mail1.linode.com[96.126.108.55]Mar 22 18:18:15 host postfix/smtpd[22574]: 2BD192839B: client=mail1.linode.com[96.126.108.55]Mar 22 18:18:15 host postfix/cleanup[22583]: 2BD192839B: message-id=<[email protected]>Mar 22 18:18:15 host postfix/qmgr[15878]: 2BD192839B: from=<[email protected]>, size=1156, nrcpt=1 (queue active)Mar 22 18:18:15 host postfix/smtpd[22574]: disconnect from mail1.linode.com[96.126.108.55]Mar 22 18:18:15 host dovecot: lmtp(22587): Connect from localMar 22 18:18:15 host dovecot: lmtp(22587, [email protected]): 5GjrDafYTFE7WAAABf1gKA: msgid=<[email protected]>: saved mail to INBOXMar 22 18:18:15 host dovecot: lmtp(22587): Disconnect from local: Client quit (in reset)Mar 22 18:18:15 host postfix/lmtp[22586]: 2BD192839B: to=<[email protected]>, relay=host.example.com[private/dovecot-lmtp], delay=0.09, delays=0.03/0.02/0.03/0.01, dsn=2.0.0, status=sent (250 2.0.0 <[email protected]> 5GjrDafYTFE7WAAABf1gKA Saved)Mar 22 18:18:15 host postfix/qmgr[15878]: 2BD192839B: removed
File excerpt:/var/log/mail.log
Mar 22 18:20:29 host postfix/smtpd[22590]: connect from 173-161-199-49-Philadelphia.hfc.comcastbusiness.net[173.161.199.49]
Page 24 of 27
Mar 22 18:20:29 host dovecot: auth-worker: mysql(127.0.0.1): Connected to database mailserverMar 22 18:20:29 host postfix/smtpd[22590]: AA10A2839B: client=173-161-199-49-Philadelphia.hfc.comcastbusiness.net[173.161.199.49], sasl_method=PLAIN, [email protected] 22 18:20:29 host postfix/cleanup[22599]: AA10A2839B: message-id=<[email protected]>Mar 22 18:20:29 host postfix/qmgr[15878]: AA10A2839B: from=<[email protected]>, size=920, nrcpt=1 (queue active)Mar 22 18:20:29 host postfix/smtp[22601]: AA10A2839B: to=<[email protected]>, relay=mail1.linode.com[96.126.108.55]:25, delay=0.14, delays=0.08/0.01/0.05/0.01, dsn=2.0.0, status=sent (250 2.0.0 Ok: queued as C4232266C9)Mar 22 18:20:29 host postfix/qmgr[15878]: AA10A2839B: removed
Congratulations! You now have a functioning mail server that can securely send and receive email. If things are not working smoothly, you may also want to consult the Troubleshooting Problems with Postfix, Dovecot, and MySQL guide. At this point, you may want to consider adding spam and virus filtering and a webmail client. If you haven't switched the DNS records for your mail server yet, you should be able to do so now. Once the DNS records have propagated, you will start receiving email for your domain on the server.
Adding New Domains, Email Addresses, and AliasesNow your mail server is up and running, but eventually you'll probably need to add new domains, email addresses, and aliases for your users. To do this, all you'll have to do is add a new line to the appropriate MySQL table. These instructions are for command-line MySQL, but you can just as easily use phpMyAdmin to add new entries to your tables as well.
DomainsHere's how to add a new domain to your Postfix and Dovecot setup:
1. Open a terminal window and log in to your Linode via SSH.2. Log in to your MySQL server with an appropriately privileged user. In this example, we'll use the
root user:
3. mysql -u root -p mailserver4. Enter your root MySQL password when prompted.
5. You should always view the contents of the table before adding new entries. Enter the following command to view the current contents of any table, replacing virtual_domains with your table:
6. SELECT * FROM mailserver.virtual_domains;7. The output should resemble the following:
8. +----+-----------------------+9. | id | name |10. +----+-----------------------+11. | 1 | example.com |12. | 2 | hostname.example.com |13. | 3 | hostname |14. | 4 | localhost.example.com |15. +----+-----------------------+16. To add another domain, enter the following command, replacing newdomain.com with your domain
name:
Page 25 of 27
17. INSERT INTO `mailserver`.`virtual_domains`18. (`name`)19. VALUES20. ('newdomain.com');21. Verify that the new domain has been added by entering the following command. You should see the
new domain name in the output.
22. SELECT * FROM mailserver.virtual_domains;23. To exit MySQL, enter the following command:
24. quit
Congratulations! You have successfully added the new domain to your Postfix and Dovecot setup.
Email AddressesHere's how to add a new email address to your Postfix and Dovecot setup:
1. Enter the following command in MySQL, replacing newpassword with the user's password, and [email protected] with the user's email address:
2. INSERT INTO `mailserver`.`virtual_users`3. (`domain_id`, `password` , `email`)4. VALUES5. ('5', ENCRYPT('newpassword', CONCAT('$6$', SUBSTRING(SHA(RAND()), -16))) ,
Note
Be sure to use the correct number for the domain_id. In this case, we are using 5, because we want to make an email address for newdomain.com, and newdomain.com has an id of 5 in the virtual_domains table.
2. Verify that the new email address has been added by entering the following command. You should see the new email address in the output.
3. SELECT * FROM mailserver.virtual_users;4. To exit MySQL, enter the following command:
5. quit
Congratulations! You have successfully added the new email address to your Postfix and Dovecot setup.
AliasesHere's how to add a new alias to your Postfix and Dovecot setup:
1. Enter the following command in MySQL, replacing [email protected] with the address from which you want to forward email, and [email protected] with the address that you want to forward the mail to. The [email protected] needs to be an email address that already exists on your server.
2. INSERT INTO `mailserver`.`virtual_aliases`3. (`domain_id`, `source`, `destination`)4. VALUES5. ('5', '[email protected]', '[email protected]');
Note
You will need to use the correct number for the domain_id. You should use the id of the domain for this email address; see the explanation in the email users section above.
Page 26 of 27

2. Verify that the new alias has been added by entering the following command. You should see the new alias in the output.
3. SELECT * FROM mailserver.virtual_aliases;4. To exit MySQL, enter the following command:
5. quit
Congratulations! You have successfully added the new alias to your Postfix and Dovecot setup.
This guide is licensed under a Creative Commons Attribution-NoDerivs 3.0 United States License.
Last edited by Sharon Campbell on Friday, March 14th, 2014 (r4333).
Page 27 of 27