Embed Size (px)
Citation preview
pg. 1
Email Configuration for iPhone, Android 3.5 and 4.4, Blackberry
Q/Z series, and Windows 8 phones
Document Version: v1.3
Date of Issue: July 24, 2014
Email Version: ICE
pg. 2
Table of Contents
iPhone/iPad iOS7 ...................................................................................................................... 3
Android 4.4.1 .............................................................................................................................. 7 Encrypt Android .................................................................................................................................. 7 Setup Email ............................................................................................................................................ 9
Android 3.5 .............................................................................................................................. 13 Encrypt Android ............................................................................................................................... 13 Setup Email ......................................................................................................................................... 15
Blackberry Z10/Q10 ............................................................................................................. 18 Encrypt Blackberry ......................................................................................................................... 18 Email Setup ......................................................................................................................................... 20
Windows 8 ................................................................................................................................ 24
Disclaimer:
Please make sure to perform regular
backups of your device. If your passcode is
entered wrong 10 times all data will be
lost.
Harvard University is not responsible for
lost data.
pg. 3
iPhone/iPad iOS7 Before setting up email on your iPhone. Please update your phone to the newest
version. Settings -> General -> Software Update. Note: Please make a backup prior to
performing update. All new iPhone 5S and iPad Air devices will come preinstalled
with iOS 7.
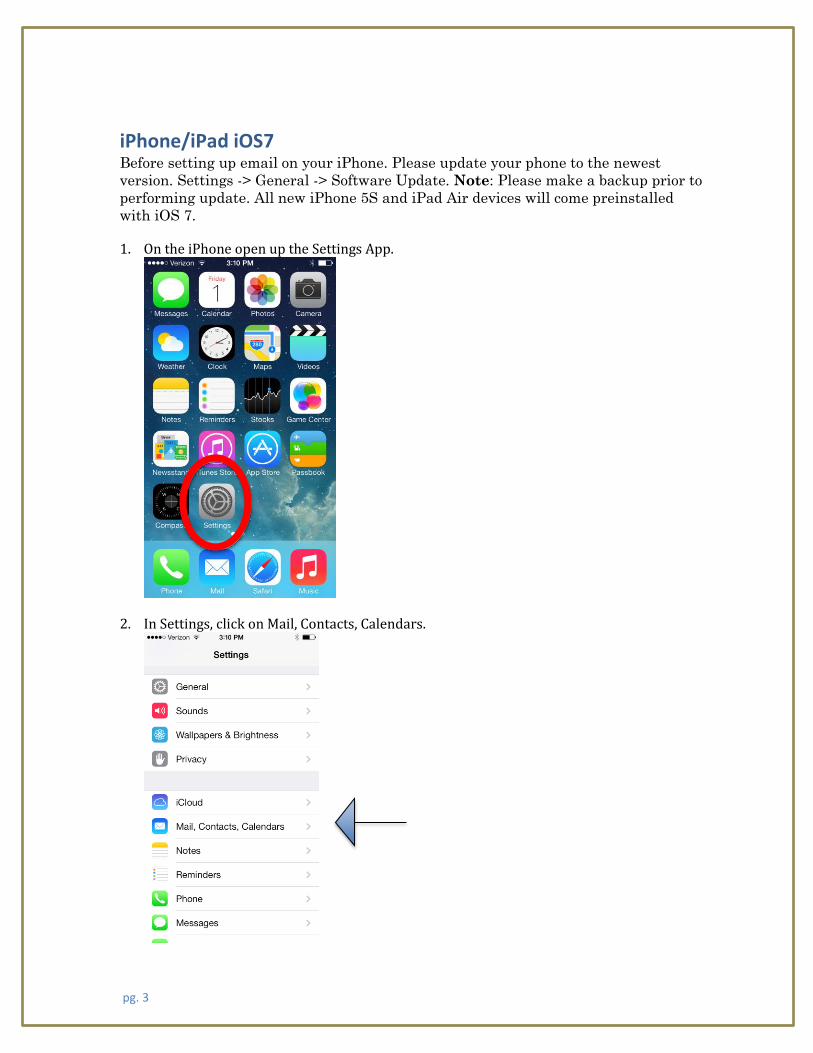
1. On the iPhone open up the Settings App.
2. In Settings, click on Mail, Contacts, Calendars.
pg. 4
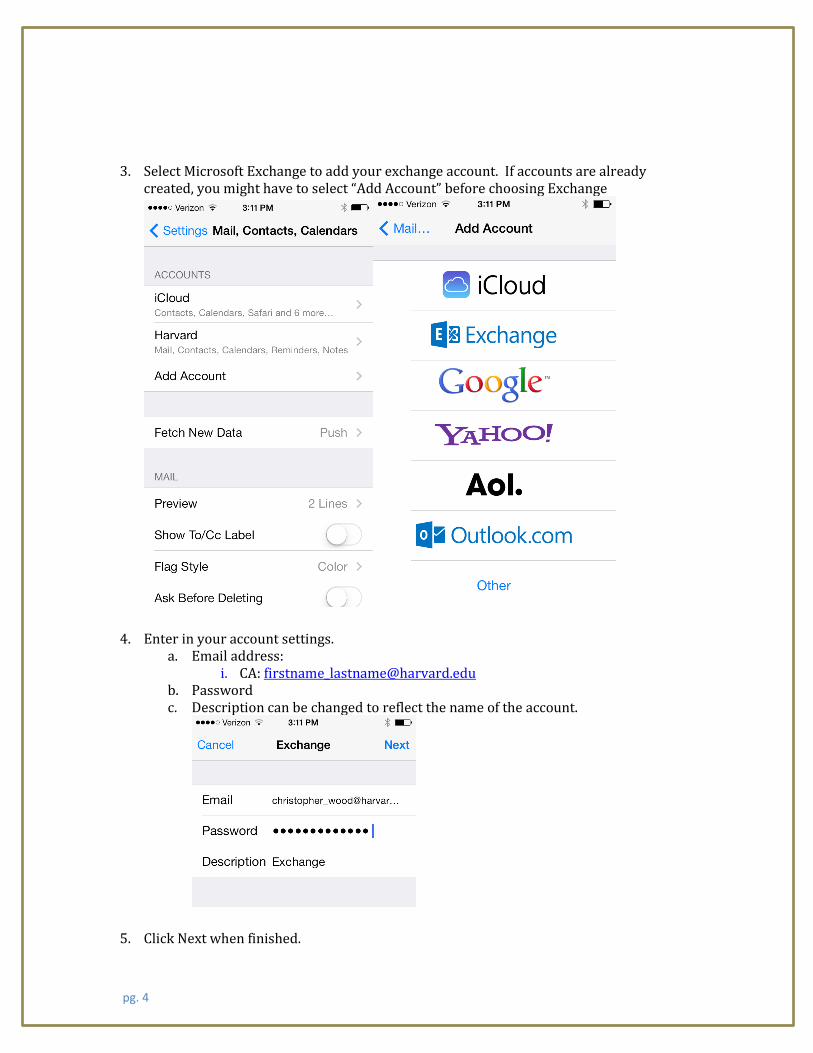
3. Select Microsoft Exchange to add your exchange account. If accounts are already created, you might have to select “Add Account” before choosing Exchange
4. Enter in your account settings. a. Email address:
i. CA: [email protected] b. Password c. Description can be changed to reflect the name of the account.
5. Click Next when finished.
pg. 5
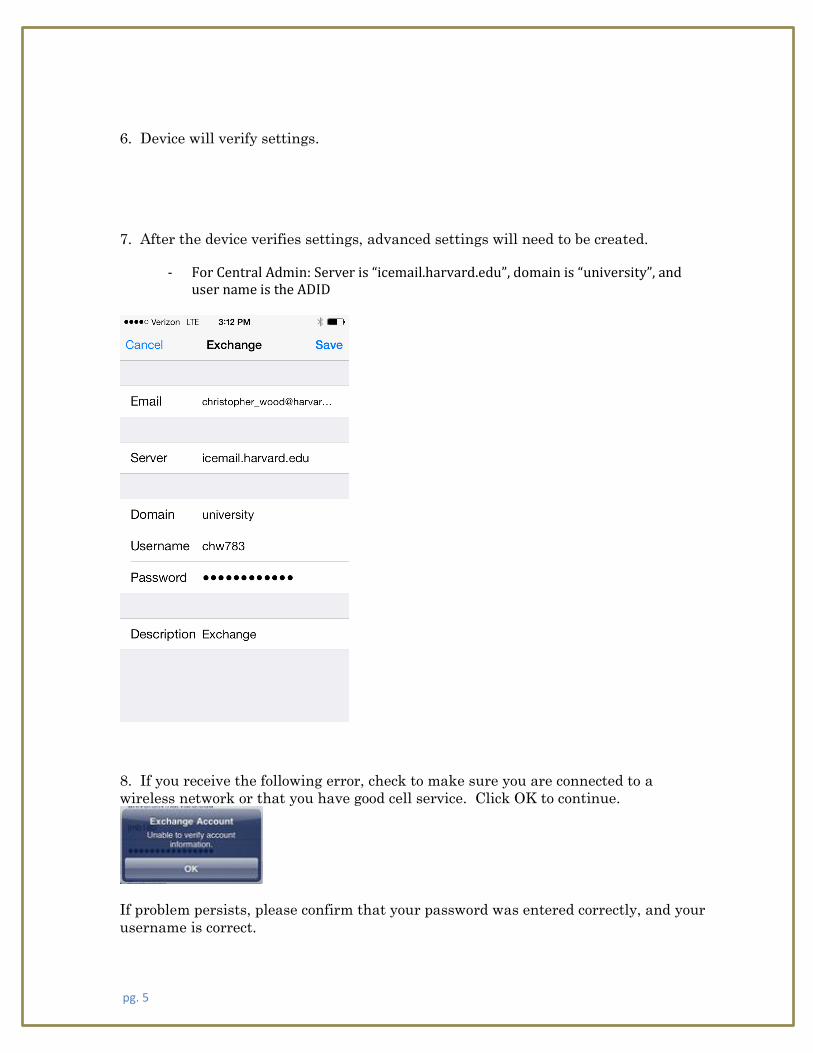
6. Device will verify settings.
7. After the device verifies settings, advanced settings will need to be created.
- For Central Admin: Server is “icemail.harvard.edu”, domain is “university”, and user name is the ADID
8. If you receive the following error, check to make sure you are connected to a
wireless network or that you have good cell service. Click OK to continue.
If problem persists, please confirm that your password was entered correctly, and your
username is correct.
pg. 6
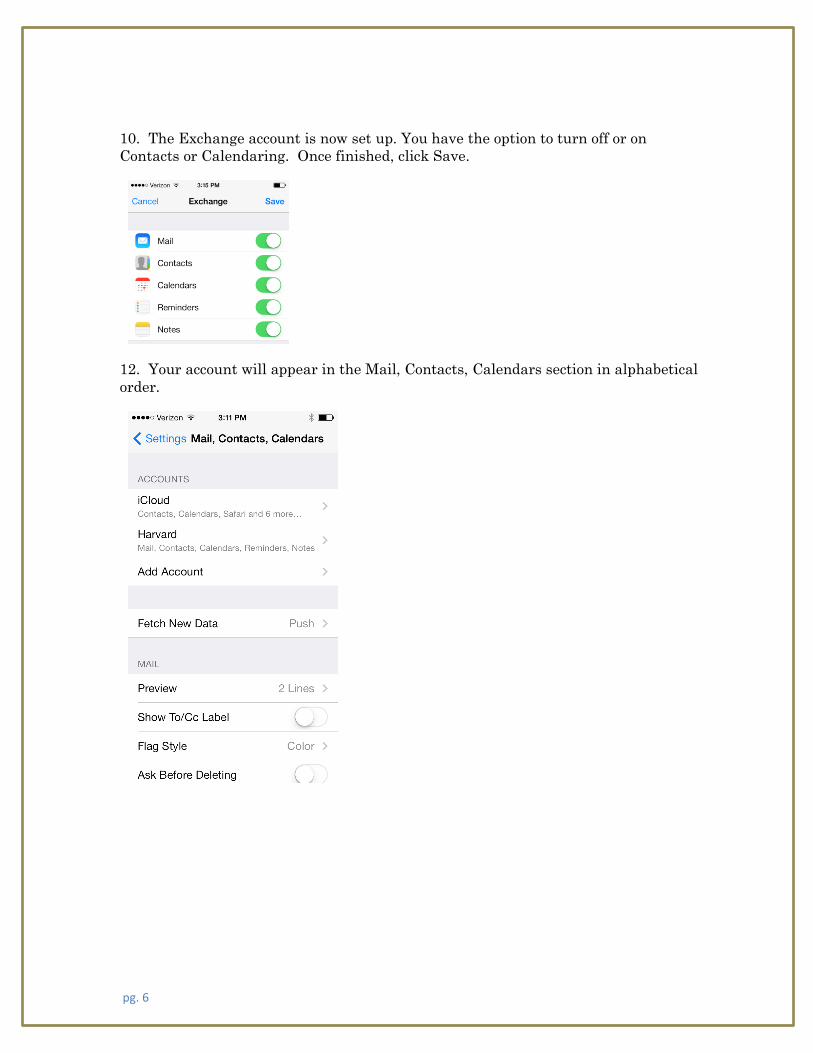
10. The Exchange account is now set up. You have the option to turn off or on
Contacts or Calendaring. Once finished, click Save.
12. Your account will appear in the Mail, Contacts, Calendars section in alphabetical
order.
pg. 7
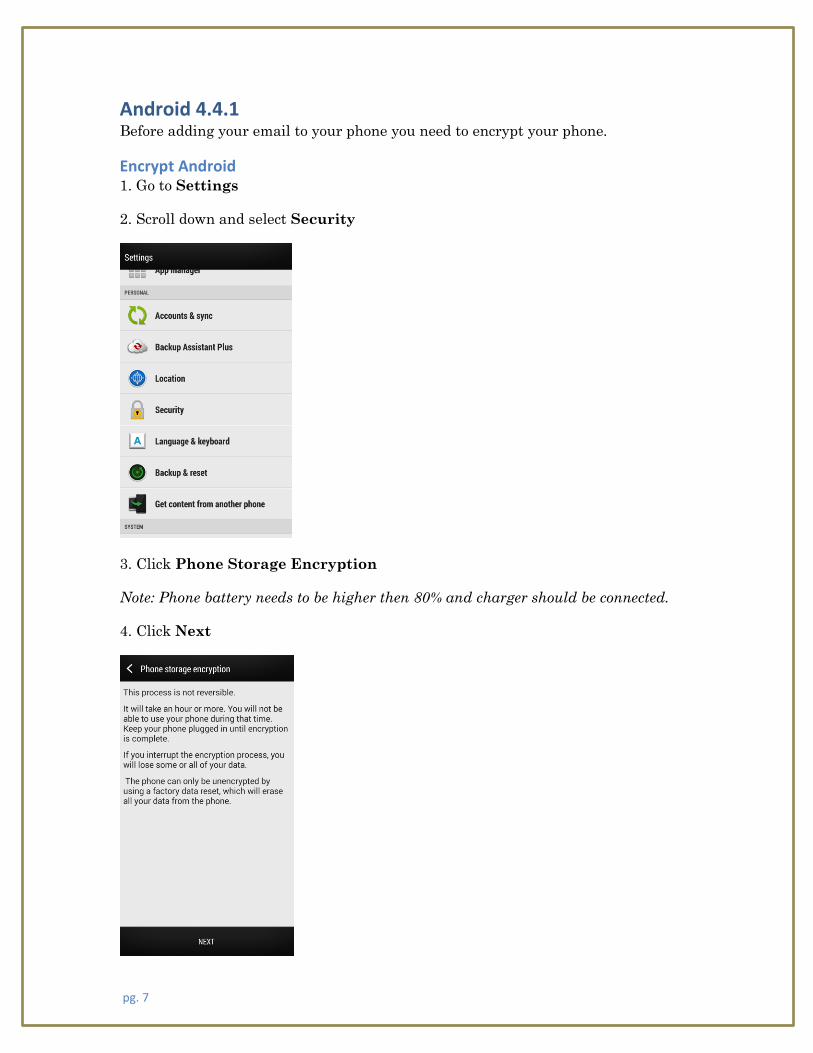
Android 4.4.1 Before adding your email to your phone you need to encrypt your phone.
Encrypt Android 1. Go to Settings
2. Scroll down and select Security
3. Click Phone Storage Encryption
Note: Phone battery needs to be higher then 80% and charger should be connected.
4. Click Next

pg. 8
5. To Encrypt the Device the PIN or Password Screen Lock is required
6. Enter twice to confirm password.
7. Click Enable Encryption
The encryption process itself takes more than one hour and possibly more
than three to complete and the device is not usable during the encryption
process. It is recommended that the device remain plugged in for the
duration of the encryption process. If the encryption fails or if the device is
interrupted, TOTAL DATA LOSS is a possibility.
pg. 9
8. The device will reboot several times during the encryption process and will display
a percentage of the progress. Once the encryption is complete, the device will reboot
once more and prompt for the PIN. After entering the PIN, the device will finish the
boot process.
NOTE: There is no decryption option available. The only way to remove the
encryption from a device is to restore the device to factory settings.
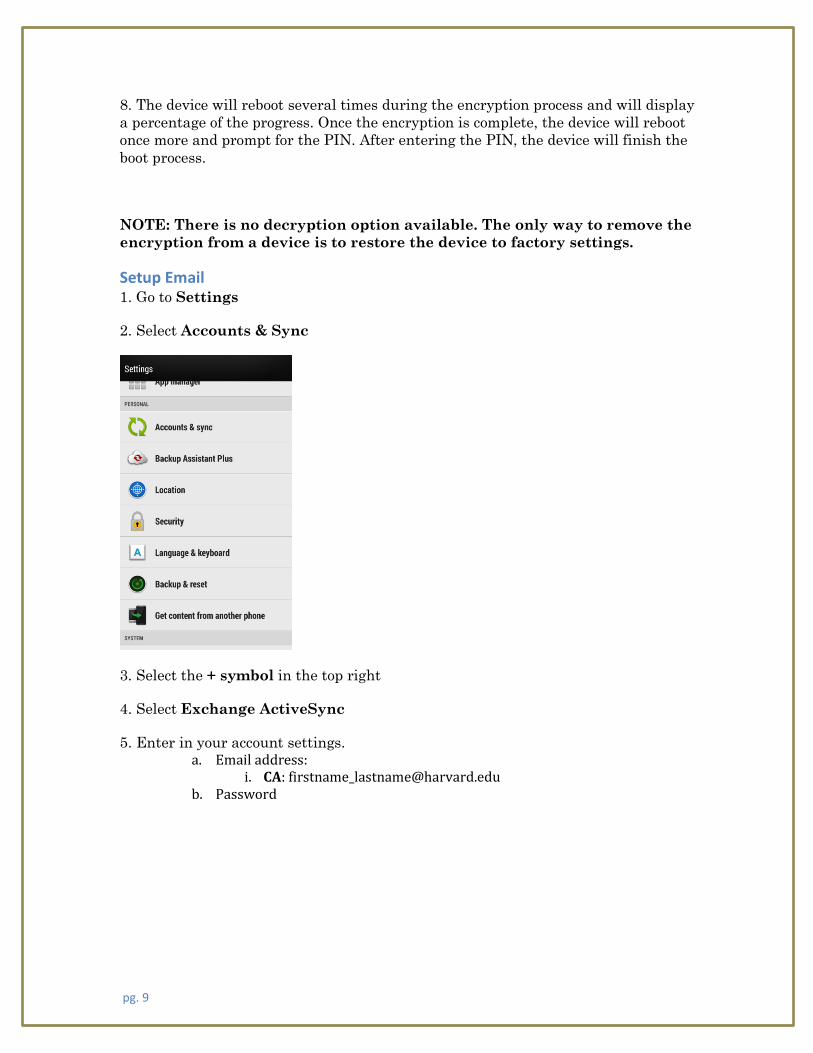
Setup Email 1. Go to Settings
2. Select Accounts & Sync
3. Select the + symbol in the top right
4. Select Exchange ActiveSync
5. Enter in your account settings. a. Email address:
i. CA: [email protected] b. Password
pg. 10
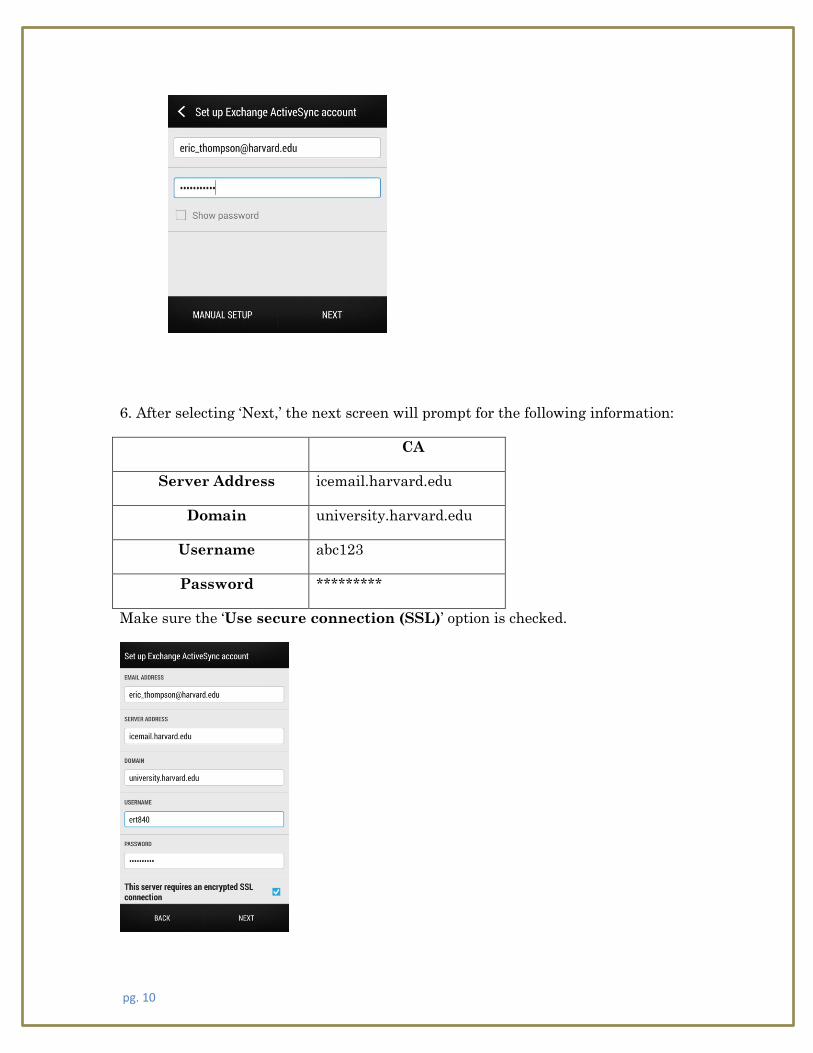
6. After selecting ‘Next,’ the next screen will prompt for the following information:
CA
Server Address icemail.harvard.edu
Domain university.harvard.edu
Username abc123
Password *********
Make sure the ‘Use secure connection (SSL)’ option is checked.
pg. 11
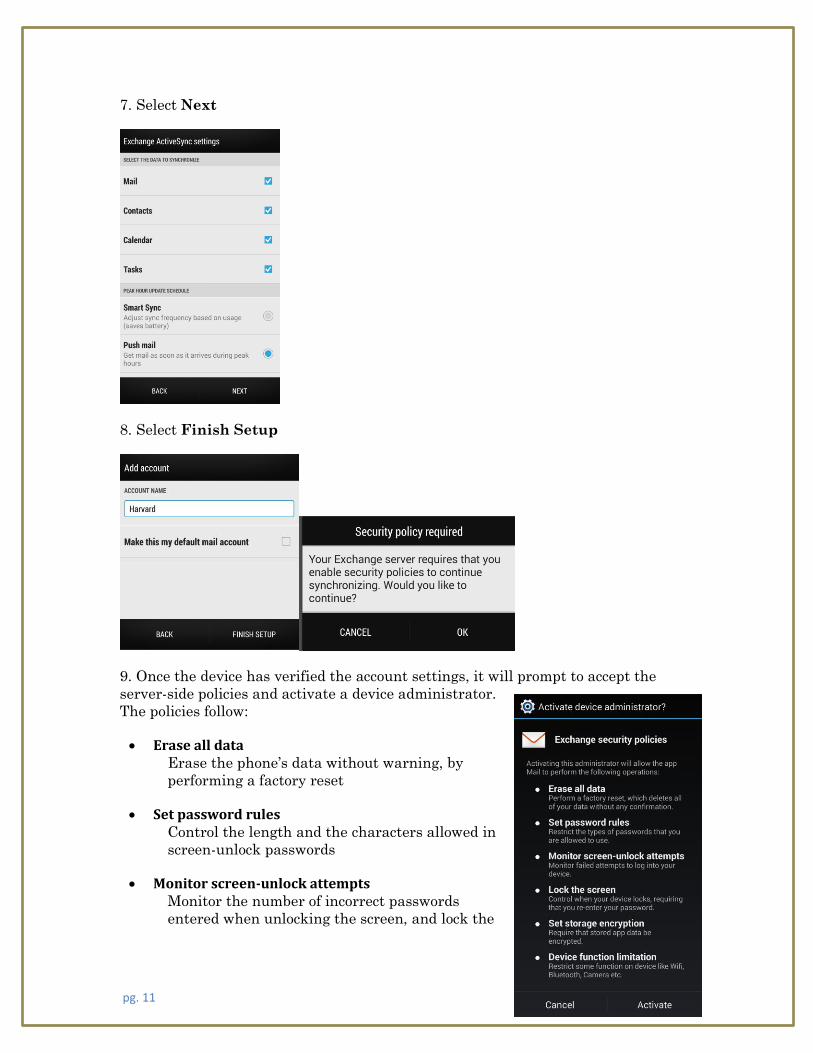
7. Select Next
8. Select Finish Setup
9. Once the device has verified the account settings, it will prompt to accept the
server-side policies and activate a device administrator.
The policies follow:
Erase all data Erase the phone’s data without warning, by
performing a factory reset
Set password rules Control the length and the characters allowed in
screen-unlock passwords
Monitor screen-unlock attempts Monitor the number of incorrect passwords
entered when unlocking the screen, and lock the
pg. 12
phone or erase all the phone’s data if too many incorrect passwords are entered
Lock the screen Control how and when the screen locks
Set lock-screen password expiration Control how frequently the lock-screen password must be changed
Set storage encryption Require that stored application data be encrypted
Disable cameras Prevent use of all devices cameras
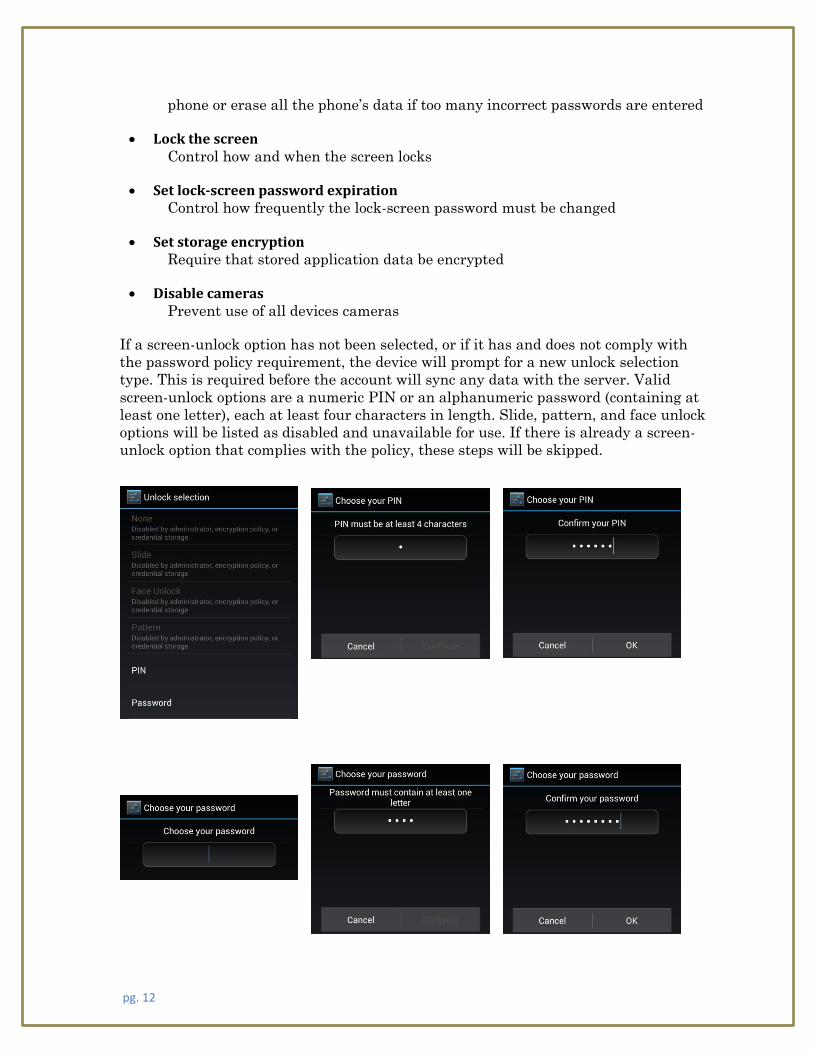
If a screen-unlock option has not been selected, or if it has and does not comply with
the password policy requirement, the device will prompt for a new unlock selection
type. This is required before the account will sync any data with the server. Valid
screen-unlock options are a numeric PIN or an alphanumeric password (containing at
least one letter), each at least four characters in length. Slide, pattern, and face unlock
options will be listed as disabled and unavailable for use. If there is already a screen-
unlock option that complies with the policy, these steps will be skipped.
pg. 13
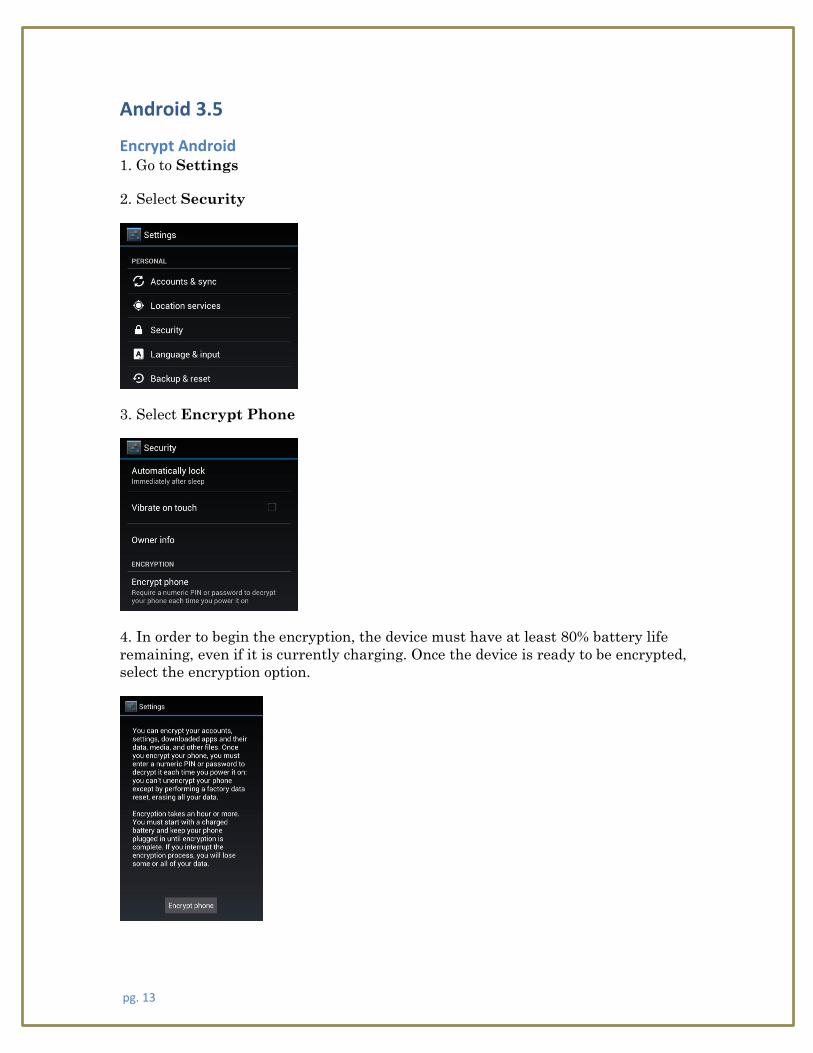
Android 3.5
Encrypt Android 1. Go to Settings
2. Select Security
3. Select Encrypt Phone
4. In order to begin the encryption, the device must have at least 80% battery life
remaining, even if it is currently charging. Once the device is ready to be encrypted,
select the encryption option.
pg. 14
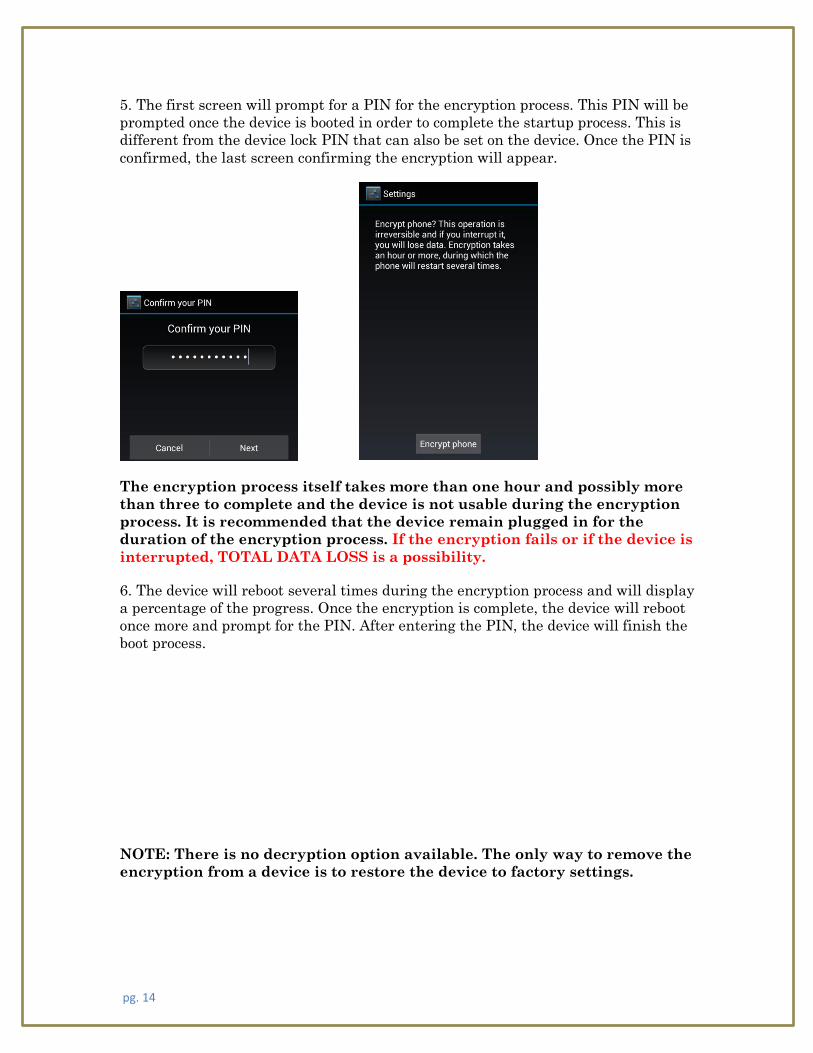
5. The first screen will prompt for a PIN for the encryption process. This PIN will be
prompted once the device is booted in order to complete the startup process. This is
different from the device lock PIN that can also be set on the device. Once the PIN is
confirmed, the last screen confirming the encryption will appear.
The encryption process itself takes more than one hour and possibly more
than three to complete and the device is not usable during the encryption
process. It is recommended that the device remain plugged in for the
duration of the encryption process. If the encryption fails or if the device is
interrupted, TOTAL DATA LOSS is a possibility.
6. The device will reboot several times during the encryption process and will display
a percentage of the progress. Once the encryption is complete, the device will reboot
once more and prompt for the PIN. After entering the PIN, the device will finish the
boot process.
NOTE: There is no decryption option available. The only way to remove the
encryption from a device is to restore the device to factory settings.
pg. 15
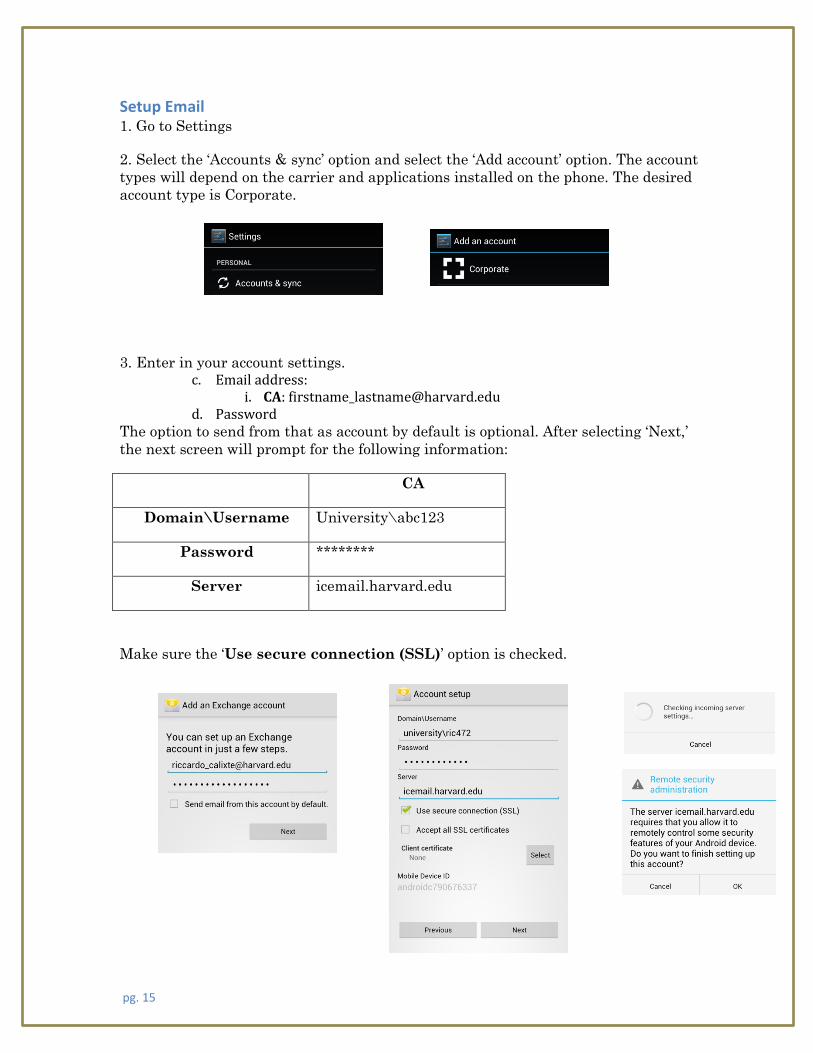
Setup Email 1. Go to Settings
2. Select the ‘Accounts & sync’ option and select the ‘Add account’ option. The account
types will depend on the carrier and applications installed on the phone. The desired
account type is Corporate.
3. Enter in your account settings. c. Email address:
i. CA: [email protected] d. Password
The option to send from that as account by default is optional. After selecting ‘Next,’
the next screen will prompt for the following information:
CA
Domain\Username University\abc123
Password ********
Server icemail.harvard.edu
Make sure the ‘Use secure connection (SSL)’ option is checked.
pg. 16
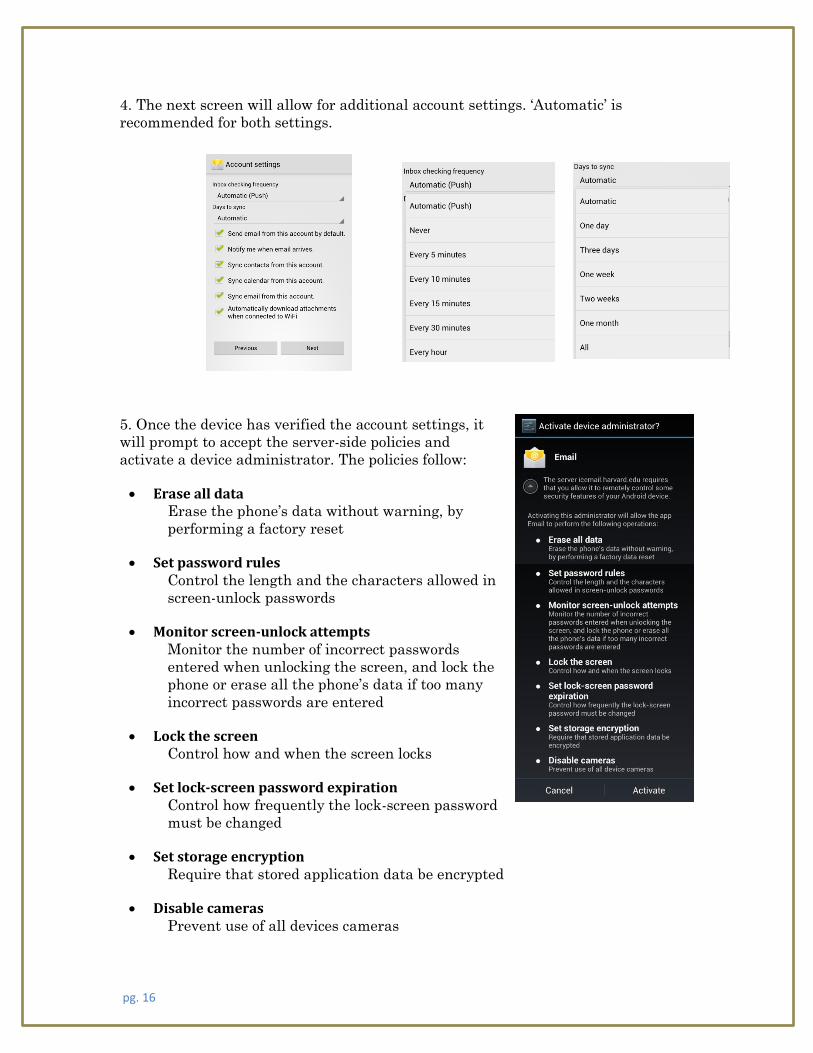
4. The next screen will allow for additional account settings. ‘Automatic’ is
recommended for both settings.
5. Once the device has verified the account settings, it
will prompt to accept the server-side policies and
activate a device administrator. The policies follow:
Erase all data Erase the phone’s data without warning, by
performing a factory reset
Set password rules Control the length and the characters allowed in
screen-unlock passwords
Monitor screen-unlock attempts Monitor the number of incorrect passwords
entered when unlocking the screen, and lock the
phone or erase all the phone’s data if too many
incorrect passwords are entered
Lock the screen Control how and when the screen locks
Set lock-screen password expiration Control how frequently the lock-screen password
must be changed
Set storage encryption Require that stored application data be encrypted
Disable cameras Prevent use of all devices cameras
pg. 17
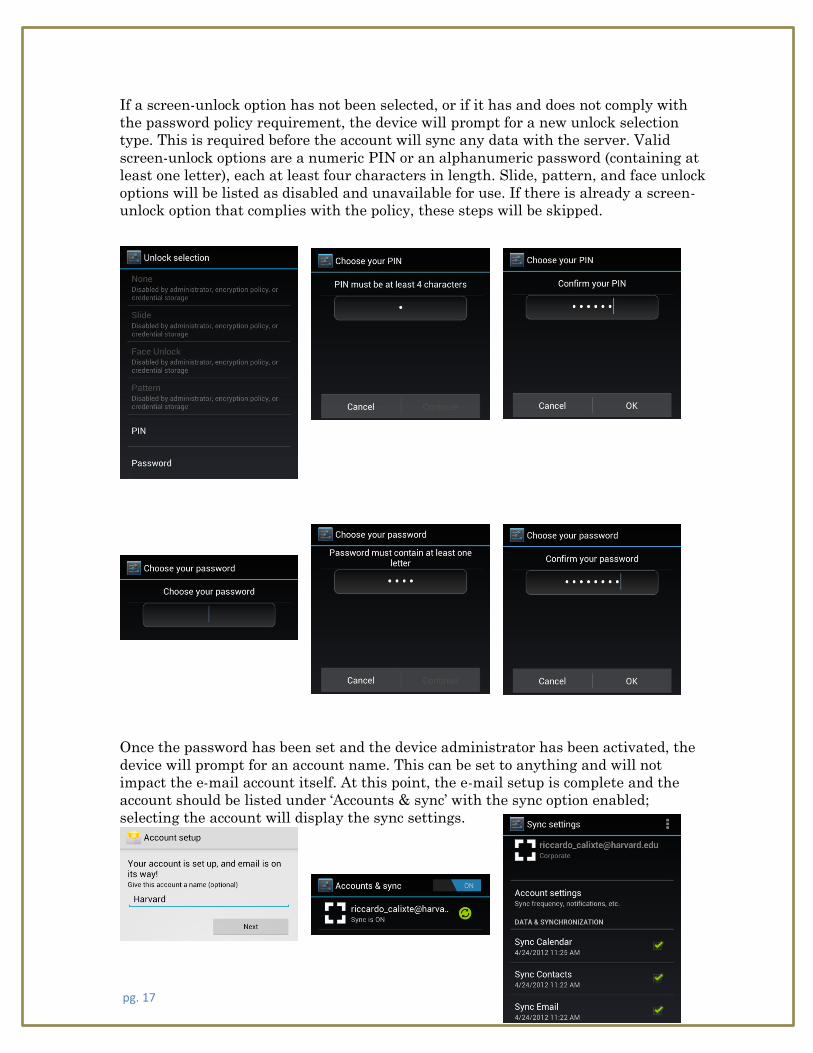
If a screen-unlock option has not been selected, or if it has and does not comply with
the password policy requirement, the device will prompt for a new unlock selection
type. This is required before the account will sync any data with the server. Valid
screen-unlock options are a numeric PIN or an alphanumeric password (containing at
least one letter), each at least four characters in length. Slide, pattern, and face unlock
options will be listed as disabled and unavailable for use. If there is already a screen-
unlock option that complies with the policy, these steps will be skipped.
Once the password has been set and the device administrator has been activated, the
device will prompt for an account name. This can be set to anything and will not
impact the e-mail account itself. At this point, the e-mail setup is complete and the
account should be listed under ‘Accounts & sync’ with the sync option enabled;
selecting the account will display the sync settings.

pg. 18
Blackberry Z10/Q10
Encrypt Blackberry 1. Select Settings
2. Scroll down to and select Security and Privacy
3. Select Encryption

pg. 19
4. Toggle the Device Encryption to On
5. Enter a password for your phone
6. Your Blackberry will now encrypt. Time varies; you are still able to use your device
during this time.
pg. 20
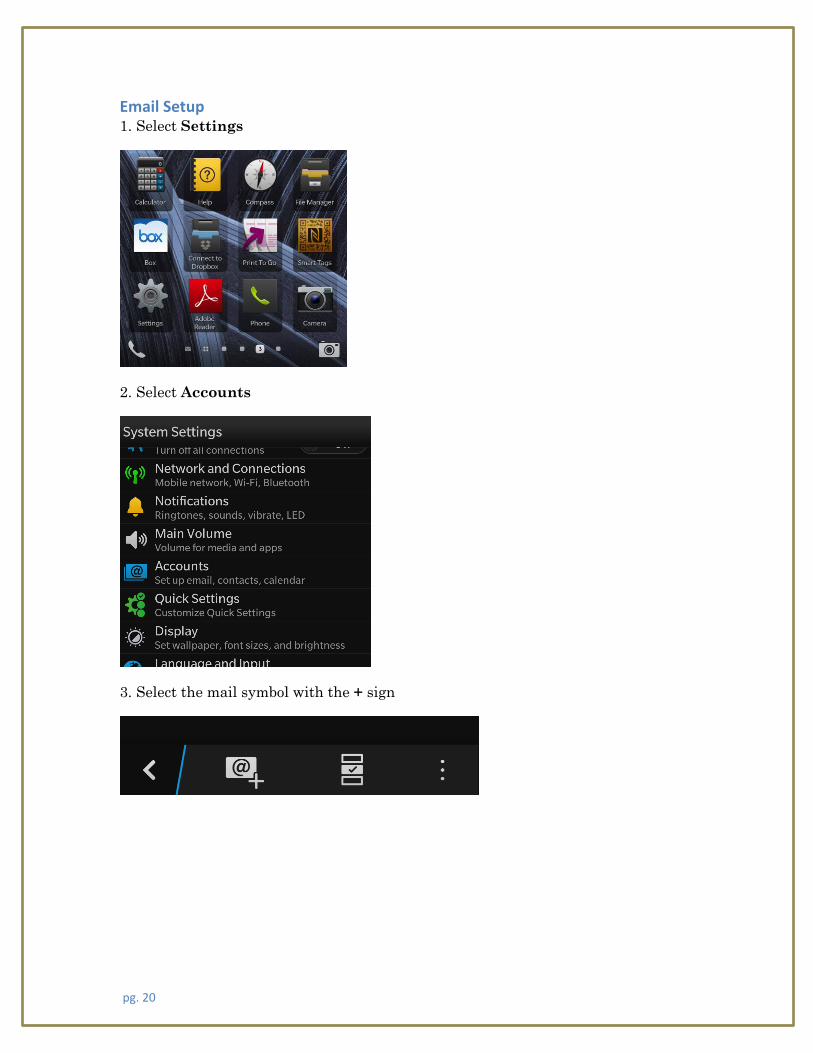
Email Setup 1. Select Settings
2. Select Accounts
3. Select the mail symbol with the + sign
pg. 21
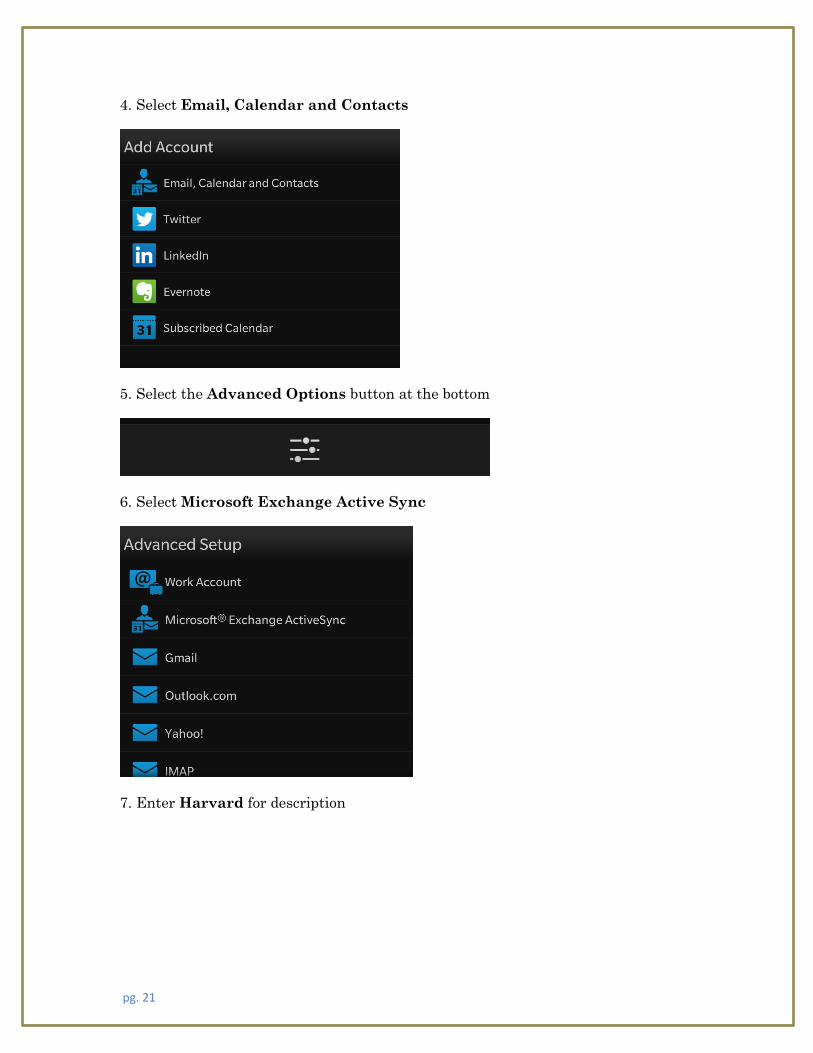
4. Select Email, Calendar and Contacts
5. Select the Advanced Options button at the bottom
6. Select Microsoft Exchange Active Sync
7. Enter Harvard for description
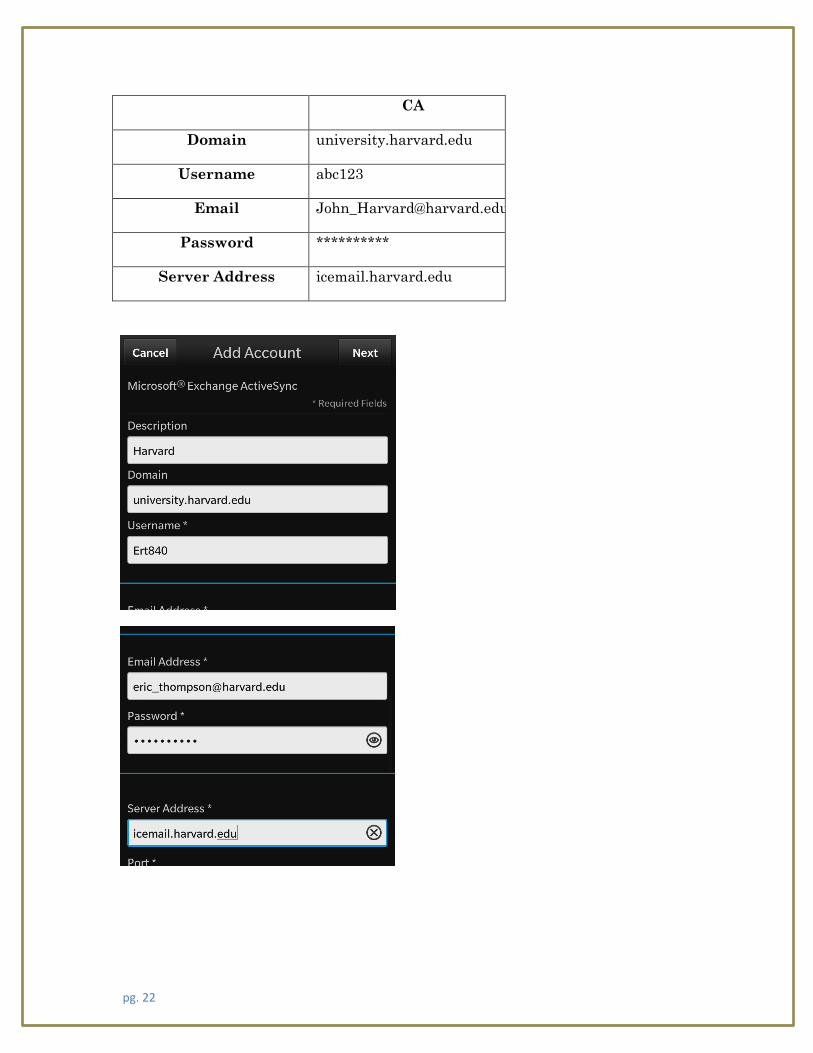
pg. 22
CA
Domain university.harvard.edu
Username abc123
Email [email protected]
Password **********
Server Address icemail.harvard.edu
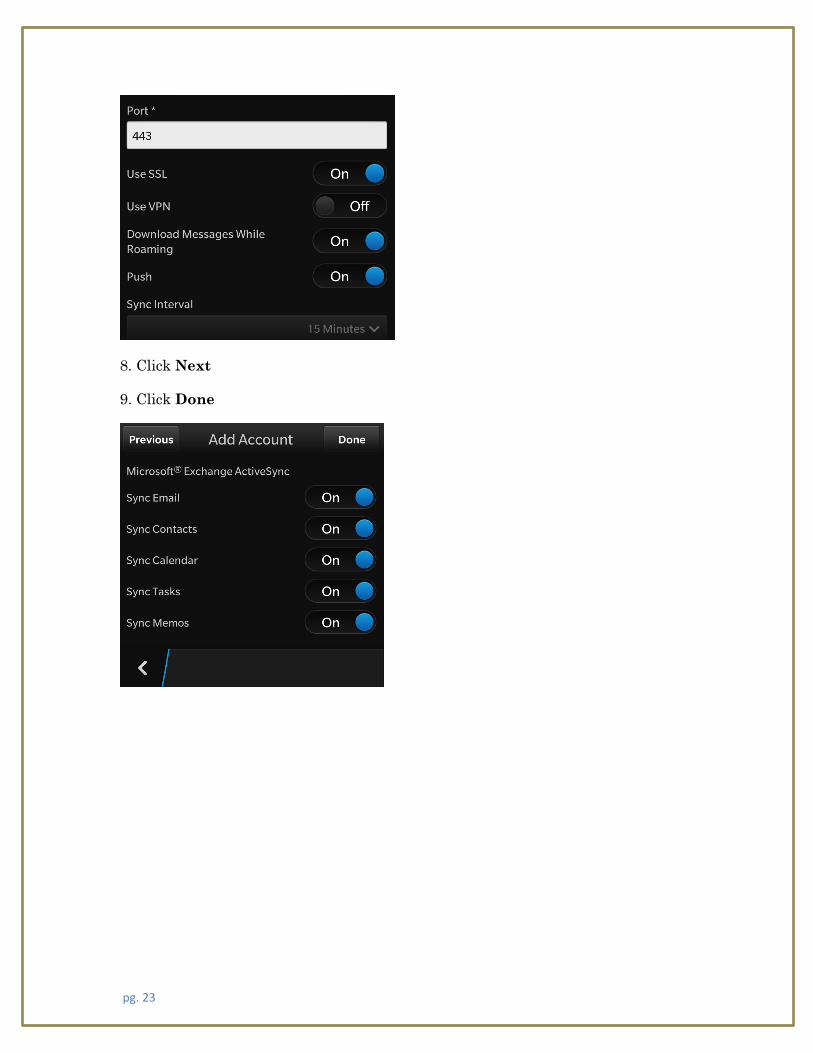
pg. 23
8. Click Next
9. Click Done
pg. 24
Windows 8
A Microsoft account for acquiring apps and backing up the device.
More info: Windows Phone 8 How-to http://www.windowsphone.com/en-us/how-
to/wp8
1. Enter account information
1. On Start, swipe left to the Apps list, tap Settings, and then tap email +
accounts
2. Tap Add an account > Outlook.
3. Type your “@harvard.edu” email address and password, and then tap Sign in
4. Add user name and domain (table below), tap Sign in
5. If you get an error, tap advanced and add the server address, tap Sign in
CA
Email Address [email protected]
Password *********
Username abc123
Domain university.harvard.edu
Server Address icemail.harvard.edu
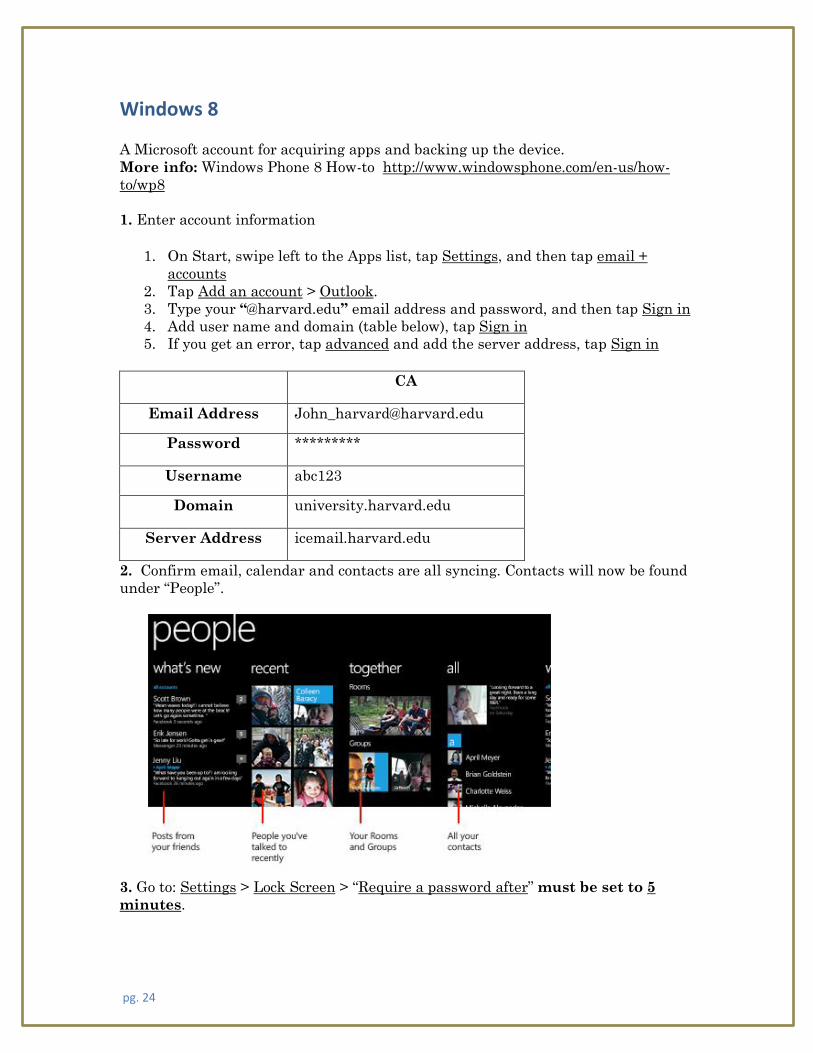
2. Confirm email, calendar and contacts are all syncing. Contacts will now be found
under “People”.
3. Go to: Settings > Lock Screen > “Require a password after” must be set to 5
minutes.