Embed Size (px)
Citation preview
1
Using WORDS as ART!Using WORDS as ART!Using WORDS as ART!Using WORDS as ART!
There is some amazingly beautiful word
art that man designers include with
their kits or that you can buy in sets
from many different sites - but did you
know that YOU can create great WORD
ART yourself to give a great custom look
to your pages? You an choose the font,
you can choose the words AND you can
fill those letters with any image you
like! You can fill it with a photo or a
background paper to get the look YOU
want! What could be better than
that??? You’ll look like a genius!
We’ve talked some about embellishments so far on this journey to learn-
ing more about our software - so you know that you can find tons of
great alphabets to “make” cute words for your page - you know you can
find TONS of great pre-created wordart that can convey many different
sentiments… BUT what if you want something totally different, what if
you want something that is unique and special to just you and your
project? Well, today - I’ll show you how! You can create custom word-
art that will be one-of-a-kind and look exactly like YOU want it to! You
can spell out your child’s name, a particular location - an interesting title
- your choice! You can also fill that word with YOUR choice of back-
ground paper image or better yet, a PHOTOGRAPH of that location,
event, child - whatever! How fun is that??? This technique is sure to be
one that you will want to use over and over again! So, why don’t we just
get to it!???
During the coming month you will receive a *DAILY*
email and PDF that will highlight one particular feature or function of your “My Memories Suite” software. Some will be
more challenging than others, some will be pretty basic. As always, I am *here* to answer any questions you might have
so never hesitate to email me or pop a post on the MyMemoriesSuite Facebook page!
I am *SO* happy you have decided to MARCH INTO MMS with me!!! Hope you enjoy it!
…..and don’t forget to make memory today !
Lisa J.
2
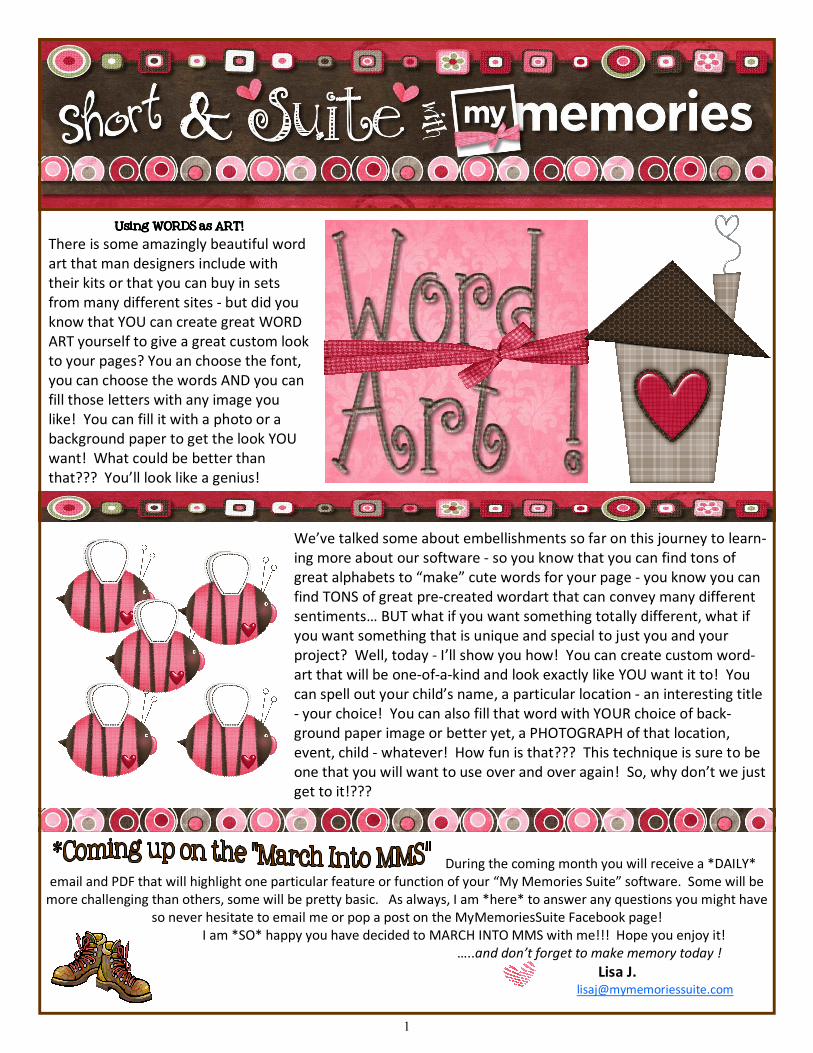
Today we are focusing on the WORD ART DESIGNER option in
your Control Panel! Let’s get started!
• Click on WORD ART DESIGNER
• Click the ADD button to add a Word Art to your layout
• Type the Word(s) into the box to create the word art that
says what you want
• Use the available options to select the FONT you like - you
can also use BOLD, ITALIC, size, etc. Remember you can
enlarge the word art box by using the corner boxes on
your actual word art as well!
• You can also rotate and change the opacity of your added
word art as well!
3
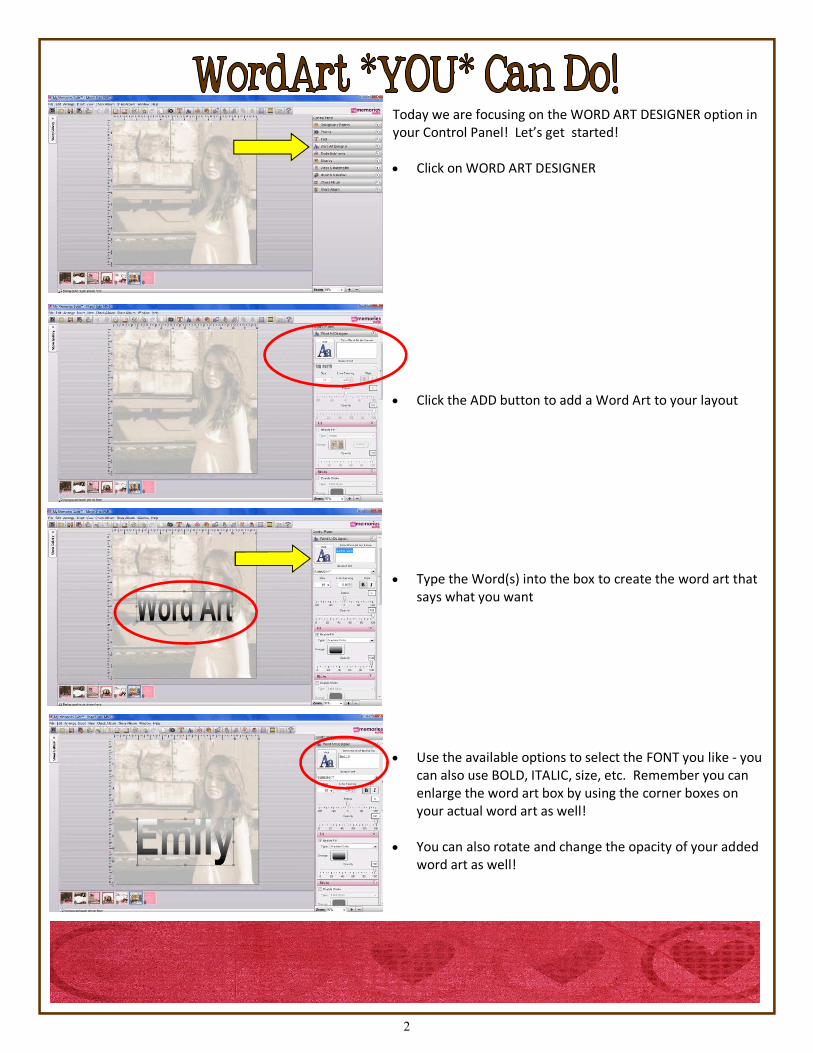
• If you want to fill the word art with a BACKGROUND
PAPER image, select IMAGE from the drop-down box
on the FILL panel
• Click the CHANGE button and from there you can
navigate to where ever your desired background
paper is stored on your computer (remember you
CAN navigate to the papers even within your MMS
software)
• Select the paper you
want and then click OK
• This will “fill” your
WORDART with the
image you have selected
(you can click the
POSITION button to
alter the area that dis-
plays)
• Click to enable any of the
other options; SHADOW,
BEVEL or SHAPE to
further enhance the
appearance of your
WORDART
Play around with all of the
different options until you
get the look YOU love!
4
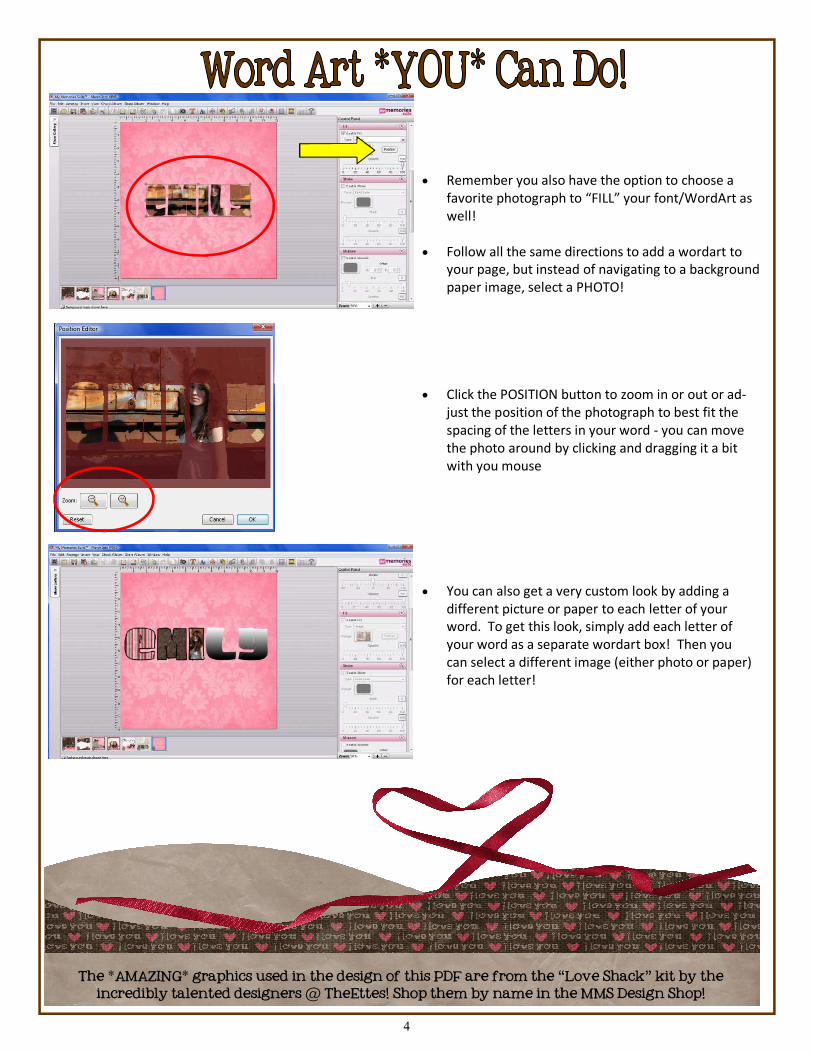
• Remember you also have the option to choose a
favorite photograph to “FILL” your font/WordArt as
well!
• Follow all the same directions to add a wordart to
your page, but instead of navigating to a background
paper image, select a PHOTO!
• Click the POSITION button to zoom in or out or ad-
just the position of the photograph to best fit the
spacing of the letters in your word - you can move
the photo around by clicking and dragging it a bit
with you mouse
• You can also get a very custom look by adding a
different picture or paper to each letter of your
word. To get this look, simply add each letter of
your word as a separate wordart box! Then you
can select a different image (either photo or paper)
for each letter!
The *AMAZING* graphics used in the design of this PDF are from the “Love Shack” kit by the
incredibly talented designers @ TheEttes! Shop them by name in the MMS Design Shop!