Embed Size (px)
Citation preview
2013
Name: _______________________
em upload process
a module of SAP lesson three

i
CONFIDENTIAL INFORMATION
This manual contains confidential, proprietary and trade secret information of Limited Brands, and its affiliated companies (“Limited Brands”) which is commercially valuable. This information cannot be used, duplicated, disclosed, distributed, modified or discussed in whole or in part for any purpose other than the legitimate business purposes of Limited Brands. Associates and vendors who have access to confidential information must use their best efforts to prevent disclosure to anyone other than expressly required in the performance of their duties to Limited Brands.
Upon request or upon your separation from Limited Brands, you will be required to return these materials or otherwise account for them.
© Limited Brands, Inc 2012. All Rights Reserved.
This manual contains material protected by copyright, trade secrets, business process, novel ideas and/or inventions which are proprietary and confidential. You may not copy, modify, publish, transmit, display, create derivative works, sell, transfer, reveal, discuss or in any way use the content of this manual for any purpose other than Limited Brands’ legitimate business purposes.
Title
Subtitle
ii
Table of Contents Table of Contents ............................................................................................................................. ii
Introduction ....................................................................................................................................... 3 Course Overview ............................................................................................................................................. 3
Course Objectives ........................................................................................... Error! Bookmark not defined.
Standard Icons Defined ................................................................................................................................... 3
Lesson 1 ............................................................................................................................................ 4 Lesson Overview ............................................................................................................................................. 4
Lesson Objectives ........................................................................................... Error! Bookmark not defined.
Find Event Management Data ........................................................................................................................ 4
Export Event Management Data ..................................................................................................................... 4
Upload of Event Management Data ................................................................................................................ 7
View Output Files .......................................................................................................................................... 10
Lesson Summary .......................................................................................................................................... 12
Appendix A: Glossary of Terms .................................................................................................... 13

3
Introduction Course Overview
The purpose of this course is to provide direction on how to download and upload data into SAP Event Management (EM).
Standard Icons Defined
The following icons may appear throughout the course:
Icon Description
Critical/Warning: Indicates critical information that, if ignored, can result in process or transaction failure.
Note: Provides helpful or advisory information.
Process: Provides business process information.
Shortcut: Provides shortcut or hint information.
Reference: Indicates a reference to additional information.
Step by Step: Indicates a system procedure.
Best Practice: Use to identify best practices used throughout the enterprise.
Thought Starter: Use to provide discussion questions, giving more in-depth consideration of a topic.
4
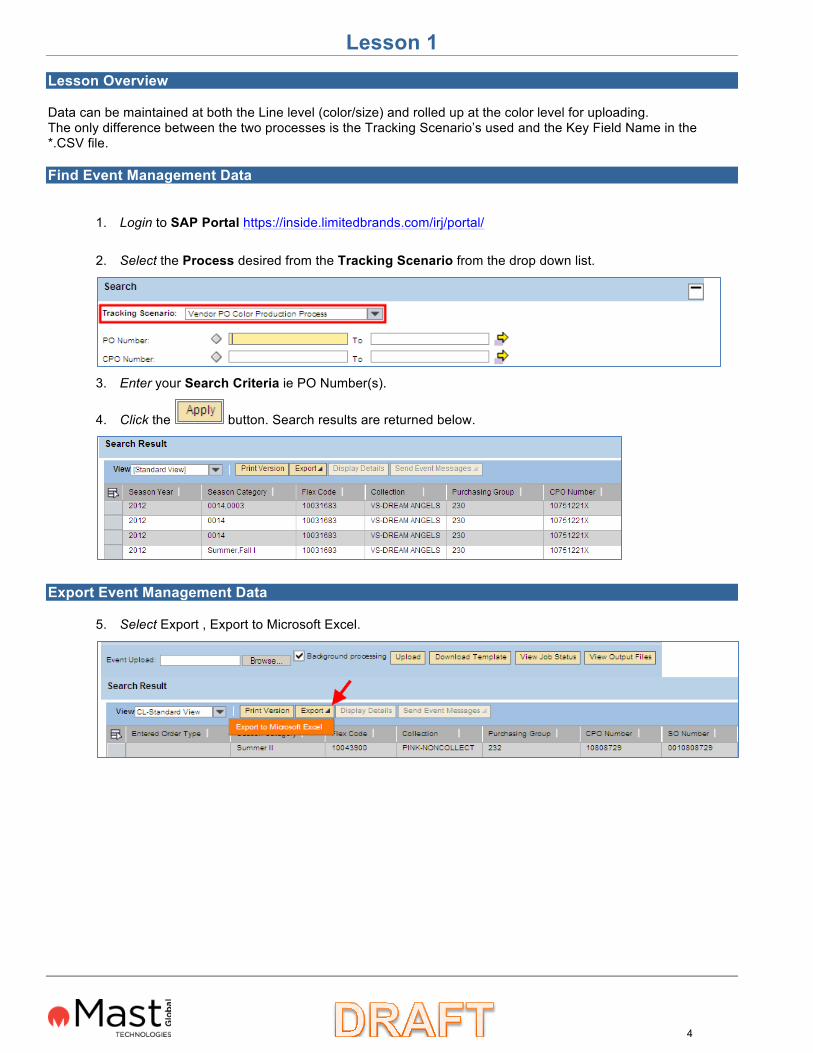
Lesson 1 Lesson Overview
Data can be maintained at both the Line level (color/size) and rolled up at the color level for uploading. The only difference between the two processes is the Tracking Scenario’s used and the Key Field Name in the *.CSV file.
Find Event Management Data
1. Login to SAP Portal https://inside.limitedbrands.com/irj/portal/
2. Select the Process desired from the Tracking Scenario from the drop down list.
3. Enter your Search Criteria ie PO Number(s).
4. Click the button. Search results are returned below.
Export Event Management Data
5. Select Export , Export to Microsoft Excel.

5
6. Select Open from ther File Download window.
7. Select Yes to open the file for viewing.
6
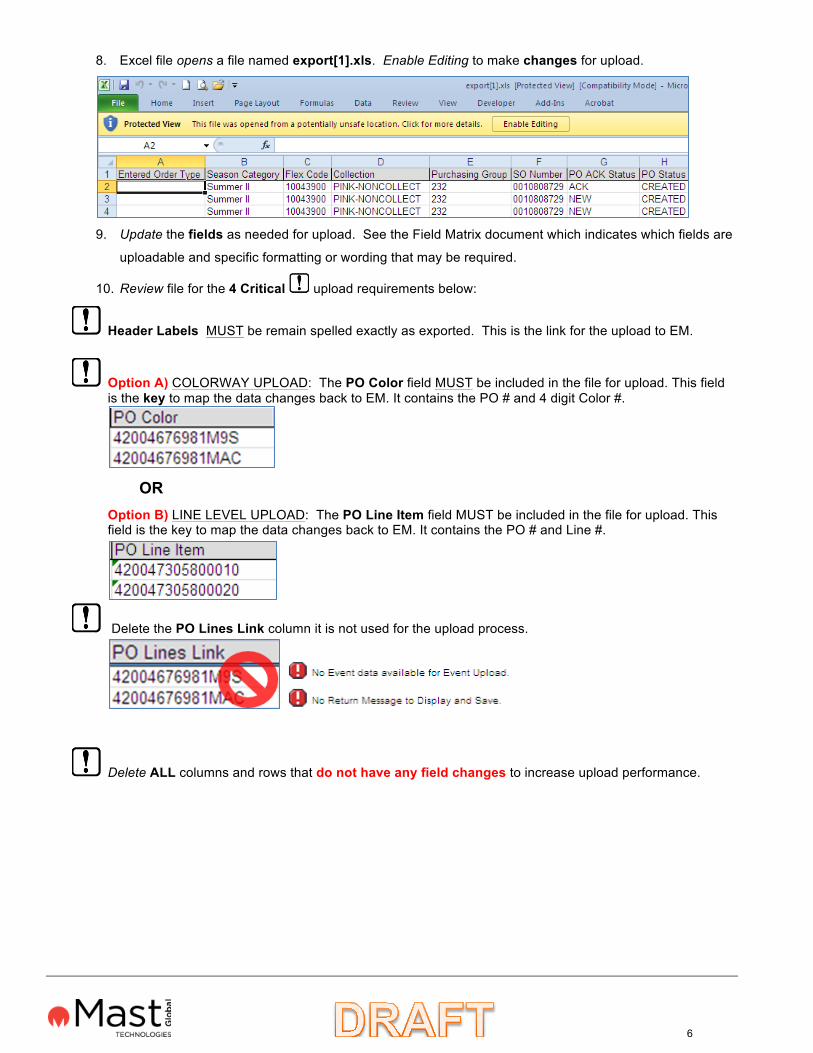
8. Excel file opens a file named export[1].xls. Enable Editing to make changes for upload.
9. Update the fields as needed for upload. See the Field Matrix document which indicates which fields are
uploadable and specific formatting or wording that may be required.
10. Review file for the 4 Critical upload requirements below:
Header Labels MUST be remain spelled exactly as exported. This is the link for the upload to EM.
Option A) COLORWAY UPLOAD: The PO Color field MUST be included in the file for upload. This field is the key to map the data changes back to EM. It contains the PO # and 4 digit Color #.
Option B) LINE LEVEL UPLOAD: The PO Line Item field MUST be included in the file for upload. This field is the key to map the data changes back to EM. It contains the PO # and Line #.
Delete the PO Lines Link column it is not used for the upload process.
Delete ALL columns and rows that do not have any field changes to increase upload performance.
OR
7
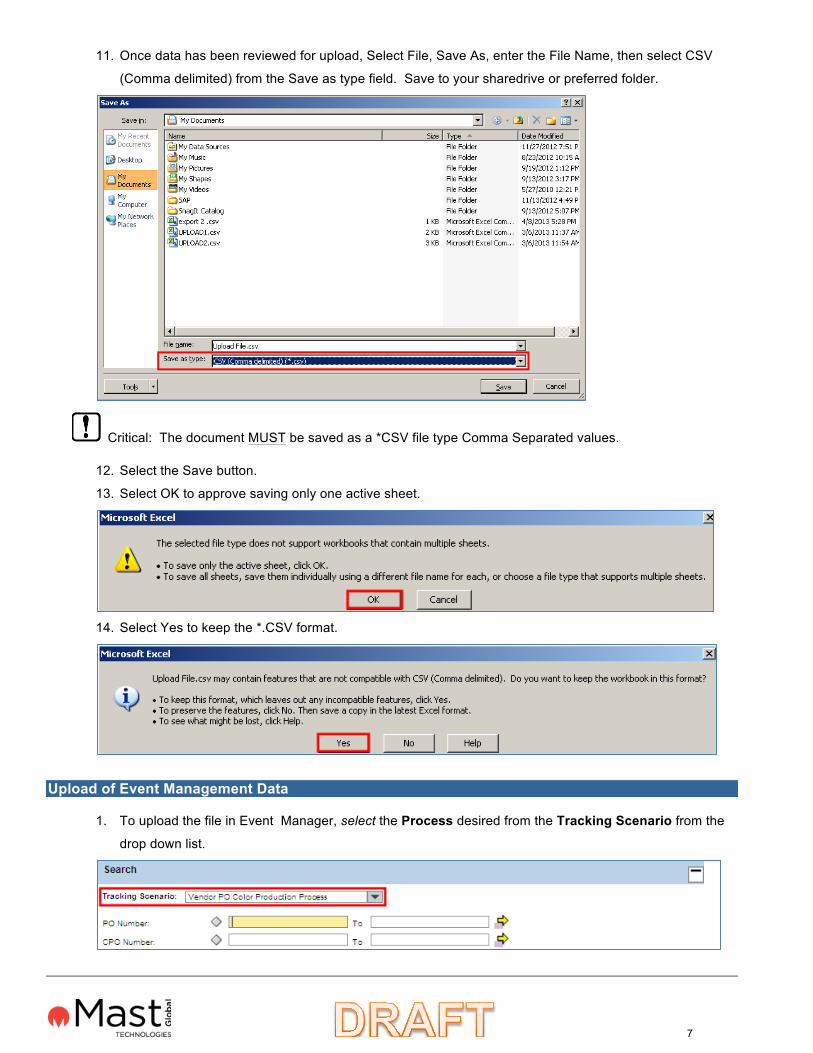
11. Once data has been reviewed for upload, Select File, Save As, enter the File Name, then select CSV
(Comma delimited) from the Save as type field. Save to your sharedrive or preferred folder.
Critical: The document MUST be saved as a *CSV file type Comma Separated values.
12. Select the Save button.
13. Select OK to approve saving only one active sheet.
14. Select Yes to keep the *.CSV format.
Upload of Event Management Data
1. To upload the file in Event Manager, select the Process desired from the Tracking Scenario from the
drop down list.
8
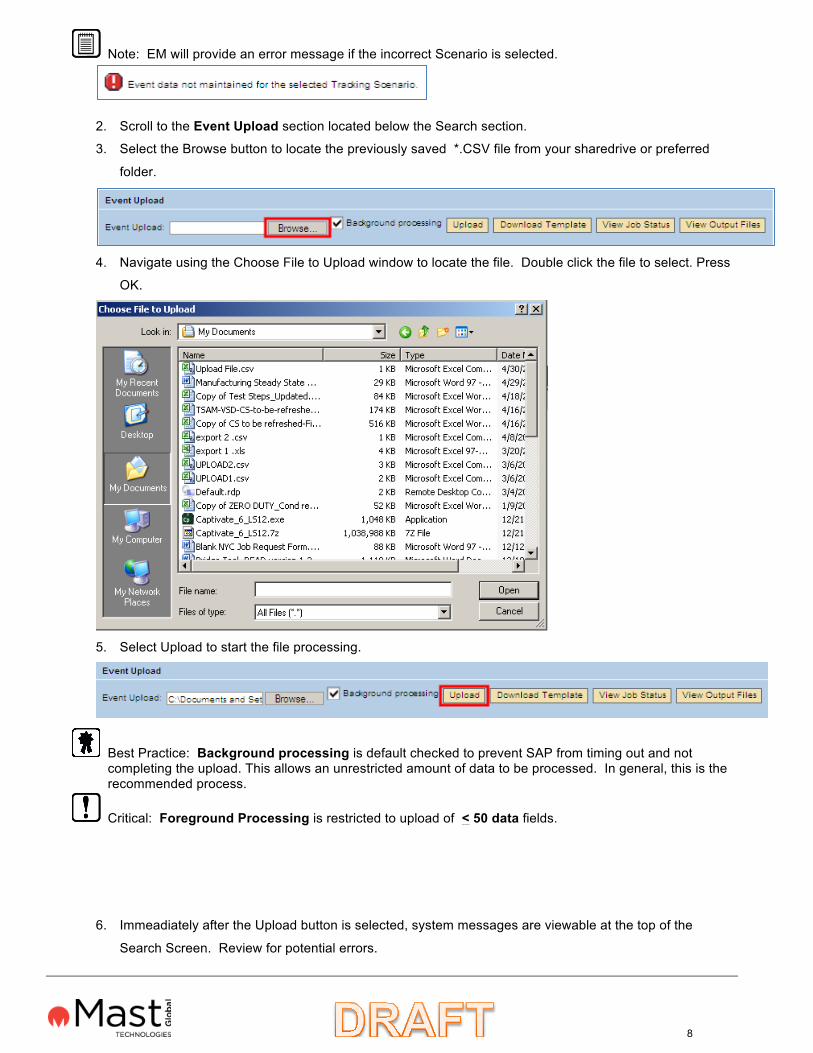
Note: EM will provide an error message if the incorrect Scenario is selected.
2. Scroll to the Event Upload section located below the Search section.
3. Select the Browse button to locate the previously saved *.CSV file from your sharedrive or preferred
folder.
4. Navigate using the Choose File to Upload window to locate the file. Double click the file to select. Press
OK.
5. Select Upload to start the file processing.
Best Practice: Background processing is default checked to prevent SAP from timing out and not completing the upload. This allows an unrestricted amount of data to be processed. In general, this is the recommended process.
Critical: Foreground Processing is restricted to upload of < 50 data fields.
6. Immeadiately after the Upload button is selected, system messages are viewable at the top of the
Search Screen. Review for potential errors.
9
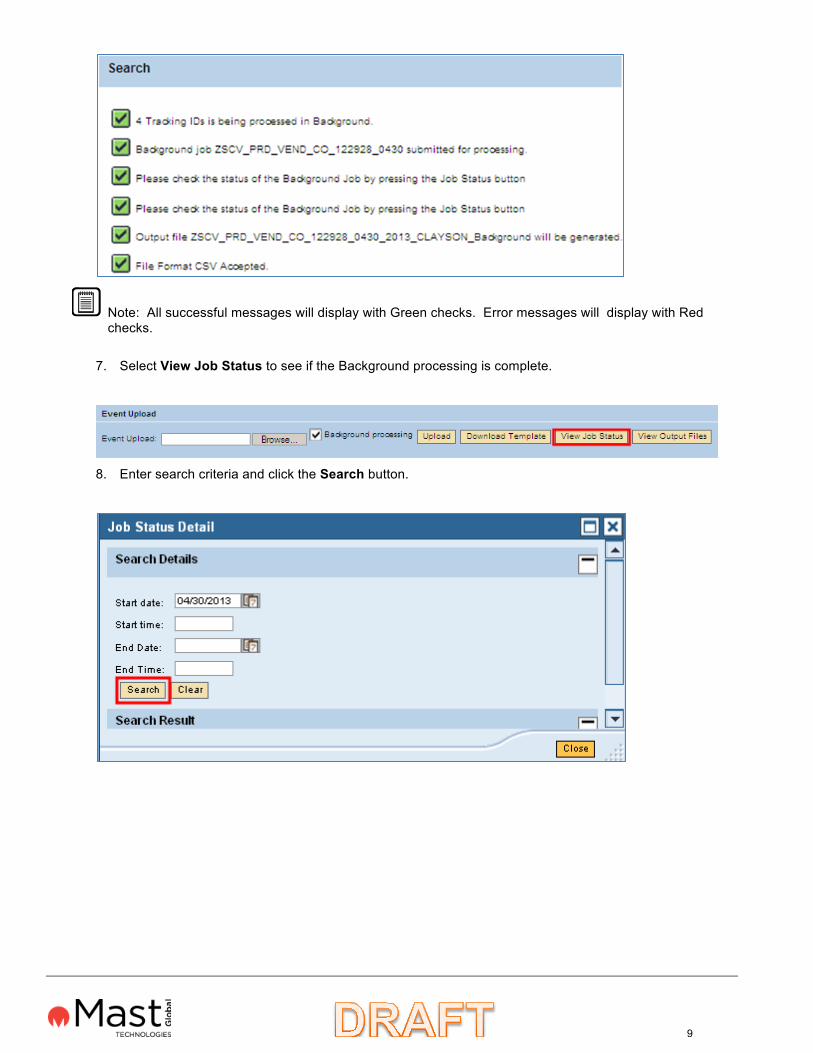
Note: All successful messages will display with Green checks. Error messages will display with Red checks.
7. Select View Job Status to see if the Background processing is complete.
8. Enter search criteria and click the Search button.
10
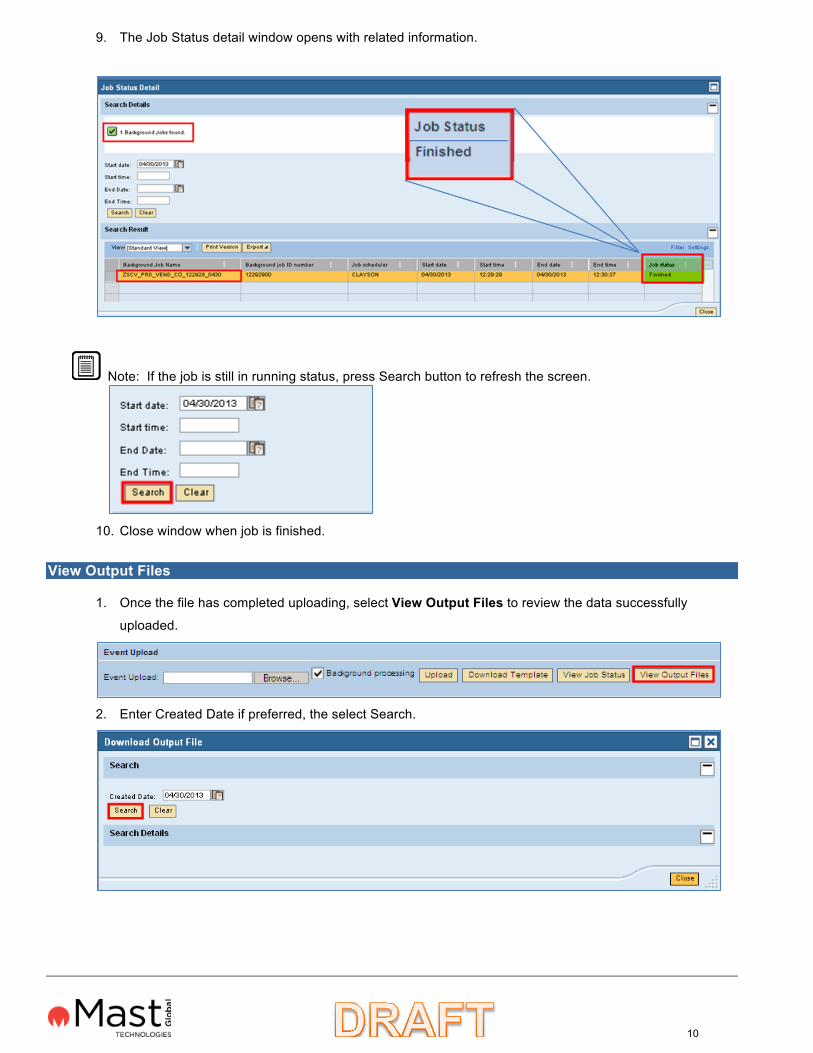
9. The Job Status detail window opens with related information.
Note: If the job is still in running status, press Search button to refresh the screen.
10. Close window when job is finished.
View Output Files
1. Once the file has completed uploading, select View Output Files to review the data successfully
uploaded.
2. Enter Created Date if preferred, the select Search.
11
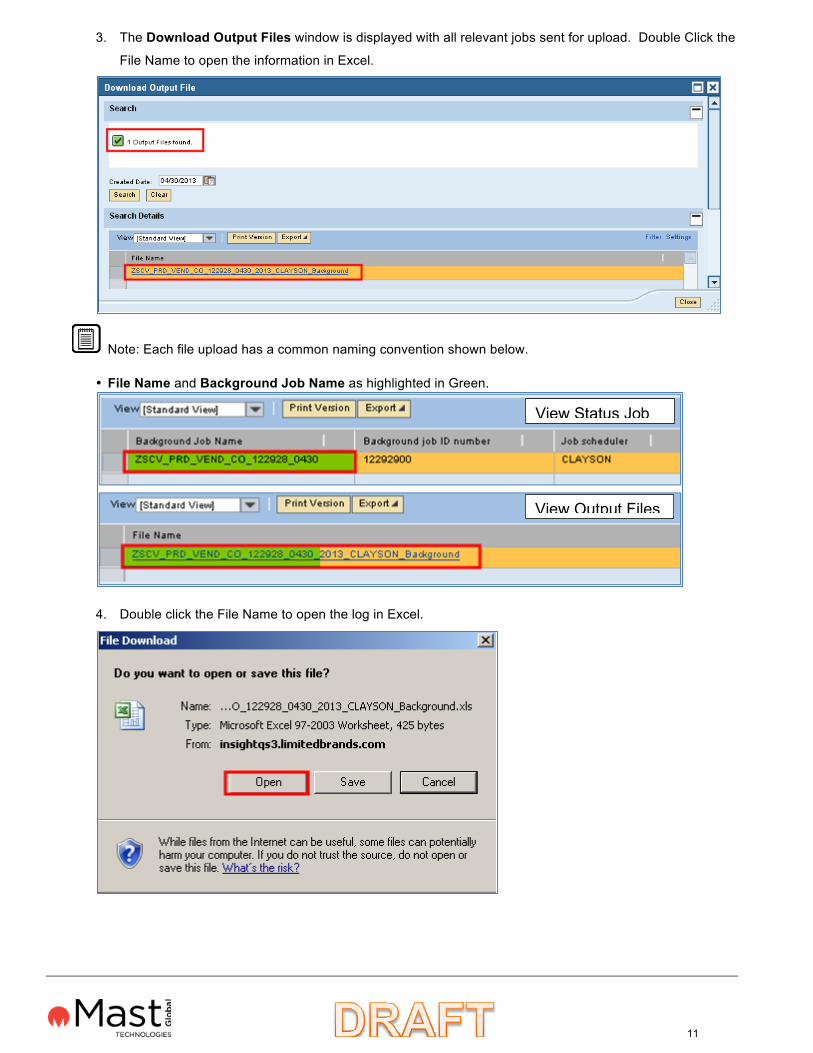
3. The Download Output Files window is displayed with all relevant jobs sent for upload. Double Click the
File Name to open the information in Excel.
Note: Each file upload has a common naming convention shown below.
• File Name and Background Job Name as highlighted in Green.
4. Double click the File Name to open the log in Excel.
View Output Files
View Status Job
12
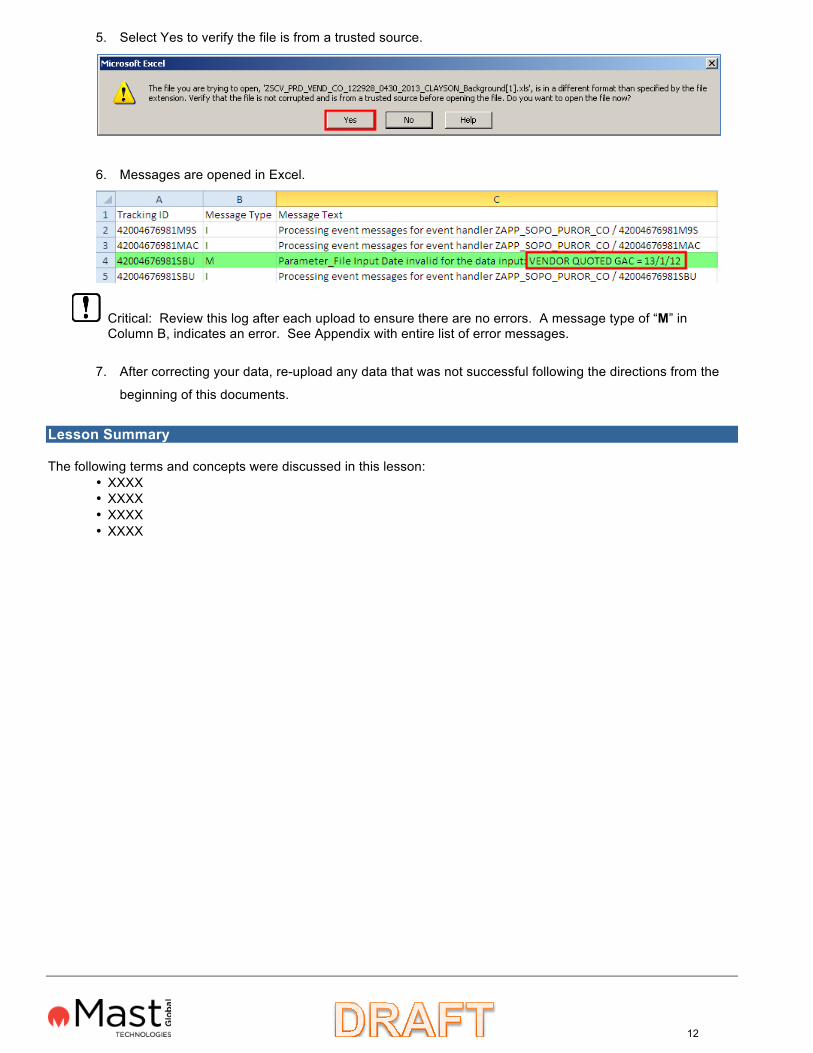
5. Select Yes to verify the file is from a trusted source.
6. Messages are opened in Excel.
Critical: Review this log after each upload to ensure there are no errors. A message type of “M” in Column B, indicates an error. See Appendix with entire list of error messages.
7. After correcting your data, re-upload any data that was not successful following the directions from the
beginning of this documents.
Lesson Summary
The following terms and concepts were discussed in this lesson: • XXXX • XXXX • XXXX • XXXX
13
Appendix A: Glossary of Terms The following terms were discussed in this course:
Note: if tracking ID is missing, nothing will happen Below will be reported and will not be processed
a.Tracking ID prespective: Header
1.If the tracking code_Table Input is missing. 2.IF the tracking event ID_Table Input is not maintained.
b.Comment prespective: Header
1.Comment Event Reason Text_File Input is not provided 2.Comment Event ID_Table Input is missing
c.Status Perspective: Header
1.Status Value_File Input not found for the data input 2.Status Value_Table Input not found for the data input 3.Status Event ID_Table Input not found for the data input, both should be maintained status value and status event
d.Plannned or Actual date Perspective: Header
1.Planned or Actual Date Value_File Input not found 2.Planned or Actual Date Value_File Format Error 3.Planned or Actual Date Event ID_Table Input not found
e.Parameters:
1.Parameters_File Input not found 2.Parameters_Table Input not found 3.Parameters_Table Input Error 4.If the data type is specified,
Note: If the data type is not passed it will just assign the the date unconverted i.e. Not the SAP Date Format
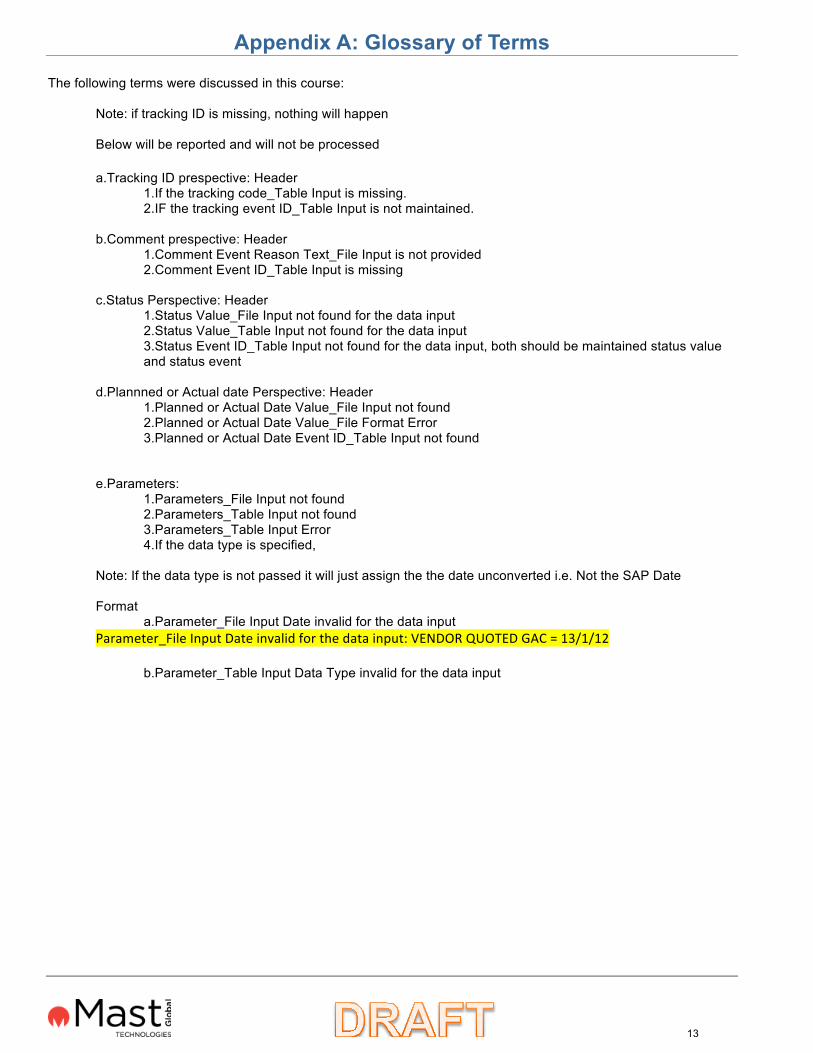
a.Parameter_File Input Date invalid for the data input Parameter_File Input Date invalid for the data input: VENDOR QUOTED GAC = 13/1/12
b.Parameter_Table Input Data Type invalid for the data input