Embed Size (px)
Citation preview
Ella Acrylic Outward Swing Walk In Tub
OWNER'S MANUAL
REPRESENTING THESE MODEL NUMBERS:
OW5130DL / OW5130DRDUAL MASSAGE
OW5130AL / OW5130ARAIR MASSAGE
OW5130SL / OW5130SRSOAKING
Kai 30 in. x 57 in.
WT5127DL / WT5127DRDUAL MASSAGE
WT5127AL / WT5127ARAIR MASSAGE
WT5127SL / WT5127SRSOAKING
Mahalo 2727 in. x 51 in.
OW5130HL / OW5130HRHYDRO
WT5130HL / WT5130HRHYDRO


General Information ................................................................................................................ Page 1
Safety Instructions .................................................................................................................... Page 2
Rough / Drawing Diagram ..................................................................................................... Page 3
Getting Started ......................................................................................................................... Page 4
Installation ..............................................................................................................................Page 5-6
Maintenance ............................................................................................................................ Page 7
Troubleshooting Guide.....................................................................................................................Page 8
Warranty Information .............................................................................................................. Page 9
Warranty Activation Form .................................................................................................Page 10-11
www.ellasbubbles.com 06/15
Contents

WARNING:***Read through the entire manual completely before beginning installation.***
SAVE THIS MANUAL: REATIN FOR CONSUMER USERead these instructions completely before installing the product. If you have any questions call: (800) 304-3598You must follow all instruction in this manual:• Failure to do so will result in your assumption of liability that may occur.• Failure to comply with all instructions can result in product and personal injury.
RESPONSIBILITY OF THE INSTALLER:The installer must inspect and water test the product prior to installation to ensure the unit is free of defect or damage. In the event of a problem, the unit must not be installed. If the crate or product has been damaged please call immediately: (800) 304-3598
This product is designed to be installed by a licensed tradesperson, licensed plumbers and electricians should be employed to insure proper installation. Installers assume all liability for the correct installation procedures.
Only accessories authorized by the manufacturer should be used with this product
General Information
www.ellasbubbles.com Page 1 06/15
IMPORTANT SAFETY INSTRUCTIONS1. When using this product, basic precautions should always be followed. Read and follow all instructions pertaining to
risk of fire, electric shock, or injury to persons.
2. Use this unit only for its intended purposes or as described in this manual. Use only attachments recommended by the manufacturer.
3. Risk of hyperthermia and possible drowning: Water temperature in excess of 100°F (38°C) may be injurious to your health. Check and adjust temperature before use.
READ AND FOLLOW ALL INSTRUCTIONS1. Danger: To reduce the risk of injury, do not permit children or persons with infirmities to use this product unless they
are closely supervised at all times.
2. To avoid injury, exercise caution when entering or exiting the tub.
3. Never drop or insert any objects into any openings.
4. Risk of electrical shock; connect only to a separate circuit protected by a ground fault circuit interrupter (GFCI).
5. Warning: Risk of electric shock, do not permit electric appliances (such as a hair dryer, lamp, telephone, radio or television) within 5-feet (1.5M) of this hydro massage bathtub.
6. This unit must be connected to a electrical circuit interrupter (GFCI). Such a circuit is provided by the installer and should be tested on a routine basis. To test the GFCI push the test button, the GFCI should interrupt power. Push the RESET button, power should be restored. If the GFCI fails to operate in this manner, there is a ground current flowing, indicating the possibility of an electrical shock. Do not use this unit. Disconnect the unit and have the problem corrected before using. Electric system should be well grounded and the electrical wiring should be done as per the safety regulations regarding electricity consumption. The product should be installed by qualified professional personnel as per the local safety regulations and codes regarding electrical and water consumption
7. Traction enhanced-textured tub button must remain clean to minimize slippage.
8. Risk of electrical shock, all pumps and heaters must be connected to a ground fault circuit interrupter (GFCI) protected outlets.
9. Avoid use of alcohol, drugs, or medication while using your tub.
10. Consult your physician before using the whirlpool/air system if you are pregnant, have heart conditions, or have high blood pressure.
11. All units must be water tested before installation.
12. The manufacturer of this product, in no case, shall be liable for any problem or accident arising out of or in connection with the failure to following the above-mentioned instructions or requirements as stipulated in the instructions.The manufacturer reserves the right to make changes to the product without prior notice.
13. The temperature of hot water supplied to the product should stay under 50°C (122°F)
14. Adjust the faucet to the desired water temperature before using various functions.
15. During the process of temperature adjustment, you can touch the water by hand to see if the temperature is suitable
16. Shut off the power supply and close the hot/cold water supply valve after using the product
17. If any abnormal performance happens, contact the local sales agent or service center in due time
18. The door should remain open when not in use.
WARNING*** The manufacturer of this product, in no case, shall be liable for any problem or accident arising out of or in connection with the failure to following the above-mentioned instructions or requirements as stipulated in the instructions. The manufacturer reserves the right to make changes to the product without prior notice.
Safety Instructions
www.ellasbubbles.com Page 2 06/15
32"
10¾"
20"
40¼
"8½"
17"
17"
5¼"
20"9¼"
51¼"
20"
7"
26¾
" 21"
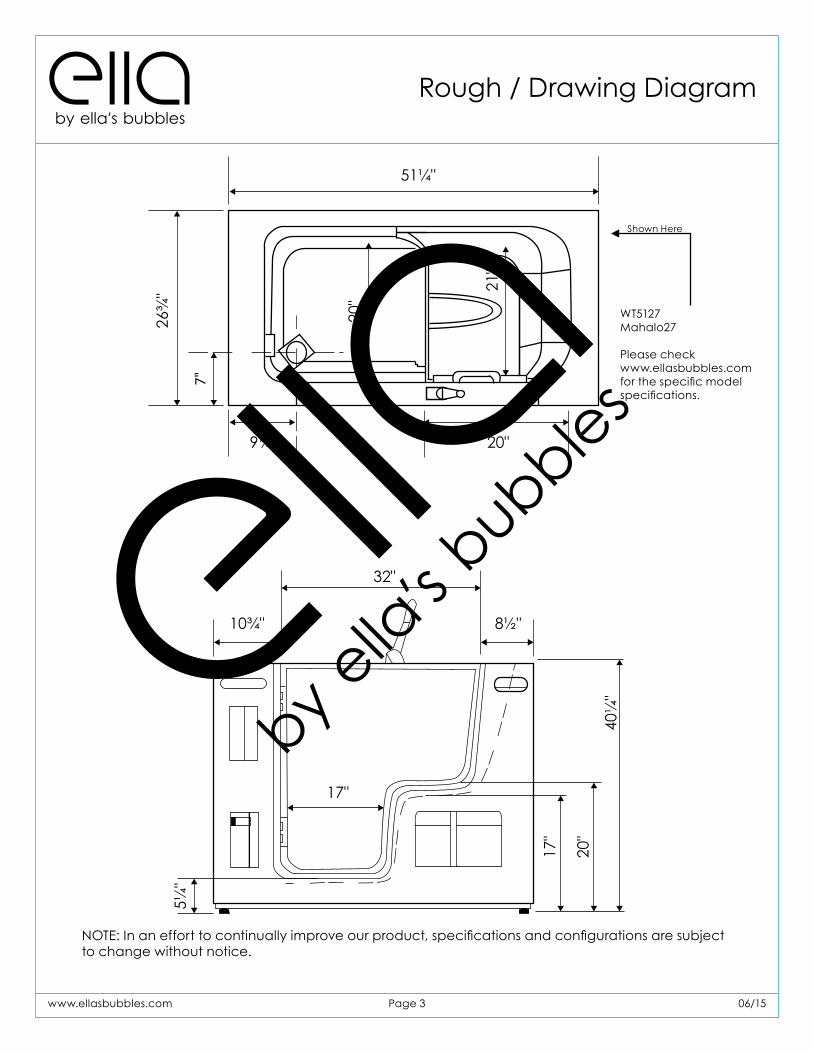
Rough / Drawing Diagram
NOTE: In an effort to continually improve our product, specifications and configurations are subject to change without notice.
WT5127Mahalo27
Please checkwww.ellasbubbles.comfor the specific model specifications.
Shown Here
www.ellasbubbles.com Page 3 06/15
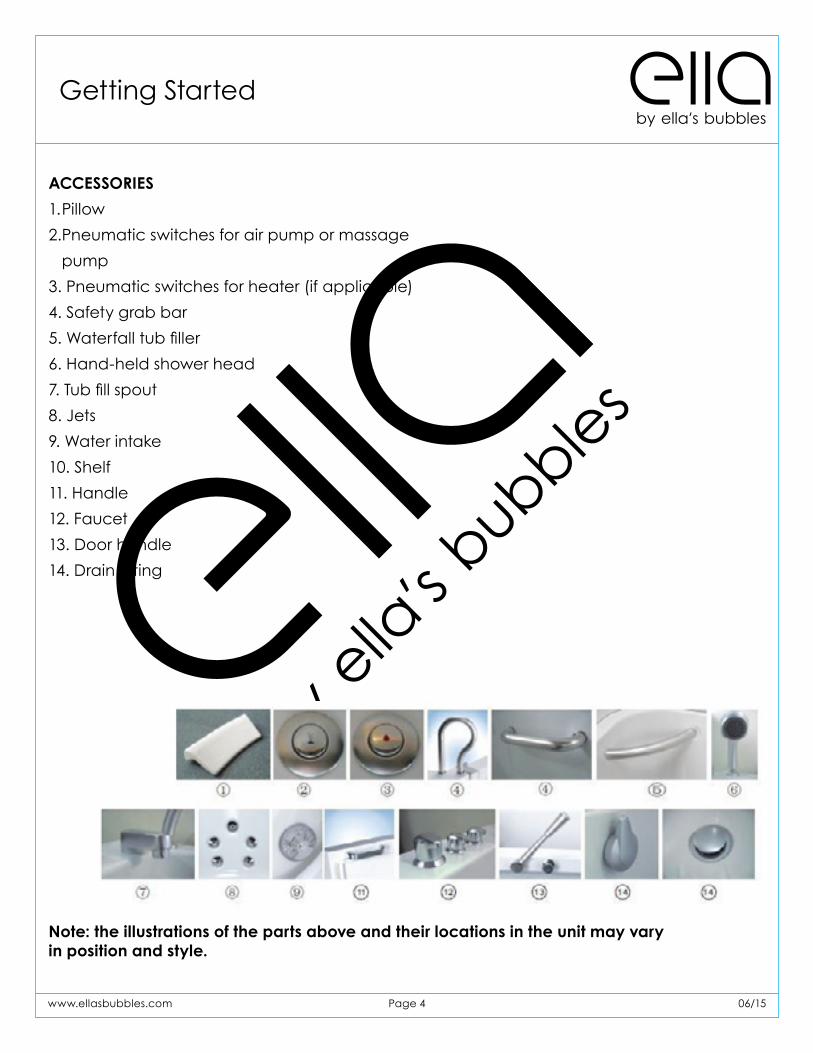
ACCESSORIES1. Pillow2. Pneumatic switches for air pump or massage pump3. Pneumatic switches for heater (if applicable)4. Safety grab bar5. Waterfall tub filler6. Hand-held shower head7. Tub fill spout8. Jets9. Water intake 10. Shelf11. Handle12. Faucet13. Door handle14. Drain fitting
Note: the illustrations of the parts above and their locations in the unit may vary in position and style.
Getting Started
5 | P a g e Rev 01/2014
PRODUCT FEATURES
Model Requirements HY11XX 110V / 20 amp dedicated line HY12XX 110V / 20 amp dedicated line HY13XX No electrical requirements
Normal working water pressure: 0.2 – 0.5Mpa Normal working water flow: 15.4L/min (4.07 gpm) Connection: Hot/Cold water supply line ½” Drainage pipe is Φ 51cm (2in) ACCESSORIES
(1). Pillow (2). Pneumatic switches for air pump or massage pump (3). Pneumatic switches for heater (if applicable) (4). Safety grab bar (5). Waterfall tub filler (6). Hand-held shower head (7). Tub fill spout (8). Jets (9). Water intake (10). Shelf (11). Handle (12). Faucet (13). Door handle (14). Drain fitting
Note: the illustrations of the parts above and their locations in the unit may vary in position and style.
www.ellasbubbles.com Page 4 06/15
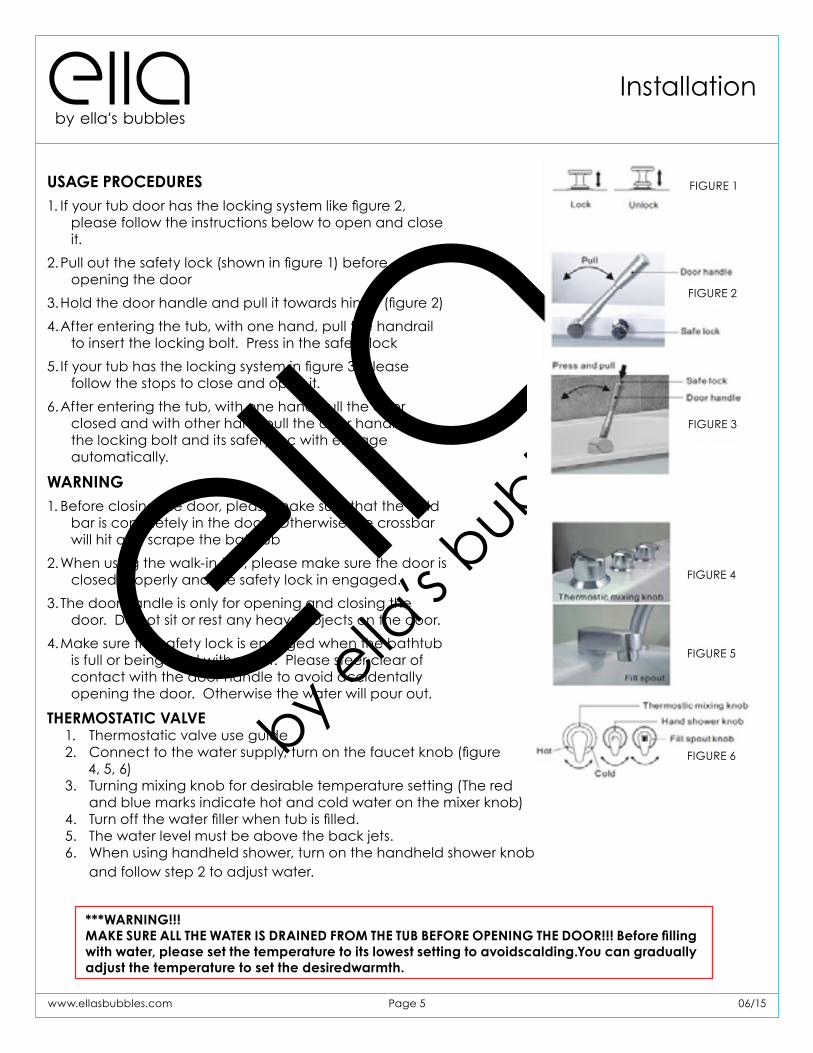
USAGE PROCEDURES1. If your tub door has the locking system like figure 2,
please follow the instructions below to open and close it.
2. Pull out the safety lock (shown in figure 1) before opening the door
3. Hold the door handle and pull it towards hinge (figure 2)4. After entering the tub, with one hand, pull the handrail
to insert the locking bolt. Press in the safety lock5. If your tub has the locking system in figure 3, please
follow the stops to close and open it.6. After entering the tub, with one hand pull the door
closed and with other hand pull the door handle, the locking bolt and its safety loc with engage automatically.
WARNING1. Before closing the door, please make sure that the bold
bar is completely in the door. Otherwise the crossbar will hit and scrape the bathtub
2. When using the walk-in tub, please make sure the door is closed properly and the safety lock in engaged.
3. The door handle is only for opening and closing the door. Do not sit or rest any heavy objects on the door.
4. Make sure the safety lock is engaged when the bathtub is full or being filled with water. Please steer clear of contact with the door handle to avoid accidentally opening the door. Otherwise the water will pour out.
THERMOSTATIC VALVE1. Thermostatic valve use guide2. Connect to the water supply, turn on the faucet knob (figure 4, 5, 6)3. Turning mixing knob for desirable temperature setting (The red
and blue marks indicate hot and cold water on the mixer knob)4. Turn off the water filler when tub is filled.5. The water level must be above the back jets.6. When using handheld shower, turn on the handheld shower knob
and follow step 2 to adjust water.
Installation
FIGURE 3
FIGURE 2
FIGURE 1
FIGURE 4
FIGURE 5
FIGURE 6
***WARNING!!!MAKE SURE ALL THE WATER IS DRAINED FROM THE TUB BEFORE OPENING THE DOOR!!! Before filling with water, please set the temperature to its lowest setting to avoidscalding.You can gradually adjust the temperature to set the desiredwarmth.
www.ellasbubbles.com Page 5 06/15
Installation Continued
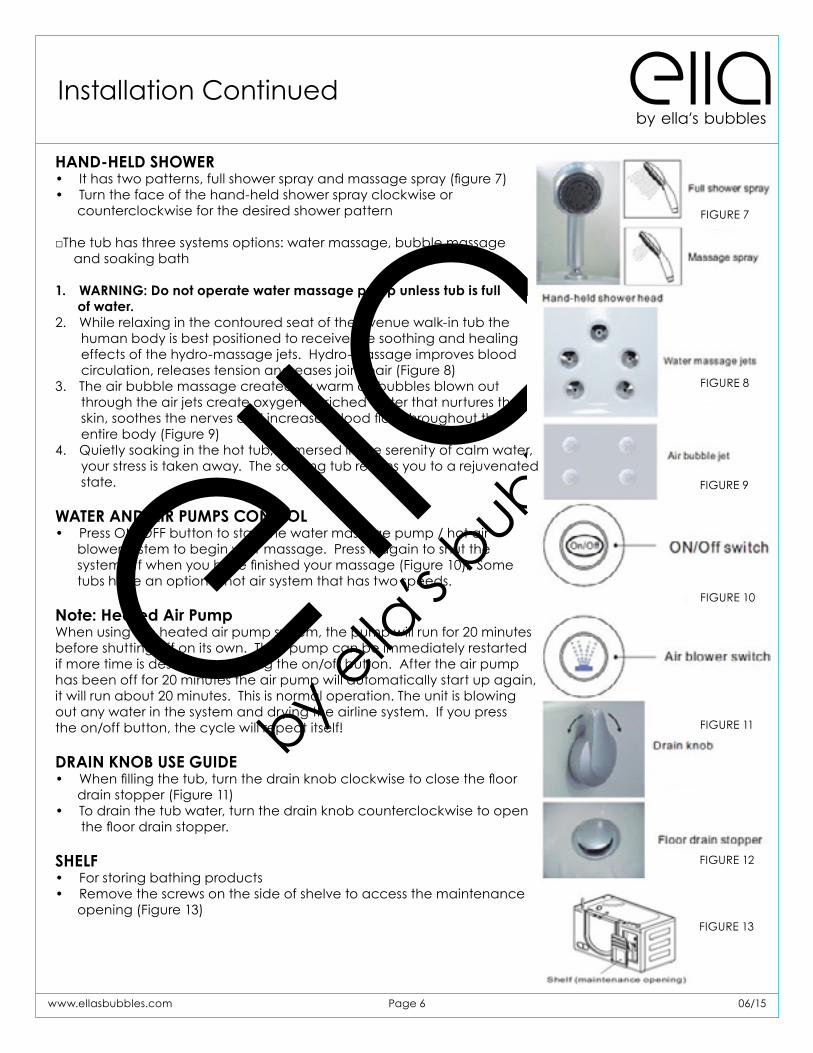
HAND-HELD SHOWER • It has two patterns, full shower spray and massage spray (figure 7)• Turn the face of the hand-held shower spray clockwise or counterclockwise for the desired shower pattern
□The tub has three systems options: water massage, bubble massage and soaking bath
1. WARNING: Do not operate water massage pump unless tub is full of water.2. While relaxing in the contoured seat of the Avenue walk-in tub the human body is best positioned to receive the soothing and healing effects of the hydro-massage jets. Hydro-massage improves blood circulation, releases tension and eases joint pair (Figure 8)3. The air bubble massage created by warm air bubbles blown out through the air jets create oxygen-enriched water that nurtures the skin, soothes the nerves and increases blood flow throughout the entire body (Figure 9)4. Quietly soaking in the hot tub, immersed in the serenity of calm water, your stress is taken away. The soaking tub returns you to a rejuvenated state.
WATER AND AIR PUMPS CONTROL• Press ON/OFF button to start the water massage pump / hot air blower system to begin your massage. Press it again to shut the system off when you have finished your massage (Figure 10). Some tubs have an optional hot air system that has two speeds.
Note: Heated Air PumpWhen using the heated air pump system, the pump will run for 20 minutes before shutting off on its own. Then pump can be immediately restarted if more time is desired by pressing the on/off button. After the air pump has been off for 20 minutes the air pump will automatically start up again, it will run about 20 minutes. This is normal operation. The unit is blowing out any water in the system and drying the airline system. If you press the on/off button, the cycle will repeat itself!
DRAIN KNOB USE GUIDE• When filling the tub, turn the drain knob clockwise to close the floor drain stopper (Figure 11) • To drain the tub water, turn the drain knob counterclockwise to open the floor drain stopper.
SHELF• For storing bathing products• Remove the screws on the side of shelve to access the maintenance opening (Figure 13)
FIGURE 7
FIGURE 8
FIGURE 10
FIGURE 9
FIGURE 11
FIGURE 12
FIGURE 13
www.ellasbubbles.com Page 6 06/15
Please make sure that the power is disconnected before doing any maintenance.1. Keep the bathtub clean and neat2. DO NOT use strong acids or alkali liquids to clean the bathtub or fixtures3. DO NOT allow the tub to run for more than 3 hours continuously4. When cleaning the shell and floor of the bathtub, please use the soft and dry cloth. If
there is light amount of dirt, use the soft cloth or sponge to clean with a non-abrasive cleaning. Use alcohol to remove stubborn stains.
5. Use a detergent that is specially made for acrylic tubs. The following substances are not to be used: acids or alkali solutions, acetone product. If these products are used, damage to the tub and accessories may occur and the warranty will be void.
6. Don’t use sharp objects to hit or strike the surface of the acrylic, glass and metal parts to avoid damaging the finish. Don’t use coarse or abrasive cleaners to clean the surface of acrylic, glass and metal parts to avoid damaging the surface.
7. Frequently check power lines, switches, water supply lines, drain pipes for possible damage. Replace as needed.
Maintenance
www.ellasbubbles.com Page 7 06/15
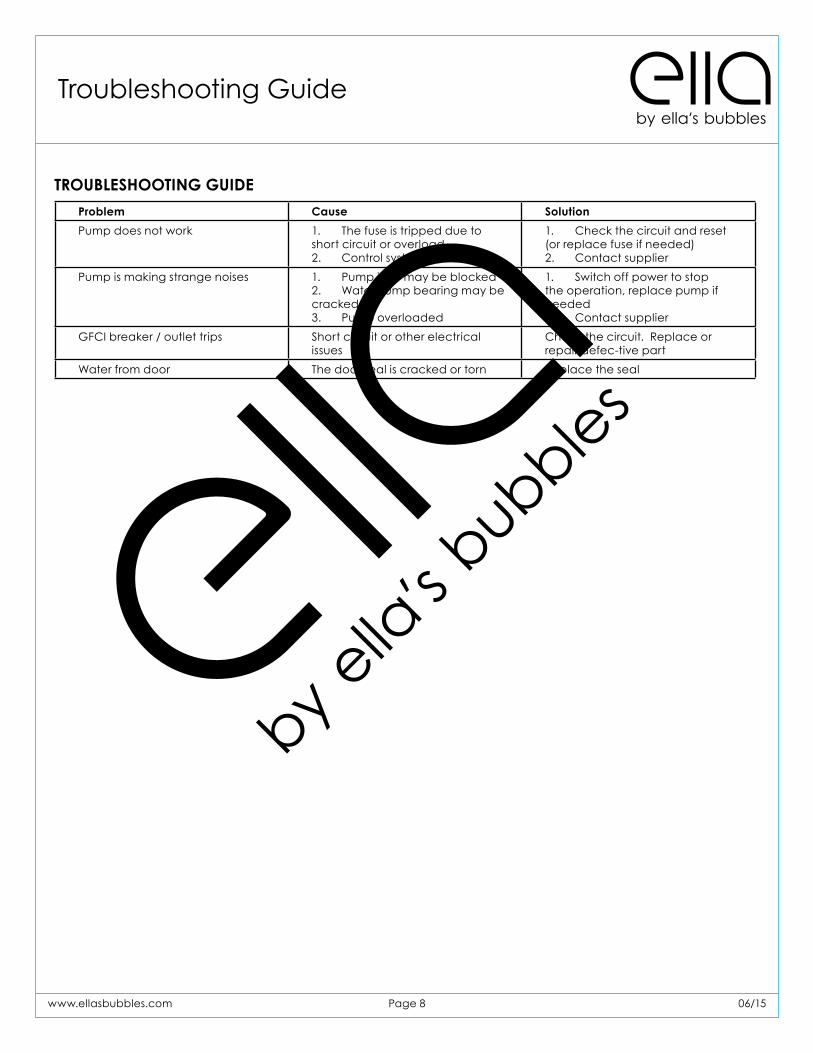
TROUBLESHOOTING GUIDEProblem Cause SolutionPump does not work 1. The fuse is tripped due to
short circuit or overload2. Control system malfunction
1. Check the circuit and reset (or replace fuse if needed)2. Contact supplier
Pump is making strange noises 1. Pump inlet may be blocked2. Water Pump bearing may be cracked3. Pump overloaded
1. Switch off power to stop the operation, replace pump if needed2. Contact supplier
GFCI breaker / outlet trips Short circuit or other electrical issues
Check the circuit. Replace or repair defec-tive part
Water from door The door seal is cracked or torn Replace the seal
Troubleshooting Guide
www.ellasbubbles.com Page 8 06/15
Ella Acrylic Outward Swing Walk In Tub Warranty Information
For all customers of private labels who complete the Ella’s Bubbles Product Registration Form and return the same to the Ella’s Bubbles Corporate Office, Ella’s Bubbles will use its best efforts to facilitate any customer warranty claim. Accordingly for any warranty claim brought to Ella’s Bubbles, terms and provisions written under the original manufacturer warranty shall to the extent reasonably possible be managed through Ella’s Bubbles to provide direct support and service to the consumer. The original manufacturer’s warranty is stated below:
The limited warranty covers hardware and components for 5 years and a lifetime warranty on the door gasket, frame and shell from the time of original purchase from an authorized Ella’s Bubbles dealer to the original buyer. If, during this period, a covered component fails, Ella’s Bubbles will provide are placement par to the owner through an authorized dealer. Shipping charges and all other incidental costs are not included. Ella’s Bubbles will not pay labor costs involved in diagnostic, removal, repair, service or replacement of the parts. Such costs may be covered by a separate warrant provided by your authorized dealer. All warranty claims must be coordinated through an authorized dealer.
The Limited Warranty does not cover defects, damage or failure caused by the shipment, delivery, installation or user, including but not limited to: modifications of any type for any reason, electrical or water connections not specified by the installation and specifications included with the unit, improper installation, unreasonable operation, accident, neglect, lack of proper routine maintenance, or acts of GOD, including, earthquakes, floods, lighting, etc.
When warranty parts are required, contact your authorized dealer. Be prepared to provide proof of purchase.
All mailing notification must be sent via certified mail to: Ella’s Bubbles, LLC.
2101 S. Carpenter Street Chicago, IL 60608
Email: [email protected]

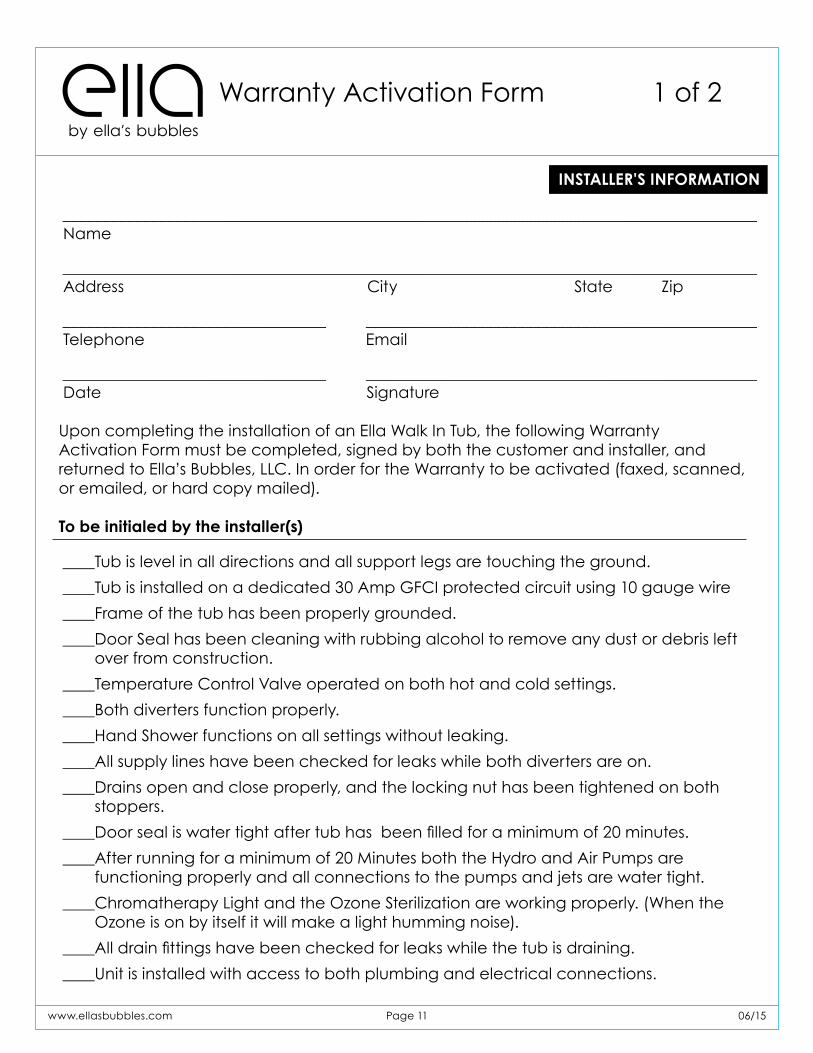
Warranty Activation Form 1 of 2
INSTALLER'S INFORMATION
_______________________________________________________________________________________ Name
_______________________________________________________________________________________ Address City State Zip
_________________________________ _________________________________________________ Telephone Email
_________________________________ _________________________________________________ Date Signature
Upon completing the installation of an Ella Walk In Tub, the following Warranty Activation Form must be completed, signed by both the customer and installer, and returned to Ella’s Bubbles, LLC. In order for the Warranty to be activated (faxed, scanned, or emailed, or hard copy mailed).
To be initialed by the installer(s)
____Tub is level in all directions and all support legs are touching the ground. ____Tub is installed on a dedicated 30 Amp GFCI protected circuit using 10 gauge wire ____Frame of the tub has been properly grounded. ____ Door Seal has been cleaning with rubbing alcohol to remove any dust or debris left
over from construction. ____Temperature Control Valve operated on both hot and cold settings. ____Both diverters function properly. ____Hand Shower functions on all settings without leaking. ____All supply lines have been checked for leaks while both diverters are on. ____ Drains open and close properly, and the locking nut has been tightened on both
stoppers. ____Door seal is water tight after tub has been filled for a minimum of 20 minutes. ____ After running for a minimum of 20 Minutes both the Hydro and Air Pumps are
functioning properly and all connections to the pumps and jets are water tight. ____ Chromatherapy Light and the Ozone Sterilization are working properly. (When the
Ozone is on by itself it will make a light humming noise). ____All drain fittings have been checked for leaks while the tub is draining. ____Unit is installed with access to both plumbing and electrical connections.
www.ellasbubbles.com Page 11 06/15
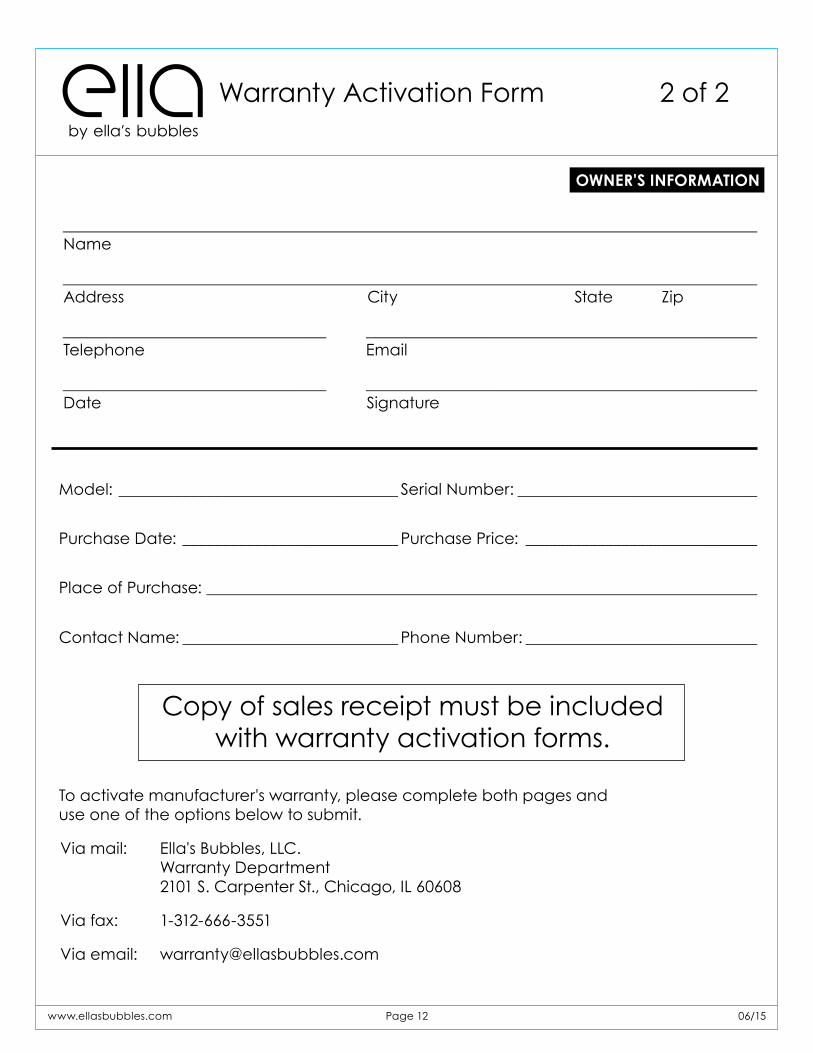
Warranty Activation Form 2 of 2
OWNER'S INFORMATION
_______________________________________________________________________________________ Name
_______________________________________________________________________________________ Address City State Zip
_________________________________ _________________________________________________ Telephone Email
_________________________________ _________________________________________________ Date Signature
Model: ___________________________________ Serial Number: ______________________________
Purchase Date: ___________________________ Purchase Price: _____________________________
Place of Purchase: _____________________________________________________________________
Contact Name: ___________________________ Phone Number: _____________________________
Copy of sales receipt must be included with warranty activation forms.
To activate manufacturer's warranty, please complete both pages and use one of the options below to submit.
Via mail: Ella's Bubbles, LLC. Warranty Department 2101 S. Carpenter St., Chicago, IL 60608
Via fax: 1-312-666-3551
Via email: [email protected]
www.ellasbubbles.com Page 12 06/15