Embed Size (px)
Citation preview

Elite and eLink Driver Installation For Hornby DCC Controllers
(Revision May 2013)
Copyright 2013 by Invicto Systems Limited. All rights reserved.


Preface
With the increasing number of different versions of Windows operating systems and the substantially different ways they work, this guide has been written to provide step-by-step guide to show you how to install the Hornby Elite and eLink USB port drivers onto your PC.
All of the drivers you need are supplied both on the RailMaster CD Rom and also installed in the C:\Program Files\RailMaster folder on your PC when RailMaster is installed. On 64-bit Windows operating systems, the path is C:\Program Files (x86)\RailMaster.
Where possible, you should always install RailMaster with default settings on your C drive.
With the different iterations of the Windows operating over the years system Microsoft have, unfortunately, made it more and more complicated to install device drivers. They may argue that they have improved security however the fact is that many more steps are required to install the driver from the three in Windows XP to up to eleven in the latest Windows 8 operating systems.
This guide will hopefully show you every scenario and should serve as the definitive document for ensuring the correct installation of the Hornby Elite and eLink driver on your PC.


CONTENTS
Windows XP driver installation 7
Windows Vista driver installation 11
Windows 7 driver installation 17
Windows 8 driver installation 25
Troubleshooting guide 33

Windows XP Driver Installation
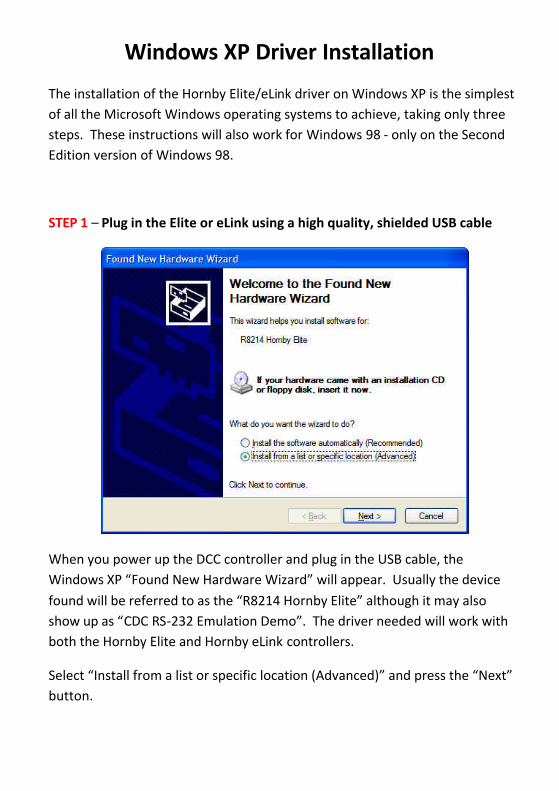
The installation of the Hornby Elite/eLink driver on Windows XP is the simplest of all the Microsoft Windows operating systems to achieve, taking only three steps. These instructions will also work for Windows 98 - only on the Second Edition version of Windows 98.
STEP 1 – Plug in the Elite or eLink using a high quality, shielded USB cable
When you power up the DCC controller and plug in the USB cable, the Windows XP “Found New Hardware Wizard” will appear. Usually the device found will be referred to as the “R8214 Hornby Elite” although it may also show up as “CDC RS-232 Emulation Demo”. The driver needed will work with both the Hornby Elite and Hornby eLink controllers.
Select “Install from a list or specific location (Advanced)” and press the “Next” button.

STEP 2 – Browse to the folder containing the Elite/eLink driver
You will then need to tell Windows where it can find the Hornby Elite/eLink driver. The driver is installed with RailMaster. If you have not already installed RailMaster, you should cancel the “Found New Hardware Wizard” and do this first. If you do not wish to install RailMaster yet then you can navigate to the RailMaster CD-Rom to locate the driver (the root of the CD Rom drive).
You can also download the Windows XP driver from the Hornby website at http//:www.hornby.com.
Click on “Search for the best driver in these locations” then use the Browse button to navigate to the correct driver folder.
On normal Windows XP systems the driver location is “C:\Program Files\RailMaster”. This is assuming that you installed RailMaster into the default folder. On 64-bit systems (which are very rare in Windows XP) the driver folder is “C:\Program Files (x86)\RailMaster”. Click “Next” to install the driver.

STEP 3 – Complete the installation
When the “Found New Hardware Wizard” has completed installing the driver you will see a window similar to the above. This concludes the installation of the driver. You should then go to the Windows Control Panel to check the port setting that Windows has assigned to the DCC controller and ensure that all settings are correct. You can read more about this in the RailMaster PDF guide.


Windows Vista Driver Installation
The installation of the Hornby Elite/eLink driver on Windows Vista is a little more involved than installing on Windows XP.
STEP 1 – Plug in the Elite or eLink using a high quality, shielded USB cable
When you power up the DCC controller and plug in the USB cable, the Windows Vista “Found New Hardware” dialogue will appear. Usually the device found will be referred to as the “CDC RS-232 Emulation Demo” although it may also show up as “R8214 Hornby Elite”. The driver needed will work with both the Hornby Elite and Hornby eLink controllers.
Click on “Locate and install driver software (recommended)”.

STEP 2 – Driver installation options
You will be asked to insert a disc containing the driver. Instead, click on “I don’t have the disc. Show me other options”.
STEP 3 – Searching for the driver
Windows will try to find the driver itself, including searching on the Internet if you have a connection.

STEP 4 – Installing the driver manually
It is likely that Windows will not find an appropriate driver itself for the Hornby Elite or eLink. If it does, you can accept this and use it, otherwise you will need to click on “Browse my computer for driver software (advanced)”.
STEP 5 – Locating the driver
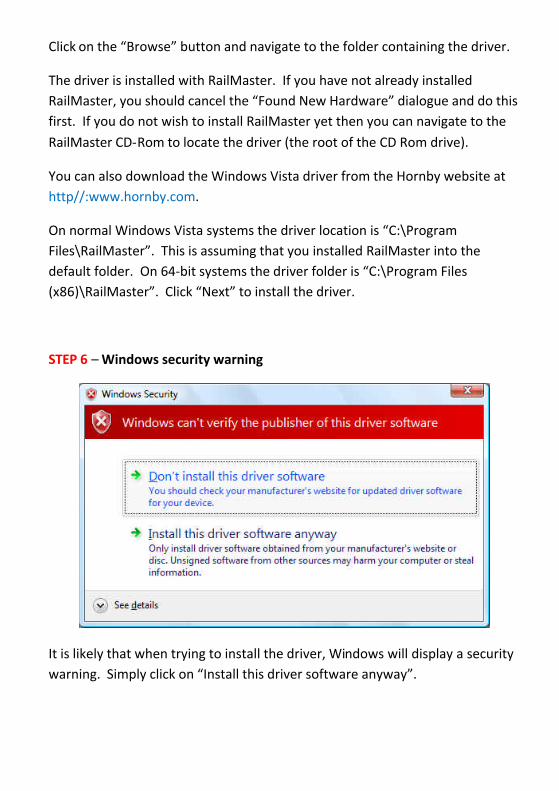
Click on the “Browse” button and navigate to the folder containing the driver.
The driver is installed with RailMaster. If you have not already installed RailMaster, you should cancel the “Found New Hardware” dialogue and do this first. If you do not wish to install RailMaster yet then you can navigate to the RailMaster CD-Rom to locate the driver (the root of the CD Rom drive).
You can also download the Windows Vista driver from the Hornby website at http//:www.hornby.com.
On normal Windows Vista systems the driver location is “C:\Program Files\RailMaster”. This is assuming that you installed RailMaster into the default folder. On 64-bit systems the driver folder is “C:\Program Files (x86)\RailMaster”. Click “Next” to install the driver.
STEP 6 – Windows security warning
It is likely that when trying to install the driver, Windows will display a security warning. Simply click on “Install this driver software anyway”.
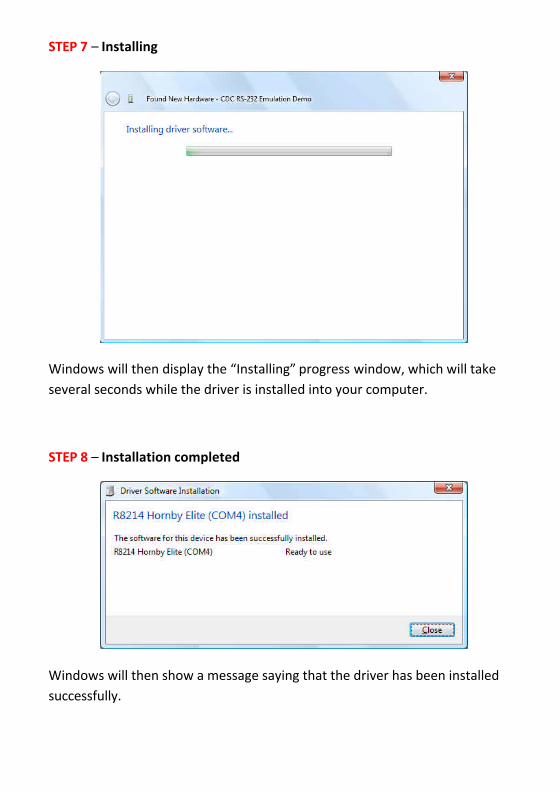
STEP 7 – Installing
Windows will then display the “Installing” progress window, which will take several seconds while the driver is installed into your computer.
STEP 8 – Installation completed
Windows will then show a message saying that the driver has been installed successfully.

This concludes the installation of the driver on Windows Vista. You should then go to the Windows Control Panel to check the port setting that Windows has assigned to the DCC controller and ensure that all settings are correct. You can read more about this in the RailMaster PDF guide.

Windows 7 Driver Installation
The installation of the Hornby Elite/eLink driver on Windows 7 is different to that on Windows XP and Windows Vista as Windows 7 should be able to find its own driver. For this to happen you must ensure your computer is connected to the Internet.
STEP 1a – Plug in the Elite or eLink using a high quality, shielded USB cable
When you power up the DCC controller and plug in the USB cable, the Windows 7 “Driver Software Installation” dialogue will appear. Usually the device found will be referred to as the “CDC RS-232 Emulation Demo” although it may also show up as “R8214 Hornby Elite”. This dialogue window may not appear on all Windows 7 systems.
STEP 1b – Installing driver automatically

If your PC is connected to the Internet, the Windows “Driver Software Installation” system will attempt to locate a suitable driver itself.
STEP 2 – Driver installed
The generic USB driver that Windows installs should work on most systems. If you have problems with communications with your Hornby Elite or Hornby eLink and you have ensured that you are using a high quality USB cable, that the Com Port number is below 5 and you have tried different USB ports first (see troubleshooting), then you can try updating the generic USB Serial Port driver installed to the Hornby driver. To do this, follow the next steps.
STEP 3 – Control panel

You should only manually install the Hornby driver if there are problems when using the generic Windows USB driver. In the majority of cases, the generic driver works perfectly well.
To update the driver to the Hornby driver click on the Windows Start button then select “Control Panel”. You may need to scroll down the Control Panel to find the “System” icon. Double-click on this icon.
STEP 4 – System
When you see the Window System Information window click on “Device Manager” on the left pane.

STEP 4 – Device Manager
Within the Device Manager, you can click on the arrow beside “Ports (COM and LPT)” to expand it or it may already be expanded if Windows found a problem. Double click the “USB Serial Port” entry.
STEP 5 – Driver settings
Within the driver settings window that appears click on “Update Driver”

STEP 6 – Update driver
Click on “Browse my computer for driver software”.
STEP 7 – Locating the driver
You will need to click on the “Browse” button and navigate to the folder containing the driver.

The driver is installed with RailMaster. If you have not already installed RailMaster, you should cancel the “Update Driver Software” dialogue and do this first. If you do not wish to install RailMaster yet then you can navigate to the RailMaster CD-Rom to locate the driver (the root of the CD Rom drive).
You can also download the Windows Vista driver (suitable for Windows 7 and 8) from the Hornby website at http//:www.hornby.com.
On normal Windows 7 systems the driver location is “C:\Program Files\RailMaster”. This is assuming that you installed RailMaster into the default folder. On 64-bit systems the driver folder is “C:\Program Files (x86)\RailMaster”. Click “Next” to install the driver.
STEP 6 – Windows security warning
If the driver is going to be updated successfully you may see the Windows Security warning window. If you do simply click on “Install this driver software anyway”.
At this point the driver will either be updated to the Hornby driver or Windows will tell you that the best driver is already installed.
The latter is more likely and in this case you will need to look for other reasons why your DCC controller may not be working correctly with Windows.

This concludes the installation of the driver on Windows 7. You should then go to the Windows Control Panel to check the port setting that Windows has assigned to the DCC controller and ensure that all settings are correct. You can read more about this in the RailMaster PDF guide.


Windows 8 Driver Installation
The installation of the Hornby Elite/eLink driver on Windows 8 is different to that on Windows XP, Windows Vista and Windows 7 as there could be additional security hurdles to pass. You should ensure your computer is connected to the Internet.
STEP 1 – Plug in the Elite or eLink using a high quality, shielded USB cable
On some Windows 8 systems, when connecting the Hornby Elite or eLink to a USB port, Windows will locate the driver itself (if the PC is connected to the Internet) in much the same way as installation under Windows 7 works (steps 1 to 2). In this case you can skip this section entirely.
In many cases, however, you will need to tell Windows 8 where to find the driver and there may be added security hurdles to overcome.
To do this, move your mouse cursor to the top right of the screen to bring up the ‘Charms’ menu and from this click on Settings. This will show a screen on the right of your display, similar to that here.
You then need to click on “Control Panel”.

STEP 2 – Control panel
At the top-right corner of the Control Panel you will see a box with the text “Search Control Panel” in light grey. Type into this box “device manager” and this will show a list of options on the left.
STEP 3 – Device Manager options
Click on “Device Manager”

STEP 4 – Device Manager
Under “Other devices” you should see “CDC RS-232 Emulation Demo”. Double click on this entry.
STEP 5 – Driver properties

You will then need to click on the “Update Driver” button.
STEP 6 – Locating the driver
You will need to click on the “Browse” button and navigate to the folder containing the driver.
The driver is installed with RailMaster. If you have not already installed RailMaster, you should cancel the “Update Driver Software” dialogue and do this first. If you do not wish to install RailMaster yet then you can navigate to the RailMaster CD-Rom to locate the driver (the root of the CD Rom drive).
You can also download the Windows Vista (suitable for Windows 7 and 8) driver from the Hornby website at http//:www.hornby.com.
On normal Windows 8 systems the driver location is “C:\Program Files\RailMaster”. This is assuming that you installed RailMaster into the default folder. On 64-bit systems the driver folder is “C:\Program Files (x86)\RailMaster”. Click “Next” to install the driver.

Under normal circumstances Windows 8 should install the driver successfully. On many systems, however, a digital signature error will be encountered. If this happens you will need to follow these additional steps.
STEP 7 – Digital signature error
If you are presented with a “digital signature” error message, as above, you will need to disable the Windows 8 digital signature system temporarily. This will involve restarting the PC in troubleshooting mode.
To do this you will need to bring up the ‘Charms’ menu as explained in step 1, then click on “Change PC Settings” at the bottom. This will take you into the settings screen.

STEP 8 – Settings
Within the Settings screen Click on “General”.
STEP 9 – General

When you have clicked on General you will need to scroll down the right pane and click on “Restart now” under the “Advanced start-up” heading. When your PC restarts you need to click on “Troubleshoot” and then on “Advanced options”. After this, select “Startup Settings” and click on “Restart”. This will restart your PC again.
At the numbered menu which appears when you restart press the number corresponding to “Disable driver signature enforcement” (usually number 7).
The PC will restart again and show your normal start-up screen. You can log in as normal and repeat the driver installation process from Step 1.
When you reach step 6, after pressing next, this time Windows 8 will continue on to the next step.
STEP 10 – Security warning
At the security prompt click on “Install this driver software anyway” and this will finally install the Elite/eLink driver onto your PC.

STEP 11 – Completed installation
This concludes the installation of the driver on Windows 8. You should then go to the Windows Control Panel to check the port setting that Windows has assigned to the DCC controller and ensure that all settings are correct. You can read more about this in the RailMaster PDF guide.

Troubleshooting
When following the above instructions precisely, and assuming there is no fault with your PC or DCC controller, you should be able to successfully install the Elite/eLink driver.
There are several factors which can affect communications between your PC and your DCC controller:-
1. Ensure the Elite is using version 1.3 of the firmware or later. This can be seen when powering the unit up. Current firmware is 1.4 available from www.hornby.com/downloads.
2. Ensure the Elite is in “Standard” mode. RailMaster does not work properly with the Elite in “Classic” mode.
3. Use a short, high quality (shielded) USB cable
4. Try using a different USB port on the PC and changing the Com Port number (in control panel) to one below 5. If you have a built in physical RS-232 serial connector on your PC, which is unused and assigned to Com1, disable it in the BIOS of the PC and use Com1 for the Elite driver.
5. Ensure the com port settings are the same in the Windows Control Panel and within RailMaster.
6. In rare cases you will need to switch off your PC, unplug the mains cable, remove the battery (if a laptop) then press the power button to discharge all internal capacitors. You should leave the PC for a further five minutes then power up again.