Embed Size (px)
Citation preview
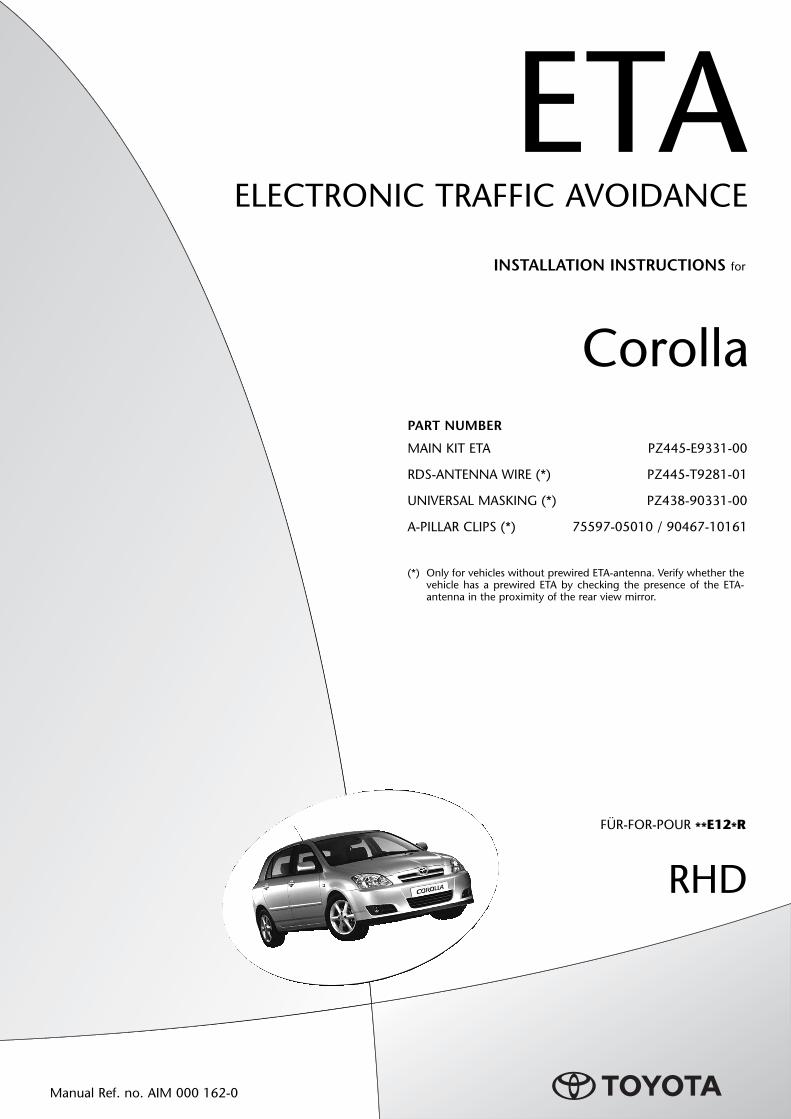
ETAELECTRONIC TRAFFIC AVOIDANCE
INSTALLATION INSTRUCTIONS for
RHD
Manual Ref. no. AIM 000 162-0
PART NUMBER
FÜR-FOR-POUR **E12*R
MAIN KIT ETA PZ445-E9331-00
RDS-ANTENNA WIRE (*) PZ445-T9281-01
UNIVERSAL MASKING (*) PZ438-90331-00
A-PILLAR CLIPS (*) 75597-05010 / 90467-10161
Corolla
(*) Only for vehicles without prewired ETA-antenna. Verify whether thevehicle has a prewired ETA by checking the presence of the ETA-antenna in the proximity of the rear view mirror.
Corolla (**E12*R) ELECTRONIC TRAFFIC AVOIDANCE
Corolla (RHD) - 205-04
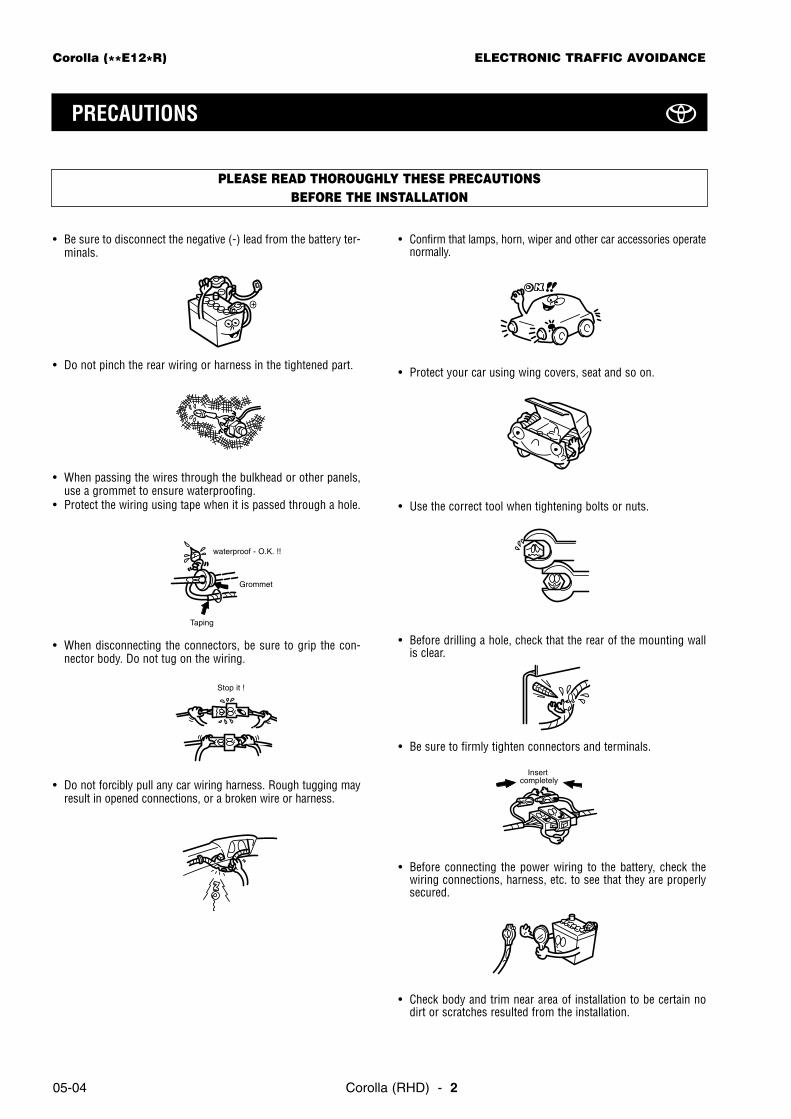
PRECAUTIONS
• Be sure to disconnect the negative (-) lead from the battery ter-minals.
• Do not pinch the rear wiring or harness in the tightened part.
• When passing the wires through the bulkhead or other panels,use a grommet to ensure waterproofing.
• Protect the wiring using tape when it is passed through a hole.
• When disconnecting the connectors, be sure to grip the con-nector body. Do not tug on the wiring.
• Do not forcibly pull any car wiring harness. Rough tugging mayresult in opened connections, or a broken wire or harness.
• Confirm that lamps, horn, wiper and other car accessories operatenormally.
• Protect your car using wing covers, seat and so on.
• Use the correct tool when tightening bolts or nuts.
• Before drilling a hole, check that the rear of the mounting wallis clear.
• Be sure to firmly tighten connectors and terminals.
• Before connecting the power wiring to the battery, check thewiring connections, harness, etc. to see that they are properlysecured.
• Check body and trim near area of installation to be certain nodirt or scratches resulted from the installation.
PLEASE READ THOROUGHLY THESE PRECAUTIONS BEFORE THE INSTALLATION
waterproof - O.K. !!
Grommet
Stop it !
Taping
Insertcompletely
Precautions....................................................................................................................................................................... 2
Main Kit ETA ..................................................................................................................................................................... 4
Universal Masking ............................................................................................................................................................ 5
RDS-Antenna Wire............................................................................................................................................................ 5
Installation Overview......................................................................................................................................................... 6
Vehicle Disassembly ......................................................................................................................................................... 7
Installation of the RDS-Antenna Wire ............................................................................................................................... 11
Installation of the RDS-Antenna........................................................................................................................................ 14
Installation of the RDS-Tuner strip ................................................................................................................................... 16
(For installation of navigation, please refer to the navigation installation manual 000 160-0)
Corolla (**E12*R) ELECTRONIC TRAFFIC AVOIDANCE
Corolla (RHD) - 3 05-04
TABLE OF CONTENTS
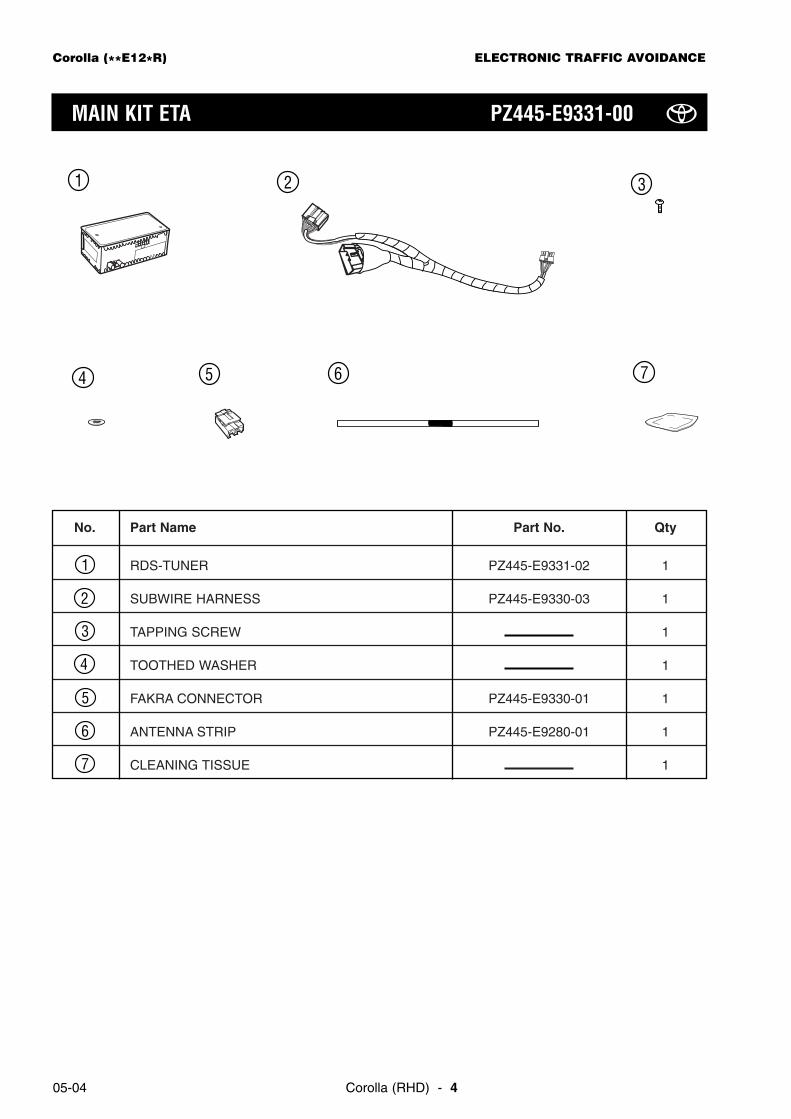
No. Part Name Part No. Qty
RDS-TUNER PZ445-E9331-02 1
SUBWIRE HARNESS PZ445-E9330-03 1
TAPPING SCREW 1
TOOTHED WASHER 1
FAKRA CONNECTOR PZ445-E9330-01 1
ANTENNA STRIP PZ445-E9280-01 1
CLEANING TISSUE 17
6
5
4
3
2
1
Corolla (**E12*R) ELECTRONIC TRAFFIC AVOIDANCE
Corolla (RHD) - 405-04
MAIN KIT ETA PZ445-E9331-00
1 2 3
4 5 6 7
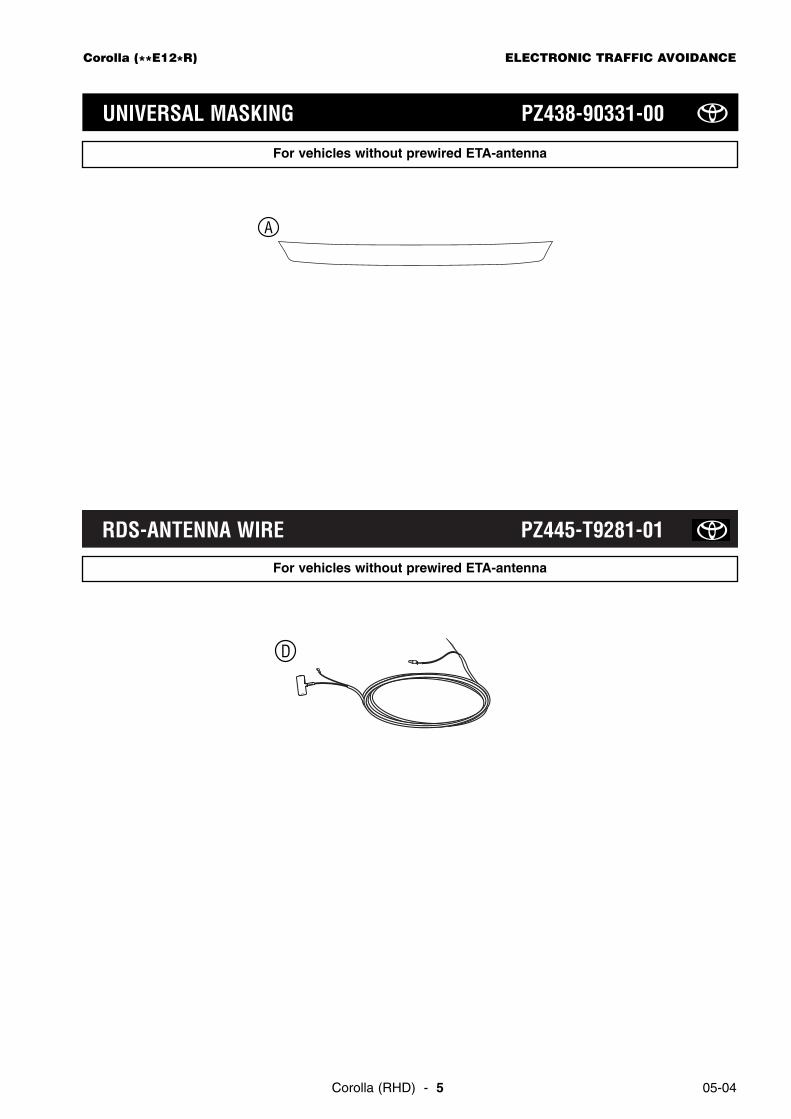
RDS-ANTENNA WIRE PZ445-T9281-01
UNIVERSAL MASKING PZ438-90331-00
Corolla (**E12*R) ELECTRONIC TRAFFIC AVOIDANCE
D
Corolla (RHD) - 5 05-04
A
For vehicles without prewired ETA-antenna
For vehicles without prewired ETA-antenna
Corolla (**E12*R) ELECTRONIC TRAFFIC AVOIDANCE
Corolla (RHD) - 605-04
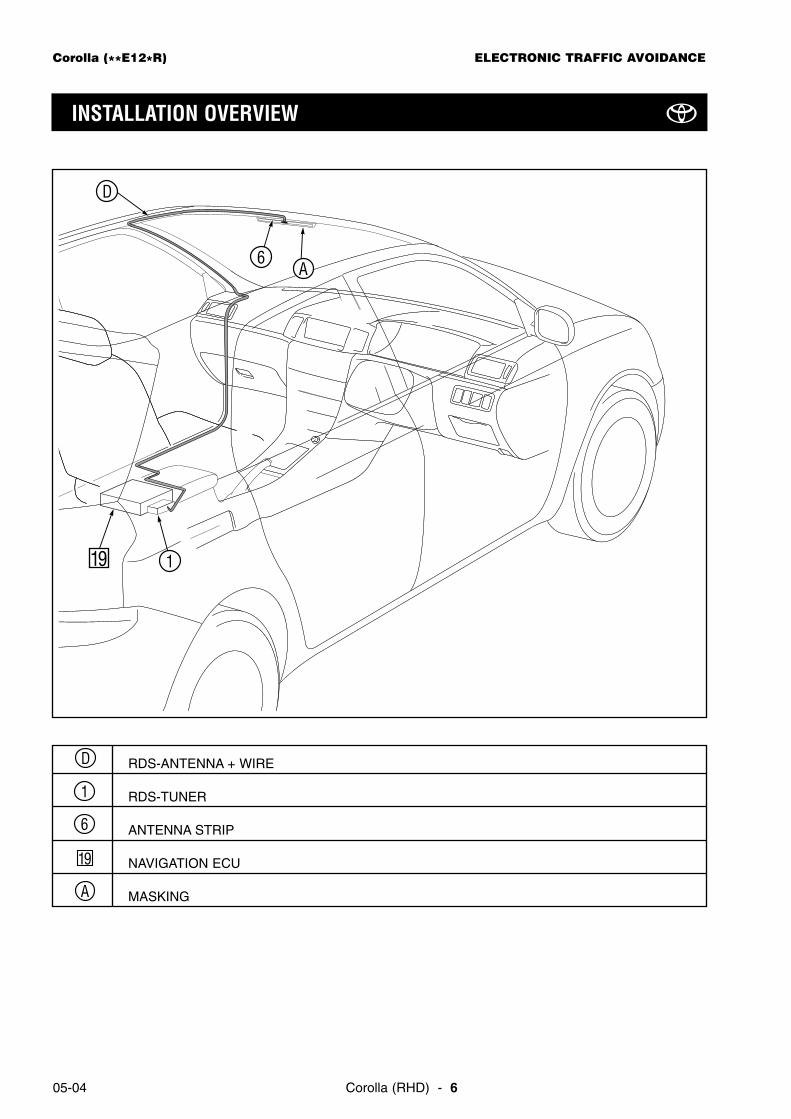
INSTALLATION OVERVIEW
D
15
1
6 A
RDS-ANTENNA + WIRE
RDS-TUNER
ANTENNA STRIP
NAVIGATION ECU
MASKINGA
19
6
1
D
19 1
6
D
A
Corolla (**E12*R) ELECTRONIC TRAFFIC AVOIDANCE
Corolla (RHD) - 7 05-04
VEHICLE DISASSEMBLY
Fig. 1
1. Remove the front door scuff plate (L).
: Clip (6x)
2
2
2. Remove the passenger seat .: Bolt (4x): Cover (2x)101
100
1
Carefully disconnect the airbag connec-tor.
CAUTION
Fasten the bolt with specified torquewrench (37 N.m) when reassembling.
CAUTION
1
101
Fig. 2
101100
100
Corolla (**E12*R) ELECTRONIC TRAFFIC AVOIDANCE
Corolla (RHD) - 805-04
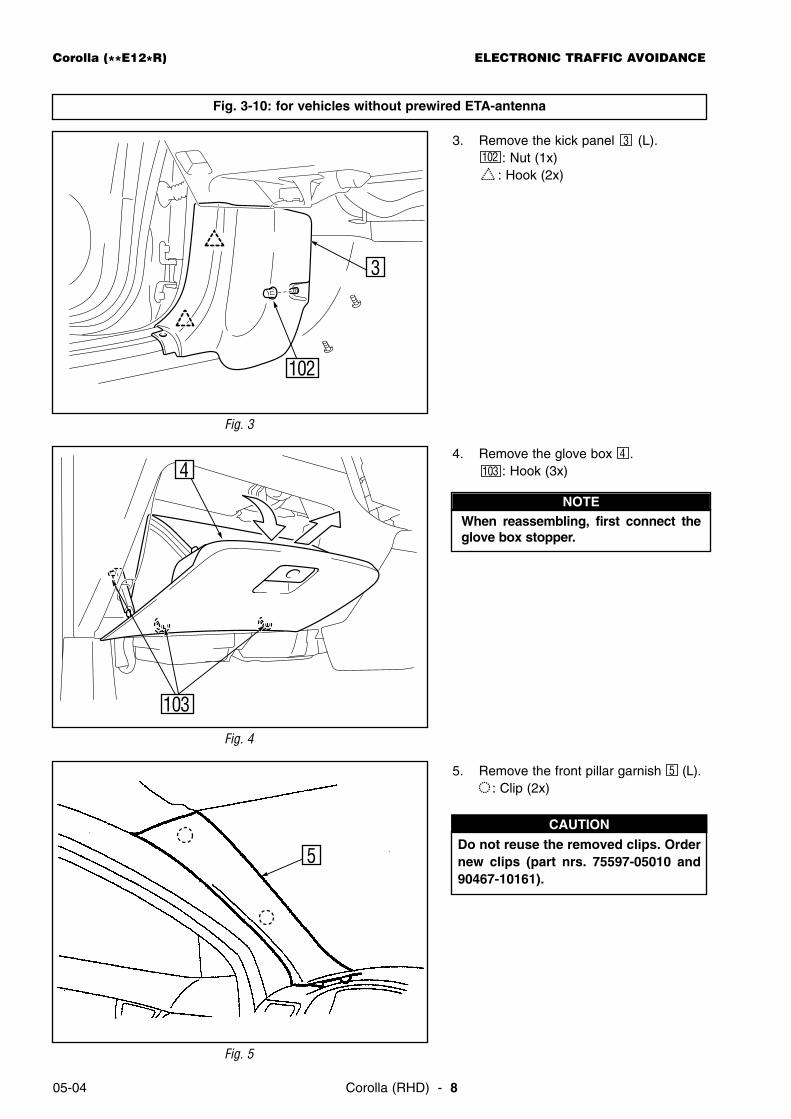
3. Remove the kick panel (L).: Nut (1x)
: Hook (2x)
Fig. 3
5. Remove the front pillar garnish (L).: Clip (2x)
5
Fig. 5
Do not reuse the removed clips. Ordernew clips (part nrs. 75597-05010 and90467-10161).
CAUTION
4. Remove the glove box .: Hook (3x)
Fig. 4
When reassembling, first connect theglove box stopper.
NOTE
Fig. 3-10: for vehicles without prewired ETA-antenna
5
Corolla (**E12*R) ELECTRONIC TRAFFIC AVOIDANCE
Corolla (RHD) - 9 05-04
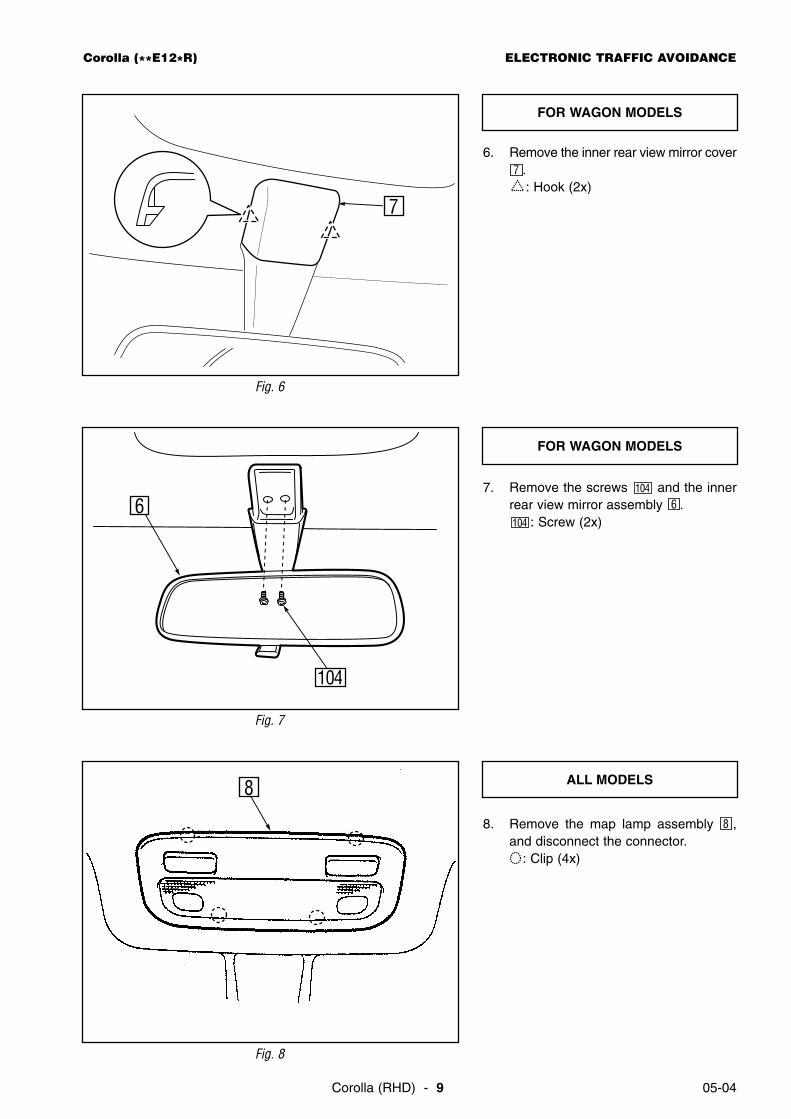
6. Remove the inner rear view mirror cover.: Hook (2x)
7
7
Fig. 6
FOR WAGON MODELS
7. Remove the screws and the innerrear view mirror assembly .
: Screw (2x)104
6104
6
104
Fig. 7
FOR WAGON MODELS
8
Fig. 8
ALL MODELS
8. Remove the map lamp assembly ,and disconnect the connector.
: Clip (4x)
8
Corolla (**E12*R) ELECTRONIC TRAFFIC AVOIDANCE
Corolla (RHD) - 1005-04
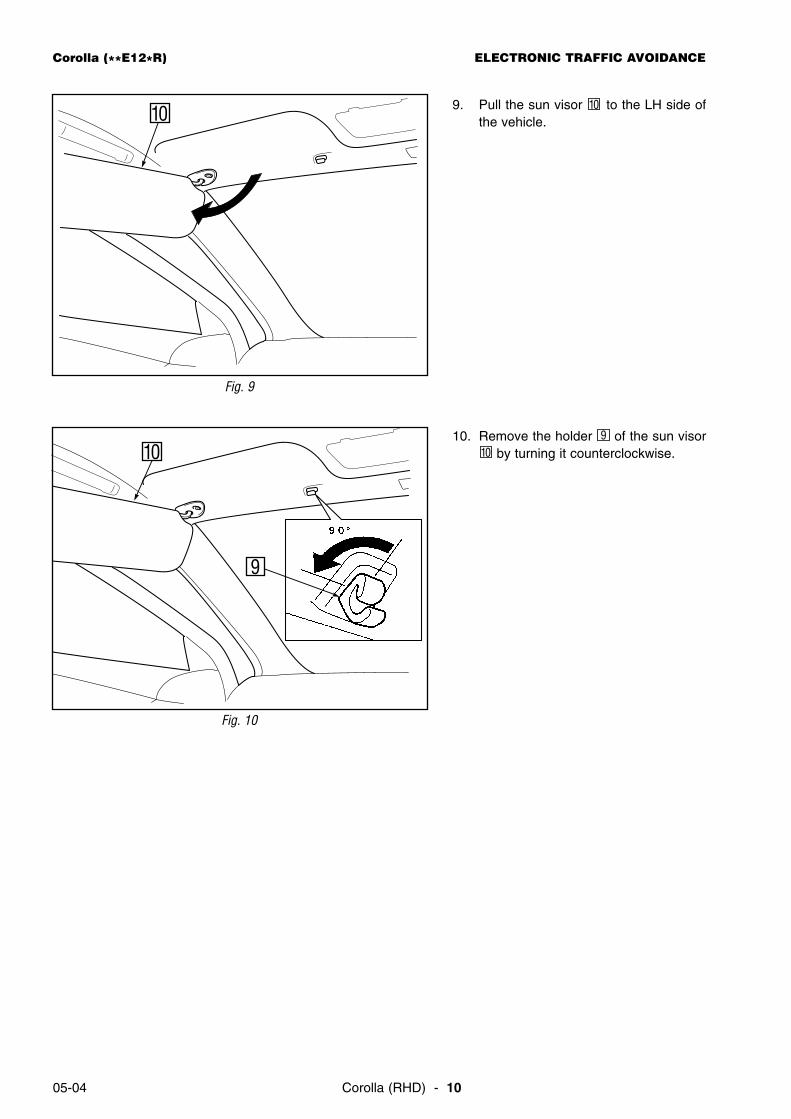
9. Pull the sun visor to the LH side ofthe vehicle.
10
Fig. 9
10
Fig. 10
10. Remove the holder of the sun visorby turning it counterclockwise.10
9
10
9
Corolla (RHD) - 11 05-04
Corolla (**E12*R) ELECTRONIC TRAFFIC AVOIDANCE
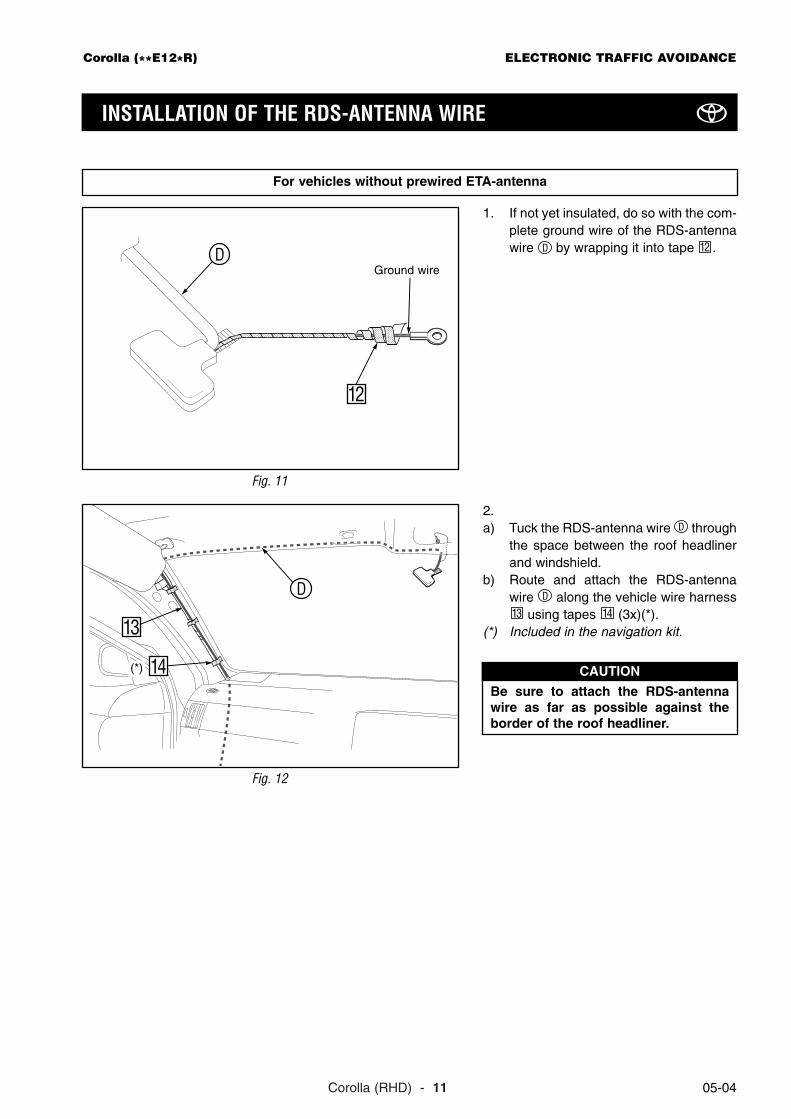
INSTALLATION OF THE RDS-ANTENNA WIRE
2.a) Tuck the RDS-antenna wire through
the space between the roof headlinerand windshield.
b) Route and attach the RDS-antennawire along the vehicle wire harness
using tapes (3x)(*).(*) Included in the navigation kit.
1413D
D
Fig. 12
D
14
13
Be sure to attach the RDS-antennawire as far as possible against theborder of the roof headliner.
CAUTION
1. If not yet insulated, do so with the com-plete ground wire of the RDS-antennawire by wrapping it into tape .12D
Fig. 11
D
12
Ground wire
(*)
For vehicles without prewired ETA-antenna
Corolla (**E12*R) ELECTRONIC TRAFFIC AVOIDANCE
Corolla (RHD) - 1205-04
D
3. Route and attach the RDS-antennawire down the instrument panel intothe left kick panel section of the vehicleusing wire ties .
: Wire tie (4x) (*)(*) Included in the navigation kit.
1515
D
Fig. 13
15
4.a) Route the antenna wire along the
front scuff plate area under the carpet(along the cross member ) to thenavigation-ECU location .
b) Attach the antenna wire to the vehi-cle wire harness using wire ties .
: Wire tie (3x) (*)(*) Included in the navigation kit.
1515
D
1716
D
Fig. 14
15D
16
17
5.a) Route the ground wire of the antenna
as shown.b) Attach the ground wire using a screw
when reinstallling the inner rearview mirror assembly .6104
D
Fig. 15
D
Ground wire
FOR WAGON MODELS
GROUNDING THE ANTENNA WIRE
(*)
(*)
Corolla (**E12*R) ELECTRONIC TRAFFIC AVOIDANCE
Corolla (RHD) - 13 05-04
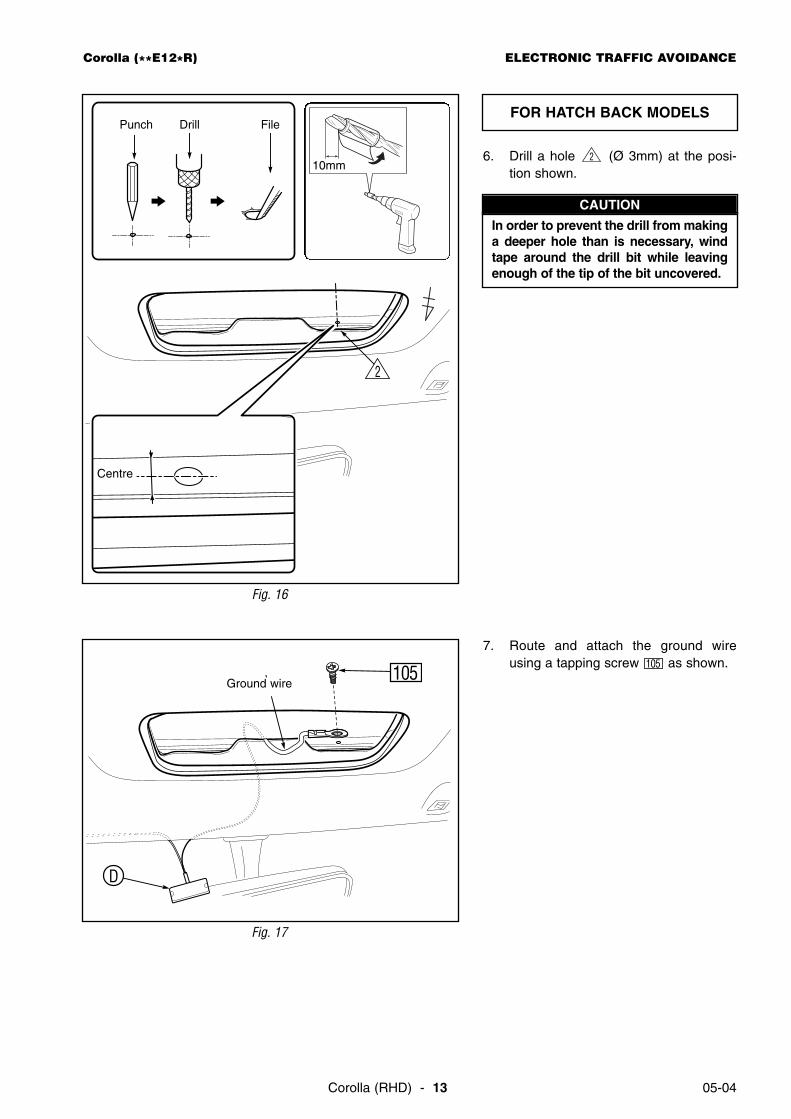
7. Route and attach the ground wireusing a tapping screw as shown.105
FOR HATCH BACK MODELS
Fig. 17
D
105Ground wire
Fig. 16
6. Drill a hole (Ø 3mm) at the posi-tion shown.
2
Drill FilePunch
2
Centre
10mm
In order to prevent the drill from makinga deeper hole than is necessary, windtape around the drill bit while leavingenough of the tip of the bit uncovered.
CAUTION
Corolla (**E12*R) ELECTRONIC TRAFFIC AVOIDANCE
Corolla (RHD) - 1405-04
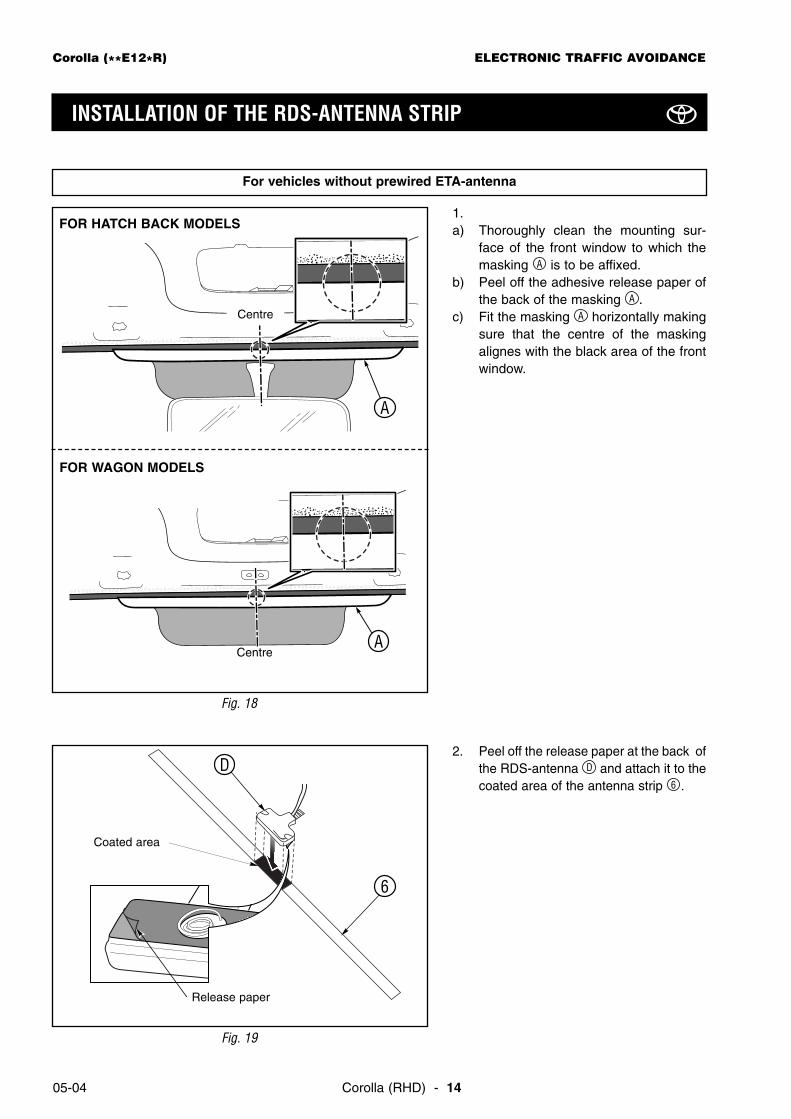
INSTALLATION OF THE RDS-ANTENNA STRIP
1.a) Thoroughly clean the mounting sur-
face of the front window to which themasking is to be affixed.
b) Peel off the adhesive release paper ofthe back of the masking .
c) Fit the masking horizontally makingsure that the centre of the maskingalignes with the black area of the frontwindow.
A
A
A
Fig. 18
A
FOR HATCH BACK MODELS
A
FOR WAGON MODELS
Centre
Centre
2. Peel off the release paper at the back ofthe RDS-antenna and attach it to thecoated area of the antenna strip .6
D
Fig. 19
6
Coated area
D
Release paper
For vehicles without prewired ETA-antenna
Corolla (**E12*R) ELECTRONIC TRAFFIC AVOIDANCE
Corolla (RHD) - 15 05-04
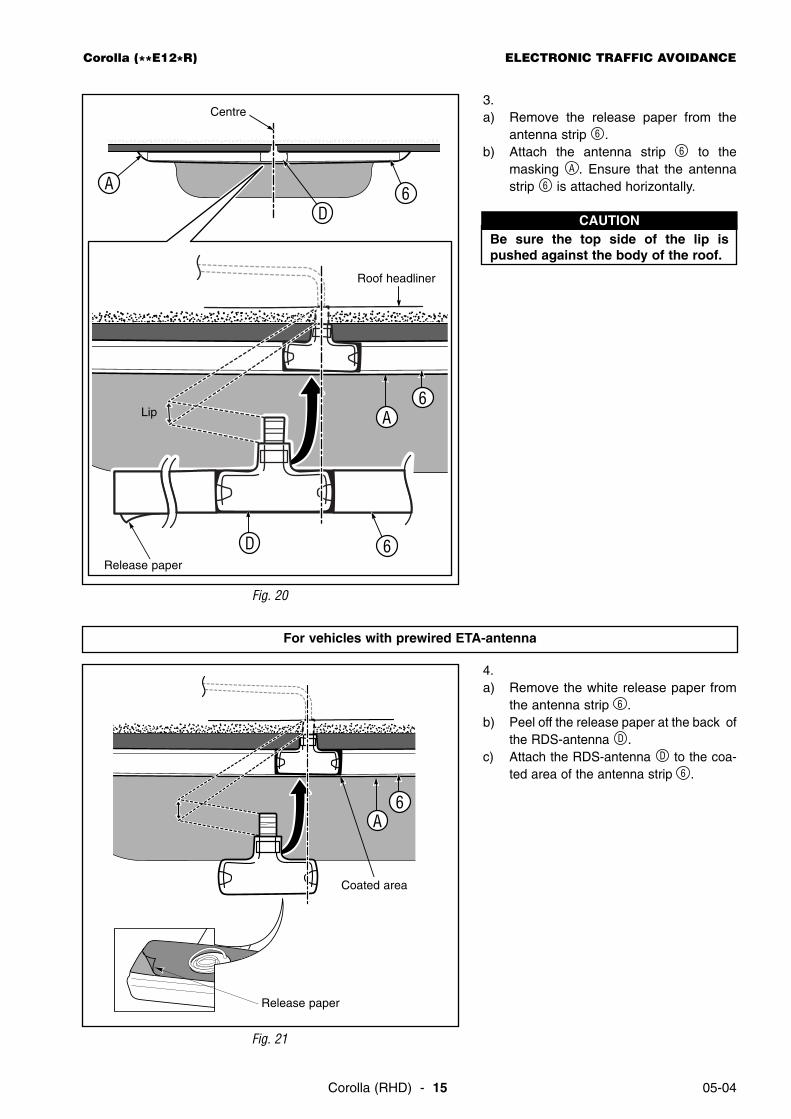
3.a) Remove the release paper from the
antenna strip .b) Attach the antenna strip to the
masking . Ensure that the antennastrip is attached horizontally.6
A
6
6
Fig. 20
6
6
6
Be sure the top side of the lip ispushed against the body of the roof.
CAUTIOND
A
A
Centre
Roof headliner
Lip
DRelease paper
4.a) Remove the white release paper from
the antenna strip .b) Peel off the release paper at the back of
the RDS-antenna .c) Attach the RDS-antenna to the coa-
ted area of the antenna strip .6
D
D
6
Fig. 21
Coated area
Release paper
For vehicles with prewired ETA-antenna
6A
Corolla (**E12*R) ELECTRONIC TRAFFIC AVOIDANCE
Corolla (RHD) - 1605-04
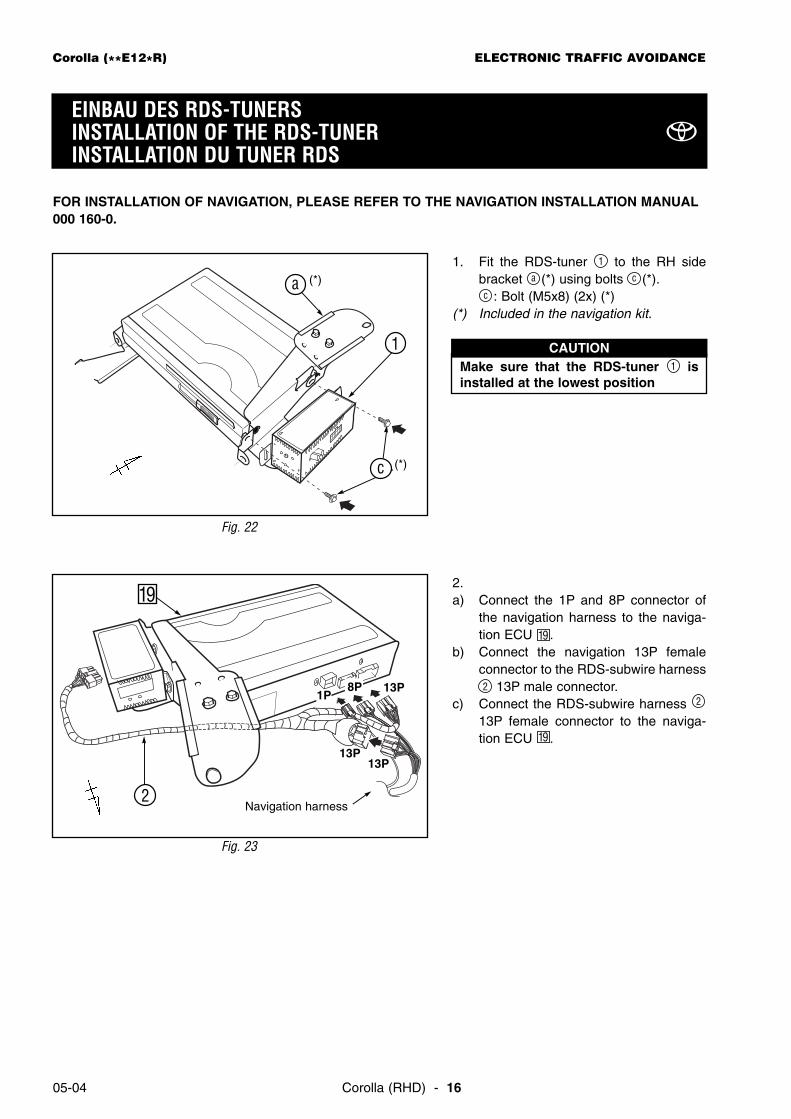
EINBAU DES RDS-TUNERSINSTALLATION OF THE RDS-TUNERINSTALLATION DU TUNER RDS
FOR INSTALLATION OF NAVIGATION, PLEASE REFER TO THE NAVIGATION INSTALLATION MANUAL000 160-0.
1. Fit the RDS-tuner to the RH sidebracket (*) using bolts (*).
: Bolt (M5x8) (2x) (*)(*) Included in the navigation kit.
c
ca
1
Make sure that the RDS-tuner isinstalled at the lowest position
1
CAUTION
2.a) Connect the 1P and 8P connector of
the navigation harness to the naviga-tion ECU .
b) Connect the navigation 13P femaleconnector to the RDS-subwire harness
13P male connector.c) Connect the RDS-subwire harness
13P female connector to the naviga-tion ECU .19
22
19
Fig. 23
19
2
13P13P
1P13P
Navigation harness
8P
Fig. 22
1
a (*)
c (*)
Corolla (**E12*R) ELECTRONIC TRAFFIC AVOIDANCE
Corolla (RHD) - 17 05-04
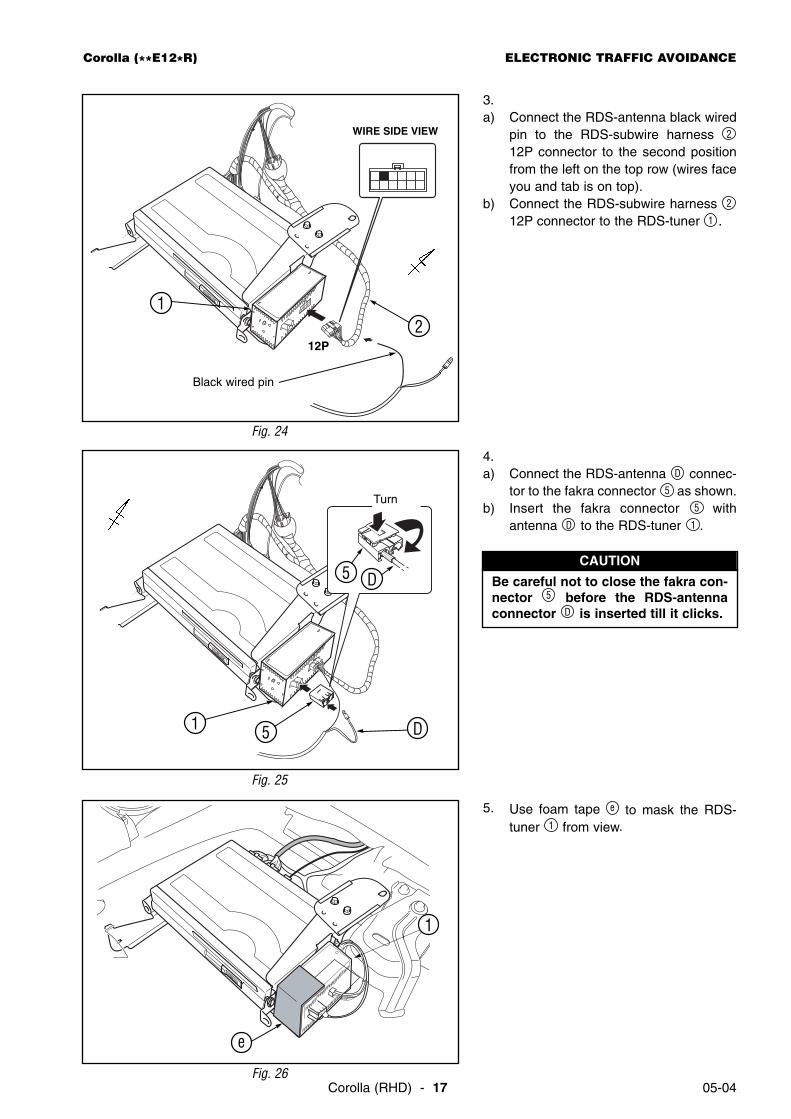
3.a) Connect the RDS-antenna black wired
pin to the RDS-subwire harness 12P connector to the second positionfrom the left on the top row (wires faceyou and tab is on top).
b) Connect the RDS-subwire harness 12P connector to the RDS-tuner .1
2
2
Fig. 24
12
12P
Black wired pin
WIRE SIDE VIEW
4.a) Connect the RDS-antenna connec-
tor to the fakra connector as shown.b) Insert the fakra connector with
antenna to the RDS-tuner .1D
5
5
D
Fig. 25
Turn
1
D
D5
5 Be careful not to close the fakra con-nector before the RDS-antennaconnector is inserted till it clicks.D
5
CAUTION
Fig. 26
5. Use foam tape to mask the RDS-tuner from view.1
e
e
1
Corolla (**E12*R) ELECTRONIC TRAFFIC AVOIDANCE
Corolla (RHD) - 1805-04
ENSURE THAT ALL REMOVED CONNECTORSARE PUT BACK CORRECTLY.
REFIT THE TRIM AND REMOVED PARTS.
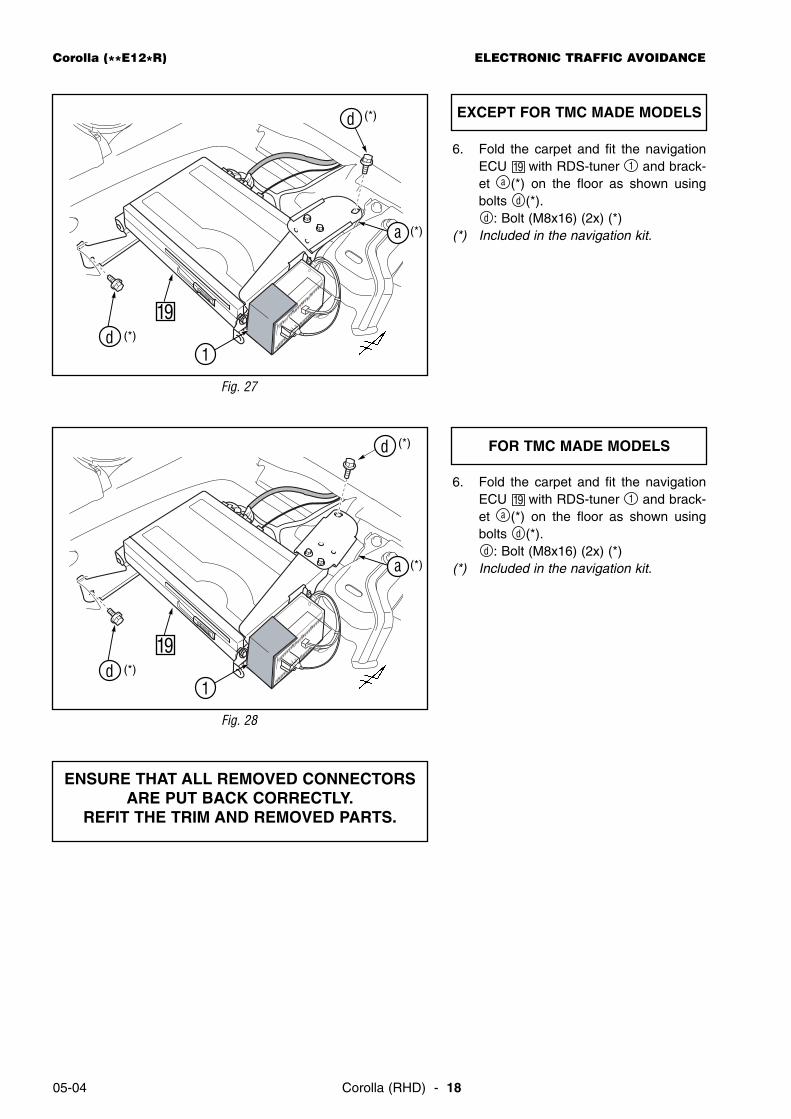
6. Fold the carpet and fit the navigationECU with RDS-tuner and brack-et (*) on the floor as shown usingbolts (*).
: Bolt (M8x16) (2x) (*)(*) Included in the navigation kit.
d
d
a119
Fig. 27
d
d
a
19
1(*)
(*)
(*) EXCEPT FOR TMC MADE MODELS
6. Fold the carpet and fit the navigationECU with RDS-tuner and brack-et (*) on the floor as shown usingbolts (*).
: Bolt (M8x16) (2x) (*)(*) Included in the navigation kit.
d
d
a119
Fig. 28
d
d
a
19
1(*)
(*)
(*) FOR TMC MADE MODELS

TOYOTA MOTOR CORPORATION


![cdbga kfij^`ehl] - Wing On Travel · 8,0 JcGq?02-.3-0./4 869+9+755+1.3 mvqe1|?BDBC CCCB HIJHGEFLK fBZUFE\du>](https://img.pdfslide.us/doc/110x75/5e2a7ac80c64e2116474bd81/cdbga-kfijehl-wing-on-travel-80-jcgq02-3-04-869975513-mvqe1bdbc.jpg)