Embed Size (px)
Citation preview

Electronic Medication Administration Record And
Bedside Medication Verification
Online Medication Administration Record: Allows you to document activity related to medications, including:
− Document the administration of a medication − Enter a comment related to the administration of a medication − Enter a reason a medication was not administered − Adjust the actual dose that is being administered − View a medication's scheduled administrations − View a medication's dose instructions. − View a medication's label comments − View a medication's monograph − View associated data for a specific medication
Benefits of BMV: - Scanning bar-coded patient armband and medication assists the nurse in documenting verification of the “5 Rights” (Patient, Med, Time, Dose, Route), but is not a substitution for the actual visual assessment by the administering nurse. - User will receive discrepancy warnings prior to administration of medications to help prevent medication errors - Provides real-time medication administration documentation
Terms Associated with eMAR/BMV Administer: To dispense a medication to the patient, with the patient receiving the dose. Barcode: A graphic representation of a set of letters and or numbers that can be read and transmitted by a specialized reader. 2D Barcode: A small, often square/rectangular, digital barcode that can contain letters and numbers, up to 5000 per just a few mm square. Linear Barcode: Traditional barcode, made up of a series of vertical lines in succession. Limited in the amount and type of data it can contain. Home Medications: Physical medications belonging to the patient prior to admission, and brought to the hospital to be taken in place of medication provided by our own pharmacy. Monograph: The published (by the FDA), standard information relating to any drug. Non-administer: To not give an eMAR scheduled medication to the patient for any reason. Med could have been administered and documented in a setting other than the specific eMAR entry (an override, for example), or not given at all. Scanner: The bar-code reader that is attached to your computer. It is simply a keyboard emulator. When you scan, it just “reads and types” for you. Schedule: A specific time a medication is due to be given to the patient. Patient Armbands:
− Patient arm bands will no longer be able to be printed on the nursing units, only in Admissions, ED, and the Outpatient Infusion Unit (there will be a printer in the Maternal/Child unit, but armbands will be transmitted to this printer by the proper registration specialists). Patient labels will still be able to be generated out of Med Forms.

− The physicians and admit date will be removed from the armbands, and the viewable data will be reduced to patient name, DOB, MR number, and account number.
− Patients will be fitted with an ID armband upon entry to Methodist Hospital. If the patient requires a new
armband because the original is damaged or removed, the clinician must contact admissions (ED after hours, House Supervisor if ED unavailable) to request a new armband which will be sent to the unit via the tube system.
− Compare the patient identifiers on the new armband with the corresponding data on the old one.
− Cut the old bracelet off (if necessary) and dispose of properly in the confidential shred bin.
BMV Work flow – Basic Overview:
− Review eMAR − Obtain medication from med cart, med room, or Pyxis − Pull meds from patient profile by time, place in the locked WOW drawer. − Take medication to patient room in original package. − Open PCS, highlight correct patient − Verify patient identity using 2 patient identifiers (name and DOB) − Scan patient's armband − Wait until “Patient ID Scanned Verified” message is off screen − Scan each medication − Watch screen for messages generated while scanning − Administer the medications − “File”
To initiate a status board medication check at beginning/end of shift: Click “Next Sched Med” column of status board to view medications and reassessments with the oncoming nurse for the shift. Do not leave shift with outstanding eMAR documentation unless reason given in report (ie: patient in surgery and will administer upon return). If PINK = past due. Once opened, the Next Sched Med list looks like this:
To access the eMAR and administer meds from this list, click the eMAR button at the bottom of the list:

To access eMAR from the static menu: From your status board, highlight the patient you need to view, and click on eMAR from the right static button toolbar.

Once you have accessed the eMAR, it looks as follows:
Electronic MAR Medications sort in the following order: Overdue for administration Next scheduled for administration No scheduled administration (monthly B12 injection) CANCELLED status DISCONTINUED status PRN (as needed)
-You can sort the medications on the MAR screen by clicking the column headers with a gray background (ie: medication, schedule, route). Clicking the header again reverses the sort order.-

And an additional view, to include the footer toolbar:
Additional information that can be view on the medication tab: Three types of information can be seen at the bottom of each medication tab when applicable. To view each, simply click on the title.
Label Comments: Select to view the complete label information entered by pharmacy. Label comments can be any specific information not related to the dose...

Dose Instructions: Click on this portion of the med display to view the complete dose instructions as entered by the pharmacy...
Linked Orders/Medications
Medications can be linked with each other on the eMAR in three ways: - Concurrent links are medications that should be given at the same time. - Alternating links are medications that should be given on an alternating schedule. - Historical links connect an edited medication with its previous order. Any associated link can be viewed under each medication on the patient's eMAR profile. Simply click the “+” to expand the link description.

Links Comments: As discussed previously, if a medication has an associated link, clicking “Links” will display the detailed information...
EMAR Footer Toolbar Administer: This button will not be utilized at Methodist Hospital and will remain low-lit at all times. Admin Comments: Click to document comments about drug administration (must have scanned or documented on med before this key is available). Non-Admin Reasons: Click to document reason a medication was not given Undo: Prior to filing (saving), can undo documentation. Admin Schedule: Click to document against a schedule other than the one displayed in next sched column. Can be used for documentation, but not for administration. THIS BYPASSES SCANNING, so not recommended for administration. View Order: Click to review original order +/- Admin Instructions: This allows you to open or collapse the label instruction and administration instructions for the entire eMAR. Additional Function: This will allow you to insert a manual barcode and check interactions between two medications. Manual Barcode (a choice within the “additional function” tab): Allows nurse to key in a bar code to verify a patient or medication when no scanner is available or in situation when scan doesn't work after 3 attempts. Display Options: This will allow nurse to view medications for up to 30 days in the past. Not all menu options are available at the same time. Your access to the menu options depends either on which medication is highlighted or your previous actions. Available menu options will appear with blue lettering on a gray background.

Colors on the eMAR Screens: The colors in the columns of the medication list on the MAR screens convey information about the medication orders. The following table describes the information that each color represents.
Color Indication Black Text on Green Background Item is selected Black Text on Pink Background Item is due or overdue Magenta Lettering Current documentation is unfiled (unsaved) Yellow Background Item was discontinued
Your Medication Administration Routine Get those Medication Orders to Pharmacy! All medication orders need to be scanned to the pharmacy as soon as received for input into the Meditech system. Medication orders will not show up on the eMAR for the nurse to administer until pharmacy personnel enter the new or revised orders. Stat meds withdrawn by override and administered must be noted and documented on as soon as possible after the order flows to the eMAR.
It is important for the nurse to be alert for any new medication, discontinue, or medication change
orders to ensure accurate administration. Always keep order acknowledgment (via your PCS status board and eMAR) and order co-signing (in the paper chart until no longer applicable) as up to date as
your situation allows.
Acknowledging Medication Orders: Nursing will be required to acknowledge new medication orders in the eMAR prior to administration. You will do so by checking the order as it was originally written against the order as it appears on the electronic MAR. (*NOTE* There will no longer be daily MAR vs. MAR checks needed since it will be one continuous, fluid document. You will only need to verify the eMAR against the written admitting medication orders once, and then any new/edited medication orders appearing on the eMAR against the original written order as they are added). If you attempt to administer a medication that has not been acknowledged, the following pop-up will appear on the screen and prevent you from doing so:
To acknowledge a medication, simply click the “ACK” tab and review the eMAR order.
How Medication Acknowledgment Works from eMAR:

1.) Click on all medications with “ACK” in the status column prior to administering. The acknowledgment screen appears displaying a box containing MAR information for the order, and below it, the Order Detail screen showing the order as it was originally entered. Be sure to scroll through the entirety of the acknowledgment screen to view all information available
And scrolling to the bottom of the screen, you can see the order details...
2) Compare the description, dose, route, and frequency information in both boxes. If the data matches and
the medication is clinically appropriate, the user clicks on the “Acknowledge” button at the bottom of the screen. When a discrepancy appears or the order is inappropriate for any reason, the user clicks on the “Reject” button and enters a required free-text reason for rejection.
3) Users can click on the “Exit” button to retire from the acknowledgment screen without either
acknowledging or rejecting the medication order, but will not be able to administer the med until acknowledgment is completed.
Rejected Medications:

Once a med order has been rejected and filed, the system will send you a warning that you are unable to administer rejected meds. To continue, click “OK”.
-IMPORTANT- The nurse must contact pharmacy about any rejected or omitted orders. Contact the pharmacy via
telephone to inform them of the med order in question, then, if necessary, write an order correction or clarification and fax to pharmacy. Once the rejection or omission is reviewed by pharmacy, they will
enter the correct order and discontinue any incorrect orders. However, if the nurse erroneously rejected an order, the same nurse will go to the “History” field of the eMAR and undo the rejection. An “undo” is
limited to the same nurse who rejected the order.
Acknowledging Discontinued or Canceled Medications: When a medication is canceled or discontinued, the “Acknowledge” option remains available until a user
acknowledges the action on that medication.
** Respiratory therapy medication orders will display on the eMAR, but RT will acknowledge those orders. Nursing can view, but will not acknowledge/document respiratory meds. RT will do so when they administer. **
Obtaining Medications: After reviewing the eMAR to determine medications that need to be administered, you must obtain the medications from the medication cart, med room, or Pyxis. Open the eMAR for each patient and obtain medications for one patient at a time. You may obtain multiple meds for the same patient as long as they are within our facility's time variance. (Methodist Hospital observes a one hour window on either side of the scheduled time. For example, DO NOT pull 1400 meds at 0900.) Take care not to throw away vials when preparing IV pushes, SC injections, and IM injections. Those vials will need to be scanned in the patient room before administering the dose. Pediatrics will draw up the medications outside of the patient’s presence, but will need to take the vial into the room to scan prior to administration. Multi-dose vials will be taken to the room, scanned, and returned to the med room.
NOTE: - Waste will still be documented at the Pyxis upon withdrawal using a licensed witness. Carry the vial to the
bedside to scan, and discard waste after administration. - DO NOT OPEN any packaging until you are at the bedside and have scanned the patient and the medication
(this may destroy the barcode, rendering it un-scannable).

We are now ready to go to our patient's room and give our medications!
Step 1: Scanning the Patient's Armband
− Enter patient's room with the medications (still in original packaging) and the computer/scanner − Wash hands. − Verify patient and date of birth with the armband. − Scan patient armband.
When the correct wristband is scanned, the user will receive the message
“Patient Scanned and Account Number Verified”. It will appear for 3 seconds and go away with no keystrokes required to clear it.
Note: The User Must Wait Until It Clears Before Any Medication Can Be Scanned!
If You have receive this a Critical Warning:
STOP!
The armband does not match the eMAR. The system prompts a warning and will not allow you to continue. When you click “OK”, you will be returned to your status board. What has gone wrong?
− You are in the wrong patient's room − You have the wrong eMAR pulled up on the screen − The patient has on the wrong armband
Click “OK” to return to your status board. Select your assigned patient again, and re-access their eMAR.
If you forget to scan the patient armband and scan a medication first, you will receive the following warning: “Patient needs to be scanned first. You scanned a RX/NDC Number”.

Always scan patient FIRST, and then you can scan each medication to be administered at that time. Click “OK”. You will see the message “Patient Scanned and Account Number Verified”. It will appear for 3 seconds and go away with no keystrokes required to clear it. (Note: The User Must Wait Until It Clears Before Any Medication Can Be Scanned!) Selecting a Medication: Before you can view or document a medication on any of the eMAR routine screens, you must select it using one of the following methods:
1) Scan the medication – Preferred Method! 2) Click on the medication within the list 3) Use the up and down arrows on the keyboard to move the highlight bar through the list of medications
Tip: By clicking on the word “Medication” in the top label area, your list will be sorted in alphabetical order. This
will assist you when looking for a specific medication by name.
The selected medication appears in black type with a green background. All other (non-selected) medications appear in blue type with white backgrounds. Step 2: Scanning Medications
− Scan each medication in its original package. − When scanned, the eMAR will be highlighted to the correct medication.
Signs of a Successful Scan If the scan matches a medication on the patient profile, the system will mark the scan as follows: a) medication displayed in green, b) a bar code symbol will appear in the status field, c) a check mark will.
appear in the medication field, and d) the purple “administered” line will be added to the selection
− Any number of orders can be scanned and filed at once. − If you file after each medication, you will have to scan the patient armband each time. − Per policy, nursing will scan the barcode 3 times before a manual barcode entry will be allowed.
NOTE: Heed any warning messages between medications!

− Enter the administration comment for the medication. For reference, the medication for which you are
entering a comment appears at the top of the screen. − When you are finished entering the medication comment, click on the “OK” button to save the comment
for filing and return to the Medication Administration Record screen. − To enter an administration comment while using the “admin schedule” routine, after selecting your time
and selecting “administer”, click inside the empty field below the admin comment label, next to the dose you are administering. This will open your text box for entry.
Non-Administration of Medications When an eMAR dose is not given or will not be documented against (as in the case of downtime), we need to non-administer the medication for that schedule. Remember, you can only Non-Admin the schedule displaying in the “Next Sched” field. To do so, click the “Non-Admin Reason” on the footer Entering Non-administration Reasons:
Enter a non-administration reason to provide an explanation of why you did not give a medication to a patient. For example, if a patient has sliding scale insulin ordered and the blood glucose falls below the coverable threshold, you need to document a “non-admin” reason of “acceptable glucose level” for the scheduled insulin administration. To enter a non-administration reason: - Highlight the medication - Ensure the date/time that you didn't administer medication is the top listing in “Next Sched”. Click the “Non-admin Reasons” menu option. The non-administration reasons screen appears.

From the list of non-administration reasons, select the reason that most closely explains why you did not give the medication to the patient. For your reference, the medication for which you are entering a non-administration reason appears at the top of the screen...
NOTE: The most frequently used reasons are at the top. The other options are alphabetical. If additional non-admin reasons are identified, please notify one of the clinical informatics nurses (x6162, 6163) or pharmacy (x7164). To save the non-administration reason, click OK and file the change. To discard the information, click the undo menu option.
Next Sched Column:
The top date and time will be the dose documented against if the documentation is done by simply scanning. Another option to select a time other than the date/time listed at the top is to click on the “Next Sched” column and choose the desired administration date/time. Clicking on the “Next Sched” column will display the following screen:
(Graphic on Following Page)
When you select an alternate schedule to document against and click “OK”, it will insert that desired schedule

into the on-deck position and you can scan against it or non-admin that time.
Dose Verification: BMV verifies the medication and also that the scanned packaging matches the ordered dose. If the amount scanned is less than ordered, the user is presented with a Dose Verification routine. For example, two tablets of the same medication (ie: Colace, 100mg tab, 200 mg PO daily). After user scans the first part of the dose, the system tells the user how much was ordered, how much scanned, and how this compares to the amount ordered. The user then scans additional units to match the ordered dose. If the dose is greater than the order, the user is prevented from continuing to document and they will be brought back to the eMAR.
Note: Most of the time, you should not administer a dose less than ordered without an order to do so. However, for example, the patient has 650 mg of acetaminophen ordered, but refuses one of the two pills. In this situation, only scan one of the 325 mg tablets and enter the comment “patient refused second pill”. Never administer greater than the ordered dose! EMAR and Adjust Dose: If you scan the medication with amount greater than/less than ordered, a screen will display allowing you to select the dose actually administered. You also still have the option to adjust the dose using the “edit” routine accessible via the history column (for example: 12.5 mg ordered, but only 6.25 given because IV infiltrated or patient refused because “medication burned”). The bottom line will remain pink (stating your overage/shortage) because you scanned a 25 mg vial. The circular button is representing the amount of drug that you actually are administering. If you have scanned less than the ordered dose, you will be prompted to scan additional units.
Caution: You must scan each item individually to verify each is the correct med and strength and that
the total dose is correct.
The “Manual Barcode” option within the “Additional Functions” button: Inside the “Additional Functions” button on the footer, the “Manual Barcode” option allows a nurse to key in a barcode to verify a patient or a medication when no scanner is available or in a situation when scan doesn't work. It invokes the same safety checks performed by scanning, but will show as “not scanned”. This practice should NOT be used routinely. The nurse will attempt to scan the medication three times (per Methodist Hospital

nursing policy) before using the manual barcode option. - Select “manual barcode” and hand key in either the pt account number or NDC number from the medication. - Administer the med. - Send empty med package to pharmacy via tube with notation of “will not scan”
Documenting Medications with Assessments/Reassessments Some medications have assessments and reassessments attached to them that will automatically pop open when the medication administration is documented. For example, when documenting Neupogen, an assessment pops up for the nurse to enter the injection site:
If more than one assessment screen is attached to a medication order (for example, one for the drug ordered and one for the route of administration), these screens will appear consecutively and you can navigate between them using the “Go To” button in the bottom right hand corner of tool bar. Reassessments will be added to medications at a later date!
Critical Warning
If you receive the message “The Barcode You Scanned Was Not Found on the Medication Profile”:
STOP!
If the medication barcode doesn't match any order on the patient's medication profile, the system prompts this warning. You have the wrong medication, or it could be a problem with the barcode. Carefully check before proceeding!

If You Receive the Message: “Barcode Not Found” - Attempt to scan again (Rotate barcode, flatten barcode, make sure barcode is intact, change the angle/distance between the barcode and scanner.) - Enter appropriate NDC or RX number into manual barcode function. If the computer can match the medication, you will receive the four indicators of a successful scan in the correct medication field. If not found, but appearing on eMAR correctly, administer using the steps below.
If You Receive the Message “No NDC #”: If the computer won't accept the NDC or RX number, verify medication with another RN → administer the medication via “Admin Sched” and “Administer” buttons (enter admin comment re: warning message; include name of verifying nurse) → send empty package to pharmacy via tube with notation of warning message displayed on eMAR.
NOTE: - Remove med from package carefully to keep the barcode intact. When sending to pharmacy, they need the information on the package to enter into the computer to prevent future scanning issues. - When staff “Admin by Schedule” a medication without either scanning or entering the manual barcode, this bypasses the built-in safety mechanisms.
Arrivals from ED and Undocumented ED Medications: Your patient has arrived from ED, and there is a medication on the eMAR that was ordered in the ED and you have no documentation to indicate whether it was administered or not. These are the steps you will take to resolve this question:
- CALL ED. They will fix it. Documenting Insulin Administration: When documenting administrations of correctional insulin, you must actually enter the number of units that you are giving to the patient. When you scan the insulin vial, the medication will be highlighted.

You can see the actual ordered sliding scale that is active on your patient under the “label comments” header. When you administer, you will receive a screen that will allow you to indicate how much are going to administer. The first screen prompts you to select whether you are going to give what has been scanned (the entire vial), or what has been ordered (the actual dose). You ALWAYS want to select “Enter”, and enter the actual number of units..
When you select “enter”, you will receive a screen that allows you to type in the number of units that you are giving.
You key in the number of units you are giving under the “Administered Dose” header, and click “OK”. Remember, when you are documenting an insulin injection, you will also see the injection site documentation screen pop open for you to document your administration.

MDV (multi-dose vials; for example - insulin) will be taken to the patient room, scanned, administered, and returned to the patient's drawer in the med room Other Important Information To Note When Documenting Medications Multiple Matches: Means the system has found more than one med on the profile with a matching NDC #. These will be linked meds. Reasons could include varying dose amounts, alternating schedules, a scheduled med and a prn dose. Both entries will display. Carefully choose the correct medication order you wish to administer against by clicking it. Click OK. If the order is a duplicate, non-administer (for one-time meds) or reject (for scheduled meds) the appropriate one
Review of Scanning Medication 1) Best way: Scan the patient and scan each medication with scanner 2) Next best way: Enter NDC/RX number into the Manual Barcode routine
3) Least favorable way: Use the “Administer” button
History Column Use this column to view medication history (date/time administered, dose given, who gave, etc), edit, or undo entries. NOTE: The cutoff date for eMAR editing is the same as all other Meditech documentation, 72 hours post-discharge. Editing Documentation: You can edit dose given, non-administration reason, and administration comments. To edit, follow these steps:
− Click the history column associated with the medication that you need to edit − Highlight the date/time you want to edit − Click the gray background of dose given, non-admin reason, or admin comment that requires editing − Delete old, enter new or additional data − To save the changes, click OK. The original entry is on the bottom, the edited entry is in green on top. − To save the information to the record, click “Return” and file the change. To delete the information, click
the “Undo” menu option prior to filing.
Undoing Documentation: You can Undo (cancel) documented administration or non-administration of medications from the history column. Caution: After you use the “Undo” option to cancel documented actions, there is no “redo” option available. In other words, if you cancel the entering of an administration comment, the only way to restore the comment is to re-enter it manually.

To undo, follow these steps:
− Click the history column for the medication you need to undo − Highlight the date/time of the documentation that you need to undo − Click the “Undo” button on the bottom toolbar. The original entry will be on the bottom, the undone entry
is in green on the top. − To save the changes, click “Return” and file the information. To delete the information prior to filing,
highlight the changes and click the “Undo” menu option. Undoing documentation prior to filing: If you choose to undo an administration in the eMAR prior to filing, you must highlight the purple documentation footer containing the date, time, and dose....
Then click “Undo” on the toolbar.
Obtaining a Co-signature for High-risk Medications When documenting high-risk medications (heparin, chemo-therapies, insulin drips, PCA's, etc.) a nursing co-signature must be documented at the bedside prior to administration. Medications requiring a co-signature have an indicator like the following:

When the nurse scans the medication for administration, the following co-sign warning screen will display...
After acknowledging the warning by clicking OK, a co-sign screen will be made available and must be completed by a second nurse before documentation of administration will be allowed:
After the co-signature is entered, the nurse will be able to click “OK” in the bottom right hand corner and administer and document the medication.
Regular SC insulin injections no longer need an actual co-signatory, but will still be required to be visually checked by a second nurse prior to administration. PCA’s The administration of new PCA syringes will be just like any other medication. You will remove the vial from the Pyxis, take it to the patient room, scan the patient armband, scan the syringe, and install it in the pump. You will still document regarding your PCA on your existing PCA assessment found on your interventions list.
Documenting Medications with Associated Data Specific medications have associated data linked to them. This is indicated by the small, black arrow in the “Assoc” field....

Certain medications are often tied to some existing result for their administration, either an assessment finding or a lab value that should be reviewed prior to giving it to your patient. The associated data from the EMR is easily accessible from this box, and clicking on the arrow will cause the pertinent data to appear for you to review. For example, a Digoxin level and heart rate when documenting for Lanoxin (Digoxin) will display…
Protocol Comments: If there is a protocol associated with the administration of a medication, it will be displayed by selecting the “Protocol” tab...
Discontinued Medications Manually discontinued medications: Will fall to the bottom of the list and remain on the eMAR screen for 24 hours after the yellow background and the DC notification appear. Automatically discontinued medications: The system automatically discontinues medication orders when they reach their stop dates (when one is entered) or terminal dose. When all scheduled administrations are given to the patient, “DC” and the discontinued date and time will appear (along with the yellow background). Discontinued medications move down the list and will only remain on the eMAR for 24 hours after the yellow background and DC notations appear, then they will drop off. Documenting on a discontinued medication: If a nurse gives a med and it gets discontinued on the MAR before it is documented, it must still be documented. If any documented doses remain on the schedule but were not given, you would non-administer those. At that point, the discontinued med will fall to the bottom of the eMAR. Patient allergies with eMAR: If you enter an allergy after the MAR has been entered by pharmacy, a new allergy conflict will appear to warn you if the patient has a medication order for that allergen. Click “OK”, and then contact the physician or

pharmacy.
Overriding Medications for Administration: Our practice of overriding for medications that have been ordered but are not yet appearing on the MAR needs to be visited here. Unless it is an emergent medication, you must wait until pharmacy has entered the order and it shows up on the patient profile before you can administer and document the med. If you must override, here is what will happen: -You will pull med from the Pyxis. A med can be overridden and pulled from Pyxis if it is a one-time order only! -The Pyxis will create an order on the eMAR for the med with a STK-MED frequency -You will administer and document against this entry. The eMAR will prompt you to enter the prescribing doctor's name, and the ordered frequency (it does this because it is not based on an order, but on your override. This helps pharmacy to match it with the correct order when they receive it) -When pharmacy receives the order, they will enter the actual order, and it will show up on your eMAR again with a frequency of “Once”. -You will need to go into your eMAR and make a “Non-Admin” entry on this duplicate order.
IV Spreadsheet Any medication that is displayed on your eMAR with a route of IV will flow to the IV spreadsheet. The IVSS will allow you to perform certain IV Site/IV Med related tasks. Benefits of the IV Spreadsheet
- IV Spreadsheet accommodates documentation of continuous and titrate IV’s. - Spreadsheet format lends itself well to tracking/trending titration over time - Medication dose adjustments and assessment documentation occur in tandem - Documentation of titration detail appropriately populates the medications panel in the EMR. - Built in logic: Calculations and actions - Ease in documenting IV Site and I & O assessment with access directly from the IV Spreadsheet.
To access the IV Spreadsheet, use the “IV Spreadsheet” static button located to the right of the screen in any patient documentation routine.
Using the IV Spreadsheet
- Initial administration process has no changes (you will select and administer the medication from the eMAR)
- Titrate Medications will be identified as such on the eMAR in the dose section

- Document any assessments associated with the medication. Any attached assessments will automatically open up upon administration.
- If you documented the IV site previous to administering the medication, you will be prompted to select that site as well.
- File, indicating the bag has been hung and the medication is infusing.
- Documenting this first administration on the eMAR inserts the first column on your IVSS and begins the titration here.
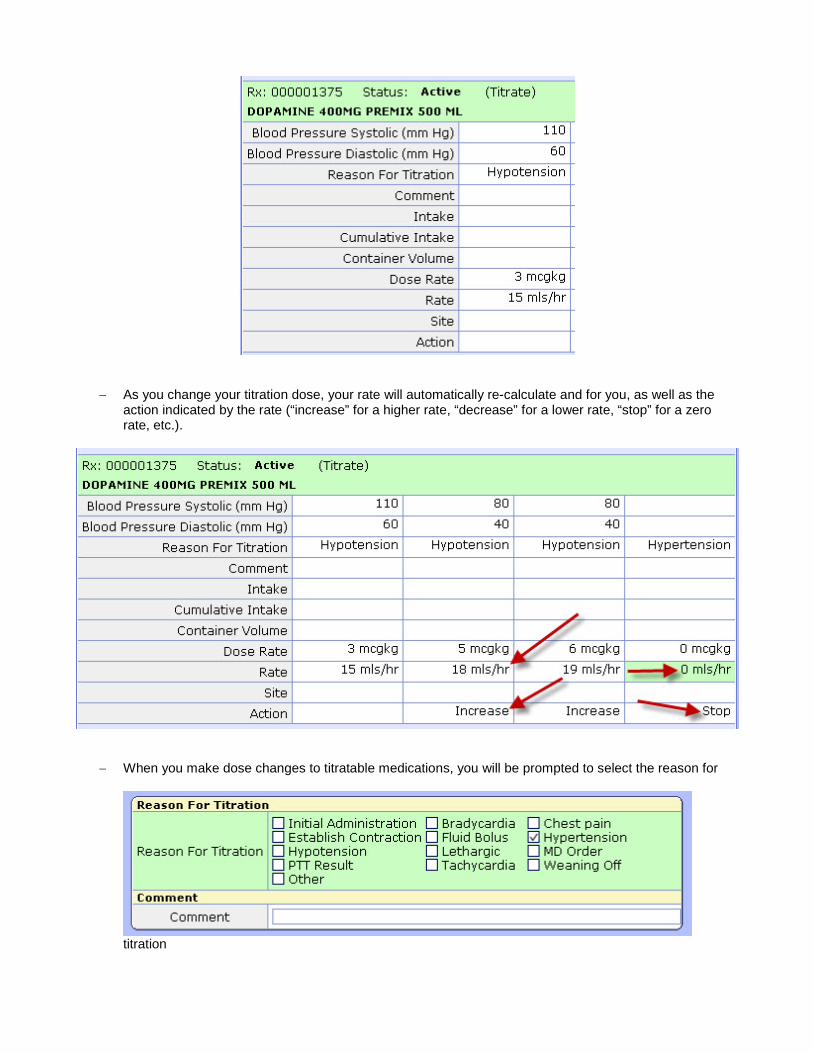
− As you change your titration dose, your rate will automatically re-calculate and for you, as well as the action indicated by the rate (“increase” for a higher rate, “decrease” for a lower rate, “stop” for a zero rate, etc.).
− When you make dose changes to titratable medications, you will be prompted to select the reason for
titration

− When IV fluids/medications are discontinued, they will turn yellow and flow to the bottom of the
spreadsheet, where they will remain for 24 hours before dropping off. This is the same as in eMAR. − NICU nurses ONLY will enter their IV intake in the appropriate “Intake” column for all medications
appearing on the IVSS. These entries will automatically auto-calculate in the “cumulative intake” field. These entries will flow to the I&O in the EMR. Only document IV Intake on the IVSS. Double documentation will wreck the totals in the EMR! All other nurses will continue to document IV intake on their existing I&O assessment, not in the IVSS.
!Remember!
The nurses' responsibility with eMAR is to make sure that there are no undocumented schedules remaining at the end of each shift. Every available time should either be
documented as an administration or as a “non-admin” with reason.
The nurse is the final check of medication accuracy. The Meditech eMAR/BMV process is only a tool for an additional measure of safety during medication administration.
Verification of patient identity, visual check of the armband, physician orders, eMAR, and medication packaging are essential to ensure safe medication administration.
Miscellaneous Information
If a patient accidentally gets discharged from the system, the nurse MUST call the pharmacy as soon as practical because all orders discontinue at discharge. This includes medication orders, and they will have to be re-entered. There will be flag labels in the Pyxis for ampules. When an ampule is withdrawn, the med will be drawn up in the med room (using a filtered needle), and a flag label will be affixed to the syringe for scanning at the bedside. Downtime In the event of system downtime, here is how the process will work: A copy of the MAR (the exact same form we use now) will write to a file on a server at frequent, regular intervals (@ 1 hr). Each time it writes, it will overwrite its old version. This server will convert this file to a pdf, and send it to a specified off-network computer as well as sending the masters to IS. The computer that has access to the MARs will have a password protected icon on the desktop. When the downtime MARs are needed, the lead nurse on each unit will call IS to receive the current password and will log in and print out all of the needed paper MARs. Medication documentation will then proceed on paper until the downtime situation is resolved. eMAR clean-up will be done by making “non-admin” entries for all of the med schedules that are documented on paper. Home Medications When a patient brings in home medications for administration, they will be sent to the pharmacy to be verified and to be labeled with a barcode. There will be a tab on the eMAR labeled “home medication”, or indications in the “label comments” field that you will use for administration. The eMAR Administration Report: The eMAR Administration Report is generated and viewed by nursing managers to insure compliance. This report includes the following information: - A list of scheduled times for acknowledgment

- When the medication was acknowledged - By whom it was acknowledged - Whether the order was acknowledged or rejected -Whether the medication was administered Strive to stay on the positive side of this report!