Embed Size (px)
Citation preview
ELECTRONIC DONOR RECORD STANDARD OPERATING PROCEDURE AND USER GUIDE
Version 5.1
June 2014

2 EDR Standard Operating Procedure and User Guide V5.1 16 June 2014

3 EDR Standard Operating Procedure and User Guide V5.1 16 June 2014
GENERAL DOCUMENTATON UPDATES EDR SYSTEM UPDATES, R2, 2014 (June 2014)
GENERAL DOCUMENTATION UPDATES
ORGAN PRE-OR
Admission course
Additional text added (page 89) to describe the correct data entry required when
SBP<70mmHg, SBP>170 mmHG, Oliguria <20 ml/hr, Temp <35 and Temp > 38 episodes do
not occur.
Flowsheet
Additional text added to Intake section description (page 104) to describe the correct data
entry of the dosage of crystalloids, drug and inotrope infusions.
Medication/Other Drugs/Nutrition
Additional text added to the description (page 105) to describe the correct data entry required
of the dosage of medications.
Med Soc List
Additional text added (page 64) to describe that once a Med Soc form has been added to a
referral, it cannot be deleted. All Med Soc forms created for a referral will be included in the
Donor Chart on transmission.
Organ offer Summary
Additional text added (page 75) to describe the verbal “Donor Brief” required to be given to the
Transplant Coordinator as described in the ATCA National Standard Operating Procedures
Electronic Donor Record Utilisation For: Organ Offer Process Organ Transfer Documentation.
Web Browser
Text added (page 12) to note that CHROME will become the only supported web browser from
September 2014
R2 2014 UPDATE
ALL PAGES
A warning added if a user enters a date in the future (60 days from current date) where future
dates do not make sense (page 25).
CASE FINDER
Refinements made to improve the ease of searching and filtering for referrals including
removal of the condition to initially display only the last 3 months of referrals. (page 21, 22).
TASK MANAGEMENT
Refinements made to improve assignment and management of Tasks (page 48).
4 EDR Standard Operating Procedure and User Guide V5.1 16 June 2014
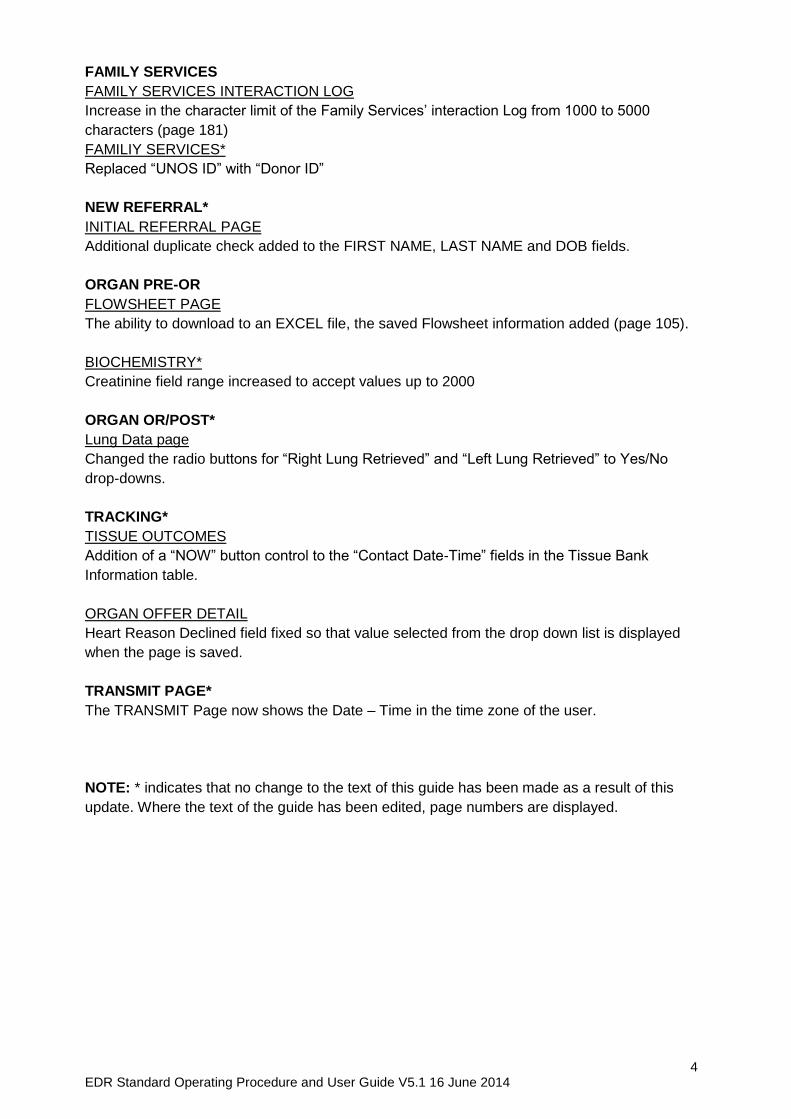
FAMILY SERVICES
FAMILY SERVICES INTERACTION LOG
Increase in the character limit of the Family Services’ interaction Log from 1000 to 5000
characters (page 181)
FAMILIY SERVICES*
Replaced “UNOS ID” with “Donor ID”
NEW REFERRAL*
INITIAL REFERRAL PAGE
Additional duplicate check added to the FIRST NAME, LAST NAME and DOB fields.
ORGAN PRE-OR
FLOWSHEET PAGE
The ability to download to an EXCEL file, the saved Flowsheet information added (page 105).
BIOCHEMISTRY*
Creatinine field range increased to accept values up to 2000
ORGAN OR/POST*
Lung Data page
Changed the radio buttons for “Right Lung Retrieved” and “Left Lung Retrieved” to Yes/No
drop-downs.
TRACKING*
TISSUE OUTCOMES
Addition of a “NOW” button control to the “Contact Date-Time” fields in the Tissue Bank
Information table.
ORGAN OFFER DETAIL
Heart Reason Declined field fixed so that value selected from the drop down list is displayed
when the page is saved.
TRANSMIT PAGE*
The TRANSMIT Page now shows the Date – Time in the time zone of the user.
NOTE: * indicates that no change to the text of this guide has been made as a result of this
update. Where the text of the guide has been edited, page numbers are displayed.
5 EDR Standard Operating Procedure and User Guide V5.1 16 June 2014
CONTENTS
CONTENTS ...................................................................................................................................5
INTRODUCTION ...........................................................................................................................9
EDR TRAINING MATERIALS ................................................................................................................ 9
EDR SYSTYEM UPDATES ................................................................................................................... 10
1. INITIAL SET-UP OF THE EDR ................................................................................................ 12
HARDWARE SETUP AND CONFIGURATION ...................................................................................... 12
SOFTWARE SETUP AND CONFIGURATION ....................................................................................... 12
E-MAIL AND NETWORK REQUIREMENTS ......................................................................................... 14
ACCESSING THE EDR ........................................................................................................................ 14
EDR USER SUPPORT AND TROUBLESHOOTING ............................................................................... 17
2. HOW TO USE THE EDR STANDARD OPERATING PROCEDURE AND USER GUIDE .................... 19
TABS ................................................................................................................................................. 19
DATA FIELDS ..................................................................................................................................... 20
PAGES NOT CURRENTLY USED IN AUSTRALIA .................................................................................. 20
NATIONAL AND STATE/TERRITORY STANDARD OPERATING PROCEDURES .................................... 20
3. GENERAL FEATURES OF THE EDR ........................................................................................ 21
GENERAL USAGE .............................................................................................................................. 21
NAVIGATION .................................................................................................................................... 21
FINDING ACTIVE DONOR CASES ....................................................................................................... 21
INPUTTING DATES AND TIMES ......................................................................................................... 25
TELEPHONE AND FAX NUMBERS ..................................................................................................... 26
CALCULATIONS ................................................................................................................................. 26
INFORMATION FIELDS ...................................................................................................................... 27
DRAG-AND-DROP MARK-UP TOOL .................................................................................................. 29
‘GROWING’ PAGES ........................................................................................................................... 29
ELECTRONIC SIGNATURES ................................................................................................................ 31
SAVING AND CLEARING DATA .......................................................................................................... 31
PATIENT HEADER BAR ...................................................................................................................... 33
MANDATORY DATA .......................................................................................................................... 34
AUTOMATIC TIME OUT .................................................................................................................... 34
4. NEW REFERRAL TAB ........................................................................................................... 35
INITIAL REFERRAL PAGE ................................................................................................................... 35
DUPLICATES...................................................................................................................................... 39
ASSIGNMENTS .................................................................................................................................. 40
6 EDR Standard Operating Procedure and User Guide V5.1 16 June 2014
TASK MANAGEMENT ....................................................................................................................... 46
5. TRACKING TAB ................................................................................................................... 49
REFERRAL SUMMARY PAGE ............................................................................................................. 49
REFERRAL WORKSHEET PAGE .......................................................................................................... 51
TISSUE DONOR SCREENING PAGE – NOT APPLICABLE IN AUSTRALIA ............................................. 55
AUTHORISATION FORM PAGE ......................................................................................................... 56
PRELIMINARY PLASMA DILUTION PAGE – NOT APPLICABLE IN AUSTRALIA .................................... 59
BRAIN STEM REFLEXES PAGE – NOT APPLICABLE IN AUSTRALIA..................................................... 60
MED SOC LIST ................................................................................................................................... 61
APPROACH INFORMATION PAGE ..................................................................................................... 65
TISSUE OUTCOMES PAGE ................................................................................................................. 67
FINAL ORGAN DISPOSITION PAGE – NOT APPLICABLE IN AUSTRALIA ............................................. 70
REFERRAL NOTES PAGE .................................................................................................................... 71
ADVERSE EVENT/ INCIDENT NOTE PAGE ......................................................................................... 72
QA CASE LOCK PAGE ........................................................................................................................ 73
ORGAN OFFER SUMMARY PAGE ...................................................................................................... 75
TRANSPORTATION SUMMARY PAGE ............................................................................................... 77
TRANSPORTATION DETAIL PAGE ..................................................................................................... 78
ASSIGNMENT SUMMARY PAGE ....................................................................................................... 80
CASE AUDIT SUMMARY PAGE .......................................................................................................... 81
CASE AUDIT DETAIL PAGE ................................................................................................................ 82
VIEW AUDIT DETAIL ......................................................................................................................... 82
6. ORGAN PRE OR TAB ........................................................................................................... 83
DONOR INFORMATION PAGE .......................................................................................................... 83
AUTHORISATION INFO PAGE ........................................................................................................... 88
ADMISSION COURSE PAGE .............................................................................................................. 89
PHYSICAL ASSESSMENT PAGE .......................................................................................................... 92
ORGAN PHYSICAL EXAMINATION PAGE........................................................................................... 95
LAB PROFILE – BIOCHEMISTRY PAGE ............................................................................................... 96
LAB PROFILE – HAEMATOLOGY PAGE .............................................................................................. 98
LAB PROFILE- URINALYSIS PAGE ...................................................................................................... 99
TOXICOLOGY PAGE – NOT APPLICABLE IN AUSTRALIA .................................................................. 100
CULTURE – CULTURE RESULTS PAGE ............................................................................................. 101
CULTURE – CULTURE REPORTS PAGE – NOT APPLICABLE IN AUSTRALIA ...................................... 102
HAEMODYNAMICS/TEMP PAGE – NOT APPLICABLE IN AUSTRALIA .............................................. 103
FLOWSHEET PAGE .......................................................................................................................... 104
7 EDR Standard Operating Procedure and User Guide V5.1 16 June 2014
MEDICATIONS/ OTHER DRUGS/ NUTRITION PAGE ........................................................................ 107
SEROLOGY PAGE ............................................................................................................................ 108
FLUID BALANCE PAGE .................................................................................................................... 110
BLOOD PRODUCT / COLLOID ADMIN PAGE ................................................................................... 111
PLASMA DILUTION PAGE ............................................................................................................... 112
CARDIAC DATA – ECG PAGE ........................................................................................................... 115
CARDIAC DATA – ECHOCARDIOGRAM PAGE ................................................................................. 116
CARDIAC DATA - ANGIOGRAM PAGE ............................................................................................. 117
RESPIRATORY DATA – CXR PAGE ................................................................................................... 118
RESPIRATORY DATA – BRONCHOSCOPY PAGE .............................................................................. 119
RESPIRATORY DATA - LUNG MEASUREMENT PAGE ...................................................................... 120
RESPIRATORY DATA – ARTERIAL BLOOD GASES PAGE................................................................... 121
DIAGNOSTIC TESTS PAGE ............................................................................................................... 122
7. ORGAN OR/POST TAB ...................................................................................................... 123
INTRAOPERATIVE MANAGEMENT PAGE ........................................................................................ 123
DCD FLOWSHEET PAGE .................................................................................................................. 126
RETRIEVAL TEAM PAGE .................................................................................................................. 127
RENAL DATA PAGE ......................................................................................................................... 128
LIVER DATA PAGE ........................................................................................................................... 131
HEART DATA PAGE ......................................................................................................................... 133
LUNG DATA PAGE .......................................................................................................................... 134
PANCREAS DATA PAGE .................................................................................................................. 135
INTESTINE DATA PAGE ................................................................................................................... 137
SUPPLY LIST PAGE .......................................................................................................................... 138
HOSPITAL PERSONNEL PAGE ......................................................................................................... 139
DONOR SUMMARY – DONOR SUMMARY PAGE ............................................................................ 140
DONOR SUMMARY – ORGAN DISPOSITION PAGE ......................................................................... 142
KIDNEY PERFUSION – GENERAL INFORMATION PAGE – NOT APPLICABLE IN AUSTRALIA ............ 144
KIDNEY PERFUSION – MEDICATION PAGE – NOT APPLICABLE IN AUSTRALIA .............................. 145
KIDNEY PERFUSION – SUPPLY LIST PAGE – NOT APPLICABLE IN AUSTRALIA ................................ 146
KIDNEY PERFUSION – PERFUSION FLOW SHEET PAGE – NOT APPLICABLE IN AUSTRALIA ........... 147
8. ATTACHMENTS TAB ......................................................................................................... 148
9. TRANSMIT ....................................................................................................................... 153
10. NOTES TAB ...................................................................................................................... 161
REFERRAL NOTE PAGE.................................................................................................................... 161
ADVERSE EVENTS/ INCIDENT NOTE PAGE ..................................................................................... 163
8 EDR Standard Operating Procedure and User Guide V5.1 16 June 2014
FILTERING/SORTING NOTES ........................................................................................................... 164
11. SUMMARY / ANZOD TAB ................................................................................................. 165
ANZOD SUMMARY PAGE ............................................................................................................... 165
ANZOD ADDITIONAL INFO PAGE .................................................................................................... 173
TRANSFERRING DATA TO THE ANZOD ........................................................................................... 175
12. FAMILY SERVICES MODULE .............................................................................................. 177
13. DASHBOARD TAB ............................................................................................................. 186
INITIAL SETUP ................................................................................................................................. 187
WIDGET MODIFICATION/DELETION .............................................................................................. 188
VIEWING AND EDITING WIDGETS .................................................................................................. 189
14. DASHBOARD - REPORTING TAB ........................................................................................ 191
15. DASHBOARD ASSIGNMENTS TAB ...................................................................................... 198
16. APPENDICES .................................................................................................................... 199
APPENDIX 1: NATIONAL AND LOCAL STANDARD OPERATING PROCEDURES ................................ 199
APPENDIX 2: EDR PAGES – NOT RELEVANT TO AUSTRALIA ........................................................... 201
APPENDIX 3: ETHNIC ORIGIN ......................................................................................................... 202
APPENDIX 4 - RELIGION.................................................................................................................. 205
APPENDIX 5: OCCUPATION ............................................................................................................ 206
APPENDIX 6: TRANSPLANT UNITS – CODE AND FULL DESCRIPTION ............................................. 207
APPENDIX 7: THE ROLE OF THE STATE/TERRITORY EDR TRAINERS ............................................... 208
APPENDIX 8: EDR/ANZOD MAPPINGS ........................................................................................... 210
17. GLOSSARY ....................................................................................................................... 214
18. PREVIOUS EDR APPLICATION UPDATES ............................................................................ 216
9 EDR Standard Operating Procedure and User Guide V5.1 16 June 2014
INTRODUCTION The Electronic Donor Record (EDR) Standard Operating Procedure and User Guide (EDR
SOP User Guide) provides information and direction on how to use the EDR for an actual or
intended donor.
The EDR SOP User Guide details which pages should be accessed, which data fields entered
and where national or local standard operating procedures should be followed.
The EDR SOP User Guide is used by the State and Territory EDR Trainers to train all Users
and provides a valuable reference for all Users as they use the EDR.
EDR TRAINING MATERIALS
In addition to the EDR SOP User Guide, EDR Trainers and Users have access to the following
materials to support the use of the EDR:
EDR Training PowerPoint Presentation
The EDR Training PowerPoint presentation contains information on all key functions and
processes that need to be followed in entering a donor case into the EDR and in transmitting
from the EDR.
This is a generic PowerPoint presentation provided for State/Territory EDR Trainers to ensure
consistency in the delivery of national training, while providing for the inclusion of State and
Territory specific information.
EDR System Administrator Guide
The EDR System Administrator Guide provides technical detail on how to administer the EDR.
It is designed to assist State and Territory System Administrators and, among other things,
contains standard operating procedures for the provision of access to Users, auditing and help
desk support.
EDR Acceptable Use Policy
The EDR contains personal and confidential information about organ and tissue donors, their
family and friends, as well as information on transplant recipients. There is an obligation on all
Users of the EDR to abide by their relevant privacy and data management legislation, as well
as by their professional codes of conduct with regard to the handling of identifiable personal
data.
The EDR Acceptable Use Policy provides advice on these matters and requires formal
acknowledgement by all Users prior to Users gaining access to the EDR.
EDR Business Continuity Procedure
The EDR Business Continuity Procedure (BCP) describes the processes, necessary to ensure
that organ and tissue donation proceeds in the event of a planned or unplanned disruption to
the provision of the EDR.
10 EDR Standard Operating Procedure and User Guide V5.1 16 June 2014
The key elements of the BCP are use of the DonateLife EDR Form and temporary donor
identification numbers to progress donation during the downtime and the entry of donor data in
the EDR once it is available again.
DonateLife EDR Form
The DonateLife EDR Form replaces the Confidential Donor Referral Form (CDRF) and aligns
with the data entry process for the EDR. It is part of the EDR risk management and Business
Continuity Procedure
Australia and New Zealand Organ Donor Registry (ANZOD) Form
The ANZOD form has been revised to reflect changes to the flow of information collected from
the EDR and provided to ANZOD.
Organ and Tissue Authority (OTA) Data Dictionary
The OTA is the data custodian of the dataset generated by the entry of state and territory data
into the EDR and the DonateLife Audit (DLA). As such, the OTA has responsibility for the
provision of best practice Data Governance to ensure the responsible use of data.
The OTA Data Dictionary contains definitions for each data element of the EDR and the
DonateLife Audit.
National Standard Operating Procedure - ‘Organ Offer Process and Organ
Transfer Documentation’
The Australasian Transplant Coordinators Association (ATCA), the Transplant Society of
Australia and New Zealand (TSANZ) and the Organ and Tissue Authority (OTA) have revised
the National Standard Operating Procedure (SOP) ‘Organ Offer Process and Organ Transfer
Documentation’ to incorporate practice changes as a result of the EDR.
EDR SYSTYEM UPDATES
The EDR is under continuous review with up to four software updates available each year.
The EDR is updated according to best practice initiatives agreed by all international Users of
the system. There is also the opportunity at these times for system specific updates to be
undertaken. These initiatives are generally agreed by all Users and Australia, as a User of the
system, has the opportunity to contribute to this process.
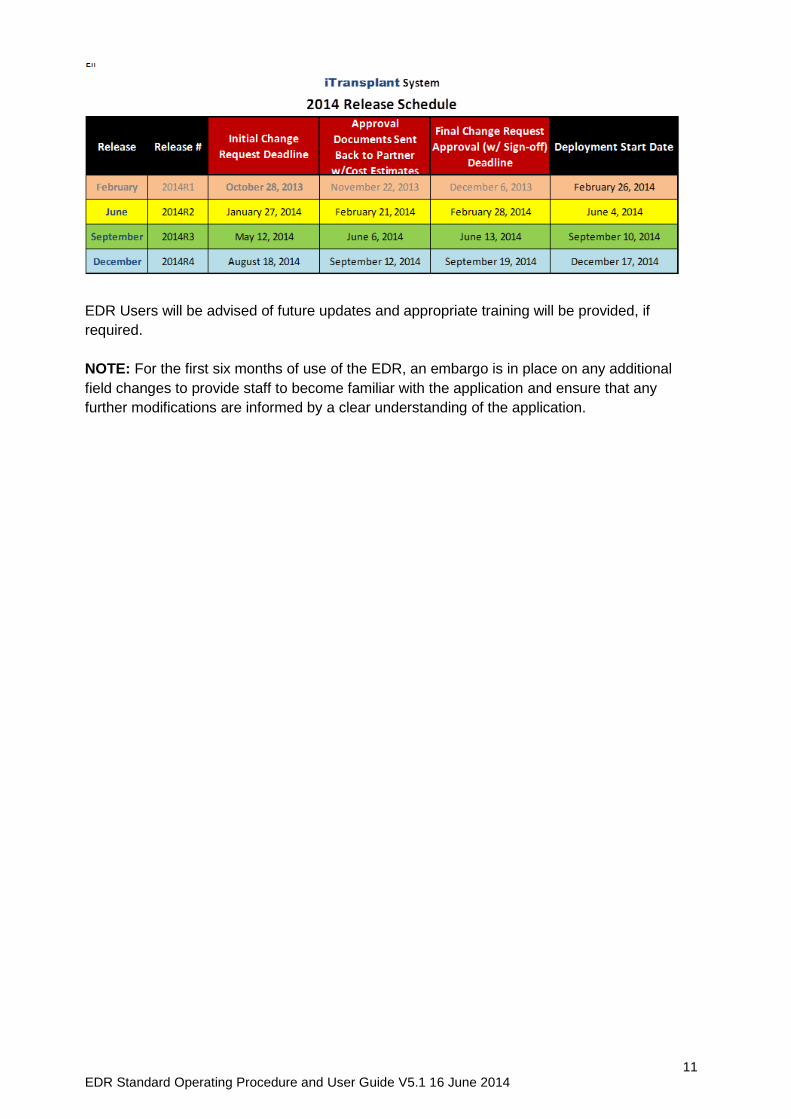
The schedule for software updates in 2014 is outlined below.
11 EDR Standard Operating Procedure and User Guide V5.1 16 June 2014
EDR Users will be advised of future updates and appropriate training will be provided, if
required.
NOTE: For the first six months of use of the EDR, an embargo is in place on any additional
field changes to provide staff to become familiar with the application and ensure that any
further modifications are informed by a clear understanding of the application.
12 EDR Standard Operating Procedure and User Guide V5.1 16 June 2014
1. INITIAL SET-UP OF THE EDR
HARDWARE SETUP AND CONFIGURATION
There are no special hardware requirements for EDR. Access to a standard personal
computer or Laptop computer and a printer are all that is required.
SOFTWARE SETUP AND CONFIGURATION
The EDR is a web-based application requiring the following components:
An Internet connection
Internet Explorer 8 (IE8) with
o JavaScript enabled
o Temporary Internet Cache configured to check for new versions every time a
page is visited
PDF Reader (for example Adobe Reader)
Any applicable application (for example MS Word to view .doc files) to view files that
have been uploaded to the EDR as an attachment.
Web Browsers
The EDR is certified for use with Internet Explorer 8 and Google Chrome. Other browsers such
as Mozilla’s Firefox and Apple’s Safari are not fully certified, and their success cannot be
guaranteed.
NOTE: From September 2014, support for Internet Explorer 8 will cease. Google
CHROME will become the only supported browser.
IMPORTANT: When navigating through the EDR via Internet Explorer, do not click the Back
button. The EDR is not designed for its use, and unpredictable results may occur.
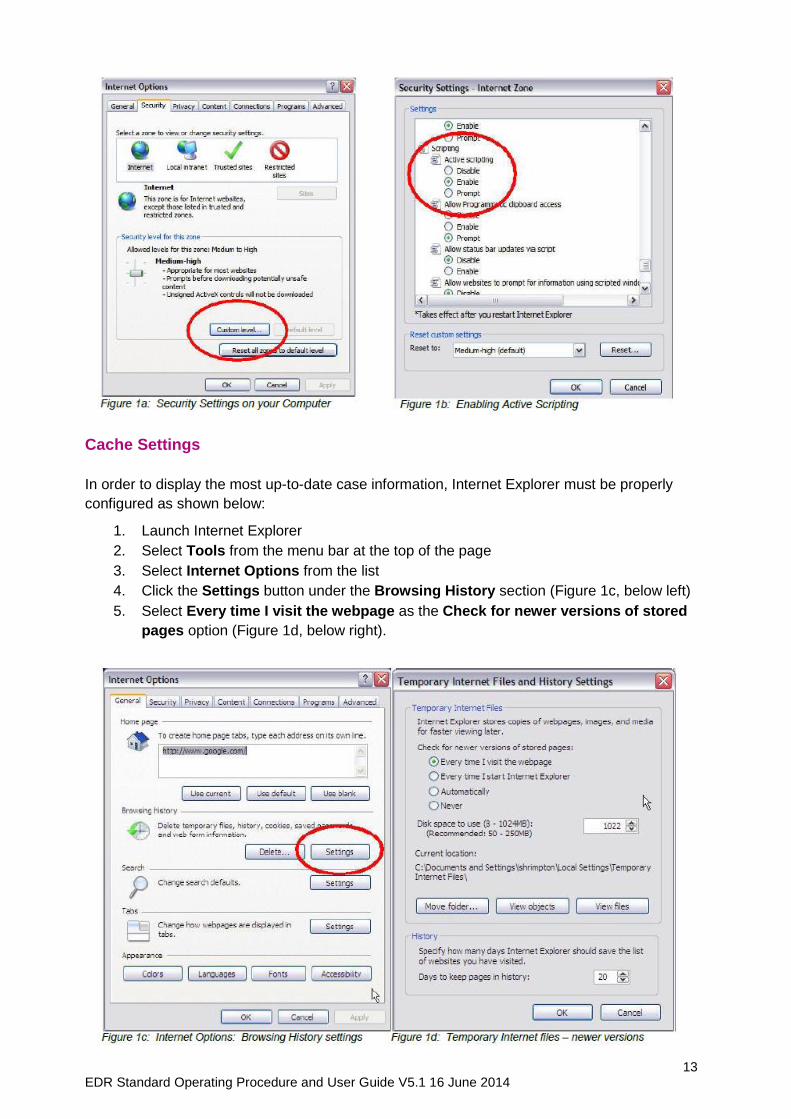
Enabling JavaScript
JavaScript is used by the EDR.
To ensure it is enabled on your computer, please complete the following steps:
1. Open Internet Explorer
2. Select Tools from the menu bar at the top of the page
3. Choose Internet Options
4. Click the Security tab (Figure 1a, below left)
5. Click Custom Level (Figure 1a, below left)
6. Locate the Scripting section
7. Under Active Scripting select Enable (Figure 1b, below right) and click OK.
13 EDR Standard Operating Procedure and User Guide V5.1 16 June 2014
Cache Settings
In order to display the most up-to-date case information, Internet Explorer must be properly
configured as shown below:
1. Launch Internet Explorer
2. Select Tools from the menu bar at the top of the page
3. Select Internet Options from the list
4. Click the Settings button under the Browsing History section (Figure 1c, below left)
5. Select Every time I visit the webpage as the Check for newer versions of stored
pages option (Figure 1d, below right).
14 EDR Standard Operating Procedure and User Guide V5.1 16 June 2014
E-MAIL AND NETWORK REQUIREMENTS
The EDR uses an email system to transmit PDF files and other attachments.
PDF files and other attachments from EDR may be up to 10Mb in size. User and Contact
email services MUST support this size limit.
If in doubt, contact your local IT Support Help Desk to ensure that emails up to 10Mb can be
transmitted and received.
ACCESSING THE EDR
URLs
To access the EDR from any computer connected to the Internet, open an Internet Explorer
browser window and enter the EDR’s secure URL in the address window.
IMPORTANT:
There are separate secure URLs for the training and production environments:
The URL for the EDR training site is: https://edrtraining.donatelife.gov.au
The URL for the production site is: https://edr.donatelife.gov.au
User Name and Password
You MUST have an authorised and activated Username and password to access the EDR.
The User Name, password and User email address are created by the State/Territory EDR
System Administrator.
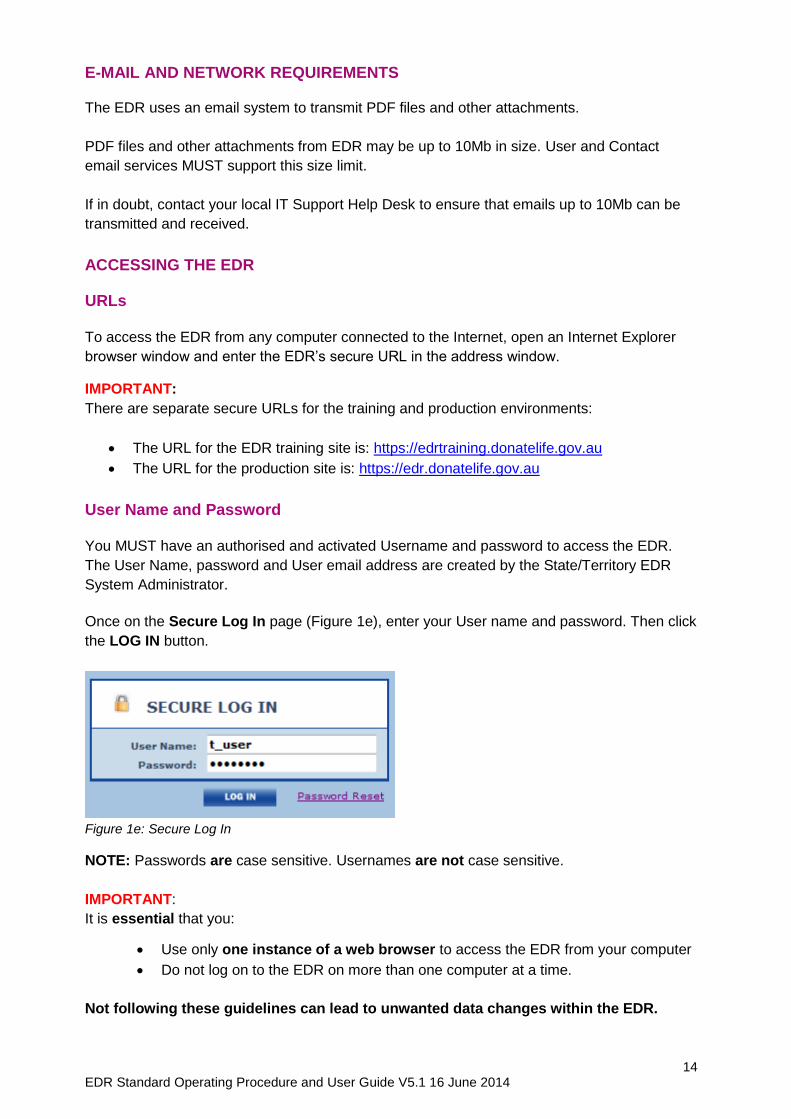
Once on the Secure Log In page (Figure 1e), enter your User name and password. Then click
the LOG IN button.
Figure 1e: Secure Log In
NOTE: Passwords are case sensitive. Usernames are not case sensitive.
IMPORTANT:
It is essential that you:
Use only one instance of a web browser to access the EDR from your computer
Do not log on to the EDR on more than one computer at a time.
Not following these guidelines can lead to unwanted data changes within the EDR.
15 EDR Standard Operating Procedure and User Guide V5.1 16 June 2014
Changing your password
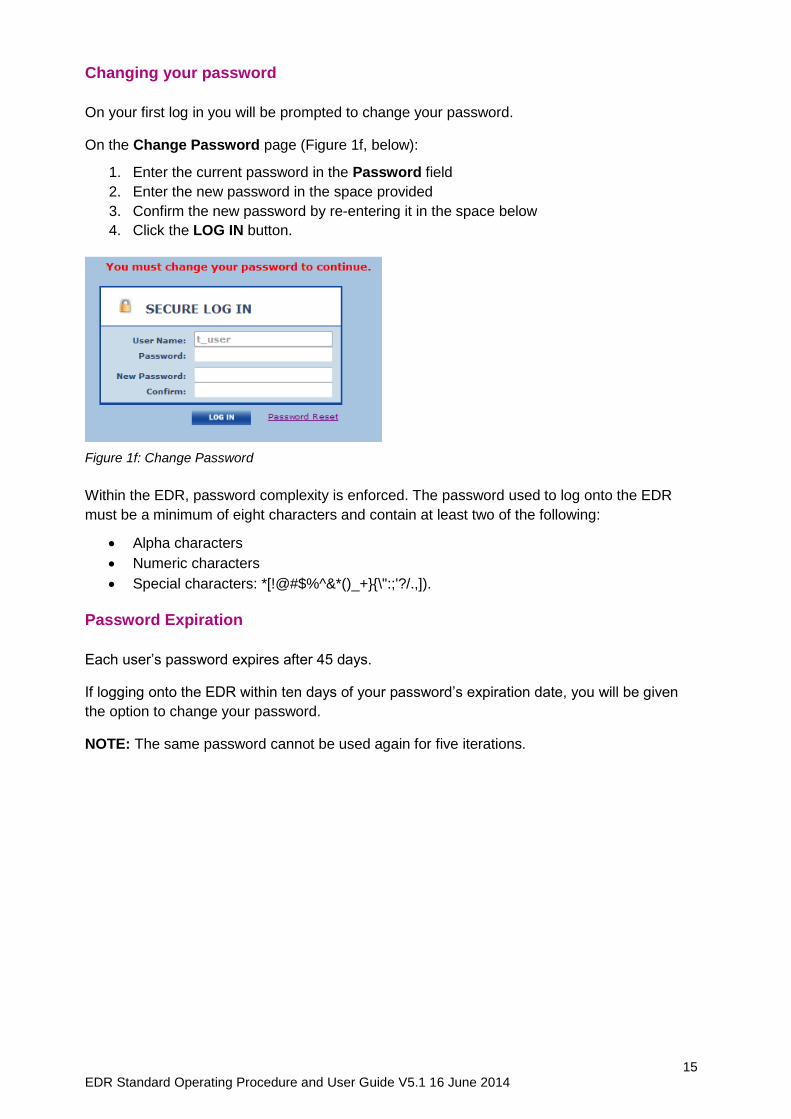
On your first log in you will be prompted to change your password.
On the Change Password page (Figure 1f, below):
1. Enter the current password in the Password field
2. Enter the new password in the space provided
3. Confirm the new password by re-entering it in the space below
4. Click the LOG IN button.
Figure 1f: Change Password
Within the EDR, password complexity is enforced. The password used to log onto the EDR
must be a minimum of eight characters and contain at least two of the following:
Alpha characters
Numeric characters
Special characters: *[!@#$%^&*()_+}{\":;'?/.,]).
Password Expiration
Each user’s password expires after 45 days.
If logging onto the EDR within ten days of your password’s expiration date, you will be given
the option to change your password.
NOTE: The same password cannot be used again for five iterations.
16 EDR Standard Operating Procedure and User Guide V5.1 16 June 2014
Forgotten and new passwords
If you forget your password, you will be locked out of the EDR after FIVE unsuccessful log on
attempts.
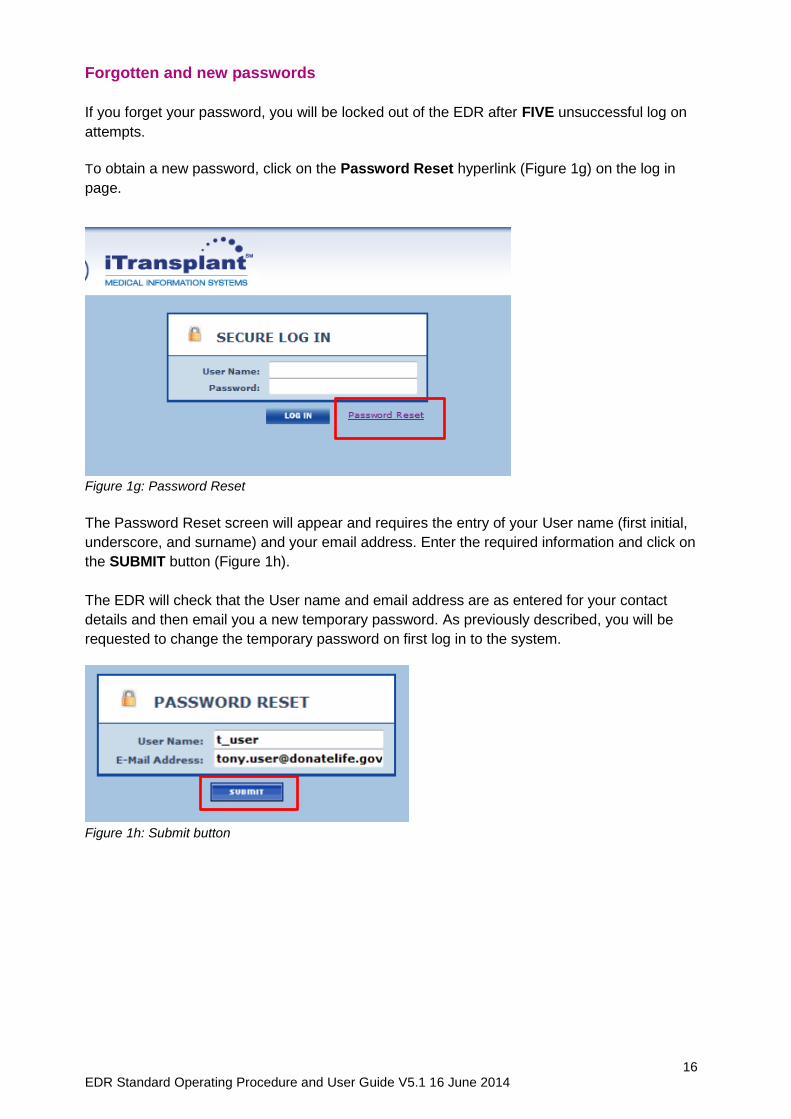
To obtain a new password, click on the Password Reset hyperlink (Figure 1g) on the log in
page.
Figure 1g: Password Reset
The Password Reset screen will appear and requires the entry of your User name (first initial,
underscore, and surname) and your email address. Enter the required information and click on
the SUBMIT button (Figure 1h).
The EDR will check that the User name and email address are as entered for your contact
details and then email you a new temporary password. As previously described, you will be
requested to change the temporary password on first log in to the system.
Figure 1h: Submit button
17 EDR Standard Operating Procedure and User Guide V5.1 16 June 2014
EDR USER SUPPORT AND TROUBLESHOOTING
EDR User Support
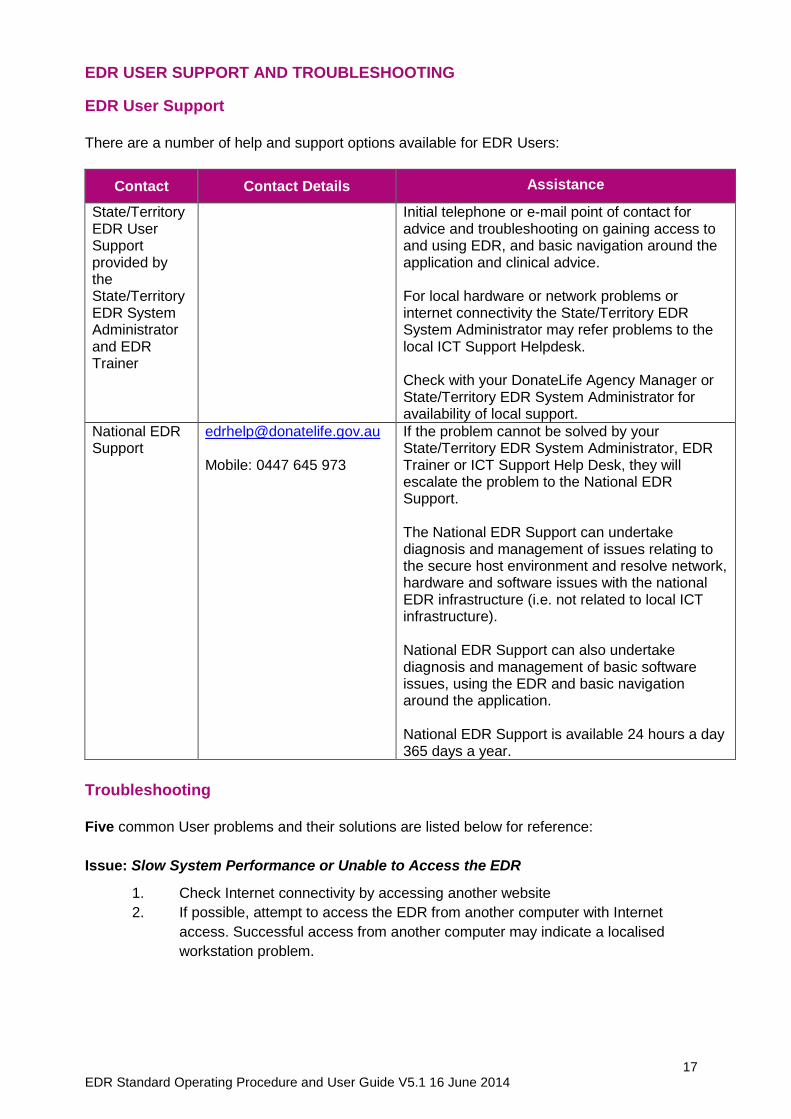
There are a number of help and support options available for EDR Users:
Contact Contact Details Assistance
State/Territory EDR User Support provided by the State/Territory EDR System Administrator and EDR Trainer
Initial telephone or e-mail point of contact for advice and troubleshooting on gaining access to and using EDR, and basic navigation around the application and clinical advice. For local hardware or network problems or internet connectivity the State/Territory EDR System Administrator may refer problems to the local ICT Support Helpdesk. Check with your DonateLife Agency Manager or State/Territory EDR System Administrator for availability of local support.
National EDR Support
[email protected] Mobile: 0447 645 973
If the problem cannot be solved by your State/Territory EDR System Administrator, EDR Trainer or ICT Support Help Desk, they will escalate the problem to the National EDR Support. The National EDR Support can undertake diagnosis and management of issues relating to the secure host environment and resolve network, hardware and software issues with the national EDR infrastructure (i.e. not related to local ICT infrastructure). National EDR Support can also undertake diagnosis and management of basic software issues, using the EDR and basic navigation around the application. National EDR Support is available 24 hours a day 365 days a year.
Troubleshooting
Five common User problems and their solutions are listed below for reference:
Issue: Slow System Performance or Unable to Access the EDR
1. Check Internet connectivity by accessing another website
2. If possible, attempt to access the EDR from another computer with Internet
access. Successful access from another computer may indicate a localised
workstation problem.
18 EDR Standard Operating Procedure and User Guide V5.1 16 June 2014
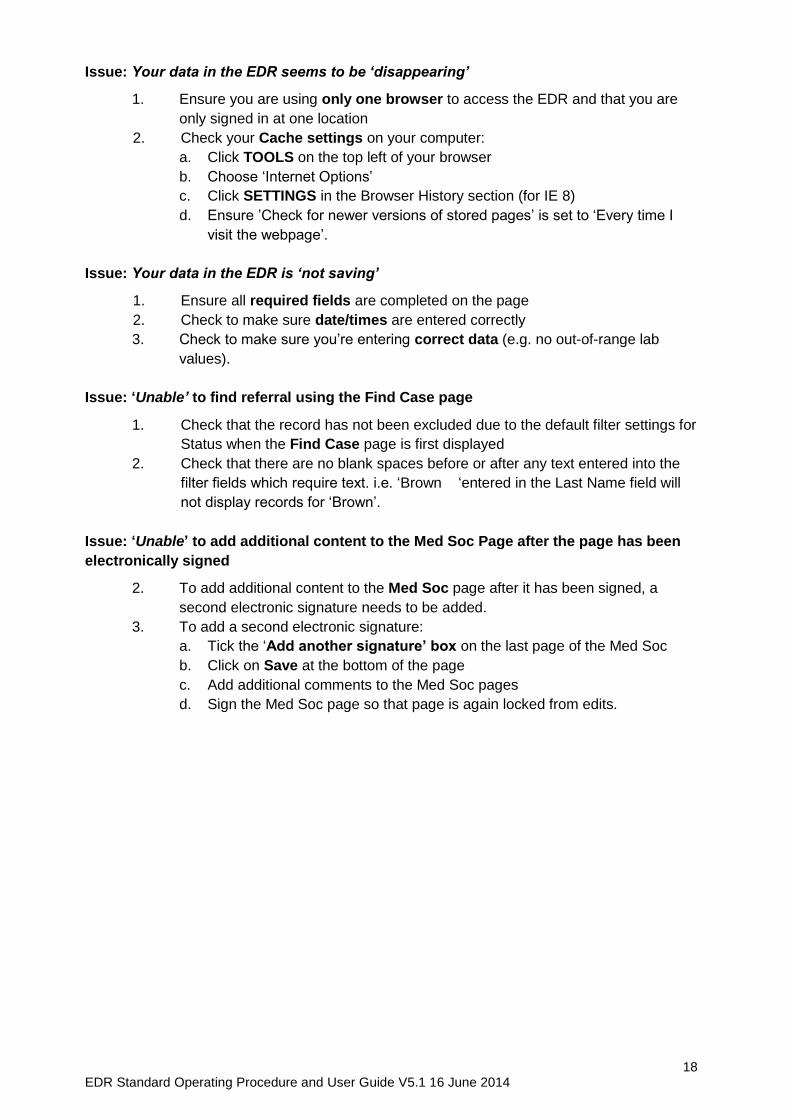
Issue: Your data in the EDR seems to be ‘disappearing’
1. Ensure you are using only one browser to access the EDR and that you are
only signed in at one location
2. Check your Cache settings on your computer:
a. Click TOOLS on the top left of your browser
b. Choose ‘Internet Options’
c. Click SETTINGS in the Browser History section (for IE 8)
d. Ensure ’Check for newer versions of stored pages’ is set to ‘Every time I
visit the webpage’.
Issue: Your data in the EDR is ‘not saving’
1. Ensure all required fields are completed on the page
2. Check to make sure date/times are entered correctly
3. Check to make sure you’re entering correct data (e.g. no out-of-range lab
values).
Issue: ‘Unable’ to find referral using the Find Case page
1. Check that the record has not been excluded due to the default filter settings for
Status when the Find Case page is first displayed
2. Check that there are no blank spaces before or after any text entered into the
filter fields which require text. i.e. ‘Brown ‘entered in the Last Name field will
not display records for ‘Brown’.
Issue: ‘Unable’ to add additional content to the Med Soc Page after the page has been
electronically signed
2. To add additional content to the Med Soc page after it has been signed, a
second electronic signature needs to be added.
3. To add a second electronic signature:
a. Tick the ‘Add another signature’ box on the last page of the Med Soc
b. Click on Save at the bottom of the page
c. Add additional comments to the Med Soc pages
d. Sign the Med Soc page so that page is again locked from edits.
19 EDR Standard Operating Procedure and User Guide V5.1 16 June 2014
2. HOW TO USE THE EDR STANDARD OPERATING
PROCEDURE AND USER GUIDE
The EDR SOP User Guide has been designed to assist Users in the use of the EDR system.
The EDR SOP User Guide is not intended to direct workflow processes or the sequence of
data entry, as the order of data entry will be different for each case and each User.
TABS
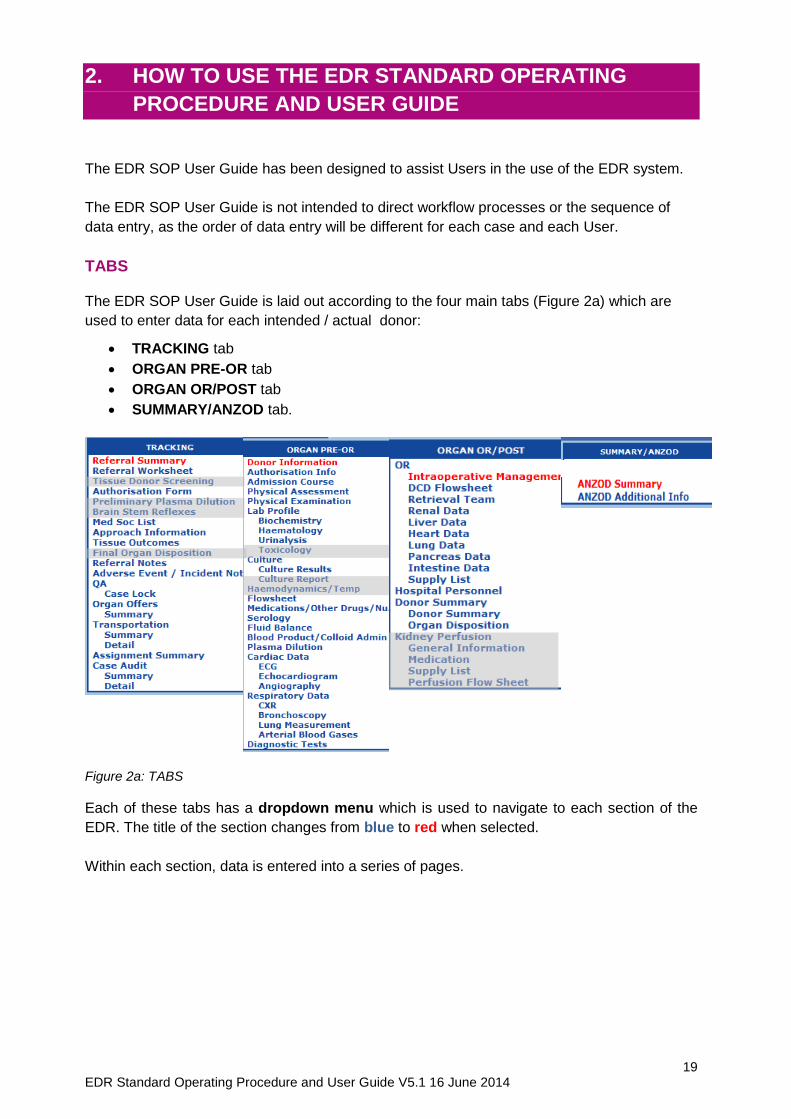
The EDR SOP User Guide is laid out according to the four main tabs (Figure 2a) which are
used to enter data for each intended / actual donor:
TRACKING tab
ORGAN PRE-OR tab
ORGAN OR/POST tab
SUMMARY/ANZOD tab.
Figure 2a: TABS
Each of these tabs has a dropdown menu which is used to navigate to each section of the
EDR. The title of the section changes from blue to red when selected.
Within each section, data is entered into a series of pages.
20 EDR Standard Operating Procedure and User Guide V5.1 16 June 2014
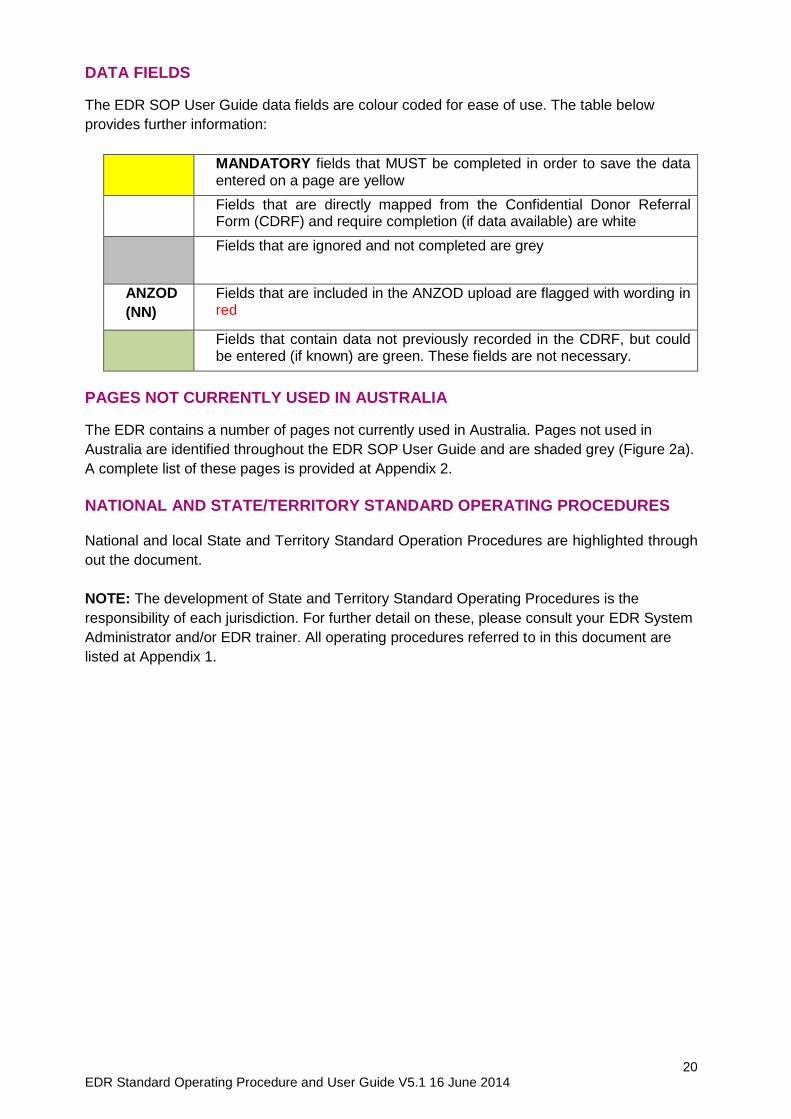
DATA FIELDS
The EDR SOP User Guide data fields are colour coded for ease of use. The table below
provides further information:
MANDATORY fields that MUST be completed in order to save the data entered on a page are yellow
Fields that are directly mapped from the Confidential Donor Referral Form (CDRF) and require completion (if data available) are white
Fields that are ignored and not completed are grey
ANZOD
(NN)
Fields that are included in the ANZOD upload are flagged with wording in red
Fields that contain data not previously recorded in the CDRF, but could be entered (if known) are green. These fields are not necessary.
PAGES NOT CURRENTLY USED IN AUSTRALIA
The EDR contains a number of pages not currently used in Australia. Pages not used in
Australia are identified throughout the EDR SOP User Guide and are shaded grey (Figure 2a).
A complete list of these pages is provided at Appendix 2.
NATIONAL AND STATE/TERRITORY STANDARD OPERATING PROCEDURES
National and local State and Territory Standard Operation Procedures are highlighted through
out the document.
NOTE: The development of State and Territory Standard Operating Procedures is the
responsibility of each jurisdiction. For further detail on these, please consult your EDR System
Administrator and/or EDR trainer. All operating procedures referred to in this document are
listed at Appendix 1.
21 EDR Standard Operating Procedure and User Guide V5.1 16 June 2014
3. GENERAL FEATURES OF THE EDR
GENERAL USAGE
Initially, certain fields on some pages are ‘read-only’ and may appear greyed-out. However, if
such fields are required, the page will automatically update based on information entered on
the pages in the EDR.
Invalid or missing information will cause an error message to display (often in bold, red
lettering) when attempting to save a page.
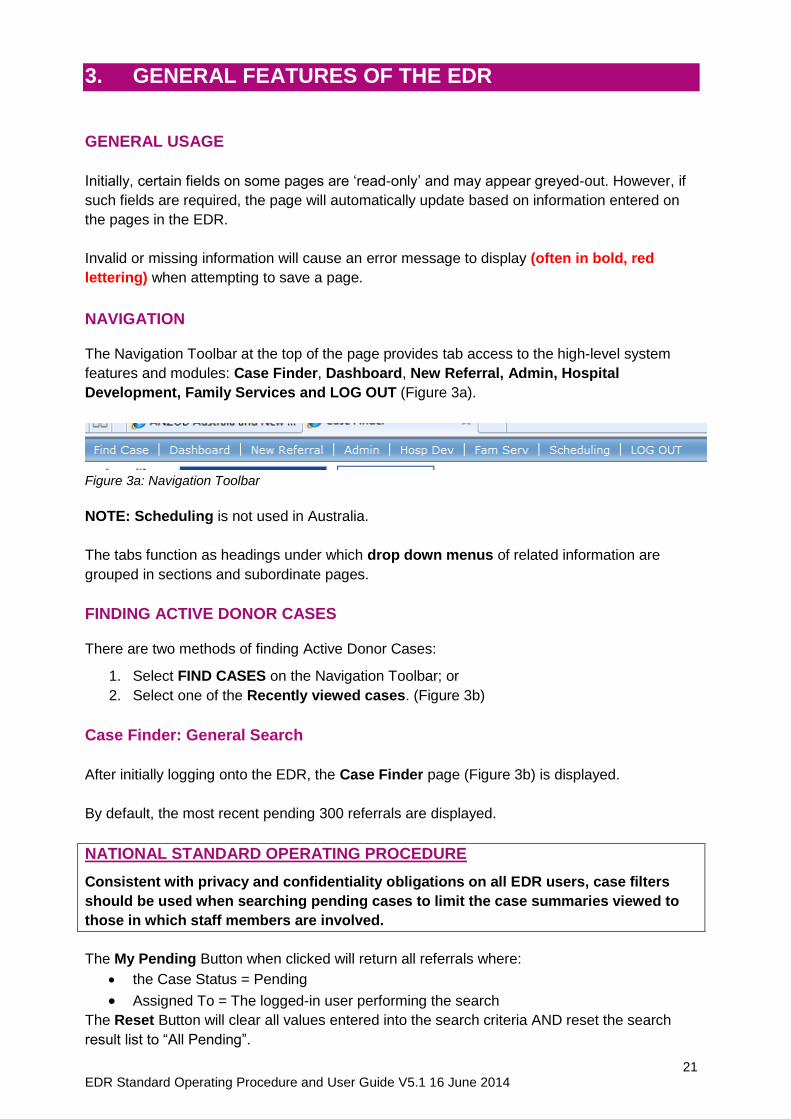
NAVIGATION
The Navigation Toolbar at the top of the page provides tab access to the high-level system
features and modules: Case Finder, Dashboard, New Referral, Admin, Hospital
Development, Family Services and LOG OUT (Figure 3a).
Figure 3a: Navigation Toolbar
NOTE: Scheduling is not used in Australia.
The tabs function as headings under which drop down menus of related information are
grouped in sections and subordinate pages.
FINDING ACTIVE DONOR CASES
There are two methods of finding Active Donor Cases:
1. Select FIND CASES on the Navigation Toolbar; or
2. Select one of the Recently viewed cases. (Figure 3b)
Case Finder: General Search
After initially logging onto the EDR, the Case Finder page (Figure 3b) is displayed.
By default, the most recent pending 300 referrals are displayed.
NATIONAL STANDARD OPERATING PROCEDURE
Consistent with privacy and confidentiality obligations on all EDR users, case filters
should be used when searching pending cases to limit the case summaries viewed to
those in which staff members are involved.
The My Pending Button when clicked will return all referrals where:
the Case Status = Pending
Assigned To = The logged-in user performing the search
The Reset Button will clear all values entered into the search criteria AND reset the search
result list to “All Pending”.
22 EDR Standard Operating Procedure and User Guide V5.1 16 June 2014
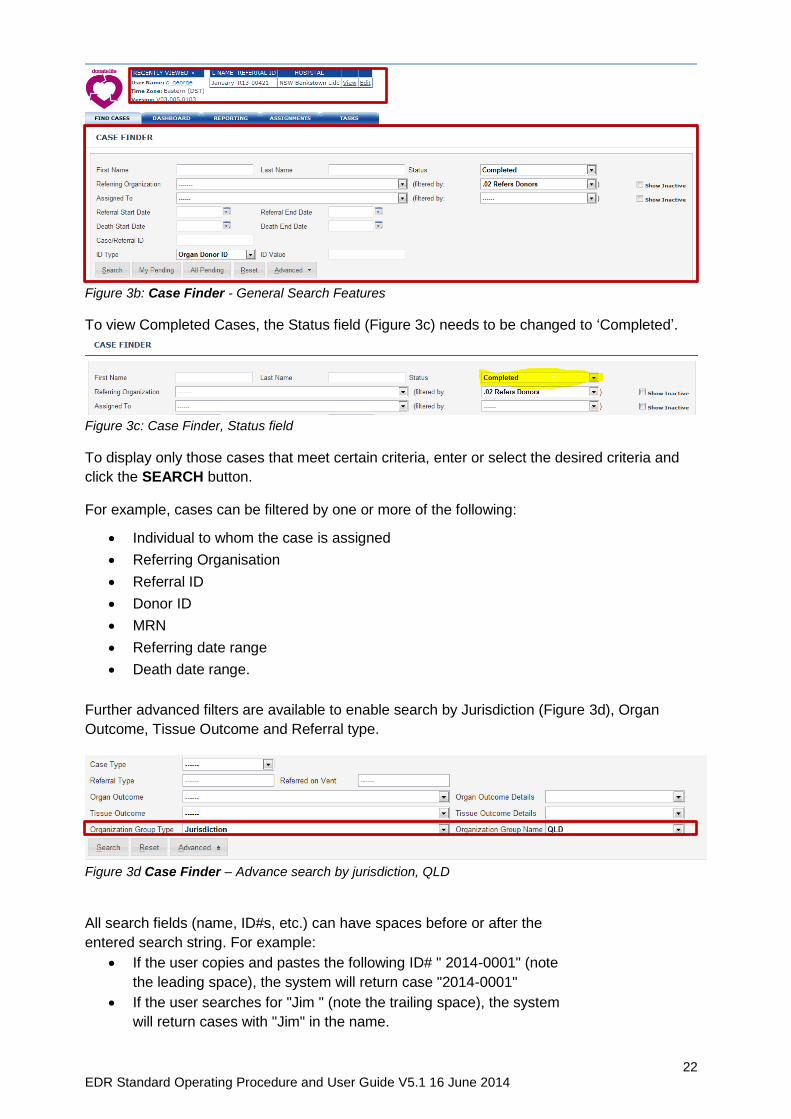
Figure 3b: Case Finder - General Search Features
To view Completed Cases, the Status field (Figure 3c) needs to be changed to ‘Completed’.
Figure 3c: Case Finder, Status field
To display only those cases that meet certain criteria, enter or select the desired criteria and
click the SEARCH button.
For example, cases can be filtered by one or more of the following:
Individual to whom the case is assigned
Referring Organisation
Referral ID
Donor ID
MRN
Referring date range
Death date range.
Further advanced filters are available to enable search by Jurisdiction (Figure 3d), Organ
Outcome, Tissue Outcome and Referral type.
Figure 3d Case Finder – Advance search by jurisdiction, QLD
All search fields (name, ID#s, etc.) can have spaces before or after the
entered search string. For example:
If the user copies and pastes the following ID# " 2014-0001" (note
the leading space), the system will return case "2014-0001"
If the user searches for "Jim " (note the trailing space), the system
will return cases with "Jim" in the name.
23 EDR Standard Operating Procedure and User Guide V5.1 16 June 2014
Case Finder: Wildcard Search
To allow for flexibility in searching for cases within the EDR, the Case Finder page has been
designed to accept four Wildcard operators.
NOTE: Any combination of the four operations may be used together to generate results.
IMPORTANT: The Wildcard search only applies to first and last name.
Match any string of zero or more characters
By using the ‘%’ character, a User can type only a few known letters of a patient’s first or last
name to obtain the desired results.
Example: ‘Dav%’ will match Dave, David, etc.
Match Any Single Character within the Range or Set in-between the Brackets
Using brackets ‘[ ]’ will return results containing what is specified within.
Example: ’Dav[a-z]%’ will match Dave or David but not Dav2
‘Ale[k,x]’ will match Alex or Alek
Match Any Single Character NOT within the Range or Set in-between the Brackets
The ‘^’ is similar to the ‘%’ operator but means NOT to match.
Example:
‘Dav[^i]%’ will match Dave but will not match David
Match Any Single Character
Using the underscore character ‘_’, you can search for any single character as a wildcard.
Example:
‘Darr_l’ will match Darrel and Darral
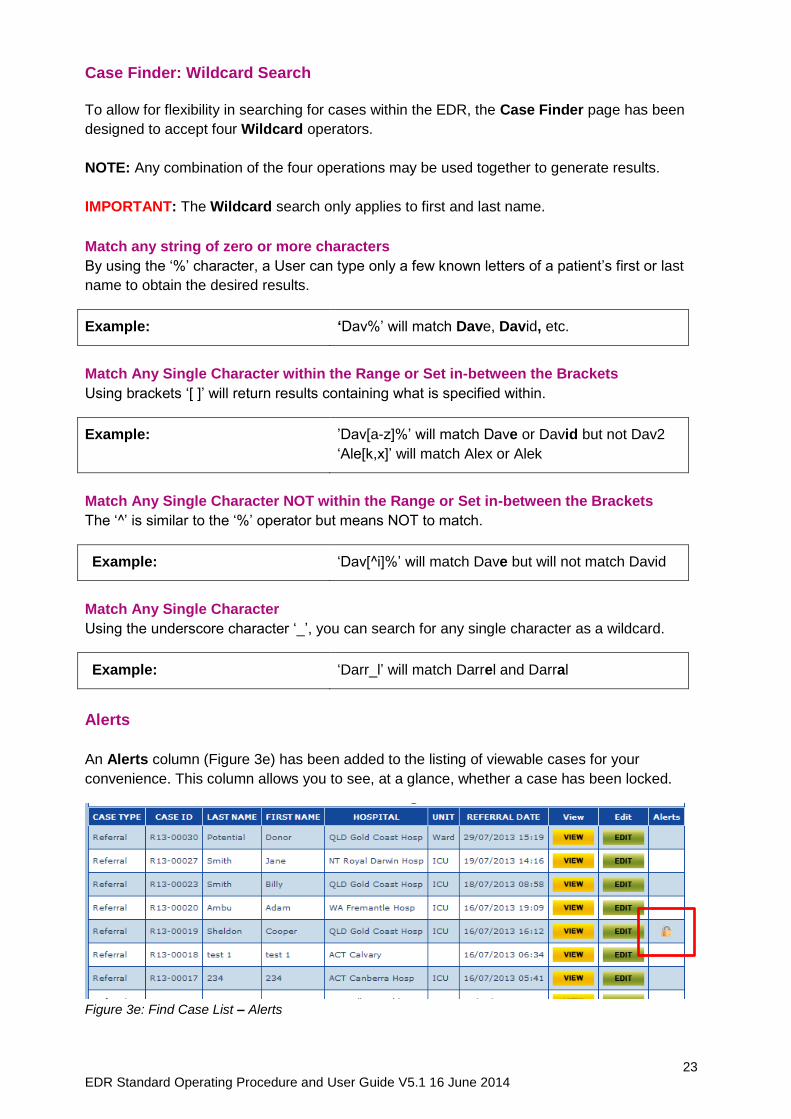
Alerts
An Alerts column (Figure 3e) has been added to the listing of viewable cases for your
convenience. This column allows you to see, at a glance, whether a case has been locked.
Figure 3e: Find Case List – Alerts
24 EDR Standard Operating Procedure and User Guide V5.1 16 June 2014
Case Access Modes
Current functionality in the EDR allows Users to select either read-only mode (VIEW) or edit
mode (EDIT) when entering a case from the Case Finder page. This level of case access
depends upon the Users assigned security settings.
IMPORTANT: VIEW/EDIT relates to any pages navigated to via Case Finder. It does not
relate to other areas of the EDR.
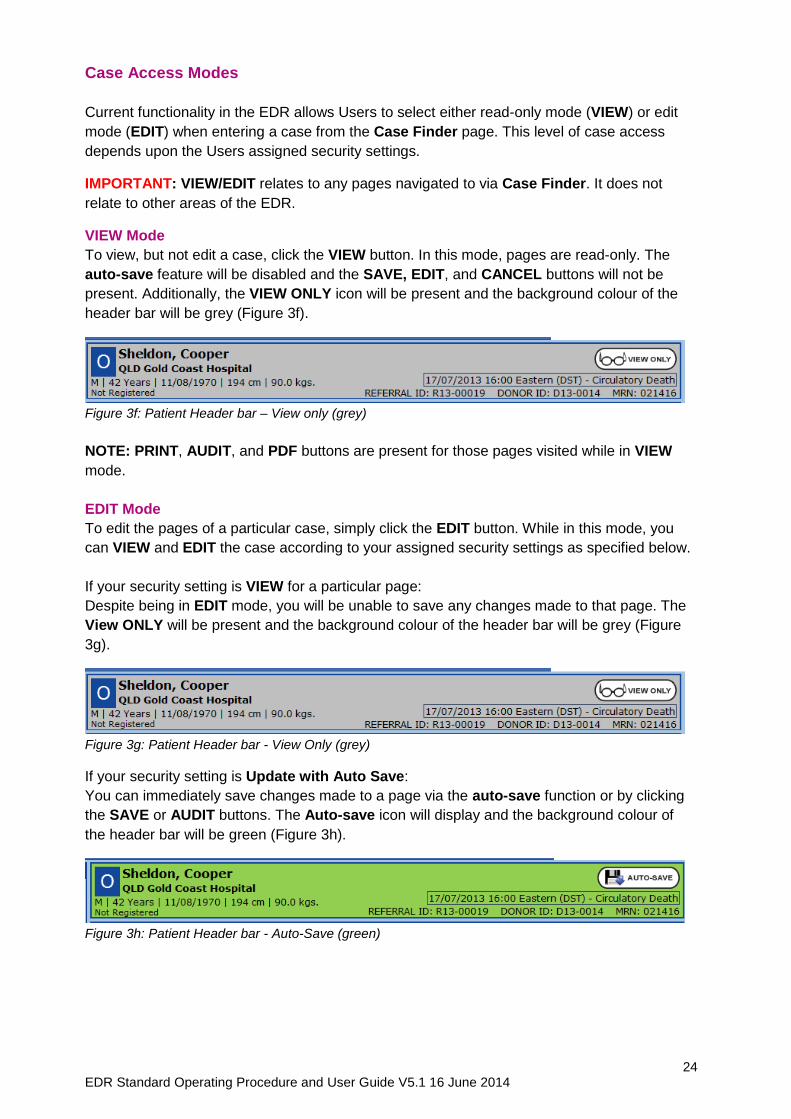
VIEW Mode
To view, but not edit a case, click the VIEW button. In this mode, pages are read-only. The
auto-save feature will be disabled and the SAVE, EDIT, and CANCEL buttons will not be
present. Additionally, the VIEW ONLY icon will be present and the background colour of the
header bar will be grey (Figure 3f).
Figure 3f: Patient Header bar – View only (grey)
NOTE: PRINT, AUDIT, and PDF buttons are present for those pages visited while in VIEW
mode.
EDIT Mode
To edit the pages of a particular case, simply click the EDIT button. While in this mode, you
can VIEW and EDIT the case according to your assigned security settings as specified below.
If your security setting is VIEW for a particular page:
Despite being in EDIT mode, you will be unable to save any changes made to that page. The
View ONLY will be present and the background colour of the header bar will be grey (Figure
3g).
Figure 3g: Patient Header bar - View Only (grey)
If your security setting is Update with Auto Save:
You can immediately save changes made to a page via the auto-save function or by clicking
the SAVE or AUDIT buttons. The Auto-save icon will display and the background colour of
the header bar will be green (Figure 3h).
Figure 3h: Patient Header bar - Auto-Save (green)

25 EDR Standard Operating Procedure and User Guide V5.1 16 June 2014
QA Case Lock
If a page has been locked via QA Case Lock, the background colour of the header bar will
change to white and the QA Locked icon will display (Figure 3i).
Figure 3i: Patient Header bar – QA Locked (white)
For more information about QA Case Lock, refer to Section 5.
Recently Viewed Cases
The Recently Viewed Cases table (Figure 3j), at the top of the page, provides always-visible,
one-click access to the last four cases viewed in a current session. To enter any of the cases
displayed, click either the View or Edit link located alongside the desired case.
Figure 3j: Recently viewed cases
INPUTTING DATES AND TIMES
Dates and times are entered throughout the EDR, so it is important they be formatted properly.
For example, enter ‘1st December 2008’ as ‘01/12/2008’ (DD/MM/YYYY). Note that the EDR
will insert slashes where appropriate.
Enter the time using the format HH:MM (24-hour military time). The EDR will insert the colon
where appropriate.
IMPORTANT: Be careful not to overlook red exclamation points appearing alongside
incorrectly formatted dates or times. The EDR will not allow you to save the page or navigate
away until these are rectified. If you are experiencing this, re-check all date and time fields on
the page.
A warning will also occur if a user enters a date in the future (60 days from current date) where
future dates do not make sense.
Every date-time field in the EDR has a time zone linked to one of the following:
The User currently logged onto the EDR (found in Contact Management)
The referring organisation (found in Contact Management)
A date-time field with an associated list of time zones (critical date-time fields such as
Cross-clamp and Brain Death)
IMPORTANT: Certain dates and times captured initially are associated with the User’s time
zone while others are associated with the referring organisation. Therefore changing either
can alter dates and times throughout the EDR.
When a User or organisation is added to the EDR, they are assigned the appropriate time
zone. Date-Times are displayed according to what has been entered for an organisation or
26 EDR Standard Operating Procedure and User Guide V5.1 16 June 2014
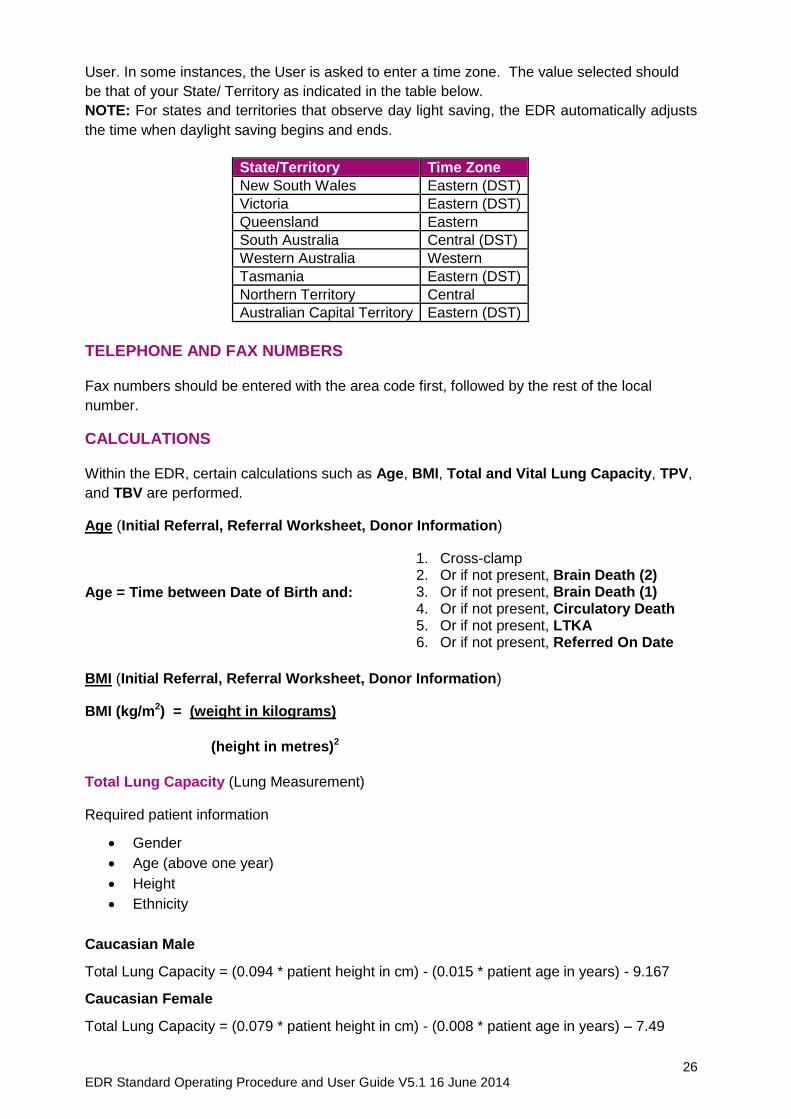
User. In some instances, the User is asked to enter a time zone. The value selected should
be that of your State/ Territory as indicated in the table below.
NOTE: For states and territories that observe day light saving, the EDR automatically adjusts
the time when daylight saving begins and ends.
State/Territory Time Zone
New South Wales Eastern (DST)
Victoria Eastern (DST)
Queensland Eastern
South Australia Central (DST)
Western Australia Western
Tasmania Eastern (DST)
Northern Territory Central
Australian Capital Territory Eastern (DST)
TELEPHONE AND FAX NUMBERS
Fax numbers should be entered with the area code first, followed by the rest of the local
number.
CALCULATIONS
Within the EDR, certain calculations such as Age, BMI, Total and Vital Lung Capacity, TPV,
and TBV are performed.
Age (Initial Referral, Referral Worksheet, Donor Information)
Age = Time between Date of Birth and:
1. Cross-clamp 2. Or if not present, Brain Death (2) 3. Or if not present, Brain Death (1) 4. Or if not present, Circulatory Death 5. Or if not present, LTKA 6. Or if not present, Referred On Date
BMI (Initial Referral, Referral Worksheet, Donor Information)
BMI (kg/m2) = (weight in kilograms)
(height in metres)2
Total Lung Capacity (Lung Measurement)
Required patient information
Gender
Age (above one year)
Height
Ethnicity
Caucasian Male
Total Lung Capacity = (0.094 * patient height in cm) - (0.015 * patient age in years) - 9.167
Caucasian Female
Total Lung Capacity = (0.079 * patient height in cm) - (0.008 * patient age in years) – 7.49
27 EDR Standard Operating Procedure and User Guide V5.1 16 June 2014
NOTE: Total lung capacity is reduced by 10% for non-Caucasian patients.
Non Caucasian Male
Total Lung Capacity =[(0.094 * patient height in cm) - (0.015 * patient age in years) -
9.167)]*0.90
Non Caucasian Female
Total Lung Capacity = [(0.079 * patient height in cm) - (0.008 * patient age in years) –
7.49]*0.90
Vital Lung Capacity (Lung Measurement)
Required patient information:
Gender
Age (above one year)
Height
Ethnicity
Caucasian Male
Vital Lung Capacity = (0.064 * patient height in cm) - (0.031 * patient age in years) - 5.334
Caucasian Female
Vital Lung Capacity = (0.052 * patient height in cm) - (0.018 * patient age in years) - 4.36
Non Caucasian Male
Vital Lung Capacity = [(0.064 * patient height in cm) - (0.031 * patient age in years) -
5.334)]*0.90
Non Caucasian Female
Vital Lung Capacity =[ (0.052 * patient height in cm) - (0.018 * patient age in years) -
4.36]*0.90
Plasma Dilution Formulas
Estimated Total Plasma Volume (TPV) = Donor Weight (kg) / .025
Estimated Total Blood Volume (TBV) = Donor Weight (kg) / .015
INFORMATION FIELDS
Information can be recorded in different ways such as text boxes, check boxes, radio buttons,
lists, and dialog boxes.
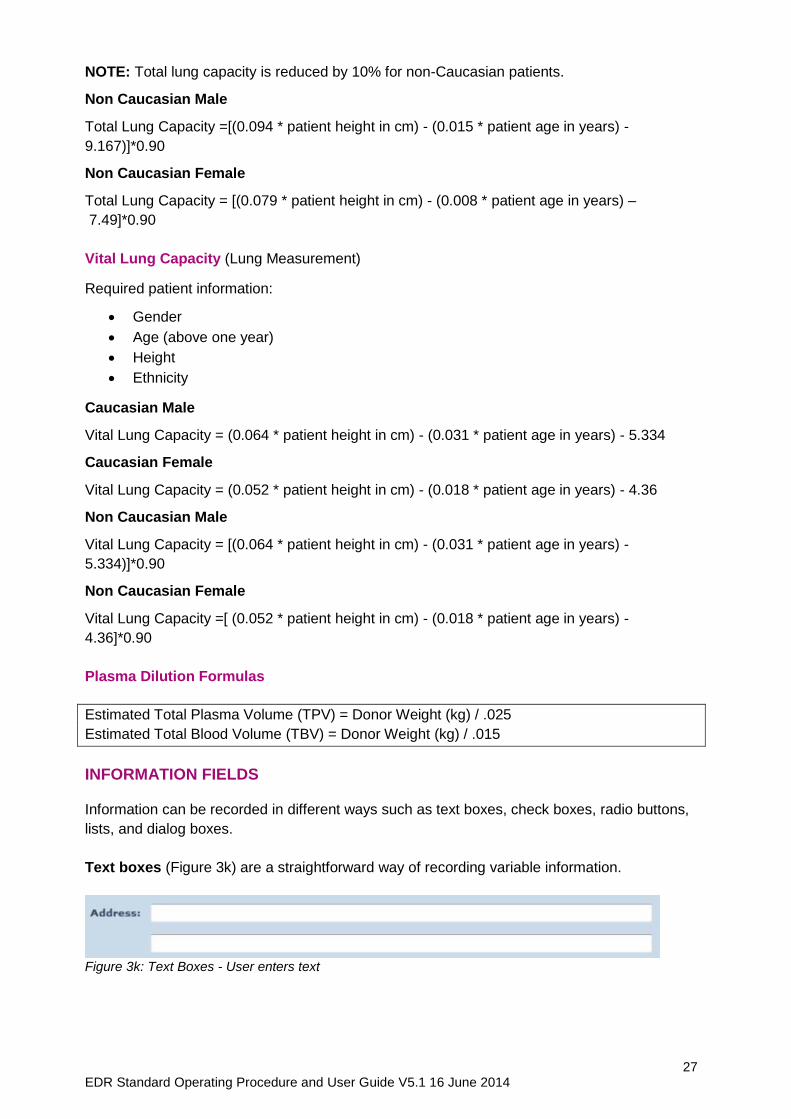
Text boxes (Figure 3k) are a straightforward way of recording variable information.
Figure 3k: Text Boxes - User enters text
28 EDR Standard Operating Procedure and User Guide V5.1 16 June 2014
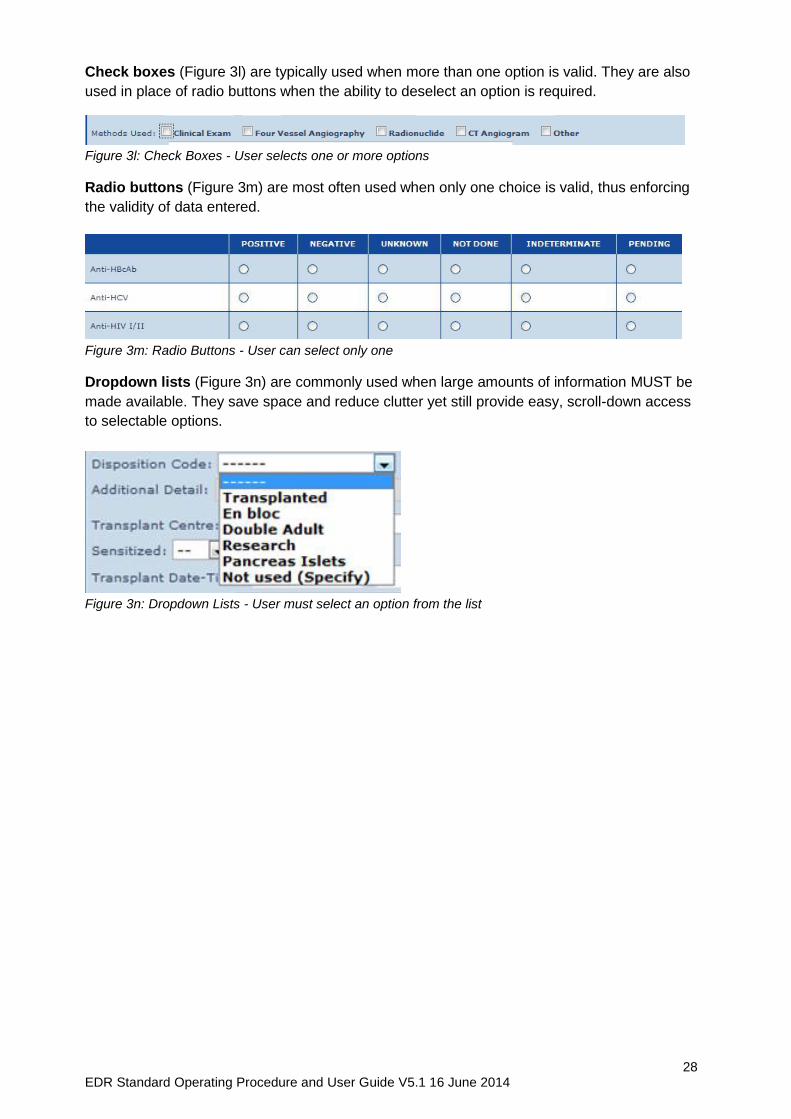
Check boxes (Figure 3l) are typically used when more than one option is valid. They are also
used in place of radio buttons when the ability to deselect an option is required.
Figure 3l: Check Boxes - User selects one or more options
Radio buttons (Figure 3m) are most often used when only one choice is valid, thus enforcing
the validity of data entered.
Figure 3m: Radio Buttons - User can select only one
Dropdown lists (Figure 3n) are commonly used when large amounts of information MUST be
made available. They save space and reduce clutter yet still provide easy, scroll-down access
to selectable options.
Figure 3n: Dropdown Lists - User must select an option from the list
29 EDR Standard Operating Procedure and User Guide V5.1 16 June 2014
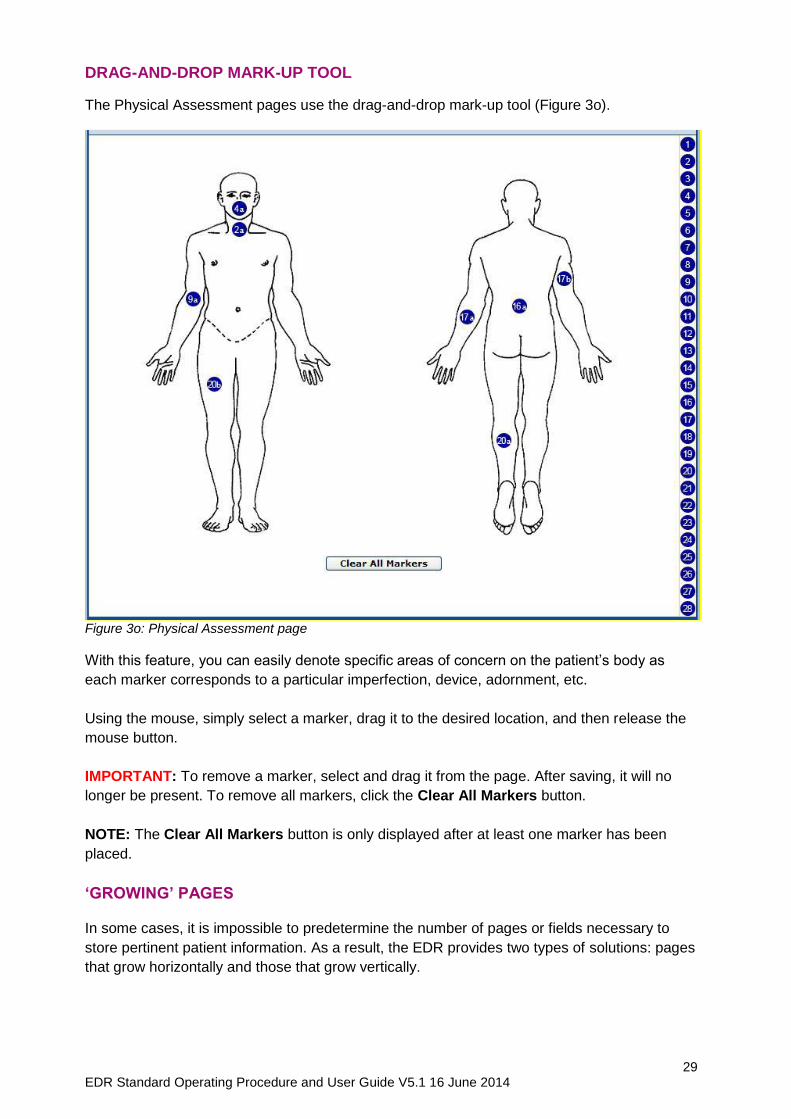
DRAG-AND-DROP MARK-UP TOOL
The Physical Assessment pages use the drag-and-drop mark-up tool (Figure 3o).
Figure 3o: Physical Assessment page
With this feature, you can easily denote specific areas of concern on the patient’s body as
each marker corresponds to a particular imperfection, device, adornment, etc.
Using the mouse, simply select a marker, drag it to the desired location, and then release the
mouse button.
IMPORTANT: To remove a marker, select and drag it from the page. After saving, it will no
longer be present. To remove all markers, click the Clear All Markers button.
NOTE: The Clear All Markers button is only displayed after at least one marker has been
placed.
‘GROWING’ PAGES
In some cases, it is impossible to predetermine the number of pages or fields necessary to
store pertinent patient information. As a result, the EDR provides two types of solutions: pages
that grow horizontally and those that grow vertically.
30 EDR Standard Operating Procedure and User Guide V5.1 16 June 2014
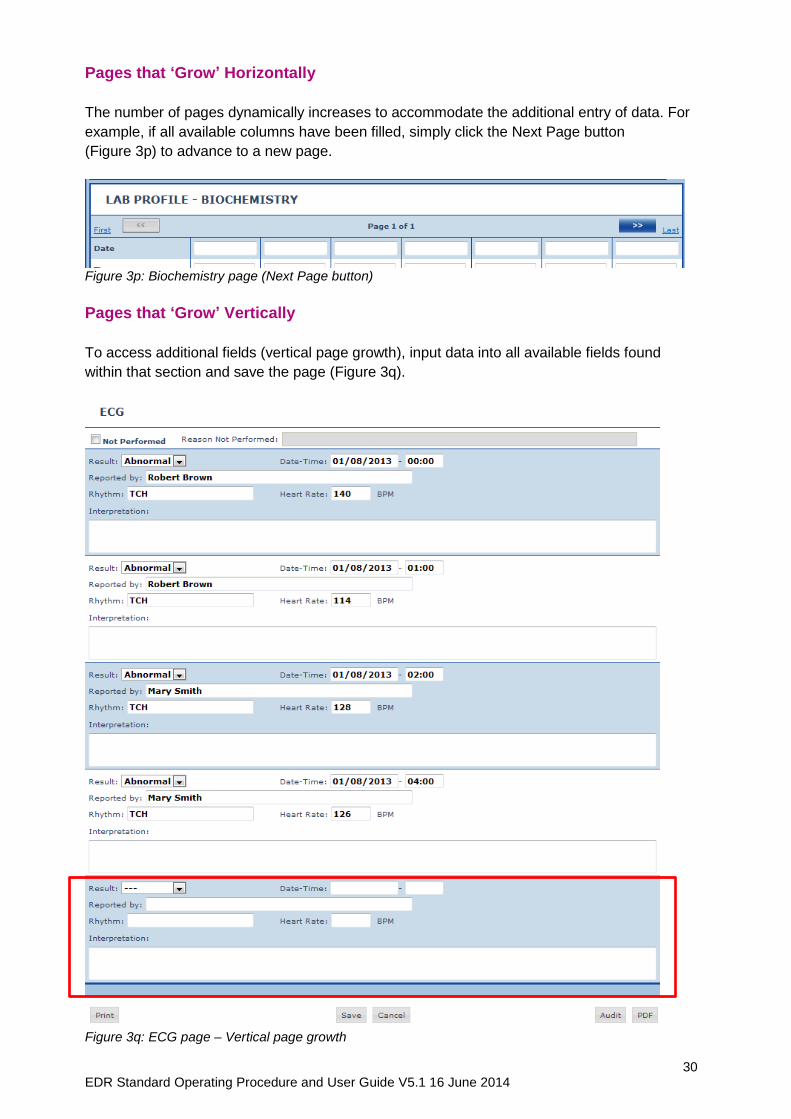
Pages that ‘Grow’ Horizontally
The number of pages dynamically increases to accommodate the additional entry of data. For
example, if all available columns have been filled, simply click the Next Page button
(Figure 3p) to advance to a new page.
Figure 3p: Biochemistry page (Next Page button)
Pages that ‘Grow’ Vertically
To access additional fields (vertical page growth), input data into all available fields found
within that section and save the page (Figure 3q).
Figure 3q: ECG page – Vertical page growth
31 EDR Standard Operating Procedure and User Guide V5.1 16 June 2014
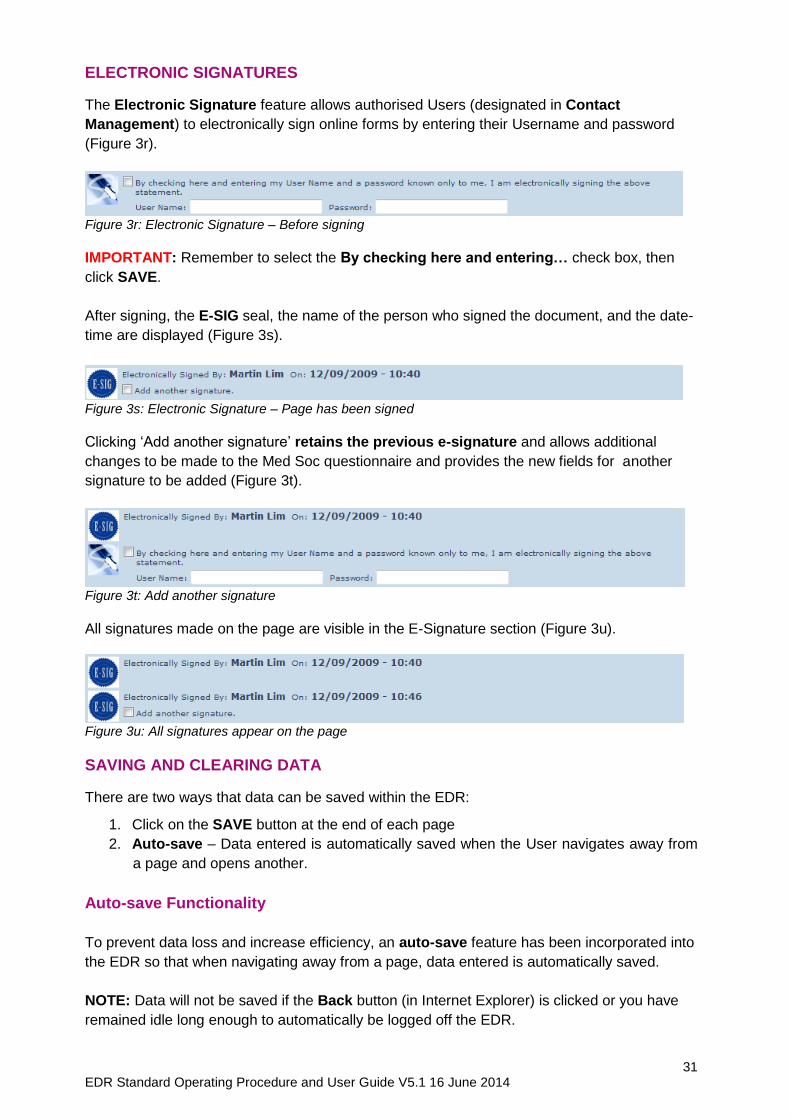
ELECTRONIC SIGNATURES
The Electronic Signature feature allows authorised Users (designated in Contact
Management) to electronically sign online forms by entering their Username and password
(Figure 3r).
Figure 3r: Electronic Signature – Before signing
IMPORTANT: Remember to select the By checking here and entering… check box, then
click SAVE.
After signing, the E-SIG seal, the name of the person who signed the document, and the date-
time are displayed (Figure 3s).
Figure 3s: Electronic Signature – Page has been signed
Clicking ‘Add another signature’ retains the previous e-signature and allows additional
changes to be made to the Med Soc questionnaire and provides the new fields for another
signature to be added (Figure 3t).
Figure 3t: Add another signature
All signatures made on the page are visible in the E-Signature section (Figure 3u).
Figure 3u: All signatures appear on the page
SAVING AND CLEARING DATA
There are two ways that data can be saved within the EDR:
1. Click on the SAVE button at the end of each page
2. Auto-save – Data entered is automatically saved when the User navigates away from
a page and opens another.
Auto-save Functionality
To prevent data loss and increase efficiency, an auto-save feature has been incorporated into
the EDR so that when navigating away from a page, data entered is automatically saved.
NOTE: Data will not be saved if the Back button (in Internet Explorer) is clicked or you have
remained idle long enough to automatically be logged off the EDR.
32 EDR Standard Operating Procedure and User Guide V5.1 16 June 2014
IMPORTANT: Auto-save will take effect only if the case is entered in EDIT mode via Case
Finder and your security setting for the page is Update with Autosave.
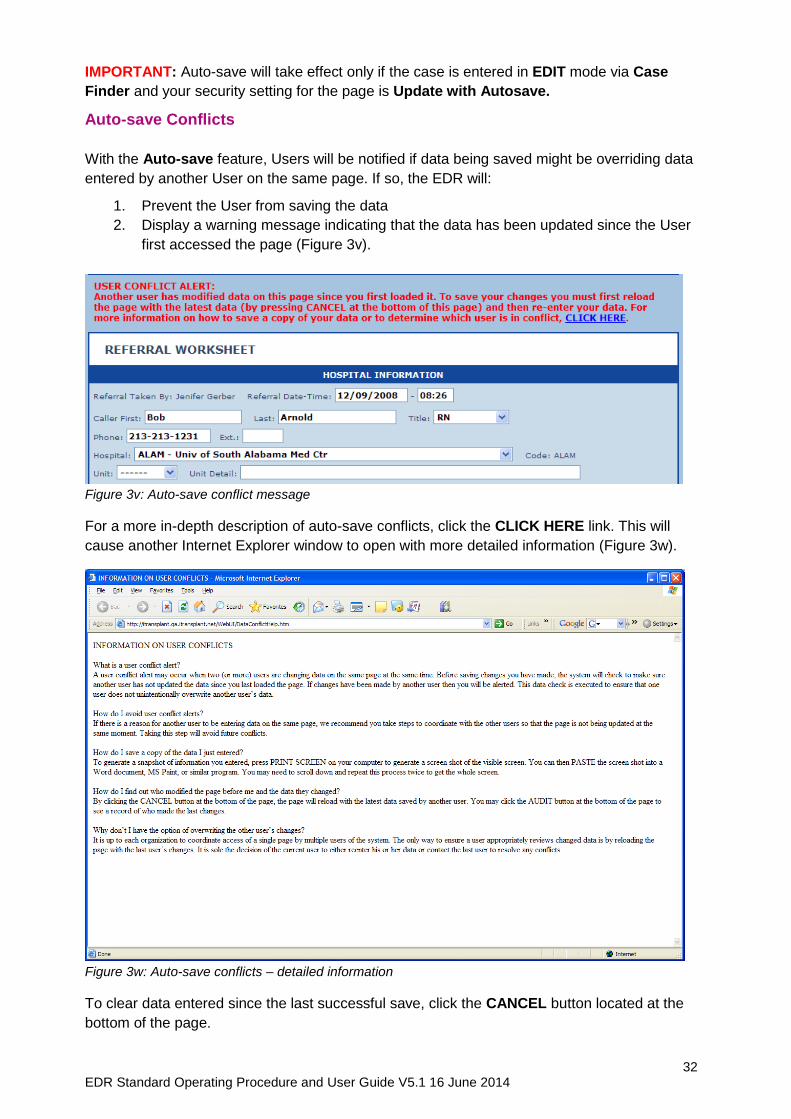
Auto-save Conflicts
With the Auto-save feature, Users will be notified if data being saved might be overriding data
entered by another User on the same page. If so, the EDR will:
1. Prevent the User from saving the data
2. Display a warning message indicating that the data has been updated since the User
first accessed the page (Figure 3v).
Figure 3v: Auto-save conflict message
For a more in-depth description of auto-save conflicts, click the CLICK HERE link. This will
cause another Internet Explorer window to open with more detailed information (Figure 3w).
Figure 3w: Auto-save conflicts – detailed information
To clear data entered since the last successful save, click the CANCEL button located at the
bottom of the page.

33 EDR Standard Operating Procedure and User Guide V5.1 16 June 2014
PATIENT HEADER BAR
A Patient Header bar (Figure 3x) has been included on every page within a given case. This
snapshot view makes key donor information readily available without having to navigate to
numerous other pages.
Figure 3x: Patient Header bar – Edit with Auto Save (green)
The patient header bar, which appears blank for any data not yet entered, displays the
following data points:
Blood Group
Name
Current Donor Hospital
Sex
Age
Registry Status
Date of Birth
Height
Weight
Cross-clamp/Circulatory Death
REFERRAL ID
DONOR ID
Medical record Number (MRN)
In addition to displaying this information, the patient header bar contains easily-identifiable
icons and is colour coded on a per-page basis for your convenience.
GREEN (Figure 3x, above) is the default background colour used for those cases entered in
AUTOSAVE mode (as set via Page Security settings).
IMPORTANT: Your assigned security settings play a role in whether you can view or edit a
particular page irrespective of being in EDIT mode.
GREY (Figure 3y) is the background colour used for those cases entered in VIEW mode via
Case Finder. It is also used if your security setting is View for a particular page.
Figure 3y: Patient Header bar – View Only (grey)
WHITE (Figure 3z) is the background colour used if a page has been locked via QA Case
Lock.
Figure 3z: Patient Header bar – QA Locked (white)
For more information regarding QA Case Lock, refer to Section 5.

34 EDR Standard Operating Procedure and User Guide V5.1 16 June 2014
MANDATORY DATA
In some instances, a page may require the entry of MANDATORY data. If MANDATORY data has not been entered:
1. Alert messages will be displayed (Figure 3za)
2. The User will not be able to navigate away from the page without clicking on the
CANCEL button or entering the missing data.
Figure 3za: Alert messages
AUTOMATIC TIME OUT
The EDR will time out after 15 minutes if no data has been saved, either via the SAVE button
or Auto Save function. A User will need to log back in if timed out of the EDR. Any data
entered since the last Save or Auto Save, will be lost.
For example:
You are entering data and are required to attend to other tasks and leave without manually
saving the page into which you have entered data. You return to the EDR after 30 minutes and
although the entered data on the page may still be visible, when you attempt to save or
navigate off the page, you will be prompted to log back in and the entered data is lost.
NATIONAL STANDARD OPERATING PROCEDURE
When a User is entering data into the EDR and is required to leave the system for any
reason, the following steps are recommended to ensure data is secure:
1. SAVE button is manually clicked to ensure that all data entered since the last auto
save is retained
2. User then will log out of the EDR.
35 EDR Standard Operating Procedure and User Guide V5.1 16 June 2014
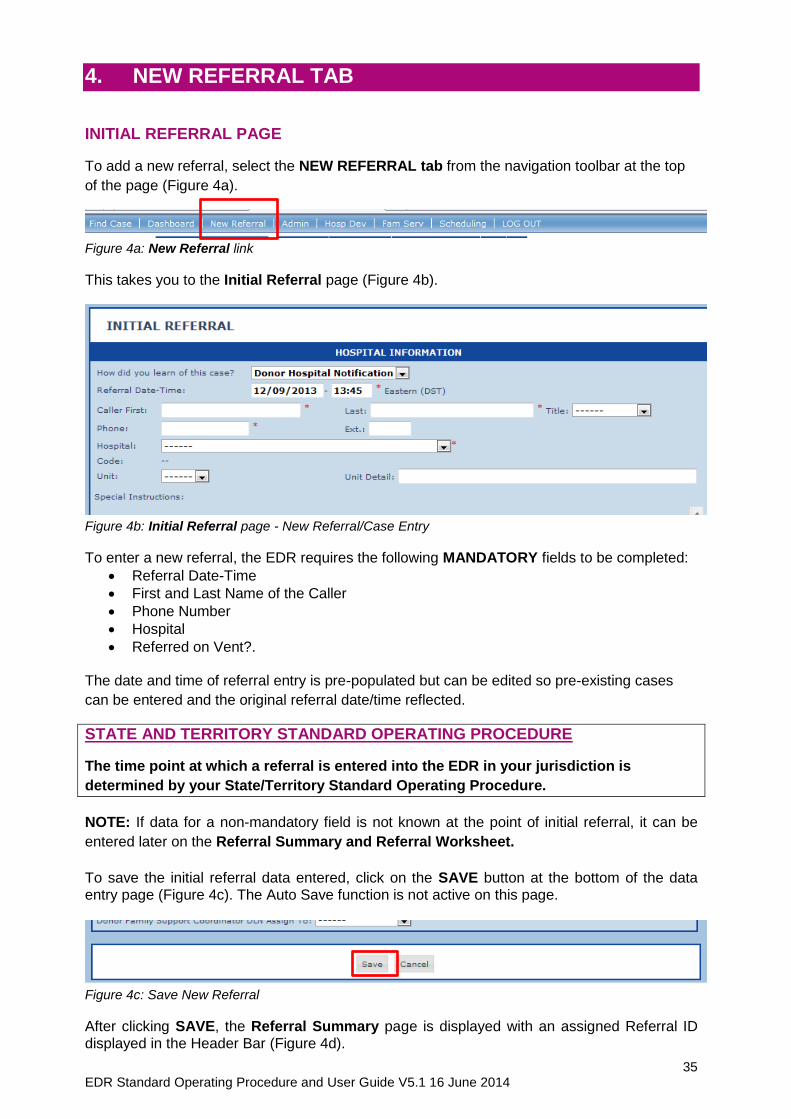
4. NEW REFERRAL TAB
INITIAL REFERRAL PAGE
To add a new referral, select the NEW REFERRAL tab from the navigation toolbar at the top
of the page (Figure 4a).
Figure 4a: New Referral link
This takes you to the Initial Referral page (Figure 4b).
Figure 4b: Initial Referral page - New Referral/Case Entry
To enter a new referral, the EDR requires the following MANDATORY fields to be completed:
Referral Date-Time
First and Last Name of the Caller
Phone Number
Hospital
Referred on Vent?. The date and time of referral entry is pre-populated but can be edited so pre-existing cases
can be entered and the original referral date/time reflected.
STATE AND TERRITORY STANDARD OPERATING PROCEDURE
The time point at which a referral is entered into the EDR in your jurisdiction is
determined by your State/Territory Standard Operating Procedure.
NOTE: If data for a non-mandatory field is not known at the point of initial referral, it can be
entered later on the Referral Summary and Referral Worksheet.
To save the initial referral data entered, click on the SAVE button at the bottom of the data entry page (Figure 4c). The Auto Save function is not active on this page.
Figure 4c: Save New Referral
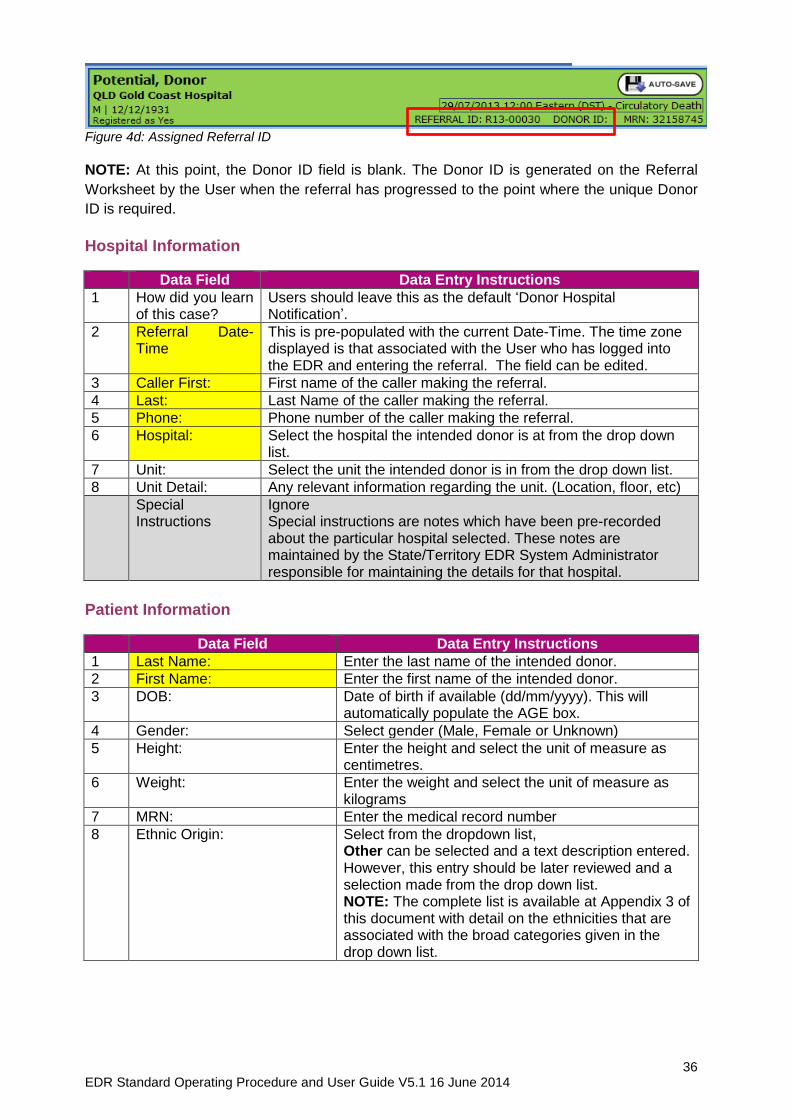
After clicking SAVE, the Referral Summary page is displayed with an assigned Referral ID displayed in the Header Bar (Figure 4d).
36 EDR Standard Operating Procedure and User Guide V5.1 16 June 2014
Figure 4d: Assigned Referral ID
NOTE: At this point, the Donor ID field is blank. The Donor ID is generated on the Referral
Worksheet by the User when the referral has progressed to the point where the unique Donor
ID is required.
Hospital Information
Data Field Data Entry Instructions
1 How did you learn of this case?
Users should leave this as the default ‘Donor Hospital Notification’.
2 Referral Date-Time
This is pre-populated with the current Date-Time. The time zone displayed is that associated with the User who has logged into the EDR and entering the referral. The field can be edited.
3 Caller First: First name of the caller making the referral.
4 Last: Last Name of the caller making the referral.
5 Phone: Phone number of the caller making the referral.
6 Hospital: Select the hospital the intended donor is at from the drop down list.
7 Unit: Select the unit the intended donor is in from the drop down list.
8 Unit Detail: Any relevant information regarding the unit. (Location, floor, etc)
Special Instructions
Ignore Special instructions are notes which have been pre-recorded about the particular hospital selected. These notes are maintained by the State/Territory EDR System Administrator responsible for maintaining the details for that hospital.
Patient Information
Data Field Data Entry Instructions
1 Last Name: Enter the last name of the intended donor.
2 First Name: Enter the first name of the intended donor.
3 DOB:
Date of birth if available (dd/mm/yyyy). This will automatically populate the AGE box.
4 Gender: Select gender (Male, Female or Unknown)
5 Height:
Enter the height and select the unit of measure as centimetres.
6 Weight:
Enter the weight and select the unit of measure as kilograms
7 MRN: Enter the medical record number
8 Ethnic Origin:
Select from the dropdown list, Other can be selected and a text description entered. However, this entry should be later reviewed and a selection made from the drop down list. NOTE: The complete list is available at Appendix 3 of this document with detail on the ethnicities that are associated with the broad categories given in the drop down list.
37 EDR Standard Operating Procedure and User Guide V5.1 16 June 2014
Data Field Data Entry Instructions
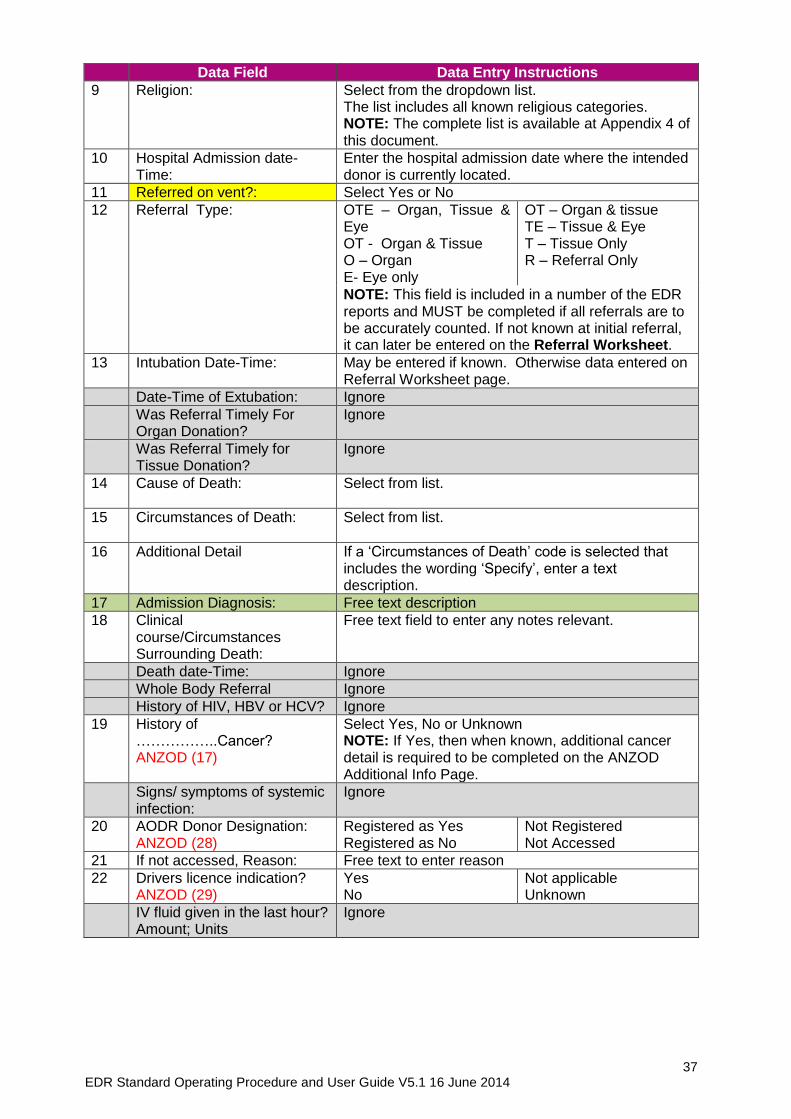
9 Religion:
Select from the dropdown list. The list includes all known religious categories. NOTE: The complete list is available at Appendix 4 of this document.
10 Hospital Admission date-Time:
Enter the hospital admission date where the intended donor is currently located.
11 Referred on vent?: Select Yes or No
12 Referral Type: OTE – Organ, Tissue & Eye OT - Organ & Tissue O – Organ E- Eye only
OT – Organ & tissue TE – Tissue & Eye T – Tissue Only R – Referral Only
NOTE: This field is included in a number of the EDR reports and MUST be completed if all referrals are to be accurately counted. If not known at initial referral, it can later be entered on the Referral Worksheet.
13 Intubation Date-Time: May be entered if known. Otherwise data entered on Referral Worksheet page.
Date-Time of Extubation: Ignore
Was Referral Timely For Organ Donation?
Ignore
Was Referral Timely for Tissue Donation?
Ignore
14 Cause of Death:
Select from list.
15 Circumstances of Death:
Select from list.
16 Additional Detail
If a ‘Circumstances of Death’ code is selected that includes the wording ‘Specify’, enter a text description.
17 Admission Diagnosis: Free text description
18 Clinical course/Circumstances Surrounding Death:
Free text field to enter any notes relevant.
Death date-Time: Ignore
Whole Body Referral Ignore
History of HIV, HBV or HCV? Ignore
19 History of ……………..Cancer? ANZOD (17)
Select Yes, No or Unknown NOTE: If Yes, then when known, additional cancer detail is required to be completed on the ANZOD Additional Info Page.
Signs/ symptoms of systemic infection:
Ignore
20 AODR Donor Designation: ANZOD (28)
Registered as Yes Registered as No
Not Registered Not Accessed
21 If not accessed, Reason: Free text to enter reason
22 Drivers licence indication? ANZOD (29)
Yes No
Not applicable Unknown
IV fluid given in the last hour? Amount; Units
Ignore

38 EDR Standard Operating Procedure and User Guide V5.1 16 June 2014
Data Field Data Entry Instructions
Blood given in the last 48 hours?
Ignore
Downtime information: Duration (minutes)
Ignore – this information is entered on the Admission course page
Person contacted not to release the body; Name:
Ignore
Approach prior to referral; approached by: Title:
Ignore
23 Admitting Doctor: Contacted Date-Time
Free text name of the treating intensivist if known. This information auto populates onto the Hospital Personnel Page.
Authorising Person Information (NOK Information)
Data Field Data Entry Instructions
Authorising Person Notified of Death
Ignore
1 Salutation Enter Salutation
2 First Name Enter First Name of authorising person
3 Last Name Enter Last Name of authorising person
4 Relationship Select from Drop down list
5 Phone Enter phone number
6 Address Enter address
7 City Enter city
8 State Postcode Country
Enter State, Postcode, Country
9 Email Enter email of authorising person
Coroner Information
Data Field Data Entry Instructions
1 Coroner Case?
ANZOD (32)
Select Yes or No
2 Contact Name: Enter the name of the Coroner
3 Contact Phone: Enter the phone number for the Coroner
Coroner/ Other Special
Requests:
Ignore
Outcome/Status
Data Field Data Entry Instructions
1 Organ Outcome
Actual Donor Intended Donor Referred Donor – no further action
2 Organ Detail Select from list
3 Tissue Outcome
Retrieved Not retrieved
4 Tissue Outcome Detail Select from list
5 Status Pending Completed NOTE: The default for this field is Pending. It can later be changed to Completed on the Referral Summary page.
39 EDR Standard Operating Procedure and User Guide V5.1 16 June 2014
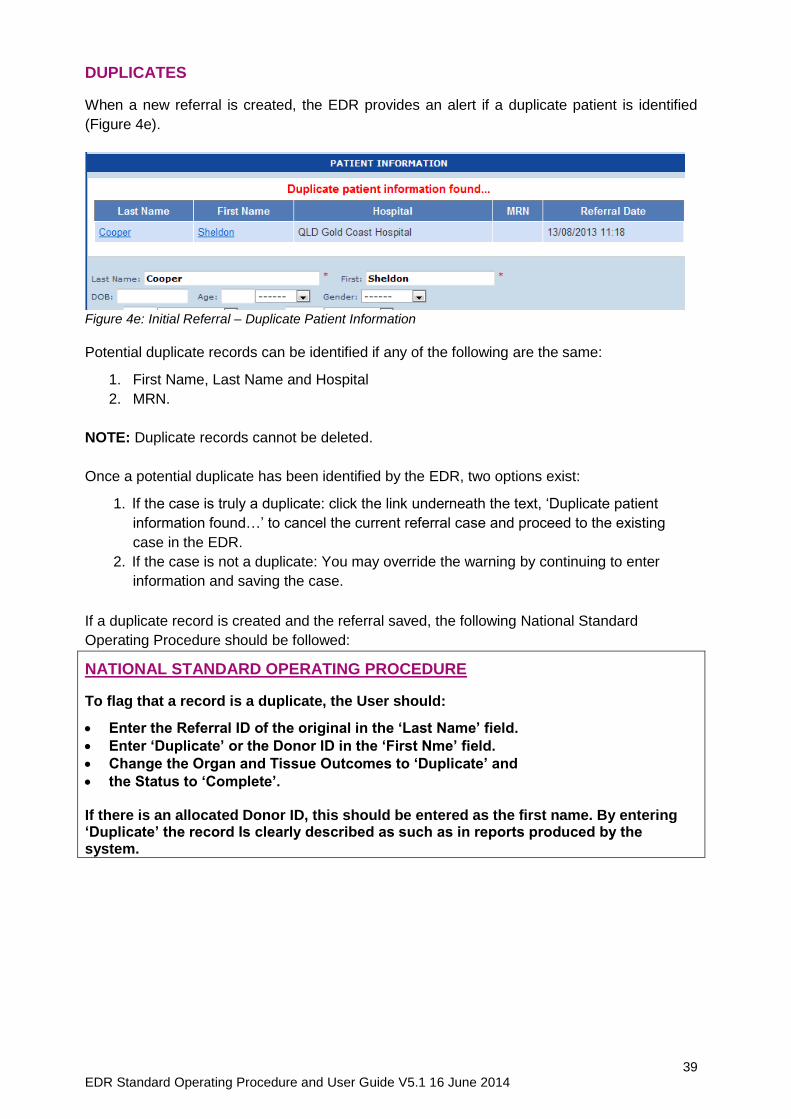
DUPLICATES
When a new referral is created, the EDR provides an alert if a duplicate patient is identified
(Figure 4e).
Figure 4e: Initial Referral – Duplicate Patient Information
Potential duplicate records can be identified if any of the following are the same:
1. First Name, Last Name and Hospital
2. MRN.
NOTE: Duplicate records cannot be deleted.
Once a potential duplicate has been identified by the EDR, two options exist:
1. If the case is truly a duplicate: click the link underneath the text, ‘Duplicate patient
information found…’ to cancel the current referral case and proceed to the existing
case in the EDR.
2. If the case is not a duplicate: You may override the warning by continuing to enter
information and saving the case.
If a duplicate record is created and the referral saved, the following National Standard
Operating Procedure should be followed:
NATIONAL STANDARD OPERATING PROCEDURE
To flag that a record is a duplicate, the User should:
Enter the Referral ID of the original in the ‘Last Name’ field.
Enter ‘Duplicate’ or the Donor ID in the ‘First Nme’ field.
Change the Organ and Tissue Outcomes to ‘Duplicate’ and
the Status to ‘Complete’. If there is an allocated Donor ID, this should be entered as the first name. By entering ‘Duplicate’ the record Is clearly described as such as in reports produced by the system.
40 EDR Standard Operating Procedure and User Guide V5.1 16 June 2014
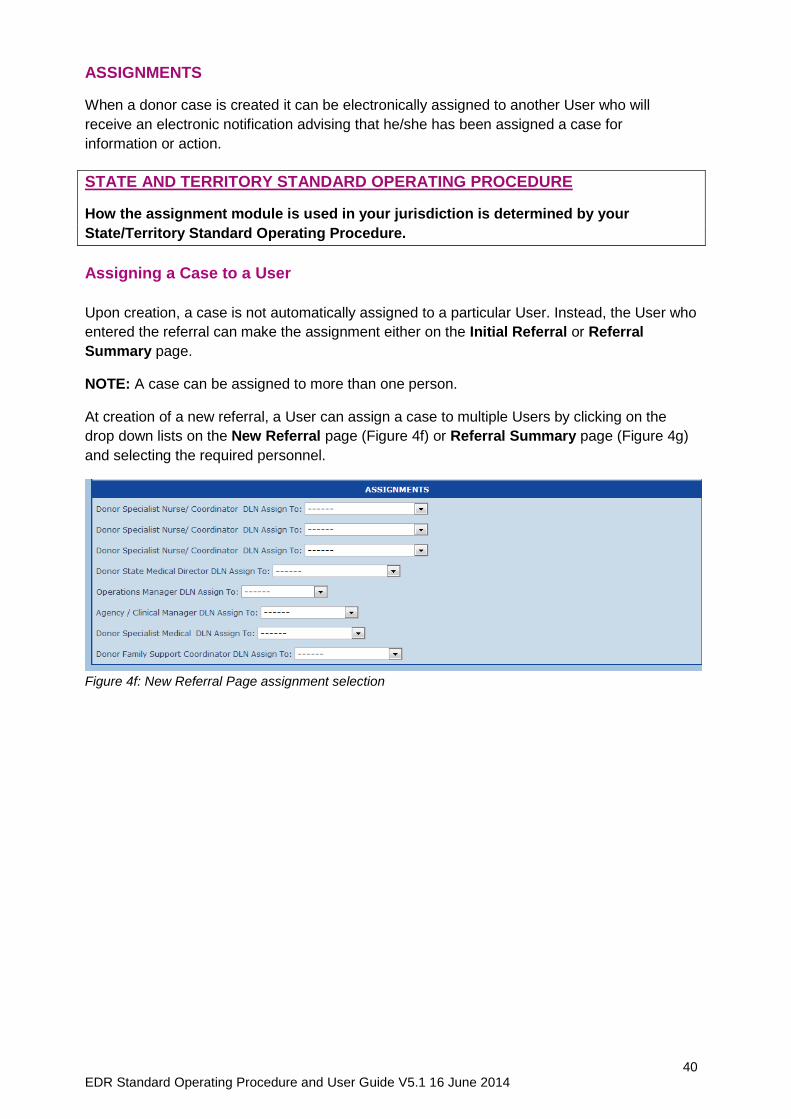
ASSIGNMENTS
When a donor case is created it can be electronically assigned to another User who will
receive an electronic notification advising that he/she has been assigned a case for
information or action.
STATE AND TERRITORY STANDARD OPERATING PROCEDURE
How the assignment module is used in your jurisdiction is determined by your
State/Territory Standard Operating Procedure.
Assigning a Case to a User
Upon creation, a case is not automatically assigned to a particular User. Instead, the User who
entered the referral can make the assignment either on the Initial Referral or Referral
Summary page.
NOTE: A case can be assigned to more than one person.
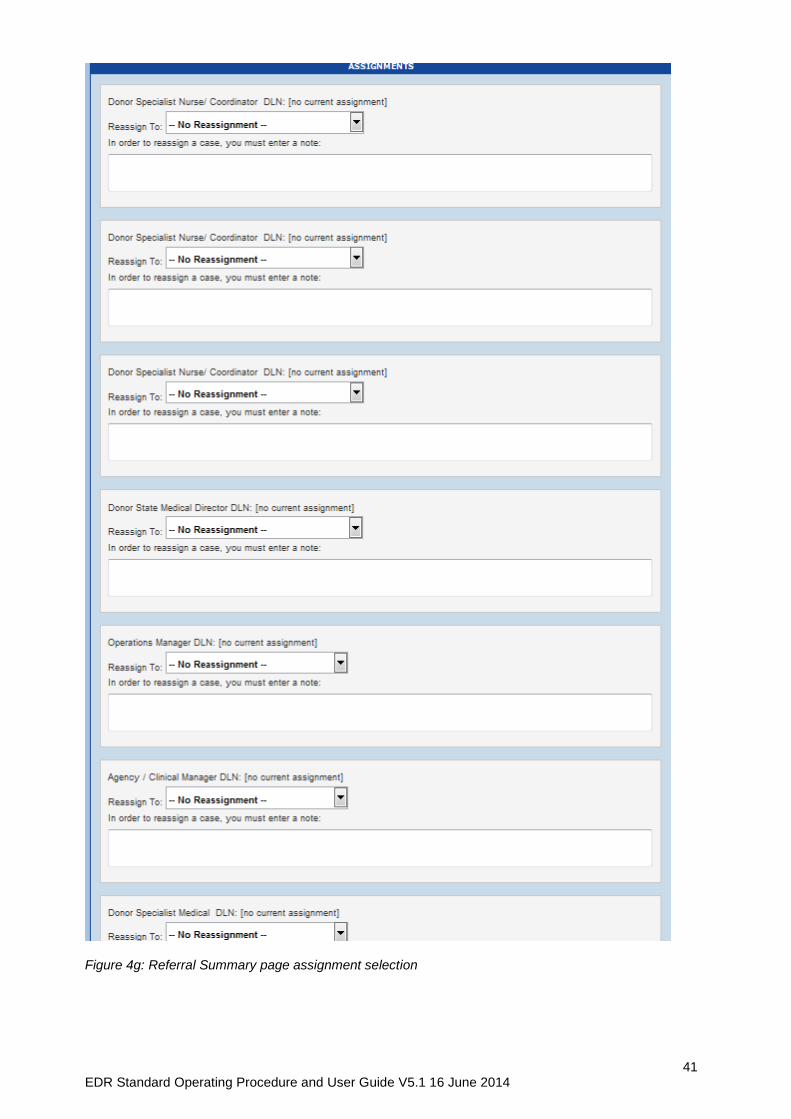
At creation of a new referral, a User can assign a case to multiple Users by clicking on the
drop down lists on the New Referral page (Figure 4f) or Referral Summary page (Figure 4g)
and selecting the required personnel.
Figure 4f: New Referral Page assignment selection
41 EDR Standard Operating Procedure and User Guide V5.1 16 June 2014
Figure 4g: Referral Summary page assignment selection
42 EDR Standard Operating Procedure and User Guide V5.1 16 June 2014
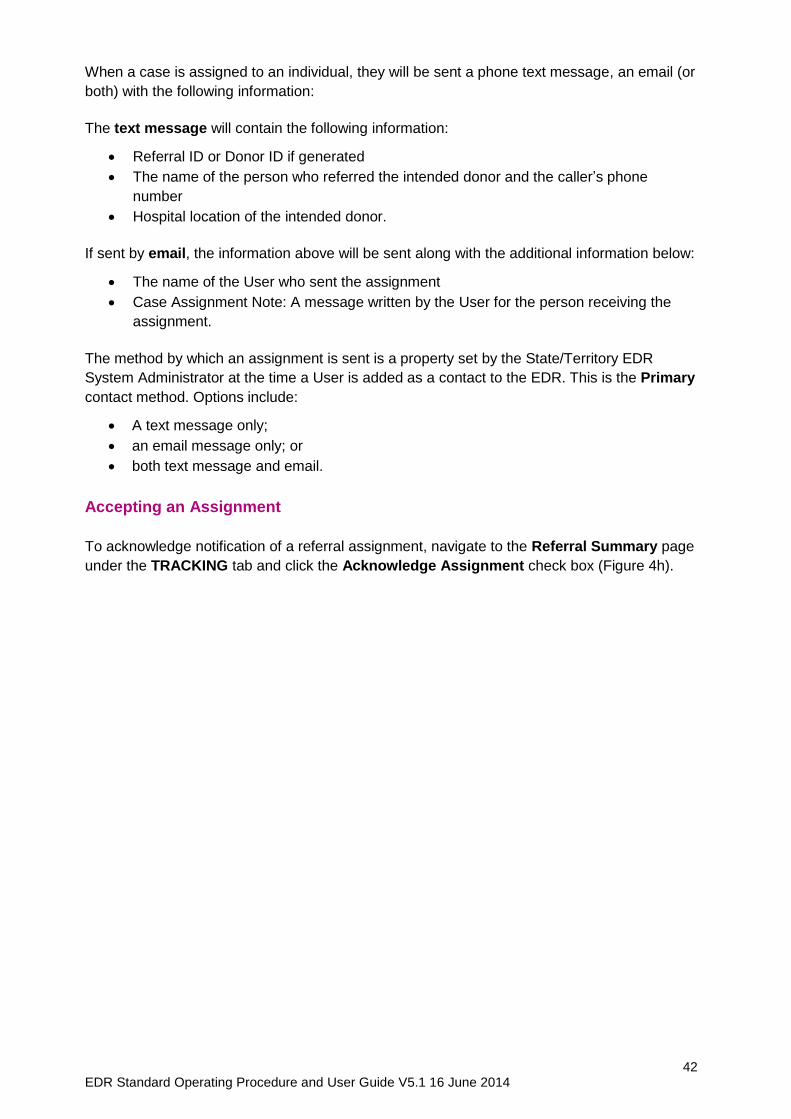
When a case is assigned to an individual, they will be sent a phone text message, an email (or
both) with the following information:
The text message will contain the following information:
Referral ID or Donor ID if generated
The name of the person who referred the intended donor and the caller’s phone
number
Hospital location of the intended donor.
If sent by email, the information above will be sent along with the additional information below:
The name of the User who sent the assignment
Case Assignment Note: A message written by the User for the person receiving the
assignment.
The method by which an assignment is sent is a property set by the State/Territory EDR
System Administrator at the time a User is added as a contact to the EDR. This is the Primary
contact method. Options include:
A text message only;
an email message only; or
both text message and email.
Accepting an Assignment
To acknowledge notification of a referral assignment, navigate to the Referral Summary page
under the TRACKING tab and click the Acknowledge Assignment check box (Figure 4h).
43 EDR Standard Operating Procedure and User Guide V5.1 16 June 2014
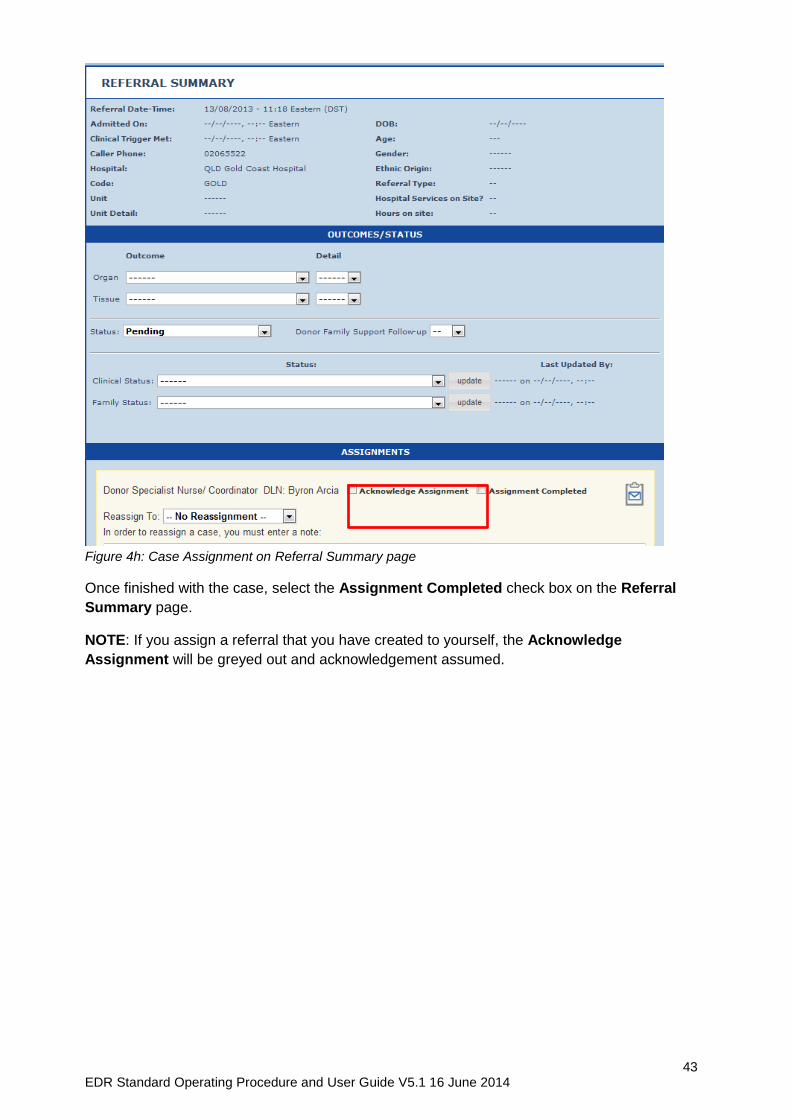
Figure 4h: Case Assignment on Referral Summary page
Once finished with the case, select the Assignment Completed check box on the Referral
Summary page.
NOTE: If you assign a referral that you have created to yourself, the Acknowledge
Assignment will be greyed out and acknowledgement assumed.
44 EDR Standard Operating Procedure and User Guide V5.1 16 June 2014
Tracking Cases
If a case has been assigned or re-assigned, the designated person will receive a notification
via the EDR.
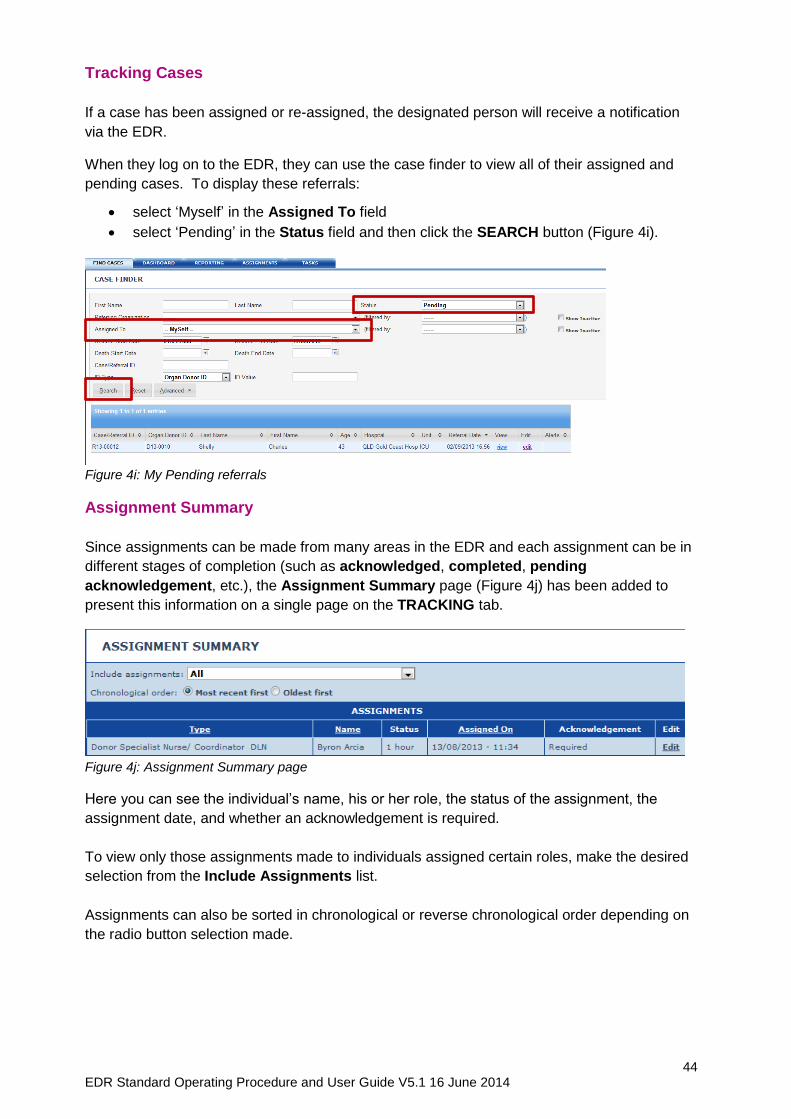
When they log on to the EDR, they can use the case finder to view all of their assigned and
pending cases. To display these referrals:
select ‘Myself’ in the Assigned To field
select ‘Pending’ in the Status field and then click the SEARCH button (Figure 4i).
Figure 4i: My Pending referrals
Assignment Summary
Since assignments can be made from many areas in the EDR and each assignment can be in
different stages of completion (such as acknowledged, completed, pending
acknowledgement, etc.), the Assignment Summary page (Figure 4j) has been added to
present this information on a single page on the TRACKING tab.
Figure 4j: Assignment Summary page
Here you can see the individual’s name, his or her role, the status of the assignment, the
assignment date, and whether an acknowledgement is required.
To view only those assignments made to individuals assigned certain roles, make the desired
selection from the Include Assignments list.
Assignments can also be sorted in chronological or reverse chronological order depending on
the radio button selection made.
45 EDR Standard Operating Procedure and User Guide V5.1 16 June 2014
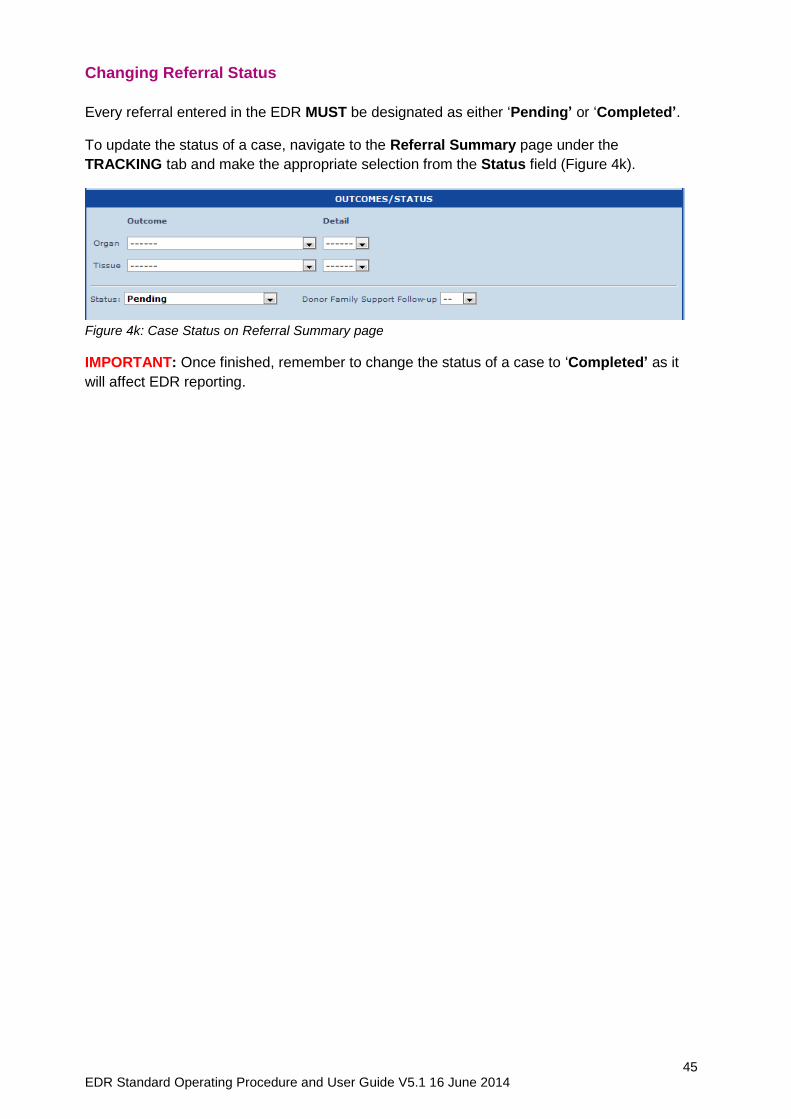
Changing Referral Status
Every referral entered in the EDR MUST be designated as either ‘Pending’ or ‘Completed’.
To update the status of a case, navigate to the Referral Summary page under the
TRACKING tab and make the appropriate selection from the Status field (Figure 4k).
Figure 4k: Case Status on Referral Summary page
IMPORTANT: Once finished, remember to change the status of a case to ‘Completed’ as it
will affect EDR reporting.
46 EDR Standard Operating Procedure and User Guide V5.1 16 June 2014
TASK MANAGEMENT
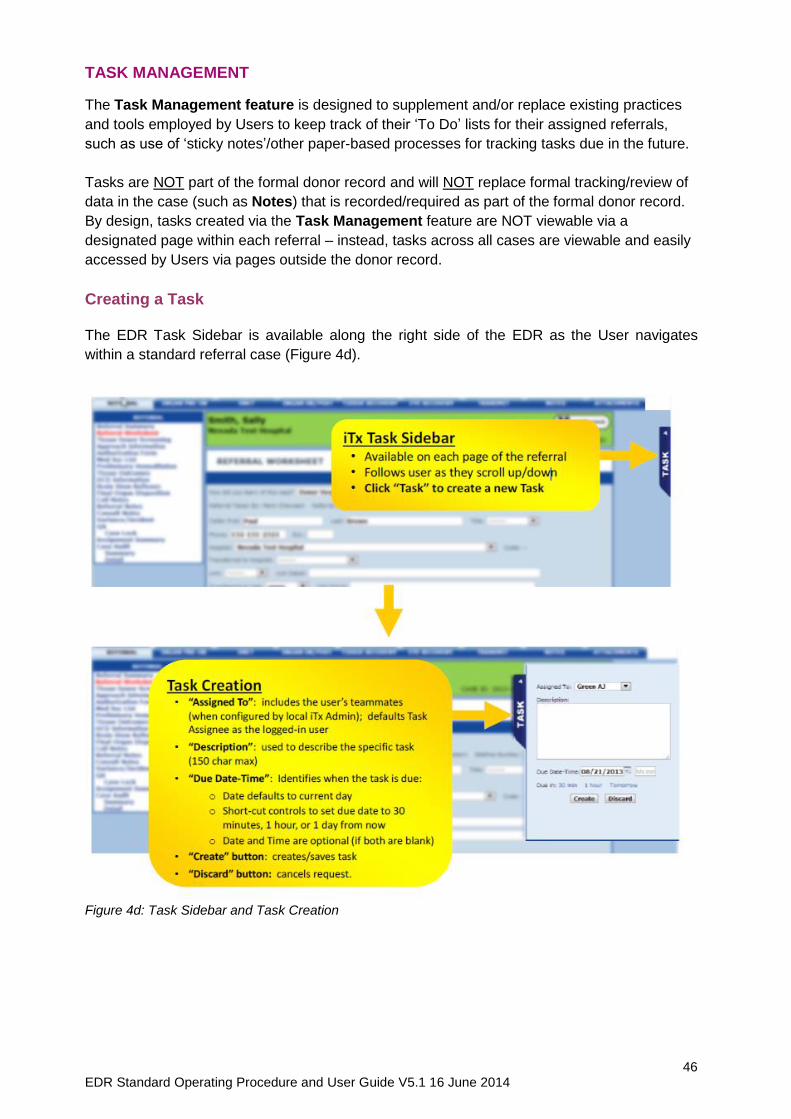
The Task Management feature is designed to supplement and/or replace existing practices
and tools employed by Users to keep track of their ‘To Do’ lists for their assigned referrals,
such as use of ‘sticky notes’/other paper-based processes for tracking tasks due in the future.
Tasks are NOT part of the formal donor record and will NOT replace formal tracking/review of
data in the case (such as Notes) that is recorded/required as part of the formal donor record.
By design, tasks created via the Task Management feature are NOT viewable via a
designated page within each referral – instead, tasks across all cases are viewable and easily
accessed by Users via pages outside the donor record.
Creating a Task The EDR Task Sidebar is available along the right side of the EDR as the User navigates
within a standard referral case (Figure 4d).
Figure 4d: Task Sidebar and Task Creation
47 EDR Standard Operating Procedure and User Guide V5.1 16 June 2014
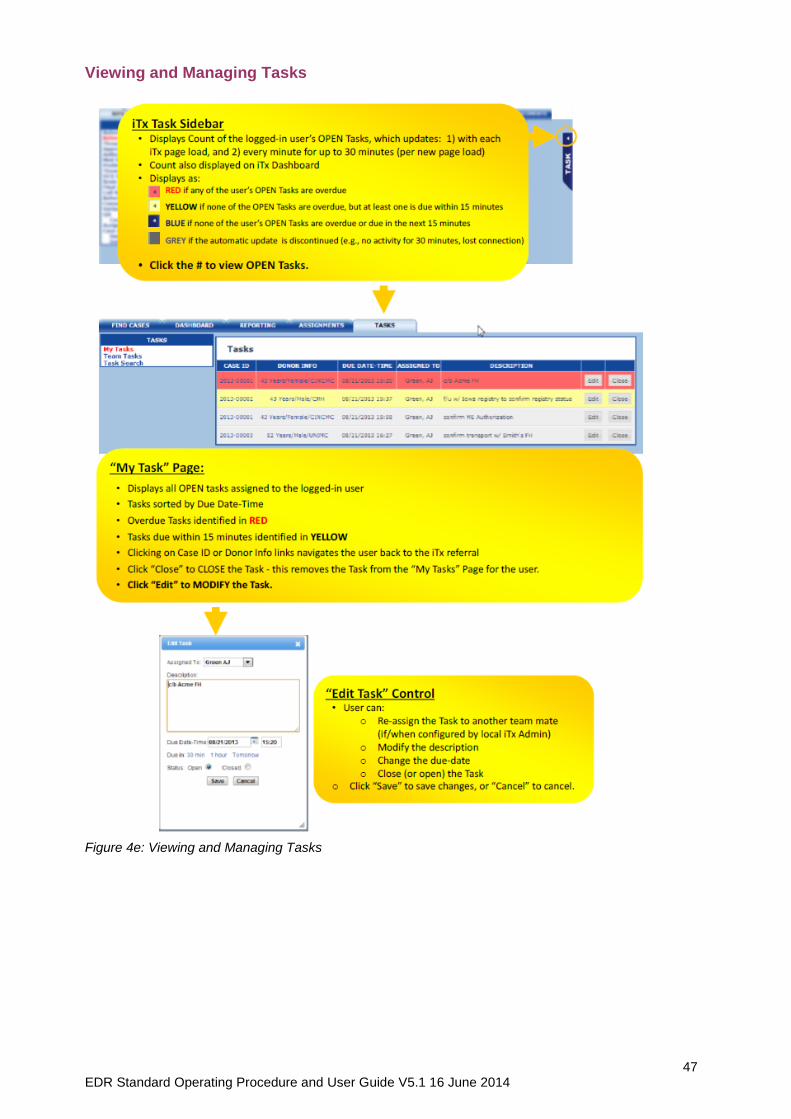
Viewing and Managing Tasks
Figure 4e: Viewing and Managing Tasks
48 EDR Standard Operating Procedure and User Guide V5.1 16 June 2014
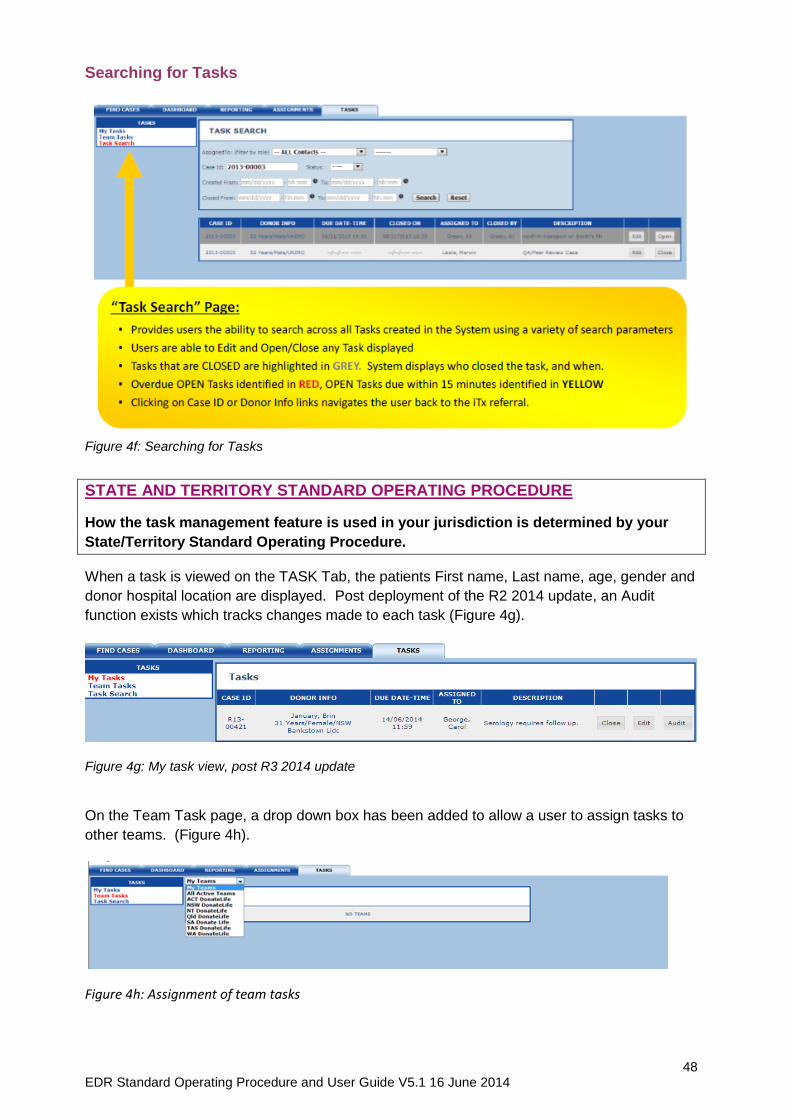
Searching for Tasks
Figure 4f: Searching for Tasks
STATE AND TERRITORY STANDARD OPERATING PROCEDURE
How the task management feature is used in your jurisdiction is determined by your
State/Territory Standard Operating Procedure.
When a task is viewed on the TASK Tab, the patients First name, Last name, age, gender and
donor hospital location are displayed. Post deployment of the R2 2014 update, an Audit
function exists which tracks changes made to each task (Figure 4g).
Figure 4g: My task view, post R3 2014 update
On the Team Task page, a drop down box has been added to allow a user to assign tasks to
other teams. (Figure 4h).
Figure 4h: Assignment of team tasks
49 EDR Standard Operating Procedure and User Guide V5.1 16 June 2014
5. TRACKING TAB
REFERRAL SUMMARY PAGE
The Referral Summary page:
provides a high level summary of information entered from the New Referral page, (auto populated across)
allows the recording of the final outcome of a referral (Actual,DCD, DBD, Intended, Intended outcome detail)
allows the assignment of the Completed status
allows a User to acknowledge an assignment
allows further assign or reassignment of a new referral to other Users and
allows navigation to the Family Services Module for the entry of next of kin detail.
NATIONAL STANDARD OPERATING PROCEDURE
Once a donor case is completed, the outcome needs to be recorded on this page. This
includes changing the Status field from ‘Pending’ to ‘Completed’. If this is not done
then the Donor Case will continue to appear as a pending case in the Case Finder
pending list.
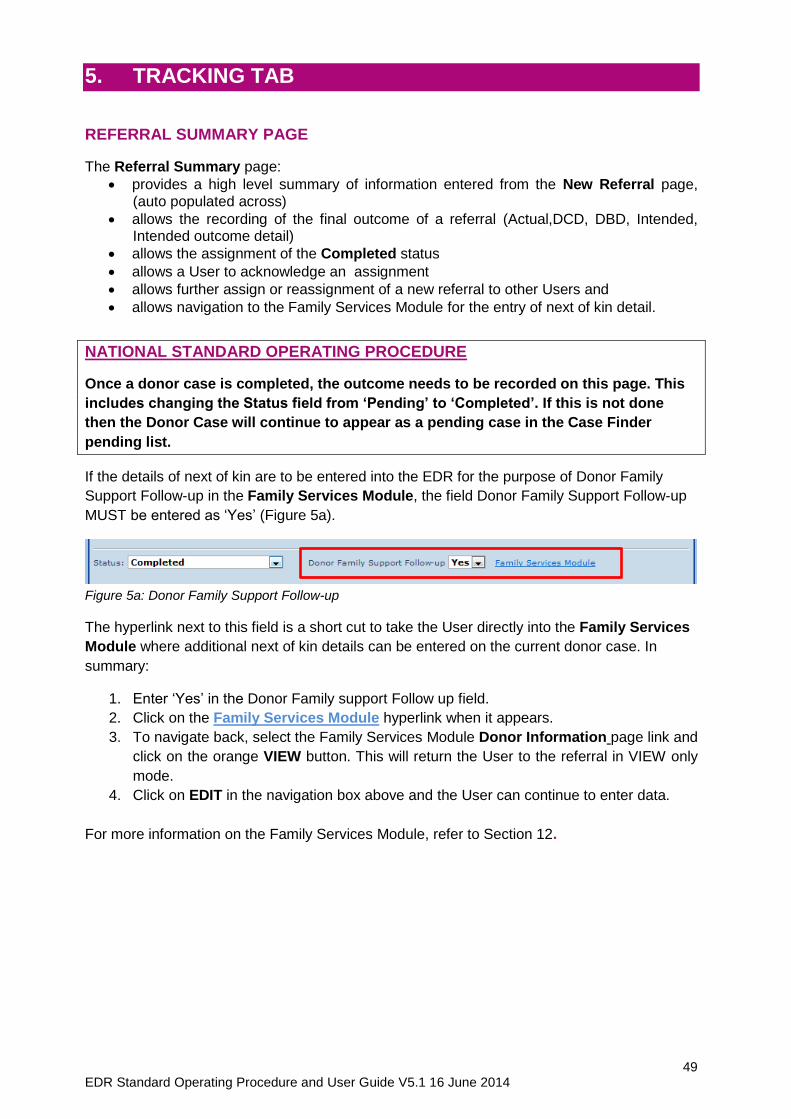
If the details of next of kin are to be entered into the EDR for the purpose of Donor Family
Support Follow-up in the Family Services Module, the field Donor Family Support Follow-up
MUST be entered as ‘Yes’ (Figure 5a).
Figure 5a: Donor Family Support Follow-up
The hyperlink next to this field is a short cut to take the User directly into the Family Services
Module where additional next of kin details can be entered on the current donor case. In
summary:
1. Enter ‘Yes’ in the Donor Family support Follow up field.
2. Click on the Family Services Module hyperlink when it appears.
3. To navigate back, select the Family Services Module Donor Information page link and
click on the orange VIEW button. This will return the User to the referral in VIEW only
mode.
4. Click on EDIT in the navigation box above and the User can continue to enter data.
For more information on the Family Services Module, refer to Section 12.
50 EDR Standard Operating Procedure and User Guide V5.1 16 June 2014
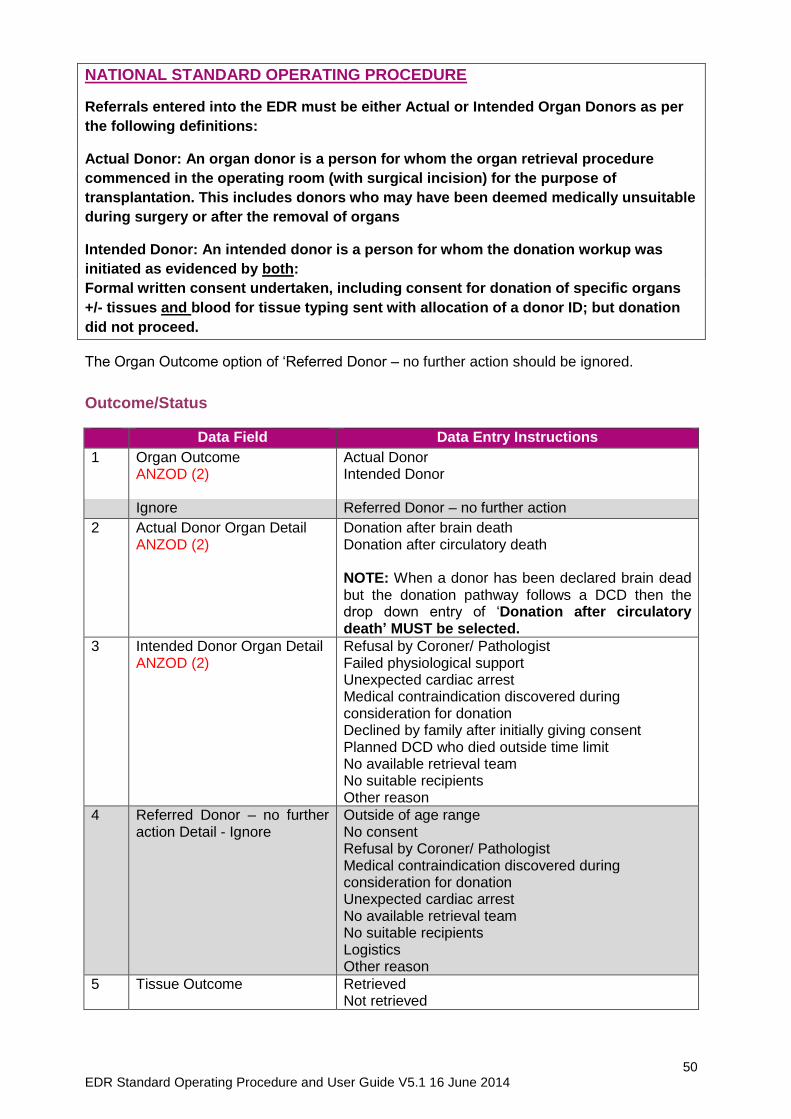
NATIONAL STANDARD OPERATING PROCEDURE
Referrals entered into the EDR must be either Actual or Intended Organ Donors as per
the following definitions:
Actual Donor: An organ donor is a person for whom the organ retrieval procedure
commenced in the operating room (with surgical incision) for the purpose of
transplantation. This includes donors who may have been deemed medically unsuitable
during surgery or after the removal of organs
Intended Donor: An intended donor is a person for whom the donation workup was
initiated as evidenced by both:
Formal written consent undertaken, including consent for donation of specific organs
+/- tissues and blood for tissue typing sent with allocation of a donor ID; but donation
did not proceed.
The Organ Outcome option of ‘Referred Donor – no further action should be ignored.
Outcome/Status
Data Field Data Entry Instructions
1 Organ Outcome ANZOD (2)
Actual Donor Intended Donor
Ignore Referred Donor – no further action
2 Actual Donor Organ Detail ANZOD (2)
Donation after brain death Donation after circulatory death NOTE: When a donor has been declared brain dead but the donation pathway follows a DCD then the drop down entry of ‘Donation after circulatory death’ MUST be selected.
3 Intended Donor Organ Detail ANZOD (2)
Refusal by Coroner/ Pathologist Failed physiological support Unexpected cardiac arrest Medical contraindication discovered during consideration for donation Declined by family after initially giving consent Planned DCD who died outside time limit No available retrieval team No suitable recipients Other reason
4 Referred Donor – no further action Detail - Ignore
Outside of age range No consent Refusal by Coroner/ Pathologist Medical contraindication discovered during consideration for donation Unexpected cardiac arrest No available retrieval team No suitable recipients Logistics Other reason
5 Tissue Outcome Retrieved Not retrieved
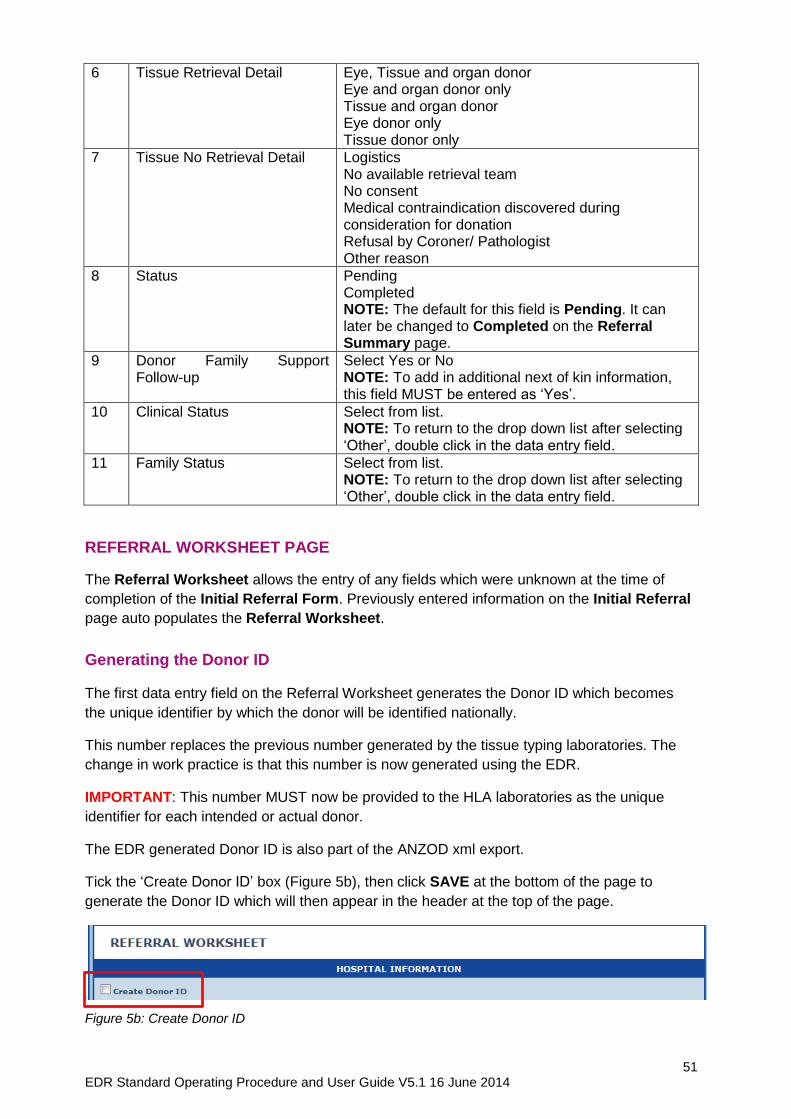
51 EDR Standard Operating Procedure and User Guide V5.1 16 June 2014
6 Tissue Retrieval Detail Eye, Tissue and organ donor Eye and organ donor only Tissue and organ donor Eye donor only Tissue donor only
7 Tissue No Retrieval Detail Logistics No available retrieval team No consent Medical contraindication discovered during consideration for donation Refusal by Coroner/ Pathologist Other reason
8 Status Pending Completed NOTE: The default for this field is Pending. It can later be changed to Completed on the Referral Summary page.
9 Donor Family Support Follow-up
Select Yes or No NOTE: To add in additional next of kin information, this field MUST be entered as ‘Yes’.
10 Clinical Status Select from list. NOTE: To return to the drop down list after selecting ‘Other’, double click in the data entry field.
11 Family Status Select from list. NOTE: To return to the drop down list after selecting ‘Other’, double click in the data entry field.
REFERRAL WORKSHEET PAGE
The Referral Worksheet allows the entry of any fields which were unknown at the time of
completion of the Initial Referral Form. Previously entered information on the Initial Referral
page auto populates the Referral Worksheet.
Generating the Donor ID
The first data entry field on the Referral Worksheet generates the Donor ID which becomes
the unique identifier by which the donor will be identified nationally.
This number replaces the previous number generated by the tissue typing laboratories. The
change in work practice is that this number is now generated using the EDR.
IMPORTANT: This number MUST now be provided to the HLA laboratories as the unique
identifier for each intended or actual donor.
The EDR generated Donor ID is also part of the ANZOD xml export.
Tick the ‘Create Donor ID’ box (Figure 5b), then click SAVE at the bottom of the page to
generate the Donor ID which will then appear in the header at the top of the page.
Figure 5b: Create Donor ID

52 EDR Standard Operating Procedure and User Guide V5.1 16 June 2014
NATIONAL STANDARD OPERATING PROCEDURE
Nationally, the Donor ID is generated when donor bloods are sent to the laboratories
and testing for tissue typing and serology/NAT testing is requested.
STATE AND TERRITORY STANDARD OPERATING PROCEDURE
It is recommended that each DonateLife Agency determine a Standard Operating
Procedure for who is responsible for generating the Donor ID. This could be a Donation
Specialist Coordinator or Donation Specialist Nurse depending on State/Territory
practice.
Hospital Information
Data Field Data Entry Instructions
1 Create Donor ID ANZOD (1)
Tick the box to generate the Donor ID. Click the SAVE button on the bottom of the page to generate the Donor ID. This identifier will appear in the Header Bar of each page once the Referral Worksheet is saved.
Hospital Services on Site Ignore
Hours on Site Ignore
Patient Information
Data Field Data Entry Instructions
1 DOB: ANZOD (4)
Date of birth if available (dd/mm/yyyy). This will automatically populate the AGE box.
2 Gender: ANZOD (6)
Select gender (Male, Female or Unknown)
3 Height: ANZOD (7)
Enter the height and select the unit of measure as centimetres.
4 Weight: ANZOD (8)
Enter the weight and select the unit of measure as kilograms
5 MRN: Enter the medical record number
6 Ethnic Origin: ANZOD (9)
Select from the dropdown list, Other can be selected and a text description entered. However, this entry should be later reviewed and a selection made from the drop down list. NOTE: The complete list is available at Appendix 3 of this document with detail on the ethnicities that are associated with the broad categories given in the drop down list. NOTE: This field allows the EDR to calculate the Total Lung Capacity (TLC) based on ethnicity so it is important to select the correct dropdown field whenever possible.
7 Religion: ANZOD (10)
Select from the dropdown list. The list includes all known religious categories. NOTE: The complete list is available at Appendix 4 of this document.
8 Hospital Admission date-Time:
Enter the hospital admission date where the intended donor is currently located.
9 Referred on vent?:
Select Yes or No
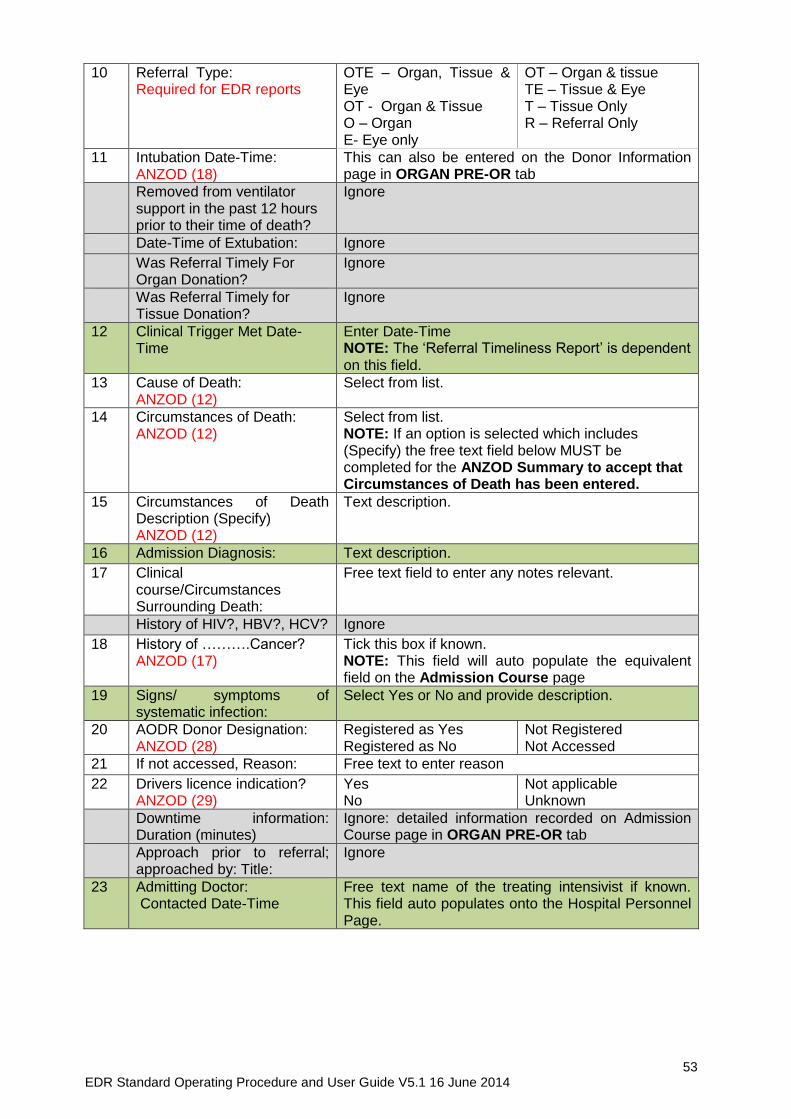
53 EDR Standard Operating Procedure and User Guide V5.1 16 June 2014
10 Referral Type: Required for EDR reports
OTE – Organ, Tissue & Eye OT - Organ & Tissue O – Organ E- Eye only
OT – Organ & tissue TE – Tissue & Eye T – Tissue Only R – Referral Only
11 Intubation Date-Time: ANZOD (18)
This can also be entered on the Donor Information page in ORGAN PRE-OR tab
Removed from ventilator support in the past 12 hours prior to their time of death?
Ignore
Date-Time of Extubation: Ignore
Was Referral Timely For Organ Donation?
Ignore
Was Referral Timely for Tissue Donation?
Ignore
12 Clinical Trigger Met Date-Time
Enter Date-Time NOTE: The ‘Referral Timeliness Report’ is dependent on this field.
13 Cause of Death: ANZOD (12)
Select from list.
14 Circumstances of Death: ANZOD (12)
Select from list. NOTE: If an option is selected which includes (Specify) the free text field below MUST be completed for the ANZOD Summary to accept that Circumstances of Death has been entered.
15 Circumstances of Death Description (Specify) ANZOD (12)
Text description.
16 Admission Diagnosis: Text description.
17 Clinical course/Circumstances Surrounding Death:
Free text field to enter any notes relevant.
History of HIV?, HBV?, HCV? Ignore
18 History of ……….Cancer? ANZOD (17)
Tick this box if known. NOTE: This field will auto populate the equivalent field on the Admission Course page
19 Signs/ symptoms of systematic infection:
Select Yes or No and provide description.
20 AODR Donor Designation: ANZOD (28)
Registered as Yes Registered as No
Not Registered Not Accessed
21 If not accessed, Reason: Free text to enter reason
22 Drivers licence indication? ANZOD (29)
Yes No
Not applicable Unknown
Downtime information: Duration (minutes)
Ignore: detailed information recorded on Admission Course page in ORGAN PRE-OR tab
Approach prior to referral; approached by: Title:
Ignore
23 Admitting Doctor: Contacted Date-Time
Free text name of the treating intensivist if known. This field auto populates onto the Hospital Personnel Page.
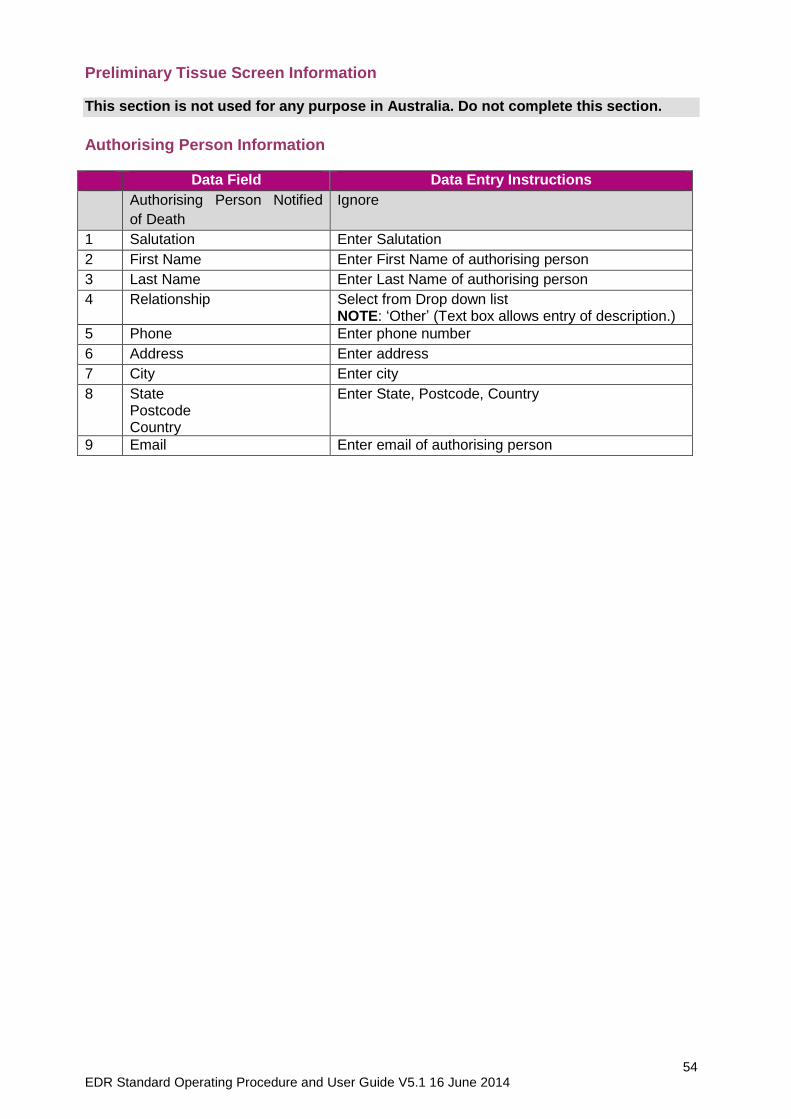
54 EDR Standard Operating Procedure and User Guide V5.1 16 June 2014
Preliminary Tissue Screen Information
This section is not used for any purpose in Australia. Do not complete this section.
Authorising Person Information
Data Field Data Entry Instructions
Authorising Person Notified
of Death
Ignore
1 Salutation Enter Salutation
2 First Name Enter First Name of authorising person
3 Last Name Enter Last Name of authorising person
4 Relationship Select from Drop down list NOTE: ‘Other’ (Text box allows entry of description.)
5 Phone Enter phone number
6 Address Enter address
7 City Enter city
8 State Postcode Country
Enter State, Postcode, Country
9 Email Enter email of authorising person

55 EDR Standard Operating Procedure and User Guide V5.1 16 June 2014
TISSUE DONOR SCREENING PAGE – NOT APPLICABLE IN AUSTRALIA
This page is not used for any purpose in Australia. Do not complete this page.
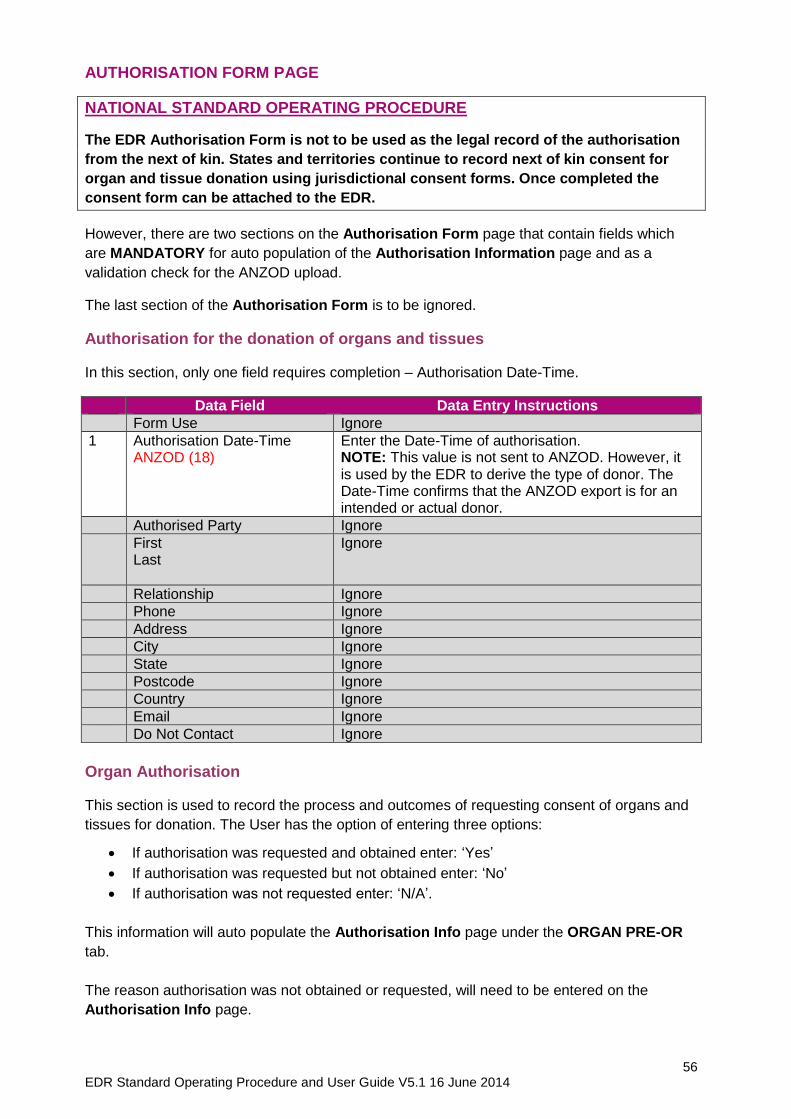
56 EDR Standard Operating Procedure and User Guide V5.1 16 June 2014
AUTHORISATION FORM PAGE
NATIONAL STANDARD OPERATING PROCEDURE
The EDR Authorisation Form is not to be used as the legal record of the authorisation
from the next of kin. States and territories continue to record next of kin consent for
organ and tissue donation using jurisdictional consent forms. Once completed the
consent form can be attached to the EDR.
However, there are two sections on the Authorisation Form page that contain fields which
are MANDATORY for auto population of the Authorisation Information page and as a
validation check for the ANZOD upload.
The last section of the Authorisation Form is to be ignored.
Authorisation for the donation of organs and tissues
In this section, only one field requires completion – Authorisation Date-Time.
Data Field Data Entry Instructions
Form Use Ignore
1 Authorisation Date-Time ANZOD (18)
Enter the Date-Time of authorisation. NOTE: This value is not sent to ANZOD. However, it is used by the EDR to derive the type of donor. The Date-Time confirms that the ANZOD export is for an intended or actual donor.
Authorised Party Ignore
First Last
Ignore
Relationship Ignore
Phone Ignore
Address Ignore
City Ignore
State Ignore
Postcode Ignore
Country Ignore
Email Ignore
Do Not Contact Ignore
Organ Authorisation
This section is used to record the process and outcomes of requesting consent of organs and
tissues for donation. The User has the option of entering three options:
If authorisation was requested and obtained enter: ‘Yes’
If authorisation was requested but not obtained enter: ‘No’
If authorisation was not requested enter: ‘N/A’.
This information will auto populate the Authorisation Info page under the ORGAN PRE-OR
tab.
The reason authorisation was not obtained or requested, will need to be entered on the
Authorisation Info page.

57 EDR Standard Operating Procedure and User Guide V5.1 16 June 2014
Data Field Data Entry Instructions
1 N/A Tick if this section is not applicable. All organs will be ticked as N/A if this box is ticked.
2 Right Kidney ANZOD (34)
Tick one of the following: Yes, No or N/A
3 Left Kidney ANZOD (34)
Tick one of the following: Yes, No or N/A
4 Liver ANZOD (34)
Tick one of the following: Yes, No or N/A
5 Intestine ANZOD (34)
Tick one of the following: Yes, No or N/A
6 Pancreas ANZOD (34)
Tick one of the following: Yes, No or N/A
7 Heart ANZOD (34)
Tick one of the following: Yes, No or N/A
8 Right Lung ANZOD (34)
Tick one of the following: Yes, No or N/A
9 Left Lung ANZOD (34)
Tick one of the following: Yes, No or N/A
10 Other ANZOD (34)
Write description of organ; then tick one of the following: Yes, No or N/A
11 If organs retrieved are unable to be transplanted or used for research
Return to body Respectfully dispose
Research and Education Authorisation
Data Field Data Entry Instructions
1 N/A ANZOD
Tick if this section is not applicable. All boxes will be ticked as N/A if this box is ticked.
2 Research ANZOD (33)
Tick one of the following: Yes, No or N/A
3 Education Tick one of the following: Yes, No or N/A
Tissue Authorisation
Authorisation can only be sought for:
Eyes (including corneas and sclera); or
Eyes- Corneas only.
Authorisation for both cannot be chosen.
1. If authorisation is sought for Eyes – Corneas only, tissue retrieved on the Tissue
Outcome page can only be recorded as Corneas only.
2. If authorisation is sought for Eyes (including corneas and sclera), tissue retrieved
on the Tissue Outcome page can only be recorded as Eyes - Whole.
Authorisation for blood vessels from abdomen and blood vessels from thoracic should only be
recorded as sought (Yes or No) when the consent is for the purpose of donation of blood
vessels for appropriate storage and processing in a tissue bank. Jurisdictions that do not have
this tissue banking process in place are required to enter N/A in this field. The reason for why
N/A has been selected should be entered as ‘Other’ with the text No Program.
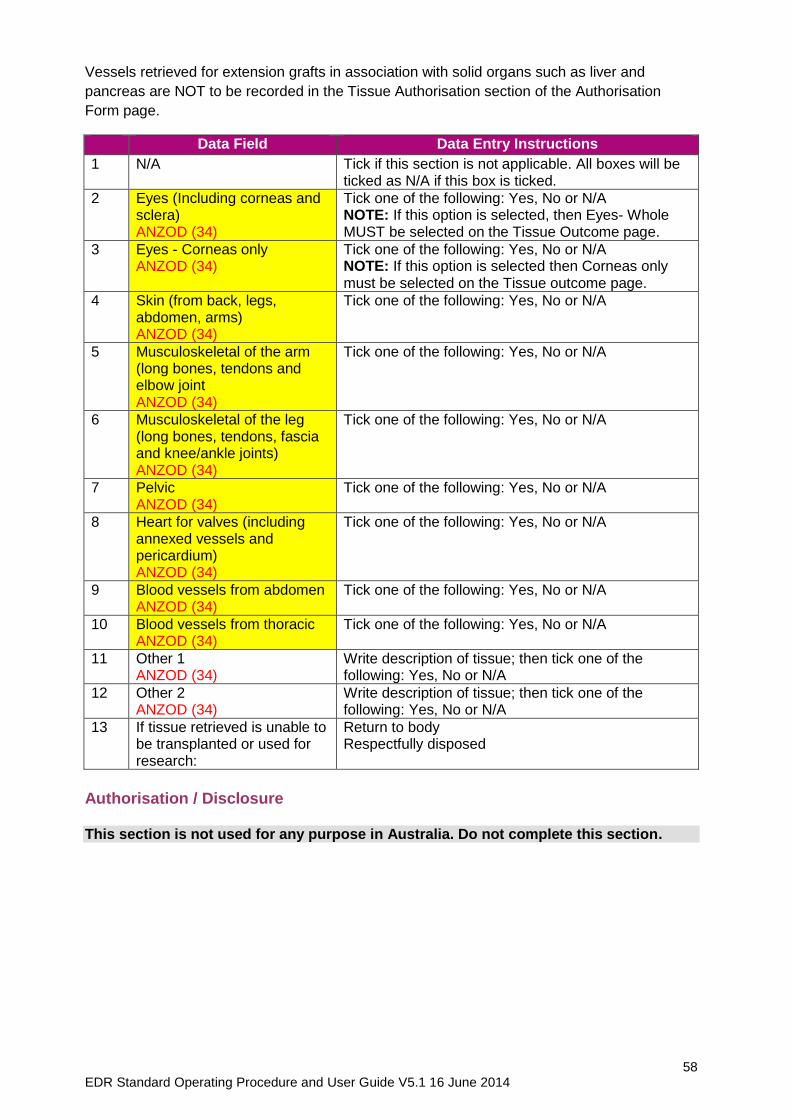
58 EDR Standard Operating Procedure and User Guide V5.1 16 June 2014
Vessels retrieved for extension grafts in association with solid organs such as liver and
pancreas are NOT to be recorded in the Tissue Authorisation section of the Authorisation
Form page.
Data Field Data Entry Instructions
1 N/A Tick if this section is not applicable. All boxes will be ticked as N/A if this box is ticked.
2 Eyes (Including corneas and sclera) ANZOD (34)
Tick one of the following: Yes, No or N/A NOTE: If this option is selected, then Eyes- Whole MUST be selected on the Tissue Outcome page.
3 Eyes - Corneas only ANZOD (34)
Tick one of the following: Yes, No or N/A NOTE: If this option is selected then Corneas only must be selected on the Tissue outcome page.
4 Skin (from back, legs, abdomen, arms) ANZOD (34)
Tick one of the following: Yes, No or N/A
5 Musculoskeletal of the arm (long bones, tendons and elbow joint ANZOD (34)
Tick one of the following: Yes, No or N/A
6 Musculoskeletal of the leg (long bones, tendons, fascia and knee/ankle joints) ANZOD (34)
Tick one of the following: Yes, No or N/A
7 Pelvic ANZOD (34)
Tick one of the following: Yes, No or N/A
8 Heart for valves (including annexed vessels and pericardium) ANZOD (34)
Tick one of the following: Yes, No or N/A
9 Blood vessels from abdomen ANZOD (34)
Tick one of the following: Yes, No or N/A
10 Blood vessels from thoracic ANZOD (34)
Tick one of the following: Yes, No or N/A
11 Other 1 ANZOD (34)
Write description of tissue; then tick one of the following: Yes, No or N/A
12 Other 2 ANZOD (34)
Write description of tissue; then tick one of the following: Yes, No or N/A
13 If tissue retrieved is unable to be transplanted or used for research:
Return to body Respectfully disposed
Authorisation / Disclosure This section is not used for any purpose in Australia. Do not complete this section.

59 EDR Standard Operating Procedure and User Guide V5.1 16 June 2014
PRELIMINARY PLASMA DILUTION PAGE – NOT APPLICABLE IN AUSTRALIA
This page is not used for any purpose in Australia. Do not complete this page.

60 EDR Standard Operating Procedure and User Guide V5.1 16 June 2014
BRAIN STEM REFLEXES PAGE – NOT APPLICABLE IN AUSTRALIA
This page is not used for any purpose in Australia. Do not complete this page.
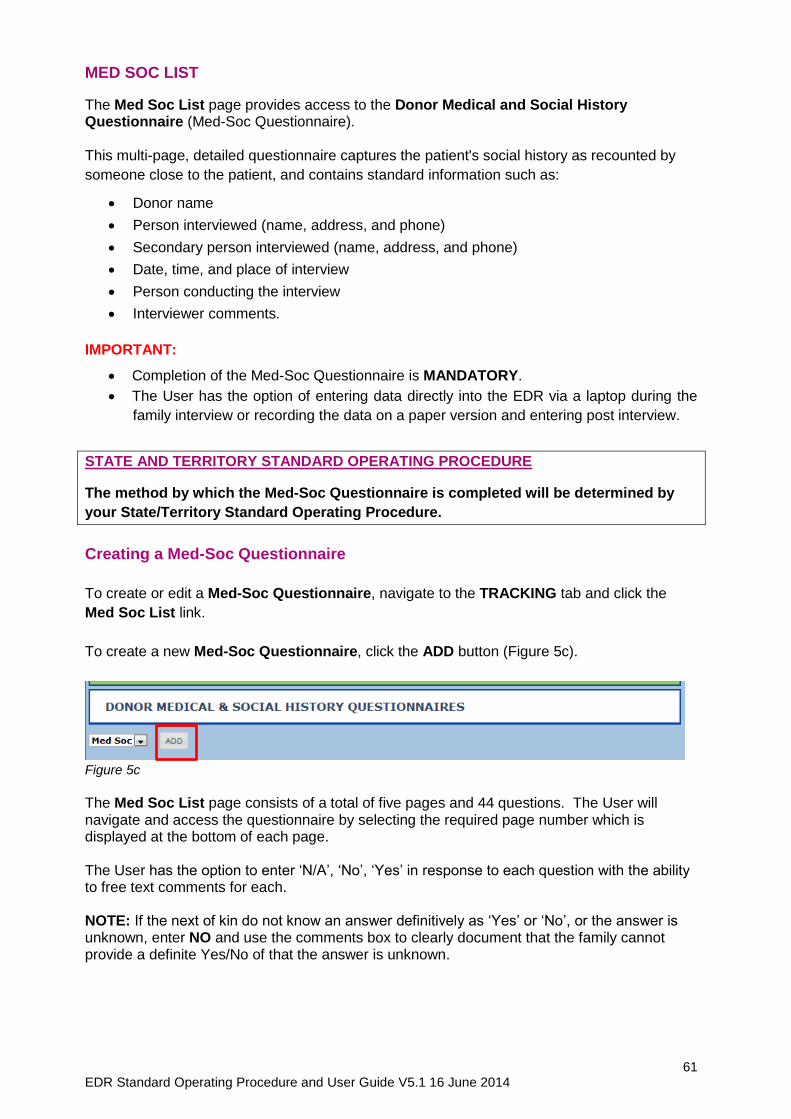
61 EDR Standard Operating Procedure and User Guide V5.1 16 June 2014
MED SOC LIST
The Med Soc List page provides access to the Donor Medical and Social History Questionnaire (Med-Soc Questionnaire). This multi-page, detailed questionnaire captures the patient's social history as recounted by
someone close to the patient, and contains standard information such as:
Donor name
Person interviewed (name, address, and phone)
Secondary person interviewed (name, address, and phone)
Date, time, and place of interview
Person conducting the interview
Interviewer comments.
IMPORTANT:
Completion of the Med-Soc Questionnaire is MANDATORY.
The User has the option of entering data directly into the EDR via a laptop during the
family interview or recording the data on a paper version and entering post interview.
STATE AND TERRITORY STANDARD OPERATING PROCEDURE
The method by which the Med-Soc Questionnaire is completed will be determined by
your State/Territory Standard Operating Procedure.
Creating a Med-Soc Questionnaire
To create or edit a Med-Soc Questionnaire, navigate to the TRACKING tab and click the
Med Soc List link.
To create a new Med-Soc Questionnaire, click the ADD button (Figure 5c).
Figure 5c
The Med Soc List page consists of a total of five pages and 44 questions. The User will navigate and access the questionnaire by selecting the required page number which is displayed at the bottom of each page. The User has the option to enter ‘N/A’, ‘No’, ‘Yes’ in response to each question with the ability to free text comments for each. NOTE: If the next of kin do not know an answer definitively as ‘Yes’ or ‘No’, or the answer is unknown, enter NO and use the comments box to clearly document that the family cannot provide a definite Yes/No of that the answer is unknown.
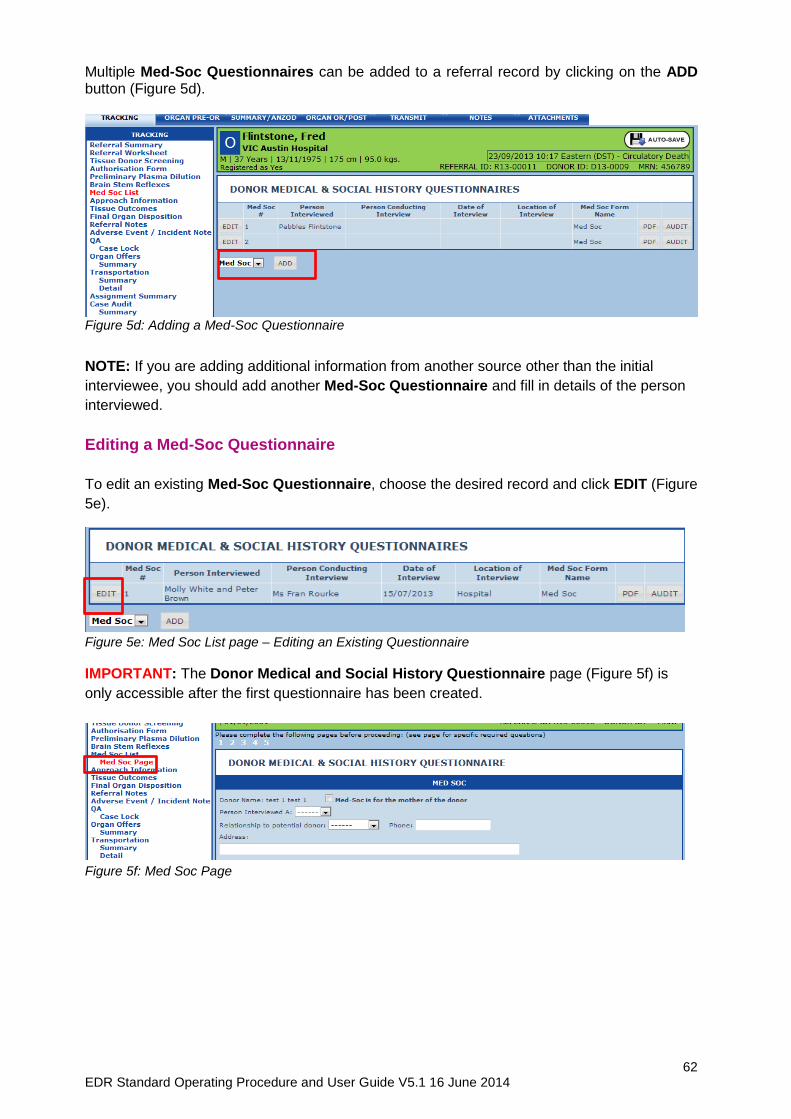
62 EDR Standard Operating Procedure and User Guide V5.1 16 June 2014
Multiple Med-Soc Questionnaires can be added to a referral record by clicking on the ADD button (Figure 5d).
Figure 5d: Adding a Med-Soc Questionnaire
NOTE: If you are adding additional information from another source other than the initial
interviewee, you should add another Med-Soc Questionnaire and fill in details of the person
interviewed.
Editing a Med-Soc Questionnaire
To edit an existing Med-Soc Questionnaire, choose the desired record and click EDIT (Figure
5e).
Figure 5e: Med Soc List page – Editing an Existing Questionnaire
IMPORTANT: The Donor Medical and Social History Questionnaire page (Figure 5f) is
only accessible after the first questionnaire has been created.
Figure 5f: Med Soc Page
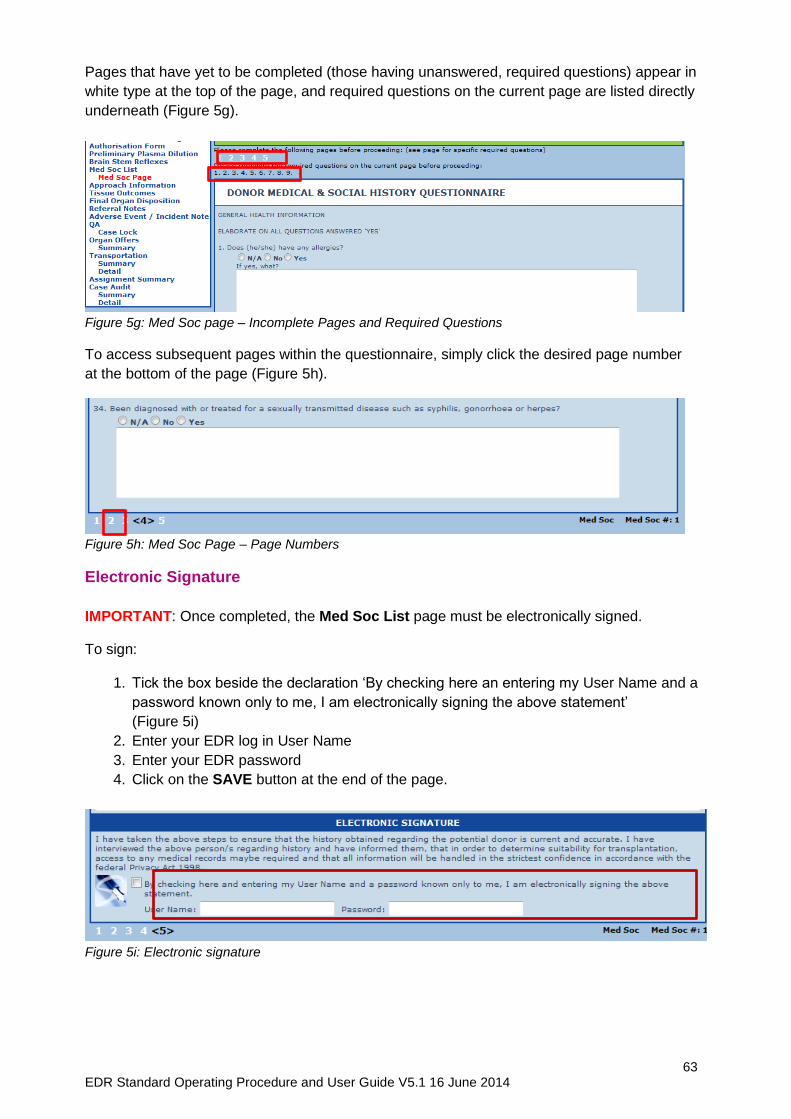
63 EDR Standard Operating Procedure and User Guide V5.1 16 June 2014
Pages that have yet to be completed (those having unanswered, required questions) appear in
white type at the top of the page, and required questions on the current page are listed directly
underneath (Figure 5g).
Figure 5g: Med Soc page – Incomplete Pages and Required Questions
To access subsequent pages within the questionnaire, simply click the desired page number
at the bottom of the page (Figure 5h).
Figure 5h: Med Soc Page – Page Numbers
Electronic Signature
IMPORTANT: Once completed, the Med Soc List page must be electronically signed.
To sign:
1. Tick the box beside the declaration ‘By checking here an entering my User Name and a
password known only to me, I am electronically signing the above statement’
(Figure 5i)
2. Enter your EDR log in User Name
3. Enter your EDR password
4. Click on the SAVE button at the end of the page.
Figure 5i: Electronic signature

64 EDR Standard Operating Procedure and User Guide V5.1 16 June 2014
No further edits to the page can be made unless a second electronic signature is added. The process to add a second electronic signature to a signed questionnaire is as follows:
1. Go to TRACKING tab then Med Soc List page
2. Select EDIT on the Questionnaire you want to update
3. This will take you to the electronically signed Questionnaire
4. To make further edits: go to page 5 of the Questionnaire and scroll to bottom of page to
Electronic Signature
5. Select ADD ANOTHER SIGNATURE (Figure 5j) then select SAVE
6. This will allow additional information to be included.
After signing, an E-SIG seal, the name of the person who signed the document and the date-time, is displayed (Figure 5j).
Figure 5j: Electronic signature, add another signature and date-time display
NOTE: Once a Med Soc form has been added, it cannot be deleted. Further edits can be made to an existing Med Soc form by ticking the ‘Add another signature’ on the last page of the form. All Med Soc forms created for a referral, will be included in the Donor Chart on its transmission.
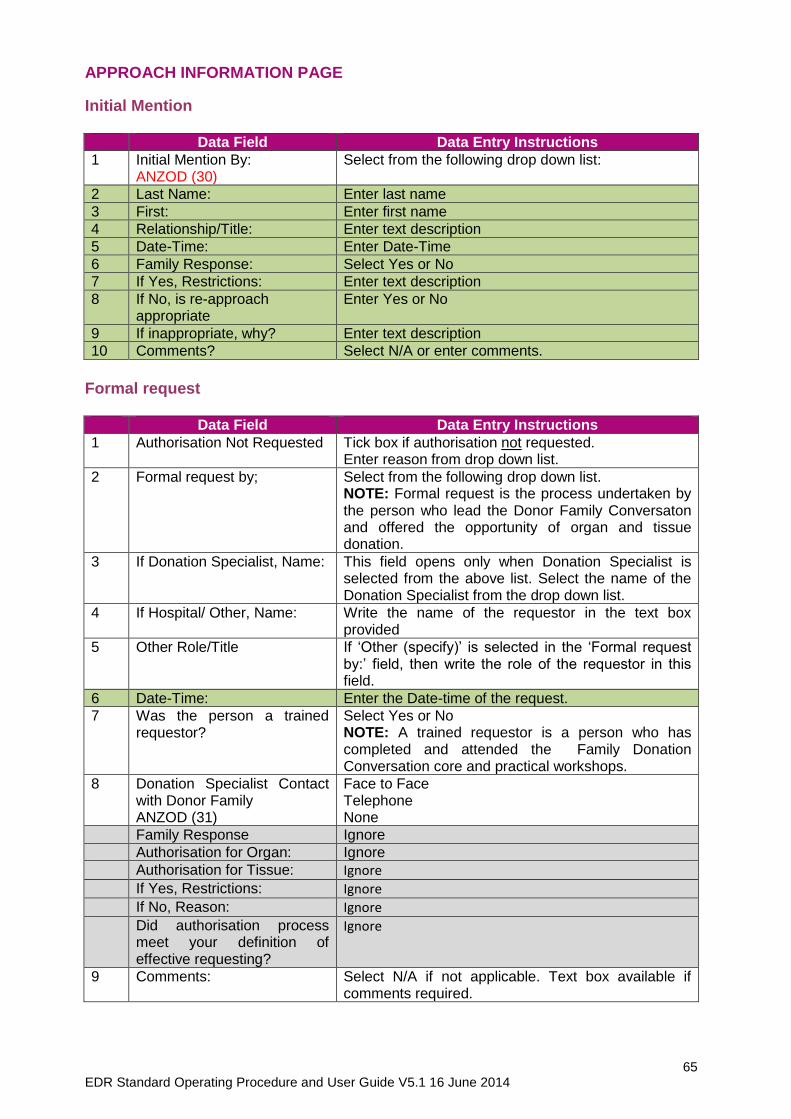
65 EDR Standard Operating Procedure and User Guide V5.1 16 June 2014
APPROACH INFORMATION PAGE
Initial Mention
Data Field Data Entry Instructions
1 Initial Mention By: ANZOD (30)
Select from the following drop down list:
2 Last Name: Enter last name
3 First: Enter first name
4 Relationship/Title: Enter text description
5 Date-Time: Enter Date-Time
6 Family Response: Select Yes or No
7 If Yes, Restrictions: Enter text description
8 If No, is re-approach appropriate
Enter Yes or No
9 If inappropriate, why? Enter text description
10 Comments? Select N/A or enter comments.
Formal request
Data Field Data Entry Instructions
1 Authorisation Not Requested Tick box if authorisation not requested. Enter reason from drop down list.
2 Formal request by;
Select from the following drop down list. NOTE: Formal request is the process undertaken by the person who lead the Donor Family Conversaton and offered the opportunity of organ and tissue donation.
3 If Donation Specialist, Name: This field opens only when Donation Specialist is selected from the above list. Select the name of the Donation Specialist from the drop down list.
4 If Hospital/ Other, Name: Write the name of the requestor in the text box provided
5 Other Role/Title
If ‘Other (specify)’ is selected in the ‘Formal request by:’ field, then write the role of the requestor in this field.
6 Date-Time: Enter the Date-time of the request.
7 Was the person a trained requestor?
Select Yes or No NOTE: A trained requestor is a person who has completed and attended the Family Donation Conversation core and practical workshops.
8 Donation Specialist Contact with Donor Family ANZOD (31)
Face to Face Telephone None
Family Response Ignore
Authorisation for Organ: Ignore
Authorisation for Tissue: Ignore
If Yes, Restrictions: Ignore If No, Reason: Ignore Did authorisation process
meet your definition of effective requesting?
Ignore
9 Comments: Select N/A if not applicable. Text box available if comments required.
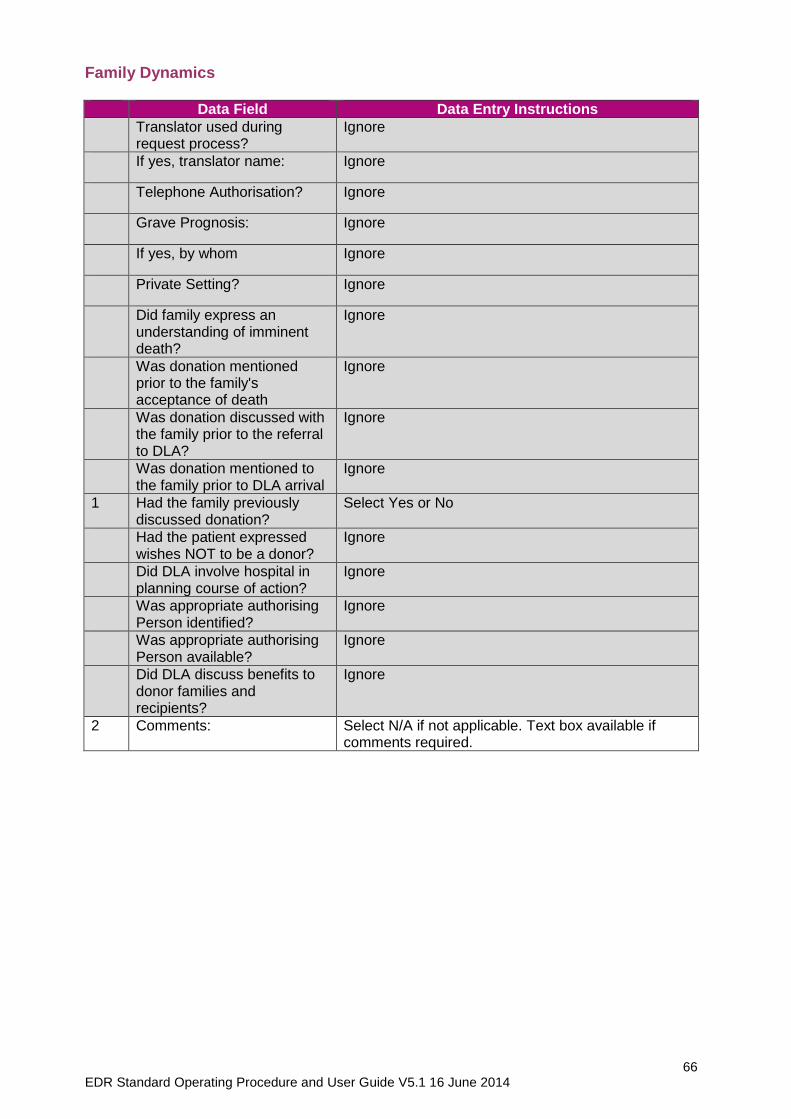
66 EDR Standard Operating Procedure and User Guide V5.1 16 June 2014
Family Dynamics
Data Field Data Entry Instructions
Translator used during request process?
Ignore
If yes, translator name: Ignore
Telephone Authorisation? Ignore
Grave Prognosis: Ignore
If yes, by whom Ignore
Private Setting? Ignore
Did family express an understanding of imminent death?
Ignore
Was donation mentioned prior to the family's acceptance of death
Ignore
Was donation discussed with the family prior to the referral to DLA?
Ignore
Was donation mentioned to the family prior to DLA arrival
Ignore
1 Had the family previously discussed donation?
Select Yes or No
Had the patient expressed wishes NOT to be a donor?
Ignore
Did DLA involve hospital in planning course of action?
Ignore
Was appropriate authorising Person identified?
Ignore
Was appropriate authorising Person available?
Ignore
Did DLA discuss benefits to donor families and recipients?
Ignore
2 Comments: Select N/A if not applicable. Text box available if comments required.
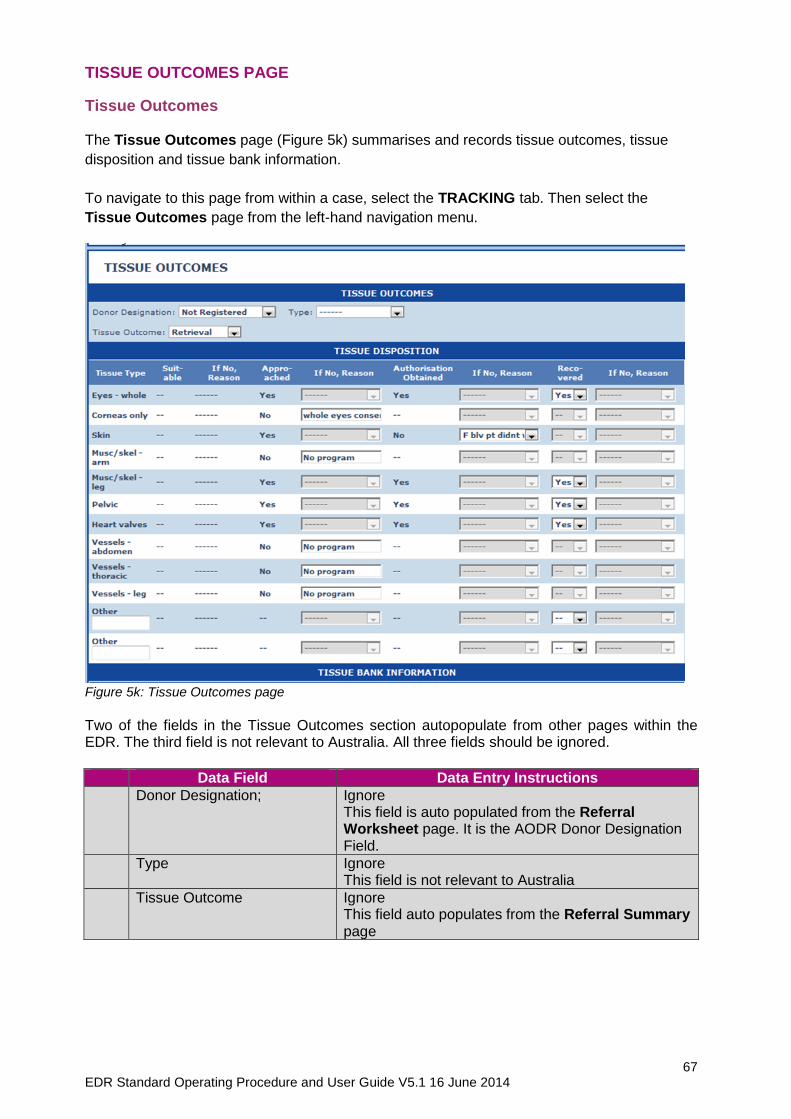
67 EDR Standard Operating Procedure and User Guide V5.1 16 June 2014
TISSUE OUTCOMES PAGE
Tissue Outcomes The Tissue Outcomes page (Figure 5k) summarises and records tissue outcomes, tissue
disposition and tissue bank information.
To navigate to this page from within a case, select the TRACKING tab. Then select the
Tissue Outcomes page from the left-hand navigation menu.
Figure 5k: Tissue Outcomes page
Two of the fields in the Tissue Outcomes section autopopulate from other pages within the EDR. The third field is not relevant to Australia. All three fields should be ignored.
Data Field Data Entry Instructions
Donor Designation; Ignore This field is auto populated from the Referral Worksheet page. It is the AODR Donor Designation Field.
Type Ignore This field is not relevant to Australia
Tissue Outcome Ignore This field auto populates from the Referral Summary page
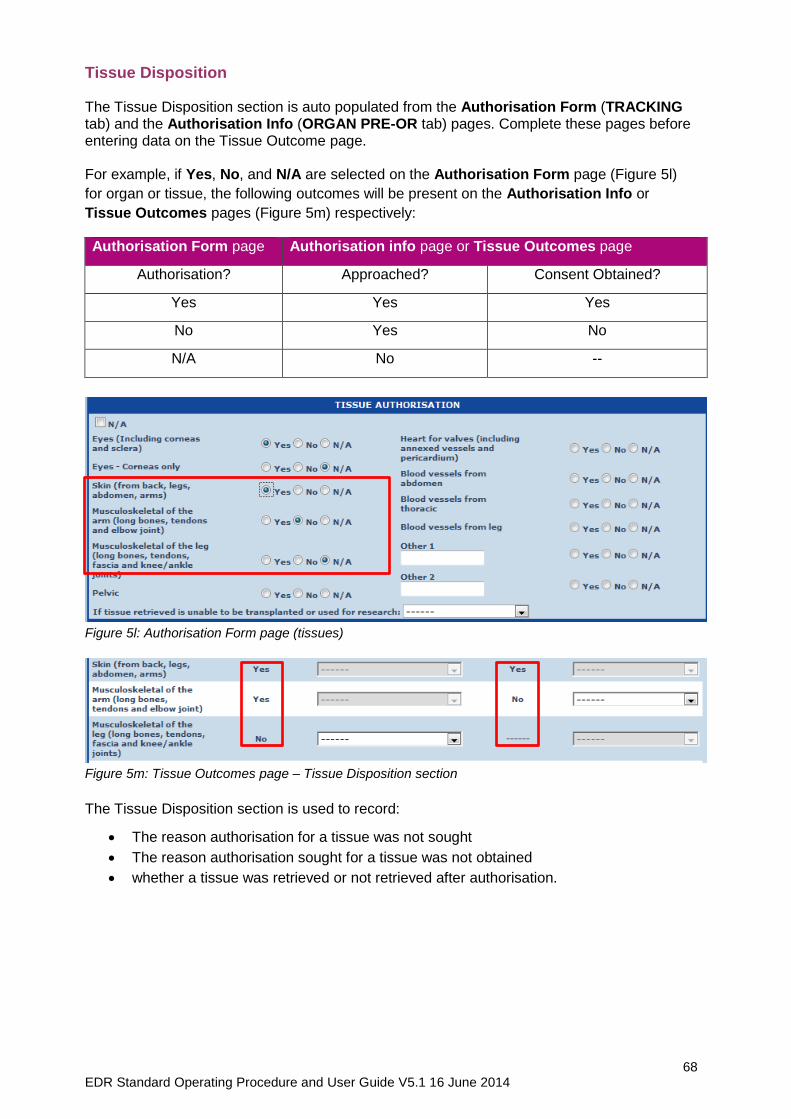
68 EDR Standard Operating Procedure and User Guide V5.1 16 June 2014
Tissue Disposition The Tissue Disposition section is auto populated from the Authorisation Form (TRACKING tab) and the Authorisation Info (ORGAN PRE-OR tab) pages. Complete these pages before entering data on the Tissue Outcome page. For example, if Yes, No, and N/A are selected on the Authorisation Form page (Figure 5l)
for organ or tissue, the following outcomes will be present on the Authorisation Info or
Tissue Outcomes pages (Figure 5m) respectively:
Authorisation Form page Authorisation info page or Tissue Outcomes page
Authorisation? Approached? Consent Obtained?
Yes Yes Yes
No Yes No
N/A No --
Figure 5l: Authorisation Form page (tissues)
Figure 5m: Tissue Outcomes page – Tissue Disposition section
The Tissue Disposition section is used to record:
The reason authorisation for a tissue was not sought
The reason authorisation sought for a tissue was not obtained
whether a tissue was retrieved or not retrieved after authorisation.
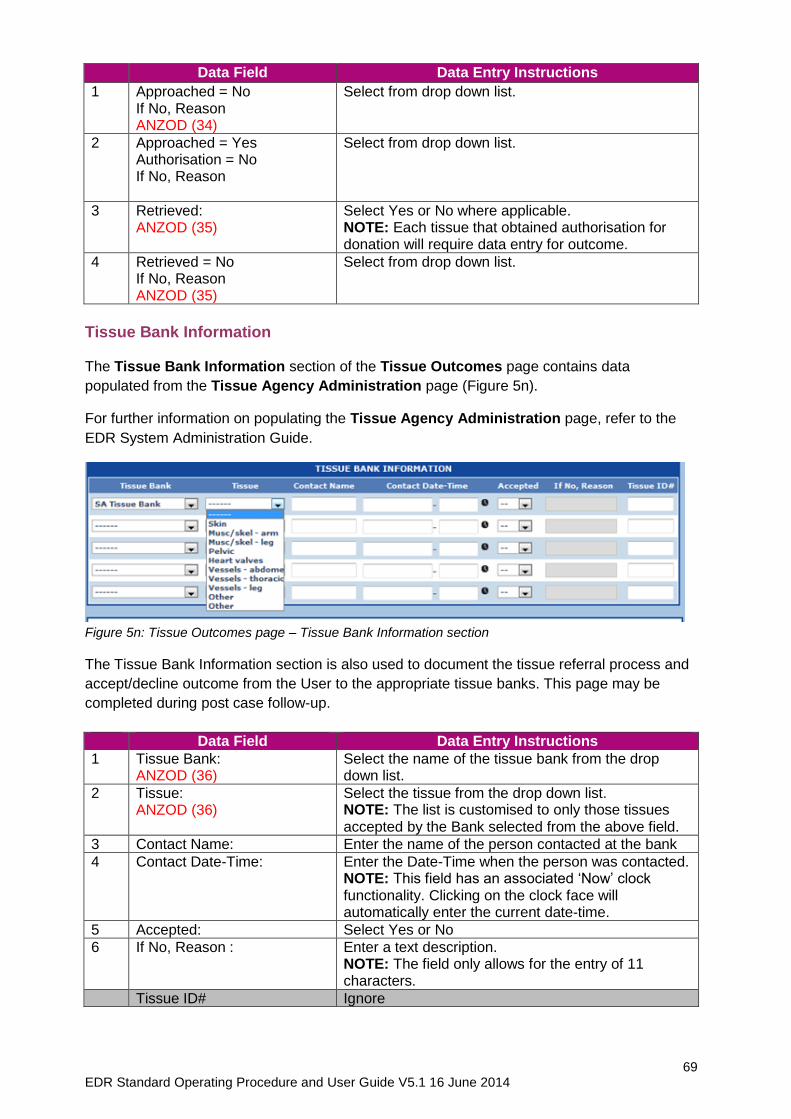
69 EDR Standard Operating Procedure and User Guide V5.1 16 June 2014
Data Field Data Entry Instructions
1 Approached = No If No, Reason ANZOD (34)
Select from drop down list.
2 Approached = Yes Authorisation = No If No, Reason
Select from drop down list.
3 Retrieved: ANZOD (35)
Select Yes or No where applicable. NOTE: Each tissue that obtained authorisation for donation will require data entry for outcome.
4 Retrieved = No If No, Reason ANZOD (35)
Select from drop down list.
Tissue Bank Information The Tissue Bank Information section of the Tissue Outcomes page contains data
populated from the Tissue Agency Administration page (Figure 5n).
For further information on populating the Tissue Agency Administration page, refer to the
EDR System Administration Guide.
Figure 5n: Tissue Outcomes page – Tissue Bank Information section
The Tissue Bank Information section is also used to document the tissue referral process and
accept/decline outcome from the User to the appropriate tissue banks. This page may be
completed during post case follow-up.
Data Field Data Entry Instructions
1 Tissue Bank: ANZOD (36)
Select the name of the tissue bank from the drop down list.
2 Tissue: ANZOD (36)
Select the tissue from the drop down list. NOTE: The list is customised to only those tissues accepted by the Bank selected from the above field.
3 Contact Name: Enter the name of the person contacted at the bank
4 Contact Date-Time: Enter the Date-Time when the person was contacted. NOTE: This field has an associated ‘Now’ clock functionality. Clicking on the clock face will automatically enter the current date-time.
5 Accepted: Select Yes or No
6 If No, Reason : Enter a text description. NOTE: The field only allows for the entry of 11 characters.
Tissue ID# Ignore
70 EDR Standard Operating Procedure and User Guide V5.1 16 June 2014
FINAL ORGAN DISPOSITION PAGE – NOT APPLICABLE IN AUSTRALIA
This page is not used for any purpose in Australia. Do not complete this page.
NOTE: Details of final outcome of organ transplantation and recipient information are recorded
on the Donor Summary-Organ Disposition page (ORGAN OR/POST tab).
71 EDR Standard Operating Procedure and User Guide V5.1 16 June 2014
REFERRAL NOTES PAGE
The EDR provides several different areas in which to enter targeted referral notes or specific
information relating to particular issues within a referral. During the patient tracking process, all
the notes are located under the TRACKING tab. Notes can also be recorded on pages under
the NOTES tab.
The NOTES tab provides access to the Referral Notes and Adverse Event/Incident Notes. For further detail on the Referral Notes page, see the NOTES tab section.

72 EDR Standard Operating Procedure and User Guide V5.1 16 June 2014
ADVERSE EVENT/ INCIDENT NOTE PAGE
For further detail on the Adverse Event/Incident Note page, see the NOTES tab section.
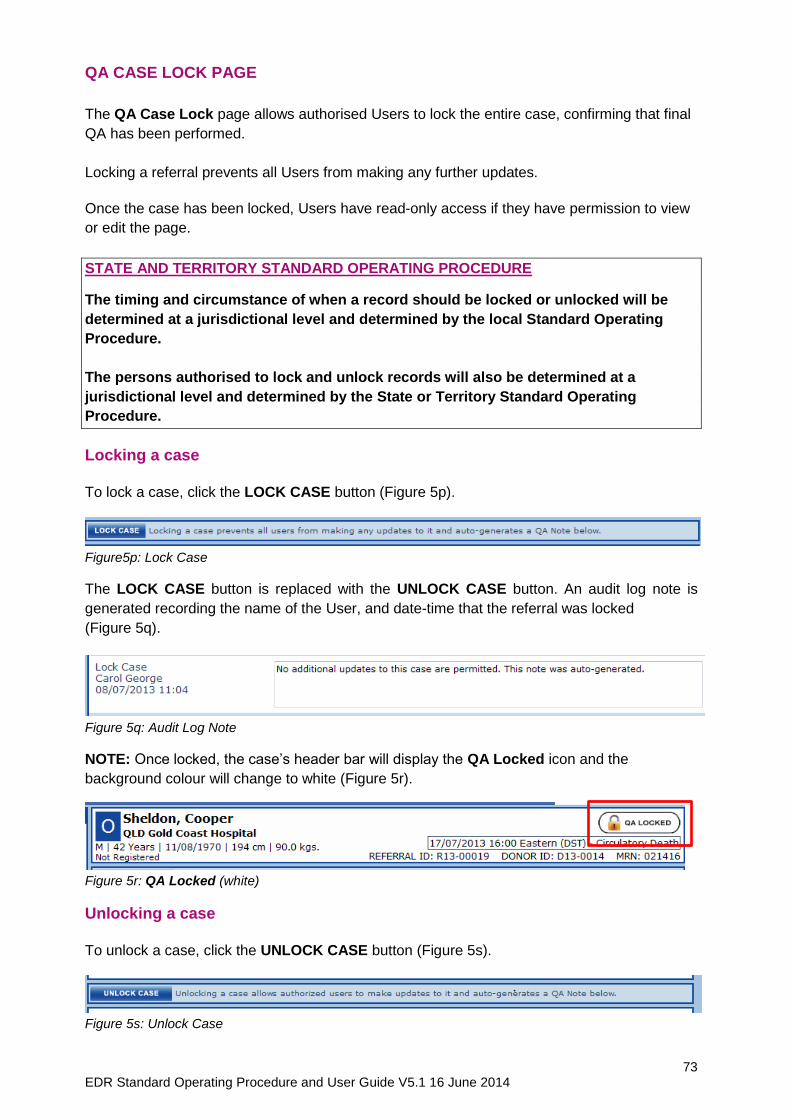
73 EDR Standard Operating Procedure and User Guide V5.1 16 June 2014
QA CASE LOCK PAGE
The QA Case Lock page allows authorised Users to lock the entire case, confirming that final
QA has been performed.
Locking a referral prevents all Users from making any further updates.
Once the case has been locked, Users have read-only access if they have permission to view
or edit the page.
STATE AND TERRITORY STANDARD OPERATING PROCEDURE
The timing and circumstance of when a record should be locked or unlocked will be
determined at a jurisdictional level and determined by the local Standard Operating
Procedure.
The persons authorised to lock and unlock records will also be determined at a
jurisdictional level and determined by the State or Territory Standard Operating
Procedure.
Locking a case
To lock a case, click the LOCK CASE button (Figure 5p).
Figure5p: Lock Case
The LOCK CASE button is replaced with the UNLOCK CASE button. An audit log note is
generated recording the name of the User, and date-time that the referral was locked
(Figure 5q).
Figure 5q: Audit Log Note
NOTE: Once locked, the case’s header bar will display the QA Locked icon and the
background colour will change to white (Figure 5r).
Figure 5r: QA Locked (white)
Unlocking a case
To unlock a case, click the UNLOCK CASE button (Figure 5s).
Figure 5s: Unlock Case

74 EDR Standard Operating Procedure and User Guide V5.1 16 June 2014
When a case is unlocked, an audit log note is again generated recording the name of the User, and date-time that the referral was unlocked.
Adding a QA Note The EDR provides for the entry of a QA note on each occasion that a referral is locked or
unlocked. The EDR records the date and time that a record is locked as well as the name of
the User who has locked the case.
Data Field Data Entry Instructions
1 ADD QA NOTE Select from drop down list.
2 If other: If Other is selected in the field above, a text description must be entered in this field
3 Text field Enter the QA note in the text box provided. NOTE: Once a referral has been locked, QA notes cannot be recorded. This functionality returns once a referral is unlocked.
STATE AND TERRITORY STANDARD OPERATING PROCEDURE
QA notes can be recorded at any time prior to a case being locked. When and why a QA
note should be recorded, will be determined by your State/Territory Standard Operating
Procedures.
Once a case is locked, the SAVE button associated with QA notes disappears. It will reappear
once the case is unlocked.
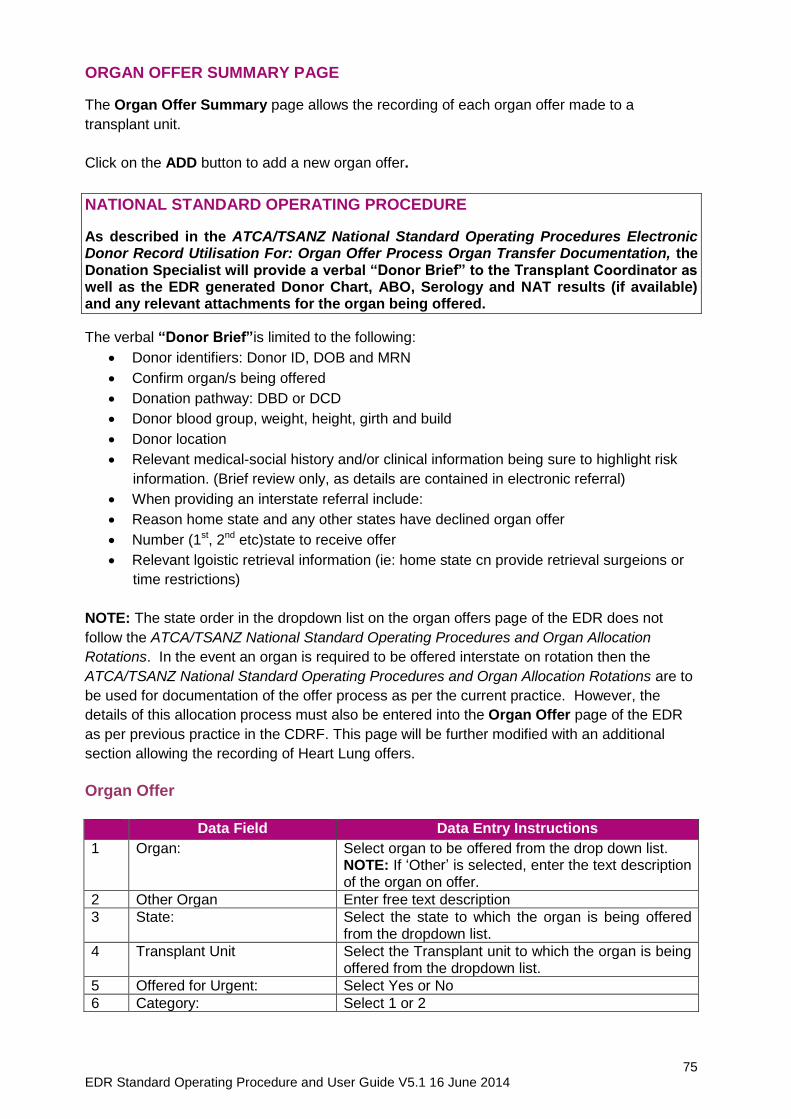
75 EDR Standard Operating Procedure and User Guide V5.1 16 June 2014
ORGAN OFFER SUMMARY PAGE
The Organ Offer Summary page allows the recording of each organ offer made to a
transplant unit.
Click on the ADD button to add a new organ offer.
NATIONAL STANDARD OPERATING PROCEDURE
As described in the ATCA/TSANZ National Standard Operating Procedures Electronic Donor Record Utilisation For: Organ Offer Process Organ Transfer Documentation, the Donation Specialist will provide a verbal “Donor Brief” to the Transplant Coordinator as well as the EDR generated Donor Chart, ABO, Serology and NAT results (if available) and any relevant attachments for the organ being offered.
The verbal “Donor Brief”is limited to the following:
Donor identifiers: Donor ID, DOB and MRN
Confirm organ/s being offered
Donation pathway: DBD or DCD
Donor blood group, weight, height, girth and build
Donor location
Relevant medical-social history and/or clinical information being sure to highlight risk
information. (Brief review only, as details are contained in electronic referral)
When providing an interstate referral include:
Reason home state and any other states have declined organ offer
Number (1st, 2nd etc)state to receive offer
Relevant lgoistic retrieval information (ie: home state cn provide retrieval surgeions or
time restrictions)
NOTE: The state order in the dropdown list on the organ offers page of the EDR does not
follow the ATCA/TSANZ National Standard Operating Procedures and Organ Allocation
Rotations. In the event an organ is required to be offered interstate on rotation then the
ATCA/TSANZ National Standard Operating Procedures and Organ Allocation Rotations are to
be used for documentation of the offer process as per the current practice. However, the
details of this allocation process must also be entered into the Organ Offer page of the EDR
as per previous practice in the CDRF. This page will be further modified with an additional
section allowing the recording of Heart Lung offers.
Organ Offer
Data Field Data Entry Instructions
1 Organ: Select organ to be offered from the drop down list. NOTE: If ‘Other’ is selected, enter the text description of the organ on offer.
2 Other Organ Enter free text description
3 State: Select the state to which the organ is being offered from the dropdown list.
4 Transplant Unit Select the Transplant unit to which the organ is being offered from the dropdown list.
5 Offered for Urgent: Select Yes or No
6 Category: Select 1 or 2
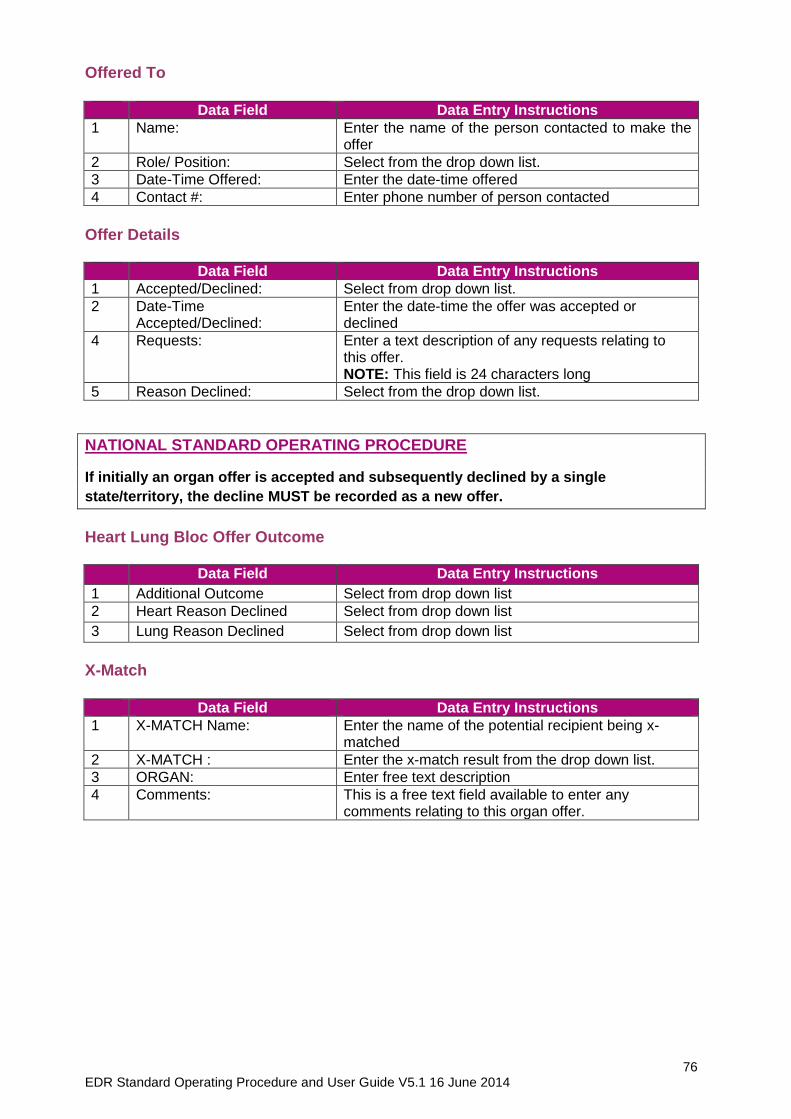
76 EDR Standard Operating Procedure and User Guide V5.1 16 June 2014
Offered To
Data Field Data Entry Instructions
1 Name: Enter the name of the person contacted to make the offer
2 Role/ Position: Select from the drop down list.
3 Date-Time Offered: Enter the date-time offered
4 Contact #: Enter phone number of person contacted
Offer Details
Data Field Data Entry Instructions
1 Accepted/Declined: Select from drop down list.
2 Date-Time Accepted/Declined:
Enter the date-time the offer was accepted or declined
4 Requests: Enter a text description of any requests relating to this offer. NOTE: This field is 24 characters long
5 Reason Declined: Select from the drop down list.
NATIONAL STANDARD OPERATING PROCEDURE
If initially an organ offer is accepted and subsequently declined by a single
state/territory, the decline MUST be recorded as a new offer.
Heart Lung Bloc Offer Outcome
Data Field Data Entry Instructions
1 Additional Outcome Select from drop down list
2 Heart Reason Declined Select from drop down list
3 Lung Reason Declined Select from drop down list
X-Match
Data Field Data Entry Instructions
1 X-MATCH Name: Enter the name of the potential recipient being x-matched
2 X-MATCH : Enter the x-match result from the drop down list.
3 ORGAN: Enter free text description
4 Comments: This is a free text field available to enter any comments relating to this organ offer.
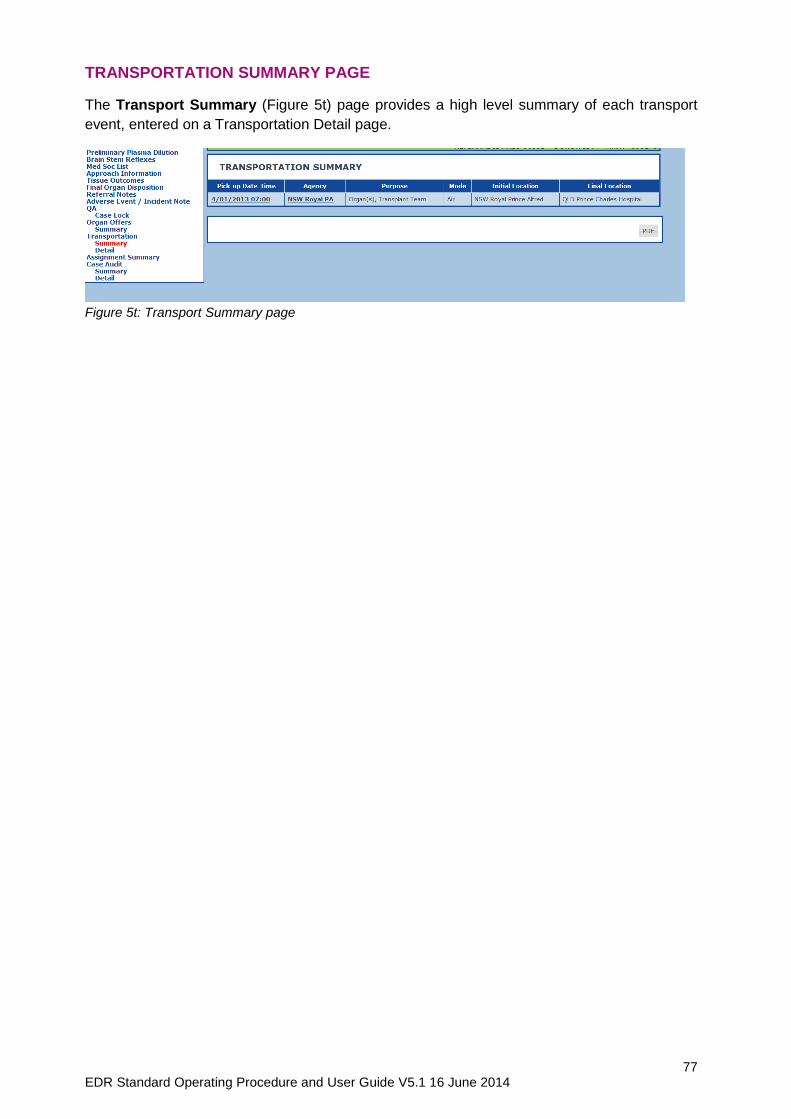
77 EDR Standard Operating Procedure and User Guide V5.1 16 June 2014
TRANSPORTATION SUMMARY PAGE
The Transport Summary (Figure 5t) page provides a high level summary of each transport
event, entered on a Transportation Detail page.
Figure 5t: Transport Summary page

78 EDR Standard Operating Procedure and User Guide V5.1 16 June 2014
TRANSPORTATION DETAIL PAGE
The Transportation Detail page allows the entry of detail relating to all transportation
associated with the organ and tissue donation and transplantation process.
Multiple pages are available and can be accessed once the first page is saved with entered
data.
Click on the double arrow button in the top right hand corner to access the next page
(Figure 5u).
Figure 5u: Next Page button
Transportation The transportation section allows the entry of detail relating to the purpose for the transport
arrangements. The destination address details are recorded here along with the name of the
person responsible for receipt of an organ at the final location.
Data Field Data Entry Instructions
1 Purpose: Tick the box which describes the transportation purpose.
2 If Organ, specify: Tick the box(es) which describe the organs being transported.
3 If Transplant Team, specify: Select code for the Transplant Centre from the drop down list. (Refer to Appendix 6 for the full name of each Transplant Centre and the associated code.)
4 Team, Enter text description of team
5 Attention: Enter the name of the person to whom the items are being sent.
6 Agency: Select the Agency type from the drop down list. The selected type will filter the organisation list and provide a shorter list from which to select the final destination. NOTE: The full address of the final destination will auto populate on this page. It does not need to be entered. The address is maintained by each State/Territory EDR System Administrator.
7 Initial contact: Enter the Date-Time of initial contact
8 Contact Name: Enter the contact name
9 Phone: Enter the phone number of the contact
10 Initial location: Enter the initial location
11 Final Location Enter the final location
12 Scheduled Pick-up time: Enter the scheduled pickup date and time
13 Actual Pick-up time: Enter the actual pick up date and time
Job#: Ignore
14 Account No of Receiving Unit:
Enter the account number of the receiving unit.
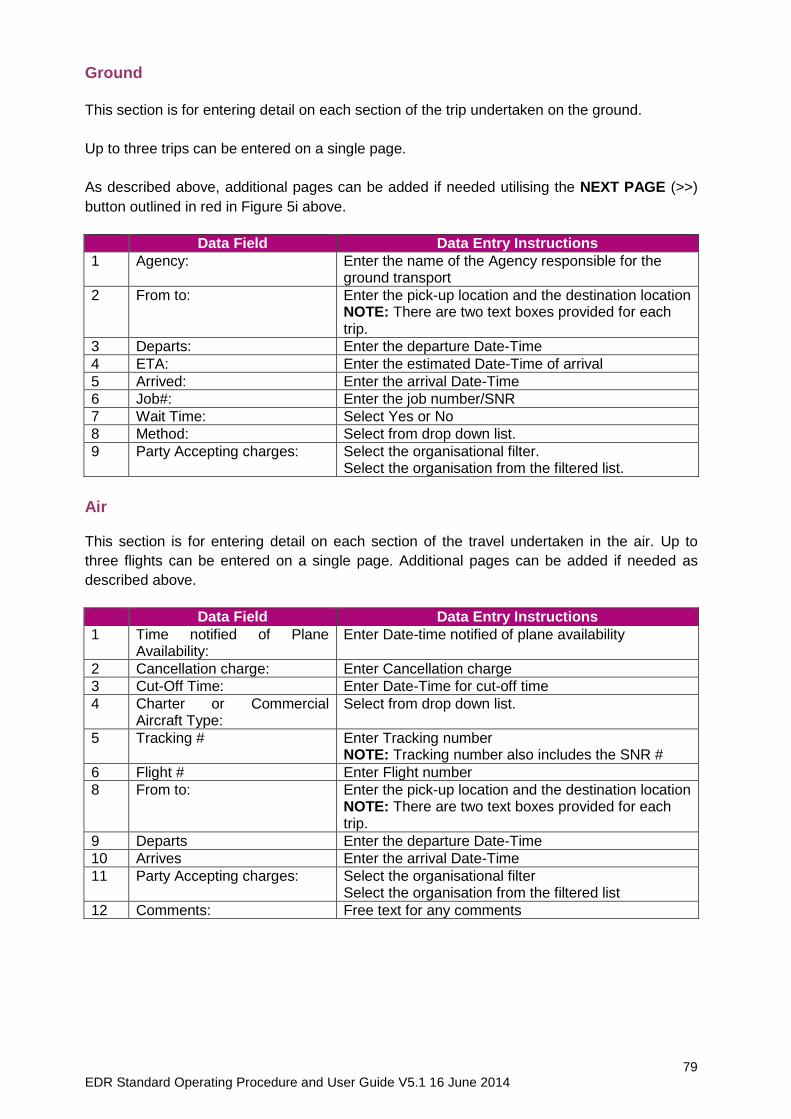
79 EDR Standard Operating Procedure and User Guide V5.1 16 June 2014
Ground
This section is for entering detail on each section of the trip undertaken on the ground.
Up to three trips can be entered on a single page.
As described above, additional pages can be added if needed utilising the NEXT PAGE (>>)
button outlined in red in Figure 5i above.
Data Field Data Entry Instructions
1 Agency: Enter the name of the Agency responsible for the ground transport
2 From to: Enter the pick-up location and the destination location NOTE: There are two text boxes provided for each trip.
3 Departs: Enter the departure Date-Time
4 ETA: Enter the estimated Date-Time of arrival
5 Arrived: Enter the arrival Date-Time
6 Job#: Enter the job number/SNR
7 Wait Time: Select Yes or No
8 Method: Select from drop down list.
9 Party Accepting charges: Select the organisational filter. Select the organisation from the filtered list.
Air This section is for entering detail on each section of the travel undertaken in the air. Up to
three flights can be entered on a single page. Additional pages can be added if needed as
described above.
Data Field Data Entry Instructions
1 Time notified of Plane Availability:
Enter Date-time notified of plane availability
2 Cancellation charge: Enter Cancellation charge
3 Cut-Off Time: Enter Date-Time for cut-off time
4 Charter or Commercial Aircraft Type:
Select from drop down list.
5 Tracking # Enter Tracking number NOTE: Tracking number also includes the SNR #
6 Flight # Enter Flight number
8 From to: Enter the pick-up location and the destination location NOTE: There are two text boxes provided for each trip.
9 Departs Enter the departure Date-Time
10 Arrives Enter the arrival Date-Time
11 Party Accepting charges: Select the organisational filter Select the organisation from the filtered list
12 Comments: Free text for any comments

80 EDR Standard Operating Procedure and User Guide V5.1 16 June 2014
ASSIGNMENT SUMMARY PAGE
The Assignment Summary page (Figure 5v) lists all assignments for the referral and their
current status.
Figure 5v: Assignment Summary page
The edit function allows the update of the ‘Assigned On’ date.
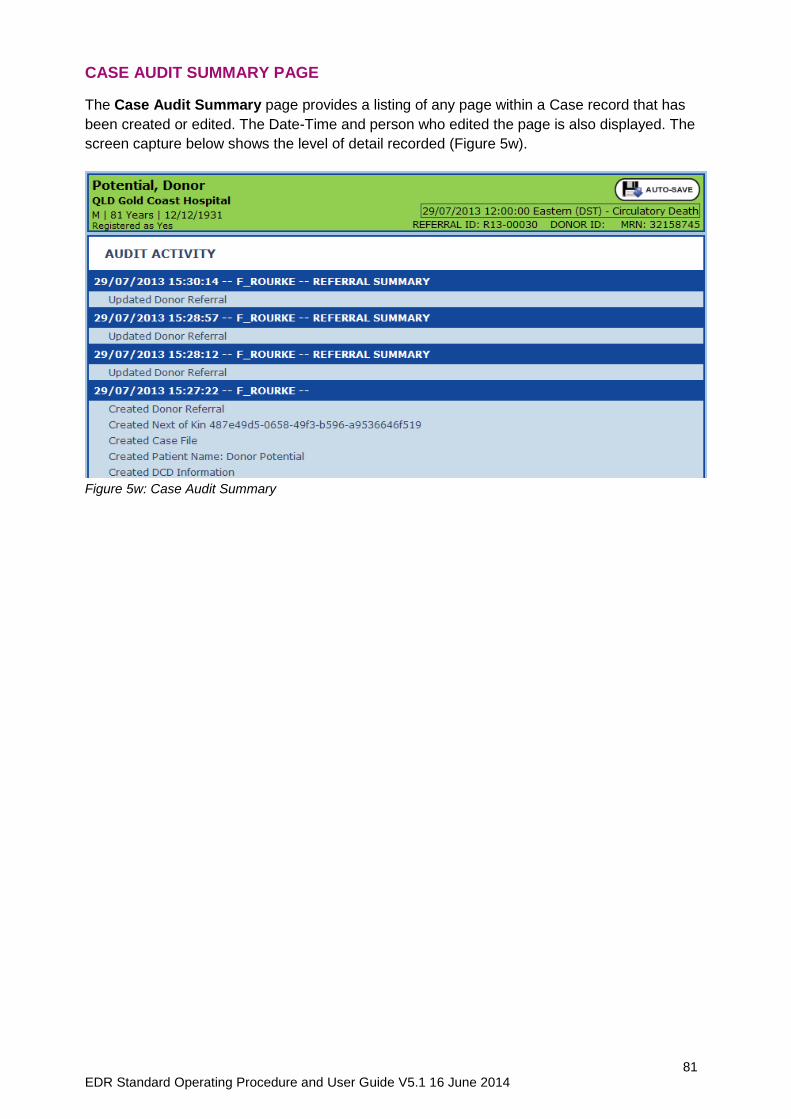
81 EDR Standard Operating Procedure and User Guide V5.1 16 June 2014
CASE AUDIT SUMMARY PAGE
The Case Audit Summary page provides a listing of any page within a Case record that has
been created or edited. The Date-Time and person who edited the page is also displayed. The
screen capture below shows the level of detail recorded (Figure 5w).
Figure 5w: Case Audit Summary
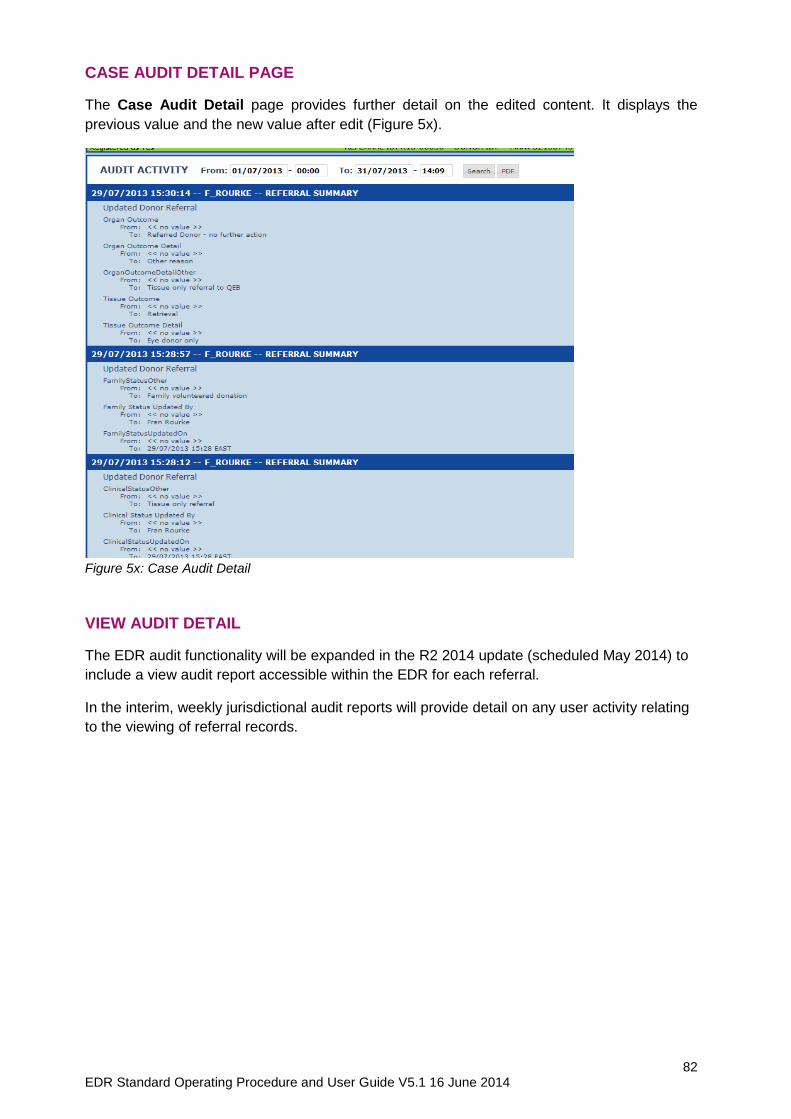
82 EDR Standard Operating Procedure and User Guide V5.1 16 June 2014
CASE AUDIT DETAIL PAGE
The Case Audit Detail page provides further detail on the edited content. It displays the
previous value and the new value after edit (Figure 5x).
Figure 5x: Case Audit Detail
VIEW AUDIT DETAIL
The EDR audit functionality will be expanded in the R2 2014 update (scheduled May 2014) to
include a view audit report accessible within the EDR for each referral.
In the interim, weekly jurisdictional audit reports will provide detail on any user activity relating
to the viewing of referral records.
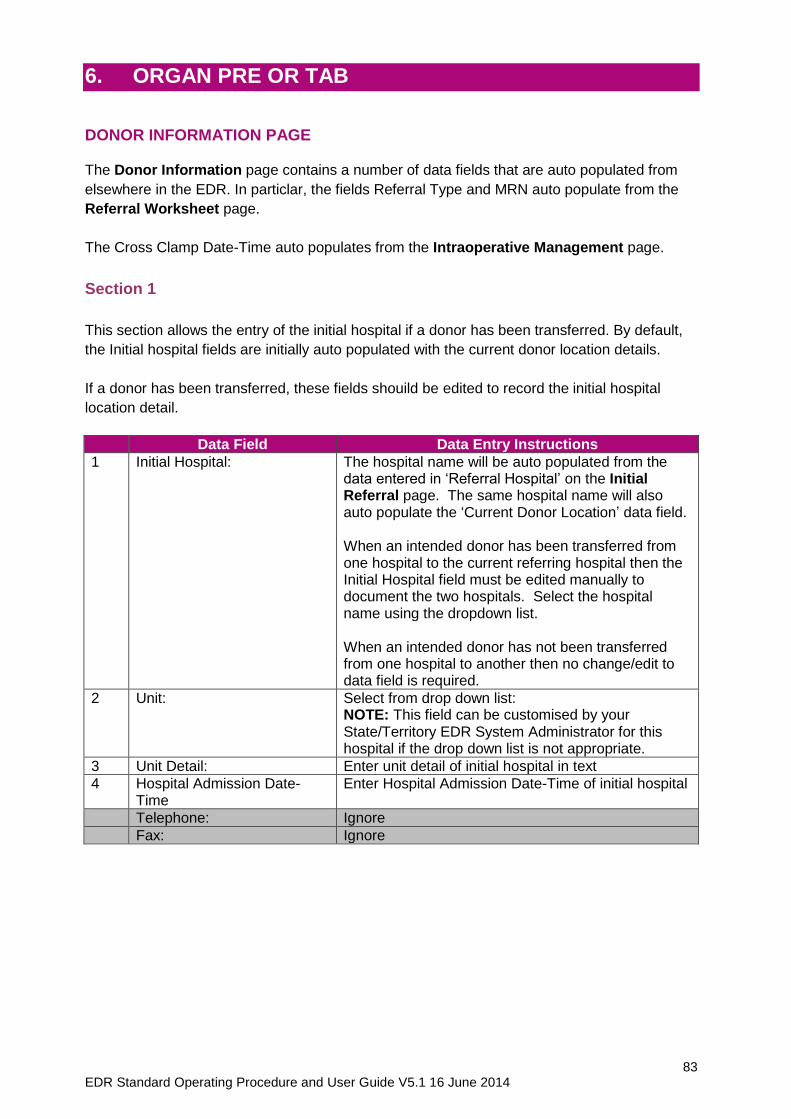
83 EDR Standard Operating Procedure and User Guide V5.1 16 June 2014
6. ORGAN PRE OR TAB
DONOR INFORMATION PAGE
The Donor Information page contains a number of data fields that are auto populated from
elsewhere in the EDR. In particlar, the fields Referral Type and MRN auto populate from the
Referral Worksheet page.
The Cross Clamp Date-Time auto populates from the Intraoperative Management page.
Section 1
This section allows the entry of the initial hospital if a donor has been transferred. By default,
the Initial hospital fields are initially auto populated with the current donor location details.
If a donor has been transferred, these fields shouild be edited to record the initial hospital
location detail.
Data Field Data Entry Instructions
1 Initial Hospital:
The hospital name will be auto populated from the data entered in ‘Referral Hospital’ on the Initial Referral page. The same hospital name will also auto populate the ‘Current Donor Location’ data field. When an intended donor has been transferred from one hospital to the current referring hospital then the Initial Hospital field must be edited manually to document the two hospitals. Select the hospital name using the dropdown list. When an intended donor has not been transferred from one hospital to another then no change/edit to data field is required.
2 Unit: Select from drop down list: NOTE: This field can be customised by your State/Territory EDR System Administrator for this hospital if the drop down list is not appropriate.
3 Unit Detail: Enter unit detail of initial hospital in text
4 Hospital Admission Date-Time
Enter Hospital Admission Date-Time of initial hospital
Telephone: Ignore
Fax: Ignore
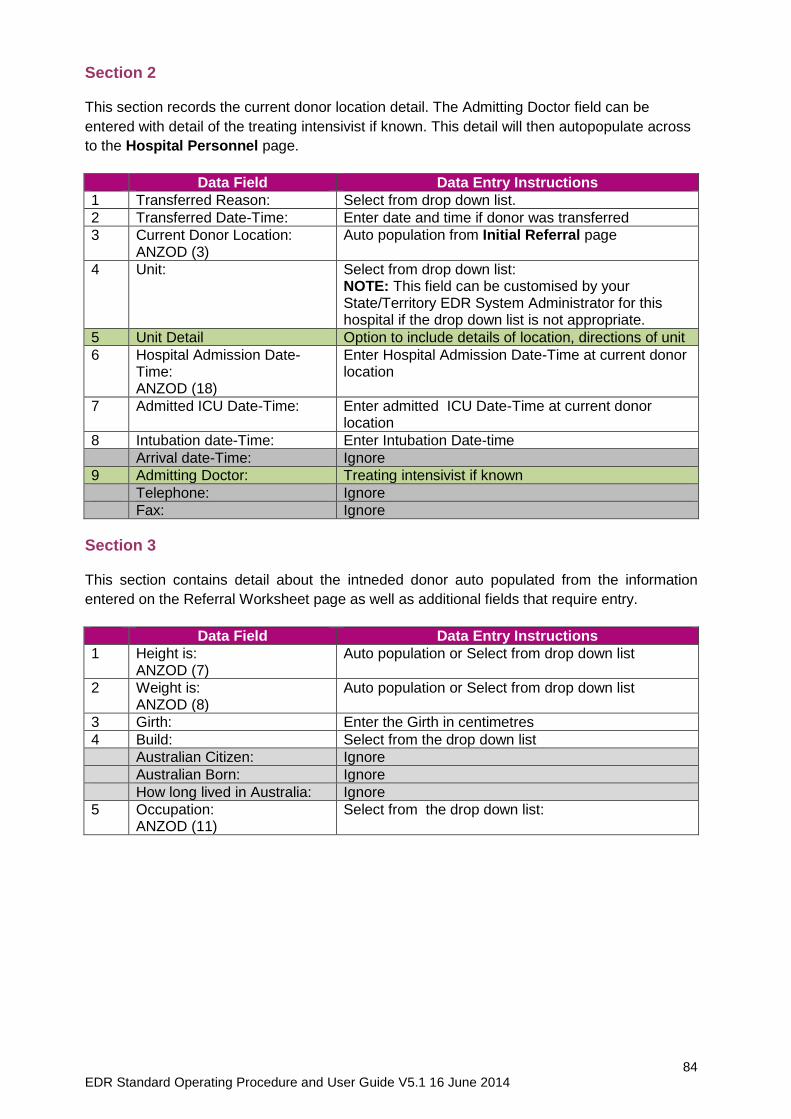
84 EDR Standard Operating Procedure and User Guide V5.1 16 June 2014
Section 2 This section records the current donor location detail. The Admitting Doctor field can be
entered with detail of the treating intensivist if known. This detail will then autopopulate across
to the Hospital Personnel page.
Data Field Data Entry Instructions
1 Transferred Reason: Select from drop down list.
2 Transferred Date-Time: Enter date and time if donor was transferred
3 Current Donor Location: ANZOD (3)
Auto population from Initial Referral page
4 Unit: Select from drop down list: NOTE: This field can be customised by your State/Territory EDR System Administrator for this hospital if the drop down list is not appropriate.
5 Unit Detail Option to include details of location, directions of unit
6 Hospital Admission Date-Time: ANZOD (18)
Enter Hospital Admission Date-Time at current donor location
7 Admitted ICU Date-Time: Enter admitted ICU Date-Time at current donor location
8 Intubation date-Time: Enter Intubation Date-time
Arrival date-Time: Ignore
9 Admitting Doctor: Treating intensivist if known
Telephone: Ignore
Fax: Ignore
Section 3 This section contains detail about the intneded donor auto populated from the information
entered on the Referral Worksheet page as well as additional fields that require entry.
Data Field Data Entry Instructions
1 Height is: ANZOD (7)
Auto population or Select from drop down list
2 Weight is: ANZOD (8)
Auto population or Select from drop down list
3 Girth: Enter the Girth in centimetres
4 Build: Select from the drop down list
Australian Citizen: Ignore
Australian Born: Ignore
How long lived in Australia: Ignore
5 Occupation: ANZOD (11)
Select from the drop down list:
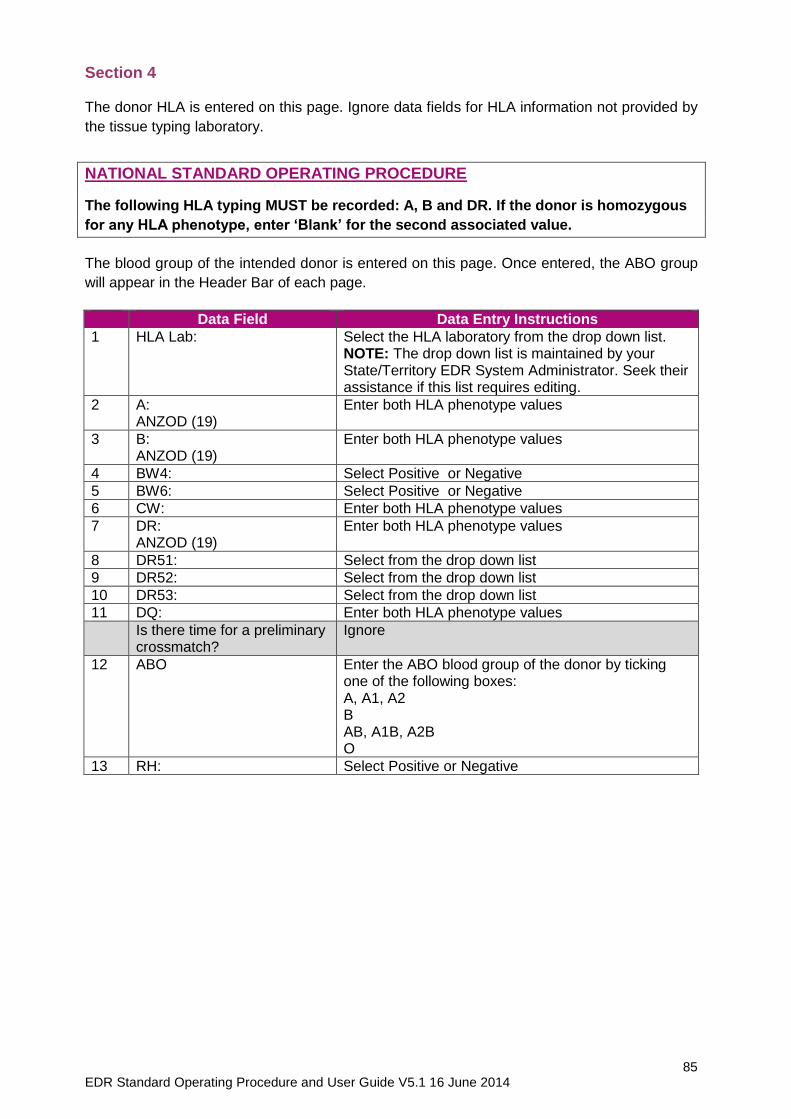
85 EDR Standard Operating Procedure and User Guide V5.1 16 June 2014
Section 4 The donor HLA is entered on this page. Ignore data fields for HLA information not provided by
the tissue typing laboratory.
NATIONAL STANDARD OPERATING PROCEDURE
The following HLA typing MUST be recorded: A, B and DR. If the donor is homozygous
for any HLA phenotype, enter ‘Blank’ for the second associated value.
The blood group of the intended donor is entered on this page. Once entered, the ABO group
will appear in the Header Bar of each page.
Data Field Data Entry Instructions
1 HLA Lab: Select the HLA laboratory from the drop down list. NOTE: The drop down list is maintained by your State/Territory EDR System Administrator. Seek their assistance if this list requires editing.
2 A: ANZOD (19)
Enter both HLA phenotype values
3 B: ANZOD (19)
Enter both HLA phenotype values
4 BW4: Select Positive or Negative
5 BW6: Select Positive or Negative
6 CW: Enter both HLA phenotype values
7 DR: ANZOD (19)
Enter both HLA phenotype values
8 DR51: Select from the drop down list
9 DR52: Select from the drop down list
10 DR53: Select from the drop down list
11 DQ: Enter both HLA phenotype values
Is there time for a preliminary crossmatch?
Ignore
12 ABO
Enter the ABO blood group of the donor by ticking one of the following boxes: A, A1, A2 B AB, A1B, A2B O
13 RH: Select Positive or Negative
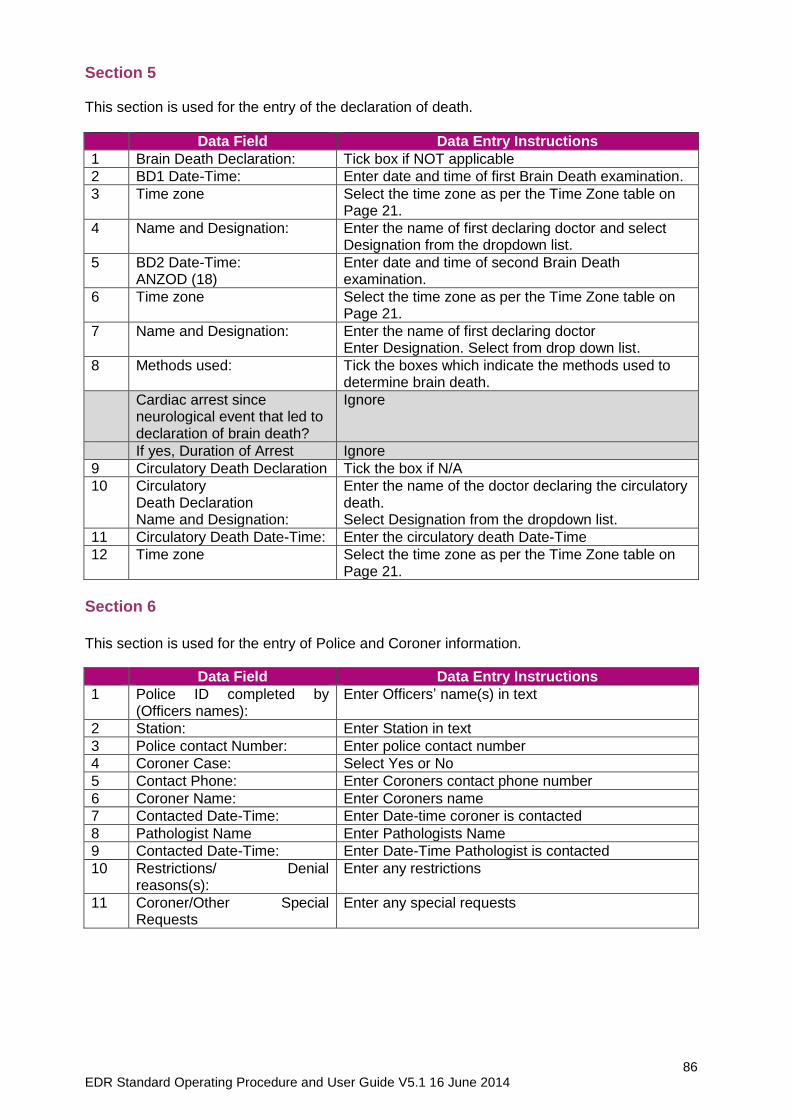
86 EDR Standard Operating Procedure and User Guide V5.1 16 June 2014
Section 5 This section is used for the entry of the declaration of death.
Data Field Data Entry Instructions
1 Brain Death Declaration: Tick box if NOT applicable
2 BD1 Date-Time: Enter date and time of first Brain Death examination.
3 Time zone Select the time zone as per the Time Zone table on Page 21.
4 Name and Designation: Enter the name of first declaring doctor and select Designation from the dropdown list.
5 BD2 Date-Time: ANZOD (18)
Enter date and time of second Brain Death examination.
6 Time zone Select the time zone as per the Time Zone table on Page 21.
7 Name and Designation: Enter the name of first declaring doctor Enter Designation. Select from drop down list.
8 Methods used: Tick the boxes which indicate the methods used to determine brain death.
Cardiac arrest since neurological event that led to declaration of brain death?
Ignore
If yes, Duration of Arrest Ignore
9 Circulatory Death Declaration Tick the box if N/A
10 Circulatory Death Declaration Name and Designation:
Enter the name of the doctor declaring the circulatory death. Select Designation from the dropdown list.
11 Circulatory Death Date-Time: Enter the circulatory death Date-Time
12 Time zone Select the time zone as per the Time Zone table on Page 21.
Section 6
This section is used for the entry of Police and Coroner information.
Data Field Data Entry Instructions
1 Police ID completed by (Officers names):
Enter Officers’ name(s) in text
2 Station: Enter Station in text
3 Police contact Number: Enter police contact number
4 Coroner Case: Select Yes or No
5 Contact Phone: Enter Coroners contact phone number
6 Coroner Name: Enter Coroners name
7 Contacted Date-Time: Enter Date-time coroner is contacted
8 Pathologist Name Enter Pathologists Name
9 Contacted Date-Time: Enter Date-Time Pathologist is contacted
10 Restrictions/ Denial reasons(s):
Enter any restrictions
11 Coroner/Other Special Requests
Enter any special requests
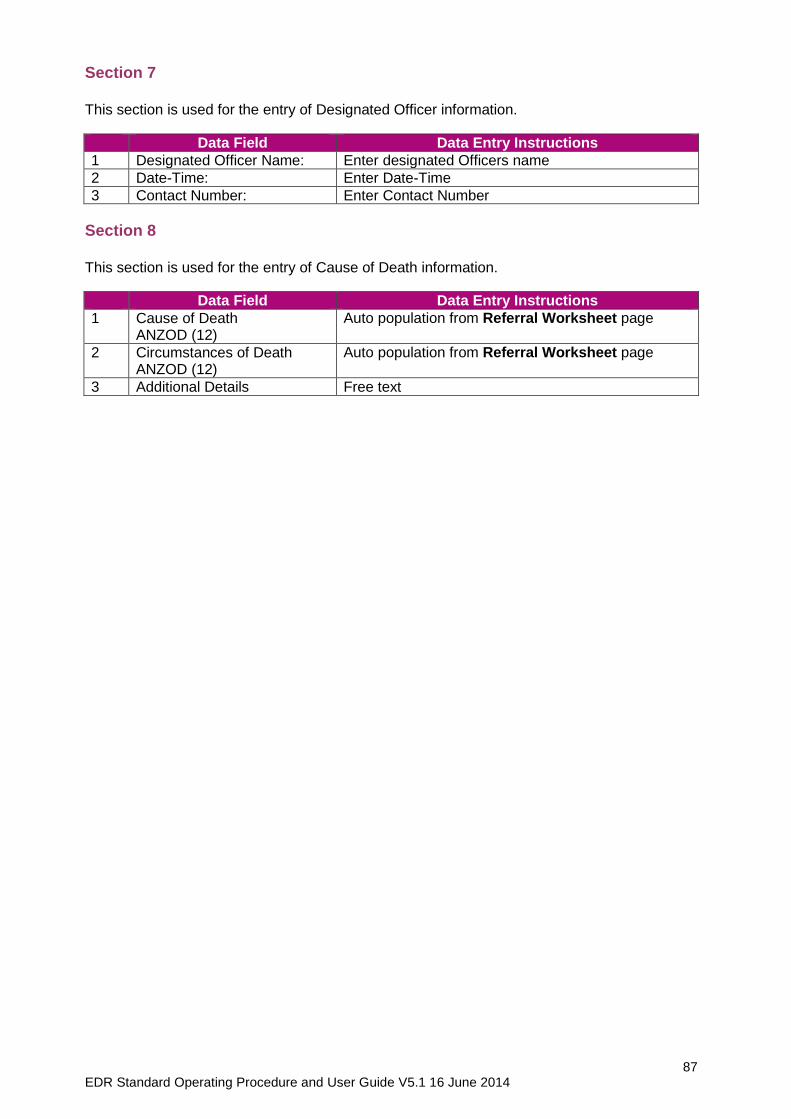
87 EDR Standard Operating Procedure and User Guide V5.1 16 June 2014
Section 7
This section is used for the entry of Designated Officer information.
Data Field Data Entry Instructions
1 Designated Officer Name: Enter designated Officers name
2 Date-Time: Enter Date-Time
3 Contact Number: Enter Contact Number
Section 8
This section is used for the entry of Cause of Death information.
Data Field Data Entry Instructions
1 Cause of Death ANZOD (12)
Auto population from Referral Worksheet page
2 Circumstances of Death ANZOD (12)
Auto population from Referral Worksheet page
3 Additional Details Free text
88 EDR Standard Operating Procedure and User Guide V5.1 16 June 2014
AUTHORISATION INFO PAGE
Authorisation Information This part of the page auto populates from data entered on the Approach Information page.
Any data fields that are not auto populated are to be ignored and not completed.
Organ Authorisation; Research and Education Authorisation; Authorisation for
Tissue and Organs; Tissue Authorisation
These sections are auto-populated from the Authorisation Form page (TRACKING tab).
NOTE: The Authorisation Form page under the TRACKING tab must be completed first before
proceeding with data entry in this section.
Fields that require entry in this section are:
the reason why authorisation was not sought for any particular organ or tissue
the reason why authorisation was requested but not obtained.
NOTE: When ‘N/A’ has been entered for an organ or tissue in the Authorisation Form page
this will be auto populated as ‘Authorisation Requested – No’ on this page and will require the
reason to be entered.
Data Field Data Entry Instructions
1 Authorisation Requested – No If not, reason: ANZOD (34)
Select from drop down list:
2 Authorisation Obtained – No If not, reason: ANZOD (34)
Select from drop down list:
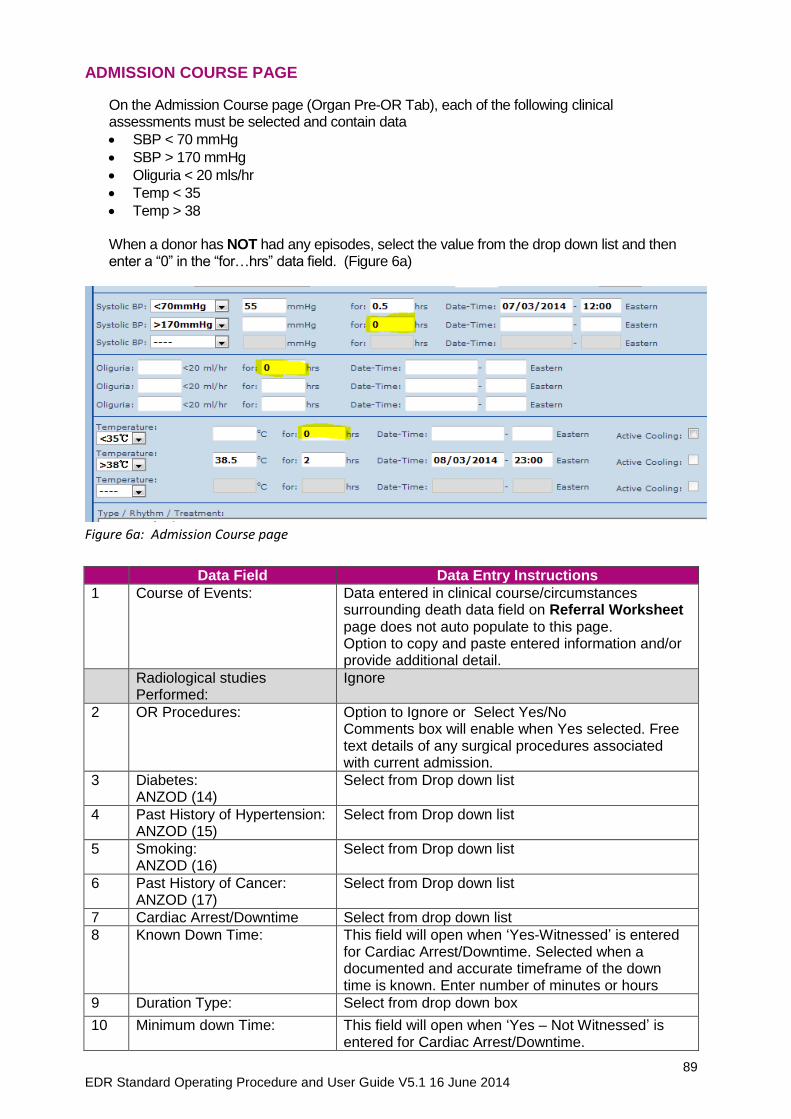
89 EDR Standard Operating Procedure and User Guide V5.1 16 June 2014
ADMISSION COURSE PAGE
On the Admission Course page (Organ Pre-OR Tab), each of the following clinical assessments must be selected and contain data
SBP < 70 mmHg
SBP > 170 mmHg
Oliguria < 20 mls/hr
Temp < 35
Temp > 38 When a donor has NOT had any episodes, select the value from the drop down list and then enter a “0” in the “for…hrs” data field. (Figure 6a)
Figure 6a: Admission Course page
Data Field Data Entry Instructions
1 Course of Events: Data entered in clinical course/circumstances surrounding death data field on Referral Worksheet page does not auto populate to this page. Option to copy and paste entered information and/or provide additional detail.
Radiological studies Performed:
Ignore
2 OR Procedures: Option to Ignore or Select Yes/No Comments box will enable when Yes selected. Free text details of any surgical procedures associated with current admission.
3 Diabetes: ANZOD (14)
Select from Drop down list
4 Past History of Hypertension: ANZOD (15)
Select from Drop down list
5 Smoking: ANZOD (16)
Select from Drop down list
6 Past History of Cancer: ANZOD (17)
Select from Drop down list
7 Cardiac Arrest/Downtime Select from drop down list
8 Known Down Time: This field will open when ‘Yes-Witnessed’ is entered for Cardiac Arrest/Downtime. Selected when a documented and accurate timeframe of the down time is known. Enter number of minutes or hours
9 Duration Type: Select from drop down box
10 Minimum down Time: This field will open when ‘Yes – Not Witnessed’ is entered for Cardiac Arrest/Downtime.
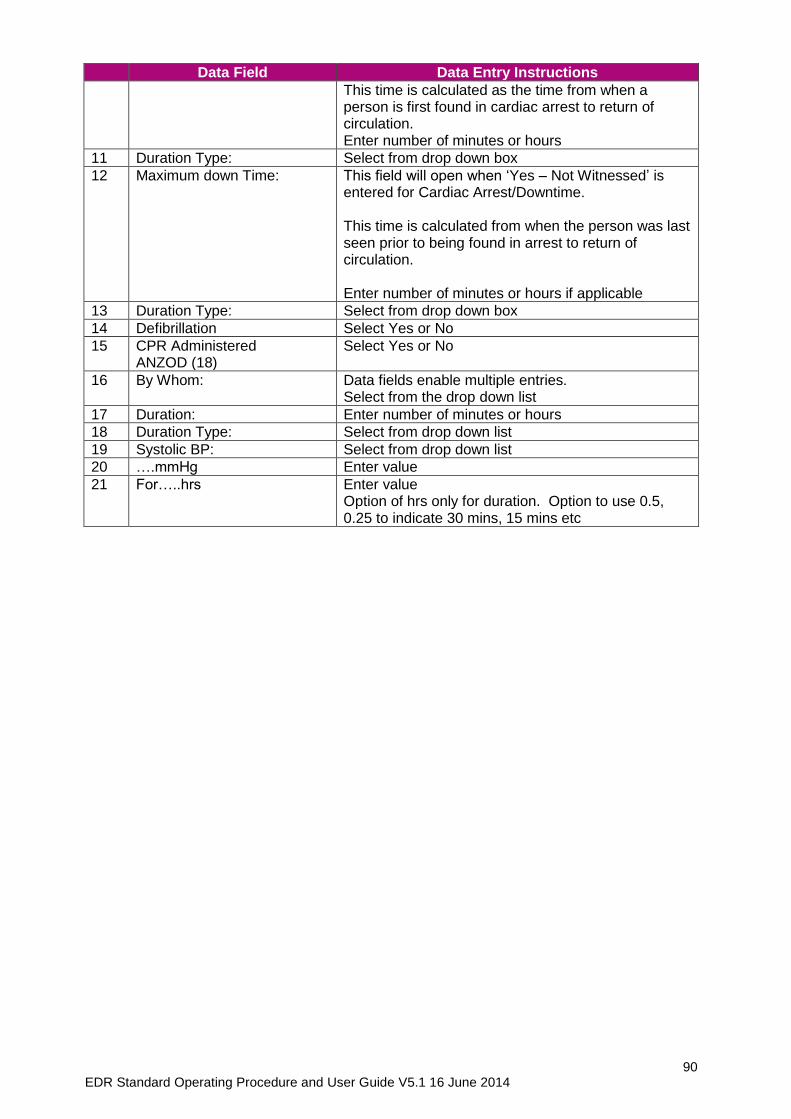
90 EDR Standard Operating Procedure and User Guide V5.1 16 June 2014
Data Field Data Entry Instructions
This time is calculated as the time from when a person is first found in cardiac arrest to return of circulation. Enter number of minutes or hours
11 Duration Type: Select from drop down box
12 Maximum down Time: This field will open when ‘Yes – Not Witnessed’ is entered for Cardiac Arrest/Downtime. This time is calculated from when the person was last seen prior to being found in arrest to return of circulation. Enter number of minutes or hours if applicable
13 Duration Type: Select from drop down box
14 Defibrillation Select Yes or No
15 CPR Administered ANZOD (18)
Select Yes or No
16 By Whom: Data fields enable multiple entries. Select from the drop down list
17 Duration: Enter number of minutes or hours
18 Duration Type: Select from drop down list
19 Systolic BP: Select from drop down list
20 ….mmHg Enter value
21 For…..hrs Enter value Option of hrs only for duration. Option to use 0.5, 0.25 to indicate 30 mins, 15 mins etc
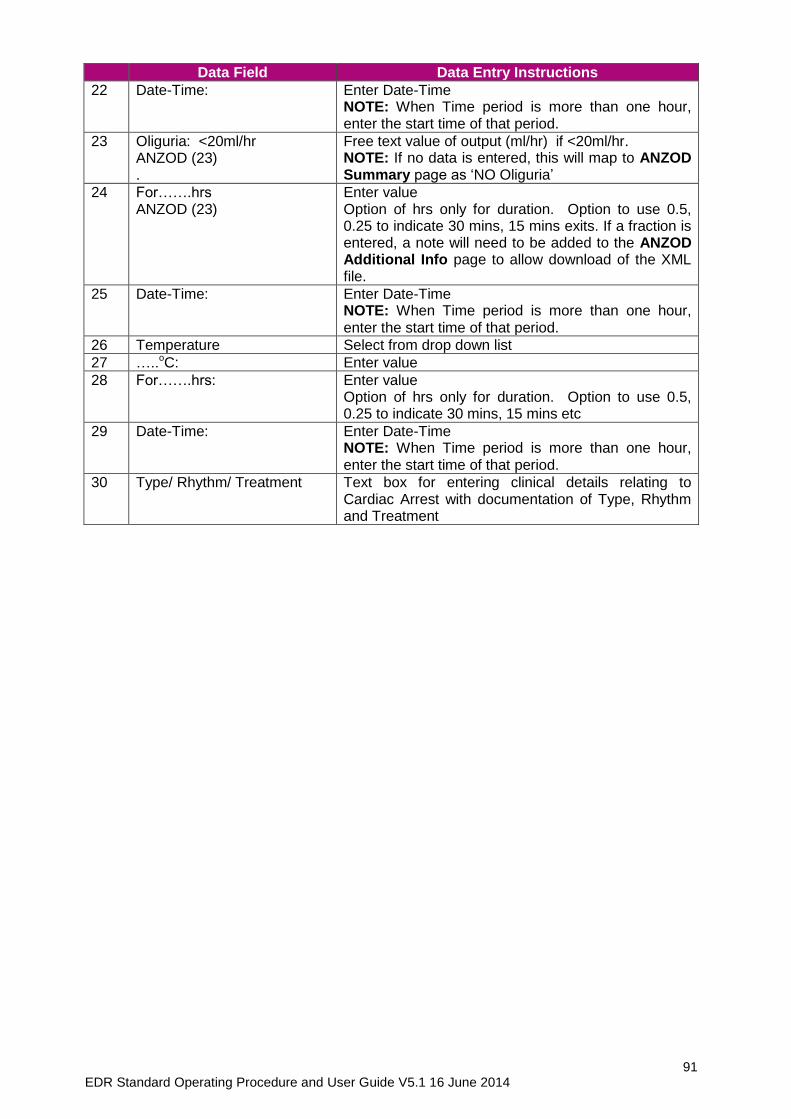
91 EDR Standard Operating Procedure and User Guide V5.1 16 June 2014
Data Field Data Entry Instructions
22 Date-Time:
Enter Date-Time NOTE: When Time period is more than one hour, enter the start time of that period.
23 Oliguria: <20ml/hr ANZOD (23) .
Free text value of output (ml/hr) if <20ml/hr. NOTE: If no data is entered, this will map to ANZOD Summary page as ‘NO Oliguria’
24 For…….hrs ANZOD (23)
Enter value Option of hrs only for duration. Option to use 0.5, 0.25 to indicate 30 mins, 15 mins exits. If a fraction is entered, a note will need to be added to the ANZOD Additional Info page to allow download of the XML file.
25 Date-Time: Enter Date-Time NOTE: When Time period is more than one hour, enter the start time of that period.
26 Temperature Select from drop down list
27 …..oC: Enter value
28 For…….hrs: Enter value Option of hrs only for duration. Option to use 0.5, 0.25 to indicate 30 mins, 15 mins etc
29 Date-Time: Enter Date-Time NOTE: When Time period is more than one hour, enter the start time of that period.
30 Type/ Rhythm/ Treatment Text box for entering clinical details relating to Cardiac Arrest with documentation of Type, Rhythm and Treatment
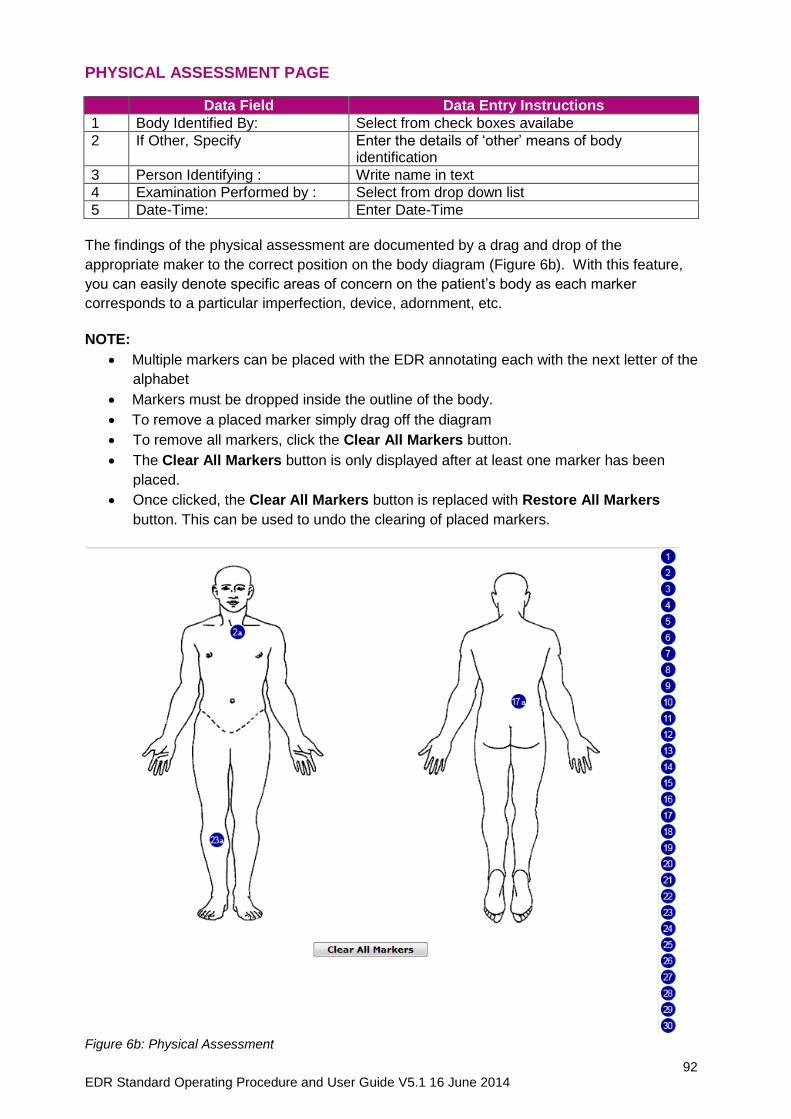
92 EDR Standard Operating Procedure and User Guide V5.1 16 June 2014
PHYSICAL ASSESSMENT PAGE
Data Field Data Entry Instructions
1 Body Identified By: Select from check boxes availabe
2 If Other, Specify Enter the details of ‘other’ means of body identification
3 Person Identifying : Write name in text
4 Examination Performed by : Select from drop down list
5 Date-Time: Enter Date-Time
The findings of the physical assessment are documented by a drag and drop of the
appropriate maker to the correct position on the body diagram (Figure 6b). With this feature,
you can easily denote specific areas of concern on the patient’s body as each marker
corresponds to a particular imperfection, device, adornment, etc.
NOTE:
Multiple markers can be placed with the EDR annotating each with the next letter of the
alphabet
Markers must be dropped inside the outline of the body.
To remove a placed marker simply drag off the diagram
To remove all markers, click the Clear All Markers button.
The Clear All Markers button is only displayed after at least one marker has been
placed.
Once clicked, the Clear All Markers button is replaced with Restore All Markers
button. This can be used to undo the clearing of placed markers.
Figure 6b: Physical Assessment
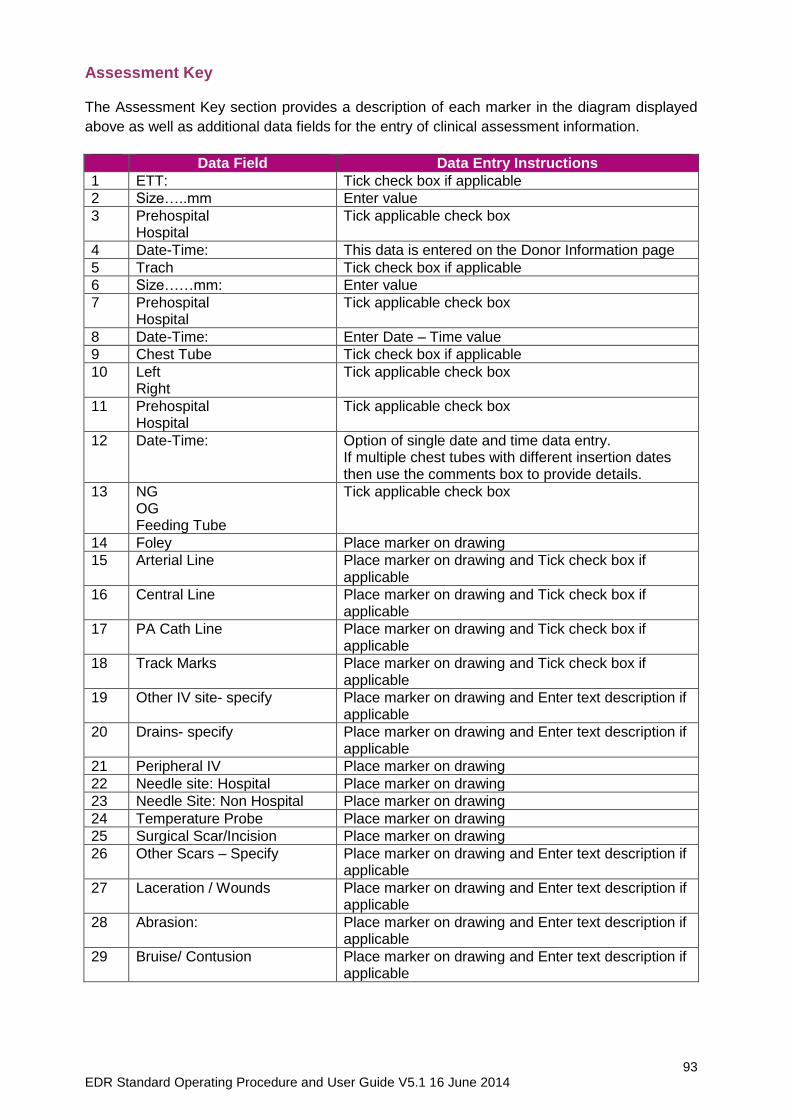
93 EDR Standard Operating Procedure and User Guide V5.1 16 June 2014
Assessment Key The Assessment Key section provides a description of each marker in the diagram displayed
above as well as additional data fields for the entry of clinical assessment information.
Data Field Data Entry Instructions
1 ETT: Tick check box if applicable
2 Size…..mm Enter value
3 Prehospital Hospital
Tick applicable check box
4 Date-Time: This data is entered on the Donor Information page
5 Trach Tick check box if applicable
6 Size……mm: Enter value
7 Prehospital Hospital
Tick applicable check box
8 Date-Time: Enter Date – Time value
9 Chest Tube Tick check box if applicable
10 Left Right
Tick applicable check box
11 Prehospital Hospital
Tick applicable check box
12 Date-Time: Option of single date and time data entry. If multiple chest tubes with different insertion dates then use the comments box to provide details.
13 NG OG Feeding Tube
Tick applicable check box
14 Foley Place marker on drawing
15 Arterial Line Place marker on drawing and Tick check box if applicable
16 Central Line Place marker on drawing and Tick check box if applicable
17 PA Cath Line Place marker on drawing and Tick check box if applicable
18 Track Marks Place marker on drawing and Tick check box if applicable
19 Other IV site- specify Place marker on drawing and Enter text description if applicable
20 Drains- specify Place marker on drawing and Enter text description if applicable
21 Peripheral IV Place marker on drawing
22 Needle site: Hospital Place marker on drawing
23 Needle Site: Non Hospital Place marker on drawing
24 Temperature Probe Place marker on drawing
25 Surgical Scar/Incision Place marker on drawing
26 Other Scars – Specify Place marker on drawing and Enter text description if applicable
27 Laceration / Wounds Place marker on drawing and Enter text description if applicable
28 Abrasion: Place marker on drawing and Enter text description if applicable
29 Bruise/ Contusion Place marker on drawing and Enter text description if applicable

94 EDR Standard Operating Procedure and User Guide V5.1 16 June 2014
Data Field Data Entry Instructions
30 Fracture/ Dislocation Place marker on drawing and Enter text description if applicable
31 Dressing/Bandage Place marker on drawing and Enter text description if applicable
32 Cast/Ortho Device: Place marker on drawing and Enter text description if applicable
33 Body Piercing – Specify Place marker on drawing and Enter text description if applicable
34 Tattoo- specify Place marker on drawing and Enter text description if applicable
35 Skin Lesion/ Rash/ Genital lesion- specify:
Place marker on drawing and Enter text description if applicable
36 VAS Cath. Place marker on drawing and Enter text description if applicable
37 Urinary Cath Place marker on drawing and Enter text description if applicable
38 Other Place marker on drawing and Enter text description if applicable
39 Unremarkable Tick check box if applicable
40 Comments Enter text description if applicable
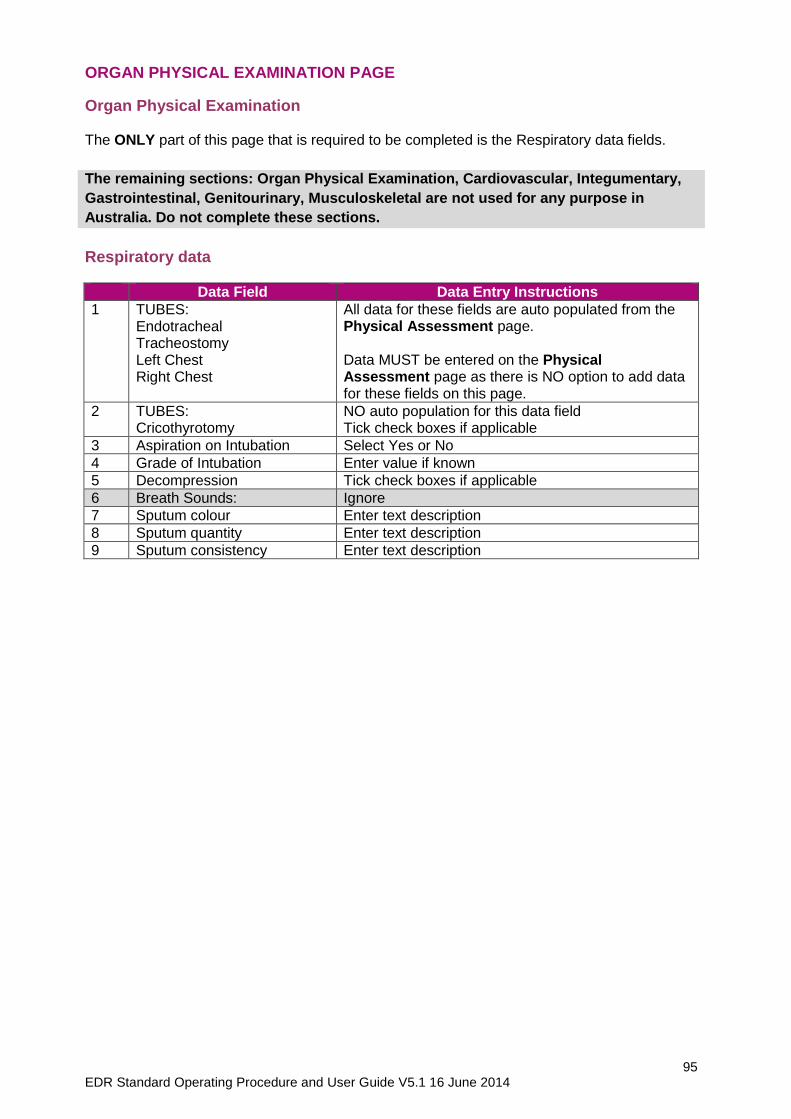
95 EDR Standard Operating Procedure and User Guide V5.1 16 June 2014
ORGAN PHYSICAL EXAMINATION PAGE
Organ Physical Examination The ONLY part of this page that is required to be completed is the Respiratory data fields.
The remaining sections: Organ Physical Examination, Cardiovascular, Integumentary,
Gastrointestinal, Genitourinary, Musculoskeletal are not used for any purpose in
Australia. Do not complete these sections.
Respiratory data
Data Field Data Entry Instructions
1 TUBES: Endotracheal Tracheostomy Left Chest Right Chest
All data for these fields are auto populated from the Physical Assessment page. Data MUST be entered on the Physical Assessment page as there is NO option to add data for these fields on this page.
2 TUBES: Cricothyrotomy
NO auto population for this data field Tick check boxes if applicable
3 Aspiration on Intubation Select Yes or No
4 Grade of Intubation Enter value if known
5 Decompression Tick check boxes if applicable
6 Breath Sounds: Ignore
7 Sputum colour Enter text description
8 Sputum quantity Enter text description
9 Sputum consistency Enter text description
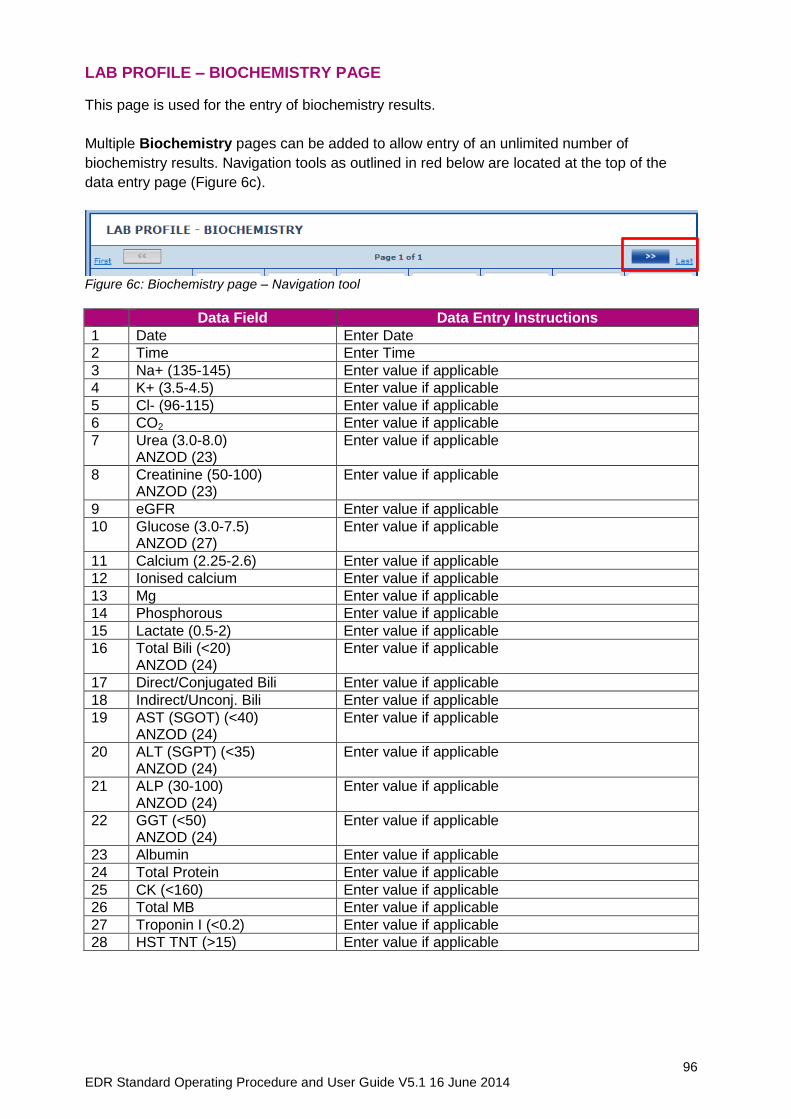
96 EDR Standard Operating Procedure and User Guide V5.1 16 June 2014
LAB PROFILE – BIOCHEMISTRY PAGE
This page is used for the entry of biochemistry results.
Multiple Biochemistry pages can be added to allow entry of an unlimited number of
biochemistry results. Navigation tools as outlined in red below are located at the top of the
data entry page (Figure 6c).
Figure 6c: Biochemistry page – Navigation tool
Data Field Data Entry Instructions
1 Date Enter Date
2 Time Enter Time
3 Na+ (135-145) Enter value if applicable
4 K+ (3.5-4.5) Enter value if applicable
5 Cl- (96-115) Enter value if applicable
6 CO2 Enter value if applicable
7 Urea (3.0-8.0) ANZOD (23)
Enter value if applicable
8 Creatinine (50-100) ANZOD (23)
Enter value if applicable
9 eGFR Enter value if applicable
10 Glucose (3.0-7.5) ANZOD (27)
Enter value if applicable
11 Calcium (2.25-2.6) Enter value if applicable
12 Ionised calcium Enter value if applicable
13 Mg Enter value if applicable
14 Phosphorous Enter value if applicable
15 Lactate (0.5-2) Enter value if applicable
16 Total Bili (<20) ANZOD (24)
Enter value if applicable
17 Direct/Conjugated Bili Enter value if applicable
18 Indirect/Unconj. Bili Enter value if applicable
19 AST (SGOT) (<40) ANZOD (24)
Enter value if applicable
20 ALT (SGPT) (<35) ANZOD (24)
Enter value if applicable
21 ALP (30-100) ANZOD (24)
Enter value if applicable
22 GGT (<50) ANZOD (24)
Enter value if applicable
23 Albumin Enter value if applicable
24 Total Protein Enter value if applicable
25 CK (<160) Enter value if applicable
26 Total MB Enter value if applicable
27 Troponin I (<0.2) Enter value if applicable
28 HST TNT (>15) Enter value if applicable
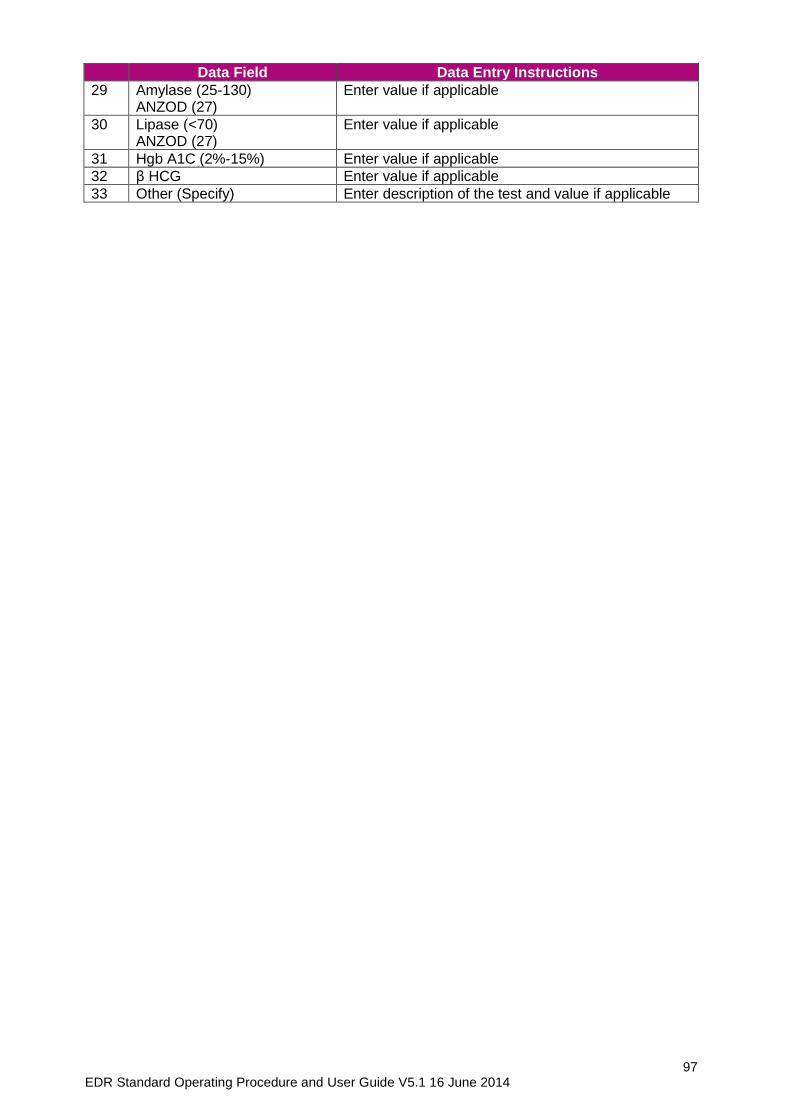
97 EDR Standard Operating Procedure and User Guide V5.1 16 June 2014
Data Field Data Entry Instructions
29 Amylase (25-130) ANZOD (27)
Enter value if applicable
30 Lipase (<70) ANZOD (27)
Enter value if applicable
31 Hgb A1C (2%-15%) Enter value if applicable
32 β HCG Enter value if applicable
33 Other (Specify) Enter description of the test and value if applicable
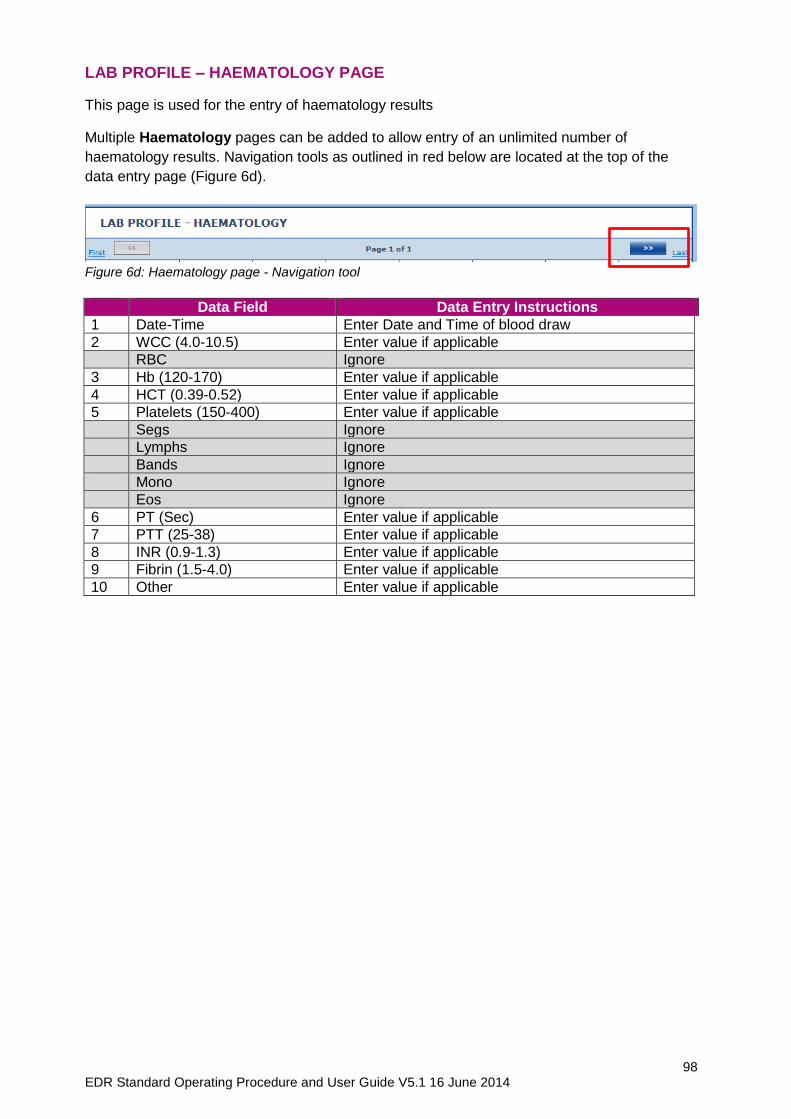
98 EDR Standard Operating Procedure and User Guide V5.1 16 June 2014
LAB PROFILE – HAEMATOLOGY PAGE
This page is used for the entry of haematology results
Multiple Haematology pages can be added to allow entry of an unlimited number of
haematology results. Navigation tools as outlined in red below are located at the top of the
data entry page (Figure 6d).
Figure 6d: Haematology page - Navigation tool
Data Field Data Entry Instructions
1 Date-Time Enter Date and Time of blood draw
2 WCC (4.0-10.5) Enter value if applicable
RBC Ignore
3 Hb (120-170) Enter value if applicable
4 HCT (0.39-0.52) Enter value if applicable
5 Platelets (150-400) Enter value if applicable
Segs Ignore
Lymphs Ignore
Bands Ignore
Mono Ignore
Eos Ignore
6 PT (Sec) Enter value if applicable
7 PTT (25-38) Enter value if applicable
8 INR (0.9-1.3) Enter value if applicable
9 Fibrin (1.5-4.0) Enter value if applicable
10 Other Enter value if applicable
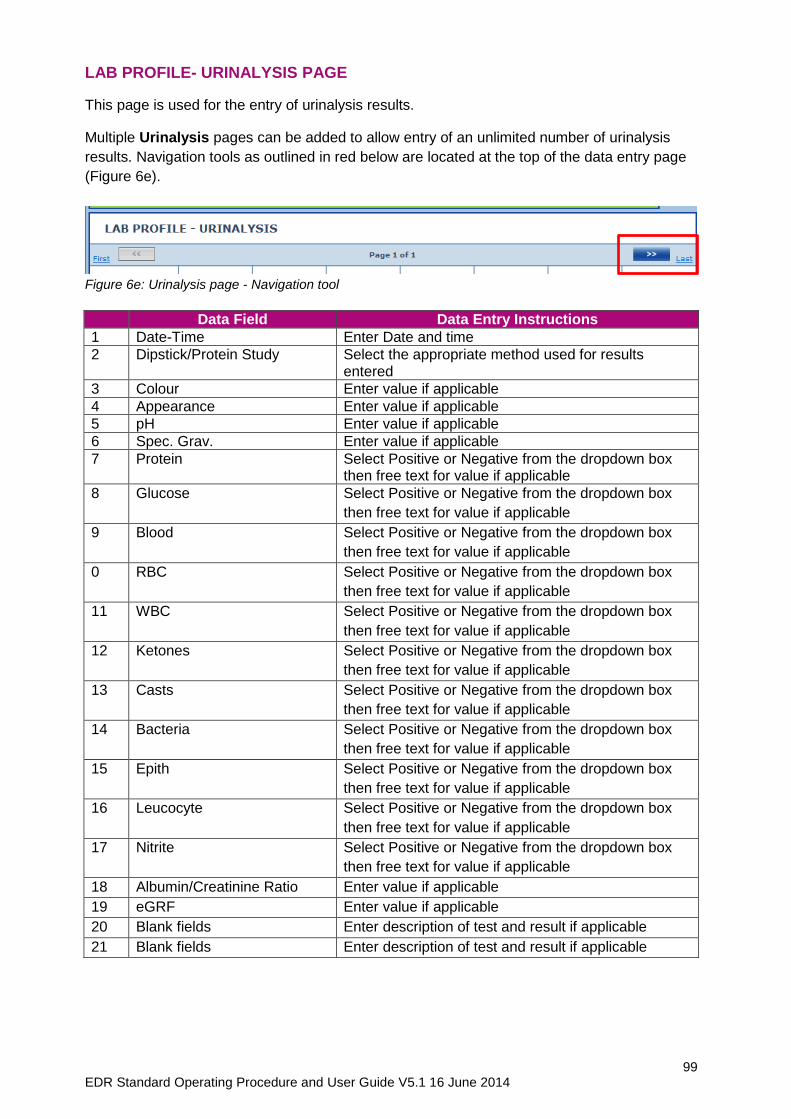
99 EDR Standard Operating Procedure and User Guide V5.1 16 June 2014
LAB PROFILE- URINALYSIS PAGE
This page is used for the entry of urinalysis results.
Multiple Urinalysis pages can be added to allow entry of an unlimited number of urinalysis
results. Navigation tools as outlined in red below are located at the top of the data entry page
(Figure 6e).
Figure 6e: Urinalysis page - Navigation tool
Data Field Data Entry Instructions
1 Date-Time Enter Date and time
2 Dipstick/Protein Study Select the appropriate method used for results entered
3 Colour Enter value if applicable
4 Appearance Enter value if applicable
5 pH Enter value if applicable
6 Spec. Grav. Enter value if applicable
7 Protein Select Positive or Negative from the dropdown box then free text for value if applicable
8 Glucose Select Positive or Negative from the dropdown box
then free text for value if applicable
9 Blood Select Positive or Negative from the dropdown box
then free text for value if applicable
0 RBC Select Positive or Negative from the dropdown box
then free text for value if applicable
11 WBC Select Positive or Negative from the dropdown box
then free text for value if applicable
12 Ketones Select Positive or Negative from the dropdown box
then free text for value if applicable
13 Casts Select Positive or Negative from the dropdown box
then free text for value if applicable
14 Bacteria Select Positive or Negative from the dropdown box
then free text for value if applicable
15 Epith Select Positive or Negative from the dropdown box
then free text for value if applicable
16 Leucocyte Select Positive or Negative from the dropdown box
then free text for value if applicable
17 Nitrite Select Positive or Negative from the dropdown box
then free text for value if applicable
18 Albumin/Creatinine Ratio Enter value if applicable
19 eGRF Enter value if applicable
20 Blank fields Enter description of test and result if applicable
21 Blank fields Enter description of test and result if applicable

100 EDR Standard Operating Procedure and User Guide V5.1 16 June 2014
TOXICOLOGY PAGE – NOT APPLICABLE IN AUSTRALIA
This page is not used for any purpose in Australia. Do not complete this page.
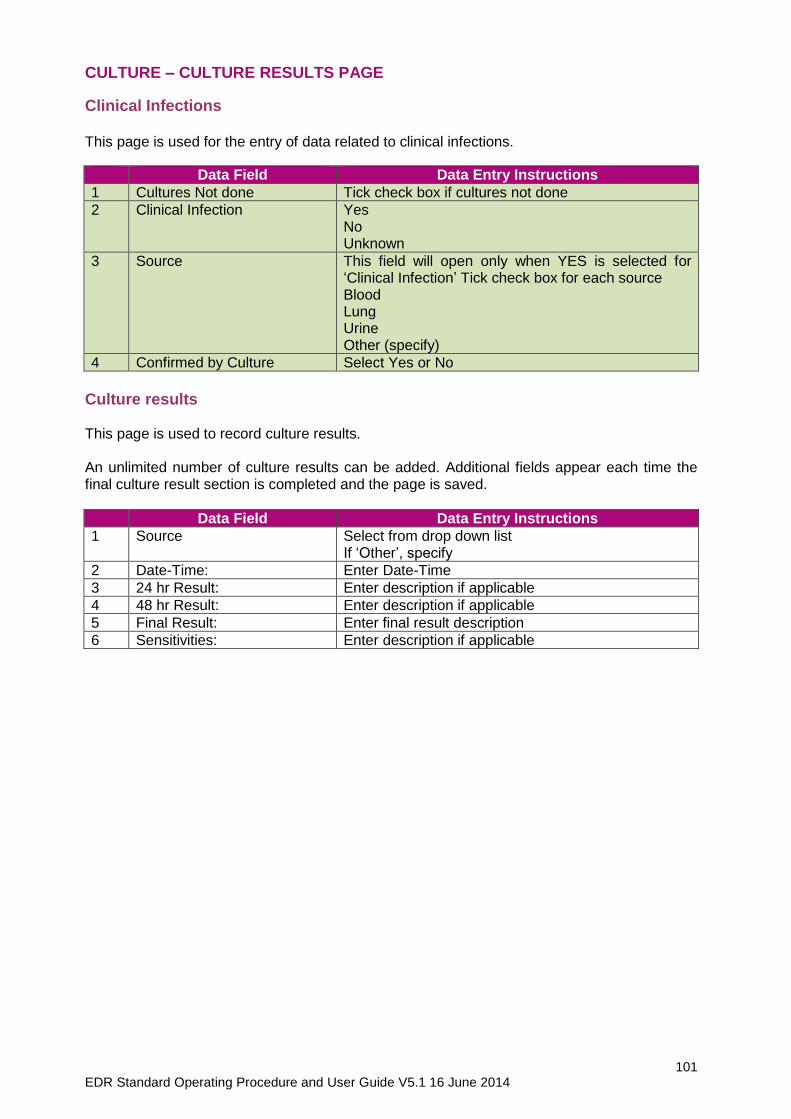
101 EDR Standard Operating Procedure and User Guide V5.1 16 June 2014
CULTURE – CULTURE RESULTS PAGE
Clinical Infections This page is used for the entry of data related to clinical infections.
Data Field Data Entry Instructions
1 Cultures Not done Tick check box if cultures not done
2 Clinical Infection Yes No Unknown
3 Source This field will open only when YES is selected for ‘Clinical Infection’ Tick check box for each source Blood Lung Urine Other (specify)
4 Confirmed by Culture Select Yes or No
Culture results This page is used to record culture results. An unlimited number of culture results can be added. Additional fields appear each time the final culture result section is completed and the page is saved.
Data Field Data Entry Instructions
1 Source Select from drop down list If ‘Other’, specify
2 Date-Time: Enter Date-Time
3 24 hr Result: Enter description if applicable
4 48 hr Result: Enter description if applicable
5 Final Result: Enter final result description
6 Sensitivities: Enter description if applicable

102 EDR Standard Operating Procedure and User Guide V5.1 16 June 2014
CULTURE – CULTURE REPORTS PAGE – NOT APPLICABLE IN AUSTRALIA
This page is not used for any purpose in Australia. Do not complete this page.
103 EDR Standard Operating Procedure and User Guide V5.1 16 June 2014
HAEMODYNAMICS/TEMP PAGE – NOT APPLICABLE IN AUSTRALIA
This page is not used for any purpose in Australia. Do not complete this page.
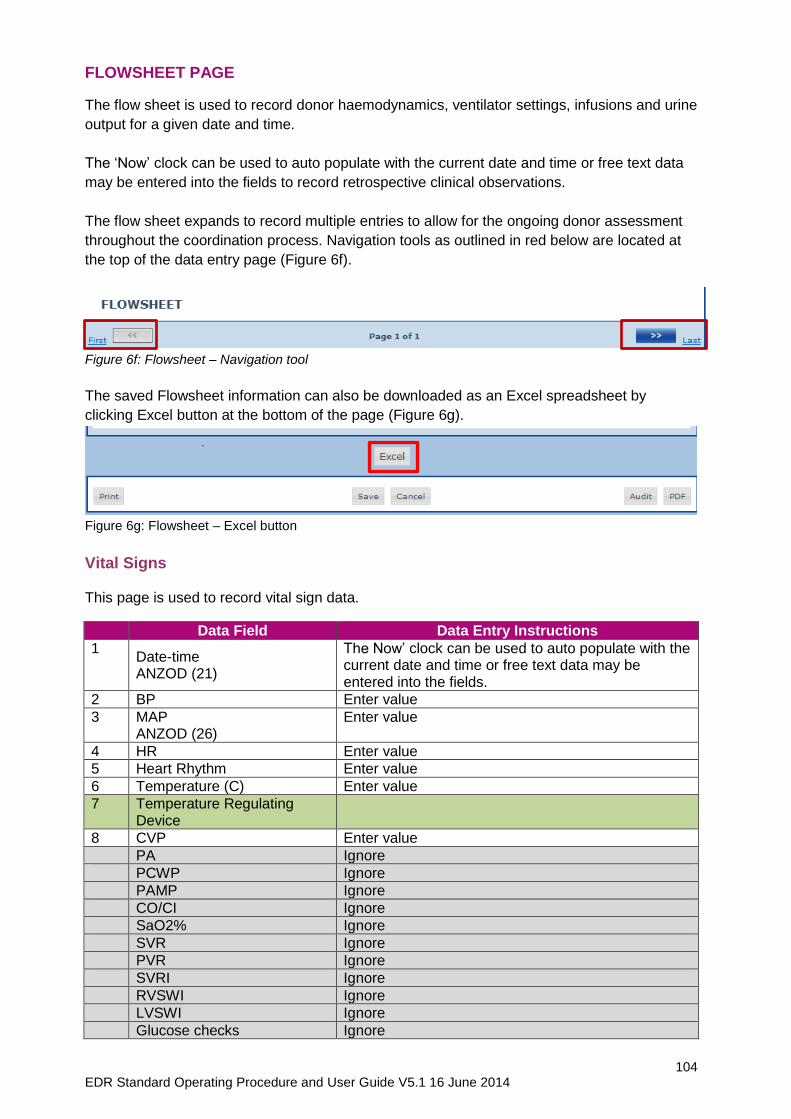
104 EDR Standard Operating Procedure and User Guide V5.1 16 June 2014
FLOWSHEET PAGE
The flow sheet is used to record donor haemodynamics, ventilator settings, infusions and urine
output for a given date and time.
The ‘Now’ clock can be used to auto populate with the current date and time or free text data
may be entered into the fields to record retrospective clinical observations.
The flow sheet expands to record multiple entries to allow for the ongoing donor assessment
throughout the coordination process. Navigation tools as outlined in red below are located at
the top of the data entry page (Figure 6f).
Figure 6f: Flowsheet – Navigation tool
The saved Flowsheet information can also be downloaded as an Excel spreadsheet by
clicking Excel button at the bottom of the page (Figure 6g).
Figure 6g: Flowsheet – Excel button
Vital Signs This page is used to record vital sign data.
Data Field Data Entry Instructions
1 Date-time ANZOD (21)
The Now’ clock can be used to auto populate with the current date and time or free text data may be entered into the fields.
2 BP Enter value
3 MAP ANZOD (26)
Enter value
4 HR Enter value
5 Heart Rhythm Enter value
6 Temperature (C) Enter value
7 Temperature Regulating Device
8 CVP Enter value
PA Ignore
PCWP Ignore
PAMP Ignore
CO/CI Ignore
SaO2% Ignore
SVR Ignore
PVR Ignore
SVRI Ignore
RVSWI Ignore
LVSWI Ignore
Glucose checks Ignore
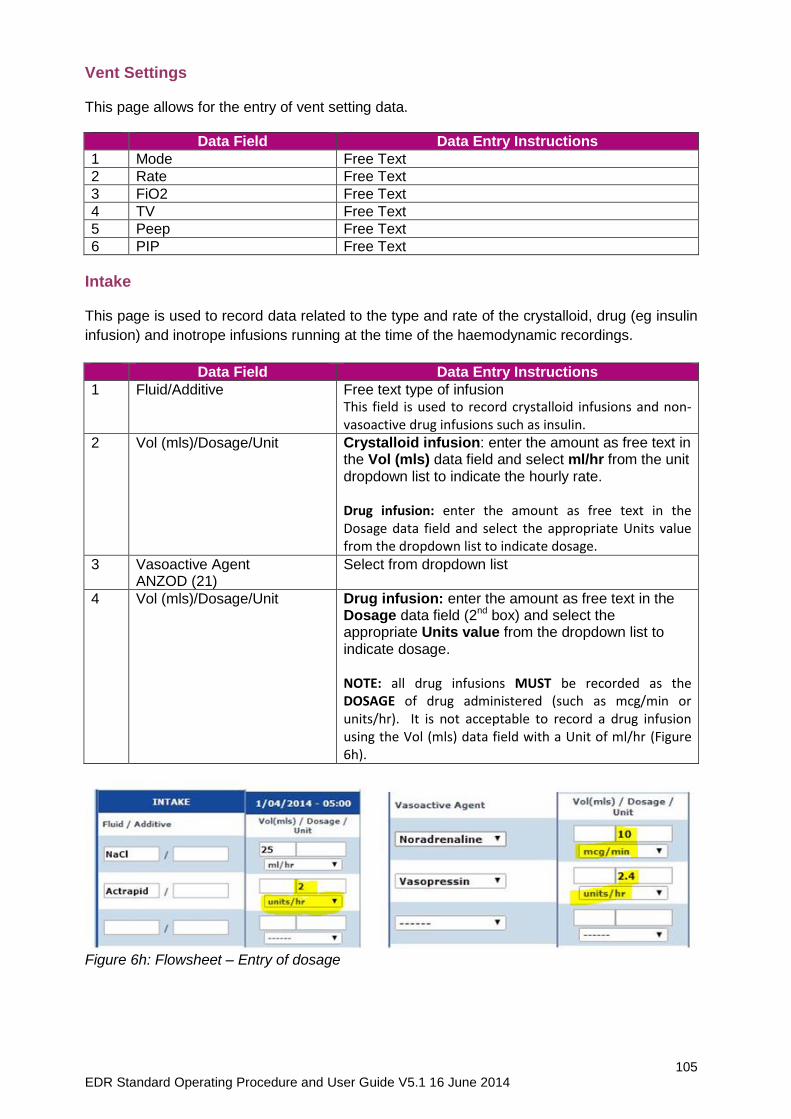
105 EDR Standard Operating Procedure and User Guide V5.1 16 June 2014
Vent Settings This page allows for the entry of vent setting data.
Data Field Data Entry Instructions
1 Mode Free Text
2 Rate Free Text
3 FiO2 Free Text
4 TV Free Text
5 Peep Free Text
6 PIP Free Text
Intake This page is used to record data related to the type and rate of the crystalloid, drug (eg insulin
infusion) and inotrope infusions running at the time of the haemodynamic recordings.
Data Field Data Entry Instructions
1 Fluid/Additive Free text type of infusion This field is used to record crystalloid infusions and non-vasoactive drug infusions such as insulin.
2 Vol (mls)/Dosage/Unit
Crystalloid infusion: enter the amount as free text in the Vol (mls) data field and select ml/hr from the unit dropdown list to indicate the hourly rate. Drug infusion: enter the amount as free text in the Dosage data field and select the appropriate Units value from the dropdown list to indicate dosage.
3 Vasoactive Agent ANZOD (21)
Select from dropdown list
4 Vol (mls)/Dosage/Unit Drug infusion: enter the amount as free text in the Dosage data field (2nd box) and select the appropriate Units value from the dropdown list to indicate dosage. NOTE: all drug infusions MUST be recorded as the DOSAGE of drug administered (such as mcg/min or units/hr). It is not acceptable to record a drug infusion using the Vol (mls) data field with a Unit of ml/hr (Figure 6h).
Figure 6h: Flowsheet – Entry of dosage
106 EDR Standard Operating Procedure and User Guide V5.1 16 June 2014
Output This page allows for entry of urine output data.
Data Field Data Entry Instructions
1 Urine Output (ml/ hr) Free text value
2 Comments: Enter comments if applicable in text box.
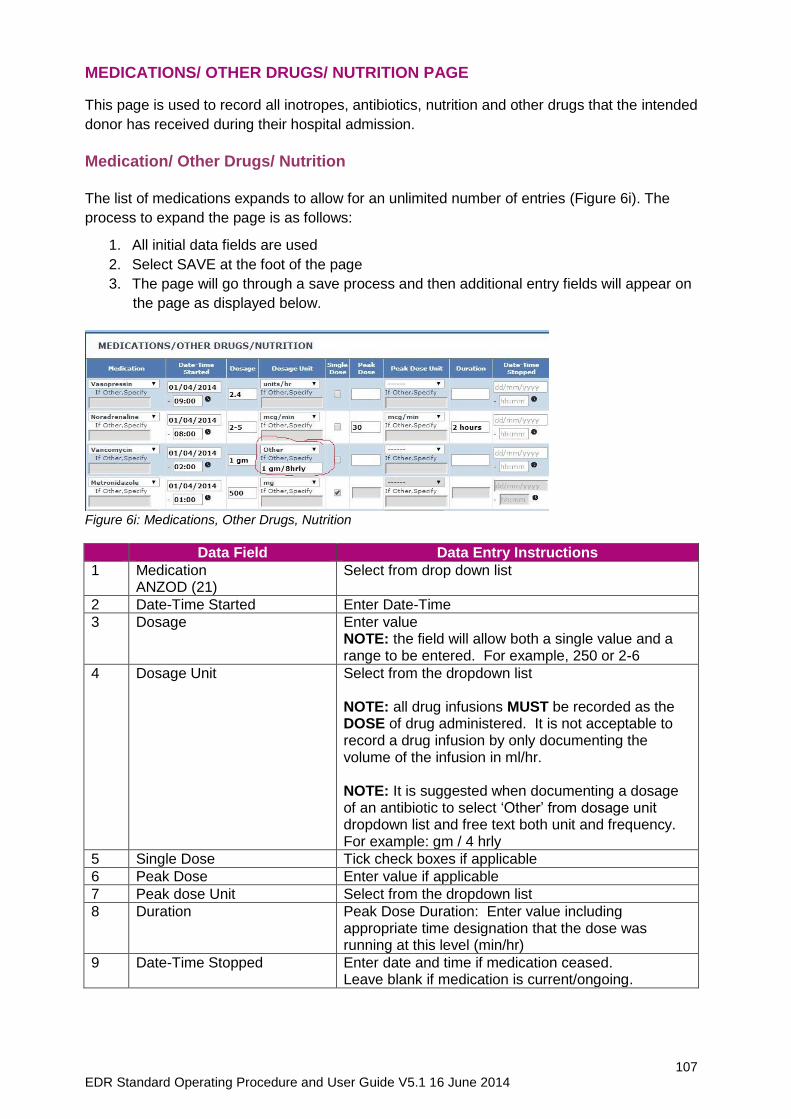
107 EDR Standard Operating Procedure and User Guide V5.1 16 June 2014
MEDICATIONS/ OTHER DRUGS/ NUTRITION PAGE
This page is used to record all inotropes, antibiotics, nutrition and other drugs that the intended
donor has received during their hospital admission.
Medication/ Other Drugs/ Nutrition
The list of medications expands to allow for an unlimited number of entries (Figure 6i). The
process to expand the page is as follows:
1. All initial data fields are used
2. Select SAVE at the foot of the page
3. The page will go through a save process and then additional entry fields will appear on
the page as displayed below.
Figure 6i: Medications, Other Drugs, Nutrition
Data Field Data Entry Instructions
1 Medication ANZOD (21)
Select from drop down list
2 Date-Time Started Enter Date-Time
3 Dosage Enter value NOTE: the field will allow both a single value and a range to be entered. For example, 250 or 2-6
4 Dosage Unit Select from the dropdown list NOTE: all drug infusions MUST be recorded as the DOSE of drug administered. It is not acceptable to record a drug infusion by only documenting the volume of the infusion in ml/hr. NOTE: It is suggested when documenting a dosage of an antibiotic to select ‘Other’ from dosage unit dropdown list and free text both unit and frequency. For example: gm / 4 hrly
5 Single Dose Tick check boxes if applicable
6 Peak Dose Enter value if applicable
7 Peak dose Unit Select from the dropdown list
8 Duration Peak Dose Duration: Enter value including appropriate time designation that the dose was running at this level (min/hr)
9 Date-Time Stopped Enter date and time if medication ceased. Leave blank if medication is current/ongoing.
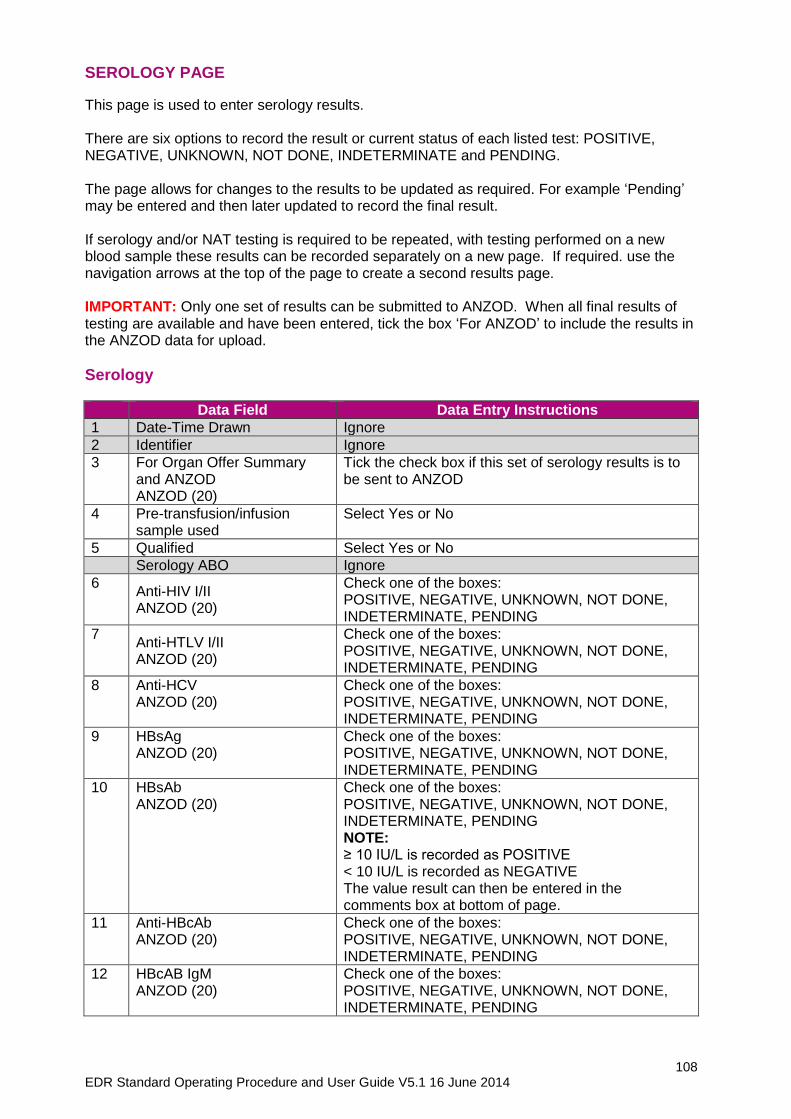
108 EDR Standard Operating Procedure and User Guide V5.1 16 June 2014
SEROLOGY PAGE
This page is used to enter serology results. There are six options to record the result or current status of each listed test: POSITIVE, NEGATIVE, UNKNOWN, NOT DONE, INDETERMINATE and PENDING. The page allows for changes to the results to be updated as required. For example ‘Pending’ may be entered and then later updated to record the final result. If serology and/or NAT testing is required to be repeated, with testing performed on a new blood sample these results can be recorded separately on a new page. If required. use the navigation arrows at the top of the page to create a second results page. IMPORTANT: Only one set of results can be submitted to ANZOD. When all final results of testing are available and have been entered, tick the box ‘For ANZOD’ to include the results in the ANZOD data for upload.
Serology
Data Field Data Entry Instructions
1 Date-Time Drawn Ignore
2 Identifier Ignore
3 For Organ Offer Summary and ANZOD ANZOD (20)
Tick the check box if this set of serology results is to be sent to ANZOD
4 Pre-transfusion/infusion sample used
Select Yes or No
5 Qualified Select Yes or No
Serology ABO Ignore
6 Anti-HIV I/II ANZOD (20)
Check one of the boxes: POSITIVE, NEGATIVE, UNKNOWN, NOT DONE, INDETERMINATE, PENDING
7 Anti-HTLV I/II ANZOD (20)
Check one of the boxes: POSITIVE, NEGATIVE, UNKNOWN, NOT DONE, INDETERMINATE, PENDING
8 Anti-HCV ANZOD (20)
Check one of the boxes: POSITIVE, NEGATIVE, UNKNOWN, NOT DONE, INDETERMINATE, PENDING
9 HBsAg ANZOD (20)
Check one of the boxes: POSITIVE, NEGATIVE, UNKNOWN, NOT DONE, INDETERMINATE, PENDING
10 HBsAb ANZOD (20)
Check one of the boxes: POSITIVE, NEGATIVE, UNKNOWN, NOT DONE, INDETERMINATE, PENDING NOTE: ≥ 10 IU/L is recorded as POSITIVE < 10 IU/L is recorded as NEGATIVE The value result can then be entered in the comments box at bottom of page.
11 Anti-HBcAb ANZOD (20)
Check one of the boxes: POSITIVE, NEGATIVE, UNKNOWN, NOT DONE, INDETERMINATE, PENDING
12 HBcAB IgM ANZOD (20)
Check one of the boxes: POSITIVE, NEGATIVE, UNKNOWN, NOT DONE, INDETERMINATE, PENDING
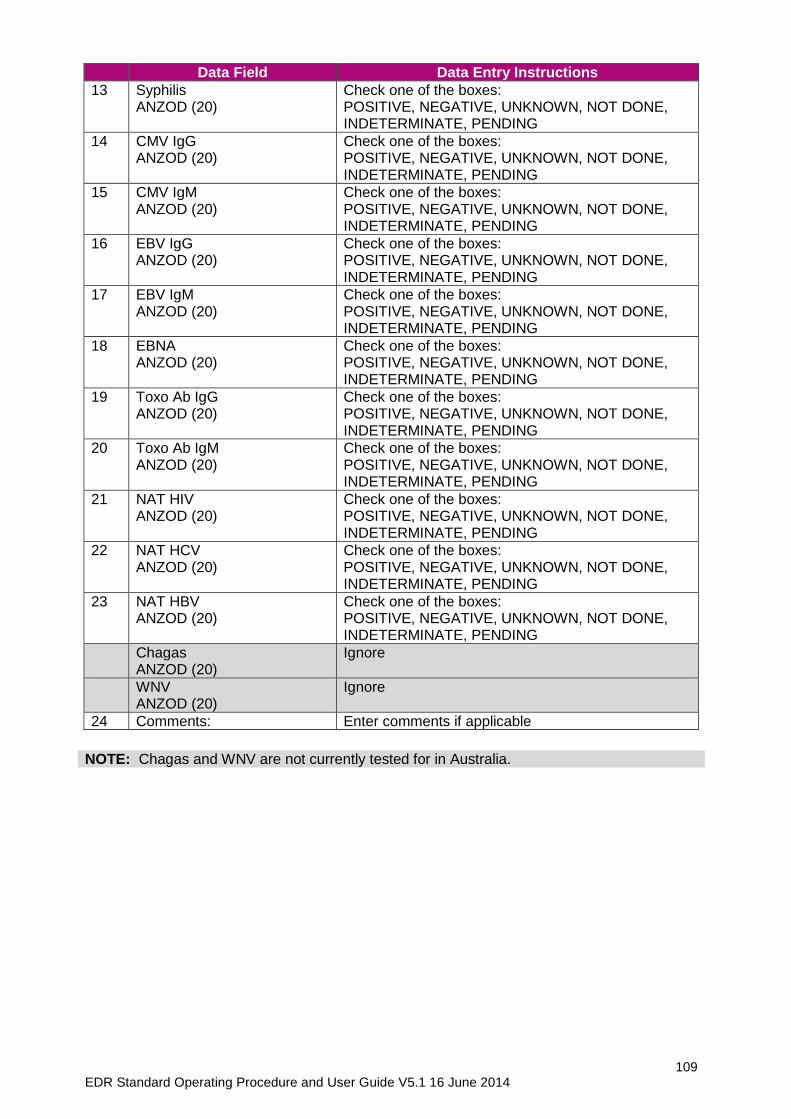
109 EDR Standard Operating Procedure and User Guide V5.1 16 June 2014
Data Field Data Entry Instructions
13 Syphilis ANZOD (20)
Check one of the boxes: POSITIVE, NEGATIVE, UNKNOWN, NOT DONE, INDETERMINATE, PENDING
14 CMV IgG ANZOD (20)
Check one of the boxes: POSITIVE, NEGATIVE, UNKNOWN, NOT DONE, INDETERMINATE, PENDING
15 CMV IgM ANZOD (20)
Check one of the boxes: POSITIVE, NEGATIVE, UNKNOWN, NOT DONE, INDETERMINATE, PENDING
16 EBV IgG ANZOD (20)
Check one of the boxes: POSITIVE, NEGATIVE, UNKNOWN, NOT DONE, INDETERMINATE, PENDING
17 EBV IgM ANZOD (20)
Check one of the boxes: POSITIVE, NEGATIVE, UNKNOWN, NOT DONE, INDETERMINATE, PENDING
18 EBNA ANZOD (20)
Check one of the boxes: POSITIVE, NEGATIVE, UNKNOWN, NOT DONE, INDETERMINATE, PENDING
19 Toxo Ab IgG ANZOD (20)
Check one of the boxes: POSITIVE, NEGATIVE, UNKNOWN, NOT DONE, INDETERMINATE, PENDING
20 Toxo Ab IgM ANZOD (20)
Check one of the boxes: POSITIVE, NEGATIVE, UNKNOWN, NOT DONE, INDETERMINATE, PENDING
21 NAT HIV ANZOD (20)
Check one of the boxes: POSITIVE, NEGATIVE, UNKNOWN, NOT DONE, INDETERMINATE, PENDING
22 NAT HCV ANZOD (20)
Check one of the boxes: POSITIVE, NEGATIVE, UNKNOWN, NOT DONE, INDETERMINATE, PENDING
23 NAT HBV ANZOD (20)
Check one of the boxes: POSITIVE, NEGATIVE, UNKNOWN, NOT DONE, INDETERMINATE, PENDING
Chagas ANZOD (20)
Ignore
WNV ANZOD (20)
Ignore
24 Comments: Enter comments if applicable
NOTE: Chagas and WNV are not currently tested for in Australia.
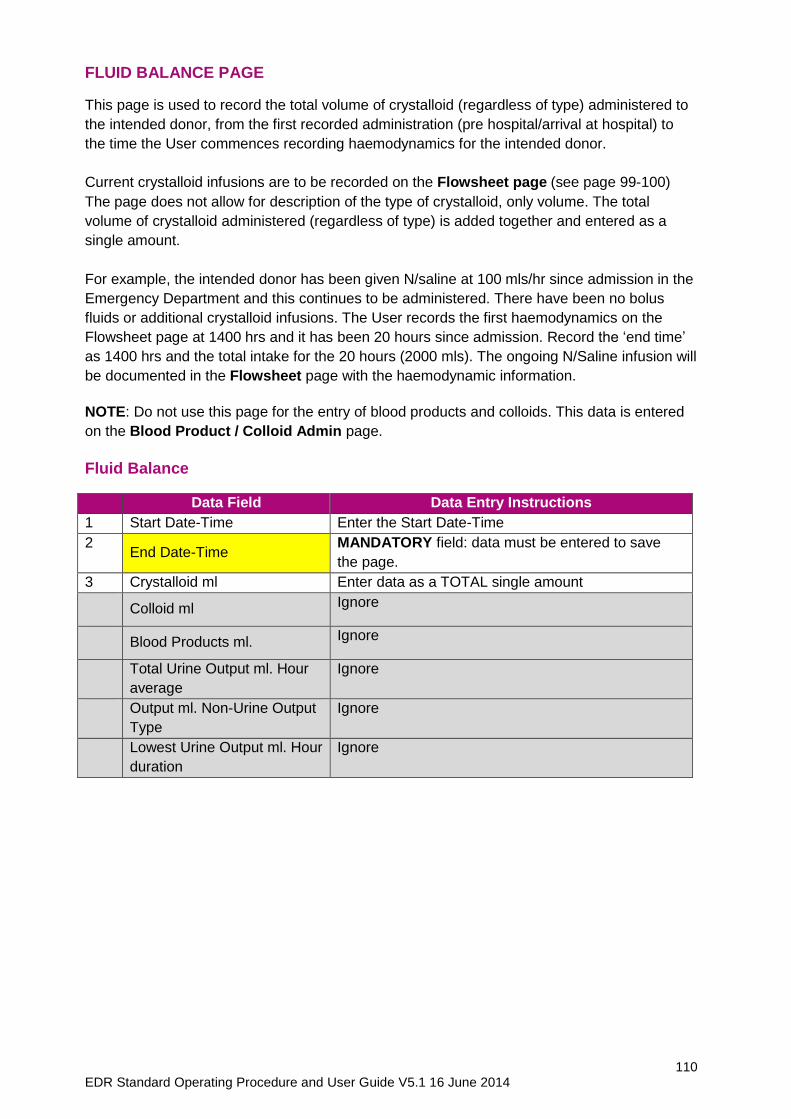
110 EDR Standard Operating Procedure and User Guide V5.1 16 June 2014
FLUID BALANCE PAGE
This page is used to record the total volume of crystalloid (regardless of type) administered to
the intended donor, from the first recorded administration (pre hospital/arrival at hospital) to
the time the User commences recording haemodynamics for the intended donor.
Current crystalloid infusions are to be recorded on the Flowsheet page (see page 99-100)
The page does not allow for description of the type of crystalloid, only volume. The total
volume of crystalloid administered (regardless of type) is added together and entered as a
single amount.
For example, the intended donor has been given N/saline at 100 mls/hr since admission in the
Emergency Department and this continues to be administered. There have been no bolus
fluids or additional crystalloid infusions. The User records the first haemodynamics on the
Flowsheet page at 1400 hrs and it has been 20 hours since admission. Record the ‘end time’
as 1400 hrs and the total intake for the 20 hours (2000 mls). The ongoing N/Saline infusion will
be documented in the Flowsheet page with the haemodynamic information.
NOTE: Do not use this page for the entry of blood products and colloids. This data is entered
on the Blood Product / Colloid Admin page.
Fluid Balance
Data Field Data Entry Instructions
1 Start Date-Time Enter the Start Date-Time
2 End Date-Time
MANDATORY field: data must be entered to save
the page.
3 Crystalloid ml Enter data as a TOTAL single amount
Colloid ml Ignore
Blood Products ml. Ignore
Total Urine Output ml. Hour
average
Ignore
Output ml. Non-Urine Output
Type
Ignore
Lowest Urine Output ml. Hour
duration
Ignore
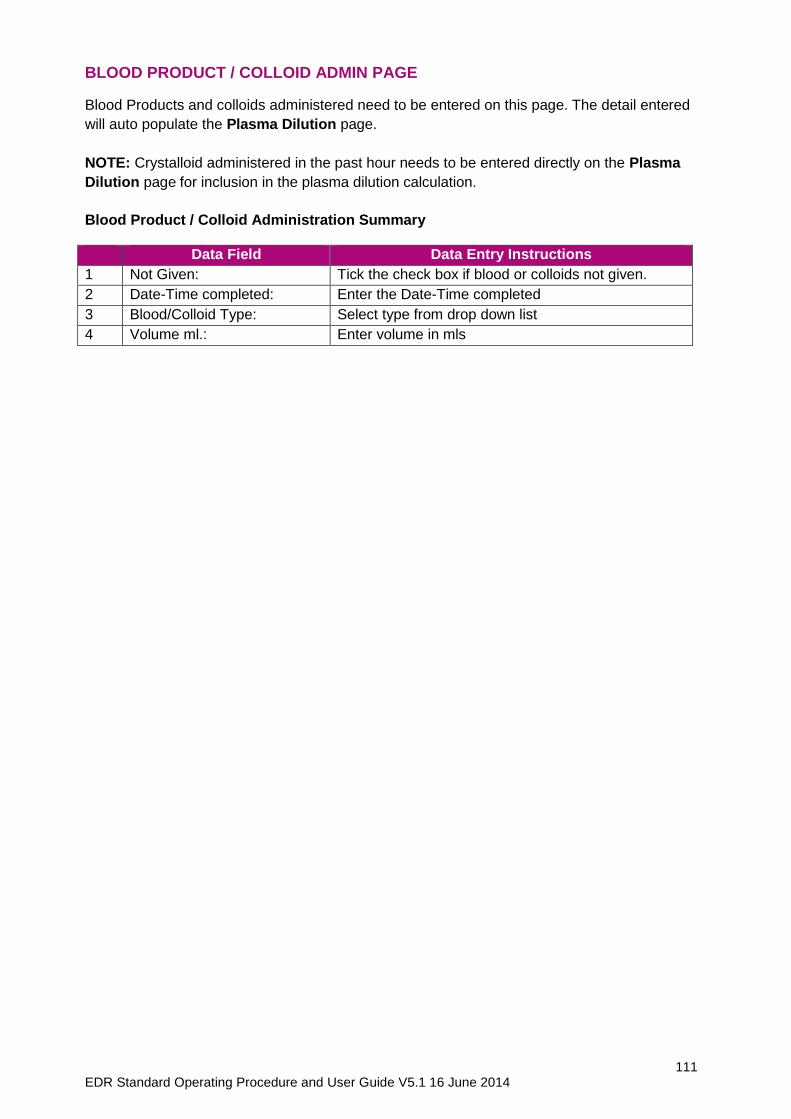
111 EDR Standard Operating Procedure and User Guide V5.1 16 June 2014
BLOOD PRODUCT / COLLOID ADMIN PAGE
Blood Products and colloids administered need to be entered on this page. The detail entered
will auto populate the Plasma Dilution page.
NOTE: Crystalloid administered in the past hour needs to be entered directly on the Plasma
Dilution page for inclusion in the plasma dilution calculation.
Blood Product / Colloid Administration Summary
Data Field Data Entry Instructions
1 Not Given: Tick the check box if blood or colloids not given.
2 Date-Time completed: Enter the Date-Time completed
3 Blood/Colloid Type: Select type from drop down list
4 Volume ml.: Enter volume in mls
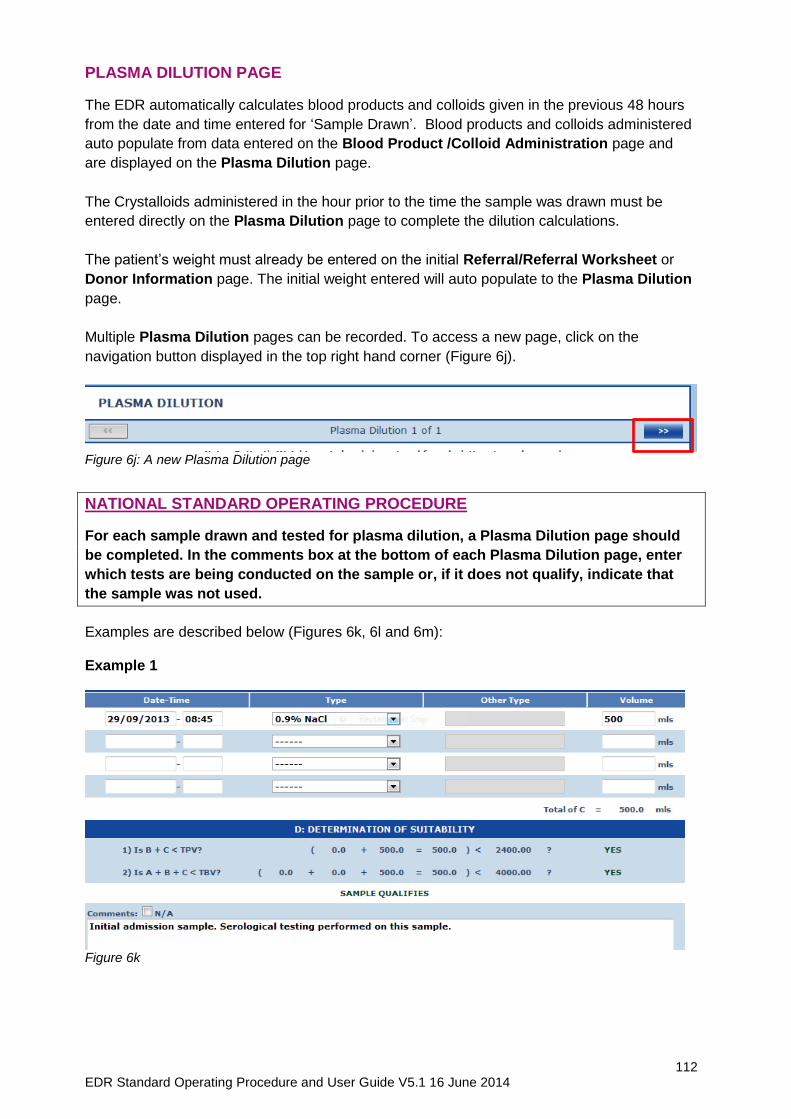
112 EDR Standard Operating Procedure and User Guide V5.1 16 June 2014
PLASMA DILUTION PAGE
The EDR automatically calculates blood products and colloids given in the previous 48 hours
from the date and time entered for ‘Sample Drawn’. Blood products and colloids administered
auto populate from data entered on the Blood Product /Colloid Administration page and
are displayed on the Plasma Dilution page.
The Crystalloids administered in the hour prior to the time the sample was drawn must be
entered directly on the Plasma Dilution page to complete the dilution calculations.
The patient’s weight must already be entered on the initial Referral/Referral Worksheet or
Donor Information page. The initial weight entered will auto populate to the Plasma Dilution
page.
Multiple Plasma Dilution pages can be recorded. To access a new page, click on the
navigation button displayed in the top right hand corner (Figure 6j).
Figure 6j: A new Plasma Dilution page
NATIONAL STANDARD OPERATING PROCEDURE
For each sample drawn and tested for plasma dilution, a Plasma Dilution page should
be completed. In the comments box at the bottom of each Plasma Dilution page, enter
which tests are being conducted on the sample or, if it does not qualify, indicate that
the sample was not used.
Examples are described below (Figures 6k, 6l and 6m): Example 1
Figure 6k
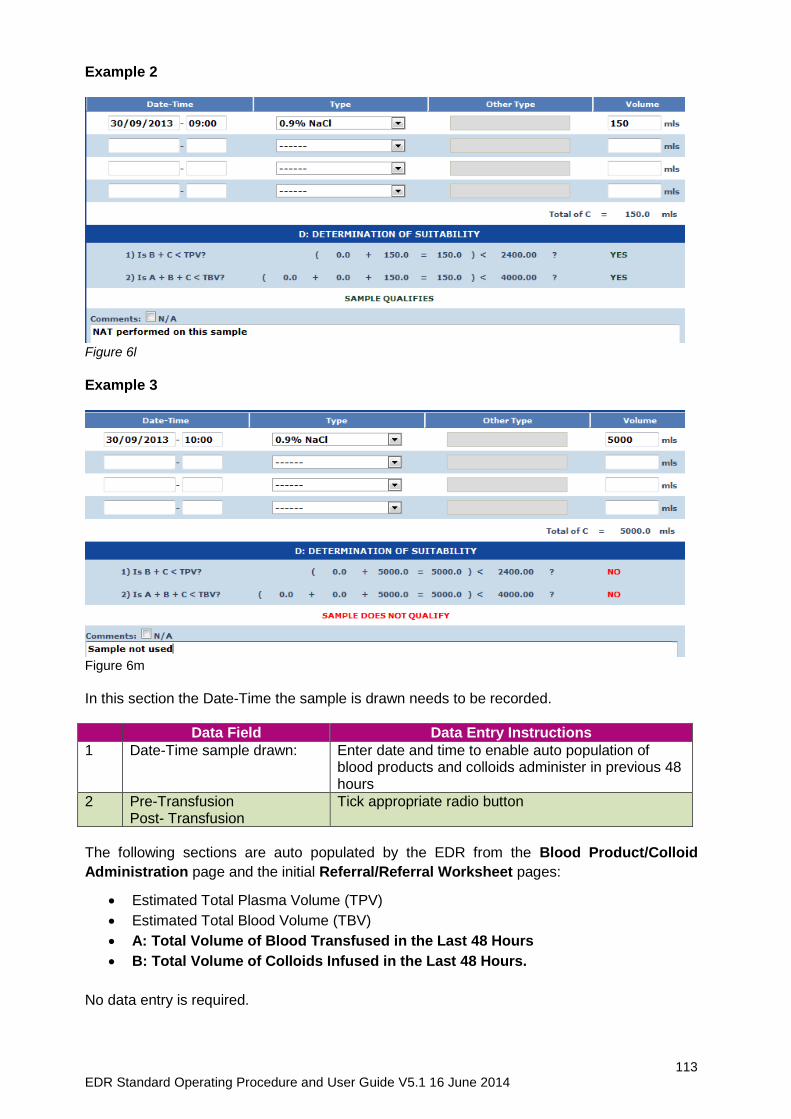
113 EDR Standard Operating Procedure and User Guide V5.1 16 June 2014
Example 2
Figure 6l
Example 3
Figure 6m
In this section the Date-Time the sample is drawn needs to be recorded.
Data Field Data Entry Instructions
1 Date-Time sample drawn: Enter date and time to enable auto population of blood products and colloids administer in previous 48 hours
2 Pre-Transfusion Post- Transfusion
Tick appropriate radio button
The following sections are auto populated by the EDR from the Blood Product/Colloid
Administration page and the initial Referral/Referral Worksheet pages:
Estimated Total Plasma Volume (TPV)
Estimated Total Blood Volume (TBV)
A: Total Volume of Blood Transfused in the Last 48 Hours
B: Total Volume of Colloids Infused in the Last 48 Hours.
No data entry is required.
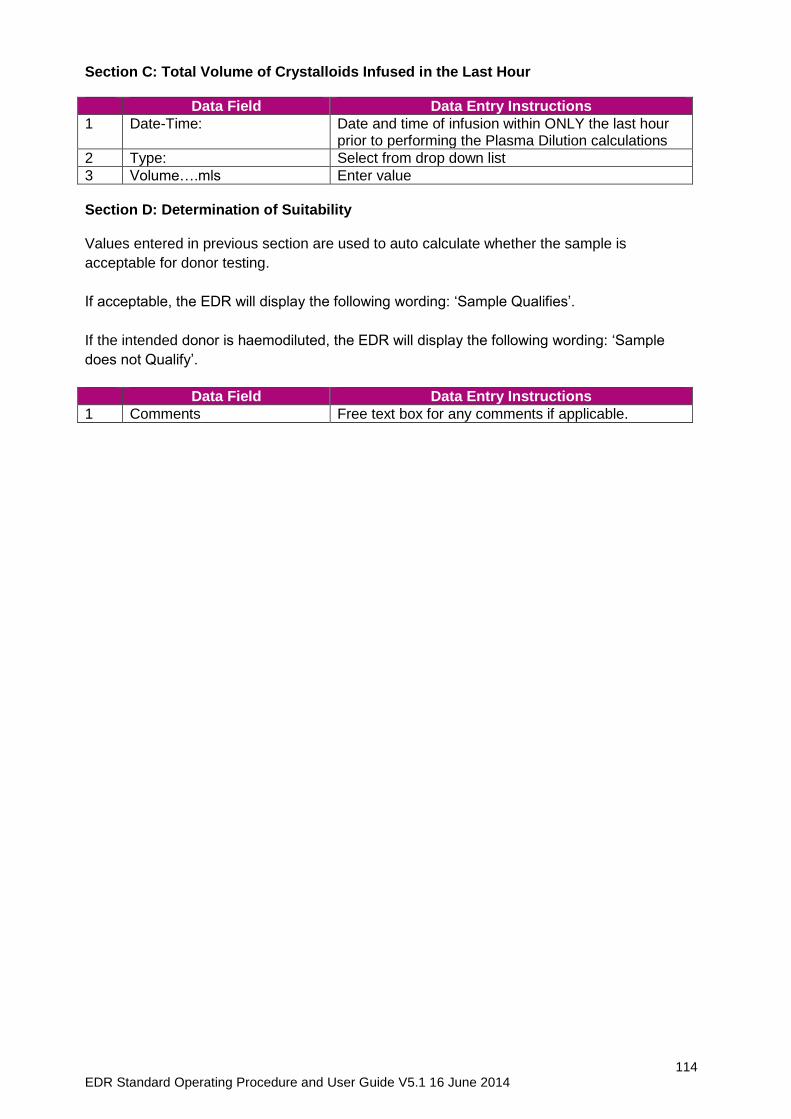
114 EDR Standard Operating Procedure and User Guide V5.1 16 June 2014
Section C: Total Volume of Crystalloids Infused in the Last Hour
Data Field Data Entry Instructions
1 Date-Time: Date and time of infusion within ONLY the last hour prior to performing the Plasma Dilution calculations
2 Type: Select from drop down list
3 Volume….mls Enter value
Section D: Determination of Suitability Values entered in previous section are used to auto calculate whether the sample is
acceptable for donor testing.
If acceptable, the EDR will display the following wording: ‘Sample Qualifies’.
If the intended donor is haemodiluted, the EDR will display the following wording: ‘Sample
does not Qualify’.
Data Field Data Entry Instructions
1 Comments Free text box for any comments if applicable.
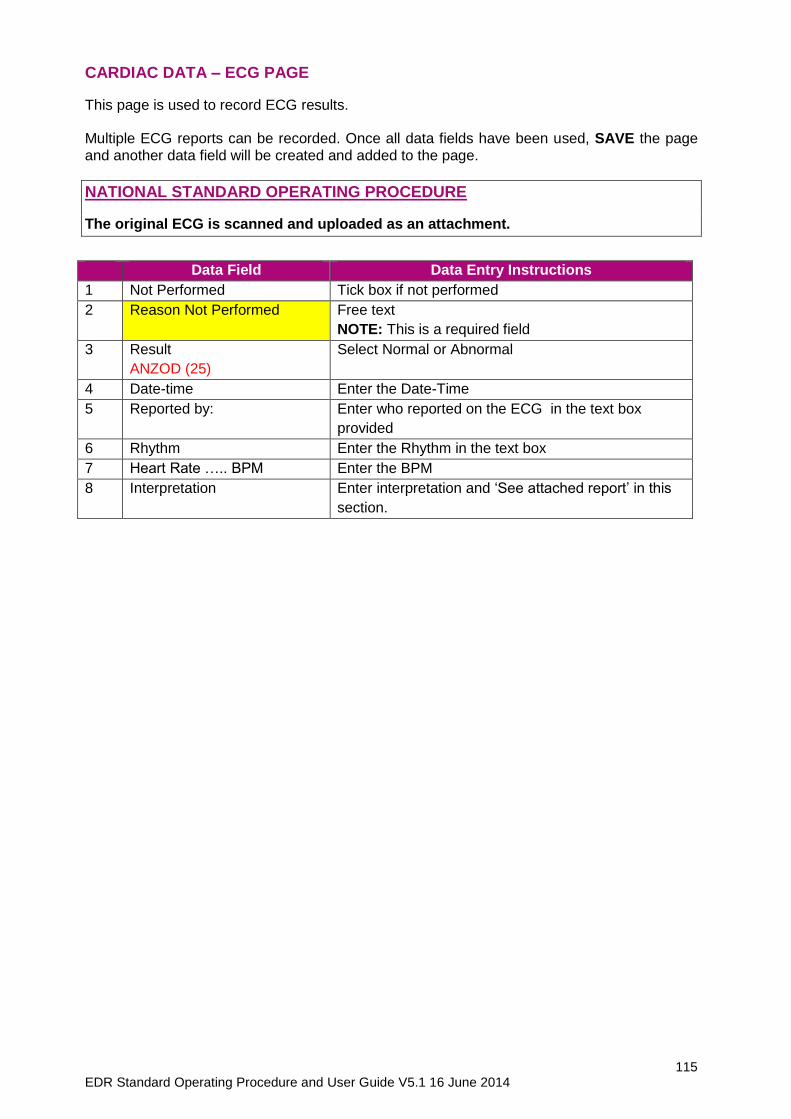
115 EDR Standard Operating Procedure and User Guide V5.1 16 June 2014
CARDIAC DATA – ECG PAGE
This page is used to record ECG results. Multiple ECG reports can be recorded. Once all data fields have been used, SAVE the page and another data field will be created and added to the page.
NATIONAL STANDARD OPERATING PROCEDURE
The original ECG is scanned and uploaded as an attachment.
Data Field Data Entry Instructions
1 Not Performed Tick box if not performed
2 Reason Not Performed Free text
NOTE: This is a required field
3 Result
ANZOD (25)
Select Normal or Abnormal
4 Date-time Enter the Date-Time
5 Reported by: Enter who reported on the ECG in the text box
provided
6 Rhythm Enter the Rhythm in the text box
7 Heart Rate ….. BPM Enter the BPM
8 Interpretation Enter interpretation and ‘See attached report’ in this
section.
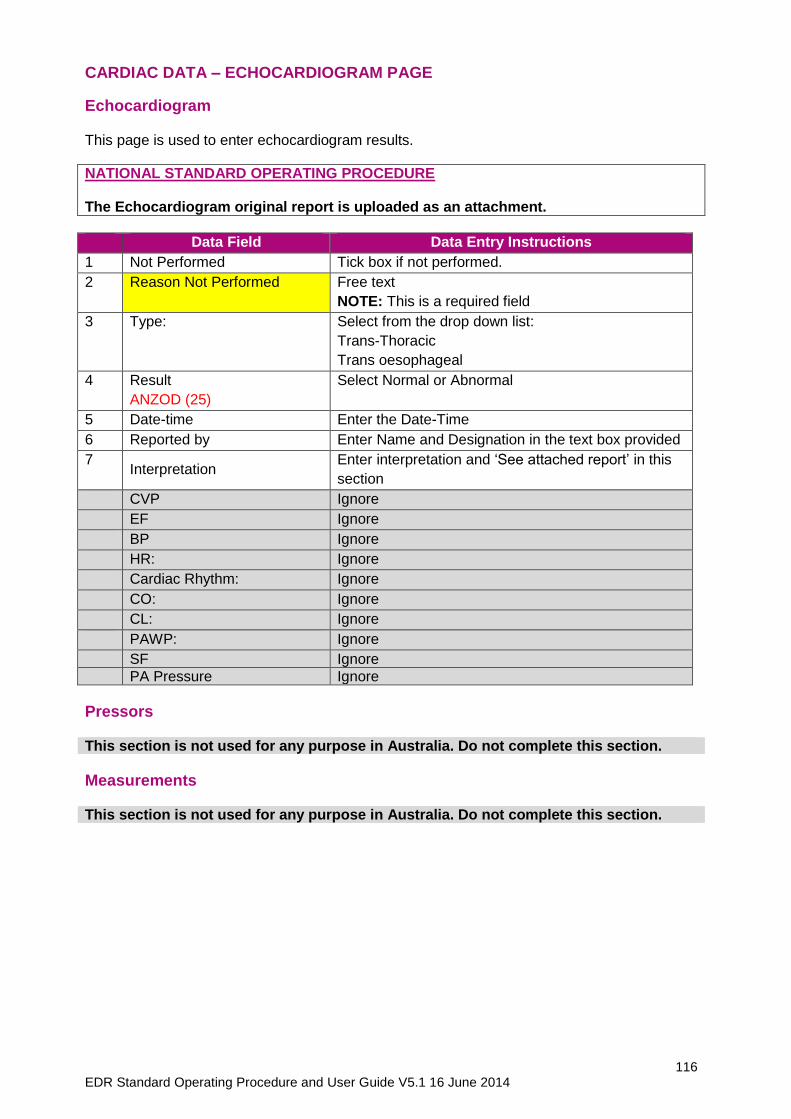
116 EDR Standard Operating Procedure and User Guide V5.1 16 June 2014
CARDIAC DATA – ECHOCARDIOGRAM PAGE
Echocardiogram This page is used to enter echocardiogram results.
NATIONAL STANDARD OPERATING PROCEDURE The Echocardiogram original report is uploaded as an attachment.
Data Field Data Entry Instructions
1 Not Performed Tick box if not performed.
2 Reason Not Performed Free text
NOTE: This is a required field
3 Type: Select from the drop down list:
Trans-Thoracic
Trans oesophageal
4 Result
ANZOD (25)
Select Normal or Abnormal
5 Date-time Enter the Date-Time
6 Reported by Enter Name and Designation in the text box provided
7 Interpretation
Enter interpretation and ‘See attached report’ in this
section
CVP Ignore
EF Ignore
BP Ignore
HR: Ignore
Cardiac Rhythm: Ignore
CO: Ignore
CL: Ignore
PAWP: Ignore
SF Ignore
PA Pressure Ignore
Pressors This section is not used for any purpose in Australia. Do not complete this section.
Measurements This section is not used for any purpose in Australia. Do not complete this section.
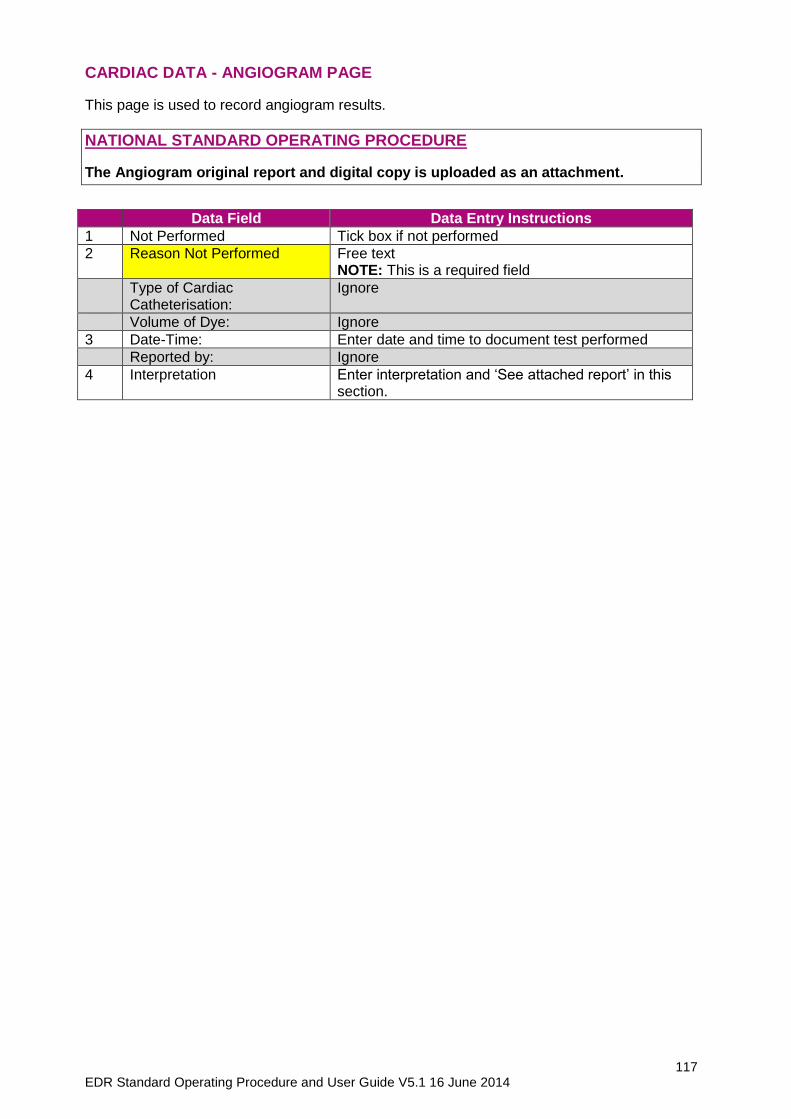
117 EDR Standard Operating Procedure and User Guide V5.1 16 June 2014
CARDIAC DATA - ANGIOGRAM PAGE
This page is used to record angiogram results.
NATIONAL STANDARD OPERATING PROCEDURE
The Angiogram original report and digital copy is uploaded as an attachment.
Data Field Data Entry Instructions
1 Not Performed Tick box if not performed
2 Reason Not Performed Free text NOTE: This is a required field
Type of Cardiac Catheterisation:
Ignore
Volume of Dye: Ignore
3 Date-Time: Enter date and time to document test performed
Reported by: Ignore
4 Interpretation Enter interpretation and ‘See attached report’ in this section.

118 EDR Standard Operating Procedure and User Guide V5.1 16 June 2014
RESPIRATORY DATA – CXR PAGE
This page is used to record chest x-ray results. Multiple chest x-rays can be entered. Once all data fields have been filled, SAVE the page and another data field will be created and added to the page CXR.
NATIONAL STANDARD OPERATING PROCEDURE
The original CXR report is uploaded as an attachment.
Data Field Data Entry Instructions
1 Chest X-Ray Select from list: No chest x-ray Normal Abnormal – left Abnormal –right Abnormal- both Results- Unknown Unknown if chest x-ray performed
2 Date-Time Enter the Date-Time
3 Result Select Normal or Abnormal
4 Reported by Enter who reported on the CXR in the text box provided
5 Interpretation Enter interpretation and ‘See attached report’ in this section.
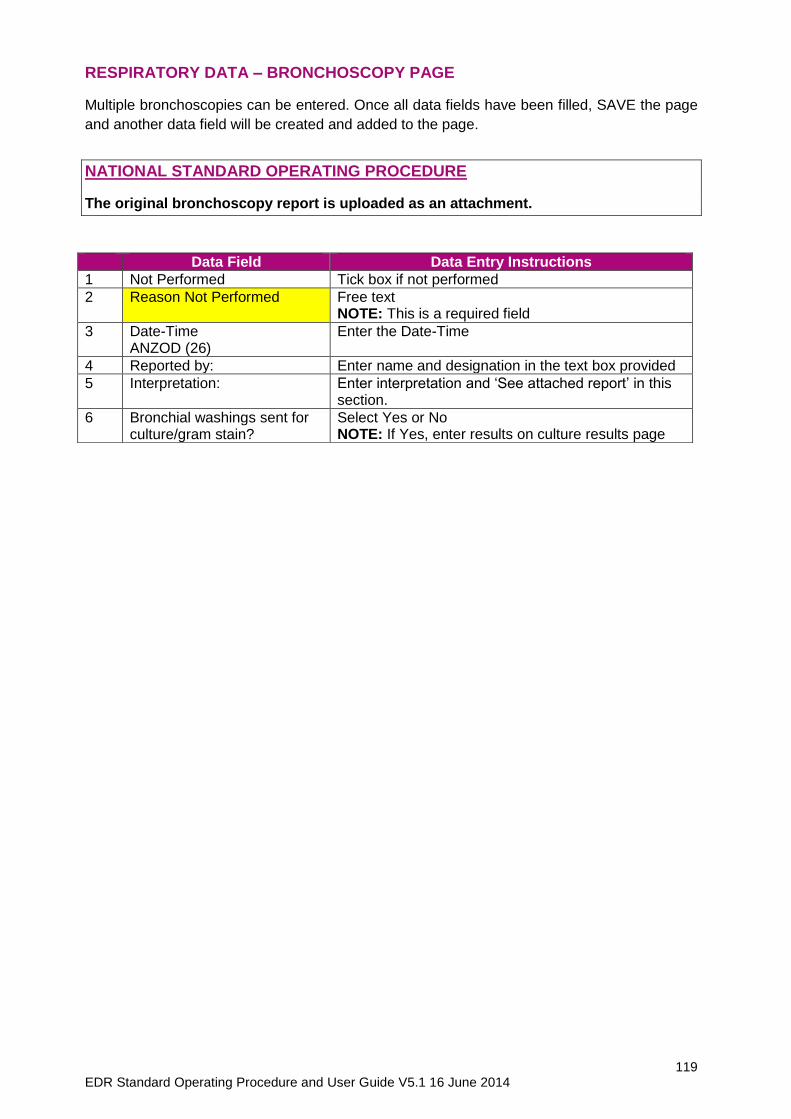
119 EDR Standard Operating Procedure and User Guide V5.1 16 June 2014
RESPIRATORY DATA – BRONCHOSCOPY PAGE
Multiple bronchoscopies can be entered. Once all data fields have been filled, SAVE the page
and another data field will be created and added to the page.
NATIONAL STANDARD OPERATING PROCEDURE
The original bronchoscopy report is uploaded as an attachment.
Data Field Data Entry Instructions
1 Not Performed Tick box if not performed
2 Reason Not Performed Free text NOTE: This is a required field
3 Date-Time ANZOD (26)
Enter the Date-Time
4 Reported by: Enter name and designation in the text box provided
5 Interpretation: Enter interpretation and ‘See attached report’ in this section.
6 Bronchial washings sent for culture/gram stain?
Select Yes or No NOTE: If Yes, enter results on culture results page
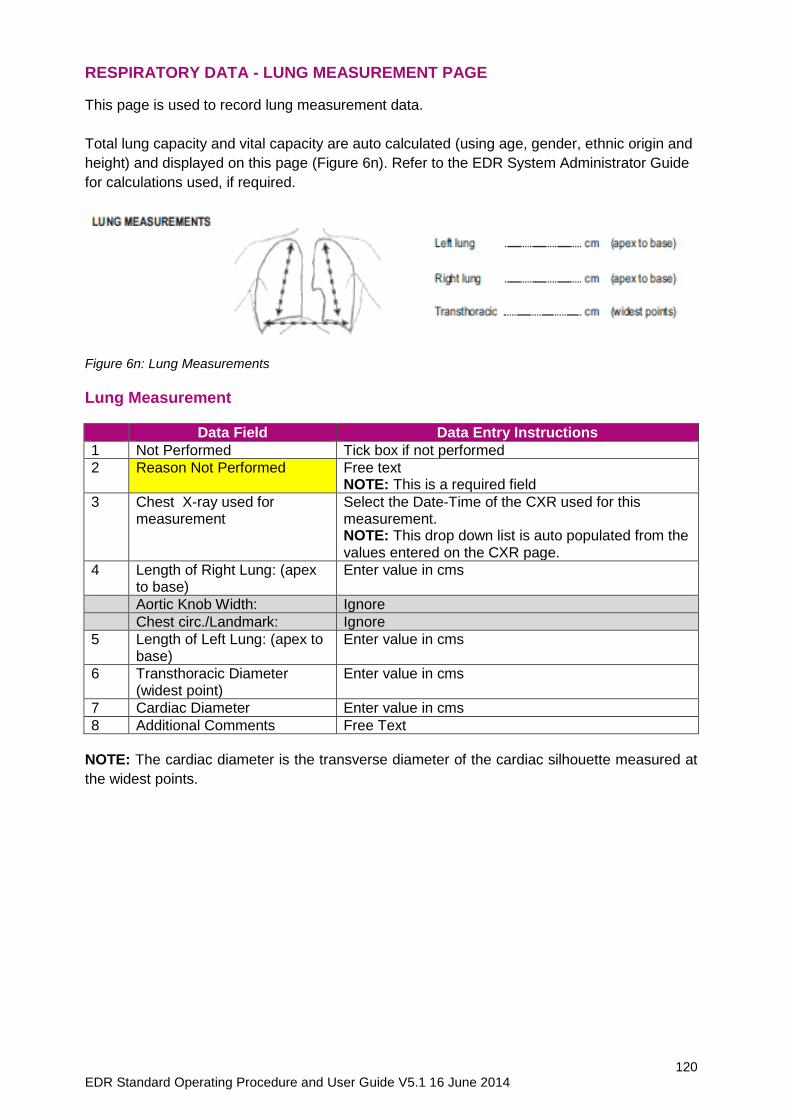
120 EDR Standard Operating Procedure and User Guide V5.1 16 June 2014
RESPIRATORY DATA - LUNG MEASUREMENT PAGE
This page is used to record lung measurement data.
Total lung capacity and vital capacity are auto calculated (using age, gender, ethnic origin and
height) and displayed on this page (Figure 6n). Refer to the EDR System Administrator Guide
for calculations used, if required.
Figure 6n: Lung Measurements
Lung Measurement
Data Field Data Entry Instructions
1 Not Performed Tick box if not performed
2 Reason Not Performed Free text NOTE: This is a required field
3 Chest X-ray used for measurement
Select the Date-Time of the CXR used for this measurement. NOTE: This drop down list is auto populated from the values entered on the CXR page.
4 Length of Right Lung: (apex to base)
Enter value in cms
Aortic Knob Width: Ignore
Chest circ./Landmark: Ignore
5 Length of Left Lung: (apex to base)
Enter value in cms
6 Transthoracic Diameter (widest point)
Enter value in cms
7 Cardiac Diameter Enter value in cms
8 Additional Comments Free Text
NOTE: The cardiac diameter is the transverse diameter of the cardiac silhouette measured at
the widest points.
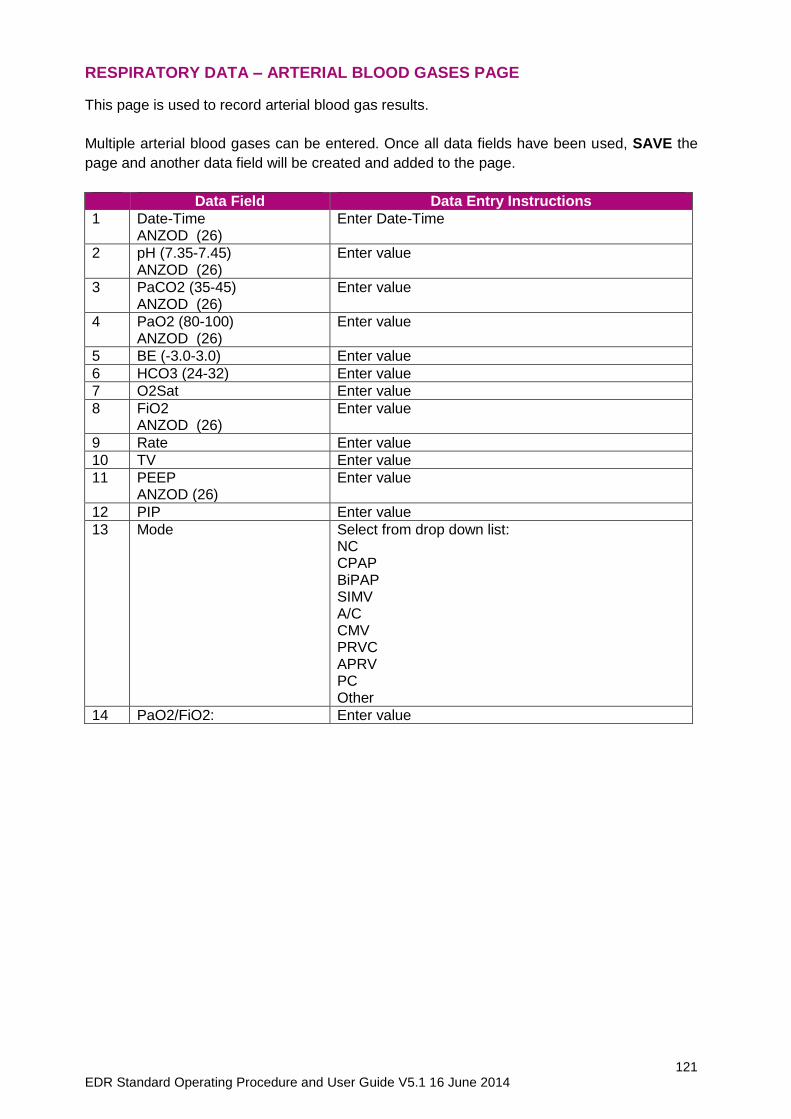
121 EDR Standard Operating Procedure and User Guide V5.1 16 June 2014
RESPIRATORY DATA – ARTERIAL BLOOD GASES PAGE
This page is used to record arterial blood gas results.
Multiple arterial blood gases can be entered. Once all data fields have been used, SAVE the
page and another data field will be created and added to the page.
Data Field Data Entry Instructions
1 Date-Time ANZOD (26)
Enter Date-Time
2 pH (7.35-7.45) ANZOD (26)
Enter value
3 PaCO2 (35-45) ANZOD (26)
Enter value
4 PaO2 (80-100) ANZOD (26)
Enter value
5 BE (-3.0-3.0) Enter value
6 HCO3 (24-32) Enter value
7 O2Sat Enter value
8 FiO2 ANZOD (26)
Enter value
9 Rate Enter value
10 TV Enter value
11 PEEP ANZOD (26)
Enter value
12 PIP Enter value
13 Mode Select from drop down list: NC CPAP BiPAP SIMV A/C CMV PRVC APRV PC Other
14 PaO2/FiO2: Enter value
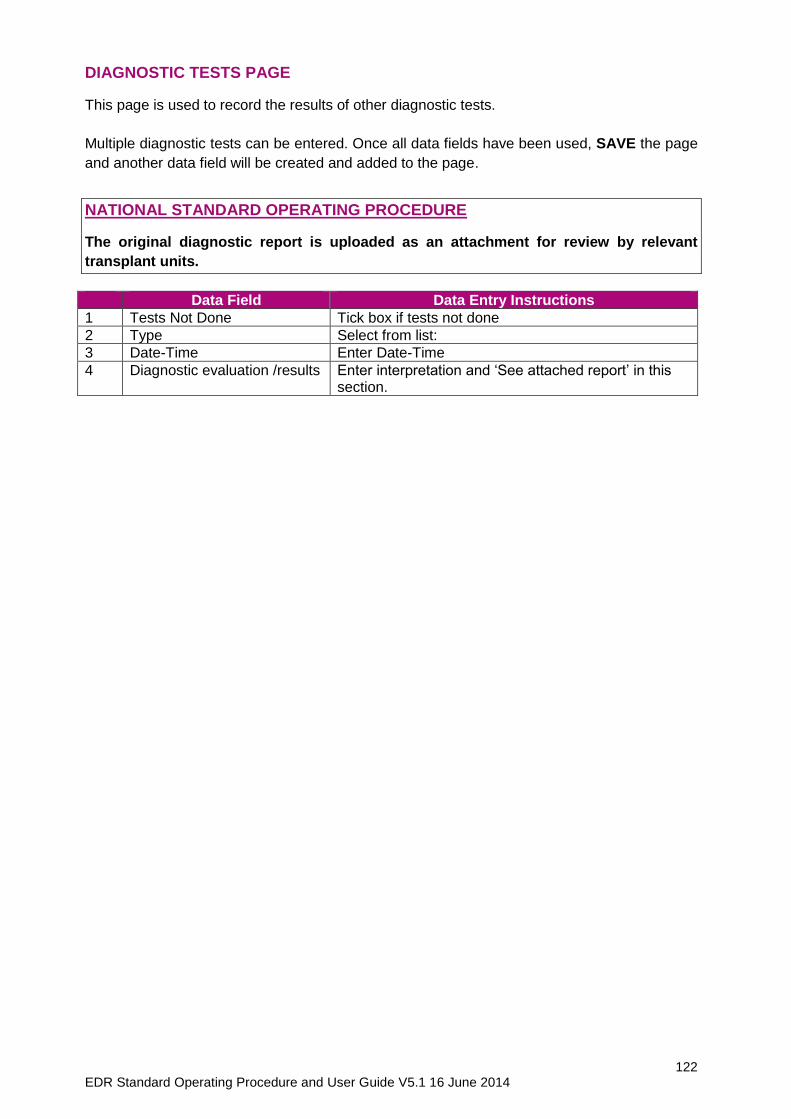
122 EDR Standard Operating Procedure and User Guide V5.1 16 June 2014
DIAGNOSTIC TESTS PAGE
This page is used to record the results of other diagnostic tests.
Multiple diagnostic tests can be entered. Once all data fields have been used, SAVE the page
and another data field will be created and added to the page.
NATIONAL STANDARD OPERATING PROCEDURE
The original diagnostic report is uploaded as an attachment for review by relevant
transplant units.
Data Field Data Entry Instructions
1 Tests Not Done Tick box if tests not done
2 Type Select from list:
3 Date-Time Enter Date-Time
4 Diagnostic evaluation /results Enter interpretation and ‘See attached report’ in this section.
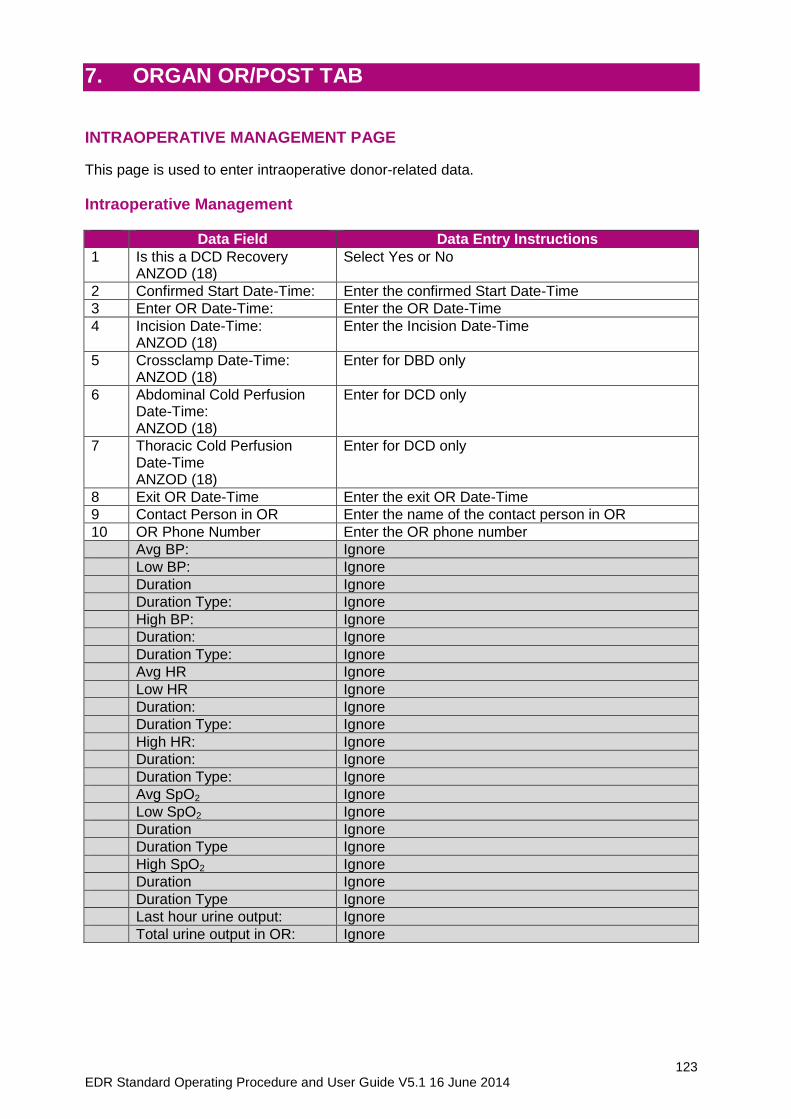
123 EDR Standard Operating Procedure and User Guide V5.1 16 June 2014
7. ORGAN OR/POST TAB INTRAOPERATIVE MANAGEMENT PAGE
This page is used to enter intraoperative donor-related data.
Intraoperative Management
Data Field Data Entry Instructions
1 Is this a DCD Recovery ANZOD (18)
Select Yes or No
2 Confirmed Start Date-Time: Enter the confirmed Start Date-Time
3 Enter OR Date-Time: Enter the OR Date-Time
4 Incision Date-Time: ANZOD (18)
Enter the Incision Date-Time
5 Crossclamp Date-Time: ANZOD (18)
Enter for DBD only
6 Abdominal Cold Perfusion Date-Time: ANZOD (18)
Enter for DCD only
7 Thoracic Cold Perfusion Date-Time ANZOD (18)
Enter for DCD only
8 Exit OR Date-Time Enter the exit OR Date-Time
9 Contact Person in OR Enter the name of the contact person in OR
10 OR Phone Number Enter the OR phone number
Avg BP: Ignore
Low BP: Ignore
Duration Ignore
Duration Type: Ignore
High BP: Ignore
Duration: Ignore
Duration Type: Ignore
Avg HR Ignore
Low HR Ignore
Duration: Ignore
Duration Type: Ignore
High HR: Ignore
Duration: Ignore
Duration Type: Ignore
Avg SpO2 Ignore
Low SpO2 Ignore
Duration Ignore
Duration Type Ignore
High SpO2 Ignore
Duration Ignore
Duration Type Ignore
Last hour urine output: Ignore
Total urine output in OR: Ignore
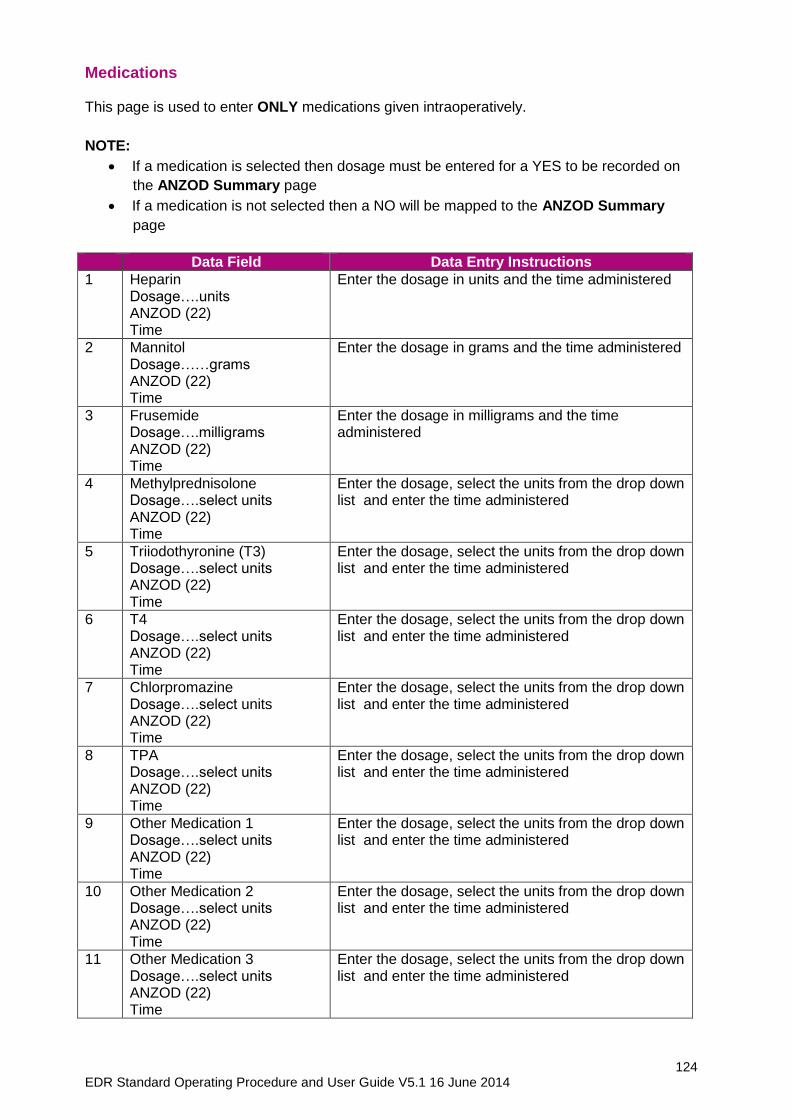
124 EDR Standard Operating Procedure and User Guide V5.1 16 June 2014
Medications This page is used to enter ONLY medications given intraoperatively.
NOTE:
If a medication is selected then dosage must be entered for a YES to be recorded on
the ANZOD Summary page
If a medication is not selected then a NO will be mapped to the ANZOD Summary
page
Data Field Data Entry Instructions
1 Heparin Dosage….units ANZOD (22) Time
Enter the dosage in units and the time administered
2 Mannitol Dosage……grams ANZOD (22) Time
Enter the dosage in grams and the time administered
3 Frusemide Dosage….milligrams ANZOD (22) Time
Enter the dosage in milligrams and the time administered
4 Methylprednisolone Dosage….select units ANZOD (22) Time
Enter the dosage, select the units from the drop down list and enter the time administered
5 Triiodothyronine (T3) Dosage….select units ANZOD (22) Time
Enter the dosage, select the units from the drop down list and enter the time administered
6 T4 Dosage….select units ANZOD (22) Time
Enter the dosage, select the units from the drop down list and enter the time administered
7 Chlorpromazine Dosage….select units ANZOD (22) Time
Enter the dosage, select the units from the drop down list and enter the time administered
8 TPA Dosage….select units ANZOD (22) Time
Enter the dosage, select the units from the drop down list and enter the time administered
9 Other Medication 1 Dosage….select units ANZOD (22) Time
Enter the dosage, select the units from the drop down list and enter the time administered
10 Other Medication 2 Dosage….select units ANZOD (22) Time
Enter the dosage, select the units from the drop down list and enter the time administered
11 Other Medication 3 Dosage….select units ANZOD (22) Time
Enter the dosage, select the units from the drop down list and enter the time administered
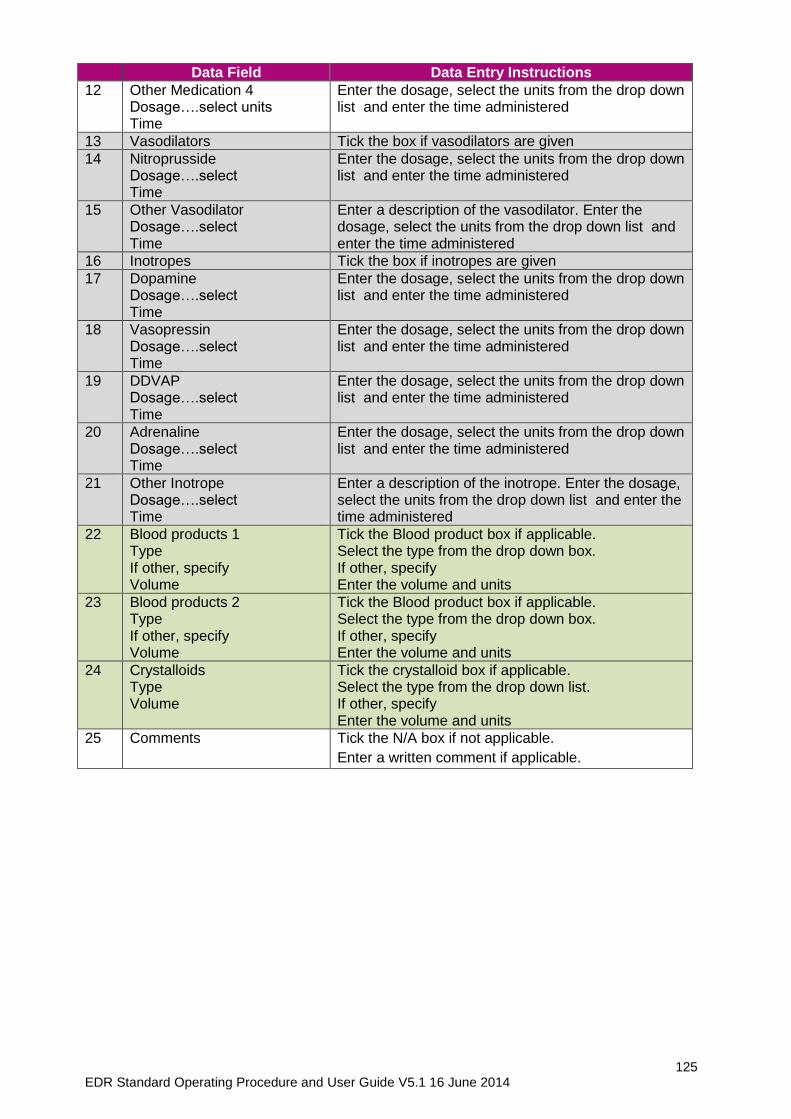
125 EDR Standard Operating Procedure and User Guide V5.1 16 June 2014
Data Field Data Entry Instructions
12 Other Medication 4 Dosage….select units Time
Enter the dosage, select the units from the drop down list and enter the time administered
13 Vasodilators Tick the box if vasodilators are given
14 Nitroprusside Dosage….select Time
Enter the dosage, select the units from the drop down list and enter the time administered
15 Other Vasodilator Dosage….select Time
Enter a description of the vasodilator. Enter the dosage, select the units from the drop down list and enter the time administered
16 Inotropes Tick the box if inotropes are given
17 Dopamine Dosage….select Time
Enter the dosage, select the units from the drop down list and enter the time administered
18 Vasopressin Dosage….select Time
Enter the dosage, select the units from the drop down list and enter the time administered
19 DDVAP Dosage….select Time
Enter the dosage, select the units from the drop down list and enter the time administered
20 Adrenaline Dosage….select Time
Enter the dosage, select the units from the drop down list and enter the time administered
21 Other Inotrope Dosage….select Time
Enter a description of the inotrope. Enter the dosage, select the units from the drop down list and enter the time administered
22 Blood products 1 Type If other, specify Volume
Tick the Blood product box if applicable. Select the type from the drop down box. If other, specify Enter the volume and units
23 Blood products 2 Type If other, specify Volume
Tick the Blood product box if applicable. Select the type from the drop down box. If other, specify Enter the volume and units
24 Crystalloids Type Volume
Tick the crystalloid box if applicable. Select the type from the drop down list. If other, specify Enter the volume and units
25 Comments Tick the N/A box if not applicable.
Enter a written comment if applicable.
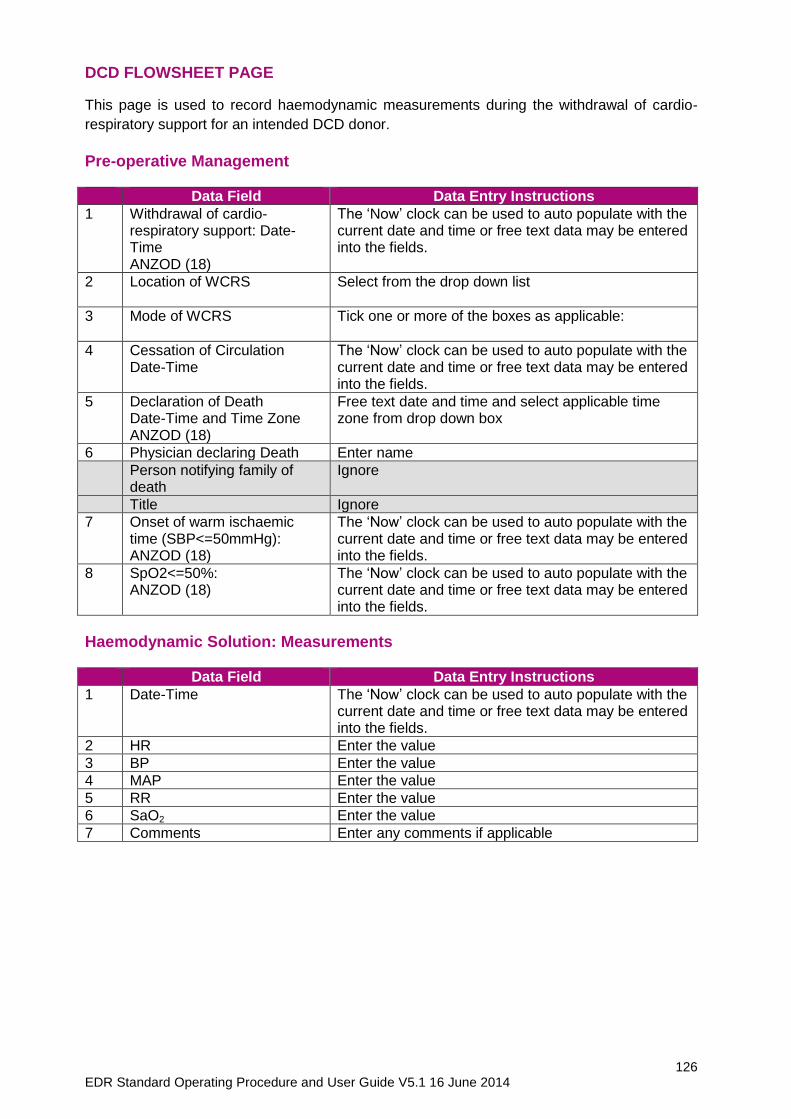
126 EDR Standard Operating Procedure and User Guide V5.1 16 June 2014
DCD FLOWSHEET PAGE
This page is used to record haemodynamic measurements during the withdrawal of cardio-
respiratory support for an intended DCD donor.
Pre-operative Management
Data Field Data Entry Instructions
1 Withdrawal of cardio-respiratory support: Date-Time ANZOD (18)
The ‘Now’ clock can be used to auto populate with the current date and time or free text data may be entered into the fields.
2 Location of WCRS Select from the drop down list
3 Mode of WCRS Tick one or more of the boxes as applicable:
4 Cessation of Circulation Date-Time
The ‘Now’ clock can be used to auto populate with the current date and time or free text data may be entered into the fields.
5 Declaration of Death Date-Time and Time Zone ANZOD (18)
Free text date and time and select applicable time zone from drop down box
6 Physician declaring Death Enter name
Person notifying family of death
Ignore
Title Ignore
7 Onset of warm ischaemic time (SBP<=50mmHg): ANZOD (18)
The ‘Now’ clock can be used to auto populate with the current date and time or free text data may be entered into the fields.
8 SpO2<=50%: ANZOD (18)
The ‘Now’ clock can be used to auto populate with the current date and time or free text data may be entered into the fields.
Haemodynamic Solution: Measurements
Data Field Data Entry Instructions
1 Date-Time The ‘Now’ clock can be used to auto populate with the current date and time or free text data may be entered into the fields.
2 HR Enter the value
3 BP Enter the value
4 MAP Enter the value
5 RR Enter the value
6 SaO2 Enter the value
7 Comments Enter any comments if applicable
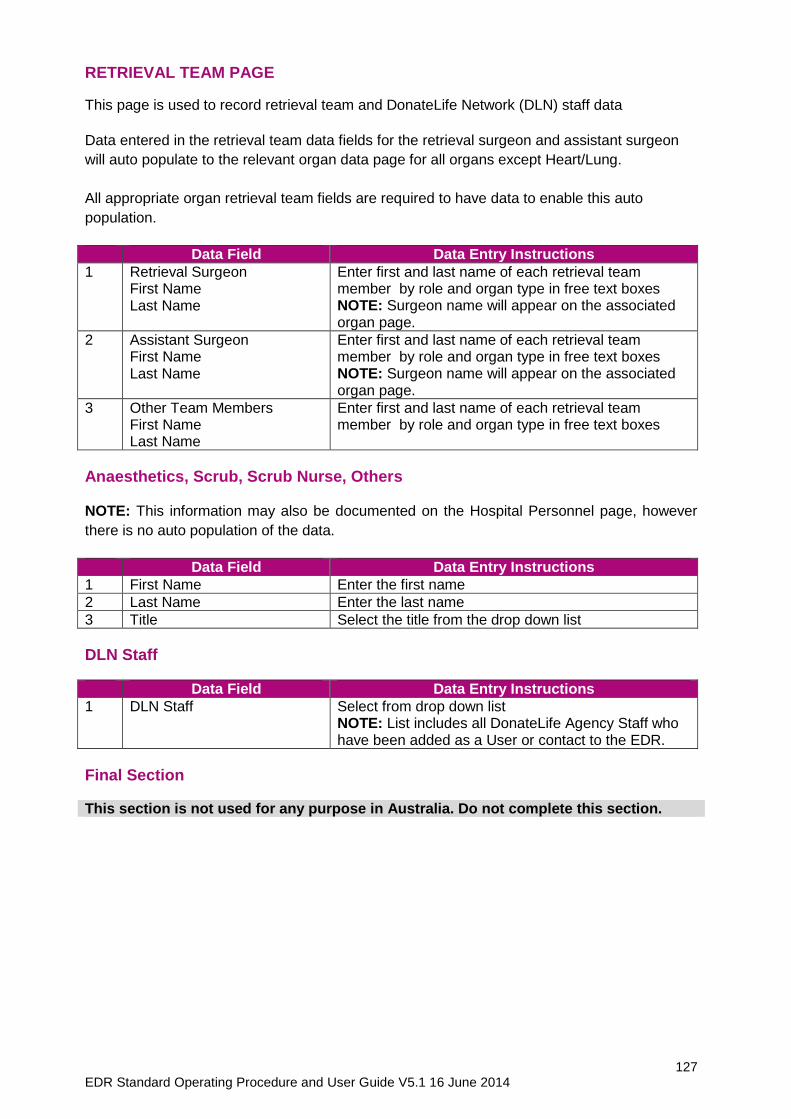
127 EDR Standard Operating Procedure and User Guide V5.1 16 June 2014
RETRIEVAL TEAM PAGE
This page is used to record retrieval team and DonateLife Network (DLN) staff data
Data entered in the retrieval team data fields for the retrieval surgeon and assistant surgeon
will auto populate to the relevant organ data page for all organs except Heart/Lung.
All appropriate organ retrieval team fields are required to have data to enable this auto
population.
Data Field Data Entry Instructions
1 Retrieval Surgeon First Name Last Name
Enter first and last name of each retrieval team member by role and organ type in free text boxes NOTE: Surgeon name will appear on the associated organ page.
2 Assistant Surgeon First Name Last Name
Enter first and last name of each retrieval team member by role and organ type in free text boxes NOTE: Surgeon name will appear on the associated organ page.
3 Other Team Members First Name Last Name
Enter first and last name of each retrieval team member by role and organ type in free text boxes
Anaesthetics, Scrub, Scrub Nurse, Others NOTE: This information may also be documented on the Hospital Personnel page, however
there is no auto population of the data.
Data Field Data Entry Instructions
1 First Name Enter the first name
2 Last Name Enter the last name
3 Title Select the title from the drop down list
DLN Staff
Data Field Data Entry Instructions
1 DLN Staff
Select from drop down list NOTE: List includes all DonateLife Agency Staff who have been added as a User or contact to the EDR.
Final Section
This section is not used for any purpose in Australia. Do not complete this section.
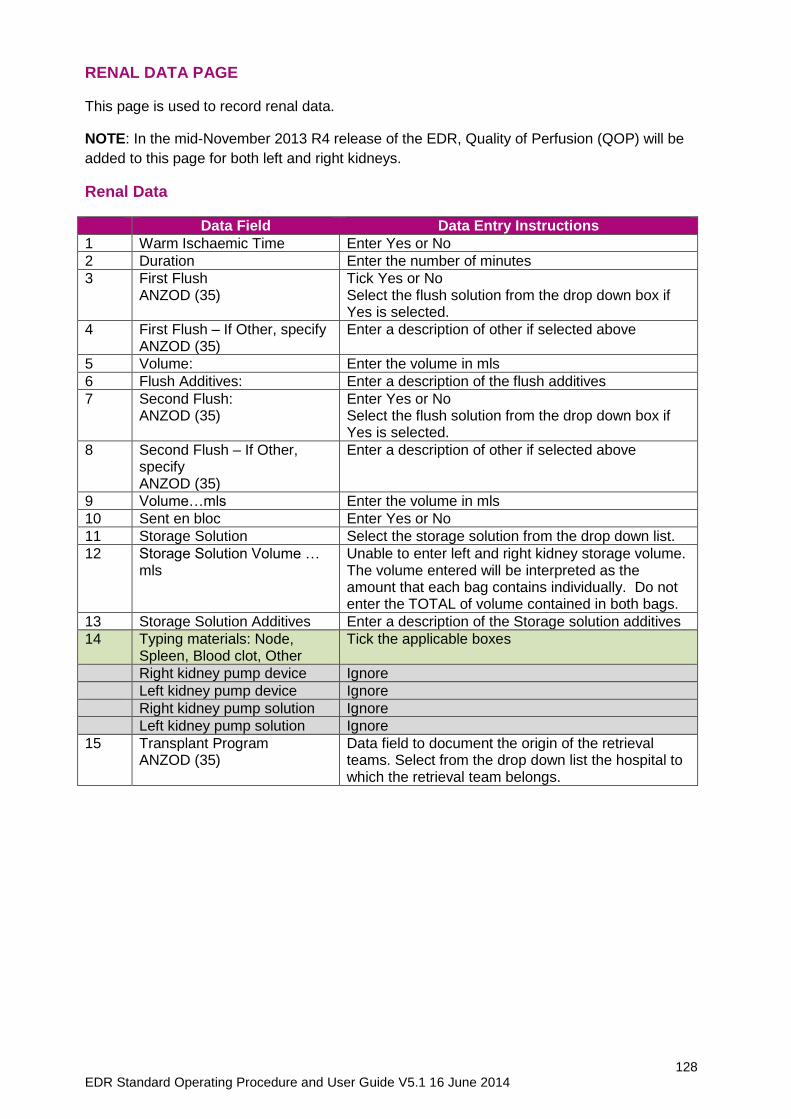
128 EDR Standard Operating Procedure and User Guide V5.1 16 June 2014
RENAL DATA PAGE
This page is used to record renal data.
NOTE: In the mid-November 2013 R4 release of the EDR, Quality of Perfusion (QOP) will be
added to this page for both left and right kidneys.
Renal Data
Data Field Data Entry Instructions
1 Warm Ischaemic Time Enter Yes or No
2 Duration Enter the number of minutes
3 First Flush ANZOD (35)
Tick Yes or No Select the flush solution from the drop down box if Yes is selected.
4 First Flush – If Other, specify ANZOD (35)
Enter a description of other if selected above
5 Volume: Enter the volume in mls
6 Flush Additives: Enter a description of the flush additives
7 Second Flush: ANZOD (35)
Enter Yes or No Select the flush solution from the drop down box if Yes is selected.
8 Second Flush – If Other, specify ANZOD (35)
Enter a description of other if selected above
9 Volume…mls Enter the volume in mls
10 Sent en bloc Enter Yes or No
11 Storage Solution Select the storage solution from the drop down list.
12 Storage Solution Volume … mls
Unable to enter left and right kidney storage volume. The volume entered will be interpreted as the amount that each bag contains individually. Do not enter the TOTAL of volume contained in both bags.
13 Storage Solution Additives Enter a description of the Storage solution additives
14 Typing materials: Node, Spleen, Blood clot, Other
Tick the applicable boxes
Right kidney pump device Ignore
Left kidney pump device Ignore
Right kidney pump solution Ignore
Left kidney pump solution Ignore
15 Transplant Program ANZOD (35)
Data field to document the origin of the retrieval teams. Select from the drop down list the hospital to which the retrieval team belongs.
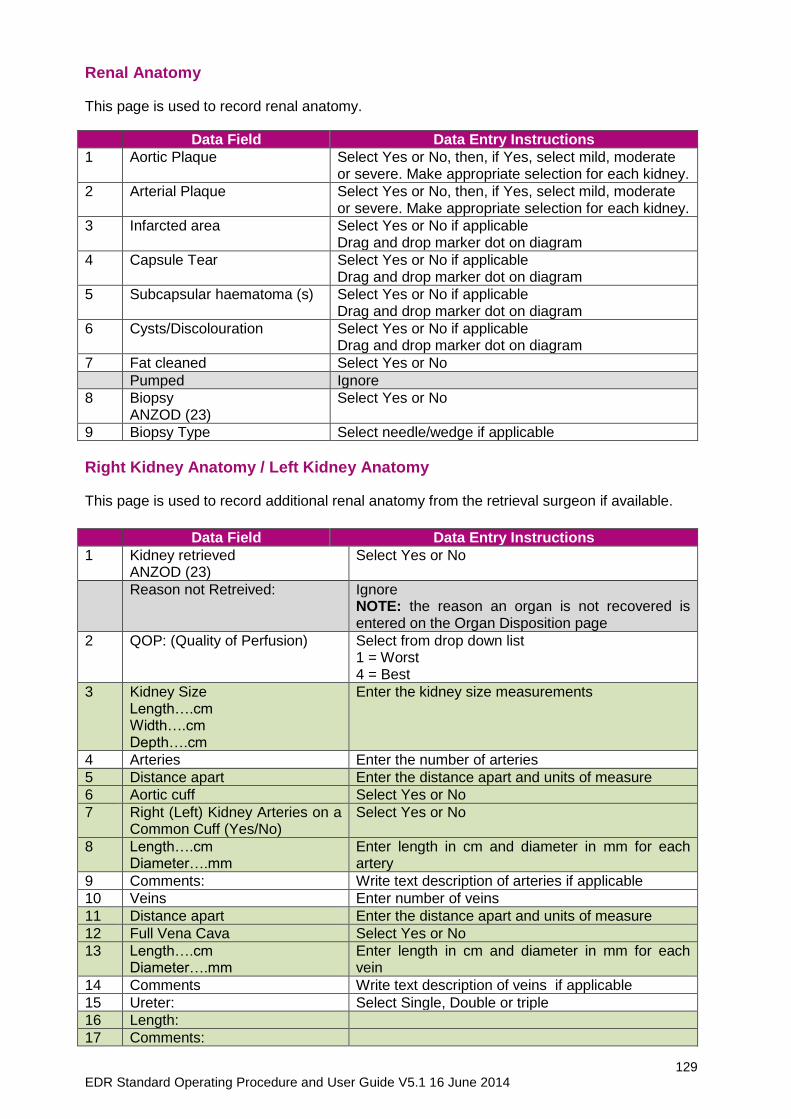
129 EDR Standard Operating Procedure and User Guide V5.1 16 June 2014
Renal Anatomy
This page is used to record renal anatomy.
Data Field Data Entry Instructions
1 Aortic Plaque Select Yes or No, then, if Yes, select mild, moderate or severe. Make appropriate selection for each kidney.
2 Arterial Plaque Select Yes or No, then, if Yes, select mild, moderate or severe. Make appropriate selection for each kidney.
3 Infarcted area Select Yes or No if applicable Drag and drop marker dot on diagram
4 Capsule Tear Select Yes or No if applicable Drag and drop marker dot on diagram
5 Subcapsular haematoma (s) Select Yes or No if applicable Drag and drop marker dot on diagram
6 Cysts/Discolouration Select Yes or No if applicable Drag and drop marker dot on diagram
7 Fat cleaned Select Yes or No
Pumped Ignore
8 Biopsy ANZOD (23)
Select Yes or No
9 Biopsy Type Select needle/wedge if applicable
Right Kidney Anatomy / Left Kidney Anatomy
This page is used to record additional renal anatomy from the retrieval surgeon if available.
Data Field Data Entry Instructions
1 Kidney retrieved ANZOD (23)
Select Yes or No
Reason not Retreived: Ignore NOTE: the reason an organ is not recovered is entered on the Organ Disposition page
2 QOP: (Quality of Perfusion) Select from drop down list 1 = Worst 4 = Best
3 Kidney Size Length….cm Width….cm Depth….cm
Enter the kidney size measurements
4 Arteries Enter the number of arteries
5 Distance apart Enter the distance apart and units of measure
6 Aortic cuff Select Yes or No
7 Right (Left) Kidney Arteries on a Common Cuff (Yes/No)
Select Yes or No
8 Length….cm Diameter….mm
Enter length in cm and diameter in mm for each artery
9 Comments: Write text description of arteries if applicable
10 Veins Enter number of veins
11 Distance apart Enter the distance apart and units of measure
12 Full Vena Cava Select Yes or No
13 Length….cm Diameter….mm
Enter length in cm and diameter in mm for each vein
14 Comments Write text description of veins if applicable
15 Ureter: Select Single, Double or triple
16 Length:
17 Comments:
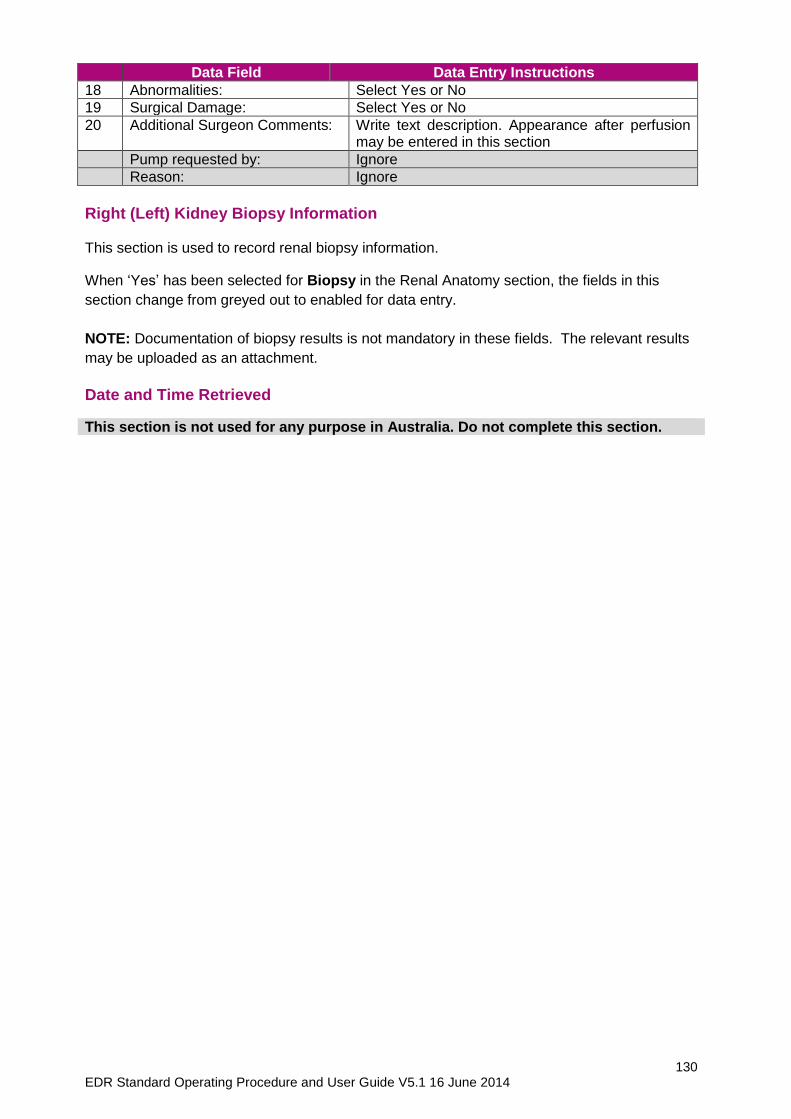
130 EDR Standard Operating Procedure and User Guide V5.1 16 June 2014
Data Field Data Entry Instructions
18 Abnormalities: Select Yes or No
19 Surgical Damage: Select Yes or No
20 Additional Surgeon Comments: Write text description. Appearance after perfusion may be entered in this section
Pump requested by: Ignore
Reason: Ignore
Right (Left) Kidney Biopsy Information This section is used to record renal biopsy information.
When ‘Yes’ has been selected for Biopsy in the Renal Anatomy section, the fields in this
section change from greyed out to enabled for data entry.
NOTE: Documentation of biopsy results is not mandatory in these fields. The relevant results
may be uploaded as an attachment.
Date and Time Retrieved
This section is not used for any purpose in Australia. Do not complete this section.
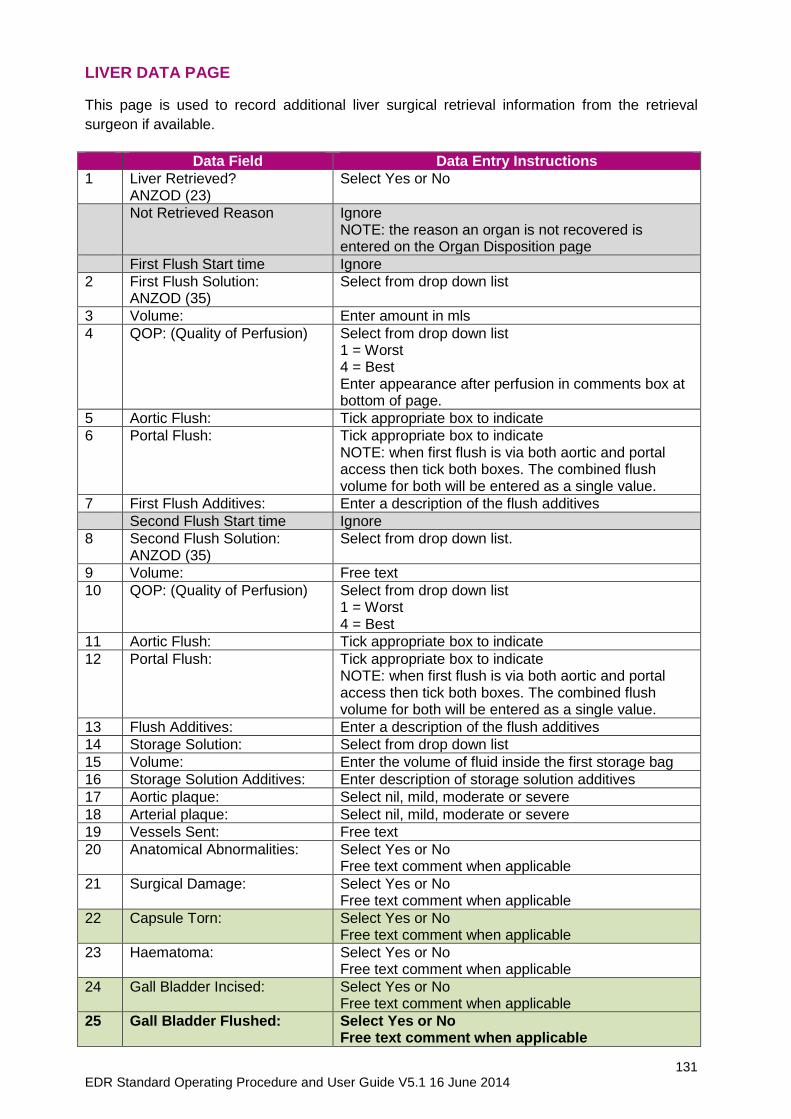
131 EDR Standard Operating Procedure and User Guide V5.1 16 June 2014
LIVER DATA PAGE
This page is used to record additional liver surgical retrieval information from the retrieval
surgeon if available.
Data Field Data Entry Instructions
1 Liver Retrieved? ANZOD (23)
Select Yes or No
Not Retrieved Reason Ignore NOTE: the reason an organ is not recovered is entered on the Organ Disposition page
First Flush Start time Ignore
2 First Flush Solution: ANZOD (35)
Select from drop down list
3 Volume: Enter amount in mls
4 QOP: (Quality of Perfusion) Select from drop down list 1 = Worst 4 = Best Enter appearance after perfusion in comments box at bottom of page.
5 Aortic Flush: Tick appropriate box to indicate
6 Portal Flush: Tick appropriate box to indicate NOTE: when first flush is via both aortic and portal access then tick both boxes. The combined flush volume for both will be entered as a single value.
7 First Flush Additives: Enter a description of the flush additives
Second Flush Start time Ignore
8 Second Flush Solution: ANZOD (35)
Select from drop down list.
9 Volume: Free text
10 QOP: (Quality of Perfusion) Select from drop down list 1 = Worst 4 = Best
11 Aortic Flush: Tick appropriate box to indicate
12 Portal Flush: Tick appropriate box to indicate NOTE: when first flush is via both aortic and portal access then tick both boxes. The combined flush volume for both will be entered as a single value.
13 Flush Additives: Enter a description of the flush additives
14 Storage Solution: Select from drop down list
15 Volume: Enter the volume of fluid inside the first storage bag
16 Storage Solution Additives: Enter description of storage solution additives
17 Aortic plaque: Select nil, mild, moderate or severe
18 Arterial plaque: Select nil, mild, moderate or severe
19 Vessels Sent: Free text
20 Anatomical Abnormalities: Select Yes or No Free text comment when applicable
21 Surgical Damage: Select Yes or No Free text comment when applicable
22 Capsule Torn: Select Yes or No Free text comment when applicable
23 Haematoma: Select Yes or No Free text comment when applicable
24 Gall Bladder Incised: Select Yes or No Free text comment when applicable
25 Gall Bladder Flushed: Select Yes or No Free text comment when applicable
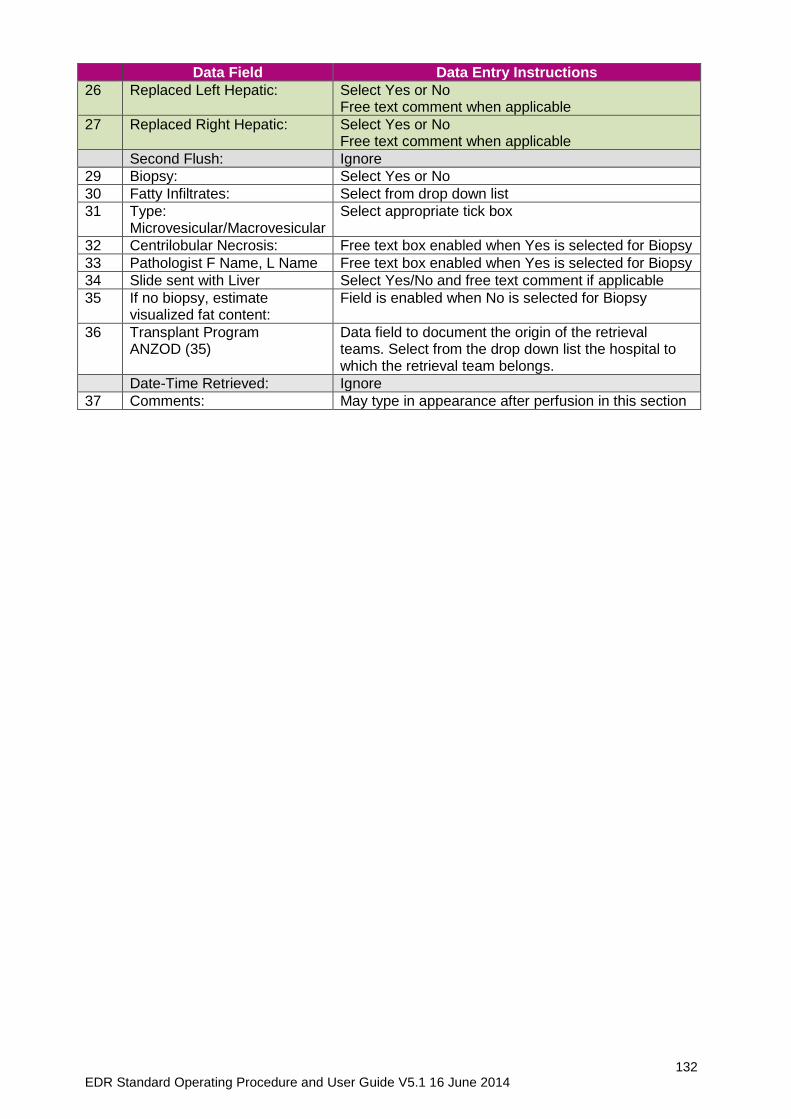
132 EDR Standard Operating Procedure and User Guide V5.1 16 June 2014
Data Field Data Entry Instructions
26 Replaced Left Hepatic: Select Yes or No Free text comment when applicable
27 Replaced Right Hepatic: Select Yes or No Free text comment when applicable
Second Flush: Ignore
29 Biopsy: Select Yes or No
30 Fatty Infiltrates: Select from drop down list
31 Type: Microvesicular/Macrovesicular
Select appropriate tick box
32 Centrilobular Necrosis: Free text box enabled when Yes is selected for Biopsy
33 Pathologist F Name, L Name Free text box enabled when Yes is selected for Biopsy
34 Slide sent with Liver Select Yes/No and free text comment if applicable
35 If no biopsy, estimate visualized fat content:
Field is enabled when No is selected for Biopsy
36 Transplant Program ANZOD (35)
Data field to document the origin of the retrieval teams. Select from the drop down list the hospital to which the retrieval team belongs.
Date-Time Retrieved: Ignore
37 Comments: May type in appearance after perfusion in this section
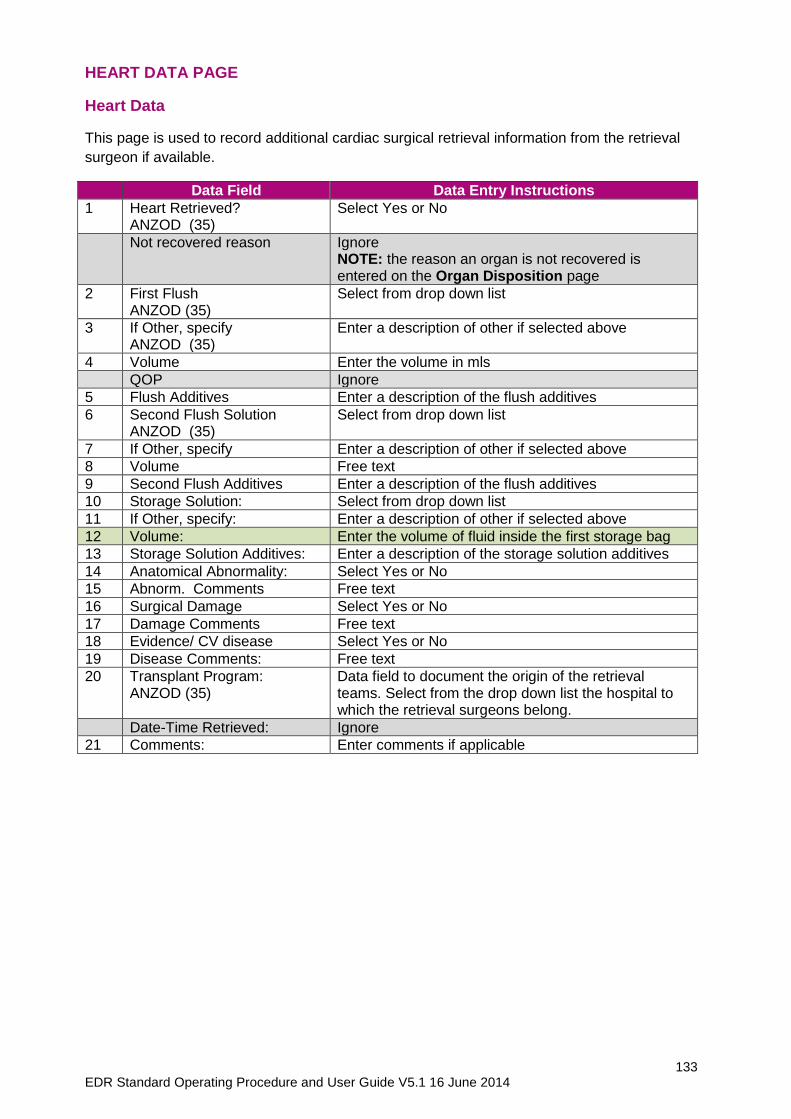
133 EDR Standard Operating Procedure and User Guide V5.1 16 June 2014
HEART DATA PAGE
Heart Data
This page is used to record additional cardiac surgical retrieval information from the retrieval
surgeon if available.
Data Field Data Entry Instructions
1 Heart Retrieved? ANZOD (35)
Select Yes or No
Not recovered reason Ignore NOTE: the reason an organ is not recovered is entered on the Organ Disposition page
2 First Flush ANZOD (35)
Select from drop down list
3 If Other, specify ANZOD (35)
Enter a description of other if selected above
4 Volume Enter the volume in mls
QOP Ignore
5 Flush Additives Enter a description of the flush additives
6 Second Flush Solution ANZOD (35)
Select from drop down list
7 If Other, specify Enter a description of other if selected above
8 Volume Free text
9 Second Flush Additives Enter a description of the flush additives
10 Storage Solution: Select from drop down list
11 If Other, specify: Enter a description of other if selected above
12 Volume: Enter the volume of fluid inside the first storage bag
13 Storage Solution Additives: Enter a description of the storage solution additives
14 Anatomical Abnormality: Select Yes or No
15 Abnorm. Comments Free text
16 Surgical Damage Select Yes or No
17 Damage Comments Free text
18 Evidence/ CV disease Select Yes or No
19 Disease Comments: Free text
20 Transplant Program: ANZOD (35)
Data field to document the origin of the retrieval teams. Select from the drop down list the hospital to which the retrieval surgeons belong.
Date-Time Retrieved: Ignore
21 Comments: Enter comments if applicable
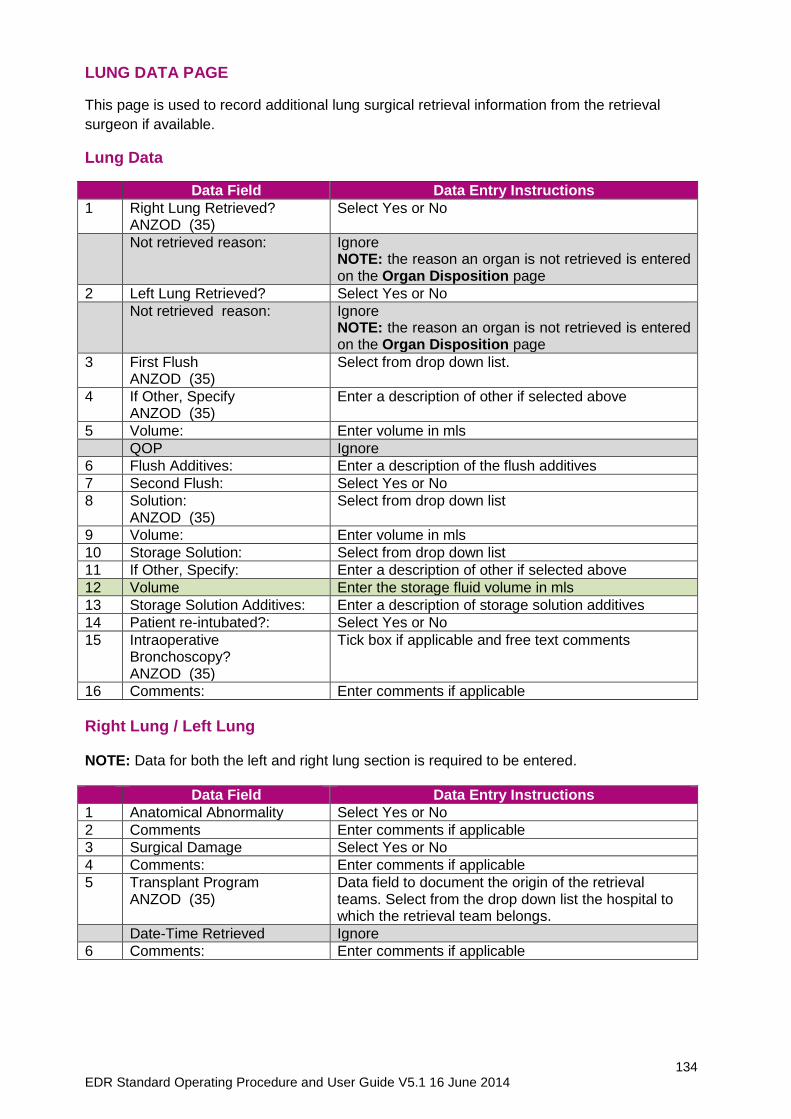
134 EDR Standard Operating Procedure and User Guide V5.1 16 June 2014
LUNG DATA PAGE
This page is used to record additional lung surgical retrieval information from the retrieval
surgeon if available.
Lung Data
Data Field Data Entry Instructions
1 Right Lung Retrieved? ANZOD (35)
Select Yes or No
Not retrieved reason: Ignore NOTE: the reason an organ is not retrieved is entered on the Organ Disposition page
2 Left Lung Retrieved? Select Yes or No
Not retrieved reason: Ignore NOTE: the reason an organ is not retrieved is entered on the Organ Disposition page
3 First Flush ANZOD (35)
Select from drop down list.
4 If Other, Specify ANZOD (35)
Enter a description of other if selected above
5 Volume: Enter volume in mls
QOP Ignore
6 Flush Additives: Enter a description of the flush additives
7 Second Flush: Select Yes or No
8 Solution: ANZOD (35)
Select from drop down list
9 Volume: Enter volume in mls
10 Storage Solution: Select from drop down list
11 If Other, Specify: Enter a description of other if selected above
12 Volume Enter the storage fluid volume in mls
13 Storage Solution Additives: Enter a description of storage solution additives
14 Patient re-intubated?: Select Yes or No
15 Intraoperative Bronchoscopy? ANZOD (35)
Tick box if applicable and free text comments
16 Comments: Enter comments if applicable
Right Lung / Left Lung NOTE: Data for both the left and right lung section is required to be entered.
Data Field Data Entry Instructions
1 Anatomical Abnormality Select Yes or No
2 Comments Enter comments if applicable
3 Surgical Damage Select Yes or No
4 Comments: Enter comments if applicable
5 Transplant Program ANZOD (35)
Data field to document the origin of the retrieval teams. Select from the drop down list the hospital to which the retrieval team belongs.
Date-Time Retrieved Ignore
6 Comments: Enter comments if applicable
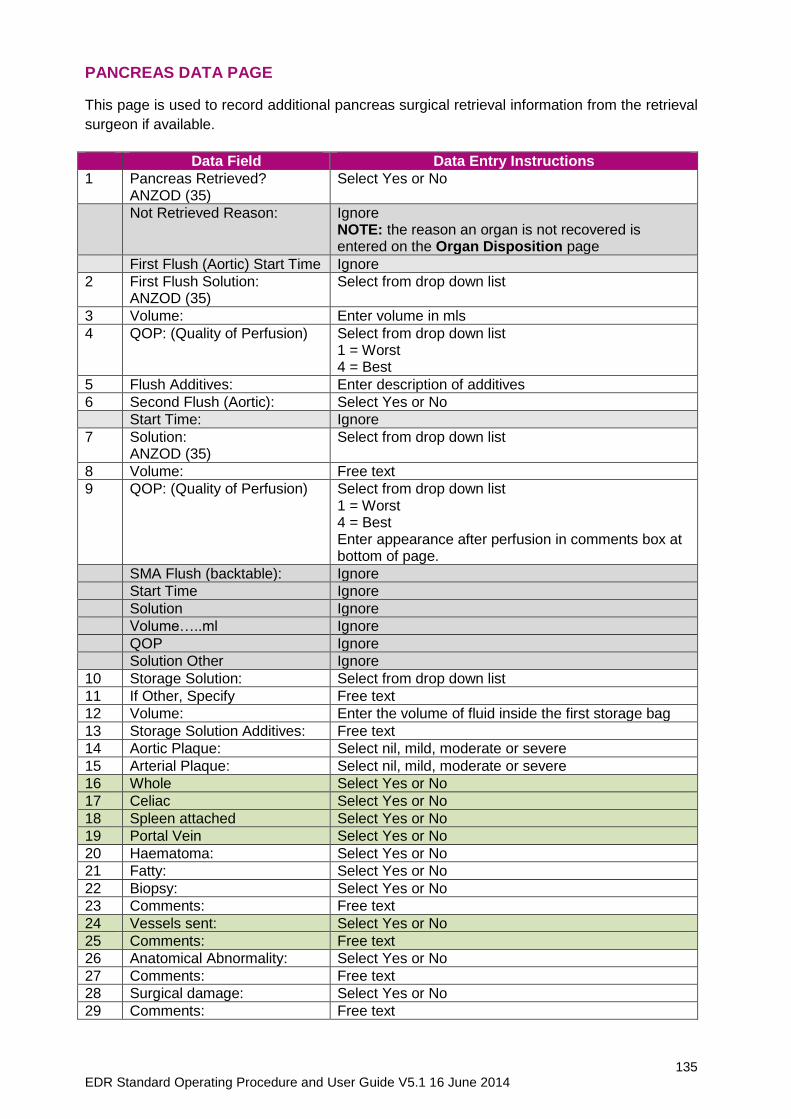
135 EDR Standard Operating Procedure and User Guide V5.1 16 June 2014
PANCREAS DATA PAGE
This page is used to record additional pancreas surgical retrieval information from the retrieval
surgeon if available.
Data Field Data Entry Instructions
1 Pancreas Retrieved? ANZOD (35)
Select Yes or No
Not Retrieved Reason: Ignore NOTE: the reason an organ is not recovered is entered on the Organ Disposition page
First Flush (Aortic) Start Time Ignore
2 First Flush Solution: ANZOD (35)
Select from drop down list
3 Volume: Enter volume in mls
4 QOP: (Quality of Perfusion) Select from drop down list 1 = Worst 4 = Best
5 Flush Additives: Enter description of additives
6 Second Flush (Aortic): Select Yes or No
Start Time: Ignore
7 Solution: ANZOD (35)
Select from drop down list
8 Volume: Free text
9 QOP: (Quality of Perfusion) Select from drop down list 1 = Worst 4 = Best Enter appearance after perfusion in comments box at bottom of page.
SMA Flush (backtable): Ignore
Start Time Ignore
Solution Ignore
Volume…..ml Ignore
QOP Ignore
Solution Other Ignore
10 Storage Solution: Select from drop down list
11 If Other, Specify Free text
12 Volume: Enter the volume of fluid inside the first storage bag
13 Storage Solution Additives: Free text
14 Aortic Plaque: Select nil, mild, moderate or severe
15 Arterial Plaque: Select nil, mild, moderate or severe
16 Whole Select Yes or No
17 Celiac Select Yes or No
18 Spleen attached Select Yes or No
19 Portal Vein Select Yes or No
20 Haematoma: Select Yes or No
21 Fatty: Select Yes or No
22 Biopsy: Select Yes or No
23 Comments: Free text
24 Vessels sent: Select Yes or No
25 Comments: Free text
26 Anatomical Abnormality: Select Yes or No
27 Comments: Free text
28 Surgical damage: Select Yes or No
29 Comments: Free text
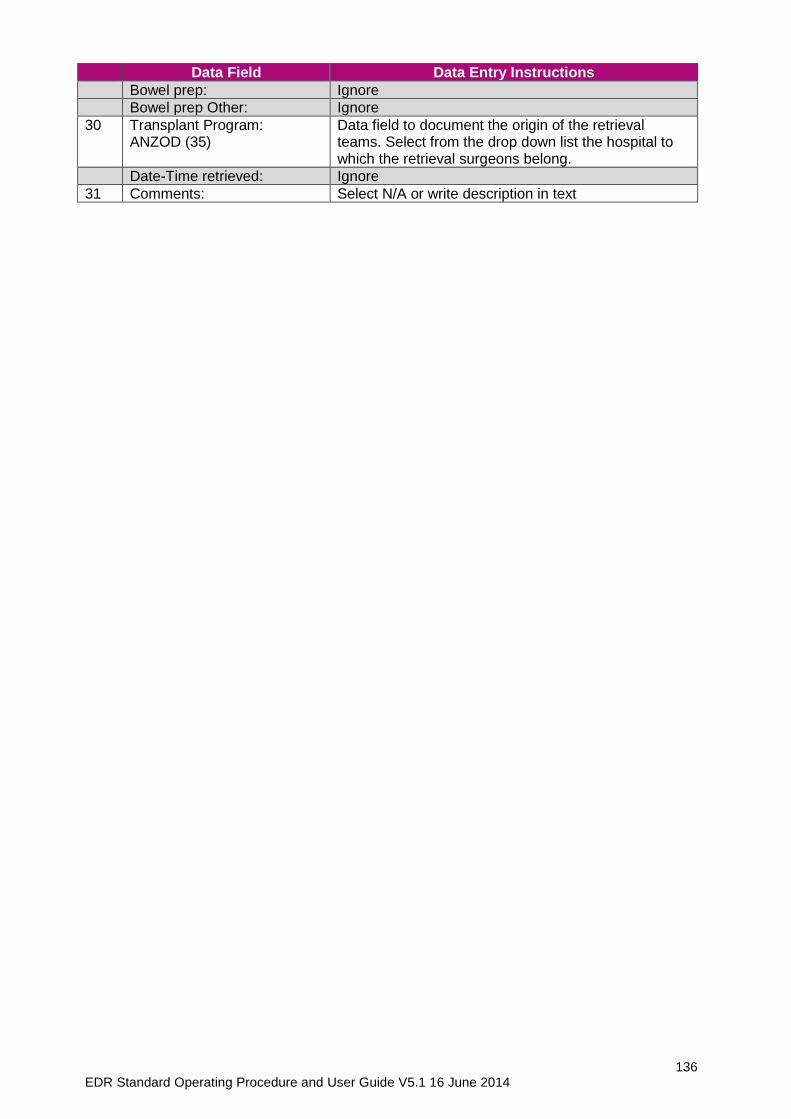
136 EDR Standard Operating Procedure and User Guide V5.1 16 June 2014
Data Field Data Entry Instructions
Bowel prep: Ignore
Bowel prep Other: Ignore
30 Transplant Program: ANZOD (35)
Data field to document the origin of the retrieval teams. Select from the drop down list the hospital to which the retrieval surgeons belong.
Date-Time retrieved: Ignore
31 Comments: Select N/A or write description in text
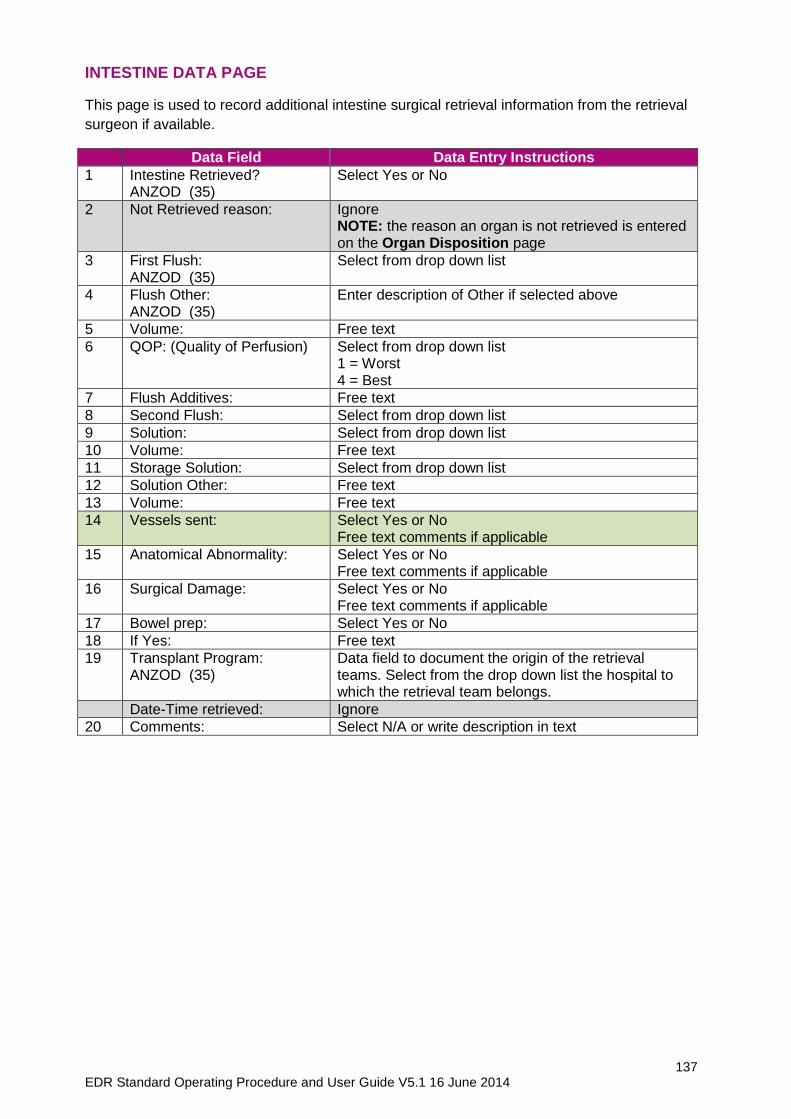
137 EDR Standard Operating Procedure and User Guide V5.1 16 June 2014
INTESTINE DATA PAGE
This page is used to record additional intestine surgical retrieval information from the retrieval
surgeon if available.
Data Field Data Entry Instructions
1 Intestine Retrieved? ANZOD (35)
Select Yes or No
2 Not Retrieved reason: Ignore NOTE: the reason an organ is not retrieved is entered on the Organ Disposition page
3 First Flush: ANZOD (35)
Select from drop down list
4 Flush Other: ANZOD (35)
Enter description of Other if selected above
5 Volume: Free text
6 QOP: (Quality of Perfusion) Select from drop down list 1 = Worst 4 = Best
7 Flush Additives: Free text
8 Second Flush: Select from drop down list
9 Solution: Select from drop down list
10 Volume: Free text
11 Storage Solution: Select from drop down list
12 Solution Other: Free text
13 Volume: Free text
14 Vessels sent: Select Yes or No Free text comments if applicable
15 Anatomical Abnormality: Select Yes or No Free text comments if applicable
16 Surgical Damage: Select Yes or No Free text comments if applicable
17 Bowel prep: Select Yes or No
18 If Yes: Free text
19 Transplant Program: ANZOD (35)
Data field to document the origin of the retrieval teams. Select from the drop down list the hospital to which the retrieval team belongs.
Date-Time retrieved: Ignore
20 Comments: Select N/A or write description in text
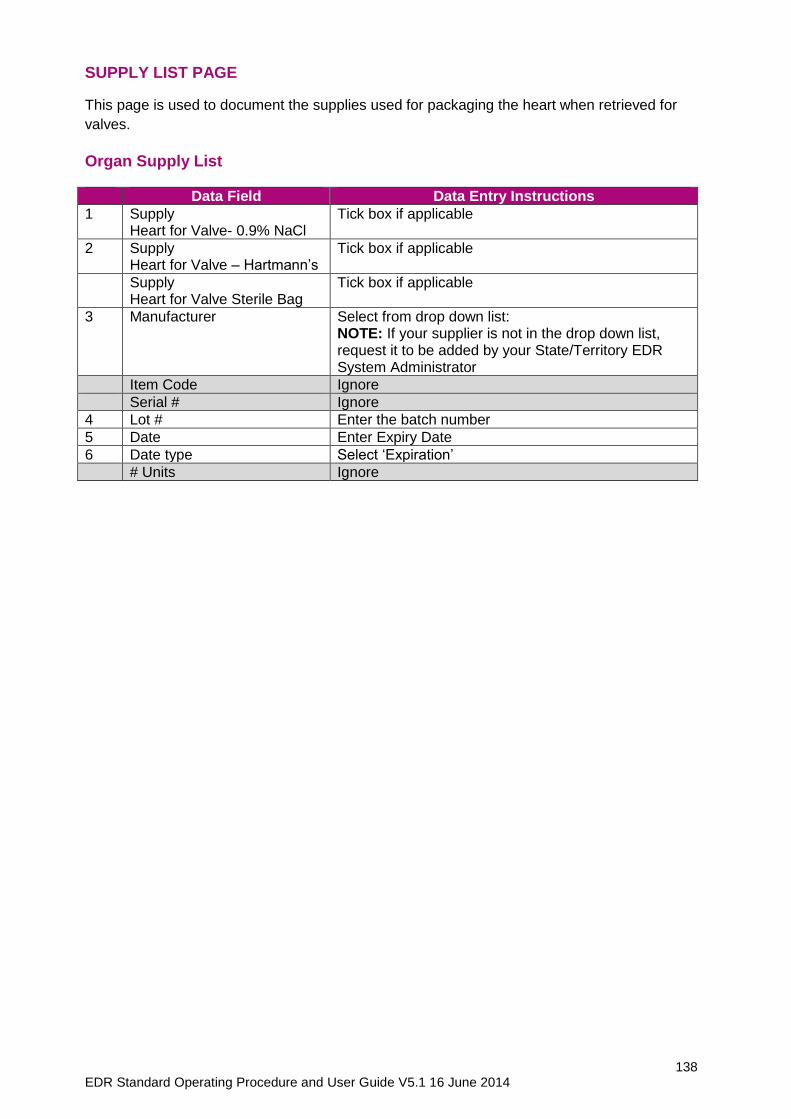
138 EDR Standard Operating Procedure and User Guide V5.1 16 June 2014
SUPPLY LIST PAGE
This page is used to document the supplies used for packaging the heart when retrieved for
valves.
Organ Supply List
Data Field Data Entry Instructions
1 Supply Heart for Valve- 0.9% NaCl
Tick box if applicable
2 Supply Heart for Valve – Hartmann’s
Tick box if applicable
Supply Heart for Valve Sterile Bag
Tick box if applicable
3 Manufacturer Select from drop down list: NOTE: If your supplier is not in the drop down list, request it to be added by your State/Territory EDR System Administrator
Item Code Ignore
Serial # Ignore
4 Lot # Enter the batch number
5 Date Enter Expiry Date
6 Date type Select ‘Expiration’
# Units Ignore
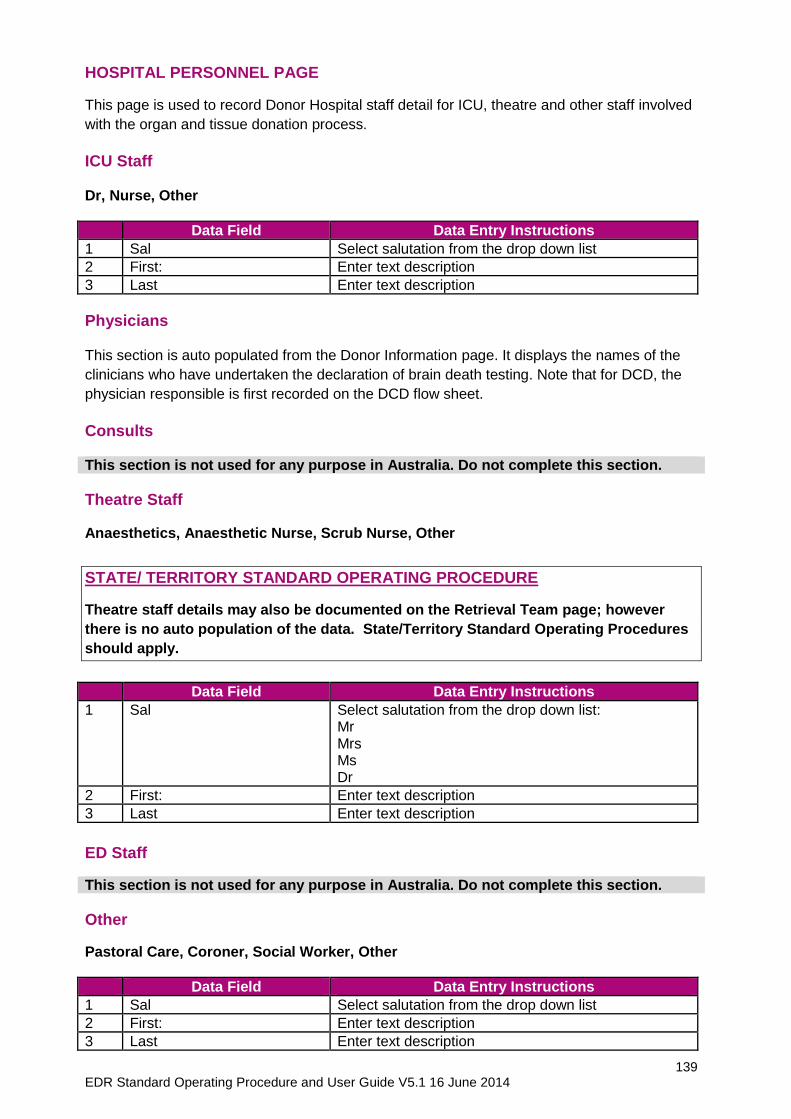
139 EDR Standard Operating Procedure and User Guide V5.1 16 June 2014
HOSPITAL PERSONNEL PAGE
This page is used to record Donor Hospital staff detail for ICU, theatre and other staff involved
with the organ and tissue donation process.
ICU Staff Dr, Nurse, Other
Data Field Data Entry Instructions
1 Sal Select salutation from the drop down list
2 First: Enter text description
3 Last Enter text description
Physicians This section is auto populated from the Donor Information page. It displays the names of the
clinicians who have undertaken the declaration of brain death testing. Note that for DCD, the
physician responsible is first recorded on the DCD flow sheet.
Consults This section is not used for any purpose in Australia. Do not complete this section.
Theatre Staff
Anaesthetics, Anaesthetic Nurse, Scrub Nurse, Other
STATE/ TERRITORY STANDARD OPERATING PROCEDURE
Theatre staff details may also be documented on the Retrieval Team page; however
there is no auto population of the data. State/Territory Standard Operating Procedures
should apply.
Data Field Data Entry Instructions
1 Sal Select salutation from the drop down list: Mr Mrs Ms Dr
2 First: Enter text description
3 Last Enter text description
ED Staff
This section is not used for any purpose in Australia. Do not complete this section.
Other
Pastoral Care, Coroner, Social Worker, Other
Data Field Data Entry Instructions
1 Sal Select salutation from the drop down list
2 First: Enter text description
3 Last Enter text description
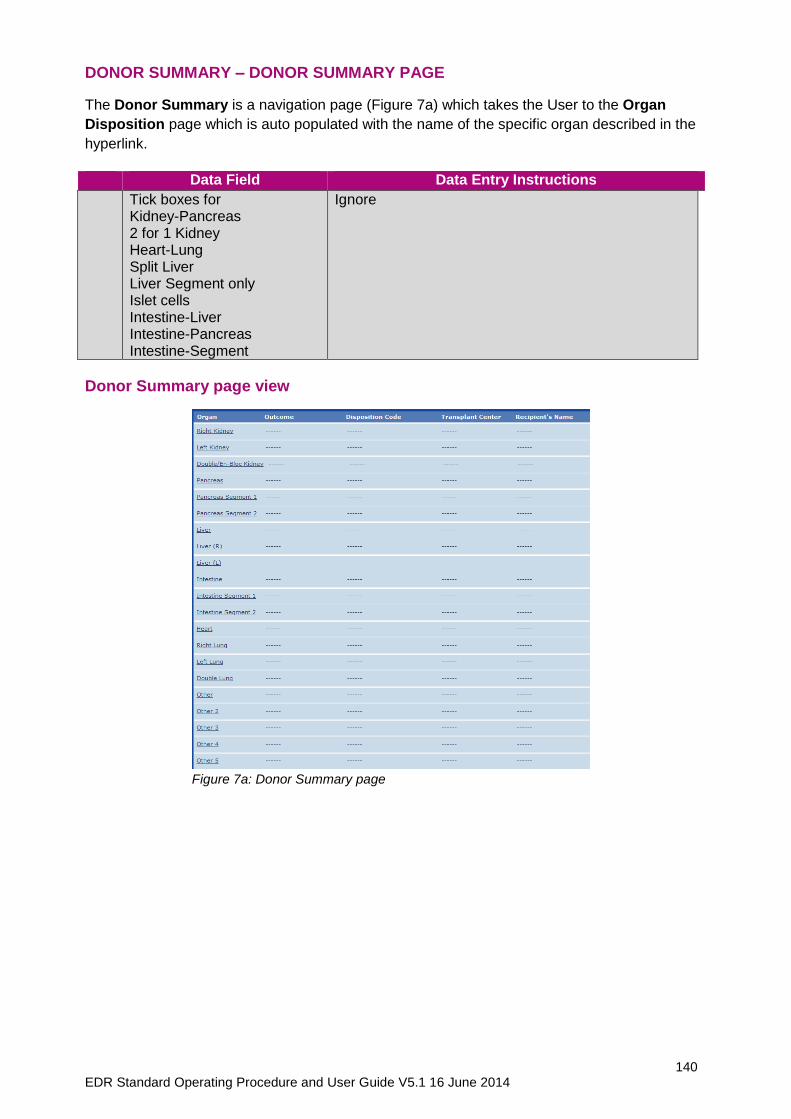
140 EDR Standard Operating Procedure and User Guide V5.1 16 June 2014
DONOR SUMMARY – DONOR SUMMARY PAGE
The Donor Summary is a navigation page (Figure 7a) which takes the User to the Organ
Disposition page which is auto populated with the name of the specific organ described in the
hyperlink.
Data Field Data Entry Instructions
Tick boxes for Kidney-Pancreas 2 for 1 Kidney Heart-Lung Split Liver Liver Segment only Islet cells Intestine-Liver Intestine-Pancreas Intestine-Segment
Ignore
Donor Summary page view
Figure 7a: Donor Summary page
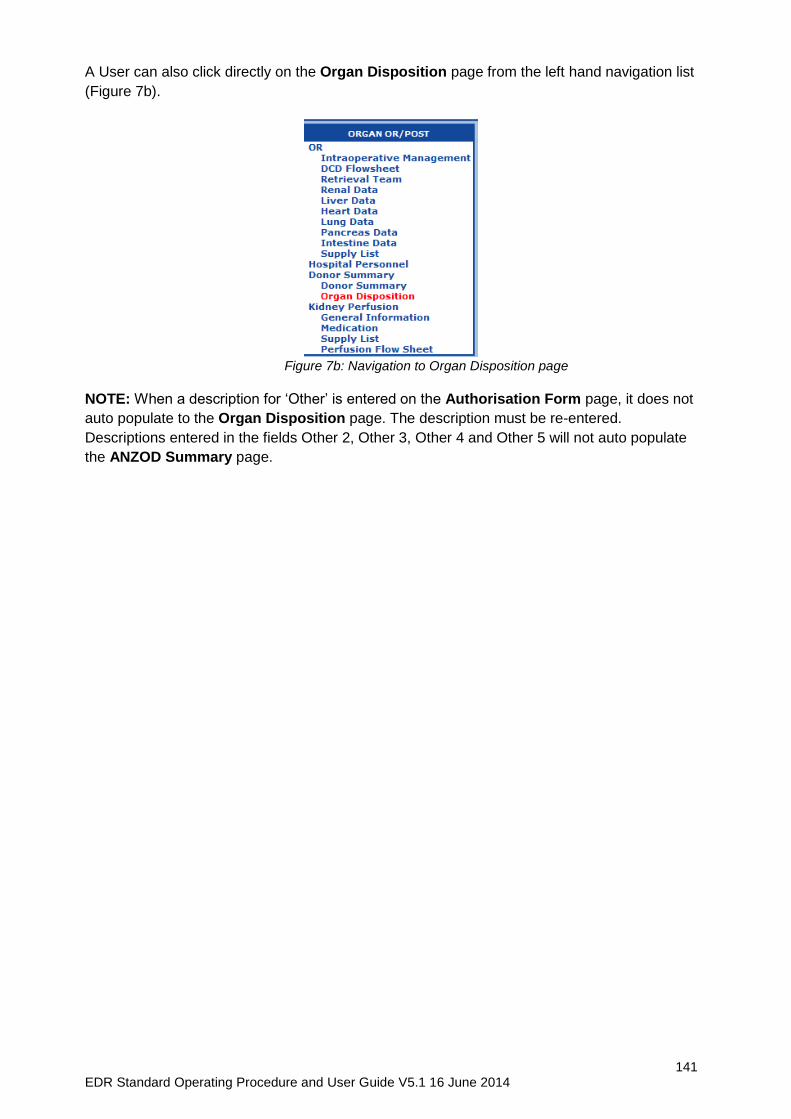
141 EDR Standard Operating Procedure and User Guide V5.1 16 June 2014
A User can also click directly on the Organ Disposition page from the left hand navigation list
(Figure 7b).
Figure 7b: Navigation to Organ Disposition page
NOTE: When a description for ‘Other’ is entered on the Authorisation Form page, it does not
auto populate to the Organ Disposition page. The description must be re-entered.
Descriptions entered in the fields Other 2, Other 3, Other 4 and Other 5 will not auto populate
the ANZOD Summary page.
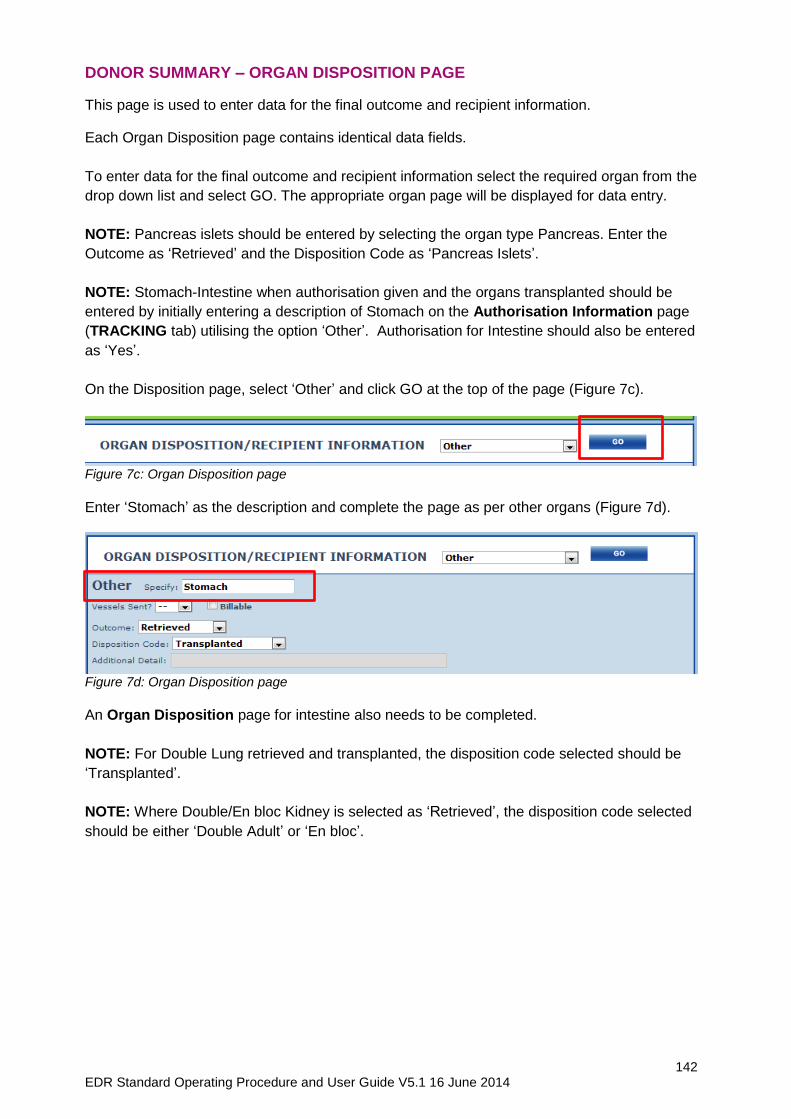
142 EDR Standard Operating Procedure and User Guide V5.1 16 June 2014
DONOR SUMMARY – ORGAN DISPOSITION PAGE
This page is used to enter data for the final outcome and recipient information.
Each Organ Disposition page contains identical data fields.
To enter data for the final outcome and recipient information select the required organ from the
drop down list and select GO. The appropriate organ page will be displayed for data entry.
NOTE: Pancreas islets should be entered by selecting the organ type Pancreas. Enter the
Outcome as ‘Retrieved’ and the Disposition Code as ‘Pancreas Islets’.
NOTE: Stomach-Intestine when authorisation given and the organs transplanted should be
entered by initially entering a description of Stomach on the Authorisation Information page
(TRACKING tab) utilising the option ‘Other’. Authorisation for Intestine should also be entered
as ‘Yes’.
On the Disposition page, select ‘Other’ and click GO at the top of the page (Figure 7c).
Figure 7c: Organ Disposition page
Enter ‘Stomach’ as the description and complete the page as per other organs (Figure 7d).
Figure 7d: Organ Disposition page
An Organ Disposition page for intestine also needs to be completed.
NOTE: For Double Lung retrieved and transplanted, the disposition code selected should be
‘Transplanted’.
NOTE: Where Double/En bloc Kidney is selected as ‘Retrieved’, the disposition code selected
should be either ‘Double Adult’ or ‘En bloc’.
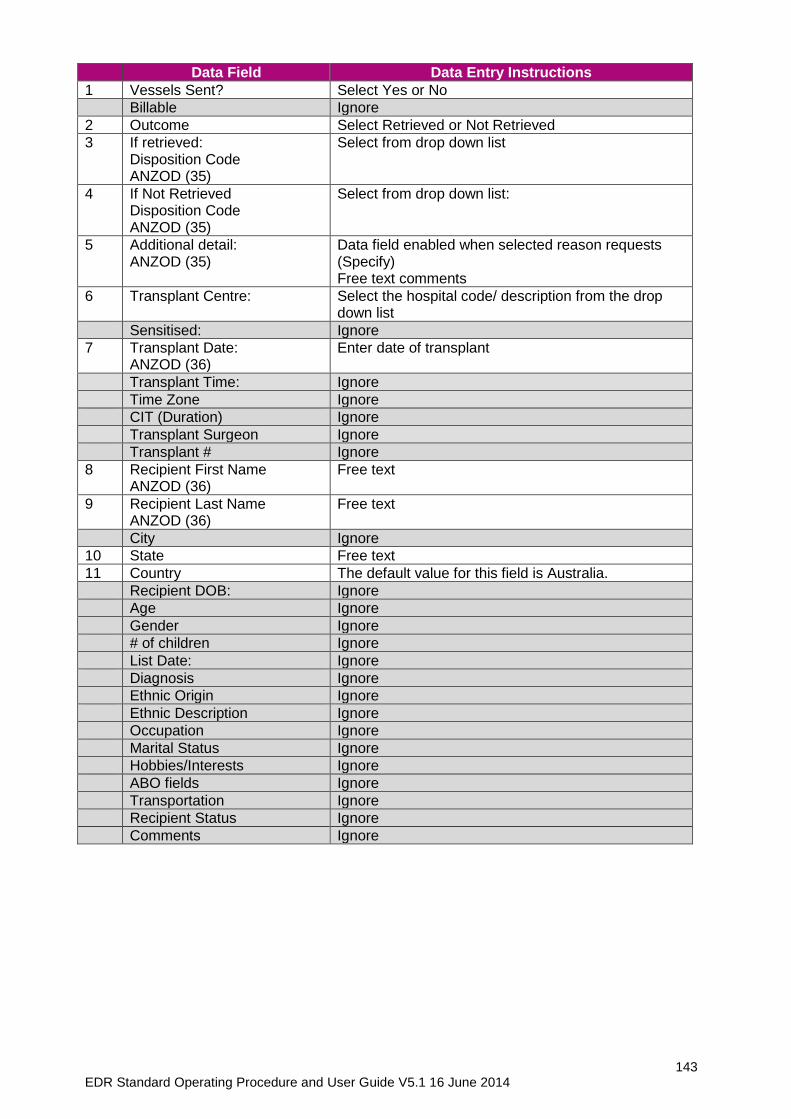
143 EDR Standard Operating Procedure and User Guide V5.1 16 June 2014
Data Field Data Entry Instructions
1 Vessels Sent? Select Yes or No
Billable Ignore
2 Outcome Select Retrieved or Not Retrieved
3 If retrieved: Disposition Code ANZOD (35)
Select from drop down list
4 If Not Retrieved Disposition Code ANZOD (35)
Select from drop down list:
5 Additional detail: ANZOD (35)
Data field enabled when selected reason requests (Specify) Free text comments
6 Transplant Centre: Select the hospital code/ description from the drop down list
Sensitised: Ignore
7 Transplant Date: ANZOD (36)
Enter date of transplant
Transplant Time: Ignore
Time Zone Ignore
CIT (Duration) Ignore
Transplant Surgeon Ignore
Transplant # Ignore
8 Recipient First Name ANZOD (36)
Free text
9 Recipient Last Name ANZOD (36)
Free text
City Ignore
10 State Free text
11 Country The default value for this field is Australia.
Recipient DOB: Ignore
Age Ignore
Gender Ignore
# of children Ignore
List Date: Ignore
Diagnosis Ignore
Ethnic Origin Ignore
Ethnic Description Ignore
Occupation Ignore
Marital Status Ignore
Hobbies/Interests Ignore
ABO fields Ignore
Transportation Ignore
Recipient Status Ignore
Comments Ignore
144 EDR Standard Operating Procedure and User Guide V5.1 16 June 2014
KIDNEY PERFUSION – GENERAL INFORMATION PAGE – NOT APPLICABLE IN AUSTRALIA
This page is not used for any purpose in Australia. Do not complete this page.

145 EDR Standard Operating Procedure and User Guide V5.1 16 June 2014
KIDNEY PERFUSION – MEDICATION PAGE – NOT APPLICABLE IN AUSTRALIA
This page is not used for any purpose in Australia. Do not complete this page.
146 EDR Standard Operating Procedure and User Guide V5.1 16 June 2014
KIDNEY PERFUSION – SUPPLY LIST PAGE – NOT APPLICABLE IN AUSTRALIA
This page is not used for any purpose in Australia. Do not complete this page.

147 EDR Standard Operating Procedure and User Guide V5.1 16 June 2014
KIDNEY PERFUSION – PERFUSION FLOW SHEET PAGE – NOT APPLICABLE IN AUSTRALIA
This page is not used for any purpose in Australia. Do not complete this page.
148 EDR Standard Operating Procedure and User Guide V5.1 16 June 2014
8. ATTACHMENTS TAB
The EDR contains a User-friendly, self-upload feature to attach files such as Word documents,
PowerPoint, Excel, PDF documents, JPEGs, and MPEGs.
There are currently three types of attachments. Those associated with:
1. A patient such as chest x-rays, CAT scans, etc.
2. An organisation
3. An interaction entry.
Prior to uploading files to EDR
Before a file is uploaded as an attachment to the EDR it must FIRST be renamed and labelled using the appropriate EDR naming convention. There is a requirement to have identified and de-identified attachments uploaded to the EDR,
therefore the file must be clearly named to ensure attachments containing identifying donor
details are NOT transmitted to unauthorised personnel. NOTE: A ‘de-identified’ file/document
has the donor’s name redacted but retains the Donor ID, MRN and DOB.
File Naming convention
The file naming convention contains the Donor ID followed by the attachment group name to which the document belongs, the next sequential number in the group and if the file is identified or de-identified.
Identified file naming convention: DONOR ID_AttachmentGroup_N_Identified
De-Identified file naming convention: DONOR ID_AttachmentGroup_N_De-Identified
For example:
Identified file: D13-0023_ABO_1_Identified
De-Identified file: D13-0023_ABO_2_De-Identifed
Attachment Groups
Within the EDR, Attachment Groups have been specified at the time of system set up.
Each file is assigned to an Attachment Group at upload. The attachment group can later be used to filter and search for specific attachment types.
The attachment groups are:
ABO
Angiography
CXR
ECG
Consent Forms
ECHO
GP Referrals
Histology
Imaging
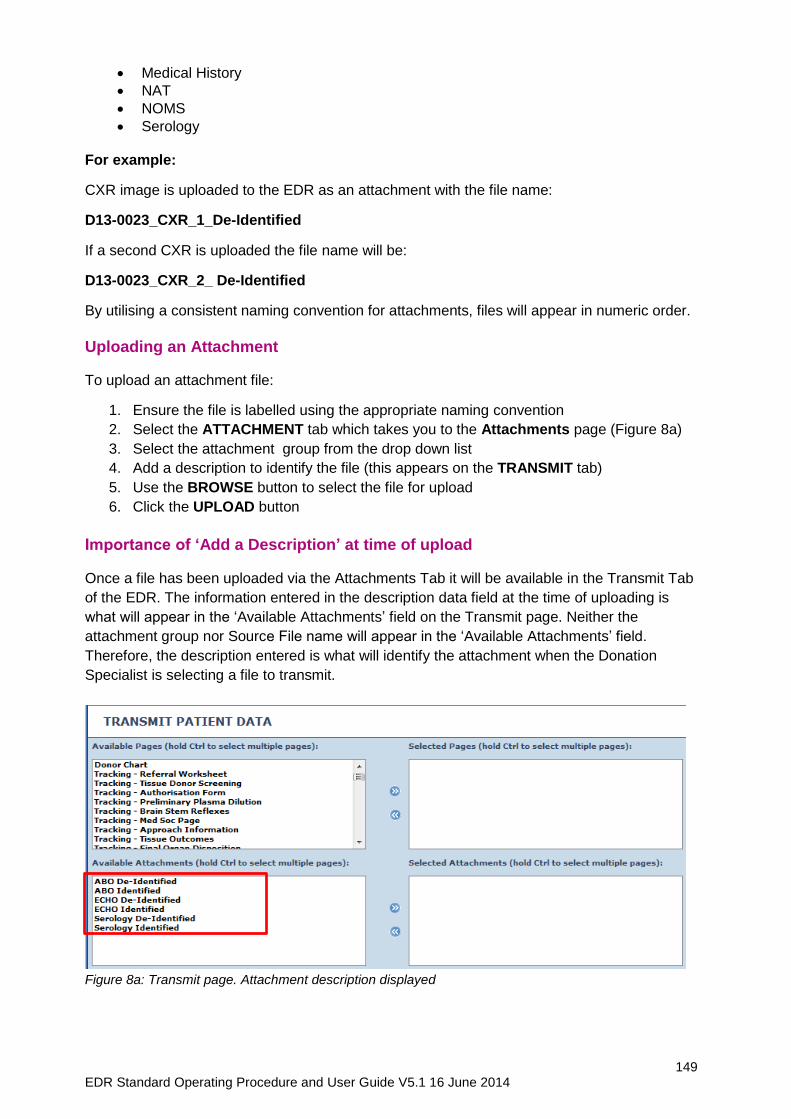
149 EDR Standard Operating Procedure and User Guide V5.1 16 June 2014
Medical History
NAT
NOMS
Serology For example:
CXR image is uploaded to the EDR as an attachment with the file name:
D13-0023_CXR_1_De-Identified
If a second CXR is uploaded the file name will be:
D13-0023_CXR_2_ De-Identified
By utilising a consistent naming convention for attachments, files will appear in numeric order.
Uploading an Attachment
To upload an attachment file:
1. Ensure the file is labelled using the appropriate naming convention
2. Select the ATTACHMENT tab which takes you to the Attachments page (Figure 8a)
3. Select the attachment group from the drop down list
4. Add a description to identify the file (this appears on the TRANSMIT tab)
5. Use the BROWSE button to select the file for upload
6. Click the UPLOAD button
Importance of ‘Add a Description’ at time of upload
Once a file has been uploaded via the Attachments Tab it will be available in the Transmit Tab
of the EDR. The information entered in the description data field at the time of uploading is
what will appear in the ‘Available Attachments’ field on the Transmit page. Neither the
attachment group nor Source File name will appear in the ‘Available Attachments’ field.
Therefore, the description entered is what will identify the attachment when the Donation
Specialist is selecting a file to transmit.
Figure 8a: Transmit page. Attachment description displayed
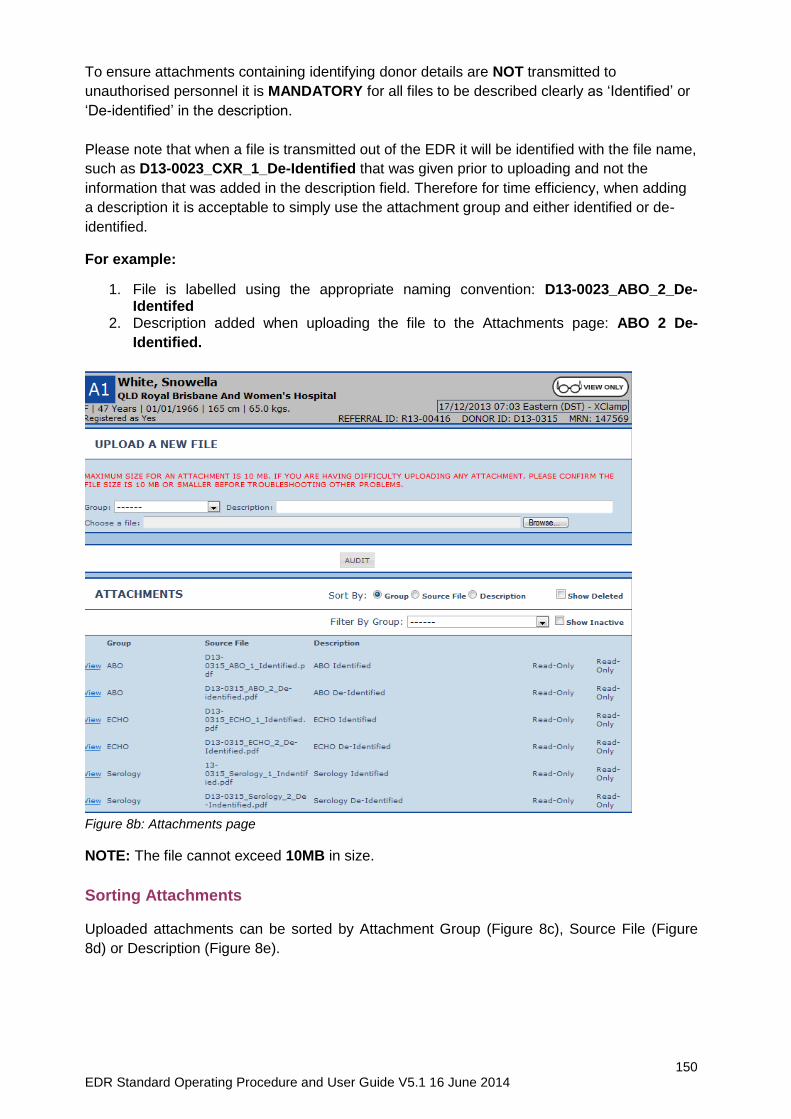
150 EDR Standard Operating Procedure and User Guide V5.1 16 June 2014
To ensure attachments containing identifying donor details are NOT transmitted to
unauthorised personnel it is MANDATORY for all files to be described clearly as ‘Identified’ or
‘De-identified’ in the description.
Please note that when a file is transmitted out of the EDR it will be identified with the file name,
such as D13-0023_CXR_1_De-Identified that was given prior to uploading and not the
information that was added in the description field. Therefore for time efficiency, when adding
a description it is acceptable to simply use the attachment group and either identified or de-
identified.
For example:
1. File is labelled using the appropriate naming convention: D13-0023_ABO_2_De-Identifed
2. Description added when uploading the file to the Attachments page: ABO 2 De-
Identified.
Figure 8b: Attachments page
NOTE: The file cannot exceed 10MB in size.
Sorting Attachments
Uploaded attachments can be sorted by Attachment Group (Figure 8c), Source File (Figure
8d) or Description (Figure 8e).
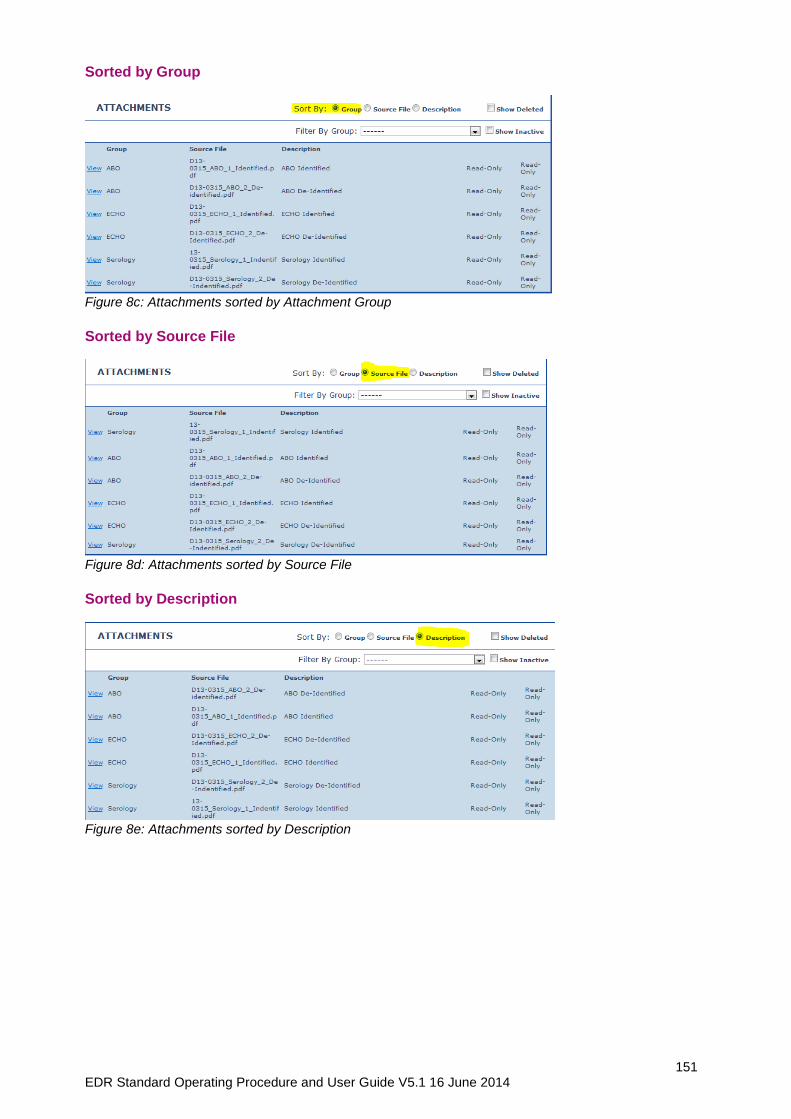
151 EDR Standard Operating Procedure and User Guide V5.1 16 June 2014
Sorted by Group
Figure 8c: Attachments sorted by Attachment Group
Sorted by Source File
Figure 8d: Attachments sorted by Source File
Sorted by Description
Figure 8e: Attachments sorted by Description
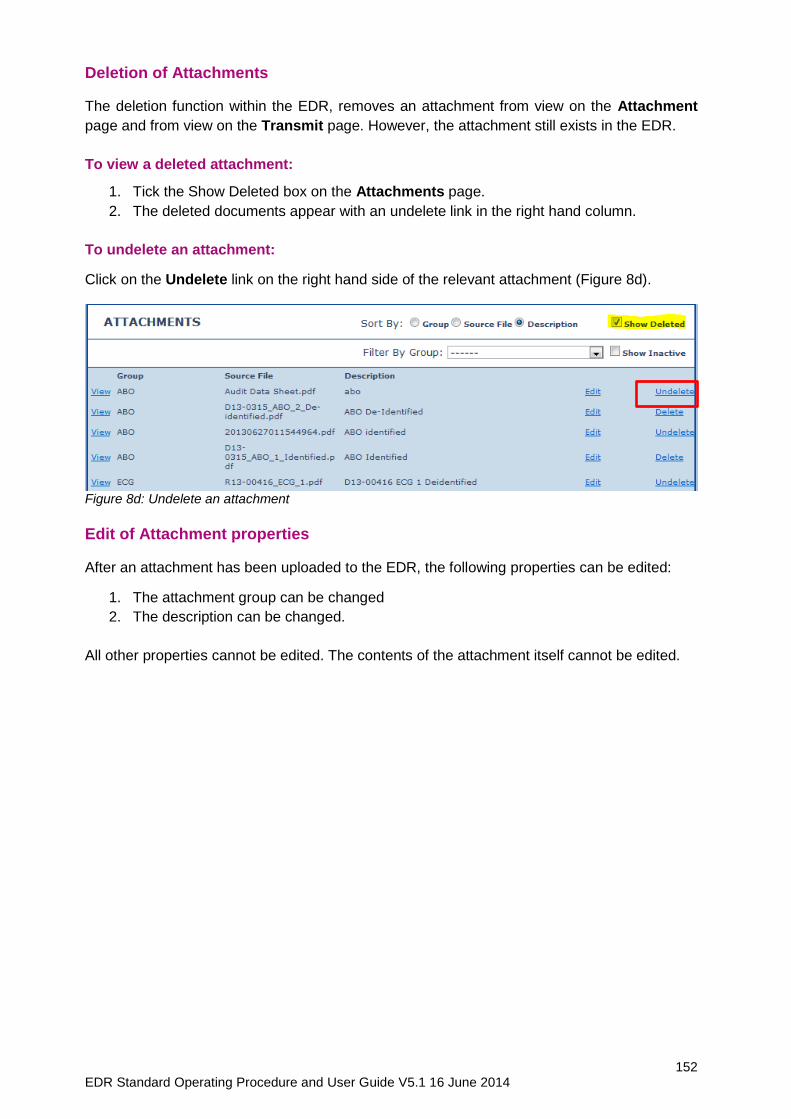
152 EDR Standard Operating Procedure and User Guide V5.1 16 June 2014
Deletion of Attachments
The deletion function within the EDR, removes an attachment from view on the Attachment
page and from view on the Transmit page. However, the attachment still exists in the EDR.
To view a deleted attachment:
1. Tick the Show Deleted box on the Attachments page.
2. The deleted documents appear with an undelete link in the right hand column.
To undelete an attachment:
Click on the Undelete link on the right hand side of the relevant attachment (Figure 8d).
Figure 8d: Undelete an attachment
Edit of Attachment properties
After an attachment has been uploaded to the EDR, the following properties can be edited:
1. The attachment group can be changed
2. The description can be changed.
All other properties cannot be edited. The contents of the attachment itself cannot be edited.
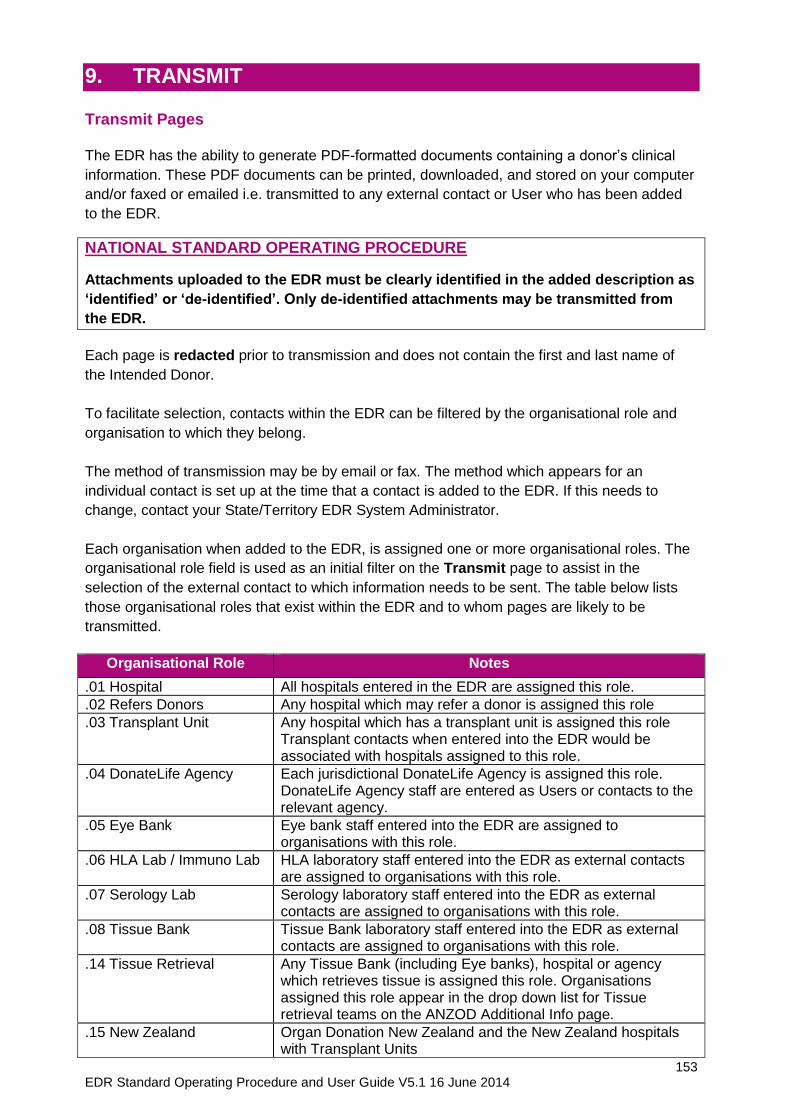
153 EDR Standard Operating Procedure and User Guide V5.1 16 June 2014
9. TRANSMIT Transmit Pages
The EDR has the ability to generate PDF-formatted documents containing a donor’s clinical
information. These PDF documents can be printed, downloaded, and stored on your computer
and/or faxed or emailed i.e. transmitted to any external contact or User who has been added
to the EDR.
NATIONAL STANDARD OPERATING PROCEDURE
Attachments uploaded to the EDR must be clearly identified in the added description as
‘identified’ or ‘de-identified’. Only de-identified attachments may be transmitted from
the EDR.
Each page is redacted prior to transmission and does not contain the first and last name of
the Intended Donor.
To facilitate selection, contacts within the EDR can be filtered by the organisational role and
organisation to which they belong.
The method of transmission may be by email or fax. The method which appears for an
individual contact is set up at the time that a contact is added to the EDR. If this needs to
change, contact your State/Territory EDR System Administrator.
Each organisation when added to the EDR, is assigned one or more organisational roles. The
organisational role field is used as an initial filter on the Transmit page to assist in the
selection of the external contact to which information needs to be sent. The table below lists
those organisational roles that exist within the EDR and to whom pages are likely to be
transmitted.
Organisational Role Notes
.01 Hospital All hospitals entered in the EDR are assigned this role.
.02 Refers Donors Any hospital which may refer a donor is assigned this role
.03 Transplant Unit Any hospital which has a transplant unit is assigned this role Transplant contacts when entered into the EDR would be associated with hospitals assigned to this role.
.04 DonateLife Agency Each jurisdictional DonateLife Agency is assigned this role. DonateLife Agency staff are entered as Users or contacts to the relevant agency.
.05 Eye Bank Eye bank staff entered into the EDR are assigned to organisations with this role.
.06 HLA Lab / Immuno Lab HLA laboratory staff entered into the EDR as external contacts are assigned to organisations with this role.
.07 Serology Lab Serology laboratory staff entered into the EDR as external contacts are assigned to organisations with this role.
.08 Tissue Bank Tissue Bank laboratory staff entered into the EDR as external contacts are assigned to organisations with this role.
.14 Tissue Retrieval Any Tissue Bank (including Eye banks), hospital or agency which retrieves tissue is assigned this role. Organisations assigned this role appear in the drop down list for Tissue retrieval teams on the ANZOD Additional Info page.
.15 New Zealand Organ Donation New Zealand and the New Zealand hospitals with Transplant Units
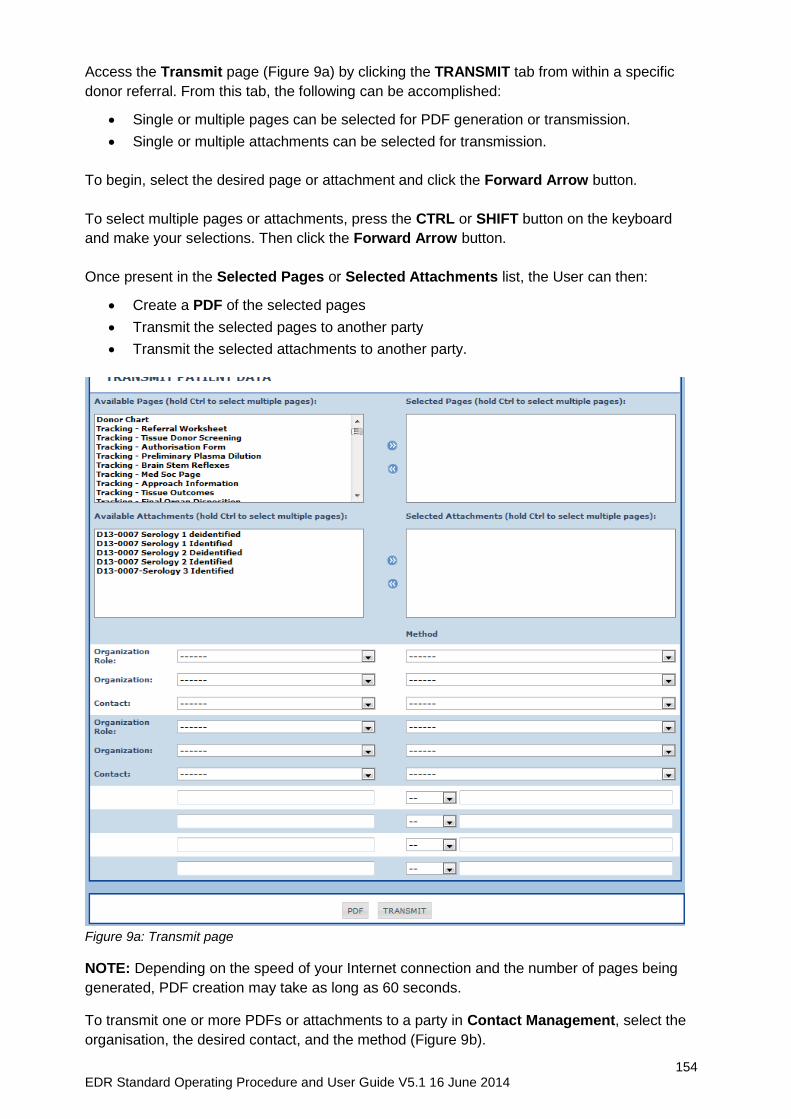
154 EDR Standard Operating Procedure and User Guide V5.1 16 June 2014
Access the Transmit page (Figure 9a) by clicking the TRANSMIT tab from within a specific
donor referral. From this tab, the following can be accomplished:
Single or multiple pages can be selected for PDF generation or transmission.
Single or multiple attachments can be selected for transmission.
To begin, select the desired page or attachment and click the Forward Arrow button.
To select multiple pages or attachments, press the CTRL or SHIFT button on the keyboard
and make your selections. Then click the Forward Arrow button.
Once present in the Selected Pages or Selected Attachments list, the User can then:
Create a PDF of the selected pages
Transmit the selected pages to another party
Transmit the selected attachments to another party.
Figure 9a: Transmit page
NOTE: Depending on the speed of your Internet connection and the number of pages being
generated, PDF creation may take as long as 60 seconds.
To transmit one or more PDFs or attachments to a party in Contact Management, select the
organisation, the desired contact, and the method (Figure 9b).
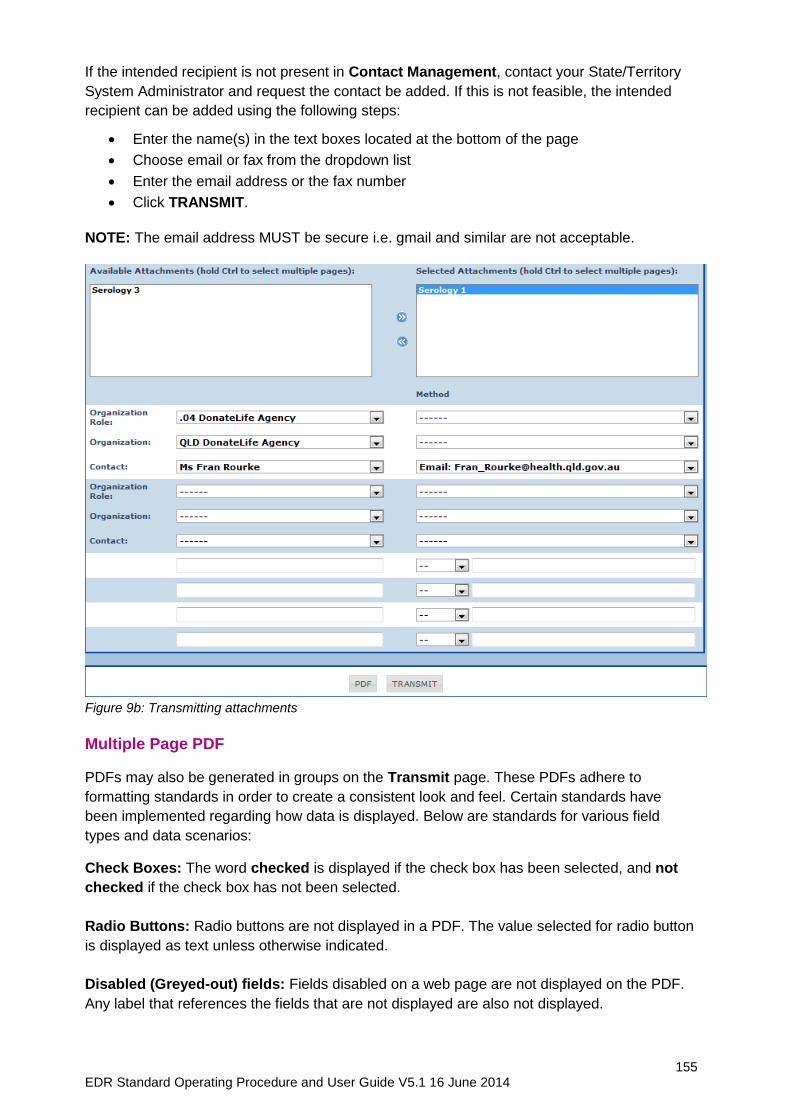
155 EDR Standard Operating Procedure and User Guide V5.1 16 June 2014
If the intended recipient is not present in Contact Management, contact your State/Territory
System Administrator and request the contact be added. If this is not feasible, the intended
recipient can be added using the following steps:
Enter the name(s) in the text boxes located at the bottom of the page
Choose email or fax from the dropdown list
Enter the email address or the fax number
Click TRANSMIT.
NOTE: The email address MUST be secure i.e. gmail and similar are not acceptable.
Figure 9b: Transmitting attachments
Multiple Page PDF
PDFs may also be generated in groups on the Transmit page. These PDFs adhere to
formatting standards in order to create a consistent look and feel. Certain standards have
been implemented regarding how data is displayed. Below are standards for various field
types and data scenarios:
Check Boxes: The word checked is displayed if the check box has been selected, and not
checked if the check box has not been selected.
Radio Buttons: Radio buttons are not displayed in a PDF. The value selected for radio button
is displayed as text unless otherwise indicated.
Disabled (Greyed-out) fields: Fields disabled on a web page are not displayed on the PDF.
Any label that references the fields that are not displayed are also not displayed.
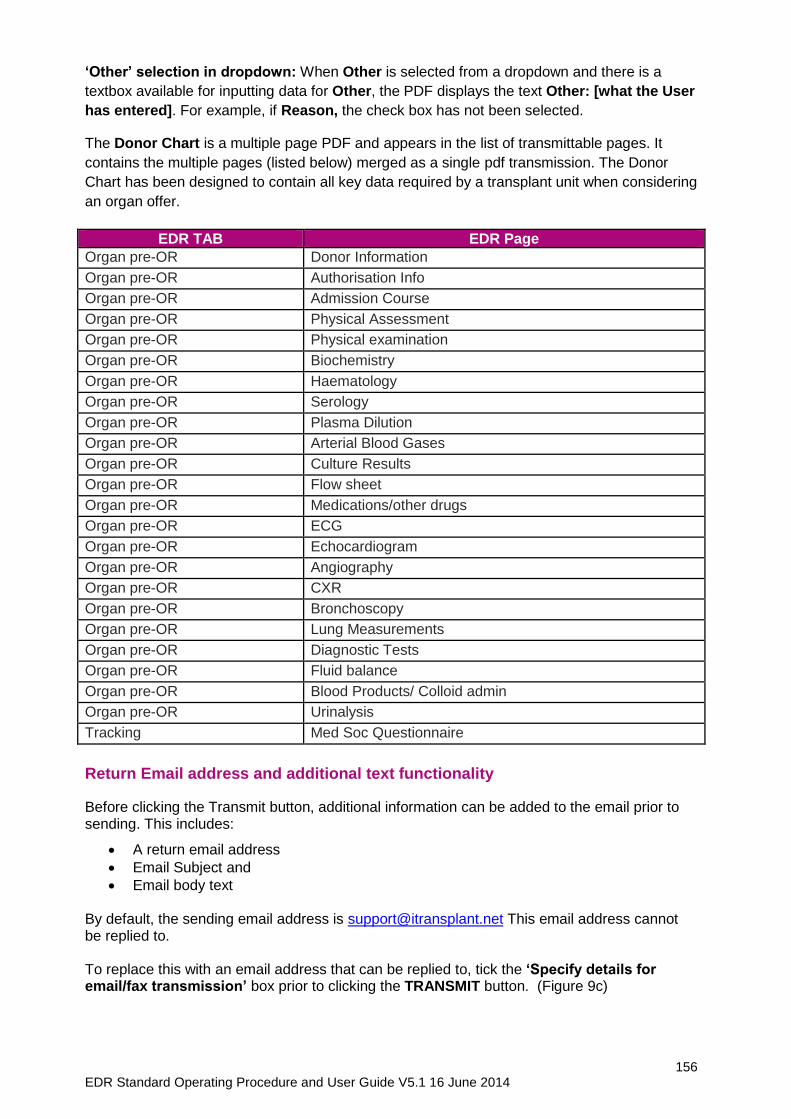
156 EDR Standard Operating Procedure and User Guide V5.1 16 June 2014
‘Other’ selection in dropdown: When Other is selected from a dropdown and there is a
textbox available for inputting data for Other, the PDF displays the text Other: [what the User
has entered]. For example, if Reason, the check box has not been selected.
The Donor Chart is a multiple page PDF and appears in the list of transmittable pages. It
contains the multiple pages (listed below) merged as a single pdf transmission. The Donor
Chart has been designed to contain all key data required by a transplant unit when considering
an organ offer.
EDR TAB EDR Page
Organ pre-OR Donor Information
Organ pre-OR Authorisation Info
Organ pre-OR Admission Course
Organ pre-OR Physical Assessment
Organ pre-OR Physical examination
Organ pre-OR Biochemistry
Organ pre-OR Haematology
Organ pre-OR Serology
Organ pre-OR Plasma Dilution
Organ pre-OR Arterial Blood Gases
Organ pre-OR Culture Results
Organ pre-OR Flow sheet
Organ pre-OR Medications/other drugs
Organ pre-OR ECG
Organ pre-OR Echocardiogram
Organ pre-OR Angiography
Organ pre-OR CXR
Organ pre-OR Bronchoscopy
Organ pre-OR Lung Measurements
Organ pre-OR Diagnostic Tests
Organ pre-OR Fluid balance
Organ pre-OR Blood Products/ Colloid admin
Organ pre-OR Urinalysis
Tracking Med Soc Questionnaire
Return Email address and additional text functionality
Before clicking the Transmit button, additional information can be added to the email prior to sending. This includes:
A return email address
Email Subject and
Email body text By default, the sending email address is [email protected] This email address cannot be replied to. To replace this with an email address that can be replied to, tick the ‘Specify details for email/fax transmission’ box prior to clicking the TRANSMIT button. (Figure 9c)
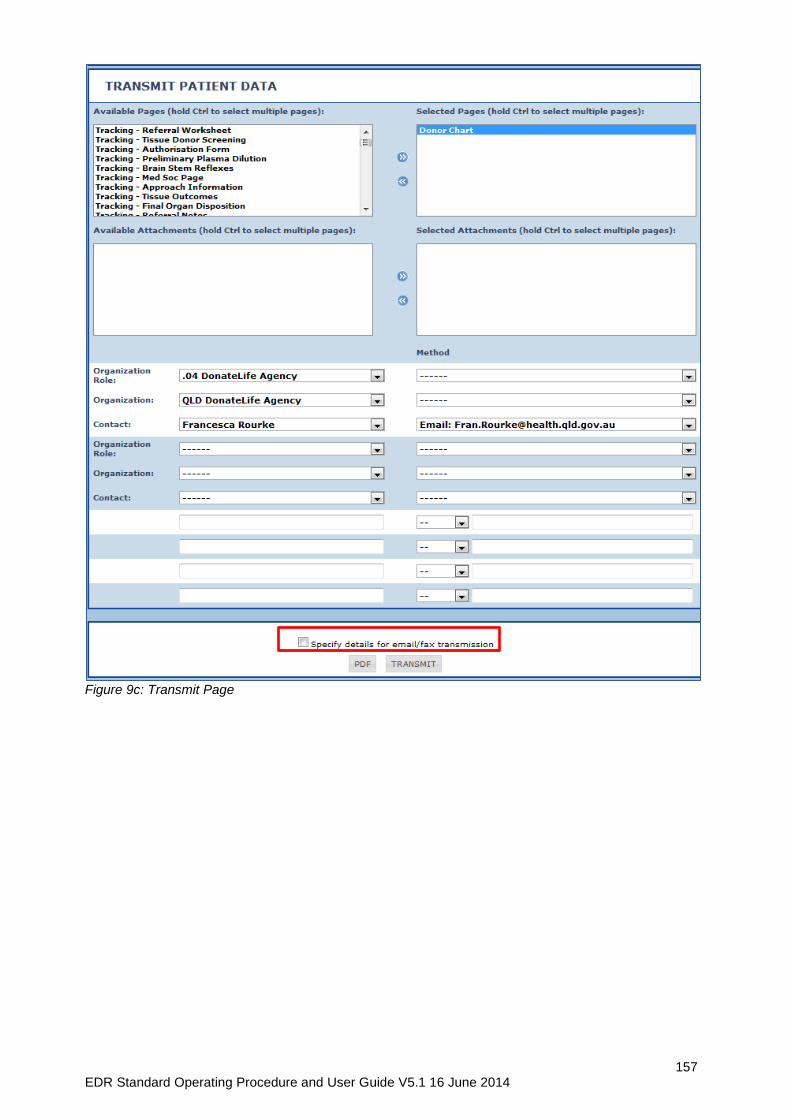
157 EDR Standard Operating Procedure and User Guide V5.1 16 June 2014
Figure 9c: Transmit Page

158 EDR Standard Operating Procedure and User Guide V5.1 16 June 2014
When the TRANSMIT button is now clicked the Details for email/fax transmission dialogue box
appears (Figure 9d). The dialogue box allows the entry of a return email address, Email
Subject and Message.
Figure 9d: Details for email/fax transmission dialogue box
To assist, automatic insert of the Referral ID, Organ Donor ID and MRN can also be performed
by clicking the buttons on the right hand side. (Figure 9d)
Provision of information to tissue banks
Where information is requested by a Tissue bank from the EDR for the purpose of tissue
retrieval, the following will be provided:
1. Transmit of the Donor Chart pdf
2. Separate to the Donor Chart pdf, the Donation specialist will send a second email to
the tissue bank containing the following information:
a. Completed Consent form
b. Donor ID
c. Donor Name
d. Donor DOB
e. Details of NOK
f. Details of those who provided answers to the medical social questionnaire
Additional information may also be required external to the EDR as agreed at each
jurisdictional level.
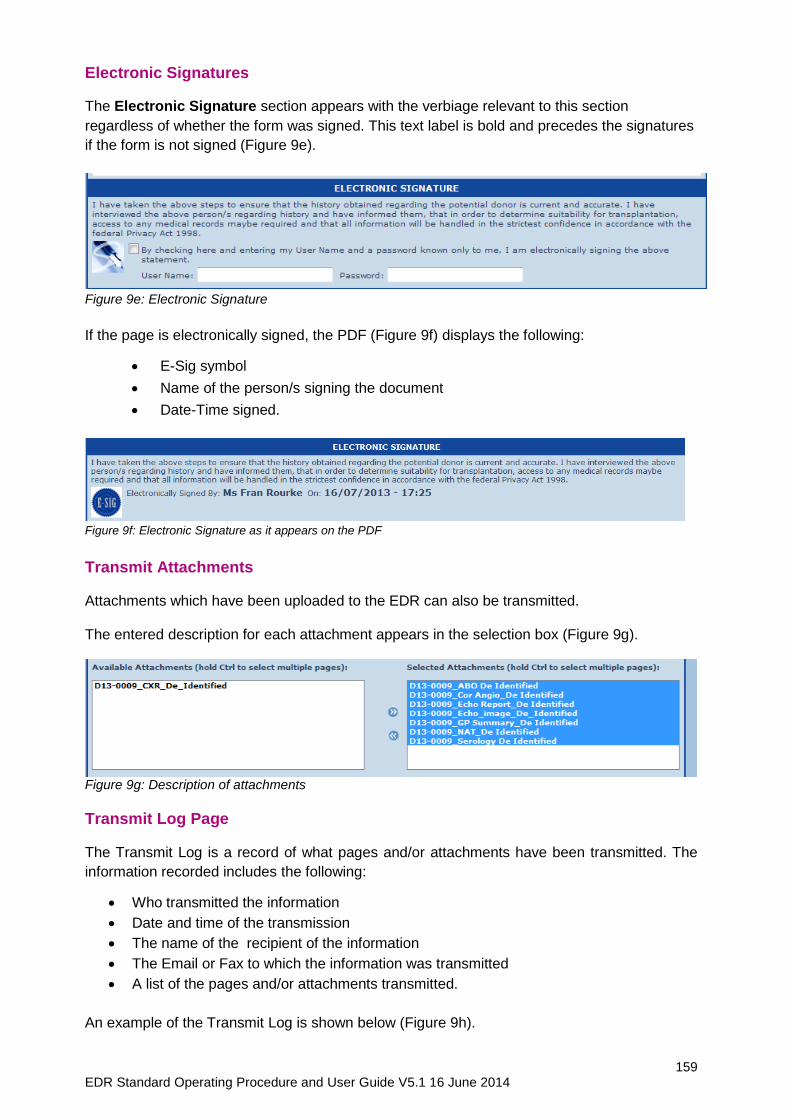
159 EDR Standard Operating Procedure and User Guide V5.1 16 June 2014
Electronic Signatures
The Electronic Signature section appears with the verbiage relevant to this section
regardless of whether the form was signed. This text label is bold and precedes the signatures
if the form is not signed (Figure 9e).
Figure 9e: Electronic Signature
If the page is electronically signed, the PDF (Figure 9f) displays the following:
E-Sig symbol
Name of the person/s signing the document
Date-Time signed.
Figure 9f: Electronic Signature as it appears on the PDF
Transmit Attachments
Attachments which have been uploaded to the EDR can also be transmitted. The entered description for each attachment appears in the selection box (Figure 9g).
Figure 9g: Description of attachments
Transmit Log Page
The Transmit Log is a record of what pages and/or attachments have been transmitted. The
information recorded includes the following:
Who transmitted the information
Date and time of the transmission
The name of the recipient of the information
The Email or Fax to which the information was transmitted
A list of the pages and/or attachments transmitted.
An example of the Transmit Log is shown below (Figure 9h).
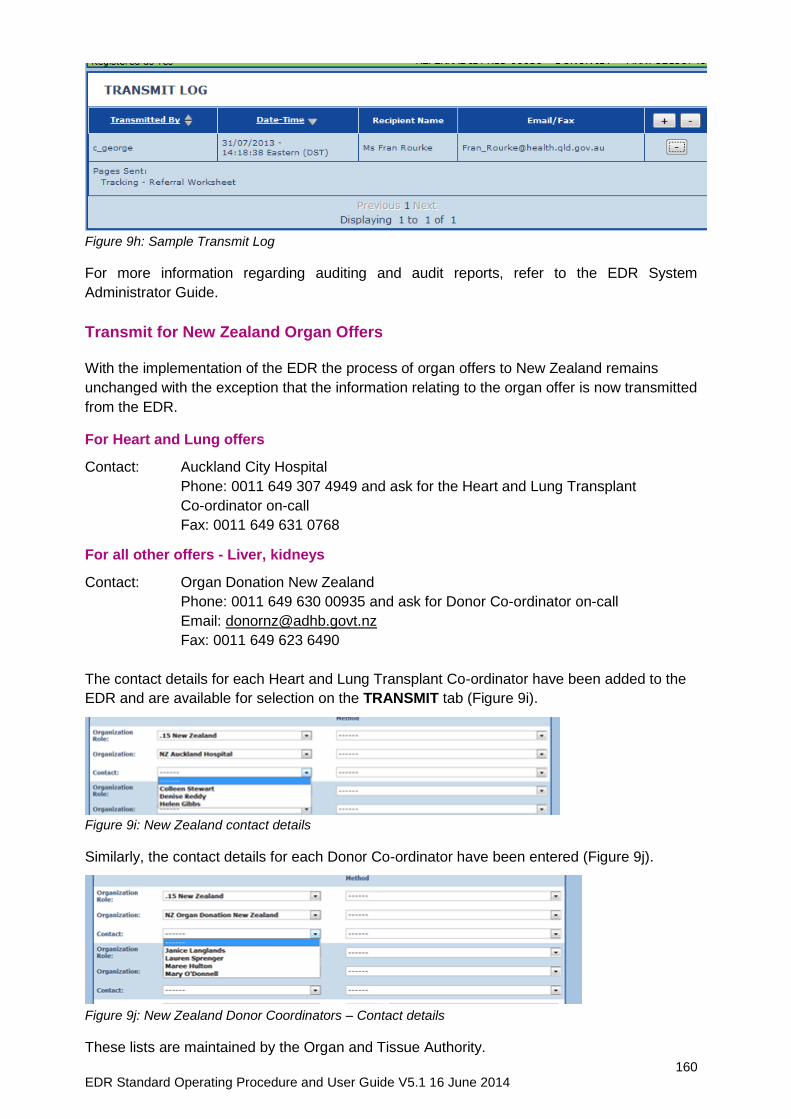
160 EDR Standard Operating Procedure and User Guide V5.1 16 June 2014
Figure 9h: Sample Transmit Log
For more information regarding auditing and audit reports, refer to the EDR System
Administrator Guide.
Transmit for New Zealand Organ Offers
With the implementation of the EDR the process of organ offers to New Zealand remains
unchanged with the exception that the information relating to the organ offer is now transmitted
from the EDR.
For Heart and Lung offers
Contact: Auckland City Hospital
Phone: 0011 649 307 4949 and ask for the Heart and Lung Transplant
Co-ordinator on-call
Fax: 0011 649 631 0768
For all other offers - Liver, kidneys
Contact: Organ Donation New Zealand
Phone: 0011 649 630 00935 and ask for Donor Co-ordinator on-call
Email: [email protected]
Fax: 0011 649 623 6490
The contact details for each Heart and Lung Transplant Co-ordinator have been added to the
EDR and are available for selection on the TRANSMIT tab (Figure 9i).
Figure 9i: New Zealand contact details
Similarly, the contact details for each Donor Co-ordinator have been entered (Figure 9j).
Figure 9j: New Zealand Donor Coordinators – Contact details
These lists are maintained by the Organ and Tissue Authority.
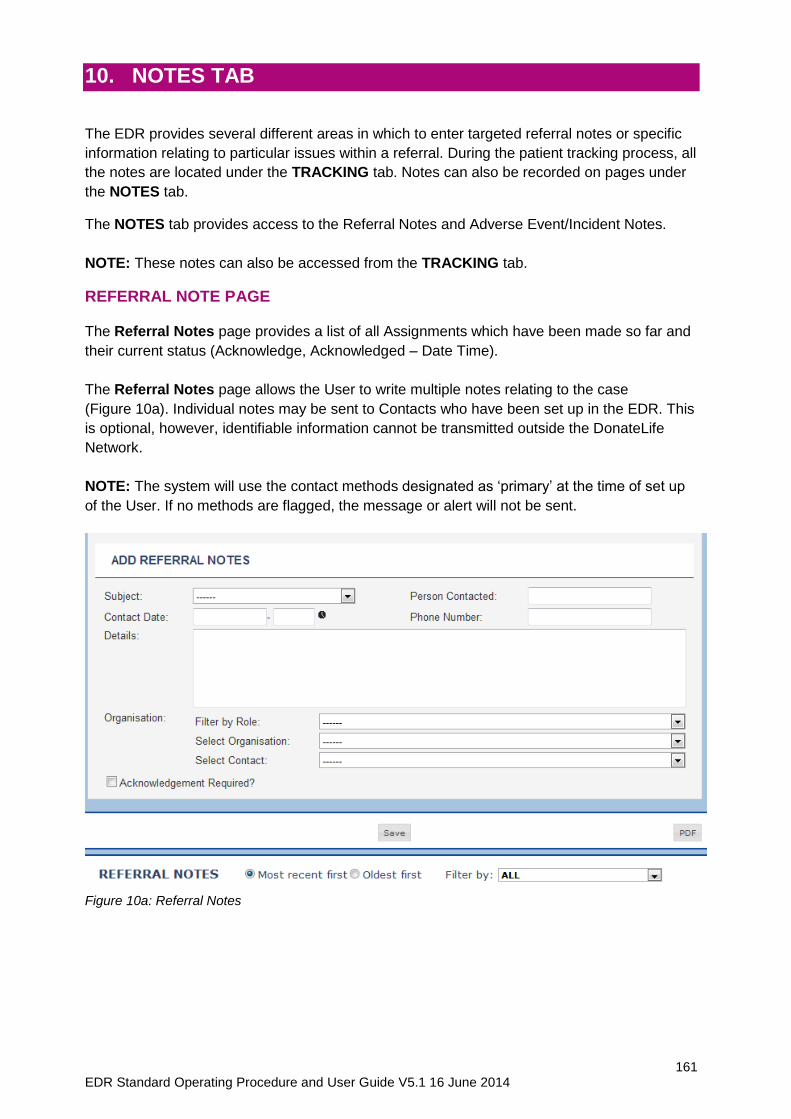
161 EDR Standard Operating Procedure and User Guide V5.1 16 June 2014
10. NOTES TAB The EDR provides several different areas in which to enter targeted referral notes or specific
information relating to particular issues within a referral. During the patient tracking process, all
the notes are located under the TRACKING tab. Notes can also be recorded on pages under
the NOTES tab.
The NOTES tab provides access to the Referral Notes and Adverse Event/Incident Notes.
NOTE: These notes can also be accessed from the TRACKING tab.
REFERRAL NOTE PAGE
The Referral Notes page provides a list of all Assignments which have been made so far and
their current status (Acknowledge, Acknowledged – Date Time).
The Referral Notes page allows the User to write multiple notes relating to the case
(Figure 10a). Individual notes may be sent to Contacts who have been set up in the EDR. This
is optional, however, identifiable information cannot be transmitted outside the DonateLife
Network.
NOTE: The system will use the contact methods designated as ‘primary’ at the time of set up
of the User. If no methods are flagged, the message or alert will not be sent.
Figure 10a: Referral Notes
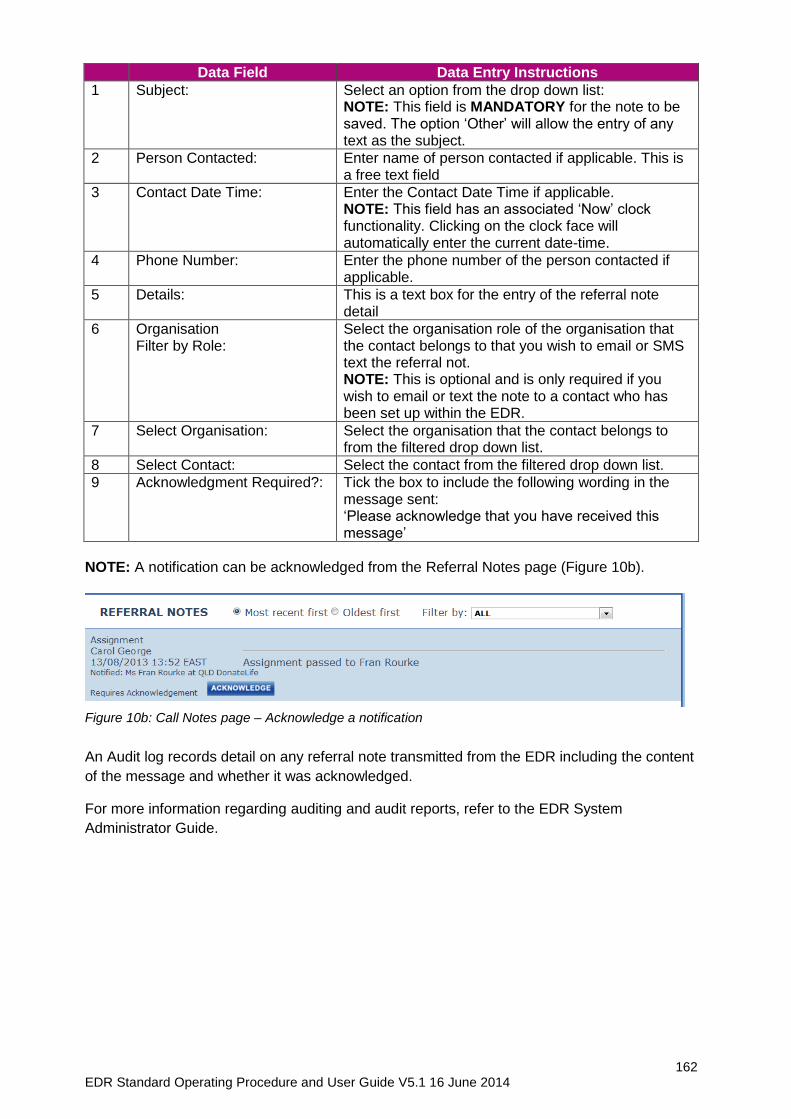
162 EDR Standard Operating Procedure and User Guide V5.1 16 June 2014
Data Field Data Entry Instructions
1 Subject: Select an option from the drop down list: NOTE: This field is MANDATORY for the note to be saved. The option ‘Other’ will allow the entry of any text as the subject.
2 Person Contacted: Enter name of person contacted if applicable. This is a free text field
3 Contact Date Time: Enter the Contact Date Time if applicable. NOTE: This field has an associated ‘Now’ clock functionality. Clicking on the clock face will automatically enter the current date-time.
4 Phone Number: Enter the phone number of the person contacted if applicable.
5 Details: This is a text box for the entry of the referral note detail
6 Organisation Filter by Role:
Select the organisation role of the organisation that the contact belongs to that you wish to email or SMS text the referral not. NOTE: This is optional and is only required if you wish to email or text the note to a contact who has been set up within the EDR.
7 Select Organisation: Select the organisation that the contact belongs to from the filtered drop down list.
8 Select Contact: Select the contact from the filtered drop down list.
9 Acknowledgment Required?: Tick the box to include the following wording in the message sent: ‘Please acknowledge that you have received this message’
NOTE: A notification can be acknowledged from the Referral Notes page (Figure 10b).
Figure 10b: Call Notes page – Acknowledge a notification
An Audit log records detail on any referral note transmitted from the EDR including the content
of the message and whether it was acknowledged.
For more information regarding auditing and audit reports, refer to the EDR System
Administrator Guide.
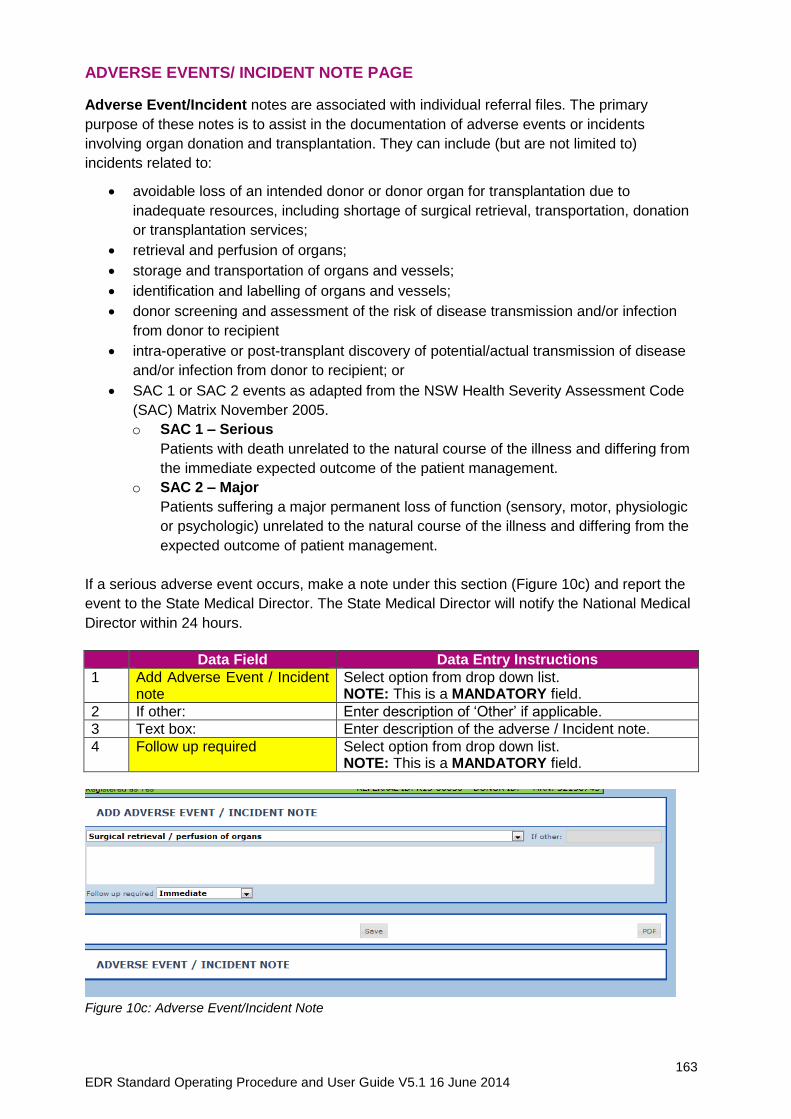
163 EDR Standard Operating Procedure and User Guide V5.1 16 June 2014
ADVERSE EVENTS/ INCIDENT NOTE PAGE
Adverse Event/Incident notes are associated with individual referral files. The primary
purpose of these notes is to assist in the documentation of adverse events or incidents
involving organ donation and transplantation. They can include (but are not limited to)
incidents related to:
avoidable loss of an intended donor or donor organ for transplantation due to
inadequate resources, including shortage of surgical retrieval, transportation, donation
or transplantation services;
retrieval and perfusion of organs;
storage and transportation of organs and vessels;
identification and labelling of organs and vessels;
donor screening and assessment of the risk of disease transmission and/or infection
from donor to recipient
intra-operative or post-transplant discovery of potential/actual transmission of disease
and/or infection from donor to recipient; or
SAC 1 or SAC 2 events as adapted from the NSW Health Severity Assessment Code
(SAC) Matrix November 2005.
o SAC 1 – Serious
Patients with death unrelated to the natural course of the illness and differing from
the immediate expected outcome of the patient management.
o SAC 2 – Major
Patients suffering a major permanent loss of function (sensory, motor, physiologic
or psychologic) unrelated to the natural course of the illness and differing from the
expected outcome of patient management.
If a serious adverse event occurs, make a note under this section (Figure 10c) and report the
event to the State Medical Director. The State Medical Director will notify the National Medical
Director within 24 hours.
Data Field Data Entry Instructions
1 Add Adverse Event / Incident note
Select option from drop down list. NOTE: This is a MANDATORY field.
2 If other: Enter description of ‘Other’ if applicable.
3 Text box: Enter description of the adverse / Incident note.
4 Follow up required Select option from drop down list. NOTE: This is a MANDATORY field.
Figure 10c: Adverse Event/Incident Note
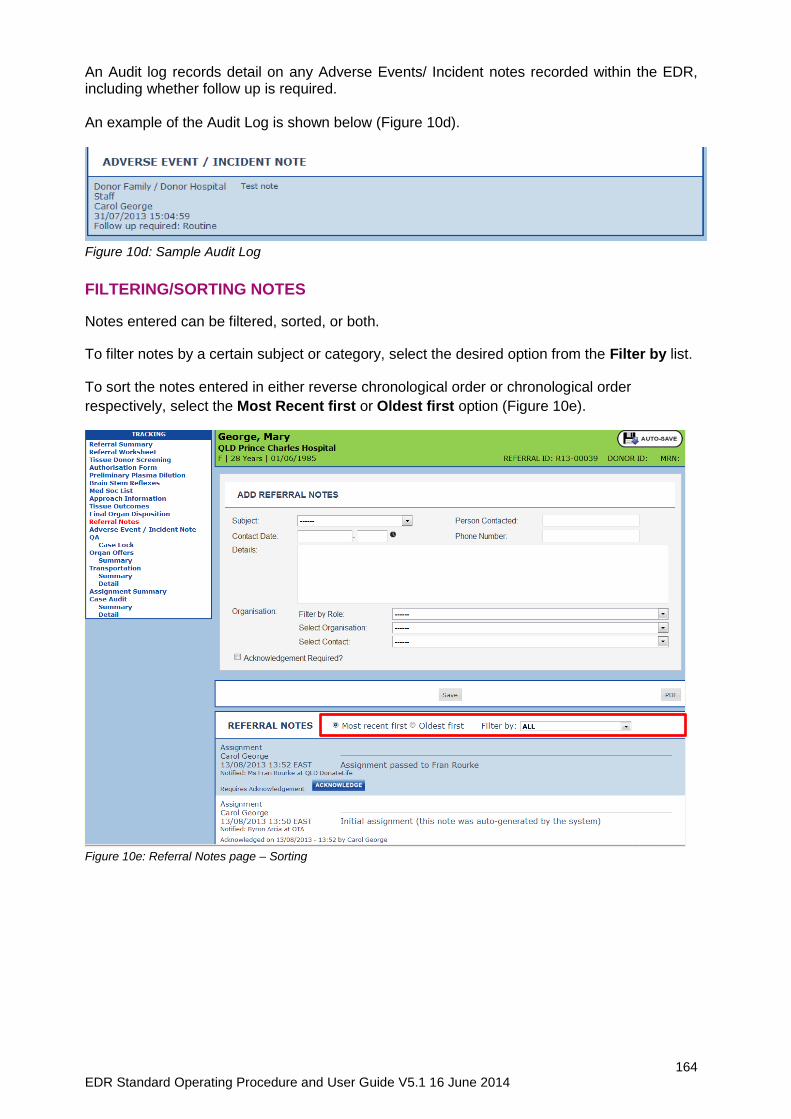
164 EDR Standard Operating Procedure and User Guide V5.1 16 June 2014
An Audit log records detail on any Adverse Events/ Incident notes recorded within the EDR, including whether follow up is required. An example of the Audit Log is shown below (Figure 10d).
Figure 10d: Sample Audit Log
FILTERING/SORTING NOTES
Notes entered can be filtered, sorted, or both.
To filter notes by a certain subject or category, select the desired option from the Filter by list.
To sort the notes entered in either reverse chronological order or chronological order
respectively, select the Most Recent first or Oldest first option (Figure 10e).
Figure 10e: Referral Notes page – Sorting
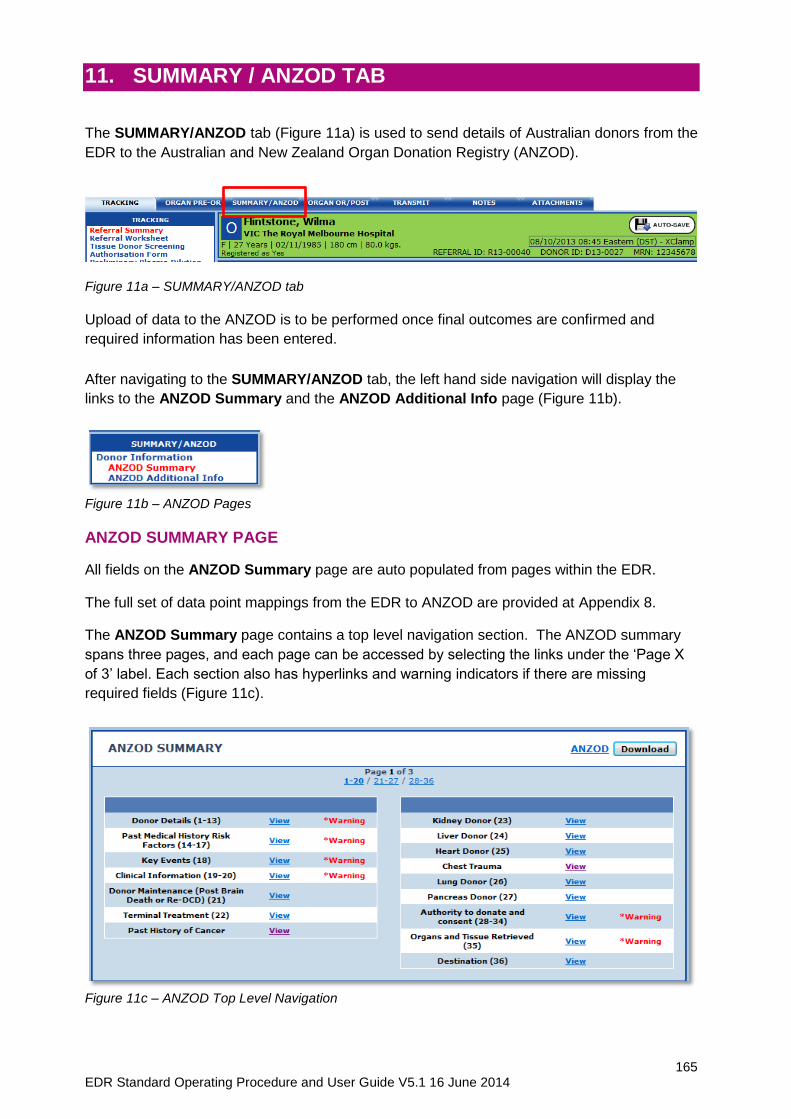
165 EDR Standard Operating Procedure and User Guide V5.1 16 June 2014
11. SUMMARY / ANZOD TAB
The SUMMARY/ANZOD tab (Figure 11a) is used to send details of Australian donors from the
EDR to the Australian and New Zealand Organ Donation Registry (ANZOD).
Figure 11a – SUMMARY/ANZOD tab
Upload of data to the ANZOD is to be performed once final outcomes are confirmed and
required information has been entered.
After navigating to the SUMMARY/ANZOD tab, the left hand side navigation will display the
links to the ANZOD Summary and the ANZOD Additional Info page (Figure 11b).
Figure 11b – ANZOD Pages
ANZOD SUMMARY PAGE
All fields on the ANZOD Summary page are auto populated from pages within the EDR.
The full set of data point mappings from the EDR to ANZOD are provided at Appendix 8.
The ANZOD Summary page contains a top level navigation section. The ANZOD summary
spans three pages, and each page can be accessed by selecting the links under the ‘Page X
of 3’ label. Each section also has hyperlinks and warning indicators if there are missing
required fields (Figure 11c).
Figure 11c – ANZOD Top Level Navigation
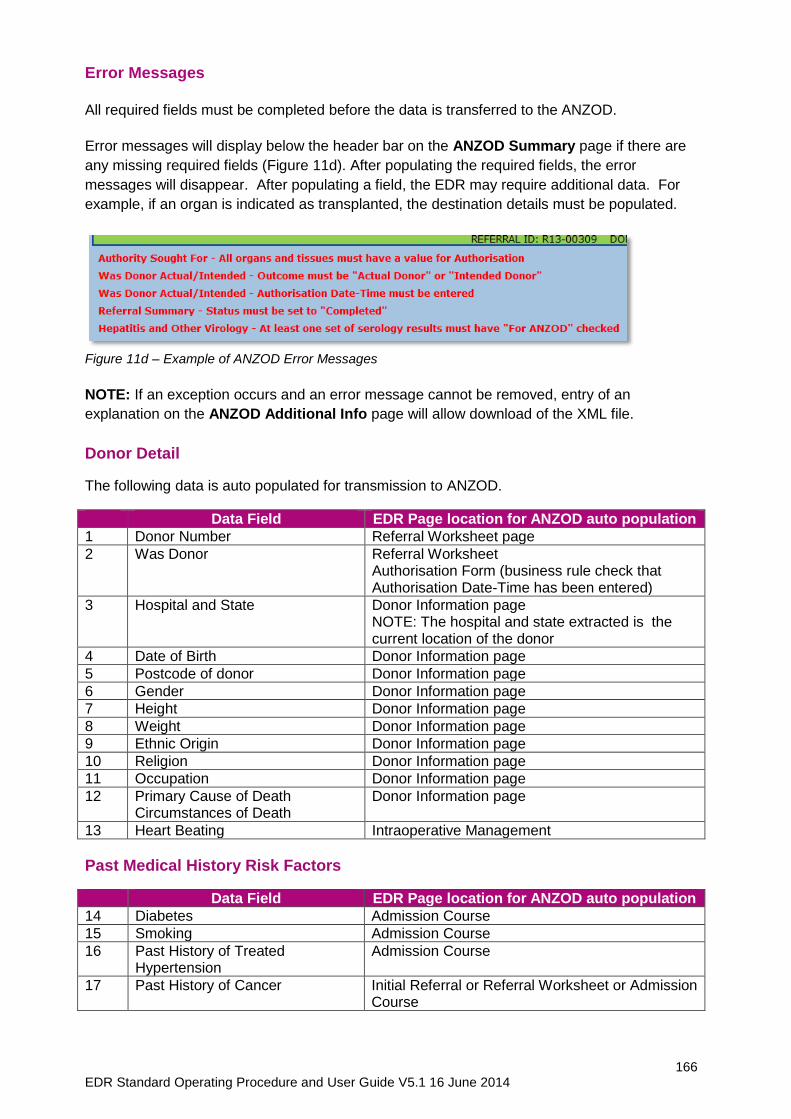
166 EDR Standard Operating Procedure and User Guide V5.1 16 June 2014
Error Messages
All required fields must be completed before the data is transferred to the ANZOD.
Error messages will display below the header bar on the ANZOD Summary page if there are
any missing required fields (Figure 11d). After populating the required fields, the error
messages will disappear. After populating a field, the EDR may require additional data. For
example, if an organ is indicated as transplanted, the destination details must be populated.
Figure 11d – Example of ANZOD Error Messages
NOTE: If an exception occurs and an error message cannot be removed, entry of an
explanation on the ANZOD Additional Info page will allow download of the XML file.
Donor Detail
The following data is auto populated for transmission to ANZOD.
Data Field EDR Page location for ANZOD auto population
1 Donor Number Referral Worksheet page
2 Was Donor Referral Worksheet Authorisation Form (business rule check that Authorisation Date-Time has been entered)
3 Hospital and State Donor Information page NOTE: The hospital and state extracted is the current location of the donor
4 Date of Birth Donor Information page
5 Postcode of donor Donor Information page
6 Gender Donor Information page
7 Height Donor Information page
8 Weight Donor Information page
9 Ethnic Origin Donor Information page
10 Religion Donor Information page
11 Occupation Donor Information page
12 Primary Cause of Death Circumstances of Death
Donor Information page
13 Heart Beating Intraoperative Management
Past Medical History Risk Factors
Data Field EDR Page location for ANZOD auto population
14 Diabetes Admission Course
15 Smoking Admission Course
16 Past History of Treated Hypertension
Admission Course
17 Past History of Cancer Initial Referral or Referral Worksheet or Admission Course
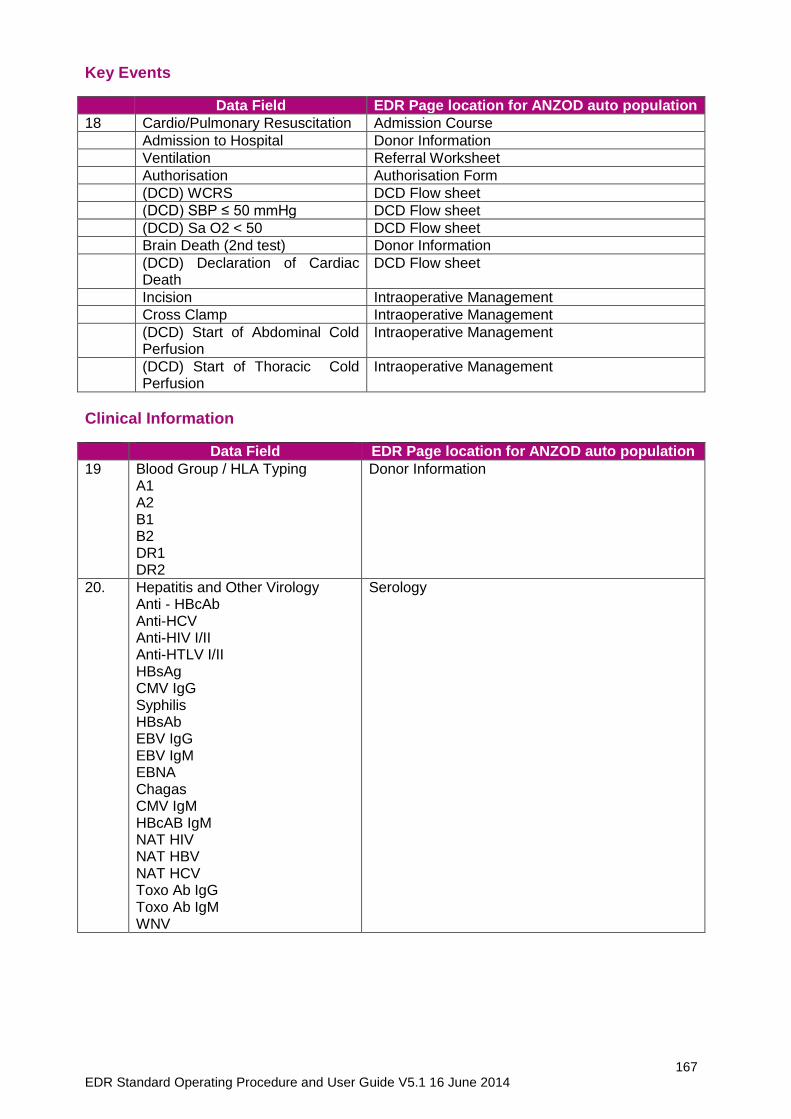
167 EDR Standard Operating Procedure and User Guide V5.1 16 June 2014
Key Events
Data Field EDR Page location for ANZOD auto population
18 Cardio/Pulmonary Resuscitation Admission Course
Admission to Hospital Donor Information
Ventilation Referral Worksheet
Authorisation Authorisation Form
(DCD) WCRS DCD Flow sheet
(DCD) SBP ≤ 50 mmHg DCD Flow sheet
(DCD) Sa O2 < 50 DCD Flow sheet
Brain Death (2nd test) Donor Information
(DCD) Declaration of Cardiac Death
DCD Flow sheet
Incision Intraoperative Management
Cross Clamp Intraoperative Management
(DCD) Start of Abdominal Cold Perfusion
Intraoperative Management
(DCD) Start of Thoracic Cold Perfusion
Intraoperative Management
Clinical Information
Data Field EDR Page location for ANZOD auto population
19 Blood Group / HLA Typing A1 A2 B1 B2 DR1 DR2
Donor Information
20. Hepatitis and Other Virology Anti - HBcAb Anti-HCV Anti-HIV I/II Anti-HTLV I/II HBsAg CMV IgG Syphilis HBsAb EBV IgG EBV IgM EBNA Chagas CMV IgM HBcAB IgM NAT HIV NAT HBV NAT HCV Toxo Ab IgG Toxo Ab IgM WNV
Serology
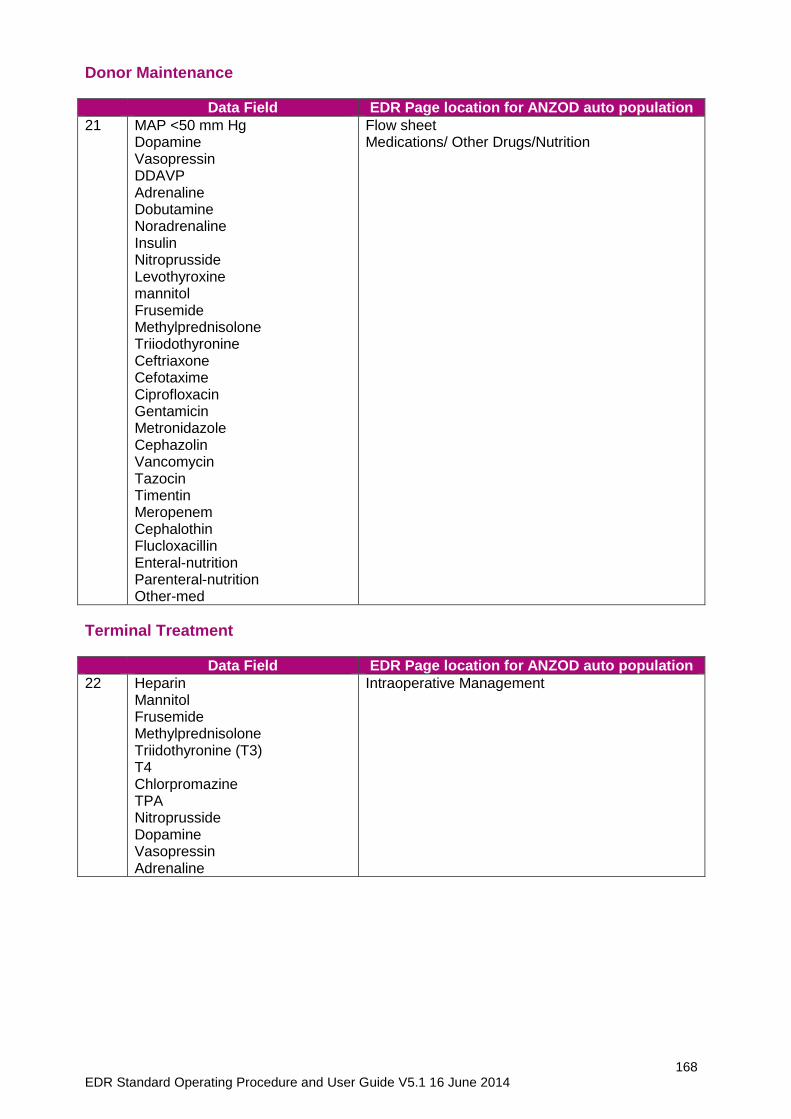
168 EDR Standard Operating Procedure and User Guide V5.1 16 June 2014
Donor Maintenance
Data Field EDR Page location for ANZOD auto population
21 MAP <50 mm Hg Dopamine Vasopressin DDAVP Adrenaline Dobutamine Noradrenaline Insulin Nitroprusside Levothyroxine mannitol Frusemide Methylprednisolone Triiodothyronine Ceftriaxone Cefotaxime Ciprofloxacin Gentamicin Metronidazole Cephazolin Vancomycin Tazocin Timentin Meropenem Cephalothin Flucloxacillin Enteral-nutrition Parenteral-nutrition Other-med
Flow sheet Medications/ Other Drugs/Nutrition
Terminal Treatment
Data Field EDR Page location for ANZOD auto population
22 Heparin Mannitol Frusemide Methylprednisolone Triidothyronine (T3) T4 Chlorpromazine TPA Nitroprusside Dopamine Vasopressin Adrenaline
Intraoperative Management
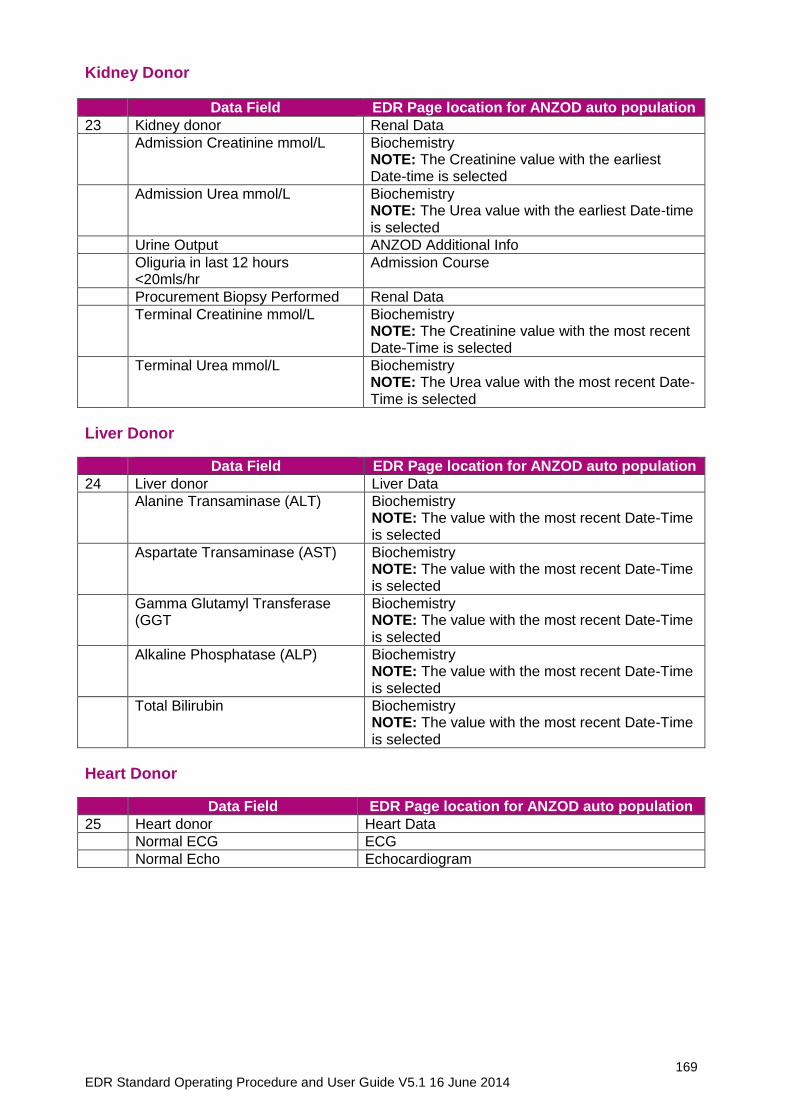
169 EDR Standard Operating Procedure and User Guide V5.1 16 June 2014
Kidney Donor
Data Field EDR Page location for ANZOD auto population
23 Kidney donor Renal Data
Admission Creatinine mmol/L Biochemistry NOTE: The Creatinine value with the earliest Date-time is selected
Admission Urea mmol/L Biochemistry NOTE: The Urea value with the earliest Date-time is selected
Urine Output ANZOD Additional Info
Oliguria in last 12 hours <20mls/hr
Admission Course
Procurement Biopsy Performed Renal Data
Terminal Creatinine mmol/L Biochemistry NOTE: The Creatinine value with the most recent Date-Time is selected
Terminal Urea mmol/L Biochemistry NOTE: The Urea value with the most recent Date-Time is selected
Liver Donor
Data Field EDR Page location for ANZOD auto population
24 Liver donor Liver Data
Alanine Transaminase (ALT) Biochemistry NOTE: The value with the most recent Date-Time is selected
Aspartate Transaminase (AST) Biochemistry NOTE: The value with the most recent Date-Time is selected
Gamma Glutamyl Transferase (GGT
Biochemistry NOTE: The value with the most recent Date-Time is selected
Alkaline Phosphatase (ALP) Biochemistry NOTE: The value with the most recent Date-Time is selected
Total Bilirubin Biochemistry NOTE: The value with the most recent Date-Time is selected
Heart Donor
Data Field EDR Page location for ANZOD auto population
25 Heart donor Heart Data
Normal ECG ECG
Normal Echo Echocardiogram
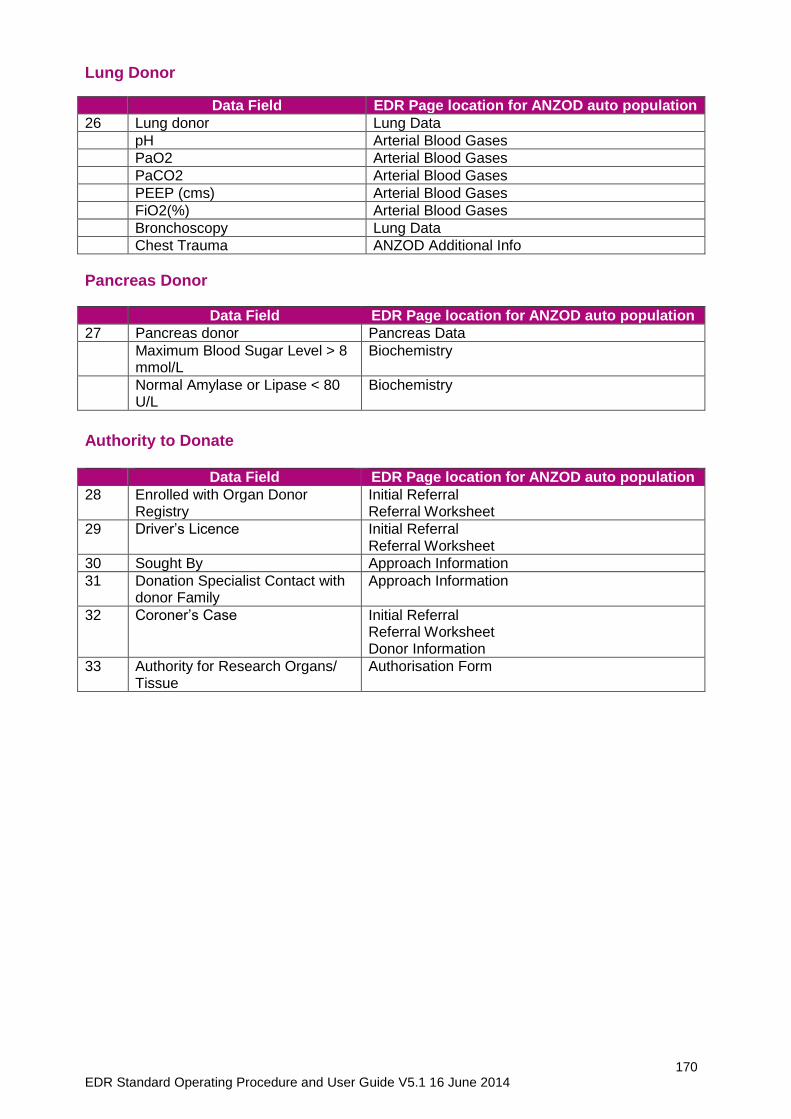
170 EDR Standard Operating Procedure and User Guide V5.1 16 June 2014
Lung Donor
Data Field EDR Page location for ANZOD auto population
26 Lung donor Lung Data
pH Arterial Blood Gases
PaO2 Arterial Blood Gases
PaCO2 Arterial Blood Gases
PEEP (cms) Arterial Blood Gases
FiO2(%) Arterial Blood Gases
Bronchoscopy Lung Data
Chest Trauma ANZOD Additional Info
Pancreas Donor
Data Field EDR Page location for ANZOD auto population
27 Pancreas donor Pancreas Data
Maximum Blood Sugar Level > 8 mmol/L
Biochemistry
Normal Amylase or Lipase < 80 U/L
Biochemistry
Authority to Donate
Data Field EDR Page location for ANZOD auto population
28 Enrolled with Organ Donor Registry
Initial Referral Referral Worksheet
29 Driver’s Licence Initial Referral Referral Worksheet
30 Sought By Approach Information
31 Donation Specialist Contact with donor Family
Approach Information
32 Coroner’s Case Initial Referral Referral Worksheet Donor Information
33 Authority for Research Organs/ Tissue
Authorisation Form

171 EDR Standard Operating Procedure and User Guide V5.1 16 June 2014
Authority Sought By
Data Field EDR Page location for ANZOD auto population
34 Authority Sought For Kidney (L) Kidney (R) Liver Heat Lung (L) Lung (R) Pancreas Intestine Eyes – whole Corneas only Skin Musculoskeletal-arm Musculoskeletal-leg Pelvic Heart valves Vessels- abdomen Vessels – thoracic Vessels - leg
Authorisation Form
Reason Authorisation not requested or Requested and not obtained for: Kidney (L) Kidney (R) Liver Heat Lung (L) Lung (R) Pancreas Intestine Eyes – whole Corneas only Skin Musculoskeletal-arm Musculoskeletal-leg Pelvic Heart valves Vessels- abdomen Vessels – thoracic Vessels - leg
Authorisation Info
Organs/ Tissues Retrieved
Data Field EDR Page location for ANZOD auto population
35 Organs/ tissues Retrieved Organ Data pages Tissue Outcomes Organ Disposition ANZOD Additional Info
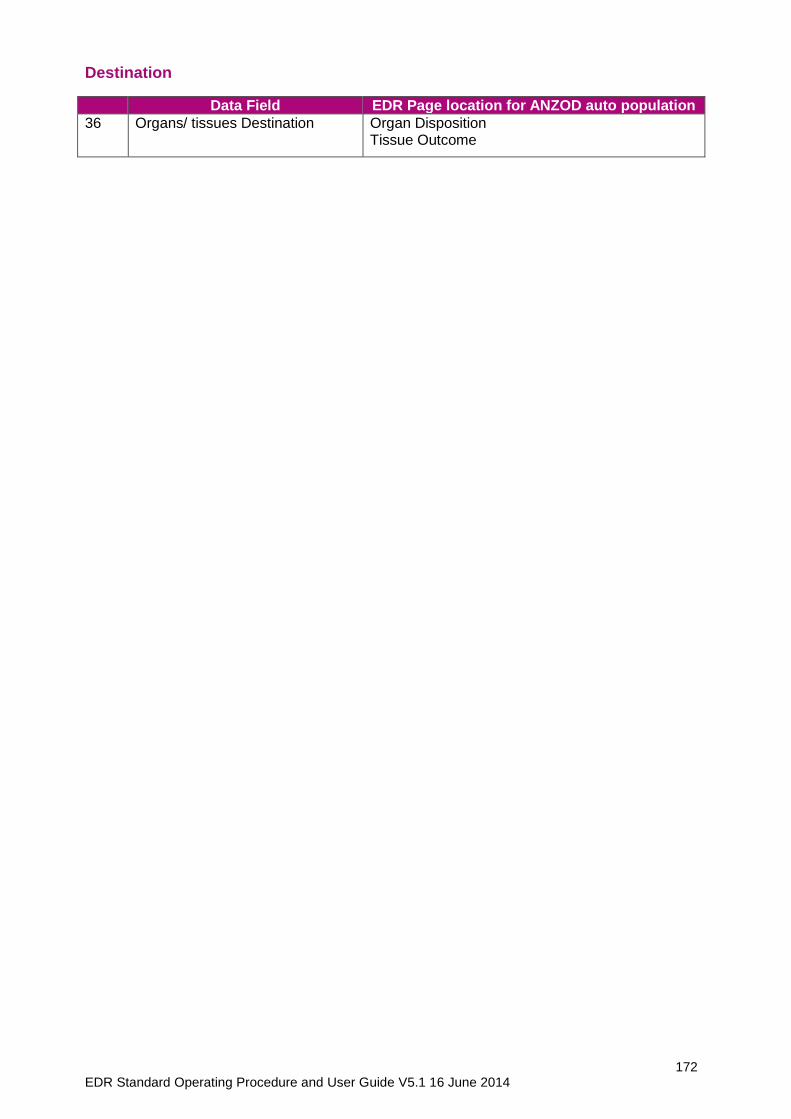
172 EDR Standard Operating Procedure and User Guide V5.1 16 June 2014
Destination
Data Field EDR Page location for ANZOD auto population
36 Organs/ tissues Destination Organ Disposition Tissue Outcome
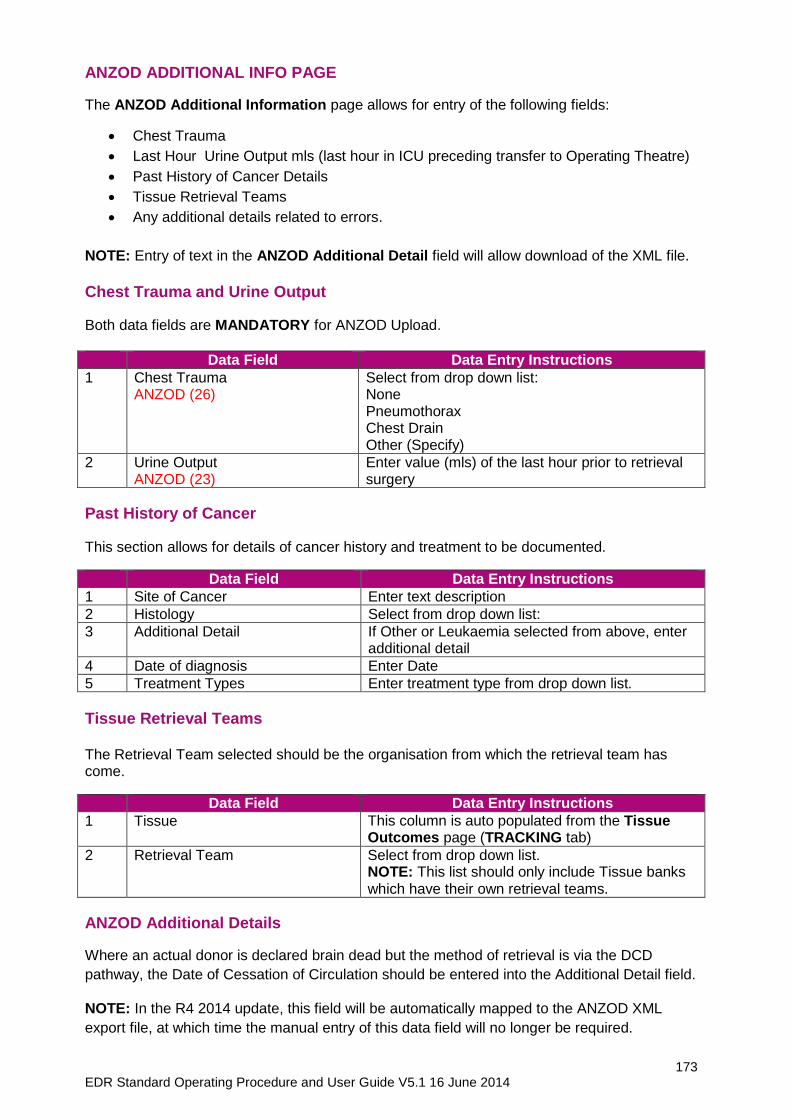
173 EDR Standard Operating Procedure and User Guide V5.1 16 June 2014
ANZOD ADDITIONAL INFO PAGE
The ANZOD Additional Information page allows for entry of the following fields:
Chest Trauma
Last Hour Urine Output mls (last hour in ICU preceding transfer to Operating Theatre)
Past History of Cancer Details
Tissue Retrieval Teams
Any additional details related to errors.
NOTE: Entry of text in the ANZOD Additional Detail field will allow download of the XML file.
Chest Trauma and Urine Output
Both data fields are MANDATORY for ANZOD Upload.
Data Field Data Entry Instructions
1 Chest Trauma ANZOD (26)
Select from drop down list: None Pneumothorax Chest Drain Other (Specify)
2 Urine Output ANZOD (23)
Enter value (mls) of the last hour prior to retrieval surgery
Past History of Cancer
This section allows for details of cancer history and treatment to be documented.
Data Field Data Entry Instructions
1 Site of Cancer Enter text description
2 Histology Select from drop down list:
3 Additional Detail If Other or Leukaemia selected from above, enter additional detail
4 Date of diagnosis Enter Date
5 Treatment Types Enter treatment type from drop down list.
Tissue Retrieval Teams The Retrieval Team selected should be the organisation from which the retrieval team has come.
Data Field Data Entry Instructions
1 Tissue This column is auto populated from the Tissue Outcomes page (TRACKING tab)
2 Retrieval Team Select from drop down list. NOTE: This list should only include Tissue banks which have their own retrieval teams.
ANZOD Additional Details
Where an actual donor is declared brain dead but the method of retrieval is via the DCD
pathway, the Date of Cessation of Circulation should be entered into the Additional Detail field.
NOTE: In the R4 2014 update, this field will be automatically mapped to the ANZOD XML
export file, at which time the manual entry of this data field will no longer be required.
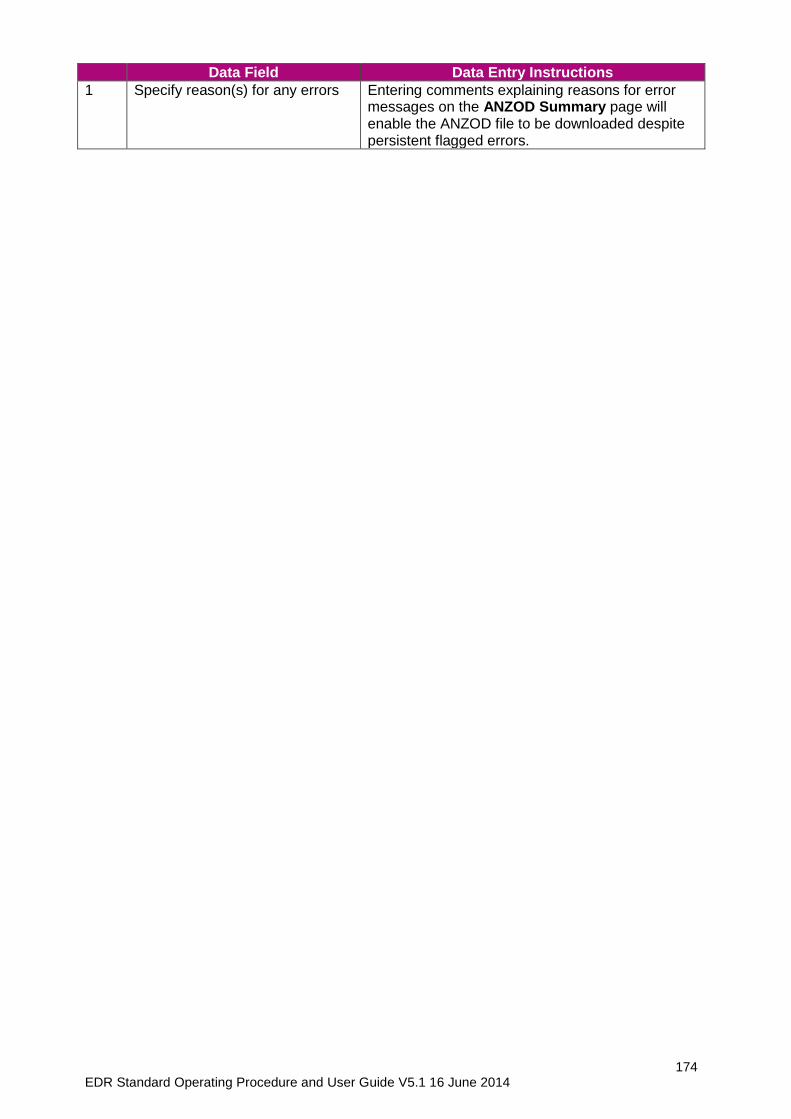
174 EDR Standard Operating Procedure and User Guide V5.1 16 June 2014
Data Field Data Entry Instructions
1 Specify reason(s) for any errors Entering comments explaining reasons for error messages on the ANZOD Summary page will enable the ANZOD file to be downloaded despite persistent flagged errors.
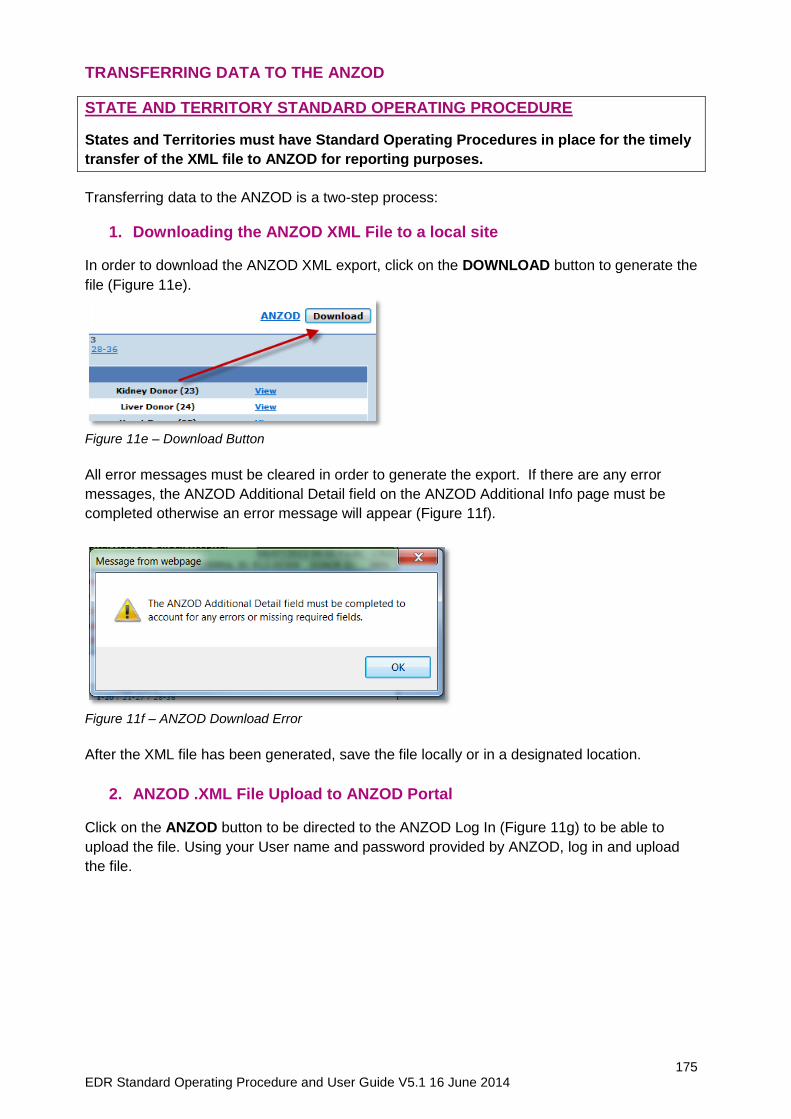
175 EDR Standard Operating Procedure and User Guide V5.1 16 June 2014
TRANSFERRING DATA TO THE ANZOD
STATE AND TERRITORY STANDARD OPERATING PROCEDURE
States and Territories must have Standard Operating Procedures in place for the timely
transfer of the XML file to ANZOD for reporting purposes.
Transferring data to the ANZOD is a two-step process:
1. Downloading the ANZOD XML File to a local site
In order to download the ANZOD XML export, click on the DOWNLOAD button to generate the
file (Figure 11e).
Figure 11e – Download Button
All error messages must be cleared in order to generate the export. If there are any error
messages, the ANZOD Additional Detail field on the ANZOD Additional Info page must be
completed otherwise an error message will appear (Figure 11f).
Figure 11f – ANZOD Download Error
After the XML file has been generated, save the file locally or in a designated location.
2. ANZOD .XML File Upload to ANZOD Portal
Click on the ANZOD button to be directed to the ANZOD Log In (Figure 11g) to be able to
upload the file. Using your User name and password provided by ANZOD, log in and upload
the file.
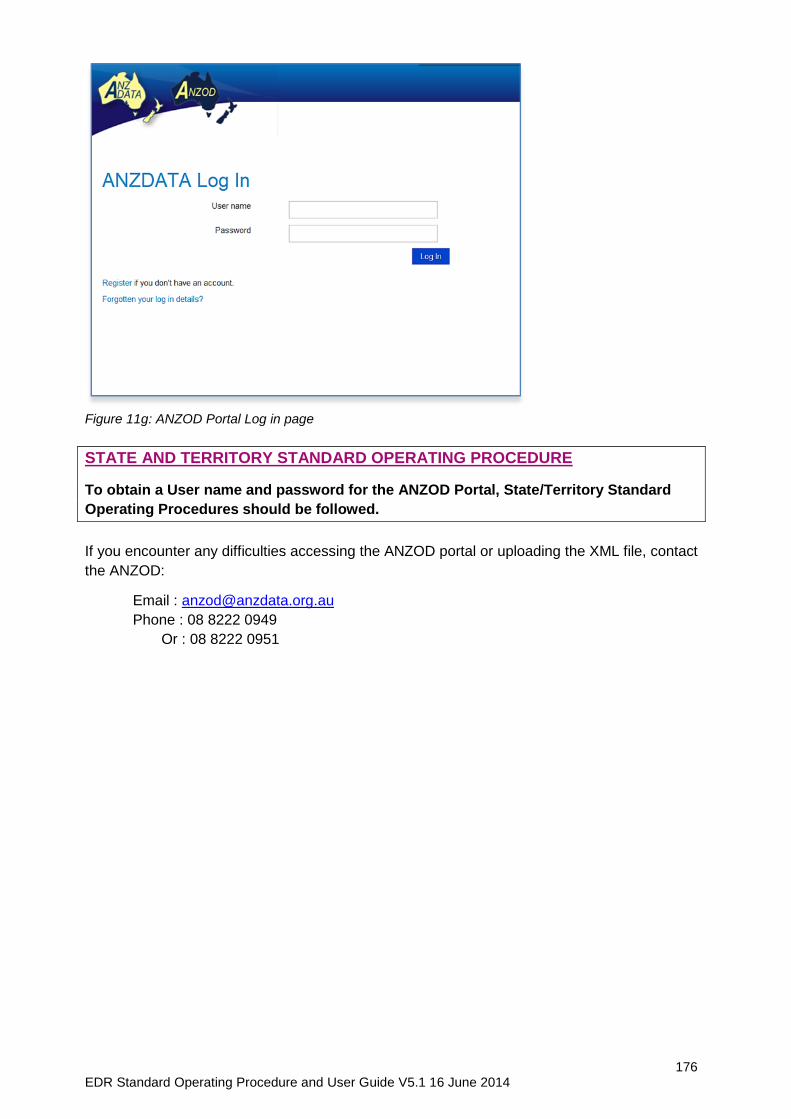
176 EDR Standard Operating Procedure and User Guide V5.1 16 June 2014
Figure 11g: ANZOD Portal Log in page
STATE AND TERRITORY STANDARD OPERATING PROCEDURE
To obtain a User name and password for the ANZOD Portal, State/Territory Standard
Operating Procedures should be followed.
If you encounter any difficulties accessing the ANZOD portal or uploading the XML file, contact
the ANZOD:
Email : [email protected]
Phone : 08 8222 0949
Or : 08 8222 0951
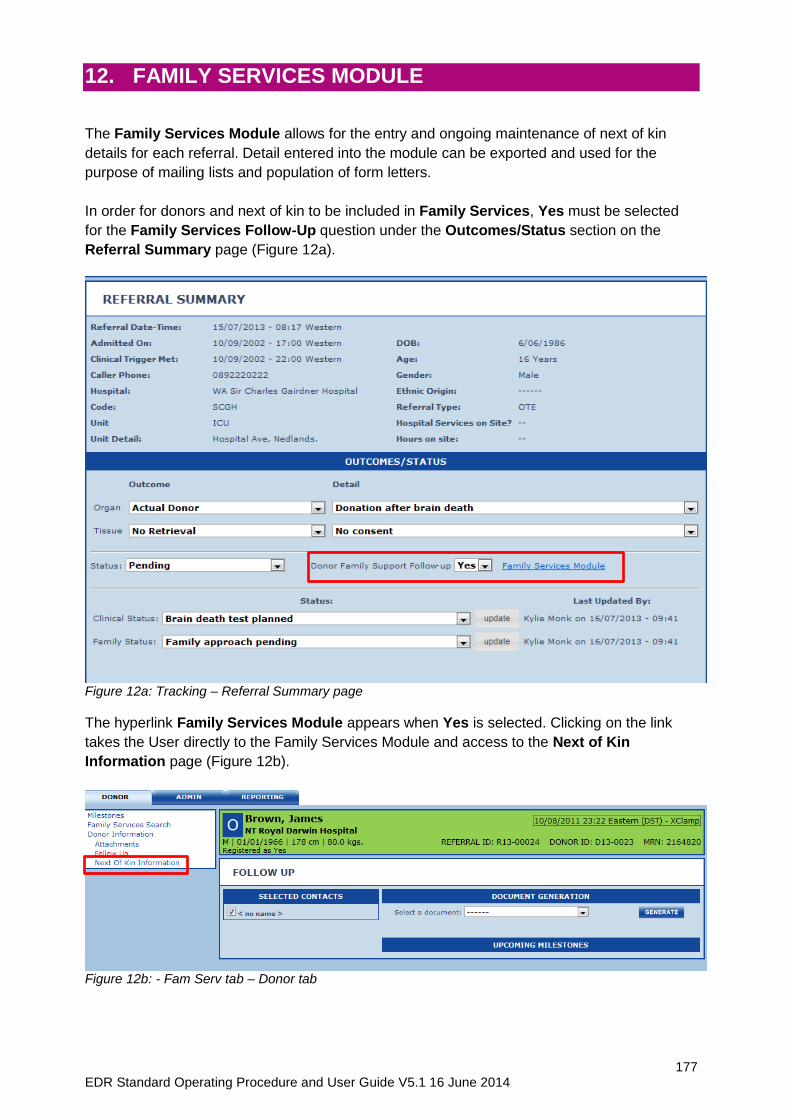
177 EDR Standard Operating Procedure and User Guide V5.1 16 June 2014
12. FAMILY SERVICES MODULE The Family Services Module allows for the entry and ongoing maintenance of next of kin
details for each referral. Detail entered into the module can be exported and used for the
purpose of mailing lists and population of form letters.
In order for donors and next of kin to be included in Family Services, Yes must be selected
for the Family Services Follow-Up question under the Outcomes/Status section on the
Referral Summary page (Figure 12a).
Figure 12a: Tracking – Referral Summary page
The hyperlink Family Services Module appears when Yes is selected. Clicking on the link
takes the User directly to the Family Services Module and access to the Next of Kin
Information page (Figure 12b).
Figure 12b: - Fam Serv tab – Donor tab
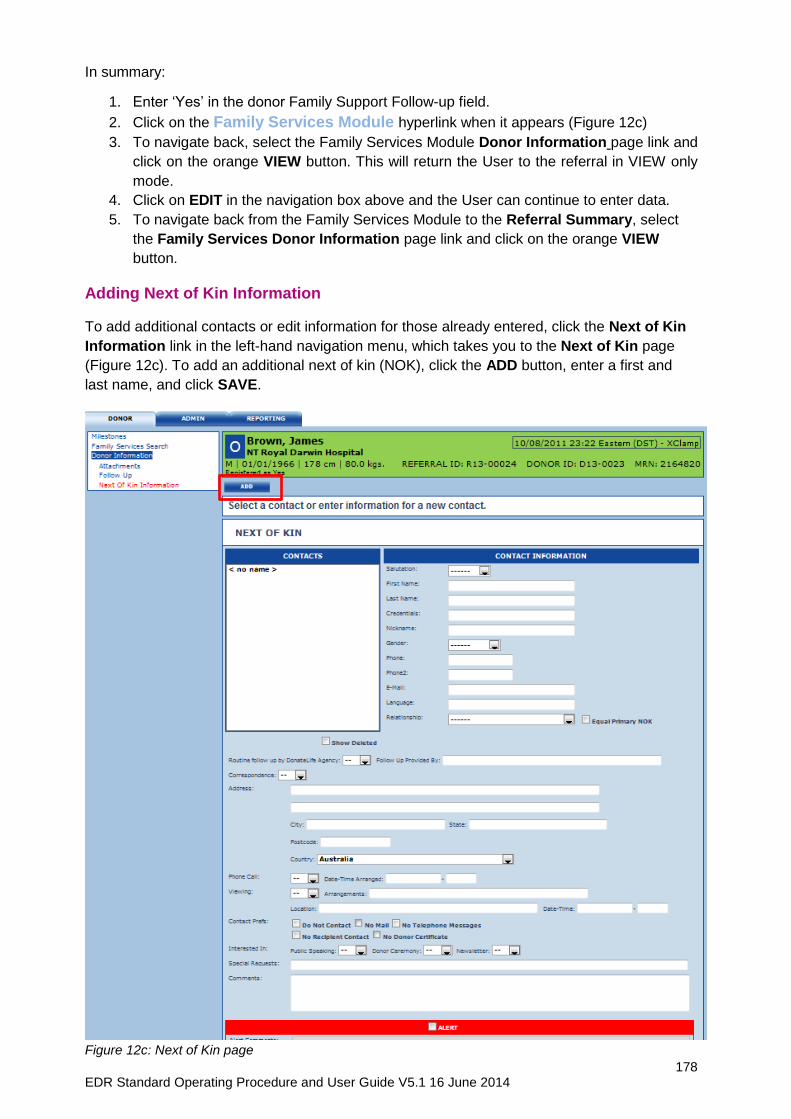
178 EDR Standard Operating Procedure and User Guide V5.1 16 June 2014
In summary:
1. Enter ‘Yes’ in the donor Family Support Follow-up field.
2. Click on the Family Services Module hyperlink when it appears (Figure 12c)
3. To navigate back, select the Family Services Module Donor Information page link and
click on the orange VIEW button. This will return the User to the referral in VIEW only
mode.
4. Click on EDIT in the navigation box above and the User can continue to enter data.
5. To navigate back from the Family Services Module to the Referral Summary, select
the Family Services Donor Information page link and click on the orange VIEW
button.
Adding Next of Kin Information
To add additional contacts or edit information for those already entered, click the Next of Kin
Information link in the left-hand navigation menu, which takes you to the Next of Kin page
(Figure 12c). To add an additional next of kin (NOK), click the ADD button, enter a first and
last name, and click SAVE.
Figure 12c: Next of Kin page
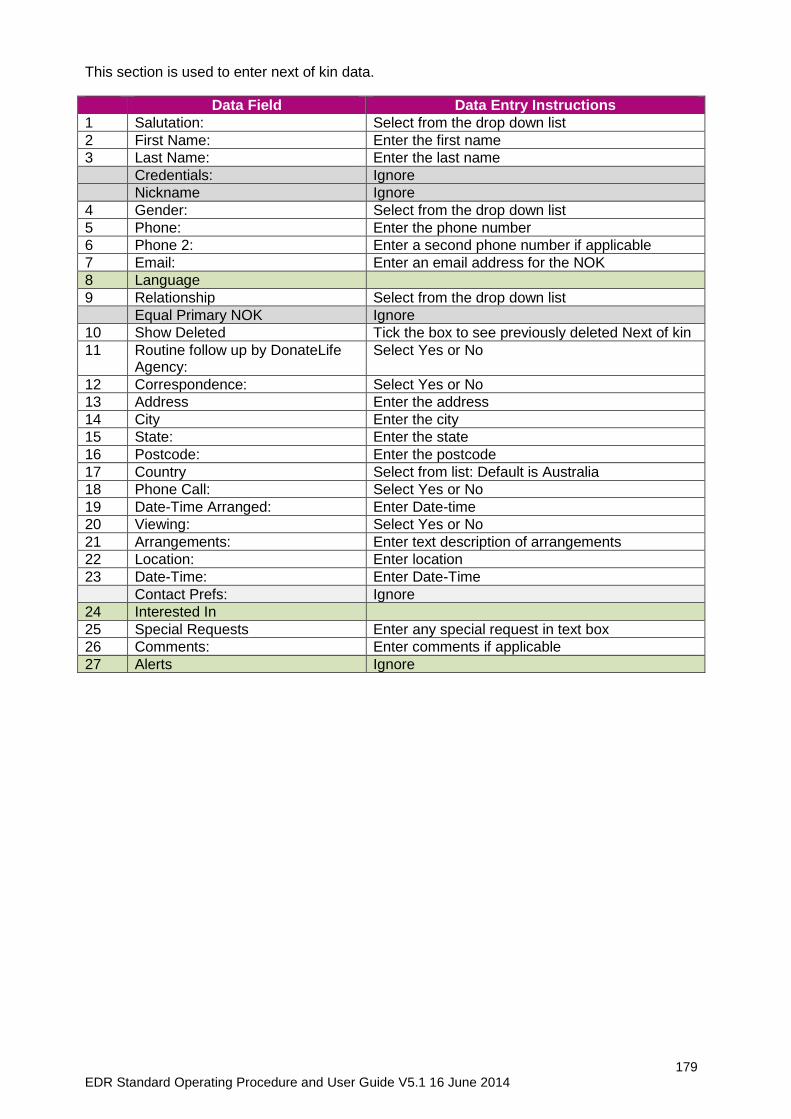
179 EDR Standard Operating Procedure and User Guide V5.1 16 June 2014
This section is used to enter next of kin data.
Data Field Data Entry Instructions
1 Salutation: Select from the drop down list
2 First Name: Enter the first name
3 Last Name: Enter the last name
Credentials: Ignore
Nickname Ignore
4 Gender: Select from the drop down list
5 Phone: Enter the phone number
6 Phone 2: Enter a second phone number if applicable
7 Email: Enter an email address for the NOK
8 Language
9 Relationship Select from the drop down list
Equal Primary NOK Ignore
10 Show Deleted Tick the box to see previously deleted Next of kin
11 Routine follow up by DonateLife Agency:
Select Yes or No
12 Correspondence: Select Yes or No
13 Address Enter the address
14 City Enter the city
15 State: Enter the state
16 Postcode: Enter the postcode
17 Country Select from list: Default is Australia
18 Phone Call: Select Yes or No
19 Date-Time Arranged: Enter Date-time
20 Viewing: Select Yes or No
21 Arrangements: Enter text description of arrangements
22 Location: Enter location
23 Date-Time: Enter Date-Time
Contact Prefs: Ignore
24 Interested In
25 Special Requests Enter any special request in text box
26 Comments: Enter comments if applicable
27 Alerts Ignore
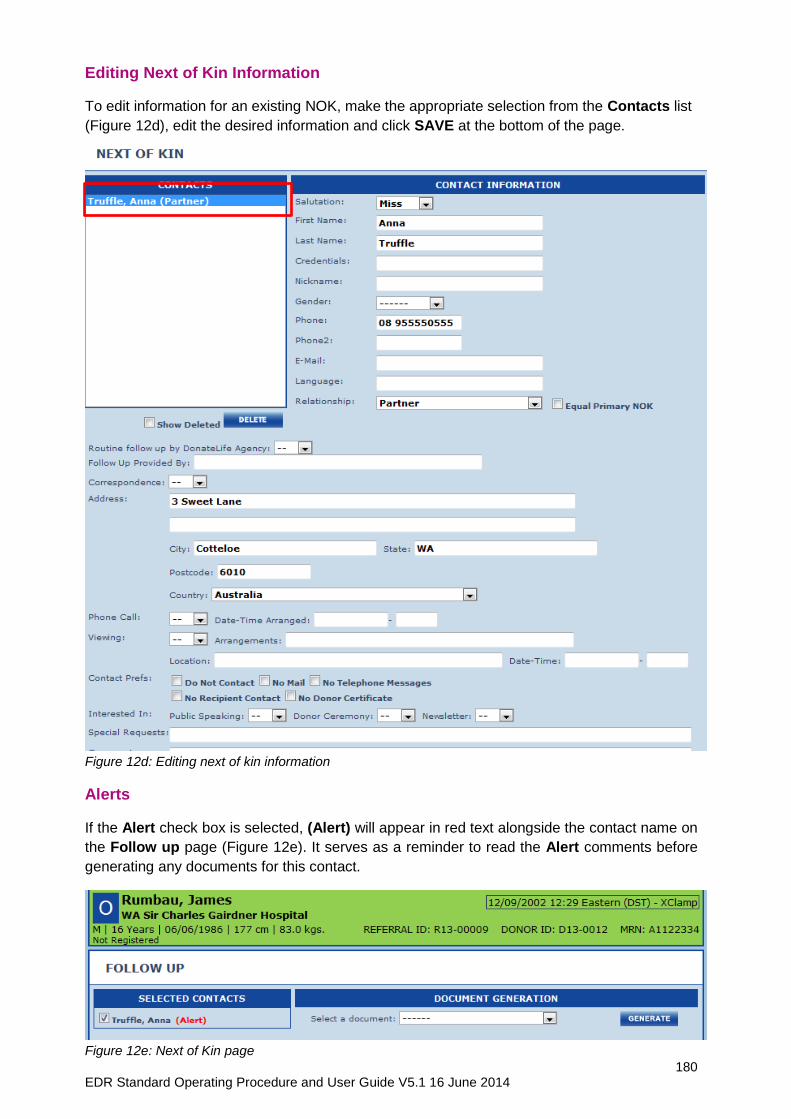
180 EDR Standard Operating Procedure and User Guide V5.1 16 June 2014
Editing Next of Kin Information
To edit information for an existing NOK, make the appropriate selection from the Contacts list
(Figure 12d), edit the desired information and click SAVE at the bottom of the page.
Figure 12d: Editing next of kin information
Alerts
If the Alert check box is selected, (Alert) will appear in red text alongside the contact name on
the Follow up page (Figure 12e). It serves as a reminder to read the Alert comments before
generating any documents for this contact.
Figure 12e: Next of Kin page
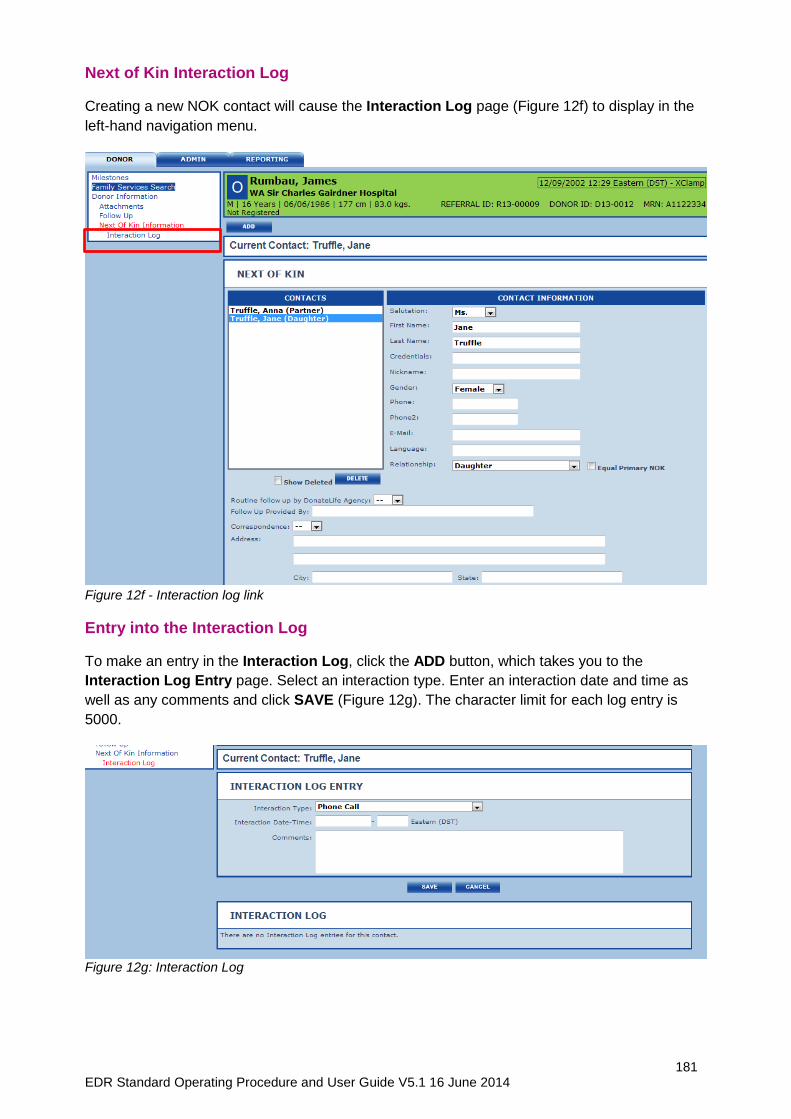
181 EDR Standard Operating Procedure and User Guide V5.1 16 June 2014
Next of Kin Interaction Log
Creating a new NOK contact will cause the Interaction Log page (Figure 12f) to display in the
left-hand navigation menu.
Figure 12f - Interaction log link
Entry into the Interaction Log
To make an entry in the Interaction Log, click the ADD button, which takes you to the
Interaction Log Entry page. Select an interaction type. Enter an interaction date and time as
well as any comments and click SAVE (Figure 12g). The character limit for each log entry is
5000.
Figure 12g: Interaction Log
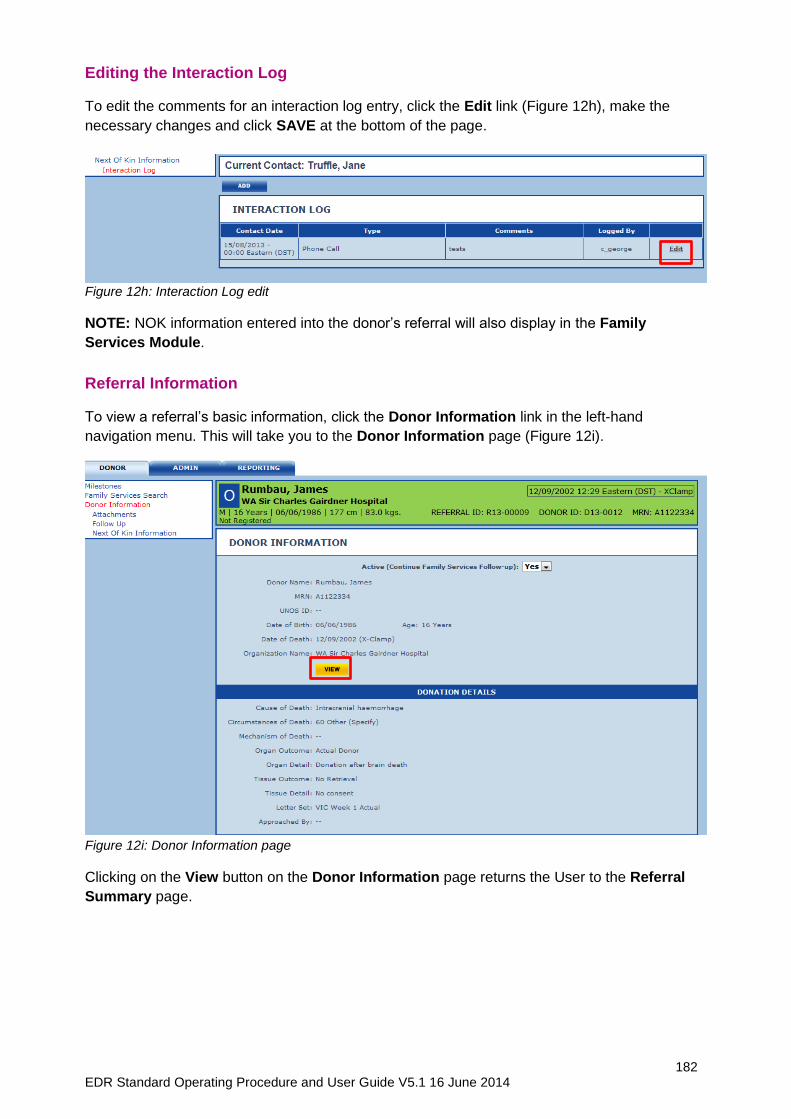
182 EDR Standard Operating Procedure and User Guide V5.1 16 June 2014
Editing the Interaction Log
To edit the comments for an interaction log entry, click the Edit link (Figure 12h), make the
necessary changes and click SAVE at the bottom of the page.
Figure 12h: Interaction Log edit
NOTE: NOK information entered into the donor’s referral will also display in the Family
Services Module.
Referral Information
To view a referral’s basic information, click the Donor Information link in the left-hand
navigation menu. This will take you to the Donor Information page (Figure 12i).
Figure 12i: Donor Information page
Clicking on the View button on the Donor Information page returns the User to the Referral
Summary page.
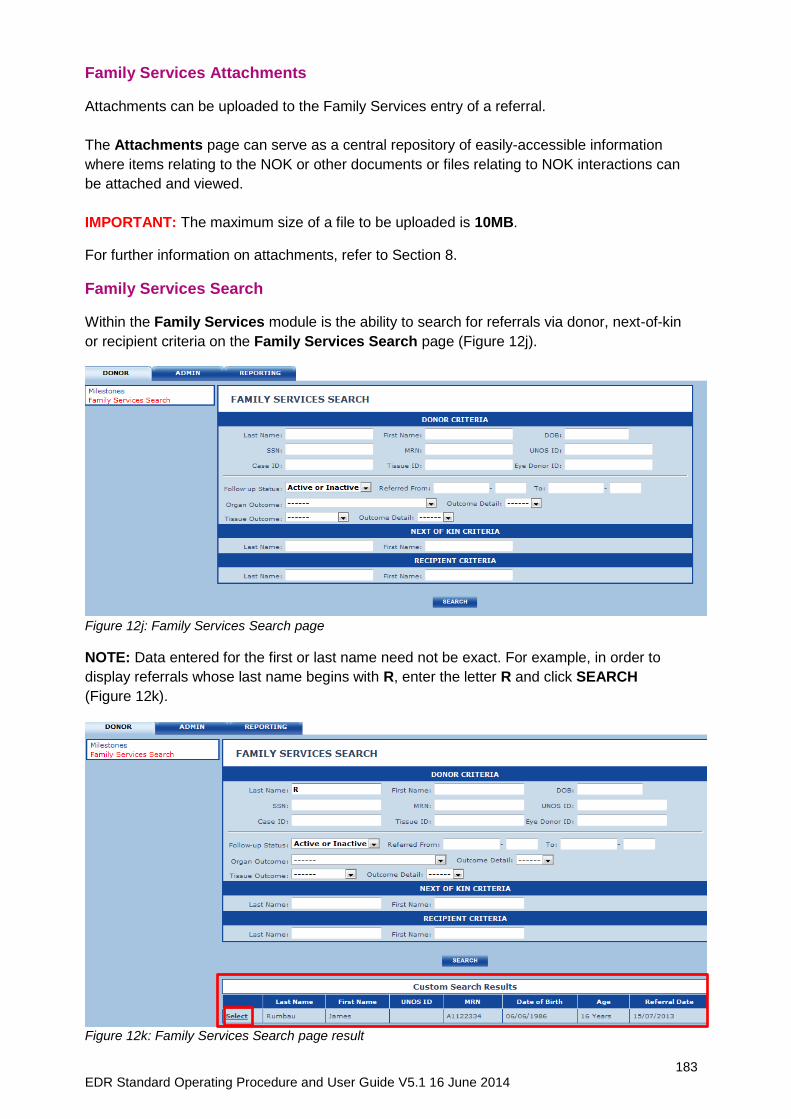
183 EDR Standard Operating Procedure and User Guide V5.1 16 June 2014
Family Services Attachments
Attachments can be uploaded to the Family Services entry of a referral.
The Attachments page can serve as a central repository of easily-accessible information
where items relating to the NOK or other documents or files relating to NOK interactions can
be attached and viewed.
IMPORTANT: The maximum size of a file to be uploaded is 10MB.
For further information on attachments, refer to Section 8.
Family Services Search
Within the Family Services module is the ability to search for referrals via donor, next-of-kin
or recipient criteria on the Family Services Search page (Figure 12j).
Figure 12j: Family Services Search page
NOTE: Data entered for the first or last name need not be exact. For example, in order to
display referrals whose last name begins with R, enter the letter R and click SEARCH
(Figure 12k).
Figure 12k: Family Services Search page result
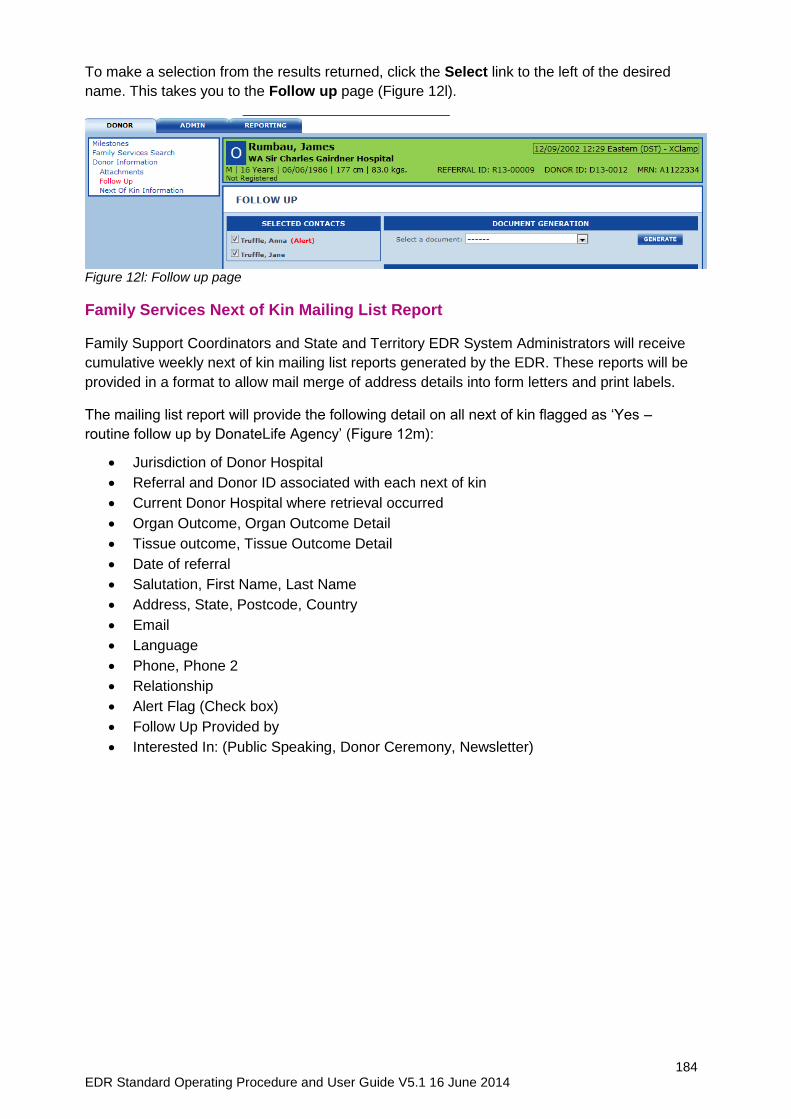
184 EDR Standard Operating Procedure and User Guide V5.1 16 June 2014
To make a selection from the results returned, click the Select link to the left of the desired
name. This takes you to the Follow up page (Figure 12l).
Figure 12l: Follow up page
Family Services Next of Kin Mailing List Report
Family Support Coordinators and State and Territory EDR System Administrators will receive
cumulative weekly next of kin mailing list reports generated by the EDR. These reports will be
provided in a format to allow mail merge of address details into form letters and print labels.
The mailing list report will provide the following detail on all next of kin flagged as ‘Yes –
routine follow up by DonateLife Agency’ (Figure 12m):
Jurisdiction of Donor Hospital
Referral and Donor ID associated with each next of kin
Current Donor Hospital where retrieval occurred
Organ Outcome, Organ Outcome Detail
Tissue outcome, Tissue Outcome Detail
Date of referral
Salutation, First Name, Last Name
Address, State, Postcode, Country
Language
Phone, Phone 2
Relationship
Alert Flag (Check box)
Follow Up Provided by
Interested In: (Public Speaking, Donor Ceremony, Newsletter)
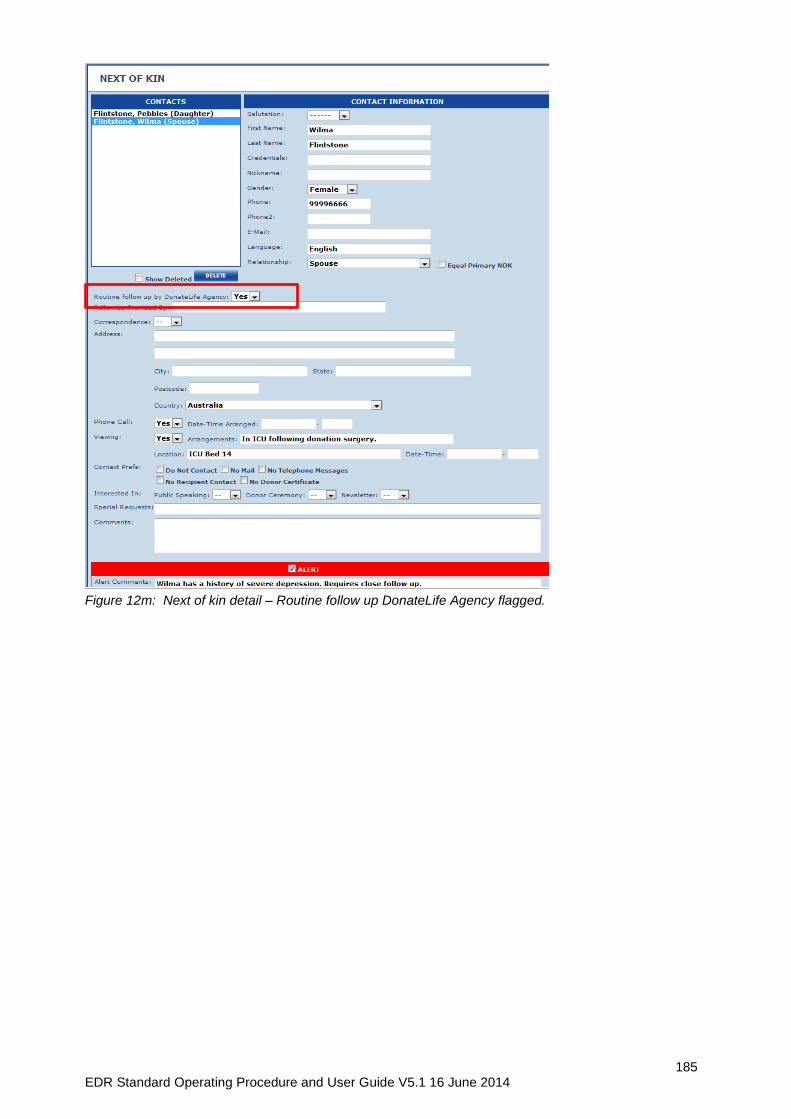
185 EDR Standard Operating Procedure and User Guide V5.1 16 June 2014
Figure 12m: Next of kin detail – Routine follow up DonateLife Agency flagged.
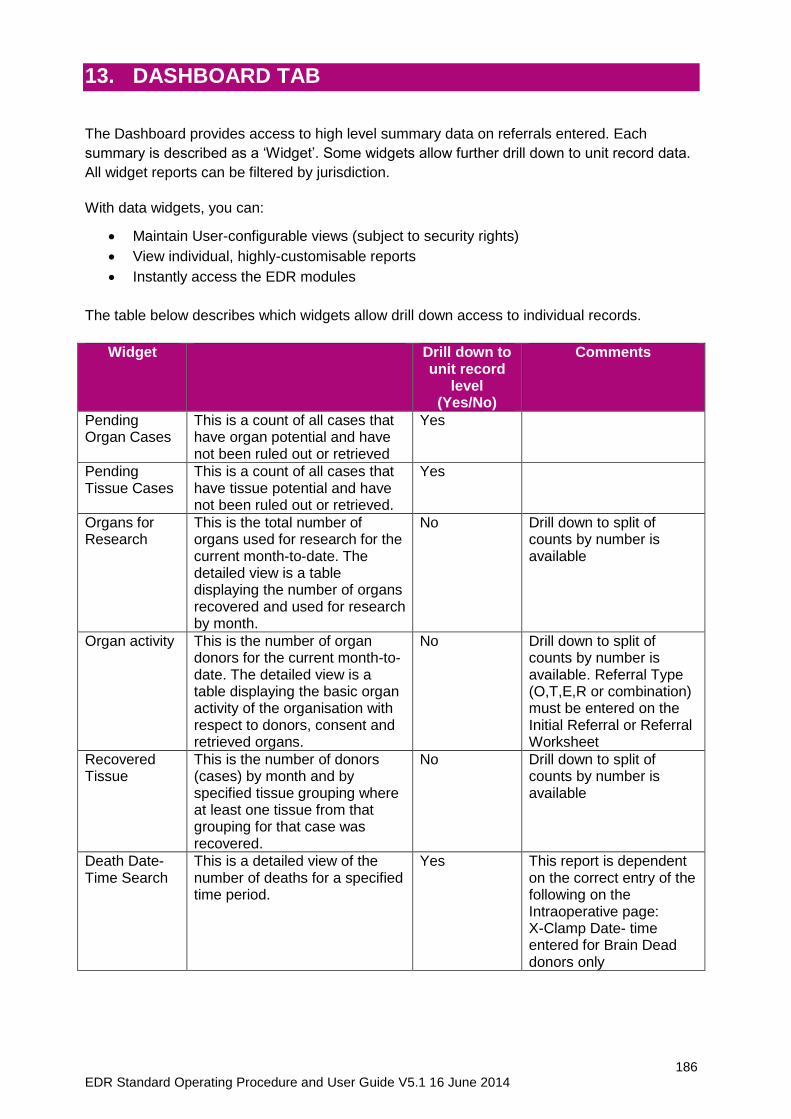
186 EDR Standard Operating Procedure and User Guide V5.1 16 June 2014
13. DASHBOARD TAB The Dashboard provides access to high level summary data on referrals entered. Each
summary is described as a ‘Widget’. Some widgets allow further drill down to unit record data.
All widget reports can be filtered by jurisdiction.
With data widgets, you can:
Maintain User-configurable views (subject to security rights)
View individual, highly-customisable reports
Instantly access the EDR modules
The table below describes which widgets allow drill down access to individual records.
Widget Drill down to unit record
level (Yes/No)
Comments
Pending Organ Cases
This is a count of all cases that have organ potential and have not been ruled out or retrieved
Yes
Pending Tissue Cases
This is a count of all cases that have tissue potential and have not been ruled out or retrieved.
Yes
Organs for Research
This is the total number of organs used for research for the current month-to-date. The detailed view is a table displaying the number of organs recovered and used for research by month.
No Drill down to split of counts by number is available
Organ activity This is the number of organ donors for the current month-to-date. The detailed view is a table displaying the basic organ activity of the organisation with respect to donors, consent and retrieved organs.
No Drill down to split of counts by number is available. Referral Type (O,T,E,R or combination) must be entered on the Initial Referral or Referral Worksheet
Recovered Tissue
This is the number of donors (cases) by month and by specified tissue grouping where at least one tissue from that grouping for that case was recovered.
No Drill down to split of counts by number is available
Death Date-Time Search
This is a detailed view of the number of deaths for a specified time period.
Yes This report is dependent on the correct entry of the following on the Intraoperative page: X-Clamp Date- time entered for Brain Dead donors only
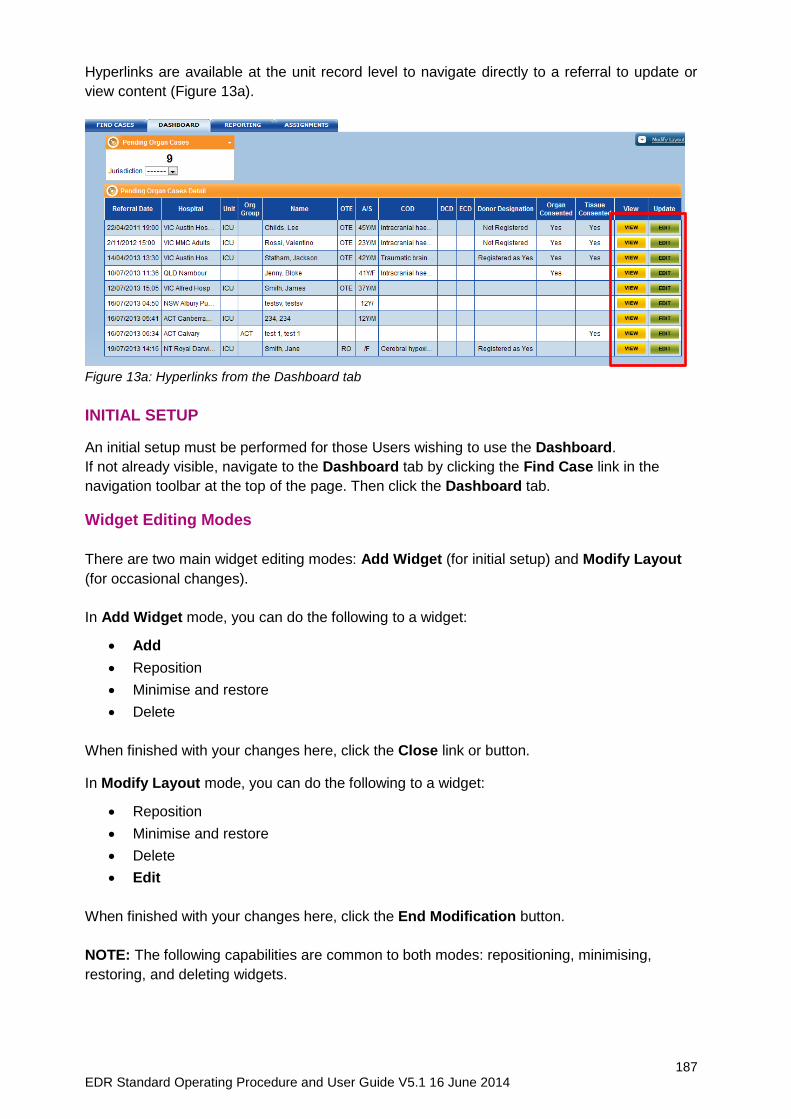
187 EDR Standard Operating Procedure and User Guide V5.1 16 June 2014
Hyperlinks are available at the unit record level to navigate directly to a referral to update or
view content (Figure 13a).
Figure 13a: Hyperlinks from the Dashboard tab
INITIAL SETUP
An initial setup must be performed for those Users wishing to use the Dashboard.
If not already visible, navigate to the Dashboard tab by clicking the Find Case link in the
navigation toolbar at the top of the page. Then click the Dashboard tab.
Widget Editing Modes
There are two main widget editing modes: Add Widget (for initial setup) and Modify Layout
(for occasional changes).
In Add Widget mode, you can do the following to a widget:
Add
Reposition
Minimise and restore
Delete
When finished with your changes here, click the Close link or button.
In Modify Layout mode, you can do the following to a widget:
Reposition
Minimise and restore
Delete
Edit
When finished with your changes here, click the End Modification button.
NOTE: The following capabilities are common to both modes: repositioning, minimising,
restoring, and deleting widgets.
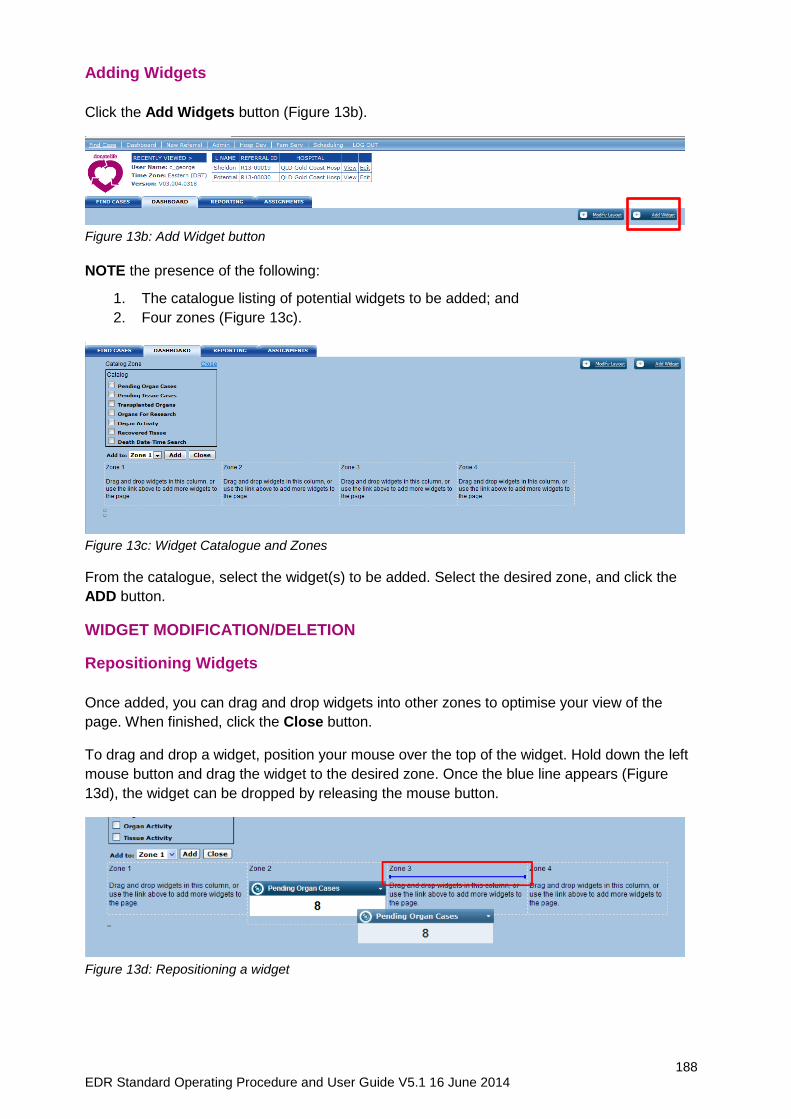
188 EDR Standard Operating Procedure and User Guide V5.1 16 June 2014
Adding Widgets
Click the Add Widgets button (Figure 13b).
Figure 13b: Add Widget button
NOTE the presence of the following:
1. The catalogue listing of potential widgets to be added; and
2. Four zones (Figure 13c).
Figure 13c: Widget Catalogue and Zones
From the catalogue, select the widget(s) to be added. Select the desired zone, and click the
ADD button.
WIDGET MODIFICATION/DELETION
Repositioning Widgets
Once added, you can drag and drop widgets into other zones to optimise your view of the
page. When finished, click the Close button.
To drag and drop a widget, position your mouse over the top of the widget. Hold down the left
mouse button and drag the widget to the desired zone. Once the blue line appears (Figure
13d), the widget can be dropped by releasing the mouse button.
Figure 13d: Repositioning a widget
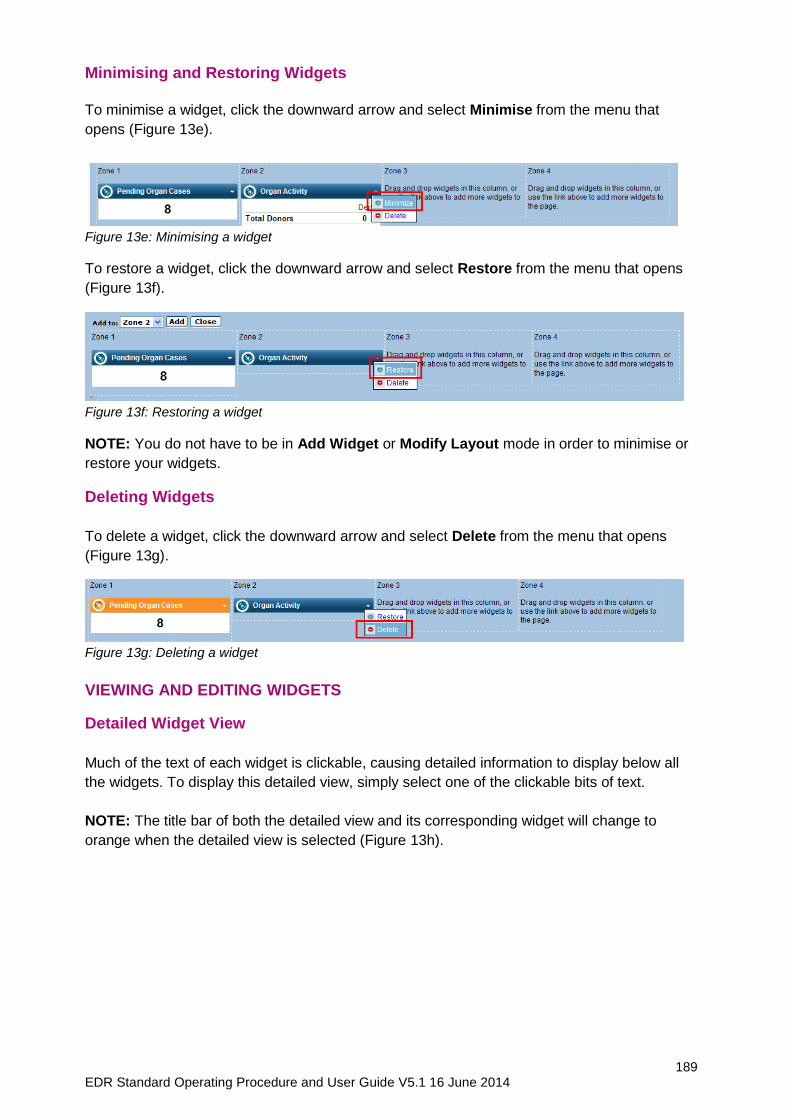
189 EDR Standard Operating Procedure and User Guide V5.1 16 June 2014
Minimising and Restoring Widgets
To minimise a widget, click the downward arrow and select Minimise from the menu that
opens (Figure 13e).
Figure 13e: Minimising a widget
To restore a widget, click the downward arrow and select Restore from the menu that opens
(Figure 13f).
Figure 13f: Restoring a widget
NOTE: You do not have to be in Add Widget or Modify Layout mode in order to minimise or
restore your widgets.
Deleting Widgets
To delete a widget, click the downward arrow and select Delete from the menu that opens
(Figure 13g).
Figure 13g: Deleting a widget
VIEWING AND EDITING WIDGETS
Detailed Widget View
Much of the text of each widget is clickable, causing detailed information to display below all
the widgets. To display this detailed view, simply select one of the clickable bits of text.
NOTE: The title bar of both the detailed view and its corresponding widget will change to
orange when the detailed view is selected (Figure 13h).
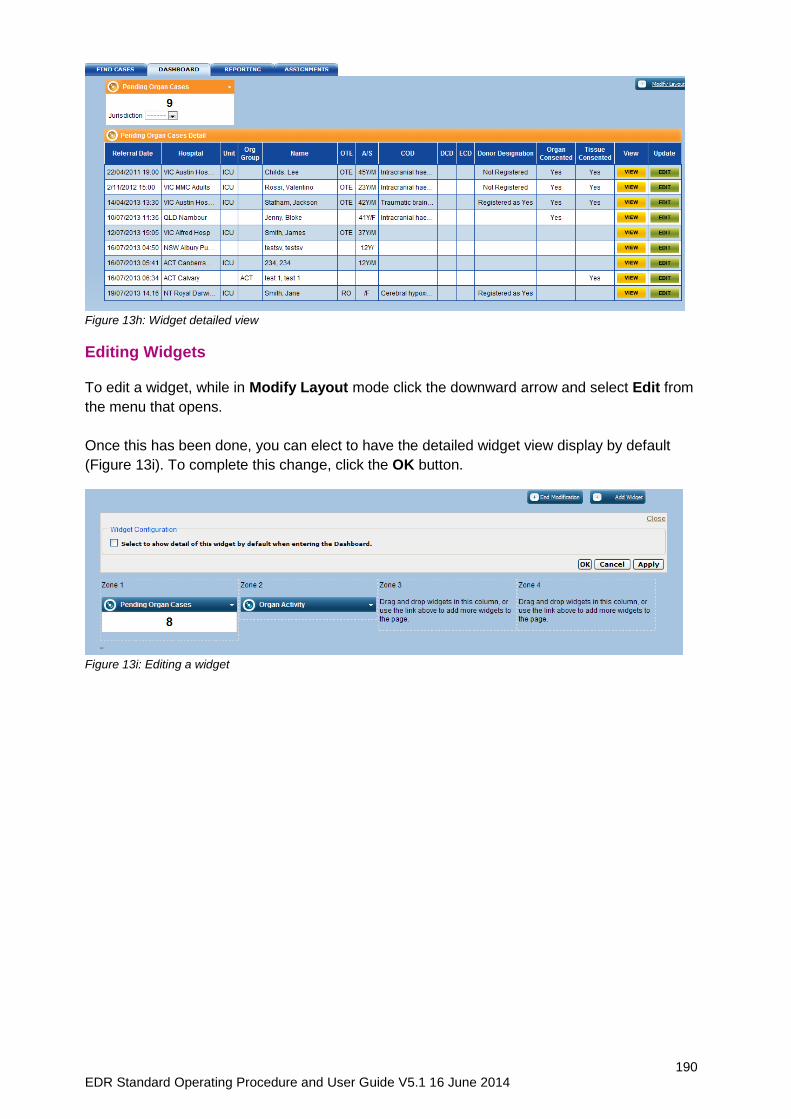
190 EDR Standard Operating Procedure and User Guide V5.1 16 June 2014
Figure 13h: Widget detailed view
Editing Widgets
To edit a widget, while in Modify Layout mode click the downward arrow and select Edit from
the menu that opens.
Once this has been done, you can elect to have the detailed widget view display by default
(Figure 13i). To complete this change, click the OK button.
Figure 13i: Editing a widget
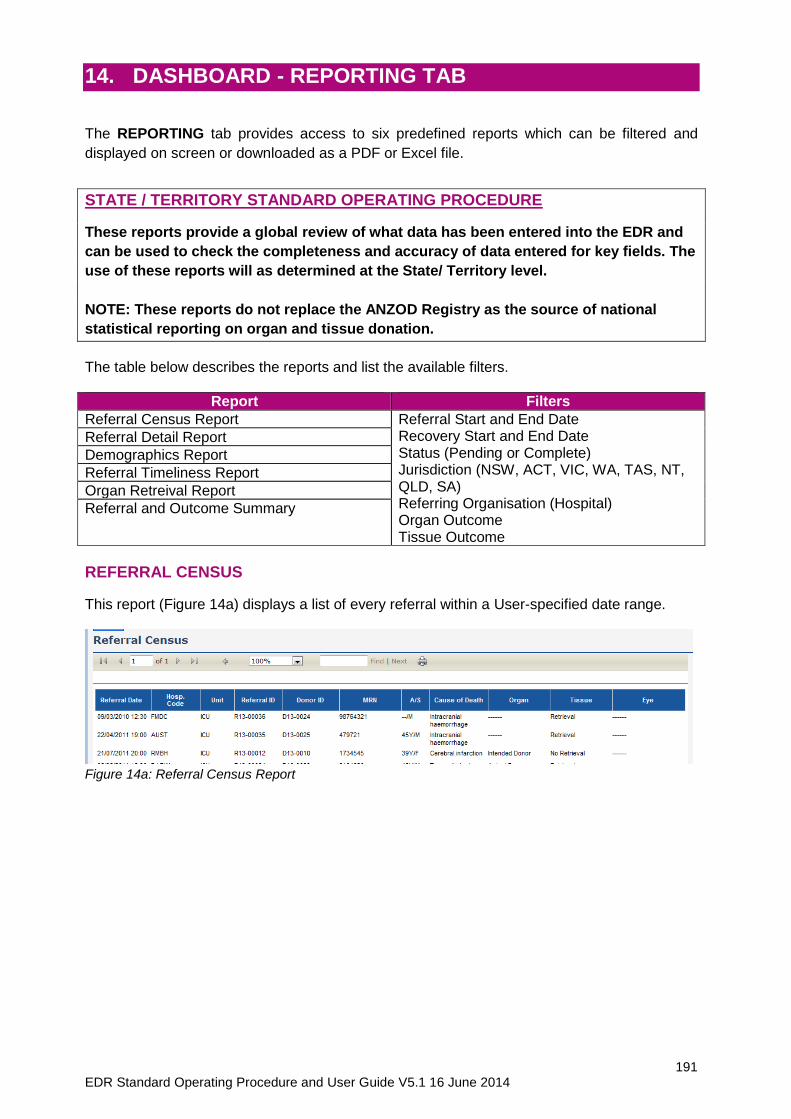
191 EDR Standard Operating Procedure and User Guide V5.1 16 June 2014
14. DASHBOARD - REPORTING TAB The REPORTING tab provides access to six predefined reports which can be filtered and
displayed on screen or downloaded as a PDF or Excel file.
STATE / TERRITORY STANDARD OPERATING PROCEDURE
These reports provide a global review of what data has been entered into the EDR and
can be used to check the completeness and accuracy of data entered for key fields. The
use of these reports will as determined at the State/ Territory level.
NOTE: These reports do not replace the ANZOD Registry as the source of national
statistical reporting on organ and tissue donation.
The table below describes the reports and list the available filters.
Report Filters
Referral Census Report Referral Start and End Date Recovery Start and End Date Status (Pending or Complete) Jurisdiction (NSW, ACT, VIC, WA, TAS, NT, QLD, SA) Referring Organisation (Hospital) Organ Outcome Tissue Outcome
Referral Detail Report
Demographics Report
Referral Timeliness Report
Organ Retreival Report
Referral and Outcome Summary
REFERRAL CENSUS
This report (Figure 14a) displays a list of every referral within a User-specified date range.
Figure 14a: Referral Census Report
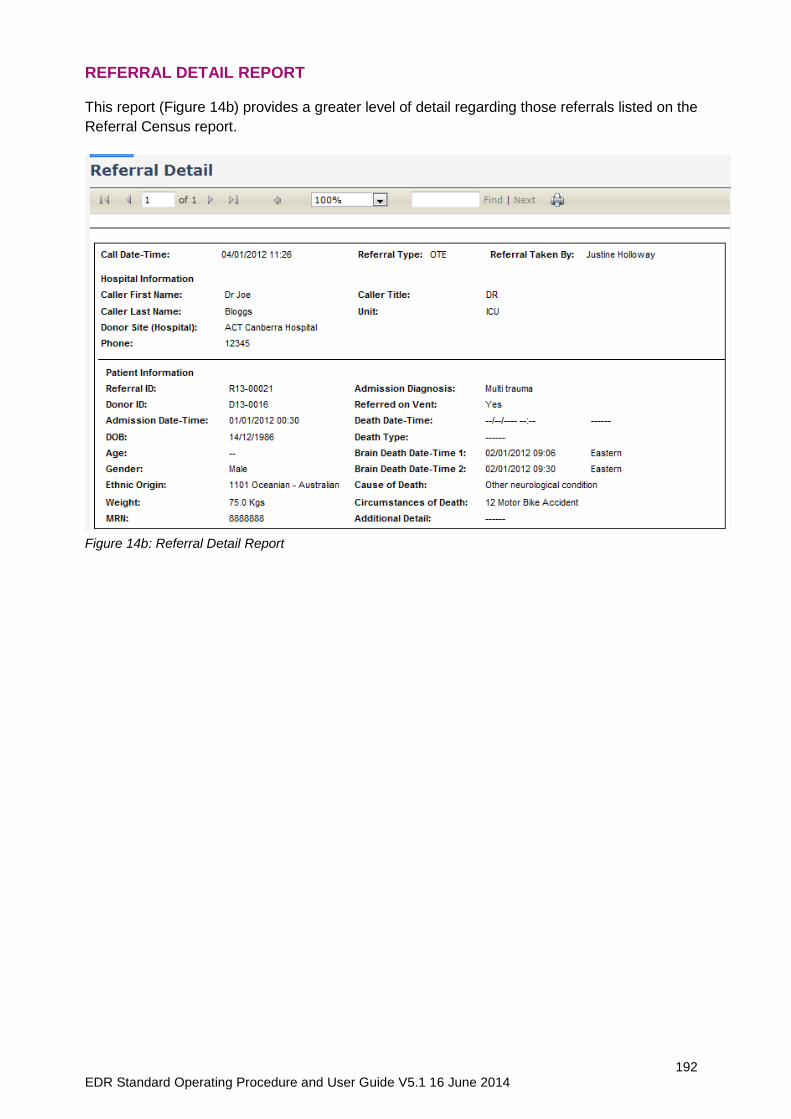
192 EDR Standard Operating Procedure and User Guide V5.1 16 June 2014
REFERRAL DETAIL REPORT This report (Figure 14b) provides a greater level of detail regarding those referrals listed on the
Referral Census report.
Figure 14b: Referral Detail Report
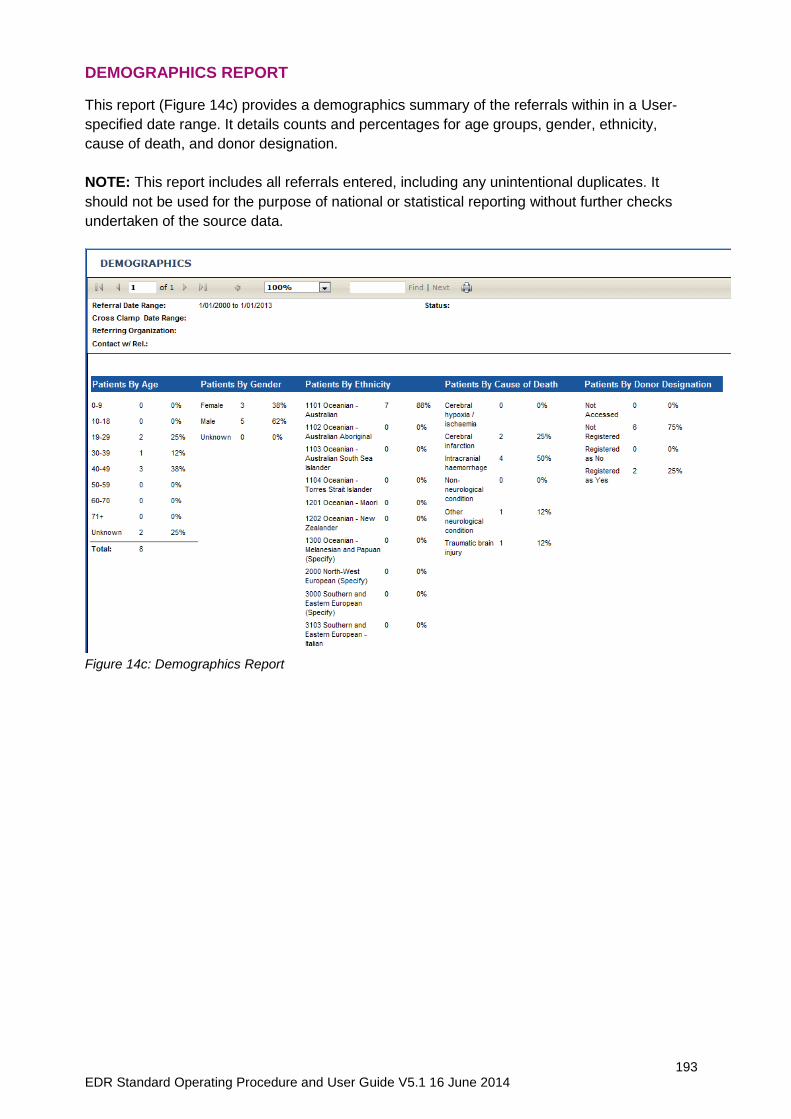
193 EDR Standard Operating Procedure and User Guide V5.1 16 June 2014
DEMOGRAPHICS REPORT
This report (Figure 14c) provides a demographics summary of the referrals within in a User-
specified date range. It details counts and percentages for age groups, gender, ethnicity,
cause of death, and donor designation.
NOTE: This report includes all referrals entered, including any unintentional duplicates. It
should not be used for the purpose of national or statistical reporting without further checks
undertaken of the source data.
Figure 14c: Demographics Report
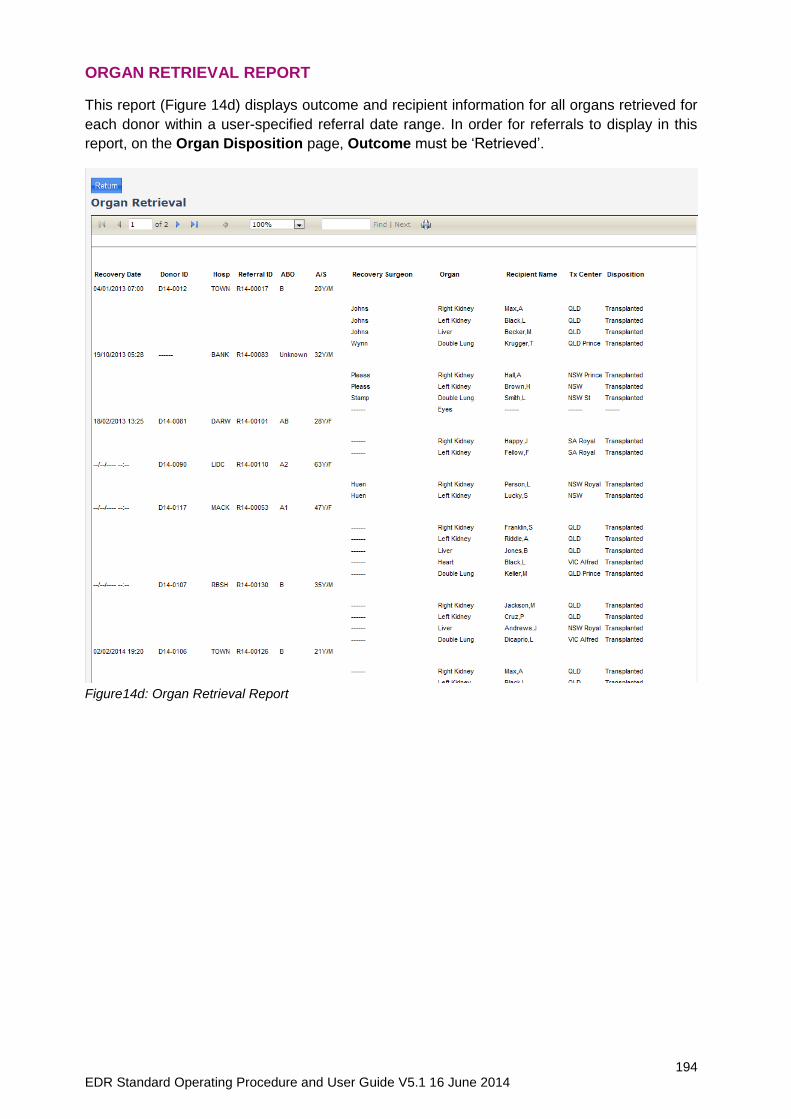
194 EDR Standard Operating Procedure and User Guide V5.1 16 June 2014
ORGAN RETRIEVAL REPORT
This report (Figure 14d) displays outcome and recipient information for all organs retrieved for
each donor within a user-specified referral date range. In order for referrals to display in this
report, on the Organ Disposition page, Outcome must be ‘Retrieved’.
Figure14d: Organ Retrieval Report
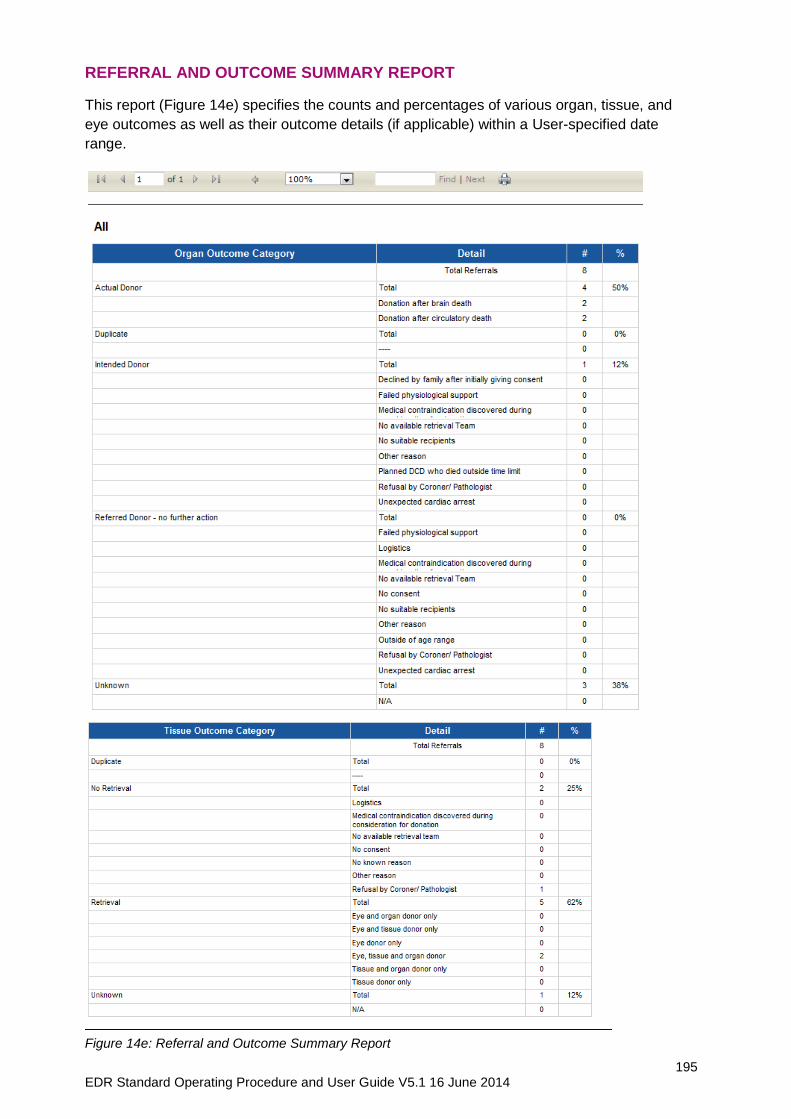
195 EDR Standard Operating Procedure and User Guide V5.1 16 June 2014
REFERRAL AND OUTCOME SUMMARY REPORT
This report (Figure 14e) specifies the counts and percentages of various organ, tissue, and
eye outcomes as well as their outcome details (if applicable) within a User-specified date
range.
Figure 14e: Referral and Outcome Summary Report
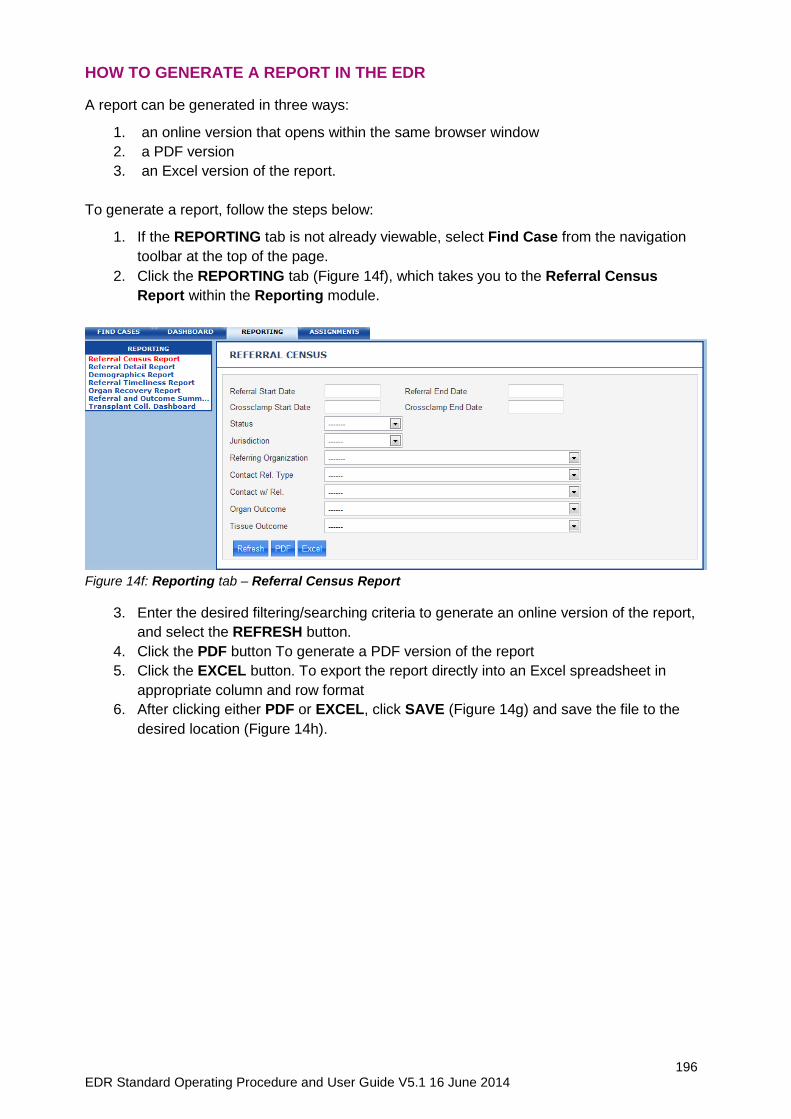
196 EDR Standard Operating Procedure and User Guide V5.1 16 June 2014
HOW TO GENERATE A REPORT IN THE EDR
A report can be generated in three ways:
1. an online version that opens within the same browser window
2. a PDF version
3. an Excel version of the report.
To generate a report, follow the steps below:
1. If the REPORTING tab is not already viewable, select Find Case from the navigation
toolbar at the top of the page.
2. Click the REPORTING tab (Figure 14f), which takes you to the Referral Census
Report within the Reporting module.
Figure 14f: Reporting tab – Referral Census Report
3. Enter the desired filtering/searching criteria to generate an online version of the report,
and select the REFRESH button.
4. Click the PDF button To generate a PDF version of the report
5. Click the EXCEL button. To export the report directly into an Excel spreadsheet in
appropriate column and row format
6. After clicking either PDF or EXCEL, click SAVE (Figure 14g) and save the file to the
desired location (Figure 14h).
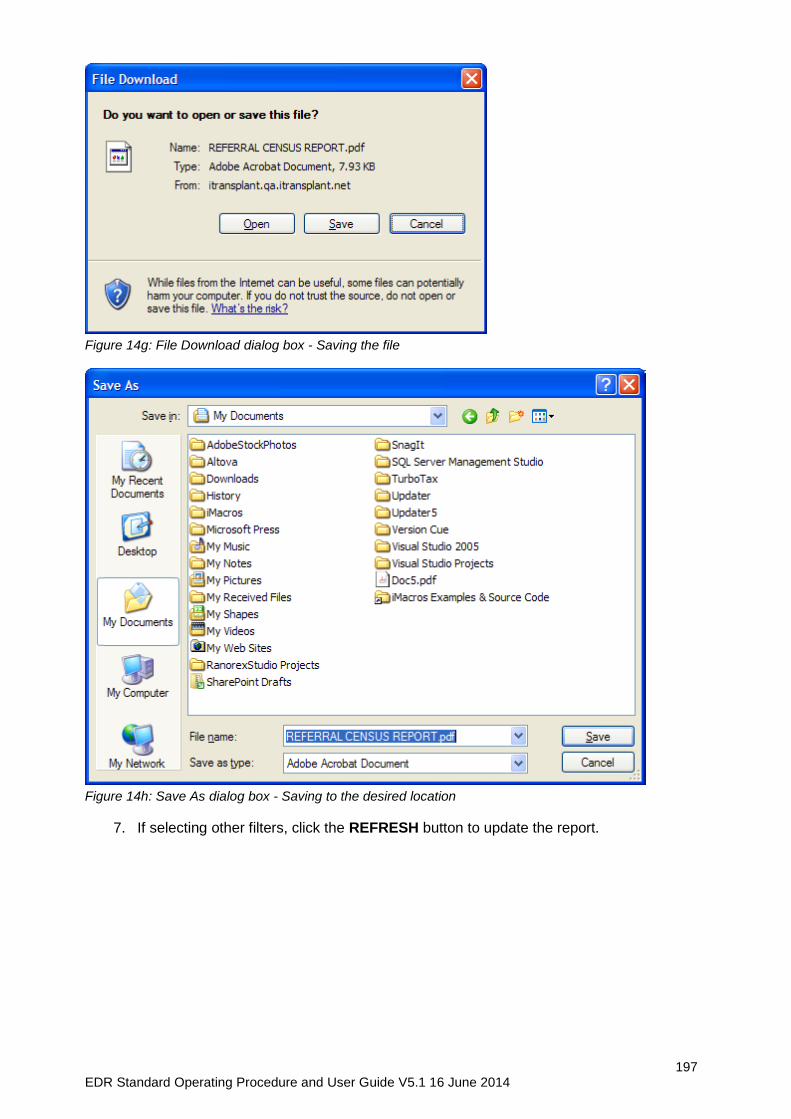
197 EDR Standard Operating Procedure and User Guide V5.1 16 June 2014
Figure 14g: File Download dialog box - Saving the file
Figure 14h: Save As dialog box - Saving to the desired location
7. If selecting other filters, click the REFRESH button to update the report.
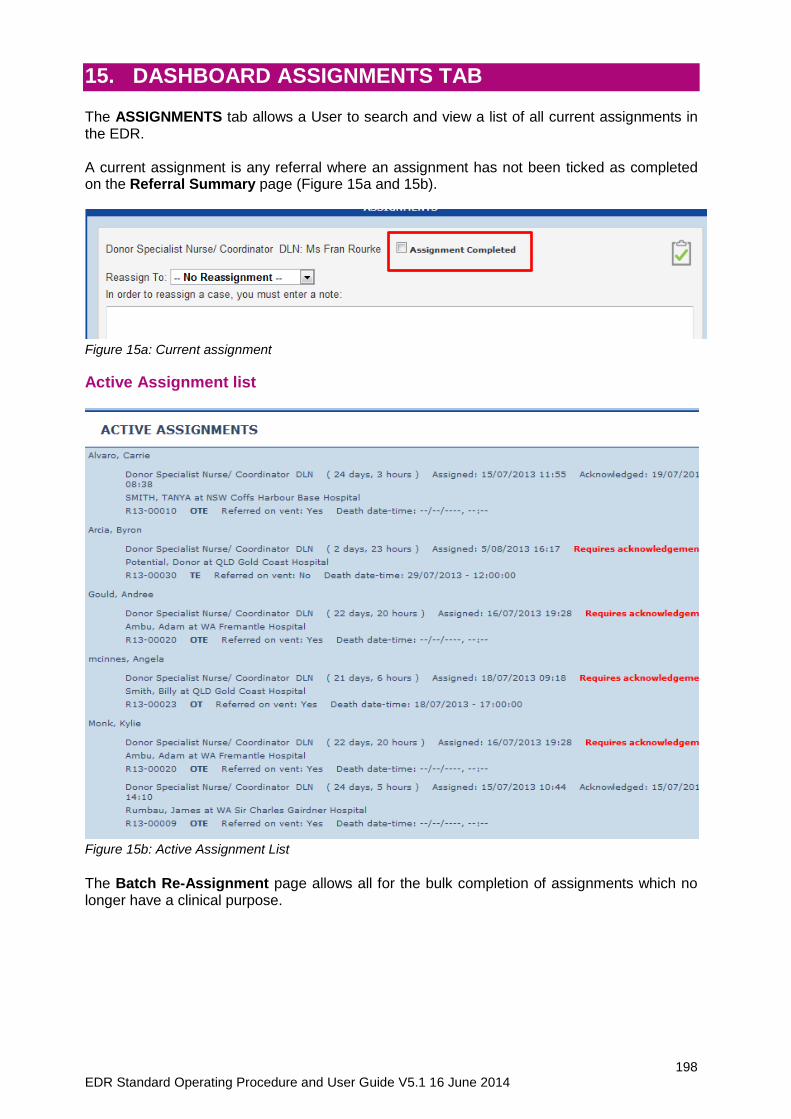
198 EDR Standard Operating Procedure and User Guide V5.1 16 June 2014
15. DASHBOARD ASSIGNMENTS TAB The ASSIGNMENTS tab allows a User to search and view a list of all current assignments in the EDR. A current assignment is any referral where an assignment has not been ticked as completed on the Referral Summary page (Figure 15a and 15b).
Figure 15a: Current assignment
Active Assignment list
Figure 15b: Active Assignment List
The Batch Re-Assignment page allows all for the bulk completion of assignments which no longer have a clinical purpose.

199 EDR Standard Operating Procedure and User Guide V5.1 16 June 2014
16. APPENDICES
APPENDIX 1: NATIONAL AND LOCAL STANDARD OPERATING PROCEDURES
Within the EDR SOP and User Guide recommendations are made where a nationally uniform
approach is suggested.
The national SOPs are listed below:
1 When a User is entering data into the EDR and is required to leave the system for any reason, the following steps are recommended to ensure data is secure:
SAVE Button is manually clicked to ensure that all data entered since the last auto save is retained
User then will LOG OUT of the EDR.
2 To flag that a record is a duplicate, the User should:
Enter the Referral ID of the original in the ‘Last Name’ field.
Enter ‘Duplicate’ or the Donor ID in the ‘First Nme’ field.
Change the Organ and Tissue Outcomes to ‘Duplicate’ and
the Status to ‘Complete’.
If there is an allocated Donor ID, this should be entered as the first name. By entering ‘Duplicate’ the record is clearly described as such as in reports produced by the system.
3 Once a Donor Case case is completed, the outcome needs to be recorded on the Referral Summary page. This includes changing the Status field from ‘Pending’ to ‘Completed. If this is not done then the Donor Case will continue to appear as a pending case in the Case Finder pending list.
4 Referrals entered into the EDR must be either Actual or Intended Organ Donors as per the following definitions:
Actual Donor: An organ donor is a person for whom the organ retrieval procedure commenced in the operating room (with surgical incision) for the purpose of transplantation. This includes donors who may have been deemed medically unsuitable during surgery or after the removal of organs
Intended Donor: An intended donor is a person for whom the donation workup was initiated as evidenced by both: Formal written consent undertaken, including consent for donation of specific organs +/- tissues and Blood for tissue typing sent with allocation of a donor ID; but donation did not proceed.
5 Nationally, the Donor ID is generated when donor bloods are sent to the laboratories and testing for tissue typing and serology/NAT is requested.
6 The EDR authorisation form is not to be used as the legal record of the authorisation from the next of kin. States and territories continue to record next of kin consent for organ and tissue donation using jurisdictional consent forms. Once completed the consent form can be attached to the EDR system.
7 If initially an organ offer is accepted and subsequently declined by a single state/territory, the
decline MUST be recorded as a new offer.
8 The following HLA typing MUST be recorded: A, B and DR. If the donor is homozygous for any
HLA phenotype, enter ‘Blank’ for the second associated value.
9 For each sample drawn and tested for plasma dilution, a Plasma Dilution page should be completed. In the comments box at the bottom of each Plasma Dilution page, type in which tests are being conducted on the sample or if it doesn’t qualify, indicate that the sample was not used.
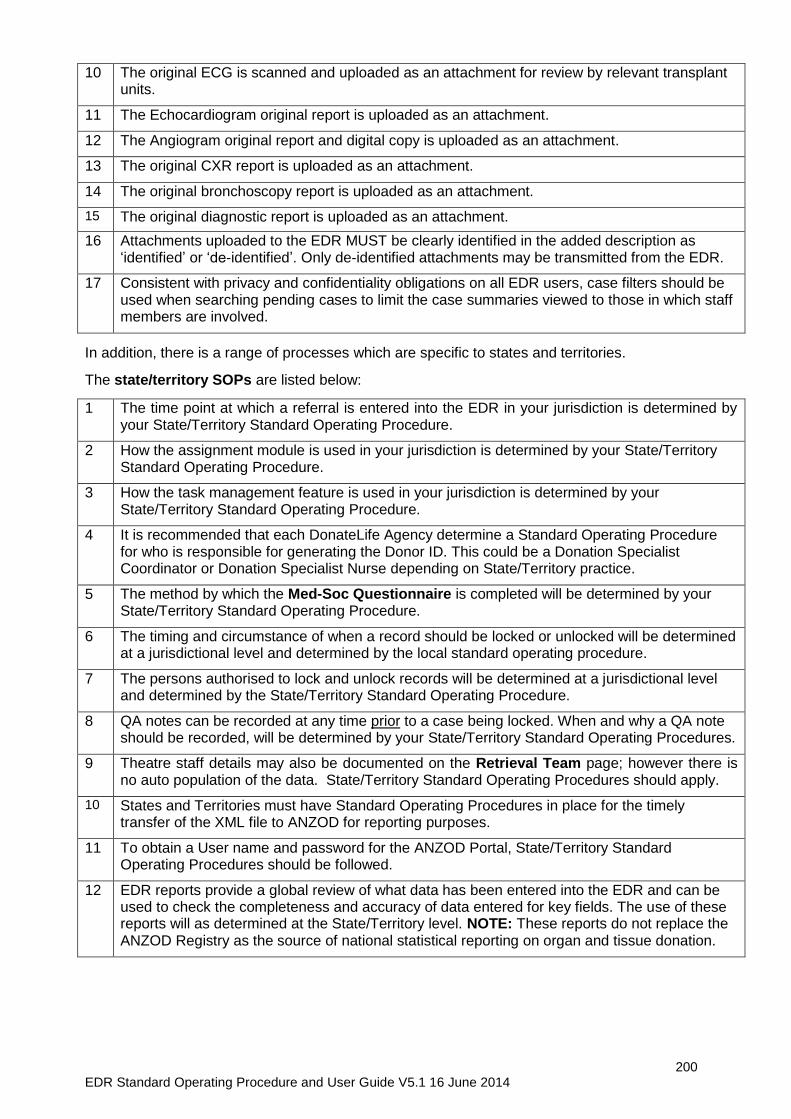
200 EDR Standard Operating Procedure and User Guide V5.1 16 June 2014
10 The original ECG is scanned and uploaded as an attachment for review by relevant transplant units.
11 The Echocardiogram original report is uploaded as an attachment.
12 The Angiogram original report and digital copy is uploaded as an attachment.
13 The original CXR report is uploaded as an attachment.
14 The original bronchoscopy report is uploaded as an attachment.
15 The original diagnostic report is uploaded as an attachment.
16 Attachments uploaded to the EDR MUST be clearly identified in the added description as ‘identified’ or ‘de-identified’. Only de-identified attachments may be transmitted from the EDR.
17 Consistent with privacy and confidentiality obligations on all EDR users, case filters should be used when searching pending cases to limit the case summaries viewed to those in which staff members are involved.
In addition, there is a range of processes which are specific to states and territories.
The state/territory SOPs are listed below:
1 The time point at which a referral is entered into the EDR in your jurisdiction is determined by your State/Territory Standard Operating Procedure.
2 How the assignment module is used in your jurisdiction is determined by your State/Territory Standard Operating Procedure.
3 How the task management feature is used in your jurisdiction is determined by your State/Territory Standard Operating Procedure.
4 It is recommended that each DonateLife Agency determine a Standard Operating Procedure for who is responsible for generating the Donor ID. This could be a Donation Specialist Coordinator or Donation Specialist Nurse depending on State/Territory practice.
5 The method by which the Med-Soc Questionnaire is completed will be determined by your State/Territory Standard Operating Procedure.
6 The timing and circumstance of when a record should be locked or unlocked will be determined at a jurisdictional level and determined by the local standard operating procedure.
7 The persons authorised to lock and unlock records will be determined at a jurisdictional level and determined by the State/Territory Standard Operating Procedure.
8 QA notes can be recorded at any time prior to a case being locked. When and why a QA note should be recorded, will be determined by your State/Territory Standard Operating Procedures.
9 Theatre staff details may also be documented on the Retrieval Team page; however there is no auto population of the data. State/Territory Standard Operating Procedures should apply.
10 States and Territories must have Standard Operating Procedures in place for the timely transfer of the XML file to ANZOD for reporting purposes.
11 To obtain a User name and password for the ANZOD Portal, State/Territory Standard Operating Procedures should be followed.
12 EDR reports provide a global review of what data has been entered into the EDR and can be used to check the completeness and accuracy of data entered for key fields. The use of these reports will as determined at the State/Territory level. NOTE: These reports do not replace the ANZOD Registry as the source of national statistical reporting on organ and tissue donation.
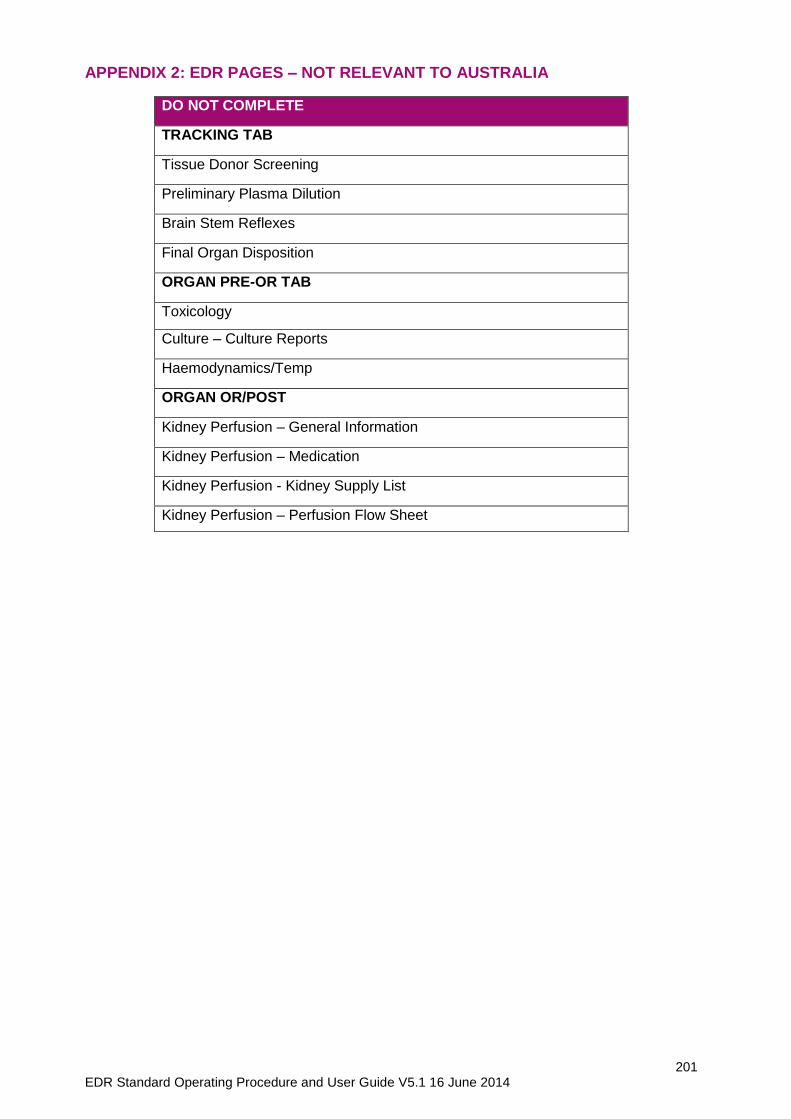
201 EDR Standard Operating Procedure and User Guide V5.1 16 June 2014
APPENDIX 2: EDR PAGES – NOT RELEVANT TO AUSTRALIA
DO NOT COMPLETE
TRACKING TAB
Tissue Donor Screening
Preliminary Plasma Dilution
Brain Stem Reflexes
Final Organ Disposition
ORGAN PRE-OR TAB
Toxicology
Culture – Culture Reports
Haemodynamics/Temp
ORGAN OR/POST
Kidney Perfusion – General Information
Kidney Perfusion – Medication
Kidney Perfusion - Kidney Supply List
Kidney Perfusion – Perfusion Flow Sheet
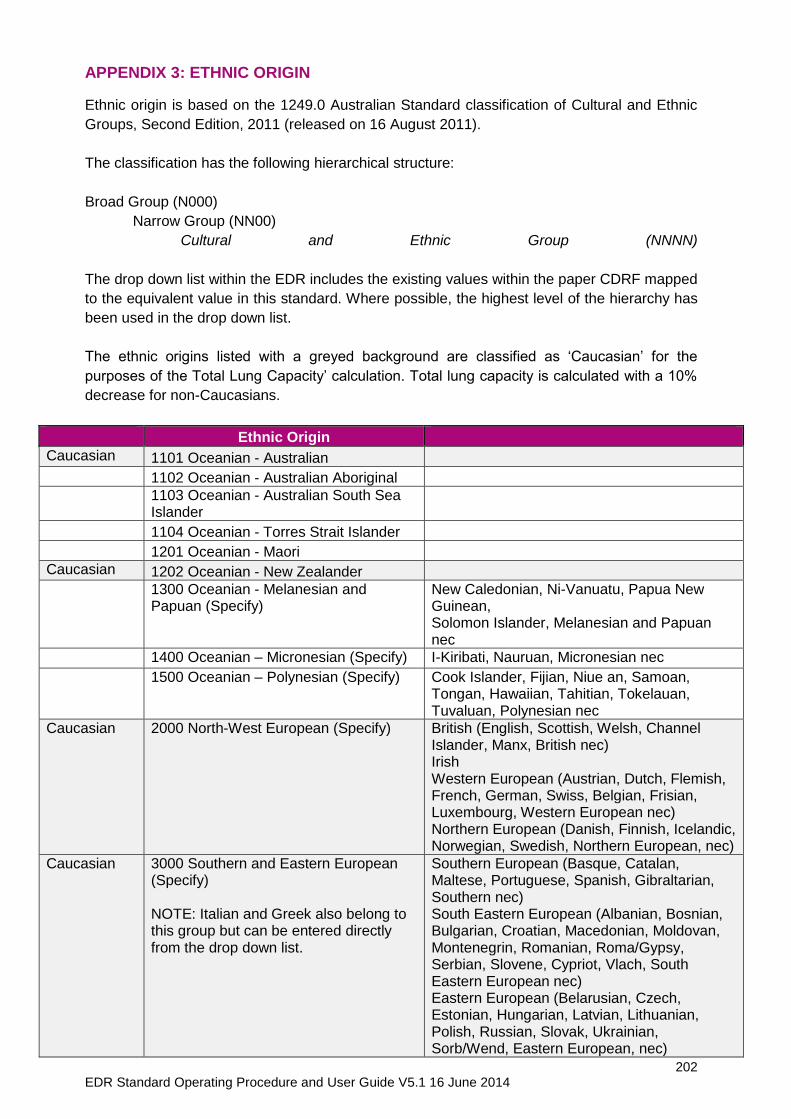
202 EDR Standard Operating Procedure and User Guide V5.1 16 June 2014
APPENDIX 3: ETHNIC ORIGIN
Ethnic origin is based on the 1249.0 Australian Standard classification of Cultural and Ethnic
Groups, Second Edition, 2011 (released on 16 August 2011).
The classification has the following hierarchical structure:
Broad Group (N000)
Narrow Group (NN00)
Cultural and Ethnic Group (NNNN)
The drop down list within the EDR includes the existing values within the paper CDRF mapped
to the equivalent value in this standard. Where possible, the highest level of the hierarchy has
been used in the drop down list.
The ethnic origins listed with a greyed background are classified as ‘Caucasian’ for the
purposes of the Total Lung Capacity’ calculation. Total lung capacity is calculated with a 10%
decrease for non-Caucasians.
Ethnic Origin
Caucasian 1101 Oceanian - Australian
1102 Oceanian - Australian Aboriginal
1103 Oceanian - Australian South Sea Islander
1104 Oceanian - Torres Strait Islander
1201 Oceanian - Maori
Caucasian 1202 Oceanian - New Zealander
1300 Oceanian - Melanesian and Papuan (Specify)
New Caledonian, Ni-Vanuatu, Papua New Guinean, Solomon Islander, Melanesian and Papuan nec
1400 Oceanian – Micronesian (Specify) I-Kiribati, Nauruan, Micronesian nec
1500 Oceanian – Polynesian (Specify) Cook Islander, Fijian, Niue an, Samoan, Tongan, Hawaiian, Tahitian, Tokelauan, Tuvaluan, Polynesian nec
Caucasian 2000 North-West European (Specify) British (English, Scottish, Welsh, Channel Islander, Manx, British nec) Irish Western European (Austrian, Dutch, Flemish, French, German, Swiss, Belgian, Frisian, Luxembourg, Western European nec) Northern European (Danish, Finnish, Icelandic, Norwegian, Swedish, Northern European, nec)
Caucasian 3000 Southern and Eastern European (Specify) NOTE: Italian and Greek also belong to this group but can be entered directly from the drop down list.
Southern European (Basque, Catalan, Maltese, Portuguese, Spanish, Gibraltarian, Southern nec) South Eastern European (Albanian, Bosnian, Bulgarian, Croatian, Macedonian, Moldovan, Montenegrin, Romanian, Roma/Gypsy, Serbian, Slovene, Cypriot, Vlach, South Eastern European nec) Eastern European (Belarusian, Czech, Estonian, Hungarian, Latvian, Lithuanian, Polish, Russian, Slovak, Ukrainian, Sorb/Wend, Eastern European, nec)
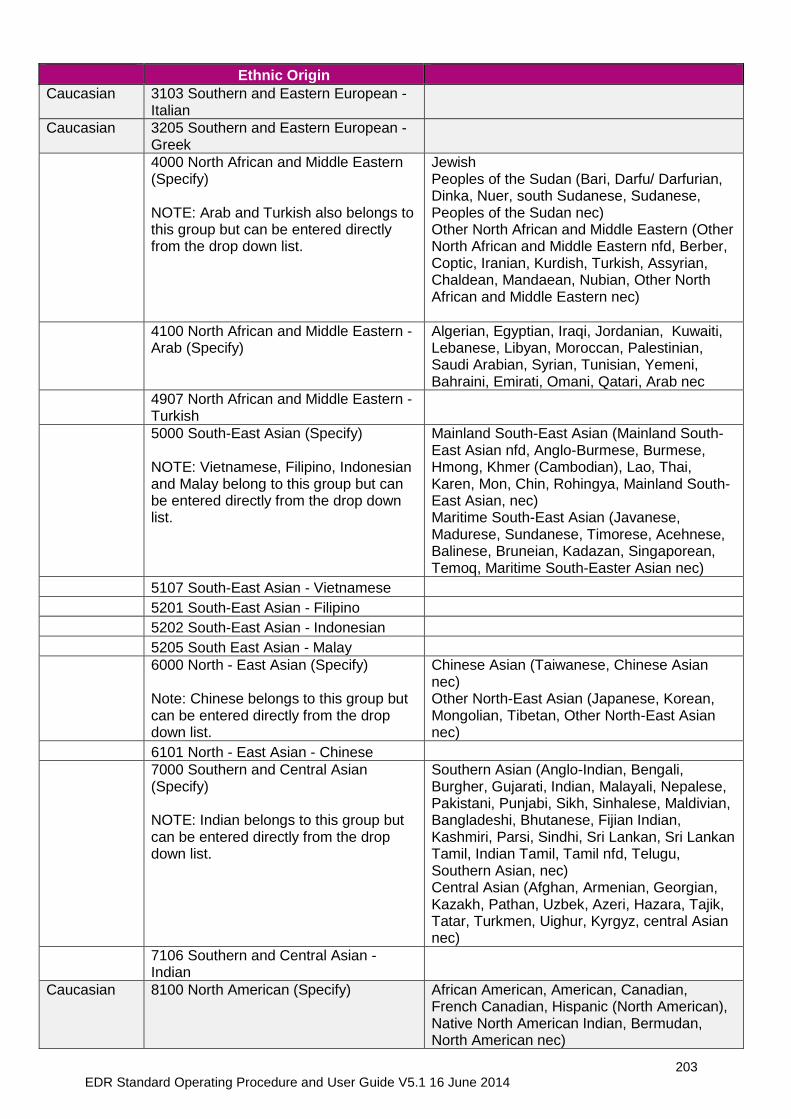
203 EDR Standard Operating Procedure and User Guide V5.1 16 June 2014
Ethnic Origin
Caucasian 3103 Southern and Eastern European - Italian
Caucasian 3205 Southern and Eastern European - Greek
4000 North African and Middle Eastern (Specify) NOTE: Arab and Turkish also belongs to this group but can be entered directly from the drop down list.
Jewish Peoples of the Sudan (Bari, Darfu/ Darfurian, Dinka, Nuer, south Sudanese, Sudanese, Peoples of the Sudan nec) Other North African and Middle Eastern (Other North African and Middle Eastern nfd, Berber, Coptic, Iranian, Kurdish, Turkish, Assyrian, Chaldean, Mandaean, Nubian, Other North African and Middle Eastern nec)
4100 North African and Middle Eastern - Arab (Specify)
Algerian, Egyptian, Iraqi, Jordanian, Kuwaiti, Lebanese, Libyan, Moroccan, Palestinian, Saudi Arabian, Syrian, Tunisian, Yemeni, Bahraini, Emirati, Omani, Qatari, Arab nec
4907 North African and Middle Eastern - Turkish
5000 South-East Asian (Specify) NOTE: Vietnamese, Filipino, Indonesian and Malay belong to this group but can be entered directly from the drop down list.
Mainland South-East Asian (Mainland South-East Asian nfd, Anglo-Burmese, Burmese, Hmong, Khmer (Cambodian), Lao, Thai, Karen, Mon, Chin, Rohingya, Mainland South-East Asian, nec) Maritime South-East Asian (Javanese, Madurese, Sundanese, Timorese, Acehnese, Balinese, Bruneian, Kadazan, Singaporean, Temoq, Maritime South-Easter Asian nec)
5107 South-East Asian - Vietnamese
5201 South-East Asian - Filipino
5202 South-East Asian - Indonesian
5205 South East Asian - Malay
6000 North - East Asian (Specify) Note: Chinese belongs to this group but can be entered directly from the drop down list.
Chinese Asian (Taiwanese, Chinese Asian nec) Other North-East Asian (Japanese, Korean, Mongolian, Tibetan, Other North-East Asian nec)
6101 North - East Asian - Chinese
7000 Southern and Central Asian (Specify) NOTE: Indian belongs to this group but can be entered directly from the drop down list.
Southern Asian (Anglo-Indian, Bengali, Burgher, Gujarati, Indian, Malayali, Nepalese, Pakistani, Punjabi, Sikh, Sinhalese, Maldivian, Bangladeshi, Bhutanese, Fijian Indian, Kashmiri, Parsi, Sindhi, Sri Lankan, Sri Lankan Tamil, Indian Tamil, Tamil nfd, Telugu, Southern Asian, nec) Central Asian (Afghan, Armenian, Georgian, Kazakh, Pathan, Uzbek, Azeri, Hazara, Tajik, Tatar, Turkmen, Uighur, Kyrgyz, central Asian nec)
7106 Southern and Central Asian - Indian
Caucasian 8100 North American (Specify) African American, American, Canadian, French Canadian, Hispanic (North American), Native North American Indian, Bermudan, North American nec)
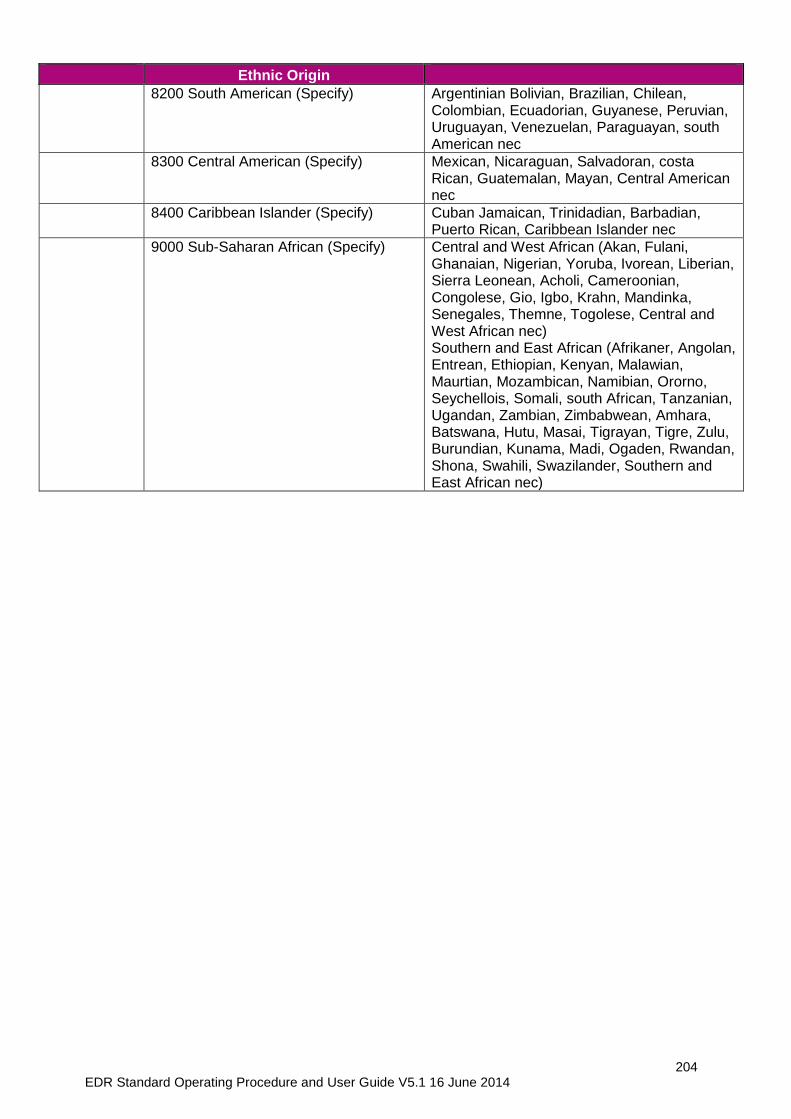
204 EDR Standard Operating Procedure and User Guide V5.1 16 June 2014
Ethnic Origin
8200 South American (Specify) Argentinian Bolivian, Brazilian, Chilean, Colombian, Ecuadorian, Guyanese, Peruvian, Uruguayan, Venezuelan, Paraguayan, south American nec
8300 Central American (Specify) Mexican, Nicaraguan, Salvadoran, costa Rican, Guatemalan, Mayan, Central American nec
8400 Caribbean Islander (Specify) Cuban Jamaican, Trinidadian, Barbadian, Puerto Rican, Caribbean Islander nec
9000 Sub-Saharan African (Specify) Central and West African (Akan, Fulani, Ghanaian, Nigerian, Yoruba, Ivorean, Liberian, Sierra Leonean, Acholi, Cameroonian, Congolese, Gio, Igbo, Krahn, Mandinka, Senegales, Themne, Togolese, Central and West African nec) Southern and East African (Afrikaner, Angolan, Entrean, Ethiopian, Kenyan, Malawian, Maurtian, Mozambican, Namibian, Ororno, Seychellois, Somali, south African, Tanzanian, Ugandan, Zambian, Zimbabwean, Amhara, Batswana, Hutu, Masai, Tigrayan, Tigre, Zulu, Burundian, Kunama, Madi, Ogaden, Rwandan, Shona, Swahili, Swazilander, Southern and East African nec)
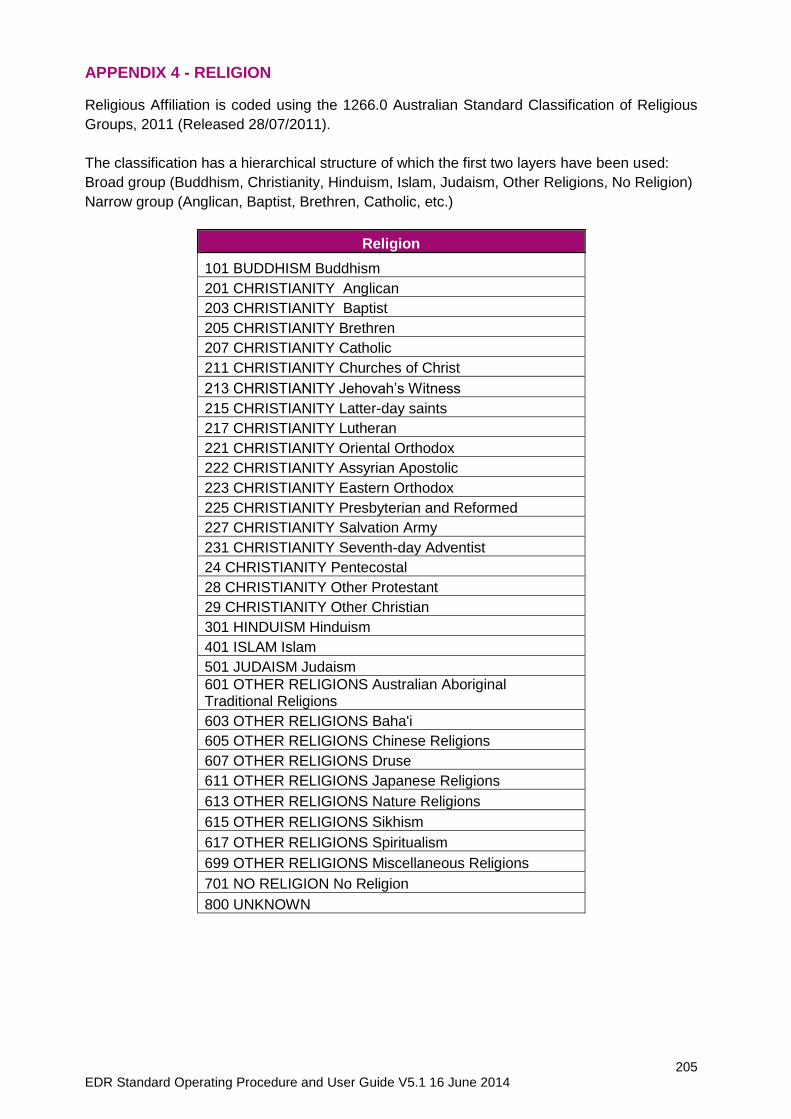
205 EDR Standard Operating Procedure and User Guide V5.1 16 June 2014
APPENDIX 4 - RELIGION
Religious Affiliation is coded using the 1266.0 Australian Standard Classification of Religious
Groups, 2011 (Released 28/07/2011).
The classification has a hierarchical structure of which the first two layers have been used:
Broad group (Buddhism, Christianity, Hinduism, Islam, Judaism, Other Religions, No Religion)
Narrow group (Anglican, Baptist, Brethren, Catholic, etc.)
Religion
101 BUDDHISM Buddhism
201 CHRISTIANITY Anglican
203 CHRISTIANITY Baptist
205 CHRISTIANITY Brethren
207 CHRISTIANITY Catholic
211 CHRISTIANITY Churches of Christ
213 CHRISTIANITY Jehovah’s Witness
215 CHRISTIANITY Latter-day saints
217 CHRISTIANITY Lutheran
221 CHRISTIANITY Oriental Orthodox
222 CHRISTIANITY Assyrian Apostolic
223 CHRISTIANITY Eastern Orthodox
225 CHRISTIANITY Presbyterian and Reformed
227 CHRISTIANITY Salvation Army
231 CHRISTIANITY Seventh-day Adventist
24 CHRISTIANITY Pentecostal
28 CHRISTIANITY Other Protestant
29 CHRISTIANITY Other Christian
301 HINDUISM Hinduism
401 ISLAM Islam
501 JUDAISM Judaism
601 OTHER RELIGIONS Australian Aboriginal Traditional Religions
603 OTHER RELIGIONS Baha'i
605 OTHER RELIGIONS Chinese Religions
607 OTHER RELIGIONS Druse
611 OTHER RELIGIONS Japanese Religions
613 OTHER RELIGIONS Nature Religions
615 OTHER RELIGIONS Sikhism
617 OTHER RELIGIONS Spiritualism
699 OTHER RELIGIONS Miscellaneous Religions
701 NO RELIGION No Religion
800 UNKNOWN
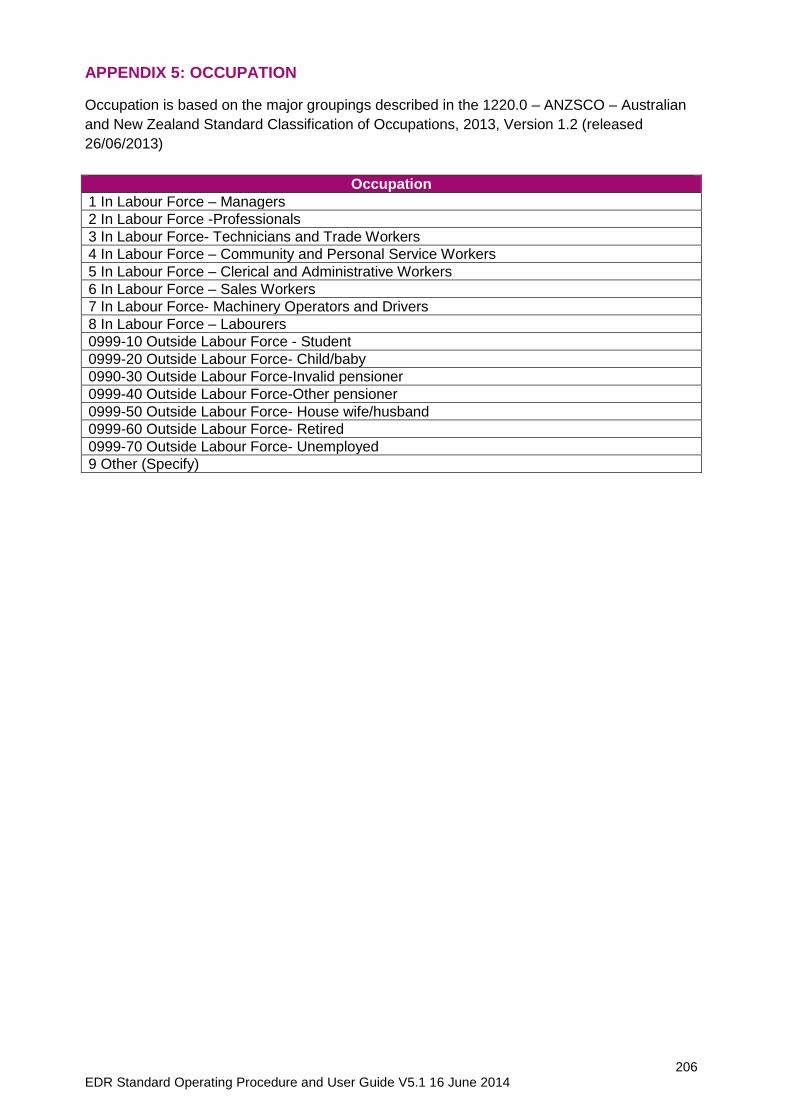
206 EDR Standard Operating Procedure and User Guide V5.1 16 June 2014
APPENDIX 5: OCCUPATION
Occupation is based on the major groupings described in the 1220.0 – ANZSCO – Australian
and New Zealand Standard Classification of Occupations, 2013, Version 1.2 (released
26/06/2013)
Occupation
1 In Labour Force – Managers
2 In Labour Force -Professionals
3 In Labour Force- Technicians and Trade Workers
4 In Labour Force – Community and Personal Service Workers
5 In Labour Force – Clerical and Administrative Workers
6 In Labour Force – Sales Workers
7 In Labour Force- Machinery Operators and Drivers
8 In Labour Force – Labourers
0999-10 Outside Labour Force - Student
0999-20 Outside Labour Force- Child/baby
0990-30 Outside Labour Force-Invalid pensioner
0999-40 Outside Labour Force-Other pensioner
0999-50 Outside Labour Force- House wife/husband
0999-60 Outside Labour Force- Retired
0999-70 Outside Labour Force- Unemployed
9 Other (Specify)
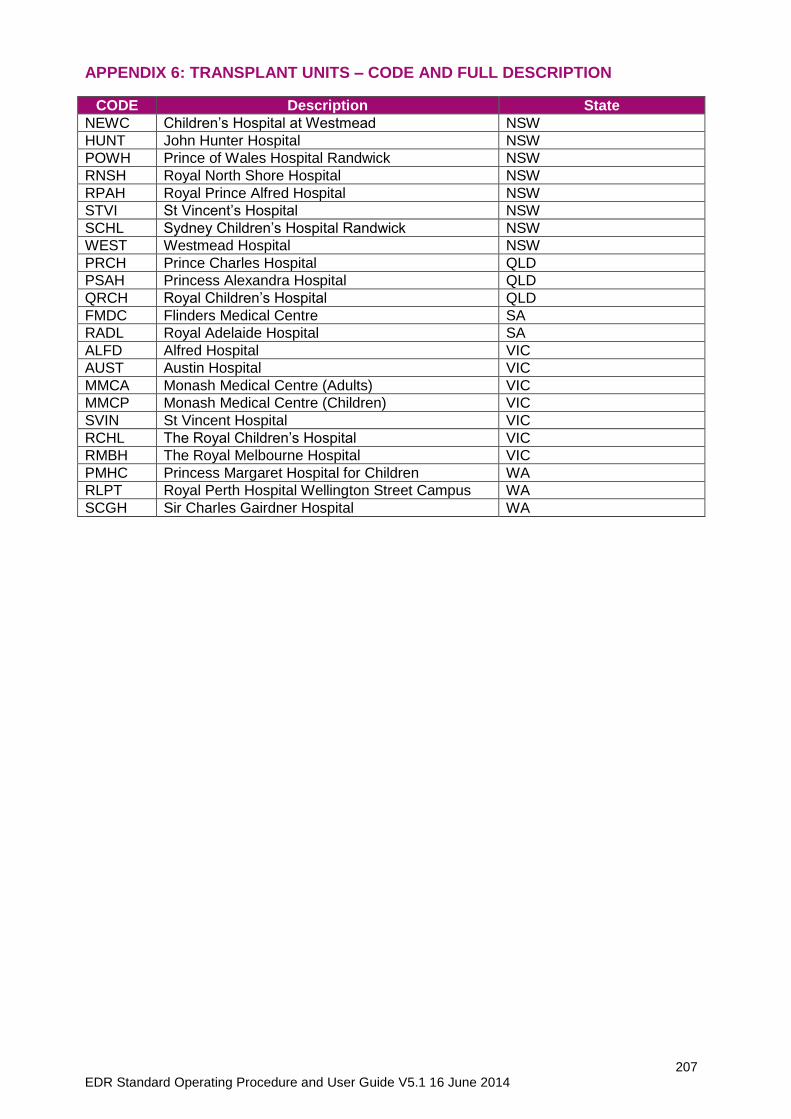
207 EDR Standard Operating Procedure and User Guide V5.1 16 June 2014
APPENDIX 6: TRANSPLANT UNITS – CODE AND FULL DESCRIPTION
CODE Description State
NEWC Children’s Hospital at Westmead NSW
HUNT John Hunter Hospital NSW
POWH Prince of Wales Hospital Randwick NSW
RNSH Royal North Shore Hospital NSW
RPAH Royal Prince Alfred Hospital NSW
STVI St Vincent’s Hospital NSW
SCHL Sydney Children’s Hospital Randwick NSW
WEST Westmead Hospital NSW
PRCH Prince Charles Hospital QLD
PSAH Princess Alexandra Hospital QLD
QRCH Royal Children’s Hospital QLD
FMDC Flinders Medical Centre SA
RADL Royal Adelaide Hospital SA
ALFD Alfred Hospital VIC
AUST Austin Hospital VIC
MMCA Monash Medical Centre (Adults) VIC
MMCP Monash Medical Centre (Children) VIC
SVIN St Vincent Hospital VIC
RCHL The Royal Children’s Hospital VIC
RMBH The Royal Melbourne Hospital VIC
PMHC Princess Margaret Hospital for Children WA
RLPT Royal Perth Hospital Wellington Street Campus WA
SCGH Sir Charles Gairdner Hospital WA
208 EDR Standard Operating Procedure and User Guide V5.1 16 June 2014
APPENDIX 7: THE ROLE OF THE STATE/TERRITORY EDR TRAINERS
The EDR Trainer role is fulfilled by a proficient and experienced User of the EDR.
The role requires a sound knowledge of the EDR as well as clinical competency required for
solving complex clinical issues related to the EDR.
Some jurisdictions have combined this role with that of the EDR System Administrator role.
Under the direction of the DonateLife Agency management personnel, functions of the EDR
Trainer include:
Undertaking appropriate training in local and national responsibilities.
Training DonateLife staff (CURRENT AND FUTURE)
Confirming proficiency for each DonateLife staff member prior to them being granted
access to the ‘live’ EDR. This requires the EDR Trainer to sign the AUP Form.
Leading the development, training and implementation of local EDR Standard
Operating Procedures as identified in the national EDR Standard Operating Procedure
and User Guide and as may be identified over time.
Acting as the local DonateLife liaison with the transplant sector and OTA to ensure the
ongoing effective utilisation of the EDR.
Attending DLN/OTA/Transplant support teleconferences.
Contributing to the local implementation of the EDR Business Continuity Procedure
when required.
Contributing to the implementation of the EDR Access Audit and EDR Breach
Notification reporting and management processes according to local processes.
Providing Level 1 CLINICAL helpdesk support and, in some jurisdictions, System
Administrator technical support.
There are three levels of help desk support:
o Level 1 provided at the jurisdictional level by State/Territory EDR Trainers (clinical
support) and System Administrators (technical support)
o Level 2 provided by the Organ and Tissue Authority (OTA) and
o Level 3 provided by Transplant Connect and Optus
If an issue cannot be resolved at the jurisdictional level, help desk support at the OTA
can be obtained during business hours by sending an email to
[email protected] or phoning 02 6198 9800. Out of hours assistance can be
obtained by phoning mobile 0447 645 973.
Where the OTA is unable to resolve the issue, further assistance will be sought from
Transplant Connect or Optus dependent on what the problem is.
The role of the EDR Trainer in providing Level 1 helpdesk support involves:
o Receiving initial telephone or e-mail inquiries and troubleshooting and managing
relatively simple clinically related EDR problems;
o Gathering User information and determining the issue by analysing the symptoms
and identifying the underlying problems;
209 EDR Standard Operating Procedure and User Guide V5.1 16 June 2014
o Providing basic troubleshooting, such as resolving data entry issues, data quality
issues and limited assistance with EDR navigation and utilisation issues using the
EDR Standard Operating Procedure and User Guide, EDR System Administrator
Guide and local Standard Operating Procedures; and
o Referring issues that cannot be resolved locally to the Organ and Tissue Authority
(Level 2).
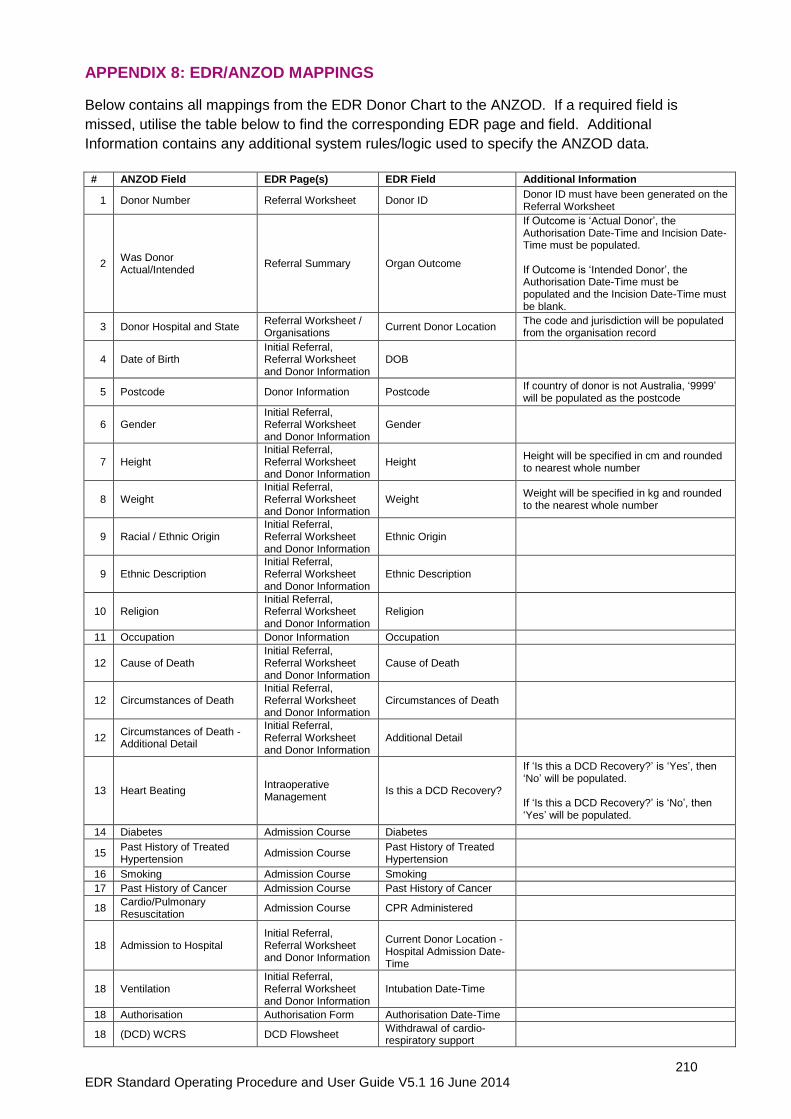
210 EDR Standard Operating Procedure and User Guide V5.1 16 June 2014
APPENDIX 8: EDR/ANZOD MAPPINGS
Below contains all mappings from the EDR Donor Chart to the ANZOD. If a required field is
missed, utilise the table below to find the corresponding EDR page and field. Additional
Information contains any additional system rules/logic used to specify the ANZOD data.
# ANZOD Field EDR Page(s) EDR Field Additional Information
1 Donor Number Referral Worksheet Donor ID Donor ID must have been generated on the Referral Worksheet
2 Was Donor Actual/Intended
Referral Summary Organ Outcome
If Outcome is ‘Actual Donor’, the Authorisation Date-Time and Incision Date-Time must be populated. If Outcome is ‘Intended Donor’, the Authorisation Date-Time must be populated and the Incision Date-Time must be blank.
3 Donor Hospital and State Referral Worksheet / Organisations
Current Donor Location The code and jurisdiction will be populated from the organisation record
4 Date of Birth Initial Referral, Referral Worksheet and Donor Information
DOB
5 Postcode Donor Information Postcode If country of donor is not Australia, ‘9999’ will be populated as the postcode
6 Gender Initial Referral, Referral Worksheet and Donor Information
Gender
7 Height Initial Referral, Referral Worksheet and Donor Information
Height Height will be specified in cm and rounded to nearest whole number
8 Weight Initial Referral, Referral Worksheet and Donor Information
Weight Weight will be specified in kg and rounded to the nearest whole number
9 Racial / Ethnic Origin Initial Referral, Referral Worksheet and Donor Information
Ethnic Origin
9 Ethnic Description Initial Referral, Referral Worksheet and Donor Information
Ethnic Description
10 Religion Initial Referral, Referral Worksheet and Donor Information
Religion
11 Occupation Donor Information Occupation
12 Cause of Death Initial Referral, Referral Worksheet and Donor Information
Cause of Death
12 Circumstances of Death Initial Referral, Referral Worksheet and Donor Information
Circumstances of Death
12 Circumstances of Death - Additional Detail
Initial Referral, Referral Worksheet and Donor Information
Additional Detail
13 Heart Beating Intraoperative Management
Is this a DCD Recovery?
If ‘Is this a DCD Recovery?’ is ‘Yes’, then ‘No’ will be populated. If ‘Is this a DCD Recovery?’ is ‘No’, then ‘Yes’ will be populated.
14 Diabetes Admission Course Diabetes
15 Past History of Treated Hypertension
Admission Course Past History of Treated Hypertension
16 Smoking Admission Course Smoking
17 Past History of Cancer Admission Course Past History of Cancer
18 Cardio/Pulmonary Resuscitation
Admission Course CPR Administered
18 Admission to Hospital Initial Referral, Referral Worksheet and Donor Information
Current Donor Location - Hospital Admission Date-Time
18 Ventilation Initial Referral, Referral Worksheet and Donor Information
Intubation Date-Time
18 Authorisation Authorisation Form Authorisation Date-Time
18 (DCD) WCRS DCD Flowsheet Withdrawal of cardio-respiratory support
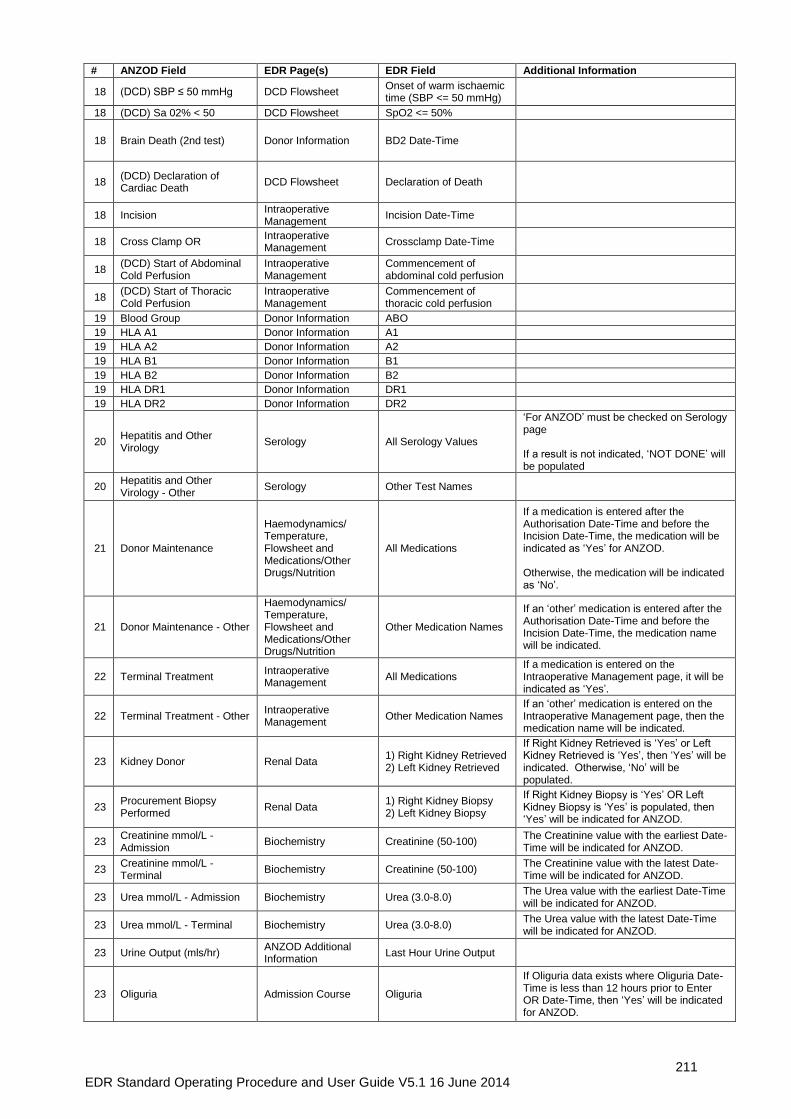
211 EDR Standard Operating Procedure and User Guide V5.1 16 June 2014
# ANZOD Field EDR Page(s) EDR Field Additional Information
18 (DCD) SBP ≤ 50 mmHg DCD Flowsheet Onset of warm ischaemic time (SBP <= 50 mmHg)
18 (DCD) Sa 02% < 50 DCD Flowsheet SpO2 <= 50%
18 Brain Death (2nd test) Donor Information BD2 Date-Time
18 (DCD) Declaration of Cardiac Death
DCD Flowsheet Declaration of Death
18 Incision Intraoperative Management
Incision Date-Time
18 Cross Clamp OR Intraoperative Management
Crossclamp Date-Time
18 (DCD) Start of Abdominal Cold Perfusion
Intraoperative Management
Commencement of abdominal cold perfusion
18 (DCD) Start of Thoracic Cold Perfusion
Intraoperative Management
Commencement of thoracic cold perfusion
19 Blood Group Donor Information ABO
19 HLA A1 Donor Information A1
19 HLA A2 Donor Information A2
19 HLA B1 Donor Information B1
19 HLA B2 Donor Information B2
19 HLA DR1 Donor Information DR1
19 HLA DR2 Donor Information DR2
20 Hepatitis and Other Virology
Serology All Serology Values
‘For ANZOD’ must be checked on Serology page If a result is not indicated, ‘NOT DONE’ will be populated
20 Hepatitis and Other Virology - Other
Serology Other Test Names
21 Donor Maintenance
Haemodynamics/ Temperature, Flowsheet and Medications/Other Drugs/Nutrition
All Medications
If a medication is entered after the Authorisation Date-Time and before the Incision Date-Time, the medication will be indicated as ‘Yes’ for ANZOD. Otherwise, the medication will be indicated as ‘No’.
21 Donor Maintenance - Other
Haemodynamics/ Temperature, Flowsheet and Medications/Other Drugs/Nutrition
Other Medication Names
If an ‘other’ medication is entered after the Authorisation Date-Time and before the Incision Date-Time, the medication name will be indicated.
22 Terminal Treatment Intraoperative Management
All Medications If a medication is entered on the Intraoperative Management page, it will be indicated as ‘Yes’.
22 Terminal Treatment - Other Intraoperative Management
Other Medication Names If an ‘other’ medication is entered on the Intraoperative Management page, then the medication name will be indicated.
23 Kidney Donor Renal Data 1) Right Kidney Retrieved 2) Left Kidney Retrieved
If Right Kidney Retrieved is ‘Yes’ or Left Kidney Retrieved is ‘Yes’, then ‘Yes’ will be indicated. Otherwise, ‘No’ will be populated.
23 Procurement Biopsy Performed
Renal Data 1) Right Kidney Biopsy 2) Left Kidney Biopsy
If Right Kidney Biopsy is ‘Yes’ OR Left Kidney Biopsy is ‘Yes’ is populated, then ‘Yes’ will be indicated for ANZOD.
23 Creatinine mmol/L - Admission
Biochemistry Creatinine (50-100) The Creatinine value with the earliest Date-Time will be indicated for ANZOD.
23 Creatinine mmol/L - Terminal
Biochemistry Creatinine (50-100) The Creatinine value with the latest Date-Time will be indicated for ANZOD.
23 Urea mmol/L - Admission Biochemistry Urea (3.0-8.0) The Urea value with the earliest Date-Time will be indicated for ANZOD.
23 Urea mmol/L - Terminal Biochemistry Urea (3.0-8.0) The Urea value with the latest Date-Time will be indicated for ANZOD.
23 Urine Output (mls/hr) ANZOD Additional Information
Last Hour Urine Output
23 Oliguria Admission Course Oliguria
If Oliguria data exists where Oliguria Date-Time is less than 12 hours prior to Enter OR Date-Time, then ‘Yes’ will be indicated for ANZOD.
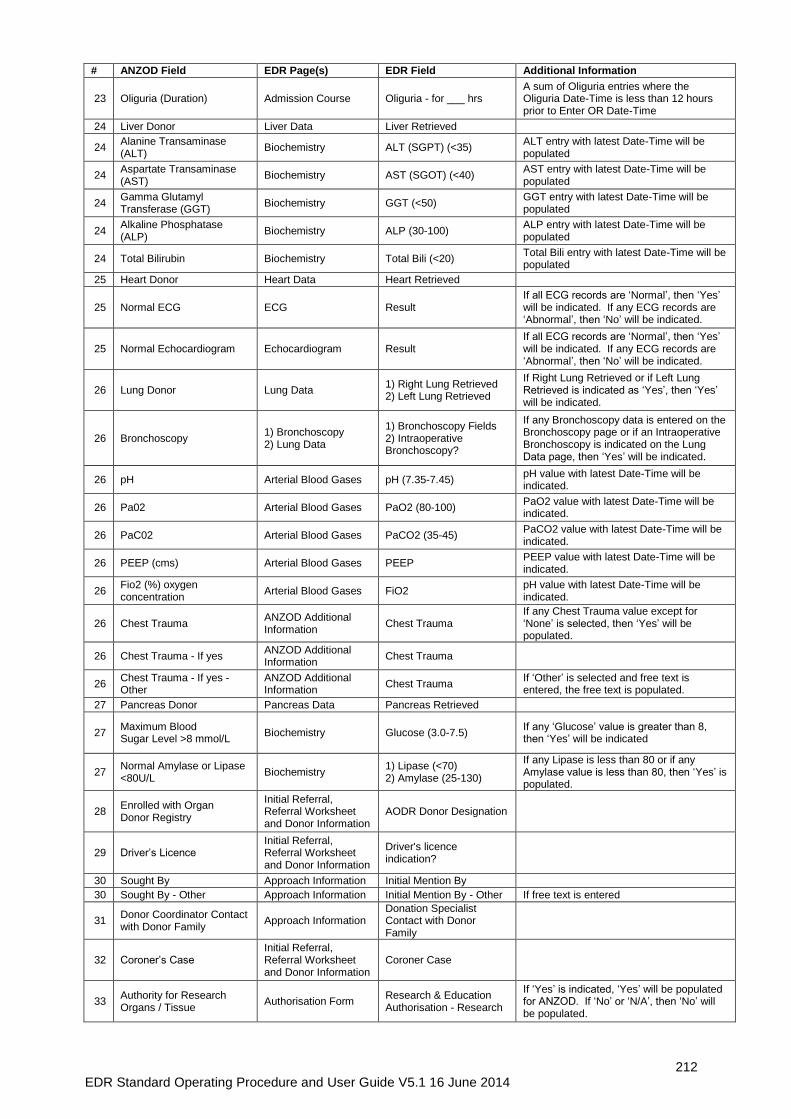
212 EDR Standard Operating Procedure and User Guide V5.1 16 June 2014
# ANZOD Field EDR Page(s) EDR Field Additional Information
23 Oliguria (Duration) Admission Course Oliguria - for ___ hrs A sum of Oliguria entries where the Oliguria Date-Time is less than 12 hours prior to Enter OR Date-Time
24 Liver Donor Liver Data Liver Retrieved
24 Alanine Transaminase (ALT)
Biochemistry ALT (SGPT) (<35) ALT entry with latest Date-Time will be populated
24 Aspartate Transaminase (AST)
Biochemistry AST (SGOT) (<40) AST entry with latest Date-Time will be populated
24 Gamma Glutamyl Transferase (GGT)
Biochemistry GGT (<50) GGT entry with latest Date-Time will be populated
24 Alkaline Phosphatase (ALP)
Biochemistry ALP (30-100) ALP entry with latest Date-Time will be populated
24 Total Bilirubin Biochemistry Total Bili (<20) Total Bili entry with latest Date-Time will be populated
25 Heart Donor Heart Data Heart Retrieved
25 Normal ECG ECG Result If all ECG records are ‘Normal’, then ‘Yes’ will be indicated. If any ECG records are ‘Abnormal’, then ‘No’ will be indicated.
25 Normal Echocardiogram Echocardiogram Result If all ECG records are ‘Normal’, then ‘Yes’ will be indicated. If any ECG records are ‘Abnormal’, then ‘No’ will be indicated.
26 Lung Donor Lung Data 1) Right Lung Retrieved 2) Left Lung Retrieved
If Right Lung Retrieved or if Left Lung Retrieved is indicated as ‘Yes’, then ‘Yes’ will be indicated.
26 Bronchoscopy 1) Bronchoscopy 2) Lung Data
1) Bronchoscopy Fields 2) Intraoperative Bronchoscopy?
If any Bronchoscopy data is entered on the Bronchoscopy page or if an Intraoperative Bronchoscopy is indicated on the Lung Data page, then ‘Yes’ will be indicated.
26 pH Arterial Blood Gases pH (7.35-7.45) pH value with latest Date-Time will be indicated.
26 Pa02 Arterial Blood Gases PaO2 (80-100) PaO2 value with latest Date-Time will be indicated.
26 PaC02 Arterial Blood Gases PaCO2 (35-45) PaCO2 value with latest Date-Time will be indicated.
26 PEEP (cms) Arterial Blood Gases PEEP PEEP value with latest Date-Time will be indicated.
26 Fio2 (%) oxygen concentration
Arterial Blood Gases FiO2 pH value with latest Date-Time will be indicated.
26 Chest Trauma ANZOD Additional Information
Chest Trauma If any Chest Trauma value except for ‘None’ is selected, then ‘Yes’ will be populated.
26 Chest Trauma - If yes ANZOD Additional Information
Chest Trauma
26 Chest Trauma - If yes - Other
ANZOD Additional Information
Chest Trauma If ‘Other’ is selected and free text is entered, the free text is populated.
27 Pancreas Donor Pancreas Data Pancreas Retrieved
27 Maximum Blood Sugar Level >8 mmol/L
Biochemistry Glucose (3.0-7.5) If any ‘Glucose’ value is greater than 8, then ‘Yes’ will be indicated
27 Normal Amylase or Lipase <80U/L
Biochemistry 1) Lipase (<70) 2) Amylase (25-130)
If any Lipase is less than 80 or if any Amylase value is less than 80, then ‘Yes’ is populated.
28 Enrolled with Organ Donor Registry
Initial Referral, Referral Worksheet and Donor Information
AODR Donor Designation
29 Driver’s Licence Initial Referral, Referral Worksheet and Donor Information
Driver's licence indication?
30 Sought By Approach Information Initial Mention By
30 Sought By - Other Approach Information Initial Mention By - Other If free text is entered
31 Donor Coordinator Contact with Donor Family
Approach Information Donation Specialist Contact with Donor Family
32 Coroner’s Case Initial Referral, Referral Worksheet and Donor Information
Coroner Case
33 Authority for Research Organs / Tissue
Authorisation Form Research & Education Authorisation - Research
If ‘Yes’ is indicated, ‘Yes’ will be populated for ANZOD. If ‘No’ or ‘N/A’, then ‘No’ will be populated.
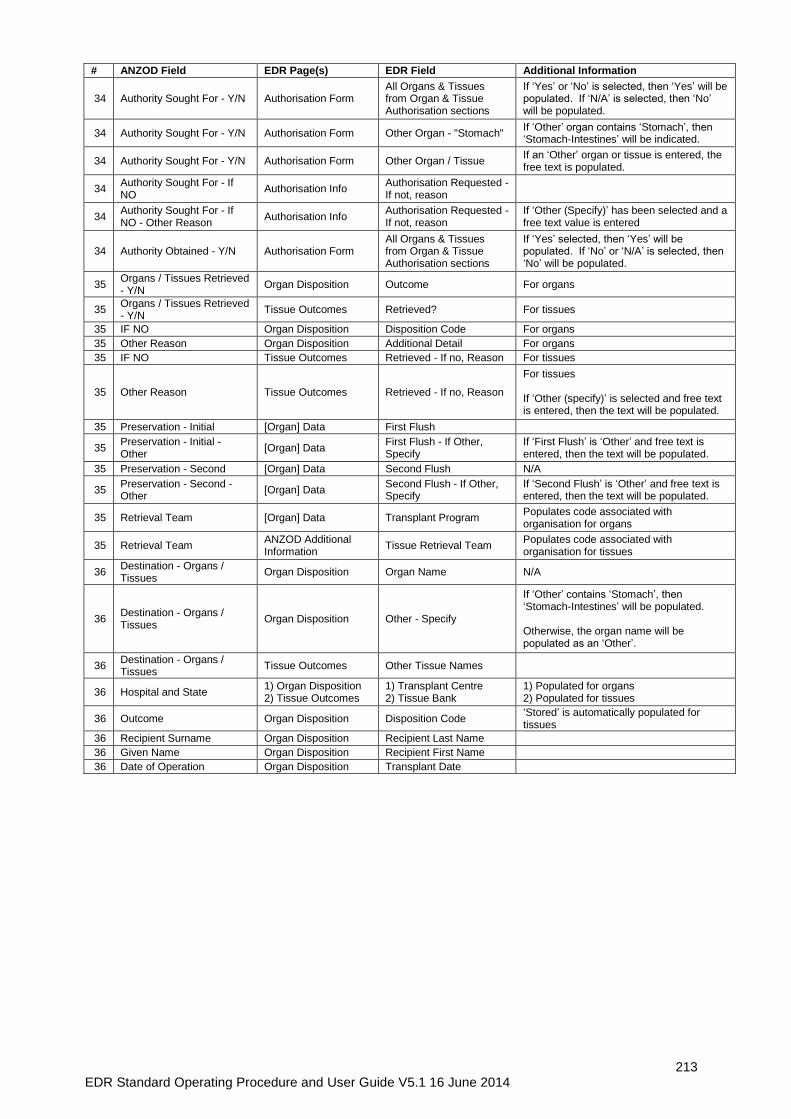
213 EDR Standard Operating Procedure and User Guide V5.1 16 June 2014
# ANZOD Field EDR Page(s) EDR Field Additional Information
34 Authority Sought For - Y/N Authorisation Form All Organs & Tissues from Organ & Tissue Authorisation sections
If ‘Yes’ or ‘No’ is selected, then ‘Yes’ will be populated. If ‘N/A’ is selected, then ‘No’ will be populated.
34 Authority Sought For - Y/N Authorisation Form Other Organ - "Stomach" If ‘Other’ organ contains ‘Stomach’, then ‘Stomach-Intestines’ will be indicated.
34 Authority Sought For - Y/N Authorisation Form Other Organ / Tissue If an ‘Other’ organ or tissue is entered, the free text is populated.
34 Authority Sought For - If NO
Authorisation Info Authorisation Requested - If not, reason
34 Authority Sought For - If NO - Other Reason
Authorisation Info Authorisation Requested - If not, reason
If ‘Other (Specify)’ has been selected and a free text value is entered
34 Authority Obtained - Y/N Authorisation Form All Organs & Tissues from Organ & Tissue Authorisation sections
If ‘Yes’ selected, then ‘Yes’ will be populated. If ‘No’ or ‘N/A’ is selected, then ‘No’ will be populated.
35 Organs / Tissues Retrieved - Y/N
Organ Disposition Outcome For organs
35 Organs / Tissues Retrieved - Y/N
Tissue Outcomes Retrieved? For tissues
35 IF NO Organ Disposition Disposition Code For organs
35 Other Reason Organ Disposition Additional Detail For organs
35 IF NO Tissue Outcomes Retrieved - If no, Reason For tissues
35 Other Reason Tissue Outcomes Retrieved - If no, Reason
For tissues If ‘Other (specify)’ is selected and free text is entered, then the text will be populated.
35 Preservation - Initial [Organ] Data First Flush
35 Preservation - Initial - Other
[Organ] Data First Flush - If Other, Specify
If ‘First Flush’ is ‘Other’ and free text is entered, then the text will be populated.
35 Preservation - Second [Organ] Data Second Flush N/A
35 Preservation - Second - Other
[Organ] Data Second Flush - If Other, Specify
If ‘Second Flush’ is ‘Other’ and free text is entered, then the text will be populated.
35 Retrieval Team [Organ] Data Transplant Program Populates code associated with organisation for organs
35 Retrieval Team ANZOD Additional Information
Tissue Retrieval Team Populates code associated with organisation for tissues
36 Destination - Organs / Tissues
Organ Disposition Organ Name N/A
36 Destination - Organs / Tissues
Organ Disposition Other - Specify
If ‘Other’ contains ‘Stomach’, then ‘Stomach-Intestines’ will be populated. Otherwise, the organ name will be populated as an ‘Other’.
36 Destination - Organs / Tissues
Tissue Outcomes Other Tissue Names
36 Hospital and State 1) Organ Disposition 2) Tissue Outcomes
1) Transplant Centre 2) Tissue Bank
1) Populated for organs 2) Populated for tissues
36 Outcome Organ Disposition Disposition Code ‘Stored’ is automatically populated for tissues
36 Recipient Surname Organ Disposition Recipient Last Name
36 Given Name Organ Disposition Recipient First Name
36 Date of Operation Organ Disposition Transplant Date
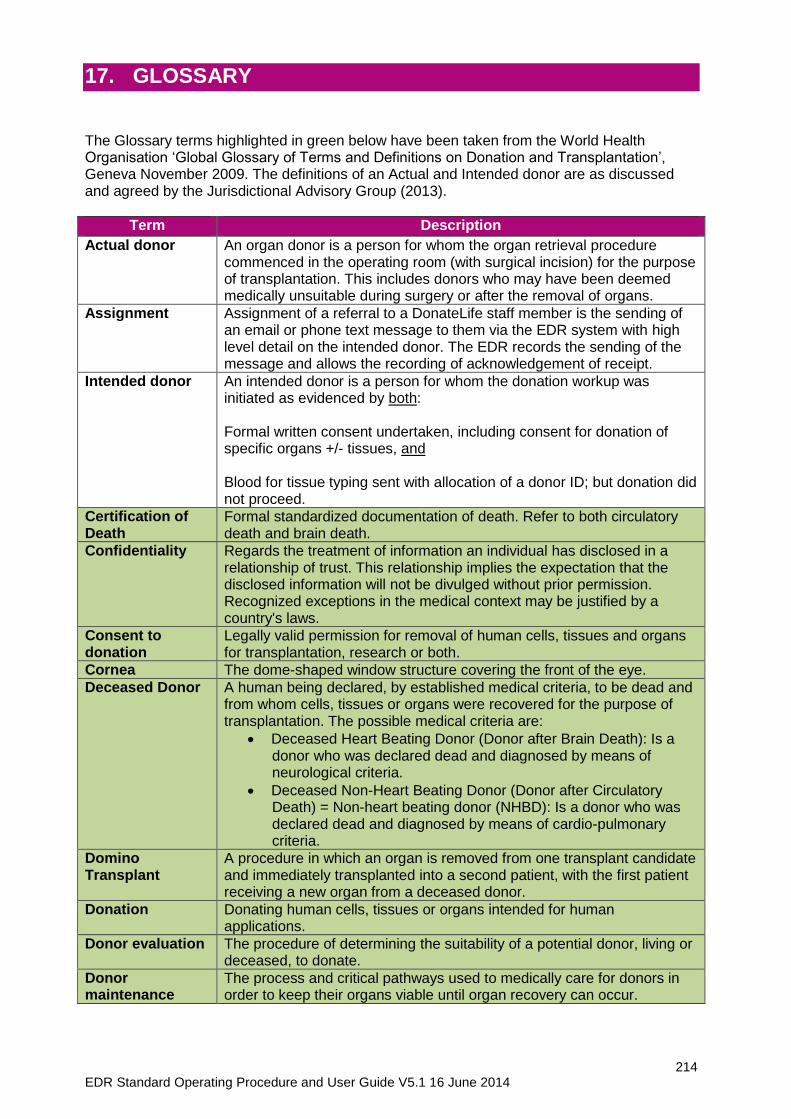
214 EDR Standard Operating Procedure and User Guide V5.1 16 June 2014
17. GLOSSARY
The Glossary terms highlighted in green below have been taken from the World Health Organisation ‘Global Glossary of Terms and Definitions on Donation and Transplantation’, Geneva November 2009. The definitions of an Actual and Intended donor are as discussed and agreed by the Jurisdictional Advisory Group (2013).
Term Description
Actual donor An organ donor is a person for whom the organ retrieval procedure commenced in the operating room (with surgical incision) for the purpose of transplantation. This includes donors who may have been deemed medically unsuitable during surgery or after the removal of organs.
Assignment Assignment of a referral to a DonateLife staff member is the sending of an email or phone text message to them via the EDR system with high level detail on the intended donor. The EDR records the sending of the message and allows the recording of acknowledgement of receipt.
Intended donor An intended donor is a person for whom the donation workup was initiated as evidenced by both: Formal written consent undertaken, including consent for donation of specific organs +/- tissues, and Blood for tissue typing sent with allocation of a donor ID; but donation did not proceed.
Certification of Death
Formal standardized documentation of death. Refer to both circulatory death and brain death.
Confidentiality Regards the treatment of information an individual has disclosed in a relationship of trust. This relationship implies the expectation that the disclosed information will not be divulged without prior permission. Recognized exceptions in the medical context may be justified by a country's laws.
Consent to donation
Legally valid permission for removal of human cells, tissues and organs for transplantation, research or both.
Cornea The dome-shaped window structure covering the front of the eye.
Deceased Donor A human being declared, by established medical criteria, to be dead and from whom cells, tissues or organs were recovered for the purpose of transplantation. The possible medical criteria are:
Deceased Heart Beating Donor (Donor after Brain Death): Is a donor who was declared dead and diagnosed by means of neurological criteria.
Deceased Non-Heart Beating Donor (Donor after Circulatory Death) = Non-heart beating donor (NHBD): Is a donor who was declared dead and diagnosed by means of cardio-pulmonary criteria.
Domino Transplant
A procedure in which an organ is removed from one transplant candidate and immediately transplanted into a second patient, with the first patient receiving a new organ from a deceased donor.
Donation Donating human cells, tissues or organs intended for human applications.
Donor evaluation The procedure of determining the suitability of a potential donor, living or deceased, to donate.
Donor maintenance
The process and critical pathways used to medically care for donors in order to keep their organs viable until organ recovery can occur.
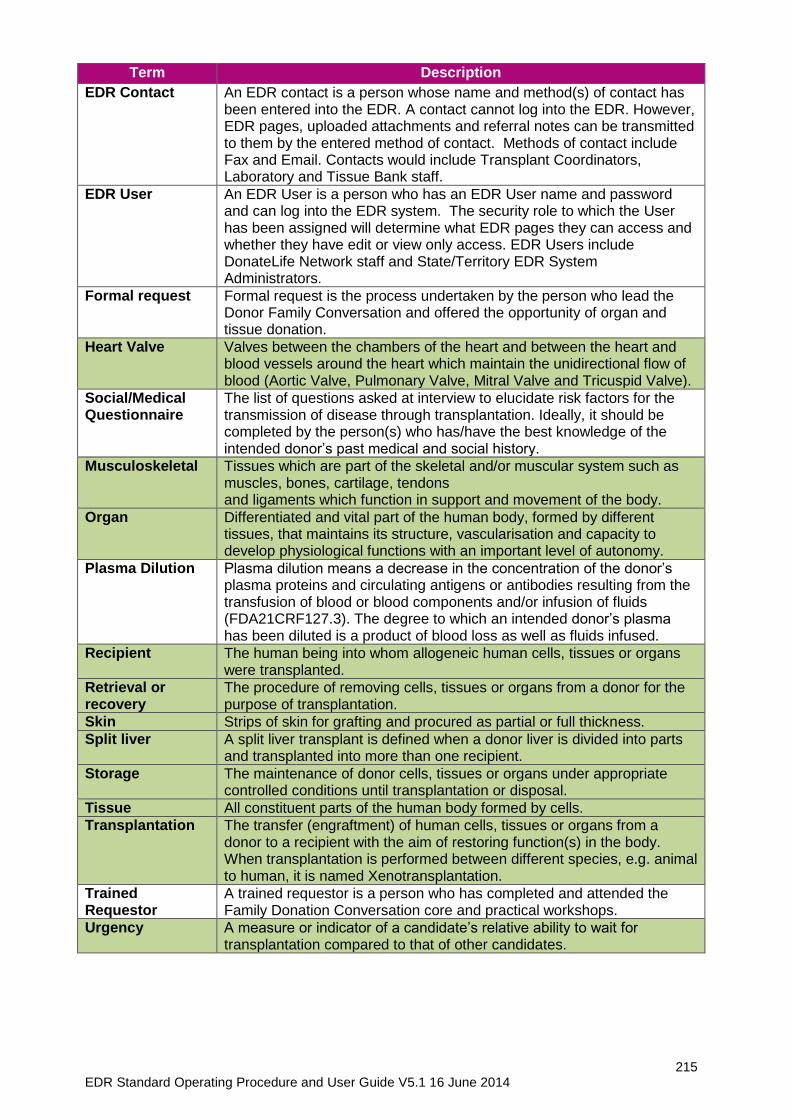
215 EDR Standard Operating Procedure and User Guide V5.1 16 June 2014
Term Description
EDR Contact An EDR contact is a person whose name and method(s) of contact has been entered into the EDR. A contact cannot log into the EDR. However, EDR pages, uploaded attachments and referral notes can be transmitted to them by the entered method of contact. Methods of contact include Fax and Email. Contacts would include Transplant Coordinators, Laboratory and Tissue Bank staff.
EDR User An EDR User is a person who has an EDR User name and password and can log into the EDR system. The security role to which the User has been assigned will determine what EDR pages they can access and whether they have edit or view only access. EDR Users include DonateLife Network staff and State/Territory EDR System Administrators.
Formal request Formal request is the process undertaken by the person who lead the Donor Family Conversation and offered the opportunity of organ and tissue donation.
Heart Valve Valves between the chambers of the heart and between the heart and blood vessels around the heart which maintain the unidirectional flow of blood (Aortic Valve, Pulmonary Valve, Mitral Valve and Tricuspid Valve).
Social/Medical Questionnaire
The list of questions asked at interview to elucidate risk factors for the transmission of disease through transplantation. Ideally, it should be completed by the person(s) who has/have the best knowledge of the intended donor’s past medical and social history.
Musculoskeletal Tissues which are part of the skeletal and/or muscular system such as muscles, bones, cartilage, tendons and ligaments which function in support and movement of the body.
Organ Differentiated and vital part of the human body, formed by different tissues, that maintains its structure, vascularisation and capacity to develop physiological functions with an important level of autonomy.
Plasma Dilution Plasma dilution means a decrease in the concentration of the donor’s plasma proteins and circulating antigens or antibodies resulting from the transfusion of blood or blood components and/or infusion of fluids (FDA21CRF127.3). The degree to which an intended donor’s plasma has been diluted is a product of blood loss as well as fluids infused.
Recipient The human being into whom allogeneic human cells, tissues or organs were transplanted.
Retrieval or recovery
The procedure of removing cells, tissues or organs from a donor for the purpose of transplantation.
Skin Strips of skin for grafting and procured as partial or full thickness.
Split liver A split liver transplant is defined when a donor liver is divided into parts and transplanted into more than one recipient.
Storage The maintenance of donor cells, tissues or organs under appropriate controlled conditions until transplantation or disposal.
Tissue All constituent parts of the human body formed by cells.
Transplantation The transfer (engraftment) of human cells, tissues or organs from a donor to a recipient with the aim of restoring function(s) in the body. When transplantation is performed between different species, e.g. animal to human, it is named Xenotransplantation.
Trained Requestor
A trained requestor is a person who has completed and attended the Family Donation Conversation core and practical workshops.
Urgency A measure or indicator of a candidate’s relative ability to wait for transplantation compared to that of other candidates.
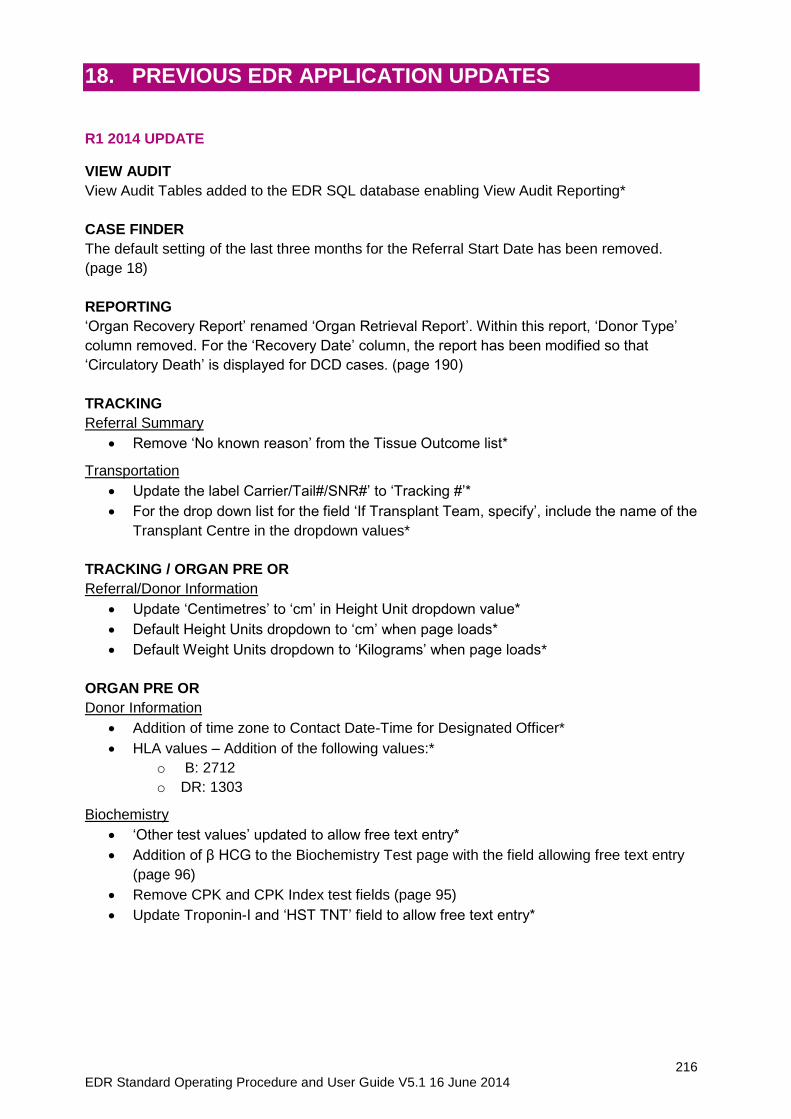
216 EDR Standard Operating Procedure and User Guide V5.1 16 June 2014
18. PREVIOUS EDR APPLICATION UPDATES
R1 2014 UPDATE
VIEW AUDIT
View Audit Tables added to the EDR SQL database enabling View Audit Reporting*
CASE FINDER
The default setting of the last three months for the Referral Start Date has been removed.
(page 18)
REPORTING
‘Organ Recovery Report’ renamed ‘Organ Retrieval Report’. Within this report, ‘Donor Type’
column removed. For the ‘Recovery Date’ column, the report has been modified so that
‘Circulatory Death’ is displayed for DCD cases. (page 190)
TRACKING
Referral Summary
Remove ‘No known reason’ from the Tissue Outcome list*
Transportation
Update the label Carrier/Tail#/SNR#’ to ‘Tracking #’*
For the drop down list for the field ‘If Transplant Team, specify’, include the name of the
Transplant Centre in the dropdown values*
TRACKING / ORGAN PRE OR
Referral/Donor Information
Update ‘Centimetres’ to ‘cm’ in Height Unit dropdown value*
Default Height Units dropdown to ‘cm’ when page loads*
Default Weight Units dropdown to ‘Kilograms’ when page loads*
ORGAN PRE OR
Donor Information
Addition of time zone to Contact Date-Time for Designated Officer*
HLA values – Addition of the following values:*
o B: 2712
o DR: 1303
Biochemistry
‘Other test values’ updated to allow free text entry*
Addition of β HCG to the Biochemistry Test page with the field allowing free text entry
(page 96)
Remove CPK and CPK Index test fields (page 95)
Update Troponin-I and ‘HST TNT’ field to allow free text entry*

217 EDR Standard Operating Procedure and User Guide V5.1 16 June 2014
Lung Measurements
Add an ‘Additional Comments’ field to the Lung Measurements (page 118)
ORGAN OR/Post
Organ Data Pages
Addition of ‘Cardioplegia A to the list of flush solutions*
Addition of flush solution to ANZOD export with a code of 216*
Update ‘Belzer UW’ to ‘UW’*
TRANSMIT
Return Email address and additional text functionality
Functionality added to allow addition of
return email address
email subject and
email body text
to the transmission email (page 154)
PDF output
Addition of MRN value to Donor Information Page*
ADMIN
Organisations
Add a ‘State’ field to New Zealand Addresses. This will allow for ‘NZ’ to be entered as
the state and get populated in the ANZOD export.*
FAMILY SERVICES
Next of Kin, Interaction Log, Donor Information
Add an audit page to track changes to each of these pages in the Family Services Tab*
ANZOD / SUMMARY
ANZOD Export
For Occupation values, only populate the numeric code in the ANZOD export*
If ‘Other’ is selected and free text is entered, the value will be populated in a new
Occupation-Other field, added to the ANZOD export.*
ANZOD Conformation Page
‘(DCD) Sa O2<50’ will no longer be a required field for Actual Donor – DCD referrals.*
Error message removed when ‘Blank’ is selected for HLA homozygous results*
NOTE: * indicates that no change to the text of this guide has been made as a result of this
update. Where the text of the guide has been edited, page numbers are displayed.
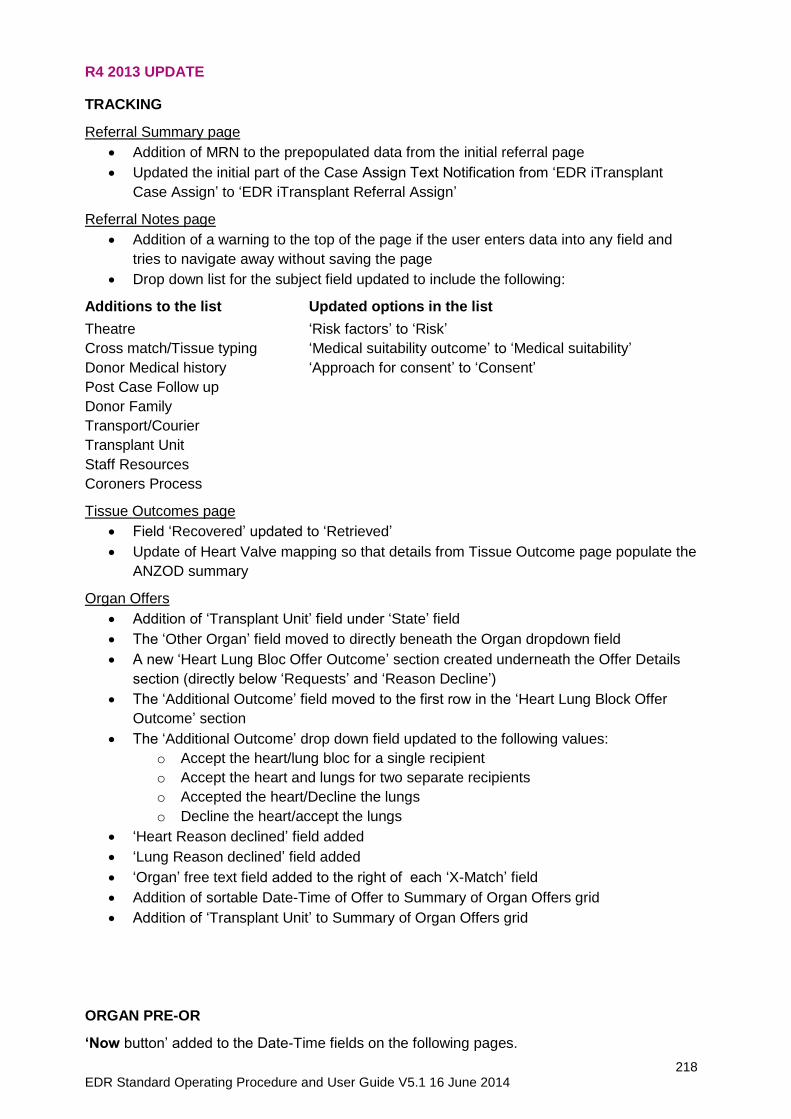
218 EDR Standard Operating Procedure and User Guide V5.1 16 June 2014
R4 2013 UPDATE
TRACKING
Referral Summary page
Addition of MRN to the prepopulated data from the initial referral page
Updated the initial part of the Case Assign Text Notification from ‘EDR iTransplant
Case Assign’ to ‘EDR iTransplant Referral Assign’
Referral Notes page
Addition of a warning to the top of the page if the user enters data into any field and
tries to navigate away without saving the page
Drop down list for the subject field updated to include the following:
Additions to the list Updated options in the list
Theatre
Cross match/Tissue typing
Donor Medical history
Post Case Follow up
Donor Family
Transport/Courier
Transplant Unit
Staff Resources
Coroners Process
‘Risk factors’ to ‘Risk’
‘Medical suitability outcome’ to ‘Medical suitability’
‘Approach for consent’ to ‘Consent’
Tissue Outcomes page
Field ‘Recovered’ updated to ‘Retrieved’
Update of Heart Valve mapping so that details from Tissue Outcome page populate the
ANZOD summary
Organ Offers
Addition of ‘Transplant Unit’ field under ‘State’ field
The ‘Other Organ’ field moved to directly beneath the Organ dropdown field
A new ‘Heart Lung Bloc Offer Outcome’ section created underneath the Offer Details
section (directly below ‘Requests’ and ‘Reason Decline’)
The ‘Additional Outcome’ field moved to the first row in the ‘Heart Lung Block Offer
Outcome’ section
The ‘Additional Outcome’ drop down field updated to the following values:
o Accept the heart/lung bloc for a single recipient
o Accept the heart and lungs for two separate recipients
o Accepted the heart/Decline the lungs
o Decline the heart/accept the lungs
‘Heart Reason declined’ field added
‘Lung Reason declined’ field added
‘Organ’ free text field added to the right of each ‘X-Match’ field
Addition of sortable Date-Time of Offer to Summary of Organ Offers grid
Addition of ‘Transplant Unit’ to Summary of Organ Offers grid
ORGAN PRE-OR
‘Now button’ added to the Date-Time fields on the following pages.
219 EDR Standard Operating Procedure and User Guide V5.1 16 June 2014
Biochemistry page
Culture Results page
Medications/Other Drugs/ Nutrition page
Arterial Blood Gases page
Urinalysis page
Update of spelling of ‘Nitrate’ to “Nitrite”
Biochemistry page
The eGRF field modified to accept alphanumeric characters
Flowsheet
Removal of ‘Running Balance’ from the bottom of the Flowsheet page
ORGAN OR/POST
Organ Data pages
Removal of the grey out rules for the flush and storage solutions if not retrieved radio
button is selected
Update of the order of the flushes on the Renal, Lung and Intestine data pages to be 1)
First Flush, 2) Second Flush and 3) Storage Solution
Renal Data page
Field added to Renal page to allow recording of the Pathologist phone number
Existing ‘QOP’ field removed. ‘QOP’ field added to the Right Kidney Anatomy column
between ‘Reason Not retrieved’ fields and ‘Kidney Size’ field. ‘QOP’ field added to the
Left Kidney Anatomy column between ‘Reason Not retrieved’ field and ‘Kidney Size’
field
Intestine and Pancreas Data pages
‘Vessels Sent’ – ‘Yes, No’ drop down list added above ‘Anatomical Abnormality’
‘Comments’ – text box, 50 characters to the right of ‘Vessels Sent’ added
‘Anatomical Abnormality’ and ‘Surgical Damage’ yes/no radio buttons converted to a
‘Yes, No’ drop down lists
Removal of the grey out rules between the ‘Yes/ No’ options and the ‘Comments’ field
to allow greater flexibility of data entry
Organ Disposition page
‘Transplant Centre’ drop down list to include the transplant centre name
Removal of ‘Heart Valve’ from the Disposition Code list
TRANSMIT
Med Soc List page
GP/Clinic fields redacted in the PDF sent from the TRANSMIT page
Donor Chart PDF
Donor Chart pages reordered
220 EDR Standard Operating Procedure and User Guide V5.1 16 June 2014
SUMMARY/ANZOD
ANZOD Additional Info Page
‘mls’ added to the right hand side of the ‘Last hour Urine Output’ field
‘Last hour Urine Output’ field decoupled from the Intraoperative Management page
ANZOD Summary page
‘Double /En-Bloc Kidney’ has been enabled as organ option on the ANZOD destination
section with the code 13 to be transmitted as part of the XML export
‘MAP<50 mmHg’ added to ANZOD Summary page and XML export
Update of Heart Valve mapping so that details from the Tissue Outcomes page
populate the ANZOD Summary