Embed Size (px)
Citation preview

Electronic Documentation/BMV Training
For
Nursing Students and Instructors
1
Tammy Galindo MSN/ed, RN
Education Coordinator

Mission Statement
Madera Community Hospital is a not-for-profit
community health resource, dedicated to actively promoting
and maintaining the health and wellbeing of residents
throughout the Central Valley. We are committed to
identifying and serving our community’s needs with
compassion, concern, care, and safety for the individual.
2

Welcome Students/Instructors to MCH!
MCH staff pride themselves in facilitating an environment that is safe,
collaborative, and beneficial to learning. The goal of this presentation is to
provide students and instructors with the knowledge of electronic
documentation and bedside medication verification (BMV), to ensure a
successful and safe learning experience at MCH.
The following slides will identify safety rules, the process of logging into
the Network and Meditech, documenting patient care, reviewing past
documentation, and medication administration using BMV. Throughout the
presentation, click the mouse or tap the downward arrow key to advance to the
next slide.
3

Safety Rules
**All students must receive verbal permission from the patient to
assist in their care, and document the permission**
Access medical records on a need to know basis only
Never leave an open screen unattended
Always log off before walking away
Remember to keep the WOW plugged in when not in use
NEVER share your password with anyone
All student documentation must be co-signed
NEVER document interventions before carrying them out
Record observations of behavior rather than your interpretation of the behavior
4

Logging into the Network
Enter your Network Username and temporary Password provided by MCH and click
OK. You will be prompted to create a permanent password and asked to set up 5
security questions. The security questions are in place in case you forget your
password when logging into the Network.
5

Logging into Meditech
6
Double click the Meditech icon
Meditech Sign-On Type in your Meditech Username and Password provided by MCH
Tap the Enter key when done
7
.

Logging into Patient Care Services (PCS) Click on PCS Live and then on Status Board
8

Creating Your Patient List Click on Find Patient
9

Patient Look Up Enter the patient’s last name first name, first name last.
Click OK when done.
10

Click on the Patient’s Name
11

Click on the Visit with the Green Dot
12
Different icons may appear on this screen depending on the
type of visits your patient has had.
Icons
•Gurney=Hospital admission
•Ambulance=ED visit
•Thermometer=Laboratory visit
•Magnifying Glass=Observational visit

Click Add to List (1st) and My List (2nd)
13

Status Board Information available on the status board includes patient name, room number,
physician name(s), diagnosis, and items continually monitored (e.g. orders,
fingersticks, tele, fall risk, isolation, etc.)
14

Integrated Desk Top The integrated desk top (column to the right) contains tabs that allow you
to document interventions, view results, and view what has been
documented
15
Interventions= Document assessments, patient care
Outcomes= Document whether goals have been met or not
eMAR= Document medication administration
IV Spreadsheet=Document IV fluid intake and rate
EMR=View all patient data and care provider documentation

Patient Care Documentation Click on the Interventions tab on the integrated desk top
16

Documentation is in “Real Time” Double click the intervention you are wanting to document on (e.g. Activities
of Daily Living). Document the intervention and click Save.
17

Interventions to Document The interventions listed in red are how they appear on the intervention list
Physical Assessment= physical assessment
Braden (skin) Assessment= skin assessment
Fall Risk Assessment= risk of fall assessment
IV Start= inserting an IV
DCIV/Invasive Line= discontinuing an IV
Vital Signs= vital signs
Pain assessment (stand alone)= pain
Intake and Output= fluid intake and output
Urinary Catheter
Insertion/Assessment= inserting
and assessing a urinary catheter
Discontinue Urinary Catheter=
urinary catheter removal
Gastric Tube
Insertion/Assessment= inserting,
assessing, and removing a gastric
tube (e.g. NGT)
Feeding Intake= meal intake
(breakfast, lunch, dinner, and
supplements)
Wound Assessment= wound
assessments and dressing changes
18

Students must receive verbal permission from the patient to
assist in their care, and document the permission. Click on Add Intervention
19

Type I: Patient in the search box. Click on the square to the
left of the I:Patient agreeable to SN providing care
intervention, a check mark will be placed. Click on Add and
Close button.
20

The I:Patient agreeable to SN providing care intervention
will appear in purple on the intervention list. Double click the
intervention and click Save.
21

Documenting a Physical Assessment Double click on Physical Assessment, each body system is listed individually
22

Charting by Exception on Physical Assessments Click WDP (Within Defined Parameters) if the patient assessment matches the defined
parameters listed. Click WDP Except if the patient assessment does NOT match the
defined parameters listed.
23
If you click WDP
Except, only document
the area(s) that are
NOT within the defined
parameters

Documenting a Repeatable Assessment/Intervention To document repeatable items; e.g. IV’s, pupils, pulses, teaching, etc. Click
on Insert Occurrence (footer button) and Occurrence #2, #3, etc. will appear.
24
For
example:
Pupils-
Occurrence
#2 has been
added

Documenting Vital Signs Double click Vital Signs intervention, click Vital Signs-Standard
Units, and click Save when done.
25

Documenting Intake & Output Double click on the Intake and Output intervention and enter the patient’s Intake
and/or Output. Click Save when done.
26
Intake from a patient’s tray does
not get entered here (enter on the
Feeding Intake intervention)
The Intake and/or Output
entered automatically
transfers to the I & O in
the EMR

Charging for Supplies
27
Ask for assistance from your instructor or
RN Team Leader if you have questions
about chargeable items
Please charge for new supplies as they are
used.
Charges are built into each intervention.

Care Plan To view the Plan of Care (POC) click on Process Plans or Outcomes on
the integrated desk top
28
The patient’s plan of care is reviewed every 12 hours. The plan
of care lists the problem, long term outcomes, and interventions
for a specific diagnosis (i.e. asthma) or suggested problem. The
plan of care is revised every 72 hours, or earlier if needed.

EMR (Enterprise Medical Record) Click on EMR to “view only” patient VS, I & O, medications, order history, lab,
microbiology, blood bank, pathology, imaging, ER notes, history and physical, care
trends, and medication reconciliation.
29

Click on Care Activity tab to view a summary of the care
documented during hospitalization.
30
This is a great
tool for hand-off
report.
Remember to
use SBAR

Bedside Medication Verification (BMV) **Always follow the 6 Rights of Medication Administration**
Click on eMAR from the integrated desk top. You will use a hand held
scanner attached to the WOW to scan your patient’s wrist band and
medications.
31
6 Rights of Med.
Admin.
1. Right patient
2. Right med.
3.Right dose
4. Right route
5. Right time
6.Right to refuse
Monograph-
where to look
up drug info.

Bedside Medication Verification (BMV) With your instructor or RN Team Leader at bedside scan the patient’s wrist band with
the hand held scanner, compare the patient’s name and medical record number from the
wristband against the eMAR, check for allergies, and medication expiration date. A
confirmation box will appear in the middle of the screen.
32
Always tell the patient
Name of Medication
What it is used for
Why he or she is
receiving it
Possible side effects

Double check the patient’s name, name of the medication,
dose, route, and scheduled time of the medication before
scanning it. Administered-date, time, amount will appear
below in purple. Click Save when done.
33
A bar code
appears after the
medication has
been scanned

**High-Risk Meds Require a Co-Signer** Insulin is an example of a high-risk med and the word Co-sign appears
34

Documenting Blood Glucose
35
After insulin is scanned a prompt will
appear to enter the blood glucose. Enter the
blood glucose by clicking on the number pad
on the screen. Click OK and then click Go to

Click on the site location and site selected for injection. When
finished, click Go to.
36

37
After entering injection site
information, a prompt for a
co-signer will appear. Two
licensed nurses will need to
verify the blood sugar
amount, sliding scale used,
and amount and type of
insulin drawn up.
Documenting Insulin Administration

Co-Signer The RN/instructor administering the insulin with the student enters his or her User
Password in the top box. The licensed co-signer enters his or her User Name and
Password in the Co-Signer boxes.
38
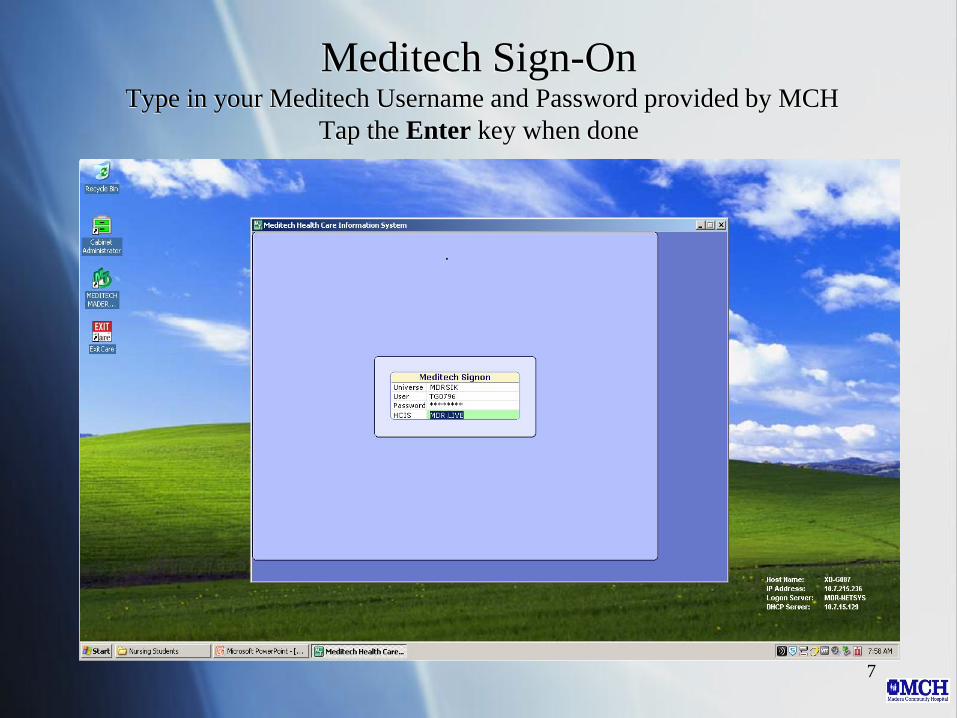
When a scheduled medication is not going to be given, click
on Non-Admin Reasons to document
39

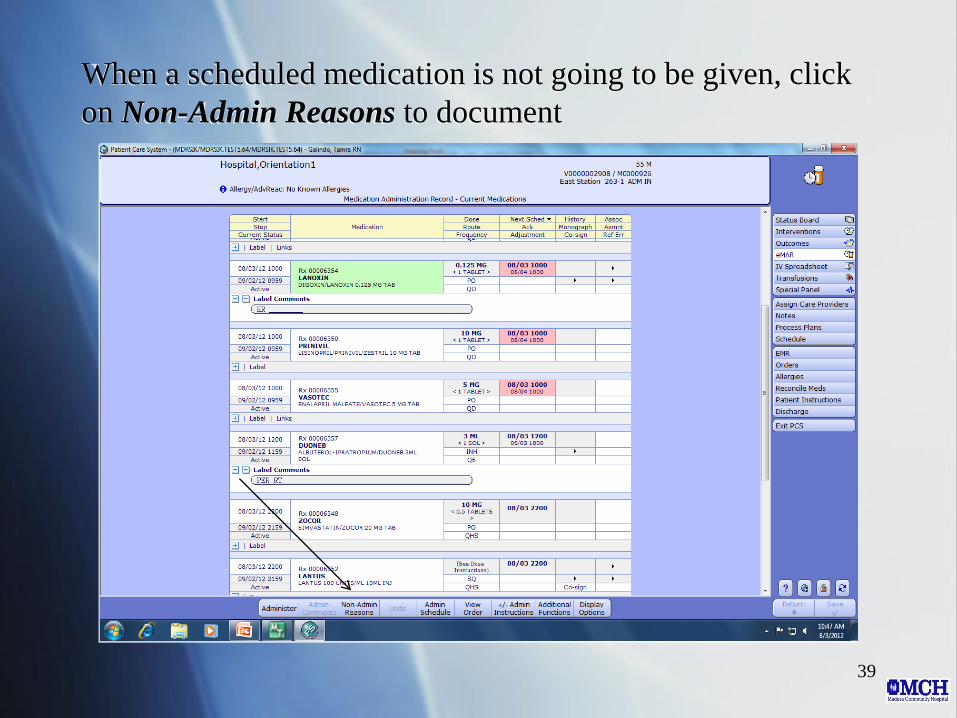
This screen will appear after clicking the Non-Admin Reasons button
40
You can free
text the reason
or scroll by
clicking the
Next button
Select from the list of Non-Admin Reasons for why the medication
was not given
41

Enter additional information if needed/prompted to support
why the medication was not administered
42
WARNING The computer will not
alert you if the value is not
appropriate for administering
the medication. YOU are
responsible for knowing lab
results, vital signs , and parameters
necessary to safely administer the
medication.

Linked Medications Medications that are to be given together will have the words Linked
Orders by Label Comments.
43

When the linked medication is scanned, the other medication
it is linked to will appear below it.
44

This screen appears after the second linked medication is
scanned. Click Return to return to the eMAR.
45

This screen appears when the dosage of the medication scanned is less or
more than the ordered dose. The order is for Lactulose 30gm and the
medication available is 10gm/15ml. You must scan 3 separate containers,
you cannot scan one container 3 times.
46
The dosage is under by 20gm, you will need to scan two
additional containers. Note the pink color.

This screen shows the medication has been rescanned
47
One additional unit needs to be scanned. Note the
pink color.

After rescanning the medication two additional times the
ordered dose of 30gm has been achieved. Note-the pink color
is gone.
48

The total amount scanned (30gm) appears in purple along
with date and time of administration. Click Save when done.
49

Some medications may need to be halved because the dosage
ordered is less than what is available. The order is for Zocor
10mg PO and Zocor 20mg PO is available.
50

Once Zocor is scanned, a prompt stating the dosage
scanned is over by 10mg (note the pink color).
51

Click Adjust and enter 10 and click OK.
52

Zocor 10mg is documented as administered.
53

This concludes Electronic Documentation/BMV Training
For Nursing Students and Instructors
Documentation is very important in health care. Patient safety,
including confidentiality must be maintained at all times.
Documenting factual, objective information in a timely
manner is key to successful documentation.
For questions regarding information in this presentation, please
contact
Tammy Galindo MSN/ed, RN
559-675-5486 or [email protected]
54