Embed Size (px)
Citation preview
Disclaimer: Your use of these application notes is subject to the following conditions:
* Your application of these notes are entirely at your own risk.
* While tested in a Lab environment, I know nothing of your environment and may be totally unsuitable.
* You will not hold myself or any company I am associated with responsible for any damages arising from
these notes. It is up to you to test in your environment to its suitability.
Elastix Application Note #201112271:
A Guide to the Elastix Firewall GUI
Title A Guide to the Elastix Firewall GUI
Author Bob Fryer
Date Written 27th
December 2011
Revision 1.0
Replaces Document N/A
Tested on Elastix Version 2.2
Backward Compatible No – Only released on Elastix 2.2
Elastix Level Beginner to Experienced
Linux Level Beginner
Network Level Intermediate to Experienced
Latest Document Source available from www.elastixconnection.com
Credits N/A
Licence GNU FDL
Disclaimer: Your use of these application notes is subject to the following conditions:
* Your application of these notes are entirely at your own risk.
* While tested in a Lab environment, I know nothing of your environment and may be totally unsuitable.
* You will not hold myself or any company I am associated with responsible for any damages arising from
these notes. It is up to you to test in your environment to its suitability.
Foreword
These application notes are intended to be a guide to implement features or extend the features of
the Elastix IP PBX system.
Whilst many (but not all) guides available are basically a random collection of notes, usually while
someone is implementing a feature for themselves, these guides are meant to be more definitive
guide that has been tested in a lab with specific equipment, and particular versions of Elastix.
Finding information on the Internet can be haphazard due to the lack of document version control,
lack of attention to software versions, and in some cases they are wrong. Then you have the cross
pollination issues, where a guide has been done for another distribution, which may or may not be
applicable to your Elastix system.
You will note on the front page of every Application note written in this way, will be an easy to read
summary, regarding the Elastix system it was tested on, when the document was written, whether it
is backward compatible, and the level of expertise needed to accomplish the implementation.
These application notes are written up and tested in a lab that has been specially setup to write
these notes. This includes
• 5 x Elastix IP PBX Hardware with a mixture of SIP only, Digium, Sangoma, OpenVox Cards
• 1 x WAN Simulator (including latency, jitter, random disconnects, random packet drop)
• 8 x Consumer / Business routers, including Drayteks, Cisco 1842, Cisco 877, Linksys WRT54GL
• 2 x IBM XSeries servers running VMware with 8 images of various versions of Elastix IP PBX
• 1 x Standard Microsoft SBS Network providing DHCP and DNS and Mail system
• 2 x Linux Servers
The Elastix IP PBX systems, both hardware and Virtual based have image systems to refresh the
systems to limit infection from other testing. Combined with a range of Phones, which include
Aastra, Linksys, Cisco, Yealink, it provides a reasonable cross section of typical systems currently in
the field.
These application notes are not just done in isolation either. Behind them is over 6-7 years of
commercial implementation of IP PBX systems, utilising these methods and concepts. The Lab is just
used to reconfirm the implementation in a less production like environment.
How you use these application notes is entirely up to you. However, it is highly recommended that in
the first instance, that you follow the notes and configurations in their entirety (except for IP
addresses) of course. If you follow it exactly, then it will be easier for others to assist you when you
do have an issue.
Disclaimer: Your use of these application notes is subject to the following conditions:
* Your application of these notes are entirely at your own risk.
* While tested in a Lab environment, I know nothing of your environment and may be totally unsuitable.
* You will not hold myself or any company I am associated with responsible for any damages arising from
these notes. It is up to you to test in your environment to its suitability.
Overview
One of the new features in Elastix 2.2 is the Firewall capability. IPTables (or its predecessors) has
always been a part of the Linux Kernel for more than 12+ years (possibly longer). Palosanto have
taken the Linux IPTables firewalling capability and wrapped it up in a nice GUI, to make it easier to
implement basic firewalling.
I mention basic firewalling, as it only implements a subset, but this subset is more than enough to
perform the firewalling that is needed for Elastix. IPTables is capable of a lot more.
If you want to implement firewalling on Elastix, your choice is either implementing IPTables at the
command line, or implementing Palosanto’s Firewall. It is one or the other; you cannot do both, due
to the way that Palosanto have implemented it. It is not because Palosanto have done it wrong, just
the way it needed to be implemented to maintain control (via the GUI) on a service that is critical to
the integrity and security of your system.
Trying to build a complete GUI around what is basically a freeform configuration, goes way beyond
the scope of the Elastix project, and no matter how well you implement it, it is never going to please
everyone. These types of firewalls are projects within themselves, and examples include Monowall,
IPCOP, PFsense, Smoothwall, Endian, and the list goes on, and also includes many commercial
firewalls which use IPTables as the basis of their firewalling.
So having said all that, that’s why Palosanto’s implementation of their Firewall is a nice balance for
the Elastix project. If you feel that you need more than Palosanto’s implementation, it is very simple
to switch it off and move over to coding IPTables yourself to achieve the advanced functionality you
need, and you can even use the work done so far & knowledge as the basis of your IPTables
implementation.
I have been involved with firewalls for over 13, in particular working with a product called IPCOP
(and Smoothwall previous to that), and was writing tutorials on IPCOP about 10 years ago. I have
coded IPChains and IPTables firewalls at the command lines (not something I enjoy), and even now I
can make mistakes that make the IPTables firewall inoperative, hence I enjoy a GUI for visualisation.
I have also been involved & implemented many other commercial/ enterprise firewall systems
include Checkpoint, FortiGate, SonicWall etc. I mention this so you understand where I am coming
from with my comments, and like all things they are my view, and not necessarily the only one, or
the most correct one.
One final thing, whilst an IPTables firewall is solid (correctly implemented), it should not be your only
line of defence. It should form part of your defence, and I am always of the opinion that a Perimeter
firewall be used at all times. What this means is that your primary firewall should not be on the
device that you are trying to protect, it should be on a physically separate device. It might be a
commercial Firewall if your budget allows, it might be a Open Source firewall, or it might be a
consumer based firewall/router. Whatever it is, it should be your first line of defence and then use
Disclaimer: Your use of these application notes is subject to the following conditions:
* Your application of these notes are entirely at your own risk.
* While tested in a Lab environment, I know nothing of your environment and may be totally unsuitable.
* You will not hold myself or any company I am associated with responsible for any damages arising from
these notes. It is up to you to test in your environment to its suitability.
the Elastix firewall as a second line. Whatever your situation, at least having the Elastix firewall
installed and functional is at least better than nothing at all.
If you have not had a lot of experience with Firewall concepts, even though the Elastix Firewall GUI
makes it simple, there is still some basic concepts that are needed to be known, to implement it
correctly and this is what hopefully the rest of this Application Note will take you through.
Finding the Elastix Firewall
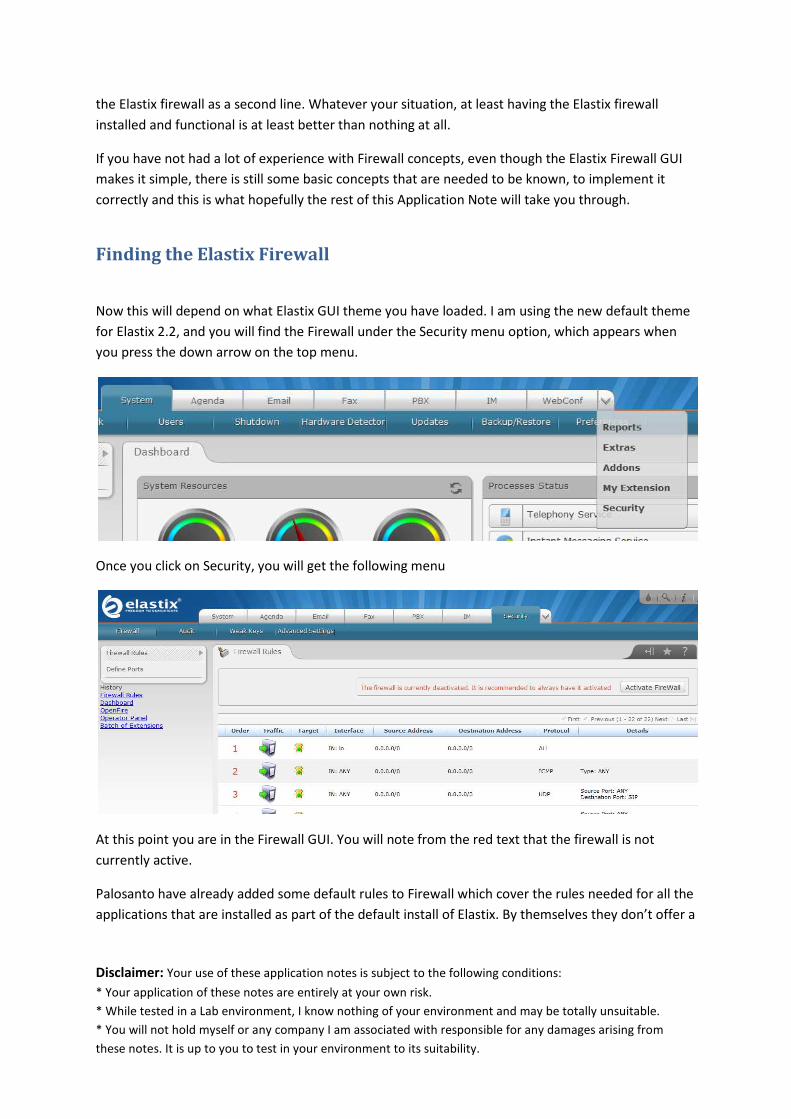
Now this will depend on what Elastix GUI theme you have loaded. I am using the new default theme
for Elastix 2.2, and you will find the Firewall under the Security menu option, which appears when
you press the down arrow on the top menu.
Once you click on Security, you will get the following menu
At this point you are in the Firewall GUI. You will note from the red text that the firewall is not
currently active.
Palosanto have already added some default rules to Firewall which cover the rules needed for all the
applications that are installed as part of the default install of Elastix. By themselves they don’t offer a

Disclaimer: Your use of these application notes is subject to the following conditions:
* Your application of these notes are entirely at your own risk.
* While tested in a Lab environment, I know nothing of your environment and may be totally unsuitable.
* You will not hold myself or any company I am associated with responsible for any damages arising from
these notes. It is up to you to test in your environment to its suitability.
great deal of protection as they allow any traffic from anywhere to reach those applications that are
in that list. It does however stop any traffic not in that list from accessing the Elastix system.
As a guide, say you just implemented Webmin (which I am not a big fan of installing on the Elastix
system), as the port 10000 (webmin’s default port) is not open, you would not be able to access it.
Anyhow, now you have found it, lets look at the basic concepts....
Basic Elastix Firewall GUI Concepts
It all starts here with the basic menu.
1) Firewall rules.
2) Define Ports.
Now you are probably thinking, that this is the same as other firewalls you have used, it might even
be similar on your Firewall/Router.
Its generally universal with all firewalls, you need to be able to define the rules, and you need to be
able to define your ports to be used in the rules.
Some more up market Firewalls, may have the large majority of the ports defined for you, but even
if they do, they normally have a method of implementing additional ports, as whilst there are
standard ports, there are also non-standard ports used, and new applications that need new ports
assigned.
Disclaimer: Your use of these application notes is subject to the following conditions:
* Your application of these notes are entirely at your own risk.
* While tested in a Lab environment, I know nothing of your environment and may be totally unsuitable.
* You will not hold myself or any company I am associated with responsible for any damages arising from
these notes. It is up to you to test in your environment to its suitability.
Editing/Defining Ports
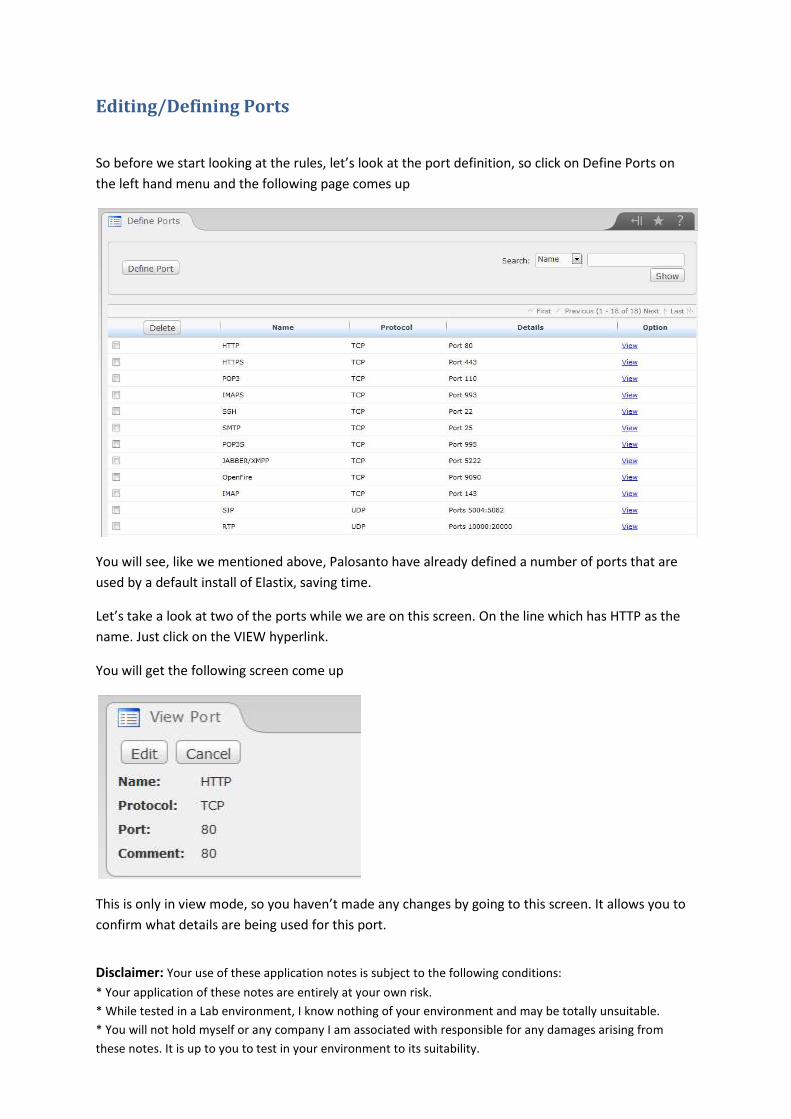
So before we start looking at the rules, let’s look at the port definition, so click on Define Ports on
the left hand menu and the following page comes up
You will see, like we mentioned above, Palosanto have already defined a number of ports that are
used by a default install of Elastix, saving time.
Let’s take a look at two of the ports while we are on this screen. On the line which has HTTP as the
name. Just click on the VIEW hyperlink.
You will get the following screen come up
This is only in view mode, so you haven’t made any changes by going to this screen. It allows you to
confirm what details are being used for this port.

Disclaimer: Your use of these application notes is subject to the following conditions:
* Your application of these notes are entirely at your own risk.
* While tested in a Lab environment, I know nothing of your environment and may be totally unsuitable.
* You will not hold myself or any company I am associated with responsible for any damages arising from
these notes. It is up to you to test in your environment to its suitability.
Anyone that knows their basic ports will note that this is the port for the standard Web Page on port
80. The Name is a meaningful name and the comment is your own comment, and the two critical
items that matter are the Protocol and the Port Number
Click on the EDIT button and you will come up with the following screen
Now we are in the write mode for the ports. Any changes you make here and pressing the Save
button will become permanent.
All the items marked with the Red asterisk are required fields.
For the moment, lets cancel out of here (make no changes) and let’s look at another Port that is
slightly different.
Click on VIEW hyperlink on the line with the Port named RTP, and the following screen will come up
As you will recognise, this is defining a port range. In this case, when we select RTP when we setup
firewall rules, we are telling the firewall to allow ports 10000 to 20000 through. For those that know

Disclaimer: Your use of these application notes is subject to the following conditions:
* Your application of these notes are entirely at your own risk.
* While tested in a Lab environment, I know nothing of your environment and may be totally unsuitable.
* You will not hold myself or any company I am associated with responsible for any damages arising from
these notes. It is up to you to test in your environment to its suitability.
their SIP requirements for Asterisk, will recognise that 10000 to 20000 are the ports required for RTP
as setup on the default Asterisk configuration.
The other difference you will recognise is the protocol. The protocol for this port has been set to
only allow UDP through, so if someone attempts connect to your Elastix system, using TCP on the
ports between 10000 and 20000 it will now allow it
Whilst we are on this subject, let’s look at the options for the protocol.
As you can see, we have four options
TCP – It will match only TCP Packets through this rule specified with this Port. Typically, HTTP, HTTPS
pages will utilise TCP.
UDP – It will match only UDP Packets through this rule specified with this port. Typically, SIP, RTP are
the main protocols that utilise UDP
ICMP – It will match only Packets such as Internet Control Message Protocol packets. These might be
TraceRoutes, Pings, etc. In other words they don’t carry data per se, but information about the
network status. This is useful, if you are trying to limit whether people can ping your Elastix system.
You will need to specify the ICMP Type and code numbers for this option.
Now finally, we have IP which many of you may not have come across where you need to use a
protocol number, instead of a Port Number. A protocol number is not the same as a Port number.
Typically these types are PPTP which uses GRE (Protoocol 47) and many others. Generally unless you
are doing something unusual with your Elastix system, you will not need to worry about these, but
they are there if you need it.
Just a note, you will note that each protocol option that you select, will change the options, as to
what is required to be filled in, which hopefully I have covered above.

Disclaimer: Your use of these application notes is subject to the following conditions:
* Your application of these notes are entirely at your own risk.
* While tested in a Lab environment, I know nothing of your environment and may be totally unsuitable.
* You will not hold myself or any company I am associated with responsible for any damages arising from
these notes. It is up to you to test in your environment to its suitability.
Even though I have taken you through having a look at preset ports, if you want to setup new ports,
then it’s as simple as pressing the DEFINE PORT button, and it is exactly the same as editing the ports
as we have shown above.
It is always good practice to make sure that you have ports defined first before you start adding
rules. Concentration can be lost starting to write rules, and have to come back to the Define Ports
interface to put a new rule in that you forgot.

Disclaimer: Your use of these application notes is subject to the following conditions:
* Your application of these notes are entirely at your own risk.
* While tested in a Lab environment, I know nothing of your environment and may be totally unsuitable.
* You will not hold myself or any company I am associated with responsible for any damages arising from
these notes. It is up to you to test in your environment to its suitability.
Defining Firewall Rules
Let’s look at the Firewall Rules interface in more detail, using the ones that are setup by default. One
of the main concepts to understand is the top down way that the rules are interpreted. You may
have come across this concept on other applications or products. For those that live in the Windows
world and have used Outlook rules for handling messages, then you have already witnessed a similar
method. Likewise, as you may have experienced with Outlook and with the incorrect ordering of the
rules, and also the action should the rule be matched, the same can occur with the Elastix Firewall,
so a reasonable amount of care is required.
Take a look at the next diagram as a simplistic look at how the Elastix Firewall works.
Simplistic Look at how the Elastix Firewall works

Disclaimer: Your use of these application notes is subject to the following conditions:
* Your application of these notes are entirely at your own risk.
* While tested in a Lab environment, I know nothing of your environment and may be totally unsuitable.
* You will not hold myself or any company I am associated with responsible for any damages arising from
these notes. It is up to you to test in your environment to its suitability.
So let’s start at the top, a packet arrives at the Elastix Firewall.
It commences its traversal of the firewall at the first rule and this rule in simple English says if the
packet is for port 22 (normally known as SSH), and is from the source IP address of 202.11.22.33
then let it move onto the action we have specified which is ACCEPT. This will then let it pass through
to Elastix
If the packet does not satisfy the rule entirely, it will then pass through to the next rule, and the next
until a match is found.
You might think that a packet is never going to get a match, because you did not setup a rule for SSH
from another IP address. Well with a properly constructed rule set, it will, as with all well
constructed rule sets, you always provide a match at the end of the rules, which as you can see from
the diagram, we have rule at the end that matches ANY port, from ANY IP address, and we define a
very clear action which is REJECT.
This might seem redundant to set a Reject at the end, but like any software application, you don’t
leave it open ended, as unexpected results may occur.
There is one other small concepts that you need to understand which you may not have taken the
time to understand before, which is the Local Loopback.
The Interface called “lo” which is short for local loopback interface. If you have ever performed a
ifconfig at the linux prompt, you may have noticed that besides your Ethernet interface, there is an
interface call “lo” like the example below.
Applications within the linux system itself communicate via the “lo” interface. You have probably
configured applications to use localhost, and this is a an example of applications that use the “lo”
Interface.
Disclaimer: Your use of these application notes is subject to the following conditions:
* Your application of these notes are entirely at your own risk.
* While tested in a Lab environment, I know nothing of your environment and may be totally unsuitable.
* You will not hold myself or any company I am associated with responsible for any damages arising from
these notes. It is up to you to test in your environment to its suitability.
As you can see from the picture above, the “lo” interface does handle traffic and is in use. It needs to
be always in the firewall rules, otherwise you will probably see many services that use local host fail.
Other uses of the Local Loopback interface is almost as a virtual adaptor that does not require a
hardware card. It allows for the initialisation of the IP Stack, without the hardware. If you have ever
built an Elastix system without a working network card (e.g. driver not available), you will note that
at least the “lo” interface is running. What this means is that applications that depend on the IP
stack being available (almost any application that uses IP communication), does come down in a
screaming heap because it expected an IP stack available to communicate with. Sure it may not find
the device it is communicating with, but that is it, it should still continue working, albeit in a non-
functional state.
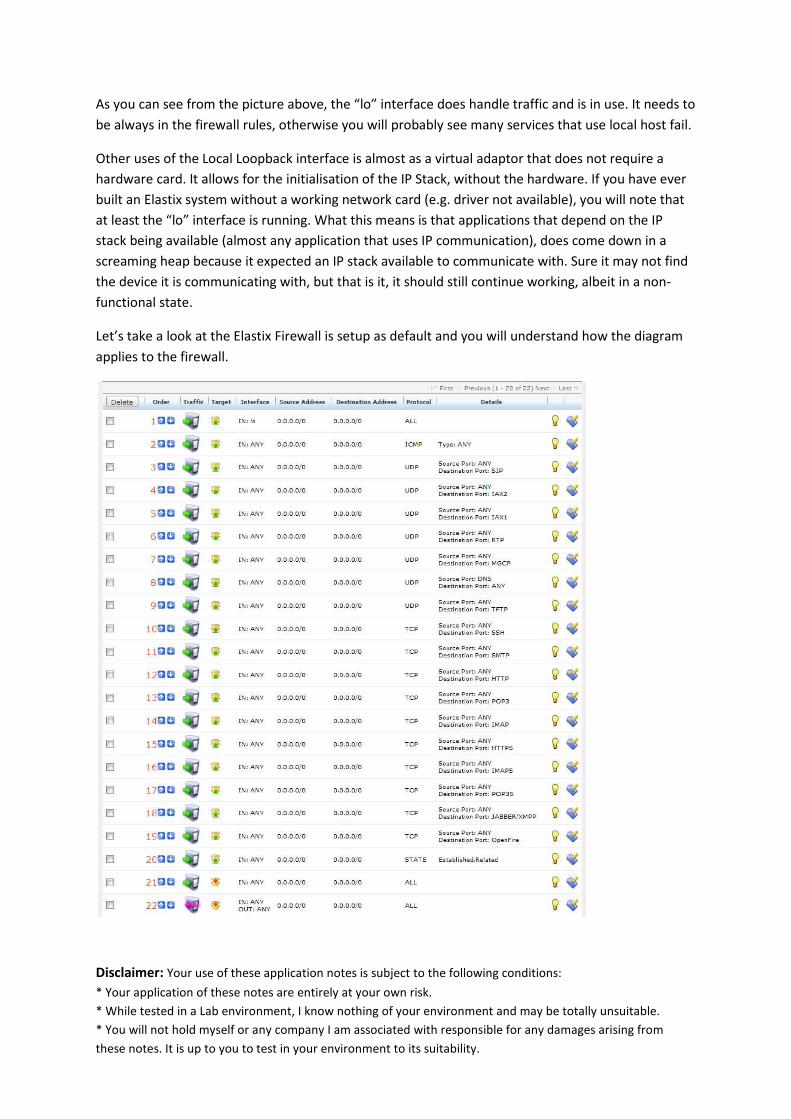
Let’s take a look at the Elastix Firewall is setup as default and you will understand how the diagram
applies to the firewall.

Disclaimer: Your use of these application notes is subject to the following conditions:
* Your application of these notes are entirely at your own risk.
* While tested in a Lab environment, I know nothing of your environment and may be totally unsuitable.
* You will not hold myself or any company I am associated with responsible for any damages arising from
these notes. It is up to you to test in your environment to its suitability.
The rules above are the default set of rules that Elastix comes predefined with. The above might
serve as a guide to reinstate the rules, should you delete the wrong ones or want to get back to a
standard state with the rules.
If your screen looks a little different, it is possible that you have not activated the firewall. Until you
activate it, you will not be able to edit the rules, or move the rules around. Don’t panic, if your
system is a live system, these default set of rules are not overly restrictive, and should not have an
impact on your system
Let’s look at a couple of areas of the Firewall Rule screen.
The Blue arrows allow you to move one rule below or above another. Nothing special, except as we
discussed before, the order of your rules (especially where you are using a large number of reject or
accept rules).
The green arrow on the computer is showing traffic coming into the firewall. To use the terms
correctly, it is set as INPUT, which is packets coming into the system. You also can set FORWARD
which is packets being routed through your Elastix system, and OUTPUT which is packets leaving
your system.
The traffic light is showing green which means that the rules action for this particular rule is ACCEPT.
The Interface shows the interface selection. In the table above it is means that the rule will apply to
any interface.
Next is the source address. As you will note, the default rules are setup allowing any IP address to
access the Elastix system. The source address is where you can limit the IP addresses that can pass
through to Elastix.
The next is the destination address. This is mainly used for outgoing rules. In a simple setup, with
Input rules being used, you can leave this to any or 0.0.0.0/0.
The protocol and the port information in Details are obtained from the Defined Port.
Disclaimer: Your use of these application notes is subject to the following conditions:
* Your application of these notes are entirely at your own risk.
* While tested in a Lab environment, I know nothing of your environment and may be totally unsuitable.
* You will not hold myself or any company I am associated with responsible for any damages arising from
these notes. It is up to you to test in your environment to its suitability.
Finally, down to the last two icons, we have the “light bulb”. This shows the rule as active or
deactivated.
And the last icon is the rule EDIT icon.
Firewall Rules – What to watch out for
There are a few basic rules before we go on any further, especially if you are new to the Firewall
concepts and have had not much exposure to IP Tables.
1) Leave the “lo” rule in place and unchanged. Leave it at the top of the table.
2) My recommendation is be careful in modifying the HTTP and HTTPS rules. You lose these
rules, or make changes that are not correct, you are likely to lock yourself out of the Elastix
GUI and that also means you are unable to make changes to the Elastix Firewall GUI. If you
make this mistake, check the FAQ at the end of this guide to get yourself out of this jam.
3) There are three rules at the bottom of the table which should remain in place, and should
remain in the order that they exist from the default settings.
We have already discussed the “lo” rule at the top of the table in the previous chapter. We will
briefly touch on the last three rules and what they are used for. The rule numbers that I refer to are
the rule numbers used in the default setup, but also the same as the diagram with the 22 rules
shown.
Rule 20 is a rule that allows traffic back into the Elastix system where outgoing traffic has already
established a link or relationship with that particular IP address using that particular port. So for
instance, if your Elastix system established a connection to a external service using say port 1678,
then it will allow traffic to come back into the Elastix system as long as it matched the IP address and
Port that Elastix used to contact the external service. This is a very simple way of looking at it, and is
actually more involved than this, and out of the scope of this document, but for more info look on
google for IPTABLES CONNECTION TRACKING for more info
Rule 21 is the DENY all rule. As we mentioned, this is almost at the end of the table. So if there are
no rule matches in any of the rules above it, it will reject the packets and not pass through to the
Elastix system.
Rule 22 is also a deny all rule, but it differs slightly from rule 21 in that it is a deny all for any traffic
that is being forwarded.
Finally one more thing to watch out for is when you implement a new rule. It will always enter at the
bottom of the table. What this means is that because it is ordered below the DENY ALL rules, it
actually never gets processed. This is actually a good feature in that you can develop your rules,

Disclaimer: Your use of these application notes is subject to the following conditions:
* Your application of these notes are entirely at your own risk.
* While tested in a Lab environment, I know nothing of your environment and may be totally unsuitable.
* You will not hold myself or any company I am associated with responsible for any damages arising from
these notes. It is up to you to test in your environment to its suitability.
check them, and line them up, ready for activation at the appropriate time. And to activate them,
you only need to move them into place, which is above the three rules at the bottom of the table (or
further up if you have some more complex rules.
Elastix Firewall – Tightening your firewall
By now your itching to make changes to suit your system. And probably one of the first rules you
want to change is to limit the IP addresses that can access SSH, instead of leaving it open for anyone
to attempt to access.
So let’s edit rule number 10
Which is the one with destination port SSH.
Click on the EDIT icon and the following screen should appear
One of the important points we have not covered so far is the use of SOURCE and DESTINATION
PORTS.
The main one to be concerned about on Inbound Rules is the Destination Port, this is the port that
you are allowing traffic into on your Elastix system.

Disclaimer: Your use of these application notes is subject to the following conditions:
* Your application of these notes are entirely at your own risk.
* While tested in a Lab environment, I know nothing of your environment and may be totally unsuitable.
* You will not hold myself or any company I am associated with responsible for any damages arising from
these notes. It is up to you to test in your environment to its suitability.
The trying to lock down the source port on Inbound rules for external traffic is not possible as it
varies depending on several factors, including the originating routers. It really serves no purpose
except by complicating your rules.
So what we want to do as an example is to limit access to SSH only from the following address
24.11.22.33, so the only change we make is in the Source Address area. So it looks like the following
You will notice the /32 Subnet on the end. In this case it is limiting the Source address to that single
IP Address only. If we could write it in another way it represents 24.11.22.33/255.255.255.255. So
only a connection from that exact IP address will be able to access SSH.
If you do not have one single address, but could be a IP number from a particular subnet, then you
can limit the subnet, so if we use 24.11.22.33/24, which is the same as writing
24.11.22.33/255.255.255.0, then basically any address matching 24.11.22.XXX could access SSH. This
is not ideal or secure especially if you do not have control of the whole subnet from that address. So
it is a case of working out what is the correct subnet to use.
Another case where you might use this is not necessarily on the SSH, but on the SIP and RTP rules,
especially where the Voice Provider, uses a round robin of four or five (or more) servers to provide

Disclaimer: Your use of these application notes is subject to the following conditions:
* Your application of these notes are entirely at your own risk.
* While tested in a Lab environment, I know nothing of your environment and may be totally unsuitable.
* You will not hold myself or any company I am associated with responsible for any damages arising from
these notes. It is up to you to test in your environment to its suitability.
SIP Services. Ideally you need to find out what that range is and what the subnet that matches that
range, allowing you to securely limit who has access to the SIP ports.
Now before you run off and start limiting your addresses, take a big breath. The one thing that gets
forgotten, especially if your Elastix system Ethernet interface is connected to the Local Area
Network, is that you firewall say the SSH to a single address from the outside world, all of a sudden
you have just locked yourself out on your internal LAN.
So you need to setup a new Firewall Rule, leaving the existing one for External access from the
Internet, and a second one for access from the LAN
So a new rule would look like the following
The Source address is my local network (LAN) ip address range, and note that I have used /24, so
that any workstation on my network can access SSH.
I save this rule and put it in the correct order.

Disclaimer: Your use of these application notes is subject to the following conditions:
* Your application of these notes are entirely at your own risk.
* While tested in a Lab environment, I know nothing of your environment and may be totally unsuitable.
* You will not hold myself or any company I am associated with responsible for any damages arising from
these notes. It is up to you to test in your environment to its suitability.
So my rules would look like the following:
You will note that we have two rules for SSH one for the External Address, and the second for the
Internal address. You might think this is cumbersome, and you might have seen it easier on another
firewall tool you have used, but this is the way that IPTables handles the rules. Sure you can perform
some fancy GUI routines, but personally as a user of IPTables, the way these rules are done, makes
sense.
The most likely next step you want to perform is limiting SIP from particular IP addresses. This is
done exactly the same way. But again remember, if you limit your SIP to an external address, get
ready for all the SIP phones to drop off Elastix. Make sure you setup an Internal Rule as well, and
that includes RTP.
Elastix Firewall – the missing chapters.
By now, you have probably wandered through the Elastix Firewall and seen that there are more
options that have not been discussed by this Application Note. This may change in later revisions, if
there is something that needs to be discussed further.
What has been included so far, is how the Elastix Firewall GUI implementation works and a brief run
down on IPTables, so that you can at least make real use of the Elastix Firewall.
There are many more chapters that can be written, which includes using the FORWARD, talking
about OUTGOING rules, talking about STATE etc.
However, this document would be yet another tutorial on IPTables, which I can guarantee you, has
been done to death on the Internet.

Disclaimer: Your use of these application notes is subject to the following conditions:
* Your application of these notes are entirely at your own risk.
* While tested in a Lab environment, I know nothing of your environment and may be totally unsuitable.
* You will not hold myself or any company I am associated with responsible for any damages arising from
these notes. It is up to you to test in your environment to its suitability.
Let me make it very clear, the Firewall being used by Elastix is IPTables. This means that almost all
the documentation on IPTables (at least the subset), applies to the Elastix Firewall GUI. A little bit of
research is needed, but generally you will find most of the answers via Google.
The GUI headings are generally in line with normal IPTables nomenclature, so if you want to find out
more about the difference between ACCEPT, REJECT, DROP, which comes under the title of TARGET,
then I would look up IPTABLES ACCEPT REJECT DROP, and this would return a number like 301,000
results.
When looking at information on IPTables, especially that on the Internet, the main things to be
aware of are
1) You do not need to install IPTables. It is installed already
2) You do not need to go to the command line to save and flush your tables, you do not need
to restart IPtables. Part of the process of saving performs these actions for you.
3) You can however, after you have finished your rules, go to the command line and look at
what your rules look like under IPTables. At the linux command line, just type iptables –L to
list your current IPTables rules
4) You do not need to start the IPTables Service, it is done by Elastix.

Disclaimer: Your use of these application notes is subject to the following conditions:
* Your application of these notes are entirely at your own risk.
* While tested in a Lab environment, I know nothing of your environment and may be totally unsuitable.
* You will not hold myself or any company I am associated with responsible for any damages arising from
these notes. It is up to you to test in your environment to its suitability.
Elastix GUI – Frequently Asked Questions
I have accidentally blocked HTTPS, and now the Elastix GUI will not come up.
Not a big deal, if you still have SSH access, connect and login and at the linux prompt type
/etc/init.d/iptables stop
Now access your Elastix Firewall GUI and fix up the mistake. Once completed save, and this should
bring the IPTables Service back online. However, as a precaution, especially after that sort of event, I
recommend performing a reboot.