Embed Size (px)
Citation preview
EIS
Deployment Document
for Epicor 7.4 Upgrade Project
Project Number 55555
06/15/2011
EIS Epicor 7.4 Upgrade Deployment Document
Epicor 7.4 Upgrade, i
Disclaimer
This business requirements document is based on an actual information systems
project. In order to maintain confidentiality and operational security, all
references to company names, financial and operation data, and names of real
people (with the exception of the author) have been either removed or replaced
with fictitious names. Any relationship to existing people is strictly coincidental.
EIS Epicor 7.4 Upgrade Deployment Document
Epicor 7.4 Upgrade, ii
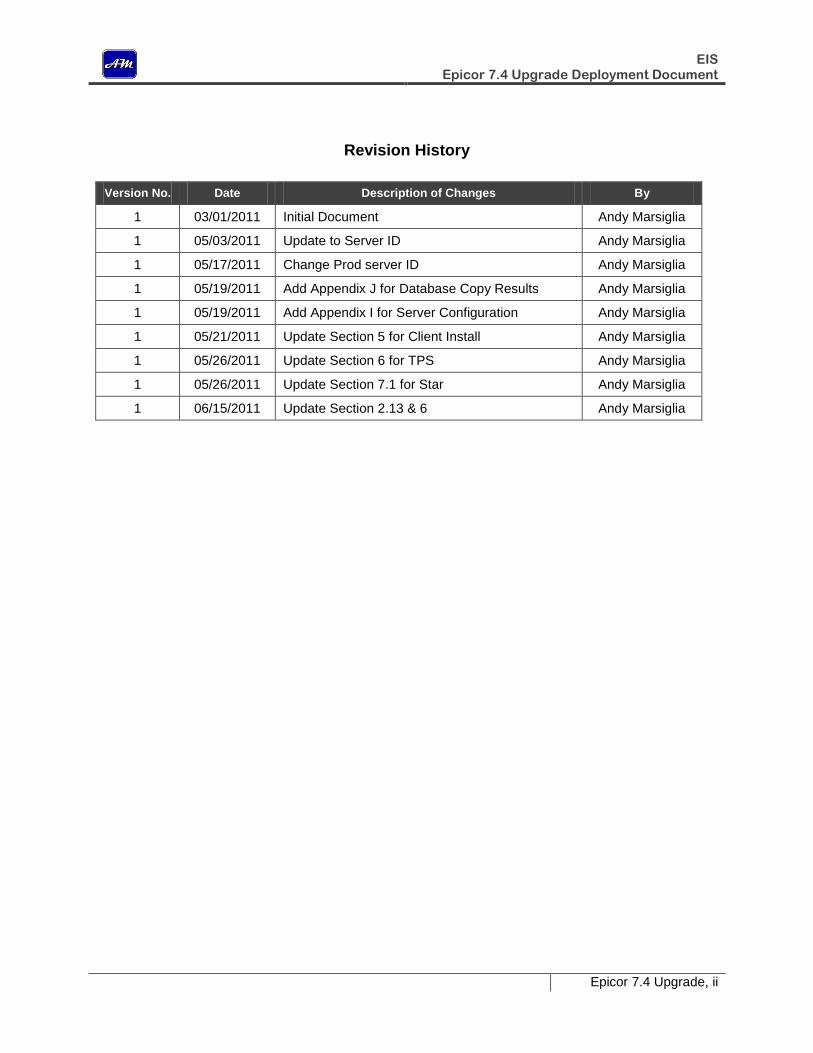
Revision History
Version No. Date Description of Changes By
1 03/01/2011 Initial Document Andy Marsiglia
1 05/03/2011 Update to Server ID Andy Marsiglia
1 05/17/2011 Change Prod server ID Andy Marsiglia
1 05/19/2011 Add Appendix J for Database Copy Results Andy Marsiglia
1 05/19/2011 Add Appendix I for Server Configuration Andy Marsiglia
1 05/21/2011 Update Section 5 for Client Install Andy Marsiglia
1 05/26/2011 Update Section 6 for TPS Andy Marsiglia
1 05/26/2011 Update Section 7.1 for Star Andy Marsiglia
1 06/15/2011 Update Section 2.13 & 6 Andy Marsiglia
EIS Epicor 7.4 Upgrade Deployment Document
Epicor 7.4 Upgrade, iii
Table of Contents
1. General Information ................................................................................................................................. 1 1.1 Epicor 7.4 Financials Suite Product Overview ................................................................................. 1 1.2 Prerequisites .................................................................................................................................... 2 1.3 Installation Overview ........................................................................................................................ 2
2 Epicor Financials Suite and Distribution Suite (FSDS) Server Software Installation ............................... 4
3 Epicor Extensions Server Components Installation ............................................................................... 16
4. Post Server Installation Tasks ................................................................................................................ 23 4.1 Installation of Service Pack FSDS74_EPRPack5 .......................................................................... 23 4.2 Optimize Databases ....................................................................................................................... 25 4.5 Obtain New Product License Key .................................................................................................. 27
5 Epicor Client Software Installation ......................................................................................................... 33 5.1 Log on to the Client Workstation as Administrator ......................................................................... 33 5.2 Uninstall Existing Financial Application Software from Client PC. ................................................. 33 5.3 Copy the Epicor 7.4 Installation Folders ........................................................................................ 33 5.4 Create the TCP/IP Server Alias ..................................................................................................... 34 5.5 Install Epicor 7.4 DLL ..................................................................................................................... 34 5.6 Install Crystal Reports Runtime ..................................................................................................... 34 5.7 Financials Suite and Distribution Suite (FSDS) Installation ........................................................... 35 5.8 Install FSDS ERA Pack 5 ............................................................................................................... 36 5.9 Extensions Software Installation for Credit and Collections (CC) .................................................. 36 5.10 Extensions Software Installation for Deferred Revenue Accounting (DRA) .................................. 36 5.11 Copy Customizations Folder Content to Client PC ........................................................................ 37 5.12 Add Executable Programs to Data Execution Prevention (DEP) List ............................................ 38 5.13 Install Crystal Reports Development Product ................................................................................ 38 5.15 Special Note to Application Administrators .................................................................................... 39 5.14 Client Installation Log ..................................................................................................................... 39
6 Third Party Security (TPS) ..................................................................................................................... 40 6.1 Remove TPS .................................................................................................................................. 40 6.2 Remove “pltsa” user from databases ............................................................................................. 40 6.3 Reinstall TPS ................................................................................................................................. 40 6.4 Reset the “pltsa” password. ........................................................................................................... 41
7. Third-Party Software Installation ............................................................................................................ 43 7.1 Star Accounting eAdvice ................................................................................................................ 43 7.2 Sage FAS Asset Accounting Software ........................................................................................... 44 7.3 FRx Financial Reporting Software ................................................................................................. 44
8. DBAudit 7.4 Installation .......................................................................................................................... 45 8.1 DBAudit 7.4 Server Installation ...................................................................................................... 45 8.2 DBAudit 7.4 Client Installation ....................................................................................................... 46
9. Epicor Customizations ........................................................................................................................... 47
10. Database Backup and Restore ...................................................................................................... 48
11. Disaster Recovery Server Installation ............................................................................................ 48
12. File Server Updates ....................................................................................................................... 48
13. Active Directory/Security Updates ................................................................................................. 48
EIS Epicor 7.4 Upgrade Deployment Document
Epicor 7.4 Upgrade, iv
14. Reporting Server Updates ............................................................................................................. 48
Appendix A .................................................................................................................................................. 49
Appendix B .................................................................................................................................................. 55
Appendix C .................................................................................................................................................. 59
Appendix D .................................................................................................................................................. 60
Appendix E .................................................................................................................................................. 61
Appendix F .................................................................................................................................................. 64
Appendix G.................................................................................................................................................. 66
Appendix H .................................................................................................................................................. 69
Appendix I ................................................................................................................................................... 71
Appendix J................................................................................................................................................... 72

EIS Epicor 7.4 Upgrade Deployment Document
Epicor 7.4 Upgrade, 1
1. General Information
The Epicor Enterprise Version 7.4 (Epicor 7.4) Upgrade involves installation of the software on the servers and on each workstation that will access the server. Affected applications include:
Financial Suite: General Ledger, Accounts Receivable, and Accounts Payable, Explorer
Epicor Extensions: Deferred Revenue Accounting, Credit and Collections
DBAudit
Customizations Workbench
Refer to helpdesk ticket 12345 and Request for Change 5555
1.1 Epicor 7.4 Financials Suite Product Overview
Several of the enhancements in this release are system-wide, including compatibility with the latest technology platforms as well as enhancements to the user interface. Microsoft® SQL Server® 2008 Compatibility for Epicor Enterprise Financials, Extensions, and DBAudit are now compatible with Microsoft SQL Server 2008, as well as SQL Server 2005. The Enterprise system now has an updated visual appearance. Several visual traits were adjusted for this theme:
• Updated toolbar icons for forms and desktop.
• New icons are used for folders, transaction entry forms, setup forms, and reports.
• New icons are used for toolbar options for Change Company, User Security, and Explorer.
• The font is consistent with Outlook 2007. For a detailed list of improvements by application, please refer to the Epicor Enterprise 7.4 Release Guide, December 2008. Guide is available at P:\Epicor 7-4\Epicor Enterprise 7.4 Release Guide.pdf.
EIS Epicor 7.4 Upgrade Deployment Document
Epicor 7.4 Upgrade, 2
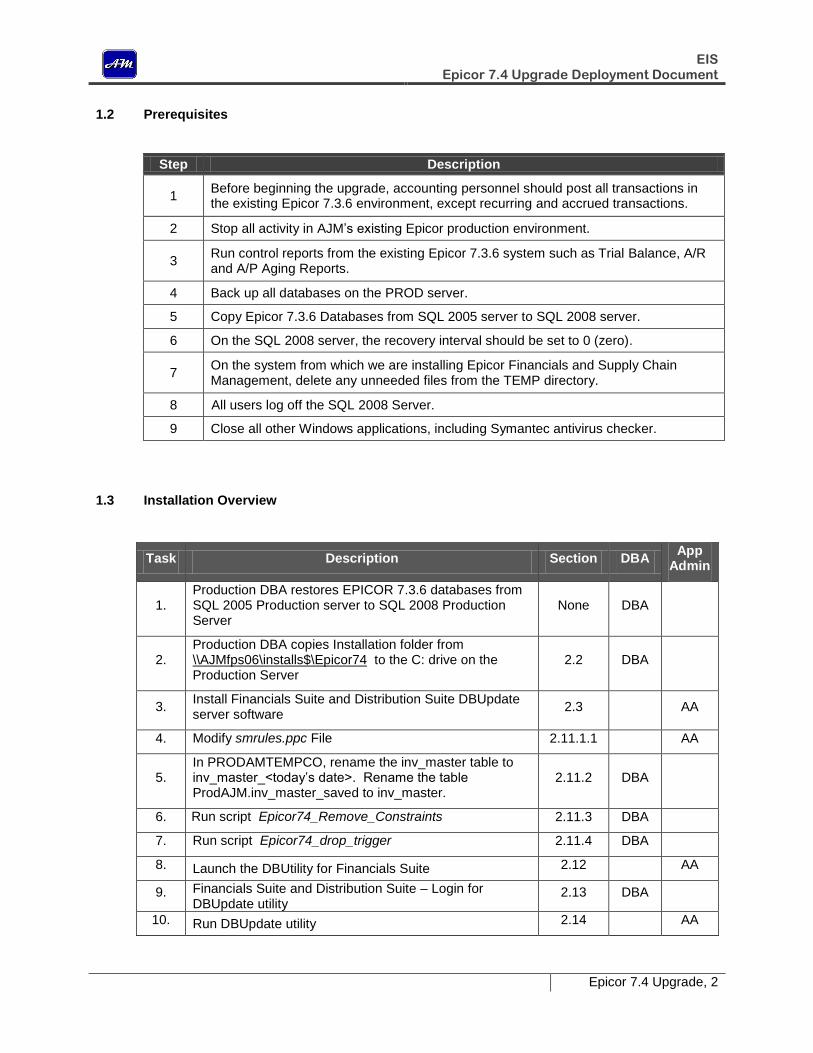
1.2 Prerequisites
Step Description
1 Before beginning the upgrade, accounting personnel should post all transactions in the existing Epicor 7.3.6 environment, except recurring and accrued transactions.
2 Stop all activity in AJM’s existing Epicor production environment.
3 Run control reports from the existing Epicor 7.3.6 system such as Trial Balance, A/R and A/P Aging Reports.
4 Back up all databases on the PROD server.
5 Copy Epicor 7.3.6 Databases from SQL 2005 server to SQL 2008 server.
6 On the SQL 2008 server, the recovery interval should be set to 0 (zero).
7 On the system from which we are installing Epicor Financials and Supply Chain Management, delete any unneeded files from the TEMP directory.
8 All users log off the SQL 2008 Server.
9 Close all other Windows applications, including Symantec antivirus checker.
1.3 Installation Overview
Task Description Section DBA App
Admin
1. Production DBA restores EPICOR 7.3.6 databases from SQL 2005 Production server to SQL 2008 Production Server
None DBA
2. Production DBA copies Installation folder from \\AJMfps06\installs$\Epicor74 to the C: drive on the Production Server
2.2 DBA
3. Install Financials Suite and Distribution Suite DBUpdate server software
2.3 AA
4. Modify smrules.ppc File 2.11.1.1 AA
5. In PRODAMTEMPCO, rename the inv_master table to inv_master_<today’s date>. Rename the table ProdAJM.inv_master_saved to inv_master.
2.11.2 DBA
6. Run script Epicor74_Remove_Constraints 2.11.3 DBA
7. Run script Epicor74_drop_trigger 2.11.4 DBA
8. Launch the DBUtility for Financials Suite 2.12 AA
9. Financials Suite and Distribution Suite – Login for DBUpdate utility
2.13 DBA
10. Run DBUpdate utility 2.14 AA
EIS Epicor 7.4 Upgrade Deployment Document
Epicor 7.4 Upgrade, 3
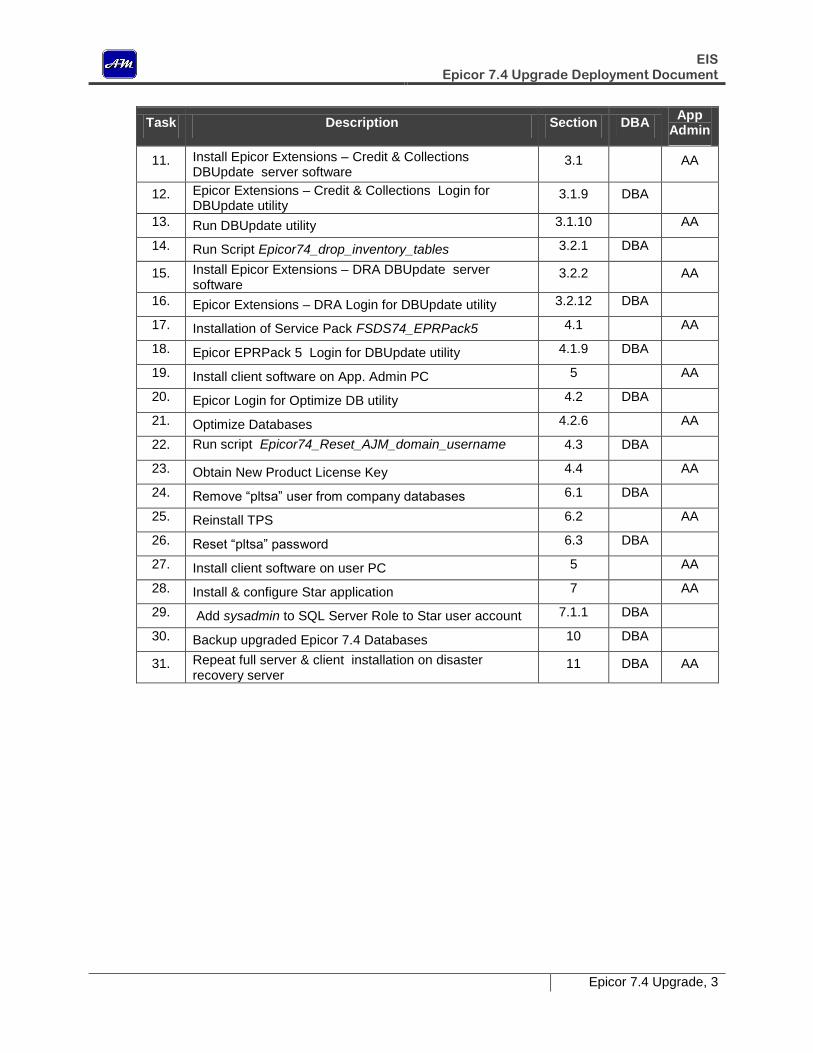
Task Description Section DBA App
Admin
11. Install Epicor Extensions – Credit & Collections DBUpdate server software
3.1 AA
12. Epicor Extensions – Credit & Collections Login for DBUpdate utility
3.1.9 DBA
13. Run DBUpdate utility 3.1.10 AA
14. Run Script Epicor74_drop_inventory_tables 3.2.1 DBA
15. Install Epicor Extensions – DRA DBUpdate server software
3.2.2 AA
16. Epicor Extensions – DRA Login for DBUpdate utility 3.2.12 DBA
17. Installation of Service Pack FSDS74_EPRPack5 4.1 AA
18. Epicor EPRPack 5 Login for DBUpdate utility 4.1.9 DBA
19. Install client software on App. Admin PC 5 AA
20. Epicor Login for Optimize DB utility 4.2 DBA
21. Optimize Databases 4.2.6 AA
22. Run script Epicor74_Reset_AJM_domain_username 4.3 DBA
23. Obtain New Product License Key 4.4 AA
24. Remove “pltsa” user from company databases 6.1 DBA
25. Reinstall TPS 6.2 AA
26. Reset “pltsa” password 6.3 DBA
27. Install client software on user PC 5 AA
28. Install & configure Star application 7 AA
29. Add sysadmin to SQL Server Role to Star user account 7.1.1 DBA
30. Backup upgraded Epicor 7.4 Databases 10 DBA
31. Repeat full server & client installation on disaster recovery server
11 DBA AA
EIS Epicor 7.4 Upgrade Deployment Document
Epicor 7.4 Upgrade, 4
2 Epicor Enterprise Financials Suite and Distribution Suite Server Software Installation
2.1 Server and Database Considerations
2.1.2 The Epicor 7.4 is certified for 32-bit operation only for both server and client. Therefore, the server components must be installed on a SQL 2008 32-bit server. Refer to the server configuration document in Appendix I of this deployment document.
2.1.2 The Epicor 7.3.6 SQL 2005 production database must be copied from SQL93B\PRODAJM to the Epicor 7.4 SQL 2008 Production server SQL01J. Refer to the Epicor database deployment document Appendix J.
2.1.3 Requires local administrator permissions on server.
2.2 Use cliconfg to create the TCP/IP server alias in each database environment as listed in the following table:
Environment Server Alias
SQL 2008 Development DEVSQL99\AJMDB Epicor74DEV
SQL 2008 Test (testsys1: TBD) SQL91A\ab1 Epicor74TEST
SQL 2008 Test (testsys2: 10.250.99.999) SQL92A\ab2 Epicor74TEST
SQL 2008 Production SQL93B\PRODAJM Epicor74PROD
2.3 The production DBA will need to copy the following folders from:
\\AJMfps06\installs$\Epicor74\Epicor74 Server Install Files
and paste in the root of the production server. The following folders will be copied:
2.3.1 Financials 74
2.3.2 Extensions 74
2.3.3 DBAudit 74
2.3.4 EPR74 SP
2.4 Launch the server installation wizard by running setup.exe from
C:\ Epicor74 Server Install Files \1 Financials 74\Server\.
The wizard will setup the Epicor DBUpdate utility on the server’s C: drive. DBUpdate will be used to install the actual server components.
2.5 When prompted to install Adobe Acrobat version 7, select NO.
2.6 Server Installation Wizard – Options page: Select Full Installation and click the Next button.
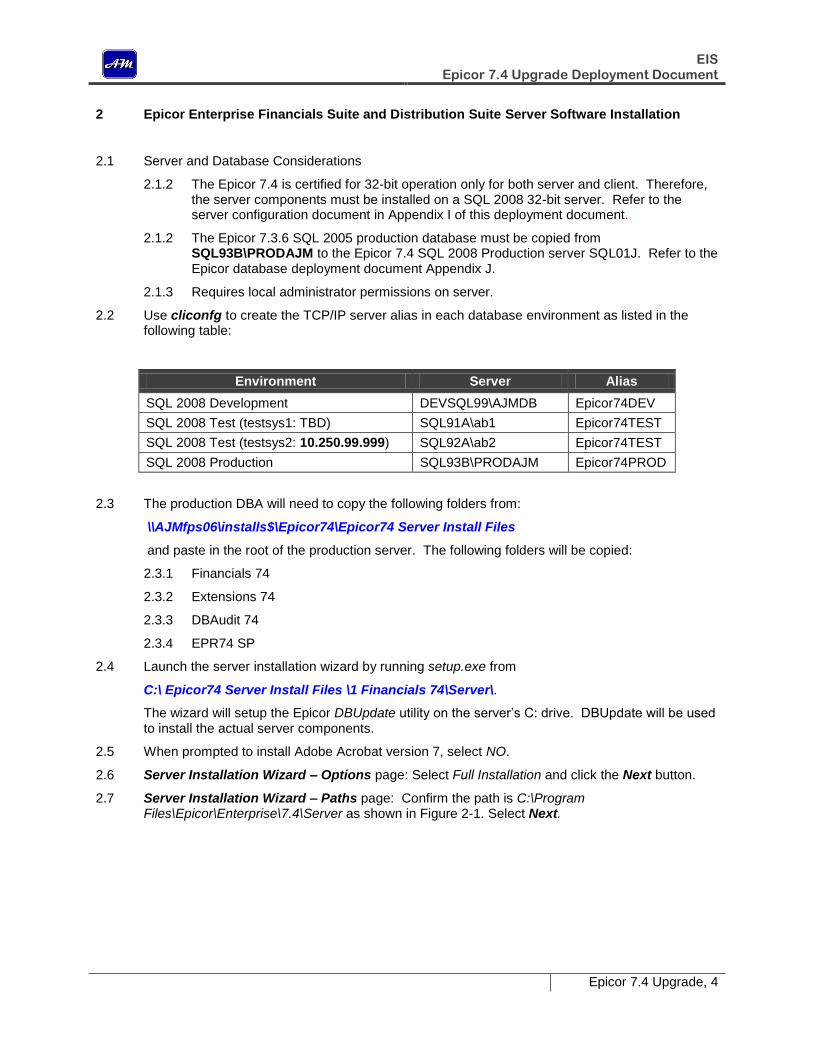
2.7 Server Installation Wizard – Paths page: Confirm the path is C:\Program Files\Epicor\Enterprise\7.4\Server as shown in Figure 2-1. Select Next.
EIS Epicor 7.4 Upgrade Deployment Document
Epicor 7.4 Upgrade, 5
Figure 2-1: Server Installation Wizard – Paths
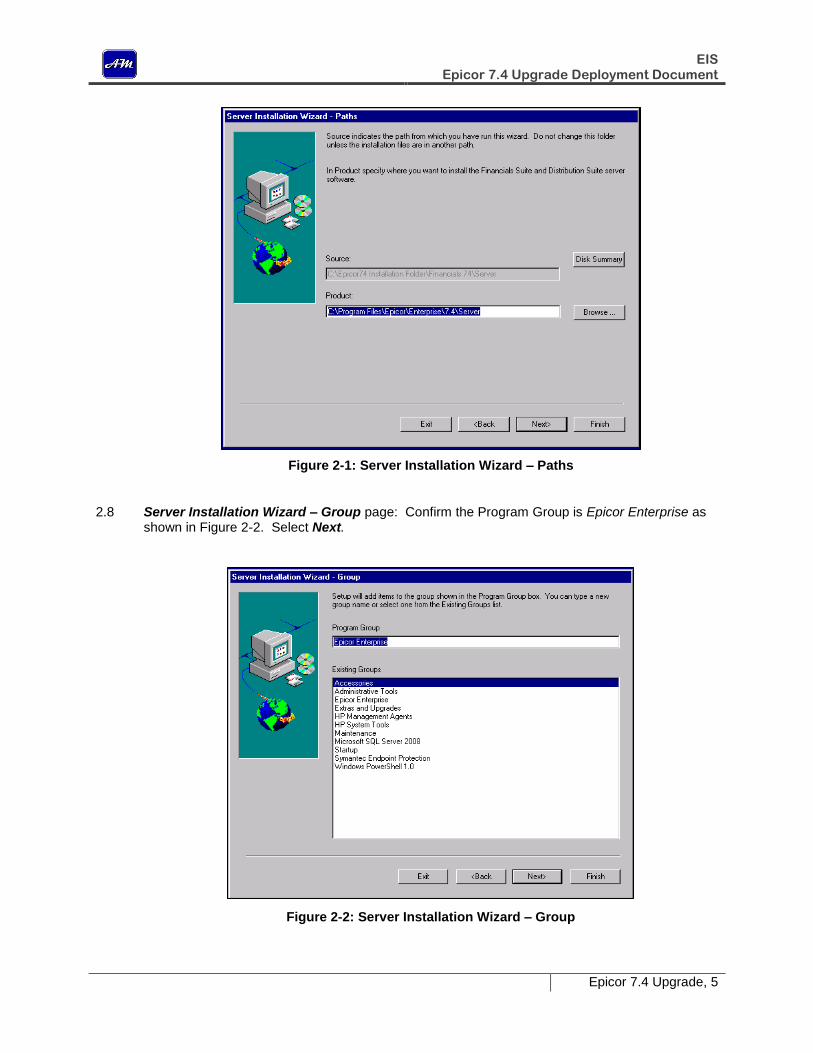
2.8 Server Installation Wizard – Group page: Confirm the Program Group is Epicor Enterprise as shown in Figure 2-2. Select Next.
Figure 2-2: Server Installation Wizard – Group

EIS Epicor 7.4 Upgrade Deployment Document
Epicor 7.4 Upgrade, 6
2.9 Server Installation Wizard – Applications page: Scroll through the Components list and confirm that the following applications are selected then select Next.
2.9.1 Distribution
2.9.2 Asset Management
2.9.3 Accounts Payable
2.9.4 AP 1099
2.9.5 Automated AP Matching
2.9.6 Accounts Receivable
2.9.7 Cash Management
2.9.8 FRx Financial Reports
2.9.9 BI Agents
2.9.10 Credit Card Authorization
2.9.11 Electronic Funds Transfer
2.10 Server Installation Wizard – Summary page: Confirm the selections match those listed in Figure 2-3 then select Finish. The Installation will proceed to set up the DBUpdate utility and load server components; nine steps in this process.
Figure 2-3: Server Installation Wizard – Summary
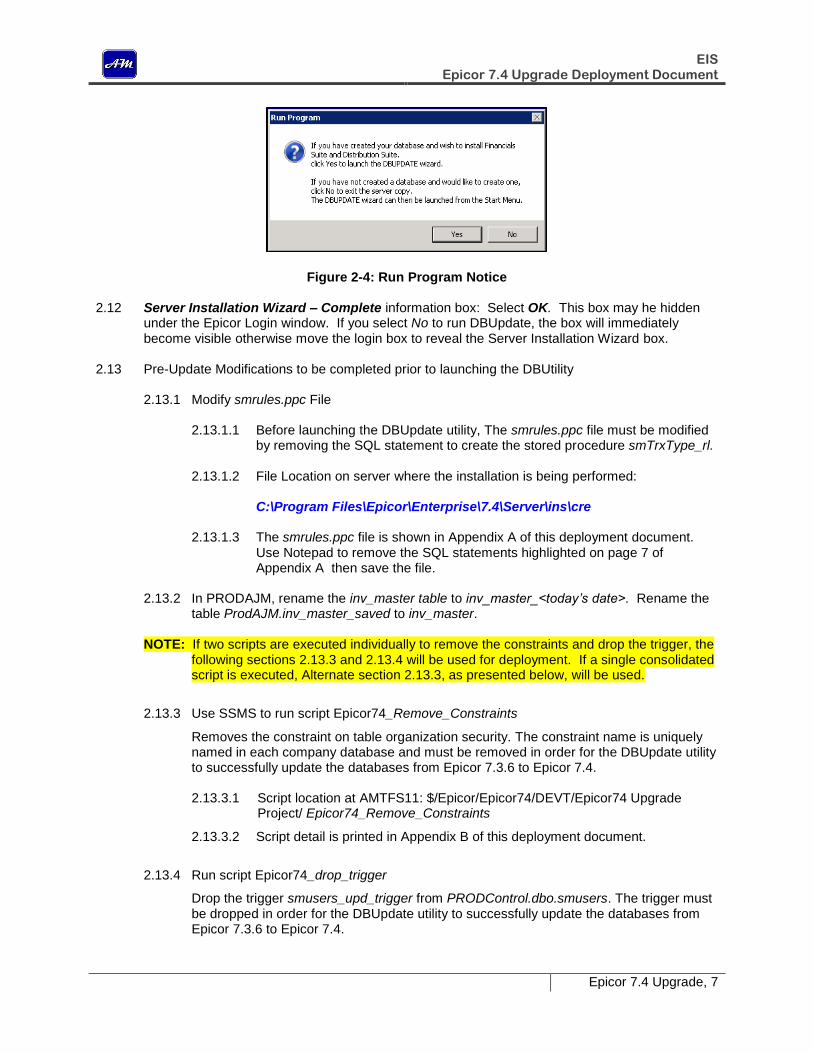
2.11 A Run Program notice to launch the DBUpdate wizard, Figure 2-4. Select No.
EIS Epicor 7.4 Upgrade Deployment Document
Epicor 7.4 Upgrade, 7
Figure 2-4: Run Program Notice
2.12 Server Installation Wizard – Complete information box: Select OK. This box may he hidden under the Epicor Login window. If you select No to run DBUpdate, the box will immediately become visible otherwise move the login box to reveal the Server Installation Wizard box.
2.13 Pre-Update Modifications to be completed prior to launching the DBUtility
2.13.1 Modify smrules.ppc File
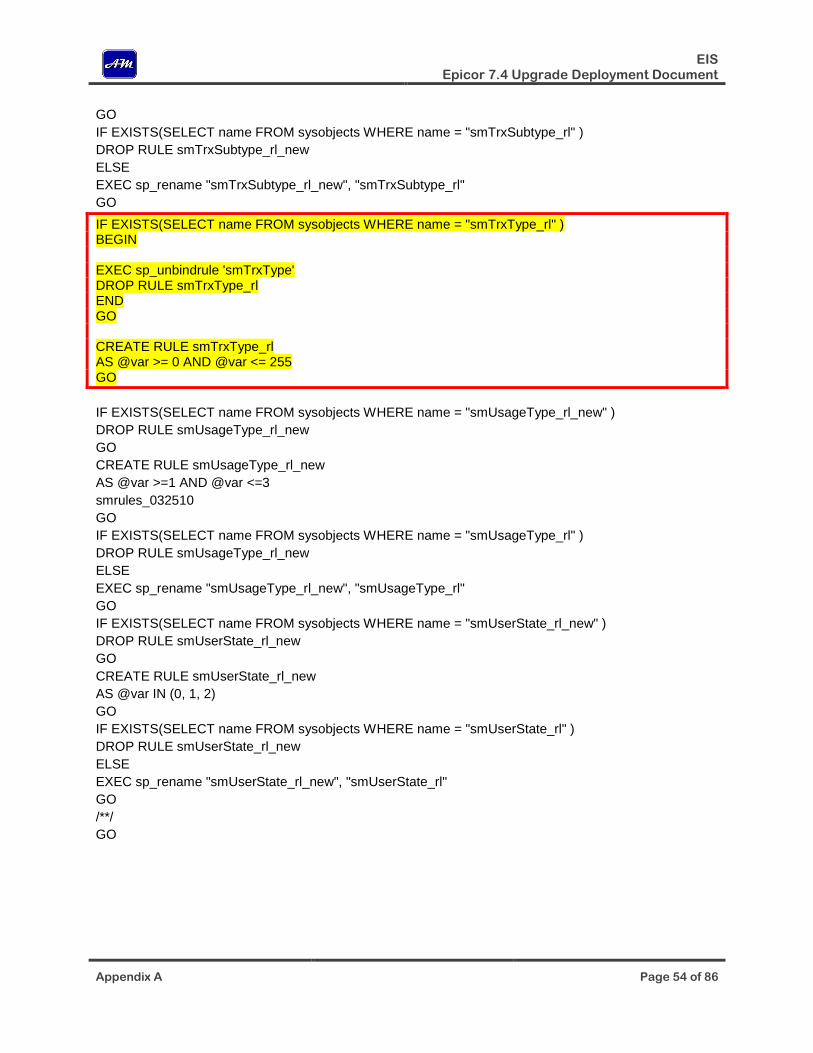
2.13.1.1 Before launching the DBUpdate utility, The smrules.ppc file must be modified by removing the SQL statement to create the stored procedure smTrxType_rl.
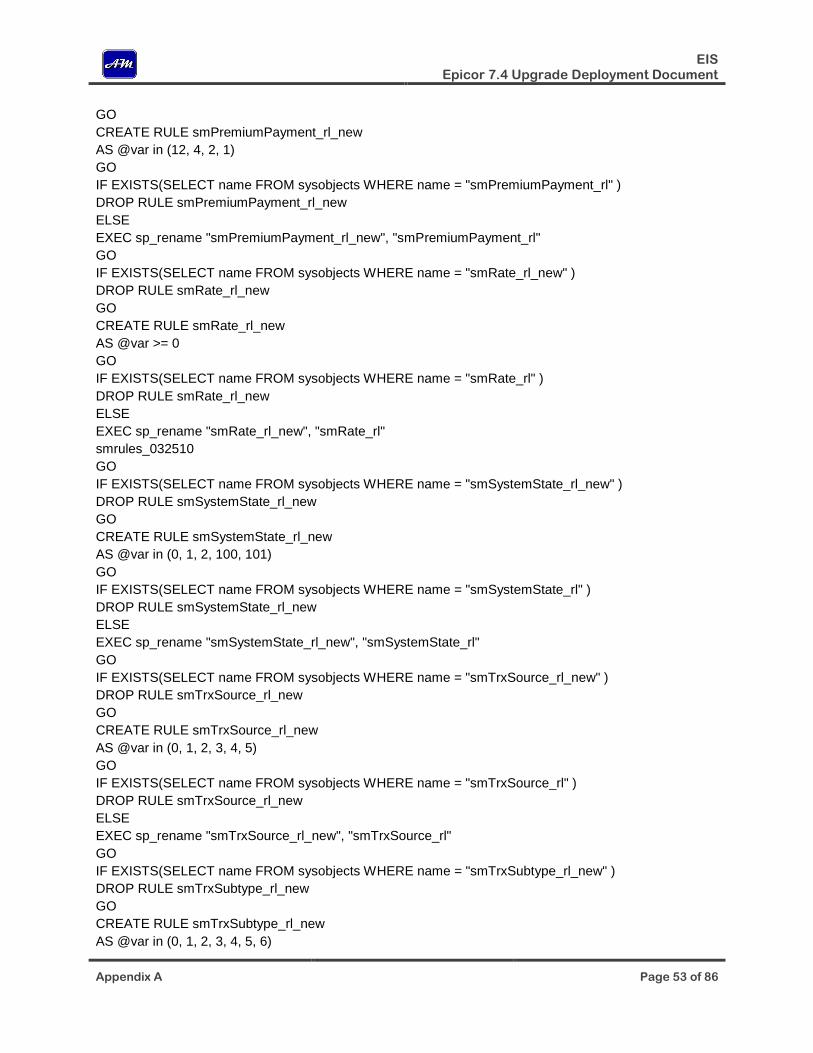
2.13.1.2 File Location on server where the installation is being performed: C:\Program Files\Epicor\Enterprise\7.4\Server\ins\cre 2.13.1.3 The smrules.ppc file is shown in Appendix A of this deployment document.
Use Notepad to remove the SQL statements highlighted on page 7 of Appendix A then save the file.
2.13.2 In PRODAJM, rename the inv_master table to inv_master_<today’s date>. Rename the
table ProdAJM.inv_master_saved to inv_master. NOTE: If two scripts are executed individually to remove the constraints and drop the trigger, the
following sections 2.13.3 and 2.13.4 will be used for deployment. If a single consolidated script is executed, Alternate section 2.13.3, as presented below, will be used.
2.13.3 Use SSMS to run script Epicor74_Remove_Constraints
Removes the constraint on table organization security. The constraint name is uniquely named in each company database and must be removed in order for the DBUpdate utility to successfully update the databases from Epicor 7.3.6 to Epicor 7.4.
2.13.3.1 Script location at AMTFS11: $/Epicor/Epicor74/DEVT/Epicor74 Upgrade
Project/ Epicor74_Remove_Constraints
2.13.3.2 Script detail is printed in Appendix B of this deployment document.
2.13.4 Run script Epicor74_drop_trigger
Drop the trigger smusers_upd_trigger from PRODControl.dbo.smusers. The trigger must be dropped in order for the DBUpdate utility to successfully update the databases from Epicor 7.3.6 to Epicor 7.4.
EIS Epicor 7.4 Upgrade Deployment Document
Epicor 7.4 Upgrade, 8
2.13.4.1 Script location at AMTFS11: $/Epicor/Epicor74/DEVT/Epicor74 Upgrade Project/Epicor74_drop_trigger
2.13.4.2 Script detail is printed in Appendix C of this deployment document.
2.13.4.3 After the script has successfully executed, proceed to item 2.12 to run the DBUpdate utility.
ALTERNATE SECTION 2.13.3: If a single consolidated section executed to remove the
constraints and drop the trigger, use this section rather than the previous sections 2.13.3 and 2.13.4.
2.13.3 Use SSMS to run script Epicor74_remove_constraints_drop_trigger
Removes the constraint on table organization security and drops the trigger smusers_upd_trigger from PRODControl.dbo.smusers. The constraint and trigger must be dropped in order for the DBUpdate utility to successfully update the databases from Epicor 7.3.6 to Epicor 7.4.
2.13.3.1 Script location at AMTFS11: $/Epicor/Epicor74/DEVT/Epicor74 Upgrade Project/ Epicor74_Remove_Constraints_drop_trigger.sql
2.13.3.2 Script detail is printed in Appendix B of this deployment document.
2.14 Launch the DBUtility. Go to All Programs>Epicor Enterprise>Database Update Wizard (DBUpdate)
2.14.1 DBupdate may prompt to erase the old error log file, select Yes.
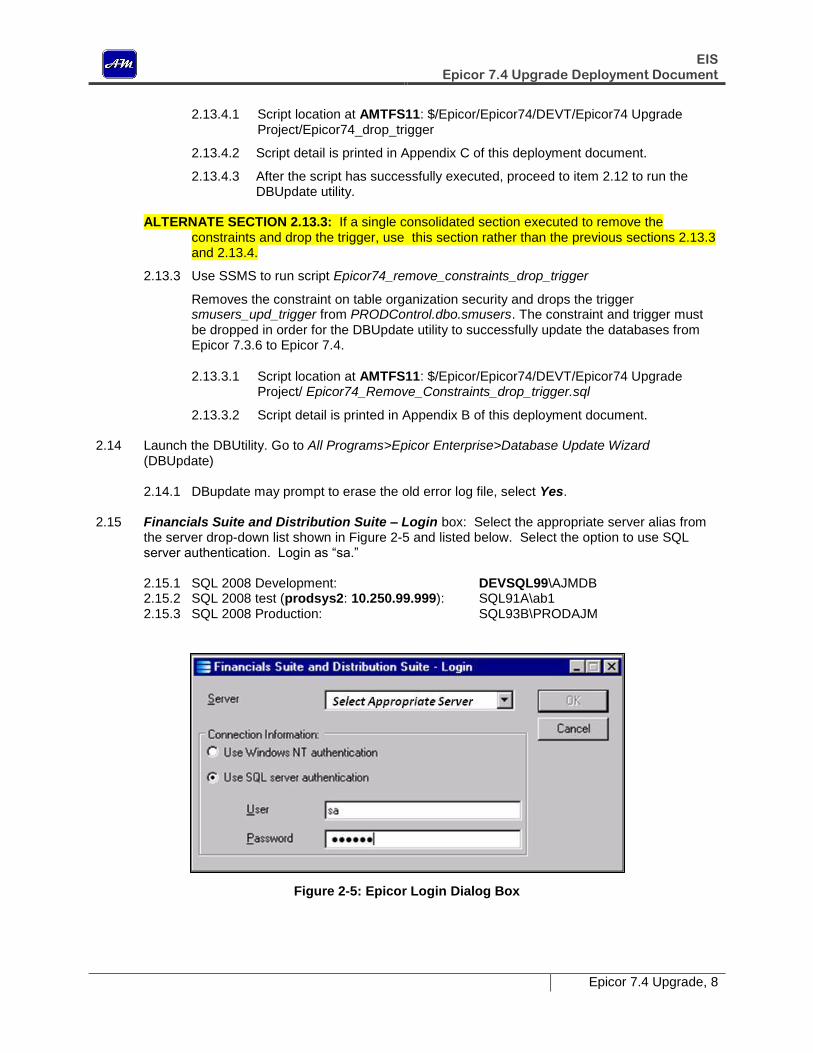
2.15 Financials Suite and Distribution Suite – Login box: Select the appropriate server alias from
the server drop-down list shown in Figure 2-5 and listed below. Select the option to use SQL server authentication. Login as “sa.”
2.15.1 SQL 2008 Development: DEVSQL99\AJMDB 2.15.2 SQL 2008 test (prodsys2: 10.250.99.999): SQL91A\ab1 2.15.3 SQL 2008 Production: SQL93B\PRODAJM
Figure 2-5: Epicor Login Dialog Box
EIS Epicor 7.4 Upgrade Deployment Document
Epicor 7.4 Upgrade, 9
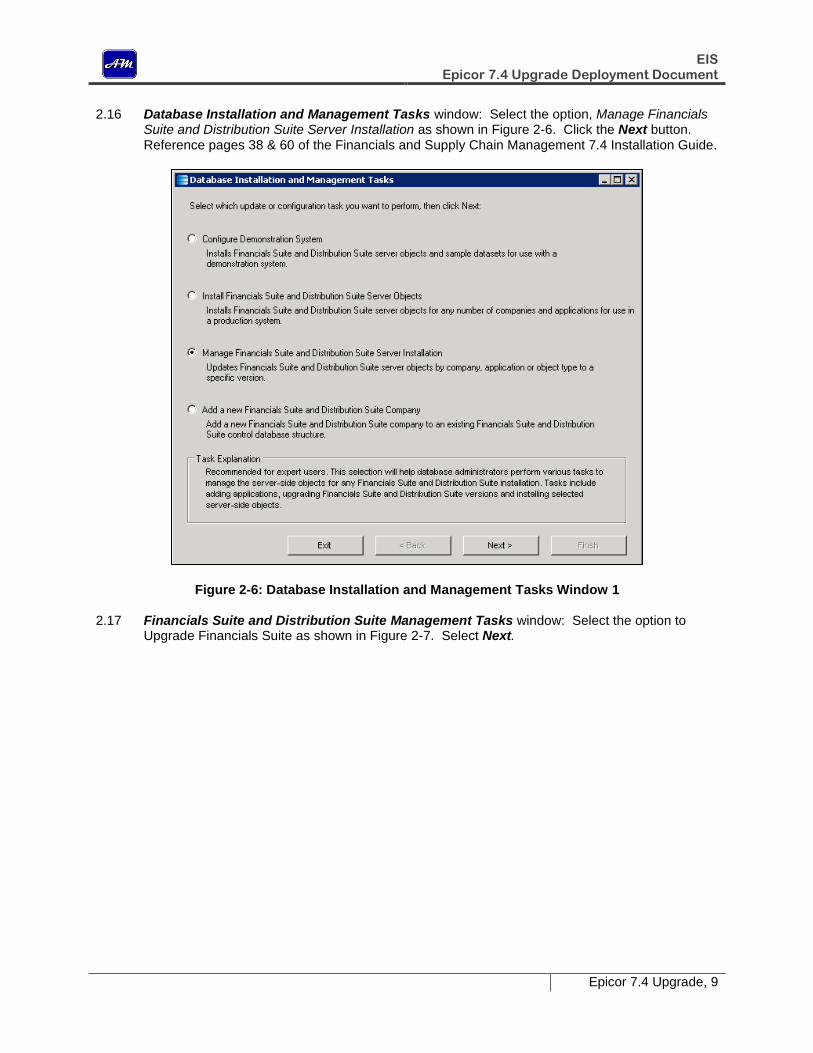
2.16 Database Installation and Management Tasks window: Select the option, Manage Financials Suite and Distribution Suite Server Installation as shown in Figure 2-6. Click the Next button. Reference pages 38 & 60 of the Financials and Supply Chain Management 7.4 Installation Guide.
Figure 2-6: Database Installation and Management Tasks Window 1
2.17 Financials Suite and Distribution Suite Management Tasks window: Select the option to Upgrade Financials Suite as shown in Figure 2-7. Select Next.

EIS Epicor 7.4 Upgrade Deployment Document
Epicor 7.4 Upgrade, 10
Figure 2-7: Financials Suite and Distribution Suite Management Tasks
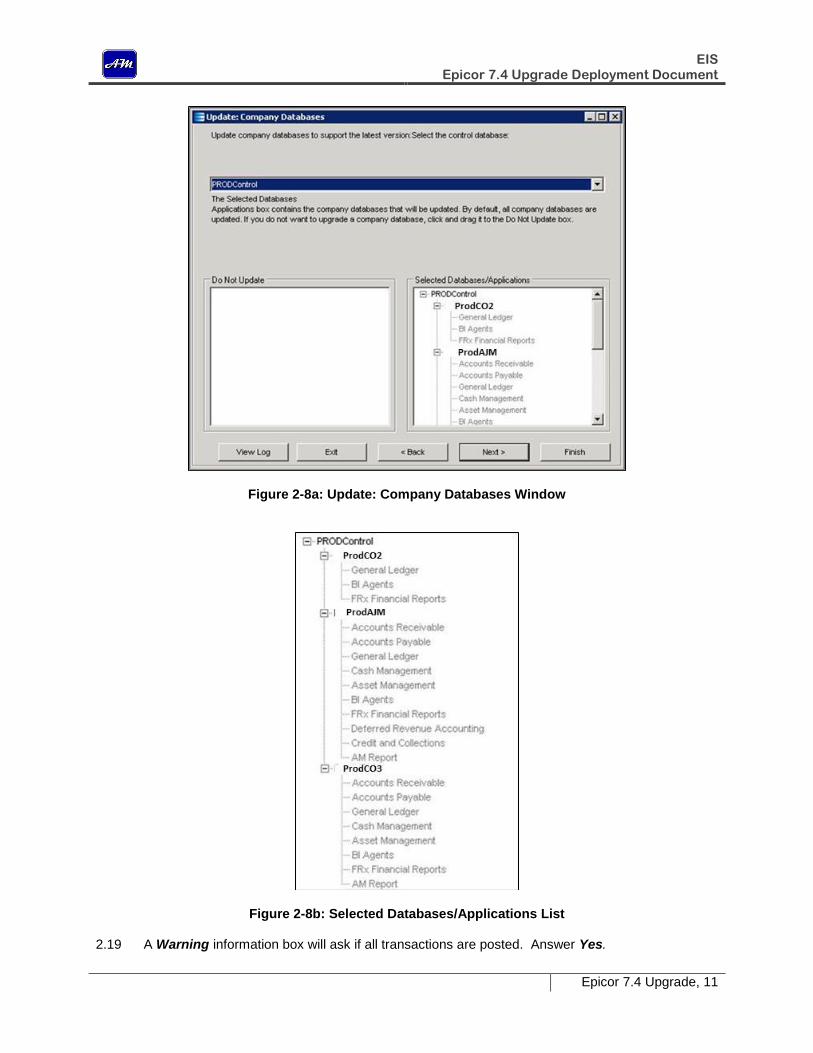
2.18 Update: Company Databases window. In the control database field, select PRODControl from the drop-down list, The install program will automatically populate the Selected Databases/Applications pane as shown in Figure 2-8a. Confirm the Selected Databases/Applications match those shown in Figure 2-9b. Select Next.
EIS Epicor 7.4 Upgrade Deployment Document
Epicor 7.4 Upgrade, 11
Figure 2-8a: Update: Company Databases Window
Figure 2-8b: Selected Databases/Applications List
2.19 A Warning information box will ask if all transactions are posted. Answer Yes.
EIS Epicor 7.4 Upgrade Deployment Document
Epicor 7.4 Upgrade, 12
2.20 A Database Update information box will display a message that the installation directory for
DRA, C&C, and AM Report was not found. These applications are part of the Epicor Extensions Suite and will be installed separately per section 3 of this deployment document. Select OK.
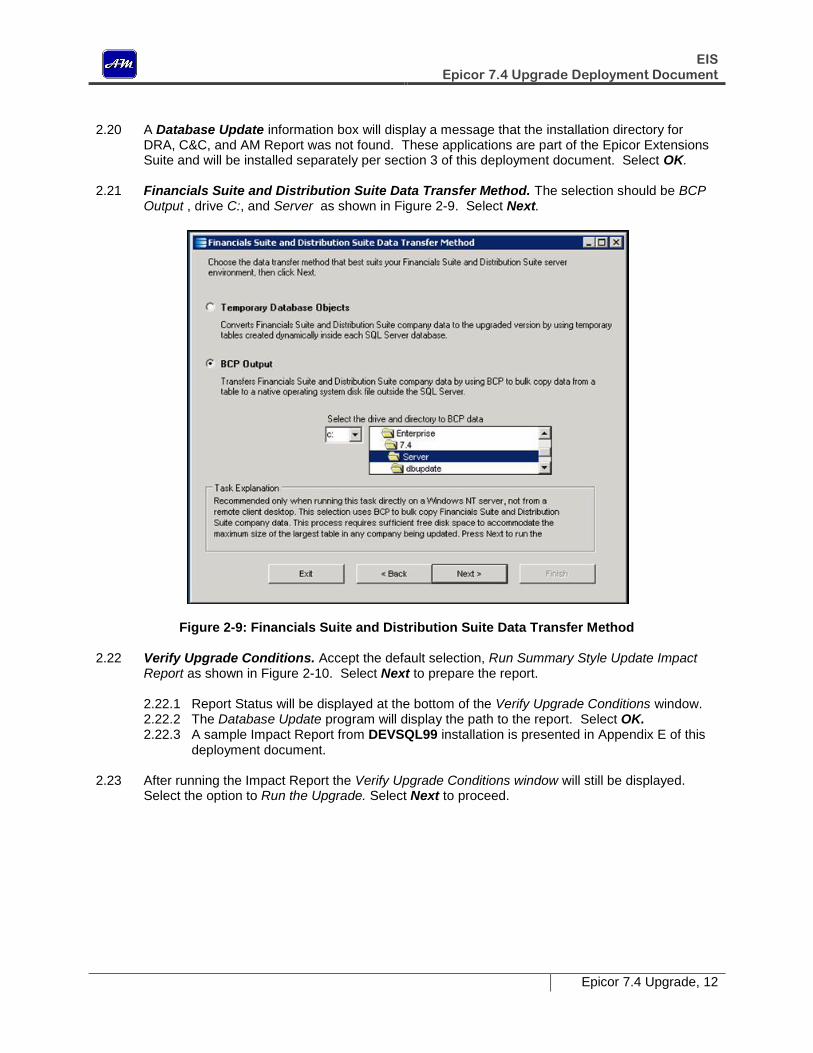
2.21 Financials Suite and Distribution Suite Data Transfer Method. The selection should be BCP
Output , drive C:, and Server as shown in Figure 2-9. Select Next.
Figure 2-9: Financials Suite and Distribution Suite Data Transfer Method
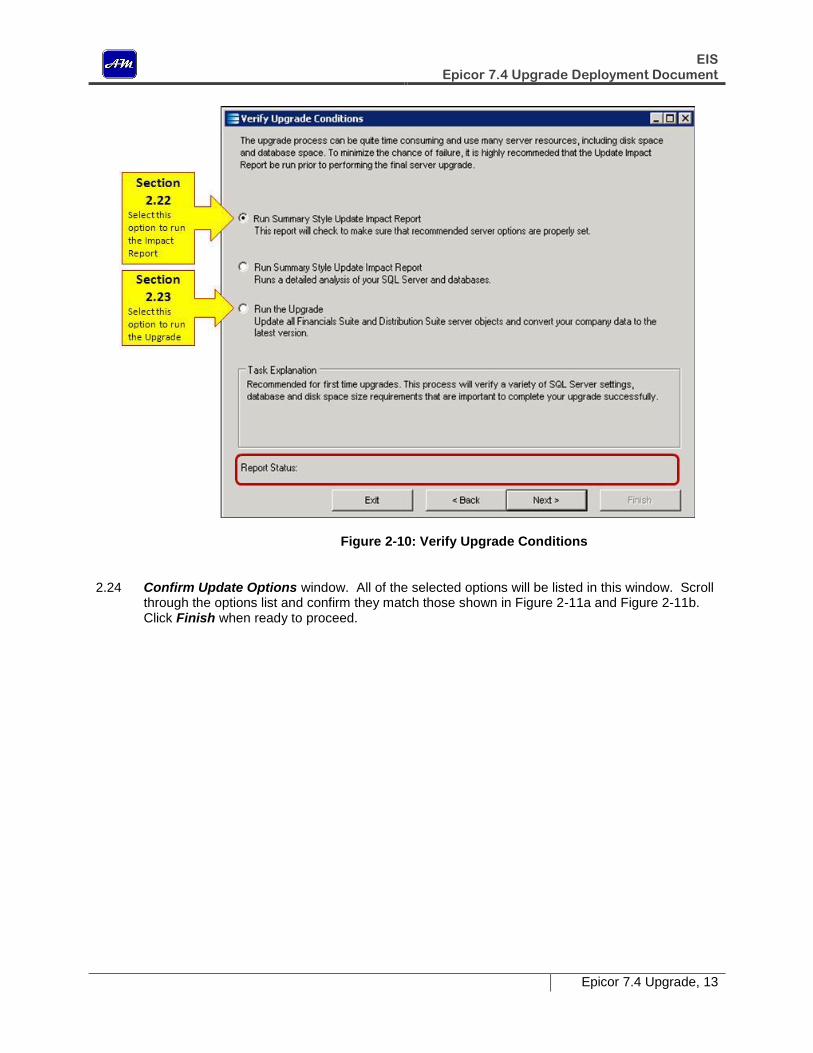
2.22 Verify Upgrade Conditions. Accept the default selection, Run Summary Style Update Impact Report as shown in Figure 2-10. Select Next to prepare the report.
2.22.1 Report Status will be displayed at the bottom of the Verify Upgrade Conditions window. 2.22.2 The Database Update program will display the path to the report. Select OK. 2.22.3 A sample Impact Report from DEVSQL99 installation is presented in Appendix E of this
deployment document.
2.23 After running the Impact Report the Verify Upgrade Conditions window will still be displayed. Select the option to Run the Upgrade. Select Next to proceed.
EIS Epicor 7.4 Upgrade Deployment Document
Epicor 7.4 Upgrade, 13
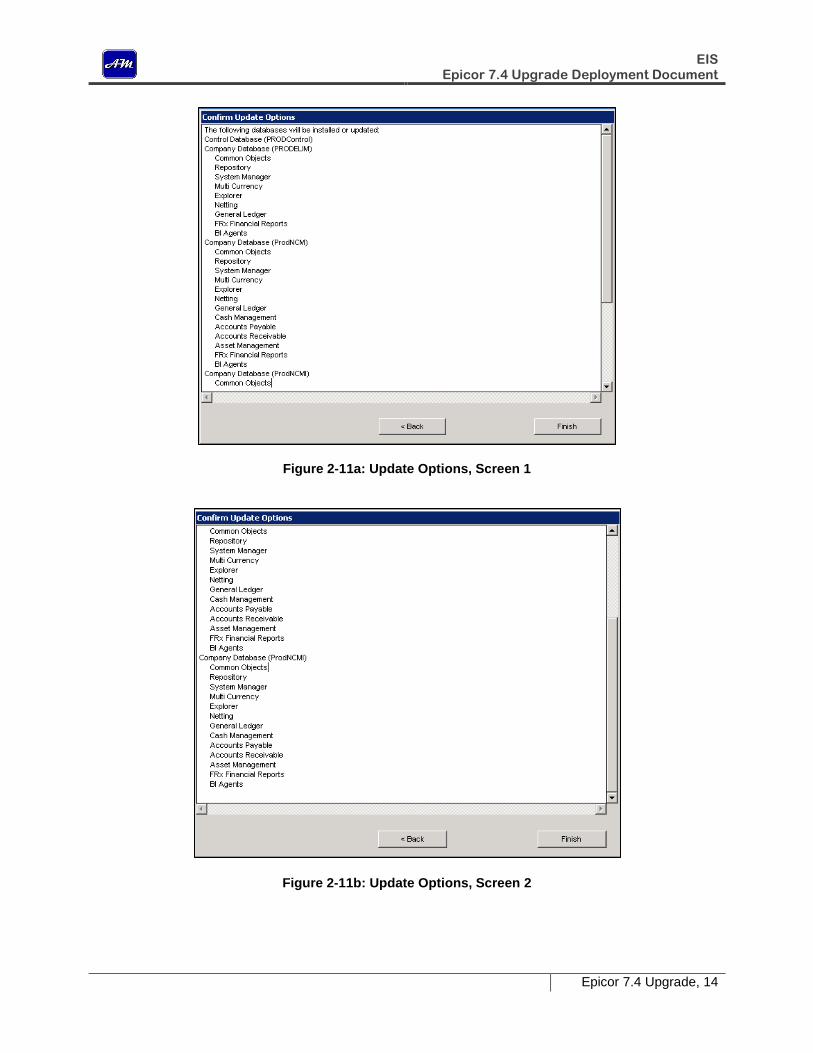
Figure 2-10: Verify Upgrade Conditions 2.24 Confirm Update Options window. All of the selected options will be listed in this window. Scroll
through the options list and confirm they match those shown in Figure 2-11a and Figure 2-11b. Click Finish when ready to proceed.
EIS Epicor 7.4 Upgrade Deployment Document
Epicor 7.4 Upgrade, 14
Figure 2-11a: Update Options, Screen 1
Figure 2-11b: Update Options, Screen 2
EIS Epicor 7.4 Upgrade Deployment Document
Epicor 7.4 Upgrade, 15
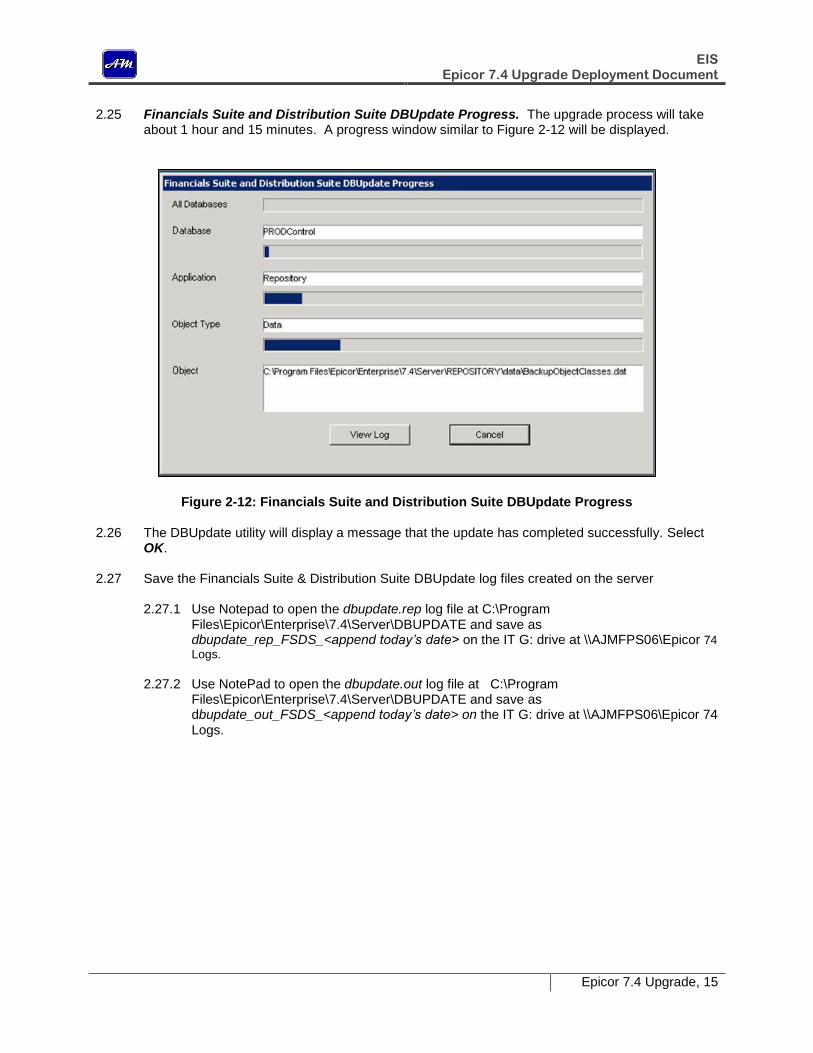
2.25 Financials Suite and Distribution Suite DBUpdate Progress. The upgrade process will take about 1 hour and 15 minutes. A progress window similar to Figure 2-12 will be displayed.
Figure 2-12: Financials Suite and Distribution Suite DBUpdate Progress
2.26 The DBUpdate utility will display a message that the update has completed successfully. Select OK.
2.27 Save the Financials Suite & Distribution Suite DBUpdate log files created on the server
2.27.1 Use Notepad to open the dbupdate.rep log file at C:\Program Files\Epicor\Enterprise\7.4\Server\DBUPDATE and save as dbupdate_rep_FSDS_<append today’s date> on the IT G: drive at \\AJMFPS06\Epicor 74
Logs.
2.27.2 Use NotePad to open the dbupdate.out log file at C:\Program
Files\Epicor\Enterprise\7.4\Server\DBUPDATE and save as dbupdate_out_FSDS_<append today’s date> on the IT G: drive at \\AJMFPS06\Epicor 74 Logs.

EIS Epicor 7.4 Upgrade Deployment Document
Epicor 7.4 Upgrade, 16
3 Epicor Extensions Server Components Installation
The server update for Epicor Financials Suite Extensions applications must be performed in two phases. The first phase is to install the Credit and Collections components and the second phase is to install the Deferred Revenue Accounting (DRA) components. This section describes the procedure to upgrade each of these Extension applications.
3.1 Credit and Collections
3.1.1 Launch the server installation wizard by running setup.exe from
C:\Epicor74 Server Install Files\2 Extensions 74\Credit and Collections\server
The wizard will setup the Epicor Credit & Collections database update utility on the server’s C: drive.
3.1.2 Credit and Collections 7.4 (Server) Installation – Option window: Confirm selection of Install/Upgrade Credit and Collections 7.4 (Server), and select Next.
3.1.3 Credit and Collections 7.4 (Server) Installation – Paths window: Confirm the product path is C:\Program Files\Epicor\Enterprise Extensions\CC\7.4\Server, and select Next.
3.1.4 Credit and Collections 7.4 (Server) Installation – Group window: Accept the default group, Epicor Extensions, and select Next.
3.1.5 Credit and Collections 7.4 (Server) Installation – Applications window: Confirm Credit and Collections box is checked, and select Next.
3.1.6 Credit and Collections 7.4 (Server) Installation – Summary window: Confirm the following selections, and select Finish.
3.1.6.1 Selected Installation Option: Install/Upgrade Credit and Collections 7.4 (Server).
3.1.6.2 Source Folder: C:\Epicor74 Installation Folder\Epicor74\Extensions 74\Credit and Collections\server
3.1.6.3 Target Folder: C:\Program Files\Epicor\Enterprise Extensions\CC\7.4\Server
3.1.6.4 Program Group: Epicor Extensions
3.1.6.5 Applications: Credit and Collections
3.1.7 When the Run Program dialog box prompts to “install server objects now”, select Yes.
3.1.8 DBUPDATE information box may request to overwrite the previous log file, select Yes.
3.1.9 Credit and Collections 7.4 (Server) Installation – Complete information box will be displayed under the Epicor Login Box. Move the login box to where the information box can be seen. Select OK on the information box then proceed to the Epicor login.
3.1.10 Financials Suite and Distribution Suite – Login box: Select the appropriate server alias from the server drop-down list shown in Figure 2-5 and listed below. Select the option to use SQL server authentication. Login as “sa.”
3.1.1 SQL 2008 Development: DEVSQL99\ACCTDB 3.1.2 SQL 2008 test (prodsys2: 10.250.99.999): SQL91A\ab1 3.1.3 SQL 2008 Production: SQL93B\PRODAJM
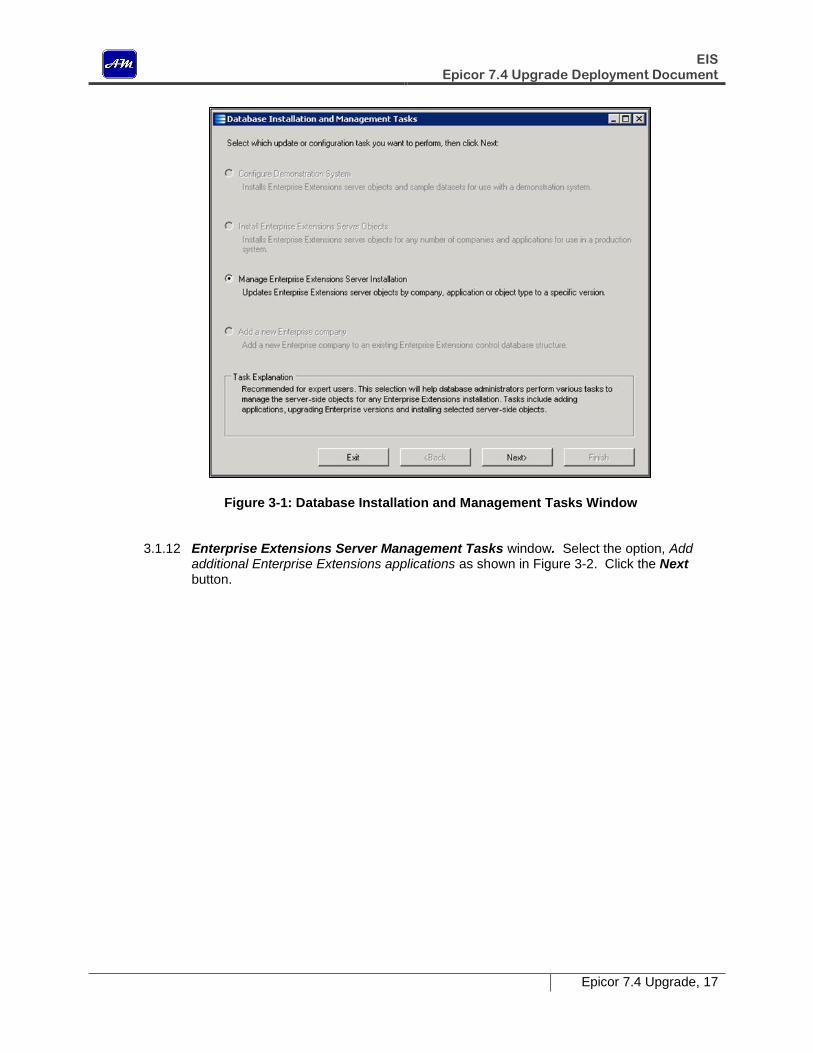
3.1.11 Database Installation and Management Tasks window. Select the option, Manage Enterprise Extensions Server Installation as shown in Figure 3-1. Click the Next button.
EIS Epicor 7.4 Upgrade Deployment Document
Epicor 7.4 Upgrade, 17
Figure 3-1: Database Installation and Management Tasks Window
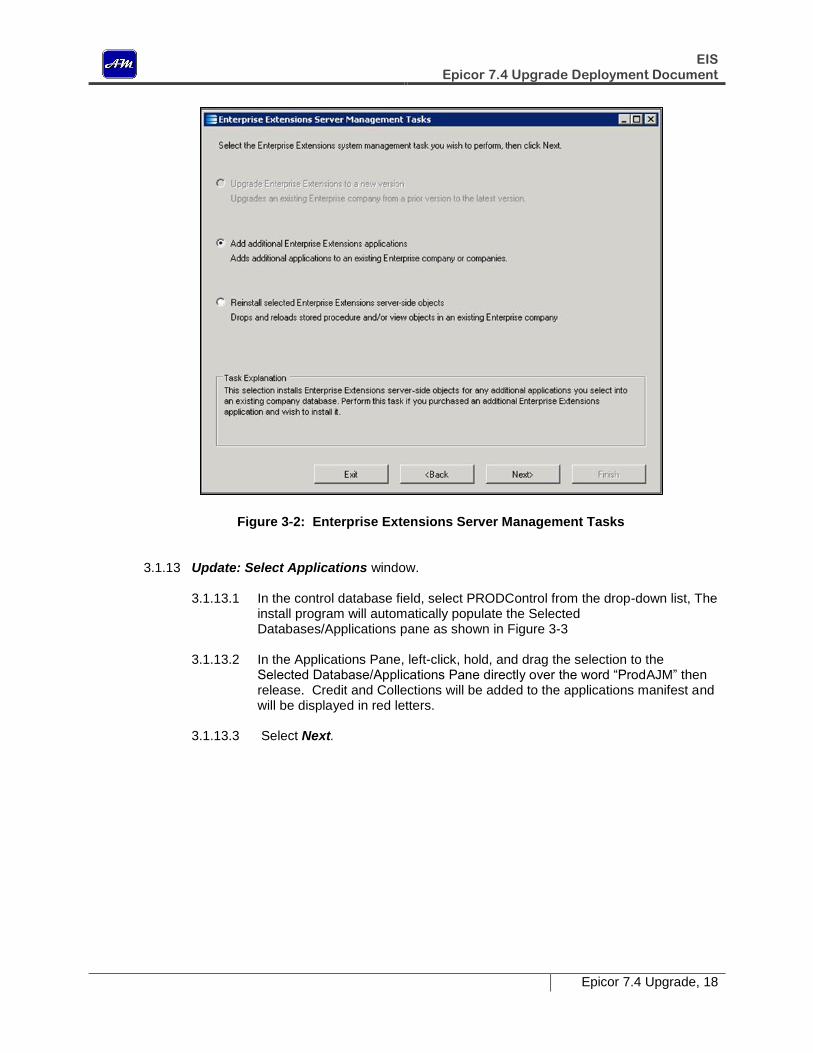
3.1.12 Enterprise Extensions Server Management Tasks window. Select the option, Add
additional Enterprise Extensions applications as shown in Figure 3-2. Click the Next button.
EIS Epicor 7.4 Upgrade Deployment Document
Epicor 7.4 Upgrade, 18
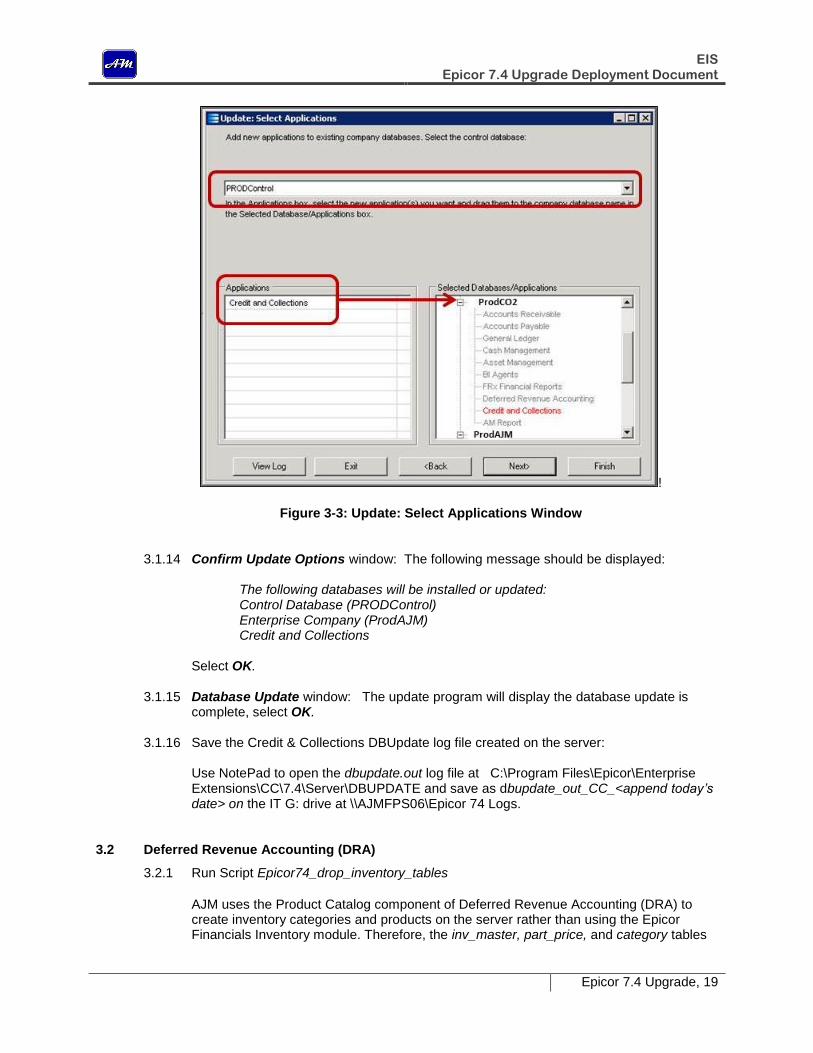
Figure 3-2: Enterprise Extensions Server Management Tasks 3.1.13 Update: Select Applications window.
3.1.13.1 In the control database field, select PRODControl from the drop-down list, The install program will automatically populate the Selected Databases/Applications pane as shown in Figure 3-3
3.1.13.2 In the Applications Pane, left-click, hold, and drag the selection to the
Selected Database/Applications Pane directly over the word “ProdAJM” then release. Credit and Collections will be added to the applications manifest and will be displayed in red letters.
3.1.13.3 Select Next.
EIS Epicor 7.4 Upgrade Deployment Document
Epicor 7.4 Upgrade, 19
!
Figure 3-3: Update: Select Applications Window
3.1.14 Confirm Update Options window: The following message should be displayed:
The following databases will be installed or updated: Control Database (PRODControl) Enterprise Company (ProdAJM) Credit and Collections
Select OK.
3.1.15 Database Update window: The update program will display the database update is complete, select OK.
3.1.16 Save the Credit & Collections DBUpdate log file created on the server:
Use NotePad to open the dbupdate.out log file at C:\Program Files\Epicor\Enterprise Extensions\CC\7.4\Server\DBUPDATE and save as dbupdate_out_CC_<append today’s date> on the IT G: drive at \\AJMFPS06\Epicor 74 Logs.
3.2 Deferred Revenue Accounting (DRA)
3.2.1 Run Script Epicor74_drop_inventory_tables
AJM uses the Product Catalog component of Deferred Revenue Accounting (DRA) to create inventory categories and products on the server rather than using the Epicor Financials Inventory module. Therefore, the inv_master, part_price, and category tables
EIS Epicor 7.4 Upgrade Deployment Document
Epicor 7.4 Upgrade, 20
must be deleted from company database ProdAJM after conversion from Epicor 7.3.6 to Epicor 7.4 but before updating them with Epicor 7.4 DRA Product Catelog tables. If the tables exist before the server update is performed, the DRA installation program will not overwrite them with the correct DRA product data. Refer to Appendix F for script details. 3.2.1.1 Script located at AMTFS11: $/Epicor/Epicor74/DEVT/Epicor74 Upgrade
Project/Epicor74_drop_inventory_tables
3.2.2 Launch the server installation wizard by running setup.exe from:
C:\Epicor74 Server Install Files\2 Extensions 74\Deferred Revenue Accounting\server.
The wizard will setup the Epicor DRA database update utility on the server’s C: drive.
3.2.3 Deferred Revenue Accounting 7.4 (Server) Installation – Option window: Confirm selection of Install/Upgrade Deferred Revenue Accounting 7.4 (Server), and select Next.
3.2.4 Deferred Revenue Accounting 7.4 (Server) Installation – Paths window: Confirm the product path is C:\Program Files\Epicor\Enterprise Extensions\DRA\7.4\Server, and select Next.
3.2.5 Deferred Revenue Accounting 7.4 (Server) Installation – Group window: Accept the default group, Epicor Extensions, and select Next.
3.2.6 Deferred Revenue Accounting 7.4 (Server) Installation – Applications window: Confirm Deferred Revenue box is checked, and select Next.
3.2.7 Deferred Revenue Accounting 7.4 (Server) Installation – Summary window: Confirm the following selections, and select Finish.
3.2.7.1 Selected Installation Option: Install/Upgrade Deferred Revenue Accounting 7.4 (Server).
3.2.7.2 Source Folder: C:\Epicor74 Installation Folder\Epicor74\Extensions 74\Deferred Revenue Accounting\server
3.2.7.3 Target Folder: C:\Program Files\Epicor\Enterprise Extensions\DRA\7.4\Server
3.2.7.4 Program Group: Epicor Extensions
3.2.7.5 Applications: Deferred Revenue
3.2.8 When the Run Program dialog box prompts to “install server objects now”, select Yes.
3.2.9 DBUPDATE information box may request to overwrite the previous log file, select Yes.
3.2.11 Deferred Revenue Accounting 7.4 (Server) Installation – Complete information box will be displayed under the Epicor Login Box. Move the login box to where the information box can be seen. Select OK on the information box then proceed to the Epicor login.
3.2.12 Financials Suite and Distribution Suite – Login box: Select the appropriate server alias from the server drop-down list shown in Figure 2-5 and listed below. Select the option to use SQL server authentication. Login as “sa.”
3.2.1 SQL 2008 Development: DEVSQL99\ACCTDB 3.2.2 SQL 2008 test (prodsys2: 10.250.99.999): SQL91A\ab1 3.2.3 SQL 2008 Production: SQL93B\PRODAJM
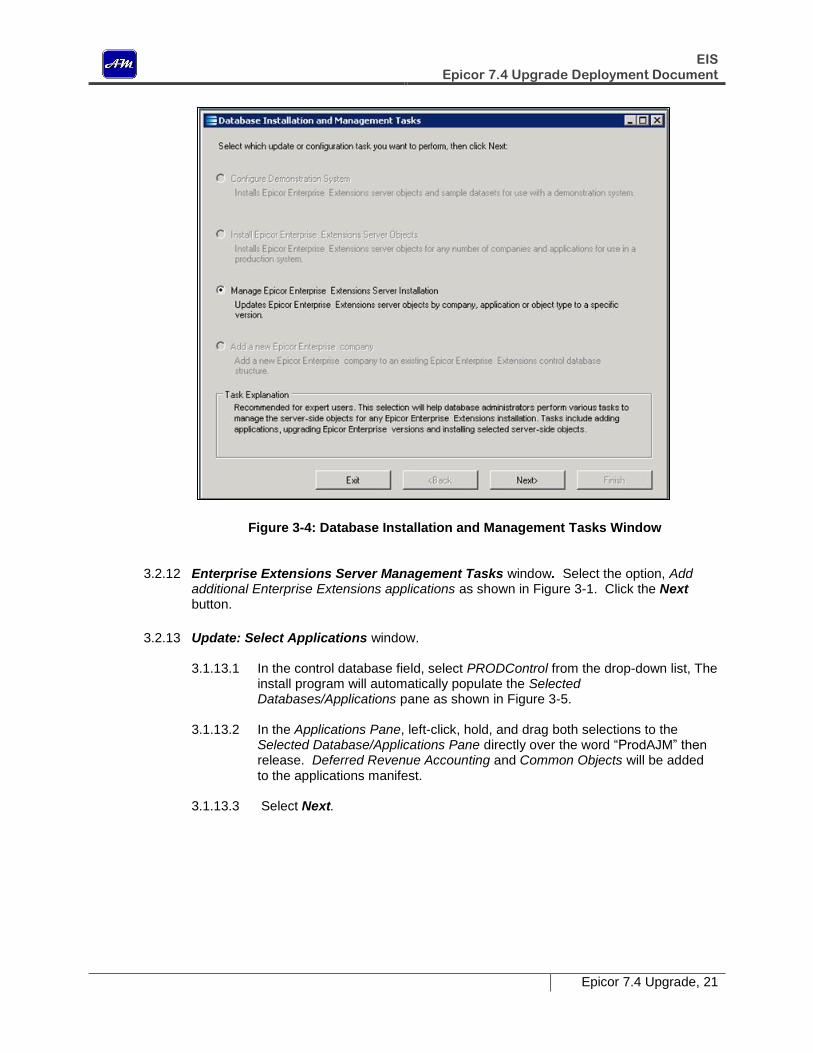
3.2.13 Database Installation and Management Tasks window. Select the option, Manage
Epicor Enterprise Extensions Server Installation as shown in Figure 3-4. Click the Next button.
EIS Epicor 7.4 Upgrade Deployment Document
Epicor 7.4 Upgrade, 21
Figure 3-4: Database Installation and Management Tasks Window 3.2.12 Enterprise Extensions Server Management Tasks window. Select the option, Add
additional Enterprise Extensions applications as shown in Figure 3-1. Click the Next button.
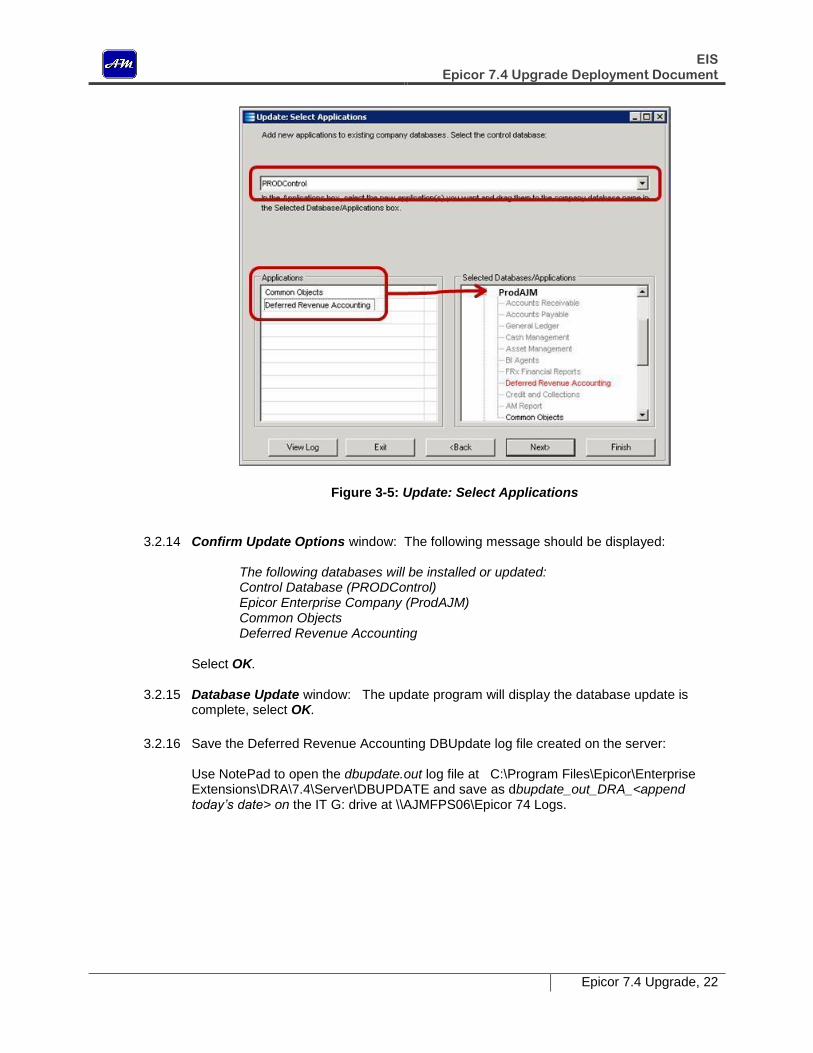
3.2.13 Update: Select Applications window.
3.1.13.1 In the control database field, select PRODControl from the drop-down list, The install program will automatically populate the Selected Databases/Applications pane as shown in Figure 3-5.
3.1.13.2 In the Applications Pane, left-click, hold, and drag both selections to the
Selected Database/Applications Pane directly over the word “ProdAJM” then release. Deferred Revenue Accounting and Common Objects will be added to the applications manifest.
3.1.13.3 Select Next.
EIS Epicor 7.4 Upgrade Deployment Document
Epicor 7.4 Upgrade, 22
Figure 3-5: Update: Select Applications
3.2.14 Confirm Update Options window: The following message should be displayed:
The following databases will be installed or updated: Control Database (PRODControl) Epicor Enterprise Company (ProdAJM) Common Objects Deferred Revenue Accounting
Select OK.
3.2.15 Database Update window: The update program will display the database update is complete, select OK.
3.2.16 Save the Deferred Revenue Accounting DBUpdate log file created on the server:
Use NotePad to open the dbupdate.out log file at C:\Program Files\Epicor\Enterprise Extensions\DRA\7.4\Server\DBUPDATE and save as dbupdate_out_DRA_<append today’s date> on the IT G: drive at \\AJMFPS06\Epicor 74 Logs.
EIS Epicor 7.4 Upgrade Deployment Document
Epicor 7.4 Upgrade, 23
4. Post Server Installation Tasks
4.1 Installation of Service Pack FSDS74_EPRPack5
The only service pack required for this stage of the Epicor 7.4 Financials Suite and Distribution Suite (FSDS) upgrade is EPRPack 5. It is a cumulative service pack that includes details of the previous packs.
4.1.1 Run Setup.exe from:
C:\Epicor74 Server Install Files\3 EPR74 SP\FSDS74_EPRPack5\Server
4.1.2 Server Installation Wizard – Option window: Confirm Full Installation is selected and click the Next button.
4.1.3 Server Installation Wizard – Paths window: Accept the default selections and click the Next button.
4.1.4 Server Installation Wizard – Group window: Confirm the Program Group is Epicor Enterprise\Epicor 7.4 EPR Pack 5 and click the Next button.
4.1.5 Server Installation Wizard – Applications window: Confirm all Components boxes are checked and click the Next button.
4.1.6 Server Installation Wizard – Summary window: Confirm the selections as listed below and click the Finish button.
4.1.6.1 Selected Installation Option: Full Installation. REQUIRES LOCAL ADMINISTRATOR PERMISSIONS.
4.1.6.2 Source Folder: C:\Epicor74 Installation Folder\Epicor74\EPR74 SP\FSDS74_EPRPack5\Server
4.1.6.3 Target Folder: C:\Program Files\Epicor\Enterprise\7.4\EPR Pack 5\Server
4.1.6.4 Program Group: Epicor Enterprise\Epicor 7.4 EPR Pack 5
4.1.6.5 Applications: General Ledger, Distribution, Accounts Payable, Accounts Receivable, Automated AP Matching, Explorer, Asset Management
4.1.6.6 Applications: Netting, System Manager
4.1.7 A Run Program information box will be displayed requesting permission to run the DBUpdate wizard. Select Yes. The Epicor login box will be displayed.
4.1.8 Server Installation Wizard – Complete window: This box will be displayed directly under the Epicor Login Box. Click the Login Box title bar and move it to the side of the desktop viewing area to reveal this box. Click the OK button and proceed to the login box.
EIS Epicor 7.4 Upgrade Deployment Document
Epicor 7.4 Upgrade, 24
4.1.9 Financials Suite and Distribution Suite – Login box: Select the appropriate server ID from the following list. Login as “sa” as shown in Figure 2-5.
4.1.1 SQL 2008 Development: DEVSQL99\ACCTDB 4.1.2 SQL 2008 test (prodsys2: 10.250.99.999): SQL91A\ab1 4.1.3 SQL 2008 Production: SQL93B\PRODAJM
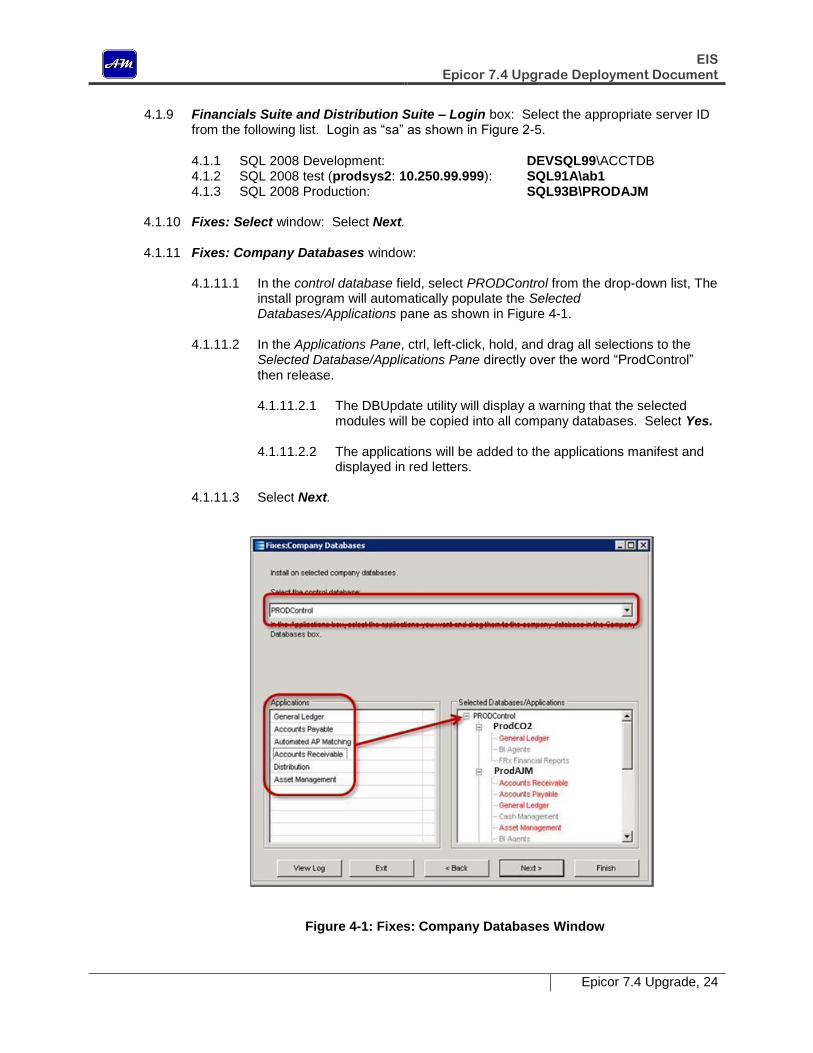
4.1.10 Fixes: Select window: Select Next. 4.1.11 Fixes: Company Databases window:
4.1.11.1 In the control database field, select PRODControl from the drop-down list, The
install program will automatically populate the Selected Databases/Applications pane as shown in Figure 4-1.
4.1.11.2 In the Applications Pane, ctrl, left-click, hold, and drag all selections to the
Selected Database/Applications Pane directly over the word “ProdControl” then release.
4.1.11.2.1 The DBUpdate utility will display a warning that the selected
modules will be copied into all company databases. Select Yes.
4.1.11.2.2 The applications will be added to the applications manifest and displayed in red letters.
4.1.11.3 Select Next.
Figure 4-1: Fixes: Company Databases Window
EIS Epicor 7.4 Upgrade Deployment Document
Epicor 7.4 Upgrade, 25
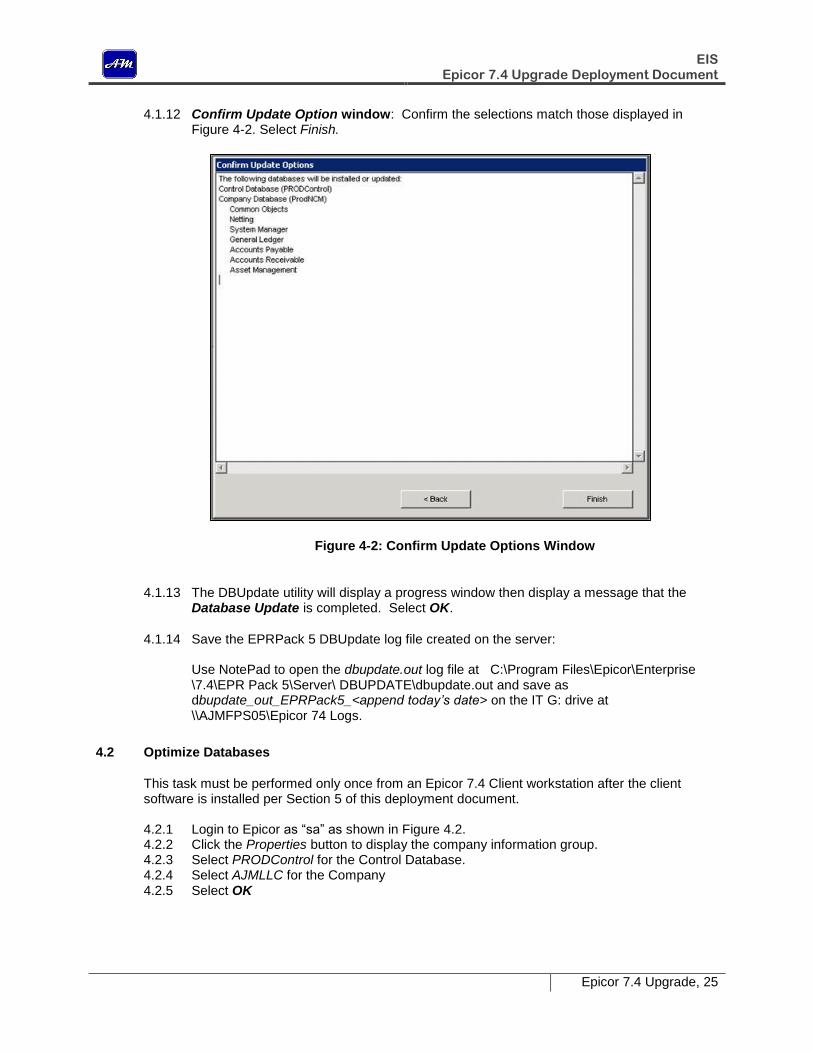
4.1.12 Confirm Update Option window: Confirm the selections match those displayed in Figure 4-2. Select Finish.
Figure 4-2: Confirm Update Options Window
4.1.13 The DBUpdate utility will display a progress window then display a message that the Database Update is completed. Select OK.
4.1.14 Save the EPRPack 5 DBUpdate log file created on the server:
Use NotePad to open the dbupdate.out log file at C:\Program Files\Epicor\Enterprise \7.4\EPR Pack 5\Server\ DBUPDATE\dbupdate.out and save as dbupdate_out_EPRPack5_<append today’s date> on the IT G: drive at \\AJMFPS05\Epicor 74 Logs.
4.2 Optimize Databases
This task must be performed only once from an Epicor 7.4 Client workstation after the client software is installed per Section 5 of this deployment document.
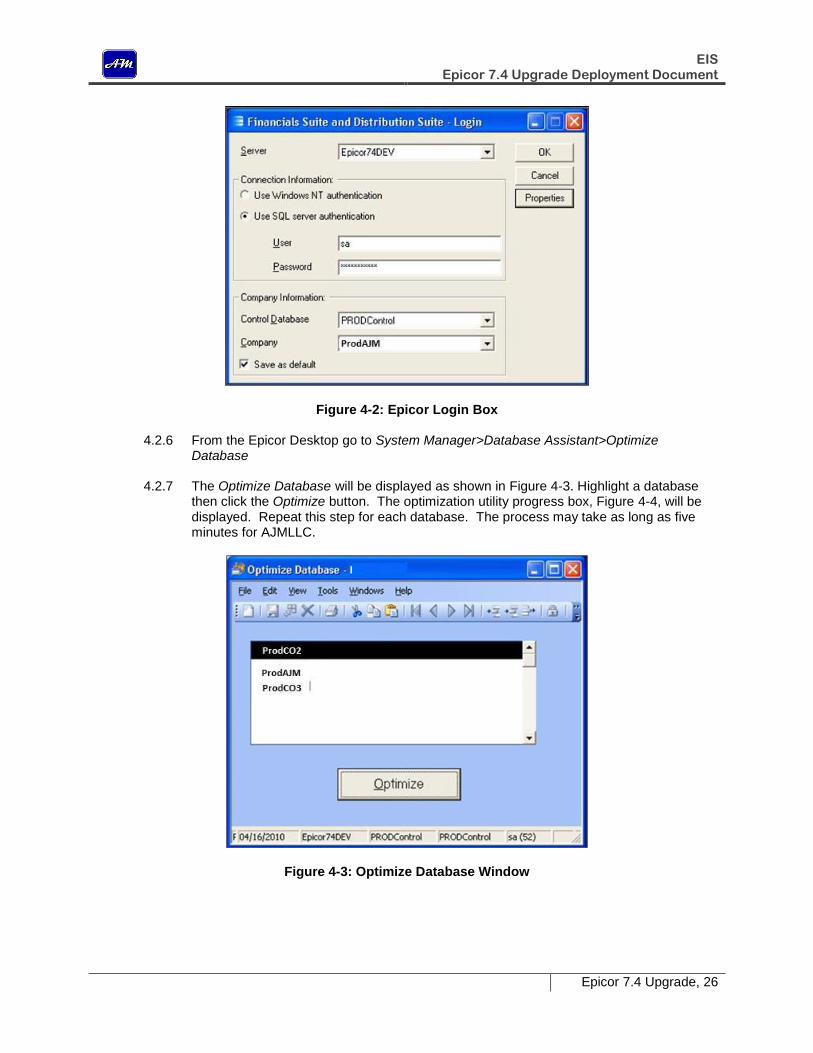
4.2.1 Login to Epicor as “sa” as shown in Figure 4.2. 4.2.2 Click the Properties button to display the company information group. 4.2.3 Select PRODControl for the Control Database. 4.2.4 Select AJMLLC for the Company 4.2.5 Select OK
EIS Epicor 7.4 Upgrade Deployment Document
Epicor 7.4 Upgrade, 26
Figure 4-2: Epicor Login Box
4.2.6 From the Epicor Desktop go to System Manager>Database Assistant>Optimize Database
4.2.7 The Optimize Database will be displayed as shown in Figure 4-3. Highlight a database
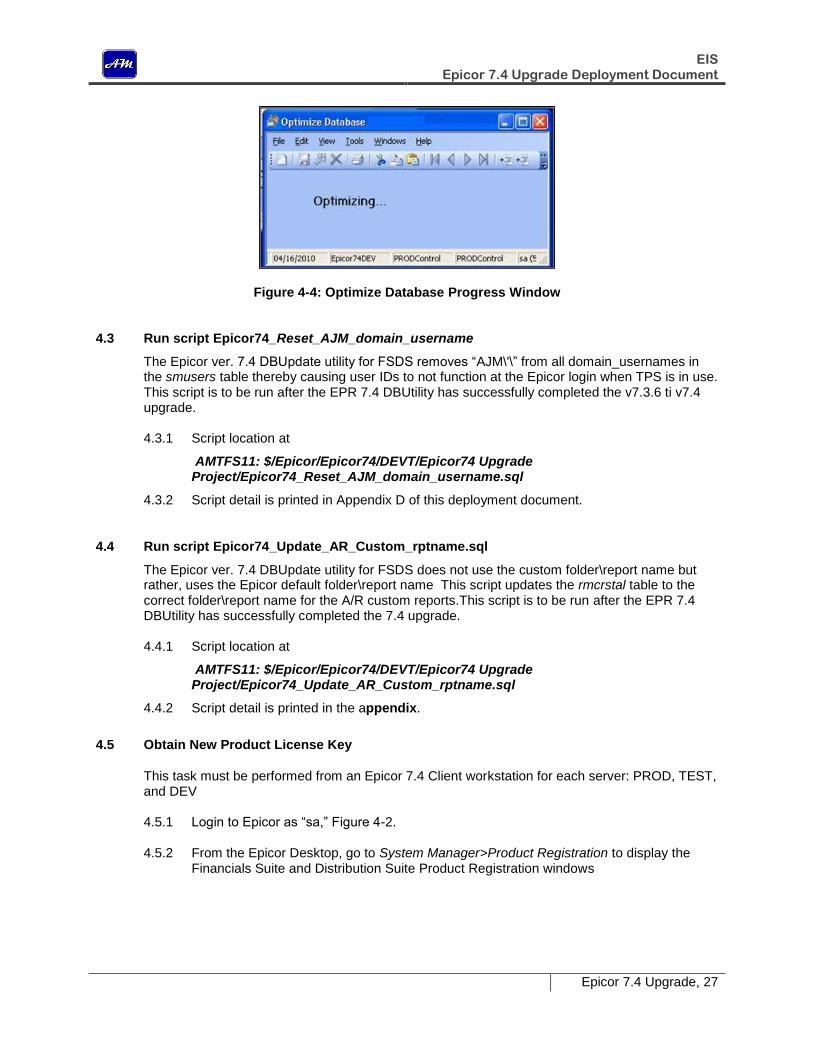
then click the Optimize button. The optimization utility progress box, Figure 4-4, will be displayed. Repeat this step for each database. The process may take as long as five minutes for AJMLLC.
Figure 4-3: Optimize Database Window
EIS Epicor 7.4 Upgrade Deployment Document
Epicor 7.4 Upgrade, 27
Figure 4-4: Optimize Database Progress Window
4.3 Run script Epicor74_Reset_AJM_domain_username
The Epicor ver. 7.4 DBUpdate utility for FSDS removes “AJM\'\” from all domain_usernames in the smusers table thereby causing user IDs to not function at the Epicor login when TPS is in use. This script is to be run after the EPR 7.4 DBUtility has successfully completed the v7.3.6 ti v7.4 upgrade.
4.3.1 Script location at
AMTFS11: $/Epicor/Epicor74/DEVT/Epicor74 Upgrade Project/Epicor74_Reset_AJM_domain_username.sql
4.3.2 Script detail is printed in Appendix D of this deployment document.
4.4 Run script Epicor74_Update_AR_Custom_rptname.sql
The Epicor ver. 7.4 DBUpdate utility for FSDS does not use the custom folder\report name but rather, uses the Epicor default folder\report name This script updates the rmcrstal table to the correct folder\report name for the A/R custom reports.This script is to be run after the EPR 7.4 DBUtility has successfully completed the 7.4 upgrade.
4.4.1 Script location at
AMTFS11: $/Epicor/Epicor74/DEVT/Epicor74 Upgrade Project/Epicor74_Update_AR_Custom_rptname.sql
4.4.2 Script detail is printed in the appendix.
4.5 Obtain New Product License Key
This task must be performed from an Epicor 7.4 Client workstation for each server: PROD, TEST, and DEV
4.5.1 Login to Epicor as “sa,” Figure 4-2.
4.5.2 From the Epicor Desktop, go to System Manager>Product Registration to display the Financials Suite and Distribution Suite Product Registration windows

EIS Epicor 7.4 Upgrade Deployment Document
Epicor 7.4 Upgrade, 28
4.5.2.1 Financials Suite and Distribution Suite Product Registration window Customer Info tab: Enter the required information per Figure 4-5.
Figure 4-5: Financials Suite and Distribution Suite Product Registration - Customer Info Tab
EIS Epicor 7.4 Upgrade Deployment Document
Epicor 7.4 Upgrade, 29
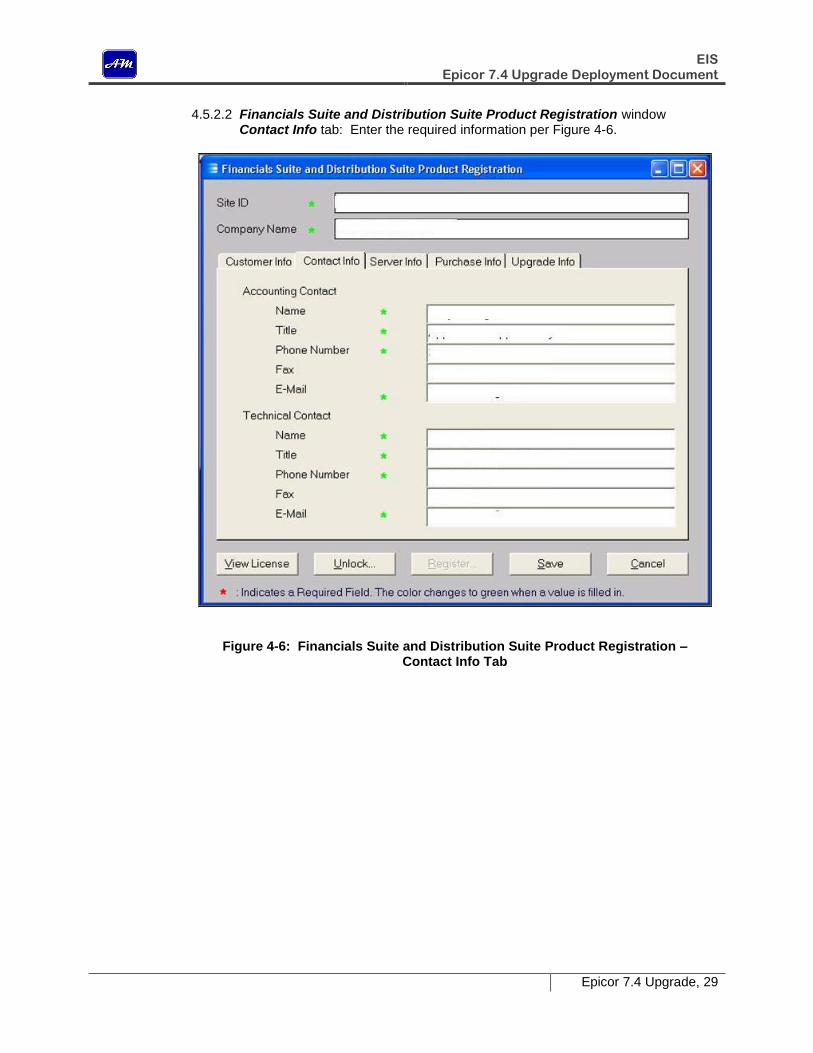
4.5.2.2 Financials Suite and Distribution Suite Product Registration window Contact Info tab: Enter the required information per Figure 4-6.
Figure 4-6: Financials Suite and Distribution Suite Product Registration – Contact Info Tab
EIS Epicor 7.4 Upgrade Deployment Document
Epicor 7.4 Upgrade, 30
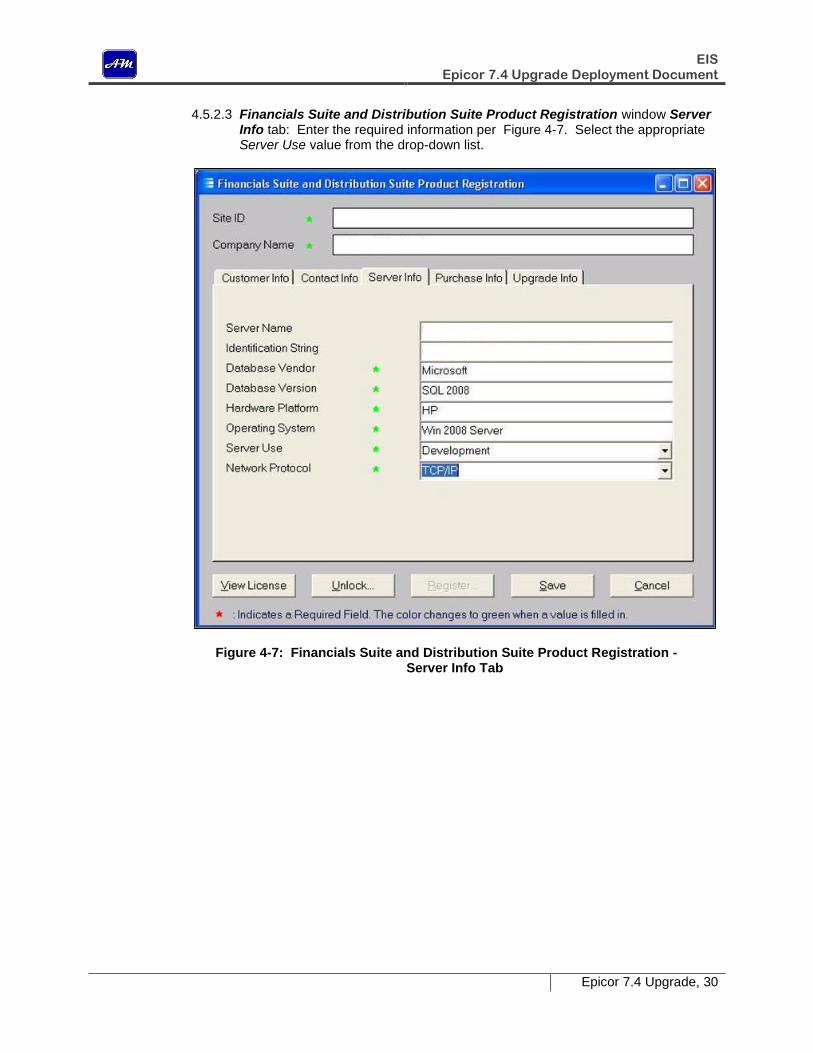
4.5.2.3 Financials Suite and Distribution Suite Product Registration window Server Info tab: Enter the required information per Figure 4-7. Select the appropriate Server Use value from the drop-down list.
Figure 4-7: Financials Suite and Distribution Suite Product Registration - Server Info Tab
EIS Epicor 7.4 Upgrade Deployment Document
Epicor 7.4 Upgrade, 31
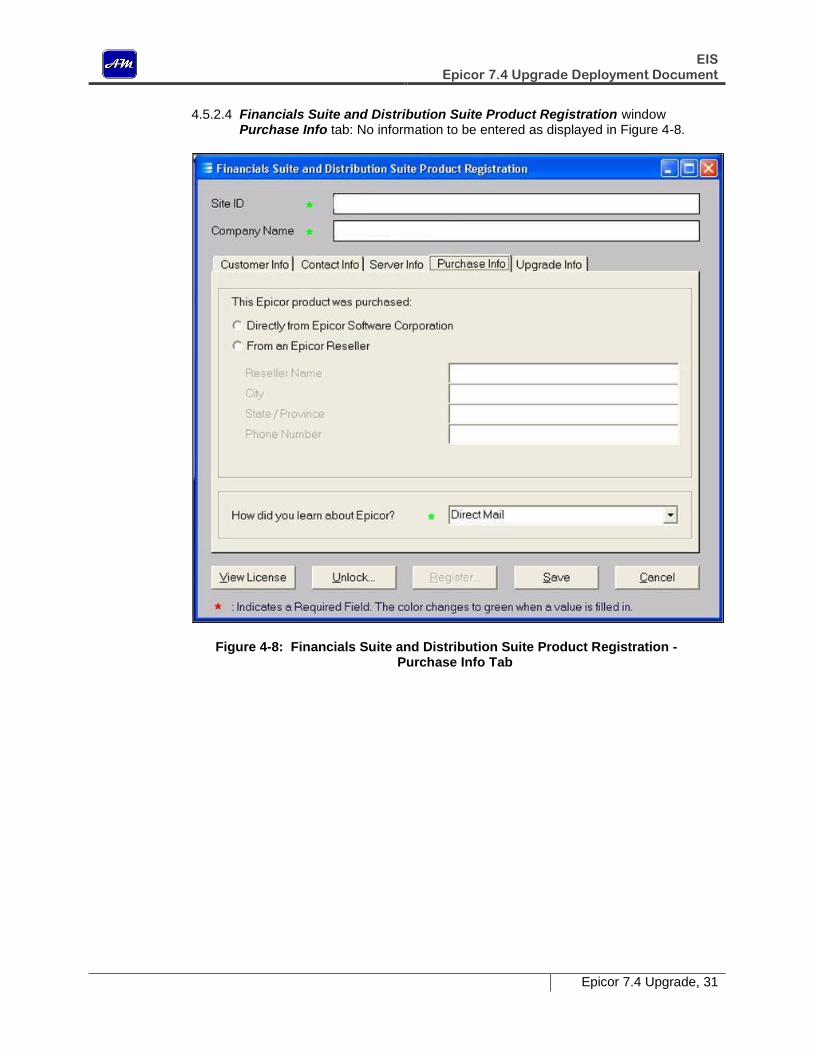
4.5.2.4 Financials Suite and Distribution Suite Product Registration window Purchase Info tab: No information to be entered as displayed in Figure 4-8.
Figure 4-8: Financials Suite and Distribution Suite Product Registration - Purchase Info Tab
EIS Epicor 7.4 Upgrade Deployment Document
Epicor 7.4 Upgrade, 32
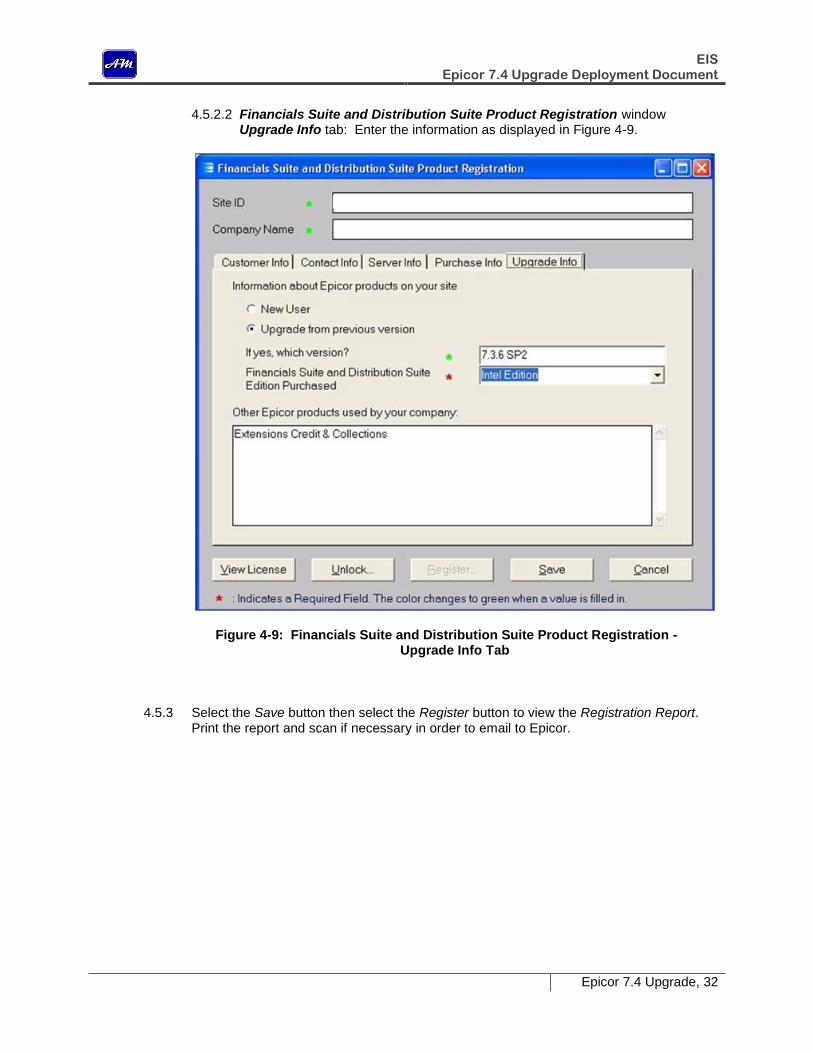
4.5.2.2 Financials Suite and Distribution Suite Product Registration window Upgrade Info tab: Enter the information as displayed in Figure 4-9.
Figure 4-9: Financials Suite and Distribution Suite Product Registration - Upgrade Info Tab
4.5.3 Select the Save button then select the Register button to view the Registration Report. Print the report and scan if necessary in order to email to Epicor.
EIS Epicor 7.4 Upgrade Deployment Document
Epicor 7.4 Upgrade, 33
5 Epicor Client Software Installation
The client software will be installed on each Epicor 7.3.6 user listed in Appendix G.
5.1 Log on to the Client Workstation as Administrator
Log on to the client workstation as Administrator to perform all aspects of the financial software client installation.
5.2 Uninstall Existing Financial Application Software from Client PC.
5.2.1 Uninstall the following applications from the client workstation:
Application Related Programs
Epicor Financials Suite & Distribution Suite
Financials Suite and Distribution Suite (Client) 7.3.6
7.3.6 Service Pack 2 Installation (Client)
Epicor 7.3.6 SP2 EPR Pack 4 Installation (Client)
Epicor 7.3.6 SP2 EPR Pack 6 Installation (Client)
Credit and Collections
Credit and Collections 7.3.6 (Client)
Credit and Collections 7.3.6 3054_3083_3086_3098_3099 (Client)
Patch for SQL 2005 Credit and Collections 7.3.6 (Client)
Deferred Revenue Accounting
Deferred Revenue Accounting 7.3.6 (Client)
Deferred Revenue Accounting 7.3.6 EPR Pack 1 (Client)
Deferred Revenue Accounting 7.3.6 EPR Pack 2 (Client)
Patch for SQL 2005 Deferred Revenue Accounting 7.3.6 (Client)
Crystal Reports
Crystal Reports 11 Runtime (if installed)
Crystal Reports XI Release 2 for Sage
Crystal Reports XI Report Pack for Deferred Revenue Accounting 7.3.6
Crystal ReportsXIRuntime
Star eAdvice eAdvice
Star PDF Writer
5.2.2 Delete the Epicor folder and all of it’s subfolders from Program Files:
5.2.2.1 Epicor files at C:\Program Files\Epicor
5.2.2.2 Sage FAS files at C:\Program Files\SageFAS
5.2.2.3 Star folders at C:\Program Files\Star
5.2.3 Restart the PC.
5.3 Copy the Epicor 7.4 Installation Folders
Copy the Epicor 7.4 installation folders from \\AJMfps06\installs$\Epicor74\Epicor74 Client Install Files to the client workstation.
EIS Epicor 7.4 Upgrade Deployment Document
Epicor 7.4 Upgrade, 34
5.3.1 You will be requested to enter your network login credentials to access \\AJMfps06.
5.3.2 Within the Epicor74 Client Install Files folder the application folders are numbered in order of installation
5.3.3 The installation folders may be removed from the client PC after successful installation of Epicor 7.4.
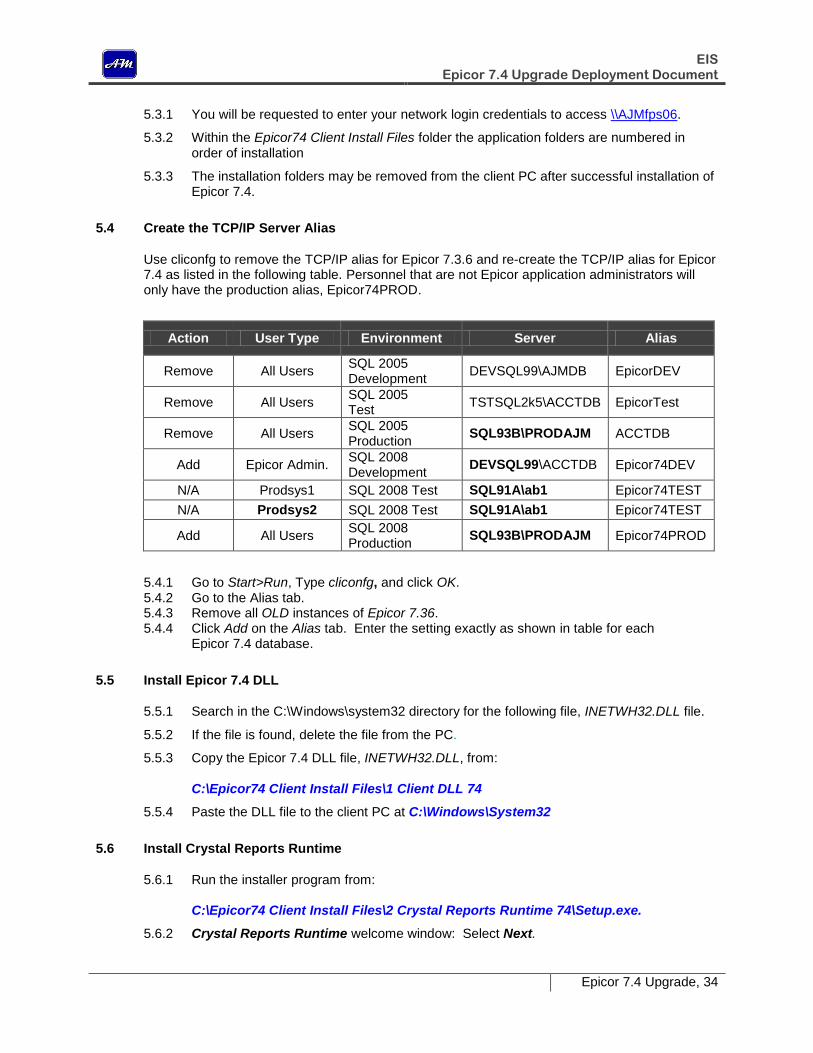
5.4 Create the TCP/IP Server Alias
Use cliconfg to remove the TCP/IP alias for Epicor 7.3.6 and re-create the TCP/IP alias for Epicor 7.4 as listed in the following table. Personnel that are not Epicor application administrators will only have the production alias, Epicor74PROD.
Action User Type Environment Server Alias
Remove All Users SQL 2005 Development
DEVSQL99\AJMDB EpicorDEV
Remove All Users SQL 2005 Test
TSTSQL2k5\ACCTDB EpicorTest
Remove All Users SQL 2005 Production
SQL93B\PRODAJM ACCTDB
Add Epicor Admin. SQL 2008 Development
DEVSQL99\ACCTDB Epicor74DEV
N/A Prodsys1 SQL 2008 Test SQL91A\ab1 Epicor74TEST
N/A Prodsys2 SQL 2008 Test SQL91A\ab1 Epicor74TEST
Add All Users SQL 2008 Production
SQL93B\PRODAJM Epicor74PROD
5.4.1 Go to Start>Run, Type cliconfg, and click OK. 5.4.2 Go to the Alias tab. 5.4.3 Remove all OLD instances of Epicor 7.36. 5.4.4 Click Add on the Alias tab. Enter the setting exactly as shown in table for each Epicor 7.4 database.
5.5 Install Epicor 7.4 DLL
5.5.1 Search in the C:\Windows\system32 directory for the following file, INETWH32.DLL file.
5.5.2 If the file is found, delete the file from the PC.
5.5.3 Copy the Epicor 7.4 DLL file, INETWH32.DLL, from:
C:\Epicor74 Client Install Files\1 Client DLL 74
5.5.4 Paste the DLL file to the client PC at C:\Windows\System32
5.6 Install Crystal Reports Runtime
5.6.1 Run the installer program from:
C:\Epicor74 Client Install Files\2 Crystal Reports Runtime 74\Setup.exe.
5.6.2 Crystal Reports Runtime welcome window: Select Next.
EIS Epicor 7.4 Upgrade Deployment Document
Epicor 7.4 Upgrade, 35
5.6.3 Crystal Reports Runtime – Select Installation Folder window: Confirm the folder is C:\Program Files\Crystal Reports Runtime\. Select Next.
5.6.4 Crystal Reports Runtime – Confirm Installation window: Select Next to start the installation.
5.6.5 Crystal Reports Runtime – installation complete window: Select Close.
5.7 Financials Suite and Distribution Suite (FSDS) Installation
5.7.1 Launch the installation wizard from:
C:\Epicor74 Client Install Files\3 FSDS 74 Client\Setup.exe.
The wizard will setup the FSDS applications on the client PC’s C: drive.
5.7.1 The Client Installation Wizard will prompt to install Adobe Acrobat version 7, select No.
5.7.2 Client Installation Wizard – Option window: Confirm the selection, Install/Upgrade Client Workstation. Select Next.
5.7.3 Client Installation Wizard – Paths window: Confirm the product path is C:\Program Files\Epicor\Enterprise\7.4\Client. Select Next.
5.7.4 Client Installation Wizard – Group window: Confirm the Program Group is Epicor Enterprise. Select Next.
5.7.3 Client Installation Wizard – Applications window: Confirm all components are selected. Select Next.
5.7.3 Client Installation Wizard – Summary window: Confirm the following selections then select Finish to start the client software installation.
5.7.3.1 Selected Installation Option: Install/Upgrade Client Workstation. REQUIRES LOCAL ADMINISTRATOR PERMISSIONS.
5.7.3.2 Source Folder: C:\Epicor74\Financials 74\Client
5.7.3.3 Target Folder: C:\Program Files\Epicor\Enterprise\7.4\Client
5.7.3.4 Online Documentation Folder: C:\Program Files\Epicor\Enterprise\7.4\Client
5.7.3.5 Program Group: Epicor Enterprise
5.7.3.6 Applications: Accounts Payable, Automated AP Matching, Accounts Receivable, Distribution, Asset Management, Cash Management
5.7.3.7 Applications: Online Documentation, BI Agents, Explorer, Report Queue Server, Accounts Payable 1099
5.7.4 Question box: Near the end of the installation the Client Installation Wizard will request a reboot of the PC. If a DOS window is open, wait until the DOS processes are finished then select Yes to reboot.
5.7.5 Client Installation Wizard – Complete window: After the PC restarts if the installation completes successfully, select OK.
5.7.5.1 If the installation wizard displays a message that the installation is complete with errors, run the regapp.bat utility available at:
C:\Program Files\Epicor\Enterprise\7.4\Client\regapp.bat
EIS Epicor 7.4 Upgrade Deployment Document
Epicor 7.4 Upgrade, 36
5.8 Install FSDS ERA Pack 5
5.8.1 Launch the installation wizard from:
C:\Epicor74 Client Install Files\4 FSDS 74 EPRPack5 Client\Setup.exe.
5.8.2 Epicor 7.4 EPR Pack 5 Installation – Paths window: Product Path should be C:\Program Files\Epicor\Enterprise\7.4\Client. Select Next.
5.8.3 Epicor 7.4 EPR Pack 5 Installation – Applications window: Confirm that all components are selected and click Next.
5.8.4 Epicor 7.4 EPR Pack 5 Installation – Summary window: Accept the default values and select Finish to start the installation.
5.8.4.1 The installer program may request to overwrite a file. The message will repeat five times; select YES at each message.
5.8.5 Epicor 7.4 EPR Pack 5 Installation – Complete window: Select OK.
5.9 Extensions Software Installation for Credit and Collections (CC)
5.9.1 Launch the installation wizard from:
C:\Epicor74 Client Install Files\5 CC 74 Client\Setup.exe.
The wizard will setup the CC applications on the client PC’s C: drive.
5.9.2 Credit and Collections 7.4 (Client) Installation – Options window: Select Next to accept the option to Install/Upgrade Credit and Collections 7.4 (Client) Workstation.
5.9.3 Credit and Collections 7.4 (Client) Installation – Paths window: Confirm the Product Path is C:\Program Files\Epicor\Enterprise\7.4\Client. Select Next.
5.9.4 Credit and Collections 7.4 (Client) Installation – Group window: Confirm the Program Group is Epicor Extensions then select Next to continue.
5.9.4.1 The installer program may request to overwrite a file. The message will repeat five times; select YES at each message.
5.9.5 Credit and Collections 7.4 (Client) Installation – Applications window: Confirm the Component is selected is Credit and Collections. Select Next to continue.
5.9.5 Credit and Collections 7.4 (Client) Installation – Summary window: Confirm the following selections then select Finish to start the installation utility.
5.9.5.1 Selected Installation Option: Install/Upgrade Credit and Collections 7.4 (Client) Workstation
5.9.5.2 Source Folder: C:\Epicor74\Extensions 74\Credit and Collections\Client
5.9.5.3 Target Folder: C:\Program Files\Epicor\Enterprise\7.4\Client
5.9.5.4 Program Group: Epicor Extensions
5.9.5.5 Applications: Credit and Collections
5.9.6 Credit and Collections 7.4 (Client) Installation – Complete window: Select OK to finish the C&C installation.
5.10 Extensions Software Installation for Deferred Revenue Accounting (DRA)
5.10.1 Launch the installation wizard from:

EIS Epicor 7.4 Upgrade Deployment Document
Epicor 7.4 Upgrade, 37
C:\Epicor74 Client Install Files\6 DRA 74 Client\Setup.exe.
The wizard will setup the DRA applications on the client PC’s C: drive.
5.10.2 Deferred Revenue Accounting 7.4 (Client) Installation – Options window: Select Next to accept the option to Install/Upgrade Deferred Revenue Accounting 7.4 (Client) Workstation. Select Next to continue.
5.10.3 Deferred Revenue Accounting 7.4 (Client) Installation – Paths window: Confirm the Product path is C:\Program Files\Epicor\Enterprise\7.4\Client. Select Next to continue.
5.10.4 Deferred Revenue Accounting 7.4 (Client) Installation – Application window: Confirm the boxes are checked for Deferred Revenue and Product Catalog. Select Next to continue.
5.10.5 Deferred Revenue Accounting 7.4 (Client) Installation – Summary window: Confirm the following selections then select Finish to start the installation utility.
5.10.5.1 Selected Installation Option: Install/Upgrade Deferred Revenue Accounting 7.4 (Client).
5.10.5.2 Source Folder: C:\Epicor74\Extensions 74\Deferred Revenue Accounting\Client
5.10.5.3 Target Folder: C:\Program Files\Epicor\Enterprise\7.4\Client
5.10.5.4 Applications: Deferred Revenue
5.10.6 Deferred Revenue Accounting 7.4 (Client) Installation – Complete window: Select OK to finish the DRA installation.
5.11 Copy Customizations Folder Content to Client PC
Copy all of the customization files from the installation folder on the client PC at
C:\Epicor74 Client Install Files\7 Customizations 74 and paste them in the corresponding folders at C:\Program Files\Epicor\Enterprise\7.4\Client on the client workstation. When copying, select Yes to overwrite the existing files. 5.11.1 Check File - Copy contents into the Crystal folder on client PC for following personnel
only:
5.11.1.1 Ann-Marie Lewandowski
5.11.1.2 Robert Vargas
5.11.1.3 Denise Saba
5.11.1.4 Roberta Napier
5.11.2 Client Folder – Copy to every workstation
5.11.3 Crystal Folder – Copy every workstation
5.11.3.1 Create a new folder called Custom within the Crystal folder.
5.11.3.2 Copy the report AJM_aragingt.rpt from the custom folder and paste in the newly created Custom folder
5.11.4 Custom Folder – Copy to every workstation
5.11.5 Dict Folder – Copy to every workstation
5.11.6 Views Folder – Copy to every workstation
EIS Epicor 7.4 Upgrade Deployment Document
Epicor 7.4 Upgrade, 38
5.12 Add Executable Programs to Data Execution Prevention (DEP) List
5.12.1 Click Start, click Control Panel, and then double-click System.
5.12.2 Click the Advanced tab and, under Performance, click Settings.
5.12.3 Click the Data Execution Prevention tab
5.12.5 Add the following programs from C:\Program Files\Epicor\Enterprise\7.4\Client to the Windows DEP list:
5.12.6 Restart the client workstation.
5.13 Install Crystal Reports Development Product
This is the development product should only be installed to workstations of Epicor Application Administrators
5.13.1 Run Setup.exe from \\AJMfps06\installs$\CRYSTAL REPORTS\Crystal Reports 2008
5.13.2 Crystal Reports 2008 Setup window: Select English as the language and click OK to launch the Windows installer utility.
5.13.3 Crystal Reports 2008 Setup Installation - Welcome window: Select Next.
5.13.4 Crystal Reports 2008 Setup Installation - License Agreement window: Accept the license agreement and select Next.
5.13.5 Crystal Reports 2008 Setup Installation – User Information window:
5.13.1 Enter the user’s full name
5.13.2 Enter Product Keycode: CFK00-PPSGU2M-100FAFF-N43M
5.13.3 Select Next
5.13.6 Crystal Reports 2008 Setup Installation – Select Installation Type window: Accept the default setting of Typical and select Next.
5.13.7 Crystal Reports 2008 Setup Installation – Choose Language Packs window: Confirm the default is English and select Next.
5.13.8 Crystal Reports 2008 Setup Installation – Start Installation window: Select Next to begin the installation.
5.13.9 Crystal Reports 2008 Setup Installation –Installation Complete window: Select Finish. .
5.13.10 Software Manager utility will check for updates. Select Finish.
5.11.11 Select Yes if prompted to reboot after install has completed.
Admrpt.exe Am.exe Amrpt.exe Ap.exe
Ap1099.exe Ar.exe Arcoll32.exe At.exe
cm.exe Desktopsecurity.exe Dra32.exe Gl.exe
Glov.exe mc.exe PSQLExex.exe PSOLEXPL.exe
Psqllr32.exe Rqserver.exe Rqviewer.exe Sm.exe
EIS Epicor 7.4 Upgrade Deployment Document
Epicor 7.4 Upgrade, 39
5.14 Log off of the workstation and login again using your Windows Authentication and confirm you can access the Epicor Desktop and application folders.
5.15 Special Note to Application Administrators
During initial server installation only, return to step 4.2 to perform Database Optimization.
5.14 Client Installation Log
5.14.1 The client software installation will be performed on Saturday of the upgrade weekend.
5.14.2 After a client workstation is upgraded, update the user list in Appendix G.
EIS Epicor 7.4 Upgrade Deployment Document
Epicor 7.4 Upgrade, 40
6 Third Party Security (TPS)
This section cannot be implemented until the Epicor 7.4 client software is installed on an administrator’s PC. The System Manager function is only available via the Epicor 7.4 Desktop.
6.1 Remove TPS
6.1.1 Login to Epicor as sa and go to the folders Security>Utilities>Third Party Security.
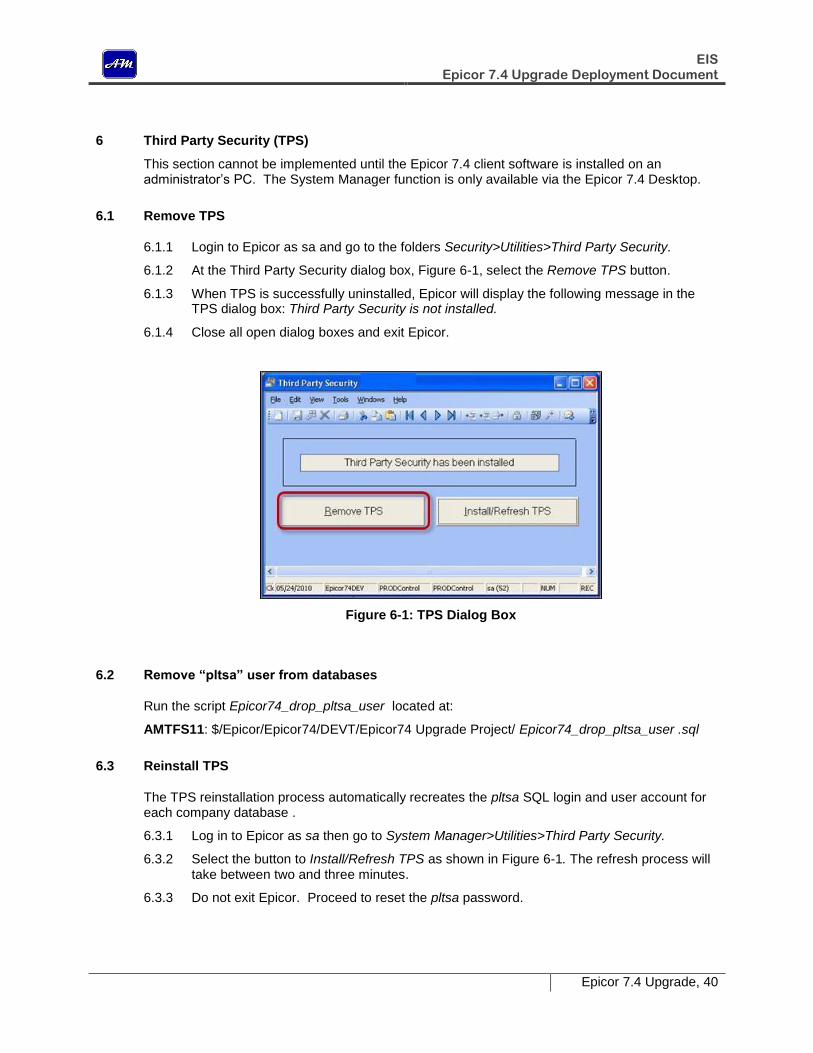
6.1.2 At the Third Party Security dialog box, Figure 6-1, select the Remove TPS button.
6.1.3 When TPS is successfully uninstalled, Epicor will display the following message in the TPS dialog box: Third Party Security is not installed.
6.1.4 Close all open dialog boxes and exit Epicor.
Figure 6-1: TPS Dialog Box
6.2 Remove “pltsa” user from databases
Run the script Epicor74_drop_pltsa_user located at:
AMTFS11: $/Epicor/Epicor74/DEVT/Epicor74 Upgrade Project/ Epicor74_drop_pltsa_user .sql
6.3 Reinstall TPS
The TPS reinstallation process automatically recreates the pltsa SQL login and user account for each company database .
6.3.1 Log in to Epicor as sa then go to System Manager>Utilities>Third Party Security.
6.3.2 Select the button to Install/Refresh TPS as shown in Figure 6-1. The refresh process will take between two and three minutes.
6.3.3 Do not exit Epicor. Proceed to reset the pltsa password.
EIS Epicor 7.4 Upgrade Deployment Document
Epicor 7.4 Upgrade, 41
6.4 Reset the “pltsa” password.
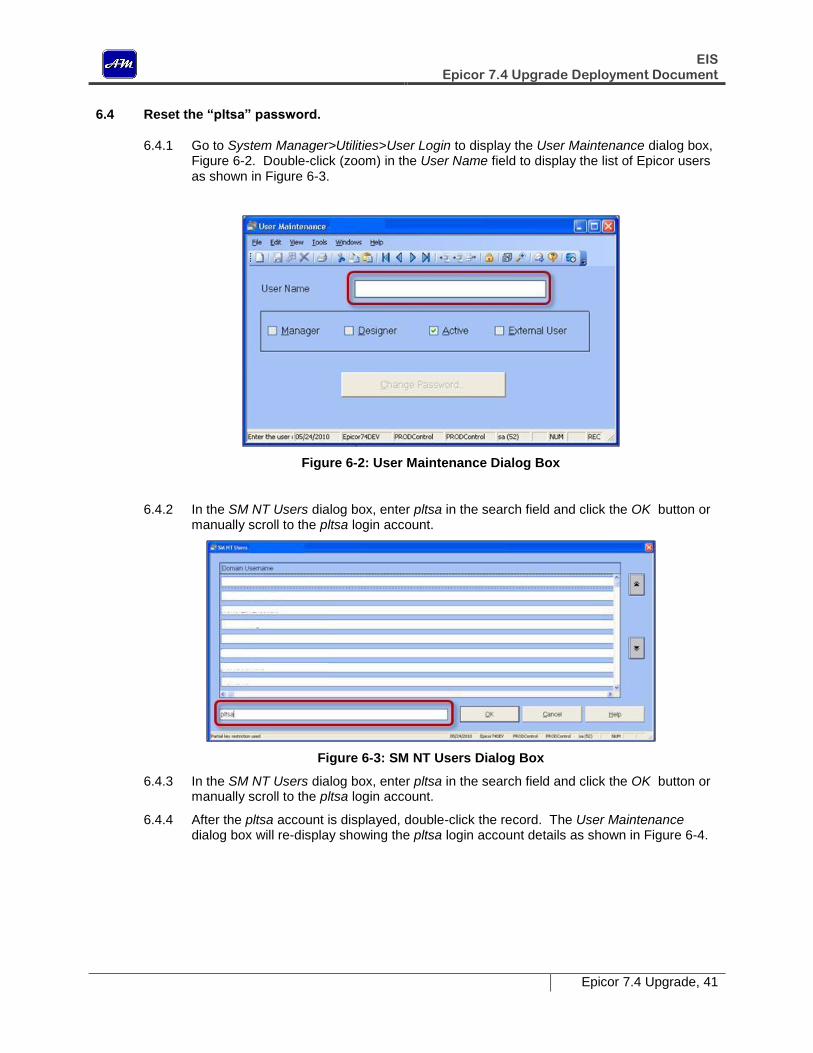
6.4.1 Go to System Manager>Utilities>User Login to display the User Maintenance dialog box, Figure 6-2. Double-click (zoom) in the User Name field to display the list of Epicor users as shown in Figure 6-3.
Figure 6-2: User Maintenance Dialog Box
6.4.2 In the SM NT Users dialog box, enter pltsa in the search field and click the OK button or manually scroll to the pltsa login account.
Figure 6-3: SM NT Users Dialog Box
6.4.3 In the SM NT Users dialog box, enter pltsa in the search field and click the OK button or manually scroll to the pltsa login account.
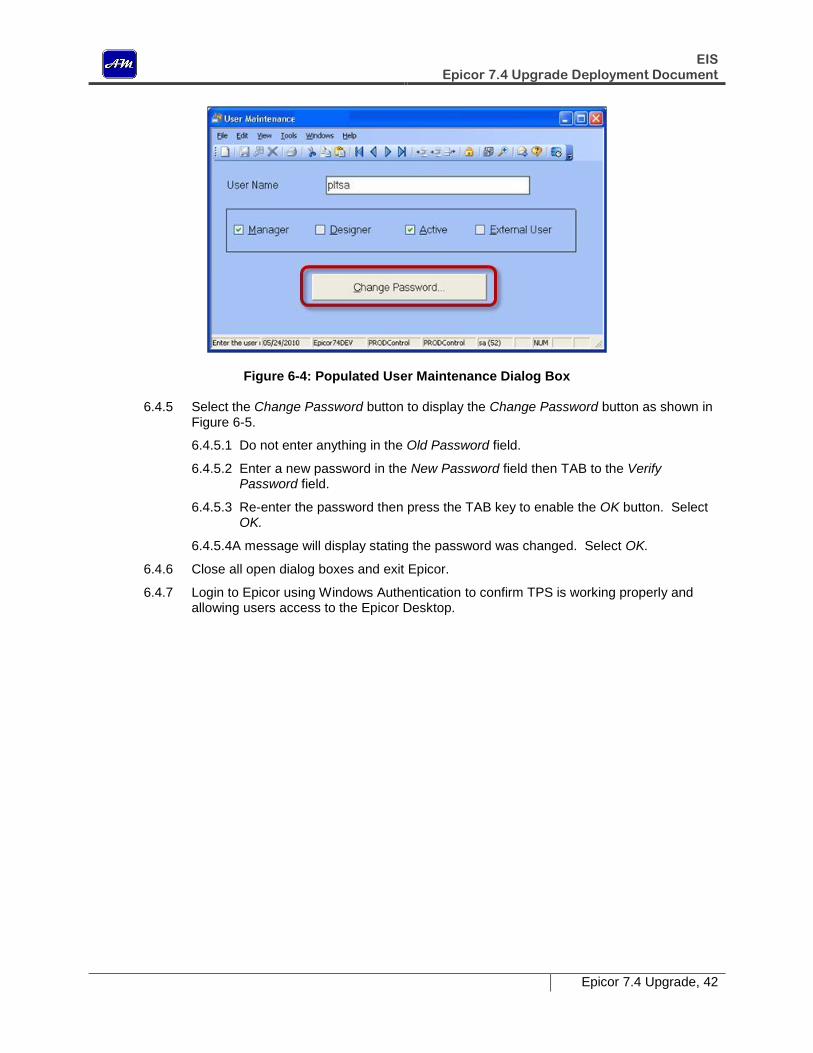
6.4.4 After the pltsa account is displayed, double-click the record. The User Maintenance dialog box will re-display showing the pltsa login account details as shown in Figure 6-4.
EIS Epicor 7.4 Upgrade Deployment Document
Epicor 7.4 Upgrade, 42
Figure 6-4: Populated User Maintenance Dialog Box
6.4.5 Select the Change Password button to display the Change Password button as shown in Figure 6-5.
6.4.5.1 Do not enter anything in the Old Password field.
6.4.5.2 Enter a new password in the New Password field then TAB to the Verify Password field.
6.4.5.3 Re-enter the password then press the TAB key to enable the OK button. Select OK.
6.4.5.4A message will display stating the password was changed. Select OK.
6.4.6 Close all open dialog boxes and exit Epicor.
6.4.7 Login to Epicor using Windows Authentication to confirm TPS is working properly and allowing users access to the Epicor Desktop.
EIS Epicor 7.4 Upgrade Deployment Document
Epicor 7.4 Upgrade, 43
7. Third-Party Software Installation
7.1 Star Accounting eAdvice
7.1.1 Server Software Installation
No client or server related software is required for this application; however, the “star” SQL login account must have the sysadmin server role selected. This step must be performed by the Production DBA logged in to SSMA as “sa.”
7.1.1.2 Maintain SQL login account for star
7.1.1.2.1 Confirm server roles are public and sysadmin.
7.1.1.3 Delete star from customer databases
7.1.1.3.1 PRODAJM Database: Delete user “star” and its schema.
7.1.1.3.2 PRODControl Database: Delete user “star” and its schema.
7.1.1.4 After installing the eAdvice client software per section 7.1.2, the Epicor Application Administrator must login to eAdvice using Windows Authentication. The login process will recreate the star user accounts in the PRODControl and PRODAJM databases and re-link the eAdvice users to the star login.
7.1.2 Client Software Installation
7.1.2.1 Install client software per existing Star Client Installation Procedure at
\\AJMfps06\installs$\Epicor74\Star Systems\ Star Client Install Procedure Epicor 7.4 051210.docx
7.1.2.2 Launch eAdvice and login with NT authentication, step 3.12 in Star Client Install Procedure Epicor 7.4 051210.docx (hereafter Installation Doc). eAdvice will immediately re-add the “star” user account to the PRODAJM and PRODControl databases.
7.1.2.3 Add new eAdvice user.
Login to eAdvice as “sa”; Prod DBA must provide sa password. Add new user AFenstermacher as a Super User per step 3.14 in the Installation Doc.
7.1.2.4 Change Epicor Application Admin user account to Designer.
Login to Epicor 74 as “sa;” Prod DBA must provide sa password. Using System Manager, add the Designer Epicor Login Type to AMarsiglia, and AFenstermacher. Close Epicor 74.
7.1.2.5 Re-launch Epicor 74 using NT Authentication and perform step 7 of the Star Installation Doc.
7.1.2.6 Module Manager
7.1.2.6.1 Modify the Star report path per step of the Installation Doc. 7.1.2.6.2 Add a user profile for AFenstermacher per step 10 of the Installation
Doc.
EIS Epicor 7.4 Upgrade Deployment Document
Epicor 7.4 Upgrade, 44
7.2 Sage FAS Asset Accounting Software
7.2.1 FAS server components will be installed only if the application has been previously installed in Production by the Epicor 7.4 cutover date. Otherwise, disregard this section.
7.2.2 Refer to the Sage FAS Asset Accounting Software Deployment Document available at:
G:\AndyM\ACCOUNTING APPLICATIONS\SAGE FAS\FAS Implementation Project\FAS Deployment Doc\Deploy Doc FAS Asset Accounting Software 030110.docx
7.3 FRx Financial Reporting Software
7.3.1 Client & Server Software Installation
No client or server related software is required for this application.
EIS Epicor 7.4 Upgrade Deployment Document
Epicor 7.4 Upgrade, 45
8. DBAudit 7.4 Installation
DBAudit tracks the changes made to SQL database tables and records to monitor selected information such as the insertion, deletion, or changes to specified information. For each change, the user, date and time, original and changed data are identified. In addition to this information, you can define up to 50 additional fields per table to track. The objects to be audited can be selected from both Epicor and non-Epicor SQL databases attached to the server on which DBAudit is installed.
8.1 DBAudit 7.4 Server Installation
8.1.1 Launch the server installation wizard by running setup.exe from
\\AJMfps06\installs$\Epicor74\DBAudit74\DBAudit74 Installation Files\Server
The wizard will setup the Epicor DBUpdate utility on the server’s C: drive. DBUpdate will be used to install the actual server components.
8.1.2 DBAudit 7.4 (Server) Installation – Option Window: Select Next to install DBAudit 7.4.
8.1.3 DBAudit 7.4 (Server) Installation – Paths Window: Select Next to select the default paths.
8.1.4 DBAudit 7.4 (Server) Installation – Group Window: Select Next to select the default of Epicor Enterprise\DBAudit 7.4.
8.1.5 DBAudit 7.4 (Server) Installation – Application Window: Confirm the DBAudit component box is checked and select Next.
8.1.6 DBAudit 7.4 (Server) Installation – Summary Window: Confirm the following options summary and select Finish.
8.1.6.1 Selected Installation Option: Install DBAudit 7.4 (Server). 8.1.6.2 Source Folder: C:\Epicor74 Installation Folder\Epicor74\DBAudit 74\Server 8.1.6.3 Target Folder: C:\Program Files\Epicor\DBAudit\7.4\Server 8.1.6.4 Program Group: Epicor Enterprise\DBAudit 7.4 8.4.6.5 Applications: DBAudit
8.1.7 Run Program dialog box: Select Yes to launch DBAudit to install the server objects now.
8.1.8 DBAudit 7.4 (Server) Installation – Complete information box will be displayed under the DBAudit Login Box. Move the login box to where the information box can be seen. Select OK on the information box then proceed to the DBAudit login.
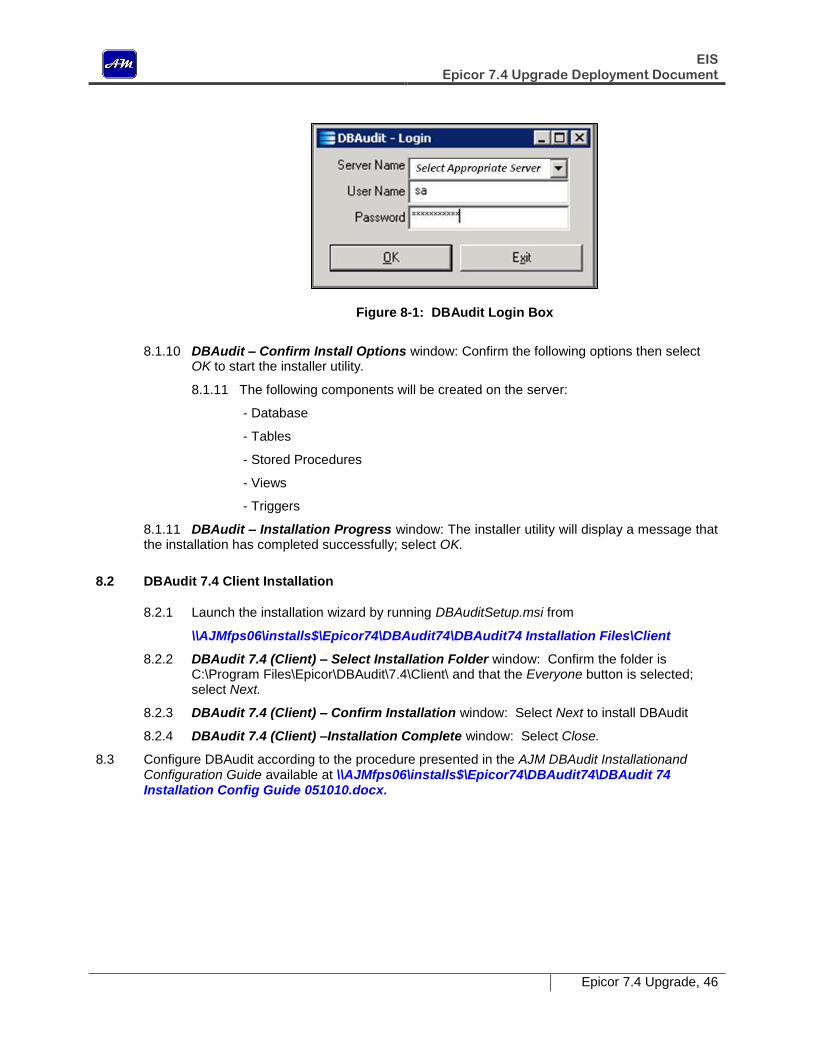
8.1.9 DBAudit – Login box: Select the appropriate server alias from the server drop-down list shown in Figure 8-1 and listed below. Select the option to use SQL server authentication. Login as “sa.”
8.1.1 SQL 2008 Development: DEVSQL99\ACCTDB 8.1.2 SQL 2008 test (prodsys2: 10.250.99.999): SQL91A\ab1 8.1.3 SQL 2008 Production: SQL93B\PRODAJM
EIS Epicor 7.4 Upgrade Deployment Document
Epicor 7.4 Upgrade, 46
Figure 8-1: DBAudit Login Box
8.1.10 DBAudit – Confirm Install Options window: Confirm the following options then select OK to start the installer utility.
8.1.11 The following components will be created on the server:
- Database
- Tables
- Stored Procedures
- Views
- Triggers
8.1.11 DBAudit – Installation Progress window: The installer utility will display a message that the installation has completed successfully; select OK.
8.2 DBAudit 7.4 Client Installation
8.2.1 Launch the installation wizard by running DBAuditSetup.msi from
\\AJMfps06\installs$\Epicor74\DBAudit74\DBAudit74 Installation Files\Client
8.2.2 DBAudit 7.4 (Client) – Select Installation Folder window: Confirm the folder is C:\Program Files\Epicor\DBAudit\7.4\Client\ and that the Everyone button is selected; select Next.
8.2.3 DBAudit 7.4 (Client) – Confirm Installation window: Select Next to install DBAudit
8.2.4 DBAudit 7.4 (Client) –Installation Complete window: Select Close.
8.3 Configure DBAudit according to the procedure presented in the AJM DBAudit Installationand Configuration Guide available at \\AJMfps06\installs$\Epicor74\DBAudit74\DBAudit 74 Installation Config Guide 051010.docx.
EIS Epicor 7.4 Upgrade Deployment Document
Epicor 7.4 Upgrade, 47
9. Epicor Customizations
9.1 Appendix I lists all known customizations in Epicor Enterprise 7.3.6. Although the Epicor 7.4 DBUpdate Utility updates most customizations, each of these customizations must be thoroughly tested to ensure operational continuity from version 7.3.6 to version 7.4.
9.2 The customizations to Accounts Payable and Accounts Receivable data entry forms were manually re-created in the Epicor test environment, Corpsys1. The new object data definition files, AJM_ap.odd and AJM_ar.odd were recompiled and tested before storing them at \\AJMfps06\installs$\Epicor74\Epicor74 Client Install Files\7 Customizations 74\Custom.
9.3 For details regarding all customizations incorporated in Epicor 7.4, refer to the document Customizations List Epicor 74 at \\AJMfps06\installs$\Epicor74
EIS Epicor 7.4 Upgrade Deployment Document
Epicor 7.4 Upgrade, 48
10. Database Backup and Restore
10.1 Immediately after the Application Administrators confirm the successful upgrade of the Epicor databases, the production DBA should backup the databases.
11. Disaster Recovery Server Installation
11.1 Server Installation
Replicate the full server deployment procedure, Sections 2, 3, and 4, for the Epicor disaster recovery server.
11.2 Client Installation
Replicate this complete client deployment procedure, Sections 5 & 7, for the Epicor disaster recovery client. Install via Citrix.
12. File Server Updates
None Required
13. Active Directory/Security Updates
None Required
14. Reporting Server Updates
None Required
EIS Epicor 7.4 Upgrade Deployment Document
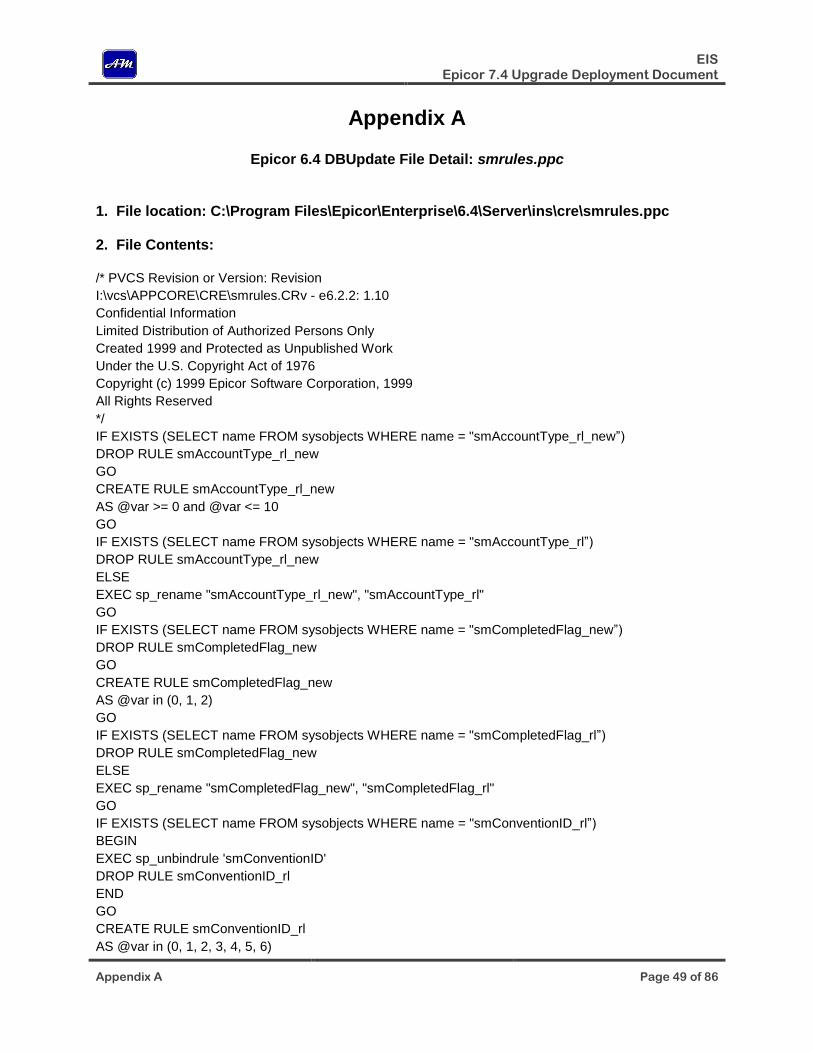
Appendix A Page 49 of 86
Appendix A
Epicor 6.4 DBUpdate File Detail: smrules.ppc
1. File location: C:\Program Files\Epicor\Enterprise\6.4\Server\ins\cre\smrules.ppc 2. File Contents: /* PVCS Revision or Version: Revision
I:\vcs\APPCORE\CRE\smrules.CRv - e6.2.2: 1.10
Confidential Information
Limited Distribution of Authorized Persons Only
Created 1999 and Protected as Unpublished Work
Under the U.S. Copyright Act of 1976
Copyright (c) 1999 Epicor Software Corporation, 1999
All Rights Reserved
*/
IF EXISTS (SELECT name FROM sysobjects WHERE name = "smAccountType_rl_new”)
DROP RULE smAccountType_rl_new
GO
CREATE RULE smAccountType_rl_new
AS @var >= 0 and @var <= 10
GO
IF EXISTS (SELECT name FROM sysobjects WHERE name = "smAccountType_rl”)
DROP RULE smAccountType_rl_new
ELSE
EXEC sp_rename "smAccountType_rl_new", "smAccountType_rl"
GO
IF EXISTS (SELECT name FROM sysobjects WHERE name = "smCompletedFlag_new”)
DROP RULE smCompletedFlag_new
GO
CREATE RULE smCompletedFlag_new
AS @var in (0, 1, 2)
GO
IF EXISTS (SELECT name FROM sysobjects WHERE name = "smCompletedFlag_rl”)
DROP RULE smCompletedFlag_new
ELSE
EXEC sp_rename "smCompletedFlag_new", "smCompletedFlag_rl"
GO
IF EXISTS (SELECT name FROM sysobjects WHERE name = "smConventionID_rl”)
BEGIN
EXEC sp_unbindrule 'smConventionID'
DROP RULE smConventionID_rl
END
GO
CREATE RULE smConventionID_rl
AS @var in (0, 1, 2, 3, 4, 5, 6)
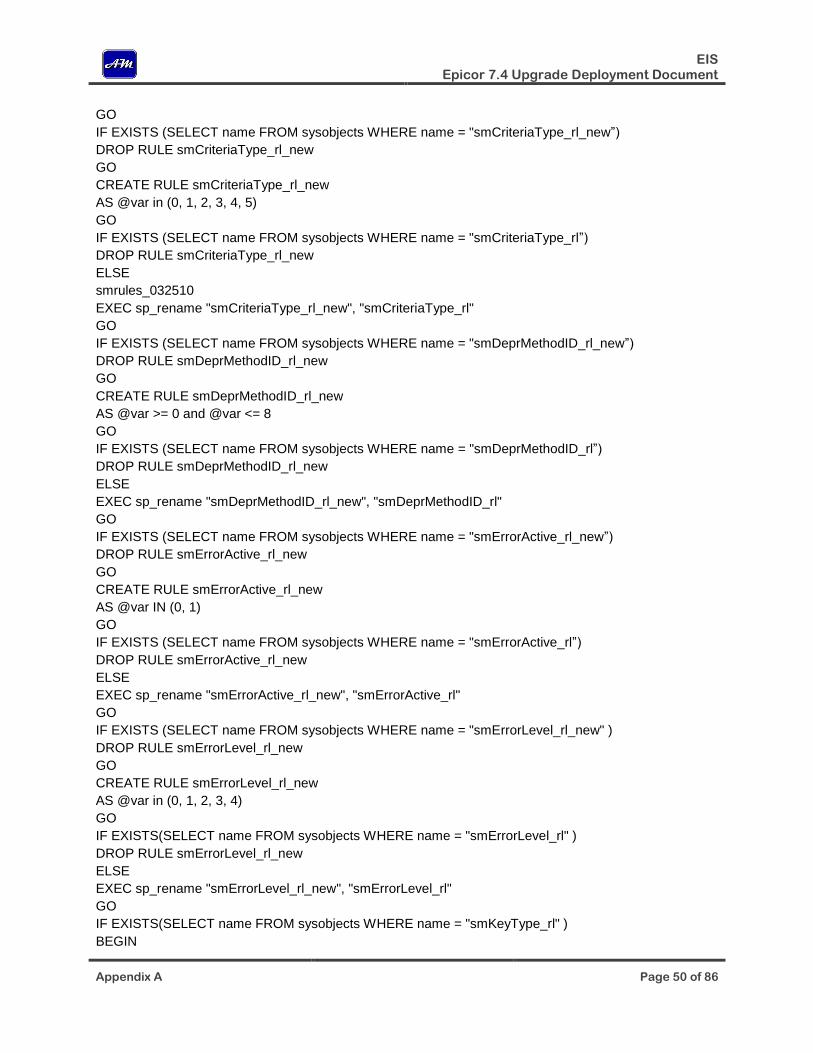
EIS Epicor 7.4 Upgrade Deployment Document
Appendix A Page 50 of 86
GO
IF EXISTS (SELECT name FROM sysobjects WHERE name = "smCriteriaType_rl_new”)
DROP RULE smCriteriaType_rl_new
GO
CREATE RULE smCriteriaType_rl_new
AS @var in (0, 1, 2, 3, 4, 5)
GO
IF EXISTS (SELECT name FROM sysobjects WHERE name = "smCriteriaType_rl”)
DROP RULE smCriteriaType_rl_new
ELSE
smrules_032510
EXEC sp_rename "smCriteriaType_rl_new", "smCriteriaType_rl"
GO
IF EXISTS (SELECT name FROM sysobjects WHERE name = "smDeprMethodID_rl_new”)
DROP RULE smDeprMethodID_rl_new
GO
CREATE RULE smDeprMethodID_rl_new
AS @var >= 0 and @var <= 8
GO
IF EXISTS (SELECT name FROM sysobjects WHERE name = "smDeprMethodID_rl”)
DROP RULE smDeprMethodID_rl_new
ELSE
EXEC sp_rename "smDeprMethodID_rl_new", "smDeprMethodID_rl"
GO
IF EXISTS (SELECT name FROM sysobjects WHERE name = "smErrorActive_rl_new”)
DROP RULE smErrorActive_rl_new
GO
CREATE RULE smErrorActive_rl_new
AS @var IN (0, 1)
GO
IF EXISTS (SELECT name FROM sysobjects WHERE name = "smErrorActive_rl”)
DROP RULE smErrorActive_rl_new
ELSE
EXEC sp_rename "smErrorActive_rl_new", "smErrorActive_rl"
GO
IF EXISTS (SELECT name FROM sysobjects WHERE name = "smErrorLevel_rl_new" )
DROP RULE smErrorLevel_rl_new
GO
CREATE RULE smErrorLevel_rl_new
AS @var in (0, 1, 2, 3, 4)
GO
IF EXISTS(SELECT name FROM sysobjects WHERE name = "smErrorLevel_rl" )
DROP RULE smErrorLevel_rl_new
ELSE
EXEC sp_rename "smErrorLevel_rl_new", "smErrorLevel_rl"
GO
IF EXISTS(SELECT name FROM sysobjects WHERE name = "smKeyType_rl" )
BEGIN
EIS Epicor 7.4 Upgrade Deployment Document
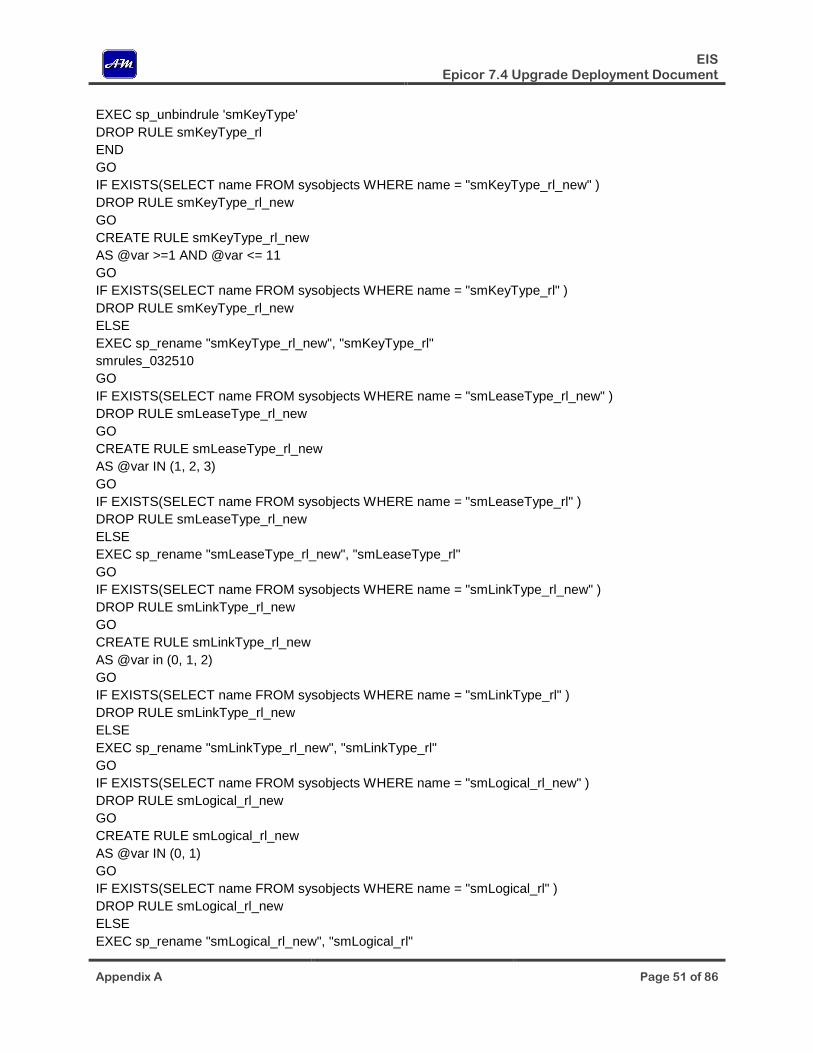
Appendix A Page 51 of 86
EXEC sp_unbindrule 'smKeyType'
DROP RULE smKeyType_rl
END
GO
IF EXISTS(SELECT name FROM sysobjects WHERE name = "smKeyType_rl_new" )
DROP RULE smKeyType_rl_new
GO
CREATE RULE smKeyType_rl_new
AS @var >=1 AND @var <= 11
GO
IF EXISTS(SELECT name FROM sysobjects WHERE name = "smKeyType_rl" )
DROP RULE smKeyType_rl_new
ELSE
EXEC sp_rename "smKeyType_rl_new", "smKeyType_rl"
smrules_032510
GO
IF EXISTS(SELECT name FROM sysobjects WHERE name = "smLeaseType_rl_new" )
DROP RULE smLeaseType_rl_new
GO
CREATE RULE smLeaseType_rl_new
AS @var IN (1, 2, 3)
GO
IF EXISTS(SELECT name FROM sysobjects WHERE name = "smLeaseType_rl" )
DROP RULE smLeaseType_rl_new
ELSE
EXEC sp_rename "smLeaseType_rl_new", "smLeaseType_rl"
GO
IF EXISTS(SELECT name FROM sysobjects WHERE name = "smLinkType_rl_new" )
DROP RULE smLinkType_rl_new
GO
CREATE RULE smLinkType_rl_new
AS @var in (0, 1, 2)
GO
IF EXISTS(SELECT name FROM sysobjects WHERE name = "smLinkType_rl" )
DROP RULE smLinkType_rl_new
ELSE
EXEC sp_rename "smLinkType_rl_new", "smLinkType_rl"
GO
IF EXISTS(SELECT name FROM sysobjects WHERE name = "smLogical_rl_new" )
DROP RULE smLogical_rl_new
GO
CREATE RULE smLogical_rl_new
AS @var IN (0, 1)
GO
IF EXISTS(SELECT name FROM sysobjects WHERE name = "smLogical_rl" )
DROP RULE smLogical_rl_new
ELSE
EXEC sp_rename "smLogical_rl_new", "smLogical_rl"
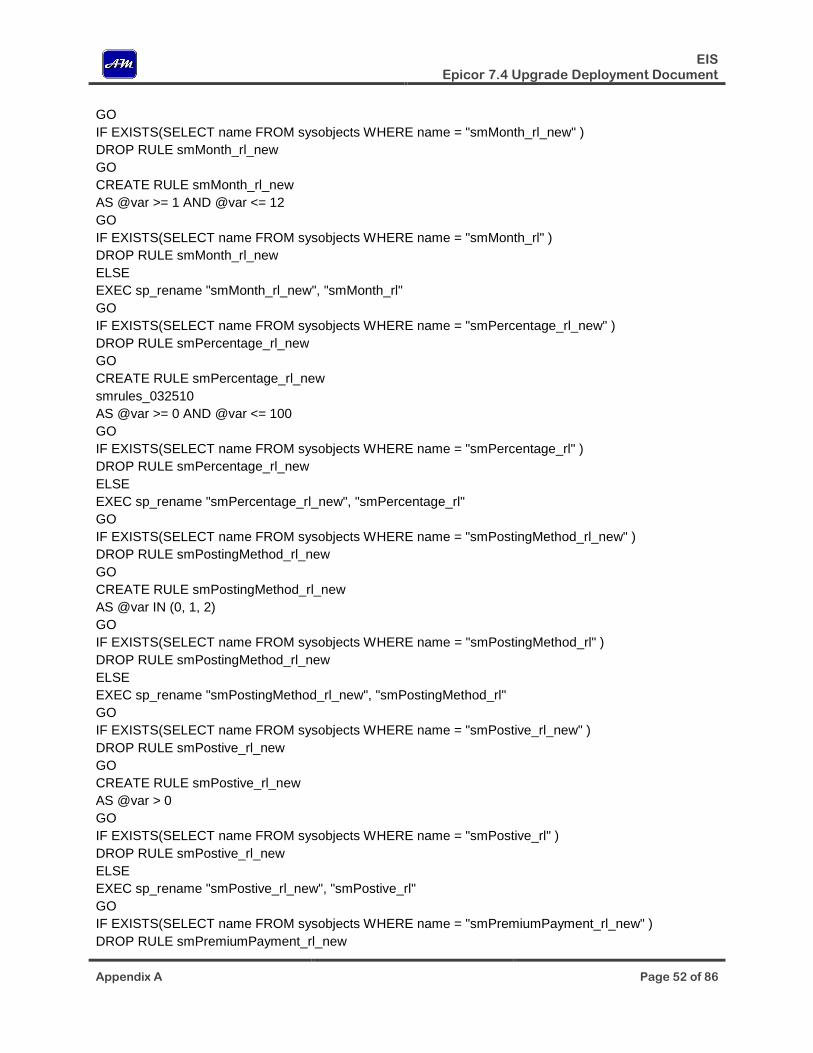
EIS Epicor 7.4 Upgrade Deployment Document
Appendix A Page 52 of 86
GO
IF EXISTS(SELECT name FROM sysobjects WHERE name = "smMonth_rl_new" )
DROP RULE smMonth_rl_new
GO
CREATE RULE smMonth_rl_new
AS @var >= 1 AND @var <= 12
GO
IF EXISTS(SELECT name FROM sysobjects WHERE name = "smMonth_rl" )
DROP RULE smMonth_rl_new
ELSE
EXEC sp_rename "smMonth_rl_new", "smMonth_rl"
GO
IF EXISTS(SELECT name FROM sysobjects WHERE name = "smPercentage_rl_new" )
DROP RULE smPercentage_rl_new
GO
CREATE RULE smPercentage_rl_new
smrules_032510
AS @var >= 0 AND @var <= 100
GO
IF EXISTS(SELECT name FROM sysobjects WHERE name = "smPercentage_rl" )
DROP RULE smPercentage_rl_new
ELSE
EXEC sp_rename "smPercentage_rl_new", "smPercentage_rl"
GO
IF EXISTS(SELECT name FROM sysobjects WHERE name = "smPostingMethod_rl_new" )
DROP RULE smPostingMethod_rl_new
GO
CREATE RULE smPostingMethod_rl_new
AS @var IN (0, 1, 2)
GO
IF EXISTS(SELECT name FROM sysobjects WHERE name = "smPostingMethod_rl" )
DROP RULE smPostingMethod_rl_new
ELSE
EXEC sp_rename "smPostingMethod_rl_new", "smPostingMethod_rl"
GO
IF EXISTS(SELECT name FROM sysobjects WHERE name = "smPostive_rl_new" )
DROP RULE smPostive_rl_new
GO
CREATE RULE smPostive_rl_new
AS @var > 0
GO
IF EXISTS(SELECT name FROM sysobjects WHERE name = "smPostive_rl" )
DROP RULE smPostive_rl_new
ELSE
EXEC sp_rename "smPostive_rl_new", "smPostive_rl"
GO
IF EXISTS(SELECT name FROM sysobjects WHERE name = "smPremiumPayment_rl_new" )
DROP RULE smPremiumPayment_rl_new
EIS Epicor 7.4 Upgrade Deployment Document
Appendix A Page 53 of 86
GO
CREATE RULE smPremiumPayment_rl_new
AS @var in (12, 4, 2, 1)
GO
IF EXISTS(SELECT name FROM sysobjects WHERE name = "smPremiumPayment_rl" )
DROP RULE smPremiumPayment_rl_new
ELSE
EXEC sp_rename "smPremiumPayment_rl_new", "smPremiumPayment_rl"
GO
IF EXISTS(SELECT name FROM sysobjects WHERE name = "smRate_rl_new" )
DROP RULE smRate_rl_new
GO
CREATE RULE smRate_rl_new
AS @var >= 0
GO
IF EXISTS(SELECT name FROM sysobjects WHERE name = "smRate_rl" )
DROP RULE smRate_rl_new
ELSE
EXEC sp_rename "smRate_rl_new", "smRate_rl"
smrules_032510
GO
IF EXISTS(SELECT name FROM sysobjects WHERE name = "smSystemState_rl_new" )
DROP RULE smSystemState_rl_new
GO
CREATE RULE smSystemState_rl_new
AS @var in (0, 1, 2, 100, 101)
GO
IF EXISTS(SELECT name FROM sysobjects WHERE name = "smSystemState_rl" )
DROP RULE smSystemState_rl_new
ELSE
EXEC sp_rename "smSystemState_rl_new", "smSystemState_rl"
GO
IF EXISTS(SELECT name FROM sysobjects WHERE name = "smTrxSource_rl_new" )
DROP RULE smTrxSource_rl_new
GO
CREATE RULE smTrxSource_rl_new
AS @var in (0, 1, 2, 3, 4, 5)
GO
IF EXISTS(SELECT name FROM sysobjects WHERE name = "smTrxSource_rl" )
DROP RULE smTrxSource_rl_new
ELSE
EXEC sp_rename "smTrxSource_rl_new", "smTrxSource_rl"
GO
IF EXISTS(SELECT name FROM sysobjects WHERE name = "smTrxSubtype_rl_new" )
DROP RULE smTrxSubtype_rl_new
GO
CREATE RULE smTrxSubtype_rl_new
AS @var in (0, 1, 2, 3, 4, 5, 6)
EIS Epicor 7.4 Upgrade Deployment Document
Appendix A Page 54 of 86
GO
IF EXISTS(SELECT name FROM sysobjects WHERE name = "smTrxSubtype_rl" )
DROP RULE smTrxSubtype_rl_new
ELSE
EXEC sp_rename "smTrxSubtype_rl_new", "smTrxSubtype_rl"
GO
IF EXISTS(SELECT name FROM sysobjects WHERE name = "smTrxType_rl" ) BEGIN EXEC sp_unbindrule 'smTrxType' DROP RULE smTrxType_rl END GO CREATE RULE smTrxType_rl AS @var >= 0 AND @var <= 255 GO
IF EXISTS(SELECT name FROM sysobjects WHERE name = "smUsageType_rl_new" )
DROP RULE smUsageType_rl_new
GO
CREATE RULE smUsageType_rl_new
AS @var >=1 AND @var <=3
smrules_032510
GO
IF EXISTS(SELECT name FROM sysobjects WHERE name = "smUsageType_rl" )
DROP RULE smUsageType_rl_new
ELSE
EXEC sp_rename "smUsageType_rl_new", "smUsageType_rl"
GO
IF EXISTS(SELECT name FROM sysobjects WHERE name = "smUserState_rl_new" )
DROP RULE smUserState_rl_new
GO
CREATE RULE smUserState_rl_new
AS @var IN (0, 1, 2)
GO
IF EXISTS(SELECT name FROM sysobjects WHERE name = "smUserState_rl" )
DROP RULE smUserState_rl_new
ELSE
EXEC sp_rename "smUserState_rl_new", "smUserState_rl"
GO
/**/
GO
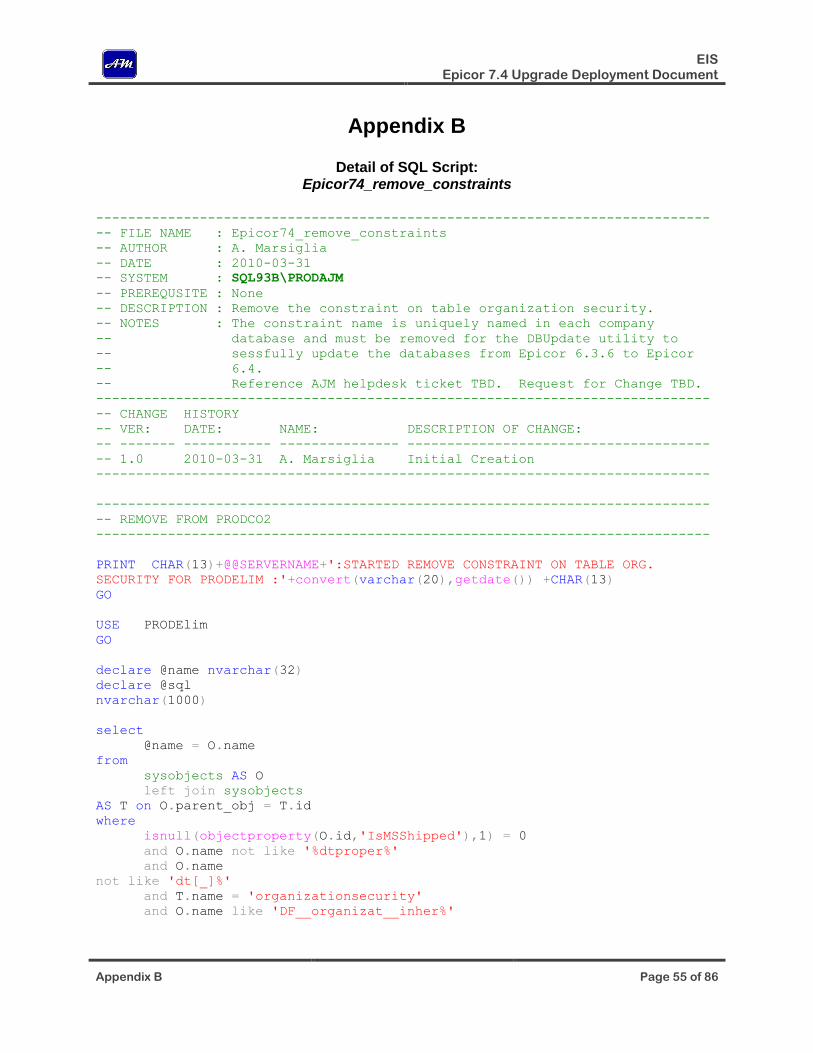
EIS Epicor 7.4 Upgrade Deployment Document
Appendix B Page 55 of 86
Appendix B
Detail of SQL Script: Epicor74_remove_constraints
-----------------------------------------------------------------------------
-- FILE NAME : Epicor74_remove_constraints
-- AUTHOR : A. Marsiglia
-- DATE : 2010-03-31
-- SYSTEM : SQL93B\PRODAJM
-- PREREQUSITE : None
-- DESCRIPTION : Remove the constraint on table organization security.
-- NOTES : The constraint name is uniquely named in each company
-- database and must be removed for the DBUpdate utility to
-- sessfully update the databases from Epicor 6.3.6 to Epicor
-- 6.4.
-- Reference AJM helpdesk ticket TBD. Request for Change TBD.
-----------------------------------------------------------------------------
-- CHANGE HISTORY
-- VER: DATE: NAME: DESCRIPTION OF CHANGE:
-- ------- ----------- --------------- --------------------------------------
-- 1.0 2010-03-31 A. Marsiglia Initial Creation
-----------------------------------------------------------------------------
-----------------------------------------------------------------------------
-- REMOVE FROM PRODCO2
-----------------------------------------------------------------------------
PRINT CHAR(13)+@@SERVERNAME+':STARTED REMOVE CONSTRAINT ON TABLE ORG.
SECURITY FOR PRODELIM :'+convert(varchar(20),getdate()) +CHAR(13)
GO
USE PRODElim
GO
declare @name nvarchar(32)
declare @sql
nvarchar(1000)
select
@name = O.name
from
sysobjects AS O
left join sysobjects
AS T on O.parent_obj = T.id
where
isnull(objectproperty(O.id,'IsMSShipped'),1) = 0
and O.name not like '%dtproper%'
and O.name
not like 'dt[_]%'
and T.name = 'organizationsecurity'
and O.name like 'DF__organizat__inher%'
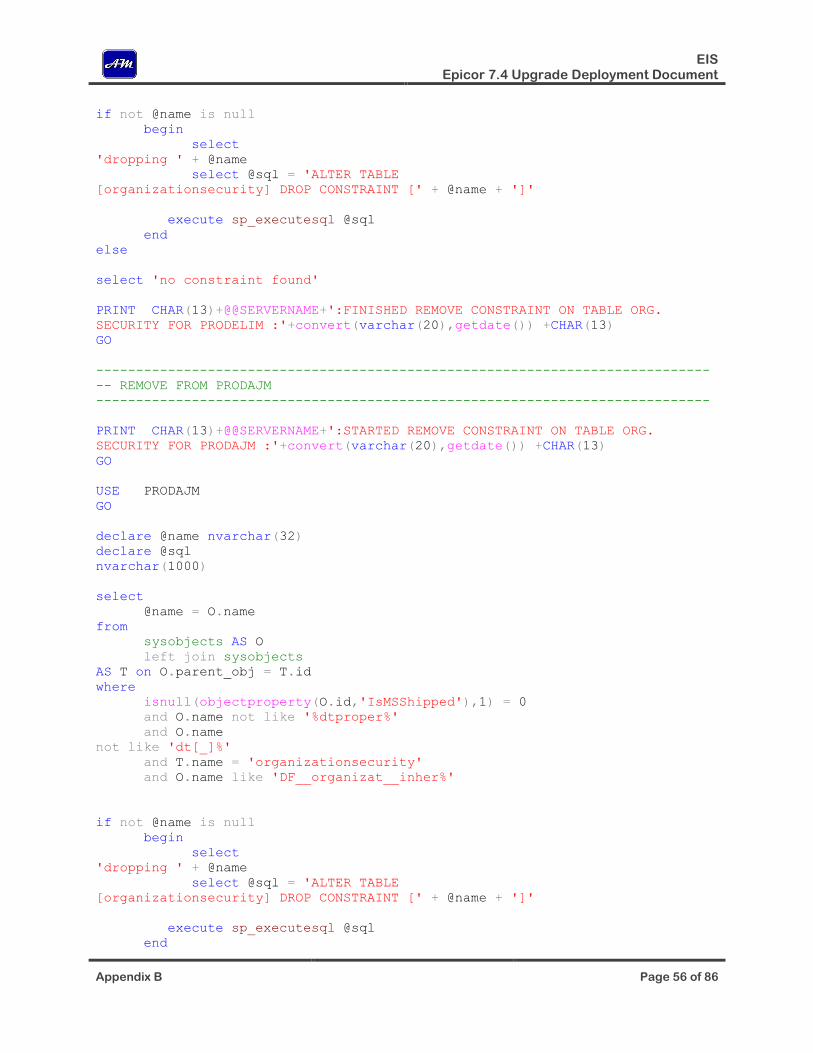
EIS Epicor 7.4 Upgrade Deployment Document
Appendix B Page 56 of 86
if not @name is null
begin
select
'dropping ' + @name
select @sql = 'ALTER TABLE
[organizationsecurity] DROP CONSTRAINT [' + @name + ']'
execute sp_executesql @sql
end
else
select 'no constraint found'
PRINT CHAR(13)+@@SERVERNAME+':FINISHED REMOVE CONSTRAINT ON TABLE ORG.
SECURITY FOR PRODELIM :'+convert(varchar(20),getdate()) +CHAR(13)
GO
-----------------------------------------------------------------------------
-- REMOVE FROM PRODAJM
-----------------------------------------------------------------------------
PRINT CHAR(13)+@@SERVERNAME+':STARTED REMOVE CONSTRAINT ON TABLE ORG.
SECURITY FOR PRODAJM :'+convert(varchar(20),getdate()) +CHAR(13)
GO
USE PRODAJM
GO
declare @name nvarchar(32)
declare @sql
nvarchar(1000)
select
@name = O.name
from
sysobjects AS O
left join sysobjects
AS T on O.parent_obj = T.id
where
isnull(objectproperty(O.id,'IsMSShipped'),1) = 0
and O.name not like '%dtproper%'
and O.name
not like 'dt[_]%'
and T.name = 'organizationsecurity'
and O.name like 'DF__organizat__inher%'
if not @name is null
begin
select
'dropping ' + @name
select @sql = 'ALTER TABLE
[organizationsecurity] DROP CONSTRAINT [' + @name + ']'
execute sp_executesql @sql
end
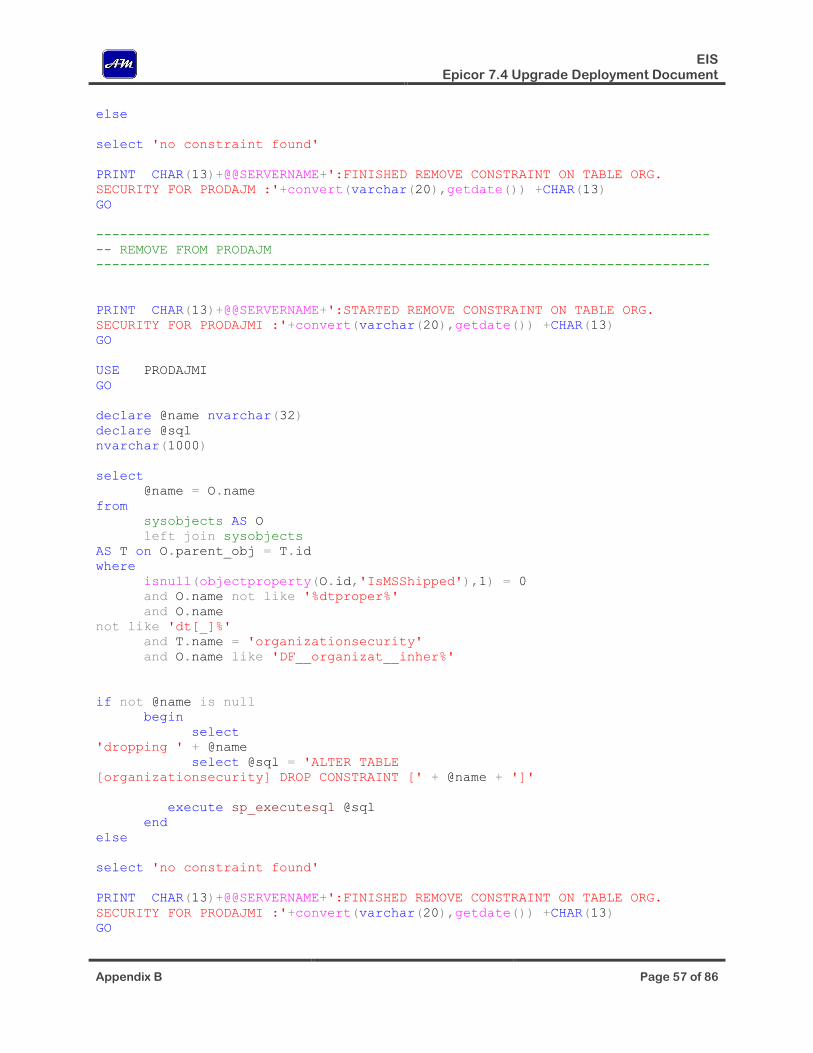
EIS Epicor 7.4 Upgrade Deployment Document
Appendix B Page 57 of 86
else
select 'no constraint found'
PRINT CHAR(13)+@@SERVERNAME+':FINISHED REMOVE CONSTRAINT ON TABLE ORG.
SECURITY FOR PRODAJM :'+convert(varchar(20),getdate()) +CHAR(13)
GO
-----------------------------------------------------------------------------
-- REMOVE FROM PRODAJM
-----------------------------------------------------------------------------
PRINT CHAR(13)+@@SERVERNAME+':STARTED REMOVE CONSTRAINT ON TABLE ORG.
SECURITY FOR PRODAJMI :'+convert(varchar(20),getdate()) +CHAR(13)
GO
USE PRODAJMI
GO
declare @name nvarchar(32)
declare @sql
nvarchar(1000)
select
@name = O.name
from
sysobjects AS O
left join sysobjects
AS T on O.parent_obj = T.id
where
isnull(objectproperty(O.id,'IsMSShipped'),1) = 0
and O.name not like '%dtproper%'
and O.name
not like 'dt[_]%'
and T.name = 'organizationsecurity'
and O.name like 'DF__organizat__inher%'
if not @name is null
begin
select
'dropping ' + @name
select @sql = 'ALTER TABLE
[organizationsecurity] DROP CONSTRAINT [' + @name + ']'
execute sp_executesql @sql
end
else
select 'no constraint found'
PRINT CHAR(13)+@@SERVERNAME+':FINISHED REMOVE CONSTRAINT ON TABLE ORG.
SECURITY FOR PRODAJMI :'+convert(varchar(20),getdate()) +CHAR(13)
GO
EIS Epicor 7.4 Upgrade Deployment Document
Appendix B Page 58 of 86
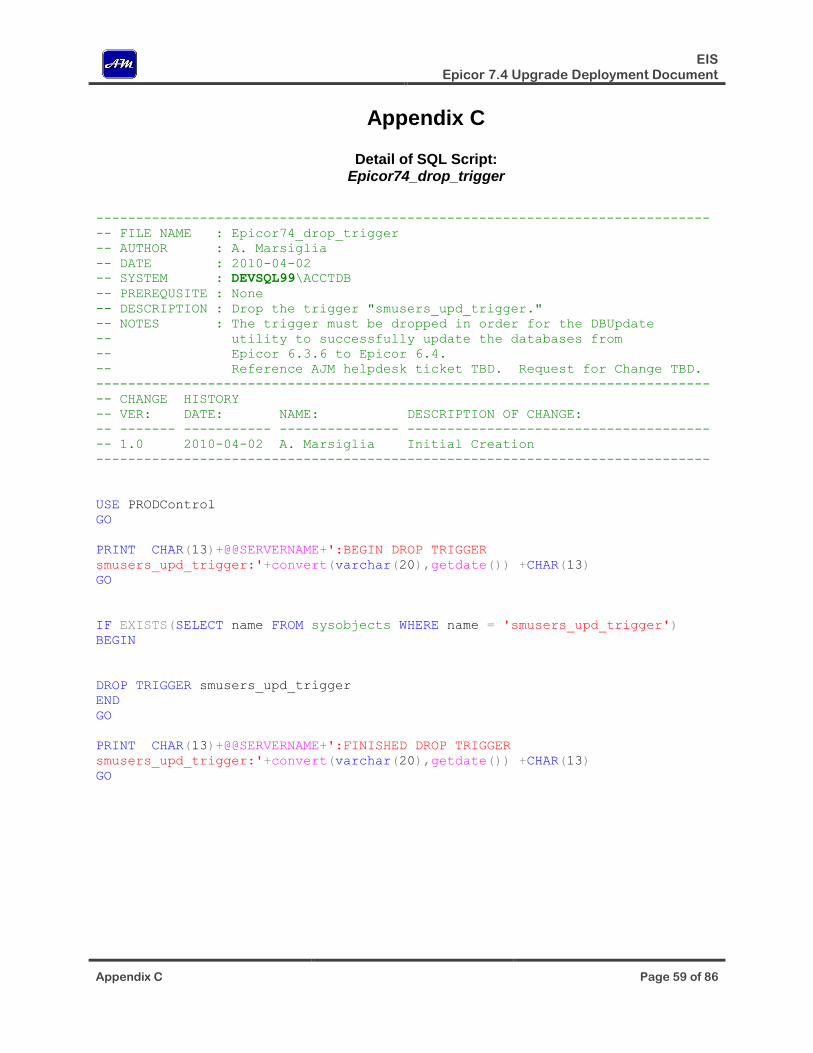
EIS Epicor 7.4 Upgrade Deployment Document
Appendix C Page 59 of 86
Appendix C
Detail of SQL Script: Epicor74_drop_trigger
-----------------------------------------------------------------------------
-- FILE NAME : Epicor74_drop_trigger
-- AUTHOR : A. Marsiglia
-- DATE : 2010-04-02
-- SYSTEM : DEVSQL99\ACCTDB
-- PREREQUSITE : None
-- DESCRIPTION : Drop the trigger "smusers_upd_trigger."
-- NOTES : The trigger must be dropped in order for the DBUpdate
-- utility to successfully update the databases from
-- Epicor 6.3.6 to Epicor 6.4.
-- Reference AJM helpdesk ticket TBD. Request for Change TBD.
-----------------------------------------------------------------------------
-- CHANGE HISTORY
-- VER: DATE: NAME: DESCRIPTION OF CHANGE:
-- ------- ----------- --------------- --------------------------------------
-- 1.0 2010-04-02 A. Marsiglia Initial Creation
-----------------------------------------------------------------------------
USE PRODControl
GO
PRINT CHAR(13)+@@SERVERNAME+':BEGIN DROP TRIGGER
smusers_upd_trigger:'+convert(varchar(20),getdate()) +CHAR(13)
GO
IF EXISTS(SELECT name FROM sysobjects WHERE name = 'smusers_upd_trigger')
BEGIN
DROP TRIGGER smusers_upd_trigger
END
GO
PRINT CHAR(13)+@@SERVERNAME+':FINISHED DROP TRIGGER
smusers_upd_trigger:'+convert(varchar(20),getdate()) +CHAR(13)
GO
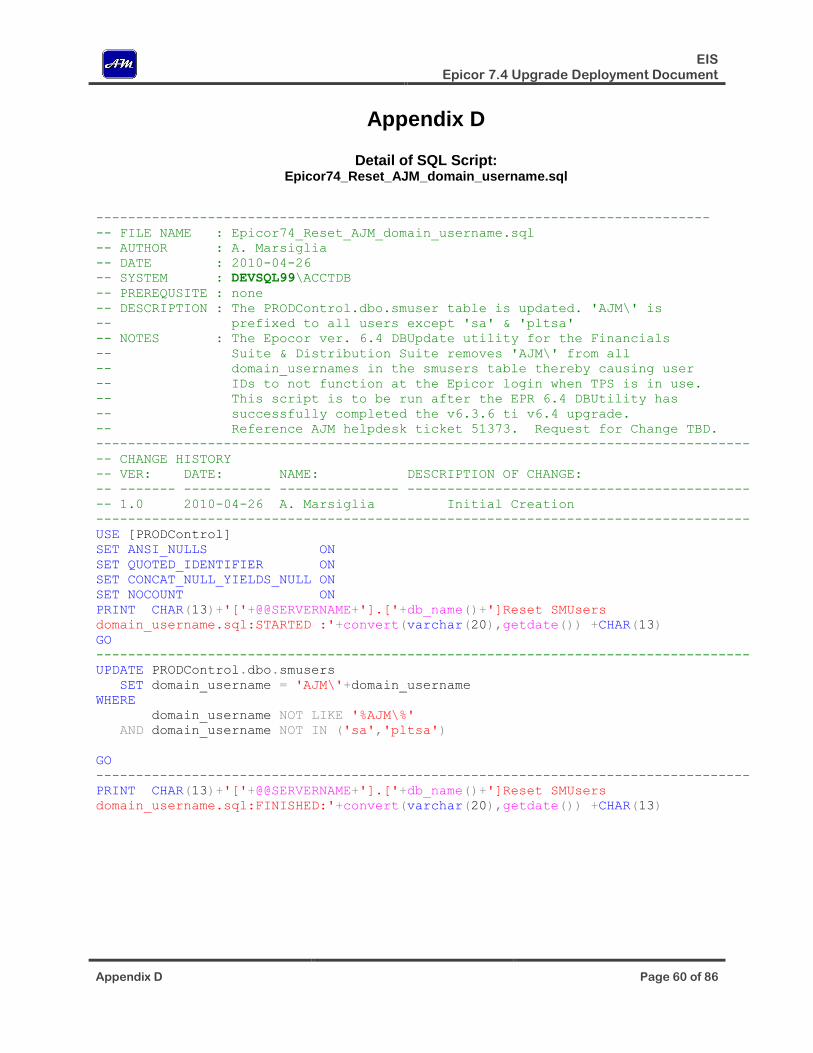
EIS Epicor 7.4 Upgrade Deployment Document
Appendix D Page 60 of 86
Appendix D
Detail of SQL Script: Epicor74_Reset_AJM_domain_username.sql
-----------------------------------------------------------------------------
-- FILE NAME : Epicor74_Reset_AJM_domain_username.sql
-- AUTHOR : A. Marsiglia
-- DATE : 2010-04-26
-- SYSTEM : DEVSQL99\ACCTDB
-- PREREQUSITE : none
-- DESCRIPTION : The PRODControl.dbo.smuser table is updated. 'AJM\' is
-- prefixed to all users except 'sa' & 'pltsa'
-- NOTES : The Epocor ver. 6.4 DBUpdate utility for the Financials
-- Suite & Distribution Suite removes 'AJM\' from all
-- domain_usernames in the smusers table thereby causing user
-- IDs to not function at the Epicor login when TPS is in use.
-- This script is to be run after the EPR 6.4 DBUtility has
-- successfully completed the v6.3.6 ti v6.4 upgrade.
-- Reference AJM helpdesk ticket 51373. Request for Change TBD.
----------------------------------------------------------------------------------
-- CHANGE HISTORY
-- VER: DATE: NAME: DESCRIPTION OF CHANGE:
-- ------- ----------- --------------- -------------------------------------------
-- 1.0 2010-04-26 A. Marsiglia Initial Creation
----------------------------------------------------------------------------------
USE [PRODControl]
SET ANSI_NULLS ON
SET QUOTED_IDENTIFIER ON
SET CONCAT_NULL_YIELDS_NULL ON
SET NOCOUNT ON
PRINT CHAR(13)+'['+@@SERVERNAME+'].['+db_name()+']Reset SMUsers
domain_username.sql:STARTED :'+convert(varchar(20),getdate()) +CHAR(13)
GO
----------------------------------------------------------------------------------
UPDATE PRODControl.dbo.smusers
SET domain_username = 'AJM\'+domain_username
WHERE
domain_username NOT LIKE '%AJM\%'
AND domain_username NOT IN ('sa','pltsa')
GO
----------------------------------------------------------------------------------
PRINT CHAR(13)+'['+@@SERVERNAME+'].['+db_name()+']Reset SMUsers
domain_username.sql:FINISHED:'+convert(varchar(20),getdate()) +CHAR(13)

EIS Epicor 7.4 Upgrade Deployment Document
Appendix E Page 61 of 86
Appendix E
Summary Update Impact Report From
DEVSQL99\ACCTDB
Upgrading from version 6.3.6 to version v 6.4
UserID: sa SQLServer: DEVSQL99\ACCTDB Control Database:
PRODControl Financials Suite and Distribution Suite Company Databases:
PRODCO2:
Common Objects
Repository
System Manager
Multi Currency
Explorer
Netting
General Ledger
FRx Financial Reports
BI Agents
ProdAJM:
Common Objects
Repository
System Manager
Multi Currency
Explorer
Netting
General Ledger
Cash Management
Accounts Payable
Accounts Receivable
Asset Management
FRx Financial Reports
BI Agents
ProdAJMI:
Common Objects
Repository
System Manager
Multi Currency
Explorer
Netting
General Ledger
Cash Management
Accounts Payable
Accounts Receivable
Asset Management
FRx Financial Reports
BI Agents
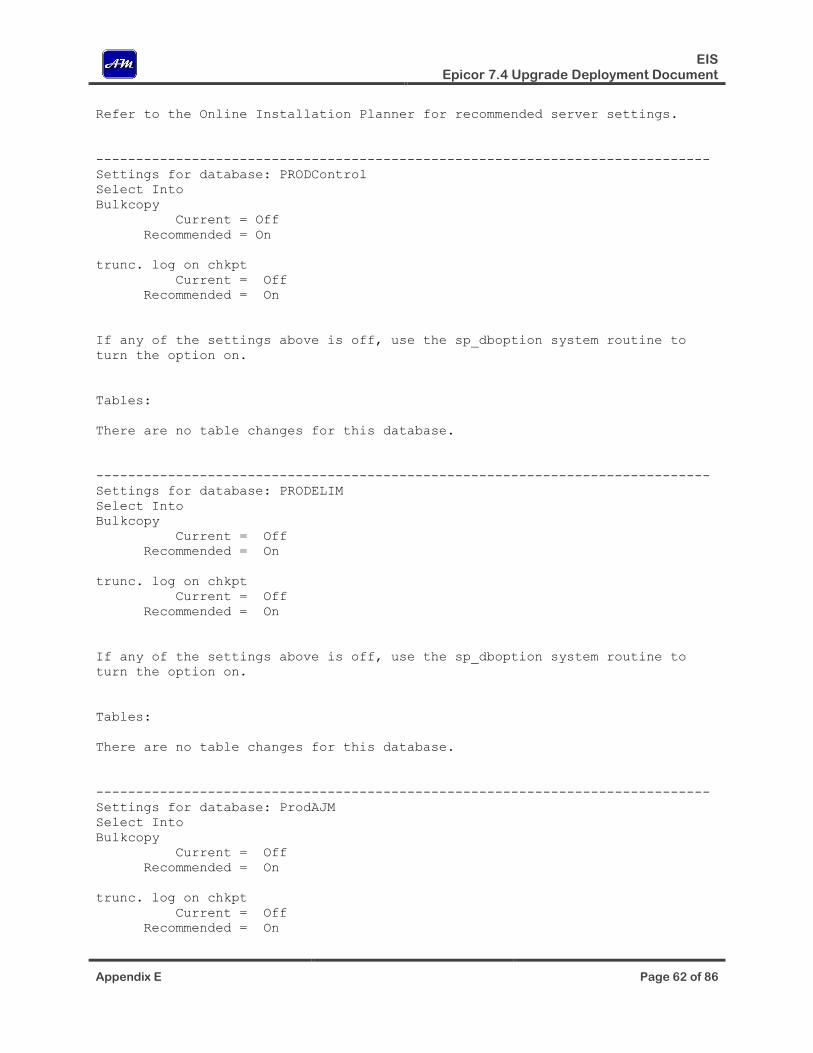
EIS Epicor 7.4 Upgrade Deployment Document
Appendix E Page 62 of 86
Refer to the Online Installation Planner for recommended server settings.
-----------------------------------------------------------------------------
Settings for database: PRODControl
Select Into
Bulkcopy
Current = Off
Recommended = On
trunc. log on chkpt
Current = Off
Recommended = On
If any of the settings above is off, use the sp_dboption system routine to
turn the option on.
Tables:
There are no table changes for this database.
-----------------------------------------------------------------------------
Settings for database: PRODELIM
Select Into
Bulkcopy
Current = Off
Recommended = On
trunc. log on chkpt
Current = Off
Recommended = On
If any of the settings above is off, use the sp_dboption system routine to
turn the option on.
Tables:
There are no table changes for this database.
-----------------------------------------------------------------------------
Settings for database: ProdAJM
Select Into
Bulkcopy
Current = Off
Recommended = On
trunc. log on chkpt
Current = Off
Recommended = On
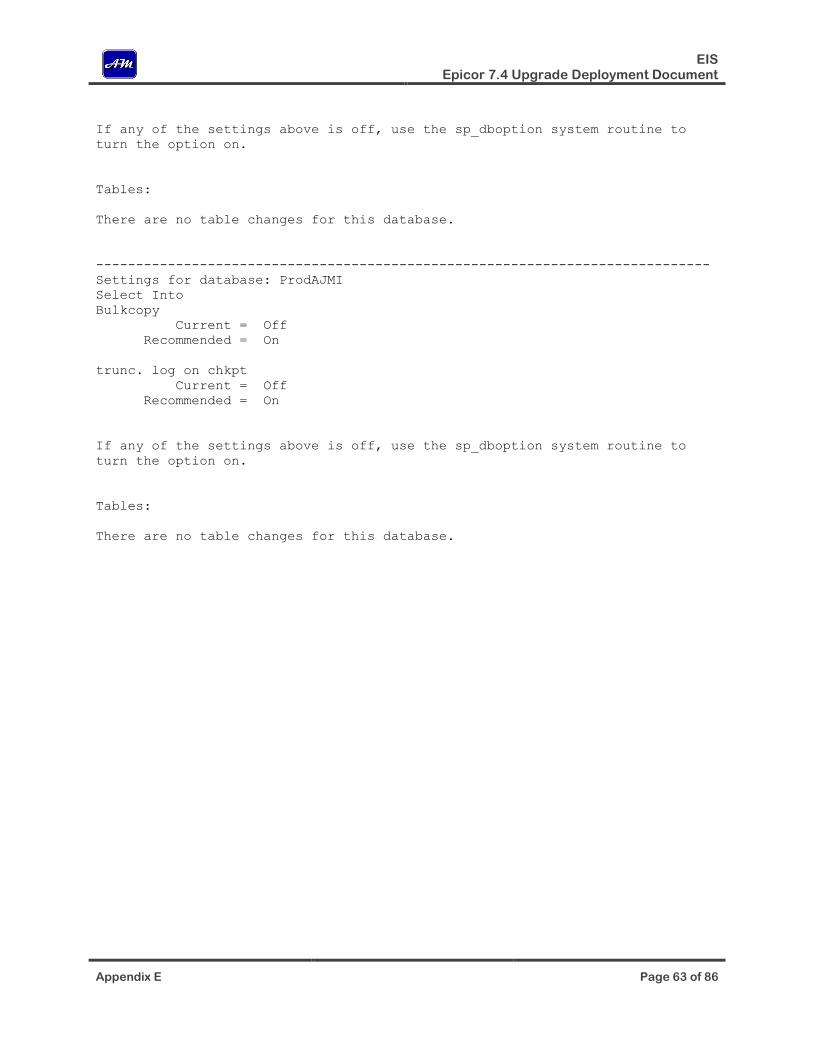
EIS Epicor 7.4 Upgrade Deployment Document
Appendix E Page 63 of 86
If any of the settings above is off, use the sp_dboption system routine to
turn the option on.
Tables:
There are no table changes for this database.
-----------------------------------------------------------------------------
Settings for database: ProdAJMI
Select Into
Bulkcopy
Current = Off
Recommended = On
trunc. log on chkpt
Current = Off
Recommended = On
If any of the settings above is off, use the sp_dboption system routine to
turn the option on.
Tables:
There are no table changes for this database.
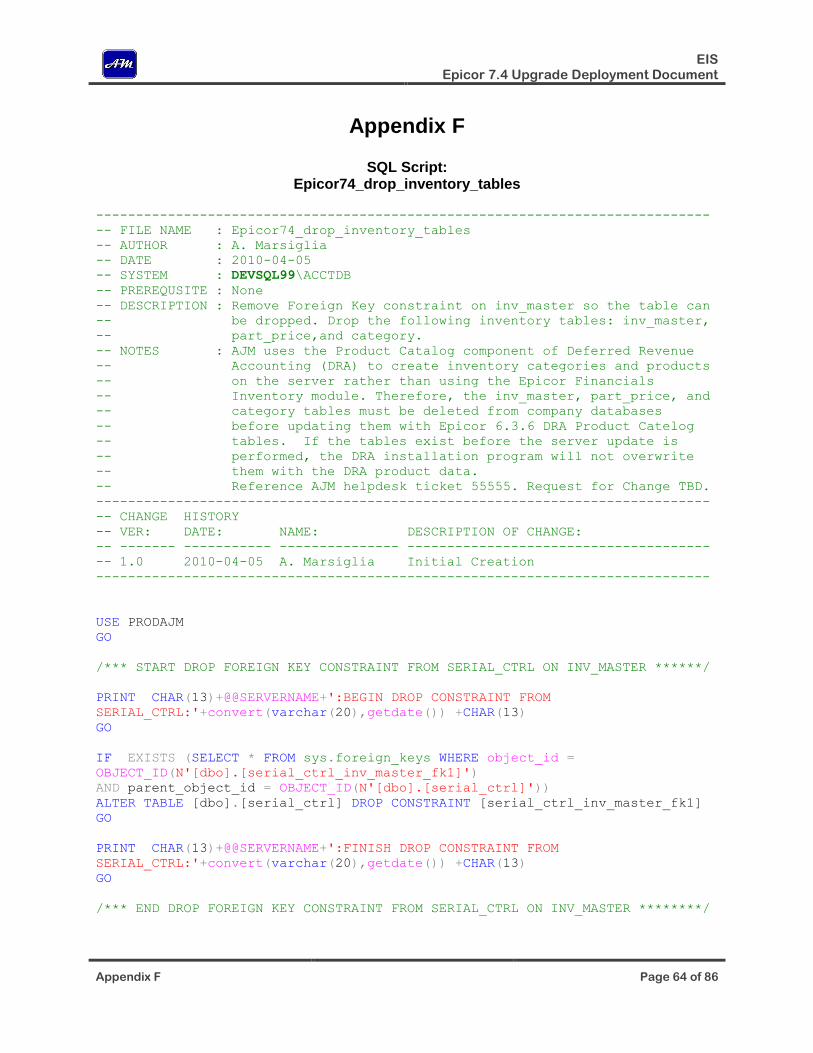
EIS Epicor 7.4 Upgrade Deployment Document
Appendix F Page 64 of 86
Appendix F
SQL Script: Epicor74_drop_inventory_tables
-----------------------------------------------------------------------------
-- FILE NAME : Epicor74_drop_inventory_tables
-- AUTHOR : A. Marsiglia
-- DATE : 2010-04-05
-- SYSTEM : DEVSQL99\ACCTDB
-- PREREQUSITE : None
-- DESCRIPTION : Remove Foreign Key constraint on inv_master so the table can
-- be dropped. Drop the following inventory tables: inv_master,
-- part_price,and category.
-- NOTES : AJM uses the Product Catalog component of Deferred Revenue
-- Accounting (DRA) to create inventory categories and products
-- on the server rather than using the Epicor Financials
-- Inventory module. Therefore, the inv_master, part_price, and
-- category tables must be deleted from company databases
-- before updating them with Epicor 6.3.6 DRA Product Catelog
-- tables. If the tables exist before the server update is
-- performed, the DRA installation program will not overwrite
-- them with the DRA product data.
-- Reference AJM helpdesk ticket 55555. Request for Change TBD.
-----------------------------------------------------------------------------
-- CHANGE HISTORY
-- VER: DATE: NAME: DESCRIPTION OF CHANGE:
-- ------- ----------- --------------- --------------------------------------
-- 1.0 2010-04-05 A. Marsiglia Initial Creation
-----------------------------------------------------------------------------
USE PRODAJM
GO
/*** START DROP FOREIGN KEY CONSTRAINT FROM SERIAL_CTRL ON INV_MASTER ******/
PRINT CHAR(13)+@@SERVERNAME+':BEGIN DROP CONSTRAINT FROM
SERIAL_CTRL:'+convert(varchar(20),getdate()) +CHAR(13)
GO
IF EXISTS (SELECT * FROM sys.foreign_keys WHERE object_id =
OBJECT_ID(N'[dbo].[serial_ctrl_inv_master_fk1]')
AND parent_object_id = OBJECT_ID(N'[dbo].[serial_ctrl]'))
ALTER TABLE [dbo].[serial_ctrl] DROP CONSTRAINT [serial_ctrl_inv_master_fk1]
GO
PRINT CHAR(13)+@@SERVERNAME+':FINISH DROP CONSTRAINT FROM
SERIAL_CTRL:'+convert(varchar(20),getdate()) +CHAR(13)
GO
/*** END DROP FOREIGN KEY CONSTRAINT FROM SERIAL_CTRL ON INV_MASTER ********/
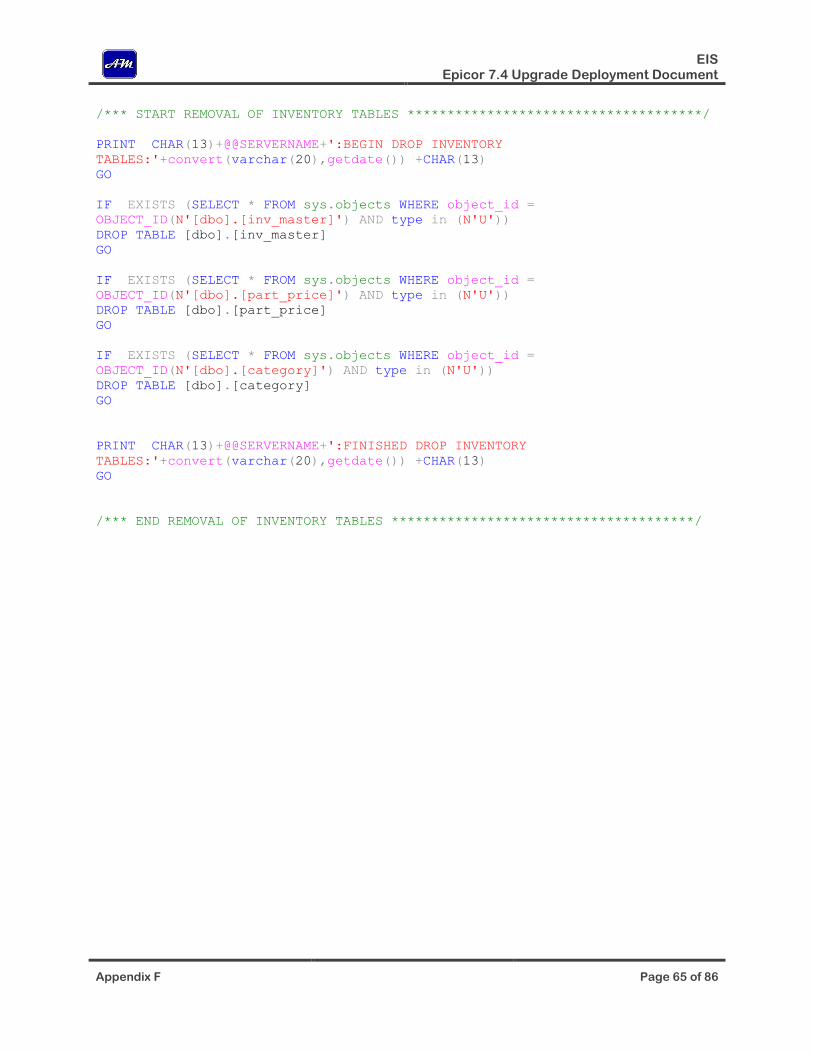
EIS Epicor 7.4 Upgrade Deployment Document
Appendix F Page 65 of 86
/*** START REMOVAL OF INVENTORY TABLES *************************************/
PRINT CHAR(13)+@@SERVERNAME+':BEGIN DROP INVENTORY
TABLES:'+convert(varchar(20),getdate()) +CHAR(13)
GO
IF EXISTS (SELECT * FROM sys.objects WHERE object_id =
OBJECT_ID(N'[dbo].[inv_master]') AND type in (N'U'))
DROP TABLE [dbo].[inv_master]
GO
IF EXISTS (SELECT * FROM sys.objects WHERE object_id =
OBJECT_ID(N'[dbo].[part_price]') AND type in (N'U'))
DROP TABLE [dbo].[part_price]
GO
IF EXISTS (SELECT * FROM sys.objects WHERE object_id =
OBJECT_ID(N'[dbo].[category]') AND type in (N'U'))
DROP TABLE [dbo].[category]
GO
PRINT CHAR(13)+@@SERVERNAME+':FINISHED DROP INVENTORY
TABLES:'+convert(varchar(20),getdate()) +CHAR(13)
GO
/*** END REMOVAL OF INVENTORY TABLES **************************************/

EIS Epicor 7.4 Upgrade Deployment Document
Appendix G Page 66 of 86
Appendix G
Epicor 7.3.6 Users
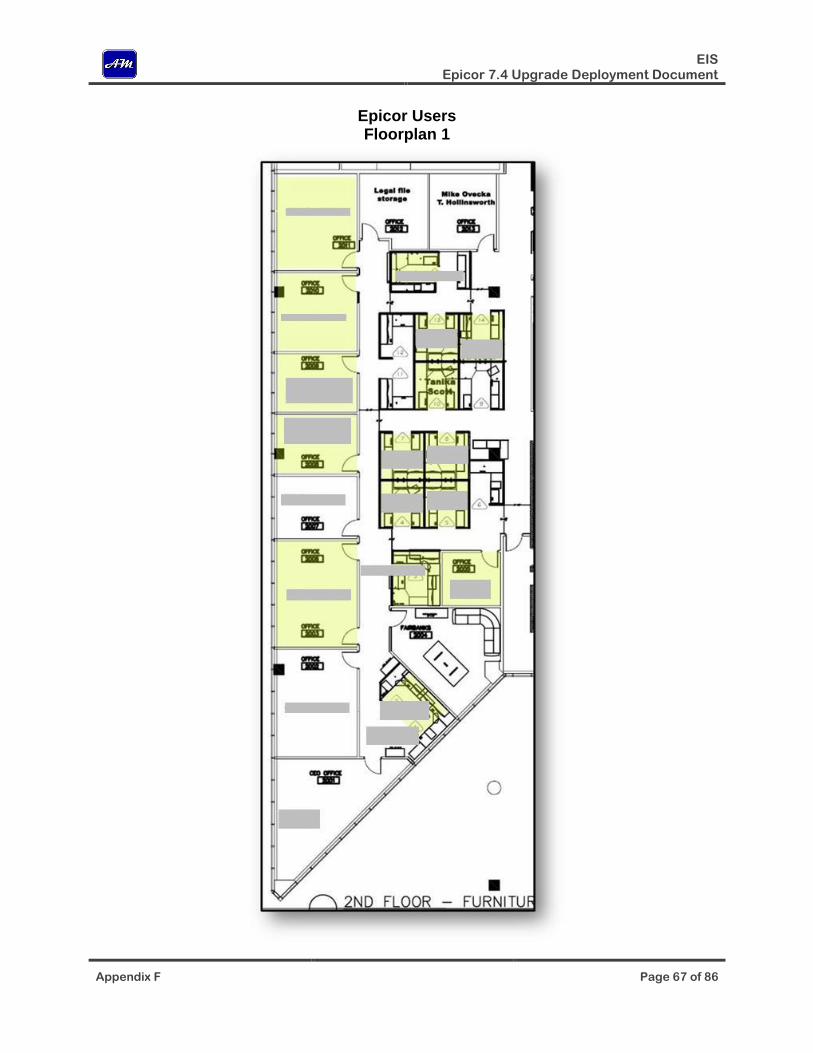
EIS Epicor 7.4 Upgrade Deployment Document
Appendix F Page 67 of 86
Epicor Users Floorplan 1
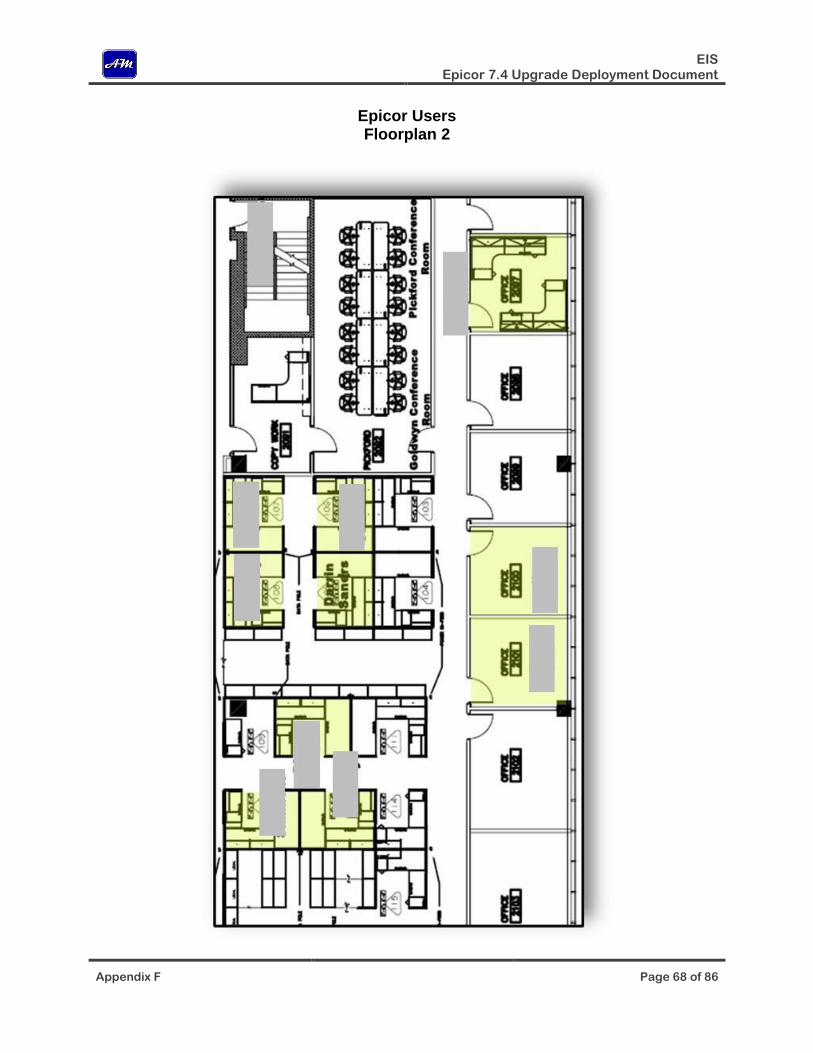
EIS Epicor 7.4 Upgrade Deployment Document
Appendix F Page 68 of 86
Epicor Users Floorplan 2
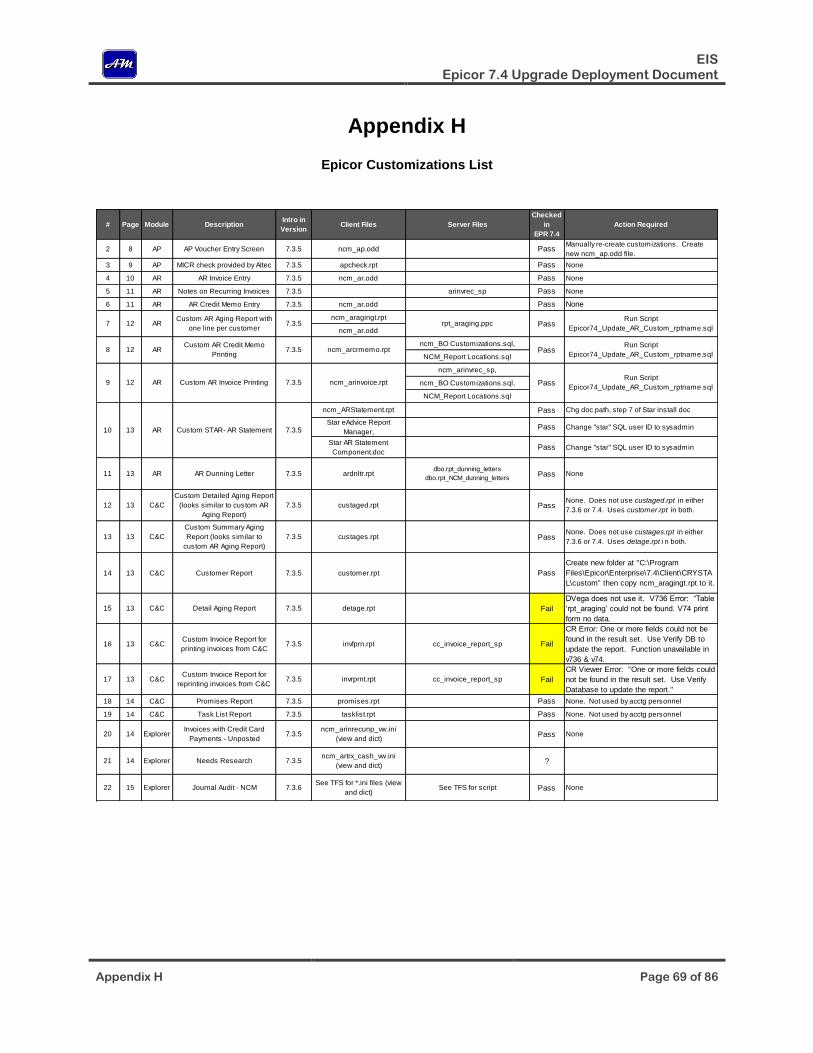
EIS Epicor 7.4 Upgrade Deployment Document
Appendix H Page 69 of 86
Appendix H
Epicor Customizations List
# Page Module DescriptionIntro in
VersionClient Files Server Files
Checked
in
EPR 7.4
Action Required
2 8 AP AP Voucher Entry Screen 7.3.5 ncm_ap.odd Pass Manually re-create customizations. Create
new ncm_ap.odd file.
3 9 AP MICR check provided by Altec 7.3.5 apcheck.rpt Pass None
4 10 AR AR Invoice Entry 7.3.5 ncm_ar.odd Pass None
5 11 AR Notes on Recurring Invoices 7.3.5 arinvrec_sp Pass None
6 11 AR AR Credit Memo Entry 7.3.5 ncm_ar.odd Pass None
ncm_aragingt.rpt
ncm_ar.odd
ncm_BO Customizations.sql,
NCM_Report Locations.sql
ncm_arinvrec_sp,
ncm_BO Customizations.sql,
NCM_Report Locations.sql
ncm_ARStatement.rpt Pass Chg doc path, step 7 of Star install doc
Star eAdvice Report
Manager,Pass Change "star" SQL user ID to sysadmin
Star AR Statement
Component.docPass Change "star" SQL user ID to sysadmin
11 13 AR AR Dunning Letter 7.3.5 ardnltr.rptdbo.rpt_dunning_letters
dbo.rpt_NCM_dunning_lettersPass None
12 13 C&C
Custom Detailed Aging Report
(looks similar to custom AR
Aging Report)
7.3.5 custaged.rpt Pass None. Does not use custaged.rpt in either
7.3.6 or 7.4. Uses customer.rpt in both.
13 13 C&C
Custom Summary Aging
Report (looks similar to
custom AR Aging Report)
7.3.5 custages.rpt Pass None. Does not use custages.rpt in either
7.3.6 or 7.4. Uses detage.rpt i n both.
14 13 C&C Customer Report 7.3.5 customer.rpt Pass
Create new folder at "C:\Program
Files\Epicor\Enterprise\7.4\Client\CRYSTA
L\custom" then copy ncm_aragingt.rpt to it.
15 13 C&C Detail Aging Report 7.3.5 detage.rpt Fail
DVega does not use it. V736 Error: “Table
‘rpt_araging’ could not be found. V74 print
form no data.
16 13 C&CCustom Invoice Report for
printing invoices from C&C7.3.5 invfprn.rpt cc_invoice_report_sp Fail
CR Error: One or more fields could not be
found in the result set. Use Verify DB to
update the report. Function unavailable in
v736 & v74.
17 13 C&CCustom Invoice Report for
reprinting invoices from C&C7.3.5 invrprnt.rpt cc_invoice_report_sp Fail
CR Viewer Error: "One or more fields could
not be found in the result set. Use Verify
Database to update the report."
18 14 C&C Promises Report 7.3.5 promises.rpt Pass None. Not used by acctg personnel
19 14 C&C Task List Report 7.3.5 tasklist.rpt Pass None. Not used by acctg personnel
20 14 ExplorerInvoices with Credit Card
Payments - Unposted7.3.5
ncm_arinrecunp_vw.ini
(view and dict)Pass None
21 14 Explorer Needs Research 7.3.5ncm_artrx_cash_vw.ini
(view and dict)?
22 15 Explorer Journal Audit - NCM 7.3.6See TFS for *.ini files (view
and dict)See TFS for script Pass None
10 AR Custom STAR- AR Statement 7.3.5
9 AR Custom AR Invoice Printing 7.3.5
13
12
7 ARCustom AR Aging Report with
one line per customer7.3.5
8 ARCustom AR Credit Memo
Printing7.3.5
12
12
rpt_araging.ppc
ncm_arcrmemo.rpt
ncm_arinvoice.rpt
Pass
PassRun Script
Epicor74_Update_AR_Custom_rptname.sql
PassRun Script
Epicor74_Update_AR_Custom_rptname.sql
Run Script
Epicor74_Update_AR_Custom_rptname.sql
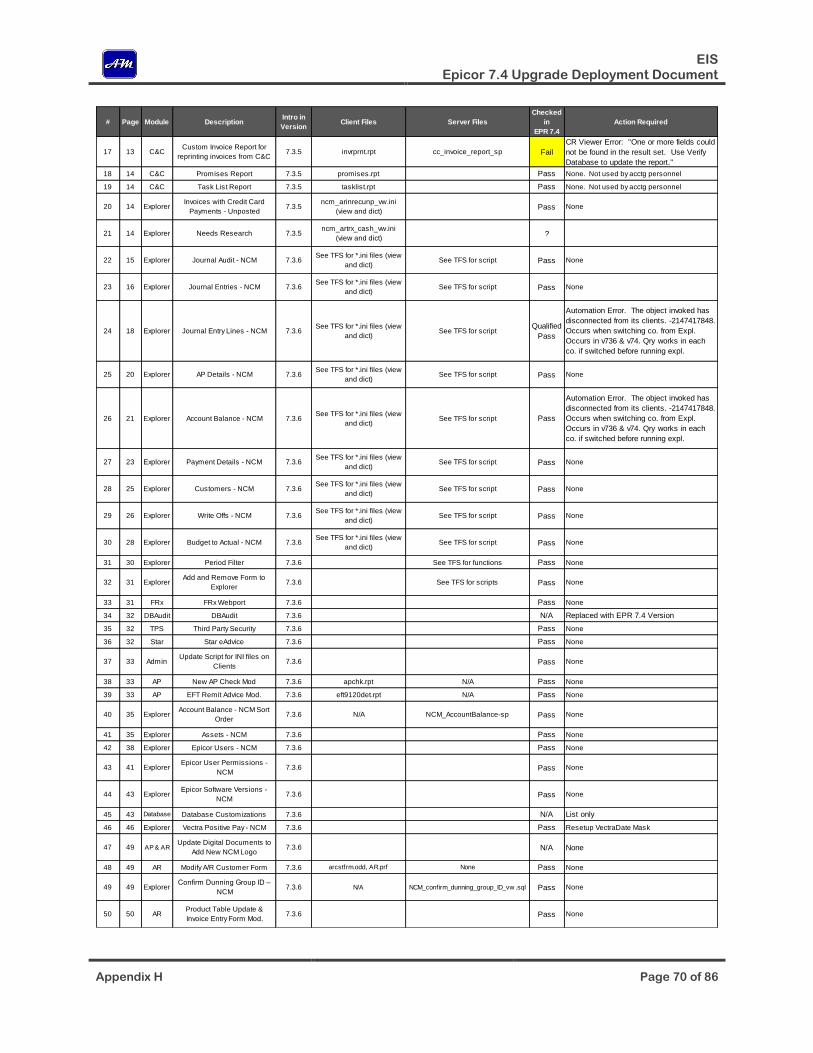
EIS Epicor 7.4 Upgrade Deployment Document
Appendix H Page 70 of 86
# Page Module DescriptionIntro in
VersionClient Files Server Files
Checked
in
EPR 7.4
Action Required
17 13 C&CCustom Invoice Report for
reprinting invoices from C&C7.3.5 invrprnt.rpt cc_invoice_report_sp Fail
CR Viewer Error: "One or more fields could
not be found in the result set. Use Verify
Database to update the report."
18 14 C&C Promises Report 7.3.5 promises.rpt Pass None. Not used by acctg personnel
19 14 C&C Task List Report 7.3.5 tasklist.rpt Pass None. Not used by acctg personnel
20 14 ExplorerInvoices with Credit Card
Payments - Unposted7.3.5
ncm_arinrecunp_vw.ini
(view and dict)Pass None
21 14 Explorer Needs Research 7.3.5ncm_artrx_cash_vw.ini
(view and dict)?
22 15 Explorer Journal Audit - NCM 7.3.6See TFS for *.ini files (view
and dict)See TFS for script Pass None
23 16 Explorer Journal Entries - NCM 7.3.6See TFS for *.ini files (view
and dict)See TFS for script Pass None
24 18 Explorer Journal Entry Lines - NCM 7.3.6See TFS for *.ini files (view
and dict)See TFS for script
Qualified
Pass
Automation Error. The object invoked has
disconnected from its clients. -2147417848.
Occurs when switching co. from Expl.
Occurs in v736 & v74. Qry works in each
co. if switched before running expl.
25 20 Explorer AP Details - NCM 7.3.6See TFS for *.ini files (view
and dict)See TFS for script Pass None
26 21 Explorer Account Balance - NCM 7.3.6See TFS for *.ini files (view
and dict)See TFS for script Pass
Automation Error. The object invoked has
disconnected from its clients. -2147417848.
Occurs when switching co. from Expl.
Occurs in v736 & v74. Qry works in each
co. if switched before running expl.
27 23 Explorer Payment Details - NCM 7.3.6See TFS for *.ini files (view
and dict)See TFS for script Pass None
28 25 Explorer Customers - NCM 7.3.6See TFS for *.ini files (view
and dict)See TFS for script Pass None
29 26 Explorer Write Offs - NCM 7.3.6See TFS for *.ini files (view
and dict)See TFS for script Pass None
30 28 Explorer Budget to Actual - NCM 7.3.6See TFS for *.ini files (view
and dict)See TFS for script Pass None
31 30 Explorer Period Filter 7.3.6 See TFS for functions Pass None
32 31 ExplorerAdd and Remove Form to
Explorer7.3.6 See TFS for scripts Pass None
33 31 FRx FRx Webport 7.3.6 Pass None
34 32 DBAudit DBAudit 7.3.6 N/A Replaced with EPR 7.4 Version
35 32 TPS Third Party Security 7.3.6 Pass None
36 32 Star Star eAdvice 7.3.6 Pass None
37 33 AdminUpdate Script for INI files on
Clients7.3.6 Pass None
38 33 AP New AP Check Mod 7.3.6 apchk.rpt N/A Pass None
39 33 AP EFT Remit Advice Mod. 7.3.6 eft9120det.rpt N/A Pass None
40 35 ExplorerAccount Balance - NCM Sort
Order7.3.6 N/A NCM_AccountBalance-sp Pass None
41 35 Explorer Assets - NCM 7.3.6 Pass None
42 38 Explorer Epicor Users - NCM 7.3.6 Pass None
43 41 ExplorerEpicor User Permissions -
NCM7.3.6 Pass None
44 43 ExplorerEpicor Software Versions -
NCM7.3.6 Pass None
45 43 Database Database Customizations 7.3.6 N/A List only
46 46 Explorer Vectra Positive Pay - NCM 7.3.6 Pass Resetup VectraDate Mask
47 49 AP & ARUpdate Digital Documents to
Add New NCM Logo7.3.6 N/A None
48 49 AR Modify A/R Customer Form 7.3.6 arcstfrm.odd, AR.prf None Pass None
49 49 ExplorerConfirm Dunning Group ID –
NCM7.3.6 N/A NCM_confirm_dunning_group_ID_vw .sql Pass None
50 50 ARProduct Table Update &
Invoice Entry Form Mod.7.3.6 Pass None
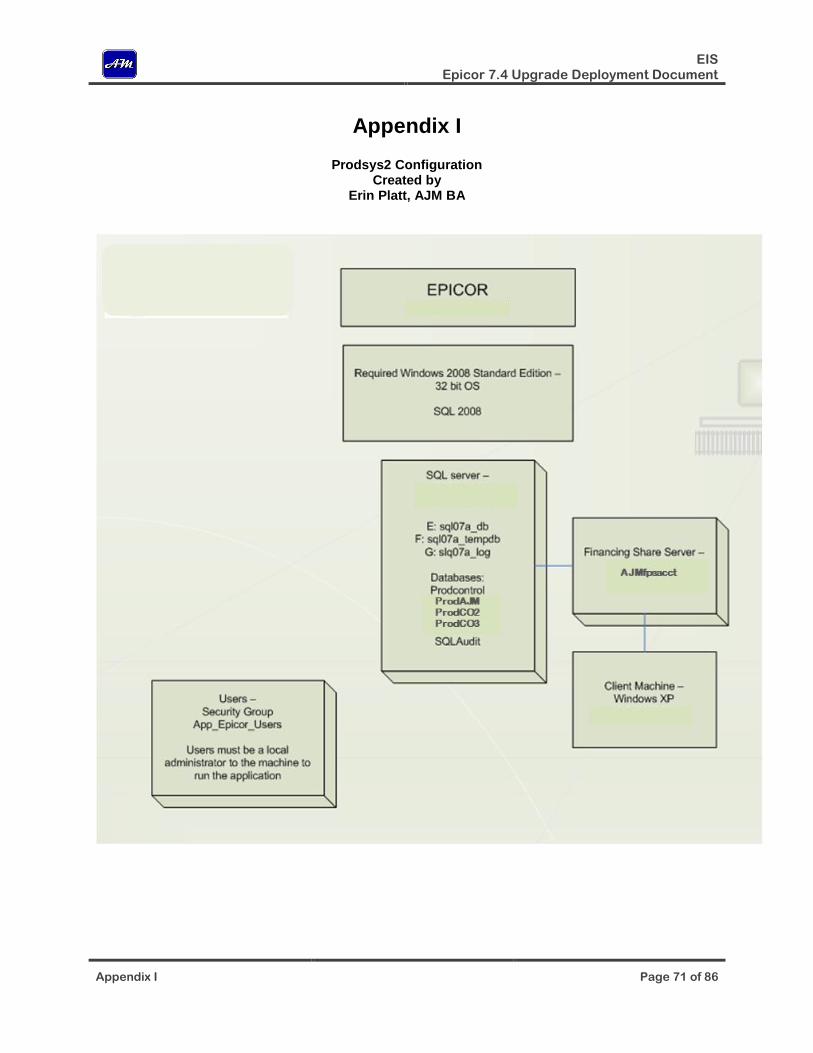
EIS Epicor 7.4 Upgrade Deployment Document
Appendix I Page 71 of 86
Appendix I
Prodsys2 Configuration Created by
Erin Platt, AJM BA
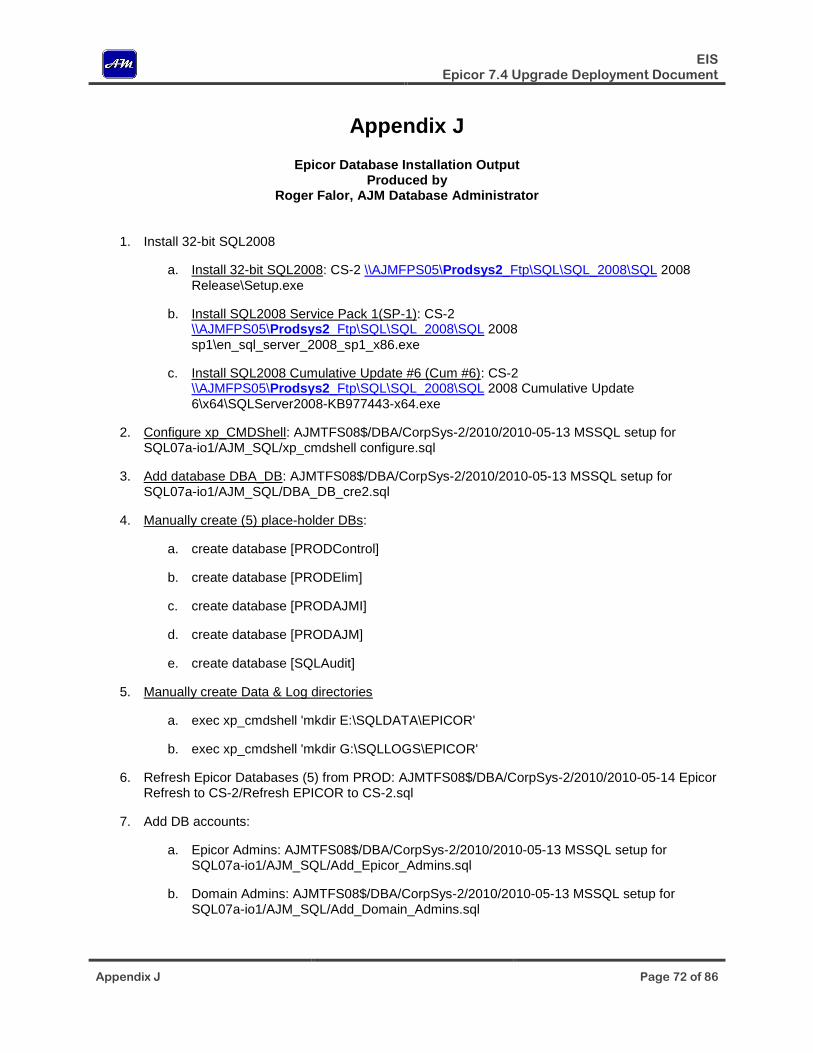
EIS Epicor 7.4 Upgrade Deployment Document
Appendix J Page 72 of 86
Appendix J
Epicor Database Installation Output Produced by
Roger Falor, AJM Database Administrator
1. Install 32-bit SQL2008
a. Install 32-bit SQL2008: CS-2 \\AJMFPS05\Prodsys2_Ftp\SQL\SQL_2008\SQL 2008
Release\Setup.exe
b. Install SQL2008 Service Pack 1(SP-1): CS-2 \\AJMFPS05\Prodsys2_Ftp\SQL\SQL_2008\SQL 2008
sp1\en_sql_server_2008_sp1_x86.exe
c. Install SQL2008 Cumulative Update #6 (Cum #6): CS-2 \\AJMFPS05\Prodsys2_Ftp\SQL\SQL_2008\SQL 2008 Cumulative Update
6\x64\SQLServer2008-KB977443-x64.exe
2. Configure xp_CMDShell: AJMTFS08$/DBA/CorpSys-2/2010/2010-05-13 MSSQL setup for SQL07a-io1/AJM_SQL/xp_cmdshell configure.sql
3. Add database DBA_DB: AJMTFS08$/DBA/CorpSys-2/2010/2010-05-13 MSSQL setup for SQL07a-io1/AJM_SQL/DBA_DB_cre2.sql
4. Manually create (5) place-holder DBs:
a. create database [PRODControl]
b. create database [PRODElim]
c. create database [PRODAJMI]
d. create database [PRODAJM]
e. create database [SQLAudit]
5. Manually create Data & Log directories
a. exec xp_cmdshell 'mkdir E:\SQLDATA\EPICOR'
b. exec xp_cmdshell 'mkdir G:\SQLLOGS\EPICOR'
6. Refresh Epicor Databases (5) from PROD: AJMTFS08$/DBA/CorpSys-2/2010/2010-05-14 Epicor Refresh to CS-2/Refresh EPICOR to CS-2.sql
7. Add DB accounts:
a. Epicor Admins: AJMTFS08$/DBA/CorpSys-2/2010/2010-05-13 MSSQL setup for SQL07a-io1/AJM_SQL/Add_Epicor_Admins.sql
b. Domain Admins: AJMTFS08$/DBA/CorpSys-2/2010/2010-05-13 MSSQL setup for SQL07a-io1/AJM_SQL/Add_Domain_Admins.sql
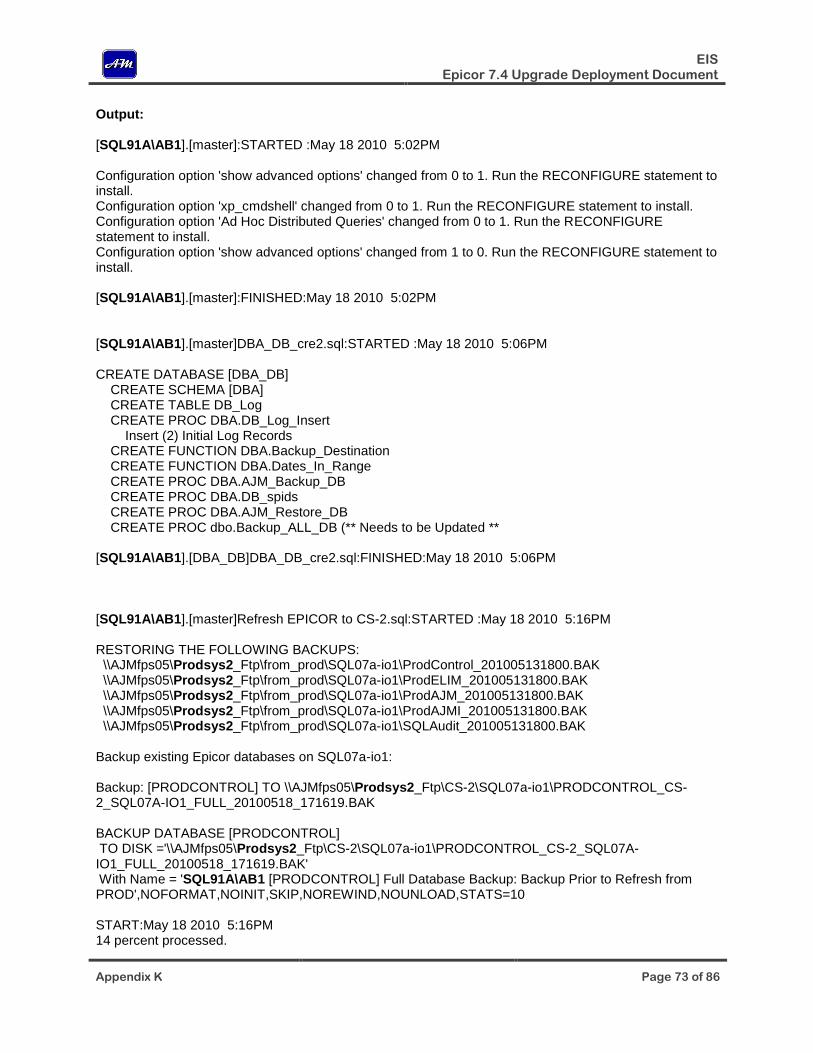
EIS Epicor 7.4 Upgrade Deployment Document
Appendix K Page 73 of 86
Output: [SQL91A\AB1].[master]:STARTED :May 18 2010 5:02PM Configuration option 'show advanced options' changed from 0 to 1. Run the RECONFIGURE statement to install. Configuration option 'xp_cmdshell' changed from 0 to 1. Run the RECONFIGURE statement to install. Configuration option 'Ad Hoc Distributed Queries' changed from 0 to 1. Run the RECONFIGURE statement to install. Configuration option 'show advanced options' changed from 1 to 0. Run the RECONFIGURE statement to install. [SQL91A\AB1].[master]:FINISHED:May 18 2010 5:02PM [SQL91A\AB1].[master]DBA_DB_cre2.sql:STARTED :May 18 2010 5:06PM CREATE DATABASE [DBA_DB] CREATE SCHEMA [DBA] CREATE TABLE DB_Log CREATE PROC DBA.DB_Log_Insert Insert (2) Initial Log Records CREATE FUNCTION DBA.Backup_Destination CREATE FUNCTION DBA.Dates_In_Range CREATE PROC DBA.AJM_Backup_DB CREATE PROC DBA.DB_spids CREATE PROC DBA.AJM_Restore_DB CREATE PROC dbo.Backup_ALL_DB (** Needs to be Updated ** [SQL91A\AB1].[DBA_DB]DBA_DB_cre2.sql:FINISHED:May 18 2010 5:06PM [SQL91A\AB1].[master]Refresh EPICOR to CS-2.sql:STARTED :May 18 2010 5:16PM RESTORING THE FOLLOWING BACKUPS: \\AJMfps05\Prodsys2_Ftp\from_prod\SQL07a-io1\ProdControl_201005131800.BAK \\AJMfps05\Prodsys2_Ftp\from_prod\SQL07a-io1\ProdELIM_201005131800.BAK \\AJMfps05\Prodsys2_Ftp\from_prod\SQL07a-io1\ProdAJM_201005131800.BAK \\AJMfps05\Prodsys2_Ftp\from_prod\SQL07a-io1\ProdAJMI_201005131800.BAK \\AJMfps05\Prodsys2_Ftp\from_prod\SQL07a-io1\SQLAudit_201005131800.BAK Backup existing Epicor databases on SQL07a-io1: Backup: [PRODCONTROL] TO \\AJMfps05\Prodsys2_Ftp\CS-2\SQL07a-io1\PRODCONTROL_CS-2_SQL07A-IO1_FULL_20100518_171619.BAK BACKUP DATABASE [PRODCONTROL] TO DISK ='\\AJMfps05\Prodsys2_Ftp\CS-2\SQL07a-io1\PRODCONTROL_CS-2_SQL07A-IO1_FULL_20100518_171619.BAK' With Name = 'SQL91A\AB1 [PRODCONTROL] Full Database Backup: Backup Prior to Refresh from PROD',NOFORMAT,NOINIT,SKIP,NOREWIND,NOUNLOAD,STATS=10 START:May 18 2010 5:16PM 14 percent processed.
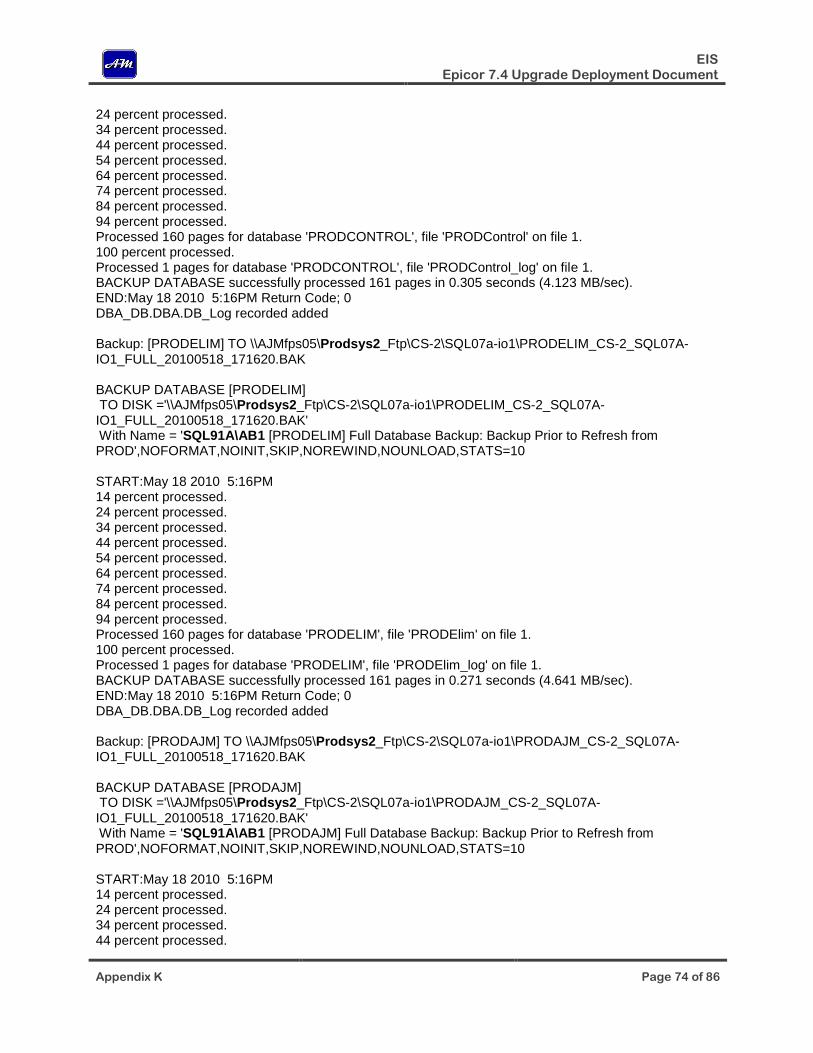
EIS Epicor 7.4 Upgrade Deployment Document
Appendix K Page 74 of 86
24 percent processed. 34 percent processed. 44 percent processed. 54 percent processed. 64 percent processed. 74 percent processed. 84 percent processed. 94 percent processed. Processed 160 pages for database 'PRODCONTROL', file 'PRODControl' on file 1. 100 percent processed. Processed 1 pages for database 'PRODCONTROL', file 'PRODControl_log' on file 1. BACKUP DATABASE successfully processed 161 pages in 0.305 seconds (4.123 MB/sec). END:May 18 2010 5:16PM Return Code; 0 DBA_DB.DBA.DB_Log recorded added Backup: [PRODELIM] TO \\AJMfps05\Prodsys2_Ftp\CS-2\SQL07a-io1\PRODELIM_CS-2_SQL07A-IO1_FULL_20100518_171620.BAK BACKUP DATABASE [PRODELIM] TO DISK ='\\AJMfps05\Prodsys2_Ftp\CS-2\SQL07a-io1\PRODELIM_CS-2_SQL07A-IO1_FULL_20100518_171620.BAK' With Name = 'SQL91A\AB1 [PRODELIM] Full Database Backup: Backup Prior to Refresh from PROD',NOFORMAT,NOINIT,SKIP,NOREWIND,NOUNLOAD,STATS=10 START:May 18 2010 5:16PM 14 percent processed. 24 percent processed. 34 percent processed. 44 percent processed. 54 percent processed. 64 percent processed. 74 percent processed. 84 percent processed. 94 percent processed. Processed 160 pages for database 'PRODELIM', file 'PRODElim' on file 1. 100 percent processed. Processed 1 pages for database 'PRODELIM', file 'PRODElim_log' on file 1. BACKUP DATABASE successfully processed 161 pages in 0.271 seconds (4.641 MB/sec). END:May 18 2010 5:16PM Return Code; 0 DBA_DB.DBA.DB_Log recorded added Backup: [PRODAJM] TO \\AJMfps05\Prodsys2_Ftp\CS-2\SQL07a-io1\PRODAJM_CS-2_SQL07A-IO1_FULL_20100518_171620.BAK BACKUP DATABASE [PRODAJM] TO DISK ='\\AJMfps05\Prodsys2_Ftp\CS-2\SQL07a-io1\PRODAJM_CS-2_SQL07A-IO1_FULL_20100518_171620.BAK' With Name = 'SQL91A\AB1 [PRODAJM] Full Database Backup: Backup Prior to Refresh from PROD',NOFORMAT,NOINIT,SKIP,NOREWIND,NOUNLOAD,STATS=10 START:May 18 2010 5:16PM 14 percent processed. 24 percent processed. 34 percent processed. 44 percent processed.
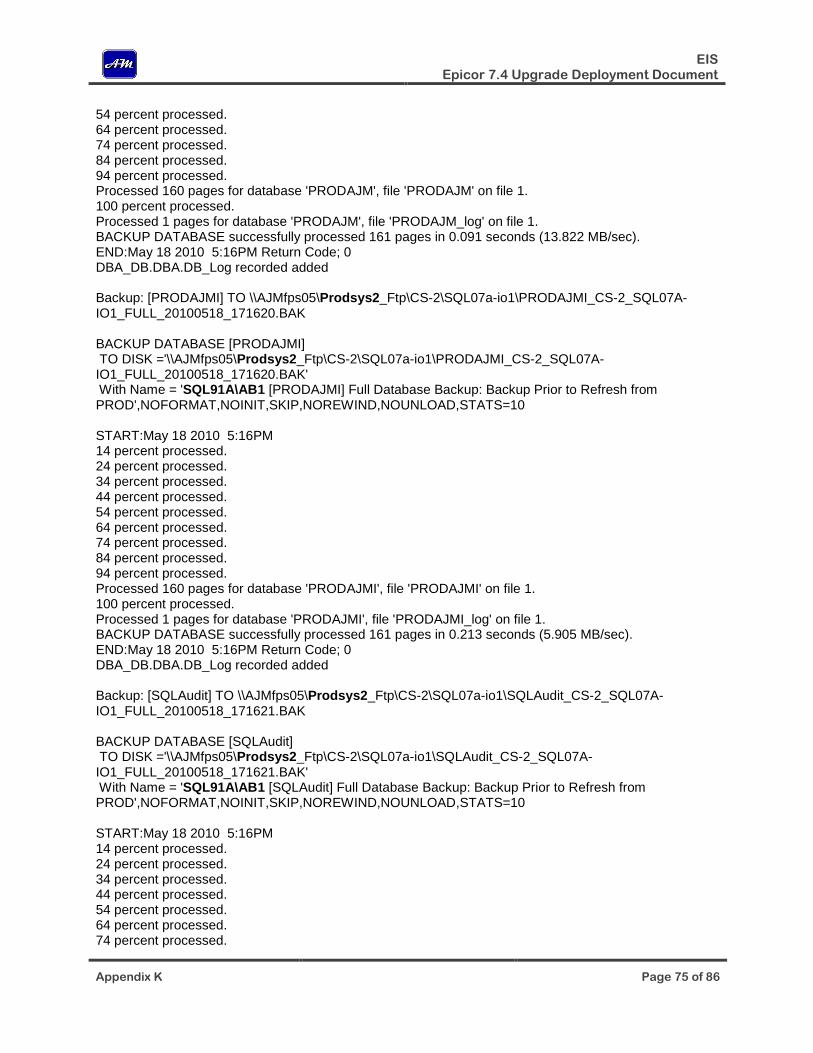
EIS Epicor 7.4 Upgrade Deployment Document
Appendix K Page 75 of 86
54 percent processed. 64 percent processed. 74 percent processed. 84 percent processed. 94 percent processed. Processed 160 pages for database 'PRODAJM', file 'PRODAJM' on file 1. 100 percent processed. Processed 1 pages for database 'PRODAJM', file 'PRODAJM_log' on file 1. BACKUP DATABASE successfully processed 161 pages in 0.091 seconds (13.822 MB/sec). END:May 18 2010 5:16PM Return Code; 0 DBA_DB.DBA.DB_Log recorded added Backup: [PRODAJMI] TO \\AJMfps05\Prodsys2_Ftp\CS-2\SQL07a-io1\PRODAJMI_CS-2_SQL07A-IO1_FULL_20100518_171620.BAK BACKUP DATABASE [PRODAJMI] TO DISK ='\\AJMfps05\Prodsys2_Ftp\CS-2\SQL07a-io1\PRODAJMI_CS-2_SQL07A-IO1_FULL_20100518_171620.BAK' With Name = 'SQL91A\AB1 [PRODAJMI] Full Database Backup: Backup Prior to Refresh from PROD',NOFORMAT,NOINIT,SKIP,NOREWIND,NOUNLOAD,STATS=10 START:May 18 2010 5:16PM 14 percent processed. 24 percent processed. 34 percent processed. 44 percent processed. 54 percent processed. 64 percent processed. 74 percent processed. 84 percent processed. 94 percent processed. Processed 160 pages for database 'PRODAJMI', file 'PRODAJMI' on file 1. 100 percent processed. Processed 1 pages for database 'PRODAJMI', file 'PRODAJMI_log' on file 1. BACKUP DATABASE successfully processed 161 pages in 0.213 seconds (5.905 MB/sec). END:May 18 2010 5:16PM Return Code; 0 DBA_DB.DBA.DB_Log recorded added Backup: [SQLAudit] TO \\AJMfps05\Prodsys2_Ftp\CS-2\SQL07a-io1\SQLAudit_CS-2_SQL07A-IO1_FULL_20100518_171621.BAK BACKUP DATABASE [SQLAudit] TO DISK ='\\AJMfps05\Prodsys2_Ftp\CS-2\SQL07a-io1\SQLAudit_CS-2_SQL07A-IO1_FULL_20100518_171621.BAK' With Name = 'SQL91A\AB1 [SQLAudit] Full Database Backup: Backup Prior to Refresh from PROD',NOFORMAT,NOINIT,SKIP,NOREWIND,NOUNLOAD,STATS=10 START:May 18 2010 5:16PM 14 percent processed. 24 percent processed. 34 percent processed. 44 percent processed. 54 percent processed. 64 percent processed. 74 percent processed.
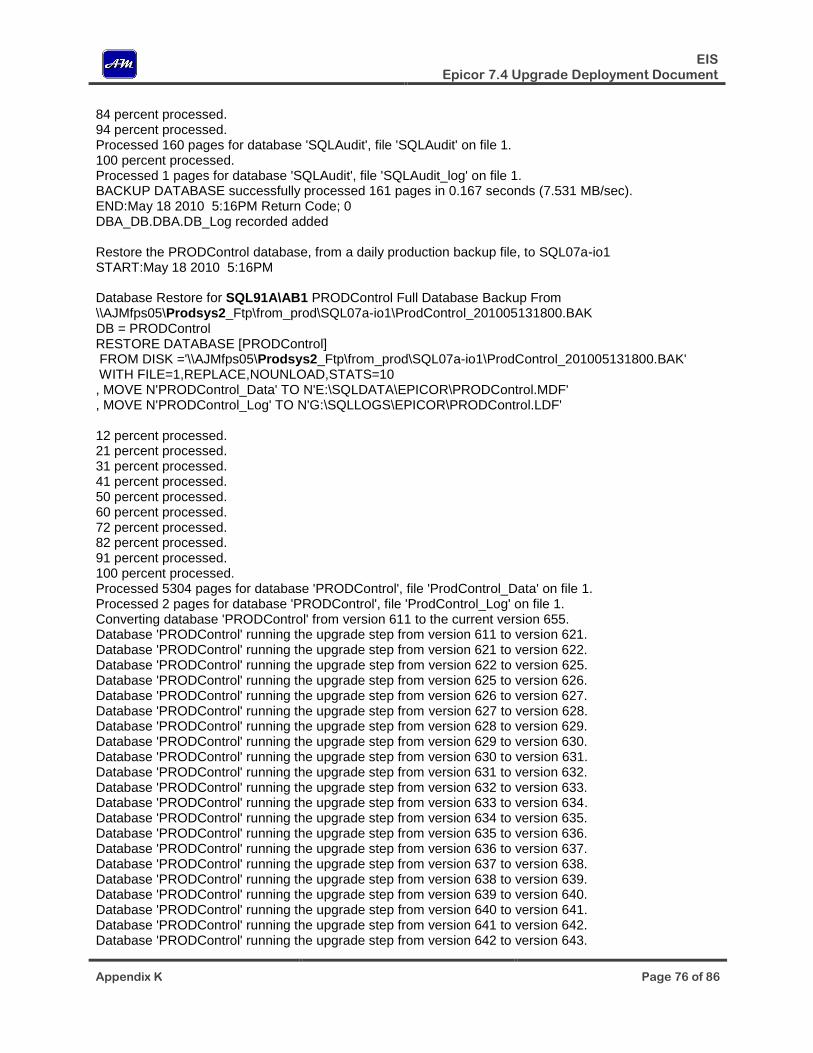
EIS Epicor 7.4 Upgrade Deployment Document
Appendix K Page 76 of 86
84 percent processed. 94 percent processed. Processed 160 pages for database 'SQLAudit', file 'SQLAudit' on file 1. 100 percent processed. Processed 1 pages for database 'SQLAudit', file 'SQLAudit_log' on file 1. BACKUP DATABASE successfully processed 161 pages in 0.167 seconds (7.531 MB/sec). END:May 18 2010 5:16PM Return Code; 0 DBA_DB.DBA.DB_Log recorded added Restore the PRODControl database, from a daily production backup file, to SQL07a-io1 START:May 18 2010 5:16PM Database Restore for SQL91A\AB1 PRODControl Full Database Backup From \\AJMfps05\Prodsys2_Ftp\from_prod\SQL07a-io1\ProdControl_201005131800.BAK DB = PRODControl RESTORE DATABASE [PRODControl] FROM DISK ='\\AJMfps05\Prodsys2_Ftp\from_prod\SQL07a-io1\ProdControl_201005131800.BAK' WITH FILE=1,REPLACE,NOUNLOAD,STATS=10 , MOVE N'PRODControl_Data' TO N'E:\SQLDATA\EPICOR\PRODControl.MDF' , MOVE N'PRODControl_Log' TO N'G:\SQLLOGS\EPICOR\PRODControl.LDF' 12 percent processed. 21 percent processed. 31 percent processed. 41 percent processed. 50 percent processed. 60 percent processed. 72 percent processed. 82 percent processed. 91 percent processed. 100 percent processed. Processed 5304 pages for database 'PRODControl', file 'ProdControl_Data' on file 1. Processed 2 pages for database 'PRODControl', file 'ProdControl_Log' on file 1. Converting database 'PRODControl' from version 611 to the current version 655. Database 'PRODControl' running the upgrade step from version 611 to version 621. Database 'PRODControl' running the upgrade step from version 621 to version 622. Database 'PRODControl' running the upgrade step from version 622 to version 625. Database 'PRODControl' running the upgrade step from version 625 to version 626. Database 'PRODControl' running the upgrade step from version 626 to version 627. Database 'PRODControl' running the upgrade step from version 627 to version 628. Database 'PRODControl' running the upgrade step from version 628 to version 629. Database 'PRODControl' running the upgrade step from version 629 to version 630. Database 'PRODControl' running the upgrade step from version 630 to version 631. Database 'PRODControl' running the upgrade step from version 631 to version 632. Database 'PRODControl' running the upgrade step from version 632 to version 633. Database 'PRODControl' running the upgrade step from version 633 to version 634. Database 'PRODControl' running the upgrade step from version 634 to version 635. Database 'PRODControl' running the upgrade step from version 635 to version 636. Database 'PRODControl' running the upgrade step from version 636 to version 637. Database 'PRODControl' running the upgrade step from version 637 to version 638. Database 'PRODControl' running the upgrade step from version 638 to version 639. Database 'PRODControl' running the upgrade step from version 639 to version 640. Database 'PRODControl' running the upgrade step from version 640 to version 641. Database 'PRODControl' running the upgrade step from version 641 to version 642. Database 'PRODControl' running the upgrade step from version 642 to version 643.
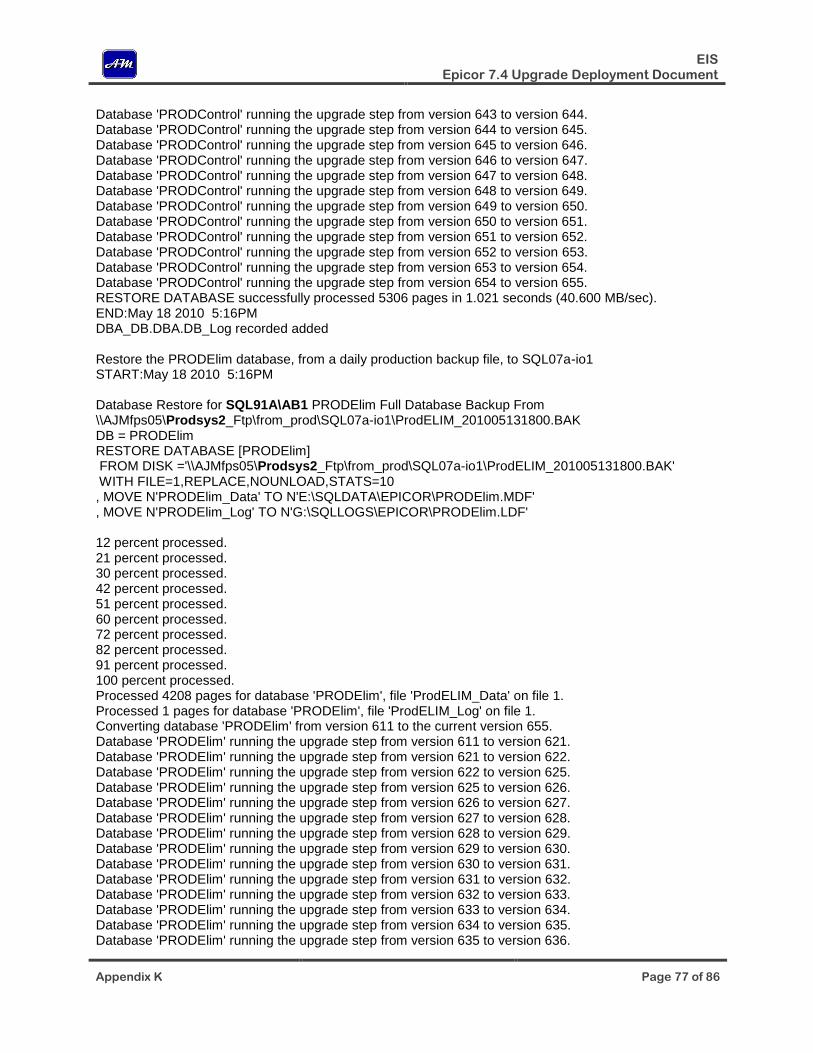
EIS Epicor 7.4 Upgrade Deployment Document
Appendix K Page 77 of 86
Database 'PRODControl' running the upgrade step from version 643 to version 644. Database 'PRODControl' running the upgrade step from version 644 to version 645. Database 'PRODControl' running the upgrade step from version 645 to version 646. Database 'PRODControl' running the upgrade step from version 646 to version 647. Database 'PRODControl' running the upgrade step from version 647 to version 648. Database 'PRODControl' running the upgrade step from version 648 to version 649. Database 'PRODControl' running the upgrade step from version 649 to version 650. Database 'PRODControl' running the upgrade step from version 650 to version 651. Database 'PRODControl' running the upgrade step from version 651 to version 652. Database 'PRODControl' running the upgrade step from version 652 to version 653. Database 'PRODControl' running the upgrade step from version 653 to version 654. Database 'PRODControl' running the upgrade step from version 654 to version 655. RESTORE DATABASE successfully processed 5306 pages in 1.021 seconds (40.600 MB/sec). END:May 18 2010 5:16PM DBA_DB.DBA.DB_Log recorded added Restore the PRODElim database, from a daily production backup file, to SQL07a-io1 START:May 18 2010 5:16PM Database Restore for SQL91A\AB1 PRODElim Full Database Backup From \\AJMfps05\Prodsys2_Ftp\from_prod\SQL07a-io1\ProdELIM_201005131800.BAK DB = PRODElim RESTORE DATABASE [PRODElim] FROM DISK ='\\AJMfps05\Prodsys2_Ftp\from_prod\SQL07a-io1\ProdELIM_201005131800.BAK' WITH FILE=1,REPLACE,NOUNLOAD,STATS=10 , MOVE N'PRODElim_Data' TO N'E:\SQLDATA\EPICOR\PRODElim.MDF' , MOVE N'PRODElim_Log' TO N'G:\SQLLOGS\EPICOR\PRODElim.LDF' 12 percent processed. 21 percent processed. 30 percent processed. 42 percent processed. 51 percent processed. 60 percent processed. 72 percent processed. 82 percent processed. 91 percent processed. 100 percent processed. Processed 4208 pages for database 'PRODElim', file 'ProdELIM_Data' on file 1. Processed 1 pages for database 'PRODElim', file 'ProdELIM_Log' on file 1. Converting database 'PRODElim' from version 611 to the current version 655. Database 'PRODElim' running the upgrade step from version 611 to version 621. Database 'PRODElim' running the upgrade step from version 621 to version 622. Database 'PRODElim' running the upgrade step from version 622 to version 625. Database 'PRODElim' running the upgrade step from version 625 to version 626. Database 'PRODElim' running the upgrade step from version 626 to version 627. Database 'PRODElim' running the upgrade step from version 627 to version 628. Database 'PRODElim' running the upgrade step from version 628 to version 629. Database 'PRODElim' running the upgrade step from version 629 to version 630. Database 'PRODElim' running the upgrade step from version 630 to version 631. Database 'PRODElim' running the upgrade step from version 631 to version 632. Database 'PRODElim' running the upgrade step from version 632 to version 633. Database 'PRODElim' running the upgrade step from version 633 to version 634. Database 'PRODElim' running the upgrade step from version 634 to version 635. Database 'PRODElim' running the upgrade step from version 635 to version 636.
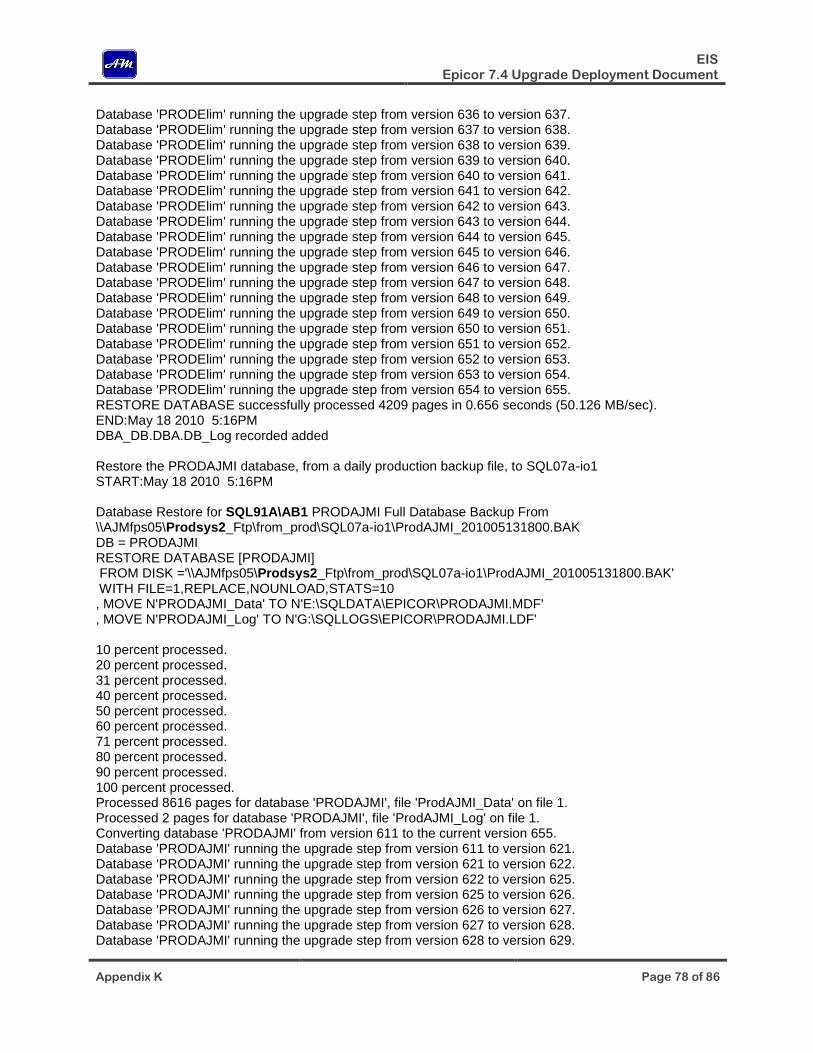
EIS Epicor 7.4 Upgrade Deployment Document
Appendix K Page 78 of 86
Database 'PRODElim' running the upgrade step from version 636 to version 637. Database 'PRODElim' running the upgrade step from version 637 to version 638. Database 'PRODElim' running the upgrade step from version 638 to version 639. Database 'PRODElim' running the upgrade step from version 639 to version 640. Database 'PRODElim' running the upgrade step from version 640 to version 641. Database 'PRODElim' running the upgrade step from version 641 to version 642. Database 'PRODElim' running the upgrade step from version 642 to version 643. Database 'PRODElim' running the upgrade step from version 643 to version 644. Database 'PRODElim' running the upgrade step from version 644 to version 645. Database 'PRODElim' running the upgrade step from version 645 to version 646. Database 'PRODElim' running the upgrade step from version 646 to version 647. Database 'PRODElim' running the upgrade step from version 647 to version 648. Database 'PRODElim' running the upgrade step from version 648 to version 649. Database 'PRODElim' running the upgrade step from version 649 to version 650. Database 'PRODElim' running the upgrade step from version 650 to version 651. Database 'PRODElim' running the upgrade step from version 651 to version 652. Database 'PRODElim' running the upgrade step from version 652 to version 653. Database 'PRODElim' running the upgrade step from version 653 to version 654. Database 'PRODElim' running the upgrade step from version 654 to version 655. RESTORE DATABASE successfully processed 4209 pages in 0.656 seconds (50.126 MB/sec). END:May 18 2010 5:16PM DBA_DB.DBA.DB_Log recorded added Restore the PRODAJMI database, from a daily production backup file, to SQL07a-io1 START:May 18 2010 5:16PM Database Restore for SQL91A\AB1 PRODAJMI Full Database Backup From \\AJMfps05\Prodsys2_Ftp\from_prod\SQL07a-io1\ProdAJMI_201005131800.BAK DB = PRODAJMI RESTORE DATABASE [PRODAJMI] FROM DISK ='\\AJMfps05\Prodsys2_Ftp\from_prod\SQL07a-io1\ProdAJMI_201005131800.BAK' WITH FILE=1,REPLACE,NOUNLOAD,STATS=10 , MOVE N'PRODAJMI_Data' TO N'E:\SQLDATA\EPICOR\PRODAJMI.MDF' , MOVE N'PRODAJMI_Log' TO N'G:\SQLLOGS\EPICOR\PRODAJMI.LDF' 10 percent processed. 20 percent processed. 31 percent processed. 40 percent processed. 50 percent processed. 60 percent processed. 71 percent processed. 80 percent processed. 90 percent processed. 100 percent processed. Processed 8616 pages for database 'PRODAJMI', file 'ProdAJMI_Data' on file 1. Processed 2 pages for database 'PRODAJMI', file 'ProdAJMI_Log' on file 1. Converting database 'PRODAJMI' from version 611 to the current version 655. Database 'PRODAJMI' running the upgrade step from version 611 to version 621. Database 'PRODAJMI' running the upgrade step from version 621 to version 622. Database 'PRODAJMI' running the upgrade step from version 622 to version 625. Database 'PRODAJMI' running the upgrade step from version 625 to version 626. Database 'PRODAJMI' running the upgrade step from version 626 to version 627. Database 'PRODAJMI' running the upgrade step from version 627 to version 628. Database 'PRODAJMI' running the upgrade step from version 628 to version 629.
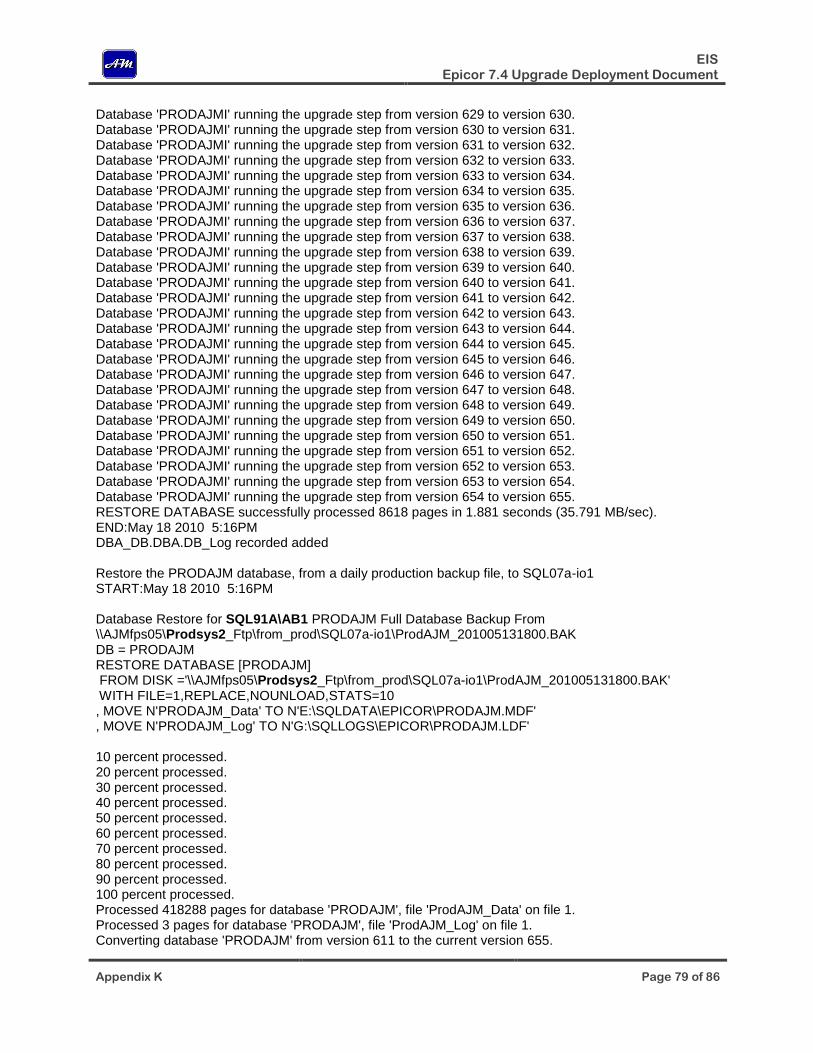
EIS Epicor 7.4 Upgrade Deployment Document
Appendix K Page 79 of 86
Database 'PRODAJMI' running the upgrade step from version 629 to version 630. Database 'PRODAJMI' running the upgrade step from version 630 to version 631. Database 'PRODAJMI' running the upgrade step from version 631 to version 632. Database 'PRODAJMI' running the upgrade step from version 632 to version 633. Database 'PRODAJMI' running the upgrade step from version 633 to version 634. Database 'PRODAJMI' running the upgrade step from version 634 to version 635. Database 'PRODAJMI' running the upgrade step from version 635 to version 636. Database 'PRODAJMI' running the upgrade step from version 636 to version 637. Database 'PRODAJMI' running the upgrade step from version 637 to version 638. Database 'PRODAJMI' running the upgrade step from version 638 to version 639. Database 'PRODAJMI' running the upgrade step from version 639 to version 640. Database 'PRODAJMI' running the upgrade step from version 640 to version 641. Database 'PRODAJMI' running the upgrade step from version 641 to version 642. Database 'PRODAJMI' running the upgrade step from version 642 to version 643. Database 'PRODAJMI' running the upgrade step from version 643 to version 644. Database 'PRODAJMI' running the upgrade step from version 644 to version 645. Database 'PRODAJMI' running the upgrade step from version 645 to version 646. Database 'PRODAJMI' running the upgrade step from version 646 to version 647. Database 'PRODAJMI' running the upgrade step from version 647 to version 648. Database 'PRODAJMI' running the upgrade step from version 648 to version 649. Database 'PRODAJMI' running the upgrade step from version 649 to version 650. Database 'PRODAJMI' running the upgrade step from version 650 to version 651. Database 'PRODAJMI' running the upgrade step from version 651 to version 652. Database 'PRODAJMI' running the upgrade step from version 652 to version 653. Database 'PRODAJMI' running the upgrade step from version 653 to version 654. Database 'PRODAJMI' running the upgrade step from version 654 to version 655. RESTORE DATABASE successfully processed 8618 pages in 1.881 seconds (35.791 MB/sec). END:May 18 2010 5:16PM DBA_DB.DBA.DB_Log recorded added Restore the PRODAJM database, from a daily production backup file, to SQL07a-io1 START:May 18 2010 5:16PM Database Restore for SQL91A\AB1 PRODAJM Full Database Backup From \\AJMfps05\Prodsys2_Ftp\from_prod\SQL07a-io1\ProdAJM_201005131800.BAK DB = PRODAJM RESTORE DATABASE [PRODAJM] FROM DISK ='\\AJMfps05\Prodsys2_Ftp\from_prod\SQL07a-io1\ProdAJM_201005131800.BAK' WITH FILE=1,REPLACE,NOUNLOAD,STATS=10 , MOVE N'PRODAJM_Data' TO N'E:\SQLDATA\EPICOR\PRODAJM.MDF' , MOVE N'PRODAJM_Log' TO N'G:\SQLLOGS\EPICOR\PRODAJM.LDF' 10 percent processed. 20 percent processed. 30 percent processed. 40 percent processed. 50 percent processed. 60 percent processed. 70 percent processed. 80 percent processed. 90 percent processed. 100 percent processed. Processed 418288 pages for database 'PRODAJM', file 'ProdAJM_Data' on file 1. Processed 3 pages for database 'PRODAJM', file 'ProdAJM_Log' on file 1. Converting database 'PRODAJM' from version 611 to the current version 655.
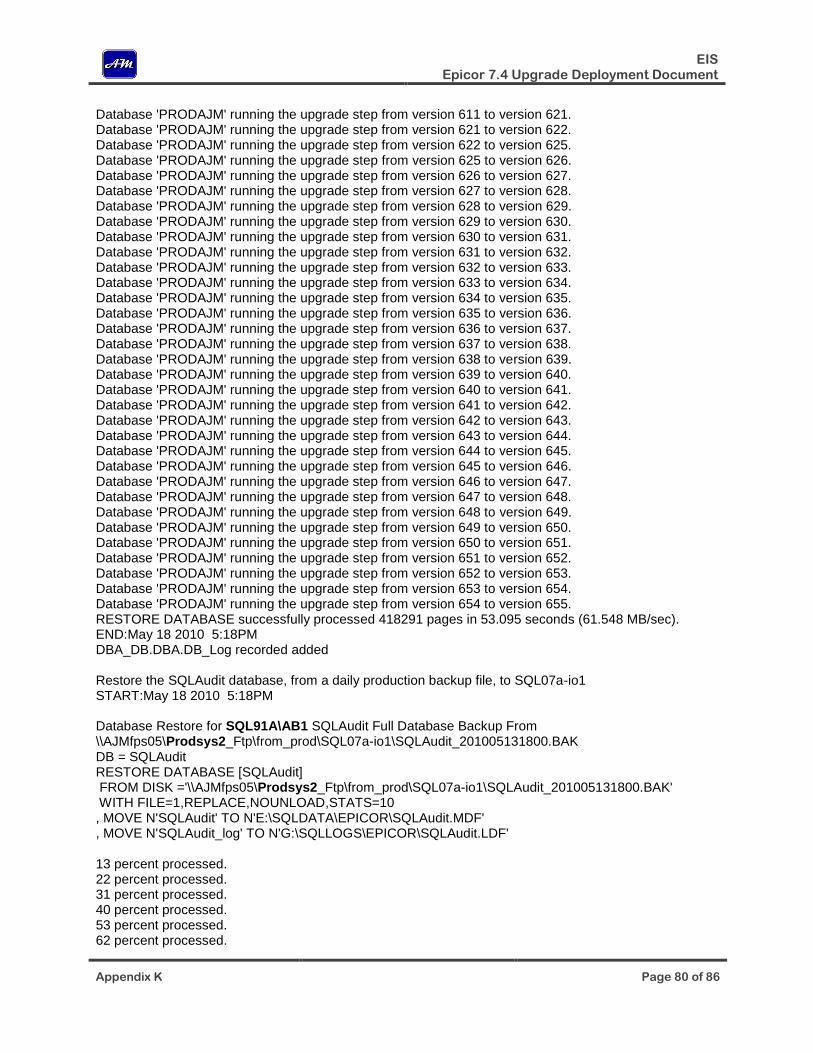
EIS Epicor 7.4 Upgrade Deployment Document
Appendix K Page 80 of 86
Database 'PRODAJM' running the upgrade step from version 611 to version 621. Database 'PRODAJM' running the upgrade step from version 621 to version 622. Database 'PRODAJM' running the upgrade step from version 622 to version 625. Database 'PRODAJM' running the upgrade step from version 625 to version 626. Database 'PRODAJM' running the upgrade step from version 626 to version 627. Database 'PRODAJM' running the upgrade step from version 627 to version 628. Database 'PRODAJM' running the upgrade step from version 628 to version 629. Database 'PRODAJM' running the upgrade step from version 629 to version 630. Database 'PRODAJM' running the upgrade step from version 630 to version 631. Database 'PRODAJM' running the upgrade step from version 631 to version 632. Database 'PRODAJM' running the upgrade step from version 632 to version 633. Database 'PRODAJM' running the upgrade step from version 633 to version 634. Database 'PRODAJM' running the upgrade step from version 634 to version 635. Database 'PRODAJM' running the upgrade step from version 635 to version 636. Database 'PRODAJM' running the upgrade step from version 636 to version 637. Database 'PRODAJM' running the upgrade step from version 637 to version 638. Database 'PRODAJM' running the upgrade step from version 638 to version 639. Database 'PRODAJM' running the upgrade step from version 639 to version 640. Database 'PRODAJM' running the upgrade step from version 640 to version 641. Database 'PRODAJM' running the upgrade step from version 641 to version 642. Database 'PRODAJM' running the upgrade step from version 642 to version 643. Database 'PRODAJM' running the upgrade step from version 643 to version 644. Database 'PRODAJM' running the upgrade step from version 644 to version 645. Database 'PRODAJM' running the upgrade step from version 645 to version 646. Database 'PRODAJM' running the upgrade step from version 646 to version 647. Database 'PRODAJM' running the upgrade step from version 647 to version 648. Database 'PRODAJM' running the upgrade step from version 648 to version 649. Database 'PRODAJM' running the upgrade step from version 649 to version 650. Database 'PRODAJM' running the upgrade step from version 650 to version 651. Database 'PRODAJM' running the upgrade step from version 651 to version 652. Database 'PRODAJM' running the upgrade step from version 652 to version 653. Database 'PRODAJM' running the upgrade step from version 653 to version 654. Database 'PRODAJM' running the upgrade step from version 654 to version 655. RESTORE DATABASE successfully processed 418291 pages in 53.095 seconds (61.548 MB/sec). END:May 18 2010 5:18PM DBA_DB.DBA.DB_Log recorded added Restore the SQLAudit database, from a daily production backup file, to SQL07a-io1 START:May 18 2010 5:18PM Database Restore for SQL91A\AB1 SQLAudit Full Database Backup From \\AJMfps05\Prodsys2_Ftp\from_prod\SQL07a-io1\SQLAudit_201005131800.BAK DB = SQLAudit RESTORE DATABASE [SQLAudit] FROM DISK ='\\AJMfps05\Prodsys2_Ftp\from_prod\SQL07a-io1\SQLAudit_201005131800.BAK' WITH FILE=1,REPLACE,NOUNLOAD,STATS=10 , MOVE N'SQLAudit' TO N'E:\SQLDATA\EPICOR\SQLAudit.MDF' , MOVE N'SQLAudit_log' TO N'G:\SQLLOGS\EPICOR\SQLAudit.LDF' 13 percent processed. 22 percent processed. 31 percent processed. 40 percent processed. 53 percent processed. 62 percent processed.
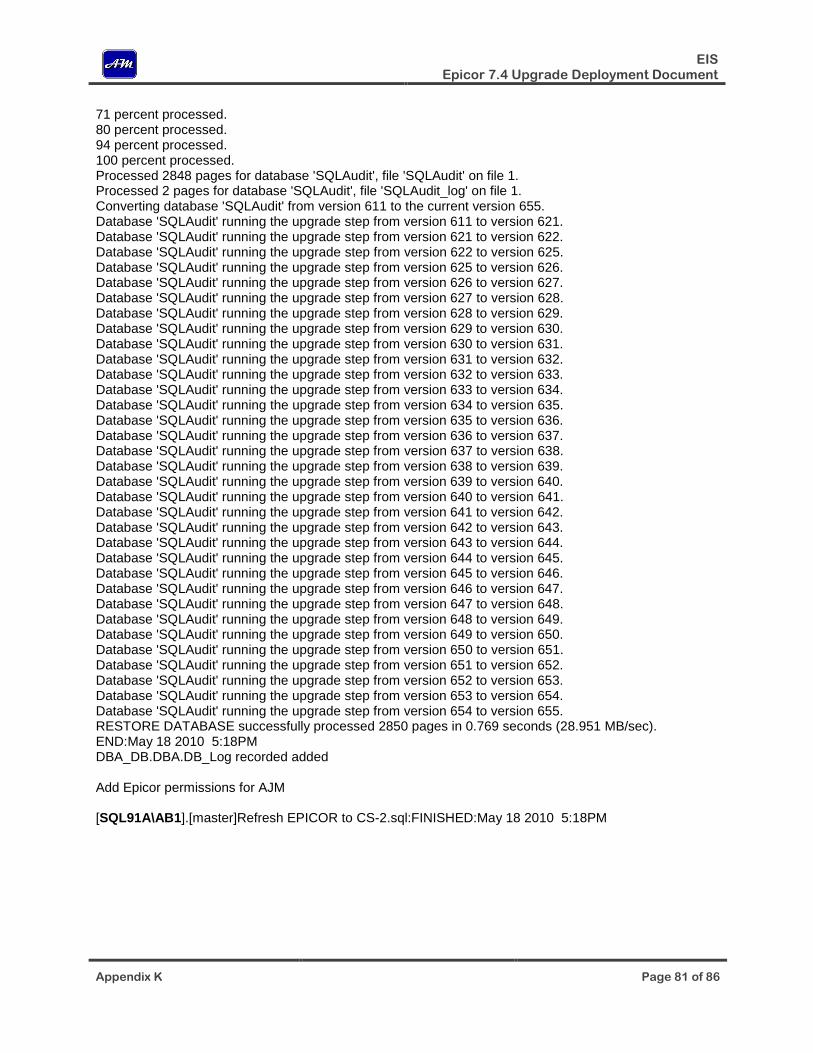
EIS Epicor 7.4 Upgrade Deployment Document
Appendix K Page 81 of 86
71 percent processed. 80 percent processed. 94 percent processed. 100 percent processed. Processed 2848 pages for database 'SQLAudit', file 'SQLAudit' on file 1. Processed 2 pages for database 'SQLAudit', file 'SQLAudit_log' on file 1. Converting database 'SQLAudit' from version 611 to the current version 655. Database 'SQLAudit' running the upgrade step from version 611 to version 621. Database 'SQLAudit' running the upgrade step from version 621 to version 622. Database 'SQLAudit' running the upgrade step from version 622 to version 625. Database 'SQLAudit' running the upgrade step from version 625 to version 626. Database 'SQLAudit' running the upgrade step from version 626 to version 627. Database 'SQLAudit' running the upgrade step from version 627 to version 628. Database 'SQLAudit' running the upgrade step from version 628 to version 629. Database 'SQLAudit' running the upgrade step from version 629 to version 630. Database 'SQLAudit' running the upgrade step from version 630 to version 631. Database 'SQLAudit' running the upgrade step from version 631 to version 632. Database 'SQLAudit' running the upgrade step from version 632 to version 633. Database 'SQLAudit' running the upgrade step from version 633 to version 634. Database 'SQLAudit' running the upgrade step from version 634 to version 635. Database 'SQLAudit' running the upgrade step from version 635 to version 636. Database 'SQLAudit' running the upgrade step from version 636 to version 637. Database 'SQLAudit' running the upgrade step from version 637 to version 638. Database 'SQLAudit' running the upgrade step from version 638 to version 639. Database 'SQLAudit' running the upgrade step from version 639 to version 640. Database 'SQLAudit' running the upgrade step from version 640 to version 641. Database 'SQLAudit' running the upgrade step from version 641 to version 642. Database 'SQLAudit' running the upgrade step from version 642 to version 643. Database 'SQLAudit' running the upgrade step from version 643 to version 644. Database 'SQLAudit' running the upgrade step from version 644 to version 645. Database 'SQLAudit' running the upgrade step from version 645 to version 646. Database 'SQLAudit' running the upgrade step from version 646 to version 647. Database 'SQLAudit' running the upgrade step from version 647 to version 648. Database 'SQLAudit' running the upgrade step from version 648 to version 649. Database 'SQLAudit' running the upgrade step from version 649 to version 650. Database 'SQLAudit' running the upgrade step from version 650 to version 651. Database 'SQLAudit' running the upgrade step from version 651 to version 652. Database 'SQLAudit' running the upgrade step from version 652 to version 653. Database 'SQLAudit' running the upgrade step from version 653 to version 654. Database 'SQLAudit' running the upgrade step from version 654 to version 655. RESTORE DATABASE successfully processed 2850 pages in 0.769 seconds (28.951 MB/sec). END:May 18 2010 5:18PM DBA_DB.DBA.DB_Log recorded added Add Epicor permissions for AJM [SQL91A\AB1].[master]Refresh EPICOR to CS-2.sql:FINISHED:May 18 2010 5:18PM