Embed Size (px)
Citation preview

EHR Parameters for Pharmacy
1

Learning Objectives• Assess need to have a properly configured Information Management
system and use of uniform data to assure medication accuracy, timely access to patient information and patient safety.
• Explain the necessity to configure Information Management system in medication management to correlate to physical processes to assure that the system supports but does not supplant the process.
• Evaluate package parameters relating to medications and medication use in both outpatient and inpatient settings to function for useability and workflow including IHS specific options, a uniform print format for EHR, controlled substance orders, the PharmEd Button, inpatient user parameters, inpatient ward setup, Ward Groups, Unit Dose Parameters and MAR/MAR Labels. Determine best practices.
2
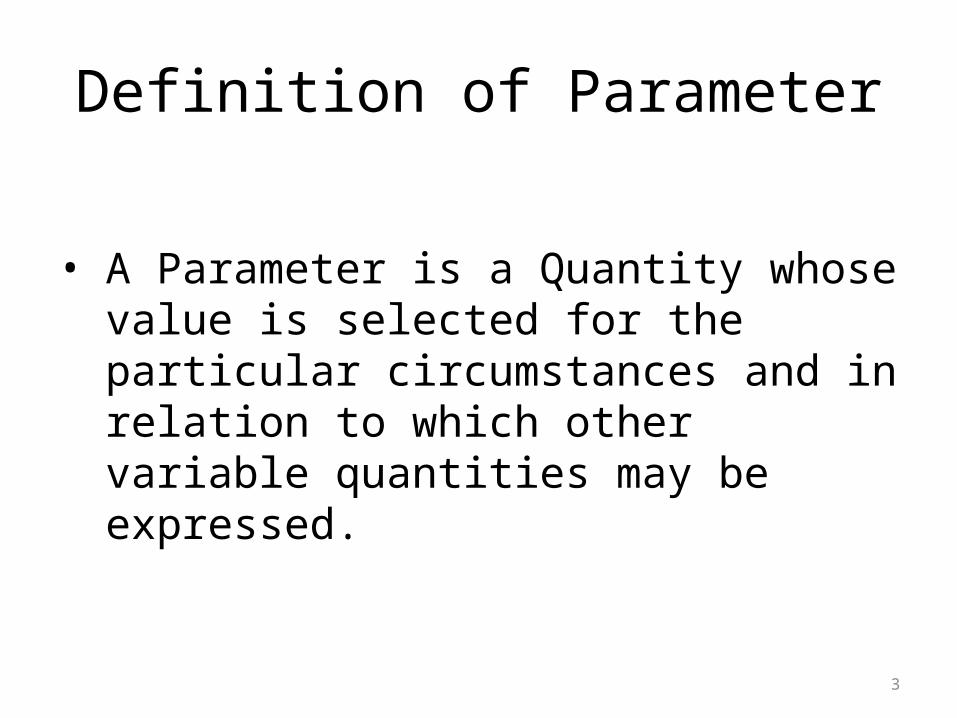
Definition of Parameter
• A Parameter is a Quantity whose value is selected for the particular circumstances and in relation to which other variable quantities may be expressed.
3
Definition of Parameter
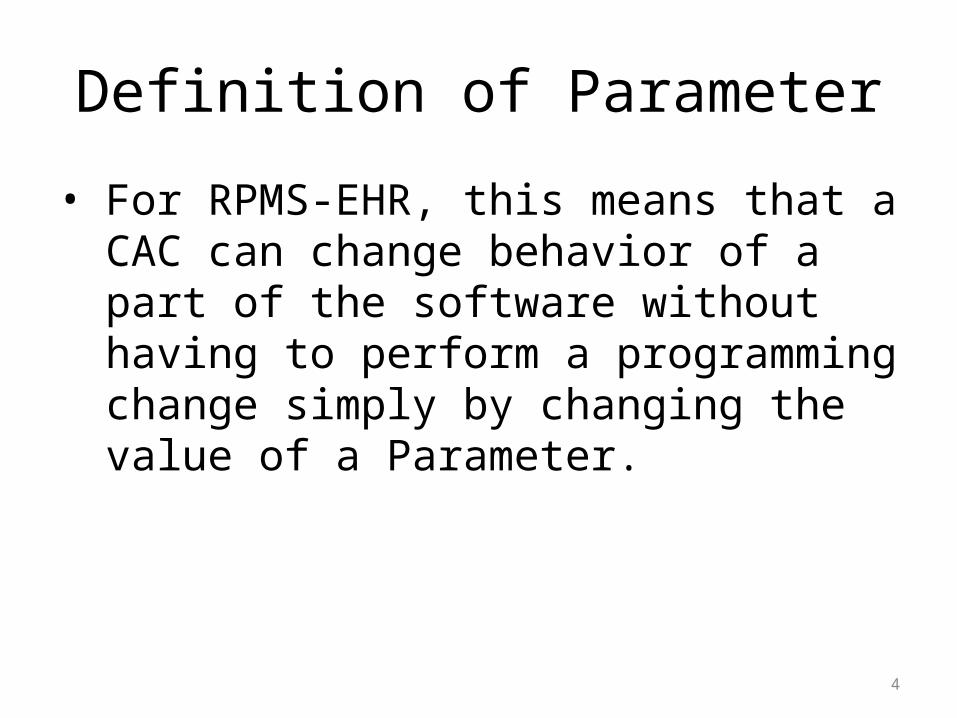
• For RPMS-EHR, this means that a CAC can change behavior of a part of the software without having to perform a programming change simply by changing the value of a Parameter.
4
Parameters:
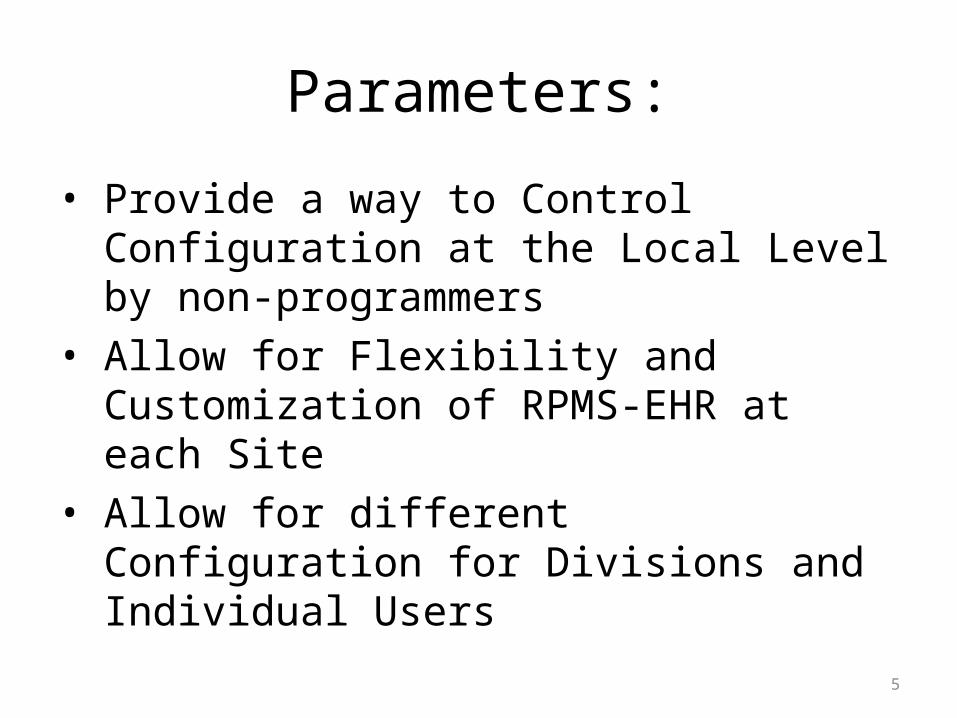
• Provide a way to Control Configuration at the Local Level by non-programmers
• Allow for Flexibility and Customization of RPMS-EHR at each Site
• Allow for different Configuration for Divisions and Individual Users
5

Parameter Structure
• The Structure of Parameters within RPMS-EHR is Hierarchical
• Parameters range from User at the top to Package at the bottom
6

Hierarchy Levels
1 User2 Team (OE/RR)3 Device4 Location5 Service6 Division7 System8 Package
7
Parameter Hierarchy
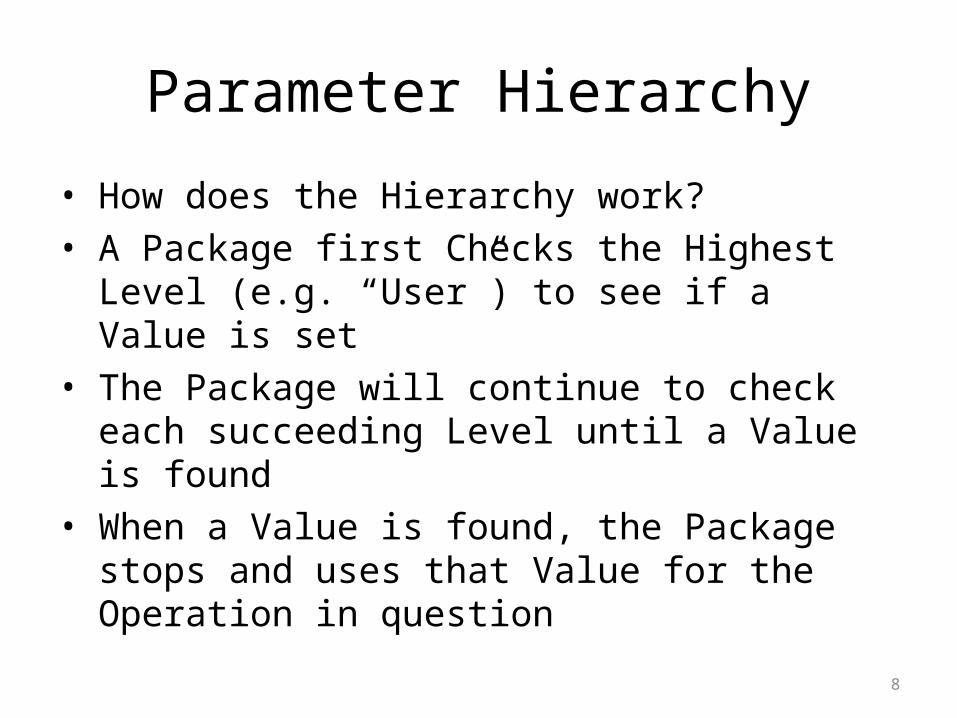
• How does the Hierarchy work?• A Package first Checks the Highest Level (e.g.
“User”) to see if a Value is set• The Package will continue to check each
succeeding Level until a Value is found• When a Value is found, the Package stops and
uses that Value for the Operation in question
8

Parameter Hierarchy
• Note that not all Levels are available for all Parameters, but only those that make sense for that particular item.
ORWOR WRITE ORDERS LIST may be set for the following:
1 User USR [choose from NEW PERSON]
2 Location LOC [choose from HOSPITAL LOCATION]
2.3 Service SRV [choose from SERVICE/SECTION]
2.7 Division DIV [MEDSPHERE DEMO HOSPITAL]
3 System SYS [DEMO.MEDSPHERE.COM]
4 Package PKG [ORDER ENTRY/RESULTS REPORTING]
9
Setting Parameters
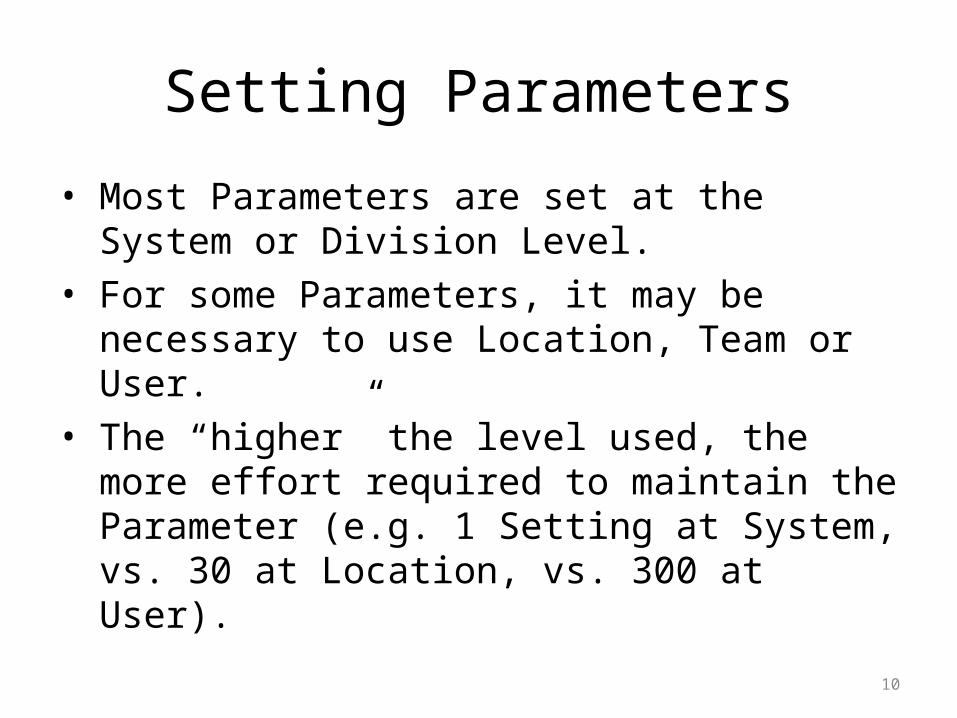
• Most Parameters are set at the System or Division Level.
• For some Parameters, it may be necessary to use Location, Team or User.
• The “higher” the level used, the more effort required to maintain the Parameter (e.g. 1 Setting at System, vs. 30 at Location, vs. 300 at User).
10
Setting Parameters
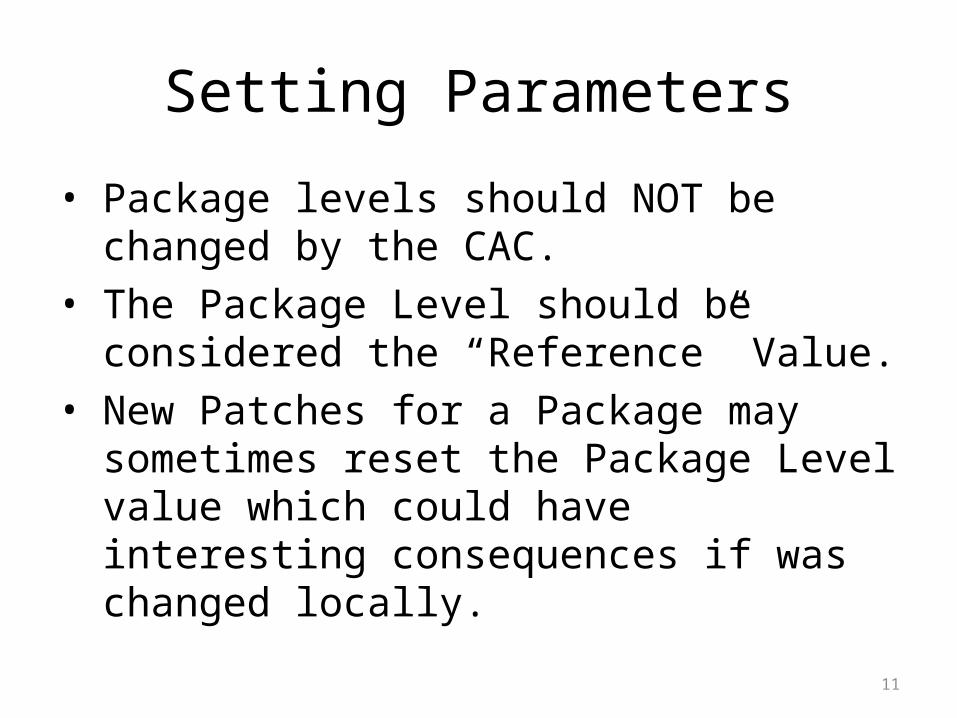
• Package levels should NOT be changed by the CAC.
• The Package Level should be considered the “Reference” Value.
• New Patches for a Package may sometimes reset the Package Level value which could have interesting consequences if was changed locally.
11

Setting Parameters
• RPMS-EHR Parameters can be set in two ways:
• Using the RPMS menu option: General Parameter Tools
• Using various RPMS menus from:RPMS-EHR Configuration Master Menu
12

Parameters – MedsCORE-EHR-BEH-MED
ACT Days of Medication ActivityDEA Print DEA on all PrescriptionsMAX Maximum Allowable Days SupplyMEC Medication Counseling ConfigurationOMD Outside Med Dosage FormORD Default Collation OrderREN Renewal Limit for Expired MedsSPL Med Tab Splitter Size
13

Days of Medication Activity
14

Print DEA on all Prescriptions
• Allows for local customization for DEA printing on all prescriptions instead of only on controlled prescriptions.
15

Maximum Allowable Days Supply
• This controls the upper limit for days supply of a dispensed medication:• The range is 90-365 days.
16
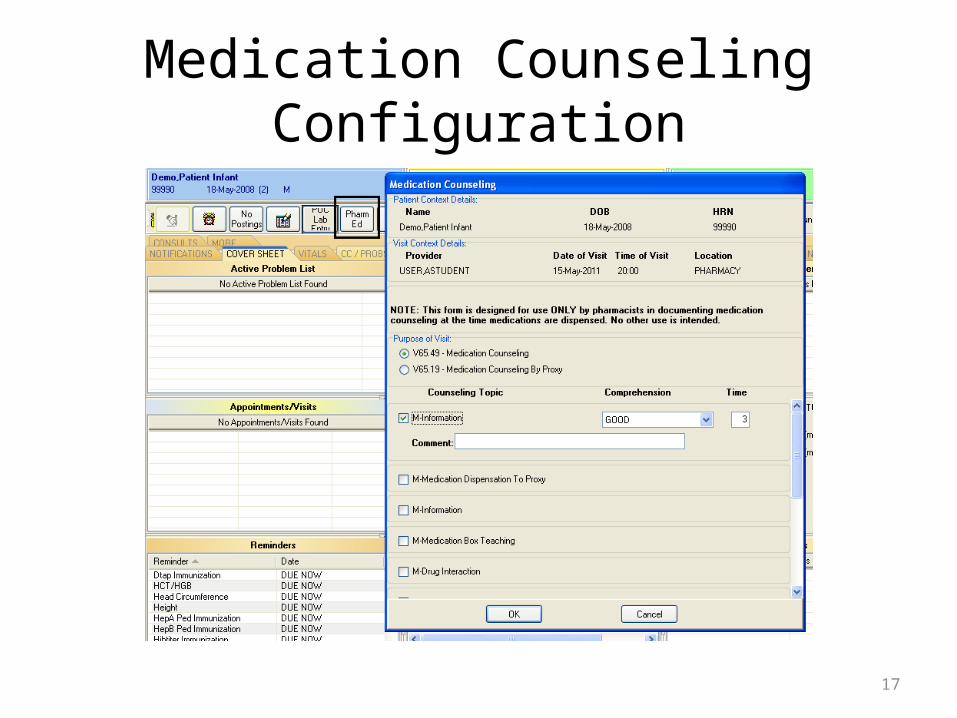
Medication Counseling Configuration
17

Medication Counseling Configuration
DCMP Default Comprehension ValueDCTM Default Counsel TimeEDTX Edit Disclaimer TextELST Education TopicsHL Hospital Location for VisitPLST POV ListDPOV Default POVPNL POV Narrative Text
18
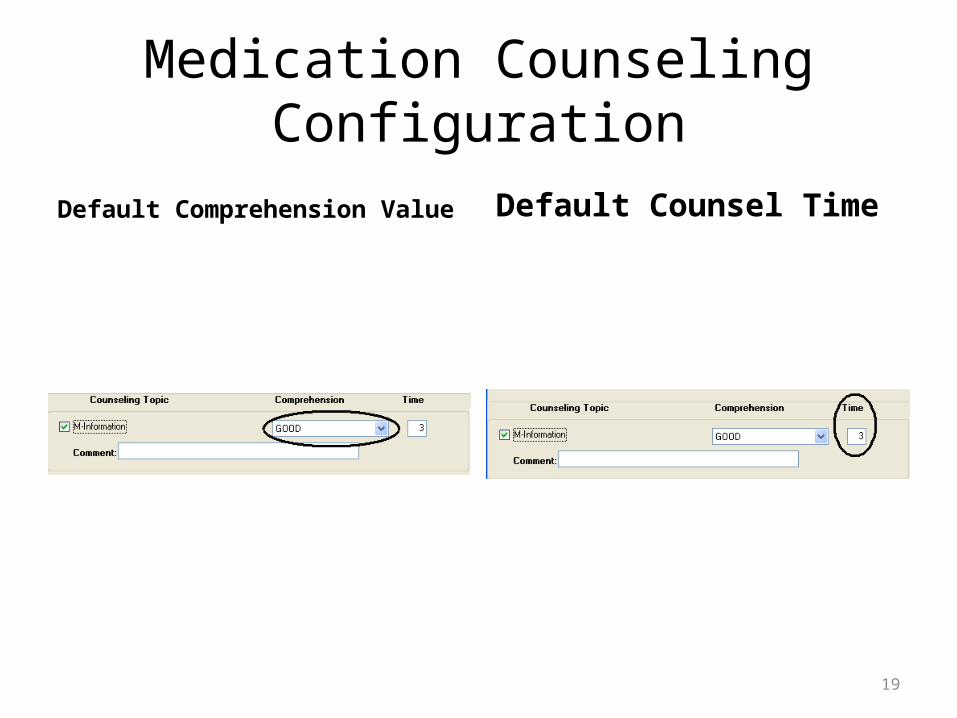
Medication Counseling Configuration
Default Comprehension Value Default Counsel Time
19

Medication Counseling Configuration
Edit Disclaimer Text Education Topics
20

Medication Counseling Configuration
Hospital Location for Visit POV List
21

Medication Counseling Configuration
Default POV POV Narrative Text
22

Outside Med Dosage Form
23

Default Collation OrderControls the default collation order for the medication list. May be one or more of the following values: C = Chronic med status E = Expiration date F = Last fill date I = Issue date M = Medication name N = Rx # P = Provider name R = Refills remaining S = Status
To reverse the collation order, use the lowercase equivalent.
24

Default Collation Order
25

Renewal Limit for Expired Meds
• This is the maximum number of days following the expiration of a prescription that it may still be renewed:• Typically set to between 90-120 days.
26
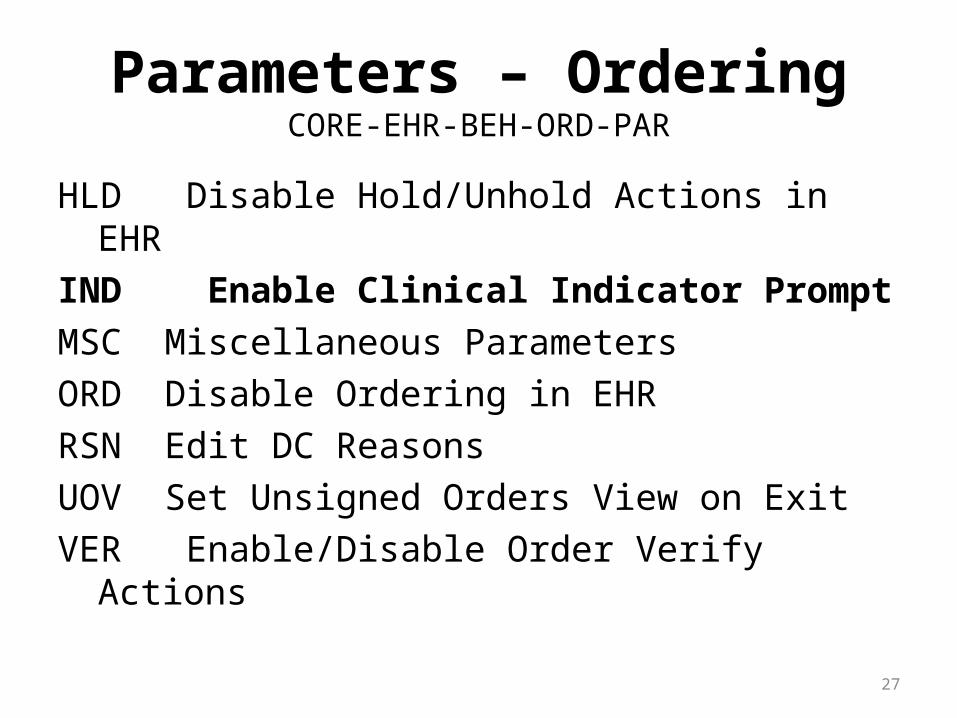
Parameters – OrderingCORE-EHR-BEH-ORD-PAR
HLD Disable Hold/Unhold Actions in EHRIND Enable Clinical Indicator PromptMSC Miscellaneous ParametersORD Disable Ordering in EHRRSN Edit DC ReasonsUOV Set Unsigned Orders View on ExitVER Enable/Disable Order Verify Actions
27

Enable Clinical Indicator Prompt
• Places a prompt for providers to enter a clinical indication for medication orders.
• Required to be turned on for e-prescribing.• EHR Patch 9:
• Requires a coded diagnosis• Pull in problem list and POVs for providers to
select from• Renew, copy, and change pre-populates with
clinical indication of new order
28
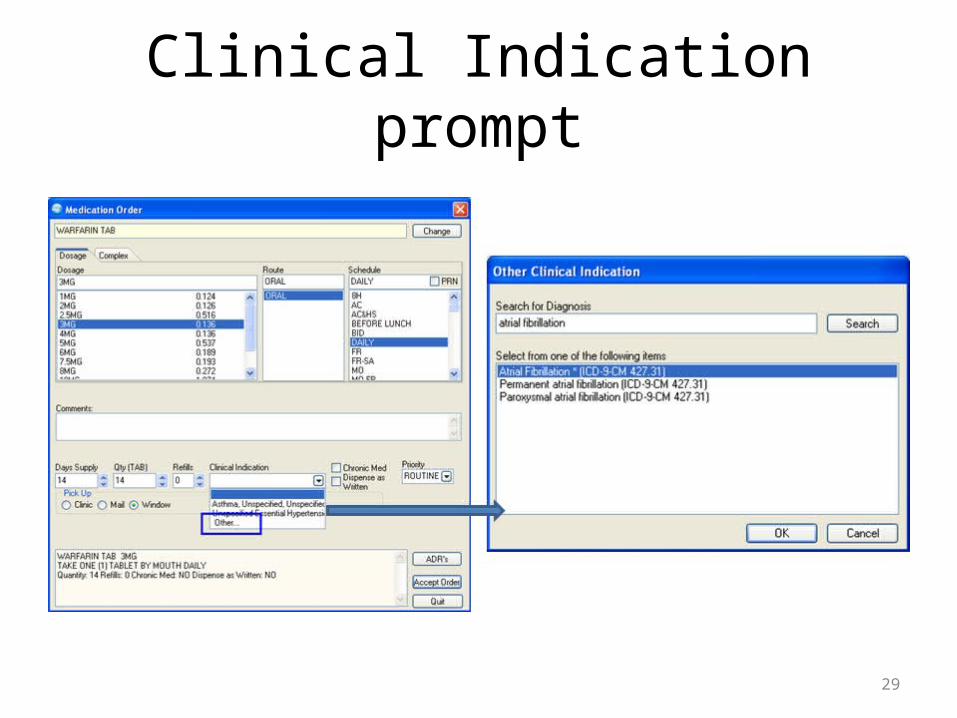
Clinical Indication prompt
29
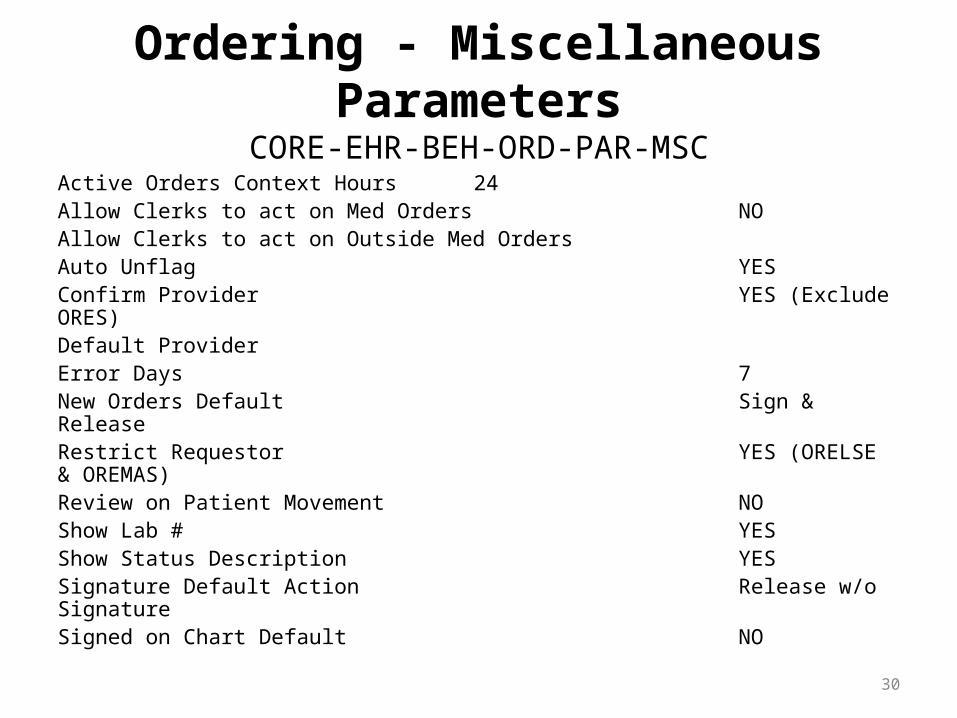
Ordering - Miscellaneous ParametersCORE-EHR-BEH-ORD-PAR-MSC
Active Orders Context Hours 24Allow Clerks to act on Med Orders NOAllow Clerks to act on Outside Med OrdersAuto Unflag YESConfirm Provider YES (Exclude ORES)Default ProviderError Days 7New Orders Default Sign & ReleaseRestrict Requestor YES (ORELSE & OREMAS)Review on Patient Movement NOShow Lab # YESShow Status Description YESSignature Default Action Release w/o SignatureSigned on Chart Default NO
30
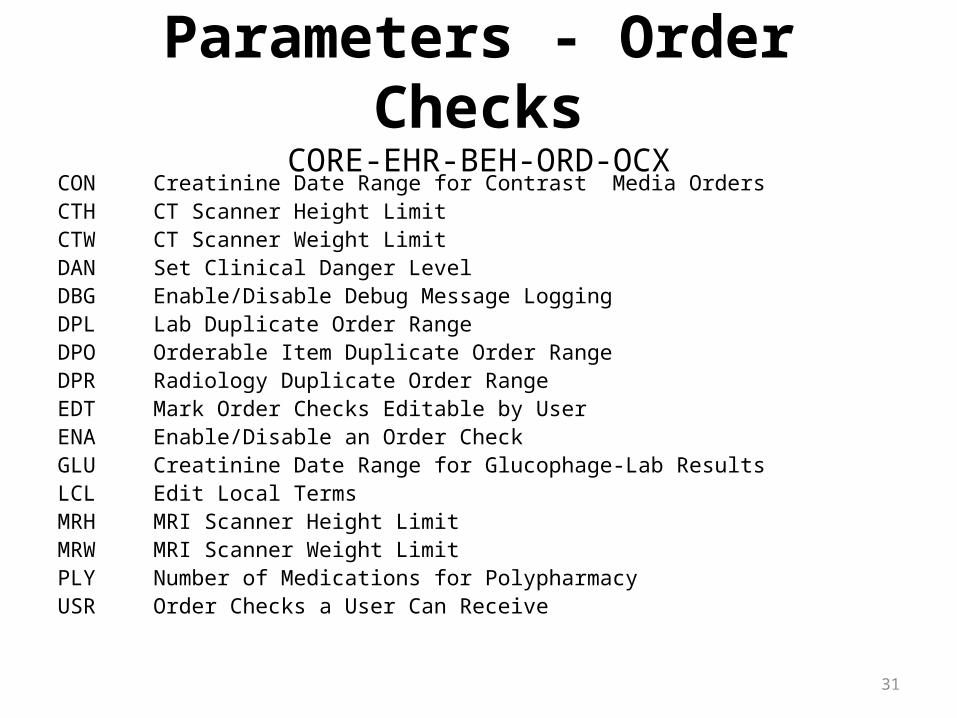
Parameters - Order ChecksCORE-EHR-BEH-ORD-OCX
CON Creatinine Date Range for Contrast Media OrdersCTH CT Scanner Height LimitCTW CT Scanner Weight LimitDAN Set Clinical Danger LevelDBG Enable/Disable Debug Message LoggingDPL Lab Duplicate Order RangeDPO Orderable Item Duplicate Order RangeDPR Radiology Duplicate Order RangeEDT Mark Order Checks Editable by UserENA Enable/Disable an Order CheckGLU Creatinine Date Range for Glucophage-Lab ResultsLCL Edit Local TermsMRH MRI Scanner Height LimitMRW MRI Scanner Weight LimitPLY Number of Medications for PolypharmacyUSR Order Checks a User Can Receive
31

Parameters – NotificationsCORE-EHR-NOT
DET Determine RecipientsDIS Display Notifications a User Can ReceiveERA Erase NotificationsFLG Flag Orderable Items to Send NotificationsFWD Forward NotificationsPAR Notification ParametersPRC Enable/Disable NotificationsREC Display Patient Alerts and Alert RecipientsSYS Enable/Disable Notification SystemUNV Set Delays for Unverified OrdersURG Set Urgency for Notifications
32

Parameters – ReportsCORE-EHR-BEH-RPT
FMT Print FormatsHSM Health Summary Configuration ...PAR Report Parameters ...SYS System Display ParametersUSR User Display Parameters
33
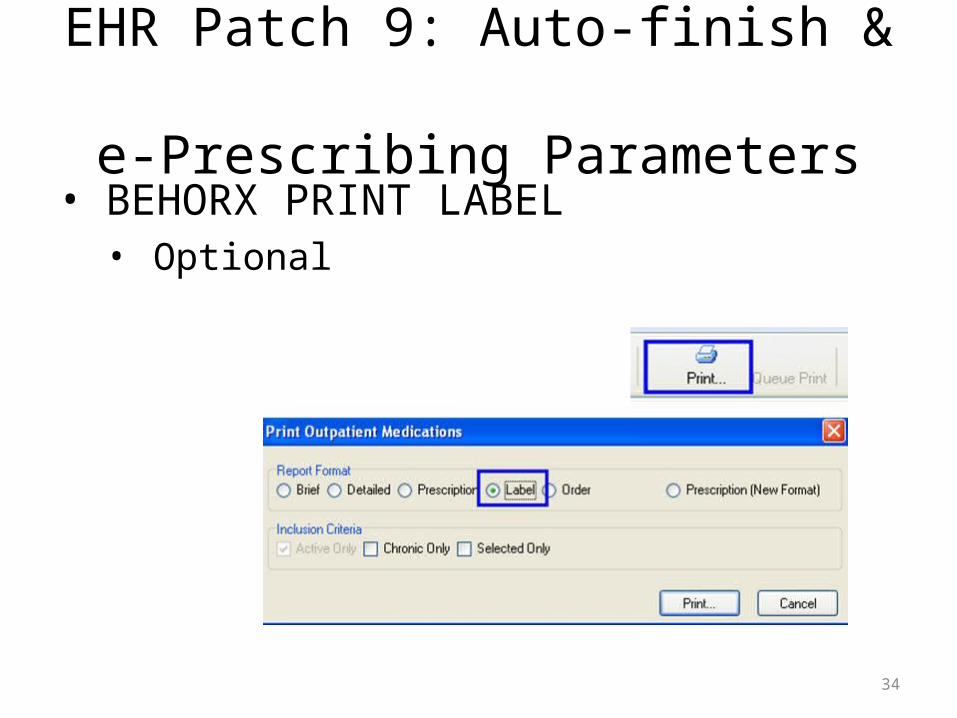
EHR Patch 9: Auto-finish & e-Prescribing Parameters
• BEHORX PRINT LABEL• Optional
34
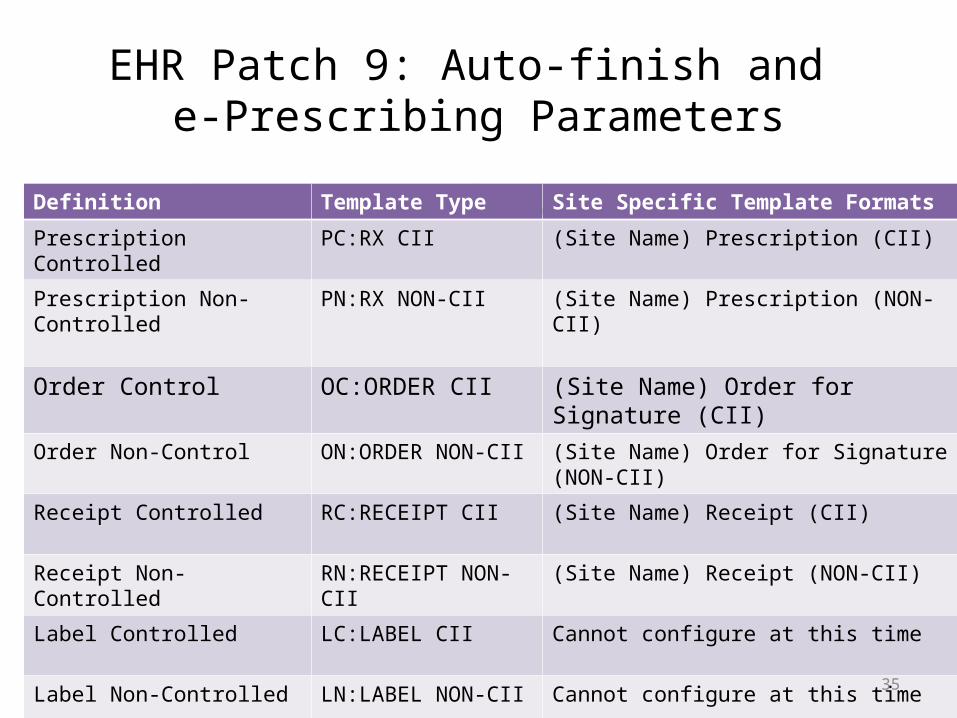
EHR Patch 9: Auto-finish and e-Prescribing Parameters
• BEHORX PRINT FORMATSDefinition Template Type Site Specific Template Formats
Prescription Controlled PC:RX CII (Site Name) Prescription (CII)
Prescription Non-Controlled PN:RX NON-CII (Site Name) Prescription (NON-CII)
Order Control OC:ORDER CII (Site Name) Order for Signature (CII)
Order Non-Control ON:ORDER NON-CII (Site Name) Order for Signature (NON-CII)
Receipt Controlled RC:RECEIPT CII (Site Name) Receipt (CII)
Receipt Non-Controlled RN:RECEIPT NON-CII (Site Name) Receipt (NON-CII)
Label Controlled LC:LABEL CII Cannot configure at this time
Label Non-Controlled LN:LABEL NON-CII Cannot configure at this time
35
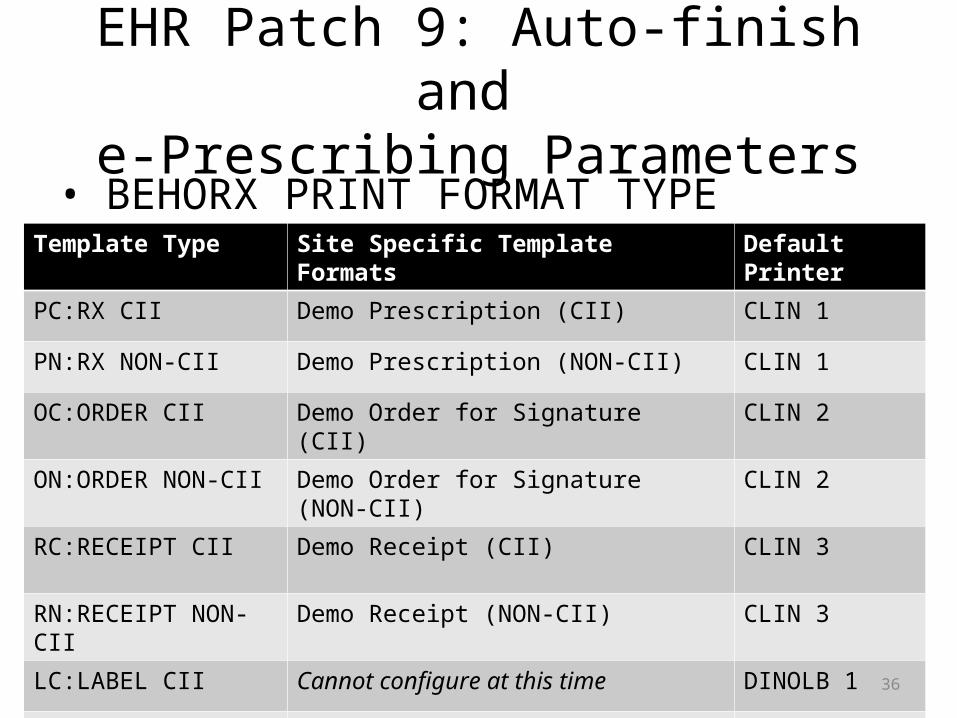
EHR Patch 9: Auto-finish and e-Prescribing Parameters
• BEHORX PRINT FORMAT TYPETemplate Type Site Specific Template Formats Default Printer
PC:RX CII Demo Prescription (CII) CLIN 1
PN:RX NON-CII Demo Prescription (NON-CII) CLIN 1
OC:ORDER CII Demo Order for Signature (CII) CLIN 2
ON:ORDER NON-CII Demo Order for Signature (NON-CII) CLIN 2
RC:RECEIPT CII Demo Receipt (CII) CLIN 3
RN:RECEIPT NON-CII Demo Receipt (NON-CII) CLIN 3
LC:LABEL CII Cannot configure at this time DINOLB 1
LN:LABEL NON-CII Cannot configure at this time DINOLB 2
36

EHR Patch 9: Auto-finish & e-Prescribing Parameters
• APSP AUTO RX DIV• Sets Pharmacy Division to divisions setup in
Outpatient Site File• Must be done before APSP AUTO RX
37

EHR Patch 9: Auto-finish & e-Prescribing Parameters
• APSP AUTO RXAPSP Auto RX Setting
Meaning
Internal Patients fill prescriptions written by in-house providers at only in-house pharmacies: In-house options for Clinic, Mail, Window retained CII order for signature queued to print
Internal/External Patients fill prescriptions written by in-house providers at in-house and outside pharmacies: In-house options for Clinic, Mail, Window retained – CII order for signature queued to print. Prior to Surescripts® set up/deployment, enables the “Outside Pharmacy – Print” functionality – Auto-finishes medications upon signature and queues prescription for printing. After Surescripts® set up/deployment, enables the “Outside Pharmacy – eRx functionality – Auto finishes medications upon signature, transmits and queues receipt for printing
External No in-house pharmacy: All medication orders auto-finish upon signature Prior to Surescripts® set up/deployment, enables the Outside Pharmacy – Print” functionality – Auto finishes medication upon signature and queues prescription for printing. After Surescripts® set up/deployment, enables the “Outside Pharmacy – eRx functionality – Auto finishes medications upon signature, transmits, and queues receipt for printing
38

EHR Patch 9: Auto-finish & e-Prescribing Parameters
• APSP AUTO RX SCHEDULE RESTRICT• Not editable
• APSP AUTO RX ERX OF CII• Not editable
• APSP AUTO RX ADD PRV COMMENT• Set to NO
• APSP AUTO RX DEF PT STATUS• Set to OUTPATIENT
39
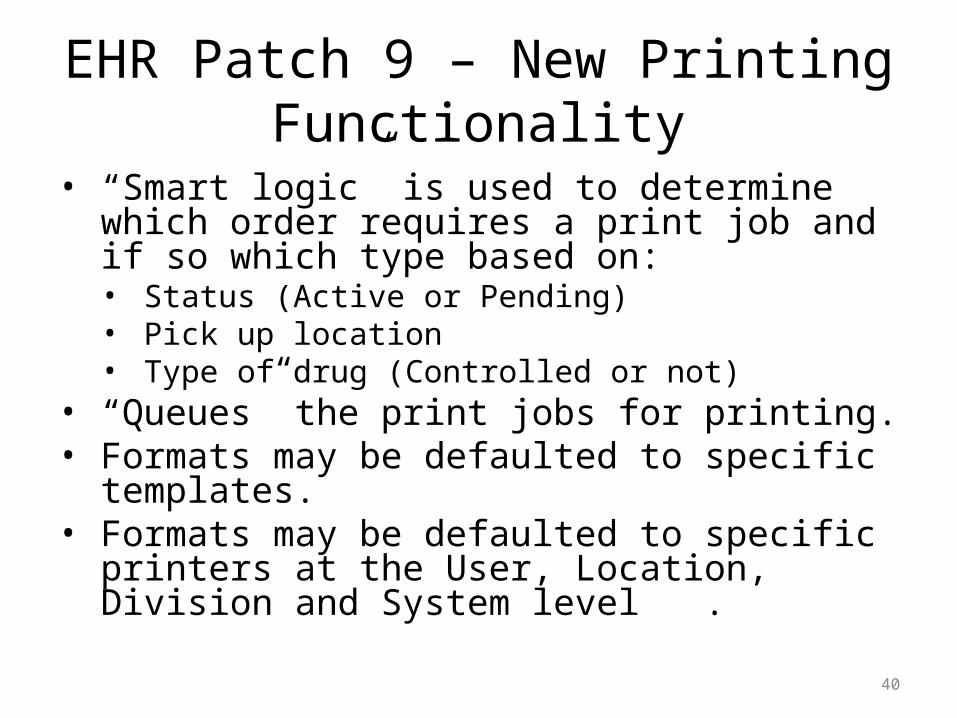
EHR Patch 9 – New Printing Functionality
• “Smart logic” is used to determine which order requires a print job and if so which type based on:• Status (Active or Pending)• Pick up location • Type of drug (Controlled or not)
• “Queues” the print jobs for printing.• Formats may be defaulted to specific templates.• Formats may be defaulted to specific printers at
the User, Location, Division and System level .
40
Queue PrintFacility type
Pick up location Status after signing
CII? Print format Icon
Internal ClinicMailWindow
ClinicWindow
PendingPendingPending
PendingPending
NoNoNo
YesYes
N/AN/AN/A
CII Order for SigCII Order for Sig
External Clinic
Outside Pharmacy – eRx
Outside Pharmacy - Print
Active
Active
Active
NoYes
No
NoYes
N/APrescription (CII)
Prescription (Non CII)
Prescription (Non CII)Prescription (CII)
41

Queue PrintFacility type
Pick up location Status after signing
CII? Print format Icon
Internal/ External
ClinicMailWindow
PendingPendingPending
NoNoNo
N/AN/AN/A
ClinicWindow
PendingPending
YesYes
CII Order for SigCII Order for Sig
Outside Pharmacy – eRx
Outside Pharmacy - Print
Active
Active
No
NoYes
Prescription (Non CII)
Prescription (Non CII)Prescription (CII)
42

Queue Print
After signing, the meds that have print jobs are highlighted and the Queue Print button is active
43
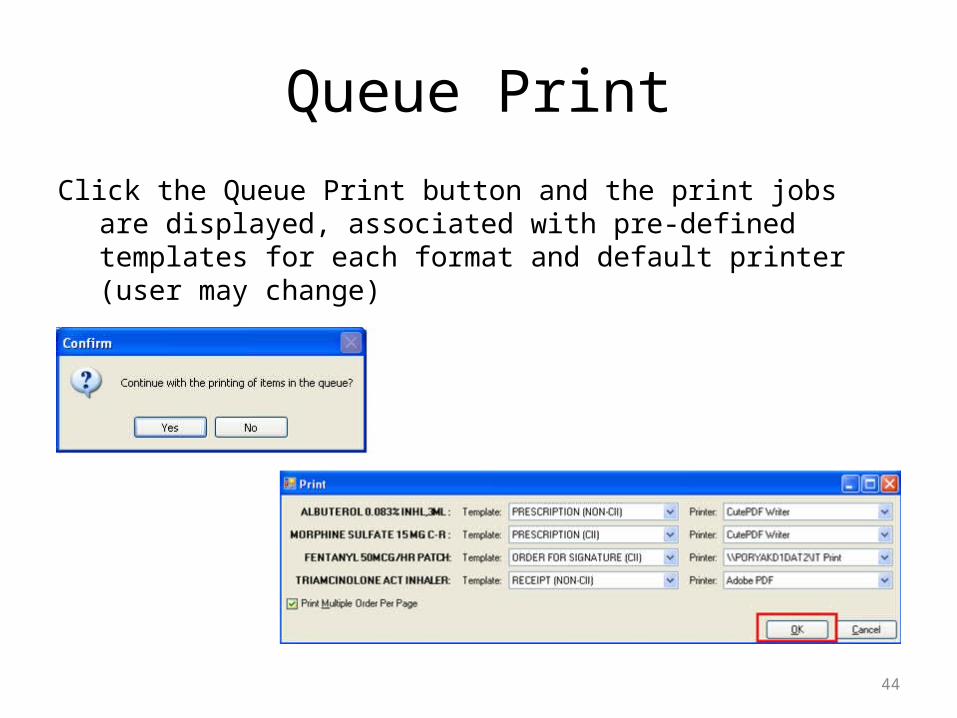
Queue Print
Click the Queue Print button and the print jobs are displayed, associated with pre-defined templates for each format and default printer (user may change)
44
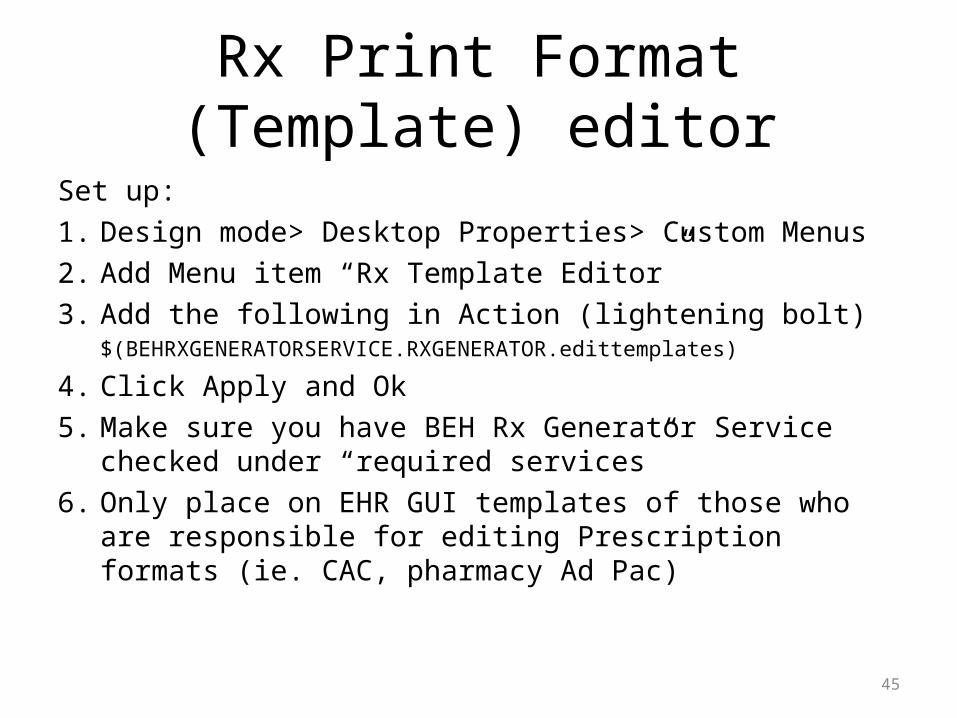
Rx Print Format (Template) editor
Set up:1. Design mode> Desktop Properties> Custom Menus2. Add Menu item “Rx Template Editor”3. Add the following in Action (lightening bolt)
$(BEHRXGENERATORSERVICE.RXGENERATOR.edittemplates)
4. Click Apply and Ok5. Make sure you have BEH Rx Generator Service checked
under “required services”6. Only place on EHR GUI templates of those who are
responsible for editing Prescription formats (ie. CAC, pharmacy Ad Pac)
45

Rx Print Format (Template) Editor
Design Mode Rx Template Editor
46
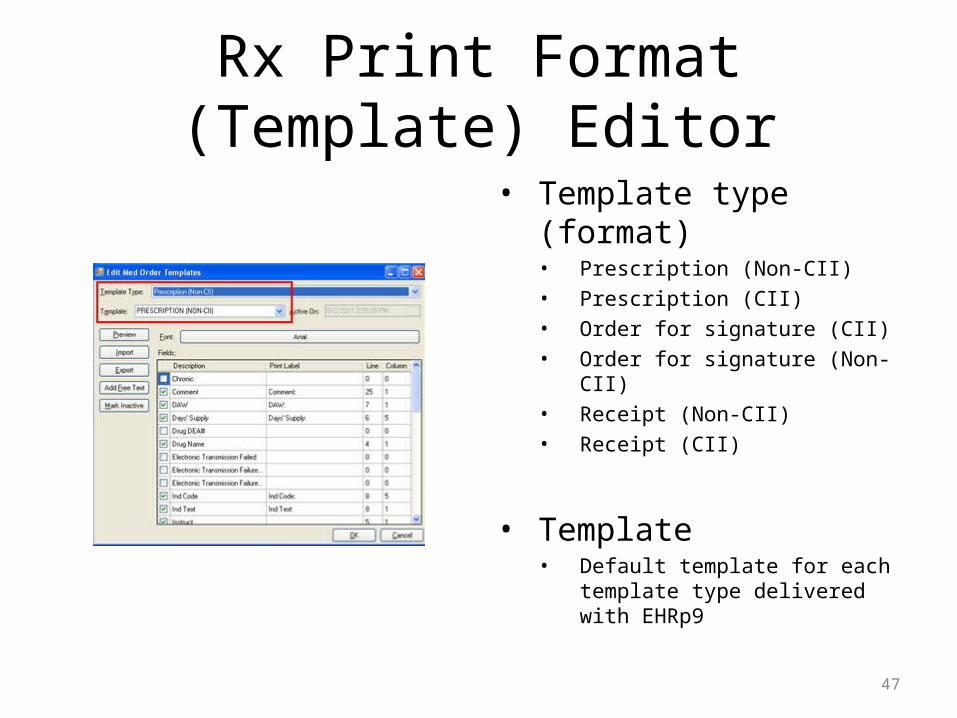
Rx Print Format (Template) Editor
• Template type (format)• Prescription (Non-CII)• Prescription (CII)• Order for signature (CII)• Order for signature (Non-CII)• Receipt (Non-CII)• Receipt (CII)
• Template• Default template for each
template type delivered with EHRp9
47

Rx Print Format (Template) Editor
Importing template:1. Save the files to a local
drive2. Open Rx template editor3. Select template type4. Click Import5. Change the name if
desired, click OK
The files are .ptxml files6. Click “active on”7. Select Yesterday at 6:00
am, then OK8. Now you may edit the
template9. Click OK to store
48


Rx Print Format (Template) Editor• Active on – set activation date
(usually Yesterday at 6:00am)• Preview – Display preview of current
template • Import – import template• Export – export template• Add Free Text – you may add as
many as you like. May include header info for format, alternate signature lines, etc.
• Mark Inactive – inactivates template so users cannot select
50
*** Tip ***To Copy a template - export, save and import:- Change to a local name on imports. - Set “active on” to Yesterday at 6:00 am.- Make changes then click OK
Highly recommend using the copy process and creating local templatesrather than editing nationally delivered default templates ***
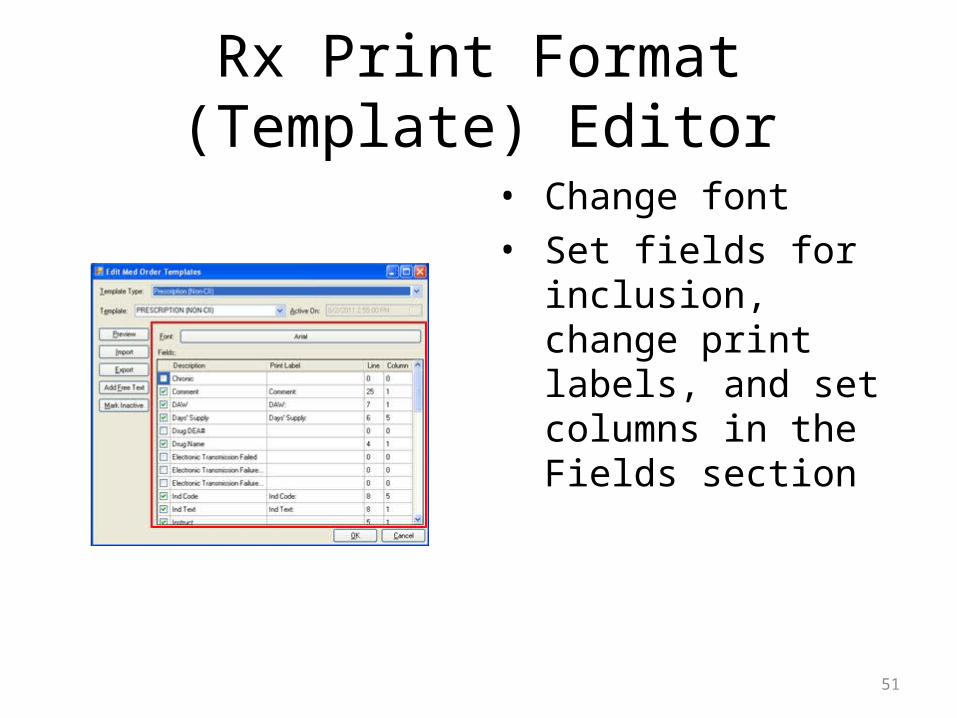
Rx Print Format (Template) Editor
• Change font • Set fields for inclusion,
change print labels, and set columns in the Fields section
51

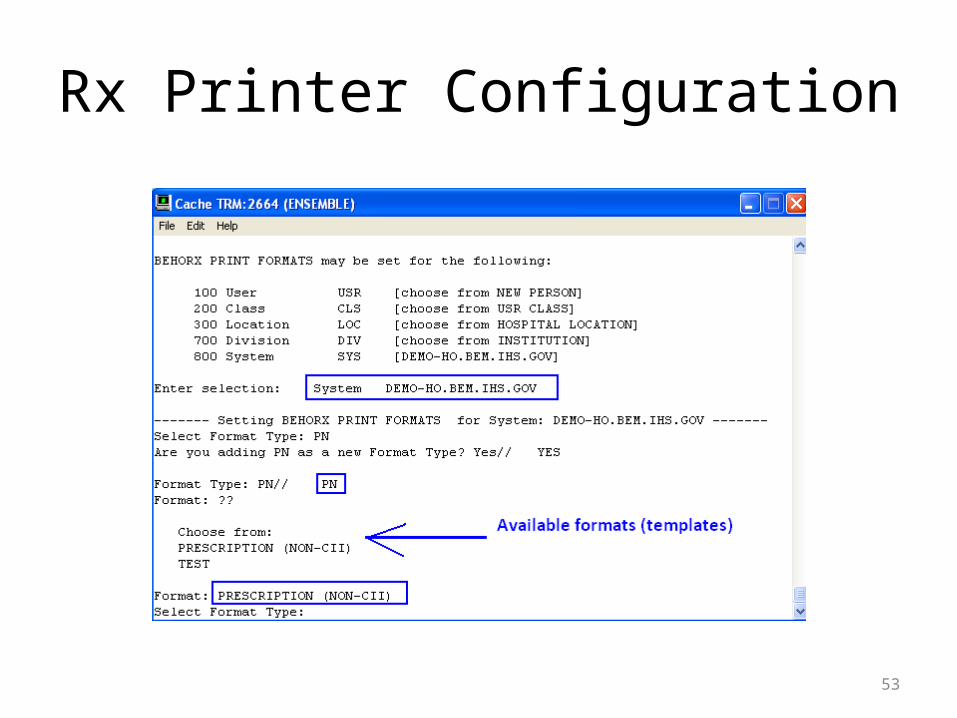
Rx Printer Configuration
In RPMS set the BEHORX PRINT FORMATS parameter• Associates the Format
type with the Format (Template)
• May set at User, Class, Location, Division and System level
• Most commonly will be set at System or Division level
Select Format Type: ?? Instance values are (Commonly set format types) : PC:RX CII PN:RX NON-CII OC:ORDER CII ON:ORDER NON-CII RC:RECEIPT CII RN:RECEIPT NON-CII LC:LABEL CII LN:LABEL NON-CII
52
Rx Printer Configuration
53
Rx Printer Configuration
Populate the BEHORX PRINT FORMAT TYPEThis associates the Format type:
Order for signature (CII)Prescription (CII)Prescription (Non-CII)Receipt (Non-CII) with a default printer. • Set at User, Location, Division or System level• In RPMS or in EHR Printer Preferences tool
54

Rx Printer Preferences EditorSet up:1. Design mode> Desktop Properties> Custom Menus2. Add Menu item “Rx Printer Config”3. Add the following in Action (lightening bolt)
$(BEHRXGENERATORSERVICE.RXGENERATOR.EditPrinterPreferences)
4. Click Apply and Ok5. Make sure you have BEH Rx Generator Service checked
under “required services”6. Users will only be able to set their own defaults7. Assign the BEHORX PRINT key for CAC/IT staff who will set
Location, Division, System settings
55

Rx Printer Preferences Editor
Design Mode Printer Preferences
56

Rx Printer Preferences Editor
Use dropdown to select level, template type, printer settings.Click APPY to store the parameter.To remove a parameter level, bring up the level and click REMOVE
57

Rx Printer Preferences EditorRPMS display parameterBEHORX PRINT FORMAT TYPE
RPMS enter/edit parameterBEHORX PRINT FORMAT TYPE
58

Questions and Discussion
59