Embed Size (px)
Citation preview
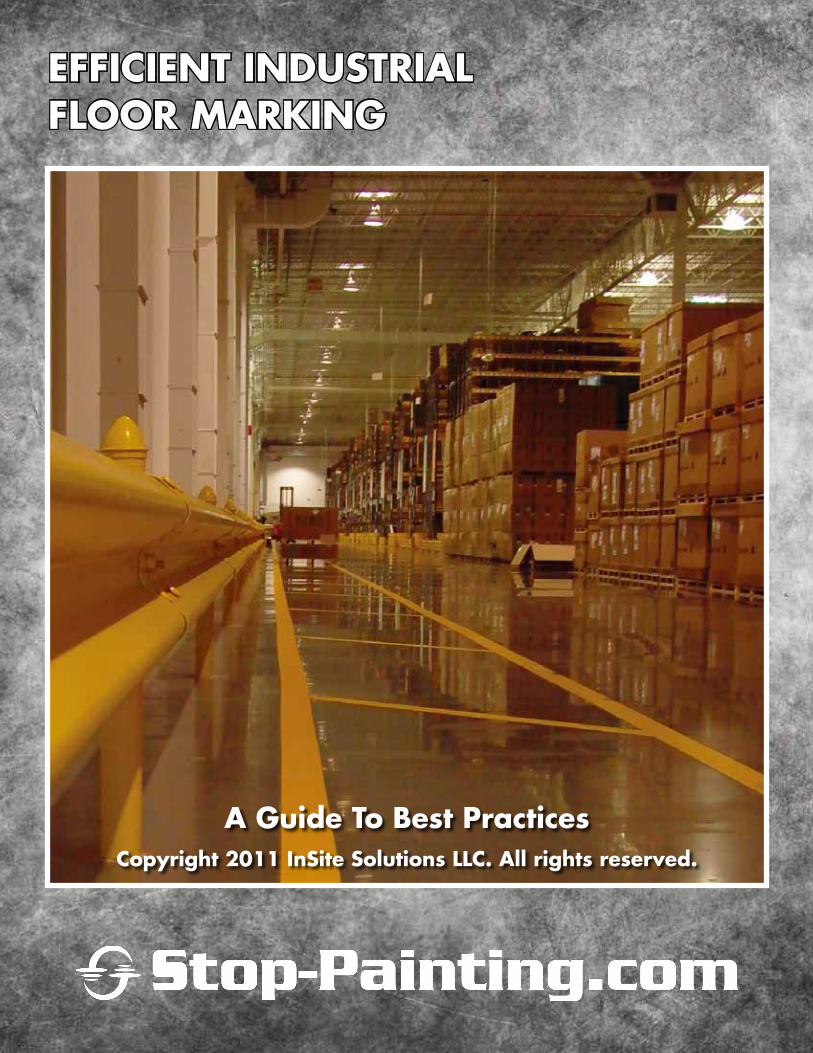
EfficiEnt industrial floor Marking
a guide to Best Practicescopyright 2011 insite solutions llc. all rights reserved.
Industrial floor marking is a necessary challenge, both to maintain a safe working environment for employ-ees as well as for the overall organization and efficiency of the operation. There are a variety of products available to accomplish the task of creating a visual workplace on the floors of factories and warehouses. There are several considerations to review when choosing a method of floor marking for a facility, in order to create an efficient system that can be easily maintained over time.
coMParing floor Marking MEthods & MatErials
line striping Paint
The most common way of marking floors is with paint. Paint presents several drawbacks, when both the material itself and the application process are considered over the long term life of the factory floor. First, paint does not adhere well to concrete. Often expensive preparation procedures are required such as bead blasting or etching, which are expensive and laborious. There are environmental considerations when dealing with painting, since it emits a considerable amount of volatile organic compounds. The facility usually must be shut down during the preparation, painting, and dry time. This downtime creates a loss of productivity for the company.
When the paint is dry, it sets at a ninety degree angle from the floor. This angle is the most vulnerable to damage created from the force of oncoming traffic. When the inevitable damage occurs, it is necessary to mark the area again, in order to maintain a safe and organized work area. The maintenance of the damaged line brings the difficulty of the whole application process back again.
Repairs and maintenance cannot happen on a daily basis, to be ready for surprise visits. They have to be scheduled to allow for floor prep and shut down time. And finally if a line is damaged or needs to be removed completely to accommodate a layout change, then removal of the paint requires heavy equipment that often damages the floor and leaves ghost lines.
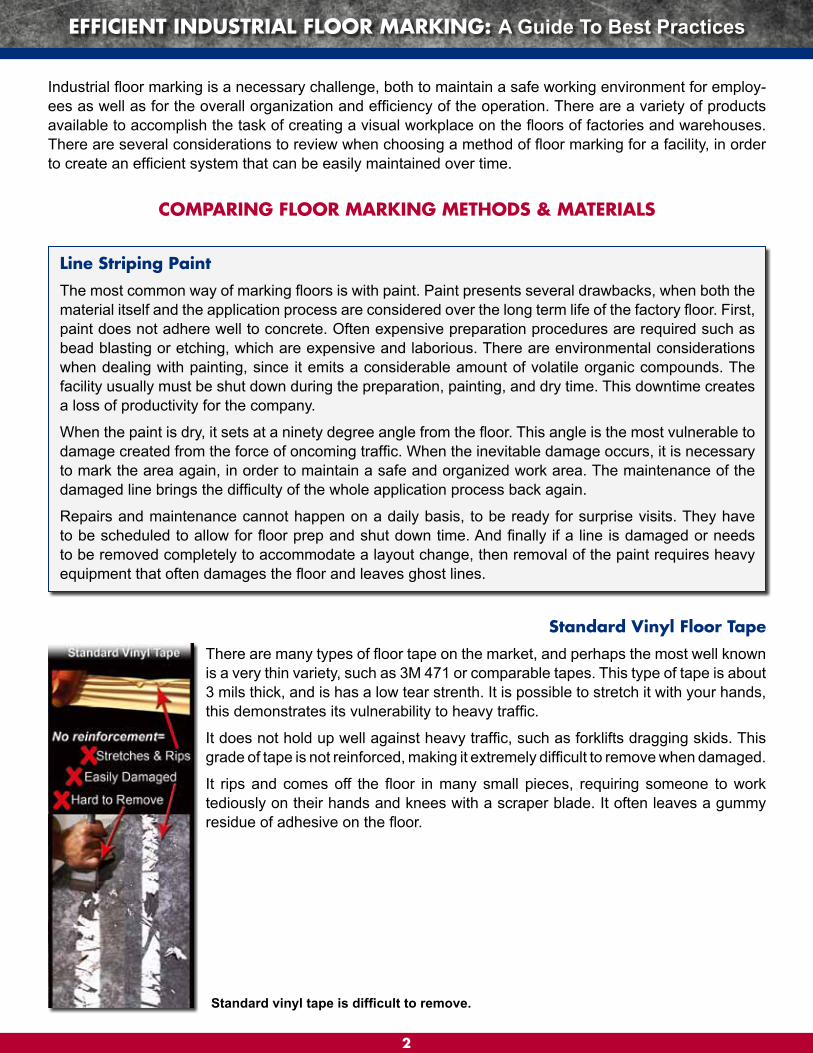
standard Vinyl floor tape
There are many types of floor tape on the market, and perhaps the most well known is a very thin variety, such as 3M 471 or comparable tapes. This type of tape is about 3 mils thick, and is has a low tear strenth. It is possible to stretch it with your hands, this demonstrates its vulnerability to heavy traffic.
It does not hold up well against heavy traffic, such as forklifts dragging skids. This grade of tape is not reinforced, making it extremely difficult to remove when damaged.
It rips and comes off the floor in many small pieces, requiring someone to work tediously on their hands and knees with a scraper blade. It often leaves a gummy residue of adhesive on the floor.
EfficiEnt industrial floor Marking: A Guide To Best Practices
Standard vinyl tape is difficult to remove.
2
EfficiEnt industrial floor Marking: a guidE to BEst PracticEs
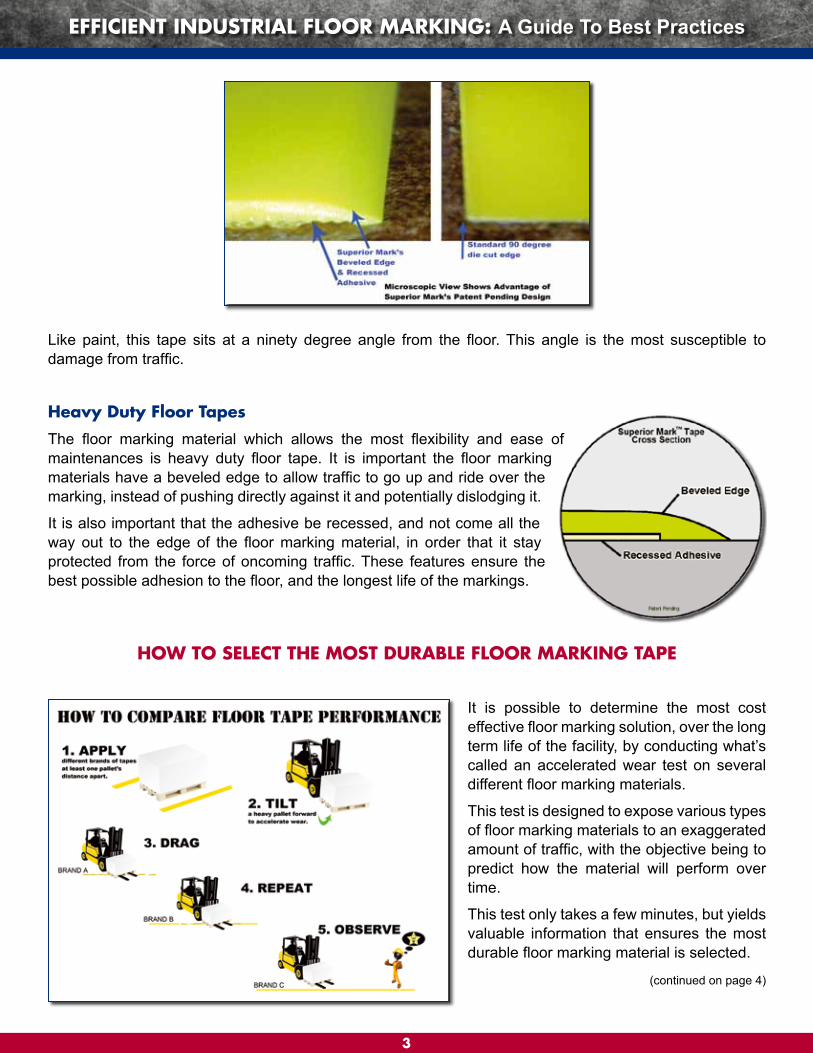
Like paint, this tape sits at a ninety degree angle from the floor. This angle is the most susceptible to damage from traffic.
heavy duty floor tapes
The floor marking material which allows the most flexibility and ease of maintenances is heavy duty floor tape. It is important the floor marking materials have a beveled edge to allow traffic to go up and ride over the marking, instead of pushing directly against it and potentially dislodging it.
It is also important that the adhesive be recessed, and not come all the way out to the edge of the floor marking material, in order that it stay protected from the force of oncoming traffic. These features ensure the best possible adhesion to the floor, and the longest life of the markings.
how to sElEct thE Most duraBlE floor Marking taPE
It is possible to determine the most cost effective floor marking solution, over the long term life of the facility, by conducting what’s called an accelerated wear test on several different floor marking materials.
This test is designed to expose various types of floor marking materials to an exaggerated amount of traffic, with the objective being to predict how the material will perform over time.
This test only takes a few minutes, but yields valuable information that ensures the most durable floor marking material is selected.
(continued on page 4)
3
EfficiEnt industrial floor Marking: A Guide To Best Practices
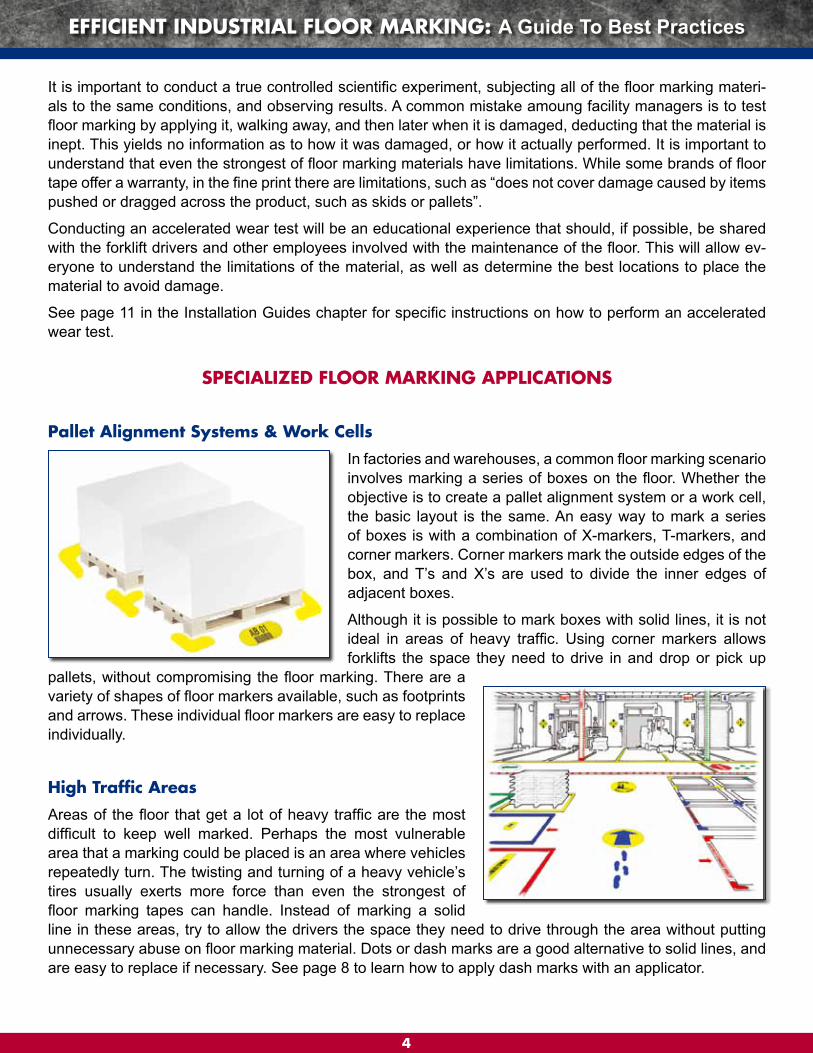
It is important to conduct a true controlled scientific experiment, subjecting all of the floor marking materi-als to the same conditions, and observing results. A common mistake amoung facility managers is to test floor marking by applying it, walking away, and then later when it is damaged, deducting that the material is inept. This yields no information as to how it was damaged, or how it actually performed. It is important to understand that even the strongest of floor marking materials have limitations. While some brands of floor tape offer a warranty, in the fine print there are limitations, such as “does not cover damage caused by items pushed or dragged across the product, such as skids or pallets”.
Conducting an accelerated wear test will be an educational experience that should, if possible, be shared with the forklift drivers and other employees involved with the maintenance of the floor. This will allow ev-eryone to understand the limitations of the material, as well as determine the best locations to place the material to avoid damage.
See page 11 in the Installation Guides chapter for specific instructions on how to perform an accelerated wear test.
sPEcializEd floor Marking aPPlications
Pallet alignment systems & work cells
In factories and warehouses, a common floor marking scenario involves marking a series of boxes on the floor. Whether the objective is to create a pallet alignment system or a work cell, the basic layout is the same. An easy way to mark a series of boxes is with a combination of X-markers, T-markers, and corner markers. Corner markers mark the outside edges of the box, and T’s and X’s are used to divide the inner edges of adjacent boxes.
Although it is possible to mark boxes with solid lines, it is not ideal in areas of heavy traffic. Using corner markers allows forklifts the space they need to drive in and drop or pick up
pallets, without compromising the floor marking. There are a variety of shapes of floor markers available, such as footprints and arrows. These individual floor markers are easy to replace individually.
high traffic areas
Areas of the floor that get a lot of heavy traffic are the most difficult to keep well marked. Perhaps the most vulnerable area that a marking could be placed is an area where vehicles repeatedly turn. The twisting and turning of a heavy vehicle’s tires usually exerts more force than even the strongest of floor marking tapes can handle. Instead of marking a solid line in these areas, try to allow the drivers the space they need to drive through the area without putting unnecessary abuse on floor marking material. Dots or dash marks are a good alternative to solid lines, and are easy to replace if necessary. See page 8 to learn how to apply dash marks with an applicator.
EfficiEnt industrial floor Marking: A Guide To Best Practices
4
EfficiEnt industrial floor Marking: a guidE to BEst PracticEsEfficiEnt industrial floor Marking: A Guide To Best Practices
lean and 5s floor Marking considerations
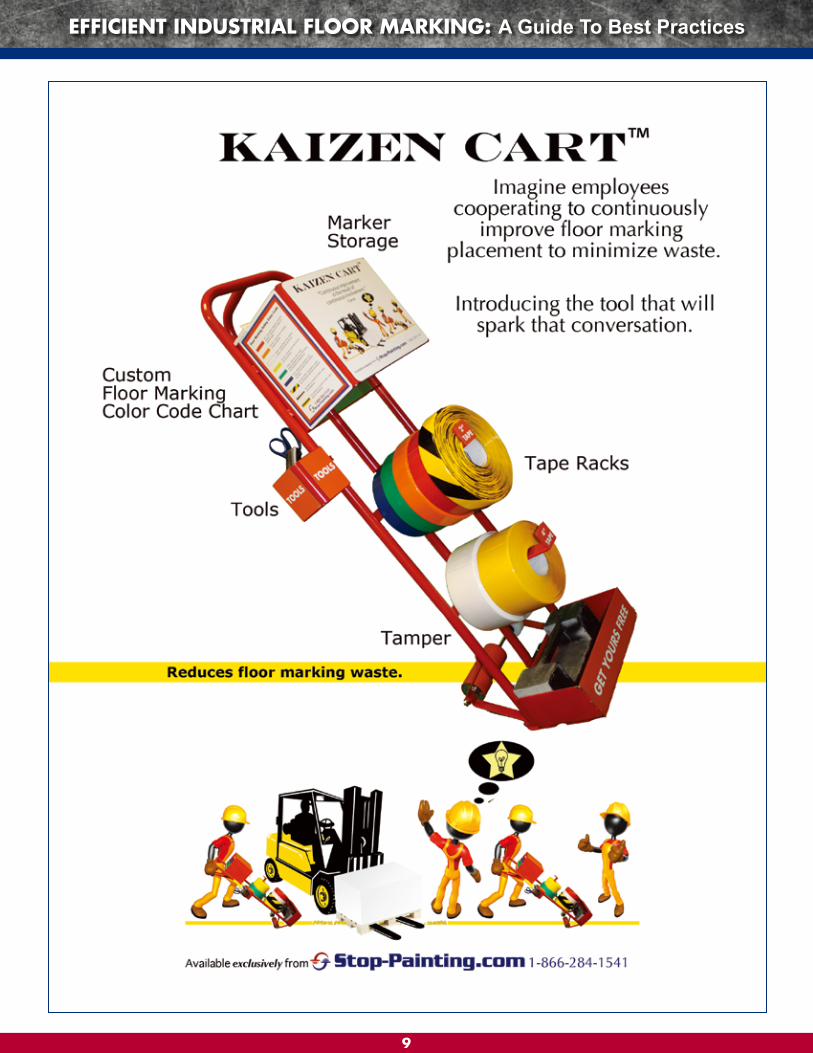
Many facilities have adopted Lean Manufacturing or 5S Systems to increase efficiency. These programs are enhanced by highly visible floor markings to enforce strict organization to facilitate increases in efficiency. Floor markings are one of the best ways to create a visual workplace. With the variety of colors and shapes of floor markings available, this can be easily accomplished. One of the concepts behind Lean is this notion of “kaizen” which means continual improvement. This can be applied to floor markings as well. Lean also encourages the suggestions of all employees as a way of continually improving operations. Often the people who understand the best placement of the floor markings are the ones who work on the floor daily, not necessarily the management. The Kaizen Cart was inspired by these concepts, and is a way of fostering these powerful concepts as they apply to the floor.
See page 9 of equipment section for more info on the Kaizen Cart.
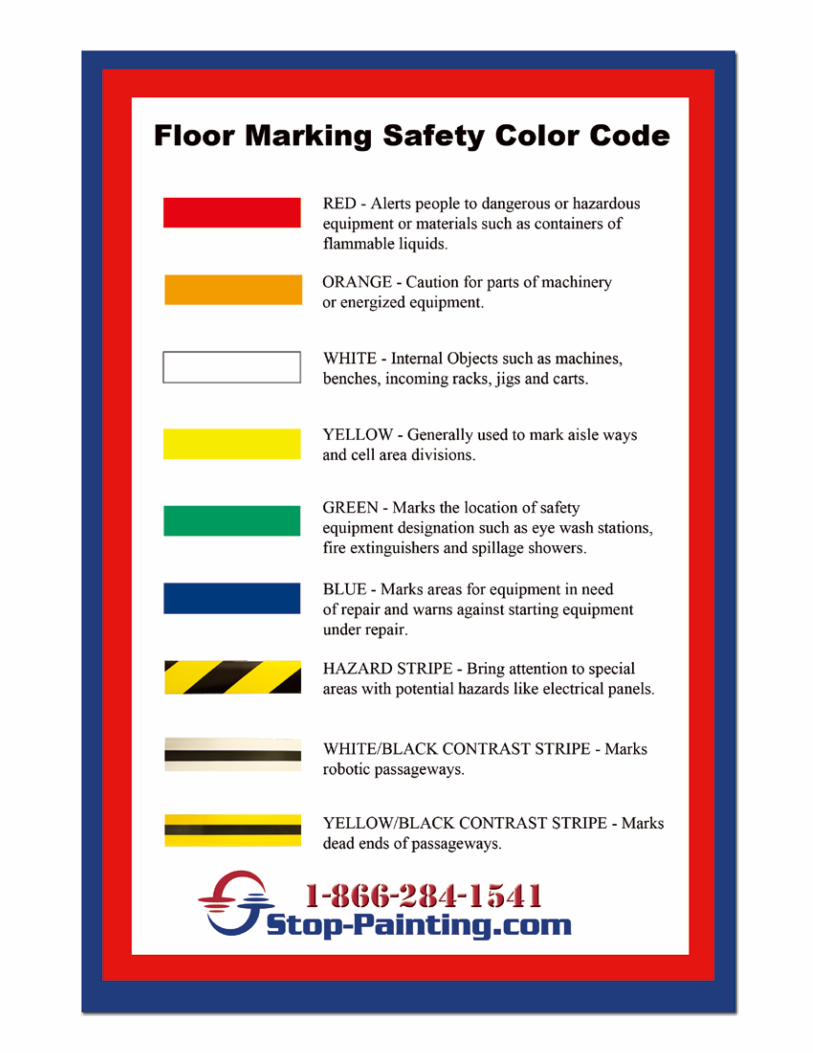
floor Marking color codEs & osha coMPliancE
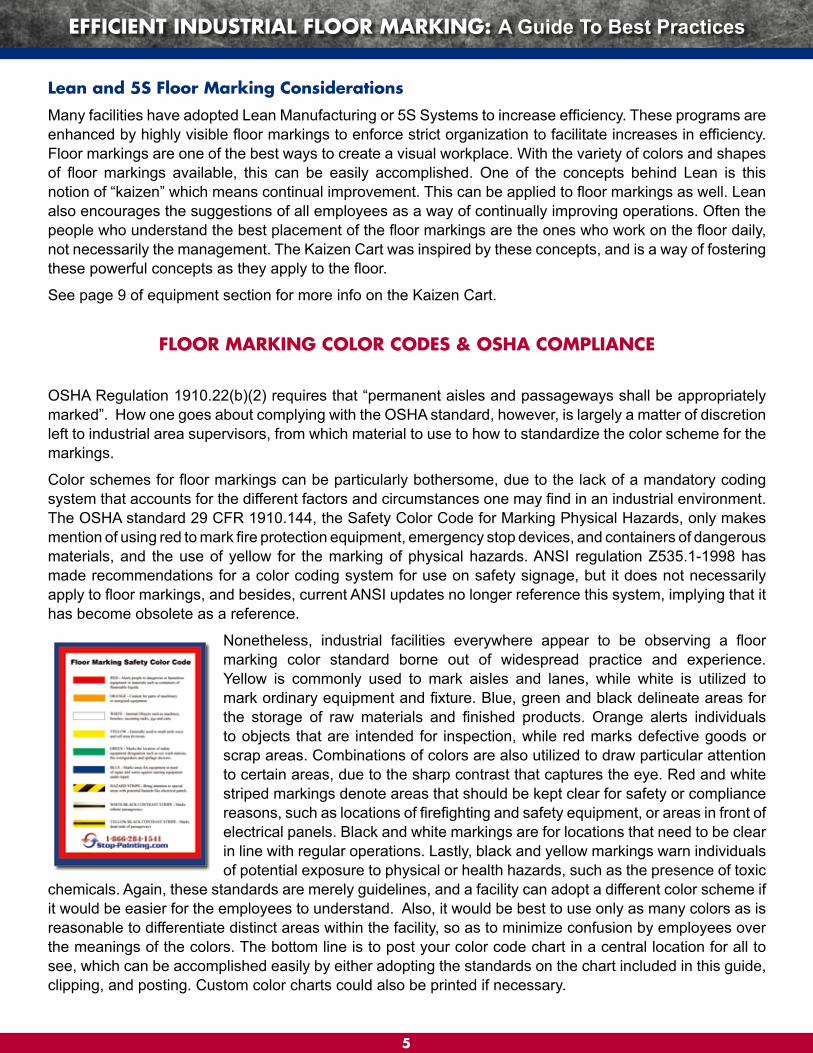
OSHA Regulation 1910.22(b)(2) requires that “permanent aisles and passageways shall be appropriately marked”. How one goes about complying with the OSHA standard, however, is largely a matter of discretion left to industrial area supervisors, from which material to use to how to standardize the color scheme for the markings.
Color schemes for floor markings can be particularly bothersome, due to the lack of a mandatory coding system that accounts for the different factors and circumstances one may find in an industrial environment. The OSHA standard 29 CFR 1910.144, the Safety Color Code for Marking Physical Hazards, only makes mention of using red to mark fire protection equipment, emergency stop devices, and containers of dangerous materials, and the use of yellow for the marking of physical hazards. ANSI regulation Z535.1-1998 has made recommendations for a color coding system for use on safety signage, but it does not necessarily apply to floor markings, and besides, current ANSI updates no longer reference this system, implying that it has become obsolete as a reference.
Nonetheless, industrial facilities everywhere appear to be observing a floor marking color standard borne out of widespread practice and experience. Yellow is commonly used to mark aisles and lanes, while white is utilized to mark ordinary equipment and fixture. Blue, green and black delineate areas for the storage of raw materials and finished products. Orange alerts individuals to objects that are intended for inspection, while red marks defective goods or scrap areas. Combinations of colors are also utilized to draw particular attention to certain areas, due to the sharp contrast that captures the eye. Red and white striped markings denote areas that should be kept clear for safety or compliance reasons, such as locations of firefighting and safety equipment, or areas in front of electrical panels. Black and white markings are for locations that need to be clear in line with regular operations. Lastly, black and yellow markings warn individuals of potential exposure to physical or health hazards, such as the presence of toxic
chemicals. Again, these standards are merely guidelines, and a facility can adopt a different color scheme if it would be easier for the employees to understand. Also, it would be best to use only as many colors as is reasonable to differentiate distinct areas within the facility, so as to minimize confusion by employees over the meanings of the colors. The bottom line is to post your color code chart in a central location for all to see, which can be accomplished easily by either adopting the standards on the chart included in this guide, clipping, and posting. Custom color charts could also be printed if necessary.
5
EfficiEnt industrial floor Marking: a guidE to BEst PracticEsEfficiEnt industrial floor Marking: A Guide To Best Practices
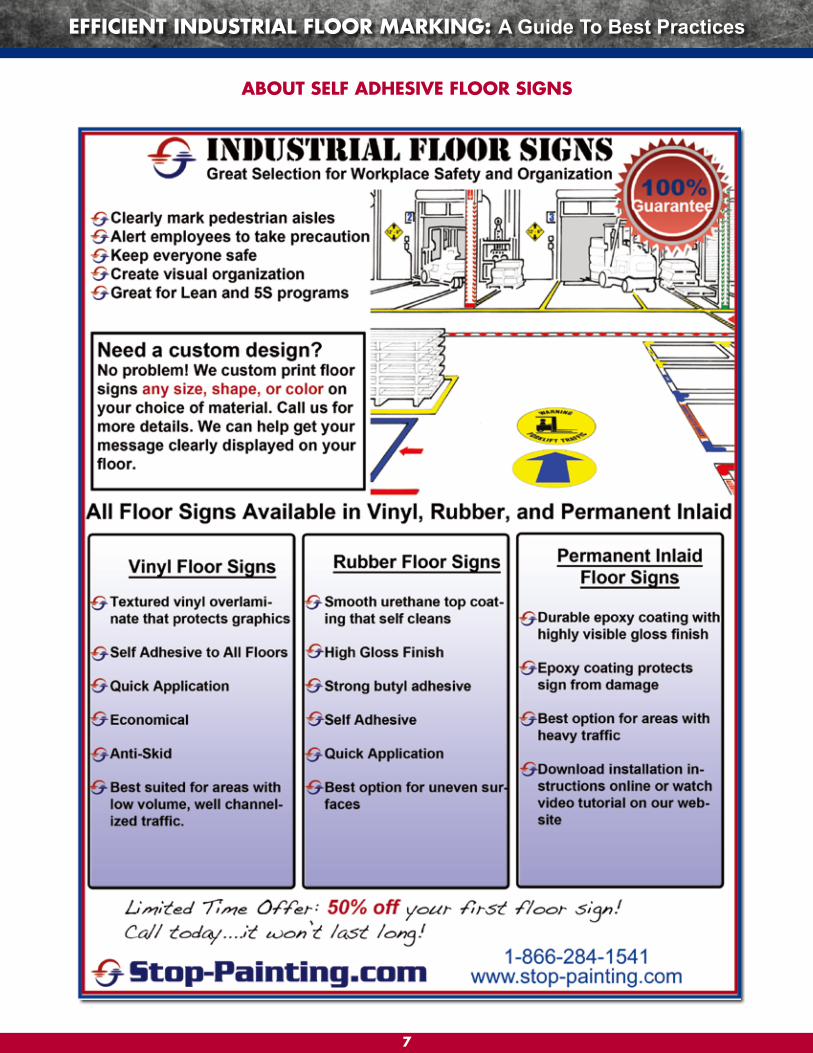
aBout sElf adhEsiVE floor signs
7
floor Marking EquiPMEnt
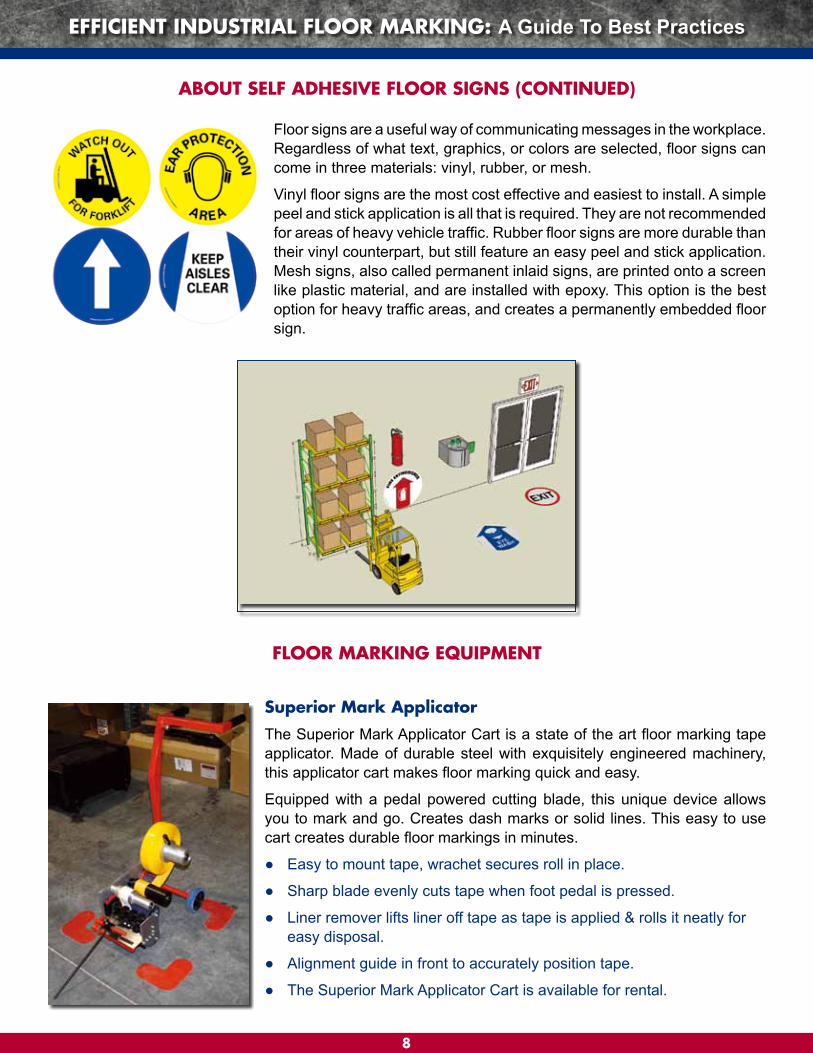
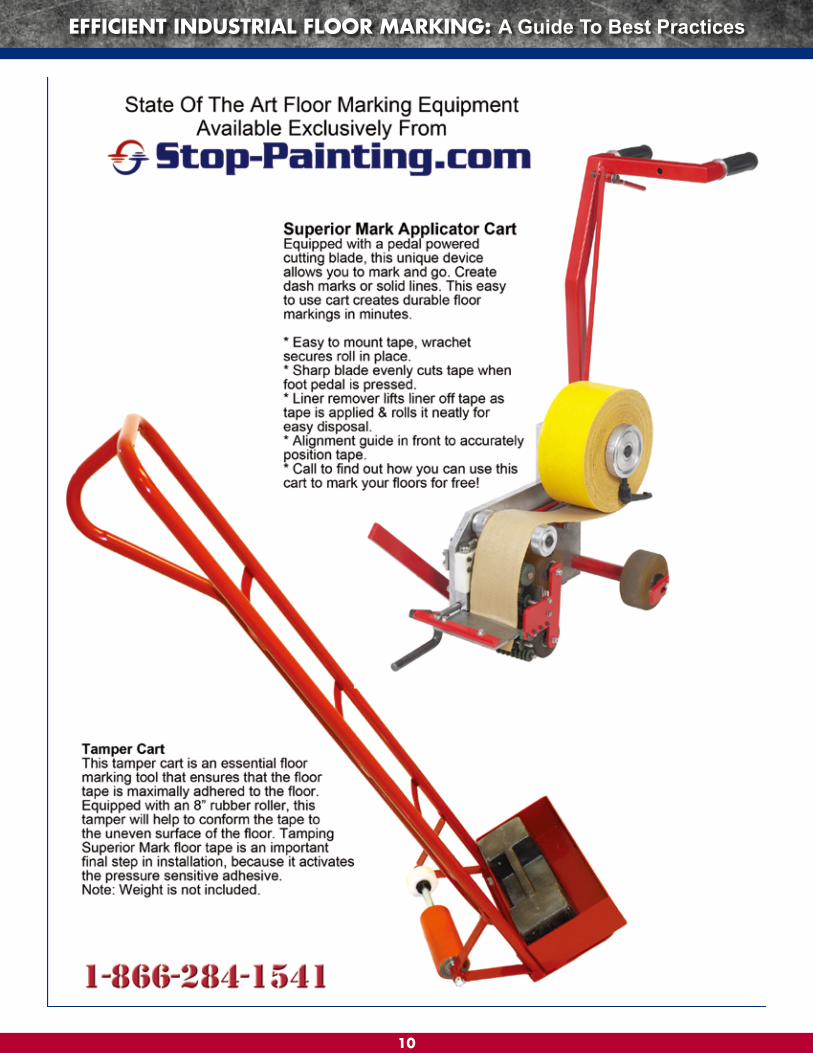
superior Mark applicator
The Superior Mark Applicator Cart is a state of the art floor marking tape applicator. Made of durable steel with exquisitely engineered machinery, this applicator cart makes floor marking quick and easy.
Equipped with a pedal powered cutting blade, this unique device allows you to mark and go. Creates dash marks or solid lines. This easy to use cart creates durable floor markings in minutes.
● Easy to mount tape, wrachet secures roll in place.
● Sharp blade evenly cuts tape when foot pedal is pressed.
● Liner remover lifts liner off tape as tape is applied & rolls it neatly for easy disposal.
● Alignment guide in front to accurately position tape.
● The Superior Mark Applicator Cart is available for rental.
aBout sElf adhEsiVE floor signs (continuEd)
Floor signs are a useful way of communicating messages in the workplace. Regardless of what text, graphics, or colors are selected, floor signs can come in three materials: vinyl, rubber, or mesh.
Vinyl floor signs are the most cost effective and easiest to install. A simple peel and stick application is all that is required. They are not recommended for areas of heavy vehicle traffic. Rubber floor signs are more durable than their vinyl counterpart, but still feature an easy peel and stick application. Mesh signs, also called permanent inlaid signs, are printed onto a screen like plastic material, and are installed with epoxy. This option is the best option for heavy traffic areas, and creates a permanently embedded floor sign.
8
EfficiEnt industrial floor Marking: A Guide To Best PracticesEfficiEnt industrial floor Marking: A Guide To Best Practices
EfficiEnt industrial floor Marking: A Guide To Best PracticesEfficiEnt industrial floor Marking: A Guide To Best Practices
9
10
EfficiEnt industrial floor Marking: A Guide To Best Practices
floor Marking how to guidEs
how to Perform an accelerated wear test
Your industrial floor marking tape may look nice and sturdy now, but will it stand up to the wear and tear of all the heavy equipment and objects that get dragged across it every day? The easiest way to tell if your marking tape can endure all of that abuse is to set up a test that will show you how tough your product really is. After all, before you spend your marking budget to cover your entire warehouse or factory floor, you’d want to make sure you’re getting adequate value for your money.
You Will Need:
● One roll of each brand or type of marking tape you are considering
● A forklift
● A heavy pallet
Step 1
Lay out a long strip of each brand or type of marking tape on the floor, at least one pallet’s distance apart.
Step 2
Load up the forklift with the heavy pallet, adjusting the position of the pallet so that most of its weight is concentrated in front, leading to increased wear on the ground.
Step 3
Drag the forklift and pallet across all of the tape strips. Do this two or three times to simulate all of the heavy loads that will be trampling across the tape.
Step 4
Compare the performance of each of the tape strips. Take note of rips, areas that have been yanked up or crumpled, or other damage.
11
EfficiEnt industrial floor Marking: A Guide To Best Practices
EfficiEnt industrial floor Marking: A Guide To Best Practices
floor Marking how to guidEs (continuEd)
how to install floor tape by hand
Industrial floor marking tape does not require a fancy machine in order for it to be laid down properly in your warehouse or factory. All you need is some cleaning equipment to prepare the area, some tools to help you measure the marking location and cut the tape accordingly, and a device for tamping the tape.
You Will Need:
● Broom
● Cleaning alcohol
● Rags for wiping
● Measuring device, such as a tape measure
● String
● Weights
● Tamping device
● Blade
Step 1
Clean the area where the tape will be placed by sweeping it up with a broom, and wiping the surface with alcohol.
Step 2
Lay out the string and weights to make straight lines that will be used to guide the tape. From the reference point, measure both ends to make sure that they are equally distant.
Step 3
Lay down the tape using the string as a guide, pressing gently down on it to secure its adhesive.
Step 4
Use the tamping device to press the tape firmly into the floor. If you do not have a tamper cart, you can also tamp with the rubber tire of a vehicle such as a golf cart or forklift. Be careful not to twist or turn the tires while driving over the tape.
Step 5
Take note of drains or cracks that may hold water, located along the length of the tape. Cut around these areas so the integrity of the tape isn’t damaged in the future.
12
EfficiEnt industrial floor Marking: a guidE to BEst PracticEsEfficiEnt industrial floor Marking: A Guide To Best Practices
floor Marking how to guidEs (continuEd)
how to remove floor tape by hand
Eventually, even the best quality of industrial floor marking tape needs to be replaced, either due to accumulated wear and tear, or because the layout of the floor needs changing. Floor tape of good quality can easily be removed by hand, with relatively little effort.
You Will Need:
● Putty knife or razor blade
Step 1
Lift the edge of the tape by scraping it up with a putty knife or razor blade.
Step 2
Pull the tape up slowly at a 90 degree angle, taking care to apply force evenly as you pull.
Step 3
If there are any remaining portions of adhesive layer on the floor, take a scrap piece of tape, usually the one you just pulled up, lay it down on top of the stray adhesive portion, press down on the tape, and pull it up again as before.
13
EfficiEnt industrial floor Marking: A Guide To Best Practices
● Aerosol adhesive spray● Paint brush● Paint stirrer● Small propane torch (optional)● Two-part epoxy
floor Marking how to guidEs (continuEd)
how to install Epoxy floor signs
In an industrial worksite like a factory or warehouse, where space comes at a premium, there simply isn’t much room to be hanging or positioning traditional signs for safety and information. Often, if these signs don’t add to the clutter, they’ll be damaged from moving heavy equipment or set aside due to the aforementioned problems with space. The solution? Attach signs directly to the floor, where they can stick around permanently.
You Will Need:● Gloves● Masking tape or other thick tape● Sander or bead blaster● Measuring device, such as a tape measure● Alcohol or alcohol-based solution for cleaning
Step 1
Prepare the area where you intend to place the sign. Make a frame using the tape, of a size that is at least a little larger than the sign.
Step 2
Clean the area inside the frame with the sander or bead blaster, then wipe it afterwards with the alcohol. Make sure the area is free from dirt and completely dry.
Step 3
Wearing gloves for protection, spray the back of the sign lightly with the adhesive. Place the sign in the center of the frame and press it down firmly, taking care to avoid wrinkles.
Step 4
Prepare the epoxy by combining its parts, and then stirring gently until it is thoroughly mixed. Pour the epoxy mixture slowly onto the center of the sign. Spread it evenly with the paint brush, making certain that all the edges are covered.
Step 5
If you want to remove any air bubbles that form, hold the propane torch about 4 to 6 inches from the sign and heat the area evenly to force out the air from the bubbles.
Step 6 Give the epoxy 2 to 3 hours to set. Remove the tape border and allow it to dry for at least 24 hours before opening the location to traffic.
14
EfficiEnt industrial floor Marking: a guidE to BEst PracticEsEfficiEnt industrial floor Marking: A Guide To Best Practices
floor Marking how to guidEs (continuEd)
how to Mark a solid line Box
Laying out warehouse tape neatly and precisely to form a solid line box may seem tedious, but it is actually quite easy to do if you have the right marking materials and the proper technique. The secret to easily marking the corners is to use corner markers with puzzle cut miters. This method is considerably faster and easier than the common method of butt splicing edges of tape together. This is an easy way to mark work cells, align pallets, or mark any rectangular area.
You Will Need:
● Superior Mark Floor Tape
● Superior Mark Corners
● Measuring device (e.g. tape measure)
● Chalk or other temporary marking material
Step 1
After sweeping and cleaning the floor with an alcohol based cleaner, measure out a square or rectangular space on the floor, according to what you need. Mark it.
Step 2
Apply the Superior Mark Corners on the corners of the box, according to the measurements that you’ve made. Align the puzzle cut edges to perfectly join the two pieces of the corner marker.
Step 3
Measure the distance between each corner marker to determine the length of tape needed to join the corners and form a box with solid lines. It helps to use a guide, such as a string tied to weights or a tape measure, to ensure the tape follows a perfectly straight course.
Step 4
Tamp. Open to traffic immediately.
how to Mark aisles and Passageways
The key to efficiently marking aisles and passageways is to use corner markers when marking intersections or other 90 degree turns in the path. The process is basically the same as for marking solid line boxes, the only difference being the angle at which the corner is applied.
15