Embed Size (px)
Citation preview
Effacts 4 Installation Guide page 1
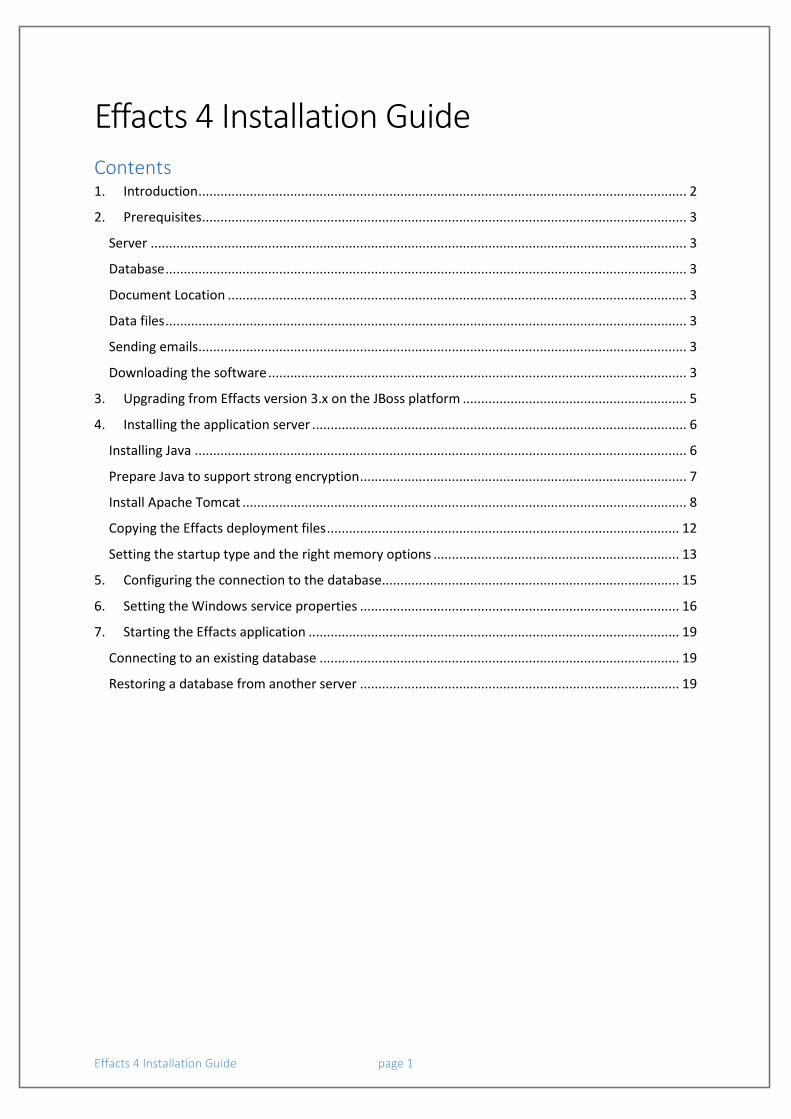
Effacts 4 Installation Guide Contents 1. Introduction ..................................................................................................................................... 2
2. Prerequisites .................................................................................................................................... 3
Server .................................................................................................................................................. 3
Database .............................................................................................................................................. 3
Document Location ............................................................................................................................. 3
Data files .............................................................................................................................................. 3
Sending emails ..................................................................................................................................... 3
Downloading the software .................................................................................................................. 3
3. Upgrading from Effacts version 3.x on the JBoss platform ............................................................. 5
4. Installing the application server ...................................................................................................... 6
Installing Java ...................................................................................................................................... 6
Prepare Java to support strong encryption ......................................................................................... 7
Install Apache Tomcat ......................................................................................................................... 8
Copying the Effacts deployment files ................................................................................................ 12
Setting the startup type and the right memory options ................................................................... 13
5. Configuring the connection to the database ................................................................................. 15
6. Setting the Windows service properties ....................................................................................... 16
7. Starting the Effacts application ..................................................................................................... 19
Connecting to an existing database .................................................................................................. 19
Restoring a database from another server ....................................................................................... 19
Effacts 4 Installation Guide page 2
1. Introduction This document contains the installation procedure for the Effacts 4 application on a Microsoft
Windows platform, using a Microsoft SQL Server. The guide assumes that the platform itself is
available and the reader is aware of how the platform functions and needs to be configured. The
guide will only mention the basic requirements of the configuration; the system administrators must
cope with the specifics.
It is possible to install the application on different platforms, including Linux and to use PostgreSQL
instead of SQL Server as a database. Installation on these platforms is quite similar to the Windows
installation, but the details will not be covered in this guide.
Effacts 4 Installation Guide page 3
2. Prerequisites
Server As a rule, the requirement of the server system operating system is Windows Server 2008 or later.
Previous versions will probably work as well as non-server operating systems like Windows 8, but
these are not supported. During the installation it is required to have local administrator rights. It will
not be required to reboot the server system to complete the installation.
Database There should be a Microsoft SQL Server installation, version 2008 or later, available. This server
should be reachable via TCP/IP from server on which Effacts will be installed. Be sure to have the IP
or Hostname and to have it available before continuing the installation.
Effacts requires an available empty database in SQL Server for this installation, or you might want to
connect to an existing Effacts database instance.
The Effacts software can connect to the SQL Server using either SQL Authentication (which uses
username and password) or Integrated Security. The user bound to the authentication method is
required to make scheme changes. Easiest way to handle this is by making the user a ‘db_owner’ for
the database. When SQL Authentication is chosen, you are required to have both username and
password available.
Document Location Before installing you should decide where Effacts should save backup snaphots and documents
uploaded to Effacts. Depending on how the software is used, the data in this location could grow
excessively and should allow enough growth possibilities to sustain the usage. This directory is
referred to as {DOCUMENT_DIRECTORY}. It is possible to use network shares instead of local
directories for the {DOCUMENT_DIRECTORY}. The user used for running the Effacts service is
required to have read, to write and to create rights for the {DOCUMENT_DIRECTORY}.
Data files If there is a previous Effacts version on a different server, it may be required to copy old files. This is
required when the old information needs to be transferred to the new server. To be able to attach
the previous contexts, it is required to run a full back up for each context you want to keep. During
the period of the transfer there should not be anyone working on the previous version as that may
cause information to be lost. To run a full backup, the owners of the context should use “System”
“Advanced” “Full backup”. After this is done, the old document location can be copied to the
{DOCUMENT_LOCATION}. When the transfer is from online to an on premise installation, it is
required to ask Effacts for a full dump of the data files.
Sending emails For some functionalities it is required to have an SMTP server available. The IP or Hostname of the
SMTP server is referred to as {SMTP_SERVER}.
Downloading the software During the installation we will need the following components:
Java 8 JRE http://www.oracle.com/technetwork/java/javase/downloads/jre8-downloads-2133155.html (select the most recent JRE that matches your server architecture)
Effacts 4 Installation Guide page 4
Java 8 Cryptograhy Extensions
http://www.oracle.com/technetwork/java/javase/downloads/jce8-download-2133166.html
Tomcat 7 Application Server http://tomcat.apache.org/download-70.cgi (Select the service installer)
Effacts 4 deployment files https://knowledgebase.effacts.com/S6709
Mod-JK proxy for IIS https://knowledgebase.effacts.com/S3378
Effacts 4 Installation Guide page 5
3. Upgrading from Effacts version 3.x on the JBoss platform When there is an existing instance of Effacts 3.x running on your system, this version needs to be
disabled first.
Open the Windows Services console, locate the “Effacts Application Service” and stop it.
Check under which user account this service is running, if it is running under another account than
“Local System”, the new Tomcat server should run under this service account as well.
Execute the batch file “{JBOSS_HOME}\jb0ss-4.2.3.GA\bin\UninstallJBossNT.bat” to unregister the
“Effacts Application Service”. Refresh the Windows Services window to make sure that the service is
removed from the list.
Check the content of the file “{EFFACTS_HOME}\jboss-4.2.3.GA\server\default\deploy\mssql-
ds.xml”, the connection url that is used here should be used for the database configuration url in the
Tomcat file “context.properties”.
Check if there is a file “{EFFACTS_HOME}\jboss-
4.2.3.GA\server\default\conf\EffactsAuthenticationMapping.xml”. If such a file exists, you need to
copy this later to the location {TOMCAT_HOME}\lib\ before the Tomcat server is started for the first
time.
Now follow the instructions in the next chapters to continue installing the new platform.
Effacts 4 Installation Guide page 6
4. Installing the application server In the next section we will describe how each of the components will be installed and configured.
First we will install the Java runtime environment, then the Apache Tomcat application server and
after that the Effacts application itself will be deployed.
The final step is to set up IIS as a frontend webserver, it is recommended to do this but since the
Tomcat application server has a simple internal webserver that runs on port 8080, this step is not
mandatory.
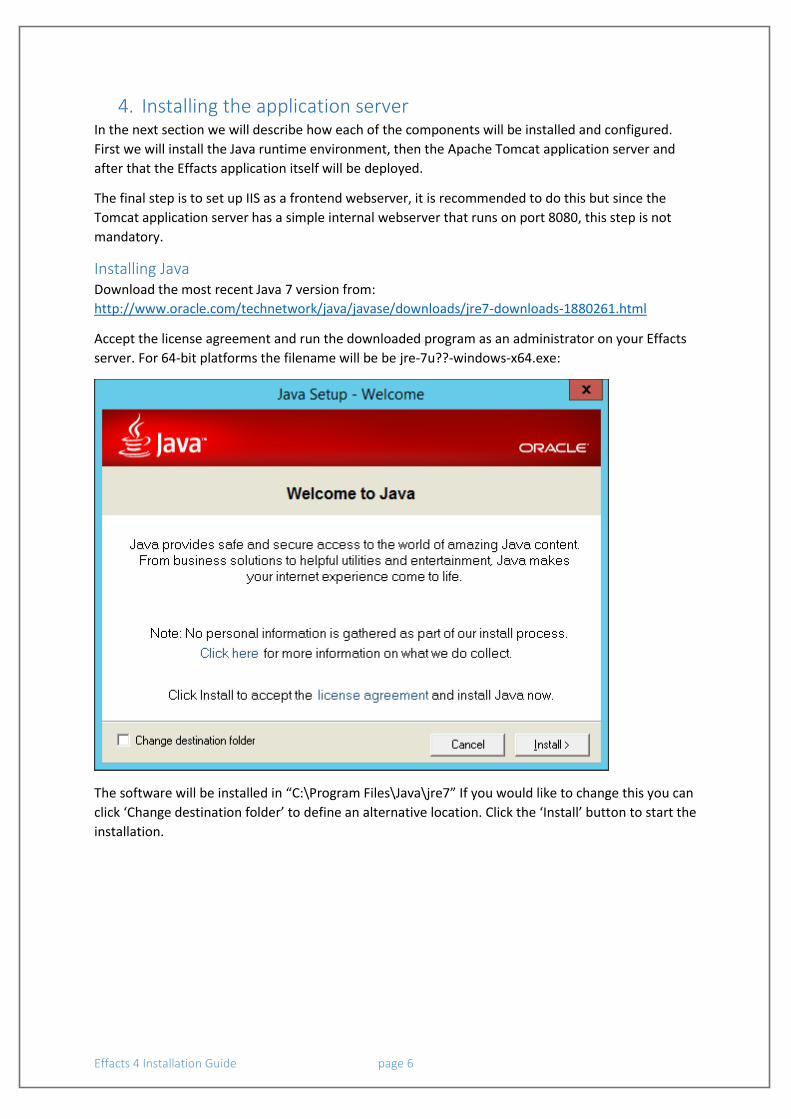
Installing Java Download the most recent Java 7 version from:
http://www.oracle.com/technetwork/java/javase/downloads/jre7-downloads-1880261.html
Accept the license agreement and run the downloaded program as an administrator on your Effacts
server. For 64-bit platforms the filename will be be jre-7u??-windows-x64.exe:
The software will be installed in “C:\Program Files\Java\jre7” If you would like to change this you can
click ‘Change destination folder’ to define an alternative location. Click the ‘Install’ button to start the
installation.
Effacts 4 Installation Guide page 7
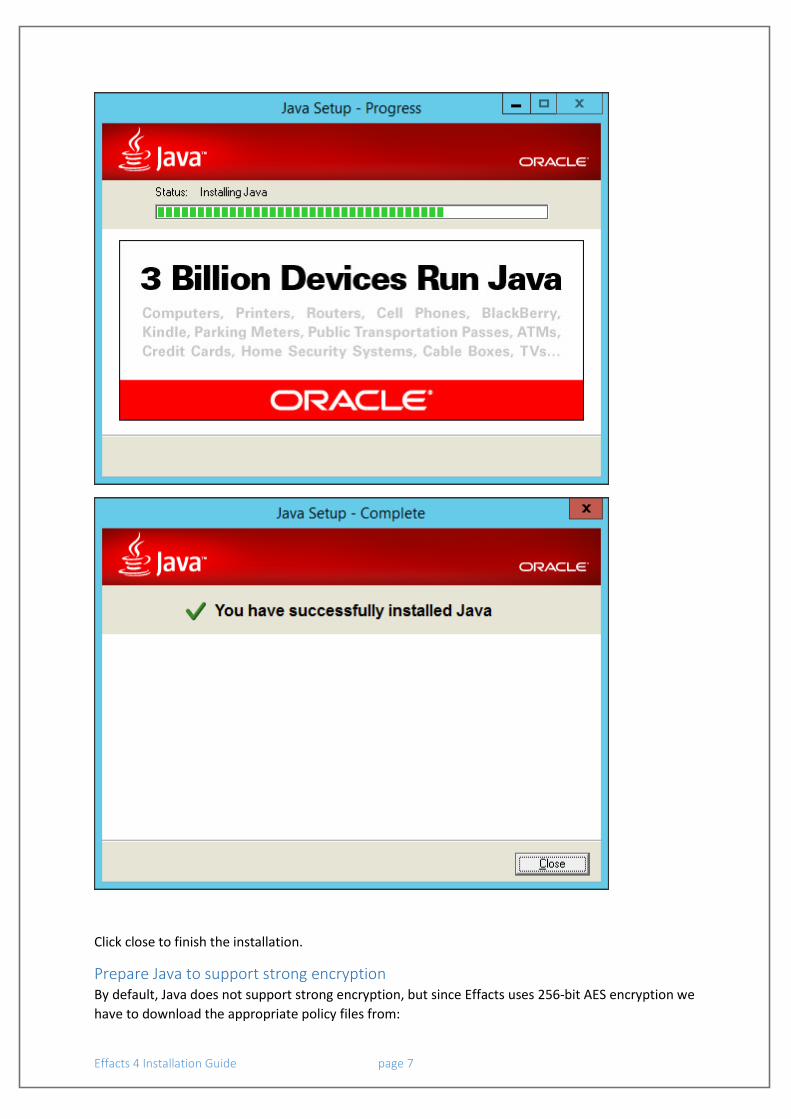
Click close to finish the installation.
Prepare Java to support strong encryption By default, Java does not support strong encryption, but since Effacts uses 256-bit AES encryption we
have to download the appropriate policy files from:
Effacts 4 Installation Guide page 8
http://www.oracle.com/technetwork/java/javase/downloads/jce-7-download-432124.html
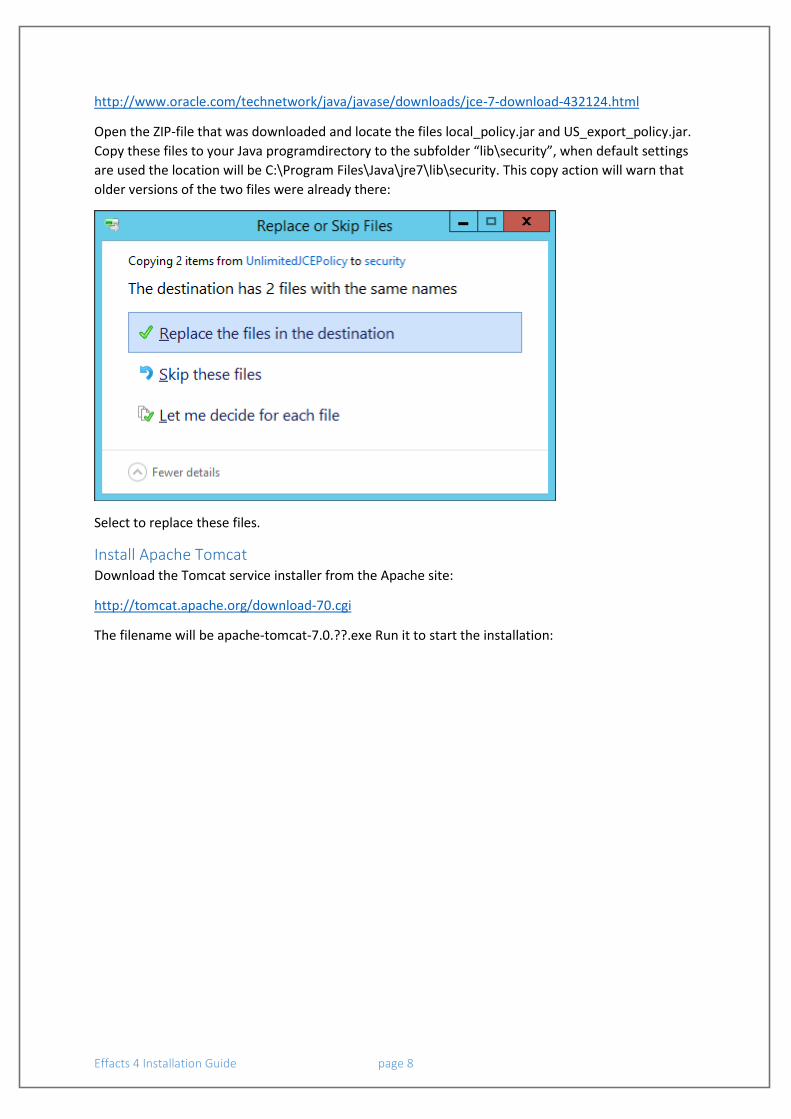
Open the ZIP-file that was downloaded and locate the files local_policy.jar and US_export_policy.jar.
Copy these files to your Java programdirectory to the subfolder “lib\security”, when default settings
are used the location will be C:\Program Files\Java\jre7\lib\security. This copy action will warn that
older versions of the two files were already there:
Select to replace these files.
Install Apache Tomcat Download the Tomcat service installer from the Apache site:
http://tomcat.apache.org/download-70.cgi
The filename will be apache-tomcat-7.0.??.exe Run it to start the installation:
Effacts 4 Installation Guide page 9
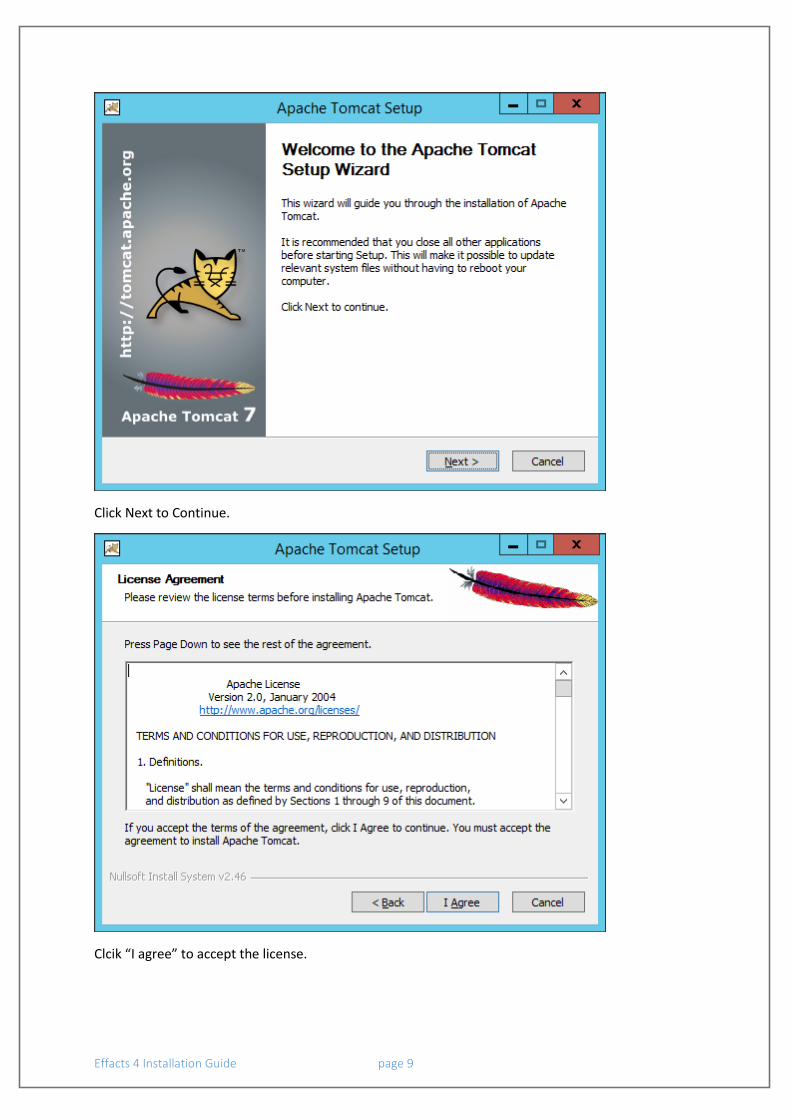
Click Next to Continue.
Clcik “I agree” to accept the license.

Effacts 4 Installation Guide page 10
Deselect the items “Start Menu Items”, “Documentation” and “Manager” and click “Next”.
Review the port settings and click “Next”.
Effacts 4 Installation Guide page 11
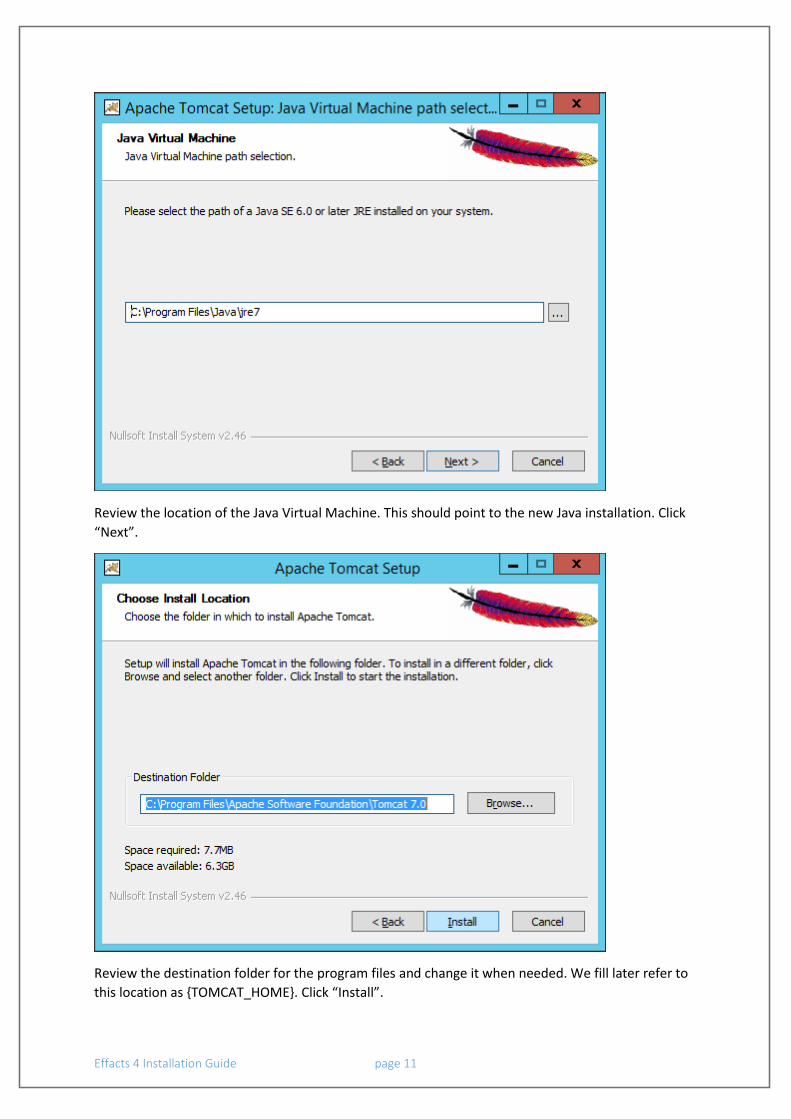
Review the location of the Java Virtual Machine. This should point to the new Java installation. Click
“Next”.
Review the destination folder for the program files and change it when needed. We fill later refer to
this location as {TOMCAT_HOME}. Click “Install”.
Effacts 4 Installation Guide page 12
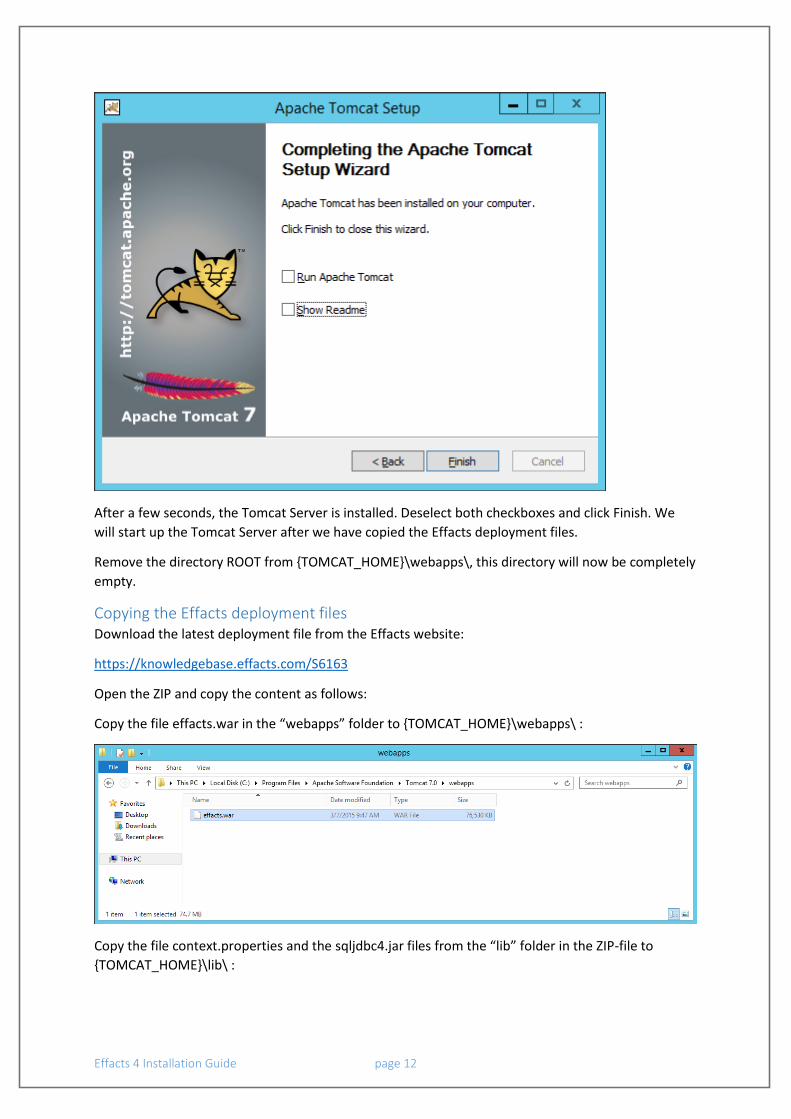
After a few seconds, the Tomcat Server is installed. Deselect both checkboxes and click Finish. We
will start up the Tomcat Server after we have copied the Effacts deployment files.
Remove the directory ROOT from {TOMCAT_HOME}\webapps\, this directory will now be completely
empty.
Copying the Effacts deployment files Download the latest deployment file from the Effacts website:
https://knowledgebase.effacts.com/S6163
Open the ZIP and copy the content as follows:
Copy the file effacts.war in the “webapps” folder to {TOMCAT_HOME}\webapps\ :
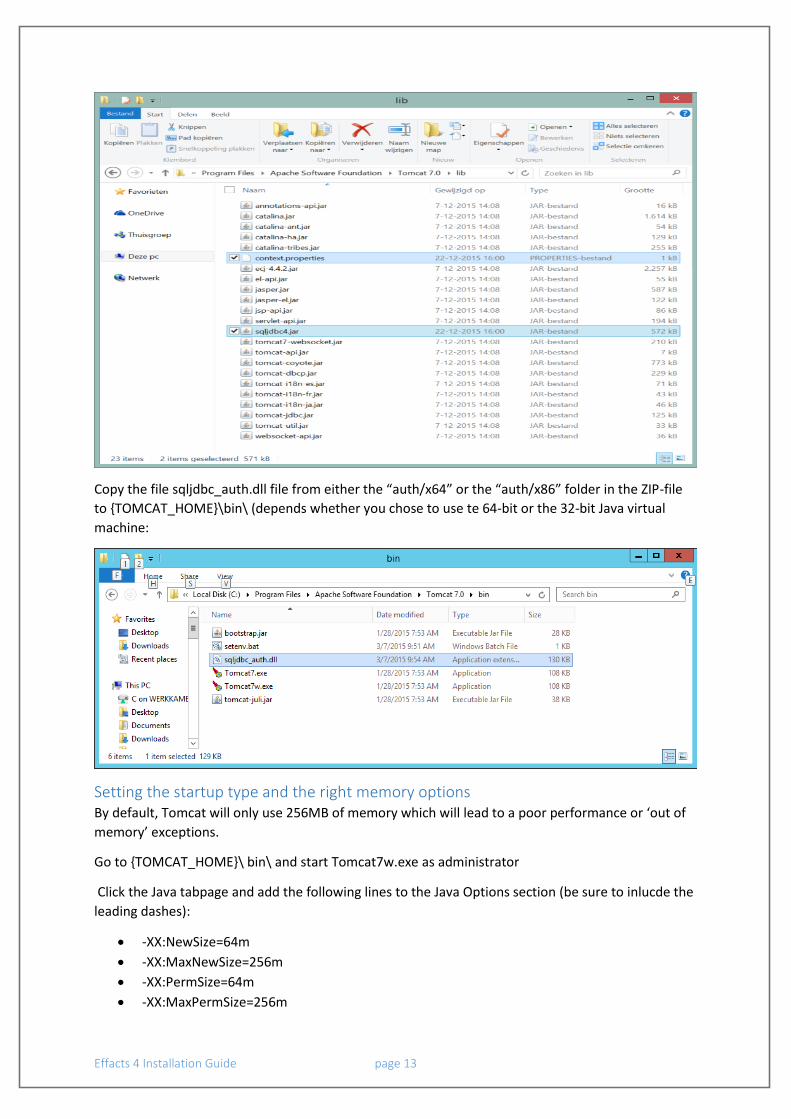
Copy the file context.properties and the sqljdbc4.jar files from the “lib” folder in the ZIP-file to
{TOMCAT_HOME}\lib\ :
Effacts 4 Installation Guide page 13
Copy the file sqljdbc_auth.dll file from either the “auth/x64” or the “auth/x86” folder in the ZIP-file
to {TOMCAT_HOME}\bin\ (depends whether you chose to use te 64-bit or the 32-bit Java virtual
machine:
Setting the startup type and the right memory options By default, Tomcat will only use 256MB of memory which will lead to a poor performance or ‘out of
memory’ exceptions.
Go to {TOMCAT_HOME}\ bin\ and start Tomcat7w.exe as administrator
Click the Java tabpage and add the following lines to the Java Options section (be sure to inlucde the
leading dashes):
-XX:NewSize=64m
-XX:MaxNewSize=256m
-XX:PermSize=64m
-XX:MaxPermSize=256m
Effacts 4 Installation Guide page 14
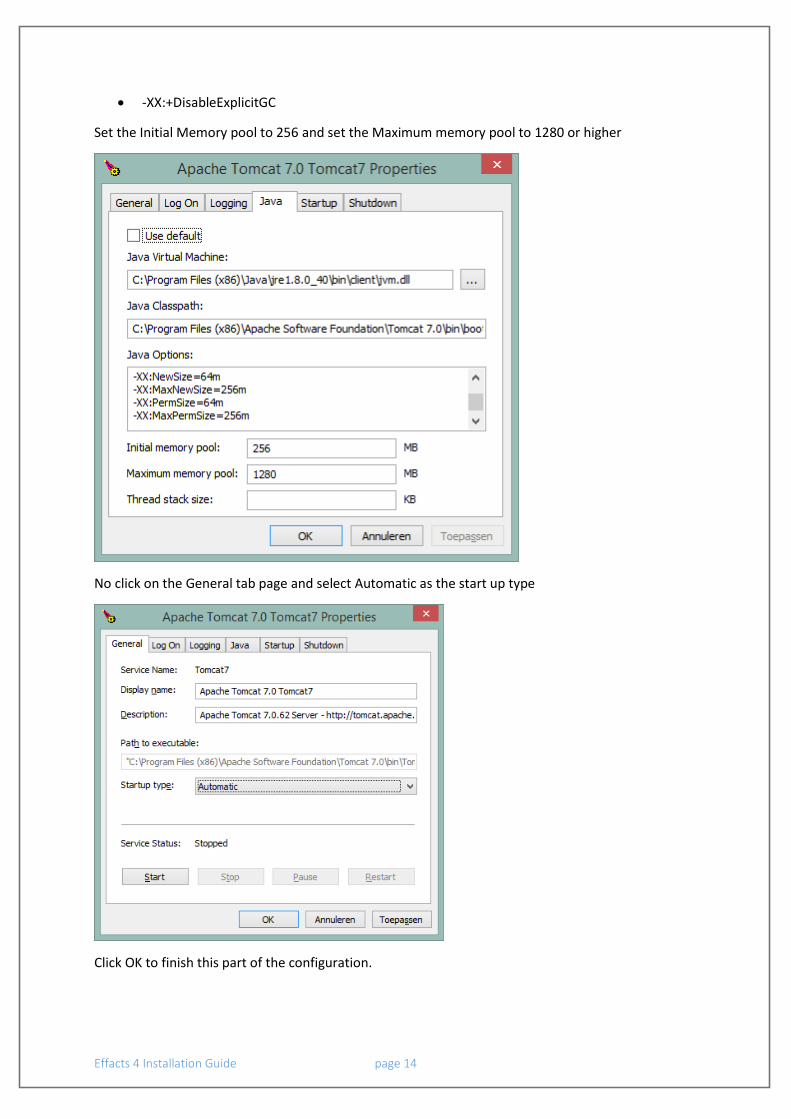
-XX:+DisableExplicitGC
Set the Initial Memory pool to 256 and set the Maximum memory pool to 1280 or higher
No click on the General tab page and select Automatic as the start up type
Click OK to finish this part of the configuration.
Effacts 4 Installation Guide page 15
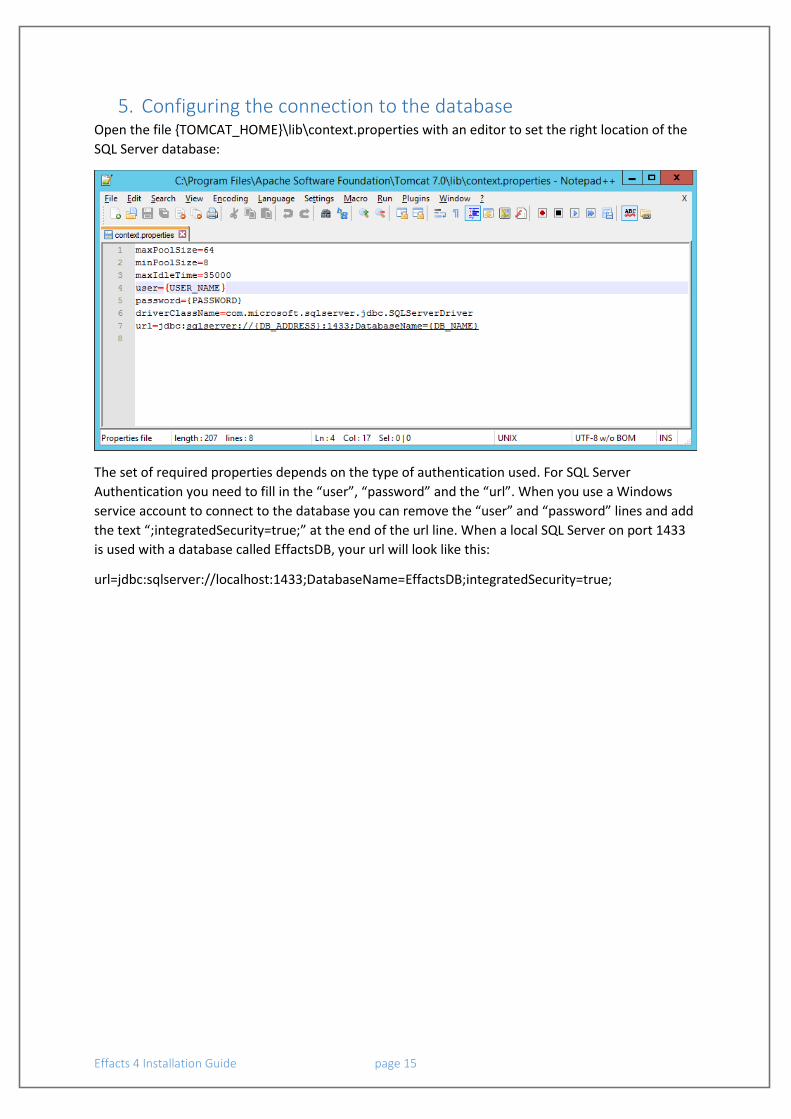
5. Configuring the connection to the database Open the file {TOMCAT_HOME}\lib\context.properties with an editor to set the right location of the
SQL Server database:
The set of required properties depends on the type of authentication used. For SQL Server
Authentication you need to fill in the “user”, “password” and the “url”. When you use a Windows
service account to connect to the database you can remove the “user” and “password” lines and add
the text “;integratedSecurity=true;” at the end of the url line. When a local SQL Server on port 1433
is used with a database called EffactsDB, your url will look like this:
url=jdbc:sqlserver://localhost:1433;DatabaseName=EffactsDB;integratedSecurity=true;
Effacts 4 Installation Guide page 16
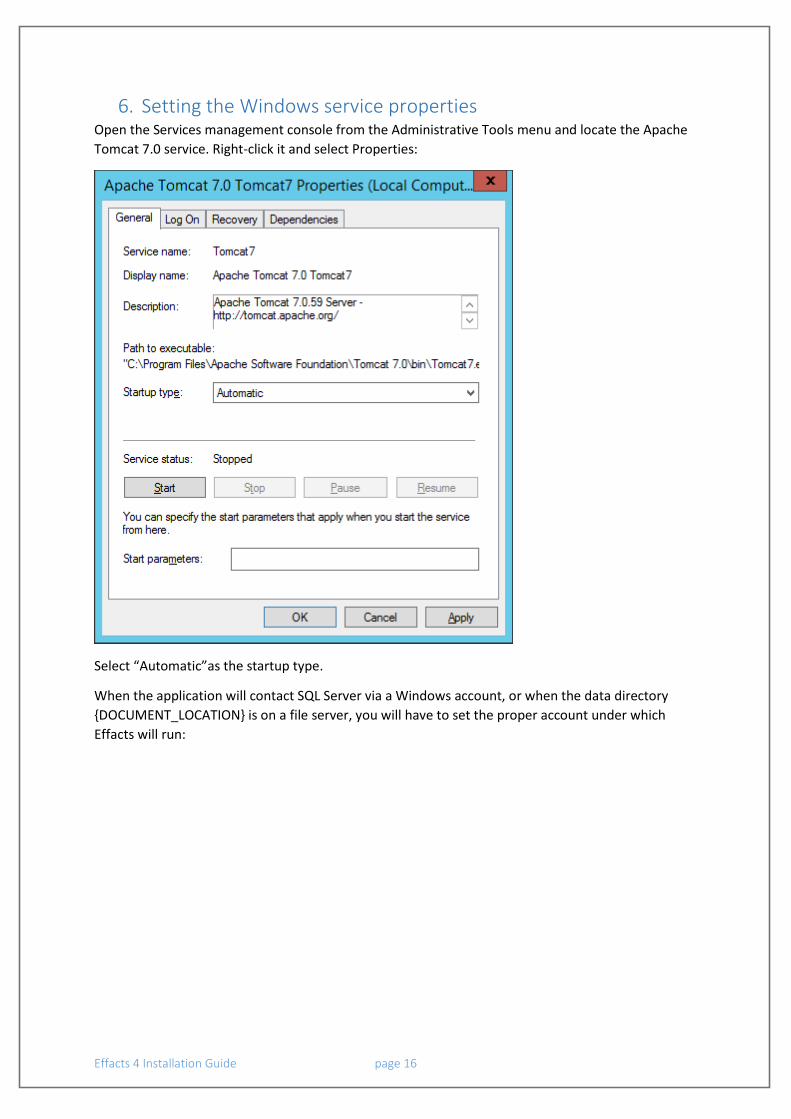
6. Setting the Windows service properties Open the Services management console from the Administrative Tools menu and locate the Apache
Tomcat 7.0 service. Right-click it and select Properties:
Select “Automatic”as the startup type.
When the application will contact SQL Server via a Windows account, or when the data directory
{DOCUMENT_LOCATION} is on a file server, you will have to set the proper account under which
Effacts will run:
Effacts 4 Installation Guide page 17
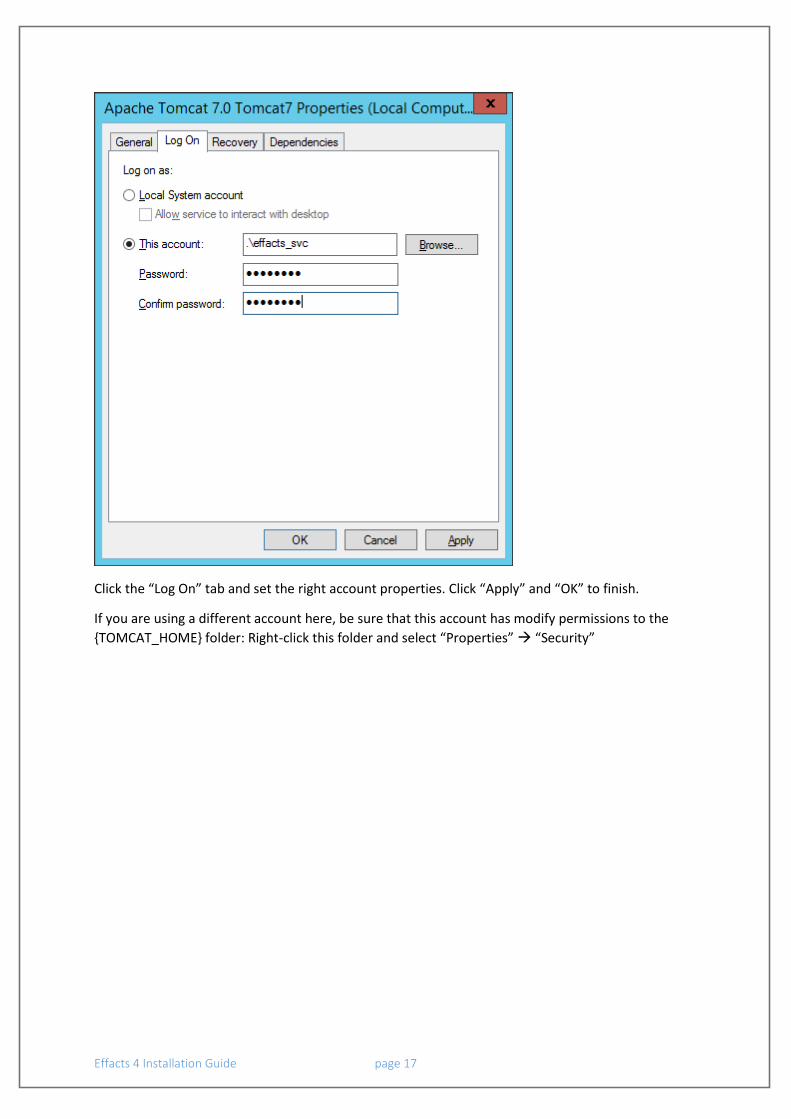
Click the “Log On” tab and set the right account properties. Click “Apply” and “OK” to finish.
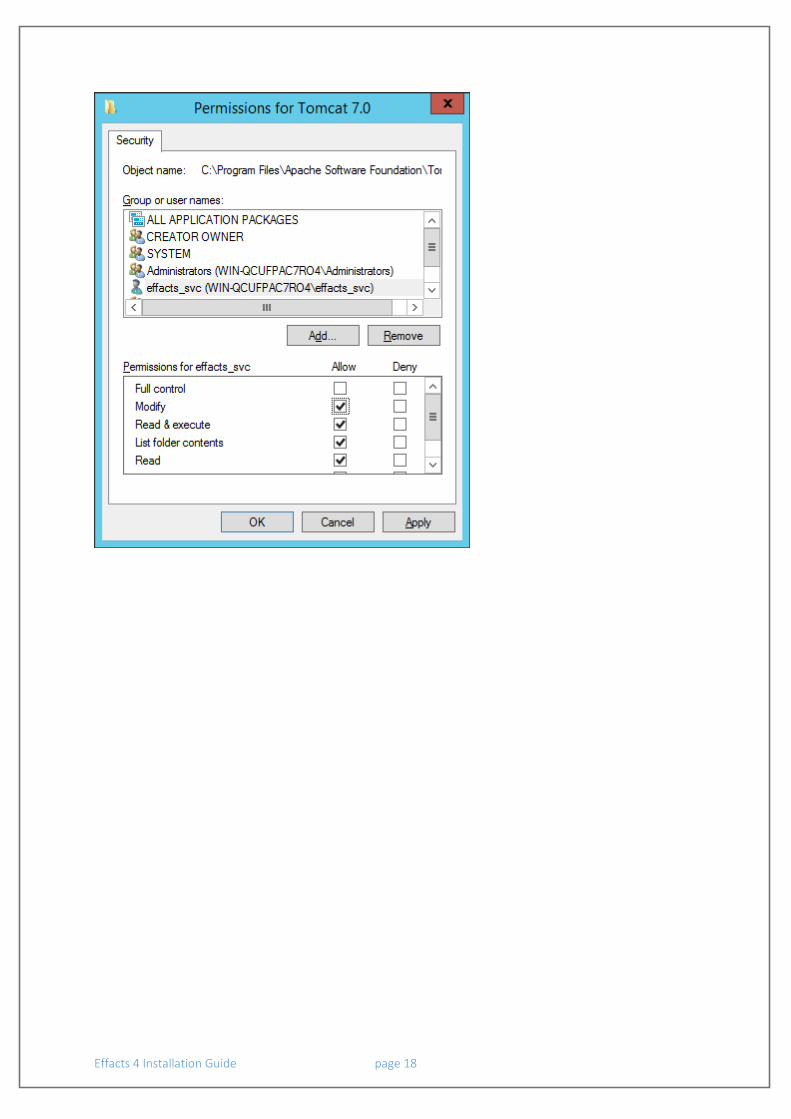
If you are using a different account here, be sure that this account has modify permissions to the
{TOMCAT_HOME} folder: Right-click this folder and select “Properties” “Security”
Effacts 4 Installation Guide page 18
Effacts 4 Installation Guide page 19
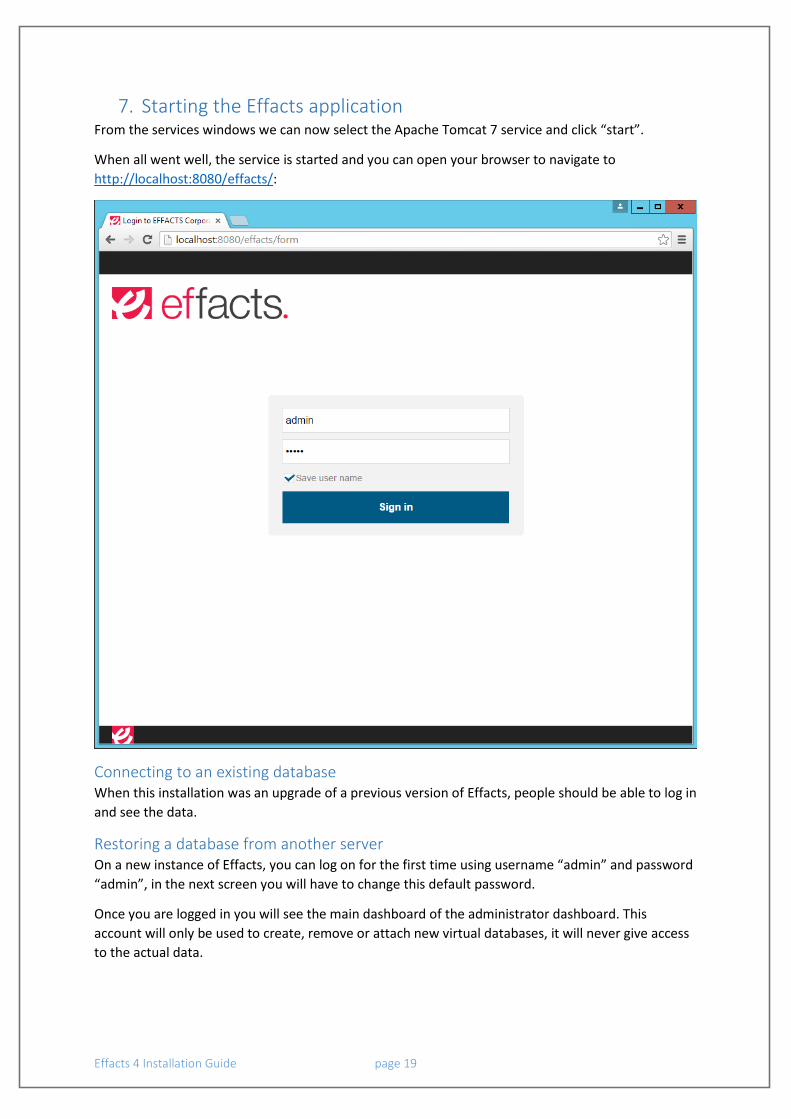
7. Starting the Effacts application From the services windows we can now select the Apache Tomcat 7 service and click “start”.
When all went well, the service is started and you can open your browser to navigate to
http://localhost:8080/effacts/:
Connecting to an existing database When this installation was an upgrade of a previous version of Effacts, people should be able to log in
and see the data.
Restoring a database from another server On a new instance of Effacts, you can log on for the first time using username “admin” and password
“admin”, in the next screen you will have to change this default password.
Once you are logged in you will see the main dashboard of the administrator dashboard. This
account will only be used to create, remove or attach new virtual databases, it will never give access
to the actual data.
Effacts 4 Installation Guide page 20
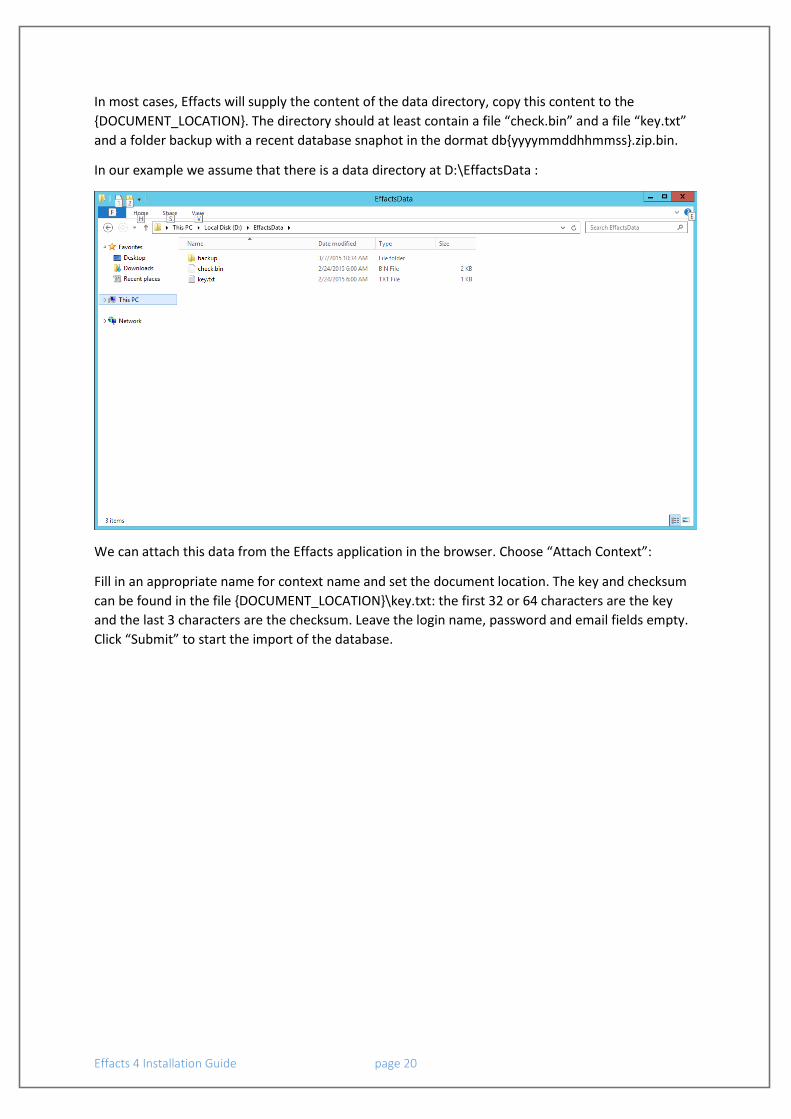
In most cases, Effacts will supply the content of the data directory, copy this content to the
{DOCUMENT_LOCATION}. The directory should at least contain a file “check.bin” and a file “key.txt”
and a folder backup with a recent database snaphot in the dormat db{yyyymmddhhmmss}.zip.bin.
In our example we assume that there is a data directory at D:\EffactsData :
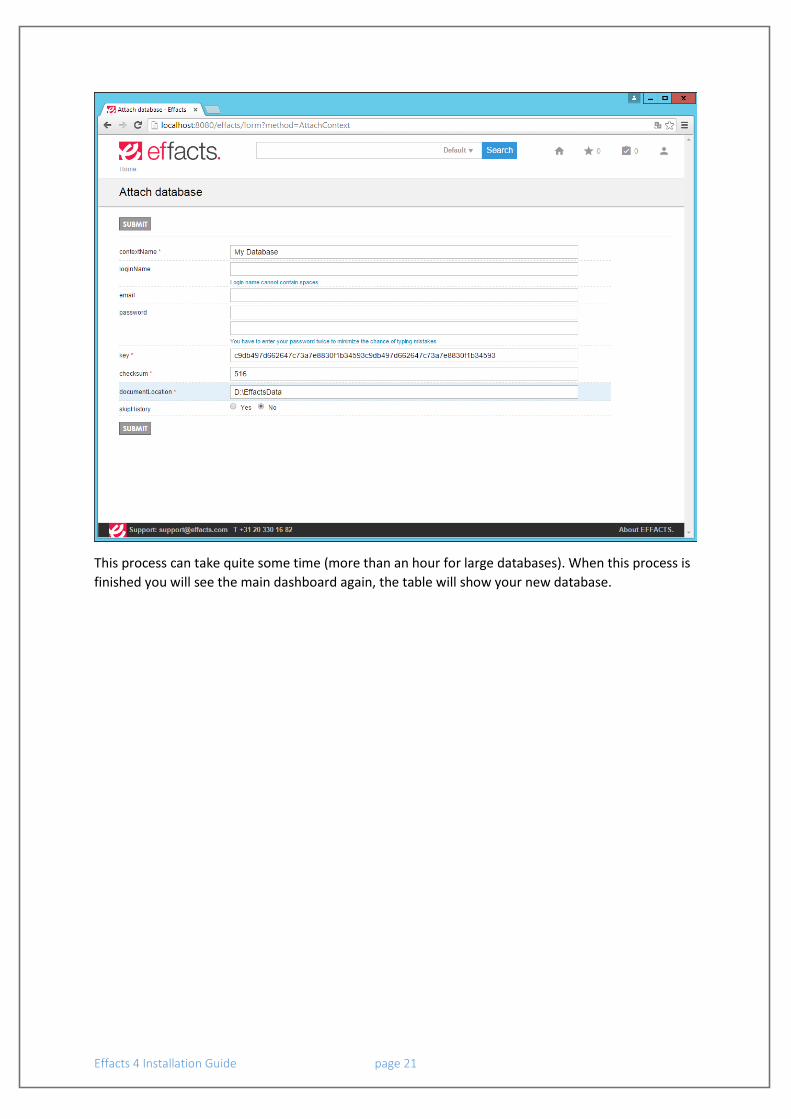
We can attach this data from the Effacts application in the browser. Choose “Attach Context”:
Fill in an appropriate name for context name and set the document location. The key and checksum
can be found in the file {DOCUMENT_LOCATION}\key.txt: the first 32 or 64 characters are the key
and the last 3 characters are the checksum. Leave the login name, password and email fields empty.
Click “Submit” to start the import of the database.
Effacts 4 Installation Guide page 21
This process can take quite some time (more than an hour for large databases). When this process is
finished you will see the main dashboard again, the table will show your new database.
Effacts 4 Installation Guide page 22
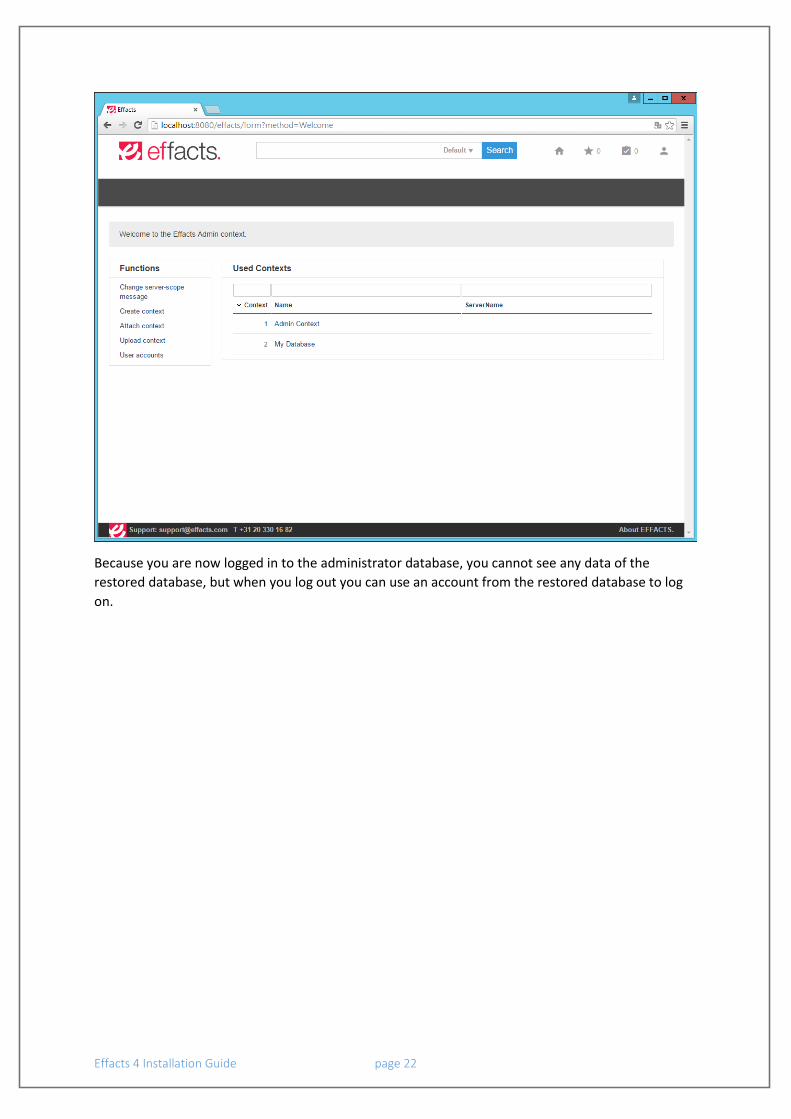
Because you are now logged in to the administrator database, you cannot see any data of the
restored database, but when you log out you can use an account from the restored database to log
on.