Embed Size (px)
Citation preview
EE320L Electronics I
Laboratory
Laboratory Exercise #3
Operational Amplifier Application Circuits
By
Angsuman Roy
Department of Electrical and Computer Engineering
University of Nevada, Las Vegas
Objective:
The purpose of this lab is to understand and apply op-amps for real world applications,
particularly in the realm of signal generation and processing.
Equipment Used:
Dual Output Power Supply
Oscilloscope
Breadboard
Jumper Wires
TL082 or LF412 Dual JFET Input Operational Amplifier
10x Scope Probes
Various Resistors and Capacitors
Background:
Op-amps can be used for almost any electronics application imaginable. Besides their
obvious application as amplifiers, op-amps can be used for signal generation and processing as
well. Using a few op-amps and a handful of passive components, complex functions can be
realized which would have taken hundreds of components fifty years ago. Through the use of
both positive and negative feedback we will design an astable multivibrator circuit whose output
is a square wave and then connect this circuit to an integrator to create a triangle wave. This
forms the foundation of a function generator and will help us understand that complex equipment
is often based on simple concepts.
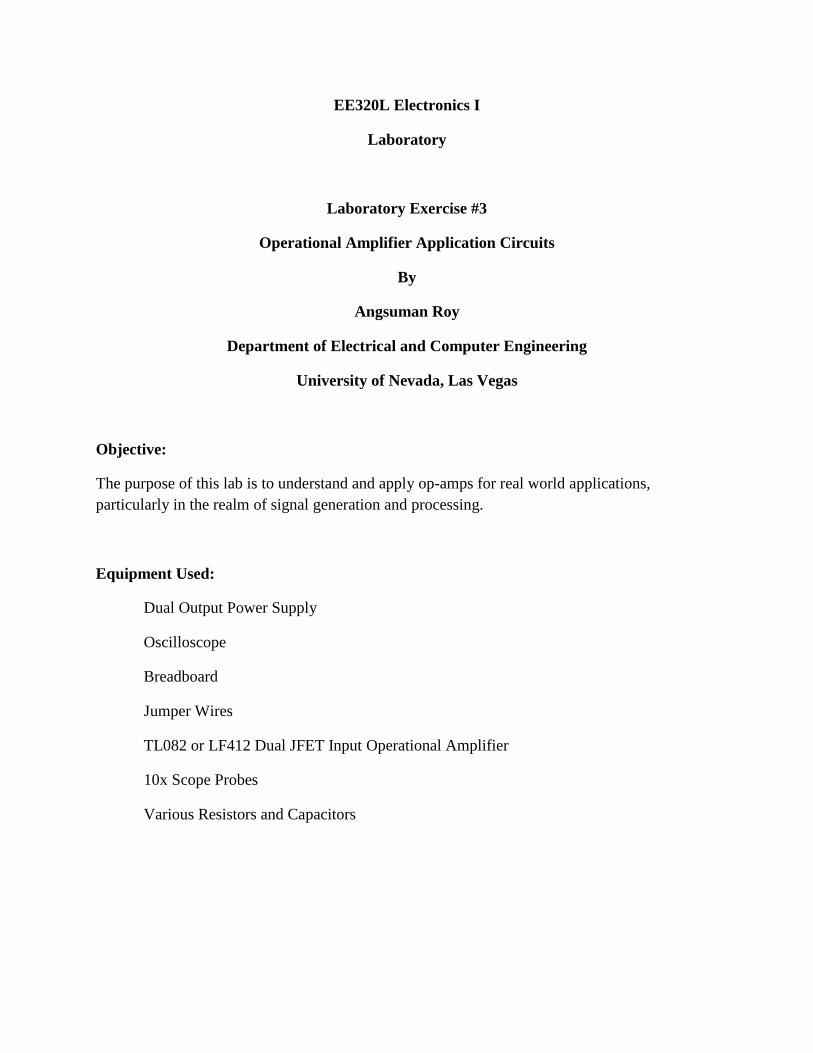
Consider the circuit shown below in fig. 1. From our current knowledge of op-amps, this
circuit may not make sense. We can clearly see it is not an inverting or a non-inverting amplifier
since the feedback path connects from the output to the non-inverting input of the op-amp.
Rather this circuit behaves as a comparator. Recall that a comparator is a circuit which compares
the magnitude of the voltages at the input. If the voltage is higher at the positive input than the
negative input then the output will swing to the V+ supply voltage. If the voltage is lower at the
positive input then the output will swing to the V- supply voltage. The circuit can only have two
values at the output, V+ or V-. In digital circuits this is usually looked at from the perspective of
either a “0” or a “1”. Another term for a circuit that behaves like this is “bistable” meaning that
there are two states in which the circuit can be stable. In the circuit in fig. 1, the voltage divider
at the non-inverting input determines the switch point. If “vin” is less than 90% of the V+ supply
voltage, “vout” will be at V+. If “vin” is greater than 90% of the V+ supply voltage then, being
in the inverting configuration, the op-amp’s output will be at V- supply voltage. The ratio of the
resistors can be varied to set the desired switch point. The 0.9V+ switch point may seem odd,
but it will be needed for our oscillator.
Fig. 1 A bistable circuit
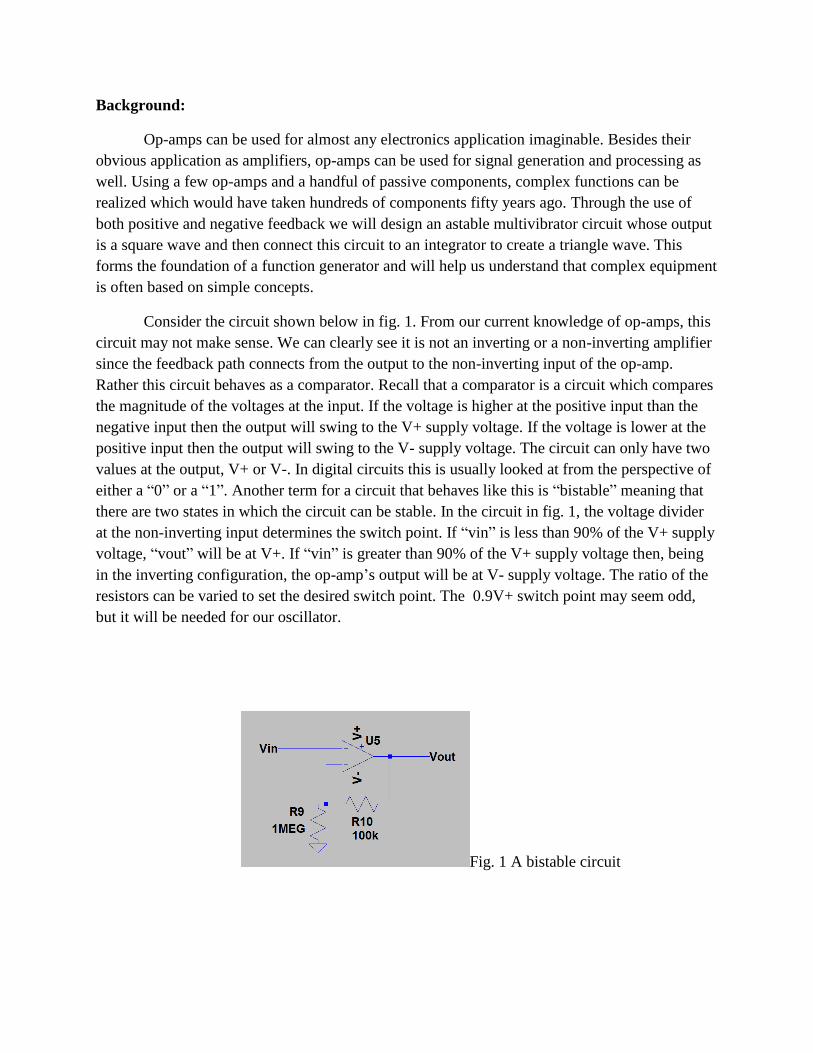
The bistable circuit has many uses indeed, but we need to modify it for our purpose since
we want to make an oscillator. The trick to doing this is to change our circuit from being bistable
to astable, that is, without stability. This can be done by adding an RC circuit between the output
and the inverting input as shown in fig. 2. The capacitor will charge up to the output voltage
through the resistor. Once the voltage at the inverting input is greater than the voltage on the
noninverting input then the output will switch to V-. The capacitor will then charge up to the
output voltage which is at V-. Once this value exceeds that at the noninverting input, the output
will switch to V+. This process will continue as long as the circuit is powered up. The circuit
constantly flips between the two states and is therefore astable. Fig. 3 shows the waveforms for
this circuit. Notice how once the capacitor charges to the switch point, the output changes state.
Fig. 2 An astable circuit
Fig. 3 Output and inverting input of circuit

Another important op-amp building block is the integrator. Its function is to perform the
mathematical operation of integration. A basic integrator schematic is shown below in fig. 4. The
output of this circuit is the voltage that results from integrating the voltage at the “vin” node. It
does this by first converting the input voltage into a current. Remember that the inputs of an op-
amp are ideally held at 0V. Let’s say that there is an input of 10V, if inverting input of the op-
amp is at 0V and the input resistor is 100k, then the input current will be
.
Recall that the current flowing in a capacitor is
. If we solve for V, then we get
∫ . The reason we can’t use a simple capacitor as a voltage integrator, is because we
need the op-amp to hold a node at a constant voltage to allow a proportional voltage to current
conversion. Fig. 5 shows that a triangle wave results from a square wave at the input. This should
make intuitive sense because the integral of a constant is a line. We can see that tops and bottoms
of the square wave are constants.
Fig. 4 An integrator circuit
Fig. 5 Input and output of an integrator circuit
Prelab:
Analysis 1: Simulate an Astable Op-amp Circuit
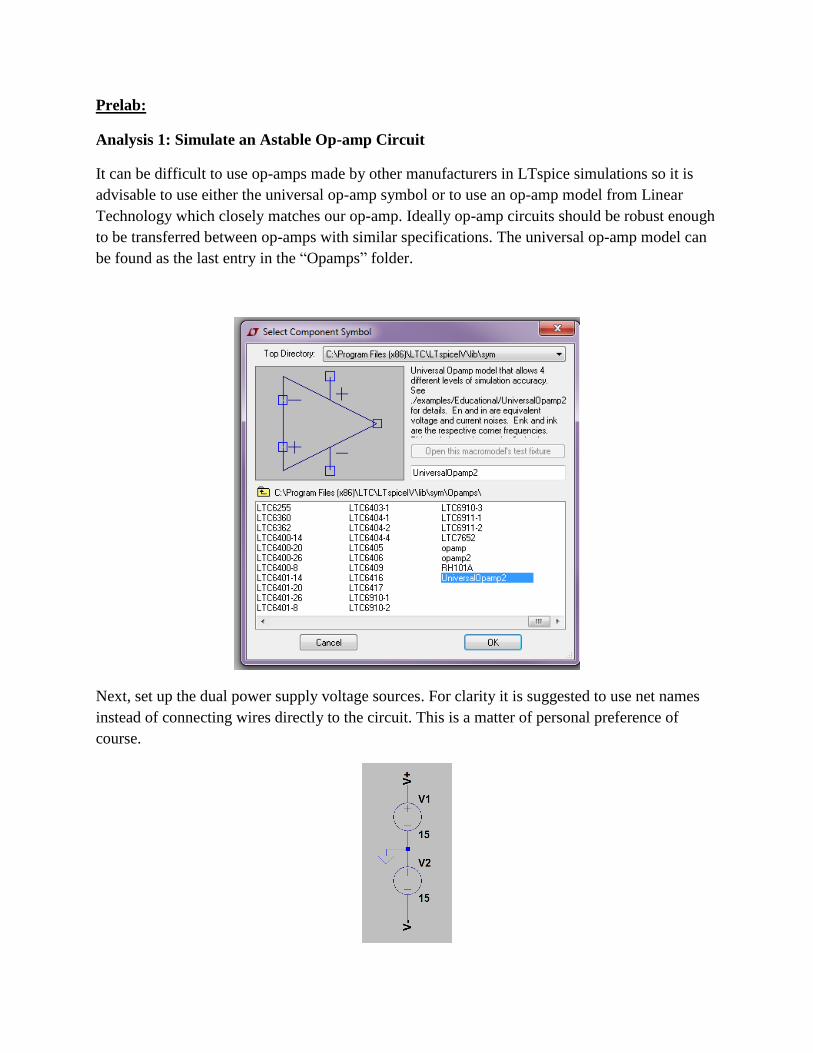
It can be difficult to use op-amps made by other manufacturers in LTspice simulations so it is
advisable to use either the universal op-amp symbol or to use an op-amp model from Linear
Technology which closely matches our op-amp. Ideally op-amp circuits should be robust enough
to be transferred between op-amps with similar specifications. The universal op-amp model can
be found as the last entry in the “Opamps” folder.
Next, set up the dual power supply voltage sources. For clarity it is suggested to use net names
instead of connecting wires directly to the circuit. This is a matter of personal preference of
course.

Draw the circuit as shown below.
If you try to simulate this circuit you will notice that it does not work. This is because circuits in
Spice need some sort of voltage source at the input. In the real world oscillators work because of
noise which builds up through positive feedback and causes the circuit to oscillate. In Spice we
need to add this noise. Add a new component called the “behavioral voltage source” as shown
below.
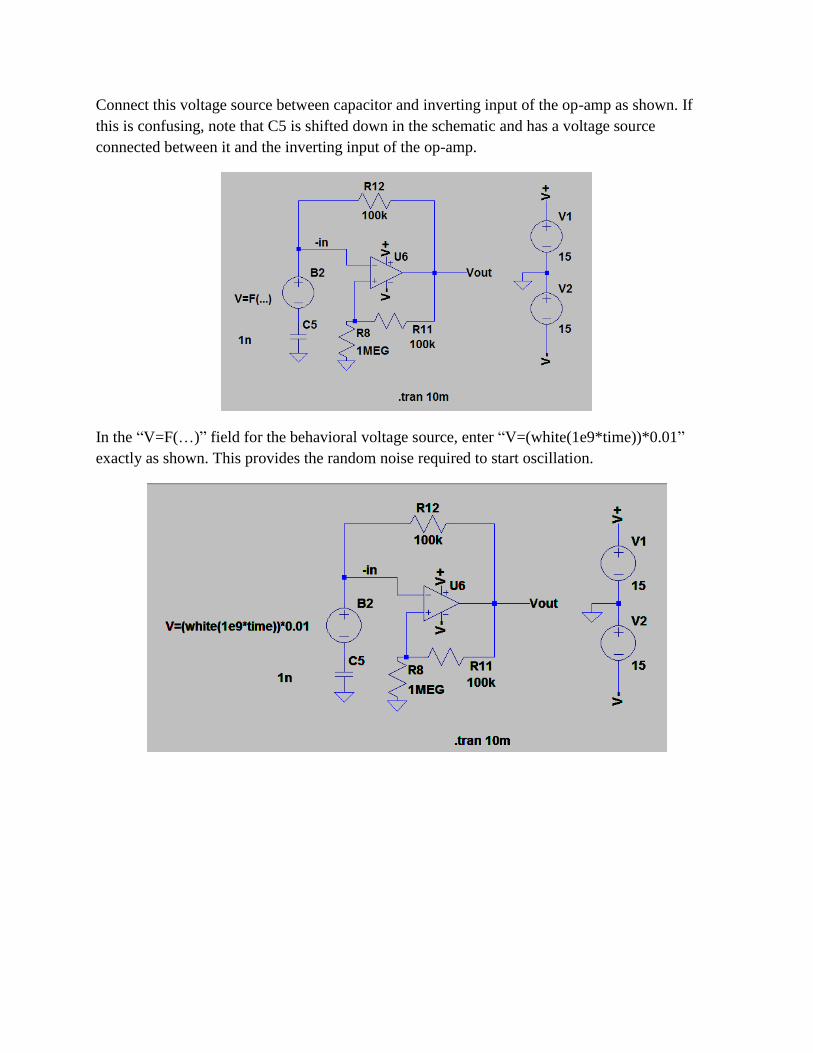
Connect this voltage source between capacitor and inverting input of the op-amp as shown. If
this is confusing, note that C5 is shifted down in the schematic and has a voltage source
connected between it and the inverting input of the op-amp.
In the “V=F(…)” field for the behavioral voltage source, enter “V=(white(1e9*time))*0.01”
exactly as shown. This provides the random noise required to start oscillation.

Finally place a .tran simulation command for 10m. Run the simulation and probe the Vout pin to
see the oscillation.
Analysis 2: Simulate an Op-amp Integrator Circuit
Draw the circuit as shown below in the same schematic. Notice how the op-amp supply voltage
pins are connected to the same V+ and V- nets as in the previous example. This helps save time
and makes for neater schematics when there are many circuits on the same schematic.
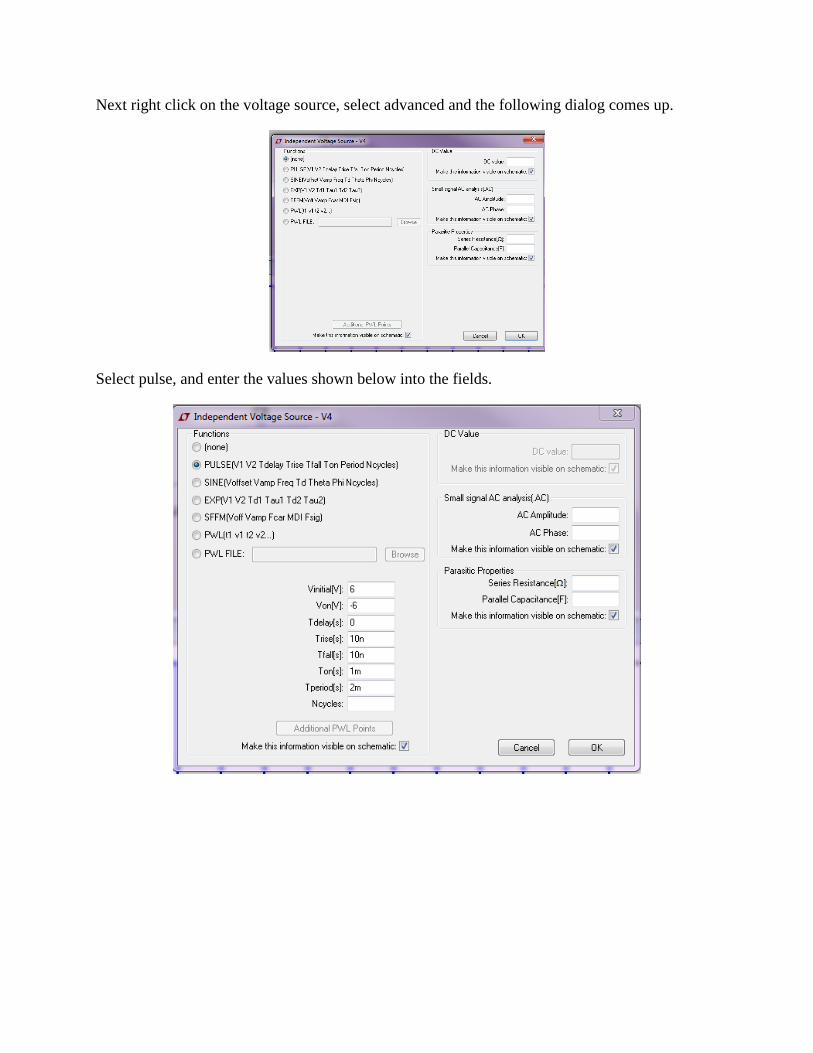
Next right click on the voltage source, select advanced and the following dialog comes up.
Select pulse, and enter the values shown below into the fields.

Your schematic should appear as shown below.
Increase the simulation time to 50m and run the simulation. The clipping and reduced amplitude
in the beginning of the simulation are due to start-up effects and will not be observed in the lab.

Analysis 3: Combining Both Circuits
We will now combine both circuits to create a very basic function generator. Delete the pulse
voltage source from the integrator circuit and connect the astable multivibrator circuit as shown
below. Remember that the move tool can be used to move objects around the schematic. Run the
simulation and probe the Vout and IntOut nodes and the result should look as shown below.
Prelab Deliverables:
1). Submit screenshots of each labs schematic and simulation output.
2). Email the .asc file (LTspice file format) of your prelab to your TA.
Laboratory Experiments:
Experiment 1: Construct and Analyze Circuit
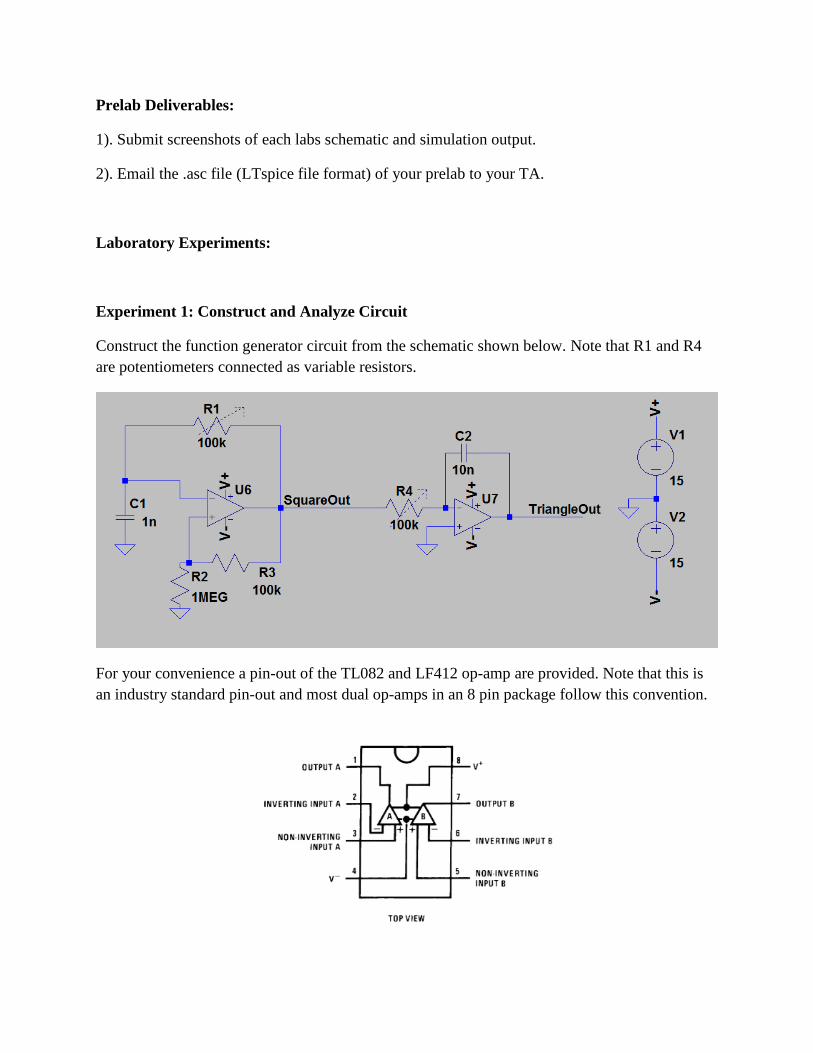
Construct the function generator circuit from the schematic shown below. Note that R1 and R4
are potentiometers connected as variable resistors.
For your convenience a pin-out of the TL082 and LF412 op-amp are provided. Note that this is
an industry standard pin-out and most dual op-amps in an 8 pin package follow this convention.
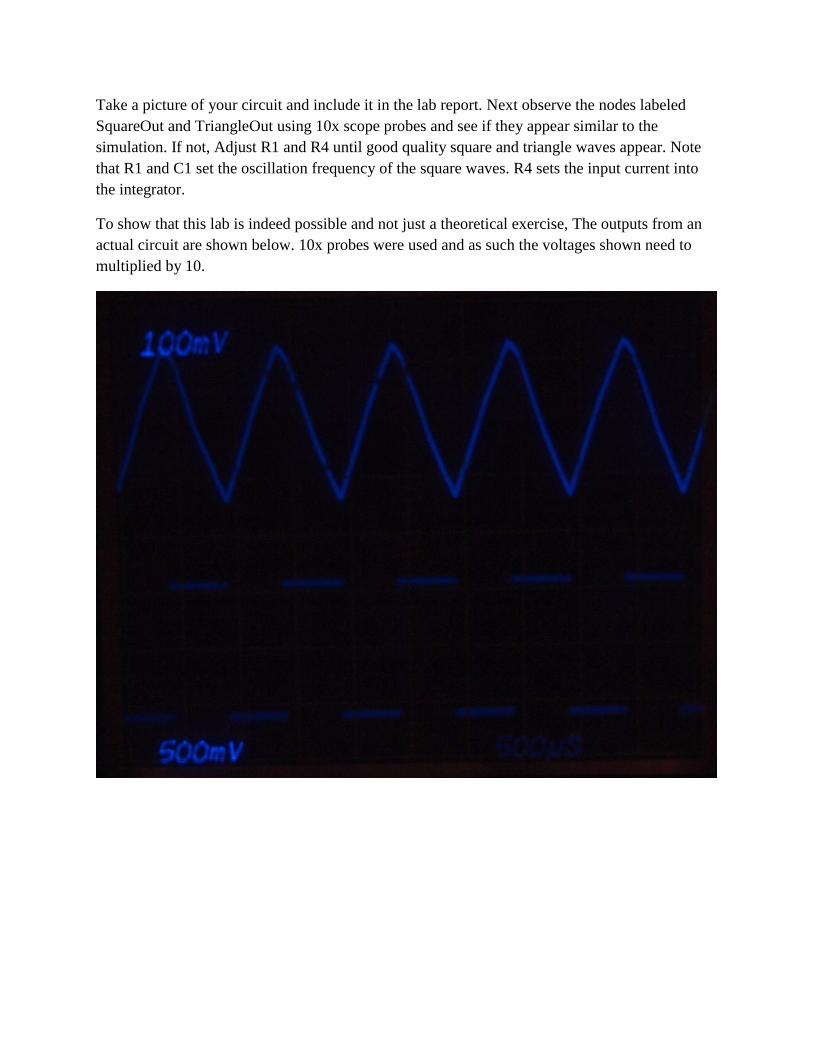
Take a picture of your circuit and include it in the lab report. Next observe the nodes labeled
SquareOut and TriangleOut using 10x scope probes and see if they appear similar to the
simulation. If not, Adjust R1 and R4 until good quality square and triangle waves appear. Note
that R1 and C1 set the oscillation frequency of the square waves. R4 sets the input current into
the integrator.
To show that this lab is indeed possible and not just a theoretical exercise, The outputs from an
actual circuit are shown below. 10x probes were used and as such the voltages shown need to
multiplied by 10.

Postlab Deliverables and Questions:
1. Submit a picture of your breadboard with your circuit on it.
2. Submit a picture showing square and triangle waves from the circuit.
3. Questions:
a. Calculate the oscillation frequency of the square wave oscillator using the time
constant of R1 and C1. Be sure to measure the value of R1 (potentiometer) at the
setting you used in the circuit to make sure your calculation is accurate. Compare
this to the measured frequency of oscillation in terms of error percentage and
comment on why this frequency deviation occurs. Hint: look at figure 3 and think
about what the effect of the switch point is on oscillation frequency.
b. Let’s say that the triangle output is clipping. List two solutions to solve this
problem.
c. Do some research and list two different sine wave oscillator topologies and briefly
describe their operation in a few sentences. Hint: One of the topologies was
invented by Bill Hewlett, of Hewlett-Packard fame. (Despite being an elegant
circuit, we didn’t create a variable sine oscillator because it much more difficult to
implement and simulate than the circuit in this lab. )
Additional Resources:
1. Application Note 31: Op Amp Circuit Collection
http://www.ti.com/lit/an/slod006b/slod006b.pdf
A quick reference that has the most widely used Op-Amp configurations
2. Op Amps for Everyone
http://www.ti.com/lit/an/slod006b/slod006b.pdf
The best reference on how to use Op-Amps with qualitative analysis and
quantitative design equations, a must read.