Embed Size (px)
Citation preview

Education

Outline
• Overview of the uCdimm/uClinux Development Environment
• Configuring the uCdimm/uClinux
• Write a “C” code using the General Purpose Parallel I/O
• Overview of the File System Hierarchy in uClinux

Overview of the uCdimm/uClinux
Development Environment

Outline
• What is uCdimm?
• What is uCgarderner?
• Overview of Development Environment
• Overview of Development Process

What is uCdimm?
• uCdimm is “uc68VZ328 Microcontroller Module”
DRAM
CPU
DragonBall
68VZ328
FLASH
ROMEthernet
Controller2Mb
8Mb33MHz
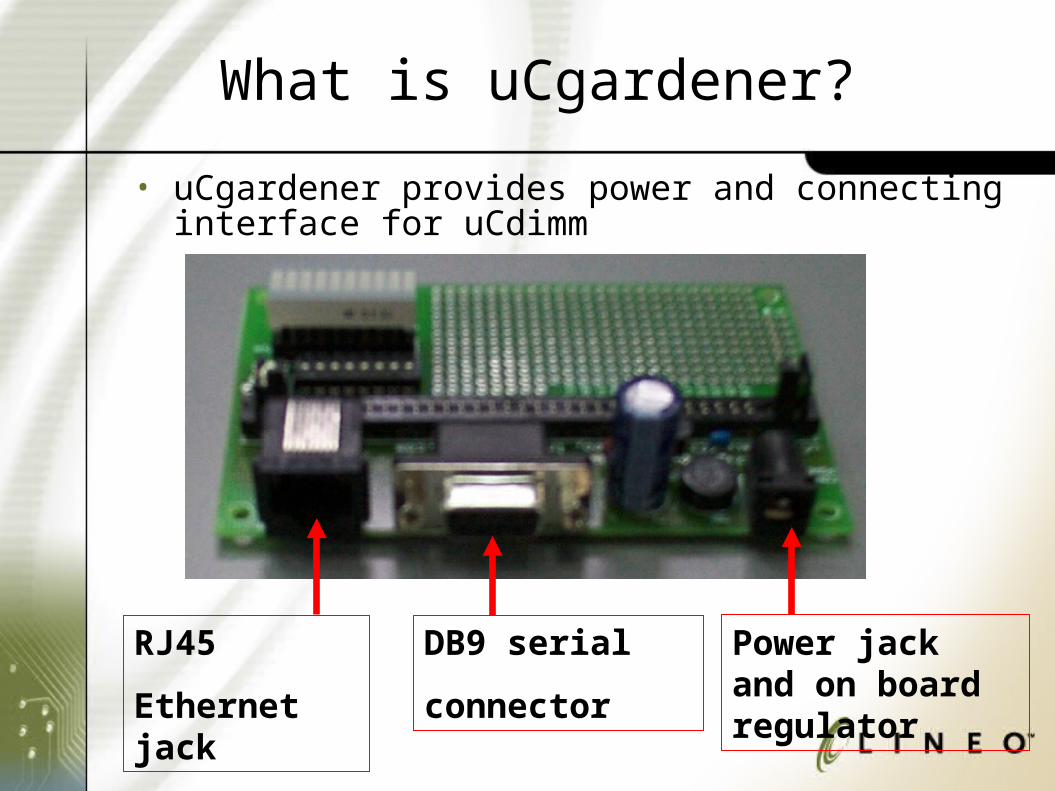
What is uCgardener?
• uCgardener provides power and connecting interface for uCdimm
RJ45
Ethernet jack
DB9 serial
connector
Power jack and on board regulator

Overview of Development Environment (1)
+
The connection between host computer and uCdimm plus uCgardener is made through serial port when running boot loader.
RS-232

Overview of Development Environment (2)
+
RS-232
Ethernet
The connection between host computer and uCdimm plus uCgardener is made through serial port and ether net when the uClinux boots.

• Kernel Image is generated on host computer using cross-compiler.
• Kernel Image is uploaded to uCdimm through serial port when running boot loader.
• Kernel Image is uploaded to uCdimm through ethernet when uClinux boots.
• Bootloader can boot uClinux kernel ether from flash ROM or memory.
Overview of Development Process

Configuring the uCdimm/uClinux

Outline
• Configuring the Linux Workstation
• Configuring the uCdimm Target
• Getting the Serial Connection Up and Running
• Getting the Ethernet Connection Up and Running
• Activities/Exercises

Configuring the Linux Workstation
• Installing the tool chains
• Setting up the working environment
• Configuring Development Environment

Installing the Tool Chains (1)
– For the libc6 case, become root and
• Mount the uClinux CD, eg “mount /dev/cdrom /mnt/cdrom”
• change into the libc6 directory, eg “cd /mnt/cdrom/RPM/libc6”
• then do a make, ie “make”
– Some items can be found at /opt/uClinuxbin/ include/ linux/man/deftemplat.sh* info/ m68-coff/romdisk/dev/ lib/ m68-pic-coff/ src/

Setting up the Working Environment (1)
• With the tool chains installed, you can create your working environment :
– Make a directory to hold your work
– Change to that directory
– Then issue the ‘buildenv’ command
– Finally issue the ‘make’ command
For example :
• mkdir /tmp/uCsimm_work
• cd /tmp/uCsimm_work
• buildenv
• make
Setting up the Working Environment (2)
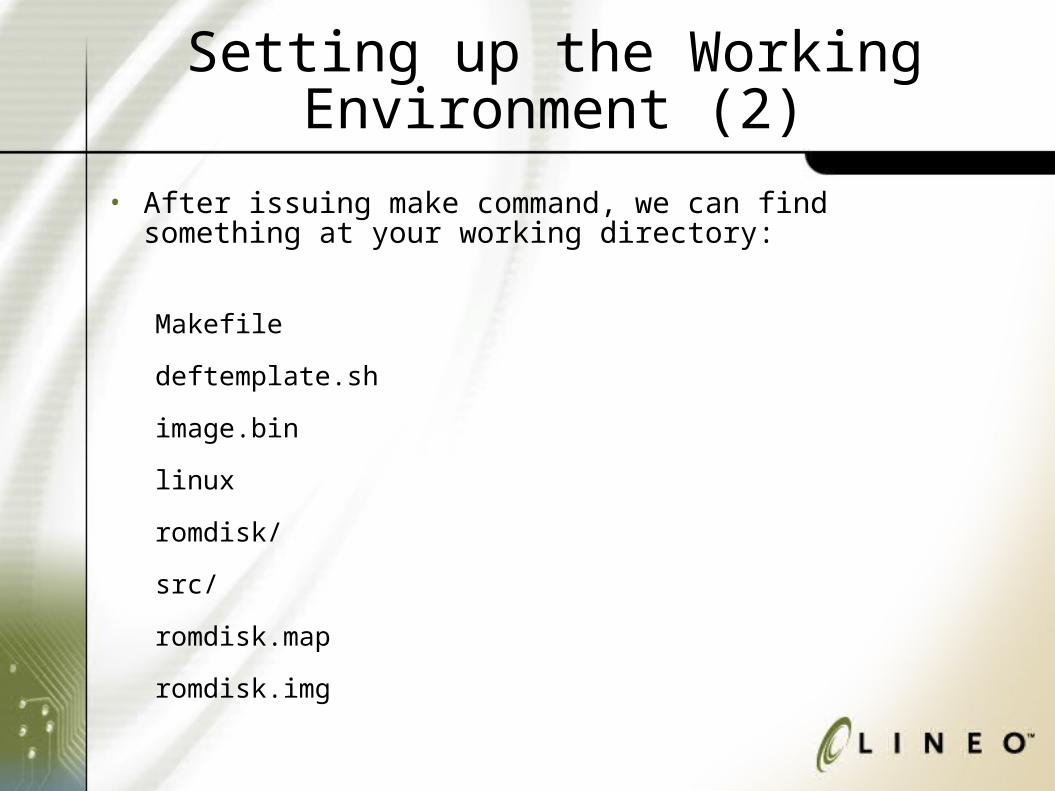
• After issuing make command, we can find something at your working directory:
Makefile
deftemplate.sh
image.bin
linux
romdisk/
src/
romdisk.map
romdisk.img

Configuring the uCsimm Target
• Power adapter
• The RS232 serial connection
• The Ethernet connection

Getting the Serial Connection Up and Running
• Using a ‘straight through’ (not null modem) cable, connect your workstation to your uCgardener.
• Setting up minicom and the serial connection
• Booting uClinux
• Uploading a new OS image

Setting up minicom and serial connection (1)
Setup minicom parameters:
– Choose the Serial port setup and within that choice :
•Select your Serial Device ( e.g. /dev/ttyS0 )
•Next set your Bps/Par/Bits as 19200 8N1
•Finally say no (N) to both Hardware and Software Flow Control

Setting up minicom and serial connection (2)
• Setup minicom parameters: (continued…)
– Choose Modem and dialing and within that choice
•remove the Init string
•remove the Reset string
– Set minicom to use ‘sz –X’ for XMODEM protocol.

Bootloader Commands (1)
• help– Print a list of commands with short descriptions
• rx– Receive a binary image via the RS232 port using XMODEM
protocol
– Store the new image starting at DRAM address 0x00020000.
• program– Erase an area of the FLASH ROM starting at 0x10C10000.
– Write the image currently in DRAM into that area of the FLASH.
• The image is presumably one that was received into DRAM via the rx command

Bootloader Commands (2)
• go– Execute the image residing in the OS area of the FLASH ROM
• goram– Execute the image residing in DRAM, presumably one that has been
received via the rx command
• md address [endaddress]– Display a memory dump in hexadecimal, starting at address and
ending at endaddress.
• mm address values…– Starting at address, sequentially write a byte at a time from values
into memory.
• mm 00020000 123456
– 0x12 into 0x00020000
– 0x34 into 0x00020001
– 0x56 into 0x00020002

Bootloader Commands (3)
• fast– Change the serial speed to 115200 bps

Booting uClinux
• bootloader’s B$ prompt– B$ go
• Login – uCsimm login: root
– Password: uClinux
• “ls” command

Uploading a new OS image (1)
• Upload a new image at – 19200bps (slow) or
– 115,200bps (fast)
• Slow– At the B$ prompt type rx.
B$ rx
– Press ctrl-a and the z to enter the “Minicom Command Summary” screen
– Choose s for Send files, the as prompted choose the xmodem for upload protocol
– Next you’ll be prompted for the filename

Upload a new OS image (2)
• To move the just uploaded image to FLASH ROM– B$ program

Getting the Ethernet Connection Up and Running
• Configuring nfs on the Linux Workstation
• Setting up the network parameters on your Linux workstation
• Transferring uClinux images aided by nfs

Setting up the network parameters on your Linux
workstation (1)• The network environment setup
– Linux workstation
• IP address = 192.168.1.100
• network mask = 255.255.255.0
• network address = 192.168.1.0
• gateway address = 192.168.1.254
• nfs service enable

Setting up the network parameters on your Linux
workstation (2)NFS server setup
– Add the following line to /etc/exports to tell the nfs server what files it may export for external mounting. For example, /nfsroot is the nfs exported directory,
/nfsroot (ro)
– Stop and start the nfs server
/etc/rc.d/init.d/nfs stop
/etc/rc.d/init.d/nfs start
/etc/rc.d/init.d/nfs restart

Configuration the uCdimm Target (1)
• The network environment setup– uCsimm
• IP address = 192.168.1.200
• network mask = 255.255.255.0
• network address = 192.168.1.0
• gateway address = 192.168.1.254
• DNS address = 203.77.1.20
– Mount the nfs directory
• /bin/mount -t nfs 192.168.1.100:/nfsroot /usr

Configuration the uCsimm Target (2)
• Modify the /etc/rc file
# attach the interfaces
/sbin/ifattach
/sbin/ifattach \
--addr 192.168.1.200 \
--mask 255.255.255.0 \
--net 192.168.1.0 \
--gw 192.168.1.254 eth0
# expand the ramdisk
/sbin/expand /ramfs.img /dev/ram0
(continued…)

Configuration the uCsimm Target (3)
• Modify the /etc/rc file ( continued … )
# mount ramdisk, proc and nfs
/bin/mount -t ext2 /dev/ram0 /var
/bin/mount -t proc proc /proc
/bin/mount -t nfs 192.168.1.100:/nfsroot /usr
# start up the internet superserver
/sbin/inetd &
# that's it... sucess
exit 0
–flashloader

A Example : Make a New Image
• Change the default password– Modify the src/init/login.c, line #24
• Make a new image, enter ‘make’• Copy the new image, image.bin, to /nfsroot
– cp image.bin /nfsroot
• Boot up the uCdimm• On the uCdimm, mount the nfs filesystem
– mount –t nfs 192.168.1.100:/nfsroot /usr
• Download and flash the new image– flashloader /usr/image.bin

Using the General Purpose Parallel I/O

OUTLINE
• Introduction
• Example Programs using Port D I/O
• Running the Example Programs
• Primitives for an I/O Control Language
• Activities / Exercise

Introduction
• Circuitry has been added to the uCgardener to make Port D available as input and output.– Available 8 output leds and 8 input switch
– Negative logic
• 1: off
• 0: on
Example Programs using Port D I/O
• Program #1 – output only, turns on leds

Example Program #1 – Write Port D
/*
* file: write_led.c
*/
#include <asm/MC68EZ328.h>
void init_portd(void)
{
PDSEL = 0xFF;/* select port D for I/O */
PDDIR = 0xFF;/* set bits 0-7 as output */
PDDATA = 0xFF; /* initialize to off */
} /* init_portd() */

Example Program #1 – Write Port D (cont’d)
int write_output_portd(unsigned int which_bit)
{
unsigned char temp;
if (which_bit > 7) return –1;
temp = 0x01 << which_bit;
PDDATA = PDDATA & ~temp;
if (temp == 0)
return 0;
else
return 1;
} /* write_output_portd() */

Example Program #1 – Write Port D (cont’d)
int main(void)
{
unsigned int out_led;
int result;
init_portd();
while (1) {
printf(“\nWhich led[range 0->7] shall we turn on?\n”);
scanf(“%d”, &out_led);
result = write_output_portd(out_led);
if (result < 0) {
printf(“Invalid led number\n”);
continue;
}
}
} /* main() */

Running from a Testing Environment (cont’d)
• The steps to running write_led– On the host, create the program file in working
directory
– On the host, compile the program file
• m68k-pic-coff-gcc write_led.c –o write_led
– From your serial terminal, run the program on the target with the working directory

The File System Hierarchy in uClinux

The File System Hierarchy Standard (1/3)
Directory Name
Directory Purpose/Contents
bin essential command binaries which may be used by the system administrator and by ordinary users, required for system boot
boot kernel image and configuration files used by the boot
dev devices files
etc host-specific configuration files
home user home directories

The File System Hierarchy Standard (2/3)
lib essential shared libraries and kernel modules
mnt mount point for temporarily mounting file system such as those on a CDROM or floppy disk
opt add-on application software packages
root the root user’s home directory
sbin system binaries, essential for system administration, but not for system boot

The File System Hierarchy Standard (3/3)
tmp location of temporary files
user secondary hierarchy, intended as shareable, read-only data. Here you’ll find games, include files used by C programs, the linux source code hierarchy, and so on.
var variable data such as spool directories and log files

The File System Hierarchy in uClinux (1/2)
Directory Name
Directory Purpose/Contents
bin per the standard
dev per the standard
etc per the standard
htdocs when the uClinux is accessed via ethernet using http, this is the directory accessed
lib contains liberror.txt, a file containing text for a variety of error messages

The File System Hierarchy in uClinux (2/2)
proc traditional
sbin per the standard
tmp a link to /var/tmp
usr empty, suggested as the mount point for
var presumably per the standard, but empty except for lost+found