Embed Size (px)
Citation preview

Report Writing in NMU Cognos Administrative Reporting 1
REV: 5/16/18
This guide assumes that you have had basic report writing
training for Cognos. It is simple guide for the new upgrade.
Basic usage of report running was covered in an earlier guide.
EDITING AN EXISTING REPORT
If you want to edit a report that already exists, simply locate it in the correct folder from the main menu
and click on the ellipses icon (…) that appears on the right of the report.
Remember, My content is the same as the old My Folders which is only accessible by you, the author.
Team content is the same as Public Folders.
My content
(My Folder)
Team content
(Public Folders)
Search
Home
Recent reports
Report Writing in NMU Cognos Administrative Reporting 2
REV: 5/16/18
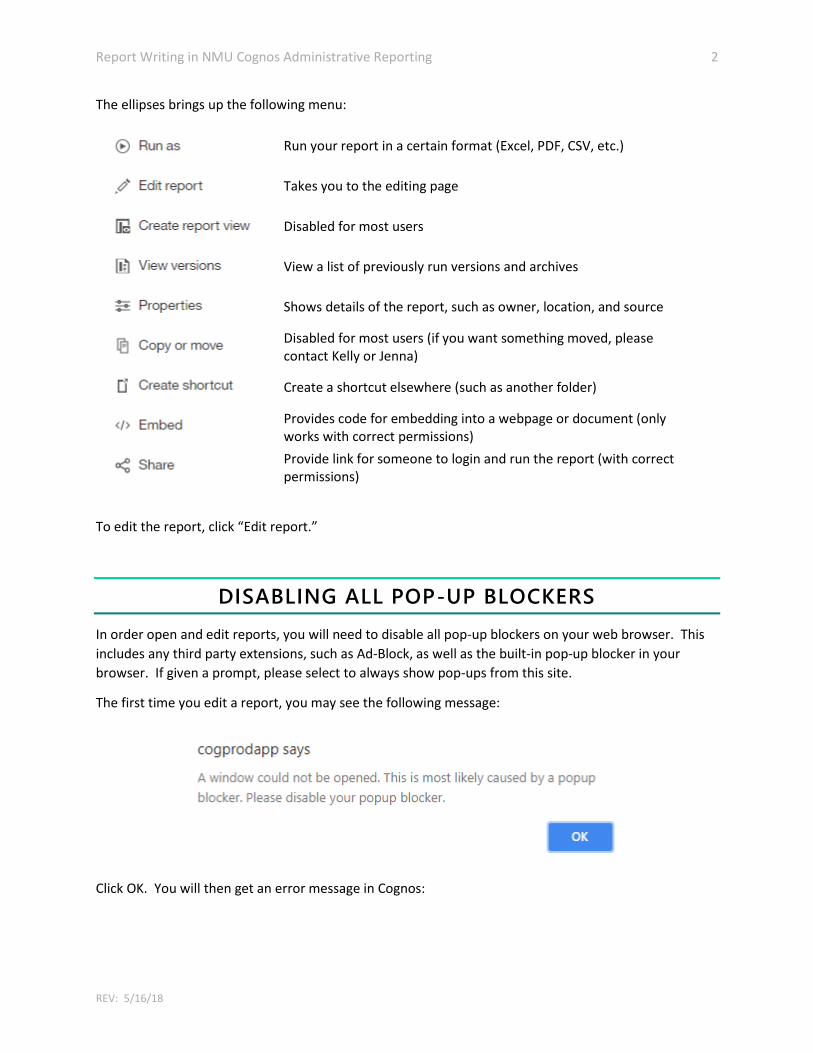
The ellipses brings up the following menu:
Run your report in a certain format (Excel, PDF, CSV, etc.)
Takes you to the editing page
Disabled for most users
View a list of previously run versions and archives
Shows details of the report, such as owner, location, and source
Disabled for most users (if you want something moved, please contact Kelly or Jenna)
Create a shortcut elsewhere (such as another folder)
Provides code for embedding into a webpage or document (only works with correct permissions)
Provide link for someone to login and run the report (with correct permissions)
To edit the report, click “Edit report.”
DISABLING ALL POP-UP BLOCKERS
In order open and edit reports, you will need to disable all pop-up blockers on your web browser. This
includes any third party extensions, such as Ad-Block, as well as the built-in pop-up blocker in your
browser. If given a prompt, please select to always show pop-ups from this site.
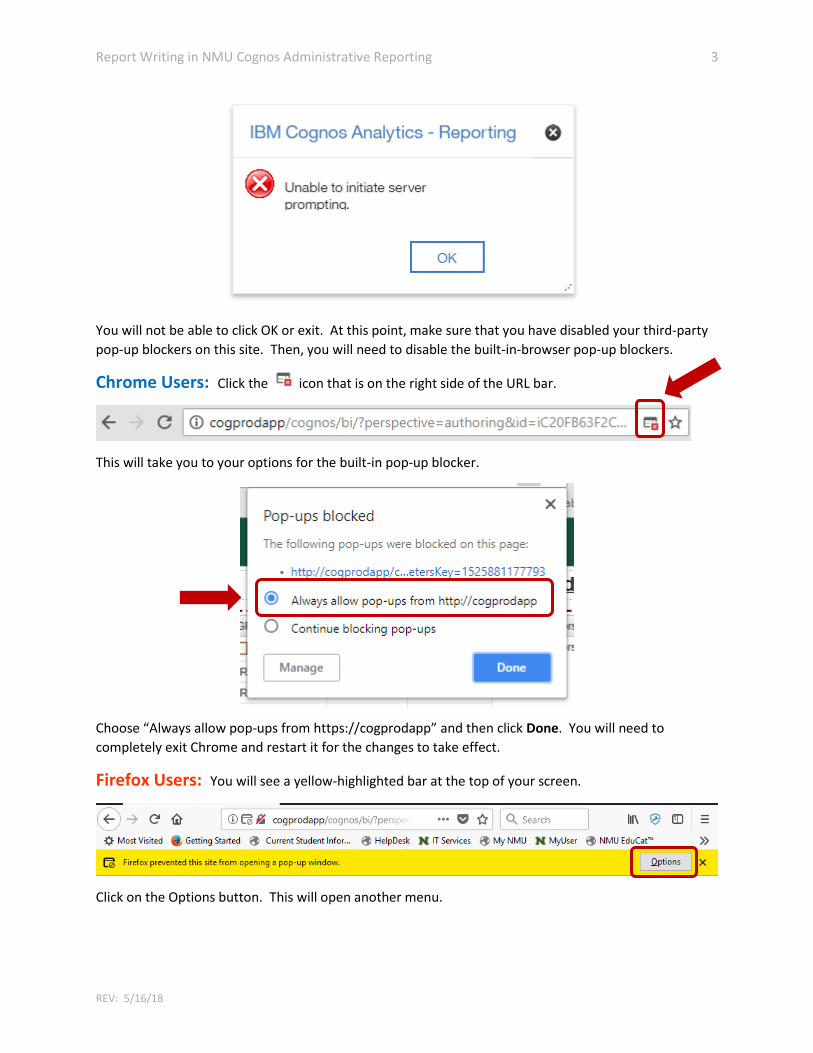
The first time you edit a report, you may see the following message:
Click OK. You will then get an error message in Cognos:
Report Writing in NMU Cognos Administrative Reporting 3
REV: 5/16/18
You will not be able to click OK or exit. At this point, make sure that you have disabled your third-party
pop-up blockers on this site. Then, you will need to disable the built-in-browser pop-up blockers.
Chrome Users: Click the icon that is on the right side of the URL bar.
This will take you to your options for the built-in pop-up blocker.
Choose “Always allow pop-ups from https://cogprodapp” and then click Done. You will need to
completely exit Chrome and restart it for the changes to take effect.
Firefox Users: You will see a yellow-highlighted bar at the top of your screen.
Click on the Options button. This will open another menu.

Report Writing in NMU Cognos Administrative Reporting 4
REV: 5/16/18
Click “Allow pop-ups for cogprodapp.” If a new window with the prompts for the report does not open
immediately, restart your browser.
Other browsers will have similar warnings and options, but we encourage you to use Chrome or Firefox
when using Cognos.
You should only have to do this once, or unless your browser is updated and for some reason resets
these settings.
REPORT PROMPTS & VALIDATION
After you have disabled your pop-up blockers, log back in to Cognos. You may notice a new feature
from the upgrade. Recent reports are now listed on the Welcome screen. To easily start editing a
previous report, simply click the ellipses in the lower right-hand corner and you will see the same action
menu as you did before.
After you have clicked “Edit report,” you will be taken to the Page view of your report, just like you were
in the old version. The system will also try to validate the report, just as it did in the old version.

Report Writing in NMU Cognos Administrative Reporting 5
REV: 5/16/18
If you get a window with prompts, you have two options:
Input selections for the prompts. This will set the “default” so when you run the report while
testing, the prompts are already selected. This is especially helpful if you are checking data
against a certain semester. You will then get a message that the report has been validated.
- OR -
Click cancel. This will not pre-load any prompt items or validate the report.
EDITING MENU
Now you are at the Page View of your report. This should look familiar. We have not updated any styles
or templates so all reports should look relatively the same as before.
The editing menu will give you access to your data sources, pages (including prompt pages), and report
objects.
Header
Footer
REPORT
AREA
Home
Editing
Menu
Save Run

Report Writing in NMU Cognos Administrative Reporting 6
REV: 5/16/18
Data: This will let you view the package (data source) the report is written from
Toolbox: Contains text items, lists, crosstabs, and other objects for creating reports
Pages: The pages and prompt pages contained in the report
Queries: The queries and joins contained in the report
You will notice when you click on one of the Editing Menu icons there is an option to pin the menu out.
This will prevent the Editing Menu from overlapping your report area. Unfortunately, the drawer area
does not have the ability to be pulled out further, but does have a scrollbar across the bottom if
necessary.
DATA DRAWER
The Data drawer contains the data items from the package. Packages are different sets of data from
tables (usually in Banner). You should be familiar with the packages you commonly use to write your
reports.
There are two tabs on the Data drawer. The Source tab shows the package in its entirety. The Data
items tab shows the data within the queries of the report. Many reports only have one query.

Report Writing in NMU Cognos Administrative Reporting 7
REV: 5/16/18
These tabs function the same as before. You can drag and drop items from the package directly or from
a query into your report list. The queries will also contain any calculations you have written.
Entire Package
Queries
Created by
Writer

Report Writing in NMU Cognos Administrative Reporting 8
REV: 5/16/18
TOOLBOX DRAWER
The Toolbox drawer contains all of the objects you need to build a report. If you are just editing an
existing report, you probably will not have to use many items from the Toolbox drawer because your
report has already been built.
Other items can be seen by clicking the blue triangle to expand each category. We will explore the
commonly used objects in the Toolbox drawer when we learn about creating a report from scratch. If
you find yourself using an item often, you can add it to the “pinned” category yourself by right-clicking
on the object and clicking “Add to Pinned Toolbox Items.”
Search for an Object Expand All Categories
Table of Detailed Data (ex: student IN, name, major)
Table of Summary Data (ex: student type
admit counts)
Styling the Report
< View Objects as Icons
Report Writing in NMU Cognos Administrative Reporting 9
REV: 5/16/18
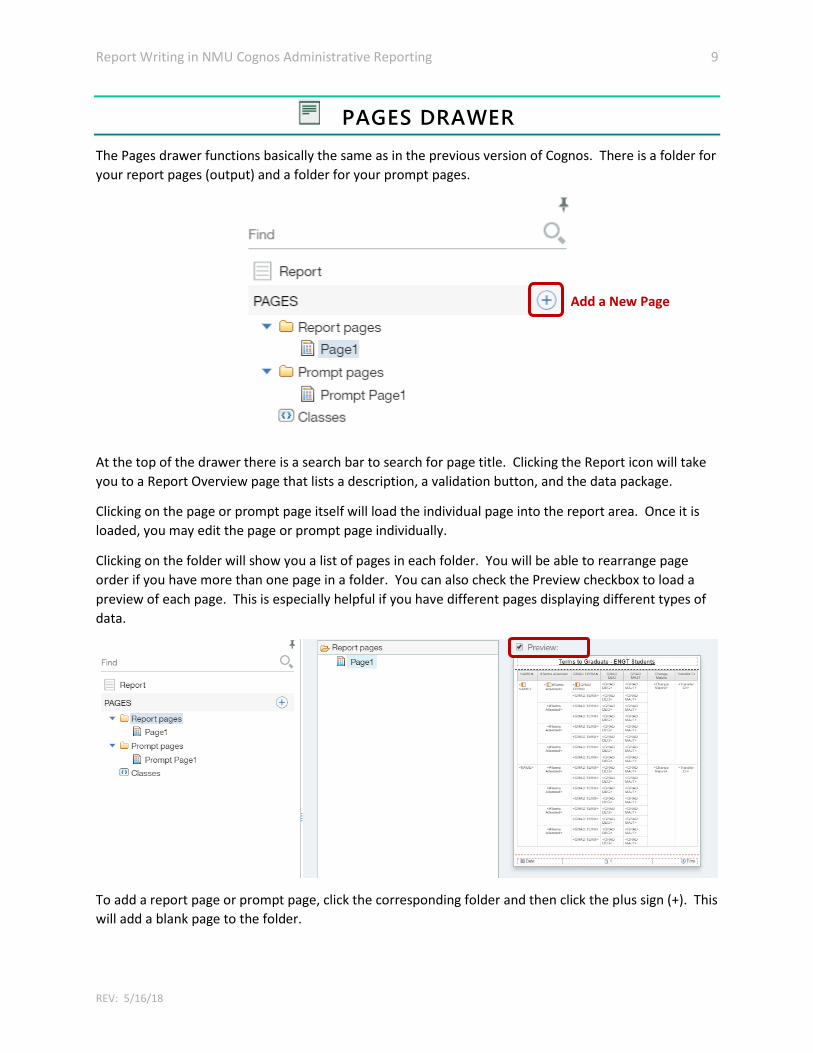
PAGES DRAWER
The Pages drawer functions basically the same as in the previous version of Cognos. There is a folder for
your report pages (output) and a folder for your prompt pages.
At the top of the drawer there is a search bar to search for page title. Clicking the Report icon will take
you to a Report Overview page that lists a description, a validation button, and the data package.
Clicking on the page or prompt page itself will load the individual page into the report area. Once it is
loaded, you may edit the page or prompt page individually.
Clicking on the folder will show you a list of pages in each folder. You will be able to rearrange page
order if you have more than one page in a folder. You can also check the Preview checkbox to load a
preview of each page. This is especially helpful if you have different pages displaying different types of
data.
To add a report page or prompt page, click the corresponding folder and then click the plus sign (+). This
will add a blank page to the folder.
Add a New Page

Report Writing in NMU Cognos Administrative Reporting 10
REV: 5/16/18
QUERIES DRAWER
The Queries drawer contains a list of all the queries used in the report. Many reports only have one
query, so you may not use this function very often. If you do not use joins, unions, or subtractions in
your reports, you may not be familiar with this area.
To view the Queries Map, which is the whitespace where you can see all the queries laid out, click the
Queries folder.
View the Queries Map
View the Report Overview
View Join
View Query and Filters
Add a New Query

Report Writing in NMU Cognos Administrative Reporting 11
REV: 5/16/18
To view an individual query, click on the name of the query.
To view or edit a join between two queries, click the icon beneath the joined query. A box will pop-
up. This will show you the relationships between the two queries. It will work the same for unions and
subtractions.
Data Items from the
Package and/or
Written Calculations
Query Filters
Join Icon

Report Writing in NMU Cognos Administrative Reporting 12
REV: 5/16/18
TOP NAVIGATION BAR
The Navigation Bar at the top of the report is where you’ll also find some functions. On the left side, you
will see:
Clicking the down arrow next to save will give the options to Save as, Convert to Template, and Convert
to Active Report. If you want to save a copy of this report with a different title, use the Save as function.
We currently do not use or store templates. If you need to convert your current report to a dashboard,
you’ll want to Convert to Active Report. All dashboards must start out as Active Reports.
When you click the Run button you’ll also be presented with options about which format you’d like to
run your report in (HTML, Excel, PDF, CSV, etc.).
At the center of the Navigation Bar you’ll see the title of your report. This title is the report name which
is displayed in the content listing, not necessarily what the output title is. If you click on the down
arrow, you’ll be able to see what reports you have open. If the title has an asterisk after it, that means
changes have not been saved. The top option to return to your homepage is also there.
On the right side of the Navigation Bar you’ll see the following icons:
Page views: View the design, preview, and structure
Properties: Depending on the selected element, this will show different information. Also has a “pin” option
More: Depending on the selected element, shows whether an item is locked, along with other parameters
Save Undo Redo Run

Report Writing in NMU Cognos Administrative Reporting 13
REV: 5/16/18
CONTEXT MENU
When you click on an item in the report itself, such as a column, you will see a floating contextual menu.
The elements you see will vary depending on what part of the report you click on.
This menu contains a lot of the items that originally at the top of the report page in the old version of
Cognos.
Think of it like this menu…
…but instead of being at the top of the page, it follows you around!
Shortcut to edit the filter used on the display query
Sorting menu
Summary menu (total, average, count distinct, etc.)
Group/ungroup duplicate data
Section/unsection, page breaks
Pick up a style in the report and use it elsewhere in the report
Change font, borders, or colors
Change data format (time, currency, etc.)
Horizontal/vertical alignment
Change chart type (if applicable)
Select elements of the page (header, footer, body, etc.)
The ellipses button also contains shortcuts to many other options, including editing queries, building
prompt pages, and changing data item labels.

Report Writing in NMU Cognos Administrative Reporting 14
REV: 5/16/18
CREATING A NEW REPORT
Usually, it is best to take a report that is already made and use the “Save as…” feature to create a new
report. However, if you would prefer to start with a new report from scratch, you can click the plus
button in the lower right corner of the screen. This will open a list of options. To create a new report,
click the “Report” button.
There are several new options, but right now we are just concentrating on reports, as that is what we
currently use the Cognos Administrative Reporting system for.
Report Writing in NMU Cognos Administrative Reporting 15
REV: 5/16/18
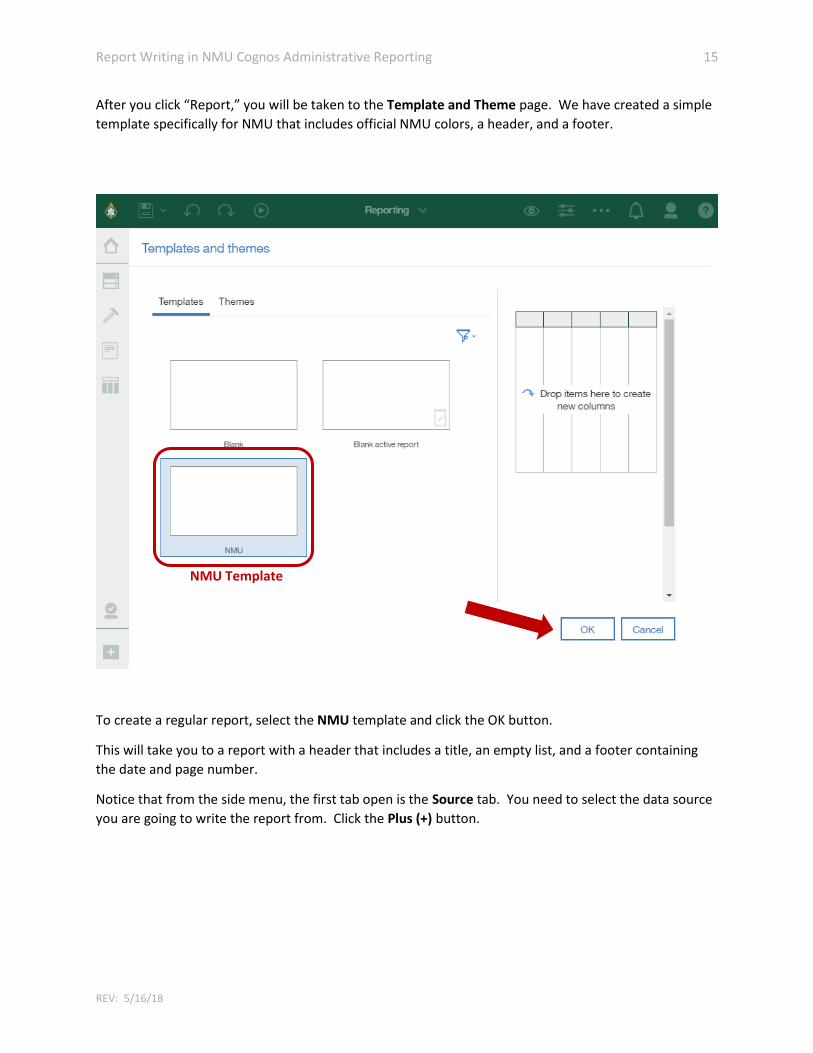
After you click “Report,” you will be taken to the Template and Theme page. We have created a simple
template specifically for NMU that includes official NMU colors, a header, and a footer.
To create a regular report, select the NMU template and click the OK button.
This will take you to a report with a header that includes a title, an empty list, and a footer containing
the date and page number.
Notice that from the side menu, the first tab open is the Source tab. You need to select the data source
you are going to write the report from. Click the Plus (+) button.
NMU Template

Report Writing in NMU Cognos Administrative Reporting 16
REV: 5/16/18
This will bring you to your Team content folder (formally Public Folders). You will then need to select
the correct data source from the Packages folder. The Packages folder lists all of the data sources you
currently have the appropriate permissions to write reports from. If you use a Cube, you would go
through the Cubes folder to locate your data source.

Report Writing in NMU Cognos Administrative Reporting 17
REV: 5/16/18
For this example, I am going to select the Banner Student package. Notice that the icon next to data
source packages is different than a folder or a report.
After you click on the package name, you’ll get the message “There is nothing in this folder.” This means
that you have selected root source of the package, which is what we want. Notice your breadcrumb
trail at the top of the window: Team content > Packages > Name of Data Source.

Report Writing in NMU Cognos Administrative Reporting 18
REV: 5/16/18
Click the Open button to connect your blank report to the data package. Now you will see the contents
of the package in the window.
Next, you will notice that on the right-hand side, where you build your report, there is already a list
waiting for your data items.
You can drag and drop directly from the data source into your list, or simply double-click the attribute
from the source (just like the old version of Cognos).
I now have the data fields I want in my report. If click on the Data items tab I can see what fields are in
the query without having to look at the entire data source.

Report Writing in NMU Cognos Administrative Reporting 19
REV: 5/16/18
Next, I want to create and apply a filter. To add a filter, click on the Queries icon and click Query 1.
This will open familiar query screen. It looks the same as the previous version of Cognos.

Report Writing in NMU Cognos Administrative Reporting 20
REV: 5/16/18
To create my filter on this query, I will click the top Data icon to take me back to my source items again,
as I am going to write my filter based off of a source item and not something that is already in my query.
I am going to base my filter off of the “STUD TERM” data item, which is the student term. I only want
my report to contain data from the term 201780, or Fall 2017. CLICK AND DRAG the data item (STUD
TERM in this example) over to the “Detail Filters” window and drop it there. If you were using an item
that was already in your query, you could simply click and drag the item in the same “Detail Filters”
window.
A pop-up will automatically prompt you to write your filter using the data item you selected. I have
defined my term as ‘201780’, or Fall 2017. Now all of the data in my query will be filtered by this term.
Click OK.

Report Writing in NMU Cognos Administrative Reporting 21
REV: 5/16/18
To navigate back to your report page with the list, click on the Pages icon and click Page1.
Now that I have my data and it’s filtered, I want to do some sorting and grouping to keep my items
together instead of having a giant list of data I would have to sort in Excel later.
I want all of my data to be grouped by department. To create a group, click the cells beneath the
column header, and then the context menu will appear. Select Group / Ungroup. This will merge all of
the “STUD DEPT” cells together when they have the same data.
Just as in the old version of Cognos, you will see that grouped data has the icon next to it. That is
how you can tell a column is grouped.
Next, I want to sort the students within their departments in alphabetical order. I will once again select
the cells beneath the header that I want to sort (in this example, LNAME, or last name) and then click on
the sort button.

Report Writing in NMU Cognos Administrative Reporting 22
REV: 5/16/18
If I only had one cell to sort by (such as full name or IN) I could select ascending and be done. However,
because I am sorting by more than one data item (last, first, and middle initial) I will select the bottom
option, “Edit Layout Sorting…”
This will bring up the Grouping and sorting window. Again, this is the same as it was in the old version of
Cognos. We can see that, overall, I have grouped STUD DEPT together. However, within each group, I
want the students to be sorted alphabetically by last name, first name, and middle initial. I simply drag
and drop those three fields (LNAME, FNAME, MI) to the Detail Sort List. Click the OK button once you
have sorted items the way you want.
Notice the sorting arrow icon at the header columns in the list. Up means it is ascending order; down
means it is descending.
Report Writing in NMU Cognos Administrative Reporting 23
REV: 5/16/18
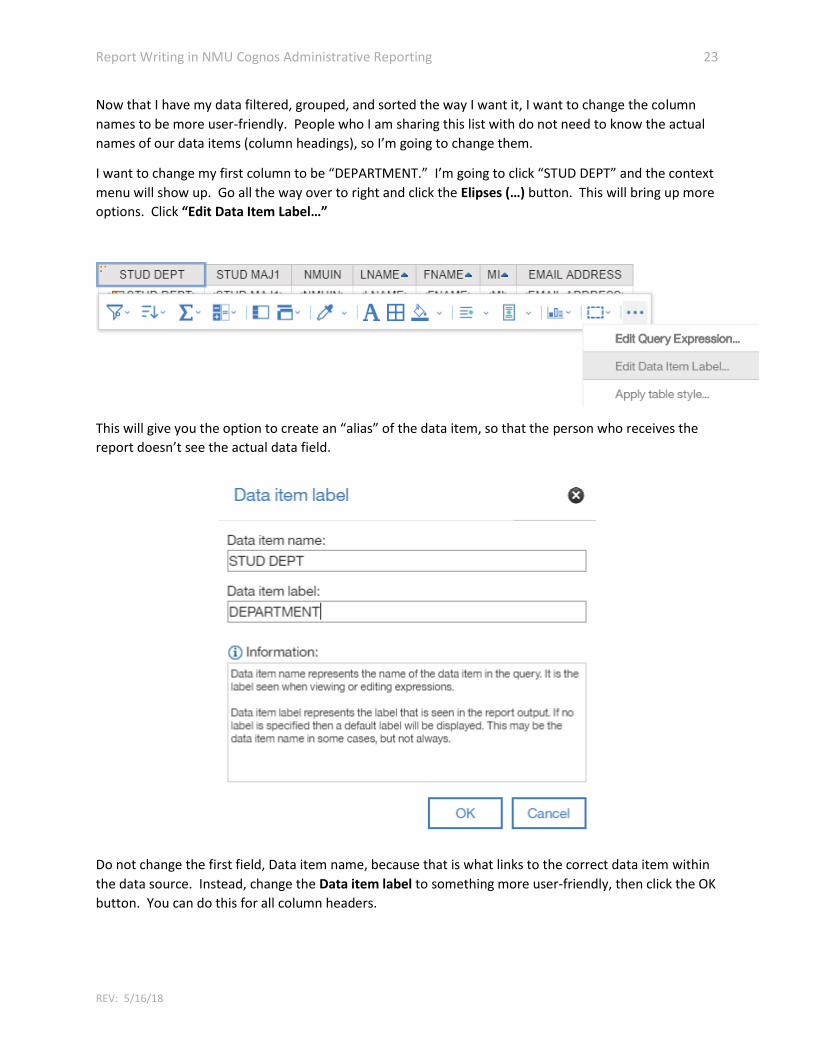
Now that I have my data filtered, grouped, and sorted the way I want it, I want to change the column
names to be more user-friendly. People who I am sharing this list with do not need to know the actual
names of our data items (column headings), so I’m going to change them.
I want to change my first column to be “DEPARTMENT.” I’m going to click “STUD DEPT” and the context
menu will show up. Go all the way over to right and click the Elipses (…) button. This will bring up more
options. Click “Edit Data Item Label…”
This will give you the option to create an “alias” of the data item, so that the person who receives the
report doesn’t see the actual data field.
Do not change the first field, Data item name, because that is what links to the correct data item within
the data source. Instead, change the Data item label to something more user-friendly, then click the OK
button. You can do this for all column headers.

Report Writing in NMU Cognos Administrative Reporting 24
REV: 5/16/18
STYLING A REPORT
Now that our list of data looks the way we want it to, we can style our report to put on the finishing
touches. First, make sure that you are view the entire page of the report by click on the Pages icon and
then Page1.
The NMU template already has a place for the title of the report. Double click “Title” and a window will
open up. Replace the word title with the name of your report.
Keep in mind that this is only the display title; not the title of the report in the folder.
You can also add other elements to the report, such as a table, link, or rich text item by exploring the
Toolbox menu.
If you ever need to create a Crosstab, which is similar to a list but for using summary data, you can add
one through the toolbox menu. A crosstab is used for comparing numbers, like the number of admitted
students of one semester compared to another semester.

Report Writing in NMU Cognos Administrative Reporting 25
REV: 5/16/18
If you need to write your own Query calculation you can also find this item in the Toolbox. When
viewing a query, you can click and drag your query calculation over to the data items pane (just like in
the old version of Cognos).

Report Writing in NMU Cognos Administrative Reporting 26
REV: 5/16/18
A window will pop up and you can begin writing your expression. It looks and behaves the same as the
previous version of Cognos.
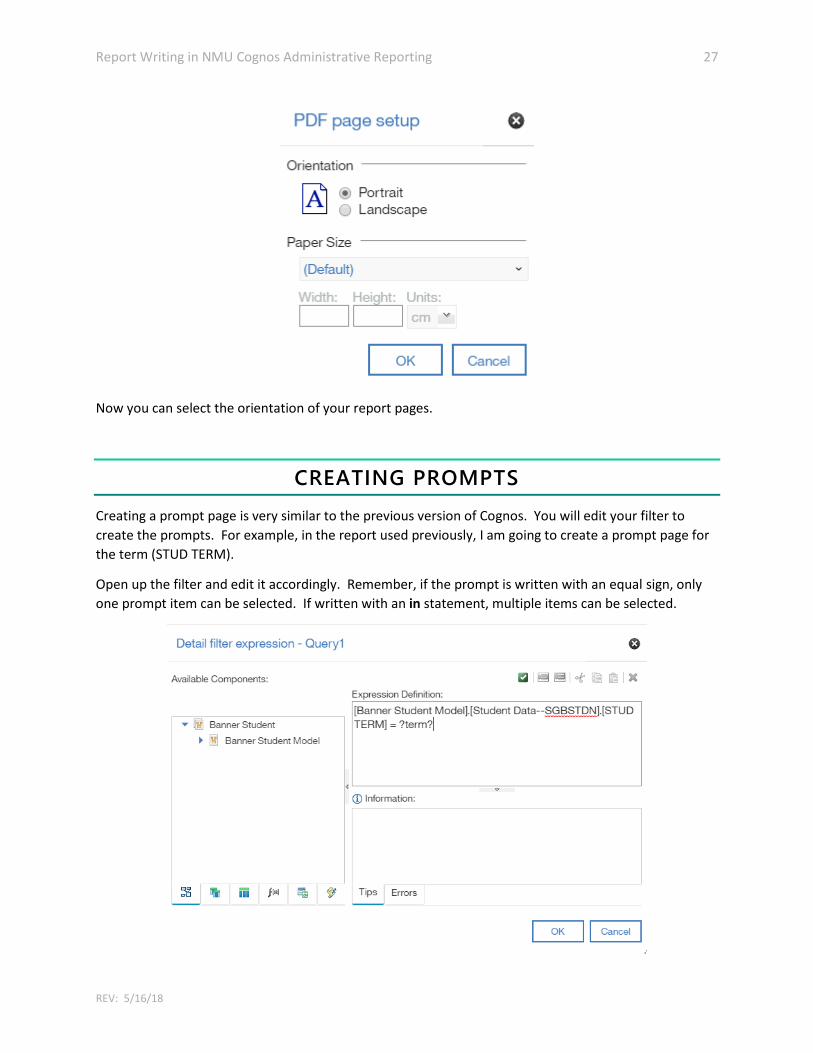
If you need to change the layout of your report (such as making it landscape) or other page properities,
go to the Report Overview. Click on the properties icon. Then scroll down and click PDF page setup.
Report Writing in NMU Cognos Administrative Reporting 27
REV: 5/16/18
Now you can select the orientation of your report pages.
CREATING PROMPTS
Creating a prompt page is very similar to the previous version of Cognos. You will edit your filter to
create the prompts. For example, in the report used previously, I am going to create a prompt page for
the term (STUD TERM).
Open up the filter and edit it accordingly. Remember, if the prompt is written with an equal sign, only
one prompt item can be selected. If written with an in statement, multiple items can be selected.
Report Writing in NMU Cognos Administrative Reporting 28
REV: 5/16/18
If I wanted to be able to select more than one term, my expression definition in the above example
would be:
The question marks that enclose “term” let Cognos know that I want to create a prompt called term.
You name your prompt anything you want, but it is most helpful to use something descriptive and
related to the data item, such as ?year?, ?date?, ?major?, etc.
Now when you run your report, you will be prompted to select an item from data in your filter.
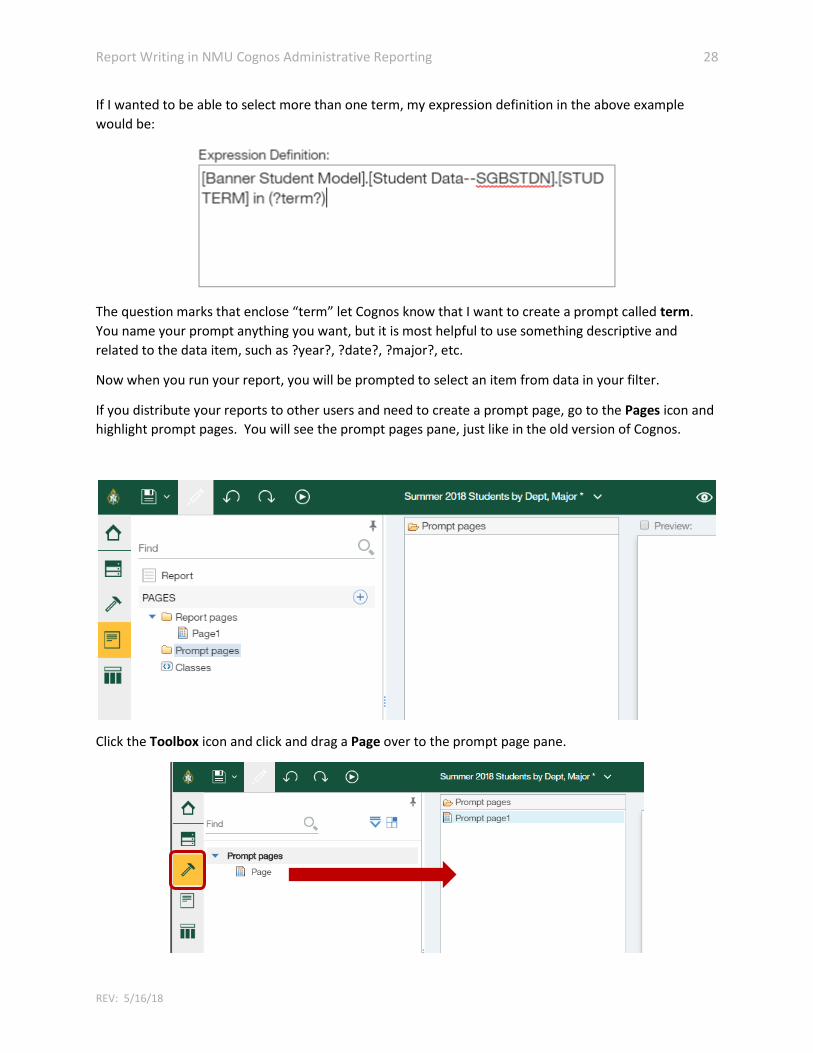
If you distribute your reports to other users and need to create a prompt page, go to the Pages icon and
highlight prompt pages. You will see the prompt pages pane, just like in the old version of Cognos.
Click the Toolbox icon and click and drag a Page over to the prompt page pane.

Report Writing in NMU Cognos Administrative Reporting 29
REV: 5/16/18
Double click the “Prompt page1” that you created in the pane. This will take you to a blank prompt
page.
If you have created prompt pages in the old version of Cognos, this should look familiar to you. Use the
Plus (+) icon to add layout elements, such as a table or text item.
The different types of prompts are located in the Toolbox under the Prompting heading. You can click
and drag the type of prompt you want to use over to the prompt page.

Report Writing in NMU Cognos Administrative Reporting 30
REV: 5/16/18
If you use prompts in your reporting and need a refresher or are interested in learning how to use
prompts, please contact Kelly or Jenna. Detailed instructions on writing prompts are not included in this
guide as many report writers do not use them.
REQUESTING A REPORT
When requesting a report, you will want to reach out to one of the two data analysts in the Business
Intelligence/Information Services department.
Kelly Larmour (x1914) Jenna Morgan (x1254) [email protected] [email protected]
Specializes in:
Student and Human Resources data
Detailed reporting
Cognos access and password changes
Specializes in:
Admissions, Finance, Purchasing, and Financial Aid data
Group reporting
When requesting a report, please tell us precisely what you are looking for:
Target your data. o Think about specific codes and filters. Do you know your major codes in your
department? Do you know what specific fields in Banner you are looking for?
o Examples: all BIOL majors with more than 95 credits and a 3.5+ GPA, all currently
enrolled undergrads with a minor in Gender Studies, the number of students admitted
for a term for specific majors in your department.
Include the fields you want generated in the report. o Typically there are two kinds of reports, detailed and counts. Detailed reporting will
give you a list of specific individuals on a report, while counts will simply give you a total
number of individuals who meet the criteria you specified.
o Examples: First Name, Last Name, NMU IN, Major, Email, count of students on
probation.
o Note: If you are requesting data from outside of your department or non-directory
information (like GPA or IN), we may require you to state the business purpose of your
report in an email to Kim Rotundo in the Registrar’s Office ([email protected]) for her
to approve.
Tell us if there is a similar report. o It can be very helpful if you can direct us to a report that already exists so that we don’t
have to start from scratch.
Tell us what you want the report to be called and where you want it to be located. o We try to name reports as specifically as possible, but if you want it to have a specific
name and be stored in a certain folder, please let us know.

Report Writing in NMU Cognos Administrative Reporting 31
REV: 5/16/18
Give a time frame of when you need your report. o Please be reasonable when requesting a report. There are some reports that take
priority over others, depending on necessity. Typically it is first-come, first-serve.
o Unforeseen events, such as server outages or upgrades, may delay reporting.
If you unsure if we would be able to obtain the data you are looking for, please don’t hesitate to contact
us over the phone to talk it out.
TROUBLESHOOTING
If you are having issues accessing Cognos, receiving server errors when you run reports, or need help
with anything else, please contact us.
Business Intelligence & Information Services (906) 227-2410
503 Cohodas
Open during university business hours.