Embed Size (px)
Citation preview

EDIT202 – Web 2.0 Lab Assignment Guidelines – Creating a Protopage
1. To create the protopage you will be using for this assignment first launch a web browser and go to the following website:
http://www.protopage.com
• Once you have launched a browser and typed in the address
http://www.protopage.com you should see a screen similar to the one shown below.
2. In order to create your protopage site first you will have to create an
account. Please note that to create your protopage site you will need access to email. Once your account has been created you will be sent a confirmation email with a link to activate your site.

• To create your account click on the following link to begin.
• This will bring up the account activation window. Where you will be prompted to type in information about your new protopage. Type in the information as follows:
Please note that it is recommended that you use your Google account information to register for protopage.
1. Choose a name for your Protopage
www.protopage.com / slscott
2. Choose a password ************** **************
3. Enter your name and email to receive your Protopage activation link
Name: your name here Email: your Gmail address here
4. Content localization This information is optional
5. Terms and Conditions agreement
Be sure to read the Terms and Conditions and click to place a checkmark in the available checkbox.
• Once all the above information has been entered click on the following link:
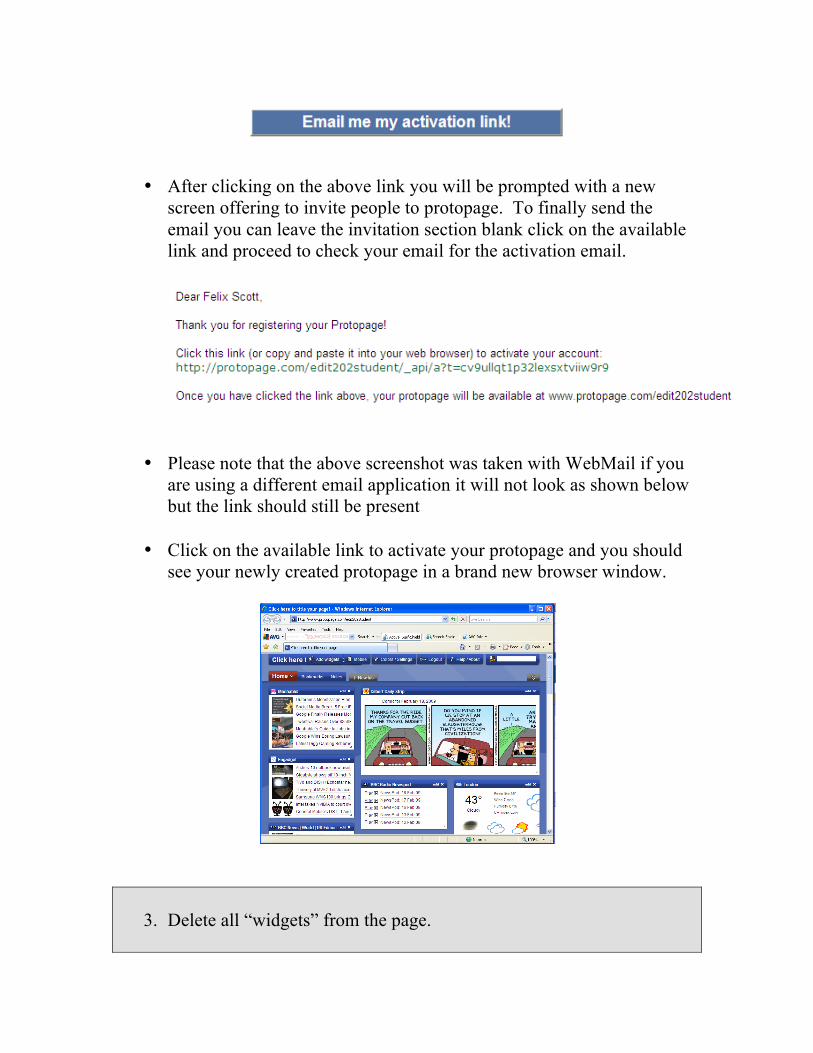
• After clicking on the above link you will be prompted with a new screen offering to invite people to protopage. To finally send the email you can leave the invitation section blank click on the available link and proceed to check your email for the activation email.
• Please note that the above screenshot was taken with WebMail if you are using a different email application it will not look as shown below but the link should still be present
• Click on the available link to activate your protopage and you should see your newly created protopage in a brand new browser window.
3. Delete all “widgets” from the page.

• A widget inside protopage takes the form of a window. These widget
windows have been linked to an available RSS feed. You are removing the default ones provided by protopage to make space for ones you will be creating.
• To delete a widget from your protopage click on the “X” provided in the
widget window.
• Once you click on the “X” you will be prompted with the following confirmation window:
• Click on OK to delete the widget.
• Proceed to delete all widgets from your page.
4. Add an appropriate page title such as “My Edit 202 Protopage”.

• To add a page title single click inside the Protopage title bar and click and drag to select the text as shown below:
• Delete the old title, type in your new title and click outside the title box. This should title your page on your protopage site and your top browser bar.
5. Using the “Add widgets” toolbar add the following widgets to your page:
• One audio feed • One video feed • One news feed
• To add a protopage widget (linked to an RSS feed) single click on the
Add widgets link located at the top of the page.
• This will bring up the following widgets window:

• To add a certain feed from a chosen category click on that category
link as shown below:
• To choose a selected feed click on one of the available feed links.

• Due to the fact that this is an audio feed to preview you can click on
one of the available Play links. If you do this you will have to use the audio playback tool to pause or stop the podcast.
Please note that link to the podcast you have previewed will now appear to have a strikethrough as shown above. • Continue previewing until you have found a podcast you like and
click to add on the title bar to add the widget to your page.

• Protopage offers three columns on your page for placement of widgets. Pick any column you like and place the widget on your page.
6. Add a Web Page widget to display a website related to your overall
topic.
• To add the Web Page widget select it from the available widget list
and click and drag to place it anywhere on your protopage.
• Then to add the website address click on the edit button.
• Type in the address for your page and click Save.

• A preview of your website should now be displayed on your protopage. (Note: For our sample purposes we used the @2Learn.ca website, you will need to find a site that is related to your topic).
• Your screen should now appear similar to the image shown below. Adjust this widget window so it displays over 3 columns of your page.
7. Add a link to an outside news feed. Choose from the list of following sites with available RSS feeds or check your favorite sites to see if there is an available feed.
• http://www.cbc.ca • http://www.tsn.ca • http://www.edmontonsun.com/

• To add a link to an outside RSS feed you will need to use the
Internet Explorer browser.
• First choose a site and open it in a new browser window. For this example we will choose http://www.cbc.ca.
• With the website open check to see if the available RSS feed icon
is lit up or greyed out. If the RSS icon is lit up this means that the site you are currently viewing has available RSS feeds you can subscribe to.
• To view the list of feeds offered by the site (in this example there is only one) click on the drop down arrow next to the RSS icon. Click on your chosen feed to bring up the feed page as shown below.

• To add this feed to your protopage you will have to select the feed address in the address bar and copy it (Remember you can use the CTRL+C hotkey to copy).
• Now to add this feed to your page add another widget to your page. This time you will be add a direct news feed as shown below:
• To add the feed link first delete the sample feed link to CNN.com and paste in the link to new feed as shown above (Remember you can use the CTRL+V hotkey to paste).
• Once you have pasted in the link click on the Go button. This will bring up the following window linking to the RSS feed.

• Click and drag on the blue bar to place the widget on your page.
8. Copy and paste the RSS feed from your blog into a new widget for your protopage.
• If it is not already open, in a new browser window open the blogger
website at http://www.blogger.com and Sign In to your account.
• With your account open click on the Dashboard link in the upper right hand corner of the blog interface.
• To open your blog click on the View Blog link for your chosen blog.
• At the bottom of your page near your first post you should see the following link to the available RSS feed for your blog:

• Click on the Subscribe to: Posts (Atom) link and this will open the feed browser window.
• Copy the RSS feed address for your protopage.
• Paste the link into the protopage news feed address and click and drag
the new widget to your protopage.
9. Ensure your Protopage is set to public.
• To make sure your Protopage is set to public so it can be marked
click on the drop-down button as shown below:

• To make your page public single click on the link shown below. Once this is done you can close your tab.
10. Submit your Web 2.0 lab by copying and pasting the link to your protopage in the assignment submission window in WebCT.
• To submit your lab copy the address to your protopage in the browser
address bar.
• Open your WebCT site and paste the link into the Add Comment: section of assignment submission window and click on Submit.

©Steven Scott & EDIT 202 Development Team University of Alberta