Embed Size (px)
Citation preview
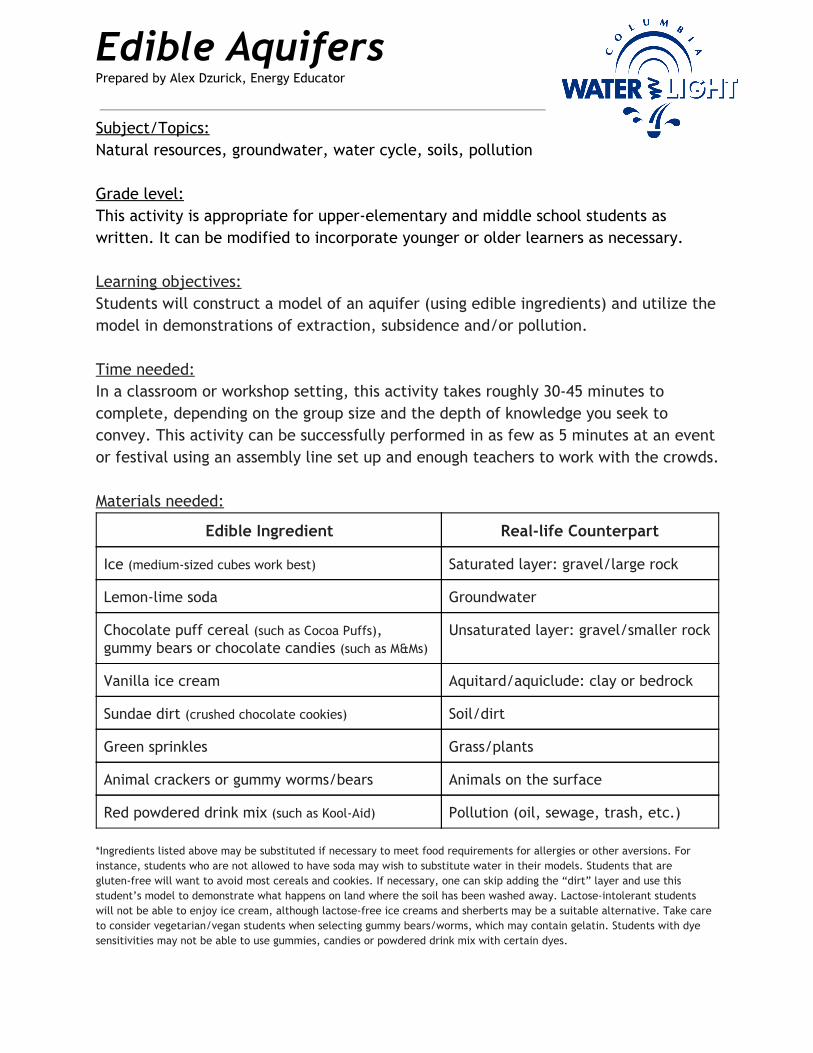
Edible Aquifers Prepared by Alex Dzurick, Energy Educator
Subject/Topics: Natural resources, groundwater, water cycle, soils, pollution Grade level: This activity is appropriate for upper-elementary and middle school students as written. It can be modified to incorporate younger or older learners as necessary. Learning objectives: Students will construct a model of an aquifer (using edible ingredients) and utilize the model in demonstrations of extraction, subsidence and/or pollution. Time needed: In a classroom or workshop setting, this activity takes roughly 30-45 minutes to complete, depending on the group size and the depth of knowledge you seek to convey. This activity can be successfully performed in as few as 5 minutes at an event or festival using an assembly line set up and enough teachers to work with the crowds. Materials needed:
Edible Ingredient Real-life Counterpart
Ice (medium-sized cubes work best) Saturated layer: gravel/large rock
Lemon-lime soda Groundwater
Chocolate puff cereal (such as Cocoa Puffs), gummy bears or chocolate candies (such as M&Ms)
Unsaturated layer: gravel/smaller rock
Vanilla ice cream Aquitard/aquiclude: clay or bedrock
Sundae dirt (crushed chocolate cookies) Soil/dirt
Green sprinkles Grass/plants
Animal crackers or gummy worms/bears Animals on the surface
Red powdered drink mix (such as Kool-Aid) Pollution (oil, sewage, trash, etc.) *Ingredients listed above may be substituted if necessary to meet food requirements for allergies or other aversions. For instance, students who are not allowed to have soda may wish to substitute water in their models. Students that are gluten-free will want to avoid most cereals and cookies. If necessary, one can skip adding the “dirt” layer and use this student’s model to demonstrate what happens on land where the soil has been washed away. Lactose-intolerant students will not be able to enjoy ice cream, although lactose-free ice creams and sherberts may be a suitable alternative. Take care to consider vegetarian/vegan students when selecting gummy bears/worms, which may contain gelatin. Students with dye sensitivities may not be able to use gummies, candies or powdered drink mix with certain dyes.
Edible Aquifers Prepared by Alex Dzurick, Energy Educator
Non-edible Material Real-life Counterpart
Plastic cup (~16 oz) n/a; this holds ingredients
Drinking straw Extraction well
Other supplies
Napkins/papertowels, spoons, scoops for edible materials, cooler for ice, shakers for sprinkles and powdered drink mix
Learning cycle (5E):
Bolded and underlined words are defined in the glossary. I. Engage Ask students where their water comes from. Most will answer “pipes” or “faucets”. Walk students back through the system to where your community’s water source originates. If you aren’t sure, or don’t live in the same community as your students, ask a local resident or contact the local water utility for more information on your community’s water system. If you are teaching in a community where the drinking water source is an aquifer, this lesson will be informative to students in understanding their own local environment. If you are not from such a community, this can be used as a lesson to demonstrate a different kind of water source to students, or to explore the mechanics of aquifers as a general science lesson. II. Explore & III. Explain Tell students they will be building their own model of an aquifer right here in the classroom. Provide each student with one clear plastic cup. Depending on students’ age, you may wish to add the ingredients to the cup yourself or have them do it on their own. In either case, you will want to perform the following steps in the same order:

Edible Aquifers Prepared by Alex Dzurick, Energy Educator
1. Add ice to the cup. We have found that filling the cup approximately halfway with medium-sized ice cubes works the best. Ice represents the larger pieces of gravel or rock that lie toward the bottom of the aquifer.
2. Saturate the ice with lemon-lime soda. Discuss with students what it means for a material to be saturated. With older students, you may want to ask them at this point what would happen if they drained all their soda. Would the ice be completely free of soda ‘particles’ or would it still contain some remnants? Why? (In a real aquifer, adhesion of small water droplets to the walls of the aquifer’s pores prevents a small portion of the water from being extracted from the aquifer.) 3. Add an unsaturated layer of cereal/gummy bears/candies. In many aquifers, the water table does not reach as high as the aquifer itself. This will be the case in our model. 4. The next layer is ice cream, representing a clay or bedrock confining layer - known as an aquitard or aquiclude depending on its function. Don’t worry too much if the ice cream doesn’t create a perfect “cap” on your aquifer; actually, some gaps and spaces around the edge can be beneficial in a later step. 5. Add the dirt and grass. Using the sundae dirt and the sprinkles, create the soil layer with plants on top of your aquifer. Adding an animal cracker or gummy worm on top can represent animals living on the surface. 6. Discuss the completed model. You can review what the layers are called and do some formative assessment, checking for understanding about which part of the aquifer is saturated, etc.
IV. Expand In this part of the learning cycle, students will take a look at what happens to an aquifer when water is extracted and how aquifers become recharged. Unlike before, students can do most of the steps in this process by themselves. You may want to be prepared to assist as necessary.

Edible Aquifers Prepared by Alex Dzurick, Energy Educator
1. Ask students if they brought their pumps with them to get the water out of the aquifer so we can use it in our community. Most will look confused. Until… 2. Hold up a handful of drinking straws. Tell students that these straws are the wells that will be drilled into the ground to pump water from. At least one or two students at this point realize that you meant for them to use their mouths as a pump to suck liquid from their model aquifers. 3. Give each student a straw and have them drill a well. It seems easiest for most to slide the straw down along the side of the cup, although some will be able to stick it through the middle without too much resistance from cereal or ice. 4. Pair students up so they are facing one another. Each student will, in turn, take a drink from their straw and their partner can watch the water table lowering. Some students aquifers by this point will be unstable enough that you can get subsidence of the “land” above the water table. Most students will note that their soda tastes a bit like ice cream or chocolate - this is a good reminder to students that groundwater still needs to be treated before it can be sent to homes and businesses in a community. 5. Now that their aquifer has had some of its liquid depleted, you’ll want to have them explore how aquifers are recharged. But first, they need to add “pollution” to their ground to reflect human activity on the surface, like dumping of oil, paint and trash or sewage leaks. Students will shake a bit of red powdered drink mix on top of their model, and it helps if you ask them to concentrate it around their well. 6. The recharge process involves adding another splash of soda to the top of the aquifer model. This part you may wish to do yourself. The splash acts as precipitation, and often students can see runoff, infiltration and eventually contamination of their “water supply” with the red drink leaking into their soda.
Edible Aquifers Prepared by Alex Dzurick, Energy Educator
At this point, students have completed building their aquifer models and using them to explore concepts like subsidence and ground- water contamintation. Once you are done having them use their models for the lesson, you can allow students to eat their models (assuming the class followed all applicable food safety policies and had clean supplies to begin the process). V. Evaluate Depending on your purpose/role for this project, you can evaluate students’ understanding in a number of ways. Informally, we typically ask a number of questions of students related to the concepts we covered. A classroom teacher may want to integrate questions about the model into a summative evaluation text or exam, or have students describe their process in a science notebook.
Glossary:
Adhesion: When two substances are in contact, there is a small molecular attraction between the two substances. This is known as adhesion. Aquifer: Any of various kinds of geologic formations that store groundwater. The main types of aquifers are confined and unconfined. Alluvial aquifers lie along the edges of bodies of water like rivers and are generally made of deposits of sand and sediments. Aquitard/aquiclude: A layer that ‘caps’ the aquifer’s water storage capacity. Aquicludes are generally less permeable than aquitards, but both prevent water from being transmitted in any significant capacity. Extraction: The process of removing water from an aquifer, typically by pumping it through wells drilled into the saturated layer of the aquifer. Infiltration: The process by which water enters the ground. As water on the surface permeates into the ground, this is known as infiltration. If an aquifer is unconfined, this water can infiltrate into the water stored in the aquifer. Pores: The spaces between rock or sediment particles that hold the water in an aquifer. These pores are often connected, and the ease by which water can flow between them is known as the ‘hydraulic conductivity’ of the aquifer.

Edible Aquifers Prepared by Alex Dzurick, Energy Educator
Precipitation: Water falling from the sky, such as rain, snow and hail. When this precipitation hits the ground it may become runoff or infiltrate into the soil. Recharge: The process of ‘refilling’ an aquifer. As water infiltrates into the aquifer and saturates the layers, the aquifer is said to be recharging. If the rate of recharge is slower than the rate of extraction, the aquifer is being used up faster than it can refill and the water table will lower. Runoff: Water on the ground that runs along the surface rather than being absorbed into the ground. This can occur with extremely dry ground, ground lacking plants to slow down water, or in areas that have seen urbanization such as roads, parking lots and roofs. Saturation: An area is said to be saturated when it can hold no more, or when it has reached capacity. The area of an aquifer that is saturated has all of its pores occupied by water. An unsaturated area may have water molecules adhered to the sediment particles, but the pores will be largely empty, thus providing capacity for further water storage. Subsidence: The process of land sinking or caving in. An aquifer that has been depleted of water may result in the land above the aquifer subsiding due to lack of support. Treatment: The process by which water is filtered, softened and made fit for human consumption. For groundwater from an aquifer, this often requires significant softening due to the minerals leached from surrounding rocks and sediments. Treatment in the United States generally involves the addition of flouride to the water for dental health. Water table: The level at which water is present in an aquifer. Extracting water lowers the water table and recharge raises the water table. Well: A device used to extract groundwater. Wells may be as simple as a hole dug to the water table (where extraction is done by hand) or complicated systems of pumps and pipes that pull water for use in entire communities.