Embed Size (px)
Citation preview

Eclipse Plug-in for the Annotation of Java Files
BAKKALAUREATSARBEIT (Projektpraktikum)
zur Erlangung des akademischen Grades
Bakkalaureus/Bakkalaurea der technischen Wissenschaften
in der Studienrichtung
INFORMATIK
Eingereicht von: Loidl Stefan, 0255886 Angefertigt am: Institut für Systemsoftware Betreuung: o.Univ.-Prof. Dr. Hanspeter Mössenböck Dipl.-Ing. Markus Löberbauer Linz, November 2005

Table of Contents:
1. PROJECT OBJECTIVES................................................................................................................................... 3 1.1. GENERAL SPECIFICATION................................................................................................................................ 3
2. ECLIPSE PLUG-IN DEVELOPMENT ............................................................................................................ 3 2.1 PLUGIN.XML ..................................................................................................................................................... 4
2.1.1 Overview Tab........................................................................................................................................... 5 2.1.2 Dependencies Tab.................................................................................................................................... 5 2.1.3 Runtime Tab............................................................................................................................................. 6 2.1.4 Extensions Tab......................................................................................................................................... 6 2.1.5 Extension Points Tab ............................................................................................................................... 6
2.2 STANDARD ‘LOOK AND FEEL’........................................................................................................................... 7 2.3 THE ADAPTER CONCEPT................................................................................................................................... 7
2.3.1 The Adapter Manager.............................................................................................................................. 8 2.4 PLUG-IN IMPLEMENTATION AND TEST ............................................................................................................. 9
2.4.1 Implementation Workflow ....................................................................................................................... 9 2.4.2 Testing via Runtime Workbench............................................................................................................ 10
3. THE ANNOTATION PLUG-IN PROJECT................................................................................................... 10 3.1 USE CASES ...................................................................................................................................................... 11 3.2 ANNOTATION STORAGE.................................................................................................................................. 11
3.2.1 Annotation File Format ......................................................................................................................... 12 3.3 PLUG-IN ARCHITECTURE ................................................................................................................................ 13
3.3.1 Packages ................................................................................................................................................ 14 3.3.2 Java Interfaces....................................................................................................................................... 15 3.3.3 Java Classes........................................................................................................................................... 15 3.3.4 Internationalization ............................................................................................................................... 21 3.3.5 Global Values ........................................................................................................................................ 21
3.4 CHALLENGES .................................................................................................................................................. 22 3.4.1 Adding Entries to a Context Menu ........................................................................................................ 22 3.4.2 IFile and the Eclipse ResourcesPlugin ................................................................................................. 23 3.4.3 Standard Widgets Toolkit ...................................................................................................................... 24 3.4.4 Adding a Multipage Editor.................................................................................................................... 25 3.4.5 Resource Change Events ....................................................................................................................... 25 3.4.6 Retrieving and Restoring Selections ..................................................................................................... 26 3.4.7 Adding a Preference Page/Store ........................................................................................................... 27 3.4.8 Creating a Context Menu ...................................................................................................................... 27
4. INSTALLATION AND USAGE....................................................................................................................... 29 4.1 PLUG-IN (UN-) INSTALLATION ....................................................................................................................... 29 4.2 PLUG-IN USAGE: STAFF .................................................................................................................................. 29 4.3 PLUG-IN USAGE: STUDENTS ........................................................................................................................... 30
5 EXPANSION PROPOSALS .............................................................................................................................. 31
1. Project Objectives The project goal is to reduce printed media in the course workflow. For example in software development practices the workflow can be structured as follows.
1. Deliver the exercises to the students via printed media (and the web) 2. The students solve the exercises 3. Deliver the revised practices for correction via printed media (and the web) 4. Correction of the practices
a. Test the revised practice (compile, run and analyze the source) b. Annotate mistakes on the printed documents
5. Return the corrected printed documents to the students As this workflow contains much redundancy (delivering documents both electronically and on printed media) it also contains many (possible) problems.
• Printed media is lost in the workflow • Student hands in two different versions (printed and electronically) • Student recognizes a failure after he has printed the documents and wants to fix it • Printed media is time consuming for both, students and correcting staff (time to hand
in and get it back) • Waste of paper
As a conclusion most of these problems could be solved if the documents would be handed in electronically only. To make this vision come true, some components have to be added to the pure electronically documents. Documents in this case references java files. As there should not be changes in the source files all these components have to be located in a separate file or file- structure. The idea of the project is to make annotation of java files possible. An annotation would contain a description and a point modification as it is written onto the printed documents in the current workflow.
1.1. General Specification To realize the wanted annotation feature the Eclipse infrastructure should be used. Eclipse should be used to generate and view the annotations. The advantage of this approach is that the Eclipse plug-in architecture can be used which leads to two major pros: The implementation expense is slighter and the user profits, because the well known Eclipse usage interface is expanded and thus the usage is easy to understand. Annotation should more over be possible referencing any piece of java code. An annotation contains a text and a number (description and point modification). The annotations should be saved in a human- and machine readable form in an external file.
2. Eclipse Plug-in Development The following section is not meant to be a tutorial for Eclipse development but has the goal to make you aware of the Eclipse concepts. Information how to use them can be found in several
books or even the Internet. It’s generally more difficult to know all the concepts than to use them. Plug-ins are an essential architectural part of the Eclipse IDE simply because Eclipse is completely built on a plug-in base. This fact shows up the difference to other extendable applications which use plug-ins only to extend their functionality. But the Eclipse plug-in architecture differs more than that. Often plug-ins are meant to be a one dimensional extension possibility; this nevertheless doesn’t fit for the Eclipse plug-in system. Since nearly each component of Eclipse is a plug-in, there is a need for a multi dimensional system; or in other words there has to be (and is) a way to extend the functionality one plug-in provides. The bindings between the plug-ins and their extension plug-ins (which in general extend more than just one plug-in) are defined in the plugin.xml file. Eclipse more over offers another extension concept that has to be known to understand the whole potential of the plug-in extensions. This concept is called ‘Adapters’ and can be described as follows: On the one hand Eclipse uses a framework structure which means that there is an extensive use of interfaces and standard sub classing. Nevertheless each plug-in developer sometimes faces the problem that he would have to change the code of the parent plug-in to implement his functionality. This happens if the functionality contains parts that were not anticipated by the parent plug-in developer. To handle this problems without changing the parent code (which would be really bad programming style) Eclipse uses the adapter concept. The big advantage is that adapters can be added dynamically even by the plug-in that wants to adapt the parent plug-in. This concept will be described in further detail in an own chapter later on. Eclipse itself contains a quite powerful toolkit for plug-in development. This toolkit contains lots of wizards for the creation of most plug-in components, an editor to handle the plugin.xml which defines most of the plug-in dependencies and the possibility to test the plug-in on a runtime workspace. The plugin.xml is essential and therefore discussed in a separate section later on. First steps in plug-in development can be made without a book or even tutorials. If a new plug-in project is initiated there is the possibility to generate code out of standard templates. These templates comprise several standard use cases, for example an editor or a view can be generated. The resulting code is quite easy to understand and can be used to get tight to the Eclipse plug-in development. But using this approach has the affect to block ones line of sight onto the underlying techniques. Therefore the next section about the plugin.xml file will try to get rid of that blockade.
2.1 Plugin.xml The plugin.xml file is the core file of a plug-in which defines the bindings with all more or less used plug-ins. Each Eclipse plug-in has such a file located in the root directory of the plug-in. This file uses the XML standard, but it is not necessary to edit it manually. Eclipse contains a quite powerful editor handling these files, which abstracts from the file format for comfortable usage. Nevertheless all changes made in this GUI styled editor are reflected to the file and the other way round. The editor has multiple tabs to structure the content of the XML file. Two of these tabs don’t reference the plugin.xml but a second file, also located in the root directory of each plug-in (in development mode only). This file is named build.properties and the referencing tabs are ‘Build’ and ‘build.properties’. The following sub sections will describe what options can be set using the other five tab sheets excluding the ‘plugin.xml’ tab which simply shows the source of the XML file. The sections also include descriptions of the architectural terms dependencies, extensions and extensions points and may be useful to get familiar with the plug-in development strategies.
2.1.1 Overview Tab This tab enables the user to view and edit the general settings of the plug-in such as ID, version, name and provider. Of all these the ID is the most important. IDs can be found at most components and sub- components and are used to define the bindings between the components. Therefore the value of this field has to be unambiguous. In the community it is usual to use a dot separated string that is similar to the package structure in the plug-in. For example the plug-in developed in this project has the ID ‘ssw.annotation.Annotations’. The overview tab moreover contains links that enable the user to test the plug-in in a runtime workspace and to configure and execute the deployment. Before the test links can be used a runtime workbench should be created. This can be done using the standard Eclipse ‘Run…’ properties. The configuration of a runtime workbench is discussed in an own section later on.
2.1.2 Dependencies Tab This tab is really important and likely to be used in almost every plug-in development project. Plug-in extension can be seen as a three step process. The first step is to define the dependencies which bind the new plug-in with others that might in any way be used. The other two steps might be called: “Define extensions” and “Implement extensions” and will be mentioned quite enough in the whole paper, so let’s focus on dependencies for now. If one does his first steps in Eclipse plug-in development using a “trial and error” approach he is likely to spend some hours searching functions that just “have to exist” and might fall to sleep frustrated because he didn’t find them. Then after some time he might find a hint somewhere confirming his thoughts of the existence- but again he will not be able to find these bloody functions. The reason is easy: to use code from other plug-ins a dependency has to be defined. This mechanism makes sure that only plug-ins are started at runtime that really are about to be used, which is a serious performance issue. Even system functions of the IDE are contributed to Eclipse as plug-ins which have to be referred in the dependency tab to access them. This is a reason that is not easy to take because most systems, as mentioned before, use plug-ins just to extend their functionality. If one gets aware of this fact he runs into the next challenge: Although he knows he has to define a binding he doesn’t know which plug-in contains the functions he wants to use. This is one weakness of the plug-in concept used within Eclipse. As each plug-in can be seen as an extension the whole functionality is provided by several layers. This means that there are a lot of plug-ins that might contain the functionality that we are looking for. This might seem to be a major disadvantage because the principle of locality is not supported. To eliminate this weakness a really good documentation work has to be done. On the whole in Eclipse it is essential to get familiar with the system plug-ins that build up the Eclipse IDE. Therefore the documentation of Eclipse has to be examined carefully. Tip: An often described trick to make the work easier in the start up phase of Eclipse development is to generate a dummy plug-in which defines dependencies to all other plug-ins. Using this dummy to test some code makes it easy to find out which plug-ins are needed for a certain task.
2.1.3 Runtime Tab The preferences made in this tab influence the behavior of the plug-in in phases of extension by other plug-ins and the usage. It defines which runtime libraries to include into the class path, which parts of the libraries are visible to other plug-ins and last but not least activation rules can be defined. As Eclipse is a plug-in system, performance is a quite serious issue. There is no real upper border of plug-ins that may be handled by the system, but if the number of plug-ins grows there is a need of loading just plug-ins that are really needed at a certain time. Therefore it is necessary to define the activation rules properly.
2.1.4 Extensions Tab Just like the dependencies tab, this is one of the most important ones. In the section about the dependencies tab we mentioned that plug-in development can be seen as a three step process. The second step is done using this extensions tab. There are two different types of extensions as there are two different types of plug-ins. One of these types are plug-ins that really contribute functionality to a workbench such as the java editor or the package explorer. The functionality of this plug-ins can be extended using extension points for example to add an item or a context menu entry. The second kind contains abstract plug-ins that don’t add functionality to the IDE themselves but can be extended to do so. One example for this type is, if one wants to add a multi tab editor, that handles a certain type of files, he may use the ‘editors’ extension point and the framework handles the file association. Let’s go further using the editor example. The first step is to add the ‘editors’ extension point, which is available if the corresponding plug-in was previously added in the dependencies tab. After adding this extension point one can add a physical editor to it (which is done in the extension tab also). The preferences of this editor enable the programmer to define things like the associated files, an image, the java class handling the editor, contributor classes and much more. There is also the possibility to use templates when creating the physical editor which results in default settings and a sample implementation. After the definition of the extensions the implementation work begins.
2.1.5 Extension Points Tab Extension points are the counter part to extensions. If a plug-in should be able to be extended, extension points have to be defined. It might seem that there are not many preferences to be made using this tab, and that’s correct if one doesn’t use schemas to make the extension easy. A schema file defines the XML elements and attributes that can be used in the extension point. This architecture makes it possible to show an appropriate editor later on. Therefore if extension points are defined the developer is strongly encouraged to provide such a schema file. Another thing to be aware of is that the own plug-in in general extends other plug-ins and therefore is extendable through their extension points too. For example, it is possible to contribute an action to the context menu of our editor simply because a context menu defines this extension point.
2.2 Standard ‘look and feel’ Eclipse is known as an easily extendible java programming IDE. But moreover it has to be mentioned, that it is capable to handle much more file formats than only java files. Its design makes Eclipse a powerful editor for most written file types. The Eclipse community extends the platform quite fast, and for most tasks a programmer would come across, there exits a plug-in able to handle it. The previous paragraph might look as it was written by a fanatic community member, but in fact it contains several restrictions concerning the usability of Eclipse. For example the fact that Eclipse is primary used as a text file editor, and that the major user group of Eclipse are programmers, restricts the usage. This is because of the way Eclipse presents itself the first time a user gets in contact with it. There are standard components that will likely show up independent of the file type that is handled by the user. The components shown are handled using perspectives. For example the Java perspective generally contains a package navigator, an editor, an outline and some views. Perspectives are meant to structure the components needed for a certain task. Generally perspectives are not extended by most plug-ins, and therefore Eclipse looks like a text editor in most of the cases. Now that Eclipse is used for lots of tasks, and in most cases the look and feel is the same, it is necessary to implement this look and feel in a new plug-in too, just to make the usage of the system easy. To implement the principles of a well known look and feel, one first has to understand what component type should be used for which task. The most important visual components are the editor, the view, the outline and the navigator. The editor handles all editing tasks and is the core component of most plug-ins (not in this case). The view is a component which contains shortened data sometimes located within more than one document. In general its content doesn’t depend just on the current edited resource. The view is used to show lists in most of the cases. The outline is similar to the view, but the data shown in this component depends on the currently edited data in most of the cases. For example the editor outline is a component shown in most perspectives- it is tightly coupled with the editor. A new editor just has to implement an adapter to outline its data in this view. The last look and feel component mentioned in this context is the navigator which enables the user to navigate between resources of any kind and flavor. The project uses of an editor, a view and a preferences tab, preferences are centralized in Eclipse within a single dialog to make it easy for the user to find them.
2.3 The Adapter Concept The functionality of Eclipse is only provided by plug-ins. This makes the extensive use of a framework structure necessary. Frameworks are a useful and powerful design principle, as long as every extension possibility is taken into consideration. Otherwise the pure plug-in based design hangs with the impossibility to add the desired feature. Therefore Eclipse uses the Adapter pattern, which enables the system to dynamically extend the functionality of classes. The Adapter concept is one of the most powerful and characteristic features the platform supplies. Nevertheless it was not necessary to create a new Adapter class during the development of the ‘Annotation’ plug-in. This is why this concept will be described in some detail but on a quite theoretical level only. In order to be adaptable a class has to implement the interface ‘IAdaptable’ which is situated within the package ‘org.eclipse.core.runtime’. This interface requires the function
‘getAdapter’ to be implemented. This function takes a class object as input and returns an instance of the class, or null if not supported. To give an example for the use of an adapter lets think of an editor outline page. An outline is normally created as a structured excerpt from currently open editor page. Therefore it is the task of the editor either to make the data accessible through an interface (which surly would break some visibility and design rules) or to directly supply the excerpt data via an object. In Eclipse the source for an outline view has to implement the interface ‘IContentOutlinePage’, which could be implemented by the editor class. Nevertheless it is not necessary for the editor to do so, but it also can supply an adapter implementing this interface. Or in other words if the ‘getAdapter’ method is queried with the class object of this interface it returns an object reflecting the content of the outline view. This architecture brings at least two major advantages. The first one is that the interface has not to be implemented by the class itself, which may reduce the overall length of the java file which is especially useful if there are tons of such interfaces as it is with some editor components. The second one is not clearly to see yet because not enough theory is done by now. It concerns the issue that adapters should be added dynamically, which naturally extends the possibilities of a plug-in developer to add new functionality. A careful reader will have asked himself some questions now: Adapter should be added dynamically, but the ‘getAdapter’ method is coded within the adaptable class. Therefore without some further concepts this method would have to be modified. This definitely is a possibility to add a new adapter, but would destroy a major part of the reasons why adapters are used. A class should be extendible without changing its code, so let us search for a better possibility to add a new adapter.
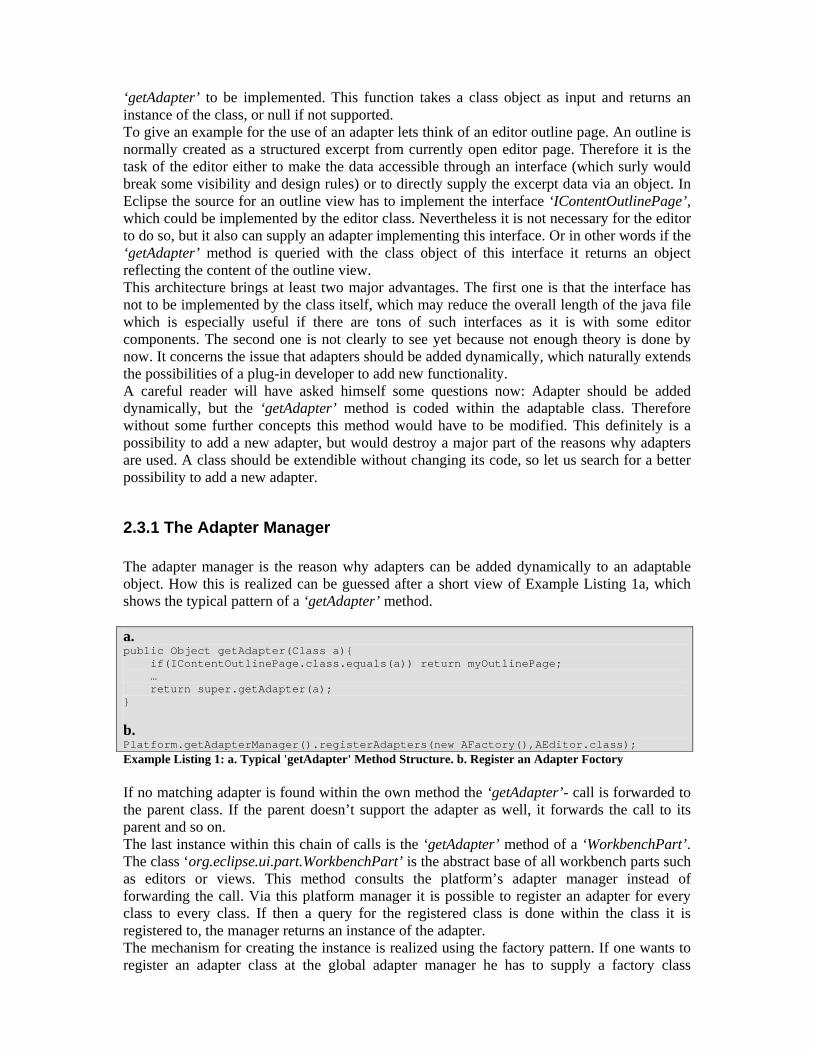
2.3.1 The Adapter Manager The adapter manager is the reason why adapters can be added dynamically to an adaptable object. How this is realized can be guessed after a short view of Example Listing 1a, which shows the typical pattern of a ‘getAdapter’ method. a. public Object getAdapter(Class a){ if(IContentOutlinePage.class.equals(a)) return myOutlinePage; … return super.getAdapter(a); }
b. Platform.getAdapterManager().registerAdapters(new AFactory(),AEditor.class); Example Listing 1: a. Typical 'getAdapter' Method Structure. b. Register an Adapter Foctory If no matching adapter is found within the own method the ‘getAdapter’- call is forwarded to the parent class. If the parent doesn’t support the adapter as well, it forwards the call to its parent and so on. The last instance within this chain of calls is the ‘getAdapter’ method of a ‘WorkbenchPart’. The class ‘org.eclipse.ui.part.WorkbenchPart’ is the abstract base of all workbench parts such as editors or views. This method consults the platform’s adapter manager instead of forwarding the call. Via this platform manager it is possible to register an adapter for every class to every class. If then a query for the registered class is done within the class it is registered to, the manager returns an instance of the adapter. The mechanism for creating the instance is realized using the factory pattern. If one wants to register an adapter class at the global adapter manager he has to supply a factory class
implementing the interface ‘org.eclipse.core.runtime.IAdapterFactory’. This interface requires a ‘getAdapter’ method to be implemented which takes the calling object and the class of the adapter as an input. Moreover a method ‘getAdapterList’ has to be implemented which returns the classes of the adapters it is able to handle. Therefore such a factory is capable to be registered to more than only one class, and is able to handle multiple adapter classes too. This architecture ensures that not too much factories are registered within one project. To register the factory finally at the adapter manager a call like the one in Example Listing 1b can be used. The factory is registered for one class only but the call can be repeated to use the same factory for multiple classes. The problem where to execute the statement is more interesting. This problem depends on the adapter type that should be inserted. Anyone who is trying to write an adapter for a visual component shall be warned; this can be a quite tricky thing because of timing constraints. In most of the other cases the ‘start’ method of the plug-in class should do its work.
2.4 Plug-in Implementation and Test The implementation is the third step of the process mentioned in the section about the dependencies tab. To adopt the Eclipse structure, in most cases predefined interfaces will be used. To implement GUI interfaces in Eclipse, the Standard Widgets Toolkit (SWT) is used. SWT provides a portable API and a tight integration to the underlying operation system. The use of SWT is different from the widget toolkits common to Java and therefore it is necessary to study its principles. On top of SWT, JFace can be used. JFace provides helper classes for common UI programming tasks. It makes the developer free to focus on the implementation, rather than the underlying widgets system. JFace contains two slightly different categories of components to support the developer. On the one hand it provides powerful frameworks to implement for example preference pages or wizards. On the other hand it implements model based widgets which enable the programmer to easily realize a visual representation of a domain specific model. For example there are Viewers for SWT widgets like a table or a list. These Viewers can be easily configured using Content- and LabelProviders. Another big advantage is the use of the simple Action objects to achieve nearly any kind of action. The action concept is tightly coupled with abstract models like the MenuManager which can easily be combined with the SWT component Menu and any JFace Viewer. To advance from a practical example on the combination of SWT and JFace see the section about ‘Creating a Context Menu’ within the ‘Challenges’ section. On the whole the combination of SWT and JFace is powerful and comfortable although it has to be mentioned that Eclipse is held ‘JFace neutral’. This means that the programmer can decide if to use pure SWT or JFace components. Nevertheless JFace is used to implement several parts of the Eclipse workbench. The global plug-in class defined in the overview tab and created by Eclipse automatically, can be used to retrieve resource bundles and preferences as well as to manage other resources. Through this architecture the resource handling is centralized which can be seen as a serious quality issue. Although the plug-in development using Eclipse is quite comfortable there were some challenges that encountered during the project work. These challenges will be added in a separate section to make it easier for other plug-in developers to come over them.
2.4.1 Implementation Workflow As mentioned before the first step in implementation is to define the dependencies to make the parent plug-in accessible and extendible. The next step is to define the extensions.
Therefore a plug-in developer, more than most Java developers, has to know what he wants to develop and how it fits into the Eclipse framework. Once the plugin.xml is configured properly the implementation of a standard plug-in is straight forward. As most of the classes to implement are given by the extension definitions and the functions to implement by the interfaces, the programmer is able to focus on coding. Because of the complex structure resulting from a source that has to run in conjunction with a whole IDE I would strongly recommend to test the written code in slightly short periods. This is because the straight forward coding approach is likely to mislead just to implement part after part making it difficult afterwards to find the source of an encountered problem. To test a plug-in, a runtime workbench is used.
2.4.2 Testing via Runtime Workbench A runtime workbench is a second instance of Eclipse running with a different workspace and possibly arguments. It can be created using at least two different approaches. The first one is to use the link in the overview tab of the plug-in manifest. Using this link will instantly create a second Eclipse workspace (runtime workbench) with the implemented plug-in already installed. The major disadvantage of this approach is that the created workbench cannot be configured. The second approach is to use the menu entry ‘Run/ Run…’ which enables us to gain full control over the resulting workbench. As known from other Eclipse project types a new ‘Run-time Workbench’ configuration has to be created. Using the tabs to the right of the dialog, a whole bunch of arguments can be configured. In the ‘Arguments’ tab the workspace data section is important. The path to the new workspace and the option if it should be cleared on every startup can be defined here. The reason why it is necessary to gain control over the workbench is buried within the second tab. The ‘Plug-ins’ tab offers the possibility to choose which plug-ins should be loaded in the new workbench. Sometimes it is essential to test the own plug-in in different constellations of installed plug-ins; for example to check if the exception handling is working if some needed plug-ins are not installed. The last tab mentioned here is called ‘Tracing’. It enables the developer to print the activity of plug-ins without debugging them. The trace is written to the standard output. What kind of information a plug-in sends to the trace can be defined using an ‘.options’ file. Such a file uses a predefined syntax, which easily can be obtained from the Eclipse help. This file contains the keys and default values. These values can then be changed using the ‘Tracing’ tab. If a plug-in supports tracing, it can check the tracing options using the method ‘Platform.getDebugOption(<Optionname>)’ and send the corresponding information.
3. The Annotation Plug-in Project Before the coding could start some definitions had to be made. For example the kind of data storage, the extendibility, the need for generic design and the use cases had to be identified. The extendibility and generic design were restricted to a refactoring level, in other words the plug-in should have a structure easily to be extended using refactoring techniques. Therefore there is no need for a generic design because the actual plug-in is meant to be used in a quite restricted usage environment. Nevertheless the whole system has to be easily extendable. To implement this requirement the components have to be loosely coupled. This is the reason why the two major components are coupled using the Eclipse resource change events only. These components therefore work separately and it would even be possible to split them into
separate plug-ins; and they wouldn’t even have to extend each other. As the system functionality is built upon both of them such considerations are only theory but confirm the assumption of easy extendibility. The kind of storage and the use cases are described in the following sections. And afterwards- following the chronology- the plug-in architecture will be described.
3.1 Use cases The plug-in is meant to be used by two major groups. On the one hand the staff correcting the exercises has to be able to add annotations to Java files easily and most of all quickly and comfortable (as they have to correct a huge number of delivered exercises). On the other hand the students have to be able to read the annotations and understand the dependency to the source code intuitively. The correcting group now has to initiate the annotation of an exercise, to add a number of annotations referencing some pieces of source code and to save them in order to deliver them back to the students. If a failure occurred during the annotation adding phase there also has to be the possibility to edit these faulty annotations. All these tasks, except the editing have to be initiated using the Eclipse Java source editor, simply because a piece of source code has to be selected and switching to other components would slow down the workflow and first of all wouldn’t be intuitively. Now the simplest and most intuitive way how to create an annotation is an entry in the context menu of the java editor. After activating this entry a dialog has to pop up in order to retrieve the input data of the annotation. Now that the annotations can be created there, as mentioned above, has to be a way to edit them. Therefore the need for an editor listing up all annotations of a project emerges. This editor should enable the staff to edit the annotations using an interface similar to the one used to create them. The easiest way to do this is to contribute an editor only listing up the annotations, which then can be selected, causing them to pop up in a similar dialog as used for creation. And last but not least the data has to be saved, but this will be described in the next section. After the student has received the annotations he should be able to view them and jump to the annotated code. This is a typical task that may be realized either in an Eclipse view or an editor outline. Both of them typically depend on an editor or in case of the view- an action or workflow. Since the outline is bound strongly to the editor- it would change its content after the highlighted source is shown in the java editor. Since we are looking for a smooth workflow this is not acceptable, or in other words, we have to choose the view. This means that we list up our annotations twice in the editor to edit the elements and in a view to enable jumping to the source code linked to the annotations. The view moreover should contribute the possibility to mark annotations as reviewed to make a comfortable usage possible. On the whole the components resulting form these use cases are: An editor, a view and an item contributed to the context menu of the Java editor. Another component to be added is a preference sheet to enable the user to set default values, as used in most other Eclipse plug-ins. As all used components are identified, the architecture of the plug-in can be defined. But regarding to the chronology, let’s focus onto the storage kind first.
3.2 Annotation Storage Annotations are used and transferred between the two mentioned groups. Because of this fact the usage of files or file- structures may be used. There would even be the possibility to store all annotations in a global database but as the annotations have a rather low expiring time this
possibility makes not much sense. Therefore let’s focus on the possibility to save annotations in files (file structures would be possible, but an overkill for this application). Annotations contain a description, a point modification value, some data referencing the source code and a value describing if the annotation has been marked as reviewed. All of these values are quite straight forward, except the source code referencing part. In Eclipse there are several ways to mark a piece of source code. As the annotations have to be saved in a human- and machine- readable form, regarding to the project objectives, they should at least contain the filename and the line number of the referenced piece of source code. More over there should be the possibility to reference a source snippet that is not starting a character 0 of a line. This makes it necessary to use a character offset. Since Eclipse supports offsets from the beginning of the source code (not in a line) this offset combined with the length of the highlighted text is used to store and restore the highlighted area. Therefore the line number is not really needed by the plug-in itself but is stored to remain easily human readable. To support higher level features like the visualization of the total score and contact information, the annotation file format has to support some single values. For example the email address of the person who wrote the annotations and the maximum score should be added. The classes implementing the storage functionality where written at the beginning of the project. The reason is that they are essential at the one hand, and at the other hand they were thought to be far off the Eclipse system, but this was a mistake that has to be mentioned here. Functions containing file handling routines have to be implemented using the Eclipse resource plug-in to profit from full compatibility. This problem will be discussed later on, among other things, in the section about challenges. The annotation file format will be discussed in the next section, the way it is actually used.
3.2.1 Annotation File Format As discussed in the previous section annotation files have to store a list of annotations and some additional values. The file extension is .ann and the default file name is annotation.ann. If an annotation is initiated such a file is created in the root directory of the project containing the annotated file. All annotations within the same project are appended to this file. The first lines of an annotation file contain the file header. This header can contain several key- value pairs. The structure of this header is quite generic. To manage this, the first line contains the number of header elements in an ASCII string format. The following lines contain a number of key- value pairs, key and value are separated by “=”. These values don’t have any syntactic restriction but nevertheless the plug-in expects the keys ‘Name’, ’eMail’ and ‘Points’ to exist. This is a restriction of the plug-in itself, not of the file handling system. The file handling system is designed to be easily extended to support any refactoring work that might follow. The header is terminated by one blank line. Following this line the annotations are listed in a comma separated value (CSV) format. Blank lines at the end of the file are skipped, but blank lines between CSV lines are not supported. The annotations contain the following items (in order):
• Reviewed: Is a boolean value (in string format) and determines if the annotation was marked as reviewed previously.
• Description: A short description of what the annotation is about. • Score modification: Is an integer value (in string format) that determines how the
maximum points are modified. This value is restricted to valid java integer values.
• Path: Is a string representation of the path referencing the annotated file. It is relative to the project working folder.
• Line Number: A string representation of the line number the annotation is referencing to. This value is not used by the plug-in in any way and is inserted to support human readability only.
• Offset: A string representation of the character offset the annotation is starting at. This value is used by the plug-in to restore the highlighted area in the annotated file.
• Length: Defines the length of the annotation in characters. This value is used in combination with the offset to restore the highlighted area.
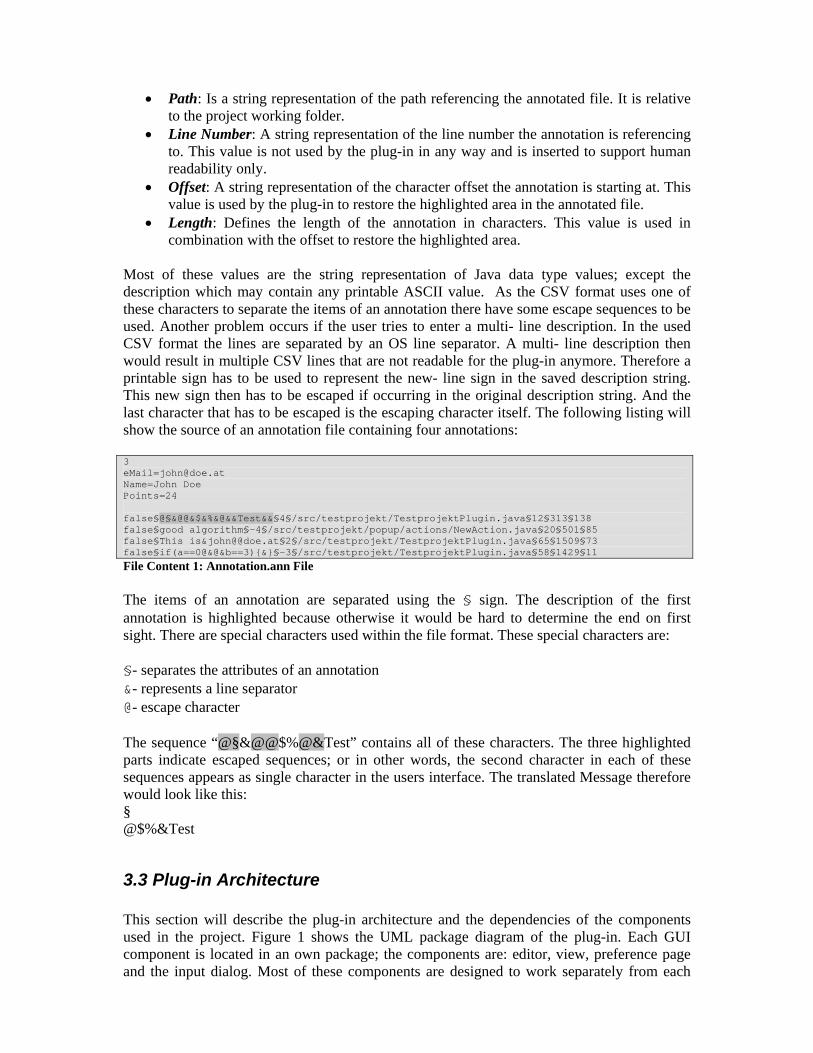
Most of these values are the string representation of Java data type values; except the description which may contain any printable ASCII value. As the CSV format uses one of these characters to separate the items of an annotation there have some escape sequences to be used. Another problem occurs if the user tries to enter a multi- line description. In the used CSV format the lines are separated by an OS line separator. A multi- line description then would result in multiple CSV lines that are not readable for the plug-in anymore. Therefore a printable sign has to be used to represent the new- line sign in the saved description string. This new sign then has to be escaped if occurring in the original description string. And the last character that has to be escaped is the escaping character itself. The following listing will show the source of an annotation file containing four annotations: 3 [email protected] Name=John Doe Points=24 false§@§&@@&$&%&@&&Test&&§4§/src/testprojekt/TestprojektPlugin.java§12§313§138 false§good algorithm§-4§/src/testprojekt/popup/actions/NewAction.java§20§501§85 false§This is&john@@doe.at§2§/src/testprojekt/TestprojektPlugin.java§65§1509§73 false§if(a==0@&@&b==3){&}§-3§/src/testprojekt/TestprojektPlugin.java§58§1429§11 File Content 1: Annotation.ann File The items of an annotation are separated using the § sign. The description of the first annotation is highlighted because otherwise it would be hard to determine the end on first sight. There are special characters used within the file format. These special characters are: §- separates the attributes of an annotation &- represents a line separator @- escape character The sequence “@§&@@$%@&Test” contains all of these characters. The three highlighted parts indicate escaped sequences; or in other words, the second character in each of these sequences appears as single character in the users interface. The translated Message therefore would look like this: § @$%&Test
3.3 Plug-in Architecture This section will describe the plug-in architecture and the dependencies of the components used in the project. Figure 1 shows the UML package diagram of the plug-in. Each GUI component is located in an own package; the components are: editor, view, preference page and the input dialog. Most of these components are designed to work separately from each
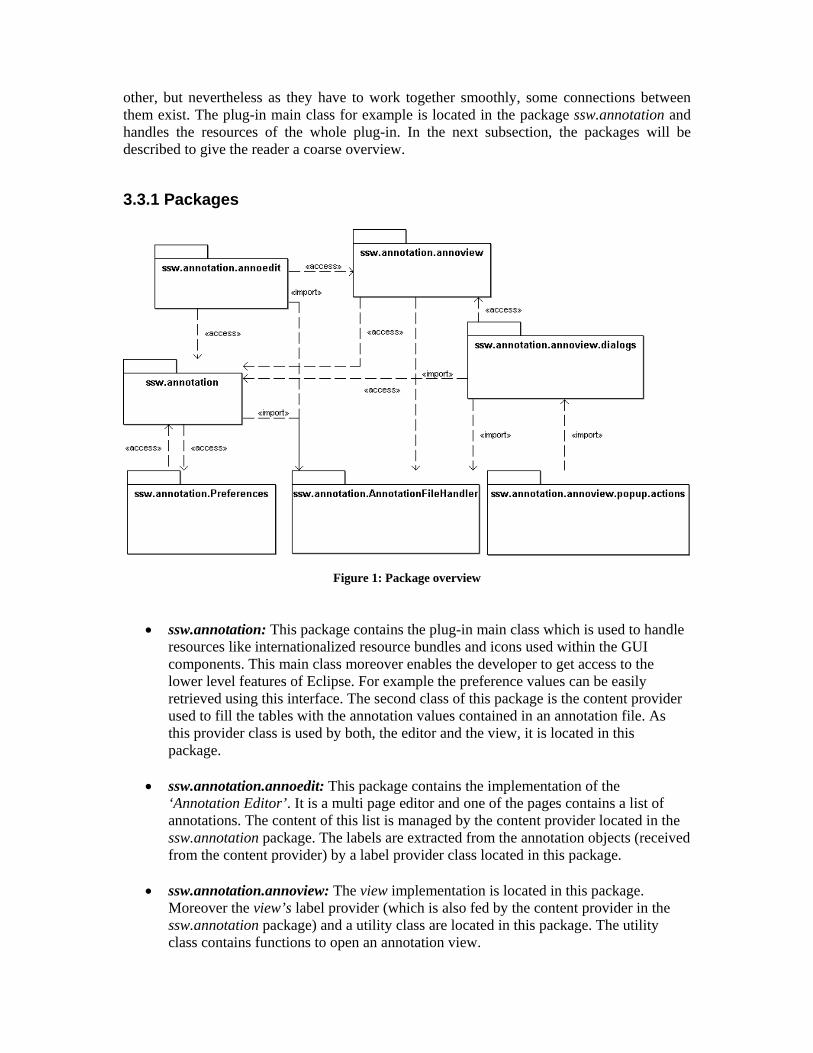
other, but nevertheless as they have to work together smoothly, some connections between them exist. The plug-in main class for example is located in the package ssw.annotation and handles the resources of the whole plug-in. In the next subsection, the packages will be described to give the reader a coarse overview.
3.3.1 Packages
Figure 1: Package overview
• ssw.annotation: This package contains the plug-in main class which is used to handle resources like internationalized resource bundles and icons used within the GUI components. This main class moreover enables the developer to get access to the lower level features of Eclipse. For example the preference values can be easily retrieved using this interface. The second class of this package is the content provider used to fill the tables with the annotation values contained in an annotation file. As this provider class is used by both, the editor and the view, it is located in this package.
• ssw.annotation.annoedit: This package contains the implementation of the
‘Annotation Editor’. It is a multi page editor and one of the pages contains a list of annotations. The content of this list is managed by the content provider located in the ssw.annotation package. The labels are extracted from the annotation objects (received from the content provider) by a label provider class located in this package.
• ssw.annotation.annoview: The view implementation is located in this package.
Moreover the view’s label provider (which is also fed by the content provider in the ssw.annotation package) and a utility class are located in this package. The utility class contains functions to open an annotation view.
• ssw.annotation.annoview.dialogs: The dialog used to collect data for new Annotations and to edit old ones is located in this package. This dialog is used in three different scenarios and therefore described in a section later on.
• ssw.annotation.annoview.popup.actions: This package contains the action called if
the “Create Annotation” command from the context menu of a compilation unit editor is called. The menu item itself is created using the plugin.xml file.
• ssw.annotation.AnnotationFileHandler: This package contains the implementation of
the storage mechanism described in chapter 3.2 Annotation Storage. In order to enable the use of other forms of saving, the implementations are abstracted by interfaces. This package moreover contains the internal representation of annotation objects.
• ssw.annotation.Preferences: The plug-in uses a preferences page to set some default
values; it is located in this package. The preference page moreover sets some static default values which cannot be modified by the user. These settings are hard coded within this class.
3.3.2 Java Interfaces ssw.annotation.AnnotationFileHandler.AnnotationItem.java This is the interface for annotation objects. It doesn’t contain any content specific definitions, as the content should not be of interest in this file handling implementation. The data contained in annotation objects is converted to a CSV string which then can easily be saved in a plain text file. An annotation item also should be able to be initialized using a CSV string. The CSV format was chosen because of the fact that annotations typically are saved in files and a single string format is easy to save and to restore, within the value range that is expected of an annotation. ssw.annotation.AnnotationFileHandler.AnnotationFileHandler.java This interface describes the structure of an annotation file handler. As annotations are not specific to any file type it could be necessary do adopt the file handler to match another goal. If for example annotations should be implemented for a completely new file type, which includes annotations and other data this interface has to be extended. It defines save and load functionality, and how to handle annotations and global data. Global data is defined as key- value string pairs, while annotations are handled via the interface AnnotationItem.
3.3.3 Java Classes This class is the main plug-in class of the project. It is instantiated once when the plug-in is started. This single instance can be queried using the static methods of the class. It can be used to obtain the resources of the plug-in. The resource bundle can be queried and it is possible to get single strings from the resource bundle. The resources are internationalized as described in section 3.3.4 Internationalization.
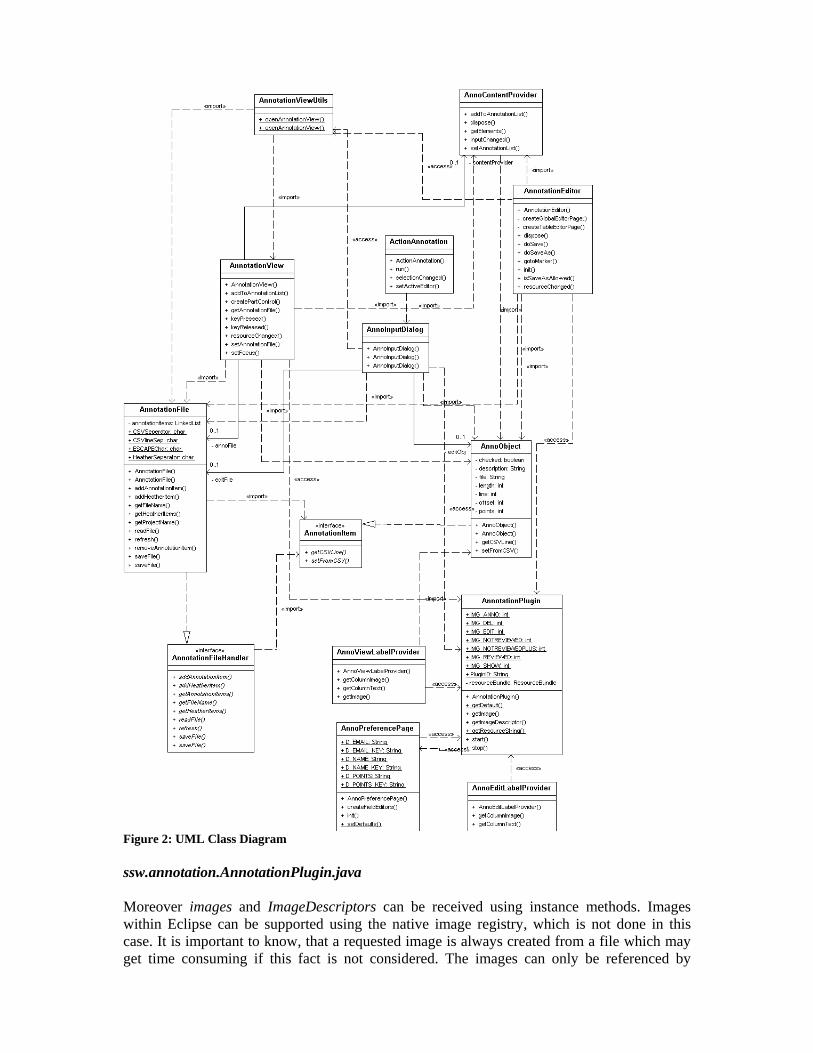
Figure 2: UML Class Diagram ssw.annotation.AnnotationPlugin.java Moreover images and ImageDescriptors can be received using instance methods. Images within Eclipse can be supported using the native image registry, which is not done in this case. It is important to know, that a requested image is always created from a file which may get time consuming if this fact is not considered. The images can only be referenced by
integer values. To support the developer, integer constants are defined which may help to choose a valid image. As usual the preferences of the plug-in can be loaded using the class interface. The default values of the preferences are actualized on plug-in activation. ssw.annotation.AnnotationFileHandler.AnnoObject.java This class represents annotation items. It implements the interface AnnotationItem and contains the data of an annotation in the concrete use case.
• checked: determines if the annotation was marked as reviewed. • description: the text of the annotation • file: file the annotation corresponds to • line: the line the annotated area begins in file • offset: the offset the annotated area begins at (whole file offset) • length: the length of the annotated area • points: the point modification value
For each of these attributes getter and setter methods are implemented. Additionally the data can be converted into a CSV string. When creating this string the description is modified with escape sequences. Line- and CSV separators are escaped. Moreover the escape character is escaped also. The attributes can be initialized using a CSV line, which either is passed to the constructor or to an instance method. ssw.annotation.AnnotationFileHandler.AnnotationFile.java This is the concrete implementation of an ‘Annotation File Handler’. It implements the AnnotatoinFileHandler interface and manages a number of annotations. The annotations are stored in a LinkedList- all types of AnnotationItems are allowed to be inserted. The global data is stored in a HashTable- both, key and value are assumed to be of the Java type String. This file is meant to be a container handling the annotations during runtime. It is possible to create an instance without indicating a file name. Annotations then can be added, and if one wants to save the file the name has to be passed. Another option is to generate an empty annotation file indicating the file name. If done so, one only has to use the save method without passing the file name. And the third option is to open an existing annotation file- which is done just like in option two, but the indicated file has to exist. This architecture makes it possible to easily create, manage and rename files. On saving, to the first line the count of header elements (global data) is written. The following lines contain the header elements. And after a blank line the annotations are written. The annotations are saved using the CSV string generated by the annotation objects. On loading this step is reversed. An annotation file is a plain text format to support human readability. The resources used within the plug-in have to be in sync with the workspace, which is realized through simply using only Eclipse internal file handling techniques. ssw.annotation.annoedit.AnnotationEditor.java
The ‘Annotation Editor’ is a multi tab editor providing the possibility to get a brief overview over the annotations (first tab) - this is meant to be the information the student is interested in when receiving the annotated work. This tab moreover provides the possibility to change the general information of the annotation file. The second tab contains the information about the annotations. It is possible to change annotations using a double click action which opens an AnnotationInputDialog. Furthermore the user has the possibility to remove items from the list. The editor is configured (plugin.xml) to work with *.ann files. These files are strictly following the definition of the plug-ins annotation file structure. The editor loads the whole file content into an AnnotationFile and its content provider. The file resources have to be in synch with the internal Eclipse workspace resources. If the resource changes, e.g. through inserting a new annotation, the editor actualizes the whole annotation information (reloads the file). The editor reacts on a resource change event of the current project. For example if the project is closed, the editor is also closed. The save infrastructure of Eclipse is not used within this editor. If an annotation is changed the changes are synchronized with the file immediately. Therefore the save as option is not available too. Annotation files generated by the system use a default annotation name. The system itself doesn’t provide the possibility to change the filename. Nevertheless the editor is able to open all *.ann files. ssw.annotation.AnnoContentProvider.java This class provides the content for both, the annotation list in the editor and the view. The background data of this provider is a list (java.util) which contains AnnoObjects. This list for example can be easily extracted form an AnnotationFile object. The objects are directly distributed without any modification. The input change tracking possibility is not used yet. ssw.annotation.annoedit.AnnoEditLabelProvider.java This is the label provider for the annotation list of the annotation editor. The contentProvider provides AnnoObject objects which capsulate information about the description, file, if the annotation was marked as reviewed, the point modification, the highlighted line, offset and length of an annotation. The editor uses the information about description, point modification and file. The description is a string and thus could contain line separators, which would not be displayed by the table in a correct way. These line separators are replaced with blanks. If the provider is queried for an invalid column, a default string is returned. ssw.annotation.annoview.AnnotationView.java This view is meant to manage the annotation reviewing cycle. It can be opened using the Eclipse standard feature to open views, but if an annotation editor is opened the view is opened anyway. It shows a list of annotations, using the AnnoContentProvider. The table contains: reviewed (checked), description, file and point modification of the annotations data. The data is managed by an underlying AnnotationFile which is used to update changed data too. If modifications are done within the view, they are written to the resource file immediately. The user is able to modify the checked status to signal that the annotation was reviewed.
Moreover the annotations can be deleted. These actions may be carried out using several different possibilities. The first possibility is to use the popup menu that is hooked to the annotation list table or in case of the restore operation a simple double click action may be used. Another possibility is to use keyboard hotkeys; and last but not least the icons in the corresponding action bar can be used. The main feature of the view is to restore the highlighted area in the java file that is referenced by the annotation. This is done using the file, offset and length data from the annotation item. The offset is the sign count from beginning of the file indicating the beginning of the highlighted area. In combination with the length the area can be reconstructed. The reconstruction is shown in the compilation unit editor usually used for displaying java files. The view listens for resource change events to update the annotation list on a change event. For example if manipulations are done within the editor the annotation file is refreshed. ssw.annotation.annoview.AnnotationViewUtils.java This class is meant to be a collection of utility methods that may be used in combination with the annotation view. By now the functionality only contains methods to open an AnnotationView passing the file name of the annotation file or not passing anything. ssw.annotation.annoview.AnnoViewLabelProvider.java This is the label provider for the table used within the ‘Annotation View’. It provides: reviewed (checked), description, points and file. The checked status is not returned directly, but in the first column a column image is used to express the state. The images are loaded using the plug-in’s main class interface for images, it is important to know that images queried from the main plug-in class do not use the native image registry, but are read from a file each time the query appears. There are three states the system differs between.
• not reviewed: The annotation contains a negative point modification and was not marked as review before.
• not reviewed plus: The annotation contains a positive point modification and was not marked as reviewed before.
• reviewed: independent from the point modification this state is forced if the annotation was marked as reviewed before.
As the table would not be able to view multi- line descriptions in a correct way, line separators are replaced with blanks. If an invalid column number is chosen the provider returns a default string. ssw.annotation.annoview.dialogs.AnnoInputDialog.java This dialog is used to create new annotations and to edit existing ones. There are three different circumstances when this dialog may appear:
• A new annotation is created and there is no annotation file where the annotation could be appended. In this case a new annotation file has to be created; this is done by instantiating an AnnotationFile passing the file name. This instance then will create an in-synch resource and save the information.
• A new annotation is created and a file to append the information exists. In this case the global data cannot be modified, as it was fixed on file creation. An ‘AnnotationFile’ instance is created, passing the file name, causing the instance to load the currently saved data. After appending the data to the ‘AnnotationFile’- list the file may be saved causing editors and views to refresh themselves.
• An existing annotation is to be edited. This causes the dialog to popup with the information of the annotation. The information is passed directly to the constructor. In the resulting dialog the annotation data can be modified. It is not possible to modify the annotation area but the description and the point modification. Global data cannot be modified by the resulting dialog.
These modes are distinguished using the calling constructor on the one hand, which enables the dialog to distinguish between the editor and the new mode. And on the other hand the fact, that the file exists, which is only questionable in new mode. New annotation files are created using a fixed default file name. If a file exists matching this file name an annotation file is supposed to exist. The default file name is hard coded within this class. The dialog handles the following data:
• Author’s name • Author’s email address • Maximum score value • Score modification value • Annotation text
The score values are essential and have to be filled in valid. The other values are optional from the dialog’s point of view. The confirmation of an invalid input causes the dialog to stay and error messages to pop up. The data for the created and saved ‘AnnoObject’ is fetched from the dialog input fields and from the currently active compilation unit editor’s highlighted area. From the editor the beginning line number, the offset and the length are extracted. The offset is the count of signs from the beginning of the file. The line number is not necessary for the reconstruction of the highlighted area, but fetched to support human readability of the resulting file. ssw.annotation.annoview.popup.actions.ActionAnnotation.java This class implements the action, performed if the button from the context menu of the compilation unit editor, to create an annotation, is pressed. The menu entry is added to the context menu using the ‘plugin.xml’ file, which is done using the ‘popupMenus’ extension point. The reference to this class is defined during the initialization of this extension point. The run method of the action class is overwritten to retrieve the information of the file to be annotated. This information is passed to a new ‘AnnoInputDialog’ which is opened to collect further annotation information. ssw.annotation.Preferences.AnnoPreferencePage.java This class represents a preference page that is contributed to the ‘Preferences’ dialog. By subclassing FieldEditorPreferencePage, a page is created that is capable to save and restore itself and moreover to use the field support build into JFace. This page is used to modify
preferences only. They are stored in the preference store that belongs to the main plug-in class. That way, preferences can be accessed directly via the preference store. There are two types of preferences used within this page. On the one hand, the ones that can be modified using the interface and on the other hand, the invisible preferences which are hard coded within this class. This is done because the values have to be easily accessible by any part of the plug-in. The easiest and cleanest way to do so is to use the preference store of the plug-in. On the other hand side this invisible preference values must not be changed by any reason, because they are part of the annotation file format. The invisible preference values can be accessed using the keys:
• ‘namekey’ • ‘emailkey’ • ‘pointskey’
The corresponding values are the keys of the annotation file header elements. The modifiable preference keys are:
• ‘namePreference’, • ‘emailPreference’ • ‘pointsPreference’
The corresponding values are the default values for name, email and points in the ‘AnnoInputDialog’ on the first creation of an annotation within a project.
3.3.4 Internationalization The implementation of the annotation plug-in is fully prepared for the use of internationalization. Resources are retrieved from the main plug-in class by all components. Within the main plug-in class a file resource bundle is used. The resource file is referenced using the following path string. This string is relative to the plug-in’s home directory: ‘ssw.annotation.AnnotationResources.Annotation’ As usual the resources bundle file is searched within: ssw.annotation.AnnotationResources and is supposed to be named like: Annotation[lang].properties; where [lang] is optional and can be replaced by the language locals (e.g. ‘_de’ for a German property family) to define resource bundles for different languages. Further details on ‘PropertyResourceBundles’ can easily be retrieved from the standard java documentation. The plug-in, as it is provided through this project work is equipped with an ‘Annotation.properties’ file which represents the standard resource bundle. It defines the resources in English language and can easily be copied to localize the plug-in with other languages. The file is broken down into several subsections, which represent the components of the plug-in. As not all of the values are described individually, it is necessary to translate the text of the values step by step.
3.3.5 Global Values In the project some constant values are used to build a base. For example the name of an annotation file is constant and therefore hard coded in the source. This information is not held in a properties file because most of it has to be consistent over all copies of the plug-in. In this section some of these values, which are essential and wide spread, are described.
• Images/Icons: Images are located in a folder called ‘/Icons/’ which is relative to the projects workspace. To access these icons some constants in the main plug-in class ‘AnnotationPlugin.java’ are used. The image paths are held in an array called ‘imageNames’ while some integer constants point to the single elements. To retrieve an image the function ‘getImage’ is used.
• Plug-in ID: To address the plug-in as a component of the workspace for some reasons the ID of the plug-in is used. This ID is kept as a final field in the main plug-in class ‘AnnotationPlugin.java’
• Editor Context Menu: The ID of the editor’s context menu is located in a field ‘CMenuID’ in the editor’s class ‘AnnotationEditor.java’.
• View Context Menu: The ID of the view’s context menu is located in a field ‘POPUPMENUID’ in the view’s class ‘AnnotationView.java’.
• Annotation File Name: As mentioned before the annotation file’s name is also hard coded within the class file ‘AnnoInputDialog.java’. It is essential that this name must not be changed only in a single copy but in the whole system if necessary. That’s because this name is used to find existing annotations.
• Preference Values: See the section about ‘AnnoPreferencePage.java’ for detailed explanations about this topic. In this class there are some constant definitions done. As it is the cleanest way to use a preference store to spread constants over the whole project, they are coded here. In difference to all other constants described by now, the ones mentioned here can be accessed from every class of the plug-in.
3.4 Challenges As I started from zero with Eclipse plug-in development, I encountered quite a few challenges. This section is meant as a guide for those of you who are about to start with plug-in development. During the work on the project problems emerged on short code fragments and I had to spend hours and hours of work on the solution. I find it useful to explain them because of two reasons. First, other programmers using this information hopefully will not get stuck so long on similar problems, and the second is to make my code easier to understand. Therefore a concrete problem, the solution and in most cases code snippets will be presented.
3.4.1 Adding Entries to a Context Menu To add an entry to the context menu of the standard Java editor was one of the first things that had to be done in the project. I found this to be a very annoying task. Most of the work to achieve this goal had to be done in the ‘plugin.xml’ editor. The first step is quite intuitive and has to be done in most projects anyway: In the dependencies tab the ‘org.eclipse.ui’ plug-in has to be added. This plug-in adds the possibilities to manipulate the Eclipse user interface. The next phase is to add the ‘org.eclipse.ui.popupMenus’ extension which enables us to add entries to most context menus in Eclipse. Next we have to add a ‘viewerContribution’ which basically means, that we want to add an action to a context menu by ID. Therefore we have to extract the ID of the Java compilation unit editor’s context menu, which could turn out to be a hard exercise for some other components. Nevertheless, once these things have been done other things get easy. Only a few straight forward fields have to be filled, and a class implementing the interface ‘IEditorActionDelegate’ has to be created to handle the Action.
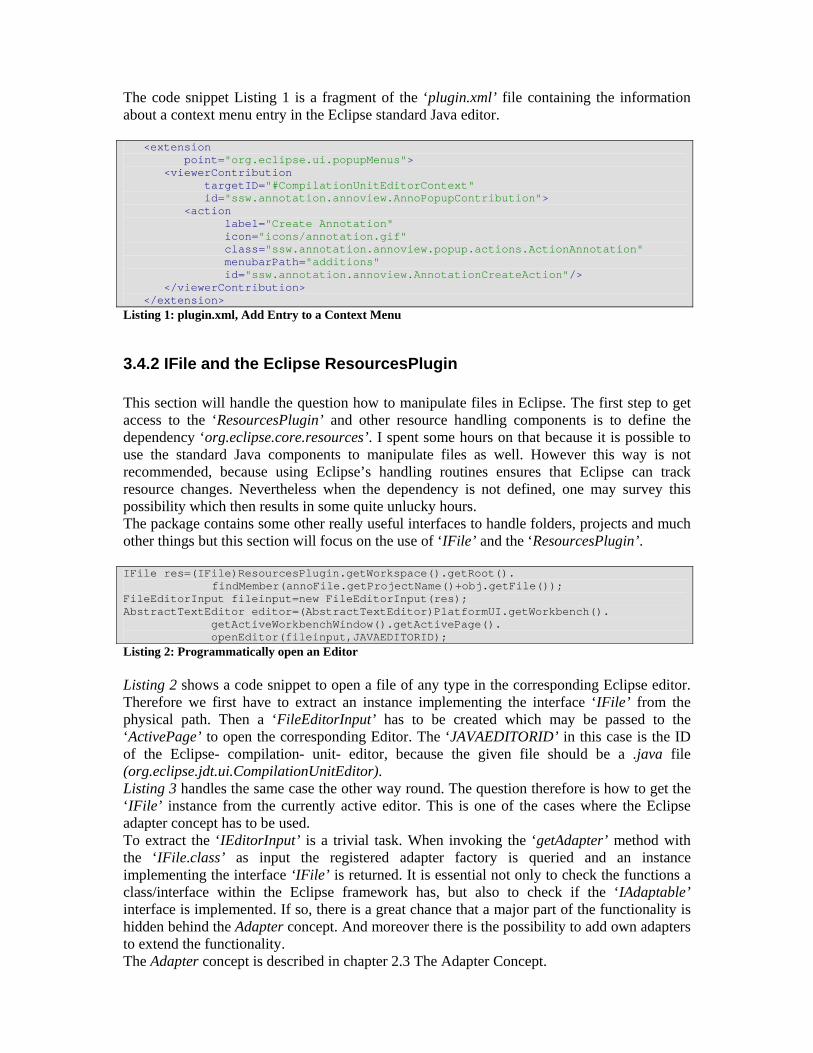
The code snippet Listing 1 is a fragment of the ‘plugin.xml’ file containing the information about a context menu entry in the Eclipse standard Java editor. <extension point="org.eclipse.ui.popupMenus"> <viewerContribution targetID="#CompilationUnitEditorContext" id="ssw.annotation.annoview.AnnoPopupContribution"> <action label="Create Annotation" icon="icons/annotation.gif" class="ssw.annotation.annoview.popup.actions.ActionAnnotation" menubarPath="additions" id="ssw.annotation.annoview.AnnotationCreateAction"/> </viewerContribution> </extension> Listing 1: plugin.xml, Add Entry to a Context Menu
3.4.2 IFile and the Eclipse ResourcesPlugin This section will handle the question how to manipulate files in Eclipse. The first step to get access to the ‘ResourcesPlugin’ and other resource handling components is to define the dependency ‘org.eclipse.core.resources’. I spent some hours on that because it is possible to use the standard Java components to manipulate files as well. However this way is not recommended, because using Eclipse’s handling routines ensures that Eclipse can track resource changes. Nevertheless when the dependency is not defined, one may survey this possibility which then results in some quite unlucky hours. The package contains some other really useful interfaces to handle folders, projects and much other things but this section will focus on the use of ‘IFile’ and the ‘ResourcesPlugin’. IFile res=(IFile)ResourcesPlugin.getWorkspace().getRoot(). findMember(annoFile.getProjectName()+obj.getFile()); FileEditorInput fileinput=new FileEditorInput(res); AbstractTextEditor editor=(AbstractTextEditor)PlatformUI.getWorkbench(). getActiveWorkbenchWindow().getActivePage(). openEditor(fileinput,JAVAEDITORID); Listing 2: Programmatically open an Editor Listing 2 shows a code snippet to open a file of any type in the corresponding Eclipse editor. Therefore we first have to extract an instance implementing the interface ‘IFile’ from the physical path. Then a ‘FileEditorInput’ has to be created which may be passed to the ‘ActivePage’ to open the corresponding Editor. The ‘JAVAEDITORID’ in this case is the ID of the Eclipse- compilation- unit- editor, because the given file should be a .java file (org.eclipse.jdt.ui.CompilationUnitEditor). Listing 3 handles the same case the other way round. The question therefore is how to get the ‘IFile’ instance from the currently active editor. This is one of the cases where the Eclipse adapter concept has to be used. To extract the ‘IEditorInput’ is a trivial task. When invoking the ‘getAdapter’ method with the ‘IFile.class’ as input the registered adapter factory is queried and an instance implementing the interface ‘IFile’ is returned. It is essential not only to check the functions a class/interface within the Eclipse framework has, but also to check if the ‘IAdaptable’ interface is implemented. If so, there is a great chance that a major part of the functionality is hidden behind the Adapter concept. And moreover there is the possibility to add own adapters to extend the functionality. The Adapter concept is described in chapter 2.3 The Adapter Concept.

IWorkbenchPage wbPage = PlatformUI.getWorkbench(). getActiveWorkbenchWindow().getActivePage(); IEditorInput input=wbPage.getActiveEditor().getEditorInput(); IFile file= (IFile)input.getAdapter(IFile.class); Listing 3: Get IFile from the Currently Active Editor One really challenging problem is to create a new file which is synchronized to the workspace. As mentioned before it is not enough just to use standard Java file handling routines, because we want a resource file to be synchronized to the workspace. When turning the option ‘Refresh workspace automatically’ in the workspace tab of the Preferences on, then even a file created with standard routines would be synchronized. As this option is turned off by default the clean way to create a synchronized resource is to use the Eclipse components. Surely there are tons of implementations doing so, but I found it to be really hard to retrieve information from the Eclipse help pages on that. Listing 4 shows the solution used in the project. The first step is to create an abstract file, independent of the fact that the file exists or not. Then it can be checked if this file physically exists. If not, it has to be created using the method ‘create’ defined in the interface ‘IFile’. Now the file has been added to the Workspace without any data. The next step is to create an ‘InputStream’ with the data we want to write to the file. Using the ‘setContents’ method we are able now to add the data to the file. All of these methods are defined as ‘long running’ and could be supervised by a ‘ProgressMonitor’. try { IPath path=new Path(file); IFile f=ResourcesPlugin.getWorkspace().getRoot().getFile(path); if(!f.exists()){ f.create(null,true,null); } … StringBuffer buffer=new StringBuffer(); … ByteArrayInputStream input= new ByteArrayInputStream(buffer. toString().getBytes()); f.setContents(input,true,false,null); } catch (CoreException e) { return false; } Listing 4: Creating a Synchronized File
3.4.3 Standard Widgets Toolkit Learning to understand SWT can be both, funny and annoying. SWT is capable to build GUIs with tight integration to the underlying operating system. Its usage is sometimes similar to the other Java GUI toolkits, and sometimes it is quite different which potentially may confuse. For example the use of layout managers is similar to SWING; there even is a similar container structure, but the object oriented structure seems to be much weaker, as all components have to be created in correct order. When an object is created, it is chained to a parent object. Listing 5 shows how to create a table in SWT, it’s quite long for such a task and it has even to be said that it is shortened! The usage of most components in SWT is similar to this table example. On the whole SWT is really powerful, but as there are so many parameters for each component it’s also time consuming.
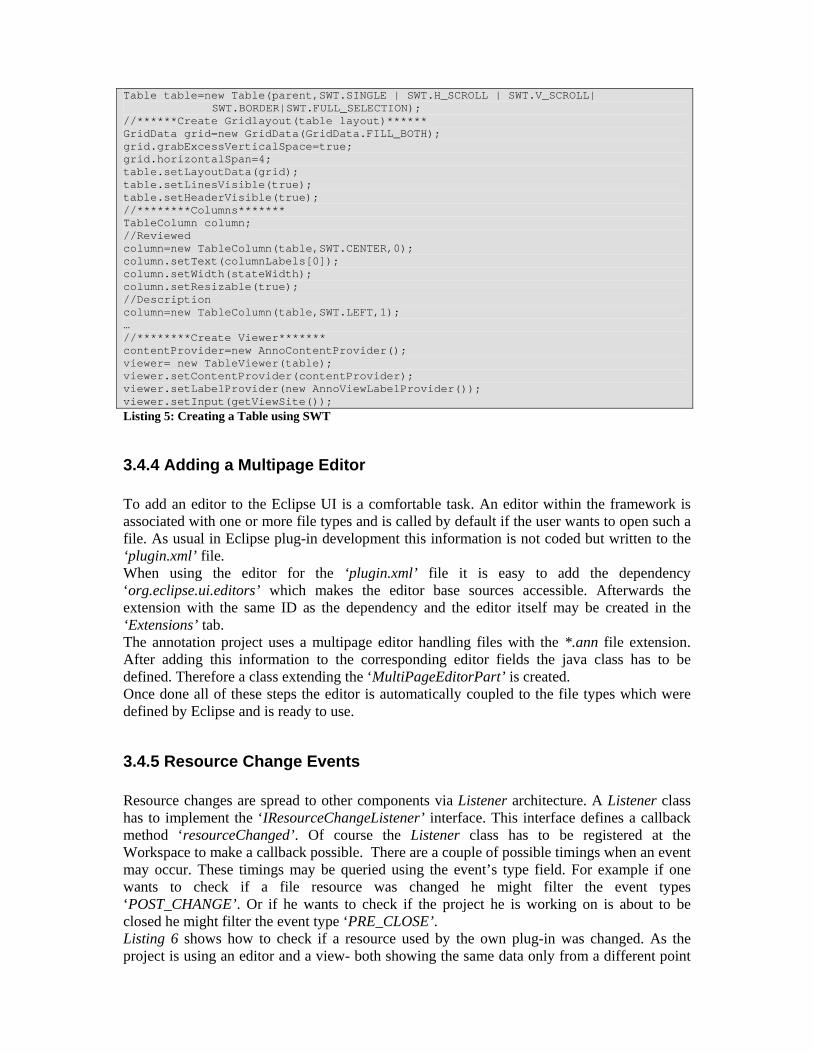
Table table=new Table(parent,SWT.SINGLE | SWT.H_SCROLL | SWT.V_SCROLL| SWT.BORDER|SWT.FULL_SELECTION); //******Create Gridlayout(table layout)****** GridData grid=new GridData(GridData.FILL_BOTH); grid.grabExcessVerticalSpace=true; grid.horizontalSpan=4; table.setLayoutData(grid); table.setLinesVisible(true); table.setHeaderVisible(true); //********Columns******* TableColumn column; //Reviewed column=new TableColumn(table,SWT.CENTER,0); column.setText(columnLabels[0]); column.setWidth(stateWidth); column.setResizable(true); //Description column=new TableColumn(table,SWT.LEFT,1); … //********Create Viewer******* contentProvider=new AnnoContentProvider(); viewer= new TableViewer(table); viewer.setContentProvider(contentProvider); viewer.setLabelProvider(new AnnoViewLabelProvider()); viewer.setInput(getViewSite()); Listing 5: Creating a Table using SWT
3.4.4 Adding a Multipage Editor To add an editor to the Eclipse UI is a comfortable task. An editor within the framework is associated with one or more file types and is called by default if the user wants to open such a file. As usual in Eclipse plug-in development this information is not coded but written to the ‘plugin.xml’ file. When using the editor for the ‘plugin.xml’ file it is easy to add the dependency ‘org.eclipse.ui.editors’ which makes the editor base sources accessible. Afterwards the extension with the same ID as the dependency and the editor itself may be created in the ‘Extensions’ tab. The annotation project uses a multipage editor handling files with the *.ann file extension. After adding this information to the corresponding editor fields the java class has to be defined. Therefore a class extending the ‘MultiPageEditorPart’ is created. Once done all of these steps the editor is automatically coupled to the file types which were defined by Eclipse and is ready to use.
3.4.5 Resource Change Events Resource changes are spread to other components via Listener architecture. A Listener class has to implement the ‘IResourceChangeListener’ interface. This interface defines a callback method ‘resourceChanged’. Of course the Listener class has to be registered at the Workspace to make a callback possible. There are a couple of possible timings when an event may occur. These timings may be queried using the event’s type field. For example if one wants to check if a file resource was changed he might filter the event types ‘POST_CHANGE’. Or if he wants to check if the project he is working on is about to be closed he might filter the event type ‘PRE_CLOSE’. Listing 6 shows how to check if a resource used by the own plug-in was changed. As the project is using an editor and a view- both showing the same data only from a different point
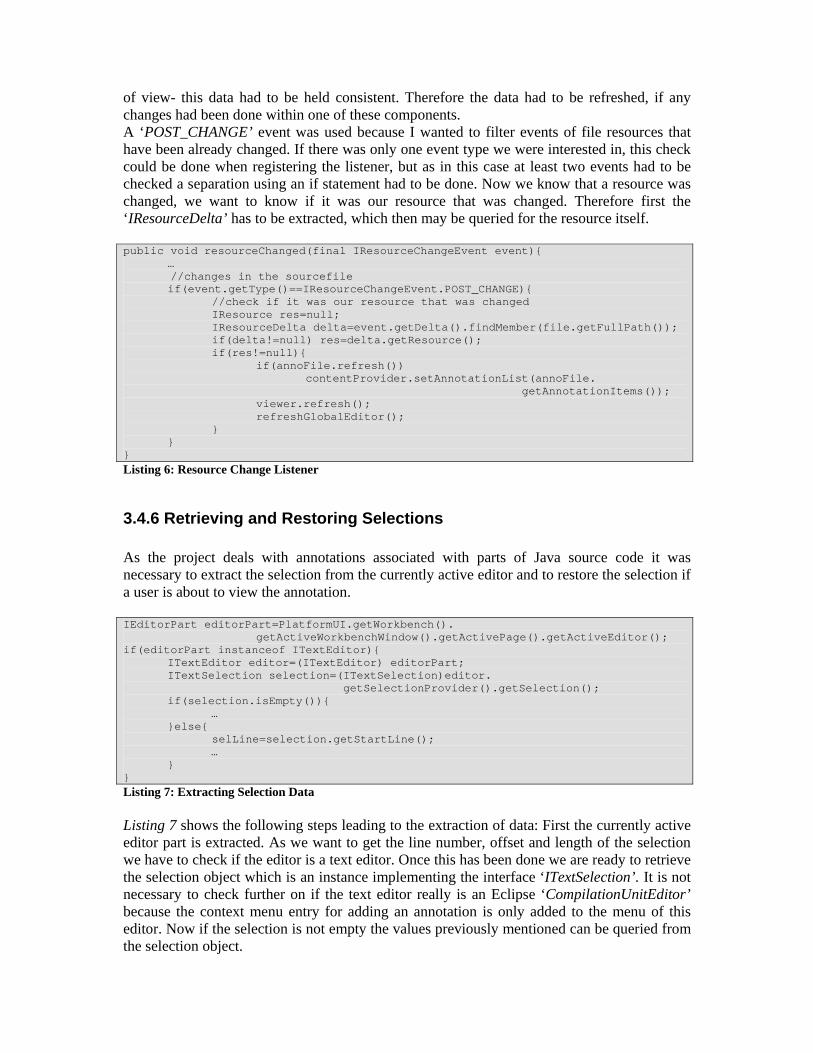
of view- this data had to be held consistent. Therefore the data had to be refreshed, if any changes had been done within one of these components. A ‘POST_CHANGE’ event was used because I wanted to filter events of file resources that have been already changed. If there was only one event type we were interested in, this check could be done when registering the listener, but as in this case at least two events had to be checked a separation using an if statement had to be done. Now we know that a resource was changed, we want to know if it was our resource that was changed. Therefore first the ‘IResourceDelta’ has to be extracted, which then may be queried for the resource itself. public void resourceChanged(final IResourceChangeEvent event){ … //changes in the sourcefile if(event.getType()==IResourceChangeEvent.POST_CHANGE){ //check if it was our resource that was changed IResource res=null; IResourceDelta delta=event.getDelta().findMember(file.getFullPath()); if(delta!=null) res=delta.getResource(); if(res!=null){ if(annoFile.refresh()) contentProvider.setAnnotationList(annoFile. getAnnotationItems()); viewer.refresh(); refreshGlobalEditor(); } } } Listing 6: Resource Change Listener
3.4.6 Retrieving and Restoring Selections As the project deals with annotations associated with parts of Java source code it was necessary to extract the selection from the currently active editor and to restore the selection if a user is about to view the annotation. IEditorPart editorPart=PlatformUI.getWorkbench(). getActiveWorkbenchWindow().getActivePage().getActiveEditor(); if(editorPart instanceof ITextEditor){ ITextEditor editor=(ITextEditor) editorPart; ITextSelection selection=(ITextSelection)editor. getSelectionProvider().getSelection(); if(selection.isEmpty()){ … }else{ selLine=selection.getStartLine(); … } } Listing 7: Extracting Selection Data Listing 7 shows the following steps leading to the extraction of data: First the currently active editor part is extracted. As we want to get the line number, offset and length of the selection we have to check if the editor is a text editor. Once this has been done we are ready to retrieve the selection object which is an instance implementing the interface ‘ITextSelection’. It is not necessary to check further on if the text editor really is an Eclipse ‘CompilationUnitEditor’ because the context menu entry for adding an annotation is only added to the menu of this editor. Now if the selection is not empty the values previously mentioned can be queried from the selection object.
To restore the selection we have previously captured, the first step is to restore the editor window. This can be done using the source from Listing 2. Doing so, opens the editor and brings it to top. Listing 8 now shows how to restore the selection within the editor. The editor automatically scrolls to the corresponding area of the source. TextSelection sel=new TextSelection(obj.getOffset(),obj.getLength()); editor.getSelectionProvider().setSelection(sel); Listing 8: Restoring a Selection
3.4.7 Adding a Preference Page/Store Each main plug-in class in Eclipse is equipped with an object implementing the interface ‘IPreferenceStore’. This object is empty by default, but can be filled with preference values, which then can be easily spread all over the project. To handle and edit preference values Eclipse offers ‘Preference pages’. These pages can be accessed using the main menu entry ‘Window/ Preferences’. A preference page has to be hooked to the Eclipse environment. This is done by using the ‘plugin.xml’ editor. This is simple, as only the extension ‘org.eclipse.ui.preferencePages’ and a corresponding page have to be added. a. public static void setDefaults(IPreferenceStore store){ store.setDefault(D_NAME, DEFAULT_NAME); … store.setDefault(D_POINTS_KEY,D_POINTS_KEY_VALUE); }
b. public void createFieldEditors() { addField(new StringFieldEditor(D_NAME,AnnotationPlugin. getResourceString("AP_NAME"), getFieldEditorParent())); … } Listing 9: Preference Page a. Default Values, b. Field Editors To implement such a preference page in the project the interface ‘IWorkbenchPreferencePage’ was implemented and the class ‘FieldEditorPreferencePage’ was extended. This makes it easy to create such an editor page. You don’t even have to create or layout the fields on your own. It is only necessary to add fields as shown in Listing 9b. A preference store may include values that can be changed using an editor, or constant values. Such a constant value for example could be used for information that would be hard coded to constants normally, but that is used in multiple classes. Listing 9a shows how default values can be added to a preference store. The same mechanism is used to add “constant” values. The only difference is that for these values no field editor is added to the preference page.
3.4.8 Creating a Context Menu This example was chosen not only because it took time to come over it. The interesting aspect covered with it, is that it shows how SWT and JFace work together in an efficient way. To contribute actions to a Context Menu several ways including pure SWT may work. Nevertheless JFace makes this task really easy and why should one bother with things if they can be easy as given? The idea behind the concept is to let SWT contribute the menu widget
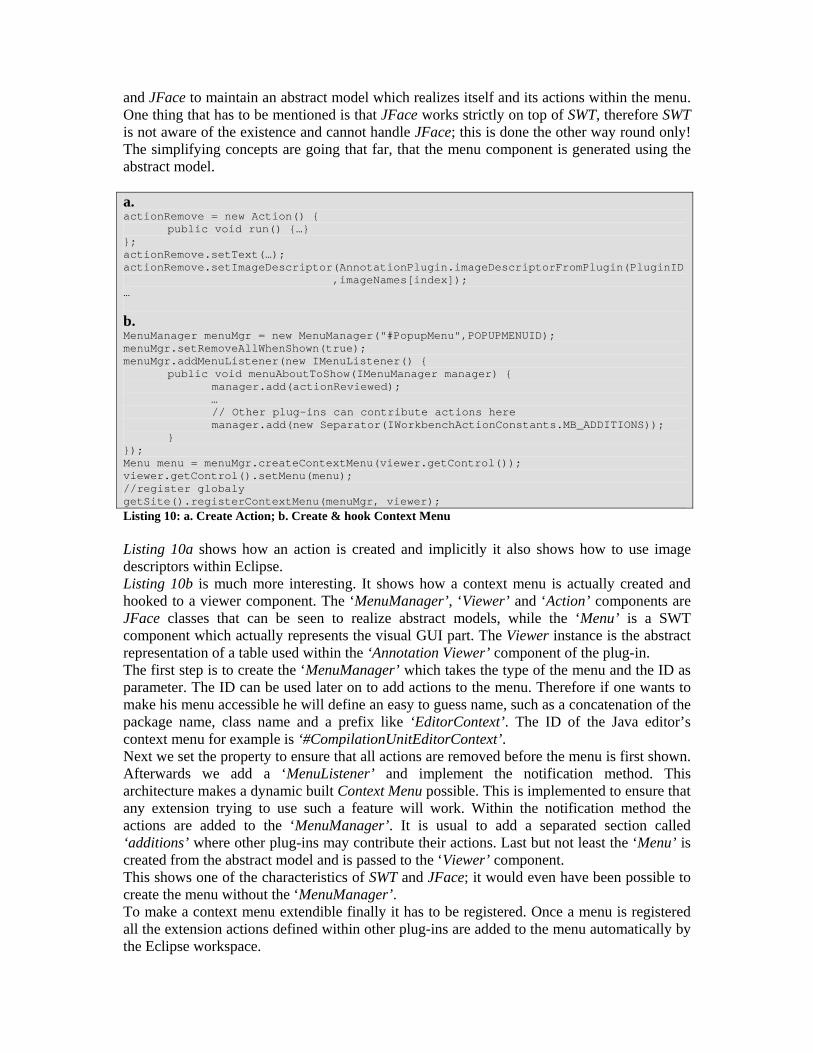
and JFace to maintain an abstract model which realizes itself and its actions within the menu. One thing that has to be mentioned is that JFace works strictly on top of SWT, therefore SWT is not aware of the existence and cannot handle JFace; this is done the other way round only! The simplifying concepts are going that far, that the menu component is generated using the abstract model. a. actionRemove = new Action() { public void run() {…} }; actionRemove.setText(…); actionRemove.setImageDescriptor(AnnotationPlugin.imageDescriptorFromPlugin(PluginID ,imageNames[index]); …
b. MenuManager menuMgr = new MenuManager("#PopupMenu",POPUPMENUID); menuMgr.setRemoveAllWhenShown(true); menuMgr.addMenuListener(new IMenuListener() { public void menuAboutToShow(IMenuManager manager) { manager.add(actionReviewed); … // Other plug-ins can contribute actions here manager.add(new Separator(IWorkbenchActionConstants.MB_ADDITIONS)); } }); Menu menu = menuMgr.createContextMenu(viewer.getControl()); viewer.getControl().setMenu(menu); //register globaly getSite().registerContextMenu(menuMgr, viewer); Listing 10: a. Create Action; b. Create & hook Context Menu Listing 10a shows how an action is created and implicitly it also shows how to use image descriptors within Eclipse. Listing 10b is much more interesting. It shows how a context menu is actually created and hooked to a viewer component. The ‘MenuManager’, ‘Viewer’ and ‘Action’ components are JFace classes that can be seen to realize abstract models, while the ‘Menu’ is a SWT component which actually represents the visual GUI part. The Viewer instance is the abstract representation of a table used within the ‘Annotation Viewer’ component of the plug-in. The first step is to create the ‘MenuManager’ which takes the type of the menu and the ID as parameter. The ID can be used later on to add actions to the menu. Therefore if one wants to make his menu accessible he will define an easy to guess name, such as a concatenation of the package name, class name and a prefix like ‘EditorContext’. The ID of the Java editor’s context menu for example is ‘#CompilationUnitEditorContext’. Next we set the property to ensure that all actions are removed before the menu is first shown. Afterwards we add a ‘MenuListener’ and implement the notification method. This architecture makes a dynamic built Context Menu possible. This is implemented to ensure that any extension trying to use such a feature will work. Within the notification method the actions are added to the ‘MenuManager’. It is usual to add a separated section called ‘additions’ where other plug-ins may contribute their actions. Last but not least the ‘Menu’ is created from the abstract model and is passed to the ‘Viewer’ component. This shows one of the characteristics of SWT and JFace; it would even have been possible to create the menu without the ‘MenuManager’. To make a context menu extendible finally it has to be registered. Once a menu is registered all the extension actions defined within other plug-ins are added to the menu automatically by the Eclipse workspace.
4. Installation and Usage The goal of the project was an annotation system for the use in a more or less limited scenario. This scenario includes two different groups of users. There are users writing and editing annotations which I will call ‘staff’ for short in the following sections. And there are users just reading the annotations which I will call ‘students’ for short in the following sections. Both groups are using the same software; therefore the installation of the plug-in is equivalent. The usage is quite intuitively but will be described to show the way it is intended. Figure 3 shows the dialog that is used to create and edit annotations. The ‘General Information’ is locked after the first annotation was created. Then these values only can be edited using the ‘Global Editor’ which is shown within Figure 4. It moreover shows the ‘Annotation View’ and the ‘annotation.ann’ file in the Package Explorer control.
4.1 Plug-in (Un-) Installation Installation and removal of the plug-in is really easy. To install the plug-in, shut down Eclipse and extract the zip file to it’s the root directory. After restarting Eclipse, the plug-in can be immediately used. The plug-in was developed and tested on the following system:
• Windows XP SP2 • Eclipse Version 3.0.2 • Build id: 200503110845 • No special plug-ins installed
As only system plug-ins are used, there is a great chance that the plug-in will be compatible to future Eclipse versions. To uninstall the plug-ins features the folder ‘ssw.annotation.Annotations_x.x.x’ has to be deleted from the ‘\plugin’ folder of the Eclipse root.
4.2 Plug-in Usage: staff
• Set default values: Some default values can be set using the ‘Window/ Preferences’ menu entry and the subsection ‘Annotation’. These values are the author’s name and email as well as the maximum points of one exercise. The values are used when a new annotation file is created but can be changed there too.
• Adding a new annotation: To add an annotation to a part of java code simply select the corresponding code fragment, click right to open the editors context menu and select the menu entry ‘Create Annotation’. A dialog pops up where the annotation data may be edited. The author’s information can only be edited once when the first annotation is created. The field ‘Point Modification’ has to be filled. It accepts both negative and positive point values.
• Editing general data: General data can be changed in the create annotation dialog only when creating the first annotation for one project. Afterwards the editor has to be used. Double clicking the ‘annotation.ann’ file in the projects root will open the editor. The ‘Global’ tab contains text fields to edit the general information. To store
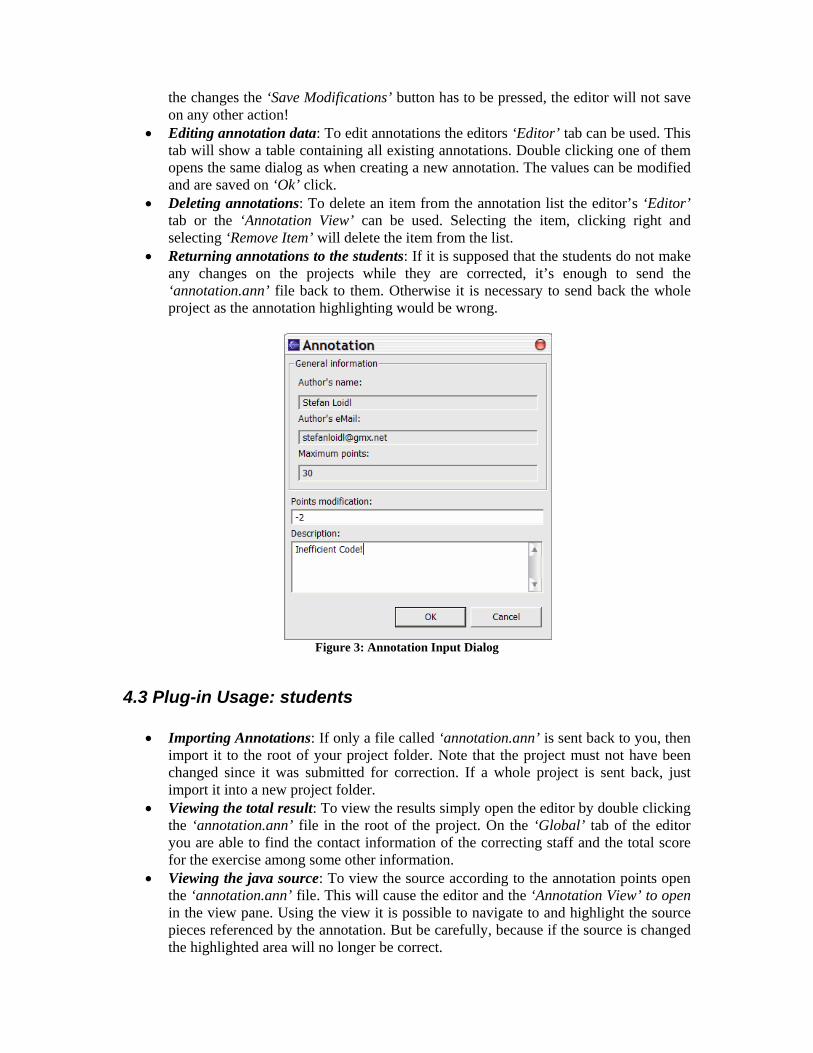
the changes the ‘Save Modifications’ button has to be pressed, the editor will not save on any other action!
• Editing annotation data: To edit annotations the editors ‘Editor’ tab can be used. This tab will show a table containing all existing annotations. Double clicking one of them opens the same dialog as when creating a new annotation. The values can be modified and are saved on ‘Ok’ click.
• Deleting annotations: To delete an item from the annotation list the editor’s ‘Editor’ tab or the ‘Annotation View’ can be used. Selecting the item, clicking right and selecting ‘Remove Item’ will delete the item from the list.
• Returning annotations to the students: If it is supposed that the students do not make any changes on the projects while they are corrected, it’s enough to send the ‘annotation.ann’ file back to them. Otherwise it is necessary to send back the whole project as the annotation highlighting would be wrong.
Figure 3: Annotation Input Dialog
4.3 Plug-in Usage: students
• Importing Annotations: If only a file called ‘annotation.ann’ is sent back to you, then import it to the root of your project folder. Note that the project must not have been changed since it was submitted for correction. If a whole project is sent back, just import it into a new project folder.
• Viewing the total result: To view the results simply open the editor by double clicking the ‘annotation.ann’ file in the root of the project. On the ‘Global’ tab of the editor you are able to find the contact information of the correcting staff and the total score for the exercise among some other information.
• Viewing the java source: To view the source according to the annotation points open the ‘annotation.ann’ file. This will cause the editor and the ‘Annotation View’ to open in the view pane. Using the view it is possible to navigate to and highlight the source pieces referenced by the annotation. But be carefully, because if the source is changed the highlighted area will no longer be correct.
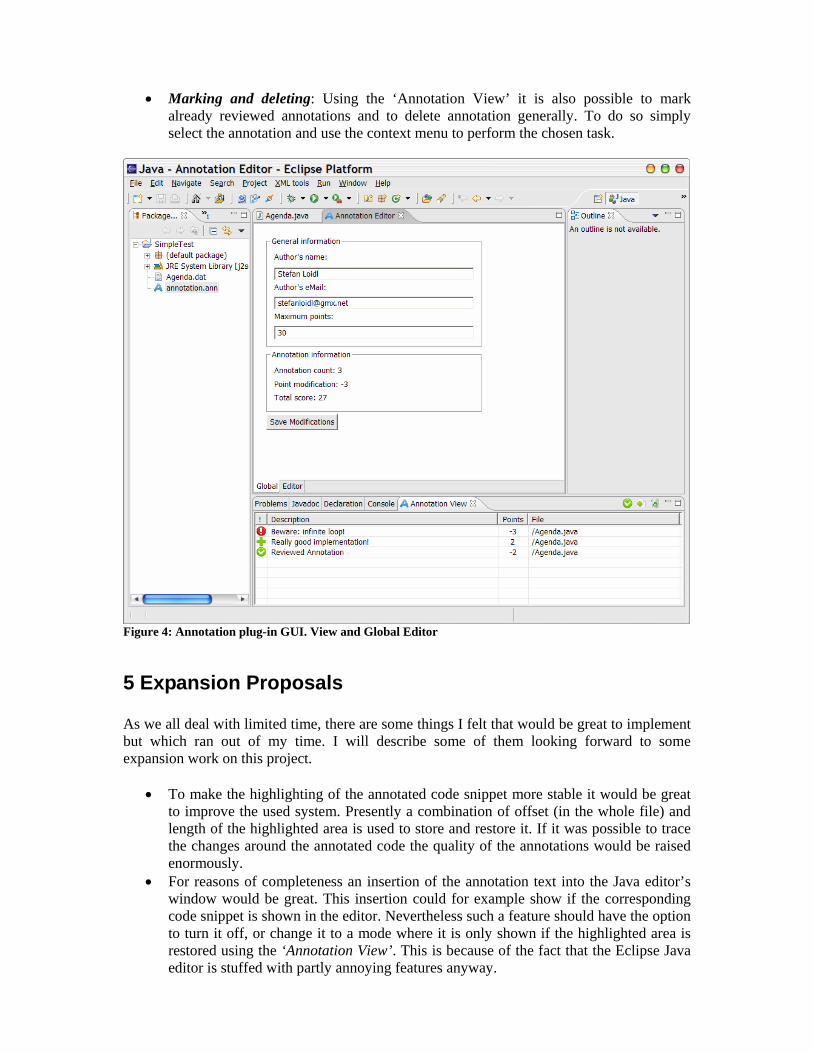
• Marking and deleting: Using the ‘Annotation View’ it is also possible to mark already reviewed annotations and to delete annotation generally. To do so simply select the annotation and use the context menu to perform the chosen task.
Figure 4: Annotation plug-in GUI. View and Global Editor
5 Expansion Proposals As we all deal with limited time, there are some things I felt that would be great to implement but which ran out of my time. I will describe some of them looking forward to some expansion work on this project.
• To make the highlighting of the annotated code snippet more stable it would be great to improve the used system. Presently a combination of offset (in the whole file) and length of the highlighted area is used to store and restore it. If it was possible to trace the changes around the annotated code the quality of the annotations would be raised enormously.
• For reasons of completeness an insertion of the annotation text into the Java editor’s window would be great. This insertion could for example show if the corresponding code snippet is shown in the editor. Nevertheless such a feature should have the option to turn it off, or change it to a mode where it is only shown if the highlighted area is restored using the ‘Annotation View’. This is because of the fact that the Eclipse Java editor is stuffed with partly annoying features anyway.
• To make the plug-in more generic, the data an annotation may contain could be configured using the preference page. This however makes it necessary to build the ‘Create Annotation’ dialog and the saving structure dynamically. The advantage of such an effort would be a plug-in for the use in much more different cases.
• Eclipse SWT tables by default only support one line representation of text. Such tables are used in the editor and in the ‘Annotation View’ component. The descriptions of annotations have multiple lines. This problem is solved by replacing new lines by blanks. The problem that arises is that a description may be too long to fit into the limited space. This problem cannot be handled by standard components yet, but is mentioned in the Eclipse ‘wish list’ a couple of times before. Perhaps in a few versions Eclipse will support multi line tables.
• In order to improve the whole workflow an electronic data transfer between the two user groups would be a great deal. Using any connection to up- and download a whole project would guarantee a smooth flow between the groups. This is the most important proposal I want to state here because it can be really annoying importing single files or whole projects to Eclipse.
• Another useful feature would be to structure the annotation output. Currently two tables are used to view a list of annotations. To group the annotations for instance by associated file could help to keep track of annotations within bigger projects. This feature for example could be realized using a tree view embedded within the editor’s outline, or in an own editor page.
• A short excerpt of the code snippet, where the annotation belongs to, (perhaps containing one or two lines in front of and behind the annotated area too) could be added to the ‘Create Annotation’ dialog. This dialog is used when creating a new or editing an existing annotation. The excerpt would surely help the staff to find the correct annotation text. Otherwise it will definitely happen sometimes that the dialog has to be closed to review the code.