Embed Size (px)
Citation preview

Hip fracture Surgical tecHniqueendo ii uni-polar acetabular component
ringloc® Bi-polar acetabular component
KneeS • Hips • ExtrEmitiEs • CEmEnt and aCCEssoriEs • Pmi • tEChnology
Echo™ hiP systEm

Echo™ hiP systEm
Biomet’s Echo™ Hip System Offers Three Stem Variations
Echo™ FX Stem: forged cobalt alloy cemented or press-fit stem
Echo™ PF Stem: forged titanium alloy grit blasted press-fit stem
Echo™ Bi-Metric® Stem: ppS® forged titanium alloy press-fit stem
any one of the echo™ Hip System components may be utilized in total or hemi hip arthroplasty.
Preoperative Planning
preoperative templates are provided for determining optimal component size, femoral neck resection level and appropriate neck length (figure 1). radiographs should include a full a/p (anteroposterior) view of the pelvis including the proximal one-half of both femurs and a lateral view of the proximal half of the affected femur.
Surgical Approach
the echo™ Hip System is designed to accommodate any standard approach based on the surgeon’s experience or personal preference. adequate exposure that allows bony landmark visualization, component alignment and thorough soft tissue assessment can contribute to more successful results (figure 2).
X-RAY TEMPLATE SET CAT. NO.BIOMET ORTHOPEDICS, INC., P.O. BOX 587, EAST BELL DRIVE, WARSAW, IN 46581
©2007 BIOMET ORTHOPEDICS, INC.ALL RIGHT RESERVED
FX17MM X 170MM
PART NO. 12-151317
20% OVERSIZE TO ALLOW FOR X-RAY MAGNIFICATION
STANDARD
+12MM+9MM
+6MM+3MM
-3MM-6MM
0
10
20
30
40
20151050-5
-10
50MM
40MM
30MM
20MM
10MM
0MM
-10MM
-20MM
-30MM
-40MM
-50MM
-60MM
-70MM
-80MM
-90MM
-100MM
-110MM
-120MM
-130MM
-140MM
-150MM
-160MM
-170MM
figure 1 figure 2
the echo™ Hip System was designed and developed in conjunction with michael Berend, m.d.; Christian Christensen, m.d.; Philip Faris, m.d.; Kevin garvin, m.d.; douglas Jessup, m.d.; michael Keating, m.d.; John meding, m.d. and Jeffery mokris, m.d.
this hip facture surgical technique is utilized by Kevin garvin, m.d. Biomet as the manufacturer of this device, does not practice medicine and does not recom-mend this device or technique. each surgeon is responsible for determining the appropriate device and technique to utilize on each individual patient.
1
Resecting the Femoral Heada broach/provisional or the femoral resection template may be used as a template for the femoral resection level (figure 3). if fractured, remove the head/neck fragment with a corkscrew.
Gauge Acetabulum
Sizing of the acetabulum is conducted by using provisional shells that are attached to the gauge handle (figure 4). these provisionals are utilized for both bi-polar and uni-polar applications. you may also utilize the femoral head gauge to determine the diameter of the resected femoral head.
Note: please refer to the product listing for femoral head
trial size options.
figure 3 figure 4
2
Echo™ hiP systEm
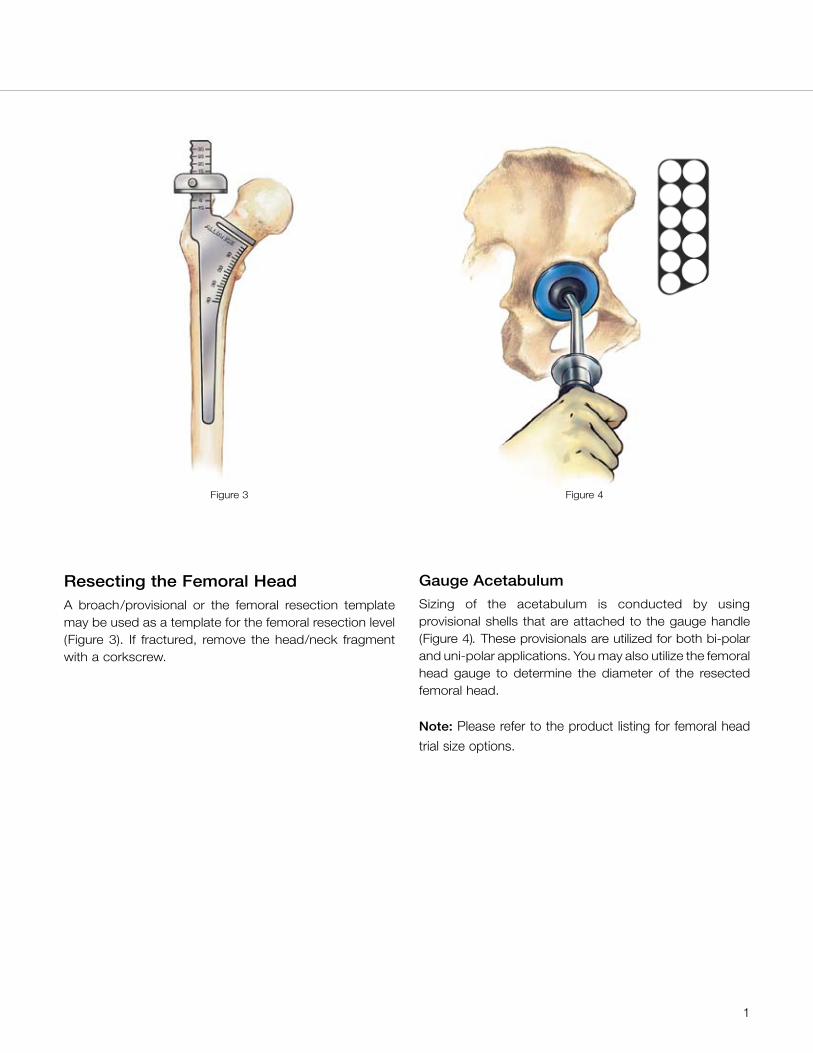
Opening Femoral Canal
a hollow chisel or starter reamer can be used to open the femoral canal (figures 5 and 6).
figure 5 figure 6

3
Reaming the Distal Femur
Note: if using the fully toothed broaches, the reaming step may be skipped.
tapered side-cutting reamers are introduced in a sequential fashion beginning with the smallest size reamer and progressing until the cutting flutes encounter resistance from the endosteal wall. the reamer is advanced until the gold portion is at the level of the planned medial resection or the appropriate reference band is at the level of the greater trochanter based on preoperative templating (figures 7 and 8).
Broaching the Proximal Femur
Begin broaching with the broach that is at least 2mm smaller than the last reamer size used. it is important that the broach is oriented so that the medial/lateral axis of the broach is parallel with the anatomic medial/lateral axis of the femoral neck. a sequentially larger broach is used until ideal or templated size is reached.
Example: ream to 12mm, sequentially broach to 12mm (figure 9).
Note: Whether press-fitting or cementing, the echo™ Hip System component’s exact™ alliance® rpp broaches, which are nitrided black, must be utilized.
figure 7
figure 8
figure 9

4
Echo™ hiP systEm
Echo™ FX Standard
Echo™ Bi-Metric LateralizedEcho™ PF Echo™ Bi-Metric Standard
Planing the Calcar
With the broach/provisional properly seated, the calcar is planed flush by using the exact™ calcar planer (figure 10).
Note: fully seat the spring loaded plunger over the broach post prior to powering-up and advancing the body and blade of the planer.
Trunnion Selection
to perform the trial reduction with the indwelling broach, attach the exact™ echo™ neck trunnion onto the broach post. the neck trunnions for the echo™ fX and echo™ pf stems are offered in standard (S) offset only. the neck trunnions for the echo™ Bi-Metric® are offered in standard (S) and lateralized (l) offset. these trunnions are color coded to represent offset. the gold trunnions represent standard offset while the black represents lateralized offset. the exact™ trunnions are sized to correspond to the final broach. the stem size is clearly marked on the top of the trunnion (figure 11).
figure 10 figure 11
5
RingLoc® Bi-Polar Trial Head
Endo II Trial Head
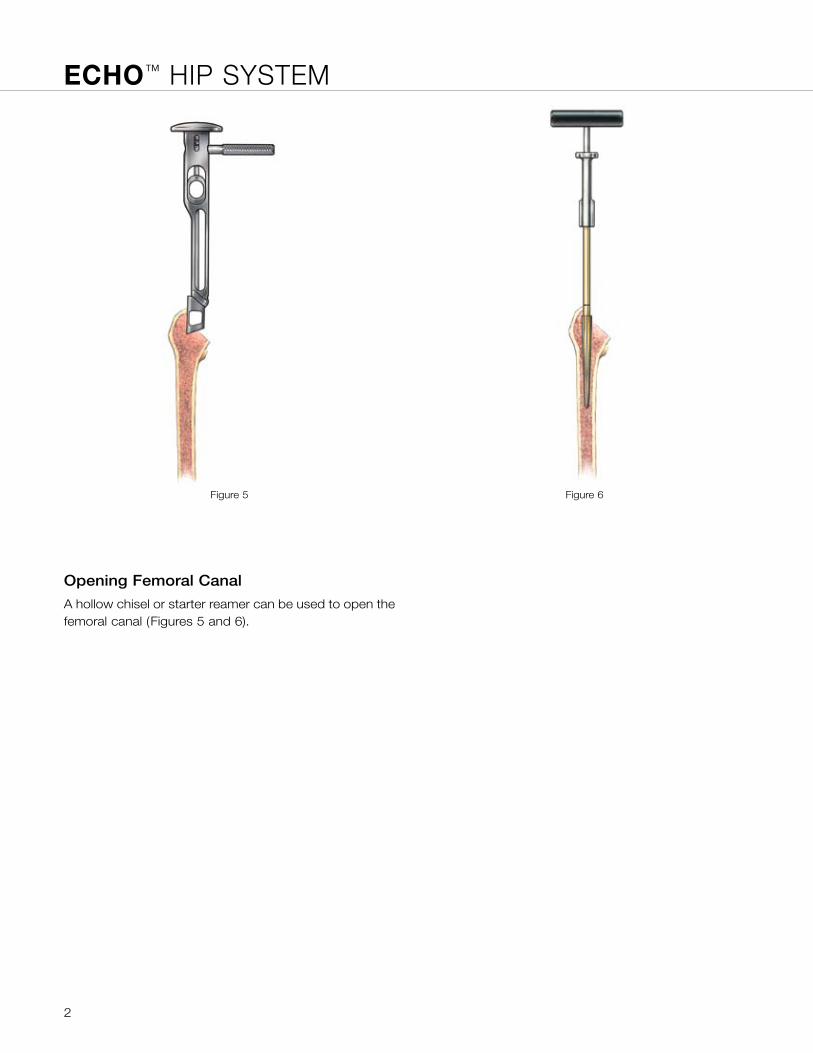
For Endo II
With the appropriate neck trunnion in place, select the desired endo ii trial head and provisional shell components. Biomet offers five neck length options (-6, -3, Standard, +3, and +6mm) for use with the endo ii uni-polar system. assemble as shown (figure 12).
Note: the endo ii trial head will snap into the apical hole of the desired provisional shell component. a trial reduction is carried out to ensure that proper leg length and joint stability have been achieved.
For RingLoc® Bi-polar
With the appropriate neck trunnion in place, select the appropriate ringloc® bi-polar trial head and provisional shell components. Biomet offers seven neck length options (-6, -3, Standard, +3, +6, +9 and +12mm) for use with the ringloc® bi-polar system. assemble as shown (figure 12).
Note: align the circumferential flat on the ringloc® bi-polar trial head with the desired provisional shell component. the bi-polar head will articulate within the provisional shell component. a trial reduction is carried out to ensure that proper leg length and joint stability have been achieved.
Echo™ Cementless Stem Insertion
Select either the echo™ pf, echo™ fX or the echo™ Bi-Metric® implant that corresponds to the last size reamer and broach used.
Example: ream and broach to a 12mm. implant a size 12mm echo™ pf or Bi-Metric® stem. attach implant to the inserter tool and impact until the stem stops advancing. do not attempt to seat the stem further if it fails to advance (figure 13).
figure 12 figure 13

6
Echo™ hiP systEm
Echo™ FX Cemented Stem Insertion
Select the echo™ fX stem that is a minimum of 2mm smaller than the final reamer and exact™ alliance® rpp broach used. undersizing the component 2mm will provide for a 2mm cement mantle (1mm per side). undersizing by 4mm will provide a 4mm mantle (2mm per side).
Example: ream and broach to 12mm. Select a size 9mm echo™ Hip fracture stem to provide a 1.5mm mantle per side. a distal cement restrictor is placed in the canal to allow a 2cm cement column below the tip of the stem. cobalt™ cement is injected into the canal in a retrograde fashion and pressurized. Slide the appropriately sized distal centralizer onto stem.
Example: echo™ fX stems accept any size distal tip centralizer and may be matched to prepared canal size. the stem is inserted to a fully seated position, and extraneous cement is removed. once cement hardening is achieved, a final trial reduction may be done (figure 14).
Final Trial Reduction
With the implant in place, a second/final trial reduction may be performed utilizing endo ii or bi-polar trial heads. Select the appropriate trial components and assemble as shown in figure 15.
figure 14
RingLoc® Bi-Polar Trial Head
Endo II Trial Head
figure 15

7
Seating the Taper on the Stem
after determining the desired neck length, dry the femoral component neck trunnion and select the appropriate endo ii taper insert (figure 16). Seat the appropriate insert with a head driver.
Note: the taper insert may be used on any Biomet® type 1 taper femoral component when implanting an endo ii uni-polar head.
Seating the Head on the Taper Adaptor
Select the desired endo ii uni-polar head and secure it onto the taper insert with a twisting motion. impact the endo ii head with a head driver (figure 17).
figure 16 figure 17
Endo II Taper Insert
Endo ii Uni-Polar In VIVo assEmBly

8
Echo™ hiP systEm
Impacting the Femoral Head
Select the appropriate 28mm femoral head that corresponds to the neck length determined at final trial reduction and impact with the head driver.
Assembling the Polyethylene Liner
lever the polyethylene liner from superior to inferior onto the assembled femoral head until a “click” is heard (figure 18).
figure 18 figure 19
Incorrect liner assembly
Correct liner assembly
The chamfer on the metal ring must face the opening of the shell.
ringloC® Bi-Polar In VIVo assEmBly

9
Positioning the Metal Ring
each shell is packaged with the metal ring in position. Before assembling the metal shell on the polyethylene liner, ensure the metal ring is intact and moves in a circular motion within the groove of the metal shell. Make sure that the chamfer on the metal ring is facing toward the opening of the metal shell (figure 19) and is visible when looking into the shell (figure 20).
Assembling the Metal Shell
Hold the liner steady against the femoral head. twist and push the metal shell onto the liner. the metal shell will be fully seated when the metal ring engages the locking groove of the polyethylene liner (figure 21).
figure 20 figure 21
Correct
Incorrect
Ring orientation

10
Echo™ hiP systEm
Assembling the Polyethylene Liner onto the Femoral Head
place the correct femoral head on a sterile field. using even pressure, apply the polyethylene liner over the femoral head until a click is heard (figure 22).
Assembling the Metal Shell
While holding the liner steady, twist and push the shell onto the liner (figure 23).
Assembling the Metal Shell onto the Femoral Stem
impact the bi-polar onto the inserted femoral component as a unit with several taps (figure 24).
figure 22 figure 24
figure 23
ringloC® Bi-Polar BaCK taBlE assEmBly

11
Engagement of Liner Removal Tool
there are eight removal tools which are marked with the corresponding cup sizes that they will remove. choose the correct size tool that matches the cup/liner size to be disassembled (figure 25).
position the appropriately sized removal tool over the taper and push it into the slots located on the periphery of the liner (figure 25).
insert the removal tool into the polyethylene liner until it is fully flush with the face of the liner.
Removal of Metal Shell
Hold the removal tool against the liner (do not allow the tool to rotate). twist and pull the metal shell away from the liner. the tool must remain flush with the liner while the shell is being removed (figure 26).
Removal of Liner
disengage the removal tool and lever the polyethylene liner away from the femoral head.
Note: if the liner and shell have been assembled without the head, use the bi-polar liner removal dumbbell (31-165341), in place of the stem and head, to pull on for separation.
figure 25 figure 26
Removal tool
Removal dumbbell
disassEmBly oF ringloC® Bi-Polar

12
Echo™ hiP systEm
place the assembled endo ii uni-polar head and taper insert over the separator. resistance will be felt due to the tines that extend proximally on the separator. Warning: Do not attempt this if the plunger is assembled to the separator.
using hand pressure only, push the head downward until an audible “click” is heard. the taper insert should sit flush on the base of the separator (figure 28).
lower the separator onto the plunger while lining the plunger post up with the hole on the bottom of the separator (figure 29).
Note: the base of the separator will stand several millimeters proud because the taper is still set.
figure 27
figure 28
figure 29
disassEmBly oF thE Endo ii Uni-Polar taPEr insErt and shEll

13
carefully place the dome over the endo ii head, plunger and separator (figure 30).
using a mallet, impact the plate on the top of the dome. this will enable the tines that have been pushed through the endo ii taper insert to force the taper with the endo ii head to break (figure 31).
remove the dome. remove the head from the taper insert (figure 32).
Note: reuse of the head is not recommended.
remove the separator and the taper insert from the post on the plunger.
Note: reuse of the taper insert is not recommended.
using Kocher forceps, squeeze the tines on the end of the separator together and slide the tapered insert off.
figure 30
figure 31
figure 32

14
Echo™ hiP systEmordEring inFormation—iMplantS
Echo™ FX Cobalt Chromium Femoral Components
Product Part Number Description Size
12-15130712-15130912-15131112-15131312-15131512-151317
echo™ fX femoralecho™ fX femoralecho™ fX femoralecho™ fX femoralecho™ fX femoralecho™ fX femoral
7mm9mm
11mm13mm15mm17mm
Echo™ PF Press-fit Titanium Femoral Components
Product Part Number Description Size
12-15030712-15030812-15030912-15031012-15031112-15031212-15031312-15031412-15031512-15031612-150317
echo™ pf press-fit femoralecho™ pf press-fit femoralecho™ pf press-fit femoralecho™ pf press-fit femoralecho™ pf press-fit femoralecho™ pf press-fit femoralecho™ pf press-fit femoralecho™ pf press-fit femoralecho™ pf press-fit femoralecho™ pf press-fit femoralecho™ pf press-fit femoral
7mm8mm9mm
10mm11mm12mm13mm14mm15mm16mm17mm
PMMA Distal Stem Positioner
Product Part Number Description Size
162656162640162657162641162658162642162659162643162660162644162661162646
Centralizer distal PositionerCentralizer distal PositionerCentralizer distal PositionerCentralizer distal PositionerCentralizer distal PositionerCentralizer distal PositionerCentralizer distal PositionerCentralizer distal PositionerCentralizer distal PositionerCentralizer distal PositionerCentralizer distal PositionerCentralizer distal Positioner
9mm10mm11mm12mm13mm14mm15mm16mm17mm18mm19mm20mm

ordEring inFormation—iMplantS
15
ordEring inFormation—instrUmEntation
Product Part Number Description Size
— 595609 metal outer (2 required) 4.5 inch
Tray 1
Product Part Number Description Size
— 595602 Plastic tray one with lid —
X31-400027X31-400028X31-400029X31-400030X31-400031X31-400032X31-400033X31-400034X31-400035X31-400036X31-400037
exact™ alliance® reamerexact™ alliance® reamerexact™ alliance® reamerexact™ alliance® reamerexact™ alliance® reamerexact™ alliance® reamerexact™ alliance® reamerexact™ alliance® reamerexact™ alliance® reamerexact™ alliance® reamerexact™ alliance® reamer
7mm8mm9mm
10mm11mm12mm13mm14mm15mm16mm17mm
Tray 2
Product Part Number Description Size
— 595603 plastic tray two with lid —
428195 r/B Starter reamer tapered —
31-112102 impact initial canal probe —
31-473192 troch reamer —
31-473190 troch router —
31-555583 lateralizing rasp reamer —
X31-400001 Stem removal tool adapter —

16
Echo™ hiP systEmordEring inFormation—instrUmEntation
Product Part Number Description Size
X31-400061 Slap Hammer —
31-473620 reamer t-Handle —
31-473191 reamer t-Handle threaded —
31-555605 cork Screw attachment for t-Handle —
31-555617cork Screw attachment
for cinch Handle (31-55611)—
31-400000 Bio-plug™ Bone plug inserter —
31-400100 i-M plug Bone plug inserter —
31-555610 exact™ Slotted Stem inserter —
31-555612 cinch femoral inserter with fork —
31-555613 cinch femoral inserter Bullet tip —
31-555614cinch femoral inserter
Slotted Bullet tip—
31-555616cinch femoral inserter
Slotted / threaded—
Tray 2 (continued)

ordEring inFormation—instrUmEntation
17
ordEring inFormation—instrUmEntation
Tray 3
Product Part Number Description Size
— 595604 plastic tray three with lid —
X31-400003 resection guide alliance® —
31-555598 resection guide MiH alliance® —
31-555588Hollow chisel attachment
for Broach Handle—
31-40010731-40010831-40010931-40011031-40011131-40011231-40011331-40011431-40011531-40011631-400117
exact™ alliance® rpp Broach fullexact™ alliance® rpp Broach fullexact™ alliance® rpp Broach fullexact™ alliance® rpp Broach fullexact™ alliance® rpp Broach fullexact™ alliance® rpp Broach fullexact™ alliance® rpp Broach fullexact™ alliance® rpp Broach fullexact™ alliance® rpp Broach fullexact™ alliance® rpp Broach fullexact™ alliance® rpp Broach full
7mm8mm9mm
10mm11mm12mm13mm14mm 15mm16mm17mm
31-40030731-40030831-40030931-40031031-40031131-40031231-40031331-40031431-40031531-40031631-400317
exact™ alliance® rpp Broach partialexact™ alliance® rpp Broach partialexact™ alliance® rpp Broach partialexact™ alliance® rpp Broach partialexact™ alliance® rpp Broach partialexact™ alliance® rpp Broach partialexact™ alliance® rpp Broach partialexact™ alliance® rpp Broach partialexact™ alliance® rpp Broach partialexact™ alliance® rpp Broach partialexact™ alliance® rpp Broach partial
7mm8mm9mm
10mm11mm12mm13mm14mm 15mm16mm17mm
31-555500 exact™ Broach Handle —
31-555501exact™ anterior Supine Broach
Handle —

18
Echo™ hiP systEmordEring inFormation—instrUmEntation
Tray 3 (continued)
Product Part Number Description Size
31-473794 exact™ Modular calcar planer 42mm
406661406662406663
exact™ Bladesexact™ Bladesexact™ Blades
38mm42mm46mm
31-47379531-47379631-473797
exact™ rasp Style Bladeexact™ rasp Style Bladeexact™ rasp Style Blade
38mm42mm46mm
31-162401
31-162402
31-162403
standard offset rPP Profile nC trunnion trial
standard offset rPP Profile nC trunnion trial
standard offset rPP Profile nC trunnion trial
7–10mm
11–14mm
15–21mm
31-162413
31-162414
31-162415
standard offset rPP Profile C trunnion trial
standard offset rPP Profile C trunnion trial
standard offset rPP Profile C trunnion trial
7–10mm
11–14mm
15–21mm

ordEring inFormation—instrUmEntation
19
ordEring inFormation—instrUmEntation
Tray 4
Product Part Number Description Size
— 595605 plastic tray with lid —
31-40114131-40114231-40114331-40114431-40114531-40114631-40114731-40114831-40114931-40115031-40115131-40115231-40115331-40115431-40115631-40115831-401160
endo/Bi-polar trial Headendo/Bi-polar trial Headendo/Bi-polar trial Headendo/Bi-polar trial Headendo/Bi-polar trial Headendo/Bi-polar trial Headendo/Bi-polar trial Headendo/Bi-polar trial Headendo/Bi-polar trial Headendo/Bi-polar trial Headendo/Bi-polar trial Headendo/Bi-polar trial Headendo/Bi-polar trial Headendo/Bi-polar trial Headendo/Bi-polar trial Headendo/Bi-polar trial Headendo/Bi-polar trial Head
41mm42mm43mm44mm45mm46mm47mm48mm49mm50mm51mm52mm53mm54mm56mm58mm60mm
31-401166 femoral Head Sizing gauges —
31-40113531-40113431-40113331-40113231-40113131-40113631-401137
Modular Head trial for Bi-polarModular Head trial for Bi-polarModular Head trial for Bi-polarModular Head trial for Bi-polarModular Head trial for Bi-polarModular Head trial for Bi-polarModular Head trial for Bi-polar
-6mm-3mm
Standard+3mm+6mm+9mm
+12mm
31-40116531-40116431-40116331-40116231-401161
Modular Head trial for endo iiModular Head trial for endo iiModular Head trial for endo iiModular Head trial for endo iiModular Head trial for endo ii
-6mm-3mm
Standard+3mm+6mm

20
Echo™ hiP systEmordEring inFormation—instrUmEntation
Tray 4 (continued)
Product Part Number Description Size
31-16530631-16530831-16531031-16531631-16532031-16532631-16533031-165340
Bi-polar liner removal toolBi-polar liner removal toolBi-polar liner removal toolBi-polar liner removal toolBi-polar liner removal toolBi-polar liner removal toolBi-polar liner removal toolBi-polar liner removal tool
41mm42mm
43/45mm46/47mm48/50mm51/52mm53/55mm58/61mm
31-165341 Bi-polar liner removal dumbbell —
31-555611 cinch Modular Handle —
31-401168cinch endo/Bipolar ii
trial attachment —
31-555618 cinch Head pusher/impactor —

ordEring inFormation—instrUmEntation
the information contained in this package insert was current on the date this brochure was printed. However, the package insert may have been revised after that date. to obtain a current package insert, please contact Biomet at the contact information provided herein.
Biomet Orthopedics, Inc. 01-50-0950 P.o. Box 587 date: 12/06 56 East Bell drive Warsaw, indiana 46581 uSa
BIOMET® HIP JOINT REPLACEMENT PROSTHESES
ATTENTION OPERATING SURGEON
DESCRIPTIONBiomet manufactures a variety of hip joint replacement prostheses. Hip joint replacement components include: femoral stems, femoral heads, acetabular shells, and acetabular liners. components are available in a variety of designs and size ranges intended for both primary and revision applications. specialty components are available including: acetabular screws, centering sleeves, canal plugs, and acetabular augments.
Materials
femoral Stems cocrMo alloy or titanium alloyfemoral Heads cocrMo alloyacetabular Shells titanium alloyacetabular liners ultra-High Molecular Weight polyethylene (uHMWpe)acetabular Screws titanium alloycentering Sleeves polymethylmethacrylate (pMMa)canal plugs uHMWpe porous coating titanium alloyacetabular augments titanium alloy
INDICATIONS 1. noninflammatory degenerative joint disease including osteoarthritis and avascular necrosis. 2. rheumatoid arthritis. 3. correction of functional deformity. 4. treatment of non-union, femoral neck fracture, and trochanteric fractures of the proximal
femur with head involvement, unmanageable using other techniques. 5. revision of previously failed total hip arthroplasty.
polished femoral Hip prosthesis with proximal cement Spacer is intended for cemented use only and may be used in partial and total hip arthroplasties.
the porous titanium augments are intended to provide the orthopedic surgeon with a prosthetic alternative to structural allograft in cases of segmental deficiencies.
the porous titanium acetabular augment is affixed to the mating acetabular cup using bone ce-ment. the assembled porous titanium augment/acetabular construct is intended for cemented or uncemented use.
Patient selection factors to be considered include: 1) need to obtain pain relief and improve function, 2) ability and willingness of the patient to follow instructions, including control of weight and activity level, 3) a good nutritional state of the patient, and 4) the patient must have reached full skeletal maturity.
porous coated devices are marketed for non-cemented use in the united States for skeletally mature patients undergoing primary hip replacement surgery as a result of non-inflammatory degenerative joint disease.
CONTRAINDICATIONSabsolute contraindications include: infection, sepsis, and osteomyelitis.
relative contraindications include: 1) uncooperative patient or patient with neurologic disorders who are incapable of following directions, 2) osteoporosis, 3) metabolic disorders which may impair bone formation, 4) osteomalacia, 5) distant foci of infections which may spread to the implant site, 6) rapid joint destruction, marked bone loss or bone resorption apparent on roentgenogram, 7) vascular insufficiency, muscular atrophy, or neuromuscular disease.
WARNINGSimproper selection, placement, positioning, alignment and fixation of the implant components may result in unusual stress conditions which may lead to subsequent reduction in the service life of the prosthetic components. Malalignment of the components or inaccurate implantation can lead to excessive wear and/or failure of the implant or procedure. inadequate preclosure cleaning (removal of surgical debris) can lead to excessive wear. improper preoperative or intraoperative implant handling or damage (scratches, dents, etc.) can lead to crevice corrosion, fretting, fatigue fracture and/or excessive wear. do not modify implants. the surgeon is to be thoroughly familiar with the implants and instruments, prior to performing surgery.
1. use Biomet® femoral and modular head component with appropriate matching “type i taper,” “type ii taper,” or “12/14 taper.”
2. firmly seat modular head components to prevent dissociation. thoroughly clean and dry taper prior to attachment of the modular head component to avoid crevice corrosion and improper seating.
3. acetabular screws are to be fully seated to assure stable fixation and to avoid interference with the acetabular liner component.
4. prior to seating the liner into the shell component, all surgical debris (tissue fragments, etc.) must be removed from the interior of the shell component, as debris may inhibit the locking mechanism from engaging and securing the liner into the shell component.
5. perforation entirely through the pelvic bone with dome fixation screws or rim screws is to be completely avoided. caution is to be used when determining and selecting the length of screws to be used, as perforation through the pelvic bone with screws that are too long can cause damage to body structures (blood vessels, etc.) located on the interior side of the pelvis.
6. tight fixation of all non-cemented components at the time of surgery is critical to the suc-cess of the procedure. each component must properly press fit into the host bone which necessitates precise operative technique and the use of specified instruments. Bone stock of adequate quality must be present and appraised at the time of surgery.
7. care is to be taken to assure complete support of all parts of the device embedded in bone cement to prevent stress concentrations, which may lead to failure of the procedure. complete preclosure cleaning and removal of bone cement debris, metallic debris and other
surgical debris at the implant site is critical to minimize wear of the implant articular surfaces. implant fracture due to cement failure has been reported.
8. laboratory testing has shown an increase in wear associated with 36mm diameter liners as compared to 32mm liners. the risks associated with the increase in wear must be weighed against the potential benefits of using the larger size liners and modular heads.
9. porous titanium acetabular shells require the placement of all-polyethylene liners using acrylic bone cement.
10. porous titanium augments must be attached to the acetabular shells using acrylic bone ce-ment.
Biomet® joint replacement prostheses provide the surgeon with a means of reducing pain and restoring function for many patients. While these devices are generally successful in attaining these goals, they cannot be expected to withstand the activity levels and loads of normal healthy bone and joint tissue.
accepted practices in postoperative care are important. failure of the patient to follow postop-erative care instructions involving rehabilitation can compromise the success of the procedure. the patient is to be advised of the limitation of the reconstruction and the need for protection of the implants from full load bearing until adequate fixation and healing have occurred. excessive activity, trauma and weight gain have been implicated with premature failure of the implant by loosening, fracture, and/or wear. loosening of the implants can result in increased production of wear particles, as well as accelerate damage to bone making successful revision surgery more difficult. the patient is to be made aware and warned of general surgical risks, possible adverse effects as listed, and to follow the instructions of the treating physician including follow-up visits.
in any instance where a liner engages the ringloc® locking ring and the liner is subsequently removed or replaced, the ringloc® locking ring should be replaced with a new ring.
PRECAUTIONSSpecialized instruments are designed for Biomet® joint replacement systems to aid in the ac-curate implantation of the prosthetic components. the use of instruments or implant compo-nents from other systems can result in inaccurate fit, sizing, excessive wear, and device failure. intraoperative fracture or breaking of instruments has been reported. Surgical instruments are subject to wear with normal usage. instruments that have experienced extensive use or excessive force are susceptible to fracture. Surgical instruments should only be used for their intended purpose. Biomet recommends that all instruments be regularly inspected for wear and disfigurement.
do not reuse implants. While an implant may appear undamaged, previous stress may have created imperfections that would reduce the service life of the implant. do not treat patients with implants that have been, even momentarily, placed in a different patient.
POSSIBLE ADVERSE EFFECTS 1. Material sensitivity reactions. implantation of foreign material in tissues can result in histologi-
cal reactions involving various sizes of macrophages and fibroblasts. the clinical significance of this effect is uncertain, as similar changes may occur as a precursor to or during the healing process. particulate wear debris and discoloration from metallic and polyethylene components of joint implants may be present in adjacent tissue or fluid. it has been reported that wear debris may initiate a cellular response resulting in osteolysis or osteolysis may be a result of loosening of the implant. further, there has been a report regarding an associa-tion between articulating surfaces of: 1) CoCrmo alloy on CoCrmo alloy, 2) CoCrmo alloy on polyethylene, and 3) titanium alloy on polyethylene in hip replacements and increased genotoxicity. this report, however, did not assess either the clinical relevance of the data or make any definite conclusions as to which metal ions or interactions between metal ions or particulate metals might be responsible for the observed data. the report further cautioned that an association does not necessarily mean a causal relationship, and that any potentially increased risk associated with metal ions needs to be balanced against the benefits result-ing from hip replacement.
2. early or late postoperative infection and allergic reaction. 3. intraoperative bone perforation or fracture may occur, particularly in the presence of poor
bone stock caused by osteoporosis, bone defects from previous surgery, bone resorption, or while inserting the device.
4. loosening or migration of the implants can occur due to loss of fixation, trauma, malalign-ment, bone resorption, or excessive activity.
5. periarticular calcification or ossification, with or without impediment of joint mobility. 6. inadequate range of motion due to improper selection or positioning of components. 7. undesirable shortening of limb. 8. dislocation and subluxation due to inadequate fixation and improper positioning. muscle
and fibrous tissue laxity can also contribute to these conditions. 9. fatigue fracture of component can occur as a result of loss of fixation, strenuous activity,
malalignment, trauma, non-union, or excessive weight. 10. fretting and crevice corrosion can occur at interfaces between components. 11. Wear and/or deformation of articulating surfaces. 12. trochanteric avulsion or non-union as a result of excess muscular tension, early weight
bearing, or inadequate reattachment. 13. problems of the knee or ankle of the affected limb or contralateral limb aggravated by leg
length discrepancy, too much femoral medialization or muscle deficiencies. 14. postoperative bone fracture and pain.
STERILITYprosthetic components are sterilized by exposure to a minimum dose of 25 kgy of gamma radiation. do not resterilize. do not use any component from an opened or damaged package. do not use implants after expiration date.
Caution: federal law (uSa) restricts this device to sale by or on the order of a physician.
Comments regarding this device can be directed to attn: regulatory dept., Biomet inc., P.o. Box 587, Warsaw, in 46581 Usa, Fax: 574-372-1683.
authorized representative: Biomet U.K., ltd. Waterton industrial estates, Bridgend, South Wales cf31 3Xa, u.K.
0086

P.o. Box 587, Warsaw, in 46581-0587 • 800.348.9500 ext. 1501 ©2007, 2008 Biomet orthopedics, inc. • www.biomet.com
Form no. Boi0066.1 • rEV022808
this material is intended for the sole use and benefit of the Biomet sales force and physicians. it is not to be redistributed, duplicated or disclosed without the express written consent of Biomet.
for product information, including indications, contraindications, warnings, precautions and potential adverse effects, see the package insert and Biomet’s website.
all trademarks belong to Biomet Manufacturing corp.