Embed Size (px)
Citation preview
U.S. DEPARTMENT OF EDUCATION Federal Student Aid
Electronic Cohort Default Rate Appeals (eCDR Appeals)
Incorrect Data Challenge (IDC) User Guide
Version 3.3.0
January 6, 2012
3.3.0
eCDR Appeals DOCUMENT VERSION HISTORY IDC User Guide
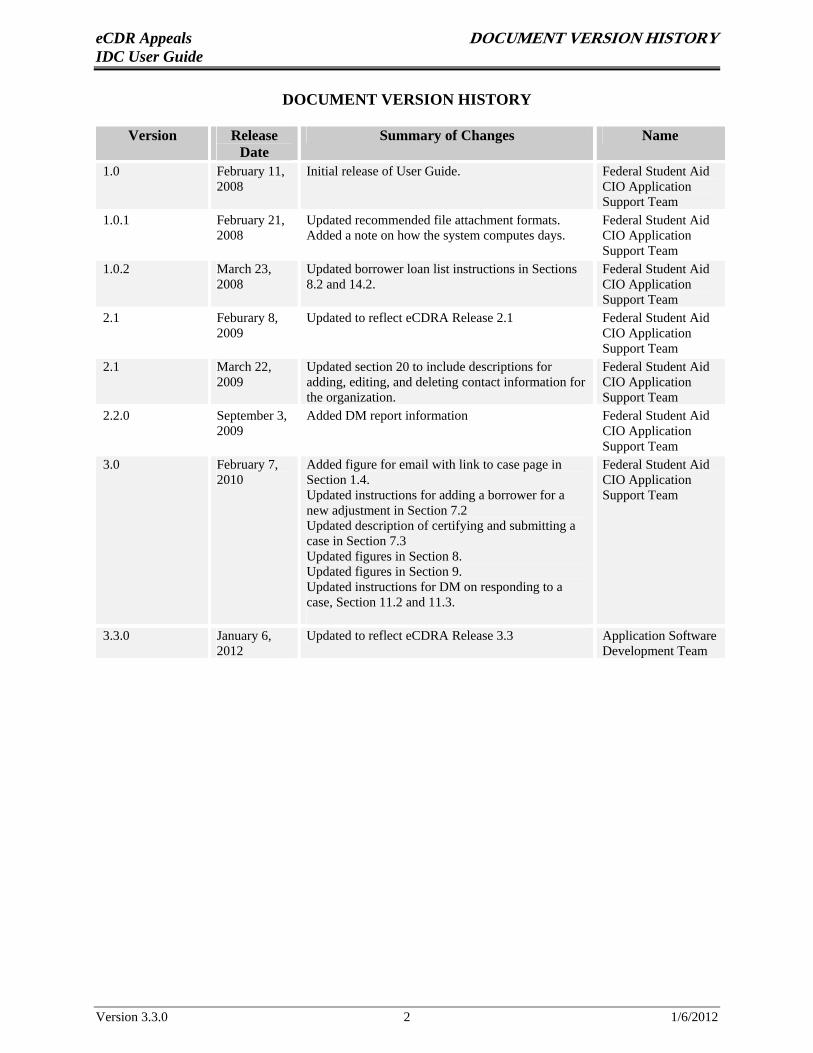
DOCUMENT VERSION HISTORY
Version Release Date
Summary of Changes Name
1.0 February 11, 2008
1.0.1 February 21, 2008
1.0.2 March 23, 2008
Initial release of User Guide.
Updated recommended file attachment formats. Added a note on how the system computes days.
Updated borrower loan list instructions in Sections 8.2 and 14.2.
Federal Student Aid CIO Application Support Team Federal Student Aid CIO Application Support Team Federal Student Aid CIO Application Support Team
2.1 Feburary 8, Updated to reflect eCDRA Release 2.1 Federal Student Aid 2009 CIO Application
Support Team 2.1 March 22, Updated section 20 to include descriptions for Federal Student Aid
2009 adding, editing, and deleting contact information for CIO Application the organization. Support Team
2.2.0 September 3, 2009
3.0 February 7, 2010
Added DM report information
Added figure for email with link to case page in Section 1.4. Updated instructions for adding a borrower for a new adjustment in Section 7.2 Updated description of certifying and submitting a case in Section 7.3 Updated figures in Section 8. Updated figures in Section 9. Updated instructions for DM on responding to a case, Section 11.2 and 11.3.
Federal Student Aid CIO Application Support Team Federal Student Aid CIO Application Support Team
January 6, Application Software Updated to reflect eCDRA Release 3.3 2012 Development Team
Version 3.3.0 2 1/6/2012
eCDR Appeals TABLE OF CONTENTS IDC User Guide
TABLE OF CONTENTS
1. Introduction........................................................................................................................... 6
1.1 Overview ......................................................................................................................... 6
1.2 User Guide Structure ...................................................................................................... 7
1.3 IDC Workflow Phases..................................................................................................... 8
1.4 Must-Read Information................................................................................................. 10
2. All Users: Navigation.......................................................................................................... 15
2.1 Login ............................................................................................................................. 15
2.2 Menus............................................................................................................................ 15
2.3 Perspectives .................................................................................................................. 16
3. OPD: Create Profile............................................................................................................ 17
3.1 Creating a Profile ......................................................................................................... 17
4. Data Manager: Create Profile ........................................................................................... 18
4.1 Creating a Profile ......................................................................................................... 18
5. School: Create Profile and Initiate IDC............................................................................ 19
5.1 Creating a Profile ......................................................................................................... 19
5.2 Initiating a New IDC..................................................................................................... 20
6. OPD: Load LRDR............................................................................................................... 23
6.1 Loading a LRDR Extract .............................................................................................. 23
7. School: Prepare and Submit IDC...................................................................................... 25
7.1 Case Details Page Overview ........................................................................................ 25
7.2 Preparing the IDC ........................................................................................................ 27
7.3 Submitting the IDC ....................................................................................................... 37
8. Data Manager: Review IDC ............................................................................................... 41
8.1 Current Cases Page and Case Details Page ................................................................ 41
8.2 Reviewing an IDC......................................................................................................... 44
9. Data Manager: Request More Information ..................................................................... 49
9.1 Requesting More Information from the School ............................................................. 49
10. School: Provide More Information ................................................................................... 51
10.1 When a Data Manager Requests Information .............................................................. 51
11. Data Manager: Submit IDC Response .............................................................................. 54
11.1 Modifying the IDC ........................................................................................................ 54
11.2 Responding to a DM Adjustment .................................................................................. 55
Version 3.3.0 3 1/6/2012
eCDR Appeals TABLE OF CONTENTS IDC User Guide
11.3 Responding to the IDC.................................................................................................. 55
12. School: Request Clarification ............................................................................................ 57
12.1 Reviewing Data Manager Responses............................................................................ 57
13. Data Manager: Respond to Clarification Request........................................................... 59
13.1 Clarification Requests................................................................................................... 59
14. OPD: Review IDC ............................................................................................................... 61
14.1 Current Cases Page and Case Details Page ................................................................ 61
14.2 Reviewing an IDC......................................................................................................... 64
15. OPD: Request More Information...................................................................................... 67
15.1 Requesting More Information from a Data Manager ................................................... 67
16. Data Manager: Provide More Information...................................................................... 69
16.1 When OPD Requests Information................................................................................. 69
17. OPD: Finalize IDC .............................................................................................................. 71
17.1 Reviewing the IDC ........................................................................................................ 71
17.2 Finalizing the IDC ........................................................................................................ 71
18. Data Manager: Review OPD Decision .............................................................................. 74
18.1 Viewing the Finalized Case .......................................................................................... 74
19. School: Review OPD Decision............................................................................................ 75
19.1 Viewing the Finalized Case .......................................................................................... 75
20. All Users: Miscellaneous Functions................................................................................... 76
20.1 Printing Case Information ............................................................................................ 76
20.2 Maintaining Your Profile.............................................................................................. 76
20.3 Adding New Contact Information ................................................................................. 76
20.4 Editing Contact Information ......................................................................................... 79
20.5 Deleting Contact Information ....................................................................................... 80
21. School: Miscellaneous Functions ....................................................................................... 81
21.1 Reports .......................................................................................................................... 81
22. Data Manager: Miscellaneous Functions.......................................................................... 83
22.1 Reports .......................................................................................................................... 83
23. OPD: Miscellaneous Functions .......................................................................................... 85
23.1 Reports .......................................................................................................................... 85
23.2 Cycle Management........................................................................................................ 85
24. Appendix: Glossary and Acronyms .................................................................................. 87
25. Appendix: Status Codes ..................................................................................................... 88
Version 3.3.0 4 1/6/2012
eCDR Appeals TABLE OF CONTENTS IDC User Guide
25.1 Case Status Codes ......................................................................................................... 88
25.2 Adjustment Status Codes ............................................................................................... 89
Version 3.3.0 5 1/6/2012
eCDR Appeals INTRODUCTION IDC User Guide
1. INTRODUCTION
1.1 Overview
Cohort Default Rates The U.S. Department of Education (the Department) calculates “cohort default rates” for schools that participate in the Federal Family Education Loan (FFEL) Program and the William D. Ford Federal Direct Loan (Direct Loan) Program. This cohort default rate forms an important basis for a school’s eligibility to continue participating in the federal student aid programs.
The Department releases cohort default rates twice each year: draft cohort default rates in February and official cohort default rates in September. After receiving their cohort default rates from the Department, schools have an opportunity to challenge their draft cohort default rates and/or appeal their official cohort default rates, based on a number of circumstances.
There are ten types of challenge/appeal processes. Each of these processes involves the exchange of information between the Department and the school that invokes its right to challenge/appeal. Additionally, data managers must in some cases respond to the school’s request and/or provide supporting evidence for or against the school’s challenge/appeal.
Purpose of the eCDR Appeals Application The Electronic Cohort Default Rate Appeals (eCDR Appeals) system is a Web-based application that facilitates the exchange of information between parties for three of the challenge/appeal processes:
• Incorrect Data Challenge (IDC) • Uncorrected Data Adjustments (UDA) • New Data Adjustments (NDA)
The eCDR Appeals application allows schools to submit these challenges and appeals during the cohort default rate appeal cycle. The application tracks the entire life cycle of each challenge/appeal case from submission to final decision.
Using eCDR Appeals helps cut down on paperwork and speeds up the appeal or challenge process. It also allows for greater protection of personally identifiable information.
Who Uses eCDR Appeals Three types of organizations use the eCDR Appeals system:
• Schools: Institutions that participate in the FFEL and/or Direct Loan programs • Data Managers: Any one of these organizations: the Federal Loan Servicer, guaranty
agency, or Federal Student Aid Operations Performance Division • OPD: Operations Performance Division (OPD), an office within Federal Student Aid
Version 3.3.0 6 1/6/2012
eCDR Appeals INTRODUCTION IDC User Guide
1.2 User Guide Structure Please read this introductory section before you decide whether you want to:
• Browse this guide online whenever you have questions • Download it in whole or in part to consult on your local computer • Print certain key chapters or sections
Purpose and Scope of the IDC User Guide The eCDR Appeals IDC User Guide is designed to guide you (whether you are a school user, data manager, or OPD personnel) through the online, paper-less IDC process used in the eCDR Appeals system. It assumes a basic knowledge of cohort default rates and associated processes. From a technical perspective, this guide also assumes you are familiar with using a computer and web browser to view and interact with web sites.
The eCDR Appeals IDC User Guide complements the Cohort Default Rate Guide. In the event of any discrepancy between this user guide and the Cohort Default Rate Guide, the Cohort Default Rate Guide is the authoritative source for regulatory considerations and constraints.
The Cohort Default Rate Guide is available online at: http://www.ifap.ed.gov/DefaultManagement/finalcdrg.html
IDC Workflow Processing an IDC from beginning to end takes multiple steps. At each step, a different individual or organization must take one or more actions. We will refer to this logical progression of steps and actions as the “IDC Workflow.” As we will see later, the School, the Data Managers and OPD go back and forth throughout the IDC Workflow to carry out their respective parts of the process.
This IDC User Guide is structured in direct correlation to the IDC Workflow. As a result, considered in its entirety, the IDC User Guide addresses all functionality eCDR Appeals has to offer all system users, in the order in which activities are most likely to occur based on the IDC Workflow.
Since each type of user will effectively need to carry out only a limited number of activities throughout the IDC Workflow, we have modularized the IDC User Guide in such a way that you can easily download or consult only those sections that pertain to you, based on your user type.
Beyond Chapters 1 and 2, we recommend you focus directly on those chapters and sections of the IDC User Guide that discuss the actions you must take in the system. The rest of the IDC User Guide should remain a reference for you to understand the entire electronic IDC process.
Miscellaneous Functions The IDC User Guide also includes chapters and sections that pertain to obtaining eCDR Appeals access credentials (i.e., a user account), the printing of reports, maintenance of organizational profile and contact information, and other miscellaneous functions not directly related to the IDC Workflow.
Version 3.3.0 7 1/6/2012
eCDR Appeals INTRODUCTION IDC User Guide
Must-Read Information Please refer to those Must-Read sections of this chapter that pertain to you for further details. The Must-Read sections provide useful and vital information.
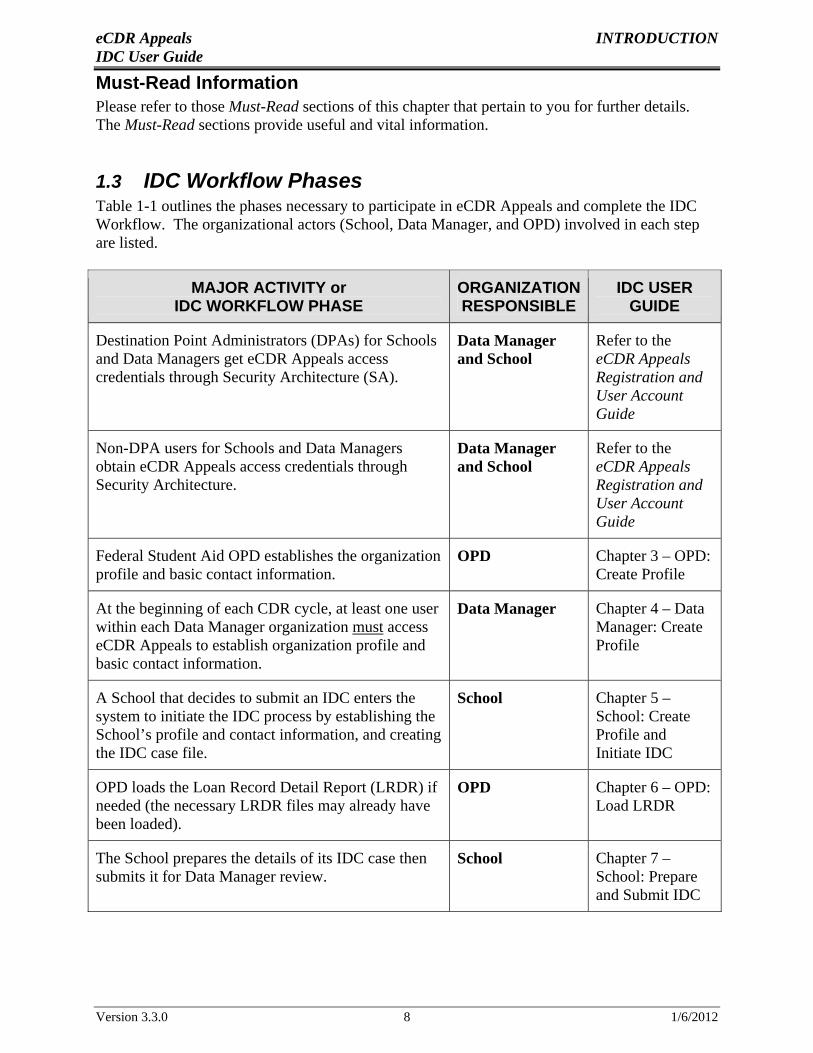
1.3 IDC Workflow Phases Table 1-1 outlines the phases necessary to participate in eCDR Appeals and complete the IDC Workflow. The organizational actors (School, Data Manager, and OPD) involved in each step are listed.
MAJOR ACTIVITY or IDC WORKFLOW PHASE
ORGANIZATION RESPONSIBLE
IDC USER GUIDE
Destination Point Administrators (DPAs) for Schools and Data Managers get eCDR Appeals access credentials through Security Architecture (SA).
Data Manager and School
Refer to the eCDR Appeals Registration and User Account Guide
Non-DPA users for Schools and Data Managers obtain eCDR Appeals access credentials through Security Architecture.
Data Manager and School
Refer to the eCDR Appeals Registration and User Account Guide
Federal Student Aid OPD establishes the organization profile and basic contact information.
OPD Chapter 3 – OPD: Create Profile
At the beginning of each CDR cycle, at least one user within each Data Manager organization must access eCDR Appeals to establish organization profile and basic contact information.
Data Manager Chapter 4 – Data Manager: Create Profile
A School that decides to submit an IDC enters the system to initiate the IDC process by establishing the School’s profile and contact information, and creating the IDC case file.
School Chapter 5 – School: Create Profile and Initiate IDC
OPD loads the Loan Record Detail Report (LRDR) if needed (the necessary LRDR files may already have been loaded).
OPD Chapter 6 – OPD: Load LRDR
The School prepares the details of its IDC case then submits it for Data Manager review.
School Chapter 7 – School: Prepare and Submit IDC
Version 3.3.0 8 1/6/2012
eCDR Appeals INTRODUCTION IDC User Guide
MAJOR ACTIVITY or IDC WORKFLOW PHASE
ORGANIZATION RESPONSIBLE
IDC USER GUIDE
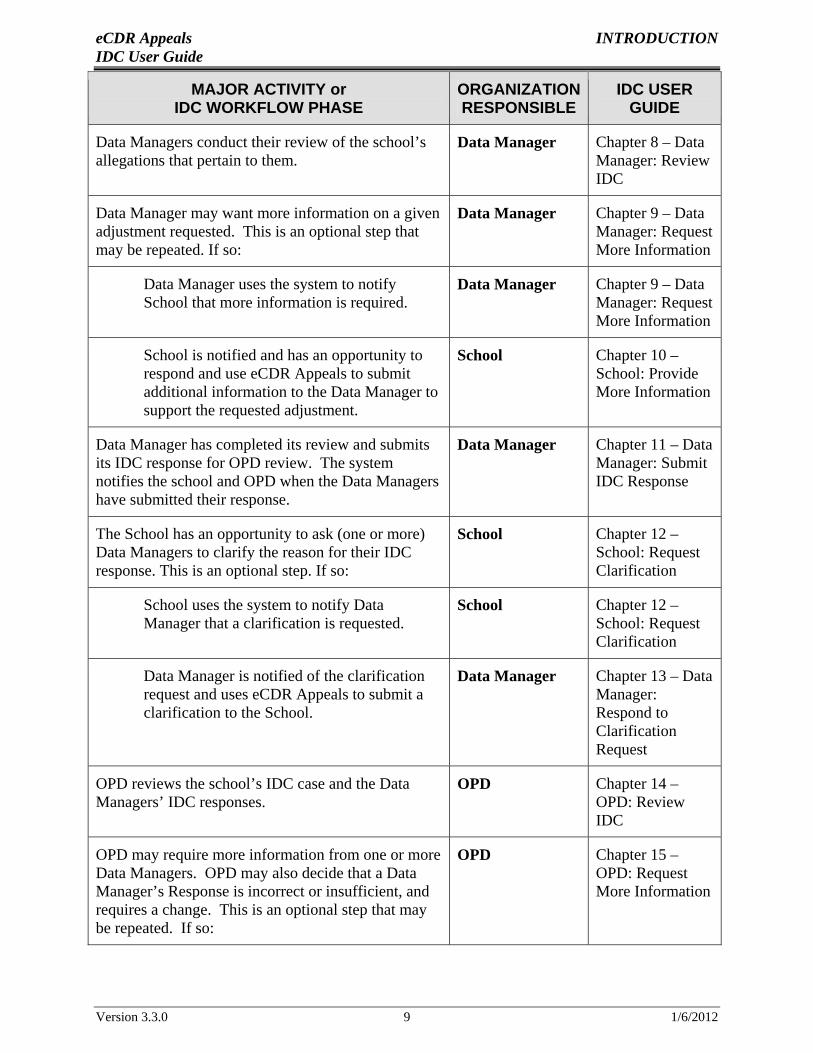
Data Managers conduct their review of the school’s allegations that pertain to them.
Data Manager Chapter 8 – Data Manager: Review IDC
Data Manager may want more information on a given adjustment requested. This is an optional step that may be repeated. If so:
Data Manager Chapter 9 – Data Manager: Request More Information
Data Manager uses the system to notify School that more information is required.
Data Manager Chapter 9 – Data Manager: Request More Information
School is notified and has an opportunity to respond and use eCDR Appeals to submit additional information to the Data Manager to support the requested adjustment.
School Chapter 10 – School: Provide More Information
Data Manager has completed its review and submits its IDC response for OPD review. The system notifies the school and OPD when the Data Managers have submitted their response.
Data Manager Chapter 11 – Data Manager: Submit IDC Response
The School has an opportunity to ask (one or more) Data Managers to clarify the reason for their IDC response. This is an optional step. If so:
School Chapter 12 – School: Request Clarification
School uses the system to notify Data Manager that a clarification is requested.
School Chapter 12 – School: Request Clarification
Data Manager is notified of the clarification request and uses eCDR Appeals to submit a clarification to the School.
Data Manager Chapter 13 – Data Manager: Respond to Clarification Request
OPD reviews the school’s IDC case and the Data Managers’ IDC responses.
OPD Chapter 14 – OPD: Review IDC
OPD may require more information from one or more Data Managers. OPD may also decide that a Data Manager’s Response is incorrect or insufficient, and requires a change. This is an optional step that may be repeated. If so:
OPD Chapter 15 – OPD: Request More Information
Version 3.3.0 9 1/6/2012
eCDR Appeals INTRODUCTION IDC User Guide
MAJOR ACTIVITY or IDC WORKFLOW PHASE
ORGANIZATION RESPONSIBLE
IDC USER GUIDE
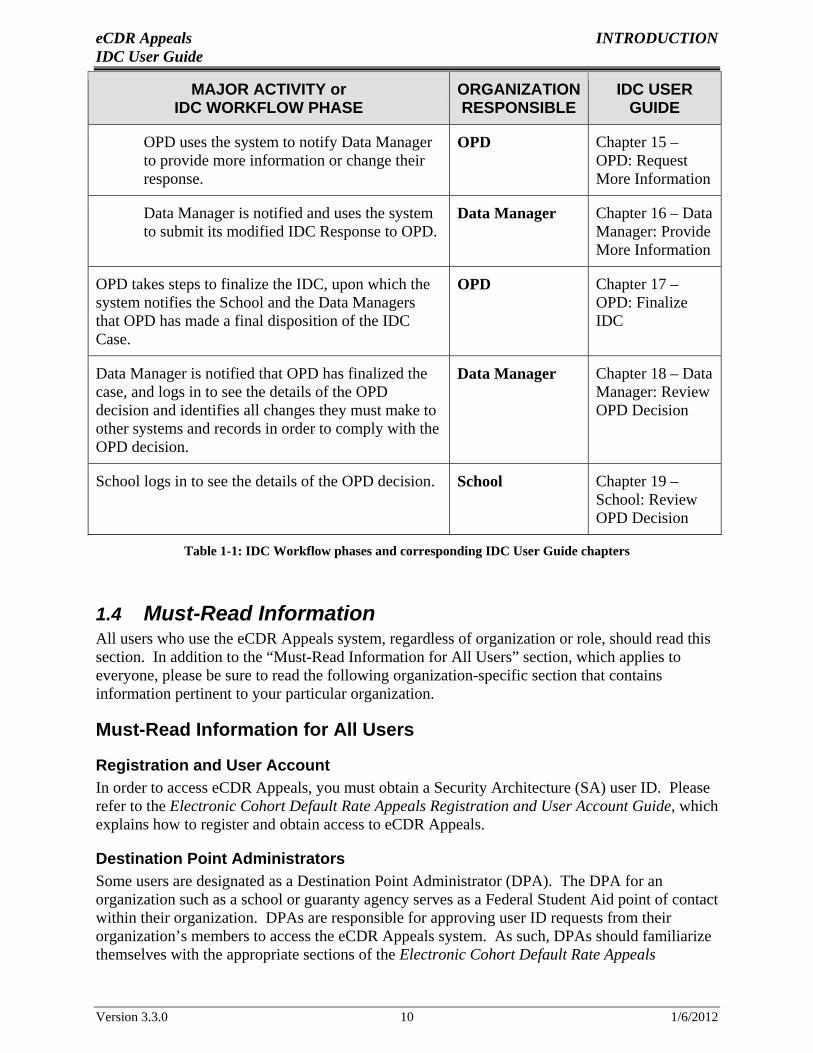
OPD uses the system to notify Data Manager to provide more information or change their response.
OPD Chapter 15 – OPD: Request More Information
Data Manager is notified and uses the system to submit its modified IDC Response to OPD.
Data Manager Chapter 16 – Data Manager: Provide More Information
OPD takes steps to finalize the IDC, upon which the system notifies the School and the Data Managers that OPD has made a final disposition of the IDC Case.
OPD Chapter 17 – OPD: Finalize IDC
Data Manager is notified that OPD has finalized the case, and logs in to see the details of the OPD decision and identifies all changes they must make to other systems and records in order to comply with the OPD decision.
Data Manager Chapter 18 – Data Manager: Review OPD Decision
School logs in to see the details of the OPD decision. School Chapter 19 – School: Review OPD Decision
Table 1-1: IDC Workflow phases and corresponding IDC User Guide chapters
1.4 Must-Read Information All users who use the eCDR Appeals system, regardless of organization or role, should read this section. In addition to the “Must-Read Information for All Users” section, which applies to everyone, please be sure to read the following organization-specific section that contains information pertinent to your particular organization.
Must-Read Information for All Users
Registration and User Account In order to access eCDR Appeals, you must obtain a Security Architecture (SA) user ID. Please refer to the Electronic Cohort Default Rate Appeals Registration and User Account Guide, which explains how to register and obtain access to eCDR Appeals.
Destination Point Administrators Some users are designated as a Destination Point Administrator (DPA). The DPA for an organization such as a school or guaranty agency serves as a Federal Student Aid point of contact within their organization. DPAs are responsible for approving user ID requests from their organization’s members to access the eCDR Appeals system. As such, DPAs should familiarize themselves with the appropriate sections of the Electronic Cohort Default Rate Appeals
Version 3.3.0 10 1/6/2012
f
r
d
f
t
eCDR Apppeals INNTRODUCTTION IDC Useer Guide Registrattion and Useer Account GGuide, whichh outlines thee process of registering and approvinng a new accoount on eCDDR Appeals.
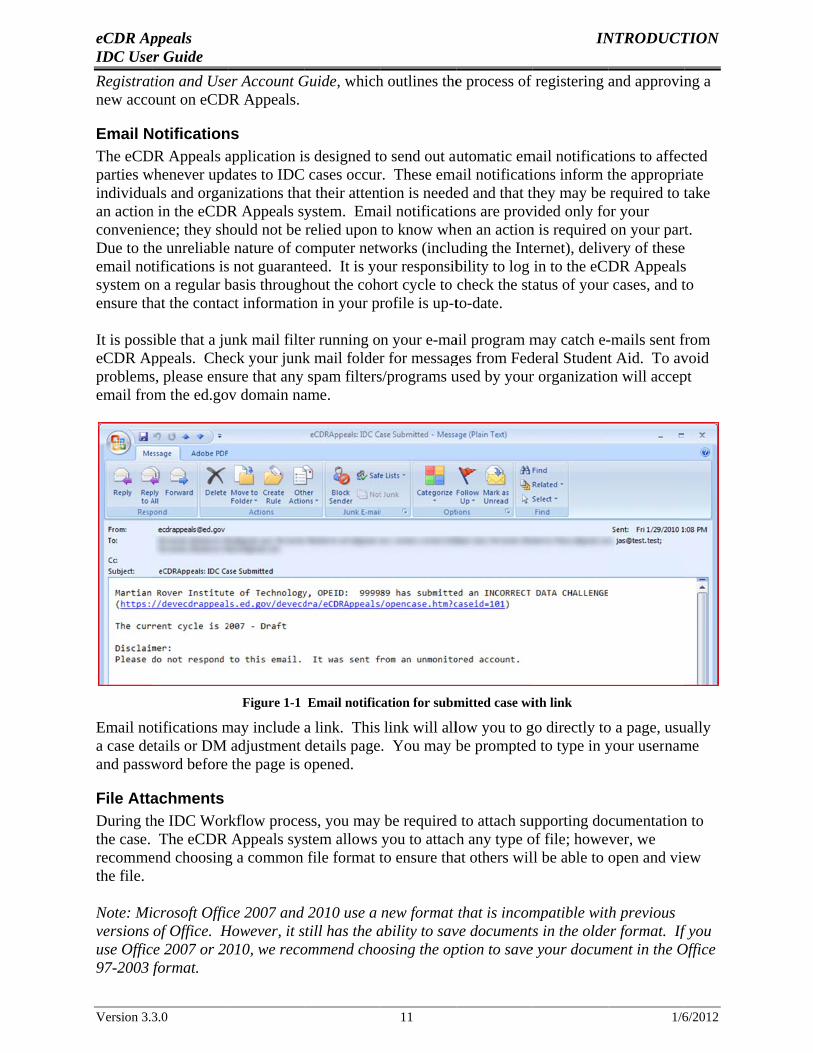
Email NNotificationns The eCDDR Appeals aapplication i s designed too send out auutomatic emmail notificattions to affeccted parties wwhenever upddates to IDC cases occurr. These emaail notificatiions inform tthe appropriiate individuaals and organnizations thaat their attenttion is needeed and that ththey may be required to ttake an actionn in the eCDRR Appeals syystem. Emaail notificatioons are provvided only foor your convenieence; they shhould not be relied upon to know whhen an actionn is required on your partt. Due to thhe unreliablee nature of coomputer netwworks (incluuding the Intternet), delivvery of thesee email nottifications iss not guarantteed. It is yoour responsibbility to log in to the eCDDR Appealss system o n a regular bbasis throughhout the cohhort cycle to check the status of yout rr cases, and tto ensure thhat the contacct informatioon in your prrofile is up-tto-date.
It is possible that a juunk mail filteer running on your e-maail program mmay catch e--mails sent ffrom eCDR Apppeals. Cheeck your junkk mail folderr for messagges from Fedderal Studentt Aid. To avvoid problemss, please ensure that any spam filterss/programs uused by yourr organizatioon will acceppt email froom the ed.gov domain naame.
Figure 1-1 Email notificcation for submmitted case wiith link
Email nootifications mmay include a link. This link will alllow you to ggo directly too a page, usuually a case deetails or DM adjustment details page . You may bbe promptedd to type in yyour usernamme and passwword before the page is opened.
File Attaachments During thhe IDC Workflow proceess, you mayy be requiredd to attach suupporting documentationn to the case. The eCDR Appeals sysstem allows you to attachh any type oof file; howe ver, we recommeend choosingg a common file format tto ensure thaat others willl be able to oopen and vieew the file.
Note: Miicrosoft Officce 2007 and 2010 use a new format that is incommpatible with previous versions of Office. HHowever, it sstill has the aability to savve documentsts in the oldeer format. Iff you use Officce 2007 or 20010, we recoommend chooosing the opption to savee your documment in the OOffice 97-2003 format.
Version 3.33.0 11 1/66/2012
eCDR Appeals INTRODUCTION IDC User Guide
Common file types include:
• Portable Document Format (PDF) • MS Excel (XLS) • MS Word (DOC) • Rich Text Format (RTF) • Plain text (TXT) • Pictures (JPG/PNG/GIF)
You are by no means required to use one of the specific file types listed here. This list only suggests some of the most commonly used file formats. Thus, if you use the above file types, other users in the eCDR Appeals system are more likely to have the appropriate software to view your files.
Deadlines and Calculation of Days The countdown toward the 45-day deadline to submit an IDC begins at 12:01 AM North American Central Time (CT) on the starting day of the cohort cycle.
For the purpose of calculating days within the eCDR Appeals system, the day rolls over at 10:00 PM CT. For instance, if a school’s deadline to submit an IDC were March 26th, then they would need to submit it by 10:00 PM CT on March 26th.
Must-Read Information for Schools
School Reference When referring to this user guide, school users only need to peruse the chapters that have titles prefixed with “School”. These chapters consist of instructions specifically for school users. Other chapters (those prefixed with “Data Manager” or “OPD”) do not necessarily apply to school users. You, however, may elect to refer to those other chapters to get an overall understanding of the actions performed by data managers and Federal Student Aid.
The chapters pertinent to schools are:
• Chapter 1, "Introduction” • Chapter 2, “All Users: Navigation” • Chapter 5, “School: Create Profile and Initiate IDC” • Chapter 7, “School: Prepare and Submit IDC” • Chapter 10, “School: Provide More Information” • Chapter 12, “School: Request Clarification” • Chapter 19, “School: Review OPD Decision” • Chapter 20, “All Users: Miscellaneous Functions” • Chapter 21, “School: Miscellaneous Functions”
School Roles Your account will be assigned one of two possible eCDR Appeals roles:
• Case Preparer: May initiate and prepare a new case.
Version 3.3.0 12 1/6/2012
eCDR Appeals INTRODUCTION IDC User Guide • Case Manager: Has the same abilities as a Case Preparer, plus the ability to submit a
case.
Must-Read Information for Data Managers
Data Manager Reference When referring to this user guide, data managers only need to peruse the chapters that have titles prefixed with “Data Manager”. These chapters consist of instructions specifically for data managers. Other chapters (those prefixed with “School” or “OPD”) do not necessarily apply to data managers. You, however, may elect to refer to those other chapters to get an overall understanding of the actions performed by schools and Federal Student Aid.
The chapters pertinent to data managers are:
• Chapter 1, "Introduction” • Chapter 2, “All Users: Navigation” • Chapter 4, “Data Manager: Create Profile” • Chapter 8, “Data Manager: Review IDC” • Chapter 9, “Data Manager: Request More Information” • Chapter 11 “Data Manager: Submit IDC Response” • Chapter 13, “Data Manager: Respond to Clarification Request” • Chapter 16, “Data Manager: Provide More Information” • Chapter 18, “Data Manager: Review OPD Decision” • Chapter 20, “All Users: Miscellaneous Functions” • Chapter 22, “Data Manager: Miscellaneous Functions”
Data Manager Roles Your account will be assigned one of two possible eCDR Appeals roles:
• Response Preparer: May prepare a response to an adjustment. • Response Manager: Has the same abilities as a Data Manager Response Preparer, plus
the ability to submit a response.
Updating Borrower and Loan Data in NSLDS and Other Systems of Records It is important to note that the eCDR Appeals system has no data interface with the National Student Loan Data System (NSLDS). Any change to borrower information or loan records in this application is solely for the purpose of documenting agreed-to changes. The borrower information and loan records in NSLDS will not automatically be updated to reflect any changes you may make in eCDR Appeals. If you modify any borrowers or loans in eCDR Appeals, you still need to perform any necessary changes to the actual records in NSLDS.
In addition to NSLDS, any other systems of records you maintain should be updated.
Must-Read Information for OPD Users
OPD Reference When referring to this user guide, OPD users only need to peruse the chapters that have titles prefixed with “OPD”. These chapters consist of instructions specifically for Federal Student Aid
Version 3.3.0 13 1/6/2012
eCDR Appeals INTRODUCTION IDC User Guide OPD users. Other chapters (those prefixed with “School” or “Data Manager”) do not necessarily apply to OPD. You, however, may elect to refer to those other chapters to get an overall understanding of the actions performed by schools and data managers.
The chapters pertinent to OPD are:
• Chapter 1, "Introduction” • Chapter 2, “All Users: Navigation” • Chapter 3, "OPD: Create Profile” • Chapter 6, “OPD: Load LRDR” • Chapter 14, “OPD: Review IDC” • Chapter 15, “OPD: Request More Information” • Chapter 17, “OPD: Finalize IDC” • Chapter 20, “All Users: Miscellaneous Functions” • Chapter 23, “OPD: Miscellaneous Functions”
OPD Roles Your account will be assigned one of three possible eCDR Appeals roles:
• Caseworker: May self-assign themselves to a LRDR request, load LRDRs, self-assign themselves to a case, review cases, request more information from data managers, and prepare a final decision.
• Case Manager: Has the same abilities as a Caseworker, plus the ability to assign other OPD personnel to a case and submit a final decision.
• Administrator: Has the same abilities as a Case Manager, plus the ability to manage cycles.
Version 3.3.0 14 1/6/2012

eCDR Appeals ALL USERS: NAVIGATION IDC User Guide
2. ALL USERS: NAVIGATION
2.1 Login Federal Student Aid’s Security Architecture (SA) system is utilized to control access to the eCDR Appeals application. In order to log in to eCDR Appeals, you will need a SA account. Please refer to the Electronic Cohort Default Rate Appeals Registration and User Account Guide for information on obtaining a SA account for use with eCDR Appeals.
To log in to the eCDR Appeals system after you have obtained an account, follow these steps: 1. Open the eCDR Appeals URL (https://ecdrappeals.ed.gov/) in a web browser.
Introductory information will be displayed, along with a “Log in” link. 2. Select the “Log in” link. The Security Architecture login page will be displayed. 3. Enter your SA username and password. 4. Select “Submit”. If you entered the correct login information and you have the proper
authorization, then you will now be in the eCDR Appeals application.
2.2 Menus Once you are logged in to the eCDR Appeals system, you will be able to navigate to the various sections of the website using the navigation menus. There are two rows of menus provided; the top row is the main menu and the bottom row is the submenu. The options available in the submenu depend on which main menu item is selected. The current selections will be highlighted. See Figure 2-1 for an example of menus (in this example, a School user is viewing their current cases).
Figure 2-1: Navigational menus as seen by a School user
Your navigation menu options will vary depending on what type of access you have. For instance, in addition to the School main menu options shown in Figure 2-1, a Data Manager will also have the “Reports” option. An OPD user will additionally have the “Reports” and “System Administration” options.
Main Menu Item Purpose
Perspective Allows you to select which Perspective to use (see Section 2.3 for more information on Perspectives)
Case Access information on current and past challenges and appeals
Version 3.3.0 15 1/6/2012
eCDR Appeals ALL USERS: NAVIGATION IDC User Guide
Main Menu Item Purpose
Reports Generate reports
System Administration Manage the cohort cycle and load Loan Record Detail Report (LRDR) information (OPD users only)
Profile Maintain your organization and individual contact information
Help Access the on-line documentation
Logout Sign out of the eCDR Appeals application
Table 2-1: Menu item descriptions
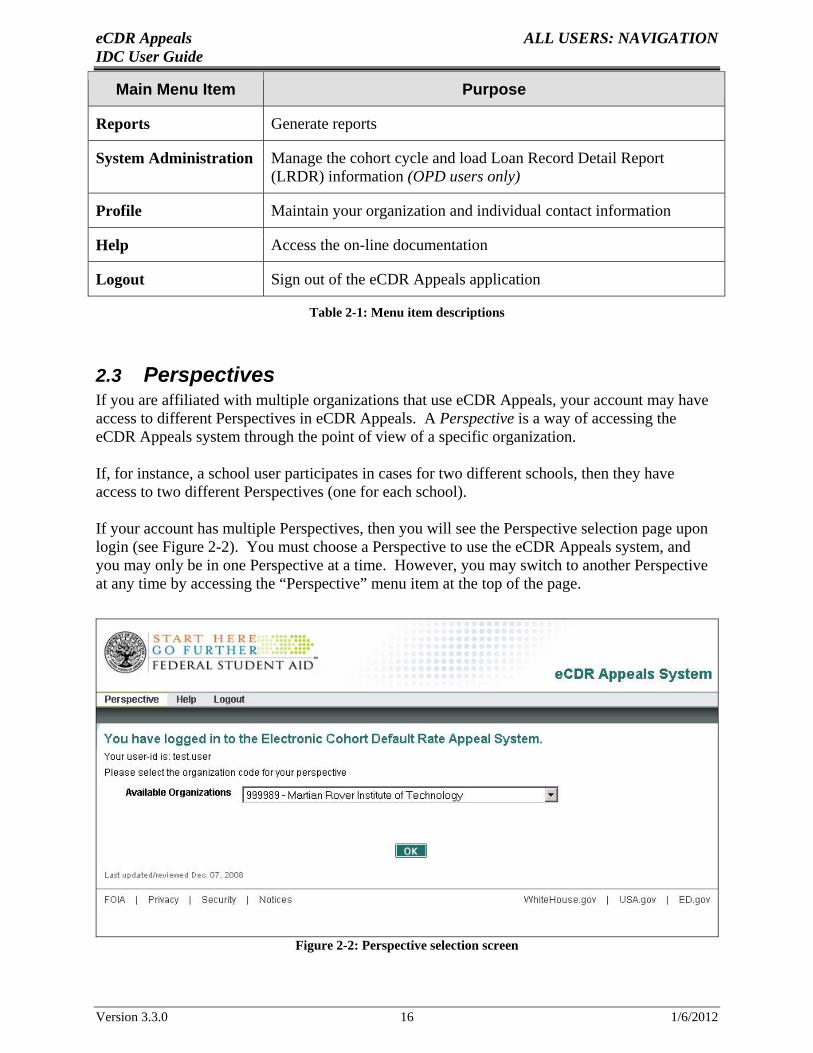
2.3 Perspectives If you are affiliated with multiple organizations that use eCDR Appeals, your account may have access to different Perspectives in eCDR Appeals. A Perspective is a way of accessing the eCDR Appeals system through the point of view of a specific organization.
If, for instance, a school user participates in cases for two different schools, then they have access to two different Perspectives (one for each school).
If your account has multiple Perspectives, then you will see the Perspective selection page upon login (see Figure 2-2). You must choose a Perspective to use the eCDR Appeals system, and you may only be in one Perspective at a time. However, you may switch to another Perspective at any time by accessing the “Perspective” menu item at the top of the page.
Figure 2-2: Perspective selection screen
Version 3.3.0 16 1/6/2012
eCDR Appeals OPD: CREATE PROFILE IDC User Guide
3. OPD: CREATE PROFILE
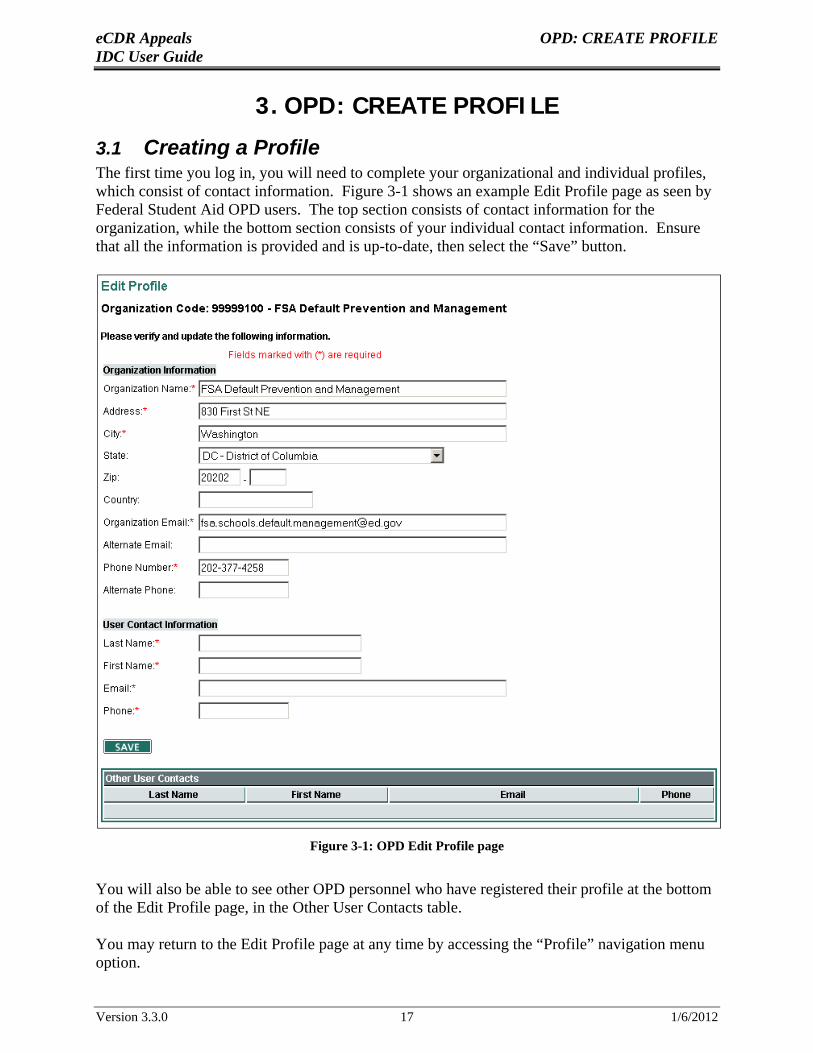
3.1 Creating a Profile The first time you log in, you will need to complete your organizational and individual profiles, which consist of contact information. Figure 3-1 shows an example Edit Profile page as seen by Federal Student Aid OPD users. The top section consists of contact information for the organization, while the bottom section consists of your individual contact information. Ensure that all the information is provided and is up-to-date, then select the “Save” button.
Figure 3-1: OPD Edit Profile page
You will also be able to see other OPD personnel who have registered their profile at the bottom of the Edit Profile page, in the Other User Contacts table.
You may return to the Edit Profile page at any time by accessing the “Profile” navigation menu option.
Version 3.3.0 17 1/6/2012
eCDR Appeals DATA MANAGER: CREATE PROFILE IDC User Guide
4. DATA MANAGER: CREATE PROFILE
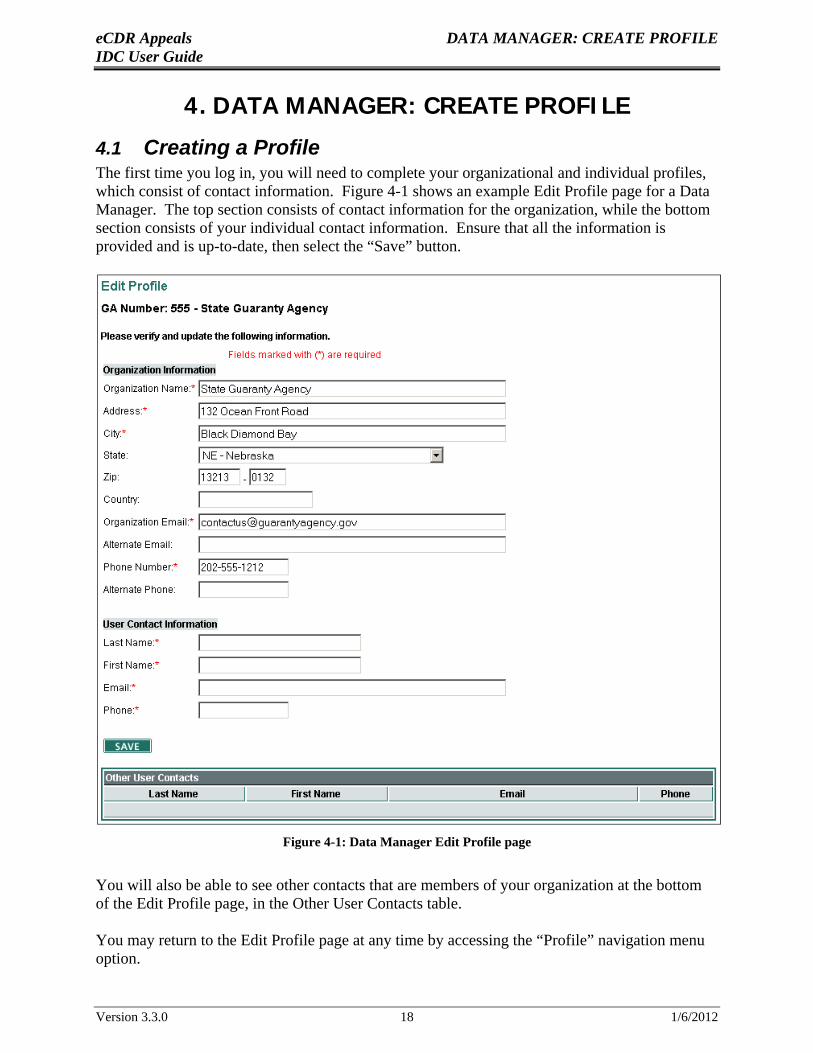
4.1 Creating a Profile The first time you log in, you will need to complete your organizational and individual profiles, which consist of contact information. Figure 4-1 shows an example Edit Profile page for a Data Manager. The top section consists of contact information for the organization, while the bottom section consists of your individual contact information. Ensure that all the information is provided and is up-to-date, then select the “Save” button.
Figure 4-1: Data Manager Edit Profile page
You will also be able to see other contacts that are members of your organization at the bottom of the Edit Profile page, in the Other User Contacts table.
You may return to the Edit Profile page at any time by accessing the “Profile” navigation menu option.
Version 3.3.0 18 1/6/2012
eCDR Appeals SCHOOL: CREATE PROFILE AND INITIATE IDC IDC User Guide
5. SCHOOL: CREATE PROFILE AND INITIATE IDC
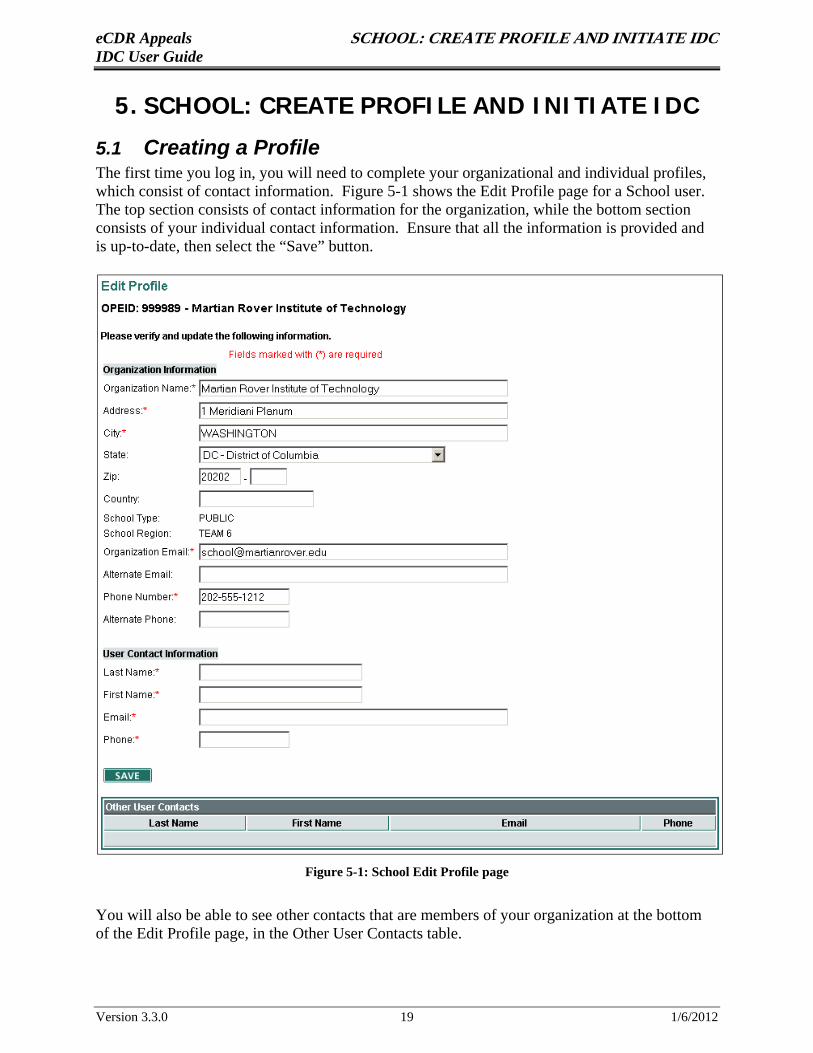
5.1 Creating a Profile The first time you log in, you will need to complete your organizational and individual profiles, which consist of contact information. Figure 5-1 shows the Edit Profile page for a School user. The top section consists of contact information for the organization, while the bottom section consists of your individual contact information. Ensure that all the information is provided and is up-to-date, then select the “Save” button.
Figure 5-1: School Edit Profile page
You will also be able to see other contacts that are members of your organization at the bottom of the Edit Profile page, in the Other User Contacts table.
Version 3.3.0 19 1/6/2012
O D
eCDR Apppeals SCHHOOL: CREEATE PROFFILE AND INITIATEE IDC IDC Useer Guide You mayy return to thhe Edit Profille page at anny time by acccessing thee “Profile” naavigation meenu option.
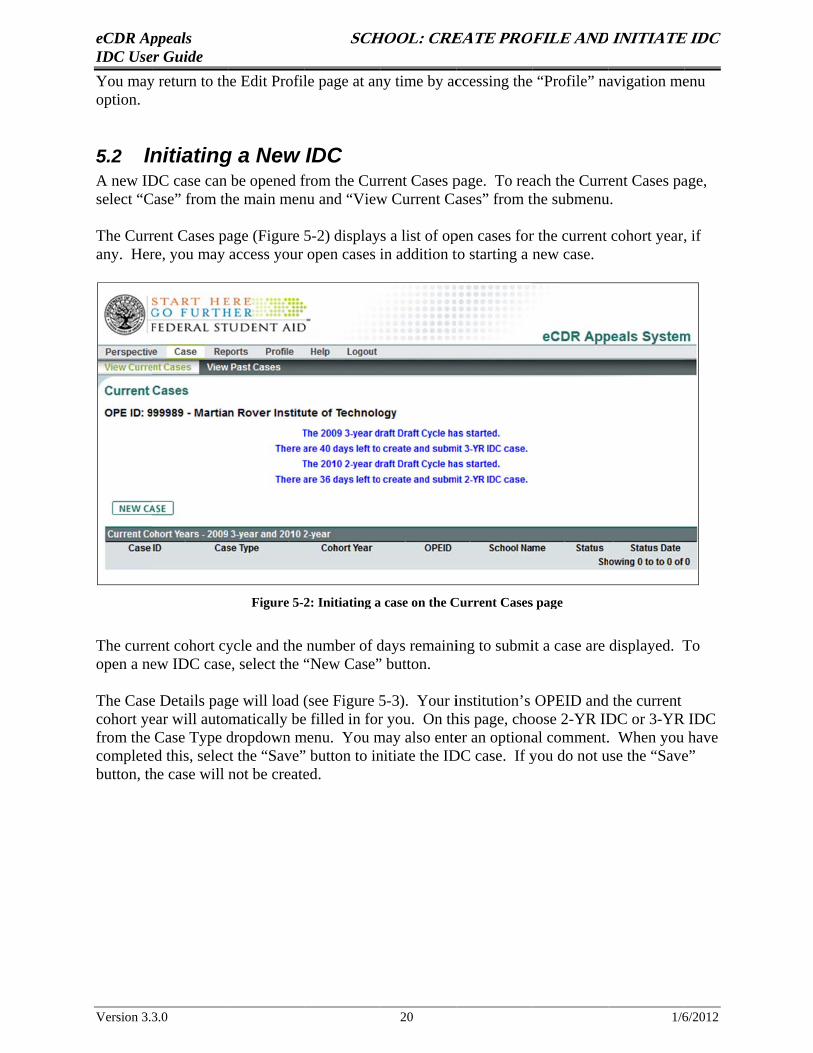
5.2 Innitiatingg a New IDC A new IDDC case can be opened ffrom the Currrent Cases ppage. To reaach the Curr ent Cases paage, select “CCase” from thhe main mennu and “Vieww Current Caases” from tthe submenuu.
The Currrent Cases paage (Figure 5-2) displays a list of oppen cases forr the current cohort year,, if any. Herre, you may access your open cases iin addition tto starting a nnew case.
Figure 5-22: Initiating aa case on the CCurrent Cases s page
The curreent cohort cyycle and the number of ddays remainiing to submiit a case are displayed. TTo open a neew IDC casee, select the ““New Case”” button.
The Casee Details pagge will load ((see Figure 55-3). Your iinstitution’s OPEID andd the current cohort yeear will auto matically bee filled in forr you. On thhis page, chooose 2-YR IDDC or 3-YRR IDC from the Case Type ddropdown mmenu. You mmay also enteer an optionaal comment.. When you have completeed this, selecct the “Save”” button to innitiate the IDDC case. If yyou do not uuse the “Savee” button, thhe case will not be createed.
Version 3.33.0 20 1/66/2012

t
O D
eCDR Apppeals SCHHOOL: CREEATE PROFFILE AND INITIATEE IDC IDC Useer Guide
Figure 5-3: Creating a neew IDC
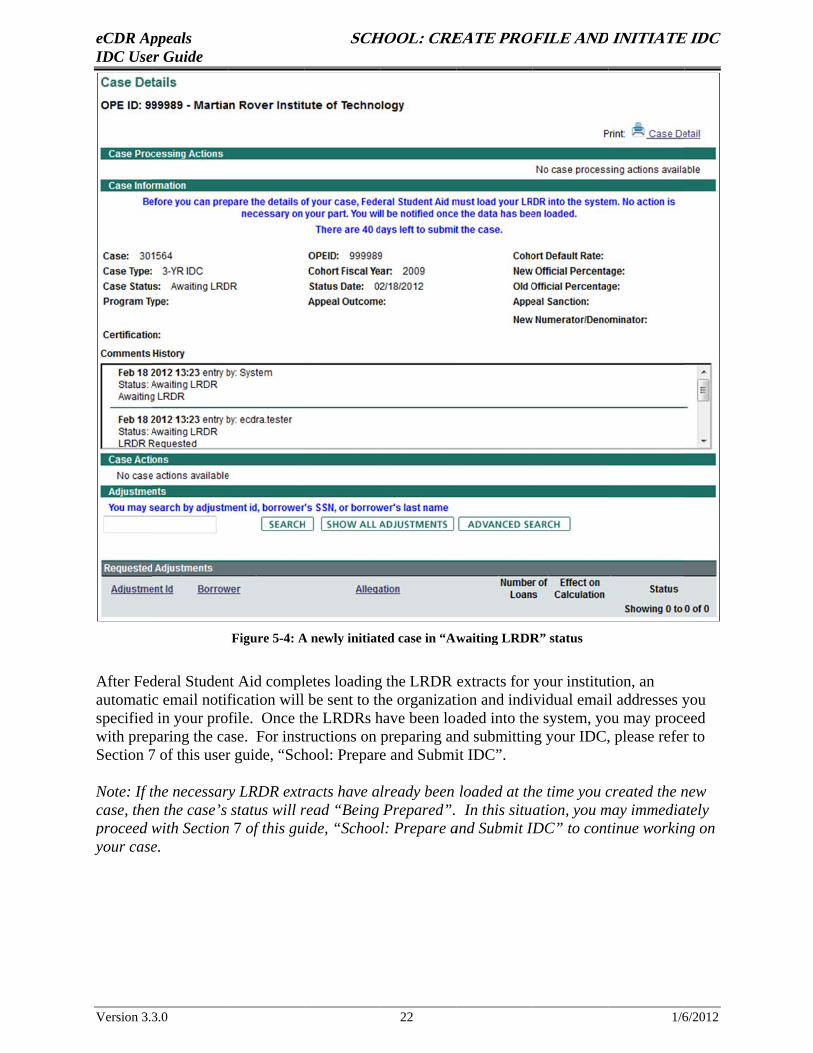
Upon sellecting “Savee”, a new caase will be crreated, and thhe Case Dettails page wiill show somme basic infoormation asssociated withh your case. If Federal SStudent Aid has not yet lloaded the prerequissite Loan Reecord Detail Report (LRDDR) extractss for your institution, youur case will begin in “Awaiting LLRDR” statuus, as depicteed in Figure 5-4.
Note: The time your IDC remainns in “Awaiting LRDR” status does not count aggainst the 455-day deadline for submit ting your ccase. Once Federal Sttudent Aid hhas loaded the LRDRss, the countdowwn to the deaadline will reesume.
Version 3.33.0 21 1/66/2012
O D
eCDR Apppeals SCHHOOL: CREEATE PROFFILE AND INITIATEE IDC IDC Useer Guide
Figure 5-4: AA newly initiatted case in “Awwaiting LRDRR” status
After Fedderal Studennt Aid complletes loadingg the LRDR extracts for your instituttion, an automati c email notiffication will be sent to thhe organizattion and indiividual emai l addresses yyou specifiedd in your profile. Once thhe LRDRs hhave been loaded into thee system, yoou may proceeed with prepparing the caase. For insttructions on preparing annd submittinng your IDC,, please referr to Section 77 of this userr guide, “Schhool: Preparee and Submiit IDC”.
Note: If tthe necessaryry LRDR extrracts have already been loaded at thhe time you ccreated the nnew case, then the case’s status will rread “Being Prepared”. In this situ ation, you mmay immediaately proceed wwith Sectionn 7 of this guuide, “School: Prepare aand Submit IDIDC” to conttinue workinng on your casee.
Version 3.33.0 22 1/66/2012
L
eCDR Apppeals OPDD: LOAD LRRDR IDC Useer Guide
6. OPD: LOAD LRDR
6.1 LLoading a LRDRR Extract When a sschool initiattes an IDC, tthe eCDR AAppeals systeem will autommatically asssess whetheer the necessaryy Loan Recoord Detail Reeports (LRDDRs) to suppoort the case hhave been looaded. If thee LRDRs aalready existt in the systeem, then Fedderal Studentt Aid does noot need to taake any actioon for the schoool to proceedd with preparring their caase.
If one or more LRDRRs are needeed to supportt the new casse, then thes e LRDRs wiill be added to the LRDRR request lisst. The case will be placced in “Awaiiting LRDR”” status, meaaning the countdowwn for the innstitution to mmeet the 45--day IDC filiing deadlinee will be temmporarily suspendeed until Fedeeral Student AAid loads thhe required LLRDR extraccts. An autoomatic emaill will be sent too OPD to inddicate that LLRDRs need to be loadedd.
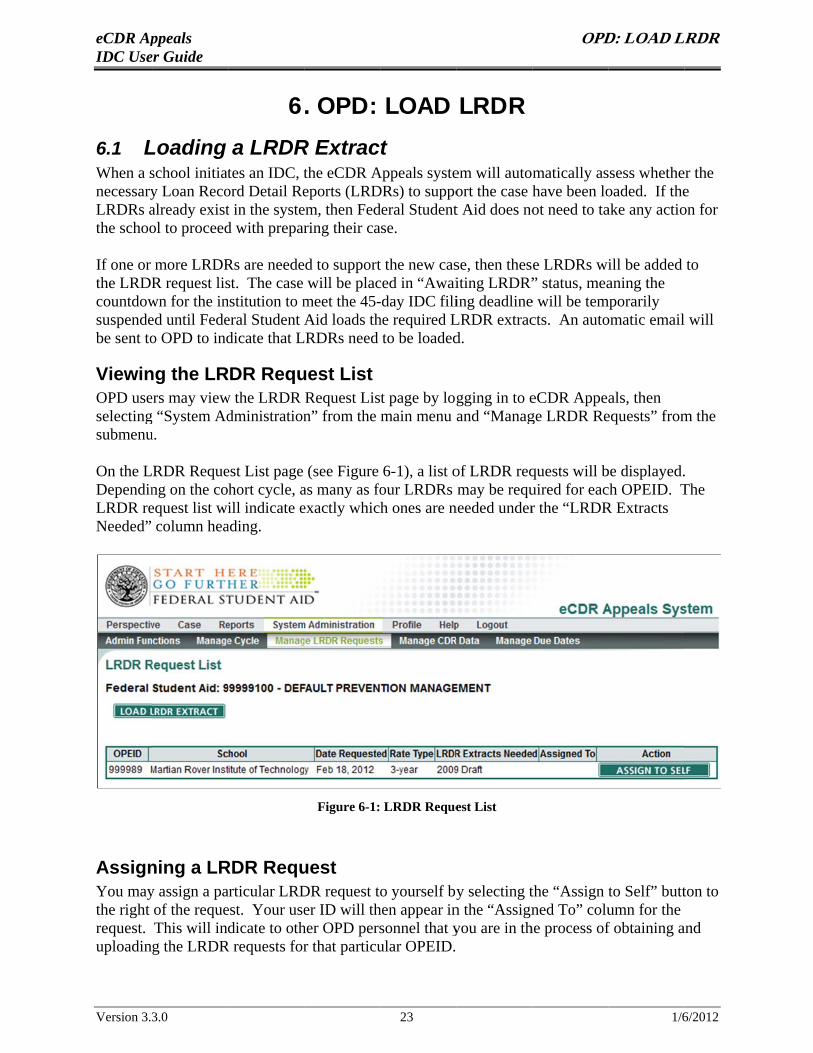
Viewinng the LRRDR Requuest List OPD useers may vieww the LRDR Request List page by loggging in to eeCDR Appeals, thena selectingg “System Addministrationn” from the main menu and “Managge LRDR Reequests” fromm the submenuu.
On the LLRDR Requeest List page (see Figure 6-1), a list oof LRDR reqquests will bbe displayed.. Dependinng on the cohort cycle, aas many as fofour LRDRs may be requuired for eacch OPEID. TThe LRDR reequest list wiill indicate eexactly whic h ones are nneeded underr the “LRDRR Extracts Needed” column heaading.
Figure 6-1: LRDR Requeest List
Assignning a LRRDR Requuest You mayy assign a paarticular LRDDR request too yourself byy selecting tthe “Assign tto Self” buttton to the right of the requeest. Your useer ID will thhen appear inn the “Assignned To” coluumn for the request. This will inddicate to othher OPD perssonnel that yyou are in thhe process off obtaining aand uploading the LRDRR requests forr that particuular OPEID.
Version 3.33.0 23 1/66/2012
L
eCDR Apppeals OPDD: LOAD LRRDR IDC Useer Guide
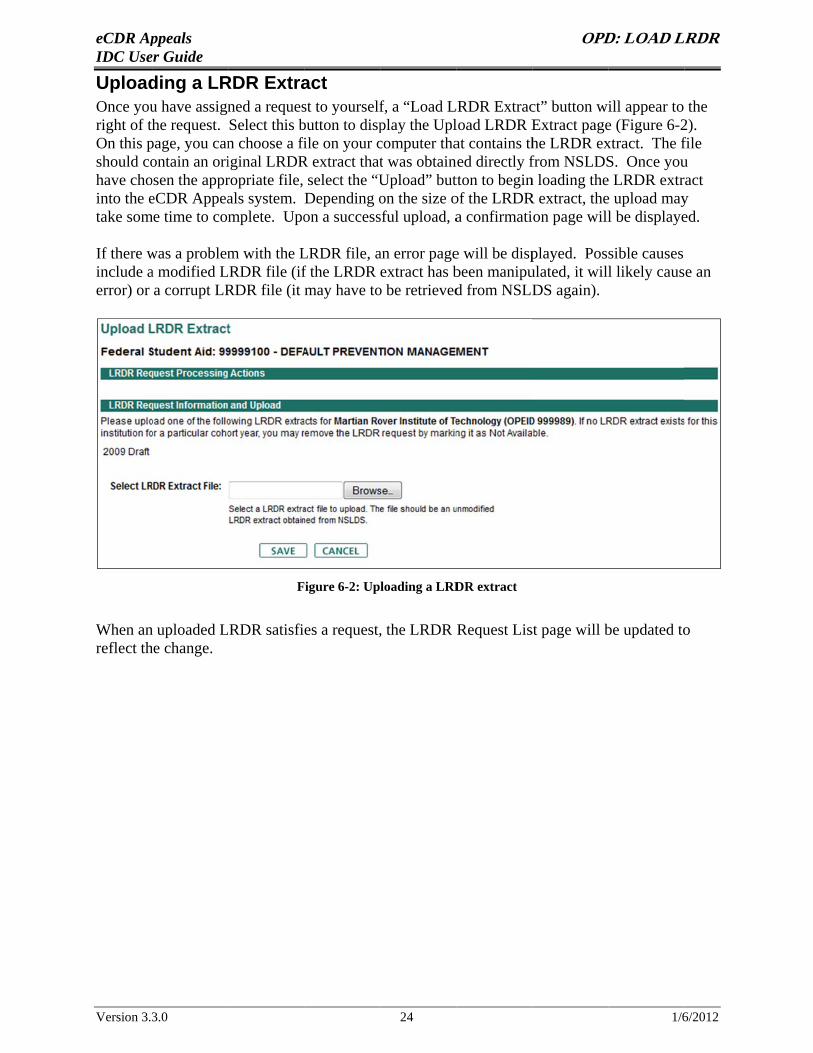
Uploadding a LRRDR Extraact Once youu have assignned a requesst to yourselff, a “Load LLRDR Extracct” button wiill appear to the right of thhe request. Select this bbutton to dispplay the Uplload LRDR EExtract pagee (Figure 6-22). On this ppage, you cann choose a fifile on your ccomputer thaat contains thhe LRDR exxtract. The ffile should coontain an oriiginal LRDRR extract thatt was obtainned directly ffrom NSLDSS. Once youu have choosen the apprropriate file, select the “UUpload” buttton to beginn loading thee LRDR extrract into the eeCDR Appeaals system. Depending oon the size oof the LRDRR extract, thee upload mayy take somme time to commplete. Upoon a successsful upload, aa confirmati on page willl be displayeed.
If there wwas a problemm with the LLRDR file, aan error pagee will be dispplayed. Possible causes include aa modified LLRDR file (iff the LRDR extract has bbeen manipuulated, it willl likely cause an error) or a corrupt LRRDR file (it may have too be retrievedd from NSLDDS again).
FFigure 6-2: Uploading a LRDDR extract
When ann uploaded LLRDR satisfies a request,, the LRDR Request Lis st page will bbe updated too reflect thhe change.
Version 3.33.0 24 1/66/2012
eCDR Apppeals SCHHOOL: PREEPARE ANDND SUBMITT IDC IDC Useer Guide
7. SCCHOOL:: PREPAARE ANND SUBBMIT IIDC
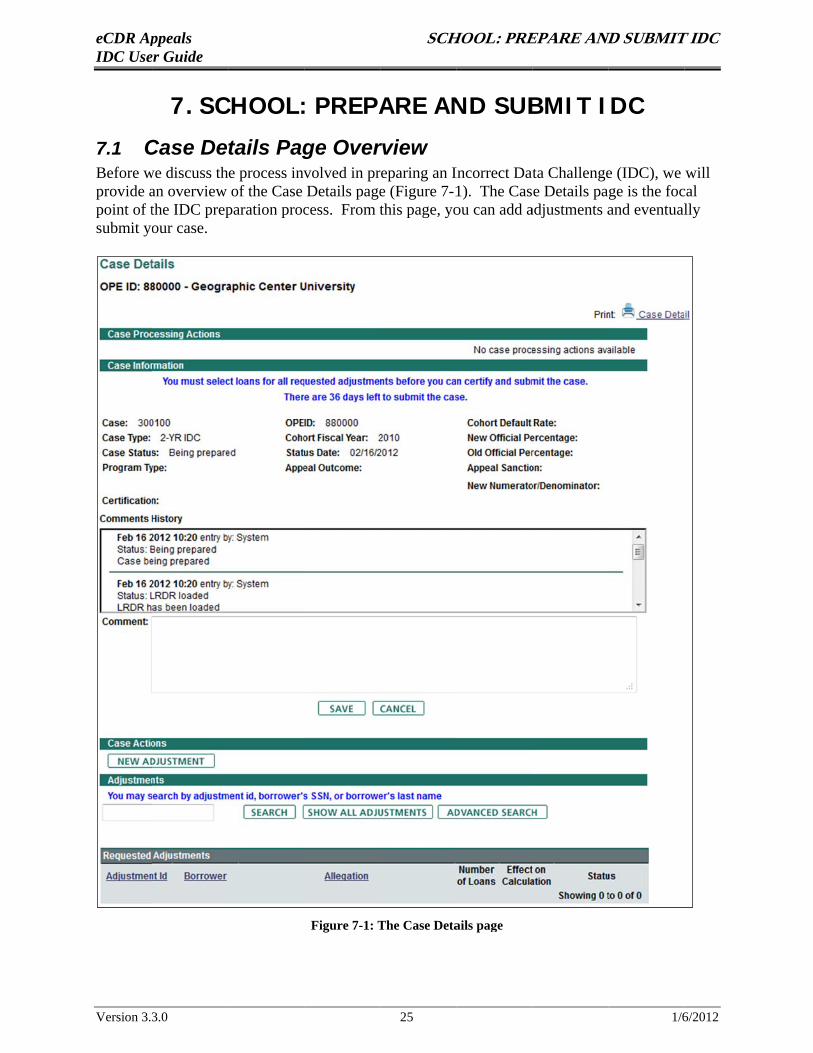
7.1 CCase Details Pagge Overrview Before wwe discuss the process invvolved in prreparing an I Incorrect Datta Challengee (IDC), we will provide aan overview of the Case Details pagee (Figure 7-11). The Cas e Details pa ge is the foccal point of tthe IDC prepparation proccess. From tthis page, yoou can add aadjustments aand eventuallly submit yoour case.
Figure 7-1: TThe Case Detaails page
Version 3.33.0 25 1/66/2012
eCDR Appeals SCHOOL: PREPARE AND SUBMIT IDC IDC User Guide
Institutional Information At the top of the Case Details page, your institution’s OPEID and name are displayed. If you have access to multiple Perspectives, this information will assist in verifying that you are in the correct Perspective.
Case Processing Actions The Case Processing Actions section of the page contains buttons that allow you to move your case to the next phase of the IDC Workflow process. When a case is initially created, no actions are available. However, when an action becomes available to you (such as the ability to submit your case), a button will appear in this area.
Case Information The current case status information is shown underneath the Case Processing Actions. This information is populated by the system and includes:
• Case: The case ID number, automatically assigned by the eCDR Appeals system. • Case Type: The type of challenge or appeal (e.g., IDC, NDA, UDA). • Case Status: Indicates which phase the case is currently in. See Section 1.3, “IDC
Workflow Phases” for more information on IDC phases. Refer to the Appendix: Status Codes for a definition of status codes.
• Program Type: Indicates the type of program the school is taking part in: FFEL, DL, or FFEL/DL.
• Certification: After the case is submitted, the document certifying the school’s case will be listed here.
• OPEID: The OPEID of the institution filing the case. • Cohort Fiscal Year: The cohort year for which the case is being filed. • Status Date: Indicates the date of the most recent case status update. • Appeal Outcome: This is used only in the official process, and will be blank for the draft
process. • Cohort Default Rate: Indicates the institution’s cohort default rate. • Appeal Sanction: This is used only in the official process, and will be blank for the draft
process.
Comments History Following the Case Information section is the Comments History box, which displays the full case history, including transitions between the various IDC Workflow phases and all comments. The history is arranged in reverse chronological order, with the most recent status change or comment at the top. The example case in Figure 7-1 shows two status changes and comments at the top. More comments and status changes can be viewed by scrolling down in the box.
Case Actions The Case Actions section of the page is located below the Comments History, and contains buttons that allow you to make changes to your case. These actions are separate from the IDC Workflow process. When an action becomes available to you, a button will appear in this area.
Version 3.3.0 26 1/6/2012
eCDR Appeals SCHOOL: PREPARE AND SUBMIT IDC IDC User Guide
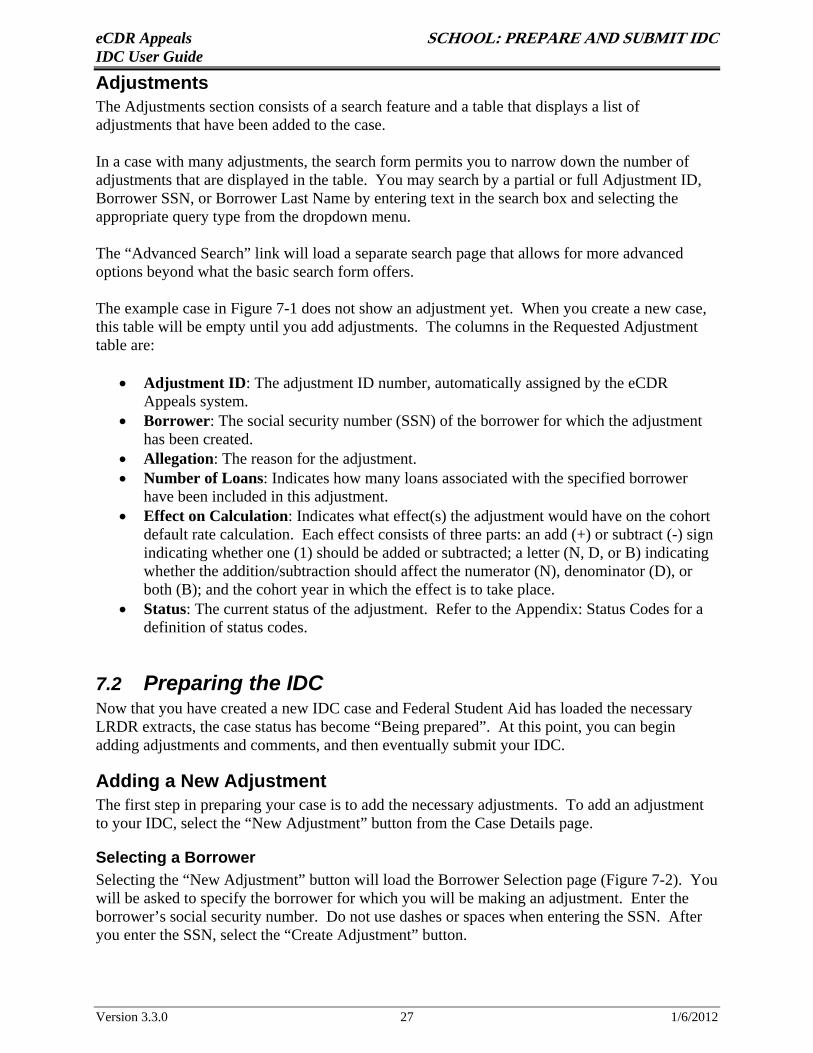
Adjustments The Adjustments section consists of a search feature and a table that displays a list of adjustments that have been added to the case.
In a case with many adjustments, the search form permits you to narrow down the number of adjustments that are displayed in the table. You may search by a partial or full Adjustment ID, Borrower SSN, or Borrower Last Name by entering text in the search box and selecting the appropriate query type from the dropdown menu.
The “Advanced Search” link will load a separate search page that allows for more advanced options beyond what the basic search form offers.
The example case in Figure 7-1 does not show an adjustment yet. When you create a new case, this table will be empty until you add adjustments. The columns in the Requested Adjustment table are:
• Adjustment ID: The adjustment ID number, automatically assigned by the eCDR Appeals system.
• Borrower: The social security number (SSN) of the borrower for which the adjustment has been created.
• Allegation: The reason for the adjustment. • Number of Loans: Indicates how many loans associated with the specified borrower
have been included in this adjustment. • Effect on Calculation: Indicates what effect(s) the adjustment would have on the cohort
default rate calculation. Each effect consists of three parts: an add (+) or subtract (-) sign indicating whether one (1) should be added or subtracted; a letter (N, D, or B) indicating whether the addition/subtraction should affect the numerator (N), denominator (D), or both (B); and the cohort year in which the effect is to take place.
• Status: The current status of the adjustment. Refer to the Appendix: Status Codes for a definition of status codes.
7.2 Preparing the IDC Now that you have created a new IDC case and Federal Student Aid has loaded the necessary LRDR extracts, the case status has become “Being prepared”. At this point, you can begin adding adjustments and comments, and then eventually submit your IDC.
Adding a New Adjustment The first step in preparing your case is to add the necessary adjustments. To add an adjustment to your IDC, select the “New Adjustment” button from the Case Details page.
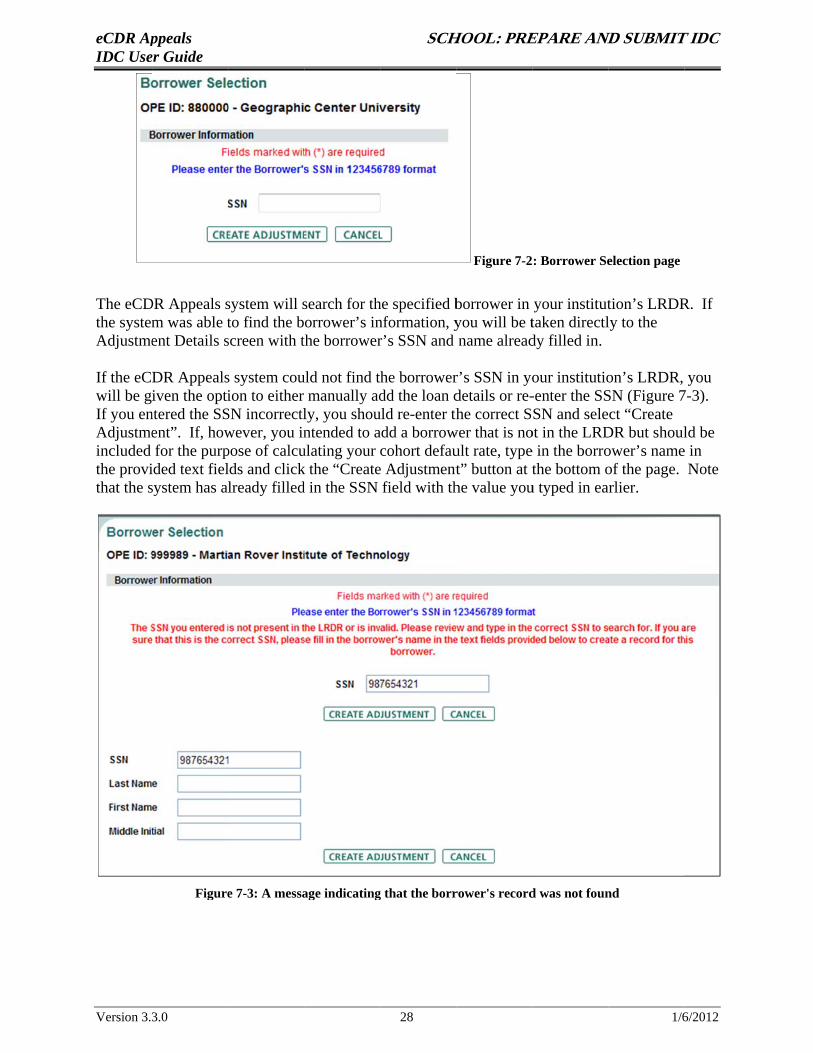
Selecting a Borrower Selecting the “New Adjustment” button will load the Borrower Selection page (Figure 7-2). You will be asked to specify the borrower for which you will be making an adjustment. Enter the borrower’s social security number. Do not use dashes or spaces when entering the SSN. After you enter the SSN, select the “Create Adjustment” button.
Version 3.3.0 27 1/6/2012
eCDR Apppeals SCHHOOL: PREEPARE ANDND SUBMITT IDC IDC Useer Guide
Figure 7-2 : Borrower Seelection page
The eCDDR Appeals ssystem will ssearch for thhe specified bborrower in your instituttion’s LRDRR. If the systemm was able tto find the b orrower’s innformation, yyou will be ttaken directlly to the Adjustmeent Details sscreen with tthe borrowerr’s SSN and name alreaddy filled in.
If the eCDDR Appealss system couuld not find the borrowerr’s SSN in yoour institutioon’s LRDR, you will be given the optiion to either manually addd the loan ddetails or re--enter the SSSN (Figure 77-3). If you enntered the SSSN incorrectlly, you shouuld re-enter thhe correct S SN and select “Create Adjustmeent”. If, howwever, you inntended to aadd a borrowwer that is noot in the LRDDR but shoulld be included for the purppose of calcuulating your ccohort defauult rate, type e in the borroower’s namee in the proviided text fiellds and clickk the “Createe Adjustmentt” button at tthe bottom oof the page. Note that the ssystem has a lready filledd in the SSN field with thhe value youu typed in eaarlier.
Figuree 7-3: A messaage indicatingg that the borrrower's recordd was not founnd
Version 3.33.0 28 1/66/2012
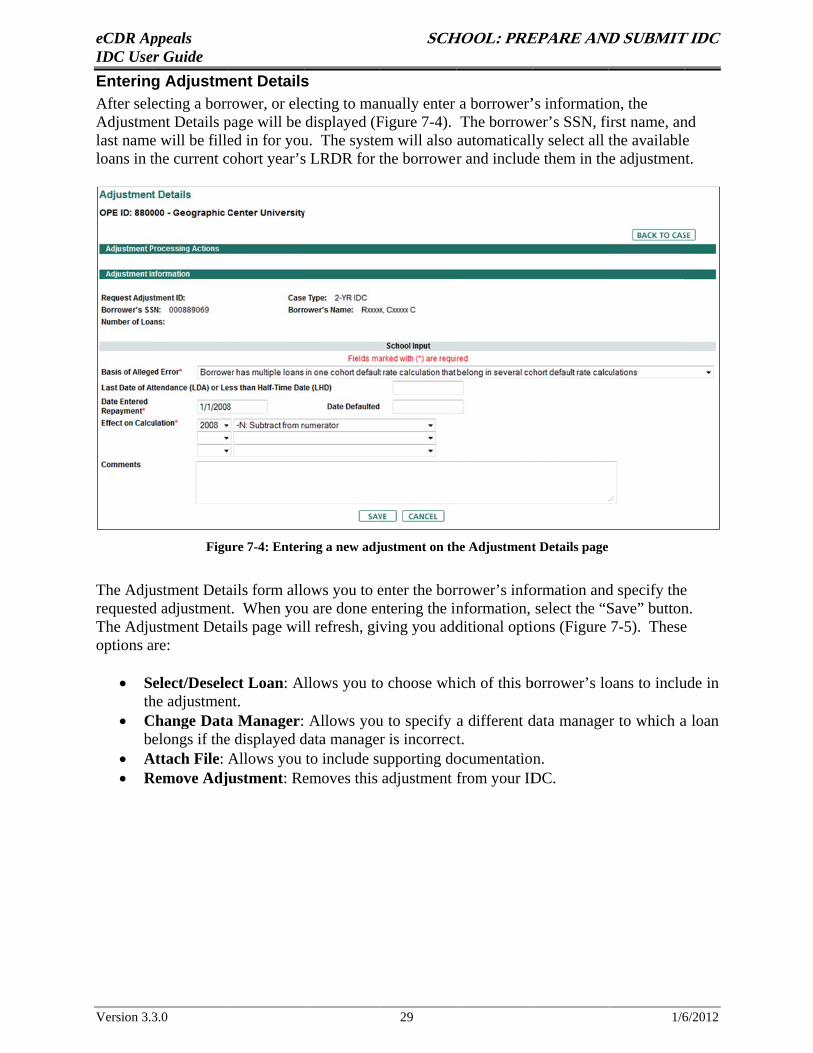
eCDR Apppeals SCHHOOL: PREEPARE ANDND SUBMITT IDC IDC Useer Guide Enteringg Adjustment Detailss After seleecting a borrrower, or eleecting to mannually enter a borrower’’s informatioon, the Adjustmeent Details ppage will be displayed (FFigure 7-4). The borrowwer’s SSN, fiirst name, annd last namee will be filleed in for youu. The systeem will also automaticallly select all tthe availablee loans in tthe current ccohort year’ss LRDR for tthe borrowerr and includde them in thhe adjustmennt.
Figuure 7-4: Enterring a new adjustment on thhe Adjustmentt Details page
The Adjuustment Detaails form alloows you to eenter the borrrower’s infoormation andd specify thee requestedd adjustmentt. When youu are done enntering the innformation, select the “SSave” buttonn. The Adjuustment Detaails page willl refresh, givving you addditional optiions (Figure 7-5). Thesee options aare:
• Select/Deseleect Loan: Allows you too choose whhich of this bborrower’s looans to incluude in thhe adjustmennt.
• CChange Dataa Manager: Allows youu to specify a different ddata manage r to which aa loan belongs if thee displayed ddata managerr is incorrectt.
• AAttach File: AAllows you to include suupporting doocumentatio n. • RRemove Adjustment: Reemoves this adjustment from your IDDC.
Version 3.33.0 29 1/66/2012
eCDR Apppeals SCHHOOL: PREEPARE ANDND SUBMITT IDC IDC Useer Guide
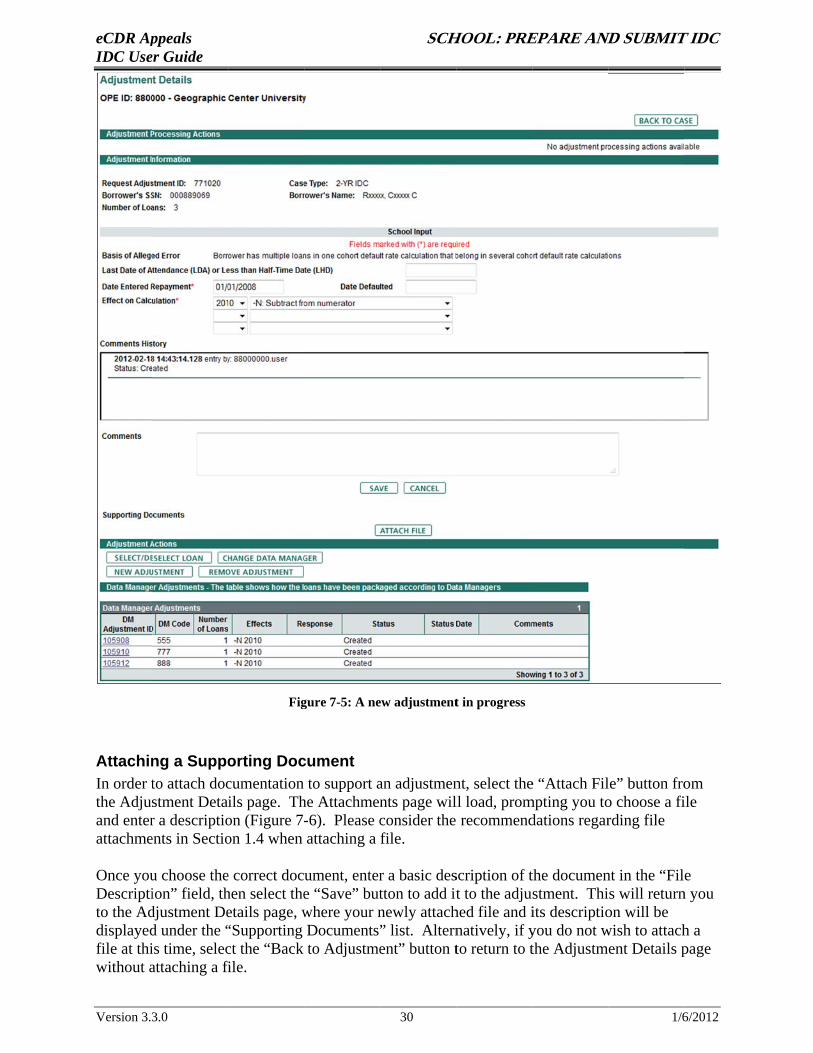
Figgure 7-5: A neew adjustmentt in progress
Attachinng a Suppoorting Doccument In order tto attach doccumentation to support aan adjustmennt, select thee “Attach Fille” button froom the Adjustment Deta ils page. Thhe Attachmennts page willl load, prommpting you too choose a fiile and enterr a descriptioon (Figure 7--6). Please cconsider the recommenddations regarrding file attachmeents in Sectioon 1.4 when attaching a file.
Once youu choose thee correct doc ument, enterr a basic desscription of tthe documennt in the “File Descriptiion” field, thhen select thee “Save” buttton to add itt to the adju stment. This will returnn you to the Addjustment Deetails page, wwhere your nnewly attachhed file and iits descriptioon will be displayedd under the ““Supporting Documents”” list. Alternnatively, if yyou do not wwish to attachh a file at thiis time, selecct the “Back to Adjustmeent” button tto return to tthe Adjustm ent Details ppage without aattaching a fifile.
Version 3.33.0 30 1/66/2012
eCDR Apppeals SCHHOOL: PREEPARE ANDND SUBMITT IDC IDC Useer Guide
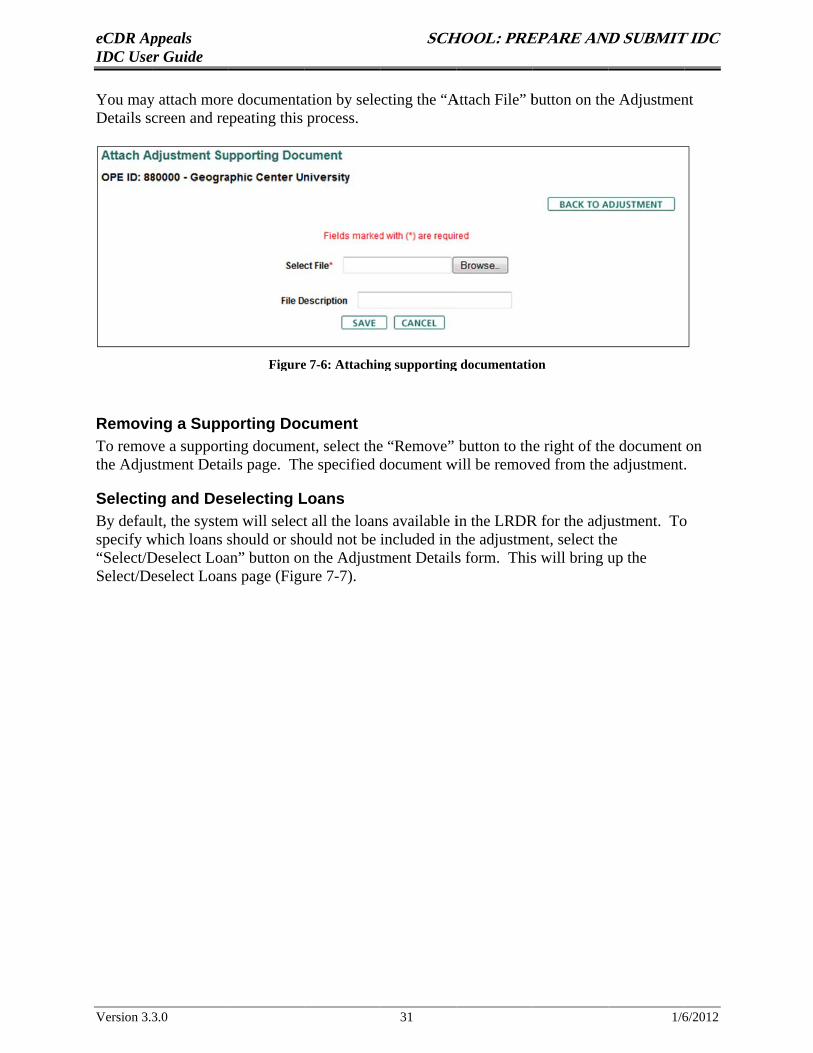
You mayy attach moree documentaation by seleecting the “AAttach File” bbutton on thee Adjustmennt Details sccreen and reepeating this process.
Figuree 7-6: Attachinng supportingg documentatioon
Removiing a Suppporting Doccument To removve a supportting documennt, select thee “Remove” button to thhe right of thee document on the Adjustment Deta ils page. Thhe specified ddocument wwill be removved from thee adjustment..
Selectinng and Desselecting LLoans By defauult, the systemm will selectt all the loanns available iin the LRDRR for the adjuustment. Too specify wwhich loans sshould or shhould not be included in tthe adjustmeent, select thhe “Select/DDeselect Loaan” button onn the Adjustmment Detailss form. Thiss will bring uup the Select/Deeselect Loanns page (Figuure 7-7).
Version 3.33.0 31 1/66/2012
r
S
eCDR Apppeals SCHHOOL: PREEPARE ANDND SUBMITT IDC IDC Useer Guide
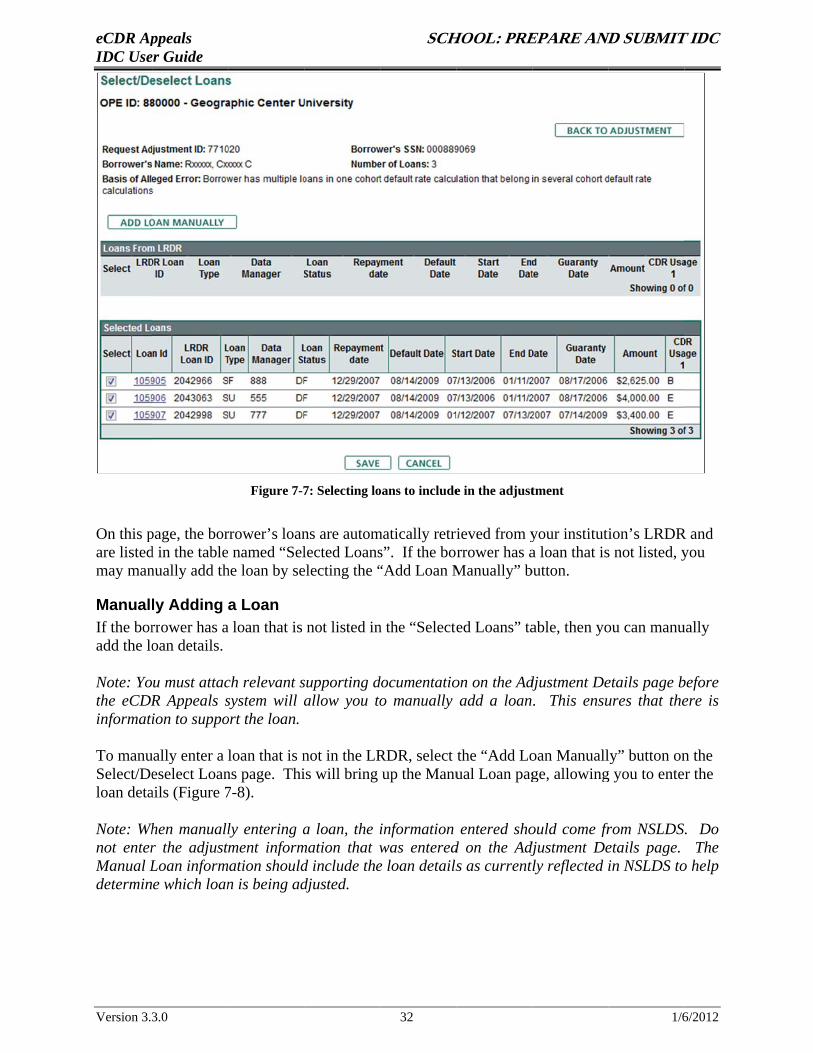
Figure 7-77: Selecting looans to includee in the adjusttment
On this ppage, the borrrower’s loanns are autommatically retriieved from yyour institutiion’s LRDRR and are listedd in the table named “Sellected Loanss”. If the borrower has aa loan that iss not listed, yyou may mannually add thhe loan by seelecting the ““Add Loan MManually” bbutton.
Manuallly Adding a Loan If the borrrower has aa loan that is not listed inn the “Selecteed Loans” taable, then yoou can manuually add the looan details.
Note: You must attacch relevant ssupporting ddocumentatioon on the Adjdjustment Deetails page bbefore the eCDRR Appeals ssystem will aallow you too manually add a loan. This ensuures that theere is informatiion to suppoort the loan.
To manuually enter a loan that is nnot in the LRRDR, select the “Add Looan Manuallly” button onn the Select/Deeselect Loanns page. Thiis will bring up the Manuual Loan pagge, allowingg you to enter the loan detaails (Figure 77-8).
Note: Whhen manuallly entering aa loan, the iinformation entered shoould come frfrom NSLDS. Do not enterr the adjustmment informmation that wwas enteredd on the Adjdjustment Deetails page. The Manual LLoan information shouldd include thee loan detailss as currentlly reflected iin NSLDS too help determine which loann is being addjusted.
Version 3.33.0 32 1/66/2012

f
eCDR Apppeals SCHHOOL: PREEPARE ANDND SUBMITT IDC IDC Useer Guide
Figure 7-8: MManually addinng a loan
Once youu have entereed the loan iinformation, select the “ Save” buttonn. You will be returned to the Selecct/Deselect LLoans page, aand the manually added loan will apppear in the ““Selected Looans” list.
Selectinng Loans from the LRRDR The default setting foor eCDR Apppeals autommatically seleects all loanss from the LRRDR and lists them undder the “Seleected Loans”” table. If yoou wish to deeselect any oof the loans, mark theappropriaate checkboxx next to thee loans that yyou wish to ddeselect and hit “Save”. The deseleccted loans willl then be dissplayed undeer the “Loanns from LRDDR” table.
When yoou are done sselecting the desired loanns and manuually adding loans, selectt the “Save”” button.
Loan Seelection Coonfirmation If you didd not select aall the availaable loans onn the Select//Deselect Looans page, a message, remindinng you that nnot selecting loans may leeave your coohort defaultt rate unchannged (Figuree 7-9), willl be displayeed after you click “Save””.
Version 3.33.0 33 1/66/2012
t
eCDR Apppeals SCHHOOL: PREEPARE ANDND SUBMITT IDC IDC Useer Guide
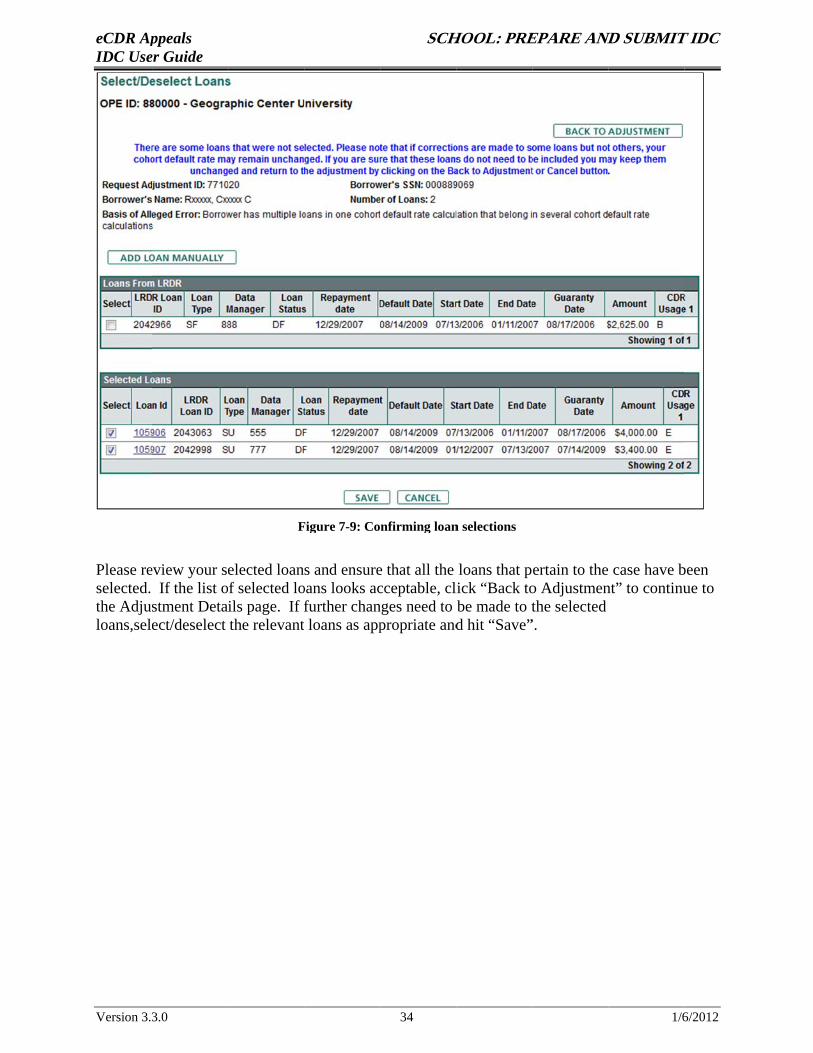
FFigure 7-9: Confirming loann selections
Please reeview your seelected loan s and ensuree that all the loans that p ertain to the case have bbeen selected. If the list of selected looans looks accceptable, cl lick “Back too Adjustmennt” to continuue to the Adjustment Deta ils page. If ffurther channges need to be made to tthe selected loans,seleect/deselect the relevant loans as apppropriate andd hit “Save””.
Version 3.33.0 34 1/66/2012
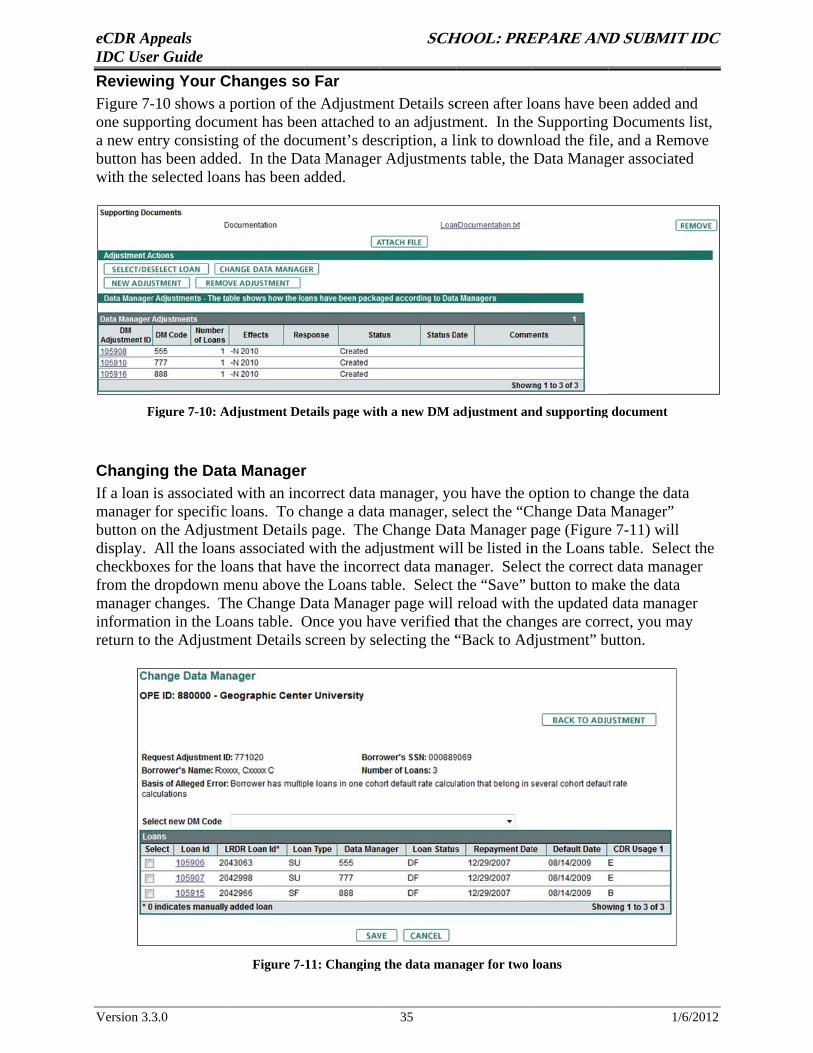
eCDR Apppeals SCHHOOL: PREEPARE ANDND SUBMITT IDC IDC Useer Guide Reviewing Your CChanges soo Far Figure 7--10 shows a portion of thhe Adjustmeent Details sccreen after looans have beeen added annd one suppporting documment has beeen attached tto an adjustmment. In thee Supporting Documents list, a new enntry consistinng of the doccument’s desscription, a l link to downnload the filee, and a Remmove button haas been addeed. In the Daata Managerr Adjustmentts table, the Data Managger associateed with the selected loanns has been added.
FFigure 7-10: AAdjustment Deetails page with a new DM aadjustment annd supporting document
Changinng the Data Managerr If a loan is associatedd with an inccorrect data mmanager, yoou have the ooption to chaange the dataa manager for specific loans. To cchange a dataa manager, sselect the “CChange Data Manager” button onn the Adjustmment Detailss page. The Change Datta Manager ppage (Figuree 7-11) will display. All the loanns associatedd with the adjjustment willl be listed inn the Loans table. Selecct the checkboxxes for the looans that havve the incorrrect data mannager. Selecct the correc t data managger from the dropdown mmenu above the Loans taable. Select the “Save” bbutton to maake the data manager changes. Thhe Change DData Manageer page will reload with the updated data managger informatiion in the Looans table. OOnce you haave verified tthat the channges are corrrect, you maay return to the Adjustmment Details screen by seelecting the ““Back to Addjustment” b utton.
Figure 7-11: Changingg the data mannager for two lloans
Version 3.33.0 35 1/66/2012
eCDR Appeals SCHOOL: PREPARE AND SUBMIT IDC IDC User Guide
Removing an Adjustment To remove an adjustment from your case, select the “Remove Adjustment” button on the Adjustment Details page of the adjustment you wish to remove. A confirmation page will load, prompting you to verify the removal of the adjustment. To remove the adjustment from your case, select “OK”. To keep the adjustment, select “Cancel” to return to the Adjustment Details page. If you select “OK”, the adjustment will be removed from the case and you will be returned to the Case Details page.
Adding Comments If you wish to add a comment to your case at any point, enter your remarks in the Comments field on the Case Detail page and select “Save”. The comment will be added to the History table. It will be visible to anyone who has access to the case, such as Data Managers and OPD Caseworkers. Adding a comment is optional.
In addition to adding a comment on the Case Detail page, you may also add adjustment-specific comments on the Adjustment Details page. Comments added to the Adjustment Details page will only be visible to those who have access to the adjustment (e.g., data managers associated with a loan in the adjustment).
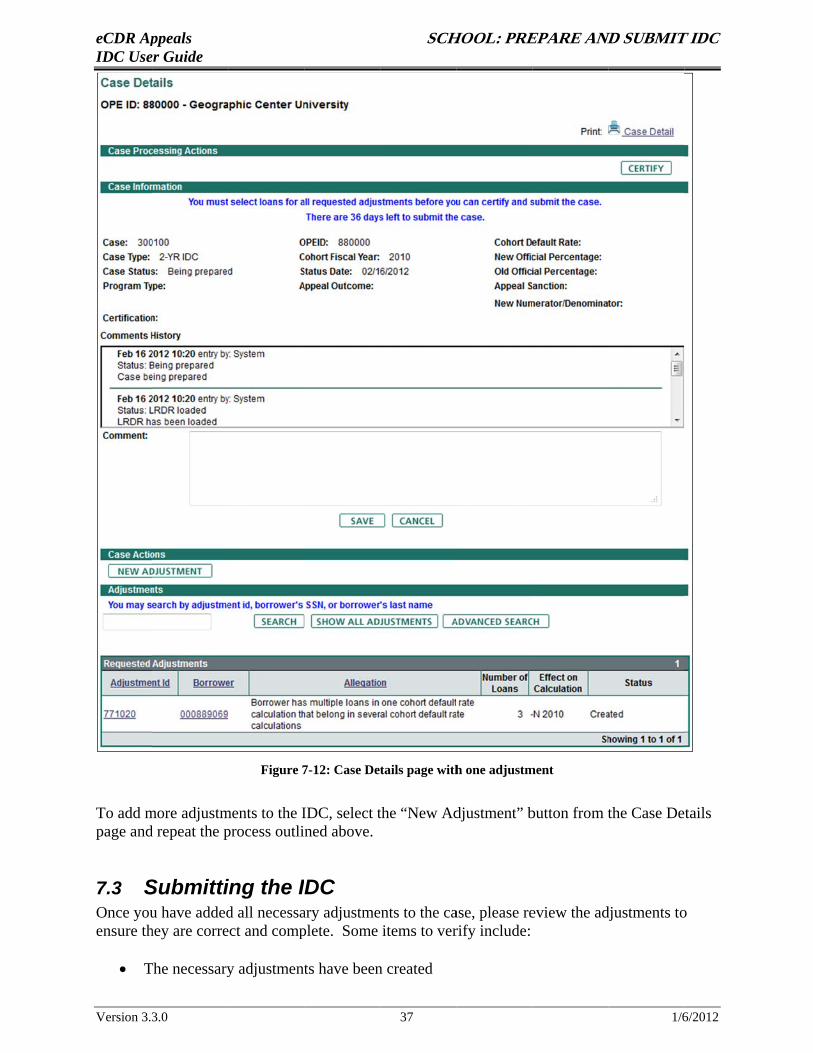
After an Adjustment is Complete When you are done adding the borrower, loans, and supporting documentation for an adjustment, select the “Back to Case” button on the Adjustment Details page. This will return you to the Case Details page, where the new adjustment will appear in the Requested Adjustments list (see Figure 7-12). You can always return to the Adjustment Details page to view or change an adjustment by selecting the adjustment record number in the Requested Adjustments list on the Case Details page.
Version 3.3.0 36 1/6/2012
I
eCDR Apppeals SCHHOOL: PREEPARE ANDND SUBMITT IDC IDC Useer Guide
Figure 77-12: Case Dettails page withh one adjustmment
To add mmore adjustmments to the IIDC, select tthe “New Addjustment” bbutton from tthe Case Details page andd repeat the pprocess outlined above.
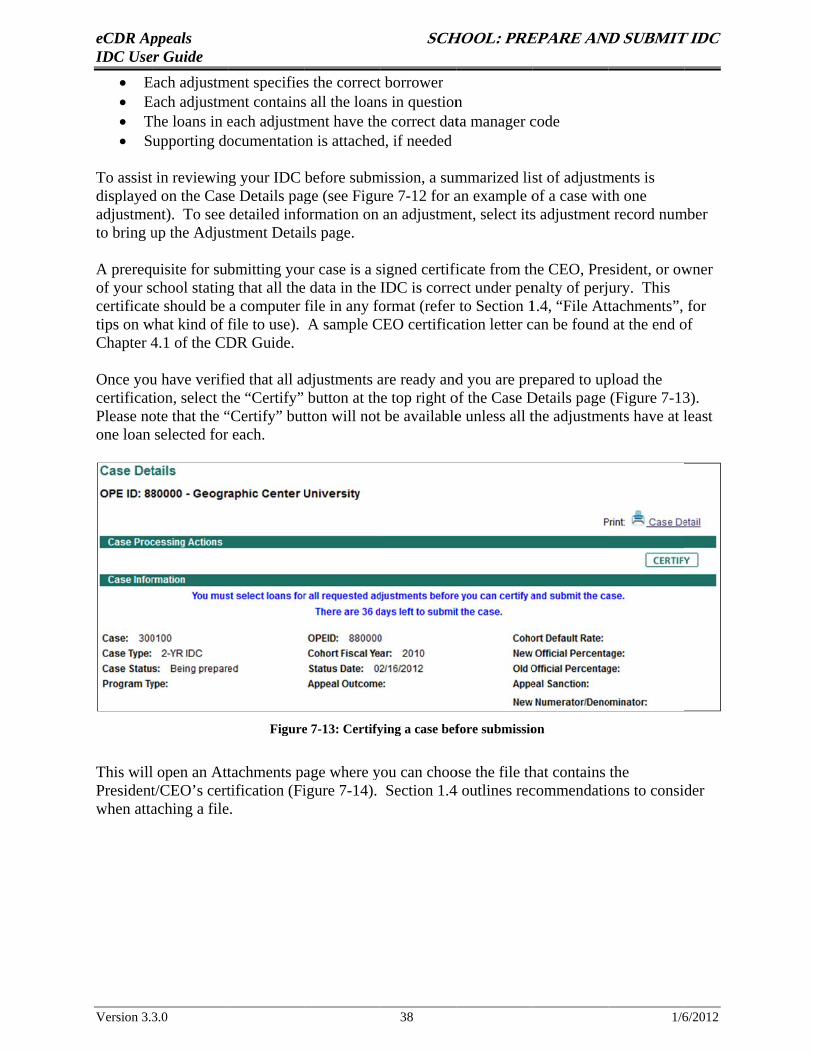
7.3 SSubmittiing the IDC Once youu have addedd all necessaary adjustmeents to the caase, please reeview the adjdjustments too ensure thhey are correect and compplete. Some items to verrify include:
• TThe necessaryy adjustmentts have beenn created
Version 3.33.0 37 1/66/2012
t
r
eCDR Apppeals SCHHOOL: PREEPARE ANDND SUBMITT IDC IDC Useer Guide • EEach adjustmment specifiess the correctt borrower • EEach adjustmment containss all the loanns in questionn • TThe loans in eeach adjustmment have the correct datta manager ccode • Supporting doocumentatioon is attachedd, if needed
To assist in reviewing your IDC before submmission, a summmarized li st of adjustmments is displayedd on the Case Details pagge (see Figuure 7-12 for aan example oof a case witth one adjustmeent). To see detailed infoormation on an adjustmeent, select itss adjustmentt record nummber to bring uup the Adjusstment Detaiils page.
A prerequisite for subbmitting youur case is a ssigned certifificate from thhe CEO, Preesident, or owwner of your school statingg that all thee data in the IDC is correect under pennalty of perjury. This certificatte should be a computer file in any foormat (refer to Section 11.4, “File Atttachments”, for tips on wwhat kind of ffile to use). A sample CCEO certificaation letter ccan be foundd at the end oof Chapter 44.1 of the CDDR Guide.
Once youu have verifii djustments aare ready andd you are prr pload theed that all a epared to up certificattion, select thhe “Certify” button at thhe top right oof the Case DDetails page (Figure 7-133). Please noote that the ““Certify” buttton will nott be availablee unless all tthe adjustmeents have at lleast one loan selected for each.
Figuree 7-13: Certifyying a case beffore submissioon
This willl open an Atttachments paage where yyou can chooose the file thhat contains the Presidentt/CEO’s certtification (Fiigure 7-14). Section 1.44 outlines reccommendatioons to consider when attaaching a filee.
Version 3.33.0 38 1/66/2012

tt
eCDR Apppeals SCHHOOL: PREEPARE ANDND SUBMITT IDC IDC Useer Guide
FFigure 7-14: AAttaching a cerrtification
In the Fille Descriptioon field, simpply enter “CCertification””. When youu are done, sselect “Save””. This willl attach the ccertification lletter to the case and upddate the casee status to “CCertified”. YYou may revi ew the certiffication letteer to verify thhat it is the ccorrect file. At this poinnt, you can nno longer addd or removee borrowers or adjustmennts, loans, or supportingg documents to the case. If you wishh to replace tthe certification letter or if you need to edit any iinformation in the case, you may clickk on the “Deecertify” button to returnn the case to “Being Preppared” statuss and delete the attached certificationn file.
Figure 7-15: Casse with DECEERTIFY and SSUBMIT buttoons available
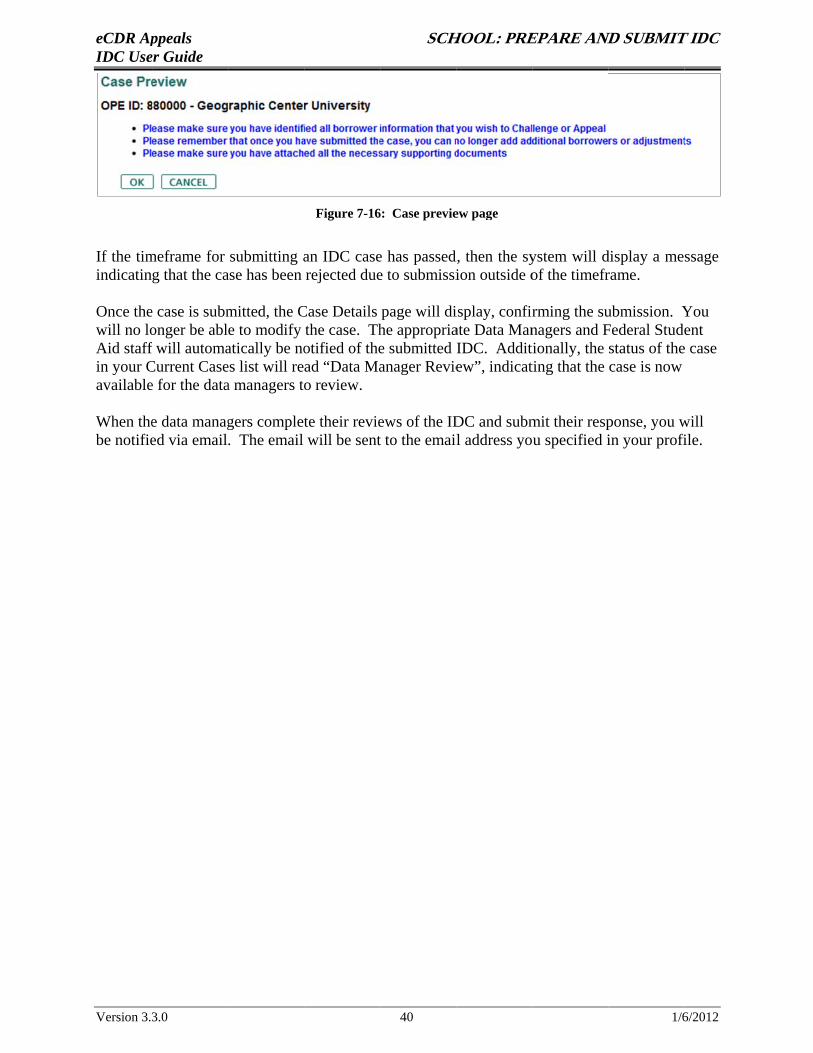
If you aree satisfied wwith the certiffication letteer and the infformation inn the case, cllick on the “Submit”” button at thhe top right oof the page. This will oppen the Casee Preview paage (Figure 7-16). The Case Prevview page liists all the reequirements for submittinng a case. If you wish to make anyy further chaanges before submission, select “Canncel” to retuurn to the Case Details paage. From theere, you can decertify thee case to retuurn to case ppreparation. If no changes are needeed, click “Okk”.
Version 3.33.0 39 1/66/2012
f
eCDR Apppeals SCHHOOL: PREEPARE ANDND SUBMITT IDC IDC Useer Guide
Figure 7-166: Case previeew page
If the timmeframe for submitting aan IDC casee has passedd, then the syystem will ddisplay a me ssage indicatin g that the caase has been rejected duee to submissiion outside oof the timefrrame.
Once thee case is submmitted, the CCase Details page will diisplay, confirrming the suubmission. YYou will no loonger be able to modify the case. Thhe appropriaate Data Mannagers and FFederal Studeent Aid staff will automaatically be nootified of thee submitted IIDC. Addittionally, the status of thee case in your CCurrent Casees list will re ad “Data Maanager Revieew”, indicatting that the case is now availablee for the dataa managers too review.
When thee data managgers complette their revieews of the IDDC and submmit their respponse, you wwill be notifieed via email . The email will be sentt to the emaill address you specified iin your profiile.
Version 3.33.0 40 1/66/2012
eCDR Apppeals DATA MMANAGERR: REVIEWW IDC IDC Useer Guide
8.. DATAA MANAAGER: RREVIEWW IDC
8.1 CCurrent Cases PPage andd Case DDetails PPage Before wwe discuss the process invvolved in revviewing andd respondingg to an Incorrrect Data Challengge (IDC), wee will providee an overvieew of the Cuurrent Cases ppage and thee Case Detaiils page.
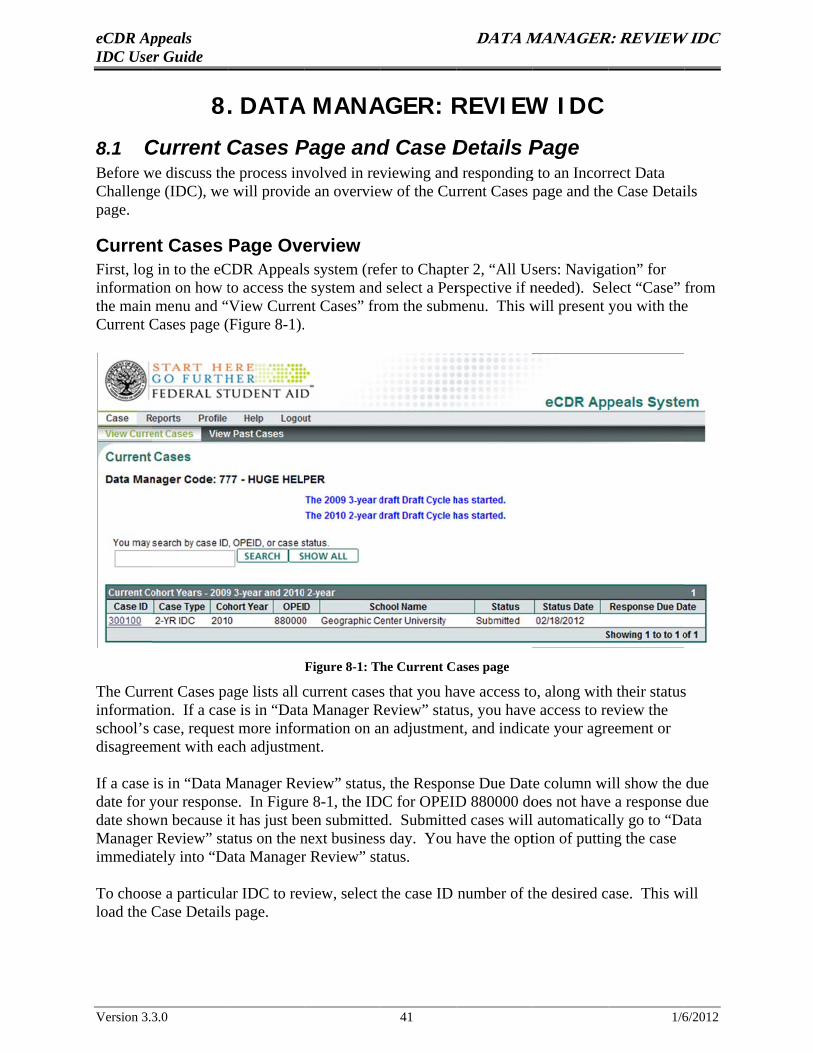
Currennt Cases Page Oveerview First, logg in to the eCCDR Appeals system (re fer to Chapt er 2, “All U sers: Navigaation” for informatiion on how tto access thee system andd select a Perrspective if nneeded). Select “Case” from the main menu and “View Currennt Cases” froom the submmenu. This wwill present you with thee Current CCases page ((Figure 8-1).
Figure 8-1: T he Current C ases page
The Currrent Cases paage lists all ccurrent casess that you haave access too, along withh their statuss informatiion. If a casse is in “Dataa Manager RReview” statuus, you havee access to reeview the school’s case, requesst more inforrmation on aan adjustmennt, and indicaate your agreeement or disagreemment with eaach adjustmeent.
If a case is in “Data MManager Revview” statuss, the Responnse Due Datte column wiill show the due date for yyour responsse. In Figuree 8-1, the IDDC for OPEIDD 880000 dooes not havee a response due date showwn because iit has just beeen submitte d. Submitteed cases willl automaticallly go to “Daata Managerr Review” staatus on the nnext businesss day. You hhave the opttion of puttinng the case immediattely into “Daata Managerr Review” sttatus.
To choosse a particulaar IDC to revview, select the case ID number of thhe desired case. This wwill load the CCase Detailss page.
Version 3.33.0 41 1/66/2012
eCDR Apppeals DATA MMANAGERR: REVIEWW IDC IDC Useer Guide
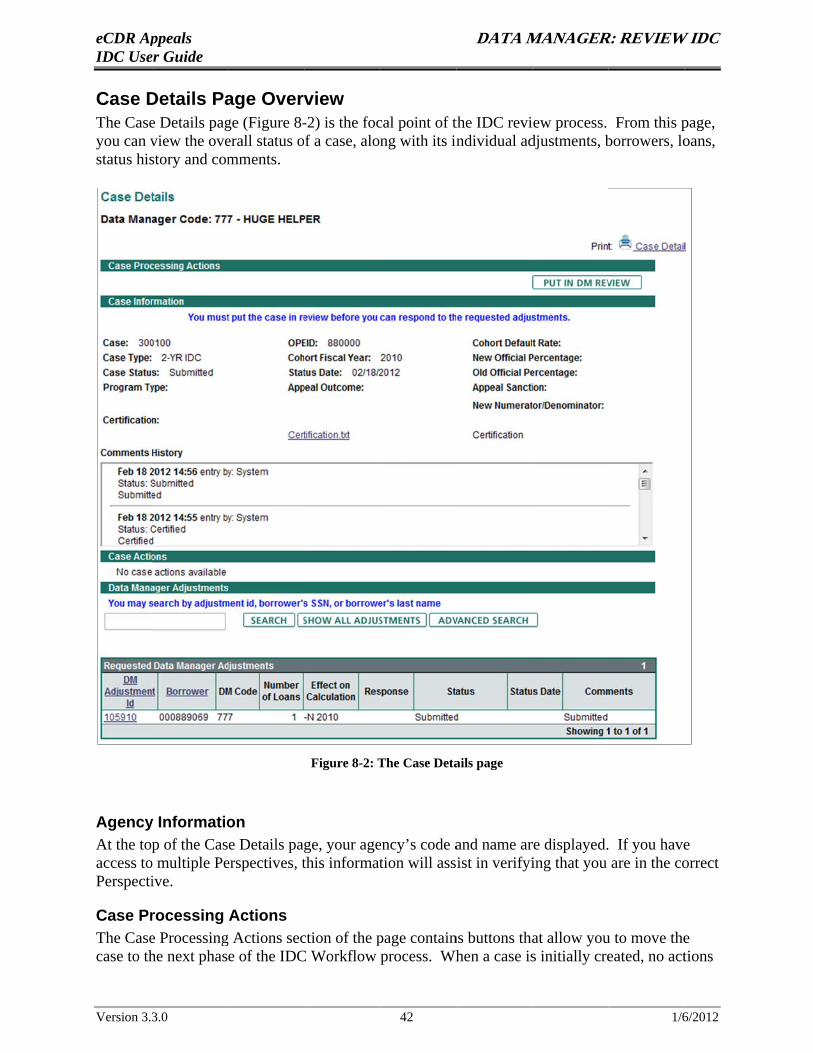
Case DDetails Paage Overvview The Casee Details pagge (Figure 8--2) is the foccal point of tthe IDC reviiew process. From this ppage, you can vview the oveerall status of a case, alonng with its inndividual addjustments, bborrowers, looans, status hisstory and commments.
Figure 8-2: TThe Case Detaails page
Agencyy Informatioon At the topp of the Cas e Details pagge, your ageency’s code aand name arre displayed. If you havee access too multiple Peerspectives, tthis informattion will assist in verifyiing that you are in the coorrect Perspectiive.
Case Prrocessing Actions The Casee Processingg Actions secction of the ppage containns buttons thaat allow youu to move thee case to thhe next phase of the IDCC Workflow process. Whhen a case iss initially creeated, no acttions
Version 3.33.0 42 1/66/2012
eCDR Appeals DATA MANAGER: REVIEW IDC IDC User Guide are available. However, when an action becomes available to you, a button will appear in this area.
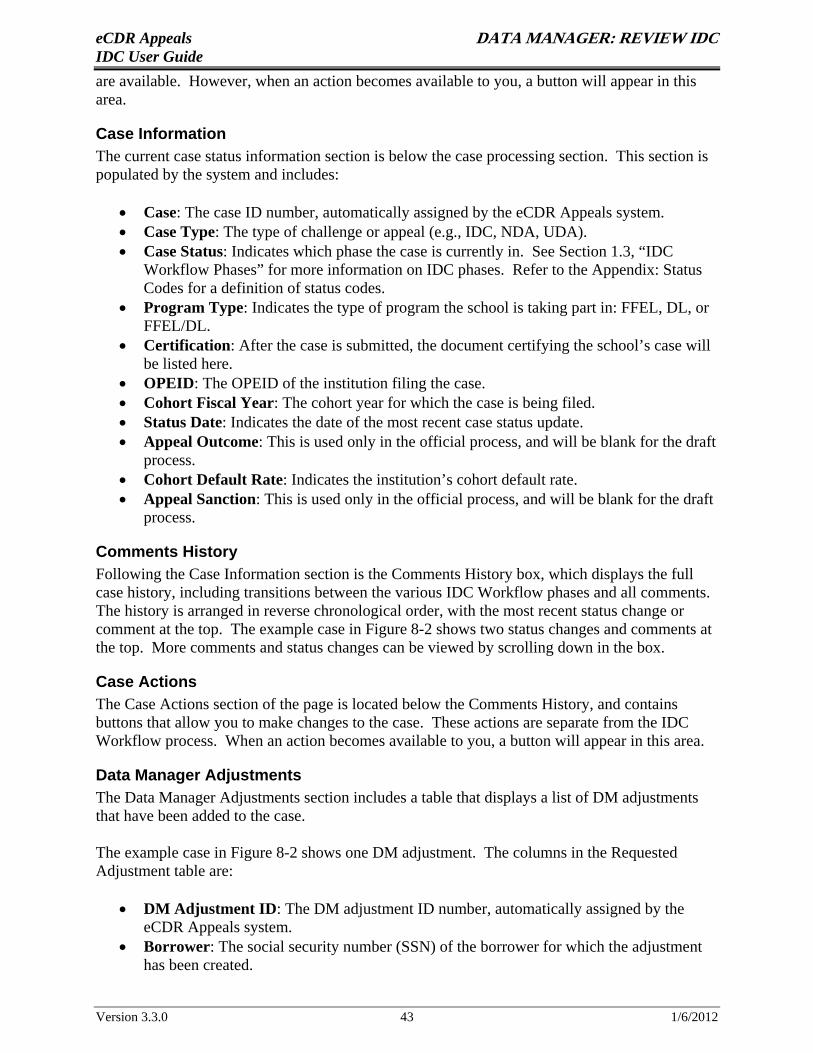
Case Information The current case status information section is below the case processing section. This section is populated by the system and includes:
• Case: The case ID number, automatically assigned by the eCDR Appeals system. • Case Type: The type of challenge or appeal (e.g., IDC, NDA, UDA). • Case Status: Indicates which phase the case is currently in. See Section 1.3, “IDC
Workflow Phases” for more information on IDC phases. Refer to the Appendix: Status Codes for a definition of status codes.
• Program Type: Indicates the type of program the school is taking part in: FFEL, DL, or FFEL/DL.
• Certification: After the case is submitted, the document certifying the school’s case will be listed here.
• OPEID: The OPEID of the institution filing the case. • Cohort Fiscal Year: The cohort year for which the case is being filed. • Status Date: Indicates the date of the most recent case status update. • Appeal Outcome: This is used only in the official process, and will be blank for the draft
process. • Cohort Default Rate: Indicates the institution’s cohort default rate. • Appeal Sanction: This is used only in the official process, and will be blank for the draft
process.
Comments History Following the Case Information section is the Comments History box, which displays the full case history, including transitions between the various IDC Workflow phases and all comments. The history is arranged in reverse chronological order, with the most recent status change or comment at the top. The example case in Figure 8-2 shows two status changes and comments at the top. More comments and status changes can be viewed by scrolling down in the box.
Case Actions The Case Actions section of the page is located below the Comments History, and contains buttons that allow you to make changes to the case. These actions are separate from the IDC Workflow process. When an action becomes available to you, a button will appear in this area.
Data Manager Adjustments The Data Manager Adjustments section includes a table that displays a list of DM adjustments that have been added to the case.
The example case in Figure 8-2 shows one DM adjustment. The columns in the Requested Adjustment table are:
• DM Adjustment ID: The DM adjustment ID number, automatically assigned by the eCDR Appeals system.
• Borrower: The social security number (SSN) of the borrower for which the adjustment has been created.
Version 3.3.0 43 1/6/2012
eCDR Appeals DATA MANAGER: REVIEW IDC IDC User Guide • DM Code: The Data Manager’s organizational code. • Number of Loans: Indicates how many loans associated with the specified borrower will
be included in this adjustment. • Effect on Calculation: Indicates what effect(s) the adjustment would have on the cohort
default rate calculation. Each effect consists of three parts: an add (+) or subtract (-) sign indicating whether one (1) should be added or subtracted; a letter (N, D, or B) indicating whether the addition/subtraction should affect the numerator (N), denominator (D), or both (B); and the cohort year in which the effect is to take place.
• Response: The Data Manager can “Agree” or “Disagree” with the requested adjustment. • Status: The current status of the adjustment. Refer to the Appendix: Status Codes for a
definition of status codes. • Status Date: The last date when the status was updated. • Comments: Any comments a user may have added.
8.2 Reviewing an IDC When a school submits an IDC containing adjustments that affect you as a data manager, then you will automatically be notified via email about the new IDC. The email will be sent to the email address specified in your eCDR Appeals profile (see Chapter 4, “Data Manager: Create Profile” for information on setting up your profile).
The email will include a link to the page for the submitted case. You may click on the link to go directly to the case details page for the IDC. You may be prompted to type in your user name and password before the page is displayed.
You may also open the IDC from the Current Cases page. To do this, select the desired case number from the Current Cases list. The Case Details page will load. If the case was just submitted, you will see a page similar to the one shown in Figure 8-3.
Version 3.3.0 44 1/6/2012

eCDR Apppeals DATA MMANAGERR: REVIEWW IDC IDC Useer Guide
Figuree 8-3: Submittted case openned by DM useer
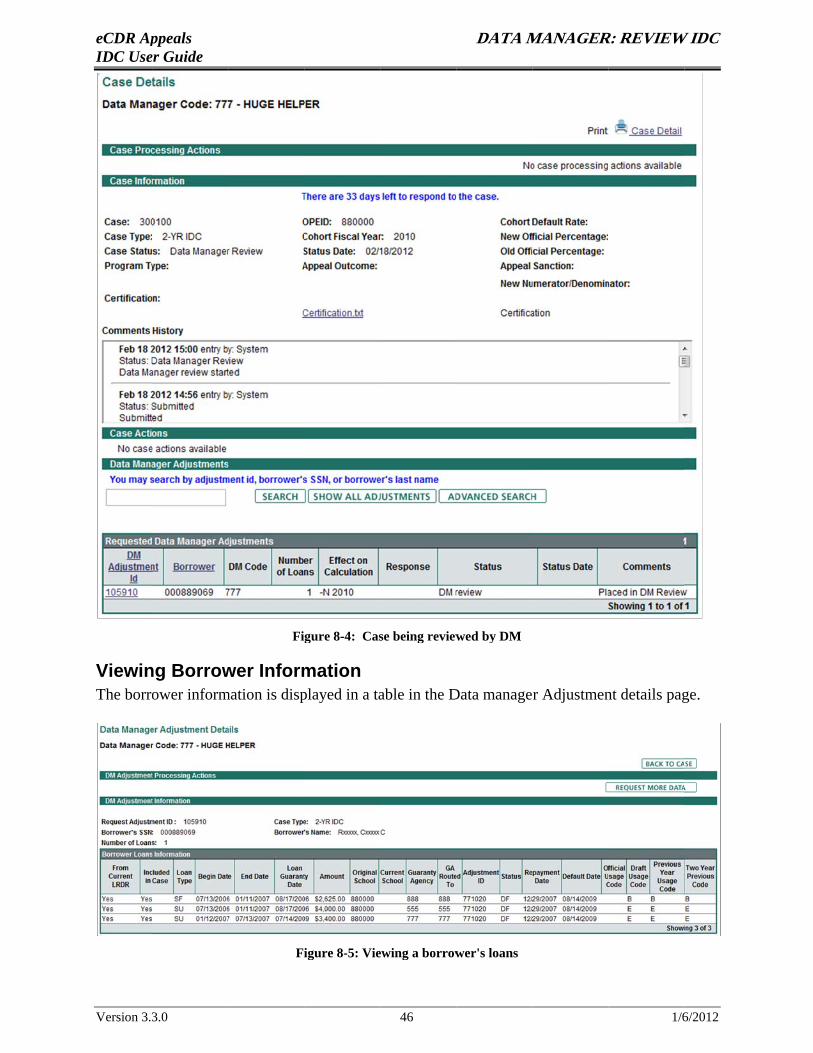
You cannnot respond to the case uuntil it is putt in DM Revview. The syystem will auutomaticallyy put the IDC iinto DM Revview on the next businesss day. If yoou want to, yyou may clicck on the “Puut in DM Reviiew” button to change thhe status immmediately. OOnce you havve done so, the page willl display hhow many daays you havee left to resp ond to the IDDC (Figure 88-4).
Version 3.33.0 45 1/66/2012
eCDR Apppeals DATA MMANAGERR: REVIEWW IDC IDC Useer Guide
Figure 8-4: Casse being reviewwed by DM
Viewinng Borrowwer Informmation The borroower informmation is dispplayed in a taable in the DData manage r Adjustmennt details pagge.
Fiigure 8-5: Vieewing a borrowwer's loans
Version 3.33.0 46 1/66/2012
eCDR Appeals DATA MANAGER: REVIEW IDC IDC User Guide
The “From Current LRDR” column identifies loans that are either in the current year's LRDR or were manually added. If there is a “Yes” indicator in that column, the loan record is from this year’s LRDR. You can see the current and previous usage codes for the loans on the right hand side of the table. You may have to scroll to the right of the page to see the columns.
Please note that the Repayment Date and Default Date columns are populated for current year loans only. Also, duplicated loans (loans that are counted in the current cohort year and one or both of the previous cohort years) are easily identifiable as they appear on one of line of the “Borrower Loans List” table with usage codes from previous years showing in the appropriate columns (“Previous Year Usage Code” and “Two Year Previous Code”).
Version 3.3.0 47 1/6/2012
eCDR Apppeals DATA MMANAGERR: REVIEWW IDC IDC Useer Guide
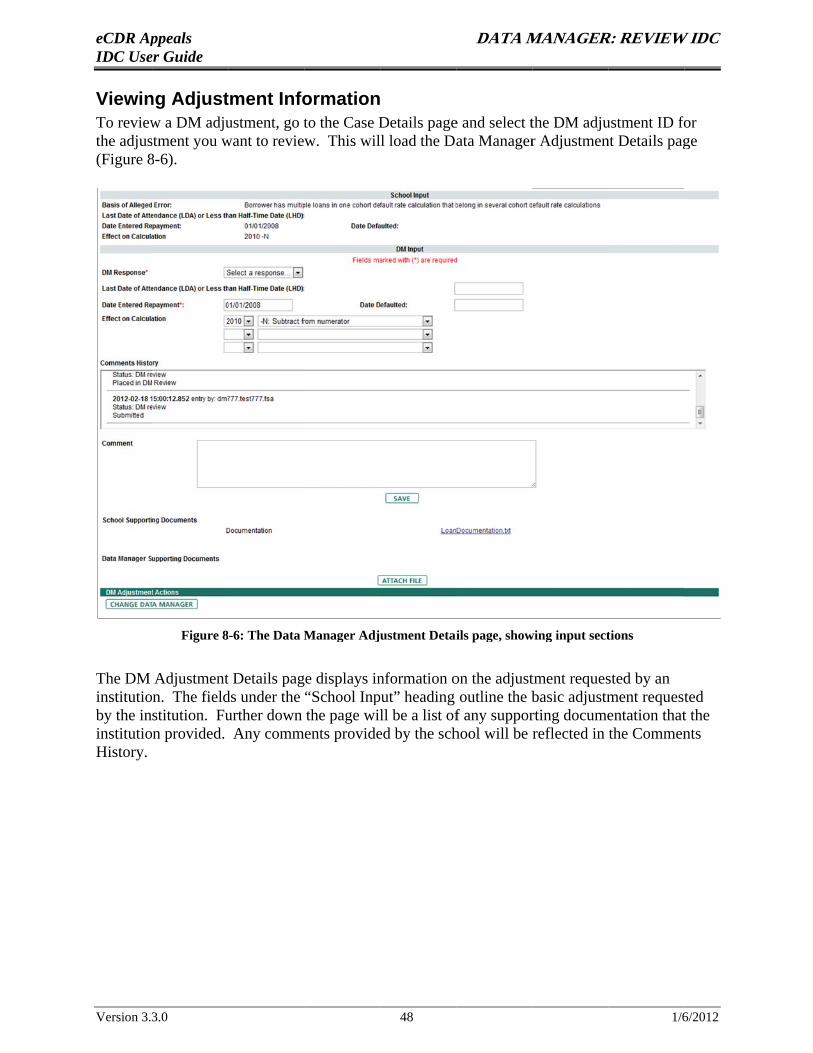
Viewinng Adjusttment Infoormation To revieww a DM adjuustment, go tto the Case DDetails pagee and select tthe DM adjuustment ID fofor the adjusstment you wwant to revie w. This will load the Daata Managerr Adjustmennt Details pagge (Figure 88-6).
Figure 88-6: The Data MManager Adjustment Detaiils page, showwing input secttions
The DM Adjustmentt Details pagge displays innformation oon the adjusttment requessted by an institution. The fieldds under the “School Inpput” heading outline the bbasic adjustmment requestted by the institution. Fuurther down the page willl be a list off any supporrting documeentation thatt the institution provided. Any comments provideed by the schhool will be rreflected in the Commennts History.
Version 3.33.0 48 1/66/2012
t
r
r
R S
l
eCDR Apppeals DATA MMANAGER: REQUESTT MORE ININFORMATTION IDC Useer Guide
9. DAATA MAANAGER: REQQUEST MORE INFORRMATIOON
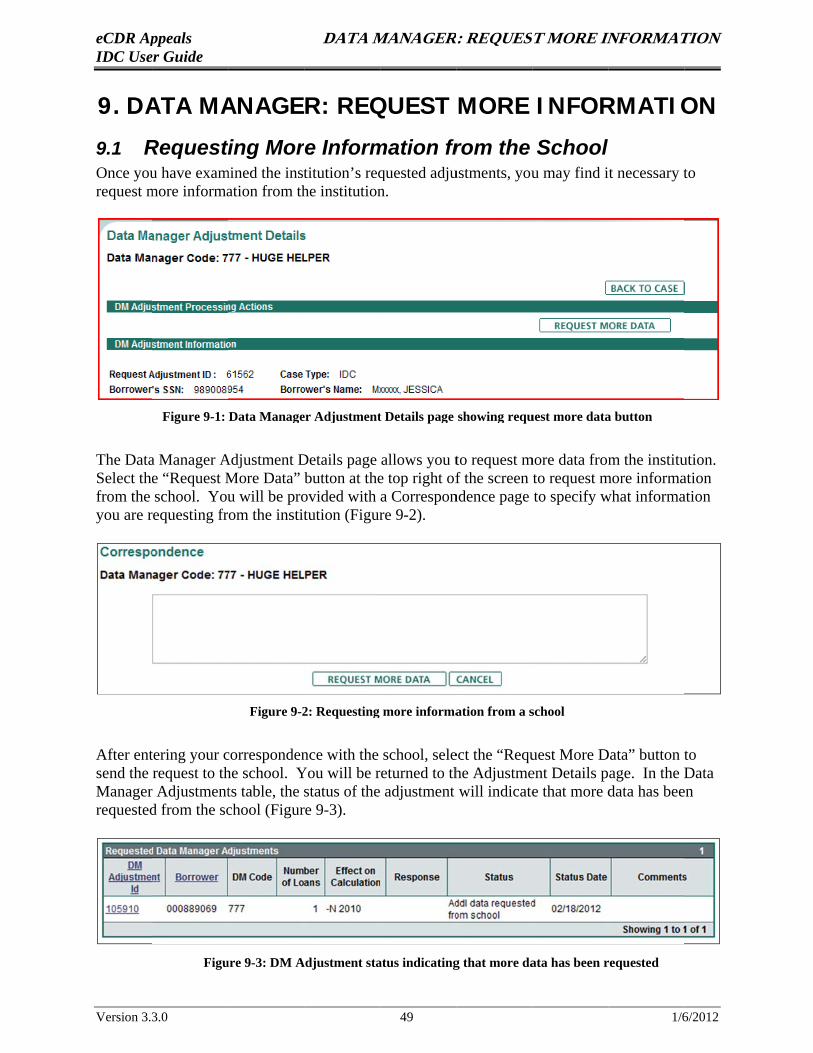
9.1 RRequesting More Informmation frrom the School Once youu have exammined the insttitution’s reqquested adjuustments, youu may find i t necessary tto request mmore informaation from thhe institutionn.
Figure 9-1: Data Manageer Adjustmentt Details page showing requuest more dataa button
The Dataa Manager AAdjustment DDetails page allows you tto request mmore data fromm the instituution. Select thee “Request MMore Data” button at thee top right off the screen to request mmore informaation from the school. Youu will be proovided with a Corresponndence page to specify wwhat informaation you are rrequesting from the instittution (Figurre 9-2).
Figure 9-22: Requesting more informaation from a sschool
After enttering your ccorrespondennce with the school, seleect the “Requuest More DData” button tto send the request to thhe school. YYou will be rreturned to thhe Adjustmeent Details page. In the DData Managerr Adjustmentts table, the status of the adjustment will indicatee that more ddata has beeen requestedd from the scchool (Figurre 9-3).
Figuure 9-3: DM AAdjustment staatus indicatingg that more daata has been rrequested
Version 3.33.0 49 1/66/2012
eCDR Appeals DATA MANAGER: REQUEST MORE INFORMATION IDC User Guide An automatic notification will be sent to the school via email to inform them that you have requested more information. After the school responds to your request, you will also be notified via email.
Note: You may repeat this information request process as often as needed after the school has responded to your most recent request subject to the timeframes for the IDC.
Version 3.3.0 50 1/6/2012
eCDR Apppeals SCHOOLL: PROVIDEDE MORE ININFORMATTION IDC Useer Guide
10. SCHHOOL: PPROVIDDE MOORE INFFORMAATION
10.1 WWhen a DData Maanager RRequestss Informmation If a data manager dettermines that more inforrmation is neecessary befoore they cann produce a response to one or mmore of your rrequested addjustments, tthey may optt to request mmore informatiion through the eCDR AAppeals systeem. If they eelect to take this step, yoou will receiive an email notification indicating thhat a data mmanager has rrequested infformation onn an adjustmment. Additionnally, schoolss can periodiically check the “Requessts for Addittional Informmation” repoort, availablee under the “Current Stattus Reports”. To do so, select the “RReports” linkk from the mmain menu of the Current Cases listingg.
Implicaations for the 45-DDay Timeeframe It is impoortant to notee that the timme period in which the ddata managerr reviews yoour IDC doess count agaainst the 45--day timeframme for your IDC submisssion. As ann example, iff you submitt your IDC withh 10 days lefft before the 45-day deaddline expiress, and the daata manager rreviews youur case for 55 days then rrequests morre informatioon, that meaans you havee 5 days left in which to respond tto the informmation requeest. At the ennd of the 45--day timefraame, any dataa manager adjustmeents with unaanswered infformation re quests will aautomaticallyy be routed bback to the ddata manager to be processsed as-is.
Please ennsure that yoou submit yoour IDC as eaarly as possiible to avoidd complicatioons in providding more infoormation at tthe last minuute.
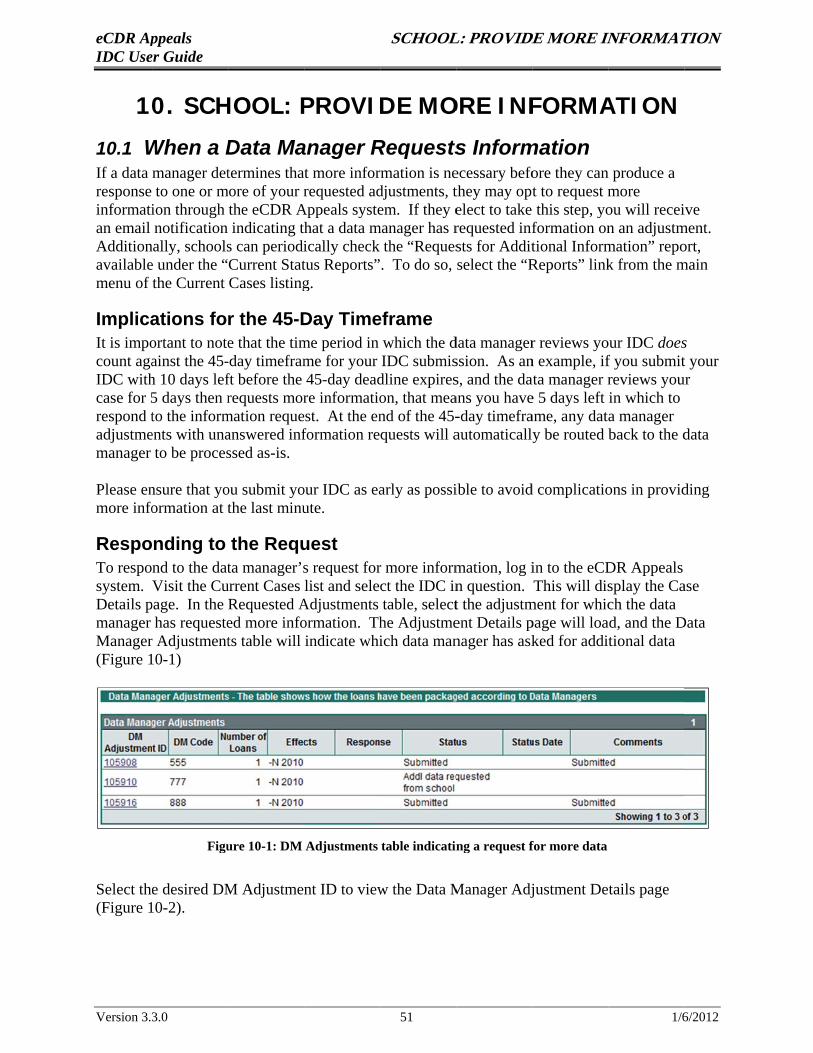
Responding to the Requuest To respond to the datta manager’ss request forr more informmation, log iin to the eCDDR Appeals system. Visit the Cuurrent Cases list and selecct the IDC inn question. This will dissplay the Caase Details ppage. In the Requested AAdjustments table, selectt the adjustmment for whicch the data manager has requesteed more infoormation. Thhe Adjustmeent Details ppage will loaad, and the DData Managerr Adjustmentts table will indicate whiich data mannager has askked for addittional data (Figure 110-1)
Figuure 10-1: DM Adjustments table indicatinng a request ffor more data
Select thee desired DMM Adjustmennt ID to vieww the Data MManager Adjjustment De tails page (Figure 110-2).
Version 3.33.0 51 1/66/2012
eCDR Apppeals SCHOOLL: PROVIDEDE MORE ININFORMATTION IDC Useer Guide
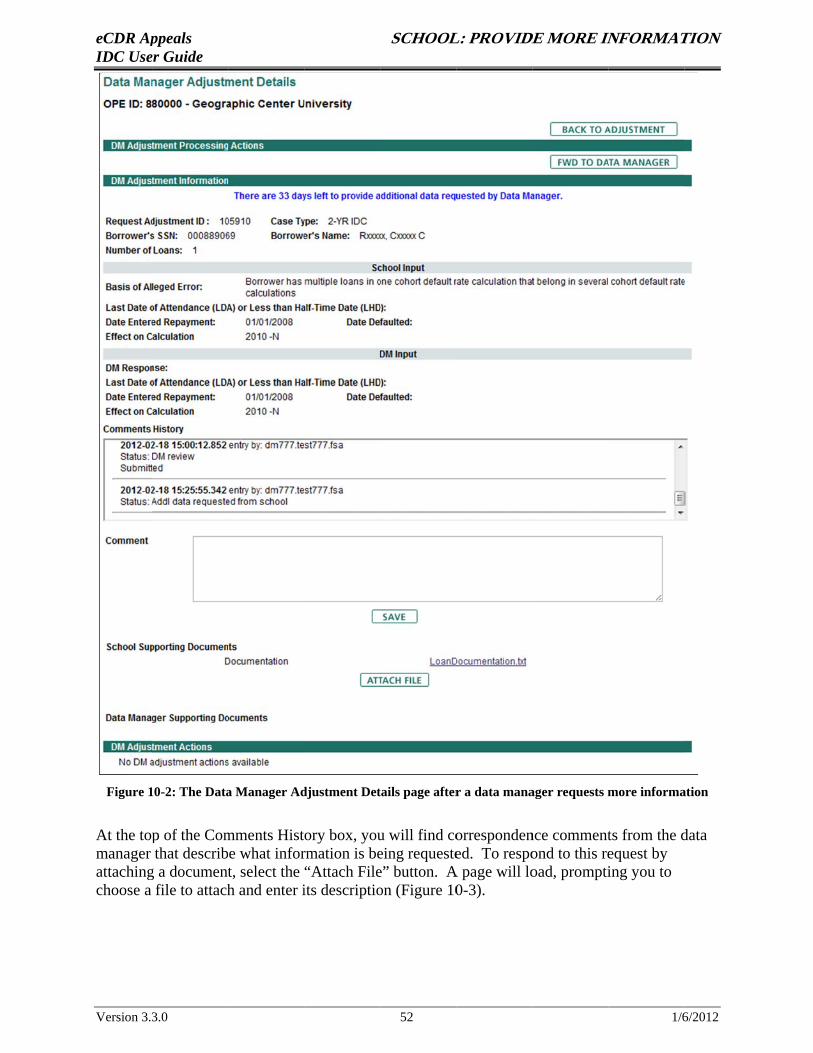
Figure 110-2: The Dataa Manager Addjustment Dettails page afterr a data manaager requests mmore informaation
At the topp of the Commments Hist ory box, youu will find coorrespondennce commentts from the ddata manager that describe what inforrmation is beeing requesteed. To respoond to this reequest by attachingg a documentt, select the “Attach Filee” button. AA page will looad, promptiing you to choose a file to attachh and enter iits descriptioon (Figure 100-3).
Version 3.33.0 52 1/66/2012
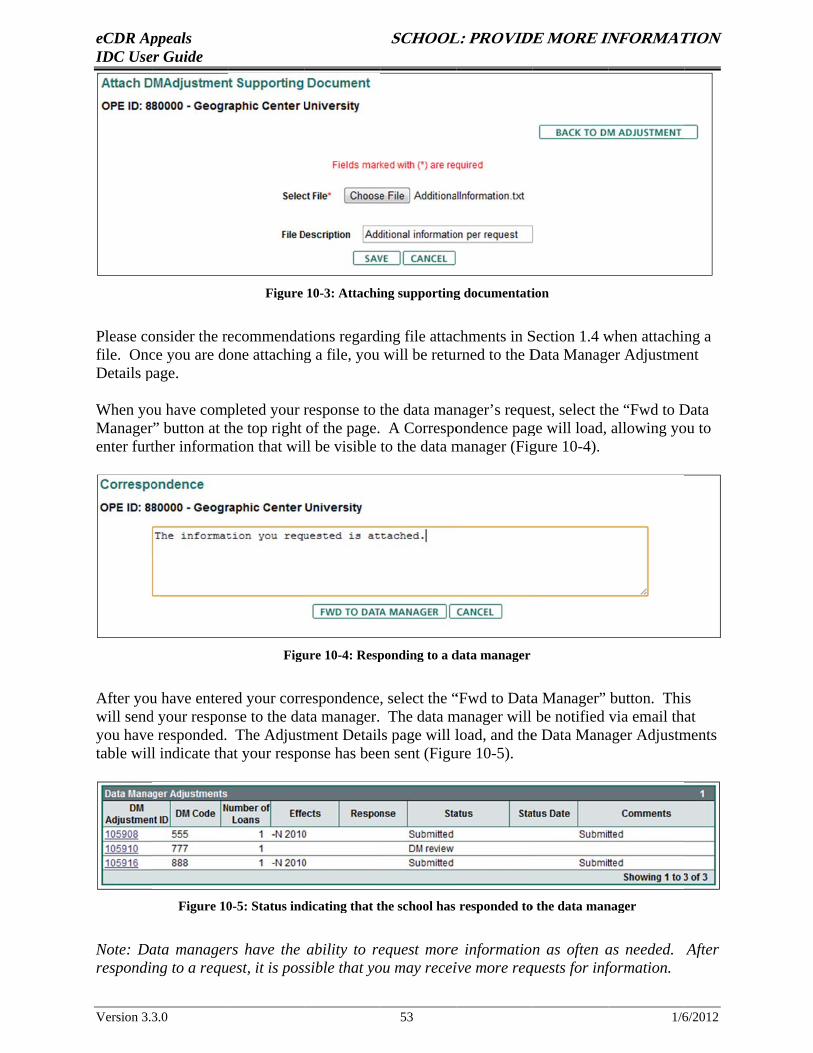
eCDR Apppeals SCHOOLL: PROVIDEDE MORE ININFORMATTION IDC Useer Guide
Figure 10-3: Attachiing supportingg documentatiion
Please coonsider the reecommendations regarding file attacchments in SSection 1.4 wwhen attachinng a file. Oncce you are doone attachingg a file, you will be retururned to the DData Manageer Adjustmeent Details ppage.
When yoou have comppleted your rresponse to tthe data mannager’s requuest, select thhe “Fwd to DData Managerr” button at the top right of the page. A Correspoondence pagge will load, allowing yoou to enter furtther informaation that willl be visible to the data mmanager (Figgure 10-4).
Figuure 10-4: Respponding to a ddata manager
After youu have entereed your corrrespondence, select the ““Fwd to Dataa Manager” button. Thiis will sendd your responnse to the daata manager. The data mmanager will be notified via email that you havee responded. The Adjusttment Detaills page will lload, and thee Data Manaager Adjustmments table willl indicate thaat your respoonse has beeen sent (Figuure 10-5).
Figure 100-5: Status inddicating that tthe school has responded too the data mannager
Note: Daata managerrs have the ability to reequest moree informationn as often aas needed. After responding to a requuest, it is pos sible that yoou may receiive more reqquests for infformation.
Version 3.33.0 53 1/66/2012
eCDR Appeals DATA MANAGER: SUBMIT IDC RESPONSE IDC User Guide
11. DATA MANAGER: SUBMIT IDC RESPONSE
11.1 Modifying the IDC The Data Manager Adjustment Details page details the institution’s requested adjustment. In addition, it provides a form in which you can enter an “Agreed” or “Disagreed” response, along with your input. You may also choose a new data manager for this adjustment, attach your supporting documentation, or add a comment.
Viewing Responses to Your Information Requests If you have requested additional information from the school (see Chapter 9) and the school has responded, you will have received an automatic email notification of their response. The response and its attached data will appear in the Data Manager Adjustment Details page for the adjustment in question.
Version 3.3.0 54 1/6/2012
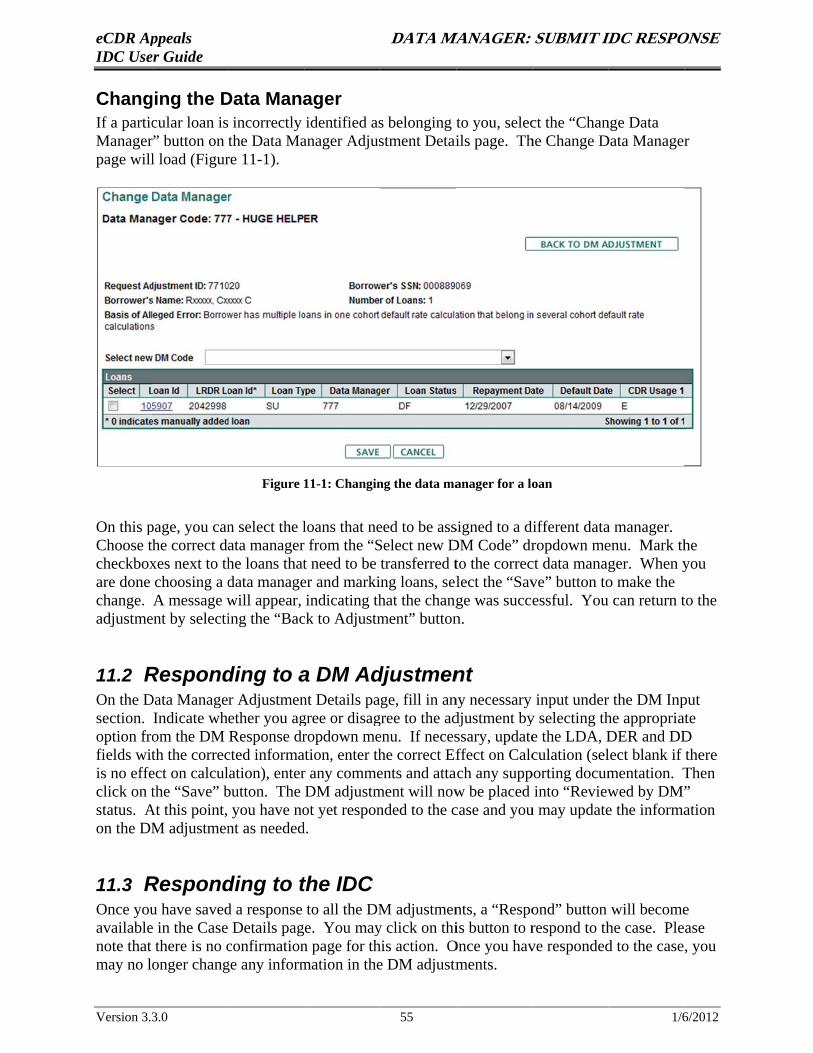
eCDR Apppeals DATA MAMANAGER: SUBMIT IDIDC RESPOONSE IDC Useer Guide
Changging the DData Manaager If a particcular loan is incorrectly identified ass belonging tto you, selecct the “Channge Data Managerr” button on the Data Maanager Adjusstment Detaiils page. Thhe Change DData Managerr page willl load (Figurre 11-1).
Figure 111-1: Changinng the data maanager for a looan
On this ppage, you cann select the lloans that neeed to be ass signed to a ddifferent dataa manager. Choose the correct daata managerr from the “SSelect new DDM Code” drropdown meenu. Mark thhe checkboxxes next to thhe loans thatt need to be transferred tto the correcct data managger. When yyou are done choosing a ddata manageer and marki ng loans, sellect the “Savve” button too make the change. A message wwill appear, indicating thhat the changge was succeessful. Youu can return tto the adjustmeent by selectiing the “Bacck to Adjustmment” buttonn.
11.2 RRespondding to aa DM Addjustmennt On the DData Manager Adjustmennt Details page, fill in anny necessary input underr the DM Inpput section. Indicate wh ether you aggree or disaggree to the addjustment byy selecting thhe appropriaate option froom the DM Response drropdown meenu. If necesssary, updatee the LDA, DDER and DDD fields witth the correccted informaation, enter thhe correct Efffect on Calcculation (sellect blank if there is no effeect on calcullation), enterr any commeents and attaach any suppporting docummentation. TThen click on tthe “Save” bbutton. The DM adjustmment will noww be placed into “Reviewwed by DM”” status. AAt this point, you have noot yet responnded to the ccase and youu may updatee the informaation on the DMM adjustmennt as neededd.
11.3 RRespondding to tthe IDC Once youu have savedd a response to all the DMM adjustmennts, a “Respoond” button will becomee availablee in the Case Details pag e. You mayy click on thiis button to rrespond to thhe case. Please note that there is no cconfirmationn page for thhis action. OOnce you havve respondedd to the case , you may no l onger changge any informmation in thee DM adjustmments.
Version 3.33.0 55 1/66/2012
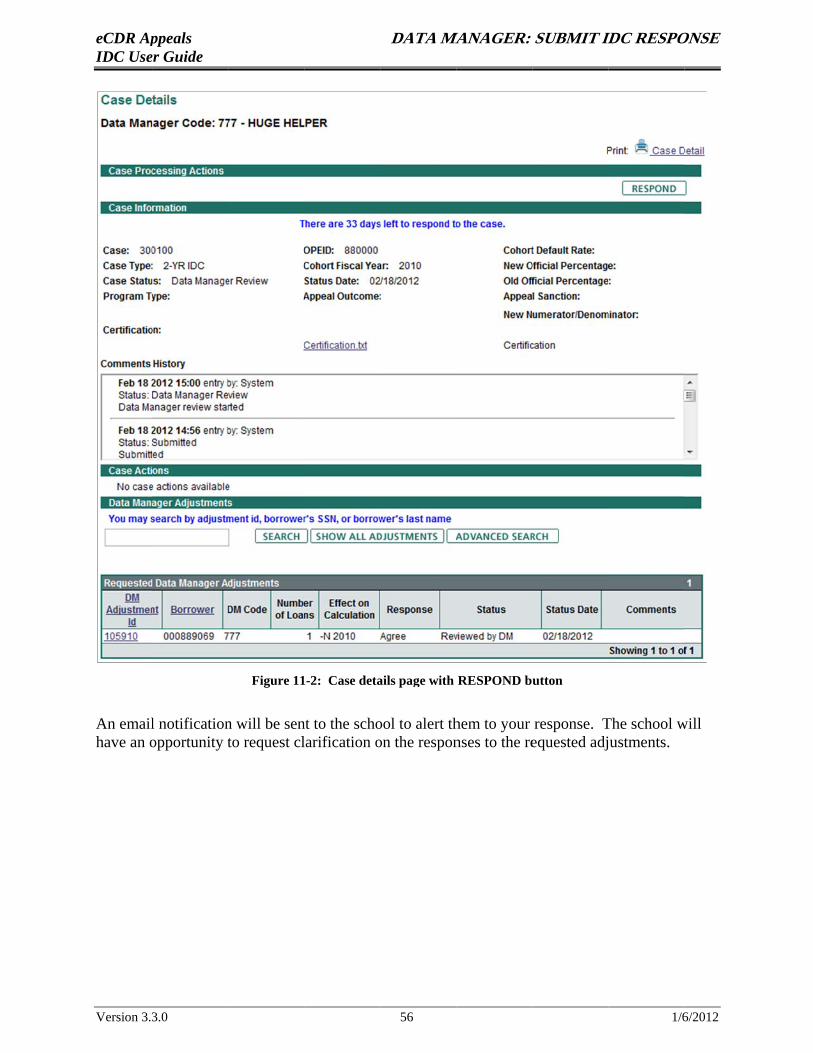
eCDR Apppeals DATA MAMANAGER: SUBMIT IDIDC RESPOONSE IDC Useer Guide
Figure 111-2: Case detaails page with RESPOND b utton
An emaill notificationn will be sennt to the schoool to alert thhem to your response. TThe school wwill have an oopportunity tto request cllarification oon the responnses to the reequested adjustments.
Version 3.33.0 56 1/66/2012
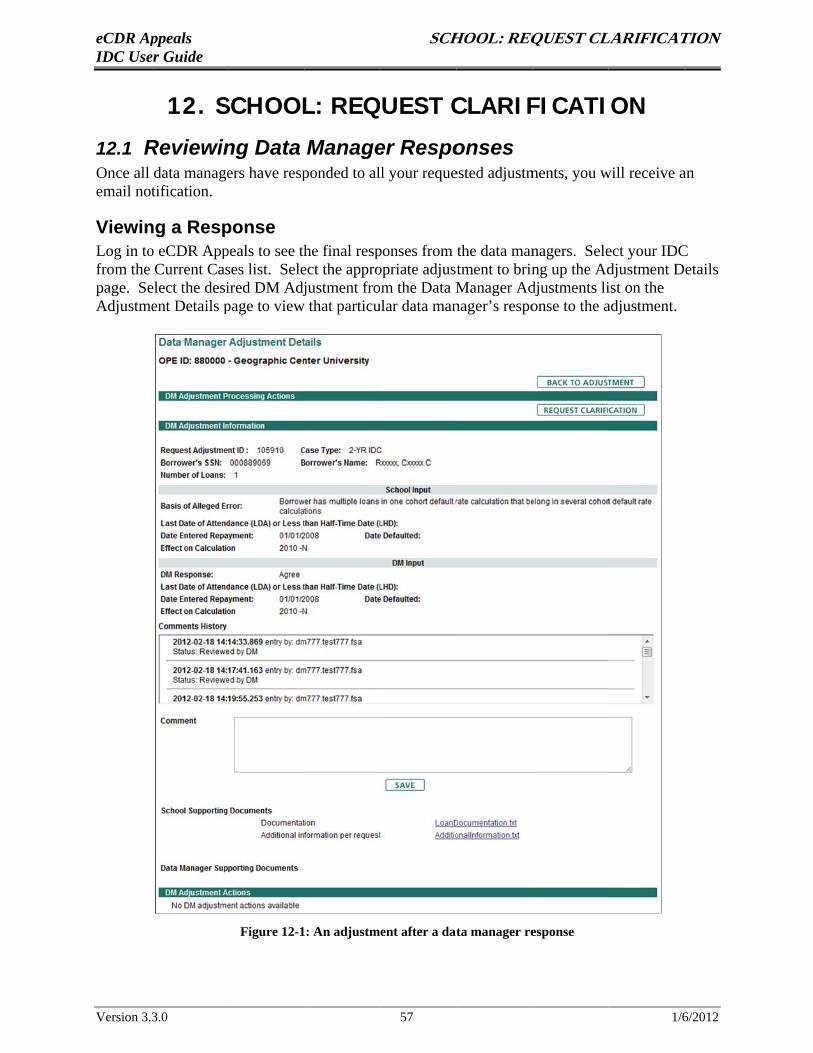
eCDR Apppeals SCHHOOL: REQQUEST CLLARIFICATTION IDC Useer Guide
12. SSCHOOLL: REQUEST CCLARIFFICATIION
12.1 RReviewinng Data Manageer Respoonses Once all data manageers have respponded to all your requeested adjustmments, you wwill receive aan email nottification.
Viewinng a Respponse Log in too eCDR Apppeals to see thhe final respponses from the data mannagers. Seleect your IDCC from the Current Casses list. Seleect the approopriate adjus tment to brinng up the Addjustment D etails page. Seelect the desiired DM Adjjustment from the Data MManager Addjustments liist on the Adjustmeent Details ppage to vieww that particuular data mannager’s respoonse to the aadjustment.
Figure 12-11: An adjustm ent after a datta manager reesponse
Version 3.33.0 57 1/66/2012
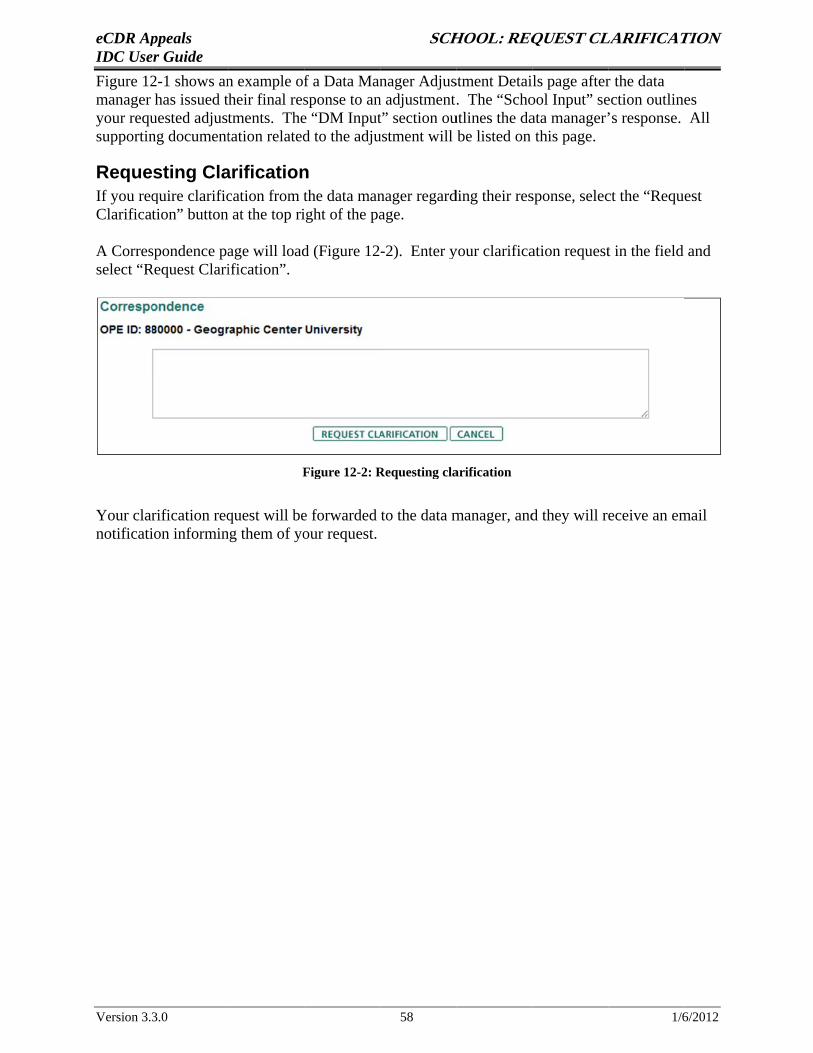
eCDR Apppeals SCHHOOL: REQQUEST CLLARIFICATTION IDC Useer Guide Figure 122-1 shows ann example off a Data Mannager Adjus stment Detai ls page afterr the data manager has issued ttheir final ressponse to ann adjustment . The “Schoool Input” seection outlinees your requuested adjusttments. Thee “DM Inputt” section ouutlines the daata manager’’s response. All supportinng documenttation relatedd to the adjuustment will be listed on this page.
Requesting Claarificationn If you reqquire clarificcation from tthe data mannager regardding their ressponse, selecct the “Requ est Clarificattion” button at the top riight of the paage.
A Corresspondence paage will loadd (Figure 12 -2). Enter yyour clarificaation requestt in the field and select “RRequest Clariification”.
FFigure 12-2: RRequesting claarification
Your clarrification reqquest will bee forwarded to the data mmanager, andd they will reeceive an emmail notificatiion informinng them of yoour request.
Version 3.33.0 58 1/66/2012
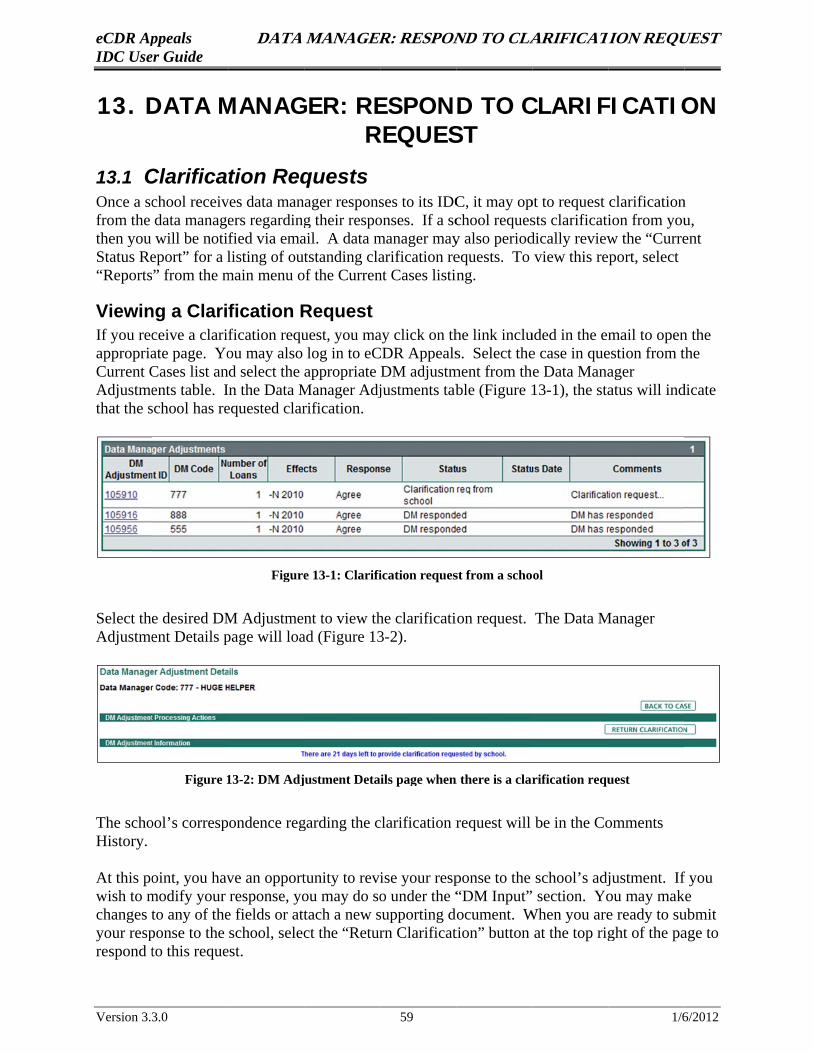
A
d
T
eCDR Apppeals DATA MANAGERER: RESPONND TO CLALARIFICATION REQUUEST IDC Useer Guide
13. DDATA MMANAGGER: REESPOND TO CCLARIFFICATIOON RREQUESST
13.1 CClarification Reqquests Once a scchool receivves data man ager responsses to its IDCC, it may oppt to request clarificationn from the data manageers regardingg their respoonses. If a scchool requessts clarificatiion from youu, then you will be notified via emaail. A data mmanager mayy also perioddically revieww the “Curreent Status Reeport” for a llisting of outtstanding claarification reequests. To view this re port, select “Reports” from the mmain menu oof the Currennt Cases listinng.
Viewinng a Clarification RRequest If you recceive a clari fication requuest, you maay click on thhe link incluuded in the emmail to openn the appropriaate page. Yoou may also log in to eCCDR Appealss. Select thee case in queestion from tthe Current CCases list and select the appropriate DM adjustmment from th e Data Manaager Adjustmeents table. IIn the Data MManager Adjjustments tabble (Figure 113-1), the staatus will inddicate that the sschool has reequested clarrification.
Figuree 13-1: Clarifiication requesst from a scho ol
Select thee desired DMM Adjustmennt to view thhe clarificati on request. The Data MManager Adjustmeent Details ppage will loaad (Figure 133-2).
Figure 113-2: DM Adjustment Deta ils page whenn there is a clarrification requuest
The schoool’s correspondence reggarding the cclarification rrequest will be in the Coomments History.
At this pooint, you havve an opporttunity to reviise your respponse to the school’s adjjustment. Iff you wish to mmodify your response, yoou may do soo under the ““DM Input”” section. Yoou may makke changes tto any of thee fields or atttach a new ssupporting document. WWhen you aree ready to suubmit your respponse to the school, selecct the “Returrn Clarificattion” button at the top rigght of the paage to respond tto this requeest.
Version 3.33.0 59 1/66/2012
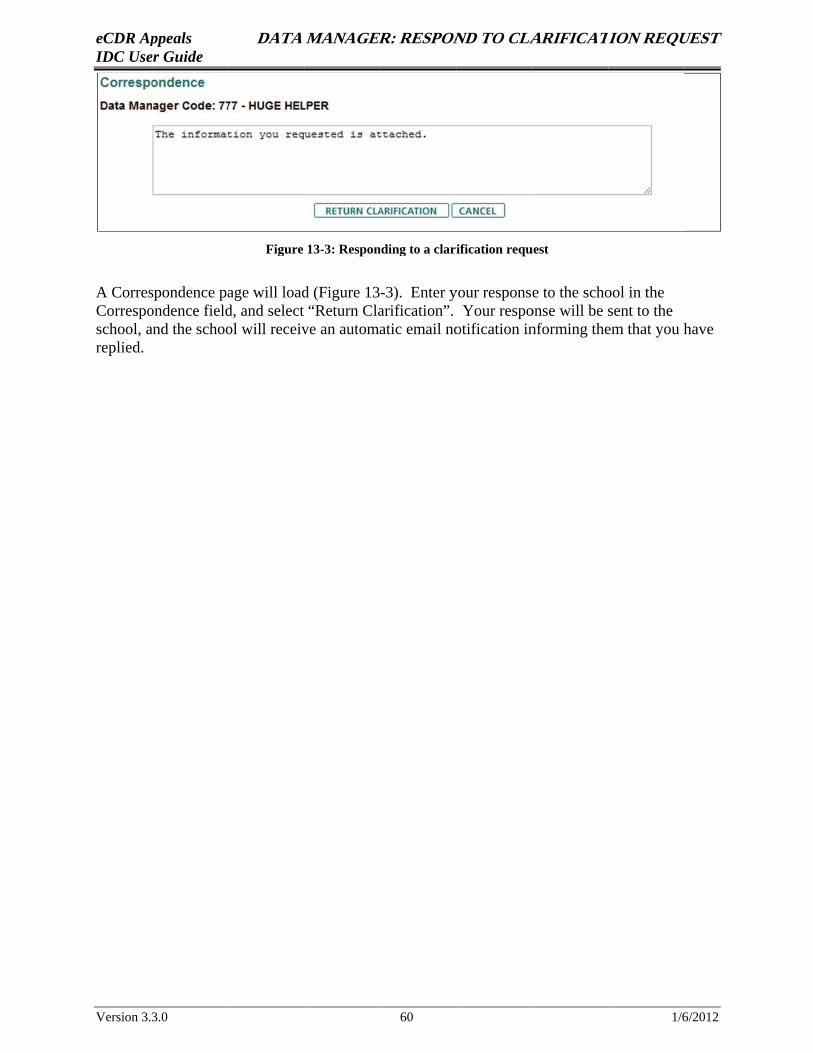
A T
eCDR Apppeals DATA MANAGERER: RESPONND TO CLALARIFICATION REQUUEST IDC Useer Guide
Figure 13-3: Responnding to a clariification requuest
A Corresspondence paage will loadd (Figure 13 -3). Enter yyour responsee to the schoool in the Correspoondence fieldd, and select “Return Claarification”. Your respoonse will be ssent to the school, aand the schoool will receivve an automaatic email nootification innforming theem that you hhave replied.
Version 3.33.0 60 1/66/2012

eCDR Apppeals OPDD: REVIEWW IDC IDC Useer Guide
14. OPD: REVIEEW IDCC
14.1 CCurrent Cases PPage andd Case DDetails PPage Before wwe discuss the process invvolved in revviewing andd finalizing aan Incorrect Data Challenge (IDC), wwe will providde an overviiew of the Cuurrent Casess page and thhe Case Detaails page.
Currennt Cases Page Oveerview First, logg in to the eCCDR Appeals system (re fer to Chapt er 2, “All U sers: Navigaation” for informatiion on how tto access thee system andd select a Perrspective if nneeded). Select “Case” from the main menu and “View Currennt Cases” froom the submmenu. This wwill present you with thee Current CCases list. OOPD Case MManagers andd OPD Casewworkers willl have a slighhtly differennt view of tthe list.
Figure 14-1: TThe Current CCases page as seen by an OPPD Case Mannager or Admiinistrator
Figure 144-1 demonsttrates an exammple Currennt Cases list as seen by aa Case Manaager or Administtrator. In thee “Assign Too” column oof the list, thee Case Manaager has the ability to asssign the case tto a particulaar Caseworkker. If the caase is alreadyy assigned, tthe name of the assigneee will also be ddisplayed herre.
Figure 14-2: Thhe Current Ca ses list as seenn by an OPD CCaseworker
Figure 144-2 shows thhe Current CCases list fromm a Caseworrker’s perspective. The difference l ies in the “Assiigned To” coolumn: the CCaseworker mmay only asssign themsellves to a casse, and cannoot assign annother Casewworker to it.
The Currrent Cases paage lists all ccurrent casess that you haave access too, along withh their statuss informatiion. To choose a particuular IDC to rreview, selecct the case IDD number off the desiredd case. Thhis will load tthe Case Deetails page.
Case DDetails Paage Overvview The Casee Details pagge (Figure 144-3) is the foocal point off the IDC revview processs. From this page, youu can view thhe overall sttatus of a casse, along witth its individdual adjustmments, data manager input, borroowers, loans,, status histoory and commments.
Version 3.33.0 61 1/66/2012
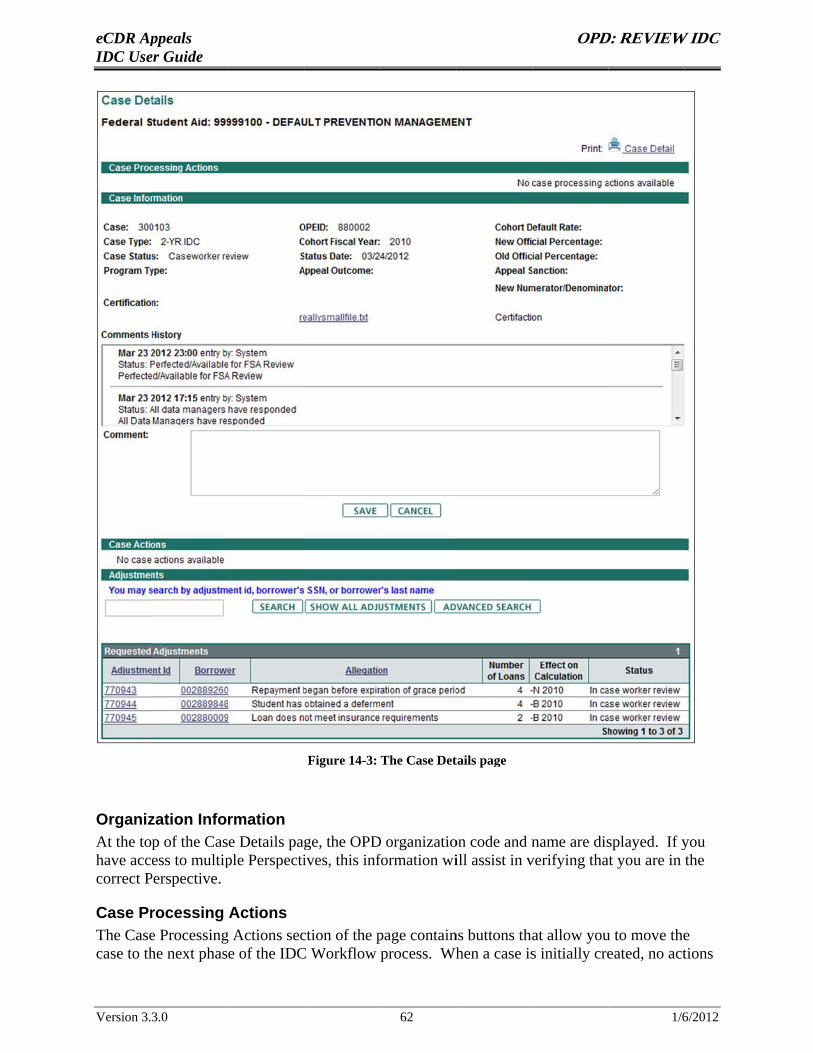
eCDR Apppeals OPDD: REVIEWW IDC IDC Useer Guide
Figure 14-3: The Case Dettails page
Organizzation Inforrmation At the topp of the Cas e Details pagge, the OPDD organizatioon code and nname are dissplayed. If yyou have acceess to multipple Perspectiives, this infformation wiill assist in vverifying thaat you are in the correct PPerspective.
Case Prrocessing Actions The Casee Processingg Actions secction of the ppage containns buttons thaat allow youu to move thee case to thhe next phase of the IDCC Workflow process. Whhen a case iss initially creeated, no acttions
Version 3.33.0 62 1/66/2012
eCDR Appeals OPD: REVIEW IDC IDC User Guide are available. However, when an action becomes available to you, a button will appear in this area.
Case Information The current case status information is shown underneath your organization’s code and name. This information is populated by the system and includes:
• Case: The case ID number, automatically assigned by the eCDR Appeals system. • Case Type: The type of challenge or appeal (e.g., IDC, NDA, UDA). • Case Status: Indicates which phase the case is currently in. See Section 1.3, “IDC
Workflow Phases” for more information on IDC phases. Refer to the Appendix: Status Codes for a definition of status codes.
• Program Type: Indicates the type of program the school is taking part in: FFEL, DL, or FFEL/DL.
• Certification: After the case is submitted, the document certifying the school’s case will be listed here.
• OPEID: The OPEID of the institution filing the case. • Cohort Fiscal Year: The cohort year for which the case is being filed. • Status Date: Indicates the date of the most recent case status update. • Appeal Outcome: This is used only in the official process, and will be blank for the draft
process. • Cohort Default Rate: Indicates the institution’s cohort default rate. • Appeal Sanction: This is used only in the official process, and will be blank for the draft
process.
Comments History Following the Case Information section is the Comments History box, which displays the full case history, including transitions between the various IDC Workflow phases and all comments. The history is arranged in reverse chronological order, with the most recent status change or comment at the top. The example case in Figure 14-3 shows two status changes and comments at the top. More comments and status changes can be viewed by scrolling down in the box.
Adjustments The Adjustments section consists of a search feature and a table that displays a list of adjustments that have been added to the case.
In a case with many adjustments, the search form permits you to narrow down the number of adjustments that are displayed in the table. You may search by a partial or full Adjustment ID, Borrower SSN, or Borrower Last Name by entering text in the search box and selecting the appropriate query type from the dropdown menu.
The “Advanced Search” link will load a separate search page that allows for more advanced options beyond what the basic search form offers.
The example case in Figure 14-3 contains three adjustments. The columns in the Requested Adjustment table are:
Version 3.3.0 63 1/6/2012
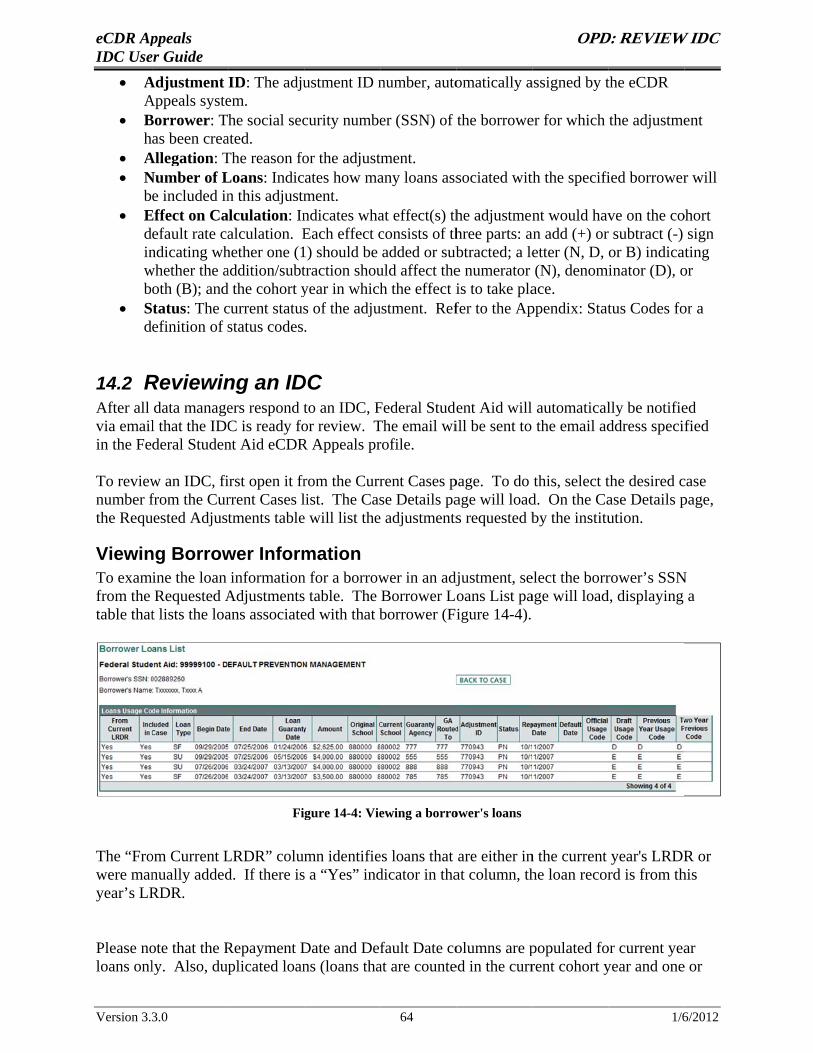
eCDR Apppeals OPDD: REVIEWW IDC IDC Useer Guide • AAdjustment ID: The adjuustment ID nnumber, autoomatically aassigned by tthe eCDR
AAppeals systeem. • BBorrower: The social seccurity numbeer (SSN) of the borroweer for which the adjustmeent
has been creaated. • AAllegation: TThe reason foor the adjusttment. • NNumber of LLoans: Indicates how maany loans asssociated withth the specifiied borrowerr will
be included inn this adjustmment. • EEffect on Caalculation: Inndicates whaat effect(s) thhe adjustmennt would havve on the coohort
default rate caalculation. EEach effect cconsists of thhree parts: aan add (+) orr subtract (-) sign inndicating whhether one (11) should be added or subbtracted; a leetter (N, D, or B) indicaating wwhether the aaddition/subttraction shouuld affect thee numerator (N), denominator (D), oor both (B); andd the cohort yyear in whichh the effect iis to take plaace.
• Status: The ccurrent statuss of the adjuustment. Reffer to the Apppendix: Stattus Codes foor a definition of sstatus codes.
14.2 RReviewinng an IDDC After all data manageers respond tto an IDC, FFederal Studeent Aid will automaticallly be notifieed via emaill that the IDCC is ready foor review. TThe email wiill be sent to the email adddress speci fied in the Federal Studennt Aid eCDRR Appeals prrofile.
To revieww an IDC, fiirst open it frrom the Currrent Cases ppage. To do this, select tthe desired ccase number ffrom the Currrent Cases llist. The Casse Details paage will loadd. On the Caase Details ppage, the Requuested Adjusttments tablee will list thee adjustmentss requested bby the instituution.
Viewinng Borrowwer Informmation To examine the loan informationn for a borrowwer in an adjdjustment, seelect the borrrower’s SSNN from the Requested AAdjustmentss table. The Borrower Looans List paage will loadd, displaying a table thatt lists the loaans associateed with that bborrower (Fiigure 14-4).
Figure 14-4: Vieewing a borroower's loans
The “Froom Current LLRDR” colummn identifiees loans that are either inn the current year's LRDRR or were mannually addedd. If there iss a “Yes” inddicator in thaat column, thhe loan recorrd is from thhis year’s LRRDR.
Please noote that the RRepayment DDate and Deffault Date coolumns are ppopulated foor current yeaar loans onlly. Also, dupplicated loanns (loans thaat are counteed in the currrent cohort yyear and onee or
Version 3.33.0 64 1/66/2012
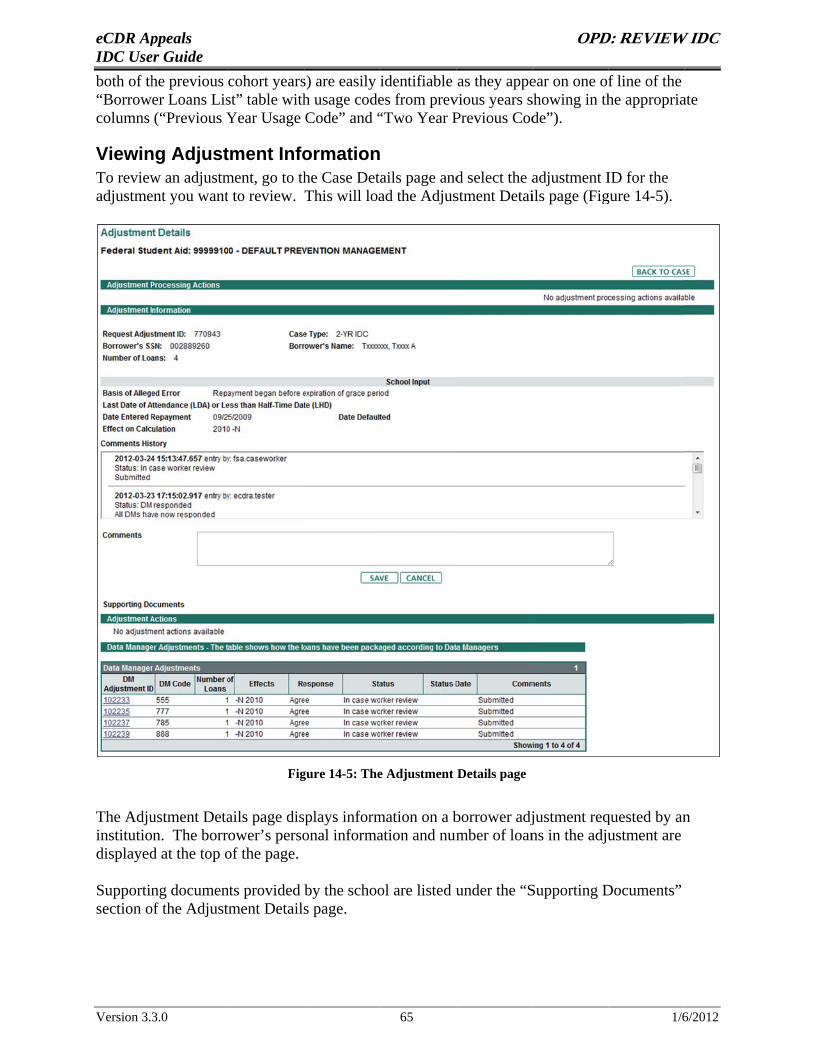
eCDR Apppeals OPDD: REVIEWW IDC IDC Useer Guide both of thhe previous cohort yearss) are easily identifiable as they appeear on one of line of the f “Borrower Loans Lisst” table withh usage codees from prevvious years sshowing in thhe appropriaate columns (“Previous YYear Usage Code” and ““Two Year PPrevious Codde”).
Viewinng Adjusttment Infoormation To revieww an adjustmment, go to thhe Case Detaails page andd select the aadjustment IID for the adjustmeent you wantt to review. This will loaad the Adjusstment Detaiils page (Figgure 14-5).
Figgure 14-5: Thee Adjustment Details page
The Adjuustment Detaails page displays informmation on a bborrower adjjustment reqquested by ann institution. The borrower’s persoonal informaation and nummber of loanns in the adjuustment are displayedd at the top oof the page.
Supportinng documennts provided by the schoool are listed uunder the “SSupporting DDocuments” section oof the Adjusttment Detailss page.
Version 3.33.0 65 1/66/2012
eCDR Appeals OPD: REVIEW IDC IDC User Guide The Data Manager Adjustments table provides links to each data manager’s response to the adjustment. Selecting one of these links will load the Data Manager Adjustment Details page, showing the data manager’s detailed response to an adjustment.
The Comments History table outlines the history of the adjustment and displays any comments that were previously added by the school and data managers. The most recent comment is listed at the top.
Version 3.3.0 66 1/6/2012
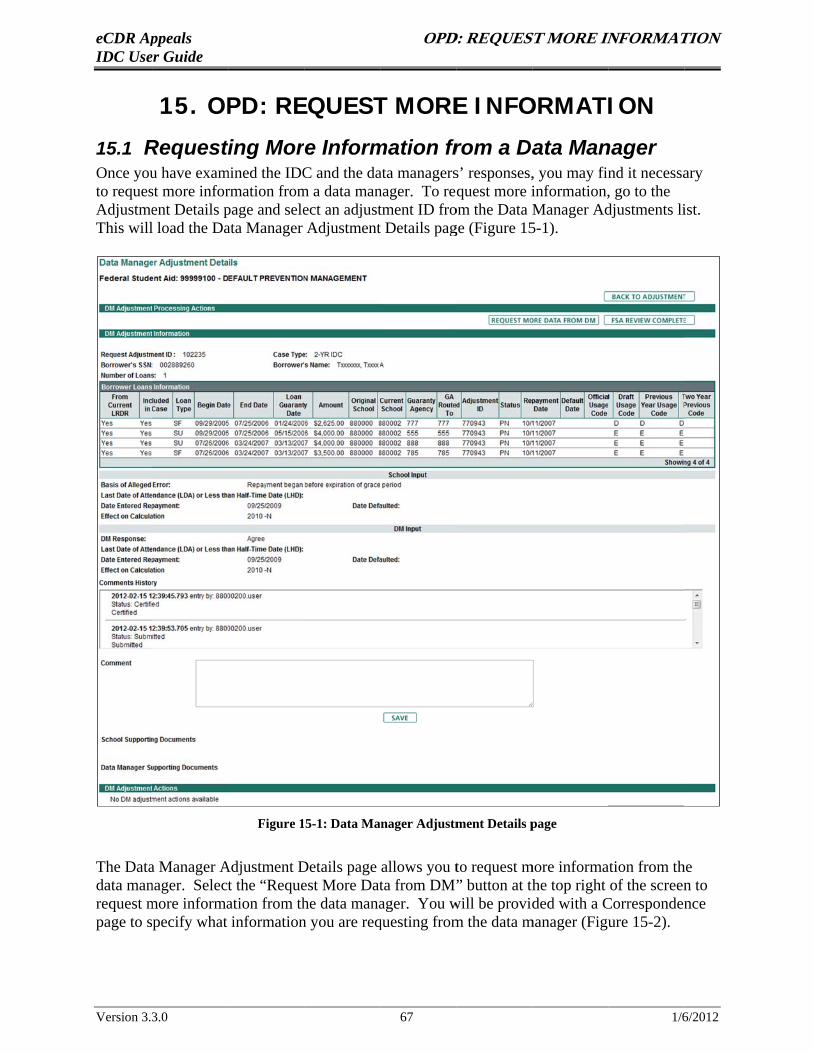
t r
eCDR Apppeals OPD: REQUED STST MORE ININFORMATTION IDC Useer Guide
15. OPPD: REEQUESTT MOREE INFOORMATIION
15.1 RRequesting More Informmation frrom a Data Mannager Once youu have exammined the IDCC and the daata managerss’ responses,, you may finnd it necessaary to requesst more inforrmation fromm a data mannager. To request more iinformation,, go to the Adjustmeent Details ppage and seleect an adjusttment ID froom the Data MManager Addjustments liist. This willl load the Daata Manager Adjustmentt Details pagge (Figure 155-1).
Figure 15-1: Data Manager Adjustmment Details ppage
The Dataa Manager AAdjustment DDetails page allows you tto request mmore informaation from thhe data mannager. Selectt the “Requeest More Datta from DM”” button at thhe top right of the screenn to request mmore informaation from thhe data manaager. You wwill be providded with a CCorrespondennce page to specify what informationn you are reqquesting fromm the data mmanager (Figuure 15-2).
Version 3.33.0 67 1/66/2012
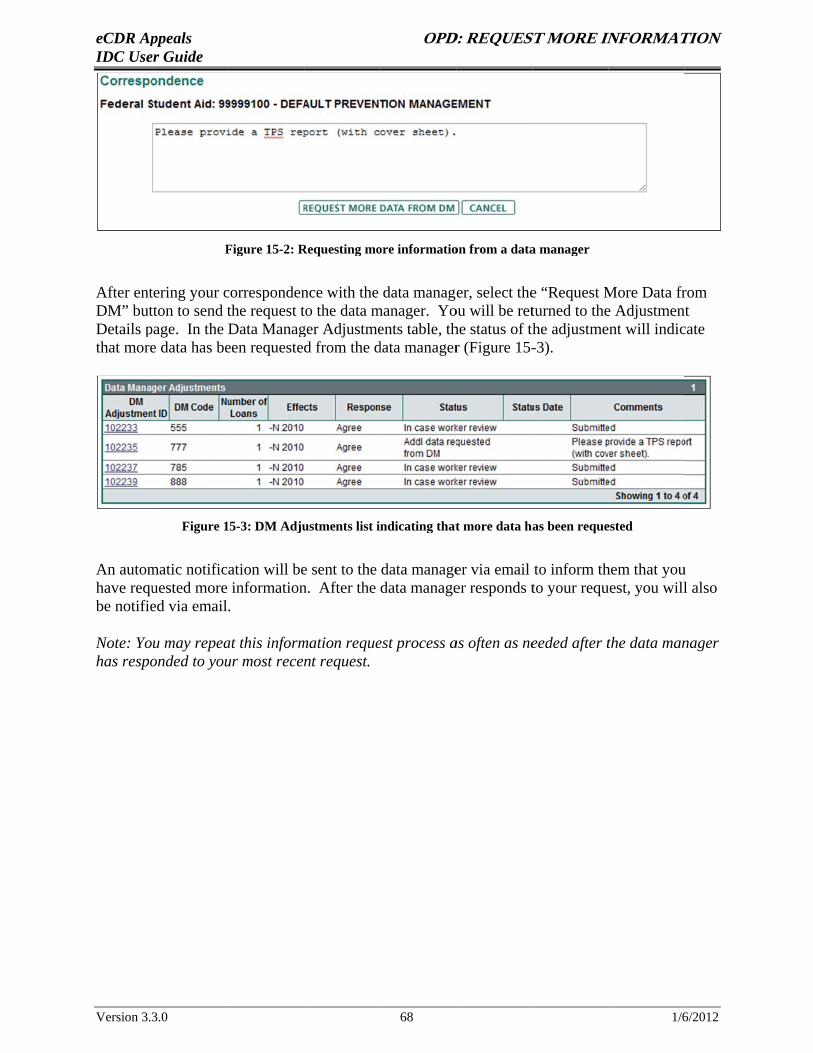
eCDR Apppeals OPD: REQUED STST MORE ININFORMATTION IDC Useer Guide
FFigure 15-2: RRequesting moore informatioon from a dataa manager
After enttering your ccorrespondennce with the data manageer, select thee “Request MMore Data frrom DM” buttton to send tthe request tto the data mmanager. Yoou will be retturned to thee Adjustmennt Details ppage. In the Data Managger Adjustmeents table, thhe status of thhe adjustmeent will indiccate that moree data has beeen requestedd from the ddata managerr (Figure 15--3).
Figure 115-3: DM Adjuustments list i ndicating thatt more data h as been requeested
An autommatic notific ation will bee sent to the data manageer via email to inform thhem that youu have requuested more informationn. After the data manageer responds tto your requuest, you willl also be notifieed via email .
Note: You may repeaat this informmation requeest process aas often as neeeded after tthe data mannager has respoonded to youur most recennt request.
Version 3.33.0 68 1/66/2012
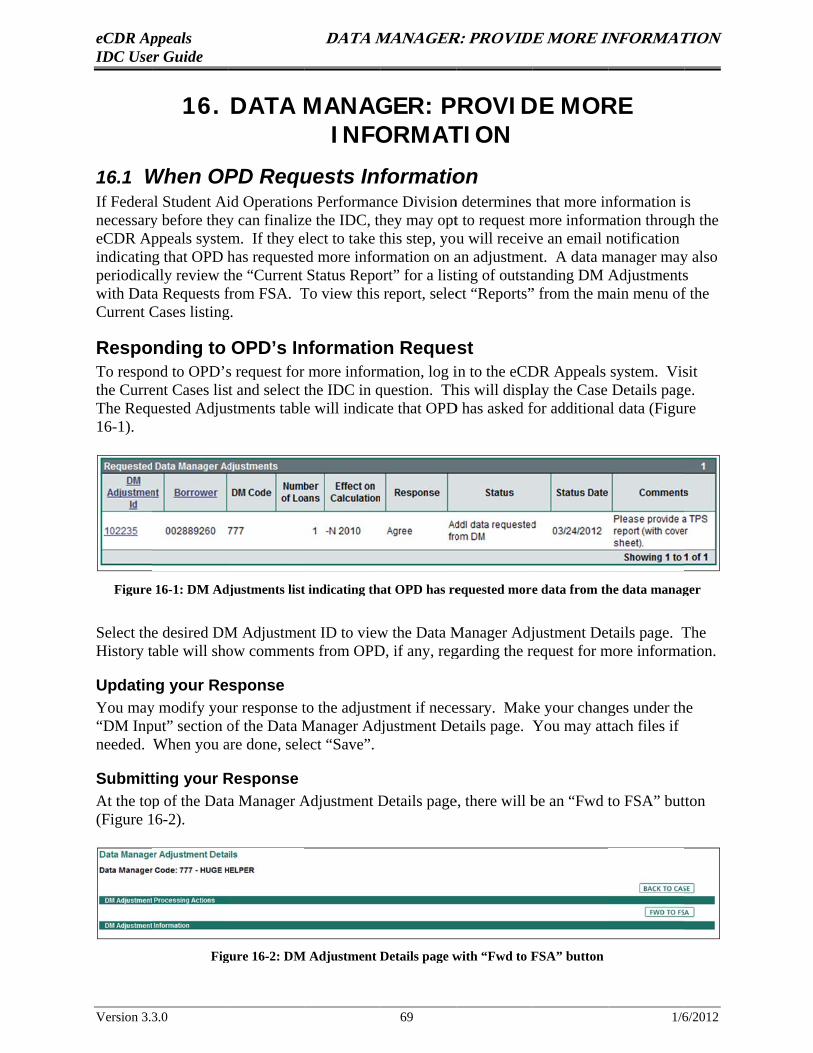
t
D
eCDR Apppeals DATA MMANAGERR: PROVIDEE MORE ININFORMATTION IDC Useer Guide
16. DATA MMANAGGER: PROVIDDE MORRE INFOORMATTION
16.1 WWhen OPPD Requuests Informatioon If Federaal Student Aiid Operationns Performannce Divisionn determines that more innformation is necessaryy before theyy can finalizze the IDC, thhey may optt to request mmore informmation througgh the eCDR Apppeals systemm. If they eelect to take tthis step, youu will receivve an email nnotification indicatin g that OPD hhas requesteed more inforrmation on aan adjustmennt. A data mmanager mayy also periodicaally review thhe “Current Status Repoort” for a listting of outstaanding DM AAdjustmentss with Dataa Requests ffrom FSA. TTo view this report, selecct “Reports”” from the mmain menu off the Current CCases listingg.
Responding to OPD’s Innformatioon Request To respond to OPD’ss request forr more informmation, log iin to the eCDDR Appeals system. Vissit the Curreent Cases lis t and select tthe IDC in qquestion. Thhis will displlay the Case Details page. The Requuested Adjusstments tablee will indicaate that OPDD has asked ffor additionaal data (Figurre 16-1).
Figure 16-1: DM Addjustments listt indicating that OPD has reequested moree data from thhe data managger
Select thee desired DMM Adjustmennt ID to vieww the Data MManager Adjjustment De tails page. TThe History table will shoow commentts from OPDD, if any, reggarding the rrequest for mmore informaation.
Updatinng your Re sponse You mayy modify youur response tto the adjustmment if neceessary. Makke your changges under thhe “DM Inpput” section oof the Data MManager Adjdjustment Deetails page. YYou may atttach files if needed. When you aare done, seleect “Save”.
Submittting your RResponse At the topp of the Dataa Manager AAdjustment DDetails pagee, there will bbe an “Fwd tto FSA” buttton (Figure 116-2).
Figgure 16-2: DMM Adjustment DDetails page wwith “Fwd to FFSA” button
Version 3.33.0 69 1/66/2012
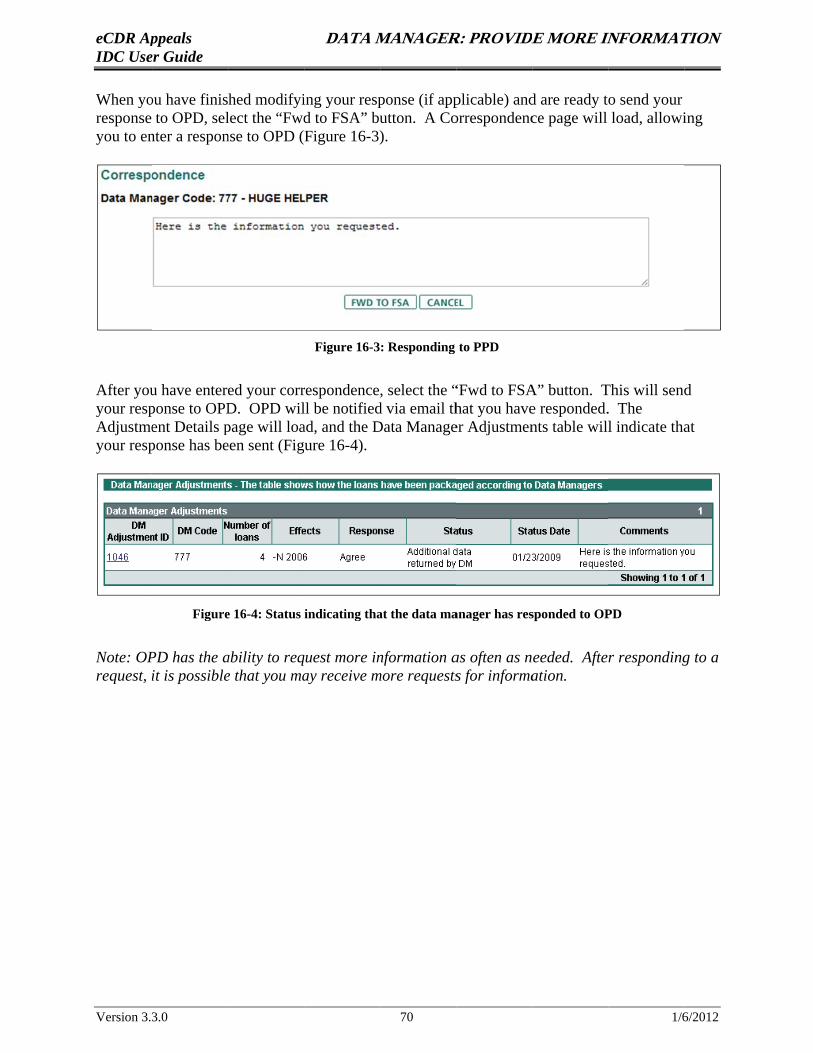
D
eCDR Apppeals DATA MMANAGERR: PROVIDEE MORE ININFORMATTION IDC Useer Guide
When yoou have finis hed modifyiing your respponse (if appplicable) andd are ready too send your response to OPD, sellect the “Fwdd to FSA” buutton. A Coorrespondencce page will load, allowiing you to ennter a responnse to OPD (Figure 16-3)).
Figure 16-3: Responding to PPD
After youu have entereed your corrrespondence, select the ““Fwd to FSAA” button. TThis will sendd your respponse to OPDD. OPD willl be notifiedd via email thhat you havee responded.. The Adjustmeent Details ppage will loaad, and the DData Manageer Adjustmennts table willl indicate thaat your respponse has beeen sent (Figure 16-4).
Figuree 16-4: Status indicating thaat the data maanager has ressponded to OPPD
Note: OPPD has the aability to reqquest more innformation aas often as needed. Afterr respondingg to a request, iit is possiblee that you maay receive mmore requestss for informaation.
Version 3.33.0 70 1/66/2012

d
q
eCDR Apppeals OPD: FINALIZEE IDC IDC Useer Guide
17. OPD: FINALIIZE IDDC
17.1 RReviewinng the IDDC The Adjuustment Detaails page dettails the instiitution’s requuested adjusstment.
Viewinng Responses to YYour Information RRequestss If you haave requestedd additional informationn from the daata manager and the dataa manager haas respondeed, you will hhave receiveed an automaatic email nootification off their responnse. The response will appear in the Data Manager Addjustment Deetails page ffor the adjusttment in question..
Complleting Revview of aa Data Maanager Addjustmennt Once it iss determinedd that a data manager adjjustment is aacceptable, oopen the Datta Manager Adjustmeent Details ppage for that adjustment.. Select the “FSA Revieew Completee” button at tthe top right of the page (Figure 17-11).
FFigure 17-1: CCompleting yoour review
You will be returned to the Adjustment Detaails page, andd the compleeted data maanager adjustmeent in the Data Manager Adjustmentss table will bbe marked ass complete.
17.2 FFinalizinng the IDDC
Forwarrding to tthe Case Managerr Once all adjustmentss in a case haave been revviewed and thhe case is ready to be finnalized, loadd the Case Dettails page. SSelect the “FSA Review Complete” bbutton at thee top right off the Case Details page (Figgure 17-2).
Version 3.33.0 71 1/66/2012
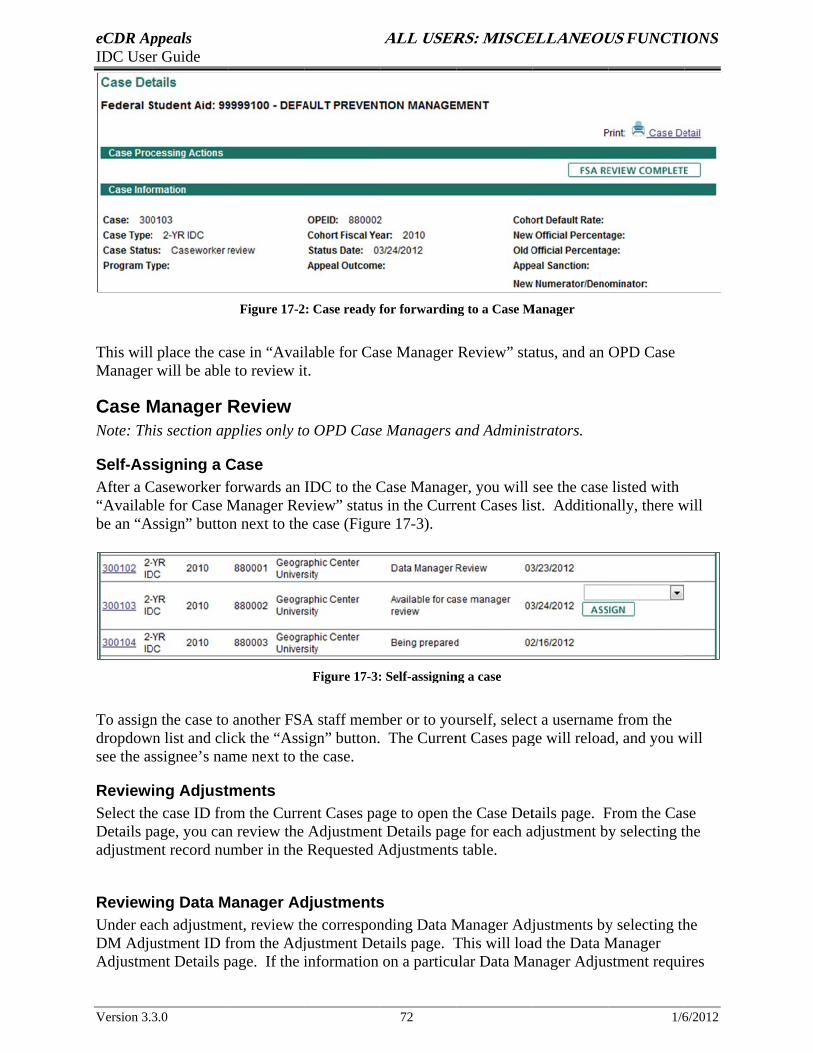
eCDR Apppeals ALL USERRS: MISCEELLANEOUUS FUNCTIIONS IDC User Guide
Figure 17-22: Case ready ffor forwardinng to a Case MManager
This willl place the caase in “Available for Casse Manager Review” staatus, and an OPD Case Managerr will be ablee to review itt.
Case MManager Review Note: This section appplies only too OPD Casee Managers aand Adminisstrators.
Self-Asssigning a CCase After a CCaseworker fforwards an IDC to the CCase Manageer, you will see the case listed with “Availabble for Case MManager Reeview” statuss in the Curr rent Cases lisst. Additionnally, there wwill be an “AAssign” buttoon next to thee case (Figurre 17-3).
Figure 17-3:: Self-assigninng a case
To assignn the case to another FSAA staff memmber or to youurself, select a usernamee from the dropdowwn list and cliick the “Assign” button. The Currennt Cases pagge will reloadd, and you wwill see the asssignee’s naame next to thhe case.
Reviewing Adjusttments Select thee case ID froom the Curreent Cases paage to open tthe Case Dettails page. FFrom the Casse Details ppage, you cann review the Adjustmentt Details pagge for each aadjustment byy selecting tthe adjustmeent record nuumber in the Requested AAdjustmentss table.
Reviewing Data MManager Addjustmentss Under eaach adjustmeent, review thhe corresponnding Data MManager Adjjustments byy selecting thhe DM Adjuustment ID ffrom the Adjjustment Dettails page. TThis will loaad the Data MManager Adjustmeent Details ppage. If the iinformation on a particuular Data Maanager Adjusstment requiires
Version 3.33.0 72 1/66/2012

eCDR Appeals ALL USERS: MISCELLANEOUS FUNCTIONS IDC User Guide further review by an OPD Caseworker, select the “Case Worker Review Required” option under the “DM Input” section and then click “Save”.
Returning the Case to the Caseworker Note: If you have completed your review of the DM adjustments and none of them need further work by a Caseworker, you may skip this section and go to the next section, “Closing the Case”.
After you have identified and marked all the DM adjustments that need further review, the case needs to be returned to the Caseworker. To do so, return to the Case Details page and select the “Back to Caseworker” button located in the Case Processing Actions section (Figure 17-4).
Figure 17-4: Returning a case to the Caseworker
This will return the IDC to the Caseworker for further review.
Closing the Case Once a case has been completely reviewed and is acceptable, select the “Close Case” button at the top right of the Case Details page.
Once a case is closed, it will remain in the Current Cases list for the remainder of the cohort year for viewing and printing; however, it can no longer be modified.
Email notifications will automatically be sent to the originating school and affected data managers, informing them that the IDC has been finalized and closed. They will be able to view and print the case, but not modify it.
Version 3.3.0 73 1/6/2012
eCDR Appeals DATA MANAGER: REVIEW OPD DECISION IDC User Guide
18. DATA MANAGER: REVIEW OPD DECISION
18.1 Viewing the Finalized Case After Federal Student Aid Operations Performance Division has reviewed and finalized a case, you will receive an email notification. The case may still be viewed by visiting the Current Cases page, then selecting the case from the list. At this point, the case can no longer be modified, but you will continue to have access to view and print the case.
Note: Any changes that were agreed to in the course of the IDC Workflow must also be manually implemented in NSLDS and/or any other systems of records you may maintain. Changes and updates to borrower data and loan data within eCDR Appeals will not affect the original records.
Version 3.3.0 74 1/6/2012
eCDR Appeals SCHOOL: REVIEW OPD DECISION IDC User Guide
19. SCHOOL: REVIEW OPD DECISION
19.1 Viewing the Finalized Case After Federal Student Aid Operations Performance Division has reviewed and finalized a case, you will receive an email notification. The case may still be viewed by visiting the Current Cases page, then selecting the case from the list. At this point, the case can no longer be modified, but you will continue to have access to view and print the case.
Note: Any changes that were agreed to in the course of the IDC Workflow must also be manually implemented in NSLDS and/or any other systems of records you may maintain. Changes and updates to borrower data and loan data within eCDR Appeals will not affect the original records.
Version 3.3.0 75 1/6/2012
eCDR Appeals ALL USERS: MISCELLANEOUS FUNCTIONS IDC User Guide
20. ALL USERS: MISCELLANEOUS FUNCTIONS This chapter covers functionality in eCDR Appeals, not directly involved in the IDC Workflow, that is available to users regardless of the organization to which they belong.
20.1 Printing Case Information If you need a printed report on one of your cases, open the desired case from the Current Cases page. At the top right, there will be a “Print: Detail” link for printing the case. The detail report provides comprehensive information on the case, all in one easy to print document.
When you select the “Detail” link, a Portable Document Format (PDF) document will load. In order to view this document, you will need the free Adobe Reader software or a similar application. Once the document loads, you may print it by selecting the print option in your web browser.
Important Note: Since the detail report contains personally identifiable information, including borrower names, social security numbers and financial information, take precautions to safeguard any reports you save to your computer or print out. Securely store all printed reports. Securely dispose of printed reports after they are no longer needed.
20.2 Maintaining Your Profile The eCDR Appeals system maintains two sets of contact information for your organization in your Profile: the organizational contact information, and your individual contact information. Both can be viewed and updated by selecting the “Profile” item from the main menu.
Please ensure that your Profile is up-to-date, especially at the beginning of a cohort cycle.
20.3 Adding New Contact Information This function is available to School Case Managers, Data Manager Response Managers, OPD Case Managers, and OPD Administrators. Any of these users may add contact information for people in their organization that they wish to receive notifications from eCDR Appeals. Users must have an updated profile (i.e. must have saved their own contact information in eCDR Appeals) before they can add contact information for other people.
Version 3.3.0 76 1/6/2012
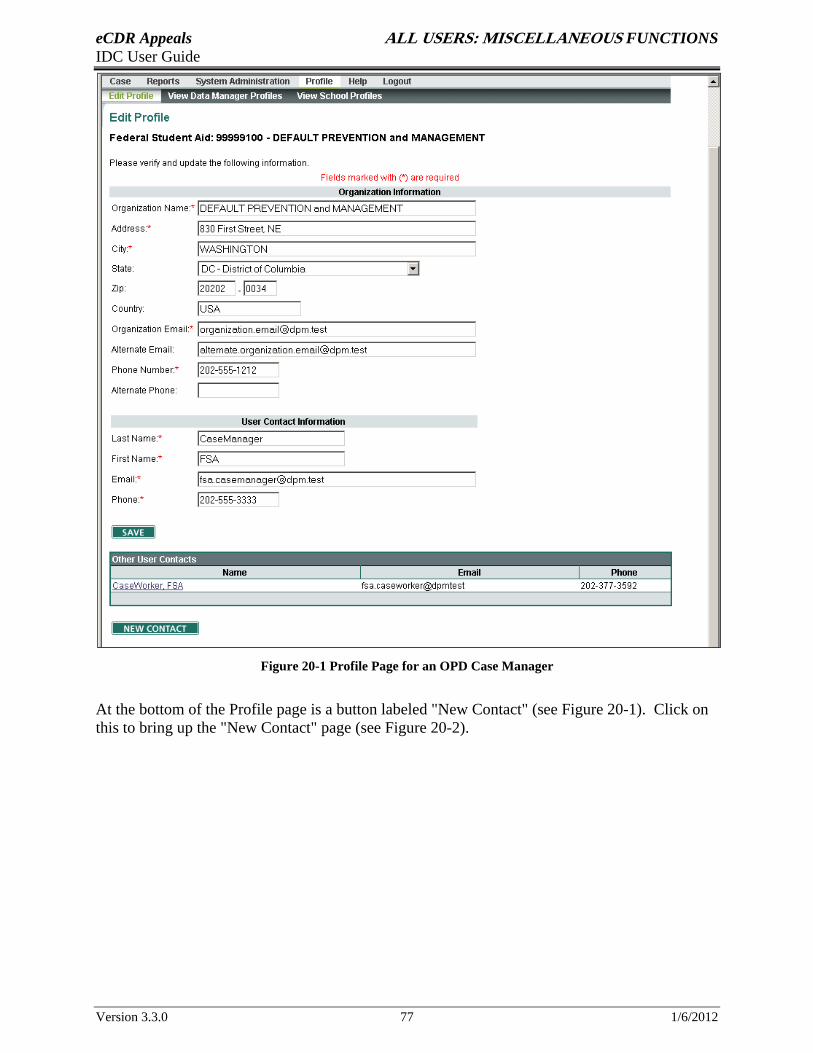
eCDR Appeals ALL USERS: MISCELLANEOUS FUNCTIONS IDC User Guide
Figure 20-1 Profile Page for an OPD Case Manager
At the bottom of the Profile page is a button labeled "New Contact" (see Figure 20-1). Click on this to bring up the "New Contact" page (see Figure 20-2).
Version 3.3.0 77 1/6/2012
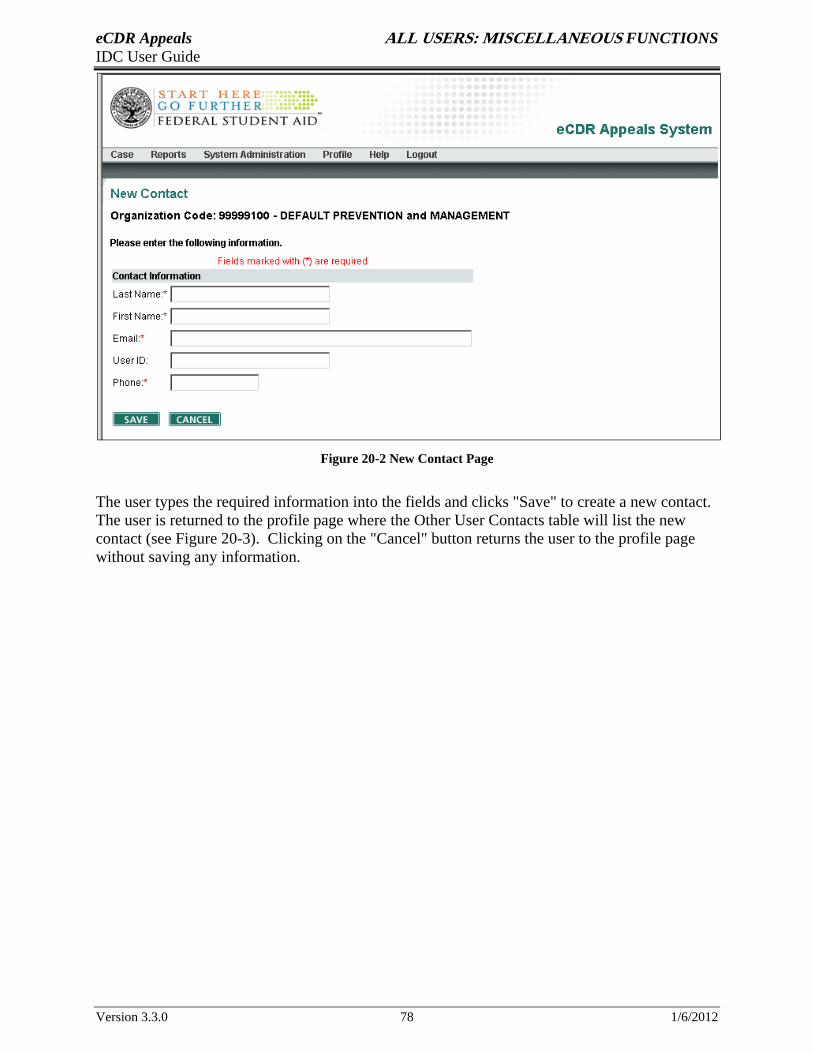
eCDR Appeals ALL USERS: MISCELLANEOUS FUNCTIONS IDC User Guide
Figure 20-2 New Contact Page
The user types the required information into the fields and clicks "Save" to create a new contact. The user is returned to the profile page where the Other User Contacts table will list the new contact (see Figure 20-3). Clicking on the "Cancel" button returns the user to the profile page without saving any information.
Version 3.3.0 78 1/6/2012
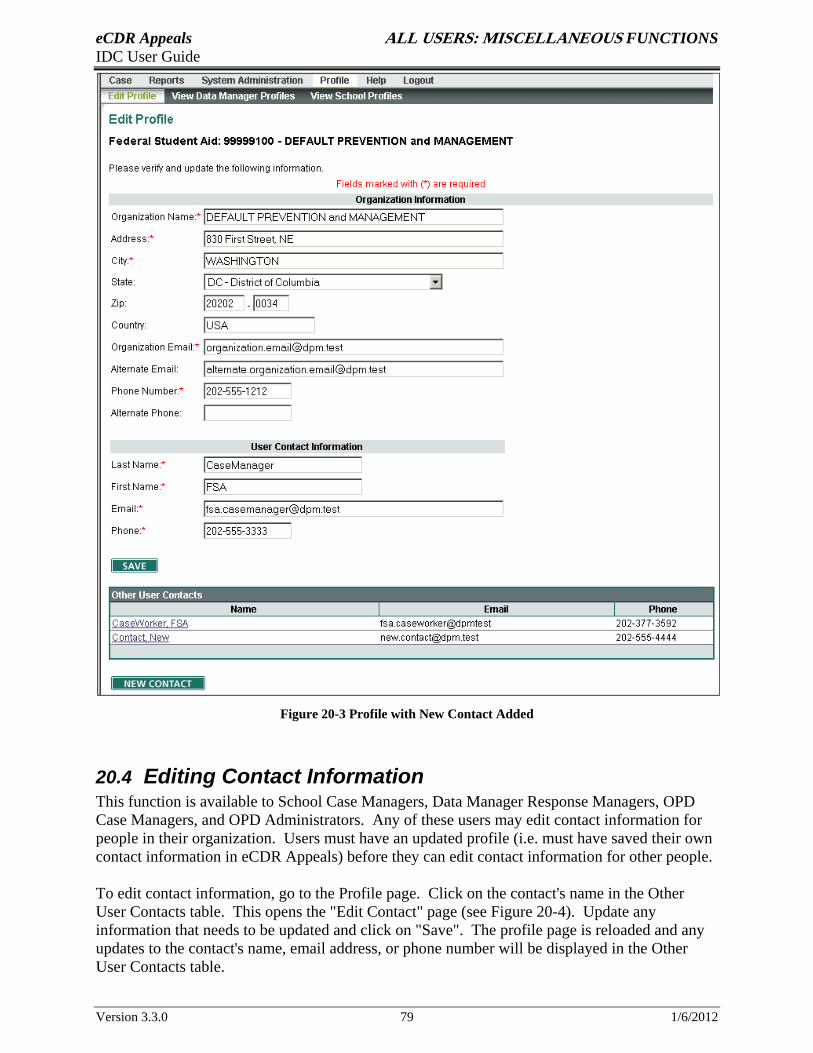
eCDR Appeals ALL USERS: MISCELLANEOUS FUNCTIONS IDC User Guide
Figure 20-3 Profile with New Contact Added
20.4 Editing Contact Information This function is available to School Case Managers, Data Manager Response Managers, OPD Case Managers, and OPD Administrators. Any of these users may edit contact information for people in their organization. Users must have an updated profile (i.e. must have saved their own contact information in eCDR Appeals) before they can edit contact information for other people.
To edit contact information, go to the Profile page. Click on the contact's name in the Other User Contacts table. This opens the "Edit Contact" page (see Figure 20-4). Update any information that needs to be updated and click on "Save". The profile page is reloaded and any updates to the contact's name, email address, or phone number will be displayed in the Other User Contacts table.
Version 3.3.0 79 1/6/2012
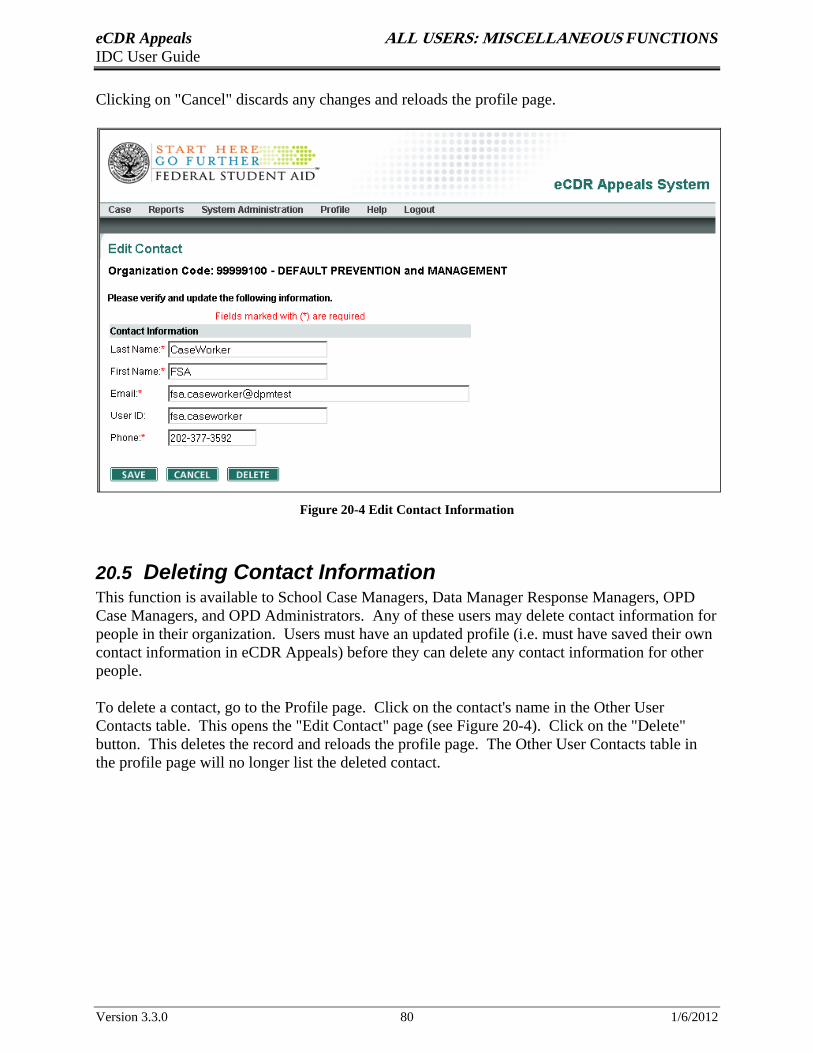
eCDR Appeals ALL USERS: MISCELLANEOUS FUNCTIONS IDC User Guide
Clicking on "Cancel" discards any changes and reloads the profile page.
Figure 20-4 Edit Contact Information
20.5 Deleting Contact Information This function is available to School Case Managers, Data Manager Response Managers, OPD Case Managers, and OPD Administrators. Any of these users may delete contact information for people in their organization. Users must have an updated profile (i.e. must have saved their own contact information in eCDR Appeals) before they can delete any contact information for other people.
To delete a contact, go to the Profile page. Click on the contact's name in the Other User Contacts table. This opens the "Edit Contact" page (see Figure 20-4). Click on the "Delete" button. This deletes the record and reloads the profile page. The Other User Contacts table in the profile page will no longer list the deleted contact.
Version 3.3.0 80 1/6/2012
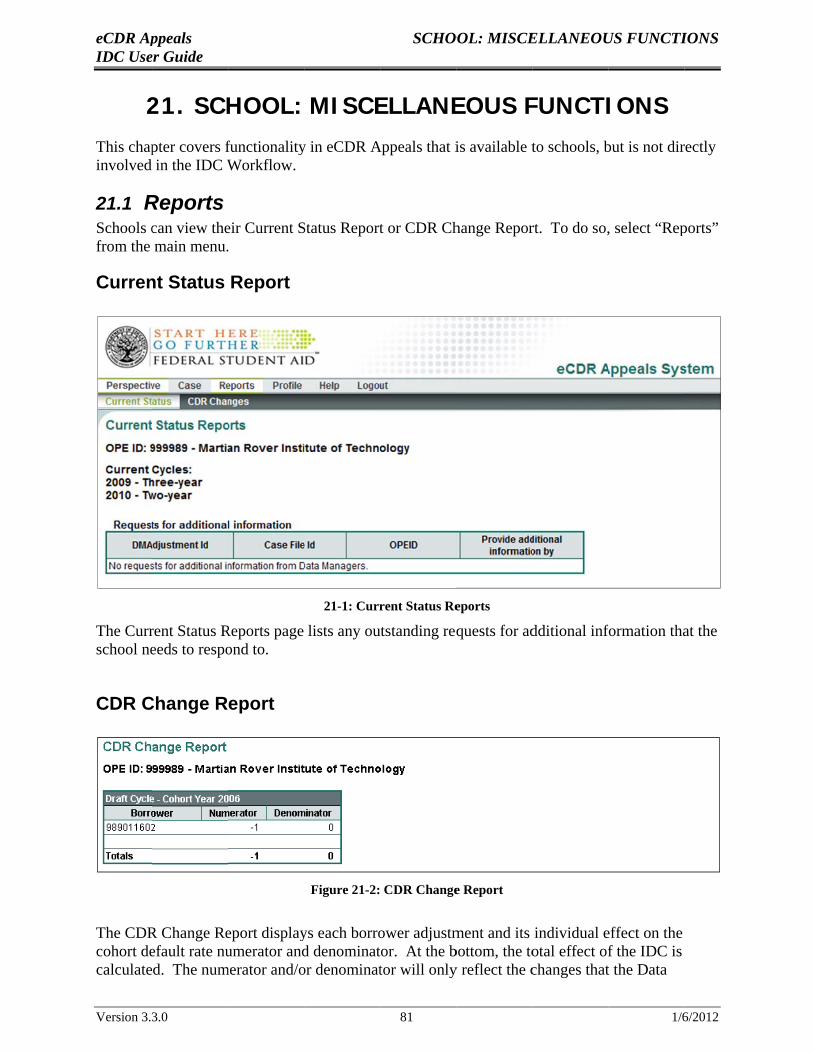
f
eCDR Apppeals SCHOOOL: MISCEELLANEOUUS FUNCTIIONS IDC Useer Guide
221. SCHHOOL: MISCEELLANEEOUS FFUNCTIIONS This chappter covers ffunctionalityy in eCDR AAppeals that iis available tto schools, bbut is not dirrectly involved in the IDC WWorkflow.
21.1 RReports Schools ccan view theeir Current SStatus Reportt or CDR Chhange Reporrt. To do so,, select “Repports” from the main menu..
Currennt Status Report
21-1: Currrent Status Reeports
The Currrent Status RReports page lists any ouutstanding reqquests for addditional information thaat the school neeeds to respoond to.
CDR CChange R eport
Figure 21-2: CDR Changee Report
The CDRR Change Reeport displayys each borroower adjustmment and its individual eeffect on the cohort deefault rate nuumerator andd denominattor. At the bbottom, the tootal effect off the IDC is calculated. The nummerator and/oor denominattor will onlyy reflect the cchanges thatt the Data
Version 3.33.0 81 1/66/2012
eCDR Appeals ALL USERS: MISCELLANEOUS FUNCTIONS IDC User Guide Manager agreed to. Also, note that if the school did not select all the loans that could count for that borrower, then the effect may be zero. For example, if a borrower has six eligible loans and the school only challenged five of the loans. If the Data Manager agrees that the adjustment has to be made, the report might show zero effect.
Version 3.3.0 82 1/6/2012
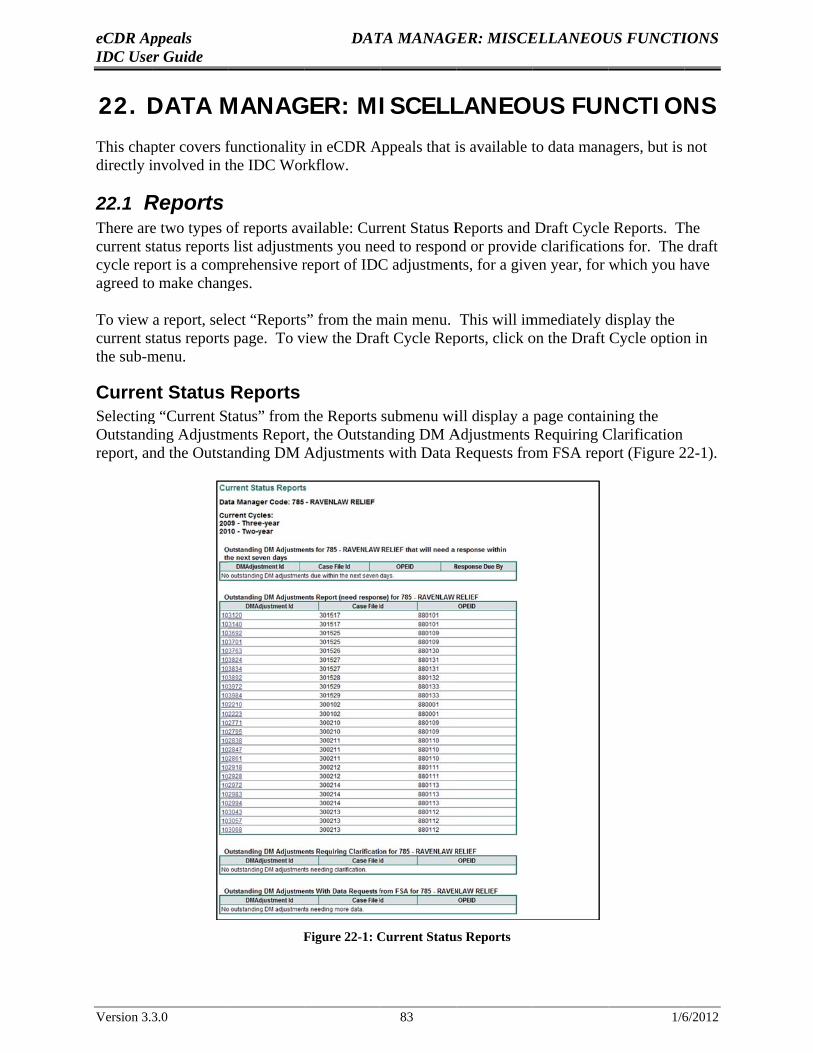
eCDR Apppeals DATTA MANAGEGER: MISCEELLANEOUUS FUNCTIIONS IDC Useer Guide
22. DDATA MMANAGGER: MIISCELLLANEOUS FUNNCTIONNS This chappter covers ffunctionalityy in eCDR AAppeals that iis available tto data manaagers, but is not directly iinvolved in tthe IDC Worrkflow.
22.1 RReports There aree two types oof reports avvailable: Currrent Status RReports and Draft Cyclee Reports. TThe current sttatus reportss list adjustmments you need to responnd or providee clarificatioons for. The draft cycle repport is a commprehensive rreport of IDCC adjustmennts, for a giveen year, for which you hhave agreed too make changges.
To view a report, seleect “Reportss” from the mmain menu. This will immmediately ddisplay the current sttatus reportss page. To vview the Drafft Cycle Repports, click oon the Draft Cycle optionn in the sub-mmenu.
Currennt Status Reports Selectingg “Current Sttatus” from tthe Reports submenu wiill display a page containning the Outstandding Adjustmments Reportt, the Outstannding DM AAdjustments Requiring CClarification report, annd the Outstaanding DM AAdjustmentss with Data RRequests froom FSA repoort (Figure 222-1).
FFigure 22-1: CCurrent Statuus Reports
Version 3.33.0 83 1/66/2012
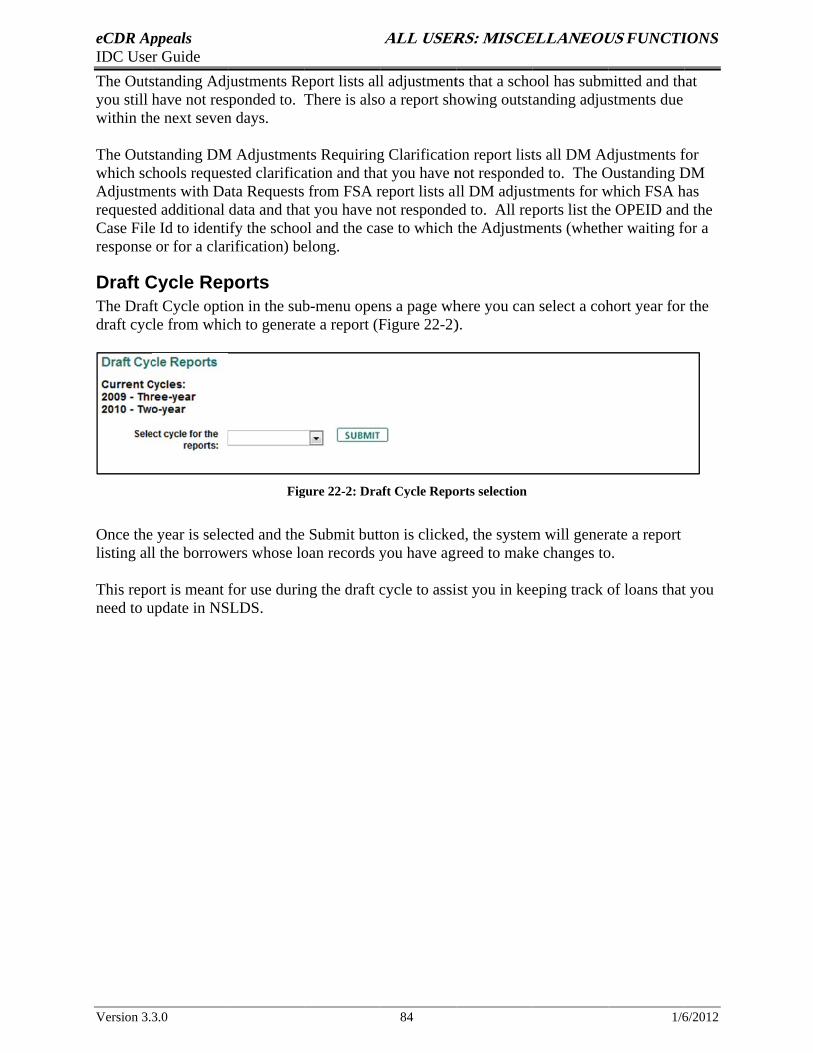
a
f
eCDR Apppeals ALL USERRS: MISCEELLANEOUUS FUNCTIIONS IDC User Guide The Outsstanding Adjjustments Reeport lists alll adjustmentts that a schoool has submmitted and thhat you still hhave not responded to. There is alsoo a report shhowing outsttanding adjusstments due within thhe next sevenn days.
The Outsstanding DMM Adjustmennts Requiringg Clarificatioon report listts all DM Addjustments ffor which schools requessted clarificaation and thaat you have nnot respondeed to. The OOustanding DDM Adjustmeents with Daata Requests from FSA rreport lists alll DM adjusttments for wwhich FSA hhas requestedd additional data and thaat you have nnot respondeed to. All repports list thee OPEID andd the Case Filee Id to identiify the schoool and the caase to which the Adjustmments (whethher waiting for a response or for a clarrification) beelong.
Draft CCycle Repports The Drafft Cycle option in the subb-menu openns a page whhere you cann select a cohhort year forr the draft cycle from whicch to generate a report (FFigure 22-2)).
Figgure 22-2: Draaft Cycle Repoorts selection
Once thee year is sele cted and thee Submit buttton is clicked, the systemm will generrate a report listing alll the borrowwers whose looan records yyou have agrreed to makee changes too.
This repoort is meant for use durinng the draft ccycle to assiist you in keeeping track oof loans thatt you need to uupdate in NSSLDS.
Version 3.33.0 84 1/66/2012
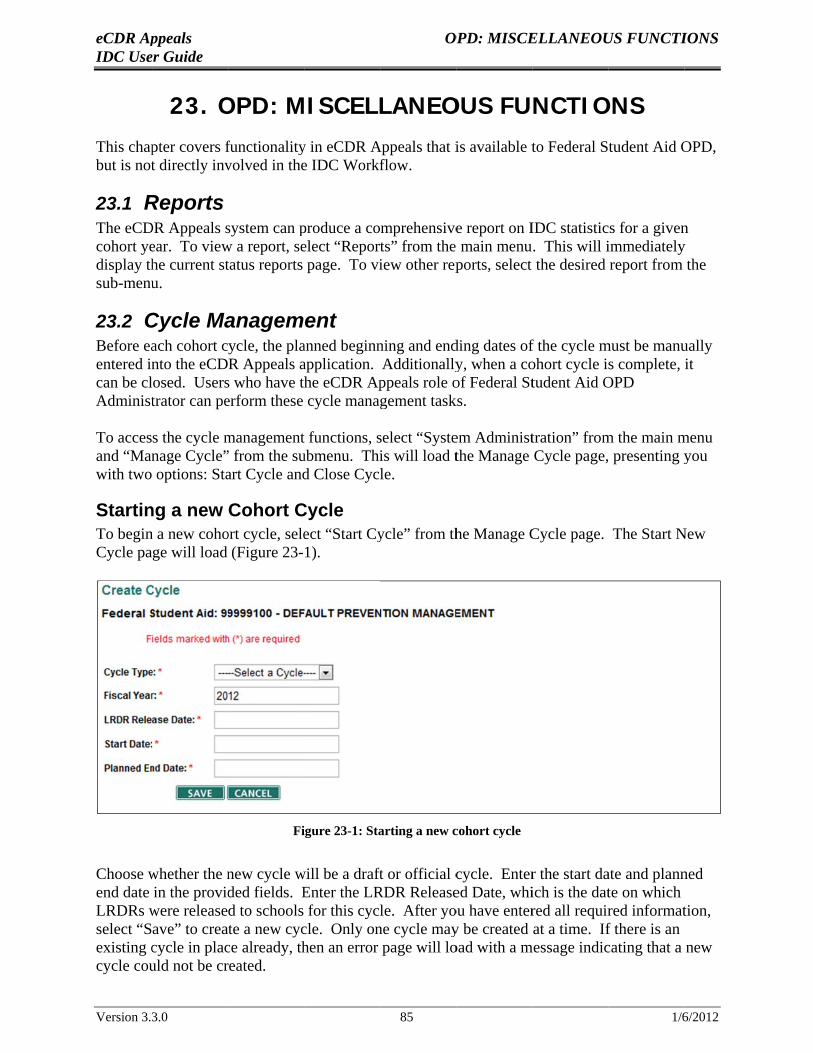
P
eCDR Apppeals OOPD: MISCEELLANEOUUS FUNCTIIONS IDC Useer Guide
23. OOPD: MMISCELLLANEOOUS FUNCTIOONS This chappter covers ffunctionalityy in eCDR AAppeals that iis available tto Federal Student Aid OOPD, but is nott directly invvolved in thee IDC Workfflow.
23.1 RReports The eCDDR Appeals ssystem can pproduce a comprehensivee report on IIDC statisticcs for a givenn cohort yeear. To vieww a report, seelect “Reportts” from the main menu . This will iimmediatelyy display thhe current sttatus reports page. To viiew other repports, select the desired report from the sub-menuu.
23.2 CCycle Maanagement Before eaach cohort cycle, the plaanned beginnning and endding dates off the cycle mmust be manuually entered innto the eCDR Appeals aapplication. Additionallyy, when a coohort cycle is complete, it can be cllosed. Userss who have thhe eCDR Apppeals role oof Federal Sttudent Aid OOPD Administtrator can peerform these cycle managgement task ks.
To access the cycle mmanagementt functions, sselect “Systeem Administtration” fromm the main mmenu and “Mannage Cycle”” from the suubmenu. Thiis will load tthe Manage Cycle page, presenting yyou with two options: Staart Cycle andd Close Cyclle.
Startinng a new Cohort CCycle To beginn a new cohoort cycle, seleect “Start Cyycle” from thhe Manage CCycle page. The Start NNew Cycle page will load (Figure 23-1).
Fiigure 23-1: Staarting a new ccohort cycle
Choose wwhether the nnew cycle wwill be a draftft or official ccycle. Enterr the start daate and plannned end date in the providded fields. EEnter the LRRDR Releaseed Date, whiich is the datte on which LRDRs wwere released to schools for this cyclle. After yoou have enterred all requirred informattion, select “Save” to create a new cyccle. Only onne cycle mayy be created at a time. Iff there is an existing ccycle in placce already, thhen an error page will looad with a mmessage indiccating that a new cycle couuld not be crreated.
Version 3.33.0 85 1/66/2012

P
eCDR Apppeals OOPD: MISCEELLANEOUUS FUNCTIIONS IDC Useer Guide
Editingg a Cohort Cycle A cohort cycle’s datees can be adjjusted, or thee cycle can bbe ended, viaa the Edit Cyycle page. (Figure 223-2).
Figure 233-2: Editing a cycle
Version 3.33.0 86 1/66/2012
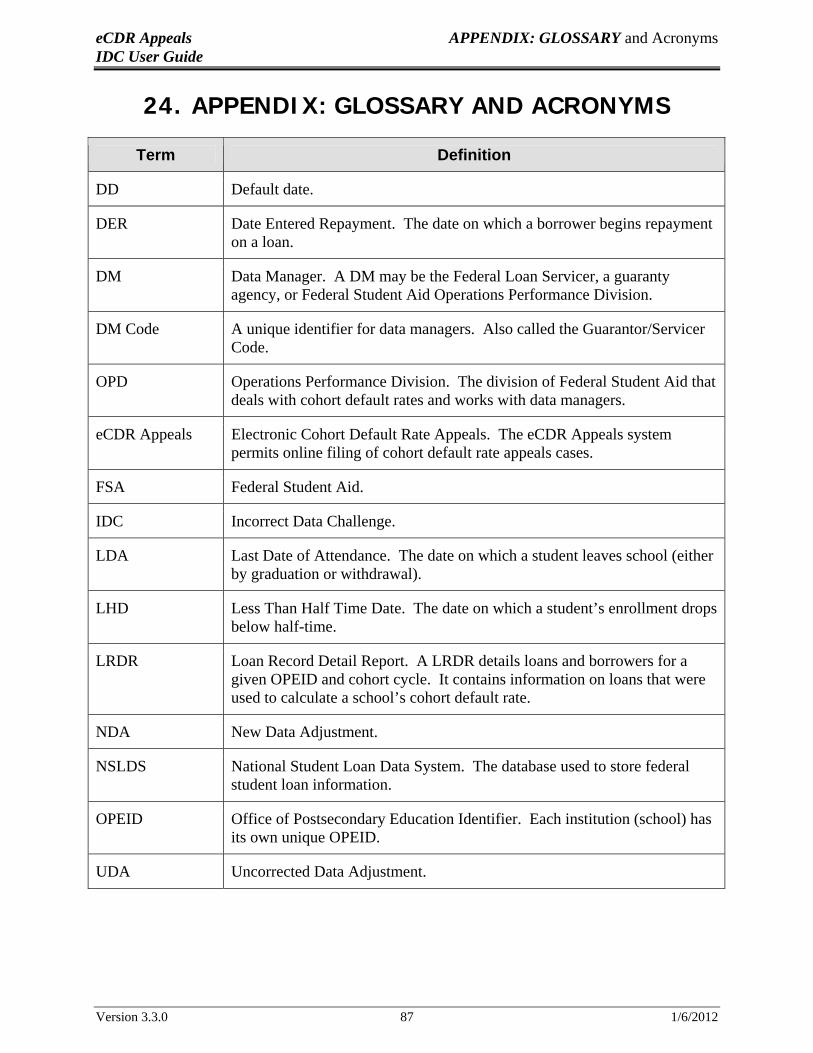
eCDR Appeals APPENDIX: GLOSSARY and Acronyms IDC User Guide
24. APPENDIX: GLOSSARY AND ACRONYMS
Term Definition
DD Default date.
DER Date Entered Repayment. The date on which a borrower begins repayment on a loan.
DM Data Manager. A DM may be the Federal Loan Servicer, a guaranty agency, or Federal Student Aid Operations Performance Division.
DM Code A unique identifier for data managers. Also called the Guarantor/Servicer Code.
OPD Operations Performance Division. The division of Federal Student Aid that deals with cohort default rates and works with data managers.
eCDR Appeals Electronic Cohort Default Rate Appeals. The eCDR Appeals system permits online filing of cohort default rate appeals cases.
FSA Federal Student Aid.
IDC Incorrect Data Challenge.
LDA Last Date of Attendance. The date on which a student leaves school (either by graduation or withdrawal).
LHD Less Than Half Time Date. The date on which a student’s enrollment drops below half-time.
LRDR Loan Record Detail Report. A LRDR details loans and borrowers for a given OPEID and cohort cycle. It contains information on loans that were used to calculate a school’s cohort default rate.
NDA New Data Adjustment.
NSLDS National Student Loan Data System. The database used to store federal student loan information.
OPEID Office of Postsecondary Education Identifier. Each institution (school) has its own unique OPEID.
UDA Uncorrected Data Adjustment.
Version 3.3.0 87 1/6/2012
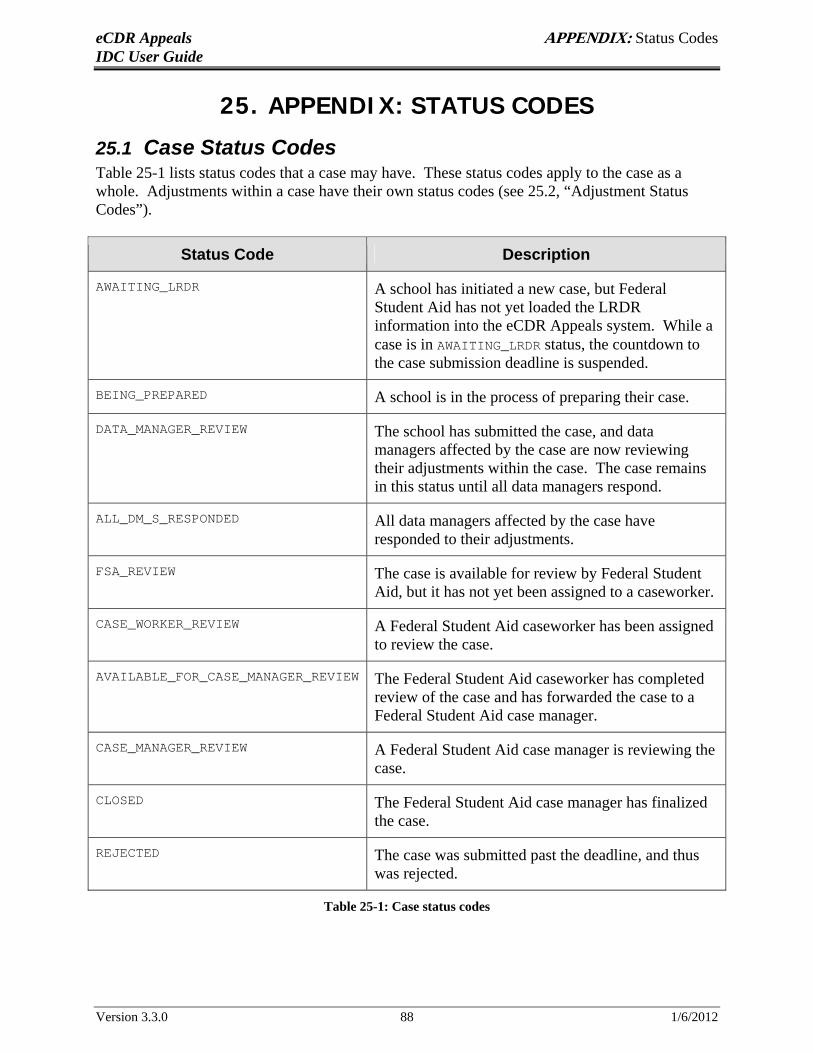
eCDR Appeals APPENDIX: Status Codes IDC User Guide
25. APPENDIX: STATUS CODES
25.1 Case Status Codes Table 25-1 lists status codes that a case may have. These status codes apply to the case as a whole. Adjustments within a case have their own status codes (see 25.2, “Adjustment Status Codes”).
Status Code Description
AWAITING_LRDR A school has initiated a new case, but Federal Student Aid has not yet loaded the LRDR information into the eCDR Appeals system. While a case is in AWAITING_LRDR status, the countdown to the case submission deadline is suspended.
BEING_PREPARED A school is in the process of preparing their case.
DATA_MANAGER_REVIEW The school has submitted the case, and data managers affected by the case are now reviewing their adjustments within the case. The case remains in this status until all data managers respond.
ALL_DM_S_RESPONDED All data managers affected by the case have responded to their adjustments.
FSA_REVIEW The case is available for review by Federal Student Aid, but it has not yet been assigned to a caseworker.
CASE_WORKER_REVIEW A Federal Student Aid caseworker has been assigned to review the case.
AVAILABLE_FOR_CASE_MANAGER_REVIEW The Federal Student Aid caseworker has completed review of the case and has forwarded the case to a Federal Student Aid case manager.
CASE_MANAGER_REVIEW A Federal Student Aid case manager is reviewing the case.
CLOSED The Federal Student Aid case manager has finalized the case.
REJECTED The case was submitted past the deadline, and thus was rejected.
Table 25-1: Case status codes
Version 3.3.0 88 1/6/2012
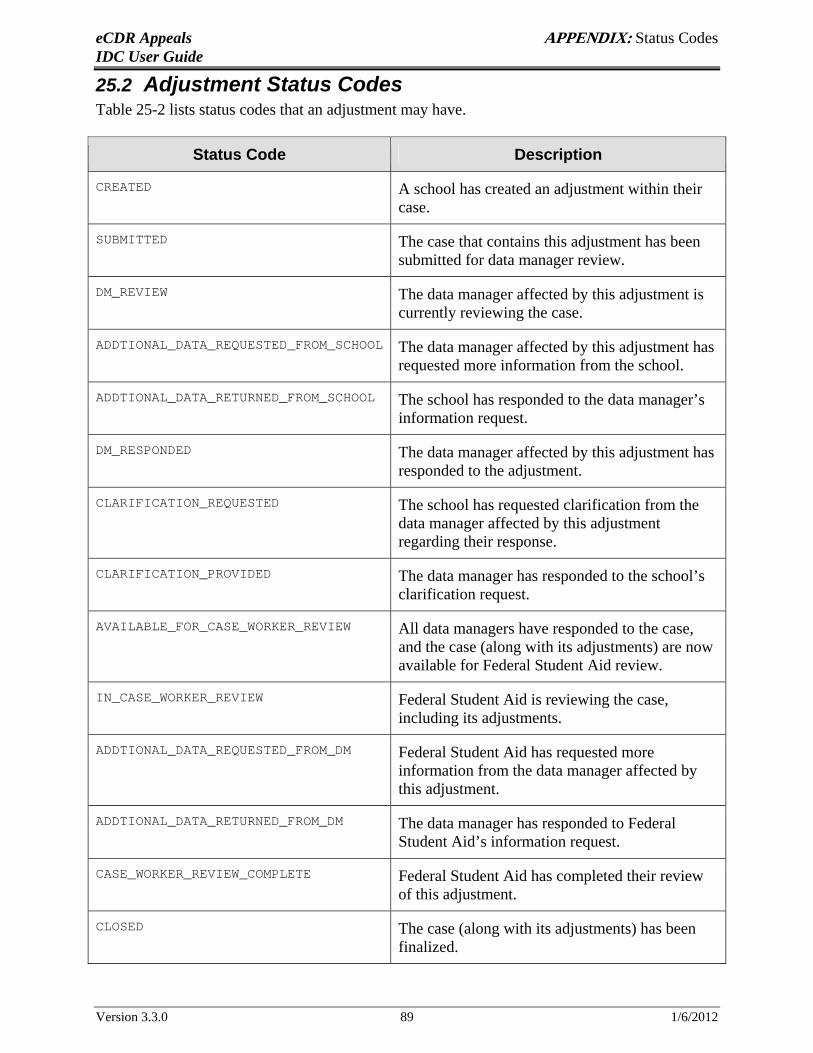
eCDR Appeals APPENDIX: Status Codes IDC User Guide
25.2 Adjustment Status Codes Table 25-2 lists status codes that an adjustment may have.
Status Code Description
CREATED A school has created an adjustment within their case.
SUBMITTED The case that contains this adjustment has been submitted for data manager review.
DM_REVIEW The data manager affected by this adjustment is currently reviewing the case.
ADDTIONAL_DATA_REQUESTED_FROM_SCHOOL The data manager affected by this adjustment has requested more information from the school.
ADDTIONAL_DATA_RETURNED_FROM_SCHOOL The school has responded to the data manager’s information request.
DM_RESPONDED The data manager affected by this adjustment has responded to the adjustment.
CLARIFICATION_REQUESTED The school has requested clarification from the data manager affected by this adjustment regarding their response.
CLARIFICATION_PROVIDED The data manager has responded to the school’s clarification request.
AVAILABLE_FOR_CASE_WORKER_REVIEW All data managers have responded to the case, and the case (along with its adjustments) are now available for Federal Student Aid review.
IN_CASE_WORKER_REVIEW Federal Student Aid is reviewing the case, including its adjustments.
ADDTIONAL_DATA_REQUESTED_FROM_DM Federal Student Aid has requested more information from the data manager affected by this adjustment.
ADDTIONAL_DATA_RETURNED_FROM_DM The data manager has responded to Federal Student Aid’s information request.
CASE_WORKER_REVIEW_COMPLETE Federal Student Aid has completed their review of this adjustment.
CLOSED The case (along with its adjustments) has been finalized.
Version 3.3.0 89 1/6/2012
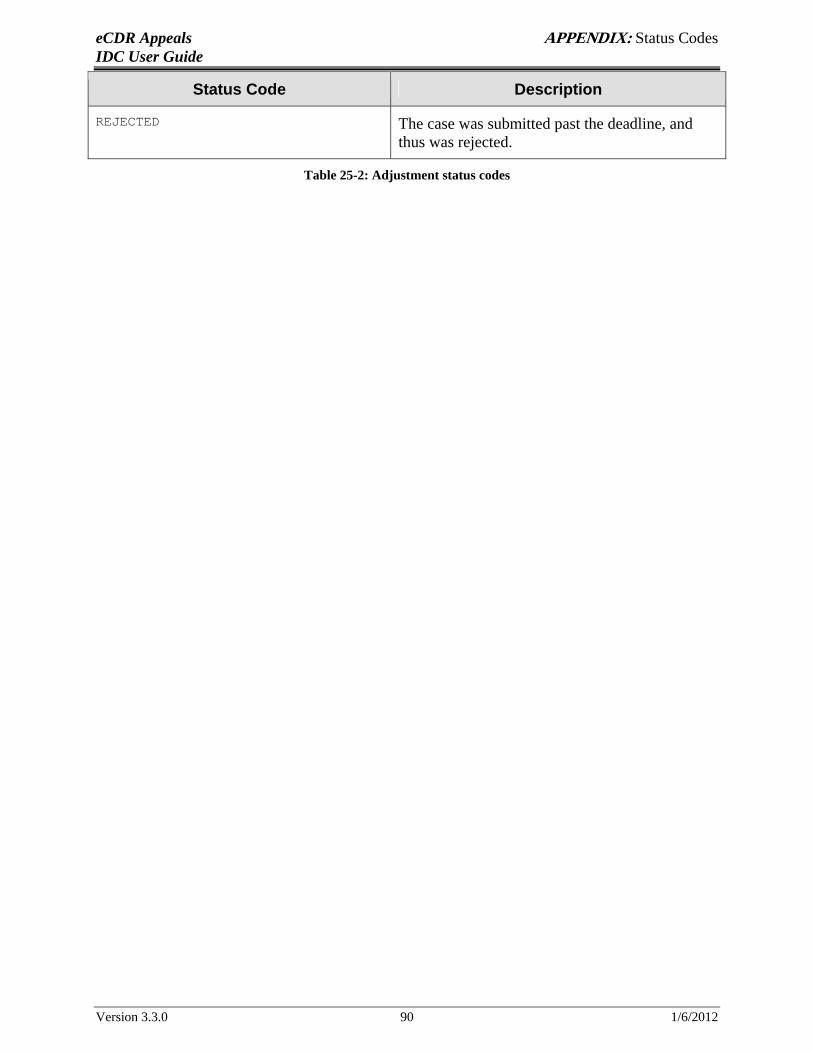
eCDR Appeals APPENDIX: Status Codes IDC User Guide
Status Code Description
REJECTED The case was submitted past the deadline, and thus was rejected.
Table 25-2: Adjustment status codes
Version 3.3.0 90 1/6/2012