Embed Size (px)
Citation preview
EasyCoder™ 3240 Printer
P/N 063257-005
Getting Started Guide

Intermec Technologies Corporation6001 36th Avenue WestP.O. Box 4280Everett, WA 98203-9280
U.S. technical and service support: 1-800-755-5505U.S. media supplies ordering information: 1-800-227-9947
Canadian technical and service support: 1-800-688-7043Canadian media supplies ordering information: 1-800-268-6936
Outside U.S. and Canada: Contact your local Intermec service supplier.
The information contained herein is proprietary and is provided solely for the purpose of allowingcustomers to operate and/or service Intermec manufactured equipment and is not to be released,reproduced, or used for any other purpose without written permission of Intermec.
Information and specifications in this manual are subject to change without notice.
1997 by Intermec Technologies CorporationAll Rights Reserved
The word Intermec, the Intermec logo, JANUS, IRL, TRAKKER, EasyCoder, Duratherm, PrecisionPrint, PrintSet, Virtual Wedge, and CrossBar are trademarks of Intermec Corporation.
Novell is a registered trademark of Novell, Inc.
Kimdura is a registered trademark of Kimberly Clark.
Kapton is a registered trademark of Dupont.
The name Centronics is wholly owned by GENICOM Corporation.
IBM is a registered trademark of International Business Machines Corporation.
Throughout this manual, trademarked names may be used. Rather than put a trademark () symbolin every occurrence of a trademarked name, we state that we are using the names only in aneditorial fashion, and to the benefit of the trademark owner, with no intention of infringement.
Contents
iii
ContentsAbout This Guide v
Related Intermec Manuals and Materials v
Warranty Information vi
Safety Summary vi
Cautions vi
Terms and Conventions vii
Preparing the Printer for Connection
Unpacking the 3240 Printer 1-3
Reporting Damage or Defects 1-4
Understanding the Printer Front Panel 1-5
Plugging In the Printer 1-6
Opening the Printer 1-7
Loading Media for Printing 1-8
Loading Media for Self-Strip Printing 1-10
Loading Thermal Transfer Ribbon 1-13
Testing Printer Operation 1-15
Connecting the Printer
Connecting the Printer to Your System 2-3Connecting the 3240 to a PC 2-3
Connecting the Printer to a PC Serial Port 2-4
Connecting the Printer to a PC Parallel Port 2-5
Connecting the 3240 to an Ethernet Network 2-5
Connecting the 3240 to an AS/400 2-7
Connecting the 3240 to a Mainframe 2-8
Verifying Printer Communications With Your System 2-9
Configuring the Serial Port 2-10
1
2

EasyCoder 3240 Printer Getting Started Guide
iv
Customizing the Printer for Your Application 2-12Using the InterDriver and ActiveX Barcode Control 2-12
Using the PrintSet Software 2-13
Using Third-Party Software 2-13
Using the Printer Command Set 2-13
Optimizing Print Quality
Troubleshooting the Printer 3-3
Printing High Registration Labels 3-7Correcting the Lateral Position of the Label Image 3-7
Accurately Detecting the Start of a Label 3-9
Correcting Uneven Print Quality 3-11
Fine-Tuning the Top of Form Position 3-13
Setting the Media Sensitivity Number 3-16Setting the Media Sensitivity Number for Intermec Media and Ribbon 3-17
Setting the Media Sensitivity Number for Other Media and Ribbon 3-18
Adjusting the Printer for Self-Strip Printing 3-20
Cleaning the Printhead 3-21
3
HelvC NugFont Co de 39About This Guide
v
About This Guide
Use this guide to get your printer up and running for the first time. This gettingstarted guide walks you through taking the printer out of the box, connecting itto your system, and verifying that you have communications with your system.Use this table to locate the information you need to get started.
For Information On Refer To
Preparing the printer forconnection
Chapter 1. This chapter explains how to unpack theprinter, understand the printer front panel, plug in theprinter, load media, load ribbon, and print a test label.
Connecting the printer Chapter 2. This chapter explains how to connect theprinter to your system, configure the serial port, andverify that you have established communications.
Optimizing print quality Chapter 3. This chapter explains how to troubleshootbasic print quality problems and perform procedures tomaintain print quality.
Related Intermec Manuals and MaterialsThe manuals and material listed below provide additional information aboutprinting labels with your 3240 printer. Please visit our Web site atwww.intermec.com for a list of available manuals or to access many of ourcurrent manuals in PDF format. To order printed versions of the Intermecmanuals, contact your local Intermec representative or distributor.
User�s Manual Intermec Part No.
3240 Bar Code Label Printer User’s Manual 063015
General Reference
Data Communications Reference Manual 044737
The Bar Code Book by Roger C. Palmer 051241
IPL Programming Reference Manual 066396
Compact Disk
Printer Companion CD 1-020036
3240 Bar Code Label Printer Getting Started Guide
vi
Warranty InformationTo receive a copy of the standard warranty provision for this product, contactyour local Intermec sales organization. In the U.S. call (800) 755-5505, and inCanada call (800) 688-7043. Otherwise, refer to the Worldwide Sales & Servicelist that comes with this guide for the address and telephone number of yourIntermec sales organization.
Safety SummaryYour safety is extremely important. Read and follow all warnings and cautionsin this guide before handling and operating Intermec equipment. You can beseriously injured, and equipment and data can be damaged if you do not followthe safety warnings and cautions.
Do Not Repair or Adjust Alone Do not repair or adjust energized equipmentalone under any circumstances. Someone capable of providing first aid mustalways be present for your safety.
First Aid Always obtain first aid or medical attention immediately after aninjury. Never neglect an injury, no matter how slight it seems.
Resuscitation Begin resuscitation immediately if someone is injured and stopsbreathing. Any delay could result in death. To work on or near high voltage,you should be familiar with approved industrial first aid methods.
Energized Equipment Never work on energized equipment unless authorizedby a responsible authority. Energized electrical equipment is dangerous.Electrical shock from energized equipment can cause death. If you mustperform authorized emergency work on energized equipment, be sure that youcomply strictly with approved safety regulations.
CautionsThe cautions in this guide use the following format.
CautionA caution alerts you to an operating procedure, practice, condition, orstatement that must be strictly observed to prevent equipment damage ordestruction, or corruption or loss of data.
ConseilUne précaution vous alerte d’une procédure de fonctionnement, d’une méthode,d’un état ou d’un rapport qui doit être strictement respecté pour empêcherl’endommagement ou la destruction de l’équipement, ou l’altération ou laperte de données.
HelvC NugFont Co de 39About This Guide
vii
Terms and ConventionsThe following special terms and conventions occur throughout this guide.
Terms“Printer” or “3240” refer to the 3240 bar code label printer.
“Media” is the label or tag stock on which the printer prints labels.
“Host” refers to a personal computer or other computer that communicateswith the printer.
ConventionsThe following conventions are used throughout this guide for operatingprocedures and descriptions of the printer.
• Feed/Pause refers to the Feed/Pause button on the printer front panel.
• Downloaded commands appear in the order that you send them to theprinter with the following conventions:
Convention Description
Ctrl Bold text represents a key on your keyboard. For example, Ctrlrepresents the Control key.
Ctrl-Z When two keys are joined with a dash, press them simultaneously. Forexample, if you see the command Ctrl-Z, press the two keys at thesame time.
E3;F3 Type all characters that appear in the Courier font by pressing anindividual key on the keyboard.


Preparing the Printer for Connection
1

HelvC Courier NugFont Co de 39Preparing the Printer for Connection
1-3
1The 3240 printer offers many configuration and programming choices, yet it is easy tooperate and understand. Intermec designed the 3240 to produce high-quality labels inharsh environments with minimal supervision and maintenance.
This chapter provides procedures for
• unpacking the printer.
• reporting damage or defects.
• understanding the printer front panel.
• plugging in the printer.
• opening the printer.
• loading media for printing.
• loading media for self-strip printing.
• loading thermal transfer ribbon.
• testing printer operation.
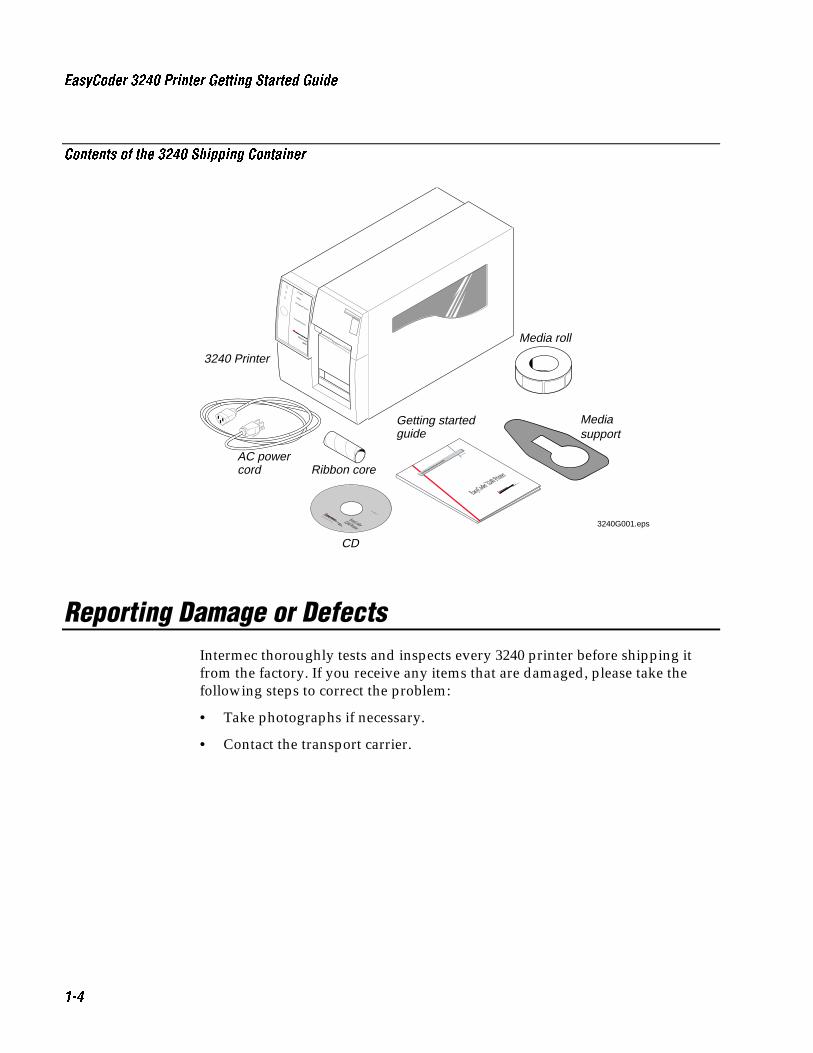
Unpacking the 3240 Printer
Remove the accessories, packing material, and the printer from the shippingcontainer. Set the printer on a clean, stable, flat surface and remove the packingmaterial. Make sure that you have enough room to open the printer cover. Savethe shipping container and packing materials in case you need to move or shipyour printer.
Verify the contents of the shipping container against the list below and thefigure on the following page.
• 3240 printer
• AC power cord
• Ribbon core
• EasyCoder™ 3240 Printer Getting Started Guide
• Printer Companion CD
• Media roll
• Media support
EasyCoder 3240 Printer Getting Started Guide
1-4
Contents of the 3240 Shipping Container
3240G001.eps
Media roll
Mediasupport
CD
Getting started guide
EasyCoder™ 3240 Printer
P/N 054324
Getting Starte
d Guide
EasyCoder
Power
3240
Alert
Feed/Pause
Empty/Pause
3240 Printer
AC powercord Ribbon core
precisionprint
Getting Started Guide
P/N 069806-001
Local Area Systems Division
EasyCoder ™
3240 Printer
Reporting Damage or Defects
Intermec thoroughly tests and inspects every 3240 printer before shipping itfrom the factory. If you receive any items that are damaged, please take thefollowing steps to correct the problem:
• Take photographs if necessary.
• Contact the transport carrier.

HelvC Courier NugFont Co de 39Preparing the Printer for Connection
1-5
1Understanding the Printer Front Panel
The front of the 3240 printer contains one button (Feed/Pause) and three lightemitting diodes (LEDs) that the printer uses to provide information duringprinter operation. The three LED indicators operate as follows:
3240G.002
Power
Alert
Empty/Pause
Feed/Pause
PowerGreen LED
Alert
Empty/Pause
OffOn
OffFlashingOn
OffFlashingOn
Power offPower on
Printing or idleOver-temperatureSystem fault
Printing or idlePrinter is pausedMedia fault
LED State Indicates
Orange LED
Yellow LED
The Feed/Pause button performs the following functions depending on themode of the printer:
Print Mode Function
If the printer is idle: Press and release the Feed/Pause button to feed out one labelor a minimum specified amount of media.Press and hold the Feed/Pause button to continuously feedmedia until you release the button.Press the Feed/Pause button twice to take the printer offline.
If the printer is printing: Press and release the Feed/Pause button to make the printerpause.Press and release the Feed/Pause button again for the printerto resume printing.Press and hold the Feed/Pause button to cancel the print job.
When the printer is firstpowered on:
Press and hold the Feed/Pause button to print the hardwareconfiguration label. Refer to “Testing Printer Operation” laterin this chapter.

EasyCoder 3240 Printer Getting Started Guide
1-6
Plugging In the Printer
The back of the 3240 printer contains the AC power cord receptacle, the serialcommunications port, the On/Off (|/O) switch, and two banks of DIPswitches.
To plug in the printer
1. Turn the On/Off switch to the off (O) position.
2. Make sure you set the DIP switches to their factory default settings.
Top Bank Set switch 1 on. Set switches 2 through 8 off.
Bottom Bank Set switches 1 through 8 off.
1 2 3 4 5 6 7 81 2 3 4 5 6 7 8
O
I
Serial communications port
On/Offswitch
AC power cordreceptacle
DIP switches
1 2 3 4 5 6 7 81 2 3 4 5 6 7 8
3240G.003
3. Plug the AC power cord into the receptacle at the rear of the printer.
4. Plug the other end of the power cord into a grounded wall outlet or surgeprotector.
5. Turn the On/Off switch to the on (|) position. When you power on theprinter, the green LED lights, the yellow LED flashes, and the platen rolleradvances. The yellow LED then stays on until you load media.

HelvC Courier NugFont Co de 39Preparing the Printer for Connection
1-7
1Opening the Printer
You need to open the printer every time you load media or performmaintenance procedures.
To open the printer
1. Place the fingers of your right hand between the two notches on the loweredge of the media cover (the media cover release) and pull the bottom ofthe media cover away from the base of the printer.
2. Grasp the front of the media cover with your left hand and lift the front ofthe media cover upward to release it from the top of the printer frame.
3. Lift the media cover away from the top of the printer.
3240G.004
Mediacover
Power
3240
Alert
Feed/Pause
Empty/Pause
Media coverrelease(between the twonotches)
1
2
3
EasyCoder
precisionprint

EasyCoder 3240 Printer Getting Started Guide
1-8
Loading Media for Printing
This procedure explains how to load a roll of media. For the purposes of thisgetting started guide, you may want to use the small roll of media that comeswith the printer.
Note: Attached to the media roll is a label with a three-digit sensitivity number printedon it. Make sure you save this label. You need this information to set the correct mediasensitivity number. See “Setting the Media Sensitivity Number” in Chapter 3 for moreinformation.
To load media
1. Open the printer.
2. Raise the printhead by rotating the head lift lever clockwise to release it.
3. Turn the supply roll retainer counterclockwise to release it and slide it tothe outer end of the supply roll post. Turn the supply roll retainer clockwiseto lock it in place.
4. Lift the media brake up and slide it towards the front of the printer until itreaches its resting position.
5. Place the media roll on the supply roll post and position it firmly againstthe printer.
6. Lift up on the media brake, slide it toward the back of the printer, andlower it onto the media roll.
7. Turn the supply roll retainer counterclockwise and slide it up to the edge ofthe media roll. Turn the supply roll retainer clockwise to secure.
Note: If you are using a narrow media roll (less than 1 inch), insert the mediasupport between the media roll and the supply roll retainer before you secure it inplace.
8. Unscrew the edge guide and slide it all the way to the outer edge of thelower media guide. Screw the edge guide in place.
9. Pull down on the lower media guide to allow access to the media path.
10. Unroll several inches of media and insert it between the two media guidesand out the front of the printer. Release the lower media guide.
11. If you are using thermal transfer media, you need to load ribbon. For help,see “Loading Thermal Transfer Ribbon,” later in this chapter.
12. Rotate the head lift lever counterclockwise until it locks in place to lowerthe printhead.

HelvC Courier NugFont Co de 39Preparing the Printer for Connection
1-9
1Loading Media
➤➤
Media
Mediabacking
Media roll
Head lift lever
Uppermedia guide
Lowermedia guide
Supply rollpost
Supply rollretainer
Edgeguide
Tearbar Label
gapsensor
LateralprintheadadjustPrinthead
3240G.005
Media support
Media brake
TOF
13. Press the Feed/Pause button until the printer feeds out approximately 6inches of media.
14. Unscrew the edge guide and slide it inward until it just touches the edge ofthe media. Screw it in place.
Note: Adjust the label gap sensor if you are using narrow media (less than1 inch wide). For help, see “Accurately Detecting the Start of a Label” inChapter 3.
15. If you are loading continuous media or mark label stock, use PrintSet,your third-party software or the printer command set to tell the printerwhat kind of media you are using.
16. Replace the media cover. Your printer is now ready to print labels.
Note: If you are using narrow media (1 inch or less), it is important that you adjustthe bias adjust screw to achieve the highest print quality possible. For help, see”Correcting Uneven Print Quality” in Chapter 3.

EasyCoder 3240 Printer Getting Started Guide
1-10
Loading Media for Self-Strip Printing
Use self-strip printing in applications where you want to apply labels to asurface immediately. After printing a label, the printer prints out the label withthe backing removed. The rewinder hub collects the backing after passing overthe self-strip assist roller. The rewinder hub can hold the backing from an entireroll of media.
Note: Attached to the media roll is a small label with a three-digit sensitivity numberprinted on it. Make sure you save this label. You need this information to set thecorrect media sensitivity number. Refer to “Setting the Media Sensitivity Number” inChapter 3 for more information.
Note: If you lift the printhead while printing with self-strip, you may not receive thebest performance from the Precision Print technology. If you must lift the printhead,remove accumulated liner from the takeup hub before resuming print.
To load self-strip media
1. Open the printer.
2. Raise the printhead by rotating the head lift lever clockwise to release it.
3. Turn the supply roll retainer counterclockwise to release it and slide it tothe outer end of the supply roll post. Turn the supply roll retainer clockwiseto lock it in place.
4. Lift the media brake up and slide it towards the front of the printer until itreaches its resting position.
5. Place the media roll on the supply roll post and position it firmly againstthe printer.
6. Lift up on the media brake, slide it toward the back of the printer, andlower it onto the media roll.
7. Turn the supply roll retainer counterclockwise and slide it up to the edge ofthe media roll. Turn the supply roll retainer clockwise to secure.
Note: If you are using a narrow roll of media (less than 1 inch), insert the mediasupport between the roll of media and the supply roll retainer before you secure itin place.
8. Unscrew the edge guide and slide it to the outer edge of the lower mediaguide. Screw the edge guide in place.
9. Pull down on the lower media guide to access the media path.
10. Unroll several inches of media and insert it between the two media guidesand out the front of the printer. Release the lower media guide.

HelvC Courier NugFont Co de 39Preparing the Printer for Connection
1-11
1Loading Media for Self-Strip Printing
Power
3240
Alert
Feed/Pause
Empty/Pause
3240G.020
➤
➤
➤
➤
➤
➤Medialiner
Lateralprintheadknob
Rewinderclasp
Rewinderhub
Self-stripassist roller
Head liftlever
Media roll
Supply rollretainer
Lower mediaguide
Mediaaccess door
Supply rollpost
Tearbar
Printhead
Upper media guide
EasyCoder
Media support
Media brake
11. Pull out 10 to 12 inches of media and remove the exposed labels from themedia liner.
12. Open the media access door and thread the media liner under the self-stripassist roller and over the rewinder hub in a clockwise direction.
13. Remove the rewinder clasp from the rewinder hub and wind approximately2 inches of media liner over the rewinder hub.
14. Secure the media by snapping the rewinder clasp onto the rewinder hub.Turn the rewinder hub clockwise to remove all slack from the media linerbetween the tear bar and the rewinder hub.
15. Close the media access door.
16. Use PrintSet, your third-party software or the printer command set toenable self-strip printing and the label taken sensor.
Note: See “Adjusting the Printer for Self-Strip Printing” in Chapter 3 forinformation on how to position the label taken sensor.
17. Rotate the head lift lever counterclockwise until it locks.
18. Press Feed/Pause to advance approximately 6 inches of media through theprinter. Remove the stripped labels from the front of the printer.

EasyCoder 3240 Printer Getting Started Guide
1-12
19. Unscrew the edge guide and slide it inward until it just touches the edge ofthe media. Screw the edge guide in place.
Note: Adjust the label gap sensor if you are using narrow media (less than 1 inchwide). See “Accurately Detecting the Start of a Label” in Chapter 3.
20. Replace the printer cover. The printer is now ready to print labels.

HelvC Courier NugFont Co de 39Preparing the Printer for Connection
1-13
1Loading Thermal Transfer Ribbon
If you plan to use thermal transfer media, you must install a thermal transferribbon (TTR) to print labels in thermal transfer mode.
Note: Save the plastic bag that your ribbon comes in. Attached to the ribbon bag is asticker with a three-digit sensitivity number printed on it. You need this information toset the correct media sensitivity number. See “Setting the Media Sensitivity Number”in Chapter 3 for more information.
To load thermal transfer ribbon
1. Make sure the printhead is in the raised position. If not, turn the head liftlever clockwise until it releases the printhead.
2. Place the empty ribbon core that comes with the printer on the ribbonrewind hub.
3. Detach the leader from the new thermal transfer ribbon roll and unwind theend of the ribbon approximately 8 inches. The edge of the ribbon has aleader (with an adhesive strip on the leader edge) to guide the ribbonthrough the printhead mechanism.
4. Slide the roll of thermal transfer ribbon onto the ribbon supply hub with theribbon roll winding clockwise.
5. Route the ribbon leader through the printer mechanism as shown in theillustration.
Note: Make sure that the ribbon goes over the label gap sensor PCB located on thetop of the upper media guide. If the ribbon becomes caught on the PCB, it can causethe ribbon to wrinkle.
Note: Make sure the ribbon runs above the upper media guide. The ribbon mustcome in contact with the printhead.
6. Attach the leader from the new thermal transfer ribbon roll to the emptyribbon core using the adhesive strip on the leader edge.
7. Turn the ribbon rewind hub clockwise until the ribbon runs smoothlythrough the printhead mechanism.

EasyCoder 3240 Printer Getting Started Guide
1-14
Loading Thermal Transfer Ribbon
Power
3240
Alert
Feed/Pause
3240G.006
Empty/Pause Ribbon supplyhub
Ribbon rewindhub
PrintheadTTR assistroller
Empty ribboncore
Thermal transfer ribbon
Upper mediaguide
Head liftlever
Lateral printheadadjust
EasyCoder
8. Engage the printhead by rotating the head lift lever counterclockwise untilit locks.
9. To enable thermal transfer printing, set DIP switch 8 on the bottom bank ofswitches to the on position. For help, see “Configuring the Serial Port” inChapter 2.
10. Press the Feed/Pause button to advance the ribbon through the printer.
11. Close the printer. The printer is now ready to print labels.
Note: When replacing the thermal transfer ribbon roll in the future, use the emptyribbon supply core as the new empty ribbon core.

HelvC Courier NugFont Co de 39Preparing the Printer for Connection
1-15
1Testing Printer Operation
You can print the hardware configuration test label to test the printer and makesure it is operating correctly. The hardware configuration test label lists yourprinter’s configuration. Use this label for reference when connecting the 3240printer to your system.
Note: For the entire hardware configuration label to print out, you must use mediathat is at least 2.6 inches wide.
To print the hardware configuration test label
1. Turn the On/Off switch to the off position.
2. Press and hold the Feed/Pause button while turning the printer power on.The Alert and Empty/Pause LEDs blink during the printer self-test.
3. Release the Feed/Pause button when the media starts moving. The printerfeeds out one or two blank labels (to verify the label length) and then printsthe hardware configuration test label.
4. Turn the printer power off and then on to enter Print mode.
3240G.007
3240 Hardware Configuration
: 128 kilobytes: 375 kilobytes: none
: 36: 12
: 1024 dots: 2.5 mil: 231
: none: none: Self Strip
Memory InstalledStorage RAM
Image RAMFlash RAM
MileageInches ProcessedInches Burned
PrintheadWidth Dot Size
Burn Pot Setting
Hardware OptionsI/O OptionInternal OptionExternal Option
Firmware ChecksumROM0 (U9) : CDE3 ROM1 (U8): 0A1E
Program : 063103 VERSION: 0.9


Connecting the Printer
2

HelvC NugFont Co de 39Connecting the Printer
2-3
2You can connect the 3240 printer to almost any system available and establishcommunications. Use this chapter for
• connecting the printer to your system.
• verifying communications between the printer and your system.
• configuring the serial port.
• customizing the printer for your applications.
Connecting the Printer to Your System
You can connect your 3240 printer to a PC, a local area network, an AS/400 (orother midrange computer), or a mainframe. This section provides theinformation necessary for connecting to any of these systems.
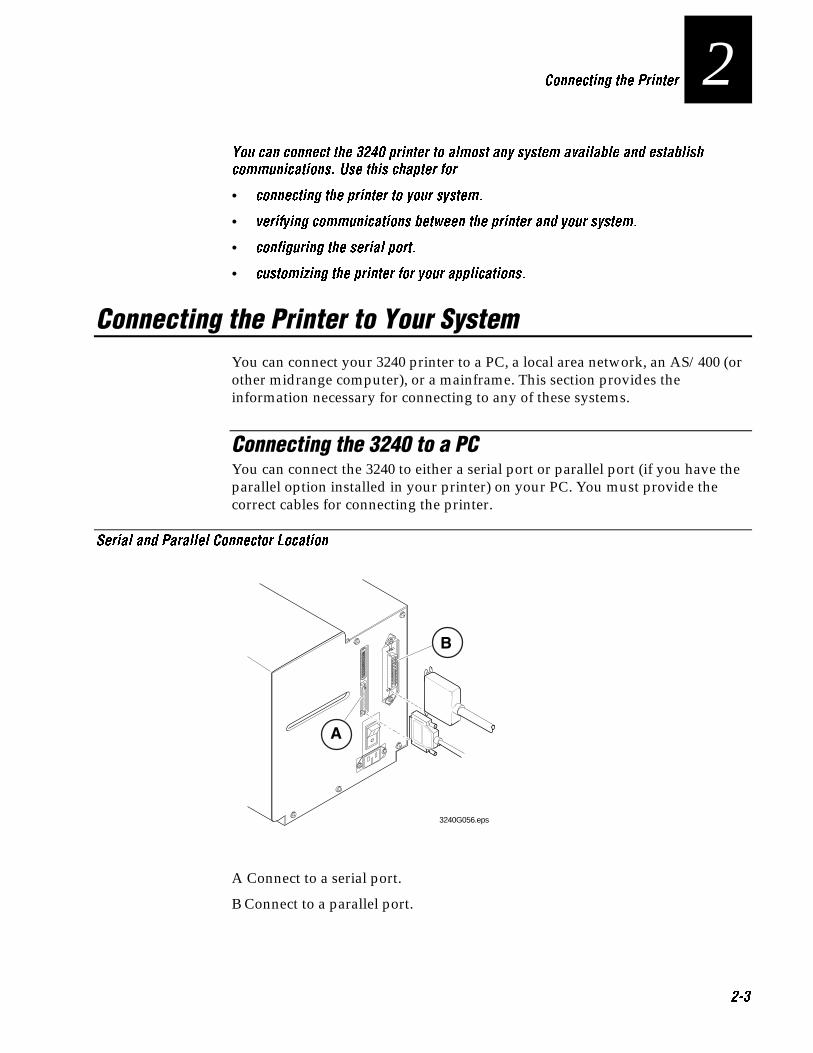
Connecting the 3240 to a PCYou can connect the 3240 to either a serial port or parallel port (if you have theparallel option installed in your printer) on your PC. You must provide thecorrect cables for connecting the printer.
Serial and Parallel Connector Location
1 2 3 4 5 6 7 81 2 3 4 5 6 7 8
O
I
3240G056.eps
A Connect to a serial port.
B Connect to a parallel port.
EasyCoder 3240 Printer Getting Started Guide
2-4
Connecting the Printer to a PC Serial PortTo connect the 3240 to your PC serial port, you need a shielded EIA RS-232,RS-422, or RS-485 electrical interface with a 25-pin D-style subminiatureconnector. It must have pins on the printer end and an appropriate serial portconnector on the other end.
Use the following table to determine the correct Intermec cable for yourapplication. See your printer user’s manual for cable schematics for thesecables.
For Connecting To Use Intermec Cable Part Number
IBM PC AT 048693 (25-pin printer to 9-pin serial port straight-through)
IBM PC XT 048668 (25-pin printer to 25-pin serial port null modem)
Contact your Intermec representative for ordering assistance if you do not havethe appropriate cable.
To connect your printer to a PC serial port
1. Turn the On/Off switch to the off position.
2. Plug the 25-pin connector into the serial communications port on the backof the 3240 printer.
3. Plug the other end of the cable into a serial COM port on the PC.
4. If necessary, change the PC serial port configuration to match your printer.The default configuration settings for the 3240 printer are:
• 9600 baud• even parity• 7 bit word length• XON/XOFF no status response protocol• device address A• direct thermal media
See “Configuring the Serial Port” later in this chapter for more information.
HelvC NugFont Co de 39Connecting the Printer
2-5
2Connecting the Printer to a PC Parallel PortIf you are using a parallel port to communicate with the printer, you need:
• a Centronics parallel interface installed in the printer.
• a parallel cable to run between the printer and the PC.
If you did not have the parallel interface installed at the factory, an Intermectechnician can install the field-installable option (Intermec Part No. 056830) inthe optional I/O board port of your printer.
You can purchase a parallel cable from Intermec (Part No. 051211) or from yourlocal computer store.
To connect your printer to a PC parallel port
1. Turn the On/Off switch to the off position.
2. Plug the Centronics cable connector into the interface adapter port on theback of the 3240 printer.
3. Plug the other end of the cable into a parallel port on the PC.
Connecting the 3240 to an Ethernet NetworkWith the Intermec Ethernet Adapter installed, you can connect the 3240 printerinto mixed network environments. The adapter is compatible with all majorsystems including: NetWare, UNIX, Windows, and Macintosh. Additionally,mainframe systems that use TCP/IP are supported.
To connect the 3240 to an Ethernet network, you must have:
• an Ethernet Adapter interface installed in your printer.
• an Ethernet network cable.

EasyCoder 3240 Printer Getting Started Guide
2-6
Parallel Port Connector and External Ethernet Adapter
1 2 3 4 5 6 7 81 2 3 4 5 6 7 8
O
I
3240G059.eps
ExternalEthernetAdapter
Optional I/O port with parallelconnectorinstalled
If you did not have the parallel interface installed at the factory, an Intermectechnician can install the field-installable option (Intermec Part No. 068789) inthe optional I/O board port of your printer.
Internal Ethernet Connector
O
I
NetworkLED
PowerLED
Test button
10BaseTconnector
3240G058.eps
See your Intermec Ethernet Adapter Installation Guide (Part No. 068748) for moreinformation. You may also want to purchase a copy of the Intermec EthernetAdapter User’s Manual (Part No. 068749) or download a copy from our Internetsite at www.intermec.com at no charge.
HelvC NugFont Co de 39Connecting the Printer
2-7
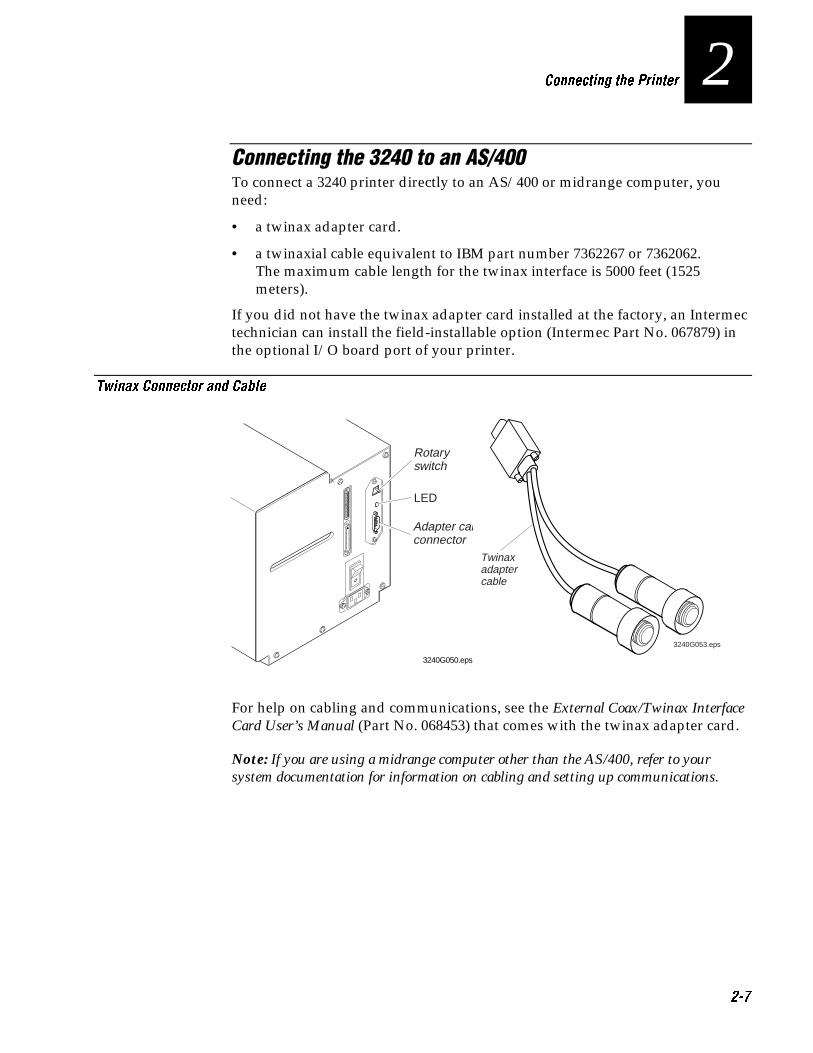
2Connecting the 3240 to an AS/400To connect a 3240 printer directly to an AS/400 or midrange computer, youneed:
• a twinax adapter card.
• a twinaxial cable equivalent to IBM part number 7362267 or 7362062.The maximum cable length for the twinax interface is 5000 feet (1525meters).
If you did not have the twinax adapter card installed at the factory, an Intermectechnician can install the field-installable option (Intermec Part No. 067879) inthe optional I/O board port of your printer.
Twinax Connector and Cable
1 2 3 4 5 6 7 81 2 3 4 5 6 7 8
O
I
3240G050.eps
Rotaryswitch
LED
Adapter cableconnector
Twinaxadapter cable
3240G053.eps
For help on cabling and communications, see the External Coax/Twinax InterfaceCard User’s Manual (Part No. 068453) that comes with the twinax adapter card.
Note: If you are using a midrange computer other than the AS/400, refer to yoursystem documentation for information on cabling and setting up communications.

EasyCoder 3240 Printer Getting Started Guide
2-8
Connecting the 3240 to a MainframeTo connect a 3240 printer directly to an IBM mainframe, you need:
• a coax adapter card.
• a coaxial cable equivalent to IBM part number 2577672 or 1833108.
Coax Connector and Cable
1 2 3 4 5 6 7 81 2 3 4 5 6 7 8
O
I
3240G050.eps
Rotaryswitch
LED
Adapter cableconnector Coax
adaptercable
3240G054.eps
The maximum cable length allowed is 4920 feet (1500 meters). See the IBMspecification Installation and Assembly of Coaxial Cable and Accessories, partnumber GA27-2805-4, for further information.
If you did not have the coax adapter card installed at the factory, you can installthe field-installable option (Intermec Part No. 067880) in the optional I/O boardport of your printer.
For help on cabling and communications, see the External Coax/Twinax InterfaceCard User’s Manual (Part No. 068453) that comes with the twinax adapter card.

HelvC NugFont Co de 39Connecting the Printer
2-9
2Verifying Printer Communications With Your System
Once you have the printer connected to your system, you need to verify thatthe printer communicates with your system. The easiest way to testcommunications is to set the printer to Data Line Print mode, which is a part ofthe Test and Service mode, and send down a character string from your system.
If you have just printed a configuration test label, you are in Data Line Printmode. Start with Step 4.
To verify communications with your system
1. Turn the On/Off switch to the off position.
2. Press and hold the Feed/Pause button while powering on the printer. Theprinter prints out the hardware configuration test label.
3. Release the Feed/Pause button after the hardware configuration label isprinted. You are now in Data Line Print mode.
4. Send down some characters from your system.
At this point the printer does not attempt to interpret any printercommands. It simply prints each character with its hexadecimal equivalentunderneath.
5. To return to Print mode, turn the printer power off and then on again.
If this procedure does not work, check to make sure that the DIP switches areset to the default configuration and that the printer cable is securely pluggedinto the correct port of your system.

EasyCoder 3240 Printer Getting Started Guide
2-10
Configuring the Serial Port
The serial port settings of the 3240 printer should match those of your PC ornetwork controlling device. If the default settings do not match yourconfiguration needs, use the DIP Switch Settings table and the Serial PortSettings table to change them.
Note: Ignore Multi-Drop switches if you are not using a Multi-Drop network.
DIP Switch Settings
3240G.010
ONO = OFF1 = ON
Multi-Drop Address Selection
*ABCDEFGHI
JKLMNOPQRSTUVWXYZ012345
Protocol SelectionXON/XOFF*
Intermec Protocols
XON/XOFF SelectionNo Status Response*
With Status Response
DT/TTRDirect Thermal*
Thermal Transfer
O1O1O1O1O1O1O1O1O1O1O1O1O1O1O1O1
OO11OO11OO11OO11OO11OO11OO11OO11
OOOO1111OOOO1111OOOO1111OOOO1111
OOOOOOOO11111111OOOOOOOO11111111
OOOOOOOOOOOOOOOO1111111111111111
O1
O1
O1
Default settings are noted with an *
Bottom Bank Switch Number
1 2 3 4 5 6 7 8
OFF
1 2 3 4 5 6 7 8
O = OFF1 = ON
Baud Rate Selection19,2009,600*
4,8002,4001,200
reservedreservedreserved
Parity SelectionEven*
OddNoneNone
Number of Data Bits7 Bit 8 Bit
Reserved
O1O1O1O1
OO11OO11
OOOO1111
O1O1
OO11
O1
O O
Default settings are noted with an *
Top Bank Switch Number
ON
OFF

HelvC NugFont Co de 39Connecting the Printer
2-11
2Serial Port Settings
The default settings are shown in bold italic text.
Parameter Settings
Baud Rate 1200, 2400, 4800, 9600, 19200
Parity Even, Odd, None
Word LengthSelection
7 bit word, 8 bit word
Protocol Intermec, XON/XOFF no status response, XON/XOFF withstatus response
Device Address A to Z, 0 to 5
Media Type Direct thermal, thermal transfer
To configure the printer serial port
1. Use the DIP Switch Settings table (previous page) and the Serial PortSettings table (above) to determine which parameters you need to changeand the correct DIP switch settings.
2. Use a small straight-slot screwdriver to set the appropriate DIP switches onor off.
For example, if you want to change the media type to thermal transfer, setDIP switch 8 on the bottom bank of switches to the on position.
3. Turn the printer power off and then on for the configuration changes totake effect.

EasyCoder 3240 Printer Getting Started Guide
2-12
Customizing the Printer for Your Application
Several configuration settings are available to improve print quality andperformance. You can use the configuration settings to control parameters suchas print darkness and the media sensitivity number. Many of the configurationsettings customize the printer for self-strip applications and the type of mediayou are using. Use PrintSet, your third-party software, or the Intermec PrinterLanguage (IPL) command set to customize the configuration settings. Refer tothe IPL Programming Reference Manual for more information on all of theconfiguration settings.
Using the InterDriver and ActiveX Barcode ControlYou can now easily create bar code labels from virtually any Windowsapplication. Simply use the InterDriver as you would any other printer driver.
With the InterDriver you can:
• Change printer configuration.
• Adjust memory.
• Use pre-defined labels or create your own customer sizes.
• Perform test prints.
• Communicate with your printer with serial, parallel, or Ethernetconnections.
With the ActiveX Barcode Control you can:
• Drop bar codes into any Windows Application.
• Easily configure the bar code to your needs.
• Update the data manually or automatically from a database.
• Generate serialized bar codes.
• Create custom applications using Visual basic and Visual C++.
For help on both the InterDriver and the ActiveX Barcode Control, refer to theonline help portion of the application software.
HelvC NugFont Co de 39Connecting the Printer
2-13
2Using the PrintSet SoftwareUse the PrintSet application software to easily configure your printer from yourPC. You can upload the current configuration settings, modify them, and thendownload them to the 3240 printer. PrintSet also lets you:
• download graphics and fonts.
• print test labels.
• allocate memory.
• download configuration files.
For help using PrintSet, refer to the online help portion of the applicationsoftware. PrintSet can be installed from the Printer Companion CD includedwith this manual or it can be downloaded from our Internet site atwww.intermec.com.
Using Third-Party SoftwareYou can use third-party software to set many of the printer parameters. Use theprinter command set or the configuration DIP switches to set the parametersthat your software cannot set (for example, the number of image bands andmedia sensitivity number).
Use your third-party software to create label formats and convert graphics intoa user-definable character (UDC) format that the 3240 printer can interpret.
Using the Printer Command SetYou can also create labels by downloading formats (designs) and data createdwith the printer command set. The commands in the printer command set canperform any function or activate any feature of the 3240 printer except for thosefeatures and functions that you set with the DIP switches. See the IPLProgramming Reference Manual for a complete list of printer commands and theirdescriptions.


Optimizing Print Quality
3


Co de 39Co de 39Optimizing Print Quality
3-3
3Use the procedures and adjustments in this chapter to optimize and maintain printquality. Optimize and maintain print quality by
• troubleshooting the printer.
• using Precision Print technology to print high registration labels.
• setting the media sensitivity number.
• cleaning the printhead.
• adjusting the label taken sensor for self-strip printing.
Troubleshooting the Printer
Use the troubleshooting table to determine what may be causing your printquality problem before you proceed. Then use the next sections to optimize andmaintain your printer.
If the print quality problem persists after performing the procedures in thischapter, see your 3240 Bar Code Label Printer User’s Manual for moretroubleshooting information, or contact your Intermec Customer ServiceRepresentative at 1-800-755-5505.

EasyCoder 3240 Printer Getting Started GuideCo de 39Co de 39
3-4
If your labels are not printing properly, check the following table to locate thesymptom and correct the problem.
Print Quality Problems
Symptom Possible Causes Solution
Blotches on labels. Printhead is dirty. Clean the printhead. See “Cleaning the Printhead”later in this chapter.
Poor quality label orribbon stock.
Replace stock with Intermec Media Products labeland/or ribbon stock. See “Setting the MediaSensitivity Number” later in this chapter to set thecorrect media sensitivity numbers for Intermec mediaand ribbon stock.
Incorrect mediasensitivity setting.
Change sensitivity setting to match the type of mediayou are using. See “Setting the Media SensitivityNumber” later in this chapter.
Printing is too lightor too dark.
Incorrect mediasensitivity setting.
Change sensitivity setting to match the type of mediayou are using. See “Setting the Media SensitivityNumber” later in this chapter.
Printhead is dirty. Clean the printhead. Refer to “Cleaning thePrinthead” later in this chapter.
Printing on label isout of alignment.
Printer is misfeedingmedia.
Make sure that you installed the media correctly alongthe entire media path. See “Loading Media forPrinting” in Chapter 1.
Print quality is poor. Incorrect mediasensitivity setting.
Change the sensitivity setting to match the type ofmedia you are using. See “Setting the MediaSensitivity Number” later in this chapter.
Printhead is dirty. Clean the printhead. See “Cleaning the Printhead” inthis chapter.
Uneven print contrast(density).
Adjust the bias adjust screw. See “Correcting UnevenPrint Quality” later in this chapter.
You are using incorrectlabel or ribbon stock toprint labels.
Use only Intermec label and ribbon stock to ensuresuperior print quality and product performance. See“Setting the Media Sensitivity Number” later in thischapter to set the correct media sensitivity numbersfor Intermec media and ribbon stock.
Ribbon wrinkling. Check to make sure that you installed the ribboncorrectly. See “Loading Thermal Transfer Ribbon” inChapter 1.
Adjust the bias adjust screw. See “Correcting UnevenPrint Quality” later in this chapter.

Co de 39Co de 39Optimizing Print Quality
3-5
3Print Quality Problems (continued)
Symptom Possible Causes Solution
Print quality is poor. Direct thermal/thermaltransfer switch set in thewrong position.
Set the DIP switch for the type of media you are using.See “Configuring the Serial Port” in Chapter 2.
The printer skips alabel or sends anintermittent error.
The label gap sensor is notin the correct position.
Properly position the label gap sensor. See“Accurately Detecting the Start of a Label” later in thischapter.
Excessive use of the TOFswitch.
Lift the printhead to reset the top of form position. See“Fine-Tuning the Top of Form Position” later in thischapter.
The printer is notwaiting until youremove a label toprint again.
The printer is not sensingthat there is a label at thestrip bar.
Properly position the label taken sensor. See“Adjusting the Printer for Self-Strip Printing” later inthis chapter.
The ribbon is movingtowards the outeredge of the mediapath.
You have incorrectly setthe bias adjust screw.
Adjust the bias adjust screw. See “Correcting UnevenPrint Quality” later in this chapter.
The ribbon and media arenot the same width.
Make sure that your ribbon and media are the samewidth. Intermec recommends that the width of theribbon and media be the same to achieve the bestperformance from your printer.
Top of form shifts inself-strip mode afteryou lift theprinthead.
The tension has changedon the liner.
Remove the accumulated liner from the rewinder hub.See “Loading Media for Self-Strip Printing” inChapter 1.
If some top of form shift remains, use the TOF switchto correct it. See “Fine-Tuning the Top of FormPosition” later in this chapter.
Top of form shifts inbatch mode after youlift the printhead.
You interrupted theprecision printtechnology.
Use the TOF switch to correct the shift. See “Fine-Tuning the Top of Form Position” later in this chapter.
Label image is notprinting in themiddle of the label.
Lateral movement of themedia through the mediapath or variations in a rollof media.
Adjust the lateral position of the printhead with thelateral printhead knob. See “Correcting the LateralPosition of the Label Image” later in this chapter.

EasyCoder 3240 Printer Getting Started GuideCo de 39Co de 39
3-6
Print Quality Problems (continued)
Symptom Possible Causes Solution
Labels stop strippingwhile in self-stripmode.
There is too much lineraccumulated on therewinder hub.
Remove the accumulated liner from the rewinder hub.See “Loading Media for Self-strip Printing” inChapter 1.

Co de 39Co de 39Optimizing Print Quality
3-7
3Printing High Registration Labels
The 3240 printer uses Precision Print technology to perform high registrationprinting, which means the printer can control the placement and quality of thelabel image it prints. Precision Print technology tracks the media through themedia path and automatically makes adjustments to keep the label imageprinting in the same horizontal position from the leading edge of each label.You can also manually adjust the printer to perform these tasks:
• Correct the lateral position of the label image.
• Accurately detect the start of a label.
• Correct uneven print quality.
• Fine-tune the top of form position.
Correcting the Lateral Position of the Label ImageIf your label image is no longer printing in the middle of your label, you mayneed to adjust the lateral position of the printhead. Use the lateral printheadknob to compensate for lateral movement of media in the media path orvariations in a roll of media. You can move the printhead 0.10 inch in eitherdirection.
Note: Do not raise the printhead or turn off the printer before adjusting the lateralposition of the printhead.
To adjust the lateral position of the label image
1. Remove the media cover.
2. Gradually turn the lateral printhead knob while printing and observe howthe image is moving on the label.
• Turn the knob clockwise to move the printhead toward the inner edgeof the media path.
• Turn the knob counterclockwise to move the printhead toward the outeredge of the media path.

EasyCoder 3240 Printer Getting Started GuideCo de 39Co de 39
3-8
3. Adjust the lateral printhead knob until the image prints exactly where youwant it to on the label.
Adjusting the Lateral Position of the Label Image
*NARR
Lateralprintheadknob
3240G.016
Printhead
Lateralprintheadknob
Printhead
*NARR
Front view
Front view
TOF
In the first part of this illustration, the label image starts out printing tooclose to the outer edge of the label. By turning the lateral printhead knobclockwise, the label image moves closer to the inner edge of the label. Thelabel image then appears exactly where you want it to, in the center of thelabel, in the last part of the illustration.
4. Replace the media cover.

Co de 39Co de 39Optimizing Print Quality
3-9
3Accurately Detecting the Start of a LabelIf you experience problems such as the printer skipping labels or the printerstopping and the yellow LED flashing, you may need to adjust the label gapsensor. You are most likely to experience any of these problems if you are usingvery narrow label stock and the label gap sensor is not in the correct position.You can adjust the label gap sensor from 0 to 1.0 inch from the inboard edge ofthe printer.
Note: Intermec positions the label gap sensor 0.5 inch from the inboard edge of theprinter at the factory. You should be able to leave it in this position for most labelswider than 1.0 inch.
To adjust the label gap sensor
1. Remove the media cover.
2. Turn the label gap sensor knob counterclockwise and slide the sensor all ofthe way to the inboard edge of the lower media guide.
3. Tear off one of the labels from your roll of media and line it up with the 0(zero) on the lower media guide.
4. Slide the label gap sensor knob to the position where the label gap sensorindicator (the tab on the label gap sensor that is visible from the top of thelower media guide) is in the middle of the label.
Here are some guidelines for you to follow:
• If your labels are less than 1.0 inch wide, position the label gap sensor inthe middle of the label.
• If your labels are greater than 1.0 inch wide, position the label gapsensor over the straight edge of the label that comes out the front of theprinter.
• If your labels are round, position the label gap sensor over the middle ofthe radius edge.
5. Turn the label gap sensor knob clockwise to secure it in the new position.

EasyCoder 3240 Printer Getting Started GuideCo de 39Co de 39
3-10
Adjusting the Label Gap Sensor
3240G.015
Labelradius
Edge guide
Lower mediaguide
Lower media guide
Top view
Label gap sensor knob
Label gap sensor
Label gap sensor
Position label gap sensor indicatorin the middle of the label
TOF
6. Try printing a label to see if the printer is detecting the top of form (frontedge of the label).
7. If the printer is still not detecting the top of form, slide the label gap sensora little further toward the outer edge of the lower media guide.
8. Replace the media cover.

Co de 39Co de 39Optimizing Print Quality
3-11
3Correcting Uneven Print QualityYou may experience problems in print quality (ribbon wrinkling or light printon one side of your label) if the printhead is not making even contact with thelabel stock. This condition can happen with any size label stock, but it is mostcommon when using narrow label stock (1.0 inch or less). You need a straight-slot screwdriver to turn the bias adjust screw.
Note: To achieve the best print quality, adjust the bias adjust screw each time you usemedia of a different width.
To adjust the bias adjust screw
1. Remove the media cover and locate the bias adjust screw.
Power
3240
Alert
Feed/Pause
Empty/Pause
3240G.013
Bias adjust screw
EasyCoder

EasyCoder 3240 Printer Getting Started GuideCo de 39Co de 39
3-12
2. To compensate for uneven print quality, turn the bias adjust screw asshown.
Note: When you adjust the bias adjust screw, the printhead rests evenly on thedrive roller and results in even print quality.
3240G.014
*N
AR
RO
AR
RO
E*
If printing is light on the right side of label,turn the bias adjust screw counterclockwise.
If printing is light on the left side of label, turn the bias adjust screw clockwise.
3. Replace the media cover.
Note: You must properly adjust the bias adjust screw to prevent premature printheadfailure and excessive platen wear.

Co de 39Co de 39Optimizing Print Quality
3-13
3Fine-Tuning the Top of Form PositionIf your label format prints too close to the front or back edge of the label, youcan fine-tune the position with the top of form (TOF) switch. The TOF switchcontrols the position of the format forward or backward along the length of thelabel.
This feature is especially important if you are printing small labels in self-stripmode because you can easily adjust for slight shifts in the label format withoutstopping the printer or sending down software commands.
Only use the TOF switch to fine-tune your label format position. This isimportant because the printer returns to your initial TOF setting when you:
• cycle printer power.
• lift the printhead.
Use the TOF switch to fine-tune the format position after you design the label.Do not use the TOF switch to design your label format. Use PrintSet or the Topof Form, Set software command <SI>F to control the initial TOF setting. Forhelp on using this command, see the PrintSet help or the IPL ProgrammingReference Manual.
The TOF switch is a small rocker switch located on the lower outboard plate ofthe printer.
1 2 3 4 5 6 7 81 2 3 4 5 6 7 8
O
I
3240G.026

EasyCoder 3240 Printer Getting Started GuideCo de 39Co de 39
3-14
To move a label format backward with the TOF switch
Note: You will see the new format position on the second label you print after pressingthe TOF switch.
You notice that your format is printing toward the front part of the label.
Í Label direction from printer
#123
#123
3240G.027
1. Remove the media cover.
Note: Do not raise the printhead while adjustingthe TOF position.
2. Press on the back part of the TOF switch. Eachtime you press the TOF switch, you move thelabel format backward .005 inch (.127 mm).
3. Press the TOF switch repeatedly until yourformat moves backward to the correct positionon the label.
#123
#123
3240G.029
To move a label format forward with the TOF switch
You notice that your format is printing toward the back part of the label.
Í Label direction from printer
#123
#123
3240G.030
1. Remove the media cover.
Note: Do not raise the printhead while adjusting the TOF position.
3240G.028

Co de 39Co de 39Optimizing Print Quality
3-15
32. Press on the front part of the TOF switch.
Each time you press the TOF switch, youmove the label format forward .005 inch(.127 mm).
3. Press the TOF switch repeatedly untilyour format moves forward to the correctposition on the label:
#123
#123
3240G.032
3240G.031

EasyCoder 3240 Printer Getting Started GuideCo de 39Co de 39
3-16
Setting the Media Sensitivity Number
Media sensitivity is important because you use it to optimize print quality andprint speed. The three-digit sensitivity number specifies the amount of heatrequired by the printhead to image a label. The amount of heat that each roll ofmedia or ribbon requires is unique due to different chemistries andmanufacturing processes.
Intermec has developed heating schedules (the amount of heat required toimage a label) to produce the highest possible print quality for Intermec mediaand ribbon combinations on Intermec printers. Look for the three digit mediasensitivity number on
• the side of the media roll. Use the last three digits (140 in the example) ofthe 15 digit number stamped on the roll for the media sensitivity number.
• a small label attached to the roll of media.
• a small label attached to the plastic bag of your ribbon roll.
3440U.016
SENSITIVITY NUMBER
5✩7
1200
6610
2605
140
120066102605140
Use this three-digit number to optimize print quality and print speed on the3240 printer. You can achieve the best print quality on the 3240 printer by usingonly Intermec ribbon and media products. The default sensitivity setting forthermal transfer media is 567. For direct thermal media, the default sensitivitysetting is 420. Use the packaging that you saved, when loading media andribbon, to determine the correct sensitivity number.
Use the PrintSet software, your third-party software, or the Intermec PrinterLanguage (IPL) command set to change the media sensitivity number. For helpsetting the media sensitivity number using PrintSet, see the example in the nextsection.
Co de 39Co de 39Optimizing Print Quality
3-17
3Setting the Media Sensitivity Number for Intermec Mediaand RibbonThe sensitivity number on each roll of thermal transfer media or ribbon has anasterisk (*) in place of one of the digits. To optimize the sensitivity number forthermal transfer media, you combine the digits as in this example.
Media or Ribbon Sensitivity Rating Description
Thermal TransferMedia
56* The asterisk reserves the third digit toidentify the ribbon’s sensitivitynumber.
Thermal TransferRibbon
5*7 The asterisk reserves the second digitto identify the media’s sensitivitynumber.
567 Optimum Sensitivity Rating
To set the sensitivity rating for direct thermal media, use the three-digitsensitivity rating located on the roll of media or listed in the Direct ThermalMedia Sensitivity Settings table on the following page.
To change the media sensitivity number with PrintSet
1. Start the PrintSet applications.
2. Click the Paper type button:
3. In the Print Quality Setup dialog box, enter your three-digit number in theMedia Sensitivity Number field.
4. Click OK.

EasyCoder 3240 Printer Getting Started GuideCo de 39Co de 39
3-18
Setting the Media Sensitivity Number for Other Media andRibbonIf you are not using Intermec media and ribbon, or you misplaced yourpackaging with the three-digit sensitivity number label on it, you can set theapproximate sensitivity setting. The approximate sensitivity numbers are thefirst entry (in bold text) for each series in the media sensitivity settings tables onthe next two pages. Enter the three-digit approximate sensitivity setting (forexample, 800) to achieve acceptable print quality.
If you are unsure of what media sensitivity number to set, start with the highestsetting that provides the lowest amount of energy (800 for thermal transfer and700 for direct thermal), and work your way down until you achieve the bestprint quality.
Use the following tables to find the correct sensitivity rating for your directthermal media or thermal transfer media and ribbon combination.
Direct Thermal Media Sensitivity Settings
Approximate Sensitivity Ratings
Sensitivity
Setting Direct Thermal Media
700 Series High Sensitivity 720 Duratherm Lightning Plus
400 Series Medium Sensitivity 480 Duratherm Lightning IR-2460 European IR450 Duratherm Lightning-1440 European Thermal420 Duratherm Lightning-2
100 Series Low Sensitivity 170 European Tag170 European Reinforced160 Duratherm II Tag140 European Top130 Duratherm II
Co de 39Co de 39Optimizing Print Quality
3-19
3
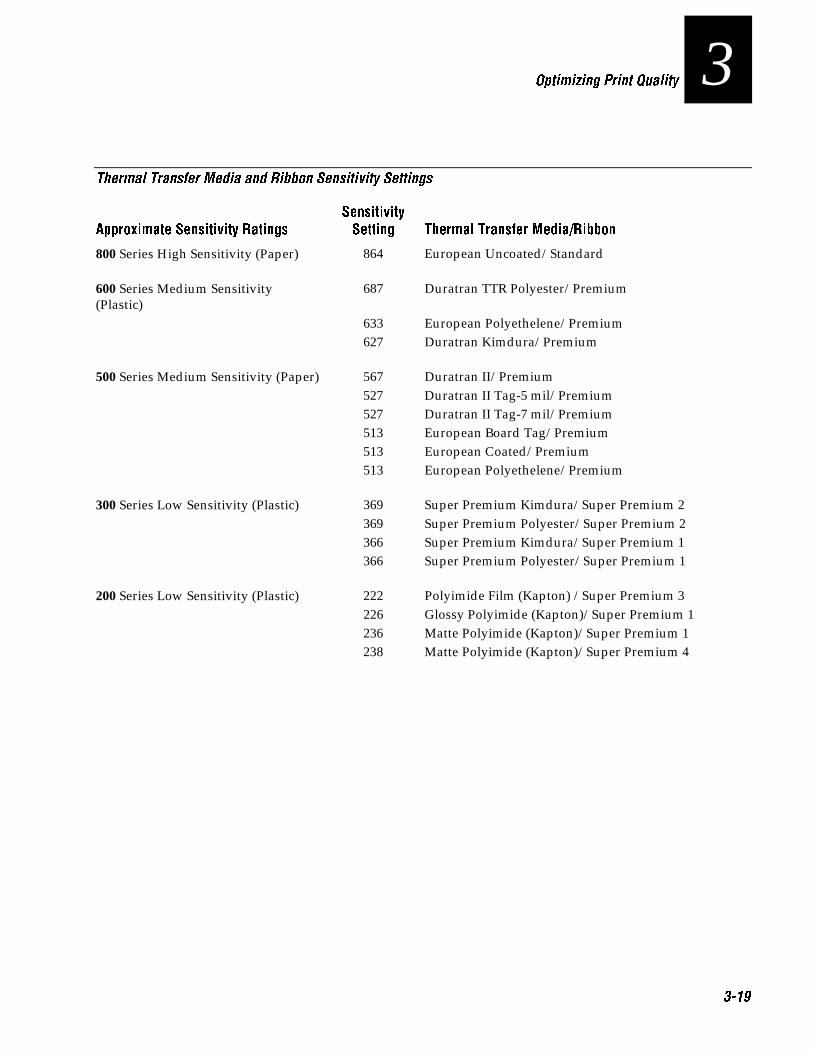
Thermal Transfer Media and Ribbon Sensitivity Settings
Approximate Sensitivity Ratings
Sensitivity
Setting Thermal Transfer Media/Ribbon
800 Series High Sensitivity (Paper) 864 European Uncoated/Standard
600 Series Medium Sensitivity(Plastic)
687 Duratran TTR Polyester/Premium
633 European Polyethelene/Premium627 Duratran Kimdura/Premium
500 Series Medium Sensitivity (Paper) 567 Duratran II/Premium527 Duratran II Tag-5 mil/Premium527 Duratran II Tag-7 mil/Premium513 European Board Tag/Premium513 European Coated/Premium513 European Polyethelene/Premium
300 Series Low Sensitivity (Plastic) 369 Super Premium Kimdura/Super Premium 2369 Super Premium Polyester/Super Premium 2366 Super Premium Kimdura/Super Premium 1366 Super Premium Polyester/Super Premium 1
200 Series Low Sensitivity (Plastic) 222 Polyimide Film (Kapton) /Super Premium 3226 Glossy Polyimide (Kapton)/Super Premium 1236 Matte Polyimide (Kapton)/Super Premium 1238 Matte Polyimide (Kapton)/Super Premium 4
EasyCoder 3240 Printer Getting Started GuideCo de 39Co de 39
3-20
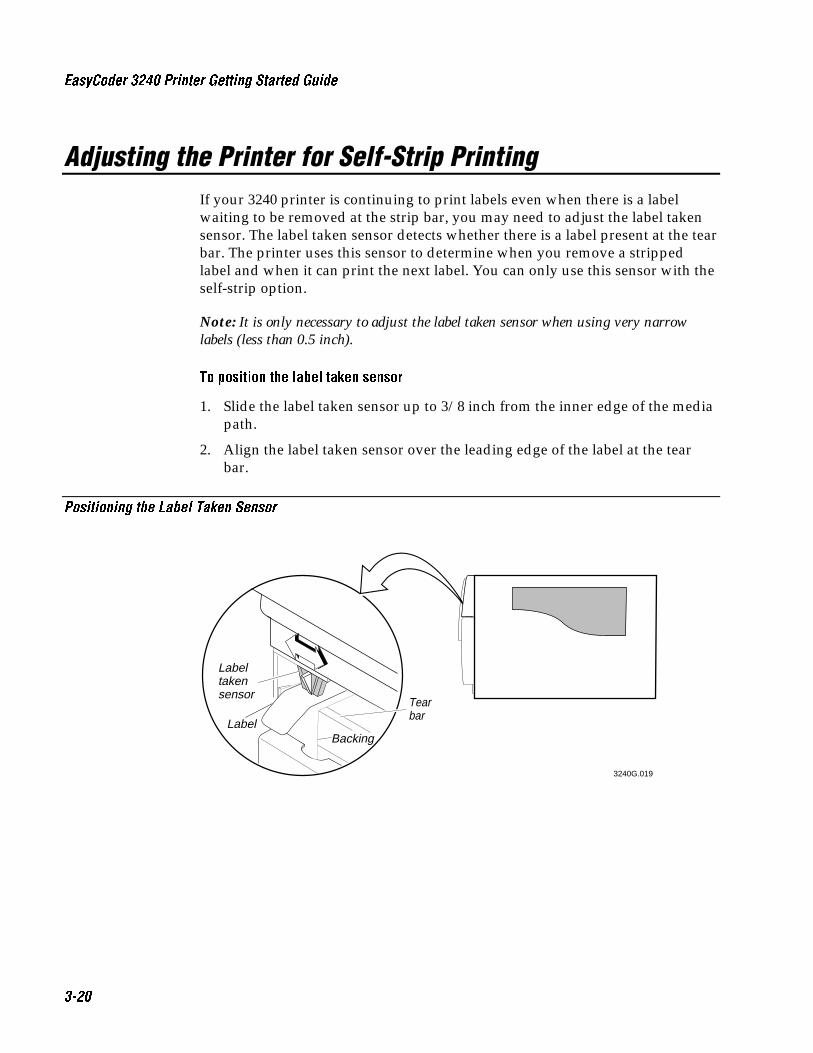
Adjusting the Printer for Self-Strip Printing
If your 3240 printer is continuing to print labels even when there is a labelwaiting to be removed at the strip bar, you may need to adjust the label takensensor. The label taken sensor detects whether there is a label present at the tearbar. The printer uses this sensor to determine when you remove a strippedlabel and when it can print the next label. You can only use this sensor with theself-strip option.
Note: It is only necessary to adjust the label taken sensor when using very narrowlabels (less than 0.5 inch).
To position the label taken sensor
1. Slide the label taken sensor up to 3/8 inch from the inner edge of the mediapath.
2. Align the label taken sensor over the leading edge of the label at the tearbar.
Positioning the Label Taken Sensor
Label taken sensor
3240G.019
LabelBacking
Tearbar

Co de 39Co de 39Optimizing Print Quality
3-21
3Cleaning the Printhead
In order for the printhead to provide good print quality, it must maintain closecontact with the media. Therefore, cleaning media debris from the printhead isvery important. Clean after every roll (6,000 inches or 152 m) of media or whennecessary.
CautionDo not use sharp objects such as knives or screwdrivers to scrape theprinthead clean. Cleaning with sharp objects will damage the printhead.Clean with only a cotton swab, or a clean, lint-free cloth or tissue damp withisopropyl alcohol.
ConseilN'utilisez pas d'objets pointus tels que couteaux ou tournevis pour nettoyerla tête d'imprimante. Nettoyer avec des objets pointus endommagera la têted'imprimante. Nettoyez-la seulement avec de la ouate ou avec un linge propreet libre de peluches, humecté avec de l'alcool d'isopropyl.
To clean the printhead
1. Turn the ON/OFF switch to the off position.
2. Remove the media cover.
3. Disengage the printhead by rotating the head lift lever clockwise until theprinthead releases. The printhead raises so you can clean it.
4. Remove the media from the supply roll post and remove the ribbon fromthe ribbon supply and rewind hubs.
5. Use a cotton swab moistened with alcohol to remove any dirt, adhesive, ordebris from the print surface on the bottom of the printhead.
6. Wait 5 to 10 seconds for the print surface to dry.
7. Replace the media and ribbon.
8. Engage the printhead by rotating the head lift lever counterclockwise untilit locks in place.
9. Replace the media cover. Turn the ON/OFF switch to the on position.

EasyCoder 3240 Printer Getting Started GuideCo de 39Co de 39
3-22
Cleaning the Printhead
Power
3240
Alert
Feed/Pause
Empty/Pause
Printhead3240G.018
Ribbonrewind hub
Ribbon supply hub Supply roll
post
Head liftlever
EasyCoder