Embed Size (px)
Citation preview

easyCHEM 770 Pool Management System
Chlorine & Acid controller with dosing pumps and timer for pool pump
easyCHEM 770 User Manual Date : 06-Sep-2007 Author : AB Version : 1.31

2
TPS Pty Ltd ABN 30 009 773 371
4 Jamberoo Street Springwood, Brisbane, Australia, 4127
Phone : (07) 32 900 400 International : 61 7 32 900 400
Fax : (07) 3808 4871 International : 61 7 3808 4871
Email : [email protected]
Web : www.tps.com.au

3
Contents
Section 1. – Introduction............................................................................................................ 4 1.1 easyCHEM 770 Display and Controls ............................................................................................... 5 1.2 easyCHEM 770 Connectors .............................................................................................................. 5 1.3 Summary of Keypad Buttons............................................................................................................. 6 1.4 Unpacking Information....................................................................................................................... 7
Section 2. – Installation.............................................................................................................. 8 2.1 Plan the installation............................................................................................................................ 8 2.2 Install the Sensor and Injection Tee .................................................................................................. 8 2.3 Fit Tubing into Chemical Drums ........................................................................................................ 9 2.4 Fit Tubing to Dosing Pumps .............................................................................................................. 9 2.5 Mount Controller and Make Electrical Connections ........................................................................ 10 2.6 Switch on and Select Pool Size....................................................................................................... 11 2.7 Prime the Dosing Pumps................................................................................................................. 11
Section 3. – Operating Instructions ........................................................................................ 12 3.1 Checking and Setting the ORP Set Point ........................................................................................ 12 3.2 Checking and Setting the pH Set Point ........................................................................................... 13 3.3 Selecting Auto or Standby Modes ................................................................................................... 14 3.4 Selecting the Pool Pump Timer Cycle ............................................................................................. 15 3.5 To Switch the Pool Pump ON manually .......................................................................................... 19 3.6 To Switch the Pool Pump OFF manually......................................................................................... 19 3.7 Pumping to Waste ........................................................................................................................... 20 3.8 Backwashing the Pool Filter ............................................................................................................ 21 3.9 easyCHEM 770 Display Messages ................................................................................................. 22
Section 4. – Peristaltic Dosing Pumps ................................................................................... 23 4.1 Lubricating the Pump Tubing........................................................................................................... 23 4.2 Replacing the Pump Tubing ............................................................................................................ 23 4.3 PUMP Error Message...................................................................................................................... 24
Section 5. – Sensor Calibration............................................................................................... 25 5.1 Temperature Calibration .................................................................................................................. 25 5.2 pH Calibration .................................................................................................................................. 27 5.3 ORP Calibration............................................................................................................................... 29 5.4 Action in case of Failed ORP Calibration ........................................................................................ 30
Section 6. – User Settings........................................................................................................ 31 6.1 Setting the Clock.............................................................................................................................. 31 6.2 Emergency ShutOFF timer .............................................................................................................. 32 6.3 Control Setup................................................................................................................................... 34 6.4 Alarms.............................................................................................................................................. 37 6.5 Super-Chlorinating........................................................................................................................... 39 6.6 Resetting the easyCHEM 770 ......................................................................................................... 40
Section 7. – Troubleshooting .................................................................................................. 41 7.1 General Error Messages from the easyCHEM 770......................................................................... 41 7.2 General Faults ................................................................................................................................. 41 7.3 ORP Troubleshooting ...................................................................................................................... 41 7.4 pH Troubleshooting ......................................................................................................................... 42 7.5 Temperature Troubleshooting ......................................................................................................... 42 7.6 Instrument firmware version number ............................................................................................... 42 7.7 Output Fuse Replacement............................................................................................................... 43
Section 8. – easyCHEM 770 Specifications............................................................................ 44
Section 9. – Warranty ............................................................................................................... 45

Section 1 – Introduction
4
Section 1. – Introduction Thank you for purchasing an easyCHEM 770.
The easyCHEM 770 a high quality, precision ORP and pH controller and is designed for maximum reliability to give you many years of reliable service.
Despite its impressive list of features, the easyCHEM 770 is a breeze to operate. This manual has been designed to help you get started, and also contains some handy application tips. If at any stage you require assistance, please contact either your local TPS representative or the TPS factory in Brisbane.
Please note that the easyCHEM 770 must be serviced or repaired by authorised personnel only. Opening the unit by unauthorised persons may cause an electrical shock, resulting in serious injury or death. If the power lead becomes damaged, the unit must be returned to TPS or repaired by an authorised person only. If in doubt, please contact TPS and we will advise you of your nearest authorised service centre.
The manual is divided into the following sections:
Section 1 – Introduction The introduction includes a diagram of the easyCHEM 770 unit and its connectors. Brief descriptions of the controls are provided. Please check the Unpacking Information section to ensure that you have received all accessories and any options you may have ordered.
Section 2 – Installation This section provides details on installing the easyCHEM 770. It is a duplicate of the information found on the easyCHEM 770 Installation Guide card.
Section 3 – Operating Instructions The Operating Instructions provide details on adjusting user settings such as the Chlorine and pH set points, pump timer etc. The meanings of the various status and alarm messages are also described, along with periodic maintenance instructions.
Section 4 – Peristaltic Dosing Pumps A section devoted to the two dosing pumps fitted to the easyCHEM 770. Describes usage and maintenance instructions.
Section 5 – Sensor Calibration Your easyCHEM 770 is supplied pre-calibrated. However, calibration of the sensors should be checked every 3 months to maintain optimum accuracy. This section describes this procedure.
Section 6 – User Settings The factory default settings for the easyCHEM 770 should suffice for most domestic pool installations. However, for larger domestic or commercial pools, refer to this section to customise the settings.
Section 7 – Troubleshooting The detailed troubleshooting section provides many useful hints and tips in case there is a problem with the easyCHEM 770. This section will help solve most problems without the need to return the unit to the factory for repair.
Section 8 – easyCHEM 770 Specifications A listing of the technical specifications of the easyCHEM 770.
Section 9 – Warranty The TPS Warranty conditions are detailed in this section. Also included are details on the procedure to follow in case the easyCHEM 770 unit needs to be returned for service or repair.

Section 1 – Introduction
5
1.1 easyCHEM 770 Display and Controls
1.2 easyCHEM 770 Connectors

Section 1 – Introduction
6
1.3 Summary of Keypad Buttons
Press to check and/or re-set the ORP set point. Returns to normal display if no key is pressed for 10 seconds.
Press to check and/or re-set the pH set point. Returns to normal display if no key is pressed for 10 seconds.
Press to access the technical menu area. Also used as an “escape” key to quit menus and data entry screens without saving changes.
Press to activate Auto Control mode. The easyCHEM 770 will automatically add Chlorine and Acid as required.
Press to place the easyCHEM 770 into Standby mode. The easyCHEM 770 will not add any chemicals, regardless of the readings.
Press to select the desired Pool Pump Timer cycles. See section 3.4 for full details.
Press to scroll up when setting data or making menu selections.
Press to scroll down when setting data or making menu selections.
Press to select and save new data and system settings.

Section 1 – Introduction
7
1.4 Unpacking Information Please check that you have received all of the items that should have been included with your new easyCHEM 770.
Standard easyCHEM 770 Kit…
ORP/Temp Sensor, 2m cable Part No : 111263
easyCHEM 770 Pool Controller Part No : 117771
pH Sensor, 2m cable Part No : 111230
pH7.00 Buffer, 200mL Part No : 121387 pH4.00 Buffer, 200mL Part No : 121381
Probe & Injection Tee, 50mm Part No : 117904
50 to 40mm reduction bushes x 2 Part No : NPRB5040
Peristaltic Pump Input and Output Tube, 4m x 2 Part No : 116360
ZoBell ORP Solution, Part A, 200mL Part No : 121309-A
ZoBell ORP Solution, Part B, 200mL Part No : 121309-B
Drum lid with gland fitting x 2 Part No : 116362
Tube weight for chemical drum x 2 Part No : 116354
easyCHEM 770 Handbook Part No : 130050
Spare Parts, not included in standard kit…
Pump tube assembly, 1.5 L/Hr Part No : 116353
Pump tube assembly, 5 L/Hr Part No : 116352
Pump Tube Lubricant, 3mL Part No : 130103

Section 2 – Installation
8
Section 2. – Installation The easyCHEM 770 is supplied with an A3 size installation guide. Installers should refer to this guide. The details have been repeated here for the purpose of having a complete user manual.
2.1 Plan the installation Ensure that…
1. The easyCHEM 770 controller is installed in a sheltered location
2. The easyCHEM 770 controller is close enough to the expected location of the Sensor/ Injection Tee for the sensor cables and pump output tubing to reach without straining.
3. The maximum suction height from the bottom of the chemical drums to the dosing pumps is 2 metres.
4. The mains power lead from the pool pump reaches the easyCHEM 770 without straining.
5. The mains power lead from the easyCHEM 770 reaches a mains power outlet. If the controller is mounted in a wet area, a weatherproof power outlet must be used. TPS highly recommends the use of an earth leakage circuit breaker with this power outlet. Please consult a qualified electrician if you are not sure if this is fitted.
2.2 Install the Sensor and Injection Tee Install the Sensor and Injection Tee as per the diagrams below. Use a suitable PVC joining compound. The Tee is installed in the return line to the pool, as the pressure is low and the sensors will only be exposed to clean, filtered water.

Section 2 – Installation
9
2.3 Fit Tubing into Chemical Drums
Insert the suction tubing through the chemical drum lid supplied and fit the drum weight, as per the diagram below. Be sure to use the correct type of chemical resistant drum. Your pool professional can advise on this. For installations where the lid provided is not compatible with the container, drill a 1/2” or 13mm hole into the lid of the container and fit the compression fitting. Drill a second 2mm diameter vent hole to avoid suction build-up.
IMPORTANT INFORMATION REGARDING ACID • Always use dilute Hydrochloric Acid. • Add 5 Litres of Acid to 20 to 25 Litres of water. • NEVER ADD WATER TO ACID • Using concentrated acid may damage your equipment and void the
warranty
2.4 Fit Tubing to Dosing Pumps Insert the suction tubing from the chemical drum to the left hand side compression fitting of the dosing pump. Screw the retaining nut into place firmly, ensuring the tube is securely anchored.
Repeat for the tubing on the right hand side of the pump.
Ensure that the Chlorine drum is connected to the Chlorine pump, and the Acid drum is connected to the Acid pump.

Section 2 – Installation
10
2.5 Mount Controller and Make Electrical Connections Mount the easyCHEM 770 controller on a sturdy wall or post using minimum 3mm or 1/8” stainless steel bolts, screws or masonary anchors.
The easyCHEM 770 controller MUST be installed in a sheltered location.
Connect the probes and pool pump to the easyCHEM 770. Plug the easyCHEM 770 into a suitable power outlet.

Section 2 – Installation
11
2.6 Switch on and Select Pool Size 1. Plug the easyCHEM 770 mains lead into the mains power outlet to switch the controller on.
2. Press .
3. Press until “→Pool Size” is selected and press .
4. Press or until the desired pool size is selected and press . If in doubt, select a size that is larger than the pool.
The Pool Size set-up adjusts the Emergency ShutOFF Timer and Control Setup to the ideal values for that pool size. For more details on these topics, see sections 6.2 and 6.3.
2.7 Prime the Dosing Pumps This step is optional, as the peristaltic dosing pumps are self priming and will operate correctly when the easyCHEM 770 is switched on. The pump priming function has been included for those installers who wish to check the operation of the dosing pumps when installation is complete.
The pump priming function can also be used to prime the peristaltic pumps with water. This is highly recommended when lubricating or changing the pump tubes, to avoid spilling dangerous chemicals out of the tubes.
1. Press .
2. Press until “→Prime Pumps” is selected and press .
3. Press or to select the Chlorine Pump, Acid Pump, or Both Pumps and press .
4. The easyCHEM 770 will now run the selected pump(s) for 3 minutes. This is enough time to suck the chemical (or water) through the suction tube, through the pump and feed it through the output tube… Priming Pumps for 3 mins 3:00
Note the countdown timer which is provided on the screen.
Press to quit pump priming.
5. The easyCHEM 770 will resume the normal pool pump cycle and dosing at the end of the 3 minutes.

Section 3 – Operating Instructions
12
Section 3. – Operating Instructions 3.1 Checking and Setting the ORP Set Point
1. Press to check the ORP Set Point.
2. Use the and keys to change the ORP Set Point.
3. Press to save the new ORP Set Point.
4. To quit without making or saving changes, simply allow the unit to return to the normal display, which occurs when no keys have been pressed for 10 seconds.
Notes 1. The easyCHEM 770 controls ORP within a 20mV “control band”. If the Set Point is 700 mV,
the Chlorine pump will start when the reading drops to 680mV and stop again when the reading reaches 700mV. The control band stops the pump being rapidly switched on and off when the reading is close to the Set Point, thereby increasing the pump’s life.
2. The exact ORP Set Point to achieve the correct Chlorine level will vary depending on other
chemical factors such as pH, Alkalinity and Cyanuric Acid (stabiliser) levels.
It is imperative that the pool water is checked once a month to ensure that all other chemical parameters are correct.
3. When first installing the easyCHEM 770, check the Chlorine levels every few days using a Chlorine test kit. Increase the ORP Set Point if the Chlorine level is low and decrease it if the Chlorine level is high. Once the pool has been fine-tuned over a week or two, the controller will accurately maintain the correct Chlorine level.
Section 3 – Operating Instructions
13
3.2 Checking and Setting the pH Set Point
1. Press to check the pH Set Point.
2. Use the and keys to change the pH Set Point.
3. Press to save the new pH Set Point.
4. To quit without making or saving changes, simply allow the unit to return to the normal display, which occurs when no keys have been pressed for 10 seconds.
Notes
1. The easyCHEM 770 controls pH within a 0.2pH control band”. If the Set Point is 7.40pH, the Acid pump will start when the rises above 7.60pH and stop again when the reading reaches 7.40pH. The control band stops the pump being rapidly switched on and off when the reading is close to the Set Point, thereby increasing the pump’s life.
2. The recommended pH range for swimming pools is pH7.40 to pH7.80. This pH range provides
the best combination of Chlorine effectiveness and compatibility with human skin and eyes.
3. The pH must be reading correctly and the pH Set Point must be set correctly in order for the Chlorine control system to work effectively.

Section 3 – Operating Instructions
14
3.3 Selecting Auto or Standby Modes
1. Press to place the easyCHEM 770 into Automatic Control mode. In this mode, the unit will measure the ORP and pH levels of the pool and automatically add Chlorine and Acid as required.
Auto mode should be selected for normal operation.
2. Press to place the easyCHEM 770 into Standby mode. In this mode, the unit will measure the ORP and pH levels of the pool, but it will NOT add any chemicals, even if they are required.
Standby mode should only be used to stop the dosing pumps operating, eg. when topping up chemical drums. Long term use of this mode will make your pool unfit for swimming.

Section 3 – Operating Instructions
15
3.4 Selecting the Pool Pump Timer Cycle The easyCHEM 770 is fitted with a 240V 10A mains power outlet for your pool pump which is controlled by a Pump Timer system built into the unit. To make its operation as simple as possible, this timer has several automatic pre-sets. A custom program can also be entered, if required.
3.4.1 To select the default Summer/Winter program The easyCHEM 770 is provided with an automatic Summer and Winter timer program for the pool pump. This program reduces the amount of time that the pump operates in Winter, as less filtration is required when the pool is not in use.
The result is a saving for your power bill and for the environment by reducing the electricity being used.
1. Press to display the Pump Timer menu… Pool Pump >Timed < ↓
2. Select ‘→Timed’ from the menu and press to select the default Timer program.
The default program operates the Pool Pump as follows… Summer : 06:00 to 10:00 and 15:00 to 19:00.
Winter : 06:00 to 10:00 only.
For the Southern Hemisphere… The easyCHEM 770 changes to Winter mode on the 15th of May.
The easyCHEM 770 changes to back to Summer mode on the 15th of August.
For the Northern Hemisphere… The easyCHEM 770 changes to Winter mode on the 15th of November.
The easyCHEM 770 changes to back to Summer mode on the 15th of February.
To change between Southern and Northern Hemisphere…
1. Press to enter the Technical Menu area.
2. Press until ‘→Summer/Winter’ is selected and press …
>Southern ↓ Northern
3. Press or to select ‘Southern’ or ‘Northern’ as required and press .

Section 3 – Operating Instructions
16
To change Winter Start and Winter End dates…
1. Press to enter the Technical Menu area.
2. Press until ‘→Summer/Winter’ is selected and press …
3. Press until ‘Custom’ is selected and press .
4. The easyCHEM 770 will now prompt you to enter the Winter Start date… Winter Start 15-May ↑↓ Enter
Use the and keys to set the date and press .
Use the and keys to set the month and press .
5. The easyCHEM 770 will now prompt you to enter the Winter Finish date… Winter Finish 15-Aug ↑↓ Enter
Use the and keys to set the date and press .
Use the and keys to set the month and press .

Section 3 – Operating Instructions
17
3.4.2 To select a pre-set Timer program Those users who do not wish to use the default Summer/Winter Timer program can select the Summer or Winter program to operate all year round…
1. Press to display the Pump Timer menu. Pool Pump >Timed < ↓
2. Press until ‘>Set Timer<’ is selected and press . The following screen is displayed… Set Pump Timer >Auto < ↓
3. Press until the desired choice is selected and press .
‘Auto’ is the default program, and operates the pool pump as per the details in section 3.4.1.
The ‘Summer’ program operates the pool pump from 06:00 to 10:00 and from 15:00 to 19:00 every day. This cycle operates all year round if selected.
The ‘Winter’ program operates the pool pump from 06:00 to 10:00 every day. This cycle operates all year round if selected.
The ‘Custom’ program is covered in section 3.4.4.
To operate the pump 24 hours per day, select ‘Continuous’. This is covered in the next section.
3.4.3 To select the Continuous program The Continuous program is available for installations where the pool pump will be operating 24 hours per day, or some other external timer device is used to control the pool pump. When an external timer device is being used to control the pool pump, ensure that the easyCHEM 770 is also controlled by the same device. This will ensure that Chlorine and/or Acid is only dosed when the pool pump is actually running.
To select the Continuous program…
1. Press to display the Pump Timer menu. Pool Pump >Timed < ↓
2. Press until ‘>Set Timer<’ is selected and press . The following screen is displayed… Set Pump Timer >Auto < ↓
3. Press until ‘>Continuous<’ is selected and press .
The easyCHEM 770 will now provide mains power to the POOL PUMP output socket continuously when the easyCHEM 770 is switched on.

Section 3 – Operating Instructions
18
3.4.4 Setting a Custom Timer program Those users who do not wish to use any of the pre-set programs can enter their own custom Timer program. Two ON and OFF cycles per day can be entered. These are labelled ‘AM’ and ‘PM’, although any time of day can be entered for either. The custom program will operate all year round.
1. Press to display the Pump Timer menu. Pool Pump >Timed < ↓
2. Press until ‘>Set Timer<’ is selected and press . The following screen is displayed… Set Pump Timer >Auto < ↓
3. Press until ‘>Custom<’ is selected and press . The AM ON screen is now displayed… AM ON : 06:00 ↑↓:Set >:Enter
Press or to set the hours for when the pool pump will turn ON and press .
Press or to set the minutes for when the pool pump will turn ON and press .
4. The AM OFF screen is now displayed… AM OFF : 10:00 ↑↓:Set >:Enter
Press or to set the hours for when the pool pump will turn OFF and press .
Press or to set the minutes for when the pool pump will turn OFF and press .
5. The PM ON screen is now displayed… PM ON : 15:00 ↑↓:Set >:Enter
Press or to set the hours for when the pool pump will turn ON and press .
Press or to set the minutes for when the pool pump will turn ON and press .
6. The PM OFF screen is now displayed… PM OFF : 19:00 ↑↓:Set >:Enter
Press or to set the hours for when the pool pump will turn OFF and press .
Press or to set the minutes for when the pool pump will turn OFF and press .
7. The Custom Timer program has now been set and will operate your pool pump accordingly.
Notes 1. Enter 00:00 for the AM or PM ON and OFF times to avoid the pump operating for that cycle.
2. Enter 00:00 for both the AM and PM ON and OFF times to avoid using the pool pump output entirely. In this case the pool pump would need to be connected to an alternative power outlet.

Section 3 – Operating Instructions
19
3.5 To Switch the Pool Pump ON manually The pool pump can be switched ON manually using the easyCHEM 770 any time.
1. Press to display the Pump Timer menu. Pool Pump >Timed < ↓
2. Press until ‘>ON <’ is selected and press . The word ‘ON’ is now displayed in the top right of the screen to indicate that the pool pump has been switched ON manually… 700.mV OK ON 7.40pH OK 25
Notes 1. The pool pump will remain ON until the next time it is due to be switched OFF by the Timer
cycle.
2. To stop the pump, press , select ‘Timed’ or ‘OFF’ and press .
3.6 To Switch the Pool Pump OFF manually The pool pump can be switched OFF manually using the easyCHEM 770 any time.
1. Press to display the Pump Timer menu. Pool Pump >Timed < ↓
2. Press until ‘>OFF <’ is selected and press . The easyCHEM 770 will now display the ‘Pump OFF’ message with the current time, and also indicate when the next pump cycle is due. Pump OFF 12:00
Alternates every 2 secs
↔ Next Pump Cycle 06:00 > 10:00
Notes 1. The pool pump will remain OFF until the next time it is due to be switched ON by the Timer
cycle.
2. To re-start the pump, press , select ‘Timed’ or ‘ON’ and press .

Section 3 – Operating Instructions
20
3.7 Pumping to Waste From time to time, all pool users need to pump some water to waste. This is normally the case when there has been heavy rainfall. The advantage of using the easyCHEM 770 to control the Pump to Waste function is that the unit will not add any chemicals while the water is being pumped to waste. Better for the environment, better for your budget ! To pump to waste…
1. Press to display the Pump Timer menu. Pool Pump >Timed < ↓
2. Press until ‘>To Waste <’ is selected and press . The following screen is displayed… Set filter to Waste Enter
The pool pump is now switched OFF. Set the control on your filter to its “Pump to Waste” setting, then press .
3. The pool pump is now pumping pool water to waste. The following screen is displayed… Pumping to Waste Enter Stops
Press to stop the pool pump.
4. The easyCHEM 770 now prompts you to return the pool filter to its normal filtration setting… Re-set filter to Normal Enter
Re-set the filter, then press .
5. The easyCHEM 770 displays the following message before returning to the normal pump timer cycle and chemical dosing… Resuming Pump Cycle & Dosing
Notes
1. The pool pump will remain ON until the user presses to stop it. Care must be taken to avoid pumping too much pool water to waste.

Section 3 – Operating Instructions
21
3.8 Backwashing the Pool Filter The pool filter needs to be backwashed regularly. Consult your pool professional to determine how often this should be done for your pool. The advantage of using the easyCHEM 770 to control the backwash function is that the unit will not add any chemicals while the water is being pumped to waste. Better for the environment, better for your budget ! To backwash…
NOTE Press any time during the following procedure to quit and return to normal operation. A prompt will be provided to return the filter to normal filtration before switching the pool pump back on.
1. Press to display the Pump Timer menu. Pool Pump >Timed < ↓
2. Press until ‘>Backwash <’ is selected and press . The following screen is displayed… Set filter to Backwash Enter
The pool pump is now switched OFF. Set the control on your filter to its “Backwash” setting, then press .
3. The pool pump will now backwash the filter to waste for 60 seconds. A countdown is provided on the screen… Backwashing 60 Filter
4. When the countdown is complete, the easyCHEM 770 will prompts you to set the control on your filter to its rinse setting… Set filter to Rinse Enter
The pool pump is now switched OFF. Set the control on your filter to its “Rinse” setting, then press .
5. The pool pump will now rinse the filter to waste for 15 seconds. A countdown is provided on the screen… Rinsing 15 Filter
6. Steps 2 to 5 will be repeated 2 more times, as it has been found that most filters will be cleaner and perform better after 3 backwash and rinse cycles. After the third rinse the easyCHEM 770 will prompt you to return the pool filter to its normal filtration setting… Re-set filter to Normal Enter
Re-set the filter, then press .
7. The easyCHEM 770 displays the following message before returning to the normal pump timer cycle and chemical dosing… Resuming Pump Cycle & Dosing

Section 3 – Operating Instructions
22
3.9 easyCHEM 770 Display Messages The easyCHEM 770 features a user-friendly text display. As well as showing the ORP, pH and Temperature readings, it is also used to provide status and alarm messages, as per the following example.
Alarms are accompanied with a beeper. The meanings of the messages are detailed below…
Status/Alarm Message Meaning
OK Reading is within Set Point and no chemical dosing is required.
Add Reading is outside Set Point and chemical is being added.
Wait Unit is in “Wait” cycle, waiting for dosed chemicals to mix before adding more chemical.
WAIT Pool Pump has just been switched on. easyCHEM 770 will wait for 20 seconds to stabilise.
WaiT After Super-Chlorinating, unit will not add Acid until the ORP Reading drops below the Set Point even if the pH is High.
Stby Unit is in Standby mode. No dosing of chemicals will occur. See section 3.3.
sOFF Emergency ShutOFF timer has been tripped. See section 6.2.
OFF Dosing Pump is off-line, due to “0 secs” of ON time being set. See section 6.3.2.
OFF + OVR for reading Dosing Pump is off-line, due to the reading being Over-Range.
Alrm Reading is outside the Alarm margin. See section 6.4
PUMP Dosing Pump High Current Error. See section 4.3
Waiting for Pump Re-Start Time
Whenever the pool pump is switched off by the easyCHEM 770, the unit will wait a minimum of 10 seconds before switching it back on. If any function is used less than 10 seconds after the pool pump was last switched off, this message is displayed.
Calibration Due See Handbook
The easyCHEM 770 provides a reminder to calibrate the sensors every 3 months. Refer to “Section 5. – Sensor Calibration” for details on calibration. Going through the calibration procedure clears this message.
Lube Pump Tubes See Handbook
The easyCHEM 770 provides a reminder to lubricate the Peristaltic pump squeeze tubes every 12 months. Refer to section 4.1 for details on lubricating the pump squeeze tubes and how to clear this message.

Section 4 – Peristaltic Dosing Pumps
23
Section 4. – Peristaltic Dosing Pumps
4.1 Lubricating the Pump Tubing The easyCHEM 770 is shipped with the correct lubrication on the peristaltic pump tubing. This lubrication should be re-applied every year. Suitable Silicon lubricant is available from TPS in a 3mL syringe (part no 130103).
The easyCHEM 770 provides a reminder to lubricate the pump tubes every year…
Lube Pump Tubes See Handbook
To lubricate the pump tubing…
1. Remove the pump tubing, as per the details in section 3, below.
2. Smear a small quantity of Silicon grease all around the tube. A thin film is all that is required.
DO NOT use petroleum based oil or lubricants, as these will cause the Santoprene rubber to perish. Use only Silicon based lubricant.
3. To reset the ‘Lube Pump Tubes’ message for next year, press to enter the Technical Menu area, press the key until ‘→Lube Pump OK’ is selected, and press .
4.2 Replacing the Pump Tubing Replace the Pump Tubing if it gets worn, begins to leak, or pumping volume is reduced. The Pump Tubing may be replaced every year as a precautionary measure.
To remove the old Pump Tube…
2
3
4 1 IMPORTANT
Place the pump suction tubing into a bucket of fresh water. Use the pump priming function (section 2.7) to prime the pump(s) with water. This ensures that there are no dangerous chemicals in the tubes when they are disconnected.
Switch off the power and disconnect the power cord from the mains power outlet.
Remove the Input and Output tubing from the compression fittings. This is simply a reversal of the procedure detailed in section 2.4.
Remove the see-through protector plate on the front of the pump.
5
Turn the roller holder so that the rollers are in a horizontal line. Pull the left hand side compression fitting from its seat. Begin turning the roller holder clockwise, so that the roller holder acts as a lever which pulls the pump tube out as it turns. After approximately 3/4 of a turn, the right hand side compression fitting can be pulled out.
The old pump tube has now been removed.

Section 4 – Peristaltic Dosing Pumps
24
To fit a new Pump Tube…
2 3
4
1
Turn the roller holder so that the rollers are in a horizontal line. Push the left hand side compression fitting into its seat, round side facing in. Begin turning the roller holder clockwise, so that the roller holder acts as a lever which pulls the pump tube in as it turns. After approximately 3/4 of a turn, the right hand side compression fitting can be pushed in, round facing in. The new pump tube has now been fitted.
Replace the see-through protector plate on the front of the pump. This is essential to protect the rollers and tube from dirt and moisture.
Re-fit the Input and Output tubing to the compression fittings. See the procedure detailed in section 2.4.
The power to the easyCHEM 770 can now be re-connected and switched on.
4.3 PUMP Error Message The easyCHEM 770 monitors the dosing pump current usage and will detect problems with the pump before damage can occur. If excess current is detected the unit will beep and display PUMP in the status window for pH or ORP. No further dosing of the chemical will occur and steps should be taken to eliminate the fault.
Turn the unit OFF and check the pump tubing for kinks and ensure that the output tube is not obstructed. A worn / faulty gearbox and motor can cause high current usage and will require replacement.
The error message will be reset by turning the unit off or by pressing the Tech Menu key. The fault will re-occur the next time dosing is required if the cause has not been eliminated.
Section 5 – Sensor Calibration
25
Section 5. – Sensor Calibration
5.1 Temperature Calibration The temperature readout must be calibrated before attempting pH or ORP calibration. The decimal point is replaced by a “ ∗ ” if the reading is not calibrated.
5.1.1 Temperature Calibration Procedure 1. Switch the pool pump OFF with the Pump Timer function (see section 3.6), and unplug it from
the POOL PUMP socket.
Remove the ORP/Temperature sensor from its Tee fitting. For installations where this fitting is below the level of the pool, a 6.5mm or 1/4” bung can be fitted to stop the water flow.
2. Press the button to place the easyCHEM 770 into Standby mode.
3. Plug the ORP/Temperature sensor into the ORP Probe socket (if not already connected).
4. Place the sensor into a beaker of room temperature water alongside a good quality mercury thermometer. Stir the sensor and the thermometer gently to ensure an even temperature throughout the beaker.
5. When the Temperature reading has fully stabilised, select Temperature Calibration
(Press , select ‘→Calibrate’, then select ‘→Cal Temp’.) The Temperature Calibration screen is now displayed. For example… 25.0oc Temp Cal. 26.0oc ↑↓ Enter
6. Use the and keys to enter the same temperature as measured by the mercury thermometer.
7. Press to calibrate the temperature readout.
Alternatively, press to abort temperature calibration.
8. The Temperature readout of the easyCHEM 770 is now calibrated. The easyCHEM 770 will now prompt you to re-fit the probe into its Tee fitting… Re-Fit Probes into Pipe Enter
9. Re-fit the probe into its Tee fitting, as per section 2.2. Return the pool pump to its normal Pump Timer setting, as per section 3.4.
Press to return the easyCHEM 770 to Automatic dosing when finished calibrating.
5.1.2 Temperature Calibration Notes 1. The easyCHEM 770 has an allowable Offset range of –10.0 to +10.0 OC. If calibration fails due
to the Offset being outside these limits, then please consult the Troubleshooting guide (section 7.5) for possible remedies.
2. Temperature calibration information is retained in memory when the easyCHEM 770 is switched off, even when the power supply is removed.
3. Temperature does not need to be re-calibrated unless the ORP/Temperature sensor is replaced or the unit is re-set.

Section 5 – Sensor Calibration
26
5.1.3 Temperature Calibration Messages 1. If a temperature calibration has been successfully performed, the easyCHEM 770 will display
the following message and the offset of the sensor. For example… Calibrate OK 0.1oc Offset
2. If a temperature calibration has failed, the easyCHEM 770 will display the following message and the failed offset value of the sensor. For example… Calibrate Failed 10.1oc Offset

Section 5 – Sensor Calibration
27
5.2 pH Calibration Before attempting a pH calibration ensure that Temperature has been correctly calibrated (see section 5.1). A “ ∗ ” in the Temperature readout in place of the decimal point indicates that Temperature is NOT calibrated.
5.2.1 pH Calibration Procedure 1. Switch the pool pump OFF with the Pump Timer function (see section 3.6), and unplug it from
the POOL PUMP socket.
Remove the pH and ORP/Temperature sensors from their Tee fittings. For installations where this fitting is below the level of the pool, 6.5mm (1/4”) and 12.5mm (1/2”) bungs can be fitted to stop the water flow.
2. Press the button to place the easyCHEM 770 into Standby mode.
3. Plug the pH sensor into the pH Probe socket and the ORP/Temperature sensor into the ORP Probe socket (if not already connected).
4. Remove the wetting cap from the pH sensor. Rinse both sensors in distilled water. Shake off as much water as possible. Blot the outside of the sensors dry.
5. Place the pH sensor into a small sample of pH7.00 buffer. Ensure that the entire bulb and reference junction are immersed, as per the diagram below. Place the ORP/Temperature sensor into a separate beaker of liquid that is at the same temperature as the buffer (this is required for correct Temperature compensation). The ORP/Temperature sensor should be immersed to approximately 20mm above the plastic tip.
DO NOT place sensors directly into buffer bottles.
6. Select pH Calibration. (Press , select ‘→Calibrate’, then select ‘→Cal pH’.)
The 7pH Calibration screen is now displayed. For example… pH7 Calibration 7.00pH Enter
Press when the pH reading on the bottom line becomes totally stable.

Section 5 – Sensor Calibration
28
7. The 4pH Calibration screen is now displayed. For example… pH4 Calibration 4.00pH Enter
Place the pH sensor into a sample of pH4.00 buffer, as per the details in Step 5, above.
Press when the pH reading on the bottom line becomes totally stable.
8. The pH readout of the easyCHEM 770 is now calibrated. The easyCHEM 770 will now prompt you to re-fit the probes into their Tee fittings… Re-Fit Probes into Pipe Enter
9. Re-fit the probes into their Tee fittings, as per section 2.2. Return the pool pump to its normal Pump Timer setting, as per section 3.4.
Press to return the easyCHEM 770 to Automatic dosing when finished calibrating.
5.2.2 pH Calibration Notes 1. The easyCHEM 770 has an allowable Asymmetry range of –1.00 to +1.00 pH. The allowable
Slope range is 85.0 to 105.0 %. If calibration fails due to either the Asymmetry or the Slope being outside these limits, please consult the Troubleshooting guide (section 7.4) for possible remedies.
2. All calibration information is retained in memory when the easyCHEM 770 is switched off, even when the power supply is removed.
5.2.3 pH Calibration Messages 1. If a pH7 has been successfully performed, the easyCHEM 770 will display the following
message and the asymmetry of the electrode. Note that the slope value from the last calibration is also shown. For example… pH7 Cal. OK Asym=0.10pH
2. If a pH7 calibration has failed, the easyCHEM 770 will display the following message and the failed asymmetry value of the electrode. For example… pH7 Cal. Failed Asym=1.10pH
3. If a pH4 calibration has been successfully performed, the easyCHEM 770 will display the following message and the asymmetry and slope of the electrode. For example… pH4 Cal. OK Slope=99.0%
4. If a pH4 calibration has failed, the easyCHEM 770 will display the following message and the failed slope value of the electrode. For example… pH4 Cal. Failed Slope=80%

Section 5 – Sensor Calibration
29
5.3 ORP Calibration Before attempting an ORP calibration ensure that Temperature has been correctly calibrated (see section 5.1). A “ ∗ ” in the Temperature readout in place of the decimal point indicates that Temperature is NOT calibrated.
5.3.1 ORP Calibration Procedure 1. Switch the pool pump OFF with the Pump Timer function (see section 3.6), and unplug it from
the POOL PUMP socket.
Remove the pH and ORP/Temperature sensors from their Tee fittings. For installations where this fitting is below the level of the pool, 6.5mm (1/4”) and 12.5mm (1/2”) bungs can be fitted to stop the water flow.
2. Press the button to place the easyCHEM 770 into Standby mode.
3. Plug the pH sensor into the pH Probe socket and the ORP/Temperature sensor into the ORP Probe socket (if not already connected).
4. Remove the wetting cap from the pH sensor. Rinse both sensors in distilled water. Shake off as much water as possible. Blot the outside of the sensors dry.
5. Make up a fresh sample of ZoBell ORP solution by mixing equal amounts of Part A and Part B. Approximately 10mL of each one should suffice, depending on the diameter of the calibration vessel.
6. Place the ORP/Temperature and pH sensors into the made-up ZoBell solution. Ensure that the entire bulb and reference junction of the pH sensor are immersed. The ORP/Temperature sensor should be immersed to approximately 20mm above the plastic tip. Refer to the diagram below.
7. Select ORP Calibration (Press , select ‘→Calibrate’, then select ‘→Cal ORP’).
The ORP calibration screen is now displayed. For example… ORP Calibration 230.mV Enter
Press when the ORP reading on the bottom line becomes totally stable.

Section 5 – Sensor Calibration
30
8. The ORP readout of the easyCHEM 770 is now calibrated. The easyCHEM 770 will now prompt you to re-fit the probes into their Tee fitting… Re-Fit Probes into Pipe Enter
9. Re-fit the probes into their Tee fittings, as per section 2.2. Return the pool pump to its normal Pump Timer setting, as per section 3.4.
Press to return the easyCHEM 770 to Automatic dosing when finished calibrating.
5.3.2 ORP Calibration Notes 1. All calibration information is retained in memory when the easyCHEM 770 is switched off,
even when the power supply is removed.
5.3.3 ORP Calibration Messages 1. If an ORP calibration has been successfully performed, the easyCHEM 770 will display the
following message and the calculated ORP offset. For example… Cal. OK Offset=10mV
2. If an ORP calibration has failed, the easyCHEM 770 will display the following message and the failed ORP offset value. For example… Cal. Failed Offset=70mV
3. If the reading is below 100 mV or above 400 mV the easyCHEM 770 will not even attempt calibration, as this indicates a user error such as incorrect calibration solution etc. For example… Cal. Failed Too Low
or : Cal. Failed Too High
5.4 Action in case of Failed ORP Calibration The following courses of action are recommended if the ORP reading fails to calibrate in the ORP standard…
• Clean the Platinum tip of the ORP sensor. This is the shiny wire at the end of the sensor. It can be cleaned by dipping into a 1:10 mix of hydrochloric acid and water, or with very fine wet-and-dry sandpaper (800 to 1200 grade).
• Clean the reference junction of the pH sensor. This can be cleaned by dipping into a 1:10 mix of hydrochloric acid and water. Immerse to the depth shown in the diagram above for 10 to 20 seconds.
NOTE DO NOT use Copper-based algicides when using an ORP control system. The Copper will plate itself onto the platinum tip of the ORP sensor, which will reduce its sensitivity. In the event of this occurring, follow the cleaning procedure detailed above.

Section 6 – User Settings
31
Section 6. – User Settings 6.1 Setting the Clock
1. Select the Clock setting menu (Press , then select ‘→Set Clock’).
2. The Clock setting screen is now displayed, with the current date and time. The cursor is on the day of the month. For example… 31/12/01 12:00 ↑↓:Set →:Enter
Use the and keys to set the day of the month.
Press the key to move to the month, then use the and keys to set the month.
Press the key to move to the year, then use the and keys to set the year.
Press the key to move to the hours, then use the and keys to set the hours.
Press the key to move to the minutes, then use the and keys to set the minutes.
3. If any corrections are required, use the to move back and the to move forward.
4. Press to save the new date and time.
Notes
1. The easyCHEM 770 tests that a valid day of the month is entered. If an invalid date is entered (eg. 31/09/01), the easyCHEM 770 beeps and displays the message ‘Invalid Date’. The meter then returns to the clock setting screen so that the correct date can be entered.
2. The easyCHEM 770 also tests for leap years.
Section 6 – User Settings
32
6.2 Emergency ShutOFF timer 6.2.1 Setting the ShutOFF Timer The Emergency ShutOFF timer is one of the items that is set when the Pool Size is entered. (section 2.6).
The emergency ShutOFF timer shuts the ORP and/or pH pumps down if they have operated continuously for a preset time without the readings coming back to within the limits. For example, this condition could occur if the drum of chemical is empty, the sensor is faulty and giving an incorrect reading, or if the added chemicals were not able to be detected by the sensors. The ShutOFF feature provides a safeguard against dosing entire Chlorine and/or Acid drums to the pool. To set the ShutOFF time…
1. Select the ShutOFF menu (Press , then select ‘→ShutOFF’).
2. The easyCHEM 770 now allows you to enter the maximum time for which the ORP pump will operate without getting back to within the limit… ORP ShutOFF 70mins ↑↓ Enter
Use the and keys to set the required time, from 1 to 240 minutes.
Press and hold the or key to scroll rapidly.
3. Press to save the ShutOFF timer setting for the ORP pump.
Press to quit and retain the current setting.
4. If was pressed above, the easyCHEM 770 will now allow you to enter the maximum time for which the pH pump will operate without getting back to within the limit… pH ShutOFF 30mins ↑↓ Enter
Use the and keys to set the required time, from 1 to 240 minutes.
Press and hold the or key to scroll rapidly.
5. Press to save the ShutOFF timer setting for the pH pump.
Press to quit and retain the current setting.
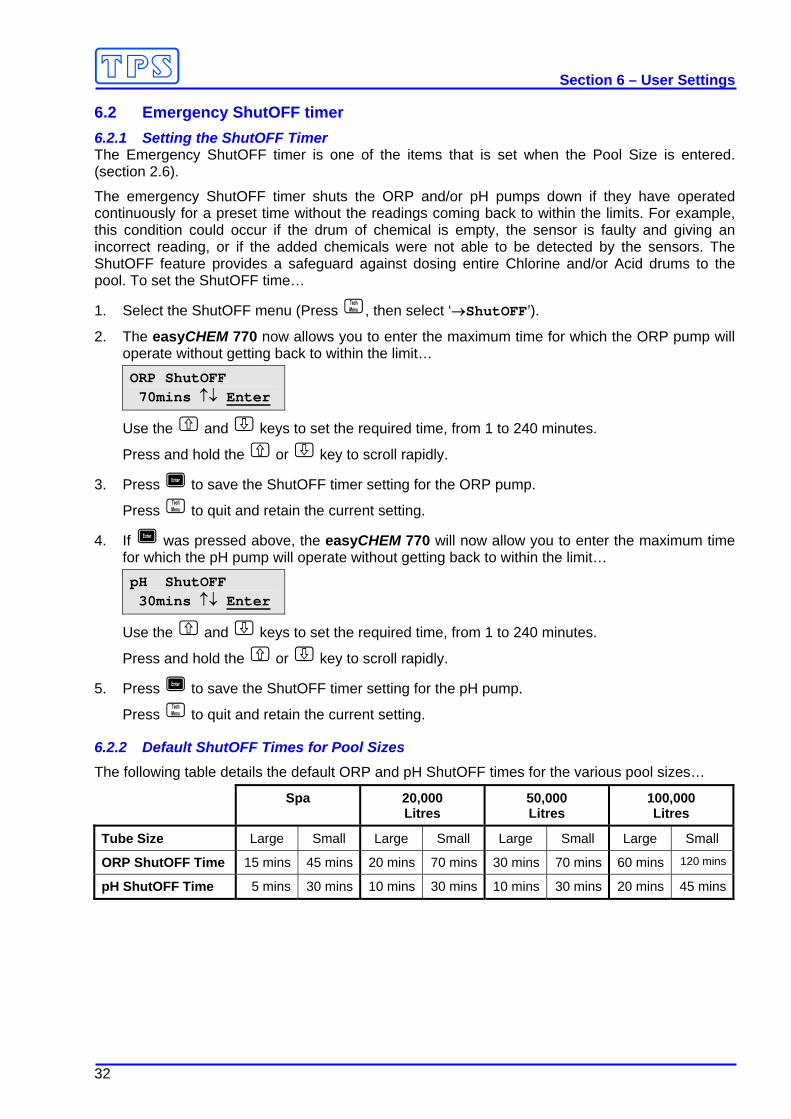
6.2.2 Default ShutOFF Times for Pool Sizes The following table details the default ORP and pH ShutOFF times for the various pool sizes…
Spa 20,000 Litres
50,000 Litres
100,000 Litres
Tube Size Large Small Large Small Large Small Large Small
ORP ShutOFF Time 15 mins 45 mins 20 mins 70 mins 30 mins 70 mins 60 mins 120 mins
pH ShutOFF Time 5 mins 30 mins 10 mins 30 mins 10 mins 30 mins 20 mins 45 mins

Section 6 – User Settings
33
6.2.3 Procedure in event of ShutOFF timer being tripped When the ShutOFF timer has been tripped, the word ‘sOFF’ is displayed as the status for the relevant reading and the easyCHEM 770 beeps.
To re-set the ShutOFF timer, press the key.
No further automatic control will occur for that parameter until the key is pressed. The condition that caused the ShutOFF timer to trip must be rectified to avoid it being tripped again. This may involve one or more of the following…
• Re-fill the Chlorine or Acid drum if they were empty.
• Check and re-calibrate the ORP and/or pH sensors to ensure the reading is actually correct.
• Extend the ON time if the pump rate is not high enough to keep up with chemical demand for the current ON time.
6.2.4 Disabling the Emergency ShutOFF Timer Extreme caution should be exercised when disabling the ShutOFF timer, as this could allow an entire drum of Chlorine and/or Acid to be dosed into the pool in the event of a malfunction. Overdosing Acid can cause serious pool, equipment and health hazards.
To disable the ShutOFF timer, set the ShutOFF time to 0 minutes for ORP and/or pH.

Section 6 – User Settings
34
6.3 Control Setup 6.3.1 Control ON and OFF Times The Control ON and OFF times are set when the Pool Size is entered. (section 2.6).
The ON time is the maximum amount of time the pump will operate continuously. For example, if the ORP ON time is set to 6 minutes, the ORP pump will add Chlorine for a maximum of 6 minutes and then wait for the OFF time. Of course, if the ORP gets back within the limit earlier, the pump will stop before the end of the 6 minutes.
The OFF time is the waiting time between ON cycles. Even if the ORP or pH go outside their normal limits during the OFF time, the easyCHEM 770 will not activate the relevant pump until the entire OFF time has elapsed.
The ON and OFF cycles for ORP and pH run sequentially. This allows time for mixing for each of the chemicals, and avoids the problem of the Chlorine affecting the pH reading or the Acid affecting the ORP reading. If no chemical has been added for the entire ON Time for either reading, the easyCHEM 770 skips the following OFF Time and goes straight to the ON Time for the other reading. This is because mixing time is not required when no chemical has been added. The diagram below illustrates the ORP and pH control cycle.
For example, if the ON times are both set to 5 minutes and the OFF times are set to 10 minutes., the unit will dose for a maximum of 5 minutes, then wait for 10 minutes. These ON and OFF times cycle repetitively. At all times, the ORP and pH pumps will only operate when the readings are outside the limits.
Correct use of an ON and OFF cycle will avoid overdosing problems.

Section 6 – User Settings
35
6.3.2 Setting the Control Direction, On Time, and Off Time For most applications, the default Control Direction, On Times and Off Times will be ideal for the selected pool size. However, some installations may need more On time if there is a continuously heavy bather load etc and the pump is not keeping up with demand. Other installations may need more Off time if, for example, the pump is overdosing due to a slow pool turnover time.
6.3.2.1 Setting up the ORP Control function 1. Plug the easyCHEM 770 mains lead into the mains power outlet to switch the controller on.
2. Press .
3. Press until “→ORP Control” is selected and press .
4. The Control Direction menu is now displayed, for example…
Too High ↑↓ >Too Low Enter
The current selection is highlighted by the arrow.
“Too Low” means that the easyCHEM 770 will add Chlorine when the reading gets too low.
“Too High” means that the easyCHEM 770 will reduce the ORP when it gets too high. This is rare, and not normally used in pool and spa applications.
Press or until the desired setting is selected and press .
5. The current Control On Time is now displayed, for example… ORP ON Time 6 min↑↓ Enter
Press or until the desired On Time is set and press .
Enter Zero minutes On time to disable the ORP pump.
6. The current Control Off Time is now displayed, for example… ORP OFF Time 5 min↑↓ Enter
Press or until the desired Off Time is set and press .
6.3.2.2 Default ORP Control Settings for Pool Sizes The following table details the default ORP control settings for the various pool sizes…
Spa 20,000 Litres
50,000 Litres
100,000 Litres
Tube Size Large Small Large Small Large Small Large Small
ORP On Time 1 mins 3 mins 1 mins 6 mins 2 mins 6 mins 5 mins 15 mins
ORP Off Time 5 mins 5 mins 5 mins 5 mins 5 mins 5 mins 15 mins 15 mins

Section 6 – User Settings
36
6.3.2.3 Setting up the pH Control function 1. Plug the easyCHEM 770 mains lead into the mains power outlet to switch the controller on.
2. Press .
3. Press until “→pH Control” is selected and press .
4. The Control Direction menu is now displayed, for example…
>Too High ↑↓ Too Low Enter
The current selection is highlighted by the arrow.
“Too High” means that the easyCHEM 770 will add acid to reduce the pH when it gets too high. This is the normal setting for pools using Sodium Hypochlorite as Chlorine.
“Too Low” means that the easyCHEM 770 will add alkali when the reading gets too low.
Press or until the desired setting is selected and press .
5. The current Control On Time is now displayed, for example… pH ON Time 1 min↑↓ Enter
Press or until the desired On Time is set and press .
Enter Zero minutes On time to disable the pH pump.
6. The current Control Off Time is now displayed, for example… pH OFF Time 5 min↑↓ Enter
Press or until the desired Off Time is set and press .
6.3.2.4 Default pH Control Settings for Pool Sizes The following table details the default pH control settings for the various pool sizes…
Spa 20,000 Litres
50,000 Litres
100,000 Litres
Tube Size Large Small Large Small Large Small Large Small
pH On Time 30 secs 1 mins 1 mins 3 mins 1 mins 3 mins 2 mins 6 mins
pH Off Time 5 mins 5 mins 5 mins 5 mins 5 mins 5 mins 15 mins 15 mins
Section 6 – User Settings
37
6.4 Alarms The easyCHEM 770 has an alarm function that applies to the ORP and pH readings. The alarm trips if the ORP reading is above or below the Set Point by at least 30mV for at least 10 minutes. It also trips if the pH reading is above or below the Set Point by at least 0.3pH for at least 10 minutes. This alarm is useful, as it can provide forewarning of a potential system problem.
The easyCHEM 770 continues to operate as normal while the Alarm is sounding, as it will continue to try to rectify the condition.
To enable or disable the Alarm function…
1. Plug the easyCHEM 770 mains lead into the mains power outlet to switch the controller on.
2. Press .
3. Press until “→Alarm” is selected and press .
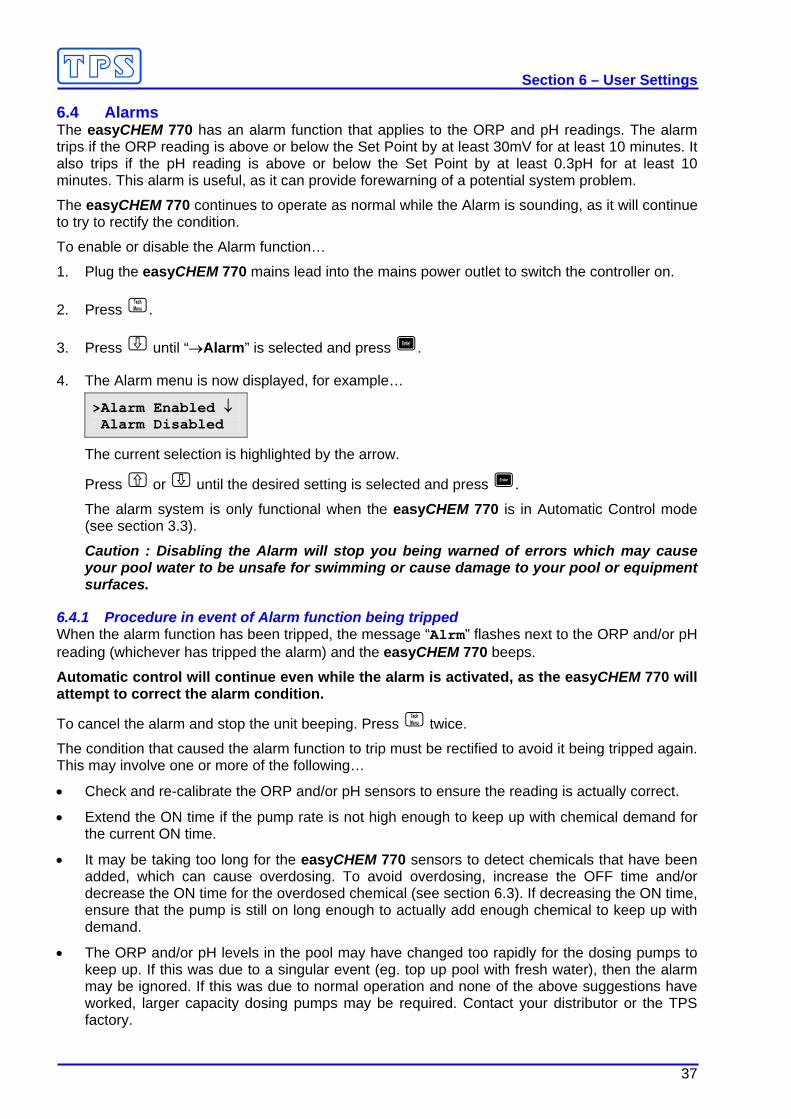
4. The Alarm menu is now displayed, for example…
>Alarm Enabled ↓ Alarm Disabled
The current selection is highlighted by the arrow.
Press or until the desired setting is selected and press .
The alarm system is only functional when the easyCHEM 770 is in Automatic Control mode (see section 3.3).
Caution : Disabling the Alarm will stop you being warned of errors which may cause your pool water to be unsafe for swimming or cause damage to your pool or equipment surfaces.
6.4.1 Procedure in event of Alarm function being tripped When the alarm function has been tripped, the message “Alrm” flashes next to the ORP and/or pH reading (whichever has tripped the alarm) and the easyCHEM 770 beeps.
Automatic control will continue even while the alarm is activated, as the easyCHEM 770 will attempt to correct the alarm condition.
To cancel the alarm and stop the unit beeping. Press twice.
The condition that caused the alarm function to trip must be rectified to avoid it being tripped again. This may involve one or more of the following…
• Check and re-calibrate the ORP and/or pH sensors to ensure the reading is actually correct.
• Extend the ON time if the pump rate is not high enough to keep up with chemical demand for the current ON time.
• It may be taking too long for the easyCHEM 770 sensors to detect chemicals that have been added, which can cause overdosing. To avoid overdosing, increase the OFF time and/or decrease the ON time for the overdosed chemical (see section 6.3). If decreasing the ON time, ensure that the pump is still on long enough to actually add enough chemical to keep up with demand.
• The ORP and/or pH levels in the pool may have changed too rapidly for the dosing pumps to keep up. If this was due to a singular event (eg. top up pool with fresh water), then the alarm may be ignored. If this was due to normal operation and none of the above suggestions have worked, larger capacity dosing pumps may be required. Contact your distributor or the TPS factory.

Section 6 – User Settings
38
6.4.2 Alarm Set-up Examples The following diagram illustrates the ORP alarm function of the easyCHEM 770. The Set Point is at 700 mV.

Section 6 – User Settings
39
6.5 Super-Chlorinating From time to time, your pool professional may ask you to super-chlorinate your pool. This is necessary when the level of Chloramines becomes too high. Chloramines are the undesirable compounds that form as a result of the Chlorine doing its job of killing bacteria and algae. Chloramines are actually the compounds that cause the “Chlorine” smell and itchy eyes and skin. They will form in all pools, including those using salt chlorinators. Super-Chlorinating oxidises these Chloramines back to useful Chlorine.
Super-chlorinating is simply the process of adding a large amount of Chlorine in one dose. Your pool professional will let you know how much Chlorine is required for your size pool. The easyCHEM 770 does all the hard work for you by adding the amount of Chlorine that is needed. You do not need to handle the Chlorine at all !
To Super-chlorinate your pool…
1. Plug the easyCHEM 770 mains lead into the mains power outlet to switch the controller on.
2. Press .
3. Press until “→SuperChlorine” is selected and press .
4. The Super-chlorination menu is now displayed, for example… Chlorine Litres 0L ↑↓ Enter
Press and to enter the number of Litres of Chlorine that you wish to add to the pool and press . The maximum dose that can be added is 25 Litres.
5. The easyCHEM 770 now proceeds to add the Chlorine. The display shows how much has been added so far and how much will be added in total, for example… Chlorine 0.1/10L Enter Stops
To stop adding the Chlorine immediately, press .
6. When the easyCHEM 770 has finished adding the Chlorine or if the user stopped the dosing prematurely, the easyCHEM 770 will continue to operate the main pool pump for a further 4 hours. This will ensure that the Chlorine that was added will be thoroughly mixed. No ORP or pH monitoring or chemical addition will occur during the 4 hours. Running 00:00 pump for 4 hours
The time on the top right hand side of the display will count up to the 4 hours so that you know how long it has been operating.
Press to stop the 4 hour pumping cycle immediately. Note that the Chlorine may not have mixed properly if pumping is stopped early.
7. Normal operation of the easyCHEM 770 will now resume. It is normal for the pH reading to be quite high due to the large dose of Chlorine that was just added. This will return to normal within a few days, when the Chlorine is back to normal levels. To avoid unnecessary chemical usage, the easyCHEM 770 will not add any acid until the ORP reading has returned to normal.

Section 6 – User Settings
40
6.6 Resetting the easyCHEM 770 The calibration information and the full system set-up information can be reset to factory defaults if required. This allows the operator to set up and calibrate the unit from the beginning with a clean system.
To reset the easyCHEM 770…
1. Plug the easyCHEM 770 mains lead into the mains power outlet to switch the controller on.
2. Press .
3. Press until “→Reset” is selected and press .
4. The Reset menu is now displayed, for example… >Calibration Full System
Select “Calibration” and press to reset only the calibration information to factory values. It will be necessary to re-calibrate Temperature, ORP and pH after this is done.
Select “Full System” and press to reset all calibration, and system settings to factory values. It will be necessary to re-calibrate Temperature, ORP and pH and re-enter your pool size and any other custom system settings after this is done.
Note that the decimal points in the ORP, pH and Temperature readings will be replaced with a “ ∗ ” to indicate that the unit must be re-calibrated.

Section 7 – Troubleshooting
41
Section 7. – Troubleshooting 7.1 General Error Messages from the easyCHEM 770 Error Message Possible Causes Remedy Fact Cal Failure maybe Inaccurate
The EEPROM chip which contains the factory calibration information has failed.
The unit must be returned to TPS for service.
EEPROM Failure Factory repair
User calibration settings have been lost or corrupted.
Switch the meter OFF and switch back ON. If the problem persists, return the unit to TPS for service.
7.2 General Faults Symptom Possible Causes Remedy Main Pool Pump does not operate when easyCHEM 770 activates output
1. Pool pump power lead not correctly connected to POOL PUMP socket.
2. Output Fuse is blown.
Ensure that the Pool Pump’s power plug is firmly connected to the POOL PUMP output socket. Replace output fuse, as per details in section 7.7. If fuses continue to blow, your Pool Pump may be drawing too much power, or it may be faulty.
Not Dosing. “PUMP” Error message displayed.
Excess Dosing pump current detected.
Press Tech Menu to reset error. If error re-occurs dosing pump will require service.
7.3 ORP Troubleshooting Symptom Possible Causes Remedy ORP reading inaccurate 1. Platinum tip of ORP
sensor dirty. 2. Reference junction of pH
sensor dirty.
Clean Platinum tip of ORP sensor by dipping into a 1:10 mix of Hydrochloric acid for 10 to 20 seconds, or sand with 800 to 1200 grade wet-and-dry sandpaper. If problem persists, adjust the set point to compensate for variation in reading. Dip pH sensor into a 1:10 mix of Hydrochloric acid for 10 to 20 seconds. Re-calibrate ORP in ZoBell solution (section 5.3). If problem persists, adjust the set point to compensate for variation in reading.
ORP reading seems low compared to Chlorine test kit
Pool water is out of balance Have sample of pool water tested by a pool professional to check its chemical balance. Check at least the following… • Cyanuric Acid (sunscreen) • Alkalinity • pH (your easyCHEM 770) tests
this). • Free and Combined Chlorine levels. Once the above have been rectified, it may be necessary to Super-chlorinate your pool to oxidise undesirable Chloramine compounds. Your pool professional can advise on this. See section 6.5 for details on using the easyCHEM 770 for super-chlorinating your pool.

Section 7 – Troubleshooting
42
7.4 pH Troubleshooting Symptom Possible Causes Remedy Unit fails to calibrate, even with new probe.
Calibration settings outside of allowable limits due to previous failed calibration.
Reset the unit. See section 6.6.
1 Point calibration fails (Asymmetry is greater than +/-1.00 pH).
Reference junction blocked. Clean reference junction as per instructions supplied with the electrode.
2 Point calibration fails (Slope is less than 85.0%).
1. Glass bulb not clean. 2. Electrode is aged. 3. Connector is damp. 4. Buffers are inaccurate.
Clean glass bulb as per instructions supplied with the electrode. Attempt rejuvenation, as per instructions supplied with the electrode. If not successful, replace electrode. Dry in a warm place. Replace buffers.
Unstable readings. 1. Reference junction blocked.
2. Glass bulb not clean. 3. Bubble in glass bulb. 4. Faulty connection to
meter. 5. Reference junction not
immersed.
Clean reference junction as per instructions supplied with the electrode. Clean glass bulb as per instructions supplied with the electrode. Flick the electrode to remove bubble. Check connectors. Replace if necessary. Ensure that the bulb AND the reference junction are fully immersed as per diagram in section 5.2.1.
Inaccurate readings, even when calibration is successful.
Reference junction blocked. Clean reference junction as per instructions supplied with the electrode.
Displays 7.00 for all solutions.
Electrical short in connector. 1. Check connector. Replace if necessary.
2. Replace electrode.
Displays 4-5 pH for all solutions.
Glass bulb or internal stem cracked.
Replace electrode.
7.5 Temperature Troubleshooting Symptom Possible Causes Remedy Temperature inaccurate and cannot be calibrated.
1. Faulty connector. 2. Faulty ORP/Temperature
sensor.
Check the connector and replace if necessary. Fit new ORP/Temperature sensor.
Displays “OVROc” when temperature probe plugged in.
1. Faulty ORP/Temperature socket.
2. Faulty ORP/Temperature sensor.
Return the instrument to the TPS factory for service. Fit new ORP/Temperature sensor.
7.6 Instrument firmware version number If you need to phone or fax TPS for any further technical assistance, the firmware version number and serial number of your easyCHEM 770 may help us to assist you. The version and serial numbers are displayed by the easyCHEM 770 at turn-on. The firmware version is “V1.1” and the serial number is “S1234” in the example below… easyCHEM 770 V1.1 S1234

Section 7 – Troubleshooting
43
7.7 Output Fuse Replacement The easyCHEM 770 has a 10 Amp fuse to protect the instrument from excessive power drain from the main Pool Pump. This can occur due to any of the following reasons…
• The Pool Pump has a power rating higher than 10 Amps. • The Pool Pump has a larger than normal start-up current, which exceeds 10 Amps long
enough for the fuse to blow. • The Pool Pump is faulty.
Other factors can also cause the fuse to blow, but these are the most common.
To replace the fuse…
1. Switch off the easyCHEM 770 at the mains power outlet and unplug the power lead.
2. Locate the fuse holder on the left hand underneath side of the unit. Un-screw it anti-clockwise until it can be removed.
3. Fully remove the glass fuse from the fuse holder.
4. Replace the fuse with a 3AG type 250V 10A fuse.
This should be the standard “fast blow” type.
A “slow blow” type fuse may be used if the unit blows fuses consistently when the pool pump starts.
5. Insert the fuse holder into the easyCHEM 770.
Push it into place then screw clockwise until it is firmly fastened in place.
DO NOT OVERTIGHTEN.
6. The easyCHEM 770 can now be connected to the mains power outlet and switched on.
7. If fuses continue to blow, the problem causing this situation must be rectified. Please consult the pump supplier or TPS directly.

Section 8 – easyCHEM 770 Specifications
44
Section 8. – easyCHEM 770 Specifications Range Resolution Accuracy
ORP 0 to 999 mV 1 mV ±1 mV
pH 1.00 to 9.99 pH 0.01 pH ±0.02 pH
Temperature 0.0 to 99.9 OC 0.1 OC ±0.2 OC
Calibration Automatic Calibration for all parameters, within the following limits…
ORP Offset Range : -60mV to +60mV ORP Standard : +231mV ZoBell solution (1:1 mix of Part A and Part B)
pH Asymmetry Range : -1.00 to +1.00 pH pH Slope Range : 85.0 to 105 % pH Buffers : pH7.00 and pH4.00
Temperature Offset Range : -10.0 OC to +10.0 OC
Calendar Clock
• 24 Hour Calendar Clock.
• Tests for valid day of the month when setting (eg. 31/09/99 is not valid).
• Adjusts for leap years.
Peristaltic Pumps
• The easyCHEM 770 has 2 x built-in Peristaltic Pumps for ORP and pH control.
• Chemical resistant Santoprene pump tubing.
• Standard small pump tubing produces 1.6 Litres / Hour
Large pump tubing produces 5 Litres / Hour
• An optional fast pump motor is available, which produces 15 Litres / Hour with large tubing only.

Section 9 – Warranty
45
Section 9. – Warranty TPS Pty. Ltd. guarantees all instruments and sensors to be free from defects in material and workmanship when subjected to normal use and service. This guarantee is expressly limited to the servicing and/or adjustment of an instrument returned to the Factory, or Authorised Service Station, freight prepaid, within twelve (12) months from the date of delivery, and to the repairing, replacing, or adjusting of parts which upon inspection are found to be defective. Warranty period on sensors is three (3) months.
There are no express or implied warranties which extend beyond the face hereof, and TPS Pty. Ltd. is not liable for any incidental or consequential damages arising from the use or misuse of this equipment, or from interpretation of information derived from the equipment.
Shipping damage is not covered by this warranty.
PLEASE NOTE A guarantee card is packed with the instrument or sensor. This card must be completed at the time of purchase and the registration section returned to TPS Pty. Ltd. within 7 days. No claims will be recognised without the original guarantee card or other proof of purchase. This warranty becomes invalid if modifications or repairs are attempted by unauthorised persons, or the serial number is missing.
PROCEDURE FOR SERVICE If you feel that this equipment is in need of repair, please re-read the manual. Sometimes, instruments are received for "repair" in perfect working order. This can occur where the sensor(s) simply requires cleaning or replacement or some other field serviceable event.
TPS Pty. Ltd. has a fine reputation for prompt and efficient service. In just a few days, our factory service engineers and technicians will examine and repair your equipment to your full satisfaction.
To obtain this service, please follow this procedure… Return the instrument AND ALL SENSORS to TPS freight pre-paid and insured in its original packing or suitable equivalent. INSIST on a proof of delivery receipt from the carrier for your protection in the case of shipping claims for transit loss or damage. It is your responsibility as the sender to ensure that TPS receives the unit.
Please check that the following is enclosed with your equipment:
• Your Name and daytime phone number. • Your return street address. • A description of the fault. (Please be SPECIFIC.)
(Note: "Please Repair" does NOT describe a fault.) Your equipment will be repaired and returned to you by air express where possible.
For out-of-warranty units, a repair cost will be calculated from parts and labour costs. If payment is not received for the additional charges within 30 days, or if you decline to have the equipment repaired, the complete unit will be returned to you freight paid, not repaired. For full-account customers, the repair charges will be debited to your account.