Embed Size (px)
Citation preview

EasyBubble

M I L L I K E N M I L L S H I G H S C H O O L
EasyBubble User’s Guide
© Computer Science Department, Milliken Mills High School 7522 Kennedy Road, Markham, Ontario L3R 9S5
Phone 905.477.0072 • Fax 905.477.6858 [email protected] http://access.mmhs.ca/easybubble

Table of Contents BACKGROUND ..............................................................................................................................................1 CONCEPTS......................................................................................................................................................2
SCREENS – MARK / COMMENT ENTRY.............................................................................................................3 SCREENS –COMMENT SELECTION....................................................................................................................4 SCREENS – INITIAL VALUES SETUP..................................................................................................................5 SCREENS – GET NEW SAS FILE.......................................................................................................................6
THE DETAILS.................................................................................................................................................7 Establishing the Ranges .............................................................................................................................8 Splitting a Range.........................................................................................................................................8 Deleting a Range.........................................................................................................................................8 Enter Ranges...............................................................................................................................................8 Entering Comments ....................................................................................................................................9 Changing Learning Skills ..........................................................................................................................9 Details Area.................................................................................................................................................9 Printing .......................................................................................................................................................9 Saving the Initial Values Setup ................................................................................................................10 Open Favourites........................................................................................................................................10
EASYBUBBLE - COMMENT SELECTION DETAILS............................................................................................11 Finding Comments ...................................................................................................................................11 Favourites File..........................................................................................................................................12 Favourites File Handling .........................................................................................................................12
EASYBUBBLE – COMMENT/MARK ENTRY DETAILS ......................................................................................14 Mode..........................................................................................................................................................14 Open Favourites........................................................................................................................................14 Class File Handling ..................................................................................................................................15 Update Class File ......................................................................................................................................15 Print a Class ..............................................................................................................................................15 Displaying the Class..................................................................................................................................16 Student Details ..........................................................................................................................................16 Entering the Information .........................................................................................................................17 eFiling the Class .......................................................................................................................................18
TIMELINES FOR EASYBUBBLE USE ................................................................................................................20 TECHNICAL DETAILS .....................................................................................................................................21
Screen resolution Details about the easybubble program .........................................................................21 Technical Details about network installation/setup...................................................................................22 efile Details relating to easybubble ...........................................................................................................22
APPENDIX A – EBCOMMENTBANK.CSV..............................................................................................23 APPENDIX B – EBSTUDENTINFO.TXT ..................................................................................................24

APPENDIX C - SAS INSTRUCTIONS .......................................................................................................25 8-17 DOWNLOADING SAS DATA FOR MARK MANAGEMENT/SUBMISSION PURPOSES...............26
OPTION 1: Download to your desktop using SAS Export/Import.............................................................26 OPTION 2: Download a SWRG report .....................................................................................................26 Transferring the data from SAS to PC.............................................................................................27
8-18 UPLOADING DATA TO SAS FOR MARK SUBMISSION PURPOSES ..........................................28

E A S Y B U B B L E U S E R ’ S G U I D E
1 © Computer Science Department, Milliken Mills High School • 7522 Kennedy Road, Markham, Ontario L3R 9S5 Phone 905.477.0072 • Fax 905.477.6858 • [email protected] • http://access.mmhs.ca/easybubble
EasyBubble
Background EasyBubble was created to find the best alternative for mark entry into the SAS – Student Administrative System that York Region District School Board is currently using in lieu of having to physically bubble marks by pencil and hand.
With the current Mark Entry Scantron Bubble Sheets being used, along with the new curriculum, it is quiet possible that a teacher would be required to physically bubble 23 bubbles per student or roughly 700 bubble entries per class or roughly 2100 bubble entries per marking period or roughly 8400 bubble entries annually.
Through the efforts of the makers of MarkBooks, an alternate method of mark entry now exists in which a text file could be supplied to SAS in lieu of the physical mark entry bubble sheets. This text file would contain the same information contained on the mark entry bubble sheets, but could be generated electronically by a computer or computer program. The makers of MarkBooks have integrated a new plug-in into their marks manager software application which provides a very basic interface in which they afford its users the ability to generate this electronic file which could replace the mark entry bubble sheets.
After reviewing the processes of mark entry, the authors of EasyBubble determined that so much more functionality could be afforded to those who seek an alternative to pencil and paper, hence, EasyBubble was born. Written in MS Visual Basic 6, this application is only supported in Windows 9X or later operating systems.
Due to the complexity and amount of information required to be displayed on screen, EasyBubble requires a screen resolution of at least 1024 x 768. Any resolution less than this will require constant scrolling of the application.
Chapter
1

E A S Y B U B B L E U S E R ’ S G U I D E
2 © Computer Science Department, Milliken Mills High School • 7522 Kennedy Road, Markham, Ontario L3R 9S5 Phone 905.477.0072 • Fax 905.477.6858 • [email protected] • http://access.mmhs.ca/easybubble
EasyBubble
Concepts • Favourites – Currently, the York Region District School Board’s Secondary Mark Comment Bank
has over 4600 comments available for teachers to use. It is a basic fact that the vast majority of our teachers use only a limited number of these 4600 comments; either those already identified by a department or having been identified by the teacher over time. EasyBubble bases itself on this reality and allows its users to create Favourites files which group comments from the YRDSB Comment Bank into useable groups of comments that could be selected for different classes.
• Comment Selection – Currently, with over 4600 comments available, it became obvious to the author’s of EasyBubble that the majority of teachers are not using the best comments for their students but finding the most suitable comment from a small subset of the 4600 comments in the main list. EasyBubble now provides a very rich interface to allow a teacher to search through all 4600 comments and introduce themselves to many new unfamiliar comments that may better suit their students. No longer is a teacher limited to their departmental shortlist of comments, but can now easily search by Topic / Department, Mark Category, Comment Category, Learning Skill. Within these choices, EasyBubble provides the ability to search for comments via Keyword using AND, OR and NOT.
• Initial Values – Through informal discussions with many teachers, it became obvious that of the Learning Skills and Comments that teachers were initially selecting for their students were based upon the marks of the students and then adjusted to the particular student’s strengths and weaknesses. As EasyBubble was designed to accelerate a teacher’s ability to complete their mark entries, it was felt that an Initial Values option might assist many of its users and continue to contribute to the reduction of RSI (Repeative Stress Injuries) issues that we are attempting to address through the use of our utility. Now a user of EasyBubble can configure mark ranges and associate various Learning Skills levels and specific default comments to these ranges. If enabled, Initial Values will automatically associate specific Learning Skills Levels and specific Comments to students as their marks are entered by the teacher. The teacher can then view these Initial Values and adjust them to suit the specific student.
• SAS Class File – Traditionally, Mark Entry Bubble Sheets are printed off and distributed to teachers for bubbling and re-submission as close to mid and end of term as possible in order to provide teachers will the most accurate “official” class listing printed on the Mark Entry Sheets. Using EasyBubble, mark entry sheets will not be required; but, a teacher’s accurate “official” class list must be available electronically. Therefore, a SAS Class File will be made available to those using EasyBubble and loaded on our network. Home users of EasyBubble would have to make arrangements to acquire the latest copy of this SAS Class File otherwise their Mark Entries would be based on old outdated data.

E A S Y B U B B L E U S E R ’ S G U I D E
3 © Computer Science Department, Milliken Mills High School • 7522 Kennedy Road, Markham, Ontario L3R 9S5 Phone 905.477.0072 • Fax 905.477.6858 • [email protected] • http://access.mmhs.ca/easybubble
EasyBubble
Screens – Mark / Comment Entry The Primary Window for EasyBubble Users will be the Mark/Comment Entry Window. This window is broken down into four regions:
• Top – Menu and Toolbar Area where all of your commands and controls are found
• Left – Class Records Area contains all of your student information for a particular class; greyed fields area fixed by the system; white fields are open for teacher input. You can select a student by clicking on a greyed field; left clicking on a white field of a student will stamp or associate a comment with that student. Care must be taken when clicking on a student’s information line; whether you wish to select or stamp (associate) a comment or change a Learning Skill. There is a Comment/Skill button just above this Class Record Area which will toggle the student input entry fields between Marks and Comments to Marks and Learning Skills.
• Right – Favourite List Area where all of your chosen comments will be listed in the order that you set them up in the Comment Selection Window. You can change this Favourites list and use a different one for each course/department that you teach.
• Bottom – Student Details Area where a detailed on screen report will be displayed containing student information for the student highlighted in the Class Records Area. Clicking on any student line on the left pane of the window will generate a detailed report for that student in this area; all comment codes will include their comment description to allow you to review each student record that you will be submitting.

E A S Y B U B B L E U S E R ’ S G U I D E
4 © Computer Science Department, Milliken Mills High School • 7522 Kennedy Road, Markham, Ontario L3R 9S5 Phone 905.477.0072 • Fax 905.477.6858 • [email protected] • http://access.mmhs.ca/easybubble
EasyBubble
Screens –Comment Selection A powerful tool for EasyBubble Users will be the Comment Selection Window. This window is broken down into three regions:
• Top – Menu and Toolbar Area where all of your commands and controls are found. You may maintain multiple Favourite Lists from this window. You may open, save, save as, close favourite lists from this window.
• Left – Your Active Favourite List Area where all of your chosen comments will be listed in the order that you prefer. You can change the order of any comment within your Favourites list by clicking on a comment and choosing a toolbar icon (Move Up, Move Down, Delete from List) You may also insert “divider” bars into your favourites list to assist in your ability to group liked comments together in an organized way. Move or remove these “divider” bars just like any other comment in this area.
• Right – Search Criteria / Search Area where the real power of EasyBubble can be found. Here for the first time ever, teachers can scour the entire YRDSB’s Secondary Comment Database using a power set of Search Criteria Tools. You may search through over 4600 comments in the blink of an eye, to find comments that you may have never know existed and may be the exact comments that you have always wished to could say. Searching by Mark Category, Comment Category, Learning Skill, Department/Topic and by Keyword with Boolean controls is possible.

E A S Y B U B B L E U S E R ’ S G U I D E
5 © Computer Science Department, Milliken Mills High School • 7522 Kennedy Road, Markham, Ontario L3R 9S5 Phone 905.477.0072 • Fax 905.477.6858 • [email protected] • http://access.mmhs.ca/easybubble
EasyBubble
Screens – Initial Values Setup A powerful tool for EasyBubble Users is also its Initial Values Capability. This setup window is broken down into four regions: and is very similar in design to the Mark/Comment Entry Window.
• Top – Menu and Toolbar Area where all of your commands and controls are found.
• Left – The Range Area is where you can establish mark ranges and within each of these ranges, you can establish a set of baseline Learning Skills levels and generic comment selections that you tend to associate with student achievement that falls into these ranges. Any of these generic baseline settings that you have will then be subsequently applied to students as you enter their marks using this favourites file. Any of these baseline settings can be easily overridden and tailored to the specific student once applied.
• Right – Favourite List Area is where all of your chosen comments are listed. You can click and highlight a comment in this area and apply it to any of the comment fields within any of your established ranges in the Left pane of this window.
• Bottom – The Range Details Area where a detailed on screen report will be displayed containing information for the Range highlighted in the Range Area. Clicking on any range line on the left pane of the window will generate a detailed report for that range; all comment codes will include their comment description to allow you to review each range record.

E A S Y B U B B L E U S E R ’ S G U I D E
6 © Computer Science Department, Milliken Mills High School • 7522 Kennedy Road, Markham, Ontario L3R 9S5 Phone 905.477.0072 • Fax 905.477.6858 • [email protected] • http://access.mmhs.ca/easybubble
EasyBubble
Screens – Get New SAS File
EasyBubble is intended to by executed by each teacher while at their school on their school network where EasyBubble has been setup and is being maintained by the Teacher Site Administrator. There the program will read the latest file produced by SAS with the latest student information for the current reporting period. A list of courses will be presented. Scroll through the list, click on the course you want and click on the “Get Class” button.
The window will close and you will see a list of student ID numbers and names for the course selected in the main Mark / Comment Entry windows.
The “Add to existing class” check box is provided only for those teaching Co-op or other subjects in which each student in the course is assigned a unique course code. In this case the student(s) in that course are ADDED to the existing list of students in the main Mark/Comment Entry form. This will allow you to enter marks and comments for your “class” as if they were all enrolled in the same course. (Classroom teachers with normal class sizes should NOT use this feature.)

E A S Y B U B B L E U S E R ’ S G U I D E
Chapter
2 EasyBubble
The Details
E A S Y B U B B L E U S E R ’ S G U I D E
8 © Computer Science Department, Milliken Mills High School • 7522 Kennedy Road, Markham, Ontario L3R 9S5 Phone 905.477.0072 • Fax 905.477.6858 • [email protected] • http://access.mmhs.ca/easybubble
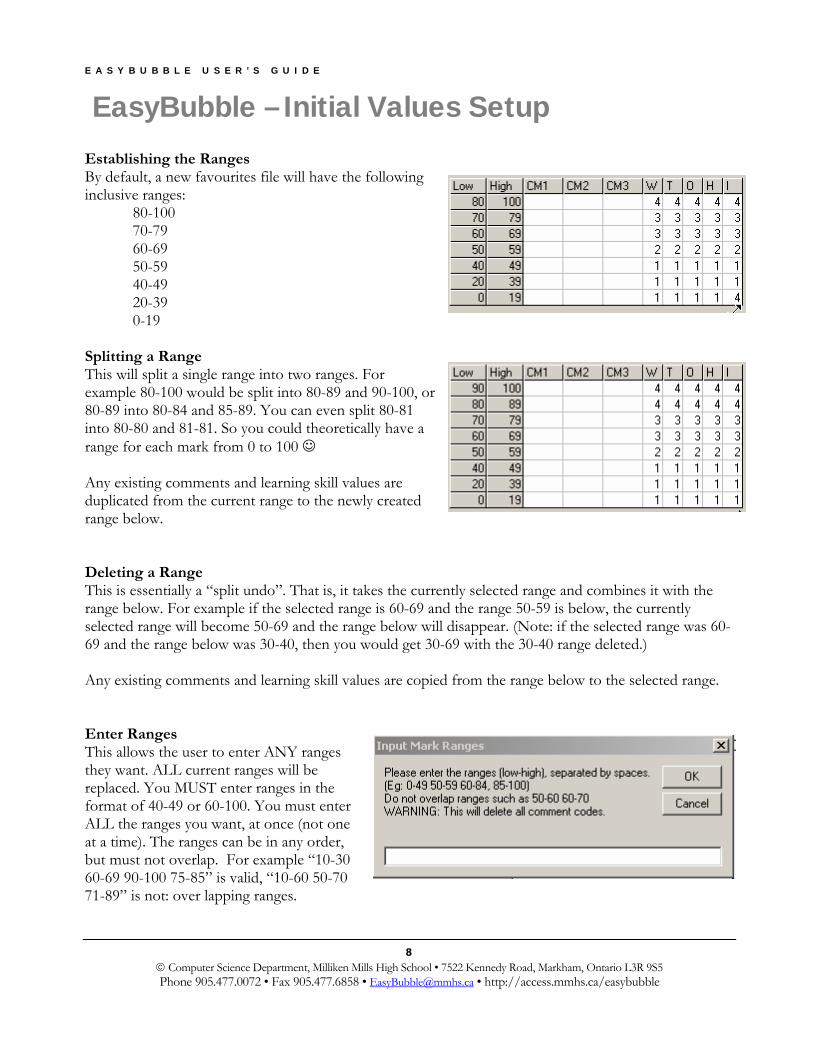
EasyBubble – Initial Values Setup Establishing the Ranges By default, a new favourites file will have the following inclusive ranges: 80-100 70-79 60-69 50-59 40-49 20-39 0-19 Splitting a Range This will split a single range into two ranges. For example 80-100 would be split into 80-89 and 90-100, or 80-89 into 80-84 and 85-89. You can even split 80-81 into 80-80 and 81-81. So you could theoretically have a range for each mark from 0 to 100 ☺ Any existing comments and learning skill values are duplicated from the current range to the newly created range below. Deleting a Range This is essentially a “split undo”. That is, it takes the currently selected range and combines it with the range below. For example if the selected range is 60-69 and the range 50-59 is below, the currently selected range will become 50-69 and the range below will disappear. (Note: if the selected range was 60-69 and the range below was 30-40, then you would get 30-69 with the 30-40 range deleted.) Any existing comments and learning skill values are copied from the range below to the selected range. Enter Ranges This allows the user to enter ANY ranges they want. ALL current ranges will be replaced. You MUST enter ranges in the format of 40-49 or 60-100. You must enter ALL the ranges you want, at once (not one at a time). The ranges can be in any order, but must not overlap. For example “10-30 60-69 90-100 75-85” is valid, “10-60 50-70 71-89” is not: over lapping ranges.

E A S Y B U B B L E U S E R ’ S G U I D E
9 © Computer Science Department, Milliken Mills High School • 7522 Kennedy Road, Markham, Ontario L3R 9S5 Phone 905.477.0072 • Fax 905.477.6858 • [email protected] • http://access.mmhs.ca/easybubble
Note: All marks need not be included within your ranges. This is useful if you wanted to use initial values ONLY for the very best and/or the very worse marks. For example having ONLY ranges from 0-34 and from 90-100 may make reasonable sense. Using the “enter range” feature will delete ALL existing comments you might have for any ranges. Learning skill values are set to reasonable values, depending on the mark range. Entering Comments Select a comment from the favourite list (left-click it), or right-click on an existing comment for a range (this is called “pick-up”), and then click the spot where you want the comment. This is called “stamping”. You can stamp the same comment in many different places without picking it up each time. Changing Learning Skills The learning skills can NEVER be blank. You can only increase or decrease their values. To increase a value, right-click it. To decrease a value, left-click it. The left or right clicking are circular: that is it will go 3 -> 4 -> 1 or from 2 ->1 -> 4. Details Area The area at the bottom of the form shows the currently selected range with comment codes and descriptions and the learning skill values.
Printing You may print the initial values setup. This means that the ranges and their associated comments and learning skills (exactly as they are displayed in the details area) will be sent to the printer.
E A S Y B U B B L E U S E R ’ S G U I D E
10 © Computer Science Department, Milliken Mills High School • 7522 Kennedy Road, Markham, Ontario L3R 9S5 Phone 905.477.0072 • Fax 905.477.6858 • [email protected] • http://access.mmhs.ca/easybubble
Saving the Initial Values Setup You can not explicitly save the initial values. They are stored as part of the favourites file (automatically) when you leave this screen or open a new favourites file. This means that if you change something in the initial values, it will be saved! There is no cancel feature. SO BE CAREFUL what you do! Open Favourites If you open a new favourites file, the existing initial values will be saved with the old favourites file. Then the new favourites file and its associated initial values will be opened and displayed.

E A S Y B U B B L E U S E R ’ S G U I D E
11 © Computer Science Department, Milliken Mills High School • 7522 Kennedy Road, Markham, Ontario L3R 9S5 Phone 905.477.0072 • Fax 905.477.6858 • [email protected] • http://access.mmhs.ca/easybubble
EasyBubble - Comment Selection Details Finding Comments
York Region Comment Bank The main comment bank consists of over 4000 comments. This list is too large for anyone to reasonably search. Therefore there are a series of search criteria provided. The main idea is to select the criteria and then hit the “Search” button. The original comment bank has been categorized as per the published printed comment reports given to each school. It is possible to change the comment categories with Easy Bubble’s “Comment Updater” program. (The EBCommentUpdater Utility is intended to be used by the Teacher Site Administrator at the beginning of each reporting period to synchronize EasyBubble’s EBCommentBank.csv file with the SAS comment bank.) You can select one or more of the following: Mark Category, Comment Category, Learning Skill and/or Department/Topic. These alone give a list of all comments that belong to that group. For example, selecting only “English” will give all the English comments (approx 300 comments). However selecting “Strengths” and “English” will give all the English Strength comments (approx. 100 comments). You can also do keyword searches. Keyword searches look for any comment with the word in it. For example, searching ALL categories for the word “exam” will yield comments with the word “exams” in them as well as comments with “examine” in them; anything with “exam” in the description. You can use a limited Boolean search: “writing” AND “reading” will return only those comments with BOTH words (approx 6 comments), while “writing” OR “reading” will return those comments with EITHER ONE of the words (approx . 100 comments). “Writing” and NOT “French” will eliminate all French writing comments (there is only one!) The “Don’t Show Dups” check box is normally checked to eliminate duplicate comments. This may explain why you cannot find a particular comment number you may have used in the past. For example “Excellent overall Achievement” is duplicated 12 times in the comment bank: 2247, 2934, 3562, …, 6554, 7012! You can uncheck the “Don’t Show Dups” check box if you want to see all the duplicates.

E A S Y B U B B L E U S E R ’ S G U I D E
12 © Computer Science Department, Milliken Mills High School • 7522 Kennedy Road, Markham, Ontario L3R 9S5 Phone 905.477.0072 • Fax 905.477.6858 • [email protected] • http://access.mmhs.ca/easybubble
Favourites File You cannot give a comment to a student except if it is in your favourite file. You MUST create at least one favourite file. This will be a list of the comments that you can use for your students. This list can be as long as you like, however the longer it is the harder it is to use. This is the ONLY place in which you can modify, in anyway, the favourites list. The main idea is to find the comments you want in the main comment bank and then double click the comment. This moves the comment to the end of your favourite list. Once there, you can move or delete the comments in the favourites list. To move a comment, select the comment and hit the appropriate arrow to move it up or down in the list. To delete a comment, select it and hit the red X button.
If you click on the button a dash separator line will be inserted into the comment list below the currently selected comment (like any other comment, this separator can be moved as well). Collectively these buttons allow you to group and order the comments in the favourites file any way you want. Favourites File Handling New Favourites - This creates a new, blank favourites file. You may find it useful to create multiple favourite files for different classes that you teach. Open Favourites - This allows you to select an existing favourite file for modification. Add to Favourites - If you are working on a favourite file and do a normal “open” favourite file, you will be prompted to save the current file, then the file you open will replace that old file on the screen. The “Add to Favourites” will not replace the old list, but will add the comments of this file to what you have currently visible. This allows you to combine several files into a single large one if you wish or permit teachers to share their comment files and merge collective works together. Note: the favourites file also contains “initial values settings”. When you add favourites files together, the initial settings are those from the first file only. Save Favourites - This will save the favourites file with the same name it was opened with. SaveAs Favourites - This will save the favourites file with any name you give it. This is handy to create several favourite files, all with common comments. You can add to, modify and save each file individually. Print Favourites - This will print the favourites list (comment numbers and descriptions) to the default printer. Leaving Comment Selection - If you have opened or saved the favourites file (that is, if it has a name), the file will be automatically saved upon exit of this form.
E A S Y B U B B L E U S E R ’ S G U I D E
13 © Computer Science Department, Milliken Mills High School • 7522 Kennedy Road, Markham, Ontario L3R 9S5 Phone 905.477.0072 • Fax 905.477.6858 • [email protected] • http://access.mmhs.ca/easybubble
You can exit the form by closing the window, selecting File / Exit or by clicking In all cases you will be returned to the main Comment Entry form.

E A S Y B U B B L E U S E R ’ S G U I D E
14 © Computer Science Department, Milliken Mills High School • 7522 Kennedy Road, Markham, Ontario L3R 9S5 Phone 905.477.0072 • Fax 905.477.6858 • [email protected] • http://access.mmhs.ca/easybubble
EasyBubble – Comment/Mark Entry Details This is the main window. All other windows and actions are connected to this main window. Mode Before you can use this window you must create a favourites file (see Comment Selection Details) and establish your Initial Values Setup (see Initial Values Setup Details). Mode / Initial Values Setup or Mode / Comment Selection takes you to either of these forms. Open Favourites On the right side of the window is your favourites list. If you have not already done so, you should open a favourites file. It must be emphasized here that if you determine at some point that the favourite list is missing a comment or you want to change/ rearrange things in the list, you MUST do so in the Comment Selection window. That is the only place in which the favourite list can be modified.

E A S Y B U B B L E U S E R ’ S G U I D E
15 © Computer Science Department, Milliken Mills High School • 7522 Kennedy Road, Markham, Ontario L3R 9S5 Phone 905.477.0072 • Fax 905.477.6858 • [email protected] • http://access.mmhs.ca/easybubble
Class File Handling The second thing to do is to get a class of students. There are several possibilities. You could start a new class or you could open a class that you have previously created and saved. Creating a new class from SAS is exactly equivalent to getting a set of bubble sheets for the main office. If you select this you will see the Get New SAS file form (see Details section on this form). Once you select a class you will be returned to this main form with the student numbers and names for that class. Open an Existing Class File is something you may wish to do if you had previously saved a class file and now wish to continue working on it. You may Save the Class File at any point. The file is saved with an “.ebc” extension. Update Class File This feature is designed for a special situation and may never be used. This feature can only be used if you are at school. You will also note that it is impossible to ever add, delete or in any way change the student numbers or names in a class. (Just as is the case with paper bubble sheets.) Suppose you had used EasyBubble to eFile the marks at midterm for a class. Now suppose it is now the end of the semester. What are you to do? You can create a new class from SAS and that way you will have an accurate class list, OR you can open your old class from midterm and select the update class feature. This will automatically add or drop students and create a current accurate class for you, just as if you had started with a new class from SAS, BUT NOW you have all the old marks, comments and learning skills! Typically this will simplify your work greatly: the marks will of course change but many comments and learning skills may NOT!! ☺ The update feature WILL be run automatically EVERY time you eFile a class. If you forget to update an old file, it will be caught before you eFile, but it is best to do so BEFORE you enter marks, etc. Print a Class This will print the class, showing the student’s number, name, mark, comments with full descriptions and all the learning skills.

E A S Y B U B B L E U S E R ’ S G U I D E
16 © Computer Science Department, Milliken Mills High School • 7522 Kennedy Road, Markham, Ontario L3R 9S5 Phone 905.477.0072 • Fax 905.477.6858 • [email protected] • http://access.mmhs.ca/easybubble
Displaying the Class
Due to space restraints on the window itself, it is unfortunately not possible to show both the comments and learning skills at the same time. You can switch from seeing the comments to seeing the learning skills or the reverse by clicking Comments/Skills button. Comment mode:
Learning Skills mode
In this mode a legend is provided where the favourites list is:
Student Details The complete information for a student can be seen at the bottom of the screen by simply clicking on the student’s name. The display will also change as you enter information for a student.

E A S Y B U B B L E U S E R ’ S G U I D E
17 © Computer Science Department, Milliken Mills High School • 7522 Kennedy Road, Markham, Ontario L3R 9S5 Phone 905.477.0072 • Fax 905.477.6858 • [email protected] • http://access.mmhs.ca/easybubble
Entering the Information Initial Values
The initial values check box should be checked if you intend to use this feature as you enter marks. Mark Entry Though not necessary, it is easiest by far to enter ALL marks for all students at once. Click on the first students mark area, type the mark and hit enter. (You are prevented from entering invalid marks such as -5 or 123 or 6y7) After you hit enter, you are automatically positioned to enter the next student’s mark. As you enter marks, if the initial values check box is checked, initial values for the comments and learning skills will be entered for that mark if it is in a range defined in your initial values setup. Initial values only works if there are NO existing comments and the Learning skills are all 3’s (default values). Hence the reason for entering marks before comments. Comment Entry This is accomplished by the “pickup” and “stamp” method. To “pickup” a comment, click on a comment in the favourites list (or right-click on an existing comment of another student to pick-up) then left-click in the comment area for the student you wish to give the comment too. Though not required, the easiest method is to pickup a single comment and then stamp it onto all students who are deserving. Alternatively, you may pick up and stamp individual comments for one student and then move on to the next student. Learning Skill Entry This is accomplished by either right or left-clicking a learning skill. Right-click will increase the value from 2 to 3 to 4 and then back to 1. Left-click will decrease the value from 3 to 2 to 1 and back to 4. The ESL, IEP and ELD boxes are simply toggled on/off (blank/Y) by clicking. Note: You may set the entire class on/off by right/left clicking the heading on the top of the ESL, IEP or ELD column. Sorting Another completely unnecessary, but possibly useful feature is sorting. You may choose to sort the students alphabetically by names (default) or by descending marks. You may find this helps in comment and/or learning skill entry and increase your consistency of assessment. Whenever you save, open or eFile a class the sorting order is restored to alphabetically by name.

E A S Y B U B B L E U S E R ’ S G U I D E
18 © Computer Science Department, Milliken Mills High School • 7522 Kennedy Road, Markham, Ontario L3R 9S5 Phone 905.477.0072 • Fax 905.477.6858 • [email protected] • http://access.mmhs.ca/easybubble
eFiling the Class This is the entire point of Easybubble: to submit your marks and comments electronically. Efile is the process whereby the file that SAS can read is created. Please note: opening and saving a class file is PURELY for Easybubble and is in no way related to eFiling and SAS. You cannot say: “Oh I’ve created a class, entered all the information and saved the class and now I’m done.” NO, YOU ARE NOT! Until you eFile, you have done NOTHING of consequence. To efile a class, enter all the information for your class file and be sure that you are complete. Ensure that everything is correct. Then select eFile / Convert Class File to SAS Format. You MUST be at school to do this step. First the class will be updated and maybe new students will be added and others dropped (see Update Class File described earlier). If there are any changes, you must return to the Mark / Comment Entry window and check things out. Fix any omissions or problems. There may also be errors of omissions: such as missing a mark or having no comments. These will be flagged. In the case of any error, you can only return to the main Mark / Comment Entry and fix the problems. The eFiling process was NOT done. If there are no errors a complete class list with all information, including names, marks, comments, full descriptions and learning skills will be displayed. Check this listing over carefully. If you agree that it is correct, check the confirmation check box and then click on the efile button that appears. You have NOW successfully eFiled your marks! You should save your class for EasyBubble before exiting the program and submit this eFile “*.sas” file to your SAS Secretary using established school submission procedures.

E A S Y B U B B L E U S E R ’ S G U I D E
19 © Computer Science Department, Milliken Mills High School • 7522 Kennedy Road, Markham, Ontario L3R 9S5 Phone 905.477.0072 • Fax 905.477.6858 • [email protected] • http://access.mmhs.ca/easybubble

E A S Y B U B B L E U S E R ’ S G U I D E
20 © Computer Science Department, Milliken Mills High School • 7522 Kennedy Road, Markham, Ontario L3R 9S5 Phone 905.477.0072 • Fax 905.477.6858 • [email protected] • http://access.mmhs.ca/easybubble
Timelines for EasyBubble Use
SAS Secretary to prepare for mark reporting period by scheduling Mark Entry Sheet Printing from the Board and run 8-17 SAS Procedures online.
Teacher Site Administrator will copy these two files into designated school network folders to prepare EasyBubble for the current reporting cycle.
Teacher Site Administrator will also run the EasyBubble Comment Bank Updater Utility to update the EasyBubble categorized Comment database DBCommentBank.csv file, identifying all adds/deletes/edits to the Comment database.
Teachers, using EasyBubble on the school network or at home, generate their EB Class Lists, complete their Learning Skills and Comment Entries and eFile their courses. Email, Floppy Disk or the school’s network must be considered and a school standard adopted for transferring eFile EB courses to their SAS Secretary.
SAS Secretary is provided/acquires EasyBubble eFile course mark submissions from their teachers through an established procedure. This procedure could be followed throughout the mark reporting period (performed in batches) or as one large singular job at the end of the mark reporting cycle. Using the established procedure outlined in the SAS Manual 8-18, the SAS Secretary would import these files into SAS in lieu of using mark entry bubble sheets.
SAS Secretary creates two files from SAS using 8-17 Instructions. The Student Information MKBK and RCOMM Comment Files. These files are given to the Teacher Site Administrator.
Teacher Site Administrator and the designated EasyBubble Lead Mentor Teacher advise/mentor/instruct and generally provide local assistance to any teacher requiring assistance in using EasyBubble.

E A S Y B U B B L E U S E R ’ S G U I D E
21 © Computer Science Department, Milliken Mills High School • 7522 Kennedy Road, Markham, Ontario L3R 9S5 Phone 905.477.0072 • Fax 905.477.6858 • [email protected] • http://access.mmhs.ca/easybubble
Technical Details T E C H N I C A L D E T A I L S A B O U T T H E E A S Y B U B B L E P R O G R A M
EasyBubble is a compiled Visual Basic 6 program utilizing many of the standard components found within this development environment. If EasyBubble is to be run with Windows 9x operating systems, The Microsoft Visual Basic Runtime Libraries will have to be installed on the user’s computer(s).
If EasyBubble is to be run with Windows 2000/Me/XP operating systems, no prior installation of run time files are required as they are already incorporated into the operating system.
S C R E E N R E S O L U T I O N D E T A I L S A B O U T T H E E A S Y B U B B L E P R O G R A M
Do to the nature of the program and the desire to reduce the use of horizontal and vertical scrolling within the desktop of EasyBubble, a decision was made during its development that a minimum screen resolution of 1024 x 768 must be used in order to effectively be able to run EasyBubble from a computer.
Service Pack 6 for Visual Basic 6.0: Run-Time Redistribution Pack (vbrun60sp6.exe)
vbrun60sp6.exe is a self-extracting executable file that installs versions of the Microsoft Visual Basic run-time files required by all applications created with Visual Basic 6.0.
http://www.microsoft.com/downloads/details.aspx?FamilyId=7B9BA261-7A9C-43E7-9117-F673077FFB3C&displaylang=en

E A S Y B U B B L E U S E R ’ S G U I D E
22 © Computer Science Department, Milliken Mills High School • 7522 Kennedy Road, Markham, Ontario L3R 9S5 Phone 905.477.0072 • Fax 905.477.6858 • [email protected] • http://access.mmhs.ca/easybubble
T E C H N I C A L D E T A I L S A B O U T N E T W O R K I N S T A L L A T I O N / S E T U P
EasyBubble has been created to be used on a school network and/or a home computer. EasyBubble will virtually run off of a floppy diskette or USB key; but we recommend that it is installed properly onto a local harddrive or network volume and executed from there.
EasyBubble has a specific directory/folder structure that needs to be maintained in order to function.
Data Directory: This directory is used to store the EBStudentInfo.txt file which is the file obtained from the SAS 8-17 procedure. This file must be renamed to EBStudentInfo.txt in order to be detected and used by EasyBubble. The accuracy of this file is very important and the frequency and timing with which this file is generated and placed in a teacher accessible network folder is important to provide them access to the most current SAS Class enrolment data available.
Teacher Directory: This directory is used to store the EasyBubble.exe executable file along with the EBCommentBank.csv file. EasyBubble will not function without the EBCommentBank.csv file being located in the same directory as the executable file EasyBubble.exe. The EBCommentBank.csv file is a comma delimited file of the YRDSB Secondary Comments. This file can and should be updated once or twice per year and the Board can alter the comments contained in this bank from time to time. This EasyBubble Comment Bank file can be maintained (carefully) using Excel or (recommended) using our EasyBubble CommentBankEditor utility.
E F I L E D E T A I L S R E L A T I N G T O E A S Y B U B B L E
EasyBubble has been equipped with numerous error checking and data integrity checks in order to ensure that the data files being prepared by teachers are accurate and synchronized with your school’s current SAS system data.
One of the ways that this is achieved is that EasyBubble’s eFile function will only work if the EBStudentInfo.txt file was created within three weeks of when the eFile function is being performed. This is an attempt to ensure that the SAS Export (Ref: 8-17) procedure was performed close to the reporting period and that the files used by the teachers are in fact the current ones.

E A S Y B U B B L E U S E R ’ S G U I D E
23 © Computer Science Department, Milliken Mills High School • 7522 Kennedy Road, Markham, Ontario L3R 9S5 Phone 905.477.0072 • Fax 905.477.6858 • [email protected] • http://access.mmhs.ca/easybubble
EasyBubble
Appendix A – EBCommentBank.csv The following table of values are used in assigning comments received from the YRDSB Secondary Comment Database. The EBCommentBank.csv file can be edited at any time and the classification of any comment may be altered by removing or adding any of the following single character category codes to the third field of any comment line.
1 Learning Skills - Initiative 2 Learning Skills - Organization 3 Learning Skills - Teamwork 4 Learning Skills - Work Habits 5 Learning Skills - Works Independently # Prevents Comment from being displayed within EasyBubble A Application B Business C Communication D Guidance E English F Absenteeism G Geography H History I Areas of Improvement J Arts K Knowledge/Understanding L Languages M Mathematics N Next Steps O Coop P Physical Education Q Final Summative Generic R Technical Studies S Strength T Thinking and Inquiry U Music V Visual Arts W Computer Studies X Science Y ESL Z Special Education

E A S Y B U B B L E U S E R ’ S G U I D E
24 © Computer Science Department, Milliken Mills High School • 7522 Kennedy Road, Markham, Ontario L3R 9S5 Phone 905.477.0072 • Fax 905.477.6858 • [email protected] • http://access.mmhs.ca/easybubble
EasyBubble
Appendix B – EBStudentInfo.txt This file is a flat text file that has been obtained from the SAS system. It is very important that this file created in a timely fashion. It is strongly recommended that this file be generated by your designated SAS Secretary in your Main office using existing instructions (Section 8-17 in the SAS Manual) that have already been established. This file should be generated at the same time that Mark Sense Mark Entry Scantron sheets would normally be requested from the Board. This would normally be within 3 weeks of a mark reporting period.
** There are two (2) different SAS procedures for generating reports of this kind. Each of these reports generates a distinctly different text file format; both formats are detectable and useable by EasyBubble.
It is very important that this file not be allowed to become stale and out of date. EasyBubble has some intelligence built-in to itself and may notify a user that the SAS Import File is out of date. This will prevent the eFile from running.
This file must be renamed to EBStudentInfo.txt and placed in the designated DATA directory in order that it can be used by EasyBubble. An example of the file format is included. This file can also be used by teachers to populate their MarkBook, Thinkwave, ClassMarks or other Marks Management Tool.
037-345-123,ALLEN, NADER , 315,86,08,02,M,(905)470-1234,AWE4M101 037-345-123,ALLEN, NADER , 315,86,08,02,M,(905)470-1234,BAT4M103 037-345-123,ALLEN, NADER , 315,86,08,02,M,(905)470-1234,BBB4M104 037-345-123,ALLEN, NADER , 315,86,08,02,M,(905)470-1234,ENG4C102 046-567-708,ALLUM, NOHA , 220,88,06,19,F,(905)470-4323,AWM2O101 046-567-708,ALLUM, NOHA , 220,88,06,19,F,(905)470-4323,CHC2P102 046-567-708,ALLUM, NOHA , 220,88,06,19,F,(905)470-4323,CHV2O109 046-567-708,ALLUM, NOHA , 220,88,06,19,F,(905)470-4323,ENG2P101 046-733-207,AMUL, SALLY ,222-P,86,06,16,F,(905)445-7866,AWD4M101 046-733-207,AMUL, SALLY ,222-P,86,06,16,F,(905)445-7866,AWE4M102 046-733-207,AMUL, SALLY ,222-P,86,06,16,F,(905)445-7866,AWQ4M101 046-733-207,AMUL, SALLY ,222-P,86,06,16,F,(905)445-7866,CGW4U102
"037345123","NADER","ALLEN","BAT4M1-03","M"," 315","86/08/02","905 470 1234","320","","" "037345123","NADER","ALLEN”,"BBB4M1-04","M"," 315","86/08/02","905 470 1234","295","","" "037345123","NADER","ALLEN”,"ENG4C1-02","M"," 315","86/08/02","905 470 1234","420","","" "037345123","NADER","ALLEN","PPL4O9-02","M"," 315","86/08/02","905 470 1234","045","","" "046567708","NOHA","ALLUM","AWM2O1-01","F"," 220","88/06/19","905 470 4323","405","","" "046567708","NOHA","ALLUM","CHC2P1-02","F"," 220","88/06/19","905 470 4323","173","","" "046567708","NOHA","ALLUM”,"CHV2O1-09","F"," 220","88/06/19","905 470 4323","020","","" "046567708","NOHA","ALLUM","SNC2P1-02","F"," 220","88/06/19","905 470 4323","170","","" "046733207","SALLY","AMUL","AWE4M1-02","F","222-P","86/06/16","905 445 7866","070","","" "046733207","SALLY","AMUL","CGW4U1-02","F","222-P","86/06/16","905 445 7866","340","","" "046733207","SALLY","AMUL","ENG4C1-02","F","222-P","86/06/16","905 445 7866","420","","" "046733207","SALLY","AMUL","TGJ3M1-03","F","222-P","86/06/16","905 445 7866","313","",""

E A S Y B U B B L E U S E R ’ S G U I D E
25 © Computer Science Department, Milliken Mills High School • 7522 Kennedy Road, Markham, Ontario L3R 9S5 Phone 905.477.0072 • Fax 905.477.6858 • [email protected] • http://access.mmhs.ca/easybubble
EasyBubble
Appendix C - SAS Instructions Through the efforts of the makers and Markbook, our SAS system has had some extra import and export routes added. These new routines facilitate the export of SAS student data from SAS into a text file that can be used by MarkBook and EasyBubble or any other mark management/submission tool that can interpret a text file of student data. These new routines also facilitate the import of student data from a mark management or submission tool back into SAS to replace the need for mark sense ScanTron style data entry.
Instructions to Export Data from SAS are outlined in section 8-17 of the SAS Manual.
Instructions to Import Data into SAS are outlined in section 8-18 of the SAS Manual.
Both 8-17 and 8-18 instruction sheets have been included as EasyBubble appendices. After having used these instruction sheets in testing, we decided to edit our versions contained in our appendices to improve the readability of these sheets.

E A S Y B U B B L E U S E R ’ S G U I D E
26 © Computer Science Department, Milliken Mills High School • 7522 Kennedy Road, Markham, Ontario L3R 9S5 Phone 905.477.0072 • Fax 905.477.6858 • [email protected] • http://access.mmhs.ca/easybubble
8-17 Downloading SAS data for Mark Management/Submission purposes There are two methods available to schools for downloading SAS data onto one’s desktop computer so that it may be used for import purposes into existing mark management or submission tools. One method is to use the RC Utility Menu in SAS to download data to your desktop, the other is to create a SWRG report to download to your desktop. The following steps will assist schools with either method. Prior to creating the download for the first time each year, ensure that you have run the RCActive/inactive (RC/2/2). Prior to downloading, schools must run the create/reassign Teacher and Room Catologues (SCHD/17/5). OPTION 1: Download to your desktop using SAS Export/Import 1. From the SAS main menu select RCUTIL/3 – Option 1 Data Extract -MarkBook/Locker Mgr. This will
extract the following data items; Student ID, Name, Course Code, Section number, Sex, Homeroom, Birth Date, Student phone number and Teacher number. At the prompt:
Have you run 'Create/Reassign Teacher and Room' function: Enter Y Export for MarkBook, Scheduling or Both (M/S/<B>): Enter M Marking Periods to Process <1> Enter the marking period to be processed. RC Status(es) to process <0,1>: Press <CR> to accept the default of 0,1 Range of Teachers (RETURN = ALL): Press <CR> to accept the default of ALL Do You Want to Run in Batch Mode [Y/N]: Press <CR> to accept the default of No At the sort fields, sort by NAME and ID and press <CR>; At the selective prompt, answer Yes; At the status prompt, enter the High and Low of A for Active students only. At “Bool”, enter ‘A’. The following files will be created:
RCMKBK_MPn_C.TXT - Where n is the marking period that was entered i.e.RCMKBK_MP1_c.TXT RCMKBK_COMM.TXT NOTE: The comment export file is created automatically.
2. Once the RCMKBK_MPn_C.TXT and RCMKBK_COMM.TXT files are created, they are ready to be
moved to a folder on your PC. (See Transferring the Data from SAS to PC below.) OPTION 2: Download a SWRG report
A SWRG report must be created that will be used to copy data from SAS to your desktop PC. For help creating a SWRG report contact the helpdesk, ext 4357 – option 2.
1. Generate the SWRG report (SWRG/3). NOTE: There is a SWRG report called MARKBOOK that can be copied from COMMON$ES:

E A S Y B U B B L E U S E R ’ S G U I D E
27 © Computer Science Department, Milliken Mills High School • 7522 Kennedy Road, Markham, Ontario L3R 9S5 Phone 905.477.0072 • Fax 905.477.6858 • [email protected] • http://access.mmhs.ca/easybubble
8-17 Downloading SAS data for Mark Management/Submission purposes
Transferring the data from SAS to PC
1. Run KEAterm from your desktop screen to transfer the SWRG report to a Personal Computer.
2. Log onto the school account HS_SCHOOLNAME. Where HS_SCHOOLNAME is the name of the school i.e., HS_THORNLEA.
3. Type EM to access e-mail, DT to access the document transfer menu then RV to receive a document from
VMS. At the prompt VMS File Name enter the full disk and directory name of the school account followed by the SWRG report filename, i.e.:
DISK??:[HBESNNNN.PRODCURR.MASTER]RCMKBK_MP1_C.TXT
ie DISK74:[HBESMILL:PRODCURR.MASTER]RCMKBK_MP1_C.TXT
Where ?? is the school's disk number and NNNN is the school's 4-digit code. i.e. MILL = Milliken Mills High School. The following prompt will be displayed:
Drawer: MAIN Folder: Enter MARKBOOK
Title: Enter a name i.e. RCMKBK_MPn (Where n is the marking period being extracted). NOTE: This procedure would be repeated to transfer RCMKBK_COMM as well.
When the file has been created, type EM to return to the E-Mail main menu. The file is now ready to be transferred from E-Mail to your PC.
Select the Transfer menu found on the upper menu bar in the KEAterm window, then click on E-Mail to PC. If the version of KEAterm that you are using does not have the option TRANSFER on the upper menu bar, your version of KEAterm needs to be upgraded. Contact the helpdesk at ext. 4357.
4. At the prompt:
Send as Filename: Enter a name i.e. RCMK or RCOMM. These are abbreviations of the names given in a
previous step. RCMK is shortened from RCMRBK_MP1 and RCOMM is RCMKBK_COMM. The names you use here can be your own. They are used to store these files on your PC.
Click on OK.
5. Once the transfer process stops and both files have been transferred (remember that you must repeat steps 3 and 4 again for the Comment file), logout of ALLIN1 and minimize your KEAterm window.
6. Double click on Windows Explorer or you’re My Computer desktop icon. Find and click on your
EMFOLDER (i.e. C:\EMFOLDER). You should find your newly transferred files from SAS located in this folder which are named according to the names you used in Step 4 (i.e. RCMK or RCOMM.)

E A S Y B U B B L E U S E R ’ S G U I D E
28 © Computer Science Department, Milliken Mills High School • 7522 Kennedy Road, Markham, Ontario L3R 9S5 Phone 905.477.0072 • Fax 905.477.6858 • [email protected] • http://access.mmhs.ca/easybubble
8-18 Uploading data to SAS for Mark Submission purposes Once teachers have entered marks, the electronic mark data can be placed into an export file and transferred back to SAS. Once this file is created, it is ready to be moved to SAS using a file transfer from PC to SAS using KeaTerm. Merging individual teacher records into a single file for importing into SAS.
1. A school must make some decisions on how electronic mark reporting data is to be collected. Teachers electing to use electronic mark reporting in lieu of using bubble sheets may e-mail these files; submit them on a disk or store them in a designated network folder on the school’s network. Whatever process works best for the school, all of these files need to be collected and copied into a designed folder in the SAS Secretary’s Office computer. They need to be stored in the same folder so that they can be merged into a single file using the “MarkBook Merge” utility.
NOTE: To obtain a copy of the MarkBook File Merge utility contact the helpdesk 4357.
2. Create a folder for each marking period at your school and keep these files (they are very small) as a historical
backup after the reporting period is complete. Information Technology Services suggests the following folder names: Mark Period Folder Name Marking Period 1 MP1 Marking Period 2 MP2 Marking Period 3 MP3 Marking Period 4 MP4
3. When teachers e-mail their data, save the attachment to the folder named after the marking period that is currently being dealt with. If teachers bring the file on a disk, drag the file to the correct folder. If you school uses a designated folder on the school network, files can be collected at designated times and transferred to SAS in batches. Once all the files are received from teachers it is time to merge all these files into one.
4. Run MarkBook Merge, which would need to be obtained and installed on the SAS secretary’s Office computer.
Within this utlity, navigate to the folder where the teachers’ mark files are stored. Click Continue .
NOTE: Through this document we will refer to MP? where MP? will represent the marking period being processed, i.e. MP1.
5. Go to the MP? Folder where you stored the teachers’ mark files then click on the MP? Button. Click Process. Check
the information box to see if any records were written to the error file. Click Finish.
6. If any errors are reported, they will be printed in the error file. Print and check RCERROR_MP?.LOG to view the records. Make a note of the course-secton information in order to inform the teachers affected that resubmission of their file(s) will be necessary or that manual keying will be required.
NOTE: The “Merge” only checks for errors such as missing ID numbers, ID’s less than 9 digits long, missing course
codes or codes less than 6-characters long and missing or non-numeric sectoin numbers. The SAS Import will do more thorough checking.

E A S Y B U B B L E U S E R ’ S G U I D E
29 © Computer Science Department, Milliken Mills High School • 7522 Kennedy Road, Markham, Ontario L3R 9S5 Phone 905.477.0072 • Fax 905.477.6858 • [email protected] • http://access.mmhs.ca/easybubble
8-18 Uploading data to SAS for Mark Submission purposes Transfer the merged file from the PC to SAS or load files individually
1. Using KEATerm, log onto the HS_Account. 2. Go to EM, click the Transfer option, then select PC to Email. 3. Select Single File and then click on the folder that contains the data to be transferred MP?. Click on the file to be
sent. A Kermit Transfer window will appear and you must now select the folder that contains all the files that were just merged. Once selected ensure that the file compression box does not have a tick in it and then click SEND.
4. Once the files are received from the workstation you must send it to VMS. This is done from the DT menu. 5. Select SV; Send a document to VMS. You will then be asked to enter a VMS File Name. Enter your disk and
directory i.e.
DISK??:[HBES????.PRODCURR.MASTER]RCDATA_MP?.DAT The ?? represents disk #, Shortname of School, and Marking period i.e. DISK74:[HBESMILL.PRODCURR.MASTER]RCDATA_MP3.DAT
Validating and importing the data
6. Validate the data submitted. (RC/4/3/2) At the prompt:
Name of MarkBook Import file: Enter RCDATA_MP?.DAT (Where ? is the current marking period.) Marking period to update Enter the current marking period Continue processing: Enter Y or N Add new Course to RCFILE: Enter N Update courses even if dropped in RC: Enter Y Update course moved to History: Enter N
Check RCDATA_MP?.ERR for errors and RCDATA_MP?.INF for a full explaination of the updating that will occur. (Where ? is the current marking period.)
7. Preview the data (RC/4/3/3). At the prompt:
Name of PC/MAC file to Preview: Enter RCDATA_MP? (Where ? is the current marking period.) Spot-check students to ensure that data looks correct and that it is going into the correct marking period.
8. Import the data by using Update RCFILE with data (RC/4/3/4). At the prompt:
Name of Import File: Enter RCDATA_MP? (Where ? is the current marking period.)
NOTE: For teachers who are not transferring marks electronically, mark entry scan sheets may still be used. Refer to
the mark reporting checklists for instructions on how to enter marks via Scanner (9.5.1) or manually (9.5.2).


![V9 series Troubleshooting / Maintenance Manual...V9 Series Reference Manual [1] Explains the functions and operation of the V9 series. 1065NE V9 Series Reference Manual [2] 1066NE](https://img.pdfslide.us/doc/110x75/5fdc0f46901d8161831e54dd/v9-series-troubleshooting-maintenance-v9-series-reference-manual-1-explains.jpg)