Embed Size (px)
Citation preview
PART NO. 3363575
Easy-To-UseAutomatic Washers
A Note to You............ 2
Washer Safety .......... 3
Parts and Features ... 4
Operating YourWasher ...................... 5
Caring for YourWasher .................... 11
Troubleshooting ...... 12
RequestingAssistance orService .................... 16
Index ....................... 17
Warranty ................. 20
TM
2
A NOTE TO YOUThank you for buying a WHIRLPOOL® appliance.Because your life is getting busier and more complicated, WHIRLPOOL appliances are easy to use, save time,and help you manage your home better. To ensure that you enjoy years of trouble-free operation, we developedthis Use and Care Guide. It is full of valuable information about how to operate and maintain your applianceproperly and safely. Please read it carefully.Also, complete and mail the Ownership Registration Card provided with your appliance. The card helps usnotify you about any new information on your appliance.
Please record your model’s information.Whenever you call to request service for your appli-ance, you need to know your complete model numberand serial number. You can find this information on themodel and serial number label (see the diagram on the“Parts and Features” page for the location of the label).Also, record the other information shown in the nextcolumn.
Keep this book and the sales slip together in a safe place for future reference.
Model Number __________________________________
Serial Number ___________________________________
Purchase Date __________________________________
Dealer Name ____________________________________
Dealer Address __________________________________
Dealer Phone ___________________________________
Our Consumer Assistance Center number is toll free. 1-800-253-1301To find detailed product information, the location of the nearest Whirlpool dealer or authorized servicer, to
purchase an accessory item, or register your appliance on-line, please visit our Web site atwww.WhirlpoolAppliances.com
3
IMPORTANT SAFETY INSTRUCTIONSWARNING – To reduce the risk of fire, electric shock, or injury to persons when usingthe washer, follow basic precautions, including the following:
•Read all instructions before using thewasher.
•Do not wash articles that have beenpreviously cleaned in, washed in, soakedin, or spotted with gasoline, dry-cleaningsolvents, other flammable, or explosivesubstances as they give off vapors thatcould ignite or explode.
•Do not add gasoline, dry-cleaning sol-vents, or other flammable, or explosivesubstances to the wash water. Thesesubstances give off vapors that couldignite or explode.
•Under certain conditions, hydrogen gasmay be produced in a hot water systemthat has not been used for 2 weeks ormore. HYDROGEN GAS IS EXPLOSIVE.If the hot water system has not been usedfor such a period, before using the wash-ing machine, turn on all hot water faucetsand let the water flow from each forseveral minutes. This will release anyaccumulated hydrogen gas. As the gasis flammable, do not smoke or use anopen flame during this time.
– SAVE THESE INSTRUCTIONS –
WASHER SAFETY
•Do not allow children to play on or in thewasher. Close supervision of children isnecessary when the washer is used nearchildren.
•Before the washer is removed from serviceor discarded, remove the door.
•Do not reach into the washer if the tub oragitator is moving.
•Do not install or store the washer where itwill be exposed to the weather.
•Do not tamper with controls.•Do not repair or replace any part of the
washer or attempt any servicing unlessspecifically recommended in this Use andCare Guide or in published user-repairinstructions that you understand and havethe skills to carry out.
•See Installation Instructions for groundingrequirements.
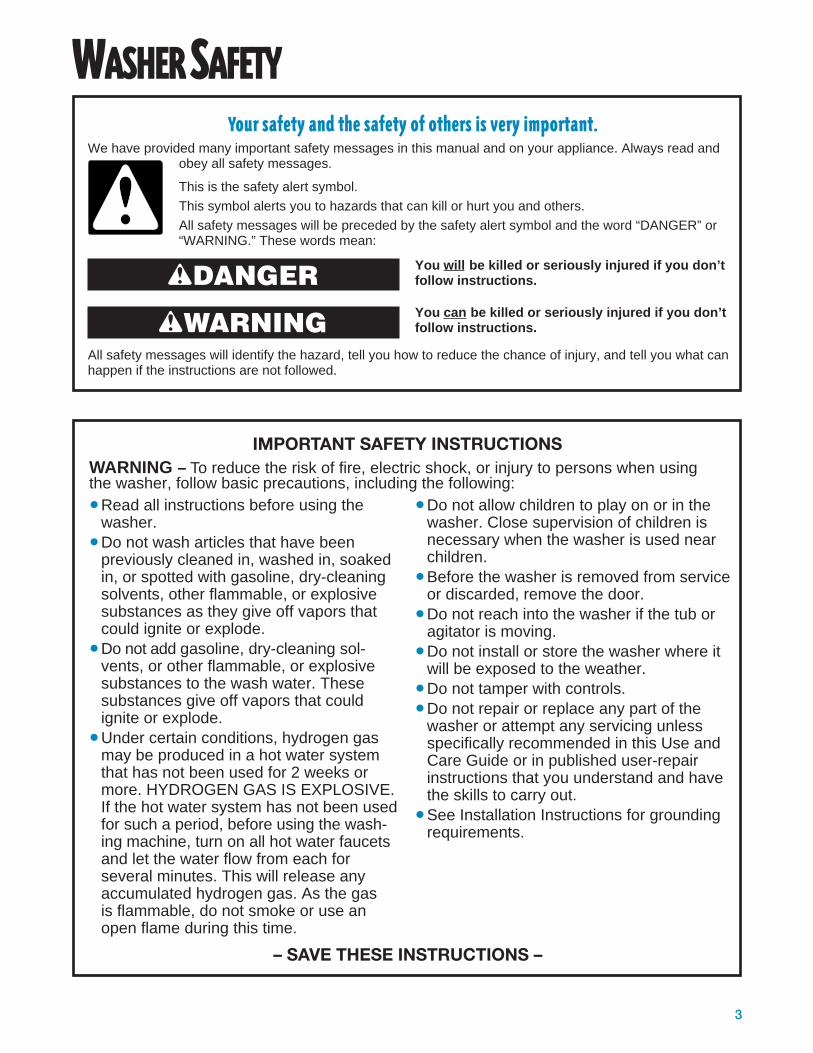
You will be killed or seriously injured if you don’tfollow instructions.
You can be killed or seriously injured if you don’tfollow instructions.
Your safety and the safety of others is very important.We have provided many important safety messages in this manual and on your appliance. Always read and
obey all safety messages.
This is the safety alert symbol.
This symbol alerts you to hazards that can kill or hurt you and others.
All safety messages will be preceded by the safety alert symbol and the word “DANGER” or“WARNING.” These words mean:
wDANGER
wWARNINGAll safety messages will identify the hazard, tell you how to reduce the chance of injury, and tell you what canhappen if the instructions are not followed.
4
Heavy
Cold
OnOnOff
Super Plus
Medium
Small
Quick Wash
Load Size
5Cycle 2 Speed Cycle Logic Laundry SystemLaundry System
Wash Temperature
ALL RINSES COLD
Extra Rinse
Normal
Quick Wash
Wrinkle ResistP. Press /
Pull to Start
Push to Stop
1-800-253-1301 ( In U
1-800-253-1301 ( In U.S.A.)
Consumer Assistance CenterAssistance Center
OFFSpinSpin
RinseRinse
36
OFF
OFF
OFF
OFF
OFF
OFF
SpinSpin
ExtraExtraRinseRinse
SpinSpin
RinseRinse
6915
SpinSpinExtraExtraRinseRinse SpinSpin
RinseRinse
CoolCoolDoDownwn
Pause69
69
SpinSpin
ExtraExtraRinseRinse
SpinSpin
RinseRinse
Heavy Duty Super Capacity
Super Wash / Heavy
Hand Washables
(Intermittent Agitate)
Delicates
Heavy SoilHeavy Soil
Towels / Wowels / Work Clothesork Clothes
WhitesSuper WSuper Wash / Heavy
HotNormalMixed ColorsMixed Colors
Heavy SoilHeavy Soil
Cottons / SheetsCottons / Sheets
Quick Wash1 or 2 Items1 or 2 Items
Light SoilLight Soil
Delicates / Hand WHand Washables
Colors that BleedColors that Bleed
Medium SoilMedium Soil
Lingerie/ KnitsLingerie/ Knits
WarmWrinkle Resist
Mixed Colors Mixed Colors
Medium SoilMedium Soil
Shirts/ BlousesShirts/ Blouses
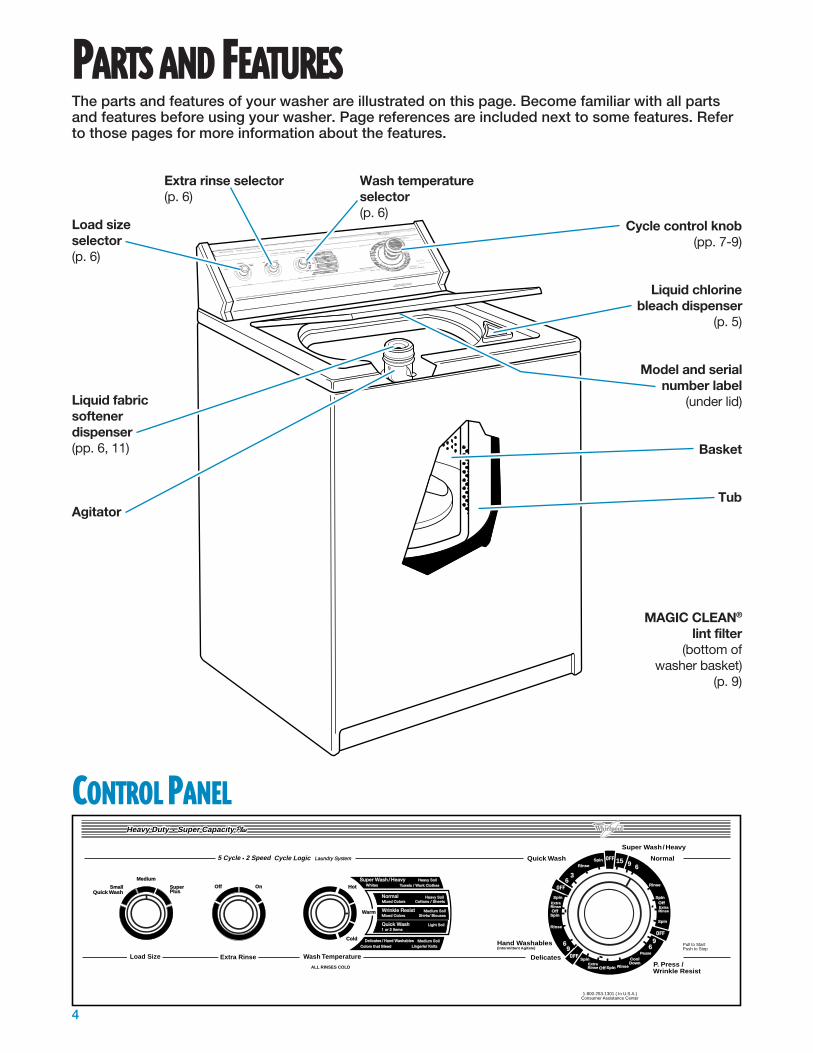
PARTS AND FEATURESThe parts and features of your washer are illustrated on this page. Become familiar with all partsand features before using your washer. Page references are included next to some features. Referto those pages for more information about the features.
Cycle control knob(pp. 7-9)
Liquid chlorinebleach dispenser
(p. 5)
Model and serialnumber label
(under lid)
Basket
Tub
Load sizeselector(p. 6)
Liquid fabricsoftenerdispenser(pp. 6, 11)
Agitator
MAGIC CLEAN®
lint filter(bottom of
washer basket)(p. 9)
Extra rinse selector(p. 6)
Wash temperatureselector(p. 6)
OnOffSuperSuperPlusPlus
MediumMedium
SmallSmallQuick Wash
Load Size
5 Cycle 2 Speed Cycle Logic Laundry System
Extra Rinse
1-800-253-1301 ( In U.S.A.)Consumer Assistance Center
Heavy Duty Super Capacity
Heavy SoilTowels / Work ClothesWhites
Super Wash / HeavyHot
NormalMixed Colors
Heavy SoilCottons / SheetsCottons / Sheets
Quick Wash1 or 2 Items
Light Soil
Delicates / Hand WashablesColors that BleedColors that Bleed
Medium SoilMedium SoilLingerie/ KnitsLingerie/ Knits
Cold
Warm Wrinkle ResistMixed Colors
Medium SoilMedium SoilShirts/ Blouses
Wash Temperature
ALL RINSES COLD
Super Wash / Heavy
NormalQuick Wash OFFSpinRinse
Hand Washables(Intermittent Agitate)
Delicates
Wrinkle ResistP. Press /
Pull to StartPush to Stop
36
OFF
OFF
OFF
Spin
ExtraRinse
SpinOff
Off
Off
Rinse
6915
SpinExtraRinse Spin Rinse
CoolDown
Pause
69
96
SpinExtraRinse
Spin
Rinse
CONTROL PANEL
5
To get the best washing results possible, you must use your washer correctly. This section tellsyou how to use your washer properly and efficiently.
USING YOUR WASHER
OPERATING YOUR WASHER
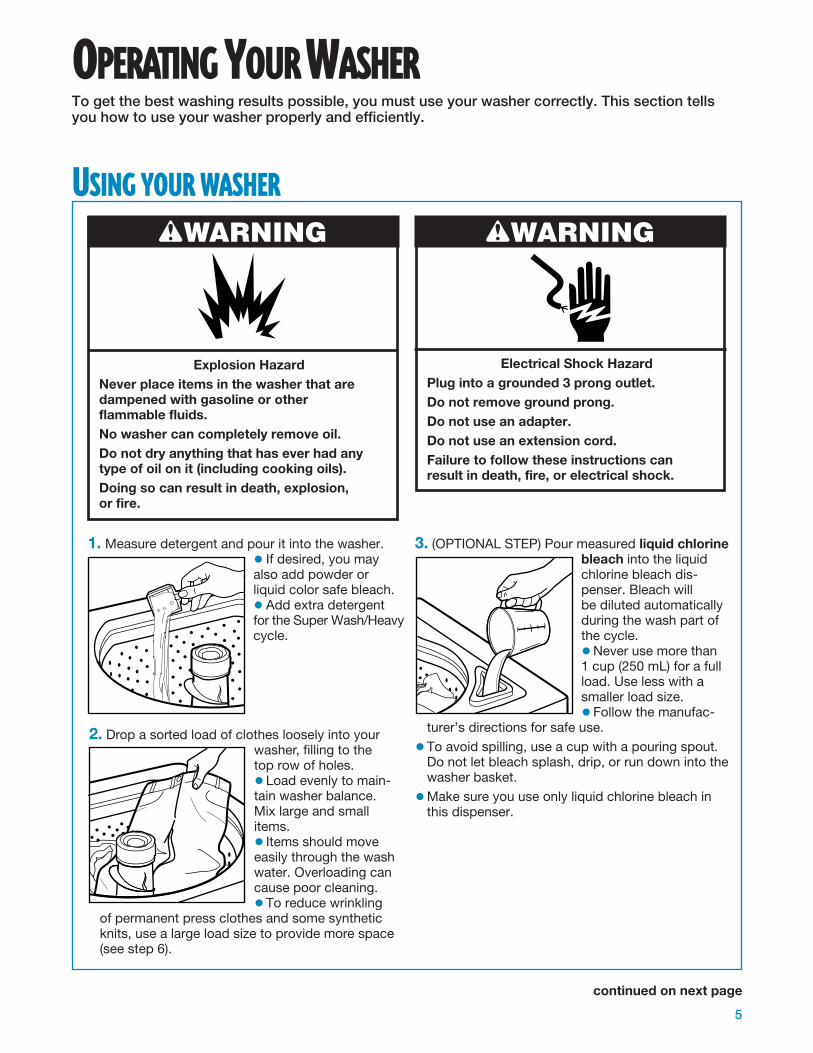
1. Measure detergent and pour it into the washer.• If desired, you mayalso add powder orliquid color safe bleach.• Add extra detergentfor the Super Wash/Heavycycle.
2. Drop a sorted load of clothes loosely into yourwasher, filling to thetop row of holes.•Load evenly to main-tain washer balance.Mix large and smallitems.• Items should moveeasily through the washwater. Overloading cancause poor cleaning.•To reduce wrinkling
of permanent press clothes and some syntheticknits, use a large load size to provide more space(see step 6).
continued on next page
3. (OPTIONAL STEP) Pour measured liquid chlorinebleach into the liquidchlorine bleach dis-penser. Bleach willbe diluted automaticallyduring the wash part ofthe cycle.•Never use more than1 cup (250 mL) for a fullload. Use less with asmaller load size.•Follow the manufac-
turer’s directions for safe use.
•To avoid spilling, use a cup with a pouring spout.Do not let bleach splash, drip, or run down into thewasher basket.
•Make sure you use only liquid chlorine bleach inthis dispenser.
wWARNING
Explosion HazardNever place items in the washer that aredampened with gasoline or otherflammable fluids.No washer can completely remove oil.Do not dry anything that has ever had anytype of oil on it (including cooking oils).Doing so can result in death, explosion,or fire.
wWARNING
Electrical Shock HazardPlug into a grounded 3 prong outlet.Do not remove ground prong.Do not use an adapter.Do not use an extension cord.Failure to follow these instructions canresult in death, fire, or electrical shock.
6
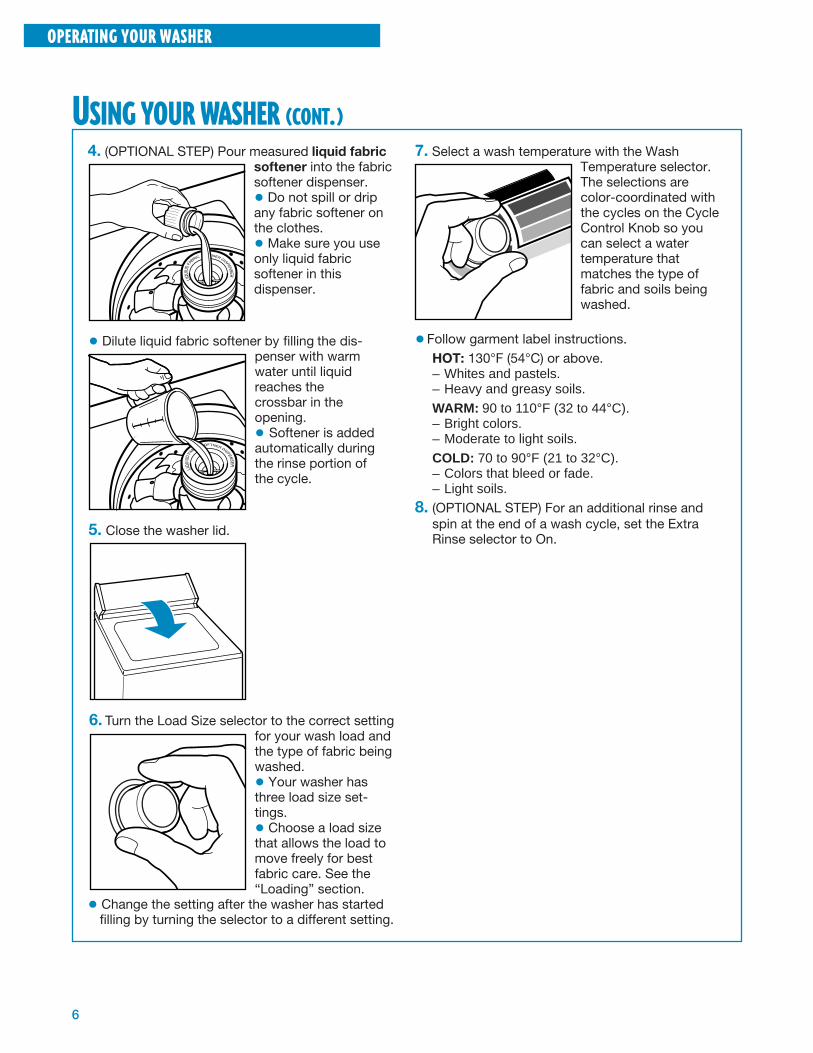
6. Turn the Load Size selector to the correct settingfor your wash load andthe type of fabric beingwashed.• Your washer hasthree load size set-tings.• Choose a load sizethat allows the load tomove freely for bestfabric care. See the“Loading” section.
• Change the setting after the washer has startedfilling by turning the selector to a different setting.
OPERATING YOUR WASHER
USING YOUR WASHER (CONT.)
4. (OPTIONAL STEP) Pour measured liquid fabricsoftener into the fabricsoftener dispenser.• Do not spill or dripany fabric softener onthe clothes.• Make sure you useonly liquid fabricsoftener in thisdispenser.
7. Select a wash temperature with the WashTemperature selector.The selections arecolor-coordinated withthe cycles on the CycleControl Knob so youcan select a watertemperature thatmatches the type offabric and soils beingwashed.
•Follow garment label instructions.HOT: 130°F (54°C) or above.– Whites and pastels.– Heavy and greasy soils.
WARM: 90 to 110°F (32 to 44°C).– Bright colors.– Moderate to light soils.
COLD: 70 to 90°F (21 to 32°C).– Colors that bleed or fade.– Light soils.
8. (OPTIONAL STEP) For an additional rinse andspin at the end of a wash cycle, set the ExtraRinse selector to On.
5. Close the washer lid.
• Dilute liquid fabric softener by filling the dis-penser with warmwater until liquidreaches thecrossbar in theopening.• Softener is addedautomatically duringthe rinse portion ofthe cycle.
7
OPERATING YOUR WASHER
USING YOUR WASHER (CONT.)
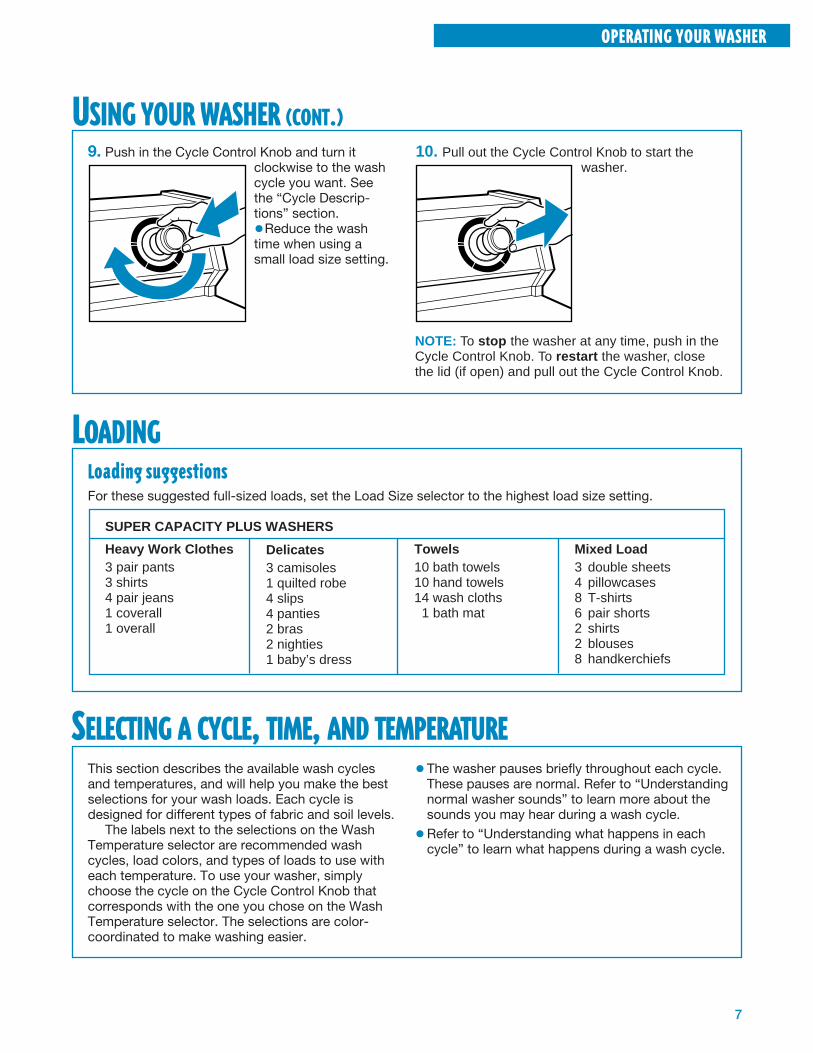
9. Push in the Cycle Control Knob and turn itclockwise to the washcycle you want. Seethe “Cycle Descrip-tions” section.•Reduce the washtime when using asmall load size setting.
10. Pull out the Cycle Control Knob to start thewasher.
NOTE: To stop the washer at any time, push in theCycle Control Knob. To restart the washer, closethe lid (if open) and pull out the Cycle Control Knob.
LOADINGLoading suggestionsFor these suggested full-sized loads, set the Load Size selector to the highest load size setting.
SUPER CAPACITY PLUS WASHERS
Heavy Work Clothes3 pair pants3 shirts4 pair jeans1 coverall1 overall
Towels10 bath towels10 hand towels14 wash cloths 1 bath mat
Mixed Load3 double sheets4 pillowcases8 T-shirts6 pair shorts2 shirts2 blouses8 handkerchiefs
Delicates3 camisoles1 quilted robe4 slips4 panties2 bras2 nighties1 baby’s dress
SELECTING A CYCLE, TIME, AND TEMPERATUREThis section describes the available wash cyclesand temperatures, and will help you make the bestselections for your wash loads. Each cycle isdesigned for different types of fabric and soil levels.
The labels next to the selections on the WashTemperature selector are recommended washcycles, load colors, and types of loads to use witheach temperature. To use your washer, simplychoose the cycle on the Cycle Control Knob thatcorresponds with the one you chose on the WashTemperature selector. The selections are color-coordinated to make washing easier.
•The washer pauses briefly throughout each cycle.These pauses are normal. Refer to “Understandingnormal washer sounds” to learn more about thesounds you may hear during a wash cycle.
•Refer to “Understanding what happens in eachcycle” to learn what happens during a wash cycle.
8
OPERATING YOUR WASHER
CYCLE DESCRIPTIONS
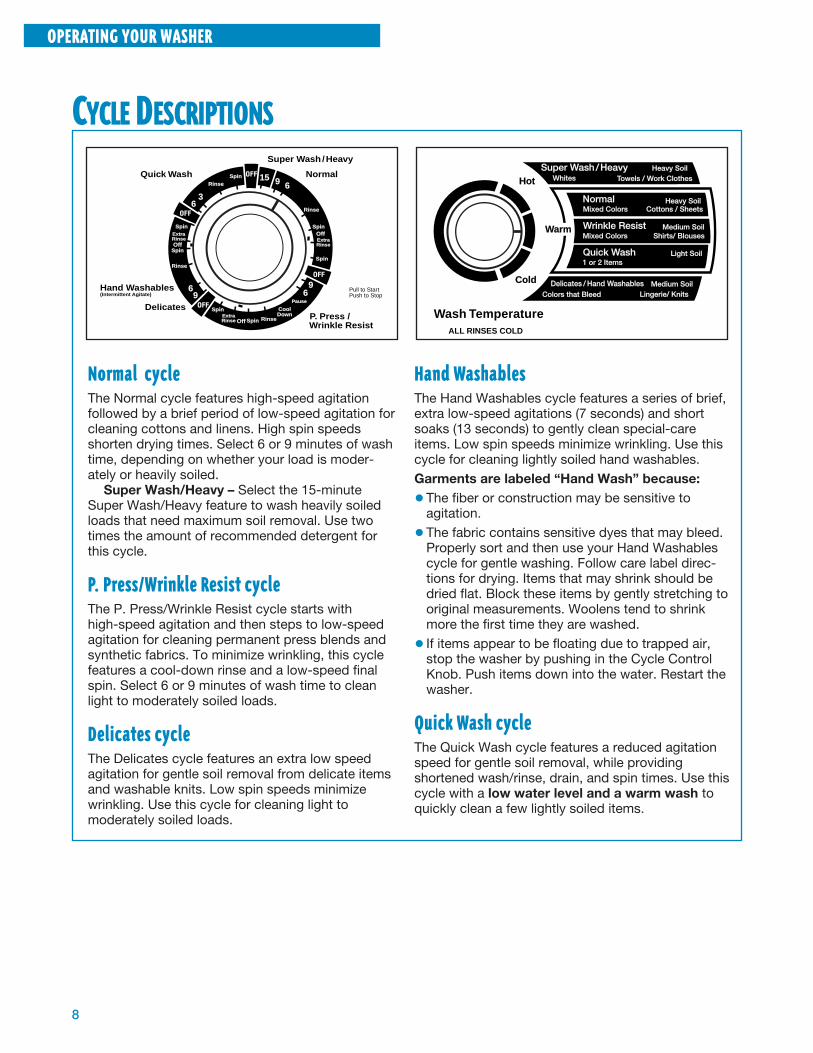
Hand WashablesThe Hand Washables cycle features a series of brief,extra low-speed agitations (7 seconds) and shortsoaks (13 seconds) to gently clean special-careitems. Low spin speeds minimize wrinkling. Use thiscycle for cleaning lightly soiled hand washables.Garments are labeled “Hand Wash” because:
•The fiber or construction may be sensitive toagitation.
•The fabric contains sensitive dyes that may bleed.Properly sort and then use your Hand Washablescycle for gentle washing. Follow care label direc-tions for drying. Items that may shrink should bedried flat. Block these items by gently stretching tooriginal measurements. Woolens tend to shrinkmore the first time they are washed.
• If items appear to be floating due to trapped air,stop the washer by pushing in the Cycle ControlKnob. Push items down into the water. Restart thewasher.
Quick Wash cycleThe Quick Wash cycle features a reduced agitationspeed for gentle soil removal, while providingshortened wash/rinse, drain, and spin times. Use thiscycle with a low water level and a warm wash toquickly clean a few lightly soiled items.
Normal cycleThe Normal cycle features high-speed agitationfollowed by a brief period of low-speed agitation forcleaning cottons and linens. High spin speedsshorten drying times. Select 6 or 9 minutes of washtime, depending on whether your load is moder-ately or heavily soiled.
Super Wash/Heavy – Select the 15-minuteSuper Wash/Heavy feature to wash heavily soiledloads that need maximum soil removal. Use twotimes the amount of recommended detergent forthis cycle.
P. Press/Wrinkle Resist cycleThe P. Press/Wrinkle Resist cycle starts withhigh-speed agitation and then steps to low-speedagitation for cleaning permanent press blends andsynthetic fabrics. To minimize wrinkling, this cyclefeatures a cool-down rinse and a low-speed finalspin. Select 6 or 9 minutes of wash time to cleanlight to moderately soiled loads.
Delicates cycleThe Delicates cycle features an extra low speedagitation for gentle soil removal from delicate itemsand washable knits. Low spin speeds minimizewrinkling. Use this cycle for cleaning light tomoderately soiled loads.
Super Wash / Heavy
NormalQuick Wash OFFSpinRinse
Hand Washables(Intermittent Agitate)
Delicates
Wrinkle ResistP. Press /
Pull to StartPush to Stop
36
OFF
OFF
OFF
Spin
ExtraRinse
SpinOff
Off
Off
Rinse
6915
SpinExtraRinse Spin Rinse
CoolDown
Pause
69
96
SpinExtraRinse
Spin
Rinse
Heavy SoilTowels / Work ClothesWhites
Super Wash / HeavyHot
NormalMixed Colors
Heavy SoilCottons / Sheets
Quick Wash1 or 2 Items
Light Soil
Delicates / Hand WashablesColors that Bleed
Medium SoilLingerie/ Knits
Cold
Warm Wrinkle ResistMixed Colors
Medium SoilShirts/ Blouses
Wash TemperatureALL RINSES COLD
9
OPERATING YOUR WASHER
RINSE/DRAIN AND SPINRinse and Spin featureWhen using extra detergent for heavily soiledclothes, or washing special-care items, you mayfind an extra rinse and spin is needed.
• For an additional rinse and spin, push in theCycle Control Knob and turn it clockwise to anyof the Rinse settings. The washer fills to theselected load size, agitates, drains, and spins.
NOTE: An Extra Rinse option is also available. See“Using your washer.”
Drain and Spin featureA drain and spin may help shorten drying times forsome heavy fabrics or special-care items by remov-ing excess water.
• For a drain and spin, push in the Cycle ControlKnob and turn it clockwise to any of the Spinsettings. Then pull out the Cycle Control Knob.The washer drains, then spins.
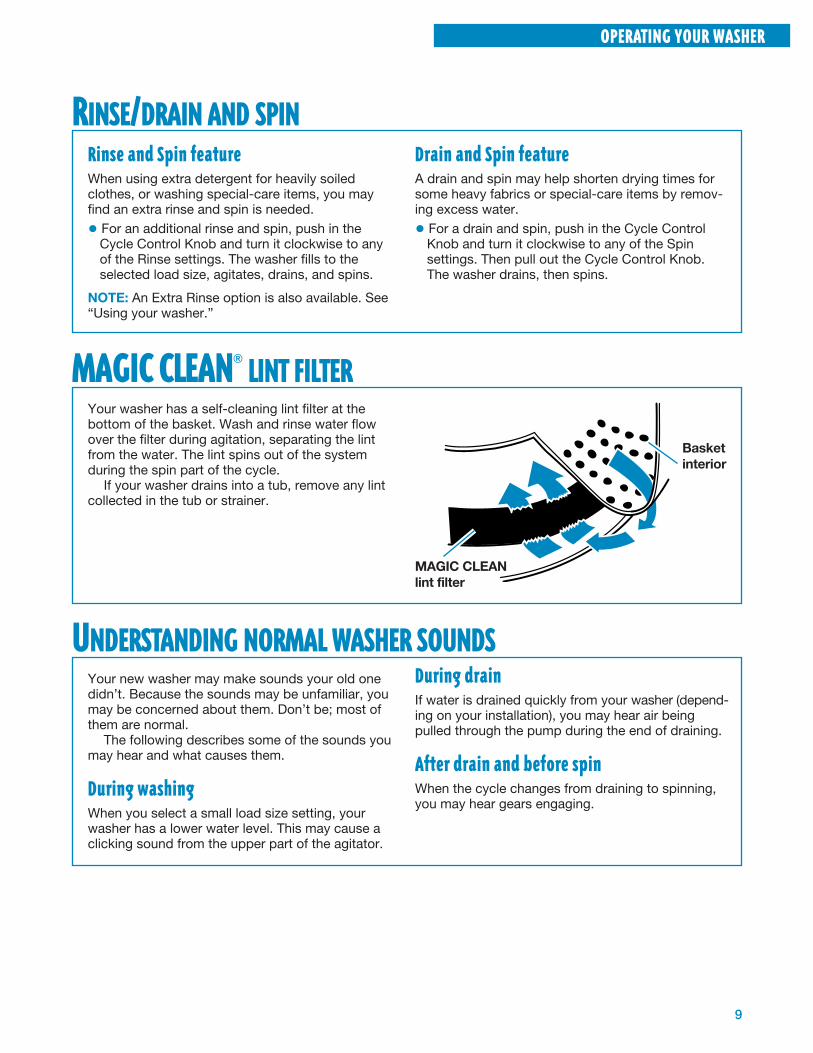
Your washer has a self-cleaning lint filter at thebottom of the basket. Wash and rinse water flowover the filter during agitation, separating the lintfrom the water. The lint spins out of the systemduring the spin part of the cycle.
If your washer drains into a tub, remove any lintcollected in the tub or strainer.
MAGIC CLEANlint filter
Basketinterior
MAGIC CLEAN® LINT FILTER
UNDERSTANDING NORMAL WASHER SOUNDSDuring drainIf water is drained quickly from your washer (depend-ing on your installation), you may hear air beingpulled through the pump during the end of draining.
After drain and before spinWhen the cycle changes from draining to spinning,you may hear gears engaging.
Your new washer may make sounds your old onedidn’t. Because the sounds may be unfamiliar, youmay be concerned about them. Don’t be; most ofthem are normal.
The following describes some of the sounds youmay hear and what causes them.
During washingWhen you select a small load size setting, yourwasher has a lower water level. This may cause aclicking sound from the upper part of the agitator.
OPERATING YOUR WASHER
10
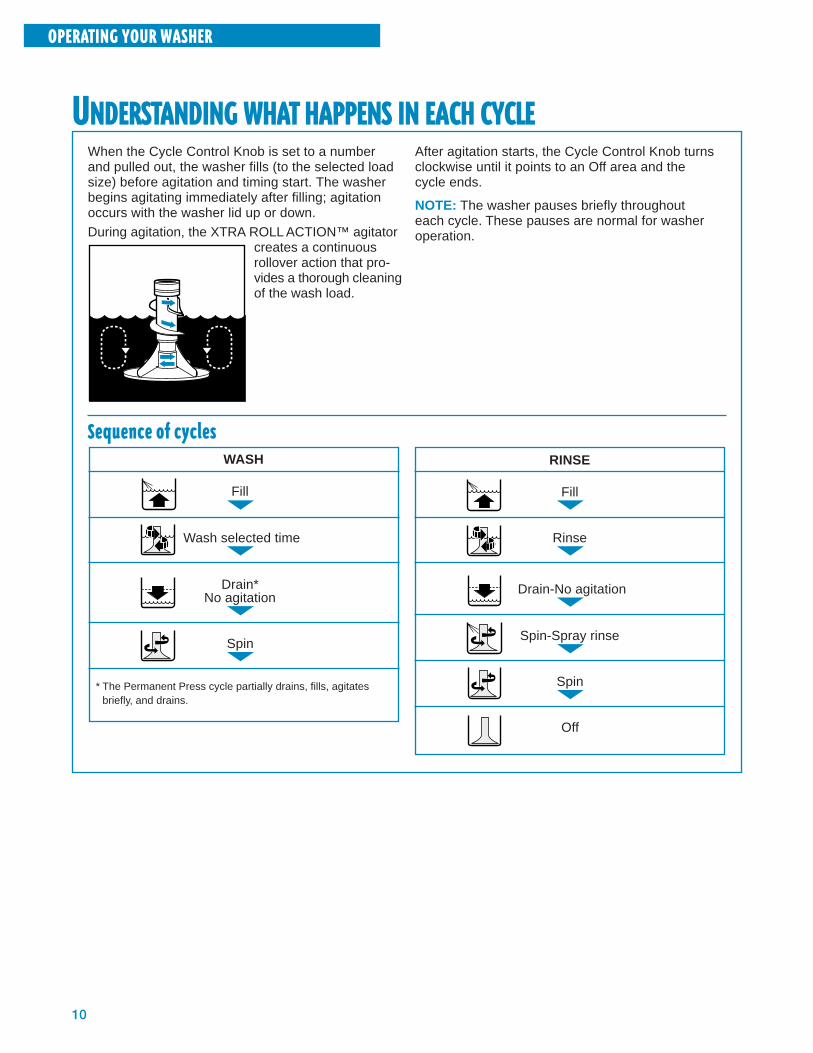
UNDERSTANDING WHAT HAPPENS IN EACH CYCLEWhen the Cycle Control Knob is set to a numberand pulled out, the washer fills (to the selected loadsize) before agitation and timing start. The washerbegins agitating immediately after filling; agitationoccurs with the washer lid up or down.
During agitation, the XTRA ROLL ACTION™ agitatorcreates a continuousrollover action that pro-vides a thorough cleaningof the wash load.
After agitation starts, the Cycle Control Knob turnsclockwise until it points to an Off area and thecycle ends.
NOTE: The washer pauses briefly throughouteach cycle. These pauses are normal for washeroperation.
Sequence of cycles
Fill▼
Rinse▼
Drain-No agitation▼
Spin-Spray rinse▼
Spin▼
Off
Fill▼
Wash selected time▼
Drain*No agitation
▼
Spin▼
WASH RINSE
* The Permanent Press cycle partially drains, fills, agitatesbriefly, and drains.
OPERATING YOUR WASHER
11
CARING FOR YOUR WASHERProper care of your washer can extend its life. This section explains how to care for your washerproperly and safely.
CLEANING YOUR WASHERCleaning the exteriorUse a soft, damp cloth or sponge to wipe up any
spills such as detergent or bleach.Occasionally wipe the outside ofyour washer to keep it looking new.
Cleaning the interiorClean your washer interior by mixing 1 cup (250 mL)of chlorine bleach and 2 cups (500 mL) of detergent.Pour this into your washer and run it through a com-plete cycle using hot water. Repeat this process ifnecessary.
NOTE: Remove any hard water deposits usingonly cleaners labeled as washer safe.
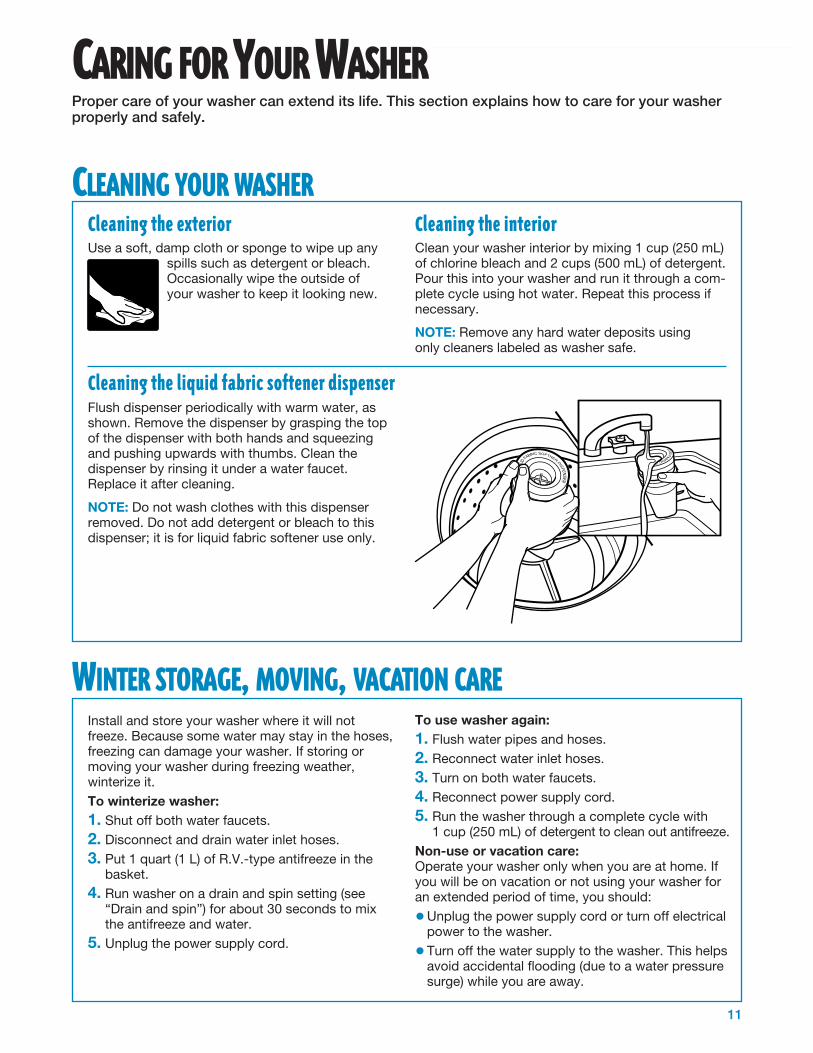
Cleaning the liquid fabric softener dispenserFlush dispenser periodically with warm water, asshown. Remove the dispenser by grasping the topof the dispenser with both hands and squeezingand pushing upwards with thumbs. Clean thedispenser by rinsing it under a water faucet.Replace it after cleaning.
NOTE: Do not wash clothes with this dispenserremoved. Do not add detergent or bleach to thisdispenser; it is for liquid fabric softener use only.
WINTER STORAGE, MOVING, VACATION CAREInstall and store your washer where it will notfreeze. Because some water may stay in the hoses,freezing can damage your washer. If storing ormoving your washer during freezing weather,winterize it.To winterize washer:1. Shut off both water faucets.2. Disconnect and drain water inlet hoses.3. Put 1 quart (1 L) of R.V.-type antifreeze in the
basket.4. Run washer on a drain and spin setting (see
“Drain and spin”) for about 30 seconds to mixthe antifreeze and water.
5. Unplug the power supply cord.
To use washer again:1. Flush water pipes and hoses.2. Reconnect water inlet hoses.3. Turn on both water faucets.4. Reconnect power supply cord.5. Run the washer through a complete cycle with
1 cup (250 mL) of detergent to clean out antifreeze.Non-use or vacation care:Operate your washer only when you are at home. Ifyou will be on vacation or not using your washer foran extended period of time, you should:
•Unplug the power supply cord or turn off electricalpower to the washer.
•Turn off the water supply to the washer. This helpsavoid accidental flooding (due to a water pressuresurge) while you are away.
12
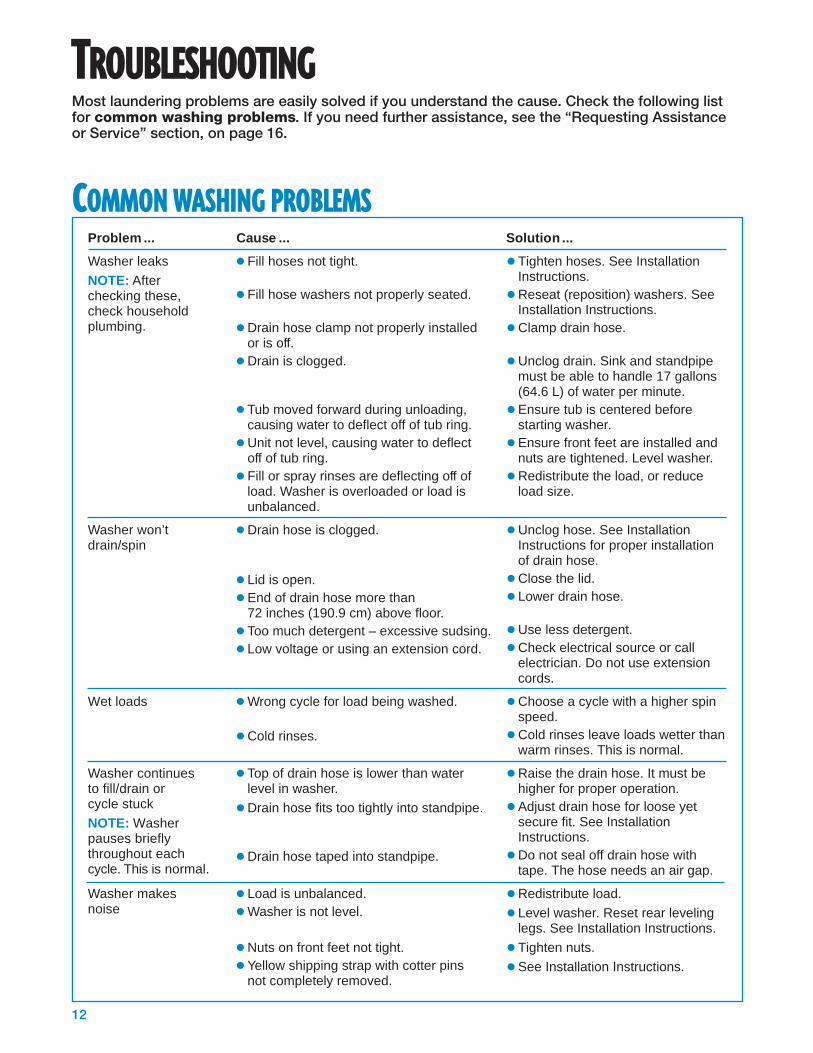
TROUBLESHOOTINGMost laundering problems are easily solved if you understand the cause. Check the following listfor common washing problems. If you need further assistance, see the “Requesting Assistanceor Service” section, on page 16.
COMMON WASHING PROBLEMSProblem ...
Washer leaks
NOTE: Afterchecking these,check householdplumbing.
Washer won’tdrain/spin
Wet loads
Washer continuesto fill/drain orcycle stuck
NOTE: Washerpauses brieflythroughout eachcycle. This is normal.
Washer makesnoise
Solution ...
•Tighten hoses. See InstallationInstructions.
•Reseat (reposition) washers. SeeInstallation Instructions.
•Clamp drain hose.
•Unclog drain. Sink and standpipemust be able to handle 17 gallons(64.6 L) of water per minute.
•Ensure tub is centered beforestarting washer.
•Ensure front feet are installed andnuts are tightened. Level washer.
•Redistribute the load, or reduceload size.
•Unclog hose. See InstallationInstructions for proper installationof drain hose.
•Close the lid.
•Lower drain hose.
•Use less detergent.
•Check electrical source or callelectrician. Do not use extensioncords.
•Choose a cycle with a higher spinspeed.
•Cold rinses leave loads wetter thanwarm rinses. This is normal.
•Raise the drain hose. It must behigher for proper operation.
•Adjust drain hose for loose yetsecure fit. See InstallationInstructions.
•Do not seal off drain hose withtape. The hose needs an air gap.
•Redistribute load.
•Level washer. Reset rear levelinglegs. See Installation Instructions.
•Tighten nuts.
•See Installation Instructions.
Cause ...
•Fill hoses not tight.
•Fill hose washers not properly seated.
•Drain hose clamp not properly installedor is off.
•Drain is clogged.
•Tub moved forward during unloading,causing water to deflect off of tub ring.
•Unit not level, causing water to deflectoff of tub ring.
•Fill or spray rinses are deflecting off ofload. Washer is overloaded or load isunbalanced.
•Drain hose is clogged.
•Lid is open.
•End of drain hose more than72 inches (190.9 cm) above floor.
•Too much detergent – excessive sudsing.
•Low voltage or using an extension cord.
•Wrong cycle for load being washed.
•Cold rinses.
•Top of drain hose is lower than waterlevel in washer.
•Drain hose fits too tightly into standpipe.
•Drain hose taped into standpipe.
•Load is unbalanced.
•Washer is not level.
•Nuts on front feet not tight.
•Yellow shipping strap with cotter pinsnot completely removed.

13
COMMON WASHING PROBLEMS (CONT.)
Solution ...
• This is normal.
• This is normal.
• Plug in power cord.
• Turn timer knob to the rightslightly and pull to start.
• Clean screens.
• Turn on water.
• Reverse hoses.
• Straighten hoses.
• Plug in power cord.
• Check electrical source or callelectrician.
• Replace fuse or reset circuitbreaker. If problem continues,call electrician.
• Do not use extension cords.
• Turn timer to the right slightlyand pull to start.
• Set and pull out knob.
• Allow cycle to continue.
• Wash smaller loads.
• This is normal.
• This is normal.
• This is normal.
• Push tub to center beforestarting.
• This is normal.
• Ensure front feet are installedand nuts tightened. Levelwasher. Reset rear leveling legs.See Installation Instructions.
Cause ...
• Gears engaging after drain andbefore spin.
• Upper part of agitator clicks during wash.
• Power cord not plugged in.
• Timer dial is not lined up.
• Water inlet valve screens are plugged.
• Water is turned off.
• Hot and cold hoses are reversed.
• Inlet hose is kinked.
• Power cord not plugged in.
• No power at plug.
• Fuse blown or circuit breaker open.
• Using an extension cord.
• Timer dial is not lined up.
• Timer knob not pulled out.
• Washer at pause in P. Press/WrinkleResist cycle (approximately 2 minutes).
• Machine is overloaded.
• The top of the agitator moves only in onedirection.
• The top of the agitator is loose.
• The top of the agitator is much higherthan the highest water level. This createsa perception of the washer not being full.
• Tub is pulled forward when unloading.
• Tub moves.
• Unit not level.
Problem ...
Washer makes noise(cont.)
Won’t fill/rinse/agitateor wrong temperature
Washer stops
Agitator operation
Water level seemstoo low or washernot completely filling
Washer tub is crooked
TROUBLESHOOTING
continued on next page

14
TROUBLESHOOTING
COMMON WASHING PROBLEMS (CONT.)
Solution ...
• Sort lint givers (towels, chenille) fromlint takers (corduroy, synthetics). Alsosort by color.
• Lint can be trapped in load if over-loaded. Wash smaller loads.
• Clean out pockets before washing.
• Use enough detergent to holdlint in water.
• Use wash water warmer than 70°F(21°C).
• Use wash water warmer than 70°F(21°C).
• Loads should move freely duringwash. Wash smaller loads.
• Do not pour chlorine bleach directlyon load. Wipe up bleach spills.Undiluted bleach will damage fabrics.
• Clean out pockets before washing.Zip zippers before washing.
• Mend rips and broken threads inseams before washing.
• Dilute fabric softener and add to rinseportion of cycle only. Do not dripfabric softener on clothes.
• Install an iron filter.
• Use enough detergent to remove soiland hold it in suspension.
• Sort dark clothing from whites andlights.
• Unload the washer as soon as itstops.
• Unload the washer as soon as itstops.
• Use the P. Press/Wrinkle Resist cycleor another cycle with low spin speedsto reduce wrinkling.
• Loads should move freely duringwash. Wash smaller loads.
• If safe for fabric, use warm or hotwash water. Use cold rinse water.
• Reverse hoses.
Cause ...
• Improper sorting.
• Overloading.
• Paper or tissue in pockets.
• Not enough detergent.
• Detergent not dissolving.
• Wash water colder than 70°F (21°C).
• Overloading. Improper use of washer.
• Improper use of chlorine bleach.
• Sharp items not removed from pockets;fasteners not fastened.
• Items damaged before washing.
• Improper use of fabric softener.
• Iron (rust) in water.
• Not enough detergent used, causing soilto be redeposited.
• Dye transfer due to not sorting loadsproperly.
• Dye transfer due to not unloadingwasher promptly.
• Not removing load promptly.
• Wrong cycle for fabrics being washed.
• Overloading.
• Wash water not warm enough to relaxwrinkles. Using warm rinses.
• Hoses reversed.
Problem ...
Residue or linton load
Tearing
Stains on load
Load is wrinkled
15
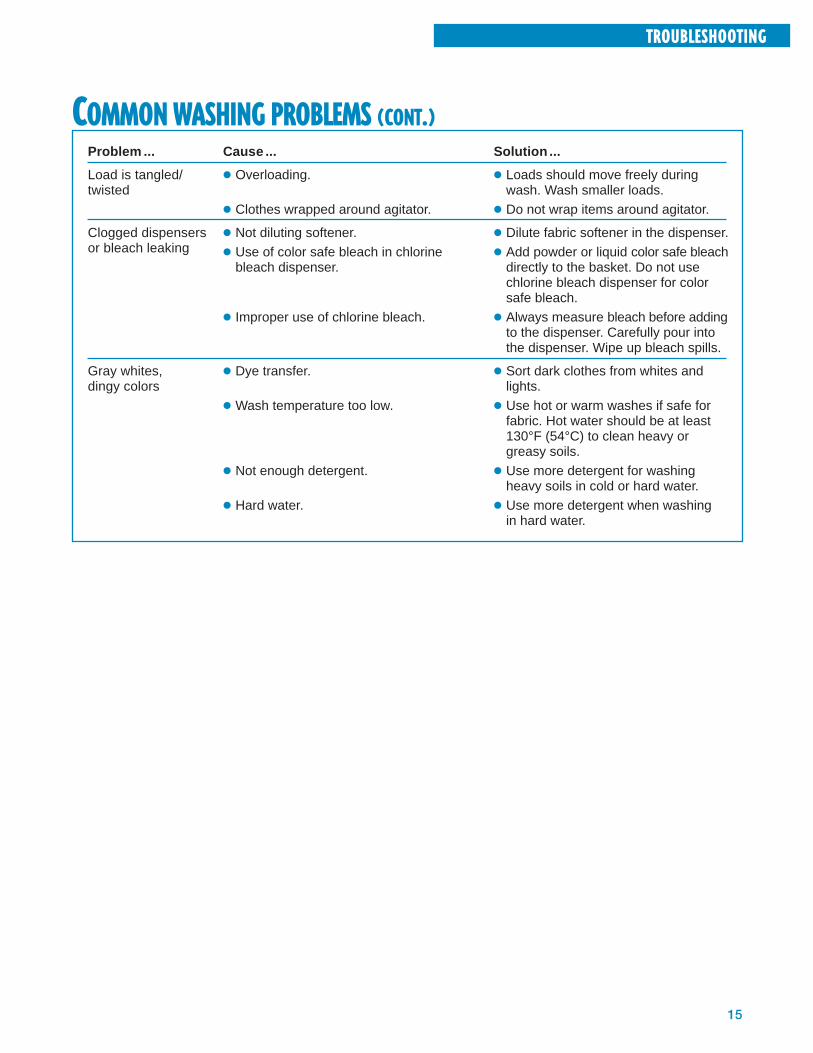
COMMON WASHING PROBLEMS (CONT.)
Problem ...
Load is tangled/twisted
Clogged dispensersor bleach leaking
Gray whites,dingy colors
Solution ...
• Loads should move freely duringwash. Wash smaller loads.
• Do not wrap items around agitator.
• Dilute fabric softener in the dispenser.
• Add powder or liquid color safe bleachdirectly to the basket. Do not usechlorine bleach dispenser for colorsafe bleach.
• Always measure bleach before addingto the dispenser. Carefully pour intothe dispenser. Wipe up bleach spills.
• Sort dark clothes from whites andlights.
• Use hot or warm washes if safe forfabric. Hot water should be at least130°F (54°C) to clean heavy orgreasy soils.
• Use more detergent for washingheavy soils in cold or hard water.
• Use more detergent when washingin hard water.
Cause ...
• Overloading.
• Clothes wrapped around agitator.
• Not diluting softener.
• Use of color safe bleach in chlorinebleach dispenser.
• Improper use of chlorine bleach.
• Dye transfer.
• Wash temperature too low.
• Not enough detergent.
• Hard water.
TROUBLESHOOTING
16
If you need to order replacement parts, we recom-mend that you only use FSP® factory authorizedparts. FSP replacement parts will fit right and workright, because they are made to the same exactingspecifications used to build every newWHIRLPOOL® appliance.
REQUESTING ASSISTANCE OR SERVICETo avoid unnecessary service calls, please check the “Troubleshooting” section. It may save youthe cost of a service call. If you still need help, follow the instructions below.
IF YOU NEED ASSISTANCE OR SERVICECall the Whirlpool Consumer Assistance Center
toll free at 1-800-253-1301. Ourconsultants are available toassist you.When calling:Please know the purchase date, and
the complete model and serial number of yourappliance (see “A Note to You” ). This informationwill help us better respond to your request.
Our consultants provide assistance with:
•Features and specifications on our full lineof appliances
• Installation information
•Use and maintenance procedures
•Accessory and repair parts sales
•Do-it-yourself repair help
•Specialized customer assistance (Spanish speak-ing, hearing impaired, limited vision, etc.)
•Referrals to local dealers, service companies, andrepair parts distributors.
Whirlpool service technicians are trained to fulfillthe product warranty and provide after-warrantyservice, anywhere in the United States.
To locate the authorized Whirlpool service companyin your area, you can also look in your telephonedirectory Yellow Pages.
IF YOU NEED REPLACEMENT PARTSTo locate FSP replacement parts in your area, callour Consumer Assistance Center telephone numberor your nearest authorized service center.
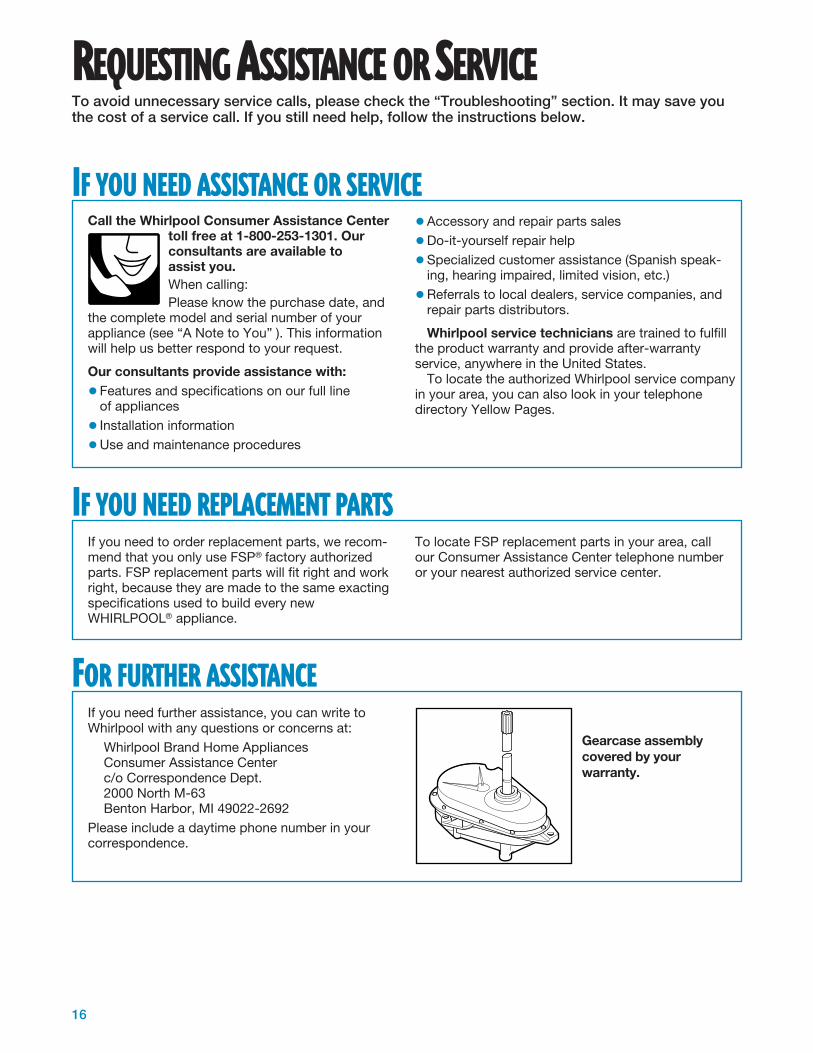
FOR FURTHER ASSISTANCEIf you need further assistance, you can write toWhirlpool with any questions or concerns at:
Whirlpool Brand Home AppliancesConsumer Assistance Centerc/o Correspondence Dept.2000 North M-63Benton Harbor, MI 49022-2692
Please include a daytime phone number in yourcorrespondence.
Gearcase assemblycovered by yourwarranty.
17
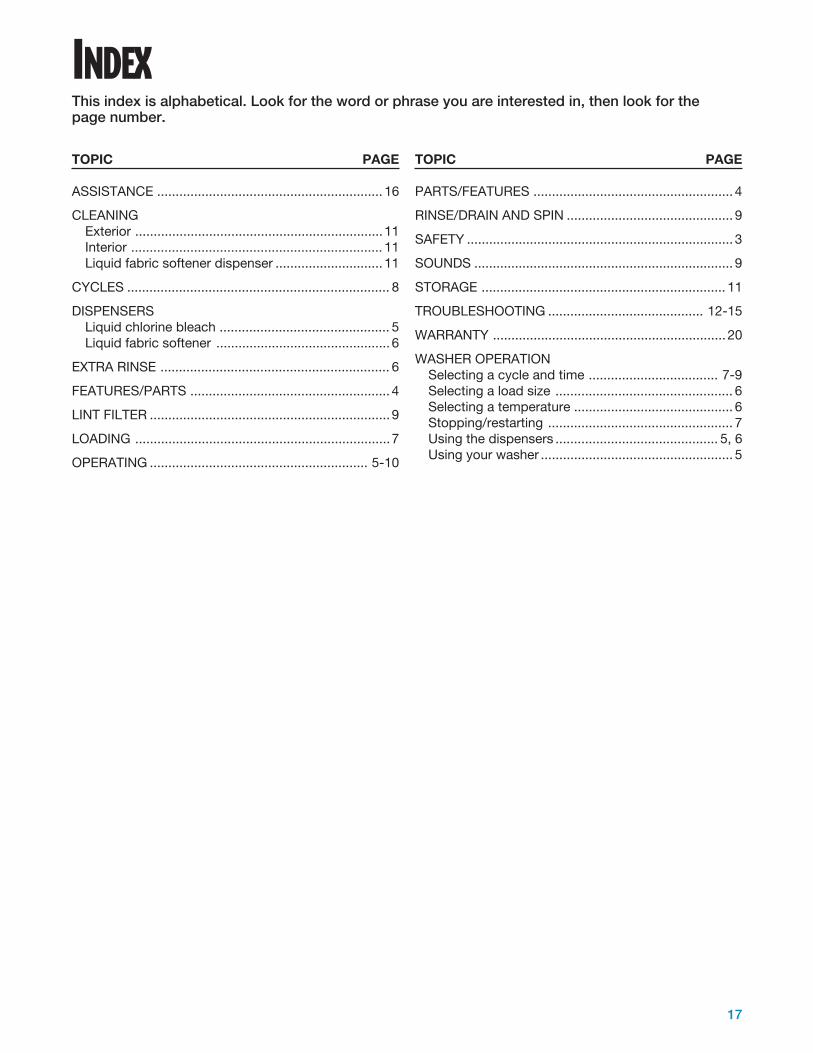
INDEXThis index is alphabetical. Look for the word or phrase you are interested in, then look for thepage number.
TOPIC PAGE
ASSISTANCE ............................................................. 16
CLEANINGExterior ...................................................................11Interior .................................................................... 11Liquid fabric softener dispenser ............................. 11
CYCLES ....................................................................... 8
DISPENSERSLiquid chlorine bleach .............................................. 5Liquid fabric softener ............................................... 6
EXTRA RINSE .............................................................. 6
FEATURES/PARTS ...................................................... 4
LINT FILTER ................................................................. 9
LOADING .....................................................................7
OPERATING ........................................................... 5-10
TOPIC PAGE
PARTS/FEATURES ...................................................... 4
RINSE/DRAIN AND SPIN ............................................. 9
SAFETY ........................................................................ 3
SOUNDS ...................................................................... 9
STORAGE .................................................................. 11
TROUBLESHOOTING .......................................... 12-15
WARRANTY ............................................................... 20
WASHER OPERATIONSelecting a cycle and time ................................... 7-9Selecting a load size ................................................ 6Selecting a temperature ........................................... 6Stopping/restarting .................................................. 7Using the dispensers ............................................ 5, 6Using your washer .................................................... 5

18
NOTES

19
NOTES
20
PART NO. 3363575© 1997 Whirlpool Corporation ® Registered Trademark/TM Trademark of Whirlpool, U.S.A.
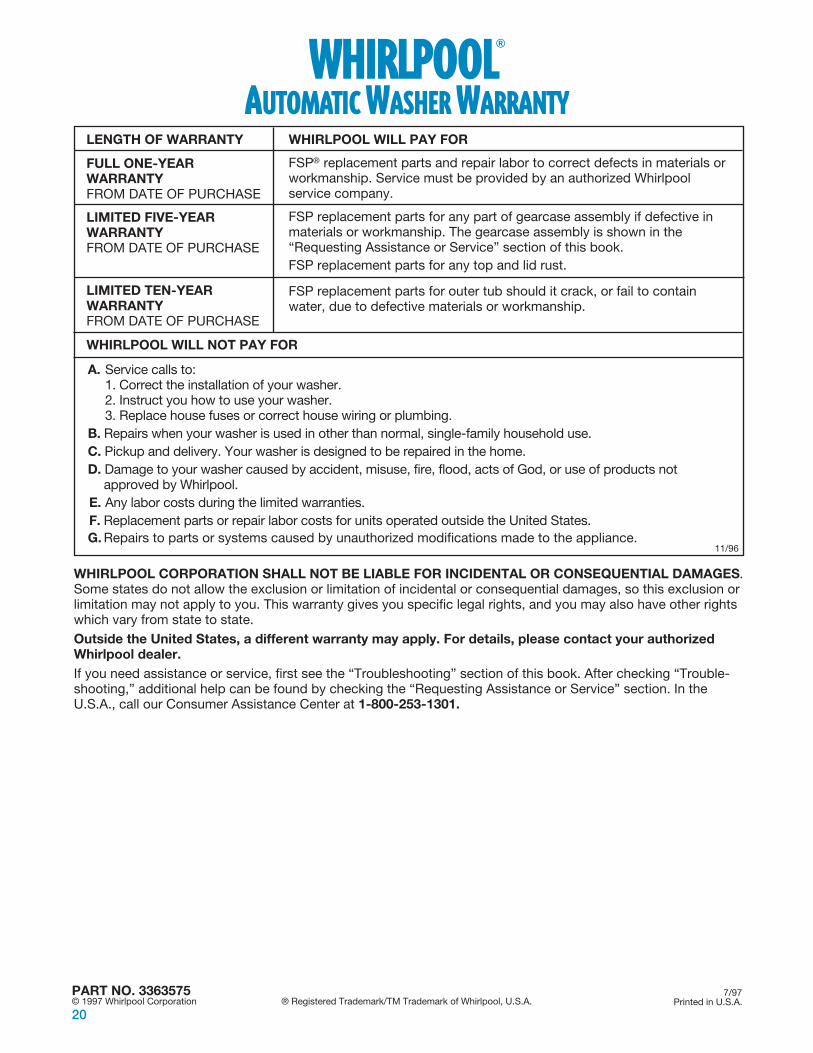
WHIRLPOOL CORPORATION SHALL NOT BE LIABLE FOR INCIDENTAL OR CONSEQUENTIAL DAMAGES.Some states do not allow the exclusion or limitation of incidental or consequential damages, so this exclusion orlimitation may not apply to you. This warranty gives you specific legal rights, and you may also have other rightswhich vary from state to state.Outside the United States, a different warranty may apply. For details, please contact your authorizedWhirlpool dealer.If you need assistance or service, first see the “Troubleshooting” section of this book. After checking “Trouble-shooting,” additional help can be found by checking the “Requesting Assistance or Service” section. In theU.S.A., call our Consumer Assistance Center at 1-800-253-1301.
WHIRLPOOL WILL NOT PAY FOR
A. Service calls to:1. Correct the installation of your washer.2. Instruct you how to use your washer.3. Replace house fuses or correct house wiring or plumbing.
B. Repairs when your washer is used in other than normal, single-family household use.C. Pickup and delivery. Your washer is designed to be repaired in the home.D. Damage to your washer caused by accident, misuse, fire, flood, acts of God, or use of products not
approved by Whirlpool.E. Any labor costs during the limited warranties.F. Replacement parts or repair labor costs for units operated outside the United States.G. Repairs to parts or systems caused by unauthorized modifications made to the appliance.
11/96
WHIRLPOOL®
AUTOMATIC WASHER WARRANTYWHIRLPOOL WILL PAY FOR
FSP® replacement parts and repair labor to correct defects in materials orworkmanship. Service must be provided by an authorized Whirlpoolservice company.
FSP replacement parts for any part of gearcase assembly if defective inmaterials or workmanship. The gearcase assembly is shown in the“Requesting Assistance or Service” section of this book.FSP replacement parts for any top and lid rust.
FSP replacement parts for outer tub should it crack, or fail to containwater, due to defective materials or workmanship.
LENGTH OF WARRANTY
FULL ONE-YEARWARRANTYFROM DATE OF PURCHASE
LIMITED FIVE-YEARWARRANTYFROM DATE OF PURCHASE
LIMITED TEN-YEARWARRANTYFROM DATE OF PURCHASE
7/97Printed in U.S.A.