Embed Size (px)
Citation preview

Easy Functions
Overview Easy Functions provides a means of creating customisations in SAP Business One without knowledge
of programming languages such as C# or Visual Basic .NET. Easy Functions has its own set of
instructions (Easy Function commands) that makes customisations a lot easier to implement than
using customize Optimizer.
Prerequisites SQL queries are at the core of Easy Functions – it is therefore necessary to know basic SQL to
implement Easy Functions.
Integration with customize Easy Functions is part of coresuite customize. It does not replace any existing functionality – it
extends the existing functionality. Depending on how an Easy Function is created, it automatically
creates an Optimizer rule of type Easy Function in the background that is responsible for triggering
the Easy Function rule.
Creating rules There are three different ways of creating Easy Function rules. Each method serves a different
purpose. These methods are described below.

,
Creating a rule from the customize menu
Easy Functions can be accessed from the customize menu (Administration -> Add-ons -> coresuite
customize -> Easy Functions).
Creating an Easy Function rule directly from the menu will not create an Optimizer rule and there
will therefore be no trigger to which the rule will react. This is useful if you want to create a
centralised rule that will be triggered from multiple Optimizer rules. In that case you can create
Optimizer rules and link them to the Easy Function rule. Another purpose of creating a rule this way
is if you want to call the rule from another Easy Function rule or by calling it from a C# Optimizer
rule.
Creating a rule from Optimizer
In Optimizer, there is a new rule type “Easy Function”. Please refer to Optimizer in the
documentation for how to create Optimizer rules.
By creating a rule from Optimizer you will define the trigger form/item and event that determines
when the rule will be executed.
.
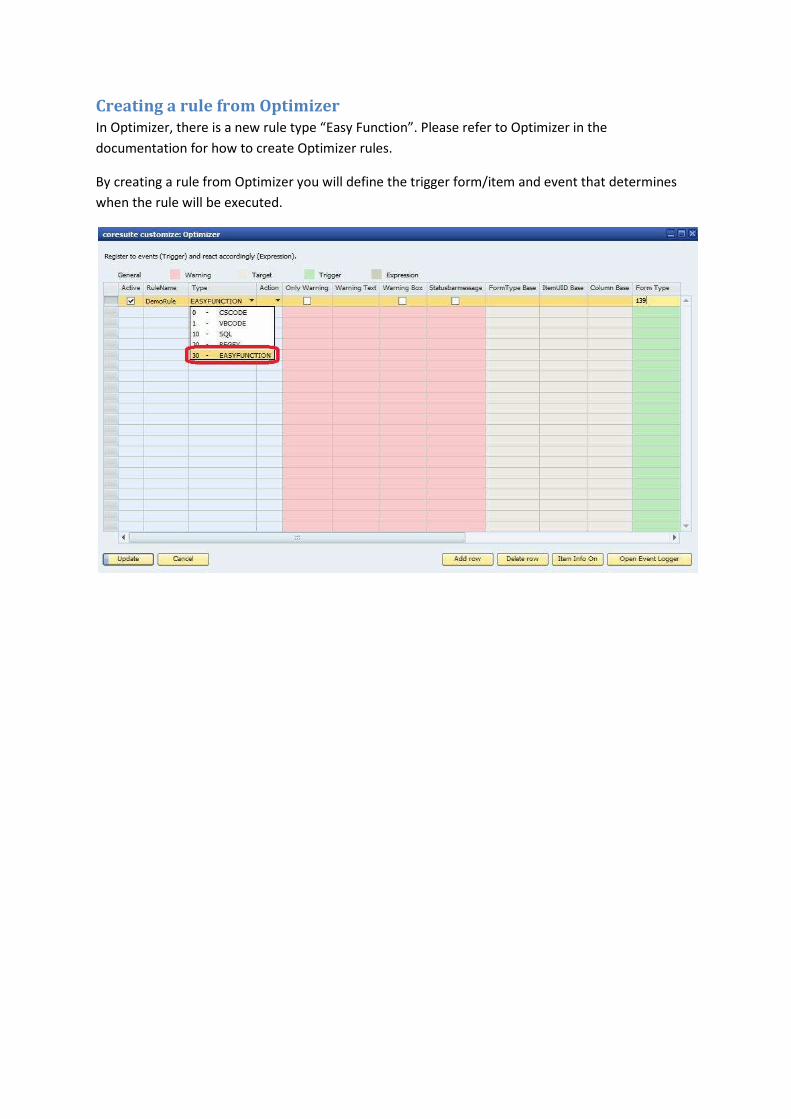
Creating a rule from a form (Validate)
Right-click a field on a form, select coresuite customize -> Validate. This will open up the Easy
Function user interface. When the rule is saved an Optimizer rule of type Easy Function is
automatically created to trigger the new Easy Function rule.
Creating an Easy Function rule this way is a shortcut to creating a rule from Optimizer. Some
additional fields will be available in the Easy Function interface when creating a validation rule for
settings triggers.

.
The Easy Function user interface
The Easy Function user interface consists of a general area where the name and description are set
and two tabs – “Query” and “Parameters and Functions”.
General area
In the general area, rule name and description are set:
Rule name: This is the name the rule is referred to elsewhere – in the Optimizer or other Easy
Function rules. The name is limited to 50 characters (letters, numbers and underscores are allowed).
The rule name must be unique – no two rules can have the same name.
Rule description: Any text up to 254 characters to describe the rule.

Query tab
The query consists of the following fields/buttons:
Template/Insert: This enables inserting predefined SQL query templates into the SQL Statement
field. Select a template and click the Insert button.
SQL Statement:
The query tab is used to determine which Conditions to execute. Conditions are described in the
next section (“Parameters and Functions tab”).
Advanced Editor:
Opens up the code editor that is used for Optimizer SQL rules. When saving the code in the
Advanced Editor the SQL Statement field is updated.
Query syntax
The SQL query in “SQL Statement” must return a scalar value. Any string is valid, for example
“Condition1”.

.
The query supports 2 different types of placeholders:
Formatted Search placeholders: These placeholders are the same as those used in the Business One
integrated Formatted Search functionality.
For a detailed explanation of formatted search placeholder syntax, please consult the Business One
documentation.
Formatted Search placeholders will be replaced with actual form data when the rule is executed.
Condition placeholders: Any string beginning with @@, e.g. @@Condition1 is used on the tab
“Parameters and Functions” to automatically insert condition names. This is not mandatory – it is
only provided as a convenience to the user.
.
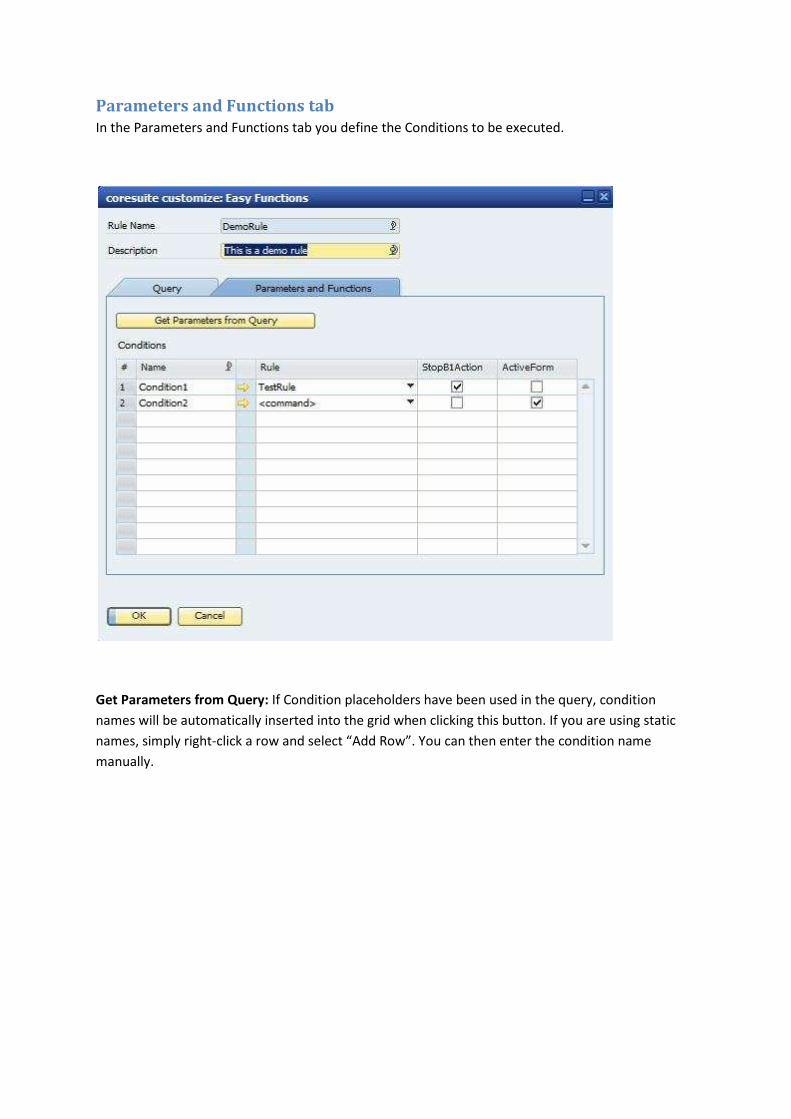
Parameters and Functions tab
In the Parameters and Functions tab you define the Conditions to be executed.
Get Parameters from Query: If Condition placeholders have been used in the query, condition
names will be automatically inserted into the grid when clicking this button. If you are using static
names, simply right-click a row and select “Add Row”. You can then enter the condition name
manually.

.
Conditions grid:
Any possible result from the query defined in the Query tab should have a corresponding entry in
the grid. When an Easy Function rule is executed, the condition to execute is determined by the
result of the query. If the query result is “Condition1”, the “Condition1” condition will be executed.
Name: The name of the condition.
Rule: This can be either an existing Easy Function rule or “<command>” which is a set of Easy
Function commands.
StopB1Action: After the condition has executed, any SAP actions that would normally run will be
aborted if this is ticket. This is relevant only if the corresponding Optimizer rule is defined to trigger
on the “Before Event”.
Active Form: When this is ticked, the form used for operations in the Easy Function commands is the
form that is currently active in Business One. When un-ticked, the trigger form is used.
Normally the result is the same. An example of an instance when it’s not is when a rule activates a
menu entry (menu click) in Business One. A new form would then be displayed. If Active Form is
selected, the newly opened form will be used for operations, whereas if un-ticked, the form that
triggered the rule would be used.
The link arrow: When clicking the link arrow, the associated rule will be opened if a rule rather than
“<command>” is selected in the Rule column. If “<command>” is selected, the Easy Functions code
editor will be displayed.

.
Command Editor
Clicking the arrow next to “<command>” opens the Command Editor:
Easy Function commands are entered in the command editor, one command per line. See next
section for a list of all supported commands.
Select Command: This combo box contains all supported Easy Function commands. When a
command is selected, it will be inserted at the cursor.

.
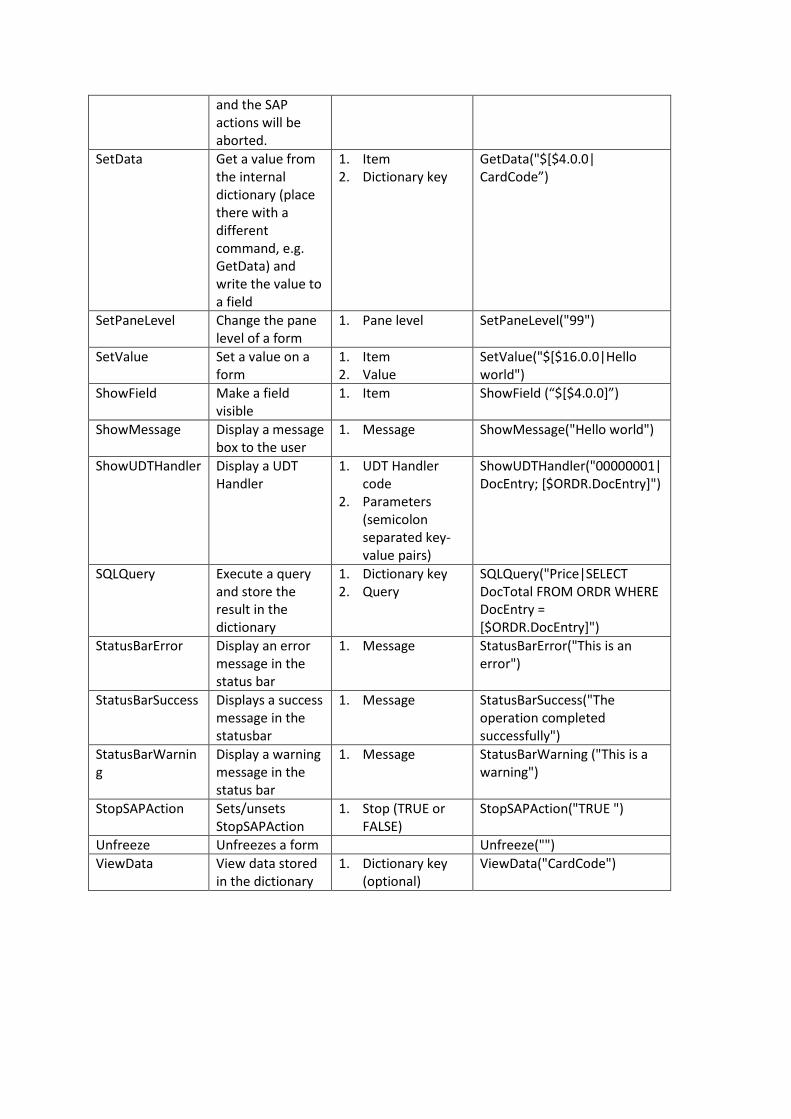
Easy Function commands
Command Description Arguments Example
CallFunction Execute another
Easy Function
1. FunctionName CallFunction(“TestFunction”)
Click Click on an item 1. Item Click(“$[$4.0.0]”)
ColorField Color a field 1. Item
2. Color
ColorField("$[$4.0.0]|Red")
ColorText Color the text of a
field
1. Item
2. Color
ColorText("$[$4.0.0]|Green")
DisableField Disable a field
(make it
readonly)
1. Item DisableField (“$[$4.0.0]”)
DoubleClick Double click on
an item
1. Item DoubleClick (“$[$4.0.0]”)
EnableField Enable a field
(make it
writeable)
1. Item EnableField (“$[$4.0.0]”)
ExecutePrintDef Execute a
coresuite
designer print
definition
1. PrintDefId or
code
2. OpenLayoutMod
e (supported
values are:
Print, Preview,
Email, Fax,
Word, Excel,
PDF, Design,
PrnAfterSave,
UserQuery)
3. Parameters
(semicolon
separated key-
valuepairs)
ExecutePrintDef("DocSalesOrd
er|Print|DocEntry;[$ORDR.Do
cEntry]")
Freeze Freeze the form Freeze(“”)
GetData Get a value for a
field on a form
and put it in an
internal
dictionary
1. Dictionary key
2. Item
GetData("CardCode|$[$4.0.0”
)
HideField Hide a field 1. Item HideField (“$[$4.0.0]”)
MenuClick Click on a menu
entry in the
Business One
menu
1. Menu Id MenuClick("257")
MessageQuestio
n
Displays a
messagebox with
Yes/No buttons. If
the user presses
“No”, the rule will
stop processing
1. Message MessageQuestion("Are you
sure?")
.
and the SAP
actions will be
aborted.
SetData Get a value from
the internal
dictionary (place
there with a
different
command, e.g.
GetData) and
write the value to
a field
1. Item
2. Dictionary key
GetData("$[$4.0.0|
CardCode”)
SetPaneLevel Change the pane
level of a form
1. Pane level SetPaneLevel("99")
SetValue Set a value on a
form
1. Item
2. Value
SetValue("$[$16.0.0|Hello
world")
ShowField Make a field
visible
1. Item ShowField (“$[$4.0.0]”)
ShowMessage Display a message
box to the user
1. Message ShowMessage("Hello world")
ShowUDTHandler Display a UDT
Handler
1. UDT Handler
code
2. Parameters
(semicolon
separated key-
value pairs)
ShowUDTHandler("00000001|
DocEntry; [$ORDR.DocEntry]")
SQLQuery Execute a query
and store the
result in the
dictionary
1. Dictionary key
2. Query
SQLQuery("Price|SELECT
DocTotal FROM ORDR WHERE
DocEntry =
[$ORDR.DocEntry]")
StatusBarError Display an error
message in the
status bar
1. Message StatusBarError("This is an
error")
StatusBarSuccess Displays a success
message in the
statusbar
1. Message StatusBarSuccess("The
operation completed
successfully")
StatusBarWarnin
g
Display a warning
message in the
status bar
1. Message StatusBarWarning ("This is a
warning")
StopSAPAction Sets/unsets
StopSAPAction
1. Stop (TRUE or
FALSE)
StopSAPAction("TRUE ")
Unfreeze Unfreezes a form Unfreeze("")
ViewData View data stored
in the dictionary
1. Dictionary key
(optional)
ViewData("CardCode")

.
Examples
Example rule: Validate price on sales order lines
Use case: When the user creates or updates a sales order, we want to validate the price. If the price
is below 10 we want to inform the user that the price is too low and cancel the SAP action (don’t let
the user leave the field until a higher price has been entered). Otherwise show a status bar message
that the price is good.
The quickest way to accomplish the task is to right-click the price field and select “Validate”. It would
also be possible to create an Optimizer rule of type Easy Function.

.
The Easy Function UI opens:
Note the Item and Event fields. These are only visible when creating a validation rule. Leave “Event”
at the default value “Validate”.
Type a name and description of the rule.
Next, select a template from the Template menu (SELECT...CASE) and click “Insert”.
Modify the query as follows:
SELECT CASE WHEN $[$38.14.Number] < 10 THEN '@@Condition1' ELSE '@@Condition2' END
$[$38.14.Number]: Item 38 is the matrix, 14 is the Price column and Number is used to get only the
numeric value without currency code.
@@Condition1 will be the condition to execute when the price is less than 10, otherwise
@@Condition2 will be executed.

.
The form will now look like this:

.
Click the “Parameters and Functions” tab.
Click “Get Parameters from Query”. This will insert two new conditions in the grid as defined in the
query (@@Condition1 and @@Condition2) without the leading @@ characters.
For both conditions, set Rule to “<command>”. Active Form can be left at the default (checked). This
doesn’t really matter as the Active Form is the same as the form that triggered the validation event.
So leaving them unchecked would have the same effect.
For Condition1, check StopB1Action. Since we want to abort the SAP Action if the Price < 10, this will
force the user to enter a price > 10, or the user will not be able to leave the field.
For Condition2, leave StopB1Action unchecked as it will execute only if the price >= 10.
Click the arrow next to Condition1 to edit the commands for the condition.
In the “Select Command” combo box, select “StatusBarError” and add a suitable error message:
StatusBarError("Price is too low!")
Click the arrow next to Condition2 to edit the commands for the condition.

.
In the “Select Command” combo box, select “StatusBarSuccess” and add a message:
StatusBarSuccess("Price is good!")
Save the rule.
Go to Administration -> Add-ons -> coresuite customize -> Optimizer.
A new Optimizer rule of type “EasyFunction” has been created to trigger our validation rule.
If you double click the row in Optimizer or click the “Edit” arrow, the validate rule will open.
Now let’s test the rule. Open the Sales Order form in add mode. Select a customer and add a new
item. Set the unit price to a value below 10:
When tabbing out of the field, an error message appears in the status bar:
Note that you won’t be able to leave the price field. It is still active. This is because we checked
“StopB1Action” on the condition.

.
Now, change the price to a value >= 10 and tab out of the field. The active field is now the next field
in the matrix and a new message appears in the status bar:
.
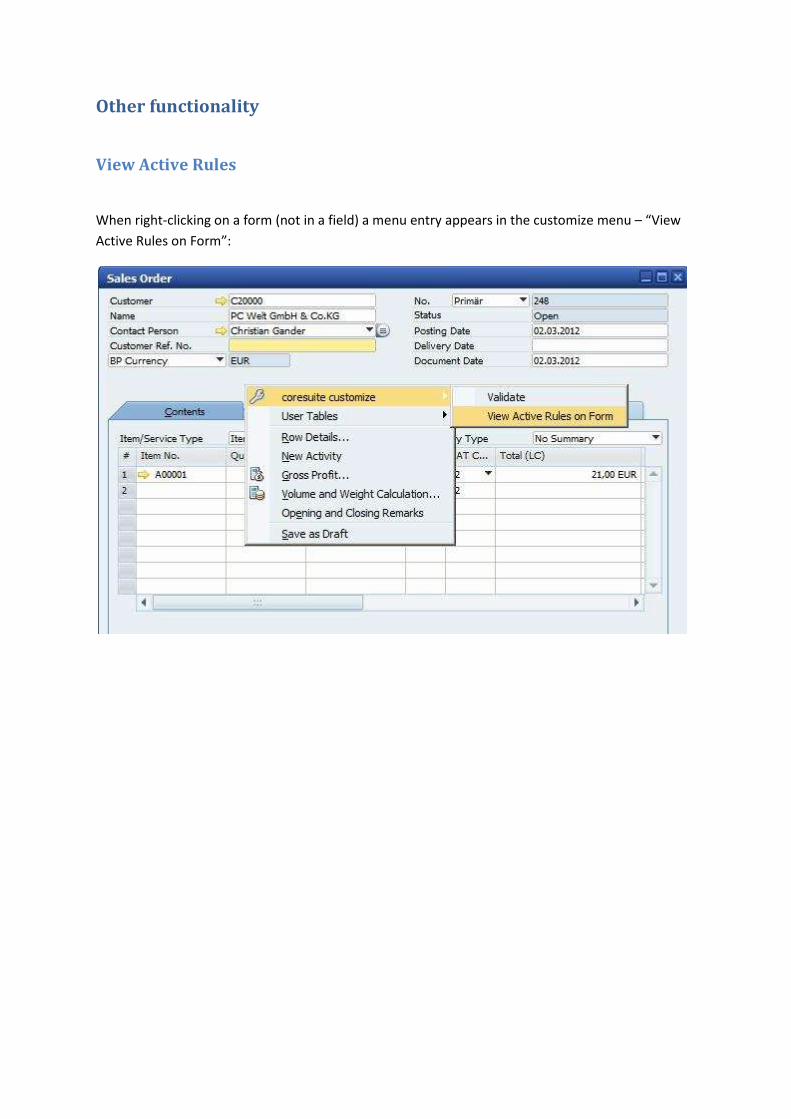
Other functionality
View Active Rules
When right-clicking on a form (not in a field) a menu entry appears in the customize menu – “View
Active Rules on Form”:

.
When activated, a form will appear displaying all customize rules that are linked to the form type:
ѓين
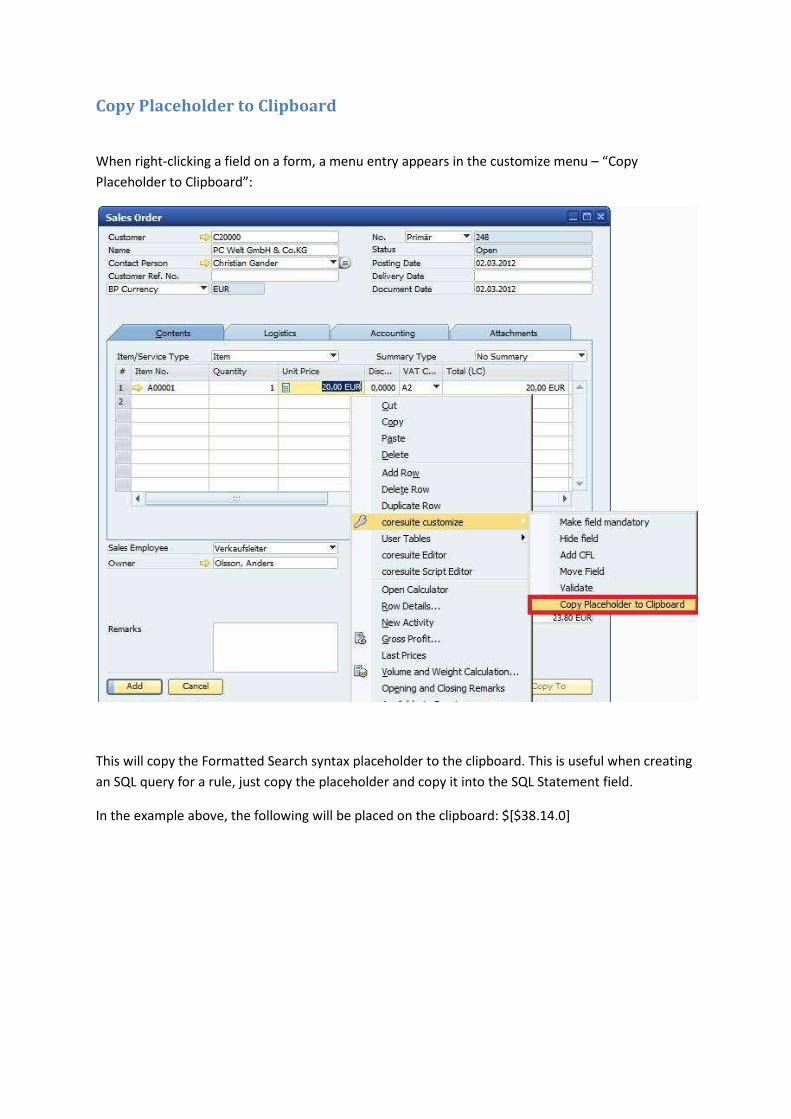
Copy Placeholder to Clipboard
When right-clicking a field on a form, a menu entry appears in the customize menu – “Copy
Placeholder to Clipboard”:
This will copy the Formatted Search syntax placeholder to the clipboard. This is useful when creating
an SQL query for a rule, just copy the placeholder and copy it into the SQL Statement field.
In the example above, the following will be placed on the clipboard: $[$38.14.0]