Embed Size (px)
Citation preview
Earth & Space Science
1
Earth & Space Science Expo Investigation Handbook
Activity Resources for Volunteers and Elementary School Teachers The “Earth & Space Science Expo Investigation Handbook” was created to assist volunteers with presenting science activities to the third-, fourth-, and fifth-grade students attending the annual Science Expo presented by the UC Davis Tahoe Environmental Research Center. The Science Expo is held annually each March and rotates between Earth & space science, life science and physical science thematic activities. Teachers scheduled to participate at this year’s annual Science Expo event may benefit by learning more about the science presented at the Science Expo for follow-up discussions and reflection with their students. The design and format of the handbook is as follows: Each page details a specific science investigation. Investigations are divided into three categories: Geology & Earth Science, Weather & Climate, and Space Science. Each investigation uniquely considers various aspects of Earth or space science including weather, air pressure, cloud formation, stream-modeling, groundwater modeling, geology, fossils, space science, and more. Activity descriptions include the learning objective or “Passport Question, “Materials List,” “Procedure,” and “Talking Points.” This handbook is designed to meet the intellectual needs of students enrolled in grades three through five as well as particular curricular standards that are determined and designated by Nevada and California departments of education. Procedures outlined in the “Earth and Space Science Expo Investigation Handbook” are for student use. Activities were gathered and described by Denise Tran (Geology & Earth Science), Gabe Griffiths (Climate & Weather) and Teagan Dolan (Space Science); AmeriCorps members with the UC Davis Tahoe Environmental Research Center. For other questions or comments, please contact Heather Segale, UC Davis Tahoe Environmental Research Center education and outreach director at [email protected] or 775-881-7562.

Earth & Space Science
2
[Page blank intentionally]
Earth & Space Science
3
Geology & Earth Science
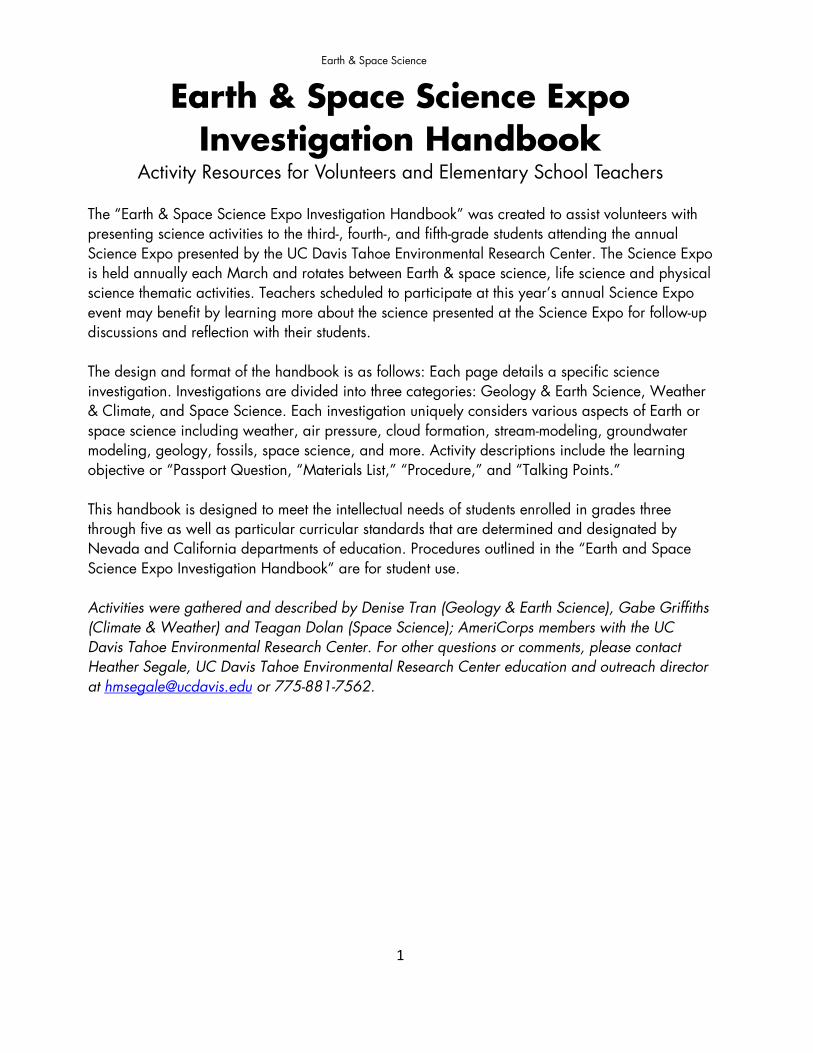
Just Around the Riverbend
Passport Question: Name three landforms created by water flowing over earth’s surface.
Passport Answer: Answers will vary (See Landforms Vocabulary)
Materials:
• Streambed Table Model (with variable flow valve) – EM river2
• Water • Bucket
Background:
• By looking at a stream model we can better understand how streams and rivers shape the Earth’s landscape.
• Water naturally flows downhill, but never in a straight channel. Erosion occurs and sediment is carried downstream.
• A stream is a body of water with a current, confined within a bed and stream banks. • Streams are important because they serve as conduits in the water cycle, instrument in
groundwater recharge, and corridors for fish and wildlife migration.
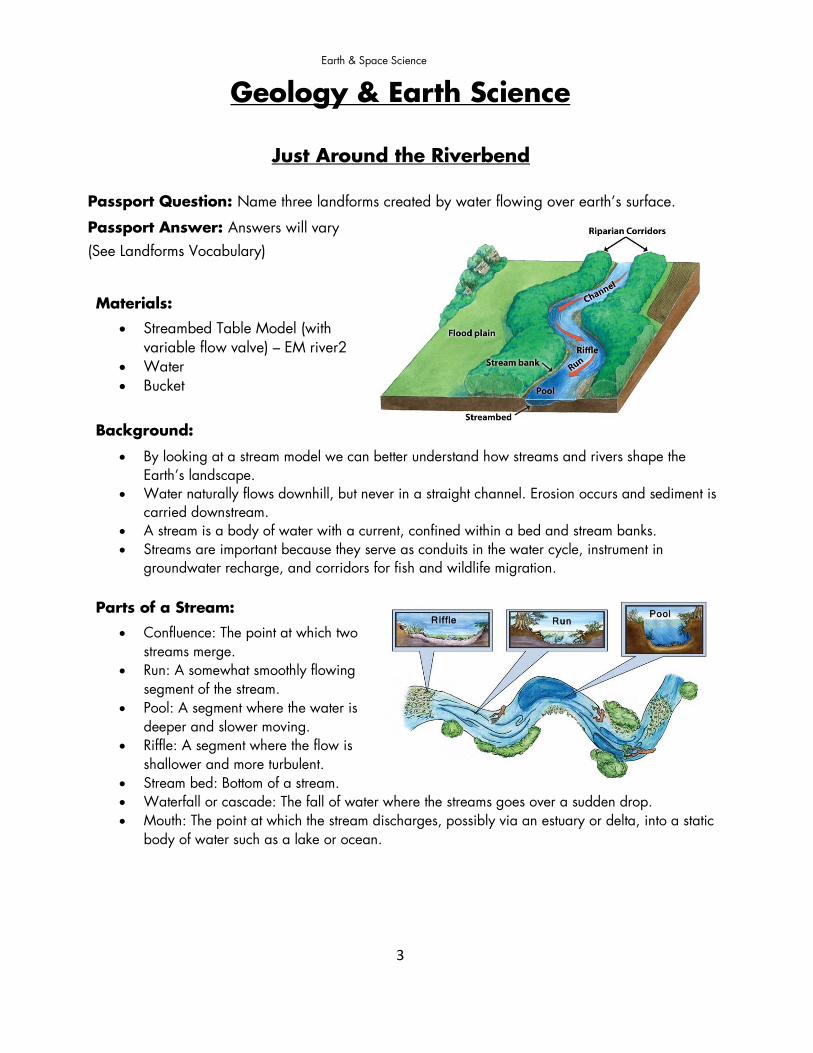
Parts of a Stream:
• Confluence: The point at which two streams merge.
• Run: A somewhat smoothly flowing segment of the stream.
• Pool: A segment where the water is deeper and slower moving.
• Riffle: A segment where the flow is shallower and more turbulent.
• Stream bed: Bottom of a stream. • Waterfall or cascade: The fall of water where the streams goes over a sudden drop. • Mouth: The point at which the stream discharges, possibly via an estuary or delta, into a static
body of water such as a lake or ocean.
4
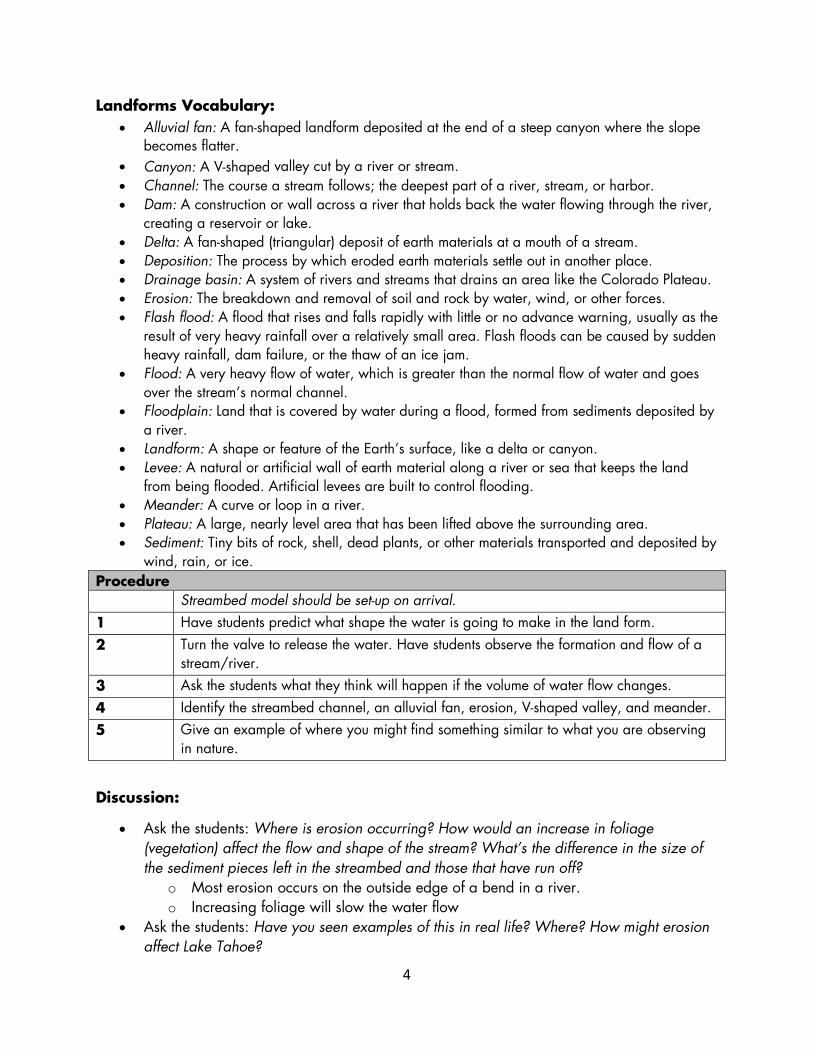
Landforms Vocabulary: • Alluvial fan: A fan-shaped landform deposited at the end of a steep canyon where the slope
becomes flatter. • Canyon: A V-shaped valley cut by a river or stream. • Channel: The course a stream follows; the deepest part of a river, stream, or harbor. • Dam: A construction or wall across a river that holds back the water flowing through the river,
creating a reservoir or lake. • Delta: A fan-shaped (triangular) deposit of earth materials at a mouth of a stream. • Deposition: The process by which eroded earth materials settle out in another place. • Drainage basin: A system of rivers and streams that drains an area like the Colorado Plateau. • Erosion: The breakdown and removal of soil and rock by water, wind, or other forces. • Flash flood: A flood that rises and falls rapidly with little or no advance warning, usually as the
result of very heavy rainfall over a relatively small area. Flash floods can be caused by sudden heavy rainfall, dam failure, or the thaw of an ice jam.
• Flood: A very heavy flow of water, which is greater than the normal flow of water and goes over the stream’s normal channel.
• Floodplain: Land that is covered by water during a flood, formed from sediments deposited by a river.
• Landform: A shape or feature of the Earth’s surface, like a delta or canyon. • Levee: A natural or artificial wall of earth material along a river or sea that keeps the land
from being flooded. Artificial levees are built to control flooding. • Meander: A curve or loop in a river. • Plateau: A large, nearly level area that has been lifted above the surrounding area. • Sediment: Tiny bits of rock, shell, dead plants, or other materials transported and deposited by
wind, rain, or ice. Procedure Streambed model should be set-up on arrival. 1 Have students predict what shape the water is going to make in the land form. 2 Turn the valve to release the water. Have students observe the formation and flow of a
stream/river. 3 Ask the students what they think will happen if the volume of water flow changes. 4 Identify the streambed channel, an alluvial fan, erosion, V-shaped valley, and meander. 5 Give an example of where you might find something similar to what you are observing
in nature.
Discussion:
• Ask the students: Where is erosion occurring? How would an increase in foliage (vegetation) affect the flow and shape of the stream? What’s the difference in the size of the sediment pieces left in the streambed and those that have run off?
o Most erosion occurs on the outside edge of a bend in a river. o Increasing foliage will slow the water flow
• Ask the students: Have you seen examples of this in real life? Where? How might erosion affect Lake Tahoe?
5
Quakes and Plates Passport Question: What happens when stress and tension build up along a fault line?
Passport Answer: Earthquakes
Materials:
• Wooden sandpaper blocks with rubber bands • Styrofoam Fault Model • Cardboard Plate Model • Convection Currents Demo
Background:
• Lake Tahoe was formed 2-3 million years ago when the Carson Range (East) and Sierra Nevada (W) blocks uplifted, and the blocks in-between down-dropped creating the Tahoe Basin.
• Pieces of the earth’s crust can break or fracture which releases energy. Crustal blocks can also “stick” and “slip” along a fault. When a large block “slips” it releases energy, causing an earthquake.
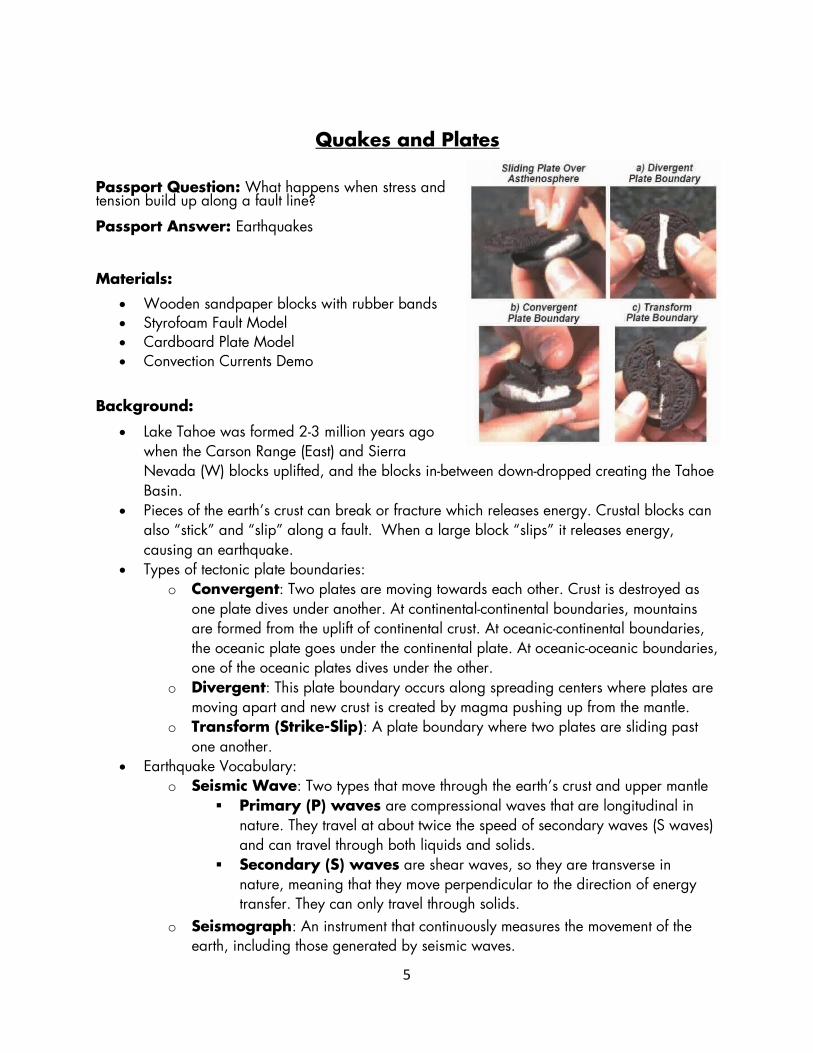
• Types of tectonic plate boundaries: o Convergent: Two plates are moving towards each other. Crust is destroyed as
one plate dives under another. At continental-continental boundaries, mountains are formed from the uplift of continental crust. At oceanic-continental boundaries, the oceanic plate goes under the continental plate. At oceanic-oceanic boundaries, one of the oceanic plates dives under the other.
o Divergent: This plate boundary occurs along spreading centers where plates are moving apart and new crust is created by magma pushing up from the mantle.
o Transform (Strike-Slip): A plate boundary where two plates are sliding past one another.
• Earthquake Vocabulary: o Seismic Wave: Two types that move through the earth’s crust and upper mantle
Primary (P) waves are compressional waves that are longitudinal in nature. They travel at about twice the speed of secondary waves (S waves) and can travel through both liquids and solids.
Secondary (S) waves are shear waves, so they are transverse in nature, meaning that they move perpendicular to the direction of energy transfer. They can only travel through solids.
o Seismograph: An instrument that continuously measures the movement of the earth, including those generated by seismic waves.
6
o Elastic Rebound: As rocks on either side of a fault shift in relation to each other, they build up energy until their internal strength is overcome and sudden fault movement occurs. This release of accumulated energy is called elastic rebound.
o Friction: This is the force resisting the relative motion of solid surfaces. Procedure Set up plate tectonic wooden demo and convection currents demo. This should be
done prior to the volunteer’s arrival 1 Ask students if they know how Lake Tahoe was formed. Explain using the cardboard
model, and then use the Styrofoam model to explain the 3 different types of plates. The movement of the plates causes stress and tension, which can result in an earthquake.
2 Ask students if they have ever felt an earthquake and that they are going to find out how earthquakes happen.
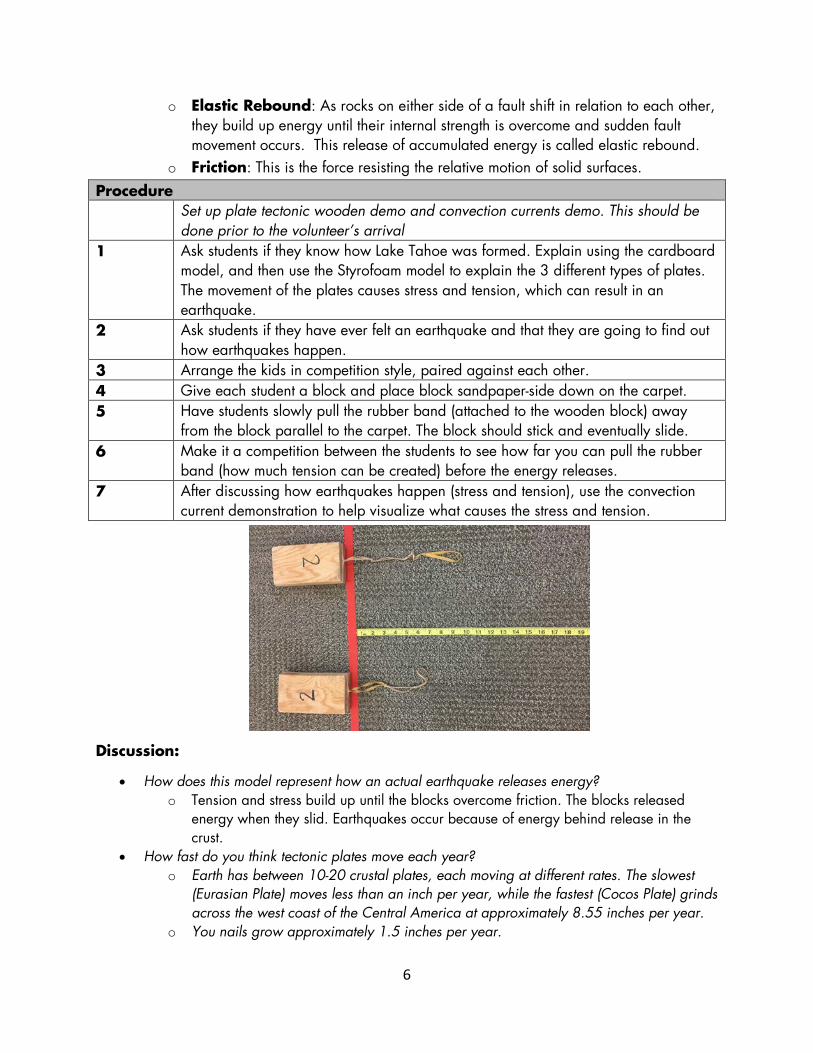
3 Arrange the kids in competition style, paired against each other. 4 Give each student a block and place block sandpaper-side down on the carpet. 5 Have students slowly pull the rubber band (attached to the wooden block) away
from the block parallel to the carpet. The block should stick and eventually slide. 6 Make it a competition between the students to see how far you can pull the rubber
band (how much tension can be created) before the energy releases. 7 After discussing how earthquakes happen (stress and tension), use the convection
current demonstration to help visualize what causes the stress and tension.
Discussion:
• How does this model represent how an actual earthquake releases energy? o Tension and stress build up until the blocks overcome friction. The blocks released
energy when they slid. Earthquakes occur because of energy behind release in the crust.
• How fast do you think tectonic plates move each year? o Earth has between 10-20 crustal plates, each moving at different rates. The slowest
(Eurasian Plate) moves less than an inch per year, while the fastest (Cocos Plate) grinds across the west coast of the Central America at approximately 8.55 inches per year.
o You nails grow approximately 1.5 inches per year.
7
Modeling Convection Currents in the Mantle (Demo linked with Quakes and Plates)
Passport Question: Convection currents cycle between magma warming and ______ and magma cooling and _________.
Passport Answer: Convection currents cycle between magma warming and rising and magma cooling and sinking.
Materials:
• Glycerin • Glitter • Beaker • Heat Source (like a single flame) • Crushed Ice
Background:
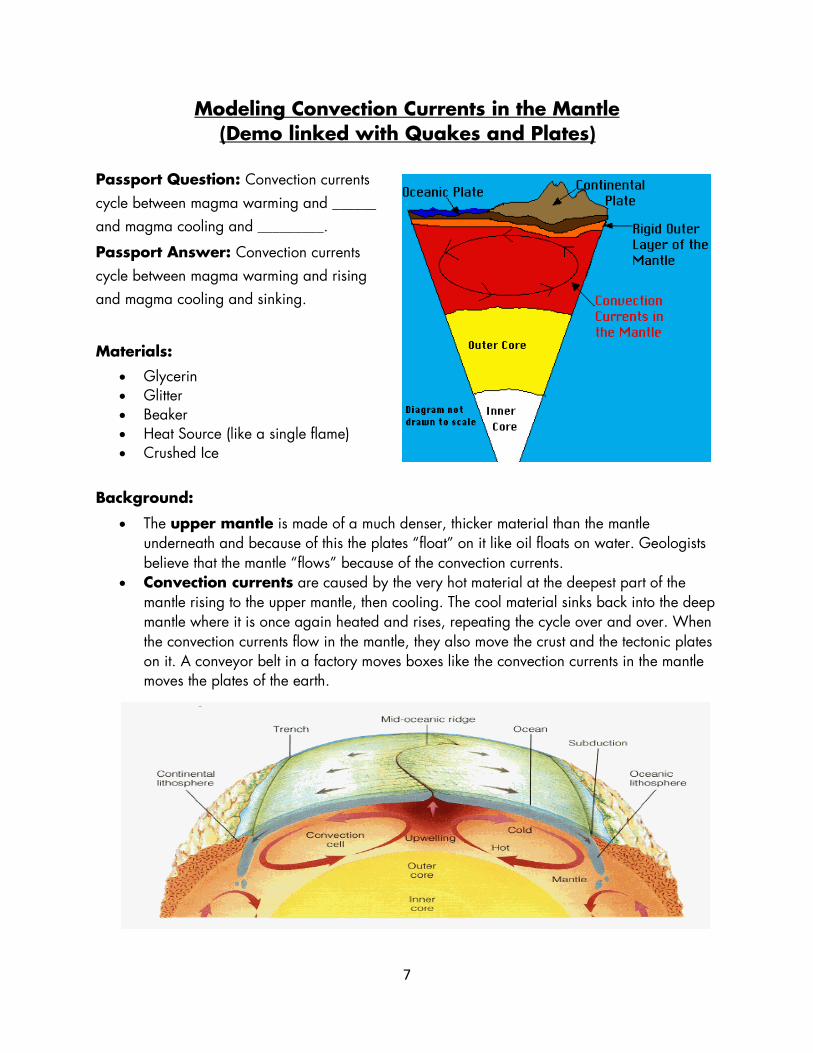
• The upper mantle is made of a much denser, thicker material than the mantle underneath and because of this the plates “float” on it like oil floats on water. Geologists believe that the mantle “flows” because of the convection currents.
• Convection currents are caused by the very hot material at the deepest part of the mantle rising to the upper mantle, then cooling. The cool material sinks back into the deep mantle where it is once again heated and rises, repeating the cycle over and over. When the convection currents flow in the mantle, they also move the crust and the tectonic plates on it. A conveyor belt in a factory moves boxes like the convection currents in the mantle moves the plates of the earth.
8
Procedure 1 Tell students this demo will illustrate why stress and tension happens. The glycerin
represents the mantle, the hot plate is the core, and the glitter helps shows the movement of the convection currents.
2 Place heat source underneath the glycerin/glitter mixture. The crushed ice on top will help the glitter move back down the beaker so that the current can be observed.
3 Give the glycerin a minute or two to heat up and observe the moving glitter. 4 Add foam “plates” so that they float and move from the convection currents. Have
students observe what is happening. 5 Discuss how this model is like the convection currents happening within the mantle.
Discussion:
• Where does the heat that creates the convection currents come from? o The core.
• How does the plate movement create earthquakes? o Link back to building up tension that eventually releases as an earthquake. The
convection currents move plate tectonics around, and as the plates move past each other, stress and tension builds up.
• Discuss what could happen if the convection currents were to stop. o If the currents stopped, then we could assume the outer core would solidify,
causing the plates to stop moving and Earth’s climate to change. The Earth would either become extremely cold or hot, and it would be harder for life to exist on Earth.
• How does density come into play with the magma in the convection currents?
o Hot air rises when you heat it because it expands. When air expands, it becomes less dense than the air around it; the less dense hot air floats in the more dense cold air much like wood floats on water because wood is less dense than water. Similarly, the hotter magma will rise because it has expanded and is less dense, while the cooler magma will sink because it is more dense.
9
The Break Down
Passport Question: What are the two types of weathering? Chemical and ____
Passport Answer: Physical
Materials:
• Craft Stick • Elmer’s Glue • Large Shallow Plastic Containers of
various sized granite pieces and sand • Hand Lenses • Microscope • Rock Hammer
Background:
• Weathering is the breakdown of the earth’s rocks, soils, and minerals caused by the earth’s atmosphere. Erosion causes the same break down from the movement of rocks, soils, and minerals from forces like water, ice, wind, and gravity.
• There are two types of weathering: Physical and Chemical. • Physical (Mechanical) weathering causes changes through processes not related to
chemical changes such as thermal stress, frost or pressure. Wind, ice and water are also mechanisms for physical weathering because they transport materials that scour and weather other rocks.
• Chemical weathering changes the composition of rocks including dissolution from acid rain, hydrolysis of silicates and carbonates, and oxidation.
10
Procedure Set-up Using the rock hammer, smash granite pieces within a plastic container to observe
the process of mechanical weathering. This should be done prior to the volunteer’s arrival
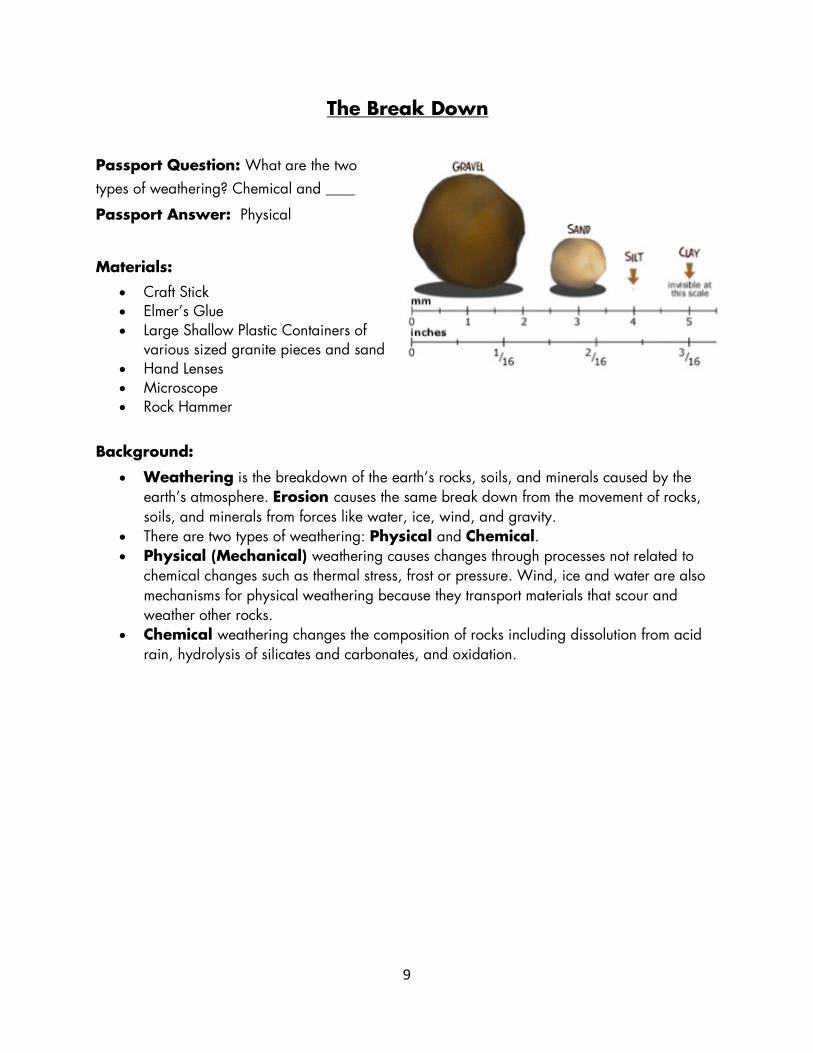
1 Have students observe look at the big granite rock and the granitic sand. Ask them if the two look similar. Tell them the big rock does become the sand, but ask them how they think it does. Brainstorm different types of weathering and then go over the weathering and the two types. Let students observe the different types of rocks and sand with the hand lenses and microscope.
2 Select several rocks (from the shallow container) of different sizes and shapes and arrange them in order of size.
3 Using glue, attach rocks in order of size onto provided craft stick. 4 Using the hand lens and microscope, observe the different sizes of rock. 5 Discuss how, in nature, rocks change size, shape, and form.
Discussion:
• What causes mechanical weathering? o Ice wedging, pressure release, plant root growth, and abrasion.
• How does mechanical weathering occur in real life? o The Grand Canyon was formed by mechanical weathering (winds and the
Colorado River) and erosion. o Soil can be created from weathered rock mixed with plant and animal remains o Trees’ roots can break large rocks. o Animals that tunnel underground also work to break apart rock and soil.
• Why is the size of the sand important in Tahoe? o Granite weathers into rather large sediments that would sink to the bottom of Lake
Tahoe, keep the water clear. o Clarity has dropped in Lake Tahoe due to an increase in fine particles and
sediments (from car exhaust and pollution). You could ask students where they think these come from and what they can do to prevent that.
• What are some factors that may affect the rate of weathering? o Humidity, rainfall, temperature, and sunlight all determine how fast or slow
weathering will occur. Weathering also depends on the type of rock. For instance, limestone generally dissolves more easily in rainwater, because rainwater is becoming increasingly acidic from pollution.
11
Shake and Break
Passport Question: Observe and describe how your “rocks” changed after the physical (mechanical) weathering.
Passport Answer: They become smaller and more rounded, but still consist of the same material.
Materials:
• Plastic containers with large screw top lids (e.g., mayo jars, peanut butter jars, coffee jars) • 1-2 strainers or colanders • Trays or cookie sheets with rims • Aluminum foil • Old bowl and spoon • Plaster of Paris • Water • Plastic pop-top bottles • Hammer • Buckets • Towels
Background:
• Physical (Mechanical) weathering: Rocks become smaller in size but are still made of the same material. Examples include wind, ice, gravity, water freezing in rocks, or plants growing in cracks of rocks.
• Erosion: Moving of rock material by water, ice, wind, and even animals and humans.
Set Up Notes:
• Fill the plastic pop-top bottles with water. • Make rocks using Plaster of Paris:
o Use aluminum foil to line tray or cookie sheet. o Use a ratio of 2 parts plaster to one part water and mix thoroughly in an old bowl.
This should make a thick paste. o Spread mixture in the lined containers to a depth of about ¾ inch. Allow to dry
overnight. (For 30 students, you will need about 8 cups of plaster and 4 trays.) o CAUTION: Do not pour unused plaster down the drain. It will harden and clog
drains. o Instead of making rocks, you can also purchase rocks. They should be irregular
shaped and 1-3 inches in size. Marble landscape rocks works well. o Fill 2-3 buckets with water for students to use. You may also want a bucket for
students to pour wastewater into.
12
o Set out materials for students to use: Plaster of Paris rocks or real rocks Plastic containers with lids Water in buckets Strainer or colanders Optional: play high-energy music
Procedure 1 In the Break Down, students learn about weathering. In this activity, they will see
physical weathering happen before their eyes. Talk about physical weathering and examples of physical weathering.
2 Ask students to observe the rocks. What do the rocks look like and how do the rocks feel? Put a couple of rocks in a plastic jar. Cover the rocks with water and screw the lid tightly onto the jar. Ask students to make a hypothesis about what will happen to the rocks if they shake the jar, or why do they think they are shaking it.
3 Students then shake the rocks vigorously but at a pace they can keep up for 5 minutes. Feel free to turn on high-energy music!
4 Strain the rocks. Observe the rocks now. What do the rocks feel like and look like? What does the water look like?
Discussion:
• What happened to the rocks as you continued to shake them? o They got rounder, smaller, smoother, etc.
• What do you think would happen if you shook the rocks for several hours or several days? o The rocks would become very round and smooth. Eventually, the rocks would
completely transform to sand. • Have students think about rocks they find at the ocean, are they usually jagged or round
and smooth? o Usually smooth, due to the wave action churning rocks over and over again.
• The rocks changed size and shape due to abrasion - the rocks rubbed against each other- breaking small pieces of the rock off. The small grains that break off feel like sand. Over time, the rocks become rounder and smoother.
13
Rock Detective
Passport Question: After completing your investigation, what is one type of rock that you discovered?
Passport Answer: Answers may vary but include: Calcite, Granite, Limestone, Pumice, Quartz, or Talc Materials:
• Complete Rock Mineral Testing Kit (6) • Magnifying Glasses (6) • Safety Glasses
Background:
• 3 main types of rocks: o Igneous rocks like obsidian, pumice, granite and basalt are formed through the
cooling and solidification of magma or lava. o Sedimentary rocks like lime stone, sand stone, and shale are formed by the
lithification (compaction) of sediment layers under great pressure. Sedimentary rocks compose 5% of the volume of the earth’s crust.
o Metamorphic rocks such as marble and quartzite have been changed from existing sedimentary rock types, limestone and sandstone respectively, and require heat and pressure.
• A mineral is a natural occurring solid with a unique and definite chemical composition. • Rocks are aggregates of one or more minerals. Rocks and minerals can be identified by
testing their hardness, luster, color, streak, cleavage, fracture, and specific gravity. • Many rocks can look alike. Sometimes telling the difference between a limestone or
marble and other rocks such as shale and quartzite can be difficult. Geologists use a variety of methods to determine the type, which students will experience in this experiment
a. Mohs Scale Scratch Test rates mineral hardness; diamond is the hardest mineral where talc is the least hard.
b. Acid or “Fizz” test. Rocks that contain calcium carbonate (limestone, oolitic limestone, coquina and marble) should “fizz”. The bubbles are telling you that your rock is a limestone or contains calcite like limestone.
c. Float Test gives an idea of the rock’s relative density d. Streak Tests on ceramic plates give an idea as to the rock type based on the
presence of a streak and the color

14
Procedure 1. Tell them that today they are going to be rock detectives! 2. Observe the different types of rocks on the table. Are there any rocks you don’t
know? How would you test the rock to find out what it is? Talk about different types of tests used.
3. Try to scratch each rock. Use your fingernail first, then the nail. Record what happened. Put an X on the chart if the rock was scratched.
4. Put on gloves and put a very small drop of acid on each rock. Was there a reaction? Record what happened. Put an X on the chart if the rock reacted (bubbled).
5. Drop the rock into the bowl of water. Does it sink or float? Put an X on the chart if the rock floated.
6. Do a streak test on the ceramic plate. Run the rock lightly across the plate. Did it leave a streak? What color was it? Record your observations in the chart.
7. Compare your chart to the Rock & Mineral Identification Key. Which rocks are which?
8. (Optional) Select your favorite rock and write out observations from the test, hand lens and eye observations. Be very detailed. Return your rock to the pile
9. (Optional) Exchange observation cards with a friend and try to find each other’s rocks based on their observations
Discussion:
• Which was the hardest/ softest rock? • To determine if various rocks are composed of dolomite or calcite, you would need to
conduct an acid test. What happens in the acid test? • Using a magnifying glass, observe the characteristics of other minerals and rocks. What
do you see? Why is this information useful? • Were you successful in determining your rock’s type? • If optional steps were done:
o What made it easy/hard to find your partner’s rock? o What observations did you make about your rock?
15
Birdseed Mining
Passport Question: After your mining experiment, what do you think are potential environment impacts from mining?
Passport Answer: Answers will vary. Environmental impacts such as water and air pollution and health impacts for miners such as occupational hazards and black lung. Materials:
• Wild Bird Food- any birdseed mix that contains sunflower seeds and at least 2 other seed varieties
• Aluminum Pie Plates • Tiny spoons • Small beads (approximately 2mm) in blue, gold, and silver • Medium beads (approximately 4-6mm) in white
Background:
• Mining is a complex process in which relatively small amounts of valuable (gold) or useful (coal) minerals or metals are extracted from very large masses of rock.
• This activity will illustrate how this “needle in a haystack” process works and demonstrate a simple lesson in economics— a less valuable commodity may be more profitable because it is more abundant.
• Students will be shown the importance of clean, environmentally conscious mining, and will learn that all mining operations must pay for reclamation work.
• Mine Reclamation: the process of restoring land that has been mined • Surface Mining Control and Reclamation Act of 1977 (SMCRA) regulates environmental
effects of coal mining in the US. Set Up:
• Prepare birdseed mixture with beads, marbles, and Styrofoam pieces. • Pour approximately one pound of birdseed in each pan. • Mix two gold beads, four silver beads, eight blue beads, and three white beads into each
pan of birdseed. o Gold beads = gold o Silver beads = silver o Blue beads = coal o Sunflower seeds = copper o All other seeds = waste o White beads = reclamation (these beads will be assigned a COST rather than a
VALUE because reclamation must be done at all mining operations regardless of how much profit was made.)
Procedure

16
1. Tell students what they are looking at is a model. The tub is earth, and the beads are valuables that people harvest. Ask them what they think people mine for.
2. Tell students they have 90 seconds to scoop out and “mine” for as many beads and sunflower seeds as they can.
3. Then have them count the sunflower seeds and beads from their piles and calculate their earnings based on the values given above. Also, pay special attention to any environmental damage that was done because of the mining. They can be fined for a messy table.
4. Total up the dollar value of the mining operation, subtracting the environmental damage fines and reclamation costs.
Discussion:
• What happened when you mined in a “messy” way? Was it worth it? What would you do differently next time? How can you maximize your profit?
• Why do we need mining? What do we use these materials for? • What “environmental impacts” did you see in your model? What would these impacts
look like in real life? • Why should we pay for reclamation?
17
Exploring Magnetic Field Lines
Passport Question: Magnets have an invisible force field known as a ________________.
Passport Answer: Magnetic field
Materials:
• 2 sheets of 8.5” x 11” paper taped together lengthwise or 1 sheet of 17” x 11”
• Bar Magnet • Compass • Cow Magnet and Iron Filing Demo • Cow Magnet and Magnaprobe Demo • Magnetic Field Pattern Window Demo
Background:
• A typical magnetic compass is actually made with a tiny magnet that aligns itself with strong magnetic fields.
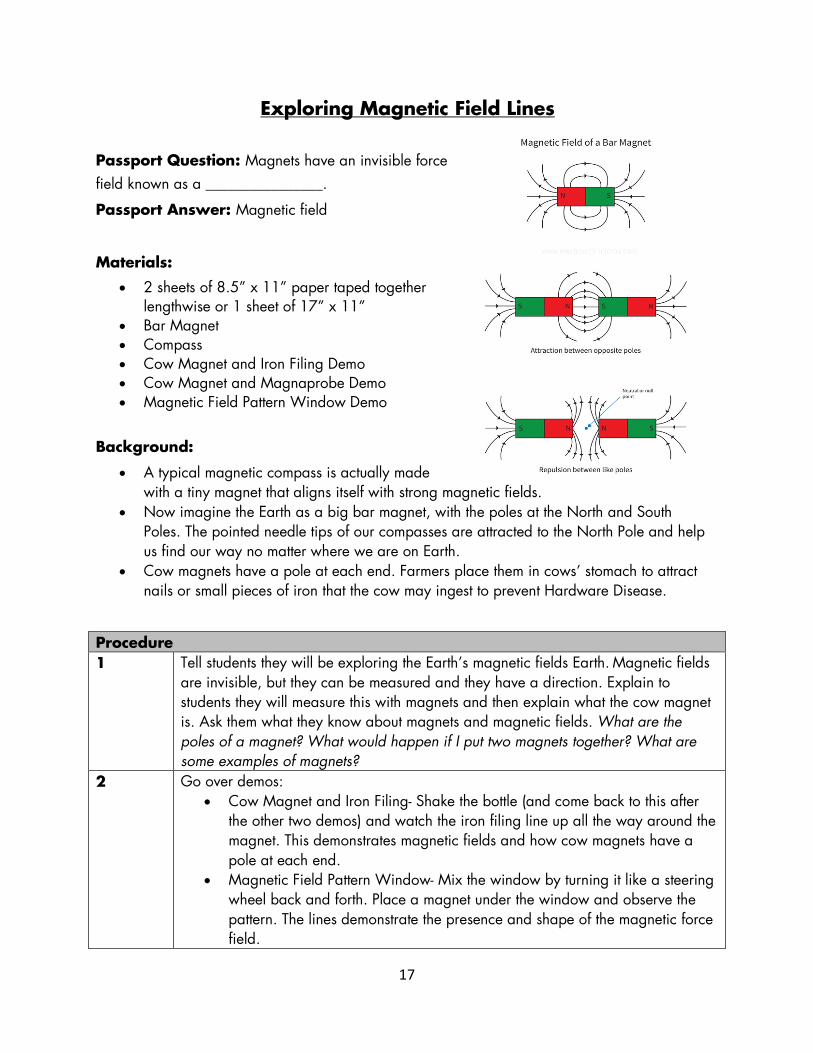
• Now imagine the Earth as a big bar magnet, with the poles at the North and South Poles. The pointed needle tips of our compasses are attracted to the North Pole and help us find our way no matter where we are on Earth.
• Cow magnets have a pole at each end. Farmers place them in cows’ stomach to attract nails or small pieces of iron that the cow may ingest to prevent Hardware Disease.
Procedure 1 Tell students they will be exploring the Earth’s magnetic fields Earth. Magnetic fields
are invisible, but they can be measured and they have a direction. Explain to students they will measure this with magnets and then explain what the cow magnet is. Ask them what they know about magnets and magnetic fields. What are the poles of a magnet? What would happen if I put two magnets together? What are some examples of magnets?
2 Go over demos: • Cow Magnet and Iron Filing- Shake the bottle (and come back to this after
the other two demos) and watch the iron filing line up all the way around the magnet. This demonstrates magnetic fields and how cow magnets have a pole at each end.
• Magnetic Field Pattern Window- Mix the window by turning it like a steering wheel back and forth. Place a magnet under the window and observe the pattern. The lines demonstrate the presence and shape of the magnetic force field.
18
• Magnaprobe- Move the probe over the cow magnet a couple times and have the students observe the probe’s poles changing. Ask students what they think the magnaprobe is doing. What does it means when it flips from side to side? What do the red and blue parts mean on the magnaprobe? Tell them the probe is a magnetic field detector and can trace a magnetic field in 3-D as well as show us the direction of magnetic poles in magnets.
3 Ask students if they have ever used a compass before. Explain to them that a compass has a tiny magnet inside and that they will use a compass to trace out the magnetic field of a magnet. Divide up the magnets and compasses between the students. Ask them what they think will happen if they put a compass next to a magnet, what will happen when they take the compass further away, and what will happen when they put it close to a different part of the magnet.
4 Tape the bar magnet in the center of the two sheets of paper. To make the tracing, have students do the following:
• Draw a dot at the location of the arrow head (or tail) of the compass needle. • Draw a line to connect the 2 dots. • Move the compass center directly over the second dot, and again draw a
dot at the location of the compass needle head or tail. • Repeat the steps above until the other end of the line meet the magnet or
paper edge. • When finished with the first line, pick another spot near the magnet and
repeat the process to trace more field lines.
Discussion:
• Have you used a compass before? Discuss your experience/ how it helped/ how you think it could be useful for others.
• Discuss how magnets are used in the “real world.” o In electrical motors, generators, and speakers o Sort magnetic and non-magnetic substances from scrap o In TV screens, computer screens, and telephones o Used in refrigerator to keep the door close
• If you were standing on the North Pole, where would your compass point? o There are actually TWO North Poles- one at the top of the earth (North Pole) and
one that is known as Magnetic North- and two south poles. o At the North Pole, if you hold the compass horizontally the needle which is
supposed to point north will point south, toward the north magnetic pole (which is in northern Canada). If you were standing exactly on top of the magnetic north pole, your compass would point nowhere in particular since the place it is used to pointing to is at your feet.
19
Discovering Fossils
Passport Question: What is evidence of past life preserved on Earth?
Passport Answer: Fossils Materials:
• Plaster of Paris • Sawdust or soil • 1 small paper cup per student • Newspaper • Craft sticks • Small paintbrushes • 1 shell per student or “fossil”
Background:
• Paleontologists are scientists who study fossils to understand ancient landscapes, climate, and life on Earth. Paleontology is the study of prehistoric times through the discovery and interpretation of fossils. Paleontologists search for and collect fossilized clues to piece together a picture of the environment and ecosystems of the distant past. As a historical science, paleontology incorporates mainly biology (the study of plants and animals) and geology (the study of rocks) to puzzle together facts to explain the past. In contrast, experimental scientists conduct experiments in order to disprove hypotheses.
• Fossils provide information about the environmental conditions that existed when the fossil organism was alive, as well as where, when, and how the organism lived.
• Fossils are formed by various ways. The dead organism can be preserved in amber (hardened tree resin), peat bogs, tar pits, or in ice. Casts or impressions (such as foot prints) could be covered by layers of sediments, which eventually become rocks preserving the casts.
Set Up:
• Put on a mask to protect your nose and mouth. Mix Plaster of Paris with soil or sawdust until the consistency is almost as thick as mashed potatoes.
• Pour this mixture into paper cups until it covers the bottom of the cup. • Drop in a shell or “fossil” and cover with more plaster mixture. • Allow to dry completely then remove paper cups.
20
Procedure 1 Set out newspaper to use to catch the mess. Tell students they are going to
paleontologists; ask if they know what a paleontologist is? After some brainstorming, give general explanation of a person who searches for and studies fossils.
2 Have students use craft sticks as picks, and pick away at the plaster to reveal the embedded fossils, taking care not to damage the fossil. They can use the paintbrushes to remove smaller particles of plaster from the fossils.
3 Have students describe their fossil.
Discussion:
• What can fossils tell us? • How are fossils formed? • What qualities should a paleontologist have to be successful at finding and excavating
fossils? • What did you enjoy about the process of “digging out” your fossils?
21
Fossil Formation
Passport Question: Oil and natural gas are also called __?
Passport Answer: Fossil fuels
Materials:
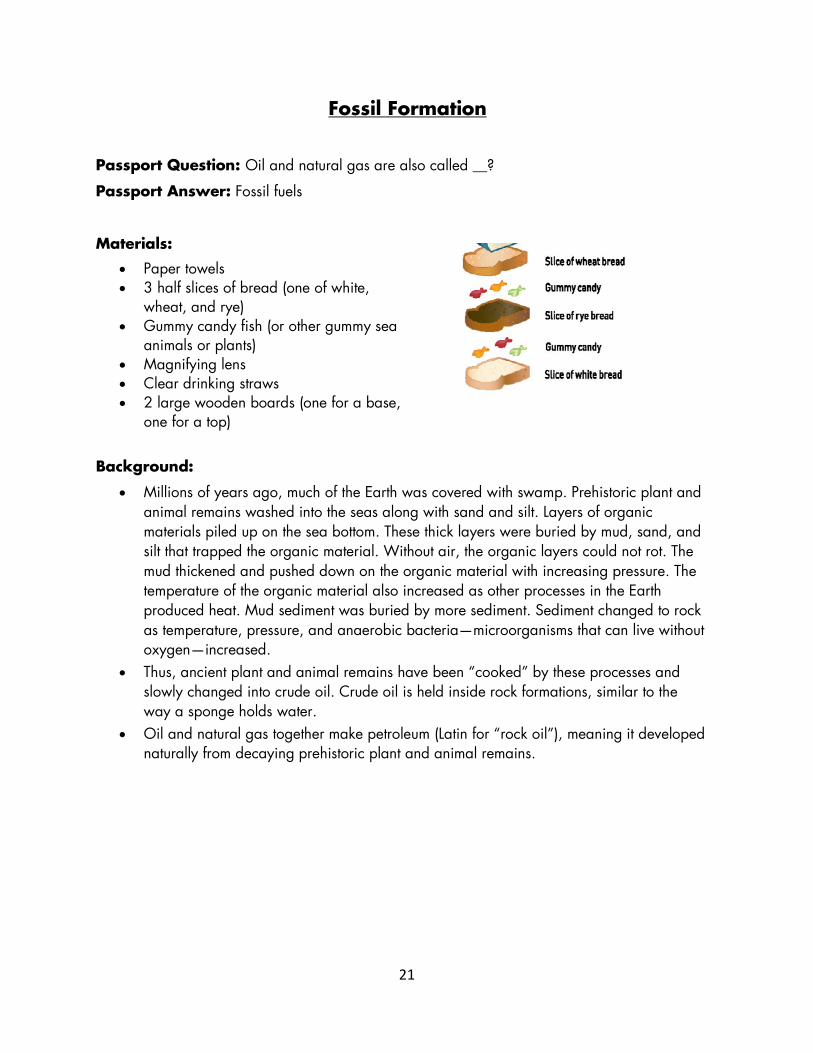
• Paper towels • 3 half slices of bread (one of white,
wheat, and rye) • Gummy candy fish (or other gummy sea
animals or plants) • Magnifying lens • Clear drinking straws • 2 large wooden boards (one for a base,
one for a top)
Background:
• Millions of years ago, much of the Earth was covered with swamp. Prehistoric plant and animal remains washed into the seas along with sand and silt. Layers of organic materials piled up on the sea bottom. These thick layers were buried by mud, sand, and silt that trapped the organic material. Without air, the organic layers could not rot. The mud thickened and pushed down on the organic material with increasing pressure. The temperature of the organic material also increased as other processes in the Earth produced heat. Mud sediment was buried by more sediment. Sediment changed to rock as temperature, pressure, and anaerobic bacteria—microorganisms that can live without oxygen—increased.
• Thus, ancient plant and animal remains have been “cooked” by these processes and slowly changed into crude oil. Crude oil is held inside rock formations, similar to the way a sponge holds water.
• Oil and natural gas together make petroleum (Latin for “rock oil”), meaning it developed naturally from decaying prehistoric plant and animal remains.
22
Procedure 1 Ask students where they think the gasoline that goes into their family car comes
from. Talk about fossil fuel. Place a paper towel, a gummy fish, and three half slices of bread (one of each) on a table. Remove crust carefully from slices. Place a piece of white bread, representing the sandy ocean floor, on top of a paper towel. Put a gummy fish on the bread to represent dead marine life. Place a piece of rye bread on the white bread to represent the way ocean currents deposit sediments on top of the dead marine life. Now add the last slice of bread which represents the natural processes that have taken place over millions of years, as more sand and sediments have been deposited by wind and ocean currents.
2 Fold the paper towel to cover your bread fossil. Have students stand on it, to simulate the natural process of pressure.
3 Have students observe the bread fossil and push a clear straw straight down the bread and pull it back up to “extract” a core sample. Observe the layers through the straw.
4 Have them try to separate the layers of the bread. Ask them why they think the layers are difficult to separate. Have them try to extract the fish. Can they identify the fish fossil’s mold (impression in the bread)? How about the fossil’s cast, which is the mineral material that fills the hole left when the fossil is gone?
5 Have students compare the colored residue of the gummy fish in the bread fossil to the remains of the plants and animals that seep into rock. The residue left by the gummy fish represents oil deposits left behind by dead ocean plants and animals. Over millions of years, these remains are pressurized to become oil and natural gas deposits.
Discussion:
• Do you think you could have dinosaur fossils in your family car’s gas tank? o Talk about oil and natural gas deposit (see step 5 in procedure).
• Did you ever hear that oil and natural gas are “fossil fuels”? • How long do you think it takes for fossil fuels to form? Are they a renewable source of
energy?
23
Volcano Loco Passport Question: Which type of volcano erupts most violently?
Passport Answer: Composite Volcanoes Materials:
• Dry Ice • Scotch tape • Warm water • Scissors • Small beaker
or cups • Gloves • Brown construction paper • Pictures of volcano types
Background:
Earth’s Layers: • Crust: This is not what we walk on. The layers of dirt and silt that cover the crust are
normally considered to be separate from it. The crust comprises the continents and ocean basins. It has a variable thickness, anywhere from 35-70 km thick in the continents and 5-10 km thick in the ocean basins.
• Mantle: Just under the crust is the mantle. It is composed mainly of ferro-magnesium silicates (iron, magnesium, and silicon). It is about 2900 km thick and is separated into the upper and lower mantle. This is where most of the internal heat of the Earth is located. Large convective cells in the mantle circulate head heat and may drive plate tectonic processes.
• Inner and Outer Core: There are two very distinct parts of the core; the outer and inner core. The outer core is 2300 km thick and the inner core is 1200 km thick. The outer core is composed mainly of nickel-iron alloy, while the inner core is almost entirely composed of iron. The outer core contains as much as 10% lighter elements than iron alloy. The inner core is thought to rotate at a different speed than the rest of the Earth and which contributes to the presence of the Earth’s magnetic field.
Volcano Formation: • Sometimes high temperatures and pressure cause the mantle to melt and become
magma. When a large quantity of magma forms, it moves up to the surface through the crust, and then releases pent-up gas and pressure that makes the volcano erupt. Once magma escapes to the Earth’s surface, air or water turns the magma into lava.
Magma Types: • There are many different types of magma. They produce different types of lava ranging
from fluid, fast moving basalt to slower and much thicker lava. Since rocks are made of
24
different materials that melt at different temperatures, the type of rock that is melted in the mantle will affect the magma that results.
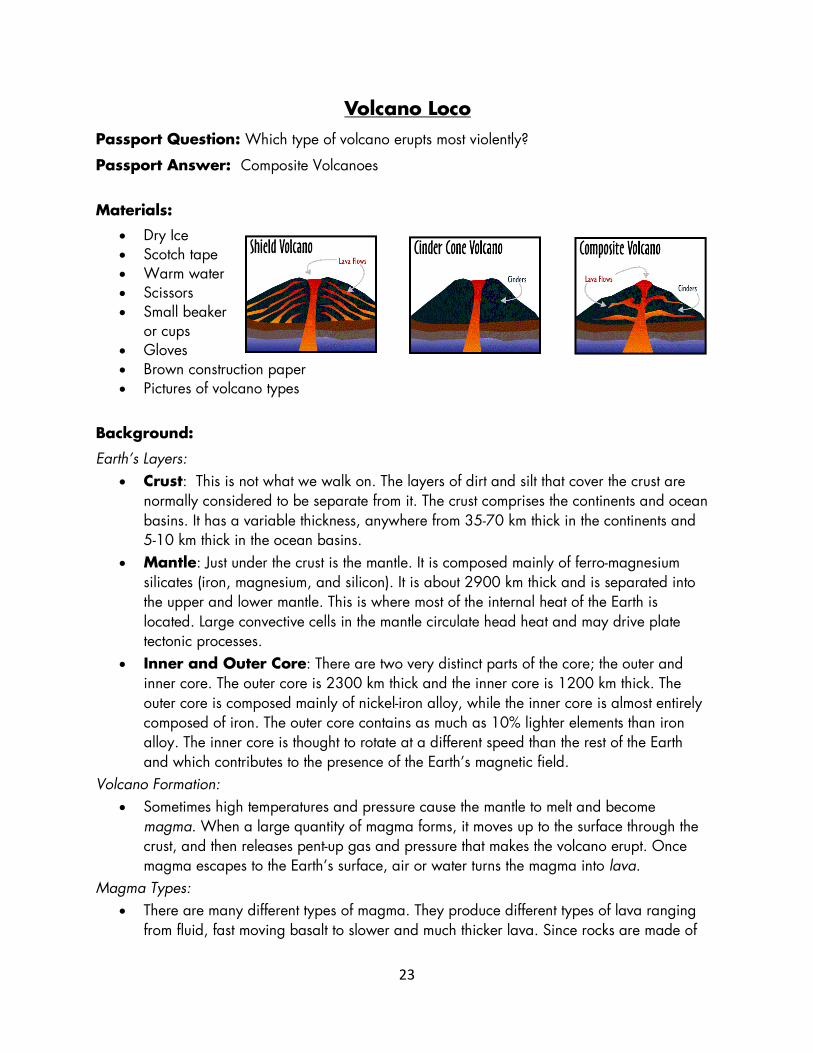
Types of Volcanoes: • Composite Cone Volcanoes (Strato volcanoes) have some of the most explosive
eruptions. The volcano is built of lava, cinders and ash, and the overall size of the volcano tends to increase after an eruption. Strato volcanoes have very steep sides and serve as a transportation system for magma to rise to the surface from deep within the Earth’s crust.
• Cinder Cone Volcanoes are named so because they were formed by lava fragments called cinders. This type of volcano only has one vent in which the magma can flow, unlink the composite and shield volcanoes. Since there is only one vent from which the magma can escape, the lava fragments burst into the air and then fall around the vent of the volcano. These volcanoes also have steep sides, but they are not as large as composite or shield volcanoes.
• Shield Cone Volcanoes got their name because they look like shields due to their gentle sloping sides. These gentle slopes are caused by the volcanoes’ eruptions. Shield volcanoes’ eruptions usually have enough time for animals and people to move to safety. Because of the way Shield Volcanoes erupt, they are some of the largest volcanoes in the world.
Volcano Vocabulary: • Active Volcano: An erupting volcano or a volcano that has erupted before and will
likely erupt in the future. • Ash: Fragments of volcanic rock that explode from the vent of a volcano in solid or
molten form. • Conduit: The passage that the magma follows through a volcano. • Dormant Volcano: A volcano that is currently inactive, but may erupt again. • Eruption: The process that ejects solid, liquid, and gaseous materials onto the Earth’s
surface and into the atmosphere by volcanic activity. These eruptions can range from violent explosions to quiet overflow of magma.
• Lava: Magma that is exposed to air or water o the Earth’s surface. • Magma: Hot, molten rock that forms beneath the Earth’s surface. • Magma Chamber: The chamber where the rising magma is collected before a
volcano erupts. • Pumice: A type of volcanic rock that forms during an eruption. • Pyroclastic Flow: Avalanche of material that comes down from the side of a volcano
during some eruptions. Contains hot ash, pumice, rock fragments, and volcanic ash. • Vent: An opening from which volcanic material is released. • Volcanic Gases: Gases that are released from the magma during an eruption. These
gases include H2O (water as steam), CO2 (carbon dioxide), SO2 (sulfur dioxide) and HCl (hydrogen chloride).
25
• Volcano: A vent in the Earth’s surface in which magma, gases, and ash erupt and form a structure that is usually cone-shaped.
Procedure 1 Ask students if they know the layers of the earth. Go over those and then talk about
how the mantle creates magma, and how that becomes lava. Talk about different types of lava and volcanoes. Now tell them that they get to build their own volcanoes to see which type of volcano erupts most violently.
2 Put on safety goggles. 3 Using paper, scissors, and tape make cones of varying size to model conic and
shield volcanoes. Use images as examples. Use laminated volcanoes as examples or for quick use.
4 Prediction: How will the shape of the volcano affect the pressure and amount of matter that comes out of the opening?
5 Place paper cone over beaker with dry ice and warm water to test predictions. Discussion:
• Observations: What do you observe about the eruption? Why do you think they look different based on the shape of the volcano?
• Which volcano do you think had the most explosive eruption and why? o Composite Cone Volcanoes are steep sided and have some of the most explosive
eruptions.

26
27
Renewable v. Nonrenewable
Passport Question: Name two examples of renewable energy.
Passport Answer: Wind, solar, hydropower, geothermal, biomass, biofuel Materials:
• Wind energy kit (Thames Kosmos Wind Power 2.0) • Solar energy kit
Background:
• Renewable resources are replenished naturally and over relatively short periods of time (i.e., wind power, hydropower, geothermal energy, solar energy, biomass, biofuel, etc.).
o Biofuel: fuel derived from living matter (i.e., ethanol from sugarcane or corn, biodiesel from vegetable oil and liquid animal fats, green diesel from algae, and biogas from animal manure’s methane).
o Hydropower: dams store water and use it to spin a turbine which activates a generator to produce electricity.
o Geothermal: Heat from the Earth as either hot water or steam reservoirs accessed by drilling.
o Biomass: When burned, it releases energy as heat (i.e., wood, crops, manure, and waste/garbage).
o Tidal power: uses ocean tides to produce electricity. • Non-renewable resources are available in limited supplies (i.e., coal, nuclear power,
oil, natural gas, etc.). o Coal: a combustible black rock consisting of carbonized plant matter, found
mainly in underground deposits o Natural Gas: flammable gas, consisting mostly of methane (i.e., ethane, propane,
and nitrogen) o Nuclear: use nuclear reactions that release nuclear energy to generate heat which
is used in steam turbines to produce electricity. o Gasoline: refined petroleum used in internal combustion engines.
• In the US, most electricity is generated from hydropower (46%), followed by wind (35%), biomass wood (8%), solar (5%), biomass waste (3%), and geothermal (3%).
Set Up:
• Build the windmill and solar energy kit.
Procedure 1 Ask students where they think electricity comes from. Ask if they think it can come
from wind or the sun. 2 Have the students use the windmill to demonstrate wind power and the solar
28
energy kit to demonstrate solar energy. 3 Have students organize the different energy sources as renewable or
nonrenewable.
Discussion:
• Why is it important to use renewable energy? Non-renewable will eventually run out, become too expensive, or too environmentally damaging.
• Why aren’t we using only renewable energy? Cost, some renewable energy sources aren’t as efficient yet, policies, etc.
• What are some other examples of renewable energy?
29
Weather and Climate
Air is Everywhere Passport Question: Air moves from areas of pressure to areas of pressure.
Passport Answer: High to Low
Background Information: When air is heated up it expands and when air is cooled it contracts. For example, on a really cold day your car’s tires may look flat because the air is cold and has contracted and is exerting less pressure on its container, the tire. If air is not in a container the change in pressure from temperature change can go unnoticed. It’s often only when we confine air to a container that we can detect this change in pressure. This experiment will let us see this change in pressure from cause by a change in temperature. Materials:
• Glass pan • Erlenmeyer flask • Water, with food coloring • Tea candles • Lighter
Procedure 1 Pour the water into the pan and place the candle in the middle of the water. 2 Add 2 or 3 drops of food coloring to the water. This will make the movement of the
water easier to see. 3 Light the candle. 4 Cover the candle with the Erlenmeyer flask. 5 Have the students think about what is taking place both inside and outside of the
vase. What invisible thing is inside the vase? 6 Have the students carefully observe what happens to the water around the vase. It's
bubbling! What happens to the candle flame?
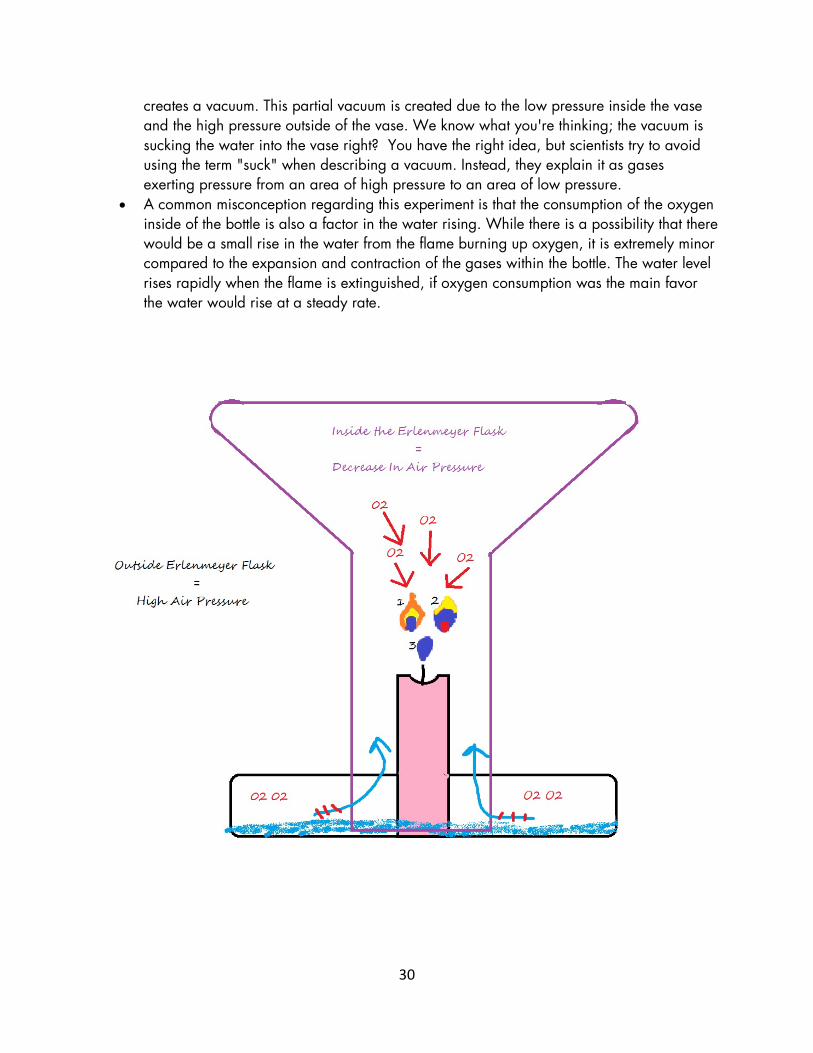
Discussion: • The candle flame heats the air in the vase, and this hot air expands creating a high
pressure area inside the Erlenmeyer flask. Some of the expanding air escapes out from under the vase — you might see some bubbles; this is because the high pressure air is escaping out of the bottom.
• When the flame goes out, the air in the vase cools down and the cooler air contracts quickly creating an area of low pressure inside the flask. The cooling air inside of the vase
30
creates a vacuum. This partial vacuum is created due to the low pressure inside the vase and the high pressure outside of the vase. We know what you're thinking; the vacuum is sucking the water into the vase right? You have the right idea, but scientists try to avoid using the term "suck" when describing a vacuum. Instead, they explain it as gases exerting pressure from an area of high pressure to an area of low pressure.
• A common misconception regarding this experiment is that the consumption of the oxygen inside of the bottle is also a factor in the water rising. While there is a possibility that there would be a small rise in the water from the flame burning up oxygen, it is extremely minor compared to the expansion and contraction of the gases within the bottle. The water level rises rapidly when the flame is extinguished, if oxygen consumption was the main favor the water would rise at a steady rate.
31
Stubborn Balloon Passport Question: Does hot air or cold air take up more space? Passport Answer: Hot Air Background information: Air pressure is the force exerted on you by the weight and motion of air molecules (tiny particles of air). Although air molecules are invisible, they still have weight and take up space. Since there's a lot of "empty" space between air molecules, air can be compressed to fit in a smaller volume. “Stubborn Balloon” displays the force associated with air pressure and its relationship with temperature and pressure. Materials:
• Hurricane Vase • Newspaper • Lighter
• Water Balloon • Water • Safety Goggles
Procedure 1 Put on safety goggles! 2 Place the water balloon on top of the jar and ask a student volunteer to try and push
it into the jar. They will be able to push it in a little but it will always pop back out. (Make sure they don’t push too hard or the balloon will pop!)
3 Remove the balloon. Be careful. Wad up a piece of newspaper, light it on fire and drop it in the jar. When you are sure it is burning well, put the balloon back on the opening of the jar. The balloon may bounce up and down a couple times and will disappear into the jar.
4 After the appropriate applause, ask the students if they want you to do it again (expect a yes!). Ask a student to attempt to pull the balloon back out of the jar. They won’t be able to do it.
5 After a sufficient number of tries hand them a straw. Ask them to hold the straw inside the jar, next to the edge, using their other hand pull out the balloon. The balloon should pop right out.
Discussion:
• How does this work? It’s all about air pressure. The balloon wouldn’t go into the jar the first time because the air in the jar was pushing back up on the balloon as the student tried to cram it in. The air compresses slightly but not enough to allow the balloon to enter the jar.
• To understand how we got the balloon into the jar, we have to think about equilibrium, which is when opposing forces are in balance. Air molecules will move from areas of high pressure to areas of low pressure to maintain a balance of pressure, or equilibrium!
32
• When you place the burning paper into the jar, the fire begins to heat up the air inside, which makes it expand. The expanded air molecules try to find a way out of the jar, but the balloon resting on the top acts as a valve blocking the only exit. As the air continues to heat, the pressure builds inside the jar up until it is strong enough to lift the balloon (opening the valve) just enough to let out a “burp” of air from the inside. Once the jar burps, the pressure is reduced inside so that the balloon once again seals it off (the valve closed). The burping action can occur several times in rapid succession, which makes the balloon look like it is dancing a jog on top of the jar.
• Until now, the air pressure inside was higher than the pressure outside, evidenced by the fact that the air kept trying to get out. Remember though, two different actions are taking place inside the jar. The other action is that the fire is burning and consuming oxygen, which has the effect reducing air pressure. Eventually, the paper burns out when there is not enough oxygen to keep it lit. Then, the gases inside the jar begin to cool causing them to lose energy and slow down. This reduces the pressure inside the jar. Because the air pressure outside of the jar is greater than that inside the jar, the balloon is pushed into the jar by the outside air pressure.
• When we try to get the balloon back out of the jar, we again have the one-way valve problem. As the balloon is pulled to the bottom of the jar, the air inside is trapped behind the balloon. The minute this happens there is a balance of forces both inside and out. This balloon is not going to go anywhere when this happens. By inserting the straw you allow air to pass by the balloon. If the air can get into the jar, the forces never get a chance to balance and the balloon can be pulled from the jar very easily.
• Air pressure contributes greatly to atmospheric stratification. In general as atmospheric height increases air pressure and density decrease. Temperature helps distinguish atmospheric layers: troposphere, stratosphere, mesosphere, thermosphere, and exosphere.
33
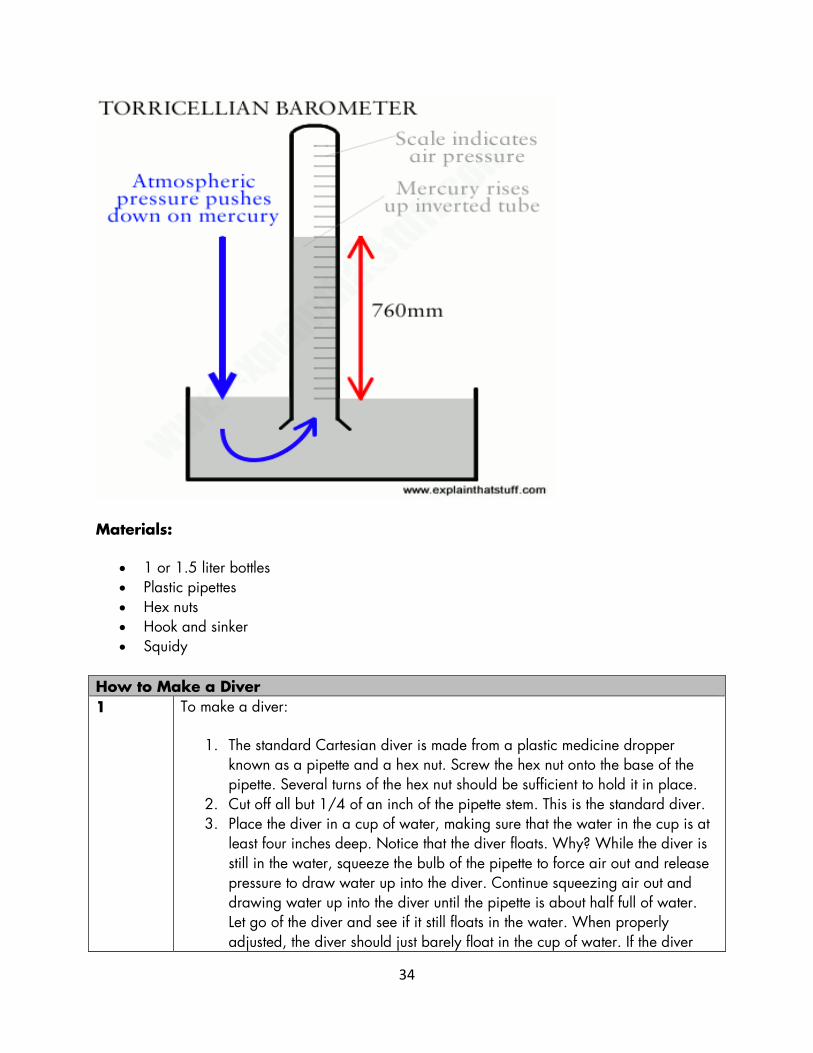
Cartesian Divers Passport Question: True or False: Molecules of gas compress easier than molecules of liquid. Passport Answer: True Background information: When you build a Cartesian diver, you are exploring three scientific properties of air: (1) Air has weight (2) Air occupies space (3) Air exerts pressure (this is our focus) Generally speaking, an object will float in a fluid if it’s fluid (density*mass/volume). If the object is denser than the fluid, then the object will sink. For example, an empty bottle will float in a full bathtub if the bottle is less dense than the water. However, as you start filling the bottle with water, its density increases and its buoyancy decreases. When it has enough water in it the bottle will sink. The Cartesian diver, consisting of a plastic medicine dropper and a metal hex nut, will float or sink in the bottle of water depending on the water level in the bulb of the dropper. When pressure is applied to the outside of the bottle, water is pushed up inside the diver, and the air inside the bulb is compressed into a smaller space. Molecules of gases are more easily compressed than molecules of liquids. The more water that is inside the diver, the denser it becomes and the diver sinks. When the pressure on the outside of the bottle is released, the compressed air inside the diver expands and this pushes some of the water back out of the diver. As the water level inside of the diver drops, the diver loses density and floats to the top. The Cartesian diver activity represents the way a barometer works. When there is high pressure in the atmosphere the air inside the barometer will be exposed to the atmospheric high pressure as well as the water outside the Barometer. This will cause the air to push a bit harder on the water, causing it to rise. Similarly, with the Cartesian Divers, when we squeeze the bottle, we raise the air pressure which will raise the water level.
34
Materials:
• 1 or 1.5 liter bottles • Plastic pipettes • Hex nuts • Hook and sinker • Squidy
How to Make a Diver 1 To make a diver:
1. The standard Cartesian diver is made from a plastic medicine dropper known as a pipette and a hex nut. Screw the hex nut onto the base of the pipette. Several turns of the hex nut should be sufficient to hold it in place.
2. Cut off all but 1/4 of an inch of the pipette stem. This is the standard diver. 3. Place the diver in a cup of water, making sure that the water in the cup is at
least four inches deep. Notice that the diver floats. Why? While the diver is still in the water, squeeze the bulb of the pipette to force air out and release pressure to draw water up into the diver. Continue squeezing air out and drawing water up into the diver until the pipette is about half full of water. Let go of the diver and see if it still floats in the water. When properly adjusted, the diver should just barely float in the cup of water. If the diver
35
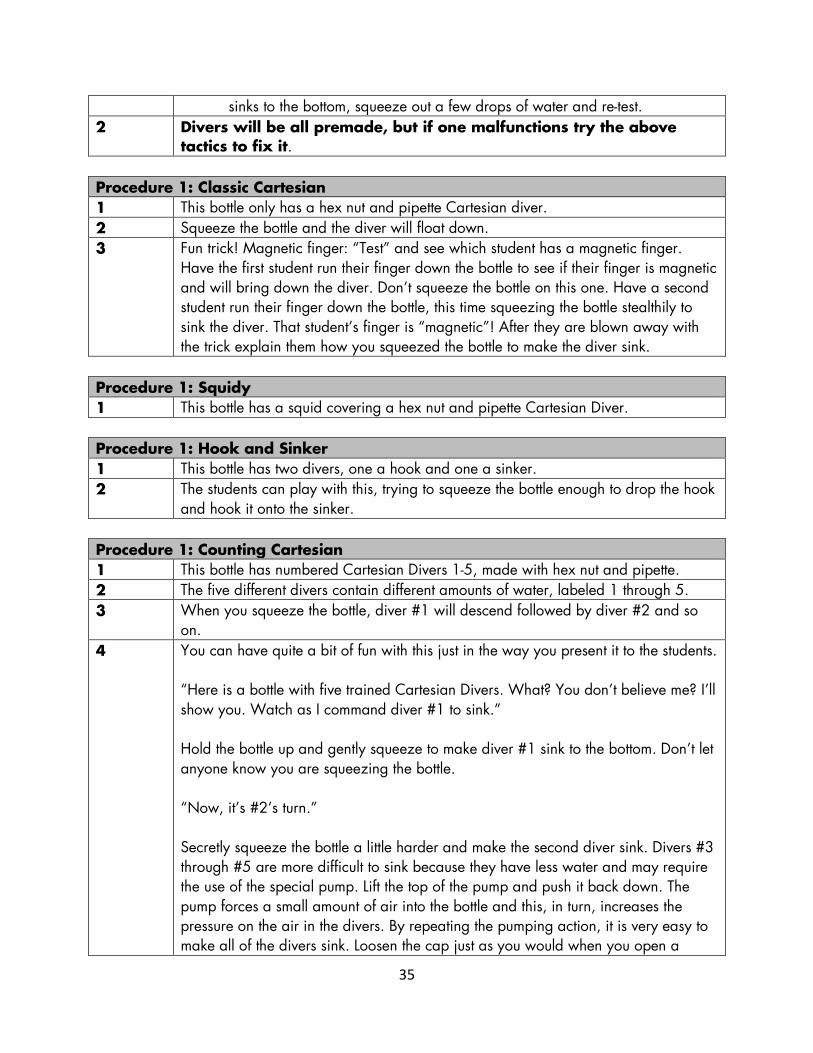
sinks to the bottom, squeeze out a few drops of water and re-test. 2 Divers will be all premade, but if one malfunctions try the above
tactics to fix it. Procedure 1: Classic Cartesian 1 This bottle only has a hex nut and pipette Cartesian diver. 2 Squeeze the bottle and the diver will float down. 3 Fun trick! Magnetic finger: “Test” and see which student has a magnetic finger.
Have the first student run their finger down the bottle to see if their finger is magnetic and will bring down the diver. Don’t squeeze the bottle on this one. Have a second student run their finger down the bottle, this time squeezing the bottle stealthily to sink the diver. That student’s finger is “magnetic”! After they are blown away with the trick explain them how you squeezed the bottle to make the diver sink.
Procedure 1: Squidy 1 This bottle has a squid covering a hex nut and pipette Cartesian Diver. Procedure 1: Hook and Sinker 1 This bottle has two divers, one a hook and one a sinker. 2 The students can play with this, trying to squeeze the bottle enough to drop the hook
and hook it onto the sinker. Procedure 1: Counting Cartesian 1 This bottle has numbered Cartesian Divers 1-5, made with hex nut and pipette. 2 The five different divers contain different amounts of water, labeled 1 through 5. 3 When you squeeze the bottle, diver #1 will descend followed by diver #2 and so
on. 4 You can have quite a bit of fun with this just in the way you present it to the students.
“Here is a bottle with five trained Cartesian Divers. What? You don’t believe me? I’ll show you. Watch as I command diver #1 to sink.” Hold the bottle up and gently squeeze to make diver #1 sink to the bottom. Don’t let anyone know you are squeezing the bottle. “Now, it’s #2’s turn.” Secretly squeeze the bottle a little harder and make the second diver sink. Divers #3 through #5 are more difficult to sink because they have less water and may require the use of the special pump. Lift the top of the pump and push it back down. The pump forces a small amount of air into the bottle and this, in turn, increases the pressure on the air in the divers. By repeating the pumping action, it is very easy to make all of the divers sink. Loosen the cap just as you would when you open a
36
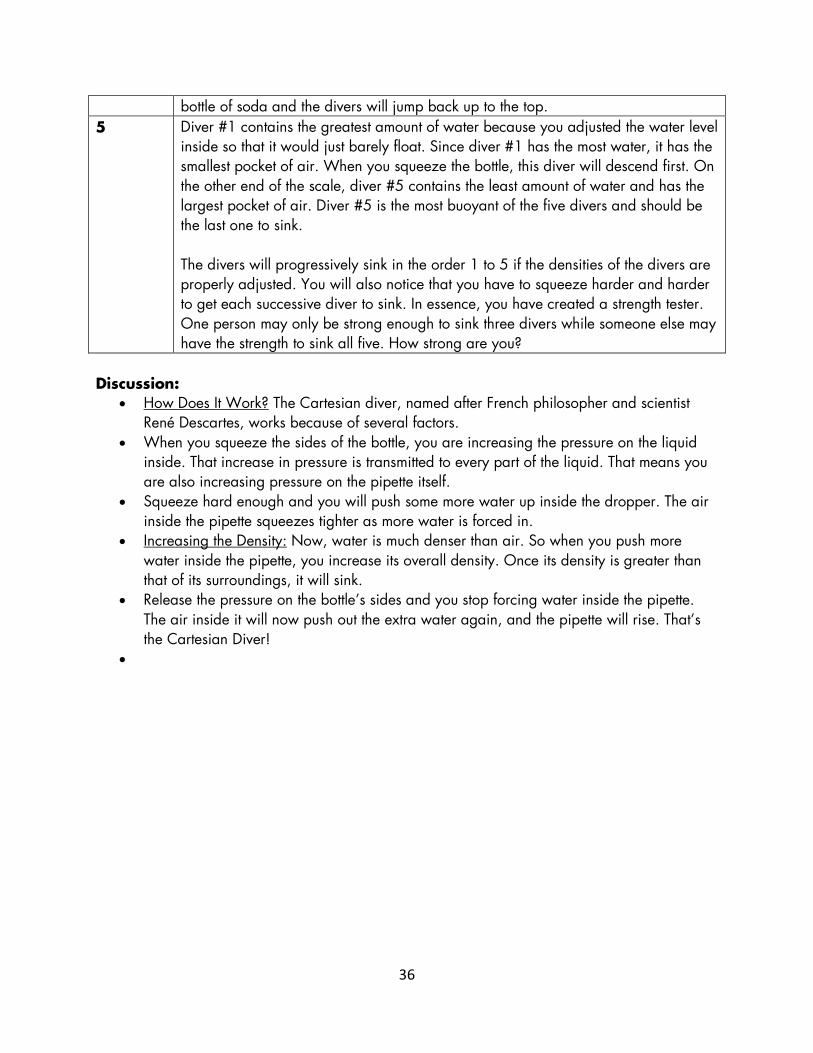
bottle of soda and the divers will jump back up to the top. 5 Diver #1 contains the greatest amount of water because you adjusted the water level
inside so that it would just barely float. Since diver #1 has the most water, it has the smallest pocket of air. When you squeeze the bottle, this diver will descend first. On the other end of the scale, diver #5 contains the least amount of water and has the largest pocket of air. Diver #5 is the most buoyant of the five divers and should be the last one to sink. The divers will progressively sink in the order 1 to 5 if the densities of the divers are properly adjusted. You will also notice that you have to squeeze harder and harder to get each successive diver to sink. In essence, you have created a strength tester. One person may only be strong enough to sink three divers while someone else may have the strength to sink all five. How strong are you?
Discussion:
• How Does It Work? The Cartesian diver, named after French philosopher and scientist René Descartes, works because of several factors.
• When you squeeze the sides of the bottle, you are increasing the pressure on the liquid inside. That increase in pressure is transmitted to every part of the liquid. That means you are also increasing pressure on the pipette itself.
• Squeeze hard enough and you will push some more water up inside the dropper. The air inside the pipette squeezes tighter as more water is forced in.
• Increasing the Density: Now, water is much denser than air. So when you push more water inside the pipette, you increase its overall density. Once its density is greater than that of its surroundings, it will sink.
• Release the pressure on the bottle’s sides and you stop forcing water inside the pipette. The air inside it will now push out the extra water again, and the pipette will rise. That’s the Cartesian Diver!
•
37
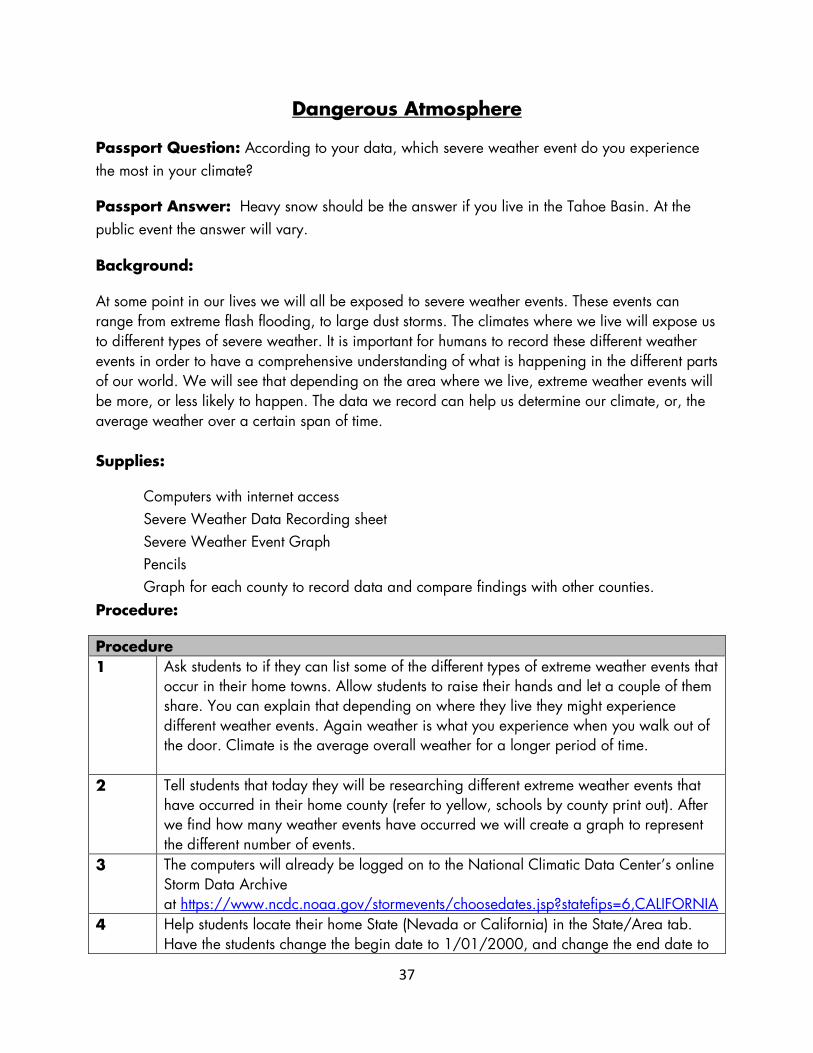
Dangerous Atmosphere
Passport Question: According to your data, which severe weather event do you experience the most in your climate?
Passport Answer: Heavy snow should be the answer if you live in the Tahoe Basin. At the public event the answer will vary.
Background:
At some point in our lives we will all be exposed to severe weather events. These events can range from extreme flash flooding, to large dust storms. The climates where we live will expose us to different types of severe weather. It is important for humans to record these different weather events in order to have a comprehensive understanding of what is happening in the different parts of our world. We will see that depending on the area where we live, extreme weather events will be more, or less likely to happen. The data we record can help us determine our climate, or, the average weather over a certain span of time. Supplies:
Computers with internet access Severe Weather Data Recording sheet Severe Weather Event Graph Pencils Graph for each county to record data and compare findings with other counties.
Procedure:
Procedure 1 Ask students to if they can list some of the different types of extreme weather events that
occur in their home towns. Allow students to raise their hands and let a couple of them share. You can explain that depending on where they live they might experience different weather events. Again weather is what you experience when you walk out of the door. Climate is the average overall weather for a longer period of time.
2 Tell students that today they will be researching different extreme weather events that have occurred in their home county (refer to yellow, schools by county print out). After we find how many weather events have occurred we will create a graph to represent the different number of events.
3 The computers will already be logged on to the National Climatic Data Center’s online Storm Data Archive at https://www.ncdc.noaa.gov/stormevents/choosedates.jsp?statefips=6,CALIFORNIA
4 Help students locate their home State (Nevada or California) in the State/Area tab. Have the students change the begin date to 1/01/2000, and change the end date to
38
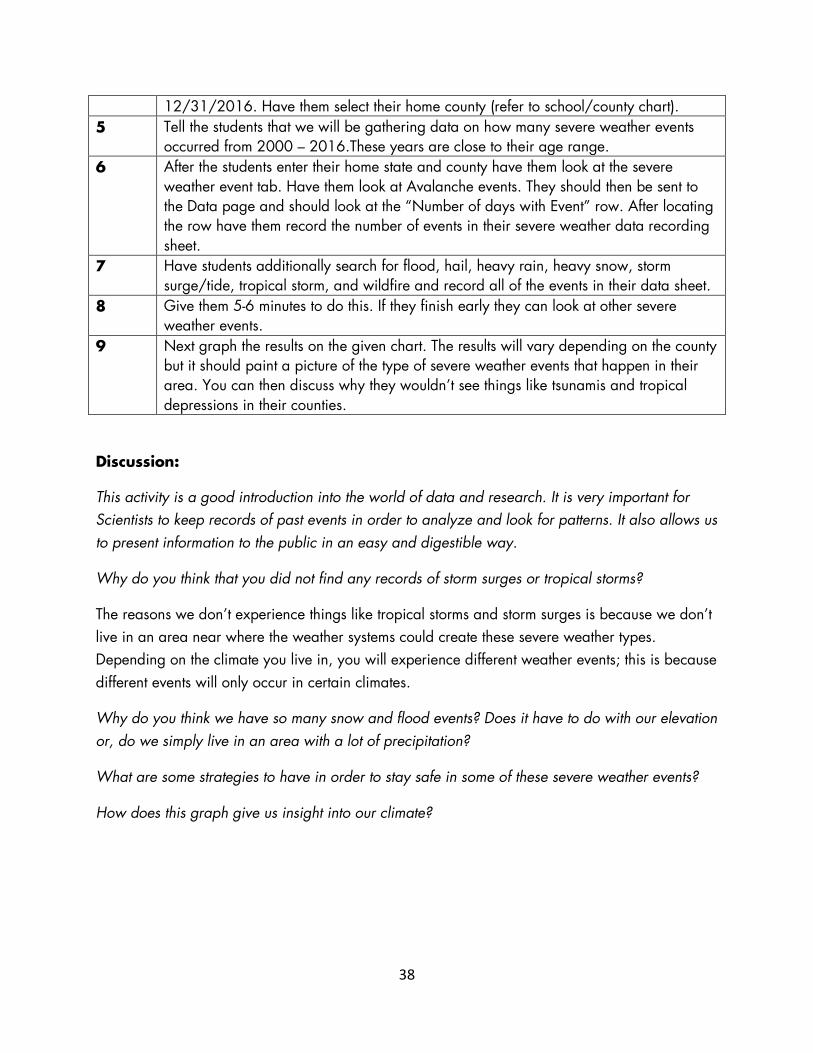
12/31/2016. Have them select their home county (refer to school/county chart). 5 Tell the students that we will be gathering data on how many severe weather events
occurred from 2000 – 2016.These years are close to their age range. 6 After the students enter their home state and county have them look at the severe
weather event tab. Have them look at Avalanche events. They should then be sent to the Data page and should look at the “Number of days with Event” row. After locating the row have them record the number of events in their severe weather data recording sheet.
7 Have students additionally search for flood, hail, heavy rain, heavy snow, storm surge/tide, tropical storm, and wildfire and record all of the events in their data sheet.
8 Give them 5-6 minutes to do this. If they finish early they can look at other severe weather events.
9 Next graph the results on the given chart. The results will vary depending on the county but it should paint a picture of the type of severe weather events that happen in their area. You can then discuss why they wouldn’t see things like tsunamis and tropical depressions in their counties.
Discussion:
This activity is a good introduction into the world of data and research. It is very important for Scientists to keep records of past events in order to analyze and look for patterns. It also allows us to present information to the public in an easy and digestible way.
Why do you think that you did not find any records of storm surges or tropical storms?
The reasons we don’t experience things like tropical storms and storm surges is because we don’t live in an area near where the weather systems could create these severe weather types. Depending on the climate you live in, you will experience different weather events; this is because different events will only occur in certain climates.
Why do you think we have so many snow and flood events? Does it have to do with our elevation or, do we simply live in an area with a lot of precipitation?
What are some strategies to have in order to stay safe in some of these severe weather events?
How does this graph give us insight into our climate?
39
Updrafts in Action
Passport Question: What two things together cause large hail to form?
Passport Answer: Very strong updrafts and super cooled water droplets.
Background:
Rain and hail will be suspended by the updraft inside a thunderstorm until the weight of the hail and water can no longer be supported. The stronger the updraft in a thunderstorm, the more intense the storm will be, and the larger the size of hail that can be produced. Suspending a ping pong ball in the stream of air supplied by a hair dryer will demonstrates how hail is supported in thunderstorm updrafts, and why with very strong thunderstorms we can see very large hail.
Bournoulli Principle - named after Daniel Bernoulli, an eighteenth-century Swiss scientist, who discovered that as the velocity of a fluid increases, its pressure decreases. The ping pong ball remains in the stream of air due to lower pressure created around the surface of the ball due to the Bournoulli Principle.
This low pressure effect also can be seen around the ping pong ball albeit in a different way. Instead of a narrowing in the center as in the venturi tube, the narrowing takes place around the perimeter of the ping pong ball (see figure right). In effect, there is an area of low pressure immediately adjacent to the ball.
Supplies:
Ping Pong Balls/Styrofoam Balls Air Pump/Hair Dryer Pictures of Hail Different Styrofoam balls to show the sizes of hail
Procedure:
Procedure 1 Ask students if they know how hail is created? Allow some answers. Tell students
that today they will be learning about updrafts and how pressure plays a role in the formation of hail.
2 To demonstrate how updrafts and pressure affect the formation of hail and rain we will be using an air blower and ping pong balls or Styrofoam balls.
3 Turn the air pump on and slowly insert one of the balls into the air stream. They should see the ball being held and oscillating in the air stream a bit. Ask them why they think the ball is moving around? ( Allow time for input)
4 Now tell them that we are going to put two balls in the air stream, and if we are lucky we might see them change position.
5 Attempt to put one ball in again, and then put another ball in the air stream. They
40
should both be held and could possibly switch places in the stream. (Have some extra balls nearby in case they fall out of the stream and roll away.)
7 You can then attempt to use the other blowers. Some of them have very strong air streams. Attempt to hold the ball in a powerful airstream. The ball should be held at a higher elevation. You can then explain that at higher elevations the air is colder. Allowing larger hail to form. Again, the stronger the updraft, the larger the hail possible.
6 Once you have done the demonstration a couple times lead the students into a discussion about hail and updrafts.
Discussion:
Why do you think the ping pong ball moved from side to side in the air stream? (Explain to them that as the speed of air increases the pressure will decrease. The air sped up around the ball creating an area of low pressure just to the side of it.)
Hail is formed when very strong thunderstorm updrafts meet super cooled water droplets. Super cooled water droplets are liquid water drops that are surrounded by air that is below freezing, and they're a common occurrence in thunderstorms.
(Ask students how they think extremely large hail is formed?)
Tell them that if the updrafts is strong enough it will suspend the hail in the air allowing more water to freeze around the other frozen water droplets until it is too heavy to be held by the updraft. Extremely strong updrafts can create very large hail!
They can then view the pictures of different hail and look at the different sized Styrofoam balls that represent the hail sizes.

41
Cloud in a Bottle
Passport Question: What causes clouds to form? Circle all that apply. Passport Answer: Water Vapor, Air Pressure, and Condensation. Background Information: A cloud is a visible mass of liquid droplets made of water, suspended in the atmosphere above the earth’s surface. They are formed by two processes: cooling the air or adding water vapor to the air. Often these processes act together to form clouds. There are several different types of clouds, classified by their shape, altitude (height in the atmosphere), and density. Latin roots are used to indicate the shape and density, with prefixes occasionally used to indicate altitude:
Latin Root
Translation
Example cumulus stratus cirrus nimbus
heap layer curl of hair rain
fair weather cumulus altostratus cirrus cumulonimbus
Cumulus clouds are the big, fluffy type; stratus clouds appear in layered sheets; cirrus clouds take the form of thin wisps; and nimbus clouds are the thick, dark types that often produce precipitation. Have students think about what types of clouds they see during pleasant weather or during storm events. Materials:
• 1-liter clear plastic bottle with cap • Foot pump with rubber stopper attached • Water • Rubbing alcohol
Procedure 1 Ask the students what they know about clouds. How are they formed? What are
they made of? Explain that water molecules are in the air all around us. These airborne water molecules are called water vapor. When the molecules are bouncing around in the atmosphere, they don't normally stick together. Clouds are formed when the water vapor cools and compresses into visible droplets. We’ll explain this a bit more after making a cloud of our own!
2 Place a few drops of rubbing alcohol in the bottom of the 1-liter bottle. We use rubbing alcohol instead of water because it volatilizes quickly and works better in
42
this demo. You don’t have to tell the students you’re using rubbing alcohol. 3 Swirl the alcohol around in the bottle, making sure to coat the sides. Then put the
rubber stopper in the bottle. 4 Pump the foot pump 10 times while holding the stopper down to make sure it
doesn’t pop off the top of the bottle. 5 When you are done pumping, pull out the stopper. You should see a cloud form in
the bottle! Discussion:
• Ask students why you were using the pumper. Pumping the bottle forces the molecules to squeeze together or compress. Releasing the pressure allows the air to expand, and in doing so, the temperature of the air becomes cooler. This cooling process allows the molecules to stick together - or condense - more easily, forming tiny droplets. Clouds are nothing more than groups of tiny water droplets!
• The reason the rubbing alcohol forms a more visible cloud is because alcohol evaporates more quickly than water. Alcohol molecules have weaker bonds than water molecules, so they let go of each other more easily. Since there are more evaporated alcohol molecules in the bottle, there are also more molecules able to condense. This is why you can see an alcohol cloud more clearly than a water cloud.
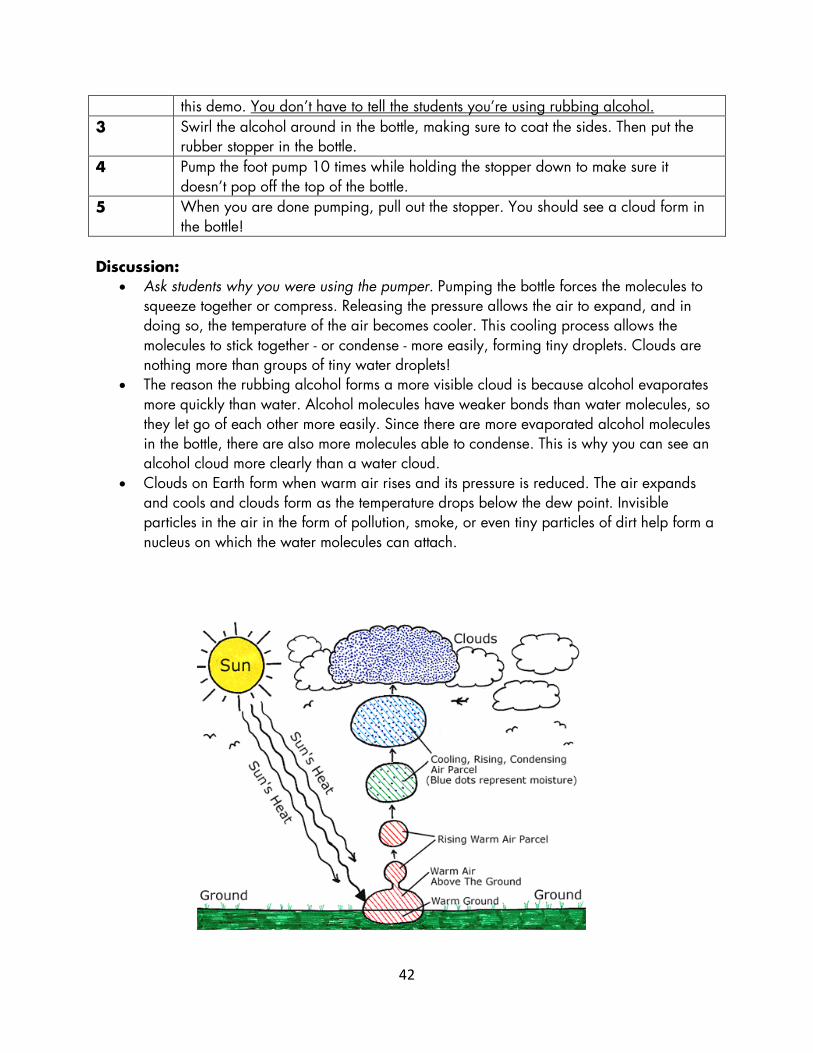
• Clouds on Earth form when warm air rises and its pressure is reduced. The air expands and cools and clouds form as the temperature drops below the dew point. Invisible particles in the air in the form of pollution, smoke, or even tiny particles of dirt help form a nucleus on which the water molecules can attach.
43
Kissing Balloons Passport Question: Blowing between the balloons creates a low pressure system which brings them together and results in what type of weather? Passport Answer: stormy Background information: Air pressure is the force exerted on you by the weight of tiny particles of air. These air molecules are invisible, but, they still have weight and take up space. Changes in temperature affect how many molecules are packed into the atmosphere. Warm air = low-pressure systems: Warm air expands so there are fewer air molecules in the atmosphere. Low pressure systems usually bring clouds and rainy days. How low-pressure systems create clouds and rain: In the Northern Hemisphere, a low-pressure system forces winds to spiral counterclockwise. Air is forced toward the center of this spiral and has nowhere to go but up. As the air rises, it cools (because the atmosphere gets colder as altitude increases). Cold air can’t hold as much water vapor as warm air, so the water condenses or comes together, to form clouds. When the water droplets join together and get too heavy, they may fall as rain or snow (which meteorologists call “precipitation”). Cool air= high-pressure systems: Cooler air contracts, which means air molecules become smaller and take up less space (so more of them can be packed into the atmosphere). High-pressure systems usually bring sunny days. How high-pressure systems create clear skies: In the Northern Hemisphere, high-pressure system winds spiral clockwise, moving from the center outward. To replace the air that flows out of the storm’s center, more air is sucked down from up higher in the atmosphere. This air warms up as it is pulled down. The warm air expands, and any clouds or precipitation that had formed disappear. Materials:
• Balloons • String • Rod
Procedure 1 Tie the strings to the rod; make sure the balloons are at the same height. 2 Ask the student: What happens if you blow between the balloons? Where will they
go?
44
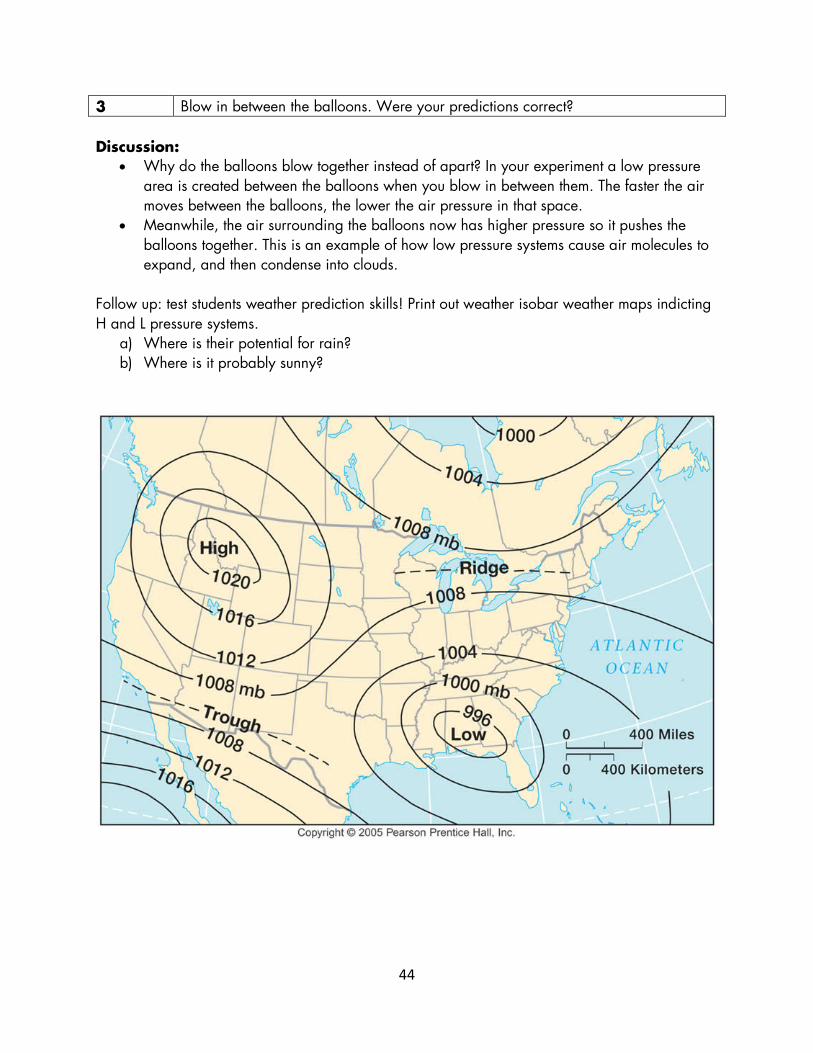
3 Blow in between the balloons. Were your predictions correct? Discussion:
• Why do the balloons blow together instead of apart? In your experiment a low pressure area is created between the balloons when you blow in between them. The faster the air moves between the balloons, the lower the air pressure in that space.
• Meanwhile, the air surrounding the balloons now has higher pressure so it pushes the balloons together. This is an example of how low pressure systems cause air molecules to expand, and then condense into clouds.
Follow up: test students weather prediction skills! Print out weather isobar weather maps indicting H and L pressure systems.
a) Where is their potential for rain? b) Where is it probably sunny?
45
Thermal Spirals Passport Question: What causes the air to rise? Passport Answer: Heat Background information: We feel the wind every day. The air is almost always in motion. One day it may be from the north and the next day from the south. There are many sources for wind: mechanical sources such as fans and, in nature, falling rain as it drags air along. But what is the origin of wind on the earth? Supplies: Paper plates Scissors Colored pencils/crayons Toaster or other heat source Procedure 1 Turn the toaster on to allow the unit to heat. 2 Ask the student where wind comes from. 3 Ask the students if a toaster can create wind. 4 Hold the spiral paper plates (10-15 inches) over the top of the toaster. What
happens? 5 Turn the toaster off. Discussion:
• Students may say clouds or trees cause the wind and that toasters cannot produce wind. They will quickly see that toasters do produce wind. Explain that wind is just air molecules in motion.
• We have all heard that “heat rises,” but why? The glowing coils in the toaster produce infrared radiation, heating the toaster. The heated metal then warms the air in the toaster, making the air less dense. Less dense air rises and cooler, denser air moves in to take its place, creating wind that spins the paper spiral.
• The source for the earth's heat is the sun. The radiation from the sun heats the ground. The ground, in turn, heats the air and we know that hot air rises. As it rises, cooler air comes in to replace the rising air. We feel this as wind.
• The faster the air rises, the faster the wind blows to take its place. Every time we feel the wind, regardless if is from the north, south, east, or west, somewhere else around the world the air is rising. The term for this rising air is convection. The wind patterns we experience have their source in convection.
46
Airzooka (bonus activity) • After they have created their thermal spiral and learned that wind is just the movement of
molecules they can try their hand at the Airzooka
• The Airzooka is a device that fires a vortex of air when you pull the elastic chord backwards and create a pressure vacuum.
• Explain to students that they can now try to manipulate the movement of molecules in the air to knock the cups over that are placed on the small table behind Thermal Spirals.
• Have the student stand behind the tape line that is about ten feet from the cups. • Give them 2-3 tries each (The Airzooka can be hard to fire correctly at first). • Fun online information about air vortices:
o A large air vortex cannon, with a 9 feet (2.7 m) wide barrel and a displacement volume of 2,873 US gallons (10.88 m3) was built in March 2008 at the University of Minnesota, and was able to blow out candles at 180 feet (55 m).
o In 2012 a large air vortex cannon was built for Czech television show Zázraky přírody (English: Wonders of Nature). It was capable of bringing down a wall of cardboard boxes from 100 meters (330 ft) in what was claimed to be a world record
47
Mini Greenhouse Effect Passport Question: What greenhouse gas is released in this experiment? Passport Answer: CO2
Background information: Earth's atmosphere is composed of a mixture of gases: 78% nitrogen, 21% oxygen, >1% argon and trace amounts of other gases, including carbon dioxide. Some gases absorb and re-radiate infrared energy that we sense as heat. These heat-absorbing gases are often referred to as greenhouse gases. Human activities have been adding carbon dioxide and other greenhouse gases to the atmosphere. How will earth's atmosphere respond to this increase in the amount of greenhouse gases? Scientists create physical models or experiments to compare how systems respond to changing conditions. In this experiment students will observe two model atmospheres: one with normal atmospheric composition and another with an elevated concentration of carbon dioxide. These two contained atmospheres will be exposed to light energy in a sunny window or from a lamp. Supplies: Vinegar Baking Soda Erlenmeyer flask Test tube Stoppers Connector Tubes
2 thermometers Black paper Light/ heat source 2 large mason jars BTB
Procedure 1 Intro Questions:
1. Explain to students that air is a mixture of many different gases, including some greenhouse gases that absorb infrared energy.
2. Ask students if they know any greenhouse gases and their sources. (Answers may include: Water Vapor; naturally present from evaporation and transpiration. Carbon dioxide; burning fossil fuels, burning forests. Methane; rice agriculture, digestive systems of cattle, decaying organic matter. Nitrous oxide; agriculture through the use of nitrogen based fertilizers, livestock waste).
3. Ask Students: What human activities have been changing the concentration of these gases in our atmosphere? (Answers: see above.) Tell students that over the past 200 years, the concentration of these gases increased from approximately 278 ppm (parts per million) in 1800 to 385 ppm in 2008.
4. How does that happen? Use carbon poster and black “carbon” dots to tell the
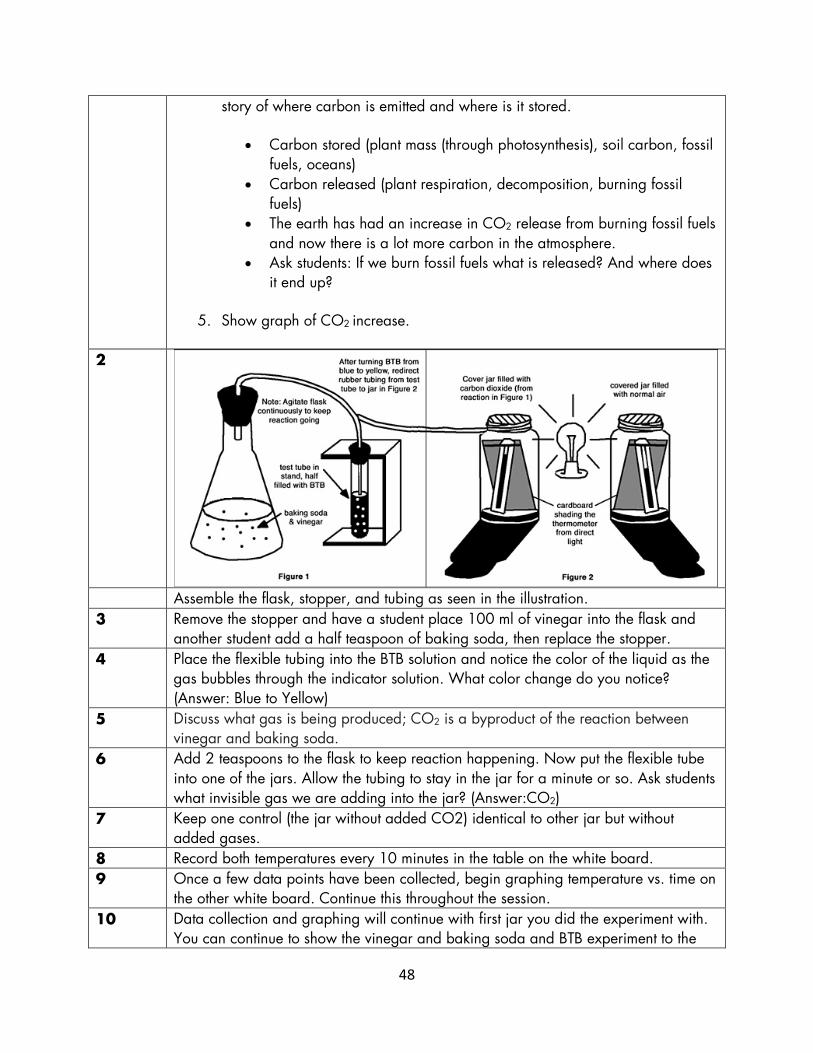
48
story of where carbon is emitted and where is it stored.
• Carbon stored (plant mass (through photosynthesis), soil carbon, fossil fuels, oceans)
• Carbon released (plant respiration, decomposition, burning fossil fuels)
• The earth has had an increase in CO2 release from burning fossil fuels and now there is a lot more carbon in the atmosphere.
• Ask students: If we burn fossil fuels what is released? And where does it end up?
5. Show graph of CO2 increase.
2
Assemble the flask, stopper, and tubing as seen in the illustration. 3 Remove the stopper and have a student place 100 ml of vinegar into the flask and
another student add a half teaspoon of baking soda, then replace the stopper. 4 Place the flexible tubing into the BTB solution and notice the color of the liquid as the
gas bubbles through the indicator solution. What color change do you notice? (Answer: Blue to Yellow)
5 Discuss what gas is being produced; CO2 is a byproduct of the reaction between vinegar and baking soda.
6 Add 2 teaspoons to the flask to keep reaction happening. Now put the flexible tube into one of the jars. Allow the tubing to stay in the jar for a minute or so. Ask students what invisible gas we are adding into the jar? (Answer:CO2)
7 Keep one control (the jar without added CO2) identical to other jar but without added gases.
8 Record both temperatures every 10 minutes in the table on the white board. 9 Once a few data points have been collected, begin graphing temperature vs. time on
the other white board. Continue this throughout the session. 10 Data collection and graphing will continue with first jar you did the experiment with.
You can continue to show the vinegar and baking soda and BTB experiment to the
49
students as they come by, but there won’t be enough time to collect new data. Discussion:
• As one can see from this controlled experiment, greenhouse gases absorb heat. Our control jar and our CO2 jar were exposed to the same amount of heat from the light and are identical in every other way. The only difference is the CO2 addition.
• Ask students how they can reduce their carbon footprint!
50
How Much Water is in That Cloud?
Passport Question: True or False: All types’ clouds hold the same amount of water.
Passport Answer: False
Background:
The updrafts in thunderstorms can be extremely strong. The stronger the updraft, the more weight of rain and hail that can be supported. This experiment will show that cotton balls, like clouds, hold a tremendous amount of water. In nature, once the weight of the water is more than the updraft can manage to support, the water falls as rain. Using cotton balls to model clouds, the students will learn the high water capacity in clouds.
Remember that we are using cotton balls to MODEL clouds. Scientists use models all the time in order to better understand the natural world. Emphasize that clouds are NOT made of cotton.
Supplies: Cotton balls Eye droppers One small cup of water per pair of students
Procedure:
Procedure 1 Distribute one cotton ball, one eyedropper, and one cup of water to each pair of
students. 2 Have one student hold the cotton ball and one the eyedropper.(For best results, the
student with the cotton ball should hold it over the cup of water by pinching a small portion of the cotton ball between his/her thumb and index finger.)
3 Explain the purpose is to put as many drops of water into the cotton ball as possible. The cotton ball will be full (saturated) when water begins to drip from the bottom.
4 Before they begin however, ask for estimates of the number of drops they think it will take to saturate the cotton ball. Write their estimates on a chart or an easel. Remember this is not a contest, this is an investigation.
5 Have the students count every drop and stop counting when water begins to drop from the bottom of the cotton ball. During the experiment the students should not leave the eyedropper in one position but should move it around to ensure they have as much water as possible in the cotton ball. Let the students share how many they were able to add before the cotton ball dripped.
6 After they perform the activity once have them divide a cotton ball in two. Remind the students that not every cloud is the same. In nature we will see smaller and larger
51
clouds. (If they have been to the activity where they make a cloud diagram from cardstock then they should know some different cloud types
7 Record their results again.
Discussion:
Remember that we are using cotton balls to MODEL clouds. Scientists use models all the time in order to better understand the natural world. Emphasize that clouds are NOT made of cotton, but in this activity represent clouds.
Air near the earth's surface is warmed by the sun. Some surfaces warm more, or faster than others and the resulting warm air rising. We call this upward moving air an "updraft." Eventually, the water vapor that is carried in the air condenses and raindrops are formed. In nature, once the weight of the water is more than can be supported by the updraft, the water falls as rain. The updrafts in thunderstorms can be extremely strong. The stronger the updraft, the more weight of rain and hail that can be supported
Typically, the original estimates will be low (10-30 drops). Often, the first estimate sets the general area around where most of the remaining estimates will occur. However, some students will throw out a "wild" answer (100, 150, etc.).
The results often surprise the students when they discover the cotton ball holds much more water than they thought. When done properly, using the smallest drops possible and completely saturating the cotton ball, more than 200 drops of water will be contained within the cotton ball.
Since the results can vary widely, ask the students which answer was the "correct" one. The correct answer, of course, is that ALL results are correct. Ask the students why the results vary. The three main reasons are...
1. Drop sizes were different, 2. Cotton balls are not exactly alike, and 3. Some students did not move the eyedropper around to saturate the cotton ball.
This is what also occurs in nature. Drop sizes are different in thunderstorms based partly upon the strength of the updraft. Although the processes involved in making a thunderstorm are similar, no two clouds are exactly the same. Also, the amount of moisture in the clouds varies.
For example, thunderstorms occasionally develop over forest fires. While they may look like rain producers, the moisture is limited so much that often these clouds produce little, if any, rain. More times than not, all they do is start more fires due to lightning.
When too much rain falls too quickly, flash flooding occurs. The National Weather Service issues Flash Flood Warnings to alert you to the dangers of the rapidly rising waters.
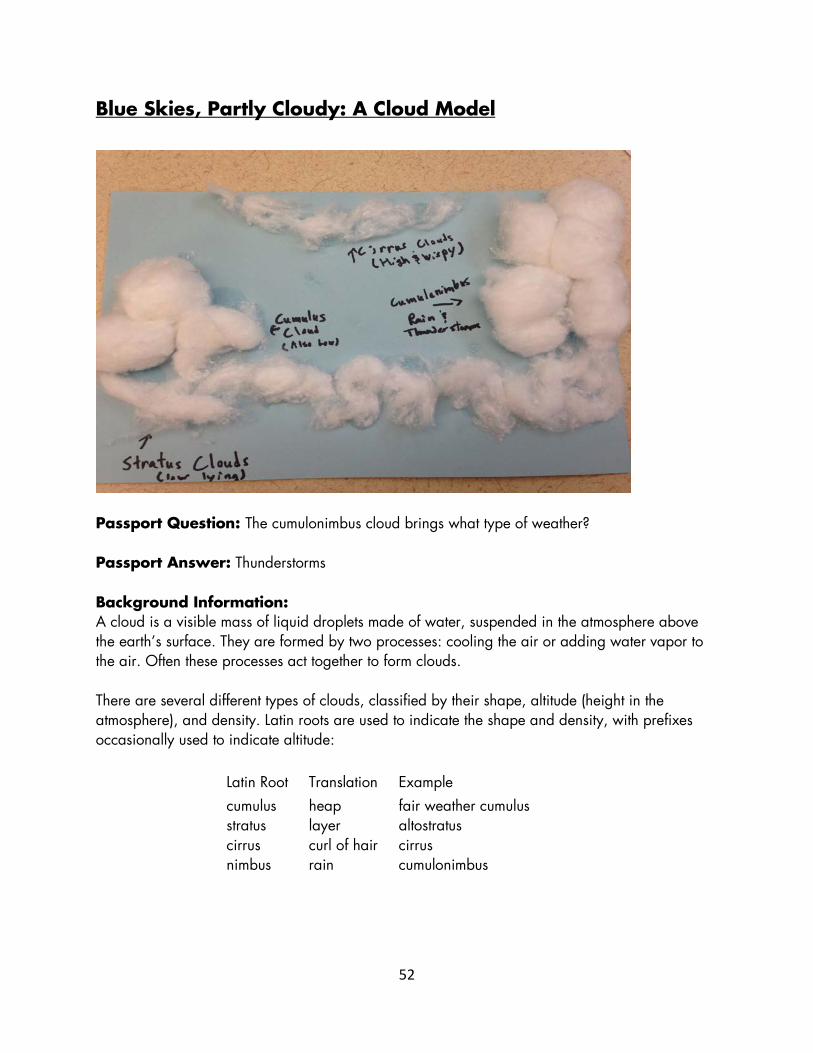
52
Blue Skies, Partly Cloudy: A Cloud Model
Passport Question: The cumulonimbus cloud brings what type of weather? Passport Answer: Thunderstorms Background Information: A cloud is a visible mass of liquid droplets made of water, suspended in the atmosphere above the earth’s surface. They are formed by two processes: cooling the air or adding water vapor to the air. Often these processes act together to form clouds. There are several different types of clouds, classified by their shape, altitude (height in the atmosphere), and density. Latin roots are used to indicate the shape and density, with prefixes occasionally used to indicate altitude:
Latin Root
Translation
Example cumulus stratus cirrus nimbus
heap layer curl of hair rain
fair weather cumulus altostratus cirrus cumulonimbus
53
Cumulus clouds are the big, fluffy type; stratus clouds appear in layered sheets; cirrus clouds take the form of thin wisps; and nimbus clouds are the thick, dark types that often produce precipitation. Supplies:
Materials Blue Cardstock Elmer’s Glue Cotton Balls Cloud Diagram Mechanical Pencils Colored Pencils
Procedure 1 Look at the cloud diagram. Ask the students to describe the differences they see
between the different types of clouds. 2 Have the students create different types of cloud shapes by gluing cotton balls on a
piece of blue cardstock. Discussion:
• Stratus clouds occur below 6,000 feet. These clouds look like flat sheets of clouds and mean an overcast or rainy day. These clouds are usually a uniform color of gray and cover most of the sky.
• Cumulus clouds are also below 6,000 feet, and look like big fluffy balls of cotton. They usually mean that the weather will be nice; however, sometimes they can get very tall and turn into thunderheads. These clouds are usually flat on the bottom, but have very lumpy tops. Cumulus clouds usually form alone, and there is a lot of blue sky between each cloud.
• Wispy cirrus clouds usually form above 18,000 feet and are often called “horse tail” clouds. Cirrus clouds generally move from west to east. They form when water vapor forms ice crystals, and they are so thin because of the height at which they form. There is very little water vapor above 18,000 feet, so big thick clouds cannot form. They sometimes appear before a front and indicate changing weather.
• These are the three main types of clouds that can form; however, there can be many combinations of clouds. One example is cumulonimbus, which is a dense towering vertical cloud associated with thunderstorms and atmospheric instability, forming from water vapor carried by powerful upward air currents.
54
Lightning Room! Passport Question: Lightning is an example of _______ electricity. Passport Answer: static Background: What is lightning? Lightning is a bright flash of electricity produced by a thunderstorm. All thunderstorms produce lightning and are very dangerous. If you can hear thunder, then you are in danger from lightning. Lightning kills or injures people between 75 to 100 people each year; more than hurricanes or tornadoes. What causes lightning? Have you ever rubbed your feet across carpet and then touched a metal door handle? If so, then you know that you can get shocked! Lightning works in the same way. Lightning is an electric current. Within a thundercloud high in the sky, many small bits of ice (frozen raindrops) bump into each other as they move around in the air. All of those collisions create an electric charge. After a while, the whole cloud fills up with electrical charges. The positive charges or protons form at the top of the cloud and the negative charges or electrons form at the bottom of the cloud. Since opposites attract, that causes a positive charge to build up on the ground beneath the cloud. The ground’s positive electrical charge concentrates around anything that sticks up, such as mountains, people, or single trees. The charge coming up from these points eventually connects with a charge reaching down from the clouds and - zap - lightning strikes! Supplies: Fluorescent light bulbs Balloons Mints (cut up in ¼) Procedure: Balloons and Light Bulbs 1 Have students grab a blown-up balloon. 2 Pass out light bulbs, one per student or pairs depending on the number of students. 3 Have students rub the balloon on their heads. 4 Turn off the lights and have students press the balloon on end of light bulb. 5 The light bulb lights up! 6 Repeat if students want to do it again.
Procedure: Mints 1 Pair up students, or hand out mirrors. 2 Hand each students a portion of a mint; tell them not to put it in their mouth yet. 3 On a count to three…have students quickly put mint in mouth and chew hard with
mouth open.
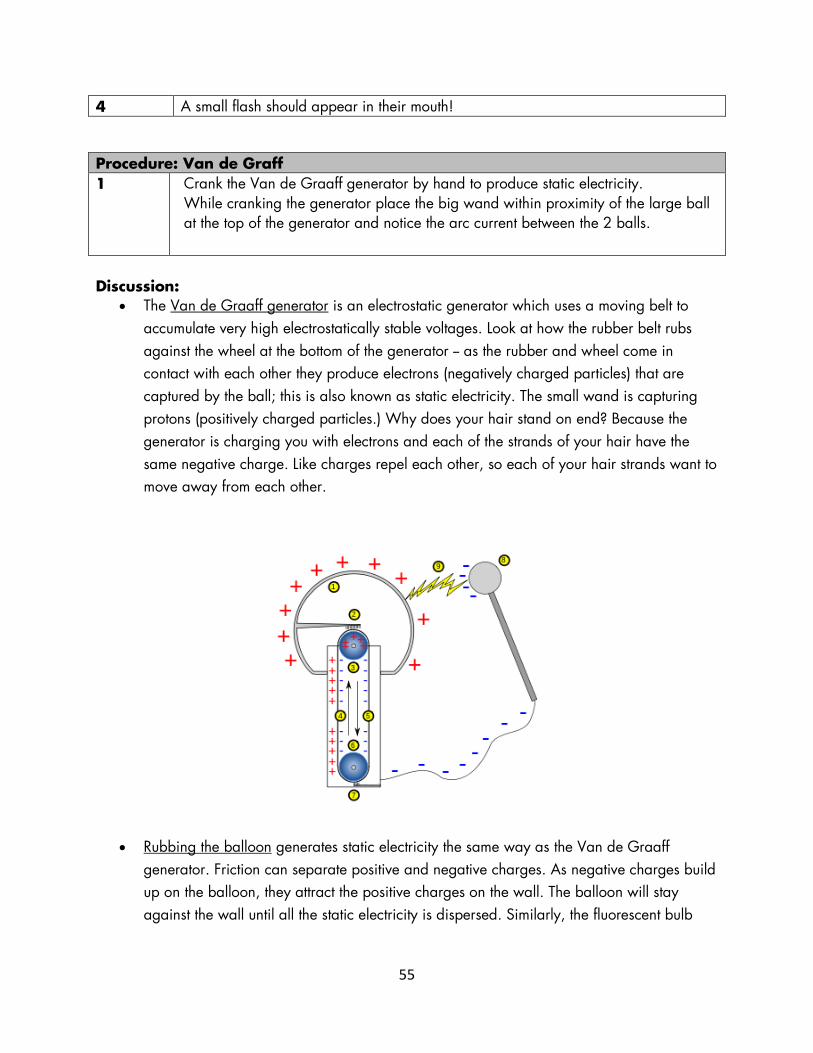
55
4 A small flash should appear in their mouth!
Procedure: Van de Graff 1 Crank the Van de Graaff generator by hand to produce static electricity.
While cranking the generator place the big wand within proximity of the large ball at the top of the generator and notice the arc current between the 2 balls.
Discussion:
• The Van de Graaff generator is an electrostatic generator which uses a moving belt to accumulate very high electrostatically stable voltages. Look at how the rubber belt rubs against the wheel at the bottom of the generator -- as the rubber and wheel come in contact with each other they produce electrons (negatively charged particles) that are captured by the ball; this is also known as static electricity. The small wand is capturing protons (positively charged particles.) Why does your hair stand on end? Because the generator is charging you with electrons and each of the strands of your hair have the same negative charge. Like charges repel each other, so each of your hair strands want to move away from each other.
• Rubbing the balloon generates static electricity the same way as the Van de Graaff generator. Friction can separate positive and negative charges. As negative charges build up on the balloon, they attract the positive charges on the wall. The balloon will stay against the wall until all the static electricity is dispersed. Similarly, the fluorescent bulb
56
lights up because of the electrical charge that is conducted from the static electricity, from your hair, and into the bulb.
• The Winter Green Mints also light up! This effect is called triboluminescence, which is similar to the electrical charge build-up that produces lightning, but on a much smaller scale. Triboluminescence is the emission of light resulting from something being smashed or torn. When you rip a piece of tape off a roll, it will produce a slight glow for the same reason.
• Triboluminescence occurs when molecules, in this case crystalline sugars, are crushed, forcing some electrons out of their atomic fields. These free electrons bump into nitrogen molecules in the air. When they collide, the electrons impart energy to the nitrogen molecules, causing them to vibrate. In this excited state, and in order to get rid of the excess energy, these nitrogen molecules emit light -- mostly ultraviolet (nonvisible) light, but they do emit a small amount of visible light as well. This is why all hard, sugary candies will produce a faint glow when cracked.
• When you bite into a Wint-O-Green Life Saver, a much greater amount of visible light can be seen. This brighter light is produced by the wintergreen flavoring. Methyl salicylate, or oil of wintergreen, is fluorescent, meaning it absorbs light of a shorter wavelength and then emits it as light of a longer wavelength. Ultraviolet light has a shorter wavelength than visible light. So when a Wint-O-Green Life Saver is crushed between your teeth, the methyl salicylate molecules absorb the ultraviolet, shorter wavelength light produced by the excited nitrogen, and re-emit it as light of the visible spectrum, specifically as blue light -- thus the blue sparks that jump out of your mouth when you crunch on a Wint-O-Green Life Saver.
57
The Rumbling Road
Passport Question: Which travels faster: light (lightning) or sound (thunder)?
Passport Answer: Light
Background:
Thunder is a result of the rapid expansion of super-heated air caused by the extremely high temperature of lightning. As the lightning bolt passes through the air, the air expands faster than the speed of sound generating a "sonic boom".
Since the sonic boom is created along the path of the lightning bolt, in effect, millions of sonic booms are created, which we hear as a rumble.
Thunder from a nearby lightning strike will have a very sharp crack or loud bang, whereas thunder from a distant strike will have a continuous rumble. The primary reason for this is that the sound shock wave modifies as it passes through the atmosphere.
Sound travels roughly 750 mph (1,200 km/h), or approximately one mile every 5 seconds (one kilometer every 3 seconds). The speed actually varies greatly with the temperature, but the thumb rule of 5 seconds per mile (3 seconds per kilometer) is a good approximation. On the other hand lightning can travel 220,000 mph.
Through a series of examples, the student will be able to determine the distance to a lightning strike.
Supplies: Flashlight
Thunder sound files
Speaker or some kind of sound amplifier
Procedure:
Procedure 1 Instruct the students about thunder and why it occurs. Ensure they know sound
travels about one mile every five seconds (three kilometers every three seconds). Instruct the student that they can approximate "seconds" by counting "One-Mississippi", "Two-Mississippi", "Three-Mississippi", etc.
2 Have the student look at the end of the flashlight and instruct them to begin counting once they see it light up
3 Rapidly turn the flashlight on and off

58
4 After you count five seconds, either say "BOOM" or play one of the sharp thunder sounds.
5 Have the students divide the time from the first light to hearing the sound by 5 seconds to determine the distance in miles from the lightning bolt.
6 Repeat the procedure but wait 10 seconds between flashing the light and playing the sound.
7 Repeat the procedure but wait 15 seconds between flashing the light and playing the sound.
8 Repeat the procedure several more times but vary the time from flash to sound (two seconds, 14 seconds, etc.). Remember, the longer the time between flash and sound, the farther away the lightning is so use the thunder sounds (distant rumbles) that, by themselves, are an indication of distance.
Discussion:
Each time you do the procedure there will be some variability in the student's results due to inconsistent counting of the seconds. However, you will quickly be able to understand the student's grasp of the concept by inquiring how many seconds they counted.
You should then move on to the next activity, the Lightning Room. In the activity they will learn about how lightning is created.
59
Space Science
The Fabric of Space-Time Passport Question: What makes the gravity model different from the actual Solar System? Passport Answer: Friction, the gravity model has it and that slows down the marbles and forces them to fall into the middle, but, in space there is no friction. Background Information: How do the planets stay in orbit around the sun? The key is gravity. Every object with mass (made of matter) has some gravity. When I hold a pencil, I am pulling on the pencil with my gravity and the pencil is pulling on me with its gravity. However, since the mass of both me and the pencil is very small, our gravitational pull is too small to have any real effect. The rest of the room isn’t pulled towards us! The sun, though, has a lot of mass and, therefore, a lot of gravity to pull on the planets with! This gravity model allows students to experiment with planetary motion. This activity is more of a guided exploration than a lesson. The goal is that students see that the marbles circle around the weight, representing the planets orbiting the sun. NOTE: The model is NOT accurate. The marbles eventually fall into the center and the planets don’t! The difference is friction—the spandex slows down the marbles, but, in space there is no material to slow the planets down. So, they orbit continuously! While the model isn’t accurate, it’s a great lesson! Emphasize that friction is the difference. Materials:
• 7 36” 1.25” PVC pipes • 14 PVC T-connectors • 14 34” .75” PVC Electrical Conduit • 28 .75” to 1.25“ Connector (PVC-1 D2466 IPS 1 x 1/2) • ~ 72” x 72” piece of Lycra/spandex (Comes in 48” width rolls) • 20 clamps • 2 1lb weights • Marbles • Other small spheres (ping pong balls, Styrofoam balls, etc.)
Procedure 1 Lay out the ground rules for this activity: Students must be gentle with the marbles
and the model, and they cannot go underneath the model for safety reasons. 2 Begin with no weight on the model. Roll a few marbles around. What happens? 3 Place one weight in the center of the model. Ask for predictions of what the marbles
will do when rolled onto the sheet. What is the difference? The marbles should move much more quickly down towards the weight.
4 Demonstrate how to roll the marbles: they should be rolled gently but with speed
60
toward the edge of the model (it may take some practice to get it down!). 5 Allow students to explore what they can do with the model. If they seem stuck,
prompt them with these ideas: What if we use spheres of different sizes? What if we roll marbles in opposite directions? What if we add a second weight to the model? What if we roll a small sphere and a big sphere together?
Discussion:
• If everything with mass has gravity, then wouldn’t the planets pull on the sun too? They do! The sun has a slight “wobble” due to the pull of the eight planets around it. However, since the sun has so much more mass than the planets, the effect is very small.
• Why do the planets orbit the sun instead of the sun orbiting a planet? Because of mass and gravity, the object with less mass always orbits the object with more mass.
• Why do the planets stay in orbit? Newton’s first law of motion says that an object in motion will stay in motion unless something acts on it. The planets stay in orbit because there is nothing in space to push or pull them, unlike the marbles in our model that are pushed against by friction.
• If the sun’s gravity is pulling on the planets, why don’t they fall into the sun? In addition to falling toward the sun, the planets are moving sideways—VERY fast! The force of the sun’s gravity and the speed of the planets are balanced. Amazingly, the planets are falling towards the sun but because they are moving so fast that they “overshoot” the sun and travel in a circular path.
61
How Big is the Moon? Passport Question: A solar eclipse happens when the moon passes between the __________ and the __________. Passport Answer: A solar eclipse happens when the moon passes between the Earth and the Sun. Background Information: The moon looks big in our sky. But, how big is it really when compared to the Earth and other planets? The moon is only 1/50th the size of Earth! A solar eclipse happens when the moon passes in between the Earth and the sun, blocking the sun’s light and casting its shadow on the Earth. The moon looks so big in the sky and can eclipse the far larger sun because of how close it is to our planet. It’s all a matter of perspective! Have students think about how someone seems shorter when they are far away and bigger when they are closer. Another fun example is “squishing” someone’s head between your thumb and pointer finger when they stand far away from you. Clearly, their head is much larger than your fingers but you are able to “squish” their head because they are so far away. Materials:
• Play-Doh • Small Zip-Loc Bags • Plastic Knives (5) • Stencil for cutting • Image of solar eclipse • Image of Sun to place on the wall
Procedure 1 Ask the students how big the moon is. How big is it compared to the Earth? The sun? 2 Take a piece of play-doh and roll it into a long cylindrical shape. Set the play-doh
against the stencil and cut it at the grey square so that you have two pieces. One piece represents 49 units and the other represents 1 unit. The large piece is the Earth and the small piece is the moon.
3 Roll each of the pieces into spheres. The large piece is the Earth and the small piece is the moon. Are you surprised?
4 What is an eclipse? Has anyone seen an eclipse before? Show the picture of the solar eclipse. A solar eclipse is when the moon crosses between the Earth and the sun, blocking the sun’s light. On this scale, the Sun would be the size of 65 million pieces of play-doh! How can our tiny moon block the giant sun in an eclipse?
5 Tell students to block the sun on the wall using either their Earth or moon models (NOTE: This part of the activity is not to scale—the big difference in size makes using a true scale very difficult. The sun would actually be much larger than the picture, but the scientific concept still holds). Allow them to experiment and figure out how to eclipse the sun. Then have them switch models and try again.
62
6 Which model is easier to block the sun with? What do they have to do to eclipse the sun with the play-doh moon? What can you guess about how far away the sun is?
Discussion:
• A total eclipse of the sun is going to happen THIS YEAR! On August 21st. • The average distance between Earth and moon is 250,000 miles. (It is 24,000 miles to
circumnavigate the globe. You would need to do this 10 times to get close to that distance!)For comparison, the next closest object is Venus with an average distance of 25 million miles. In astronomical terms, the moon is right on top of us!
• The current theory on how the moon formed is that about 4.45 billion years ago, while the Earth was still forming, an object about the size of Mars hit the Earth at an angle. The impact threw debris into space from the Earth's mantle and crust. The object itself melted and merged with the Earth, and the debris came together to form the moon.
• Solar eclipses are very rare—they are only possible when the moon is crossing Earth’s orbital plane, which only happens twice a year, AND is in the new moon phase.
• The sun is 93 million miles from the Earth and the moon on average. Light, the fastest thing in the universe, takes 8 minutes to get to the Earth from the sun. That’s how the little moon can block the giant sun!
63
Pocket Solar System Passport Question: Name three things that are a part of our solar system. Passport Answer: Answers vary but include any of the planets and Earth’s sun and moon. Background Information: What does our solar system look like? Building scale models of the solar system is a challenge due to the vast distances and huge size differences involved. This is a simple, small model to give students an overview of the distances between the orbits of the planets and other objects in our solar system. NOTE: While the distances are to scale, the planet images we use are not. Materials:
• 1 completed Pocket Solar System for reference • 1 meter per person of paper tape, such as adding machine or receipt paper • Meter stick • Planet sheet • Scissors • Glue sticks • Recycling bin
Procedure 1 Ask the students: What does our solar system look like? 2 Give each student a meter length of paper tape, a sheet of planets, scissors, and a
glue stick. Students can cut the planets out at the beginning or as they do the activity. Have them place the Sun at one end and Pluto at the opposite end. (Note: Instruct students to cut the planets as small as possible while still retaining the planet name.) Tell students that this activity requires listening!
3 Fold the tape in half and then in half again. Unfold and lay it flat. Now you have the tape divided into quarters with the Sun at one end, Pluto on the other and Uranus in the middle (Note: Pronounce this planet “your-in-us”). Place Saturn at the quarter mark (closer to the Sun) and Neptune at the 3/4 mark (closer to Pluto). Which planet is in the middle of our solar system? Many will be surprised that it is Uranus!
4 Stop and inspect your work. You’ve only been mapping out the places for the 3 most distant planets and Pluto. That means that you’ve still got 5 planets and the asteroid belt. Where do you think they will go? Now, you have to try to fit them into the quarter between the Sun and Saturn! Let’s keep going to see how this will work.
5 Fold the Sun up to Saturn and crease it. Unfold and lay flat again. Place Jupiter at the halfway mark between the Sun and Saturn (1/8th mark). If you take a look, you’ve got the four gas giants and Pluto all on there. For the remaining bodies in the Solar System, you’ll only need inner 1/16th of your tape length!
6 Fold the Sun out to meet Jupiter to mark the 1/16th spot. A planet does not go here, but the Asteroid Belt does.
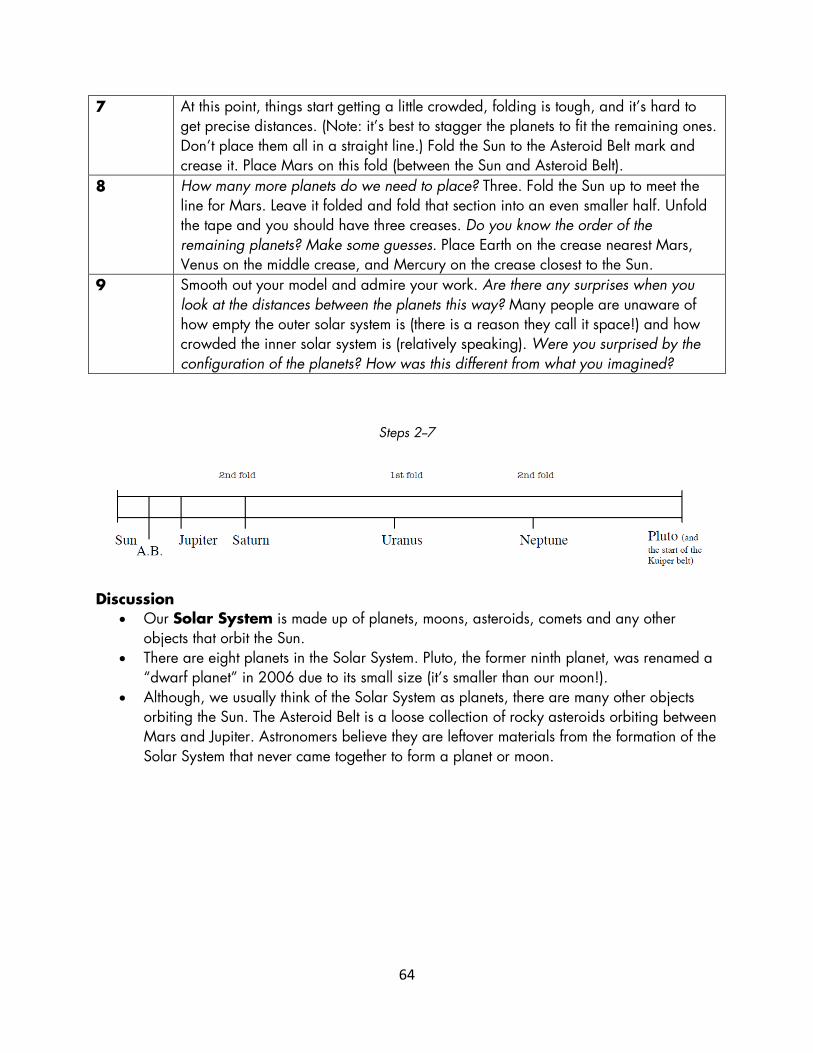
64
7 At this point, things start getting a little crowded, folding is tough, and it’s hard to get precise distances. (Note: it’s best to stagger the planets to fit the remaining ones. Don’t place them all in a straight line.) Fold the Sun to the Asteroid Belt mark and crease it. Place Mars on this fold (between the Sun and Asteroid Belt).
8 How many more planets do we need to place? Three. Fold the Sun up to meet the line for Mars. Leave it folded and fold that section into an even smaller half. Unfold the tape and you should have three creases. Do you know the order of the remaining planets? Make some guesses. Place Earth on the crease nearest Mars, Venus on the middle crease, and Mercury on the crease closest to the Sun.
9 Smooth out your model and admire your work. Are there any surprises when you look at the distances between the planets this way? Many people are unaware of how empty the outer solar system is (there is a reason they call it space!) and how crowded the inner solar system is (relatively speaking). Were you surprised by the configuration of the planets? How was this different from what you imagined?
Steps 2--7
Discussion
• Our Solar System is made up of planets, moons, asteroids, comets and any other objects that orbit the Sun.
• There are eight planets in the Solar System. Pluto, the former ninth planet, was renamed a “dwarf planet” in 2006 due to its small size (it’s smaller than our moon!).
• Although, we usually think of the Solar System as planets, there are many other objects orbiting the Sun. The Asteroid Belt is a loose collection of rocky asteroids orbiting between Mars and Jupiter. Astronomers believe they are leftover materials from the formation of the Solar System that never came together to form a planet or moon.
65
Cooking Up Comets Passport Question: Name two ingredients that make up comets. Passport Answer: Ice, frozen gases, rocks, dust, organic material Background Information: Comets are small objects that orbit the sun and are made of water, rocks, dust, and frozen gases such as ammonia, methane and carbon dioxide. They are created from some of the materials left over after the formation of planets. Much of these materials were lumped together to form planets. But, the remaining amounts circulated in the outer edges of our solar system where temperatures were cold enough to produce ice. Some people even refer to comets as “dirty snowballs!” In this activity you will “cook” a comet to show what one might look like up close. Materials:
• Water • Dry Ice • Sand • Ammonia • Molasses or dark corn syrup • Cooler • Hammer • Heavy Duty Yard Trash Bag • Construction Gloves • Metal Bowls (2) • Large Metal Spoon • Measuring cup • Goggles • Optional: Lab coat
Procedure 1 Put on safety goggles and gloves! This activity involves dry ice and students must
not touch the comet with their bare hands. Say: Everyone needs to be conscious about safety! I am wearing my Personal Protective Equipment (PPE) that includes gloves and goggles. Whoever handles the dry ice must wear PPE.
2 Have all ingredients and utensils arranged in front of you. Cut open a garbage bag and use it to line your mixing bowl. In our solar system, comets were part of what nature didn’t clean up after the solar system was formed from swirling gas and dust. As it cooled, it formed small rocks which then gathered together to make even bigger rocks, which ended up forming the planets and moon! Comets were the leftovers. Think of them as the bits of dough left in the bowl when you make cookies!
3 Place 1 cup of water in mixing bowl. Comets have water in them. Add one spoonful of sand, stirring well. You can’t buy interplanetary dust at the store. So, we have to use sand and dust in its place! Luckily, sand and dirt have the same minerals and
66
compounds found in comets. Add a dash of corn syrup. This represents our organic material. Organic material means anything made up of carbon, hydrogen, nitrogen and oxygen! Add a dash of ammonia. Stir while talking. Ammonia is the same chemical we use to clean windows. Have you ever helped your parents clean the house? Ammonia is another organic compound found in comets. When you help clean the windows, it’s with some of the same chemicals found in comets! Continue to stir until well mixed.
4 Place approximately 1 cup of dry ice in a second garbage bag (you may be able to re-use this bag in multiple sessions). Be sure to wear gloves while handling dry ice to keep from being burned. Crush dry ice by pounding it with hammer.
5 Add the dry ice to the rest of the ingredients in the mixing bowl while stirring vigorously. Dry ice is frozen carbon dioxide, the same gas that makes bubbles in pop/soda. When a comet is far from the sun, its carbon dioxide is frozen into dry ice just like this! Continue stirring until mixture is almost totally frozen. We are stirring up this comet because that is just like the rotation of the comet as it is whirled through space. Lift the comet out of the bowl using the plastic liner and shape it as you would a snowball. Unwrap the comet as soon as it is frozen enough to hold its shape.
6 Observe the comet! As it begins to melt, the students may notice small jets of gas coming from it. These are locations where the gaseous carbon dioxide is escaping through small holes in the still frozen water. This is also detected on real comets, where the jets can sometimes expel enough gas to propel the comet in another direction and change its orbit.
Discussion:
• Comets have several distinct parts: o a nucleus made of ice, frozen gases, dust, small rocks, and organic material,
usually 1-10 km in diameter; o a coma which is a dense cloud of water and gases that have evaporated from the
nucleus; o a long dust tail made of tiny particles evaporated from the nucleus, which reflects
sunlight and is the most visible part of the comet; and o a very long ion tail composed of electrically charged gas molecules pushed
away from the nucleus by solar wind. o hydrogen envelope—trails along between the dust tail and the ion tail;
• Comets are invisible most of the time except when they are near the sun because they need sunlight to reflect off of their particles to be seen. They don’t give off their own light.
• Most comets have elongated elliptical orbits that take them close to the sun for a part of their orbit, and then out into the further reaches of the Solar System for the remainder.
• Some scientists believe that comets were the source of Earth’s water and possibly organic compounds during our planet’s early formation approximately 4.5 billion years ago.
67
Meteor Impact! Passport Question: Name one variable that affects the size and shape of a crater Passport Answer: Size of meteor, speed of meteor, angle of impact Background Information: A crater is the remains of a collision between an asteroid, comet, or meteorite and a planet or moon. Craters can be found on many planets including Mercury, Venus, Earth, and Mars. The size, speed, and angle of the falling object determine the size, shape, and complexity of the resulting crater. Small, slow objects have a low energy impact and cause small, simple craters. Large, fast objects release a lot of energy and form large, complex craters. Very large impacts can even cause secondary cratering, as ejected material falls back to the ground, forming new, smaller craters. In this activity students will experiment to see how craters of different shapes and sizes are formed. NOTE: How to set-up the moon model. This should already be done prior to volunteer’s arrival. Directions: In a pie pan, create the surface of the moon by filling the pan first with flour (about half of the large sifter) and then sift cocoa powder (about half of the small sifter) over the top to create contrast. Materials:
• 9” Pie Pans (6) • Flour (~5 lbs. per day) • Cocoa Powder (2-3 containers) • Fine Sifter • Hand Strainer • Golf Balls (6) • Marbles (6) • Rulers (6) • Bucket (3 gal) • Drop Cloth • Meteor Impact! Data sheets • Images of Moon’s surface, craters on Earth, and secondary craters
Procedure 1 Examine the pie pan. Say: Today we are going to make a hypothesis about how the
different “meteors” will impact the surface of the “moon.” Who can tell me what a hypothesis is? Look at the different “meteors” you will be using. Think about the size and shape of these meteors. Think about how what will happen if you drop them from different heights and at different angles. Do you think that will create different types of craters?
2 Change independent variables (important to use scientific terms in this activity!) such as the height the meteor is dropped, the angle of impact, and the size (marble
68
or golf ball). Students may choose to test one variable or all three. Have the students make hypotheses before dropping any “meteors.” Introduce the activity sheets here. You can even do a quick demo by filling out your own sheet and dropping a ball. Warn students to be responsible with the “meteors” or the “moon surface.”
3 Begin the experiment! Use a ruler to measure the drop height and the diameter of the crater. Be sure to record the results! Let the student do this for a few minutes. You can monitor their progress by making sure they are filling out their sheets and not causing a huge mess.
4 Were the students’ hypotheses correct? Why or why not? What have they learned about how craters are formed?
5 Compare the surface you created to the pictures of the surface of the moon. Using what you now know about craters, what can you tell from looking at these images?
Discussion:
• Meteors hit at a wide range of speeds, but the average is about 12 miles per second. • Erosion from wind and water on Earth has worn away existing craters, making them less
visible. • The surface of the moon is scarred with millions of impact craters. Unlike the Earth, there is
no atmosphere on the moon to help protect it from potential impactors. Most objects from space burn up in the Earth’s atmosphere. Since there is no erosion and little geologic activity to wear away these craters, they remain unchanged—until another object hits!
• Most of the craters on the moon are circular. The few craters that are not circular, like Messier and Messier A in the Mare Fecunditatis, are mysteries. Scientists do not know exactly how these oddly-shaped craters were formed.

69
Jumping on Jupiter Passport Question: Our weight changes on other planets because each planet has a different __________ which affects its __________. Passport Answer: Our weight changes on other planets because each planet has a different mass which affects its gravity. Background Information: How far you can jump and your weight depend on gravity. Gravity depends on a planet’s mass—or how much STUFF it’s made of. Smaller planets usually have less mass and therefore less gravity so you weigh less and can jump farther than you can on Earth. Larger planets usually have more mass and more gravity so you weigh more and can’t jump as far or high as you can on Earth. Students will demonstrate this with some simple calculations and a demo with spheres of different masses. Materials:
• Scale • Tape Measure—(Tape out distances ahead of time) • Tape • “Jumping on Jupiter” worksheet • Pencils • Calculators (6) • String • Large and small spheres • Solar System poster
Procedure 1 Show students the solar system poster. On which planet do you think you can jump
the farthest? Why? 2 Have students line up on the starting line and challenge them to see how far they
can jump on Earth! Make sure that they note where they land. 3 Look at the “Jumping on Jupiter” worksheet and complete the chart to determine how
far you can jump on each planet. 4 If time permits: Based on what you just learned, on what planet do you think you
would weigh the most? Why? See how much you weigh on Earth and complete the opposite side of the worksheet.
5 On what planet could you jump the farthest? Were your predictions correct? 6 If your body stays the same, why does your weight change on each planet?
Hint: What do you notice about the planets where you weigh more? 7 To further illustrate the concept that more mass means more gravity, have the
students (carefully!) swing the spheres on the rope. Which one is easier to swing? Why? Because the larger sphere has more mass, it is heavier and harder to swing than the smaller sphere.
70
8 Bonus question: What do you think you would weigh in space? Discussion:
• What is the difference between weight and mass? We often use the words "mass" and "weight" as if they were the same, but to an astronomer or a physicist they are completely different things. The mass of a body is a measure of how much matter it contains. Matter is anything that takes up space—it can be a solid, liquid or gas. You, me, the lake, the air, the Earth, they are all made of matter and have mass.
• Weight is related to mass. Simply put, weight = mass x gravity. You can measure your weight by standing on a scale—the force of Earth’s gravity pulling on you is your weight!
• So what is the difference between mass and weight? Your mass is always the same no matter where you are, but your weight changes depending on the gravity of planet you’re on.
• Space by definition is empty—it has no matter. Without matter it can’t have mass or gravity. In space, your weight would be zero!
71
Moon Dance Passport Question: An object spinning around on its axis is __________. An object circling around another object is ______________. Passport Answer: An object spinning around on its axis is rotating. An object circling around another object is orbiting. Background Information: A rotation is an object spinning around on what is called an axis (an imaginary line down the middle). An orbit is when an object circles another object, such as the Earth going around the sun. Just as the Earth orbits the sun, the moon orbits the Earth. The moon doesn’t make any of its own light—it only reflects light from the sun. In this activity we will see how this reflected light causes the phases of the moon. Materials:
• Flashlights (1 for each pair of students) • Styrofoam spheres • Toothpicks
Procedure 1—Rotation, Orbit and Axis Before beginning the main activities, there are three important concepts to make
sure everyone knows: rotation, axis, and orbit. 1 Have the students stand in a circle around you in the room. Tell them to turn around
in place. What is a scientific word for what you are doing? Rotation. Does the Earth rotate? Yes. How long does its rotation take? One day.
2 If you could draw a line down the center of your rotation, where would it be? They should indicate down the center of their bodies. This time, hold your right arm straight over your head and then rotate. What does your arm represent? Your axis, the imaginary line right down the middle of a rotation.
3 Now, ask the students to walk around the circle. What is a scientific word for this? It’s an orbit. An orbit is when an object circles around another object regularly. Does the Earth orbit? Yes. How long does its orbit take? One year.
4 The Earth rotates and orbits at the same time. Have the students complete another orbit while rotating! So, what’s the difference between an orbit and a rotation?
Procedure 2—Moon Dance 1 Ask students why the moon looks different every night. What is a new moon? Once,
or sometimes twice, a month the moon disappears from our view. This is called a new moon, and it happens when the illuminated side of the moon faces away from us. What is a full moon? At a full moon, the earth, moon, and sun are in approximate alignment, just as the new moon, but the moon is on the opposite side of the earth, so the entire sunlit part of the moon is facing us. The shadowed portion is entirely hidden from view.
1
72
2 Group the students in pairs and give each pair a flashlight and a sphere. The person with the flashlight is the sun, the person with the sphere is the Earth, and the sphere is the moon.
3 Give directions to the students: Each pair stands facing each other a few feet apart. The Earth holds the moon in front of them at arm’s length and a little above their head. The sun holds the flashlight a little above their head and shines it straight at the moon.
4 Ask the Earths to describe what the moon looks like to their partner. 5 Tell the Earths to rotate very slowly to their left, holding the moon in the same
position. The suns should stand still and continue shining the light straight at the moon. Ask the Earths to stop every two small steps and describe what the moon looks like. What do they see?
6 Once the Earths have rotated all the way around, they switch roles with their partners. The new Earths do the same activity, describing the moon as they slowly rotate.
7 Have the students discuss these questions with their partners and then ask a few people to share their answers: Where is the moon when we see a new moon? Where is it when we see a full moon? Where does the moon’s light come from? Why does the moon’s appearance in the night sky change? How would you eclipse your moon?
Discussion:
• As the moon orbits our planet the amount of sunlight it reflects changes. When the moon is on the far side of the Earth the sun’s light hits the side facing us, causing a full moon. When the moon is between the Earth and the sun, the side facing us is dark, causing a new moon.
• When the moon is less than half full is it a crescent; half full is a quarter (because it is ¼ through its cycle); and more than half full is called gibbous. As the shape grows from new to full it is waxing, and as it shrinks back to the new moon it is waning. In the Northern Hemisphere the moon is waxing when the lit area is increases from the right to the left. Which means it’s waning when the lit area is decreases from the right to the left. Therefore you can tell if the Moon is waxing or waning based on whether the right side of the Moon is dark or light. Waxing = Right side lit, Waning = Left side lit. In the Southern Hemisphere the effect is just the opposite!)
• Why do we always see the same side of the moon? The moon orbits the Earth because it is pulled by the planet’s gravity. Earth’s gravity “drags” the moon so that it rotates at the same speed as it orbits (both of which take about 27 days). So we always see the same side! The “dark” side of the moon is the side that we never see from Earth, although it’s not actually dark—it’s lit up during the new moon.
73
Time of the Seasons Passport Question: What causes seasons on Earth to change? Passport Answer: The tilt of the Earth’s axis. Background Information: We all know that it is cold in the winter and hot in the summer, but have you ever thought about why that is? People hold a lot of misconceptions about what causes the seasons and this activity will teach the scientific reason for the seasons. Materials:
• Lamp • 4 large Styrofoam spheres • 4 rubber bands • 4 stands • 4 thumbtacks • Protractor • Station markers labeled December 21, March 21, June 21, and September 21 • North Star image
Procedure Students have just learned about rotation, axis, and orbit and how the sun’s light
creates the phases of the moon. Now they will see how the sun cause the seasons. 1 Ask the students what they know about the seasons. Why do we have seasons? Let
students answer without correcting them. 2 Divide the students into four groups and give them an Earth model. On this model
the sphere represents the Earth, the dowel is the axis, the black line is the equator, and the dot is our location in Tahoe. (You can also ask students what they think each component represents before explaining.) Where is the Earth’s axis? What do you notice about it?
3 Place the model near the sun (the lamp) and with the axis pointing toward the image of the North Star (behind December). Have each group slowly turn the straw so that the earth spins to the left for one rotation. Ask them to make observations about the dot with their group.
4 They should see that the dot is in light (day) for about half of the rotation and is in shadow (night) for about half of the rotation. This rotation is called a day!
5 Now place one group at each of the dates: December 21, March 21, June 21, and September 21 (see setup below). Have each group model a day at each position, making sure that the Earth’s axis is tilted towards the North Star. Students should make observations with their group.
6 For what fraction of the day is the dot in the light? More than half? Less than half? About half? How is the light from the sun striking the dot? Is it direct or at an angle?
7 After a couple of minutes, move the groups to the next date and have them discuss
2
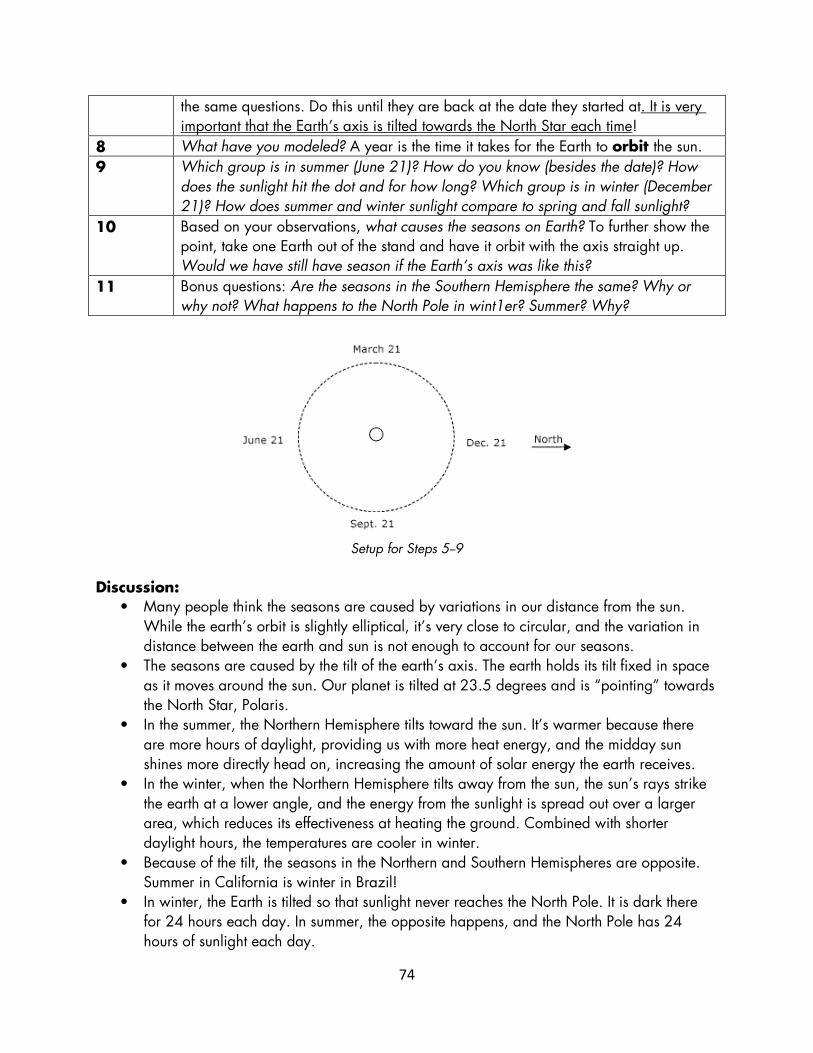
74
the same questions. Do this until they are back at the date they started at. It is very important that the Earth’s axis is tilted towards the North Star each time!
8 What have you modeled? A year is the time it takes for the Earth to orbit the sun. 9 Which group is in summer (June 21)? How do you know (besides the date)? How
does the sunlight hit the dot and for how long? Which group is in winter (December 21)? How does summer and winter sunlight compare to spring and fall sunlight?
10 Based on your observations, what causes the seasons on Earth? To further show the point, take one Earth out of the stand and have it orbit with the axis straight up. Would we have still have season if the Earth’s axis was like this?
11 Bonus questions: Are the seasons in the Southern Hemisphere the same? Why or why not? What happens to the North Pole in wint1er? Summer? Why?
Setup for Steps 5--9
Discussion:
• Many people think the seasons are caused by variations in our distance from the sun. While the earth’s orbit is slightly elliptical, it’s very close to circular, and the variation in distance between the earth and sun is not enough to account for our seasons.
• The seasons are caused by the tilt of the earth’s axis. The earth holds its tilt fixed in space as it moves around the sun. Our planet is tilted at 23.5 degrees and is “pointing” towards the North Star, Polaris.
• In the summer, the Northern Hemisphere tilts toward the sun. It’s warmer because there are more hours of daylight, providing us with more heat energy, and the midday sun shines more directly head on, increasing the amount of solar energy the earth receives.
• In the winter, when the Northern Hemisphere tilts away from the sun, the sun’s rays strike the earth at a lower angle, and the energy from the sunlight is spread out over a larger area, which reduces its effectiveness at heating the ground. Combined with shorter daylight hours, the temperatures are cooler in winter.
• Because of the tilt, the seasons in the Northern and Southern Hemispheres are opposite. Summer in California is winter in Brazil!
• In winter, the Earth is tilted so that sunlight never reaches the North Pole. It is dark there for 24 hours each day. In summer, the opposite happens, and the North Pole has 24 hours of sunlight each day.