Embed Size (px)
Citation preview

Ear taping after cropping
This is a simple procedure. I heard so much about problems and re-taping for 5 monthsor even a longer! Well, in 28 years of Dane experience I never had a problem removingthe tape and the ears would stand pointed up perfectly in 3 weeks or less, rarely a month.Anubis, a shorter cut because he was cropped much later at age 6 months(recommendation is to crop before 12 weeks, the goal is 8 weeks, maximum 16 weeks.The reason Anubis was done so late is because his breeder was going to keep him forhimself for breeding until I talked him into selling him to me, still, on a co-ownershipcontract) – so, I was saying, Anubis’ ears took 3 weeks, Nifi’s were up and tape-free in10 days.
Once ears are cropped, they must be “taped” for about a month to be safe, to makesure they stand permanently. If they are cropped too late, there is a chance thateither one or both ears will fail to stand perfectly. In fact, many vets will refuse tocrop after 12 weeks of age. The usual fee for cropping is in the neighborhood of $280plus related expenses.
There are several approaches by different breeders and they will all work if done right.
Cleopatra, my most recent pup, when came from the vet after cropping, she had her earstaped up to a foam (to-go) coffee cup placed upside down on the top of her head betweenher ears.
This procedure requires taping the ears to the foam cup. The two (outside) sides of theears facing each other are taped to the cup placed on her head. they use of apharmaceutical skin latex glue. A strip of two sided sticky tape is taped to the outsideeach ear and the other side is taped to the cup. The glue helps ensure the tape sticking tothe cup and the ear.
Most procedures use a flexible thick foam glued or taped to the inside of each ear asshown below.
There are several other methods and in fact I never used the foam cup & cone approachmyself. I have always used a piece of foam rod. Recently I discovered that some haveanother idea, a ladies tampon size super plus! I think the foam rod is simple, safe and
effective.
Ok, so sutures will probably beremoved from the edge of the earabout 7-10 days after surgery. Theears are usually re-taped a day or 2later. During this time, the puppyshould be separated from other dogs ifpossible to prevent them from lickingthe exposed sutures thus delayinghealing and causing excessive scar

tissue formation which, in many instances, will prevent the ears from standingproperly. Other pups or even mom would also lick off the antibiotic cream you apply.
Generally, after the cropping, the pup will be on antibiotic medication, tablets and
ointment for up to a week.
Some puppies simply are not all that interested in what is going on around them anddo not try to work their ears by perking them up. If your puppy displays thisbehavior, use a silent dog whistle and any other means possible to try to stimulatesome interest in perking the ears up.
Baby socks taped over the rear paws or a hand towel rolled like a donut and pinnedaround the neck will help prevent the puppy from scratching at its ears and pullingout the sutures. Several breeders don’t recommend Elizabethan collars.
In the picture above, with a normal, slightly longer cut, ears may not stayangled correctly. The addition to the displayed illustration above would betaping the base of the ears together around the top of the head, to maintainthe desired position of the ears, not just that each is extended. In somecases you may have to use tape and go around the neck, the bottom sidetoo - (make sure it is not too tight, place two fingers between the tape andthe bottom of the neck) and go around the head, going around each ear toposition it’s angle correctly.
Learning to tape your puppy’s ears yourself will save you from having to pay thevet’s office to do it for you. It also helps your puppy become accustomed to beinghandled. Don’t worry if your first attempt is not as pretty as the vet can do it. Youcan always start over if you don’t think you’ve done a good job and, with just a littlepractice, you’ll get quite good at it. Another advantage of knowing how is that it canbe done as often as you think it needs to be done (for example if the tape gets wet,soiled or ragged or if you wish to inspect the ears for healing progress or infection).
I usually leave the tape on the first time about 3 days then remove it by carefullysliding a blunt ended pair of scissors between the edge of the ear and the tape thenslowly peeling the tape from the ears.

I then inspect the ears for dampness and infection. After I have inspected the ears, Inext clean them inside and out with warm water and bacterial hand soap (like youwash your own hands with in the bathroom), rinse them thoroughly and let them airdry. Finally, I massage the ears carefully for several minutes along the edges toprevent scar formation and in the middle of the ear with a slight pulling motion fromthe base of the ear toward the tip while rubbing the ear back and forth betweenfinger and thumb to stimulate circulation and to encourage the cartilage to growstraight.
1. Materials needed:One roll of ½ inch diameter “backer rod” (available at Home Depot in the hardwaresection). Actually the famous tampon super-plus size with its 6 inches length and itsrod-like shape, is solid enough yet harmless when bent and as such it can be usedand will do the job just fine!One pair of blunt ended scissors.Two rolls of ½ inch width waterproof first aid sticky tape (waterproof tape helpsresist moisture from other dogs should they chew or lick the tape or from watersources the puppy may encounter). If your puppy’s ears are sensitive or if yourpuppy objects to being handled, you may need a helper to hold the puppy while thetaping is performed.
2. Cut about 7 inches length of the backer rod off the roll and, starting at one end,wrap it with a spiral from one end to the other with the first aid tape to provide therod with some rigidity. Leave about ¼ inch of the rod uncovered at one end toprovide a soft cushion which will not irritate the inside of the puppy’s ear when therod is inserted. Next, wrap a second spiral layer of tape STICKY SIDE OUT aroundthe rod from one end to the other still leaving the ¼ inch foam rubber end of the rodexposed. This sticky side out layer will help the rod stick to the inside of the puppy’sear and help it to remain in place. Cut 6 four or five inch lengths of tape off and

lightly stick one end of the tape to the edge of the surface area you will be workingon so they will quickly available when you are ready for them.
3. Place the foam rubber exposed end of the tape-covered rod into the bottom of theear well (NOT THE EAR CANAL) then press and wrap the inside and the edges of theear around the sticky rod so that it sticks to the rod. Stretch the ear upward slightlythen press it to the tape so the ear is in a completely erect position. Make sure theinside of the ear makes contact with the sticky rod from top to bottom.
3. Place a single band of tape around the outside of the ear and rod where the earmeets the top of the skull and trim off any excess tape. Place a second band of tapearound the ear and rod about halfway between the base and the tip of the ear. Placea third band around the tip of the ear and the rod. DO NOT MAKE BANDS TOO TIGHTOR YOU WILL INDUCE SWELLING IN THE EAR TISSUE OR CUT OFF CIRCULATION.Cut off any excess backer rod and tape about ¼ inch above the tip of the ear. Youmay also wish to place a “cap” of tape from below the tip of the ear up and over theend then down the side of the rod to help keep the rod in place but I usually don’tfind a cap to be necessary.
4. OPTIONAL: Place a band of tape stretching from the tip of one ear across the spanto the tip of the other ear forming a “bridge” to hold the ears straight up and down.Some breeders don’t perform this step for four reasons: First, it is usually notnecessary to get the ears to stand properly. Second, it makes it easier for the puppyto remove tape and rods from the ear when it scratches by getting its paw in thearea between the skull and the horizontal bridge of tape and literally pushing thetape and rod out of and off the ears. Third, it is an excellent place for other pets tograb with their teeth and tug during play which results in a ruined tape job. Fourth,the puppy may catch it on an obstruction and hurt itself as it tries to pull free. If youdecide to use this bridge between the tips of the ears, you may wish to run a “chinstrap” strip or two of tape under the puppy’s jaw and up to the rod in each ear oneach side then a strip around the ear and the end of the chin strap where it meetsthe rod to help keep the tape on the ears and the rod in the ears and from beingpulled out. Do not place the chin strap so far forward under the puppy’s chin that itprevents free chewing or swallowing movement or so tightly or far back that it canchoke the puppy if the bridge becomes entangled on an obstruction or on pulled onby other pets.
5. I then re-tape the ears for another 5 days before repeating the proceduresoutlined above. I usually extend the period between tapings to 7 days unless itbecomes ragged or dirty. Breeders experience in average has been that usually 4-8weeks maximum is sufficient to ensure that the ears will stand but the time mayvary. In the past I have been lucky I guess and 3 weeks has been my average.
I immediately begin taping again if an ear looks like it is not ready to stand properly.As a rule, with longer cuts, the ears must be taped for longer periods before theystand well than will be necessary with shorter cuts

Now here is material submitted by another breeder:
The pipe foam method of ear taping has become quite popular. In most caseshowever, the post method is used for a month or so following the initial surgery.Using the post method of dog ear taping for the first month or two will assure aproperly developed ear bell and offer required support for the young pup's eartissue.
Once the dog's ear bell is established and the ear cartilage has stiffened, the foammethod of dog ear taping is a great choice. Foam supports are much morecomfortable for your growing Dane.
With any method of dog ear taping, it isimportant to watch for signs of odor, discharge,or wetness. Keep an eye on your dog,constant scratching or head shaking can be anearly warning sign that something has goneawry beneath the dressing!
In any event, if you notice something out ofthe ordinary, remove the tape so the ears can"breath" for a while. Typically, it is acceptableto leave the ears "taped up" for 5 to 7-days orso without a problem.
Take the opportunity to clean and inspect theears while the tape is removed. Give themample time to dry out and breathe.
Don't leave the ears down for more than one day, unless of course there are signsof infection. Leaving the ears un-taped for long periods or allowing the dog to sleepon semi-rigid ears, will most likely reverse any progress you have made withcartilage development!
Keep on taping until the ears stand proud! Stay patient, from time to time, a nicelystanding ear can bend or flop for no apparent reason. Maintenance dog ear taping isnot uncommon, you may need to tape an ear occasionally until it is truly set.
This article discusses the "foam method" of dog ear taping plus construction andplacement of the foam stay.
As the ears "firm up" youcan decrease the length offoam that goes downwardinto the bell and offer muchmore comfort to you Dane:)Over time, the bondbetween foam and inner earwill no longer be required. Atthis point of your dog eartaping adventures, simply
Required supplies:Pipe insulating foam for 3/4" or 1" copper pipe.
Medical adhesive tape like 3M or Johnson &Johnson, both 3/4" and 1-1/2" wide.
(Alternative) "Stick to itself" bandages, see"Teri's Tip" towards the bottom of thetampon/post method page.
If necessary........ Medical adhesive such asSkin Bond, Skin Prep pads and medicaladhesive cleaner.
Antiseptic wash, hydrogen peroxide 3%,cornstarch powder.

coat the foam with cornstarch powder and tape the ears around them.
Cut a piece of pipe foam the approximate length of your dog's ear, bell to tip. Theshape should look similar to the red outline on our sketch. Trim and taper the pieceas needed to achieve a nice matching fit. Dry fit the stay to assure proper shape andmake any adjustments here. Once satisfied, ready your dog's ears by cleaning withantiseptic wash and leave them to dry.
About this drawing:
Our Dane profile does not illustrate thecurve of the ear. The red outline isthe finished shape of the foam stay.Pipe foam is round and the ear shouldcurl around this rounded piecenicely.
Reinforce if needed!
In the event that your foam stay isn'trigid enough to keep the ear fromfolding in the middle, glue or tape aPopsicle stick or similar rigid objectto the inside of the foam piece.
Alternative.......Glue?
Many dogs have a knack for destroyingthe tape-job by head shaking,scratching, and a variety of other crafty tricks.
If this is your Dane, substitute the reverse tape wrapping on the foam stay withSkin Bond or similar medical adhesive. Our goal is to keep the foam pieces in-place!
Ears should first be prepped with Skin Prep or similar solution to remove the oils anddirt.
The glue works awesome and usually holds for a week until ear oils eventually breakdown its bond.
Most medical adhesives have a cleaner that should also be on hand to remove theold glue in between taping.
Tip:
When using Skin Bond or adhesives for dog ear taping, be sure to wipe out the earswith Skin Prep pads. Oils in the ear can interfere with glue adhesion, the prep padswill neutralize the oils.

We are now ready to wrap the foam stays with tape. This can be tricky, using 1-1/2"tape folded over on itself to act as a two sided tape usually works best. Due to theodd shape and angles of the stay it is also difficult to wrap a piece of tapecontinuously, using numerous 4" pieces will be much easier.
Once the posts are nice and sticky (with tape or adhesive), go get your Dane:) Holdthe ear up straight and press the stay firmly against the inside of the ear. Have some4" pieces of 3/4" tape ready and wrap from the opposite side of the post at threeareas. One as close to the base as possible, one wrap in the middle, and a wrapabout 1/2" down from the tip.
Grab the roll of 3/4" tape now and beginning at the base, start wrapping upward allthe way to the tip. There is a small flap of skin at the base of the ear that should befolded back under the tape.
After both ears are wrapped up, cut a 16" piece of 3/4" tape. Hold the ears in correctposition and use the tape to connect the bases together. Length of this linkage willhave to be adjusted at times if the ears begin to fall inward or outward.
Important!
While wrapping tape around the ear, don't wrap too tight, this can causecirculation loss and tissue damage! We are trying to "lay" the tape around the ear,use just as much tension as required, don't over due it.
Now here are three methods I (Paul Gouda) used:
1- The foam rod method I explained above is simple and effective.
2- Get a piece of foam and cut it to the shape shown in red, shapeit like the ear, apply skin glue, pull the ear up to make sure it’s
stretched up and tape the foam to the inside of each ear; hold in place fora few minutes. Then tape on the outside of the ear, first at the base nearthe top of the head, then near the top of the ear. Make sure to keep the natural earfold (see the arrow above, the right arrow you would fold the ear edge inward to theleft; and the left arrow you would fold the ear edge away from the other ear to theright). Finally tape the base of the two ears together to control the angle of the ears.Make sure you have two ear folds in the directions shown by arrows
3- I found a product at HomeDepot, a flexible rubber-wrapped rod that you canshape. It takes and keeps the shape and angle you make and yet firm enough to stayin the shape you made and soft on the outside with thick foam coating. You can useit in the ear and out and around the dead, and just tape around it. Perfect.

Now, more on-line material on the subject:
Picture 1
Picture 2
Ear Taping (posting) method
Post the ears and leave them up to six days, thentake down but never leave them un-taped overnight.Re-tape the ears for another 6 days.
You need (See picture 1):Peroxide or Rubbing Alcohol.Backer Rod 5/8” wide (ask in any HomeDepot)TapeScissors
Start by cutting the piece of Backer rod, a littlelarger than the length of the ear.
Take tape and start taping firmly around the rodto achieve the flexible but tight ear-stick. (Seepicture 2).
When you have taped it to the end, reverse andstart taping in the opposite direction, making surethat the sticky surface is now outside of the ear-stick(See pictures 3 and 4). Continue taping until all ofthe surface of the rod is taped with the stickysurface facing outwards.

Picture 3
Picture 4
Now tape the second rod in the same manner.Cut 2 pieces of tape 6-7” and 2 shorter pieces of 3”.
Clean the ears with the tampons and the rubbingalcohol if you have not already done this, if the earsare not quite healed use peroxide instead. Dry theears thoroughly with a dry paper towel.
Press the sticky rod to the inside of the ear.(Picture 5) Stretch the ear along the rod.
Picture 5
Picture 6
Take one of the 6” strips and press one end into asticky surface of the rod (under an angle) (See redline on the picture 7). Leave the blue area (stickysurface) to be able to secure a good grip for theother end of the tape strip. Start taping around thebase in the direction of ear fold (See Picture 6)(towards the inside), making sure that the fold is nottwisted or squeezed. Be careful do not tape tootightly, as it may stop the circulation of blood intothe ear. Go around the ear one time and press thetape against the blue area (sticky area) of the rod.
Picture 7
Picture 8
Cut the end of the strip. (Picture 8)
note the ear fold. You need to fold the ear in bothend and in two different directions. In other words,the ears must not be pulled up flat. I’ll enter a handdrawn illustration at the end.
Cut the rod at the top of the ear. (Picture 9)
ape around the very top of the ear lightly, you cancut off circulation by putting too much pressure.

Picture 9
Picture 10
(Picture 10) The sticky surface of the rod and thesticky surface of the tape will keep the rod in asecure position.
Do the same procedure with the second ear. Usingthis method, you do not need to tape in-between theears. The rods will keep the ears in the verticalposition. (Picture 11). The dog will be able to movethe ears freely and you will avoid wrong posting thatsometimes happens when one ear is taped to theother ear in a figure 8-manner - then one ear mightbe pulling the other into the wrong position andcreating a crinkle. It often happens during sleep,when the dog may accidently lay on one of the earand pull the other one in an awkward position.

Picture 11
---------------------------------------------------------------------------------------------------------Here is another article posted on line – obviously for free & public viewing
Aftercare of the cropped ear
by Jill Swedlow
Once your puppy has been cropped, the racks or cups are off, and the ear is
healed, it’s time for the after care to begin. Without proper aftercare, the
ears are unlikely to stand properly. Be sure that the ears are completely
healed. If there are one or two areas still scabby, be sure not to tape over
them or place a tiny bit of cotton there with some antibiotic powder so the
tape won’t stick to it.
There are probably as many after care methods as there are breeders. The
two basic differences in most methods are that one completely encloses the
ear and the ear canal and the others leave it open to the air. I don’t care for
the enclosed method as not only is it extremely irritating to the puppy, it
often causes infection or a major case of the gooeys. The gooeys are when
you get this disgusting gray goo under the more enclosed areas of tape. I
much prefer and recommend any method which leaves the ear open to the
air. I’ve included my method and directions below.
You will need:
Although this material was notposted by a Dane breeder; theinformation are still applicable.However, note here that with aDane you are likely going to needto build a bridge between the twoears by taping the base of the earstogether to control the angle.

1. Foam pipe insulation, available at any hardware store. Cut these long
enough to reach from the top of the “bump” (Figure 1) of the ear to just
past the ear tip. Then cut lengthwise so that each appliance will be about 1
inch wide. Remove the plastic strip that protects the sticky side of the
insulation.
2. Johnson & Johnson’s “Zonas” adhesive tape 1" wide roll. You’ll probably
find this at your vets, or a hospital supply although some drug stores carry
it. It’s also sold under the name of “Sports Tape” by Johnson & Johnson in
the drug store. However most of that is 1 1/2 inches wide so you’ll have to
tear it lengthwise.
3.Benzoin compound. Available from you drug store but you’ll probably have
to order it.
4. Q-Tips
5. Bandage scissors
6. Antibiotic powder, BFI powder or even Dr. Scholls foot powder.
7. Alcohol
8. Cotton balls or gauze squares
9. Surgical glue or ear cement (use this only if you are having trouble getting
the tape to stay put after a day or two. If you do use this, use it very
sparingly. Only a dot or 2 on the inside and outside of the ear should suffice.
When you remove it be sure and use adhesive remover.
11. Adhesive remover
************************
PREPARATION
After you’ve cut the pipe insulation, take the tape and back wrap it so it’s
sticky side out. Set aside.
Next, cut 2 pieces each of 1 tape long enough to wrap twice around the base
of the ear, approximately 10" long. Cut 2 pieces each of 1" tape,
approximately 9", 6" & 3" in length.
PREPARE THE EARS. Clean the ears well with alcohol and dry thoroughly.
Next, using a couple Q-Tips, paint the ear with the Benzoin compound. Paint
the inside of the ear from the “bump” (See Figure 1) to the tip. Paint the
outside of the ear to the tip and pay particular attention to the outside of
the base. Allow to dry until tacky, about 2-3 minutes.
Shake a small amount of the antibiotic powder in the little fold at the base
of the ear on top of the head. (Figure 1). This will help prevent the “gooies”
that usually start here.

Next take one of the back wrapped appliances and set it into the inside of
the ear just resting on the “bump”. Smooth and apply pressure until stuck
firmly (Figure 2).
Take the 9" long piece of tape and wrap it around the base of the ear and
appliance as shown in Figure 5. It is important to keep tension on the ear at
this point (Figure 4). You want the base pulled out from the head and slightly
to the side so you can tape it properly in order for it to stand (Figure 4).
Wrap in the direction of the small ear fold at base of ear. Wrap snug but
not too tight and angle the tape down into the base of the ear where it
meets the head (Figure 5).
Next take one of the 3” pieces of tape and starting flat at the upper 1/3 of
the inside of the ear appliance, take it up and over the tip of the ear and
down the back. Figure 3.
Now take the 9" piece of 1" wide tape and wrap it around the ear base about
¼” above the top of the roller. The 6" piece goes around the ear in the
middle of the ear and another 3" piece wraps the very tip of the ear. (Figure
6).
Repeat the procedure on the other ear. [Note that the tape will be pulled
tighter than shown in the illustration.] For the first couple tapings after
cropping (that is, after the incisions have healed, sutures are removed and
the rack or cups are off) it’s a good idea to brace the ears across the top of
the head.
BRACING THE TAPED EARS (Figure 7). Cut a piece of 1" tape long enough to
reach from one ear to the other, circle the ear, return to the first ear,
circle it, and wrap about half way back to the other ear. Ears should be held
erect, and allowed to turn into a naturally held position, usually slightly out
from the side of the head. You’ll need a helper to hold the ears while you
tape. (You need a helper throughout the entire procedure, for that matter!)
Start taping at the front of one ear, span to the other, circle it around the
back of this ear, to the front span then continue back to the first ear,
overlap the tape where it begins and take a couple tight turns around the
span of tape between the ears. Be very careful not to twist or turn the ears
out of their natural resting position. If you come up a little short, just cut a
short (about 2") piece of tape and wrap around the span between the ears a
couple times. You’re done! Leave ears taped about a week, then take tape off
and allow ears to rest for a day. Repeat until the ears are standing.
At first the puppy will shake its head and probably scratch at his ears. This
is normal right after taping has been done. If it continues for more than a

couple days, you may have placed the insulation appliance incorrectly, usually
too deep into the ear.
If the ears constantly flop forward or hang out to the side, you have not
taped the bases close enough to the head. You can try putting another wrap
of tape around the base and see if that works. If not, you’ll have to re-tape
the whole ear.
Figure 1 Figure 2
Figure 3Figure 4
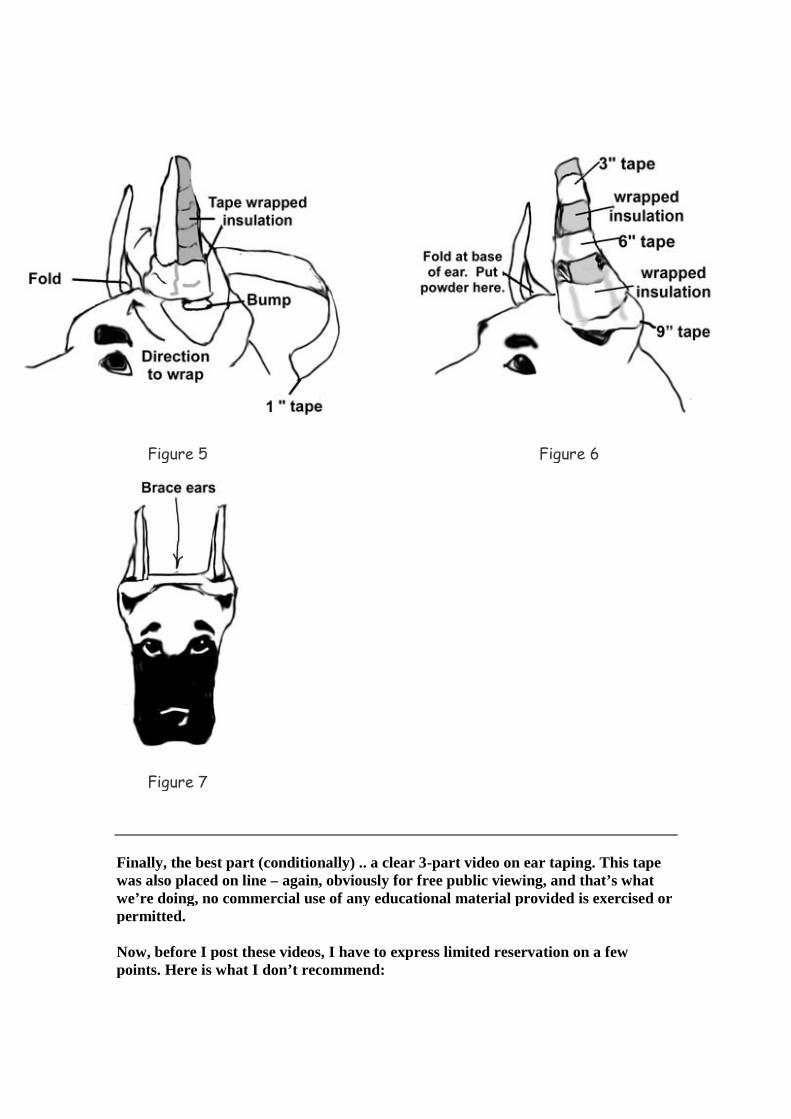
Figure 5 Figure 6
Figure 7
Finally, the best part (conditionally) .. a clear 3-part video on ear taping. This tapewas also placed on line – again, obviously for free public viewing, and that’s whatwe’re doing, no commercial use of any educational material provided is exercised orpermitted.
Now, before I post these videos, I have to express limited reservation on a fewpoints. Here is what I don’t recommend:

1- No need to tape-cover the whole ear. Start at the bottom, one in the centreand one at the top are sufficient. That will allow better air circulation andbetter visible inspection of the ear to monitor infection.
2- Do not cut the foam rod at the end. Measure first and cut then use it. No needto risk cutting the Dane’s ear and accidentally poking him as he suddenlyturns his head.
3- Instead of a foam rod, a ladies super plus tampon works better.4- Use glue. I use “OSTO-Bond skin bonding latex adhesive” a Canadian
product made by M.O.C. and “Solvo-Plast II” adhesive remover.5- Use a piece of wider and thick foam between the bottom base of the two ears
if you have a problem controlling the angle of pointing the ears.6- If done right, there is no reason why 2 weeks, maximum 3 or even 4 if the dog
has a softer ear – after which they should stand fine. 2 or 3 months of re-taping indicates a problem in the application.
Now here are the videos. I hope to have the time next breeding to make my ownvideo and when I do, I’ll post for public education, free with no restrictions.
Note that our library contains illustrative
Videos on ear taping