Embed Size (px)
Citation preview
Ear, Nose, & Throat (ENT)
Pediatric Tracheostomy
Handbook
Adebola Olarewaju, MS, CPNP Revised: 04/01/2019 2 Otolaryngology HNS
Special thanks to the UC Davis Children’s Hospital
Pediatric Tracheostomy Team
who make going home possible.
Adebola Olarewaju, MS, CPNP Revised: 04/01/2019 3 Otolaryngology HNS
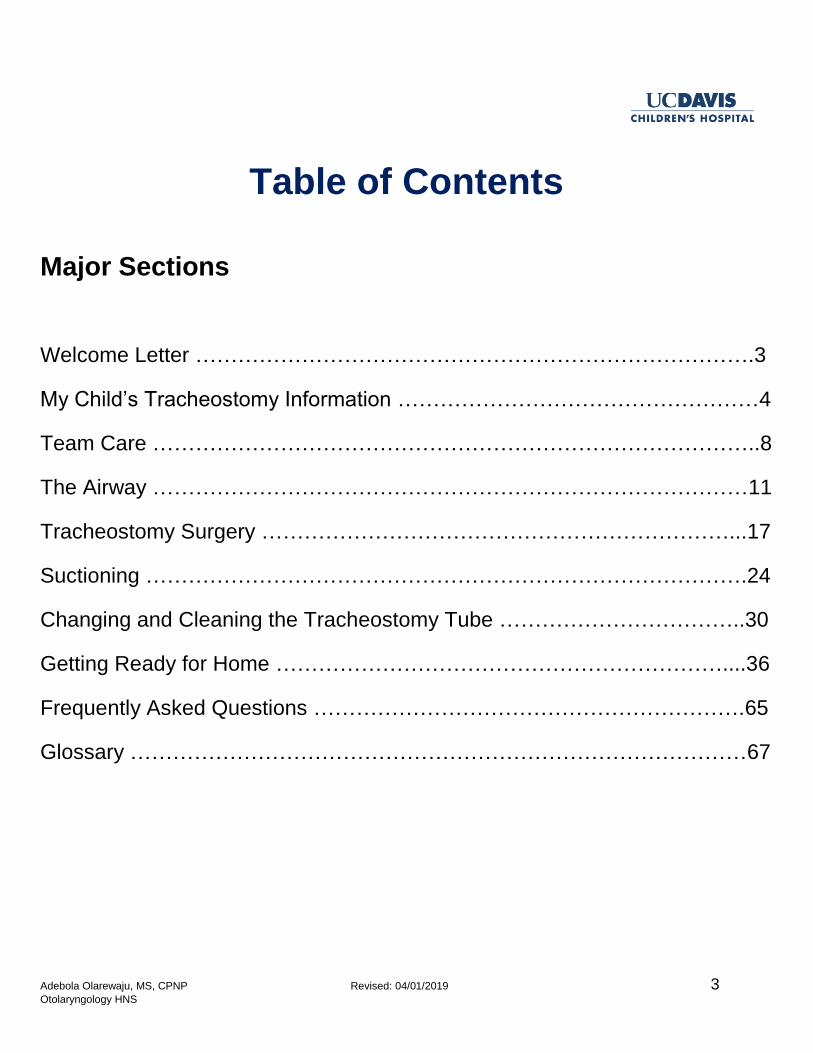
Table of Contents
Major Sections
Welcome Letter …………………………………………………………………….3
My Child’s Tracheostomy Information ……………………………………………4
Team Care …………………………………………………………………………..8
The Airway …………………………………………………………………………11
Tracheostomy Surgery …………………………………………………………...17
Suctioning ………………………………………………………………………….24
Changing and Cleaning the Tracheostomy Tube ……………………………..30
Getting Ready for Home ………………………………………………………....36
Frequently Asked Questions …………………………………………………….65
Glossary ……………………………………………………………………………67
Adebola Olarewaju, MS, CPNP Revised: 04/01/2019 4 Otolaryngology HNS
WELCOME LETTER
Dear Parents and Caregivers, Welcome to the pediatric otolaryngology tracheostomy program at the University of California, Davis (UC Davis) Children’s Hospital. We are honored that you have selected our team to participate in your child’s care. This Tracheostomy Handbook has been developed for parents and caregivers of children with tracheostomies. The purpose of this handbook is to provide you with information about tracheostomy care. In addition, you will find information on activities of daily living, challenges you may face, and how to care for your child in case of an emergency. We know this may be a challenging time. Financial resources and information for support groups have also been provided. You will come into contact with many providers and supply companies during your hospital stay. We have included space for you to add important contact (specialists, home health, pharmacy, supply company, etc.) information to help you stay organized. As we travel together on this tracheostomy journey our staff will be happy to answer any questions that you may have. You will find a glossary and a frequently asked questions (FAQs) section to help with the learning process. The goal is for you to feel comfortable caring for your child at home. This handbook is an addition to the hands-on training, video, and in-person education that you will get at the bedside. Sincerely, Adebola Olarewaju, MS, RNC-NIC, CPNP Pediatric Nurse Practitioner Pediatric Otolaryngology Michelle Young, MBA, BSRC, RRT Manager Respiratory Care & Pulmonary Services Jamie Funamura, MD Assistant Professor Pediatric Otolaryngology Craig Senders, MD, FACS Professor and Director of Cleft and Craniofacial Program Pediatric Otolaryngology

Adebola Olarewaju, MS, CPNP Revised: 04/01/2019 5 Otolaryngology HNS
MY CHILD’S TRACHEOSTOMY INFORMATION
Reason for tracheostomy: _____________________________________________
Tracheostomy Tube type (select one from each row, if needed):
Shiley Bivona Portex
Neonatal Pediatric Adult
FlexTend Standard FlexTend Extra Length
Customized
Size _____
Inner Diameter (ID) _____mm
Outer Diameter (OD) _____mm
Length _____mm
Cuff: Yes No
Air Water (distilled or sterile only)
How many mL is needed to inflate the cuff? _______mL
Suction Catheter
Size ______FR
Depth _____
Adebola Olarewaju, MS, CPNP Revised: 04/01/2019 6 Otolaryngology HNS
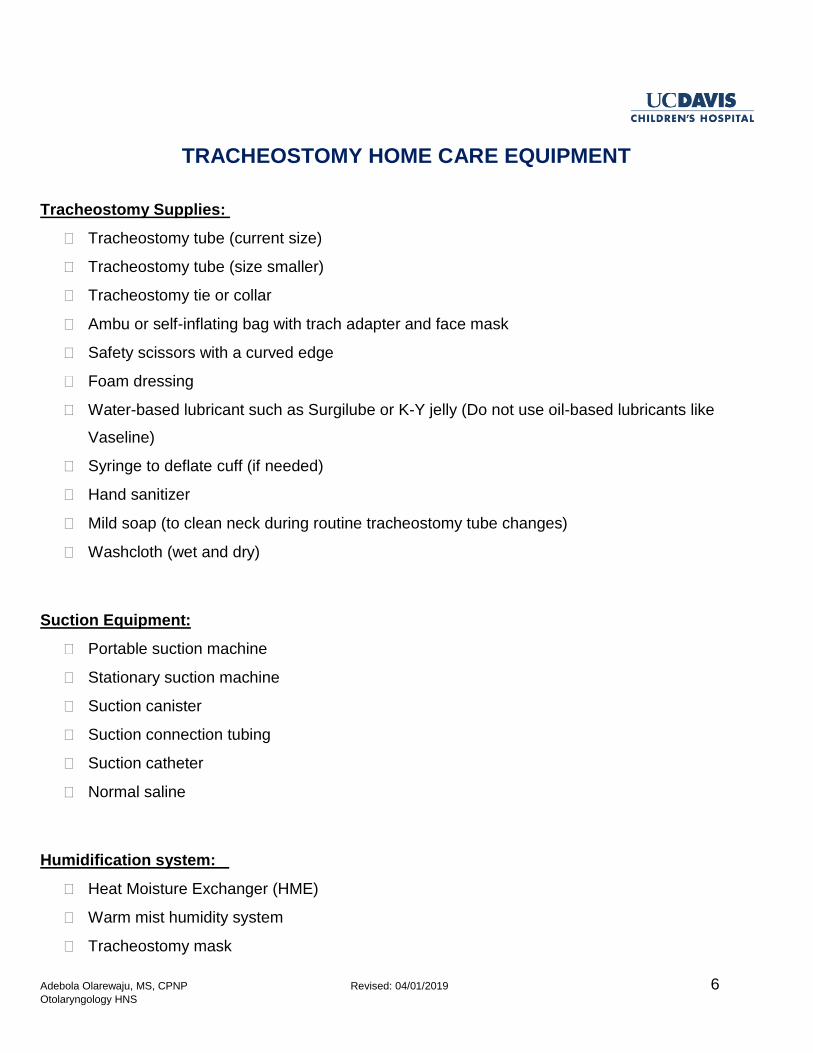
TRACHEOSTOMY HOME CARE EQUIPMENT
Tracheostomy Supplies:
Tracheostomy tube (current size)
Tracheostomy tube (size smaller)
Tracheostomy tie or collar
Ambu or self-inflating bag with trach adapter and face mask
Safety scissors with a curved edge
Foam dressing
Water-based lubricant such as Surgilube or K-Y jelly (Do not use oil-based lubricants like
Vaseline)
Syringe to deflate cuff (if needed)
Hand sanitizer
Mild soap (to clean neck during routine tracheostomy tube changes)
Washcloth (wet and dry)
Suction Equipment:
Portable suction machine
Stationary suction machine
Suction canister
Suction connection tubing
Suction catheter
Normal saline
Humidification system:
Heat Moisture Exchanger (HME)
Warm mist humidity system
Tracheostomy mask
Adebola Olarewaju, MS, CPNP Revised: 04/01/2019 7 Otolaryngology HNS
Monitoring equipment:
Pulse oximeter machine
Pulse oximeter probes
Pulmonary Equipment (if needed):
Ventilator
Oxygen
Cough Assist
IPV machine
Nebulizer machine
Helpful Hints:
Your pulmonologist will order and renew the pulmonary equipment. All other tracheostomy related
supplies will ordered and renewed by your otolaryngologist (Ear, Nose, and Throat specialist).
Notes
Adebola Olarewaju, MS, CPNP Revised: 04/01/2019 8 Otolaryngology HNS
IMPORTANT CONTACTS
Surgeon ______________________________________________________
Nurse Practitioner _______________________________________________
ENT clinic and after hours numbers _________________________________
Hospital Main line _______________________________________________
ED main line ___________________________________________________
Pharmacy _____________________________________________________
Tracheostomy supplies company ___________________________________
Respiratory equipment company ___________________________________
Home Nursing Agency ___________________________________________
Adebola Olarewaju, MS, CPNP Revised: 04/01/2019 9 Otolaryngology HNS
TEAM CARE
Meet Your Team
Surgeon
Otolaryngologists (pronounced oh/toe/lair/in/goll/oh/jists) are doctors trained in the medical and surgical
treatment of ear, nose, and throat (ENT) problems. We commonly refer to them as ENT surgeons. The
ENT surgeon performs the tracheotomy (surgical technique to create the stoma or opening in the neck)
and places the tracheostomy tube. After hospital discharge you will see your ENT surgeon for follow-up
1 to 2 times per year.
Nurse Practitioner
Nurse practitioners have advanced training beyond their early preparation as a registered nurse and
have completed a masters or doctoral program. Our nurse practitioners also have specialized training
in pediatrics. The nurse practitioner will help to co-manage your tracheostomy care along with the ENT
surgeon. After hospital discharge you will see your nurse practitioner every 4 months for the first year,
then every 6 months after that in the ENT Tracheostomy Clinic. If you need to be seen more often,
extra visits will be scheduled.
Respiratory Therapist
Respiratory therapists work with doctors and nurses in evaluating breathing disorders and give
treatments. The respiratory therapist helps with breathing machines and tracheostomy tubes for people
who cannot breathe normally on their own. Our respiratory therapists will teach you about tracheostomy
care.
Pulmonologist
Pulmonologists (pronounced puhl/mo/nahl/oh/jists) are doctors who have specialty training in the
treatment of lung and breathing problems. If your child needs a ventilator or breathing machine to
breathe comfortably then he/she will be followed by our pediatric pulmonologist.
Adebola Olarewaju, MS, CPNP Revised: 04/01/2019 10 Otolaryngology HNS
After hospital discharge you will see your pulmonologist every 4 to 6 months for follow-up in the
pediatric ENT Airway clinic. This will be a joint visit with the pulmonologist, nurse practitioner, and/or
ENT surgeon.
Speech-Language Pathologist
Speech-language pathologists, also known as speech therapists, have advanced training in speech and
swallowing disorders and have completed a masters or doctoral degree. Children with tracheostomies
are at risk for developmental delays, difficulty with communication, and difficulty feeding such as
swallowing problems. The speech therapist will help you find local providers that can work on speech
and feeding with your child.
Discharge Planner
The discharge planner is a registered nurse (RN) or social worker who will help to transition your child
from the hospital to their home environment. You will meet with your discharge planner many times
during your hospital stay. Discharge planners look at the needs of the patient and the family and help
make a plan. They will also work with your insurance provider to get coverage for your medical
supplies.
Otolaryngology Residents
Otolaryngology (ENT) residents are doctors who have completed medical school and are undergoing
additional training to specialize in surgery for the ear, nose, and throat. They help with the placement
and management of tracheostomies. You may meet many different residents from the team while you
are in the hospial. There is always an ENT doctor on call in the hospital, and available 24 hours a day,
7 days a week to assist with your child’s care.
Registered Nurses (RNs)
A bedside registered nurse (RN) is a nurse that is involved with direct patient care. The bedside RN will
help you with tracheostomy care while you are still learning.
Adebola Olarewaju, MS, CPNP Revised: 04/01/2019 11 Otolaryngology HNS
TRACHEOSTOMY CLINIC
The ENT Tracheostomy Program starts while you are in the hospital (inpatient) and continues after you
leave the hospital when we see you in the clinic (outpatient).
Clinic visits
You will follow up with the nurse practitioner in the ENT Tracheostomy clinic 1 to 2 weeks after
hospital discharge. Then every 4 months for the first year and every 6 months for the following
years. If extra visits are needed they will be scheduled.
You will follow up with the ENT surgeon every 6 to 12 months.
If your child needs a ventilator (long term breathing machine) at hospital discharge they will be
followed up in the ENT Airway clinic by the nurse practitioner, pulmonologist, and/or ENT
surgeon.
Airway evaluations
A micro direct laryngoscopy and bronchoscopy (MDLB) is also referred to as an “airway
evaluation”.
Yearly evaluations are needed to monitor your child’s airway and change the size of the
tracheostomy tube as your child grows. The airway may experience changes as your child grows
so it is important that we take a look every year.
Tracheostomy supplies
While your child is the hospital the nurse practitioner will work with the discharge planner in
ordering the tracheostomy supplies for home.
Durable Medical Equipment or DME is a general term used to describe home health supplies.
Your first set of supplies will be delivered to the hospital so that we can review the order and
make sure that it is correct.
The nurse practitioner will update and renew your tracheostomy supplies from time to time. It is
important that you keep all follow-up visits in ENT Tracheostomy clinic to make sure that
supplies remain up to date and to prevent delays in shipments to your home.
Adebola Olarewaju, MS, CPNP Revised: 04/01/2019 12 Otolaryngology HNS
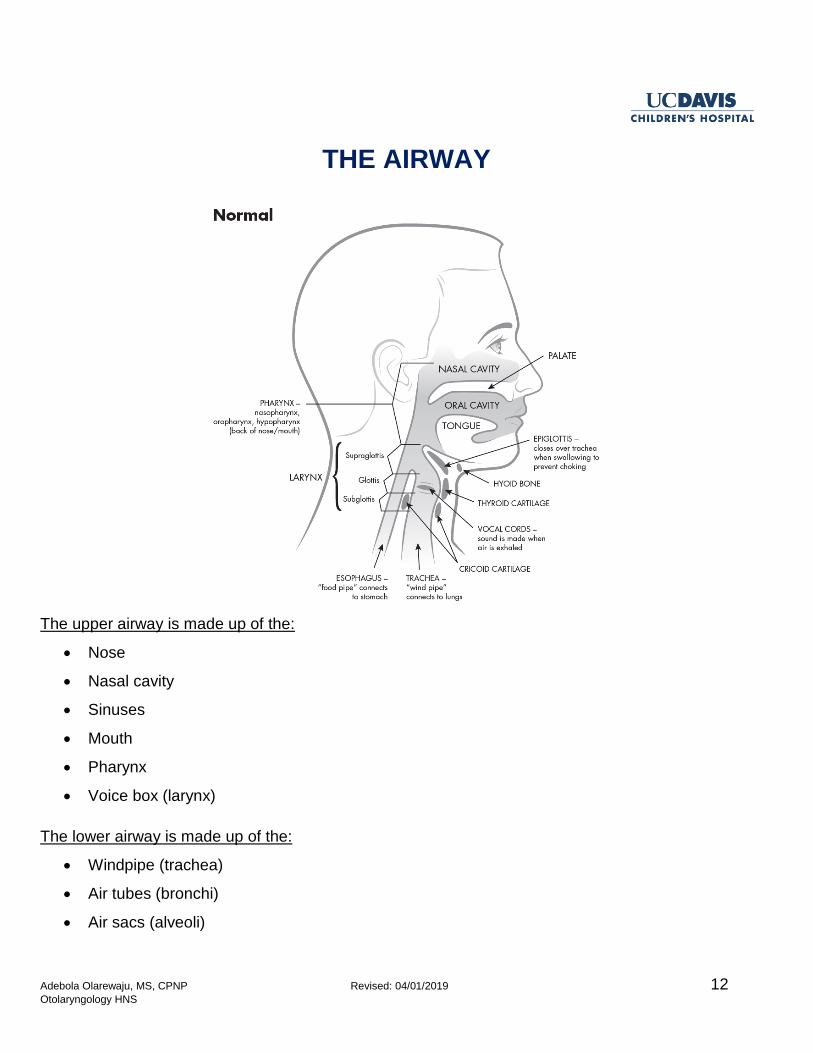
THE AIRWAY
The upper airway is made up of the:
Nose
Nasal cavity
Sinuses
Mouth
Pharynx
Voice box (larynx)
The lower airway is made up of the:
Windpipe (trachea)
Air tubes (bronchi)
Air sacs (alveoli)
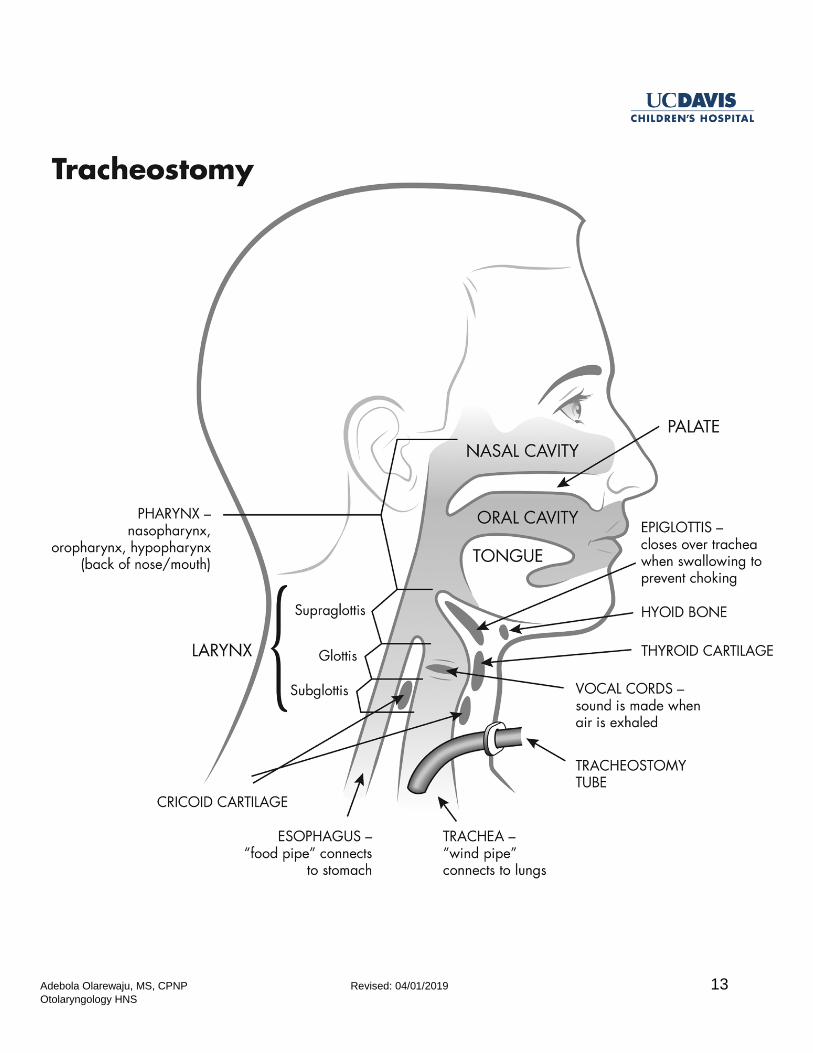
Adebola Olarewaju, MS, CPNP Revised: 04/01/2019 13 Otolaryngology HNS

Adebola Olarewaju, MS, CPNP Revised: 04/01/2019 14 Otolaryngology HNS
REASONS FOR A TRACHEOSTOMY
There are many reasons that a person might need a tracheostomy:
The upper airway may be blocked (large tongue, small jaw)
The windpipe may be too narrow, small, or floppy
A long-term connection to a breathing machine (ventilator) may be needed
Adebola Olarewaju, MS, CPNP Revised: 04/01/2019 15 Otolaryngology HNS
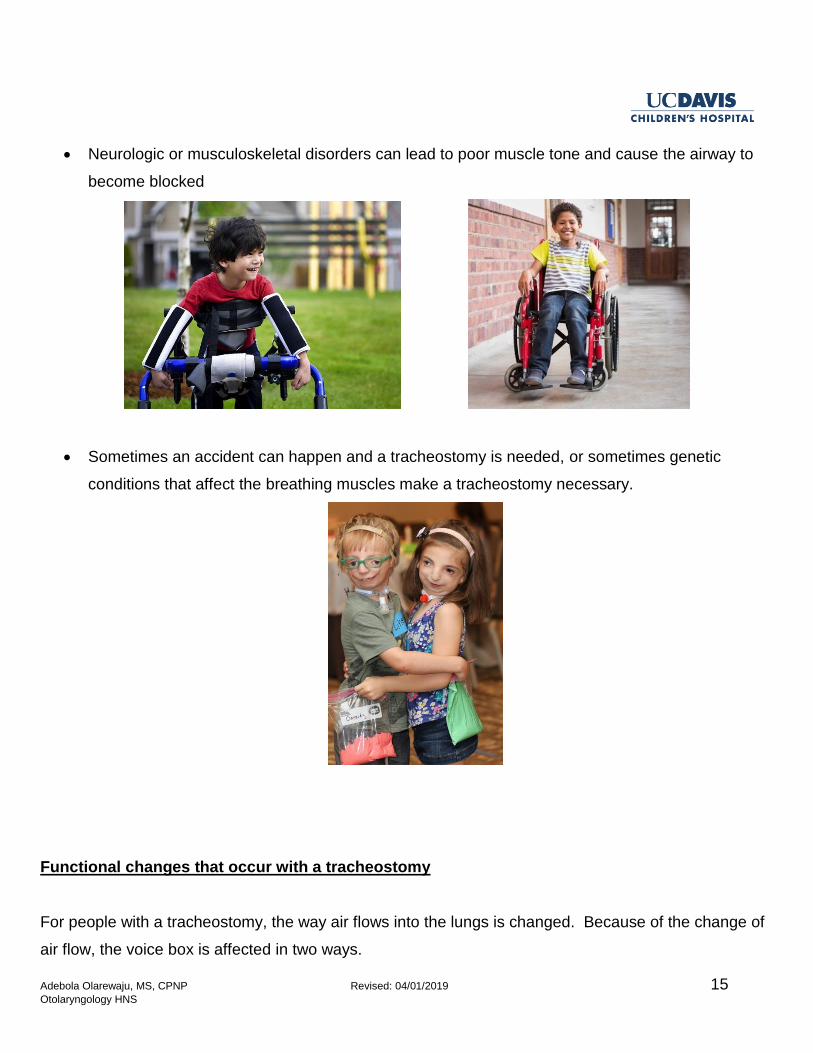
Neurologic or musculoskeletal disorders can lead to poor muscle tone and cause the airway to
become blocked
Sometimes an accident can happen and a tracheostomy is needed, or sometimes genetic
conditions that affect the breathing muscles make a tracheostomy necessary.
Functional changes that occur with a tracheostomy
For people with a tracheostomy, the way air flows into the lungs is changed. Because of the change of
air flow, the voice box is affected in two ways.
Adebola Olarewaju, MS, CPNP Revised: 04/01/2019 16 Otolaryngology HNS
First, being able to keep the lungs moist becomes hard, as the moisture in the nose and mouth warms
the air with normal respiration. Moisture is very important to the windpipes because without it, the
windpipes become sticky and dry. Mucus can dry out and block the windpipes, so extra attention to
humidification is important.
Second, because of the redirection of airflow your child will not make sounds/speech until they are
cleared to do finger occlusion, use a speaking valve or tracheostomy cap. It will be important for you
and your child to find ways to communicate.
For infants, facial expressions and body movements are their form of communication. For young
children, learning some sign language may be helpful. For older children who can write or type, paper
and pencil or a tablet may be useful for communication.
Notes
Adebola Olarewaju, MS, CPNP Revised: 04/01/2019 17 Otolaryngology HNS
TRACHEOSTOMY SURGERY
The Procedure
A tracheotomy is a small opening, also known as the stoma, made in the windpipe (trachea). The
tracheostomy tube will be placed in the stoma. This surgical procedure is done under general
anesthesia in the operating room.
The tracheostomy tube will be sutured in place to prevent accidentally moving the tube during the
healing period. Your child will be transferred to the Intensive Care Unit (ICU) after surgery for recovery.
Your child will be connected to the ventilator until they wake up from anesthesia. Some children need
the ventilator for a longer amount of time.
What to expect during the first week after surgery
Your child will need rest after surgery. Expect that your child will be sleepy after the procedure due to
the anesthesia. Anesthesia can linger in the system for 24 hours. Your child also may need pain
medication to keep them comfortable.
The ICU team will decide when your child is ready to come off the ventilator.
Expect that your child will need a lot of suctioning of secretions from the tracheostomy tube. It is
normal for your child to produce mucous.
The ENT team will perform the first tracheostomy tube change 5 to 7 days after the surgery. At that
time all stitches will be removed.
Adebola Olarewaju, MS, CPNP Revised: 04/01/2019 18 Otolaryngology HNS
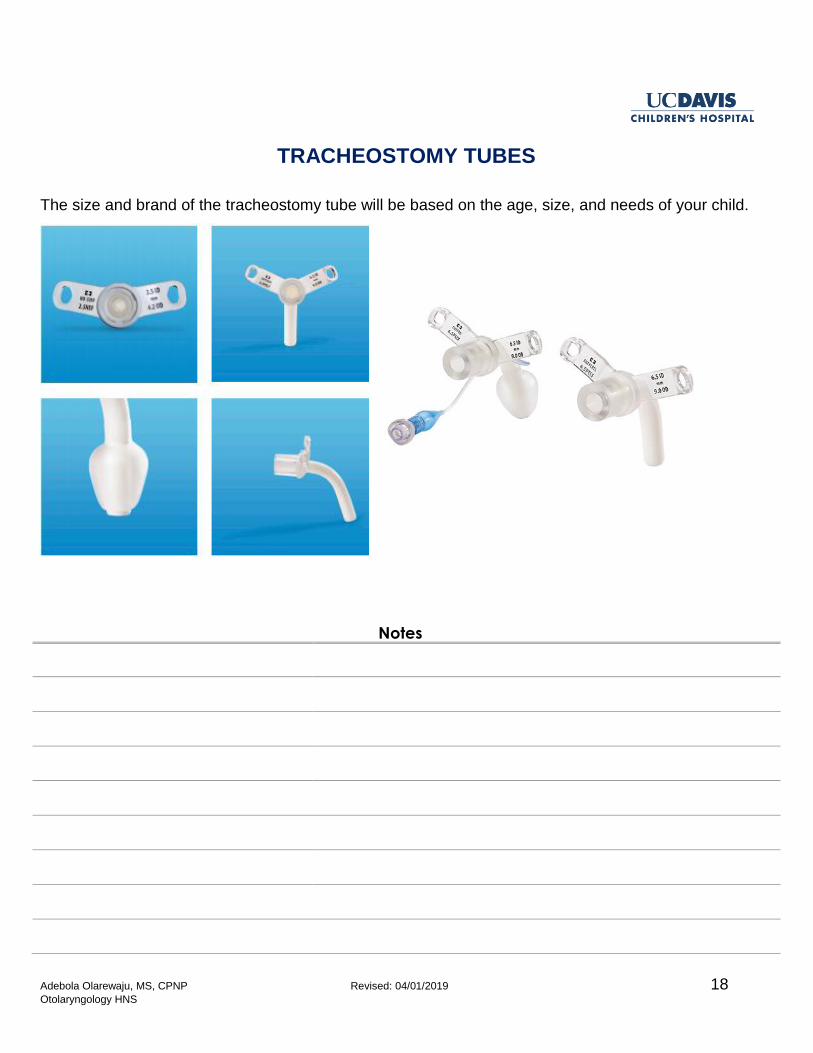
TRACHEOSTOMY TUBES
The size and brand of the tracheostomy tube will be based on the age, size, and needs of your child.
Notes
Adebola Olarewaju, MS, CPNP Revised: 04/01/2019 19 Otolaryngology HNS
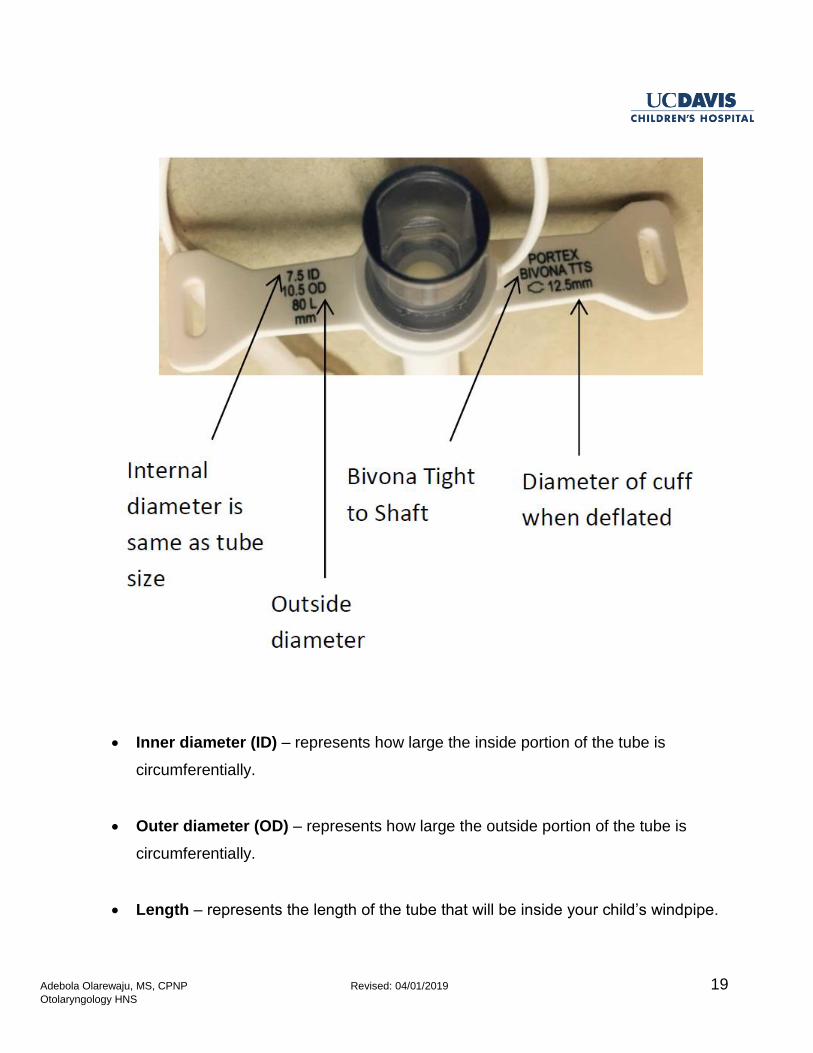
Inner diameter (ID) – represents how large the inside portion of the tube is
circumferentially.
Outer diameter (OD) – represents how large the outside portion of the tube is
circumferentially.
Length – represents the length of the tube that will be inside your child’s windpipe.
Adebola Olarewaju, MS, CPNP Revised: 04/01/2019 20 Otolaryngology HNS
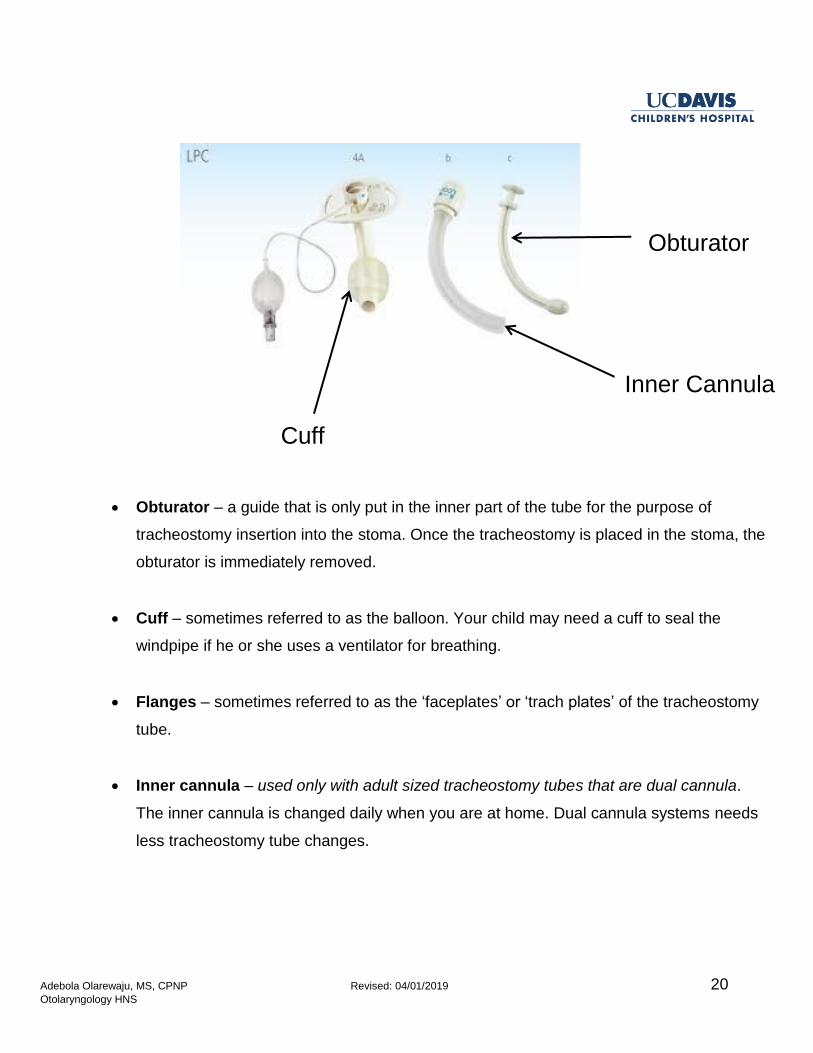
Obturator – a guide that is only put in the inner part of the tube for the purpose of
tracheostomy insertion into the stoma. Once the tracheostomy is placed in the stoma, the
obturator is immediately removed.
Cuff – sometimes referred to as the balloon. Your child may need a cuff to seal the
windpipe if he or she uses a ventilator for breathing.
Flanges – sometimes referred to as the ‘faceplates’ or ‘trach plates’ of the tracheostomy
tube.
Inner cannula – used only with adult sized tracheostomy tubes that are dual cannula.
The inner cannula is changed daily when you are at home. Dual cannula systems needs
less tracheostomy tube changes.
Obturator
Inner Cannula
Cuff
Adebola Olarewaju, MS, CPNP Revised: 04/01/2019 21 Otolaryngology HNS
HUMIDIFICATION
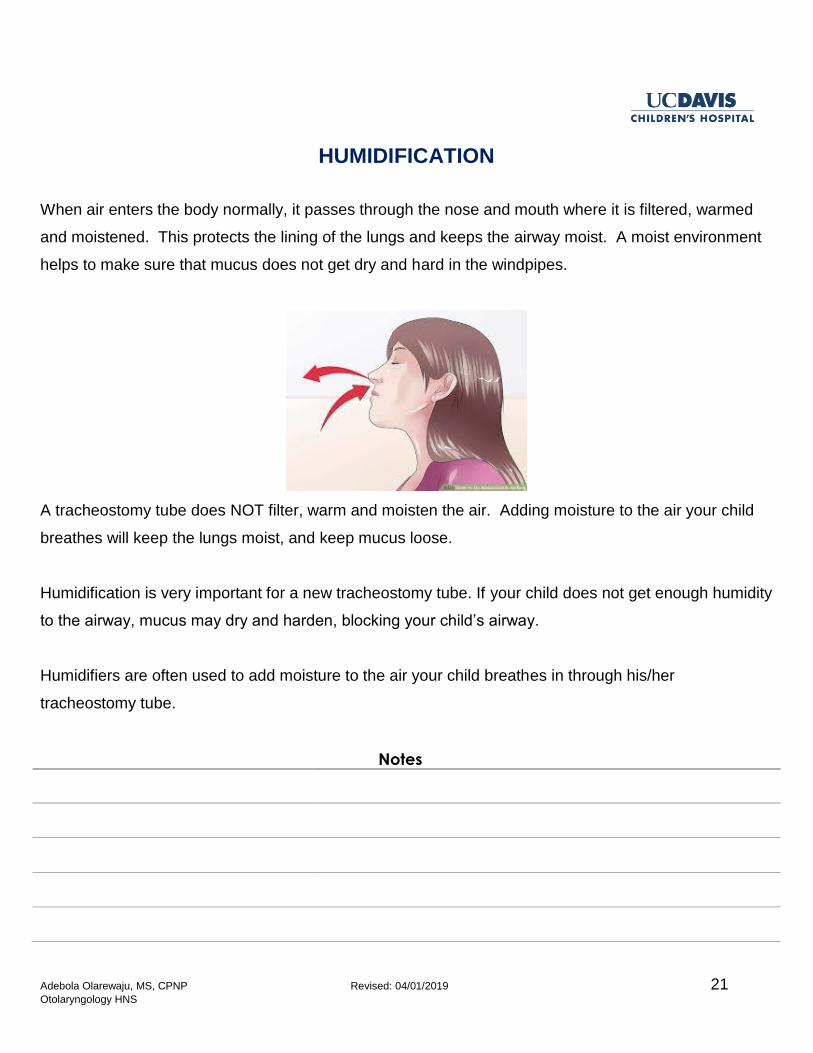
When air enters the body normally, it passes through the nose and mouth where it is filtered, warmed
and moistened. This protects the lining of the lungs and keeps the airway moist. A moist environment
helps to make sure that mucus does not get dry and hard in the windpipes.
A tracheostomy tube does NOT filter, warm and moisten the air. Adding moisture to the air your child
breathes will keep the lungs moist, and keep mucus loose.
Humidification is very important for a new tracheostomy tube. If your child does not get enough humidity
to the airway, mucus may dry and harden, blocking your child’s airway.
Humidifiers are often used to add moisture to the air your child breathes in through his/her
tracheostomy tube.
Notes
Adebola Olarewaju, MS, CPNP Revised: 04/01/2019 22 Otolaryngology HNS
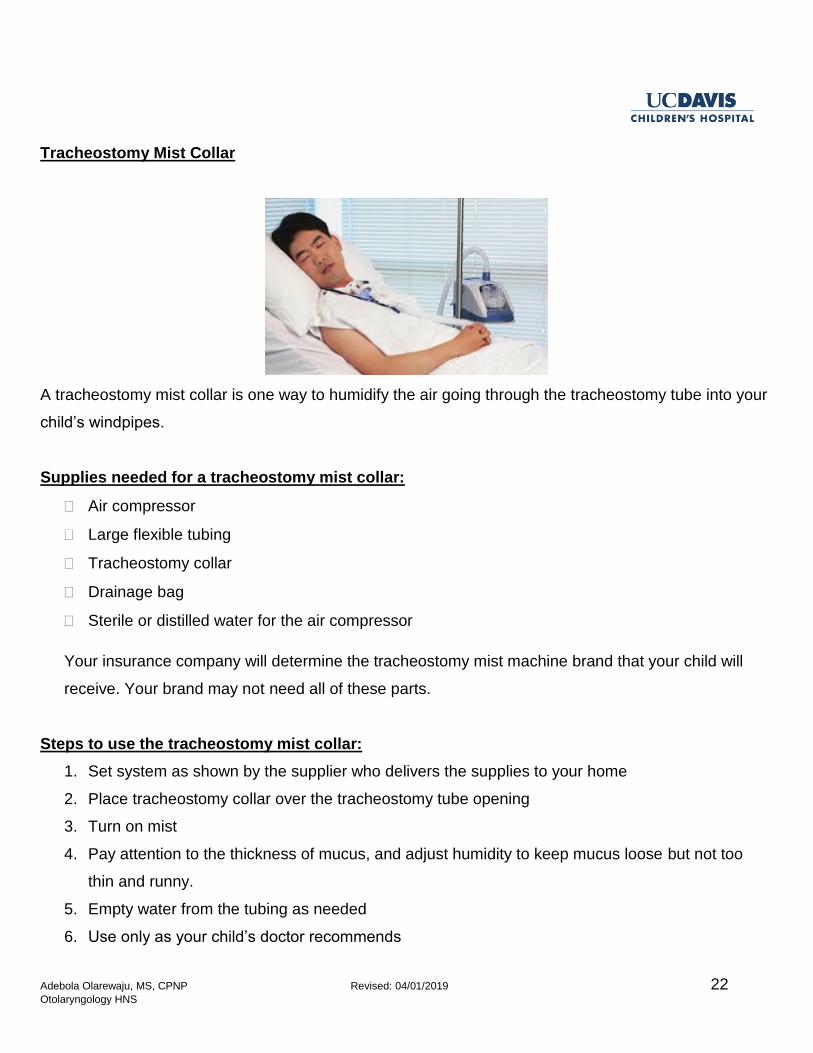
Tracheostomy Mist Collar
A tracheostomy mist collar is one way to humidify the air going through the tracheostomy tube into your
child’s windpipes.
Supplies needed for a tracheostomy mist collar:
Air compressor
Large flexible tubing
Tracheostomy collar
Drainage bag
Sterile or distilled water for the air compressor
Your insurance company will determine the tracheostomy mist machine brand that your child will
receive. Your brand may not need all of these parts.
Steps to use the tracheostomy mist collar:
1. Set system as shown by the supplier who delivers the supplies to your home
2. Place tracheostomy collar over the tracheostomy tube opening
3. Turn on mist
4. Pay attention to the thickness of mucus, and adjust humidity to keep mucus loose but not too
thin and runny.
5. Empty water from the tubing as needed
6. Use only as your child’s doctor recommends
Adebola Olarewaju, MS, CPNP Revised: 04/01/2019 23 Otolaryngology HNS
Helpful Hints:
Warmed humidification is best as cold mist can be irritating to the windpipes. When you first get home
you might need to use the mist humidifier all day and night. Eventually, humidification will only need to
be used when your child is sleeping.
When the weather is hot or dry, or the air quality is poor, your child may need more humidification.
During illness, your child might also need more humidification to keep mucus loose. If mucus is too thin
and runny it can be a constant irritation to your child’s windpipes and make them cough a lot.
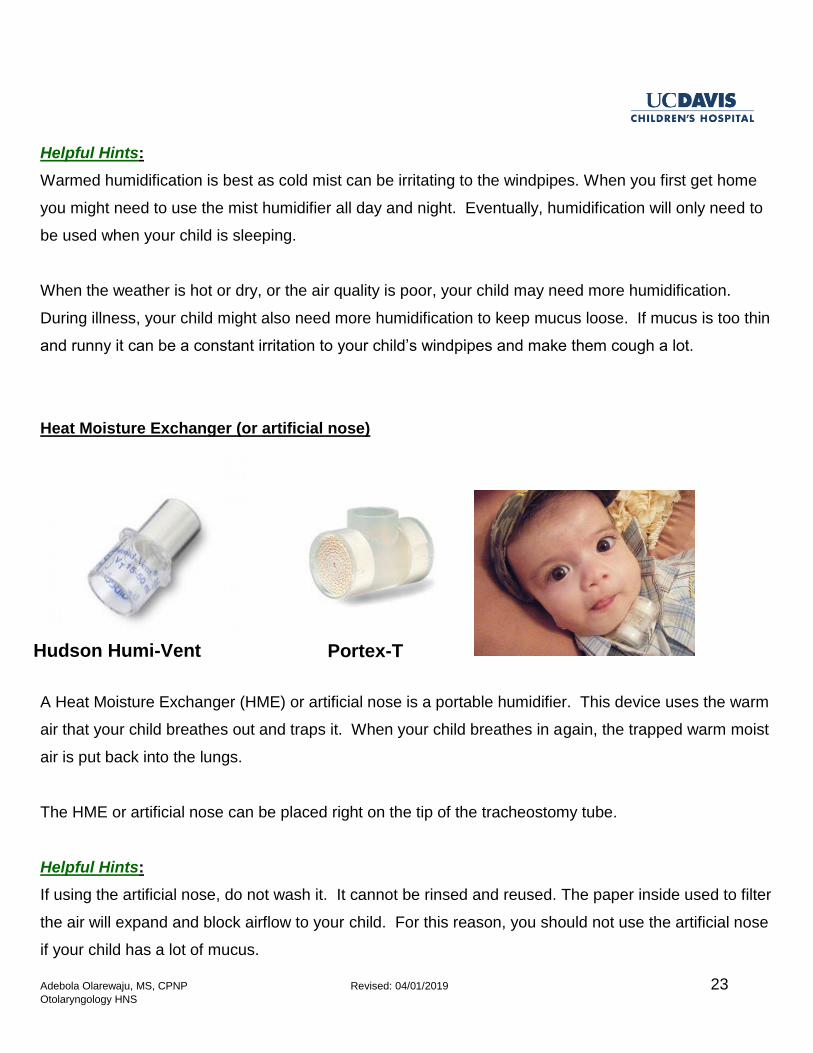
Heat Moisture Exchanger (or artificial nose)
A Heat Moisture Exchanger (HME) or artificial nose is a portable humidifier. This device uses the warm
air that your child breathes out and traps it. When your child breathes in again, the trapped warm moist
air is put back into the lungs.
The HME or artificial nose can be placed right on the tip of the tracheostomy tube.
Helpful Hints:
If using the artificial nose, do not wash it. It cannot be rinsed and reused. The paper inside used to filter
the air will expand and block airflow to your child. For this reason, you should not use the artificial nose
if your child has a lot of mucus.
Hudson Humi-Vent Portex-T
Adebola Olarewaju, MS, CPNP Revised: 04/01/2019 24 Otolaryngology HNS
SUCTIONING
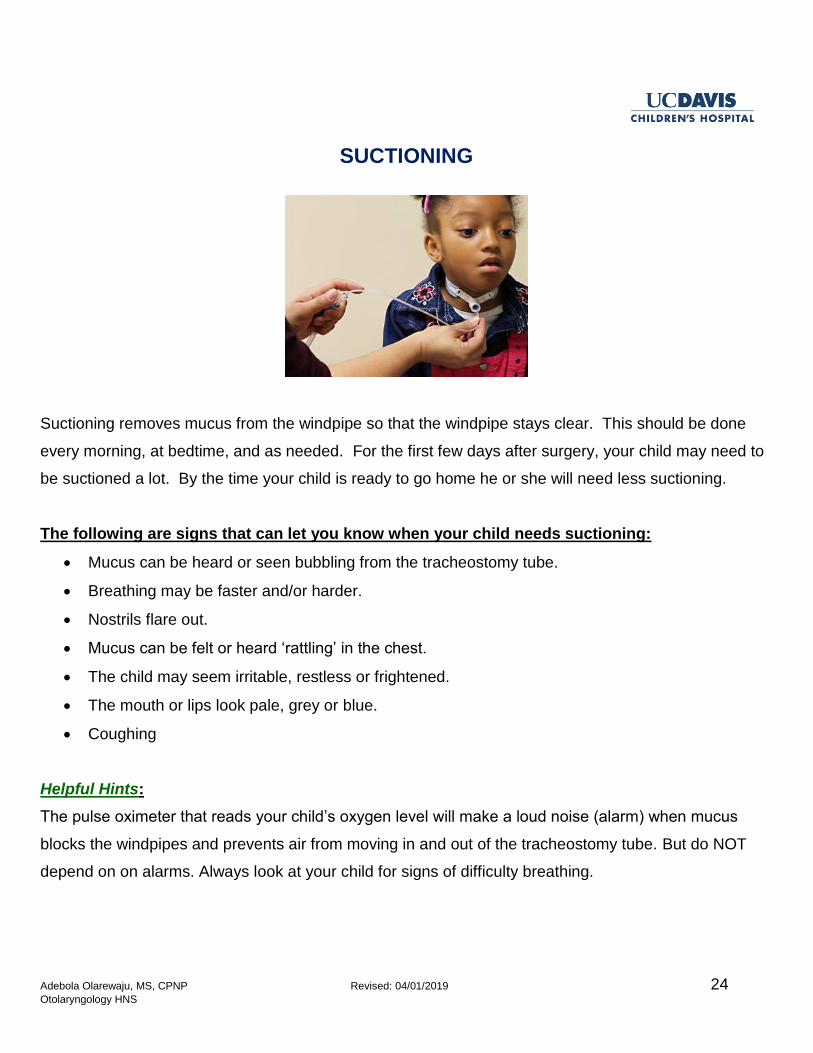
Suctioning removes mucus from the windpipe so that the windpipe stays clear. This should be done
every morning, at bedtime, and as needed. For the first few days after surgery, your child may need to
be suctioned a lot. By the time your child is ready to go home he or she will need less suctioning.
The following are signs that can let you know when your child needs suctioning:
Mucus can be heard or seen bubbling from the tracheostomy tube.
Breathing may be faster and/or harder.
Nostrils flare out.
Mucus can be felt or heard ‘rattling’ in the chest.
The child may seem irritable, restless or frightened.
The mouth or lips look pale, grey or blue.
Coughing
Helpful Hints:
The pulse oximeter that reads your child’s oxygen level will make a loud noise (alarm) when mucus
blocks the windpipes and prevents air from moving in and out of the tracheostomy tube. But do NOT
depend on on alarms. Always look at your child for signs of difficulty breathing.
Adebola Olarewaju, MS, CPNP Revised: 04/01/2019 25 Otolaryngology HNS
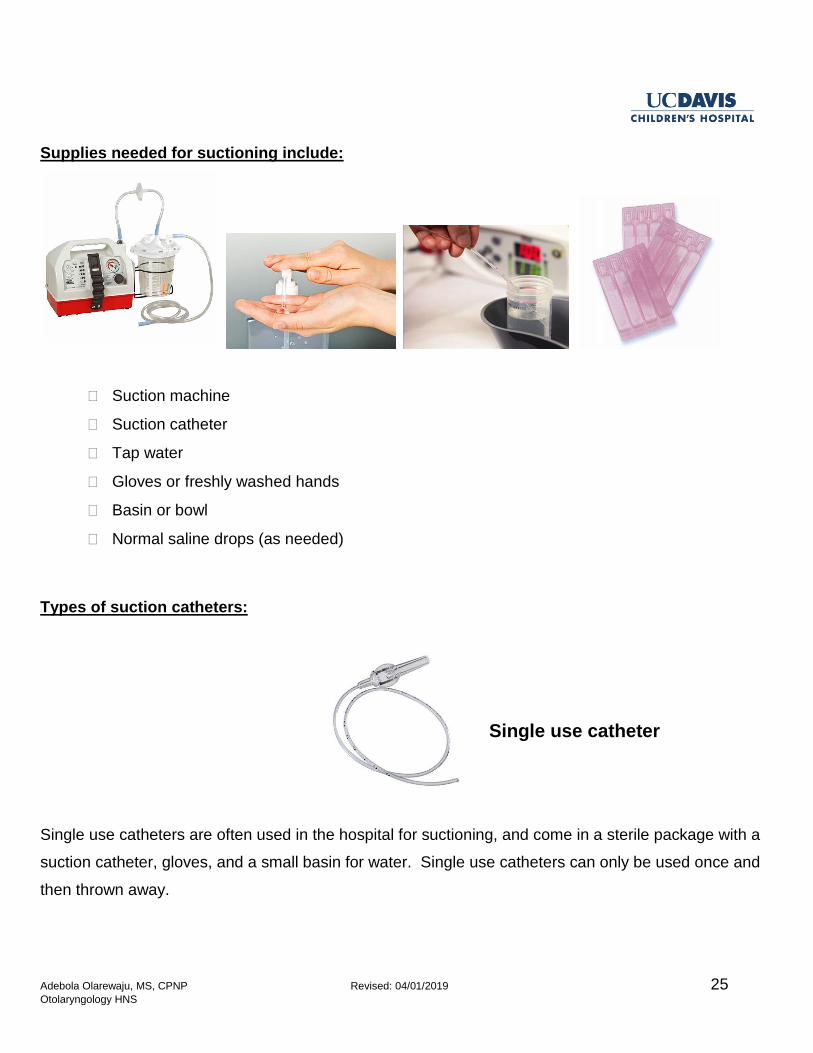
Supplies needed for suctioning include:
Suction machine
Suction catheter
Tap water
Gloves or freshly washed hands
Basin or bowl
Normal saline drops (as needed)
Types of suction catheters:
Single use catheters are often used in the hospital for suctioning, and come in a sterile package with a
suction catheter, gloves, and a small basin for water. Single use catheters can only be used once and
then thrown away.
Single use catheter
Adebola Olarewaju, MS, CPNP Revised: 04/01/2019 26 Otolaryngology HNS
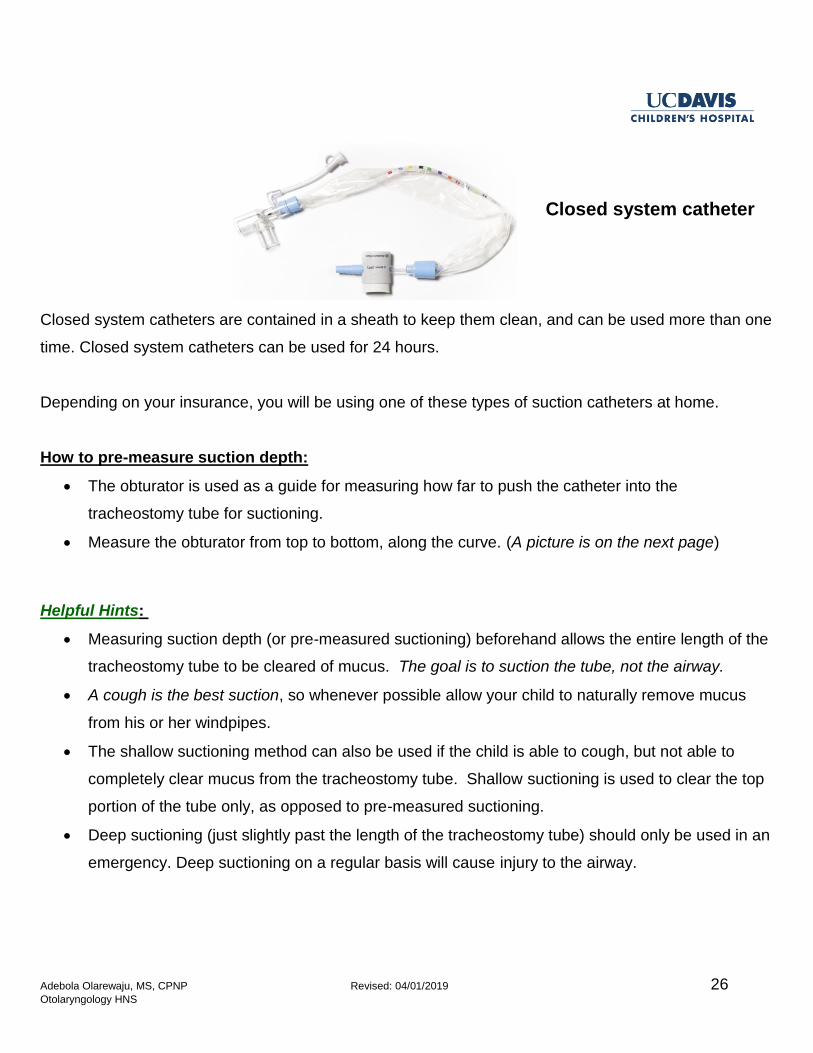
Closed system catheters are contained in a sheath to keep them clean, and can be used more than one
time. Closed system catheters can be used for 24 hours.
Depending on your insurance, you will be using one of these types of suction catheters at home.
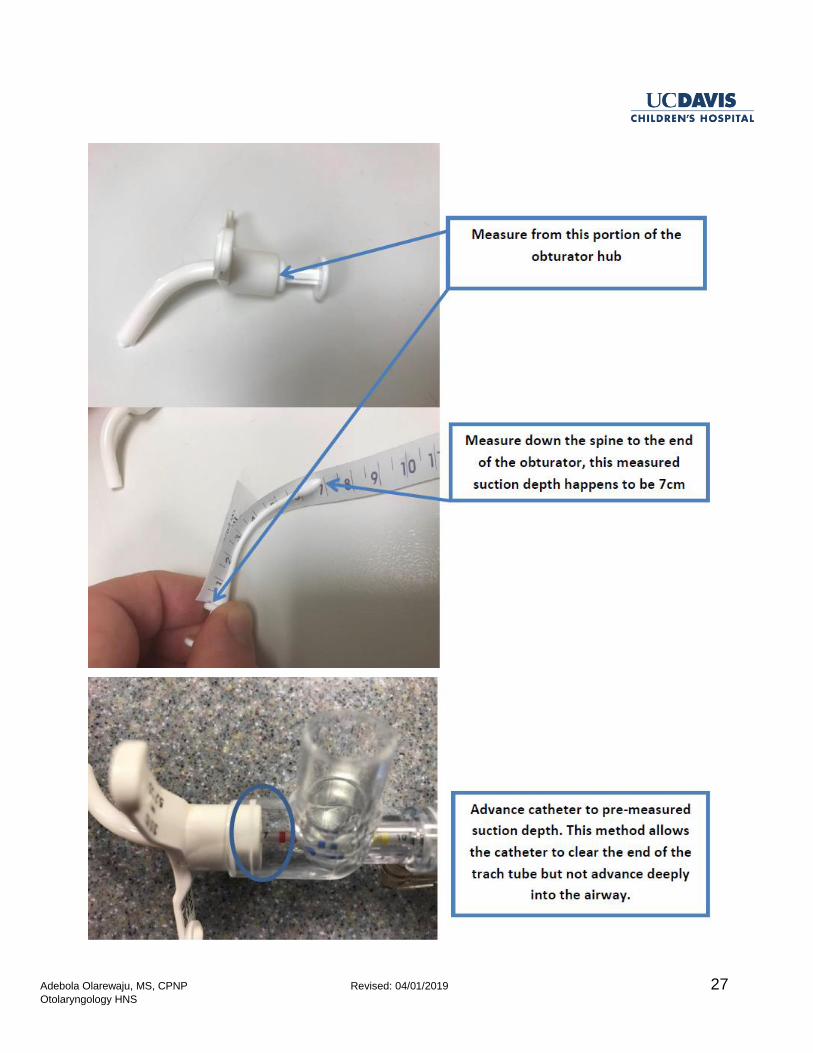
How to pre-measure suction depth:
The obturator is used as a guide for measuring how far to push the catheter into the
tracheostomy tube for suctioning.
Measure the obturator from top to bottom, along the curve. (A picture is on the next page)
Helpful Hints:
Measuring suction depth (or pre-measured suctioning) beforehand allows the entire length of the
tracheostomy tube to be cleared of mucus. The goal is to suction the tube, not the airway.
A cough is the best suction, so whenever possible allow your child to naturally remove mucus
from his or her windpipes.
The shallow suctioning method can also be used if the child is able to cough, but not able to
completely clear mucus from the tracheostomy tube. Shallow suctioning is used to clear the top
portion of the tube only, as opposed to pre-measured suctioning.
Deep suctioning (just slightly past the length of the tracheostomy tube) should only be used in an
emergency. Deep suctioning on a regular basis will cause injury to the airway.
Closed system catheter
Adebola Olarewaju, MS, CPNP Revised: 04/01/2019 27 Otolaryngology HNS
Adebola Olarewaju, MS, CPNP Revised: 04/01/2019 28 Otolaryngology HNS
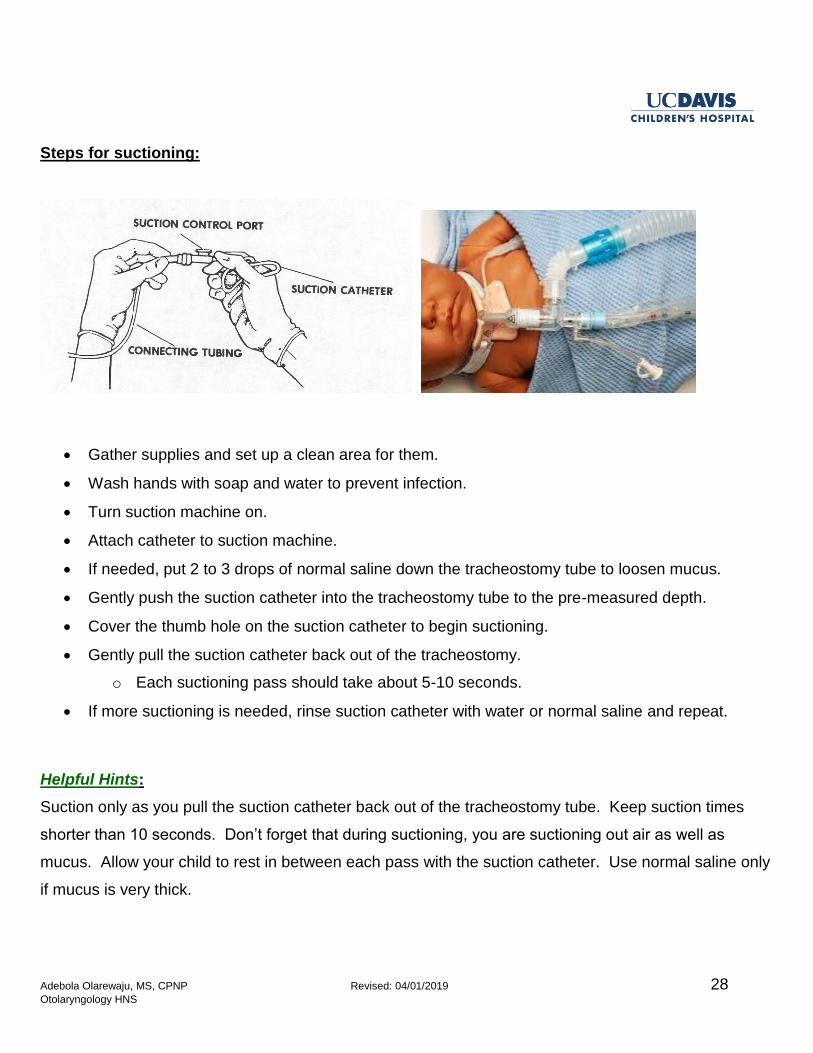
Steps for suctioning:
Gather supplies and set up a clean area for them.
Wash hands with soap and water to prevent infection.
Turn suction machine on.
Attach catheter to suction machine.
If needed, put 2 to 3 drops of normal saline down the tracheostomy tube to loosen mucus.
Gently push the suction catheter into the tracheostomy tube to the pre-measured depth.
Cover the thumb hole on the suction catheter to begin suctioning.
Gently pull the suction catheter back out of the tracheostomy.
o Each suctioning pass should take about 5-10 seconds.
If more suctioning is needed, rinse suction catheter with water or normal saline and repeat.
Helpful Hints:
Suction only as you pull the suction catheter back out of the tracheostomy tube. Keep suction times
shorter than 10 seconds. Don’t forget that during suctioning, you are suctioning out air as well as
mucus. Allow your child to rest in between each pass with the suction catheter. Use normal saline only
if mucus is very thick.
Adebola Olarewaju, MS, CPNP Revised: 04/01/2019 29 Otolaryngology HNS
Pay attention to the color and/or smell of your child’s mucus because it could be giving you clues:
White/Clear: Normal
Yellow: Could be a virus (common cold)
Dark Yellow: Common cold or possible infection (pneumonia or bronchitis). Increase
humidity.
Red/Brown: Blood stained mucus can be warning of an irritated throat.
Green: Possible bacterial infection, but can be due to poor humidification. Increase
humidity and encourage your child to drink fluids.
Call the doctor for a visit if your child looks ill, or if mucus is particularly foul smelling.
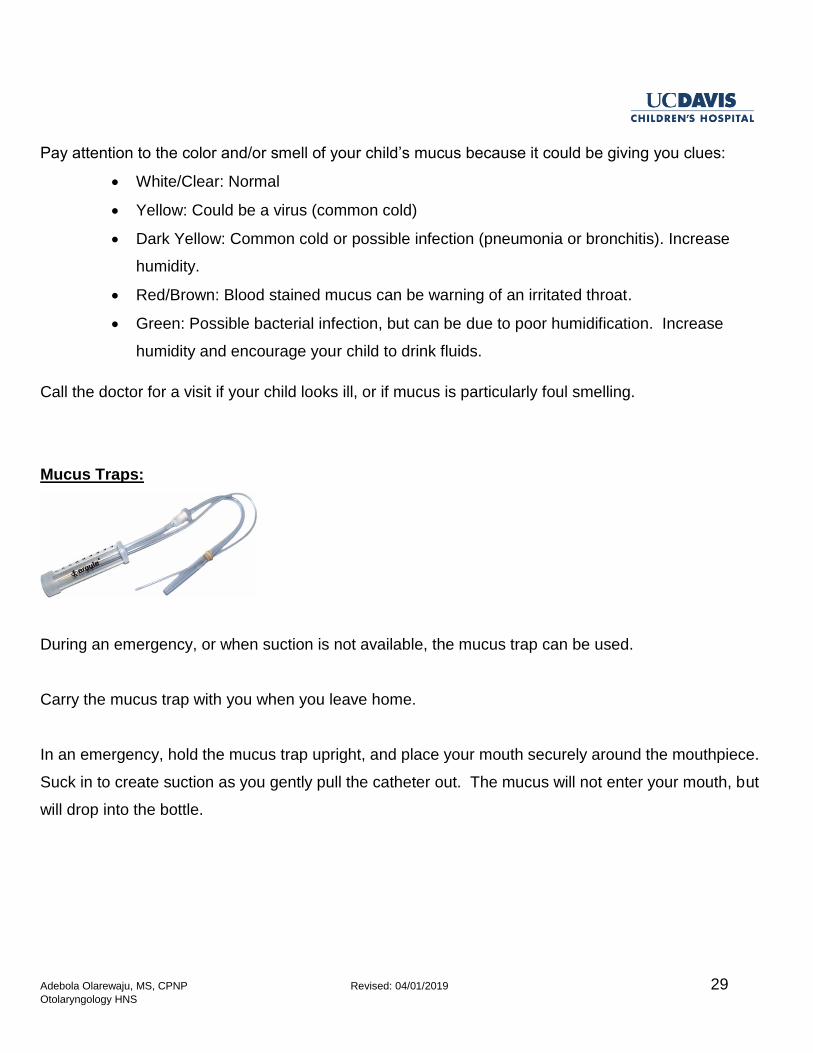
Mucus Traps:
During an emergency, or when suction is not available, the mucus trap can be used.
Carry the mucus trap with you when you leave home.
In an emergency, hold the mucus trap upright, and place your mouth securely around the mouthpiece.
Suck in to create suction as you gently pull the catheter out. The mucus will not enter your mouth, but
will drop into the bottle.
Adebola Olarewaju, MS, CPNP Revised: 04/01/2019 30 Otolaryngology HNS
CHANGING THE TRACHEOSTOMY TUBE
To change the tracheostomy tube, it is important to have your supplies ready:
Suction machine and catheter
Clean tracheostomy tube with obturator in place
Size smaller tracheostomy tube with obturator in place
Clean tracheostomy collar
Scissors
Foam dressing cut in the shape of a bib
Ambu bag or self-inflating resuscitation bag
Pulse oximeter monitor and probe
Sterile water or lubricant
Rolled towel to place under the shoulder blades to extend neck
Phone (mobile or landline)
If your child has a tracheostomy with a cuff, which is a balloon at the end of the tube, you will also need
an empty syringe for deflating the cuff before removing it, and placing either air or sterile water
(depending on the type of tracheostomy tube used) back into the cuff after placing it into the neck
opening.
A wet baby wash cloth with mild soap and tap water can be used to clean around the neck under the
tracheostomy collar before removing the old tracheostomy.
Note: It is important to keep the new tracheostomy tube clean. To help with this, set up a clean area for
your supplies. In the clean area, squeeze some lubricating jelly onto a sterile gauze pad that you can
dip the clean tracheostomy tube into if needed. You can also use sterile water.
Changing the tracheostomy tube is always a two-person job.
Adebola Olarewaju, MS, CPNP Revised: 04/01/2019 31 Otolaryngology HNS
Steps to change the tracheostomy tube:
Position: For infants, place a rolled towel under shoulder blades to better see the neck. Older
children can be in whatever position is comfortable.
o Restraining with blankets is not advised
Suction if needed
Person 1: Keeping the new tracheostomy tube with obturator in place clean, attach one side of
the clean tracheostomy collar to the tracheostomy tube. Add lubrication or sterile water to the tip
of the tube.Set it back down on the clean area.
Person 2: Hold old tracheostomy tube in place with two fingers on the faceplate.
Person 1: Remove the old tracheostomy tube collar from one side of the tracheostomy tube.
Person 2: Position hand under infant’s jaw being careful to only put pressure on the jawbone.
Count to 3 and remove old tube.
Breathe, you have a minute.
Person 1: Pick up the new clean tracheostomy tube with the obturator in place.
Person 1: Insert the new tracheostomy tube from a side angle, rotating into correct position
while pushing it further into the neck opening (right handed rotate counter-clockwise, left handed
rotate clockwise).
o If there is any resistance, do not keep pushing. Instead, remove the tracheostomy tube,
look closely at the tube and neck opening, and try again.
o A cuffed tube will have mild resistance, this is expected.
Person 1: Once the tracheostomy tube is in place, hold the new tracheostomy tube in place with
two fingers on the faceplate, and remove the obturator.
o Airflow will be blocked by the obturator while it is still inside the tracheostomy tube.
Person 2: Secure the new clean tracheostomy collar.
o Sit the child up to check how snug the tracheostomy collar is. You should be able to fit
one pinky finger between the tracheostomy collar and the skin on the right side, left side,
and back of the neck.
Adebola Olarewaju, MS, CPNP Revised: 04/01/2019 32 Otolaryngology HNS
Helpful Hints:
Cuffed tracheostomy tubes will have mild resistance upon removal and insertion of the tube.
If the same size tracheostomy tube won’t fit, try placing the size smaller.
If the size smaller doesn’t fit:
Call 911
If your child is in distress or ventilator dependent, cover the neck opening and start bag-mask
ventilation, using the mask on the face.
Start CPR if your child stops breathing, becomes unresponsive, or does not have a pulse
Notes
Adebola Olarewaju, MS, CPNP Revised: 04/01/2019 33 Otolaryngology HNS
CLEANING THE TRACHEOSTOMY TUBE
Shiley
Shiley tracheostomy tubes are meant to be used once and thrown away, also known as “single-use
only”. For example, if your child has tracheostomy tube changes weekly, then you would throw out the
old tube every time a new one is placed. Do not re-sterilize your Shiley tube or attempt to clean it in
boiling hot water.
Please contact your DME company every month to confirm your next shipment date and update your
current address and phone number.
Bivona and Portex
Bivona and Portex tracheostomy tubes are meant to be cleaned and reused. For neonatal and
pediatric tubes it can be cleaned and reused up to five times. For adult tracheostomy tubes it can be
cleaned and reused up to ten times.
Supplies needed for cleaning the tracheostomy tube:
Mild, fragrance-free, clear dishwashing soap
2 deep trays or bowls
Clean plastic storage bag
Pipe cleaner or soft-bristled brush
Steps for cleaning the tracheostomy tube:
1. Wash hands with soap and water.
2. Set up supplies.
3. Soak tube and obturator in the first tray with distilled water and clear dish soap. Do NOT use vinegar
or hydrogen peroxide.
4. Gently wash the inside and outside of the tube using a pipe cleaner or soft bristled brush. Be careful!
Too much scrubbing, scraping, or stretching may damage the tube.
Adebola Olarewaju, MS, CPNP Revised: 04/01/2019 34 Otolaryngology HNS
5. Rinse the tube with distilled water and place in the second tray.
6. Gently wash the obturator with distilled water and detergent as described in step 3.
7. Rinse the obturator with distilled water and place in the second tray.
8. Pour rapidly boiling hot water over the tube and obturator in the second tray. Allow them to soak for a
minimum of 15 minutes.
9. Once cool, remove the tube and obturator from the water, holding the tube by the neck faceplate and
the obturator by its handle.
10. Inspect the tube prior to use. Do not use a tube that is cut or damaged.
11. Allow tube and obturator to air dry completely. Once dry, store in a clean plastic bag.
Helpful Hints:
Hospital environment
If your child has an adult tracheostomy tube, while in the hospital you will change the inner cannula
twice a day. This is because while in the hospital there are a lot of sick patients in need of care. We do
our best to limit exposure to germs. One of the ways we do this is by changing the inner cannula twice
a day and throwing it away after each use.
Home environment
When your child is at home there can be less exposure to germs. For this reason your child only needs
to change the inner cannula once a day. Sometimes children produce more secretions for various
reasons such as weather changes, allergies, cold symptoms, or they naturally produce a lot of
secretions. If you are concerned about the inner cannula getting clogged you can wash and re-use it.
But, we still recommend that after 24 hours of use it should be thrown away.
Adebola Olarewaju, MS, CPNP Revised: 04/01/2019 35 Otolaryngology HNS
CLEANING THE INNER CANNULA
Supplies needed for cleaning the inner cannula:
Mild, fragrance-free, clear dishwashing soap
2 deep trays or bowls
Clean plastic storage bag
Pipe cleaner or soft-bristled brush
Steps for cleaning the inner cannula:
1. Wash hands with soap and water.
2. Set up supplies.
3. Soak inner cannula in the first tray with distilled water and clear dish soap. Do NOT use vinegar or
hydrogen peroxide.
4. Gently wash the inside and outside of the inner cannula using a pipe cleaner or soft bristled brush.
Be careful! Too much scrubbing, scraping, or stretching may damage the tube.
5. Rinse the inner cannula with distilled water and place in second tray.
6. Pour rapidly boiling hot water over the inner cannula in second tray. Allow it to soak for a minimum of
15 minutes.
7. Once cool, remove the inner cannula from the water, holding the inner cannula by the head at the
connector site. Don’t touch the part of the cannula that will be going inside the tracheostomy tube.
8. Inspect the inner cannula prior to use. Do not use an inner cannula that is cut or damaged.
9. Allow inner cannula to air dry completely. Once dry, store in clean plastic bag.
Adebola Olarewaju, MS, CPNP Revised: 04/01/2019 36 Otolaryngology HNS
GETTING READY FOR HOME
Home Care Nursing
Prior to hospital discharge the case manager will ask you if you are interested in having a home care
nurse. The thought of having a stranger in the home may be uncomfortable for some people. Before
you decline nursing services weigh the pros and cons of receiving extra help.
Home care nurses cares will care for your child in your home environment and can administer
medications, oral or tube feedings, and prescribed therapies.
Your home care nurse will either be a registered nurse (RN) or licensed vocational nurse (LVN).
If your assigned nurse does not have tracheostomy experience we always recommend to the
home health agency that the nurse come to the hospital for training as a caregiver during your
child’s hospital stay.
Eligibility for nursing services will depend on your child’s insurance coverage and staff availability
at the home health agency.
Tracheostomy Supplier
Prior to hospital discharge a tracheostomy supplier will be assigned to you. Supplier assignments are
dependent on your insurance carrier and where you live within California. Your first shipment of
supplies will be delivered to the hospital so that we can make sure that the order is correct.
The supplier will send a respiratory therapist or a representative to the hospital to meet with you
and your child, and discuss the equipment that will be supplied at home after discharge. They
will teach you how to use your equipment (ventilator, pulse oximeter, or tracheostomy mist
machine). Safe handling practices and cleaning instructions for your equipment will be reviewed.
You will be given the contact information for your supplier.
Contact your supplier for issues with your tracheostomy supplies or to confirm delivery.
Adebola Olarewaju, MS, CPNP Revised: 04/01/2019 37 Otolaryngology HNS
Delays in shipment are most likely related to insurance authorization and less likely due to an expired
home supply order.
If you move addresses or change your phone number be sure to update your information with your
supplier to avoid delays in shipment.
ENT and pulmonary clinic will work together to make sure you have the appropriate supplies and
equipment.
ENT clinic will manage all tracheostomy supplies, monitoring equipment, and suction equipment.
Pulmonary clinic will manage all ventilators, nebulizing machines, and home oxygen.
Please call the appropriate clinic if you need help with your supplies or equipment.
Notes
Adebola Olarewaju, MS, CPNP Revised: 04/01/2019 38 Otolaryngology HNS
COMPLICATIONS
Some complications might occur when taking care of a child with a tracheostomy tube. See below for a
list of possible complications and things you can do to help.
Accidental Decannulation
This is when the tracheostomy tube accidently comes out.
Follow the steps for changing the tracheostomy tube, including trying one size smaller if unable
to place same size tracheostomy tube.
Remain calm, and if unable to replace tracheostomy tube, call 911.
Bag-mask ventilation if child is in distress or ventilator dependent.
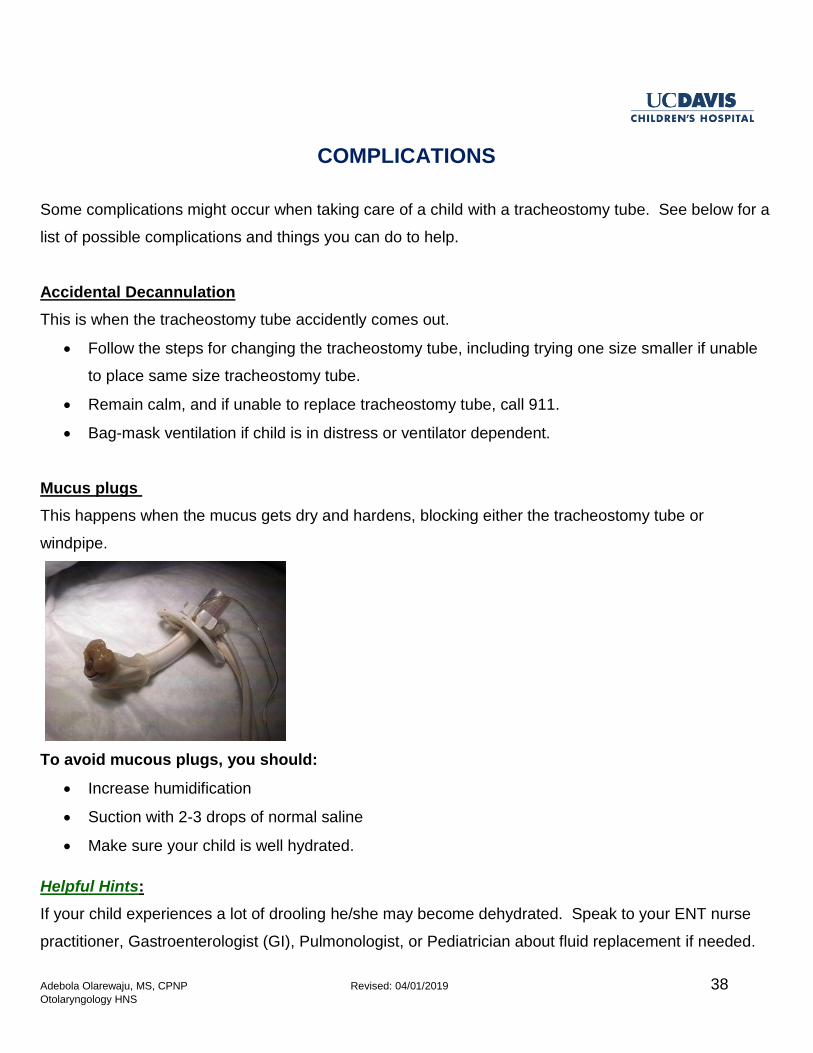
Mucus plugs
This happens when the mucus gets dry and hardens, blocking either the tracheostomy tube or
windpipe.
To avoid mucous plugs, you should:
Increase humidification
Suction with 2-3 drops of normal saline
Make sure your child is well hydrated.
Helpful Hints:
If your child experiences a lot of drooling he/she may become dehydrated. Speak to your ENT nurse
practitioner, Gastroenterologist (GI), Pulmonologist, or Pediatrician about fluid replacement if needed.
Adebola Olarewaju, MS, CPNP Revised: 04/01/2019 39 Otolaryngology HNS
Bleeding
Bleeding is usually related to the following:
1. Suctioning too deep
o This causes injury to the windpipe. Blood/secretions from the tracheostomy may start out
bright red and then become pink as bleeding decreases. After 24 hours secretions should
become clear.
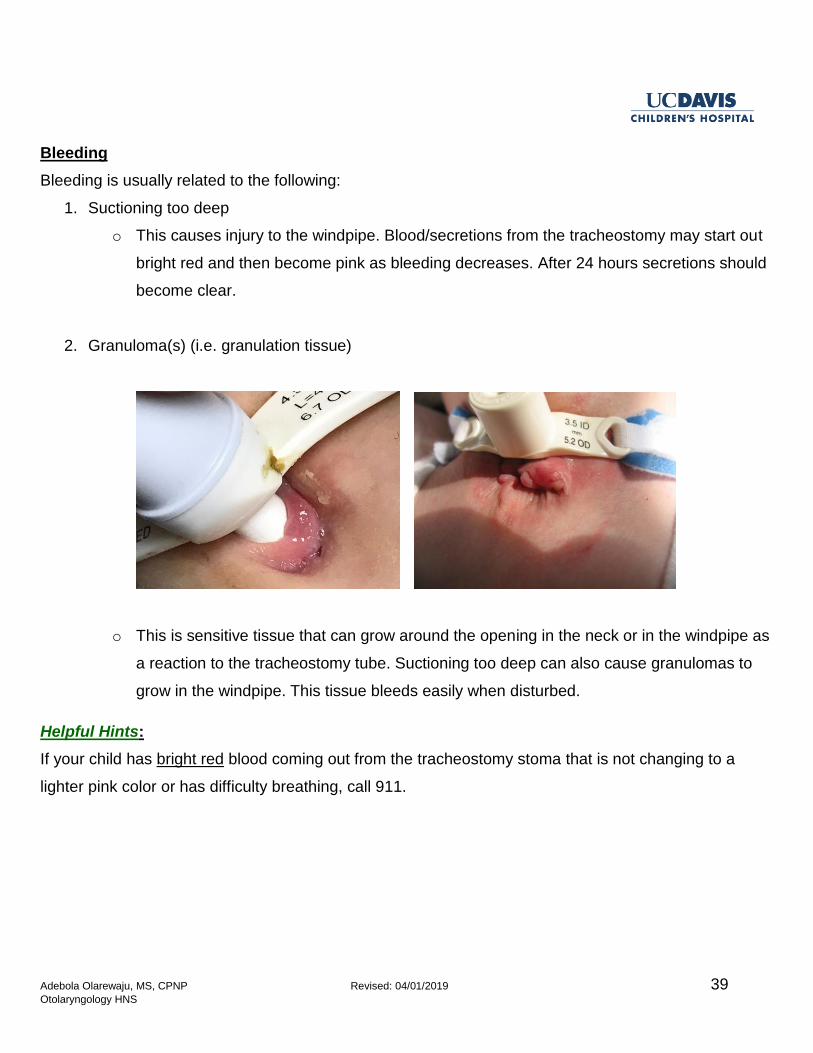
2. Granuloma(s) (i.e. granulation tissue)
o This is sensitive tissue that can grow around the opening in the neck or in the windpipe as
a reaction to the tracheostomy tube. Suctioning too deep can also cause granulomas to
grow in the windpipe. This tissue bleeds easily when disturbed.
Helpful Hints:
If your child has bright red blood coming out from the tracheostomy stoma that is not changing to a
lighter pink color or has difficulty breathing, call 911.
Adebola Olarewaju, MS, CPNP Revised: 04/01/2019 40 Otolaryngology HNS
EMERGENCY CARE FOR A CHILD WITH A TRACHEOSTOMY TUBE
This information describes emergency care for a child with a tracheostomy tube. It does not certify you
in Cardio Pulmonary Resuscitation (CPR). Please attend a CPR training course in your community.
How do I know my child is having problems breathing through the tracheostomy tube?
If your child’s tracheostomy tube becomes plugged with mucus and your child is having trouble
breathing, you may notice:
Appearance of distress or worry
Your child placing their hands on the tracheostomy tube or trying to remove it
A whistling sound from the tracheostomy tube with breaths
Skin color turning pale, grey or blue
Ineffective coughing (not able to clear tube of mucus)
Chest not rising and falling with each breath
Ventilator alarming
What do I do if my child cannot breathe through the tracheostomy tube?
Do not hesitate to change the tracheostomy tube!
Try suctioning the tracheostomy tube first if you are able to see secretions in the tube. If the
suction catheter sticks, or you cannot pass the suction catheter through the tracheostomy tube,
remove the tracheostomy and quickly replace it with a new tracheostomy tube.
Even if you are able to suction the tracheostomy tube and your child is not breathing, we
recommend changing the tube. Your child may cough with the tracheostomy tube change.
Suction the new tracheostomy tube, if needed, to clear the secretions from the tube.
What do I do if my child’s color is still pale, blue or gray after the tracheostomy tube change?
In many cases changing the tracheostomy tube is all that is needed to help your child start to
breathe.
Adebola Olarewaju, MS, CPNP Revised: 04/01/2019 41 Otolaryngology HNS
If your child is not breathing you will need to start breathing for your child. Call 911.
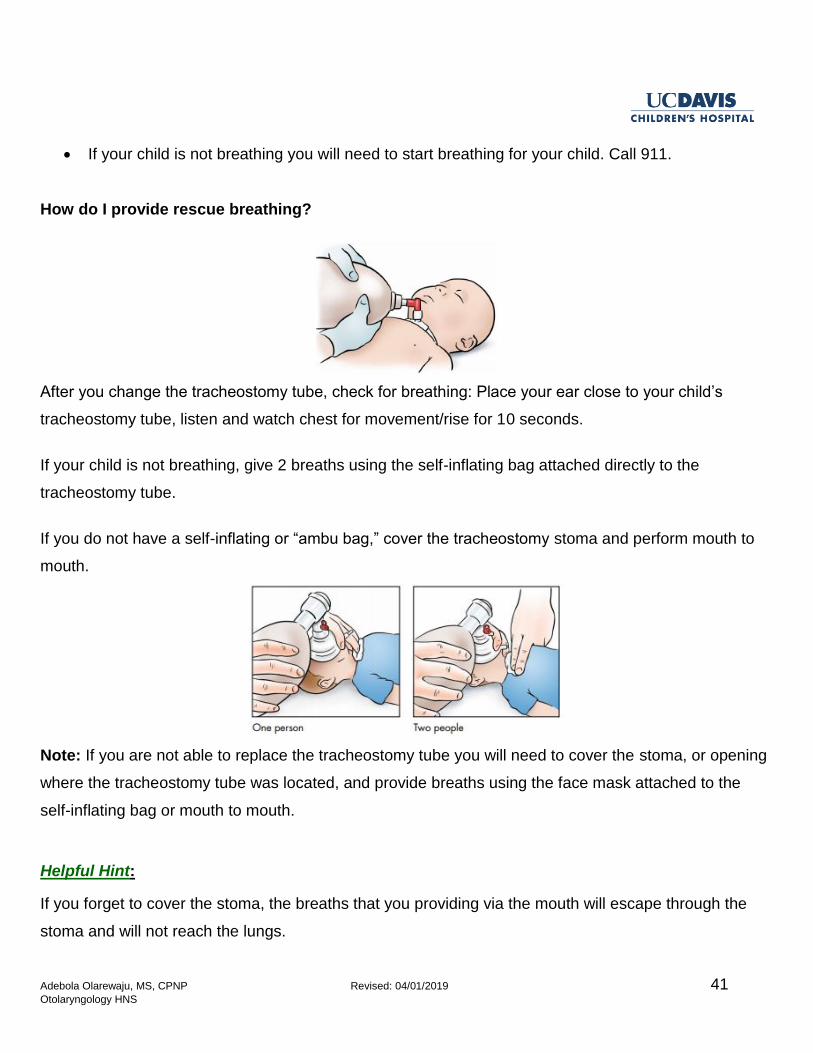
How do I provide rescue breathing?
After you change the tracheostomy tube, check for breathing: Place your ear close to your child’s
tracheostomy tube, listen and watch chest for movement/rise for 10 seconds.
If your child is not breathing, give 2 breaths using the self-inflating bag attached directly to the
tracheostomy tube.
If you do not have a self-inflating or “ambu bag,” cover the tracheostomy stoma and perform mouth to
mouth.
Note: If you are not able to replace the tracheostomy tube you will need to cover the stoma, or opening
where the tracheostomy tube was located, and provide breaths using the face mask attached to the
self-inflating bag or mouth to mouth.
Helpful Hint:
If you forget to cover the stoma, the breaths that you providing via the mouth will escape through the
stoma and will not reach the lungs.
Adebola Olarewaju, MS, CPNP Revised: 04/01/2019 42 Otolaryngology HNS
The mask should fit below the eyes and tightly cover the mouth and nose.
Tilt the head back and lift on the chin pulling it up to help seal the mask to the face. If someone else is
with you, ask them to cover the stoma while you give 2 breaths with the self-inflating bag.
Gently squeeze the bag and give 2 breaths – just enough to make the chest rise. Allow the bag to re-
inflate between breaths.
Check for breathing and a pulse for 10 seconds. If your child has a pulse, but not breathing effectively,
continue providing 1 breath every 3 seconds with the ambu bag attached directly to the tracheostomy
tube or the mask if you were not able to replace the tracheostomy tube. Call 911.
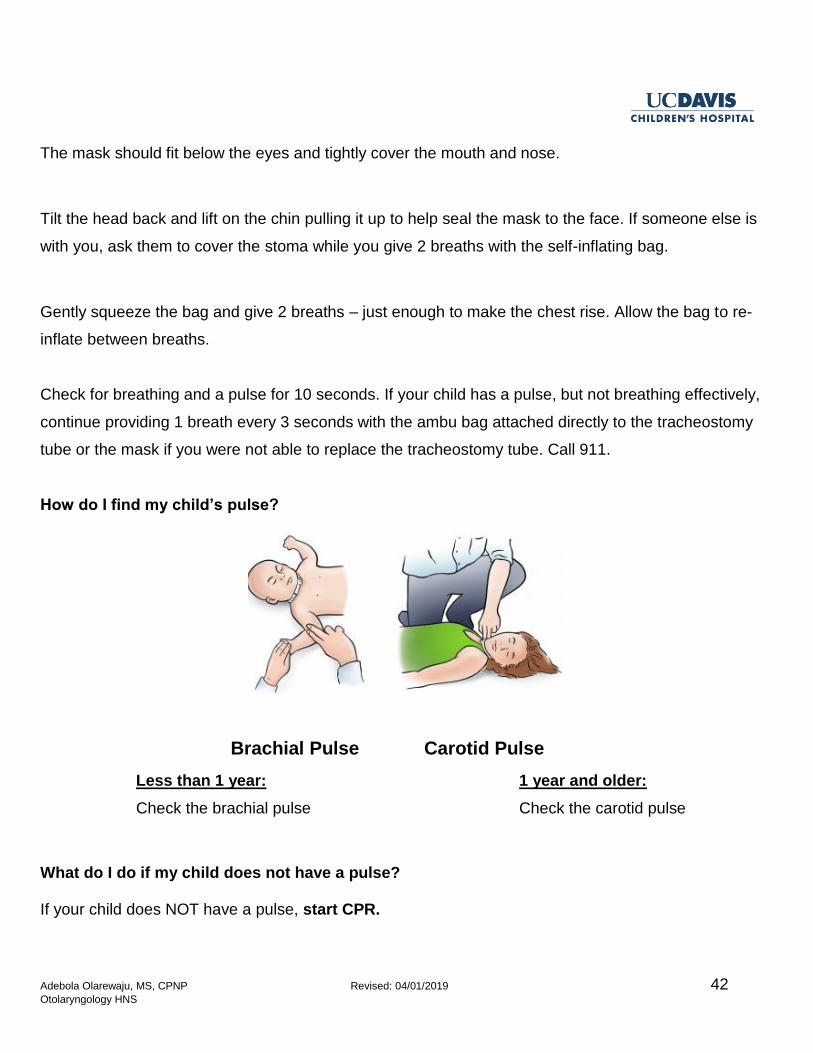
How do I find my child’s pulse?
Less than 1 year: 1 year and older:
Check the brachial pulse Check the carotid pulse
What do I do if my child does not have a pulse?
If your child does NOT have a pulse, start CPR.
Carotid Pulse Brachial Pulse
Adebola Olarewaju, MS, CPNP Revised: 04/01/2019 43 Otolaryngology HNS
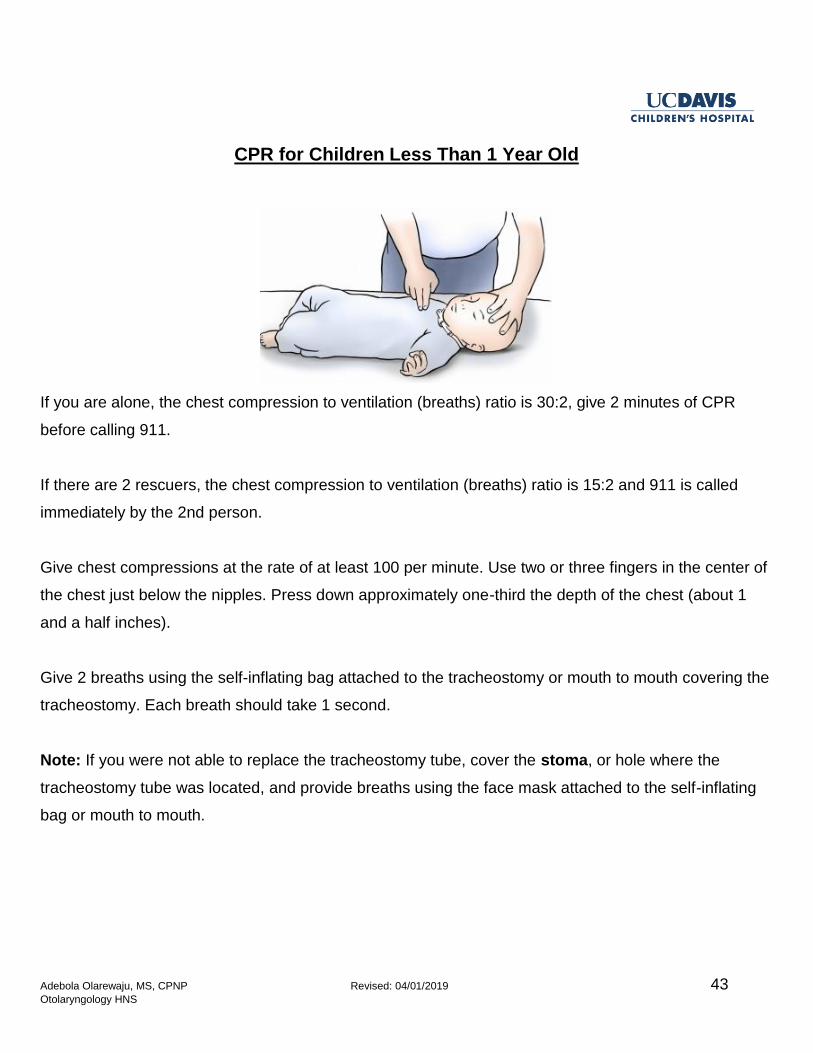
CPR for Children Less Than 1 Year Old
If you are alone, the chest compression to ventilation (breaths) ratio is 30:2, give 2 minutes of CPR
before calling 911.
If there are 2 rescuers, the chest compression to ventilation (breaths) ratio is 15:2 and 911 is called
immediately by the 2nd person.
Give chest compressions at the rate of at least 100 per minute. Use two or three fingers in the center of
the chest just below the nipples. Press down approximately one-third the depth of the chest (about 1
and a half inches).
Give 2 breaths using the self-inflating bag attached to the tracheostomy or mouth to mouth covering the
tracheostomy. Each breath should take 1 second.
Note: If you were not able to replace the tracheostomy tube, cover the stoma, or hole where the
tracheostomy tube was located, and provide breaths using the face mask attached to the self-inflating
bag or mouth to mouth.
Adebola Olarewaju, MS, CPNP Revised: 04/01/2019 44 Otolaryngology HNS
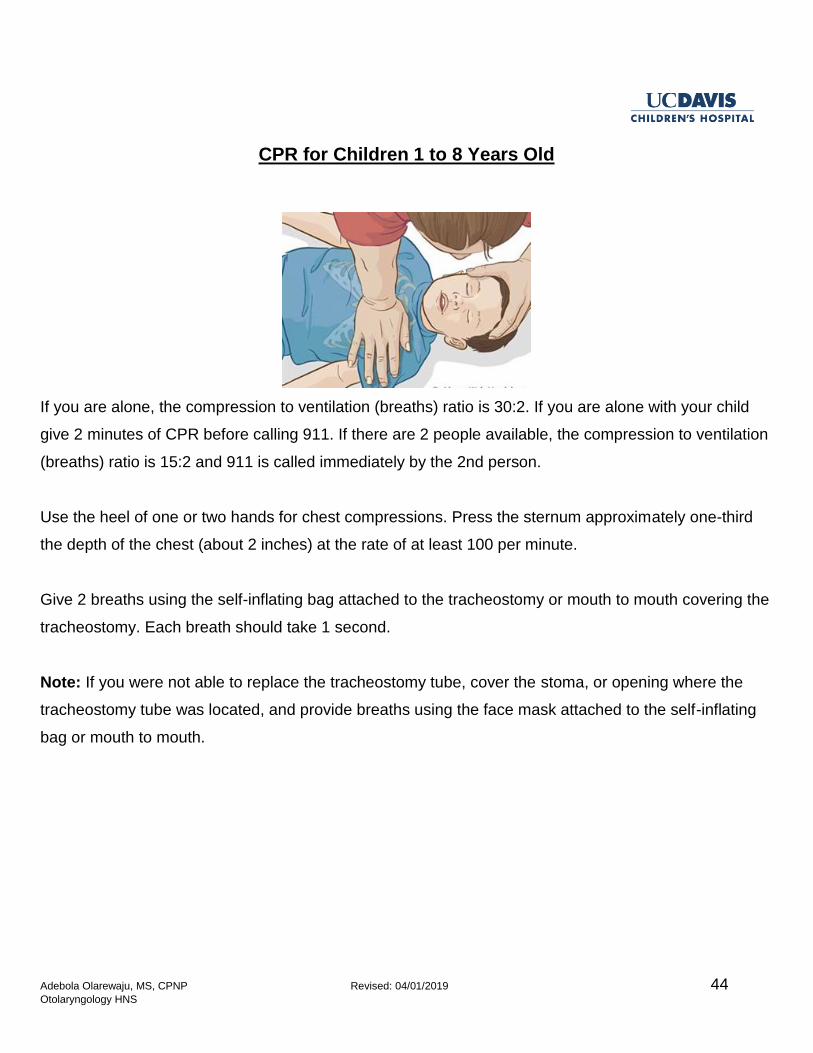
CPR for Children 1 to 8 Years Old
If you are alone, the compression to ventilation (breaths) ratio is 30:2. If you are alone with your child
give 2 minutes of CPR before calling 911. If there are 2 people available, the compression to ventilation
(breaths) ratio is 15:2 and 911 is called immediately by the 2nd person.
Use the heel of one or two hands for chest compressions. Press the sternum approximately one-third
the depth of the chest (about 2 inches) at the rate of at least 100 per minute.
Give 2 breaths using the self-inflating bag attached to the tracheostomy or mouth to mouth covering the
tracheostomy. Each breath should take 1 second.
Note: If you were not able to replace the tracheostomy tube, cover the stoma, or opening where the
tracheostomy tube was located, and provide breaths using the face mask attached to the self-inflating
bag or mouth to mouth.
Adebola Olarewaju, MS, CPNP Revised: 04/01/2019 45 Otolaryngology HNS
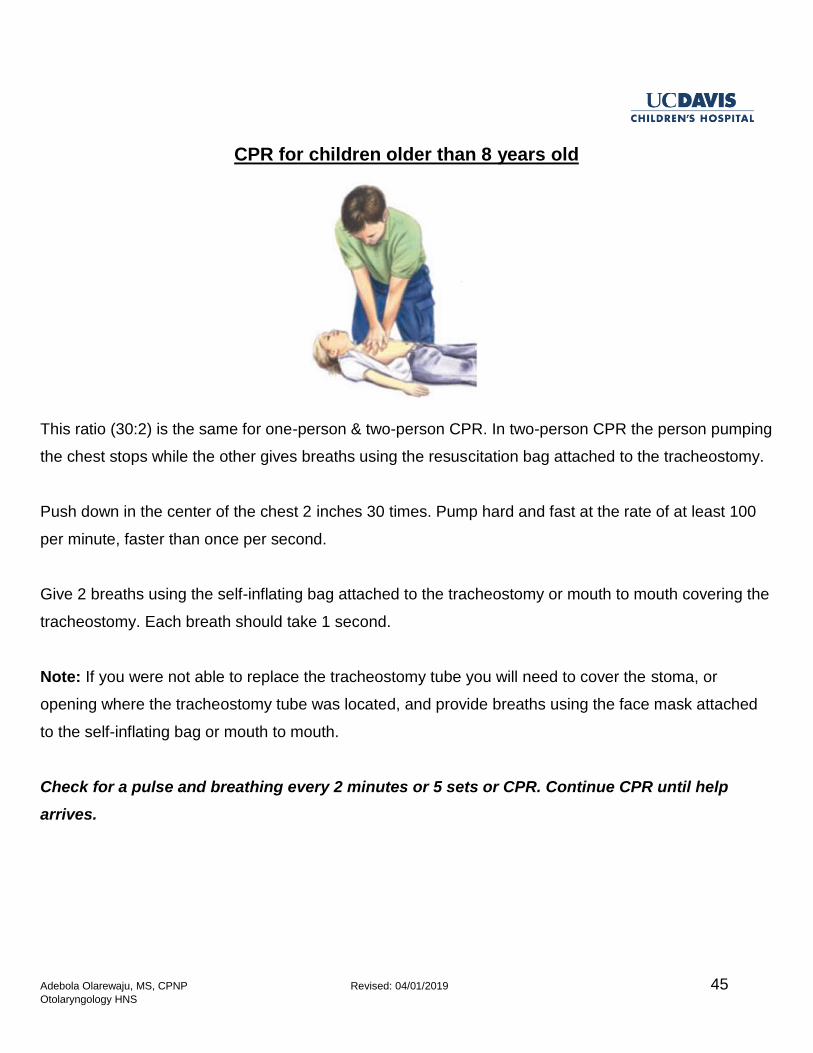
CPR for children older than 8 years old
This ratio (30:2) is the same for one-person & two-person CPR. In two-person CPR the person pumping
the chest stops while the other gives breaths using the resuscitation bag attached to the tracheostomy.
Push down in the center of the chest 2 inches 30 times. Pump hard and fast at the rate of at least 100
per minute, faster than once per second.
Give 2 breaths using the self-inflating bag attached to the tracheostomy or mouth to mouth covering the
tracheostomy. Each breath should take 1 second.
Note: If you were not able to replace the tracheostomy tube you will need to cover the stoma, or
opening where the tracheostomy tube was located, and provide breaths using the face mask attached
to the self-inflating bag or mouth to mouth.
Check for a pulse and breathing every 2 minutes or 5 sets or CPR. Continue CPR until help
arrives.
Adebola Olarewaju, MS, CPNP Revised: 04/01/2019 46 Otolaryngology HNS
ACTIVITIES OF DAILY LIVING
Bathing
Your child should be bathed every day. Take care to make sure that water does not enter the
tracheostomy tube. Use an HME or speaking valve during bathing. Giving your child a tub bath or a
sponge bath are popular options. Some parents opt to have their child stand in the shower while using
a hand held showerhead. This ensures that the water stream stays below the level of the tracheostomy
tube.
Helpful Hint:
If the HME gets wet during the bath, remove it, and throw it away.
Swimming
It is not safe for your child to swim while they have a tracheostomy tube.
Using an HME, speaking valve, or tracheostomy caps are not safe to use for swimming.
Your child should never be submerged under water.
Play
It is safe for your child to engage in age appropriate play activities.
Infants can spend time on their tummy and their back without issue while supervised.
Small children should be supervised during play by themselves or with peers to make sure that
they do not try to remove their tracheostomy tube or place small objects inside the tube.
Contact sports such as football or rugby are not safe for your child because of the possibility of
tracheal injury.
Sports such as golf, tennis, volleyball, or track and field activities have minimal contact and may
be appropriate for your child.
Adebola Olarewaju, MS, CPNP Revised: 04/01/2019 47 Otolaryngology HNS
Helpful Hint:
Get clearance from your pediatrician and ENT surgeon prior to starting any sports. If your child has a
cardiologist they will need clearance from them as well. If your child has difficulty with endurance or
breathing while engaged in exercise please follow up in ENT clinic. There may some things we can do
to improve endurance.
School
If your child is school-age they will need an aide in the classroom who can assist in
tracheostomy care until your child is old enough to change their own tracheostomy tube. The
aide can be a licensed professional such as a nurse, a parent, or a parent designee who has
been trained in tracheostomy care.
Your child’s school district can assist you in finding a classroom aide.
Older children who know how to suction themselves and change their own tracheostomy tube do
not need an aide in the classroom.
Quit Smoking
It is not safe your child to be exposed to cigarette or tobacco smoke. This is known as
secondhand smoke. When your child has a tracheostomy there is direct connection to their
windpipe.
Exposure to smoke can lead to an infection and respiratory distress. Exposure to smoke is also
a well-known cause of cancer.
If a member of the household is not ready to quit smoking they should smoke outside the home.
Prior to re-entering the home they should change their clothes because smoke attaches to the
fibers in clothing.
Helpful Hint:
It is never too late to quit smoking. Your primary care provider can provide various techniques to help
you quit. Your primary care provider can also refer you to ENT clinic for tobacco cessation services.
Adebola Olarewaju, MS, CPNP Revised: 04/01/2019 48 Otolaryngology HNS
Oxygen Safety
Your supply company will give you a card to put in the window of your home. This will inform
others that oxygen is being used inside the home.
Oxygen is a gas that can start fires or cause explosions.
Do not smoke or allow anyone else to smoke anywhere near the oxygen equipment.
Oxygen tanks should be kept at least 5 to 10 feet away from an open flame such as a gas stove,
wood-burning stove, fireplace, or candle.
Prevention of Infection
Wash hands with soap and water or use hand sanitizer before handling the tracheostomy
equipment or supplies.
Routinely clean your home equipment per the guidelines from your supply company.
A yearly flu vaccine is recommended for your child and anyone who lives in the household.
Maintaining a clean household and routinely using disinfectant is recommended.
Avoid exposure to secondhand smoke.
Notes
Adebola Olarewaju, MS, CPNP Revised: 04/01/2019 49 Otolaryngology HNS
SPEECH WITH A TRACHEOSTOMY
The goal is that all children with a tracheostomy tube should speak.
The speech pathologist will work with your child on:
1. Language comprehension (e.g. use of signals, turn taking, following directions, pointing),
2. Expressive language (e.g. gestures, sign language, and supplemental communication), and
3. Vocal and speech sound development to strengthen vocalizations, speech sounds and words.
This may involve finger occlusion or a speaking valve once your child is cleared by a trained
healthcare provider to this activity.
Language
Language is the ability to understand words and the ability to use words to communicate. By ten
months of age infants can separate speech sounds and participate in babbling. Children need to hear
themselves speak and communicate with others in order to continue to develop their language skills.
Tracheostomy placement usually does not affect language skills unless there is another diagnosis that
prohibits speech. For example, a diagnosis of vocal cord paralysis, deafness, developmental delay, or
a genetic syndrome may affect speech.
Speech
Speech includes your voice and the way you pronounce sounds.
In order to produce sounds the vocal cords in your throat need to be functioning properly. When air
passes through the vocal cords they vibrate and produce a sound. That sound is your voice.
Adebola Olarewaju, MS, CPNP Revised: 04/01/2019 50 Otolaryngology HNS
The tracheostomy is placed below the vocal cords as a result air passes through the tracheostomy tube
before it can reach the vocal cords.
To produce speech you and your child will be taught “finger occlusion”. Finger occlusion is the process
of placing one finger over the opening of the tracheostomy tube. When the tube is open you will not be
able to hear your child’s voice.
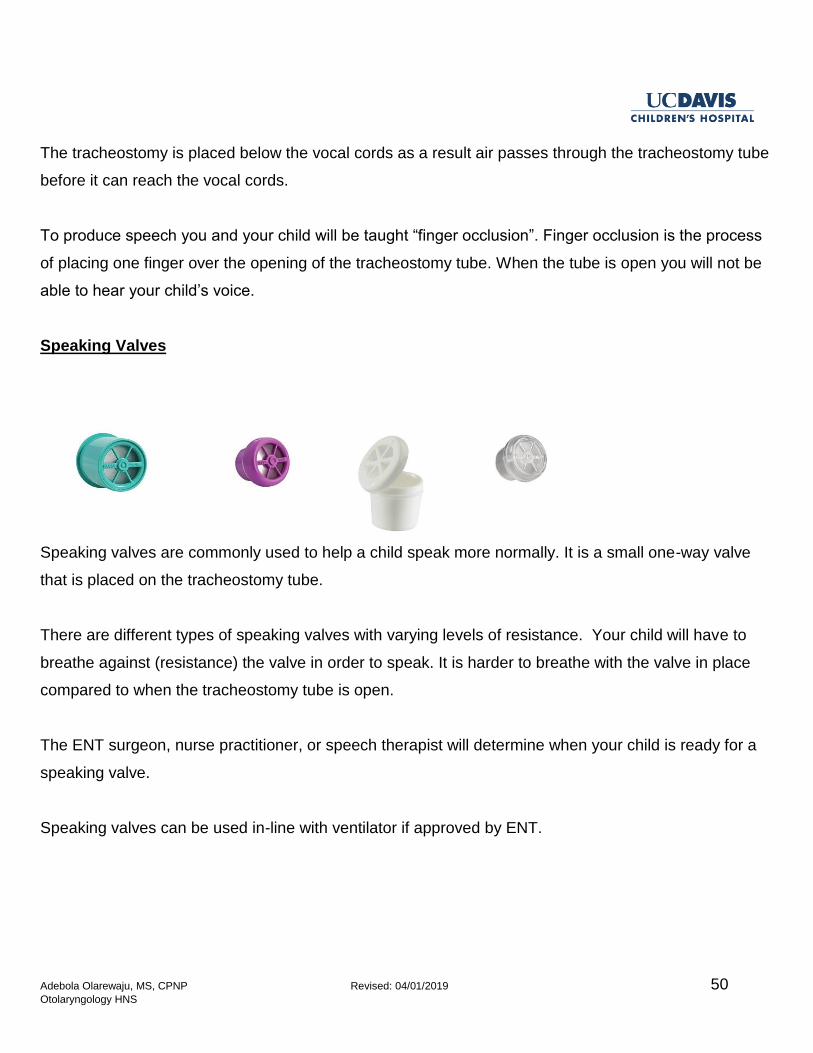
Speaking Valves
Speaking valves are commonly used to help a child speak more normally. It is a small one-way valve
that is placed on the tracheostomy tube.
There are different types of speaking valves with varying levels of resistance. Your child will have to
breathe against (resistance) the valve in order to speak. It is harder to breathe with the valve in place
compared to when the tracheostomy tube is open.
The ENT surgeon, nurse practitioner, or speech therapist will determine when your child is ready for a
speaking valve.
Speaking valves can be used in-line with ventilator if approved by ENT.
Adebola Olarewaju, MS, CPNP Revised: 04/01/2019 51 Otolaryngology HNS
It may take some time before your child is comfortable wearing the valve. They may only be able to
wear it for a few minutes at a time initially. Your child may need to be distracted with a game or a movie
while they learn to use the speaking valve.
Signs that your child should not use a speaking valve:
Child is asleep
Child is unconscious
Excessive tracheostomy secretions
Excessive drooling
Aspiration risk
Chronic cough
Notes
Adebola Olarewaju, MS, CPNP Revised: 04/01/2019 52 Otolaryngology HNS
EATING WITH A TRACHEOSTOMY TUBE
The speech pathologist will decide if your child is interested in eating (feeding aversion), has difficulty
handling food in the mouth or throat, and if food is entering the airway (aspiration).
Often children with tracheostomies have limited positive oral experiences. We need to be able to get
near your child’s mouth to be able to assess it.
Oral motor therapy for the mouth can be used to build a foundation for feeding. Depending on your
child’s age, we will start with a pacifier or empty utensils and then tastes of food on your child’s fingers.
We want to build positive experiences around feeding and swallowing for the best long term results.
Safe Swallow
If your child was able to eat safely by mouth prior to the tracheostomy, then it is likely that your
child will continue to eat safely after surgery.
If your child was not able to eat safely by mouth prior to surgery, then it is likely that your child
will need a short-term or long-term feeding tube.
All children will have a swallow evaluation at the bedside before being allowed to take liquids or
solid foods by mouth. It may take some time to get used to the new sensation in their throat
because of the tracheostomy tube.
If it is decided that your child does not have a safe swallow he/she may need to have a
diagnostic swallow study (DSS).
For young children or children with developmental delays, an adult should always be present
during mealtimes to supervise chewing and swallowing.
Your child should never eat by mouth when connected to the ventilator.
Adebola Olarewaju, MS, CPNP Revised: 04/01/2019 53 Otolaryngology HNS
Swallow Evaluation
A swallow evaluation will occur in the hospital once your child has recovered from surgery.
The ENT nurse practitioner or speech pathologist will evaluate your child’s readiness to trial
liquid, soft, and/or solid foods.
Helpful Hint:
Always suction your child prior to meals. Secretions in the tracheostomy tube can cause excessive
coughing and result in vomiting.
Signs that your child may need diagnostic swallow study:
Upper windpipe noise, constantly sounding like there is mucous at the back of the throat
Rattling noise in the chest
Frequent respiratory infections
Excessive drooling
Difficulty swallowing
Having the sensation of food getting stuck in your throat or chest or behind your breastbone
Choking, coughing, or gagging while drinking or eating
Food in the tracheostomy secretions
Reflux
Notes
Adebola Olarewaju, MS, CPNP Revised: 04/01/2019 54 Otolaryngology HNS
TRAVEL
You will need medical clearance from your ENT surgeon or nurse practitioner prior
to all domestic or international travel.
Local Travel:
When traveling locally be sure to take along a travel bag that has all of your tracheostomy supplies.
This includes everything that is listed under the tracheostomy supplies list (see page 6).
Always make sure the battery for your equipment is fully charged before leaving the house. When
electrical outlets are available, plug in your equipment and save the battery power.
Always have the same size tracheostomy tube and size smaller
Remember to take your portable suction machine AND charger, extra suction catheters, and
normal saline.
If your child needs a ventilator be sure to take the charger.
You will need to have extra HMEs on hand while out in the community and going to doctor’s
appointments.
The trach mist machine cannot be used in the car because it needs an electrical outlet for use.
Domestic Travel:
If you plan on taking an extended trip anywhere within the United States of America and your child has
a new tracheostomy that is less than 9 months old it is important that you get clearance from the ENT
surgeon or nurse practitioner that it is safe for your child to travel. If your child sees any other
specialists such as pulmonology or cardiology it is important that you get clearance from those
departments.

Adebola Olarewaju, MS, CPNP Revised: 04/01/2019 55 Otolaryngology HNS
For extended trips by car, plane, or train you will need to take ALL of your supplies with you. This
includes:
Tracheostomy supplies
Suction equipment
Humidification system
Monitoring equipment
Ventilator or oxygen, if applicable
Take enough supplies to cover the length of the trip plus a few extra in case of unexpected events.
Examples of unexpected events:
Travel delays
Weather advisories that can affect access to power or travel to hospitals
Emergency tracheostomy tube changes
Malfunctioning suction equipment
Malfunctioning pulse oximeter probes
The United States Federal Aviation Administration (FAA) does not need a letter of necessity to clear
tracheostomy equipment. Your tracheostomy supplies, suction machine, pulse oximeter machine, mist
machine and ventilator can be carried onto to the plane.
It is important that this equipment be kept with you in case your child has an emergency during the
flight. Checked baggage is stored underneath the plane and you will not have access to any of this
equipment until the plane lands.
Adebola Olarewaju, MS, CPNP Revised: 04/01/2019 56 Otolaryngology HNS
Helpful Hint:
You will not be able to carry scissors onto the plane and will need to keep it in your checked
baggage.
You will not be able to bring bottled water for the mist machine from home onto the plane it will
need to be stored in your checked baggage. Or, once you pass the security checkpoint you can
buy bottled water from one of the shops in the airport.
Power outlets at the airport or on the plane may not be readily available.
Keep a few HMEs with you depending on the length of the flight (or train ride) and how quickly
your child goes through them.
International Travel:
If you plan on traveling outside of the United States of America please follow the rules of the domestic
travel policy with the following additions:
Check with your pediatrician to make sure that your child has all needed immunizations prior to
travel.
Traveling to a foreign country will require that you get clearance from customs on the way in and
on the way out of that country. For this reason you may need a letter of medical necessity from
your ENT surgeon or nurse practitioner stating why you need the tracheostomy equipment.
Buy bottled water for your mist machine for the length of your trip. Do not use the local tap water.
Make sure that you have the appropriate adapters for the electrical outlets that are used in the
destination country.
Helpful Hint:
If you are able to plan ahead, locate the nearest children’s hospital in your destination city in case of an
emergency.
Adebola Olarewaju, MS, CPNP Revised: 04/01/2019 57 Otolaryngology HNS
FINANCIAL RESOURCES
SMUD (Sacramento Municipal Utility District)
The Medical Equipment Discount (MED) Rate discount program is designed to help customers who
have higher electricity costs from running certain energy-intensive medical equipment. A full-time
resident of your household must have a medical need. You may be eligible for up to $15 per month
discount.
The MED rate covers in-home dialysis cycler, electric wheelchair, oxygen concentrator, and
extraordinary heating or air-conditioning needs due to a person’s medical condition. The discharge
planner can help you get an application for the program. A doctor will have to sign the form as well.
The Energy Assistance Program Rate (EAPR) program is a discount for low-income households. The
EAPR and the MED rate programs can be combined. This will help you get the most savings every
month.
Contacting Your Insurance Company
Every insurance company has dedicated case managers to help their patients navigate the health care
system. The case management process begins when a new case is “opened”. A case manager
evaluates what services are considered medically necessary, and works with different providers to
ensure that the services are being given in the appropriate setting. Insurance companies plan for the
ongoing medical needs in order to reduce the need for expensive emergency room visits and
hospitalizations.
Contacting Your Social Worker, if applicable
You may have been assigned a social worker by your insurance company or a state-run agency. Your
social worker may have social/emotional or financial resources that they can refer you to such as relief
care or Supplemental Security Income (SSI).

Adebola Olarewaju, MS, CPNP Revised: 04/01/2019 58 Otolaryngology HNS
Women, Infants, and Children (WIC)
WIC’s mission is to protect the health of low-income women, infants, and children up to age 5 who are
at nutrition risk by providing healthy food to supplement diets, information on healthy eating, and
referrals to health care. Speak to your pediatrician or your social worker to see if you meet income
eligibility requirements and to obtain an application.
In Home Support Services (IHSS)
If eligible, the IHSS program will help pay for services provided to your child so that your child can
remain safely in your home. Disabled children are potentially eligible for IHSS. IHSS is considered an
alternative to out-of-home care, such as nursing homes or board and care facilities. Speak to your
social worker to see if you meet eligibility requirements and to obtain an application.
Once your application is submitted a county social worker will interview you at your home to determine
your child’s eligibility and need for IHSS. The social worker will assess the types of services you need
and the number of hours the county will authorize for each of these services. This assessment will
include information given by you and, if appropriate, by your family, friends, physician or other licensed
health care professional.
Supplemental Security Income (SSI)
Supplemental Security Income (SSI) is a federal income supplement program funded by general tax
revenues (not social security taxes). It is designed to help aged, blind, and disabled people who have
little or no income. They provide cash to meet basic needs for food, clothing, and shelter. Your social
worker can help you to navigate the SSI eligibility tool online and direct you through the application
process.
Adebola Olarewaju, MS, CPNP Revised: 04/01/2019 59 Otolaryngology HNS
TRACHEOSTOMY RESOURCES
UC Davis ENT Clinic
2521 Stockton Boulevard, Ste 5200
Sacramento, Ca 95817
Phone (916) 734-5400
http://www.ucdmc.ucdavis.edu/medicalcenter/
Shiley Tracheostomy Tubes
Manufactured by Medtronic
http://www.medtronic.com/covidien/products/tracheostomy
Bivona Tracheostomy Tubes
Manufactured by Smiths Medical
https://www.smiths-medical.com/products/tracheostomy
Online Tracheostomy Support Groups (Facebook)
Tracheostomy
Moms of Trach Babies
Neck-breather’s Connection
Global Tracheostomy Tube Awareness
TrachCare
Kids with Vents
Adebola Olarewaju, MS, CPNP Revised: 04/01/2019 60 Otolaryngology HNS
DEVELOPMENTAL RESOURCES
Early Intervention Program
Parents know their children better than anyone. The first three years are very important in a child’s life.
If a parent, family member, caregiver, or professional has a concern about a child’s development, it is
best to identify the concern as soon as possible. Families whose infants or toddlers have
developmental delay or disabilities, or are at risk for developmental delay or disabilities may qualify for
early intervention services up to the age of 3. Regional center staff can evaluate and assess an infant
or toddler to determine eligibility for Early Start.
MIND Institute
The UC Davis MIND Institute clinic provides comprehensive evidence-based assessments of children
with possible neurodevelopmental disorders. The clinic providers give treatment recommendations to
referring schools, agencies, doctors, and mental health clinicians.
Families interested in having their children seen in our clinic should ask their primary-care doctors
(PCP) to submit a referral to the UC Davis Health System's Physician Referral Center at 800-482-
3284. Insurance and self-pay options are available. To learn more about the referral process, please
call 916-703-0308.
Physical, Medicine, & Rehabilitation (PM&R)
The Pediatric Rehabilitation Program offers care to children with congenital and acquired neurological
and musculoskeletal diseases. Patients may have disorders such as cerebral palsy, brain injury,
neurologic disorders, and congenital or acquired amputation.
Pediatric Rehabilitation is provided through ambulatory clinics directed by a specialist in Pediatric
Physiatry.
Adebola Olarewaju, MS, CPNP Revised: 04/01/2019 61 Otolaryngology HNS
Population served includes patients from birth to age 21 with any of the following impairments:
Brain injury
Multiple trauma
Deconditioning
Cerebral palsy
Spasticity
Acquired amputations and limb deficiencies
Spinal cord injury
Peripheral nerve disorders (e.g. Guillian Barre)
Other musculoskeletal and neurological disorders
Patients who would like more information about the clinic should call (916) 734-7041.
Child Health and Disability Prevention Program (CHDP)
The Child Health and Disability Prevention (CHDP) is a preventive program that delivers periodic health
assessments and services to low income children and youth in California.
CHDP provides care coordination to assist families with medical appointment scheduling,
transportation, and access to diagnostic and treatment services. Health assessments are provided by
enrolled private doctors, local health departments, community clinics, managed care plans, and some
local school districts.
Special Education
Local school districts are responsible for providing special education services to children 3 to 22 years
of age.
Special Education is instruction specially designed to meet the unique needs of children who need
some help with learning.
Adebola Olarewaju, MS, CPNP Revised: 04/01/2019 62 Otolaryngology HNS
To receive special education services, an Individualized Education Program (IEP) must be written and
reviewed regularly. It describes educational needs, goals, and accommodations for the student.
The step-by-step process includes a referral, an assessment, an IEP meeting, and placement.
Section 504 of the Americans with Disabilities Act requires students with disabilities be given
appropriate accommodations to learn in the least restrictive environment.
Notes
Adebola Olarewaju, MS, CPNP Revised: 04/01/2019 63 Otolaryngology HNS
CHALLENGES AND COPING STRATEGIES
Your child’s disorder may have books, websites, and national organizations devoted to them. Parents
often know more about the specific disorder than any individual professional involved in treating the
child because they devote hours to researching all available information. The Internet has made it
possible to contact other parents with similar concerns.
Challenges of Relief Care
There is little relief from the daily challenge of caring for children. Finding someone to watch their child
for a few hours so they can have time for personal, marital, or family activities is a universal challenge.
The typical babysitter and extended family often do not have the skills, understanding, or patience
needed to help.
Financial Challenges
Children with severe special needs may need large amounts of time, energy, and money in order to
care for them. Depending on your insurance plan, you may need to pay fees related your child’s
supplies and equipment. Your child may have appointments with multiple specialists. This may be a
financial strain because of increased transportation needs, money for gas, and co-pays for
appointments. Admission to the hospital for respiratory infections or issues related to your child’s
underlying health conditions may lead to missed work days and loss of wages.
Challenges for Couples
The reduced couple’s time is challenging because there is more that needs to be discussed and dealt
with, including the feelings of grief and disappointment that sometimes never get processed. The ability
to learn to enjoy the positive aspects of your child can only take place after having grieved the loss of
what you had expected from that child at birth.
Adebola Olarewaju, MS, CPNP Revised: 04/01/2019 64 Otolaryngology HNS
Challenges for Siblings
Sibling issues need attention. Parents and professionals often lose sight of the need to help siblings
understand the problem that is affecting their brother or sister. Then there is the challenge of trying to
reduce the jealousy that results when so much attention is focused on one child or limitations on doing
common family activities. It is clear that siblings need an opportunity to voice their questions, concerns,
and feelings.
Coping Strategies
Take a time-out. Practice yoga, listen to music, meditate, get a massage, or learn relaxation
techniques.
Eat well-balance meals
Limit alcohol and caffeine. These beverages can make anxiety worse.
Get enough sleep. When stressed, your body needs additional sleep and rest.
Exercise daily
Take deep breaths. Inhale and exhale slowly.
Count to 10 slowly. Repeat, and count to 20 if necessary.
Do your best. Don’t aim for perfection.
Accept that you cannot control everything. Put your stress in perspective: Is it really as bad as
you think?
Welcome humor. A good laugh goes a long way.
Maintain a positive attitude.
Get involved. Join a support network in the community or online.
Adebola Olarewaju, MS, CPNP Revised: 04/01/2019 65 Otolaryngology HNS
Frequently Asked Questions (FAQs)
How long will my child need a tracheostomy tube?
The length of time needed for a tracheostomy tube depends on why the tube is needed. Tracheostomy
tubes can be for a lifetime depending on your child’s diagnosis and health status.
Why does the tracheostomy tube need to be changed 5 to 7 days after the surgery?
The tracheostomy tube is changed approximately 5 to 7 days after surgery by the ENT surgeon. During
the first week after tube placement your will have a lot of secretions including mucous and old blood.
This may line the tube and create a plug making it difficult for your child to breathe. So it is important
that the tube gets changed.
The 5 to 7 day period allows for the tract between the skin and the windpipe to heal, so that the tube
may be safely changed. At the time of the first tube change we will also remove all safety stitches that
were placed during surgery. After adequate training, the caregiver is expected to perform all routine
tracheostomy changes. You will be instructed on how often your child’s tube needs to be changed.
How often will my child need to be seen in clinic?
Your child will be seen in clinic within 1 to 2 weeks after hospital discharge. You will have follow-up
every 4 months for the first year. In year 2 and beyond you will be seen for follow-up every 6 months.
There may be times when your child needs to be seen more frequently depending on their health
status.
Will my child be able to eat by mouth?
If your child was eating well by mouth before the tracheostomy tube placement then there is a strong
chance that he or she will be able to eat my mouth after surgery. Your child will have a swallow
evaluation performed by a speech therapist or the ENT nurse practitioner to make sure your child still
has a “safe swallow”. If your child is at risk for liquid or food going into their lungs they will need a
feeding tube.
Adebola Olarewaju, MS, CPNP Revised: 04/01/2019 66 Otolaryngology HNS
Can my child take a shower or have a bath?
Your child should be bathed every day. Take care to make sure that water does not enter the
tracheostomy tube. Use an HME or speaking valve during bathing. Giving your child a tub bath or a
sponge bath are popular options. Some parents opt to have their child stand in the shower while using
a hand held showerhead. This ensures that the water stream stays below the level of the tracheostomy
tube.
Can my child go swimming?
It is not safe for your child to swim while they have a tracheostomy tube. Using an HME, speaking
valve, or tracheostomy caps are not safe to use for swimming. Your child should never be submerged
under water.
When do I call my ENT doctor?
Bleeding from the tracheostomy that has not stopped after 24 hours. *If bleeding is not well
controlled, call 911.
Bad smell from the tracheostomy site
Brown or green secretions that are not clearing up throughout the day with extra
hydration and humidity
If you perform a tracheostomy tube change and only the ‘size smaller’ will fit
If you notice granulation tissue at the stoma and you are concerned that it may
affect your ability to change the tracheostomy tube
If your child has difficulty breathing, call 911
*For all other medical concerns, call your pediatrician or specialist if appropriate.
Adebola Olarewaju, MS, CPNP Revised: 04/01/2019 67 Otolaryngology HNS
Glossary
Ambu bag (or self-inflating bag): A hand-held device use to provide air to the lungs when your child
is not breathing well.
Cuff: Sometimes referred to as the balloon. Your child may need a cuff to seal the space between the
tracheostomy tube and the windpipe if he or she uses a ventilator for breathing or if there a high risk for
saliva flooding the airway.
Durable Medical Equipment (DME): General term used to describe home medical supplies
Humidification: To make the air moist
Inner Cannula: Used only with adult sized tracheostomy tube that has a dual cannula.
Obturator: A guide that is only put in the inner part of the tracheostomy tube for the purpose of
tracheostomy insertion into the stoma. It is removed as soon as the tracheostomy tube is inserted.
Speaking valve: A device used to support the speech and swallow for a person with a tracheostomy
tube.
Stoma: Small opening in the windpipe (trachea).
Suction: The act of removing secretions such as mucous or saliva.
Suction Catheter: A device use to remove mucous and saliva from the upper airway
Tracheostomy or Tracheotomy: Surgical technique to create the stoma or opening in the windpipe
(trachea) where the tracheostomy tube will be placed.
Otolaryngology: Also known as the Ear, Nose, and Throat specialist.
Ventilator: Machine used to help your child breath when they are unable to breathe well on their own.
Adebola Olarewaju, MS, CPNP Revised: 04/01/2019 68 Otolaryngology HNS
Notes

Adebola Olarewaju, MS, CPNP Revised: 04/01/2019 69 Otolaryngology HNS

Adebola Olarewaju, MS, CPNP Revised: 04/01/2019 70 Otolaryngology HNS