Embed Size (px)
Citation preview
© SightLine Applications, Inc.
EAN-ARM-Application-Development
2021-08-03
Exports: Export Summary Sheet
EULA: End User License Agreement
Web: sightlineapplications.com
Sales: [email protected]
Support: [email protected]
Phone: +1 (541) 716-5137
1 Overview .................................................................. 1
1.1 Developing On-Board Applications .......................... 1
1.1.1 Lua ............................................................................ 1
1.1.2 C/C++ ........................................................................ 1
1.2 Sample Applications ................................................. 2
1.3 Development and Debugging - Windows Visual Studio ....................................................................... 3
1.4 Additional Support Documentation ......................... 4
1.5 SightLine Software Requirements ............................ 4
2 Third Party Software ................................................ 4
3 Conventions ............................................................. 4
4 Preparation .............................................................. 5
4.1 VMware .................................................................... 5
4.2 Setup R: Drive ........................................................... 5
4.2.1 Edit Adapter ............................................................. 6
4.3 CodeSourcery ........................................................... 7
4.4 Code Composer Studio ............................................. 7
4.5 Windows Environment Variables ............................. 8
4.6 Sample Application Installation ............................... 9
5 Debugging and Deployment .................................... 9
5.1 Debug Mode ............................................................ 9
5.2 Access the U-Boot Console .................................... 10
5.2.1 1500-OEM: Booting from NFS ................................ 11
5.2.2 1500-OEM: Access NAND File System after NFS Boot ........................................................................ 11
5.2.3 3000-OEM: Booting from NFS ................................ 11
5.2.4 3000-OEM: Access NAND Filesystem after NFS Boot ........................................................................ 12
5.2.5 1500-OEM: Booting from NAND (Deploy Mode) ... 12
5.2.6 1500-OEM: Access Files on NFS after NAND Boot . 12
5.2.7 3000-OEM: Booting from NAND (Deploy Mode) ... 13
5.2.8 3000-OEM: Access Files on NFS after NAND Boot . 13
5.2.9 1500-OEM and 3000-OEM: Access Files on NAND through SCP Protocol ............................................. 13
6 Start Development ................................................. 13
6.1 Building the Application ......................................... 14
6.2 Deploying the Application ..................................... 15
6.2.1 1500-OEM Startup Script ....................................... 15
6.2.2 3000-OEM Startup Script ....................................... 15
6.2.3 Configuring U-Boot to Boot from NAND ................ 16
6.3 Overlay DLL - Build and Enable .............................. 16
7 Troubleshooting ..................................................... 16
7.1 Code Composer Studio Troubleshooting ............... 16
7.1.1 Misleading Link Errors ........................................... 16
7.1.2 False Compiling Errors ........................................... 16
7.2 General Troubleshooting ....................................... 17
7.3 NFS Boot Troubleshooting ..................................... 17
7.3.1 Wi-Fi Adapter Conflicts .......................................... 17
7.3.2 IP Address Conflicts or Mismatch .......................... 18
7.3.3 Windows 10 Update Issues .................................... 18
7.3.4 Reinstall VMware Application ............................... 18
7.4 Shift+S Interrupt Issues .......................................... 18
7.5 Issues with VMWare - Binary Translation Warning ................................................................. 20
7.6 Issues with Code Composer Studio and Windows 10 ........................................................... 20
7.7 Questions and Additional Support......................... 20
Appendix A - Managing Parameter File - ARM or PC Application Development ................................................. 20
Appendix B - Using VMware ............................................. 21
B2 Disable Sleep and Hibernate (optional) ................. 21
Appendix C - Using GDB Debugging in CCS ....................... 22
Appendix D - Updating the VMware Environment ........... 24
CAUTION: Alerts to a potential hazard that may result in personal injury, or an unsafe practice that causes damage to the equipment if not avoided
IMPORTANT: Identifies crucial information that is important to setup and configuration procedures.
Used to emphasize points or reminds the user of something. Supplementary information that aids in the use or understanding of the equipment or subject that is not critical to system use.
EAN-ARM-Application-Development
© SightLine Applications, Inc. 1
1 Overview
This document describes the development environment setup and build, deployment, and debug processes for applications compiled to run on the ARM processor of SightLine video processing boards.
The sample programs for ARM-side development:
- can be built under Windows using the CodeSourcery cross-compiler,
- use TI CodeComposer Studio 5.x for development, debugging, and deployment,
- can communicate with the VideoTrack application running on the SightLine OEM hardware using the SightLine Command and Control protocol over IP sockets,
- can additionally be built and run on windows using Visual Studio.
This allows a large part of the development and debugging of custom user applications to be done on a windows platform. See the Development and Debugging - Windows Visual Studio section.
See the EAN-ARM-Application-Development-4000-OEM for build and deployment processes for applications built to run on the 4000-OEM ARM processor.
1.1 Developing On-Board Applications
SightLine provides two primary ways for customers to develop their own on-board applications: C/C++ and Lua. Each technology has benefits and costs for solving a problem. It is impossible to prescribe the right technology for every scenario. This section helps provide general guidelines to assist in understanding the tradeoffs.
1.1.1 Lua
Lua is recommended for light-weight applications that need to perform simple data processing and interaction with the onboard video processing VideoTrack application. Applications such as dynamic on-screen displays based on telemetry data, or simple command and control from serial ports are good uses for Lua. Lua scripts are executed in-line with our video processing and cannot be synchronized with the processing of video frames. Issues such as increased latency and other performance impacts can arise from Lua scripts that can be very complex.
See the EAN-Script Development for more information for developing and using Lua scripts.
1.1.2 C/C++
If an application requires complex data handling, frequent real-time access to IO, or should be run in parallel with VideoTrack, SightLine recommends creating C/C++ applications that can be run on the ARM processor.
When reviewing options, contact Support to discuss your application.
EAN-ARM-Application-Development
© SightLine Applications, Inc. 2
Table 1: Lua and C/C++ Comparison Table
Benefits Drawbacks
Lua
• Simple to deploy
• Frame synchronized execution
• Can leverage numerous examples from SightLine or the internet
Lua
• Not as widely used as C/C++
• Access to IO is complex and difficult
• Real-time debugging is not available
• Networking is not yet supported
C/C++
• Wide acceptance within the embedded programming industry
• Can be easy to test on a PC before deploying on target OEM hardware.
• Real-time debugging
• Complete access to IO, file system, etc.
• Can leverage numerous examples from SightLine or the internet
• Can run in parallel to existing applications
• Portable to numerous platforms
C/C++
• Deploying application to launch at run time can be error prone (file location, system permission, etc.)
• Existing setup procedure is complex1 (VMWare, CCStudio, mapped drives, NFS booting, ...)
1.2 Sample Applications
This document was written for the SLAGimbal sample application. However, the same procedures are applicable to other sample applications described below. The sample applications send data to VideoTrack on port 14003 reserved for user programs. The sample applications receive responses and telemetry on port 16002. Multiple applications can simultaneously transmit packets to port 14003, but each application must use a unique receiving port.
Each of the following applications uses predefined example values for serial ports, network ports and IP Addresses. These will be different in your application. Please review the code and replace these example numbers with those required in your system. These values will be in all capitals, e.g., from gcMain.cpp: IPADDR_VIDEOTRACK, SLFIP_TO_BOARD_PORT2, GC_FROM_VT_PORT.
SLAGimbal Provides an example of controlling a gimbal to follow a track. Receives TrackPosition messages from the VideoTrack application over a local UDP socket. Track position information is used to update a PID controller, which then sends serial control commands to an external gimbal microcontroller to steer in the direction of the track.
SLAGPIO Toggles SD card video recording on/off using a GPIO input, displays recording status via an LED attached to another GPIO output, and initiates a snapshot to the SD card using a second GPIO input.
SLALandingApp Receives landing aid telemetry from VideoTrack and sends commands to an autopilot.
Overlay DLL Provides access to the image data prior to encoding for rendering custom overlays.
1 These tools and procedures are complex but used industry wide with TI embedded systems.
EAN-ARM-Application-Development
© SightLine Applications, Inc. 3
1.3 Development and Debugging - Windows Visual Studio
Each of the sample projects listed above includes a Windows Visual Studio 2017 solution.
This process allows a large part of the development and debugging of custom user applications to be done on a Windows platform.
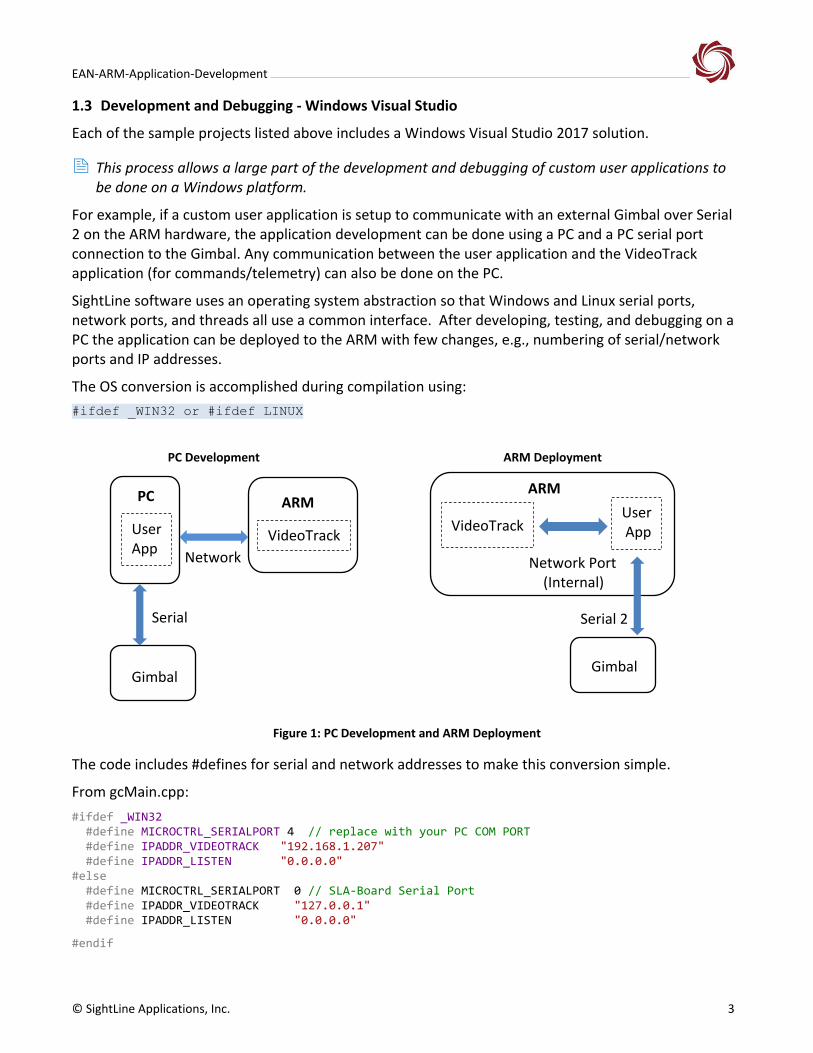
For example, if a custom user application is setup to communicate with an external Gimbal over Serial 2 on the ARM hardware, the application development can be done using a PC and a PC serial port connection to the Gimbal. Any communication between the user application and the VideoTrack application (for commands/telemetry) can also be done on the PC.
SightLine software uses an operating system abstraction so that Windows and Linux serial ports, network ports, and threads all use a common interface. After developing, testing, and debugging on a PC the application can be deployed to the ARM with few changes, e.g., numbering of serial/network ports and IP addresses.
The OS conversion is accomplished during compilation using:
#ifdef _WIN32 or #ifdef LINUX
Figure 1: PC Development and ARM Deployment
The code includes #defines for serial and network addresses to make this conversion simple.
From gcMain.cpp:
#ifdef _WIN32 #define MICROCTRL_SERIALPORT 4 // replace with your PC COM PORT #define IPADDR_VIDEOTRACK "192.168.1.207" #define IPADDR_LISTEN "0.0.0.0" #else #define MICROCTRL_SERIALPORT 0 // SLA-Board Serial Port #define IPADDR_VIDEOTRACK "127.0.0.1" #define IPADDR_LISTEN "0.0.0.0"
#endif
PC Development ARM Deployment
User App
VideoTrack
Gimbal
Serial
Network
ARM
Gimbal
Serial 2
Network Port (Internal)
VideoTrack User App
ARM
PC
EAN-ARM-Application-Development
© SightLine Applications, Inc. 4
1.4 Additional Support Documentation
EAN-GPIO-and-I2C: Describes how to create an application compiled for the 1500-OEM ARM processor that reads the GPIO state and sends commands to the VideoTrack1500 application.
EAN-Script Development: Describes everything needed to develop and run custom scripts in Lua on the 1500-OEM and 3000-OEM hardware.
1.5 SightLine Software Requirements
IMPORTANT: The Panel Plus software version should match the firmware version running on the board.
2 Third Party Software
The software listed in Table 2 is based on working in a development environment using a PC running Windows 7 or above.
Table 2: Third Party Software Requirements
Software Purpose
VMware Player (see the VMware section)
Hosts Linux sources
Hosts shared folder for PC development
Hosts TFTP and NFS for debugging applications on SightLine OEM hardware
Code Composer Studio from Texas Instruments (see the Code Composer Studio section)
Used to compile applications for deployment on SightLine OEM hardware
CodeSourcery from Mentor Graphics (see the CodeSourcery section)
Cross-compiler
Tera Term (or PuTTY) SightLine recommends Tera Term for troubleshooting, debugging, and issuing commands on SightLine OEM hardware.
3 Conventions
SightLine hardware SightLine embedded video processor (1500-OEM, 3000-OEM, etc.)
OMAP Logic # Typed U-Boot command to serial terminal on 1500-OEM
SLA3000# Typed U-Boot command to serial terminal on 3000-OEM
DM-37x# 1500 Linux console (usually through serial port, or use SSH terminal)
root@sla3000:~# 3000 Linux console (usually through serial port, or use SSH terminal)
host> Ubuntu Linux virtual machine console
PC> Windows command prompt (cmd.exe)
<< some text >> Indicates that user supplied information is required in place of << some text >>
EAN-ARM-Application-Development
© SightLine Applications, Inc. 5
4 Preparation
4.1 VMware
Download VMware Player. For Windows 10, use VMware Player version 6.
Download the UbuntuSLA Virtual Machine from the Example Code page. A zip utility is needed to extract the archive. See Using VMware in the Appendix to start the VMware session.
4.2 Setup R: Drive
Once the virtual machine has booted, map the R: drive to the /home/slroot directory on the Ubuntu VM. The mapped drive contains the Linux kernel source/header files to include in the application and bootable network file system where the application will be located.
Samba version 1 support is required to access shares on the Ubuntu VM. Some Windows 10 systems ship without SMBv1 support enabled. If the sla share does not appear in the list or Windows displays a message that \\IP_ADDRESS cannot be accessed (error 0x80040005), see the Enable SMBv1 Support section in the Appendix for instructions to verify that the Samba version 1 client is installed.
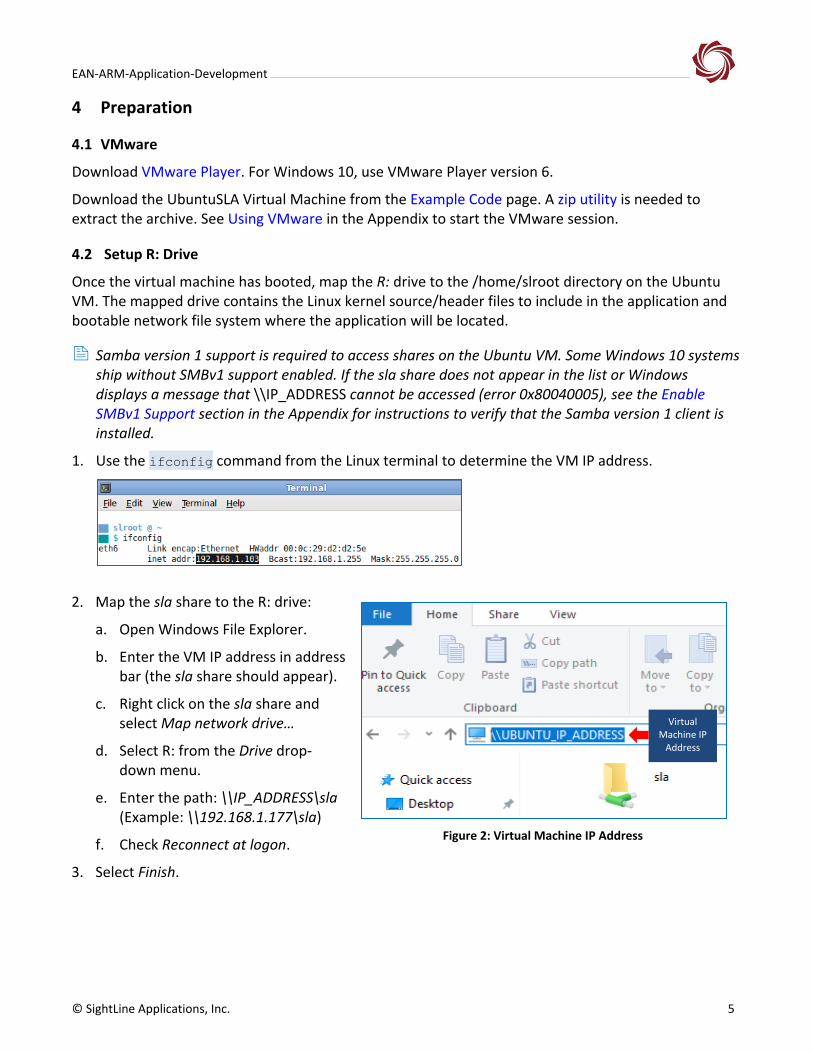
1. Use the ifconfig command from the Linux terminal to determine the VM IP address.
2. Map the sla share to the R: drive:
a. Open Windows File Explorer.
b. Enter the VM IP address in address bar (the sla share should appear).
c. Right click on the sla share and select Map network drive…
d. Select R: from the Drive drop-down menu.
e. Enter the path: \\IP_ADDRESS\sla (Example: \\192.168.1.177\sla)
f. Check Reconnect at logon.
3. Select Finish.
Figure 2: Virtual Machine IP Address
Virtual Machine IP
Address
EAN-ARM-Application-Development
© SightLine Applications, Inc. 6
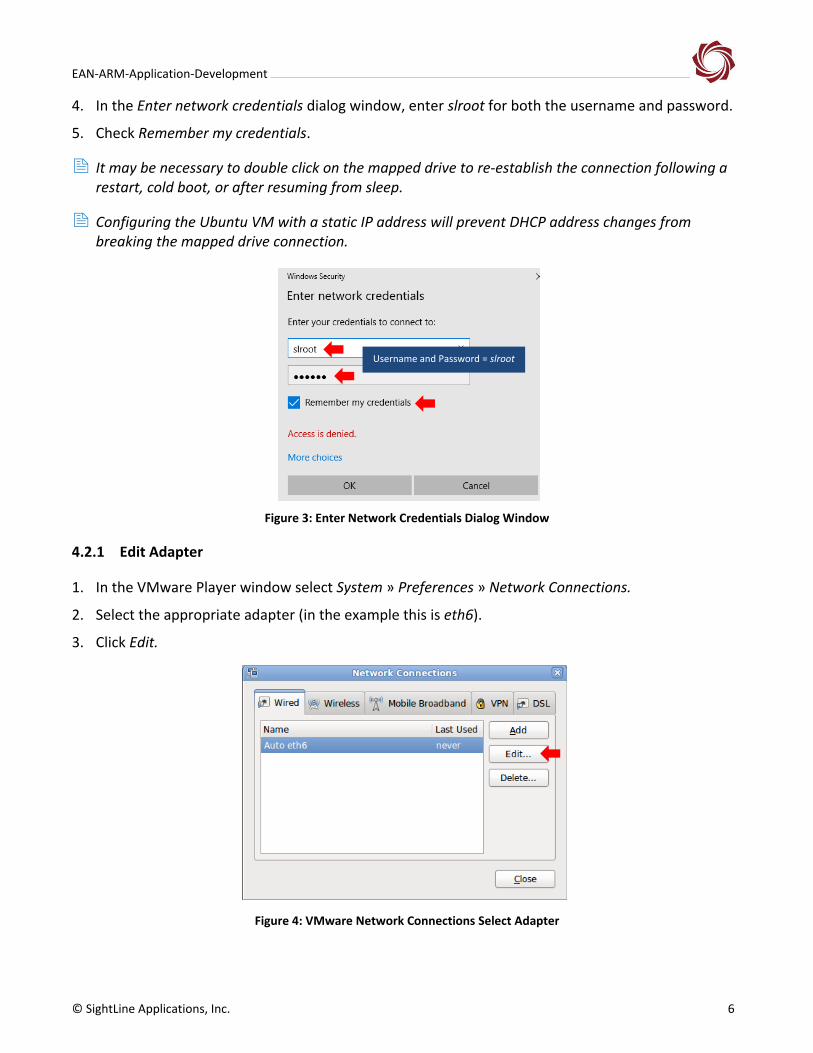
4. In the Enter network credentials dialog window, enter slroot for both the username and password.
5. Check Remember my credentials.
It may be necessary to double click on the mapped drive to re-establish the connection following a restart, cold boot, or after resuming from sleep.
Configuring the Ubuntu VM with a static IP address will prevent DHCP address changes from breaking the mapped drive connection.
Figure 3: Enter Network Credentials Dialog Window
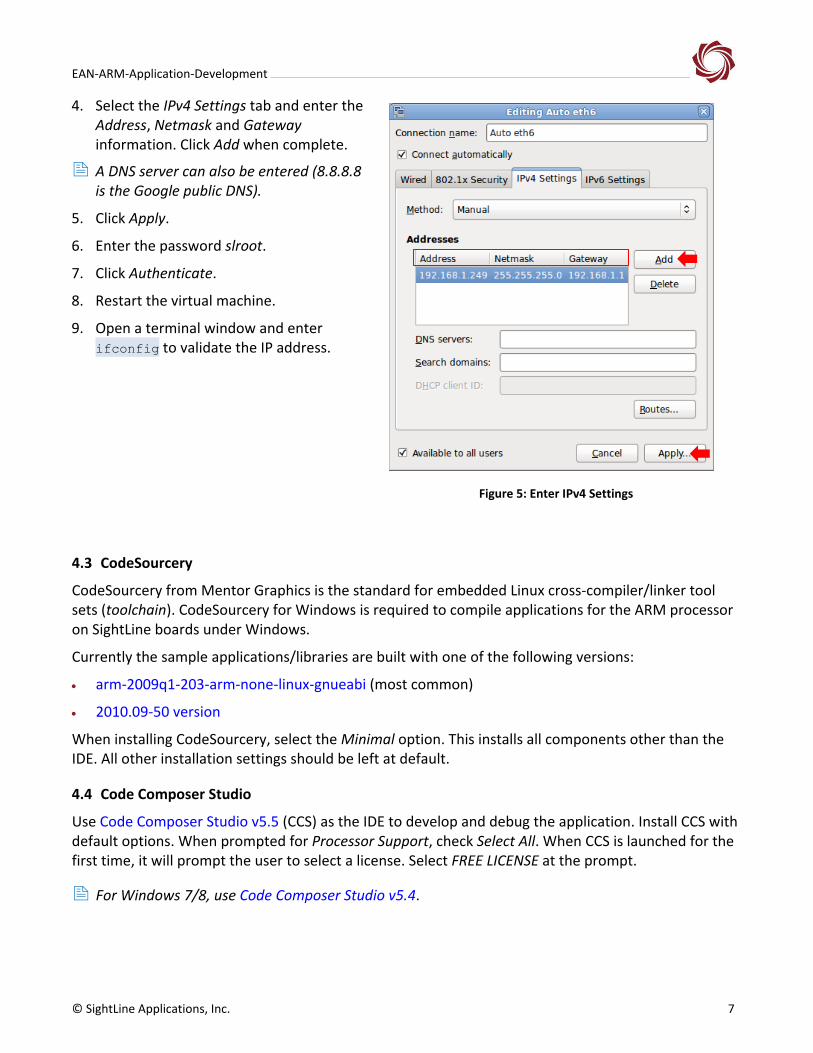
4.2.1 Edit Adapter
1. In the VMware Player window select System » Preferences » Network Connections.
2. Select the appropriate adapter (in the example this is eth6).
3. Click Edit.
Figure 4: VMware Network Connections Select Adapter
Username and Password = slroot
EAN-ARM-Application-Development
© SightLine Applications, Inc. 7
4. Select the IPv4 Settings tab and enter the Address, Netmask and Gateway information. Click Add when complete.
A DNS server can also be entered (8.8.8.8 is the Google public DNS).
5. Click Apply.
6. Enter the password slroot.
7. Click Authenticate.
8. Restart the virtual machine.
9. Open a terminal window and enter ifconfig to validate the IP address.
Figure 5: Enter IPv4 Settings
4.3 CodeSourcery
CodeSourcery from Mentor Graphics is the standard for embedded Linux cross-compiler/linker tool sets (toolchain). CodeSourcery for Windows is required to compile applications for the ARM processor on SightLine boards under Windows.
Currently the sample applications/libraries are built with one of the following versions:
• arm-2009q1-203-arm-none-linux-gnueabi (most common)
• 2010.09-50 version
When installing CodeSourcery, select the Minimal option. This installs all components other than the IDE. All other installation settings should be left at default.
4.4 Code Composer Studio
Use Code Composer Studio v5.5 (CCS) as the IDE to develop and debug the application. Install CCS with default options. When prompted for Processor Support, check Select All. When CCS is launched for the first time, it will prompt the user to select a license. Select FREE LICENSE at the prompt.
For Windows 7/8, use Code Composer Studio v5.4.
EAN-ARM-Application-Development
© SightLine Applications, Inc. 8
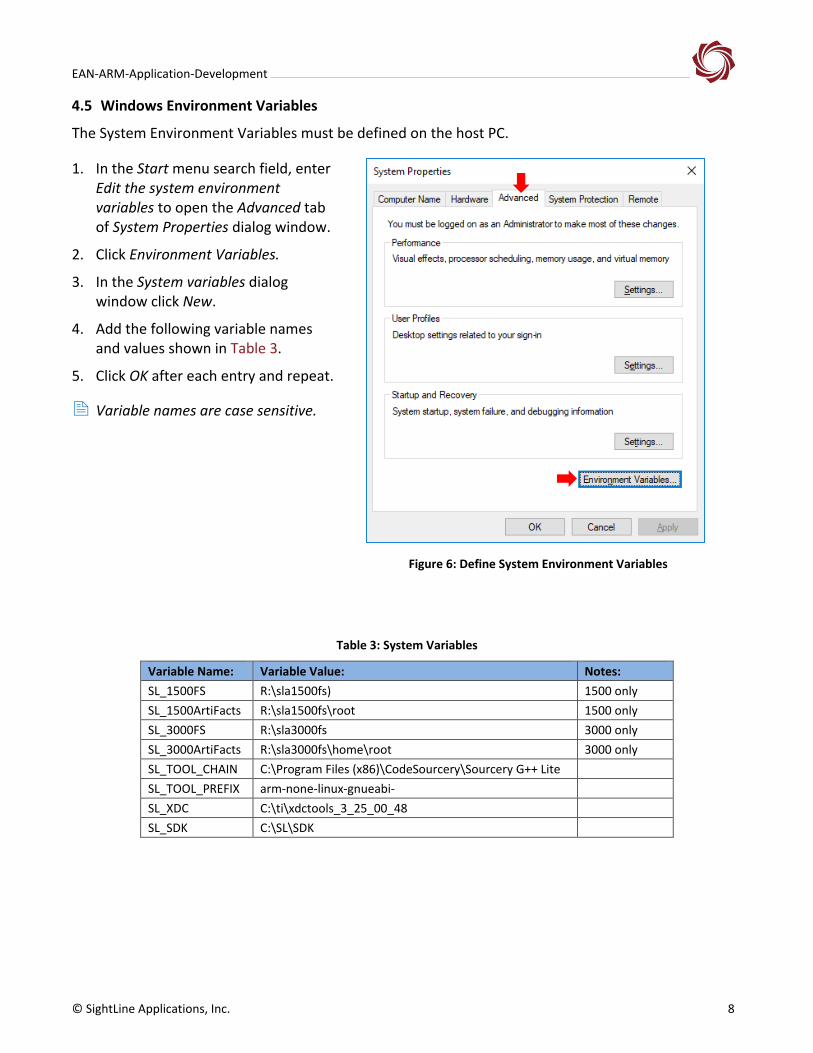
4.5 Windows Environment Variables
The System Environment Variables must be defined on the host PC.
1. In the Start menu search field, enter Edit the system environment variables to open the Advanced tab of System Properties dialog window.
2. Click Environment Variables.
3. In the System variables dialog window click New.
4. Add the following variable names and values shown in Table 3.
5. Click OK after each entry and repeat.
Variable names are case sensitive.
Figure 6: Define System Environment Variables
Table 3: System Variables
Variable Name: Variable Value: Notes:
SL_1500FS R:\sla1500fs) 1500 only
SL_1500ArtiFacts R:\sla1500fs\root 1500 only
SL_3000FS R:\sla3000fs 3000 only
SL_3000ArtiFacts R:\sla3000fs\home\root 3000 only
SL_TOOL_CHAIN C:\Program Files (x86)\CodeSourcery\Sourcery G++ Lite
SL_TOOL_PREFIX arm-none-linux-gnueabi-
SL_XDC C:\ti\xdctools_3_25_00_48
SL_SDK C:\SL\SDK
EAN-ARM-Application-Development
© SightLine Applications, Inc. 9
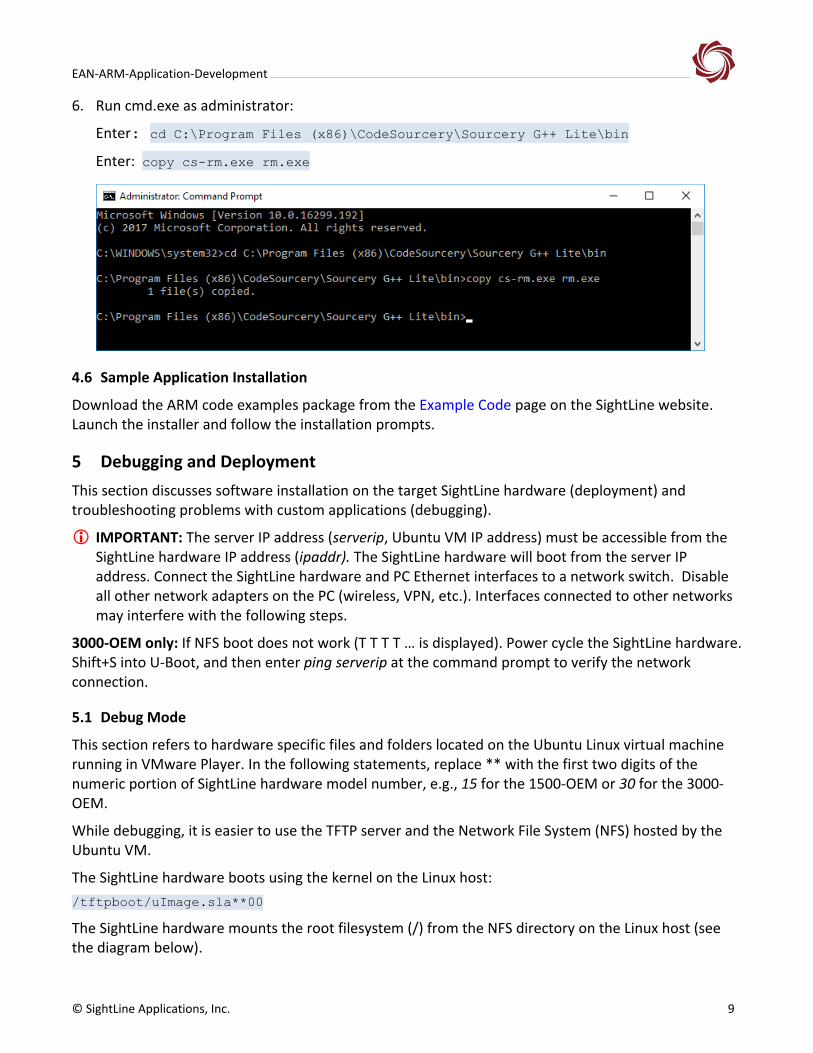
6. Run cmd.exe as administrator:
Enter: cd C:\Program Files (x86)\CodeSourcery\Sourcery G++ Lite\bin
Enter: copy cs-rm.exe rm.exe
4.6 Sample Application Installation
Download the ARM code examples package from the Example Code page on the SightLine website. Launch the installer and follow the installation prompts.
5 Debugging and Deployment
This section discusses software installation on the target SightLine hardware (deployment) and troubleshooting problems with custom applications (debugging).
IMPORTANT: The server IP address (serverip, Ubuntu VM IP address) must be accessible from the SightLine hardware IP address (ipaddr). The SightLine hardware will boot from the server IP address. Connect the SightLine hardware and PC Ethernet interfaces to a network switch. Disable all other network adapters on the PC (wireless, VPN, etc.). Interfaces connected to other networks may interfere with the following steps.
3000-OEM only: If NFS boot does not work (T T T T … is displayed). Power cycle the SightLine hardware. Shift+S into U-Boot, and then enter ping serverip at the command prompt to verify the network connection.
5.1 Debug Mode
This section refers to hardware specific files and folders located on the Ubuntu Linux virtual machine running in VMware Player. In the following statements, replace ** with the first two digits of the numeric portion of SightLine hardware model number, e.g., 15 for the 1500-OEM or 30 for the 3000-OEM.
While debugging, it is easier to use the TFTP server and the Network File System (NFS) hosted by the Ubuntu VM.
The SightLine hardware boots using the kernel on the Linux host:
/tftpboot/uImage.sla**00
The SightLine hardware mounts the root filesystem (/) from the NFS directory on the Linux host (see the diagram below).
EAN-ARM-Application-Development
© SightLine Applications, Inc. 10
From the Linux host running on the target SightLine hardware, the root directory ('/') of the filesystem is the same as /tftpboot/sla**00fs/ on the Ubuntu VM.
Example:
When a 1500-OEM boots from the TFTP server on the Ubuntu VM and mounts /tftpboot/sla**00fs as the root file system, DM-37x# ls '/' is equivalent to host> ls ~/sla1500fs.
From the Ubuntu VM: /tftpboot/sla**00fs and ~/sla**00fs points to /home/slroot/sla**00fs.
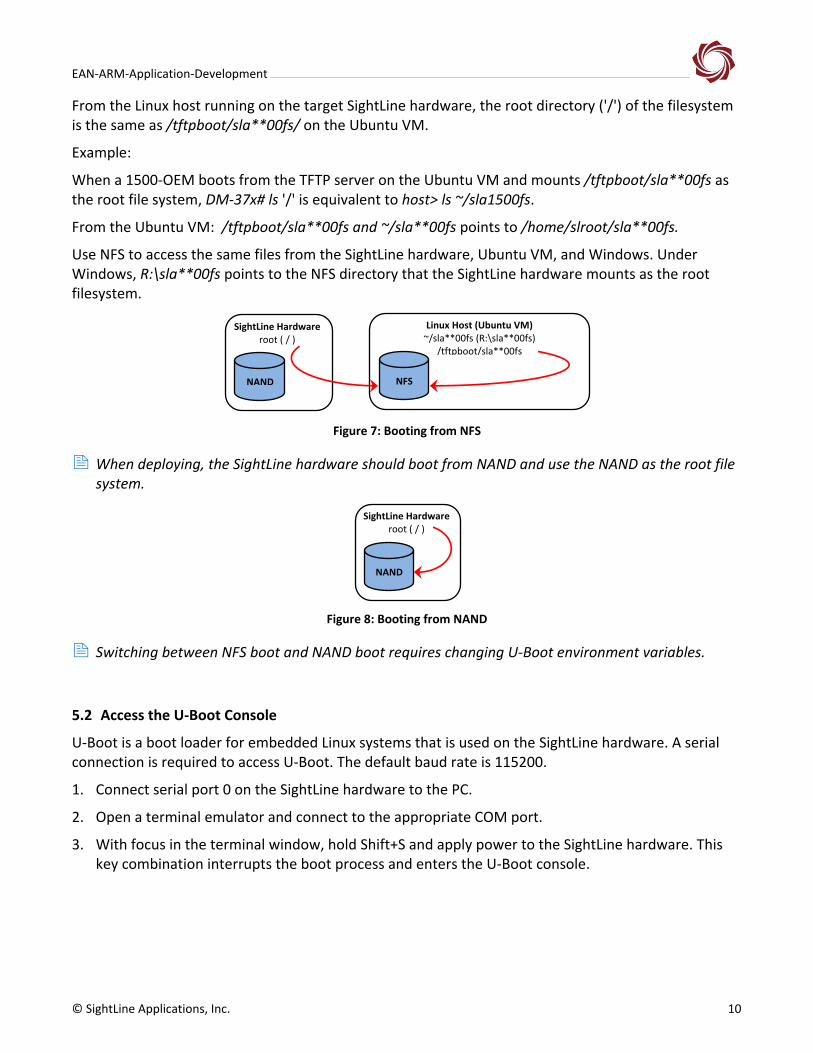
Use NFS to access the same files from the SightLine hardware, Ubuntu VM, and Windows. Under Windows, R:\sla**00fs points to the NFS directory that the SightLine hardware mounts as the root filesystem.
Figure 7: Booting from NFS
When deploying, the SightLine hardware should boot from NAND and use the NAND as the root file system.
Figure 8: Booting from NAND
Switching between NFS boot and NAND boot requires changing U-Boot environment variables.
5.2 Access the U-Boot Console
U-Boot is a boot loader for embedded Linux systems that is used on the SightLine hardware. A serial connection is required to access U-Boot. The default baud rate is 115200.
1. Connect serial port 0 on the SightLine hardware to the PC.
2. Open a terminal emulator and connect to the appropriate COM port.
3. With focus in the terminal window, hold Shift+S and apply power to the SightLine hardware. This key combination interrupts the boot process and enters the U-Boot console.
Linux Host (Ubuntu VM) ~/sla**00fs (R:\sla**00fs)
/tftpboot/sla**00fs
NFS NAND
SightLine Hardware root ( / )
NAND
SightLine Hardware root ( / )
EAN-ARM-Application-Development
© SightLine Applications, Inc. 11
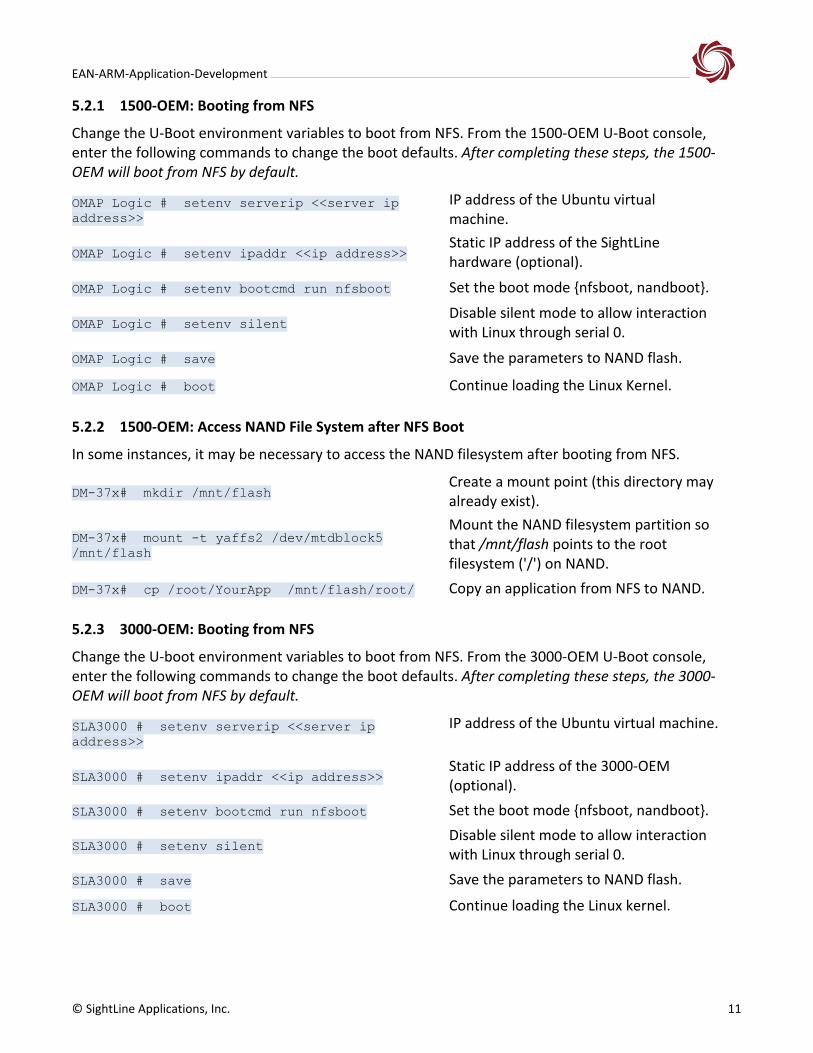
5.2.1 1500-OEM: Booting from NFS
Change the U-Boot environment variables to boot from NFS. From the 1500-OEM U-Boot console, enter the following commands to change the boot defaults. After completing these steps, the 1500-OEM will boot from NFS by default.
OMAP Logic # setenv serverip <<server ip
address>>
IP address of the Ubuntu virtual machine.
OMAP Logic # setenv ipaddr <<ip address>> Static IP address of the SightLine
hardware (optional).
OMAP Logic # setenv bootcmd run nfsboot Set the boot mode {nfsboot, nandboot}.
OMAP Logic # setenv silent Disable silent mode to allow interaction
with Linux through serial 0.
OMAP Logic # save Save the parameters to NAND flash.
OMAP Logic # boot Continue loading the Linux Kernel.
5.2.2 1500-OEM: Access NAND File System after NFS Boot
In some instances, it may be necessary to access the NAND filesystem after booting from NFS.
DM-37x# mkdir /mnt/flash Create a mount point (this directory may already exist).
DM-37x# mount -t yaffs2 /dev/mtdblock5
/mnt/flash
Mount the NAND filesystem partition so that /mnt/flash points to the root filesystem ('/') on NAND.
DM-37x# cp /root/YourApp /mnt/flash/root/ Copy an application from NFS to NAND.
5.2.3 3000-OEM: Booting from NFS
Change the U-boot environment variables to boot from NFS. From the 3000-OEM U-Boot console, enter the following commands to change the boot defaults. After completing these steps, the 3000-OEM will boot from NFS by default.
SLA3000 # setenv serverip <<server ip
address>>
IP address of the Ubuntu virtual machine.
SLA3000 # setenv ipaddr <<ip address>> Static IP address of the 3000-OEM
(optional).
SLA3000 # setenv bootcmd run nfsboot Set the boot mode {nfsboot, nandboot}.
SLA3000 # setenv silent Disable silent mode to allow interaction
with Linux through serial 0.
SLA3000 # save Save the parameters to NAND flash.
SLA3000 # boot Continue loading the Linux kernel.
EAN-ARM-Application-Development
© SightLine Applications, Inc. 12
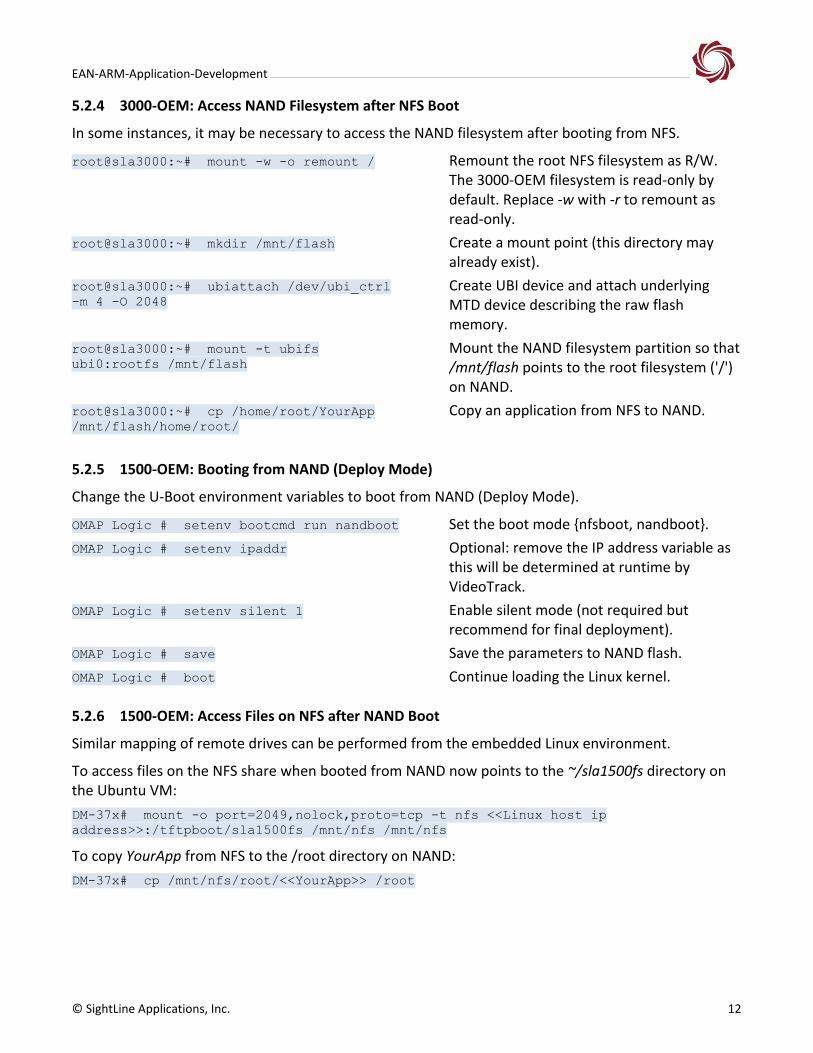
5.2.4 3000-OEM: Access NAND Filesystem after NFS Boot
In some instances, it may be necessary to access the NAND filesystem after booting from NFS.
root@sla3000:~# mount -w -o remount /
Remount the root NFS filesystem as R/W. The 3000-OEM filesystem is read-only by default. Replace -w with -r to remount as read-only.
root@sla3000:~# mkdir /mnt/flash
Create a mount point (this directory may already exist).
root@sla3000:~# ubiattach /dev/ubi_ctrl
-m 4 -O 2048 Create UBI device and attach underlying MTD device describing the raw flash memory.
root@sla3000:~# mount -t ubifs
ubi0:rootfs /mnt/flash Mount the NAND filesystem partition so that /mnt/flash points to the root filesystem ('/') on NAND.
root@sla3000:~# cp /home/root/YourApp
/mnt/flash/home/root/
Copy an application from NFS to NAND.
5.2.5 1500-OEM: Booting from NAND (Deploy Mode)
Change the U-Boot environment variables to boot from NAND (Deploy Mode).
OMAP Logic # setenv bootcmd run nandboot Set the boot mode {nfsboot, nandboot}.
OMAP Logic # setenv ipaddr Optional: remove the IP address variable as this will be determined at runtime by VideoTrack.
OMAP Logic # setenv silent 1 Enable silent mode (not required but recommend for final deployment).
OMAP Logic # save Save the parameters to NAND flash.
OMAP Logic # boot Continue loading the Linux kernel.
5.2.6 1500-OEM: Access Files on NFS after NAND Boot
Similar mapping of remote drives can be performed from the embedded Linux environment.
To access files on the NFS share when booted from NAND now points to the ~/sla1500fs directory on the Ubuntu VM:
DM-37x# mount -o port=2049,nolock,proto=tcp -t nfs <<Linux host ip
address>>:/tftpboot/sla1500fs /mnt/nfs /mnt/nfs
To copy YourApp from NFS to the /root directory on NAND:
DM-37x# cp /mnt/nfs/root/<<YourApp>> /root
EAN-ARM-Application-Development
© SightLine Applications, Inc. 13
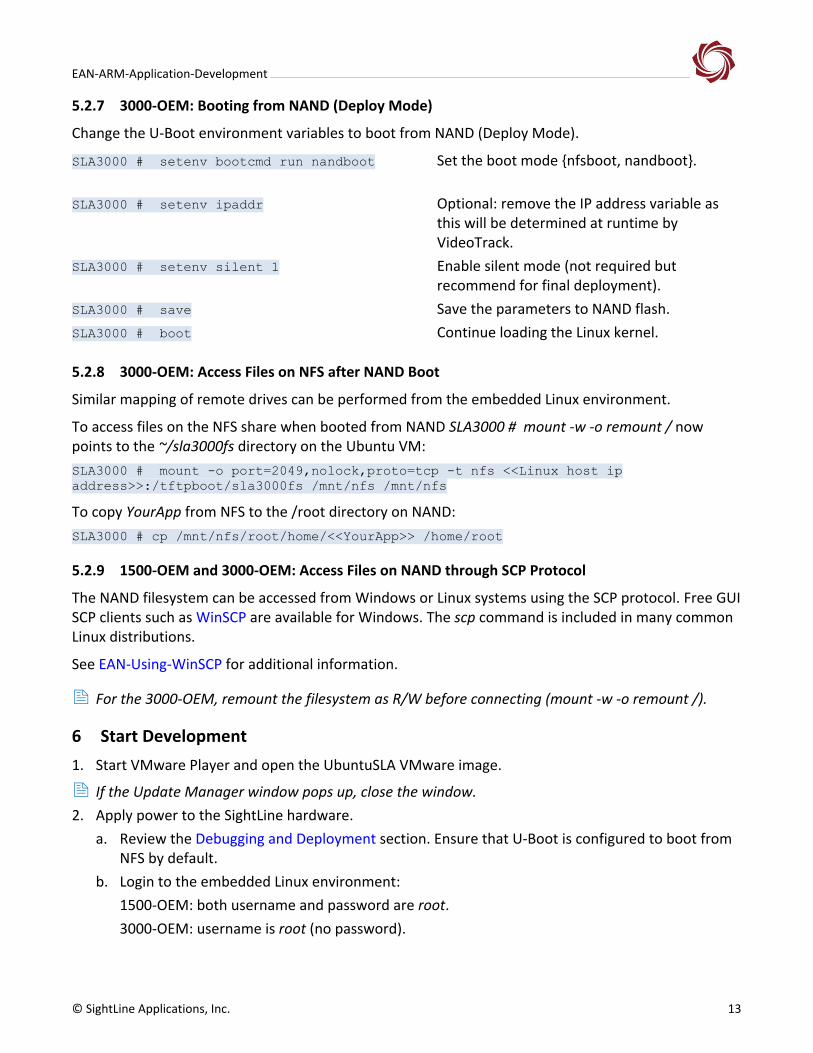
5.2.7 3000-OEM: Booting from NAND (Deploy Mode)
Change the U-Boot environment variables to boot from NAND (Deploy Mode).
SLA3000 # setenv bootcmd run nandboot Set the boot mode {nfsboot, nandboot}.
SLA3000 # setenv ipaddr Optional: remove the IP address variable as
this will be determined at runtime by VideoTrack.
SLA3000 # setenv silent 1 Enable silent mode (not required but recommend for final deployment).
SLA3000 # save Save the parameters to NAND flash.
SLA3000 # boot Continue loading the Linux kernel.
5.2.8 3000-OEM: Access Files on NFS after NAND Boot
Similar mapping of remote drives can be performed from the embedded Linux environment.
To access files on the NFS share when booted from NAND SLA3000 # mount -w -o remount / now points to the ~/sla3000fs directory on the Ubuntu VM:
SLA3000 # mount -o port=2049,nolock,proto=tcp -t nfs <<Linux host ip
address>>:/tftpboot/sla3000fs /mnt/nfs /mnt/nfs
To copy YourApp from NFS to the /root directory on NAND:
SLA3000 # cp /mnt/nfs/root/home/<<YourApp>> /home/root
5.2.9 1500-OEM and 3000-OEM: Access Files on NAND through SCP Protocol
The NAND filesystem can be accessed from Windows or Linux systems using the SCP protocol. Free GUI SCP clients such as WinSCP are available for Windows. The scp command is included in many common Linux distributions.
See EAN-Using-WinSCP for additional information.
For the 3000-OEM, remount the filesystem as R/W before connecting (mount -w -o remount /).
6 Start Development
1. Start VMware Player and open the UbuntuSLA VMware image.
If the Update Manager window pops up, close the window.
2. Apply power to the SightLine hardware.
a. Review the Debugging and Deployment section. Ensure that U-Boot is configured to boot from NFS by default.
b. Login to the embedded Linux environment:
1500-OEM: both username and password are root.
3000-OEM: username is root (no password).
EAN-ARM-Application-Development
© SightLine Applications, Inc. 14
c. The system may attempt to launch VideoTrack at startup. The first time that VideoTrack is launched, it will fail to start because the license file is not present. Skip to the next step.
d. If VideoTrack starts successfully, click Enter to stop the process.
3. The license file is required to run VideoTrack from NFS. Copy the license file from NAND to NFS.
1500-OEM:
DM-37x# mkdir /mnt/flash
DM-37x# mount -t yaffs2 /dev/mtdblock5 /mnt/flash
DM-37x# cp /mnt/flash/root/*.license /root/
Reboot the 1500-OEM after copying the license file.
3000-OEM: root@sla3000:~# mount -w -o remount /
root@sla3000:~# ubiattach /dev/ubi_ctrl -m 4 -O 2048
root@sla3000:~# mount -t ubifs ubi0:rootfs /mnt/flash
root@sla3000:~# cp /mnt/flash/home/root/*.license ~/
Reboot the 3000-OEM after copying the license file.
6.1 Building the Application
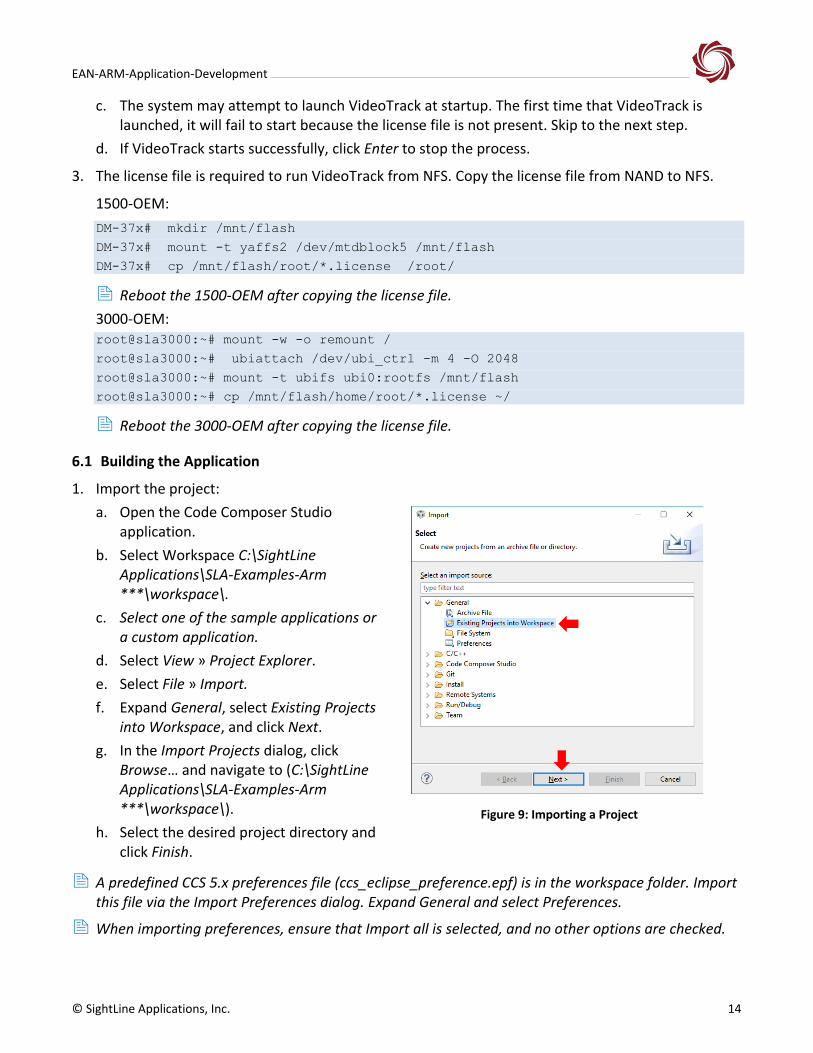
1. Import the project:
a. Open the Code Composer Studio application.
b. Select Workspace C:\SightLine Applications\SLA-Examples-Arm ***\workspace\.
c. Select one of the sample applications or a custom application.
d. Select View » Project Explorer.
e. Select File » Import.
f. Expand General, select Existing Projects into Workspace, and click Next.
g. In the Import Projects dialog, click Browse… and navigate to (C:\SightLine Applications\SLA-Examples-Arm ***\workspace\).
h. Select the desired project directory and click Finish.
Figure 9: Importing a Project
A predefined CCS 5.x preferences file (ccs_eclipse_preference.epf) is in the workspace folder. Import this file via the Import Preferences dialog. Expand General and select Preferences.
When importing preferences, ensure that Import all is selected, and no other options are checked.
EAN-ARM-Application-Development
© SightLine Applications, Inc. 15
2. Build the project:
a. Right click on a project.
b. Select Build Project.
c. Test the application. From the embedded Linux console:
DM-37x# ./YourApp_Debug
For debugging, see the Using GDB Debugging in CCS in the Appendix.
d. The Overlay DLL project creates a library instead of an executable. To enable the library, see Overlay DLL - Build and Enable section.
Windows often fails to automatically re-establish mapped drive connections after rebooting or resuming from sleep. If the build fails because R: is not accessible, navigate to the root directory of the mapped drive via file explorer to ensure that the connection is active.
With an executable project that depends on another static library project, editing a file in the static library project may not cause the executable to be rebuilt. It is safer to manually build each project (the file may need to be edited in the executable project to correctly rebuild the executable).
6.2 Deploying the Application
Copy the custom application from NFS to NAND. See the Debugging and Deployment section for detailed instructions
6.2.1 1500-OEM Startup Script
When the 1500-OEM starts, it executes /etc/rc.d/rc.local at the end of initialization. If the application needs to start automatically edit the script file accordingly.
The rc.local file exists both on NFS and NAND. Edit the script on the NAND for deployment. It may be necessary to insert a 10-20 second sleep before executing the custom application. This ensures that VideoTrack is running when the application is launched.
Near the end of this script there is an example of delaying then starting rtspMain. This can be copied and modified to start the application with an appropriate delay. Building a release version of the application for deployment would be beneficial.
6.2.2 3000-OEM Startup Script
When the 3000-OEM starts, it executes /home/root/sla3000_init.sh at the end of initialization. If the application needs to start automatically edit the script file accordingly.
The sla3000_init.sh file exists both on NFS and NAND. Edit the script on the NAND for deployment. It may be necessary to insert a 10-20 second sleep before executing the custom application. This allows time for VideoTrack to start before the application is launched.
The SLA3000 file system must be changed to writeable before editing the script. Near the end of this script there is an example of delaying then starting rtspMain. This can be copied and modified to start the application with an appropriate delay. Building a release version of the application for deployment would be beneficial.
mount -w -o remount / # To make the filesystem writable

EAN-ARM-Application-Development
© SightLine Applications, Inc. 16
6.2.3 Configuring U-Boot to Boot from NAND
For instruction on to on how to boot from NAND, see the 1500-OEM or 3000-OEM Booting from NAND (Deploy Mode) sections.
6.3 Overlay DLL - Build and Enable
Follow the steps in the Building the Application section to build the SLAOverlayDLL3000 project.
1. Select the release build to build the file R:\sla3000fs\home\root\\x_SLOverlay_DLL_Release.so.
2. Reboot the system.
3. Connect to the system with Panel Plus.
4. Enable the library:
a. From the main menu » File » Programs.
b. Select the DLLs option, and then select x_SLOverlay_DLL_Release.so in the list.
c. Click Send.
5. From the main menu » Parameters » Save to Board, and then main menu » Reset Board to persist the settings through subsequent restarts.
6. Verify a red X is drawn over the video.
7 Troubleshooting
7.1 Code Composer Studio Troubleshooting
7.1.1 Misleading Link Errors
Occasionally CCS reports numerous linker errors that do not make sense. In many cases this can be resolved by deleting all the projects from the Project Explorer list and then reimporting them.
7.1.2 False Compiling Errors
Occasionally CCS reports syntax and semantic errors that do not actually keep the project from building. To eliminate these errors, go the Window drop-down menu in CCS and select Preferences. Expand the C/C++ menu in the sidebar tree.
Check and uncheck Syntax and Semantic Errors.
Figure 10: Syntax and Semantic Errors Checkbox
EAN-ARM-Application-Development
© SightLine Applications, Inc. 17
7.2 General Troubleshooting
Applications may not function as expected when deployed to SightLine hardware. The VideoTrack application can operate differently when booted from NFS or NAND.
✓ Check the param*.txt file in the /root (1500-OEM) or /home/root (3000-OEM) directory. This file stores VideoTrack configuration settings.
✓ Verify that the same param*.txt (parameter) file is present on NFS and NAND. Deleting or renaming this file may help. This resets the system to factory default parameters.
✓ Ensure that the NAND and NFS filesystems contain matching board firmware versions.
✓ Disable silent mode before running applications (setenv silent from the U-Boot prompt).
✓ For long command line commands, create a shell (.sh) script that executes them for ease of use, e.g., starting GDB server on target during debugging, mounting NFS/NAND filesystems, etc.
✓ Verify that a valid license file has been copied from the SightLine hardware to the NFS filesystem.
✓ Make sure all file permissions are set properly (chown, chmod a+x, etc.).
7.3 NFS Boot Troubleshooting
This section describes how to troubleshoot problems if the hardware NFS boot is failing. Use the following methods in the order in that they are presented (most common to least common).
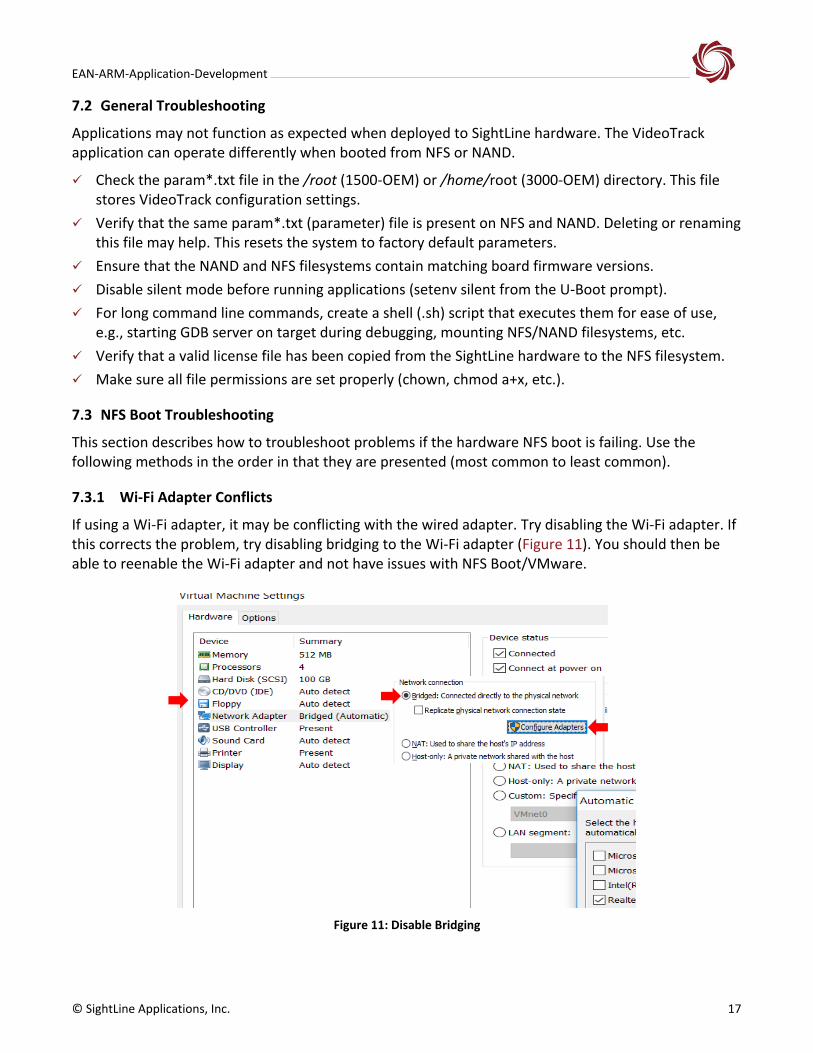
7.3.1 Wi-Fi Adapter Conflicts
If using a Wi-Fi adapter, it may be conflicting with the wired adapter. Try disabling the Wi-Fi adapter. If this corrects the problem, try disabling bridging to the Wi-Fi adapter (Figure 11). You should then be able to reenable the Wi-Fi adapter and not have issues with NFS Boot/VMware.
Figure 11: Disable Bridging
EAN-ARM-Application-Development
© SightLine Applications, Inc. 18
7.3.2 IP Address Conflicts or Mismatch
1. Open a terminal window on the VMware machine and type ifconfig. This shows the IP address of the VMware server (serverip). This can be a DHCP address or a static IP address (if setting a static IP using the instructions in Setup R: Drive.
2. Check the IP address that the system is trying to boot from. Break into the boot using Shift+S, and then type: printenv serverip
Make sure this matches the IP address of the VMware (serverip).
3. Check the SightLine hardware IP address. Type: printenv ipaddr
ipaddr must be on the same subnet as the serverip for the NFS boot to work. If there is a mismatch it will prevent the NFS boot. As an example of a mismatch, the TFTP IP server address is 192.168.1.46, and the SightLine IP address is192.168.3.99.
4. Open a cmd window on the PC and ping the serverip address.
5. For the 3000-OEM, use Shift+S to break into the boot sequence, and then ping the serverip address from the uboot prompt. This feature is not available on the 1500-OEM.
7.3.3 Windows 10 Update Issues
If there has been Windows 10 update, it can remove the VMware Bridge protocol and prevent the VMWare image from coming up with an IPV4 address after the update. Use the following steps to restore functionality.
1. Go to Control Panel » Network and Internet » Network Sharing Center » Change adapter settings.
2. Click on VMware Network Adapter and choose Properties.
3. Check VMware Bridge Protocol.
4. Reboot the PC.
7.3.4 Reinstall VMware Application
Windows update has been found to remove or disable drivers. Try reinstalling the VMWare application following a Windows update.
7.4 Shift+S Interrupt Issues
Shift+S interrupt issues most often occur with USB to RS-232 adapters. PCI controllers can also cause problems. Prolific PL2303-based USB to RS-232 adapters have performed well during tests. While Shift+S issues are infrequent with these adaptors, they can still happen. This may be due to an inherent problem in Windows.
Try unplugging the USB to RS-232 adapters from the USB port. Wait ~10 seconds for Windows to recognize that the adapter is unplugged. Plug the adapter back in. Restart the terminal emulator. If this does not work restart the PC. In most cases this should fix the problem.
EAN-ARM-Application-Development
© SightLine Applications, Inc. 19
Shift+S notes:
• The default baud rate for the boot loader console is 115200. This is defined by the baud rate U-Boot environment variable.
• When silent mode is enabled, the VideoTrack application changes the baud rate for Serial Port 0 during the initialization process (default 57600).
• VideoTrack does not change the baud rate when silent mode is disabled. The Linux serial console uses the U-Boot baud rate.
• During SightLine testing, there have not been any issues with adapters using the default Windows device settings (normally 9600/8-N-1) and configuring the port in the terminal emulator.
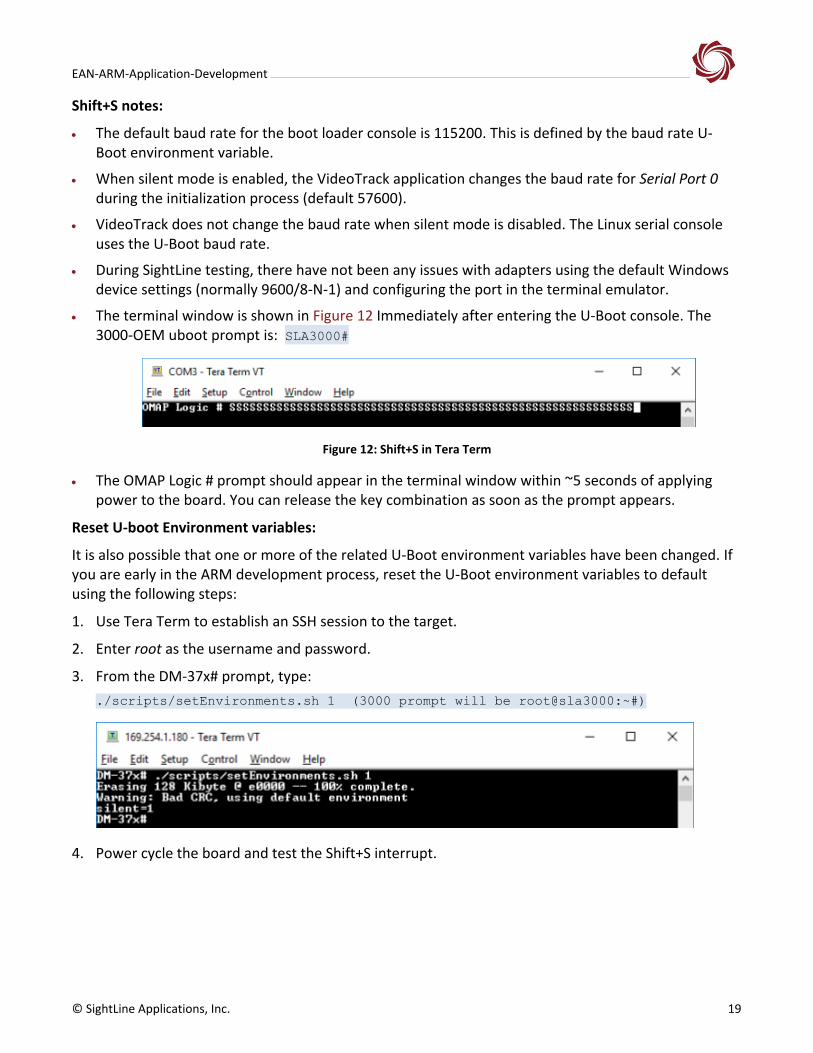
• The terminal window is shown in Figure 12 Immediately after entering the U-Boot console. The 3000-OEM uboot prompt is: SLA3000#
Figure 12: Shift+S in Tera Term
• The OMAP Logic # prompt should appear in the terminal window within ~5 seconds of applying power to the board. You can release the key combination as soon as the prompt appears.
Reset U-boot Environment variables:
It is also possible that one or more of the related U-Boot environment variables have been changed. If you are early in the ARM development process, reset the U-Boot environment variables to default using the following steps:
1. Use Tera Term to establish an SSH session to the target.
2. Enter root as the username and password.
3. From the DM-37x# prompt, type:
./scripts/setEnvironments.sh 1 (3000 prompt will be root@sla3000:~#)
4. Power cycle the board and test the Shift+S interrupt.

EAN-ARM-Application-Development
© SightLine Applications, Inc. 20
7.5 Issues with VMWare - Binary Translation Warning
It is safe to click OK to this warning. Since the VM image is being used for as a repository for Linux sources and as an TFTP/NFS server, it is unlikely any problems will arise from this issue.
Figure 13: Binary Translation Warning
7.6 Issues with Code Composer Studio and Windows 10
The Code Composer Studio warning about incompatibility with Windows 10 can safely be ignored.
Figure 14: Code Composer Incompatibility Warning
7.7 Questions and Additional Support
For questions and additional support, please contact Technical Support. Additional support documentation and Engineering Application Notes (EANs) can be found on the Support pages of the SightLine Applications website.
Appendix A - Managing Parameter File - ARM or PC Application Development
When developing an ARM or PC application to send SLA commands to the OEM hardware, commands sent by external applications can affect the state of the system when saving the parameter file. To alleviate these issues SightLine recommends the following guidelines when managing the parameter file:
• Disable ARM or PC applications when configuring and saving parameters to OEM hardware.
• Configure a single system with parameters and test the configuration.
• If the configuration test passes, use the SightLine upgrade utility application to retrieve the parameter file from the OEM hardware and save it to a separate location as a known good system configuration file.
• The upgrade utility can then be used to upload the known good system parameter file to OEM hardware.
See the EAN-Firmware Upgrade Utility for information on how to use the SightLine upgrade utility to manage the parameter file.
EAN-ARM-Application-Development
© SightLine Applications, Inc. 21
Appendix B - Using VMware
1. From the Player drop-down menu select File » Open.
2. Navigate to the UbuntuSLA*** directory extracted from the downloaded archive, select UbuntuSLA.vmx, and click Take Ownership if prompted.
3. Select the UbuntuSLA virtual machine and click the green triangle button to start the VM.
4. Select I copied it. VMware will update the virtual machine configuration and continue booting.
5. At the login window, click on the UbuntuSLA user.
6. Enter password: slroot (username is also slroot). The virtual machine is now ready to use.
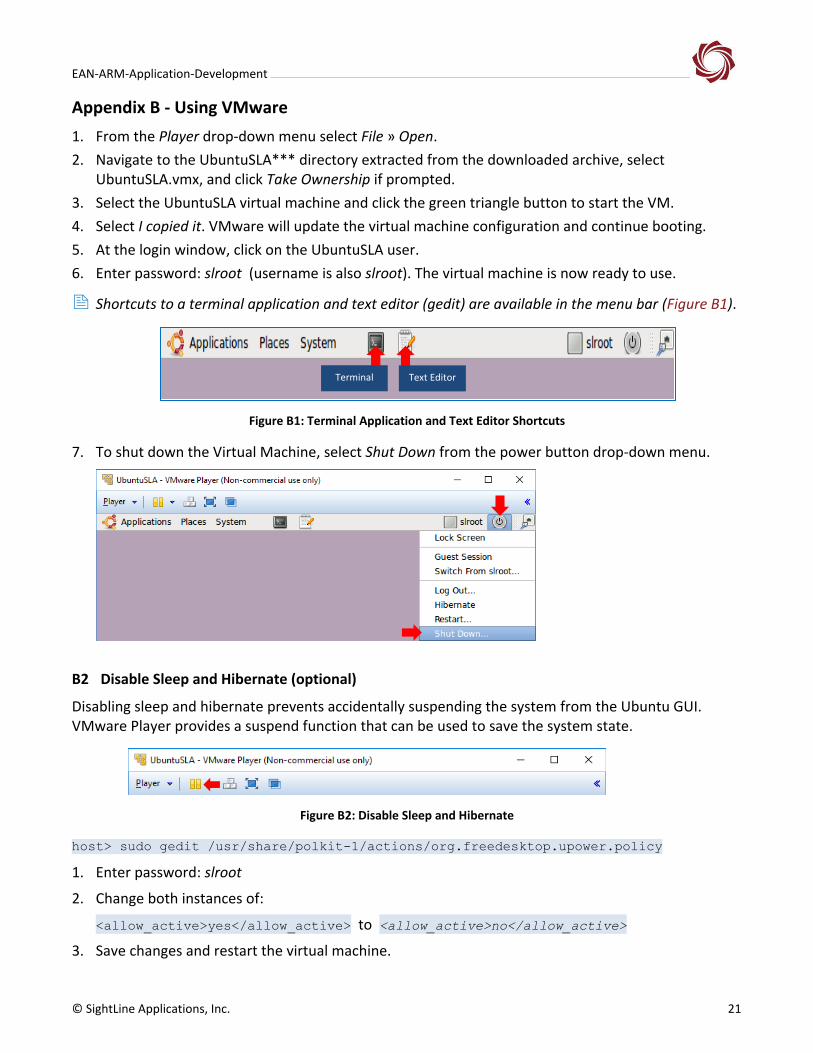
Shortcuts to a terminal application and text editor (gedit) are available in the menu bar (Figure B1).
Figure B1: Terminal Application and Text Editor Shortcuts
7. To shut down the Virtual Machine, select Shut Down from the power button drop-down menu.
B2 Disable Sleep and Hibernate (optional)
Disabling sleep and hibernate prevents accidentally suspending the system from the Ubuntu GUI. VMware Player provides a suspend function that can be used to save the system state.
Figure B2: Disable Sleep and Hibernate
host> sudo gedit /usr/share/polkit-1/actions/org.freedesktop.upower.policy
1. Enter password: slroot
2. Change both instances of:
<allow_active>yes</allow_active> to <allow_active>no</allow_active>
3. Save changes and restart the virtual machine.
Text Editor Terminal
EAN-ARM-Application-Development
© SightLine Applications, Inc. 22
Appendix C - Using GDB Debugging in CCS
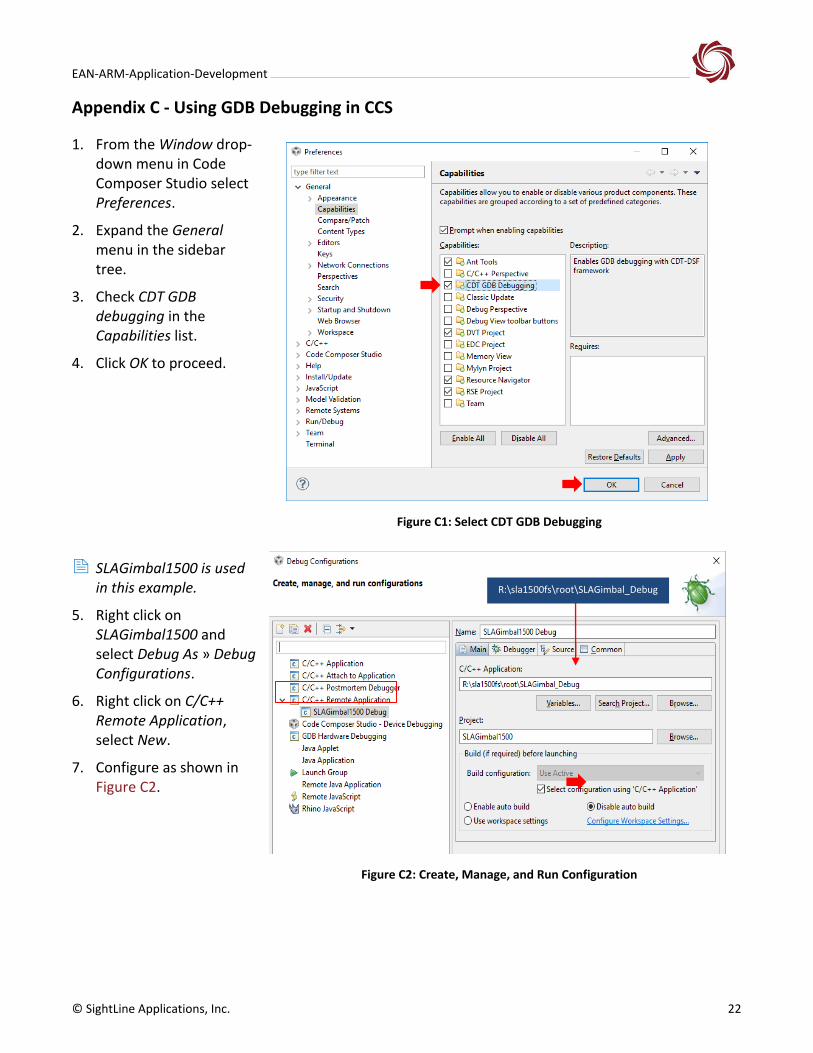
1. From the Window drop-down menu in Code Composer Studio select Preferences.
2. Expand the General menu in the sidebar tree.
3. Check CDT GDB debugging in the Capabilities list.
4. Click OK to proceed.
Figure C1: Select CDT GDB Debugging
SLAGimbal1500 is used in this example.
5. Right click on SLAGimbal1500 and select Debug As » Debug Configurations.
6. Right click on C/C++ Remote Application, select New.
7. Configure as shown in Figure C2.
Figure C2: Create, Manage, and Run Configuration
R:\sla1500fs\root\SLAGimbal_Debug
EAN-ARM-Application-Development
© SightLine Applications, Inc. 23
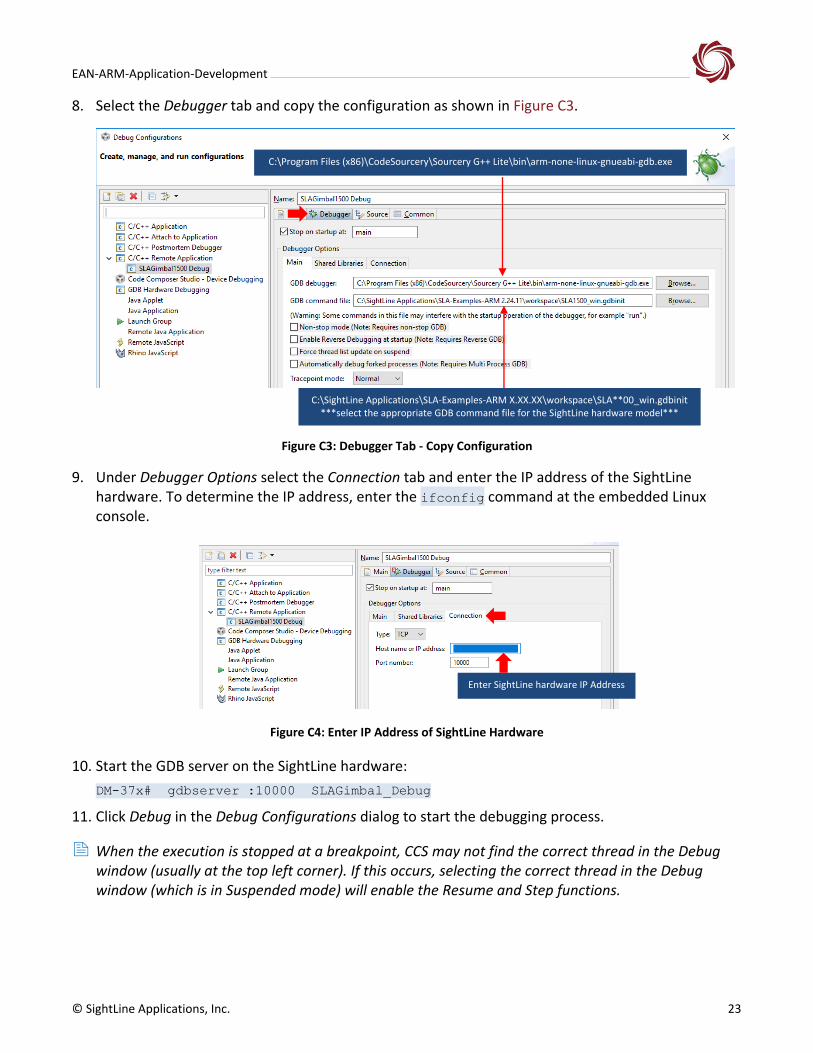
8. Select the Debugger tab and copy the configuration as shown in Figure C3.
Figure C3: Debugger Tab - Copy Configuration
9. Under Debugger Options select the Connection tab and enter the IP address of the SightLine hardware. To determine the IP address, enter the ifconfig command at the embedded Linux console.
Figure C4: Enter IP Address of SightLine Hardware
10. Start the GDB server on the SightLine hardware:
DM-37x# gdbserver :10000 SLAGimbal_Debug
11. Click Debug in the Debug Configurations dialog to start the debugging process.
When the execution is stopped at a breakpoint, CCS may not find the correct thread in the Debug window (usually at the top left corner). If this occurs, selecting the correct thread in the Debug window (which is in Suspended mode) will enable the Resume and Step functions.
C:\Program Files (x86)\CodeSourcery\Sourcery G++ Lite\bin\arm-none-linux-gnueabi-gdb.exe
C:\SightLine Applications\SLA-Examples-ARM X.XX.XX\workspace\SLA**00_win.gdbinit ***select the appropriate GDB command file for the SightLine hardware model***
Enter SightLine hardware IP Address
EAN-ARM-Application-Development
© SightLine Applications, Inc. 24
Appendix D - Updating the VMware Environment
For versions 2.23.1 and above.
It is important to keep the development environment up to date as SightLine releases new firmware. This section explains how to update the firmware on the Ubuntu virtual machine.
Prerequisites:
• UbuntuSLA VMware image for 2.23.1 (or later) release
• SLA-1500 / SLA-3000 Upgrade Utility installed
UbuntuSLA Image Version
From a terminal or SSH session on the Ubuntu VM, enter:
ls ~/Downloads/sla1500
If the directory exists, the image version is in 2.23.1 or later.
Copy Firmware from Program Files
This section refers to hardware-specific files and folders. In the following statements, replace ** with the first two digits of the numeric portion of SightLine hardware model number, e.g., 15 for the 1500-OEM or 30 for the 3000-OEM.
1. Install the firmware Upgrade Utility on the host PC. The default installation directory is: C:\Program Files (x86)\SightLine Applications\.
2. Copy the firmware directory (under SLA-**00 Upgrade Utility x.xx.xx) to: R:/Downloads/sla**00/.
sla_updateDevEnv.sh
host> cd ~/Downloads/sla**00/firmware
1. Run the sla_updateDevEnv.sh script. There are two methods for updating the environment:
a. Incremental update, some files overwritten, most remain unchanged:
host> ./sla_updateDevEnv.sh update
b. Reset the environment to the factory default state:
host> ./sla_updateDevEnv.sh factory
This method completely deletes the existing filesystem including user-created files. Backing up files is recommended even when using the various options to preserve the license file, root filesystem, etc.
The factory option is recommended when downgrading to an earlier software release (>2.23.1).
c. host> ./sla_updateDevEnv.sh (# displays help)
2. Follow the instructions and select the desired options.
3. A confirmation message will be displayed when the process is complete.
EAN-ARM-Application-Development
© SightLine Applications, Inc. 25
ToDo Message
If a ToDo message is displayed, additional steps are required to complete the development environment update. The instructions may be different from in each release. It is not necessary to perform the indicated steps more than once for a given firmware version.
Example ToDo message:
ToDo: *** run the following commands on the 3000-OEM ***
On the serial Terminal, hold Shift+S to break into u-boot, then power cycle 3000.
At u-boot prompt (SLA3000#) set NFS server by: set serverip xx.xx.xx.xx
Start NFS boot: run nfsboot
Logon to 3000 (username=root, no password).
mount -w -o remount / # To make the filesystem writable.
/etc/init.d/38xx-demo # To initialize graphics libraries.
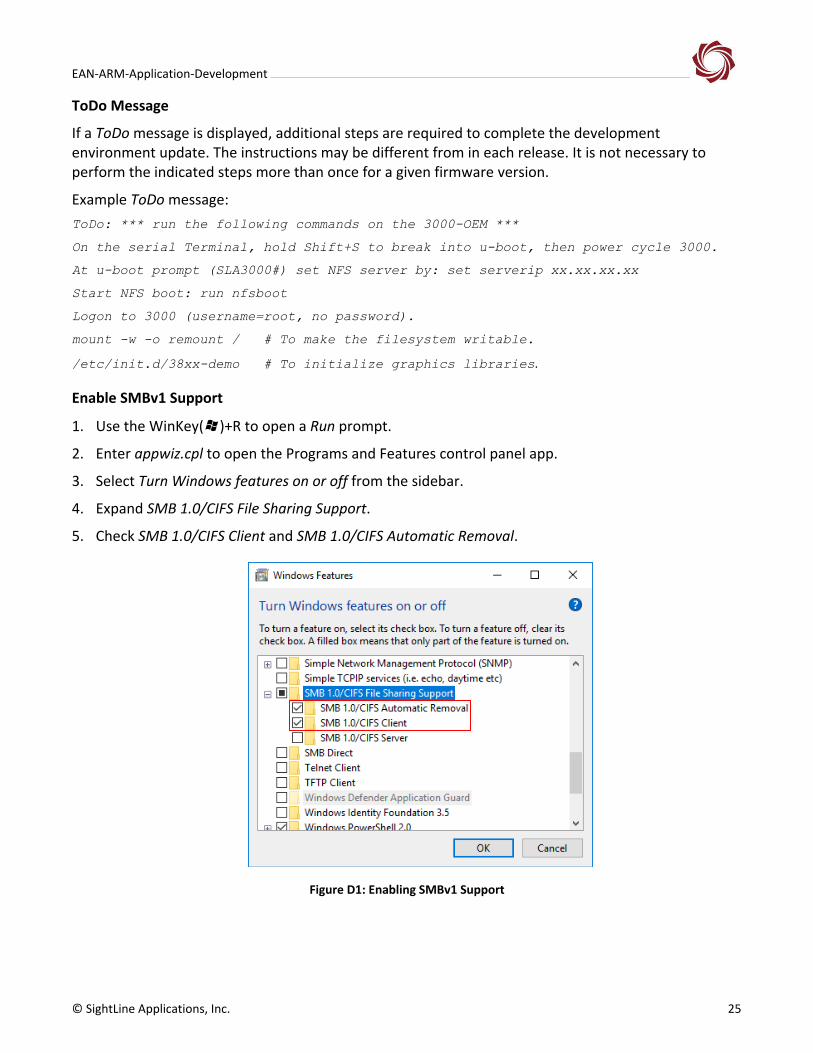
Enable SMBv1 Support
1. Use the WinKey()+R to open a Run prompt.
2. Enter appwiz.cpl to open the Programs and Features control panel app.
3. Select Turn Windows features on or off from the sidebar.
4. Expand SMB 1.0/CIFS File Sharing Support.
5. Check SMB 1.0/CIFS Client and SMB 1.0/CIFS Automatic Removal.
Figure D1: Enabling SMBv1 Support


![INDEX []ART. NR. SW013 EAN 3838851360700 ART. NR. SW018 EAN 3838851360762 ART. NR. SW011 EAN 3838851360755 ART. NR. SW003 EAN 3838851360243 ART. NR. SW005 EAN 3838851360267 DISPLAY](https://img.pdfslide.us/doc/110x75/5f4984ad9c7ca71e5f7c2d5b/index-art-nr-sw013-ean-3838851360700-art-nr-sw018-ean-3838851360762-art.jpg)