Embed Size (px)
Citation preview
ST.AN.E10074.1Issue 1
ENGLISH (UK)
`
APPLICATION NOTE
Encoder Motherboard SoftwareUpgrade Procedure for
E57xx and E6100
Encoder Motherboard Software Upgrade
Page 2 of 20 ST.AN.E10074.1
Issue 1, first published in 2001 by:TANDBERG TELEVISION LTD
REGISTERED ADDRESS:UNIT 2 STRATEGIC PARK, COMINES WAY,HEDGE END, SOUTHAMPTON,HAMPSHIRE,SO30 4DAUNITED KINGDOM
Registered Company Number 03695535
This document and the information contained in it is the property ofTANDBERG Television Ltd and may be the subject of patentspending and granted. It must not be used for commercial purposesnor copied, disclosed, reproduced, stored in a retrieval system ortransmitted in any form or by any means (electronic, mechanical,photocopying, recording or otherwise), whether in whole or in part,without TANDBERG Television’s prior written agreement.
� 2001 TANDBERG Television Ltd. All rights reserved.
SVENSKALÄS DETTA FÖRST!
Om Ni inte förstår informationen i denna handbokARBETA DÅ INTE MED DENNA UTRUSTNING.
En översättning till detta språk av denna handbok kan också anskaffas, påEr bekostnad.
ENGLISH (UK)READ THIS FIRST!
If you do not understand the contents of this manualDO NOT OPERATE THIS EQUIPMENT.
Also, translation into any EC official language of this manual can be madeavailable, at your cost.
ΕΛΛΗΝΙΚΑ
ÄΙΑΒΑΣΤΕ ΠΡÙΤΑ ΑΥΤΟ!
Αν δεν καταλÜβετε το περιεχüìενο αυτοý του βοηθÞìατοò/εγχειριδßουΜΗΝ ΛΕΙΤΟΥΡΓΗΣΕΤΕ ΑΥΤΟΝ ΤΟΝ ΕΞΟΠΛΙΣΜΟ.
Επßσηò, αυτü το εγχειρßδιο εßναι διαθÝσιìο σε ìετÜφρασησε αυτÞ τη γλþσσα και ìπορεßτε να το αγορÜσετε.
DEUTSCHLESEN SIE ZUERST DIESEN HINWEIS!
Sollte Ihnen der Inhalf dieses Handbuches nicht klar verständlich sein,dann
BEDIENEN SIE DIESE GERÄTE NICHT!
Eine Übersetzung des Handbuches in diese Sprache ist gegenBerechnung lieferbar.
ESPAÑOLLEA ESTE AVISO PRIMERO!
Si no entiende el contenido de este manualNO OPERE ESTE EQUIPO.
Podemos asimismo suministrarle una traducción de este manual al(idioma) previo pago de una cantidad adicional que deberá abonar usted
mismo.
FRANÇAISAVANT TOUT, LISEZ CE QUI SUIT!
Si vous ne comprenez pas les instructions contenues dans ce manuelNE FAITES PAS FONCTIONNER CET APPAREIL.
En outre, nous pouvons vous proposer, à vos frais, une version françaisede ce manuel.
ITALIANOLEGGERE QUESTO AVVISO PER PRIMO!
Se non si capisce il contenuto del presente manualeNON UTILIZZARE L’APPARECCHIATURA.
È anche disponibile la versione italiana di questo manuale, ma il costo è acarico dell’utente.
PORTUGUÊSLEIA O TEXTO ABAIXO ANTES DE MAIS NADA!
Se não compreende o texto deste manualNÃO UTILIZE O EQUIPAMENTO.
O utilizador poderá também obter uma tradução do manual para oportuguês à própria custa.
NEDERLANDSLEES DIT EERST!
Als u de inhoud van deze handleiding niet begrijptSTEL DEZE APPARATUUR DAN NIET IN WERKING.
U kunt tevens, op eigen kosten, een vertaling van deze handleidingkrijgen.
DANSKLÆS DETTE FØRST!Udstyret må ikke betjenes
MEDMINDRE DE TIL FULDE FORSTÅR INDHOLDET AF DENNEHÅNDBOG.
Vi kan også for Deres regning levere en dansk oversættelse af dennehåndbog.
SUOMILUE ENNEN KÄYTTÖÄ!
Jos et ymmärrä käsikirjan sisältöäÄLÄ KÄYTÄ LAITETTA.
Käsikirja voidaan myös suomentaa asiakkaan kustannuksella.
Encoder Motherboard Software Upgrade
ST.AN.E10074.1 Page 3 of 20
Contents1 Read This First! 71.1 Before You Start ............................................................................................................................................................................ 71.2 Connecting the Encoder to the Power Supply............................................................................................................................... 7
2 Powering Up/Down 82.1 Before Powering Up ...................................................................................................................................................................... 82.2 Powering Up.................................................................................................................................................................................. 82.3 Powering Down ............................................................................................................................................................................. 8
3 Software Upgrade Procedure 9
4 Upgrade Wizard 104.1 Using the Upgrade Wizard .......................................................................................................................................................... 104.2 Resetting the Unit Using the Upgrade Wizard............................................................................................................................. 16
5 Alternative Upgrade Methods 175.1 Using FTP.................................................................................................................................................................................... 175.2 Upgrading via the Boot Code ...................................................................................................................................................... 18
6 Copying Encoder Configurations 196.1 General........................................................................................................................................................................................ 196.2 Reading From an Encoder .......................................................................................................................................................... 196.3 Writing to an Encoder .................................................................................................................................................................. 19
List of FiguresFigure 2.1: 1U Encoder Startup Screen ................................................................................................................................................................8Figure 2.2: 2U Encoder Startup Screen ................................................................................................................................................................8Figure 4.1: 1U Encoder IP Address Screen ........................................................................................................................................................10Figure 4.2: 2U Encoder IP Address Screen ........................................................................................................................................................10Figure 4.3: Ethernet Connectors .........................................................................................................................................................................11
List of TablesTable 5.1: Upgrade Files That can be Sent to an Encoder Using FTP...............................................................................................................18Table 6.1: Files That can be Read From/Written to an Encoder.........................................................................................................................19
Encoder Motherboard Software Upgrade
Page 4 of 20 ST.AN.E10074.1
General Information
About this DocumentThis Application Note describes the motherboard software upgrade for thefollowing Encoders: E57xx family and E6100. It assumes that the Encodercontains functional software and has been tested in accordance withapplicable procedures. For details of how to get a new Motherboard up andrunning, refer to document TP.00077 (TANDBERG Television internaldocument).
Issues of this document are listed below:
Issue Date Author Comments1 Nov 2001 Glenn Medcalf Initial Release
AcknowledgementsAll best endeavours have been made to acknowledge registeredtrademarks and trademarks used throughout this document. Any notifiedomissions will be rectified in the next issue.
Some trademarks may be registered in some countries but not in others.In general, the situation in the UK will prevail throughout TANDBERGTelevision Ltd documents.
Registered trademarks and trademarks used are acknowledged below andmarked with their respective symbols. However, they are not markedwithin the text of this manual.
TrademarksEthernet® is a registered trademark of Xerox Corporation.
AC-3® and Dolby Digital® are registered trademarks of DolbyLaboratories Licensing Corporation.
Windows NT™ is a trademark of Microsoft Corporation.
Encoder Motherboard Software Upgrade
ST.AN.E10074.1 Page 5 of 20
Contact Information
TANDBERG Television Customer Services
Support ServicesOur primary objective is to provide first class customer care that is tailoredto your specific business and operational requirements. All levels aresupported by one or more service performance reviews to ensure theperfect partnership between TANDBERG Television and your business.
Levels of SupportWe offer a number of support service levels so you can choose the onemost appropriate to your business requirements.
� For the initial 12 months, Bronze Level Support is provided free on thisproduct. An extended time period can be purchased for this level.
� Silver Level Support extends the coverage to include on-site support,preventive maintenance and discount on predesigned training.
� The Gold Level Support gives an enhanced support package. It buildson the Silver Level by including advanced repair exchange, an accountfocused engineer, version migration support and further discount onpredesigned training.
Where to Find UsEurope, Middle East +44 (0) 23 8048 4455and Africa: Fax: +44 (0) 23 8048 4467
Norway: +47 6711 6200
Americas: +1 (321) 308 [email protected]
China: +86 10 6539 1109 (Beijing)
+ 852 2899 7000 (Hong Kong)[email protected]
Australia/NZ: +61 2 9356 [email protected]
Germany: +49 8996 999 870
Poland: +48 58 3000 940
Internet Address: http://www.tandbergtv.com

Encoder Motherboard Software Upgrade
Page 6 of 20 ST.AN.E10074.1
Technical Training
Training CoursesTANDBERG Television provides a wide range of training courses on theoperation and maintenance of our products and on their supportingtechnologies. TANDBERG can provide both regularly scheduled courses andtraining tailored to individual needs. Courses can be run either at yourpremises or at one of our dedicated training facilities.
Where to Find UsFor further information on TANDBERG Television's training programmeplease contact us:
International Telephone: +44 23 8048 4229International Facsimile +44 23 8048 4467
E-mail Address: [email protected] Address http://www.tandbergtv.com
Customer Services and Technical Training Postal AddressTANDBERG TelevisionStrategic ParkComines WayHedge EndSouthamptonHampshireSO30 4DAUnited Kingdom
Technical PublicationsIf you need to contact TANDBERG Television Technical Publicationsregarding this publication e-mail: [email protected].

Encoder Motherboard Software Upgrade
ST.AN.E10074.1 Page 7 of 20
1 Read This First!
1.1 Before You StartThe Encoder must be handled carefully and thoughtfully to prevent safetyhazards and damage. It is usually supplied as part of a system installed byTANDBERG Television engineers. In any case, ensure the personneldesignated to install the unit have the appropriate skills and knowledge. Ifin any doubt, contact TANDBERG Customer Services.
Follow the instructions for installation and use only the installationaccessories recommended by the manufacturers.
1.2 Connecting the Encoder to the Power Supply
WARNINGS...
1. DO NOT OVERLOAD WALL OUTLETS AND EXTENSION CORDS AS THIS CAN RESULT IN ARISK OF FIRE OR ELECTRIC SHOCK.
2. AS NO MAINS SWITCH IS FITTED TO THIS UNIT, ENSURE THE LOCAL POWER SUPPLY ISSWITCHED OFF BEFORE CONNECTING THE SUPPLY CORD.
3. THE ENCODER IS NOT FITTED WITH AN ON/OFF SWITCH. ENSURE THAT THE SOCKET-OUTLET IS INSTALLED NEAR THE EQUIPMENT SO THAT IT IS EASILY ACCESSIBLE. FAILURETO ISOLATE THE EQUIPMENT PROPERLY MAY CAUSE A SAFETY HAZARD.
To connect the unit to the local power supply perform the following:1. Ensure the local supply is switched OFF.2. Ensure the correct fuse type and rating has been fitted to both the
equipment and the power cable.3. Connect the power lead to the Encoder mains input connector and then
to the local mains supply.
Encoder Motherboard Software Upgrade
Page 8 of 20 ST.AN.E10074.1
2 Powering Up/Down
2.1 Before Powering UpBefore powering up the Encoder, check that:1. The unit has been installed in a suitable location.2. The unit has been connected to external equipment and power supply,
as required.3. The power supply has been checked and a good earth provided.4. The correct fuse type and rating has been fitted to the equipment and,
for the ac supply version, the ac power cable.
2.2 Powering UpTo power up the Encoder:1. Turn on the local power supply and check that the Stand-by Switch (if
fitted) is set to ON. The Encoder executes a series of power-upinitialisation and self-test routines.
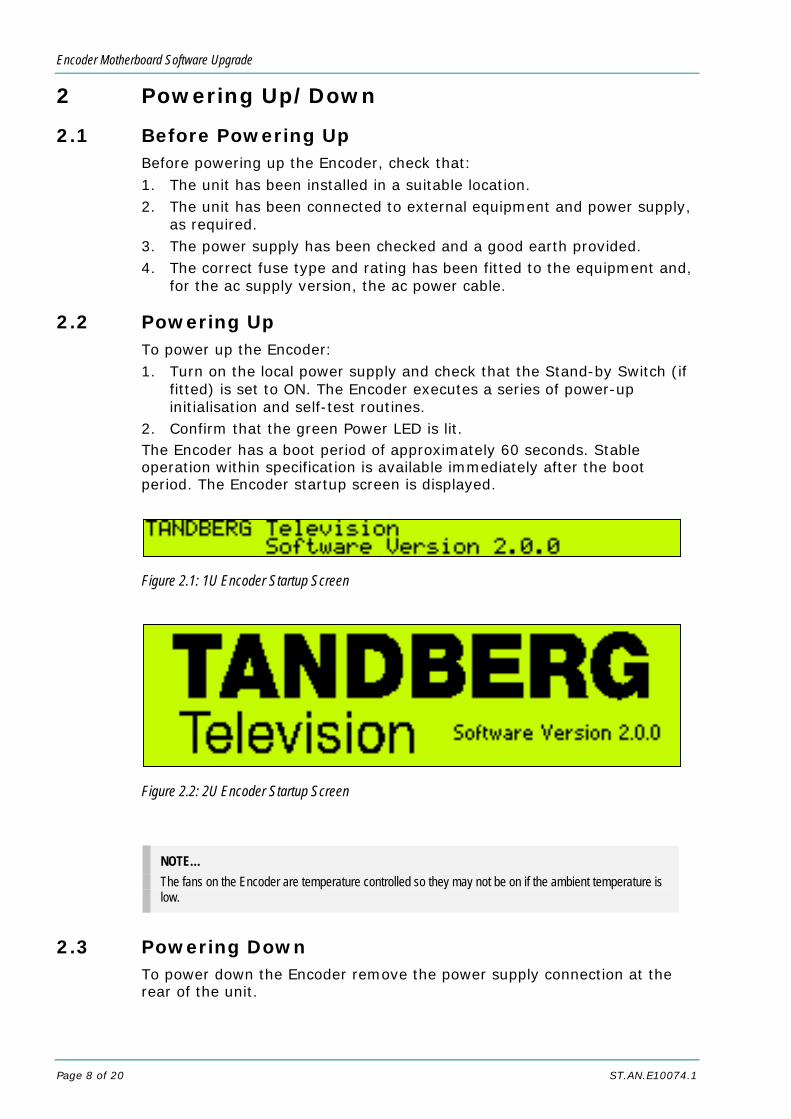
2. Confirm that the green Power LED is lit.The Encoder has a boot period of approximately 60 seconds. Stableoperation within specification is available immediately after the bootperiod. The Encoder startup screen is displayed.
Figure 2.1: 1U Encoder Startup Screen
Figure 2.2: 2U Encoder Startup Screen
NOTE…The fans on the Encoder are temperature controlled so they may not be on if the ambient temperature islow.
2.3 Powering DownTo power down the Encoder remove the power supply connection at therear of the unit.
Encoder Motherboard Software Upgrade
ST.AN.E10074.1 Page 9 of 20
3 Software Upgrade Procedure
CAUTION…Do not reboot or disconnect the Encoder during the following download procedures unless instructed to do so.
The following sections describe the software upgrade procedures. In mostcases only Section 4 Using the Upgrade Wizard will be required.
The Upgrade Wizard provides a means of upgrading all files in the Encoderto a known Build Standard and is the recommended method for upgradingEncoders both in the factory and in the field. It uses FTP to transfer files tothe Encoder and takes all steps necessary to ensure that the Encoder isready to receive files before sending them.
Section 5 is provided in case difficulties are encountered. It describes howto send individual files to the Encoder using FTP. This process should onlybe used if problems are encountered using the Upgrade Wizard or if youhave been specifically instructed to do so by TANDBERG Television.
This document assumes that the Encoder contains functional software andhas been tested in accordance with applicable procedures. For details ofhow to get a new Motherboard up and running, refer to documentTP.00077 (TANDBERG Television internal document).
Encoder Motherboard Software Upgrade
Page 10 of 20 ST.AN.E10074.1
4 Upgrade Wizard
4.1 Using the Upgrade WizardThe simplest way to upgrade an Encoder to a known build version is usinga software application called the Upgrade Wizard. This uses FTP to transferfiles to the Encoder via its on board FTP server. The Upgrade Wizard issupplied in the form of a self-extracting executable file.
All that is required is a PC running Windows 95, 98, Me, NT4, 2000 or laterconnected to the same network as the Encoder. If more than one Encoderis to be upgraded, this can be done simultaneously using the UpgradeWizard.
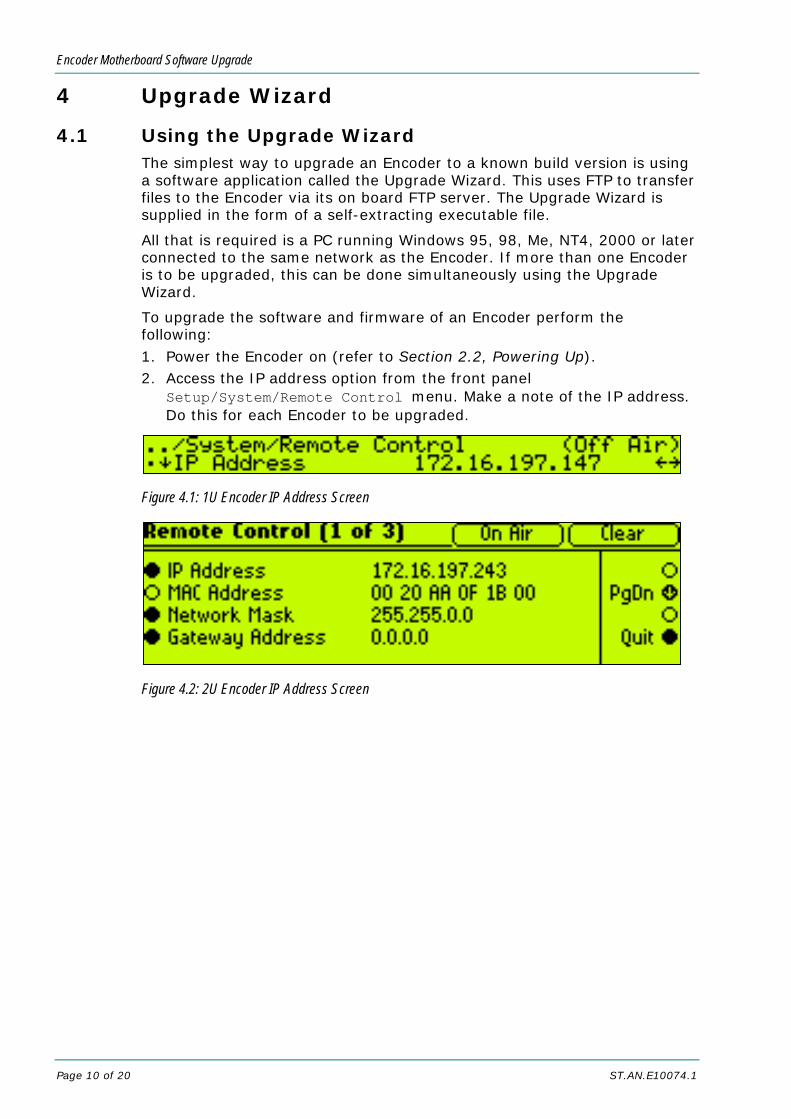
To upgrade the software and firmware of an Encoder perform thefollowing:1. Power the Encoder on (refer to Section 2.2, Powering Up).2. Access the IP address option from the front panel
Setup/System/Remote Control menu. Make a note of the IP address.Do this for each Encoder to be upgraded.
Figure 4.1: 1U Encoder IP Address Screen
Figure 4.2: 2U Encoder IP Address Screen
Encoder Motherboard Software Upgrade
ST.AN.E10074.1 Page 11 of 20
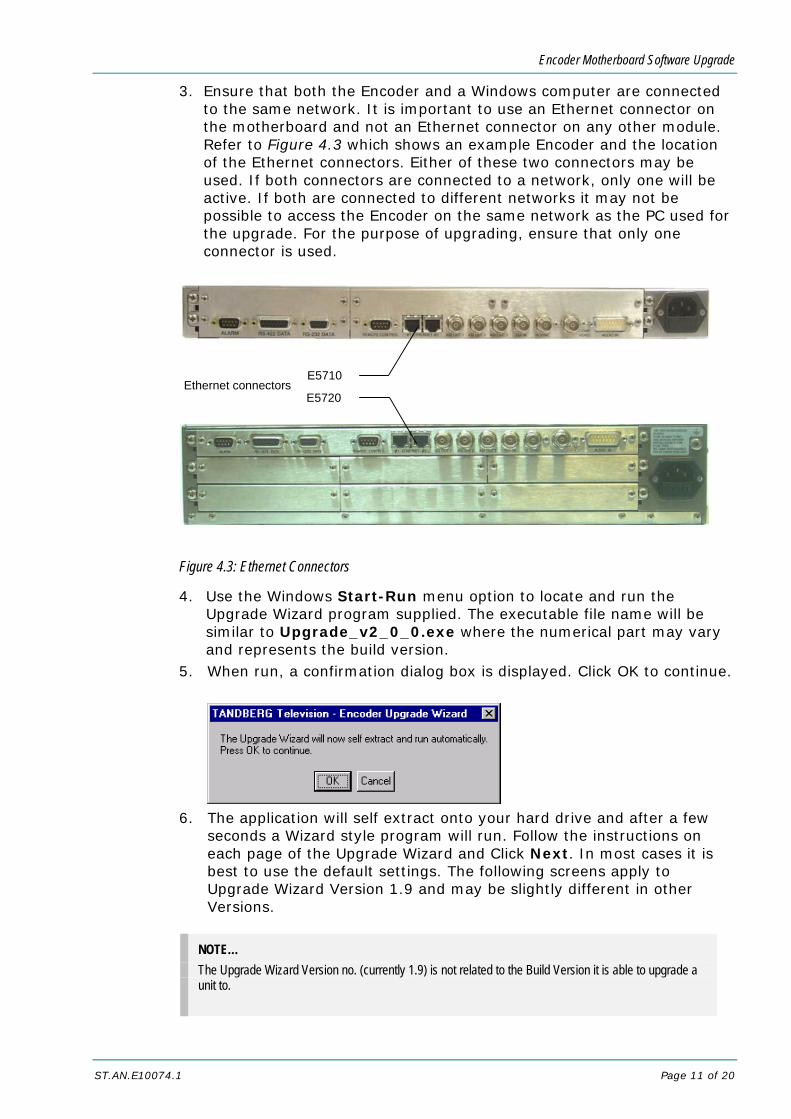
3. Ensure that both the Encoder and a Windows computer are connectedto the same network. It is important to use an Ethernet connector onthe motherboard and not an Ethernet connector on any other module.Refer to Figure 4.3 which shows an example Encoder and the locationof the Ethernet connectors. Either of these two connectors may beused. If both connectors are connected to a network, only one will beactive. If both are connected to different networks it may not bepossible to access the Encoder on the same network as the PC used forthe upgrade. For the purpose of upgrading, ensure that only oneconnector is used.
Figure 4.3: Ethernet Connectors
4. Use the Windows Start-Run menu option to locate and run theUpgrade Wizard program supplied. The executable file name will besimilar to Upgrade_v2_0_0.exe where the numerical part may varyand represents the build version.
5. When run, a confirmation dialog box is displayed. Click OK to continue.
6. The application will self extract onto your hard drive and after a fewseconds a Wizard style program will run. Follow the instructions oneach page of the Upgrade Wizard and Click Next. In most cases it isbest to use the default settings. The following screens apply toUpgrade Wizard Version 1.9 and may be slightly different in otherVersions.
NOTE…The Upgrade Wizard Version no. (currently 1.9) is not related to the Build Version it is able to upgrade aunit to.
Ethernet connectorsE5710
E5720
Encoder Motherboard Software Upgrade
Page 12 of 20 ST.AN.E10074.1
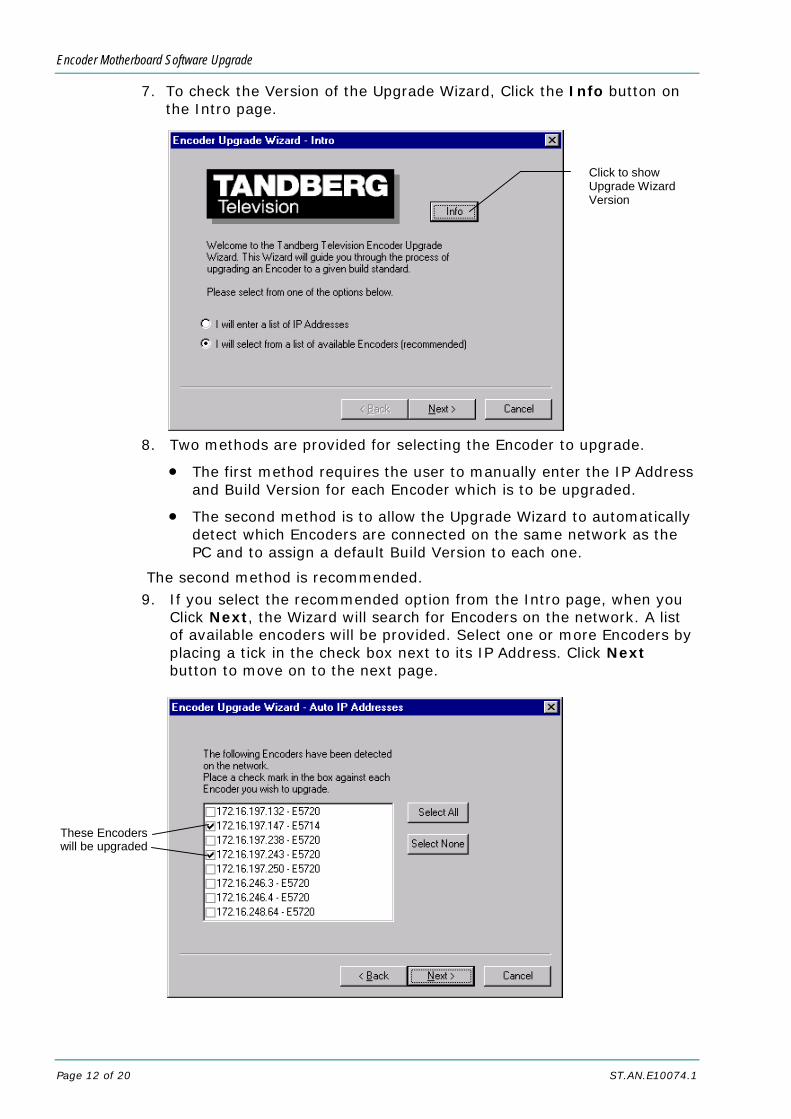
7. To check the Version of the Upgrade Wizard, Click the Info button onthe Intro page.
8. Two methods are provided for selecting the Encoder to upgrade.
� The first method requires the user to manually enter the IP Addressand Build Version for each Encoder which is to be upgraded.
� The second method is to allow the Upgrade Wizard to automaticallydetect which Encoders are connected on the same network as thePC and to assign a default Build Version to each one.
The second method is recommended.9. If you select the recommended option from the Intro page, when you
Click Next, the Wizard will search for Encoders on the network. A listof available encoders will be provided. Select one or more Encoders byplacing a tick in the check box next to its IP Address. Click Nextbutton to move on to the next page.
Click to showUpgrade WizardVersion
These Encoderswill be upgraded

Encoder Motherboard Software Upgrade
ST.AN.E10074.1 Page 13 of 20
10. Options can be set individually for each Encoder. By default theUpgrade Wizard will select the most appropriate Build Version for eachEncoder. If this is not the required Build Version or if you simply wishto reset the Encoder after having already sent all files to it, select theEncoder from the list and update the Build Version from thedrop- down list.
11. The Upgrade Wizard will send a predefined set of files to each Encoder.If you have been instructed by TANDBERG to not send all files, thenselect the Encoder from the list and Click the Advanced button. Adialog box will appear with a list of files. Only those files with a ticknext to them will be sent to the specified Encoder. Click OK to close theAdvanced dialog box and accept the new setting or Cancel to abandonany changes.
Click Next to confirm the build version and move onto the next page ofthe Upgrade Wizard.
The Build Version forthe selected Encodercan be changed here
Only files with a tick will besent to the Encoder. (Bydefault all files should beticked)
Encoder Motherboard Software Upgrade
Page 14 of 20 ST.AN.E10074.1
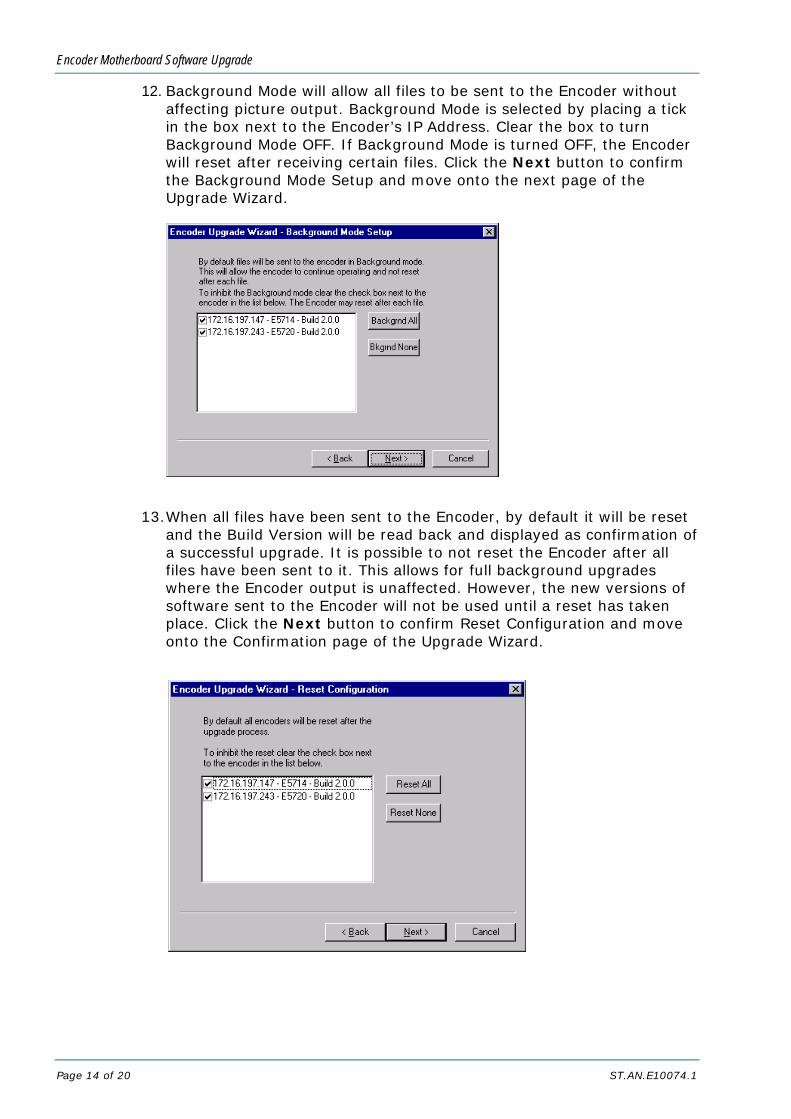
12. Background Mode will allow all files to be sent to the Encoder withoutaffecting picture output. Background Mode is selected by placing a tickin the box next to the Encoder’s IP Address. Clear the box to turnBackground Mode OFF. If Background Mode is turned OFF, the Encoderwill reset after receiving certain files. Click the Next button to confirmthe Background Mode Setup and move onto the next page of theUpgrade Wizard.
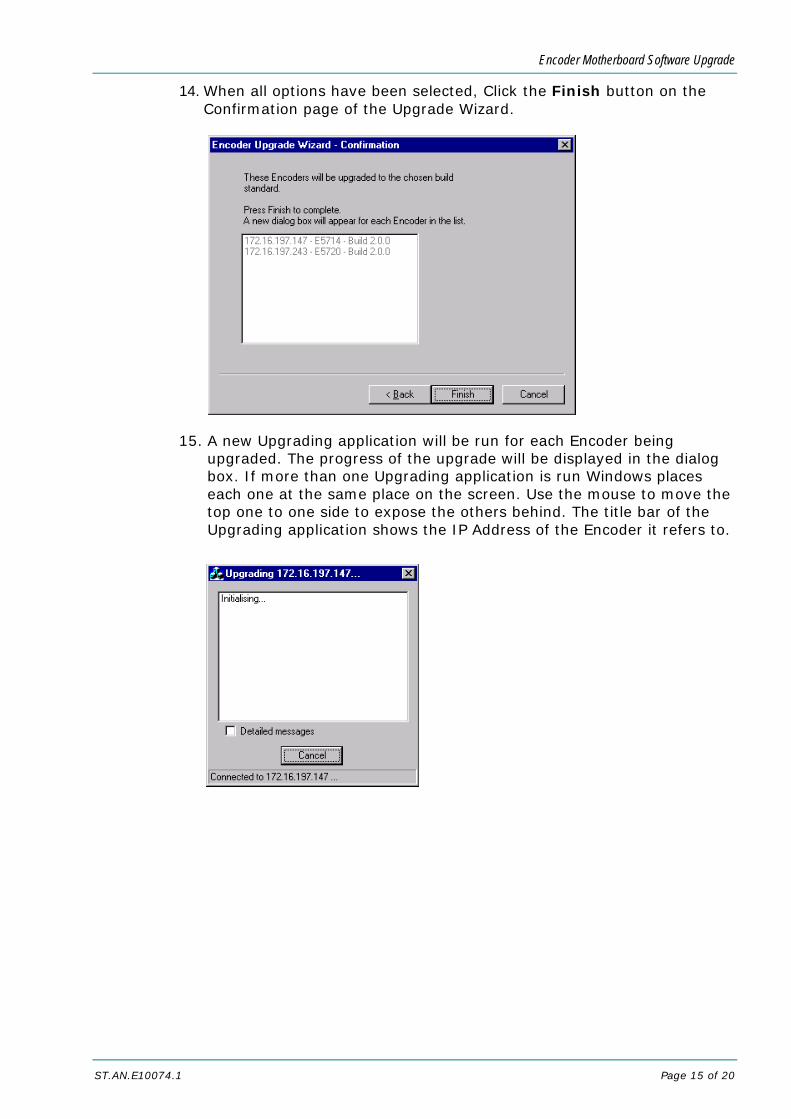
13. When all files have been sent to the Encoder, by default it will be resetand the Build Version will be read back and displayed as confirmation ofa successful upgrade. It is possible to not reset the Encoder after allfiles have been sent to it. This allows for full background upgradeswhere the Encoder output is unaffected. However, the new versions ofsoftware sent to the Encoder will not be used until a reset has takenplace. Click the Next button to confirm Reset Configuration and moveonto the Confirmation page of the Upgrade Wizard.
Encoder Motherboard Software Upgrade
ST.AN.E10074.1 Page 15 of 20
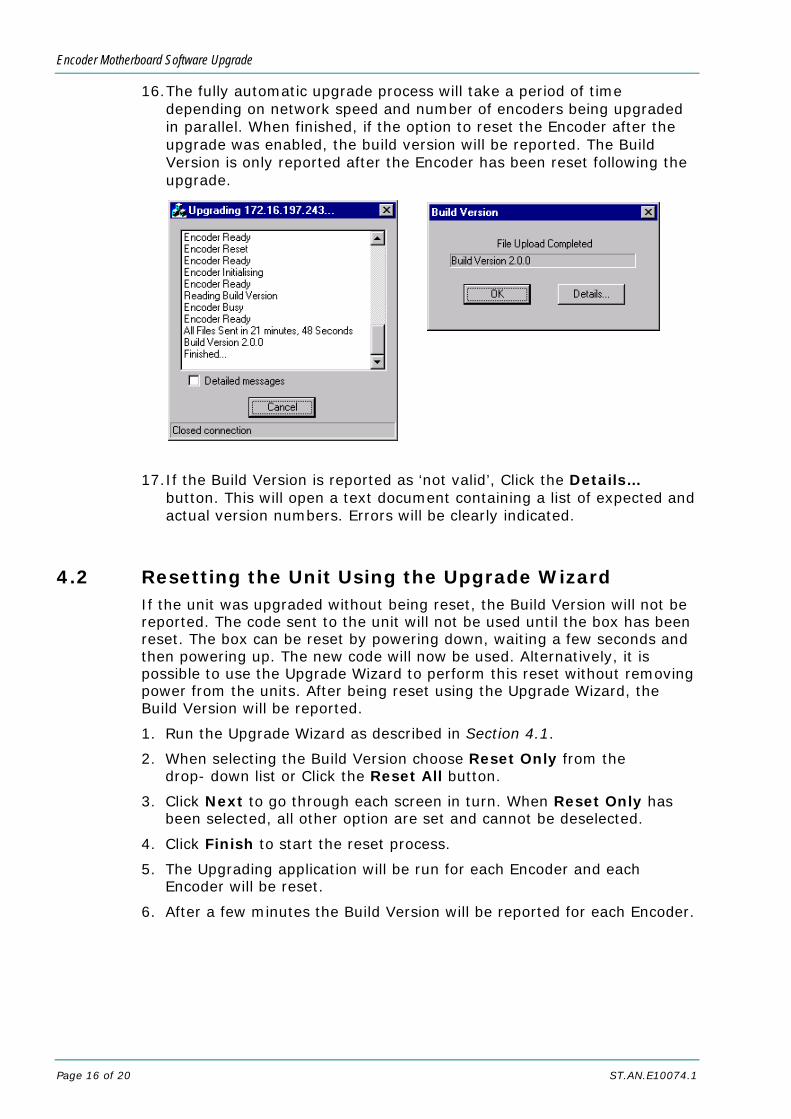
14. When all options have been selected, Click the Finish button on theConfirmation page of the Upgrade Wizard.
15. A new Upgrading application will be run for each Encoder beingupgraded. The progress of the upgrade will be displayed in the dialogbox. If more than one Upgrading application is run Windows placeseach one at the same place on the screen. Use the mouse to move thetop one to one side to expose the others behind. The title bar of theUpgrading application shows the IP Address of the Encoder it refers to.
Encoder Motherboard Software Upgrade
Page 16 of 20 ST.AN.E10074.1
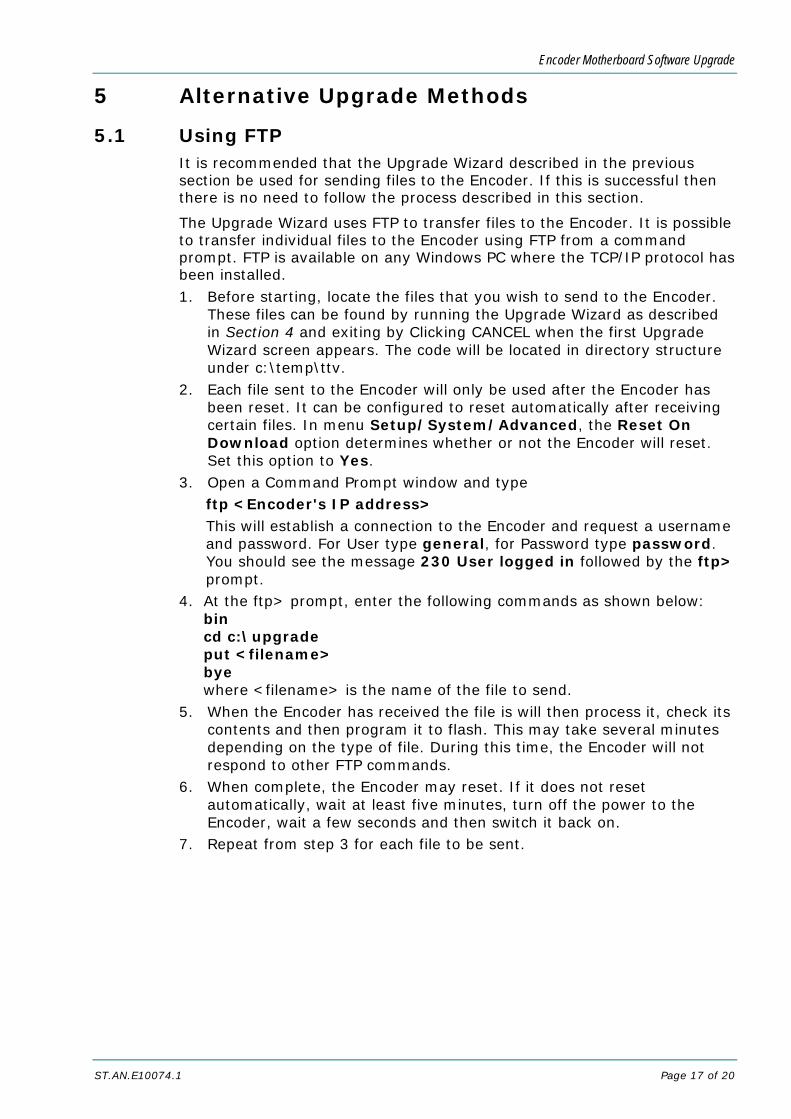
16. The fully automatic upgrade process will take a period of timedepending on network speed and number of encoders being upgradedin parallel. When finished, if the option to reset the Encoder after theupgrade was enabled, the build version will be reported. The BuildVersion is only reported after the Encoder has been reset following theupgrade.
17. If the Build Version is reported as ‘not valid’, Click the Details…button. This will open a text document containing a list of expected andactual version numbers. Errors will be clearly indicated.
4.2 Resetting the Unit Using the Upgrade WizardIf the unit was upgraded without being reset, the Build Version will not bereported. The code sent to the unit will not be used until the box has beenreset. The box can be reset by powering down, waiting a few seconds andthen powering up. The new code will now be used. Alternatively, it ispossible to use the Upgrade Wizard to perform this reset without removingpower from the units. After being reset using the Upgrade Wizard, theBuild Version will be reported.
1. Run the Upgrade Wizard as described in Section 4.1.
2. When selecting the Build Version choose Reset Only from thedrop- down list or Click the Reset All button.
3. Click Next to go through each screen in turn. When Reset Only hasbeen selected, all other option are set and cannot be deselected.
4. Click Finish to start the reset process.
5. The Upgrading application will be run for each Encoder and eachEncoder will be reset.
6. After a few minutes the Build Version will be reported for each Encoder.
Encoder Motherboard Software Upgrade
ST.AN.E10074.1 Page 17 of 20
5 Alternative Upgrade Methods
5.1 Using FTPIt is recommended that the Upgrade Wizard described in the previoussection be used for sending files to the Encoder. If this is successful thenthere is no need to follow the process described in this section.
The Upgrade Wizard uses FTP to transfer files to the Encoder. It is possibleto transfer individual files to the Encoder using FTP from a commandprompt. FTP is available on any Windows PC where the TCP/IP protocol hasbeen installed.1. Before starting, locate the files that you wish to send to the Encoder.
These files can be found by running the Upgrade Wizard as describedin Section 4 and exiting by Clicking CANCEL when the first UpgradeWizard screen appears. The code will be located in directory structureunder c:\temp\ttv.
2. Each file sent to the Encoder will only be used after the Encoder hasbeen reset. It can be configured to reset automatically after receivingcertain files. In menu Setup/System/Advanced, the Reset OnDownload option determines whether or not the Encoder will reset.Set this option to Yes.
3. Open a Command Prompt window and typeftp <Encoder's IP address>This will establish a connection to the Encoder and request a usernameand password. For User type general, for Password type password.You should see the message 230 User logged in followed by the ftp>prompt.
4. At the ftp> prompt, enter the following commands as shown below:bincd c:\upgradeput <filename>byewhere <filename> is the name of the file to send.
5. When the Encoder has received the file is will then process it, check itscontents and then program it to flash. This may take several minutesdepending on the type of file. During this time, the Encoder will notrespond to other FTP commands.
6. When complete, the Encoder may reset. If it does not resetautomatically, wait at least five minutes, turn off the power to theEncoder, wait a few seconds and then switch it back on.
7. Repeat from step 3 for each file to be sent.
Encoder Motherboard Software Upgrade
Page 18 of 20 ST.AN.E10074.1
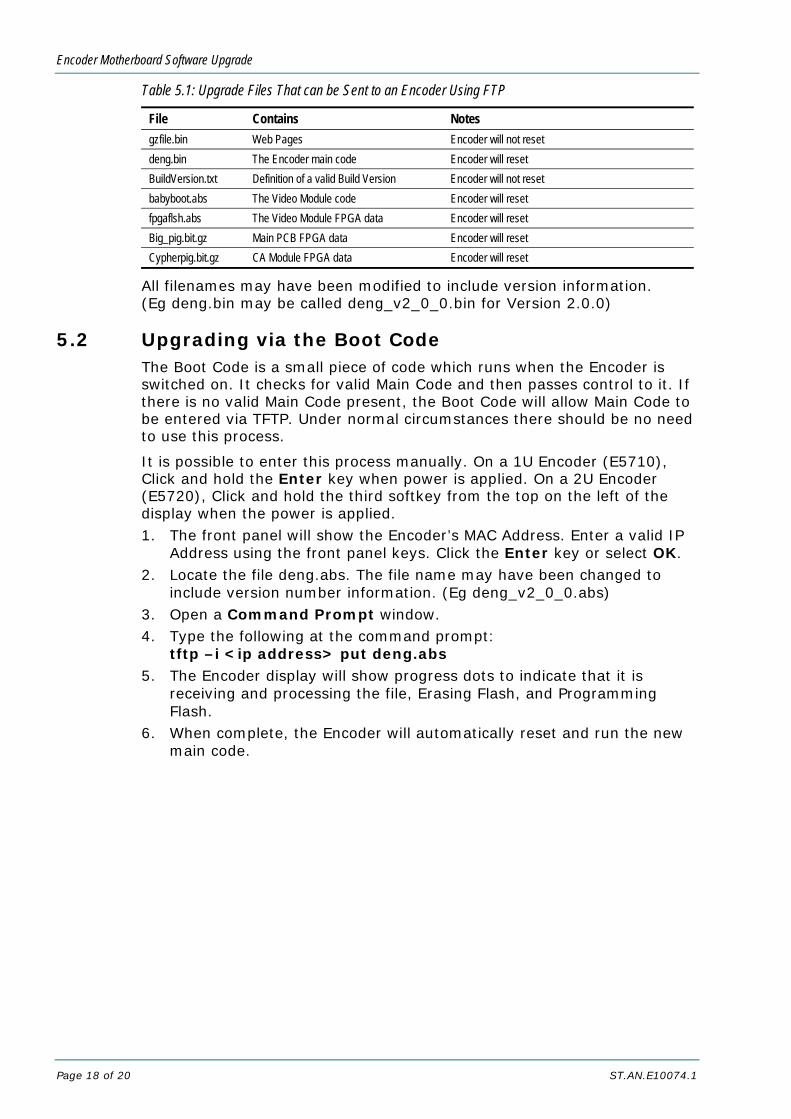
Table 5.1: Upgrade Files That can be Sent to an Encoder Using FTP
File Contains Notesgzfile.bin Web Pages Encoder will not resetdeng.bin The Encoder main code Encoder will resetBuildVersion.txt Definition of a valid Build Version Encoder will not resetbabyboot.abs The Video Module code Encoder will resetfpgaflsh.abs The Video Module FPGA data Encoder will resetBig_pig.bit.gz Main PCB FPGA data Encoder will resetCypherpig.bit.gz CA Module FPGA data Encoder will reset
All filenames may have been modified to include version information.(Eg deng.bin may be called deng_v2_0_0.bin for Version 2.0.0)
5.2 Upgrading via the Boot CodeThe Boot Code is a small piece of code which runs when the Encoder isswitched on. It checks for valid Main Code and then passes control to it. Ifthere is no valid Main Code present, the Boot Code will allow Main Code tobe entered via TFTP. Under normal circumstances there should be no needto use this process.
It is possible to enter this process manually. On a 1U Encoder (E5710),Click and hold the Enter key when power is applied. On a 2U Encoder(E5720), Click and hold the third softkey from the top on the left of thedisplay when the power is applied.1. The front panel will show the Encoder’s MAC Address. Enter a valid IP
Address using the front panel keys. Click the Enter key or select OK.2. Locate the file deng.abs. The file name may have been changed to
include version number information. (Eg deng_v2_0_0.abs)3. Open a Command Prompt window.4. Type the following at the command prompt:
tftp –i <ip address> put deng.abs5. The Encoder display will show progress dots to indicate that it is
receiving and processing the file, Erasing Flash, and ProgrammingFlash.
6. When complete, the Encoder will automatically reset and run the newmain code.
Encoder Motherboard Software Upgrade
ST.AN.E10074.1 Page 19 of 20
6 Copying Encoder Configurations
6.1 GeneralIt is possible via TFTP to upload and download copies of the Encoder’sconfiguration and identity, including an exact memory dump of theconfiguration and identity area of non-volatile RAM. Great care should beobserved when changing configurations in this way. This is potentiallyrisky because it copies over the identity of an Encoder: i.e. the IP addressand the serial number.
NOTE…The file names are not case sensitive, but the characters shown in Table 5.1 and Table 6.1 must beentered exactly as shown (i.e. with no extra characters such as c:\etc).
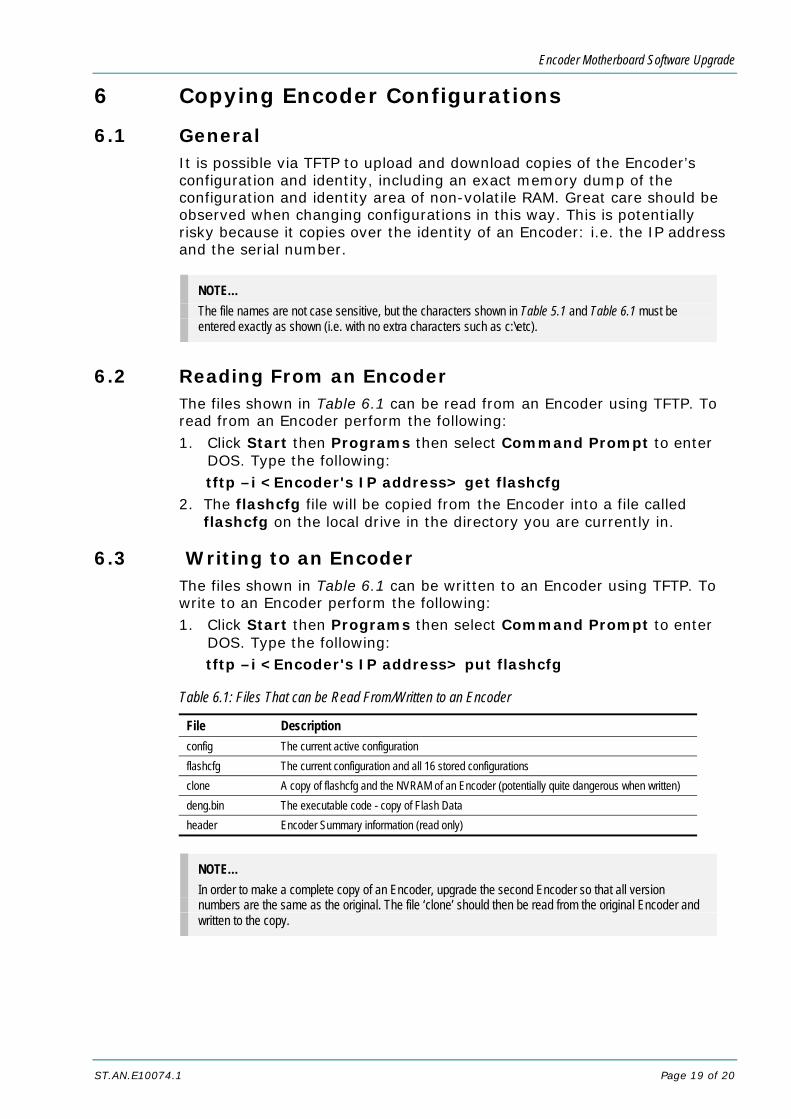
6.2 Reading From an EncoderThe files shown in Table 6.1 can be read from an Encoder using TFTP. Toread from an Encoder perform the following:1. Click Start then Programs then select Command Prompt to enter
DOS. Type the following:tftp –i <Encoder's IP address> get flashcfg
2. The flashcfg file will be copied from the Encoder into a file calledflashcfg on the local drive in the directory you are currently in.
6.3 Writing to an EncoderThe files shown in Table 6.1 can be written to an Encoder using TFTP. Towrite to an Encoder perform the following:1. Click Start then Programs then select Command Prompt to enter
DOS. Type the following:tftp –i <Encoder's IP address> put flashcfg
Table 6.1: Files That can be Read From/Written to an Encoder
File Descriptionconfig The current active configurationflashcfg The current configuration and all 16 stored configurationsclone A copy of flashcfg and the NVRAM of an Encoder (potentially quite dangerous when written)deng.bin The executable code - copy of Flash Dataheader Encoder Summary information (read only)
NOTE…In order to make a complete copy of an Encoder, upgrade the second Encoder so that all versionnumbers are the same as the original. The file ‘clone’ should then be read from the original Encoder andwritten to the copy.

Encoder Motherboard Software Upgrade
Page 20 of 20 ST.AN.E10074.1
BLANK

![update procedure for T49 language update - Leagend time burn SNI Upgrade internal file C] Auto upgarde Start Upgrade Upgrade external Title Microsoft Word - update procedure for T49](https://img.pdfslide.us/doc/110x75/5af653ab7f8b9a4d4d90508f/update-procedure-for-t49-language-update-time-burn-sni-upgrade-internal-file-c.jpg)


![GSR IOS XR Release 4.0.0 Upgrade / Downgrade Procedure 3.7 ...€¦ · 4.0.0 GSR-XR Upgrade/Downgrade Procedure [EDCS-905559] Upgrade to IOS XR Release 4.0.0 | Cisco Systems, Inc](https://img.pdfslide.us/doc/110x75/6118e9a02f2d800c667e1492/gsr-ios-xr-release-400-upgrade-downgrade-procedure-37-400-gsr-xr-upgradedowngrade.jpg)