Embed Size (px)
Citation preview

1
E-RECRUITMENT SYSTEM : INSTRUCTION
MANUAL FOR CANDIDATES
PREFACE :
E-Recruitment is now accepted as the standard method for recruitment process in most of the companies. GSFC has developed a seamless, transparent and un-biased customized application for purpose of application acceptance, on-line test, interview and finally appointment. As per standard procedure all information declared by the candidate will be treated as true and incase of discrepancy the candidate’s application will be disqualified.
Following steps are the instructions for entering data :
ON-LINE APPLICATIONS ACCEPTANCE
1) LOGIN – INTERNET
Click on http://www.gsfclimited.com/
- GSFC web-site for knowing the company profile and for
information on recruitment.

2
Click on Career � Current Openings : By clicking on Current
Openings the Recruitment Dashboard will Open.
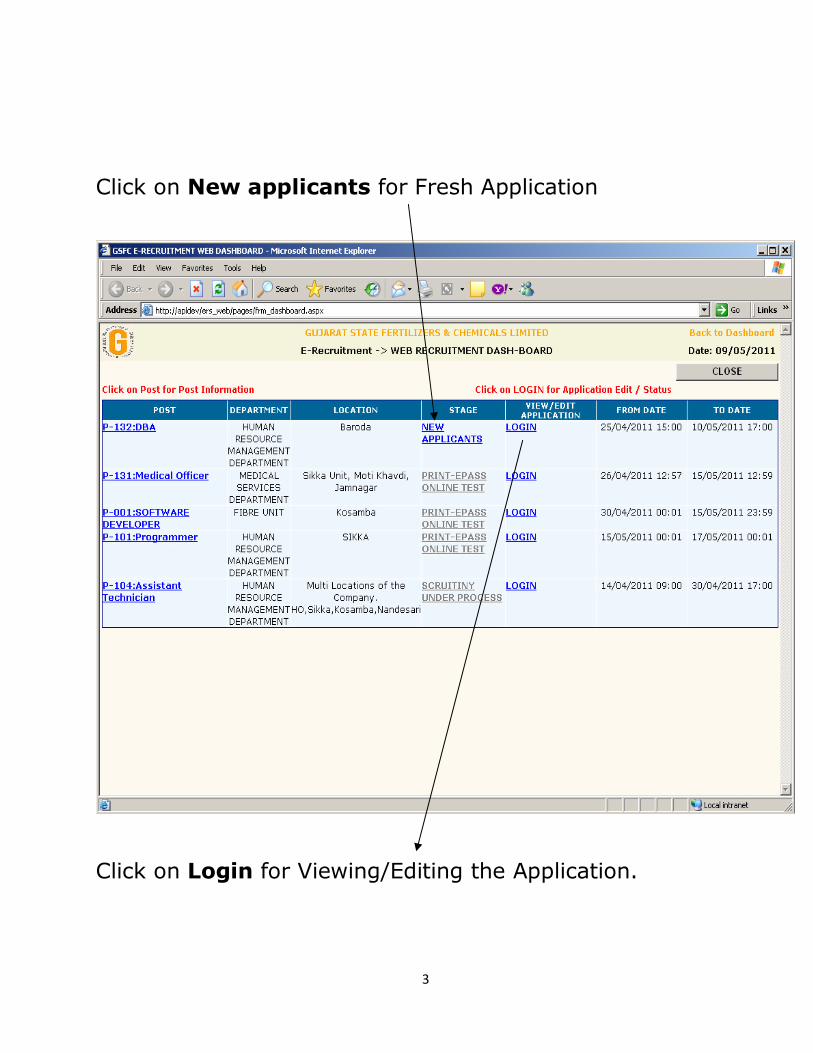
3
Click on New applicants for Fresh Application
Click on Login for Viewing/Editing the Application.
4
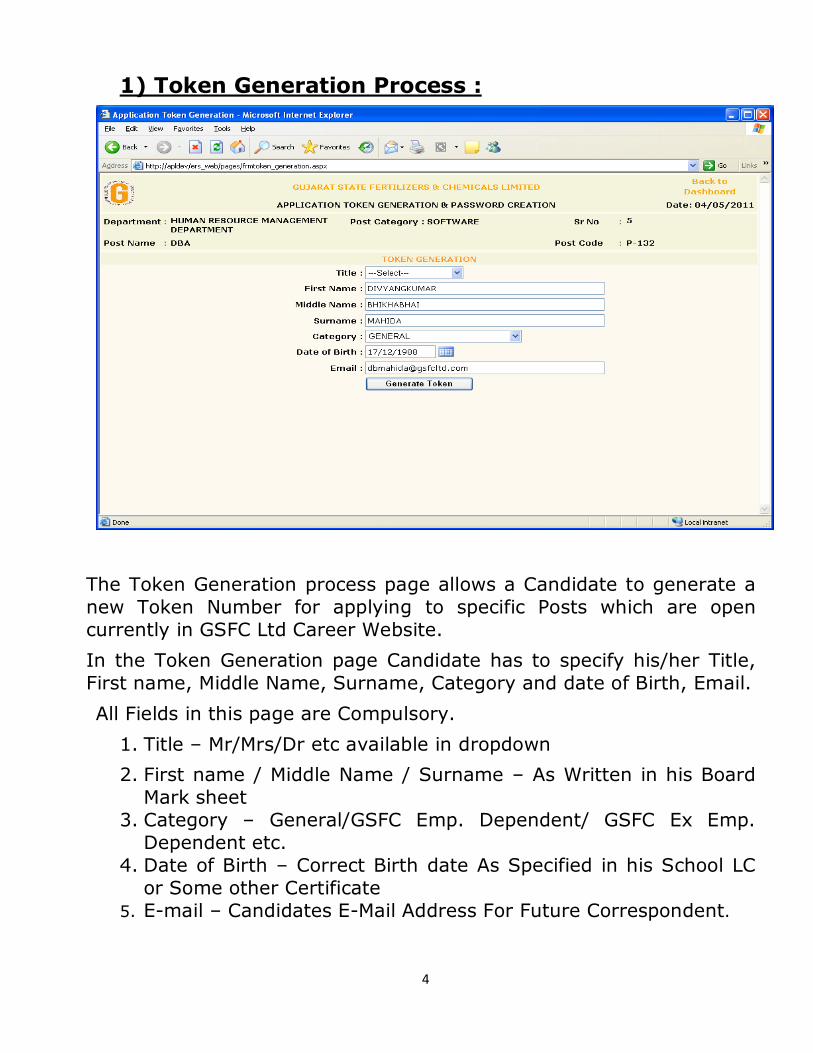
1) Token Generation Process :
The Token Generation process page allows a Candidate to generate a
new Token Number for applying to specific Posts which are open
currently in GSFC Ltd Career Website.
In the Token Generation page Candidate has to specify his/her Title,
First name, Middle Name, Surname, Category and date of Birth, Email.
All Fields in this page are Compulsory.
1. Title – Mr/Mrs/Dr etc available in dropdown
2. First name / Middle Name / Surname – As Written in his Board Mark sheet
3. Category – General/GSFC Emp. Dependent/ GSFC Ex Emp. Dependent etc.
4. Date of Birth – Correct Birth date As Specified in his School LC or Some other Certificate
5. E-mail – Candidates E-Mail Address For Future Correspondent.
5
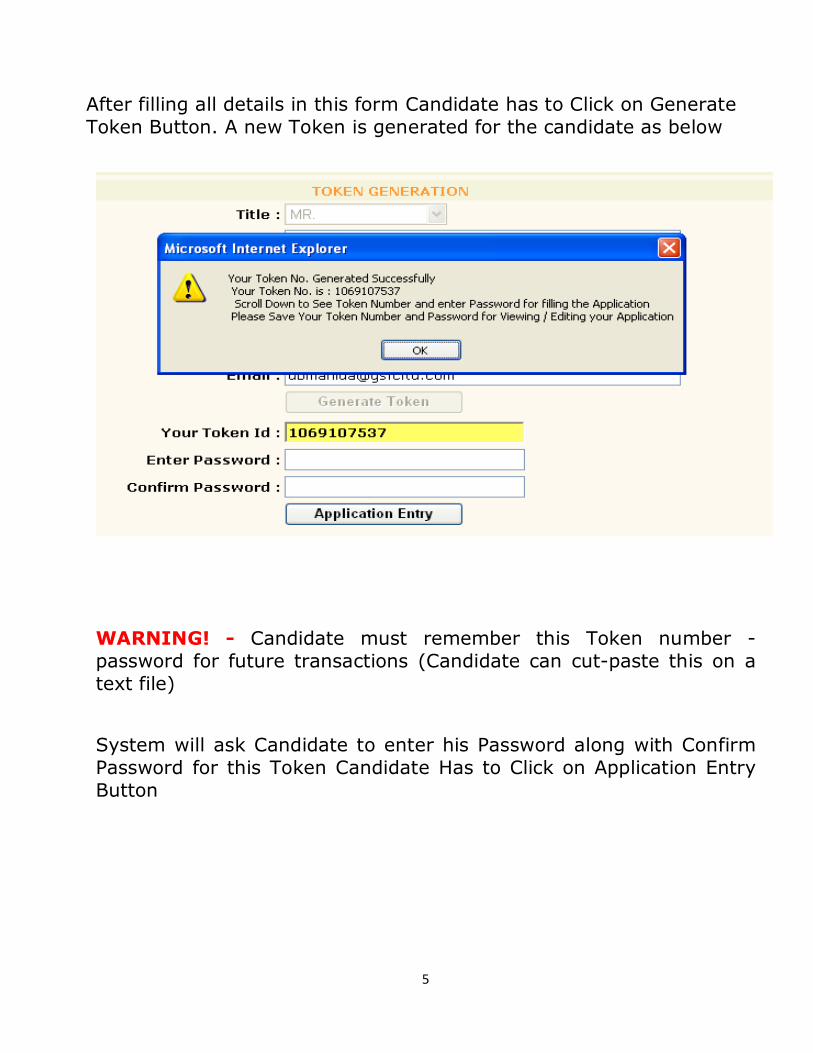
After filling all details in this form Candidate has to Click on Generate
Token Button. A new Token is generated for the candidate as below
WARNING! - Candidate must remember this Token number -
password for future transactions (Candidate can cut-paste this on a
text file)
System will ask Candidate to enter his Password along with Confirm
Password for this Token Candidate Has to Click on Application Entry
Button
6
2) Application Login Process :
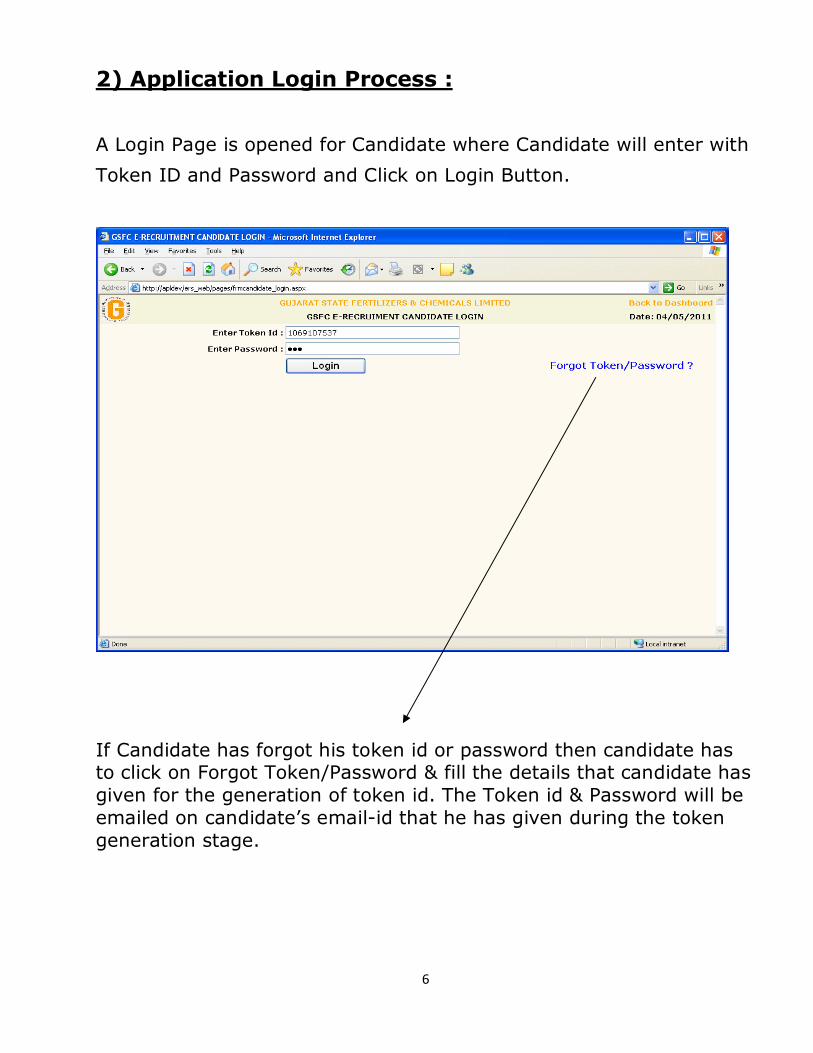
A Login Page is opened for Candidate where Candidate will enter with
Token ID and Password and Click on Login Button.
If Candidate has forgot his token id or password then candidate has to click on Forgot Token/Password & fill the details that candidate has
given for the generation of token id. The Token id & Password will be
emailed on candidate’s email-id that he has given during the token
generation stage.
7
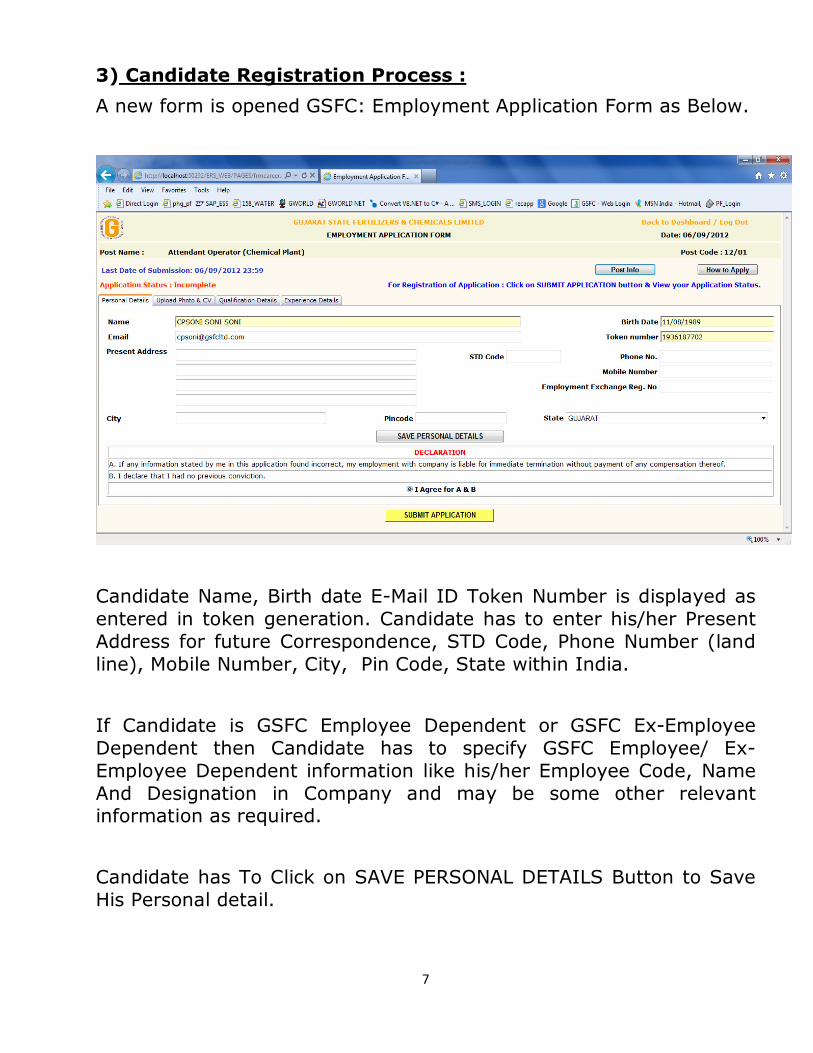
3) Candidate Registration Process :
A new form is opened GSFC: Employment Application Form as Below.
Candidate Name, Birth date E-Mail ID Token Number is displayed as
entered in token generation. Candidate has to enter his/her Present
Address for future Correspondence, STD Code, Phone Number (land
line), Mobile Number, City, Pin Code, State within India.
If Candidate is GSFC Employee Dependent or GSFC Ex-Employee
Dependent then Candidate has to specify GSFC Employee/ Ex-
Employee Dependent information like his/her Employee Code, Name
And Designation in Company and may be some other relevant information as required.
Candidate has To Click on SAVE PERSONAL DETAILS Button to Save
His Personal detail.
8
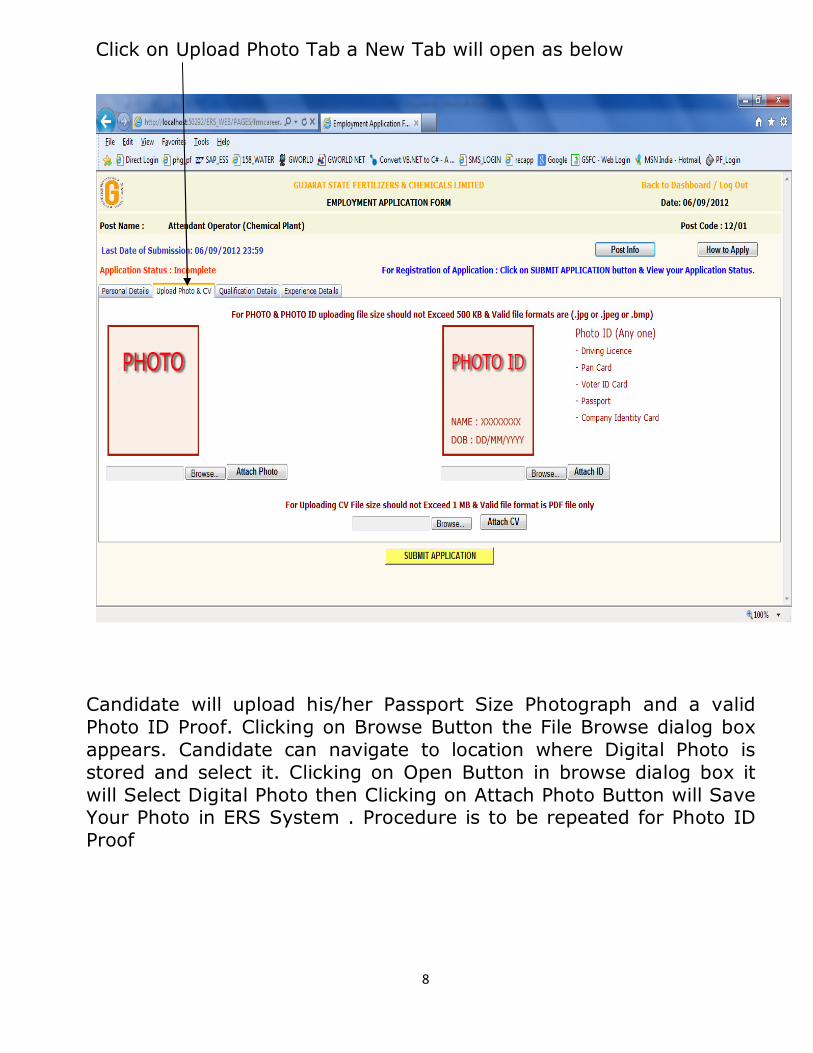
Click on Upload Photo Tab a New Tab will open as below
Candidate will upload his/her Passport Size Photograph and a valid
Photo ID Proof. Clicking on Browse Button the File Browse dialog box
appears. Candidate can navigate to location where Digital Photo is
stored and select it. Clicking on Open Button in browse dialog box it
will Select Digital Photo then Clicking on Attach Photo Button will Save Your Photo in ERS System . Procedure is to be repeated for Photo ID
Proof
9
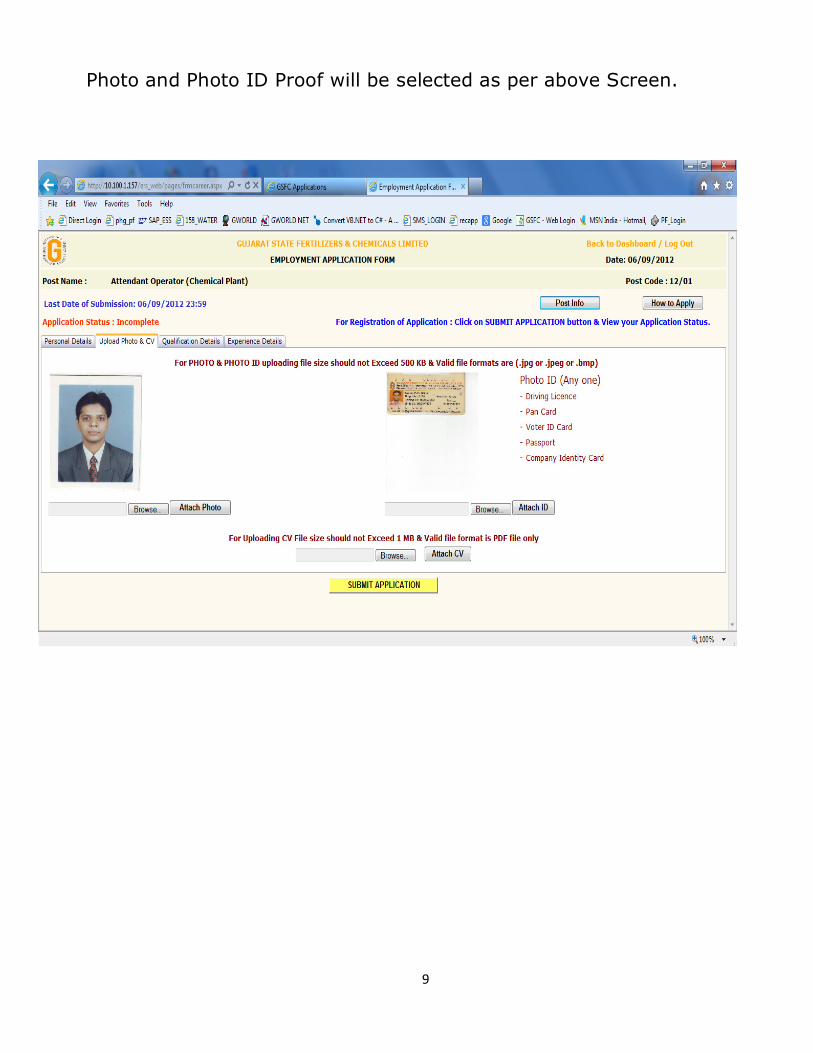
Photo and Photo ID Proof will be selected as per above Screen.
10
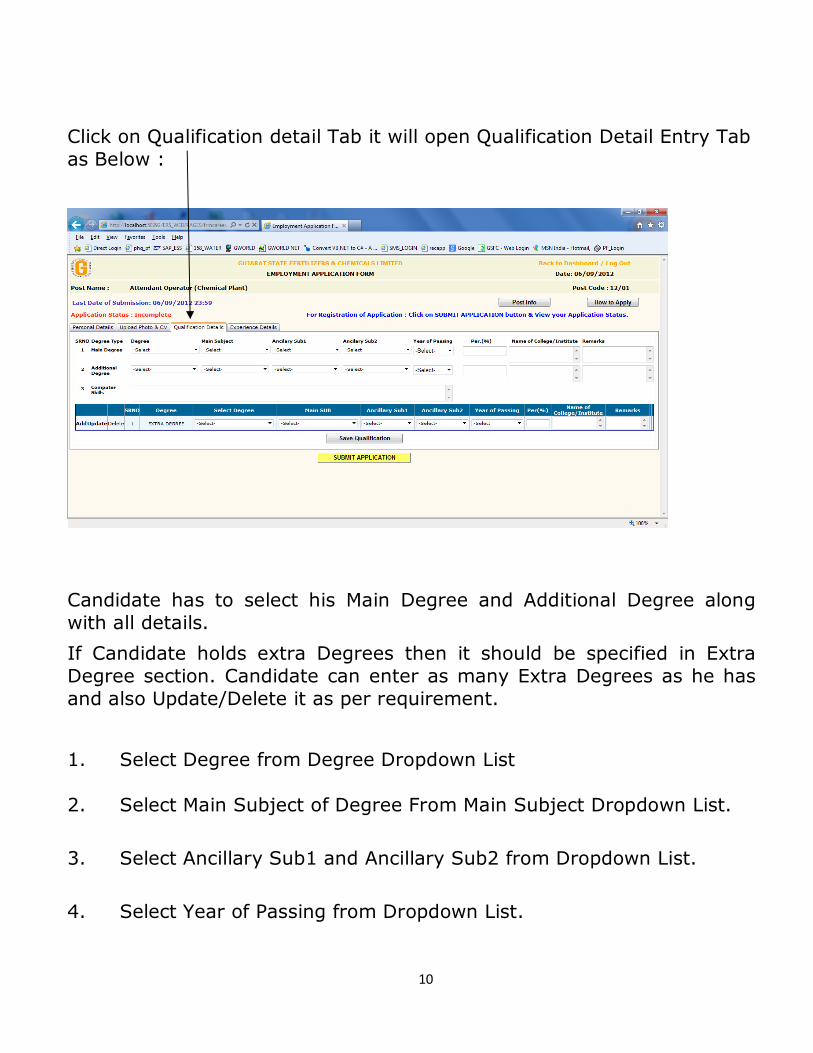
Click on Qualification detail Tab it will open Qualification Detail Entry Tab
as Below :
Candidate has to select his Main Degree and Additional Degree along
with all details.
If Candidate holds extra Degrees then it should be specified in Extra
Degree section. Candidate can enter as many Extra Degrees as he has
and also Update/Delete it as per requirement.
1. Select Degree from Degree Dropdown List
2. Select Main Subject of Degree From Main Subject Dropdown List.
3. Select Ancillary Sub1 and Ancillary Sub2 from Dropdown List.
4. Select Year of Passing from Dropdown List.
11
5. Enter Actual Percentage Obtained (no Rounding) in Degree in Per.
(%) Textbox
6. Enter Name of College / Institute from where Degree was awarded.
7. If candidate wishes to provide more information about the Degree
then short descriptioncan be entered in Remarks Field.
Clicking on Save Qualification Button will Save Candidate Qualification as
entered in Form. ERS system will give Alerts to Candidate – e.g.
Percentage Criteria Not match /Year of Passing not matching etc.
Candidate not fulfilling all Post Criteria will not be allowed to Save his/her Qualification. Candidate qualification information remains
incomplete and will be treated as not eligible.
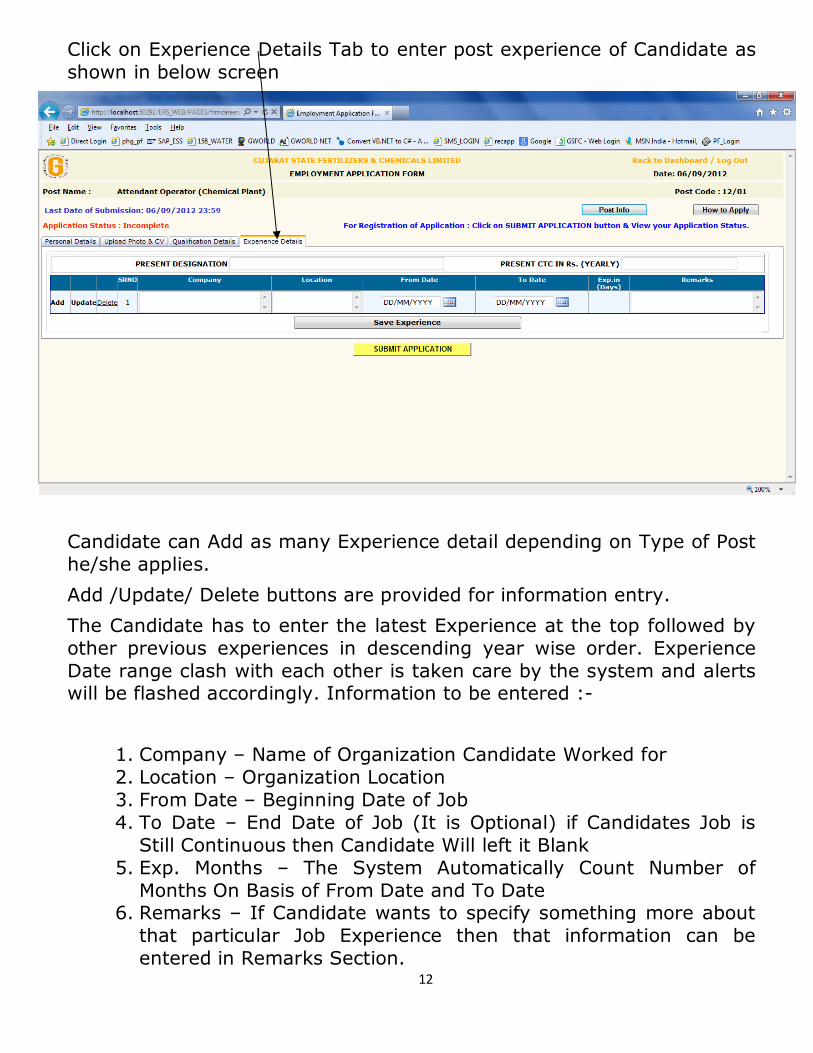
12
Click on Experience Details Tab to enter post experience of Candidate as
shown in below screen
Candidate can Add as many Experience detail depending on Type of Post
he/she applies.
Add /Update/ Delete buttons are provided for information entry.
The Candidate has to enter the latest Experience at the top followed by
other previous experiences in descending year wise order. Experience
Date range clash with each other is taken care by the system and alerts will be flashed accordingly. Information to be entered :-
1. Company – Name of Organization Candidate Worked for 2. Location – Organization Location 3. From Date – Beginning Date of Job 4. To Date – End Date of Job (It is Optional) if Candidates Job is Still Continuous then Candidate Will left it Blank
5. Exp. Months – The System Automatically Count Number of Months On Basis of From Date and To Date
6. Remarks – If Candidate wants to specify something more about that particular Job Experience then that information can be
entered in Remarks Section.
13
After Entering All Experience Information Candidate Has to Click on Save
Experience Information Button to Completely Save Experience
Information.
After Entering All Information like Personal Details, Upload Photo,
Qualification Details, Experience Details Candidate Must Click on
“SUBMIT APPLICATION” Button to Complete the Application Process.
After Submitting Application the ERS System will give you a message
that Your Application Filling Process is finished.
Note: Candidates can edit/modify Application till the Last Date
of Application as many times as required
WARNING: - It is a must for a Candidate to Click on “SUBMIT
APPLICATION” Button finally to permanently Save Candidates
information and complete the Application Process. If the Candidate has not Click on the “SUBMIT APPLICATION” Button then his Application
will not be accepted.